

Page 1
ETC® Setup Guide
Primary
Master
Backup
Sync
Client
Offline
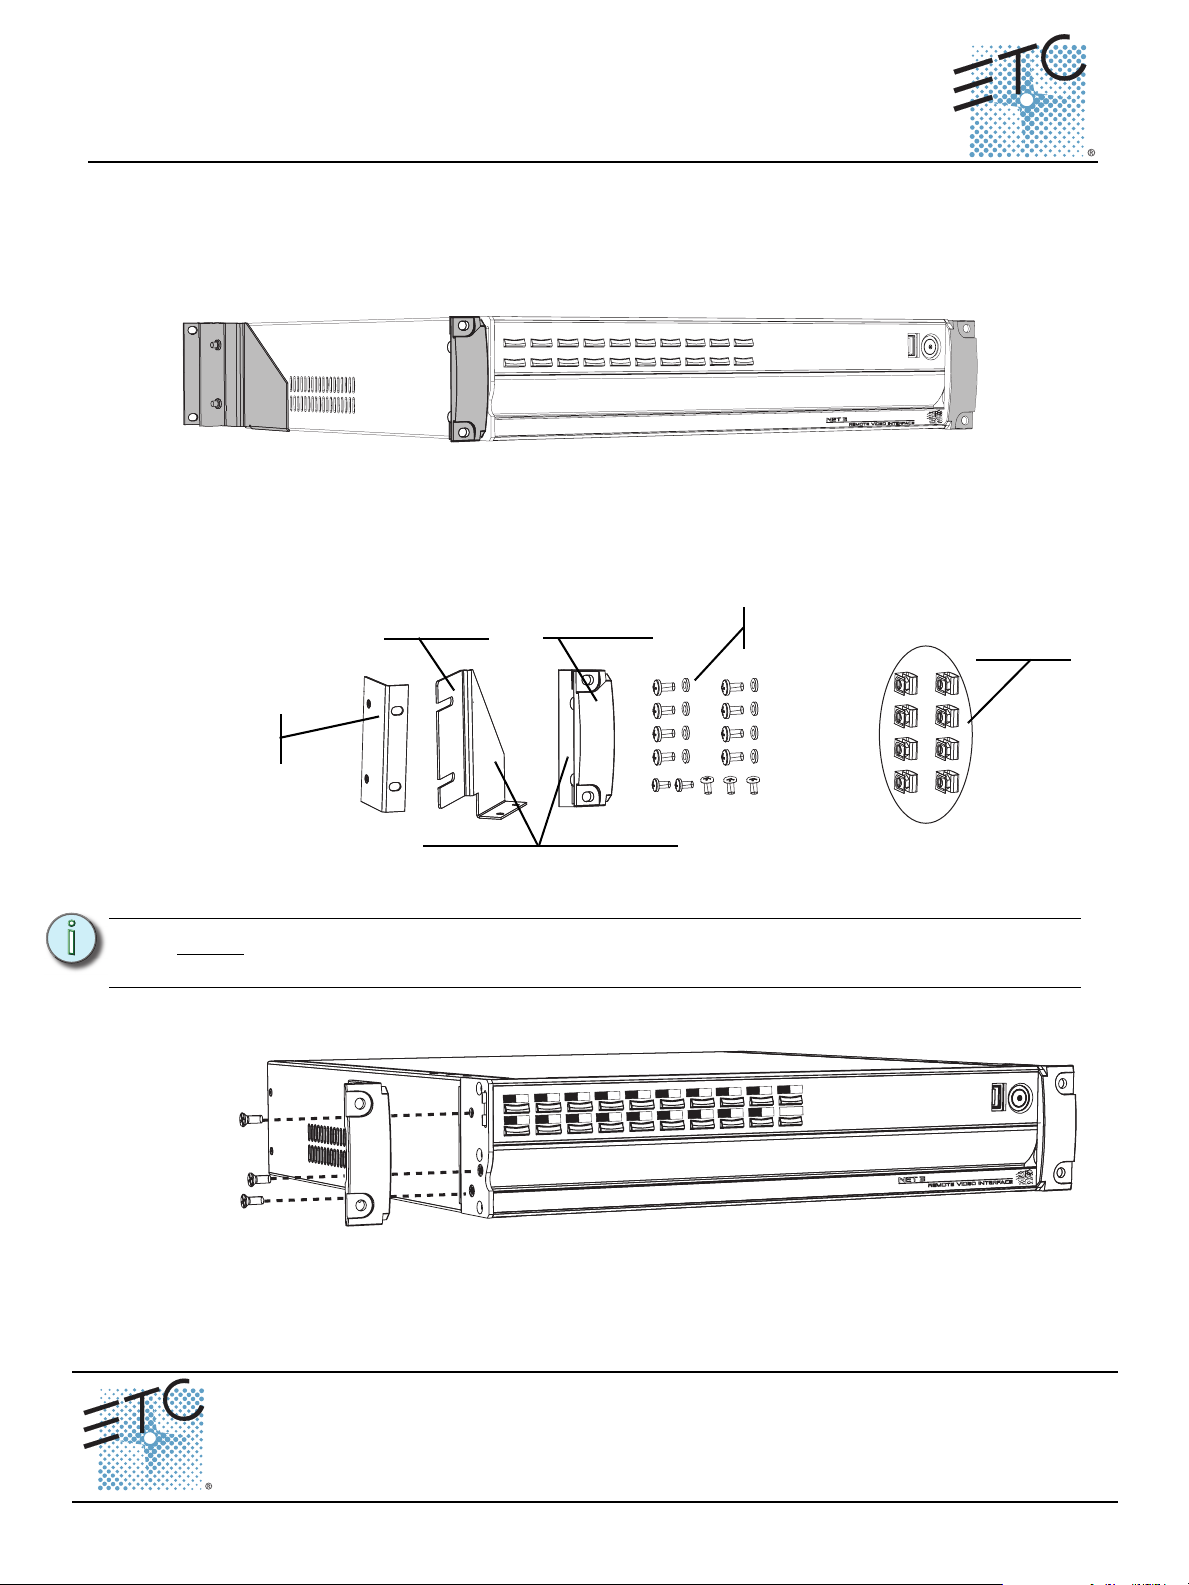
Net3 RVI shown
rail adapter (x2)
kit includes (1) left side and (1)
right side for each bracket type
hardware
included
rear bracket front bracket
Spring Clips
(optional)
2U and 3U Rack Mount Kits
2U Rack Mounting Instructions
The 2U Rack Mount kit (7310A2024) may be used to mount either the Net3 Remote Video Interface
(RVI), Ion Remote Processor Unit (RPU), Congo Light Server (CLS) or the Net3 Project PC into a 19”
rack enclosure. Each product requires 2U of rack space. Both the front and rear mounting brackets are
required for a stable rack mounting installation.
Install Front Rack Mounting Ears
Step 1: Remove the four rubber feet from the bottom of the unit.
Step 2: Locate the rack mounting hardware kit including the mounting brackets and mounting
hardware.
Note:
If you wish to change the label strips in the unit, you must do so before attaching the
rack mounting brackets.
Step 3: Align the front side mounting bracket to the appropriate side of the unit and secure using
three 10-32 x .5 screws provided.
Primary
Master
Sync
Offline
Client
Backup
Step 4: Install the opposite side front mounting bracket.
(Asia) service@etcasia.com
Corporate Headquarters
London, UK
Rome, IT
Holzkirchen, DE
Hong Kong Rm 1801, 18/F, Tower 1 Phase 1, Enterprise Square, 9 Sheung Yuet Road, Kowloon Bay, Kowloon, Hong Kong Tel +852 2799 1220 Fax +852 2799 9325
Service:
Web:
7310M2220
Unit 26-28, Victoria Industrial Estate, Victoria Road, London W3 6UU, UK Tel +44 (0)20 8896 1000 Fax +44 (0)20 8896 2000
Via Pieve Torina, 48, 00156 Rome, Italy Tel +39 (06) 32 111 683 Fax +44 (0) 20 8752 8486
(Americas) service@etcconnect.com
www.etcconnect.com
Rev D Released 2012-05 ETC intends this document to be provided in its entirety.
Rack Mount Kits Page 1 of 3 Electronic Theatre Controls, Inc.
3031 Pleasant View Road, P.O. Box 620979, Middleton, Wisconsin 53562-0979 USA Tel +608 831 4116 Fax +608 836 1736
Ohmstrasse 3, 83607 Holzkirchen, Germany Tel +49 (80 24) 47 00-0 Fax +49 (80 24) 47 00-3 00
Copyright © 2012 ETC. All Rights Reserved. Product information and specifications subject to change.
(UK) service@etceurope.com (DE) techserv-hoki@etcconnect.com
Page 2
ETC Setup Guide
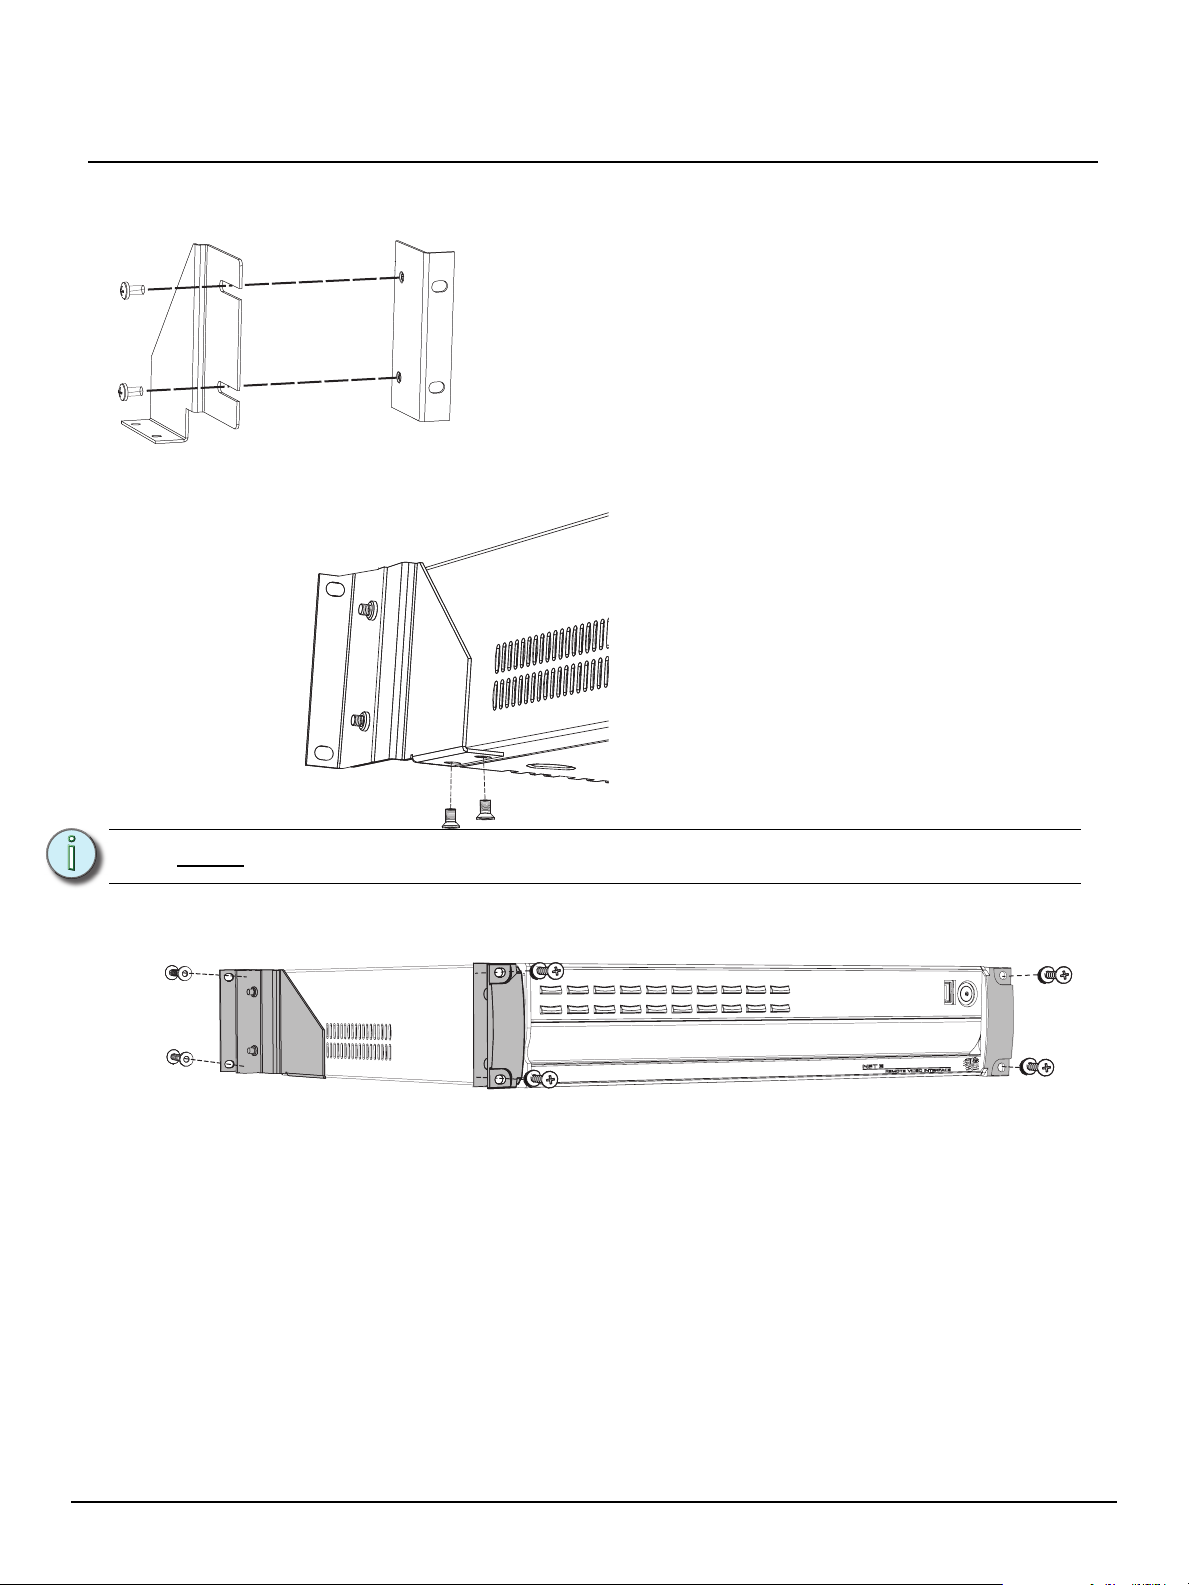
• Locate the two rear rack mounting brackets (left and right
side), the two rail adapters and four 10-32 x .5 screws from the
kit.
• Attach the rear brackets to the rail adapters as shown.
Primary
Master
Backup
Sync
Client
Offline
Install Rear Rack Mounting Ears
Step 1: Assemble the rear rack mounting brackets and the rail adapters together.
Step 2: Align the new rear mounting bracket assembly to the unit and secure using two 6-32 x .25
screws provided as shown below.
Rack Mount Kits
Note:
Remember that the rear brackets are specific to the left or right side.
Step 3: Install the opposite side rear mounting bracket assembly.
Step 4: Use the remaining hardware to secure the unit into the 19” rack enclosure.
Rack Mount Kits Page 2 of 3 Electronic Theatre Controls, Inc.
Page 3
ETC Setup Guide
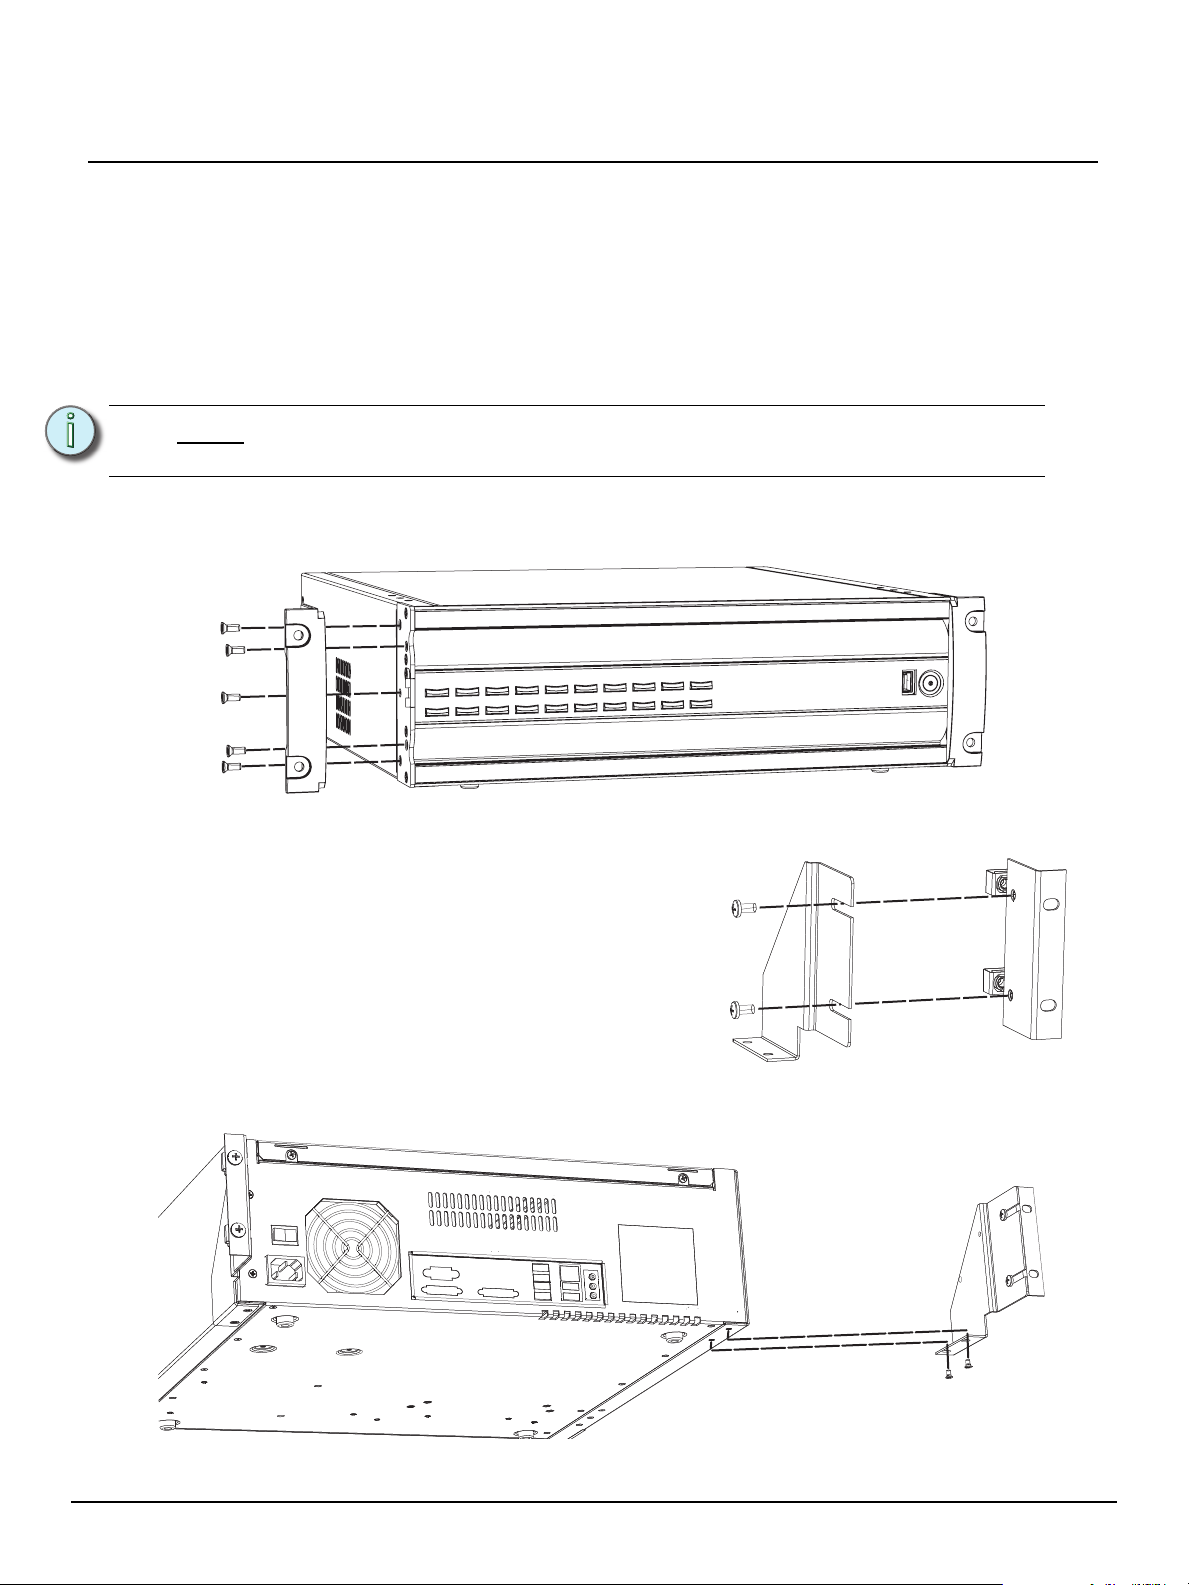
Bracket
Rail Adapter
3U Rack Mounting Instructions
The 3U Rack Mount kit (4250A2024) may be used to mount the Eos Remote Processor Unit (RPU) into
a rack enclosure. The Eos RPU requires 3U of rack space. Rack mounting the RPU requires both the
front and rear mounting brackets.
Install Front Rack Mounting Ears
Step 1: Remove the four rubber feet from the bottom of the unit.
Step 2: Locate the rack mounting hardware kit. It includes two front rack-mounting brackets and
10 screws.
Rack Mount Kits
Note:
Step 3: Align the mounting brackets to the appropriate sides of the RPU and attach them using
If you wish to change the labels for the RPU buttons, you must do so before
attaching the rack mount brackets.
the screws provided as shown below. The brackets are interchangeable and will attach to
either side of RPU.
Install Rear Rack Mounting Ears
Step 1: Locate the two rear rack-mounting brackets (left
& right) and rail adapters found in the rack
mounting hardware kit. The rear rack-mount
ears are not interchangeable and must be
attached to the proper side of the RPU.
Step 2: Attach the brackets to the rail adapters as
shown at right.
Step 3: Attach the combined bracket-adapter to the
RPU using the two 3/8” screws. Insert the
screws up through the bracket and into the
bottom side of the RPU as shown below.
.
Step 4: Repeat steps 1-3 for installation of the second bracket and adapter.
Step 5: Install the RPU in the equipment rack using the appropriate rack-mounting hardware.
Rack Mount Kits Page 3 of 3 Electronic Theatre Controls, Inc.
 Loading...