

ESYLUX PD-C360i, PD-C360i/24 DUOplus, PD-C360i/8 DIM Series, PD-C360i/24 DIM Series Operating Instructions Manual
• •
Mobil-PDi/plus
www.esylux.com
GB
GB OPERATING INSTRUCTIONS
PD-C360i/8 DIM… + PD-C360i/24 DIM…
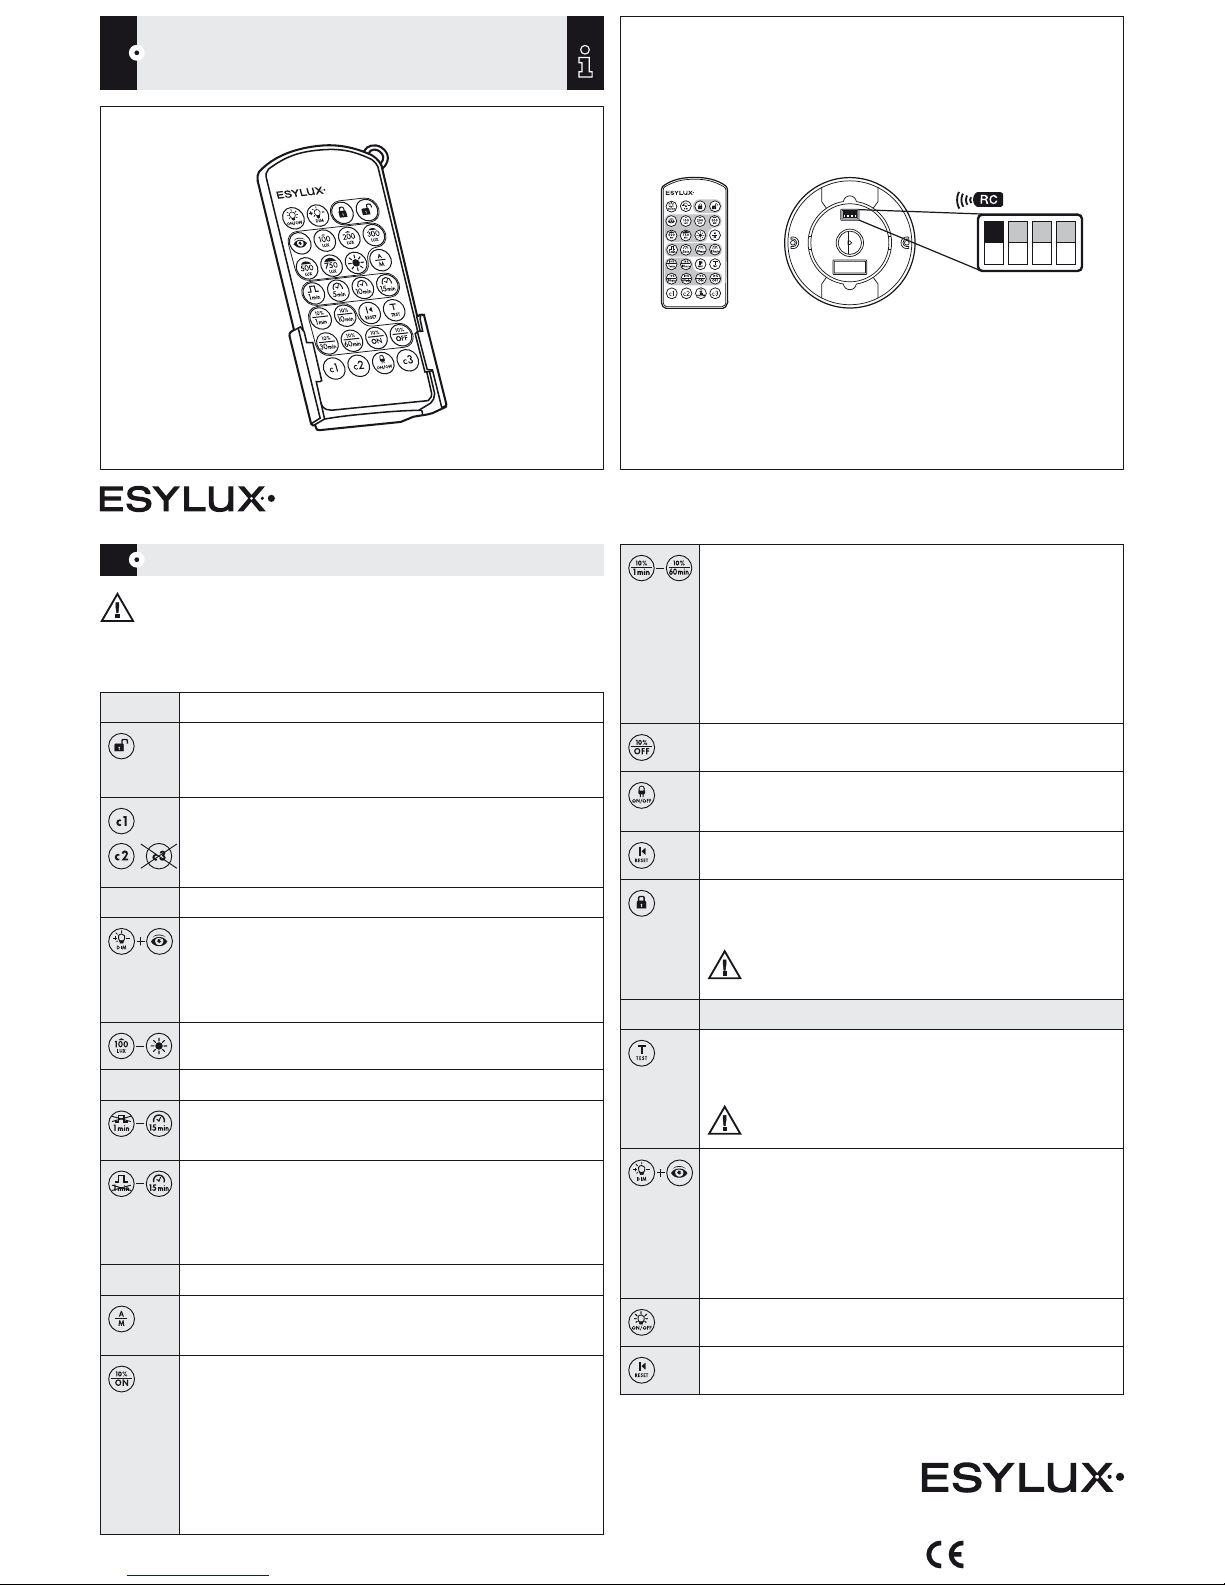
Settings and functions via Mobil-PDi/plus remote control
(Item no. EM10425530)
NOTE: For optimum reception, when programming the settings, point the remote control at the
detector. Please note that if the sun shines directly on the sensor, the sta ndard detection range of
approx. 8 m may be dra matically reduced owi ng to the sun’s infrared rays.
1. Setting via remote control
The DIP switch 1 on the detector needs to be set as shown in the illustration.
GB00029MAN
ALK 08/2011
ESYLUX GmbH
Postfach 1834, 22908 Ahrensburg/Germany
Internet: www.esylux.com
e-mail: info@esylux.com
Button Customised setting
Entering programming mode
Blue LED lights up on the detector, indicating “blue mode”
(programming mode). The connected lighting turns on.
Whilst in programming mode, the detector’s movement sensor is disabled.
Channel selection
C1 = lighting (confirmed by blue and red LED flashing alternately)
C2 = HVAC (confirmed by blue and green LED flashing alternately)
Set switc h-on light value using the eye button or a fixed light value
By pressing the “DIM” button once, the dimmer begins periodically and
automatically adjusting the light intensit y of the lighting gradually between
max. and min. values.
When the desired ambient brightness level has been reached, press the
“eye ” button.
The light value will be stored as the new predetermined brightness value.
Preset switch-on values (100 lux - daytime operation)
Confirmed by blue and red LED on the detector flashing alternately.
Adjusting the time setting – first select channel C1 or C2.
Determining a time setting for channel “lighting-C1”:
(channel C1 must be selected first) 1 min. to 15 min.
Confirmed by blue and red LED on the detector flashing alternately.
Determining a time setting for channel “HVAC-C2”:
(channel C2 must be selected first) 5 min. to 15 min. or
short pulse: once the detector has been triggered by movement,
the channel and the green LED will be switched on for 5 seconds
and then off for 5 seconds.
Confirmed by blue and green LED on the detector flashing alternately.
Setting fully and semiautomatic operation modes – first select cha nnel C1 or C2.
Alternating between “ful ly automatic” and “semiautomatic” operation modes
Semiautomatic mode = press but ton, the blue LED will turn off for approx. 3 seconds.
Fully automatic mode = press button, the blue LED will flash for approx. 3 seconds.
Activating the orientation light (10 % of luminous efficiency)
So-called “night-lig ht feature”: if the natural light in a room/hallway decreases
and the lighting level falls below the light value set on the detector (e.g.:
400 lux), the lighting is automatically dimmed to approx. 10 % of the
max. luminous efficiency. When movement is sensed, the detector turns
the lighting up to the preset light value. If the presence detector no longer
detects movement, the lights will revert to approx. 10 % of their maximum
luminous efficiency once the set time has elapsed.
If the ambient brightness is greater than the preset light value, the presence
detector will automatically switch the orientation lighting off.
Confirmed by blue and red LED on the detector flashing alternately.
Activating the orientation light (10 % of luminous efficiency),
but with fixed switch-on time of 1 min. to 60 min.
Lighting has been switched on, either automatically or by manually pressing
a button. If the presence detector no longer detects movement, the lights will
revert to approx. 10 % of their maximum luminous efficiency once the set
time has elapsed. The selected orientation light switch- on time (e.g. 10 min.)
will now begin. If the detector senses new movement within this period, the
detector turns the lighting up to the preset light value. If, however, no new
movement is sensed within this period, the orientation light is switched off
automatically.
Confirmed by blue and red LED on the detector flashing alternately.
Deactivating the orientation light (10 % of luminous efficiency)
Confirmed by blue and red LED on the detector flashing alternately.
Switchi ng LEDs on/off (red/green LED)
To switch LEDs off = press button, the blue LED will turn off for approx. 3 seconds.
To switch LEDs on = press button, the blue LED will flash for approx. 3 seconds.
Reinstating factory settings
Confirmed by blue and red LED on the detector flashing alternately.
Exiting programming mode
Blue LED goes out; settings are now saved.
The detector will now operate automatically according to the preset values.
NOTE: If the programming mode is not exited by pressing the button, the
detector automatically exits the programming mode 10 minutes after the last
button was pressed.
Additional functions via Mobil-PDi/plus remote control
Checking the range/detection using test m ode
Connected lighting turns on – for clear inspection/pacing out of a detector’s
field of detection. Real-time, load-free indication of movement given by
2 flashes of the blue LED.
NOTE: Exit test mode by pressing the “TEST” or “RESET” button.
Temporary dimm ing to the desired light value (replaces button)
By pressing the “DIM” button once, the dimmer begins periodically and
automatically adjusting the light intensit y of the lighting gradually between
max. and min. values. When the desired ambient brightness level has been
reached, press the “ey e” button.
This light value will be maintained for as long as persons are present in
the room. Should these persons leave the detection range, the presence
detector will revert to the previous set ting mode after the default time setting
has elapsed.
Switching chan nel “lighting-C1” or “HVAC-C2” on/off manually
(replaces button) – f irst select the channel.
Interru pting the “TEST”, “light ON/OFF” functions
The detector switches back to the corresponding set operating mode.
• •
Mobil-PDi/plus
www.esylux.com
GB
GB OPERATING INSTRUCTIONS
PD-C360i/24 DUOplus
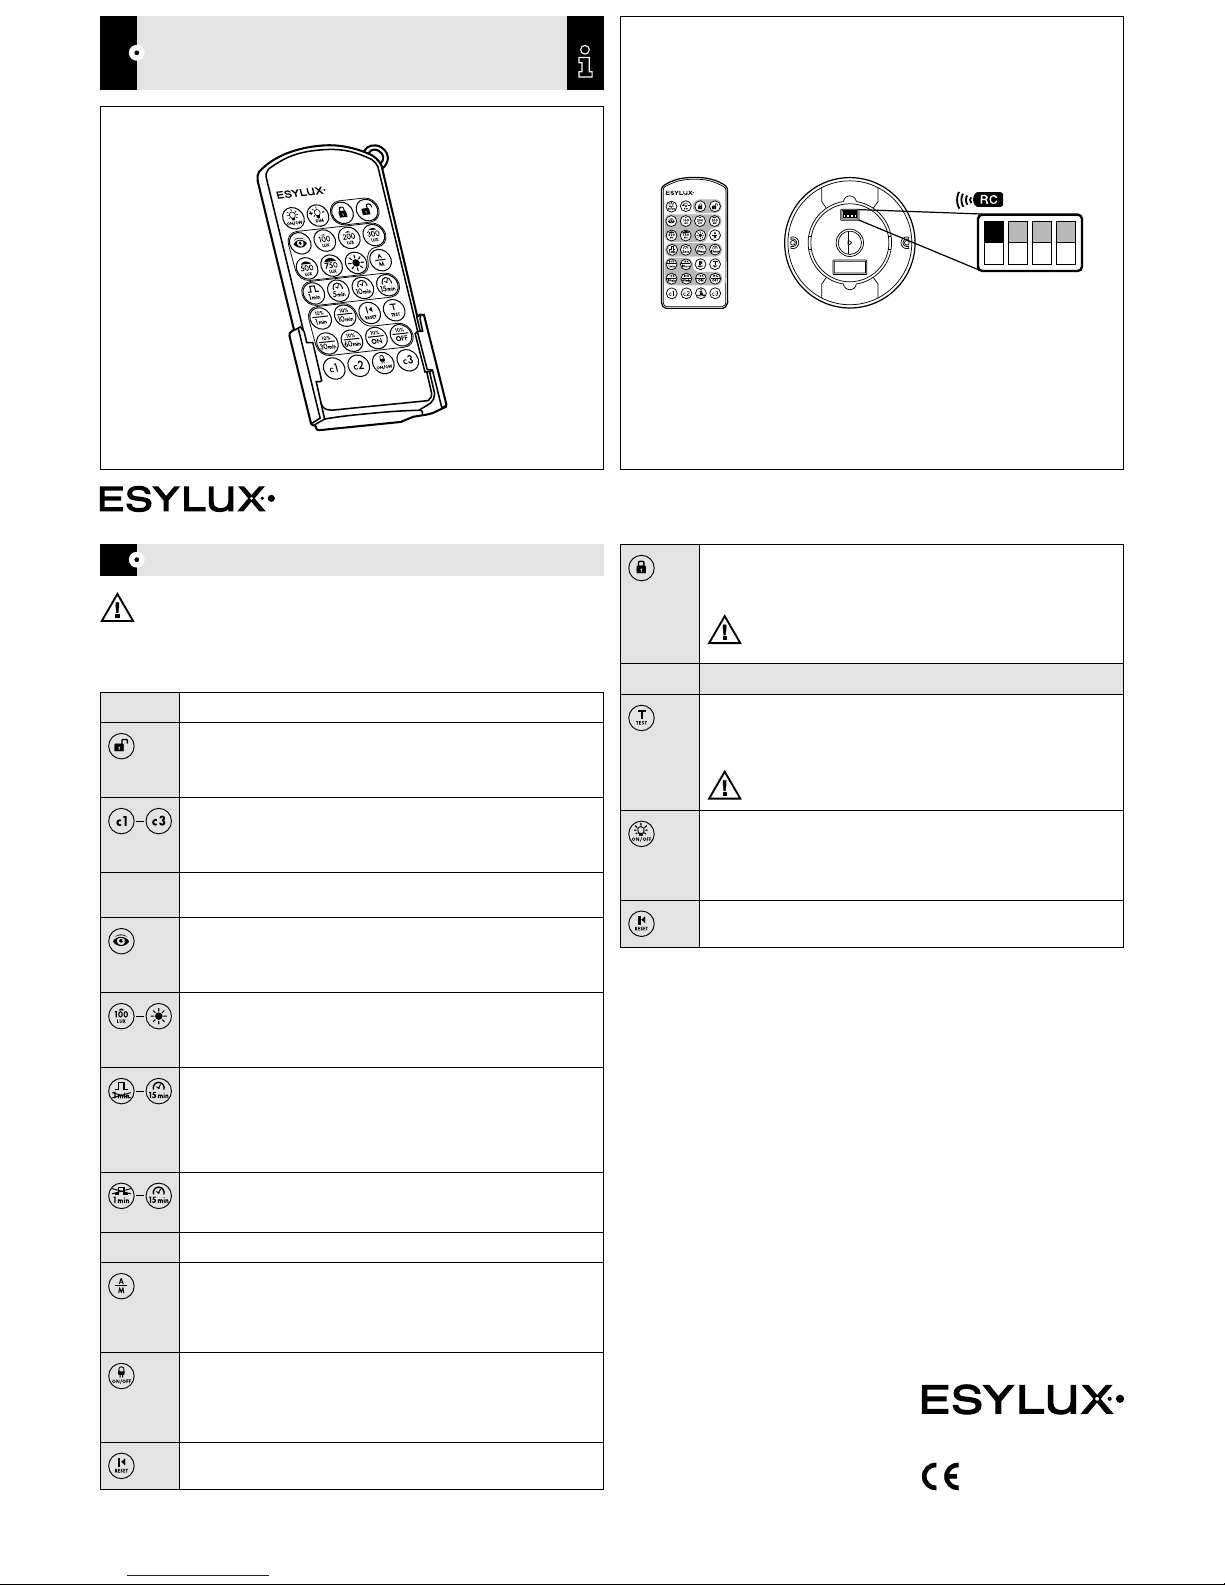
Settings and functions via Mobil-PDi/plus remote control
(Item no. EM10425530)
NOTE: For optimum reception, when programming the settings, point the remote control at the
detector. Please note that if the sun shines directly on the sensor, the sta ndard detection range
of approx. 8 m may be dramatically red uced owing to the sun’s infrared rays.
1. Setting via remote control
The DIP switch 1 on the detector needs to be set as shown in the illustration.
Button Customised setting
Entering programming mode
Blue LED lights up on the detector, indicating “blue mode” (programming mode).
The connected lighting turns on.
Whilst in programming mode, the detector’s movement sensor is disabled.
Channel selection
C1 = lighting (confirmed by blue and red LED flashing alternately)
C2 = lighting (confirmed by blue and green LED flashing alternately)
C3 = HVAC (confirmed by flashing blue LED)
Set the switch-on light value using the eye button for both channels C1 + C2 or select a
fixed light value for channel C1 or C2 individually
Inputting the current am bient light value as switch-on light value: between 5 - 2000 lux
Connected lighting C1 + C2 and the blue LED switch off. Once the input
process has been successfully completed, the lighting turns on and the
blue LED lights up continuously.
Setting a fixed, individual switch-on value for ch annel C1 or C2:
(channel C1 or C2 must be selected first) 100 lux - daytime operation
Confirmed for C1 by blue and red LED on the detector flashing alternately.
Confirmed for C2 by blue and green LED on the detector flashing alternately.
Determining a common ti me setting for cha nnel “lighting C1 + C2”:
5 min. to 15 min. or
short pulse: once the detector has been triggered by movement (lighting is
below preset ambient lighting level), the lighting and the red LED will be
switched on for 1 second and then off for 9 seconds.
Confirmed by blue and red LED on the detector flashing alternately.
Determining a time setting for channel “HVAC C3”:
(channel C3 must be selected first) 1 min. to 15 min.
Confirmed by flashing blue LED on the detector.
Setting fully and semiautomatic operation modes – first select cha nnel C1, C2 or C3!
Alternating between “ful ly automatic” and “semiautomatic” operation modes
Semiautomatic mode = press button, the blue LED will turn off for
approx. 3seconds.
Fully automatic mode = press button, the blue LED will flash for
approx. 3 seconds.
Switchi ng LEDs on/off (red/green LED)
To switch LEDs off = press button, the blue LED will turn off for
approx. 3 seconds.
To switch LEDs on = press but ton, the blue LED will flash for
approx. 3 seconds.
Reinstating factory settings
Confirmed by blue and red LED on the detector flashing alternately.
Exiting programming mode
Blue LED goes out; settings are now saved.
The detector will now operate automatically according to the preset values.
NOTE: If the programming mode is not exited by pressing the button,
the detector automatically exits the progra mming mode 10 minutes
after the last button was pressed.
Additional functions via Mobil-PDi/plus remote control
Checking the range/detection using test m ode
Connected lighting turns on – for clear inspection/pacing out of a detector’s
field of detection. Real-time, load-free indication of movement given by
2 flashes of the blue LED.
NOTE: Exit test mode by pressing the “TEST” or “RESET” button.
Switching chan nel “lighting C1 or C2” or “HVAC C3” on/off manually (replaces button) –
first se lect the channel!
C1 = lighting (confirmed by flashing red LED)
C2 = lighting (confirmed by flashing green LED)
C3 = HVAC (confirmed by flashing blue LED)
Interru pting the “TEST”, “light ON/OFF” functions
The detector switches back to the corresponding set operating mode.
GB00004MAN
ESYLUX GmbH
Postfach 1834, 22908 Ahrensburg/Germany
Internet: www.esylux.com
e-mail: info@esylux.com
ALK 10/2009
 Loading...