

Page 1

CAR AUDIO LOUDSPEAKERS
QXE42 · QXE52 · QXE62
QXE5.2C · QXE6.2C
QXE6.2W
Page 2

DEUTSCH
EINBAUHINWEISE
Der erste Schritt bei der Installation der Lautsprecher sollte die sorgfältige Planung sein. Folgen Sie einfach
diesen Vorschlägen um das bestmögliche Resultat zu erreichen.
1. Wählen Sie eine Position für die einzelnen Komponenten, bei der das Signal am besten ohne Hindernisse im Fahrgastraum verteilt wird. Beachten Sie dabei auch die Position der Sitze, Nackenstützen und
anderer Aufbauten im Innenraum.
2. Montieren Sie die Lautsprecher rechts und links in der selben Anordnung, d.h. sie sollten auf der gleichen Höhe und direkt gegenüber zueinander eingebaut werden. Vermeiden Sie wenn möglich, dass ein
Lautsprecher höher, tiefer, weiter weg oder näher wie der gegenüberliegende Lautsprecher montiert
wird.
3. Achten Sie beim Einbau darauf, dass der Abstand zwischen dem Hochtöner und
dem Mitteltöner möglichst gering ist.
4. Überprüfen Sie vor dem Bohren von Montagelöchern immer, was sich hinter der gewählten Montageä-
che bendet. Bitte beschädigen Sie auf keinen Fall Fensterhebevorrichtungen, Kabelbäume, den Tank
oder andere Fahrzeugteile.
5. Sie erreichen das beste Klangresultat, wenn die Lautsprecher fachgerecht in einem Türpanel oder einer
Heckablage fest montiert werden. Lücken oder lose Stellen zwischen Lautsprecherkorb und Monta-
geoberäche sollten abgedämmt bzw. geschlossen werden.
6. Bitte behandeln Sie die Komponenten mit Sorgfalt während des Einbaus, andernfalls könnten diese
ernsthaft beschädigt werden.
7. Bitte achten Sie beim Anschließen der einzelnen Komponenten stets auf die korrekte Polarität (+ / –)
der Anschlüsse.
8. Schließen Sie die Lautsprecher niemals an den Masseanschluss oder an die Karosserie des Fahrzeugs
an.
GARANTIE
Dieses ESX Produkt besitzt eine 2-jährige Herstellergarantie ab Kaufdatum.
Um Ihren Garantieschutz aufrecht zu erhalten, bewahren Sie bitte zwecks Nachweis des Kaufdatums Ihren
Originalkaufbeleg auf. Jeglicher Schaden an dem Produkt, der auf falsche bzw. unsachgemäße Verwendung, Unfall, falschen Anschluss, ungeeignete Installation, Veränderung der Strichcodekennzeichnung,
Naturkatastrophen oder jegliche zweckfremden Eingriffe, Reparatur oder Abänderung außerhalb unseres
Werkes oder autorisierter Service-Zentren, sowie alle anderen Handlungen zurückzuführen ist, die unberechtigter, weil inkompetenter Weise vorgenommen wurden, ist von der Garantie ausgeschlossen. Diese
Garantie ist auf defekte Teile beschränkt und schließt insbesondere alle zufälligen bzw. eventuellen Folgeschäden aus, die damit einhergehen.
Retournieren Sie das Produkt bei einem Defekt zusammen mit einer Kopie des Kaufbelegs und einer detaillierten Fehlerbeschreibung an Ihren Fachhändler, von dem Sie das Produkt gekauft haben.
2
Page 3
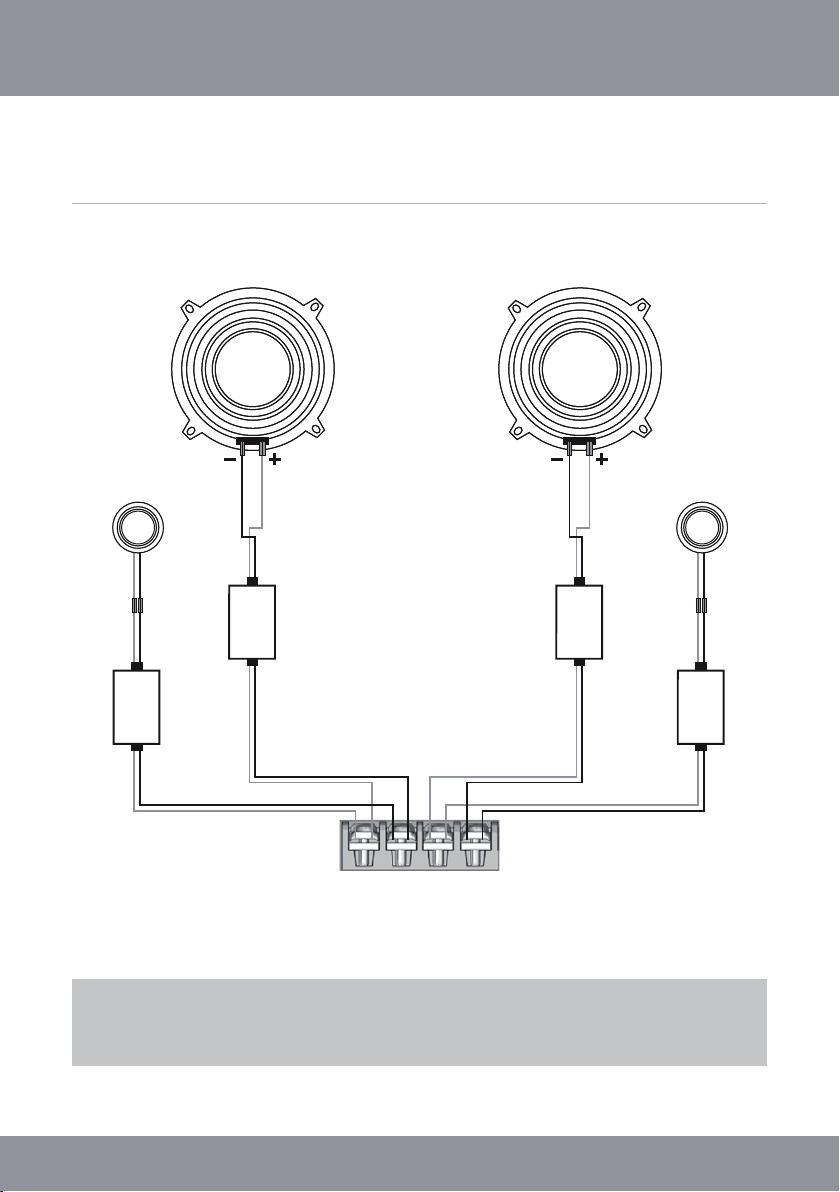
ANSCHLUSS QXE5.2C, QXE6.2C
Tiefmitteltöner Tiefmitteltöner
L R
DEUTSCH
Hochtöner
L R
+ WF – + WF –
+ IN – + IN –
+ TW – + TW –
+ IN – + IN –
Kabelweiche TW
Kabelweiche WF
+ L – + R –
Lautsprecherausgänge
am Verstärker
WICHTIG:
Bitte achten Sie unbedingt auf die korrekte Polarität (+ oder –)
aller Anschlüsse und Verbindungen.
Kabel-
weiche WF
Kabel-
weiche TW
Hochtöner
3
Page 4

DEUTSCH
HOCHTONABSCHWÄCHUNG QXE5.2C, QXE6.2C
Darunter bendet sich ein Steckkontakt, der in drei Positionen eingesteckt werden kann:
Optional: Ziehen Sie das Gehäuse der Hochtönerweiche (TW) ab.
0 dB = keine Abschwächung bzw. – 3dB oder – 6dB Hochtonabschwächung
ANSCHLUSS QXE42, QXE52, QXE62, QXE6.2W
Lautsprecher Lautsprecher
L R
+ L – + R –
Lautsprecherausgänge
am Verstärker
Bitte achten Sie unbedingt auf die korrekte Polarität (+ oder –)
aller Anschlüsse und Verbindungen.
WICHTIG:
4
Page 5

ENGLISH
INSTALLATION NOTES
The rst step of installing a speaker system is thorough planning. Choose a suitable location for your speaker components carefully. Follow these suggestions to ensure proper imaging and maximum performance:
1. Choose a location that offers the least amount of obstruction between the components and your ears.
Pay also attention to the position of the seats, headrests and other constructional systems in the interior
space of the car.
2. Try to mount the speakers on the same arrangement. They should be installed at the same height and
directly across from each other. Do not mount one speaker higher, lower, further forward or further backward from the opposite speaker.
3. The tweeter should always be installed as close as possible to the midbass speaker.
4. Always take a look behind the chosen mounting locations to ensure that there is proper clearance for the
rearside of the speakers and avoid obstructions such as window tracks, wire harnesses, gas tank etc.
5. Maximum performance is achieved when the speaker is securely mounted to a door panel or rear speak-
er deck. There should be no gaps between the speaker basket and the mounting surface
6. Please handle the components with care, otherwise they will get damaged.
7. Please pay attention to the correct polarity (+ or -) for all terminals and connections.
8. Never connect the speakers to the electrical ground or with the body of the vehicle.
WARRANTY
This ESX product has a 2-year warranty from date of purchase.
To maintain your warranty coverage upright, keep your original purchase receipt to prove the date of pur-
chase. Any damage of the product, based on incorrect or improper use, accident, incorrect and improper
installation, modication of the barcode, natural disaster or any non-appropriate interventions, repairing or
alteration outside our factory or authorized service centers, and caused by other acts, which are unauthorized, because have been made in an incompetent manner, is excluded from the warranty. This warranty is
limited only to defective parts and especially excludes all incidental or consequential damages and those
who are associated with.
Please return the defective product along with a copy of your purchase receipt and a detailed malfunction
description to the dealer from whom you purchased the product.
5
Page 6

ENGLISH
INTERCONNECTION QXE5.2C, QXE6.2C
Midbass / Woofer Midbass / Woofer
L R
Tweeter
Tweeter
L R
+ WF – + WF –
+ IN – + IN –
+ TW – + TW –
+ IN – + IN –
Crossover TW
Crossover WF
+ L – + R –
Speaker Outputs
at the Amplier
IMPORTANT:
Please pay attention to the correct polarity (+ or -)
for all terminals and connections.
Cross-
over WF
Cross-
over TW
6
Page 7

ENGLISH
TWEETER ATTENUATION QXE5.2C, QXE6.2C
Optional: Pull off the housing of the tweeter crossover (TW).
Underneath is a jumper which can be plugged into three positions:
0 dB = no attenuation resp. – 3dB or – 6dB attenuation
INTERCONNECTION QXE42, QXE52, QXE62, QXE6.2W
Speaker Speaker
L R
+ L – + R –
Speaker Outputs
at the Amplier
IMPORTANT:
Please pay attention to the correct polarity (+ or -)
for all terminals and connections.
7
Page 8

D E S I G N
Am Breilingsweg 3 · D-76709 Kronau/Germany
Audio Design GmbH
Tel. +49(0)7253 - 9465-0 · Fax +49(0)7253 - 946510
www.esxaudio.de • www.audiodesign.de
©2018 Audio Design GmbH, All Rights Reserved
 Loading...