

Page 1

User Manual for ESWING
SHENZHEN XINLI TECHNOLOGY CO., Limited
Address: 103, Building 2, JiuXiangLing New Industrial Zone, No.4227, XiLiHu Road, NanShan District,
ShenZhen City, GuangDong Province, China Zip: 518000
Tel: +86 755 86534066 Fax: +86 755 86534099
Sales hotline: (86)4000-966-065 (exit) 3 Wechat: ESWING-0313
Web: www.xinlitech.com
Factory address:
F4/A, Building 5, HanHaiDa High Tech Industrial Park, BaoShan Road, TianLiao Village, GongMing Town,
GuangMing New District, ShenZhen City, GuangDong Province, China Zip: 518132
Email: sales03@xinlitech.com, Mobile: +86 180 2533 0919
Tel: +86 755 23409266 (exit.) 806 Fax: +86 755 23405986
Page 2

1
Welcome Use
ESWING is the future of transportation with two wheels and a technology using a
self-balancing electric vehicle.
To ensure ESWING brings you the best driving experience, please read this manual
book carefully, it is user responsibility to follow all the safety instructions.
Recommended for adults use. Not suitable for children under 10 years. Parents are
advised to accompany all children.
Please wear helmet, knee and elbow guards for safety purposes.
Do not abuse the unit.
Please maintain ESWING according to the user manual for best condition. If there is
a need after service, please contact our agent who will take care for you.
Sincerely wish you have a nice driving.
The user manual contains important safety information --- Please read
carefully.
Page 3

2
Contents
Chapter I Introduction of ESWING.......................................................................3
Chapter II Parts Explanation................................................................................4
Chapter III Instruction manual of remote control..................................................6
Chapter IV Getting Started...................................................................................8
Chapter V ESWING Driving................................................................................10
Chapter VI Charging...........................................................................................14
Chapter VII Maintenance ...................................................................................15
Chapter VIII Notice ............................................................................................16
Chapter IX Indicator and Sound Alarm...............................................................17
Chapter X Technical Data...................................................................................19
Page 4

3
Chapter I Introduction of ESWING
The working principle is based on the basic principle called "dynamic stability"
which is the automatic balance ability of the vehicle itself. After judging body
posture position with a built-in precision solid gyroscope, the vehicles electronic
brain works out proper instructions through a sophisticated and high-speed central
microprocessor, electric scooter will drive the motor to balance the vehicle.
As a new transporter, ESWING is difficult to classify in the traditional way, some
people think that ESWING should be a kind of double-wheeled Unicycle, while
other people think it should be classed as a power stand-up Scooter, with its
uniaxial double design which is different from the traditional biaxial double scooter,
for official road regulations, this transporter is called Electric Personal Assistive
Mobility Device (EPAMD)
ESWING is equipped with dual wheels; its width is as narrow as a normal adult
shoulder's width. It is around 46.5KG (Li-ion battery) operated. It is not necessary
to have a brake or throttle during driving. When the driver leans his body forward,
ESWING will run forward, when the body is upright, it will stop. It uses the dynamic
balance principle, as the body moves to change the center of gravity so as to keep
balance. Just as the human body stands and leans forwards it can lose balance,
but the body's natural instinct will maintain balance, the dynamic stability
replicates this. ESWING uses the wheels to replace the function of the feet,
reproducing the high precision balance action of a human, it is also cheap and
convenient to use. The energy comes from two repeat charging BTM batteries
which are free from maintenance. If sufficient power is supplied to your battery, the
full charge capacity will last continuous for 5 hours driving, the driving range
depends on the way you drive and ground conditions, driving on grass and slopes
will consume more driving power.
Page 5

4
2. Power Switch
(1) The power switch is used to turn on and off the power, when the power switch is
on the ESWING will finish the initialization-settings.
(2) It is dangerous to stand on ESWING without turning on the power.
Chapter II Parts Explanation
Picture 1
1. Handle Bar/Turning Pipe
(1)Used to control and make the ESWING turn left or right, turn around, rotate 360
degrees. It also has support function and can play a subsidiary role in keeping body
balance.
(2) The height is adjustable. The driver can adjust it according to his or her own
height to make the handle bar comfortable.
(3)Lock the steering rod after adjustment, then turn the handle bar to confirm that it
has had been locked.
(4)Above adjustment of the handle bar/ turning pipe should be locked in position
before driving.
(5)The turning pipe can be taken apart easily for carrying or storage.
Page 6

5
3. Pedal Switch (SAFE switch)
(1) Under each left and right foot pedal,there are 2 switchers, which can help connect
complete the system and recognize if there is any foot or people on ESWING;
(2)Once you leave ESWING,it recognizes nothing on and will alarm.
Tip: You must keep at least 1 pedal switcher works, and disconnect the others
(totally 4 pedals switchers).
4. Indicator Lights on Pedal
(1)Green light (Operating light 1)
Battery is full, system is normal.
(2)Orange light (warning light 2)
Battery will run out soon.
(3)Red light (warning light 3)
Battery will run out completely
5. Assembly instruction of steering pipe
(1) Assembly the handlebar: Use the smaller hex screwdriver (along with the
package) to fix the 3 screws with the assistant bar with the handlebar.
(2) Assembly the steering pipe: Take out the round cover at the end of pipe, and take
out the screw on the left side of the pipe; push the pipe into the joint, fix the screw
afterwards.
(3) Assembly the steering pipe up and down parts: Slot the up part into the down
part, be carefully to the tube height, it could help to adjust the total height as your
body height; after that, fix the screw bolt.
Page 7
6
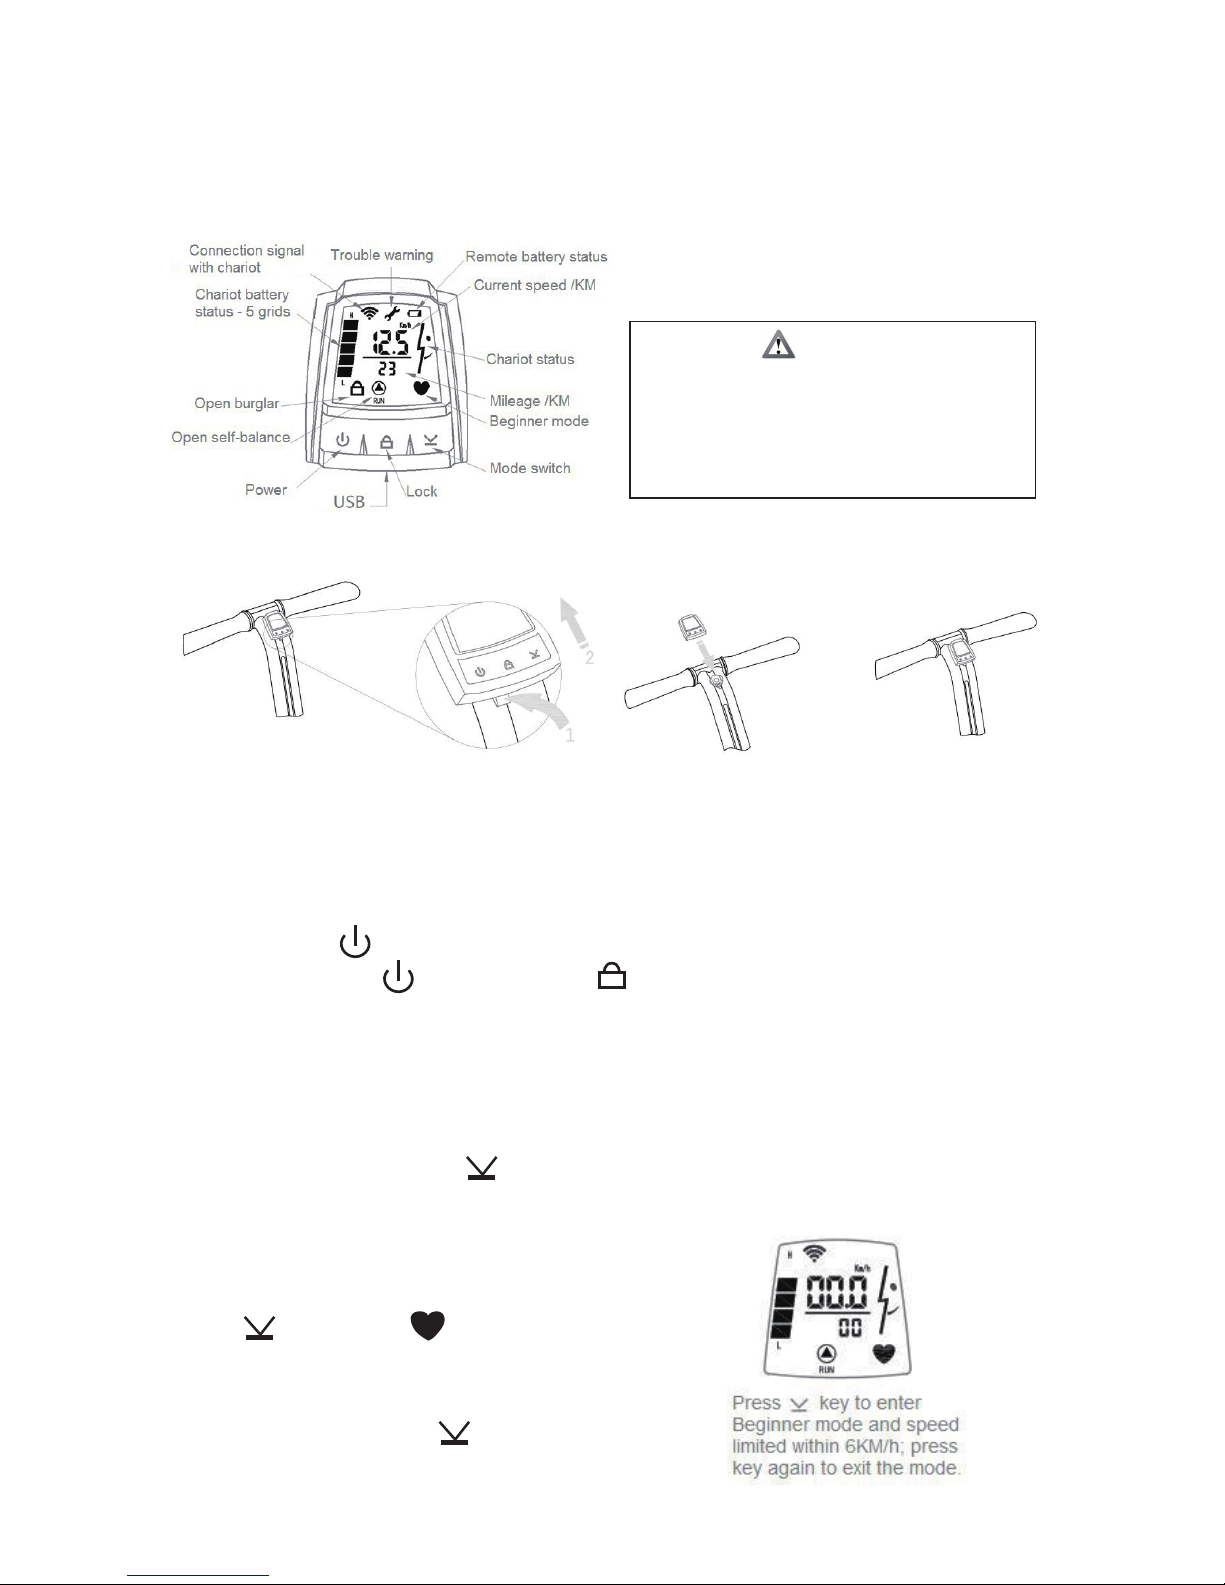
1. Press power key on the remote to turn ON;
2. Press power key and lock key together, the wifi symbol will flash;
3. During the flashing, turn ON the power switcher on the chariot;
4. Then connected ESWING and the remote.
Chapter III Instruction manual of remote control
Install the remote control then the instruction on how to connect
How to connect the remote to the unit
Long pressing on the 3rd key .
How to turn ON/OFF the front&back lights
Remote control – icons explanations
1、Beginner mode
Take remote control out,
operate according to picture.1
Put remote control back,
operate according to picture.2
Picture. 1 Picture. 2
CAUTION
If the chariot upwards, don’ t lean it forward anymore, the
rider must lean backward firmly to stop immediately;
otherwise the rider will be fall off and hurt himself, even
more serious consequences happened if not in according
with the speed limit.
Please ride carefully to avoid falls. Beginners are
recommended to use beginner mode.
Press key and icon
displays, it means beginner mode
starts, and the speed is limited
within 6KM. You can press key
again to exit the beginner mode.
Page 8
7
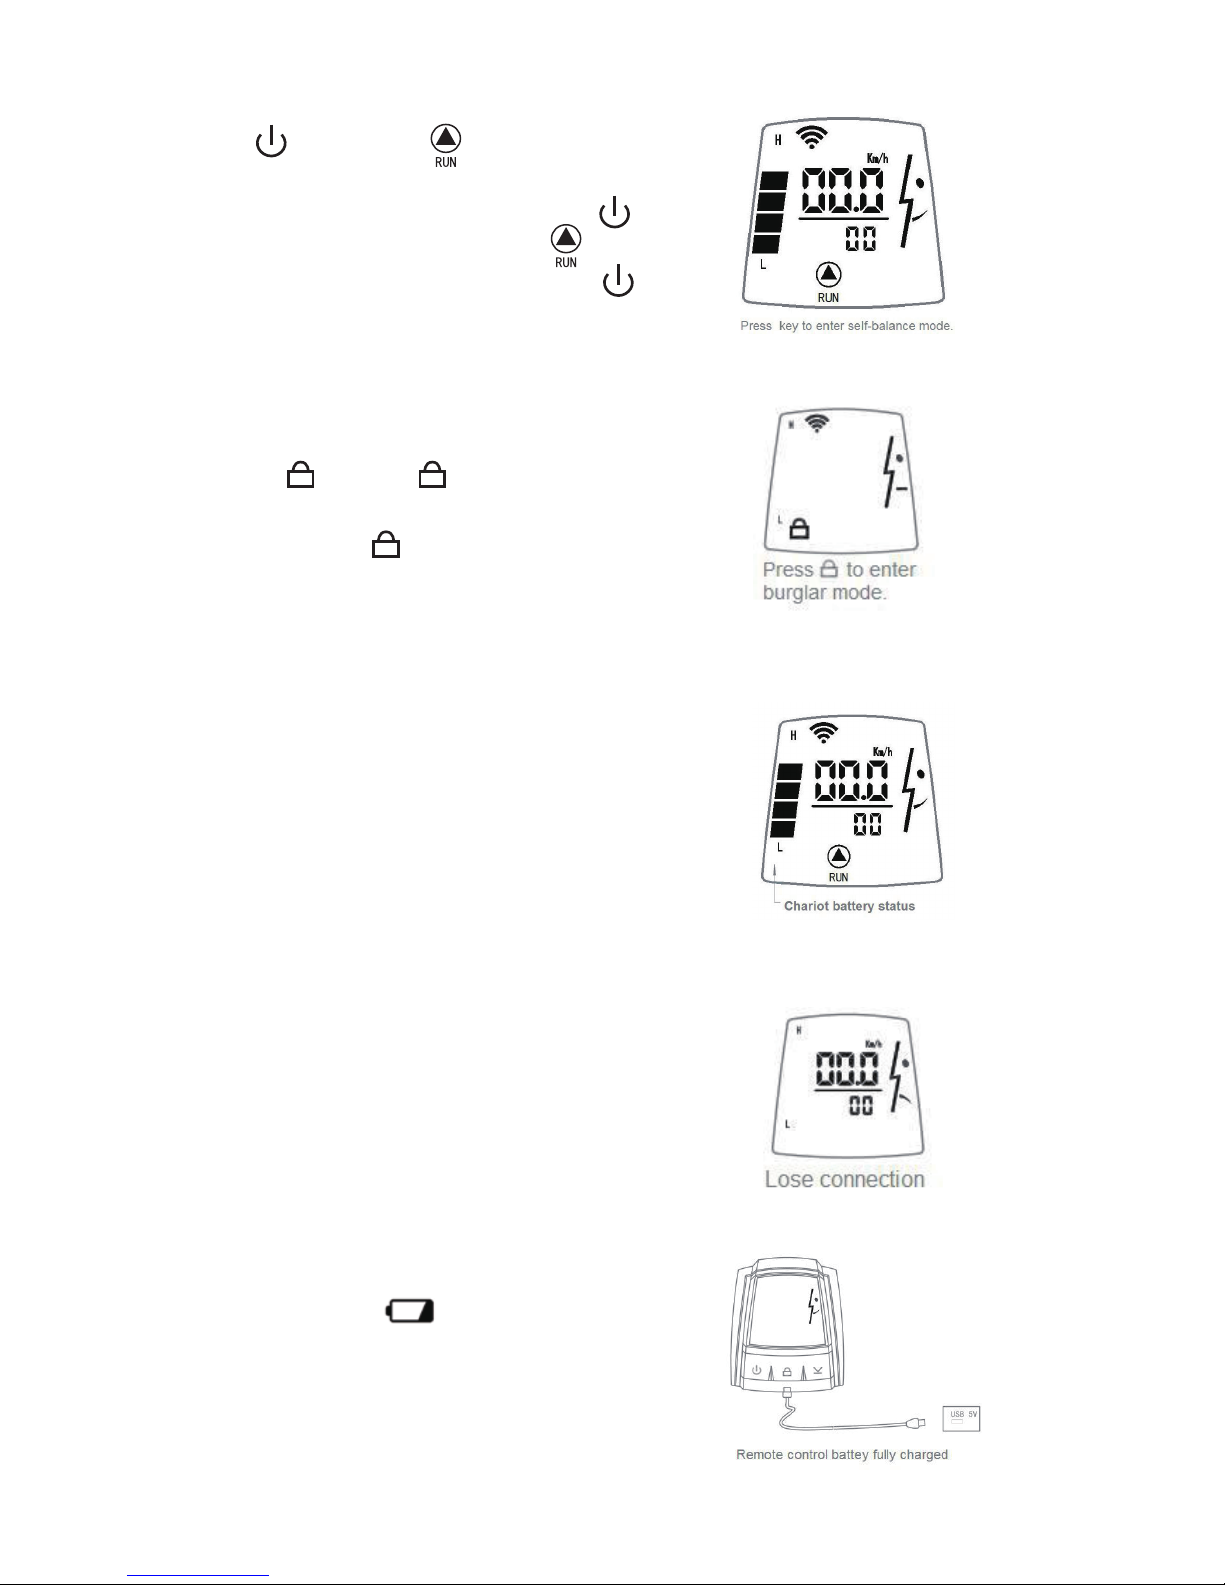
4、Chariot battery status
5、Connection signal with chariot
6、Remote control low battery status
3、Lock mode
Press key and displays, the chariot
starts lock mode. If anyone moved it, alarm sound
will ring out; press again to release burglar
mode.
The chariot battery is showed by 5 grids. With the
battery gradually reducing; the chariot will
automatically limit speed in order to ensure the
safety to the riders.
Note: Above 4 grids, speed limited at 16KM/H; 3
grids, speed limited at 14KM/H; 2 grids, speed
limited at 8KM/H; 1 grid, speed limited at 5KM/H.
The chariot connection signal distance is within 15
meters; once beyond this range, the remote will
display no connection.
Once the icon of displays, it means
battery is low and less than enough. Please take
the remote control off, charge it by connecting
with computer or 5V power source by a Micro USB
cable. Once charging completed, low battery icon
will disappear automatically.
2、Self-balance mode (shove mode)
Press key and displays, it means
chariot starts self-balance mode, you can easily
push the chariot go ahead. You can press key
again to exit self-balance mode, and icon will
disappears. A one-second long pressing on key
to turn on the screen backlight, and long pressing
again to turn off the screen backlight.
Page 9
8
Picture 3 Picture 4
Picture 5 Picture 6
Chapter IV Getting Started
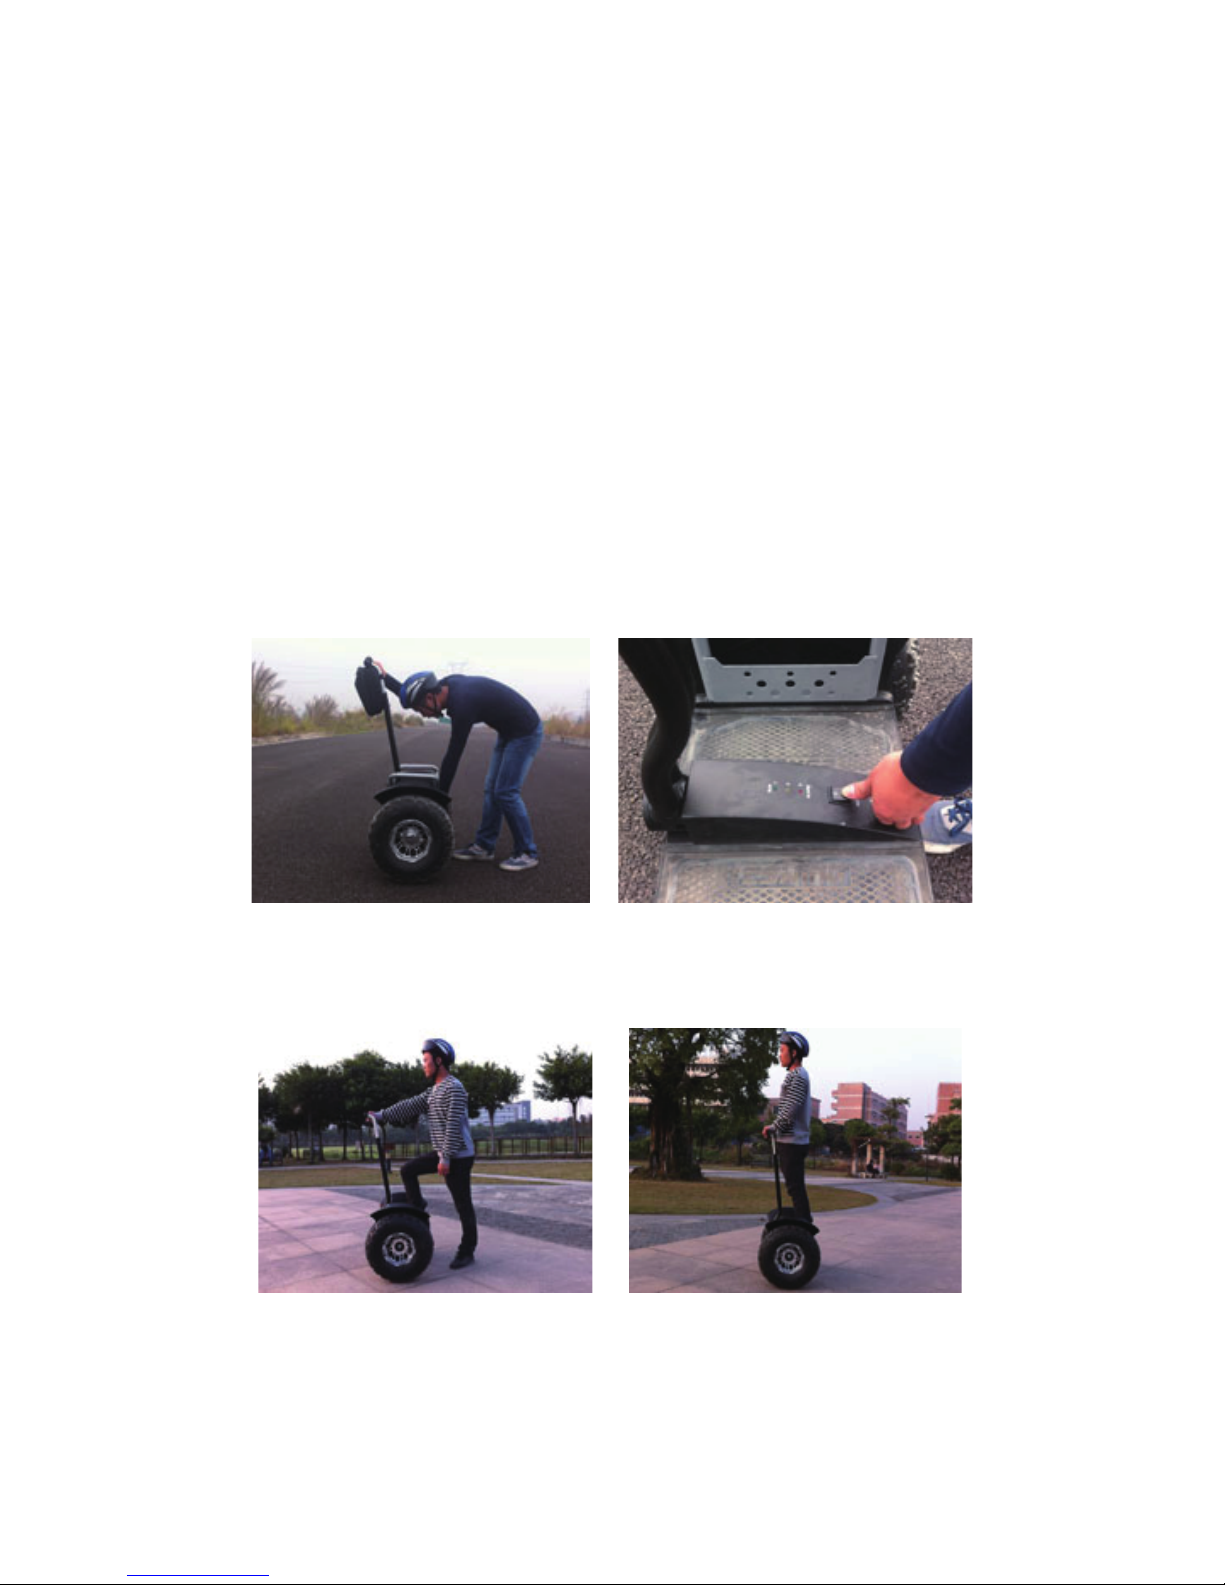
1.The Right Starting Operation
Hold the turning pipe/handle bar with one hand, keeping the pedal upright ,turn on
the power, after green light, orange light and red light flash at the same time, and the
green light stay on continuous, it means starting success (refer to picture 3,4,5).
Then hold the handlebar firmly with two hands (refer to picture 6).
Make sure the pedal is on horizontal level when power on, because ESWING cannot
power on if it is not on horizontal level.
Page 10
9
Picture 7
Picture 9
Picture 8
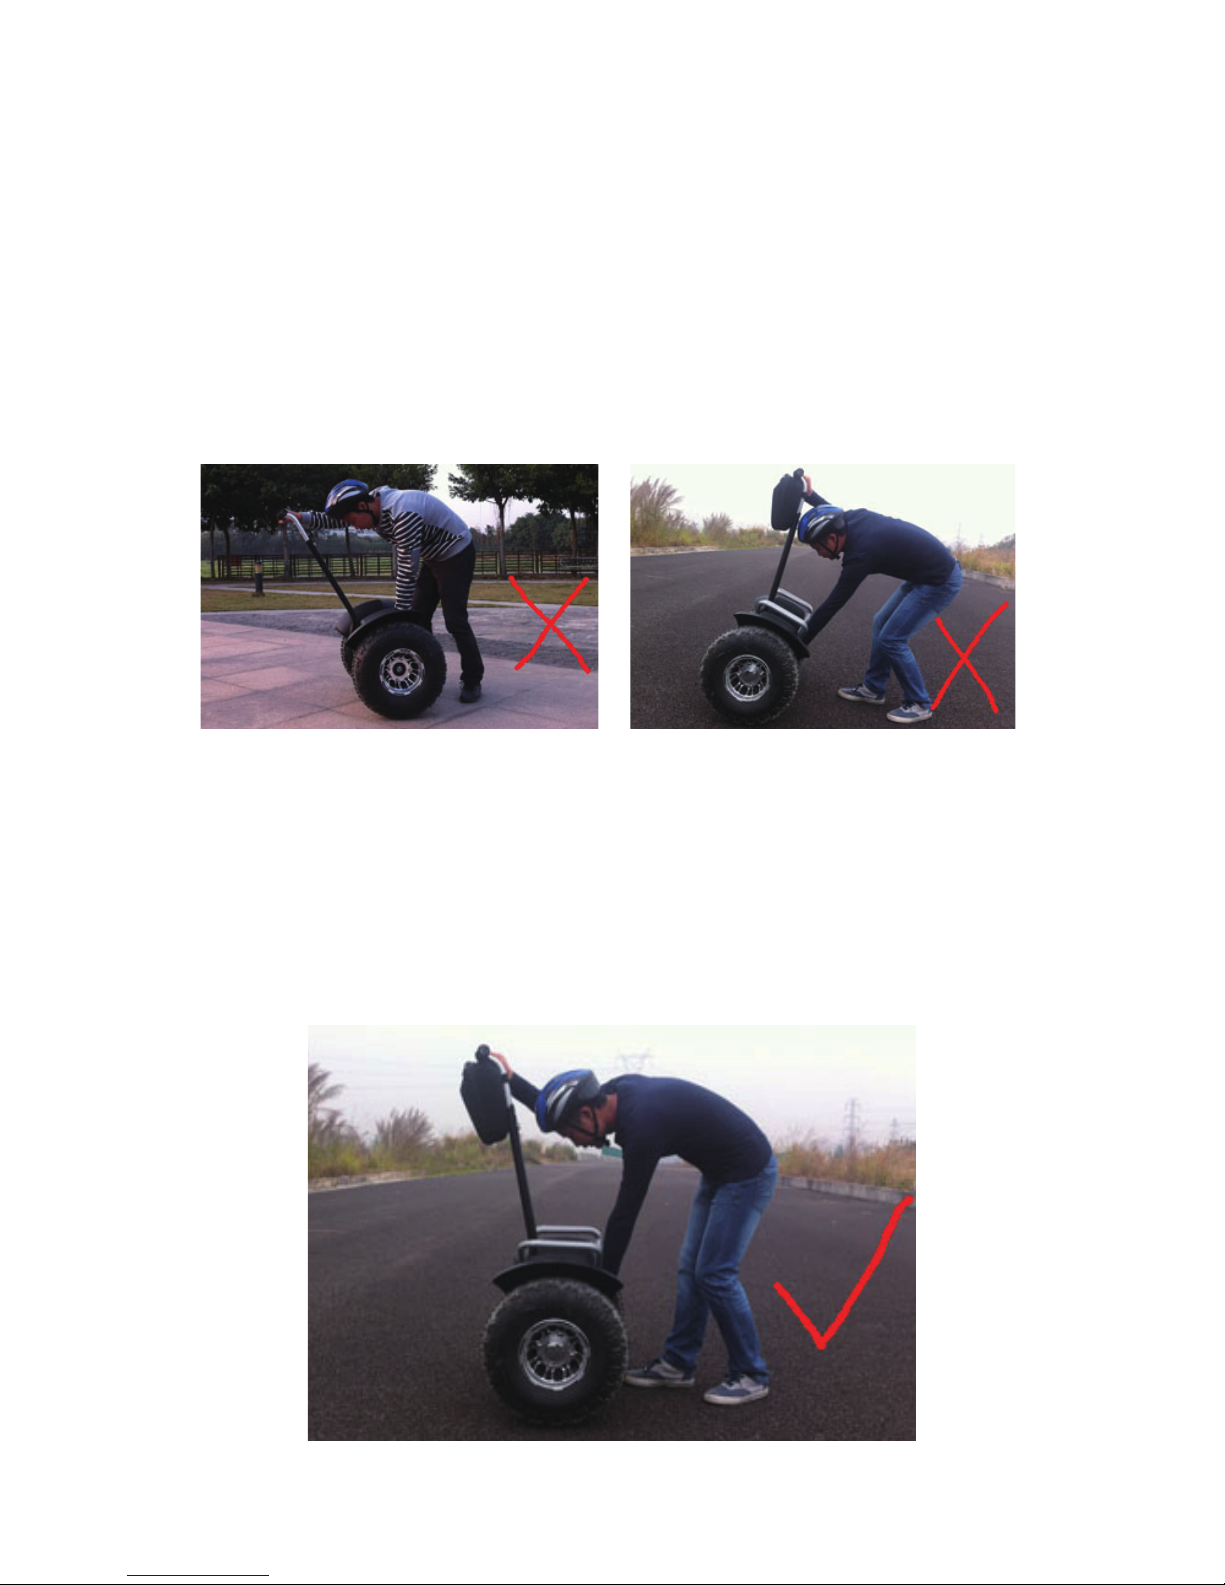
3. Correct Starting Operation (refer to picture 9)
Make the pedal of ESWING on horizontal level before power on it.
2.Wrong Starting Operation (refer to picture 7 and 8 )
ESWING cannot power on if it is not on horizontal level, so we must make sure the
pedal is on horizontal level, then power on it.
Page 11
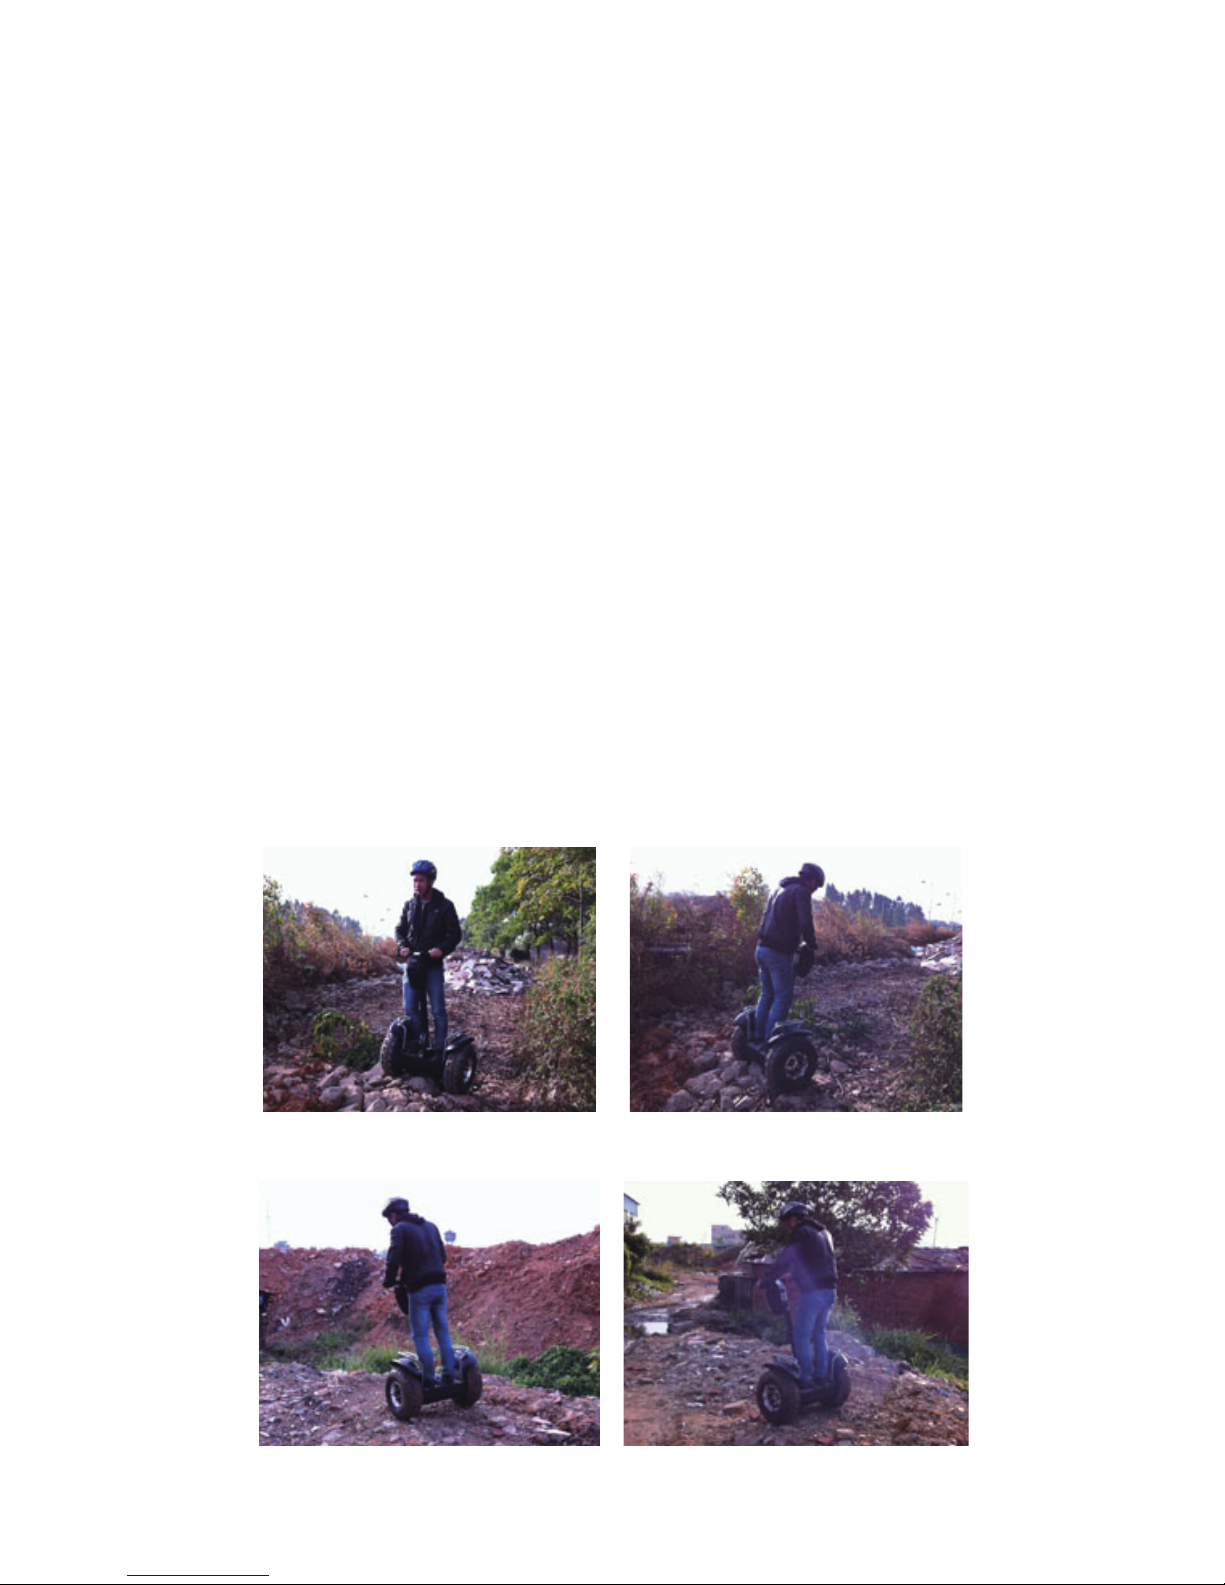
10
Chapter V ESWING Driving
Driving the ESWING is totally different from anything you may have driven before,
ESWING does not have a brake, accelerator or gear system. Please read the user
manual or get instruction from an experienced person for your first driving.
ESWING is very addictive once you enjoy the fun of driving, you could not stop
driving whenever you get the chance. The following instructions will be beneficial for
your enjoyment.
Below description will be helpful to your driving.
Tip: We suggest you use Beginner Mode if you did not driver our ESWING before.
We are offering you driving detail as below:
It is with big gear tires apply for all landform, it can conquer all kinds of grounds made
of dirt, gravels, grasses or sands, since the wider ruts increase its stability, and the
higher chassis ensure your driving will pass thought steep slopes, uneven surfaces
and part of the rock exposed. ESWING can travel up to 35 km after completely
charging.
Picture 10 Picture 11
Picture 12 Picture 13
Page 12
11
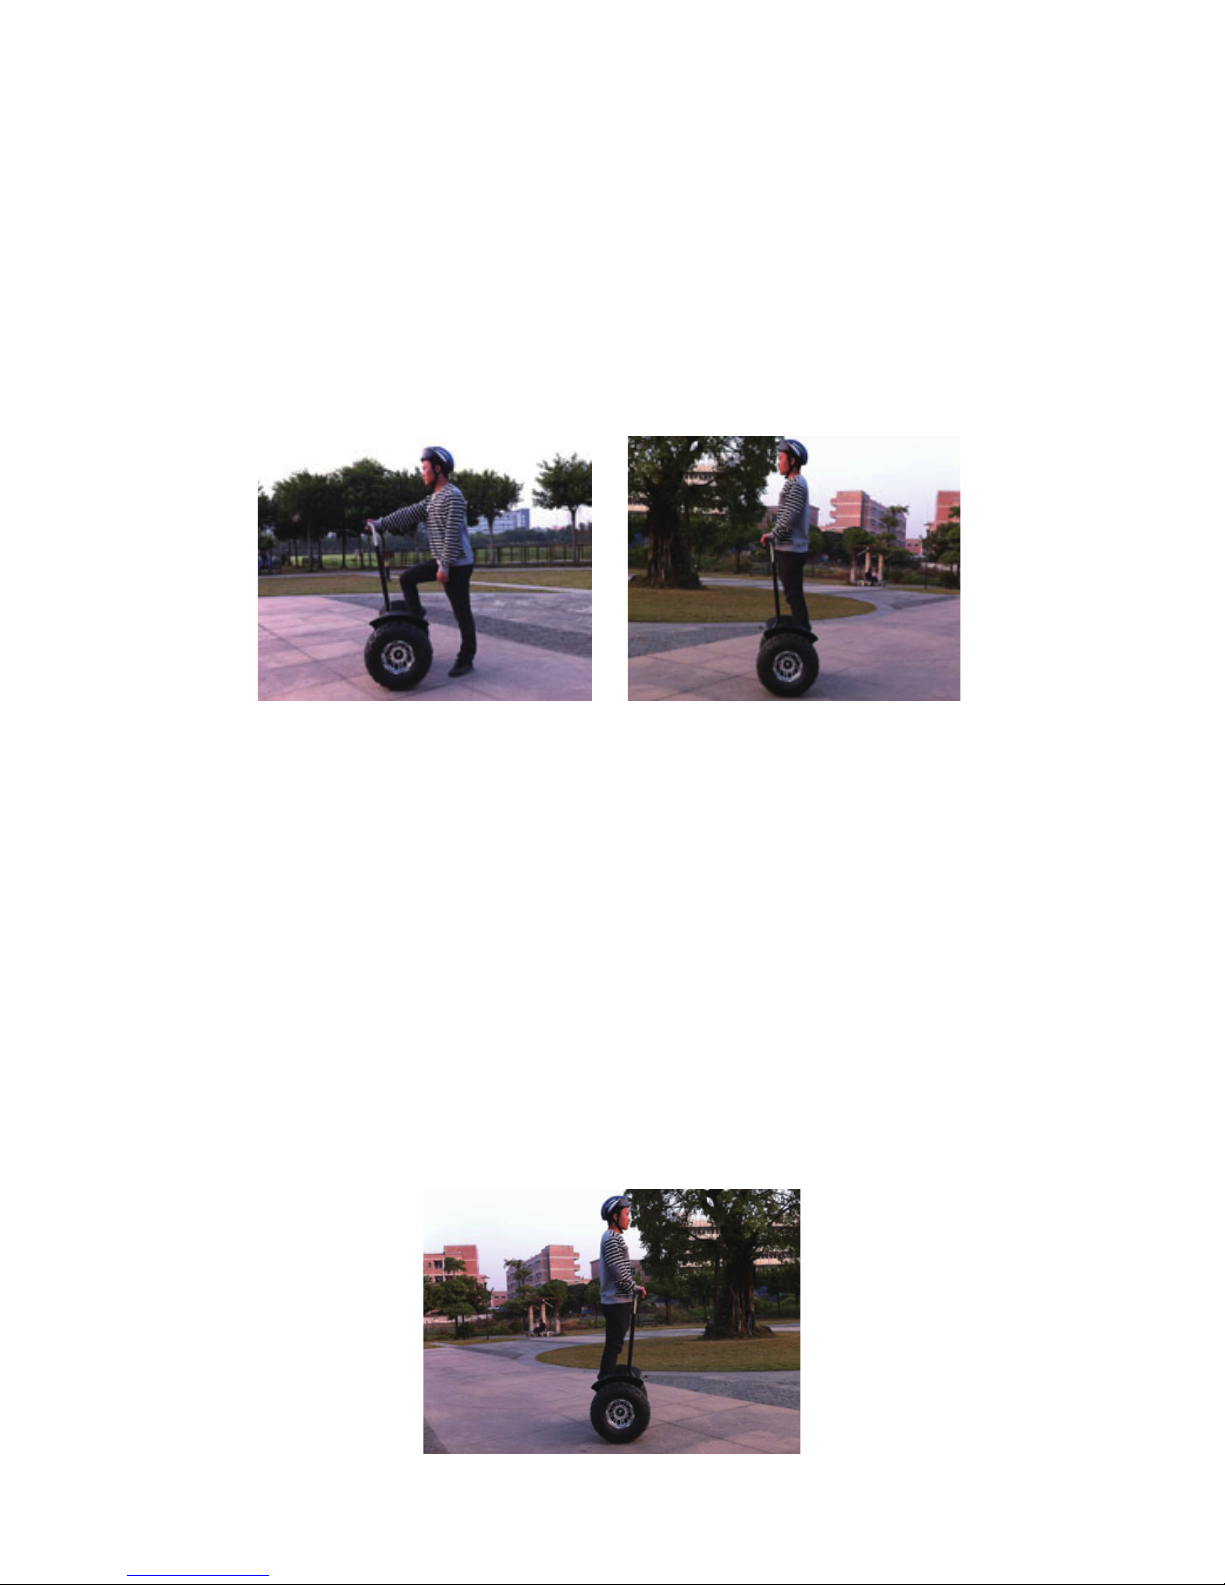
1. Standing on ESWING
After switching on, hold the handle bar with left hand, mean while step on pedal with
right foot (refer to picture 14); or vice versa. To keep it balance, just stand upright
without any movement (refer to picture 15).
Picture 14 Picture 15
2. Driving straight forward
Lean your body forward slowly using the centre of gravity, ESWING will forward
(refer to picture 16). The driving speed is controlled by the leaning angle of your
body. For a stable driving, we suggest you lean slowly forward little by little. It is very
dangerous if lean forward suddenly, a sudden acceleration may cause lost of
balance.
Picture 16
Page 13
12
Picture 18 Picture 19
Picture 17
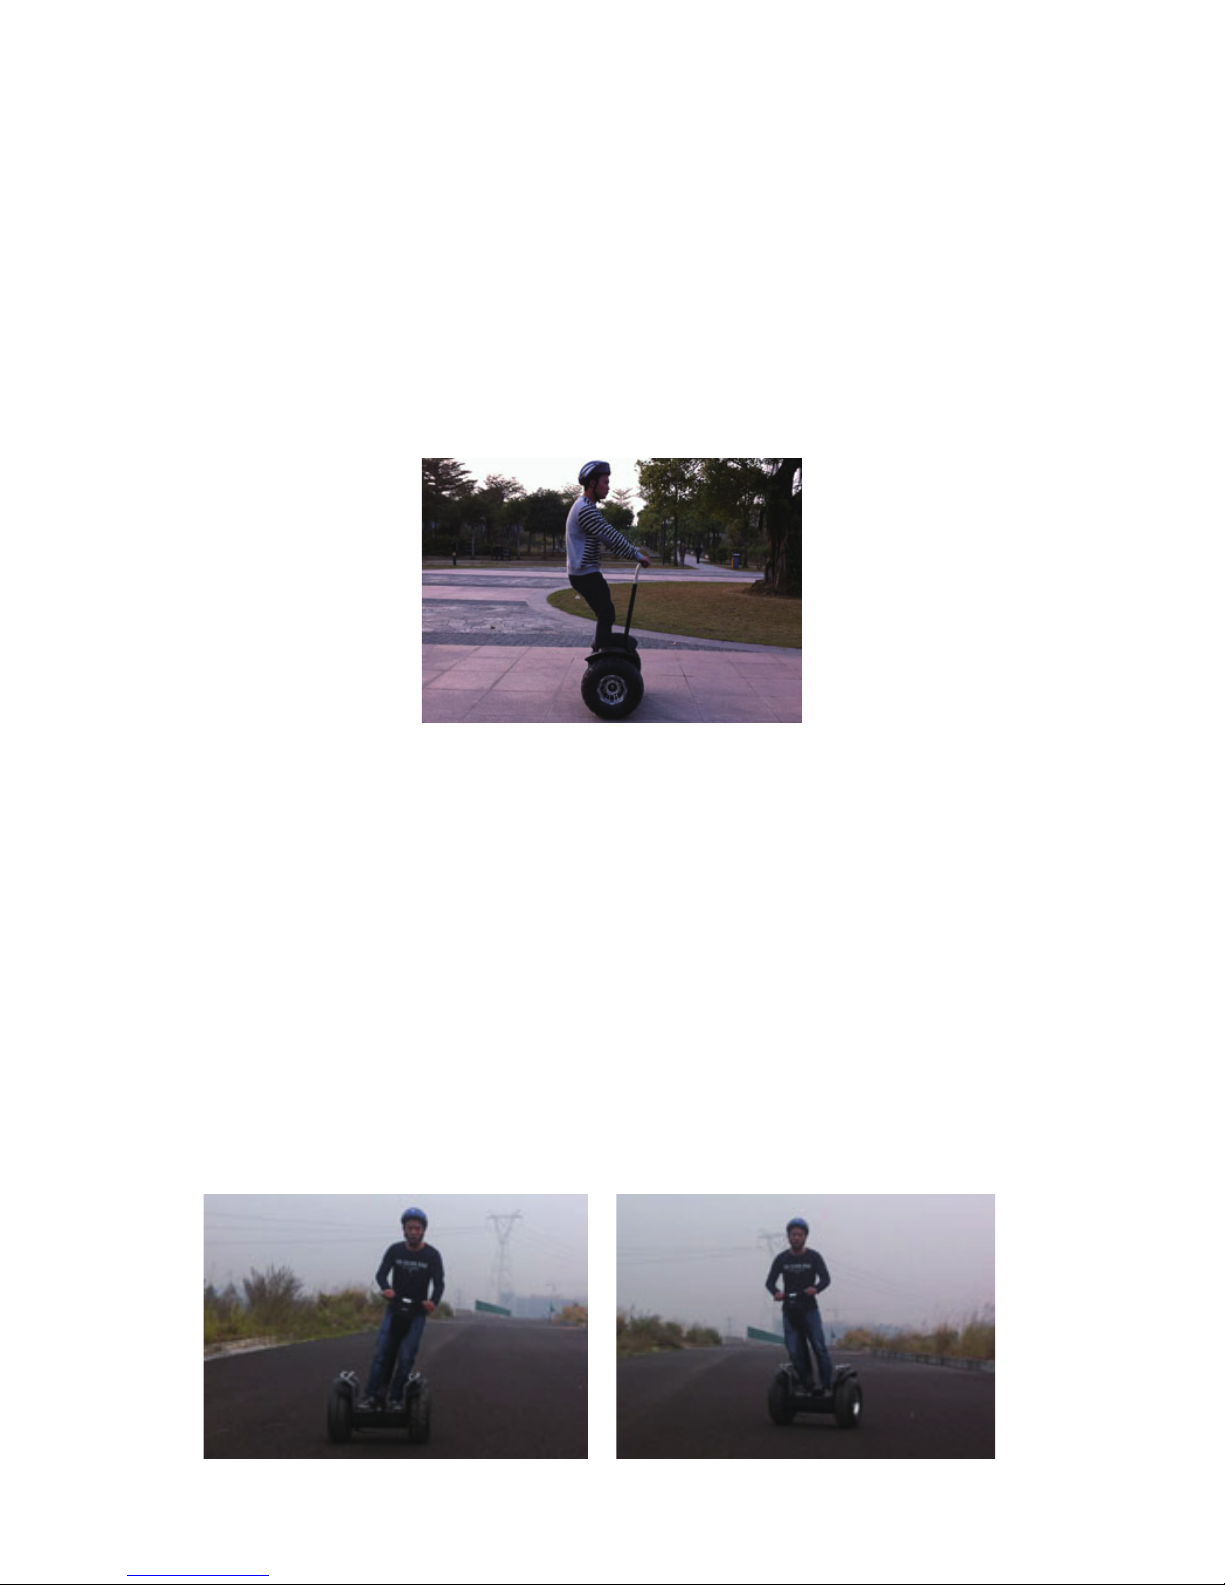
3. Braking, Driving Backward
Driving backward is not recommended for the driver’s safety. Turning radius of
ESWING is zero, which can be easily achieved in continues spin around 360 at one
spot. When driving forward in a straight line and want to slow down or stop, you can
just lean backward or squat down (the center of gravity backward). Lean slowly or
smoothly backward is helpful for slowing down and stopping safely (refer to picture
17).
Tip: Driving forward in a straight line you just simply push the handle forward, then
backward to slow down or stop.
4. Turning in Original Place, Turn Around and Rotate 360°
It is easy to turn the ESWING when driving. Keep the turning pipe/handle bar
left-forward or right-forward to the end, at the same time keep your body
correspondingly left-forwarded or right-forwarded as the trend of ESWING (refer to
picture 18 and 19).Thus you can easily achieve various turns. When the ESWING
faces the right position, you just need return the pipe to the original position and
stand straight ESWING will stop.
Page 14
13
Picture 20 Picture 21
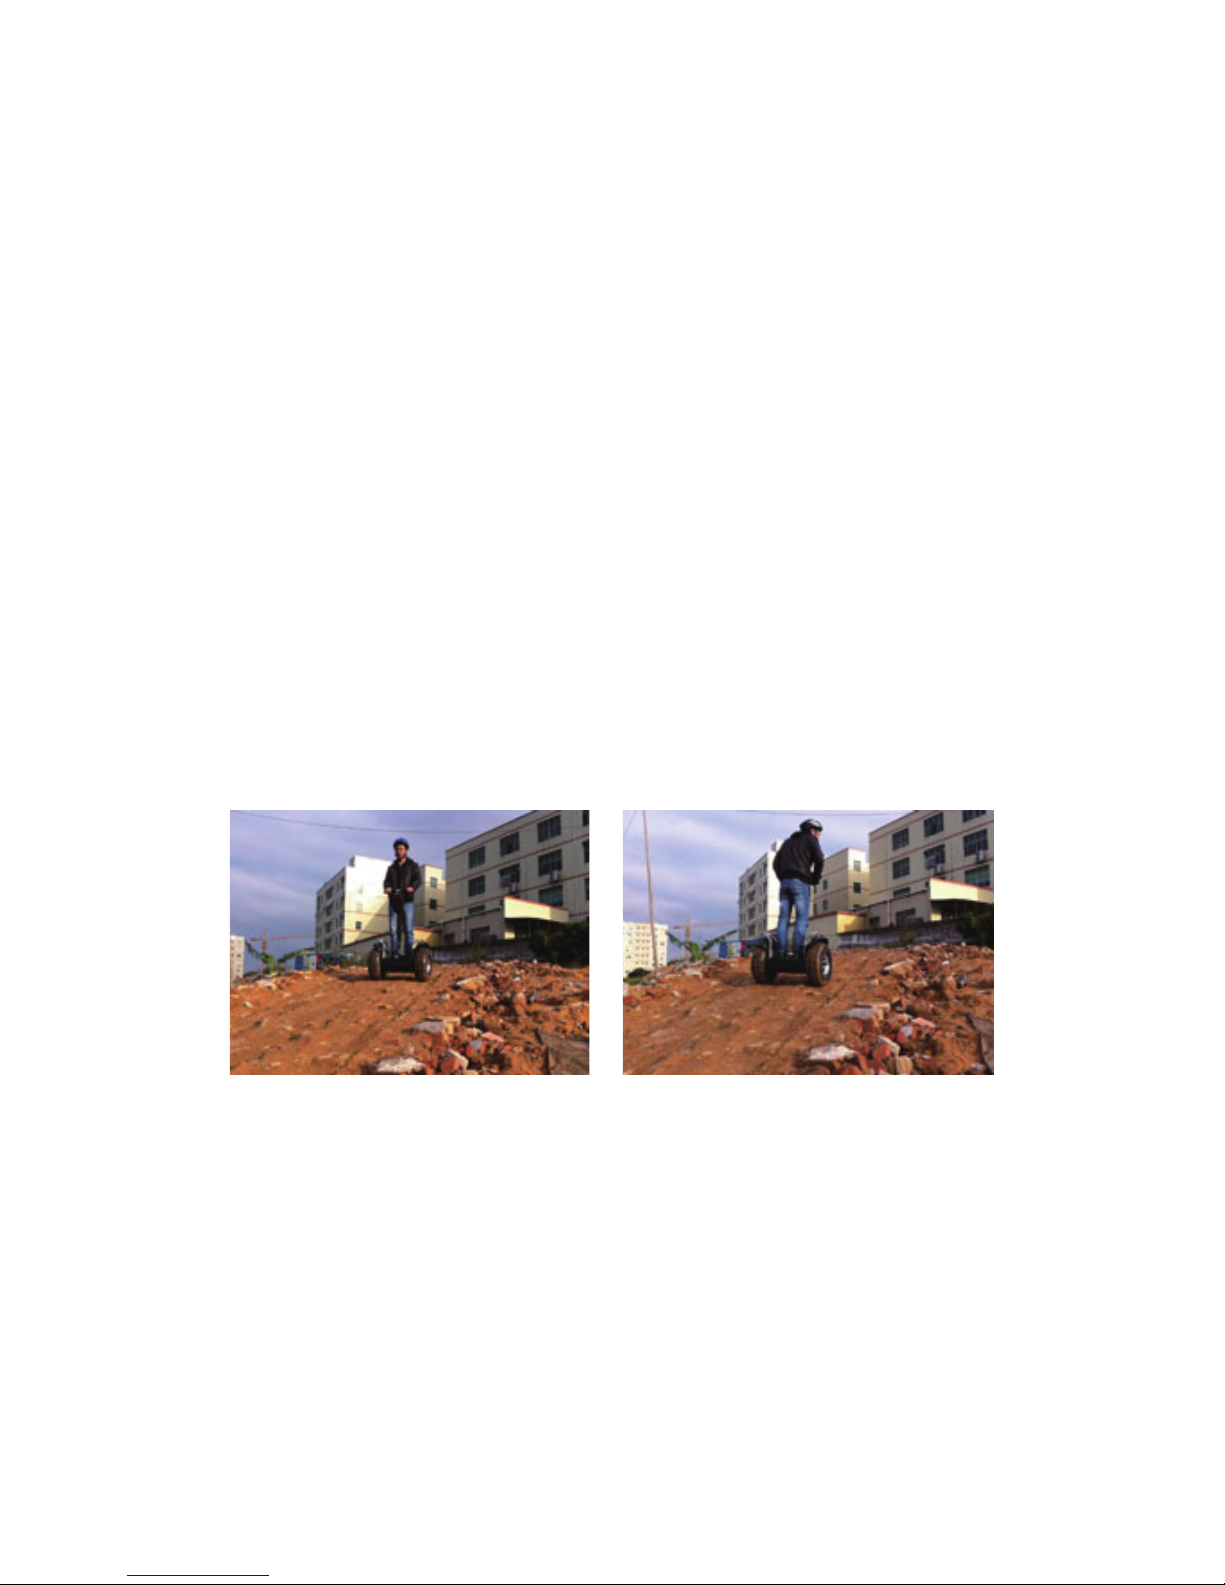
6. Upslope and downslope
The max climbing degree of ESWING is 25°, it is also depend on the driver's actual
skill. Before climbing up slope, you should increase the speed in advance, keeping
two wheels parallel and keeping your body forward slightly. When getting down
slope, you should also remain two wheels parallel and keeping your body backward
slightly to maintain the center of your body gravity by holding the handle.
7. Driving in bad weather
ESWING is not waterproof; please do not drive it in rainy day. The water may
damage the electronic mechanic. ESWING does not recommend to be operated
during the night (Light accessories is optional). ESWING can be operated on snow,
however this is not recommend for a beginner.
5. Turning during Driving
ESWING's turning range is calculated automatically according to the driving speed,
the speed is faster, the turn range will be less to ensure safety of the driver, and it is
stopped by the turning pipe and body's corporation. To turn left, the turning pipe
should be swung smoothly to the left at the same time as your body leans left. The
angle of ESWING's turn is decided by the swinging angle of the turning pipe and the
leaning of your body.
Page 15
14
Chapter VI Charging
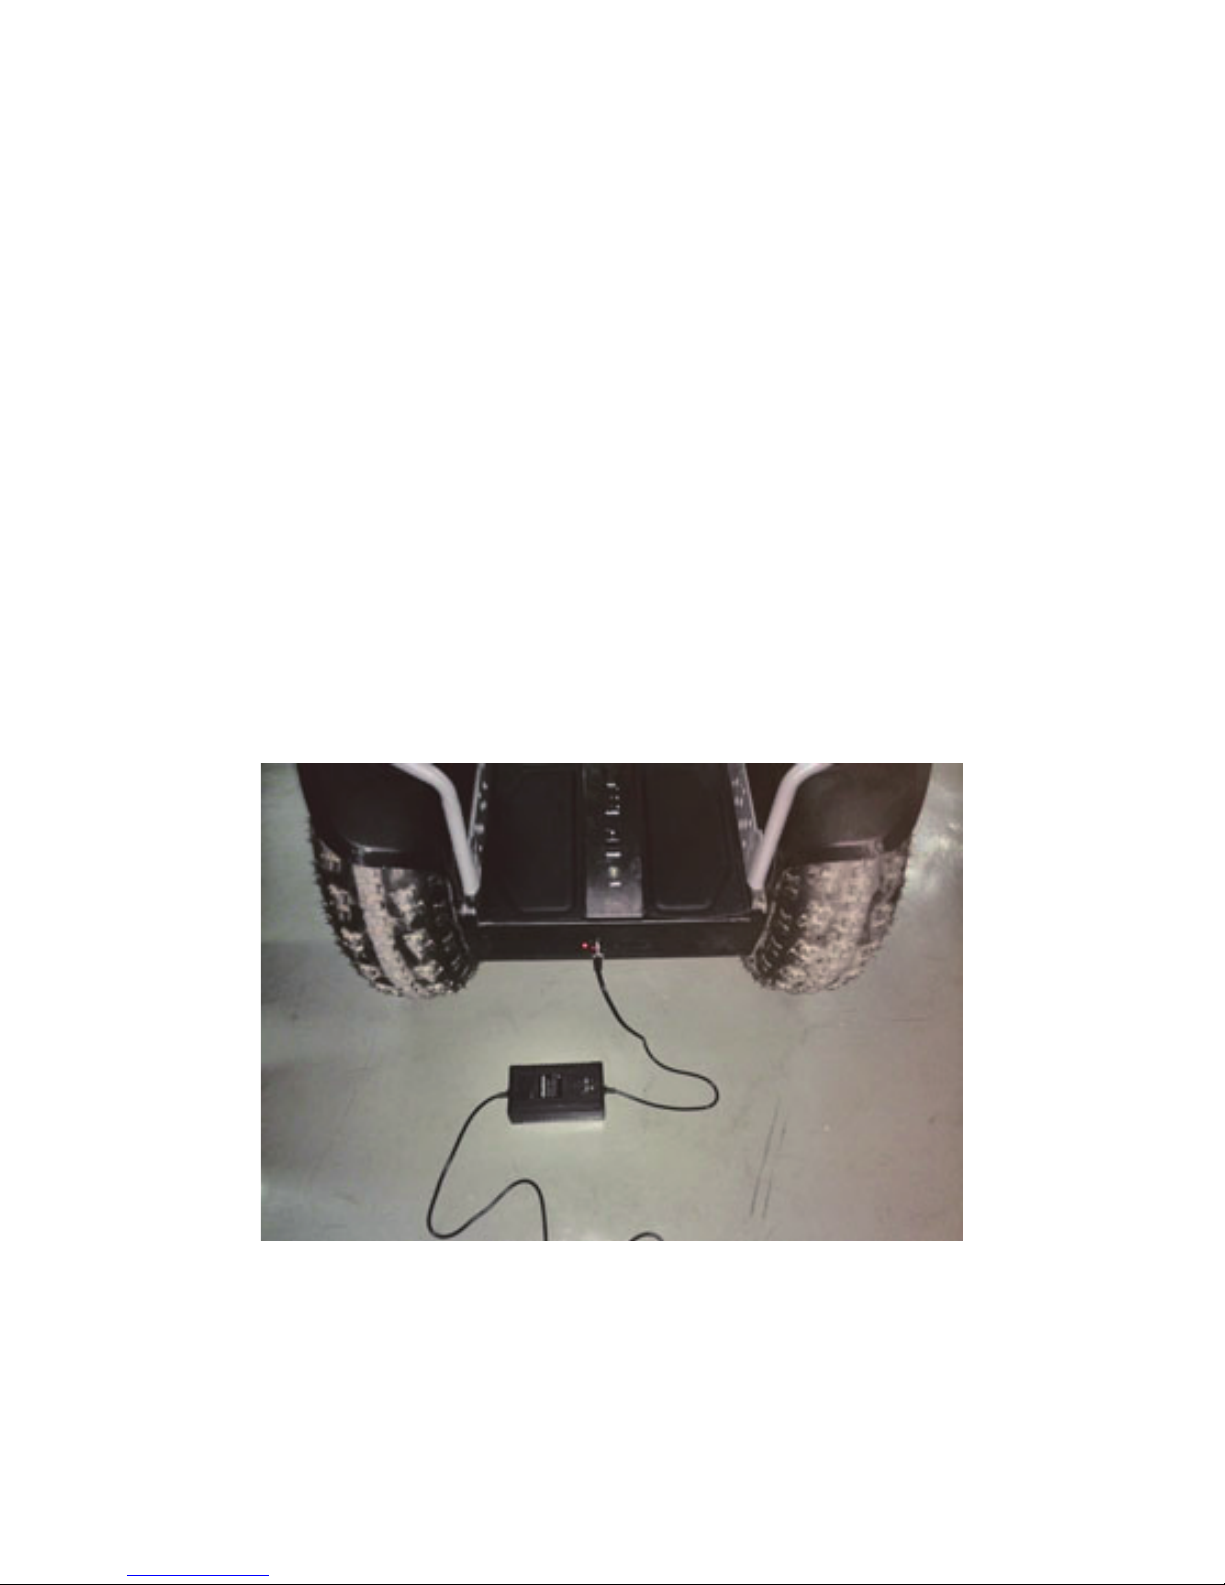
When you find the orange light and red indicator are continuously on, it shows the
batteries need to be charged. Firstly, turn off the power switch and use the
specialized battery charger. Insert the plug into ESWING 's charge jack. Then turn
on the power. When charger is connected, the Red light will glow continuously,
showing ESWING is in charge mode (refer to picture22).
The charger has two light, Red light means charging mode, Green light means fully
charged, please pull out the charger AC inlet in soon. The fully charging normally
takes 3-5 hours. When fully charging finished, the Green light will be on continuously,
and the charging electric current will decrease output current. During charging, the
charger may get warmer, please place it on suitable area.
Picture 22
Must keep power switch OFF when charging, otherwise it will cause power
consumption, which is bad for charging and battery life.
Page 16

5. Appearance Cleaning
It is necessary to keep the pedal and body of ESWING clean. Please clean the
gravel, soil and mud off after driving. Don't use any corrosive chemical such as petrol
to clean ESWING, you can clean it by soft cloth and brush. Don’t wash ESWING with
water.
15
4. Maintenance of Tire
The normal air pressure is the basic guarantee your safe driving. The standard tire
pressure is 80kpa = 0.8bar = 0.8 kg, which is we recommend. It is necessary to
check the tire pressure regularly, under inflation and over inflation will cause tire
unequally wear and tear, influences control and comfort, and also shorten the life of
tire. In addition, under-inflated tires also influence the power saving.
Please also check if there any cuts, splits or other things which could cause the tire
to be damaged worse; and to check if there is necessary to replace one new tire.
Chapter VII Maintenance
All other items that are not mentioned in this chapter in the below should be done by
a professional person or technician.
1. The Maintenance of Battery
Self-Balanced Vehicle use BTM free maintenance battery. When you find the orange
light and red light are continuously on, please do charging in soon. Keep the charge
time no more than 15 hours. Even if you will not use ESWING for long periods, you
also need charge it. Over- discharging or overcharging is bad for the battery life, and
even to scrap. (Suggestion: please keep it charged every month even though you
don’t drive it)
2. When not Drive ESWING
Please turn off the power switch and lock the key in case of accidental starting.
3. Fastening the Nut of Tire
Pay attention to the big nut on the wheel, please do regularly checking; if it is loose,
you must stop the driving and tighten it with a 21mm spanner by approximate 108Nm
torque.
Page 17

16
Chapter VIII Notice
1. Balance Output of ESWING
Computer balance can start immediately when you step on the pedal of ESWING. If
you keep pressing the pedal switch, the computer balance will always on. But the
computer keeps balance output only 5-second at a low speed, then OFF
automatically as the pedal switch restored. Please pay attention that ESWING will
keep balance always if the balance output function is ON, it means letting this
scooter on a flat road without driver on it will go forward by itself.
2. ESWING Parking
If for temporary parking, you can just turn on the balance output by remote control
and lean it against a wall or step that can stop it from moving forward; if for long time
parking, you can switch off the power and put the supporting foot down. This parking
supporting foot can be purchased from us independently.
3. Water Accident
Turn the power off immediately if ESWING poured into water accidentally. Do not
drive it again if you are not sure of the default. The ESWING weighs 55kg, you can
take it home easily without help; and please contact us for after-service guide.
4. Lock Switch
To lock ESWING is for preventing accidental run. Just power off and lock, then try to
power on again, if red light flashes 5 times, it means ESWING is locked.
When ESWING is ON and already initialized, if you lock at this time, it will lead to
pedal switch short circuited. ESWING will think one driver standing on it and will start
balance automatically. Please do not drive under this situation.
In some countries, ESWING is difficult to define vehicle type, so please don't drive
on public roads used for motor vehicles .When driving on the sidewalk, single
driveway or public places, please obey the local traffic rules.
Page 18

17
Chapter IX Indicator and Sound Alarm
1.Indicator introduction
(1)Green light (Indicator light 1)
Continually On (no blinking): System starts normally, and battery is full.
(2) Orange light (Warning light 2)
Continually On (no blinking): Battery is low; it needs charge in time.
Blinking: Overload!
(3) Red light (Warning light 3)
Continuous on (no blinking): battery run out and must charge immediately.
2.Alarm Sound and light blinking fast:
The pedal switch is not in the correct position (the pedal switch is pressed down) or
the driver left the ESWING when driving, which can make the pedal switch restore
(the pedal switch is pulled up). In this situation, if the pedal switch is still not in the
correct position in 3 seconds (the pedal switch is pressed down), ESWING will think
the driver has fallen off and will stop automatically to keep the driver safe.
Please remember, pedal switch must be in right position (the pedal switch is
pressed down), or ESWING will switch off power and the rider will lose
balance.
3. Alarm Sound and light blinking 5 times
(1) Check whether Lock is locked. If locked, the power indicator will not light and
alarms 5 times when you power on. It is because we locked it as factory default
mode to avoid transportation accident, so please unlock ESWING before driving.
(2) Pedal problem also leads alarm sound and lights blinking 5 times, you can press
pedal switch on several times by hand or feet to make pedal restore (the pedal
switch is pressed down). Then try to test it by powering on ESWING again, if alarm
sound and lights blinking are still there, please contact the technicians.
Page 19

18
4. Indicator light is normal, ESWING cannot use
After power on ESWING, green light, orange light and red light flash at the same
time; after then, green light should be continuous on as normal starting. If the scooter
can’t balance by using remote control or pressing pedal switch ON, it means that
there is some problem on gyroscope or accelerometer. In above two situations,
please power off ESWING and stop driving, then contact the technicians.
5. Function of battery display and sound alarm
Green light continually On: System works well and battery in normal state.
Orange light continually On: Battery is less, need to charge in time.
Red light continually On: Battery power run out and must charge immediately.
Always keep battery charged before it is fully run out (red light is continually on). It
is harmful to battery and will reduce battery’s life.
Page 20

19
Unit imension(W*D*H)
n.w
Packing size
Container loading units (20GP/40GP/40HQ)
Battery value
Power
Tyre
Height of Handle
Max Load
Max Speed
Max Mileage
Height of Pedal
Max Height off-ground
Min Turning Radius
Max Climbing
Charging Time
Parameter Of Eswing
ESWING W1X
(ES1350X)
19”Vacuum
(Aluminum Alloy Rim)
83cm*47cm*60cm
46.5kg
Brush DC Motor
80-110cm /adjustable
110kg
16km/h
30km
270mm
160mm
0m
≤30°
4-6h
86cm*52.5cm*72.5cm
84 / 168
48V/11Ah
ESWING W1
(ES1350)
19”Vacuum
(Aluminum Alloy Rim)
83cm*47cm*60cm
55kg
Brush DC Motor
80-110cm /adjustable
110kg
16km/h
25km
270mm
160mm
0m
≤30°
6-8h
86cm*52.5cm*72.5cm
84 / 168
4pcs*12V/14Ah
ESWING C3X
(ES1349X)
17”Vacuum
(Aluminum Alloy Rim)
68cm*43cm*43cm
38kg
Brush DC Motor
80-110cm /adjustable
100kg
14km/h
30km
260mm
130mm
0m
≤30°
4-6h
74.5cm*45.5cm*51cm
160 / 336
36/15Ah
ESWING C3
(ES1349)
17”Vacuum
(Aluminum Alloy Rim)
68cm*43cm*43cm
74.5cm*45.5cm*51cm
160 / 336
43kg
Brush DC Motor
80-110cm /adjustable
100kg
14km/h
25km
260mm
130mm
0m
≤30°
6-8h
3pcs*12V/14Ah
 Loading...