

Page 1
1
Instruction manual
For software version 2.6.2. and following versions
Article no.: 53450 / 53451
March 2009
LokProgrammer
Page 2

2
Index of contents
Declaration of ConformityDeclaration of Conformity
Declaration of ConformityDeclaration of Conformity
Declaration of Conformity
......................................................................
......................................................................
...................................
33
33
3
WEEE-DeclarationWEEE-Declaration
WEEE-DeclarationWEEE-Declaration
WEEE-Declaration
..............................................................................................
..............................................................................................
...............................................
33
33
3
1. Important notes – Please read this first1. Important notes – Please read this first
1. Important notes – Please read this first1. Important notes – Please read this first
1. Important notes – Please read this first
........................
........................
............
44
44
4
2. 2.
2. 2.
2.
Installation and Installation and
Installation and Installation and
Installation and
ss
ss
s
tart-up of the LokProgrammertart-up of the LokProgrammer
tart-up of the LokProgrammertart-up of the LokProgrammer
tart-up of the LokProgrammer
..........
..........
.....
44
44
4
2.1. System requirements .................................................. 4
2.2.Connecting the LokProgrammer ................................. 4
2.3. Installing the software ............................................... 4
2.4. Starting the program ................................................. 4
2.5. Software updates ...................................................... 5
2.6. Firmware updates ...................................................... 5
3. LokSound basics3. LokSound basics
3. LokSound basics3. LokSound basics
3. LokSound basics
........................................................................................
........................................................................................
............................................
55
55
5
3.1. Sound characteristics of locomotives .......................... 5
3.1.1. Steam locomotive ................................................... 5
3.1.2. Diesel locomotive (diesel-electric) ............................. 5
3.1.3. Diesel locomotive (diesel-hydraulic) ......................... 6
3.1.4. Diesel locomotive with manual transmission ........... 6
3.1.5. Electric locomotive .................................................. 6
3.2. User defined sounds ................................................. 6
3.3. Automatic / Random sounds .................................... 7
3.4. Digital system / Protocols ........................................... 7
3.4.1. DCC (NMRA) ......................................................... 7
3.4.2. Motorola® ............................................................. 7
3.4.3. M4 ........................................................................ 7
3.4.4. Selectrix® ............................................................... 7
3.5. CVs ........................................................................... 7
3.5.1. Definition and application ...................................... 7
3.5.2. Advantages / Disadvantages .................................. 7
3.6. Further information about LokSound decoders ......... 7
3.6.1. General .................................................................. 7
3.6.2. Connecting the speaker ......................................... 7
3.6.3. Suitable sounds ..................................................... 8
3.6.4. Supported hardware .............................................. 8
4. Purpose of the LokProgrammer software4. Purpose of the LokProgrammer software
4. Purpose of the LokProgrammer software4. Purpose of the LokProgrammer software
4. Purpose of the LokProgrammer software
..................
..................
.........
88
88
8
4.1. Overview ................................................................... 8
4.2. Assistant ................................................................... 8
5. Main screen5. Main screen
5. Main screen5. Main screen
5. Main screen
......................................................................................................
......................................................................................................
...................................................
99
99
9
5.1. Registers ................................................................... 9
5.2. Task bar..................................................................... 9
5.3. Tool bar..................................................................... 9
6. V6. V
6. V6. V
6. V
irtual driver’irtual driver’
irtual driver’irtual driver’
irtual driver’
s cabs cab
s cabs cab
s cab
..............................................................................
..............................................................................
.......................................
1010
1010
10
7. Edit CVs7. Edit CVs
7. Edit CVs7. Edit CVs
7. Edit CVs
..........................................................................................................
..........................................................................................................
.....................................................
1010
1010
10
8. The „decoder“ register8. The „decoder“ register
8. The „decoder“ register8. The „decoder“ register
8. The „decoder“ register
..................................................................
..................................................................
.................................
1010
1010
10
8.1. View window „address“ ........................................ 11
8.1.1. Address (CV1, CV17, CV18) ............................... 11
8.1.2. Consist settings (CV 19) ..................................... 11
8.2. Driving characteristics ............................................... 1 1
8.2.1. Selecting the number of speed steps (CV 29, CV 49) 11
8.2.2. Reverse mode (CV 29) ......................................... 11
8.2.3. Acceleration and deceleration (CV 3, CV 4) ......... 1 1
8.2.4. Supported brake modes (CV 51) ......................... 1 1
8.2.5. Trimm (CV 66, CV 95).......................................... 1 1
8.3. Motor ..................................................................... 1 1
8.3.1. DC motor PWM frequency (CV 49) ...................... 11
8.3.2. Load compensation (CV 49, CV 53 until CV 56) . 11
8.3.3. Speed curves (CV 2, 5, 6, 26, 67-97) ..................... 11
8.4. DCC / Analogue ..................................................... 1 1
8.4.1. Zimo® manual function ....................................... 1 1
8.4.2. Analogue mode (CV29) ..................................... 11
8.4.3. Supported analogue modes and settings ............ 1 1
8.4.4. Analogue mode F1-F8 / Analogue mode FL, F9-F12 .. 1 1
8.5. Sound settings ........................................................ 12
8.5.1. Type of sounds (CV57, CV58) ............................. 12
8.5.2. Minimum time between exhaust chuffs (CV 249) ..... 12
8.5.3. Random sounds (CV 61, CV 62) ......................... 12
8.5.4. Speed of driving sound (CV 59, 60) .................... 12
8.5.5. Brake sound threshold (CV 64) ........................... 12
8.5.6. Sound volume ....................................................... 12
8.5.7. Load dependent sound ....................................... 1 2
8.5.8. Sound steam shift (CV 250, CV 251, CV 252) .... 1 2
8.6. Function mapping ................................................... 13
8.6.1. Description of the matrix columns ........................ 13
8.6.2. Head lights, back-up lights .................................. 1 3
8.6.3. Aux 1-4 ............................................................... 13
8.6.4. Acceleration and coasting of diesel locomotives .. ..... .. 1 3
8.6.5. Acceleration / Deceleration ................................... 14
8.6.6. Shunting mode .................................................... 1 4
8.6.7. Sound on/off ....................................................... 14
8.6.8. Shift mode ........................................................... 14
8.6.9. Fan sound ........................................................... 1 4
8.6.10. Doppler effect .................................................... 14
8.6.11. Volume / Mute ................................................... 14
8.6.12. Dynamic brake ................................................... 14
8.6.13. Sound slots ....................................................... 1 4
8.6.14. Configuration of outputs (lights and AUX-outputs) 14
8.6.15. Blinking frequency of strobe effects (CV 112) .... 14
8.6.16. Activate LGB® mode (CV 49) ............................. 14
8.6.17. Behaviour of function buttons ................................
(LokSound 2 mode) (CV 49) ............................. 1 4
8.6.18. Märklin® delta mode (CV 49) ............................ 14
8.7. Manual CV entry ..................................................... 1 4
8.8. Special options (CV 124) ........................................ 15
8.9. Identification (CV 7, CV 8) ...................................... 15
9. Sounds9. Sounds
9. Sounds9. Sounds
9. Sounds
................................................................................................................
................................................................................................................
........................................................
1515
1515
15
9.1. Concept of LokSound ............................................. 15
9.2. Basic methodology for working in the „Sound“ register 1 5
9.2.1. Nomenclature ...................................................... 1 5
9.2.2. Importing / Deleting sounds in projects ............... 15
9.2.3. Allocate / Delete sounds to (from) sound slots ...... 16
9.2.4. Extended functions in the „Sound“ .................... 16
9.3.Schedule .................................................................. 1 6
9.3.1. Schedule for running (driving) sounds ................. 17
9.3.2. Schedule for fan sounds ...................................... 1 7
9.3.3. Thresholds in the schedule for running (driving) sounds1 8
9.4. Setting the schedule ................................................ 1 8
9.4.1. Soundslots in detail ............................................. 18
9.4.2. Sound settings ..................................................... 1 9
9.5. Random sounds ..................................................... 19
9.6. User sounds ............................................................ 2 0
9.6.1. General settings ................................................... 20
9.6.2. Special options for slots 14, 15 and 16 ............... 20
9.7. Alternative sounds .................................................. 2 0
10. Special configurations for M410. Special configurations for M4
10. Special configurations for M410. Special configurations for M4
10. Special configurations for M4
..........................................
..........................................
.....................
2121
2121
21
10.1. „M4 Settings“ in the „Decoder“ .......................... 21
10.2.Driving characteristics .............................................. 2 1
10.3. Motor ................................................................... 21
10.4. Motorola® settings ............................................... 21
10.5. Analogue settings ................................................. 2 1
10.6. Sound settings ...................................................... 2 1
10.7. Function outputs .................................................. 2 1
10.8. Special options ...................................................... 21
10.9. Sound ................................................................... 2 1
11. Special settings for11. Special settings for
11. Special settings for11. Special settings for
11. Special settings for
Loksound micro Loksound micro
Loksound micro Loksound micro
Loksound micro
andand
andand
and
XL XL
XL XL
XL
........
........
....
2121
2121
21
11.1. Special settings for Loksound micro ....................... 21
11.2. Special settings for Loksound XL ........................... 21
Page 3
3
Declaration of Conformity
We, ESU electronic solutions ulm GmbH & Co KG, Industriestraße 5, D-89081 Ulm, declare herewith in sole responsibility
compliance of the product "LokProgrammer“ to which this
declaration is related to, with the following standards:
EN 71 1-3 : 1988 / 6 : 1994 – EN 50088 : 1996 – EN 55014, part
1 + part 2 : 1993
EN 61000-3-2 : 1995 – EN 60742 : 1995 – EN 61558-2-7 : 1998
The „LokProgrammer“ bears the CE-mark according to the
guidelines as per
88 / 378 / EWG – 89 / 336 / EWG – 73 / 23 / EWG
WEEE-Declaration
Disposal of old electrical and electronic devices (applicable in
the European Union and other European countries with separate collection system). This mark on the product, the packaging
or the relevant documentation indicates, that this product may
not be treated as ordinary household garbage. Instead this
product has to be delivered to a suitable disposal point for
recycling of electrical or electronic equipment.
By disposing of this product in the appropriate
manner you help to avoid negative impact on
the environment and health that could be caused
by inappropriate disposal. Recycling of materials
contributes to conserve our natural environment.
For more information on recycling this product
please contact your local administration, the rubbish disposal
service or the shop where you have purchased this product.
Batteries do not belong into household trash!Batteries do not belong into household trash!
Batteries do not belong into household trash!Batteries do not belong into household trash!
Batteries do not belong into household trash!
Please do not dispose of discharged batteries in your household
trash: take them to a collection point at your local town hall or
dealer. Thus you assure an environmentally friendly way of
disposal.
Copyright 1998 - 2009 by ESU electronic solutions ulm GmbH & Co KG. Irrtum,
Änderungen die dem technischen Fortschritt dienen, Liefermöglichkeiten und alle
sonstigen Rechte vorbehalten. Elektrische und mechanische Maßangaben sowie Abbildungen ohne Gewähr. Jede Haftung für Schäden und Folgeschäden durch nicht
bestimmungsgemäßen Gebrauch, Nichtbeachtung dieser Anleitung, eigenmächtige
Umbauten u. ä. ist ausgeschlossen. Nicht geeignet für Kinder unter 14 Jahren. Bei
unsachgemäßem Gebrauch besteht Verletzungsgefahr.
Märklin® ist ein eingetragenes Warenzeichen der Firma Gebr. Märklin® und Cie.
GmbH, Göppingen. RailCom® ist ein eingetragenes Warenzeichen der Firma Lenz
Elektronik GmbH, Giessen.Alle anderen Warenzeichen sind Eigentum ihrer jeweiligen Rechteinhaber.
ESU electronic solutions ulm GmbH & Co. KG entwickelt entsprechend seiner Politik
die Produkte ständig weiter. ESU behält sich deshalb das Recht vor, ohne vorherige
Ankündigung an jedem der in der Dokumentation beschriebenen Produkte Änderungen und Verbesserungen vorzunehmen.
Vervielfältigungen und Reproduktionen dieser Dokumentation in jeglicher Form bedürfen der vorherigen schriftlichen Genehmigung durch ESU.
12. Project examples12. Project examples
12. Project examples12. Project examples
12. Project examples
................................................................................
................................................................................
........................................
2121
2121
21
12.1. Available sounds ................................................... 21
12.2. Project for a steam locomotive ............................... 2 2
12.2.1. Create a new file ................................................ 22
12.2.2. Settings .............................................................. 2 2
12.2.3. Import and place sounds ................................... 22
12.2.4. Function mapping ............................................. 2 3
12.2.5. Set the wheel synchronicity of exhaust chuffs ...... 24
12.2.6. Fine tuning ........................................................ 24
12.3. Diesel-electric locomotive ....................................... 2 4
12.3.1. Generate new file ............................................... 24
12.3.2. Settings .............................................................. 2 4
12.3.3. How to import and set sounds .......................... 25
12.3.4. Function mapping ............................................. 2 5
12.3.5. Fine tuning ........................................................ 25
12.4. Diesel-hydraulic / Diesel-mechanical ....................... 2 6
12.4.1. Generate new file ............................................... 26
12.4.2. Settings .............................................................. 2 6
12.4.3. How to import and set sounds .......................... 26
12.4.4. Function mapping ............................................. 2 6
12.4.5. Fine tuning ........................................................ 26
12.5. Electric locomotive ................................................. 2 6
12.5.1. Generate new file ............................................... 26
12.5.2. Settings .............................................................. 2 6
12.5.3. How to import and set sounds .......................... 26
12.5.4. Function mapping ............................................. 2 7
12.5.5. Fine tuning ........................................................ 27
13. APPENDIX13. APPENDIX
13. APPENDIX13. APPENDIX
13. APPENDIX
....................................................................................................
....................................................................................................
..................................................
2828
2828
28
13.1. Miscellaneous ....................................................... 2 8
13.1.1. Activating the Doppler effect during operation ... 28
13.1.2. Hardware of LokSound (cables, colours) ............ 28
13.1.3. Problems when reading the decoder ................. 28
13.1.4. Memonry types 8MBits and 16MBits ................. 28
13.2. Customer service – Assistance and support ........... 28
13.3. CV overview chart ................................................. 29
14. Licence Agreement14. Licence Agreement
14. Licence Agreement14. Licence Agreement
14. Licence Agreement
..........................................................................
..........................................................................
.....................................
3434
3434
34
15. Warrany Certificate15. Warrany Certificate
15. Warrany Certificate15. Warrany Certificate
15. Warrany Certificate
........................................................................
........................................................................
....................................
3636
3636
36
Page 4

4
1. Important notes – Please read this first
Thank you for purchasing the LokProgrammer set 53450/Thank you for purchasing the LokProgrammer set 53450/
Thank you for purchasing the LokProgrammer set 53450/Thank you for purchasing the LokProgrammer set 53450/
Thank you for purchasing the LokProgrammer set 53450/
53451. 53451.
53451. 53451.
53451. With the LokProgrammer you can program ESU LokPilotand LokSound decoders.
The LokProgrammer 53450 consists of two elements: An
interface module that serves as the physical connection
between the PC and the locomotive, and the software that
can be run on any PC using MS Windows. The set 53451 has
an additional USB adapter but is otherwise the same as 53450.
Never was it easier to program a digital decoder than with
LokProgrammer. Thanks to the graphic interface of MS
Windows you can achieve the optimal adaptation of LokSound
decoders even if you have very little or no experience in
programming digital decoders. This combination allows you to
easily manipulate and adjust the many features and properties
of LokSound decoders with your PC.
LokProgrammer also allows you to modify all sound fragments
and sound effects stored on the decoder as often as you desire.
ESU provides over 100 different sound files on the ESU web
site at www.esu.eu. You will certainly find the right sound for
your locomotive.
Please also take note of the license agreement regarding
downloading and using the sound files contained in the appendix.
This manual describes in detail how to modify sounds and which
methods to use to achieve the desired results.
We wish you lots of fun in the world of LokSound.
ESU electronic solutions ulm GmbH & Co KG, March 2009
2. Installation and start-up of the LokProgrammer
Please note the remarks regarding installation to assure that
your LokProgrammer software keeps working to your full
satisfaction!
2.1. 2.1.
2.1. 2.1.
2.1.
System requirementsSystem requirements
System requirementsSystem requirements
System requirements
In order to use this software you need a commercially available
PC with the following requirements:
• Operating system: Microsoft Windows 98, 2000 or XP, alsoVista
as from version 2.6.3; but not Windows NT
• CD-ROM drive
• One serial port or an USB interface on your PC
• Audio card
• 10MB minimum available memory on your hard disc
For the utilization of the sound files with this software an Audio
Card must be installed. All cards with a Windows driver are
suitable.
Installation and start of the LokProgrammer
2.2. Connecting the LokProgrammer2.2. Connecting the LokProgrammer
2.2. Connecting the LokProgrammer2.2. Connecting the LokProgrammer
2.2. Connecting the LokProgrammer
The LokProgrammer has to be connected as shown in Figure 1:
Use the serial cable respectively the USB-adapter cable provided
to connect the LokProgrammer to any available COM port (or
USB-port) of your PC. Which port you select is immaterial.
Please make sure that the programming track is completely
isolated from the rest of the layout to avoid possible damage of
your LokProgrammer hardware!
Also make sure that there are no electrical connections
between the individual wires.
Fig.2.: Polarity of Power Supply Connector
There are two options for the power supply:
• Use the power pack with mains plug provided with the
LokProgrammer. Connect the output of the power pack to
the power supply terminals of the LokProgrammer as per Figure
2.
• Use the AC power output of a model train transformer and
wire it to the screw terminals. We recommend this option for
programming gauge 1 locomotives
Never connect both terminals at the same time. This could
destroy the LokProgrammer!
After connecting the power supply the green LED on the
LokProgrammer should light up.
The terminals „Track Out“ on the LokProgrammer are to be
wired to the programming track. Polarity is irrelevant.
Make sure that the programming track is fully isolated from
the layout!
The two LEDs on the LokProgrammer indicate the following:
Green LED:
• Is lit continuously when supply voltage is available.
• Blinks when the LokProgrammer receives data from the PC.
Yellow LED:
• Blinks quickly when voltage is applied to the programming
track and data is transferred.
• Blinks slowly if the LokProgrammer detects a high current and
is disconnecting the programming track.
2.3. Installing the software2.3. Installing the software
2.3. Installing the software2.3. Installing the software
2.3. Installing the software
Make sure that the LokProgrammer is connected as described
above and is ready for use.
As soon as you insert the CD-ROM into the drive the installation
program is starting automatically.
Should this not be the case select the CD-ROM drive in „Desk
Top“ or in the „Windows Explorer“ and click onto „Set up“.
Alternatively you may click on the START button in the tool bar
and select „Run“. Then type „x:\setup.exe“ and „OK“. Of
course you must enter the name of the CD-ROM drive instead
of the „x“ (usually „D“):
After a short while the program should start. Follow the
instructions on the monitor and wait until the program is installed
on the hard disk.
2.4. Starting the program2.4. Starting the program
2.4. Starting the program2.4. Starting the program
2.4. Starting the program
The installation program creates an entry in the start menu.
Select „LokProgrammer vX“ in the Start menu under „Programs“; „X“ stands for the version number of the software.
Select „LokProgrammer“. Then the program will start.
Fig.1.: Wiring the LokProgrammer
Page 5
5
LokSound Basics
Privacy Protection:
ESU guarantees that no information will be downloaded from
your PC to the ESU website. Data transmission is strictly limited
to sending data from the ESU home page to your PC. Your
personal data are protected at any time.
3. LokSound basics
In the following chapter it is explained how the LokSound
decoder reproduces prototypical sounds, what options are
available with digital command control for model trains and
which protocols of digital systems are currently available in the
market. Should you already have experience with digital systems
and also be familiar with locomotive sounds you may skip this
chapter and continue reading on page 16.
3.1. 3.1.
3.1. 3.1.
3.1.
Sound characteristics of locomotivesSound characteristics of locomotives
Sound characteristics of locomotivesSound characteristics of locomotives
Sound characteristics of locomotives
With LokProgrammer and LokSound decoders you can
reproduce sounds of steam locomotives, diesel-hydraulic and
diesel-electric locomotives, electric locos or locos with manual
transmission (e.g.: rail car). Of course the sound sequences are
subject to the type of locomotive.
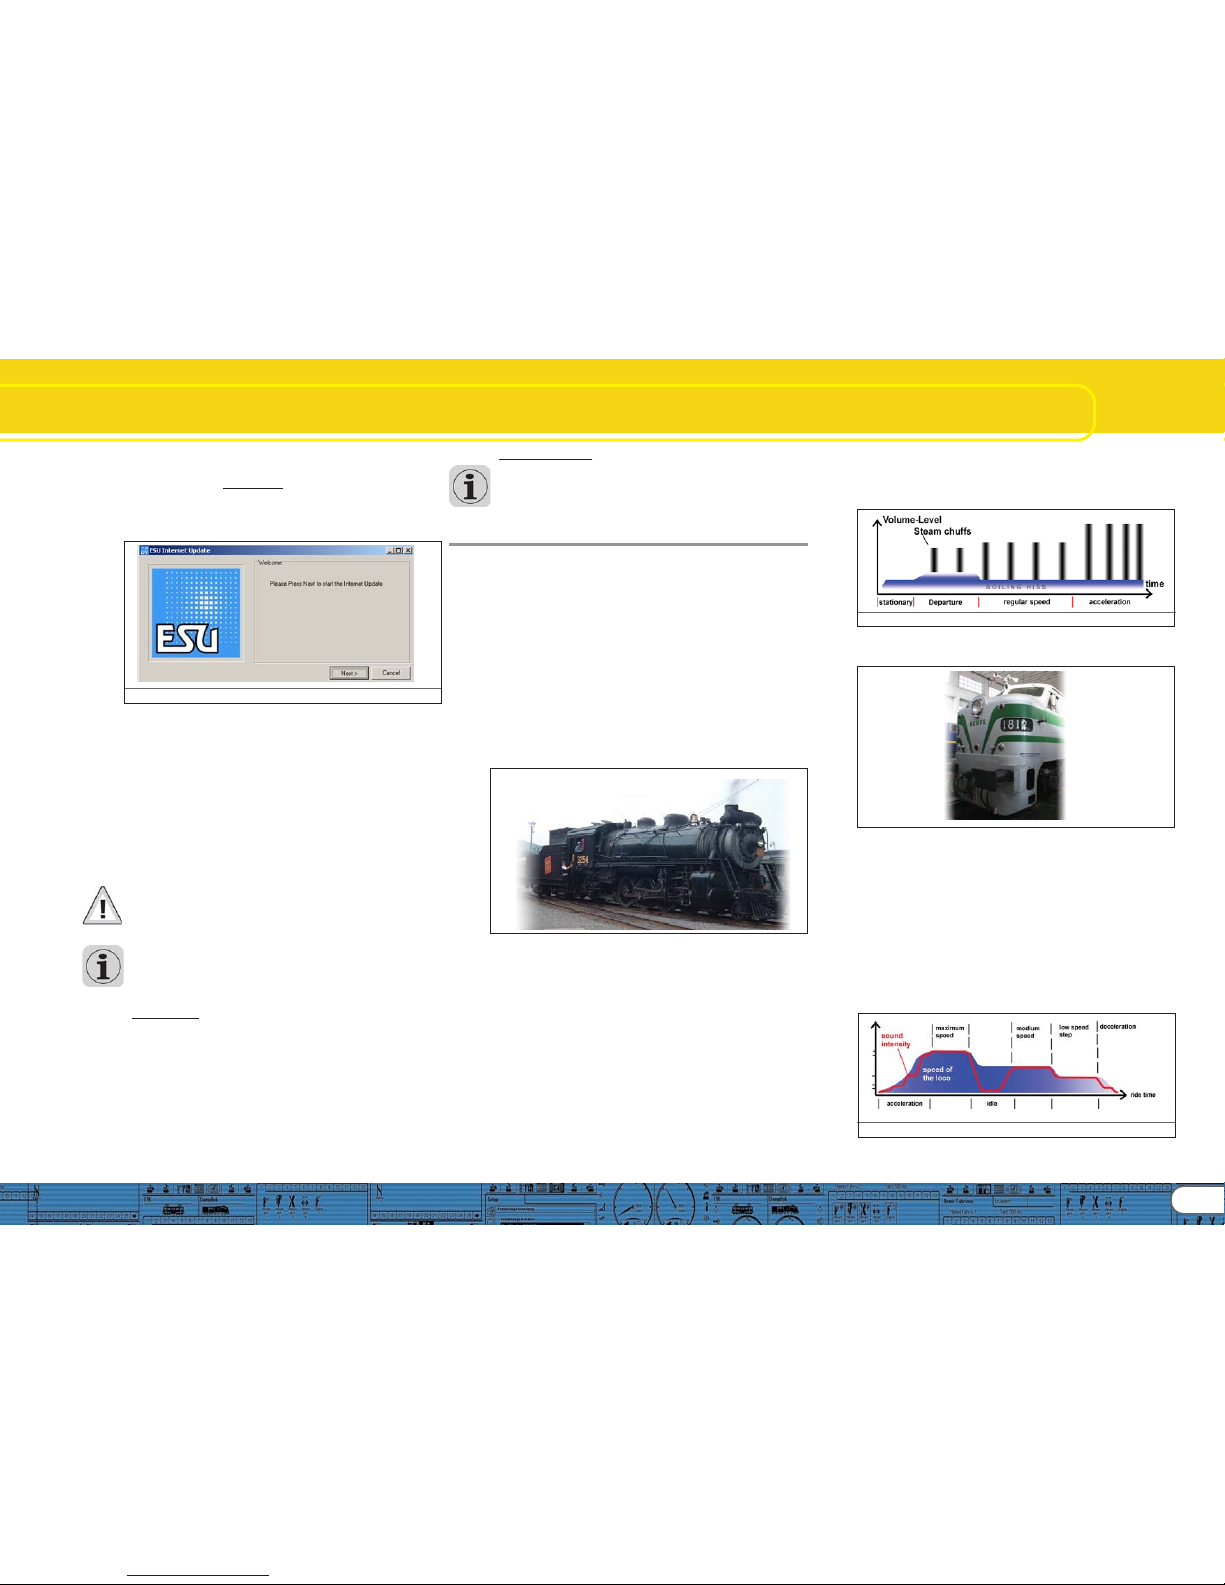
3.1.1. Steam locomotive3.1.1. Steam locomotive
3.1.1. Steam locomotive3.1.1. Steam locomotive
3.1.1. Steam locomotive
The dominant sounds of a steam locomotive are the hissing of
the boiler and the exhaust chuffs when the locomotive is
running. The chuffs are synchronized to the revolutions of the
drivers and therefore accelerate or slow down whenever the
locomotive runs faster or slower. We differentiate between
locomotives with 2 or 4 cylinders and others with 3 cylinders. A
steam locomotive with 3 cylinders generates either 3 or 6
exhaust chuffs per revolution of the drivers while a 2- or 4cylinder locomotive generates 4 exhaust chuffs per revolution.
The exhaust chuffs appear to be louder and harder during
acceleration compared to normal running at constant speed.
Whenever the valves are closed the only audible noise is the
clank of the driving rods.
When the locomotive starts moving, the cylinder valves are
open in order to push out any condensed steam and thus to
avoid breakage of the driving rods.
This behaviour can be simulated with LokSound decoders and
with the aid of the LokProgrammer. The individual stages are
divided into separate Driving notches. The different sounds of
the respective stages consist of individual recordings of the
exhaust chuffs (also refer to Fig. 4 and chapter 9.4.1 for
detailed explanations).
2.5. Software updates2.5. Software updates
2.5. Software updates2.5. Software updates
2.5. Software updates
ESU offers the latest version of the LokProgrammer software
on the web page www.esu.eu. You will find it in the „Downloads“ menu under „Software“. Click onto the Downloadsymbol at the end of the line. A window opens. Click „Run“.
Now the program will guide you through the installation
procedure.
Fig.3.: Start Window for Internet Update
There is also an option for an automatic update provided the
software is already installed on your computer:
• Go into the Start Menu and select Program „LokProgrammer
vX“, (the X stands for the version number of your software).
• Click onto „Internet Update“. A window as per Fig. 3 opens.
• Click onto „Next“. The note „Downloading required Files. Please
be patient“ appears. While this window is shown the files
required for the update will be installed. Subsequently you can
start the LokProgrammer software from the installation
window.
Please note that software version 2.6.6. only runs and opens
appropriate data (meant for version 2.6.6. and all following
updates). The software doesn´t run former or previous versions
(before version 2.6.6).
2.6. Firmware updates2.6. Firmware updates
2.6. Firmware updates2.6. Firmware updates
2.6. Firmware updates
The firmware is the operating system of the LokPilot- or
LokSound decoders.
Please note: Certain new software options can only be activated
with LokSound decoders with the latest firmware-update.
You will find the latest firmware-updates on our website at
www.esu.eu under „Download“ and „Software“.
Update procedure:
• Connect the desired decoder to the LokProgrammer and start
the update.
• Select „Run“ in the pop-up window.
• Follow the instructions for installation.
• First the firmware-update will be installed on your PC, then the
update will be downloaded onto your decoder.
Fig.4.: Performance of a Steam Locomotive
3.1.2. Diesel locomotive (diesel-electric)3.1.2. Diesel locomotive (diesel-electric)
3.1.2. Diesel locomotive (diesel-electric)3.1.2. Diesel locomotive (diesel-electric)
3.1.2. Diesel locomotive (diesel-electric)
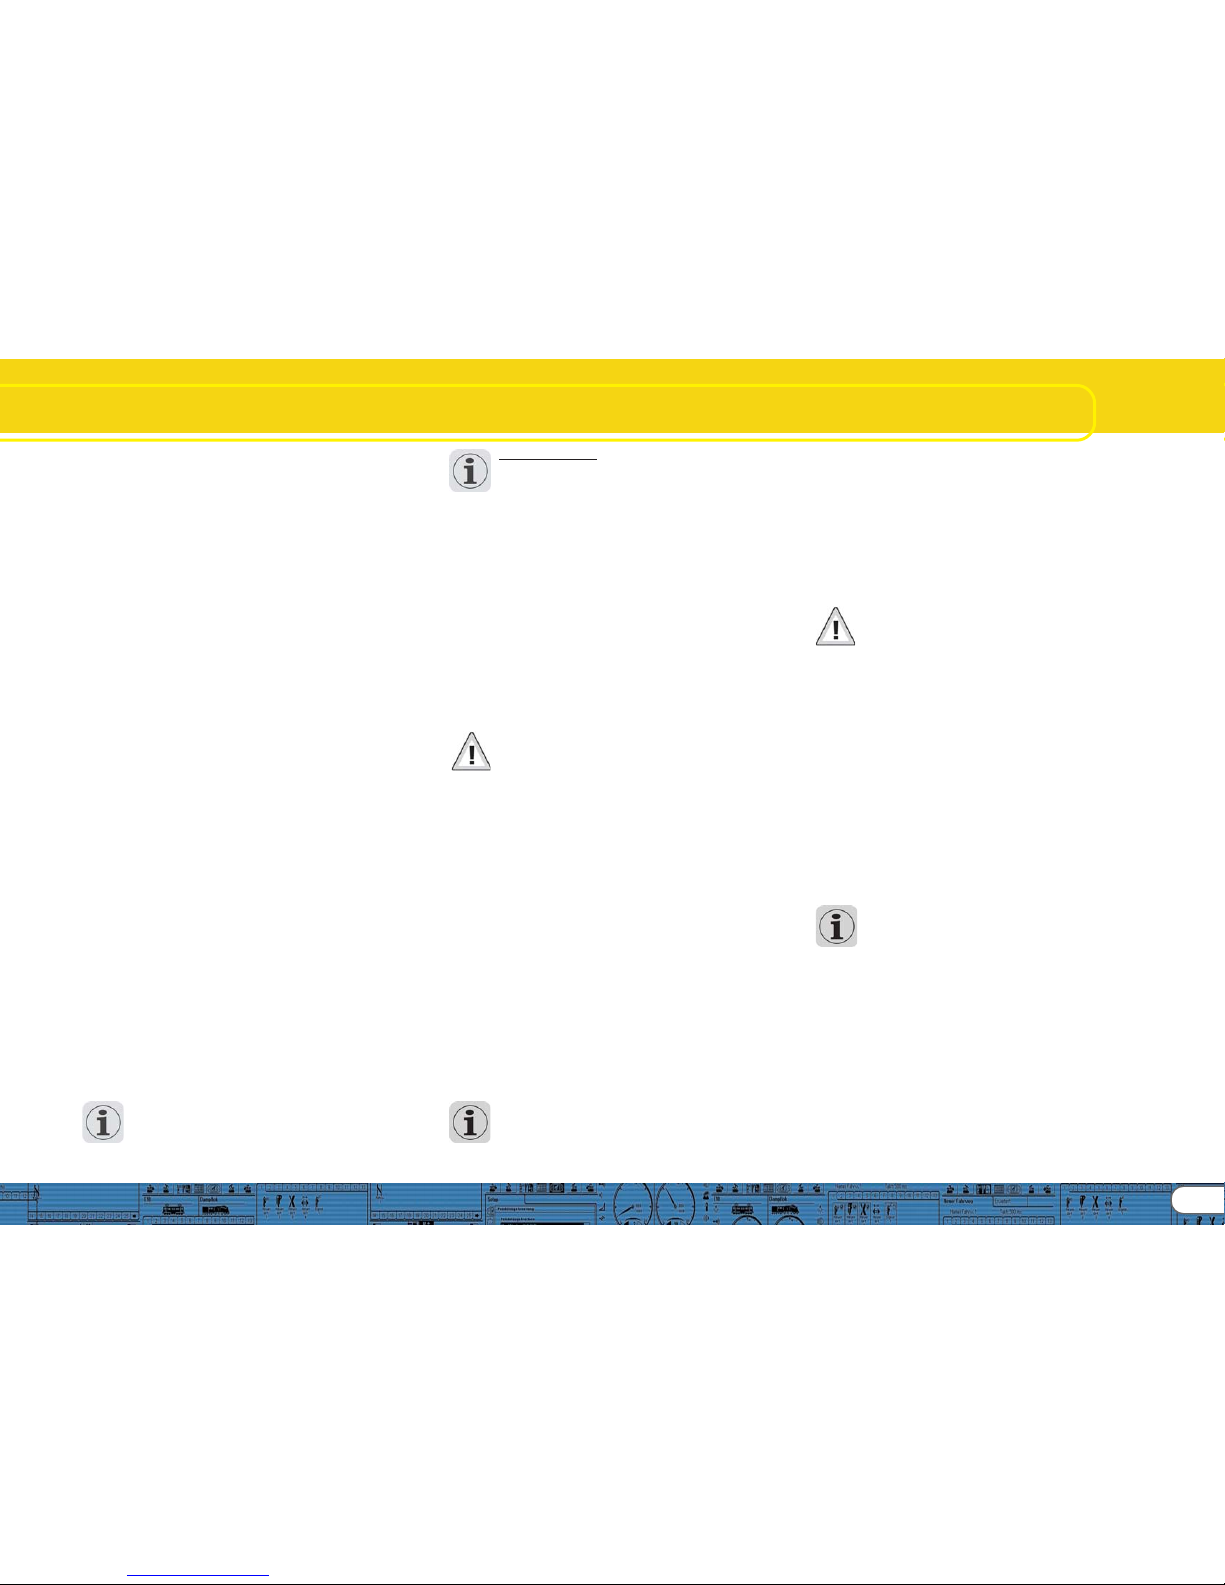
Diesel-electric locomotives are in principle electric locomotives
with electrical generators that are powered by diesel engines.
The diesel locomotive is generally driven at constant Driving
notches subject to the speed of the locomotive. Therefore the
noise generated changes (driving) step by (driving) step. The
quiet electric motor can hardly be heard over the noise of the
diesel powered plant. Most diesel-electric locomotives have 4
to 8 throttle notches. The LokProgrammer can handle up to 10
throttle notches plus one each for acceleration and idle
respectively coasting (for more info please refer to chapter
12.3).
ExamplesExamples
ExamplesExamples
Examples of diesel-electric locomotives are the DB class 232
(„Ludmilla“), most American diesel locomotives by GE or ALCO
or the MZ-locomotives by the Danish State Railways.
Fig.5.: Performance of a diesel-electric locomotive
Page 6

6
LokSound Basics
3.1.3. Diesel locomotive (diesel-hydraulic)3.1.3. Diesel locomotive (diesel-hydraulic)
3.1.3. Diesel locomotive (diesel-hydraulic)3.1.3. Diesel locomotive (diesel-hydraulic)
3.1.3. Diesel locomotive (diesel-hydraulic)
The main item of equipment of a diesel-hydraulic locomotive is
the torque-converter that uses fluids for power transmission.
This energy flow is literally „fluent.“
That is the reason why diesel-hydraulic locomotives howl audibly
once the throttle is opened and before the locomotive is actually
moving. Since the revs of the motor sound depend on the
speed, the noises generated during driving change without
audible thresholds. Simply put, the sound is directly proportional to the speed.
Locomotives with LokSound decoders behave the same way;
first the diesel engine revs up and once the revs are high
enough the locomotive starts moving. The pitch of the sound
can be adjusted subject to the speed. This is only possible in a
combined unit (decoder plus sound module in one piece – for
further info also refer to chapter 8.5.4).
ExamplesExamples
ExamplesExamples
Examples for diesel-hydraulic locomotives are the DB class V200
(class 220) and the Regio-Shuttle or the DMU41 by the SNCB/
NMBS.
Fig.6.: Performance of a Diesel-hydraulic Locomotive
3.1.4. 3.1.4.
3.1.4. 3.1.4.
3.1.4.
Diesel locomotive with manual transmissionDiesel locomotive with manual transmission
Diesel locomotive with manual transmissionDiesel locomotive with manual transmission
Diesel locomotive with manual transmission
(manual gear gear box)(manual gear gear box)
(manual gear gear box)(manual gear gear box)
(manual gear gear box)
Diesel locomotives with manual transmission employ pinion gear
for transmitting the power from the motor to the wheels
similar to automobiles. The clutch is pressed during shifting
from one gear to the next and thus the power transmission is
interrupted for a short moment. The shifting of gears can
clearly be heard in many a diesel locomotive with manual
transmission. With the LokProgrammer software you can either
store the original sound of gear shifting or you may choose the
option „gear shift“ (User-Sound Slot 14) as described in chapter
9.6.2:
ExamplesExamples
ExamplesExamples
Examples of diesel locomotives with manual transmission are
the German rail cars VT95 or some shunting locomotives, since
manual transmissions are only practical in vehicles of relatively
low weight and with low maximum speeds.
Fig.7.: Performance of a Diesel Locomotive with Manual Transmission
3.1.5. Electric locomotive3.1.5. Electric locomotive
3.1.5. Electric locomotive3.1.5. Electric locomotive
3.1.5. Electric locomotive
There are different sound types for electric locomotives. On
the one hand the hum of the electric traction motor(s) is audible;
it changes its pitch with the speed similar to diesel-hydraulic
locomotives.
Other electric locomotives generate very dominant fan sounds.
In some electric locomotives the sound of the fan is constant
and therefore the sound does not change during driving.
By and large electric locomotives are not as noisy as other
locomotive types and therefore they are ideal for applying
User Sounds such as the whistle, horn, compressor, etc. (for
more info please refer to chapter 9.5 and 9.6).
Fig.8.: Performance of an Electric Locomotive
3.2. User defined sounds3.2. User defined sounds
3.2. User defined sounds3.2. User defined sounds
3.2. User defined sounds
User-defined sounds („User-Sounds“)
could be horns and whistles, coupler clank,
sanding, etc. These sounds can be
triggered by pressing a function button
on your throttle once you have
programmed them onto the decoder.
Currently LokSound decoders support up
to 16 functions such as head lights, smoke generator, etc. The latest versions of digital command
stations such as the ESU ECoS can fully utilize this range.
Page 7
7
LokSound Basics
3.3. Automatic / Random sounds3.3. Automatic / Random sounds
3.3. Automatic / Random sounds3.3. Automatic / Random sounds
3.3. Automatic / Random sounds
Random Sounds are triggered automatically and irregularly
and can be used for safety valves, fans, compressors, etc.
With the LokProgrammer you can select the time between
Random Sounds (details in chapter 8.5.3).
Other possibilities for triggering sounds automatically such as
squealing brakes are contained in Function Mapping and the
sound schedule (see chapter 9). Such sounds will be triggered
at specific times.
3.4. Digital system / Protocols3.4. Digital system / Protocols
3.4. Digital system / Protocols3.4. Digital system / Protocols
3.4. Digital system / Protocols
In this chapter we list all digital protocols for running model
trains and setting signals and turnouts that are supported by
the LokProgrammer.
3.4.1. DCC (NMRA)3.4.1. DCC (NMRA)
3.4.1. DCC (NMRA)3.4.1. DCC (NMRA)
3.4.1. DCC (NMRA)
DCC stands for „Digital Command Control“ and was formulated
as standard by the NMRA (National Model Railroad Association).
In the early stages operation was limited to 14 speed steps and
80 addresses; today up to 10,000 addresses and 128 speed
steps are available.
DCC is downward compatible in terms of control and decoders,
e.g. older decoders can be controlled with up-to-date command
stations / throttles and with certain limitations new decoders
can be operated and programmed with older control devices.
3.4.2. Motorola®3.4.2. Motorola®
3.4.2. Motorola®3.4.2. Motorola®
3.4.2. Motorola®
The Motorola®-protocol goes back to 1984 is one of the oldest
digital systems for model trains. Due to its age the operational
options are limited.
The Motorola®-protocol can only handle 80 locomotive
addresses with 14 speed steps and besides the headlight function
only four additional function outputs can be controlled (functions
5-8 can be selected with the second Motorola®-address).
Since the Motorola®-protocol is still used in many digital systems
ESU decoders are designed to work with this protocol as well.
3.4.3. M43.4.3. M4
3.4.3. M43.4.3. M4
3.4.3. M4
Since 2004 the MFX®-system is on the market. Theoretically
this could run more than 16,000 model locomotives simultaneously
with 128 speed steps.
The LokProgrammer software deals with certain settings
somewhat differently to DCC.
For instance, instead of locomotive addresses the name of the
locomotive has to be entered (e.g.: „class 01“ or „ICE“). The
allocatement of certain parameters to the CVs is also different
to DCC.
Do not use the DCC-CVs mentioned from chapter 3.5 onwards
for M4!
What does M4 mean?What does M4 mean?
What does M4 mean?What does M4 mean?
What does M4 mean?
At some points in this manual you will notice the term „M4“ for the first
time and rightly wonder what this might mean.
This question can be answered quite simply: from 2009 forward, M4 is the
name of a data protocol that was chosen by ESU to be implemented in
their decoders. Decoders with the M4 protocol are one hundred percent
compatible with command stations using mfx®. At such stations (e.g.
Märklin® Central Station®) they will be recognized automatically and all
playing functions are available just like when using mfx®. On the other
hand, our ESU command stations using M4 will recognize all (Märklin®
and ESU) mfx® decoders without any restrictions and will still work
without any problems. As the (mutual) inventor of mfx® we can assure
you of this.
In short: the technique stays the same, only the name has been changed.
3.4.4. Selectrix®3.4.4. Selectrix®
3.4.4. Selectrix®3.4.4. Selectrix®
3.4.4. Selectrix®
Selectrix® is another digital system. In contradiction to DCC
the locomotive addresses are not transmitted individually but in
groups. Thus it is limited to the driving sounds and Random
Sounds but it is not possible to trigger any user defined sounds
(e.g.: a whistle or bell). Selectrix® is almost exclusively used for
N scale and Z scale; therefore it is also supported by the ESU
LokSound micro decoder.
It is important not to confuse these systems when programming
any sounds. For instance is it not possible to store any M4project files on a DCC-decoder let alone to replay them.
3.5. CVs3.5. CVs
3.5. CVs3.5. CVs
3.5. CVs
3.5.1. Definition 3.5.1. Definition
3.5.1. Definition 3.5.1. Definition
3.5.1. Definition
and applicationand application
and applicationand application
and application
CV stands for „Configuration Variable“. CVs can have values in
bits or bytes. The CVs with bytes can have a range from 0 to
255 while the CVs programmed in bits function as on / offswitches.
Examples:Examples:
Examples:Examples:
Examples:
CV 63 (sound volume) is a CV that can be programmed byte-
wise with a maximum value of 64. The value 0 means no sound
while 64 stands for maximum sound volume.
In CV 49, bit 0 is a „switch“ for activating load compensation
(as per 8.3.2). Is this bit set to 0, load compensation is deactivated,
is it set to 1, and then load compensation is active.
The NMRA (National Model Railroad Association) has allocateed
certain CVs to certain functions. For instance CV 1 is always
used for the address, CV 5 for the maximum speed.
3.5.2. 3.5.2.
3.5.2. 3.5.2.
3.5.2.
Advantages / DisadvantagesAdvantages / Disadvantages
Advantages / DisadvantagesAdvantages / Disadvantages
Advantages / Disadvantages
Digital decoders can be programmed without the need of
comprehensive programming knowledge or equipment. Many
digital command stations also offer internal programming
menus.
Furthermore the programming with bits and bytes requires
little memory space. Programming solely with CVs is not easy to
remember and depending on the type of command station it
can be quite cumbersome.
Furthermore CVs have only limited effect on sounds in LokSound
decoders (e.g.: sound volume). The actual sounds cannot be
adjusted with CVs but depend on the actual sound recording.
In the LokProgrammer software CVs are shown in registers or
as slide controls and can therefore easily be set to the desired
values.
3.6. Further information about LokSound decoders3.6. Further information about LokSound decoders
3.6. Further information about LokSound decoders3.6. Further information about LokSound decoders
3.6. Further information about LokSound decoders
3.6.1. General3.6.1. General
3.6.1. General3.6.1. General
3.6.1. General
At the core of a LokSound decoder is a powerful processor. It
is supported by an audio amplifier and a sound memory that
can store up to 130 seconds of sound.
The four channel mixer with active filter can replay four different sounds simultaneously: One channel is reserved for the
driving noises while the other three can be used for User Sounds
(such as bells, whistles, etc.) and Random Sounds (e.g.:
automatic safety valves or shovelling coal). All four channels will
be mixed to one output in the decoder and transmitted to the
speaker.
The memory of the LokSound decoder can be deleted at any
time to make room for new sounds. Thus it is no problem
whatsoever to modify a steam sound decoder into diesel sound.
You can easily do that yourself with the aid of the ESU
LokProgrammer whenever you want to!
Please note: this unimpeded change of sounds is limited to
decoders sold for installation into locomotives by the user.
LokSound decoders that are installed in locomotives by a model
train manufacturer may not always offer this option!
A field at the lower edge of the screen shows the available
memory space during programming (in seconds and bytes) as
well as the total capacity of the particular decoder. Select the
„Sound“ register and then one of the sound displays in order
to see this (also refer to chapter 9.).
If you wish to save some files but do not have enough memory
space on the decoder you may have to delete some sound files
from this project. Alternately you can shorten some of the
sound fragments with your audio-program.
3.6.2. Connecting the speaker3.6.2. Connecting the speaker
3.6.2. Connecting the speaker3.6.2. Connecting the speaker
3.6.2. Connecting the speaker
The speaker is the end piece of the sound equipment. Of
course we can only install small speakers into our model
locomotives.
Therefore the speaker must meet a very demanding
specification. ESU offers a range of speakers of different size
and for different decoder types.
Please note that the audio output of the LokSound decoder is
designed for 100 Ohm speakers. Speakers with other resistance
values may cause overheating of the amplifier in the decoder
or simply result in lower sound volume.
If you wish to install two speakers in one model it is best to use
two 50 Ohm speakers in series.
Page 8
8
Tasks of the LokProgrammer Software
3.6.3. Suitable sounds3.6.3. Suitable sounds
3.6.3. Suitable sounds3.6.3. Suitable sounds
3.6.3. Suitable sounds
ESU offers many different sound files for all sorts of locomotives
on the website www.esu.eu. Please take note of the licensing
conditions mentioned in the appendix regarding the download
of sound files. Of course you can program your own sound
projects on your LokSound decoder.
Generally you may use all files in Windows *.wav-format for
LokSound decoders. WAV is the standard format for storing
sounds of any kind on windows. If the recording is noise, music
or speech makes no difference.
The files can originate from the CD-ROM supplied with the
LokProgrammer, they could be downloaded from the internet
or they could be created by you.
Wave-files can be stored in different levels of sound quality on
the hard disc. The better the sound quality, the more memory
space is required.
In order to achieve optimal sound quality you should use wave
files that match the respective LokSound decoder:
Sampling frequency: 15625 Hz
(corresponds roughly with double
The displayed hearing frequency)
Resolution (corresponds with volume driving steps): 8 Bit
Number of channels: 1 (Mono)
The program automatically converts the files to the suitable
format matching the particular decoder. However, under certain
circumstances this could lead to lower sound quality.
Hint:Hint:
Hint:Hint:
Hint:
It would be best to prepare the wave file by adjusting them to
the above mentioned sampling frequency, resolution and
number of channels matching the corresponding parameters
of the decoder.
Firstly, this helps to save memory space while assuring the best
possible sound quality. Secondly, one can appraise the sounds
best during the preparation phase.
There are a number of programs for generating wave files.
The best known ones are Windows-Media Recorder for
recording sounds and to save them in digital format as *.wav
file on the hard disc. There are also more sophisticated audio
editors that offer professional features such as tone control,
echo, editing, etc.
It is recommended to record sounds with hard discs or other
high fidelity audio recorders in order to achieve a high level of
sound quality. Cassette recorders or even worse dictaphones
are not suitable.
In this manual we cannot provide comprehensive instructions
on how to convert sound to digital files and how to save them
on a hard disc. Please observe the manuals that were supplied
with your PC or with your audio card.
3.6.4. 3.6.4.
3.6.4. 3.6.4.
3.6.4.
Supported hardwareSupported hardware
Supported hardwareSupported hardware
Supported hardware
The LokProgrammer software as from version 2.5.0 supports
only the LokProgrammer 53450 „LokProgrammer V3.0“. Using
this software with older versions of the LokProgrammer (e.g.:
50450) is currently not possible.
The number of supported decoders varies subject to the
LokProgrammer version.
The versions as from 2.6.1. support the following ESU-decoders:
• LokSound V3.5 with 8 and 16 MBit memory for 0 scale and H0
scale (DCC and Motorola®)
• LokSound micro for TT and N scale (DCC, Motorola® and
Selectrix®)
• LokSoundXL V3.5 for G and I gauge (DCC and Motorola®)
• LokSound M4 for 0 and H0 scale for the users of Märklin®
systems.
In addition the following (partly older product versions) are
supported:
LokSound V3.0, LokSoundXL V3.0, LokSound2, LokSoundXL
V2.0, LokPilot, LokPilotDCC, LokPilotXL, LokPilotXL DCC.
The LokProgrammer software is subject to continous
development. In order to assure that you always work with the
latest software version you should regularly call up the internet
update facility. Whenever a new version with extended
functionality and bug fixing is available it will be placed in the
download section on our website.
The appearance on the screen may change subject to the
features of a specific decoder. Therefore in certain cases only
some of the features described here will be active or even
more options may be available. Please always refer to the
manual supplied with the decoder.
4. Purpose of the LokProgrammer software
In the following chapters the program functions of the
LokProgrammer will be described. First the general functions
and then the more special possibilities of adjusting ESU decoders
(LokPilot and LokSound).
The appropriate CV in the DCC protocol for each option will be
named as well as which setting is supported by which ESU
decoder. LP stands for LokPilot, LS for LokSound.
Please bear in mind that you can only fully utilize the potential
features of a decoder with the latest firmware.
4.1. Overview4.1. Overview
4.1. Overview4.1. Overview
4.1. Overview
• Setting / changing of all parameters of ESU decoders: all options
can be set comfortably on the PC. Of course it is still possible to
manually adjust any CV via digital command stations such as
the ESU ECoS-command station.
• Modification of sound files, that are stored on an ESU LokSound
module: it is possible to change all sound files on the LokSound
module at any time, e.g. also at a later stage. Thus you can
compose your own sounds using anything as source that can
be saved on your PC: locomotive sounds, music, speech, etc.
There are no limits to what you can do.
It is for instance easily possible to change the sounds from a
steam locomotive to a diesel or electric locomotive - or vice
versa.
• Test new ESU sounds: With the aid of the virtual cab (see
chapter 6) you can test decoders on the programming track.
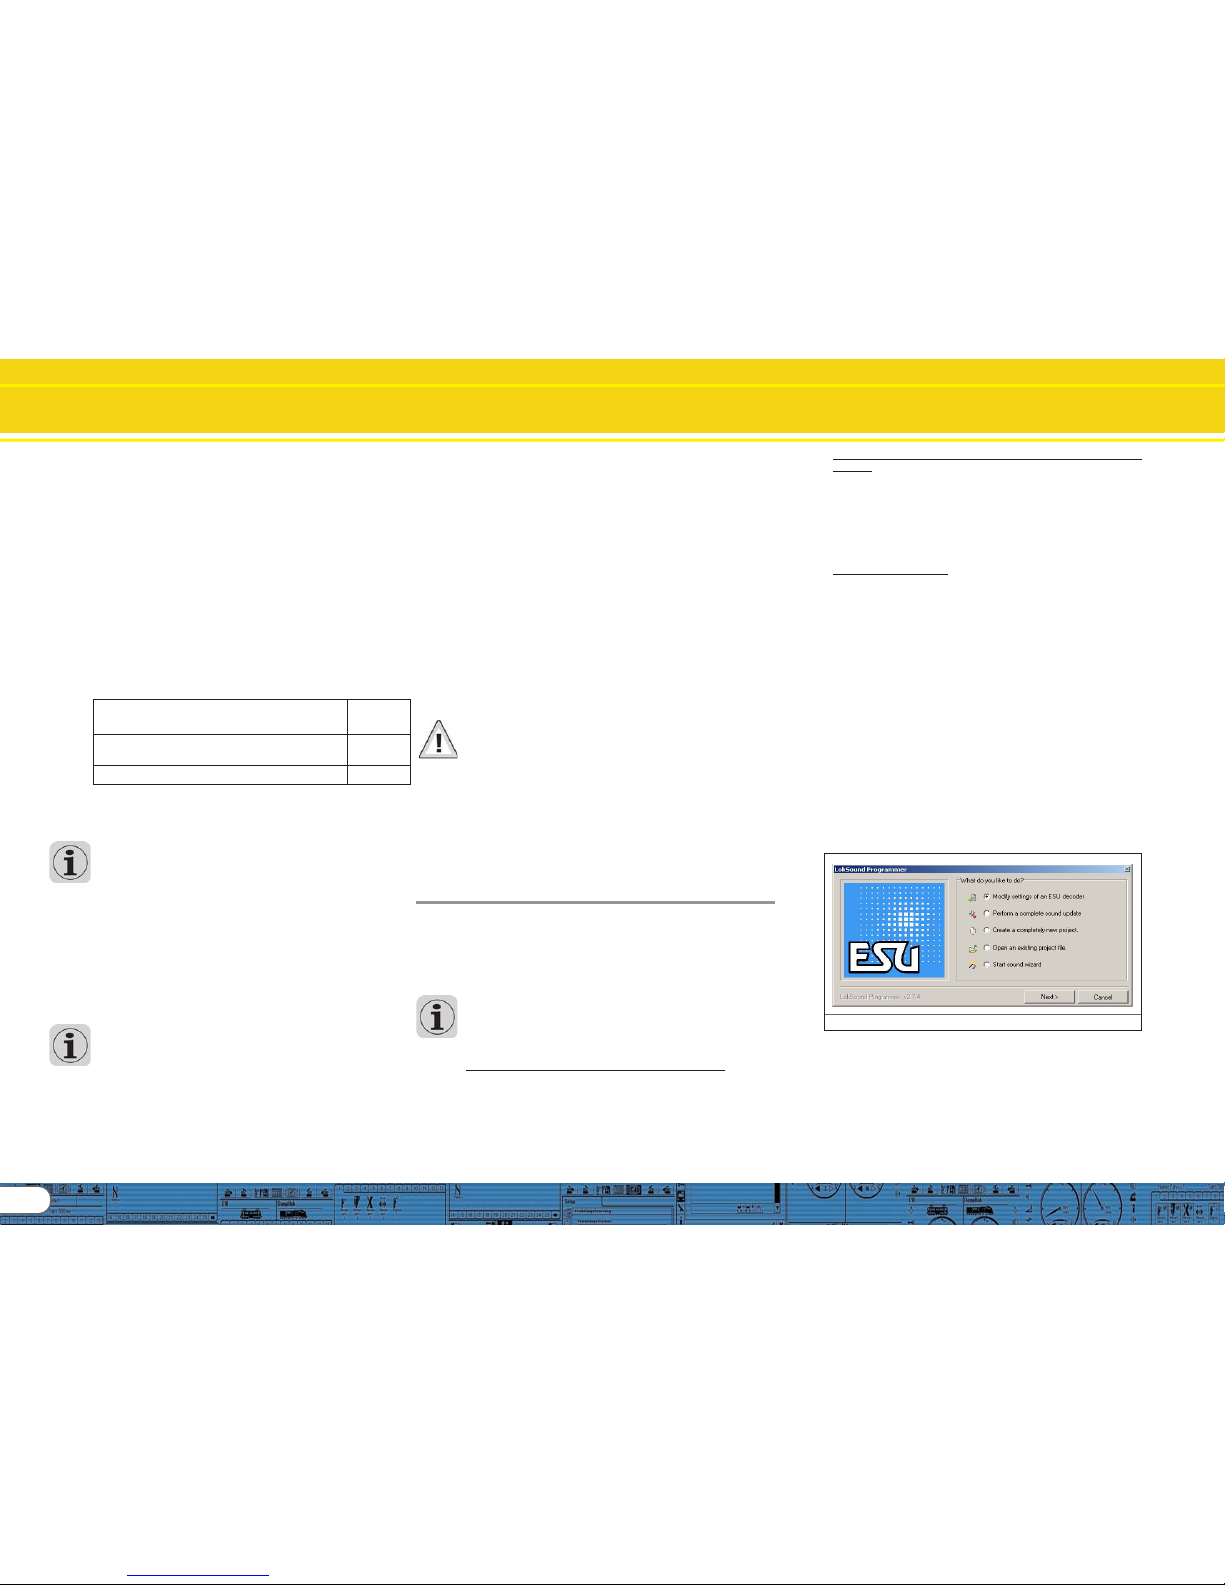
4. 2. Assistant4. 2. Assistant
4. 2. Assistant4. 2. Assistant
4. 2. Assistant
As soon as the software is started the assistant window pops
up on the monitor. This enables you to call up the most important
functions of the program. Subject to which function you select
the appropriate window appears immediately. With the help
of the assistant you can deal with important tasks easily and
quickly.
The assistant helps you to carry out the following tasks:
• To read out decoder data for comfortable evaluation and
modification.
• To completely modify the sound files of a decoder in order to
easily change a steam sound decoder into one for a diesel
locomotive.
• To generate a completely new project
• To open an already saved project.
In order to do this, select the desired option and follow the
instructions in the small window
Fig.9. Assistant
Page 9
9
5. Main screen
5.1. Registers5.1. Registers
5.1. Registers5.1. Registers
5.1. Registers
According to the different tasks of the program it is divided into
different registers and menus. Figure 10 shows the main screen
of the LokProgrammer software and its main components:
• Virtual Cab: Here you can test decoders in an easy manner
• Modifying CV’s: individual adjustment of CVs provided the
decoder supports DCC (NMRA).
• Decoder: for comfortable programming of ESU decoders with
a graphic display
• Sound: this serves for modifying sounds or to generate new
sound compositions for LokSound decoders.
Fig.10.: Main screen
5.2. T5.2. T
5.2. T5.2. T
5.2. T
ask barask bar
ask barask bar
ask bar
Fig.11.: Task bar
•File: in this menu you can do the following with projects:
Generate a new project,
load resp. „open“ a new project, save a project
Please note that all files of the LokProgrammer software version
2.6.6. can only be opened and changed when software version
2.6.6. is used!
You can also call up the internet update facility (refer to 2.5)
and close the LokProgrammer software.
During „Saving“ all data, settings and sound files will be written
into the project file. Project files are saved with the ending
„.esu“.
• Programmer: here you can read and write decoder data and
read sound files and allocatement of addresses. Extended
decoder data such as type of decoder and version number of
the firmware can also be read here.
Fig.12.: Menu „Programmer“
• Editing: in this menu you can enter additional info such as the
name of the locomotive or a photo and description of the
locomotive. It is also possible to convert LokSound 2 project files
into the current format of the LokProgrammer. After this
procedure you may have to check the CV values since not all
CVs can be transferred.
• Settings: here you can determine the project directory and the
programming language (German or English). Please note that
the new language only operates after restarting the program.
• Help: here you can open this manual and obtain other
information on this software
5.3. T5.3. T
5.3. T5.3. T
5.3. T
ool barool bar
ool barool bar
ool bar
„Add Sound File“. This button is only active when a sound file
was selected in the window „Folder“ or at the „Sound“ register.
„Delete Sound File“. This button is only active when a sound
file was selected in the window „Project Sound“ or at the
„Sound“ register.
„Play Sound File“ for testing purposes. This button is active
when a sound file was selected.
„Play Sound File continuously“. This button is active when a
sound file was selected. This type of replay is useful for sound
loops (driving noises).
„Stop Playing Sound Loop“. This button is active when a sound
file was selected.
It is possible to first listen to sounds on your PC prior to adding
them to a project. Mark the file you want to listen to in the
window „Folder“ (in the window „Sound“ / „Schedule“ in the
lower half of the left column). Then click onto
or .
To finish click onto .In this manner you can also listen to
sounds that are already contained in the list „Project Sounds“.
„Read Decoder Data“: Prior to changing any data on the
decoder it is advisable to read out all decoder data. Place the
locomotive on the programming track and make sure the
programming track is correctly connected.
Then click onto „Read CVs of the Decoder“ in the task bar at
the top of the screen. Alternately you can select the command
„Read out Decoder Data …“ in the menu „Programmer“. The
program starts to read the data immediately. Please be patient,
this process may take one or two minutes.
The status is displayed in the progress bar.
Should the program not be able to read the data please refer
to chapter 13.1.
„Write Decoder Data“: The CVs contained in the project file
will be written onto the decoder connected to the
LokProgrammer. Click „Continue“ in the window that opens
first in order to write the CVs.
All data on the decoder will be replaced by the new data.
Main Screen
Page 10

10
Virtual Driver’s Cab
„Write Sound Files“: This button enables you to write the sound
files contained in the project file onto the decoder connected
to the LokProgrammer. Click „Continue“ in the window that
opens first in order to write the sound files. Depending on the
size of the file and the size of the memory this may take up to
10 minutes.
Please bear in mind, that you have to write the CVs once
again, if you have made any changes.
„Write Address Allocations“. Any data contained in the project
file regarding the allocation (e.g.: sound slots to function buttons)
will be written onto the decoder.
The following fields next to the tool bar are of purely informative character:
This field shows the decoder type connected to the
LokProgrammer. In this example it is a LokSound decoder version
3.5. Of course you can work with any LokSound decoders (as
from LokSound 2 upwards), as well as LokPilot-types in DCC
(NMRA), Motorola®, M4 and Selectrix ®.
This field shows the size of the sound memory of the decoder.
Depending on the type this could be 1Mbit, 2Mbit, 4 Mbit
(LokSound 2), 8Mbit or 16Mbit (LokSound 3.5).
6. Virtual driver’s cab
With the aid of the virtual cab you can test decoders. You can
run the locomotive and trigger all functions. Therefore you can
test run your locomotive on the programming track with the
LokProgrammer.
Fig.13.: Virtual Driver’s Cab
There are some limitations, though: the LokProgrammer limits
the permitted current to about 400 mA. Should the motor of
the locomotive draw a higher current then the over current
protection will be triggered and the power to the programming
track will be shut off. This is indicated by the blinking yellow
LED on the LokProgrammer. In this case deactivate the virtual
cab and then turn it on again.
All other functions in this register are self explanatory: You can
enter the address and the number of speed steps. Please make
sure that the speed steps matches the ones set on the
LokProgrammer.
The LokProgrammer can run locomotives in DCC format, as
from version 2.5 also in the Motorola® format. Due to the
hardware the LokProgrammer cannot handle M4. Test your
M4 projects in the Motorola® format.
Please check that your programming track is fully isolated from
the mainline of your layout prior to turning on the virtual cab.
Should there be any electrical bridge it could damage the
LokProgrammer (also refer to 2.2.)!
Activate the locomotive for the test run by clicking the field
„Activate Cab“.
Control the speed of the locomotive with the slide throttle.
Clicking into the appropriate fields turns functions on and off.
Up to function F12 you may also press the numbers on your
computer keyboard.
Please bear in mind that running a locomotive with the
LokProgrammer cannot and should not substitute a command
station: due to the limited power of the power pack you will
not be able to run more than one locomotive at any one time.
The virtual cab simply gives you the opportunity to quickly test
run your locomotive.
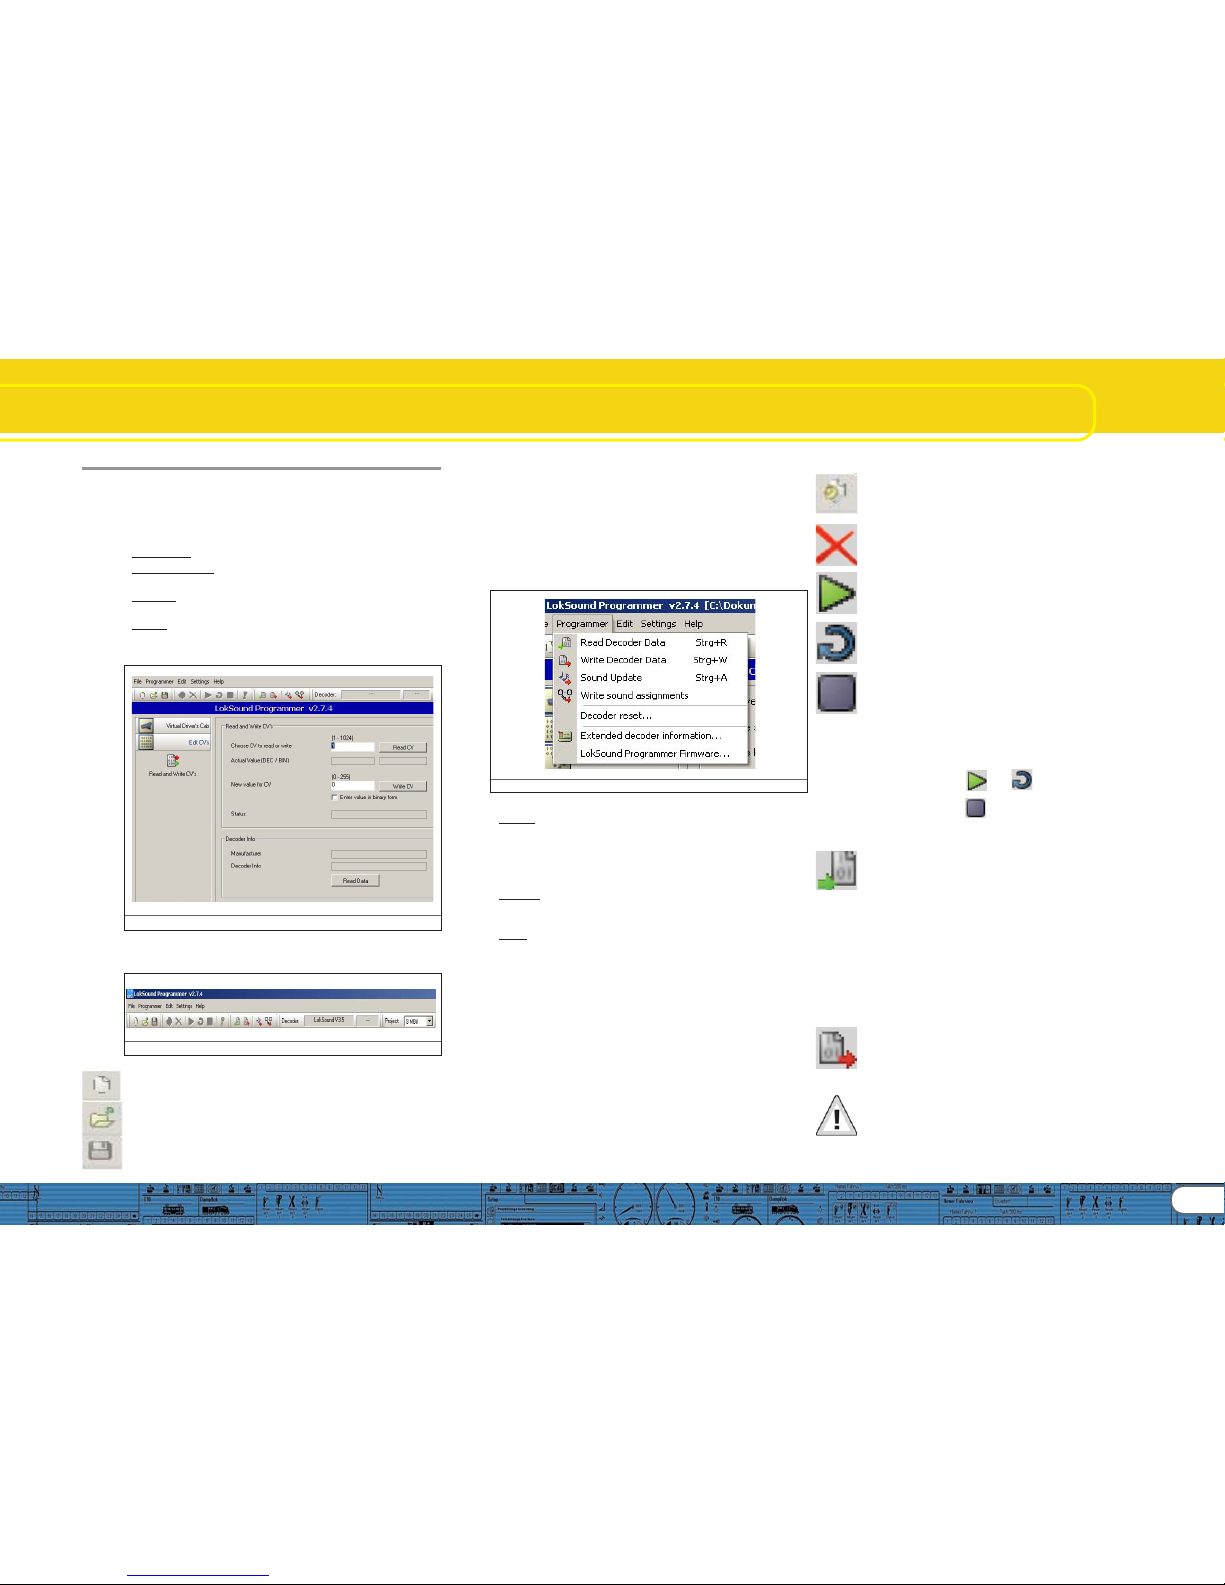
7. Edit CVs
In the register „Edit CVs“ you can read or write individual CVs.
Select the register „Read / Write CVs“.
Fig.14.: Subwindow „Edit CVs“
Read a CV:
• Enter the number of the CV you want to read in the upper
data entry field.
• Press the button „Read CVs“.
• The result will be shown in binary and decimal format.
Write a CV:
• Enter the number of the CV you want to write in the field at
the top.
• Write the new value of the CV in the lower data entry field.
• Click onto the button „Write CVs“.
• The CV will be overwritten with the new value.
You can also read out the manufacturer’s code. Simply click
onto „Read Data“.
Please bear in mind that any changes made here are not
automatically displayed under „Decoder“. You must first read
out the decoder data (also refer to chapter 5.3).
You will find a comprehensive list of CVs in 13.1.
8. The „decoder“ register
All settings regarding the motor control part of the decoder
are handled in the „Decoder“ register. Please note that this
register is initially empty when you start the program. Info will
only be displayed in this field after you have generated a new
project, opened an existing project or read out a decoder.
Projects are an image of all data stored on a decoder.
Fig.15.: The „Decoder“ register
The buttons that let you go to the different options are on the
left of the screen. Besides movement and sound behaviour you
can adjust specific settings such as brake mode, address, etc.
On the following pages we will explain the parameters and
options.
Page 11
11
Subwindow „Decoder“
8.1. View window „address“8.1. View window „address“
8.1. View window „address“8.1. View window „address“
8.1. View window „address“
8.1.1. Address (CV 1, CV 17, CV 18)8.1.1. Address (CV 1, CV 17, CV 18)
8.1.1. Address (CV 1, CV 17, CV 18)8.1.1. Address (CV 1, CV 17, CV 18)
8.1.1. Address (CV 1, CV 17, CV 18)
All modifications of the address are done in the window
„Address“. Subject to the decoder type so called short (two
digits, CV1) or long addresses (four digits, CV17 and CV18) can
be used.
Please note that any settings in these CVs are only effective for
operation with NMRA-DCC compliant command stations.
When operating decoders with the Märklin® / Motorola®protocol a separate address, namely the Märklin®-address is
valid.
You may enter a second address for M4-decoders in Motorola®
mode in order to activate F5 to F8. Normally this would be the
address of the decoder plus 1.
8.1.2. Consist settings (CV 19)8.1.2. Consist settings (CV 19)
8.1.2. Consist settings (CV 19)8.1.2. Consist settings (CV 19)
8.1.2. Consist settings (CV 19)
The DCC consist address is useful for multiple traction. It is also
possible to activate function outputs for consists as well as
function buttons for consist mode.
In some cases it is desirable to set certain functions in consist
mode in such a way that the function is actually triggered by
pressing one button in both (or all) locomotives (e.g.: lights).
Click onto the appropriate button of the function that should
be activated in consist mode.
8.2. Driving characteristics8.2. Driving characteristics
8.2. Driving characteristics8.2. Driving characteristics
8.2. Driving characteristics
8.2.1. Selecting the number of speed steps (CV 29,8.2.1. Selecting the number of speed steps (CV 29,
8.2.1. Selecting the number of speed steps (CV 29,8.2.1. Selecting the number of speed steps (CV 29,
8.2.1. Selecting the number of speed steps (CV 29,
CV 49) CV 49)
CV 49) CV 49)
CV 49)
Here you can adjust more settings for running your locomotive.
In DCC mode you have to first set the number of speed steps to
14, 28 or 128 or alternately to automatic detection of speed
steps.
8.2.2. Reverse mode (CV 29)8.2.2. Reverse mode (CV 29)
8.2.2. Reverse mode (CV 29)8.2.2. Reverse mode (CV 29)
8.2.2. Reverse mode (CV 29)
A tick at „Reverse mode“ changes the direction of travel and
the directional characteristics of the headlights. This is useful in
case the wiring has been done incorrectly (swapping of track
leads or motor leads).
8.2.3. Acceleration and deceleration (CV 3, CV 4)8.2.3. Acceleration and deceleration (CV 3, CV 4)
8.2.3. Acceleration and deceleration (CV 3, CV 4)8.2.3. Acceleration and deceleration (CV 3, CV 4)
8.2.3. Acceleration and deceleration (CV 3, CV 4)
This option allows you to set the acceleration time (CV3)
respectively the braking time (CV4). The time is calculated by
multiplying the CV-value with 0.869 seconds.
The acceleration time is the time the locomotive takes from
stop to maximum speed. Of course the acceleration time from
stop to mid speed is accordingly shorter.
The same is valid for the braking time. This is the time from
maximum speed until the locomotive stops.
8.2.4. Supported brake modes (CV 51)8.2.4. Supported brake modes (CV 51)
8.2.4. Supported brake modes (CV 51)8.2.4. Supported brake modes (CV 51)
8.2.4. Supported brake modes (CV 51)
Here the brake modes can be selected. The LokProgrammer
supports the Märklin®-, Zimo- and Lenz-brake modes.
8.2.5. T8.2.5. T
8.2.5. T8.2.5. T
8.2.5. T
rim (CV 66, CV 95)rim (CV 66, CV 95)
rim (CV 66, CV 95)rim (CV 66, CV 95)
rim (CV 66, CV 95)
The trim function allows you to set the maximum speed
separately for forward and reverse movement. The factor
that is used to multiply the motor voltage, results from dividing
the CV-value by 128 (forward CV 66 and reverse CV 95).
8.3. Motor8.3. Motor
8.3. Motor8.3. Motor
8.3. Motor
8.3.1. DC motor PWM frequency (CV 49)8.3.1. DC motor PWM frequency (CV 49)
8.3.1. DC motor PWM frequency (CV 49)8.3.1. DC motor PWM frequency (CV 49)
8.3.1. DC motor PWM frequency (CV 49)
Here you can select the desired tact frequency for motor control
(pulse width modulation). The possible values are 15kHz and
30kHz. LokSound decoders as from V3.5 are normally set to
30kHz.
8.3.2. Load compensation (CV 49, CV 53, CV 54,8.3.2. Load compensation (CV 49, CV 53, CV 54,
8.3.2. Load compensation (CV 49, CV 53, CV 54,8.3.2. Load compensation (CV 49, CV 53, CV 54,
8.3.2. Load compensation (CV 49, CV 53, CV 54,
CV 55 and CV 56) CV 55 and CV 56)
CV 55 and CV 56) CV 55 and CV 56)
CV 55 and CV 56)
Load compensation helps to adjust the motor power in case of
obstructions such as gradients.
First of all you may decide if you want to use load compensation
or not (CV 49). Then you can set the reference voltage (CV 53)
and the two control parameters K and I (CV 54 and 55).
Furthermore you can set the impact (effectiveness) of load
compensation (CV 56). At 100%, load compensation is active
over the entire speed range; at 50% it is only active up to half
the maximum speed.
With this setting your locomotives benefit from load
compensation at lower speeds while their speed changes
prototypically on gradients.
The numbers of values respectively the values themselves are
subject to the type of decoder. For useful values please consult
chapter X.1 or the user manual of your decoder.
8.3.3. Speed curves (CV 2, CV 5, CV 6, CV 26,8.3.3. Speed curves (CV 2, CV 5, CV 6, CV 26,
8.3.3. Speed curves (CV 2, CV 5, CV 6, CV 26,8.3.3. Speed curves (CV 2, CV 5, CV 6, CV 26,
8.3.3. Speed curves (CV 2, CV 5, CV 6, CV 26,
......
......
...
and CV 67-97) and CV 67-97)
and CV 67-97) and CV 67-97)
and CV 67-97)
The field „Speed Curves“ gives you a choice of a three-pointspeed curve or a user-defined speed curve.
The three-point-speed-curve is determined by the start voltage
(CV 2), the medium speed (CV 6) and the maximum speed (CV
5).
The speed curve has a higher resolution with 28 speed steps.
Subject to the selected speed steps you can move the individual speed points up and down with the mouse and adjust them
to the most prototypical setting.
The three-point-speed-curve and the individual speed curve
with 28 entries are valid for all operating modes: DCC 14, 28 or
128 speed steps, Motorola® format (14 speed steps) or M4;
the selected speed curve will always be adapted (interpolated)
to the actual speed mode.
With the choice menu „Default“ you can enter a simple linear
or exponential speed curve.
8.4. DCC / Analogue8.4. DCC / Analogue
8.4. DCC / Analogue8.4. DCC / Analogue
8.4. DCC / Analogue
8.4.1. Zimo® manual function (CV 49)8.4.1. Zimo® manual function (CV 49)
8.4.1. Zimo® manual function (CV 49)8.4.1. Zimo® manual function (CV 49)
8.4.1. Zimo® manual function (CV 49)
Activates the Zimo® manual function.
8.4.2. Analogue mode (CV 29)8.4.2. Analogue mode (CV 29)
8.4.2. Analogue mode (CV 29)8.4.2. Analogue mode (CV 29)
8.4.2. Analogue mode (CV 29)
Activates the analogue mode.
8.4.3. Supported analogue modes and settings8.4.3. Supported analogue modes and settings
8.4.3. Supported analogue modes and settings8.4.3. Supported analogue modes and settings
8.4.3. Supported analogue modes and settings
(CV 50, CV 125, CV 126, CV 127 and CV 128)(CV 50, CV 125, CV 126, CV 127 and CV 128)
(CV 50, CV 125, CV 126, CV 127 and CV 128)(CV 50, CV 125, CV 126, CV 127 and CV 128)
(CV 50, CV 125, CV 126, CV 127 and CV 128)
In analogue mode load compensation is not active. Therefore
by using the appropriate slide control you can adapt the start
voltage and the maximum speed separately for AC or DC
analogue mode to match the characteristics of your motor or
transformer.
Furthermore you can select the functions that should be active
in analogue mode (DC, AC or both; CV 50).
8.4.4. Analogue mode F1-F8 / Analogue mode FL,8.4.4. Analogue mode F1-F8 / Analogue mode FL,
8.4.4. Analogue mode F1-F8 / Analogue mode FL,8.4.4. Analogue mode F1-F8 / Analogue mode FL,
8.4.4. Analogue mode F1-F8 / Analogue mode FL,
F9-F12 (CV 13, CV 14) F9-F12 (CV 13, CV 14)
F9-F12 (CV 13, CV 14) F9-F12 (CV 13, CV 14)
F9-F12 (CV 13, CV 14)
Since most analogue layouts do not have input devices to trigger
functions, these parameters allow you to pre-select which
functions should be automatically active in analogue mode.
It is recommended to turn on the sound (default value F1) and
the smoke generator of steam locomotives (often F4).
Furthermore the headlights in both directions would be switched
on in analogue mode (marked as FL(f) and FL(r) in the register).
Functions F9 and F10 can also be set as directional functions
(F9(f), F9(r), F10(f), F10(r)).
Page 12
12
Subwindow „Decoder“
8.5. Sound settings8.5. Sound settings
8.5. Sound settings8.5. Sound settings
8.5. Sound settings
This window shows the behaviour of all sounds that are related
to the movement of the locomotive, also characteristics of
Random Sounds and main volume control. However, we are
not talking about the actual sound files (wav-files) but the
parameters that control these sound files.
Of course these settings must match the type of sound files
stored on the decoder. Otherwise some absurd results may
occur when for instance steam sounds are stored on the
decoder but the settings here are for a diesel locomotive.
On the other hand there is no limit to the creative use of the
LokProgrammer for achieving exceptional sound effects. For
instance it is quite easy to insert discussions between engineer
and fireman, station announcements or even music into the
project and to replay them with your LokSound decoder.
8.5.1. T8.5.1. T
8.5.1. T8.5.1. T
8.5.1. T
ype of sounds (CV 57, CV 58)ype of sounds (CV 57, CV 58)
ype of sounds (CV 57, CV 58)ype of sounds (CV 57, CV 58)
ype of sounds (CV 57, CV 58)
Selection of locomotive type (also refer to chapter 3.1.):
• Diesel locomotive - hydraulic
• Diesel locomotive with manual transmission
• Diesel-electric locomotive or electric locomotive
Here it is possible to use only one sound file for driving and to
add extra effects with „Interval between Throttle Notches“. It
is necessary to set the „Speed of Driving sound“ to the
appropriate value (also see 8.5.4) in order to make differences
in pitch audible.
„Interval between Throttle Notches“ divides the speed curve
into certain sectors in which the driving noise is played at a
different pitch. If this parameter is set to „1“ the decoder will
play the driving noises without audible throttle notches.
• Steam locomotives without external wheel sensor: the exhaust
chuffs can be synchronized with the revolutions of the drivers.
The time between the exhaust chuffs is determined by
multiplying the value of CV 57 („Interval between Exhaust
Chuffs at Speed Step 1“) by 0.064 seconds.
The value of CV 58 („… and at Speed Step 2“) determines the
degree of reduction of the time between exhaust chuffs with
increasing speed starting at speed step 2.
Since these settings depend on the circumference of the drivers,
the selected maximum speed and the motor characteristics
they have to be determined by trial and error. The
LokProgrammer in conjunction with a test oval provides the
best testing conditions.
More info on synchronizing without external sensor can be
found in chapter 12.2.
• Steam locomotive with external wheel sensor: Steam
locomotives with external wheel sensors are very common in
the large scales such as G and 1 gauge. The parameter „Trigger Pulse“ (CV 58) determines after how many pulses from the
sensor the exhaust chuff will be played. The decoder
differentiates between „On“ and „Off“ pulses. If CV 58 is set
to „1“ then the decoder will play an exhaust cuff for each
„On“ and „Off“ pulse. Value „2“ triggers an exhaust chuff for
each „On“ pulse while value 4 triggers the chuff for every
second „On“ pulse. The default value is „2“. In principle the
value can be increased up to 250.
8.5.2. Minimum time between exhaust chuffs (CV 249)8.5.2. Minimum time between exhaust chuffs (CV 249)
8.5.2. Minimum time between exhaust chuffs (CV 249)8.5.2. Minimum time between exhaust chuffs (CV 249)
8.5.2. Minimum time between exhaust chuffs (CV 249)
Normally exhaust chuffs are speed dependant. However, in
case of a somewhat unfortunate configuration of wheel
circumference and maximum speed this could lead to an
undesirable sound at high speeds rather like a machine gun
and not like a steam locomotive.
To counter this effect you can adjust „Minimum Time between
Exhaust Chuffs“. The value represents the minimum time
between two chuffs even when the maximum speed has not
yet been reached.
Of course the chuffs are not synchronized to the drivers any
more at that stage but this is hardly noticeable at high speeds.
8.5.3. Random sounds (CV 61, CV 62)8.5.3. Random sounds (CV 61, CV 62)
8.5.3. Random sounds (CV 61, CV 62)8.5.3. Random sounds (CV 61, CV 62)
8.5.3. Random sounds (CV 61, CV 62)
In this field you can activate the Random Sounds and the time
intervals between them.
The LokSound decoder plays the Random Sounds arbitrarily
within these minimum and maximum intervals. The values
correspond with seconds (also refer to 9.5).
8.5.4. Speed of driving sound (CV 59, 60)8.5.4. Speed of driving sound (CV 59, 60)
8.5.4. Speed of driving sound (CV 59, 60)8.5.4. Speed of driving sound (CV 59, 60)
8.5.4. Speed of driving sound (CV 59, 60)
These parameters allow you to simulate the revs of the motor.
The sound files for the driving sound are the basis. The value is
given in %. 100% means original speed of the sound file,
200% twice the speed. The pitch is changed subject to the
speed. One could compare this effect with a cassette player
that is running too slowly. If you set the value of „… at the
highest Speed Step“ to 100% then the driving sound will remain
constant (provided you have only one sound file for driving).
8.5.5. Brake sound threshold (CV 64)8.5.5. Brake sound threshold (CV 64)
8.5.5. Brake sound threshold (CV 64)8.5.5. Brake sound threshold (CV 64)
8.5.5. Brake sound threshold (CV 64)
Here you determine when exactly the decoder starts playing
the brake squeal. The higher the value, the sooner the squeal
will start.
8.5.6. Sound 8.5.6. Sound
8.5.6. Sound 8.5.6. Sound
8.5.6. Sound
vv
vv
v
olume (CV 63, CV 121, CV 122 and CV 123)olume (CV 63, CV 121, CV 122 and CV 123)
olume (CV 63, CV 121, CV 122 and CV 123)olume (CV 63, CV 121, CV 122 and CV 123)
olume (CV 63, CV 121, CV 122 and CV 123)
The sound volume can be adjusted to match the speaker with
the slide controls.
Controls 1, 2 and 3 can be used as group controls. The overall
volume (CV 63) influences controls 1, 2 and 3. Control 1 (CV
121) is intended for horns and whistles, control 2 (CV 122) for
bells and control 3 (CV 123) for additional sounds. This is only a
suggestion. Of course you may use the controls for other sound
groups as well. The advantage of the group control is that you
could link for instance the driving noise of a steam locomotive
to one group in order to be able to adjust the volume of all
exhaust chuffs simultaneously should they be too loud or too
quiet compared to User Sounds or Random Sounds.
8.5.7. Load dependent sound (CV124)8.5.7. Load dependent sound (CV124)
8.5.7. Load dependent sound (CV124)8.5.7. Load dependent sound (CV124)
8.5.7. Load dependent sound (CV124)
If the decoder registers a load – i.e.: when load compensation
becomes active – the driving noises will be played louder. This
works only if the overall volume is set to a lower value than
maximum. Only then are some „volume reserves“ available.
8.5.8. Sound steam shift (CV250, CV251, CV252)8.5.8. Sound steam shift (CV250, CV251, CV252)
8.5.8. Sound steam shift (CV250, CV251, CV252)8.5.8. Sound steam shift (CV250, CV251, CV252)
8.5.8. Sound steam shift (CV250, CV251, CV252)
One can hear that the chuffs of compound steam locomotives
are generated by two drive mechanisms. The LokProgrammer
achieves this effect by adding an additional exhaust chuff
between the regular ones. This extra chuff continuously changes
its timing relative to the regular chuffs.
After activating „Sound Steam Shift“ the following parameters
can be edited:
• Duration of steam shift: here you determine how long the
shifted chuff needs to go from the earliest possible relative
start position to the latest start position and back again. The
value entered here is a relative value and must be determined
by testing.
• Earliest relative start position for steam shift: in order to avoid
that the additional chuff is played at the same time as the
regular one and thus would lead to over-modulation of the
sound it is recommended to slightly delay the steam shift.
This delay is set in this parameter.
• Latest relative start position for steam shift: in order to avoid
that the additional chuff is played at the same time as the
following regular chuff and thus would lead to over-modulation
of the sound it is recommended to bring forward the end of
the steam shift. This can be set with this parameter.
Page 13
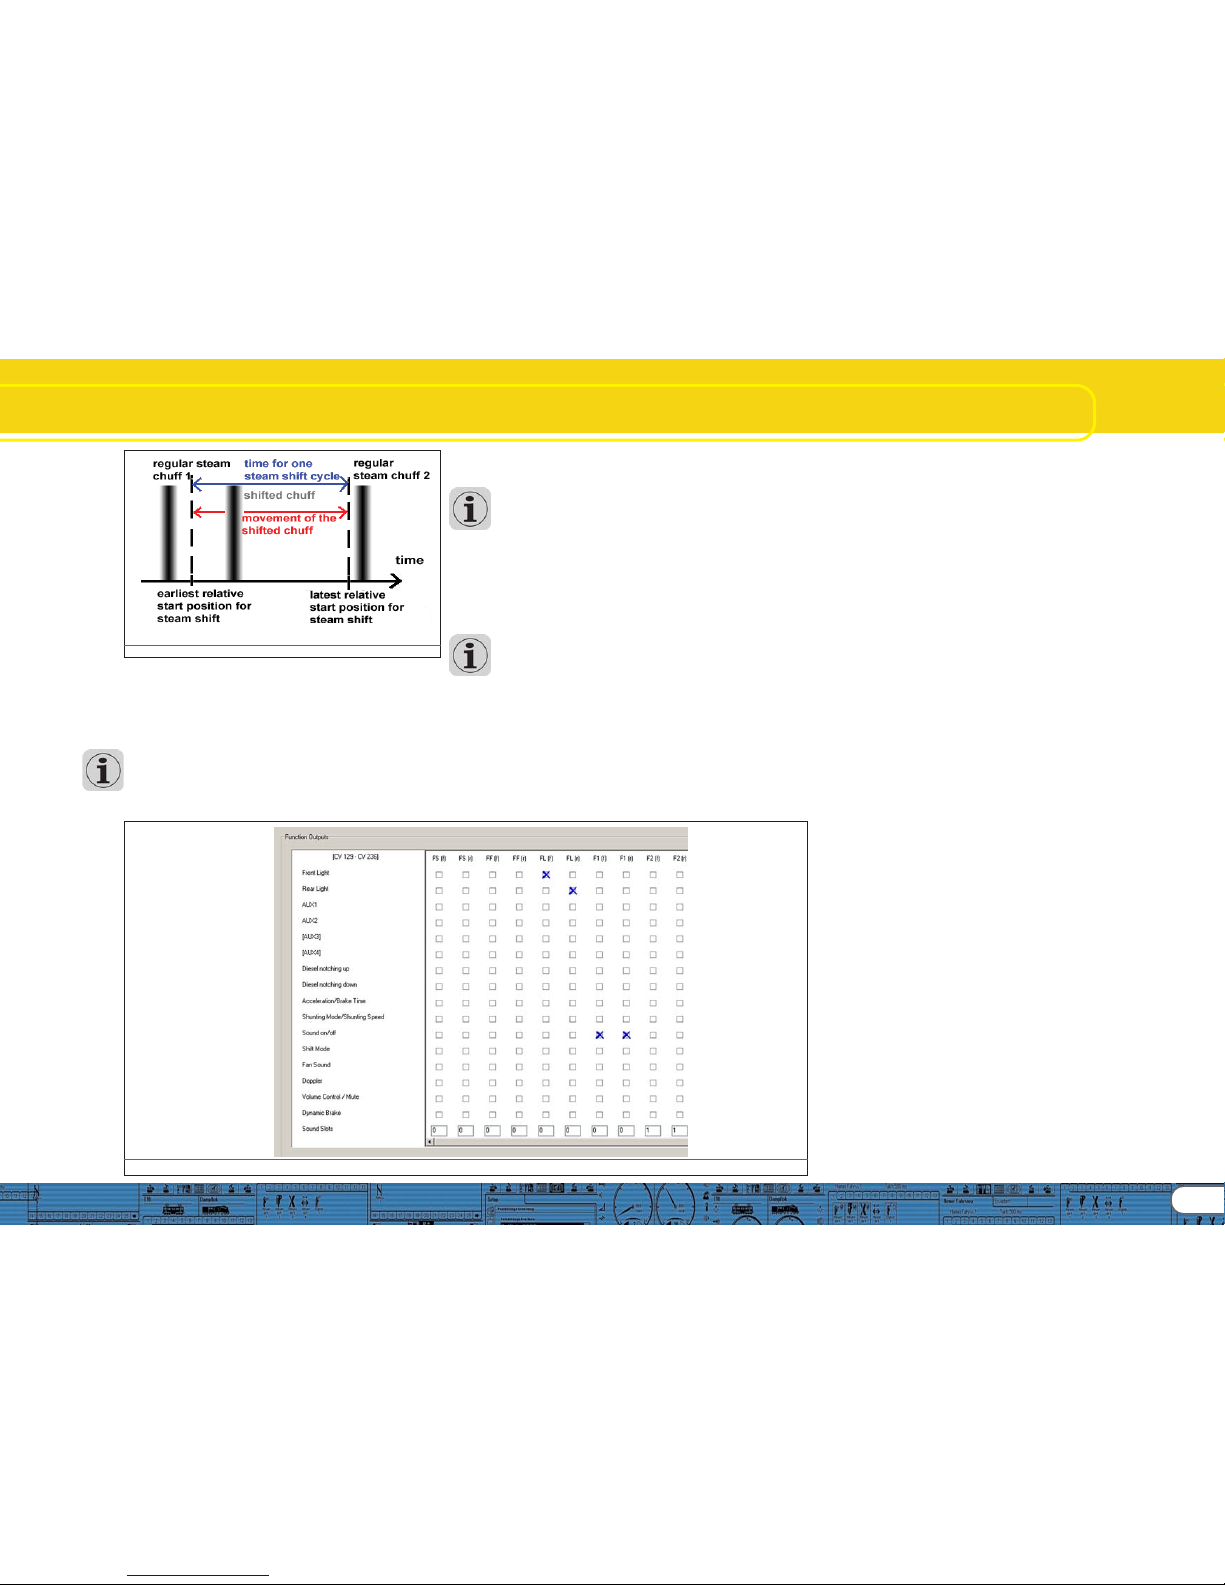
13
Fig.16: Steam Shift Schematic
8.6. Function mapping8.6. Function mapping
8.6. Function mapping8.6. Function mapping
8.6. Function mapping
Here you can allocate functions to each function button.
Depending on the decoder type there are the function buttons
FL and F1 to F15.
Please note that Märklin®-Motorola® systems only support
the buttons F1 to F4. F5 to F8, however, can be activated by
means of a second address (see 10.4).
Figure 14 provides an overview of possible settings.
For allocating a certain function to a certain button tick the
appropriate field at the intersection of the column „Function
Button“ and the line „Function“.
Please remember that function mapping is stored in the CVs.
Therefore you should always read the decoder data first in
order to get to know the current status before making any
changes (also see chapter 5.3). The functions are allocateed
with the CVs 129 – 230 (also refer to 13.1.).
You may allocate several functions to one button. You could
for instance trigger a sound effect or other functions every
time you switch AUX1.
However, it is not possible to play two or more sounds
simultaneously by pressing one function button.
Please note that functions can be allocateed separately for
forward (f) and reverse (r) motion. Thus the behaviour of some
functions can vary subject to direction of travel and / or different sounds could be triggered (e.g.: directional horn signals). If
you wish to allocate a function for both directions simply enter
the function respectively the sound in both columns of the
corresponding function allocatement.
8.6.1. Description of the matrix columns8.6.1. Description of the matrix columns
8.6.1. Description of the matrix columns8.6.1. Description of the matrix columns
8.6.1. Description of the matrix columns
• FS(f), FS(r): Allocated functions and sounds will be activated
automatically while the locomotive is standing and thus are not
switched with a function button.
• FF(f), FF(r): Allocated functions and sounds will be activated
automatically while the locomotive is moving and thus are not
switched with a function button.
• FL(F), FL(r): Allocated functions and sounds will be activated via
the lighting button of the command station (respectively by F0
in the „Virtual Cab“).
• F1(f), F1(r) to F15(f), F(r): Allocated functions and sounds will be
activated via the function buttons 1-15 of the command station.
In the following paragraphs the individual options (lines) in the
function mapping register and their effects will be explained.
8.6.2. Head lights, back-up lights8.6.2. Head lights, back-up lights
8.6.2. Head lights, back-up lights8.6.2. Head lights, back-up lights
8.6.2. Head lights, back-up lights
Normally the headlights and back-up lights are wired in such a
way that they are switched subject to direction of movement.
Set a cross into „Headlights“ at FL(f) and another one for
„Back-up Lights“ at FL(r).
Now you can switch the lights with the lighting button of your
command station or throttle respectively with „F0“ of the
virtual cab. In Fig. 14 you see the default entry for the lights in
the columns FL (f) and FL (r) for locomotives with standard
wiring.
8.6.3. Aux 1-48.6.3. Aux 1-4
8.6.3. Aux 1-48.6.3. Aux 1-4
8.6.3. Aux 1-4
With the aid of AUX outputs you can activate (electro-)
mechanical functions of your locomotive (e.g.: smoke generator,
pantograph, etc.) in accordance with the wiring.
Please note that decoders with the 8-pole plug support only
AUX 1 and 2. Decoders with the 21-pole plug „mtc“ also
support AUX 4. XL-decoders have 6 AUX outputs (AUX 1-6).
8.6.4. Acceleration and coasting of diesel locomotives8.6.4. Acceleration and coasting of diesel locomotives
8.6.4. Acceleration and coasting of diesel locomotives8.6.4. Acceleration and coasting of diesel locomotives
8.6.4. Acceleration and coasting of diesel locomotives
Here you can play the idle and driving sounds while standing still
and moving. Activate the function „Accelerate Diesel“ then
the decoder shifts from the sound of the current speed step to
the sounds of the following higher speed steps until you
deactivate this function no matter at what speed or if the
locomotive is standing still. The actual speed (or no movement
if the locomotive was stationary prior to your first command)
remains intact.
When you trigger „Coasting“ then the above sequence will be
played in reverse without changing the actual status of
movement or standing still.
This function serves to rev the diesel motor wile standing or to
simulate the sound of a locomotive with a heavy load (for
instance on a gradient). This function is only appropriate for
diesel-electric locomotives.
It is best to allocate this function to both directions.
Fig.17.: Function Outputs Matrix
Subwindow „Decoder“
Page 14

14
Subwindow „Decoder“
8.6.11. V8.6.11. V
8.6.11. V8.6.11. V
8.6.11. V
olume / Muteolume / Mute
olume / Muteolume / Mute
olume / Mute
With this function you can mute the sound and – by double
clicking – you can set 4 different levels of the overall volume. It
is best to allocate this function to both directions.
8.6.12. Dynamic brake8.6.12. Dynamic brake
8.6.12. Dynamic brake8.6.12. Dynamic brake
8.6.12. Dynamic brake
In order to simulate this function, that is often present in diesel
and electric locomotives, as close to the original as possible the
acceleration and deceleration is reduced to half the time. It is
best to allocate this function to both directions.
8.6.13. Sound slots8.6.13. Sound slots
8.6.13. Sound slots8.6.13. Sound slots
8.6.13. Sound slots
Here you enter the numbers of the desired user sound slots. If
you have already imported some user sound slots then you can
click onto the corresponding square with the right mouse button.
A choice list appears showing all occupied sound slot numbers
and the corresponding sound files.
Fig.19.: Popup Menu for selecting the Sound Slots
8.6.14. 8.6.14.
8.6.14. 8.6.14.
8.6.14.
Configuration of outputsConfiguration of outputs
Configuration of outputsConfiguration of outputs
Configuration of outputs
..................................................
..................................................
.........................
(lights and AUX-outputs) (CV 113- CV 120) (lights and AUX-outputs) (CV 113- CV 120)
(lights and AUX-outputs) (CV 113- CV 120) (lights and AUX-outputs) (CV 113- CV 120)
(lights and AUX-outputs) (CV 113- CV 120)
This parameter allows you to adjust the type and intensity of
physical outputs.
The available choices are:
• Dimmer: uniform voltage is available at the output for operating
constant functions.
• Blinking light (Phase 1) / Blinking light (Phase 2)
• Strobe: Stroboscopic effect
• Double Strobe: Stroboscopic effect with double blinking
• Fire box: generates flickering light for the imitation of the open
fire box. This function makes sense in conjunction with the
sound of shovelling coal.
• Smoke generator: while the locomotive is stopped a smoke
generator only heats to a limited degree when operating in
conjunction with driving noises. However, it operates to its
maximum in synchronization with the exhaust chuffs during
movement. If you wish to simulate a uniform amount of smoke
coming out of the chimney it is recommended to set the output
function for the smoke generator to „Dimmer“.
Fig.18.: Notch behaviour
8.6.5. Acceleration / Deceleration8.6.5. Acceleration / Deceleration
8.6.5. Acceleration / Deceleration8.6.5. Acceleration / Deceleration
8.6.5. Acceleration / Deceleration
This function turns off the delay in accelerating or slowing
down as set in the window „Driving Characteristics“ (also refer
to 8.2.3.).
This is useful when the locomotive is set to shunting mode and
therefore should respond quicker to your commands.
It is best to allocate this function to both directions.
8.6.6. Shunting mode8.6.6. Shunting mode
8.6.6. Shunting mode8.6.6. Shunting mode
8.6.6. Shunting mode
This function reduces the speed to half of the current speed. It
is recommended to allocate the shunting mode to the same
function as the acceleration / deceleration. It is best to allocate
this function to both directions.
8.6.7. Sound on / off8.6.7. Sound on / off
8.6.7. Sound on / off8.6.7. Sound on / off
8.6.7. Sound on / off
With this you activate all driving noises and all other sounds that
depend on the driving noises. It is best to allocate this function
to both directions.
8.6.8. Shift mode8.6.8. Shift mode
8.6.8. Shift mode8.6.8. Shift mode
8.6.8. Shift mode
All alternative sound slots that are parallel to the regular sounds
are activated with shift mode. When shift mode is active all
regular sound slots are deactivated (also refer to chapter 9.7.).
Pure (electromechanical) functions are affected by this.
8.6.9. Fan sound8.6.9. Fan sound
8.6.9. Fan sound8.6.9. Fan sound
8.6.9. Fan sound
This function activates the sound channel for the fan that runs
parallel to the actual driving noise. This function is particularly
useful for electric locomotives where you can hear the fan
continuously in the background.
It is best to allocate this function to both directions.
8.6.10. Doppler effect8.6.10. Doppler effect
8.6.10. Doppler effect8.6.10. Doppler effect
8.6.10. Doppler effect
This function simulates the so called Doppler Effect as it is
heard when a train is moving away very quickly. This function is
most useful in combination with the sound of a horn or a
whistle activated with the same function button (how to activate
the Doppler Effect during operation is described in chapter
13.1.1.).
It is best to allocate this function to both directions.
• Fade lights up and down: contrary to the setting „Dimmer“ the
lights do not appear at full brightness immediately but are
slowly fading up respectively down.
• Mars light: Simulation of a blinking warning light mainly used
on American locomotives.
• Gyro light: Simulation of a rotating beacon.
• Rule 17 forward / rule 17 back-up: simulates a dimming method
of American headlights.
• Pulse (limited time): lights up when activated and switches off
after a certain time automatically. The „Switch-on Period“ is
set with the „Brightness“ controller.
• Ditch light (Phase 1) / ditch light (Phase 2): Setting for additional
headlights for American locomotives
8.6.15. Blinking frequency of strobe effects (CV 112)8.6.15. Blinking frequency of strobe effects (CV 112)
8.6.15. Blinking frequency of strobe effects (CV 112)8.6.15. Blinking frequency of strobe effects (CV 112)
8.6.15. Blinking frequency of strobe effects (CV 112)
The time can be set between 0.262 seconds (value 4) up to
4.194 seconds (value 64) and affects all blinking effects.
8.6.16. Activate LGB® mode (CV 49)8.6.16. Activate LGB® mode (CV 49)
8.6.16. Activate LGB® mode (CV 49)8.6.16. Activate LGB® mode (CV 49)
8.6.16. Activate LGB® mode (CV 49)
All ESU decoders except M4 can be operated with the LGB
multiple train control system (MZS). This mode must be activated
here prior to use.
8.6.17. Behaviour of function buttons8.6.17. Behaviour of function buttons
8.6.17. Behaviour of function buttons8.6.17. Behaviour of function buttons
8.6.17. Behaviour of function buttons
..................................
..................................
.................
(LokSound 2 mode) (CV 49) (LokSound 2 mode) (CV 49)
(LokSound 2 mode) (CV 49) (LokSound 2 mode) (CV 49)
(LokSound 2 mode) (CV 49)
In LokSound 2 mode all sounds and functions will be activated
whenever the function button is pressed (on or off).
8.6.18. Märklin® delta mode (CV 49)8.6.18. Märklin® delta mode (CV 49)
8.6.18. Märklin® delta mode (CV 49)8.6.18. Märklin® delta mode (CV 49)
8.6.18. Märklin® delta mode (CV 49)
Here you can set the decoder for operation with Märklin®
Delta-devices.
8.7. Manual CV entry8.7. Manual CV entry
8.7. Manual CV entry8.7. Manual CV entry
8.7. Manual CV entry
The LokProgrammer software offers all CVs at a glance. In this
display you can adjust all CVs in decimal values and save the CV
list as a text document.
Change CVs manually:Change CVs manually:
Change CVs manually:Change CVs manually:
Change CVs manually:
• Click onto the field with the decimal values of the CV you want
to change
• Enter the new value
• Click onto the button „Check Values and Accept“.
Export CVExport CV
Export CVExport CV
Export CV
-List as text file:-List as text file:
-List as text file:-List as text file:
-List as text file:
• Click onto the button „Export…“
• Save the file as .txt-file in the desired folder
• Now you can read and print this file with any text processing
program. Changes in this document do not affect the project
file in the LokProgrammer.
Page 15

15
Sound
8.8. Special options (CV 124)8.8. Special options (CV 124)
8.8. Special options (CV 124)8.8. Special options (CV 124)
8.8. Special options (CV 124)
Here you can pre-select certain options so they are available
after an interruption of power on your layout.
• „Save Direction of Travel“ activates the so called „Directional
Bit“, a Märklin®-specific term that refers to the layout-specific
direction of travel.
• „Save Status of Function Buttons“ assures that all functions
recommence their status after an interruption of power.
• „Save Current Target Speed“ preserves the „old“ speed in the
decoder.
• When „Accelerate after a Reset with the Programmed Delay“
is set, the locomotive will accelerate as per the programmed
parameters; otherwise it will „jump-start“.
If a decoder supports these options is subject to the version of
the decoder firmware.
8.9. Identification (CV 7, CV 8)8.9. Identification (CV 7, CV 8)
8.9. Identification (CV 7, CV 8)8.9. Identification (CV 7, CV 8)
8.9. Identification (CV 7, CV 8)
This read-only option provides the manufacturer’s ID (CV 8)
and the internal version number of the decoder firmware (CV
7). The manufacturer’s code of ESU is „151“. If you write the
value „8“ into CV 8 then you trigger a factory-reset (default
values) but do not delete the manufacturer’s ID. The value of
CV 8 will always remain at „151“. Entering value „8“ simply
triggers the reset.
All LokSound types offer two user fields for any personal codes,
etc. in („User-ID 1“ and „User-ID 2“).
9. Sounds
In 1999 the very first LokSound „classic“ decoder already
offered the feature to store real sounds and to change them
at will or replace them with completely different ones. Since
then each LokSound decoder is a platform for all sorts of sound
sequences that may occur when operating railways. This universal and very flexible concept even allows to store and replay
music or voices besides the typical railway sounds. There is no
limit to your imagination.
In order to make sure that you can utilize the multiple features
of the LokSound decoders to the optimum we will explain
below first the general concept of the sound module of
LokSound decoders and then the specific methods of the
software. You should make a point of reading this introduction
before you start any specific sound project. Without
understanding the concept you may not fully realize the potential of the software.
We explain the concept based on the LokSound decoder version
3.5. This is also valid for LokSound micro and LokSound XL. M4
offers at least partially different features that are described in
chapter 10.
Older LokSound 2-decoders have perhaps less functions to
offer, but the principle remains the same. Since the LokSound
2 decoder is no longer manufactured it will not be dealt with in
this manual.
9.1. Concept of LokSound9.1. Concept of LokSound
9.1. Concept of LokSound9.1. Concept of LokSound
9.1. Concept of LokSound
The decoder has an internal memory chip with 8 MBit (LokSound
hardware 3.3) or 16 MBit (LokSound hardware 3.5) capacity.
This is enough for 69 respectively 138 seconds of digital sound.
In order to achieve a continuous sound that does not stop after
69 seconds we have to use a few tricks: the memory contains
only a short fragment of the motor sound (about half a second).
This fragment is played as a loop in the LokSound decoder thus
generating continuous sound.
Such tricks enable us to utilize the memory space to the
optimum. The number of sounds is not pre-determined and is
only limited by the size of the memory.
Generally this is sufficient to store all necessary sounds for a
locomotive. A simple steam locomotive can be equipped with
sound with only 20 seconds of sound fragments. That includes
the bell, whistle, air pump, etc.
There are three categories of sounds: Driving sounds, Random
Sounds and User Sounds (sounds that are triggered by the
user).
The LokSound decoder works with a „schedule“. It contains all
information such as when to play which sound.
The different stages are connected with arrows and thus
represent the possible changes from one stage to the next.
The driving noises are stored in so called sound slots and are
called up according to the pre-determined speed of the
locomotive.
Sound Fragments of varying number are entered into the Sound
Slots. There must be at least three sound fragments in each
sound slot. These three standard sound fragments are generally
used as start, middle and end part of the respective sound (also
refer to 9.2.1.). The sound fragments do not have to fill the
available memory space completely. At certain points (for
instance within a throttle notch) it only makes sense to enter
the sound loop of the motor.
Whenever the LokSound module undergoes a change of status
the sound fragments in the corresponding sound slots will be
played.
If there should be no sound at a certain stage or change of
status then the corresponding field of the sound slot must
remain empty.
Empty sound slots are displayed in white while sounds slots that
contain sound fragments are displayed in blue.
Random Sounds are stored in „Extra Sound Slots“ and will be
played according to the settings in the register „Decoder“ (also
refer to chapter 8.5.3).
User Sounds are also stored in their own sound slots. These
sound slots are allocated to the desired function buttons in
function mapping (also refer to 8.6.).
9.2. Basic methodology for working in the9.2. Basic methodology for working in the
9.2. Basic methodology for working in the9.2. Basic methodology for working in the
9.2. Basic methodology for working in the
....................
....................
..........
„Sound“ register „Sound“ register
„Sound“ register „Sound“ register
„Sound“ register
9.2.1. Nomenclature9.2.1. Nomenclature
9.2.1. Nomenclature9.2.1. Nomenclature
9.2.1. Nomenclature
For your better understanding we have defined the terminology
for the three fields within a sound slot in the following chapters
as outlined below:
• The starting part is called „Init“(„initial“)
• The middle part is called „Loop“
• The final part is called „Exit“
These terms relate to the standard application of these fields
for ESU products (also refer to chapter 12). Regardless of the
terminology you could for instance enter a loop sound into the
Init field (also refer to 9.6.).
For each of the three parts of a sound slot you can use different sound files that are then played by the decoder in sequence.
We call the groups-of-three in the data entry fields sound
Slots. They are located within the squares in the project schedule
and in the windows „Random Sounds“ and „User Sounds“.
9.2.2. Importing / Deleting sounds in projects9.2.2. Importing / Deleting sounds in projects
9.2.2. Importing / Deleting sounds in projects9.2.2. Importing / Deleting sounds in projects
9.2.2. Importing / Deleting sounds in projects
Figure 17 shows the lower part of the view „Sound“. In the
right column („Project Sounds“) are all the sounds listed that
have already been imported into the project, in other words
that are to be stored in the memory.
At the bottom of the left column („Folder“) you see a data tree
of all folders on the hard disc of your PC. Besides the folder this
also shows the audio files and esu.-files. If you click onto an ESU
file the data tree is expanded and shows the sound fragments
that are already contained in the sound files (.wav).
In order to import a sound file or sound fragment from the
folders on the hard disc of your PC (or from the CD-ROM
supplied with the LokProgrammer) you proceed as follows:
• Mark the file with a mouse click, keep holding the mouse
button.
• Drag the file with the mouse from the folder into the window
„Project Sounds“. Now the desired file appears in the list of
project sounds.
Page 16

16
Sound
In order to delete an allocation, proceed as follows.
• Open the desired sound slot by a mouse click
• Mark the file name of the sound to be deleted within the
sound slot
• Delete the allocation by pressing „Del“ on the keyboard. The
allocation will be deleted but not the file in the list „Project
Sounds“. Thus this sound may still be used within the project.
Fig.21.: : Sound Slot „D1“ (opened)
9.2.4. Extended functions in the „Sound“9.2.4. Extended functions in the „Sound“
9.2.4. Extended functions in the „Sound“9.2.4. Extended functions in the „Sound“
9.2.4. Extended functions in the „Sound“
At the top left corner of this window there is another tool bar
with the following functions:
Set project as steam locomotive. This button is linked to the
parameter „Type of Sound“. (also refer to 8.5.1.).
Set project as diesel locomotive. This button is linked to the
parameter „Type of Sound“.
Set project as electric locomotive. This button is linked to the
parameter „Type of Sound“.
Edit motor. You can see and edit the schedule of the driving
noises. This button is active for all locomotive types.
Edit fan motor. The schedule of the fan sound channel will be
opened (also refer to chapter 9.3.2.).
Further settings: Here you can edit auxiliary functions that
relate to the schedule of steam locomotives and user sounds.
Thus you can set user sound slot 16 for the braking sound. User
sound slot 15 can be used for an automatically triggered sound
after the locomotive has stopped, such as an air pump of
steam locomotives. User sound slot 14 can be used for shift
sounds (for instance for diesel locomotives with mechanical
transmission). This does not only play the sound of shifting
gears but also the prototypical change of the revs of the
locomotive (also refer to 9.6.).
In order to remove a sound file from the list, proceed as follows:
• Mark the file with a mouse click in the column „Project Sounds“.
• Delete the file with the „Del“ button on your keyboard.
Fig.20.: Lower Part of „Sound“ Window
9.2.3. Allocate / Delete sounds to (from) sound slots9.2.3. Allocate / Delete sounds to (from) sound slots
9.2.3. Allocate / Delete sounds to (from) sound slots9.2.3. Allocate / Delete sounds to (from) sound slots
9.2.3. Allocate / Delete sounds to (from) sound slots
All sound fragments that you want to allocate to different
sound slots must first be imported into the list „Project sounds“.
Only sounds from that list will ultimately be transferred to the
LokSound module.
A sound is allocated to a sound slot by doing the following:
• Open a square (throttle notch, random sound or user sound) to
which you want to allocate a sound with a mouse click.
• A pop-up window opens as shown in Fig. 21.
• Mark the desired file in „Project Sounds“ and keep holding the
mouse button.
• Drag the sound into the desired field in the pop-up window.
A simple option of allocation:
• Mark the desired .wav file in „Project Sounds“
• Drag the file onto the desired (but yet unopened) square. The
sound will be automatically imported into the „Loop“. The
square changes its colour from white to blue.
• This option is only suitable for sounds that have to be imported
into the loop section of the sound slot anyway (e.g.: driving
noises in loop mode or individual user sounds without Init- or
Exit-part).
Fig.22.: Menu „Extended Settings“ for Steam Locomotives
For diesel and electric locomotives only the field „Trigger Sounds
Automatically“ is available.
Add throttle notches. Depending on the number of different
available throttle notch sounds you can import up to 5 for
steam locomotives or up to 10 for diesel and electric locomotives.
These throttle notches do not correspond with the 12 resp. 28
or 128 speed steps of the digital protocols. The throttle notches
of your sound schedule will be equally divided across the entire
speed range of your command station.
Import at least one sound file into all throttle notches you want
to use otherwise one could hear a silent gap between throttle
notches when the locomotive is running.
Fig.23.: Pop-up Menu for selecting Throttle Notches
9.3. Schedule9.3. Schedule
9.3. Schedule9.3. Schedule
9.3. Schedule
This and the following chapters outline the rules and possibilities
regarding the composition of sounds.
After having imported various sounds into the sound slots it is
necessary to determine when each sound should be played. All
necessary information is contained in the schedule. 9.3. Ablaufplan.
Page 17

17
Fig.24.: Excerpt of Schedule
9.3.1. 9.3.1.
9.3.1. 9.3.1.
9.3.1.
Schedule for running (driving) soundsSchedule for running (driving) sounds
Schedule for running (driving) soundsSchedule for running (driving) sounds
Schedule for running (driving) sounds
This displays a graphic representation of all possible states of a
locomotive:
•
„M“„M“
„M“„M“
„M“ (=“Mute“ or silent) stands for a stationary locomotive
with the sound turned off. No sounds have to be imported
here.
•
„MS“„MS“
„MS“„MS“
„MS“ (=“Mute to stop“) stands for a stationary locomotive
with the sound turned on. This sound slot has two fields that
will be played in sequence (if they are both filled). This enables
you to play a two-part sound with one start, middle and end
part each simulating the starting of the motor. Here you would
import the sound of the starting diesel engine or the raising of
the pantograph of an electric locomotive.
• The sound slot
„SM“„SM“
„SM“„SM“
„SM“ (=“Stop to mute“) contains „parking“
sounds such as turning off the diesel motor or lowering the
pantograph. You could also add a valve releasing compressed
air. There is no limit to what sounds you might want to play.
•
„S“„S“
„S“„S“
„S“ (=“Stand“) stands for a stationary locomotive with the
sounds in idle (e.g.: the hiss of steam or the sound of an idling
diesel motor). There are two sound parts. It is important to
know that all sounds in step 2 are automatically played in loop
mode. However, you can change this if needed.
• In the stages
„Dx“„Dx“
„Dx“„Dx“
„Dx“ (=“Drive“), the locomotive is moving and
plays the appropriate sounds. „x“ indicates the number of the
throttle notch.
Depending on the type of locomotive there may be up to 10
„D“ notches. Thus it is possible to allocate the sound recordings
of different notches to the corresponding speeds of the
locomotive.
• Status
„A“„A“
„A“„A“
„A“ (=“Acceleration“) is reached when the locomotive
accelerates. For the decoder acceleration means the target
speed is higher than the actual speed.
An example:An example:
An example:An example:
An example: Acceleration of the locomotive has been set to
10 seconds. The locomotive is moving slowly and you turn up
the throttle to maximum. Then the locomotive will accelerate
according to the corresponding settings for acceleration. During
this phase only the sounds imported into sound slot „A“ will be
played.
Thus it is possible to use particularly powerful exhaust chuffs or
a hard working diesel motor during acceleration. In sound slot
„A“ the appropriate sounds for each speed (notch) will be
played. Depending on the type of locomotive up to 10 „A“
notches are available. As soon as the target speed is reached
the decoder shifts into stage „D“.
•
„CX“„CX“
„CX“„CX“
„CX“ (=“Coast“) is reached when the throttle is turned back
and the locomotive is coasting. Similar to the acceleration delays
that affect sound slot „A“ the braking delays affect sound slot
„CX“.
There are also transition notches since the transition from one
sound loop to the next would otherwise be to abrupt.
•„
DA“DA“
DA“DA“
DA“ (=“Drive to acceleration“) is the transition between
driving at constant speed and acceleration. Here one could
place a howl of a motor when it starts revving up.
•
„AD“„AD“
„AD“„AD“
„AD“ (=“Acceleration to drive“) is the transition from
acceleration back to driving at constant speed. This driving
step is not available for steam locomotives since we use the
same chuffs for DA and AD.
•
„DC“„DC“
„DC“„DC“
„DC“ (=“Drive to coast“) is the transition from driving to
coasting.
•
„CD“„CD“
„CD“„CD“
„CD“ (=“Coast to drive“) is the transition from coasting to
driving. This step is not available for steam locomotives since
we use the same chuffs for DC and CD.
Please note that you have to import one transition for each
driving notch to avoid any hard transitions or „crackling“ noises.
•
„SD“„SD“
„SD“„SD“
„SD“ (=“Stop to drive“) is the sound at start of movement.
The two sound fragments are played in sequence in different
states of motion: the first sound is played shortly before the
start, when the locomotive is still stationary; the second part is
played just after the locomotive started moving. The division
into two parts is particularly meaningful for howling diesel motors
or humming electric motors; it generates a very prototypical
impression of movement and its associated sound.
•
„DS“„DS“
„DS“„DS“
„DS“ (=“Drive to stop“) is the transitional sound of the motor
during stopping.
•
„CS“„CS“
„CS“„CS“
„CS“ (=“Coast to stop“) is the transition from the coasting
sound to the stop sound (locomotive has stopped, motor is still
running). Often there is no audible change between CX and S.
Import the sound for idle into CS in order to avoid an audible
gap in the schedule.
Fig. 25: SD-Performance
• In diesel and electric locomotives there are two more transitions,
namely
„Dxy“„Dxy“
„Dxy“„Dxy“
„Dxy “ and
„Dyx“„Dyx“
„Dyx“„Dyx“
„Dyx“; „x“ stands for the number of the
previous drive notch and „y“ for the number of the following
one.
Should you not wish to utilize the option of having different
sounds for acceleration and slowing down (perhaps because
you do not have any suitable sound fragments) then you can
lock the sound slots „A“ and „CX“ (also refer to 9.3.3.) or you
can use the same settings as in sound slot „D1“. Sound slot
„D1“ must have an entry otherwise no driving noises will be
played at all.
9.3.2. Schedule for fan sounds9.3.2. Schedule for fan sounds
9.3.2. Schedule for fan sounds9.3.2. Schedule for fan sounds
9.3.2. Schedule for fan sounds
In most electric locomotives there is a fan which runs parallel to
the traction motors. Therefore we have introduced a separate
schedule for the fan sounds that can be opened with the
button in the small tool bar in the „Sound“ register. This
schedule contains one step for the stationary locomotive as
well as four driving notches for the moving locomotive. These 4
driving notches are independent of the notches of the driving
noises and are equally divided over the entire speed range.
• The driving notches
„M“„M“
„M“„M“
„M“,
„MS“„MS“
„MS“„MS“
„MS“,
„SM“„SM“
„SM“„SM“
„SM“ and
„S“„S“
„S“„S“
„S“ describe the
same stages as in the schedule for running.
•
„Rx“„Rx“
„Rx“„Rx“
„Rx“ stands for the fan notches with „x“ being the number of
the individual notches. There are 4 driving notches for the fan
equally divided over the entire speed range. If you want to run
up the fan to maximum speed then you must enter sound
fragments into all „R“ driving steps. If you want the fan to
remain at a constant level from a certain speed onwards you
must import the same sound fragments into the remaining
„R“-running steps to avoid an audible gap.
•
„SR“„SR“
„SR“„SR“
„SR“ respectively
„RS“„RS“
„RS“„RS“
„RS“ are the transitional running notches
between start and stop (analogue to „SD“ and „DS“ in the
schedule of the driving noises).
•
„Rxy“„Rxy“
„Rxy“„Rxy“
„Rxy“ respectively
„Ryx“„Ryx“
„Ryx“„Ryx“
„Ryx“ are (analogue to „Dxy“ and „Dyx“)
the transitional running notches between the individual fan
running notches with „x“ being the number of the previous
running notch and „y“ for the following one. Of course you can
import other parallel driving noises into the fan schedule if you
wish to do so.
Sound
Page 18

18
Thresholds on the sound schedule
9.3.3. 9.3.3.
9.3.3. 9.3.3.
9.3.3.
Thresholds in the schedule for runningThresholds in the schedule for running
Thresholds in the schedule for runningThresholds in the schedule for running
Thresholds in the schedule for running
............
............
......
(driving) sounds (driving) sounds
(driving) sounds (driving) sounds
(driving) sounds
In order to be able to play the driving noises correctly for each
situation the LokSound decoder uses thresholds. These
thresholds define the limits where the sound should change.
The LokSound decoder differentiates between two types of
thresholds:
• Thresholds that divide the speed values between stop and the
maximum speed. These values range from 0 to 255 and are
shown in a horizontal arrangement in the driving sound schedule.
• Thresholds that work according to the difference between
target speed and actual speed. Here the decoder compares
the current speed of the motor with the target speed as given
by the command station resp. the throttle. These thresholds
become effective whenever the locomotive accelerates or
slows down and have a range between -128 to 127 (including 0).
• Time parameters that determine the time between idle and
re-entry of the driving sound. The following illustration provides
an overview on how to deal with thresholds:
Example:Example:
Example:Example:
Example: Your project has 4 driving notches that are equally
divided over the entire speed range between 0 and 255 („63“
between D1 and D2, „127“ between D2 and D3, „191“
between D3 and D4). You slowly increase speed in DCC mode
(DCC 28). The driving sounds will change between driving notch
7 and 8, 14 and 15 and 21 and 22 provided the speed curve is
linear.
The value 15 has been entered between step D1 and DA1 (also
refer to Fig. : 26). You drive your locomotive in speed step 1
(DCC 28 mode) and then accelerate to speed step 10 (this
roughly corresponds with the internal value 91). The difference
of the internal values between target speed and actual speed
is about 82 (for a range from 0 – 255 instead of 0 – 28) and
therefore greater than 15. Thus the decoder changes from D1
to DA1 and subsequently to A1 because the difference is also
greater than 16.
The decoder accelerates and passes the threshold between
D1 and D2. Furthermore it continuously reduces the difference.
Once the difference is less than 2 the decoder changes again
to the corresponding DA step (in our case DA2) and reaches D“
once the difference is less than 1.
Target speed – actual speed > 16
=> Decoder changes to A1 Target speed – actual speed. < 2
=> Decoder changes to DA2
Number of repetitions
Target speed – actual speed - > 15 Target speed – actual speed. < 1
=> Decoder changes to DA1 => Decoder changes to D2
Target speed – actual speed > -1 Target speed – actual speed. < -15
=> Decoder changes to D1 => Decoder changes to D2
Target speed – actual speed. > 0 Target speed – actual speed. < -16
=> Decoder changes to DC1 => Decoder changes to DC2
Duration of idle:
app. 3.75 seconds (at value 30)
Fig.26.: Thresholds
Fig. 27: Path of Sound during Acceleration
9.4. 9.4.
9.4. 9.4.
9.4.
Setting the scheduleSetting the schedule
Setting the scheduleSetting the schedule
Setting the schedule
9.4.1. Soundslots in detail9.4.1. Soundslots in detail
9.4.1. Soundslots in detail9.4.1. Soundslots in detail
9.4.1. Soundslots in detail
As soon as you click onto any square of a sound slot with the
mouse a pop-up window opens as shown in figures 28 and 29.
In order to make editing very easy this window shows the
individual sound slots in detail.
Fig. 28: Sound Slots of Steam Locomotives
The decoder changes the sound speed step from 1 to 2 when reaching appr. half the speed (127 of 255)
Page 19

19
Sound configuration
Fig. .29.: Sound Slots of Diesel and Electric Locomotives
The pop-up window can be moved across the screen as desired
and always shows the content of the selected square. The
currently open square is also marked with a red frame in the
schedule.
The sound slots of the driving sounds vary with the type of
locomotive. A driving notch of a diesel locomotive or an electric
locomotive contains only one sound slot since only one sound
loop is required. The driving notches of a steam locomotive
contain 4 sound slots to allow for up to for exhaust chuffs per
wheel turn (this is subject to the number of cylinders of the
prototype) and the following hiss of the steam.
You must set the number of cylinders of the prototype in the
menu „Extended Settings“ prior to the adjustments here.
Otherwise there may be an audible gap.
9.4.2. Sound settings9.4.2. Sound settings
9.4.2. Sound settings9.4.2. Sound settings
9.4.2. Sound settings
Besides the mere allocation you can make additional
adjustments for each sound slot:
For this there is a button called „Sound Settings“ which is
located next to the actual sound slot allocation. Fig. 30. Shows
„Sound Settings“ and „Extended Sound Settings“.
Fig. 30: Menu „Sound Settings“ and „Extended Settings“
• In this menu you can select if you want to play this sound as a
loop, only once or in a certain number of repetitions.
You can define a minimum and maximum number of
repetitions. If the sound should be repeated by a definite number
simply enter the same number in both fields. Thus you can
enter the definite value „1“ for transitions and choose „Loop
Mode“ for driving sounds and the stationary sounds (also refer
to 12.3.).
•
VV
VV
V
olume:olume:
olume:olume:
olume: Use the slide control to adjust the volume of each
sound individually or by clicking onto control 1, 2 or 3 in order to
allocate it to a group (with equal volume) (also refer to 8.5.6.).
• With
„Adapt Sound to Driving State“„Adapt Sound to Driving State“
„Adapt Sound to Driving State“„Adapt Sound to Driving State“
„Adapt Sound to Driving State“ you determine if the
„revs“ of the sound should be modulated in accordance with
the increasing revolutions. The maximum revs are
predetermined in the „Decoder“ register under „Sound Settings“ (also refer to 8.5.4.).
If you perhaps wish to modulate the revs in the driving sound
together with a constant fan sound in the background simply
select „Adapt Sound to Driving Noise“ in the slots of the driving
sound but not in the slots of the fan sound (also refer to 9.3.).
• The button „Volume“ (all slots) controls the volume of all slots
and allocations of the selected notch in one step and enables
you to select modulation options.
• For more information regarding the field „Display Alternative
Sounds“ continue reading in chapter 9.7.
9.5. Random sounds9.5. Random sounds
9.5. Random sounds9.5. Random sounds
9.5. Random sounds
Behind the symbol „Random Sounds“ are a total of 16 squares
/ sound slots (compare with Fig. 31). Here you can import up to
8 sounds each for a standing or moving locomotive that will be
played arbitrarily at different time intervals while the locomotive
is stationary or moving. The time frame is adjusted in the „Decoder“ register under „Sound Settings“ (also refer to 8.5.3.).
Which sound is played and in what sequence cannot be predetermined. Therefore the sequence will change all the time.
Here you might import sound fragments such as shovelling
coal, releasing steam, air or water pumps, etc..
For sounds that should be repeated (e.g.: shovelling coal several
times in a row) enter a minimum and maximum number of
repetitions in „Sound settings“. Never choose „Play Sound in a
Loop“ since the sound would continue until you turn off the
power.
Fig. 31.: Window „Random sounds“
Page 20

20
User Sounds
It is possible to allocate function outputs to Random Sounds.
This can be done by pressing the button „Display Extended
Settings“ in an extension of the window „Sound Settings“.
This button is located at the right bottom corner of the window
„Sound Settings“.
These outputs will be activated as long as the sounds are played.
This enables you for instance to let the firebox light up as long
as you hear fireman Fred shovelling coal.
Furthermore you can set a time delay between individual sounds.
This time can be adjusted in steps of one second each after
which the imported sound is played. This time delay can be
increased or reduced for each repetition (in case of several
repetitions). Enter a value in the field „Then Change the Value
by“. If this value is 0 then the time delay remains constant.
With this time delay you can simulate for instance air pumps
that start off very fast and become slower with increasing air
pressure.
It also helps to save memory space that would otherwise be
filled with „silent“ sound fragments to facilitate the delays.
In the window „Extended Sound Settings“ you can choose the
priority of each sound. This determines which random sound or
user sound gets priority in case all 4 sound channels are engaged.
If the decoder selects a random sound with a higher priority
than sounds that are already playing and if all sound channels
are already engaged then the sound with lower priority will be
interrupted and the one with higher priority will be played.
Driving sounds always have highest priority. User Sounds are
normally played with second highest priority while Random
Sounds have the lowest priority. The priority is expressed by
values ranging from 1 (lowest priority) to 15 (highest priority).
Random Sounds have normally priority 1 or 2.
9.6. User sounds9.6. User sounds
9.6. User sounds9.6. User sounds
9.6. User sounds
9.6.1. General settings9.6.1. General settings
9.6.1. General settings9.6.1. General settings
9.6.1. General settings
Besides the sounds that depend on the status of the locomotive
(stationary or moving) the LokSound decoder offers the option
of sounds that can be triggered by pressing a button on your
command station or throttle. There are a total of 16 sound
slots for user sounds as shown in the following illustration.
You can enter one sound sequence into each of these sound
slots that can be triggered (almost) by any function button (also
refer to 8.6.).
Furthermore you can select in the window „Sound Settings“ if
the sound should be played every time you press the
corresponding function button once or if it should be played as
long as you press the button.
Thus you can for instance generate a user controlled horn or
whistle as follows:
Import the swelling start of the whistle into the first part of the
sound slot, a middle part of the whistle in loop mode into the
second part and the fading whistle into the last part.
It is recommended to set the priority for the gear shift rather
high (14 or 15) to assure that it is definitely played. There are
examplesexamples
examplesexamples
examples in chapters 12.2. and 12.5..
Slot 16:Slot 16:
Slot 16:Slot 16:
Slot 16: Import the swelling start of the break squeal into the
first part, a sound loop in to the middle square and the fading
sound of the brakes in to the third part. Select „Play Sound in
a Loop“ for the middle part. Set the priority to high (14 or 15)
to assure that it is definitely played.
The brake sound will be played until the locomotive has stopped.
You will find an example in 12.2. to 12.5..
9.7. Alternative sounds9.7. Alternative sounds
9.7. Alternative sounds9.7. Alternative sounds
9.7. Alternative sounds
In the windows „Sound Settings“ of the sound slots there is an
option called „Display Alternative Sounds“. Here you can add
additional random or user sounds that run „parallel“ to the
normal sounds. The alternative sounds will be played after you
pressed the „Shift“ function (also refer to 8.6.8.).
As a standard the „normal“ sounds will be displayed in a sound
slot. If you have also imported alternative sounds into a sound
slot then the latter will be displayed in yellow.
It is possible to import driving sounds into the sound slots that
are played in certain situations only. Thus the LokSound decoder
can simulate driving with open cylinder cocks (also refer to
3.1.1.). If you stop a locomotive and immediately afterwards
you start it again or if the locomotive is running for a while
already, then you will not hear the cylinder cocks anymore, just
like with the prototype. Only once the locomotive has been
stopped for a while and then starts moving again, will you hear
the open cylinder cocks.
How to adjust this is explained in chapter 12.2..
Fig.32.: „User Sounds“
Select „1“ for the number of repetitions for start and end and
loop mode for the middle part.
As is the case with random sounds you may select extended
sound settings (also refer to 9.5.).
The normal priority of user sounds is 3 or 4.
User Sounds can also be combined with function outputs. Let’s
assume you link a digital coupler wired to AUX 1 with the sound
of the coupler clank. Then the coupler will be activated while
the sound is played and afterwards the coupler is deactivated.
9.6.2. Special options for slots 14, 15 and 169.6.2. Special options for slots 14, 15 and 16
9.6.2. Special options for slots 14, 15 and 169.6.2. Special options for slots 14, 15 and 16
9.6.2. Special options for slots 14, 15 and 16
The sound slots 14, 15 and 16 may have special importance
under certain circumstances. As described in 9.2.4. slot 14 can
be used for automatic shift sounds, slot 15 for automatically
triggered sounds immediately after the locomotive has stopped
(e.g.: air pump for steam locomotives) and slot 16 for the
automatic play of the brake squeal during braking.
To facilitate this, import the suitable shift sound into
slot 14slot 14
slot 14slot 14
slot 14 and
set slot 14 as automatic sound in the menu of the … button.
Provided you have set rev-modulation (CV 59 and 60, also
refer to 8.5.4.) and a certain „Time between Throttle Notches“
in „Sound Settings“ within the „Decoder“ register (CV 57 and
58, also refer to 8.5.1.), then you hear not only the sound of
the gear shift but also the changing revs during the transition
from one throttle notch to the next. It is recommended to set
the priority for the gear shift rather high (14 or 15) to assure
that it is definitely played. There is an example in chapter 12.4..
Slot 15:Slot 15:
Slot 15:Slot 15:
Slot 15: Import the suitable sound that should be played
immediately after the locomotive has stopped (e.g.: air pump
or parking brake). If you use a sound that should be repeated,
only enter a limited number of repetitions. Otherwise the sound
would only stop once you disconnect power from this locomotive.
Set this sound as „Stop Sound“ with the button … in the menu
of Slot 15.
Page 21

21
Special Configurations for M4
10. Special configurations for M4
M4 offers several possible settings that are different to DCC as
described above. Since the methodology is only slightly different to DCC we only provide an overview.
Please note: Value ranges in M4 are generally different to
those in DCC. Therefore the CV numbers for DCC as stated in
the previous chapters are not valid for M4.
Please find the correct numbers and values of our sounds for
later conversion of non-sound locomotives at www.esu.eu.
10.1. „M4 Settings“ in the „Decoder“10.1. „M4 Settings“ in the „Decoder“
10.1. „M4 Settings“ in the „Decoder“10.1. „M4 Settings“ in the „Decoder“
10.1. „M4 Settings“ in the „Decoder“
Locomotive symbol: Select a symbol matching your type of
locomotive. During operations it will be displayed on your mfx®
central unit.
Decoder name: Enter the name of the locomotive (e.g.: „class
50“ or „ICE“). Entries with a maximum of 16 characters are
permitted. This name will also be displayed on your mfx® central
unit.
Fig.33.: Loco symbols and decoder names
Function symbols FL up to F15: Allocate symbols on your mfx®
central unit to the appropriate functions (e.g.: bell, whistle,
pantograph, etc.) for better orientation and identification.
Under „Momentary Action“ you can select the operating mode
of the function button. If this option has not been selected, the
sound will be played when you press the button and will remain
on until you press the button again.
If you have selected this option, then the sound will be played
as long as you press the button.
Fig.34.: Function symbols
10.2. Driving characteristics10.2. Driving characteristics
10.2. Driving characteristics10.2. Driving characteristics
10.2. Driving characteristics
In M4 mode you do not have to set the number of speed steps
since they are almost always 128. Therefore this window does
not display a choice list for speed steps.
In M4 mode you can only activate the Märklin® brake mode.
10.3. Motor10.3. Motor
10.3. Motor10.3. Motor
10.3. Motor
M4 uses only one speed curve but not the three-pointcharacteristic.
Minimum and maximum speed is displayed in this window.
10.4. Motorola® settings10.4. Motorola® settings
10.4. Motorola® settings10.4. Motorola® settings
10.4. Motorola® settings
You can set the two Motorola® addresses and also the
functions that should be activated automatically in Motorola®
mode. To activate this, click into the square of the appropriate
function.
10.5. Analogue settings10.5. Analogue settings
10.5. Analogue settings10.5. Analogue settings
10.5. Analogue settings
Here you can set the analogue parameters that are supported
by the M4 decoder. They are the same as for DCC decoders.
10.6. Sound settings10.6. Sound settings
10.6. Sound settings10.6. Sound settings
10.6. Sound settings
As with DCC the following parameters can be adjusted: „Type
of Sound“, „Speed of Driving sound“, „Random Sounds“,
„Braking Sound Threshold“ and „Overall Volume“. You will
find explanations for each of the above in 8.5.
10.7. Function outputs10.7. Function outputs
10.7. Function outputs10.7. Function outputs
10.7. Function outputs
The function allocation enables you to set sounds, head lights
front and back, AUX1 to AUX4, acceleration / deceleration on
/ off, shunting speed, alternative sounds and sound on / off.
The output configuration as well as the blinking frequency of
the stroboscopic effect can be adjusted here (also refer to
8.6.).
10.8. Special options10.8. Special options
10.8. Special options10.8. Special options
10.8. Special options
Refer to 10.8.
10.9. Sound10.9. Sound
10.9. Sound10.9. Sound
10.9. Sound
Editing of sounds and of the schedule is exactly the same for
M4 as with other decoder types. Only the volume has to be set
individually for each sound slot. There are also group volume
controllers as with DCC.
11. Special settings for Loksound micro and XL
The LokSound micro and the LokSound XL are only slightly
different to the LokSound decoders for H0 scale. Almost all
options and parameters are identical; editing sound works
exactly the same way.
This section provides a short overview.
11.1. Special settings for Loksound micro11.1. Special settings for Loksound micro
11.1. Special settings for Loksound micro11.1. Special settings for Loksound micro
11.1. Special settings for Loksound micro
• In the view Driving Characteristics it is really possible to select
the „Trix braking mode“.
• In analogue mode LokSound micro can only be operated with
DC; AC operation is not permitted.
• There are two more possible settings in special options:
„Switch off Load Compensation in Analogue Mode“; however,
load compensation remains active in digital mode provided it is
not disabled in CV49, Bit 0.
• „Disable PWM in Analogue Mode“: switches off pulse width
modulation in analogue mode.
11.2. Special Settings for LokSound XL11.2. Special Settings for LokSound XL
11.2. Special Settings for LokSound XL11.2. Special Settings for LokSound XL
11.2. Special Settings for LokSound XL
• LokSound XL offers the option „Diesel Notch Up“ and „Diesel
Notch Down“ and six AUX outputs for extended control of
electric or electromechanical devices of your locomotive.
• Aux 5 and 6 can be used as outputs and inputs.
• Functions can also be triggered via sensors. The columns for
the sensors are contained in the function mapping table next
to the allocation columns for F15.
• The function „Smoke Generator“ cannot be connected to the
AUX outputs.
12. Project examples
12.1. Available sounds12.1. Available sounds
12.1. Available sounds12.1. Available sounds
12.1. Available sounds
The composition of sound building blocks for LokSound decoders
is quite complex. Therefore ESU electronic solutions ulm GmbH
& Co KG provides several hundred pre-configured sound files
(project files) for you. By now there is an ESU sound for almost
every class and specific type of locomotive.
Thanks to the LokSound technology you can write different
sound files onto your decoder and test them as long as you like
respectively until you find the sound of your personal preference.
Of course you have the opportunity to create your own sound
with the LokProgrammer by mixing individual sounds.
The following chapters show the step-by-step creation of sound
projects in DCC.
Page 22

22
Project for a Steam Locomotive
12.2. Project for a steam locomotive12.2. Project for a steam locomotive
12.2. Project for a steam locomotive12.2. Project for a steam locomotive
12.2. Project for a steam locomotive
12.2.1. Create a new file12.2.1. Create a new file
12.2.1. Create a new file12.2.1. Create a new file
12.2.1. Create a new file
• Select the option „New…“ in the „File“ menu“
• The window „New Project“ pops up
• Select „LokSound V3.5“
• Determine the size of the flash memory (8 Mbit or 16 Mbit) in
the scroll down menu at the lower edge of the window. Please
note that the size of the flash memory must match the real size
of the decoder memory. For our example please choose 8
MBit.
• Click onto „OK“
12.2.2. Settings12.2.2. Settings
12.2.2. Settings12.2.2. Settings
12.2.2. Settings
Go through the settings as described in chapter 8. The following
values are examples for this project:
Go to address:
• Set the address to „1“ in order to run this locomotive with this
number on your layout at a later stage.
Go to speed step selection:
• Choose „28 or 128 speed steps“
• Reverse mode: leave the reverse mode switched off. Otherwise
your locomotive would move backwards even though your
command station or throttle indicates forward.
• Acceleration: Set the value to „10“. This corresponds with
8.69 seconds that means the locomotive takes 8.69 seconds to
reach the maximum speed starting at 0.
The acceleration from on intermediate step to the next is
reduced accordingly.
• Deceleration: set the braking time to value „8“. This corresponds
with 6.952 seconds that means the locomotive takes 6.952
seconds to stop from maximum speed. The time from one
intermediate step to the previous one is accordingly lower.
• Supported brake modes: select all supported brake modes to
make sure your locomotive behaves as desired regardless of
the command station used.
• Trim: Activate the forward-trim and set the value to „128“.
Thus the locomotive travels forward according to the selected
maximum speed.
• Activate reverse-trim and set the value to „64“. Thus the
locomotive travels backwards at maximum 50% of the selected
maximum speed. Some steam locomotives travelled slower in
reverse than forward.
If the trim options are not activated then the trim value is
100%.
Change to the window „Motor“:
• Set the DC motor PWM frequency to 30kHz as suitable value
for LokSound V3.5
• Load compensation: keep the default values as displayed.
• Speed register: go with the cursor to the point in the middle
and drag it down a bit within the diagram. Therefore the
speed in the lower speed ranges will be somewhat reduced
while it increases in the upper range. Particularly diesel
shunters and some steam locomotives showed this kind of
characteristics.
Change to the window „DCC / Analogue“:
• Leave the Zimo manual function switched off
• Leave all analogue modes active that are already activated
• Set the start voltage for DC to the value „20“; that
corresponds to about 4 Volts
• Set the maximum speed for DC to the value „60“; that
corresponds to about 12 Volts
• Set the start voltage for AC to the value „30“; that
corresponds to 6 Volts
• Set the maximum speed for AC to the value „80“; that
corresponds to 16 Volts. The values given here serve as a
guide for H0 and XL decoders only. They can be used as
starting points for fine tuning your locomotive.
• Activate the outputs FL(f), FL(r) and F1 for the analogue
mode. F1 shall be allocated to sound on / off later on.
Change to the window „Sound Settings“:
• Select „Steam Locomotive without External Wheel Sensor“.
The synchronization (CV 57 and 58) will be set later (also
refer to 12.2.5.)
• Random Sounds: set the values „15“ for minimum time
between them and „35“ for maximum time between them.
Random sounds will now be played with a time interval of at
least 15 and maximum 35 seconds.
• Speed of driving sound: set the minimum value to „32“; that
corresponds to 100%. Set the maximum value to „40“; that
corresponds to 125%. At maximum speed of the locomotive
the speed of the driving sound will be increased by a quarter
of the frequency. The transition between the normal and
the transposed sounds is subject to the speed and will take
place as a soft transition in this case.
• Sound volume: at first leave all controllers on the default
value „64“ (maximum).
• Leave also all other parameters in this window on the default
values. The fine tuning comes later (also refer to 12.2.6).
• Skip the window „Functions“. It is recommended to do the
function mapping only after completing the sound project.
Change to the window „Special Options“:
• Select all options. In case of a power interruption all activated
buttons and set speed values including direction of travel will
remain the same.
12.2.3. Import and place sounds12.2.3. Import and place sounds
12.2.3. Import and place sounds12.2.3. Import and place sounds
12.2.3. Import and place sounds
Please use the project file for the class 64 (52403) which you
can download from the ESU website at www.loksound.de.
• Change to the „Sound“ register and select „Schedule“
• Open the file „Class 64“ in the window „Folder“ where you
have saved it.
• Drag the sound files with the mouse from the window „Folder“
into the window „Project Sounds“. You can observe any changes
in the memory at the lower edge of the window.
• Please use the following driving sounds for our example: a11s
to a24a, d11s to d24a, da11s to da24a, siedens, siedena, dsa,
sda and sd1, as well as cx1 to cx4.
• Import the following sound in the same manner for random
sounds and user sounds: all „whistle“-wav-files (init, loop, exit),
all bell-wav-files, all injector, air pump and coal shovelling-wavfiles.
• Also import the files „brakes_init.wav“, „brakes_loop.wav“
and „brakes_exit.wav“ in the same manner.
Fig.35.: Import audiofiles
• Click now onto the square marked „S“ and insert
„siedens.wav“ in each middle square of the two sound slots
• Click onto „D1“ and import „d11s.wav“ in the head end of the
first sound slot.
• Import „siedens.wav“. in the middle part of the first sound slot.
Repeat this procedure with „d12s.wav“ and „siedens.wav“ in
the second slot and so forth until finally „D1“ looks the same as
shown in Fig. 35.
• Then click onto „Display Alternative Sounds“ and import
„d11a.wav“ to „d14a.wav“ as well as „siedena.wav“ in the
same manner as before.
• Open „Sound Settings“ of the individual audio files (also refer
to chapter 9.4.).
• Enter the value „1“ for all „d-sounds“ in „Repeat Sound“ in
order to play each exhaust chuff once per turn of the driver.
Page 23

23
Import and insert sounds
• Select „Loop Mode“ for all boiler sounds; thus the sound is
played until the next exhaust chuff no matter how long it
takes. There is one exception, namely „sieden.wav“, which
you have to import in the upper part of „S“.
• Allocate all sounds to group controller 3 (AUX); thus the driving
sounds are all controlled by group controller 3 and can be
adjusted as one (also refer to 8.5.6.).
• Click onto „Adapt Sound to Driving Noise“. This causes the
driving sounds to increase in pitch with increasing speed.
Fig.36.: Extended Sound Settings
(D11s.wav & siedens.wav) for a Steamer Project)
Change to the window „Random Sounds“:
• Open the square „Stand1“ by double clicking it
• Import „kohle_init.wav“ in the upper square of the open sound
slot
• Import „kohle_loop.wav“ in the middle square of the open
sound slot
• Click onto the button „Sound Settings“ next to the middle
square and enter the value „2“ at „Min.“ in „Repeat Sound“
and „4“ at „Max.“. This causes the loop part of coal shovelling
to be repeated several times; thus the duration of shovelling
coal varies arbitrarily.
• Import „kohle_exit.wav“ in the lower square of the open sound
slot
• Repeat this procedure with the square marked „Fahrt1“
Change to the window „User Sounds“:
• Open the square „Slot1“ by double clicking it
• Import „pfiff_init.wav“ in the upper square of the open sound
slot
• Import „pfiff_loop.wav“ in the middle square of the open sound
slot
• Click on the button „Sound Settings“ next to the middle square
and select the option „Loop Mode“. This causes the loop part
of the whistle to play until the user releases the function.
• Import „pfiff_exit.wav“ in the lower square of the open sound
slot
• Repeat this procedure with the bell in the square „Slot2“, the
injector in „Slot3“ and the air pump in „Slot 4“.
• Allocate the whistle to the volume controller 1 (=CV121) in the
window „Sound Settings“ and the bell to volume controller 2
(=CV122). Thus the volume of these important sounds can
later be adjusted from your command station (also refer to
8.5.6.).
• Deal with slot 16 in the same manner by importing the brake
sound-wav-files
• Select the option „Sound Requires Driving sounds“ for all brake
sound files in the window „Sound Settings“.
• Click onto the button „Display Extended Settings“ and enter
the highest value 15 at „Priority“. This assures that in case of
exceeding a certain speed and rapid braking the brake sounds
will definitely be played and not suppressed by some other
sound.
• Deal with slot 15 with the air pump-wav-files in the same
manner. Click onto the button „Sound Settings“ next to the
middle square and enter the values 4 at „min.“ and 6 at „Max.“.
This causes the decoder to play the loop part of the air pump in
slot 15 between four and six times. Ultimately the duration of
air pump action varies after the locomotive has come to a
complete stop.
• Select the option „Sound Requires Driving Noise“ in the window
„Sound Settings“ for all sound files in slot 15.
• Click onto the button „Display Extended Settings“ and enter
the highest value 15 at „Priority“. Confirm with OK.
• Go to the button „more settings“ at the top left corner of the
screen.
• Select the options „Stop sound“ (user sound slot 15) and „Brake
Sound“ (user sound slot 16). Thus the user sound slots 15 and
16 are defined as automatic sounds. The brake sound is
automatically played during braking action and the air pump
after braking has finished.
12.2.4. Function mapping12.2.4. Function mapping
12.2.4. Function mapping12.2.4. Function mapping
12.2.4. Function mapping
Allocate your functions to any buttons as desired (also refer to
8.6.) by clicking the appropriate squares in the corresponding
lines respectively columns. The default allocations are as follows:
• Headlights on FL(f), back-up lights on FL(r). Please make sure
that the output configuration of the lights is set to „Dimmer“
and the dimmer setting is „15“.
• Driving sounds („Sound on / off“) on F1(f) and F1 (r)
• Horn / whistle on F2 (f) and F2 (r) (e.g.: on user sound slot 1). Set
the Doppler effect for a whistle in loop mode; then you can
activate it as described in 13.1..
• Shunting speed on F6 (f) and F6 (r). It is recommended to switch
off acceleration and deceleration with the same function
button in order to assure a faster response in shunting mode.
• Allocate sounds as desired to the other function buttons; you
have to import these sounds in user sound slots (also refer to
12.2.3.), e.g.: bell on F3, injector on F4, air pump on F5.
According to the default values the allocations would be as
follows:
Illustration on the following page.
Page 24

24
Set the Wheel Synchronicity of Exhaust Chuffs
Fig.37.: Default Allocation of Function Buttons
12.2.5. Set the wheel synchronicity of exhaust chuffs12.2.5. Set the wheel synchronicity of exhaust chuffs
12.2.5. Set the wheel synchronicity of exhaust chuffs12.2.5. Set the wheel synchronicity of exhaust chuffs
12.2.5. Set the wheel synchronicity of exhaust chuffs
After you have imported all sounds into the correct sound slots
and have entered the first driving parameters it is time to look
at a special feature for steam locomotives without external
wheel sensor, namely setting the exhaust chuffs according to
the revs of the drivers. You can set the necessary parameters
with the option „Type of Sound“ 12.2.5. Radsynchronität der
Dampfstöße einstellen(CV57 and 58). First make sure that the
correct number of cylinders has been entered in the menu
„Extended Settings“ and that you have imported the
appropriate chuff sounds (also refer to 9.2.4.). Furthermore
the mid speed and the maximum speed (CV5 and 6) must have
been set since this would influence the synchronicity if it was
changed later on.
• Place the locomotive onto the programming track or a test
bed.
• Run the locomotive on speed step 1 with the virtual cab or your
digital system.
• Observe one wheel and its movement and count the number
of exhaust chuffs that are played during one turn of the wheel.
• If there are too many chuffs during one turn the time span is
too small. Increase the value in CV 57 until the desired
synchronicity is achieved.
• If there are not enough chuffs during one turn the time span is
too big. Reduce the value in CV 57 until the desired synchronicity
is achieved.
• Now switch to speed step 2.
• Observe one wheel and its movement and count the number
exhaust chuffs that are played during one turn of the wheel.
• If there are too many chuffs during one turn the time span is
too small. Increase the value in CV 58 until the desired
synchronicity is achieved.
• If there are not enough chuffs during one turn the time span is
too big. Reduce the value in CV 57 until the desired synchronicity
is achieved.
Since CV 57 and 58 influence each other you must check the
synchronicity of speed steps 1 and 2 repeatedly. Thus you get
closer and closer to the desired synchronicity in several steps.
12.2.6. Fine tuning12.2.6. Fine tuning
12.2.6. Fine tuning12.2.6. Fine tuning
12.2.6. Fine tuning
Save the project and write it onto your decoder with the aid of
your LokProgrammer. Use the buttons , and . Listen
to the sounds during normal operation and fine tune them
further if necessary.
Sound volumes: You can adjust the volume of the individual
sound settings in the sound slots separately or with the group
volume controllers 1 to 312.2.6. Feinabstimmung.
In our example you can adjust all driving sounds with controller
3 (=CV123), the whistle with controller 1 (=CV121) and the bell
with controller 2 (=CV122); all other sounds are adjusted
individually.
You can adjust the overall volume in the menu „Sound Settings“ or with CV 63.
Minimal time between chuffs: should the exhaust chuffs sound
too hard a high speeds you can set a time limit with the option
„Minimal time between exhaust chuffs“. Then the chuffs will
not be played any closer together than that time limit. Once
the locomotive reaches the speed at which the current time
between chuffs corresponds with the minimal time between
chuffs the time remains constant – even at higher speeds. This
method is recommended for high speeds of the locomotive
since the synchronicity cannot be observed anyway.
Brake sound threshold: If the brake sound starts too late or
(due to the large file size) it is not played at all simply increase
the value for the brake sound threshold. The higher the value,
the sooner the brake sound starts playing and therefore has
more time to be played completely (also refer to 8.5.5.).
In the following chapters many processes that you already
know are repeated from the creation of the steam sound
project. Therefore we only describe the settings that are different in the following chapter.
12.3. Diesel-electric locomotive12.3. Diesel-electric locomotive
12.3. Diesel-electric locomotive12.3. Diesel-electric locomotive
12.3. Diesel-electric locomotive
12.3.1. 12.3.1.
12.3.1. 12.3.1.
12.3.1.
Generate new fileGenerate new file
Generate new fileGenerate new file
Generate new file
Proceed as in 12.2.1..
12.3.2. Settings12.3.2. Settings
12.3.2. Settings12.3.2. Settings
12.3.2. Settings
Proceed as in 12.3.2.., but select „Diesel-electric“ as type of
locomotive. Enter the value „1“ for „Time between Throttle
Notches“. Then the decoder does not divide the sound
automatically in to throttle notches; this is done later with the
different sound files for different throttle notches.
Also set the following under „Address“: Click onto the squares
„FL (f)“ and „FL(r)“ in „Function outputs in consists“. If
locomotives are run in consist, then the lights can be controlled
in both locomotives simultaneously.
Should there be only one driving sound file (d1.wav) it is
recommended to set a higher value for „Time between throttle
notches“. This results in the modulation of sound with different
pitch levels.
Page 25

25
Diesel-electric
12.3.3. Import and set sounds12.3.3. Import and set sounds
12.3.3. Import and set sounds12.3.3. Import and set sounds
12.3.3. Import and set sounds
Please use the project file for the ALCO 244 (72400) for this
example, which you can download from the ESU website at
www.esu.eu.
• Change to the „Sound“ register and select „Schedule“.
• Open the file of the ALCO 244 in the window „Folders“.
• Drag the audio files with the mouse from „Folders“ to „Project
sounds“. You can observe changes in memory space during
this process.
• Please use the following driving sounds for this example: all msand sm-sounds, d1.wav to d4.wav, cd1/dc1- to dc/cd4-, d12to d34- and d43- to d21-, ds-, sd- and s.wav
• Import the following sounds in the same manner for Random
Sounds and User Sounds: all „Wabco-A2“-wav-files (init, loop,
exit, short), all „bell“-wav-files, all fan-files, „coupler_exit.wav“
and the detector file.
• Also import the files „brake_init.wav“, „brake_loop.wav“ and
„brake_exit.wav“ in the same manner.
• Click onto the square called „MS“ and import the files for ms1
into the first square of the upper sound slot, ms2 into the
second square.
• Click now onto the square „S“ and import „s.wav“ in the
middle squares of the two sound slots.
• Click on to „D1“ and import „d1.wav“ into the middle square
of the sound slot (also refer to Fig. 38.).
• Repeat this procedure with all throttle notches up to D4.
• Import d12.wav, d21.wav, d23.wav, cd1.wav, cd2.wav etc.
into the respective transition steps.
• Open „Sound Settings“ for the individual audio files (also refer
to chapter 9.4.).
• Enter „Loop mode“ for all sounds from D1, D2, D3 and D4, CX.
In the square „S“ choose this option only for the second sound
slot.
• Enter the value 1 in „Repeat sounds“ for all transition sounds
so as to play each transition sound only once until the following
throttle notch is reached.
• Allocate all sounds to volume controller 3 („AUX“). Thus the
driving sounds will be controlled simultaneously by controller 3.
• Click onto „Adapt sound to Driving Sound“ for each sound.
This causes the driving sound to increase in pitch with increasing
speed.
Since there are no acceleration files in this example (A1, A2,
Da1 etc,) you must enter in the thresholds for each path
between the D- and DA-squares the highest possible value of
127. That means that the „barrier“ upwards is so big that the
sound sequence always goes via the D-notches and not via the
A-notches. To facilitate this, click into the appropriate squares
and enter the value 127.
Change to the window „Random Sounds“:
• Open the square „Stand1“ by double clicking it.
• Import „coupler_exit.wav“ in the middle square of the open
sound slot; this sound shall simulate the automatic air release
later on.
• Repeat this process with the squares called „Fahrt1“
Change to the window „User Sounds“:
• Open the „Slot1“ by double clicking the square
• Import „wabcoa2_init.wav“ in the upper square of the open
sound slot
• Import „wabcoa2_loop.wav“ in the middle square of the open
sound slot
• Click onto the button „Sound settings“ next to the middle
square and select the option „Loop mode“. This cause the
whistle to sound until the user deactivates this function.
• Import „wabcoa2_exit.wav“ in the lower square of the open
sound slot
• Repeat this procedure with the bell in the square „Slot2“, the
detector in „Slot3“ and the fan in „Slot 4“.
• Allocate the whistle to the volume controller 1 (=CV121) and
the bell to volume controller 2 (=CV122) in the window „Sound
settings“. Thus you can later adjust the volume of these
important sounds with your digital system later on.
• Proceed in the same manner with Slot16 and the braking
sound-wav-files.
• Select for all brake sound files the option „Sound requires
Driving Sound“ in the window „Sound Settings“.
• Click onto the button „Display Extended Settings“ and enter
the highest value 15 in „Priority“ in order to assure that the
brake sound is not suppressed by any other sound. Confirm
with OK.
• Go to the button „Extended Settings“ at the top left corner of
the screen.
Select the option „Brake Sounds“ (user sound slot 16). Thus the
user sound slot 16 is marked as an automatic sound. The brake
sound will be played automatically during operation.
12.3.4. Function mapping12.3.4. Function mapping
12.3.4. Function mapping12.3.4. Function mapping
12.3.4. Function mapping
Allocate your functions to any buttons as desired (also refer to
8.6.) by clicking the appropriate squares in the corresponding
lines respectively columns.
Here we also use the same default allocations:
• Headlights on FL(f), back-up lights on FL(r). Please make sure
that the output configuration of the lights is set to „Dimmer“
and the dimmer setting is „15“.
• Driving sounds („Sound on / off“) on F1(f) and F1 (r)
• Horn / whistle on F2 (f) and F2 (r) (e.g.: on user sound slot 1). Set
the Doppler Effect for a whistle in loop mode; then you can
activate it as described in 13.1..
• Shunting mode on F6 (f) and F6 (r). It is recommended to switch
off acceleration and deceleration with the same function
button in order to assure a faster response in shunting mode.
• Allocate sounds as desired to the other function buttons; you
have to import these sounds in user sound slots (also refer to
12.2.3.), e.g.: bell on F3, injector on F4, air pump on F5.
12.3.5. Fine tuning12.3.5. Fine tuning
12.3.5. Fine tuning12.3.5. Fine tuning
12.3.5. Fine tuning
Save the project and write it onto your decoder with the aid of
your LokProgrammer.
Use the buttons , and . Listen to the sounds
during normal operation and fine tune them further if necessary.
Adjust the sound volumes as described in 12.2.6.
If you wish to play a certain driving sound (e.g.: D2) with a
certain delay, enter a higher value into the square „barrier“
between the throttle notches and the transition steps (also
refer to 9.3.3.). If you wish that a certain throttle notch starts
sooner reduce the barrier value on the left by clicking onto the
square and entering the new value.
This tuning requires some experience and should definitely be
tried out.
Should the coasting sound start too quickly in case of a rapid
reduction of speed you can enter a negative value into the
thresholds between the D- and DC-notches (e.g.: -10 instead
of -5). You can also suppress the transition to coasting completely
by entering the lowest possible value, namely -128. .
Should the coasting sound be played for too long reduce the
value in the square „Coasting“ at the top edge of the notch
CX (9.3.3.).
Page 26

26
Diesel-hydraulic/Diesel-mechanical
12.4. Diesel-hydraulic / Diesel-mechanical12.4. Diesel-hydraulic / Diesel-mechanical
12.4. Diesel-hydraulic / Diesel-mechanical12.4. Diesel-hydraulic / Diesel-mechanical
12.4. Diesel-hydraulic / Diesel-mechanical
12.4.1. Generate new file12.4.1. Generate new file
12.4.1. Generate new file12.4.1. Generate new file
12.4.1. Generate new file
Proceed as in 12.2.1..
12.4.2. Settings12.4.2. Settings
12.4.2. Settings12.4.2. Settings
12.4.2. Settings
Proceed as in 12.4.2. Einstellungen12.2.2., but select the
locomotive type „Diesel locomotive hydraulic“ respectively „Diesel locomotive with manual transmission“.
12.4.3. How to import and set sounds12.4.3. How to import and set sounds
12.4.3. How to import and set sounds12.4.3. How to import and set sounds
12.4.3. How to import and set sounds
Please use the project file for the class VT 98 (52454), which
you can download from the ESU website at www.esu.eu.
Change to the „Sound“ register and select „Schedule“:
• Open the file of the V 98 in the window „Folders“.
• Drag the audio files with the mouse from „Folders“ to „Project
sounds“. You can observe changes in memory space during
this process.
• Please use the following driving sounds for this example: all
ms.wav und sm.wav, d1.wav, ds-, sd- und s.wav
• Import the following sounds in the same manner for Random
Sounds and User Sounds: all „Horn“-wav-files (init, loop, exit,
short), all „Conductor“-wav-files and „Compressed air.wav“.
• Also import the files „brake_init.wav“, „brake_loop.wav“ and
„brake_exit.wav“ in the same manner.
• Import the sounds to the appropriate throttle notches.
• Now open „Sound Settings“ for the individual audio files (also
refer to chapter 9.4.).
• Enter „Loop mode“ for all sounds from D1 and the second part
of notch S.
• Enter the value 1 in „Repeat sounds“ for all transition sounds
and for s.wav in the first part of notch S so as to play each
transition sound only once until the following throttle notch is
reached.
• Allocate all sounds to volume controller 3 („AUX“). Thus the
driving sounds will be controlled simultaneously by controller 3.
• Click onto „Adapt Sound to Driving Sound“ for each sound.
This causes the driving sound to increase in pitch with increasing
speed.
Since there are no acceleration files in this example (A1, A2,
Da1, DC1, etc,) you must enter in the thresholds for each path
between the D- and DA-squares the highest possible value of
127 and towards CX to -127.
Change to the window „User Sounds“:
• Open the „Slot1“ by double clicking the square
• Import „horn_init.wav“ in the upper square of the open sound
slot
• Import „horn_loop.wav“ in the middle square of the open
sound slot
• Click onto the button „Sound settings“ next to the middle
square and select the option „Loop mode“. This causes the
horn to sound until the user deactivates this function.
• Import „horn_exit.wav“ in the lower square of the open sound
slot
• Repeat this procedure with the conductor’s whistle in the square.
• Allocate the horn to the volume controller 1 (=CV121) and the
conductor’s whistle to volume controller 2 (=CV122) in the
window „Sound settings“. Thus you can later adjust the volume
of these important sounds with your digital system later on.
• Proceed in the same manner with Slot 16 and the braking
sound-wav-files.
• Select for all brake sound files the option „Sound requires
Driving Sound“ in the window „Sound settings“.
• Click onto the button „display extended settings“ and enter
the highest value 15 in „Priority“ in order to assure that the
brake sound is not suppressed by any other sound. Confirm
with OK.
• Go to the button „more settings“ at the top left corner of the
screen.
Select the option „brake sounds“ (user sound slot 16). Thus the
user sound slot 16 is marked as an automatic sound. The brake
sound will be played automatically during operation.
• Import pressluft.wav in sound slot 14 and set the priority to
value 15. Go to the button „more settings“ at the top left
corner of the screen. Select the option „Shift sound“ (user
sound slot 14). Thus the user sound slot 14 is defined as an
automatic sound. The shift sound will be played automatically
during operation.
12.4.4. Function mapping12.4.4. Function mapping
12.4.4. Function mapping12.4.4. Function mapping
12.4.4. Function mapping
Allocate your functions to any buttons as desired (also refer to
8.6.) by clicking the appropriate squares in the corresponding
lines respectively columns.
Here we also use the same default allocations:
• Headlights on FL(f), back-up lights on FL(r). Please make sure
that the output configuration of the lights is set to „Dimmer“
and the dimmer setting is „15“.
• Driving sounds („Sound on / off“) on F1(f) and F1 (r)
• Horn on F2 (f) and F2 (r) (e.g.: on user sound slot 1). Set the
Doppler effect for a whistle in loop mode; then you can activate
it as described in 13.1..
• Shunting speed on F6 (f) and F6 (r). It is recommended to switch
off acceleration and deceleration with the same function
button in order to assure a faster response in shunting mode.
• Allocate sounds as desired to the other function buttons; you
have to import these sounds in user sound slots (also refer to
12.2.3.), e.g.: bell on F3, detector on F4, fan on F5.
12.4.5. Fine tuning12.4.5. Fine tuning
12.4.5. Fine tuning12.4.5. Fine tuning
12.4.5. Fine tuning
Save the project and write it onto your decoder with the aid of
your LokProgrammer.
Use the buttons , and .
Listen to the sounds during normal operation and fine tune
them further if necessary.
Adjust the sound volumes as described in 12.2.6.
12.5. Electric locomotive12.5. Electric locomotive
12.5. Electric locomotive12.5. Electric locomotive
12.5. Electric locomotive
12.5.1. Generate new file12.5.1. Generate new file
12.5.1. Generate new file12.5.1. Generate new file
12.5.1. Generate new file
12.5.2. Settings12.5.2. Settings
12.5.2. Settings12.5.2. Settings
12.5.2. Settings
Proceed as in 12.3.2..
12.5.3. How to import and set sounds12.5.3. How to import and set sounds
12.5.3. How to import and set sounds12.5.3. How to import and set sounds
12.5.3. How to import and set sounds
Please use the project file for the Euro Sprinter (524876), which
you can download from the ESU website at www.esu.eu.
Change to the „Sound“ register and select „Schedule“:
• Open the file of the Euro Sprinter in the window „Folders“.
• Drag the audio files with the mouse from „Folders“ to „Project
sounds“. You can observe changes in memory space during
this process.
• Please use the following driving sounds for this example:
• Pantograph up und Pantograph down
• Hs_on.wav
• Mute.wav
• Sd1-, sd2-, ds- und d1
• Import the following sounds in the same manner for Random
Sounds and User Sounds: all „airhorn_1“-wav-files (init, loop,
exit, short) and all „fan“-wav-files.
• Also import the files „brake_init.wav“, „brake_loop.wav“ and
„brake_exit.wav“ in the same manner.
• Click onto the square „MS“ and import the file
„pantograph_up.wav“ into the upper sound slot and hs_on.wav
into the second square.
• Now click onto the square „S“ and import the two files
„mute.wav“ in the middle squares of the two sound slots.
• Now click onto „D1“ and import the file „d1.wav“ in the middle
square of the sound slot (also refer to Fig. 36).
• Now click onto the square „sd“ and import the file „sd1.wav“
in the upper sound slot and „sd2.wav“ in the second square.
• Now click onto the square „ds“ and import the file „ds.wav“.
• Now open the „Sound settings“ of the individual audio files
(also refer to chapter 9.4.).
• Enter „Loop mode“ for D1 and the second part of notch „S“.
Page 27

27
Dieselhydraulic/Dieselmechanical
• Enter the value 1 in „Repeat sounds“ for all transition sounds
and for s.wav in the first part of notch S so as to play each
transition sound only once until the following throttle notch is
reached.
• Allocate all sounds to volume controller 3 („AUX“). Thus the
driving sounds will be controlled simultaneously by controller 3.
• Click onto „Adapt sound to Driving Sound“ for each sound.
This causes the driving sound to increase in pitch with increasing
speed.
Since there are no acceleration files in this example (A1 to Da1)
and no coasting files (in CD1, DC1 and CX) you must enter in
the thresholds for each path between the D1- and DA1-squares
the highest possible value of 127. Furthermore you must set
the threshold between D1 and DC1 to -128.
Change to the window „User Sounds“:
• Open the „Slot1“ by double clicking the square
• Import „airhorn1_init.wav“ in the upper square of the open
sound slot
• Import „airhorn1_loop.wav“ in the middle square of the open
sound slot
• Click onto the button „Sound settings“ next to the middle
square and select the option „Loop mode“. This causes the
horn to sound until the user deactivates this function.
• Import „airhorn_exit.wav“ in the lower square of the open
sound slot
• Allocate the horn to the volume controller 1 (=CV121) in the
window „Sound settings“. Thus you can adjust the volume of
this important sound with your digital system later on.
• Proceed in the same manner with Slot 16 and the brake soundwav-files and with Slot 15 with the „fan“ files.
• Select for all brake sound files the option „Sound requires
Driving Sound“ in the window „Sound settings“.
• Click onto the button „display extended settings“ and enter
the highest value 15 in „Priority“ in order to assure that the
brake sound is not suppressed by any other sound. Do the
same with slot 15 to assure that the fan sound is not suppressed
by any other sound.
• Confirm with OK and go to the button „more settings“ at the
top left corner of the screen.
Select the option „brake sounds“ (user sound slot 16). Thus the
user sound slot 16 is marked as an automatic sound. The brake
sound will be played automatically during operation.
• Also select „Stop Sound“ (user sound slot 15); thus the fan will
be heard every time after braking.
12.5.4. Function mapping12.5.4. Function mapping
12.5.4. Function mapping12.5.4. Function mapping
12.5.4. Function mapping
Allocate your functions to any buttons as desired (also refer to
8.6.) by clicking the appropriate squares in the corresponding
lines respectively columns.
Here we also use the same default allocations:
• Headlights on FL(f), back-up lights on FL(r). Please make sure
that the output configuration of the lights is set to „Dimmer“
and the dimmer setting is „15“.
• Driving sounds („Sound on / off“) on F1(f) and F1 (r)
• Horn on F2 (f) and F2 (r) (e.g.: on user sound slot 1). Set the
Doppler effect for a whistle in loop mode; then you can activate
it as described in 13.1..
• Shunting speed on F6 (f) and F6 (r). It is recommended to switch
off acceleration and deceleration with the same function
button in order to assure a faster response in shunting mode.
12.5.5. Fine tuning12.5.5. Fine tuning
12.5.5. Fine tuning12.5.5. Fine tuning
12.5.5. Fine tuning
Save the project and write it onto your decoder with the aid of
your LokProgrammer.
Use the buttons , and .
Listen to the sounds during normal operation and fine tune
them further if necessary.
Adjust the sound volumes as described in 12.2.6.
Page 28
28
APPENDIX
13.1.3. Problems when reading the decoder13.1.3. Problems when reading the decoder
13.1.3. Problems when reading the decoder13.1.3. Problems when reading the decoder
13.1.3. Problems when reading the decoder
Should the program not be able to read out decoder data
then an error message will be displayed.
The display of that message could have several reasons:
• The locomotive is not set properly on the programming track
or the track is not properly connected to the LokProgrammer.
• The decoder is not wired correctly – particularly the motor
leads - in the locomotive.
• The decoder may be faulty.
• The track is dirty.
13.1.4. Memonry types 8MBits and 16MBits13.1.4. Memonry types 8MBits and 16MBits
13.1.4. Memonry types 8MBits and 16MBits13.1.4. Memonry types 8MBits and 16MBits
13.1.4. Memonry types 8MBits and 16MBits
Generation 3 LokSound-decoders provide different memory
sizes: 8MBits (for about 69 seconds of sound data) and 16MBits
(for about 138 seconds of sound data). The ESU-retailmarket
sounds on our Website are mostly made for 8MBits memory,
so that owners of older Loksound 3 sound decoders can use
them. But OEM-LokSound-Projects could be bigger than
8MBits.
It is always possible to transfer 8MBit-files onto a 16MBitsdecoder zu übertragen. You can’t transfer a 16MBits-file onto
an 8MBits decoder because of the memory discrepancies.
Please do the following procedure to change an 8MBits Soundfile to a 16MBits file:
• load the requested ESU-file
• upload the 8MBits ESU-file onto a 16MBits-decoder (see also
5.3.)
• Read out the decoder date by using the intended button ,
while the file is still loaded (see also 5.3.)
• Confirm that the decoder data should be adopted to the open
project file.
16MBits memory size is now shown on the information display
in the upper center of the screen.
The memory capacity in the menu „Sound“ is now 16MBits
(which equals about 138 seconds). This memory is now available
for your projects.
• Save the file. The 16MBits characteristics will be saved now.
13. Appendix
13.1. Miscellaneous13.1. Miscellaneous
13.1. Miscellaneous13.1. Miscellaneous
13.1. Miscellaneous
13.1.1. Activating the Doppler effect during13.1.1. Activating the Doppler effect during
13.1.1. Activating the Doppler effect during13.1.1. Activating the Doppler effect during
13.1.1. Activating the Doppler effect during
................
................
........
operation: operation:
operation: operation:
operation:
• Press the appropriate function button (e.g.: F2 horn) at a speed
of more than 50% of the maximum speed.
• Wait for about 3 seconds. Then double click the function button.
The pitch will be lowered.
• Deactivate the horn button. A few seconds later the sound will
go back to normal.
13.1.2. Hardware of LokSound (cables, colours)13.1.2. Hardware of LokSound (cables, colours)
13.1.2. Hardware of LokSound (cables, colours)13.1.2. Hardware of LokSound (cables, colours)
13.1.2. Hardware of LokSound (cables, colours)
Fig.39.: Wiring of H0-decoder and micro-decoder
13.2. Customer service – Assistance and support13.2. Customer service – Assistance and support
13.2. Customer service – Assistance and support13.2. Customer service – Assistance and support
13.2. Customer service – Assistance and support
Should you require assistance your first call should be to your
dealer where you purchased your LokSound decoder. He is
your competent partner for all questions around model trains.
We recommend highly checking the FAQs on our website at
www.esu.eu.
You can reach us by several means. However, we kindly request
you to contact us by fax or email first. We will reply within a
short period of time. Please always state your own fax number
or email address.
Our telephone hotline can be pretty busy. Therefore you should
only call if the other options do not seem practical. Also check
our website, you will find many useful hints and answers to
questions already raised by others under Tips & Tricks.
Hotline: +49 (0) 700 - 56576863 *)
( 0 )700 - LOKSOUND
Tuesday and Wednesday
10:00 am - 12:00 pm
Fax: +49 (0) 700- 37872538 *)
Online: www.esu.eu/en/support
Post: ESU electronic solutions ulm GmbH & Co. KG
-Technical SupportIndustriestrasse 5
D - 89081 Ulm
www.esu.eu
*) 0.12Euro per minute
PinPin
PinPin
Pin
DescriptionDescription
DescriptionDescription
Description
Color CodeColor Code
Color CodeColor Code
Color Code
1 motor terminal right orange
2 rear light yellow
3 function F1 green
4 track connection left black
5 motor terminal left gray
6 headlight white
7 common (+pole) blue
8 track connection right red
PinPin
PinPin
Pin
DescriptionDescription
DescriptionDescription
Description
Color CodeColor Code
Color CodeColor Code
Color Code
1 motor terminal right orange
2 motor terminal left gray
3 track connection right red
4 track connection left black
5 head light white
6 rear light yellow
Figure1Figure1
Figure1Figure1
Figure1: NEM651 interface
Figure1Figure1
Figure1Figure1
Figure1: NEM652 interface
1
6
Page 29

29
CV Overview Chart
13.3. CV overview chart13.3. CV overview chart
13.3. CV overview chart13.3. CV overview chart
13.3. CV overview chart
CVCV
CVCV
CV
NameName
NameName
Name
DescriptionDescription
DescriptionDescription
Description
RangeRange
RangeRange
Range
Def.Def.
Def.Def.
Def.
1 Engine address Address of engine 1 – 127 3
2 Start voltage Sets the minimum speed of the engine 1 – 75 3
3 Acceleration This value multiplied by 0.869 is the time from stop to maximum speed 0 – 64 8
4 Deceleration This value multiplied by 0.869 is the time from maximum speed to stop 0 – 64 6
5 Maximum speed Maximum speed of engine 0 – 64 64
6 Medium speed Medium speed of engine 0 – 64 22
7 Version number Internal software version of LokSound decoder
8 Manufacturer’s ID Manufacturer’s ID & reset to factory defaults
by writing value 8 in this CV 151
13 Analogue mode F1-F8 Status of functions F1 to F8
in analogue mode 0-255 1
Bit Description Value
0F1 1
1F2 2
2F3 4
3F4 8
4F5 16
5F6 32
6F7 64
7 F8 128
14 Analogue mode FL, Status of functions
F9-F12 FL, F9 to F12 in analogue mode 0-255 3
Description Value
0 FL (f) 1
1 FL (r) 2
2 F9 (f) 4
3 F10 (f) 8
4 F11 16
5 F12 32
6 F9 (r) 64
7 F10 (r) 128
17 Extended engine address Long address of engine; CV17 contains byte with higher value (bit 6 0-128
and 9999, bit 6 and bit 7 must always be active), CV18 contains byte
with lower value (only active when function is switched on in CV 29).
19 Consist address Value 0 or 128 means: consist address deactivated
(additional in case of 1 - 127 consist address, normal direction
double traction) 129-255 consist address, reverse direction 0 – 255
CVCV
CVCV
CV
NameName
NameName
Name
DescriptionDescription
DescriptionDescription
Description
RangeRange
RangeRange
Range
Def.Def.
Def.Def.
Def.
29 Configuration register Bit Function value 0 - 55 4
0 Reverse travel direction (forward becomes reverse)
normal direction 0
reversed direction 1
1 speed steps (only for DCC mode)
14 speed steps 0
28 or 128 speed steps 2
2 analogue operation
analogue operation off 0
analogue operation on 4
4 selection of speed curve
speed curve through CV 2,5, 6 0
speed curve through CV 67 – 96 16
5 selection of engine address (only for DCC)
short addresses (CV 1) in DCC mode 0
long addresses (CV 17 + 18) in DCC mode 32
49 Extended configuration Activate support for brake sections
or switch off Back EMF control 0-128 19
Bit description value
0 load control off 0
load control activated in 1
1 DC motor PWM frequency
15 kHz pulse frequency 0
30 kHz pulse frequency 2
2 Märklin® delta mode
Delta mode off 0
Delta mode on 4
3 Märklin® second address
second address off 0
second address on 8
4 Automatic speed step detection
DCC speed step detection off 0
DCC speed step detection on 16
5 LGB function button mode
LGB mode off 0
LGB mode on 32
6 Zimo manual function
Zimo manual function off 0
Zimo manual function on 64
7 Loksound 2 behaviour on 0
LokSound 2 behaviour off 128
50 Analogue mode Selection of desired analogue mode 0-3 3
Bit description value
0 AC analogue mode
AC analogue mode off
AC analogue mode on 1
1 DC analogue mode
DC analogue mode off
DC analogue mode on 2
Page 30

30
CV Overview Chart
CVCV
CVCV
CV
NameName
NameName
Name
DescriptionDescription
DescriptionDescription
Description
RangeRange
RangeRange
Range
Def.Def.
Def.Def.
Def.
51 Brake mode Selection of desired brake mode 0-16 3
Bit description value
0 Märklin® brake mode
Märklin® brake mode off 0
Märklin® brake mode on 1
1 Zimo brake mode
Zimo brake mode off 0
´Zimo brake mode on 2
3 Lenz DC brake mode
Lenz brake mode off 0
Lenz brake mode on 8
4 Trix brake mode
Trix brake mode off 0
Trix brake mode on 16
53 Control reference Defines the Back EMF voltage, which the motor should 0-80 56
generate at maximum speed. The higher the efficiency
of the motor, the higher this value may be set. If the engine
does not reach maximum speed, reduce this parameter.
54 Load control parameter K K-component of internal PI-controller Defines the effect of 0-80 32
load control. The higher the value, the stronger the effect
of Back EMF control
55 Load control parameter I „I“-component of internal PI-controller, defines momentum 0-80 24
inertia) of motor. The higher the momentum of the motor
(large flywheel or bigger diameter motor) the lower this
value has to be set (see Chapter X.X.)
56 Operating range of 0 – 100 % 1-64 64
load control Defines up to which speed in % load control
will be active. A value of 32 indicates that load control will
be effective up to half speed.
57 Sound mode 1 Multiplied by 0,64 is the time in seconds between two chuff 0-127
sounds at speed step 1. Value 0 indicates that period Steam:15;
between exhaust chuffs is controlled by a wheel sensor Diesel: 0
58 Sound mode 2 Value defines the gradual decrease of intervals of exhaust 0-127
chuffs with increasingspeed.A higher value indicates a more Steam: 15;
rapid decrease, a lower value a slower decrease. If exhaust Diesel/
chuffs are triggered by a wheel sensor (if CV 57 = 0), this Electric: 0
value specifies the number of trigger pulses required for one
exhaust chuff.
59 Lowest Speed Step Divided by 32 this will yield the factor for eproducing the 0-64 32
sound at the slowest speed step. Values < 32 are slower,
values > 32 are faster than original speed.
60 Highest Speed Step Divided by 32 this will yield the factor for reproducing the 0-64 48
sound at the fastest speed step values < 32 are slower,
values > 32are faster than original speed.
61 Random sound min Multiplied by 1 is the time in secs. for the shortest random 0-64 5
sound interval. These values represent the interval between
Irandom sounds.
62 Random sound max Multiplied by 1is the time in seconds for the longest interval 0-64 10
between random sounds.These values represent the interval
between random sounds. Playing of random sounds is
deactivated when CV 61 and CV 62 = 0
63 Sound volume volume of running and additional sounds 0-64 64
64 Brake sound threshold Specifies when the decoder starts the braking noises. The 0-64 8
higher the value, the sooner it will start. If CV 64= 0, the
braking sound is only played once the engine has stopped.
66 Forward trim Value divided by 128 is the factor used to multiply the motor 0-255 0
voltage when driving forward. Value 0 deactivates the trim.
CVCV
CVCV
CV
NameName
NameName
Name
DescriptionDescription
DescriptionDescription
Description
RangeRange
RangeRange
Range
Def.Def.
Def.Def.
Def.
67 Speed table Defines motor voltage for speed steps. 0-255 --
-94 Intermediate values will be interpolated.
95 Reverse trim Divided by 128 is the factor used to multiply the motor voltage 0-255 0
when driving backwards. Value 0 deactivates the trim.
112 Blinking light Blinking frequency of Strobe effects. Always a multiple of 4-64 33
65.536 milliseconds.
113 Headlight configuration configuration of headlights 0-255 15
Description Value
continuous (dimmer) Vol +0 (Vol)
blinking (phase 1) Vol + 16
blinking (phase 2) Vol + 32
Strobe light Vol + 48
Double Strobe light Vol + 64
Fire box Vol + 80
Smoke generator Vol + 96
Headlight bright/dim Vol + 112
Mars light Vol + 128
Gyra light Vol + 144
Rule 17 for head light Vol + 160
Rule 17 for rear light Vol + 176
Pulse Vol + 192
Ditch Phase 1 Vol + 208
Ditch Phase 2 Vol + 224
Vol = brightness. Range 0 (dark) – 15 (maximum)
114 Back light configuration configuration of back lights, see also CV113 0-255 15
115 Aux 1 configuration configuration of Aux 1, see also CV113 0-255 15
116 Aux 2 configuration configuration of Aux 2, see also CV113 0-255 15
117 Aux 3 configuration configuration of Aux 3, see also CV113 0-255 15
118 Aux 4 configuration configuration of Aux 4, see also CV113 0-255 15
119 Aux 5 configuration configuration of Aux 5, see also CV113 (Loksound XL only) 0-255 15
120 Aux 6 configuration configuration of Aux 6, see also CV113 (Loksound XL only) 0-255 15
121 Volume Control 1 Subgroup volume for all sounds routed to Volume Control 1(horn / whistle) 0-64 64
122 Volume Control 2 Subgroup volume for all sounds routed to Volume Control 2 (bell) 0-64 64
123 Volume Control 3 Subgroup volume for all sounds routed to Volume Control 1 (auxilary) 0-64 64
124 Special Options Activates special options 0-128 0
Bit Description Value
0 Store direction 1
1 Store function state 2
2 Store current speed setting 4
3 Start again with acceleration ramp 8
4 Deactivate load dependend sound 16
5 Disable motor EMK meassure 32
125 Start Voltage DC The value multiplied by 0.2 equals the voltage value 0-127 20
126 Maximum speed DC The value multiplied by 0,2 equals the voltage value 0-127 60
127 Start voltage AC The value multiplied by 0.2 equals the voltage value 0-127 30
128 Maximum speed AC The value multiplied by 0.2 equals the voltage value 0-127 80
Page 31

31
CV Overview Chart
CVCV
CVCV
CV
NameName
NameName
Name
DescriptionDescription
DescriptionDescription
Description
RangeRange
RangeRange
Range
Def.Def.
Def.Def.
Def.
129 Assignment of function Assignment of function outputs activated in status „stop – forward“ 0-255 0
„stop“ forward A Bit Description value
0 headlights 1
1 back lights 2
2 function output AUX 1 4
3 function output AUX 2 8
4 function output AUX 3 16
5 function output AUX 4 32
6 function output AUX 5 (Loksound XL),
Diesel Notching Up (LSV3.5 und micro) 64
7 function output AUX 6 (Loksound XL),
Diesel Notching down (LSV3.5 und micro) 128
130 Assignment of function Assignment of function outputs activated in status „stop – forward“ 0-255 0
„stop“ forward B Bit Description value
0 acceleration on / off 1
1 shunting mode on / off 2
2 sound on / off 4
3 shift mode 8
4 Fan sound 16
5 Doppler on/off 32
6 Mute / Volume Control 64
7 Dynamic Brake 128
131 Assignment of function Assignment of function outputs activated in status „stop – forward“ 0-16 0
„stop“forward C Bit Description Value
0-3 Soundslot 1 - 16 0
132 Assignment of function Assignment of function outputs activated in status „stop – backward“ 0-255 0
„stop“ backward A refer to CV 129
133 Assignment of function Assignment of function outputs activated in status „stop – backward“ 0-255 0
„stop“ backward B refer to CV 130
134 Assignment of function Assignment of function outputs activated in status „stop – forward“ 0-16 0
„stop“ backward C Bit Description Value
0-3 Soundslot 1 - 16 0
135 Assignment of function Assignment of function outputs, activated in when driving forward;
Driving Forward A see CV129 0-255 0
136 Assignment of function Assignment of function outputs, activated in when driving forward;
Driving Forward B see CV130 0-255 0
137 Assignment of function Assignment of function outputs, activated in when driving forward;
Driving Forward C Soundslot 1 - 16 0-16 0
138 Assignment of function Assignment of function outputs, activated in when driving backward;
Driving Backward A see CV132 0-255 0
139 Assignment of function Assignment of function outputs, activated in when driving backward;
Driving Backward B see CV133 0-255 0
140 Assignment of function Assignment of function outputs, activated in when driving backward;
Driving Backward C Soundslot 1- 16 0-16 0
141 Assignment of function Assignment of function outputs, activated in light forward;
Light Forward A see CV129 0-255 0
142 Assignment of function Assignment of function outputs, activated in light forward;
Light Forward B see CV130 0-255 0
143 Assignment of function Assignment of function outputs, activated in light forward;
Light Forward C Soundslot 1 - 16 0-16 0
CVCV
CVCV
CV
NameName
NameName
Name
DescriptionDescription
DescriptionDescription
Description
RangeRange
RangeRange
Range
Def.Def.
Def.Def.
Def.
144 Assignment of function Assignment of function outputs, activated in light backward;
Light Backward A see CV132 0-255 0
145 Assignment of function Assignment of function outputs, activated in light backward;
Light Backward B see CV133 0-255 0
146 Assignment of function Assignment of function outputs, activated in light backward;
Light Backward C Soundslot 1- 16 0-16 0
147 Assignment of function Assignment of function outputs, activated in F1 forward;
F1 Forward A see CV129 0-255 0
148 Assignment of function Assignment of function outputs, activated in F1 forward;
F1 Forward B see CV130 0-255 0
149 Assignment of function Assignment of function outputs, activated in F1 forward;
F1 Forward C Soundslot 1 - 16 0-16 0
150 Assignment of function Assignment of function outputs, activated in F1 backward;
F1 Backward A see CV132 0-255 0
151 Assignment of function Assignment of function outputs, activated in F1 backward;
F1 Backward B see CV133 0-255 0
152 Assignment of function Assignment of function outputs, activated in F1 backward;
F1 Backward C Soundslot 1- 16 0-16 0
153 Assignment of function Assignment of function outputs, activated in F2 forward;
F2 Forward A see CV129 0-255 0
154 Assignment of function Assignment of function outputs, activated in F2 forward;
F2 Forward B see CV130 0-255 0
155 Assignment of function Assignment of function outputs, activated in F2 forward;
F2 Forward C Soundslot 1 - 16 0-16 0
156 Assignment of function Assignment of function outputs, activated in F2 backward;
F2 Backward A see CV132 0-255 0
157 Assignment of function Assignment of function outputs, activated in F2 backward;
F2 Backward B see CV133 0-255 0
158 Assignment of function Assignment of function outputs, activated in F2 backward;
F2 Backward C Soundslot 1- 16 0-16 0
159 Assignment of function Assignment of function outputs, activated in F3 forward;
F3 Forward A see CV129 0-255 0
160 Assignment of function Assignment of function outputs, activated in F3 forward;
F3 Forward B see CV130 0-255 0
161 Assignment of function Assignment of function outputs, activated in F3 forward;
F3 Forward C Soundslot 1 - 16 0-16 0
162 Assignment of function Assignment of function outputs, activated in F3 backward;
F3 Backward A see CV132 0-255 0
163 Assignment of function Assignment of function outputs, activated in F3 backward;
F3 Backward B see CV133 0-255 0
164 Assignment of function Assignment of function outputs, activated in F3 backward;
F3 Backward C Soundslot 1- 16 0-16 0
165 Assignment of function Assignment of function outputs, activated in F4 forward;
F4 Forward A see CV129 0-255 0
166 Assignment of function Assignment of function outputs, activated in F4 forward;
F4 Forward B see CV130 0-255 0
167 Assignment of function Assignment of function outputs, activated in F4 forward;
F4 Forward C Soundslot 1 - 16 0-16 0
168 Assignment of function Assignment of function outputs, activated in F4 backward;
F4 Backward A see CV132 0-255 0
169 Assignment of function Assignment of function outputs, activated in F4 backward;
F4 Backward B see CV133 0-255 0
170 Assignment of function Assignment of function outputs, activated in F4 backward;
F4 Backward C Soundslot 1- 16 0-16 0
Page 32

32
CVCV
CVCV
CV
NameName
NameName
Name
DescriptionDescription
DescriptionDescription
Description
RangeRange
RangeRange
Range
DefDef
DefDef
Def
171 Assignment of function Assignment of function outputs, activated in F5 forward;
F5 Forward A see CV129 0-255 0
172 Assignment of function Assignment of function outputs, activated in F5 forward;
F5 Forward B see CV130 0-255 0
173 Assignment of function Assignment of function outputs, activated in F5 forward;
F5 Forward C Soundslot 1 - 16 0-16 0
174 Assignment of function Assignment of function outputs, activated in F5 backward;
F5 Backward A see CV132 0-255 0
175 Assignment of function Assignment of function outputs, activated in F5 backward;
F5 Backward B see CV133 0-255 0
176 Assignment of function Assignment of function outputs, activated in F5 backward;
F5 Backward C Soundslot 1- 16 0-16 0
177 Assignment of function Assignment of function outputs, activated in F6 forward;
F6 Forward A see CV129 0-255 0
178 Assignment of function Assignment of function outputs, activated in F6 forward;
F6 Forward B see CV130 0-255 0
179 Assignment of function Assignment of function outputs, activated in F6 forward;
F6 Forward C Soundslot 1 - 16 0-16 0
180 Assignment of function Assignment of function outputs, activated in F6 backward;
F6 Backward A see CV132 0-255 0
181 Assignment of function Assignment of function outputs, activated in F6 backward;
F6 Backward B see CV133 0-255 0
182 Assignment of function Assignment of function outputs, activated in F6 backward;
F6 Backward C Soundslot 1- 16 0-16 0
183 Assignment of function Assignment of function outputs, activated in F7 forward;
F7 Forward A see CV129 0-255 0
184 Assignment of function Assignment of function outputs, activated in F7 forward;
F7 Forward B see CV130 0-255 0
185 Assignment of function Assignment of function outputs, activated in F7 forward;
F7 Forward C Soundslot 1 - 16 0-16 0
186 Assignment of function Assignment of function outputs, activated in F7 backward;
F7 Backward A see CV132 0-255 0
187 Assignment of function Assignment of function outputs, activated in F7 backward;
F7 Backward B see CV133 0-255 0
188 Assignment of function Assignment of function outputs, activated in F7 backward;
F7 Backward C Soundslot 1- 16 0-16 0
189 Assignment of function Assignment of function outputs, activated in F8 forward;
F8 Forward A see CV129 0-255 0
190 Assignment of function Assignment of function outputs, activated in F8 forward;
F8 Forward B see CV130 0-255 0
191 Assignment of function Assignment of function outputs, activated in F8 forward;
F8 Forward C Soundslot 1 - 16 0-16 0
192 Assignment of function Assignment of function outputs, activated in F8 backward;
F8 Backward A see CV132 0-255 0
193 Assignment of function Assignment of function outputs, activated in F8 backward;
F8 Backward B see CV133 0-255 0
194 Assignment of function Assignment of function outputs, activated in F8 backward;
F8 Backward C Soundslot 1- 16 0-16 0
195 Assignment of function Assignment of function outputs, activated in F9 forward;
F9 Forward A see CV129 0-255 0
196 Assignment of function Assignment of function outputs, activated in F9 forward;
F9 Forward B see CV130 0-255 0
197 Assignment of function Assignment of function outputs, activated in F9 forward;
F9 Forward C Soundslot 1 - 16 0-16 0
198 Assignment of function Assignment of function outputs, activated in F9 backward;
F9 Backward A see CV132 0-255 0
CVCV
CVCV
CV
NameName
NameName
Name
DescriptionDescription
DescriptionDescription
Description
Range Range
Range Range
Range
DefDef
DefDef
Def
199 Assignment of function Assignment of function outputs, activated in F9 backward;
F9 Backward B see CV133 0-255 0
200 Assignment of function Assignment of function outputs, activated in F9 backward;
F9 Backward C Soundslot 1- 16 0-16 0
201 Assignment of function Assignment of function outputs, activated in F10 forward;
F10 Forward A see CV129 0-255 0
202 Assignment of function Assignment of function outputs, activated in F10 forward;
F10 Forward B see CV130 0-255 0
203 Assignment of function Assignment of function outputs, activated in F10 forward;
F10 Forward C Soundslot 1 - 16 0-16 0
204 Assignment of function Assignment of function outputs, activated in F10 backward;
F10 Backward A see CV132 0-255 0
205 Assignment of function Assignment of function outputs, activated in F10 backward;
F10 Backward B see CV133 0-255 0
206 Assignment of function Assignment of function outputs, activated in F10 backward;
F10 Backward C Soundslot 1- 16 0-16 0
207 Assignment of function Assignment of function outputs, activated in F11 forward;
F11 Forward A see CV129 0-255 0
208 Assignment of function Assignment of function outputs, activated in F11 forward;
F11 Forward B see CV130 0-255 0
209 Assignment of function Assignment of function outputs, activated in F11 forward;
F11 Forward C Soundslot 1 - 16 0-16 0
210 Assignment of function Assignment of function outputs, activated in F11 backward;
F11 Backward A see CV132 0-255 0
211 Assignment of function Assignment of function outputs, activated in F11 backward;
F11 Backward B see CV133 0-255 0
212 Assignment of function Assignment of function outputs, activated in F11 backward;
F11 Backward C Soundslot 1- 16 0-16 0
213 Assignment of function Assignment of function outputs, activated in F12 forward;
F12 Forward A see CV129 0-255 0
214 Assignment of function Assignment of function outputs, activated in F12 forward;
F12 Forward B see CV130 0-255 0
215 Assignment of function Assignment of function outputs, activated in F12 forward;
F12 Forward C Soundslot 1 - 16 0-16 0
216 Assignment of function Assignment of function outputs, activated in F12 backward;
F12 Backward A see CV132 0-255 0
217 Assignment of function Assignment of function outputs, activated in F12 backward;
F12 Backward B see CV133 0-255 0
218 Assignment of function Assignment of function outputs, activated in F12 backward;
F12 Backward C Soundslot 1- 16 0-16 0
219 Assignment of function Assignment of function outputs, activated in F13 forward;
F13 Forward A see CV129 0-255 0
220 Assignment of function Assignment of function outputs, activated in F15 forward;
F13 Forward B see CV130 0-255 0
221 Assignment of function Assignment of function outputs, activated in F13 forward;
F13 Forward C Soundslot 1 - 16 0-16 0
222 Assignment of function Assignment of function outputs, activated in F13 backward;
F13 Backward A see CV132 0-255 0
223 Assignment of function Assignment of function outputs, activated in F13 backward;
F13 Backward B see CV133 0-255 0
224 Assignment of function Assignment of function outputs, activated in F13 backward;
F13 Backward C Soundslot 1- 16 0-16 0
225 Assignment of function Assignment of function outputs, activated in F14 forward;
F14 Forward A see CV129 0-255 0
226 Assignment of function Assignment of function outputs, activated in F14 forward;
F14 Forward B see CV130 0-255 0
CV Overview Chart
Page 33

33
CVCV
CVCV
CV
NameName
NameName
Name
DescriptionDescription
DescriptionDescription
Description
RangeRange
RangeRange
Range
DefDef
DefDef
Def
227 Assignment of function Assignment of function outputs, activated in F14 forward;
F14 Forward C Soundslot 1 - 16 0-16 0
228 Assignment of function Assignment of function outputs, activated in F14 backward;
F14 Backward A see CV132 0-255 0
229 Assignment of function Assignment of function outputs, activated in F14 backward;
F14 Backward B see CV133 0-255 0
230 Assignment of function Assignment of function outputs, activated in F14 backward;
F14 Backward C Soundslot 1- 16 0-16 0
231 Assignment of function Assignment of function outputs, activated in F15 forward;
F15 Forward A see CV129 0-255 0
232 Assignment of function Assignment of function outputs, activated in F15 forward;
F15 Forward B see CV130 0-255 0
233 Assignment of function Assignment of function outputs, activated in F15 forward;
F15 Forward C Soundslot 1 - 16 0-16 0
234 Assignment of function Assignment of function outputs, activated in F15 backward;
F15 Backward A see CV132 0-255 0
235 Assignment of function Assignment of function outputs, activated in F15 backward;
F15 Backward B see CV133 0-255 0
236 Assignment of function Assignment of function outputs, activated in F15 backward;
F15 Backward C Soundslot 1- 16 0-16 0
237 Assignment of function Assignment of function outputs, activated in Sensor 1 forward ;
Sensor 1 Forward A see CV129 0-255 0
238 Assignment of function Assignment of function outputs, activated in Sensor 1 forward;
Sensor 1 Forward B see CV130 0-255 0
239 Assignment of function Assignment of function outputs, activated in Sensor 1 forward;
Sensor 1 Forward C Soundslot 1 - 16 0-16 0
240 Assignment of function Assignment of function outputs, activated in Sensor 1 backward;
Sensor 1 Backward A see CV132 0-255 0
241 Assignment of function Assignment of function outputs, activated in Sensor 1 backward;
Sensor 1 Backward B see CV133 0-255 0
242 Assignment of function Assignment of function outputs, activated in Sensor 1 backward;
Sensor 1 Backward C Soundslot 1- 16 0-16 0
243 Assignment of function Assignment of function outputs, activated in Sensor 2 forward;
Sensor 2 Forward A see CV129 0-255 0
244 Assignment of function Assignment of function outputs, activated in Sensor 2 forward;
Sensor 2 Forward B see CV130 0-255 0
245 Assignment of function Assignment of function outputs, activated in Sensor 2 forward;
Sensor 2 Forward C Soundslot 1 - 16 0-16 0
246 Assignment of function Assignment of function outputs, activated in Sensor 2 backward;
Sensor 2 Backward A see CV132 0-255 0
247 Assignment of function Assignment of function outputs, activated in Sensor 2 backward;
Sensor 2 Backward B see CV133 0-255 0
248 Assignment of function Assignment of function outputs, activated in Sensor 2 backward;
Sensor 2 Backward C Soundslot 1- 16 0-16 0
249 Minimum distance of The time interval in milliseconds that the steam chuffs can have to each other 0-255 0
the steam chuffs
250 Time for the steam Relative throughput time of one steam shifts 0-255 0
shifts flow
251 Earliest relative starting Relative distance of the steam Shifts to the previous chuff 0-255 0
position for Steam Shift
252 Latest relative starting Relative distance of the steam shifts to the subsequent chuff 0-255 0
position for Steam Shift
CV Overview Chart
Page 34

34
Licence Agreement
This license agreement („the Agreement“) is a legal agreement
between you and ESU, LLC („ESU“) for the sound samples
(„Sound Samples“) and software licensed from this internet
site („Content“) as well as other content owned by ESU and its
third party licensors that also includes images, mixes and
documentation. By installing or using the Content, you are
agreeing to be bound by the terms of this Agreement. IF YOU
DO NOT AGREE TO THE TERMS OF THIS AGREEMENT, YOU
ARE GRANTED NO RIGHTS IN RESPECT OF THE CONTENT AND
MUST PROMPTLY DELETE THE CONTENT YOU HAVE
INSTALLED.
1. GRANT OF LICENSE1. GRANT OF LICENSE
1. GRANT OF LICENSE1. GRANT OF LICENSE
1. GRANT OF LICENSE
1.1 ESU grants you a non-transferable, limited, non-exclusive
right to use the Content solely for your own personal purposes.
You may load the Content into RAM, as well as installation on
a hard disk or other storage device on a single computer,
hardware product or mobile device owned by you or under
your control. The installation process may result in a copy of the
Content residing on your computer, in which case, you may
retain one (1) copy of the Content on your computer, provided
that you retain all copyright and other proprietary notices on
the copy and the copy is kept in your possession with the
original.
1.2 By using the Content, you shall not obtain any ownership,
copyright, proprietary or other interest in or to the Content.
The Content is licensed, not sold.
1.3 You are licensed to use, modify and combine the Sound
Samples with sound samples provided by third parties, to create
your own sound compositions which, subject to you complying
with the terms of this Agreement, you are free to distribute as
you wish provided that: (i) the Sound Samples have been mixed
together to create an original work; (ii) individual Sound Samples
are not used in isolation and (iii) the Sound Samples or derivatives are not used to create sound libraries for distribution to
third parties.
2. PROHIBITED USES2. PROHIBITED USES
2. PROHIBITED USES2. PROHIBITED USES
2. PROHIBITED USES
Neither you, nor anyone at your direction, shall:
2.1 use the Content, or any part of it, for any public
performance, live broadcast or time delayed live broadcast
where the Content is used unattended for commercial purposes
without ESU’s prior written consent;
2.2 use the Content, or any part of it, in any competitive
product;
2.3 sub-license, copy, reproduce, transmit, assign, rent, sell,
lease, offer on a pay-per-play basis, distribute for money or any
other consideration, or commercially exploit in any other manner
or through any medium whatsoever or otherwise transfer in
any way the Content or any part thereof;
2.4 manufacture and/or distribute for money or otherwise
commercially exploit any product that incorporates any part of
the Content. If you wish to use any part of the Content for
manufacture, resale, sub-license or further distribution, you
must contact ESU (and where relevant, its licensors) to enter
into an appropriate agreement with ESU (and, where relevant, its licensors);
2.5 publish the results of any analysis or comparative evaluation
of the Content or any part thereof without ESU’s prior written
consent;
2.6 reverse engineer, recompile or disassemble any part of the
Content except to the extent and in the circumstances expressly
permitted by ESU and its licensors in writing or by law;
3. INTELLECTUAL PROPERTY RIGHTS3. INTELLECTUAL PROPERTY RIGHTS
3. INTELLECTUAL PROPERTY RIGHTS3. INTELLECTUAL PROPERTY RIGHTS
3. INTELLECTUAL PROPERTY RIGHTS
You acknowledge that all intellectual property rights in the
Content are and shall remain vested in ESU and its licensors.
You undertake not to interfere with or diminish, whether by
act or omission, the rights, title and interest in the Content of
ESU and its licensors. You may be held responsible by ESU and/
or any of its licensors for any infringement of any intellectual
property rights in the Content. For the avoidance of doubt,
provided that you comply with the terms of this Agreement,
ESU shall not claim ownership of the intellectual property rights
in any compositions created by your use of the Content.
4. TERM AND TERMINA4. TERM AND TERMINA
4. TERM AND TERMINA4. TERM AND TERMINA
4. TERM AND TERMINA
TIONTION
TIONTION
TION
This Agreement is effective from the first date you install the
Content. The rights granted to you under this Agreement shall
terminate if you fail to abide by its terms. Upon such termination
you agree to destroy the Content including any Content stored
on the hard disk of any computer under your control. You may
terminate this Agreement at any time by destroying or erasing
all your copies of the Content. Any termination of this Agreement (howsoever occasioned) shall not affect any accrued
rights or liabilities of you or ESU nor shall it affect the coming
into force or the continuance in force of the provisions of
Clauses 2, 3, 5 and 6 and any provision hereof which is by
implication intended to come into or continue in force on or
after such termination.
5. NO WARRANTIES5. NO WARRANTIES
5. NO WARRANTIES5. NO WARRANTIES
5. NO WARRANTIES
TO THE MAXIMUM EXTENT PERMITTED BY APPLICABLE LAW,
ESU AND ITS LICENSORS PROVIDE THE CONTENT „AS IS“ AND
ESU EXCLUDES ON BEHALF OF ITSELF AND ITS LICENSORS,
ALL CONDITIONS, TERMS, REPRESENTATIONS (OTHER THAN
FRAUDULENT REPRESENTATIONS) AND WARRANTIES RELATING
TO THE CONTENT, WHETHER IMPOSED BY STATUTE OR BY
OPERATION OF LAW OR OTHERWISE, INCLUDING BUT NOT
LIMITED TO, IMPLIED WARRANTIES OF SATISFACTORY QUALITY
AND FITNESS FOR A PARTICULAR PURPOSE. NEITHER ESU NOR
ITS LICENSORS WARRANT THAT THE OPERATION OF THE
CONTENT WILL BE UNINTERRUPTED, ERROR FREE, VIRUS FREE
OR MEET YOUR SPECIFIC REQUIREMENTS. YOU MAY HAVE
OTHER RIGHTS THAT VARY FROM JURISDICTION TO
JURISDICTION.
6. ESU’6. ESU’
6. ESU’6. ESU’
6. ESU’
s LIABILITYs LIABILITY
s LIABILITYs LIABILITY
s LIABILITY
Neither ESU nor its licensors shall have any liability to you for
any loss or damage caused directly or indirectly in connection
with the Content, any part thereof or this Agreement, except
to the extent that such liability cannot be lawfully excluded. In
any case, neither ESU nor its licensors shall be liable for any loss
of business, data, profits, savings, or any other special, incidental,
consequential, indirect or economic loss whatsoever even if
such losses were contemplated at the date of this Agreement
7. GENERAL7. GENERAL
7. GENERAL7. GENERAL
7. GENERAL
7.1 You acknowledge that damages alone might be insufficient
remedy for any breach of the terms of this Agreement and
that the remedies of injunction, specific performance or other
equitable relief would be suitable remedies in the event of any
breach or threatened breach of this Agreement.
7.2 You may not assign or otherwise transfer all or any part of
this Agreement or the rights granted to you hereunder.
7.3 ESU is not obliged to provide any maintenance, technical
support or upgrades to you.
7.4 You agree to comply with all applicable import and export
regulations and acknowledge that you have the responsibility
for obtaining all necessary licenses to export, re-export, transfer
or import the Content.
7.5 This Agreement constitutes the entire agreement between
you and ESU with respect to the subject matter hereof and
supersedes all prior agreements, arrangements and
understandings between the parties and constitutes the entire
agreement between the parties relating to such subject matter hereof. No addition to or modification of any provision of
this Agreement shall be binding upon ESU and you unless made
by a written instrument signed by a duly authorized
representative of ESU and you.
7.6 No forbearance, delay or indulgence by either party in
enforcing the provisions of this Agreement shall prejudice or
restrict the rights of that party nor shall any waiver of its rights
operate as a waiver of any subsequent breach and no right,
power or remedy herein conferred upon or reserved for either
party is exclusive of any other right, power or remedy available
to that party and each such right, power or remedy shall be
cumulative.
7.7 Notwithstanding that the whole or any part of any provision
of this Agreement may prove to be illegal or unenforceable the
other provisions of this Agreement and the remainder of the
provision in question shall remain in full force and effect.
Page 35

35
Page 36

36
Warranty card
Retailer´s stamp or address
Goods return note
1. Customer data (Please write in block letters)
Name: ..........
Street: ..........
Postal Code / Town:
Country: .........
E-Mail: ..........
Telephone ........
Date:.............
Signature: ....
2. Type of fault
Network connection
Data connector
Input (PC)
Output (track)
LED display
Body
3. Description of software bug (use extra page, if necessary)
4. Receipt of purchase
Please enclose the receipt to the shipment!
5. Details of retailer
Warranty certificate
24 months warranty from date of purchase
Dear customer,
congratulations to your purchase of this ESU product. This high tech product has been manufactured
according to the latest production processes and has passed stringent quality checks and tests.
Therefore ESU electronic solutions ulm GmbH & Co KG offers you in addition to the national warranty
rights as governed by law a special
manufacturers warranty of 24 months from date of purchase
Warranty conditions:
• This warranty is valid for all ESU products, purchased at an ESU dealer.
• Any repair or replacement under this warranty is subject to proof of purchase. The warranty certificate
completed by your ESU dealer together with the receipt serves as the proof of purchase. We recommend
to keep the receipt together with the certificate.
• Please fill in the goods return note on the left accurately and send it in as well.
Content of warranty / exemptions:
The warranty of ESU electronic solutions ulm GmbH & Co KG comprises the free of charge disposal or
replacement of any faulty part due to faulty
design, manufacturing or material or transport damagedesign, manufacturing or material or transport damage
design, manufacturing or material or transport damagedesign, manufacturing or material or transport damage
design, manufacturing or material or transport damage.
Any further claims are excluded.
This warranty expires:
1. in case of failure due to wear and tear
2. if ESU products have been modified with parts not approved by ESU
3. if parts have been altered, especially missing shrink sleeves, or wires soldered directly to the decoder
4. if the product is used for a different purpose than the one intended by the manufacturer
5. if recommendations issued by ESU electronic solutions ulm GmbH & Co KG are not adhered to.
For reasons of liability no examination or repairs can be carried out on parts built into locos or coaches.
The warranty period will not be extended due to repairs or replacement.
You may submit your claim by either returning the faulty product to your dealer or by shipping it directly
to ESU electronic solutions ulm GmbH & Co KG together with the warranty certificate, the receipt and
a detailed description of the fault.
ESU electronic solutions ulm GmbH & Co. KG
- Warranty departmentIndustriestrasse 5
D-89081 UlmD-89081 Ulm
D-89081 UlmD-89081 Ulm
D-89081 Ulm
 Loading...