

ESTES Magician User Manual

G
L
U
E
G
L
U
E
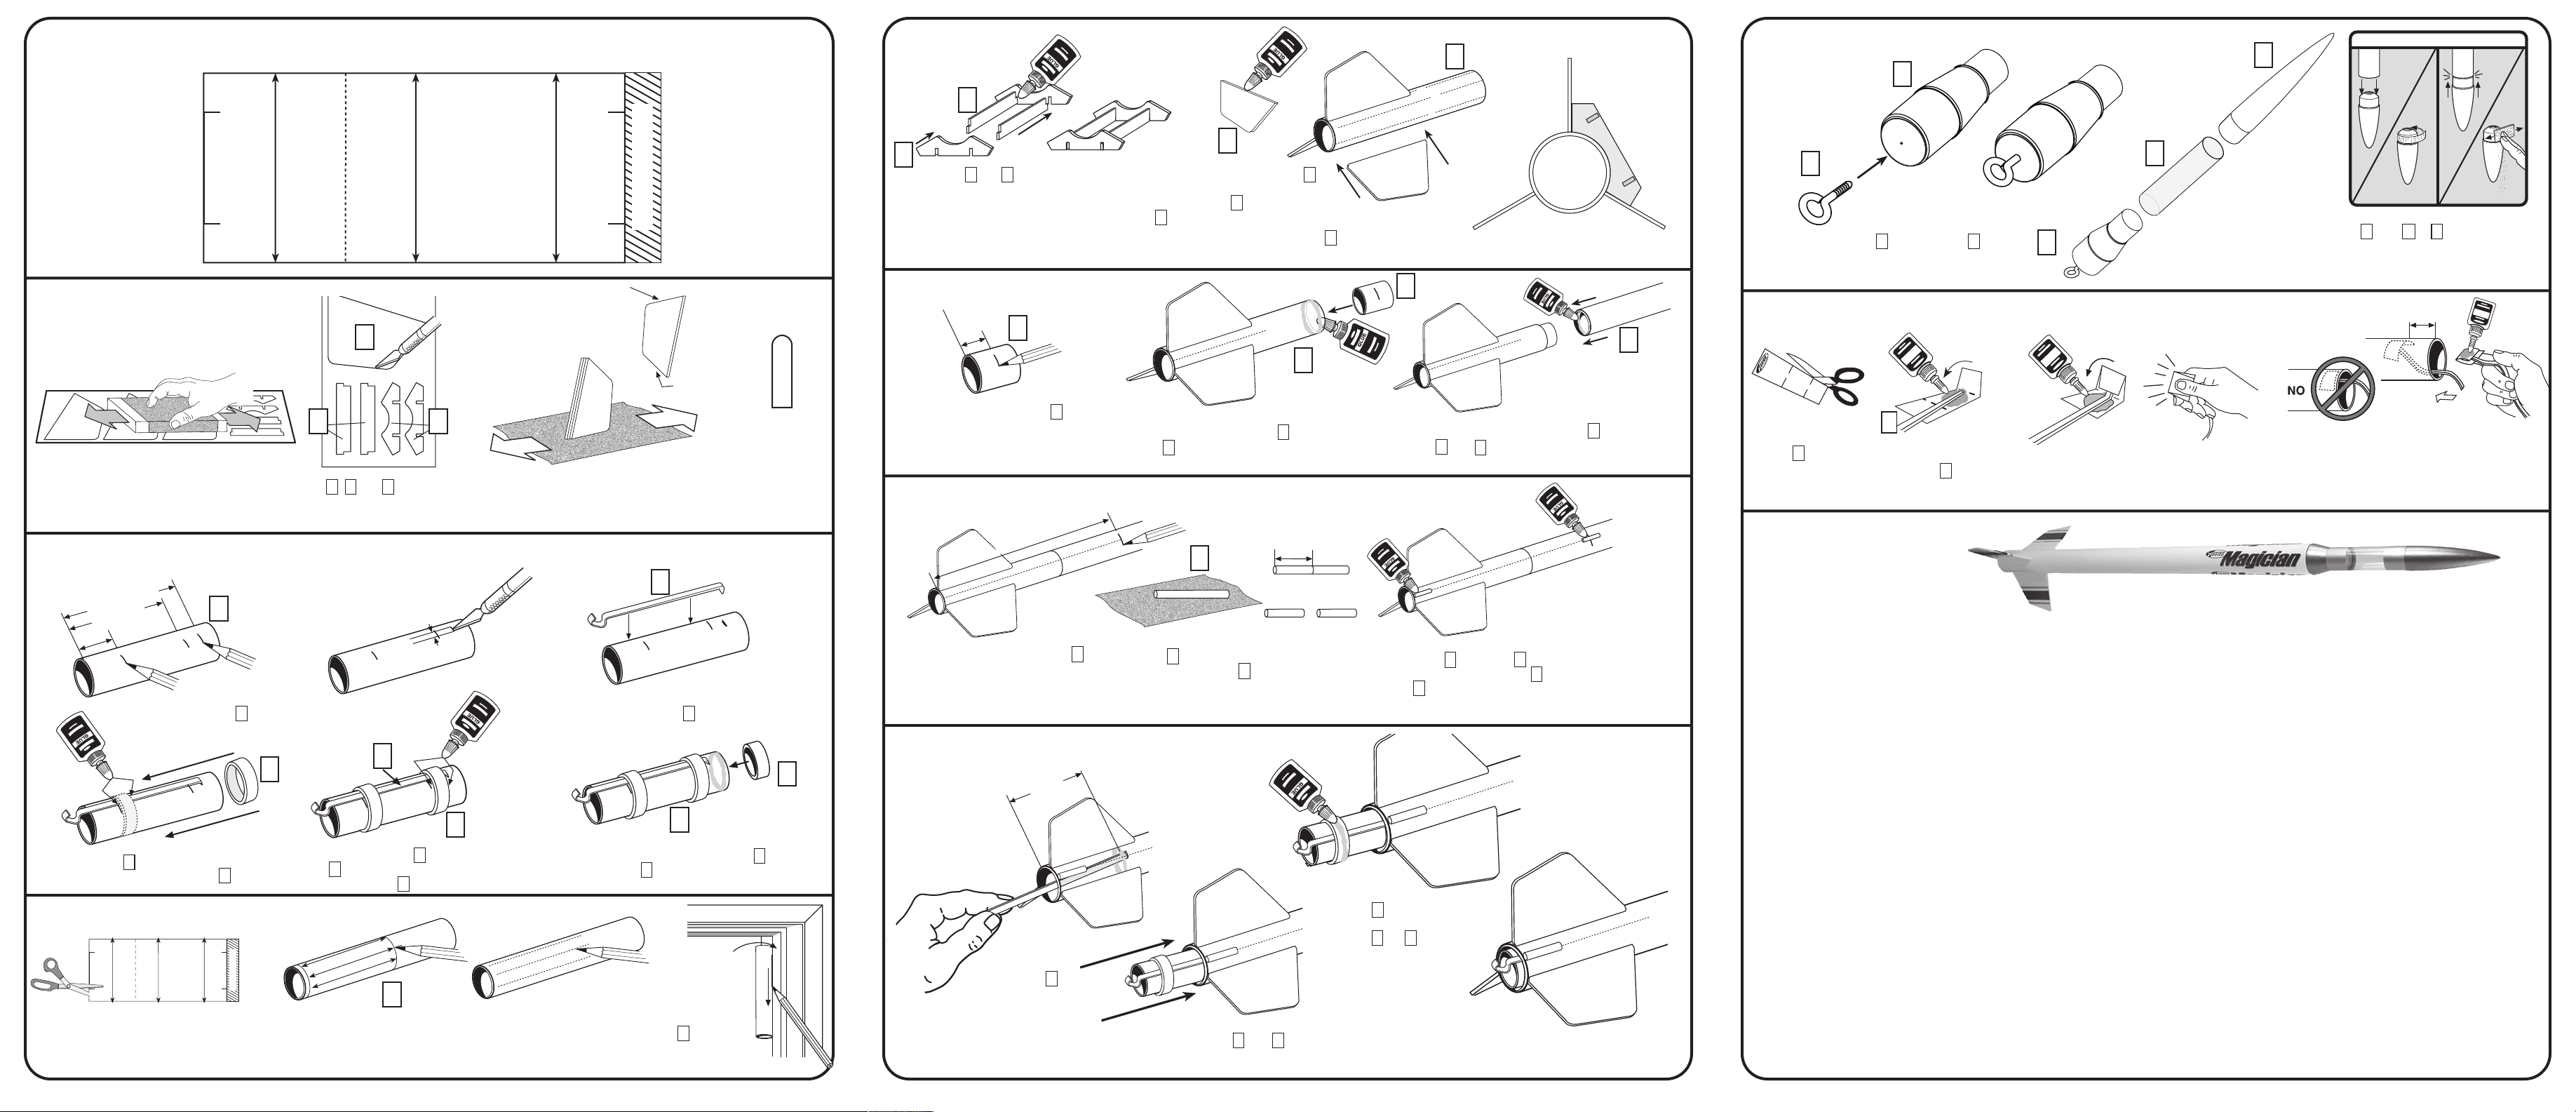
TUBE MARKING GUIDE
G
L
U
E
(Make a copy if you want to keep instructions.)
FIN ATTACHMENT
I
PAYLOAD AND NOSE CONE ASSEMBLY
E
N
FI
LL
FIN
Fin
Alignment
Guide
K
M
HELPFUL HINT:
TOO
LOOSE
IF NOSE CONE FIT IS. . .
TOO
TIGHT
MATCHING LINES
FIN PREPARATION
1. Sand both sides of balsa
sheet with fine sandpaper
(#320 or #400 grit).
ENGINE MOUNT ASSEMBLY
(89 mm)
1"
(25 mm)
3-1/2"
(76 mm)
3"
A
1. Measure and mark A.
4. Slide C to mark. Apply
glue to both sides of C.
TUBE MARKING
FIN
MATCHING LINES
1. Cut tube marking guide from
instructions.
FIN
LAUNCH LUG
FIN
MATCHING LINES
OVERLAP TAB
FIN
LAUNCH LUG
FIN
H
I J
2. Cut H, I and J from sheet.
1
/8
"
(3
m
m
)
2. Cut slit at mark. 3. Insert B in slit.
B
C
C
5. Slide remaining C over end
of B to mark. Apply glue to
both sides of C .
N
FI
UNCH LUG
LA
N
FI
LL
E
2. Mark fin locations “FL” at arrows.
Mark launch lug line “LL” .
FIN
MATCHING LINES
OVERLAP TAB
ROUND
LEADING
EDGE
3. Stack like fins together. Sand
edges smooth. Do not sand
root edge round.
B
A
6. Apply glue inside end of A.
Insert D until it stops. Let dry.
FL
LL
FL
3. Remove guide. Extend “FL” and
“LL” lines full length on E . Use
door frame as a straight edge.
DOOR FRAME
ROOT
EDGE
TRAILING
EDGE
4. Sand leading
edge round.
LEADING
EDGE
TRAILING
EDGE
D
J
1. Glue I and J together
forming Fin Alignment
Guide. Let dry.
2. Apply glue to root edge of H.
JOIN BODY TUBES
F
5/8"
(16 mm)
1. Measure and mark F .
2. Apply ring of glue inside E .
Insert F to mark. Wipe excess
glue. Let dry.
LAUNCH LUG ATTACHMENT
(25.4 cm)
10"
1. Extend launch lug line on G.
Measure and mark on “LL” .
LL
2. Sand N with fine sandpaper.
Measure and cut N.
ENGINE MOUNT ATTACHMENT
2-1/2"
(64 mm)
1. Apply glue
inside of E .
H
Let dry 1 minute. Apply 2nd layer
of glue. Attach H even with end
of E.
3. Repeat for remaining H. Use Fin
Alignment Guide for accuracy. Let dry.
LL
E
m
1"
(25
m
)
N
2. Slide engine mount assembly
half way into E with B aligned
with launch lug.
F
LL
3. Apply ring of glue to inside of G.
Slide F into G. Wipe excess glue. Let dry.
3. Apply glue to E. Position N centered on “LL”
even with end. Apply glue to G forward of mark.
Position N centered on “LL” . Let dry.
3. Apply ring of glue to
rear C .Slide engine
mount assembly even
with E so B is aligned
with “LL” .
Let dry.
Complete assembly.
O
1. Screw O centered in K .
K
L
ADD
MASKING TAPE.
2. Check fit of K and M in L. Sand as
required for fit. Separate parts until
SAND FOR FIT.
painted. DO NOT GLUE IN PLACE.
SHOCK CORD INSTALLATION
1 1/2” (38 mm)
G
ORD
T
C
3
N
O
I
MOUN
T
C
SHOCK
E
2
S
N
O
I
T
C
E
1
S
N
O
I
T
C
E
S
3
1
2
3
P
1. Cut S from
pattern.
2. Apply glue
to section 2.
Place P on
glue. Fold
forward.
3. Apply glue and fold
forward.
4. Squeeze tight!
5. Apply glue to shock cord mount
and insert in body tube. Hold
until glue sets. Let dry.
FINISHING ROCKET
LL
NOTE: We have found Testors spray primers (Testors #2948 White Primer), Testors One Coat Lacquer spray paints (color
of your choice), Te stors Model Master spray paints (color of your choice) and Testors Gloss Lacquer (#1961) to be excellent
for providing a long lasting and durable finish on your rocket. Always be sure to spray your models outside or in a well
ventilated area.
Steps to a quality finish
1. Insert shock cord into body tube and hold in place with paper.
2. Lightly sand body tube, fins and nose cone with fine sandpaper (#320 or #400 grit).
3. Apply glue fillets to fins, joints and launch lugs.
a. Allow glue to dry overnight.
4. Insert a dowel into the engine tube end of the rocket for painting.
5. Insert small nail in nose cone base and hold with pliers or clip for painting.
6. Hold screw eye with pliers for painting.
7. We recommend a good filler/primer to be applied to the balsa fins, tube adapter and nose cone before painting.
8. Apply 1-2 light coats of white primer to rocket body, tube adapter and nose cone, lightly sanding with fine sandpaper (#320
or #400 grit) between coats.
a. Allow to dry between each coat.
9. Apply gloss white to rocket body.
a.
Let dry overnight (24 hours is best).
10. Paint nose cone and tube adapter silver or platinum.
a. Allow paint to dry overnight (24 hours is best).
11. Apply water slide decals where shown. Cut the decal to be applied from the decal sheet, trimming close to the decal edge.
a. Hold the decal in warm water until decal begins to curl.
b. Remove the entire decal, position in place and slide the decal from the backing material and onto
the model as close to final position as possible.
c. Gently blot out excess water with a clean paper towel.
d. Allow decals to set overnight before applying protective clear coat. Allow to set overnight.
12. When decals are dry, spray entire rocket (main body, tube adapter and nose cone separately) with a light coat of
Testors Gloss Lacquer (#1961). This will provide added protection and shine to your Magician
TM
rocket!
Page 2 Page 3 Page 4
 Loading...