

Page 1
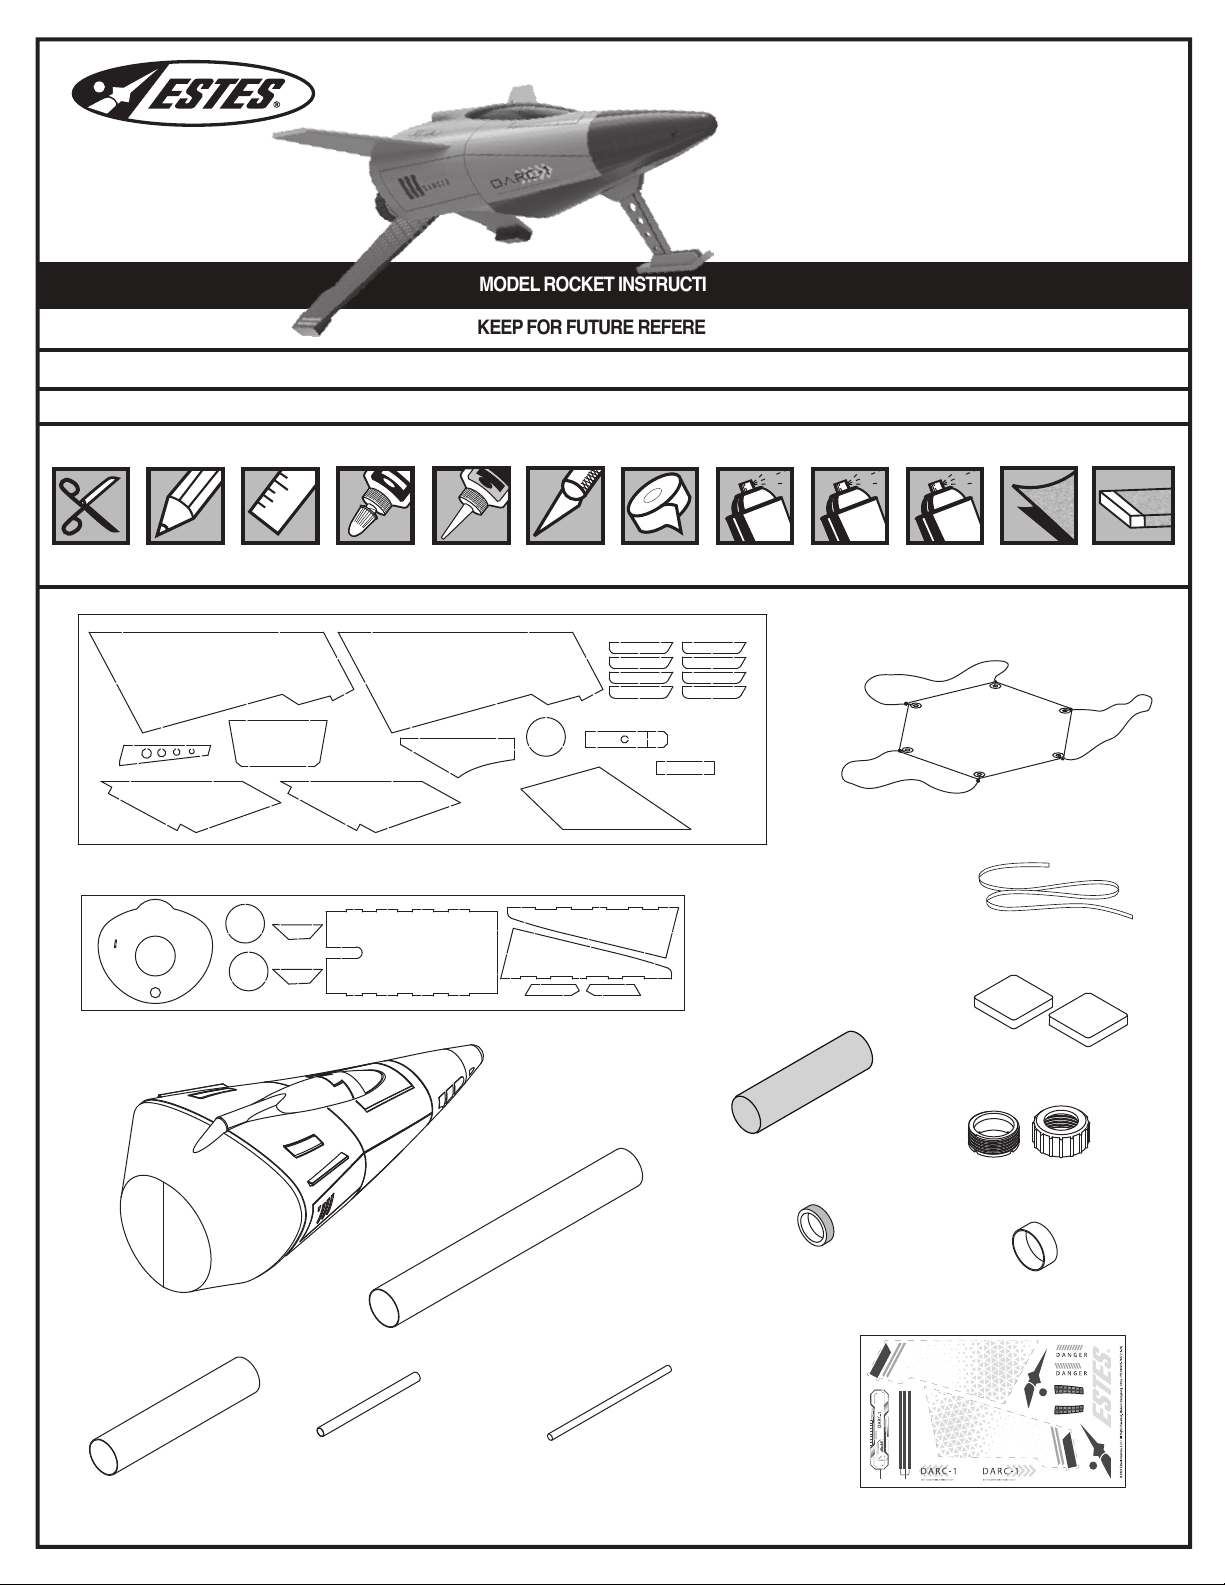
DARC-1
EstesRockets.com
MODEL ROCKET INSTRUCTIONS
KEEP FOR FUTURE REFERENCE
IMPORTANT: Please record date found on decal and keep for future reference. ______________
Read all instructions. Make sure you have all parts and supplies. Test fit all parts before applying glue.
SUPPLIES
™
7307
W
YELLOW GLUE
D
P
T T
Q
K
Z
Q
MEDIUM CA GLUE
D
U
O
HOBBY KNIFE RULERPENCILSCISSORS
MASKING TAPE
PRIMER
(WHITE)
PAINT
(GRAY, BLACK)
090051-7307
Laser cut wood sheet
(OPTIONAL)
FINE SANDPAPERCLEAR COAT
SAND BLOCK
C
R
X
L
E
090052-7307
N
Laser cut card stock
AA 035801
Parachute
G 038367
Shock cord
X2
N
Y
S 085705
Clay
E 035003
Yellow spacer tool
H 072421
Engine retainer
037120
J
I 073225
Aero shroud
M 038178
Launch lug
6" LONG
A 030327
Body tube
V 032054
Wood dowel
B 30162-2
Green engine block
090001-7307
Waterslide decal
1
F 030168
Mylar retainer ring
Page 2
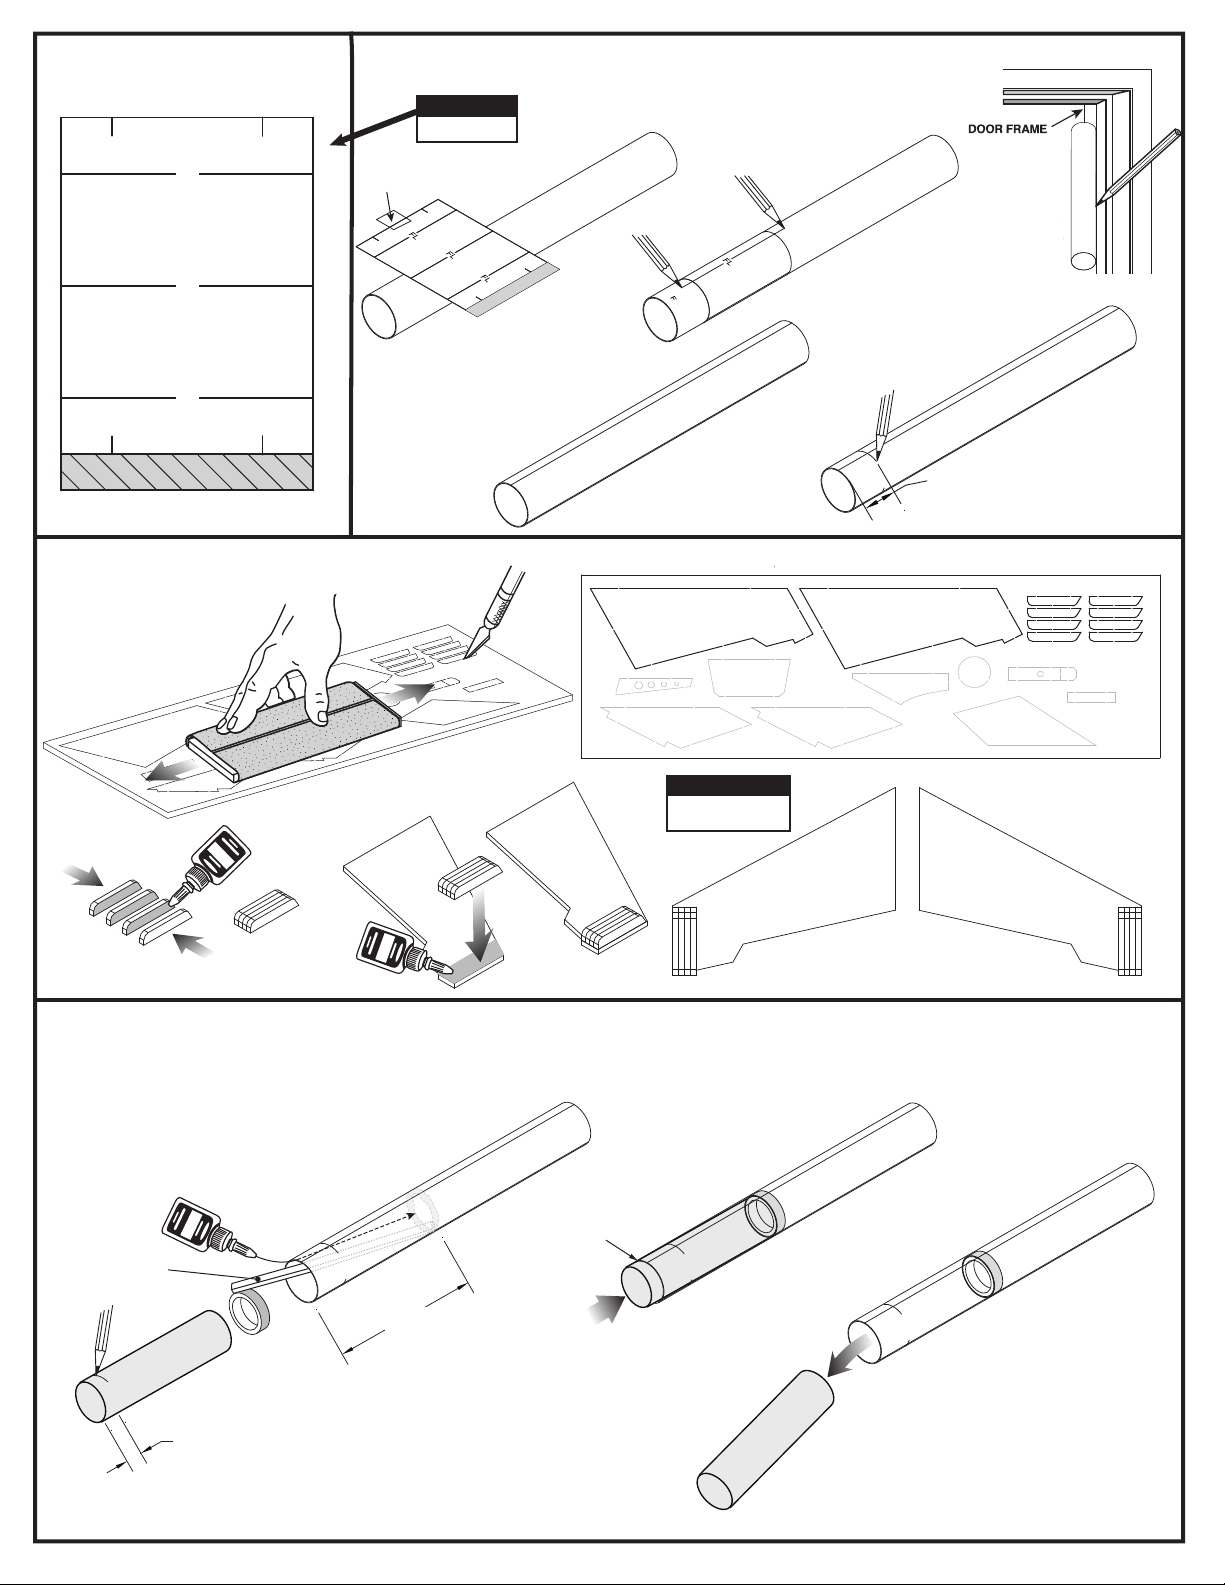
TUBE MARKING GUIDE
Make a copy if you want to keep instructions.
FL FL FL
MARK BODY TUBE
1.
NOTE:
Cut from here.
TAPE
Remove guide. Use
2.
Mark A as shown.
A
3.
door frame to
extend lines to end
of tube.
A
PREPARE WOOD PARTS
1.
Sand both sides.
4.
2.
5.
5.
Make pencil marks on
lines you marked in
step 3 as shown.
4.
5/8” (16 mm)
3. Wood pieces used in this step.
NOTE:
Create an opposite
set of parts.
D
C
X2
INSERT ENGINE BLOCK
1. Measure and mark E.
Scrap balsa.
B
E
1/4” (6 mm)
2. Apply glue inside A.
2 1/4” (5.7 cm)
A
Insert E to mark.
Mark
LET DRY
3.
Use E (yellow spacer
tool) to insert
engine block) into
position.
B (green
4. Remove E.
E
E
REMOVE E
IMMEDIATELY.
LET DRY
2
Page 3
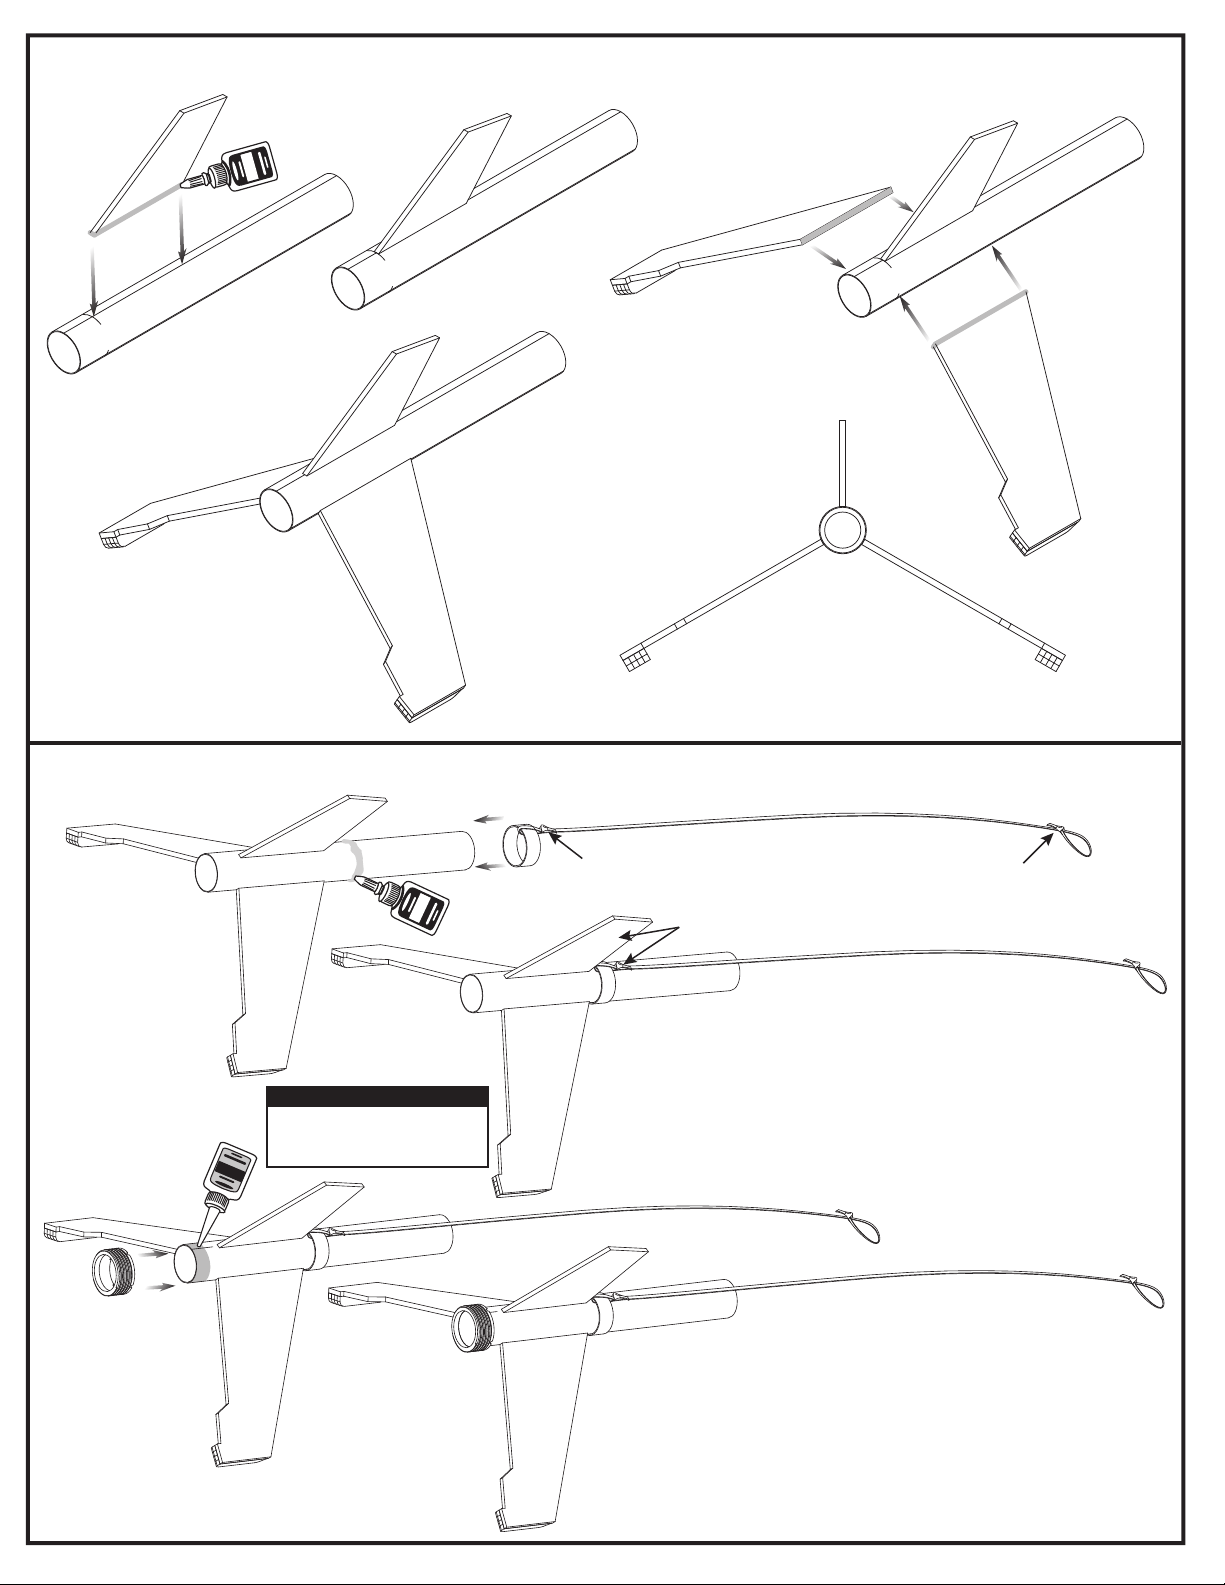
ATTACH FINS TO BODY TUBE
1. Apply glue on E
as shown.
E
2.
3. Apply glue on both D
as shown.
A
4.
LET DRY
ATTACH LOWER SHOCK CORD AND ENGINE RETAINER
1. Apply glue on A
as shown.
A
F
D
END VIEW
2. Loop G through F and tie a double knot.
Make another loop on opposite end of
and tie another double knot.
DOUBLE
KNOT
ALIGN KNOT
WITH FIN
G
3. Slide F into glue.
G
D
DOUBLE
KNOT
4. Apply CA glue on A
as shown.
H
CAUTION
Please be extremely careful using
cyanoacrylate adhesive (CA). Avoid
getting in your eyes or on your skin.
Safety glasses are recommended.
A
H
5. Slide H into glue.
LET DRY
3
Page 4
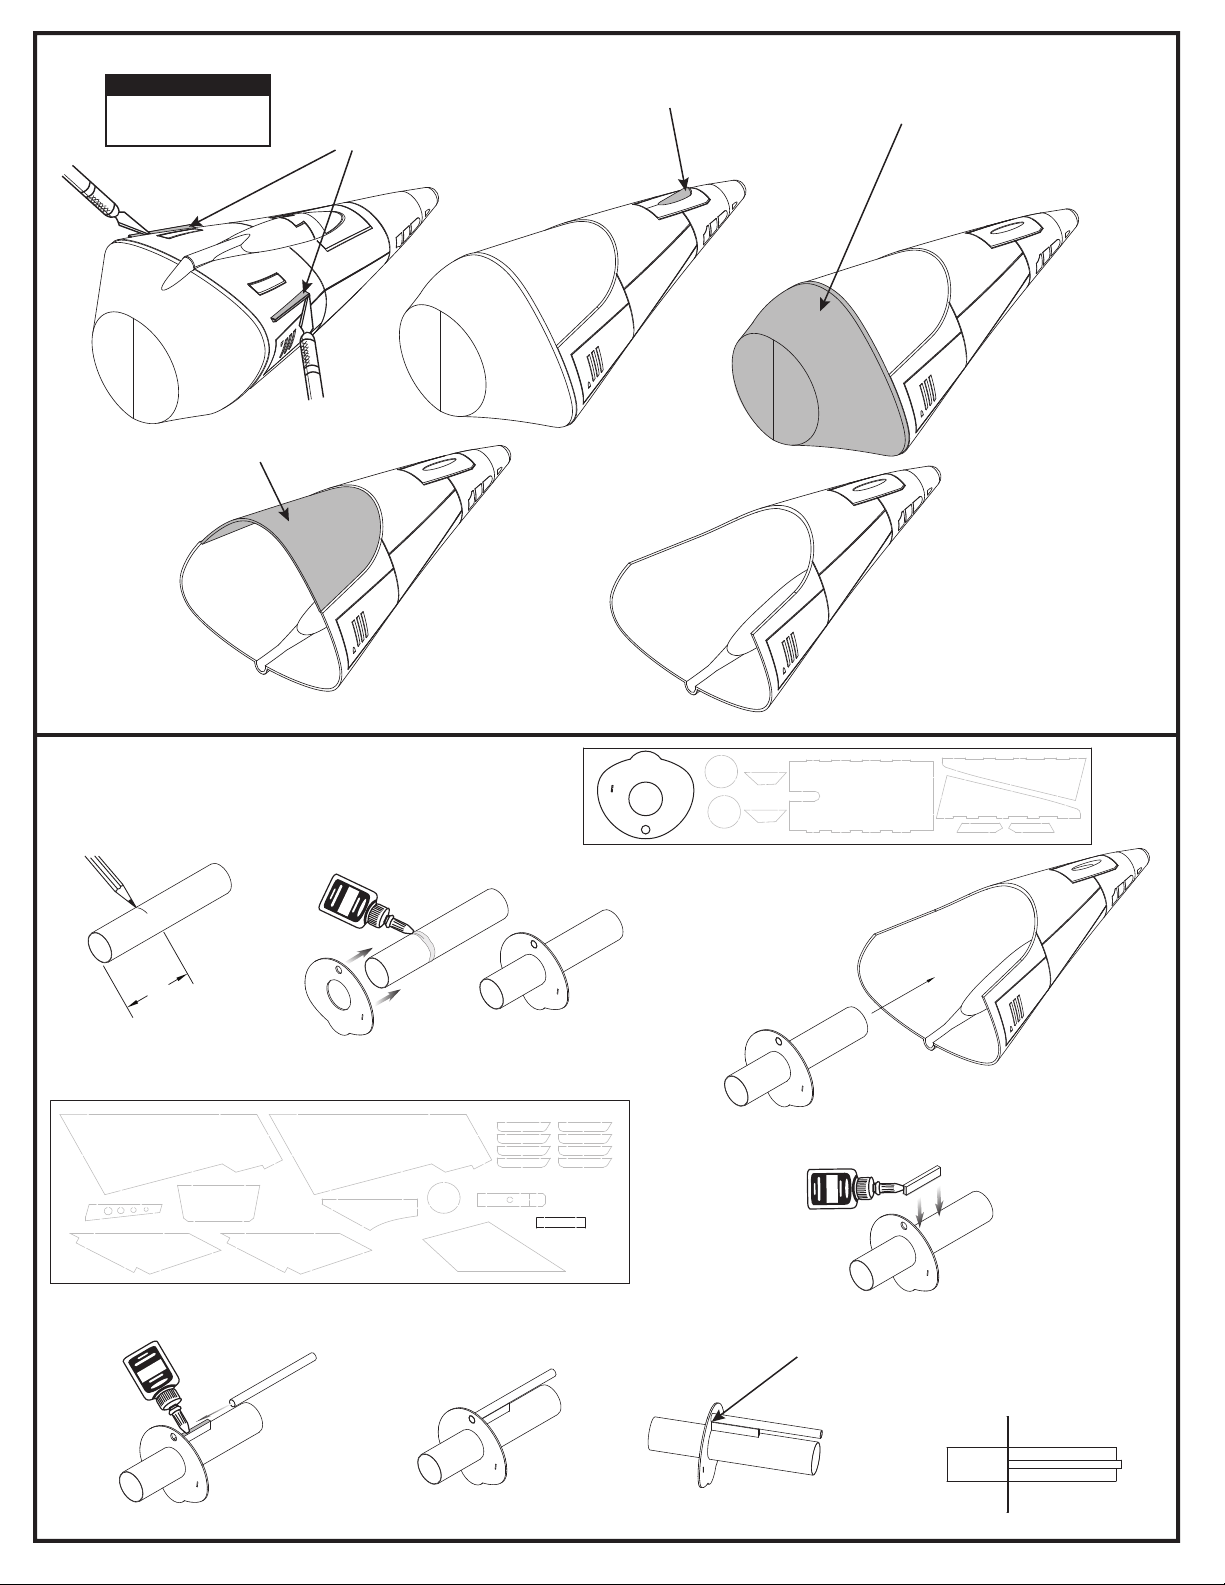
PREPARE AERO SHROUD
NOTE:
Use a brand new blade.
Make several passes
applying light pressure.
I
4. Remove this piece.
1. Carefully remove thses two pieces.
2. Remove this piece.
5.
3. Remove this piece.
ASSEMBLE UPPER FIN UNIT SUPPORT
2. Measure and mark J.
3. Apply glue on mark.
K into glue.
Slide
J
TBD” (?? cm)
K
5. Laser cut wood sheet used in this step.
7.
1. Laser cut card stock
used in this step.
J
8.
4. Test fit inside aero shroud.
FRONT OF TUBE SHOULD
MAKE CONTACT WITH
INSIDE OF SHROUD
FRONT
6. Apply glue as shown.
6. Only apply glue fillets in these locations.
L
M
LET DRY
4
BOTTOM VIEW
Page 5
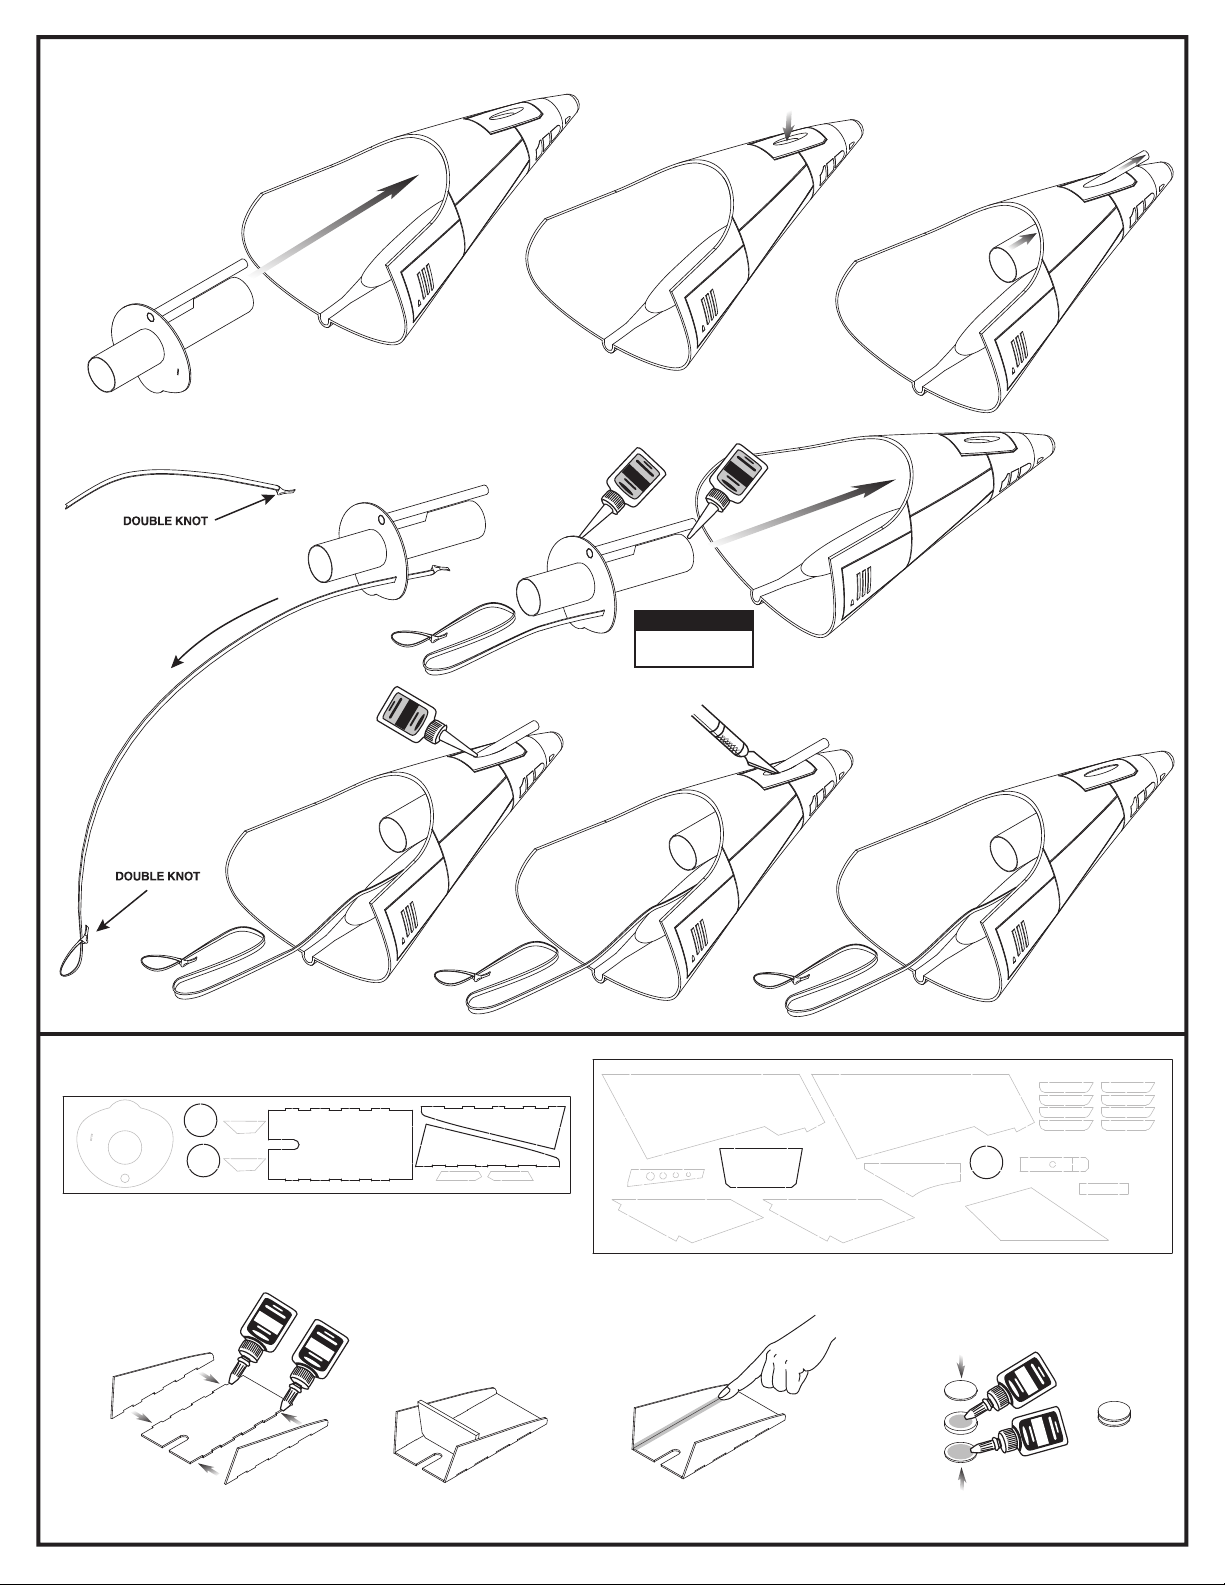
INSTALL BOOSTER SUPPORT AND SHOCK CORD
1. Trial fit assembly into shroud
with launch lug sticking out
the front hole.
5. Remove tube unit assembly.
G through slot in K
Slide
4. Tie a double knot in end of G.
G
Make another loop on opposite
G and tie another
end of
double knot..
K
G
7. Apply CA glue as shown.
2. Enlarge hole with round file or sandpaper
rolled into a tube until assembly fits in
place without bending launch lug.
6. Apply CA glue as shown.
Slide tube unit assembly
into place.
NOTE:
Avoid getting glue
on shock cord.
8. Use hobby knife to remove
excess launch lug as shown.
3. Slide tube unit assembly
into place.
ASSEMBLE RECOVERY COMPARTMENT
Q
O
Q
1. Apply glue as shown.
2. Use P to set angles of N.
LET DRY
N
N
P
3. Apply glue fillets
to inside joints.
R
4. Apply glue as shown.
N
O
P
N
LET DRY
5
Q
R
LET DRY
Q
Page 6
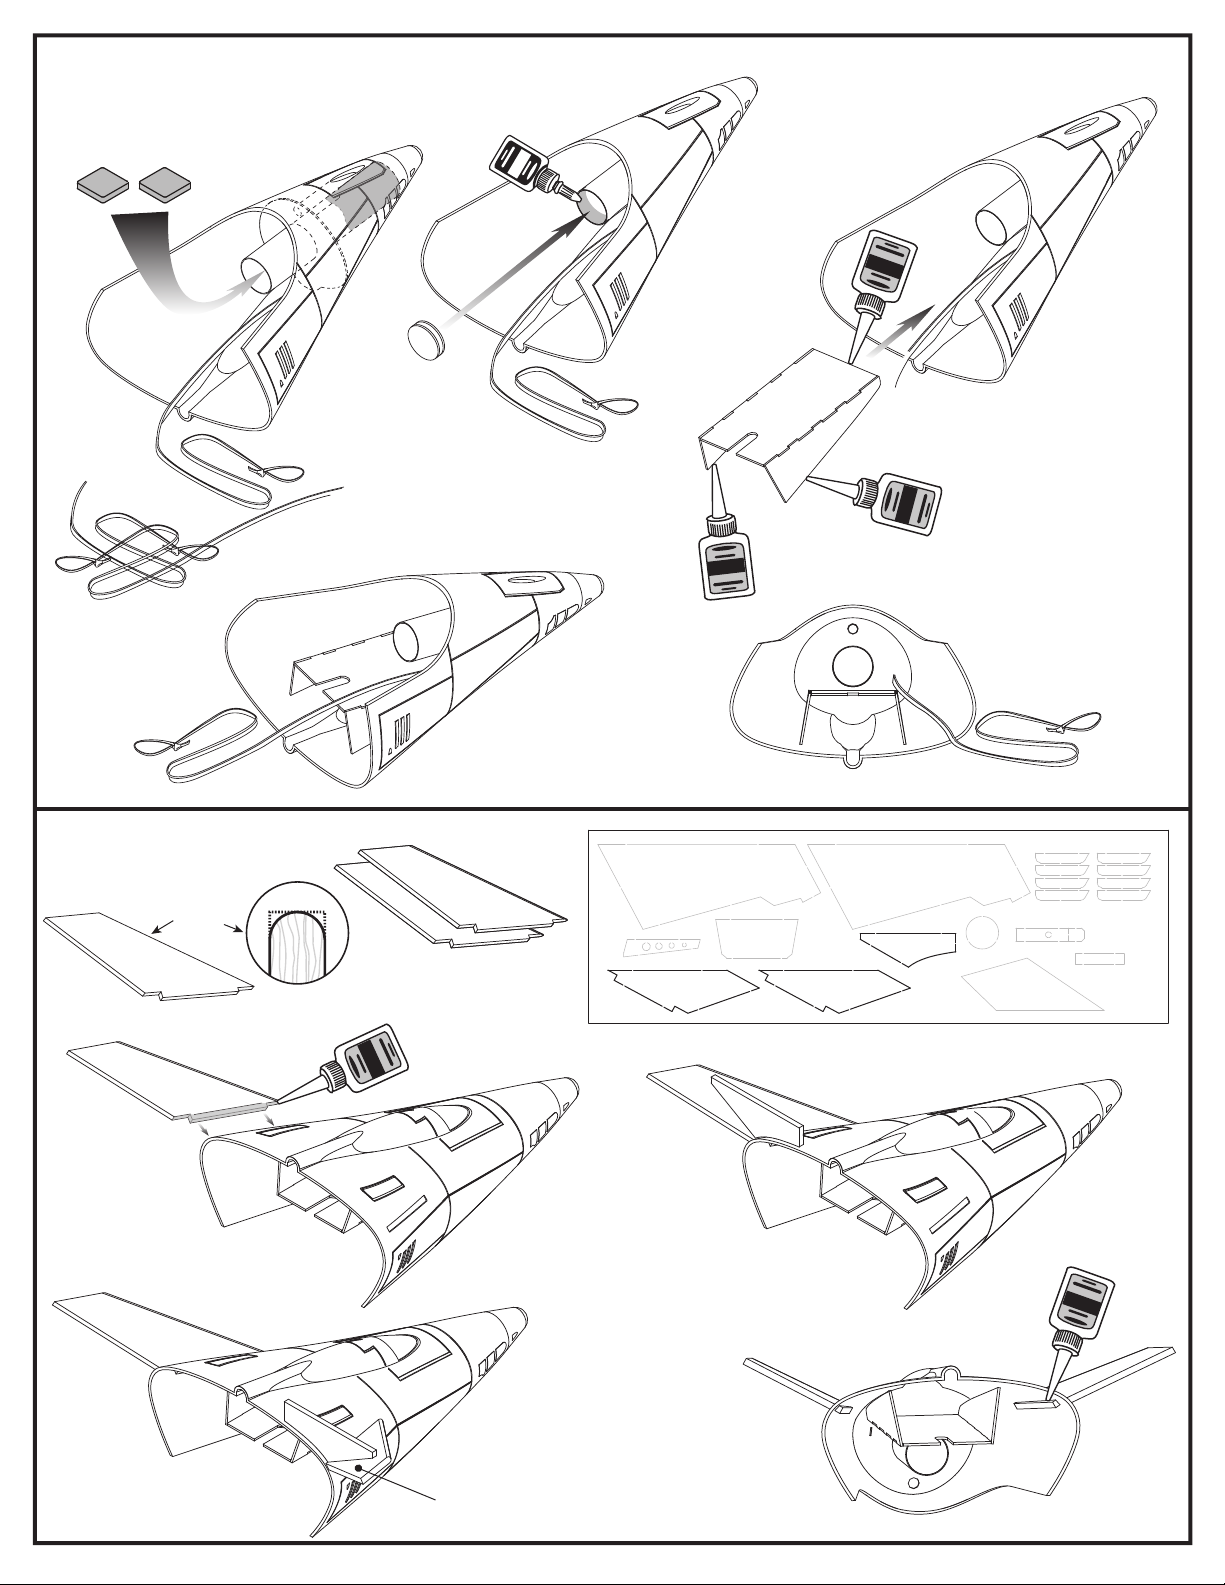
ASSEMBLE RECOVERY COMPARTMENT AND INSTALL NOSE WEIGHT
2. Apply glue as shown. Push
1. Insert S all the way into forward
body tube as shown.
plug into glue.
4. Recovery compartment should appear as shown.
3. Apply CA glue as shown.
Install recovery compartment.
ATTACH AERO SHELL FINS
1. Round leading egdes as shown.
ROUND
LEADING
EDGES
T
2. Apply CA glue as shown.
4. Repeat for second T.
T
LET DRY
X2
END VIEW
T
3. Use U to set angle of T.
T
U
5. Apply CA glue fillets to T
on inside of Aero Shell.
U
T
U
T
6
LET DRY
Page 7
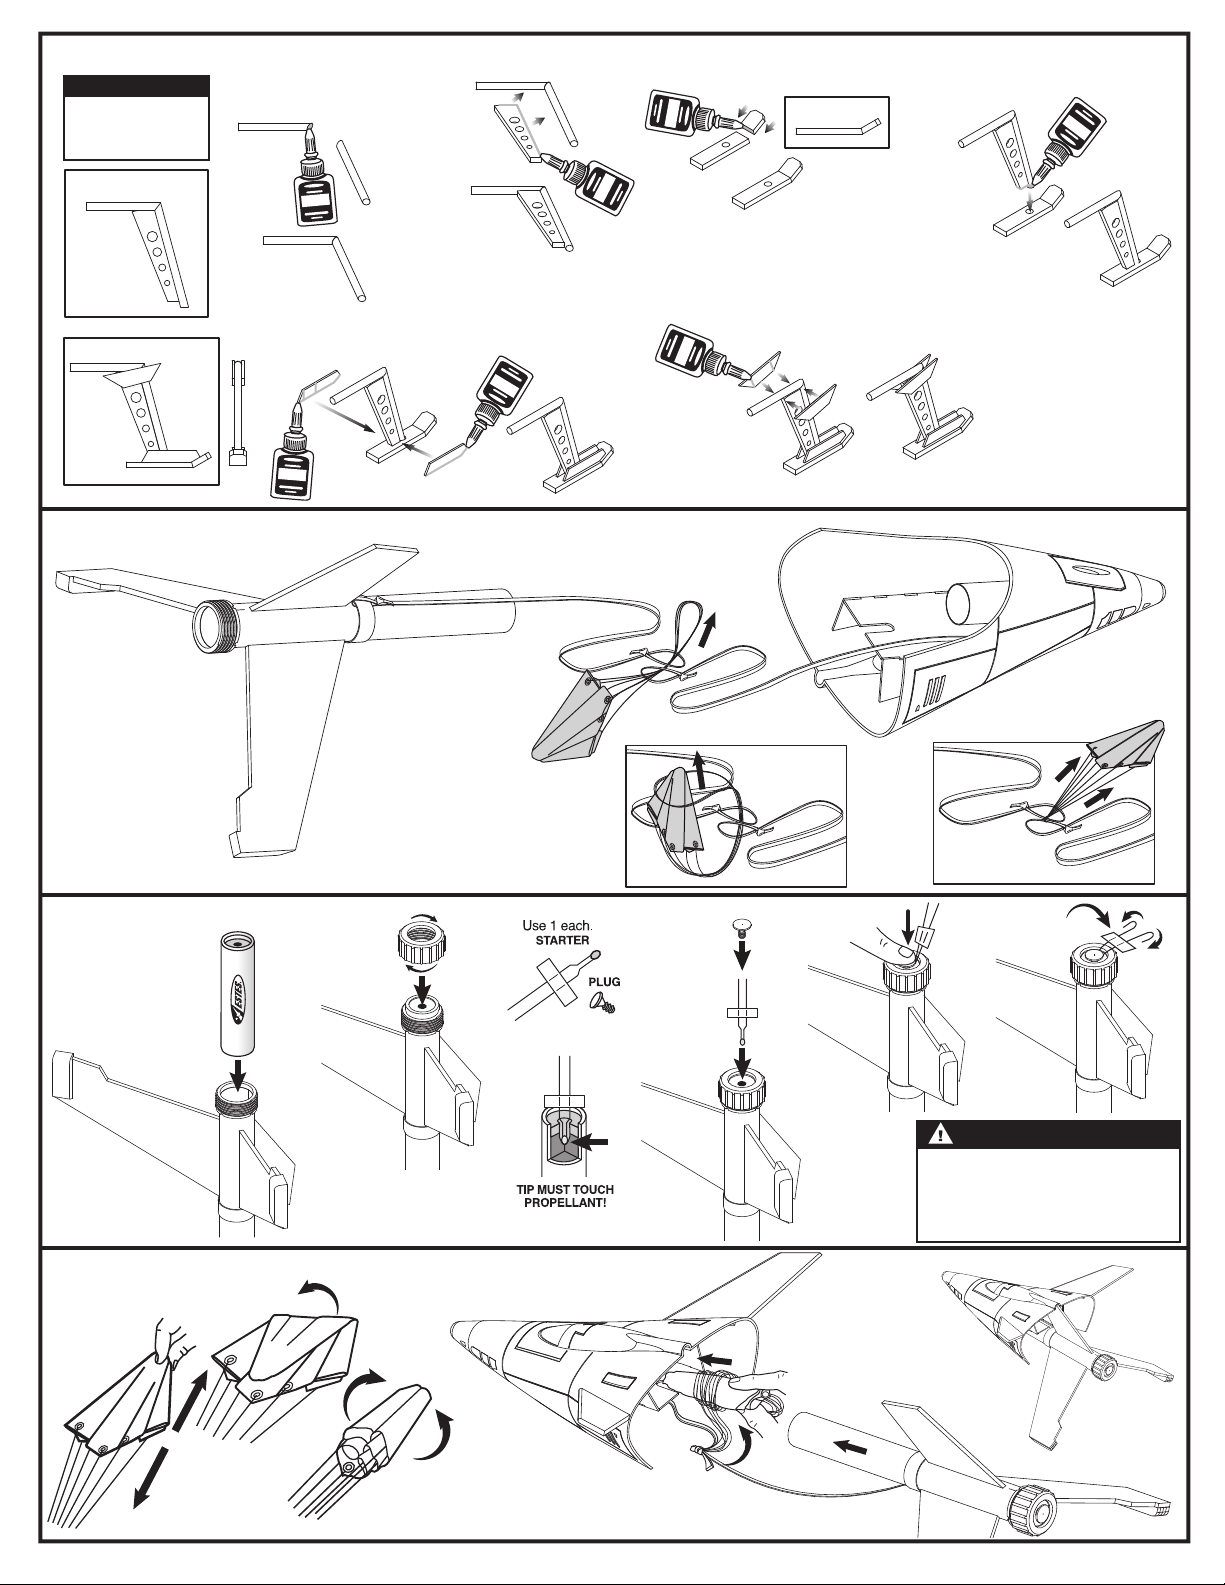
ASSEMBLE FRONT LANDING GEAR
NOTE:
Place wax paper over
SIDE VIEWS and glue
parts together on top
of the wax paper.
SIDE VIEW
SIDE VIEW
1. Use SIDE VIEW to cut V
at correct lengths and angles.
V
5. Apply glue as shown. Use
SIDE VIEW to align parts.
Y
2. Apply glue as shown.
3. Use SIDE VIEW to cut and sand X
at correct angles. Apply glue as shown.
SIDE VIEW
4. Apply glue as shown. Use
SIDE VIEW to align parts.
W
V
PLACE OVER SIDE
VIEW LET DRY
X
PLACE OVER SIDE
VIEW LET DRY
6. Apply glue as shown. Use
SIDE VIEW for correct placement.
PLACE OVER SIDE
VIEW LET DRY
Z
PLACE OVER SIDE
VIEW LET DRY
Y
ATTACH PARACHUTE
PREPARE ENGINE
1.
ENGINE
2.
1. Run AA shroud lines through
both loops in both
2. Run AA through loop
in shroud lines.
H
G.
3.
4.
3. Pull tight.
5.
PREPARE PARACHUTE AND MODEL FOR FLIGHT
2. Fold.
1. Spike.
3. Roll
4. Wrap lines loosly around
AA and insert into
recovery compartment.
7
WARNING: FLAMMABLE
To avoid serious injury, read instructions & NAR
Safety Code included with engines.
PREPARE YOUR ENGINE ONLY WHEN YOU ARE
OUTSIDE AT THE LAUNCH SITE PREPARING TO
LAUNCH. If you do not use your prepared engine,
remove the starter before storing your engine.
5. Insert lower body tube over
upper body tube.
Page 8
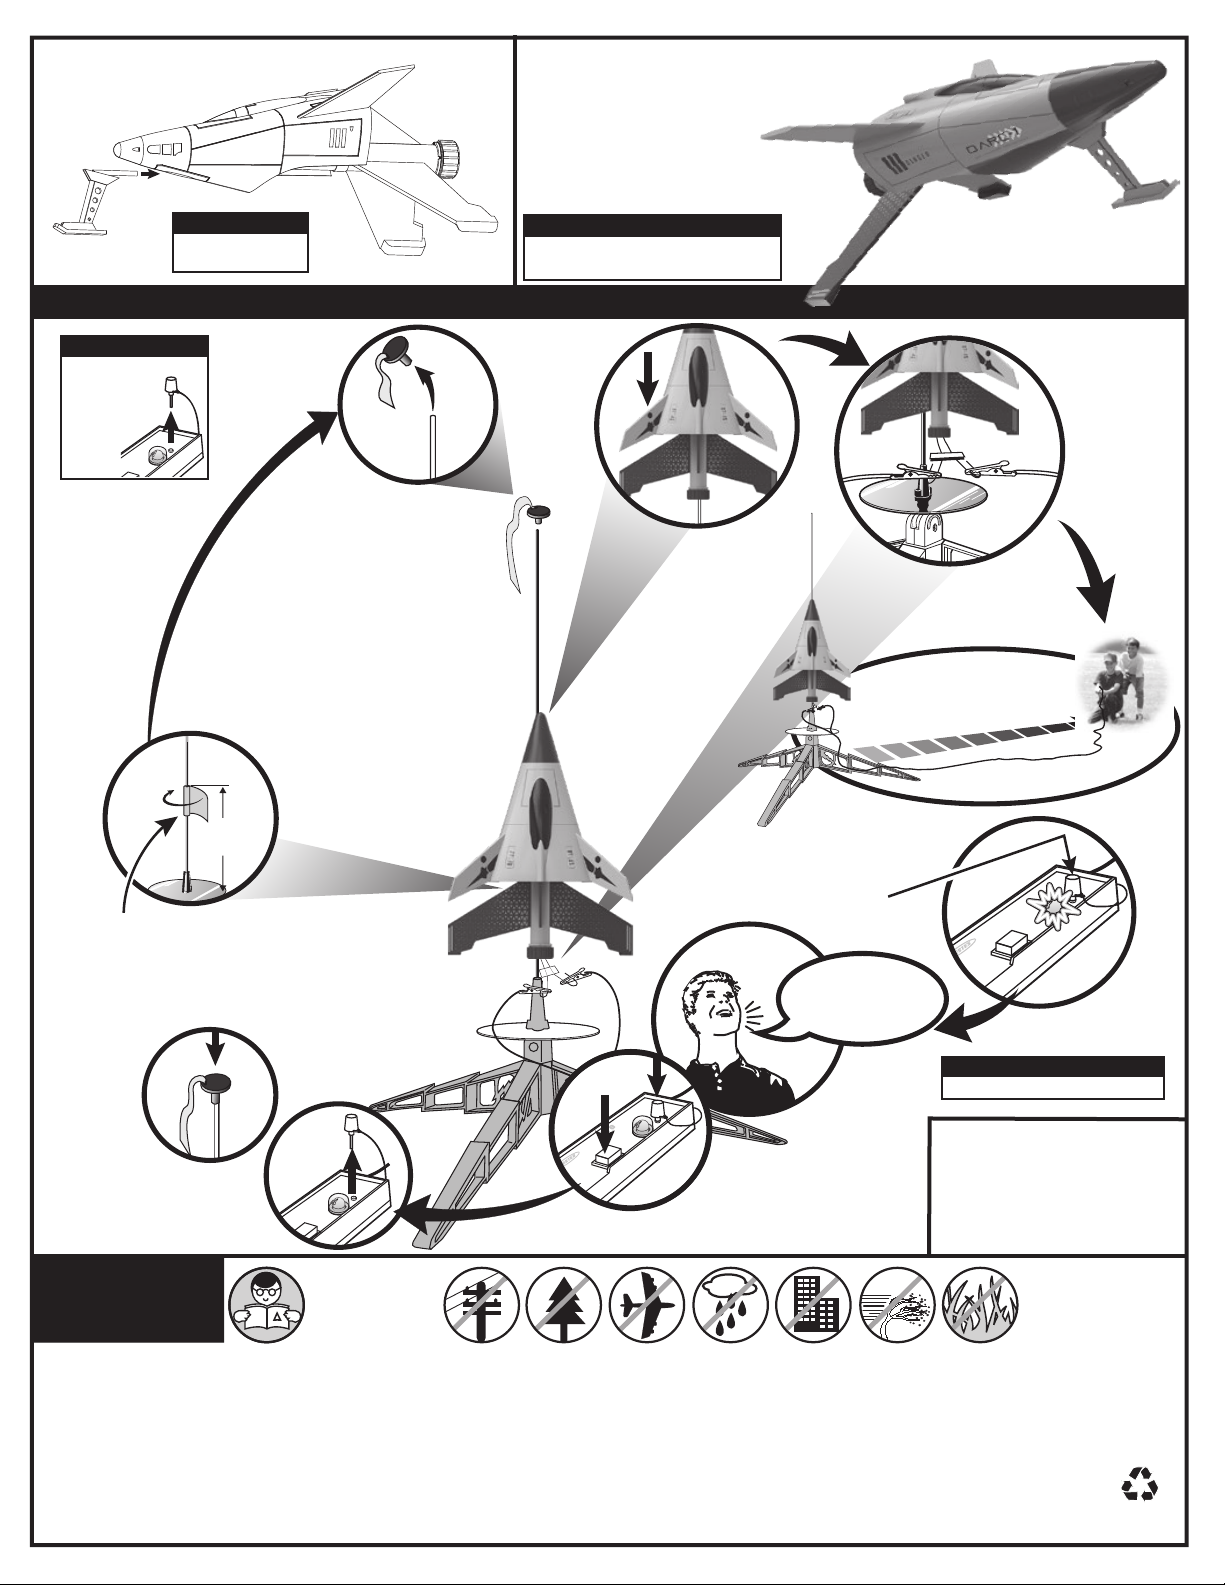
INSTALL NOSE LANDING GEAR
ROCKET FINISHING
1. Spray rocket with white primer, let dry, and sand. Repeat until
rocket is smooth, then paint. Apply decals after paint is dry.
2. Cut decals from sheet, trimming close to edge.
3. One at a time, place in warm water until
decal curls and begins to relax.
4. Remove and position on rocket,
sliding decal away from backing material.
5. Blot with clean paper towel. Let set overnight.
6. OPTIONAL: Apply protective clear coat.
NOTE:
Front landing gear
for display only.
COUNTDOWN AND LAUNCH
NOTE:
Key always out until
nal countdown!
1.
2.
NOTE:
Please refer to packaging for suggested
paint scheme and/or decal placement.
3.
4.
5.
16.4 ft. (5 m)
Fully extend your
launch controller wire
before launching.
2”
(5.1 cm)
KEY
MASKING TAPE
7.
4...
3...
2...
10.
9.
8.
While holding key down FIRMLY,
press launch button until LIFTOFF!
PRECAUTIONS
PRE-LAUNCH CHECK For safety, never launch a damaged rocket. Check the rocket's body, nose cone and ns. Also, check the engine mount, recovery system and launch lug(s).
Repair any damage before launching the rocket.
FLYING YOUR ROCKET Choose a large eld (500 ft. [152 m] square) free of dry weeds and brown grass. The larger the launch area, the better your chance of recovering your rocket.
Football elds and playgrounds are great. Launch only with little or no wind and good visibility. Always follow the National Association of Rocketry SAFETY CODE (enclosed).
MISFIRES TAKE THE KEY OUT OF THE CONTROLLER. WAIT ONE MINUTE BEFORE GOING NEAR THE ROCKET. Disconnect the micro-clips and remove the engine. Take the plug and
starter out of the engine. A burned starter means the starter tip was not touching engine propellant. Install a new starter; be sure the tip is touching propellant inside the engine. Push the
plug in place. Repeat steps under Countdown and Launch.
©2020 Estes Industries, LLC • All Rights Reserved
Estes Industries, LLC • 1295 H Street • Penrose, CO 81240-9698 • Made in: Guangdong, China PN 090004-7307 (11-20)
NAR SAFETY CODE
6.
1...
Insert key, push down hard.
Bulb will light.
NOTE:
Estimated weight :
ESTES® LAUNCH SUPPLIES NEEDED
(Sold Separately)
• Launch Pad
• Launch Controller
• Recovery Wadding
• Starters (with engines)
• Plugs (with engines)
®
Engines: B6-2, C5-3
• Estes
2 oz. (56.7 g)
NO DRY GRASS OR
WEEDS
22
PAP
8
 Loading...