

Page 1

™
4553
Estes-Cox Corp.
1295 H Street, PO Box 227
Penrose, CO 81240-0227
A subsidiary of Hobbico, Inc.
INSTRUCTIONS
KEEP FOR FUTURE REFERENCE
Made In Zhongshan, Guangdong, China
Contents
Spare propellers
™
Wild Sky
Safety Precautions:
Warning: Do not modify or alter this unit. Changes or modifi cations to this unit not
expressly approved by the party responsible for compliance could void the user’s authority to
operate the equipment.
• Do not turn on aircraft unless controller has
been turned on fi rst.
•
Keep hands, hair and loose clothing away
from spinning propellers.
• Turn off controller and aircraft when not
in use.
• Parental guidance is recommended while
fl ying.
• Do not submerge into water. This could
damage electronic assemblies.
• Replace batteries in controller with new
ones as soon as any function becomes
diminished.
• Follow operating instructions exactly.
• This is not intended for children under 8
years old.
• Do not fl y the aircraft if any of the parts are
damaged. Repair any damaged or broken
parts before attempting to fl y.
• Have spectators stand behind and away
from the aircraft.
Controller
FCC STATEMENT AND
INDUSTRY CANADA NOTICE:
1. This device complies with Part 15 of the FCC Rules and RSS210 of Industry Canada. Operation is subject to the following two
conditions:
(1) This device may not cause harmful interference, and
(2) This device must accept any interference received, including
interference that may cause undesired operation.
2. Changes or modifications not expressly approved by the party
responsible for compliance could void the user’s authority to
operate the equipment.
Remark: This device is in accordance with the digital device
grade B limitation and the 15th regulation of FCC. This limitation
requires reasonable anti-interference protection around the
residence. The device can transmit radio wave during use and can
interrupt the mobile communication without proper installment.
Interruption will occur for special device. If the device do interrupt
the radio or television, please turn the device off then turn it on to
adjust. Below are some resolution for your reference:
• Move the receiving antenna
• Enlarge the distance between the device and receiver
• Try to not connect the device and the receiver on the same
circuit
• Ask for professional help from experts
3. This digital apparatus does not exceed the Class B limits for
radio noise emissions from digital apparatus set out in the Radio
Interference Regulations of Industry Canada.
Battery Requirements for Controller:
Requires: 6 x 1.5V AA size batteries (not included)
Care and Maintenance:
•
Regularly examine all parts for damage. If any is found,
do not use again until the damage has been repaired.
Battery Cautions:
• Parental guidance is recommended when installing or
replacing batteries.
• For best performance, use new alkaline batteries in
controller.
• Do not power controller by mixing different types of
batteries, or old and new batteries.
• Use only batteries of the same or equivalent type as
those recommended.
90 DAY LIMITED WARRANTY
PLEASE DO NOT RETURN YOUR PRODUCT TO THE STORE – Estes will repair or replace factory defects for 90 days from the date of purchase. This warranty
specifi cally does not cover crash damage, misuse or abuse. To make a warranty claim, please contact our product support team at 1-217-398-8970 or e-mail
us at [email protected]
If requested by Product Support, please send defective product to: Hobby Services, 3002 N Apollo Dr., Suite #1, Champaign, IL 61822
This warranty applies only if the product is operated in compliance with the instructions and warnings provided with each model. Estes assumes no liability except for
the exclusive remedy or repair of parts as specifi ed above. Estes shall not be liable for consequential or incidental damages. Some states do not allow the exclusion of
consequential or incidental damages so the above exclusion may not apply to you. This warranty gives you specifi c legal rights and you may also have other rights which
vary from state to state.
The aircraft is equipped with a rechargeable 3.7V
Li-Ion battery. Please pay attention to the following
cautions for safe use:
• Do not dispose of battery into fi re or heat.
• Do not use or leave battery near a heat source, such
as fi re or a heater.
• Do not strike battery or throw it against a hard surface.
• Do not immerse battery into water. Keep battery cool
and dry.
• Do not directly solder battery or pierce it with a nail or
other sharp object.
• Do not transport or store battery together with metal
objects such as necklaces, hairpins, etc.
• Do not disassemble or alter battery.
• Recycle used batteries.
LiPo
• The battery in the aircraft is not replaceable.
CAUTION: Changes or modifi cations to this product
not expressly approved by the party responsible for
compliance may void the user’s authority to operate
the equipment.
Do not touch the spinning propellers
or fl y over another person’s head.
Adult supervision is required.
BC
1
Page 2

u
1. Peel tape backing.
Controller with Built-in ChargerWing Installation Instructions
Throttle Stick:
Push and hold up for full motor
power. Push halfway up for
cruising speed. Release to stop.
2. Connect plug.
3. Attach wing.
STEERING AN AIRCRAFT COMING TOWARD YOU
1. Imagine you’re in the cockpit. Turn and point the
controller antenna in the direction the aicraft is flying.
OR
2. While the aircraft’s wing is banked, tap the
direction control stick in the direction of the low wing
until it levels.
TA P
Remove screw and back cover.
Insert 6 new “AA” alkaline
batteries in the correct polarity.
Replace cover and screw. New
batteries should be installed after
every fourth complete charge of
the Wild Sky.
LEFT TURN PATH
Tap direction control stick left.
5.
Switch “ON” for fl ying
Switch “OFF” for charging
Flying Yo
CHOOSE A GOOD FLYING SITE:
Find a large open area.
You don’t want to fly
near people, streets,
houses, trees or power
lines.
100 YARDS (91 m)
100 YARDS (91 m)
To stop turning, tap the direction control
stick in the low wing’s direction.
TA P
TA P
2
TA P
LANDING THE AIRCRAFT
Release the throttle
control stick to begin
descent. Tap the
direction control stick
left or right to steer into
the wind and keep the
wings level.
Tap the throttle control
stick to keep the aircraft
on a gentle path to
touchdown.
1.
6.
5 mph [8km/h] or less
START
END LEFT TURN
Tap direction control stick right.
Hold aircraft under
the wing.
1. Check wind speed and
direction.
2. Turn controller switch ‘ON’. The
red LED will illuminate.
3. Turn aircraft switch ‘ON’.
4. Check motor and turn controls.
5. Apply full power (throttle
control stick pushed up).
6. Toss aircraft straight and level
into the wind.
PUSH
Page 3
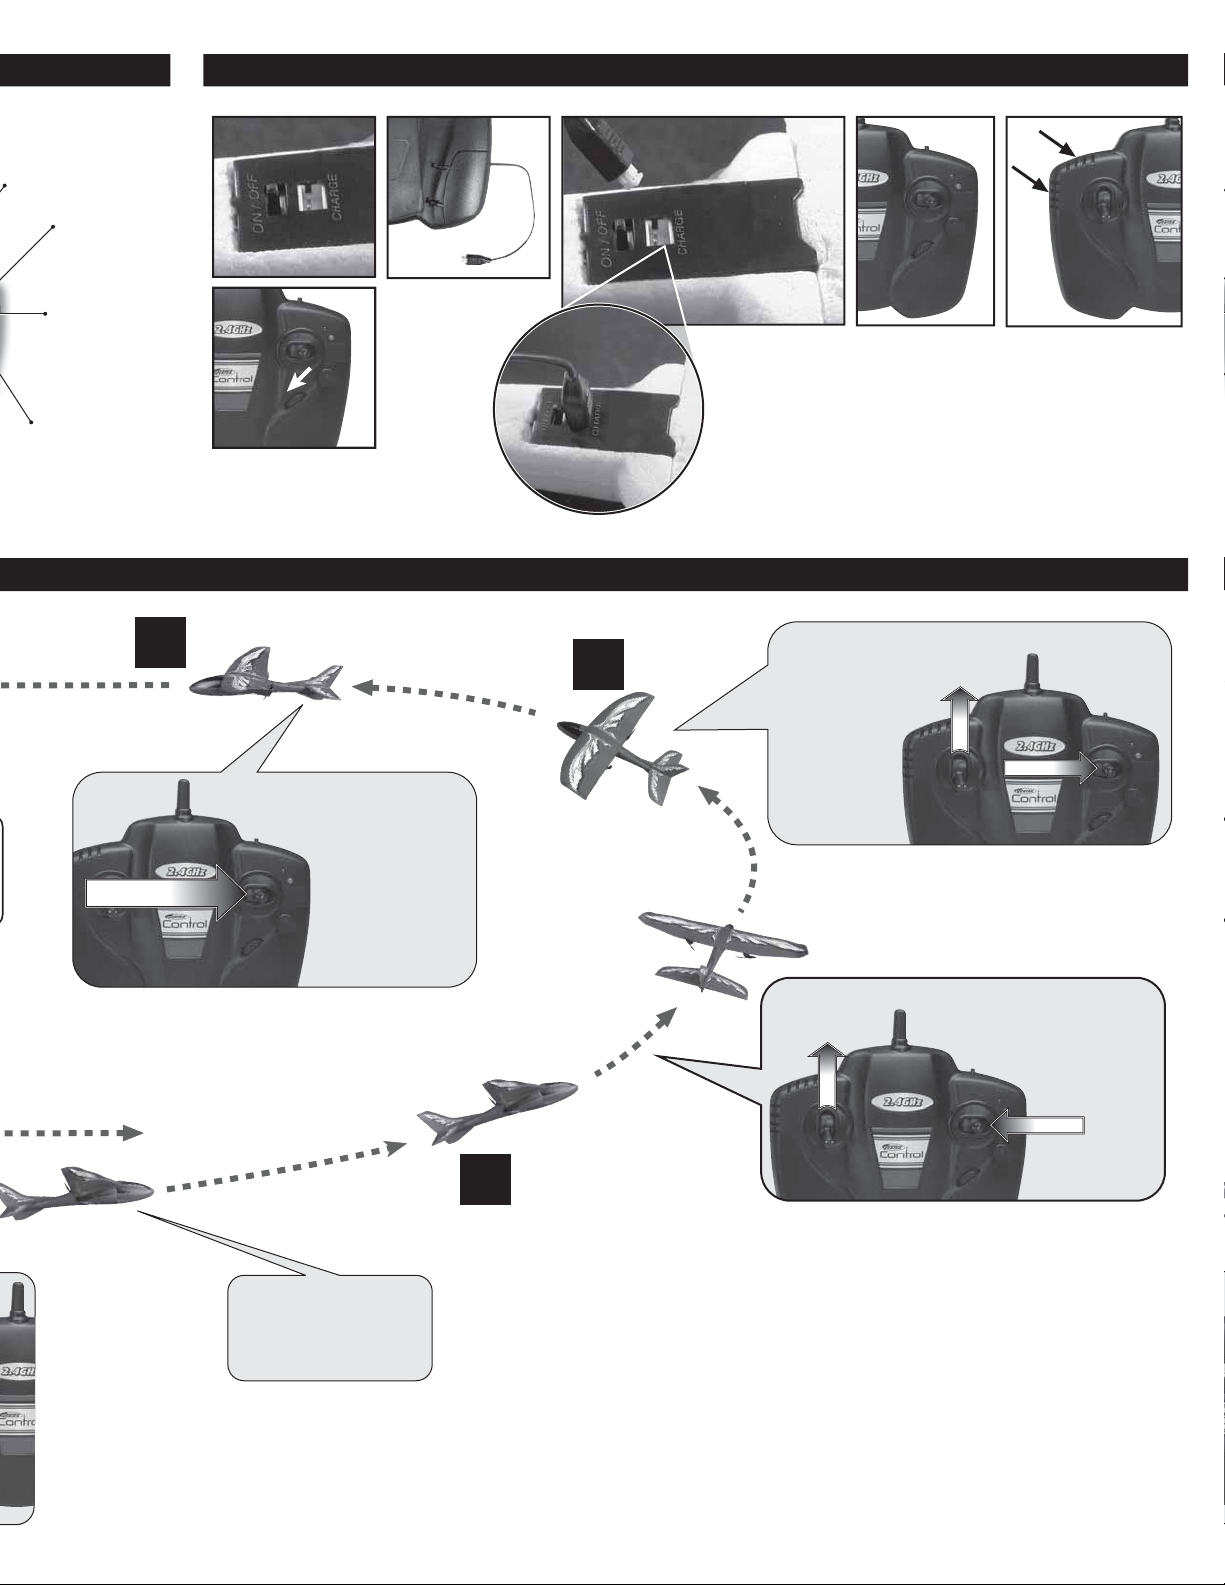
Power LED (red)
Charger LED
(green)
Direction Stick:
Tap (push and
release) left or
right to steer.
Flight Direction Trim:
Adjusts the right and
left direction.
r Aircraft
4.
1. Turn aircraft and
controller off.
2. Open controller
charging door.
Extend charge
cord.
END LEFT TURN
Tap direction control
stick right.
Charge the Aircraft
3. Plug charge
cord into aircraft
(DO NOT FORCE
OR PLUG
BACKWARDS). The
green controller
LED glows.
3.
4. Charge until
green LED turns
off. Unplug cord
and store in
controller charge
compartment.
End turns by tapping the stick
shown to the right, leveling the
wings to fly straight.
Vents
NOTE: While charging,
heat is released through
the controller vents. Never
cover the vents.
CENTER
Fly straight by
centering the
direction control
stick. Tap left or
right to keep the
wings level.
Let the aircraft fly on its
own for 3- 5 seconds to
gain speed and altitude
before making first turn.
BEGIN LEFT TURN
Tap direction control
2.
stick left.
PUSH
TA P
Turn by tapping the stick
shown left — fast repeated
taps for tight turns, or slow
repeated taps for wide
turns.
PUSH
TA P
ALWAYS FLY OVER
SOFT GRASSY FIELDS!
DO NOT FLY IN PARKING LOTS OR STREETS.
Flying Time: Up to 10 minutes.
3
Page 4
Troubleshooting
Problem
Motors will not operate
Aircraft is flying too low
Aircraft will not turn
Binding Procedure
If the controller can no longer communicate with the aircraft, it may need to be “bound” again following the procedure below:
1. Press and hold binding button on top right of controller
2. Turn on controller
3. Turn on aircraft
4. Release binding button
5. Confi rm that the controller now controls the aircraft
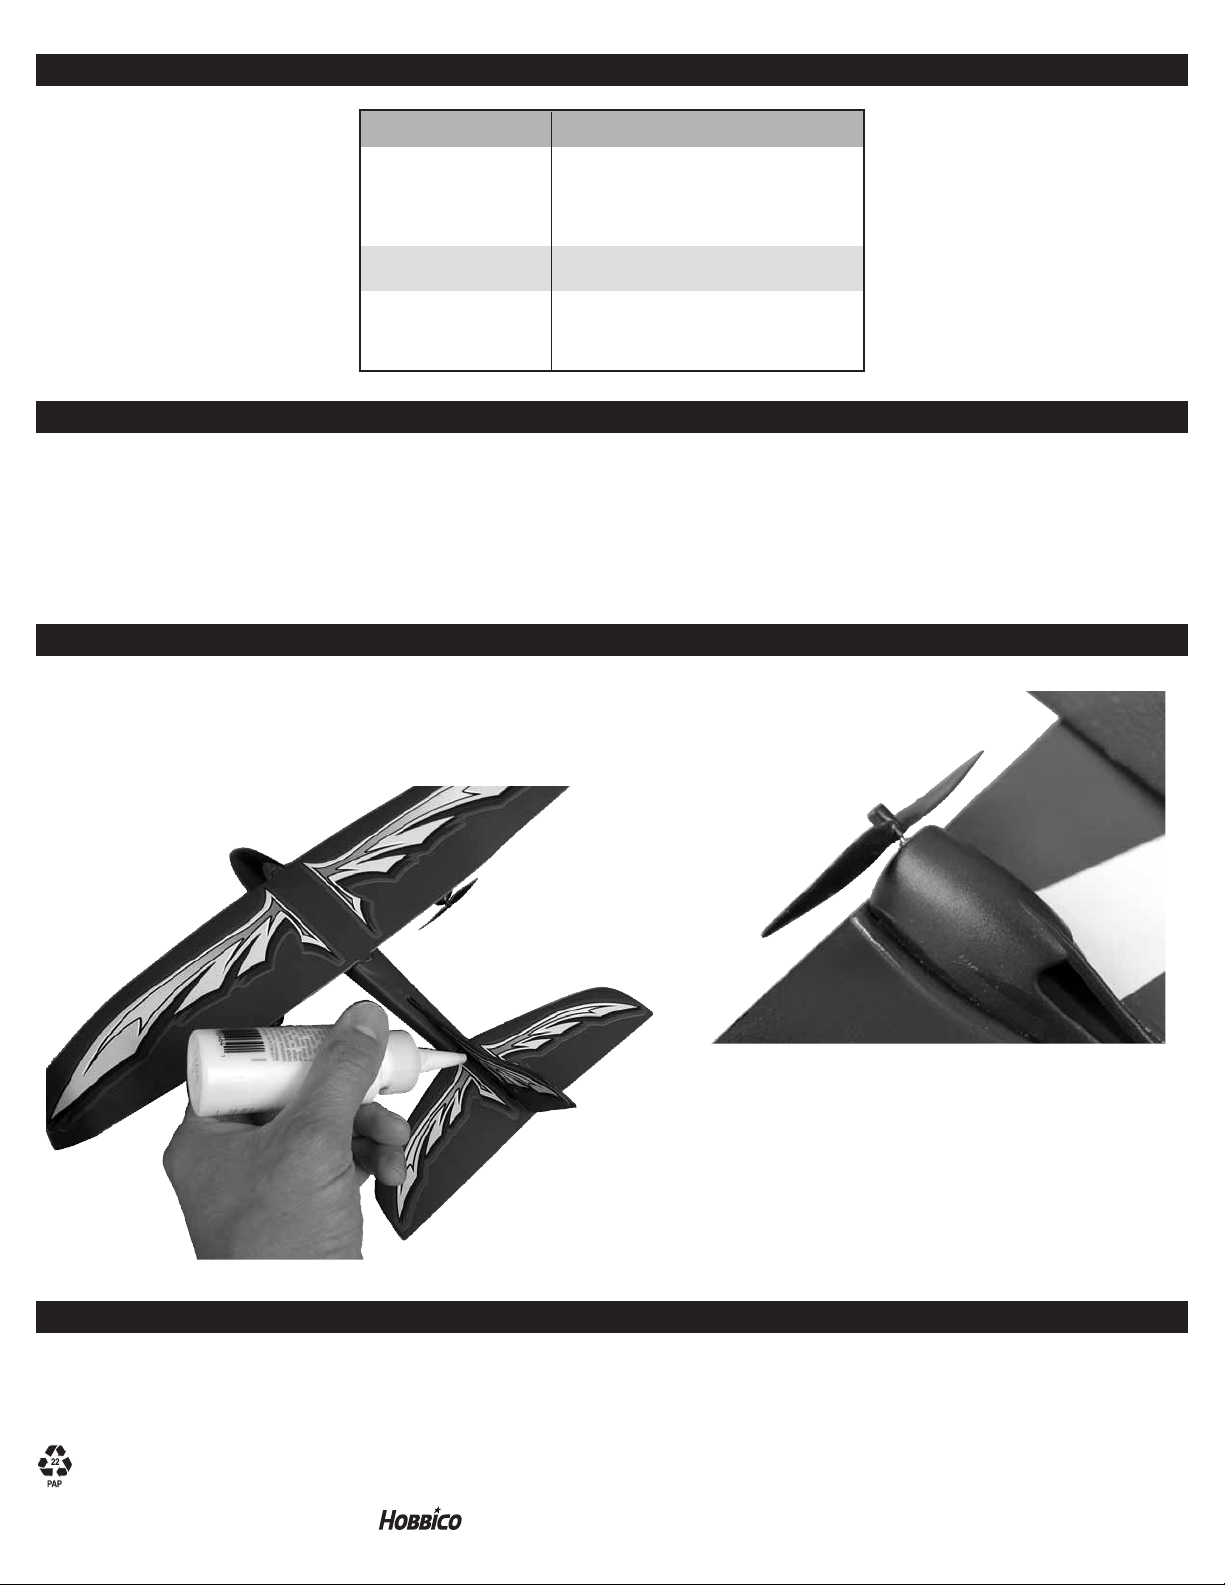
If crash damage occurs, your aircraft may easily be repaired using household
tape and glue. Clear packing tape works well for most repairs; however,
larger breaks may require glue and tape for best results. Use 5-minute epoxy
or household white glue and allow the glue to dry fully undisturbed.
Cause
s!IRCRAFTNOTCHARGED
s#ONTROLLERBATTERYPOWERISDRAINED
s!IRCRAFTNOTTURNED@/.
s!IRCRAFTNOTBOUNDTOCONTROLLER
s!IRCRAFTNOTFULLYCHARGED
s!PPLYFULLPOWER
s#ONTROLLERISNOTTURNED@/.
s&LYINGINTOOSTRONGOFWIND
s-ODELHASFLOWNOUTOFCONTROLLERRANGE
Easy Repairs
If your aircraft requires repairs or replacement, DO NOT RETURN TO RETAILER. Contact:
PN067050 (3-14)
© 2013 Estes-Cox Corp. A subsidiary of Hobbico, Inc.
4
To replace a broken propeller: Use small needle nose pliers to pry
off a broken propeller from the motor shaft. Press the replacement
propeller onto the motor shaft in the orientation shown in the photo.
There is a left and right propeller. If the propeller thrust is backwards
with throttle applied, swap it with the other replacement propeller.
Service
Hobby Services
3002 N. Apollo Drive, Suite 1
Champaign, Il, 61822, U.S.A.
9am-5pm Central Mon.-Fri.
(217) 398-0007
[email protected]
 Loading...