

Page 1

gy,
ESTeem MODEL 195E SERIES
USER’S MANUAL
Models 195Eg – 195Ed - 195Ep – 195Ea
Manual Revision 1.0
October 2012
Electronic Systems Technolo
Inc.
Page 2

Author:
Name:
Title:
Eric P. Marske
Product Support Manager
Date:
Approved by:
Name:
Title:
Tom L. Kirchner
President
Date:
Electronic Systems Technology, Inc.
Building B1
415 N. Quay Street
Kennewick, WA 99336
Phone: 509-735-9092
Fax: 509-783-5475
E-mail: market@esteem.com
Web Site: www.esteem.com
Copyright© 2013 by Electronic Systems Technology, Inc.
All rights reserved. Printed in the United States of America. No part of this publication may be reproduced, stored
in a retrieval system, or transmitted, in any form or by any means, electronic, mechanical, photocopying, recording,
or otherwise, without the prior written permission of Electronic Systems Technology.
Page 3

PRODUCT WARRANTY
Electronic Systems Technology, Inc., (hereinafter EST) expressly warrants its products as free of manufacturing defects for a period
of one year from the date of sale to first user/customer.
THERE IS EXPRESSLY EXCLUDED ALL WARRANTIES OF MERCHANTABILITY OR FITNESS FOR A PARTICULAR
PURPOSE. NO OTHER WARRANTY GIVEN BY ANY EMPLOYEE, AGENT, DISTRIBUTOR OR OTHER PERSON WITH
RESPECT TO THE PRODUCT SHALL BE BINDING ON EST.
LIMITATION OF LIABILITY:
EST's liability shall be limited to refunding of purchase price, repair or replacement of product. IN NO EVENT SHALL EST HAVE
LIABILITY FOR CONSEQUENTIAL, INCIDENTAL, SPECIAL OR EXEMPLARY DAMAGES CAUSED DIRECTLY OR
INDIRECTLY BY THE PRODUCT, INCLUDING BUT NOT LIMITED TO ANY INTERRUPTION OF SERVICES, LOSS OF
BUSINESS OR ANTICIPATORY PROFITS. IN NO EVENT SHALL EST BE LIABLE FOR ANY DAMAGES WHATSOEVER IN
EXCESS OF THE PURCHASE PRICE OF THE PRODUCT.
In the event that a unit or part requires replacement or factory servicing, the following conditions apply:
a) Customer must obtain from EST an authorized RMA (Return Materials Authorization) Number before shipment of product
or parts to EST for any reason;
b) If the whole unit is shipped, it must be in its original carton and shipping components, or a carton and shipping components
supplied by EST, or it parts only are shipped, they must be packaged and cushioned so as to prevent damage in transit
and shipped freight prepaid;
PRODUCT WILL BE CONSIDERED OUT OF WARRANTY IF:
a) If the product is damaged due to improper or abnormal use, abuse, mishandling, accident or improper maintenance or
failure to follow operating instruction;
b) If the product is defective as a result of sand, dirt, or water damage;
c) If any factory-sealed enclosure has been opened or shows evidence of an attempt to be opened;
d) If defects or damage are caused by the use of unauthorized parts or unauthorized service;
e) If the product has had its serial numbers altered or removed.
Warranty repair form must be accompanied by proof of user's purchase of unit. Product must be shipped to the manufacturer at the
following address:
Electronic Systems Technology
415 North Quay Street
Kennewick, Washington USA 99336
ADDITIONAL SERVICE:
If EST releases an improvement update to firmware internal to the ESTeem unit during the 90 day period after the unit was
purchased by the first user/customer, EST will update the applicable unit with the revised version at no charge other than for UPS
handling and shipping to and from your location to the EST factory. Return of any such item must be accompanied with proof of
purchase.
THERE ARE NO OTHER WARRANTIES, EXPRESS OR IMPLIED AND
ELECTRONIC SYSTEMS TECHNOLOGY, INC. Specifications subject to change without notice
415 North Quay Street • Kennewick, WA 99336 www.esteem.com
Phone (509) 735-9092 • Fax (509) 783-5475 Revised: 28 Aug 2013
Page 4

TABLE OF CONTENTS
CHAPTER 1 – Introduction
Before You Begin
Model 195E Overview
Model 195E Configuration Modes
Access Point Modes --------------------------------------------- 1-2
Access Point Repeater --------------------------------------------- 1-3
Self-Healing Mesh Network --------------------------------------------- 1-3
Station (802.11g Client) Modes --------------------------------------------- 1-4
RS-232 Serial Applications --------------------------------------------- 1-5
CHAPTER 2 – Starting Out
Three Configuration Phases
Model 195E Hardware Description
Front Panel Layout --------------------------------------------- 2-2
Antenna Connection Overview --------------------------------------------- 2-2
Model 195Eg Hardware Configuration
CHAPTER 3 – Example Applications
Modes of Operation Description and Examples
Ethernet Bridge Mode --------------------------------------------- 3-1
Router Modes --------------------------------------------- 3-3
Mobile Client Modes --------------------------------------------- 3-4
802.11 Access Point Modes --------------------------------------------- 3-5
Programming Examples
Using ESTeem Network Configuration (ENC) Utility --------------------------------------------- 3-7
Example 1 – Point to Point Ethernet Bridge --------------------------------------------- 3-9
Example 2 – Point to Point Ethernet Bridge with Repeater --------------------------------------------- 3-10
Example 3 – Point to Multipoint with Mesh Repeater --------------------------------------------- 3-11
Example 4 – Point to Multipoint Router Mode --------------------------------------------- 3-13
Example 5 – Mobile Client Mode --------------------------------------------- 3-15
Example 6 – 802.11 Access Point Mode --------------------------------------------- 3-16
Router Addressing Examples --------------------------------------------- 3-17
CHAPTER 4 – Utilities and Features
ESTeem Network Configuration (ENC) Utility --------------------------------------------- 4-1
Using ESTeem Discovery Program --------------------------------------------- 4-2
Using EtherStation Status Program --------------------------------------------- 4-5
Setting Local Time 195Eg --------------------------------------------- 4-6
Configuring Time Server --------------------------------------------- 4-7
VLAN Operation --------------------------------------------- 4-9
IGMP Snooping --------------------------------------------- 4-10
Simple Network Management Protocol (SNMP) --------------------------------------------- 4-15
1-1
1-1
1-1
2-1
2-1
2-3
3-1
3-7
Revised: 30 Oct 12 Page 1 EST P/N AA107G
Page 5

TABLE OF CONTENTS
CHAPTER 5 – Web Configuration
Logging Into Web Configuration Manager
Web Configuration Manager
Top Menu --------------------------------------------- 5-2
Setting ModemID Field --------------------------------------------- 5-2
Status Menu --------------------------------------------- 5-3
System Log Screen --------------------------------------------- 5-5
Setup Screen --------------------------------------------- 5-5
Advanced Configuration Screen --------------------------------------------- 5-6
Backup Screen --------------------------------------------- 5-6
Restore Screen --------------------------------------------- 5-7
Software Update --------------------------------------------- 5-8
System Reboot --------------------------------------------- 5-8
CHAPTER 6 – Serial Configuration and Applications
Using RS-232 Programming Port
Using RS-232 Data Port
Second Connections --------------------------------------------- 6-3
Second Configuration --------------------------------------------- 6-3
CHAPTER 7 – Repeating and Mesh Networking
ESTeem Mesh Network
Configuration --------------------------------------------- 7-1
Rapid Spanning Tree Protocol (RSTP)
Spanning Tree Protocols (STP)
Overview --------------------------------------------- 7-3
Phases --------------------------------------------- 7-4
Priority and Path Cost --------------------------------------------- 7-4
Root Bridge --------------------------------------------- 7-4
Redundant Backup
Redundant Master Configuration --------------------------------------------- 7-5
CHAPTER 8 – Antenna Setups
Antenna and Cable Configurations
Model 195Eg/195Eg-lp Antenna and Cable Configuration --------------------------------------------- 8-1
Model 195Ea Antenna and Cable Configuration --------------------------------------------- 8-3
Model 195Ed Antenna and Cable Configuration --------------------------------------------- 8-4
Model 195Ep Antenna and Cable Configuration --------------------------------------------- 8-5
Weatherproofing Coaxial Cable Connections
Antenna Diversity
Antenna Port Selection --------------------------------------------- 8-7
5-1
5-2
6-1
6-3
7-1
7-2
7-3
7-5
8-1
8-6
8-6
Revised: 30 Oct 12 Page 2 EST P/N AA107G
Page 6

TABLE OF CONTENTS
Assembling the AA195PM Outdoor Pole Mounting Kit
195E Grounding Procedure
Fresnel Zone
APPENDIX A – FCC Information
APPENDIX B – Interface Ports
Ethernet Interface --------------------------------------------- B-1
Configuring DHCP Server --------------------------------------------- B-1
RS-232 Programming Port Pin-Out --------------------------------------------- B-2
RS-232 Data Port Pin-Out --------------------------------------------- B-2
APPENDIX C – Radio Configuration
Frequency of Operation --------------------------------------------- C-1
Setting RF Bandwidth --------------------------------------------- C-2
Setting Data Rates --------------------------------------------- C-2
Setting RF Power Level --------------------------------------------- C-3
Average RF Output Power --------------------------------------------- C-4
APPENDIX D – Security
APPENDIX E – Troubleshooting
Testing Communication Link --------------------------------------------- E-1
Viewing RF Data Rates --------------------------------------------- E-3
Signal Strength vs Data Rates --------------------------------------------- E-4
Setting Maximum Distance Value --------------------------------------------- E-4
Troubleshooting Tips --------------------------------------------- E-5
APPENDIX F – 195Eg Specifications
195Eg Specifications --------------------------------------------- F-1
Case Diagram --------------------------------------------- F-2
Antenna Specifications --------------------------------------------- F-3
APPENDIX G – 195Ea Specifications
195Ea Specifications --------------------------------------------- G-1
Case Diagram --------------------------------------------- G-2
Antenna Specifications --------------------------------------------- G-3
APPENDIX H – 195Ed Specifications
195Ed Specifications --------------------------------------------- H-1
Case Diagram --------------------------------------------- H-2
Antenna Specifications --------------------------------------------- H-3
APPENDIX I – 195Ep Specifications
195Ep Specifications --------------------------------------------- I-1
Case Diagram --------------------------------------------- I-2
Antenna Specifications --------------------------------------------- I-3
APPENDIX J – 195Eg-lp Specifications
8-9
8-14
8-15
Revised: 30 Oct 12 Page 3 EST P/N AA107G
Page 7
CHAPTER 1
INTRODUCTION
BEFORE YOU BEGIN
Thank you and congratulations on your purchase of the ESTeem
Model 195E Wireless Ethernet Radio Modem! This manual was
written to help both the first time and advanced user of the 195E to
configure the wireless modem for your application. If this is your
first time configuring the 195E and you would like to get going as
soon as possible, we recommend using the ESTeem Resource CD
provided with the modem. The Resource CD will provide the
software utilities and guide you through the configuration of the
wireless modem for your application.
The ESTeem 195E series wireless modems are very sophisticated
networking devices. To keep the manual usably short, many of the application descriptions and programming details assume
the user has a good working knowledge of the following network concepts:
• General Ethernet networking and the configuration of LAN topologies
• Common Ethernet terminology and acronyms
• TCP/IP network protocol structure and how to configure TCP/IP networks
and subnets
• How to identify and set the TCP/IP address on your computer
• Have administrator privileges to the computer and network you are configuring
• If using routing protocols, you must be able to identify and configure the network routers, gateways and firewalls
• You must be familiar with using web browser software such as Internet Explorer, Netscape or Mozilla
If you are unfamiliar with any of the above networking concepts, you may need to contact your network administrator for
assistance.
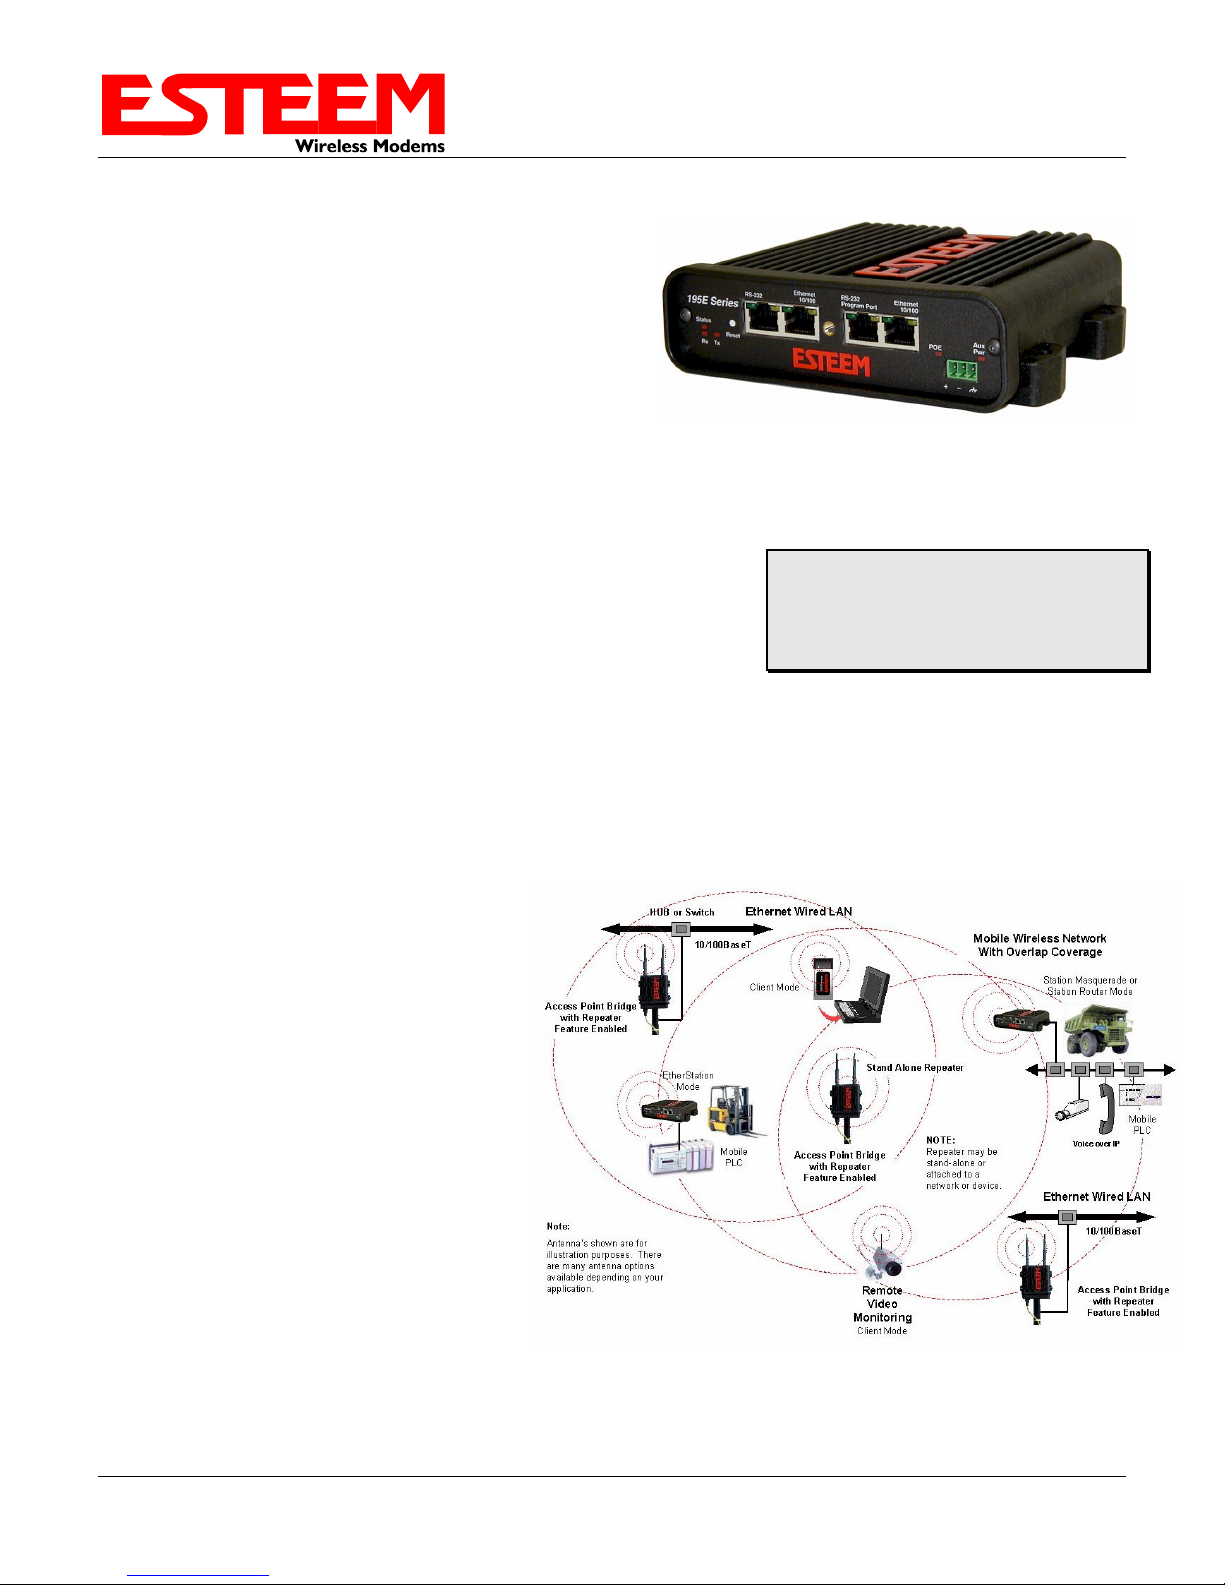
MODEL 195E OVERVIEW
The ESTeem Model 195E is a series of wireless
LAN transceivers that can be used to build many
types of Wireless Local Area Networks (WLAN).
The wireless modems in 195E series can provide
RF data rates up to 54 Mbps and have an RS-232
serial port for legacy device networks. The Model
195E is a very sophisticated networking device
that can be configured for multiple modes of
operation depending upon the needs of the wireless
and wired LAN system. The following
configuration modes are provided as an overview
of the basic network types, as all possible network
configurations can not be listed. For further help
in selecting the correct network type, please refer
to Chapter 4 of this User’s Manual or call
Customer Support at 509-735-9092.
Figure 1: ESTeem Model 195E Series
Throughout this User’s Manual are
“Technical Tips” in boxes like this that
have been added to help answer the
most commonly asked questions.
Revised: 19 Oct 12 1-1 EST P/N AA107E
Figure 2: Access Point Bridge Diagram
Page 8
CHAPTER 1
INTRODUCTION
CONFIGURATION MODES
A Model 195E can be configured for multiple
modes of operation without any changes to the
hardware. The following are brief descriptions
of the configuration modes. For detailed
descriptions and suggested applications for
each mode, please refer to Chapter 4.
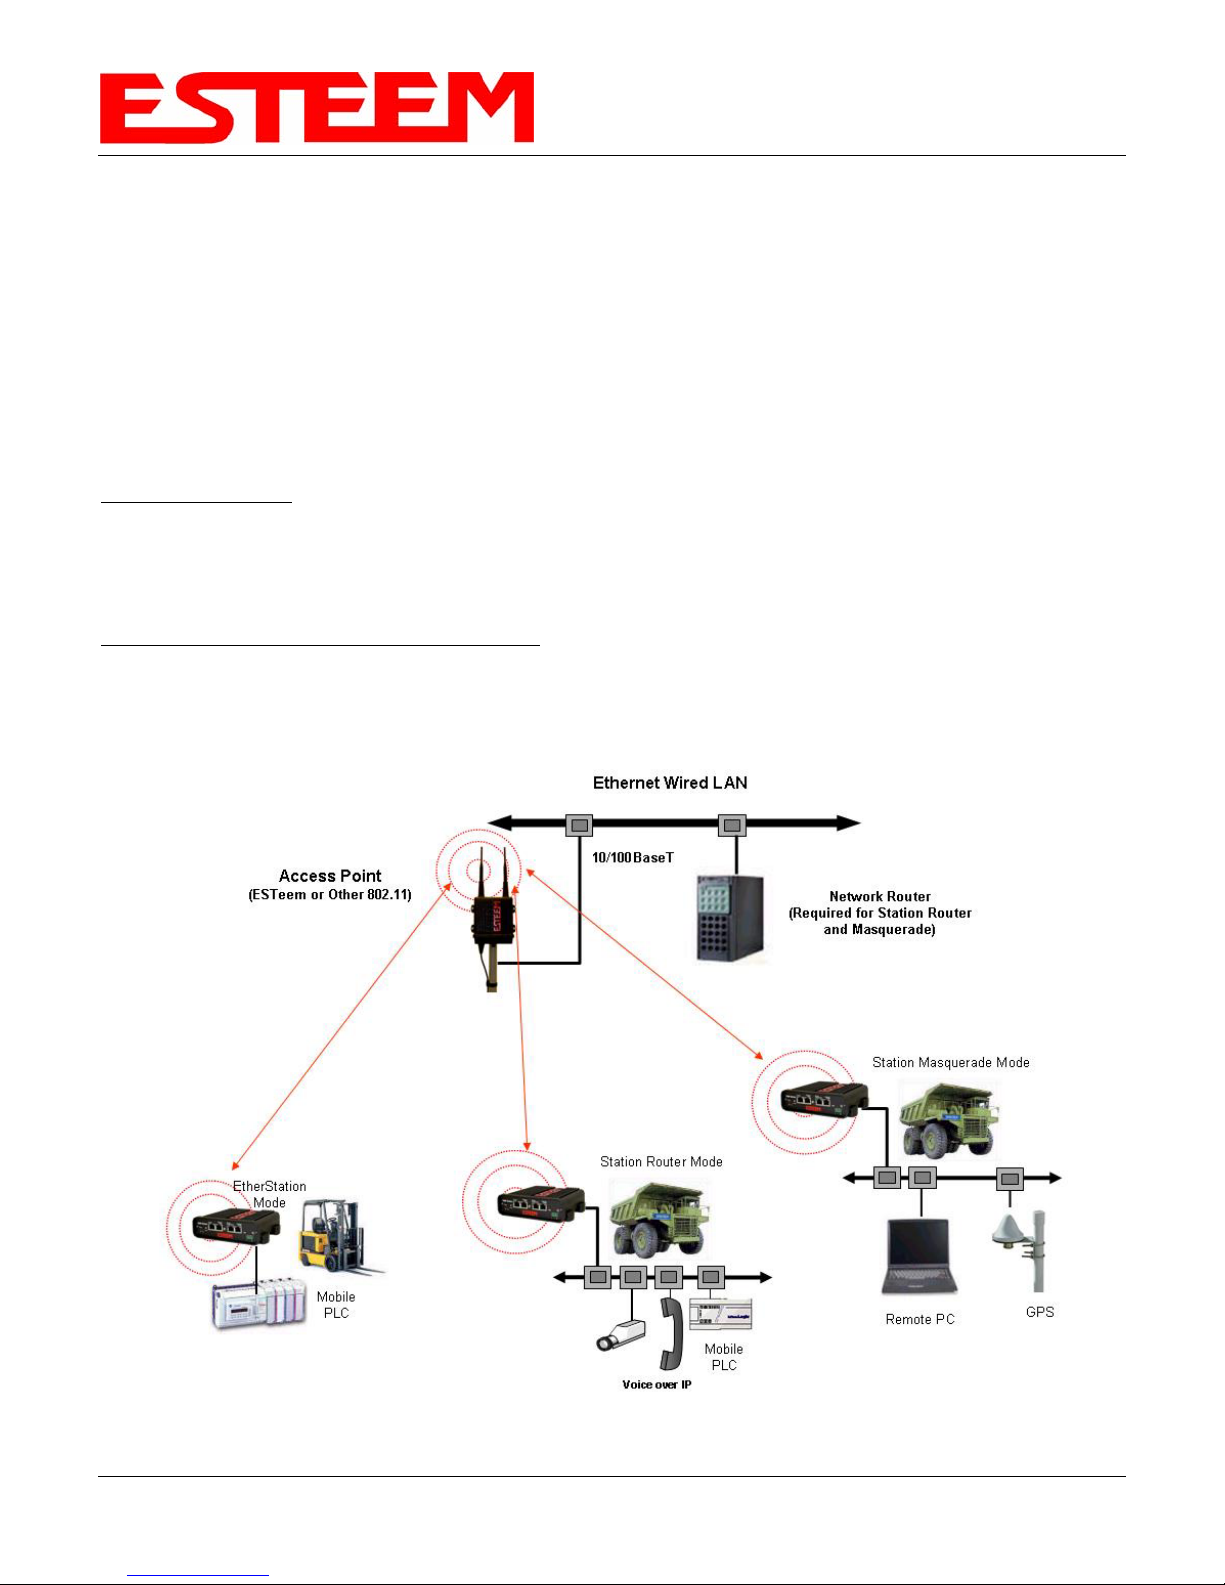
Access Point Modes
When a Model 195E is configured as an Access
Point it will provide a wireless bridge for
mobile clients such as Model 195E modems in
client modes or Wi-Fi devices with the 195Eg
and 195Ea. Multiple Access Points can be
physically connected to the same network
(LAN) or through a radio link using the Access
Point Repeater mode to provide overlapping,
seamless Ethernet communication for mobile
devices.
1. Access Point Bridge Mode
An ESTeem Model 195E in Access Point Bridge mode will both provide wireless access to mobile clients (Access Point)
and bridge all Ethernet data connected to the Ethern et ports. The AP Bridge mode will pass all network traffic between
connected devices including global network broadcasts. (See Figure 2)
2. Access Point Router Mode
In this mode the ESTeem Model 195E will function as a router between wired Ethernet networks, connected to the
195E’s Ethernet port, and the
wireless clients in the network. As in
all standard router configurations, the
wireless and wired Ethernet networks
will need to be on separate subnets.
The 195E in Access Point Router
mode will pass network traffic for
connected devices but will block
global network broadcasts from the
wired network. This mode of
operation should be used instead of
the Access Point Bridge mode when
a separation between networks is
required or the ESTeem is connected
to larger LAN Networks that will
continuously send global network
broadcasts (Figure 3).
Figure 3: Repeater Mode Diagram
Revi s e d : 1 9 O c t 1 2 1-2 EST P/N AA107E
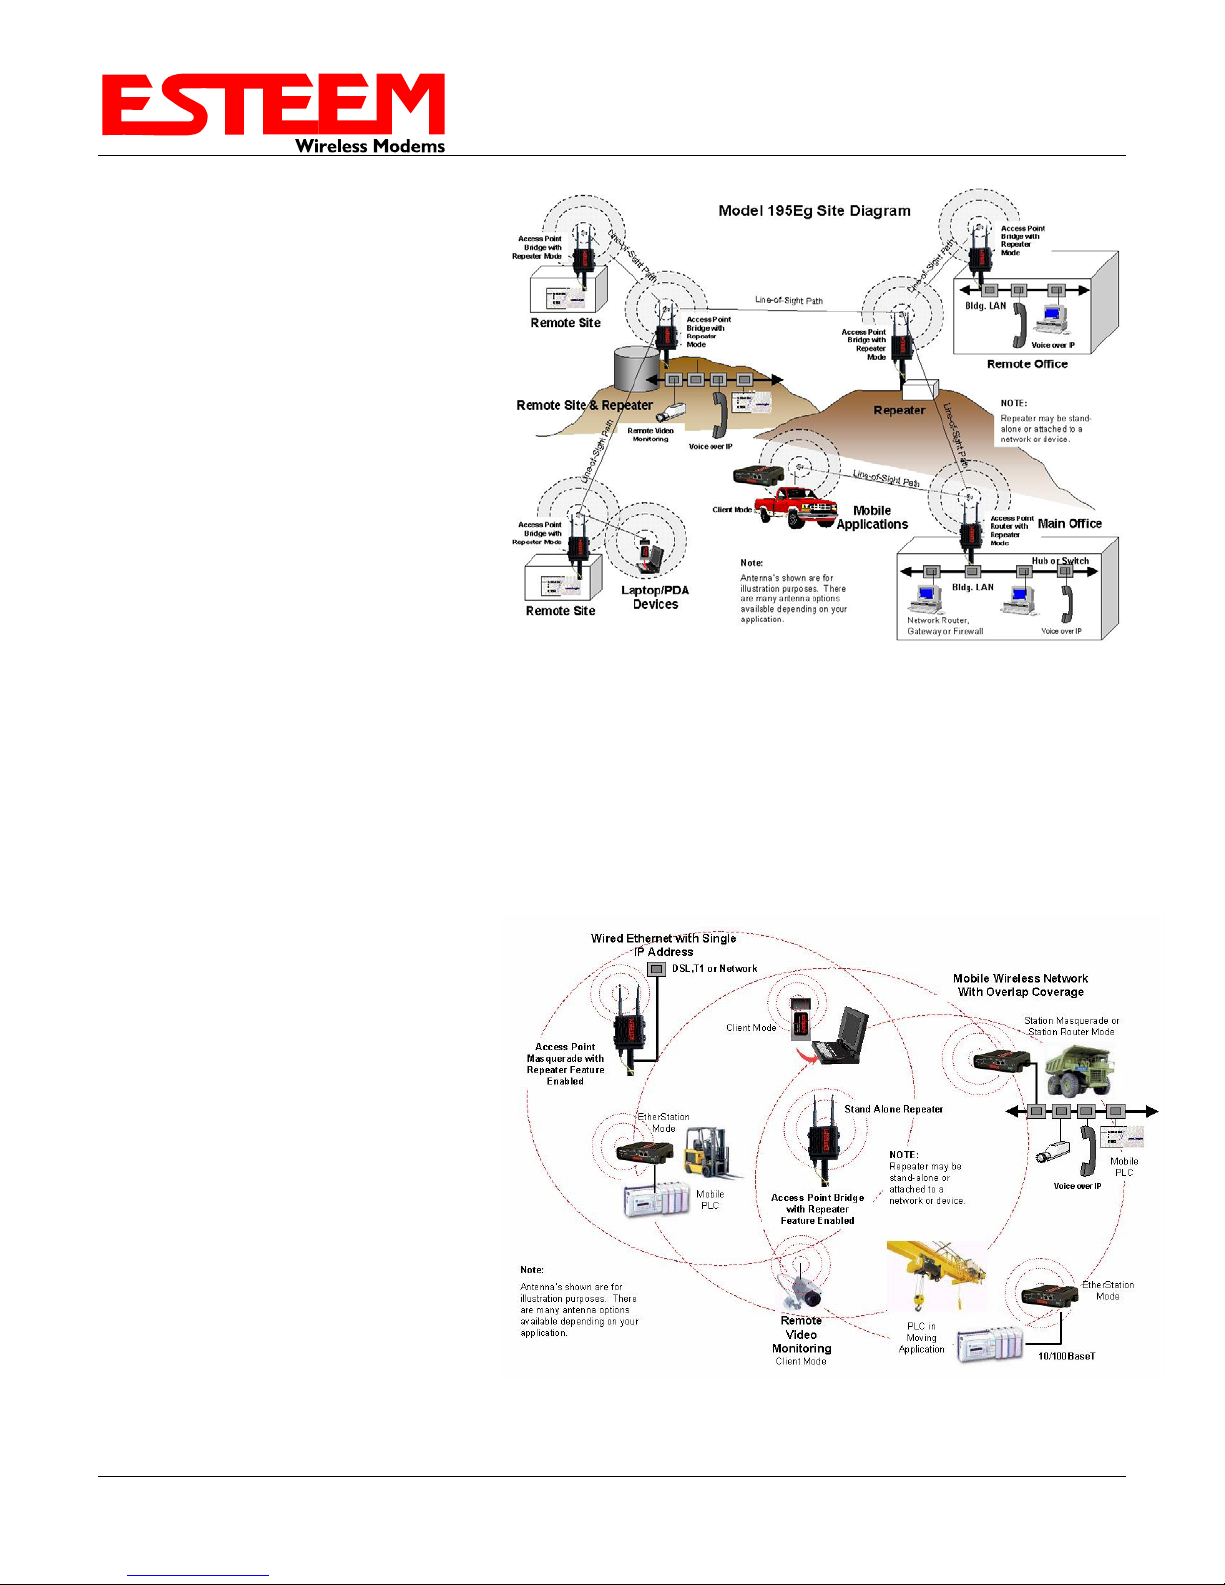
Figure 4: Access Point Masquerade Diagram
Page 9
CHAPTER 1
INTRODUCTION
3. Access Point Masquerade Mode
The Access Point Masquerade mode is a special use of the Access Point mode where the Model 195E will connect
mobile clients into a single static IP address on a wired network. Data requests from the wireless network will be
processed through the Access Point Masquerade 195E, but any request from the wired Ethernet network to devices on the
wireless network will be rejected similar to the operation of a “firewall”. The 195E will hide all the IP addresses
connected on the wireless link. You would use this mode of operation if Model 195E is connected directly to the Inte rnet
with a static IP address (DSL, T1, etc.) and you want the wireless clients to access the information through the Model
195E (Figure 4). This mode should also be used for attaching the Model 195E to a network where few IP addresses are
available or a firewall for the wireless clients is required.
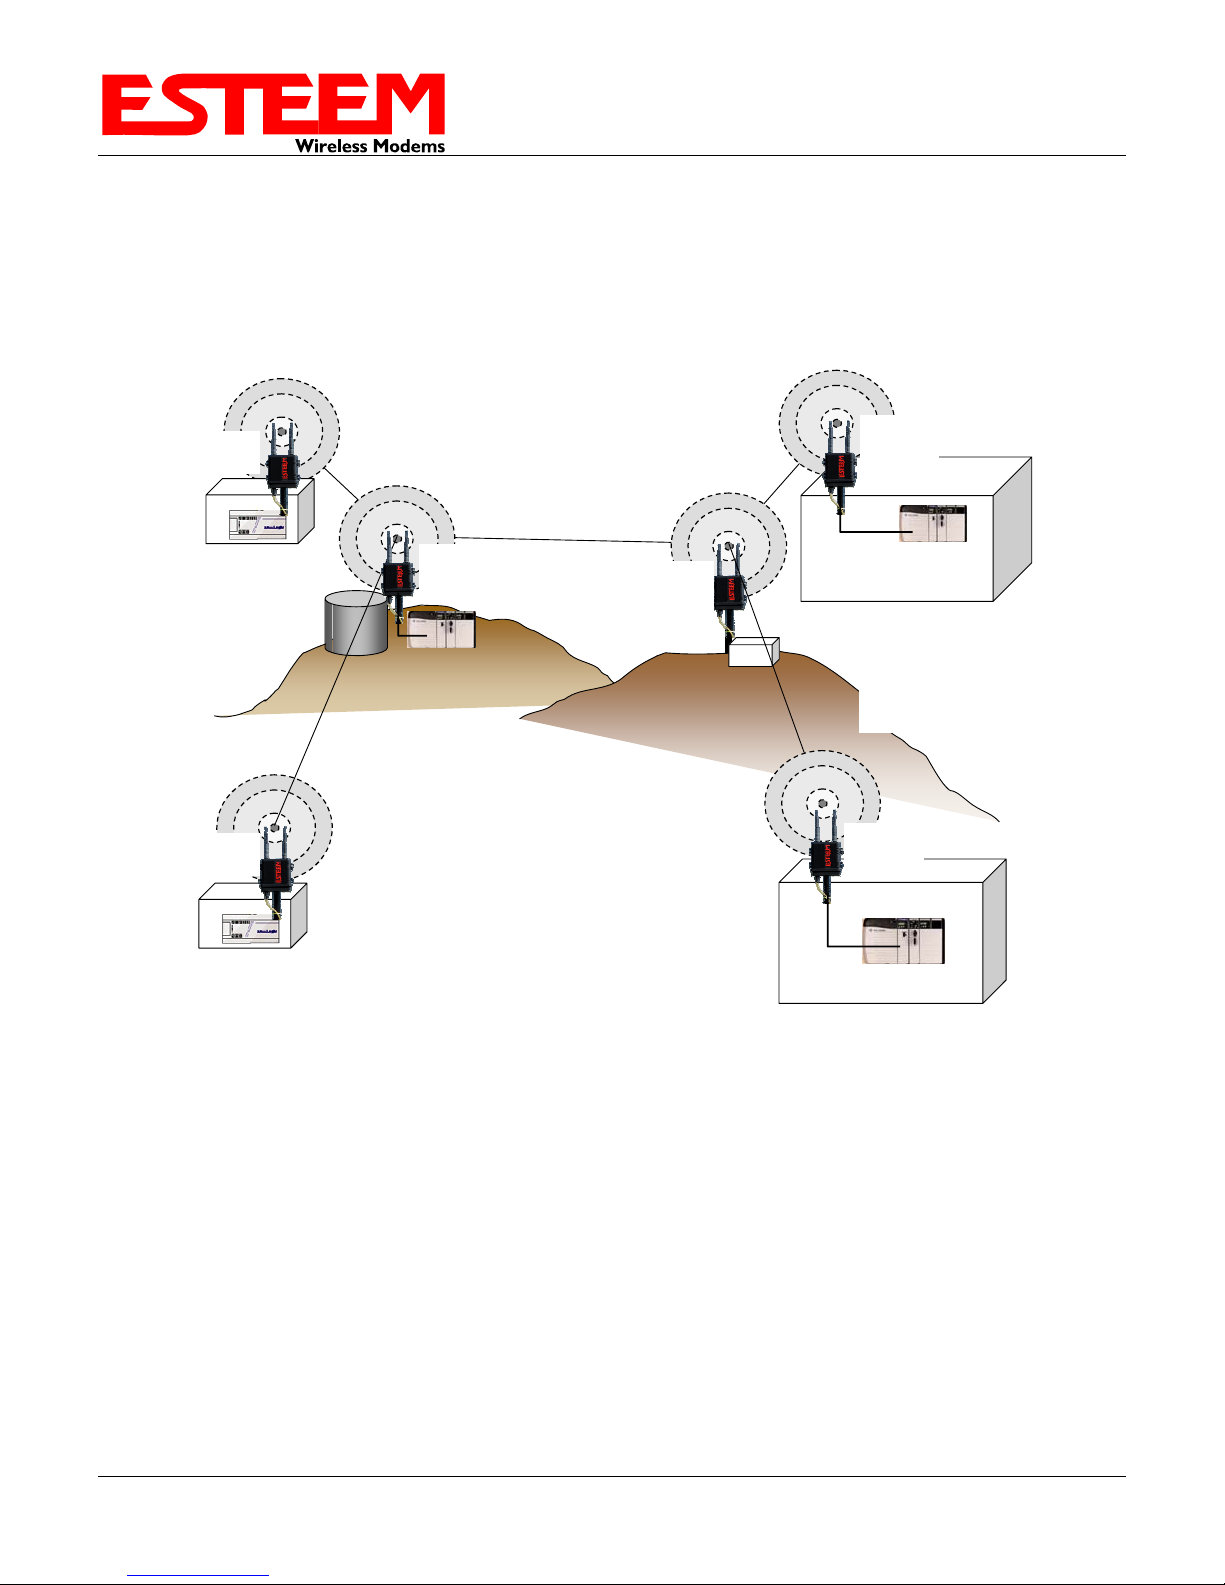
Access Point Repeater
The Access Point Repeater is a unique enhancement of the ESTeem Model 195E series. The Access Point Repeater can
be used with any of the above Access Point modes. With this repeater feature enabled, the Model 195E Access Points do
not have to be hardwired together on the same physical LAN to provide seamless Ethernet communication for roaming
clients. In addition to greatly extending the Access Point canopy range, the Model 195E will also bridge any Ethernet
device or Ethernet network connected to the unit over this same wireless Ethernet network. This mode gives the user the
features of a point to multi-point bridge network but also allows the Model 195E in the Client mode to simultaneously
roam under the network canopy.
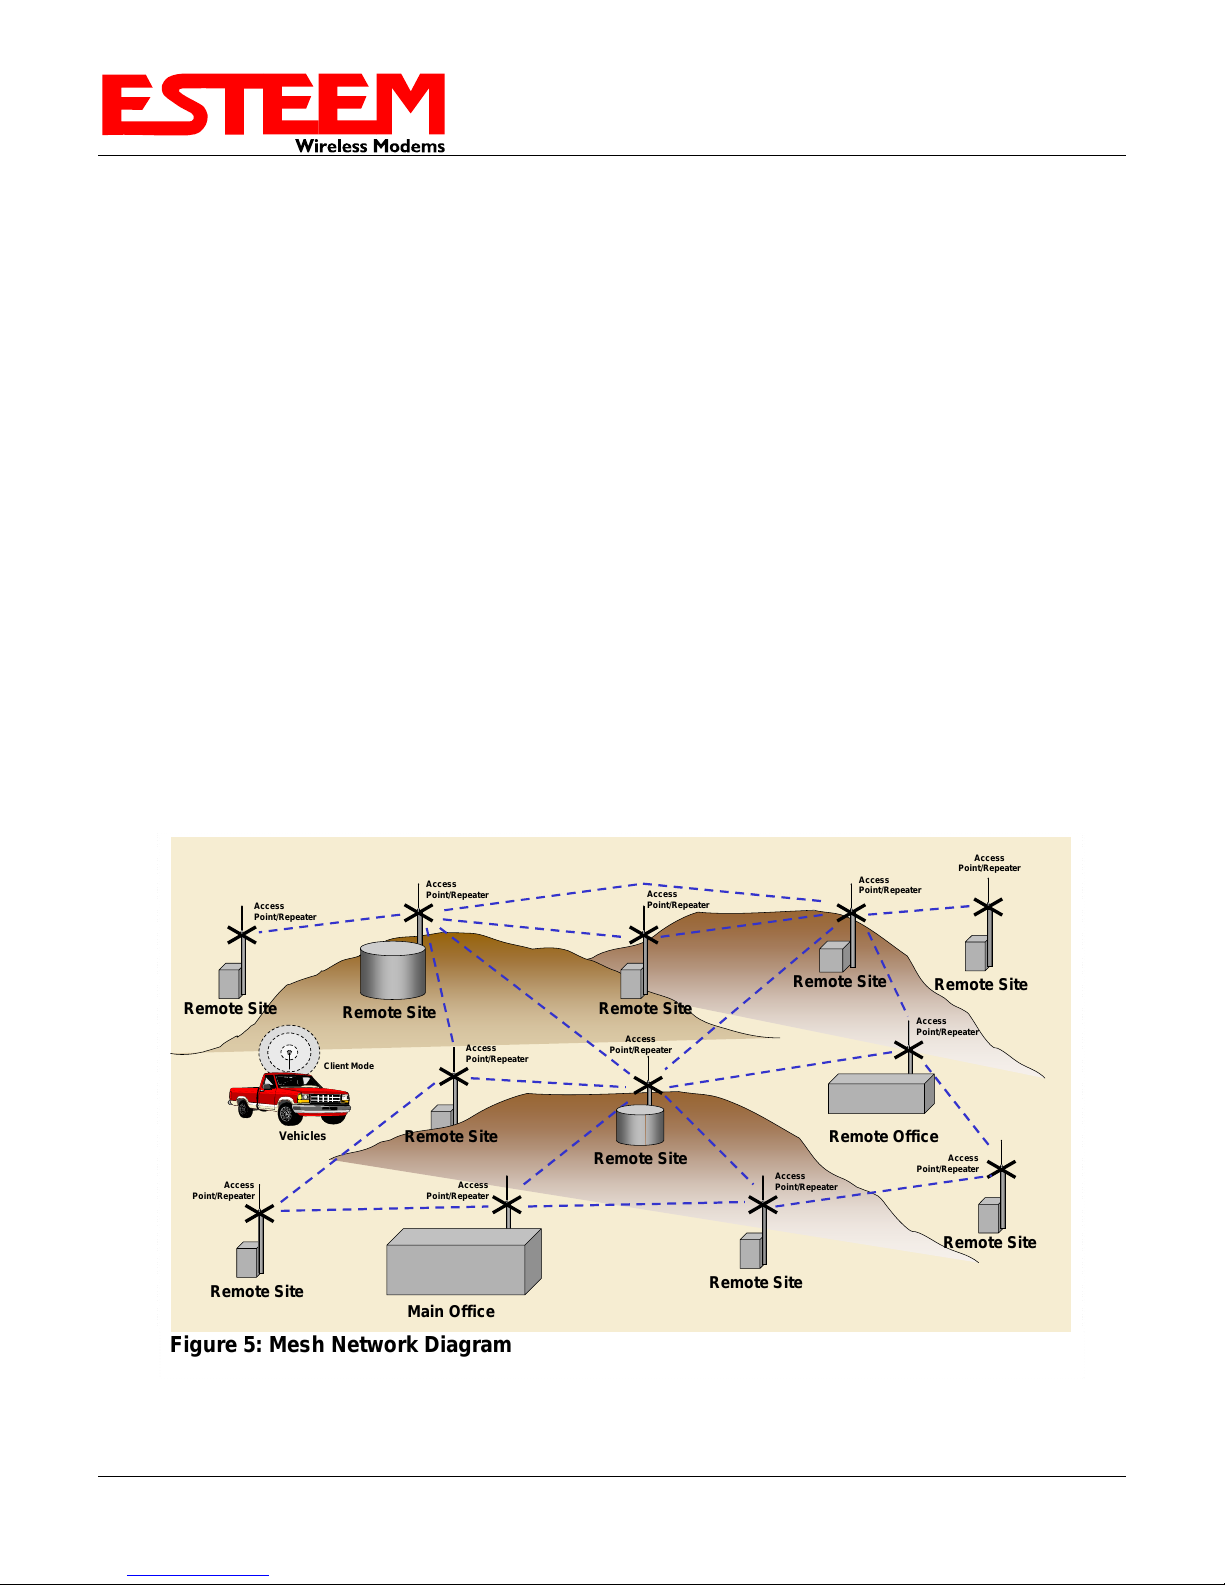
Self-Healing Mesh Network
If multiple Access Point Repeater routes are configured to the same destination ESTeem, the 195E will create a “self-
healing” mesh network by automatically re-routing data through alternate paths to reach its destination if the primary
path is inoperable. The routing and priority of alternate paths is completely user configurable. (See Figure 5)
Access
Point/Repeater
Remote Site
Access
Point/Repeater
Access
Point/Repeater
Access
Point/Repeater
Remote Site
Access
Point/Repeater
Vehicles
Remote Site
Client Mode
Access
Point/Repeater
Access
Point/Repeater
Remote Site
Access
Point/Repeater
Access
Point/Repeater
Remote Site
Access
Point/Repeater
Remote Site
Remote Site
Remote Office
Access
Point/Repeater
Access
Point/Repeater
Remote Site
Remote Site
Main Office
Remote Site
Figure 5: Mesh Network Diagram
Revi s e d : 1 9 O c t 1 2 1-3 EST P/N AA107E
Page 10

CHAPTER 1
INTRODUCTION
Station (Client) Modes
1. EtherStation Mode
When the 195E is configured in the EtherStation mode and attached to a single Ethernet Device, the Model 195E will
emulate an 802.11 wireless card in functionality for communication as a mobile client. The 195E will seamless roam
under the radio canopy of Access Points and can provide greatly increased range over a Wireless LAN Card for mobile
Ethernet devices such as vehicles, forklifts, cranes, etc (Figures 2-4).
2. Station Router Mode
The Station Router mode will also functions as a mobile client, similar to EtherStation, but will allow multiple Ethernet
devices to be connected to a single 195E (Figure 4). The 195E will function as a router between the wireless client mode
and the wired Ethernet devices connected to the Ethernet port. Similar in configuration to the Access Point Router mode,
the wireless and wired Ethernet networks will need to be on separate subnets. To communicate from wireless network to
devices on the wired Station Router network, a separate router (connected to the Ethernet side of the Access Point) is
required. This mode would be used where multiple Ethernet devices will be connected to a single Model 195E in a
mobile client application and the connected Ethernet devices will need to be accessible from the Access Point’s LAN
network.
3. Station Masquerade Mode
The Station Masquerade mode is another case multiple devices will be connected to a single ESTeem in a mobile or
client application. However, unlike the Station Router mode, the Station Masquerade will consolidate all connected
Ethernet devices to a single IP address on the network. The devices connected to the Station Masquerade 195E will be
able to access information from both the wireless and wired LAN, but will be inaccessible the other way similar in
application to a firewall. This mode would be used where multiple Ethernet devices will be connected to a single Model
195E in a mobile application and the IP addresses for each device will be hidden from the LAN connected to the Access
Point. See Figure 4.
Revi s e d : 1 9 O c t 1 2 1-4 EST P/N AA107E
Page 11
CHAPTER 1
INTRODUCTION
RS-232 Serial Applications
The ESTeem 195E is installed with an RS-232 data port for serial data applications run over the broadband link (Figure
6). The serial over broadband network can be used in a po int-to-point or p oint-to-multi-point application for networking
serial (RS-232C) devices, providing serial connections to legacy hardware in a new Ethernet network or providing for
high-bandwidth devices (such as Video or Voice over IP) in an existing serial network.
Li
Access Point
Bridge with
Repeater Mode
RS-232 Data
Remote Site
Remote Site & Repeater
Access Point
Bridge with
Repeater Mode
RS-232 Data
ne-
of
-
S
i
ght
P
ath
L
i
n
Access Point
Bridge with
Repeater
Mode
RS-232 Data
h
t
a
P
t
h
g
i
S
-
f
o
-
e
n
i
L
Note:
Antenna’s shown are for
illustration purposes. There
are many antenna options
available depending on your
application.
Remote Site
Figure 6: Multi-point Serial Diagram
Access Point
RS-232 Data
P
a
t
h
Access Point
Bridge with
Repeater
Mode
Bridge with
Repeater
Mode
Remote PLC
NOTE:
Repeater may be standalone or attached to a
network or device.
RS-232 Data
Master PLC
h
t
a
P
t
h
g
i
S
-
f
o
-
e
n
i
e
-
o
f
-
S
i
g
h
t
P
a
t
h
Access Point
Bridge with
Repeater
Mode
L
Repeater
L
i
n
e
-
o
f
-
S
i
g
h
t
To begin setup of your wireless Ethernet network, continue to Chapter 2 - Staring Out of t his User’s M anual.
Revi s e d : 1 9 O c t 1 2 1-5 EST P/N AA107E
Page 12

CHAPTER 2
STARTING OUT
OVERVIEW
There are three main phases to prepare the ESTeem 195E for operation in a wireless network:
Phase 1 - Determine the correct mode of operation for the ESTeem in the wireless network. The ESTeem 195E is a
sophisticated networking device that can be configured for multiple modes of operation. Determining the correct mode of
operation for the ESTeem 195E is the first step. Chapter 3 of this User’s Manual detail s the m odes of operati on and appli cations
where each would be used.
Phase 2 - Program the ESTeem for operation in the wireless network. Once the correct mode of operation for the ESTeem
has been determined, the 195E can be programmed for the wirel ess network. To simplify the programming of the Model 195E,
ESTeem has created a new software utility called the ESTeem Network Configuration (ENC) Utility which is used to graphically
configure the primary and backup communication routes between ESTeem 195E’s in the network. The ENC Utility can be
installed from the ESTeem Resource Disk or from the ESTeem web site (www.esteem .com ). Chapter 4 (Utilities and Features) of
this User’s Manual will guide you in the installation of the software and give a brief overview of operation of the ENC Utility, but
a detailed User’s Guide is available both on the ESTeem Resource Disk and i n the Help secti on of the program i tself.
The ESTeem Model 195E can also be programmed through the internal Web interface (discussed in detail in Chapter 5) if you do
not have access to the ENC Utility or your firmware version is older version 799.
Phase 3 - Install the ESTeem hardware and test communication. After the ESTeem Model 195E’s programming, inst all t he
hardware in each remote location. Chapter 8 of this User’s Manual describes the antenna specifications, mounting options and the
configuration of the pole mounting hardware for the ESTeem. For instructi ons on test ing and t roubleshooti ng the wirel ess li nk,
refer to Appendi
MODEL 195E HARDWARE LAYOUT
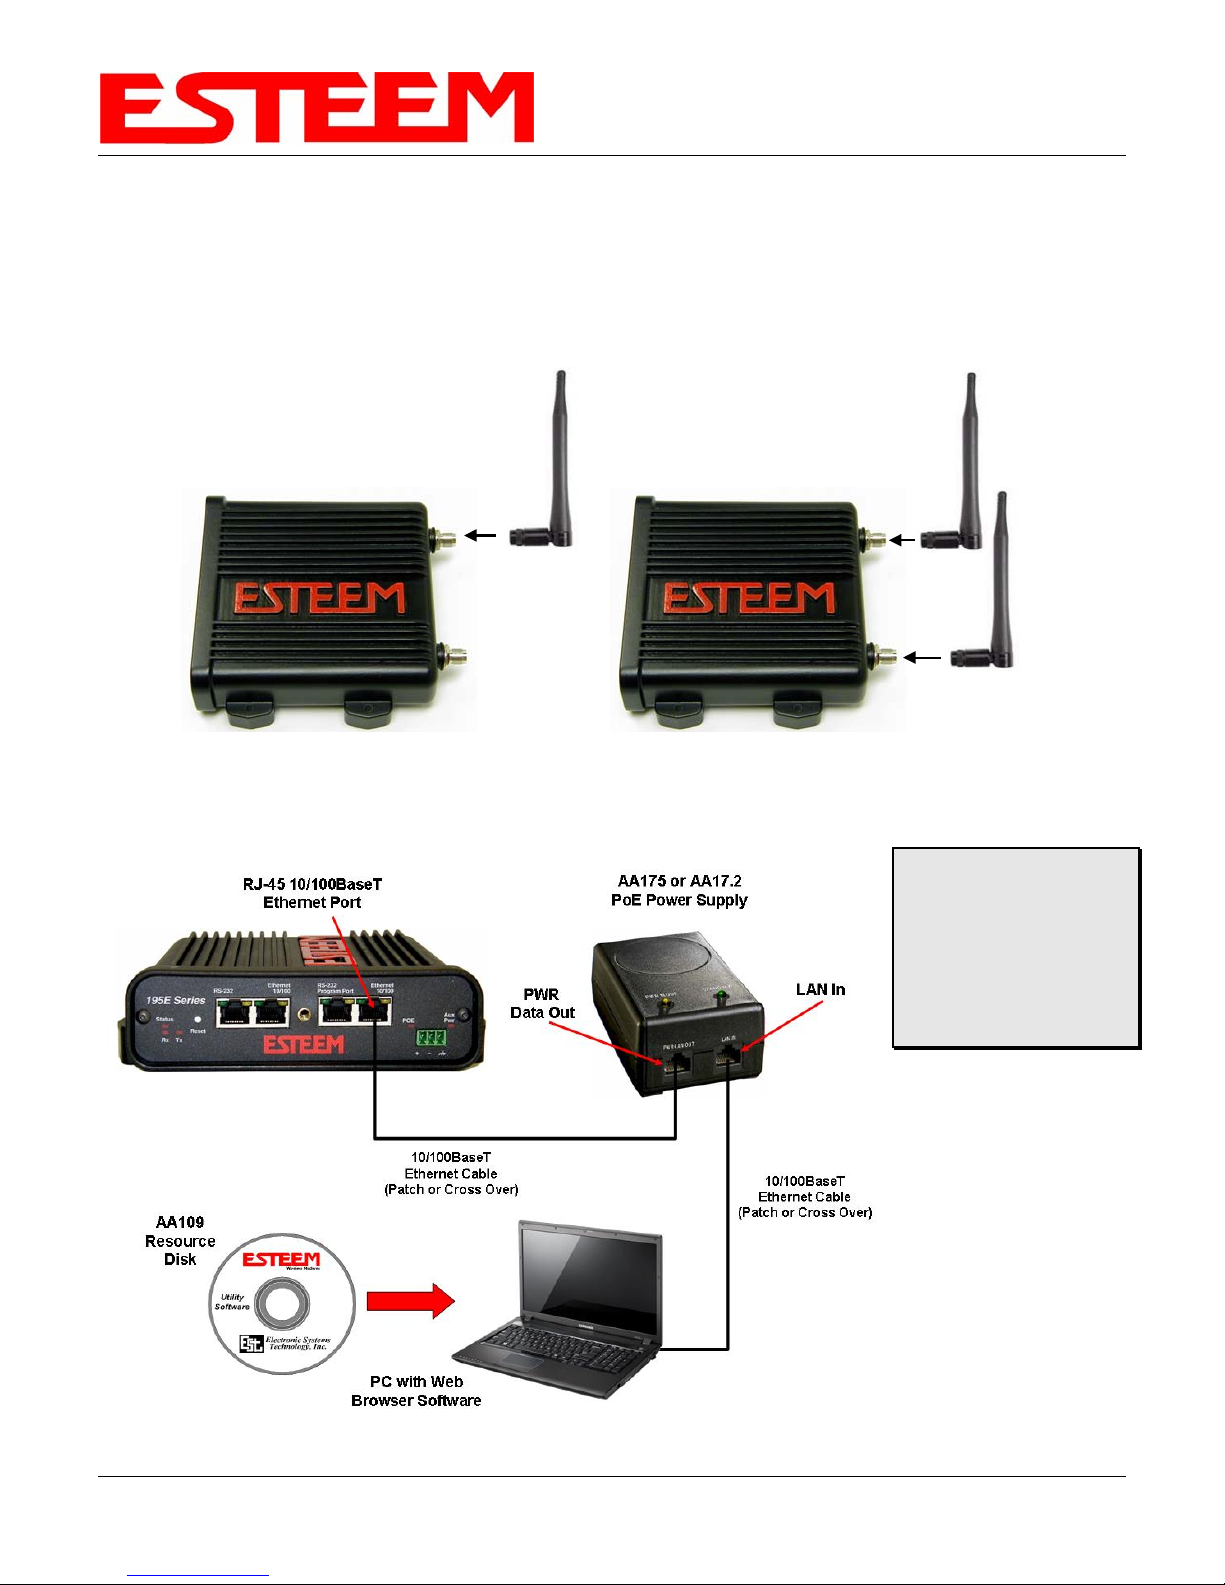
To begin the configuration, unpack the ESTeem Model 195E shipping boxes and locate the items below for initial configuration.
Take a few minutes to inventory your equipment before you proceed. Report any missing or damaged item s to Customer Support
(509-735-9092) as soon as possible. Each node in your ESTeem Model 195E’s network may have different hardware
components based upon the final installation location (i .e. Outdoor, Indoor, Poi nt-to-poi nt or M uti-Poi nt). Ante nna types, cable
lengths, power supplies may be different, but the following items will be required for basic setup:
(AA01S Displayed)
Power Supply
(AA175 Displayed)
x E (Troubleshooting).
Model 195E
Antenna
AA109 Resource Disk
(2) Ethernet Cables
Serial Interface Cable
(AA6021.1)
Note: Your accessory model numbers may vary from the above, but you will need to locate each of above items to continue
configuration.
Revi s e d : 1 9 O c t 1 2 2-1 EST P/N AA107E
Page 13

CHAPTER 2
STARTING OUT
Figure 1: 195E Front Panel Overview
Revi s e d : 1 9 O c t 1 2 2-2 EST P/N AA107E
Figure 2: 195E Antenna Overview
Page 14
CHAPTER 2
STARTING OUT
MODEL 195E HARDWARE CONFIGURATION
The following steps should be completed to begin configuration of the ESTeem Model 195E:
1. Connect the antenna to the antenna connector on the ESTeem Model 195E (Figure 3). For a single antenna use Antenna Port
A and connect both if using dual antennas.
Single Antenna
Configuration
Leave
Open
2. Assemble the 195E hardware as shown in Figure 4.
Dual Antenna
Configuration
Figure 3: Antenna Configuration Diagram
Technical Tips:
1. Configure the Model
195E prior to mounting.
2. Attach antenna to the
Model 195E before
powering up.
Revi s e d : 1 9 O c t 1 2 2-3 EST P/N AA107E
Figure 4: Hardware Configuration Diagram
Page 15
CHAPTER 3
EXAMPLE APPLICATIONS
MODES OF OPERATION
The ESTeem Model 195E is a sophisticated wireless networking device that can be configured for multiple modes
of operation. Determining the correct mode of operation for the ESTeem is the first step in creating a reliable
wireless network. This chapter will explain each mode of operation, provide example applications and detailed
programming information for each mode. Please review the following modes of operations. If you do not see an
example of your application, please contact ESTeem support at 509-735-9092 for help in selecting your mode of
operation.
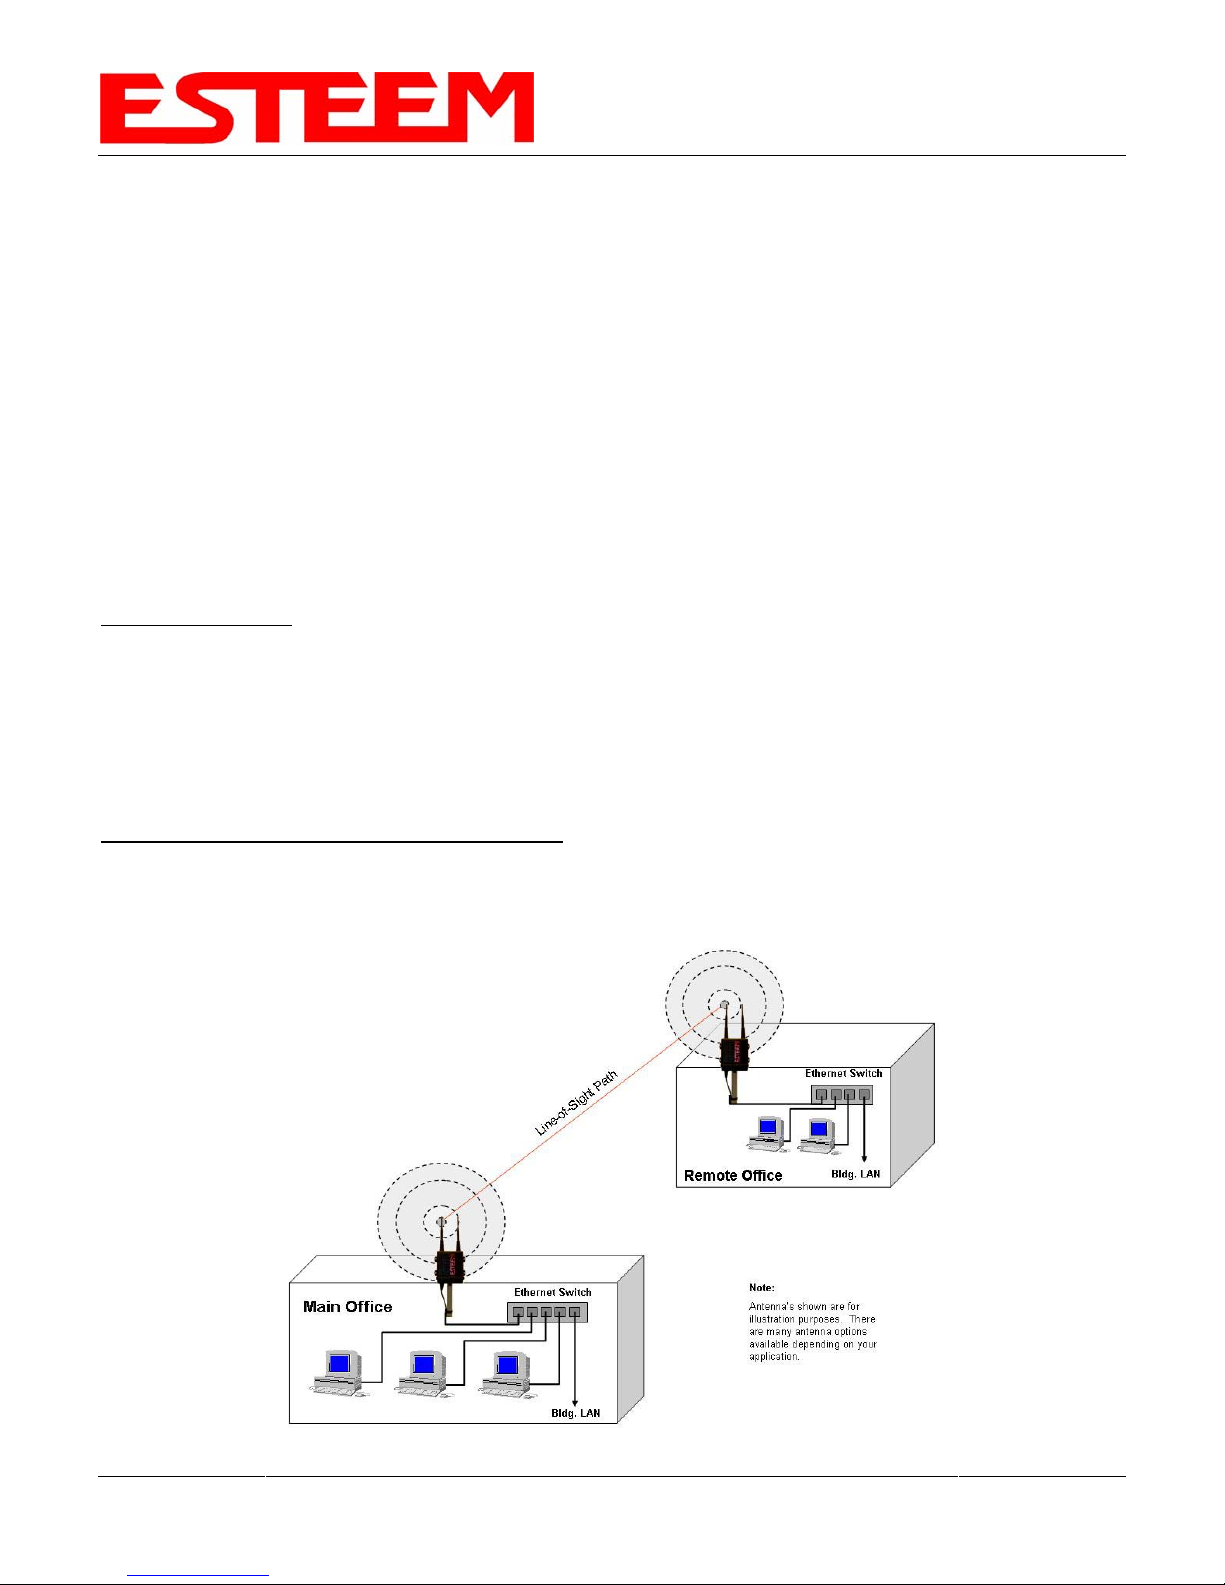
Ethernet Bridge Mode (AP Bridge)
The most commonly used mode of operation with the ESTeem Model 195E is the Ethernet bridge mode. The
Ethernet bridge mode will connect two or more ESTeem 195E’s while passing all network traffic that arrives in both
the wireless and connected Ethernet ports; including all global network traffic (Figure 1). This mode will work in
most wireless applications of the 195E to wirelessly connect two or more remote Ethernet devices or networks. The
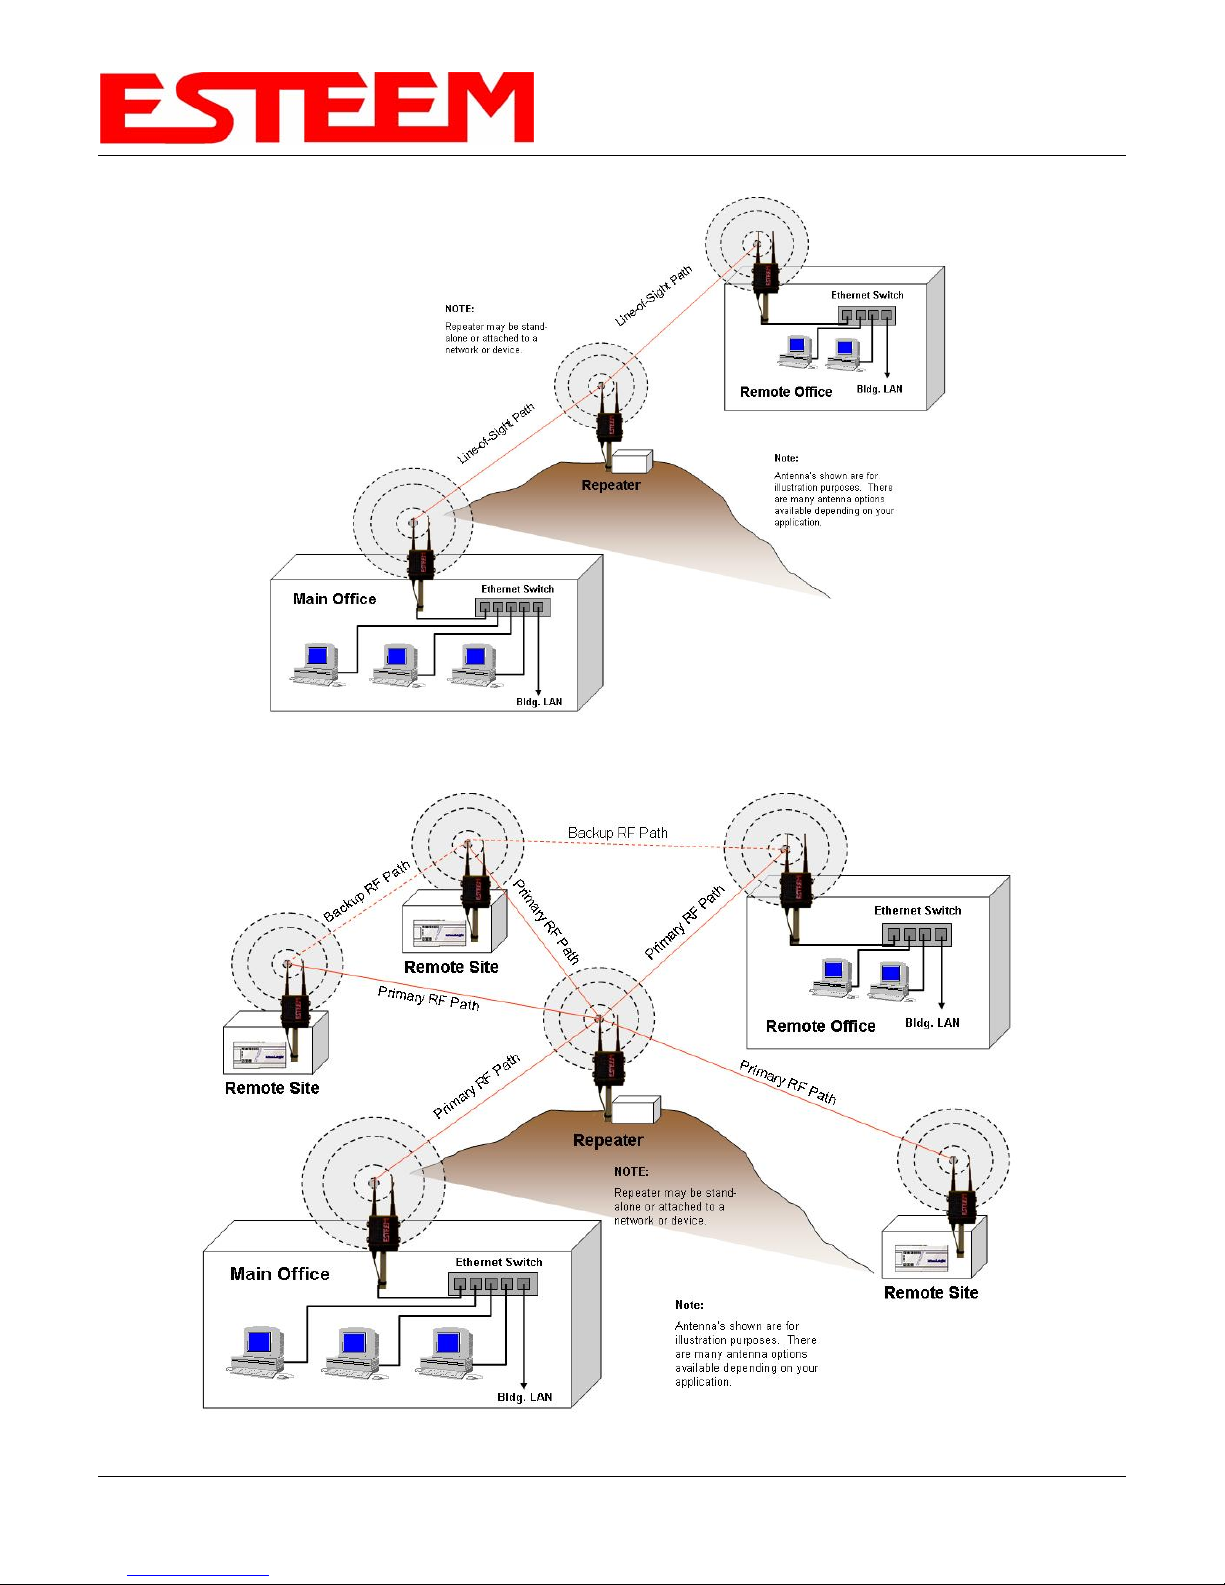
Ethernet bridge mode is also used in repeating (Figure 2) and in self-healing Mesh networks (Figure 3) for fixed
(non mobile) applications.
Example Applications
• Building to building remote wireless LAN networks
• Point to point wireless Ethernet communication devices
• Multi-point wireless Ethernet networks
• Remote Supervisory Control and Data Acquisition (SCADA) networks
• Redundant, self-healing Mesh networks
• Fixed locations with mobile ESTeem 195E’s
Applications Where Ethernet Bridge Mode Not Used
• Mobile applications (see Mobile Clients)
• Connections to large Ethernet traffic networks such as large office buildings or plant networks (see Router
modes)
Figure 1: Point to Point Example
Revi s e d : 1 9 O c t 1 2 3-1 EST P/N AA107E
Page 16
CHAPTER 3
EXAMPLE APPLICATIONS
Figure 2: Ethernet Bridge with Repeater
Figure 3: Multipoint Bridge with Mesh Networking
Revi s e d : 1 9 O c t 1 2 3-2 EST P/N AA107E
Page 17
CHAPTER 3
EXAMPLE APPLICATIONS
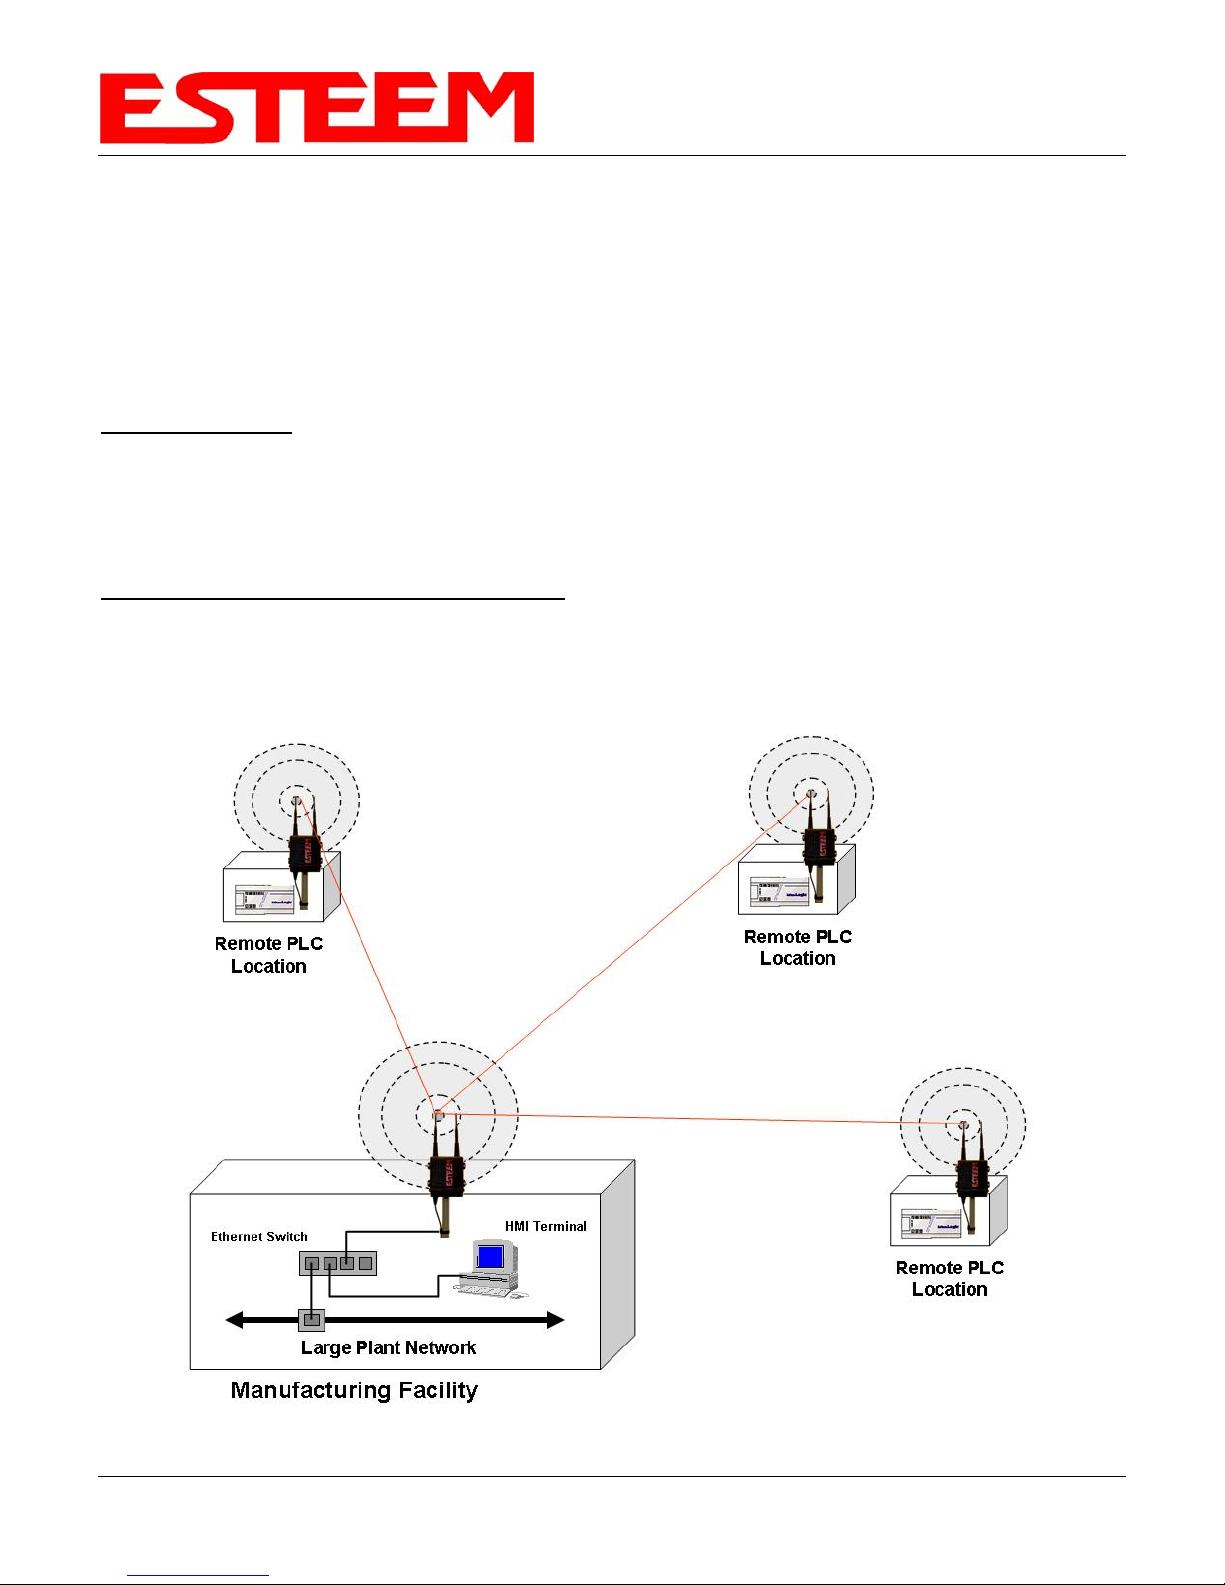
Router Modes (AP Router and AP Masquerade)
The ESTeem 195E can be configured as a network router or network firewall between the Ethernet LAN connection
and the wireless network of remote locations. The router modes are used to limit the network traffic from a busy
Ethernet network connection to only those specific IP address used on the wireless network (see Figure 4). The
Ethernet router mode (AP Router) will allow bi-directional communication from the Ethernet LAN connection to the
wireless network. The Ethernet firewall mode (AP Masquerade) will allow Ethernet devices in the wireless network
to request information from the Ethernet LAN network and receive a response, but no traffic can be generated from
the Ethernet LAN side.
Example Applications
• Wireless Ethernet networks connected to large company or plant Ethernet LAN networks (AP Router)
• Wireless Ethernet networks with a requirement for network isolation from the plant or company network
(AP Router)
• Shared Ethernet connection to direct Internet service (DSL, Cable, T1, etc.) (AP Masquerade)
Applications Where Ethernet Router Mode Not Used
• Mobile applications (see Mobile Clients)
• Simple network connections only using a single IP network subnet (see Ethernet Bridge modes)
Figure 4: Router Mode Example
Revi s e d : 1 9 O c t 1 2 3-3 EST P/N AA107E
Page 18
CHAPTER 3
EXAMPLE APPLICATIONS
Mobile Client Modes (EtherStation, Station Router or Station Masquerade)
The ESTeem 195E can also be configured to function as a mobile client. The client modes allow the 195E to
seamlessly roam between fixed Access Points. These Access Points can either be ESTeem 195E wireless
modems configured in one of the three Access Point modes (AP Bridge, AP Router or AP Masquerade – see
above) or any IEEE 802.11 (Wi-Fi) Access Point for the ESTeem 195Eg and 195Ea. The client modes will allow
mobile Ethernet devices to connect to each other or to an Ethernet LAN through the fixed AP (Figure 5).
The EtherStation mode is used to connect a single Ethernet device to the ESTeem 195E. If you are connecting the
195E to multiple Ethernet devices in a mobile mode, the Station Router or Station Masquerade will be required.
The Station Router will allow bi-directional communication between the Ethernet devices connected to the 195E
and the wireless network, while the Station Masquerade will serve as a firewall on the Ethernet side.
Example Applications
• Mobile applications where the 195E will change links often between fixed Access Points
• Long range mobile client networks
• Public safety applications for police, fire and EMS
Applications Where Mobile Client Mode Not Used
• Fixed locations using Ethernet Bridging or Routing
• Wireless Ethernet networks with repeaters
Figure 5: Router Mode Example
Revi s e d : 1 9 O c t 1 2 3-4 EST P/N AA107E
Page 19
CHAPTER 3
EXAMPLE APPLICATIONS
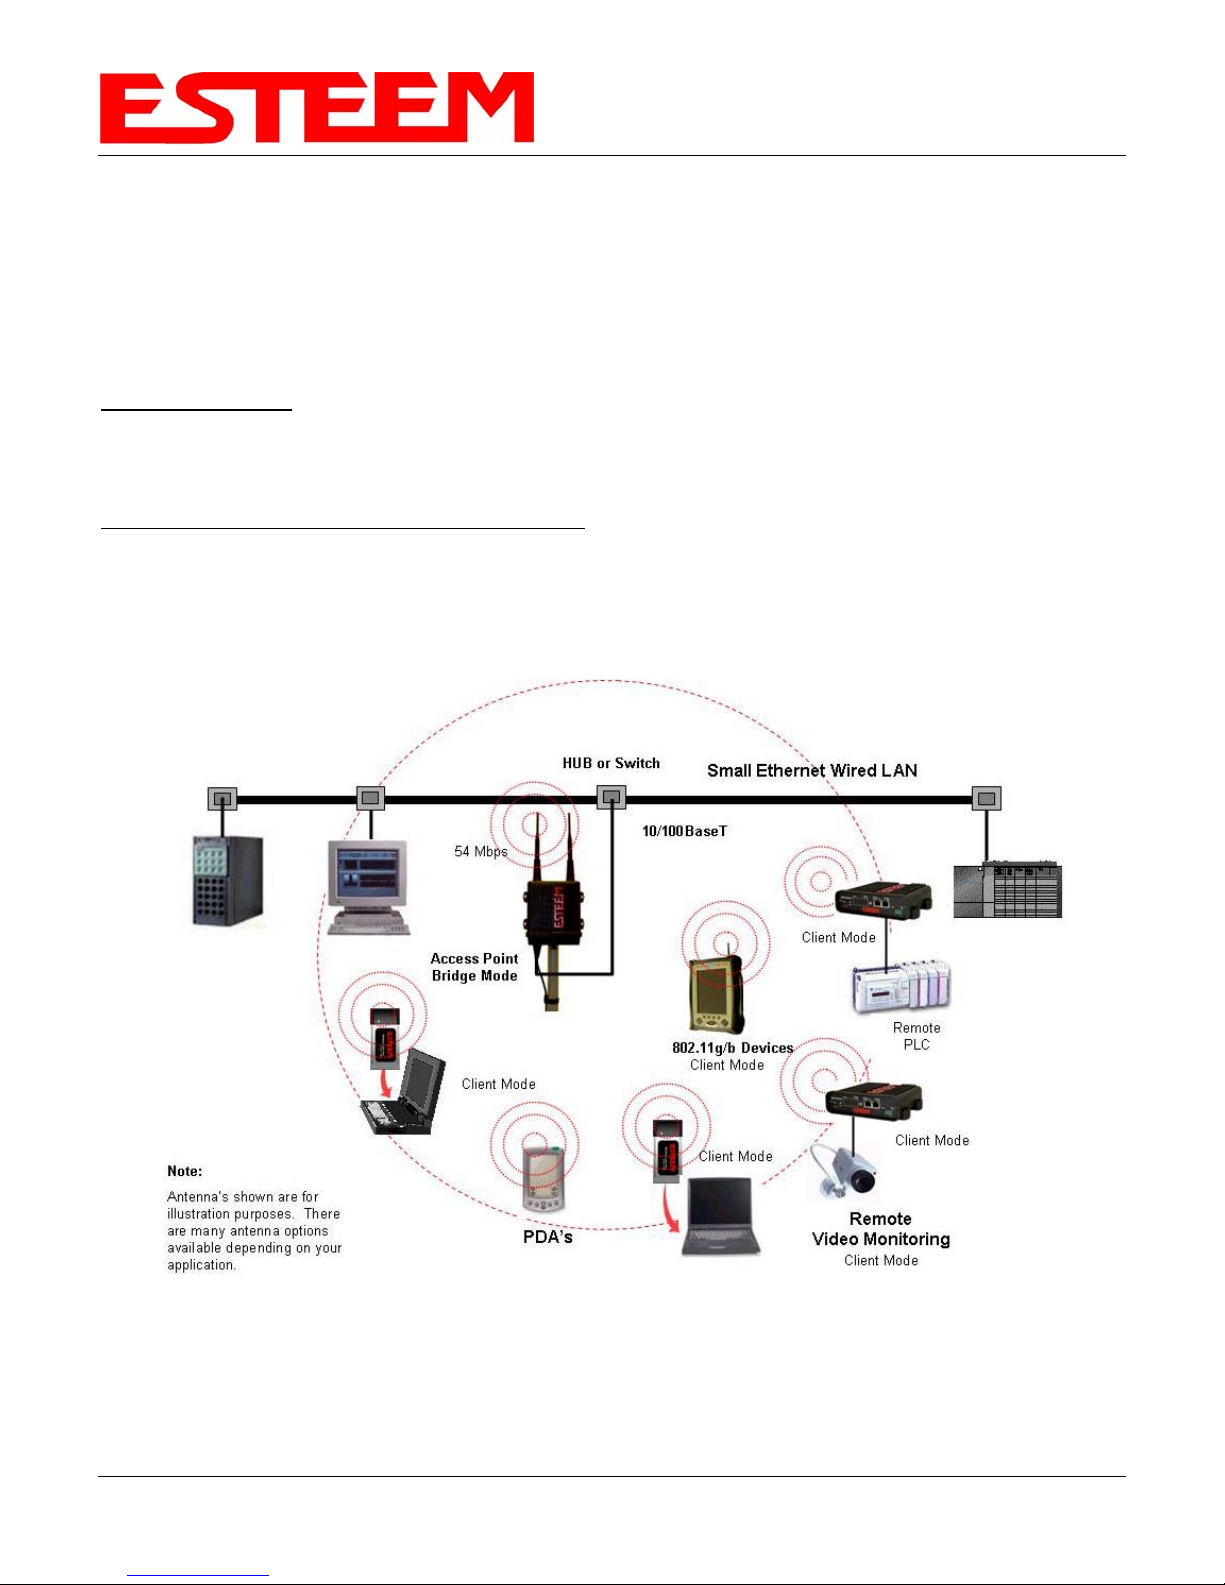
802.11 Access Point Modes (AP Bridge, AP Router or AP Masquerade) (195Eg and 195Ea Only)
The ESTeem 195E can be configured as a high power 802.11 Access Point (AP). The IEEE 802.11g/b Access
Point (AP) functionality is available in all three of the Access Point modes (AP Bridge, AP Router or AP
Masquerade). The Access Point mode will provide either a single wireless connection (Figure 6) or overlapping
coverage (Figure 7) to create a “canopy” of wireless coverage for 802.11 devices. The ESTeem 195E in AP mode
can function as both an Ethernet bridge or router and 802.11 AP simultaneously (Figure 8).
Example Applications
• Industrial, long range 802.11 (Wi-Fi) networks
• Hybrid networks of Ethernet bridging/routing and mobile client access
Applications Where Access Point (AP) Mode Not Used
• Mobile applications
Figure 6: Single Access Point Network
Revi s e d : 1 9 O c t 1 2 3-5 EST P/N AA107E
Page 20
CHAPTER 3
EXAMPLE APPLICATIONS
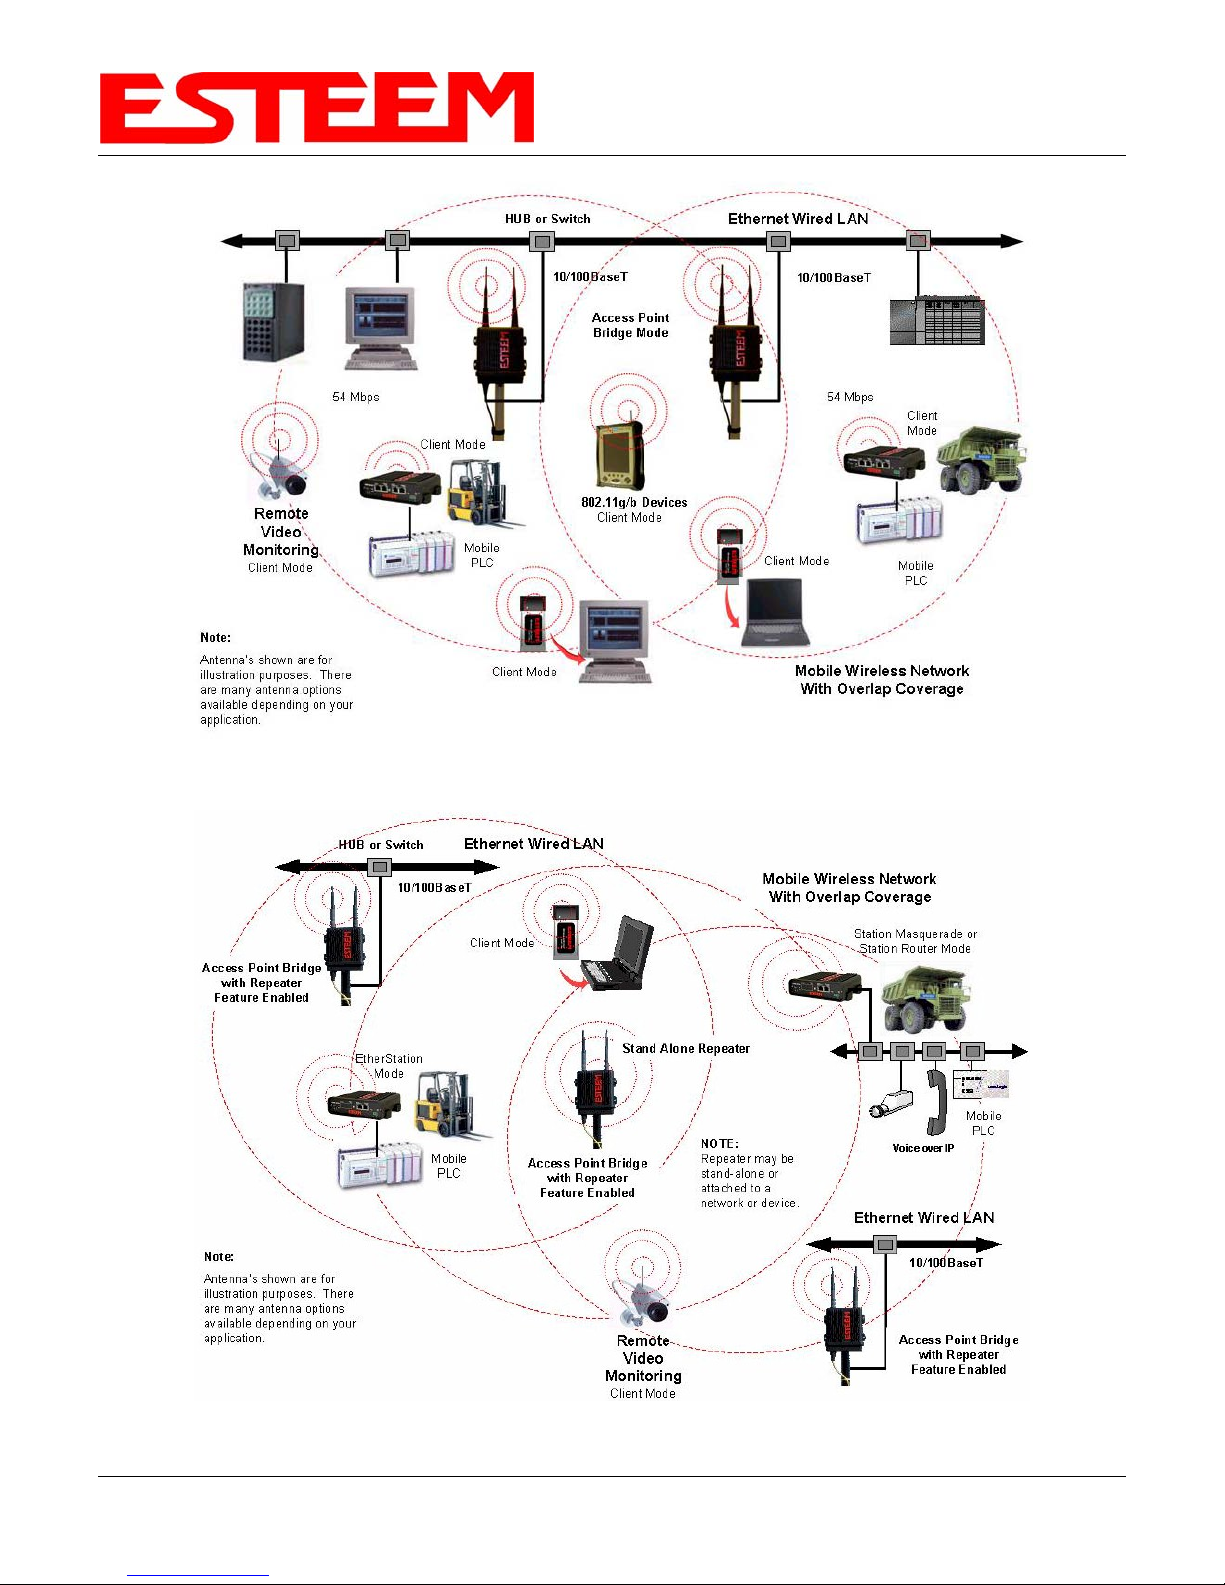
Figure 7: Overlapping Access Point Coverage
Figure 8: Access Point and Ethernet Bridge
Revi s e d : 1 9 O c t 1 2 3-6 EST P/N AA107E
Page 21
CHAPTER 3
EXAMPLE APPLICATIONS
PROGRAMMING EXAMPLES
Once the mode of operation for the ESTeem has been
determined, you are now ready to program the Model 195E for
use. ESTeem has created a simplified network programming
utility call the ESTeem Network Configuration (ENC) Utility. This
ENC Utility will be used in all the following programming
examples. For detailed instructions on installing the ENC Utility,
please refer to the User’s Guide (found in the ESTeem Resource
CD or Utility program itself) or Chapter 4 of this User’s Manual
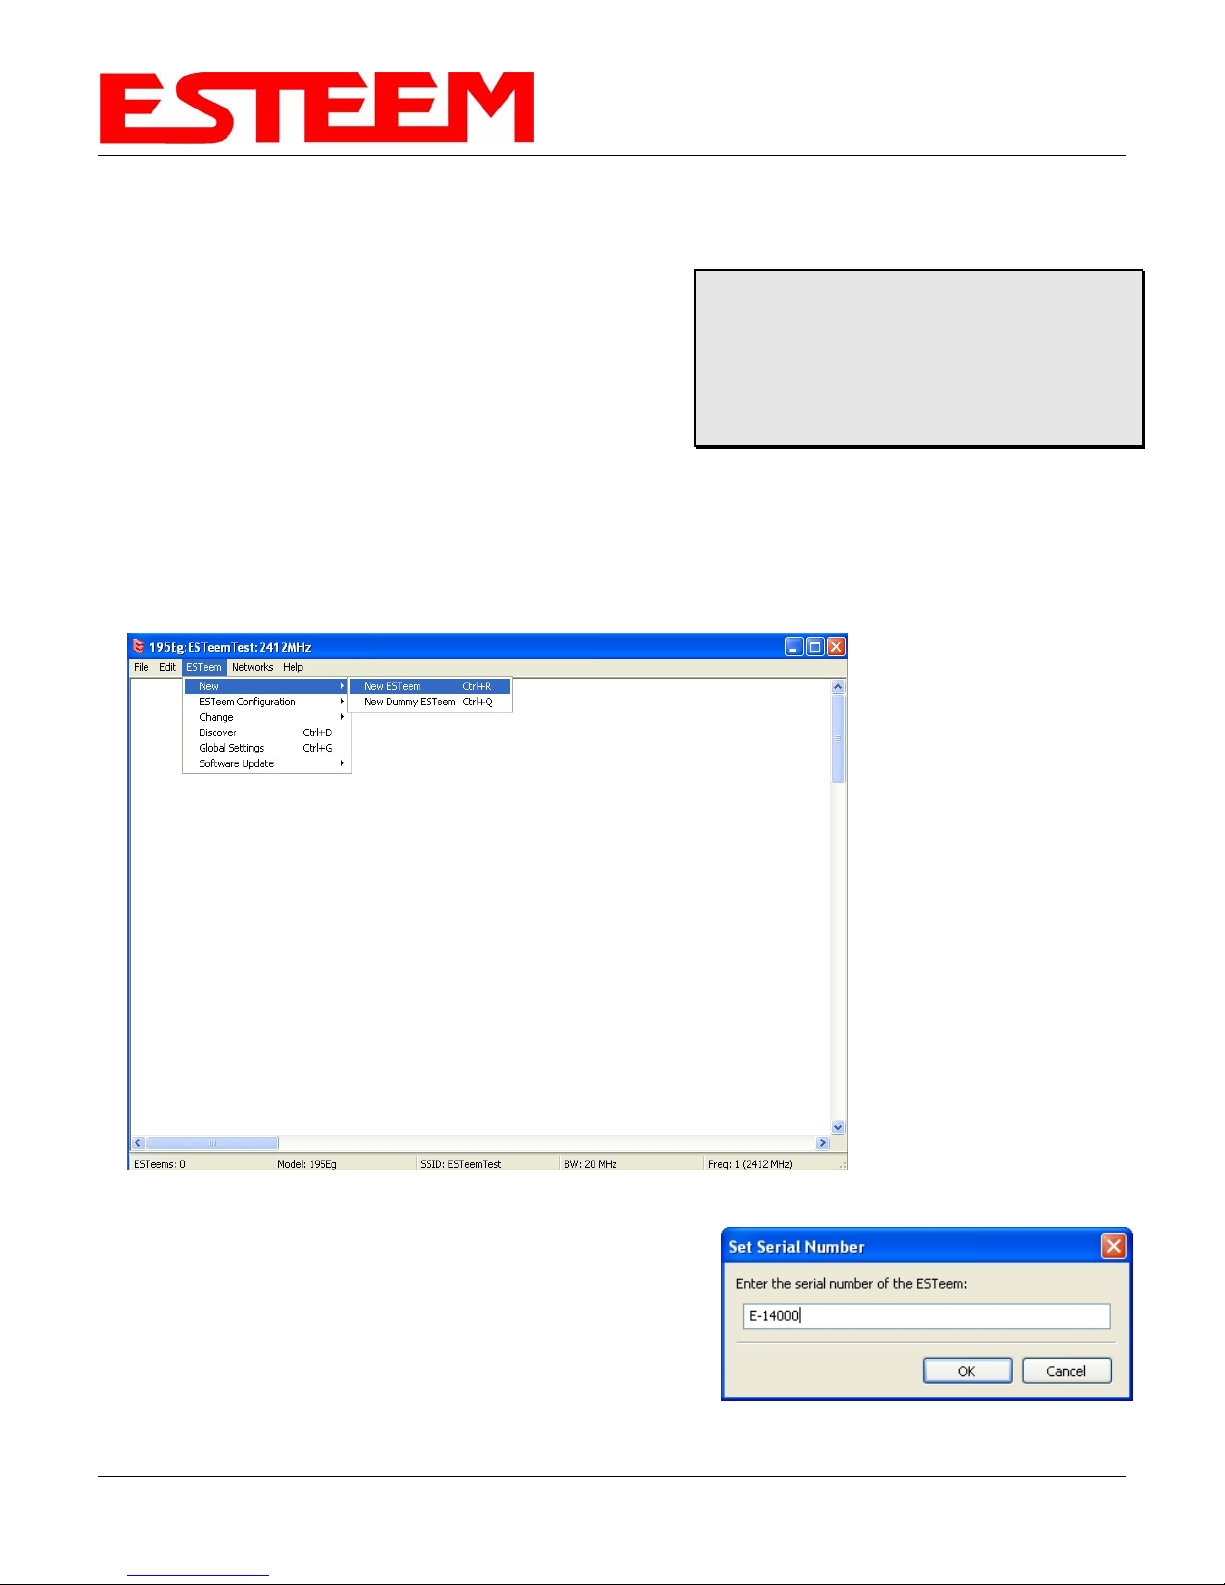
Adding ESTeems to ENC Utility and Changing Name
Each of the example applications will use the following procedure to add and rename ESTeem 195E’s.
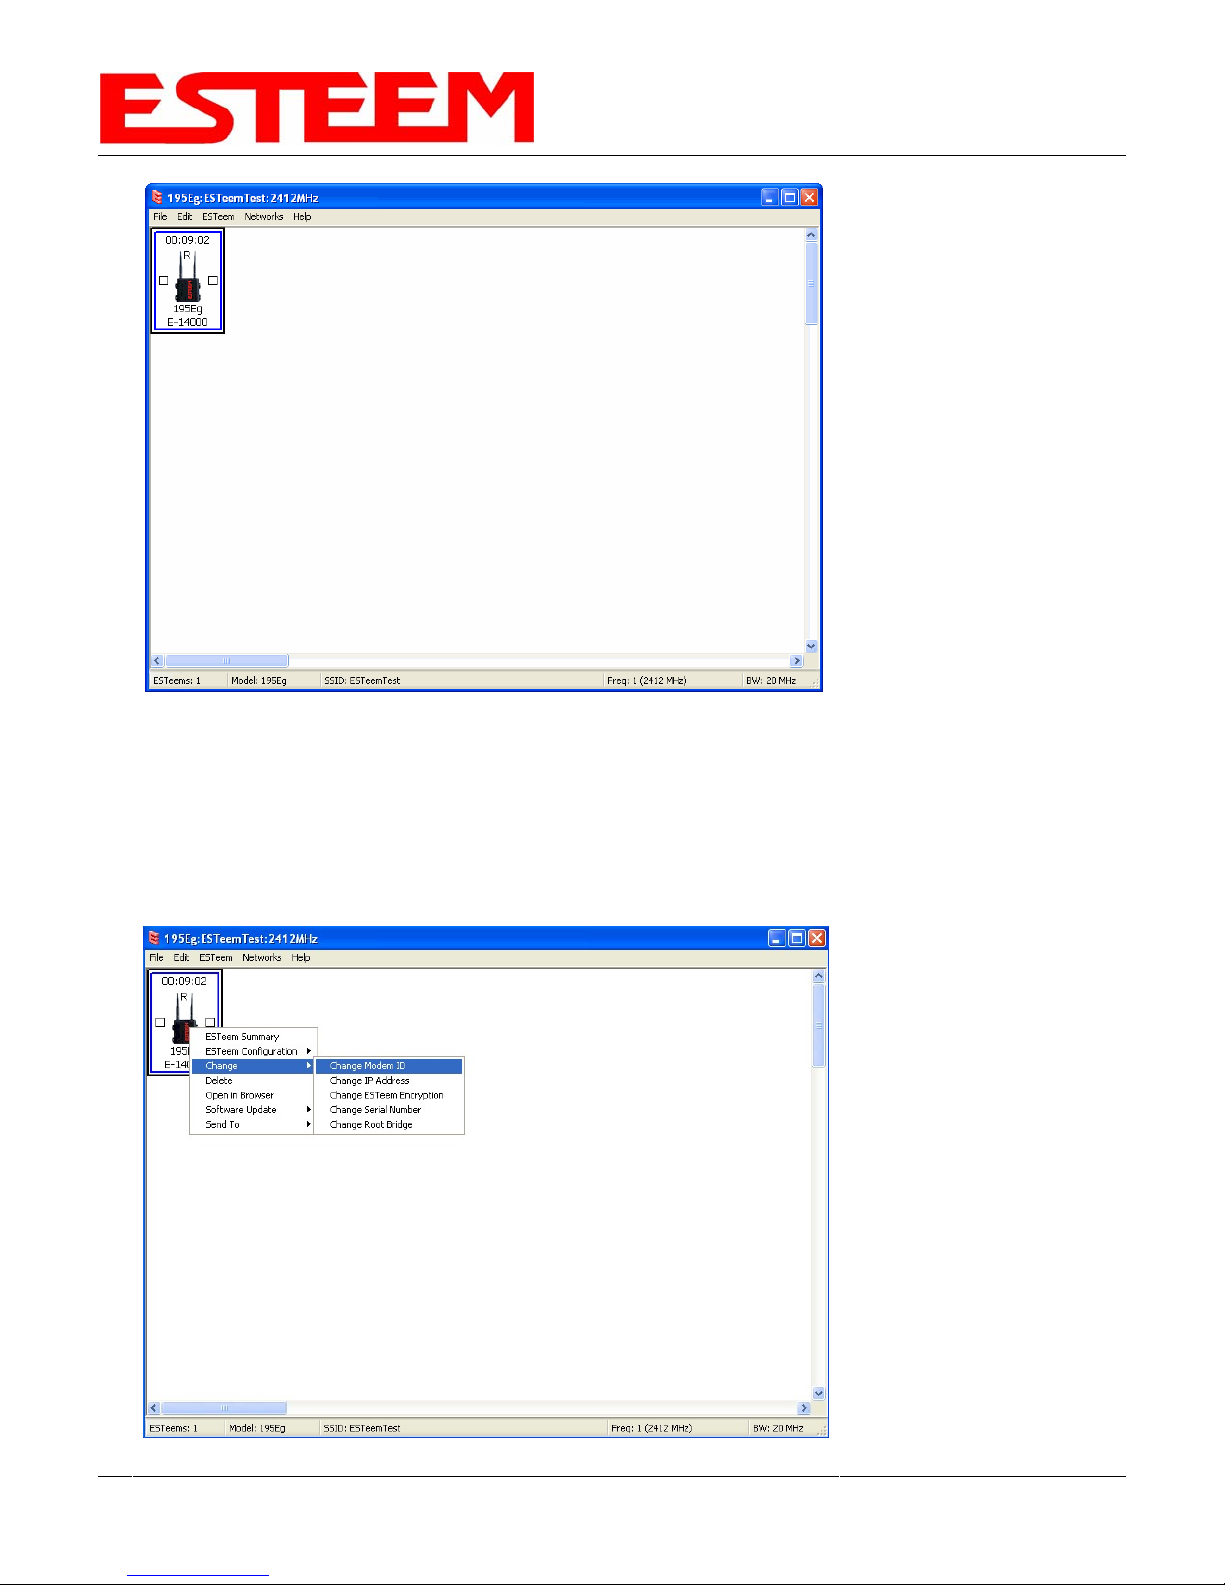
1. Consult the ENC Utility’s User Guide on how the create a new wireless network. Once you have a blank
network configuration page (Figure 9), select ESTeem from the menu items to display the drop down menu,
then select New>New ESTeem.
Technical Tip: The ENC Utility calculates the
wireless link information based upon exact
ESTeem serial numbers. The serial numbers
listed in the following examples are for example
only. Enter the correct ESTeem serial numbers
for your application.
Figure 9: Adding ESTeem to Blank ENC Configuration Page
2. Enter in the ESTeem Model 195E serial numbers used for the
example (for example enter E-14000 in the Set Serial Number
Box) and press the OK button (Figure 10). The ENC Utility
will look up the ESTeem 195E’s serial number in the
database and match the correct Wireless LAN MAC (WLAN
MAC) address to the modem. This WLAN MAC address will
be displayed above the modem symbol on the screen
(Figure 11).
Revi s e d : 1 9 O c t 1 2 3-7 EST P/N AA107E
Figure 10: Enter the Serial Number
Page 22
CHAPTER 3
EXAMPLE APPLICATIONS
Figure 11: Main Office ESTeem 195E
3. To change the name of the ESTeem 195E from the WLAN MAC address to “Main Office” (or any other location
name) to match the example configuration, Right-Mouse click on the ESTeem icon and select
Change>Change Modem ID (Figure 12). Enter “Main Office” in the pop-up window and select OK.
4. Duplicate the above procedure for each ESTeem 195E added to the network.
Figure 12: Change Modem ID
Revi s e : 19 Oct 1 2 3- 8 EST P/N AA107E d
Page 23

CHAPTER 3
EXAMPLE APPLICATIONS
Ethernet Bridge Mode Example 1 (Figure 1)
Point to Point Ethernet Bridge
(2) ESTeem Model 195E
Serial Numbers: E-14000 (Main Office) and E-14001 (Remote Office)
1. Add the two ESTeem Model 195Es to the network using the above procedure. Once both ESTeem 195Es are
on the configuration page, create a wireless
link by clinking on one of the two connection
boxes and dragging a line to the other
modem (Figure 13).
5. Verify both ESTeem modems are connected
to the same switch as the computer running
the ENC Utility and send the configuration to
both modems at the same time by selecting
ESTeem>ESTeem Configuration>Send
Configuration to All ESTeems (Figure 14).
6. Once the ENC Utility has downloaded the
configuration for both ESTeem 195Es, the
status box around the ESTeems will change
from yellow to blue. This indicates that the
configuration was completed successfully
and the ESTeem 195Es are ready to be
installed in the application.
Figure 13: Create Wireless Link
Figure 14: Send Configuration to ESTeems
Revi s e d : 1 9 O c t 1 2 3-9 EST P/N AA107E
Page 24
CHAPTER 3
EXAMPLE APPLICATIONS
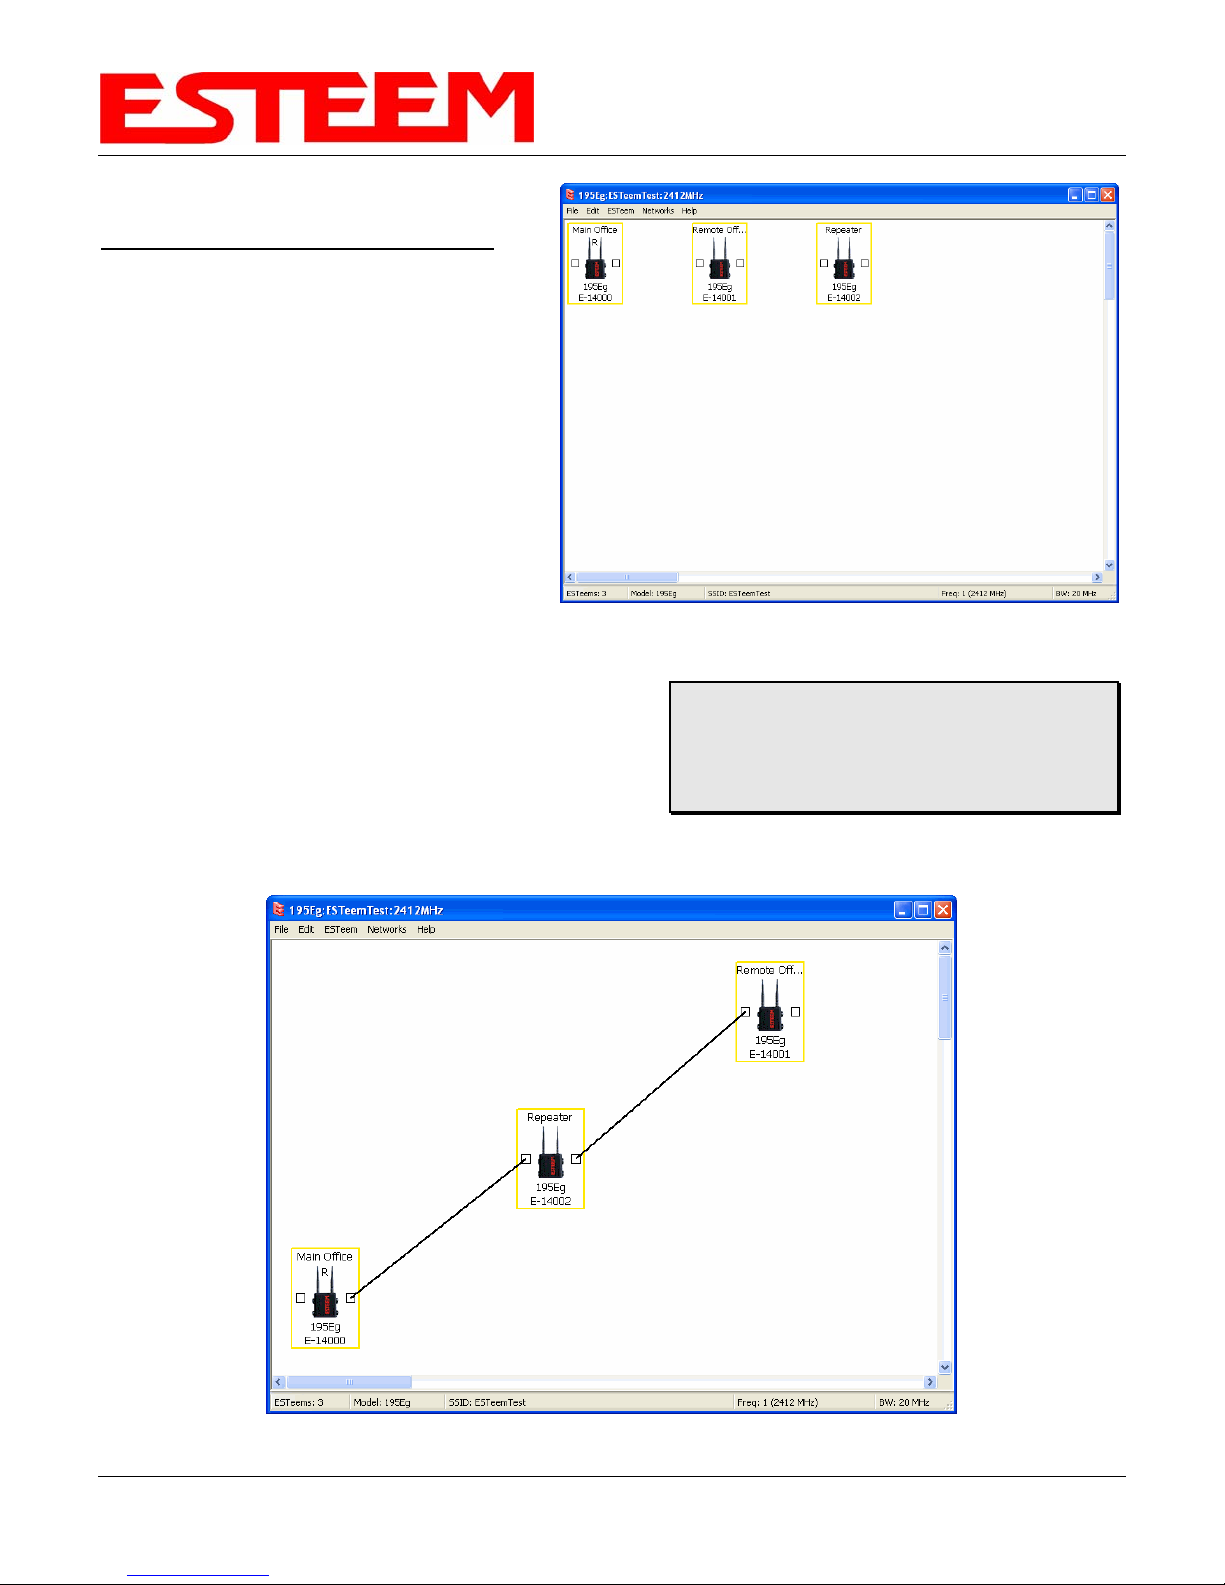
Ethernet Bridge Mode Example 2 (Figure 2)
Point to Point with Repeater Ethernet Bridge
(3) ESTeem Model 195E
Serial Numbers:
E-14000 (Main Office)
E-14001 (Remote Office)
E-14002 (Repeater)
1. Using the above procedure, enter the three
ESTeem 195Es into the ENC Utility. Your
layout should appear like Figure 14.
2. Move the ESTeem 195E icons on the
screen to simulate the layout of the
diagram. Draw connection lines between
the modems to make the wireless link in the
same order as the network layout
(Figure 15).
3. Verify all ESTeem modems are connected to the same
switch as the computer running the ENC Utility and send
the configuration to both modems at the same time by
selecting ESTeem>ESTeem Configuration>Send
Configuration to All ESTeems. Once the ENC Utility has
downloaded the configuration for both ESTeem 195E’s,
the status box around the ESTeem‘s will change from
yellow to blue. This indicates that the configuration was completed successfully and the ESTeem 195E’s are
ready to be installed in the application.
Figure 14: Example 2 Modems
Technical Tip: Although it does not matter
where the ESTeem icons are located on the
screen, putting them in the same layout as the
application makes it easier to visually verify the
network connections.
Figure 15: Example 2 Layout
Revi s e d : 1 9 O c t 1 2 3-10 EST P/N AA107E
Page 25
CHAPTER 3
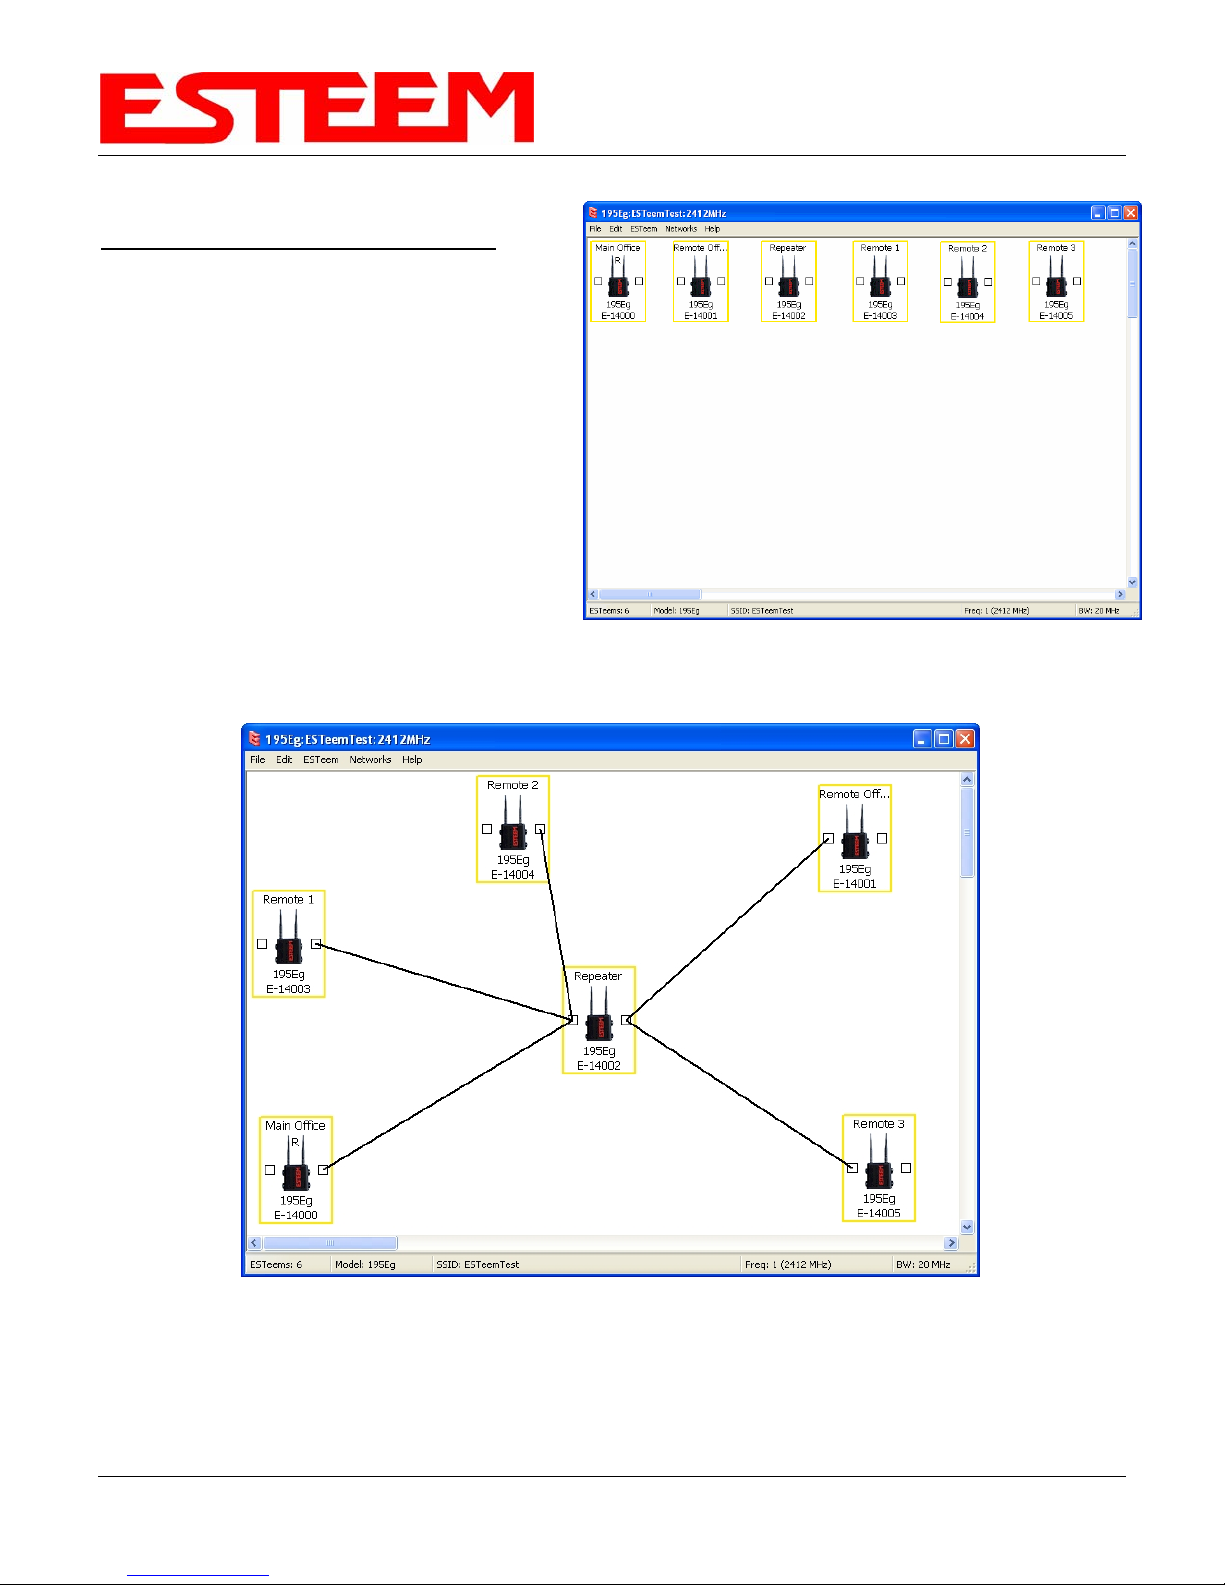
Ethernet Bridge Mode Example 3 (Figure 3)
Point to Multipoint with Mesh Repeater Links
(6) ESTeem Model 195E
Serial Numbers:
E-14000 (Main Office)
E-14001 (Remote Office)
E-14002 (Repeater)
E-14003 (Remote Site 1)
E-14004 (Remote Site 2)
E-14005 (Remote Site 3)
1. Using the above procedure for adding
ESTeem Model 195Es, add the six ESTeem
195Es for this example and rename by
location. Your layout should appear like
Figure 16.
2. Move the ESTeem 195E icons on the screen
to simulate the layout of the diagram. Draw
connection lines between the primary wireless
links modems in the same order as the network layout (Figure 17).
Figure 16: Example 3 Modems
EXAMPLE APPLICATIONS
Figure 15: Example 2 Layout
3. To create the backup link between Remote 1 and Remote 2 and the other backup link from Remote 2 to the
Remote Office, draw a wireless connection as you would on the primary link. Double-click on the line created.
The Link Editor box will be displayed (Figure 16). Any Path Length greater than 1 will display as a dashed line
Revi s e d : 1 9 O c t 1 2 3-11 EST P/N AA107E
Page 26

CHAPTER 3
EXAMPLE APPLICATIONS
Figure 16: Backup Link Configuration
indicating a backup link in the repeater Mesh configuration (Figure 17). For detailed instruction on Mesh
network configuration, refer to Chapter 7 of this User’s Manual.
4. Verify all ESTeem modems
are connected to the same
switch as the computer
running the ENC Utility and
send the configuration to all
modems at the same time by
selecting ESTeem>ESTeem
Configuration>Send
Configuration to All ESTeems.
Once the ENC Utility has
downloaded the configuration
for both ESTeem 195E’s, the
status box around the
ESTeem‘s will change from
yellow to blue. This indicates
that the configuration was
completed successfully and
the ESTeem 195E’s are ready
to be installed in the
application.
Revi s e d : 1 9 O c t 1 2 3-12 EST P/N AA107E
Figure 17: Mesh Network Configuration
Page 27
CHAPTER 3
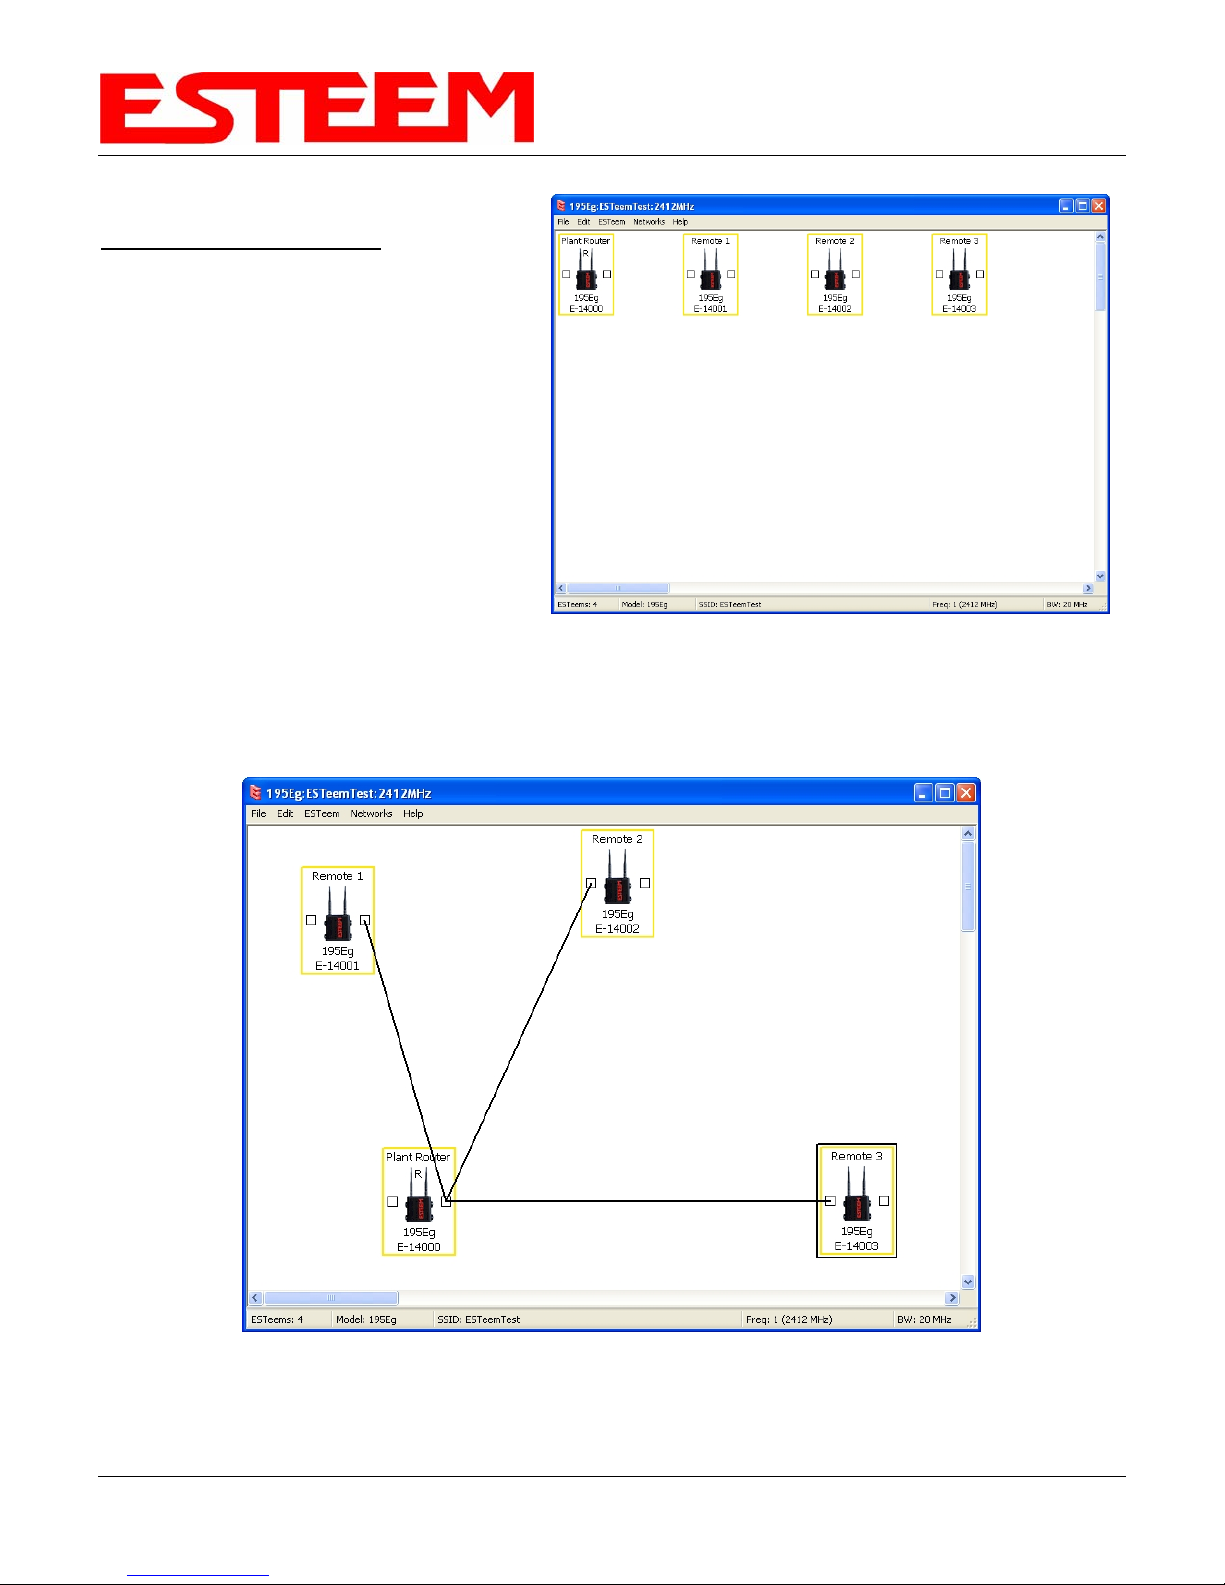
Ethernet Router Mode Example (Figure 4)
Point to Multipoint Router Mode
(4) ESTeem Model 195E
Serial Numbers:
E-14000 (Router at Network)
E-14001 (Remote Site 1)
E-14002 (Remote Site 2)
E-14003 (Remote Site 3)
1. Using the above procedure for adding
ESTeem Model 195Es, add the four
ESTeem 195Es for this example and
rename by location. Your layout should
appear like Figure 18.
2. Move the ESTeem 195E icons on the
screen to simulate the layout of the
diagram. Draw connection lines between
the wireless links modems in the same
order as the network layout (Figure 19).
EXAMPLE APPLICATIONS
Figure 18: Router Mode Example Modems
Figure 19: Router Example Layout
Revi s e d : 1 9 O c t 1 2 3-13 EST P/N AA107E
Page 28
CHAPTER 3
EXAMPLE APPLICATIONS
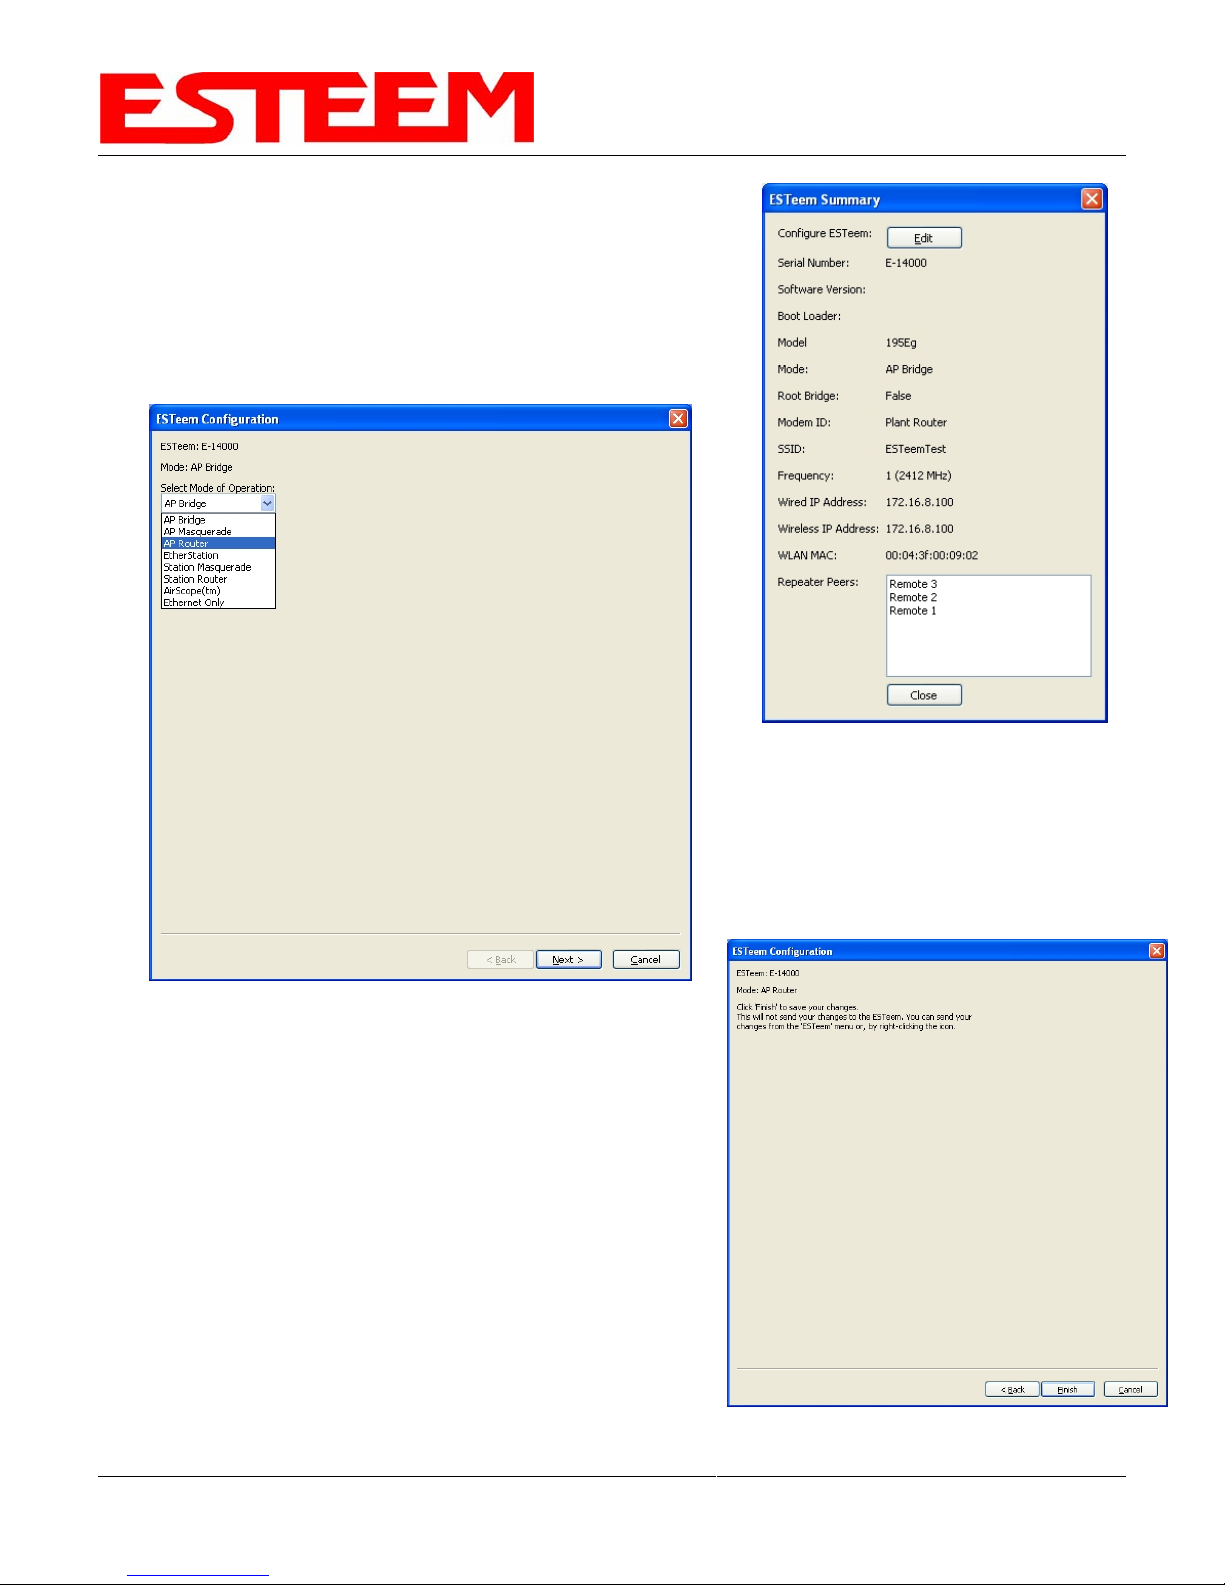
3. By default, the ENC Utility sets all ESTeem modems in AP Bridge
mode. To change the Plant Router ESTeem to AP Router mode,
double-click on the icon to bring up the ESTeem Summary window
and press the Edit button (Figure 20).
4. Change the Mode of Operation from AP Bridge to AP Router
(or Masquerade if desired) and press the Next button at the
bottom of the window (Figure 21).
Figure 20: ESTeem Summary Page
Figure 21: AP Router Configuration
5. Continue through the configuration screens setting the AP
Router addressing to match the IP address ranges for your
network. For help with setting the router addressing please
refer to Router Address Examples later in this chapter. You
will end on the screen in Figure 22. Press the Finish button to
return to the configuration page.
6. Verify all ESTeem modems are connected to the same switch
as the computer running the ENC Utility and send the
configuration to all modems at the same time by selecting
ESTeem>ESTeem Configuration>Send Configuration to All
ESTeems. Once the ENC Utility has downloaded the
configuration for both ESTeem 195Es, the status box around
the ESTeems will change from yellow to blue. This indicates
that the configuration was completed successfully and the
ESTeem 195Es are ready to be installed in the application.
Figure 22: ESTeem Summary Page
Revi s e d : 1 9 O c t 1 2 3-14 EST P/N AA107E
Page 29
CHAPTER 3
EXAMPLE APPLICATIONS
Mobile Client Mode Example (Figure 5)
EtherStation, Station Router and Station Masquerade Modes
(3) ESTeem Model 195E
Serial Numbers:
E-14000 (EtherStation)
E-14001 (Station Router)
E-14002 (Station Masquerade)
Setting the ESTeem for Mobile Client (station) mode with the ENC Utility is different than
the Bridge/Router or Access Point (AP) modes. ESTeem modems configured in as a
Mobile Client will not link with a specific fixed modem; but will roam between any 802.11
Access Point with the correct Network Name (SSID) and Encryption. The ESTeem
configured as a client is also not set on a specific operating frequency (channel) but will
scan all channels looking for the AP. Use the following procedure to configure an
ESTeem 195E in one of the three mobile client modes:
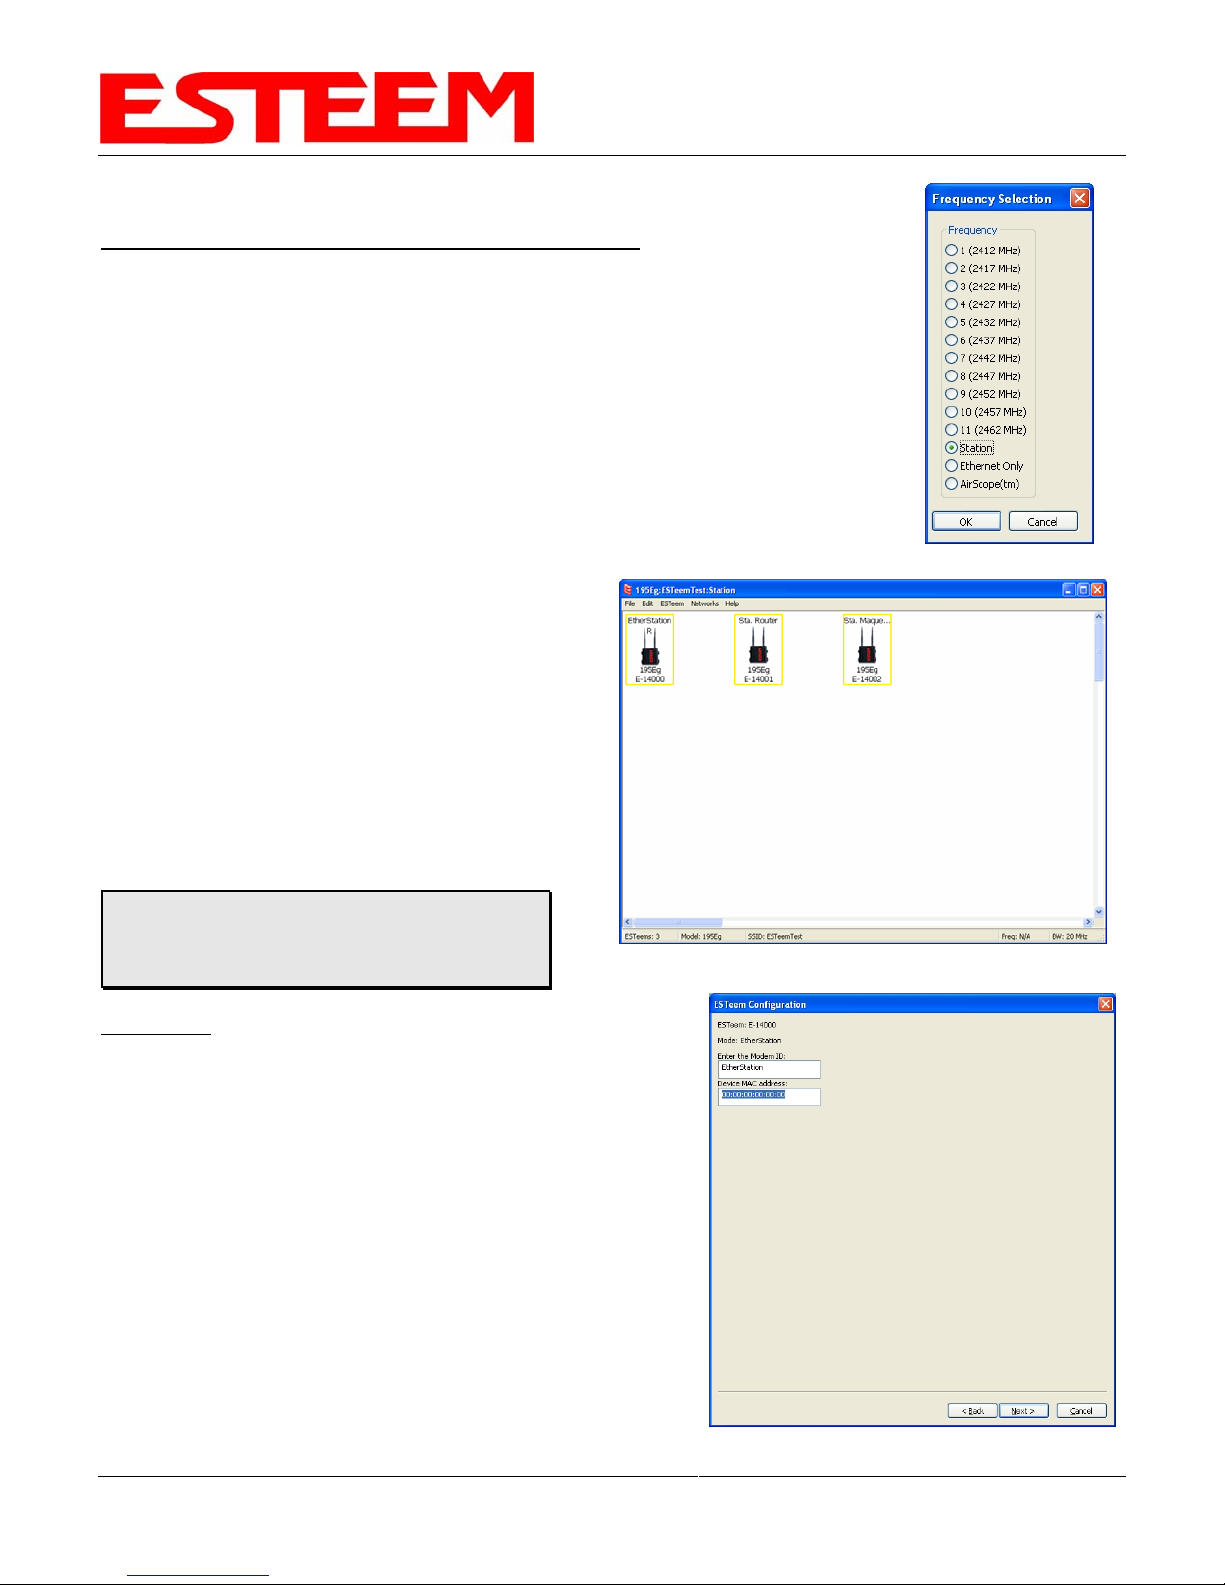
1. Starting a new network of ESTeem 195Es in
Mobile Client mode is the same as any of the
Bridge modes except when you are asked for the
frequency (channel) of operation, select “Station”
(Figure 23).
2. Add the three mobile client modems to the ENC
Utility configuration page as instructed above and
set the Modem ID to match the three modes of
operation. Your configuration will appear as in
Figure 24.
Figure 23: Station
Technical Tip: The ESTeem 195E’s in Mobile
Client modes do not have a specific frequency
of operation as can be seen in Figure 24.
Figure 24: Station Mode Example Modems
EtherStation
3. By default, the ENC Utility sets all station mode ESTeem
modems to EtherStation mode. The only adjustment
necessary to the EtherStation modem in our example is to
enter the connected Ethernet device’s MAC address. The
ESTeem 195E will “clone” the Ethernet MAC address of the
connected Ethernet device. To configure the EtherStation
modem, double-click on the icon to bring up the ESTeem
Summary window and press the Edit button (Figure 20).
4. EtherStation mode should be selected in the Mode of
Operation. Press the Next button at the bottom of the
window to continue. Enter the connected Ethernet device’s
MAC address in the “Device MAC Address” box (Figure 25)
and press the Next button at the bottom of the window to
continue.
Figure 25: MAC Address Entry
Revi s e d : 1 9 O c t 1 2 3-15 EST P/N AA107E
Page 30
CHAPTER 3
EXAMPLE APPLICATIONS
5. Verify the encryption settings are correct for the
802.11 AP network in which the EtherStation modem
will be working and press the Finish button to return to
the configuration page.
Station Router and Station Masquerade
6. To configure the two other modems, double-click on
their icons to bring up the ESTeem Summary window
and press the Edit button (Figure 20).
7. Select Station Router for E-14001 and Station
Masquerade for E-14002 in the Mode of Operation
(Figure 26). Press the Next button at the bottom of the
window to continue.
8. Continue through the configuration screens setting the
Station Router/Masquerade addressing to match the
IP address ranges for your network. For help with
setting the router addressing please refer to Router
Address Examples later in this chapter.
9. Verify the encryption settings are correct for the
802.11 AP network in which the EtherStation modem
will be working and press the Finish button to return to the configuration page.
10. Verify all ESTeem modems are connected to the same switch as the computer running the ENC Utility and
send the configuration to all modems at the same time by selecting ESTeem>ESTeem Configuration>Send
Configuration to All ESTeems. Once the ENC Utility has downloaded the configuration for both ESTeem
195Es, the status box around the ESTeems will change from yellow to blue. This indicates that the
configuration was completed successfully and the ESTeem 195Es are ready to be installed in the application.
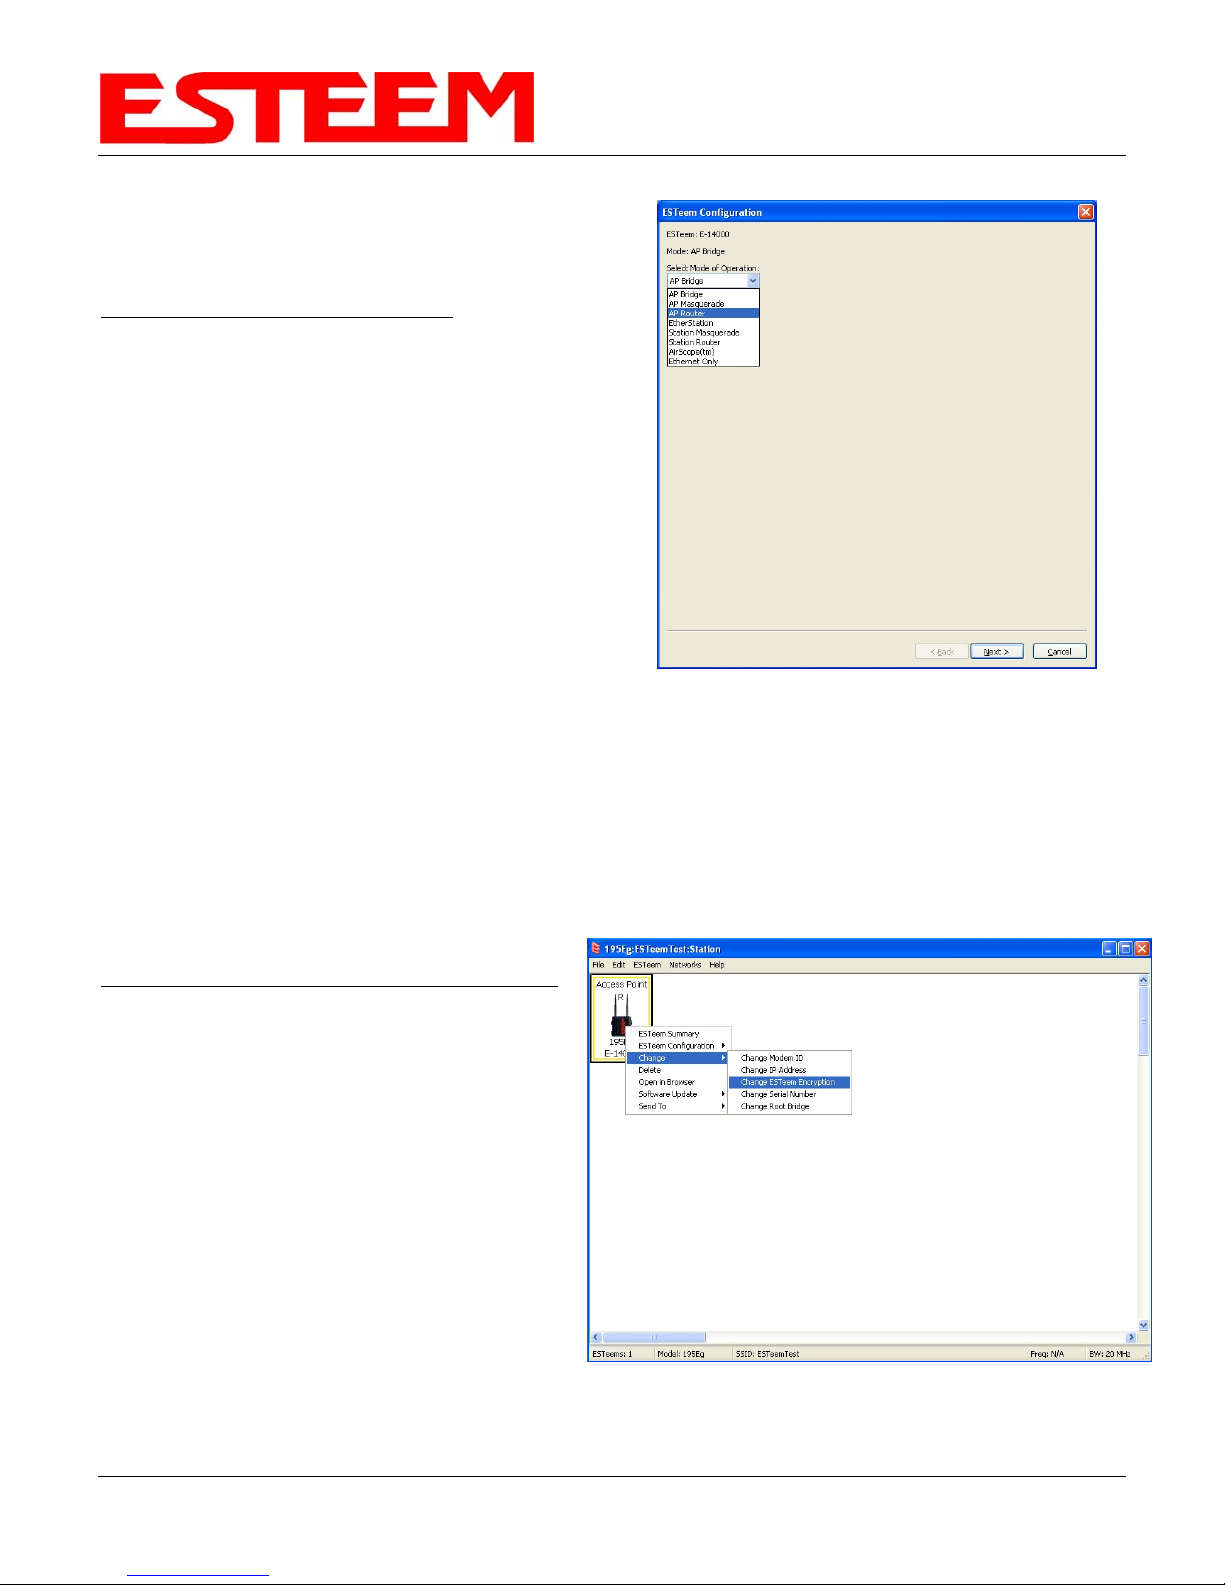
802.11 Access Point Modes (Figures 6-8)
Access Point Bridge, Router or Masquerade Modes
Configuring the ESTeem 195E as an Access Point
for 802.11 clients (as seen Figures 6-8) is exactly
the same as configuration for AP Bridge, AP Router
and AP Masquerade as shown above. The only
difference being that a wireless link is only added
between ESTeem 195Es where a wireless
connection is necessary. In figures 6 and 7 there
would be no wireless link listed in the ENC Utility.
In figure 8, the configuration would be exactly as
shown in Figure 2 with the addition of the mobile
clients in the network.
The 802.11 clients will use the SSID configured
during the setup of the network with the ENC Utility.
The encryption will be set at the factory default
settings for clients (WPA PSK). To adjust the
encryption type, right-mouse click on the ESTeem
icon and select Change>Change ESTeem
Figure 27: Encryption Configuration
Figure 26: Mode of Operation Selection
Revi s e d : 1 9 O c t 1 2 3-16 EST P/N AA107E
Page 31

CHAPTER 3
Encryption (Figure 27).
EXAMPLE APPLICATIONS
Revi s e d : 1 9 O c t 1 2 3-17 EST P/N AA107E
Page 32

CHAPTER 3
EXAMPLE APPLICATIONS
ROUTER ADDRESSING EXAMPLES
The following are examples of the IP addressing and subnets required for the ESTeem Router modes.
Point to Point Access Point Router to Station Router
AP Router
Wireless IP Address: 172.16.1.6
Netmask: 255.255.0.0
Default Route: 172.17.1.6
Ethernet IP Address: 1 72.17.1.6
Netmask: 255.255.0.0
Wireless I P Address: 172.16.2.22
Netmask: 255.255.0.0
Default Route: 172.16.1.6
Eth ernet IP Address: 172.20.2.22
Netmask: 255.255.0.0
Stat ion Router
Static Route: 172.20.0.0
255.255.0.0
gateway: 172.16.2.22
Device
IP address: 172.17.X.X
Netmask: 255.255.0.0
Default gateway 172.17.1.6
Figure 28: AP Router Addressing Example
Device
IP address: 172.20.X.X
Netmask: 255.255.0.0
Default gateway 172.20.2.22
Revi s e d : 1 9 O c t 1 2 3-18 EST P/N AA107E
Page 33

CHAPTER 3
Stand-Alone Access Point Router and Single Station Router
Computer
IP Address = 172.17.1.1
Netmask = 255.255.0.0
Default Route = 172.17.1.6
Note: Wireless Networks and
Station Devices Must Be on
Separate Subnets
EXAMPLE APPLICATIONS
ESTeem 195E in Access Point Router
Mode
Ethernet IP Address = 172.17.1.6
Wireless IP Address 172.16.1.6
Netmask = 255.255.0.0
Default Route = 172.17.1.6
Static Routes
Routes for 172.18.0.0 network use
gateway 172.16.2.20
ESTeem 195E in Station
Router Mode
Netmask 255.255.0.0
Wireless IP Address
172.16.2.20
Ethernet IP Address
172.18.2.20
Gateway(Route)
172.16.1.6
Figure 29: Station Router Addressing Example
Connected Ethernet Devices
IP Address 172.18.X.X
Netmask 255.255.0.0
Gateway (Route) =
172.18.2.20
Revi s e d : 1 9 O c t 1 2 3-19 EST P/N AA107E
Page 34

CHAPTER 3
EXAMPLE APPLICATIONS
Stand-Alone Access Point Router with Multiple Station Routers
ESTeem 195E in
Station Router Mode
Netmask 255.255.0.0
Wireless IP Address
172.16.2.21
Ethernet IP Address
172.19.2.20
Gateway(Route)
172.16.1.6
Connected Ethernet
Devices
IP Address 172.19.X.X
Netmask 255.255.0.0
Gateway (Route) =
172.19.2.20
ESTeem 195E in Station Router Mode
Netmask 255.255.0.0
Wireless IP Address 172.16.2.20
Ethernet IP Address
172.18.2.20
Gateway(Route) 172.16.1.6
Connected Ethernet
Devices
IP Address 172.18.X.X
Netmask 255.255.0.0
Gateway (Route) =
172.18.2.20
ESTeem 195E in Access Point Router
Ethernet IP Address = 172.17.1.6
Wireless IP Address 172.16.1.6
Netmask = 255.255.0.0
Default Route = 172.17.1.6
ESTeem 195E in Access Point
Bridge IP Address = 172.16.1.7
Default Route = 172.16.1.6
Connected Ethernet Devices
Gateway (Route) = 172.16.1.6
Blockage
Mode
Bridge Mode
Netmask = 255.255.0.0
IP Address 172.16.X.X
Netmask 255.255.0.0
Blockage
ESTeem 195E in
Station Router
Mode
Netmask 255.255.0.0
Wireless IP Address
172.16.2.22
Ethernet IP Address
172.20.2.20
Gateway(Route)
172.16.1.6
Connected Ethernet
Devices
IP Address
172.20.X.X
Netmask
255.255.0.0
Gateway (Route) =
172.20.2.20
Note: Wireless Networks
and Station Devices
Must Be on Separate
Subnets
Routes for 172.18.0.0 network use gateway 172.16.2.20
Routes for 172.19.0.0 network use gateway 172.16.2.21
Routes for 172.20.0.0 network use gateway 172.16.2.22
Routes for 172.16.0.0 network use gateway 172.16.1.6
Static Routes
Figure 30: Complete Router Addressing Example
Connected Ethernet Devices
IP Address 172.17.X.X
Netmask 255.255.0.0
Gateway (Route) = 172.17.1.6
Revi s e d : 1 9 O c t 1 2 3-20 EST P/N AA107E
Page 35

CHAPTER 4
UTILITIES & FEATURES
ESTeem Network Configuration Utility (ENC)
The ESTeem Network Configuration (ENC) Utility is a software program designed to greatly simplify the configuration
of your ESTeem Model 195E wireless Ethernet network. The ENC Utility will allow graphical, point-and-click
configuration of your network routing, then configure each ESTeem wireless modem for the network as designed
(Figure 1). The ENC Utility will eliminate the need to program or update each ESTeem wireless modem individually.
The ENC Utility can send all wireless modem configuration changes simultaneously to a new or existing network.
Figure 1: ESTeem Network Configuration Utility
The ENC Utility will be used for all wireless network programming in this User’s Manual. For detailed instructions on
the use of the ESTeem Network Configuration (ENC) Utility please refer the ENC Utility User’s Guide available on the
ESTeem Resource CD or in the application itself.
Revised: 19 Oct 12 4-1 EST P/N AA107E
Page 36

CHAPTER 4
UTILITIES & FEATURES
ESTEEM DISCOVERY UTILITY
The ESTeem Discovery Utility will allow you to
configure the IP address on the Model 195E to
match your network regardless of its current IP
subnet. This utility will also allow you to update
the software in the 195E and open the web
configuration for that wireless modem.
Installation
To install the Discovery Utility on your computer,
insert the Resource Disk in your CD drive.
Note: The ESTeem Resource Disk is a stand-
alone copy of the ESTeem Web site
(Figure 2). Navigation of the Resource
Disk is as simple as using your web browser. All technical documentation, User’s Manuals and the
ESTeem Utility Program are available on the disk.
1. Place the ESTeem Utility CD in your CD-ROM drive. The CD will auto load the ESTeem main page
Note: If the page does not auto load, open your web browser and set your address line to D:\index.html
(Where D: is the drive letter for your CD-ROM drive).
2. From the Main Page select
ESTeem Utilities and click on ESTeem Discovery Utility (Figure 3).
Figure 2: ESTeem Resource Main Page
Figure 3: Discovery Utility Download
Revised: 19 Oct 12 4-2 EST P/N AA107E
Page 37

CHAPTER 4
UTILITIES & FEATURES
Note: This program is saved in a compressed file format.
3. Double click on the 195EDiscoverySetup<Current Version>.exe file listed in the window to install the program.
Figure 4: Discovery Program Main Page
4. Connect the Model 195E to your computer either directly to the Ethernet card or through a HUB/Switch using a
CAT-5e Ethernet cable. The Ethernet port on the 195E supports Auto-Negotiation, so either a patch cable or
crossover cable will work. Open the ESTeem Discovery Program and press the
Model 195E will be displayed in the program by the Ethernet MAC address and Current IP Address (Figure 4).
Note: The SSID, Mode of Operation and Modem ID will be adjusted through the ENC Utility or the Web
Configuration Manager...
5. Double-click on the 195E you want to program and the Configure IP Address window will be displayed (Figure 5).
Enter an IP address and Subnet Mask for the 195E that matches your network subnet and press the
save this to the ESTeem. You will receive notification that the Configuration was Successful and the 195E will
reboot.
Discover Modems button. The
OK button to
Figure 5: Change IP Address Window
Revised: 19 Oct 12 4-3 EST P/N AA107E
Page 38

CHAPTER 4
UTILITIES & FEATURES
Firmware Updates
To update firmware on any ESTeem Model 195 that is shown on the Discovery program, “right-mouse” click on the
195’s MAC address and select
button and the 195 will update, validate and then reboot with the updated operating system.
Figure 6: Discovery Features Menu
Opening Web Browser
To quickly open a web browser page to the IP address programmed in the 195 modem, “right-mouse” click on the
195’s MAC address and select
IP subnet at the ESTeem 195 wireless modem, you will be asked to sign in with the Username and Password
(Figure 7). You can now begin programming the Model 195 for your application.
Update from the menu (Figure 6). Once you locate the update file, select the Open
Open Browser from the menu (Figure 6). If your computer is configured for the same
Figure 7: ESTeem Web Page Log-on Screen
Revised: 19 Oct 12 4-4 EST P/N AA107E
Page 39

CHAPTER 4
UTILITIES & FEATURES
ETHERSTATION STATUS PROGRAM
When configured for EtherStation mode, the Web Configuration Manger is turned off. To gather information from the
195E on Access Point, link status and received signal strength you will need to install the ESTeem 195E Status Utility.
The EtherStation Status Utility version 2.0.0.0 or greater provides a new feature that will automatically program the
connected ESTeem 195E to match up with the computer running the software. This software requires the ESTeem
195E to have software version 302.8.102 or greater installed for this feature to function.
This software program is found on the AA109 Resources Disk or available from the ESTeem web site. To install the
utility, please complete the following:
Installation
The ESTeem Discovery Utility will allow you to configure the IP address on the Model 195E to match your network.
Install the Discovery Utility on your computer by inserting the Resource Disk in your CD drive.
Note: The ESTeem Resource Disk is a stand-alone copy of the ESTeem Web site (Figure 1). Navigation of the
Resource Disk is as simple as using your web browser. All technical documentation, User’s Manuals
and the ESTeem Utility Program are available on the disk.
1. Place the ESTeem Utility CD in your CD-ROM drive. The CD will auto load the ESTeem main page.
Note: If the page does not auto load, open your web browser and set your address line to D:\index.html
(Where D: is the drive letter for your CD-ROM drive).
2. From the Main Page select
Note: This program is saved in a compressed file format. Microsoft Windows XP® will open the file directly,
but other operating systems will require a common compression program such as WinZip available for
download at
3. Double click on the 195EStatusSetup.exe file listed in the window to install the program.
4. Connect the Model 195E to your computer either directly to the Ethernet card or through a Switch using a CAT-5e
Ethernet cable. The Ethernet port on the 195E supports Auto-Negotiation so either a patch cable or crossover
cable will work. Open the ESTeem Status
Program. Status icons will appear in your system
tray (Figure 8). When the status menu is opened
from the system tray, the status window will be
displayed (Figure 8) to show the Access Point MAC
address and signal strength. The tray icon and
Signal Strength bar will display the colors from
Green, Yellow to Red on progressively poorer
signal or will show Grey if roaming.
Note: This Utility will only operate with an ESTeem
Model 195E in EtherStation mode.
http://www.winzip.com
ESTeem Utilities and click on EtherStation Status Utility
Figure 8: EtherStation Status Program
Revised: 19 Oct 12 4-5 EST P/N AA107E
Page 40

CHAPTER 4
UTILITIES & FEATURES
SETTING LOCAL TIME
The ESTeem Model 195E will be shipped from the factory with the internal real-time clock set to Pacific Time. To
change the clock settings to the local time for accurate log file entries:
1. Select Advanced from the top
Menu, then Wireless LAN
Settings>wlan0 device.
Press the
(Figure 9).
2. Select Global Settings>Set
System Time from the menu
and press the
continue.
3. Select the correct date and
time from the drop-down
menus (Figure 10) and press
Set System Time button to
the
save the time to the real time
clock.
Next button
Next button to
Figure 9: Advanced Features Screen
Figure 10: Advanced Features Screen
Revised: 19 Oct 12 4-6 EST P/N AA107E
Page 41

CHAPTER 4
UTILITIES & FEATURES
CONFIGURING TIME SERVER
Enabling NTP time synchronization services on the ESTeem 195E will allow usage of time services from upstream
services to keep the time on the system accurate.
To allow time synchronization, the Model 195E must be configured with the NTP Daemon enabled and the appropriate
IP address of the upstream network NTP server.
1. Select Advanced from the menu items and Global Variables (Figure 11).
Figure 11: Advanced Settings Menu
2. Press the
configurations.
Revised: 19 Oct 12 4-7 EST P/N AA107E
Next button and Figure 11 will be displayed. At the bottom of the page are the NTP server
Page 42

CHAPTER 4
UTILITIES & FEATURES
3. The NTP daemon is enabled by selecting YES for NTP ENABLE (Figure 12). When enabled, the NTP
daemon will use time services from upstream services to keep the time on this system accurate.
4. Next, the NTP SERVICE ENABLE should be configured to “YES,” if you want to allow the system to provide
NTP service for clients wishing time synchronization (Figure 12).
Figure 12: NTP Settings
5. The final step in configuring NTP services is to enter the IP address or the host name of the upstream NTP
server.
Revised: 19 Oct 12 4-8 EST P/N AA107E
Page 43

CHAPTER 4
UTILITIES & FEATURES
6. Once configuration is complete, press the Return to Advanced button.
7. To complete the configuration, select “Commit and Reboot.” The ESTeem 195E will now commit the
configuration changes and reboot. (Figure 13)
Figure 13: Advanced Settings Menu
VLAN OPERATION
Virtual LAN (VLAN) systems are rapidly becoming the desired configuration on larger Ethernet networks. The
ESTeem 195E software will allow the Ethernet modems to transparently pass the VLAN packets for these networks.
The 195E currently can not be used as a VLAN switch, but will pass VLAN tagged Ethernet packets through the
wireless bridge.
Revised: 19 Oct 12 4-9 EST P/N AA107E
Page 44

CHAPTER 4
UTILITIES & FEATURES
IGMP SNOOPING
Internet Group Management Protocol (IGMP) Snooping allows the ESTeem 195E to operate more efficiently in
networks with high Multicast (UDP, etc.) traffic. IGMP Snooping will define the destination for the Multicast traffic and
send the data to the correct wireless Ethernet modem, not the entire network. This limiting of Multicast traffic to
specific destinations greatly increases the overall network efficiency.
The problem with using multicast traffic over a wireless connection is that multicast packets do not require an
Acknowledge on the protocol layer. If the wireless network misses a data packet on the RF network, that multicast
data packet is lost.
Theory of Operation
There are two types of Ethernet packets on a network, unicast and multicast. Unicast is intended for exactly one
recipient (and ignored by all others). Multicast is intended to be received by multiple recipients. Interested parties can
listen for particular multicast packets, but most nodes ignore it. In any case, the network medium is still utilized no
matter how many nodes are listening. Broadcast packets are a special type of multicast traffic which all nodes always
receive. These are particularly useful for global announcements (Hey, I'm Alice!) and queries (Hey, I'm Alice and I'm
looking for Bob!). More relevantly, it is how hosts on a network find out each other's addresses, and are absolutely
crucial to the proper functioning of a network.
As the network grows physically, it encounters some growing pains. The first is more physical, relating to the cabling
limitations. Bridges solve this problem by joining two physical networks together so they appear to be a single large
network. Through use of bridges, a network can scale to hundreds or even thousands of hosts. There is a downside,
however. Well before the physical limitations of bridging hit, you start to run into efficiency problems, as all traffic has
to travel everywhere on the network. The raw carrying capacity of this shared medium, often referred to as bandwidth,
is the second scaling problem.
Smart bridges, or switches, help alleviate the bandwidth problem by only passing traffic across the bridge if the
destination host was on the other side. This greatly increases the capacity and efficiency of the network by allowing
two pairs of hosts communicating simultaneously on each side of the switched bridge. Only when the packet needs to
go to the other side is both mediums utilized simultaneously for the same packet.
Unfortunately, broadcast and multicast traffic by its very nature must always be relayed across the bridge. While the
number of network nodes may grow linearly, the multicast traffic tends to grow exponentially. This isn't generally a
problem for wired networks, as they have a considerable amount of bandwidth to spare, but wireless networks have,
at best, an order of magnitude less bandwidth to begin with. If a wireless network is bridged with a wired network,
while the absolute numbers are the same, a much higher proportion of the wireless network’s available bandwidth is
used up by multicast traffic. This effect is further magnified if multiple wireless repeaters are in use.
The preferred way of dealing with excess multicast traffic is to put the wireless network on a different sub-network
(subnet) and use a router to join it to the wired network. This ensures that only unicast traffic intended for the wireless
network crosses over, as multicast and broadcast traffic stays within its local subnet. Normally this is fine, but there
are times where you need multicast traffic to span subnets. For IP traffic, this can be obviated by using a multicastcapable router, but for legacy multicast protocols that were not designed to be routed, another solution must be found.
There are two primary types of communication networks used in wireless Ethernet systems; fixed points
communicating to each other through an Ethernet Bridge and mobile devices communicating to these fixed points.
The fixed point Ethernet bridge communication in the 195E is through Repeater Peer links, while the mobile
communication is from the Client modes (EtherStation, Station Router and Station Masquerade) to the Access Points
(Fixed Locations) in the network. Each of these networks handles Multicast traffic differently as explained below.
Revised: 19 Oct 12 4-10 EST P/N AA107E
Page 45

CHAPTER 4
UTILITIES & FEATURES
Ethernet Bridge Mode (Repeater Peers)
When the ESTeem 195E is configured as a repeater peer, all multicast traffic is “wrapped” in a Unicast frame and sent
to all other repeater peers. (Figure 14) This operation allows the ESTeem network to receive an acknowledge packet
and retransmit the data if the packet is lost during transmission. This unicast encapsulation will work regardless if the
protocol can support IGMP or not.
Figure 14: Repeater Peer Operation
Revised: 19 Oct 12 4-11 EST P/N AA107E
Page 46

CHAPTER 4
UTILITIES & FEATURES
Ethernet Bridge Mode (Repeater Peers) With IGMP Snooping
When the ESTeem 195E is configured as a repeater peer, IGMP Snooping is enabled and the network supports IGMP
protocol, the 195E will begin to identify the connected Ethernet devices using Multicast transmissions and report this
information to the network. As this process continues, all sites that have Multicast traffic on the wireless network will
only send these requests to the specific ESTeem reporting the Ethernet device (see Figure 15).
Figure 15: Repeater Peer with IGMP Enabled
Revised: 19 Oct 12 4-12 EST P/N AA107E
Page 47

CHAPTER 4
UTILITIES & FEATURES
Client Modes
When the ESTeem 195E is configured as a mobile client (EtherStation, Station Router or Station Masquerade), there
are two configurations that will increase the reliability of Multicast traffic. The first phase is encapsulation of the
multicast packets, as described in the Repeater Peer, and the second is IGMP Snooping if the network will support the
protocol. The encapsulation of the Multicast packets will operate regardless of the IGMP support to increase the
reliability.
Figure 16: Unicast Packet to All Clients
Figure 17: Unicast Packet to Single Client
Revised: 19 Oct 12 4-13 EST P/N AA107E
Page 48

CHAPTER 4
UTILITIES & FEATURES
Multicast Encapsulation
To enable Multicast Encapsulation, select Advanced>Wireless LAN Settings>wlan0 device and press the
Button (Figure 18). Select wlan0_EncapsulateMulitcast to either Multicast (for all Multicast including Broadcast) or
Broadcast (Broadcast only). Press the
Accept Button and then Commit and Reboot.
Next
Figure 18: Multicast Enable
Enabling IGMP Snooping
To enable the ESTeem 195E for IGMP Snooping, select
(Figure 19). Select IGMP Snoop to YES, press the
Accept Button and then Commit and Reboot.
Advanced>Bridge Variables and press the Next Button
Figure 19: Repeater Peer with IGMP Enabled
Revised: 19 Oc 12 4-14 EST P/N AA107E t
Page 49

CHAPTER 4
UTILITIES & FEATURES
Simple Network Management Protocol (SNMP)
The ESTeem 195E supports SNMP Version 1 (SNMPv1) and Version 2 (SNMPv2c) protocol. This protocol enables
any SNMP server to view the status of the wireless network while the system is in operation. The following are a list of
the Management Information Base (MIB) items that are supported in the ESTeem 195E and their MIB location:
MIB Name MIB Directory Location Notes
System Temperature EST-MIB::sysInternalTemp.0 in C * 1000
HOST-RESOURCES-
Uptime
ModemID EST-MIB::sysIdentifier.0 User-specified “nickname” for ESTeem
Serial Number EST-MIB::sysSerialNumber.0 ESTeem serial number
Model EST-MIB::sysModel.0 ESTeem model number
Firmware Version EST-MIB::sysFirmwareRevision.0 Firmware revision
System Mode EST-MIB::sysMode.0 AP_BRIDGE/STA_ETHERSTA, etc
Free Memory UCD-SNMP-MIB::memTotalFree.0 Total Free Memory
Idle CPU UCD-SNMP-MIB::ssCpuIdle.0 Percentage of CPU Idle
[[ per-interface ]]
IP Address IF-MIB::ifAddress
Port Speed IF-MIB::ifSpeed In bps
Port Status IF-MIB::ifOperStatus
Mac Address IF-MIB::ifPhysAddress
MIB::hrSystemUptime.0
System Update
[[ per-wlandev entry ]] EST-MIB::wirelessDevicesNumber.0 Wireless Port Identification
Device Name EST-MIB::wirelessDeviceTable.1.wName.1 Name of device (wlan0 standard)
ESTMIB::wirelessDeviceTable.1.wMacAddress.
MAC Address
Mode EST-MIB::wirelessDeviceTable.1.wMode.1
Frequency EST-MIB::wirelessDeviceTable.1.wFreq.1 Frequency in MHz
Bandwidth
SSID EST-MIB::wirelessDeviceTable.1.wSSID.1 Service Set Identification
BSSID EST-MIB::wirelessDeviceTable.1.wBSSID.1 Basic Service Set Identification
Operational Rates
Basic Rates
Revised: 19 Oct 12 4-15 EST P/N AA107E
1
ESTMIB::wirelessDeviceTable.1.wBandwidth.1
ESTMIB::wirelessDeviceTable.1.wOpRates.1
ESTMIB::wirelessDeviceTable.1.wBasRates.1
MAC address of WLAN port
Current Mode ap=access point, sta=station
mode and airscope
Bandwidth (5, 10, or 20 MHz if used)
List of RF Data Rates in Rate Set
List of RF Basic Rates for status messages
Page 50

CHAPTER 4
UTILITIES & FEATURES
All entries in the Peer Table will have a
device entry index, both ESTeem and
[[ peer table entry ]]
EST-MIB::wirelessPeersNumber.0 Total number of peer entries in table
wlan device EST-MIB::wirelessPeerTable.1.pDevice.1
Peer MAC Address EST-MIB::wirelessPeerTable.1.pMacAddr.1 MAC address of peer
isRepeater? EST-MIB::wirelessPeerTable.1.pRepeater.1 Is the peer an ESTeem repeater
isAP? EST-MIB::wirelessPeerTable.1.pAP.1 Is the peer an Access Point
isAssocSta? EST-MIB::wirelessPeerTable.1.pAssoc.1 Is the peer an Mobile Client
isAdhoc? EST-MIB::wirelessPeerTable.1.pAdhoc.1 Is the peer an AdHoc Station (802.11 only)
Frequency EST-MIB::wirelessPeerTable.1.pFreq.1 Frequency in MHz
current rate set EST-MIB::wirelessPeerTable.1.pCurRates.1 Current Operating Rates
last rx signal EST-MIB::wirelessPeerTable.1.pSignal.1 Receive Signal in –dBm
last rx noise EST-MIB::wirelessPeerTable.1.pNoise.1 Background Noise in –dBm
BSSID EST-MIB::wirelessPeerTable.1.pBssid.1 Basic Service Set ID (In Hex)
SSID EST-MIB::wirelessPeerTable.1.pSSID.1 SSID in Text
isValid? EST-MIB::wirelessPeerTable.1.pCurrent.1 True if peer info is for a “current” peer.
last rx EST-MIB::wirelessPeerTable.1.pLastRxl.1
last tx EST-MIB::wirelessPeerTable.1.pLastTx.1
EST-
current tx rate
Downloading MIB Tables
To download the MIB items listed above and import into your SNMP server, log into any ESTeem 195E and select the
About page (Figure 20). Press the Download
MIB::wirelessPeerTable.1.pCurrentRate.1
MIB Files hyperlink on the page and save the files to your computer.
other wireless devices
index into the wirelessDeviceTable (each
entry will have a unique number
seconds since last received packet from
peer
seconds since last transmitted packet to
peer
current tx rate in bps.
Figure 20: MIB Table Download
Revised: 19 Oct 12 4-16 EST P/N AA107E
Page 51

CHAPTER 5
WEB CONFIGURATION
The ESTeem Model 195E Web Configuration Manager is an internal web server that will allow setup, monitoring and
diagnostics of all operating parameters in the Model 195E. The 195E can be configured using any current web
browser software such as Internet Explorer, Mozilla, FireFox or Google Chrome®.
LOGGING ON TO THE ESTeem WEB PAGE
1. Using your Web Browser connect to the Model 195E
Web Page with the IP Address that you have assigned it
in Chapter 3.
2. You will now see the Log-on Menu on Figure 1. To enter
the Model 195E Top Menu you will need to log into the
system with a User Name and Password.
3. For the User Name enter admin and press the Enter key
(<Enter>). The User Name is defined at the factory and
is not changeable.
4. Enter your Password and press the Enter key (<Enter>).
Note: If this is the first time the Model 195E has been
programmed and the Password was not changed
from the factory default values, proceed with the steps below to access the Configuration Menu. The
factory default Password is also admin. Enter admin for the Password and press the Enter key
(<Enter>). All characters are lower case.
5. After Log-in the next screen displayed will be the Model 195E Top Menu page (Figure 2). This example screen
shows the Top Menu screen.
Note: Throughout the Configuration Manager are Help Screens that can be accessed for further information
on each item.
Figure 1: ESTeem Web Page Log-on Screen
Figure 2: Top Menu Screen
Revised: 19 Oct 12 5-1 EST P/N AA107E
Page 52

CHAPTER 5
WEB CONFIGURATION
WEB CONFIGURATION MANAGER SECTIONS
The following sections will describe the features in each of the main and sub menu items in the web pages. For stepby-step examples of how to configure the Model 195E in different Modes of Operation, please refer to Chapter 3 –
Example Applications.
Top Menu
The Top Menu will be the default web page for the Model 195E Web Configuration Manager (Figure 2). This section
will display the current configuration summary for the Model 195E and allow changing of the default password. This
page will also display the Modem ID field that can be used to easily identify the 195E you are programming. This
Modem ID field can be set to any text combination for example, location name, GPS coordinates or addresses.
Setting the Modem ID
1. The Modem ID field can be adjusted
under the Global Variables of the
Advanced Menu tab. Select Global
Variables and press the Next button.
Figure 3 will be displayed.
2. Scroll to the bottom of the Global
Variables window and enter the text you
would like displayed in the Modem ID
field (Figure 4). When complete, press
the Save Settings button and the
Commit Changes button on the next
screen to save the name to the 195E.
Figure 3: Global Variables Screen
Figure 4: Modem ID Field in Global Variables Screen
Revised: 19 Oct 12 5-2 EST P/N AA107E
Page 53

CHAPTER 5
WEB CONFIGURATION
Status Menu
The Status Menu provides a summary of the current mode of operation, system time, processor usage, internal
temperature and status of the communication links to other wireless devices. An example is shown below in Figure 5.
Most of the communication troubleshooting is done in this section of the Web Configuration Manager.
Figure 5: Status Screen
Peer Status Table
The Peer Status submenu lists the connected wireless devices (Model 195E’s or 802.11 clients), their signal strength,
data rate and time of last packet sent. Press the
displayed (Figure 6). For a detailed analysis of the information provided in this table, please review Appendix E –
Troubleshooting.
Revised: 19 Oct 12 5-3 EST P/N AA107E
View Peer Table link and Repeater Peer Status Table will be
Page 54

CHAPTER 5
WEB CONFIGURATION
Associated Station – This section will list all the associated stations that are attached to the Access Point. These
could be other Model 195E’s in one of the three Client modes or 802.11 devices.
Repeater Peers – This section will list all connected 195E repeater peers by their Wireless MAC address. For detailed
information on repeaters, see Chapter 6 – Repeating Features.
Access Points – This section will list all other 802.11 Access Points that are sharing the operating channel (frequency)
of the 195E. You can also note that the Repeater Peers listed above are also included in this list.
Figure 6: Peer Table Screen
Counter Details
The Counter Details submenu will summarize all transmitted and receive data packets for the Model 195E (Figure 5).
Revised: 19 Oct 12 5-4 EST P/N AA107E
Page 55

CHAPTER 5
WEB CONFIGURATION
System Log Screen
The Log Screen is a trouble-shooting tool that shows the current log of Model 195E system messages. See Figure 7.
The System Details button will display a more detailed system diagnostics that may be requested by ESTeem
technical support.
Figure 7: System Log Screen
Setup Screen
The Setup screen allows the step-by-step configuration of the Model 195E. Please see Chapter 5 for complete
description on System Setup menu and examples for system configurations. See Figure 8.
Figure 8: Setup Screen
Revised: 19 Oct 12 5-5 EST P/N AA107E
Page 56

CHAPTER 5
WEB CONFIGURATION
Advanced Configuration Screen
The Advanced screen allows the user to access all configuration parameters. The parameters are grouped based
upon their variable. It is recommended that only advanced users of the Model 195E enter this section unless
instructed by ESTeem technical support. See Figure 9.
Figure 9: Advanced Features Screen
Backup Screen
The Backup Screen saves the current configuration in the Model 195E to a file on the computer or network. See
Figure 10. Pressing the Backup Button will create a configuration file that can be saved to the computer. This saved
file can then be later opened, if necessary, by the Restore menu to quickly replace a Model 195E with a spare modem.
Figure 10: Backup Screen
Revised: 19 Oct 12 5-6 EST P/N AA107E
Page 57

CHAPTER 5
WEB CONFIGURATION
Restore Screen
The Restore screen is used to restore the 195E to factory defaults, return to the last saved configuration or to access
the configuration files that were backed up to the computer. See Figure 11.
Figure 11: Restore Setting Screen
Factory Default – Returns the Model 195E to all factory default values.
Last Committed Changes – This button will remove any changes to the modem that have been done since the last
committed changes. The last committed changes will be read from the Flash file and reset in the Model 195E.
File – Pressing this button will bring up a selection of where the restore file was saved during the Backup (Figure 12).
Select “Upload via web browser” to browse for files saved on a local computer or select “Download from an http or ftp
URL” for files saved on a network or over the Internet.
Figure 12: Restore From Local File Screen
Revised: 19 Oct 12 5-7 EST P/N AA107E
Page 58

CHAPTER 5
WEB CONFIGURATION
Software Update Screen
The Software Update feature allows the user to update the latest Model 195E operating system software from a file
supplied by the factory or the Internet to the Model 195E’s flash memory. To upload from a file on your computer,
select Upload via web browser and a file selection window will be displayed. To upload directly from the Internet,
select Download from an http or ftp URL and enter the site address. See Figure 13.
Figure 13: Software Update Screen
System Reboot Screen
The Reboot screen allows the user to reset the Model 195E. See Figure 14.
Figure 14: System Reboot Screen
Revised: 19 Oct 12 5-8 EST P/N AA107E
Page 59

CHAPTER 6
SERIAL APPLICATIONS
USING THE RS-232 PROGRAMMING PORT
Any terminal emulation program that can run with VT100 emulation can be used for this configuration of the ESTeem.
Most Windows users will probably use either Hyper Terminal or the Terminal Emulation in the ESTeem Utility program.
Configure your RS-232C port for a Baud Rate to 38,400, Data Bits to 8, Parity to None, Stop Bits to 1 and
Handshaking to None. Set the Emulation type to VT100. Once your ESTeem has an IP address, you can attach the
ESTeem to your network and use the Web Server for further programming.
Programming Using the RS-232 Port
1.
When configuring the Model 195E for the first time you can use the ESTeem RS-232C Configuration Menu to
setup the basic operating parameters such as assigning the IP Address, IP Net Mask, and Gateway IP Address.
2.
Connect the serial cable (EST P/N: AA0621.1) between the RS-232 connector (RJ-45) on the Model 195E’s
programming port to the serial port on the computer.
3.
Plug the Model AA175 or AA175.2 power supply into a wall socket and connect an Ethernet patch cable from the
Model 195E Ethernet port to the J1 (Data&PWR) port on the power supply. The Power over Ethernet (PoE) LED
on the front of the ESTeem should be illuminated.
If your computer is configured properly, you will see the ESTeem Model 195E booting sequence on your Terminal
4.
Emulation program. Once the ESTeem boot sequence is complete (approximately 45 seconds) you will receive
this message:
“Please press Enter to active this console.”
If you don’t see this message press the Reset button on the front panel of the Model 195E and/or check the
programming of your RS-232 port.
5.
Press the Enter key and you will be at the Configuration Menu 195E login prompt. See Figure 1.
To enter the Model 195E Main Menu you will need to log into the system with a login name and password.
6.
If this is not the first time configuration of the Model 195E, see your network systems administrator for the
7.
password.
At the 195E login prompt type admin for the login name and press the
8.
defined at the factory and is not
changeable by the user. Note
that all characters are lower
case.
If this is the first time the Model 195E
has been programmed or the
Password was not changed from the
factory default values, the factory
default password is also admin.
Enter admin for the password and
press the Enter key (<Enter>). The
ESTeem Configuration Welcome
Screen (Figure 2) will now be
displayed. Note that all characters
are lower case.
Enter key (<Enter>). The login name is
Figure 1: RS-232 Port Log-in Screen
Revised: 19 Oct 12 6-1 EST P/N AA107E
Page 60

CHAPTER 6
SERIAL APPLICATIONS
9.
To set the IP address in the ESTeem 195E, type the letter “A” and press the Enter key. Enter the value for the IP
address, Netmask and default route pressing the Enter key after each entry.
Figure 2: RS-232 Welcome Screen
After the basic parameters have been entered into the Model 195E you will need to commit the changes to the
10.
Model 195E (Figure 3). Press the C key and then Enter. The changes will be saved to flash memory. You can
use programming features in the ESTeem Web Configuration Manager to configure the unit for your application.
Figure 3: RS-232 Welcome Screen
Revised: 19 Oct 12 6-2 EST P/N AA107E
Page 61

CHAPTER 6
SERIAL APPLICATIONS
USING THE RS-232 DATA PORT
The ESTeem 195E has a serial data port that can provide RS-232 communication between two or more serial devices
using the wireless broadband link. The serial data is encapsulated and transferred as a standard Ethernet packet over
an operating 195E wireless Ethernet system. The configuration for a serial 195E network will be the same as an
Ethernet or a serial (RS-232) based communication network.
The serial interface option can be used to link two or more serial devices in a new or existing system. The serial data
has very little impact on the network bandwidth and will allow for both Ethernet and serial applications simultaneously.
A possible application would be installation of the 195E in an existing serial based network that was looking for future
upgrade to an Ethernet based system. Another would be using the high-bandwidth Ethernet connections to provide a
link to remote video hardware while also providing a serial link to the existing PLC in a SCADA type application.
SERIAL CONNECTIONS
The RJ-45 serial data port is the far-left port on the face
of the 195E (Figure 4). Using the ESTeem AA0621.1
interface cable, the 195E can be connected to a
standard DTE-device (PC) with a male 9-pin Sub-D
connector. The complete cable configuration is
available in Appendix C – Interface Ports.
SERIAL CONFIGURATION
Configuration of the serial port is completed during the standard setup of the 195E. After completion of the Repeater
Peer configuration screen, the Serial Port Setup screen (Figure 5) will be displayed. Each section in the Serial Port
Setup screen is described in detail with the following:
Enable the RS-232 Data Port
Enabling the serial data port allows the modem to send RS-232 data over the broadband wireless connection
established with the ESTeem repeater peers. The modem can be configured in a point-to-point or point-to-multipoint
system. Select Yes if you wish to enable the serial data port.
Mode of Operation
There are two distinct modes of operation for the serial port in the 195E. The Redirector mode will provide two-way
serial communication between two or more serial devices, while the Terminal Server mode will allow serial
communication to a specific remote site by connecting through telnet or SSH. Select one of the following modes of
operation:
Full Redirector Mode - This mode allows bi-directional RS-232 data communication with other ESTeem Model 195E’s.
The RS-232 data transmission will appear transparent to the connected devices as if a serial cable is connected
between the two ports. This mode will also be used in a multi-point serial network were all serial devices will need bidirectional communication (Figure 6).
Terminal Server Mode - This mode of operation translates RS-232 serial data into a network-oriented terminal
protocol, such as telnet or SSH. This mode would be selected if an interactive RS-232 session at remote locations is
desired over the wireless Ethernet link.
Baud Rate
Select the data rate of the RS-232 connection to match your serial device.
Figure 4: 195E Front Panel Overview
Revised: 19 Oct 12 6-3 EST P/N AA107E
Page 62

CHAPTER 6
SERIAL APPLICATIONS
Figure 5: Serial Configuration Screen
Data Bits
Select the number of data bits on the RS-232 connection to match your serial device.
Stop Bits
Select the number of stop bits on the RS-232 connection to match your serial device.
Parity
Select the parity of the RS-232 connection to match your serial device.
Revised: 19 Oct 12 6-4 EST P/N AA107E
Page 63

CHAPTER 6
SERIAL APPLICATIONS
Flow Control
Select the type of data flow control used on the RS-232 connection. The ESTeem can support Hardware flow control
(RTS/CTS control lines) or Software Flow Control (XON/XOFF). Select
Maximum Bridge Links for Multicast Packets
This value sets the maximum number of Ethernet bridge links that the multicast packets will be sent through when
used in a multi-point system. A multi-point serial network uses multicast packets (UDP) to send the data to more than
one remote ESTeem. You want to limit the number of network bridge links that these UDP packets will be passed
through to make the network more efficient.
If you are using multiple ESTeem repeater links to send the serial data to remote locations, the value for the
bridge link needs to be increased to a number greater than the longest repeater chain. For example, if you are using
four repeater (peer) links to send the serial data between two or more sites the number will need to be five (5) or
greater (Figure 4).
Destination IP Address
The ESTeem configured for the correct destination IP and port number will send and receive the serial data from
another modem. Set the destination IP address for the ESTeem where the serial data will be sent. If sending to more
than one ESTeem (Multipoint) set to a multicast address (i.e 224.0.0.1).
Note: If you are using the ESTeem 195E in a multipoint application (multicast), you must have default Gateway
configured in the ESTeem set to the IP address of the Root Bridge modem.
Serial IP Port Number
The ESTeem configured for the correct destination IP and port number will send and receive the serial data from
another modem. Set the IP port numbers to match where the serial data will be sent. The serial data will not be sent if
both the IP address and port number is not correct.
Maximum Packet Size
This number represents the maximum size of the serial data packet in bytes. If the number of bytes of data in the
serial port buffer exceeds the
send forward the serial packet. For example, if the
receives 100 bytes the data will be sent through the wireless connection.
Number of Milliseconds for Packetization
This number represents the time the ESTeem will hold data in the serial data buffer before sending to the remote
ESTeem. This feature is generally used if the serial data does not have a consistent packet length or delimiter
character. For example, if the number of milliseconds is set to a value of 10 the ESTeem will monitor the incoming
serial data stream and any break in characters longer than 10 milliseconds will cause the data will be sent through the
wireless connection.
Delimiter Characters
Enabling and specifying a delimiter character will transmit the data in the serial buffer when the delimiter character is
recognized in the serial data stream. There are two unique delimiter characters that can be configured and enabled
independently.
Terminal Server Control Lines
Enabling this feature will allow the ESTeem in the Terminal Server mode to read and generate modem control lines to
the connected device.
maximum packet size before the timer or delimiter character is reached, the ESTeem will
maximum packet size is set to a value of 100, when the serial port
None if no serial flow control is necessary.
maximum
Revised: 19 Oct 12 6-5 EST P/N AA107E
Page 64

CHAPTER 6
Access Point
Bridge with
Repeater Mode
RS-232 Data
Remote Site
Remote Site & Repeater
S
-
f
o
-
e
in
L
Access Point
Bridge with
Repeater Mode
RS-232 Data
SERIAL APPLICATIONS
L
i
n
e
-
o
f
-
S
i
g
h
t
P
a
t
h
L
Access Point
Bridge with
Repeater
Mode
RS-232 Data
L
i
n
e
-
o
f
-
S
i
g
h
t
P
a
th
Access Point
Bridge with
Repeater
Mode
Repeater
h
t
a
P
t
h
ig
Note:
Antenna’s shown are for
illustration purposes. There
are many antenna options
available depending on your
application.
h
t
a
P
ght
i
S
-
f
o
e-
in
L
i
n
e
-
o
f
-
S
i
g
h
t
P
a
t
h
Access Point
Bridge with
Repeater
Mode
RS-232 Data
NOTE:
Repeater may be standalone or attached to a
network or device.
Access Point
Bridge with
Repeater
Mode
RS-232 Data
Remote PLC
Remote Site
Figure 6: Serial Full Redirector Example
Master PLC
Revised: 19 Oct 12 6-6 EST P/N AA107E
Page 65

CHAPTER 7
REPEATING FEATURES
To increase the wireless network’s area of coverage
for both indoor and outdoor applications, the
ESTeem 195E utilizes a custom repeating feature
that allows increased coverage areas without the
added expense of hard cabling or adding an
additional point to point radio link.
With a conventional IEEE 802.11g or 802.11a
Access Point (AP) network, all of the APs have to be
interfaced to a common network either by hardwire, see Figure 1, or a separate, dedicated RF backbone. The Model
195E can create this RF backbone, bridge Ethernet networks connected to the wired Ethernet port and provide the
wireless canopy for 802.11 clients simultaneously.
When programmed in any of the three Access Point (AP) Repeater Modes, the Model 195E will create a wireless
network with other Model 195E units in radio range that are programmed in the AP Repeater Peer table during setup.
This feature adds the increased functionality of repeaters to the typical Ethernet Bridge configuration.
ESTEEM MESH NETWORK
One of the most powerful features of the AP
Repeater Mode is the ability to input multiple
communication routes and designate the priority for
each of these routes to create a wireless Mesh
network. The ESTeem Model 195E will
automatically change communication routes in the
network if a route has failed. The new route will be
based upon the priority level set during
configuration. This wireless Meshing technology
allows the RF network to “self-heal” if any of the
communication paths fail.
The routing priority is manually set during the
configuration of the 195E. A manual path
configuration is far superior to standard “selfdiscovery” networks, because you have direct
control over the best RF paths and can easily
identify any failed routes for easy troubleshooting.
For example, Figure 2 shows a typical wireless
Ethernet system used in the Water/Waste Water Industry. The problem with a standard “self-discovery” Mesh network
is the selection of routes. Notice that the communication between the Water Plant (Site A) and Pump Site D has a
marginal link, but it is the most direct route between the Ethernet devices.
This scenario poses the question, which path will the network select? The ESTeem Mesh Network takes out the
guessing games by allowing the user to select and prioritize all communication routes in the system. In our example
we would want the primary link to go through Tank B (Repeater) and use the direct link only if this primary link fails.
The following sections will show how this completed.
Configuration
The configuration of the repeater paths is completed during setup of the Access Point modes. All three Access Point
modes support repeating and Meshing features. The Mesh network configuration using the ESTeem Network
Configuration (ENC) Utility is shown in detail in Chapter 3 of this User’s Manual.
Figure 1: Conventional Access Point Diagram
Figure 2: Small Mesh Network Diagram
Revised: 19 Oct 12 7-1 EST P/N AA107E
Page 66

CHAPTER 7
REPEATING FEATURES
You can also configure the Mesh networking directly through the web configuration setup (Chapter 5). Figure 3 shows
an example repeater peer table from the setup menus. For an ESTeem 195E to communicate with another ESTeem
195E, select
195E that will have direct communications must be added to the Repeater Peer List. Finally, enabling the link allows
the corresponding 195E to be included in the communication routing. Mobile clients do not require input in the repeater
peer table. If multiple Mesh routes are configured, you will also need to set the values for Priority and Path Costs
(explained in Spanning Tree below). For multiple examples of repeater configurations, please refer to Chapter 3 of this
user’s manual.
Yes must at Enable Repeater Capability. Next, the Wireless LAN (WLAN) MAC address of each Model
Figure 3: Repeater Configuration Example
RAPID SPANNING TREE PROTOCOL (RSTP)
The ESTeem Model 195E, with firmware version 271 and above, uses Rapid Spanning Tree Protocol (RSTP - IEEE
802.1d) to determine the radio routing structure of the wireless network. This RSTP functions the same as standard
Spanning Tree Protocol (STP) listed below, but the network recovery is three times faster. If the 195E is used in a
network that has any older STP only modems, the entire network will be STP.
Revised: 19 Oct 12 7-2 EST P/N AA107E
Page 67

CHAPTER 7
REPEATING FEATURES
SPANNING TREE PROTOCOL (STP)
The ESTeem Model 195E uses standard Ethernet Spanning Tree Protocol (STP) or Rapid Spanning Tree Protocol
(RSTP) to determine the radio routing structure of the wireless network. The primary purpose of STP/RSTP is to
make sure that “network loops” are not created. A network loop is having two communication paths to the same
destination where the remote device would receive the same data multiple times. If there were no way to control the
data flow, this data would be constantly passed around this loop causing a “packet storm” that would shut down the
entire network. The Spanning Tree Protocol will block all these redundant links.
The STP operation begins by determining which Ethernet device on the network will be the Root Bridge. All Ethernet
networks have a Root Bridge that is selected by the lowest MAC address. All path costs are evaluated against this
Root Bridge device to determine routing and which paths will be blocked. On a wired Ethernet network, the location of
the Root Bridge is not really important, but in a wireless network selection of the Root Bridge is critical to the wireless
network routing. Let’s use one of the Example network diagrams from Chapter 3 to continue the discussion (Figure 4).
HUB or Switch
Network
Router
(Required)
Plant Network
Large Wired LAN
Example #1
S/N: E-14001
WLAN MAC=00:04:3F:00:09:01
10/100BaseT
Access Point Router
with Repeater
Feature Enabled
EtherStation
Mode
P
r
im
a
r
y
R
e
p
e
a
t
e
r
P
a
t
h
P
r
i
B
a
c
k
u
p
R
e
p
e
a
t
e
r
P
a
t
h
m
a
r
y
R
e
p
e
a
t
Stand-Alone Repeater Site
Example #2
S/N: E-14002
WLAN MAC= 00:04:3F:00:09:05
Access Point Bridge
with Repeater
Feature Enabled
e
r
P
a
t
h
Remote Building
Small Ethernet Wired LAN
Example #3
S/N: E-14003
WLAN MAC=00:04:3F:00:09:10
Mobile Vehicle
Single Ethernet Device
Example #4
S/N: 14004
Figure 4: Programming Example #1 Diagram
Revised: 19 Oct 12 7-3 EST P/N AA107E
Mobile
PLC
10/100BaseT
Access Point Bridge
with Repeater
Feature Enabled
Page 68

CHAPTER 7
REPEATING FEATURES
STP Phases
The following sections describe the process of the STP in the ESTeem Model 195E as how it would happen in the
above example.
Learning Phase - Once properly configured, each Model 195E will begin to search out the other Model 195E units in
radio range that are programmed in the AP Repeater Peer table. All Model 195E’s will calculate their routes to every
Model 195E in the network based upon the lowest “path length” to the Root Bridge. Path length is the total number of
wireless links (repeater peer links) to transmit a packet through the wireless network to the Root Bridge. Note: The
Root Bridge in a network should be the Model 195E where the majority of the data flow is processed. In every
wireless network of two or more radios, the Root Bridge should be user defined. If not defined, the ESTeem 195E with
the lowest MAC address will be designated as the Root Bridge.
In Figure 4, the Plant network (Example 1) is the most logical location for the Root Bridge based upon the amount of
data flow. Setting this site as the root bridge is discussed below in Root Bridge.
Blocking and Forwarding Phase – To ensure you do not have a network loop situation due to redundant paths in your
wireless network, the Model 195E will recognize and disable (block) one or more redundant links and provide back up
links should the primary link fail. This establishes a wireless mesh network with a series of forwarding links, based
upon the shortest path length to the Root Bridge.
For example, looking at Figure 4, the Remote Building has two routes to the Root Bridge (Plant Network –
Example #1); directly to the site and through the repeater. The direct link between the two sites is the shortest route
(lowest Path Length) and will be selected as the primary route unless overridden by manually changing the Path
Length in the configuration.
Path Length
If more than one communication path to the Root Bridge is found, the 195E must determine which route to take based
upon the lowest Path Length. The default path length to all links in the 195E network is 1. If the Path Lengths are
equal then the lowest MAC address will determine the priority route. In the ESTeem Mesh Network we want to directly
control all data flow so do not want the routes to be automatically determined.
Looking again at our Example in Figure 4, if we made no changes to the default path length of 1 (note values in Figure
3) the lowest path cost would be direct from the Remote Building to the Root Bridge (Plant Network).
Link Description Total Path Length
Direct from Remote Building 1
Remote Build to Root Bridge Through
Repeater
To configure the 195E to select the repeater as the primary radio path, set the path length value for the direct link
greater than 2 (such as a value of 3) to make this the primary radio path. The lowest path length will identify the
highest priority. The Model 195E will use this routing, but also switch to direct communication if the repeater were to
disappear.
Root Bridge
In any Access Point Repeater network consisting of more than two sites, one Model 195E should be designated as the
Root Bridge. Only one Model 195E can be designated as the Root Bridge in a given network and should be located
where the majority of the Ethernet data flow is processed. This site may be the Master location in a SCADA network
or could be configured at a repeater site. Selection is important because all Model 195E’s NOT configured as the
Root Bridge will choose routing based upon the Path Length to the Root Bridge. If you have any question as to which
2
(Length 1 to repeater + Length 1 to Master = 2)
Revised: 19 Oct 12 7-4 EST P/N AA107E
Page 69

CHAPTER 7
REPEATING FEATURES
site in your AP Repeater application should be the Root Bridge, contact ESTeem Customer Support at 509-735-9092
or e-mail your application to
The Root Bridge will be selected in one of two ways: the Root Bridge can be manually set (recommended) during the
configuration of the Repeater Peer table (Figure 3) or the Root Bridge designation will default to the lowest MAC
address of all the Model 195E’s in the network. The manual Root Bridge configuration is located in the “Advanced
Settings” section.
Redundant Backup
The ESTeem Model 195E configured in Access Point
Repeater mode will automatically function as a redundant
backup if two Model 195E’s are installed at the same
location (Figure 7). If two Model 195E’s are connected to
the same switch, one of the Model 195E’s will be Blocked
when the Spanning Tree Protocol is completed. The
network will continue to use this route until any problem with
the original Model 195E is detected and the second Model
195E will begin operation at that site.
Redundant Master Configuration
The configuration in Figure 7 will also provide a redundant
backup for the Master Site (Root Bridge). Configure both
Model 195E’s as Root Bridges (see above) giving the
primary Root Bridge a value of 1 and the secondary Root
Bridge a value of 2.
support@esteem.com.
Figure 7: Redundant Backup Diagram
Revised: 19 Oct 12 7-5 EST P/N AA107E
Page 70

CHAPTER 8
A
ANTENNA SETUPS
195Eg and 195E-lp ANTENNA AND CABLE CONFIGURATIONS (POLE MOUNT)
ESTeem offers different types of antennas for both indoor and outdoor configurations. To reduce potential radio
interference to other users, the antenna type and its gain should be chosen so that the equivalent isotropically radiated
power (e.i.r.p.) is not more than that permitted for successful communication.
Warning: Only the tested cable lengths and antennas provided by EST meet the FCC maximum peak output
power requirements. Any other combination of antennas or coax cables is not authorized. This
device has been designed to operate in a pole mount configuration with the antennas listed below,
having a maximum gain of 6 dB in a multi-point system or 19dB in a point to point network.
Antennas not included in this list or having a gain greater 6 dB in a multi-point system or 19dB in a
point to point network are strictly prohibited for use with this device. The required antenna
impedance is 50 ohms.
Part Number: AA01S
• Omni-directional, rubber duck, direct mount, unity
gain antenna.
• Indoors and short range outdoor applications.
• There must be a minimum separation distance of
20 cm. from the antenna to the user.
See Warnings.
Part Number: AA20DMEg
• Omni-directional direct mount antenna, 5 dBi
gain.
• Indoor and outdoor applications.
• There must be a minimum separation distance of
20 cm. from the antenna to the user.
See Warnings.
Part Number: AA20Eg
• Omni-directional external pole mount antenna, 6
dBi gain with 3-ft. integral feedline and connector.
• Outdoor applications.
• Antenna port B is not used in this configuration.
There must be a minimum separation distance of 20
cm. from the antenna to the user.
See Warnings.
Part Number: AA203Eg
• Directional pole mount antenna, 6 dBi gain with 3-
ft. integral feedline and connector.
• Point to point and point to multi-point outdoor
applications.
• Antenna port B is not used in this configuration.
• There must be a minimum separation distance of
20 cm. from the antenna to the user.
See Warnings.
Part Number: AA204Eg
• Directional pole mount antenna, 19 dBi gain with
3-ft. integral feedline and connector.
• Point to point applications only.
• Maximum Output Power of 250mWatts (Power
Level = Low Power)
• Antenna port B is not used in this configuration.
• There must be a minimum separation distance of
50 cm. from the antenna to the user.
Revised: 19 Oct 12 8-1 EST P/N AA107E
Transmit/Receive
ntenna Port 1
Receive Only
Antenna Port 2
Notes:
Antenna Port A is a transmit and receive port for use in all
applications. Antenna Port B is a receive only port and is
used for dual diversity antennas applications only. This
port is not used for point to point applicati ons.
Warnings:
Only pre-made coax cables from the factory used in
conjunction with either the AA20Eg Omni-directional
and AA203Eg or AA204Eg directional antennas meet all
FCC Section 15.247(b) EIRP maximum power
requirements.
Use of the AA204Eg, directional antenna is limited to
fixed point to point applications only. In accordance
FCC Section 15.247(b)iii, this antenna must be
professionally installed. The installer must ensure the
system is used exclusively for fixed, point-to-point
applications and the ESTeem Model 195Eg is set for 0.25
Watts output power (Power Level = Min).
Page 71

CHAPTER 8
See Warnings.
ANTENNA SETUPS
Revised: 19 Oct 12 8-2 EST P/N AA107E
Page 72

CHAPTER 8
ANTENNA SETUPS
195Eg and 195Eg-lp ANTENNA AND CABLE CONFIGURATIONS (CABINET MOUNT)
Warning: Only the tested cable lengths and antennas provided by EST meet the FCC maximum peak output
power requirements. Any other combination of antennas or coax cables is not authorized. This
device has been designed to operate in a cabinet mount configuration with the antennas listed
below, having a maximum gain of 7 dB in a multi-point system or 11dB in a point to point network
with the authorized ESTeem coax cables. Antennas not included in this list or having a gain
greater 7 dB in a multi-point system or 11dB in a point to point network with any other types or
lengths of coax cable are strictly prohibited for use with this device. The required antenna
impedance is 50 ohms.
Part Number: AA20E
• Omni Directional Building Mount Antenna, 6 dBd
gain
• Feedline minimums: 25 ft. RG-8 Cable or 50 ft.
Heliax Cable with AA228LMR and Lightning
Arrestor (EST P/N: AA165).
Part Number: AA203ES
• Directional Building Mount Antenna, 7 dBd gain
• Feedline minimums: 25 ft. RG-8 Cable or 50 ft.
Heliax Cable with AA228LMR and Lightning
Arrestor (EST P/N: AA165).
• Point to point and point to multi-point applications
Part Number: AA204ES* (Point-to-point ONLY)
• Directional Building Mount Antenna, 11 dBd gain
• Feedline minimums: 25 ft. RG-8 Cable or 50 ft.
Heliax Cable with AA228LMR and Lightning
Arrestor (EST P/N: AA165).
• Point to point applications only. See Warning.
COAXIAL CABLES
A 25-ft. length of RG-8 coax cable or 50-ft. length of ½” Heliax cable are the minimum cable lengths allowed for use
with the above antennas (AA20E, AA203ES, AA204ES) when the Model 195Eg is set at Max Power. Listed below are
representative cable losses in db/100 ft at the 2.4 GHz frequency range:
Feedline Type
RG-8 (Solid) 7 AA228LMR (2.5’ TNC-MRP/NLMR 600 4.4 AA165 Lightning Arrestor 0.1
3/8" Heliax 6.5 All Coax Connector Terminations
1/2" Heliax 3.5
7/8" Heliax 2
1.25" Heliax 1.6
In a severe noise environment it may be necessary to use a double shield type of coax cable such as RG-214/U in
place of the RG-8. This cable must be purchased from the factory to meet FCC requirements.
Note: A -3 dB loss means you have lost 1/2 of your signal or transmitter power. A +3 dB gain means you have
doubled (x2) your signal or transmitter power.
Attenuation
(dB/100 ft.) @ 2.4 GHz
Warning:
Only pre-made coax cable systems (Cable, Lightning
Arrestor and AA228LMR jumper cable) from the factory
used in conjunction with either the AA20E omnidirectional and AA203ES or AA204ES directional
antennas meet all FCC Section 15.247(b) EIRP
maximum power requirements.
Use of the AA204ES, directional antenna is limited to
fixed point to point applications only. In accordance
FCC Section 15.247(b)iii, the operator or installer is
responsible for ensuring the systems is used exclusively
for fixed, point-to-point applications.
Additional RF Losses Attenuation (dB)
0.9
MRP) Jumper Cable
0.2
(2 for every coax cable)
Revised: 19 Oct 12 8-3 EST P/N AA107E
Page 73

CHAPTER 8
ANTENNA SETUPS
195Ea ANTENNA AND CABLE CONFIGURATIONS
Warning: Only the tested cable lengths and antennas provided by EST meet the FCC and DOC maximum peak output power
requirements. Any other combination of antennas or coax cables is not authorized.
ESTeem offers different types of antennas for both indoor and outdoor configurations. Thi s device has been desi gned to operate
with the antennas listed below, and having a maxim um gai n of 22 dBi . Antennas not included i n this list or having a gai n greate r
than 22dBi are strictly prohibited for use with this device. The requi red antenna i m pedance is 50 ohm s.
Part Number: AA20DMa
• Omni-directional direct mount antenna, 4.5 dB i gai n.
• Indoor and outdoor applications.
• There must be a minimum separati on distance of 23
cm. from the antenna to the user. See Warnings.
Part Number: AA20Ea
• Omni-directional external pole mount ant enna, 10 dBi
gain with 18 inch integral feedline and connector.
• Outdoor applications.
• There must be a minimum separati on distance of 23
cm. from the antenna to the user. See Warnings.
Part Number: AA205Ea
• Directional linear panel, pole mount antenna, 22 dBi
gain with 18 inch integral feedline, bandpass filter and
connector.
• Point to point and point to multi-point outdoor
applications.
• There must be a minimum separati on distance of 50
cm. from the antenna to the user. See Warnings.
Warnings:
Only pre-made coax cables from the factory used in
conjunction with either the omni-directional and
directional antennas meet all FCC Section 15.247(b)
EIRP maximum power requirements.
To comply with the FCC exposure compliance
requirements, a separation distance of at least 20 cm
must be maintained between the antenna and all
This radio transmitter (ESTeem 195Ea - 2163A-195EA) has been approved by Industry Canada to operate with the antenna types
listed above with the maximum permissible gain and required antenna impedance for each antenna type indi cated. Antenna types
not included in this list, having a gain greater than the ma xim um gai n indicat ed for that t ype, are st rictl y prohi bite d for use with
this device.
(Le présent émetteur radio (ESTeem 195Ea – 2163A-195EA) a été approuvé par Industrie Canada pour fonctionner avec les types
d'antenne énumérés au-dessous et ayant un gain admissible maximal et l'impédance requise pour chaque type d'antenne. Les types
d'antenne non inclus dans cette liste, ou dont le gain est supérieur au gai n maximal i ndiqué, sont strict ement int erdit s pour
l'exploitation de l'émetteur.)
Antenna
Port 1
Revised: 19 Oct 12 8-4 EST P/N AA107E
Page 74

CHAPTER 8
ANTENNA SETUPS
195Ed ANTENNA AND CABLE CONFIGURATIONS
Warning: Only the tested cable lengths and antennas provided by EST meet the FCC and DOC maximum peak output power
requirements. Any other combination of antennas or coax cables is not authorized. To reduce potenti al radio i nterference t o
other users, the antenna type and its gain should be so chosen that the equivalent i sotropical ly radi ated pow er (e.i.r.p.) is not
more than that permitted for successful communication.
ESTeem offers different types of antennas for both indoor and outdoor configurations. Thi s device has been desi gned to operate
with the antennas listed below, and having a maxim um gain of 7 dB. Ante nnas not incl uded in thi s li st or havi ng a gain greater
than 7 dB are strictly prohibited for use with this device. The required ant enna impedance is 50 ohms.
Part Number: AA191Es
• Omni-directional, permanent vehicle m ount ant enna,
5dB gain with integral 17’ coax cable.
• Outdoor mobile applications.
• There must be a minimum separati on distance of 23
cm. from the antenna to the user. See Warnings.
Part Number: AA20DMs
• Omni-directional direct mount antenna, 2 dB i gai n.
• Indoor and outdoor applications.
• There must be a minimum separati on distance of 23
cm. from the antenna to the user. See Warnings.
Part Number: AA20Es900
• Omni-directional external pole mount ant enna, 7 dBi
gain with 3-ft. integral feedline and connector.
• Outdoor applications.
• There must be a minimum separation distance of
23cm. from the antenna to the user. See Warnings.
Part Number: AA203Es900
• Directional pole mount antenna, 7 dBi gain with 3-ft .
integral feedline and connector.
• Point to point and point to multi-point outdoor
applications.
• There must be a minimum separati on distance of 23
cm. from the antenna to the user. See Warnings.
Notes:
Antenna Port A is a transmit and receive port for use in all
applications.
Antenna Port B is a receive only port and is used for dual
diversity antennas applications only. This port is not used
for point to point applications.
Warnings:
Only pre-made coax cables from the factory used in
conjunction with either the AA20Es900 omni-directional
and AA203Es900 directional antennas meet all FCC
Section 15.247(b) EIRP maximum power requirements.
Antenna
Port 1
Antenna
Port 2
Revised: 19 Oct 12 8-5 EST P/N AA107E
Page 75

CHAPTER 8
195Ep ANTENNA AND CABLE CONFIGURATIONS
ESTeem offers different types of antennas for indoor, outdoor and mobil e configurat ions.
Part Number: AA191Ep
• Omni-directional, vehicle mount, 5.5dBi gai n antenna.
• Mobile vehicle mount applications.
• The AA191Ep antenna must be installed to provide a
separation distance of at least 20 cm from all persons
and must not be co-located or operating in conjunction
with any other antenna or transmitter.
Part Number: AA20DMEp
• Omni-directional direct mount antenna, 5 dB i gai n.
• Indoor and outdoor applications.
• The AA20DMp antenna must be fixed-mounted on
outdoor permanent structures with a separation
distance of at least 20 cm from all persons during
normal operation and must not be co-located or
operating in conjunction with any other antenna or
transmitter.
Part Number: AA20Ep
• Omni-directional pole mount antenna, 10 dBi gain
• Antenna port B is not used in this configuration.
• The AA20Ep antenna must be fixed-mounted on
outdoor permanent structures with a separation
distance of at least 20 cm from all persons during
normal operation and must not be co-located or
operating in conjunction with any other antenna or
transmitter.
Part Number: AA204Ep
• Directional pole mount antenna, 21 dBi gain with 3-ft .
integral feedline and connector.
• Antenna port B is not used in this configuration.
• The AA204Ep antenna must be fixed-mounted on
outdoor permanent structures with a separation
distance of at least 1.1 meters from all persons during
normal operation and must not be co-located or
operating in conjunction with any other antenna or
transmitter.
Antenna
ANTENNA SETUPS
Antenna
Port 1
Port 2
Revised: 19 Oct 12 8-6 EST P/N AA107E
Page 76

CHAPTER 8
ANTENNA SETUPS
WEATHER PROOFING COAX CONNECTIONS
1. Lightly coat the threads of the connectors with silicone lubricant prior to assembly (See Note 1) and hand tighten.
Make sure to use the silicon sparingly so when assembled, any excess does not get on center conductor. Care
should be taken not to get any lubricant on the center conductor.
2. Wrap the connector assembly with a non-adhesive silicone tape, EST part number AA243, for weather proofing
(See Note 2 and instructions below).
a) Clean surface to be wrapped. Cut off length to be used.
b) Peel back a short length of protective film. Keep tape clean and dry.
c) Begin with one complete overlap of tape onto itself.
d) STRETCH CoaxWrap while continuing to wrap object with “half-laps”, removing clear film as you go (Figure
1). For greater pressure resistance, use 2 or more tightly wrapped layers.
e) End of tape at final wrap should be completely positioned onto itself.
Note: CoaxWrap’s bond begins to cure immediately upon contact with itself.
Repositioning or removal is not recommended after 2 minutes of wrapping.
3. Apply an electrical coating (sealing agent), over the vapor barrier patch for added
protection (See Note 3).
NOTES:
1. Dow Corning RTV-3140 or equivalent.
2. CoaxWrap, CW10B or equivalent.
3. SCOTCHKOTE, 3-M Company, or equivalent.
ANTENNA DIVERSITY
The dual diversity antenna configuration on the ESTeem Model 195E allows the radio to operate more efficiently in
areas with high reflections (such as indoors or in a city) without direct line of sight (LOS) between the antennas. One
of the most difficult conditions to control in a radio system is the effect of a destructive reflected radio signal called
mutipathing. Multipathing occurs when waves emitted by the transmitter travel along a different path and interfere
destructively with waves traveling on a direct line-of-site path. The phenomenon occurs because waves traveling
along different paths may be completely out of phase when they reach the antenna, thereby canceling each other out.
The dual diversity antenna configuration places a physical distance between the antennas where one reflected signal
will be out of phase, but the second will be not. The ESTeem Model 195E will sample both antennas and select the
best receive signal.
Figure 1: Installation
Example
Revised: 19 Oct 12 8-7 EST P/N AA107E
Page 77

CHAPTER 8
ANTENNA SETUPS
ANTENNA PORT SELECTION
The antenna ports on the Model 195E must be configured for either a single receive antenna (external mount
antennas) or dual diversity antenna setup. To access the port configuration open ESTeem Web page using your
computer’s Web Browser as per instructions in Chapter 5. Select Advanced from the menu items and Radio Settingswlan0 device (Figure 1).
Figure 2: Advanced Settings Menu
Revised: 19 Oct 12 8-8 EST P/N AA107E
Page 78

CHAPTER 8
ANTENNA SETUPS
Press the next button and wlan0 configuration menu will be displayed. The receive antenna is configured by selecting
the wlan0_dot11CurrentRXAntenna drop down (Figure 3) and selecting the receive antenna. A value of 0 = Dual
diversity (Both antenna Ports A & B will be used to receive). A value of 1 = Single receive source (Antenna Port A
only).
Figure 3: Receive Antenna Settings Menu
Revised: 19 Oct 12 8-9 EST P/N AA107E
Page 79

CHAPTER 8
ANTENNA SETUPS
ASSEMBLING THE AA195PM TWO HOLE OUTDOOR POLE MOUNTING KIT
The AA195PM mounting kit contains everything required for pole mounting and weatherproofing the ESTeem Model
195Eg for outdoor installations. The 195Eg with AA195PM mounting kit can be directly mounted to a round pole from
1.25” to a diameter of 2.25” OD. Any mounting structure greater than 2” requires hose clamp strapping run through
the Pole Mount Brackets. The mounting kit requires the following assembly:
1. If you purchased an AA195PM mounting kit with your Model 195Eg, the kit will be packed in the same packing box
as the ESTeem (Figure 4).
Figure 4: Packet Box Contents
2. Remove and inventory the two (2) Pole Mounting Brackets, one (1) Two-Hole Face Plate Cover (with single port
cover installed), one (1) Heat Shield and (1) AA195PM Hardware bag from the packing box (Figure 4). Report
any missing or damaged items to ESTeem Customer Support (Phone 509-735-9092) as soon as possible for
replacement.
Figure 5: AA195PM Hardware Contents
Revised: 19 Oct 12 8-10 EST P/N AA107E
Page 80

CHAPTER 8
ANTENNA SETUPS
3. Inventory the AA195PM Hardware bag for all the components listed in Figure 5.
4. Assemble the two Pole Mounting Brackets with the included U-bolts, hardware and Pole Mount Clamps.
Reference Figure 6.
Figure 6: Pole Mount Assembly
5. Place the four supplied 10-24 x 1” Phillips Pan Head screws through the mounting holes of the Heat Shield and
attach to the top of the ESTeem 195Eg (Figure 7).
Figure 7: Heat Shield Attachment
Revised: 19 Oct 12 8-11 EST P/N AA107E
Page 81

CHAPTER 8
ANTENNA SETUPS
6. Attach the two Pole Mounting Brackets to the ESTeem Model 195Eg with the 10-24 x 1” Phillips Pan Head screws
through the top of the heat shield. Reference Figure 8 (Heat Shield removed for detail).
Figure 8: Pole Mount Connection to Case
(Heat Shield Removed for Detail)
7. Assemble the outdoor rated CAT-5e Ethernet cable (Not Provided) with the supplied Ethernet Cable Boot
(Figure 9).
Ethernet Cable Boot
Figure 9: Ethernet Cable Assembly
Revised: 19 Oct 12 8-12 EST P/N AA107E
Page 82

CHAPTER 8
ANTENNA SETUPS
8. Feed the CAT-5e Ethernet connector(s) through the Face Plate Cover and secure the Ethernet Cable Boot to the
cover. Reference Figure 10.
NOTE: The Ethernet cable boot must be installed before the RJ-45 end is installed. If using the ESTeem AA09.1
outdoor Ethernet cable, verify that the Ethernet cable boot end is routed toward the ESTeem 195Eg.
Second Port Cover
Face Plate Cover
Ethernet Cable Boots
Figure 10: Ethernet Cable Routing
nd
Figure 11: Face Plate Cover Strain Relief
9. Route the CAT-5e Ethernet cable through the molded strain-relief fins in the Face Plate Cover (Figure 11) to
secure the cable and provide strain-relief for the connector. If a second Ethernet cable is installed, remove the
second port cover and route cable.
10. Plug the CAT-5e Ethernet cable to the Model 195Eg’s Ethernet port and secure the Face Plate Cover with the
attached thumb screw. Verify that the weatherproof seal on the Face Plate Cover is sealed against the outer rim
of the Model 195Eg. Reference Figure 12.
11. Attach the antenna connector boots as show in Figure 13 for either dual attached antennas or external antennas.
You are now ready to mount the ESTeem Model 195Eg
Revised: 19 Oct 12 8-13 EST P/N AA107E
Page 83

CHAPTER 8
ANTENNA SETUPS
EST Approved Direct Mount
Antenna Only
Port A
Direct Mount
Antenna Boots
Figure 13: Completed AA195PM Mounts
Caution: Outdoor mounting of the 195Eg requires the use of weatherproof boots. Improper
installation could result in radio failure.
Caution: Always mount the 195Eg vertically with the antenna ports on top.
Figure 12: Face Plate Cover Installed on ESTeem
EST Approved External
Antenna With Factory
Installed Boot
Port B
Weather Proof Boot
NOTE: Remove Plastic
Connector Cover
Before Installation
Face Towards The
South
(North America)
Revised: 19 Oct 12 8-14 EST P/N AA107E
Page 84

CHAPTER 8
ANTENNA SETUPS
195E POLE MOUNT GROUNDING PROCEEDURES
Mounting the 195E series radio modem outdoors requires proper grounding procedures to prevent damage to both the
radio hardware and the connected Ethernet and Serial peripherals. The case on the 195E series wireless modem is
electrically conductive, but the AA195 Pole Mount kit provides isolation from the connected structure. To bring the
195E case to a ground potential with Earth ground and eliminate any static buildup on the case itself, the shield on the
Ethernet cable is used to provide the ground connection.
Outdoor Ethernet Cable
A critical component of this grounding protection system is the ESTeem AA09.1 outdoor, shielded CAT-5E Ethernet
cable. This cable provides three, necessary elements; Ethernet data, DC Power over Ethernet (PoE) applications,
and a ground from the 195E case to the AA166 surge protector. The Ethernet cable is outdoor rated and protected
from UV breakdown.
Installation
The following diagram outlines all the critical components and connections in the 195E series system. The Earth
ground connection to the surge protector must be installed to comply with local Electrical code requirements.
ESTeem Model 195E
Metal RJ-45 Hood
(Amp 5-569530-3)
ESTeem AA09.1
Outdoor, Shielded
CAT-5E Cable
(300 ft. maximum)
Figure 14: Pole Mount Installation Diagram
Series Wireless Modem
Drain Wire Soldered
To Metal RJ-45
Metal RJ-45 Hood
(Amp 5-569530-3)
AA166 Ethernet
Surge Protection
Drain Wire With
Ring Terminal Connected
to Ground Lug
Approved Earth
Ground Connection
Power Over Ethernet
Supply
(AA175)
Ethernet Patch Cable
(AA09.2)
Revised: 19 Oct 12 8-15 EST P/N AA107E
Page 85

CHAPTER 8
ANTENNA SETUPS
FRESNEL ZONE
Figure 15: Fresnel Zone Diagram
The Fresnel zone shows the ellipsoid spread of the radio waves around the visual line-of-sight after they leave the
antenna (see Figure 15). This area must be clear of obstructions or the signal strength will be reduced due to signal
blockage. Typically, 20% Fresnel Zone blockage introduces little signal loss to the link. Beyond 40% blockage, signal
loss will become significant. This calculation is based on a flat earth. It does not take into account the curvature of the
earth. It is recommended for RF path links greater than 7 miles to have a microwave path analysis done that takes the
curvature of the earth and the topography of the terrain into account.
Fresnel Zone Radius = 72.1 SQRT [(d1d2) / (F (d1 + d2)]
Units
Fresnel Zone Radius in feet.
d1 and d2 in statue miles
F in GHz
Revised: 19 Oct 12 8-16 EST P/N AA107E
Page 86

APPENDIX A
FCC INFORMATION
INFORMATION TO USERS
The ESTeem Model 195E complies with Part 15 of the
FCC Rules. Operation is subject to the following two
conditions: (1) This device may not cause harmful
interference, and (2) this device must accept any
interference received, including interference that may
cause undesired operation.
Note to User:
Changes or modifications to this equipment not exp ressly
approved by Electronic Systems Technology for
compliance could void the user's authority to o perate the
equipment.
The equipment has been tested and found to comply with the limits for a Class A digital device, pursuant to Part 15 of the FCC
Rules. These limits are designed to provide reasonab le protec t ion ag ain st har mful in terf eren ce wh en the eq uip ment is oper ated in a
commercial environment. This equipment genera tes, uses, and can radiate radio frequency energy and, if not installed and used in
accordance with the instruction manual, may cause harmful interference to radio communications. Operation of this equipment in a
residential area is likely to cause har mful interference in wh ich case the user will be required to correct the interference at his own
expense.
Other Information
Model 195Eg
Direct Sequence Spread Spectrum Device
FCC Type Acceptance No: ENPESTEEM195EG-1
Canadian Certification Number: 1457A-195EG
Model 195Ed
Direct Sequence/OFDM Spread Spectrum Device
(USA) FCC ID: ENPESTEEM195ED-1
(Canada) IC No: 1457A-195ED1
Model 195Ea
OFDM Spread Spectrum Device
FCC Type Acceptance No: ENPESTEEM195EA
Canadian Certification Number: 2163A-195EA
Model 195Ep
Direct Sequence Spread Spectrum Device
FCC Type Acceptance No: ENPESTEEM195EP
Canadian Type Acceptance No: 1457A-195EP
Revised: 18 Oct 12 APX A-1 EST P/N AA107E
Page 87

FEDERAL COMMUNICATIONS COMMISSION FIELD OFFICES
ALASKA
1011 E. Tudor Rd.
Rm 240 Box 2955
Anchorage, AK 99510
CALIFORNIA
Interstate Office Park
4542 Ruffner St., Room 370
San Diego, CA 92111-2216
Los Angeles Office (LA)
Ceritos Corporate Tower
18000 Studebaker Rd., Room 660
Cerritos, CA 90701-3684
San Francisco Office (SF)
5653 Stoneridge Drive, Suite 105
Pleasanton, CA 94588-8543
COLORADO
Denver Office (DV)
215 S. Wadsworth Blvd., Suite 303
Lakewood, CO 80226-1544
FLORIDA
919 Federal Bldg
51 SE First Ave.
Miami, FL 33130
Tampa Office (TP)
2203 N. Lois Ave., Room 1215
Tampa, FL 33607-2356
GEORGIA
Atlanta Office (AT)
3575 Koger Blvd., Suite 320
Duluth, GA 30096-4958
HAWAII
7304 Prince Kuhi
Federal Building
Honolulu, HI
ILLINOIS
Chicago Office (CG)
Park Ridge Office Ctr., Room 306
1550 Northwest Highway
Park Ridge, IL 60068-1460
LOUISIANA
New Orleans Office (OR)
2424 Edenborn Ave. Suite 460
Metarie, LA 70001
MARYLAND
1017 Geo. Fallon
Building 31
Hopkins Plaza
Baltimore, MD
MASSACHUSETTS
Boston Office (BS)
1 Batterymarch Park
Quincy, MA 02169-7495
MICHIGAN
Detroit Office (DT)
24897 Hathaway Street
Farmington Hills, MI 48335-1552
MINNESOTA
691 Federal Building
316 N Robert St.
St. Paul, MN
MISSOURI
Kansas City Office (KC)
520 NE Colbern Road
Second Floor
Lee’s Summit, MO 64086
NEW YORK
1307 Federal Building
111 W. Huron
Buffalo, NY 14202
APPENDIX A
FCC INFORMATION
NEW YORK
New York Office (NY)
201 Varick Street, Suite 1151
New York, NY 10014-4870
OREGON
1782 Federal Building
1220 SW 3rd Avenue
Portland, OR 97204
PENNSYLVANIA
Philadelphia Office (PA)
One Oxford Valley Office Bld.
Room 404
2300 E. Lincoln Hwy
Langhorne, PA 19047-1859
PUERTO RICO
747 Federal Building
Carlo Chardon Ave.
Hato Rey, PR 00918
TEXAS
Dallas Office (DL)
9330 LBJ Freeway, Room 1170
Dallas, TX 75243-3429
5636 Federal Building
515 Rusk Avenue
Houston, TX 77002
WASHINGTON DC
Columbia Office (CF)
9300 East Hampton Drive
Capitol Heights, MD 20743
WASHINGTON
Seattle Office (ST)
11410 NE 122
Room 312
Kirkland, WA 98034-6927
nd
Way
Revised: 18 Oct 12 APX A-2 EST P/N AA107E
Page 88

APPENDIX B
INTERFACE PORTS
ETHERNET INTERFACE
The ESTeem Model 195E’s Ethernet Port is a Full and Half-Duplex Auto-negotiation interface supporting both 10 Mbps and 100
Mbps (10/100BaseT). The Ethernet port is compliant with IEEE 802.3af Power Over Ethernet (PoE) to provide both data and
power over the same CAT-5E grade Ethernet cable. The port is compatibl e with TIA/ EIA-568B cabl e configurati on (Figure 1).
Figure 1: Ethernet Pin Layout
A second Ethernet port is included with the ESTeem 195E. This second Ethernet port can be configured to bridge to the primary
Ethernet port or configured to communicate on the Wireless or Ethernet si de of the 195E in rout er m ode.
Revised: 19 Oct 12 APX B-1 EST P/N AA107E
Page 89

APPENDIX B
INTERFACE PORTS
CONFIGURING DHCP SERVER
The ESTeem 195E Ethernet port supports both client and server Dynamic Host Configuration Protocol (DHCP). Figure 2 shows
the DHCP host configuration screen that will be shown if DHCP server is selected in the setup screens. Enter the values that
match the DHCP configuration for your network.
Figure 2: DHCP Server Configuration
Revised: 19 Oct 12 APX B-2 EST P/N AA107E
Page 90

RS-232C PROGRAMMING PORT
CONFIGURATION
The ESTeem Model 195E has a proprietary RS-232C
interface in a RJ-45 connector on the front panel. To
interface the 195E to the serial port on the computer, you
need ESTeem cable AA0621 that combines a standard
Ethernet patch cable to a 9-pin Female adapter.
The serial port on the ESTeem Model 195E can be used
to access the configuration menu in the ESTeem for
system and network configuration. The ESTeem
communications port operates at 38,400 bps, No Parity,
8 Data Bits and 1 Stop Bit (38,400,N,8,1). Configure
your terminal program to match these settings.
RS-232 PROGRAMMING PORT PIN-OUT TABLE
ESTeem Model AA0621
RS-232C Port Pin-Out Table
RJ-45
Pin No.
4
5
6 3
Function DB-9
Pin No.
Signal Ground (GND)
Receive Data (RxD)
Transmit Data (TxD)
5
2
RS-232C DATA PORT CONFIGURATION
The ESTeem Model 195E has an RS-232C data interface in
a RJ-45 connector on the front panel. See Chapter 6 for
further information on serial data port configuration. To
interface the 195E to the serial port on the computer, you
need serial cable with the following pin-out:
ESTeem Model AA0621
RS-232C Port Pin-Out Table
RJ-45
Pin No.
1
2
3
4
5
6
7
8 7
Function DB-9
Pin No.
Data Set Ready (DSR)
Data Carrier Detect (DCD)
Data Terminal Ready (DTR)
Signal Ground (GND)
Receive Data (RxD)
Transmit Data (TxD)
Clear to Sent (CTS)
Request to Sent (RTS)
6
1
4
5
2
3
8
Model 195E Serial Data Port Interface
APPENDIX B
INTERFACE PORTS
RS-232
Programming Port
Model 195E Serial Port Interface
Ethernet Pin-out
RS-232
Data Port
Revised: 19 Oct 12 APX B-3 EST P/N AA107E
Page 91

APPENDIX C
Channel Number
Frequency
Bandwidths
Model 195Ed
4
907 MHz
5, 10 MHz
5
912 MHz
5, 10, 20 MHz
6
917 MHz
5, 10, 20 MHz
7
922 MHz
5, 10 MHz
Model 195Eg
1
2412 MHz
20 MHz
2
2417 MHz
20 MHz
3
2422 MHz
20 MHz
4
2427 MHz
20 MHz
5
2432 MHz
20 MHz
6
2437 MHz
20 MHz
7
2442 MHz
20 MHz
8
2447 MHz
20 MHz
9
2452 MHz
20 MHz
10
2457 MHz
20 MHz
11
2462 MHz
20 MHz
Model 195Ep
192
4960 MHz
20 MHz
196
4980 MHz
20 MHz
Model 195Ea
149
5745 MHz
5, 10, 20 MHz
150
5750 MHz
5, 10, 20 MHz
151
5755 MHz
5, 10, 20 MHz
152
5760 MHz
5, 10, 20 MHz
153
5765 MHz
5, 10, 20 MHz
154
5770 MHz
5, 10, 20 MHz
155
5775 MHz
5, 10, 20 MHz
156
5780 MHz
5, 10, 20 MHz
157
5785 MHz
5, 10, 20 MHz
158
5790 MHz
5, 10, 20 MHz
159
5795 MHz
5, 10, 20 MHz
160
5800 MHz
5, 10, 20 MHz
161
5805 MHz
5, 10, 20 MHz
162
5810 MHz
5, 10, 20 MHz
163
5815 MHz
5, 10, 20 MHz
164
5820 MHz
5, 10, 20 MHz
165
5825 MHz
5, 10, 20 MHz
Note: Shaded Channels Used for WiFi Operation
RADIO CONFIGURATION
195E FREQUENCIES OF OPERATION
In a wireless Ethernet network all of the ESTeem Model 195E’s must be set to the same radio frequency of operation (channel) and
bandwidth. The following table shows the channels and corresponding frequencies of operation for each model of ESTeem. The
frequency of operation is selectable when configuring the mode of operation of the 195E (reference Chapter 3).
Figure 1: Radio Frequency Channel Selection
Revised: 18 Feb 14 APX C-1 EST P/N AA107E
Page 92

APPENDIX C
RF
Bandwidth
RF Data
Rate
Equivalent Wired
Ethernet Data
Rate
Recommended Use
5MHz
1.5 to 13.5
Mbps
750 Kbps to 6.75
Mbps
Narrow bandwidth for enhanced transmission reliability
in high interference environments
10MHz
3 to 27
Mbps
1.5 to 13.5 Mbps
Midrange bandwidth for higher speed but lower
interference environments
20MHz
6 to 54
Mbps
3 to 27 Mbps
Wide bandwidth for maximum RF data rates in low
interference environments
Figure 3: Advanced Data Rate Selection
RADIO CONFIGURATION
RF BANDWIDTH
The ESTeem 195Ed and 195Ea have three adjustable RF bandwidths for operation. Reducing the RF bandwidth increases the
number of available channels and the radio's ability to reject RF interference. See figure 1 for which channels are available in the
ESTeem 195Ed when operating at a specific bandwidth.
It is recommended to use the lowest RF bandwidth and data rate required for your application to increase reliability and number of
available frequency channels. Figure 2 shows the available selections.
NOTE: All ESTeem radios in the same network MUST be on the same frequency channel and use the same bandwidth selection.
Figure 2: RF Bandwidth Selection
RF COMMUNICATIONS DATA RATE
The RF data rate of the Model 195E can be programmed for operation at 1, 2, 5.5, 6, 9, 11, 12, 18, 24, 36, 48, or 54 Mbps. The
RF data rate can be set for a fixed rate or a specific range that is dynamically scaled by the Model 195E from monitoring the
received signal quality. Dynamic scaling means that the Model 195E will operate at the highest RF data rate that is programmed
into unit. If the received data quality drops below the required minimums for reliable communications, the Model 195E will reduce
the data rate to the next lowest step to increase signal quality. Conversely if the signal quality increases above the minimums the
Model 195E will increase the RF data rate the next highest level.
The ESTeem 195E is set at the
factory to operate at maximized
scaling speed data rates and should
not need adjustment. The RF Data
Rate is programmed in the Model
195E through the Advanced
Menu>Wireless LAN
Settings>Wlan0 Device and the
value for wlan0_OPRATES:. In the
example shown in Figure 3 the RF
Date Rate is programmed to dynamic
scale all data rates to 54 Mbps
(recommend factory default setting).
To set the values for the data rate,
check the box next to the listed data
rate to enable this rate for operation.
Revised: 18 Feb 14 APX C-2 EST P/N AA107E
Page 93

APPENDIX C
Max (Maximum)
Full Power
Hi (High)
75% Power
Lo (Low)
50% Power
Min (Minimum)
25% Power
Figure 5: Power Level Settings
Figure 4: Advanced Global Variables
RADIO CONFIGURATION
SETTING RF POWER LEVEL
The ESTeem Model 195E peak power is adjustable in output power from the advanced configuration menu. The output power is
adjusted on the Advanced Menu>Wireless LAN Settings>Wlan0 Device screen (Figure 4) of the Web Configuration Manager.
Select the value and press the Save Settings button.
Revised: 18 Feb 14 APX C-3 EST P/N AA107E
Page 94

APPENDIX C
ESTeem 195Eg
RF Data Rate (Mbps)
Average Power
Modulation Type
1
30dBm
BPSK
2
30dBm
BPSK
5.5
30dBm
BPSK
6
30dBm
OFDM
9
30dBm
OFDM
11
30dBm
BPSK
12
28dBm
OFDM
18
28dBm
OFDM
24
27dBm
OFDM
36
27dBm
OFDM
48
24dBm
OFDM
54
24dBm
OFDM
ESTeem 195Ed
RF Data Rate (Mbps)
Average Power
Modulation Type
6
30dBm
OFDM
9
30dBm
OFDM
12
28dBm
OFDM
18
28dBm
OFDM
24
27dBm
OFDM
36
27dBm
OFDM
48
24dBm
OFDM
54
24dBm
OFDM
ESTeem 195Ea
RF Data Rate (Mbps)
Average Power
Modulation Type
6
27dBm
OFDM/BPSK
9
27dBm
OFDM/BPSK
12
27dBm
OFDM/QPSK
18
27dBm
OFDM/QPSK
24
27dBm
OFDM/16QAM
36
24.8dBm
OFDM/16QAM
48
23dBm
OFDM/64QAM
54
20dBm
OFDM/64QAM
RADIO CONFIGURATION
AVERAGE RF OUTPUT POWERS
The average measurable output power on the ESTeem Model 195E will vary from 20dBm to 30dBm depending upon modulation
type and RF data rate. The average power is used when entering the output power level in the ESTeem RF Design program. The
following table provides that level and modulation type at each data rate:
Revised: 18 Feb 14 APX C-4 EST P/N AA107E
Page 95

APPENDIX C
ESTeem 195Ep
RF Data Rate (Mbps)
Average Power
Modulation Type
1
33dBm
BPSK
2
33dBm
BPSK
5.5
33dBm
BPSK
6
33dBm
OFDM
9
33dBm
OFDM
11
33dBm
BPSK
12
32dBm
OFDM
18
32dBm
OFDM
24
31dBm
OFDM
36
31dBm
OFDM
48
28dBm
OFDM
54
28dBm
OFDM
RADIO CONFIGURATION
Revised: 18 Feb 14 APX C-5 EST P/N AA107E
Page 96

APPENDIX D
SECURITY
OVERVIEW
The security for the ESTeem Model 195E, like all network security, must be multi-layered. One level of security is never enough
to make sure that data does not end up in the wrong hands. Please review the following security levels and decide what is the most
appropriate for your network.
AES-CCMP (802.11i and WPA-2)
AES-CCMP (Advanced Encryption Standard-Counter Mode CBC-MAC Protocol) is the encryption algorithm used in the IEEE
802.11i and WPA-2 security protocols. This national encryption standard uses a 128 bit-AES block cipher and CCMP technique to
ensure the highest level of security and integrity available on a wireless network. AES-CCMP incorporates two sophisticated
cryptographic techniques (counter mode and CBC-MAC) and adapts them to Ethernet frames to provide a robust security protocol
between the mobile client and the
eavesdropper to spot patterns, and the CBC-MAC message integrity method ensures that messages have not been tampered with.
The ESTeem 195E is compatible as either an Access Point or client in either WPA2 or IEEE 802.11i security systems.
Wi-Fi Protected Access 2 with Preshared Key (WPA2 PSK)
WPA2 PSK uses a common passphrase (preshared key) between the Access Point (AP) and the client to begin a secure
communication session. This passphrase must be entered exactly the same in both the Access Point and the client. This passphrase
is used to authenticate communication session between the AP and client to begin the secure wirel ess networking session.
Wi-Fi Protected Access 2 with Enterprise Server (WPA Enterprise)
Like WPA2 PSK, WPA2 Enterprise verifies the authenticity of the Access Point and client, but uses an 802.1x backend
authentication server handling the authentication decision. The most commonly type of authentication server is a RADIUS server.
The ESTeem Model 195E can be configured to operate with an established RADIUS server on the net work.
WPA
Wi-Fi Protected Access with Preshared Key (WPA PSK)
WPA, which uses 802.1x, was introduced in 2003 to improve on the authentication and encryption features of WEP. All
authentication is handled within this access point device. WPA has two significant advantages over WEP:
1. An encryption key differing in every packet. The TKIP (Temporal Key Integrity Protocol) mechanism shares a starting key
between devices. Each device then changes their encryption key for every packet. It is extremely difficult for hackers to read
messages even if they have intercepted the data.
2. Certificate Authentication (CA) can be used, blocking a hacker posing as a valid user.
Wi-Fi Protected Access with Enterprise Server (WPA Enterprise)
Like WPA PSK, WPA Enterprise verifies the authenticity of the Access Point and client, but uses an 802.1x backend
authentication server handling the authentication decision. The most commonly type of authentication server is a RADIUS server.
The ESTeem Model 195E can be configured to operate with an established RADIUS server on the net work.
WPA is server/client relationship from a software driver on a computer’s wireless LAN (WLAN) card to an Access Point. The
scope of WPA is limited in use to this configuration only. The ESTeem Model 195E can support WPA Enterprise and PSK as an
Access Point, but the level of security on the Bridging layer is configured separately.
access point. AES itself is a very strong cipher, but counter mode makes it difficult for an
Revised: 18 Oct 12 APX D-1 EST P/N AA107E
Page 97

APPENDIX D
SECURITY
128-BIT WEP
The 128 WEP uses a particular algorithm called RC4 encryption to encode and decode traffic that is based on a 104-bit encryption
key and a 24-bit Initialization Vector (IV). RC4 starts with a relatively short encryption key (104 bits) that is expanded into a
nearly infinite stream of keys to accompany the stream of packets.
The basic concept of RC4 is good, but the way it’s implemented in WEP leaves it open to compromise. The researchers that test
the integrity of the system usually focus on one piece of the implementation, the Initialization Vector (IV).
The IV (24 bits) is the algorithm component that’s supposed to keep expanded keys from repeating. From the researcher’s point
of view, a high-volume access point is mathematically guaranteed to reuse the same key stream at least once a day. When this
happens, it’s called an IV collision this becomes a soft spot to enter the system.
The researchers aren’t saying that it’s easy to break into the system, or that it’s being done on a regular basis, only that it is
possible and administrators should consider ways to reduce the possibility
ACCESS CONTROL LIST (ACL)
The ACL is one of the simplest yet most secure methods of network security. The ACL is a configurable MAC filter in the Model
192E that can be set to allow specific MAC address on the wireless network by individual address or address ranges. The same
filter can also be set to reject individual MAC addresses or address ranges.
The MAC address is a unique, 6 hexadecimal field address assigned at the manufacturer that can not be changed. The MAC
address is traceable through the IEEE governing body to the manufacturer and is the “fingerprint” for all Ethernet devices.
Using a combination of both the WPA or 128-Bit WEP encryption and the ACL filter provide the ESTeem an extremely secure
wireless networking layer.
DISABLING BROADCAST PROBES AND HIDING SSID
A simple but very effective way of securing a network is to make the network difficult to find. By disabling broadcast probes and
hiding the Service Set Identification (SSID), wireless and network “sniffers” will not be able to find your ESTeem Model 195E
network. To gain access to the wireless network, you would be required to have the SSID and all security loaded in the WLAN
card software prior to entering the network.
PROPRIETARY BRIDGE COMMUNICATION
Although the ESTeem Model 195E is compatible with the open communication standards IEEE 802.11g and 802.11b, the repeater
communication between the units is a proprietary communication link. No other manufacturer of wireless hardware can access the
ESTeem repeater network when bridging between Ethernet networks. This proprietary communication layer, in combination with
the other security settings, allows you as the user to reject wireless clients into the network if so desired. When used in
conjunction with the Access Control List the 802.11g and 802.11b client access can be removed.
The security level of the bridge communication link is configurable for 64-Bit WEP, 128-Bit WEP or TKIP and is completely
independent of the client access level or any other communication link level. For example, an ESTeem Model 195E can be
configured for WPA Enterprise for client level access, communicate to another ESTeem Model 195E using a TKIP bridge link and
also communicate 128-Bit WEP to our older ESTeem M odel 192E radi o m odem s al l running si m ult aneously .
Revised: 18 Oct 12 APX D-2 EST P/N AA107E
Page 98

APPENDIX D
SECURITY
MASQUERADE MODES
When the ESTeem Model 195E is configured in either the Access Point Masquerade or the Client Masquerade modes, the wireless
modem functions as a network firewall. If access to the wired network is the greatest concern, place the ESTeem in the
Masquerade mode and the wireless network will be completely isolated from the wired Ethernet network.
INCREASING NETWORK SECURITY
The following are a few suggestions to help improve the overall security of y our wirel ess network:
1. Enable the security. If you research all of the articles regarding hackers, they have g otten into the user’s network due to the
security not being enabled.
2. Set the ACL filter to include only those MAC address of the wireless Ethernet device being used on the network.
3. Make sure the keys are not reused in your company, since reuse increases the statistical li keli hood t hat someone can figure the
key out and change the default password on your access point or wireless router
4. As a network administrator, you should periodically survey your company using a tool like NetStumbler to see if any "rogue"
access points pop up within your company without authorization. All of your hard work to "harden" your wireless network
could be wasted if a rogue AP was plugged into your network behind the firewall.
5. Many access points allow you to control access based on the MAC address of the NIC attempting to associate with it. If the
MAC address of your NIC isn't in the table of the access point, you won't associate with it. And while it's true that there are
ways of spoofing a MAC address that's been sniffed out of the air, it takes an additional level of sophistication to spoof a
MAC address. The downside of deploying MAC address tables is that if you have a lot of access points, maintaining the
tables in each access point could be time consuming. Some higher-end, enterprise-level access points have mechanisms for
updating these tables across multiple access points of the same brand.
6. Consider using an additional level of authentication, such as Remote Access Dailin User Service (RADIUS), before you
permit an association with your access points through WPA and WPA2 Enterprise.
7. If you're deploying a wireless router, think about assigning static IP addresses for your wireless NICs and turn off Dynamic
Host Configuration Protocol (DHCP). If you're using a wireless router and have decided to turn off DHCP, also consider
changing the IP subnet. Many wireless routers default to the 192.168.1.0 network and use 192.168.1.1 as the default rout er.
8. Only purchase Access Points that have flashable firmware. There are a number of security enhancements that are being
developed, and you want to be sure that you can upgrade your access point.
9. A simple security technique used by the military is to have th e administrator periodically change the key for the system i.e.
weekly, monthly, etc.
Revised: 18 Oct 12 APX D-3 EST P/N AA107E
Page 99

APPENDIX E
TROUBLESHOOTING
TESTING COMMUNICATION LINK
After you have configured at least two of the Model 195E wireless Ethernet modems for operation, you can verify
communication with each the following steps:
Status Light
The quickest source of link status is to view the Status
Light on the face of the 195E (Figure 1). If the Status
light is solid, the Model 195E has a connection to
another Model 195E listed in the Peer Table.
Status Screen/Peer Table
To view detailed information on the status of the communication link (such as connection speed, signal strength and
last update time) you can open the Status Screen from the Web Interface. After press the Status tab at the top of the
screen the Status: Summary will be displayed showing the status of all ports and memory in the 195E. Under the
Wireless Status heading click on the
195Ea only) or mobile client wireless activity seen by the 195E and how it is classified.
Note: The data rate displayed is not necessarily indicative of the RF data rate between the ESTeems. The rate
show in the Repeater Peer table will be the last RF packet, w hich could consist of either data, repeater
beacon or network probes.
View Peer Table (Figure 2). The Peer Table will list all other Wifi (195Eg and
Status LED
Solid Red on Link
Figure 1: Connection Status Light
Figure 2: Repeater Peer Table
Revised: 19 Oct 12 APX E-1 EST P/N AA107E
Opposite Modem’s Wireless MAC
Receive Signal Strength (dBm)
Last Packet Received
Peer Modem ID
Other Access Points
Page 100

APPENDIX E
TROUBLESHOOTING
Repeater Peers - The Peer Table will display all connected 195Es configured to repeat to this ESTeem by their
Wireless (WLAN) MAC address.
Received Signal Strength – This is the first of the two numbers listed in the block. This signal strength value is listed in
dBm.
Last RX – This is the time of the last received data packet. When monitoring the status menu, it is important to note
the time the last transmission was updated so you are not looking at “stale” data.
Current Data Rate – This is the current speed the last data packet received by the Model 195E. This may not be the
data rate between the radio modems. Note that the speed is listed in kbps, so that 11000 kbps is equal to 11 Mbps.
Note: The ESTeem Model 195E uses spread spectrum technology that analyzes each data packet for signal strength
and data quality (strength vs. noise). The higher your signal, the mare background noise you can sustain
without causing degradation in the data transfer. This is also true for lower signal strengths with a very low
background noise. These values are provided for guidance and if you have any questions about the values in
your application, please contact ESTeem Customer Support at 509-735-9092 or e-mail your application to
support@esteem.com.
Modem ID – This is Modem ID for the opposite repeater peer.
Revised: 19 Oct 12 APX E-2 EST P/N AA107E
 Loading...