

Specifications and Main Features
- Model Number: 2173445
- Type: Side by Side Refrigerator No Frost
- Electrical Requirements: AC only, 127 Volts, 60 Hz.
- Power Consumption: 8.5 A
- Have Automatic Ice: Yes
- Ice Maker Storage Capacity: About 1.5 Liters
- Temperature Control Settings:
- Refrigerator Control: 1 (warmest) to 5 (coldest)
- Freezer Control: A (warmest) to C (coldest)
- Glass Shelves: Yes Adjustable
- Crisper Drawers: Yes
- Snack Bin: Yes
- Features:
- A control panel with a light
- A system for dispensing ice and water
- Control of automatic moisture on outside
- Warranty: One year warranty for parts and labor; five years warranty on sealed refrigeration system components.
Frequently Asked Questions
- Q: What are the settings for the controls for the refrigerator?
A: Recommended values are to set the Refrigerator Control to 3 and Freezer Control to B.
- Q: Why is my ice maker not making ice?
A: Make sure there is cold air in the freezer, check if the ON/OFF lever at the set is in the ON position, and check whether the water valve is opened.
- Q: How do I unclog my refrigerator?
A: First unplug the refrigerator then remove all the removable parts and wash all the surfaces with mild detergent and warm water.
- Q: What are the recommended steps to take if my refrigerator malfunctions?
A: First, verify that the power supply cord is connected to the socket, ascertain whether a fuse has blown or inspect if the Refrigerator Control is in the OFF position.
- Q: As a refrigerator owner, what measures can I take to conserve energy?
A: The recommended measures include avoiding unnecessary opening of the refrigerator door, cleaning condenser coils frequently, and making certain the gaskets on the door are well sealed.
User Manual
USE AND CARE GUIDE
Table of Contents
(complete) . . . . . . . . . . . . . . . . . . 2
A Note to You . . . . . . . . . . . . . . . . . 2
Refrigerator Safety
. . . . . . . . 3
Parts and Features . . . . . . . . 4
Before Using Your
Refrigerator . . . . . . . . . . . . . . . . 6-6
Using Your
Refrigerator . . . . . . . . . . . . . . .7-21
Caring for Your
Refrigerator . . . . . . . . . . . . .22-24
Food Storage
Guide . . . . . . . . . . . . . . . . . . . . . . . 25-26
Troubleshooting
. . . . . . . . . . 27
Requesting Assistance
or Service . . . . . . . . . . . . . . . . . . . . . 28
Warranty . . . . . . . . . . . . . . . . . . . . . . . 30
2173445
NO-FROST
SIDE BY SIDE REFRIGERATOR
2l95
Table of Contents
Page
A Note to You.. .......................................... 2
Refrigerator Safety ................................... 3
Parts and Features ................................... 4
Before Using Your Refrigerator ............. 5
Using Your Refrigerator.. ......................... 7
Setting the controls ............................... 7
Changing the control settings.. ............. .7
Removing the door shelf fronts ............. 8
Removing the drop-in dcor trim.. .......... .9
Adjusting the cantilever refrigerator
shelves .................................................. 9
Removing the meat drawer
and cover.. ........................................... 10
Adjusting the meat drawer
temperature.. .......................................
Removing the crisper and crisper
cover ...................................................
Removing the snack bin.. ....................
10
10
11
Page
Removing the freezer binlbasket ........ 11
Removing the freezer shelf .................
Using the ice and water dispensing
system ................................................ 12
Using the automatic ice maker.. ..........
Removing the ice maker storage bin.. .15
Attaching the ice maker to a
water suppty ....................................... 18
Removing the base grille.. ................... 19
Changing the light bulbs ..................... 19
Understanding the sounds you
may hear.. ........................................... 21
Saving energy ..................................... 21
Reversing the dcor swing.. .................. 21
Caring for Your Refrigerator.. ................ 22
Food Storage Guide ............................... 25
Troubleshooting ..................................... 27
Requesting Assistance or Service.. ..... .28
Warranty .................................................. 30
11
13
A
Note to You
Thank you for buying an Estate. appliance.
Estate appliances give you ail the functionalii of name brand appliances at a value price. To
ensure you enjoy years of troublefree operation, we developed this Use and Care Guide. it
contains valuable information about how to operate and maintain your appliance properly and
safely. Please read it carefully. Also, please complete and mail the Owner&ii Registration
Card provided with your appliance. This card helps us notify you about any new information
on your appliance.
Please record your model’s information.
Whenever you call to request service on
your appliance, you need to know your
complete modelnumber and sefiai number.
You can find thii information on the model
and serial number label (see diagram on
page 4
your appliance and your dealer’s name,
address, and telephone number.
Keep this book and the sales slip together in a safe place for future reference.
2
for location of label).
Please also record the purchase date of
Our Consumer Assistance Center number is tollfree from anywhere in the U.S.A. 24-hours a day.
Model Number
Serial Number
Purchase Date
Dealer Name
Dealer Phone
l-800-253-1 301
Refrigerator Safety
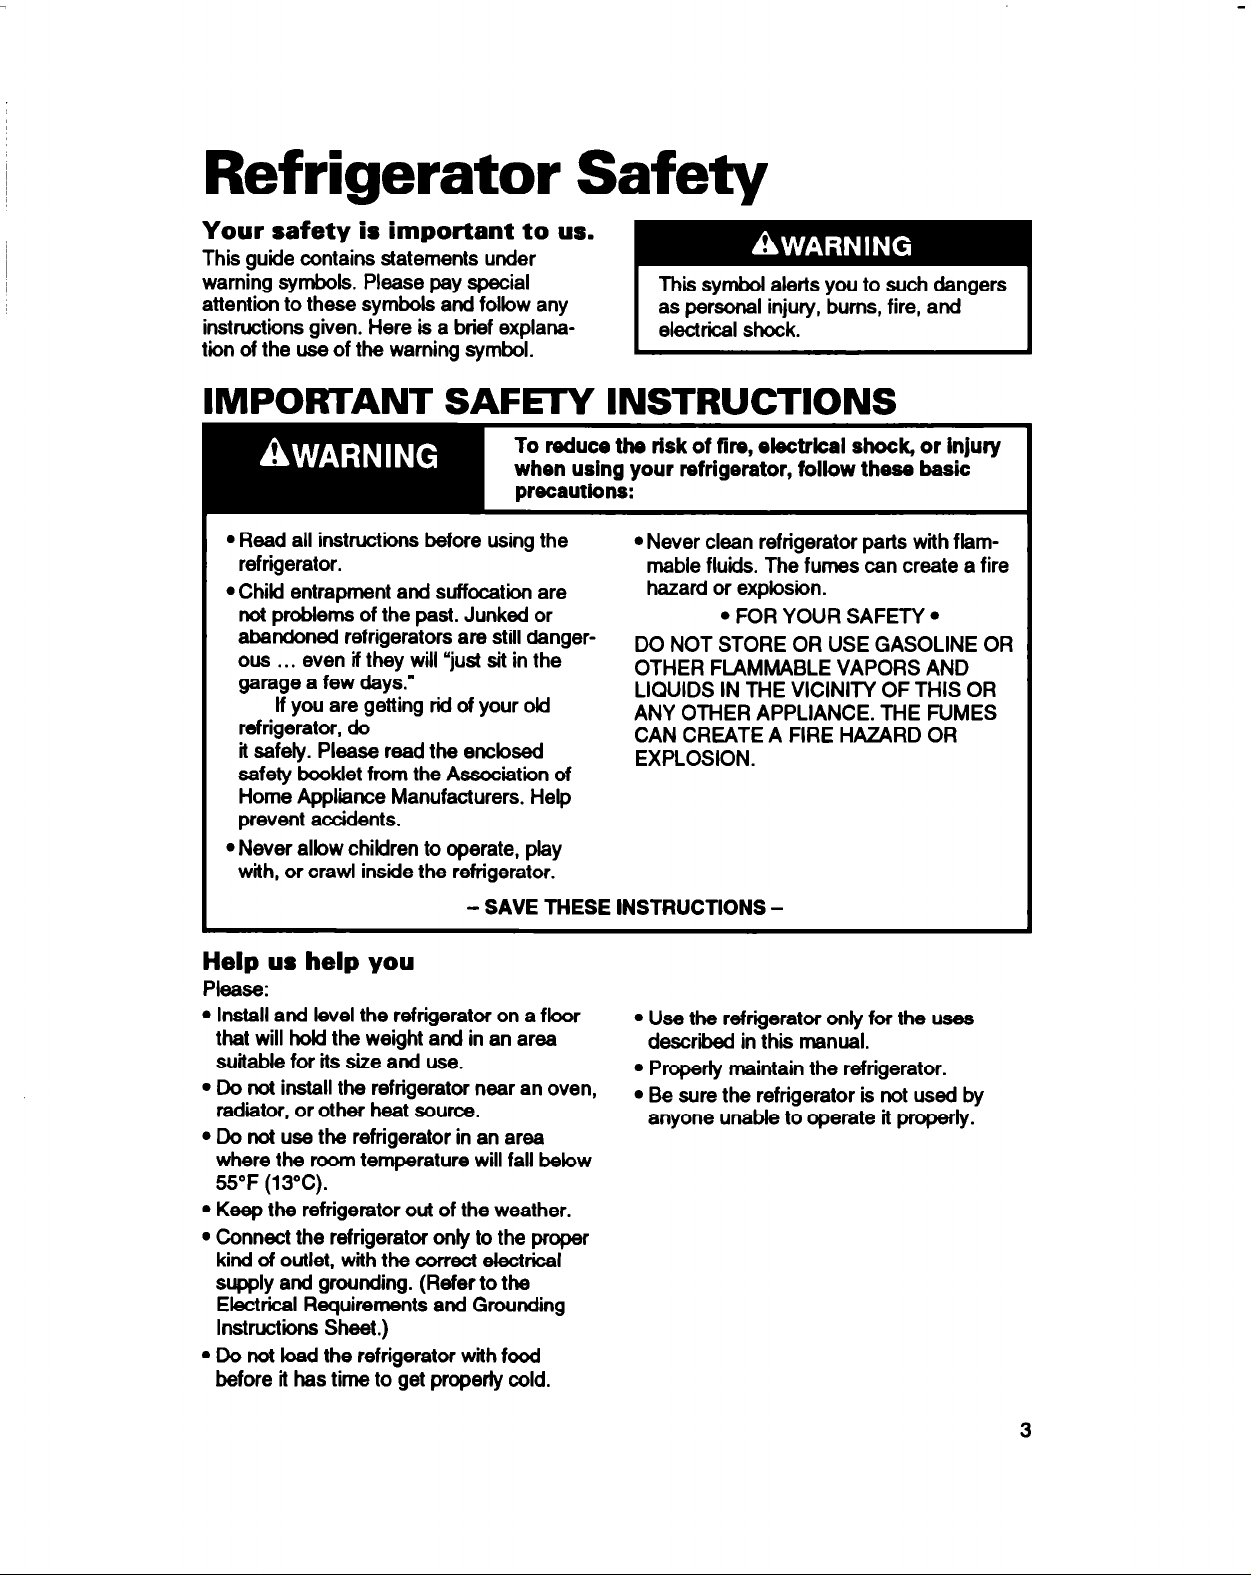
Your safety is important to us.
This guide contains statements under
warning symbols. Please pay special
attention to these symbols and follow any
instructions given. Here is a brief explana-
tion of the use of the warning symbol.
IMPORTANT SAFEN INSTRUCTlONS
l
Read all instructions before using the
refrigerator.
l
Child entrapment and suffocation are
not prohlems of the past. Junked or
abandoned refrigerators are still dangerous . . .
even if they will “just sit in the
garage a few days.”
If you are getting rid of your okl
refrigerator, do
it safety. Please read the enclosed
safety booklet from the Association of
Home Appliance Manufacturers. Help
prevent accidents.
@Never allow children to operate, play
with, or crawl inside the refrigerator.
l
Never clean refrigerator parts with flamrnable fluids. The fumes can create a fire
hazard or explosion.
l
FOR YOUR SAFETY
DO NOT STORE OR USE GASOLINE OR
OTHER FlAhMABLE VAPORS AND
LIQUIDS IN THE VICINITY OF THIS OR
ANY OTHER APPLIANCE. THE FUMES
CAN CREATE A FIRE HAZARD OR
EXPLOSION.
l
- SAVE THESE INSTRUCTIONS -
Help us help you
Please:
l
Install and level the refrigerator on a fbor
that will hokf the weight and in an area
suitable for its size and use.
l
Do not install the refrigerator near an oven,
radiator, or other heat source.
l
Do not use the refrigerator in an area
where the room temperature will fall below
55°F (13°C).
l
Keep the refrigerator out of the weather.
l
Connect the refrigerator only to the proper
kind of outlet, with the correct electrical
supply and grounding. (Refer to the
Electrical Requirements and Grounding
lnstructbns Sheet.)
l
Do not bad the refrigerator with food
before it has time to get properly cold.
l
Use the refrigerator only for the uses
described in thii manual.
l
Properly maintain the refrigerator.
l
Be sure the refrigerator is not used by
anyone unable to operate it properly.
3
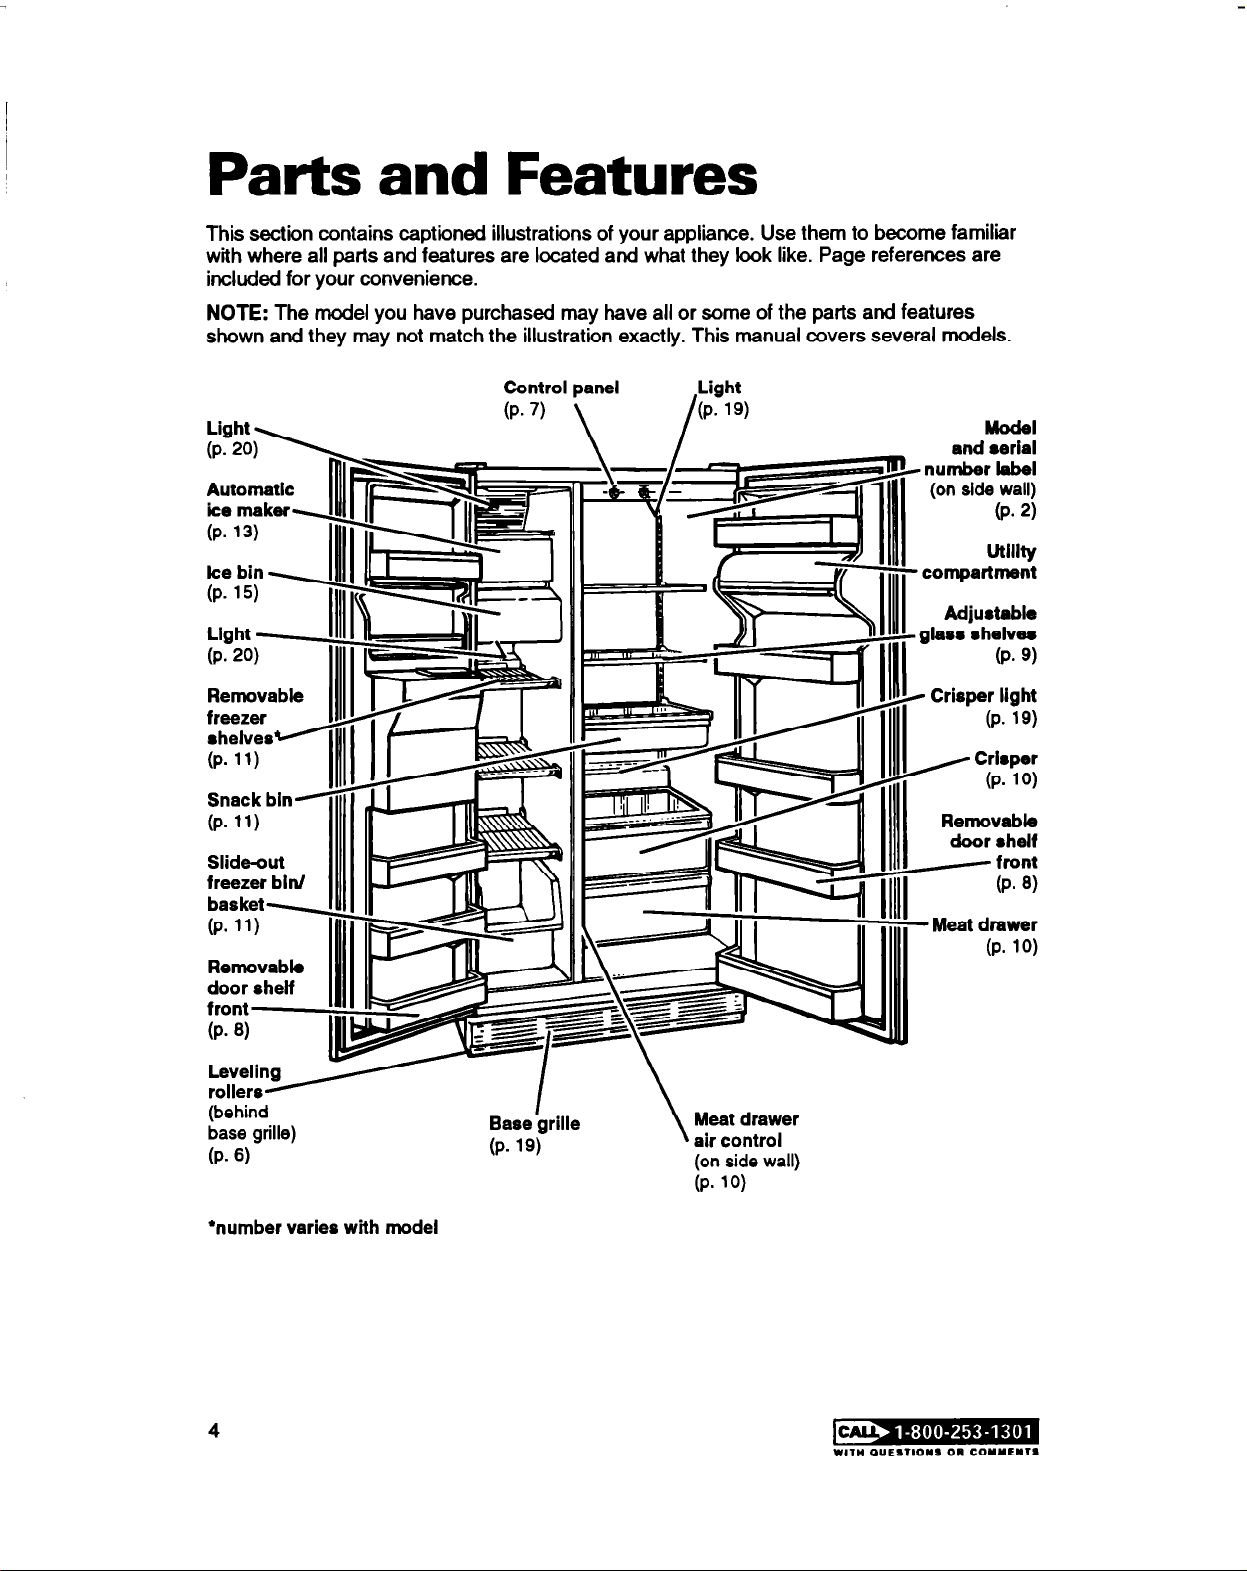
Parts and Features
This section contains captioned illustrations of your appliance. Use them to become familiar
with where all parts and features are located and what they look like. Page references are
included for your convenience.
NOTE:
The model you have purchased may have all or some of the parts and features
shown and they may not match the illustration exactly. This manual covers several models.
Control panel
(P. 7) -
\
Llght - _
(P. 20)
Removable
:tx*~
(P. 11)
Ill
Snack bin(P- 11)
Slide-out
freezer bin/
Light
(P. 19)
Model
and aerial
-number label
(P. 19)
H Crl8per
(P. 10)
Removable 11
(behind
base grille)
(P- 6)
*number varies with model
Baselgrille
(P- 19)
Meat drawer
\
air control
(on side wall)
(Pm 10)
W,,” QUESTIONS 011 COYYENlS
Before Using Your Refrigerator
It is important to prepare your refrigerator for use. This section tells you how to clean it,
connect it to a power source, install it, and level it.
Cleaning your refrigerator
Removing packaging
materials
Remove tape and any inside labels (except
the model and serial number label) before
using the refrigerator.
To remove any remalnlng tape or label
glue:
l
Rub briskly with thumb.
OR
l
Apply liquid handdishwashing detergent to
area before removing glue as described
above. Do not use sharp instruments,
rubbing alcohol, flammable fluids, or
abrasive cleaners. These can damage the
material. See ‘Important Safety Instruc-
tions” on page 3.
NOTE: Do not remove any permanent
instruction labels inside your refrigerator. Do
not remove the Tech Sheet fastened under
the refrigerator at the front.
Cleaning it before use
After removing all packaging
materials, clean your refrigera-
tor before using it, if necessary.
See cleaning instructions on
page
22.
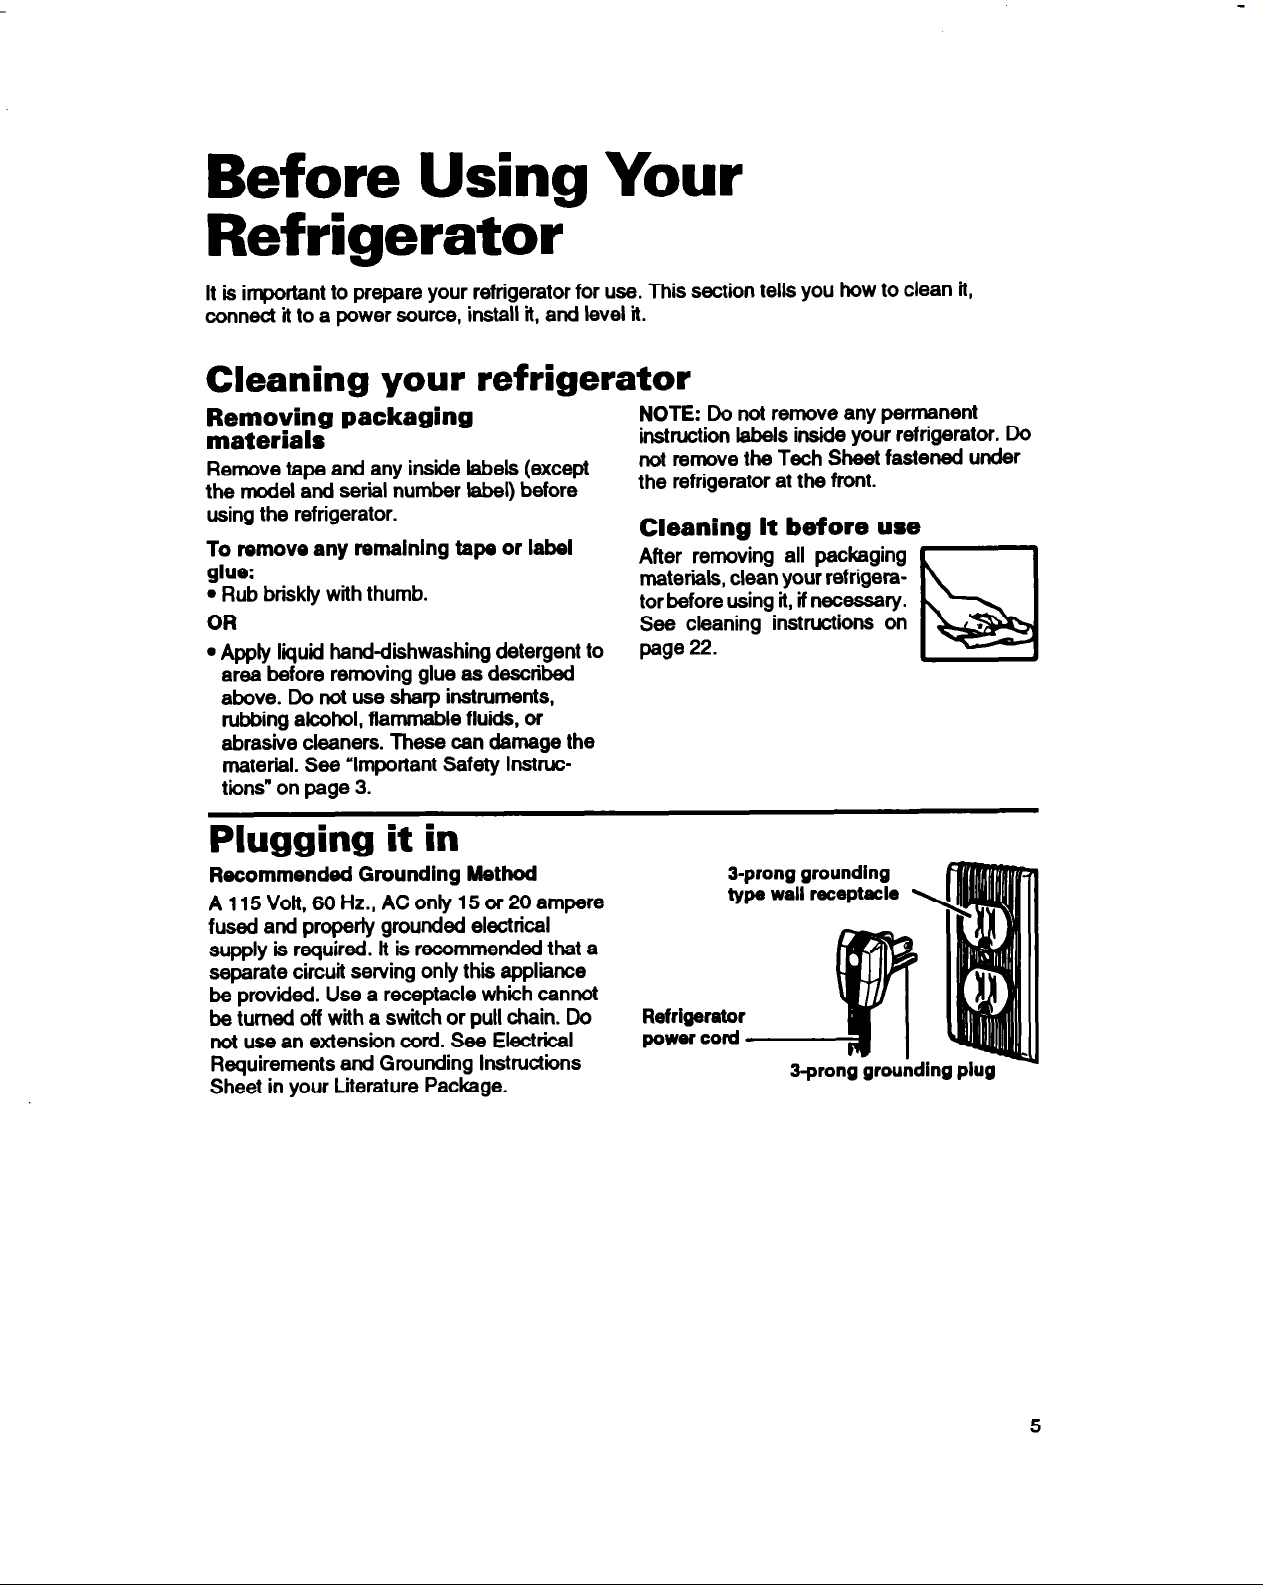
Plugging it in
Recommended Grounding Method
A115Volt,60Hz.,AConly15or20ampere
fused and properly grounded electrical
supply is required. lt is recommended that a
separate circuit serving only thii appliance
be provided. Use a receptacle which cannot
be turned off with a switch or pull chain. Do
not use an extension cord. See Electrical
Requirements and Grounding
Sheet in your Literature Package.
lnst~ctiom
&prong grounding
type well receptacle
Refrigerator
power cord
3-prong grounding plug
-
5
installing it properly
1. Allow l/i inch (1.25 cm) space on each
side and at the top of the refrigerator for
ease of installation.
2. If the hinge side of the refrigerator is to be
against a wall, you might want to leave
extra space so the door can be opened
wider.
3. The refrigerator can be flush against the
back wall.
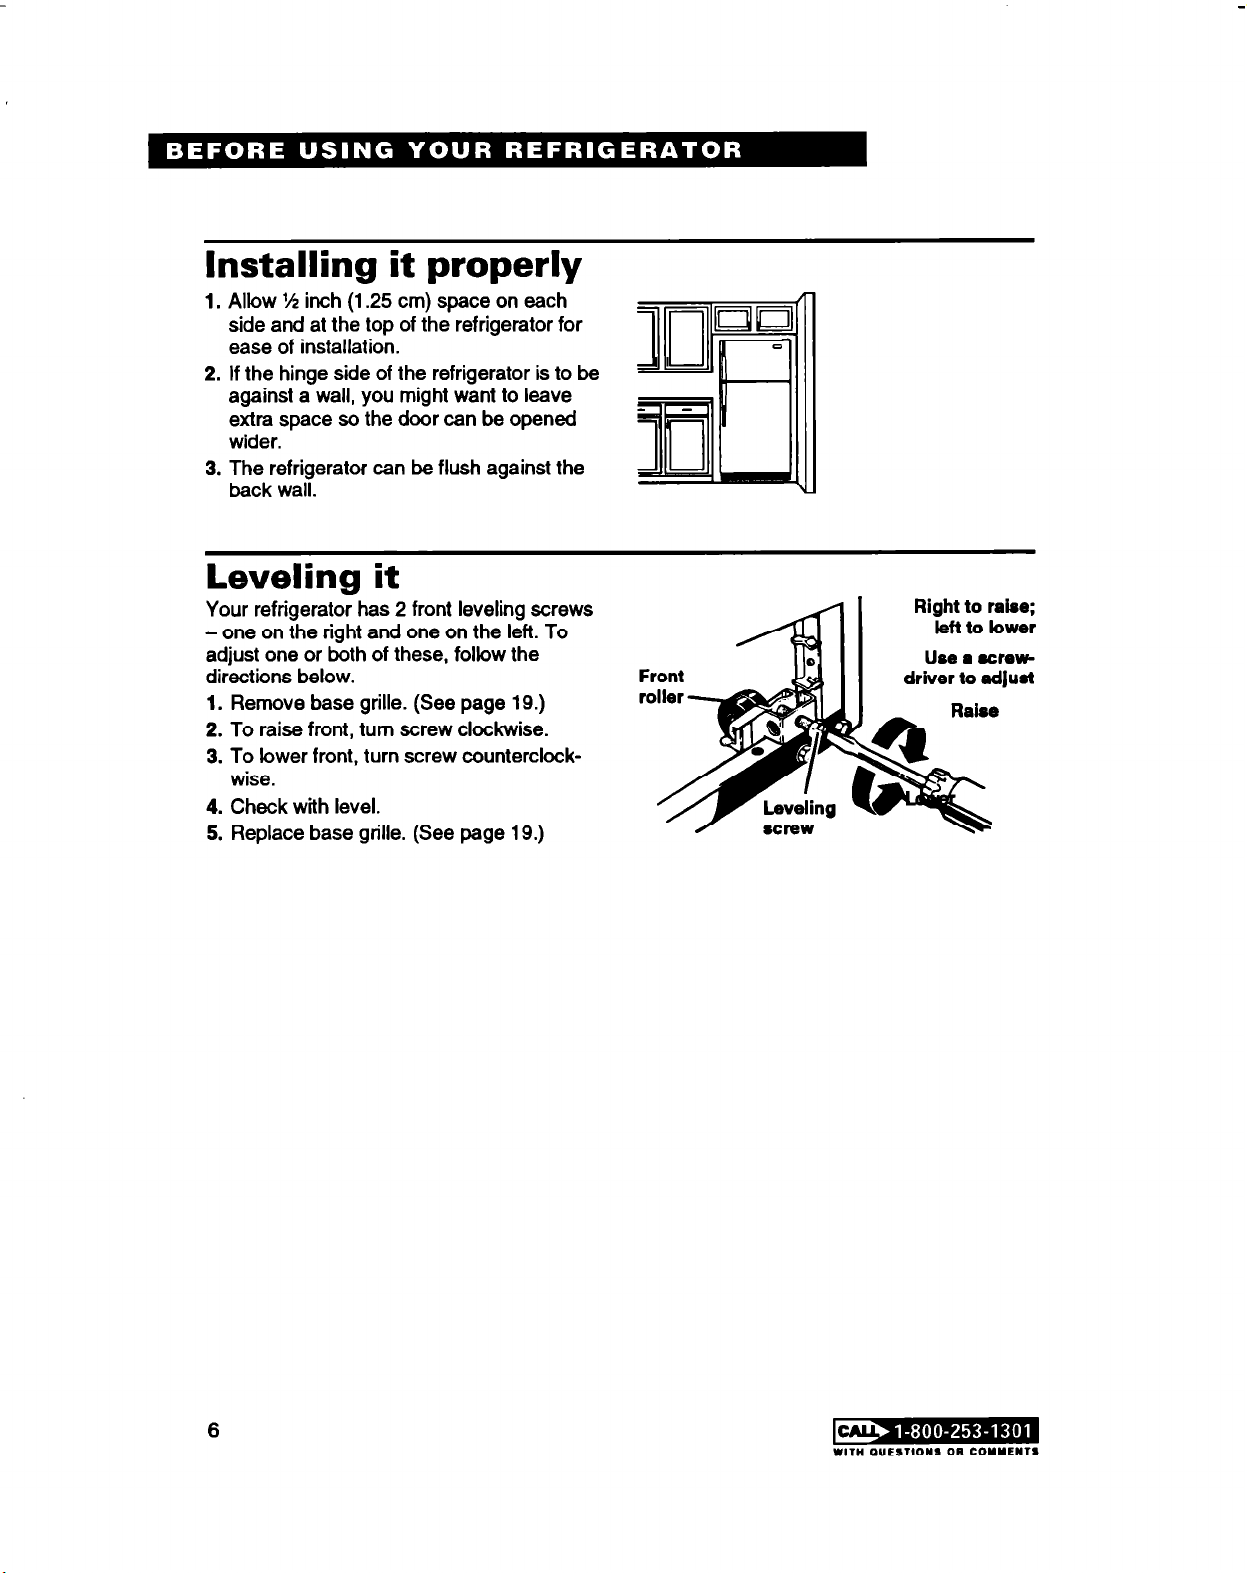
Leveling it
Your refrigerator has 2 front leveling screws
- one on the right and one on the left. To
adjust one or both of these, follow the
directions below.
1. Remove base grille. (See page 19.)
2. To raise front, turn screw clockwise.
3. To lower front, turn screw counterclockwise.
4.
Check with level.
5. Replace base grille. (See page 19.)
YlT” OUEITlON¶ OR COYYENTS
Using Your Refrigerator
To obtain the best possible results from your refrigerator, it is important that you operate it
properly. This section tells you how to set the controls, remove, and adjust the features in
your refrigerator, and how to save energy.
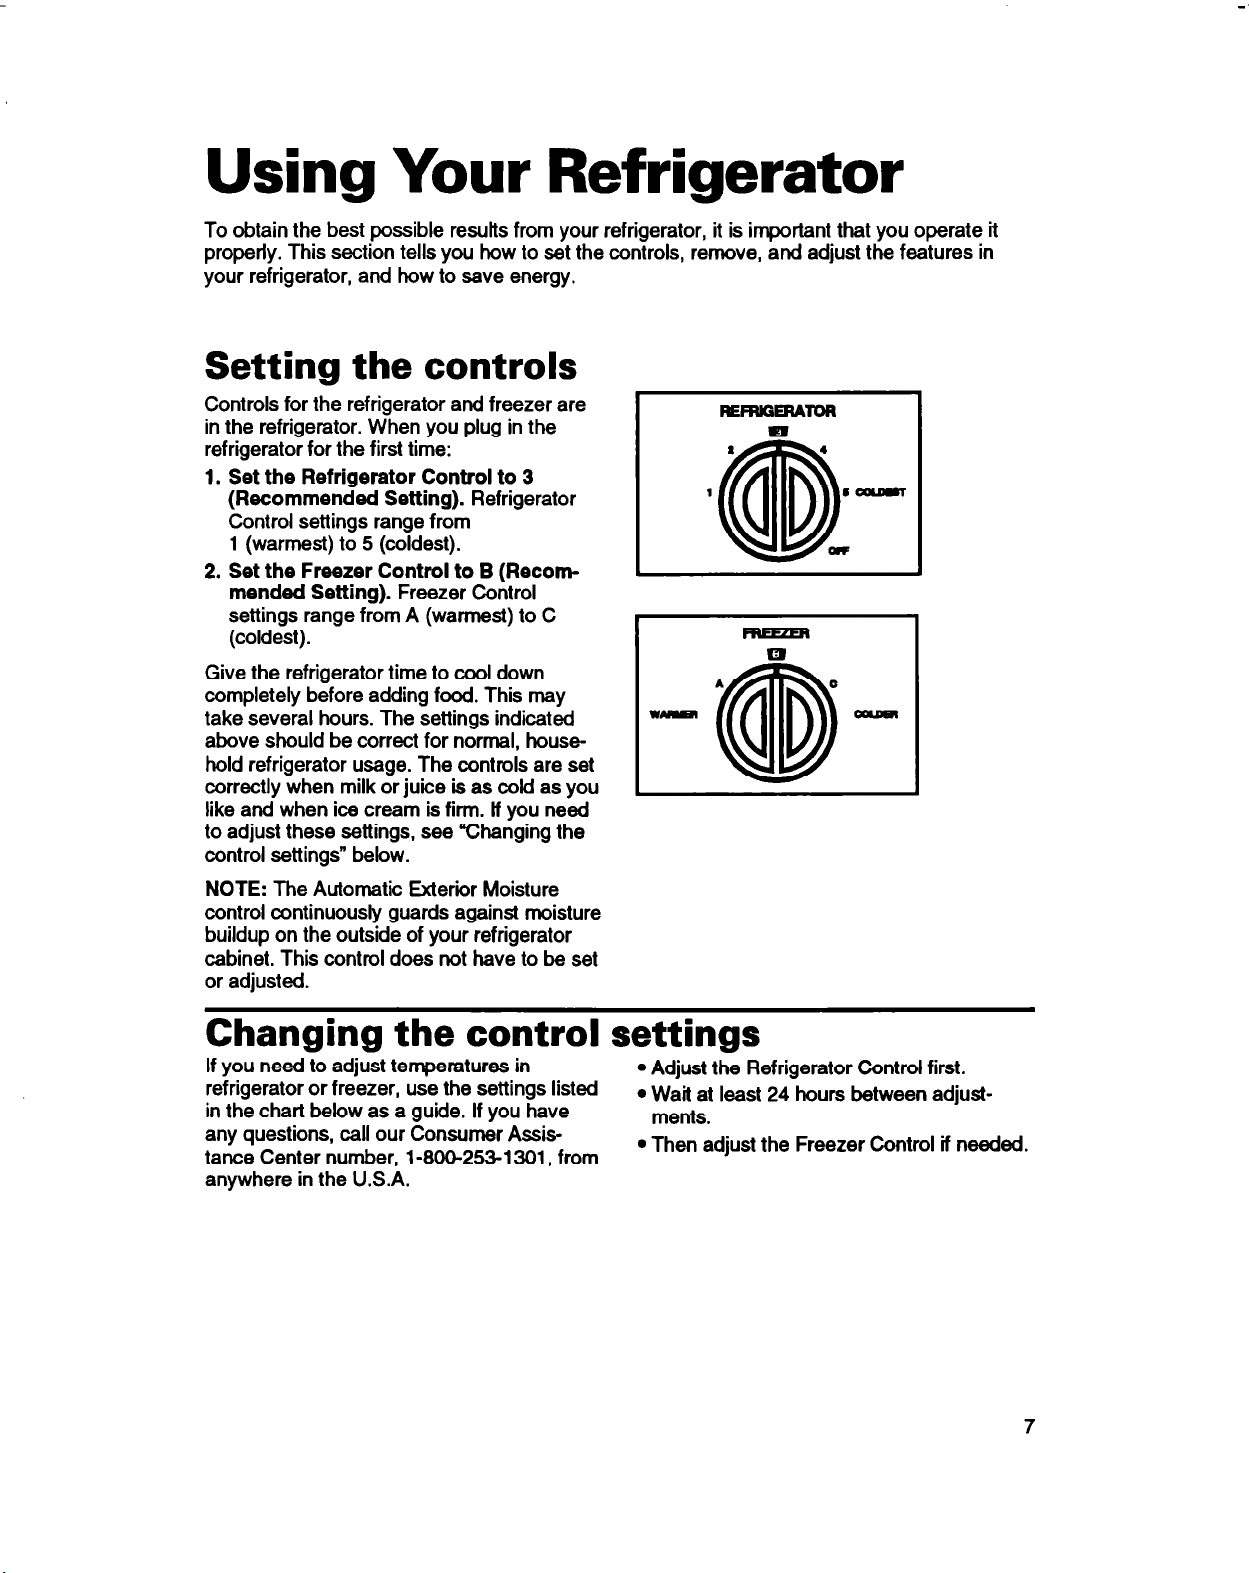
Setting the controls
Controls for the refrigerator and freezer are
in the refrigerator. When you plug in the
refrigerator for the first time:
1. Set the Refrigerator Control to 3
(Recommended Setting).
Control settings range from
1 (warmest) to 5 (coldest).
2. Set the Freezer Control to B (Recommended Setting).
settings range from A (warmest) to C
(coldest).
Give the refrigerator time to cool down
completely before adding food. This may
take several hours. The settings indicated
above should be correct for normal, household refrigerator usage. The controls are set
correctly when milk or juice is as cold as you
like and when ice cream is firm. lf you need
to adjust these settings, see “Changing the
control settings” below.
Freezer Control
Refrigerator
I
A
vm
(ID -
a
w
0
NOTE:
control continuously guards against moisture
buildup on the outside of your refrigerator
cabinet. This control does not have to be set
or adjusted.
The Automatic Exteriir Moisture
Changing the control settings
If you need to adjust temperatures in
refrigerator or freezer, use the settings listed
in the chart below as a guide. If you have
any questions, call our Consumer Assistance Center number, l-800-2531 301. from
anywhere in the U.S.A.
l
Adjust the Refrigerator Control first.
l
Wait
at
least 24 hours between adjust-
ments.
l
Then adjust the Freezer Control if needed.
7

CONDlTION:
REASON:
RECOMMENDED SElTINGS:
Refrigerator
Freezer
Refrigerator
section too warm
Freezer section
too warm
l
Door opened often
l
Large amount of food added
l
Room temperature too warm
l
Door opened often
l
Large amount of food added
l
Very cold rmrn temperature
(can’t cycle often enough)
Refrigerator
section too cold
Ice not made
fast enough
l
Controls not set correctly for
your conditions
l
Heavy ice usage
l
Very cold room temperature
(can’t cycle often enough)
Both sections
too warm
l
Door opened often
l
Large amount of food added
l
Very warm or very cold room
temperatures
Removing the door shelf fronts
(on some models)
Remove the door shelf fronts for easier
cleaning.
To remove shelf fronts:
1.
Remove all items from the shelf.
2. Pull out on the inside tab at each end of
the shelf fronts.
3. Pull shelf front straight out.
4
3
2
3
4
A
C
B
C
B
To replace shelf fronts:
1.
Line up ends of the shelf front with the
button on the door liner wall.
2. Push shelf front straight back until it
snaps securely into place.
3. Replace items on the shelf.
8
WITH QUESTIONS 01 COMMENTS

Removing the drop-in door trim
(dispenser area)
(on some models)
Remove the trim above the dispenser area
for easier cleaning.
To remove the trim piece:
1.
Remove all items from the shelf.
2. Pull straight up on the trim piece at
each end.
To replace the trim piece:
1.
Locate each end of the trim piece above
the trim pocket opening.
2. Push the trim piece straight down until
it stops.
3. Replace items on the sheff.
Adjusting the cantilever refrigerator shelves
Adjust the shelves to match the way you use
your refrigerator. Glass shefves are strong
enough to hold bottles, milk, and other
heavy food items.
To remove a shelf:
1. Remove items
2. Tilt shelf up at front.
3.
Lii shelf at back.
4. Pull shelf straight out.
from shelf.
To replace a shelf:
1. Guide the rear shelf hooks into the slots
in the shelf supports on the back liner
wall.
2. Tilt front of shelf up until hooks drop into
slots.
3. Lower front of shelf to a level position.
NOTE:
them carefully.
Glass shelves are heavy. Handle
9
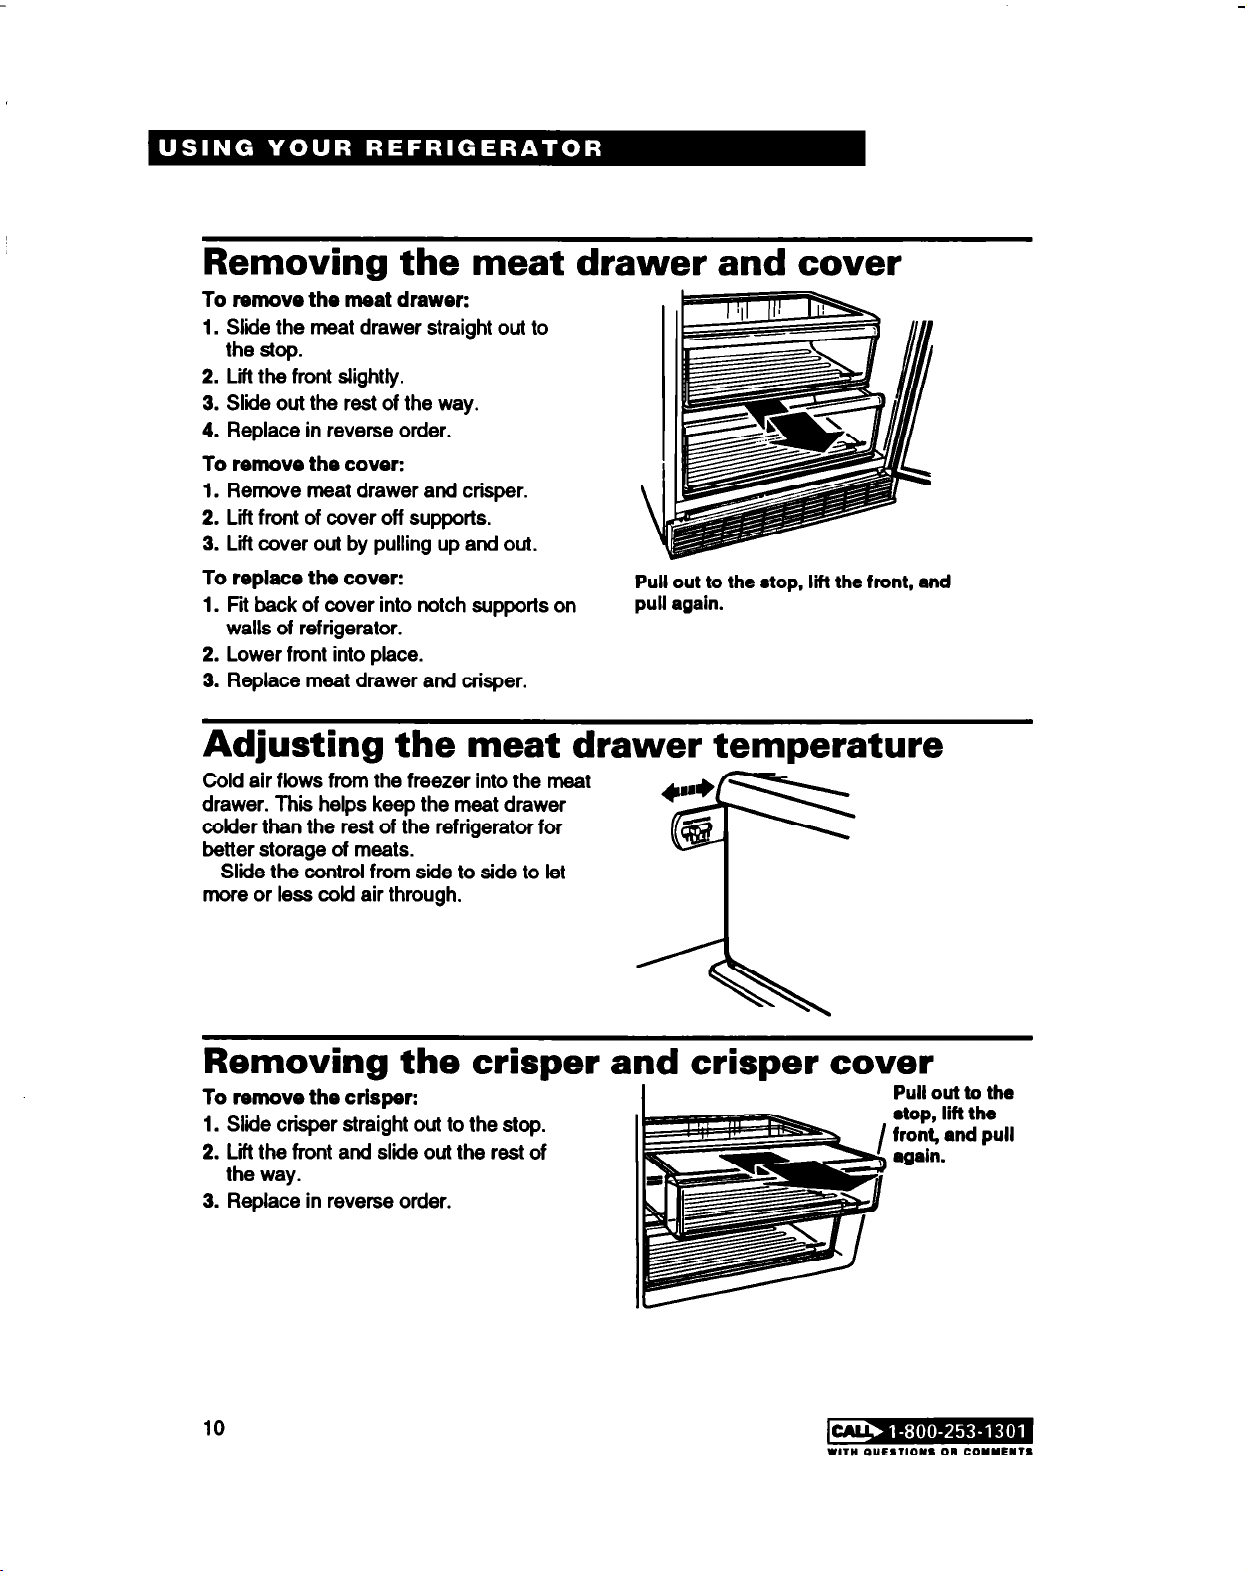
Removing the meat drawer and cover
To remove the meat drawer:
1.
Slide the meat drawer straight out to
the stop.
2. Lii the front slightly.
3.
Slide out the rest of the way.
4. Replace in reverse order.
To remove the cover:
1.
Remove meat drawer and crisper.
2. Lii front of cover off supports.
3. Lii cover out by pulling up and out.
To replace the cover:
1.
Fit back of cover into notch supports on
walls of refrigerator.
2. Lower front into place.
3. Replace meat drawer
and
crisper.
Pull out to the etop. lift the front, and
pull again.
Adjusting the meat drawer temperature
Cold air flows from the freezer into the meat
drawer. Thii helps keep the meat drawer
colder than the rest of the refrigerator for
better storage of meats.
Slide the control from side to side to let
more or less cold air through.
Removing the crisper and crisper cover
To remove the crisper:
1.
Slide crisper straight out to the stop.
2.
Lii the front and slide out the rest of
the way.
3. Replace in reverse order.
Pull out to the
8top, lift tT he
I a---* ---I
rrP”b mncl pull
again.
10
WTN OUEallON8 011 COMMENTS
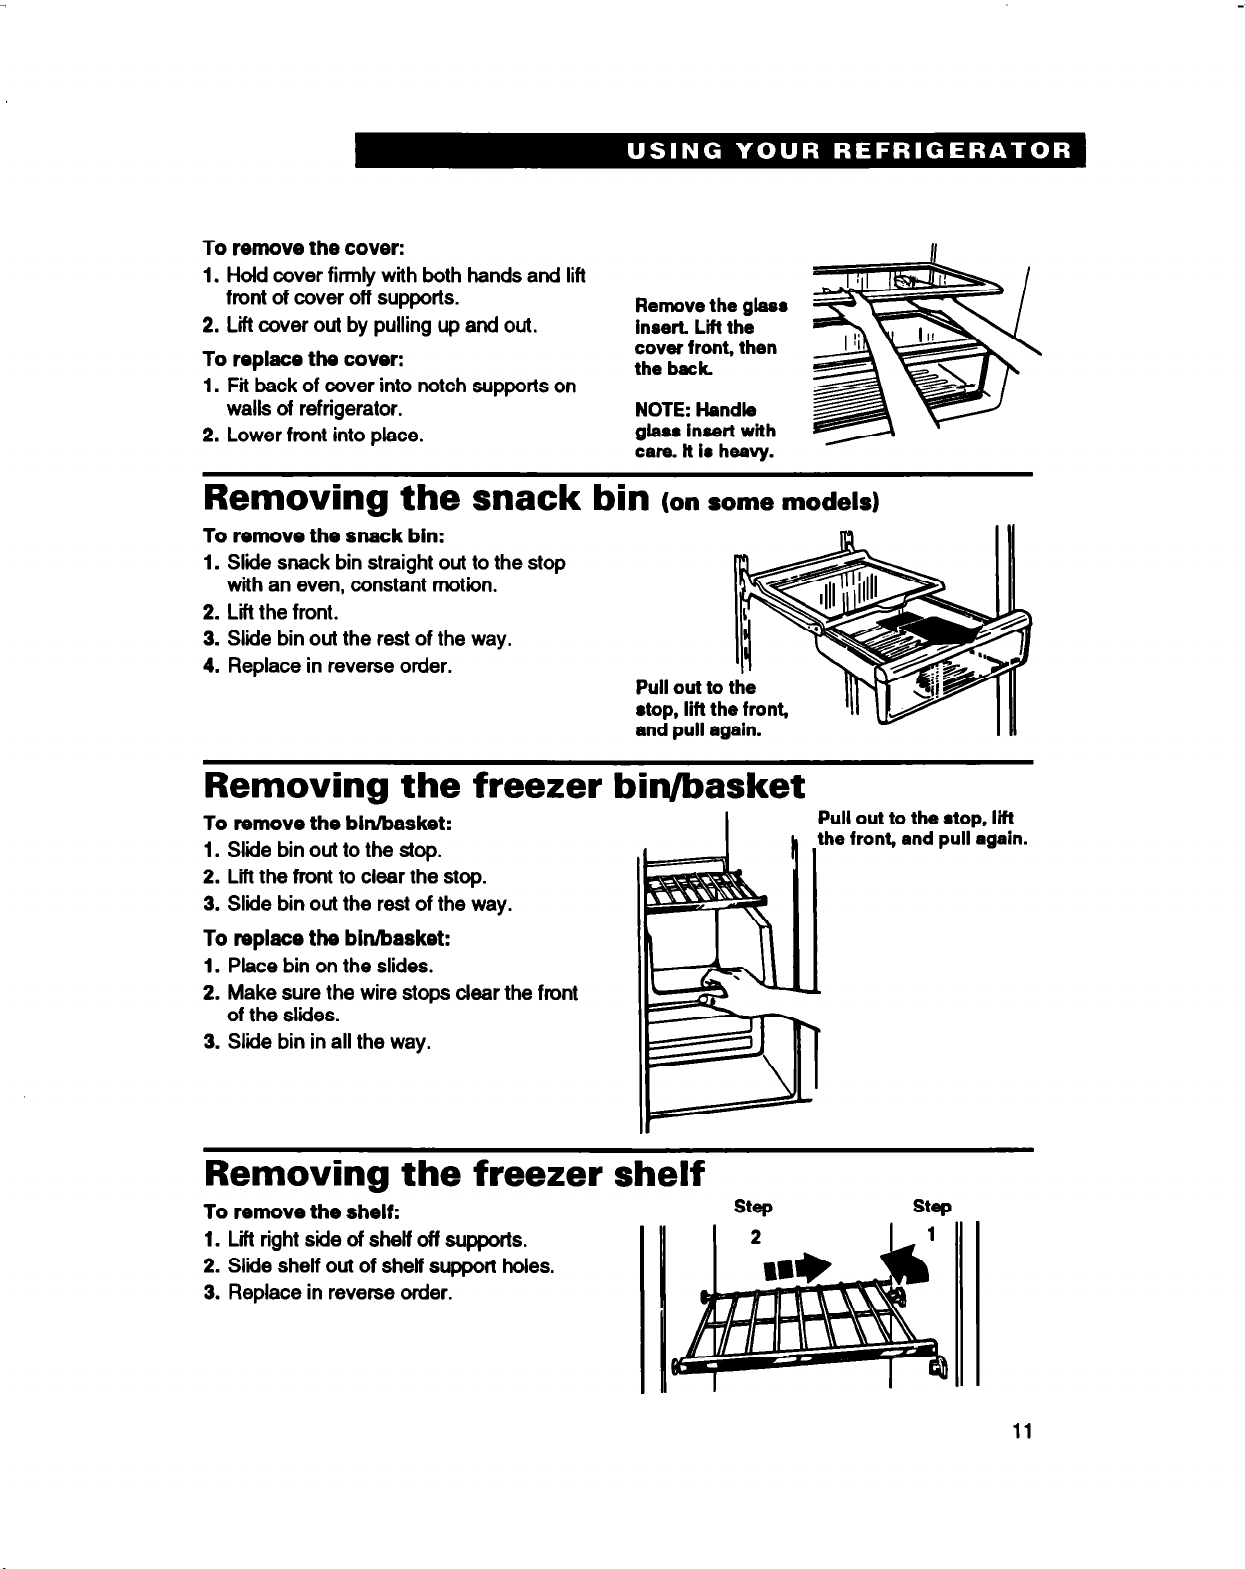
To remove the cover:
1.
Hold cover firmly with both hands and lift
front of cover off supports.
2. Lift cover out by pulling up
To
replace the cover:
1.
Pii back of cover into notch supports on
walls of refrigerator.
2. Lower front into place.
and out.
Remove the giasr
insert. Lii the
cover front, then
the beck
NOTE: Hendie
giarr inoeti with
care. it I8 heavy.
Removing the snack bin
(on some models)
To remove the snack bin:
1.
Slide snack bin straight out to the stop
with an even, constant motion.
2. Lift the front.
3. Slide bin out the rest of the way.
4. Replace in reverse order.
Removing the freezer bin/basket
To remove the bIdbasket:
1. Slide bin out to the stop.
2.
Lii the front to clear the stop.
3. Slide bin out the rest of the way.
To replace the bin/basket:
1.
Place bin on the slides.
2. Make sure the wire stops clear the front
of the slides.
3. Slide bin in all the way.
Pull out to the atop, lift
the front, and
pull again.
Removing the freezer shelf
To remove the shelf:
1.
Lii right side of shelf off supports.
2. Slide shelf out of shelf support holes.
3. Replace in reverse order.
Using the ice and water dispensing system
The ice dispenser
Ice dispenses from the ice maker storage
bin in the freezer. When you press the
dispenser bar, a trapdoor opens in a chute
between the dispenser and the ice bin. Ice
moves from the bin and falls through the
chute. When you release the dispenser bar,
a buzzing sound may be heard for a few
seconds as the trapdoor closes. The dispenser system will not operate when the
freezer door is open.
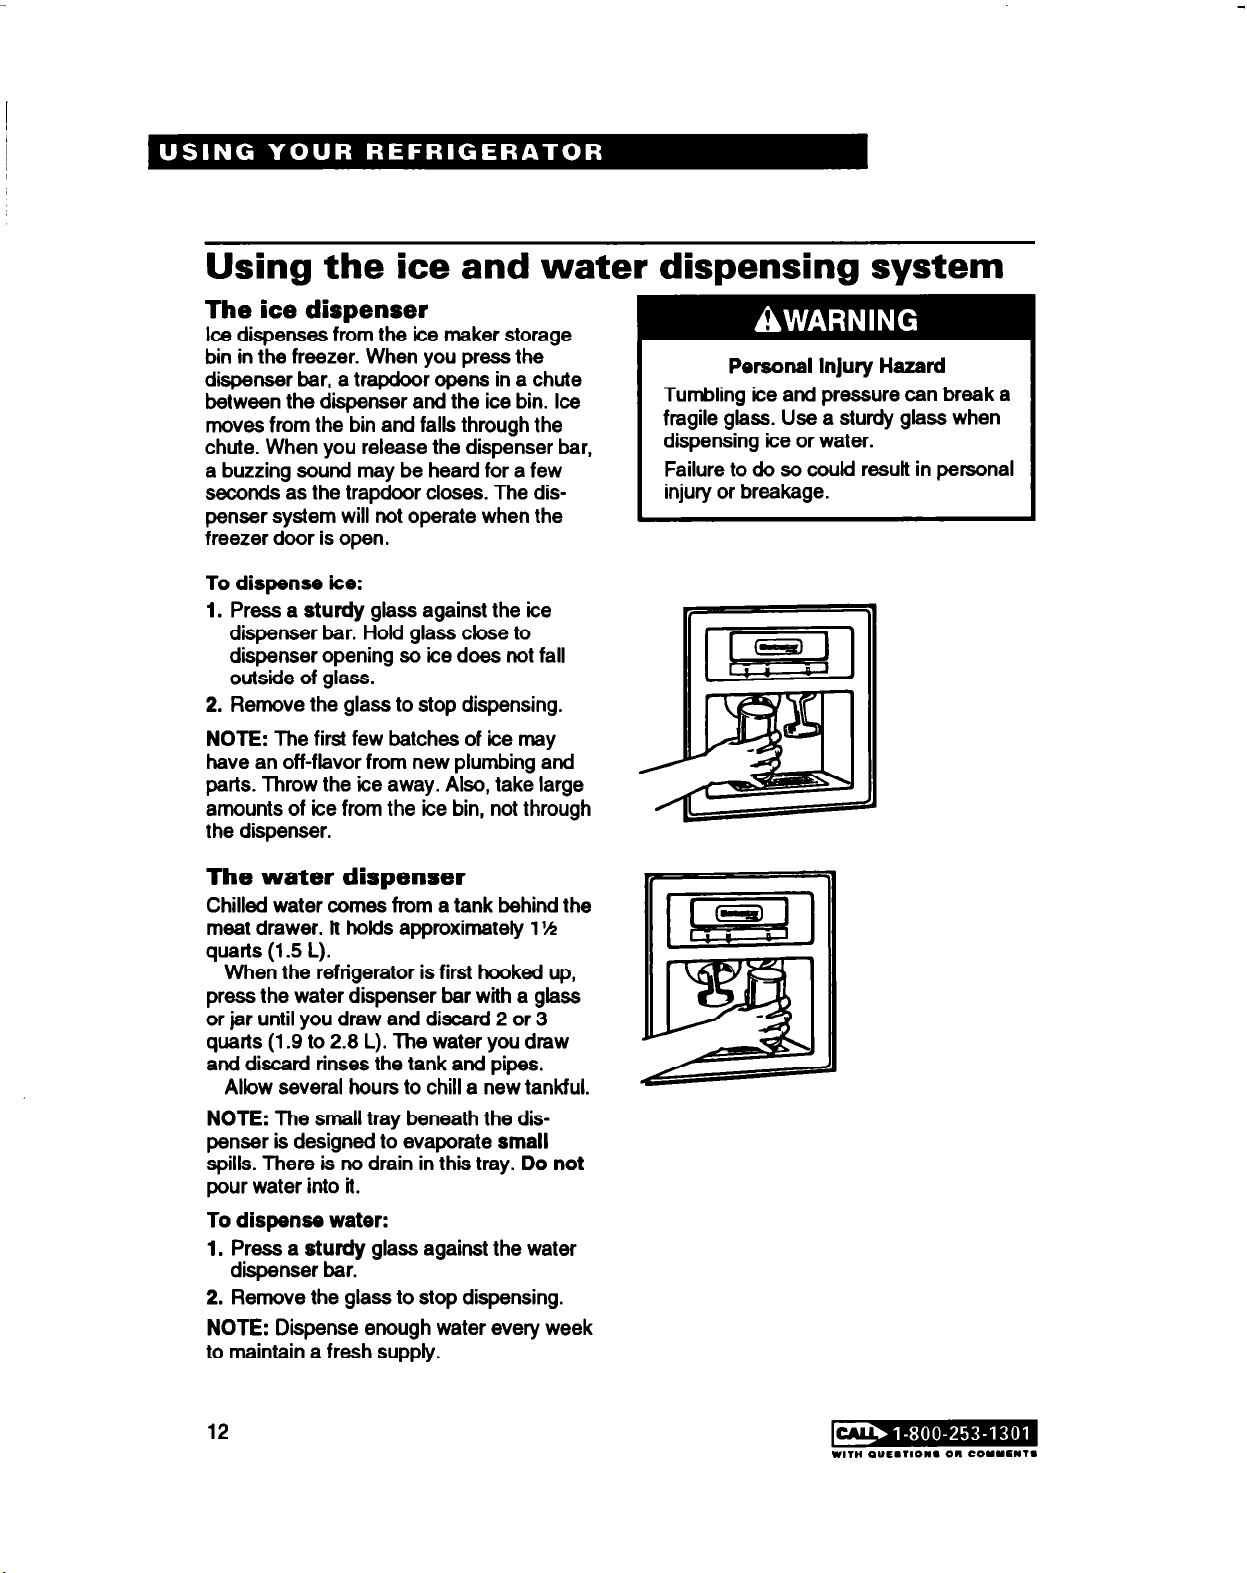
To dispense ice:
1.
Press a sturdy glass against the ice
dispenser bar. Hold glass close to
dispenser opening so ice does not fall
outside of glass.
2. Remove the glass to stop dispensing.
NOTE: The first few batches of ice may
have an off-flavor from new plumbing and
parts. Throw the ice away. Also, take large
amounts of ice from the ice bin, not through
the dispenser.
Tumbling ice and pressure can break
fragile glass. Use a sturdy glass when
dispensing ice or water.
Failure to do so could resuft in personal
injury or breakage.
Personal Injury Hazard
a
The water dispenser
Chilled water comes from a tank behind the
meat drawer. lt holds approximately 1%
quarts (1.5 L).
When the refrigerator is first hooked up,
press the water dispenser bar with a glass
or jar until you draw and discard 2 or 3
quarts (1.9 to 2.8 L). The water you draw
and discard rinses the tank and pipes.
Allow several hours to chill a new tankful.
NOTE: The
penser is designed to evaporate
spills. There is no drain in this tray.
pour water into it.
To dispense water:
1.
Press a sturdy glass against the water
dispenser bar.
2. Remove the glass to stop dispensing.
NOTE:
to maintain a fresh supply.
12
small tray beneath the dis-
small
Do not
Dispense enough water every week
l,,N QUESTIONS 011 COYYENTS
Using the automatic ice maker
Here are a few things you will want to know
about
your automatic ice maker:
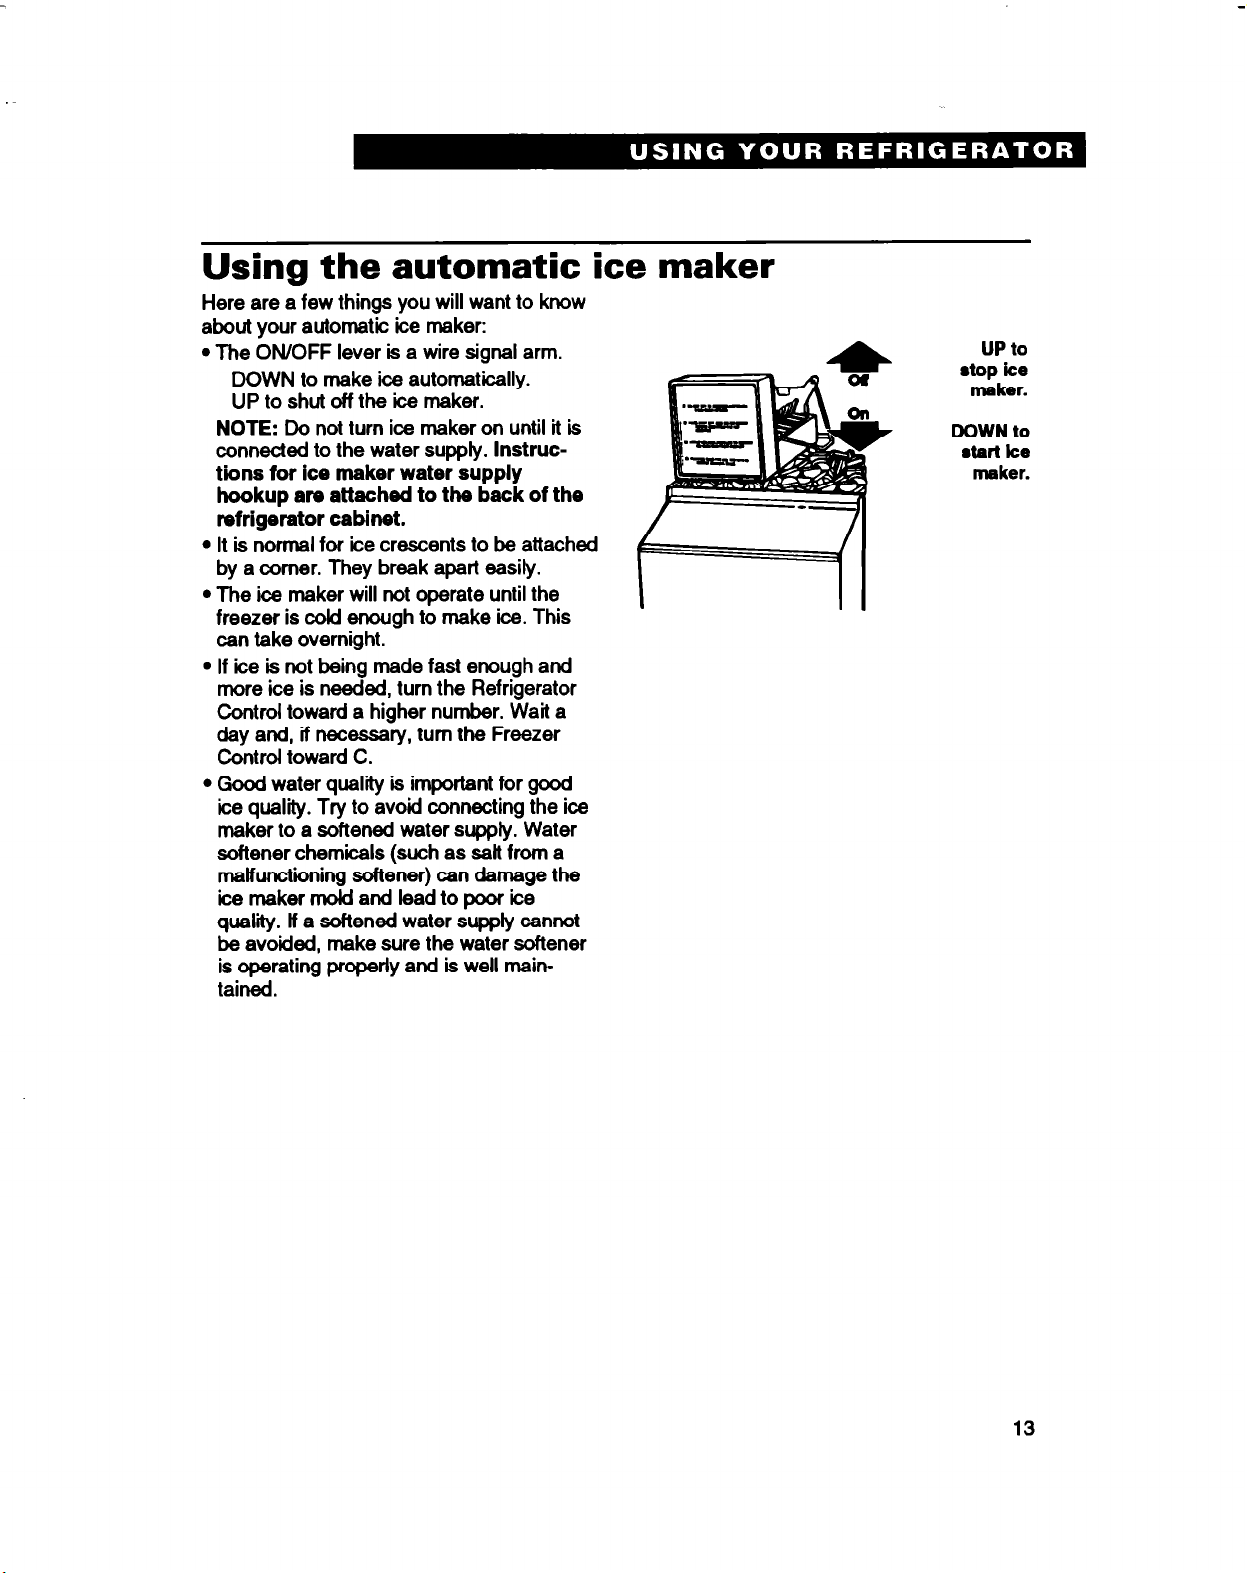
l
The ON/OFF lever is a wire signal arm.
DOWN to make ice automatically.
UP to shut off the ice maker.
NOTE:
connected to the water
tions for ice maker water supply
hookup am attached to the back of the
refrigerator cabinet.
l
It is normal for ice crescents to be attached
by a comer. They break apart easily.
l
The ice maker will not operate until the
freezer is cold enough to make ice. This
can take overnight.
l
If ice is not being made fast enough and
more ice is needed, turn the Refrigerator
Control toward a higher number. Wait a
day and, if necessary, turn the Freezer
Control toward C.
l
Good water quality is important for good
ice quality. Try to avoid connecting the ice
maker to a softened water supply. Water
softener chemicals (such
malfunctioning softener) can damage the
icemakermoldandleadtopcxrice
quality. lf a softened water supply cannot
be avoided, make sure the water softener
is operating properly and is well maintained.
Do not turn ice maker on until it is
supply. Instruc-
as salt from a
UP to
atop ke
maker.
r
DOWN to
atart ke
mker.
13
Solving common ice maker/dispenser problems
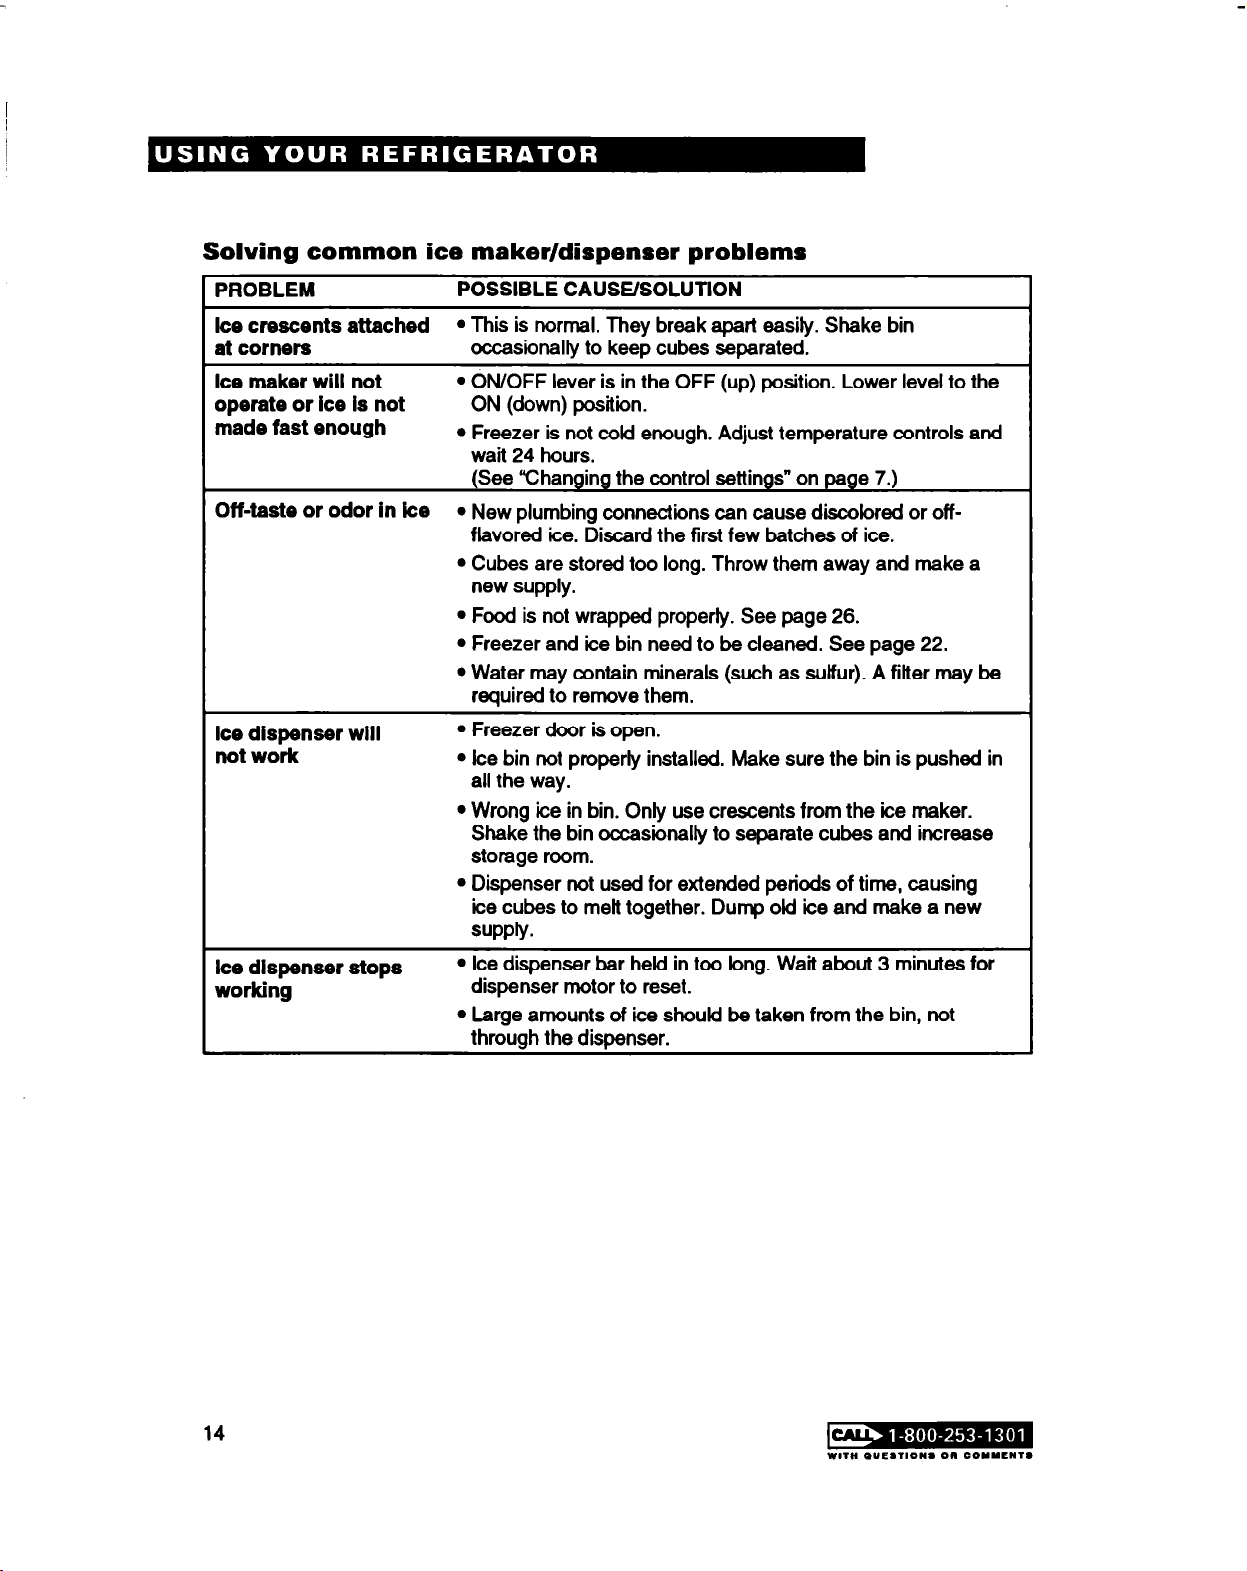
PROBLEM
Ice crescents attached
at corners
Ice maker will not
operate or Ice Is not
made fast enough
Off-taste or odor In ke
Ice dispenser will
not
work
Ice dispenser stops
working
POSSIBLE CAUSE/SOLUTION
l
This is normal. They break apart easily. Shake bin
occasionally to keep cubes separated.
l
ON/OFF lever is in the OFF (up) position. Lower level to the
ON (down) position.
l
Freezer is not cold enough. Adjust temperature controls
wait 24 hours.
(See “Changing the control settings” on page 7.)
l
New plumbing connections can cause discolored or off flavored ice. Discard the first few batches of ice.
l
Cubes are stored too long. Throw them away and make a
new supply.
l
Food is not wrapped properly. See page 26.
l
Freezer and ice bin need to be cleaned. See page 22.
l
Water may contain minerals (such as sulfur). A filter may be
required to remove them.
l
Freezer door is open.
l
Ice bin not properly installed. Make sure the bin is pushed in
all the way.
l
Wrong ice in bin. Only use crescents from the ice maker.
Shake the bin occasionally to separate cubes and increase
storage room.
l
Dispenser not used for extended periods of time, causing
ice cubes to melt together. Dump old ice
supply.
l
Ice dispenser bar held in too long. Wait about 3 minutes for
dispenser motor to reset.
l
Large amounts of ice should be taken from the bin, not
through the dispenser.
and
make a new
and
14
WITH PUEIIIONS 011 COYYENTI

Removing the ice maker storage bin
Remove, empty, and clean the storage bin if:
l
the ice dispenser has not, or will not, be
used for a week or more.
l
a power failure causes ice in the bin to
melt and freeze together.
l
the ice dispenser is not used regularly.
To
remove ice bin:
1. Pull the covering panel out from the
bottom and slide it to the rear.
2. Lii the signal
(up) position. Ice can still be dispensed,
but no more can be made.
3. Lii the front of the storage bin and pull
it out.
4. Empty the ice bin. Use hot or warm water
to rneft the ice if necessary. Never usa
anything sharp
bin. This can damage the bin and dispenser mechanism.
5. Wash
6. When replacing the bin, make sure it is
with mild detergent. Rinse well. Do
not use harsh or abrasive cleaners or
solvents.
pushed in
signal arm
restart ice production.
arm
so it clicks into the OFF
to break up ice in the
all
the way. Then push the
down to the ON position to
15
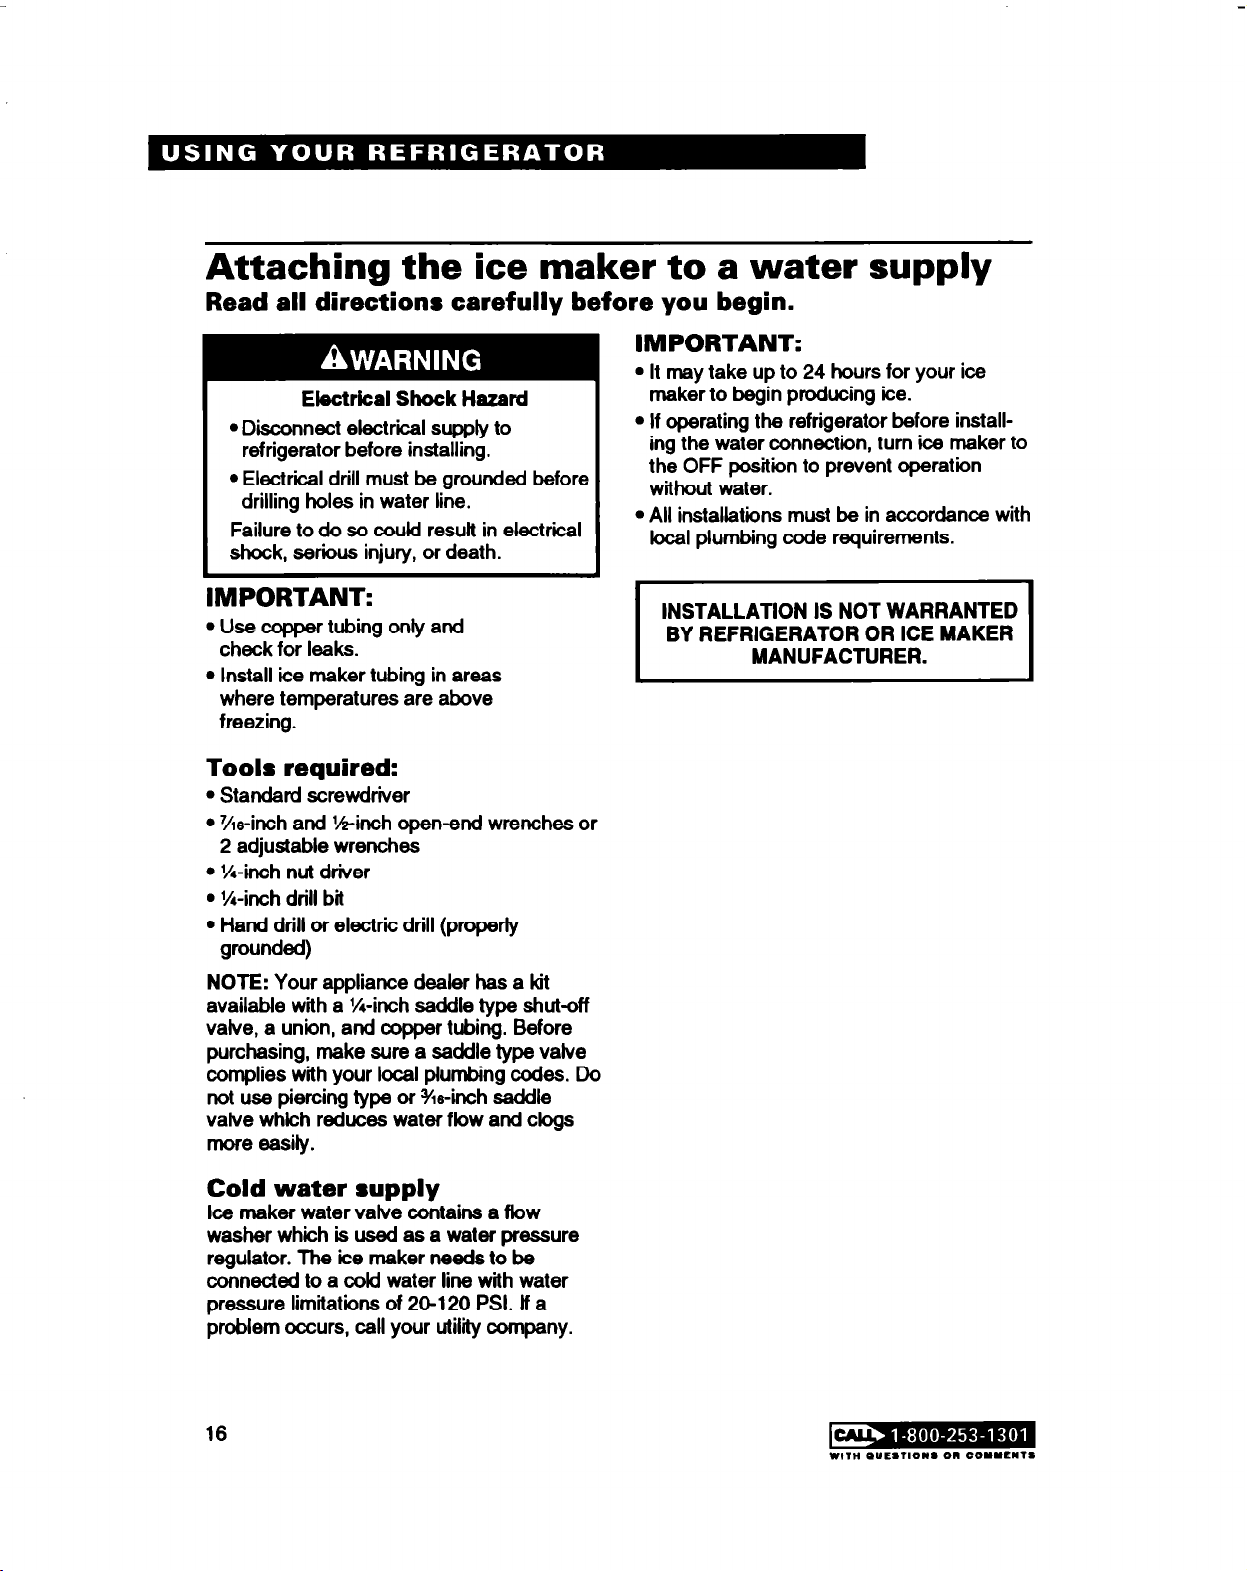
Attaching the ice maker to a water supply
Read all directions carefully before you begin.
IMPORTANT:
l
It may take up to 24 hours for your ice
Electrical Shock Hazard
l
Disconnect electrical supply to
refrigerator before installing.
l
Electrical drill must be grounded before
drilling holes in water line.
Failure to do so could result in electriil
shock, serious injury, or death.
maker to begin producing ice.
l
If operating the refrigerator before installing the water connection, turn ice maker to
the OFF position to prevent operation
without water.
l
All installations must be in accordance with
local plumbing code requirements.
IMPORTANT:
l
Use copper tubing only
and
check for leaks.
l
Install ice maker tubing in areas
where temperatures are above
freezing.
Tools required:
l
Standard screwdriver
l
‘As-inch and X-inch open-end wrenches or
2 adjustable wrenches
l
1/r-inch nut driver
l
X-inch drill bit
l
Hand drill or electric drill (properly
grounded)
NOTE: Your appliance dealer has a kit
available with a X-inch saddle type shutoff
valve, a union, and copper tubing. Before
purchasing, make sure a saddle type valve
complies with your local plumbing codes. Do
not use piercing type or %-inch saddle
valve which reduces water flow and clogs
more easily.
INSTALLATION IS NOT WARRANTED
BY REFRIGERATOR OR ICE MAKER
MANUFACTURER.
Cold water supply
Ice maker water valve
washer
which is used as a
regulator. The ice maker needs to be
connected to a cold water line with water
pressure limitations of 20-120 PSI. If
problem occurs, call your utility company.
16
contains a fiow
water
pressure
a
W,,”
~UESlIONS 011 COYIEMTS

Connecting to water line
1.
Find a %-inch to 1 %-inch vertical COLD
water pipe near the refrigerator.
NOTE: Horizontal pipe will work, but
the following precaution must be taken:
Drill on the top side of the pipe, not
the bottom. This will help keep water
away from the drill. This also keeps nor-
mal sediment from collecting in the valve.
2.
Measure from connection on rear of refrig-
erator to water pipe. Add 7 feet (2.1 m) to
allow for moving refrigerator for cleaning.
This is the length of N-inch O.D. copper
tubing you will need for the job (length
from connection to water pipe PLUS 7
feet [2.1 ml). Be sure both ends of copper
tubing are cut square.
3.
Turn OFF main water suppfy. Turn ON
nearest faucet long enough to clear line
of water.
4.
Using a grounded drill, drill a X-inch hole
on the cold water pipe you have selected.
5.
Fasten shut-off valve to cold water pipe
with pipe clamp. Be sure outlet end is sol-
idly in the %inch drilled hole in the water
pipe and that washer is under the pipe
clamp. Tighten packing nut. Tighten the
pipe clamp screws carefully and evenly
so washer makes a watertight seal. Do
not overtighten or you may crush the
copper tubing, especially if soft (coiled)
copper tubing is used. Now you are ready
to connect the copper tubing.
6.
Slip compression sleeve and compres-
sion nut on copper tubing as shown in
diagram. Insert end of tubing into outlet
end squarely as far as it will go. Screw
compression nut onto outlet end with adjustable wrench. Do not over tighten. Turn
ON main water supply and flush out tub-
ing until water is clear. Turn OFF shut-off
valve on the water pipe. Coil copper tubing.
Vertical cold
water pipe water pipe
r&e rleeve
Compression nut
Compression nut
TO REFRIGERATOR + TO REFRIGERATOR +
%-Inch O.D.
%-Inch O.D.
copper tubing
copper tubing
inlet
on reer of inlet on reer of
17
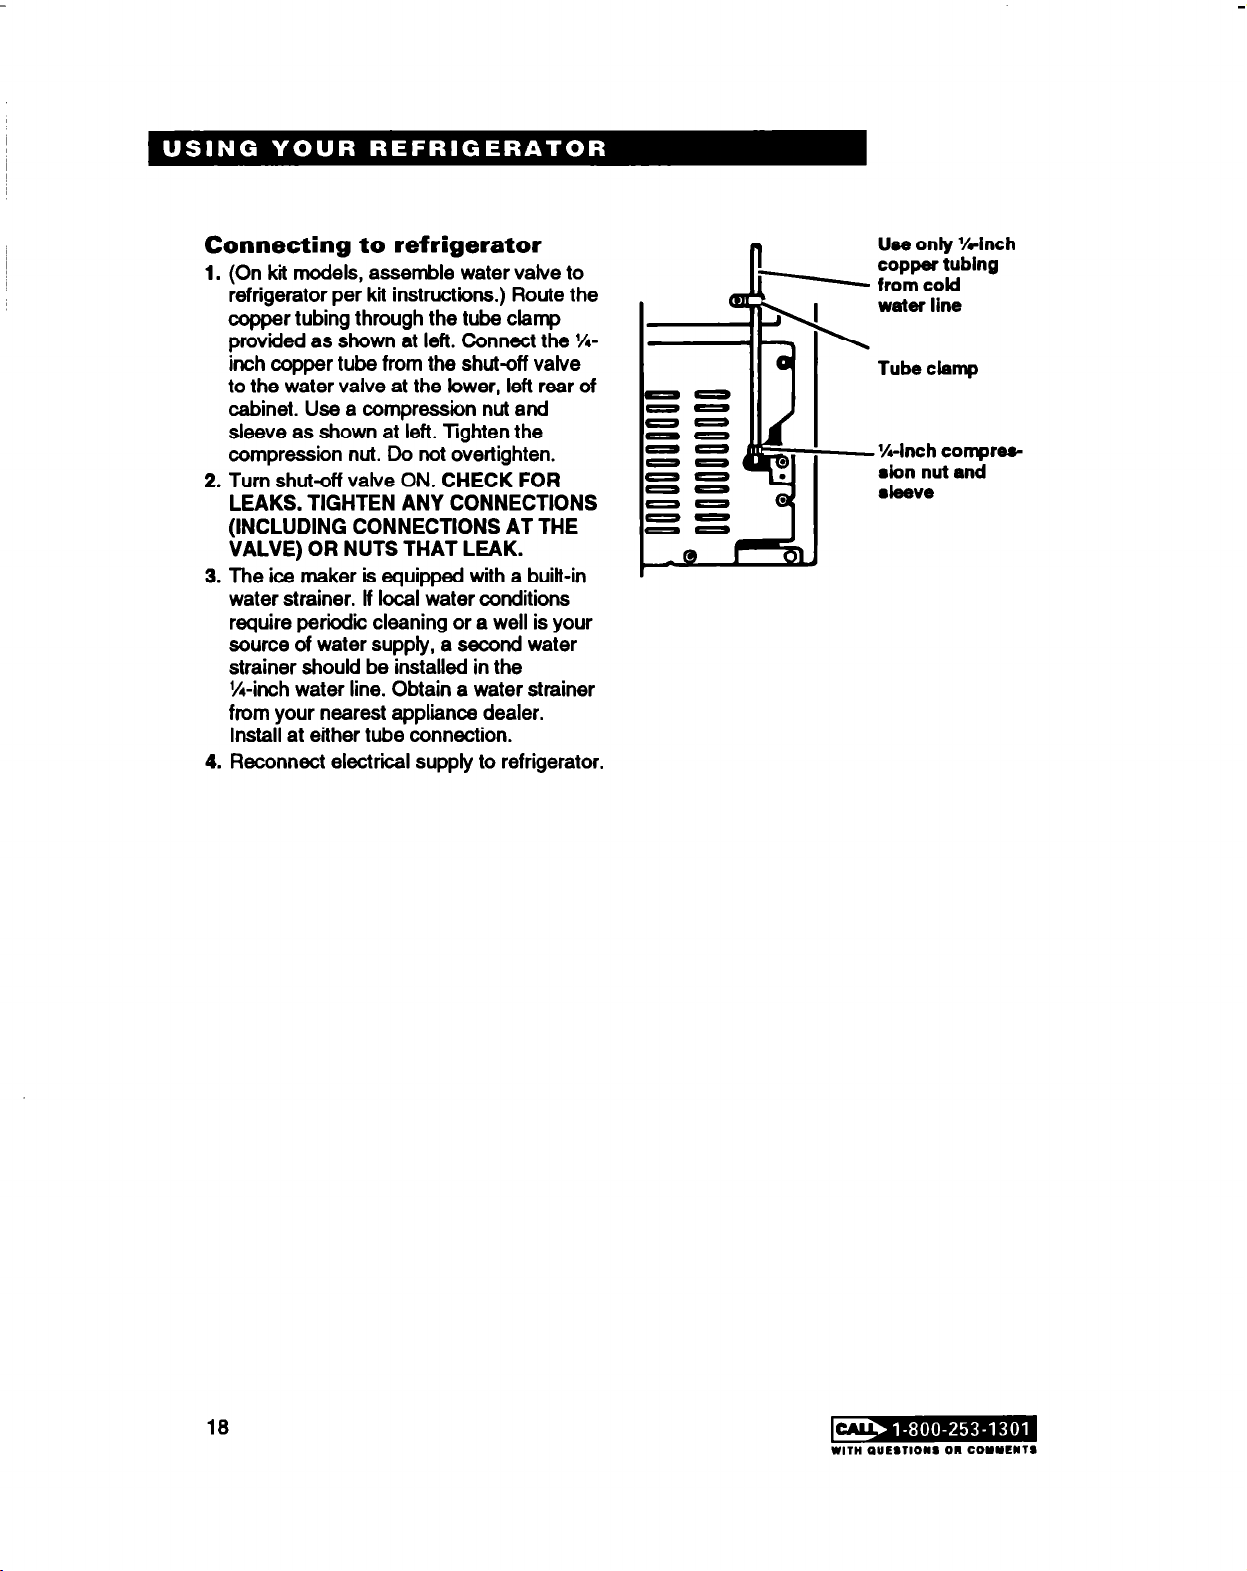
Connecting to refrigerator
1. (On kii models, assemble water valve to
refrigerator per kit instructions.) Route the
copper tubing through the tube clamp
provided as shown at left. Connect the %
inch copper tube from the shut-off valve
to the water valve at the lower, left rear of
cabinet. Use a compression nut and
sleeve as shown at left. Tighten the
compression nut. Do not overtighten.
2. Turn shut-off valve ON. CHECK FOR
LEAKS. TIGHTEN ANY CONNECTIONS
(INCLUDING CONNECTIONS AT THE
VALVE) OR NUTS THAT LEAK.
3. The ice maker is equipped with a built-in
water strainer. If local water conditions
require periodic cleaning or a well is your
source of water suppty, a second water
strainer should be installed in the
%-inch water line. Obtain a water strainer
from your nearest appliance dealer.
Install at either tube connection.
4. Reconnect electriil supply to refrigerator.
Uee only Wnch
copper tublng
from cold
water line
Tube clamp
- %-Inch compreedon nut end
l l88ve
18
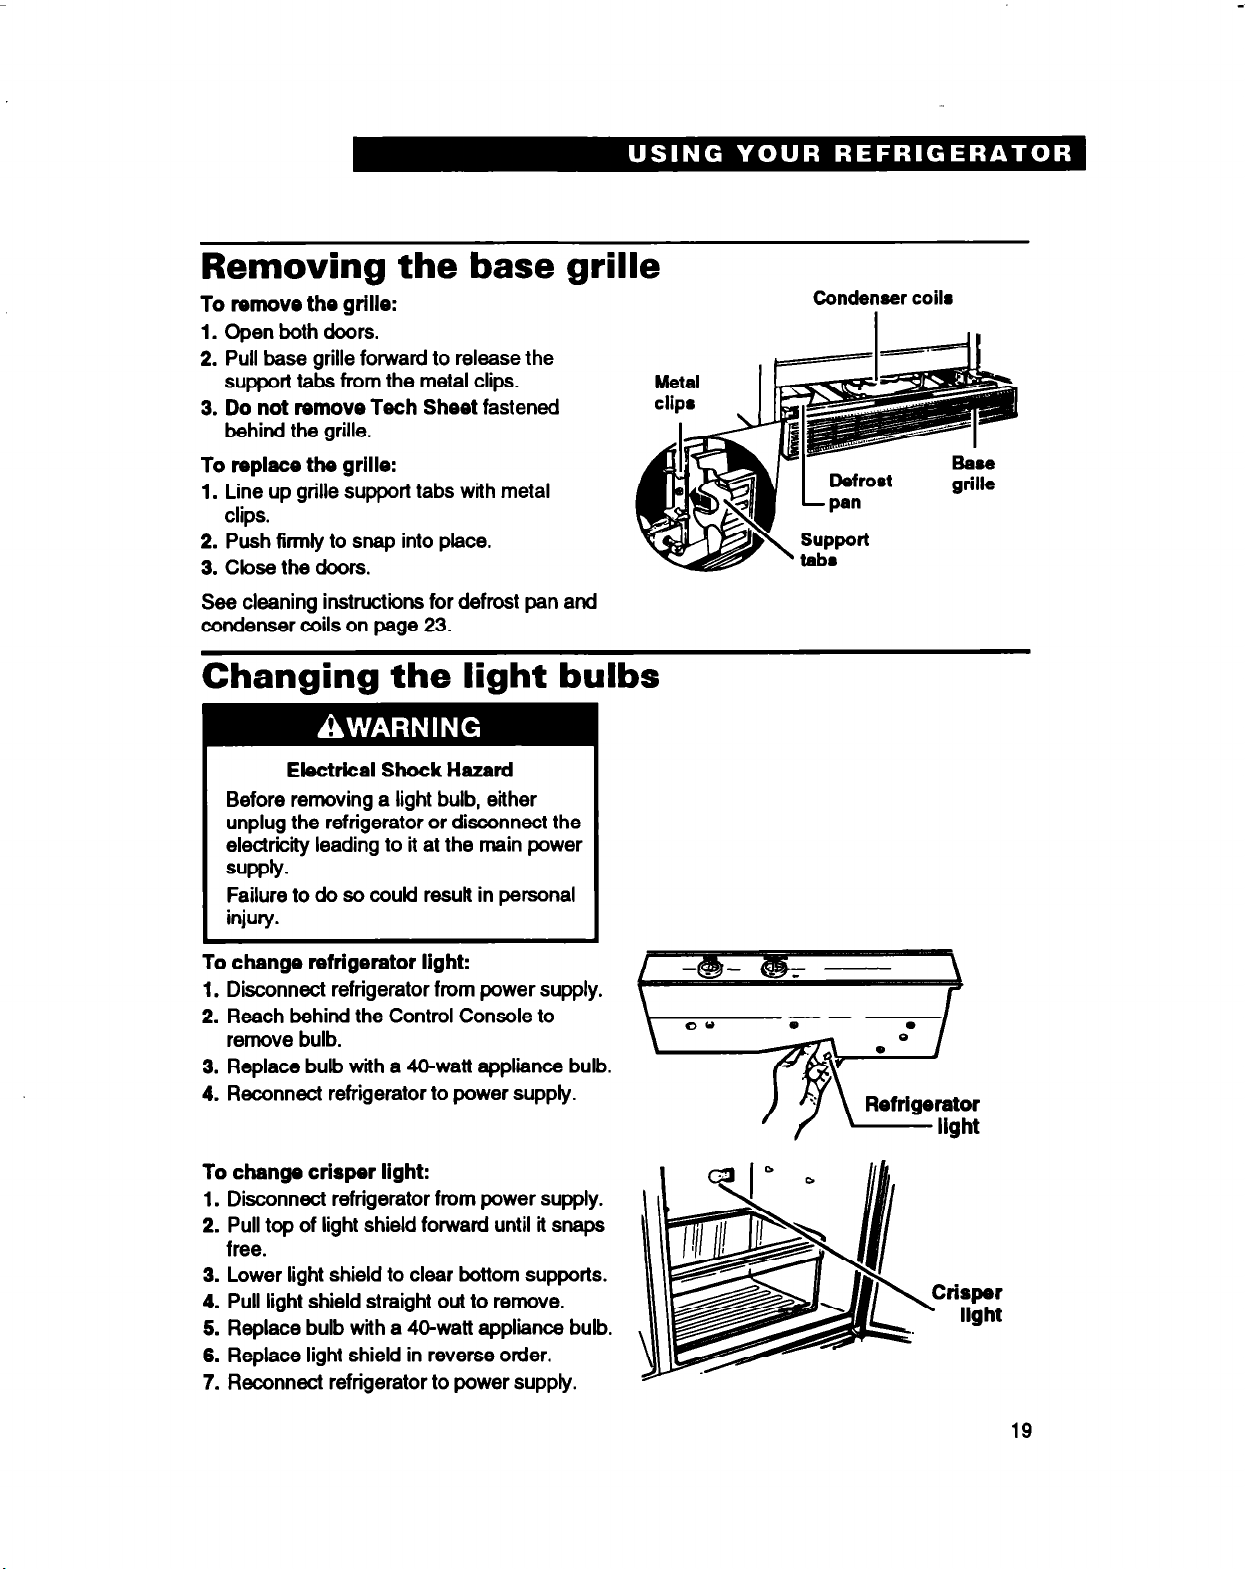
Removing the base grille
To remove the grille:
1. Open
2. Pull base grille forward to release the
3.
both doors.
support tabs from the metal clips.
Do not remove Tech Sheet
behind the grille.
fastened
Condenser coils
To replace the
1.
Line up grille support tabs with metal
clips.
2. Push firmly to snap into place.
3. Close the doors.
See cleaning instructions for defrost pan and
condenser coils on page 23.
grille:
Changing the light bulbs
Electrical Shock Hazard
Before removing a light bulb, either
unplug the refrigerator or disconnect the
electricii leading to it
WPbFailure to do so could result in personal
injury.
To change refrigerator light:
1.
Disconnect refrigerator from power supply.
2. Reach behind the Control Console to
remove bulb.
3. Replace bulb with a U-watt appliance bulb.
4. Reconnect refrigerator to power supply.
at
the main power
m
I
m
) 7 \ Refrige;;
I
To change crisper light:
1.
Disconnect refrigerator from power supply.
2. Pull top of light shield forward until it snaps
free.
3. Lower light shield to clear bottom supports.
4. Pull light shield straight out to remove.
5. Replace bulb with a 4Ckwatt appliance bulb.
6. Replace light shield in reverse order.
7. Reconnect refrigerator to power supply.
risper
light
19
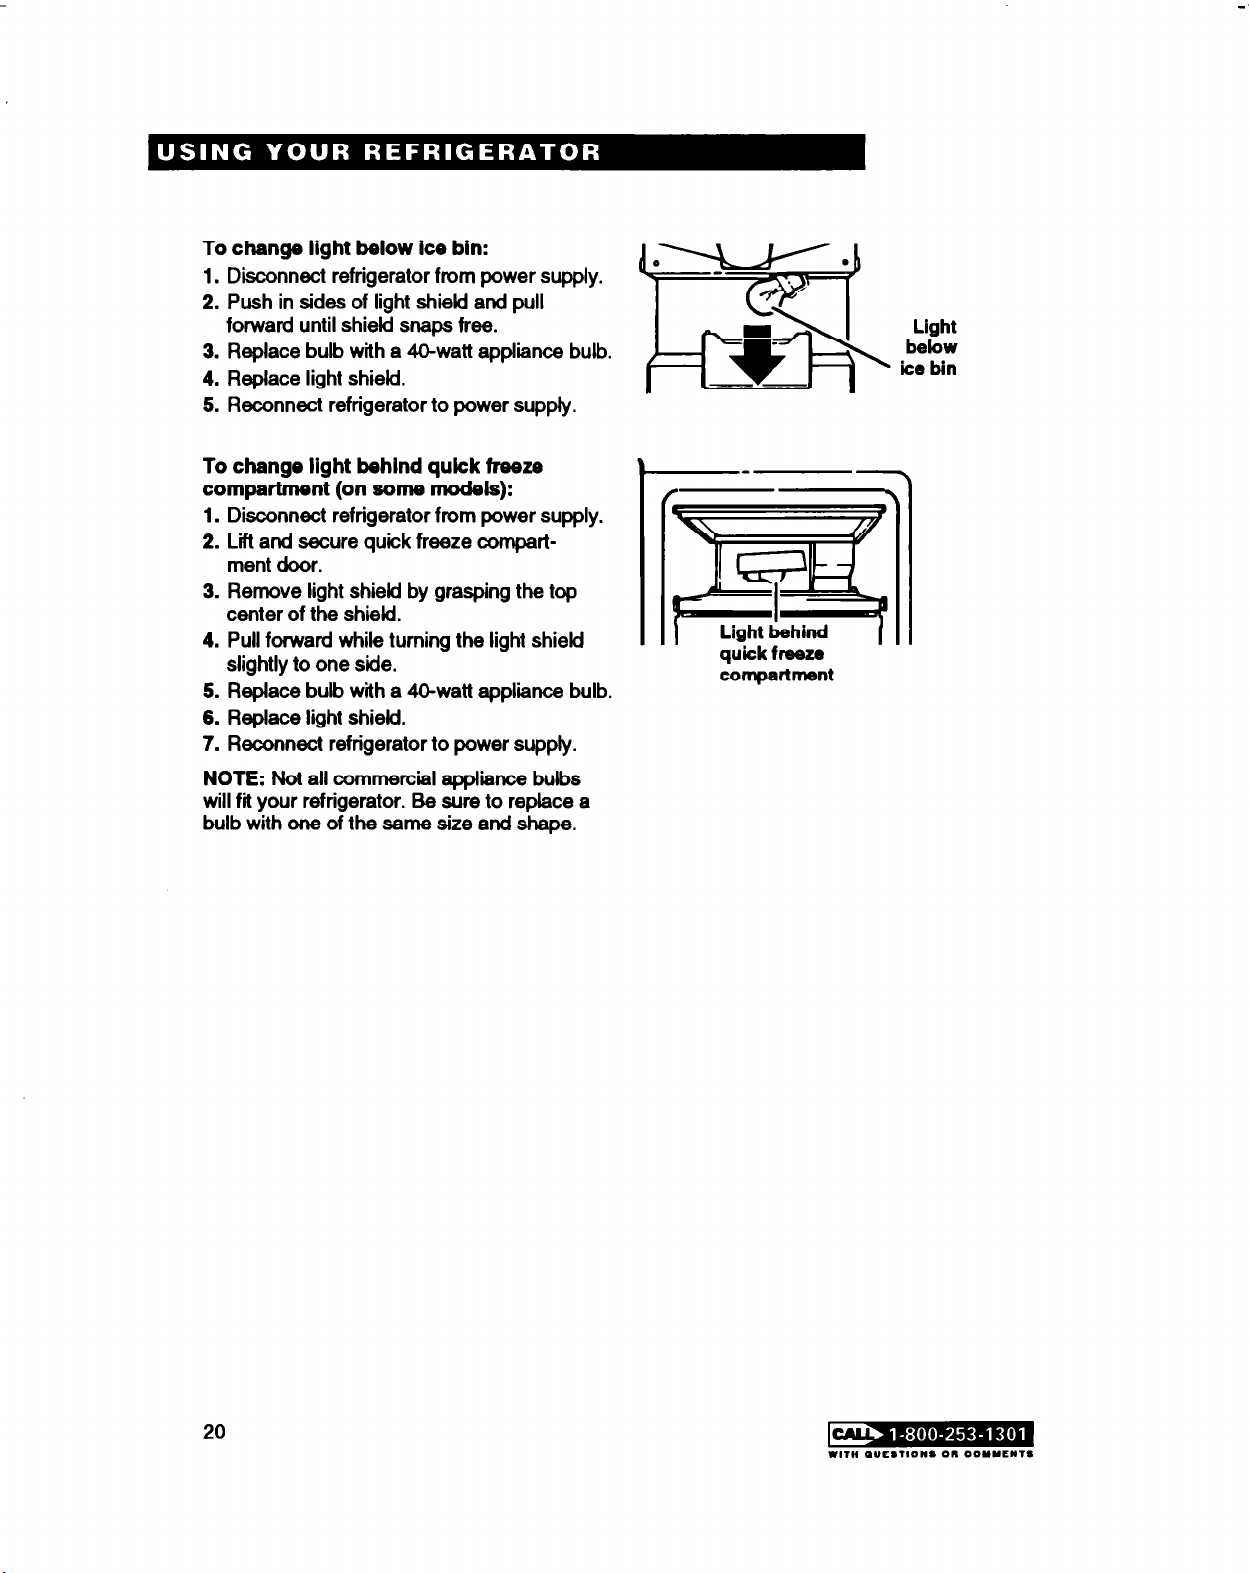
To change light below ice bin:
1.
Disconnect refrigerator from power supply.
2. Push in sides of light shield and pull
forward until shield snaps free.
3. Replace bulb with a 40-watt appliance bulb.
4. Replace light shield.
5. Reconnect refrigerator to power supply.
To change light behind qukk freeze
compartment (on some models):
1.
Disconnect refrigerator from power supply.
2. Lff and secure quick freeze compart-
ment door.
3. Remove light shiekf by grasping the top
center of the shiekf.
4. Pull forward while turning the light shield
slightly to one side.
5.
Replace
6. Replace light shield.
7. Reconnect refrigerator to power suppfy.
bulb with
a &watt
appliance bulb.
Light
below
lee bin
Light Lhind
quick freeze compartment
NOTE:
will fii your refrigerator. Be sure to replace a
bulb with one of the same size and shape.
Not all commercial eppliance bulbs
20
E,,,” PUESlIOIIl 011 COMMENTS
Understanding the sounds you may hear
Your new refrigerator may make sounds that
your OM one didn’t. Because the sounds are
new to you, you might be concerned about
them. Don’t be. Most of the new sounds are
normal. Hard surfaces like the floor, walls,
and cabinets can make the sounds seem
louder. The following describes the kinds of
sounds that might be new to you, and what
may be making them.
Slight hum, soft hiss
You may hear the refrigerator’s fan motor
and moving air.
Clicking or snapping sounds
The thermostat makes a definite click when
the refrigerator stops running. It also makes
a sound when the refrigerator starts. The
defrost timer will click when the defrost
cycle starts.
Water sounds
When the refrigerator stops running, you
may hear gurgling in the tubing for a few
minutes after it stops. You may also hear
defrost water running into the defrost water
pan.
Ice maker sounds
l
trickling water
l
thud (clatter of ice)
You may hear buzzing (from the water
valve), trickling water, and the clatter of ice
dumped into the bin.
Running sounds
Your refrigerator has a high-efficiency
compressor and motor. It will run longer than
older designs. It may even seem to run most
of the time.
Saving energy
You can help your refrigerator use less
electricity.
l
Check door gaskets for a tight seal. Level
the cabinet to be sure of a good seal.
l
Clean the condenser coils regularly.
l
Open the door as few times as possible.
Think about what you need before you
open the door. Get everything out at one
time. Keep food organized so you won’t
have to search for what you want. Close
door as soon as food is removed.
l
Go ahead and fill up the refrigerator, but
don’t overcrowd it so air movement is
blocked.
l
It is a waste of electricity to set the refrigerator and freezer to temperatures colder
than they need to be. If ice cream is firm in
the freezer and drinks are as cold as your
family likes them, that’s cold enough.
l
Make sure your refrigerator is not next to a
heat source such as a range, water heater,
furnace, radiator, or in direct sunlight.
Reversing the door swing
The doors on your refrigerator are revers-
ible. If you need to reverse the door swing,
refer to the instruction sheet included with
your refrigerator.
21
Caring for Your Refrigerator
Your refrigerator is buitt to give you many years of dependable service. However, there are a
few things you can do to help extend its product life. This section tells you how to clean your
refrigerator and what to do when going on vacation, moving, or during a power outage.
Cleaning your refrigerator
Roth the refrigerator and freezer
sections defrost automatically.
However, clean both about once
a month to help prevent odors
from buikling up. Wipe up spills
right away.
To clean your refrigerator, unplug it, take
out all removable parts, and clean the
refrigerator according to the following
directions.
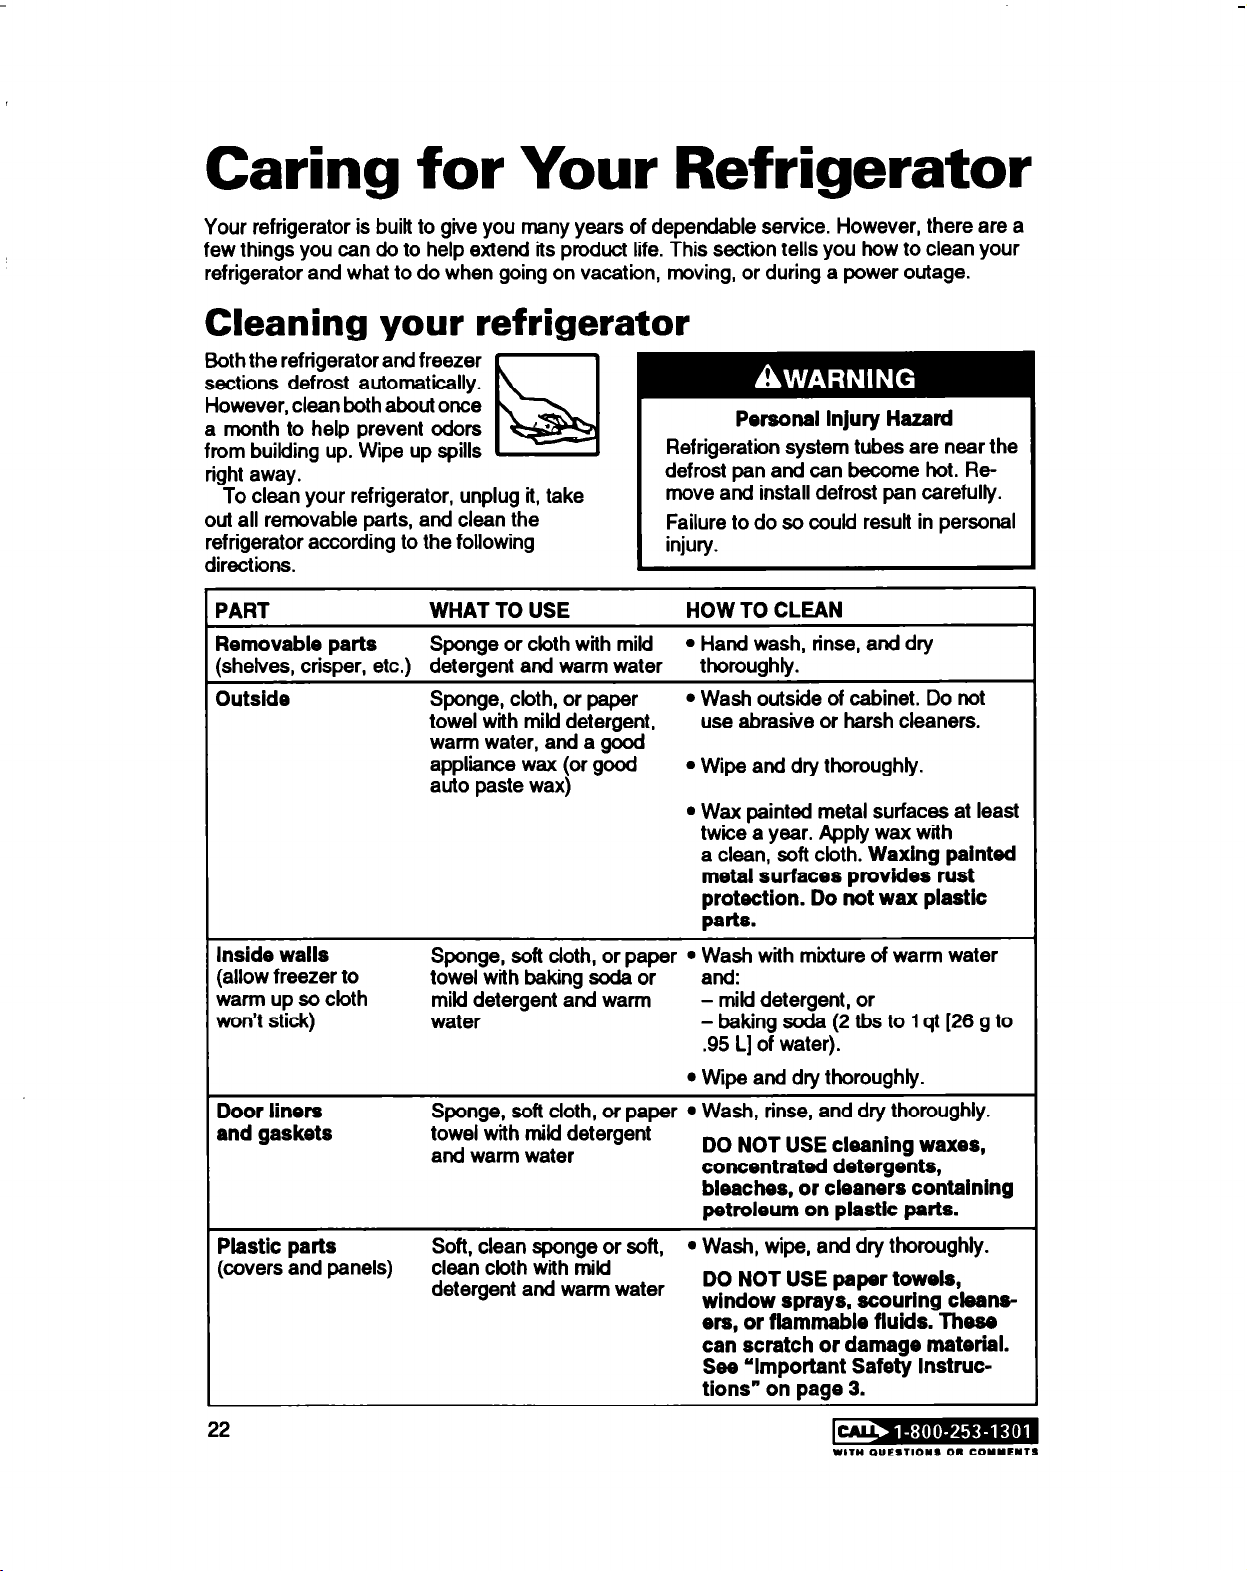
Refrigeration system tubes are near the
defrost pan and can become hot. Remove and install defrost pan carefully.
Failure to do so could result in personal
injury.
Personal Injury Hazard
=ART
Removable parts
shelves, crisper, etc.) detergent and warm water
Dutside
Inside wails
(allow freezer to
warm up so cloth
won’t stick)
Door liners
mnd gaskets
WHAT TO USE
Sponge or cloth with mild
Sponge, cloth, or paper
towel with mild detergent,
warm water, and a good
appliance wax (or good
auto paste wax)
Sponge, soft cloth, or paper l Wash with mixture of warm water
towel with baking soda or
mild detergent and warm - mild detergent, or
water
Sponge, soft cloth, or paper l Wash, rinse, and dry thoroughly.
towel with mild detergent
and warm water
HOW TO CLEAN
l
Hand wash, rinse, and dry
thoroughly.
l
Wash outside of cabinet. Do not
use abrasive or harsh cleaners.
l
Wipe and dry thoroughly.
l
Wax painted metal surfaces at least
twice a year. Apply wax with
a clean,
soft
cloth.
Waxing painted
metal surfaces provides rust
protection. Do not wax plastic
parts.
and:
- baking soda (2 tbs to 1 qt [26 g to
.95 L] of water).
l
Wipe and dry thoroughly.
DO NOT USE cleaning waxes,
concentrated detergents,
bleaches, or cleaners containing
petroleum on plastic parts.
Plastic
(covers and panels) clean cloth with mild
22
parts
Soft, clean sponge or soft, l Wash, wipe, and dry thoroughly.
detergent and warm water
DO NOT USE paper towels,
window sprays, scouring cieansers, or flammable fluids. These
can scratch or damage material.
See ‘Important Safety Instructions” on page 3.
NIT” OUESTIONS OR COYlENTS

1 PART
Defrost pan
WHAT TO USE
Sponge or cloth with mild
detergent and warm water
Collch8er
coils
Vacuum cleaner with
extended narrow
attachment
Vacation and moving care
Short vacations
No need to shut off the refrigerator if you will
be away for less than four weeks.
1. Use up any perishables.
2. Freeze other items.
3. If your refrigerator has an automatic ice
maker:
l
Raise signal arm to OFF (up) position.
l
Shut off water supply to the ice maker.
HOW TO CLEAN
l
Remove base grille. (See page 19.)
l
Reach into small opening at right
edge and remove the defrost pan.
l
Wash, rinse, and dry thoroughly.
l
Replace defrost pan. Make sure to
push it completely into the opening.
l
Replace base grille.
l
Remove base grille.
l
Vacuum coils when dusty or dirty.
Coils may need to be cleaned as
often as every other month.
l
Replace base grille.
Long vacations
If you will be gone a month or more:
1.
Remove all food from the refrigerator.
2. If your refrigerator has an automatic ice
maker:
l
Turn off the water suppfy to the ice
maker at least one day ahead of time.
l
When the last load of ice drops, turn off
the ice maker. Make sure all ice is dispensed out of the ice maker mechanism.
3. Unplug the refrigerator.
4. Clean it, wipe, and dry well.
5. Tape rubber or wood blocks to the tops of
both doors to prop them open far enough
for air to get in. This stops odor and mold
from building up.
23

Personal Injury Hazard
Do not allow children to climb on, play
near, or climb inside the refrigerator
when the doors are blocked open.
They may become injured or trapped.
To restart refrigerator, see page 7.
Moving
When you are moving the refrigerator to a
new home:
1.
If your refrigerator has an automatic ice
maker:
l
Turn off the water supply to the ice
maker at least one day ahead of time.
l
Disconnect the water line.
l
After the last load of ice drops, lift the
signal arm to the OFF (up) position.
2. Remove all food from the refrigerator.
3. Pack all frozen food in dry ice.
4. Unplug the refrigerator.
5. Clean it thoroughly. Wipe well and dry.
6. Take out all removable parts, wrap them
well, and tape them together so they don’t
shift and rattle.
7. Screw in the leveling rollers.
6. Tape the doors shut and tape the power
supply cord to the cabinet.
When you get to your new home, put
everything back and refer to page 5. Also, if
your refrigerator has an automatic ice
maker, remember to reconnect the water
supply line.
Power interruptions
If electricii goes off, call the power com-
pany. Ask how long power will be off.
1.
If service will be interrupted 24 hours or
less,
keep both doors closed.
helps foods stay frozen.
2. If service will be interrupted longer than
24 hours:
(a) Remove all frozen food and store in a
frozen food locker.
OR
(b) Place 2 Ibs. (900 g) of dry ice in
freezer for every cubic foot (liter) of
freezer space. This will keep food
frozen for 2 to 4 days. Wear gloves to
protect your hands from dry ice bums.
OR
(c) If neither a food locker or dry ice is
available, use or can perishable food
at once.
This
3. A full freezer stays cold longer than a
partly filled one. A freezer full of meat
stays cold longer than a freezer full of
baked goods. If food contains ice crystals,
it may be safety refrozen, although the
quality and flavor may be affected. If the
condition of the food is poor, or if you feel
it is unsafe, dispose of ft.
Questions?
Call our Consumer Assistance Center
telephone number from anywhere in the
U.S.A., 1-600-253-1301.
24
“IT”
QUESTIONS 011 COllENTS
Food Storage Guide
There is a correct way to package and store refrigerated or frozen food. To keep food fresher,
longer, take the time to study these recommended steps.
Storing fresh food
Wrap or store food in the refrigerator in
airtight and moisture-proof material. This
prevents food odor and taste transfer
throughout the refrigerator. For dated
products, check code date to ensure
freshness.
Leafy vegetables
Remove store wrapping and trim or tear off
bruised and discolored areas. Wash in cold
water and drain. Place in plastic bag or
plastic container and store in crisper.
Vegetables with skins
(carrots, peppers)
Store in crisper, plastic bags, or plastic
container.
Fruit
Wash, let dry, and store in refrigerator in
plastic bags or crisper. Do not wash or hull
berries until they are ready to use. Sort and
keep berries in original container in a
crisper, or store in a loosely closed paper
bag on a refrigerator shelf.
Butter or margarine
Keep opened butter in covered dish or
closed compartment. When storing an
extra supply, wrap in freezer packaging
and freeze.
Cheese
Store in the original wrapping until you are
ready to use it. Once opened, rewrap tightly
in plastic wrap or aluminum foil.
Leftovers
Cover leftovers with plastic wrap or alumi-
num foil. Plastic containers with tight lids can
also be used.
Meat
Store most meat in original wrapping
as it is airtight and moisture-proof. Rewrap if
necessary. See the following for storage
times. When storing meat longer than the
times given, freeze the meat.
Chicken . . . . . . . . . . . . . . . . . . . . . . . . . . . . . . . . . . . . . . . . . .
Bacon . . . . . . . . . . . . . . . . . . . . . . . . . . . . . . . . . . . . . . . . . . . . . . 5-7
as
long
1-2 days
days
Eggs
Store without washing in original carton on
interior shelf. On some models, an egg
storage container is provided for your
convenience.
Milk
Wipe milk cartons. For best storage, place
milk on interior shelf.
Ground beef . . . . . . . . . . . . . . . . . . . . . . . . . . . . . . . . . . .
Cold cuts . . . . . . . . . . . . . . . . . . . . . . . . . . . . . . . . . . . . . . . .
Steakslroasts . . . . . . . . . . . . . . . . . . . . . . . . . . . . . . . . . .
Variety meats
Cured meats . . . . . . . . . . . . . . . . . . . . . . . . . . . . . . . . .
NOTE:
day as purchased.
Use fresh fish and shellfish the same
. . . . . . . . . . . . . . . . . . . . . . . . . . . . . . . . . l-2 days
1-2 days
3-5 days
35 days
7-10 days
25

Storing frozen food
The freezer section is designed for storage
of commercially frozen food and for freezing
food at home.
NOTE:
ing food for freezing or food storage times,
check a freezer guide or reliable cookbook.
Packaging
The secret of successful freezing is in the
packaging. The way you close and seal the
package must not allow air or moisture in or
out. Packaging done in any other way could
cause food odor and taste transfer throughout the refrigerator and drying of frozen
food.
Packaging recommended for use:
l
l
l
l
l
Follow package or container instructions for
proper freezing methods.
For further information about prepar-
Rigid plastic containers with tight-fitting lids
Straight-sided canning/freezing jars
Heavy-duty aluminum foil
Plastic-coated paper
Non-permeable plastic wraps (made from
Saran film)
Do not use:
l
Bread wrappers
l
Non-polyethylene plastic containers
l
Containers without tight lids
l
Wax paper
l
Wax-coated freezer wrap
l
Thin, semi-permeable wrap
The use of these wrappings could cause
food odor, taste transfer, and drying of
frozen food.
Freezing
Do not expect your freezer to quick-freeze
any large quantity of food. Put no more
unfrozen food into the freezer than will
freeze within 24 hours (no more than 2-8
Ibs. of food per cubic foot [900-l ,850 g per
liter] of freezer space). Leave enough space
for air to circulate around packages. Be
careful to leave enough room at the front so
the door can close tightly.
Storage times will vary according to the
quality of the food, the type of packaging or
wrap used (airtight and moisture-proof), and
the storage temperature, which should be
0°F (-17.8%).
26
WITH
OUESTIOYS 011 COYYEN

Troubleshooting
Performance problems often result from little things you can fii without tools. Please read
through “Before calling for assistance . . .”
Before calling for assistance . . .
Listed in this chart are the most common problems consumers mn into with their appliances.
Please read through this and see if it can solve your problem.
below before calling for service on your appliance.
PROBLEM
r
Your refrigerator
will not operate
The lights do
not work
The ke maker
does not work
Unfamiliar sounds
or a rattling/
jingling noise
There is water in
the defrost pan
CHECK THE FOLLOWING
Is the power supply cord firmly plugged into a lie circuit with proper
voltage?
Has a household fuse or circuit breaker blown/tripped?
Is the Refrigerator Control set to the OFF positiin?
Is the power suppfy cord firmly plugged into a live circuit with proper
voltage?
Has a household fuse or circuit breaker bbwtiripped?
Is a bulb burned out?
Is the freezer cokl enough to make ice? It could take overnight for
the freezer to reach the proper temperature.
Is the ON/OFF lever in the ON (down) position? (See page 13.)
Is the water valve turned on?
Does the water line have a clog or leak?
Is something on top of or behind the refrigerator3
Some new sounds are normal. See ‘Understanding the sounds you
may hear” on page 21.
This is normal on hot, muggy days. Make sure the refrigerator is
level so the pan does not overflow.
The motor seems
to run too much
Are the condenser coils dirty?
Has the door been opened often? Has a large amount of food been
added
happen.
Is the room hot? lf the room is too warm, the motor runs longer to
keep the unit cool.
at one time? ihe motor naturally runs longer if these things
27

Requesting Assistance or
Service
Before calling for assistance or service, please check “Troubleshooting” on page
save you the cost of a service call. If you still need help, follow the instructions below.
27. If may
For assistance or service in the USA.:
1. If you need assistance* . . .
Call Whirlpool Consumer Assistance Center telephone
number. Dial toll-free from any-
where in the U.S.A.:
l-50&2581301
and talk with one of our trained consultants.
The consultant can instruct you in how to
obtain satisfactory operation from your appliance or, if service is necessary, recommend a
qualified service company in your area.
If you prefer, write to:
Mr. William Clark
Consumer Assistance Representative
Whirlpool Corporation
2000
North M-66
Benton Harbor, Ml 49022-2692
Please include a daytime phone number in
your correspondence.
w
L!a
2. If you need service* . . .
Whirlpool has a nationwide net- 1-1
work. of authorized Whirlpool
service companies. Whirlpool sERm
service technicians are trained
tofulfillthe product warranty and
provide after-warranty service, anywhere in
the United States. To locate the authorized
Whirlpool service company in your area, call
our Consumer Assistance Center telephone
number (see Step 1) or took in your telephone
directory Yellow Pages under:
l
APPiJANCGHOUSEHOLB
MAJOR, SERVICE L REPUR SERVICE L REPAIR
-s8aWHdpdApQEwwosa
Aulldmd WhIrlpod Smvka
(Gmpb~mswvklco.) (-xX! suvka co.)
. REFRIQERATORS L FMEZEW,
-SHWlMpDdAp+llMM~
AIUlorlZd whkpool swvkl
I!3
3. If you need FSP replacement parts . . .
FSP is a registered trademark of Whirlpool
Corporation for quality parts. Look for this
symbol of quality whenever you need
replacement part for your Whirlpool@ appliance. FSP replacement parts will fii right
and work right, because they are made to
the same exacting specifiitions used to
build every new Whirlpool appliance.
To locate FSP replacement parts in your
area, refer to Step 2 or call the Whirlpool
Consumer Assistance Center number in
Step 1.
4. If you are not satisfied with
how the problem was
solved . . .
l
Contact the Major Appliance Consumer
Action Program (MACAP). MACAP is a
group of independent consumer experts
that voices consumer views at the highest
levels of the major appliance industry.
l
Contact MACAP only when the dealer,
authorized servicer, and Whirlpool have
failed to resolve your problem.
Major Appliance Consumer
Action Program
20 North Wacker Drive
Chicago, IL 60606
l
MACAP will in turn inform us of your
action.
a
*When asking for help or service:
Please provide a detailed description of the problem, your appliance’s complete model and
serial numbers, and the purchase date. (See page 2.) This inforrr&ion will help us respond
property to your request.
28
1,711 ~UESTIOYS OR COYYENTS

ESTATE”
Refrigerator Warranty
(U.S.A. only)
LENGTH OF WARRANTY WHIRLPOOL WILL PAY FOR
FULL ONE-YEAR
WARRANTY
From Date of Purchase
FULL FIVE-Y EAR
WARRANTY
From Date of Purchase
WHIRLPOOL WILL NOT PAY FOR
A.
Service calls to:
1. Correct the installation of your refrigerator.
2. Instruct you how to use your refrigerator.
3. Replace house fuses or correct house wiring or plumbing.
4. Replace light bulbs.
B. Repairs when your refrigerator is used in other than normal, single-family household use.
C. Pickup and delivery. Your refrigerator is designed to be repaired in the home.
D.
Damage to your refrigerator caused by accident, misuse, fire, flood, acts of God, or use
of products not approved by Whirlpool.
E.
Any food loss due to product failure.
F. Repairs to parts or systems caused by unauthorized modifications made to
the appliance.
FSPQ replacement parts and repair labor to correct defects in
materials or workmanship. Service must be provided by an
authorized Whirlpool service company.
FSP replacement parts and repair labor to correct defects in
materials or workmanship in the sealed refrigeration system.
These parts are:
1. Compressor
2. Evaporator
3. Condenser
4. Drier
5. Connecting tubing
Service must be provided by an authorized Whirlpool
service company.
6194
WHIRLPOOL CORPORATION SHALL NOT BE LIABLE FOR INCIDENTAL OR CONSEQUENTIAL DAMAGES. Some states do not allow the exclusion or limitation of incidental or
consequential damages, so this limitation or exclusion may not apply to you. This warranty
gives you specific legal rights, and you may also have other rights which vary from state
to state.
Outside the United States, a different warranty may apply. For details, please contact your
authorized Whirlpool distributor or military exchange.
If you need service, first see the “Requesting Assistance or Service” section of this book.
After checking “Requesting Assistance or Service,” additional help can be found by calling
our Consumer As&stance Center telephone number,
the U.S.A.
Tradmurk d WhIrlpool. U.SA
2173445
0 lees whlflpod cupordbn
rnR.SldWdTM
“Tmdomukdl~LMl.d,Cmmda
l-500-253-1301,
from anywhere in
2/95

MANUEL DE US0 Y MANEJO
lndice
(complete) . . . . . . . . . . . . . . . . . . 2
Seguridad del
Ref rigerador . . . . . . . . . . . . . . . . . . 4
Partes y
Caracterlstlcas . . . . . . . . . . . . . . . 5
Antes de Usar su
Ref rigerador . . . . . . . . . . . . . . . . 6-7
Corn0 Usar su
Ref rigerador . . . . . . . . . . . . . . 8-23
Cuidado de su
Ref rigerador . . . . . . . . . . . . 24-26
2173445
Guia para la
Consenracidn de los
Alimentos
. . . . . . . . ..I..... 27-20
Diagndstico de
Problemas . . . . . . . . . . . . . . . . . . . . 29
Pdliza de Garantia . . . . . . . 33
REFRIGERADORES WE NO HACEN ESCARCHA
2ms

lndice
Lo invitarnos a leer este manual de use y manejo antes de utilizar su refrigerador Estate.
muy importante seguir &a information con el objet0 de l-racer un uso seguro y apropiado de
su aparato.
Pdgina
Seguridad del
Partes y
Antes de Usar su
c6mo Usar su
C6mo poner en posici6n
bs conttoles..
C&no carkiir la position de
los conholes..
C&no quitar el anaquel de presion
de la puerta
C&no quitar el anaquel movible de
la puetta
C&no ajustar las parrillas del
refrigerador
C&no quitar el cajdn
latapa
Para ajustar la temperatura del cajon
para tames .........................................
C&-no quitar el cajon para legumbres
y la tapa
C&no quitar el cajon para cornidas
ligeras
C&no quitar el recipiente/la canasta
del congelador
Refrigerador ..................... 4
Caracterlsticas
........................... 5
Refrigerador.. .............. 6
Refrigerador.. ................... 6
........................................ 6
........................................ 9
.........................................
..............................................
.........................................
pare came y
................................................. 11
.............................................. 12
.................................................
.................................... 13
IO
10
11
12
13
C&no ajustar el anaquel del
congelador
C&no usar el distribuidor de agua
helada y hielo
C&no usar el fabricador autom&ico
de hielo optional
Para quitar el recipiente para hielo
Cortexion de la f&brica de hater hielo
al suministro de agua
C&no quitar la rejilla de la base..
C6mo cambiar bs focos
Sonidos provenientes de
su refrigerador..
Ahorro de energfa
C6rno cambiar la abertura de la
puerta ..................................................
Cuidado de su
.......................................... 13
...................................... 14
................................. 15
......................... 16
..................... 21
................................... 23
............................... 23
Refrigerador .................. 24
Guia para Is Conservacidn de 10s
Alirnentos ................................................
Diagndstico de
Poliza de Garantla
Problemas .................... 29
.................................. 33
Es
Pagina
..... 17
........ 21
23
27
IMPORTADO POR:
Vitrornatic Comercial, S.A. de C.V.
Ave. San Nicok 2121 Nte.
Col. lo. de Mayo
Monterrey, N.L. Mexico
Tel. 329-22-00
FABRICADO POR:
Whirlpool Corporation
Benton Harbor, Michigan
U.S.A.
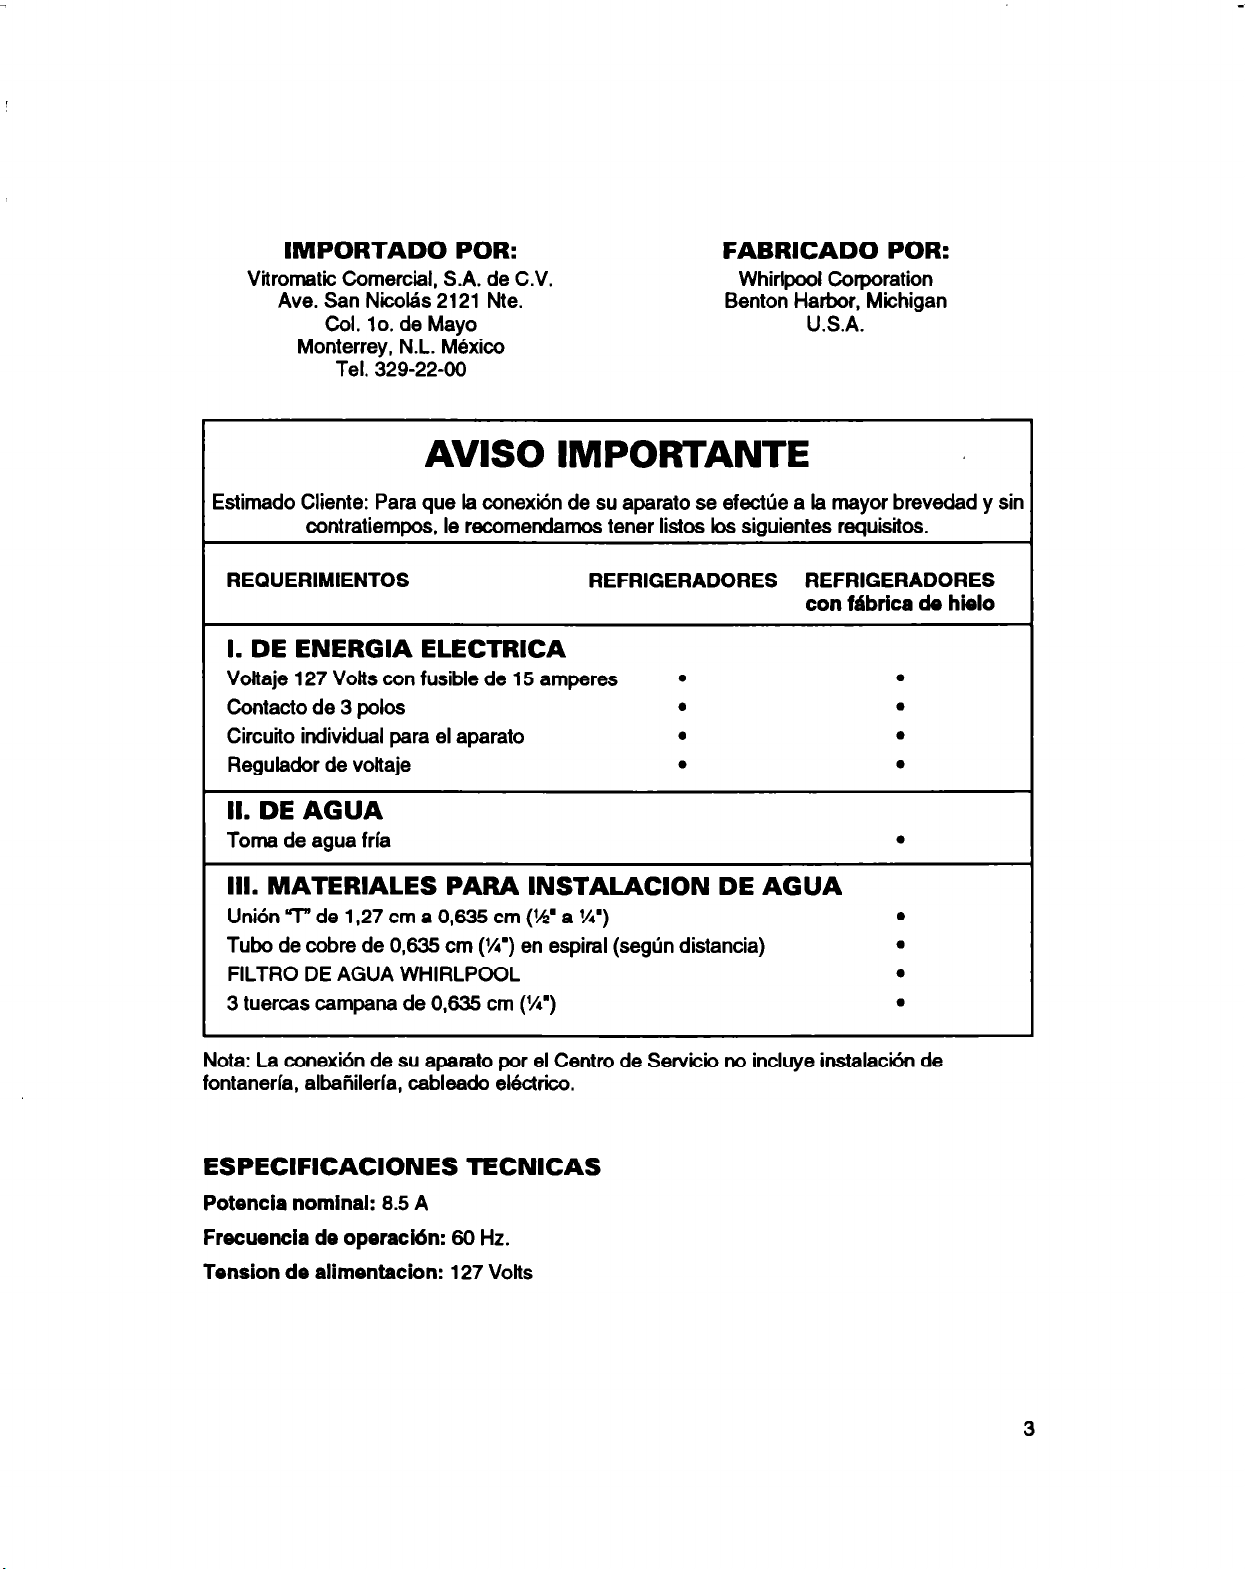
AVIS0 IMPORTANTE 1
Estimado Cliente: Para que la conexk de su aparato se efectue a la mayor brevedad y sin
contratiempos. le recomendamos tener listos los siauientes requisiios.
REQUERIMIENTOS
REFRIGERADORES REFRIGERADORES
con fabrica de hielo
I. DE ENERGIA ELECTRICA
Voltaje 127 Volts con fusible de 15 amperes
Contact0 de 3 polos
Circuit0 individual para el aparato
Regulador de voltaje
l
a
a
. 0
.
.
0
II. DE AGUA
Toma de agua frfa
l
Ill. MATERIALES PARA INSTALACION DE AGUA
Union 17” de 1,27 cm a 0,635 cm (%’ a 1/4’)
Tubo de cobre de 0,635 cm (1/4.) en espiral (segtin distancia)
FILTRO DE AGUA WHIRLPOOL
3 tuercas campana de 0,635 cm (Y?)
Nota: La conexidn de su aparato por el Centro de Servicio no incluye instalacion de
fontanerfa, albafiilerfa, cableado ektrico.
0
.
0
0
ESPECIFICACIONES TECNICAS
Potencia nominal: 8.5
Frecuencia de opera&n: 60
Tension de alimentacion: 127
A
Hz.
Volts
3
Seguridad del Refrigerador
Su seguridad es importante
para nosotros.
Esta guia contiene declaraciones bajo
simbolos de advertencia. Por favor ponga
atencih especial a estos y siga cualquier
instruccih proporcionada. Aqui esta una
explicacih r&ii de el uso de este simbolo.
INSTRUCCIONES IMPO#TANTES DE
SEGURIDAD
Para reducir ei riesgo de incendio, choque
eiectrico o iesidn cuando use su refrigerador,
siga estas precauciones bkicas:
l
Lea tcdas las instrucciones antes de
usar el refrigerador.
l
Los niiios que se asfixian 0 quedan
atrapados dentro de un refrigerador no
son problemas del pasado. Los
refrigeradores que son abandonados 0
deschados ah constituyen un peligro . . .
alin si se “dejan en el garaje por &lo
unos dias.”
Si usted va a descartar su
refrigerador antiguo, Mgalo de manera
segura. Lea el folleto sobre seguriid
que se adjunta publicado por la
Asociacih de Fabriintes de Aparatos
Domhsticos. Ayude a evitar accidentes.
I
- CONSERVE ESTAS INSTRUCCIONES - I
l
Nunca permita que los nihos hagan
funcionar, jueguen 0 se escondan en el
interior del refrigerador.
.Nunca limpie las piezas del refrigerador
con liquidos inflamables. Los vapores
pueden Causar incendios 0 expbsiines.
l
PARA SU SEGURIDAD
NO ALMACENE 0 USE GASOLINA Y
LIQUIDOS INFlAMABLES EN LA
PROXIMIDAD DE ESTE 0 DE
CUALQUIER OTRO ARTEFACTO. EXISTE
EL PELIGRO DE QUE LOS VAPORES
PROVOQUEN UN INCENDIO 0 UNA
EXPLOSION.
l
Aytidenos a ayudarle
Le rogamos seguir las siguientes
recomendaciones:
l
Instale y nivele el refrigerador en una
superficie que pueda soportar su peso y en
un ha que sea adecuada para su tamaho
y uso.
l
No instale el refrigerador cerca de un horno,
radiador u otra fuente de calor.
l
No use el refrigerador en un ha donde la
temperatura ambiente puede ser inferior a
13°c(55"F).
l
Mantenga el refrigerador protegido contra
cambii de clima.
4
l
Conecte el refrigerador solamente al tipo
de tomacorriente adecuado, con la fuente
de energia y debiimente aterrizado.
(Cons&e la hojj de instrucciones sobre
los Requerimientos Ekctrii y
Aterrizado.)
l
No guarde alimentos en el refrigerador
hasta que no est6 completamente frio.
l
Use el refrigerador de acuerdo a las
instrucciones de este manual.
l
Preoctipese del mantenimiento adecuado
del refrigerador.
l
Aseglirese de que el refrigerador no sea
usado por alguna persona que no est6
capacitada para hacerlo en forma debii.
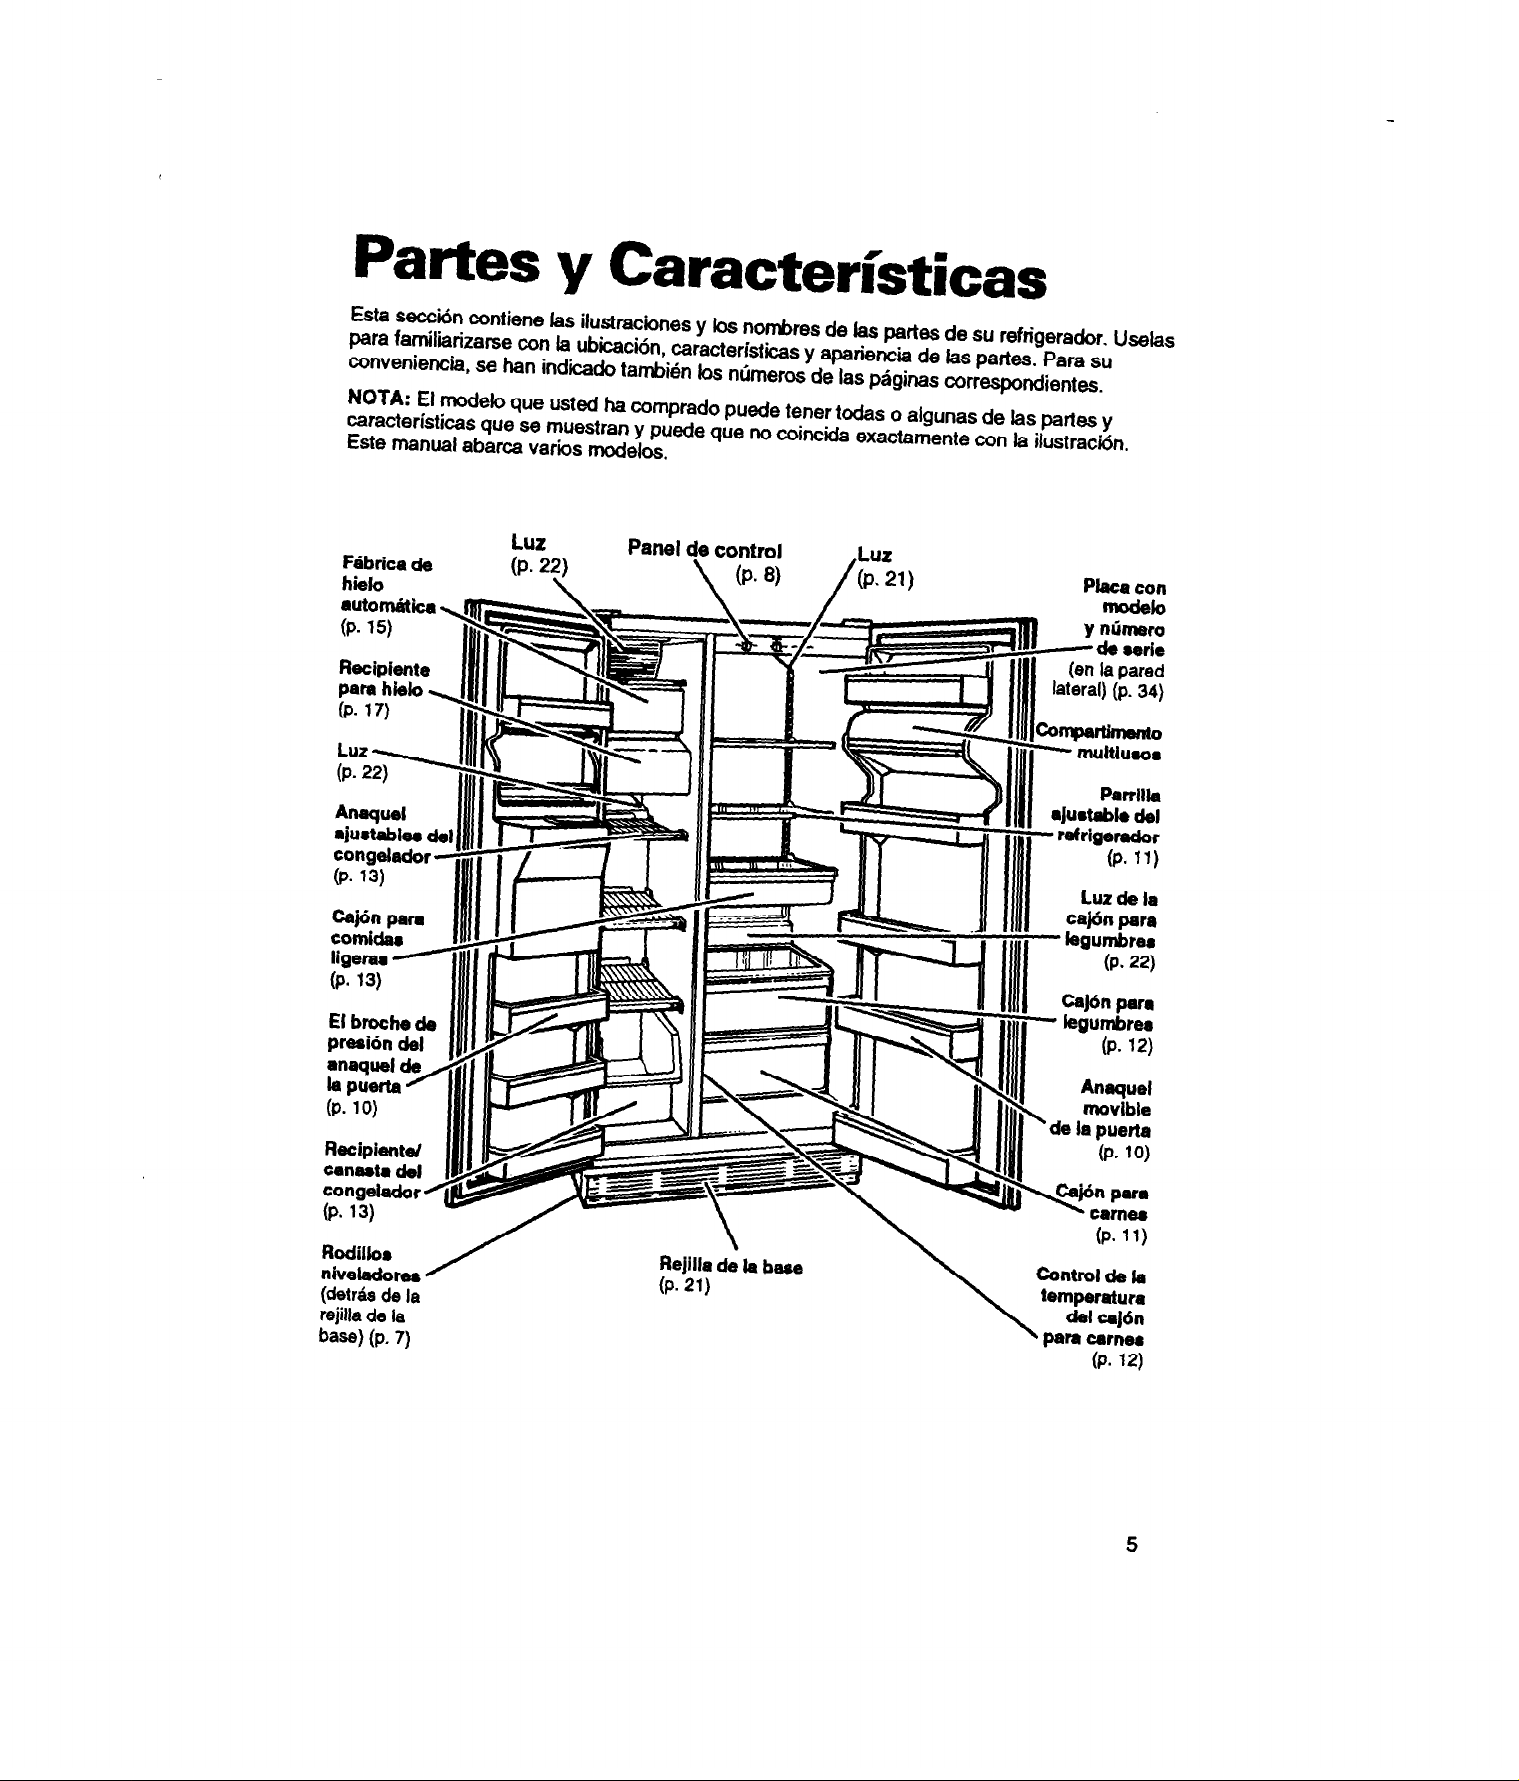
Partes y Caracterkticas
Esta secci6n contiene las ilustraciones y los norhres de &s parks de su refrigerador
pare fa!liirizarse co” la. ubicacibn, caracteristicas y apariencia de las parks. Para &I
convenlencta, se han lndlcado tambikn los nljmeros de las phginas correspondientes.
NOTA: El
caracteristicas que se muestran y puede que no coincida exactamente con la ilustractin.
Este manual abarca varios modeios.
Mbrica de
hi&
rllfnmYi..- ._
modelo que usted ha comprado puede tener todas o algunas de las partes y
LUZ
(P. 22)
-
-
\ -
I
Placa con
y Mimer0
de eerie
Us&s
-lo
Rodillo8
nivelackw8e
(detrks de la
rejilla de la
b-9 (P- 7)
/
Rejilla cl: la baoe
(P. 21)
\
Control de k
temperatura
del cej6n
pan cernw
(P. 12)
5
Antes de Usar su
Refrigerador
Es importante que prepare su refrigerador para usarb. Esta seccbn le explica coma
limpiarb, conectarb a la fuente de energfa, instalarb y nivelarfo.
Limpieza de su refrigerador
Retire las etiquetas
comerciales
Retire cualquier etiqueta interior (except0 la
etiqueta con el numero de modeb y de
serie) antes de user el refrigerador.
NOTA:
instruccbnes permanentes cobcadas
dentro del refrigerador. No quite la Fiiha
Tkcnica cobcada hajo el refrigerador, en la
parte delantera.
No quite las etiquetas con
Como quitar los restos de goma:
l
Frote fuertemente con el pulgar para
formar una holita y luego quftela.
0
l
Humedezca el area con detergente liquid0
para lavar platos y luego quite la goma
coma se descrbio anteriormente. No use
instrumentos afilados, alcohol, lfquidos
inflamahles 0 limpiadores ahrasivos.
Estos pueden da5ar el material. Ver
“Instruccbnes Importantes de Seguridad”
en la pagina 4.
Limpieza antes del uso
Despues de quitar todos bs
materiales de empaque, limpie
su refrigerador antes de usarb,
si es necesario. Vea las nstruccbnes de limpieza en la
pagina 24.
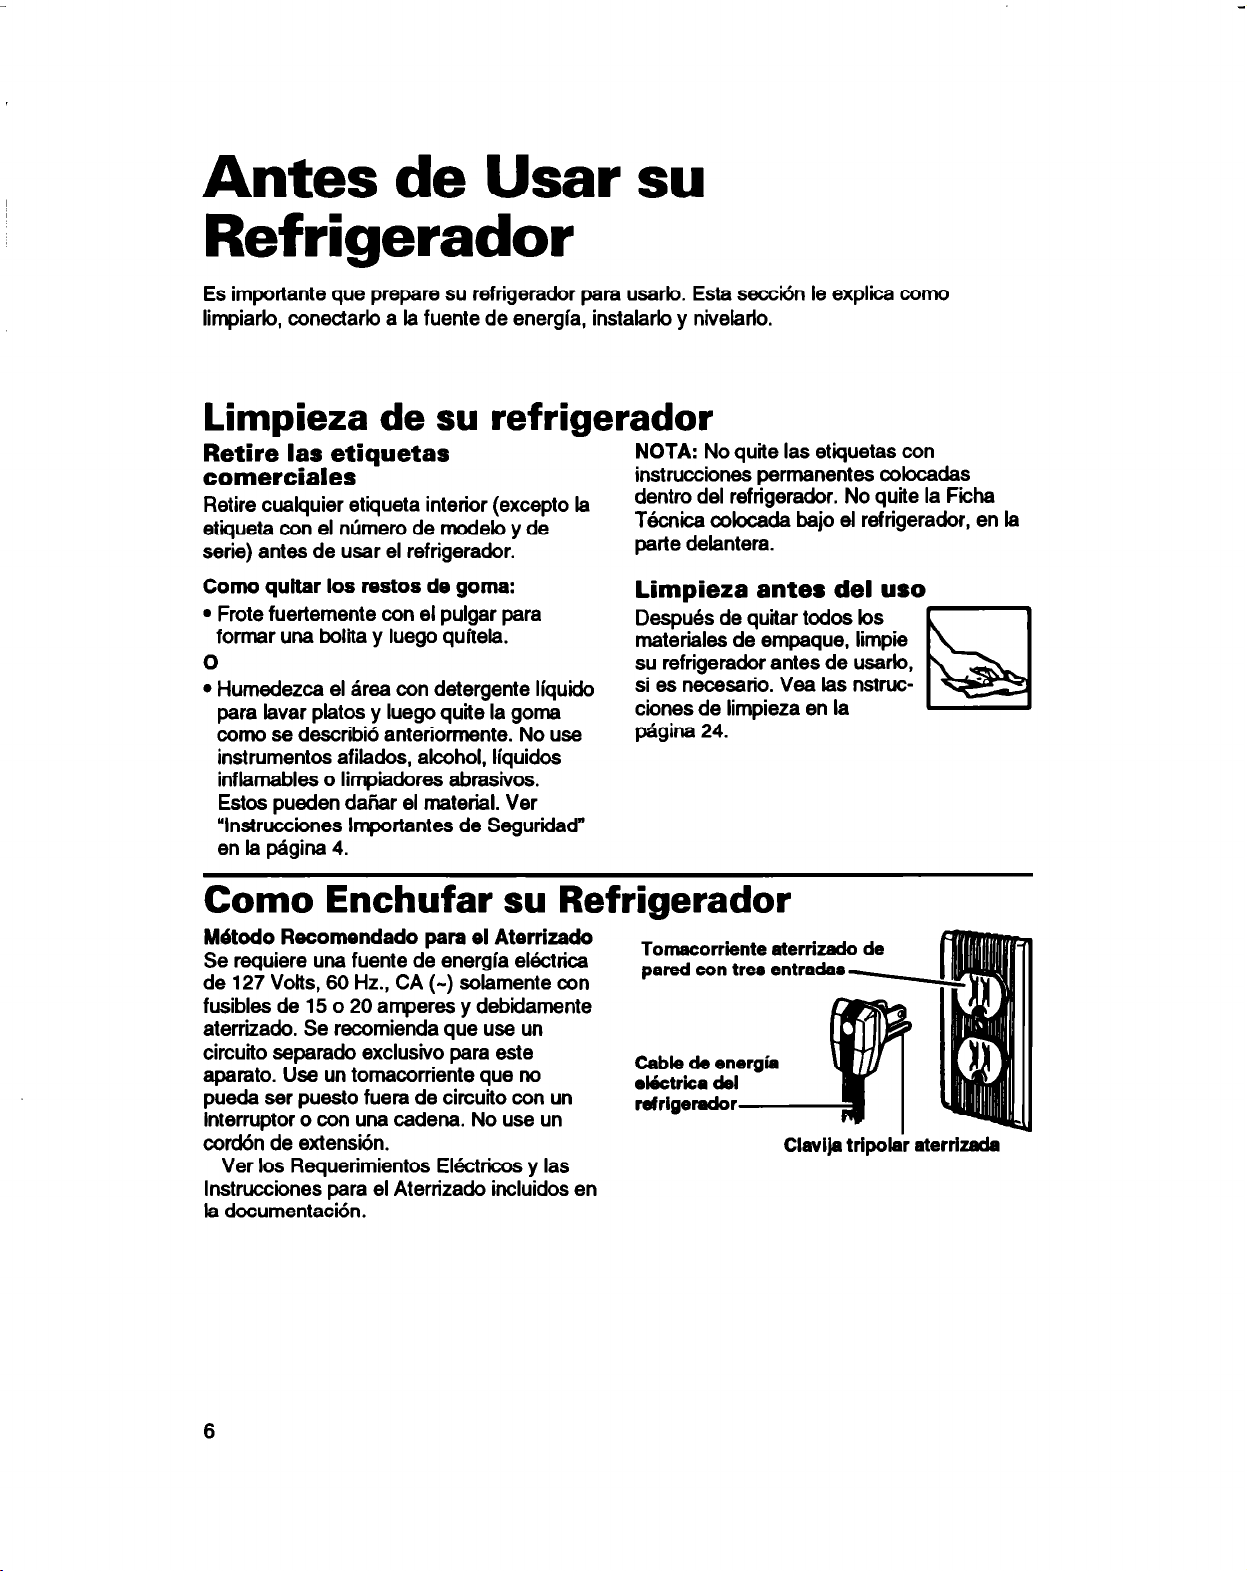
Como Enchufar su Refrigerador
M&do Recomendado para el Aterrizado
Se requiere una fuente de energfa ektrica
de 127 Volts, 60 Hz., CA (-) solamente con
fusibles de 15 o 20 amperes y debiamente
aterrizado. Se recomienda que use un
circuit0 separado exclusive para este
aparato. Use un tomacorriente que no
pueda ser puesto fuera de circuito con un
interruptor o con una cadena. No use un
co&n de extension.
Ver 10s Requerimientos Ebctricos y las
lnstruccbnes para el Aterrizado incluidos en
la documentacbn.
Tornacorriente aterrizado de
pared con trea entradas
Cable de energia
elhctrlca del
refrigerador
.
q
Clavija tripolar aterrizada
6
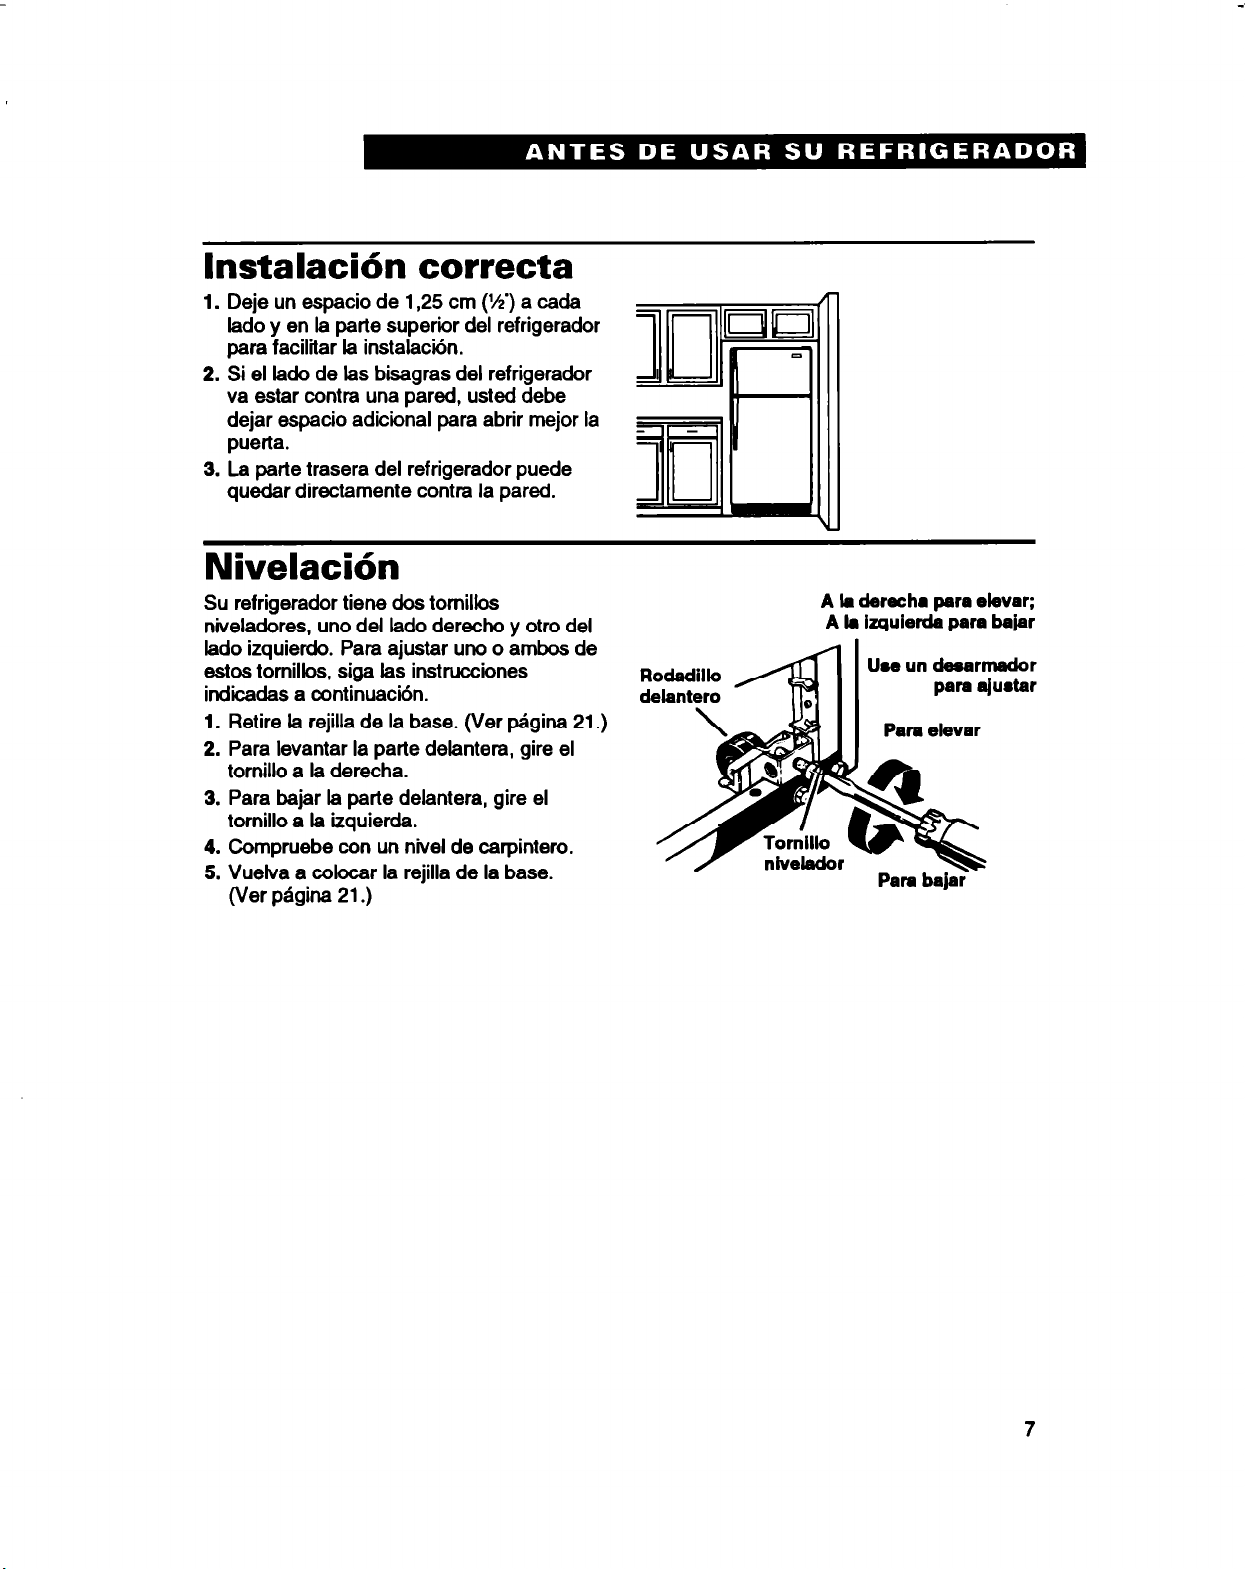
lnstalacib correcta
1.
Deje un espacio de 1,25 cm (l/z’) a cada
lado y en la pane superior del refrigerador
para facilitar la instalacion.
2. Si el lado de las bisagras del refrigerador
va estar contra una pared, usted debe
dejar espacio adicional para abrir mejor la
puerta.
3. La parte trasera del refrigerador puede
quedar directamente contra la pared.
Nivelacih
Su refrigerador tiene dos tomillos
niveladores, uno del lado derecho y otro del
lado izquierdo. Para ajustar uno o ambos de
estos tomillos, siga las instrucciones
indicadas a continua&n.
1. Retire la rejilla de la base. (Ver pagina 21.)
2. Para levantar la parte delantera, gire el
tornillo a la derecha.
3. Para bajar la parte delantera, gire el
tornillo a la izquierda.
4. Compruebe con un nivel de carpintero.
5. Vuelva a colocar la rejilla de
(Ver
pagina 21.)
la base.
Rodadillo
detantero
A la derecha para
A
k izquierda
Use
Pare bajar
para bajar
un desarmmdor
para afuotar
elevar;
7
C6mo Usar su Refrigerador
Para obtener
haga funcbnar en forma debii. Esta secci6n le explii coma ajustar bs controles, coma
sacar y ajustar bs componentes de su refrigerador y coma ahorrar energia.
bs mejores
resultados
posibles de su refrigerador, es importante que usted lo
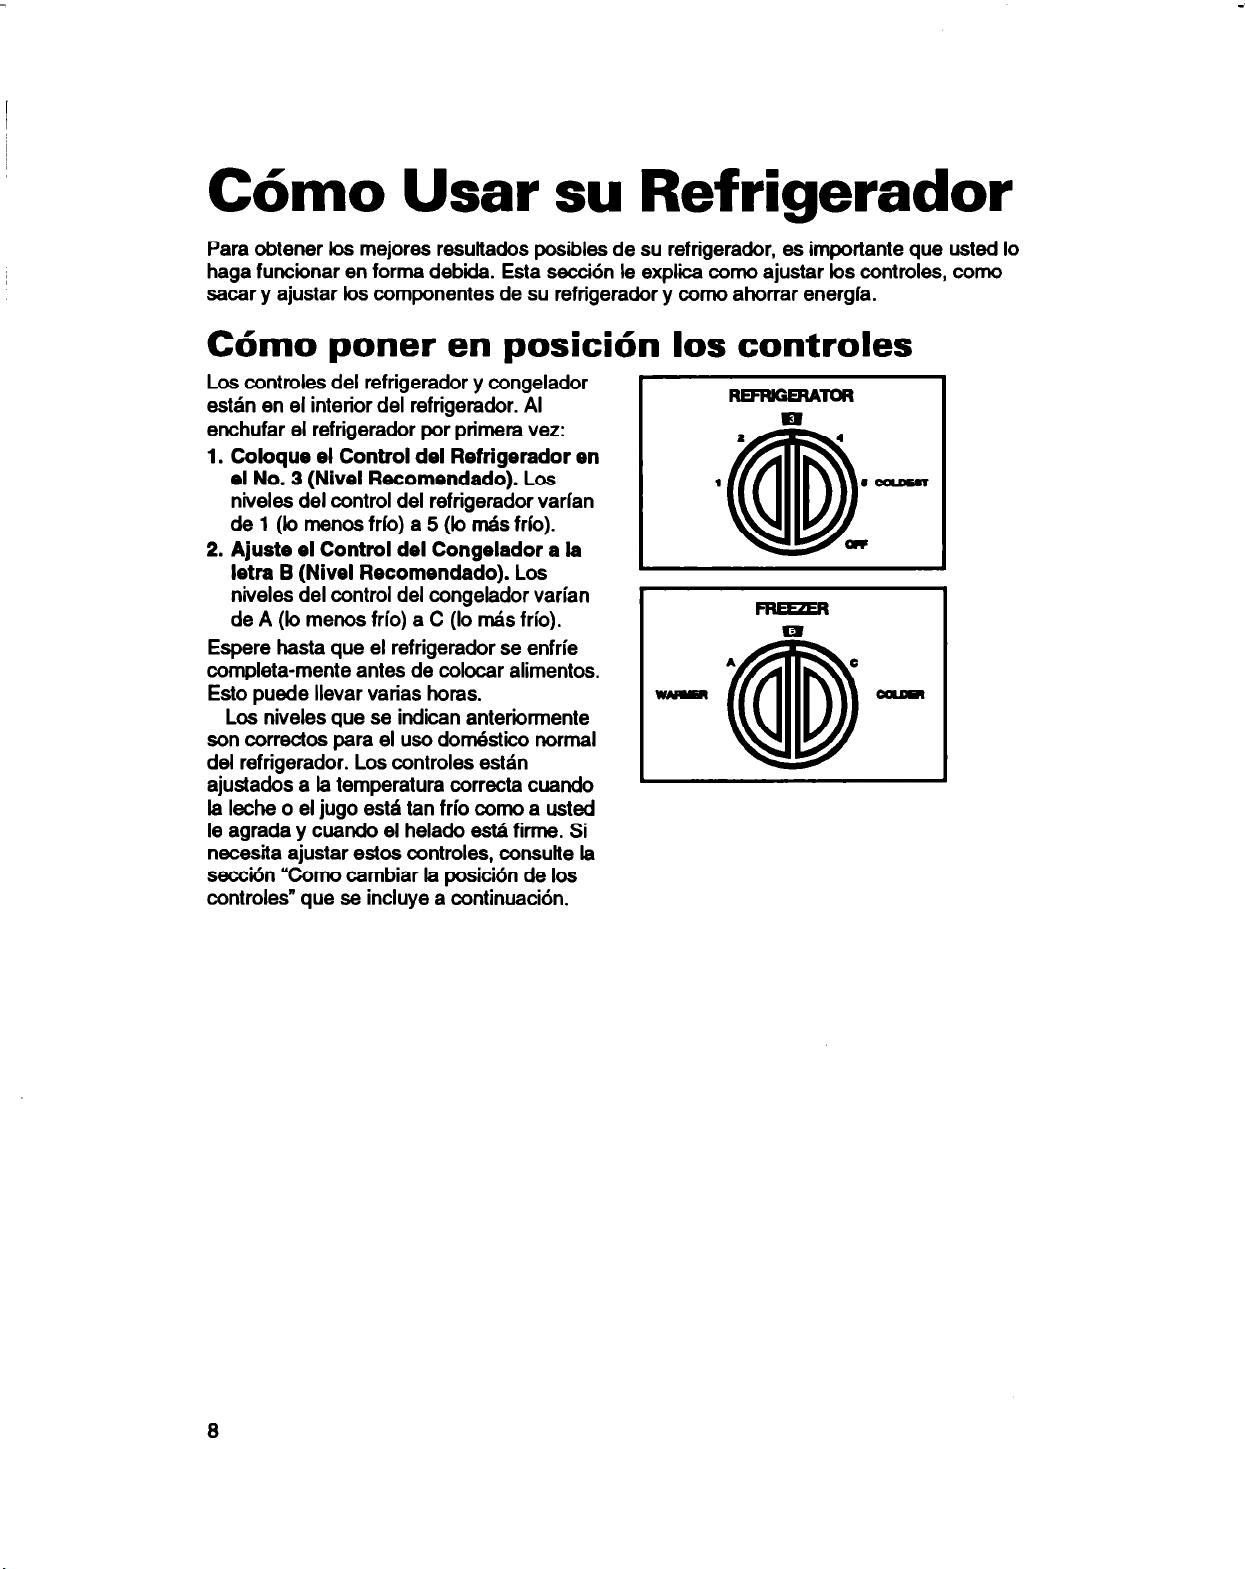
C6mo poner en posicih 10s controles
Los controles del refrigerador y congelador
esten en el interior del refrigerador. Al
enchufar el refrigerador por primera vez:
1. Coloque el Control del Refrigerador en
el No. 3 (Nivel Recomendado). Los
niveles del control del refrigerador varlan
de 1 (b menos frb) a 5 (b m&s frlo).
2. Ajuste el Control del Congelador a la
letra B (Nivel Recomendado).
niveles del control del congelador varian
de A (b menos frio) a C (lo nds frio).
Espere hasta que el refrigerador se enfrie
completa-mente antes de cobcar alimentos.
Esto puede llevar varias horas.
Los niveles que se indican anteriirmente
son correctos para el uso dorrktico normal
del refrigerador. Los controles estdn
ajustados a la temperatura correcta cuando
la leche 0 el jug0 est6 tan frio coma a usted
le agrada y cuando el helado esG fimw. Si
necesita ajustar estos controles, consulte la
secctin “Como cambiar la posici6n de bs
controles” que se incluye a continuaci6n.
Los
I
I
- dD -
RFwGmATm
m
2 4
1
ap
CD
I3
A
aI
c
l -
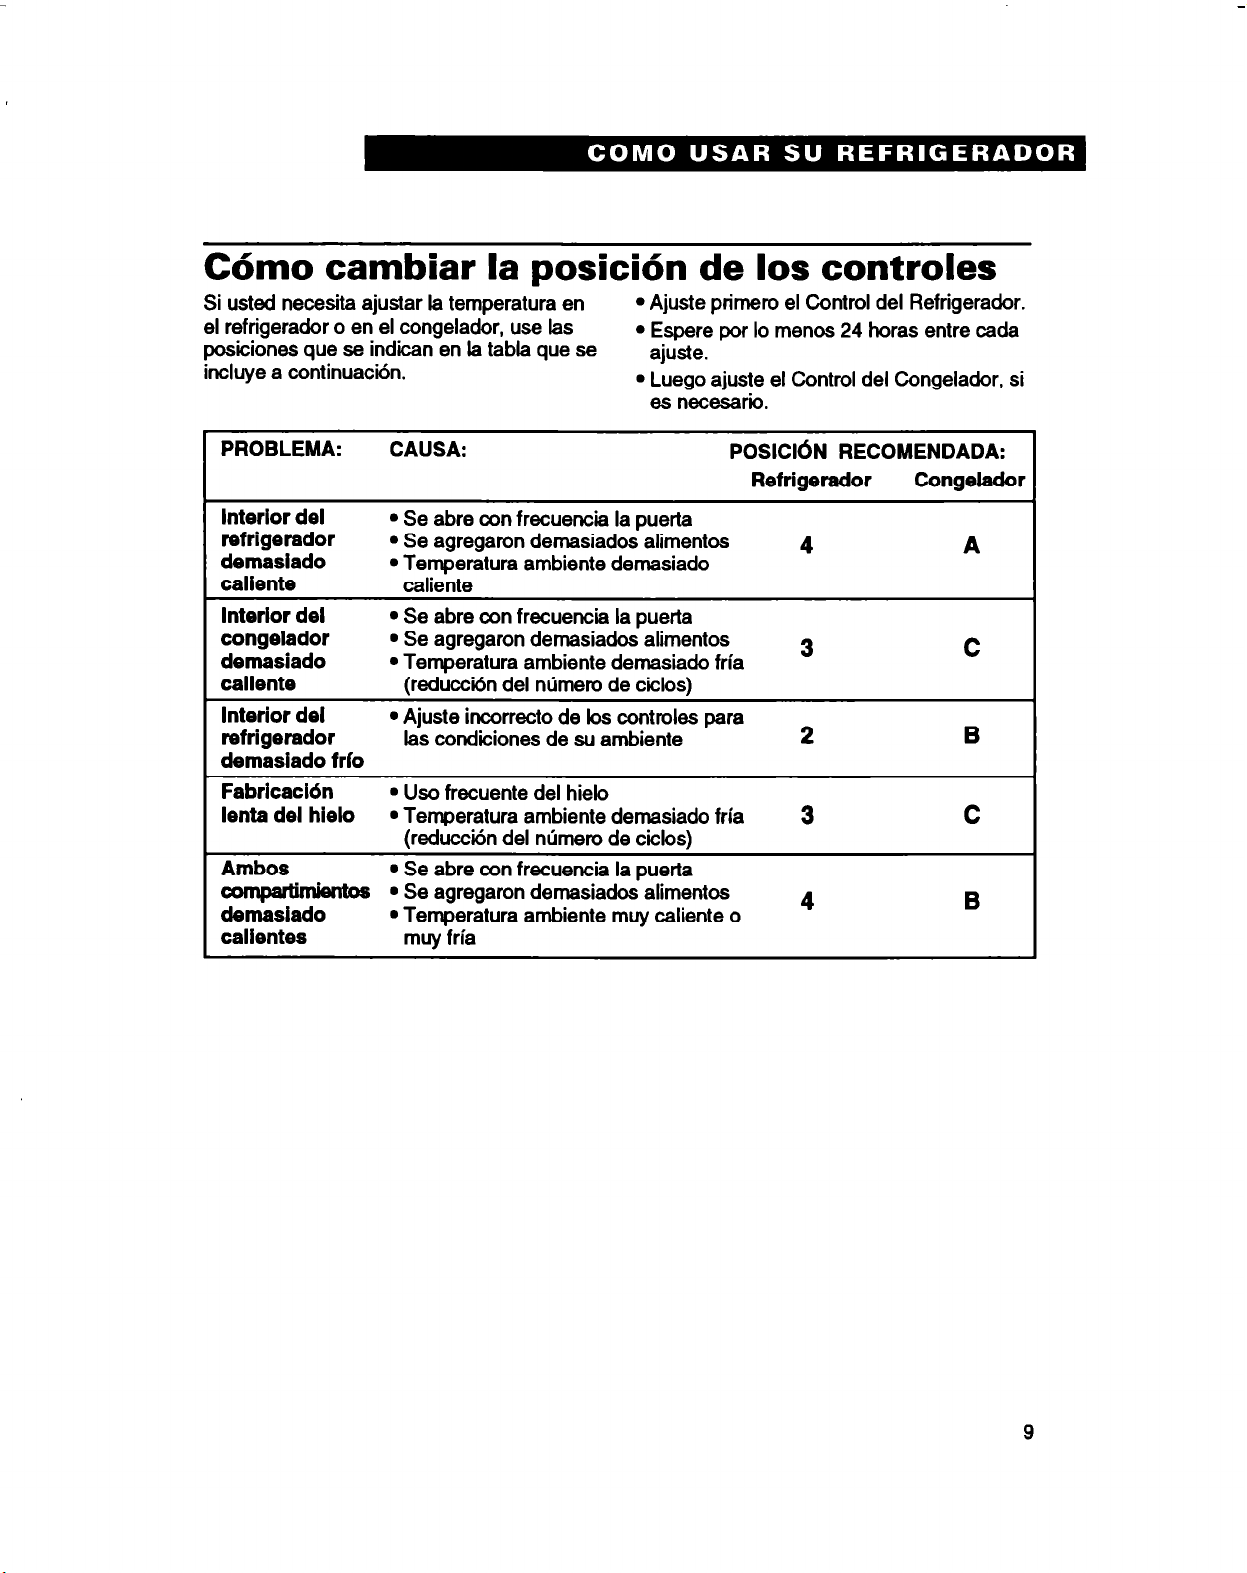
Cdmo cambiar la posicidn de 10s controles
l
Si usted necesita ajustar la temperatura en
el refrigerador 0 en el congelador, use las
posiciones que se indican en la tabla que se
incluye a continuactin.
Ajuste primer0 el Control del Refrigerador.
l
Espere por lo menos 24 horas entre cada
ajuste.
l
Luego ajuste el Control del Congelador, si
es necesario.
PROBLEMA:
Interior del
refrigerador
demaslado
caliente
Interior del
congelador
demasiado
caliente
Interior del
refrigerador
demasiado frlo
Fabricacidn
lenta del hielo
Ambos
zay
callentes
CAUSA:
l
Se abre con frecuencia la puerta
l
Se agregaron demasiados alimentos
l
Temperatura ambiente demasiado
caliente
l
Se abre con frecuencia la puerta
l
Se agregaron demasiados alimentos
l
Temperatura ambiente demasiado fria
(reducctin del nlimero de ciclos)
l
Ajuste incorrecto de bs controles para
las condiciones de su ambiente
l
Uso frecuente del hielo
l
Temperatura ambiente demasiado fria
(reducci6n del ntimero de ciclos)
l
Se abre con frecuencia la puerta
l
Se agregaron demasiados alimentos
l
Temperatura ambiente muy caliente o
muy fria
POSlCldN RECOMENDADA:
Refrigerador
Congelaclor
4 A
3 C
2
3
4
B
C
B
9
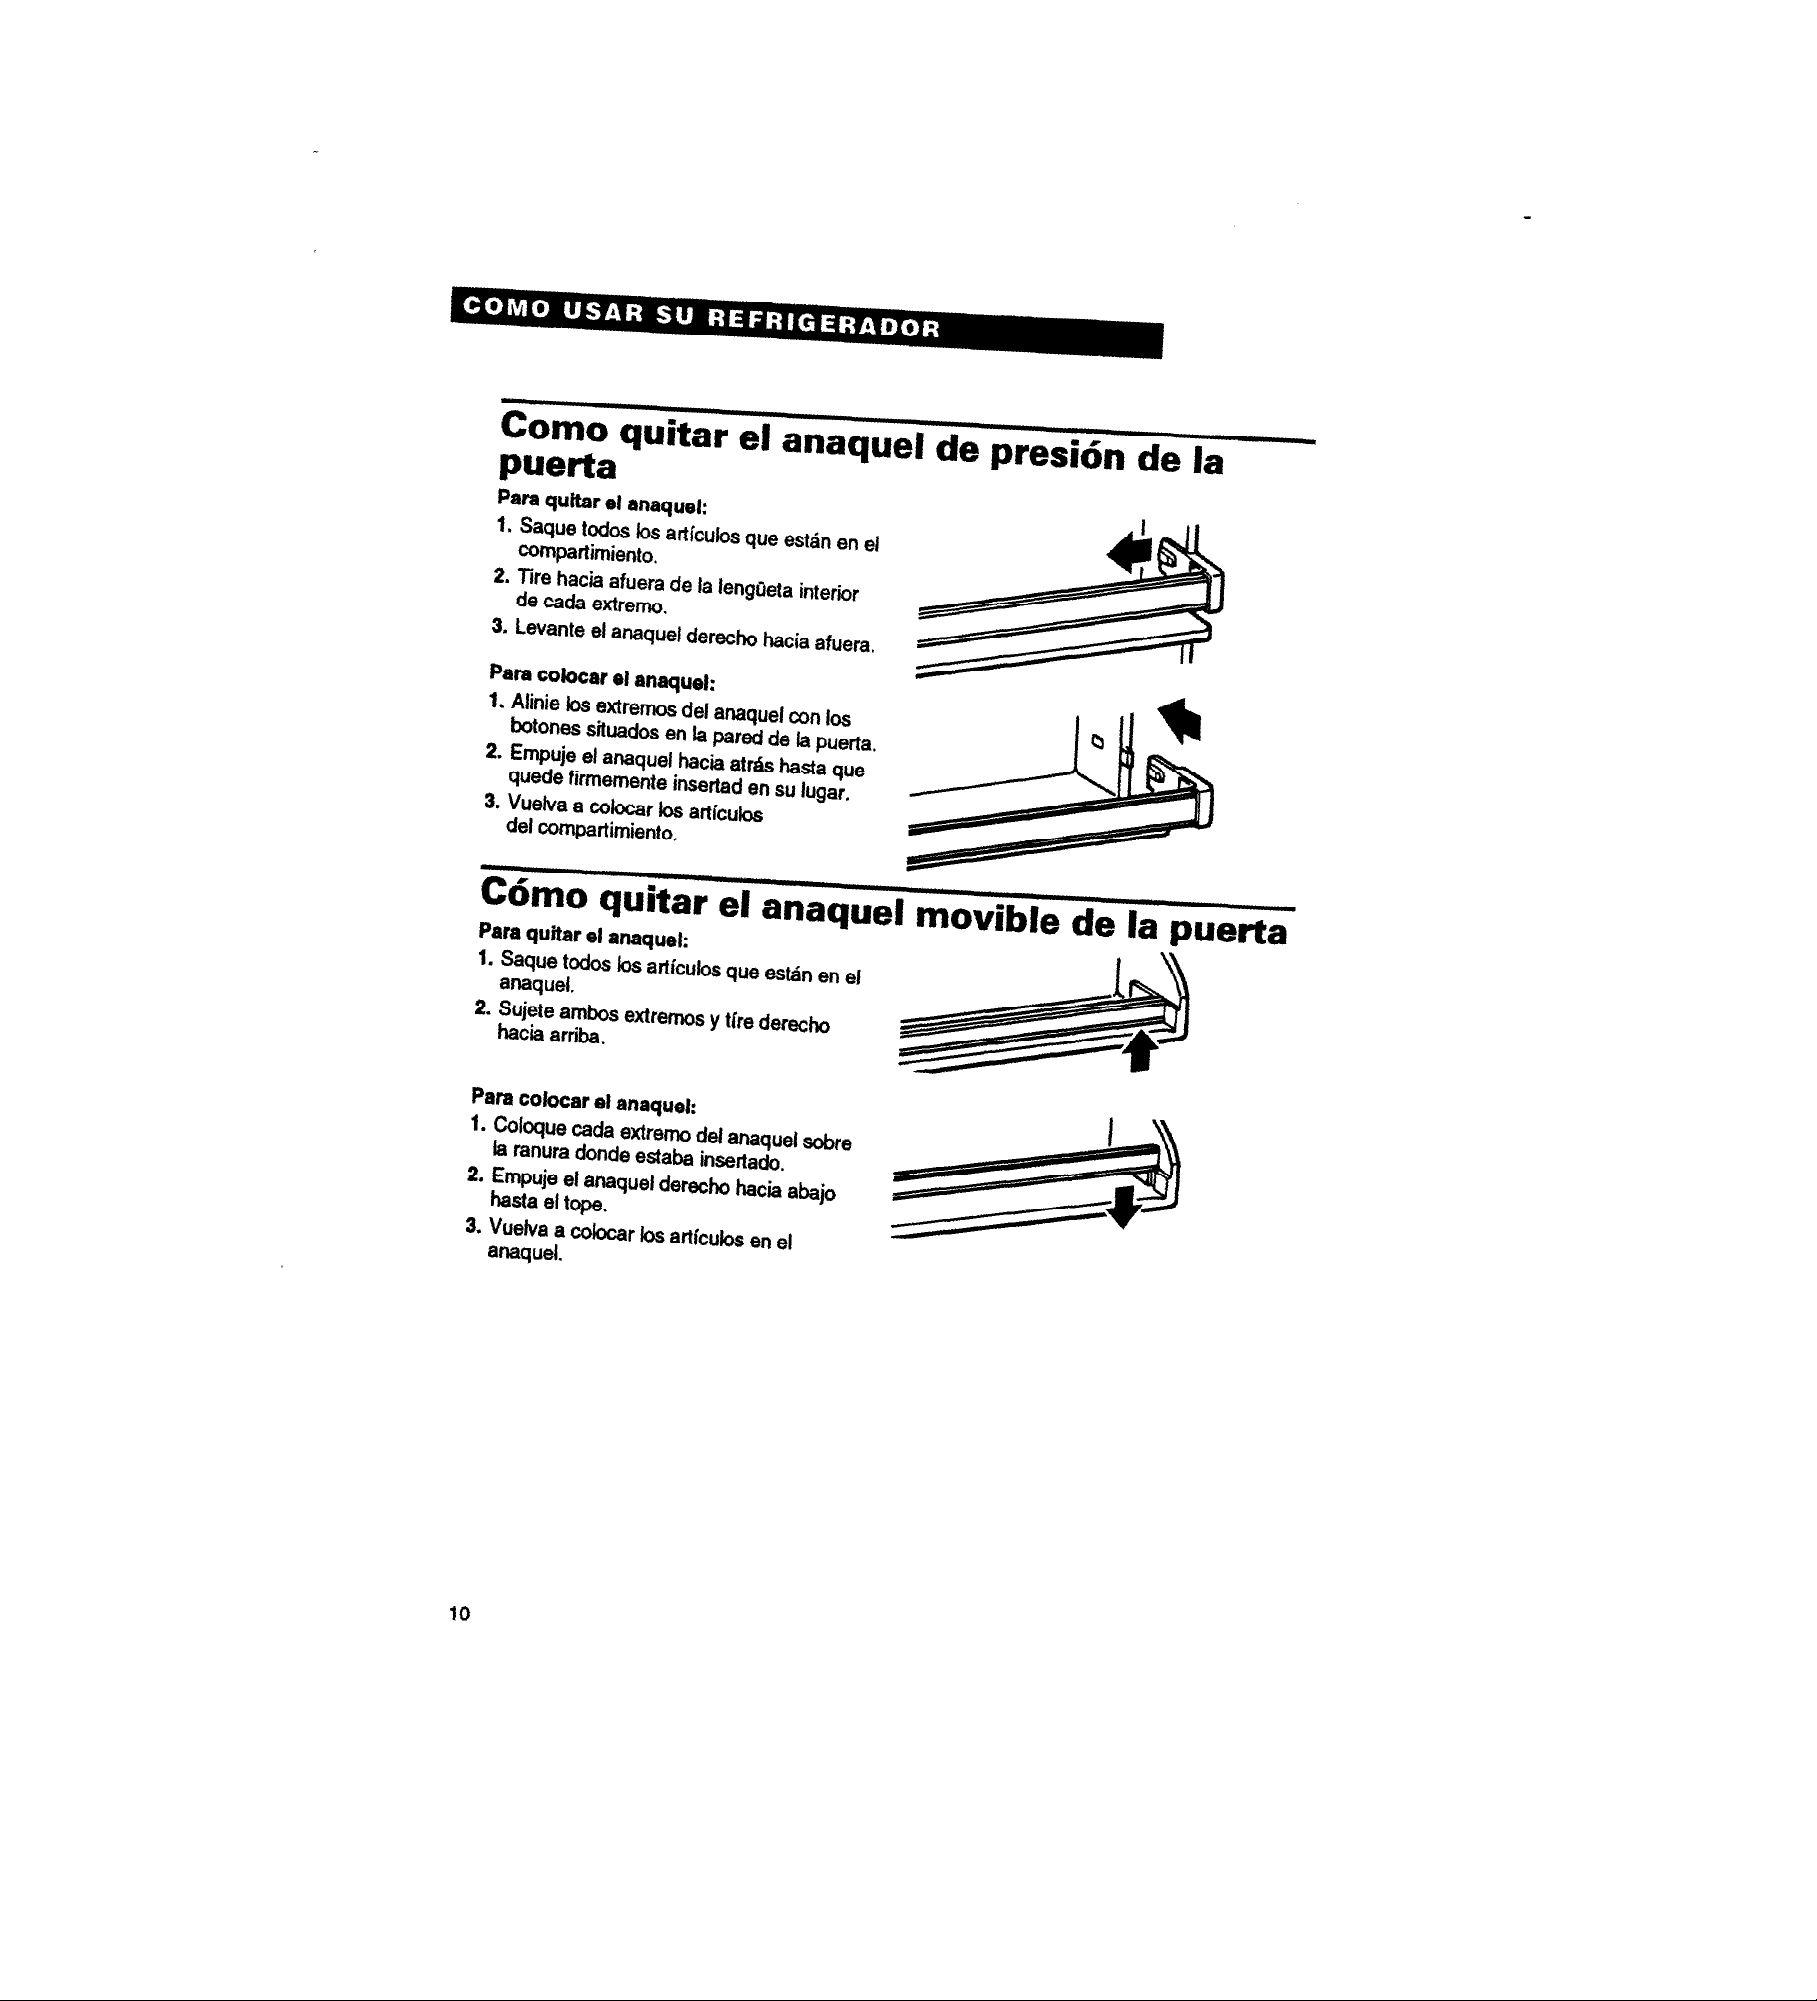
Come quitar el anaauel de presidn de la
.
puerta
Para quitar el anaquei:
1. Saque Was los articulos que es&in en el
cornpartimiento.
2. Tire hacia afuera de la lengibta interior
de cada extremo.
3. Levante el anaquel derecho hacia afuera.
Para colocar el anaquel:
1. Alinie los extremes del anaquel con
botows sibados en la pared de la puerta.
2.
hpuje el anaquel hacia atrds hasta que
quede firmemente insertad en su lugar.
3.
Vuelva a c&car los articulos
del compartimiento,
10s
Cbmo
Para quitar el anaquel:
1.5@.w bdos los articulos que es&in en el
anaquel.
2.
Sujete ambos extremos y tire derecho
hacia arriba.
Pm c&car el anaquel:
1. C&que cada extreme det anaquel sotwe
la ranura donde estaba insertado.
2. Empuje el anaquel derecho hacia abajo
hasta el tope.
3.
Vuelva a coiocar los artfculos en el
anaquel.
guitar
el anaquel movible de la puerta
10
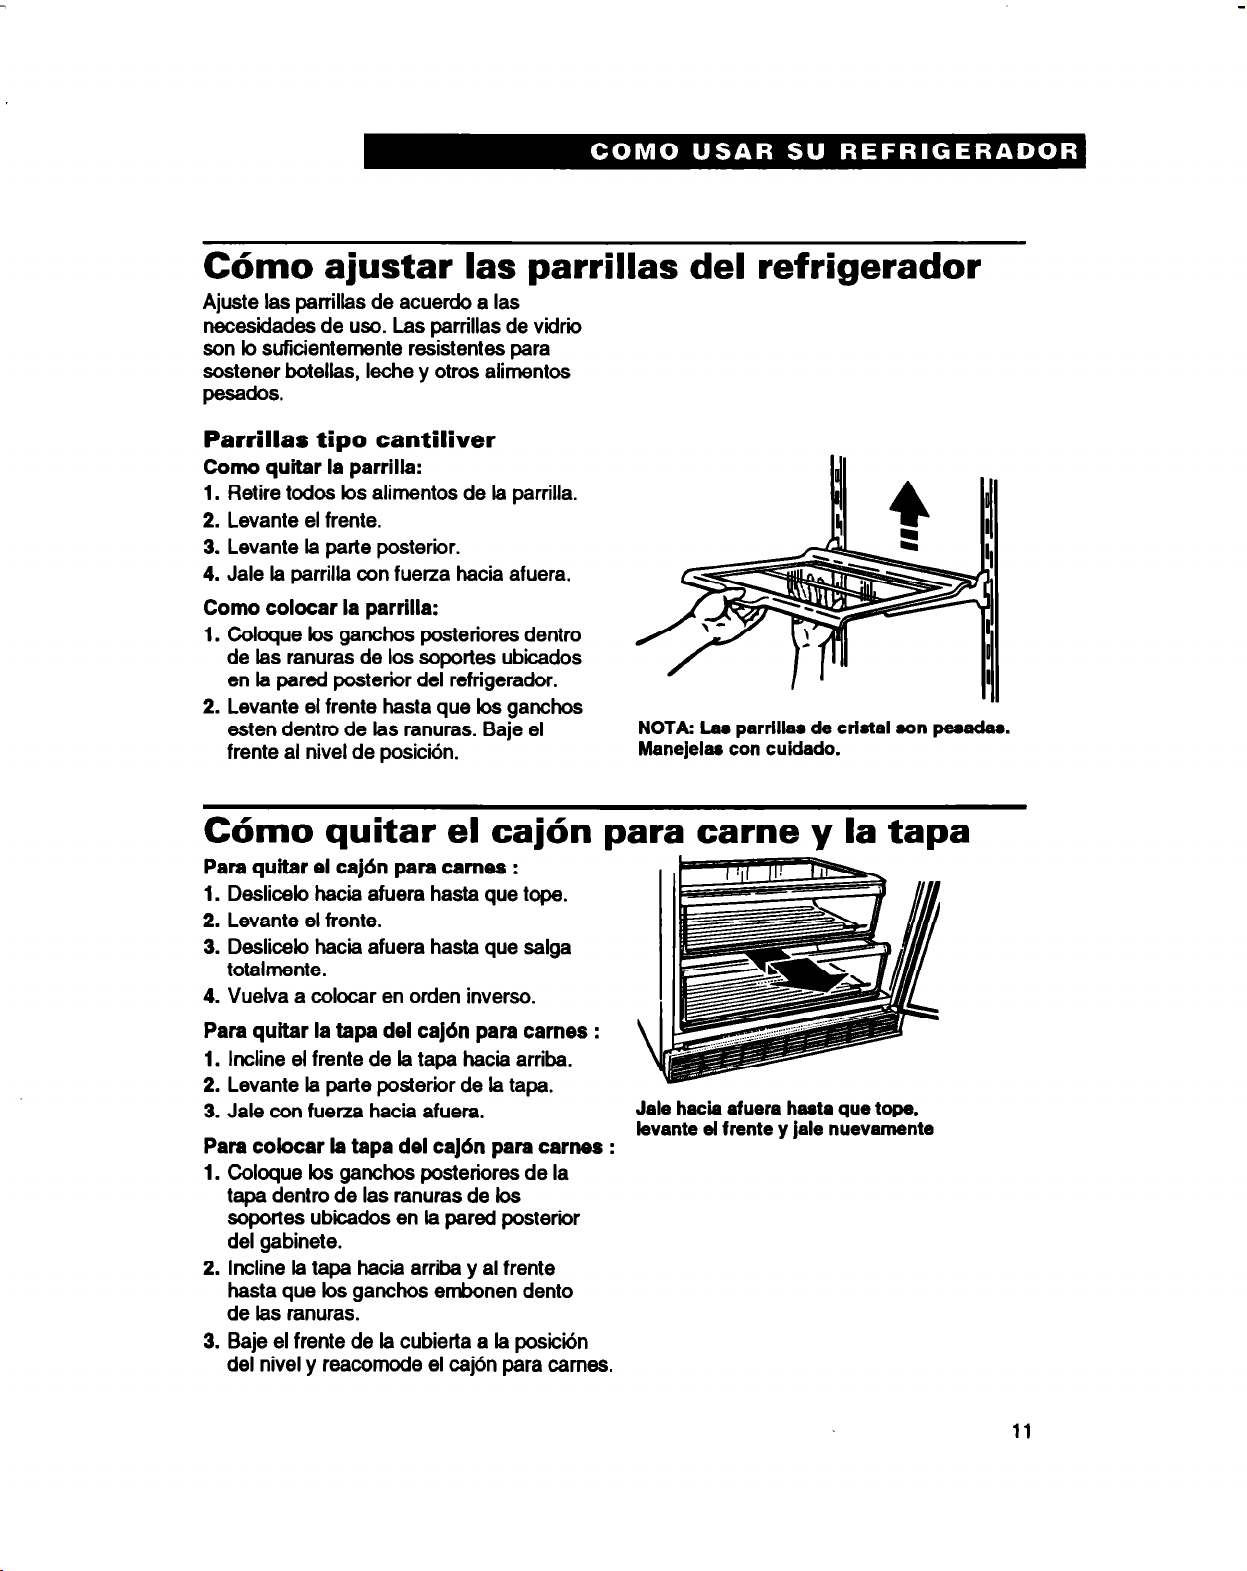
C6mo ajustar las parrillas del refrigerador
Ajuste las parrillas de acuerdo a las
necesidades de uso. Las parrillas de vidrb
son b suficientemente resistentes para
sostener botellas, leche y otros alimentos
pesadOS.
Parrillar tip0 cantiliver
Como quitar la parrilla:
1.
Retire todos bs alimentos de la parrilla.
2. Levante el frente.
3. Levante la parte posterior.
4. Jale la parrilla con fuetza hacia afuera.
Corn0 colocar la parrilla:
1.
Cobque bs ganchos posteriores dentro
de las ranuras de bs sopor& ubicados
en la pared posteriir del refrigerador.
2. Levante el frente hasta que bs ganchos
esten dentro de las ranuras. Baje el
frente al nivel de posictin.
C6mo quitar el caj6n para came y la tapa
Para quitar el cajdn para tames :
1.
Desliceb hacia afuera hasta que tope.
2. Levante el frente.
3. Desliceb hacia afuera hasta que salga
totalmente.
4. Vuelva a cobcar en orden inverso.
Para quitar la tapa del cajdn para carnes :
1.
Incline el frente de la tapa hacia arriba.
2. Levante la parte posterior de la tapa.
3. Jale con fuerza hacia afuera.
Para colocar la tapa del cajdn para tames :
1.
Coloque bs ganchos posteriores de la
tapa dentro de las ranuras de bs
soportes ubiidos en la pared posterior
del gabinete.
2. Incline la tapa hacia arriba y al frente
hasta que bs ganchos embonen dento
de hs ranuras.
3. Baje el frente de la cubierta a la posici6n
del nivel y reacomode el caj6n para tames.
Jale
hacia afuera haata que tope.
levante el frente y jale nuevamente
11
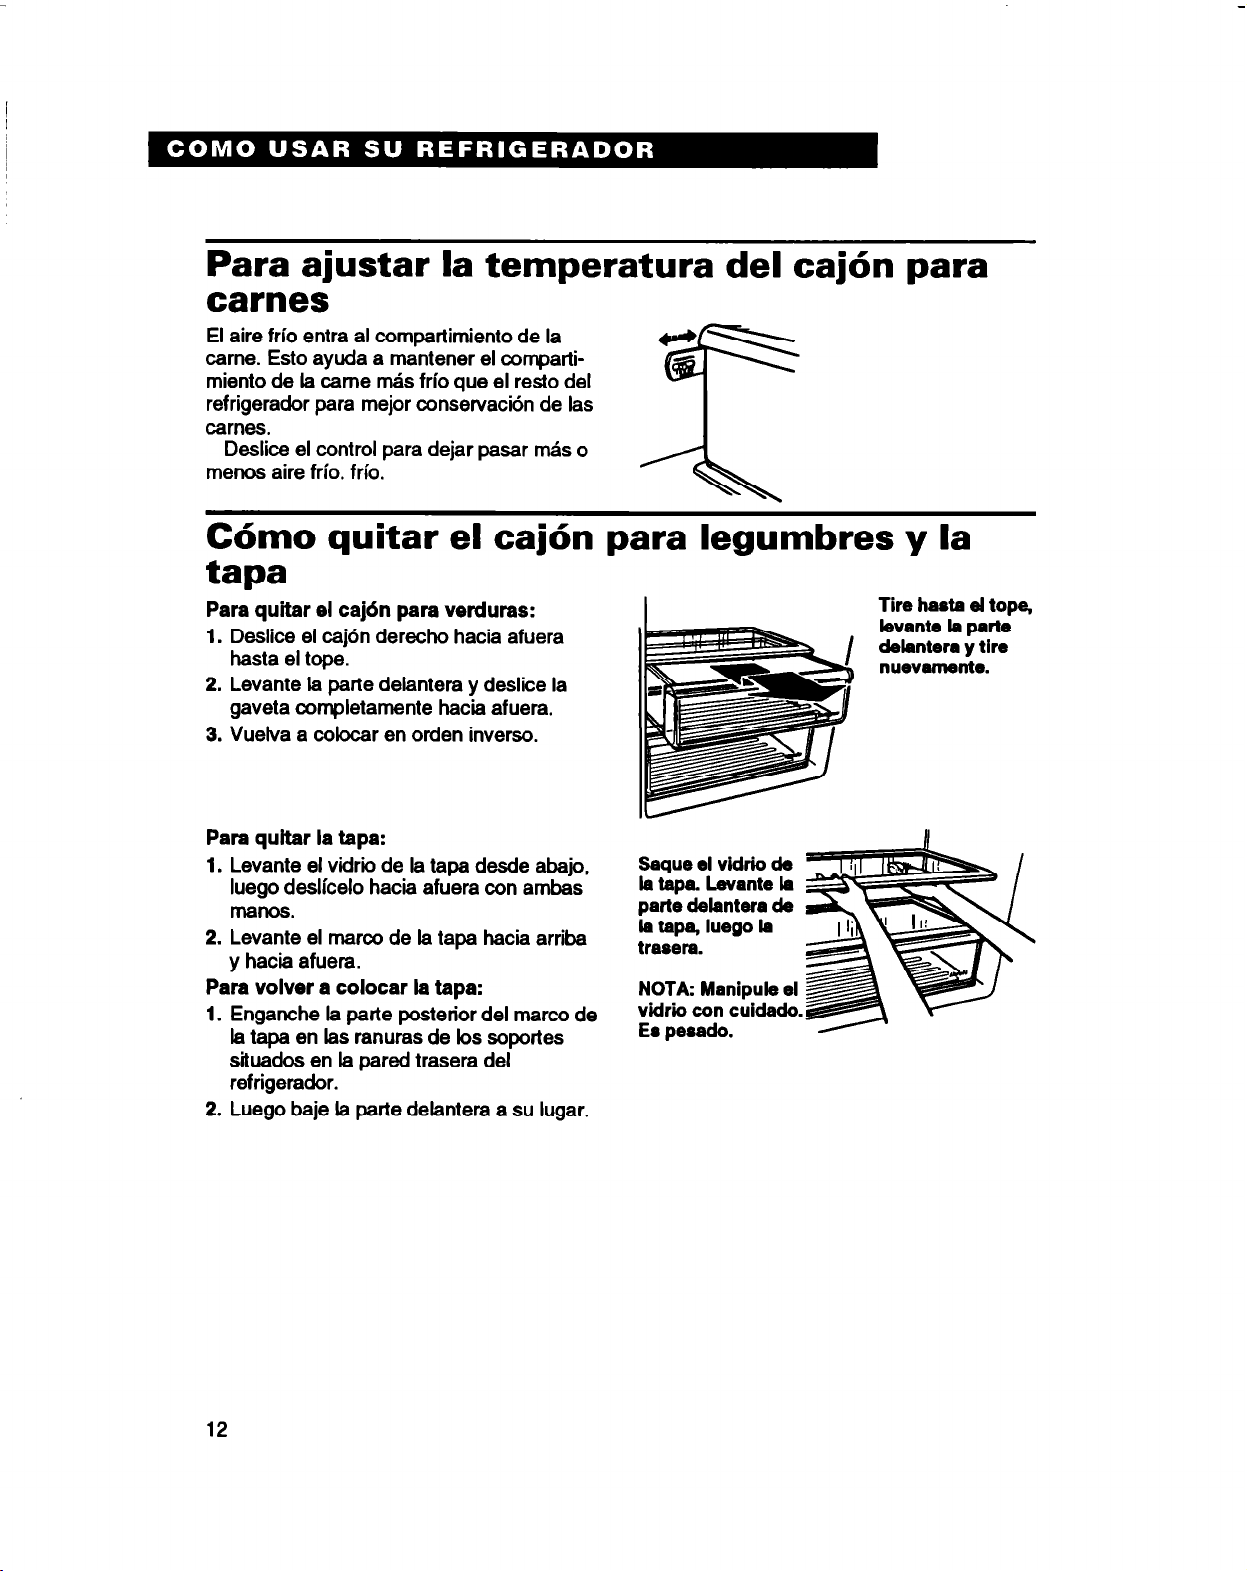
Para ajustar la temperatura del caj6n para
carnes
El aire frio entra al comparlimiento de la
came. Esto ayuda a mantener el compatti-
miento de la came m&s frio que el resto del
refrigerador para mejor conservaci6n de las
carries.
Deslice el control para dejar pasar m&s o
menos aire frio. frio.
C6mo quitar el cajdn para legumbres y la
tapa
Para quitar el caj6n pars verduras:
1.
Deslice el caj6n derecho hacia afuera
hasta el tope.
2. Levante la parte delantera y deslice la
gaveta cornpletamente hacia afuera.
3. Vuelva a colocar en orden inverso.
Para qultar la tapa:
1.
Levante el vidrio de la tapa desde abajo,
luego deslicelo ha& afuera con ambas
manos.
2. Levante el marco de la tapa hacia arriba
y hacia afuera.
Para volver a colocar la tapa:
1.
Enganche la patte posterior del marco de
la tapa en las ranuras de bs soportes
situados en la pared trasera del
refrigerador.
2. Luego baje le parte delantera a su lugar.
Saque el vidrio de
la tape. Levante la
parte delantern de
In tapa, luego la
tresera.
NOTA: Manipule el
vldrio con cuidado.
Eo
pesado.
Tire hasta el tape,
levante la parte
dekintera y tire
nuevsmmte.
12

C6mo quitar el caj6n para comidas ligeras
(en algunos modelos)
Para qultar el cajdn para comldas ligeras:
1. Jale
2. Levante la parte delantera.
3. Deslice el caj6n completamente hacia
4. Vuelva a colocarla en el orden inverso.
el caj6n hasta el tope, con un
movimiento constante y parejo.
afuera.
Jale el caj6n
harts el tope,
levente la patte
delantera y jale
nuevamente.
C6mo quitar el recipiente/la canasta del
congelador
Para quitar el recipiente/la canasta:
1.
Jale el recipiente hasta el tape.
2. Levante la parte delantera para dejar libre
el tope.
3. Deslice el recipiente completamente
hacia afuera.
Jale hasts el tope,
levante la parte
delentera. y jale
nuevamente.
Para volver a colocar el reclpiente/la
canasta:
1.
Coloque el recipiente en las correderas.
2.
Asegtirese de que el alambre del tope no
obstruya la parte delantera de las
correderas.
3. Deslice el recipiente completamente
hacia adentro.
Cdmo ajustar el anaquel del congelador
Para sacar el anaquel:
1.
Levante el lado derecho del anaquel y
fuera de los apoyos del anaquel.
2. Desk el anaquel fuera de las cavidades
de apoyo.
3. Vuelva a colocar en el orden inverso.
Paso Paw
13

C6mo usar el distribuidor de agua helada y
hielo
El despachador
El hieb proviene del recipiente para hielo en
el congelador. Al presionar la palanca
despachadora, se abre una puerta entre el
despachador y el recipiente a trav6s de un
conducto. Al liberar la palanca despachadora,
en ocasiones se escuchard un leve zumbiio
durante unos cuantos segundos.
El despachador de hieb no funcionarti
cuando la puerta del congelador est6 abierta.
NOTA: Para grandes cantidades de hielo,
retire directamente del recipiente, no b
retire a travb del despachador.
Despachador de hielo:
1.
Oprima la barra del despachador con un
vaso resistente. Ponga el vaso cerca de
la abertura del despachador para que
todo el hielo caiga en el interior.
2. Para que deje de caer el hieb, retire el vaso.
NOTA: Las primeras cargas de una ndquina
nueva pueden tener un sabor extraiio. Tire el
hieb y haga una nueva resewa.
Peligro de
El hielo que cae y la presi6n pueden
quebrar un vaso fkgil. Use un vaso
resistente para recibir hieb o agua
del distribuidor.
No hacerlo puede ocasionar lestin
personal o que se quiebre el vaso.
lesl6n personal
El distribuidor de agua
El
agua
helada proviene de un tanque que
esti dettis de la gaveta para tames. Tiine
capacidad para 1 l/z cuartos de gabn (1.5
litros) aproximadamente.
Cuando cone&e el refrigerador por
primera vez, oprima la barra del distribuidor
de agua con un vaso o una jarra hasta que
haya sacado y eliminado de 2 a 3 cuartos
de gal& (de 1.9 a 2.8 litros). El agua que
usted saca y elimina enjuaga el tanque y bs
tllbOS.
Deje transcurrir variis horas antes de volver
a helar un nuevo tanque de
NOTA: La
distribuidor est6 diseFiada para evaporar
pequeAos
bandeja no Gene desagire. No vierta agua
en ella.
14
pequeiia bandeja detrk del
derramamientos de agua. Esta
agua.

Para distribuir agua:
1.
Oprima la barra del distribuidor con un
vaso resistente.
2. Para que deje de salir agua, retire el vaso.
NOTA:
suficiente para mantener una reserva fresca.
Obtenga todas las semanas agua
C6mo usar el fabricador automStico de
hielo optional
Si su refrigerador Gene un fabricador
autotitico de hieb o si usted intenta
agregar uno nds tarde (p6ngase en
contact0 con el distribuidor para obtener
el nlimero de la pieza), a continuaci6n se
incluye cierta informaci6n que usted debe
saber.
l
La palanca ON/OFF es un brazo de
control el6ctrii.
Cuando esti en la posici6n HACIA
ABAJO (orJ encendido) la tiquina hate
hieb autondticamente.
Cuando est6 en la posiciin HACIA
ARRIBA (off/ apagado) la ndquina
queda desconectada.
IMPORTANTE: No
fabriidor de hielo hasta que no haya sido
conectado al suministro de agua.
l
Si usted saca el recipiente para hielo,
levante la palanca para desconectar el
fabricador. Cuando vuelva a colocar el
recipiente, emptijelo hasta adentro y baje
la palanca a la posictin ON (encendido).
l
Para obtener hielo de buena calidad es
necesario que el agua sea tambikn de
buena calidad. Se recomienda no conectar
el fabricador de hielo a un suministro de
agua suave. Los pmductos quimicos
del suavizante del agua (tal coma la sal
proveniente de un suavizante que est6
funcionando mal) pueden daiiar el molde
del fabricador de hielo y producir hieb de
mala calidad. Si usted no puede evitar
usar un suministro de agua suave,
asegtirese de que el suavizante del agua
est6 funcionando debidamente y sea bien
mantenido.
ponga en marcha el
-
ARRIBA no
fabrkari
-” hlelo.
_ b
ABAJO
fabrkar
hielo.
pera
15

Solucidn a Droblemas comunes del fabricador de hielo
distribuid-or
PROBLEMA
Los cubes de hielo se
unen en las esquinas
La fabrica de hielo no
funciona 0 la
fabricacidn es lenta
POSIBLE CAUSAISOLUCION
l
Esto es normal. Se separan facilmente. Agite el recipiente
ocasbnalmente para mantener bs cubes separados.
l
La palanca de ON/OFF (encendidokpaqado) este en la
posicbn OFF (HACIA ARRIBA). Baje la palanca
ON (HACIA ABAJO).
l
El congelador no esti bastante frio. Ajuste bs controles de la
temperatura y espere 24 horas. (Ver “C&no carnhiar la
position de bs controles” en la Mgina 9.)
a la
position
Olor y aabor
desagradeble del
hielo
El distribuidor de
hlelo no funciona.
El distrlbuldor de hielo
deja de funcionar.
l
Las conexbnes de la tuberfa nueva pueden hater que el hielo
tenga obr o s&or desagradable. No use bs prfmeros btes de
hieb.
l
Los cubes no estln frescos. Desc&tebs y haga nuevos
cubes de hielo.
l
Los alimentos en el congelador no estan debidamente
envueltos. Ver pagina 27.
l
El congelador y el deprkiio del hieb necesitan limpieza. Ver
Mgina 24.
l
El agua puede contener minerales (coma et azutre). Puede
que necesite un filtro para quitarbs.
l
La puerta del congelador ests abierta.
l
El recipiente para hielo no ha sido instalado debiiamente.
Aseglirese de empujar el recipiente completamente ha&
adentro.
l
El recipiente no contiene el hielo adecuado. Use solamente
hiebs en forma de media luna provenientes del fabricador de
hieb. Agite el recipiente ocasbnalmente para separar bs
cubes y aumentar el espacb para el hielo.
l
El distribuidor no ha sido usado por mucho tiempo, por lo que
bs cubes de hieb se han derretido juntos. Tire el hieb viejo y
haga
un nuevo bte.
l
La harra del distribuidor de hieb ha estado hacia abajo
durante mucho tiempo. Espere unos 3 minutos para que el
motor del distribuidor se reajuste.
l
Cuando desee sacar grandes cantidades de hieb, hagab
directamente del recipiente, no a traves del distribuidor.
16

Para quitar el recipiente para hielo
Quitar, vaciar y limpiar el recipiente para hielo:
l
Si el despachador de hielo no ha sido usado
o no sera usado por una semana o mhs.
l
Si una falla en la energia ektrica
ocasiona que el hielo en el recipiente se
derriia y se pegue.
l
Si el despachador de hielo no se usa con
frecuencia.
Para quitar el recipiente para hielo:
1. Levante el panel que lo cubre y deslicelo
hacia at&.
2. Levante el braze a que quede en la
posicidn APAGADO (OFF). El hielo aun
podti ser despachado, pero ya no se
producirti m&s.
3. Levante el frente del recipiente, jale hacia
af uera.
4. Vacie el recipiente. Si es necesario, use
agua caliente o tibia para derretir el hieb.
Nunca use utensillos fifosos para
quebrar el hielo en el recipiente. Esto
puede dafiar el recipiente y mecanismo
despachador.
5. Lave con un detergente suave. Enjuague
bien. No use limpiadores, solventes
fuertes o abrasivos.
6. Al colocar de nuevo el recipiente,
asegurese de empujarb hasta adentro.
Baje el braze a la posick5n ENCENDIDO
(ON) para reiniciar la production
de hieb.
17

Conexidn de la fabrica de hater hielo al
suministro de agua
Lea cuidadosamente todas las instrucciones antes de comenzar.
Riesgo de Choque Ektrlco
l
Desconecte la energia eMctrica hacia el
refrigerador antes de la instalacion.
l
El taladro el&Gco debe estar
debidamente puesto a tierra antes de
hater bs oriiicios en la tuberfa del agua
El incumplimiento de estas instrucciones
puede ocasionar choque el&riio, lesion
grave 0 la muerte.
IMPORTANTE:
l
Use tuberia de cobre solamente y verifique
si hay escapes.
l
Instale la tuberia de la fabrica de hieb en
lugares donde las temperaturas seran
superiires a la temperatura de
congehcion.
HERRAMIENTAS
NECESARIAS:
l
Desarrnador e&Mar
l
Llavesdebocadel,ll
y W) 0 2 llaves ajustables
l
Llave de tuerca de 0,688 cm (W)
l
Broca de taladro de 0,685 cm (W)
l
Taladro manual o taladro electrico
(debidamente puesto a tierra)
Cmyl,27Cm(!/t6’
NOTA:
Su distribuidor de aparatos
electrii tiene disponible un paquete con
una v&lvula de cierre de silla de 0,688 cm
(Vi’), una union y tuberia de cobre. Antes de
adquirirla asegtirese de que la valvula de
silla cumple los codigos de plomerfa locales.
No utilice una vBivula de tipo perforante o
una v&Ma de silla de 0,476 cm
(%6”)
pulgadas pues reduce el flujo de agua y se
obstruye m&s f&cilmente.
Suministro de agua fria
La valvula del agua de la fabrii de hieb
esta provista de una arandela de flujo que
se usa coma un regulador de la pm&n del
agua. La fabrica de hieb debe ser
conectada a una tuberia de agua fria con
limites de presion del
agua
de 188827 k Pa
(20-l 20 lbs/pul#.) Si se produce algun
problema llame a su compahia de agua
potable.
IMPORTANTE:
l
Su Wbrica de hieb puede demorar hasta
24 horas en comenzar a producir hieb.
l
Si se usa el refrigerador antes de in&alar
la cortexion del agua. cobque la f&ii de
hieb en la posici& OFF
evitar que funcione sin agua.
l
Todas las instalaciones deben ser he&as
de acuerdo con Los codigos de pbmeria
local.
(apagado) para
18
LA INSTALACION NO ES
GARANTIZADA
POR EL FABRICANTE DEL
REFRIGERADOR
0 DE LA FABRICA DE HIELO
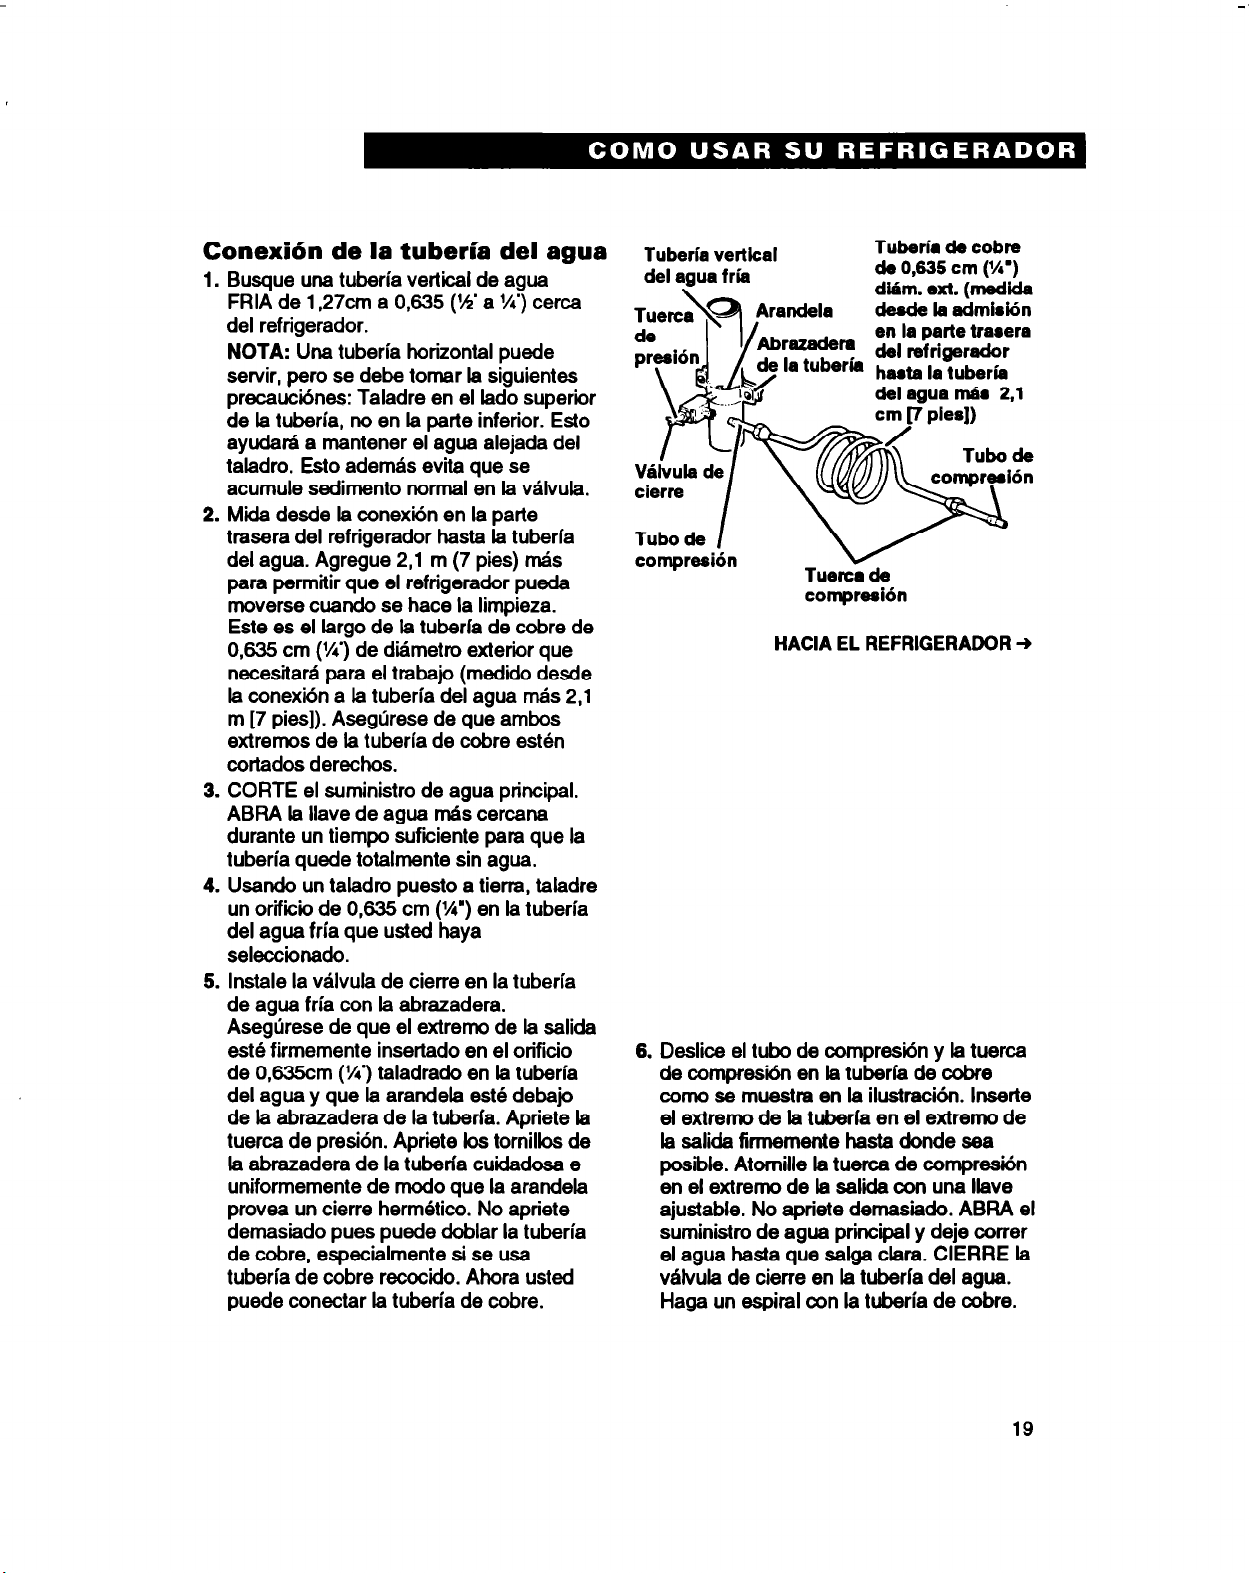
Conexihn de la tuberia del agua
1.
Busque una tuberia vertical de agua
FRIA de
del refrigerador.
NOTA:
servir, pero se debe tornar la siguientes
precauctines: Taladre en el lade superiir
de la tuberia, no en la parte inferior. Esto
ayudak a mantener el
taladro. Esto ademas evita que se
acumule sediment0 normal en la valvula.
2.
Mkla desde la wnexitk en la parte
trasera del refrigerador hasta la tuberia
del agua. Agregue 2,l m (7 pies) rrks
para permitir que el refrigerador puede
movers8 cuando se hate la limpieza.
Este es el largo de la tuberfa de wbre de
0,635 cm (l/4’) de dtimetro exterior que
necesitara para el trabajo (medido desde
la wnexion a la tuberia del agua mas 2,l
m [7 pies]). Asegtirese de que ambos
extremos de la tuberia de cobre esten
wrtados derechos.
3.
CORTE el suministro de agua principal.
ABRA la llave de agua m&s cercana
durante un tiempo sufEiente para que la
tuberia quede totalmente sin agua.
4.
Usando un taladro puesto a tierm, taladre
un orifiiio de 0,635 cm (l/4’) en la tuberia
del agua fria que usted haya
seleccionado.
5.
Male la valvula de cierre en la tuberfa
de agua fria con la abrazadera.
Aseglirese de que el extremo de la salida
este firmemente insertado en el orificio
de 0,635cm (X) taladrado en la tuberia
del agua y que la arandeta e&e debajo
de la abrazadera de la tuberfa. Apriete la
tuerca de presion. Apriete los tornillos de
la abrazadera de la tuberfa cuidadosa e
uniformemente de modo que la arandela
provea un cierre hermetico. No apriete
demasiado pues puede doblar la tuberia
de cobre, especialmente si se usa
tuberia de wbre recocido. Ahora usted
puede conectar la tuberia de wbre.
1,27cm
a 0,635 (55 a K) cerca
Una tuberia horizontal puede
agua
alejada del
Tuberia vertkal
del agua fria
Tuberie de cobn
de 0,535 cm (W)
dYm. ext. (medidm
desde la admM6n
en la parte traaera
del ref rigerador
heata la tuberia
del agua tie 2.1
cmp PI-l)
Tubo de
rammeaibn
compresi6n
Tuemx
compresi6n
HACIA EL REFRIGERADOR +
6. Deslice el tubo de wrnpresion y la tuerca
de wmpre&n en la tuberfa de cobre
corn0 se muestre en la ilustraci6n. Ins&e
el extremo de la tuberfa en el extreme de
la salida firmemente hasta donde sea
posible. Atornille la tuerca de wrnpresion
en el extreme de la salida con una llave
ajustable. No apriete demasiado. ABRA el
suministro de agua principal y deje wrrer
el agua hasta que salga clara. CIERRE la
v&ula de cierre en la tuberfa del agua.
Haga un espiral wn la tuberia de wbre.
19
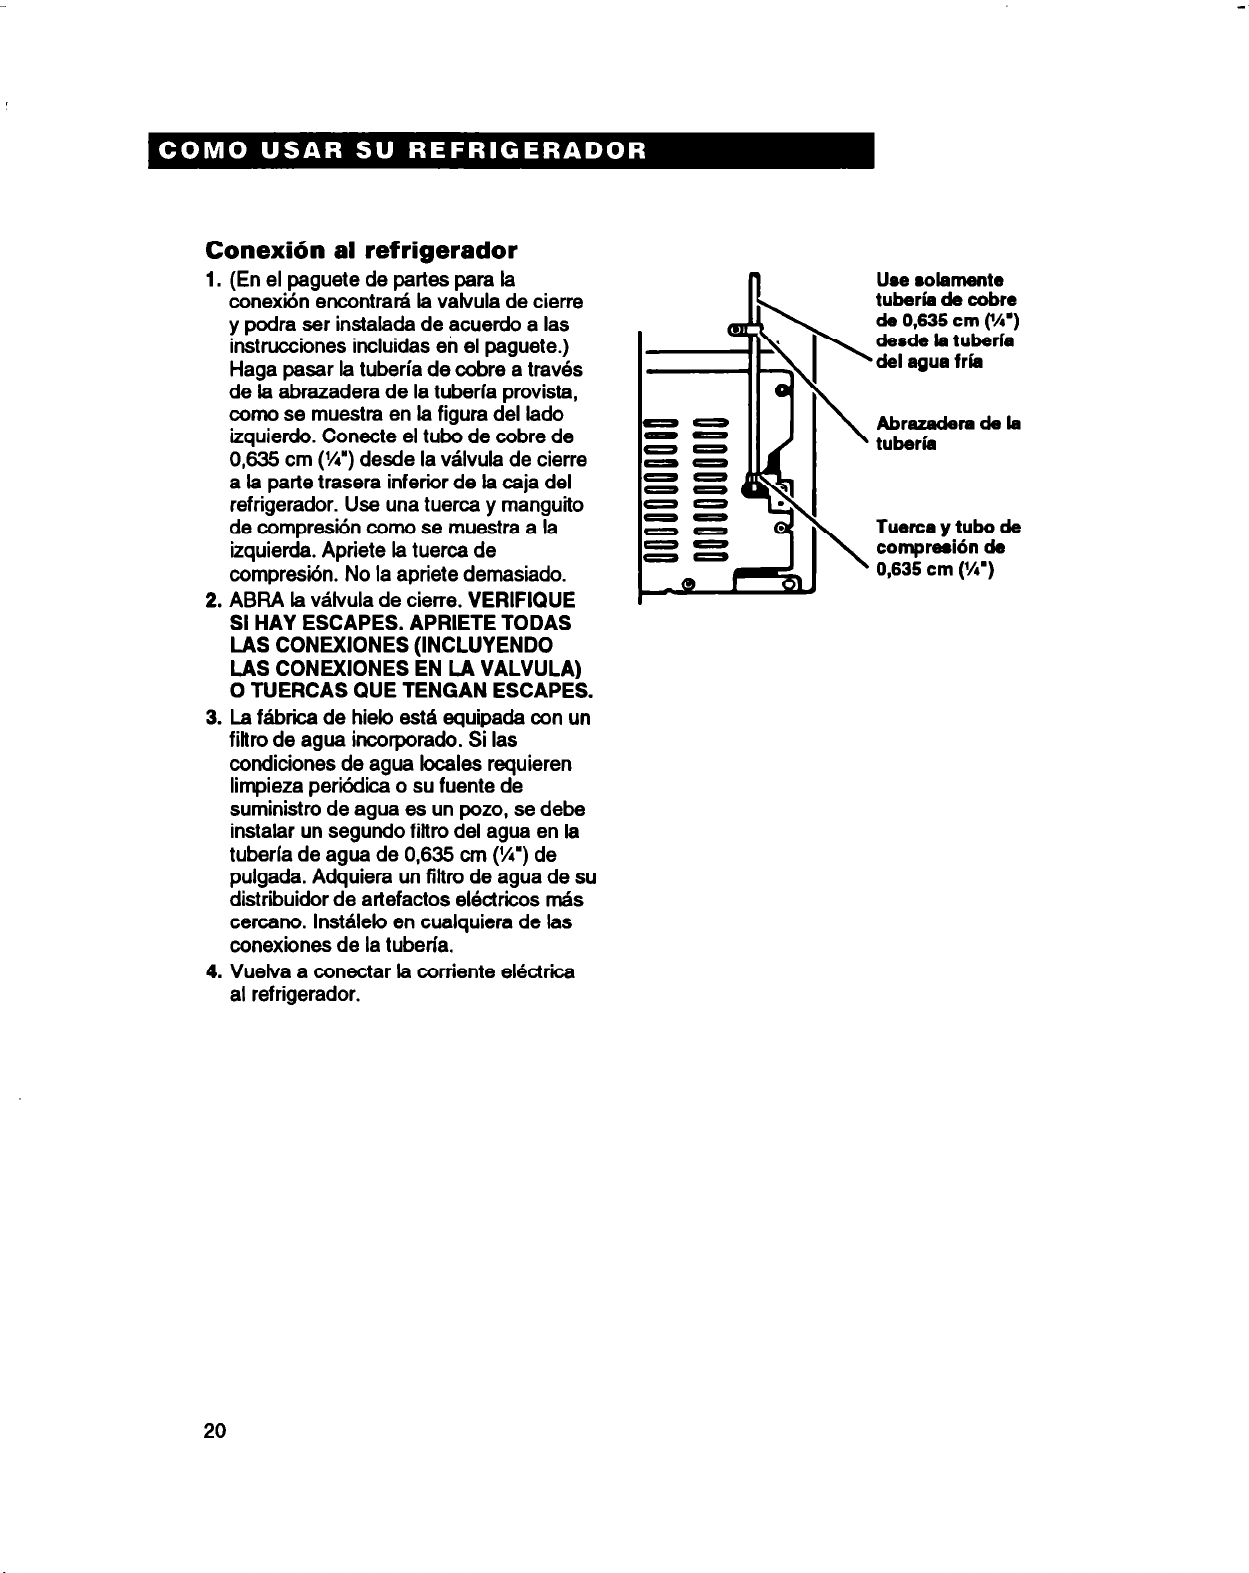
Conexih al ref rigerador
1. (En el paguete de parks para la
wnexkk encontrak la valvula de cierre
y podra ser instalada de acuerdo a las
instrucciones incluidas en el paguete.)
Haga pasar la tuberia de cobre a traves
de la abrazadera de la tuberia provista,
wmo se muestm en la figura del lado
izquierdo. Cone&e el tubo de wbre de
0,635 cm (W) desde la vklvula de cierre
a la parte trasera inferior de la caja del
refrigerador. Use una tuerca y manguito
de wmpresi& wrno se muestra a la
izquierda. Apriete la tuerca de
wmpresion. No la apriete demasiado.
2. ABRA la valvula de cierre. VERIFIQUE
SI HAY ESCAPES. APRIETE TODAS
LAS CONEXIONES (INCLUYENDO
LAS CONEXIONES EN LA VALVULA)
0 TUERCAS WE TENGAN ESCAPES.
3. La fabrica de hieb esti equipada con un
filtro de agua incorporado. Si las
wndiciones de agua locales requieren
limpieza periklica o su fuente de
suministro de agua es un pozo, se debe
in&alar un Segundo filtro del agua en la
tuberfa de agua de 0,635 cm (W) de
pulgada. Adquiera un filtro de agua de su
distribuidor de artefactos ektriios rnk
cercano. lnstalelo en cualquiera de las
wnexiones de la tuberfa.
4. Vuelva a wnectar la wrriente ektrica
al refrigerador.
00
00
= =
00
00
00
00
00
lJ8e 8olamente
tuberie de cobre
da 0,635 cm (W)
desde le tuberka
del agua fria
Abrazadera de la
tubericl
Tuerca y tubo de
compreeih de
0,635 cm (W)
20
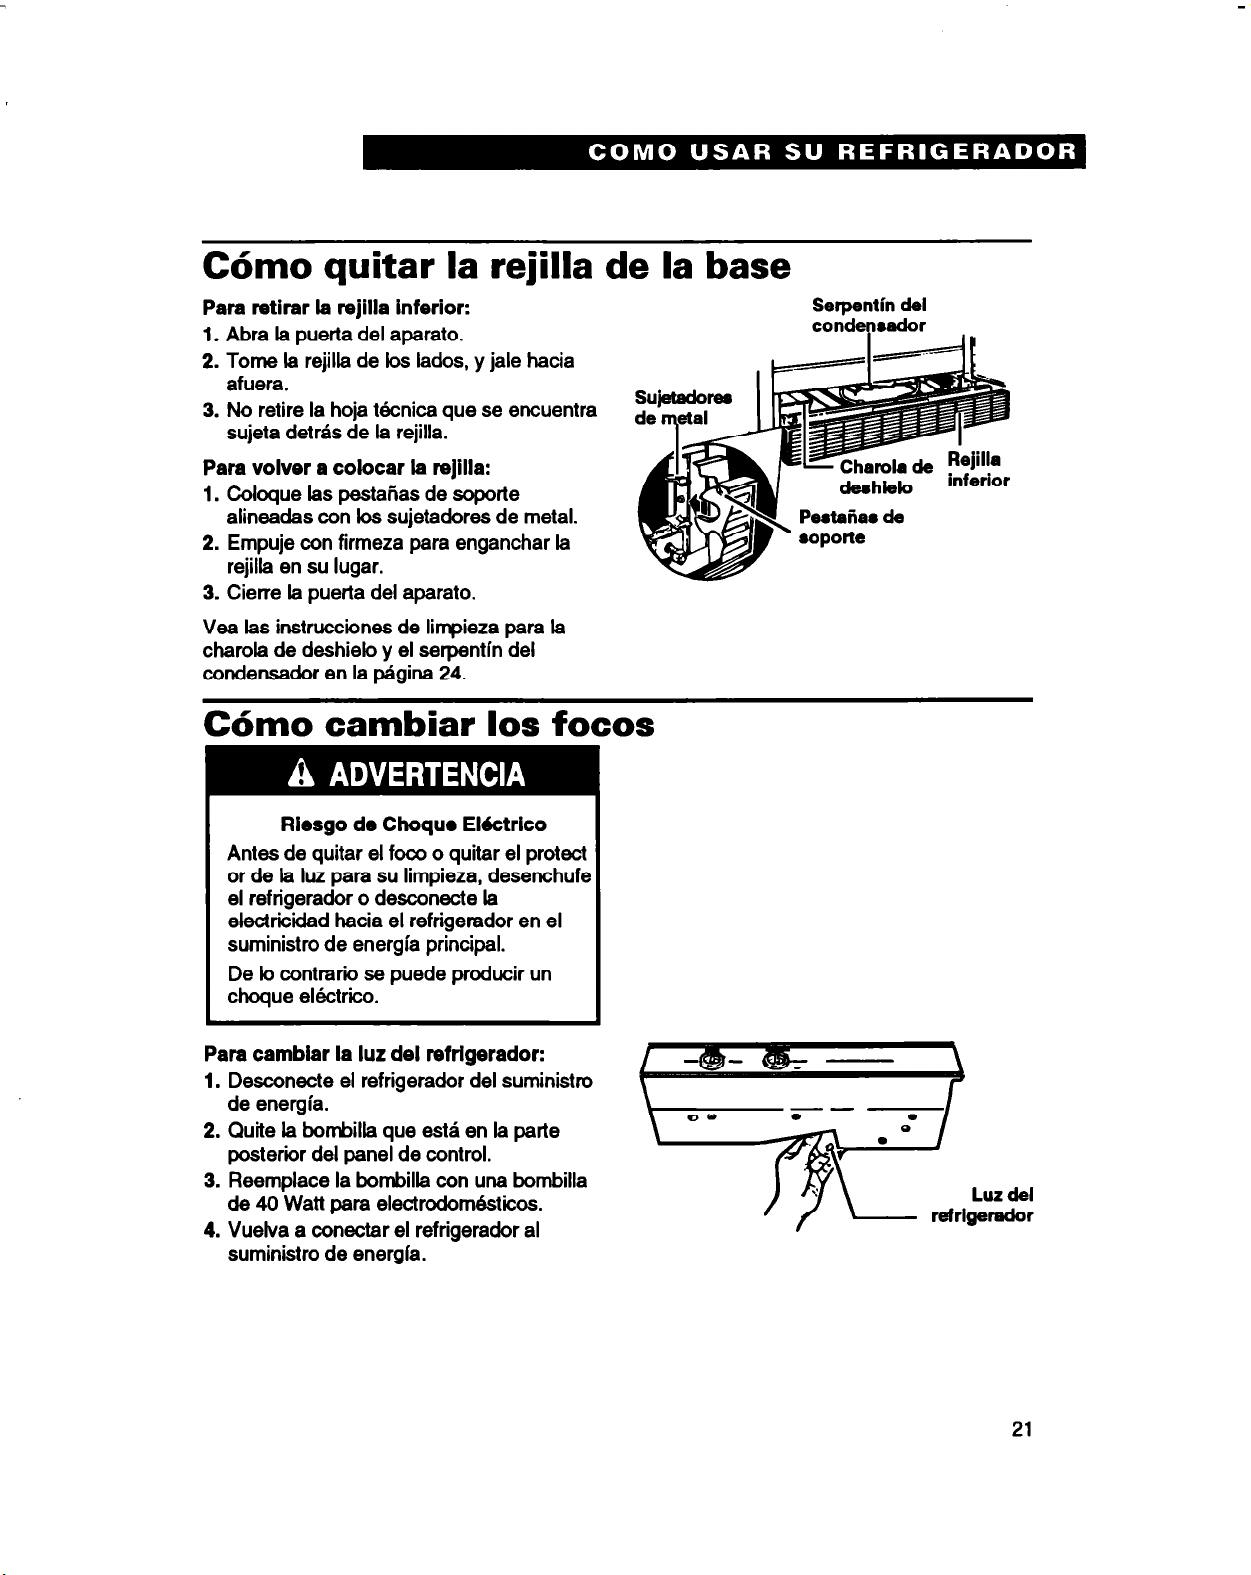
C6mo quitar la rejilla de la base
Para retirar la rejilla inferior:
1.
Abra la puerta del aparato.
2. Tome la rejilla de bs lados, y jale hacia
afuera.
3. No retire la hoja Gcnica que se encuentra
sujeta detras de la rejilla.
Para volver a colocar la rejilla:
1.
Cobque las pestaAas de soporte
alineadas con bs sujetadores de metal.
2. Empuje con firmeza para enganchar la
rejilla en su lugar.
3. Cierre h puerta del aparato.
Vea las instruccbnes de limpieza para la
charola de deshieb y el serpentfn del
wndensador en la @gina 24.
C6mo cambiar 10s focos
Riesgo de Choque Ektrlco
Antes de quitar el foco o quitar el protect
or de la luz para su limpieza, desenchufs
el refrigerador o desconecte la
electricidad hacia el refrigerador en el
suministro de energia principal.
De b wntmrii se puede prcducir un
choque ektrico.
Sefpentin del
condenmdor
.
eharola de
i=
Pestaiiae de
i\
roporte
deehielo
Para cambiar la luz del refrlgerador:
1.
Desconecte el refrigerador del suministro
de energia.
2.
Quite la hombilla que esta en la parte
posterior del panel de control.
3. Reemplace la bornbilh con una bombilla
de 40 Watt para electrodom&icos.
4. Vuelya a wnectar el refrigerador al
suministro de energfa.
21
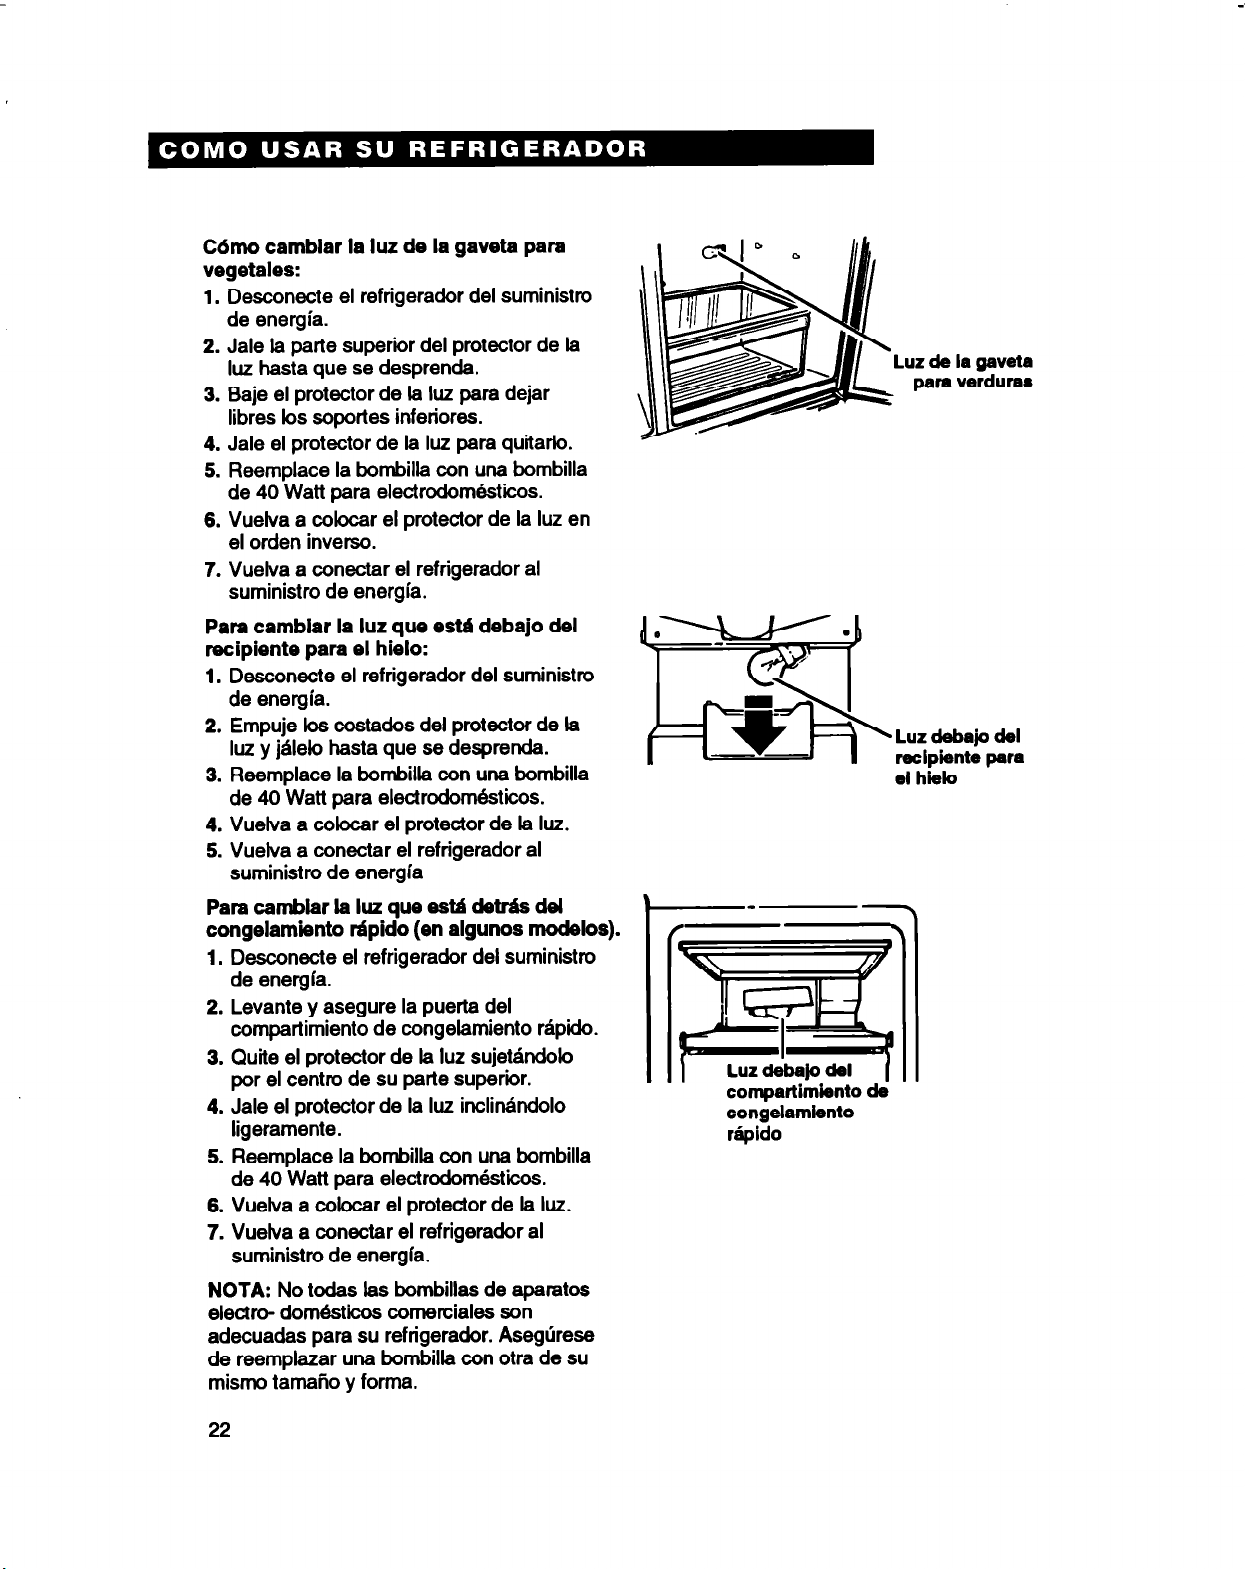
C&no cambiar la luz de la gaveta para
vegetales:
1.
Desconecte el refrigerador del suministro
de energia.
2. Jale la parte superiir del protector de la
luz hasta que se desprenda.
3. Baje el protector de la luz para dejar
libres bs soportes inferiores.
4. Jale el protector de la luz para quitarlo.
5. Reemplace la bombilla con una bombilla
de 40 Watt para electrodom&icos.
6. Vuelva a wbcar el protector de la luz en
el orden inverse.
7. Vuelva a wnectar el refrigerador al
suministro de energia.
Para camblar la luz que esta debajo del
recipiente para el hielo:
1.
Desconecte el refrigerador del suministro
de energia.
2. Empuje los costados del protector de la
luz y jdleb hasta que se desprenda.
3. Reemplace la bombilla con una bombilla
de 40 Watt para electrodom&icos.
4. Vuelva a wlocar el protector de la luz.
5. Vuelva a wnectar el refrigerador al
suministro de energia
Luz de la gaveta
pan
verdure8
Luz ckbajo del
reclpiente
01 hielo
p8ra
Para cambiar la luz que esta detr%s del
congelamiento tipido (en algunos modelos).
1.
Desconecte el refrigerador del suministro
de energla.
2. Levante y asegure la puerta del
wmpartimiento de wngelamiento rApido.
3. Quite el protector de la luz sujetindob
por el centro de su parte superiir.
4. Jale el protector de la luz inclinhdolo
ligeramente.
5. Reemplace la bombilla con una bombilla
de 40 Watt para electrodom&kos.
6. Vuelva a wlocar el protector de la luz.
7. Vuelva a wnectar el refrigerador al
suministro de energla.
NOTA:
electro- domkhos wmerciales son
adecuadas para su refrigerador. Asegtirese
de reemplazar una bombilla con otra de su
mismo tamaiio y forma.
22
No todas las bombillas de aparatos
compartimiento de
congelamlento
rhpido
Sonidos provenientes de su refrigerador
Su nuevo refrigerador puede emitir sonidos
que el antiguo no emitia. Debido a que estos
sonidos son nuevos para usted, usted podria
preocuparse. No hay motivo para elb. La
mayoria de bs nuevos sonidos son
normales. Las superficies duras wmo el
piso, las paredes y bs e&antes pueden
hater que bs sonidos Sean r&s fuertes.
A continua&n se describen las clases de
sonidos que usted puede escuchar y que bs
producen.
Leve murmullo, silbido suave
Puede provenir del motor del ventilador del
refrigerador y del movimiento del aire.
Sonidos del agua
Cuando el refrigerador deja de funcionar
puede oir gorgoteo en la tuberia por algunos
minutes despu6s de que se detiene.
Tambien puede oir el agua descongelada
que wrre hacia la bandeja wlectora del
agua.
Sonidos de la fgbrica de hielo
l
goteo de agua
l
caida del hielo
Usted puede oir un zumbii (la v6lvula del
agua), agua que gotea y el ruido de bs
cubes del hielo al caer al dep6sito.
Chasquidos o golpes secos
El termostato emite un chasquido definido
cuando el refrigerador deja de funcbnar.
Tambien produce un sonido cuando el
refrigerador wmienza a funcionar.
El medidor de descongelacbn tambien
produce un chasquido cuando wmienza el
cicb de descongelacbn.
Ahorro de energia
Usted puede ayudar a que su refrigerador
utilice menos energia.
l
Verifiiue si bs empaques de las puertas
estan herrn6ticos. Nivele el refrigerador
para asegurarse
de que el cierre es herm&ico.
l
Limpie bs serpentines del wndensador
regularmente.
l
Abra la puerta tan pocas veces wrno sea
posible. Piense en b que necesita sacar
antes de abrir la puerta. Saque todo de una
sola vez. Mantenga el aliment0 organizado
de modo de que usted no tiene que
wmenzar a buscar b que necesita. Cierre
la puerta tan pronto wrno haya sacado el
alimento.
Los sonidos de
funcionamiento
El refrigerador tiene un wmpresor y un
motor de alta efiiiencia. Funcionati por
periodos nds probngados que el modeb
antiguo. Le puede parecer que el
refrigerador estB funcbnando la mayor parte
del tiempo.
l
Usted puede llenar el refrigerador. Sin
embargo debe dejar espacb para que el
aire pueda circular lihremente.
l
Es un desperdicb de electricidad wbcar
el refrigerador y el descongelador a
temperaturas m&s frias de b que sea
necesarb. Si el helado esta firme en el
wngelador y las bebidas estin tan frias
coma a su familia les gustan, el
refrigerador esta b suficientemente frio.
l
Asegurese de que su refrigemdor no este
cerca de una fuente de cabr tal wmo la
estufa, un calentador del agua, una
caldera, un radiador o a la luz directa
del sol.
C6mo cambiar la abertura de la puerta
Las puertas de su refrigerador son reversibles.
Si usted necesita cambiar la abertura al otro
lade, wnsulte la hoja de instruccbnes que se
incluye con su refrigerador.
23

Cuidado de su Refrigerador
Su refrigerador ha sido wnstruido para proporcionarle muchos aFios de setvicio seguro. Sin
embargo, hay algunas sugerencias que pueden ayudarle a probngar su vida Ml. Esta
secci6n describe wmo limpiar su refrigerador y como pmceder cuando se va de vacaciones,
durante tas mudanzas o cuando hay fallas de energia elkctrica.
Limpieza de su
Tanto el refrigerador wrno el L-1
congelador se descongelan
autom&icamente. Sin embargo,
limpie ar&os por b menos una
vez al mes para ayudar a evitar
los obres que se acumulan. Limpie los
derrames inmediatamente.
Para
limpiar su refrigerador, desenchtifelo,
saque todas las piezas removibles y limpie
el refrigerador de acuerdo a las siguientes
instrucciones.
PIEZA
Piezas
removibles
(parrillas, cajones,
etc.)
Exterior
QUE USAR
Esponja o paiio con
detergente suave y
agua caliente
Esponja, paho o toalla
de papel con detergente refrigerador. No use limp&lores fuertes
suave, agua calinete y 0 abrasivos.
una buena cera para
apartos el&Arii (0
una buena cera para
limpiar autorrtoviles)
refrigerador
*
M
Riesgo de Lesh Personal
Los tubos del sistema de refrigeraci6n
estin cerca de la bandeja wlectora del
agua y puede estar caliente. Saque e
instale la bandeja wlectora del
cuidadosamente.
De lo contrario puecle ocasionar una
lesion personal.
ague
COMO HACER LA LIMPIEZA
l
Lavar a mano, enjuagar y secar bien.
l
Lave la parte exterior de la caja del
l
Enjuague y seque bien.
l
Coloque cera a las superficies de metal
pintadas por b menos dos veces al aho.
Aplique cefa con un paR0 limpio y
suave.
La cers proteje las superfkies
de metal pintadas contra la
oxidacibn. No coloque cera en las
piezas de pWstico.
Paredes
interiores
(deje
que el
congeiador se
caliente para que el
paiio no se pegue)
Revestimientos y
empaques
de las puertas
24
Esponja, paib o toalla
de papel con
biirbonato de sodio o
un detergente suave y
agua caliente
Esponja, paiio o toalla
de papel con detergente
suave y agua tibia
l
Lavar con una mezcla de agua caliinte
y detergente suave o biirbonato de
sodb idos cucharadas 26 a loor cuarto
de galbn] .95 L de agua). 1 ”
l
Enjuagar y secar bien.
l
Lave, enjuague y seque bien.
NO USE ceras de Ilmpiexa, detergentes
concentrados, blanqueadores o
limpiadores a base de petrho en las
piezas de plhtico.
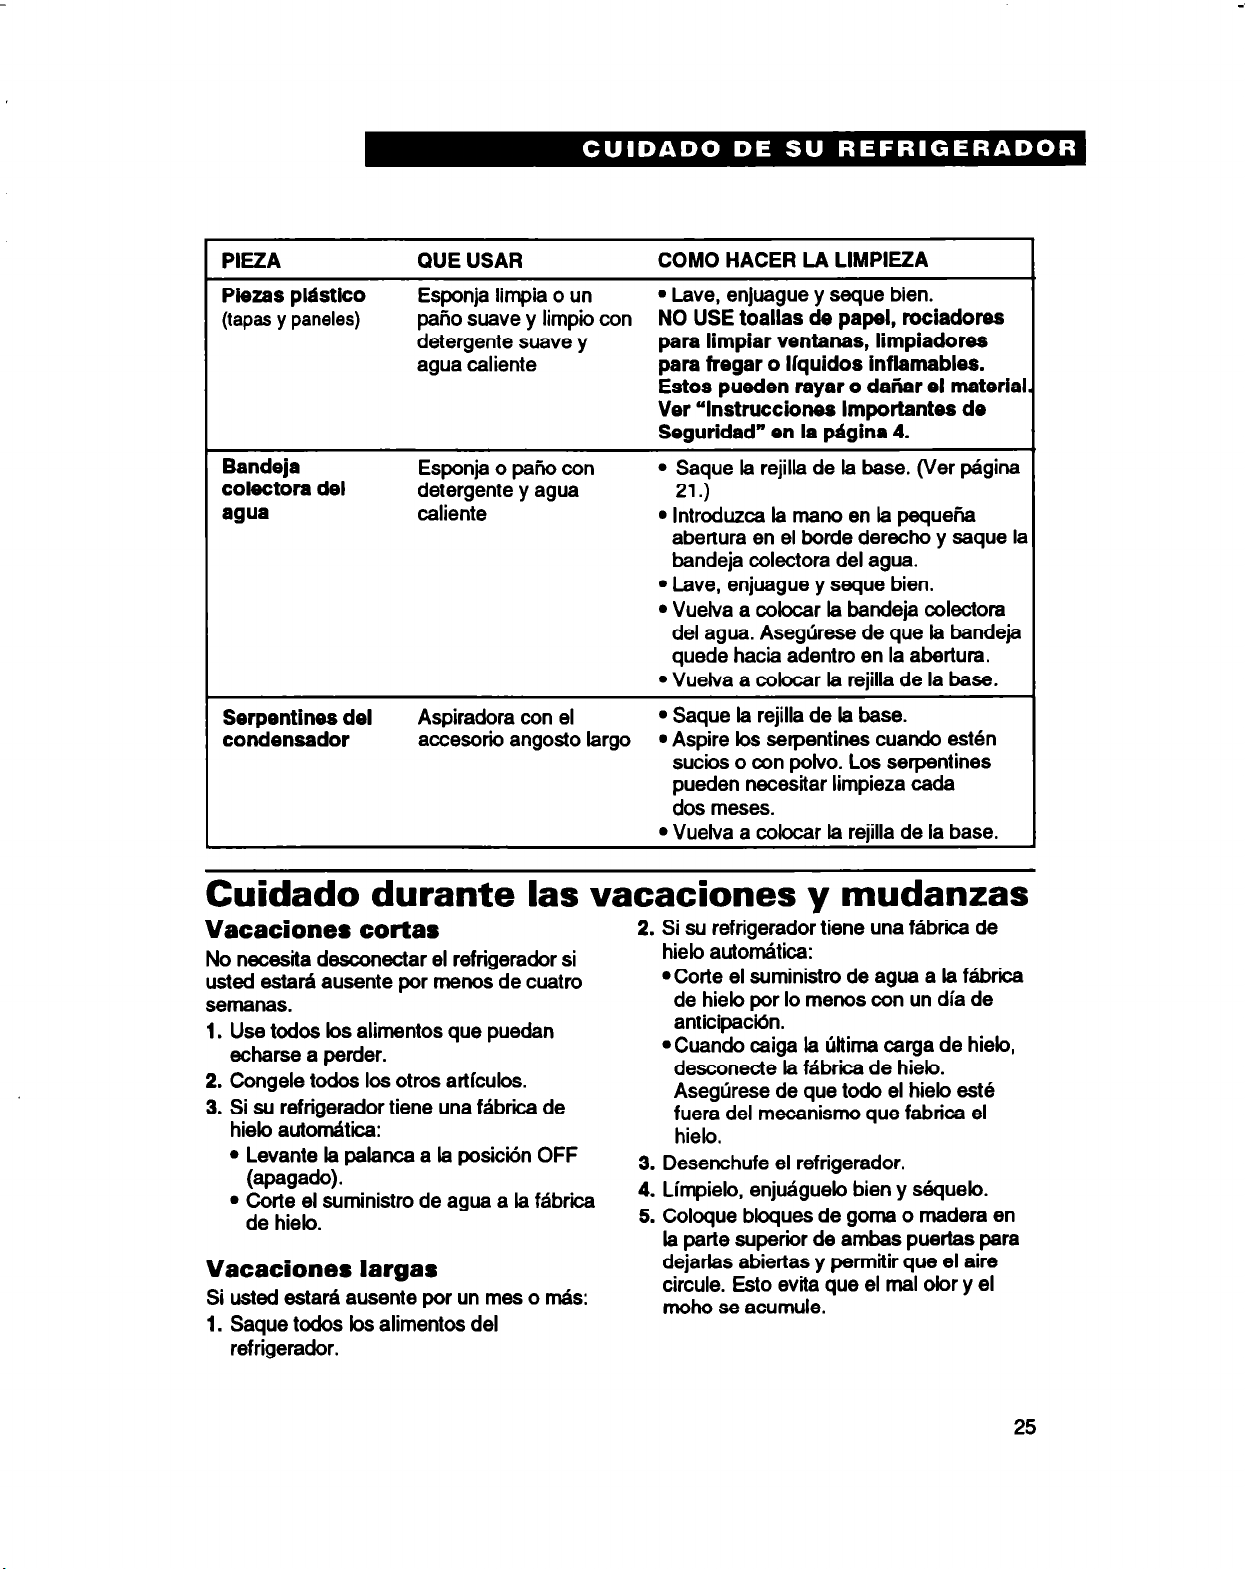
PIEZA
Piezas plhtico
(tapas y pan&s)
QUE USAR
Esponja limpia o un
paho suave y limpio con
detergente suave y
agua caliente
COMO HACER IA LIMPIEZA
l
Lave, enjuague y seque bien.
NO USE toallas de papel, rociadores
para limpiar ventanas, limpiadores
para fregar o llquidos inflamables.
Estos pueden rayar o dab el material
Ver “Instrucciones Importantes de
Seguridad” en la @gina 4.
1
Bandeja
cofectora
agua
del
Esponja o pafio con
detergente y agua
caliente
l
Saque la rejilla de la base. (Ver pagina
21.)
l
lntroduzca la mano en la pequeha
abertura en el borde derecho y saque
bandeja colectora del agua.
l
Lave, enjuague y seque bien.
l
Vuelva a colocar la bandeja colectora
del agua. Asegljrese de que la bandeja
quede ha& adentro en la abertura.
l
Vuelva a colocar la rejilla de la base.
l
Serpentines del
condensador
Aspiradora con el
accesorio angosto largo
Saque la rejilla de la base.
l
Aspire bs serpentines cuando e&n
sucios 0 con polvo. Los serpentines
pueden necesitar limpieza cada
dos meses.
l
Vuelva a colocar la rejilla de la base.
Cuidado durante las vacaciones y mudanzas
Vacaciones cortas
No necesita desconectar el refrigerador si
usted estara ausente por menos de cuatro
semanas.
1. Use todos los alimentos que puedan
echarse a perder.
2. Congele todos los otros artfculos.
3. Si su refrigerador tiene una fdbrii de
hielo autorrdtica:
l
Levante la palanca a la posici6n OFF
@fwaW.
l
Corte el suministro de agua a la fabrica
de hielo.
Vacaciones largas
Si usted estara ausente por un mes 0 m&s:
1. Saque todos los alimentos del
refrigerador.
2. Si su refrigerador tiene una fabrii de
hielo autondtica:
l
Corte el suministro de agua a la f6brica
de hielo por lo menos con un dfa de
anticipactin.
.Cuando caiga la tittima carga de hielo,
desconecte la fabrica de hielo.
Asegurese de que todo el hielo este
fuera del mecanismo que fabrica el
hielo.
3. Desenchufe el refrigerador.
4. Lirnpielo, enjrkguelo bien y Gquelo.
5. Coloque bloques de goma o madera en
la parte superior de
ambes
puertas para
deja&s abiertas y permitir que el aire
circule. Esto evita que el mal olor y el
moho se acumule.
la
25
Riesgo de Lesidn Personal
No permita que los niiios suban, jueguen
o trepen dentro del refrigerador cuando
las puertas estan abiertas.
Se pueden lesionar 0 quedar atrapados.
Para volver a conectar el refrigerador, vea
la @gina 8.
Mudanzas
Cuando este cambiando el refrigerador a su
nuevo hogar:
1. Si su refrigerador tiene una fabrii de
hielo autondtica:
l
Corte el suministro de
de hielo por lo menos con un dia de
anticipation.
l
Desconecte la tuberfa del agua.
l
Deje que caiga la uftirna carga de hielo,
levante la palanca a la position OFF
(apawdo).
agua
a la fabrica
2.
Saque todos los alimentos del
refrigerador.
3.
Empaque todos los alimentos congelados
con hielo seco.
Desenchufe el refrigerador.
4.
5.
Lfmpielo bien. Enjuague bien y seque.
Saque todas las piezas removibles,
6.
envuelvalas bien y p&galas juntas para
que no se muevan y hagan ruido.
7.
Atomille hacia adentro los rodadillos
niveladores.
Cobque cinta para mantener la puertas
6.
cerradas y sujete con cinta el cordon
elkctrico a la caja del refrigerador.
Cuando llegue a su nuevo hogar, coloque
todo de vuelta en su lugar y consulte la
pagina 6. Adem&, si su refrigerador tiene
una fabrica de hielo autom&ca, recuerde
volver a conectar la tuberia del agua.
lnterrupciones de energia elktrica
Si la energia ektrica se interrumpe, llame
a la compafiia de luz. Pregunte cuanto
tiempo va estar la corriente cortada.
1.
Si el servicio sera interrumpido durante
24 horas o
puertas cerradas.
mantener los alimentos congelados.
2. Si el servicio va a ser interrumpido por
rds de 24 horas:
(a) Saque todos el aliment0 congelado y
cobquelo en un congekbr separado.
0
(b) Coloque 900 g (2 libras) de hielo seco
en el congelador por cada litro (pie
cubii) de espacio del refrigerador.
Esto ayudara a mantener el aliment0
congelado durante 2 a 4 dias. Use
guantes para proteger sus manes
contra las quemaduras del hielo seco.
26
menos,
mantenga ambas
Esto ayuda a
0
(c) Si no dispone de un congelador
separado o de hielo seco, use o
coloque en conserva el aliment0 que
puede descomponerse.
3. Un congelador lleno se mantiene frfo por
n-k tiempo que un congelador
parcialmente Ileno. Un congelador lleno
de came se mantiene m&s frfo que un
congelador lleno de pmductos de
panaderia. Si el aliment0 tiene cnstales
de hielo, puede ser recongelado con toda
seguridad, aunque la caliiad del s&or
puede ser inferior. Si el estado del
alimento es deficiente o si usted no se
siente seguro, desckteb.
Gul’a para la Conservacih
de 10s Alimentos
Existe una manera correcta de guardar y empaquetar el aliment0 refrigerado 0 congelado.
Para rnantener el aliment0 rn& fresco, durante m6s tiempo, estudii bs pasos que se
recomiendan a continuacbn.
Almacenamiento de alimentos frescos
Envuelva o guarde el aliment0 en el
refrigerador en material o envases herm6ticos
o a prueba de humedad. Esto evita que el obr
y el sabor del aliment0 circule a travks del
refrigerador. Para bs productos que tienen
fecha de caducidad, verifique la fecha en
&dig0 para asegurar su frescura.
Las verduras con hojas
Saque la envoltura original y elimine bs talbs
o areas descobridas o maltratadas. Lave en
agua frfa y deje escurrir. Cobque en una bolsa
plktica o en un envase de pbstico y
almacene en el caj6n para verduras.
Los vegetales con pie1
(zanahorias, pimientos)
Guardar en el cajon para verduras en bolsas
pbsticas o en envases de pbstico.
Fruta
Lavar, dejar secar y cobcar en el refrigerador
en t&as de pktico o en el compartimiento
de hs verduras. No favar o limpiar las frutillas
hasta que no e&n listas para ser usadas.
Clasifque y mantenga las fresas en el envase
original en el caj6n para verduras 0 gukdelas
en una bolsa de papel a medb cerrar en una
division del refrigerador.
Huevos
Guardebs sin lavar en el carton original en las
parrillas interbres. Para su conveniencia, en
algunos modebs se ha incluido un recipiente
para guardar huevos.
Mantequilla o margarina
Mantenga la mantequilla que haya usado en
un Plato tapado 0 en el compartimiento
cerrado. Cuando guarde rnantequilla
adicional, envuelvala en papel para
congelador y congebla.
Queso
Guardeb en su envoltura original hasta que
est6 list0 para usarb. Una vez abierto,
vueka a envokerlo bien con pktico o papel
de aluminb.
Restos de aliment08
Cubra bs restos de alimentos con pl&tico o
con papel de aluminb. Los envases de
pktico con tapas herm6tbas tambi6n
pueden ser usados.
Carne
IA mayorfa de la came puede ser guardada
en su envoltura original siempre que sea
hermetica y a prueba de humedad. Vuefva a
envolver si es necesarb. Ver bs siguientes
perbdos de consetvacbn. Cuando se
almacena came por perbdos de tiempo m6s
probngado que bs indicados a continuacbn,
se recomienda congelar la came.
Poll0 . . . . . . . . . . . . . . . . . . . . . . . . . . . . . . . . . . . . . . . . . . . . . . . . .
Tocino . . . . . . . . . . . . . . . . . . . . . . . . . . . . . . . . . . . . . . . . . . . . . . 5-7 dfas
Came de res molii
Carnes frfas
Bisteceskames para asar . . . . . . . . . . . . .
. . . . . . . . . . . . . . . . . . . . . . . . . . . . . . . . . . . . . .
. . . . . . . . . . . . . . . . . . . . . . . . . l-2 dfas
l-2 dfas
3-5 dfas
7-l 0 dfas
Leche
Seque las cajas de carton. Pam almacenarlas
mejor, cobque la leche en la parrilla interior.
Carnes variidas dias
Carnes curadas
NOTA: Use el pescado y bs mariscos
fresoos el mismo dia que bs compre.
. . . . . . . . . . . . . . . . . . . . . .
. . . . . . . . . . . . . . . . . . . . . . . . . . . . . . . .
5-7 dfas
l-2 dias
27

Almacenamiento de Alimentos Congelados
En el congelador se pueden wnsewar bs
alimentos wngelados wrnercialmente y
aquellos que se desean wngelar del hogar.
NOTA:
Para mayor information acerca de la
preparation del alimento para wngelarto o
los perbdos de wnservacidn de bs
alimentos, p6ngase en contact0 con su
Senkio de Extension Cooperativa o
wnsulte una gufa sobre wngelacion de
alimentos o un libro de cock
Corn0 envasar lo8 aliment08
El secret0 de la wngelacion exitosa es el
envase. El envase no debe permitir la
entrada o salida del aire o de la humedad.
De b wntrario, el olor y saber de 10s
alimentos circular& a trav6s del refrigerador
y secara el aliment0 wngelado.
Envolturas recomendadas:
l
Envases de plastiw con tapas herrn6ticas
l
Frasws para wnservas/wngelacin
l
Envoltura de papel de aluminio grueso
l
Papel con form de plastic0
l
Envofturas pkticas impermeables
(he&as de pelfcula Saran)
Congelacidn
No espere que su wngelador wngele
grandes cantidades de aliment0
kpidamente. No ponga mas aliment0 en el
wngelador del que pueda wngelar dentro
de 24 horas (no rn6s de 900-l ,350 g por litro
[2-3 libras de aliment0 por pi6 cubii] de
espacio del wngelador). Deje sufiiiente
espacio para que circule el aire alrededor de
los paquetes. Tenga cuidado de dejar
suficiente espacio al frente de manera que
la puerta pueda cerrarse hermeticamente.
Los periodos de tiempo de wnservacion
variaran de acuerdo con la calidad del
alimento, el tipo de paquete o con la
envoltura usada (herm6tico y a prueba de
humedad) y con la temperatura de
wnsewacion que debe ser de
-17,8”C (0°F).
Siga las instrucciones del paquete o del
envase para los metodos de wngelaci6n
adecuados.
No
usar:
l
EMsas del pan
l
Envases pktiws que no son de
polietileno
l
Envases sin tapas hermkas
l
Papel de cera
l
Papel encerado de wngelador
l
Papel delgado semipermeable
El uso de estas envolturas puede causar
transferencia del olor y del sabor de bs
alimentos y secar el aliment0 wngelado.
28

Diagnktico de Problemas
A menudo los problemas que puedan producirse se pueden solucionar sin necesidad de
herramientas. Por favor lea la secci6n “Antes de pedir ayuda...” que se incluye a
wntinuacion antes de solicitar servicio para su aparatos.
Antes de pedir ayuda...
En esta tabla se incluye la mayorfa de los problemas rrk wmunes que bs wnsumidores
enfrentan con sus aparatos. Le rogamos leer atentamente para que pueda solucionar su
problema.
PROBLEMA SOLUCION
El refrlgerador no
funciona
Las lutes no
trabajan
La fabrica de
hielo no trabaja
Ruidos extranos
0 tintineo
LEsta el cordon el6ctrico bien enchufado en un circuit0 con el voltaje
apropiado?
ASe ha quemado o disparado un disyuntor o un fusible del hogar?
LEsta el wntrol del refrigerador en la posictin OFF (apagado)?
~Esta el cordon ektriw bien enchufado en un circuit0 con el voltaje
apropiado?
ASe ha quemado o disparado un disyuntor o un fusible del hogar?
LSe quern6 alguna ampolleta?
LEsta el wngelador bastante frio corn0 para l-racer hielo? El
wngelador puede demorar toda la noche en alcanzar la temperatura
adecuada.
LEsta la palanca ON/OFF (encendidokpagado) en la posiciin ON
(hacia abajo)? (Ver pagina 15.)
LEsta la llave del agua abierta?
iHay una obstrucci6n o un escape en la tuberfa del agua?
LHay algo arriba o detras del refrigerador?
Algunos de los sonidos son normales. Ver la section ‘Sonidos
provenientes de su refrigeradof en la pagina 23.
Hay agua en la
bandeja
cofectora refrigerador esta bien nivelado para que la bandeja M se derrame.
El motor parece
que funciona
exceslvamente
Esto es normal en dfas de mucho calor. Asegurese de que el
LEstan los serpentines del wndensador sucios?
LSe ha abierto la puerta muy a menudo? @e agreg una gran
cant&d de alimentos de una sola vez? El motor naturalmente
funcionar6 por perfodos r&s prolongados si 6sto sucede.
LEsta la habiiaci6n caliente? Si la habitation ests demasiado caliente,
el motor funciona por perfodos rrks largos para mantener el
refrigerador frfo.
29

Centro de Servicio y Venta de
Refacciones y Partes
SERVICIO ACROS - WHIRLPOOL
Utilice sin cargo para usted el Centro de Atencih al Cliente
Tel: 91-800-83-004
Zona Norte
MONTERREY
Centro Industrial Acres
Whirlpool.
Carretera Miguel Alerrkn
Km 16.695
Interior 6. Apodaca, N.L.
C.P. 66600
Tel. 329-21-00 y 366-21-31.
Fax 329-2143
Ave Alfonso Reyes No. 3210,
Col. Regina
C.P.64290 Monterrey N.L.
Tel. 351-27-37 y 351-27-03
CHIHUAHUA
Calle Sexta No. 3407. Col.
Sta Rosa
Chihuahua, Chih.
C.P. 31050
Tel./Fax 1 o-05-50
TORREON
Bhrd. Aguila National
2495 Ote.
Col. Centro
Torrebn, Coahuila,
C.P. 27000,
Tel. 22-30-78, 18-l 2-20
Fax 18-l 2-21
TAMPICO
Av. Hidalgo No. 1205 Col.
Moctezuma, C.P. 89177
Tampico Tamps.
Tel. 1 g-26-20 y 19-26-21
Fax 19-27-52
Zona Occidente
CUUACAN
Calz. H. Colegio Militar No. 165
Col. Benito Juirez,
Culiacan, Sin. C.P. 80120
Tel. 13-92-35 y 15-65-96
Fax 17-l 2-30
HERMOSILLO
Reforma y Jesus
Siqueiros No. 1
Hermosillo, Son. C.P. 83180
Tel./Fax 1 o-46-80
GUADALAJARA
Calz. Glez. Gallo No. 1269,
Sector Reforma
Guadalajara Jal. C.P. 44870,
Tel. 619-l 6-50, 619-l 5-l 5
y 61 g-23-03,
Fax 650-35-64
LEON
Av. Autotransporte No. 426
Fracc. El Papalote,
Le6n Guanajuato, C.P. 37130.
Tel. 16-01-80, 16-31-22 y
16-39-57 Ext. 4467.
Zona Centro y Sureste
MEXICO
Canela No. 47-L, Col.
Granjas Mexico,
M6xico D.F., C.P. 08400
Tel. 650-65-33 y 657-29-56
con 12 lineas.
Fax 650-38-49
Poniente 134 No. 559, Col.
Industrial Vallejo
Mexico D.F.,C.P. 02300
Tel. 368-25-25, 368-25-06.
368-2566. y 368-25-76
VERACRUZ
Miguel Alerrkn No. 652,
Col. Diaz Mir6n
Veracruz. Ver., C.P. 91909
Tel./Fax 31-28-81
VILLAHERYOSA
Guaycan No. 124, Co. del
Bosque,
Villahennosa, Tab. C.P. 86160
Tel./Fax 51-35-l 3
MERIDA
Calle 54 No. 466 por 53 y 55
Merida Yuc., C.P. 97000
Tel./Fax 28-l 038.
30

WHIRLPOOL@
P6liza de Garantia
VALIDA SOLO EN MEXICO
VITROMATIC COMERCIAL, S.A. DE C.V.
Ave. San Nicol6.s 2121 Nte. Monterrey Nvo.
Leon, Tel. 329-22-W en bs terminos de
esta p&a, garantiza al comprador y
usuarb del refrigerador marca ESTATE
identifiido en la presente p&a
exclusivamente b siguiente:
AMPARA LOS SIGUIENTES
MODELOS:
CONCEPTOS CUBIERTOS POR LA GARANTIA:
Defectos de fabriicbn que impidan total o parcialmente el correct0 funcbnamiento
del aparato que se presenten dentro de bs terminos de vigencia de esta garantfa. En
este case, la reparacbn se hara sin cost0 alguno pare el comprador o usuario. Si se
requiere el reemplazo de alguno de bs componentes, piezas o del aparato, asimismo
correra por cuenta del otorgante. lgualmente bs gastos de transporte dentro de la red
de setvicb y mano de obra derivados del cumplimiento de la garantfa se&r cubiertos
par el otorgante.
CONCEPTOS QUE INVALIDAN LA GARANTIA:
Cuando el product0 ha sido utilizado en condiibnes distintas a las normales
(el refrigarador no es para uso comer&l 0 industrial).
Cuando el producto no ha sido operado de acuerdo con el Manual de Instalacion, Uso
y Cuidado del refrigerador.
Cuando el product0 ha sido alterado 0 reparado por personas 0 establecimientos no
autorizados por Setvicb Acres-Whirpool S.A. de C.V.
PROCEDIMIENTO PARA HACER EFECTWA LA GARANTIA:
Al considerar al comprador que ha ocurrido alguno de bs eventos amparados por esta
p&a, debera ponerse en contact0 con alguno de bs estahlecimientos indicados en ta
lista de Centros de Senkb autorizados aqui incluida.
TERMINO
Esta garantfa tiene una vigencia de UN A6lO en todas sus partes usuarb reciba de
conformidad el producto. Adem& de la cobertura base de un afio, esta garantfa
ampara bs siguientes componentes y perk&s adiciinales;
4 afios para el sisterna de refrigeracbn que se compone del compresor, evaporador,
secador, condensador, filtro, tubo de conexbn y succbn.

FORMAT0 DE IDENTIFICACION
NOMBRE DEL COMPRADOR :
DoMlClLlO :
NOMBRE DEL DlSTRlBllDoR :
DoMlClLlO :
PRODllcTO :
PJlhA. DE SERIE :
FIRMA DEL DISTRIBUIDOR Y SELL0
(Sehalar con precisi6n la calle, nhero exterior 0 Interior, colonia, ciudad, eatado y C.P.)
TEL :
MODEL0 :
FECHA DE ENTREGA :
REPRESENTANTE AUTORIZADO
NOTAS IMPORTANTES
Este document0 deberh ser presentado para cualquier trimite relacionado con la garantia.
EL COMPRADOR DEBEFLA MANTENER ESTE DOCUMENT0 EN SU PODER Y EN UN
LUGAR SEGURO.
El consumidor podr6 soliciir que se haga efectiva la garantia que ampara esta poliza, ante
la casa comer&l donde adquiri6 el producto. En case de extravio de la p&a mencionada,
el proveedor expedirh una nueva p&a de garantla, previa presentacih de la nota de
compra 0 factura respectiva.
2173445
 Loading...