

Page 1
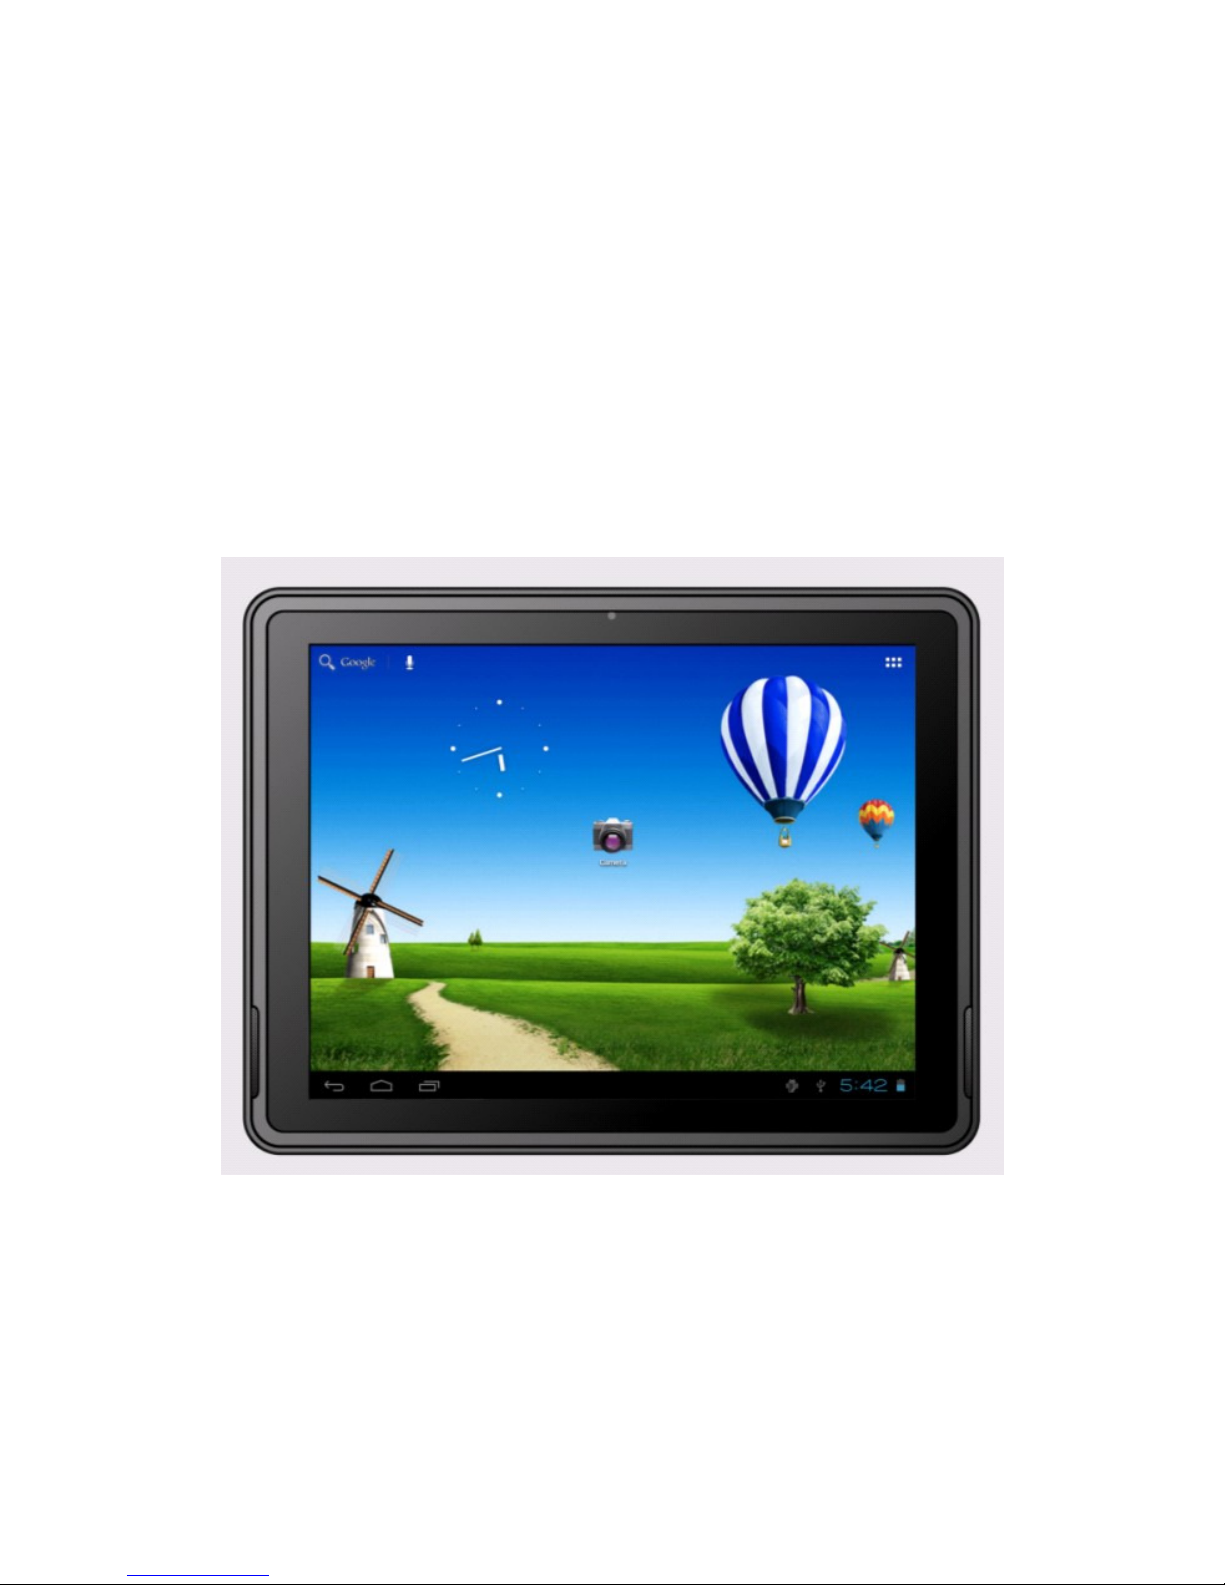
E STAR MID9728
User Manual
9.7" Tablet Android 4.0
Page 2

2
Welcome ........................................................................................................................3
Important Notices........................................................................................................... 3
Keys and Functions........................................................................................................3
I. Getting Started............................................................................................................5
1.1 Turn on/off ...................................................................................................... 5
1.1.1 Turn on.................................................................................................... 5
1.1.2 Turn off.................................................................................................... 5
1.2 Lock/unlock the screen (sleep mode) ..................................................5
1.3 Connect to computer ................................................................................6
II. Your Home Screen .................................................................................................... 6
2.1 Change wallpaper for home screen: .................................................... 7
2.2 Add/delete applications on home screen: .........................................7
2.3 Add widgets to home screen:..................................................................7
III. Network Connection ................................................................................................7
3.1 Wi-Fi ..................................................................................................................7
3.1.1 Turn on Wi-Fi..........................................................................................8
3.1.2 Turn off Wi-Fi..........................................................................................8
3.1.3 Add a Wi-Fi network...........................................................................8
3.2 3G Network .................................................................................................... 8
IV. Internet Browsing ..................................................................................................11
4.1 Internet Browsing ........................................................................................ 11
V. Install and Manage Apps......................................................................................... 12
5.1 Install Apps ...................................................................................................12
5.2 Manage Apps.............................................................................................12
VI. Multi-media Functions........................................................................................... 13
6.1 Music..............................................................................................................13
6.2 Video ............................................................................................................. 14
6.2.1 Video Player ....................................................................................... 14
6.2.2 HDMI Output ......................................................................................14
6.3 Gallery ...........................................................................................................15
6.4 Camera......................................................................................................... 15
6.5 E-book reader ............................................................................................. 16
VII. Settings .................................................................................................................17
VII. Battery ..................................................................................................................18
Troubleshooting ...........................................................................................................19
Page 3

3
Welcome
Thank you for purchasing this tablet.
It brings you much convenience for your business (supports Word, Excel,
send & receive e-mails...) and entertainment (supports 3D game,
chatting, movie playback, eBooks.....).
Running on Android 4.0, with a 1.2 GHz processor and highly responsive
capacitive touch screen, it brings you wonderful user experience.
Before beginning, please refer to this user manual carefully.
Important Notices
⊙ The new battery will be in its best condition after 2-3 times full charge
and discharge.
⊙ While using the earphone, if the volume is excessively high it may
cause hearing damage. So please adjust the volume of the player to
a moderate level and balance the time of using.
⊙ Do not disconnect the tablet suddenly when formatting or uploading
and downloading, which can lead to program errors.
⊙ Do not dismantle the tablet by yourself, and do not use alcohol,
thinner or benzene to clean its surface.
⊙ Do not use the tablet while driving or walking.
⊙ The tablet is not moisture and water resistant. Please do not use it in a
damp environment.
⊙ Do not drop or hit it to hard surface, or the screen may get damaged.
⊙ Do not upgrade the firmware by yourself. This would cause damage to
your tablet.
Keys and Functions
Page 4
4
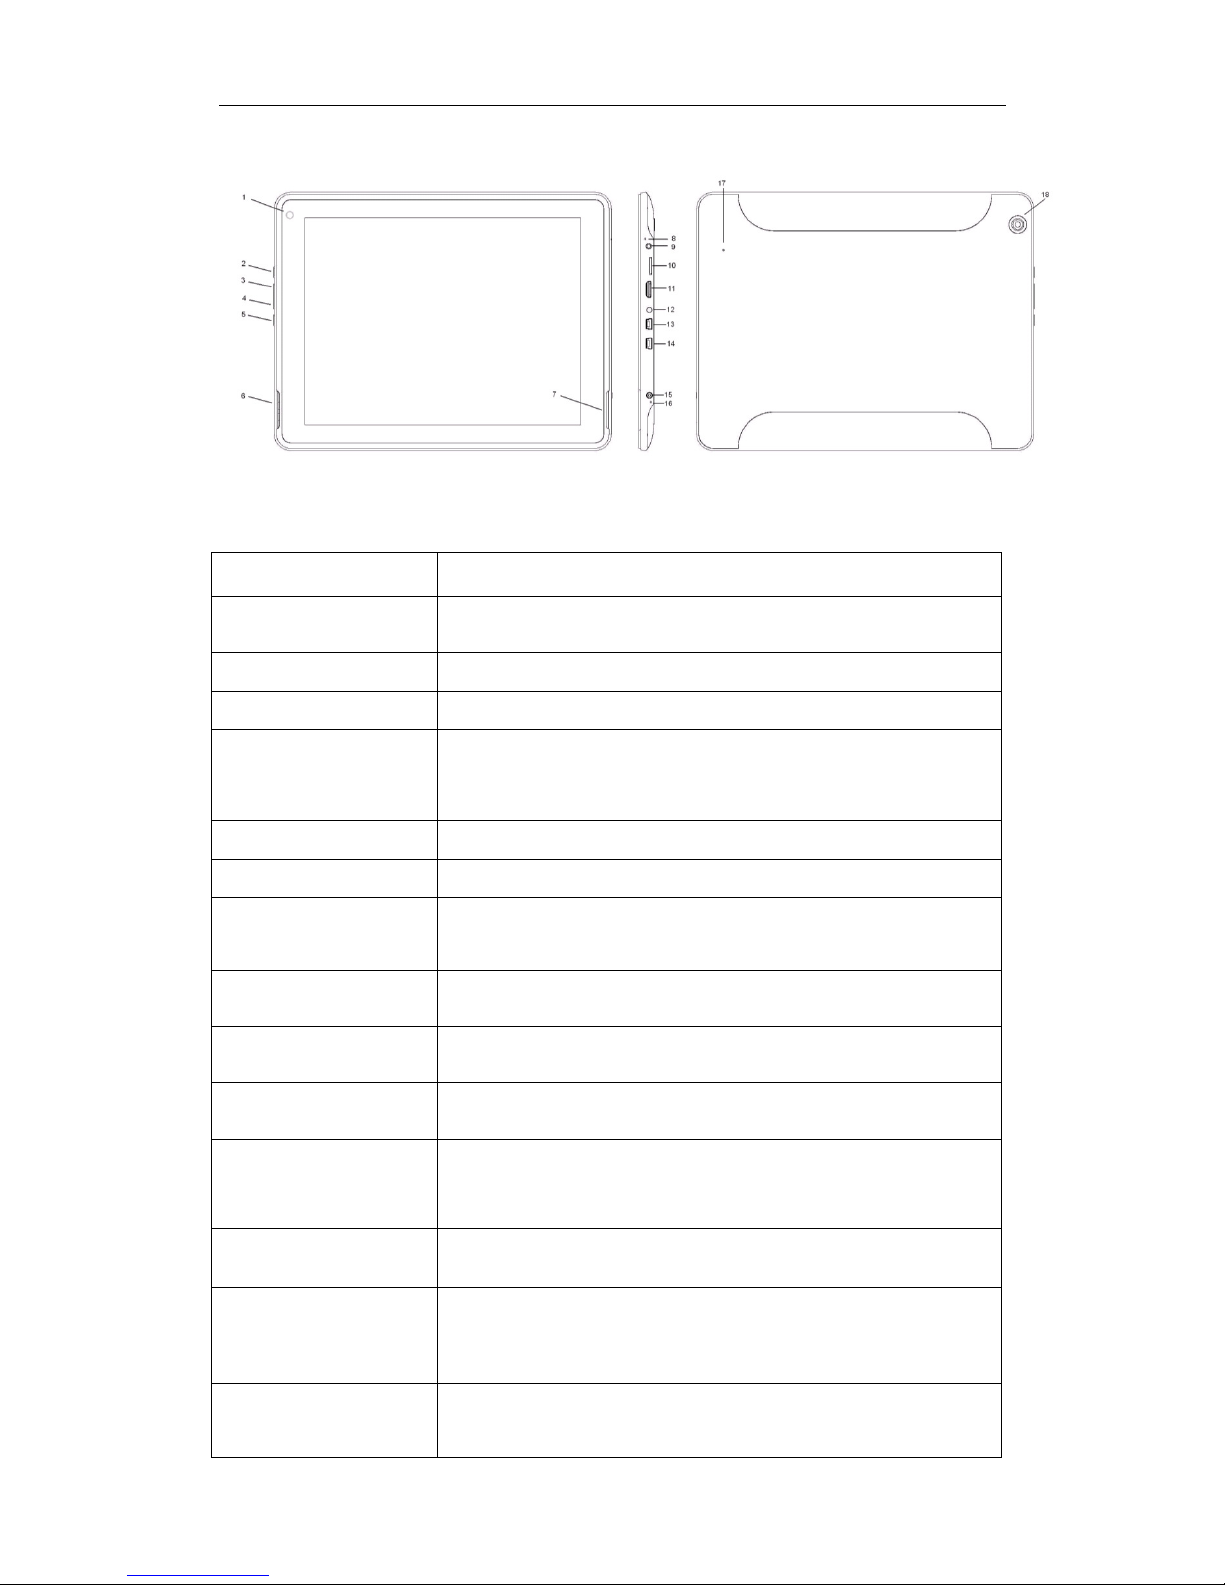
1. Front camera 2M pixel camera
2. ESC Key Tap to return to the previous screen/ page.
3. Vol+ Key Press to increase the volume
4. Vol- Key
Press to decrease the volume
5. Menu key
Tap to view the option menu. When you Tap the
Menu key from within an application, you will see
the sub-menus for the application.
6&7. Speaker Go to your home screen
8. LED slot When it is charging, it will indicate.
9. Power jack
(DC input)
Connect to a 9
V output adaptor as included in the
accessories
10. TFcard slot To insert your TF card
11. HDMI slot Connect to TV output via a HDMI cable
12. Earphone jack To connect your earphone
13. Mini-USB slot
Connect to a computer via a USB cable to
transfer data
(e.g., music, videos, photos, and other files).
14. USB host
supports mouse, keyboard, USB flash disk, etc, but
need a converter cable
15. Power and lock
key
Hold and press to turn on or turn off this unit.
Briefly press to turn on or turn off the screen.
16. MIC MIC
Page 5
5
17. Reset hole
Press to reset the tablet if it freezes or behaves
abnormal. (Use a paperclip or other sharp
object to
stab this reset hole, and then press power button to
turn it on.)
18. Rear camera 2M pixel rear camera
I. Getting Started
1.1 Turn on/off
1.1.1 Turn on
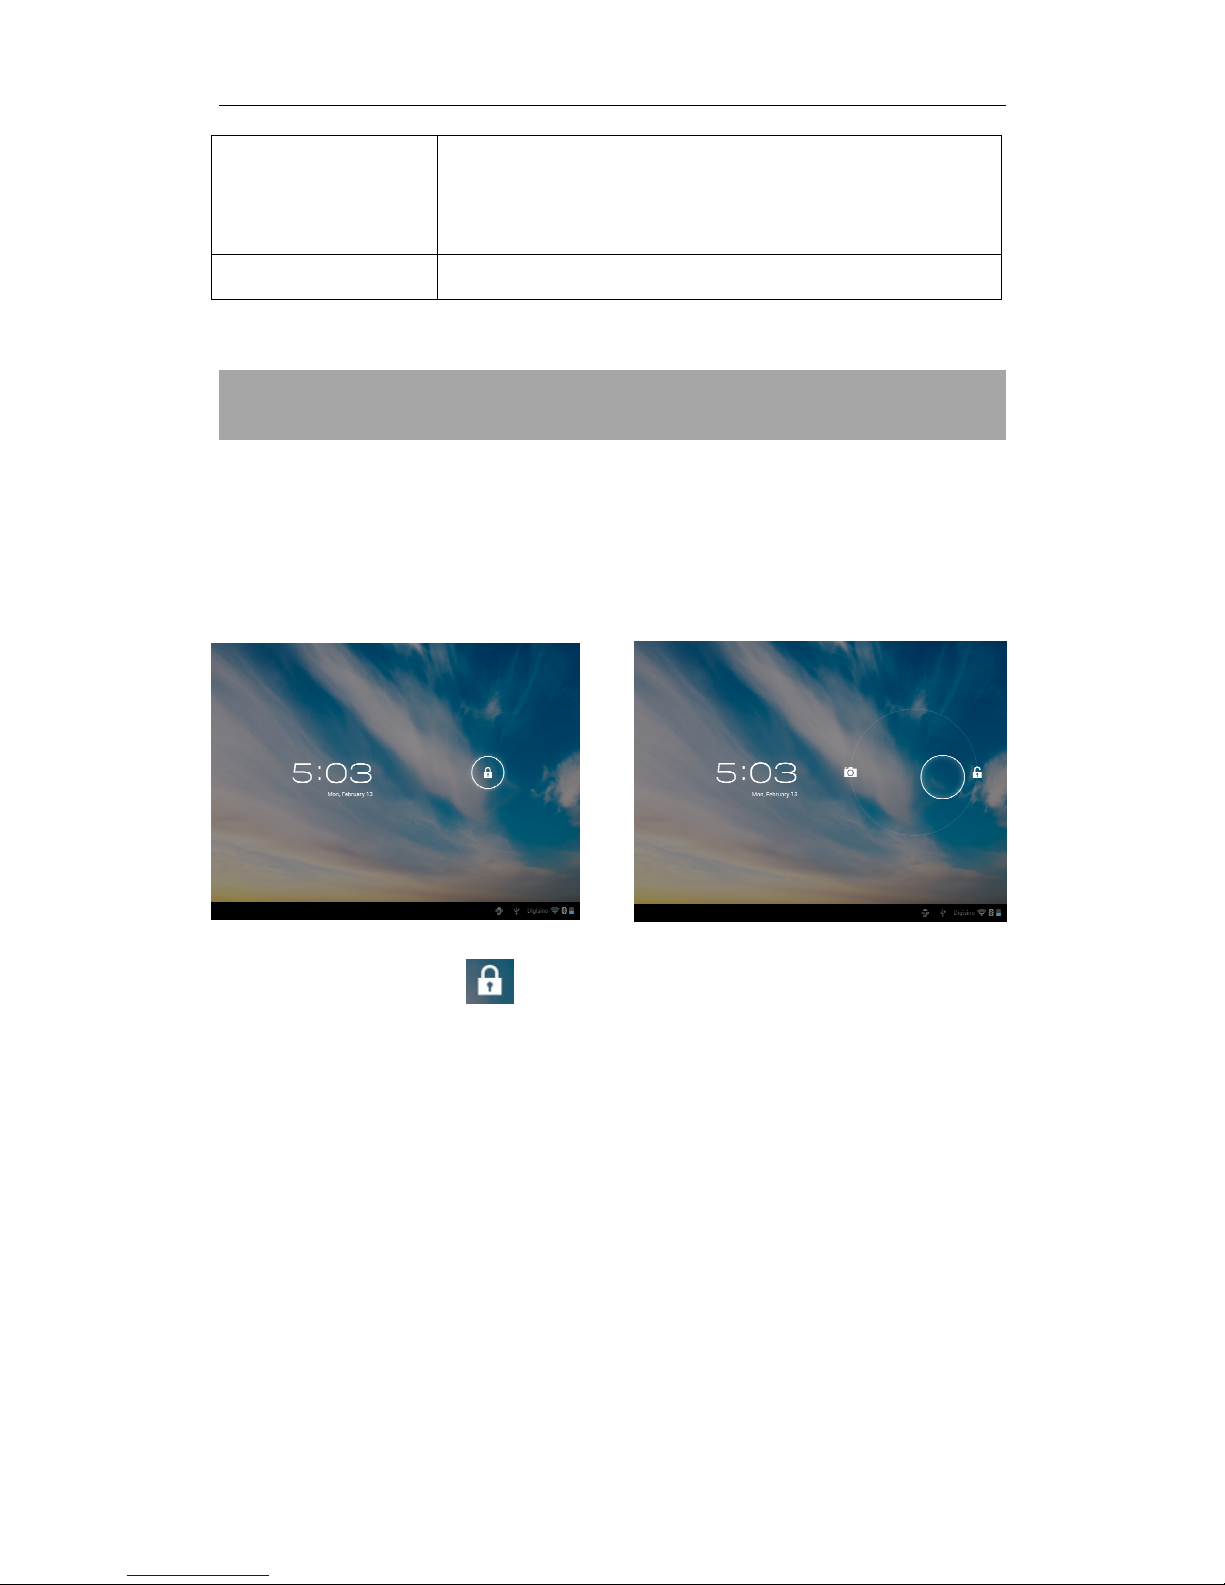
To start your tablet, press and hold the power key at the right side of your
tablet for a while. Tab and drag the lock out of the circle to unlock.
→
Tab and drag the lock out of the circle to unlock.
Drag the lock to right: you will go to the home screen.
Drag the lock to left: you will go to camera directly.
1.1.2 Turn off
To power off your tablet, press and hold the power button until the
“Would you like to shut down?” dialog appears and tap “OK” to power it
off.
1.2 Lock/unlock the screen (sleep mode)
To save battery, you should put your tablet in sleep mode by turning off
the LCD display. To do this, shortly press the power key. Press it again to
wake up the screen.
Page 6
6
1.3 Connect to computer
You can connect your tablet to your computer with the supplied USB
cable so you can transfer media files.
If your computer is XP system, please install a Windows Media Player 11
for your computer before transfer media fiels as android 4.0 system
needs Windows Media Player 11 support.
II. Your Home Screen
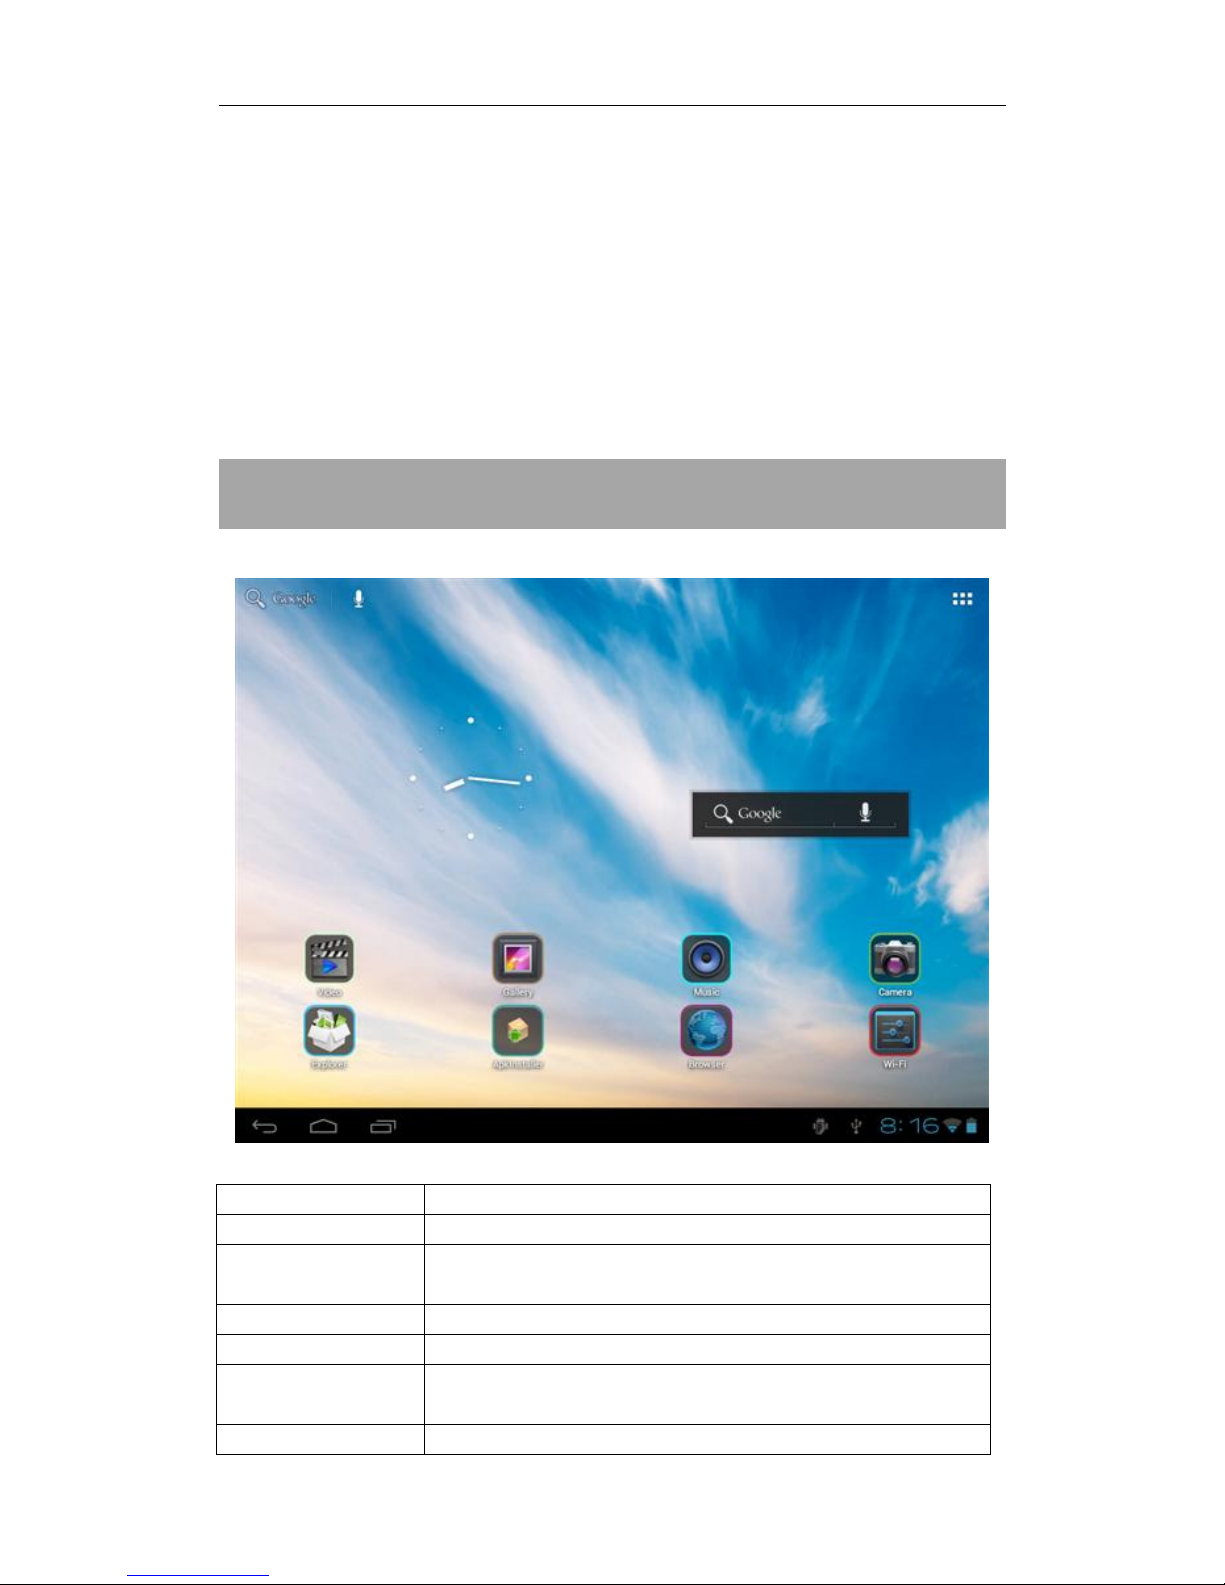
a. Google search Tap to enter Google search page
b. Voice search Tap to open voice search
c. All apps
Launcher
Tap to show all the applications installed
d. ESC key Tap to return to the previous screen/ page.
e. Home Tap to return to your home page
f. Recent
operations
Tap to show your recent operations
g.
Connect to PC
When connect to PC, this icon will show here. Slide
a b
c
d
e
f
g h
i
j
Page 7
7
to choose connected as a media device or camera
h. System time Show the system current time
i. Wi-Fi Wi-Fi signal show here if connected with Wi-Fi
j.
Battery status Show battery status
2.1 Change wallpaper for home screen:
Tab and hold your finger in any blank space of the home screen, you will
see a pop-up options; you can choose wallpaper from Gallery, live
Wallpapers or Wallpapers.
2.2 Add/delete applications on home screen:
There are several apps in the home screen, you can also add more
frequently-used app icons in this home page and delete some less
frequently-used ones.
Tab the app launcher in the top right corner to go to all apps panel, tap
and move the app you want to the home screen.
To delete an app from home screen, tap and hold it, and them movie it
to the remove icon
2.3 Add widgets to home screen:
Tab all Apps launcher→Tab WIDGETS. There are Analog clock,
bookmarks, calendar, Email, and lots of other widgets. Drag the widget
you want to the home screen.
Tips: Besides your home screen, you can access to other four panels by
sliding left or right in your home screen. You can also customize these
panels.
III. Network Connection
3.1 Wi-Fi
Wi-Fi can only be used when it connects with home Wi-Fi Access Point
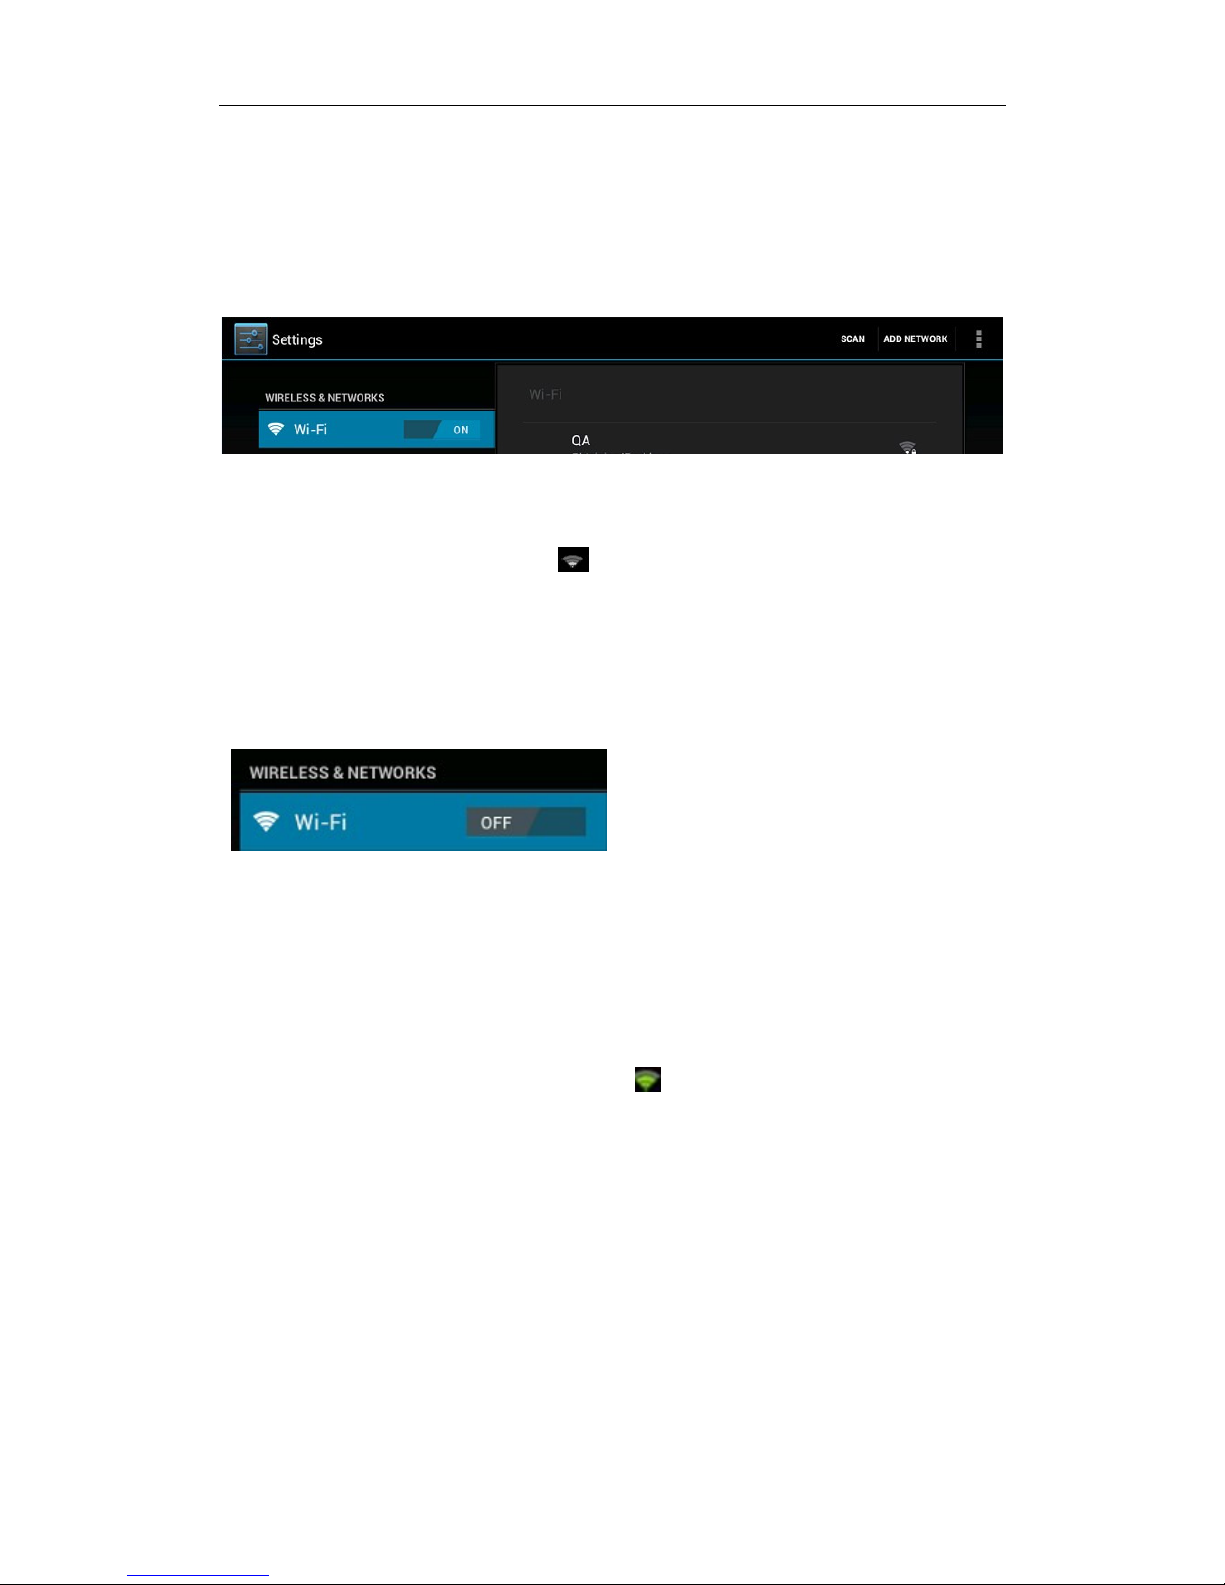
(AP) or a free unsecured Wi-Fi hotpot. Under “Wireless & networks”, tap
Page 8
8
“Wi-Fi” to turn it on. After a moment, your Wi-Fi networks list should
populate. If you need to rescan for available networks, tap "scan"
3.1.1 Turn on Wi-Fi
Within the App Panel, tap “Settings” → then “Wireless & networks” →
“Wi-Fi” to turn on wifi.
Your tablet lists the networks it finds within range. Tap a network to
connect. If necessary, enter Network SSID, Security, and Wireless
password, and tap “Connect”. When your tablet is connected to the
network, the wireless indicator appears in the status bar. Waves
indicate connection strength.
3.1.2 Turn off Wi-Fi
Please turn off Wi-Fi if you’re not using it to save the battery. To turn off
Wi-Fi, Tab it again.
3.1.3 Add a Wi-Fi network
Users may also add a Wi-Fi network under “Wi-Fi settings”. In “Wi-Fi
settings”, tap “Add network”. Enter the SSID (name) of the network. If
necessary, enter security or other network configuration details. Touch
Save.
Note: Network status icons turn green if you have a Google Account
added to your tablet and the tablet is connected to Google services, for
syncing your Gmail, Calendar events, contacts, for backing up your
settings, and so on.
3.2 3G Network
A 3G network is a mobile network that allows high-speed data access
and advanced network capacity. It features a wider range of services
and advanced network capacity over the previous 2G network.
If you purchase the tablet with a SIM card slot, you can access to the
Internet via your 3G SIM card while Wi-Fi network is not available.
How to use 3G network:
1, insert your 3G SIM card into the SIM slot.
Page 9
9
2, power on your tablet. Your tablet will obtain signal automatically.
3, if you have already powered it on, please go through the following
settings:
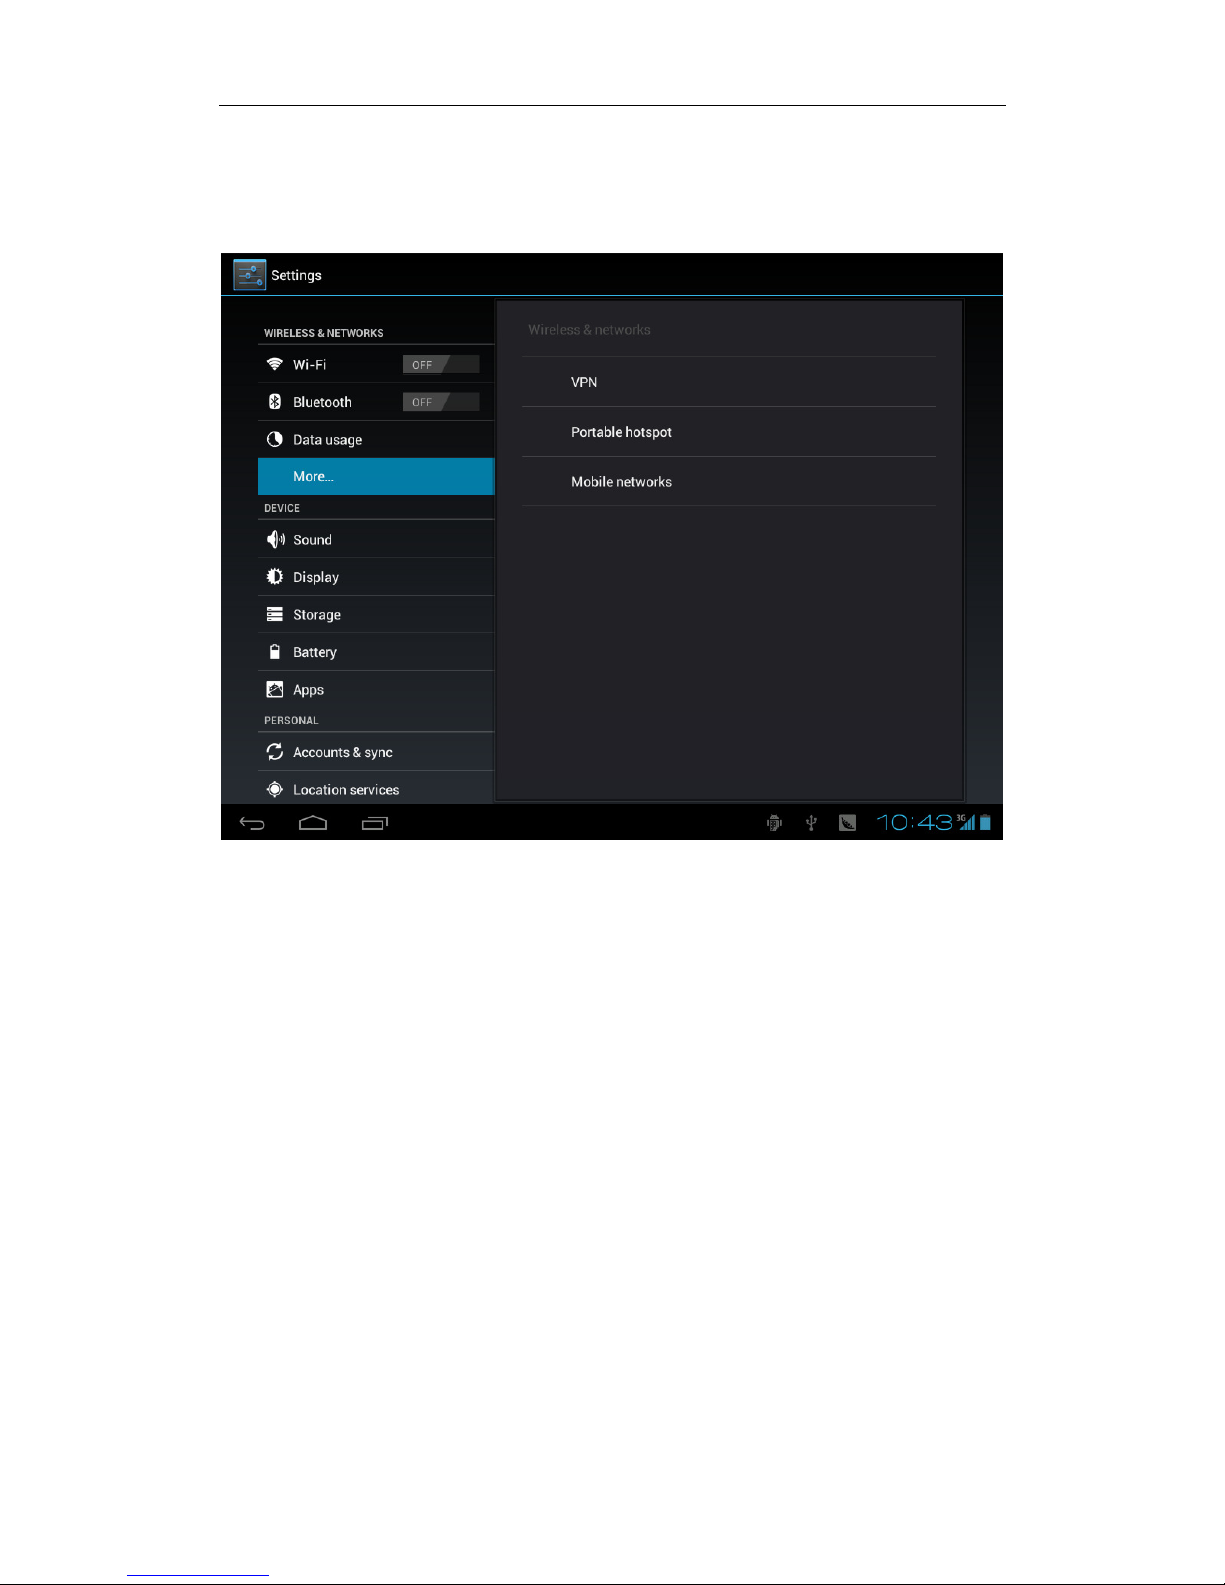
Tab settings icon to go to settings, tab "More..." in "wireless & networks":
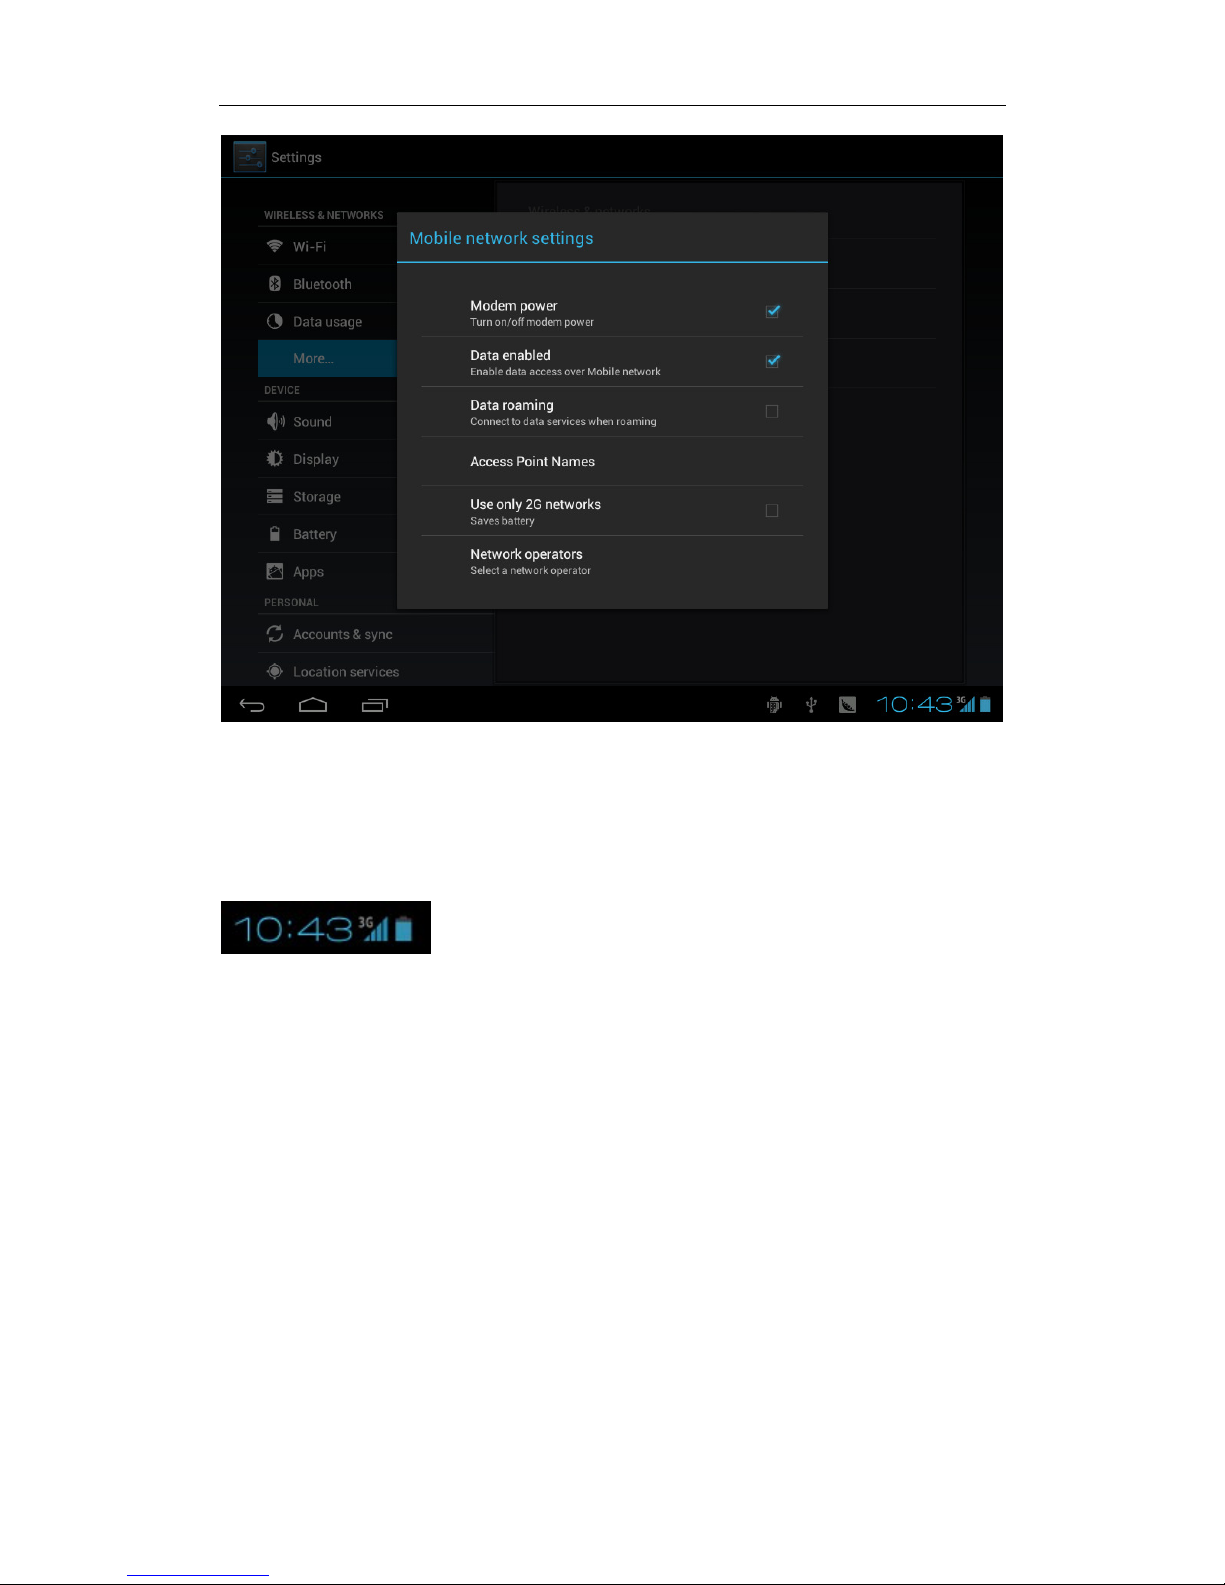
Tab Mobile networks to show below window:
Page 10
10
Tab "Modem Power" to turn on/ off modem power. Please tab it to turn
it off first if there is already a green check mark, and tab it again to turn it
on.
4, wait for several minutes till you see there is 3G signal icon in the status
bar as below:
5, your tablet is successfully connected with your SIM card 3G network.
You can surf the internet now.
Tips: To use your SIM card 3G network will use your mobile data flow and
it might be very costly. Please choose to use SIM card 3G network
carefully.
If you purchase the tablet without a SIM card slot, you can also try to
access to Internet with a USB 3G dongle.
Page 11
11
IV. Internet Browsing
4.1 Internet Browsing
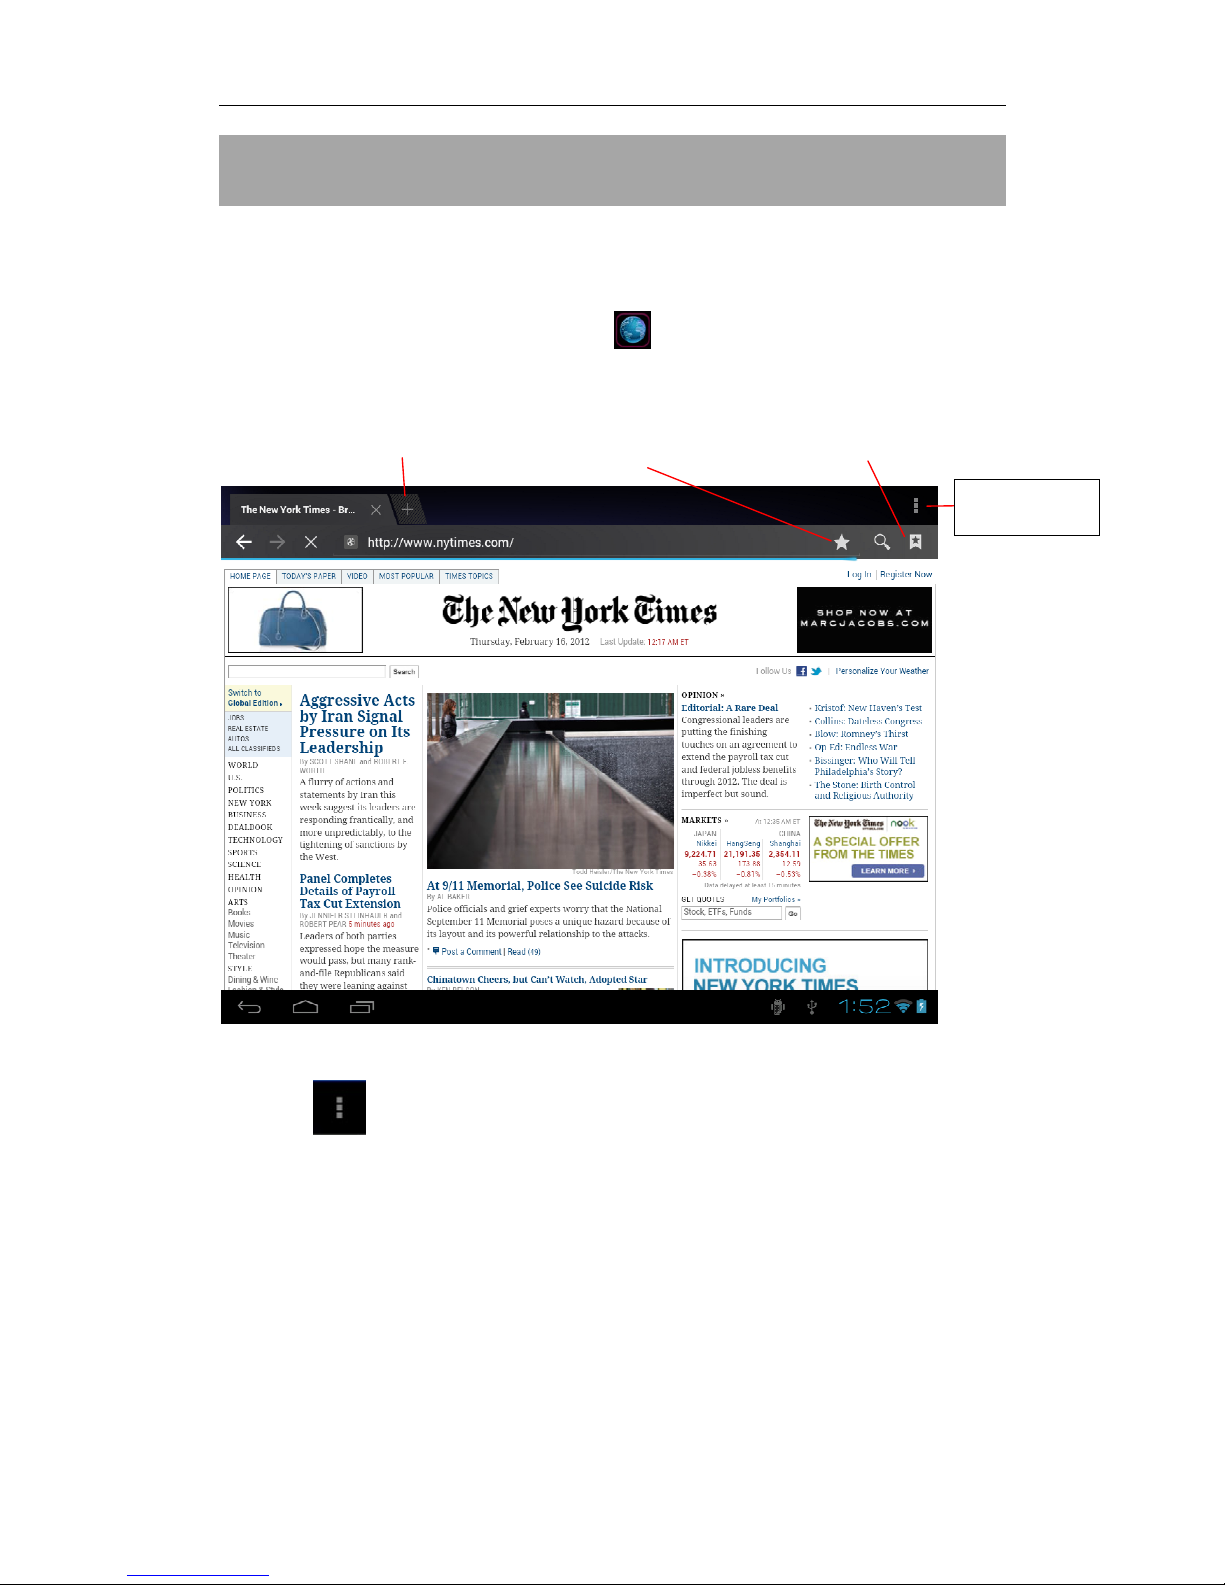
Before using your browser, make sure Wi-Fi or internet is connected.
In your app panel, Tab the browser icon to open your browser.
Tap the address bar, the Android keyboard will appear for your entry of
keywords or URL.
New tab bookmark this page Open bookmarks
Tab the icon in the top corner of the brower page to open the
submenu.
submenu
Page 12
12
V. Install and Manage Apps
5.1 Install Apps
Go to the “ApkInstaller” to install and manage your apps. To
install an application, follow below steps:
1. Tap to open the ‘APKInstaller’ → ‘Install’ → then tap “Internal
Memory” or “TF Card”. Available .apk files will appear at the right side.
Touch the required one to install it.
Note: Make sure the .apk file is workable on android 4.0, and the suffix
is .apk. e.g. “angrybirds.apk”.
In some cases, there may be no icon on in the App Panel after a .apk file
is installed. Possible reasons may be that this app is not compatible with
your OS or the downloaded .apk file is a broken one so you may need to
download a full version.
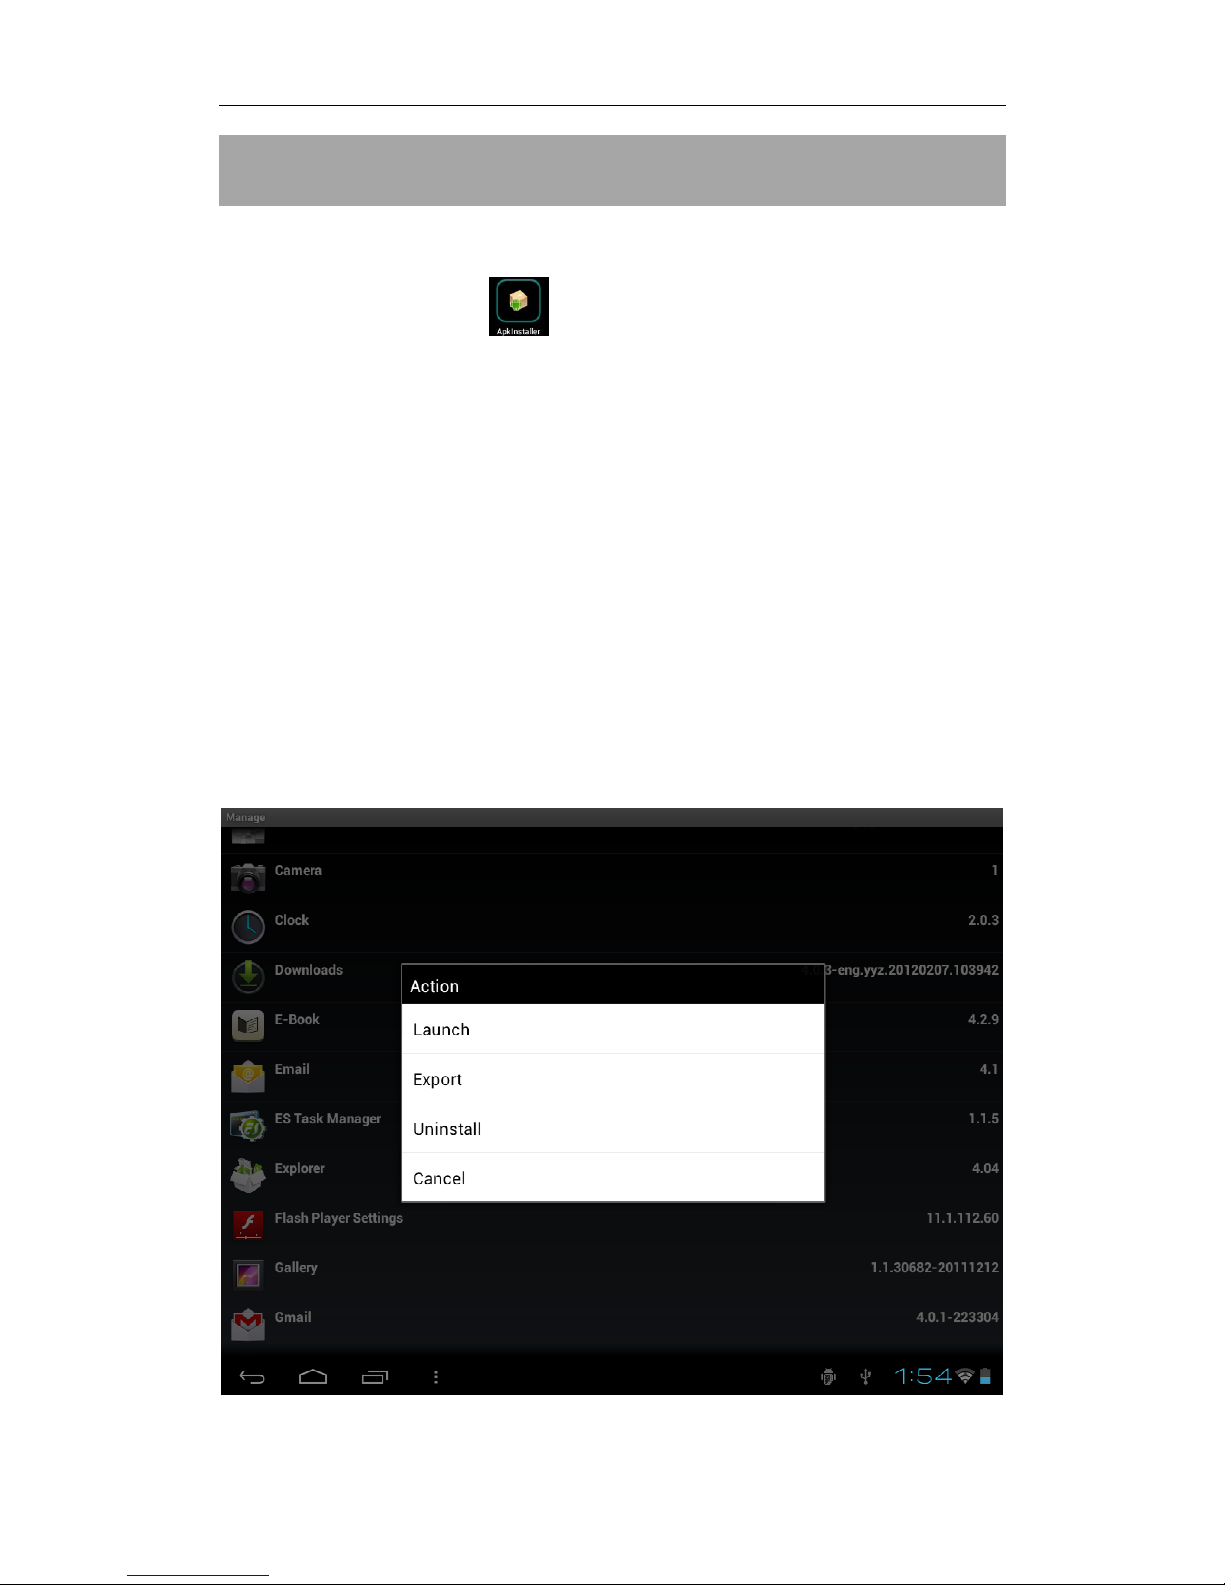
5.2 Manage Apps
Tap to open the ‘APKInstaller’ → ‘Manage’. Tab the app and then you
can launch, export, uninstall it.
You can also go to “AppS” under “Settings” to manage apps.
Page 13
13
VI. Multi-media Functions
6.1 Music
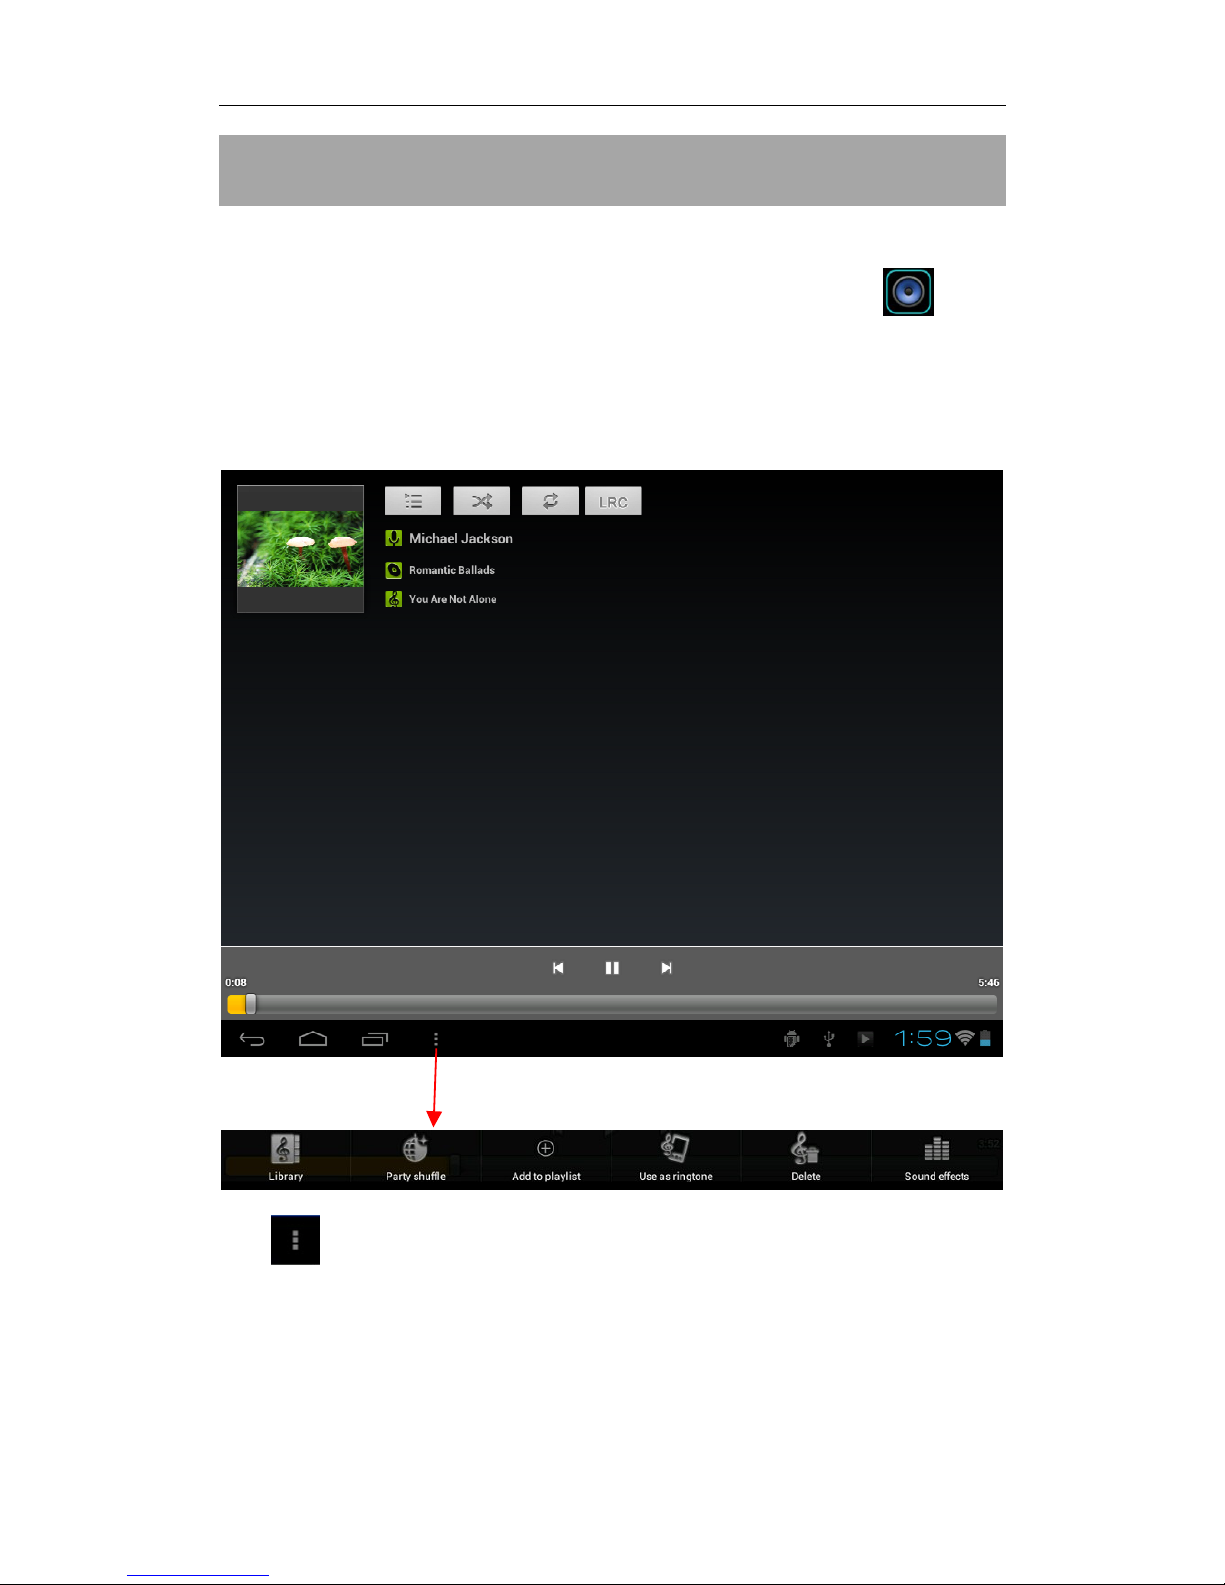
After loading your music into your tablet, tap the music icon to
open the music player. You can select songs by Artist, Albums, songs or
Playlists. Tap to select. The media player allows you to shuffle, skip, or
pause your current selection and even displays the album artwork when
available.
Tab in the bottum line to open a submenu in music playing page.
Page 14
14
6.2 Video
6.2.1 Video Player
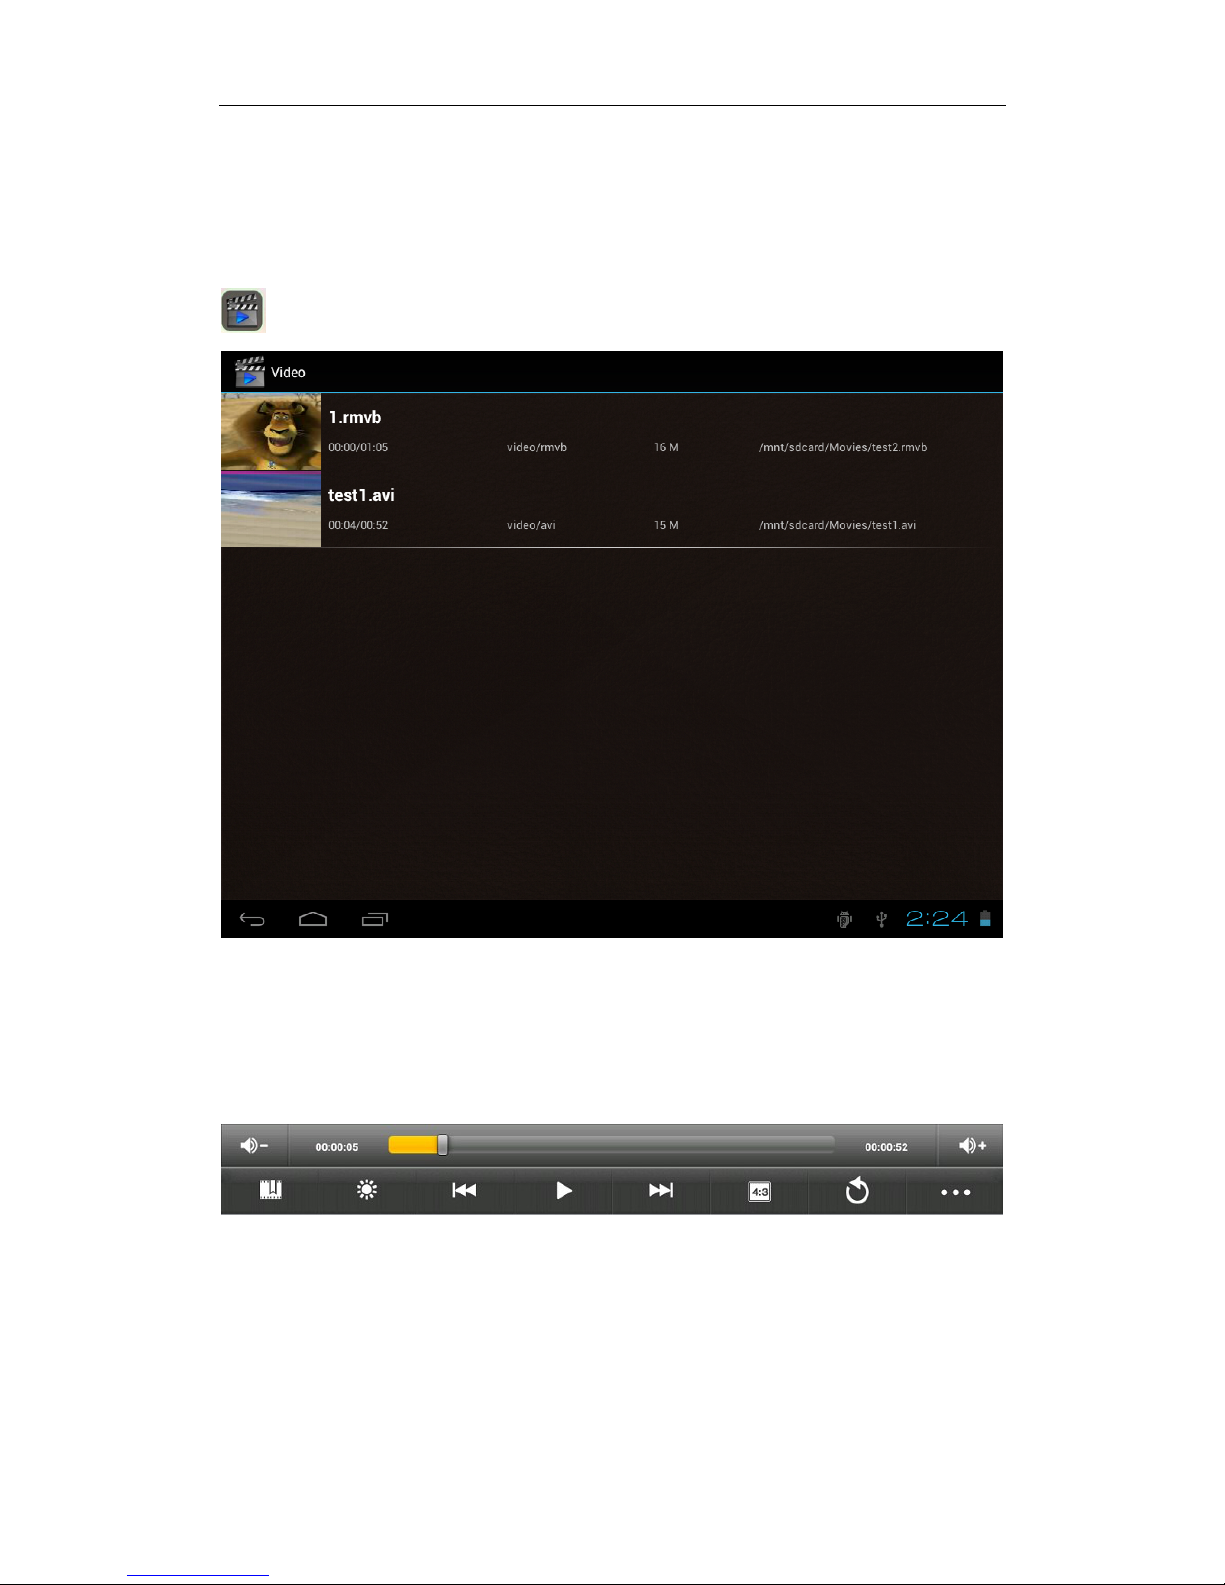
You can play videos saved in your tablet or TF card. To play, tap Video
icon to launch the video player:
Tab the video you would like to play. Tab the screen to show the video
tool bar. You can play back, fast forward, pause your video here. You
can also add bookmark for your video, adjust brightness, or set screen
ratio here. Here is the toolbar:
With the Wi-Fi on, you are also able to view an on-line video.
6.2.2 HDMI Output
Connect the tablet to your TV via HDMI cable and wait for a while for
your TV set to receive signal. Adjust your TV if necessary. HDMI cable is
not included as an accessory.
Page 15
15
The HDMI port is one-end output. The tablet PC goes dark when
connected to TV. To carry out operations on the tablet, please use a USB
mouse.
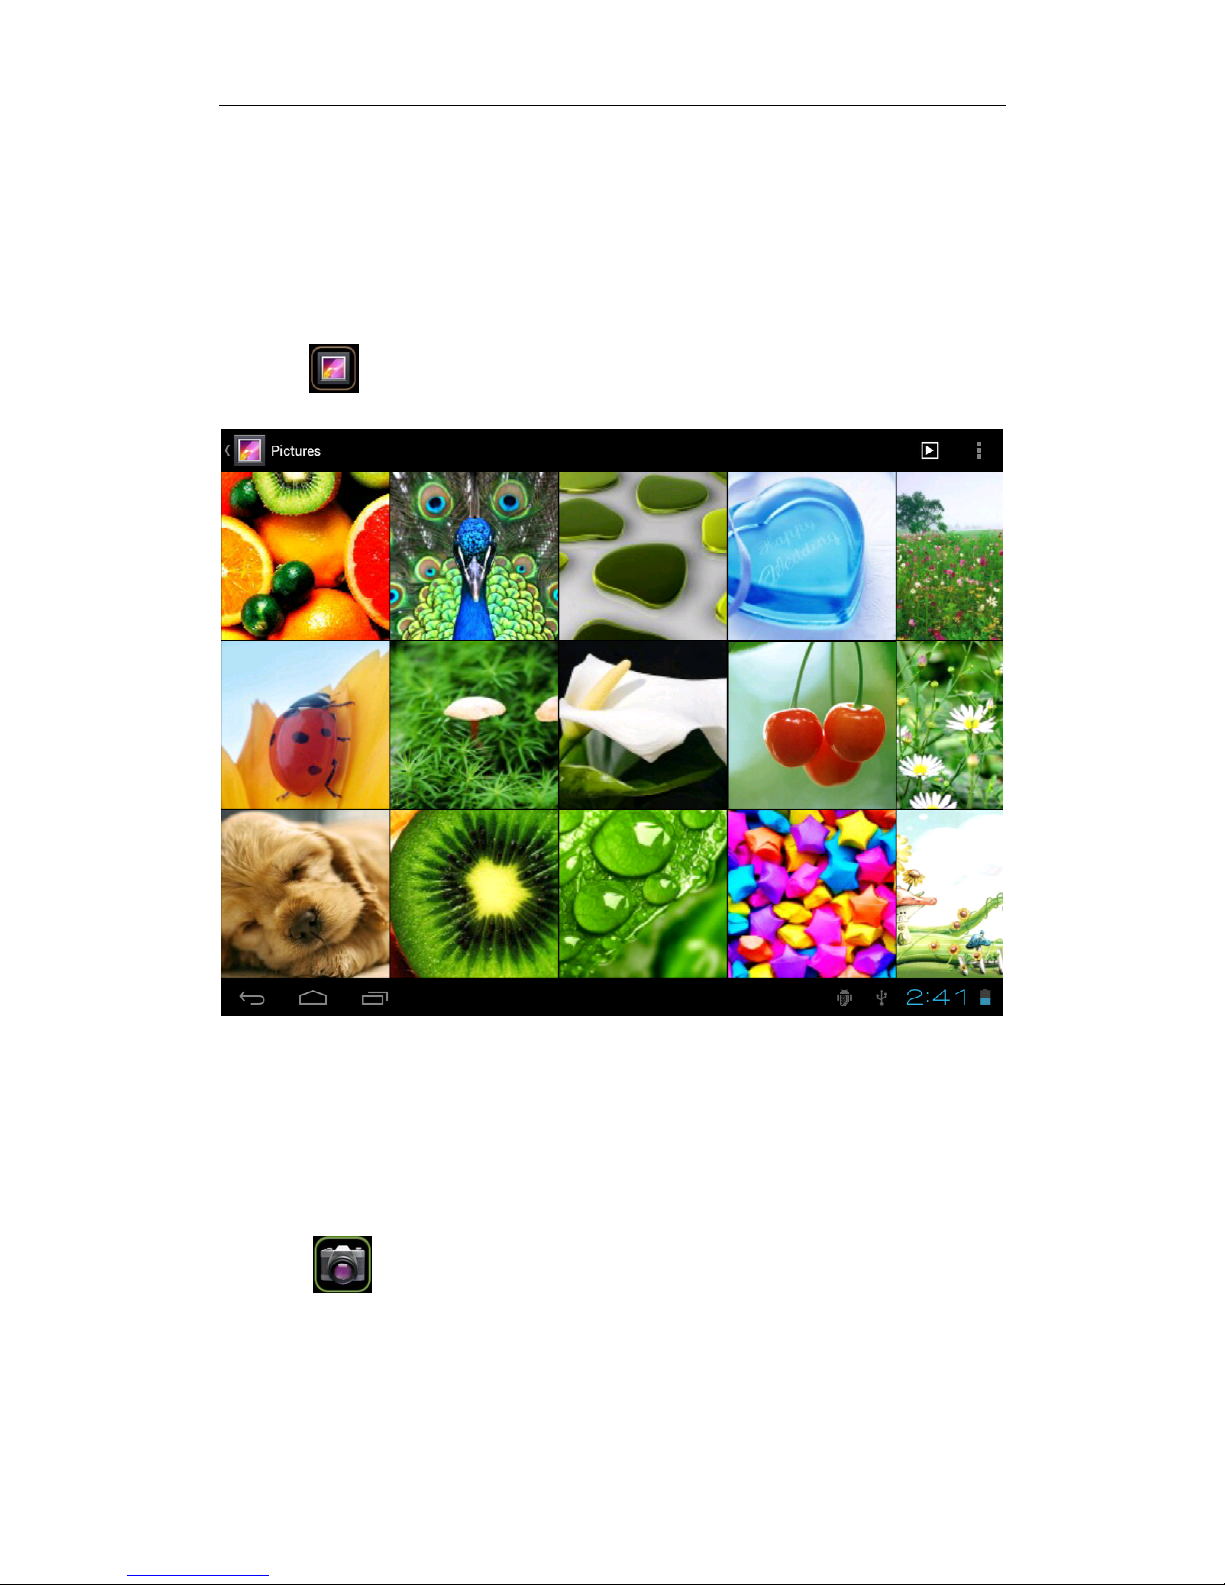
6.3 Gallery
You can view, show off, and even edit your digital pictures on the
tablet’s full color, high-resolution display. After loading your media, tap
Gallery to display your pictures:
Tab the picture you want to display it, and slide right or left to show other
pictures.
Tap the menu icon, you can edit, rotate, crop, or set it as wallpaer.
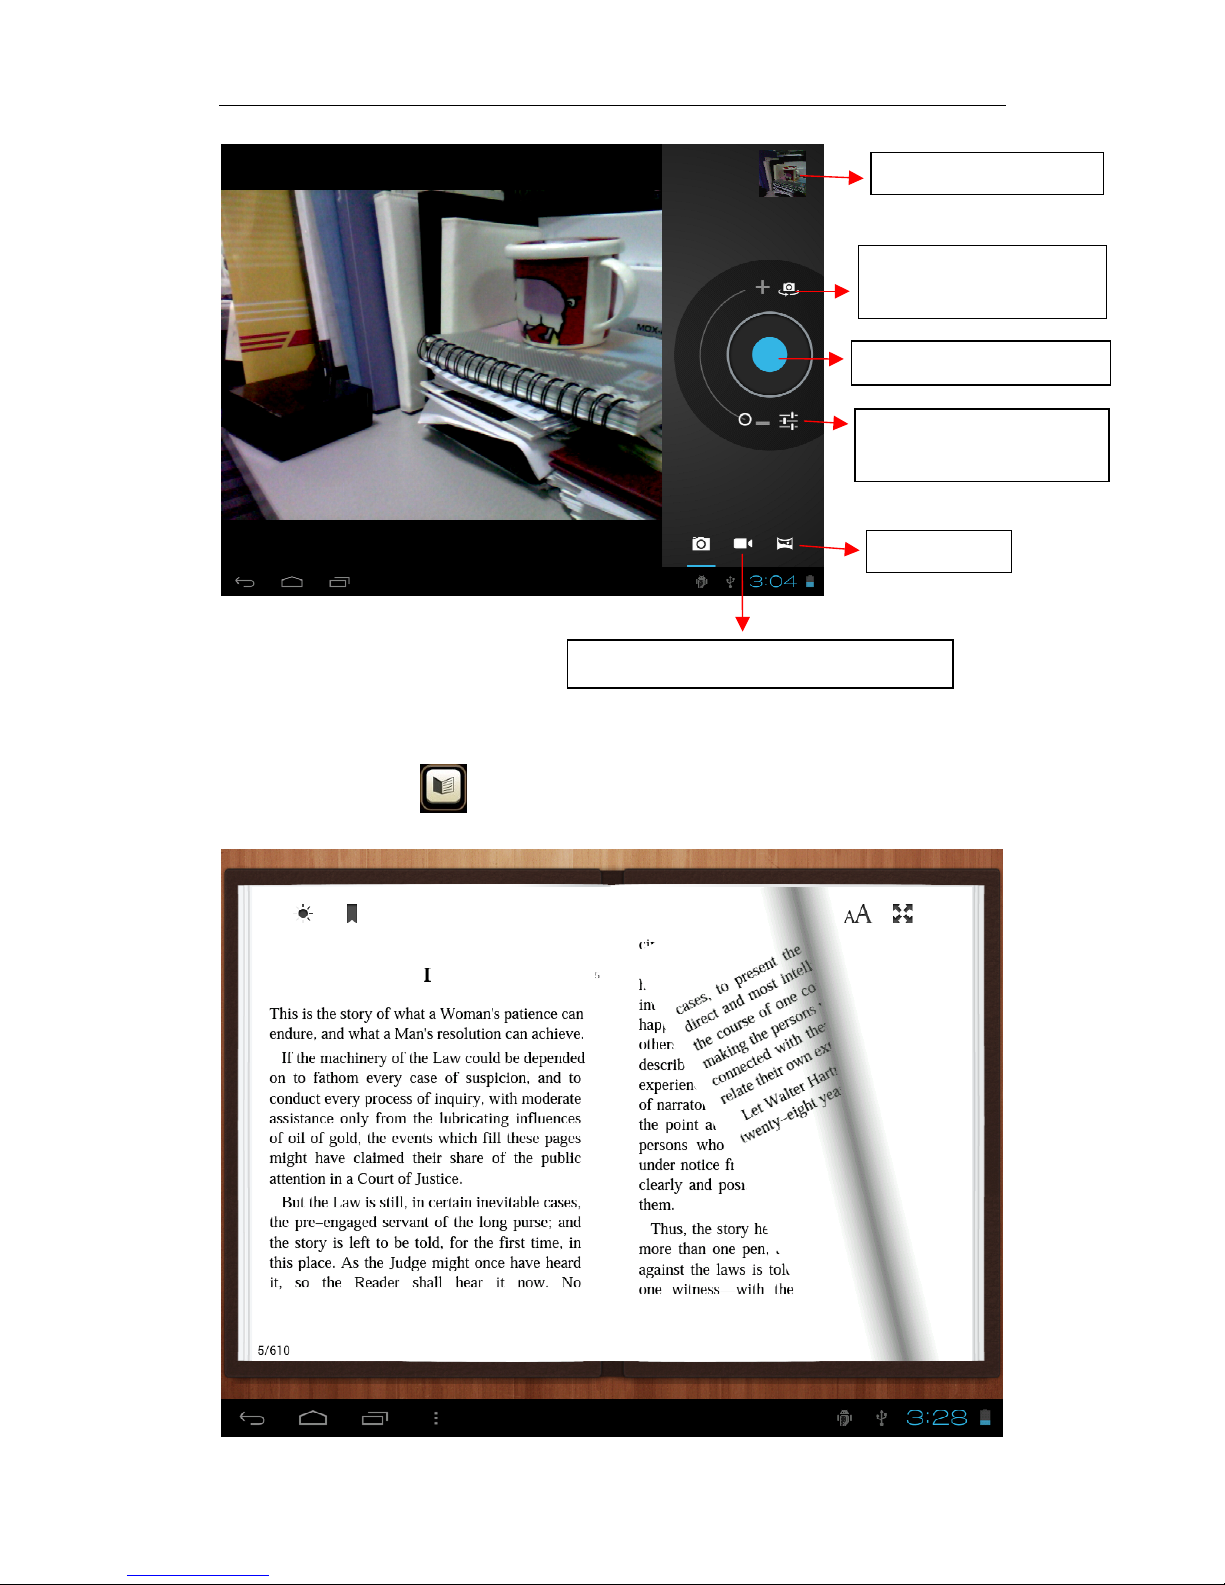
6.4 Camera
Tap the icon to open camera. Your tablet is built in 2M front
camera dn 2M rear camera. You can take a photo, or a video both by
front camera and rear camera.
Note: After you power on your tablet, you can go to camera directly by
drag the lock to left.
Page 16
16
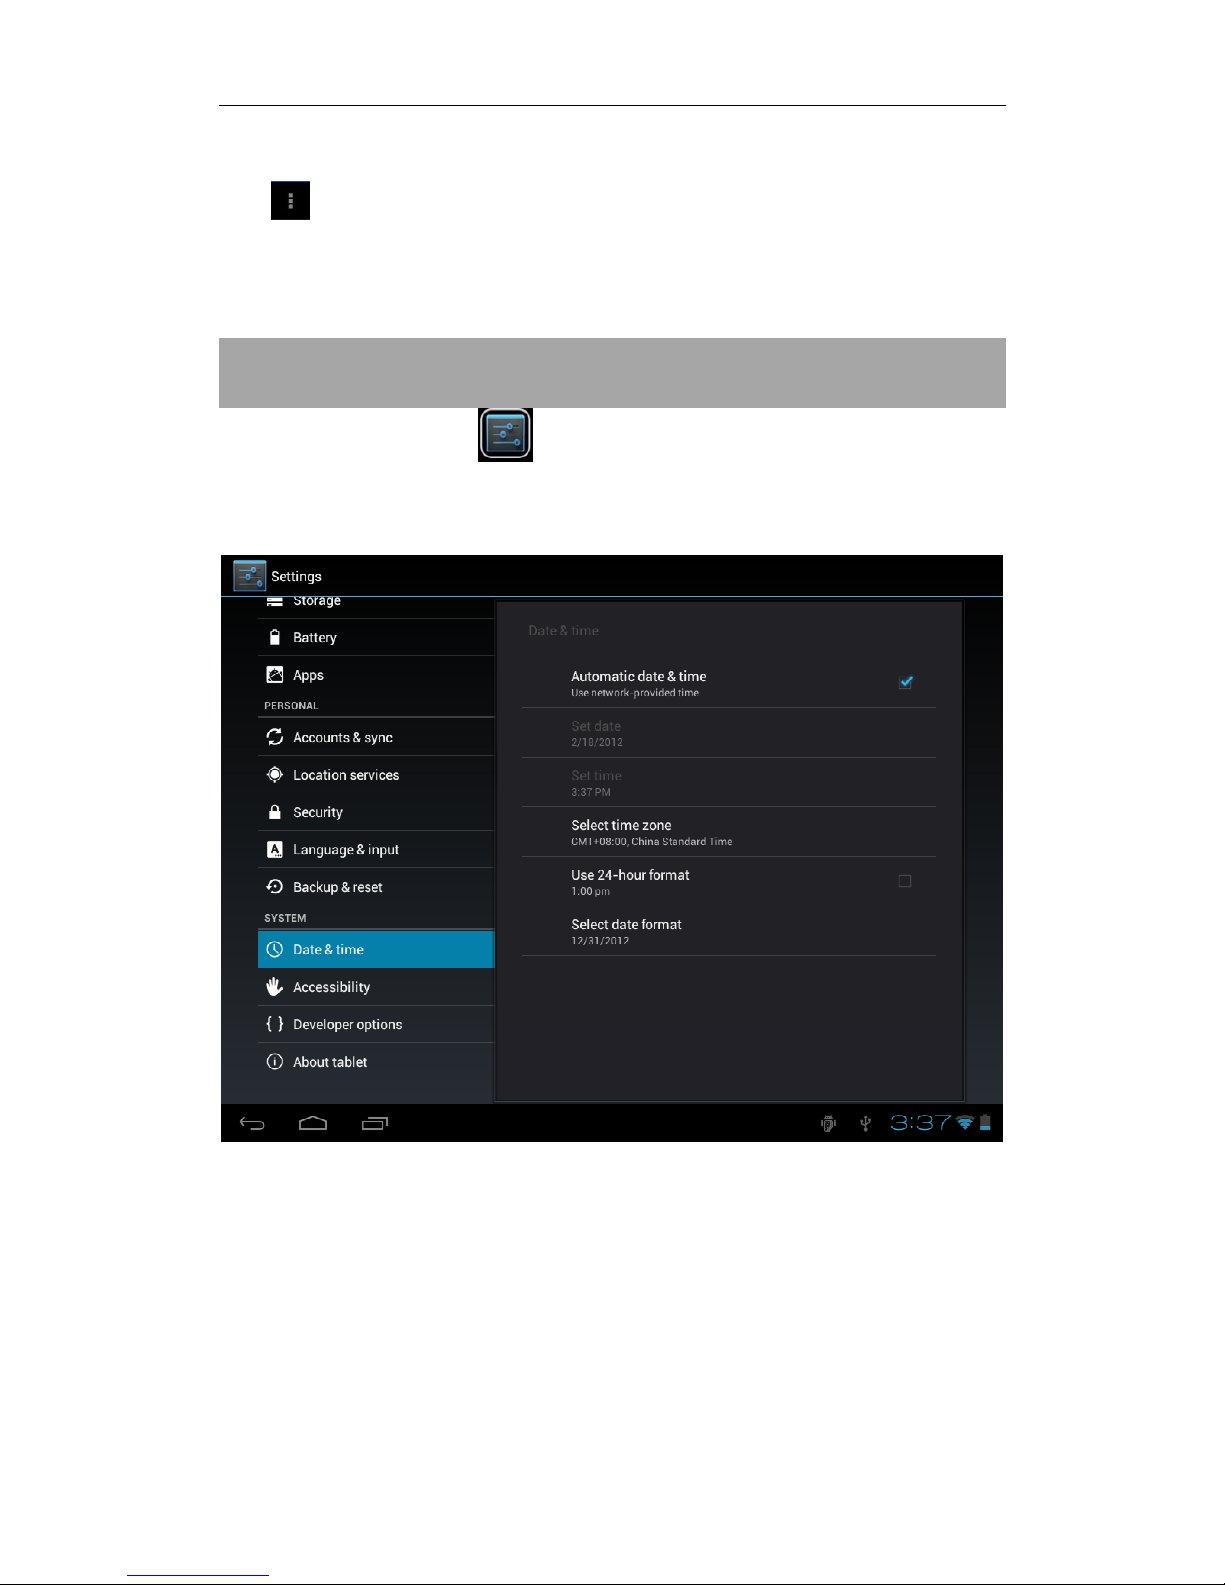
6.5 E-book reader
The tablet supports many eBook formats like PDF, Text, E-Pub, FB2....
Tap the “e-book” icon to open e-book shelves. Tab an e-book to
open the book and read.
To view photos
To select Front/ back
camera
Tab to take a photo
Set white balance, Scene
mode, etc.
Pan-shot
Change to video-taking Interface
Page 17
17
You can page up or page down by sliding your finger right or left.
Tab or the menu button to check the sub-menus. You can set the
font size, Go To Page jump, check your bookmarks, set the auto flip time,
etc.
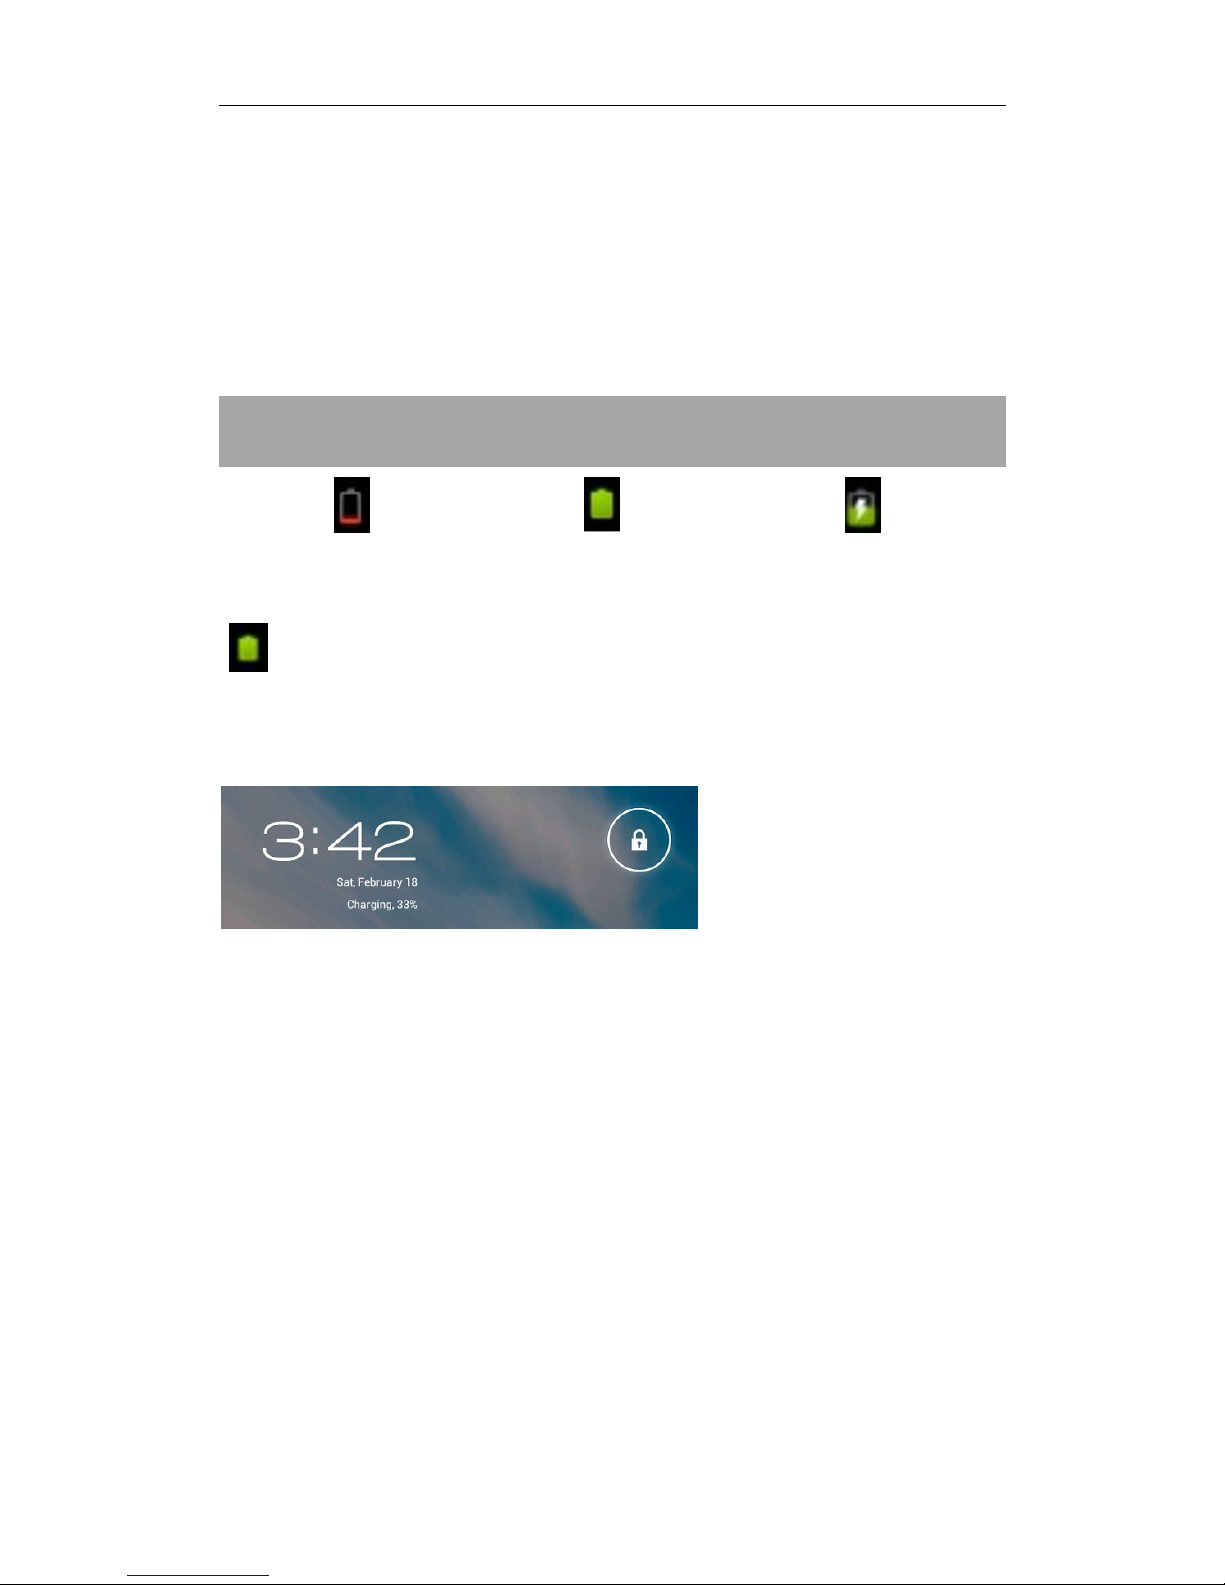
VII. Settings
Tap the “Settings” icon to go to settings.
you can check and set wireless&networks, sound, display, storage,
Battery, Accounts &sync, security, language, date&time, about tablet,
etc.
Wi-Fi: tap “Settings” → “Wireless & networks” to turn on wifi and scan.
It will show a list of Wi-Fi networks scanned in range. Choose a strong
Wi-Fi network to connect. (You may need to input the password).
Display: To set Brightness, Wallpaper, Sleep time-out, Font size here.
Storage: Check internal storage here. If you insert an Micro SD card, or
USB disk, you can check the total and available space for your Micro SD
card or USB disk. Please unmount it to safely remove it.
Battery: Check the Battery status here.
Display: Tab “Settings” → “Display” to set brightness, screen time-out,
etc.
Page 18
18
Language & input: to set language and keyboard input.
Backup & reset: to go to submenu "back up my data" and "Factory
data reset". If you choose factory data reset, all data from your tablet's
internal storage will be erased. Choose this option carefully.
About Tablet: To check information about your tablet, such as Model
number, android version, etc.
VII. Battery
Very Low Battery Full Battery Charging Battery
‘ ’ indicates that the power of Battery is full. When the battery level
becomes too low, a prompt comes up to note you to charge your
tablet.
While charging, you can check the charging status in the lock screen:
It takes around 5 hours to charge your tablet to full battery. Please only
use a 9V /2.5A adaptor included in the gift box to charge it.
Page 19

19
Troubleshooting
1. Can not turn on the tablet
Check the tablet’s power level, please charge it before starting it. In
case your tablet still cannot be turned on, you may try to reset it
2. No sound from earphone
Check if volume is set to ‘0’. Or earphone may be broken, please
change for another one.
3. Big noise
Check if there is dust in the earphone or speaker. Check if the file is
broken.
4. Frozen to any operation
Please pin the reset hole in the rear side of the tablet, and restart it
again.
5. Screen drift or unresponsive screen
Press and hold the power button for about 15 seconds to force the
tablet to shut down. Calibration will be automatically done after you
start up your tablet. Or you can try to reset it.
6. Application not workable
Possible reasons may be that this app is not compatible with your OS or
the downloaded .apk file is broken so you may need to download a full
version.
8. How delete a Google account?
If an account is added, the account is shown in “Accounts & sync” of
“Settings”, where you may also add another account. To delete an
undesired account, go to “Settings” → “Privacy settings” → “Factory
data reset”. Your tablet’s internal storage, downloaded apps, etc. will
also be deleted, except the info in your flash memory. Be careful before
you carry out this operation.
 Loading...