

Page 1
INNOVATION IN QUALITY & DESIGN
47” FULL HD LCD TV
Operating Instructions
ES470FHD
Please read this manual carefully before operating your set.
Retain it for future reference.
Record model number and serial number of the s et.
See the label attached on the back cover and quote this
information to your dealer when you require service.
1
Page 2

2
Page 3
Before Using This Product
BEFORE USING THIS PRODUCT
PLEASE READ AND OBSERVE ALL THE WARNINGS AND CAUTIONS IN THIS USER’ S MANUAL
AND RETAIN IT FOR FUTURE REFERENCE.
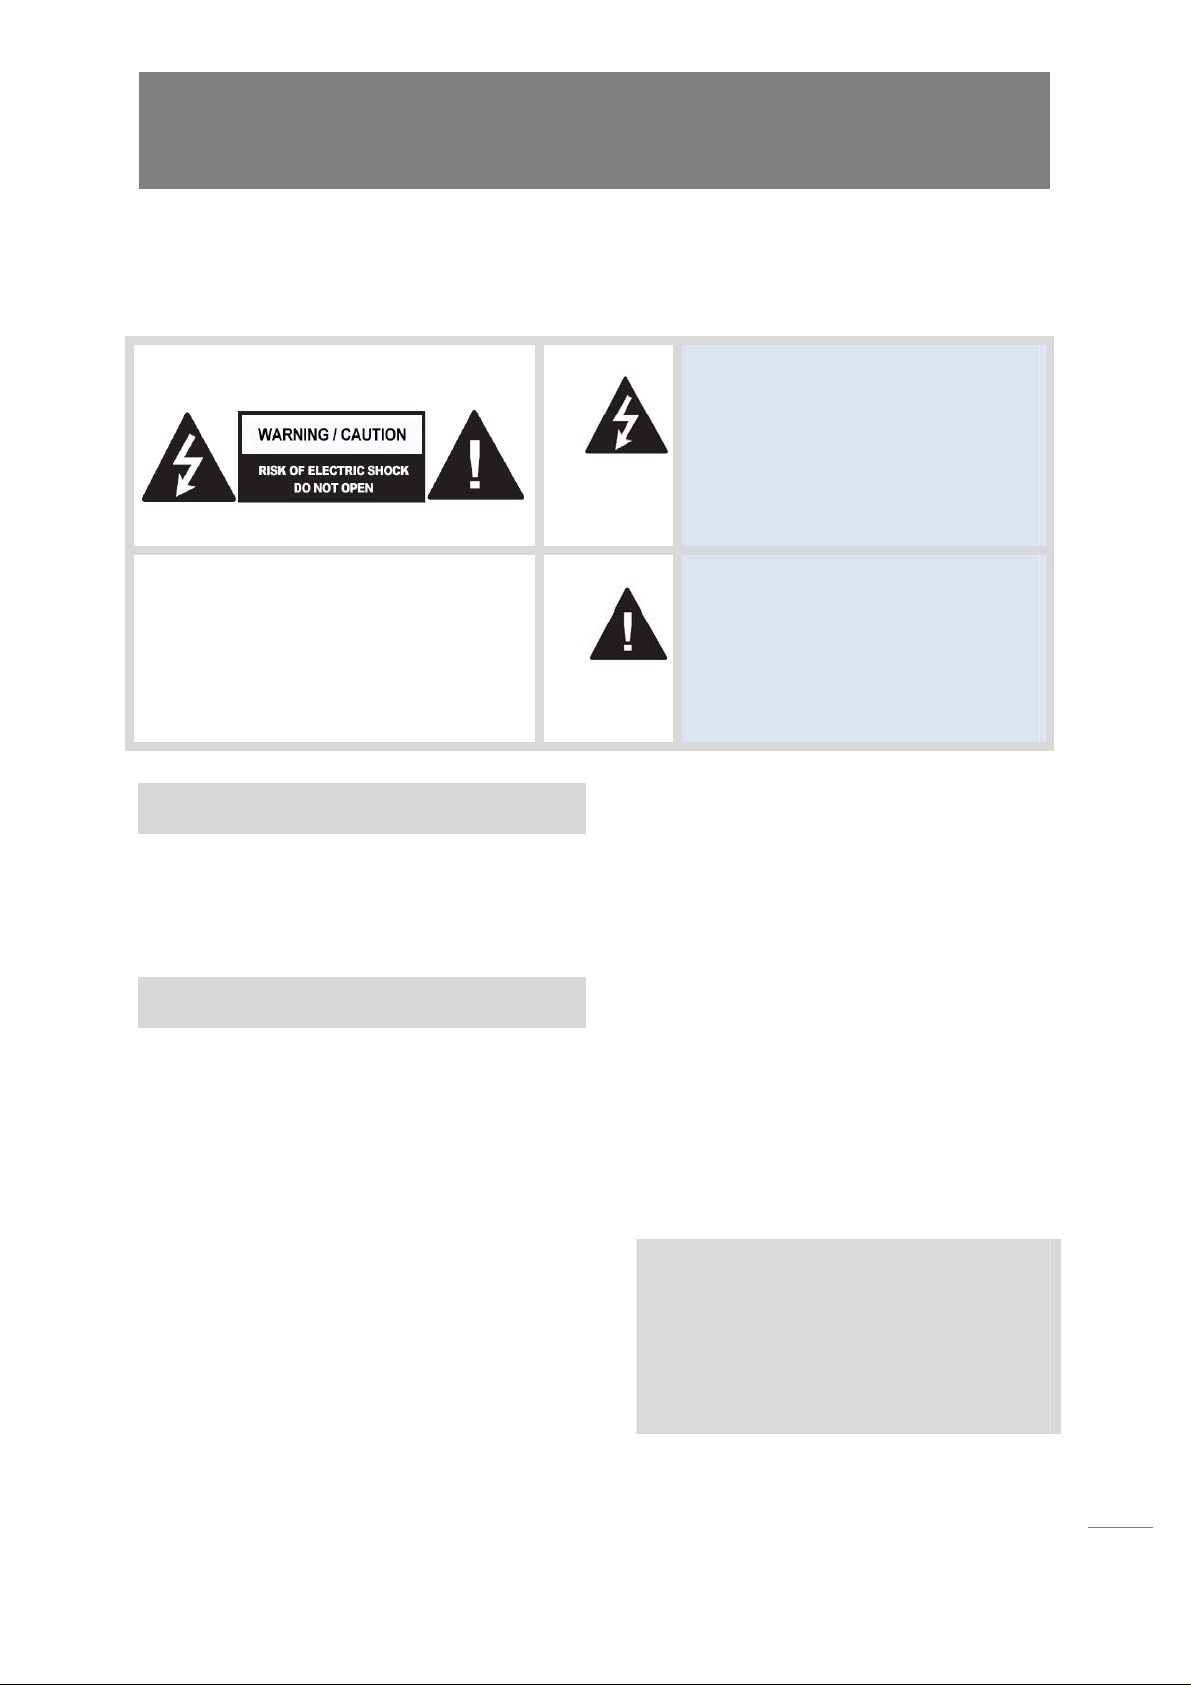
TO REDUCE THE RISK OF ELECTRIC
SHOCK DO NOT REMOVE COVER (OR
BACK). NO USER SERVICEABLE PARTS
INSIDE. REFER TO QUALIFIED SERVICE
PERSONNEL.
WARNING / CAUTION
To prevent fire or shock hazards, do not
expose this product to rain or moisture.
FCC NOTICE
Class B digital device
This equipment has been tested and found to
comply with the limits for a Class B digital device,
pursuant to Part 15 of the FCC Rules. These
limits are designed to provide reasonable
protection against harmful interference in a
residential installation. This equipment generates,
uses and can radiate radio frequency energy and,
if not installed and used in accordance with the
instructions, may cause harmful interference to
radio communications.
However, there is no guarantee that interference
will not occur in a particular installation. If this
equipment does cause harmful interference to
The lightning flash with arrowhead
symbol, within an equilateral triangle, is
intended to alert the user to the
presence of uninsulated “dangerous
voltage” within the product’s enclosure
that may be of sufficient magnitude to
constitute a risk of electric shock to
persons.
The exclamation point within an
equilateral triangle is intended to alert
the user to the presence of important
operating and maintenance (servicing)
instructions in the literature
accompanying the appliance.
radio or television reception, which can be
determined by turning the equipm ent of f and on,
the user is encouraged to try to correct the
interference by one or more of the following
measures:
- Reorient or relocate the receiving antenna.
- Increase the separation between the equipment
and receiver.
- Connect the equipment to an outlet on a circuit
different from that to which the receiver is
connected.
- Consult the dealer or an experienced radio/TV
technician for help.
ANY CHANGES OR MODIFICATIONS NOT
EXPRESSLY APPROVED BY THE PARTY
RESPONSIBLE FOR COMPLIANCE COULD
VOID THE USER’S AUTHORITY TO
OPERATE THE EQUIPMENT.
3
Page 4

IMPORTANT SAFETY INSTRUCTIONS
Important safety instructions shall be provided with each apparatus. This information shall be given in a
separate booklet or sheet, or be located before any operating instructions in an instruction for installation
for use and supplied with the ap paratus.
This information shall be given in a language acceptable to the country where the apparatus is intended to
be used.
The important safety instructions shall be entitled “Important Safety Instructions”. The following safety
instructions shall be included where applicable, and, when used, shall be verbatim as follows. Additional
safety information may be included by adding statements after the end of the following safety instruction
list. At the manufacturer’s option, a picture or drawing that illustrates the intent of a specific safety
instruction may be placed immediately adjacent to that safety instruction:
1. Read these instructions.
2. Keep these instructions.
3. Heed all warnings.
4. Follow all instructions.
5. Do not use this apparatus near water.
6. Clean only with a dry cloth.
7. Do not block any of the ventilation openings.
Install in accordance with the manufacturers
instructions.
8. Do not install near any heat sources such as
radiators, heat registers, sto ves, or other
apparatus (including amplifiers) that produce
heat.
9. Do not defeat the safety purpose of the polarized
or grounding-type plug. A polarized plug has
two blades with one wider than the other. A
grounding type plug has two blades and third
grounding prong. The wide blade or third prong
are provided for your safety. When the provided
plug does not fit into your outlet , consult an
electrician for replacement of the obsolete
outlet.
10. Protect the power cord from being walked on or
pinched particularly at plugs, convenience
receptacles, and the point where they exit from
the apparatus.
11. Only use attachments/accessories specified
by the manufacturer.
12. Use only with a cart, stand, tripod, bracket,
or table specified by the manufacturer, or
sold with the apparatus. When a cart is
used, use caution when moving the
cart/apparatus combination to avoid injury
from tip-over.
13. Unplug this apparatus during lightning
storms or when unused for long periods of
time.
14. Refer all servicing to qualified service
personnel. Servicing is required when the
apparatus has been damaged in any way,
such as power-supply cord or plug is
damaged, liquid has been spilled or objects
have fallen into apparatus, the apparatus
has been exposed to rain or moisture, does
not operate normally, or has been dropped.
15. This product may contain lead or mercury.
Disposal of these materials may be
regulated due to environmental
considerations. For disposal or recyclin g
information, please contact your local
authorities or the Electronic Industries
Alliance: www.eiae.org.
4
Page 5

16. Damage Requiring Service - The appliance
should be serviced by qualified service
personnel when:
A. The power supply cord or the plug has been
damaged; or
B. Objects have fallen, or liquid has been spilled
into the appliance; or
C. The appliance has been exposed to rain; or
D. The appliance does not appear to operate
normally or exhibits a marked change in
performance; or
E. The appliance has been dropped, or the
enclosure damaged.
17. Tilt/Stability - All televisions must comply with
recommended international global safety
standards for tilt and stability properties of its
cabinets design.
• Do not compromise these design standards by
applying excessive pull force to the front, or
top, of the cabinet which could ultimately
overturn the product.
• Also, do not endanger yourself, or children, by
placing electronic equipment/toys on the top of
the cabinet. Such items could unsuspectingly
fall from the top of the set and cause product
damage and/or personal injury.
18. Wall or Ceiling Mounting - The appliance should
be mounted to a wall or ceiling only as
recommended by the manufacturer.
19. Power Lines - An outdoor antenna should be
located away from power lines.
20. Outdoor Antenna Grounding - If an outside
antenna is connected to the receiver, be
sure the antenna system is grounded so as
to provide some protection against voltage
surges and built up static charges.
Section 810 of the National Electric Code,
ANSI/NFPA No. 70-1984, provides
information with respect to proper grounding
of the mats and supporting structure
grounding of the lead-in wire to an antennadischarge unit, size of grounding connectors,
location of antenna-discharge unit,
connection to grounding electrodes and
requirements for the grounding electrode.
See Figure below.
21. Objects and Liquid Entry - Care should be
taken so that objects do not fall and liquids
are not spilled into the enclosure through
openings.
a) Warning: To reduce the risk of fire or electric
shock, this apparatus should not be exposed
to rain or moisture and objects filled with
liquids, such as vases should not be placed
on this apparatus.
22. Battery Usage CAUTION - To prevent
battery leakage that may result in bodily
injury, property damage, or damage to the
unit:
• Install all batteries correctly, with + and alignment as marked on the unit.
• Do not mix batteries (old and new or carbon
and alkaline, etc.)
• Remove batteries when the unit is not used for
a long time.
5
Page 6

FEATURES OF THIS TV
High Digital Broadcasting Support
This TV is designs to receive and process
High Definition TV (1920x1080p) with built-in
digital tuner.
- Easy to use and convenient to connect to
other digital devices.
- Better picture quality than conventional
digital TVs.
Electronic Program Guide
Electronic Program Guide (EPG) is the very
convenient feature to display the channel
information for the digital TV program, which
enables you to check the programs with
reference to Date, Time, and Channels.
Favorite Channel / Virtual Channel
Favorite Channel helps you to create your
own favorite channel list using Channel
Editing Window and watch what you only
want:
- Favorite Channel: After scanning all the
available channels on broadcast, you can
sort or manage the channels as your favorite
ones. Once they are registered as favorite,
you can easily change the channels among
them.
The TV is a high-tech product composed of over 2 millions of thin -film transistors. A few
cell defects will normally occur in the LCD manufacturing process. Several tiny, minute
colored dots visible on the screen should be acceptable, which means no adverse effect on
the monitor's performance.
- Virtual Channel: Without this feature,
normally, HD Supported Channel are stored
and assigned at high number of channel. For
Example, some channel in Analog is
Channel Number 6 while its HD Channel is
83. However, with this feature, HD Channel
will be assigned virtually as 6-1 and easily
recognized while analog channel is 6.
PiP (Picture in Picture) and Dual Screen
This TV provides PIP (Picture-in-Picture) and
dual screen modes.
- In PIP mode, you can change PIP source,
PIP position, and PIP size. Additionally, you
can swap main picture and PI P pi ct u re. If
PIP source is TV mode, you can change
channels, too.
- In dual screen mode, you can also change
PIP source and swap main picture and sub
picture. If either main picture is in TV mode
or sub picture is in TV mode, you can
change channels by CH + and CH - keys.
SuperSlim™ Technology
The SuperSlim™ Technology makes it easy to
install your TV display in a variety of locations
where conventional TVs do not fit.
6
Page 7

Contents
Contents
Before Using This Product
Warning / Caution………………………………………………………………
Important Safety Instructions…………………………………………..……
Features of This TV……………………………………………………………
Getting Started
Preparation………………………………………………………………………
Accessories ……………………………………………………….…………
Stand Installation ……………………………………………………………
Side Panel ……………………………………………………………..…….
Rear Panel ………………………………………………………………..….
External Equipment Settings ……………………………………………..…
Connecting an Antenna ………………………………………………….…
Connecting a VCR ………………………………………………………….
Connecting the cable TV or satellite with a set-top box ……………….
Connecting a DVD player ………………………………………………….
Remote Control ………………………………………………………………..
Remote Control Functions………………………………………………….
Using the Menu
Channel Settings ………………………………………………………………
Selecting Tuner Mode ………………………………………………………
Storing Channels Automatically……………………………………………
Setting Channel Edit and Favorite Channels……………………………..
Displaying Signal Strength………………………………………………….
Setting the Input Mode………………………………………………………
Picture Setting………………………………………………………………….
Adjusting Picture Mode ……………………………………………..………
Setting the Desired Picture / DNR………………………………………….
Selecting the Aspect Ratio …………………………………………………
Sound Settings …………………………………………………………………
Selecting the Sound Mode …………………………………………………
Adjusting the Desired Audio Mode …………………………..….…………
3
4
6
9
9
10
11
11
12
12
12
13
14
15
15
18
18
19
20
21
22
23
23
24
25
27
27
28
7
Page 8

Selecting the Automatic Volume Level (AVL)……………………………..
Setting Audio Language….…………………………………….……………
Setting the Digital Audio Output ……………………………………………
Functions…………………………………………………………………………
Setting the Auto Lock………………………………………………………..
Setting Block by Rating………………………………………………………
Setting the Closed Caption………………………………………………….
Viewing the Closed Caption…………………………………………………
Setting the EPG View……………………………………………………….
Set up…………………………………………………..………..………………
Setting Date / Time………………………….………….…………………..
29
30
31
32
32
34
35
37
39
40
40
Setting Power on Time……………………….………………..……………
Setting Power off Time………………………………………………………
Setting Sleep Time……………..……………………………….……………
Selecting Menu Language ……………………………………………….…
Setting Menu Opacity ………………………………………..………..……
Setting Emergency Alert …………………………………………….……..
Setting PC Mode…………………………………………..…………………
Selecting PIP/Dual Screen…………………….……………………………
Other Information…………………………………………………………….
Trouble Shooting………………………………………………………………
Specifications …………………………………………………………………
42
43
44
45
46
47
48
52
54
54
56
8
Page 9
Getting Started
Preparation
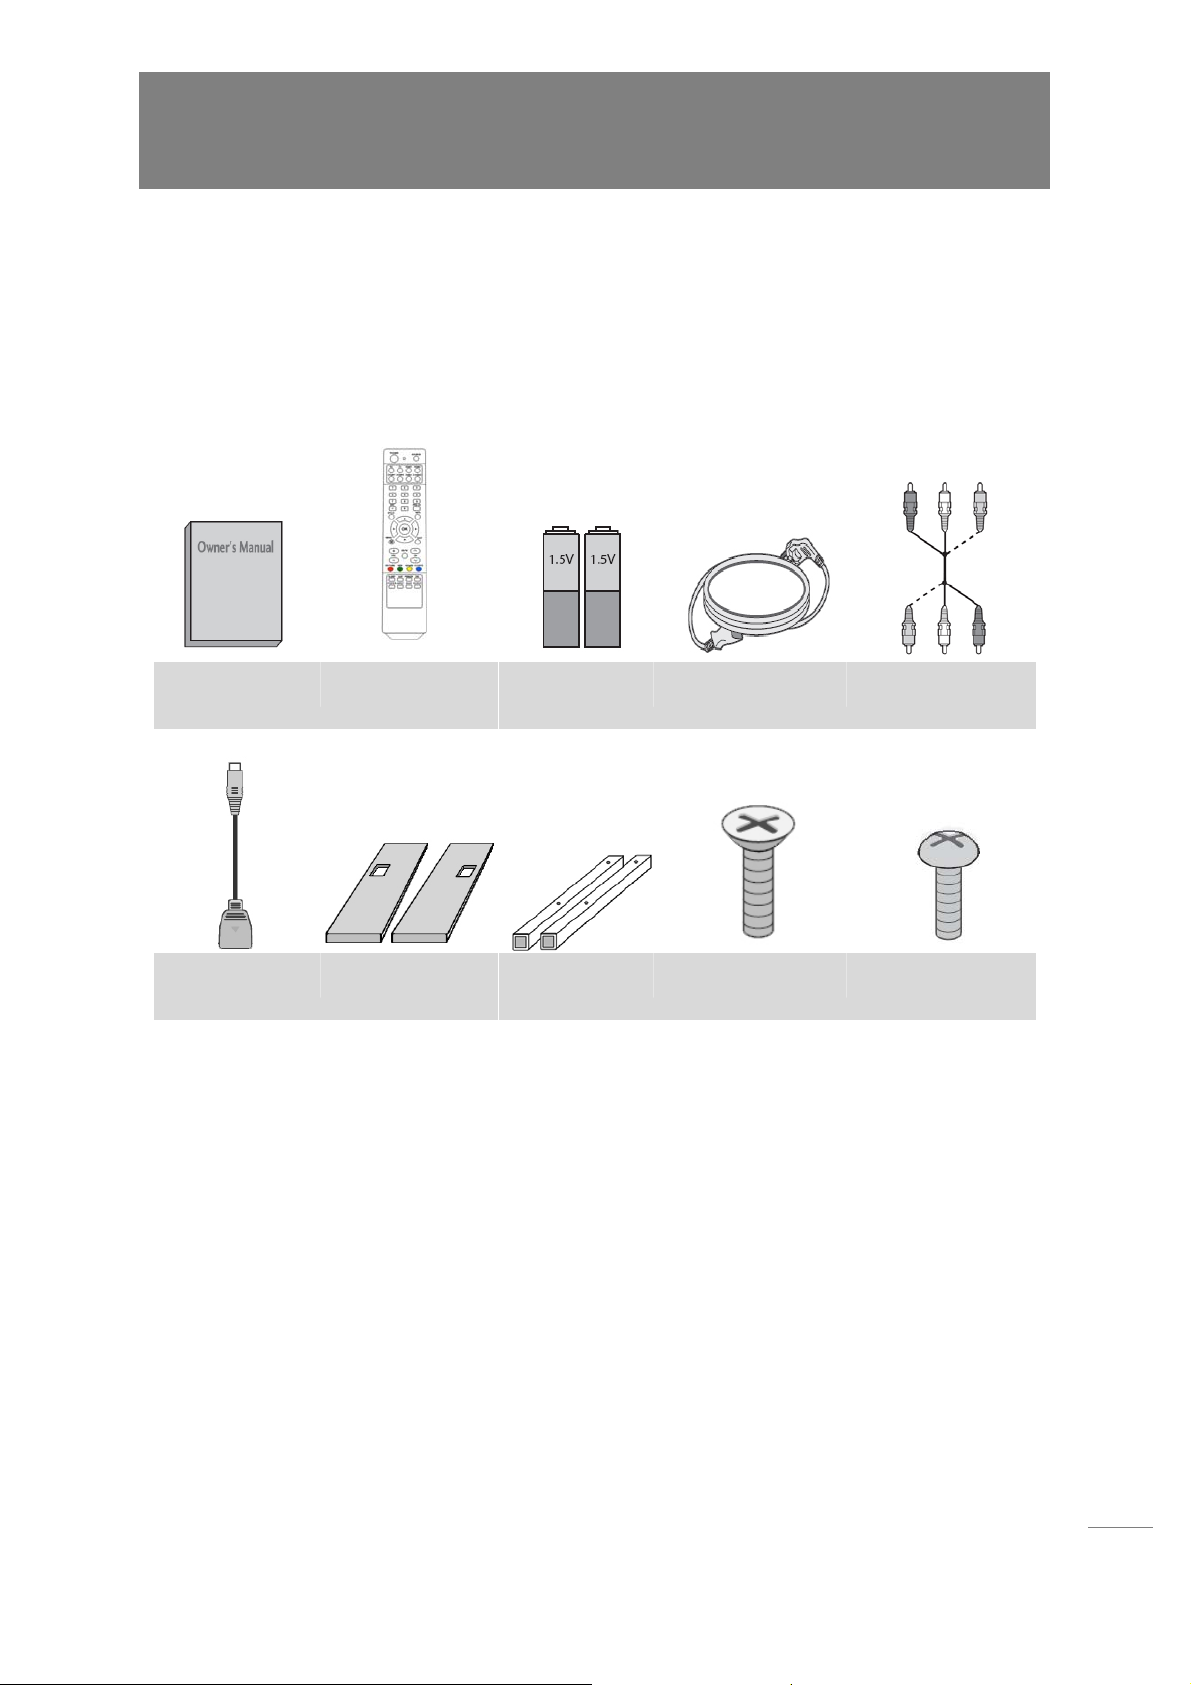
Accessories
Ensure that the following accessories are included with your product. If an accessory is
missing, please contact the dealer where you purchased the product.
2 AA Batteries
Power Cable
AV cable
User’s
Instruction
Remote Control
USB gender
2 Stands
2 Stand bars
2 M8*20 screws
4 M6*20 screws
9
Page 10
Stand Installation
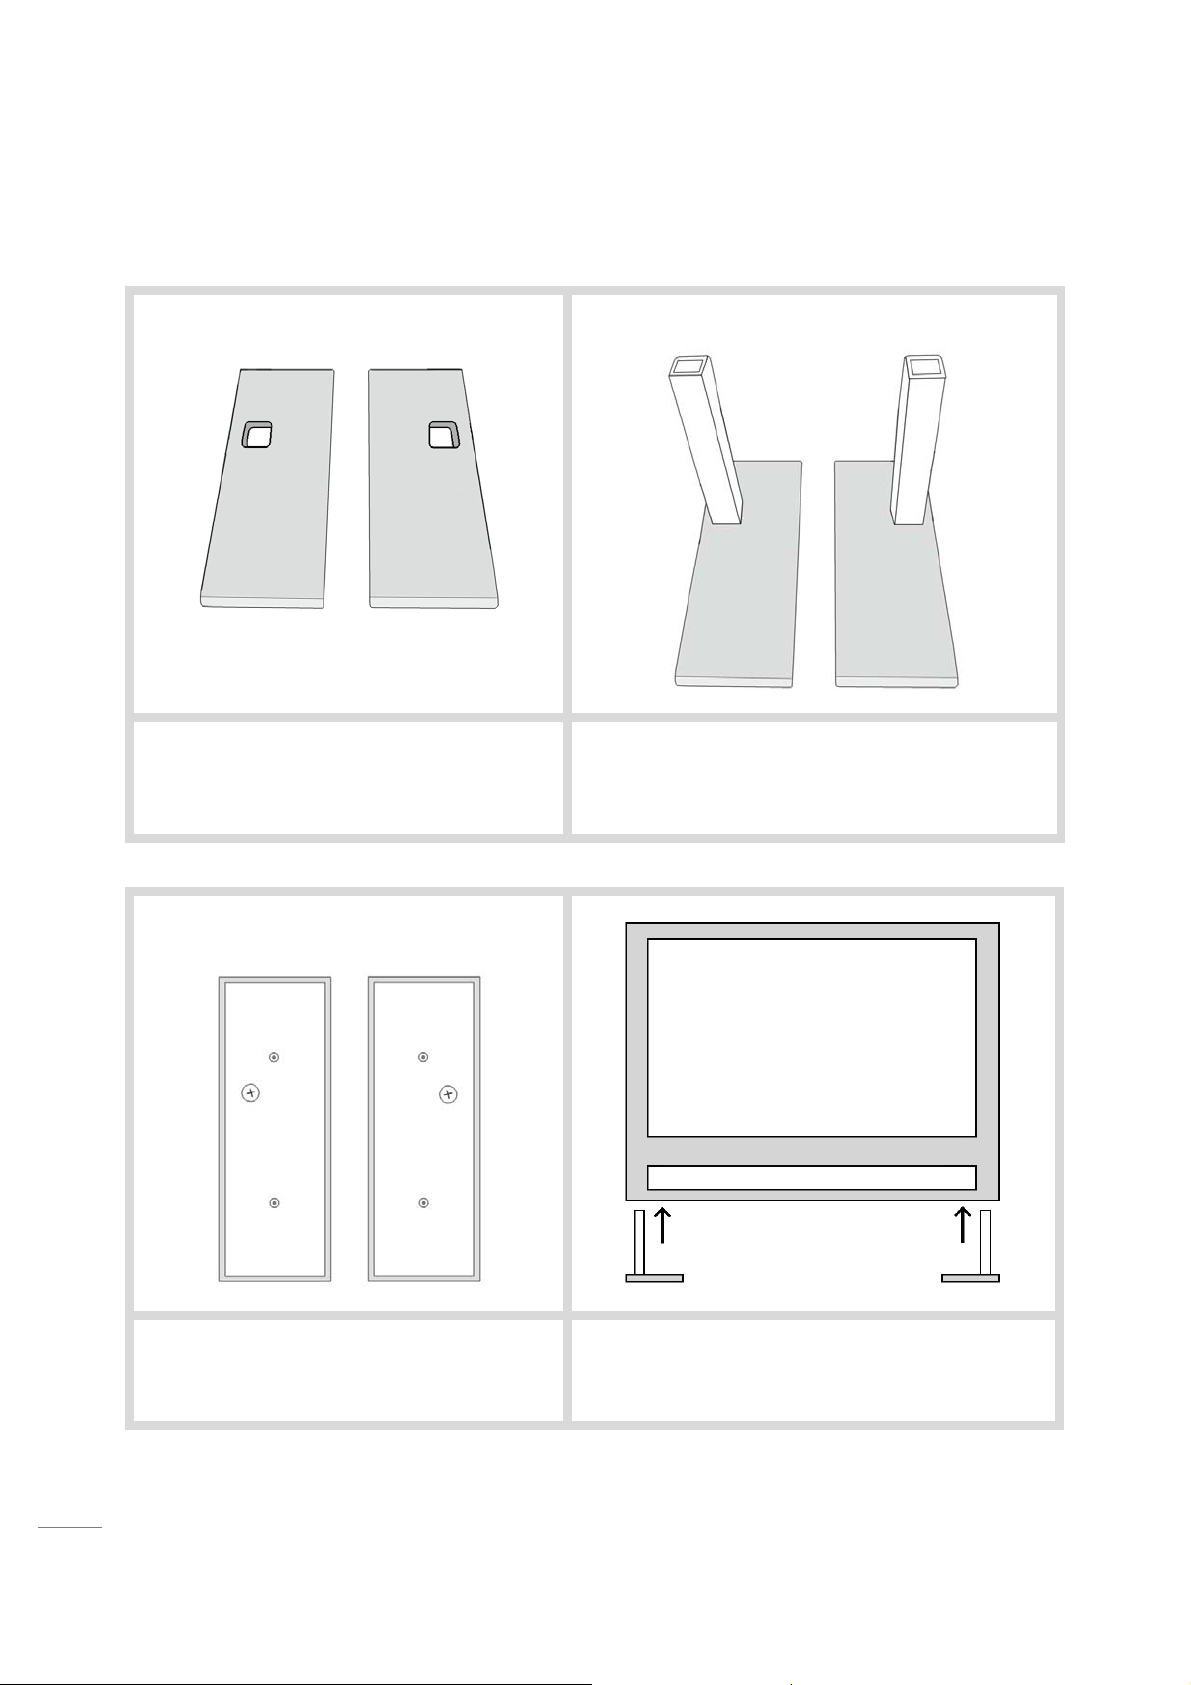
1. Place two stands on a stable surface.
Make sure Left and right are properly placed .
2. Assemble the stand with the stand bars as shown.
Make sure that the hole for bolt should be located at
the back side of the stand bar.
10
3. Install the 2 bolts securely, on the bottom of
the stands in the holes provided.
4. Insert stand set into the holes provided at the
bottom of the TV carefully.
Page 11
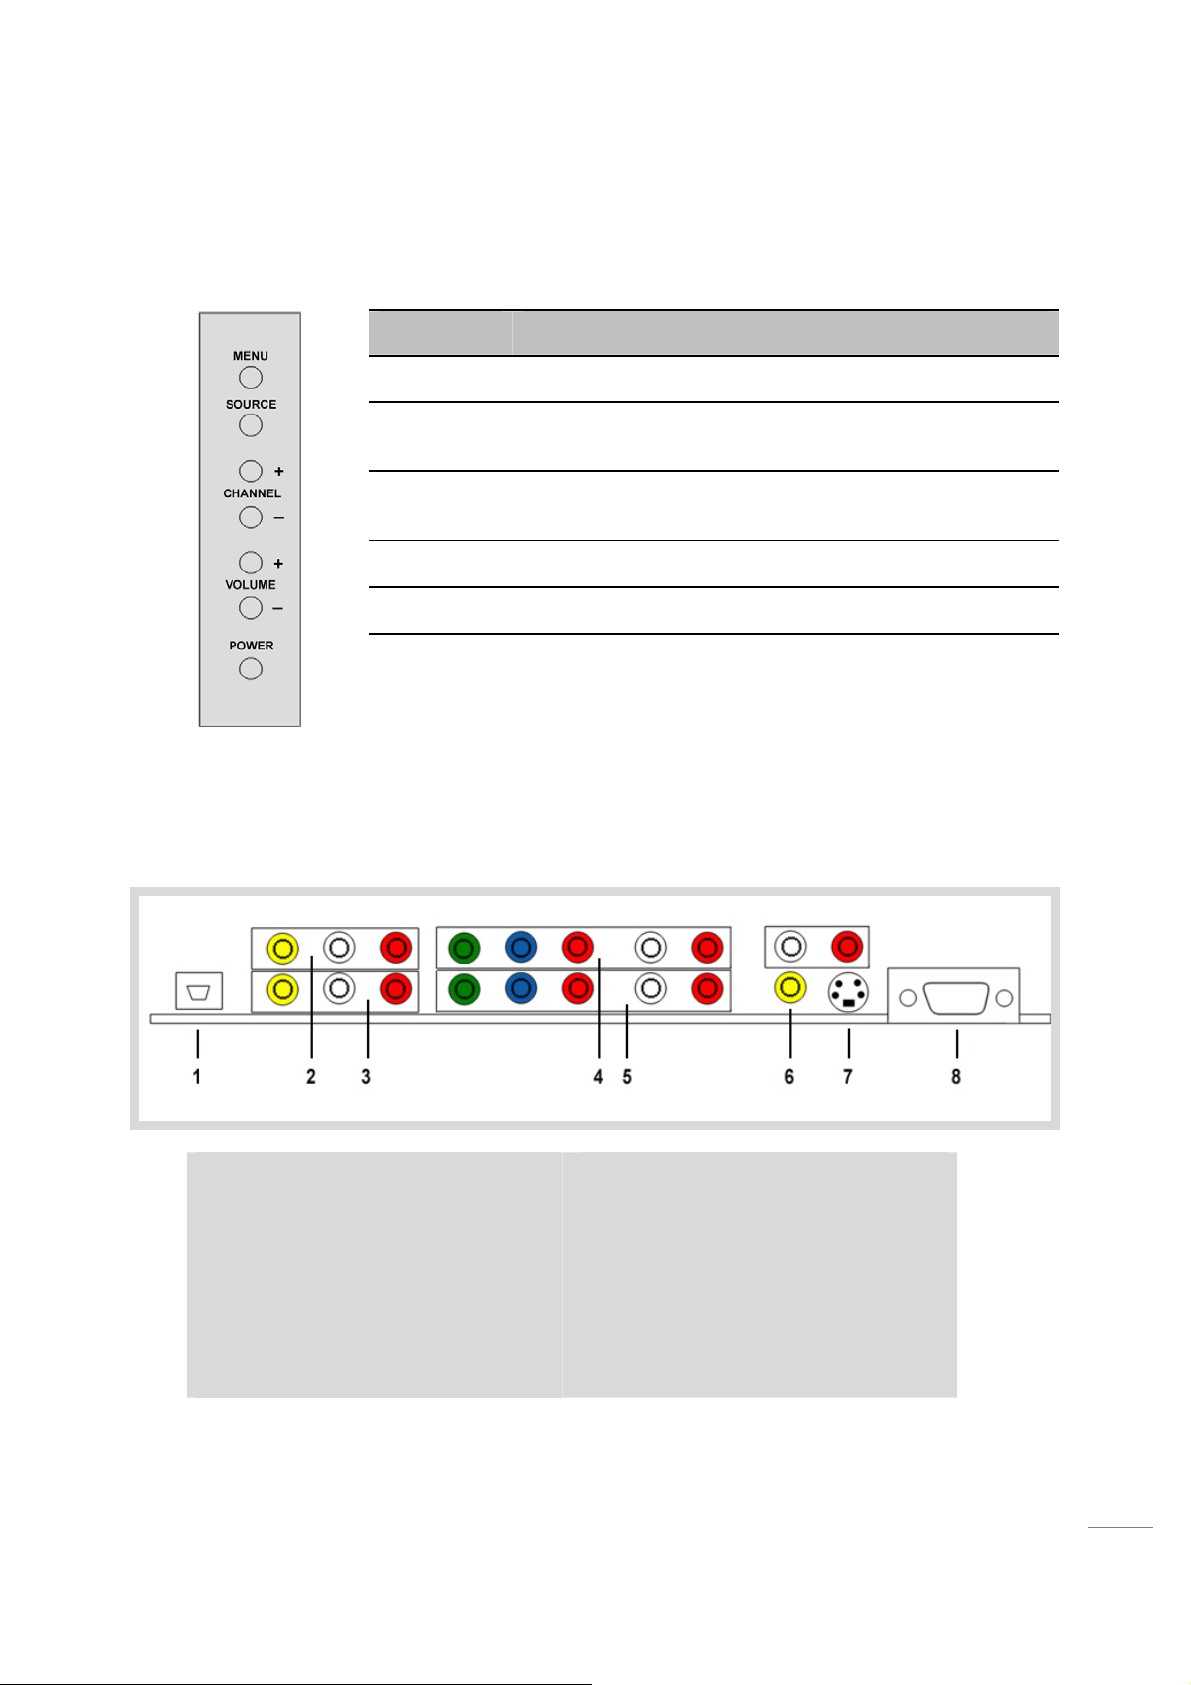
Side Panel
Button Description
Rear Panel
MENU
SOURCE
VOLUME
CHANNEL
POWER
Press to display MENU with TV functions
Change input sources. In MENU screen, this key is used for
selecting to or toggling current settings
Adjust sound level or set the value while On Screen Menu is
active
Change channel or navigate while On Screen Menu is active
Press to turn on and off the TV
① Digital Audio Out
② Composite 1 (AV1) In
③ Composite Out
④ Component 1 (AV4) In
⑤ Component 2 (AV5) In
⑥ Composite 2 (AV2) In
⑦ S-V i de o (AV3) In
⑧ PC RGB (AV6) In
11
Page 12
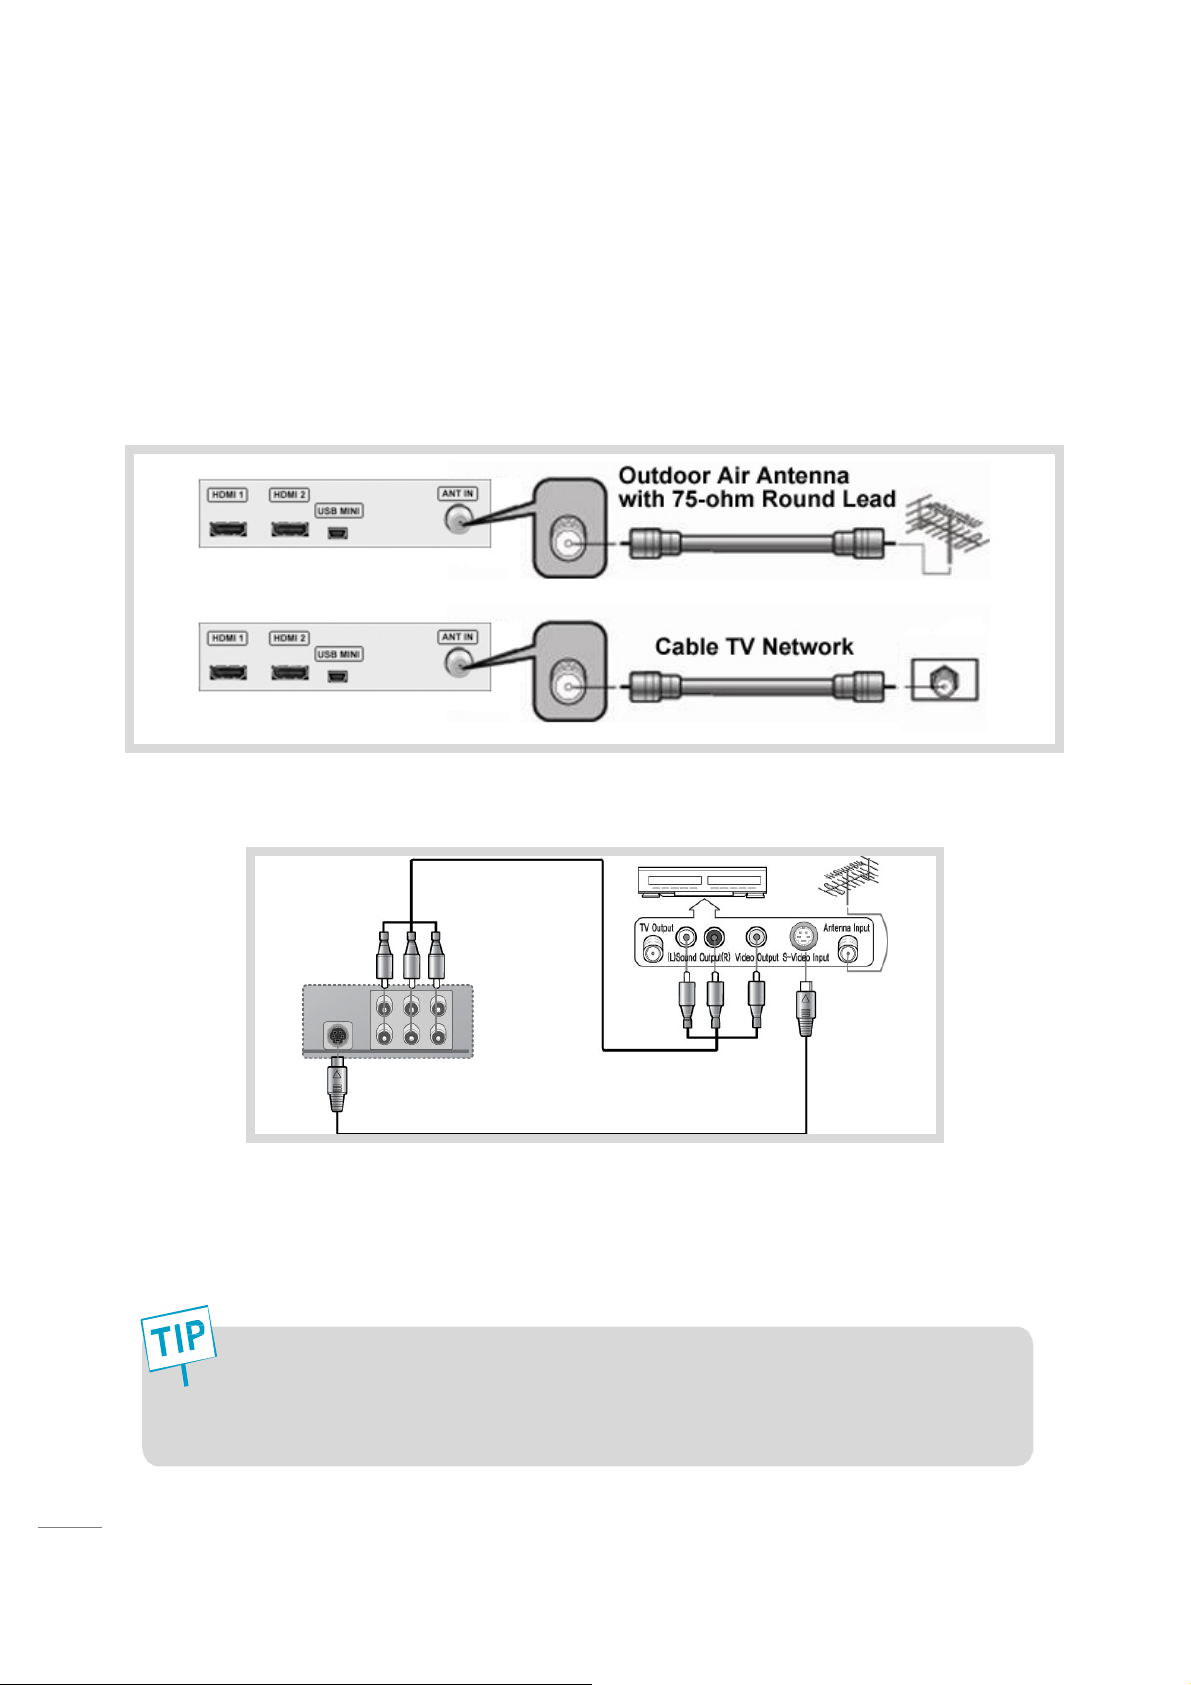
External Equipment Settings
Connecting an Antenna
Connect an Outdoor Air Antenna / Cable Television Network with SPDIF (Optical) Output
(refer rear panel information) without a Cable Box Connections. For optimum picture quality,
adjust antenna direction if needed.
Connecting a VCR
12
n When you connect Audio/Video composite cables using composite cab le , please make sure
of the colors of the jacks. (Video should be connected to yellow, audio to white and red).
o Using S-Video Cable: If the VCR, you have, supports S-Video Output, connect S-Video
Input of the LCD to S-Video Output of the VCR and do the same in Sound cable (White
and Red).
To Watch VCR
1. Turn on the TV and press “SOURCE” button on the remote control to select the
connected input mode.
2. Turn on the VCR, insert a video cassette then press “Play” button.
Page 13
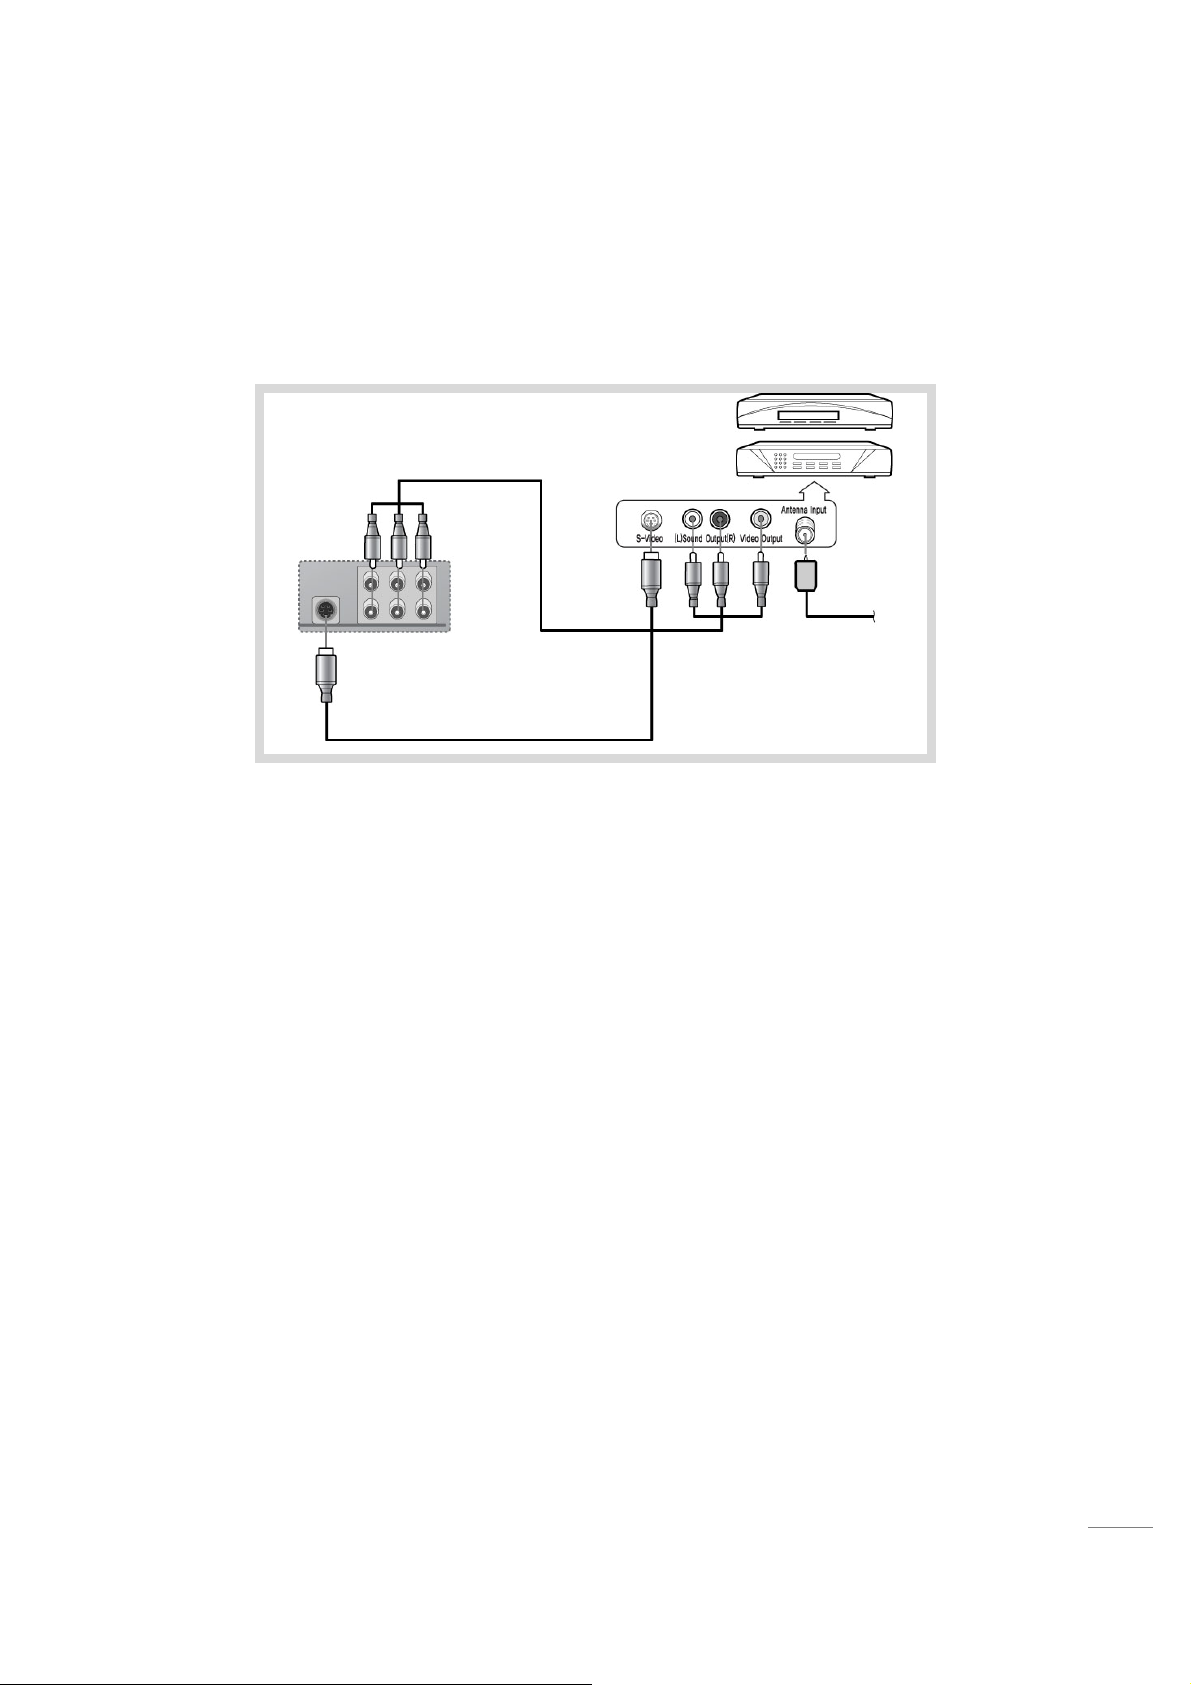
Connecting the cable TV or satellite with a set-top box
Plug the Antenna cable with 75-Ohm Round Lead into the Antenna Input terminal of the
Cable Box / Satellite Receiver.
n Using Composite (A/V) Cable
- Video Connection: Connect the Video Input port of the LCD TV to the Video Output port
of the Cable Box / Satellite Receiv er with the Composite cable. The color o f Video Cable
and Output Port are in Yellow.
- Sound Connection: Connect the Sound Input port of the LCD TV to the Sound Outpu t Port
of the Cable Box / Satellite Receiver with Composite cable. Th e color of Sound Cable and
Output Ports are in White and Red.
o Using S-Video Cable (While S-Video is supported)
- Video Connection: Connect the S-Video Input port of the LCD TV to the S-Video Output
port of the Cable Box / Satellite Receiver by using S-Video cable.
- Sound Connection: Connect the Sound Input port of the LCD TV to the Sound Outpu t Port
of the Cable Box / Satellite Receiver with Sound Cable. The color of Sound Cable and
Output Ports are in White and Red.
13
Page 14
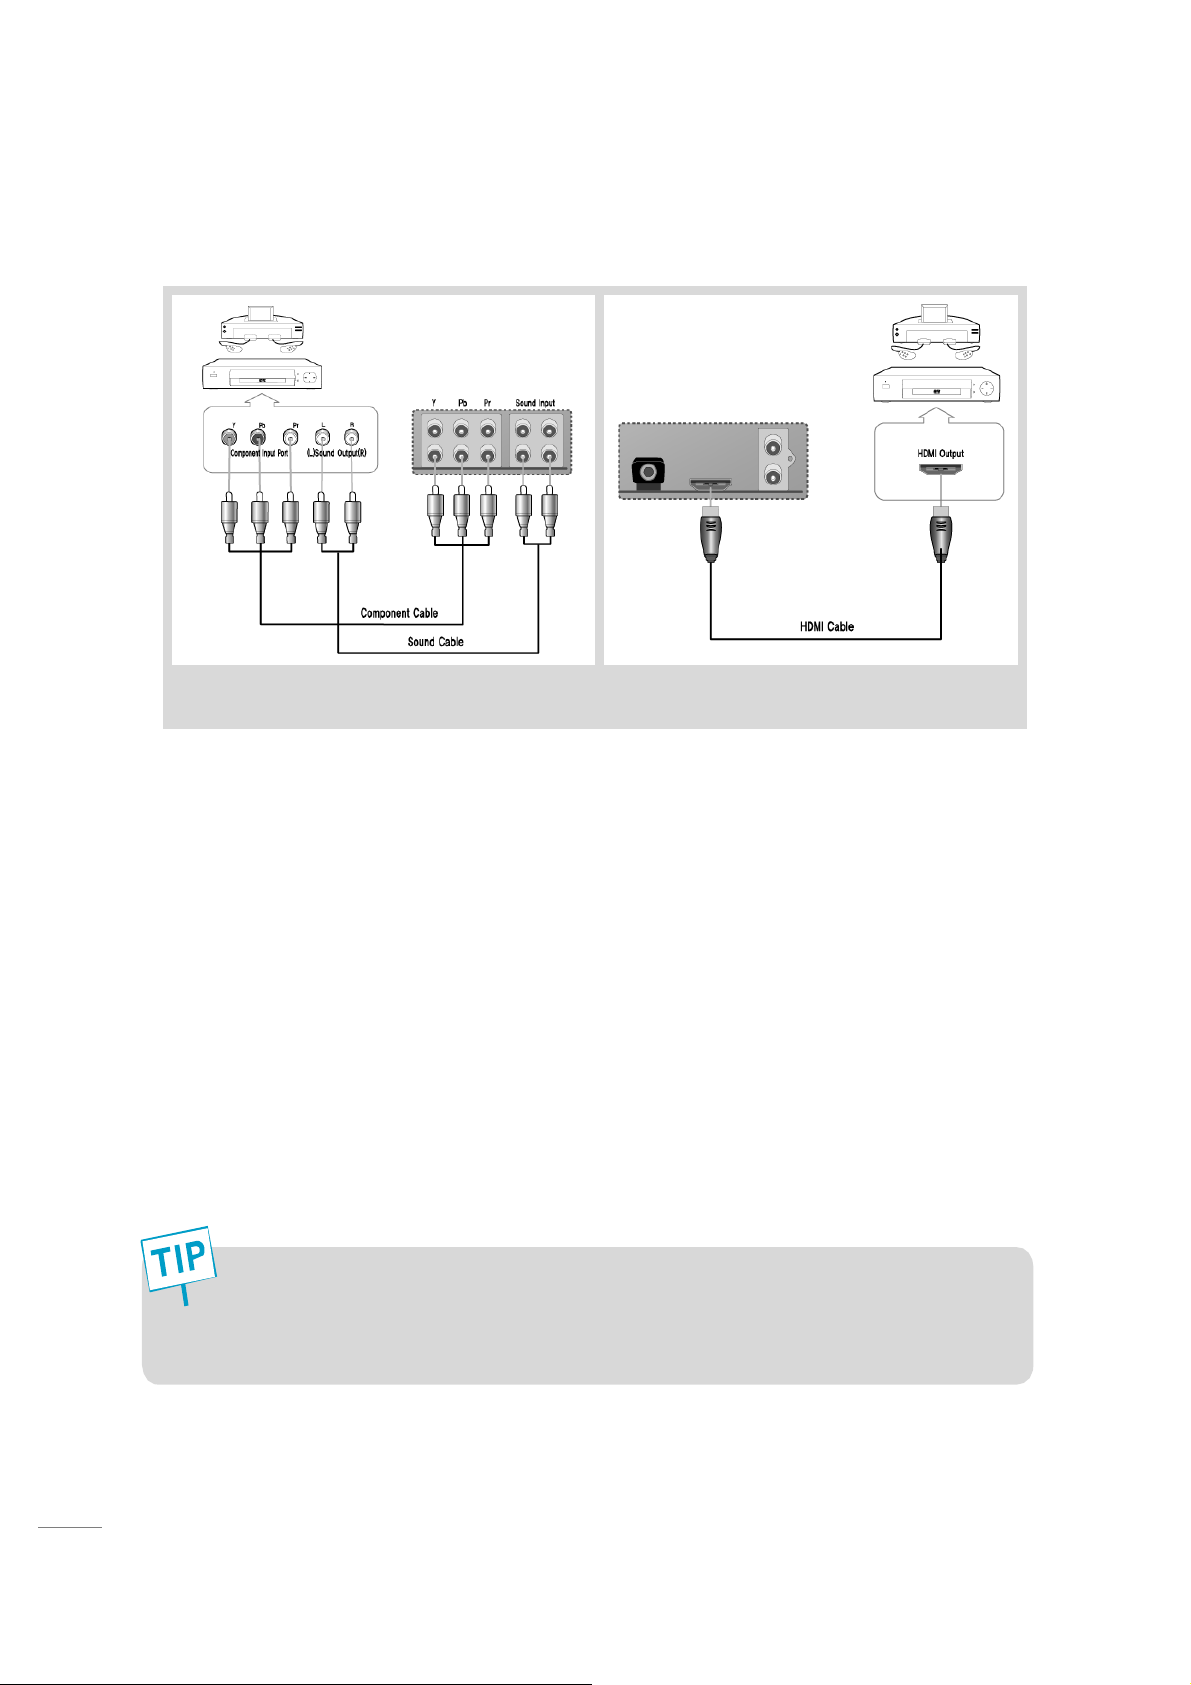
Connecting a DVD player
Component Connection HDMI Connection
n Using Component Cable (Green, Blue & Red Color).
- Video Connection: Connect the Component Input port of the LCD TV to the Component
Output port of the DVD Player / Video Game Machine with the Component cable. The
color of the Cable and the In/Out Ports are in Green, Blue & Red Color accordingly.
- Sound Connection: Connect the Sound Input port of the LCD TV to the Sound Outpu t Port
of the DVD Player / Video Game Machine with Composite cable. The color of Sound
Cable and Output Ports are in White and Red. In this case, the sound ports are generally
located by the component ports.
* Component Connection is also required to connect sound L/R properly. If fails, there will
be no sound.
o Using HDMI (Source) to HDMI Cable:
This is only where both of devices have HDMI Port. Since HDMI deliver sound signal
with its video signal, no additional connection requires for sound.
14
To watch DVD / Play Video Game Mach ine
1. Turn on the LCD TV and press [SOURCE] button on the remote control and select
correct input source.
2. Turn on the DVD Player and press [Play] button
Page 15
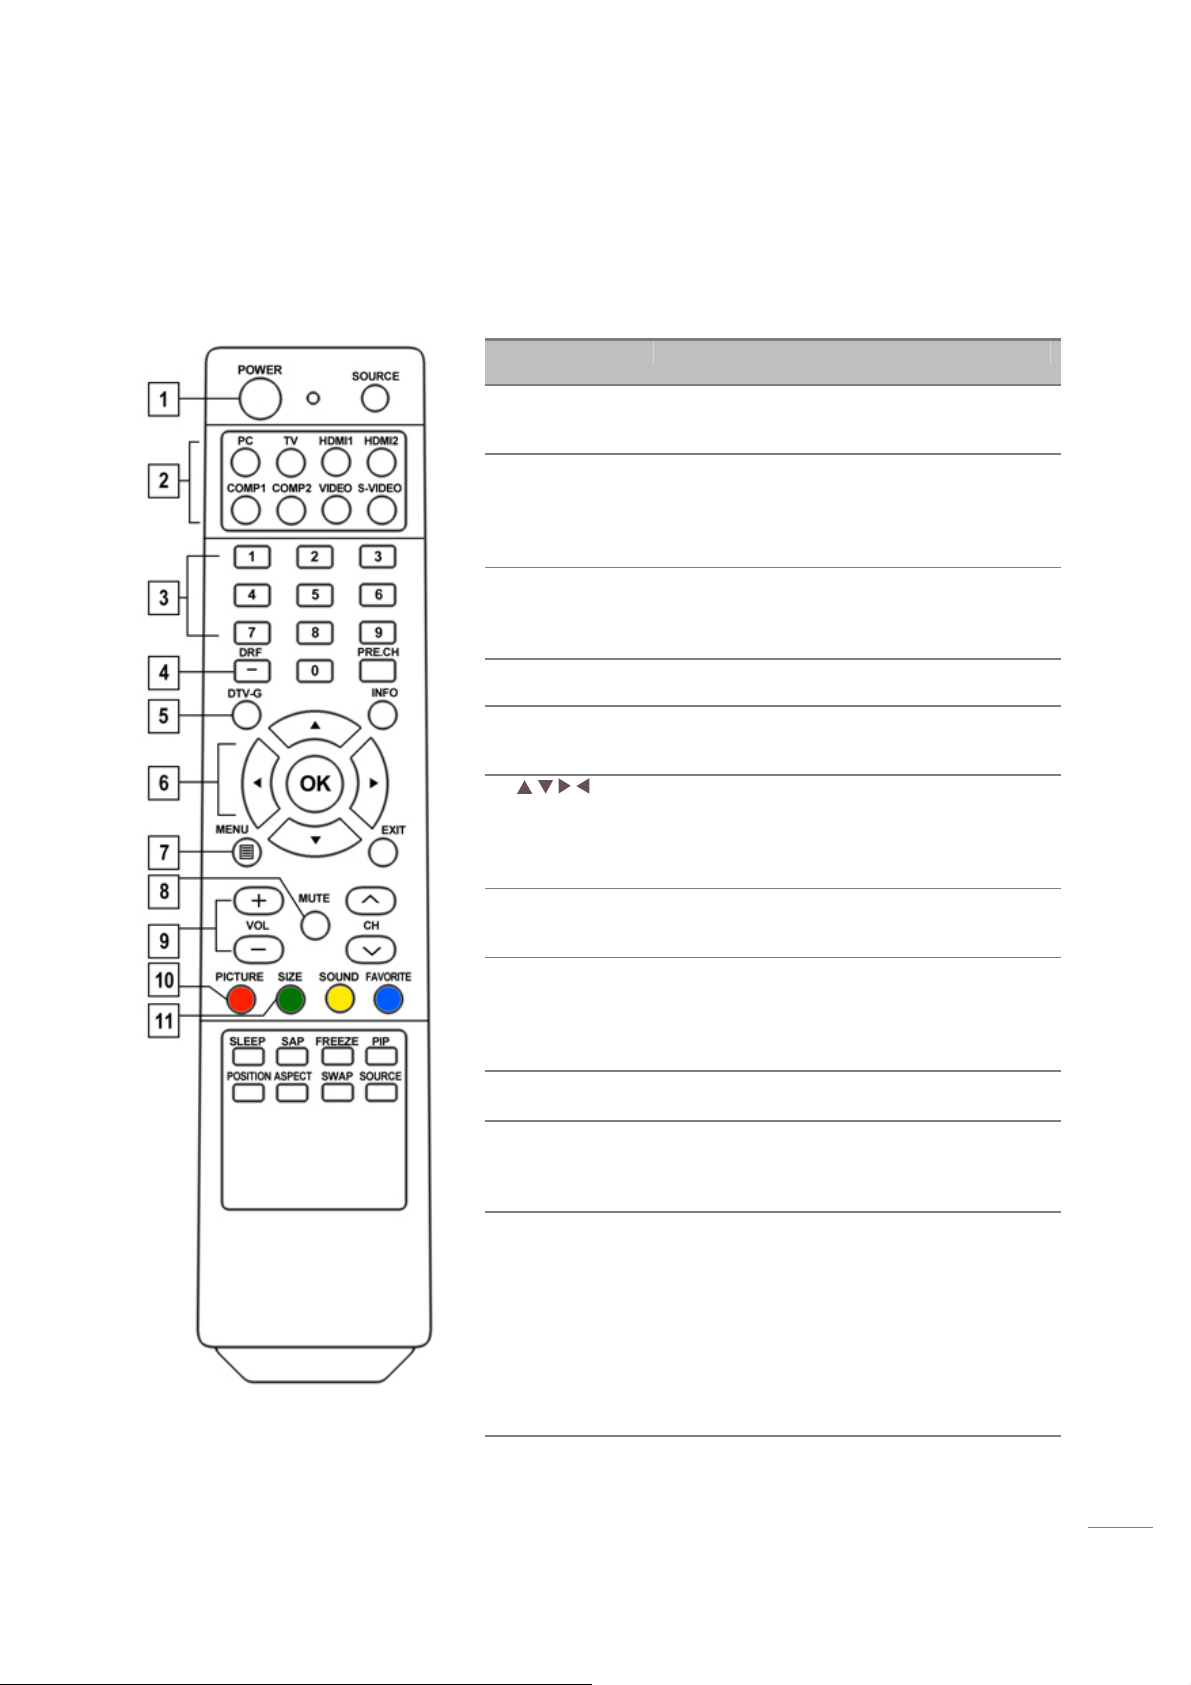
Remote Control
Remote Control Functions
Button Description
1. POWER
2. INPUT
SELECTION
3. NUMBER
4. DRF
5. DTV-G
6. / / /
OK
7. MENU
8. MUTE
9. VOL-
VOL+
10. PICTURE
11. SIZE
Power on/off.
Press to select the input source directly.
PC / TV (Air, Cable) / HDMI1 / HDMI2 /
COMPONENT 1 / COMPONENT 2 /
VIDEO / S-VIDEO
Press 0 – 9 to select a channel.
The channel changes after 2 seconds.
Press OK to change channels immediately.
Virtual channel separator.
Single channel EPG (Electronic Program
Guide).
Press to move OSD (Up /Down/ Right
/Left).
While using the on-screen menus, press to
select or change a particular function.
Press to display the on-screen menus, or to
exit the on-screen menus.
Press to mute for speaker output. In mute
status, if you press volume up key or tune
off and turn on power, mute will be
released.
Volume up & down.
Press repeatedly to cycle through the
available picture modes: Custom,
Standard, Mild, Vivid, and Multimedia.
Press to select the screen size. 16:9, 4:3,
Zoom1, Zoom2, and Panorama are
available.
15
Page 16
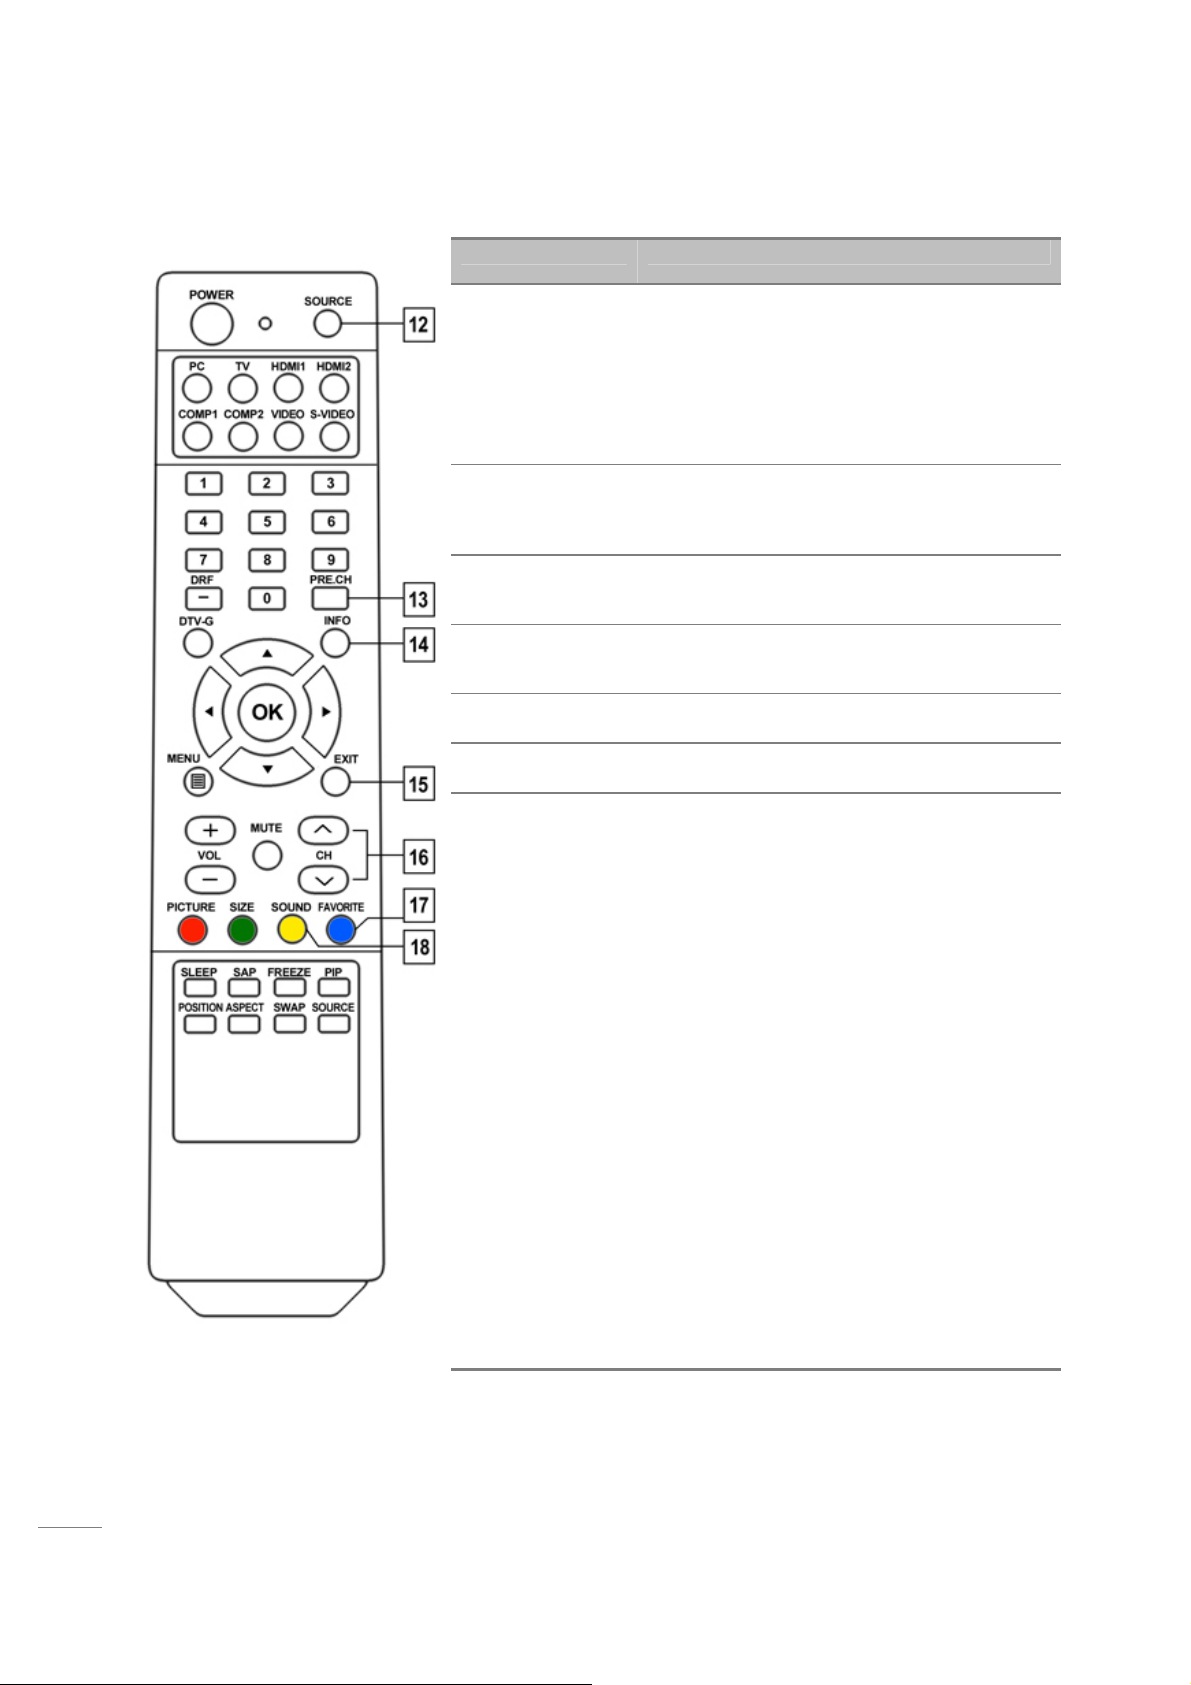
Button Description
12. SOURCE
13. PRE.CH
14. INFO
15. EXIT
16. CH- CH+
17. FAVORITE
18. SOUND
The following input selection is available.
TV(Air, Cable), AV1(CVBS), AV2(CVBS),
AV3(S-Video), AV4(Component),
AV5(Component), AV6(VGA),
AV7(HDMI), AV8(HDMI)
Press to alternate between the current
channel and the last channel that was
displayed.
Press to display the information of current
channel.
Press to exit from any on-screen display at a
time.
Channel up & down.
Press to switch to your favorite channels.
Press to change the pre-defined sound
modes: Custom, Standard, Movie, Music, and
Speech.
16
Page 17
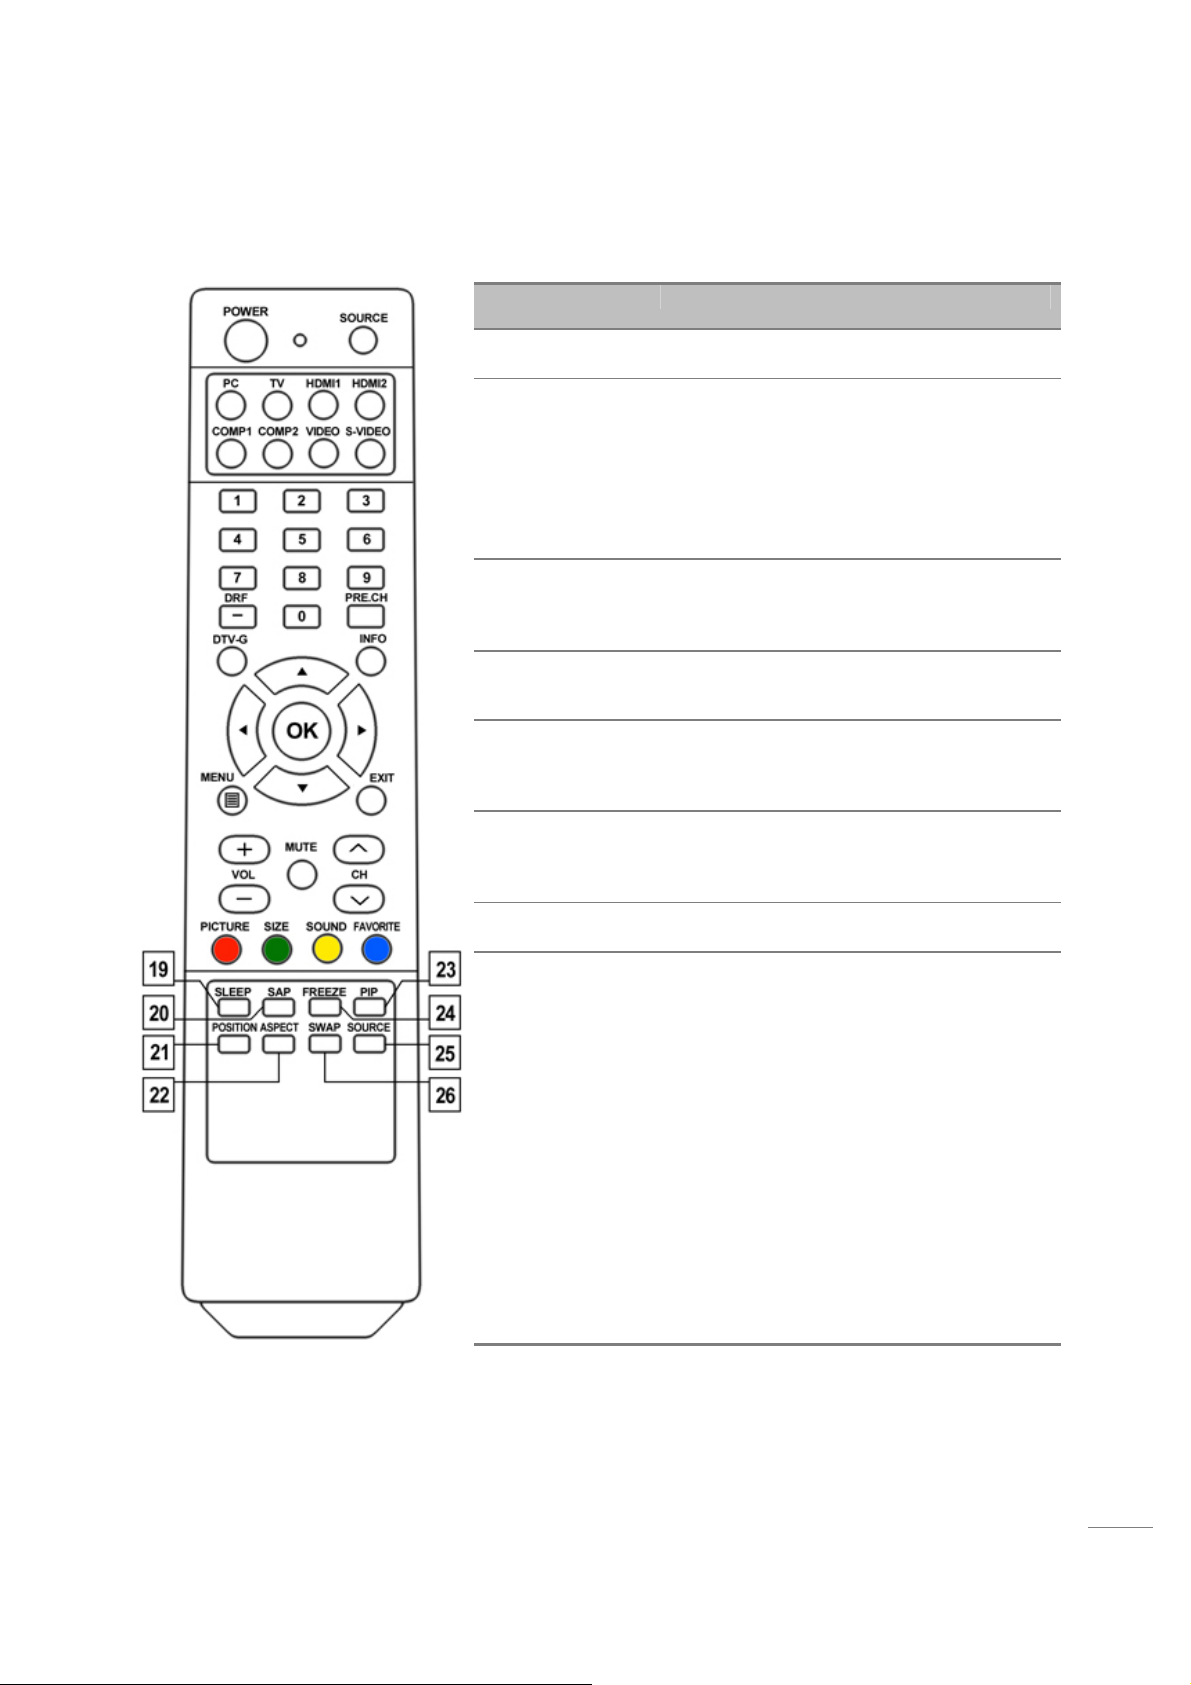
Button Description
19. SLEEP
20. SAP
21. POSITION
22. ASPECT
23. PIP
24. FREEZE
25. SWAP
26. SOURCE
Press to set sleep timer.
Press to select available “SAP” or “audio
languages”.
z In digital channel: Depending on the
particular broadcast, one or more foreign
language translation maybe available.
In analog channel: It is available about
Mono, Stereo and SAP.
Press to change the position of PIP. Four
positions are available.
Left-top, right-top, right-bottom, left-bottom.
Press to toggle the size of PIP (large and
small).
Press to change PIP/DW modes. Possible
modes: Normal (no PIP/no DW), PIP, DW
(DW: Double window or Picture-and-Picture).
Press to freeze the current picture. Press
again to resume motion. If you change the
channel, the frozen picture will be released.
Press to swap the main/sub pictures.
Press to change the input source of PIP/DW
for selecting sub picture.
17
Page 18
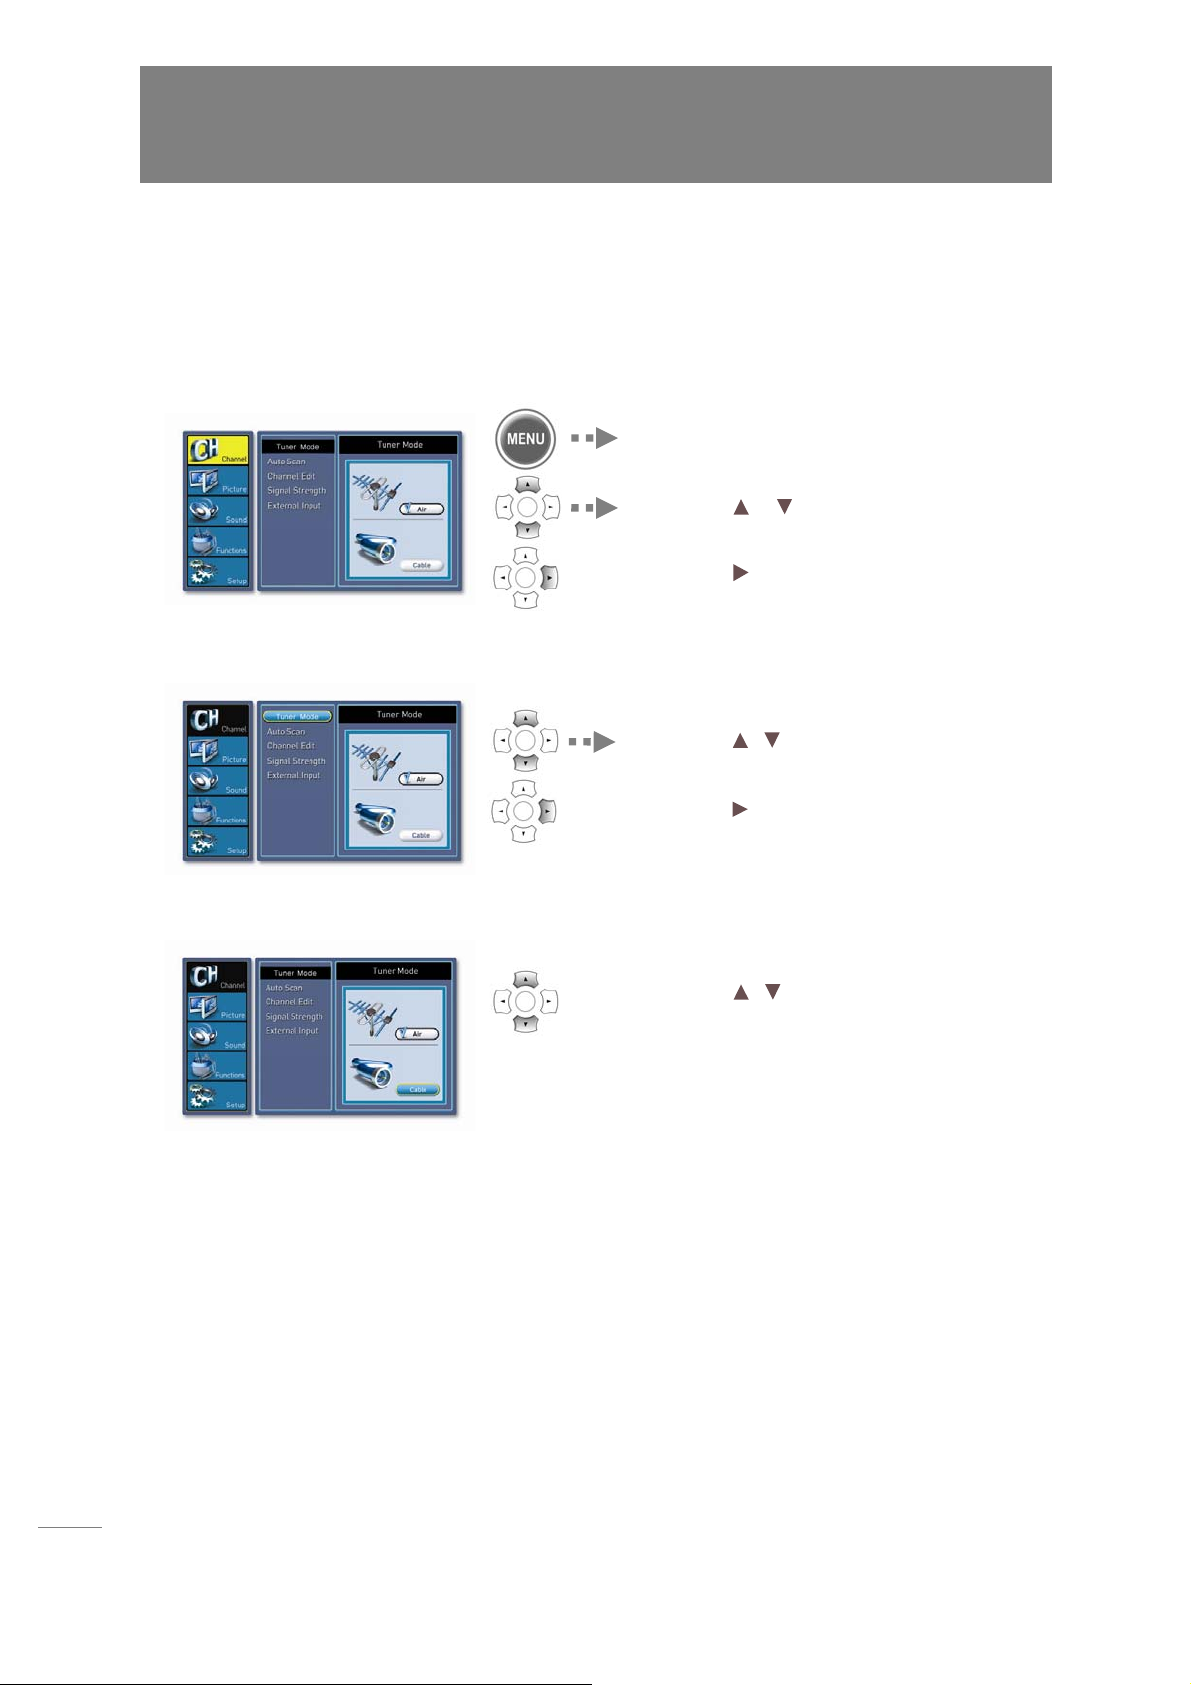
Using the Menu
Channel Settings
Selecting Tuner Mode
You can choose the RF-input between off-air and cable.
1. Select “Channel” in the Menu
2. Select “Tuner Mode”
Press the MENU button .
Press the
highlight the “Channel” icon.
Press the
or on the remote control to
or OK button.
3. Tuner Mode
Press the / button on the remote
control to highlight the “Tuner Mode” icon.
Press the
or OK button.
Press the / button to move to Air /
Cable you want.
18
Page 19
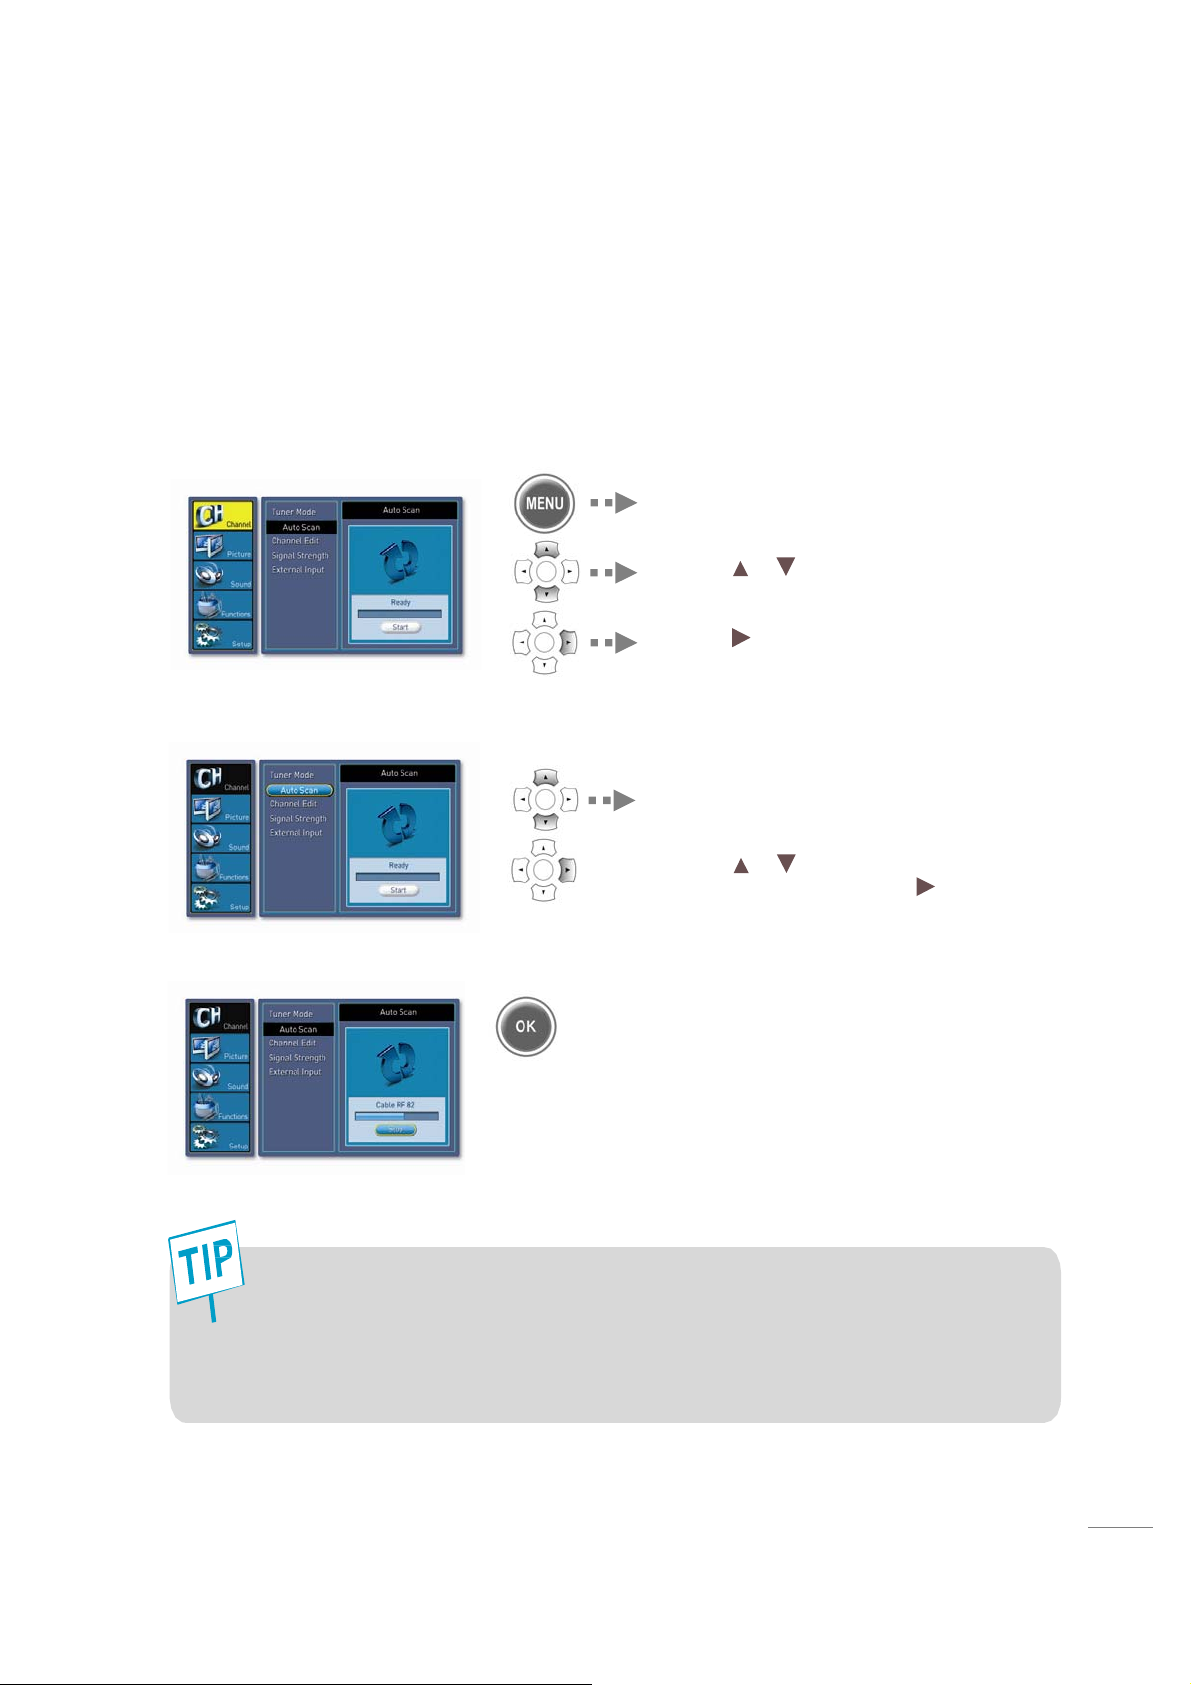
Storing Channe ls Auto m ati c al ly
n Your TV can memorize and store all of the avai lable analog/d igital bro adcast signals for both
“off-air” (antenna) and cable channels.
o Before your television can begin memorizing the available channels, make sure to specify the
type of the signal source (antenna or cable) connected to your TV.
1. Select “Channel” in the Menu
Press the MENU button.
Press the
“Channel” icon
Press the
or button to highlight the
or OK button.
2. Select “Auto Scan”
Press the MENU button.
Press the
“Auto Scan” icon and press the
button.
or button to highlight the
or OK
3. Auto Scan
Press the OK button and Auto Scan is
activated.
- If you want to stop the Auto Scan during scanning, press the OK button once more.
- As soon as Auto Scan is run, all previously stored channels are removed and newly scanned
channels are stored.
- If you have changed the connection of an antenna or cable, perform Auto Scan again.
- If the scrambled channel is detected, it is not added in channel list.
19
Page 20
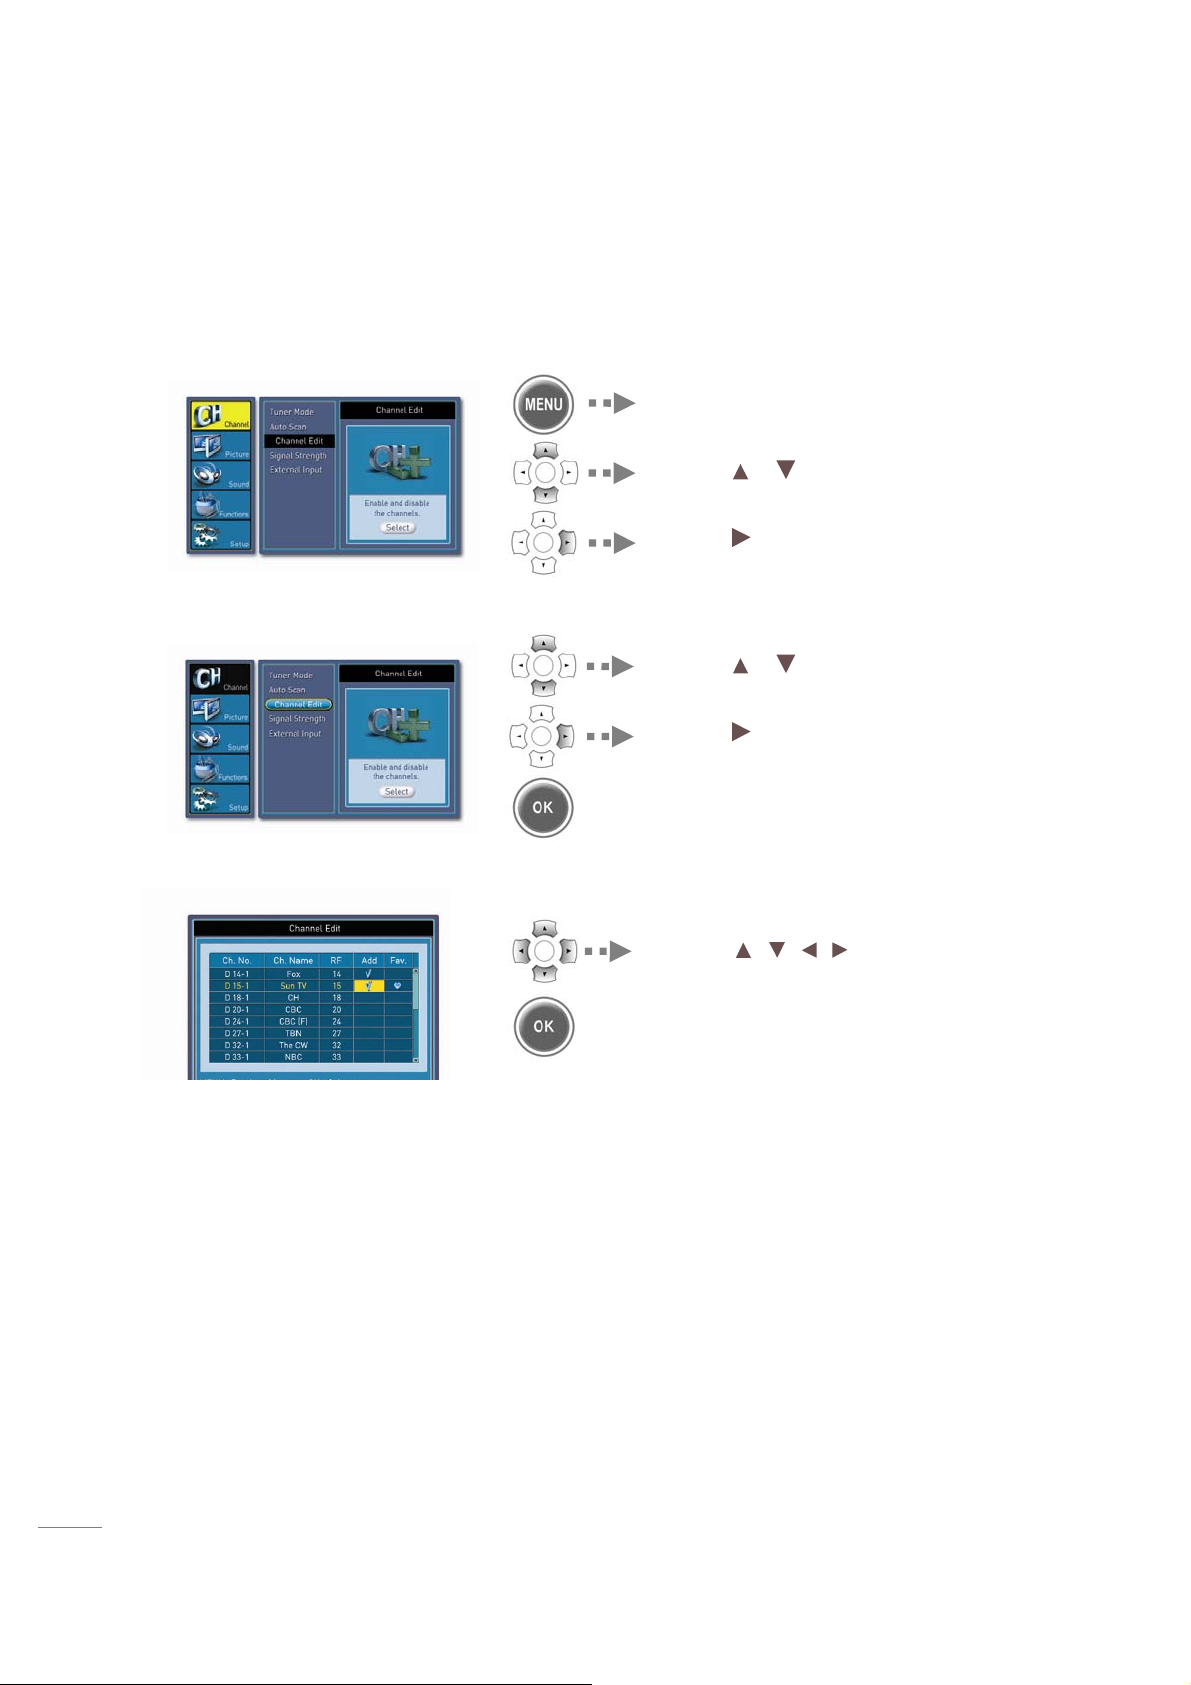
Setting Channel Edit / Favorite Channels
/
Users can store frequently watc he d channels to quickly access a preferr e d cha nnel.
1. Select “Channel” in the Menu
Pressthe MENU button.
Press the
to highlight the “Channel” icon
Press the
or on the remote control
or OK button.
2. Select “Channel Edit”
Press the or on the remote control
to highlight the “Channel Edit” icon.
Press the
or OK button.
3. Channel Edit
Press the/ /
desired channel and
Press the OK button to activate or
deactivate the channel on your channel list
or delete from your favorite list.
button to move to
20
Page 21
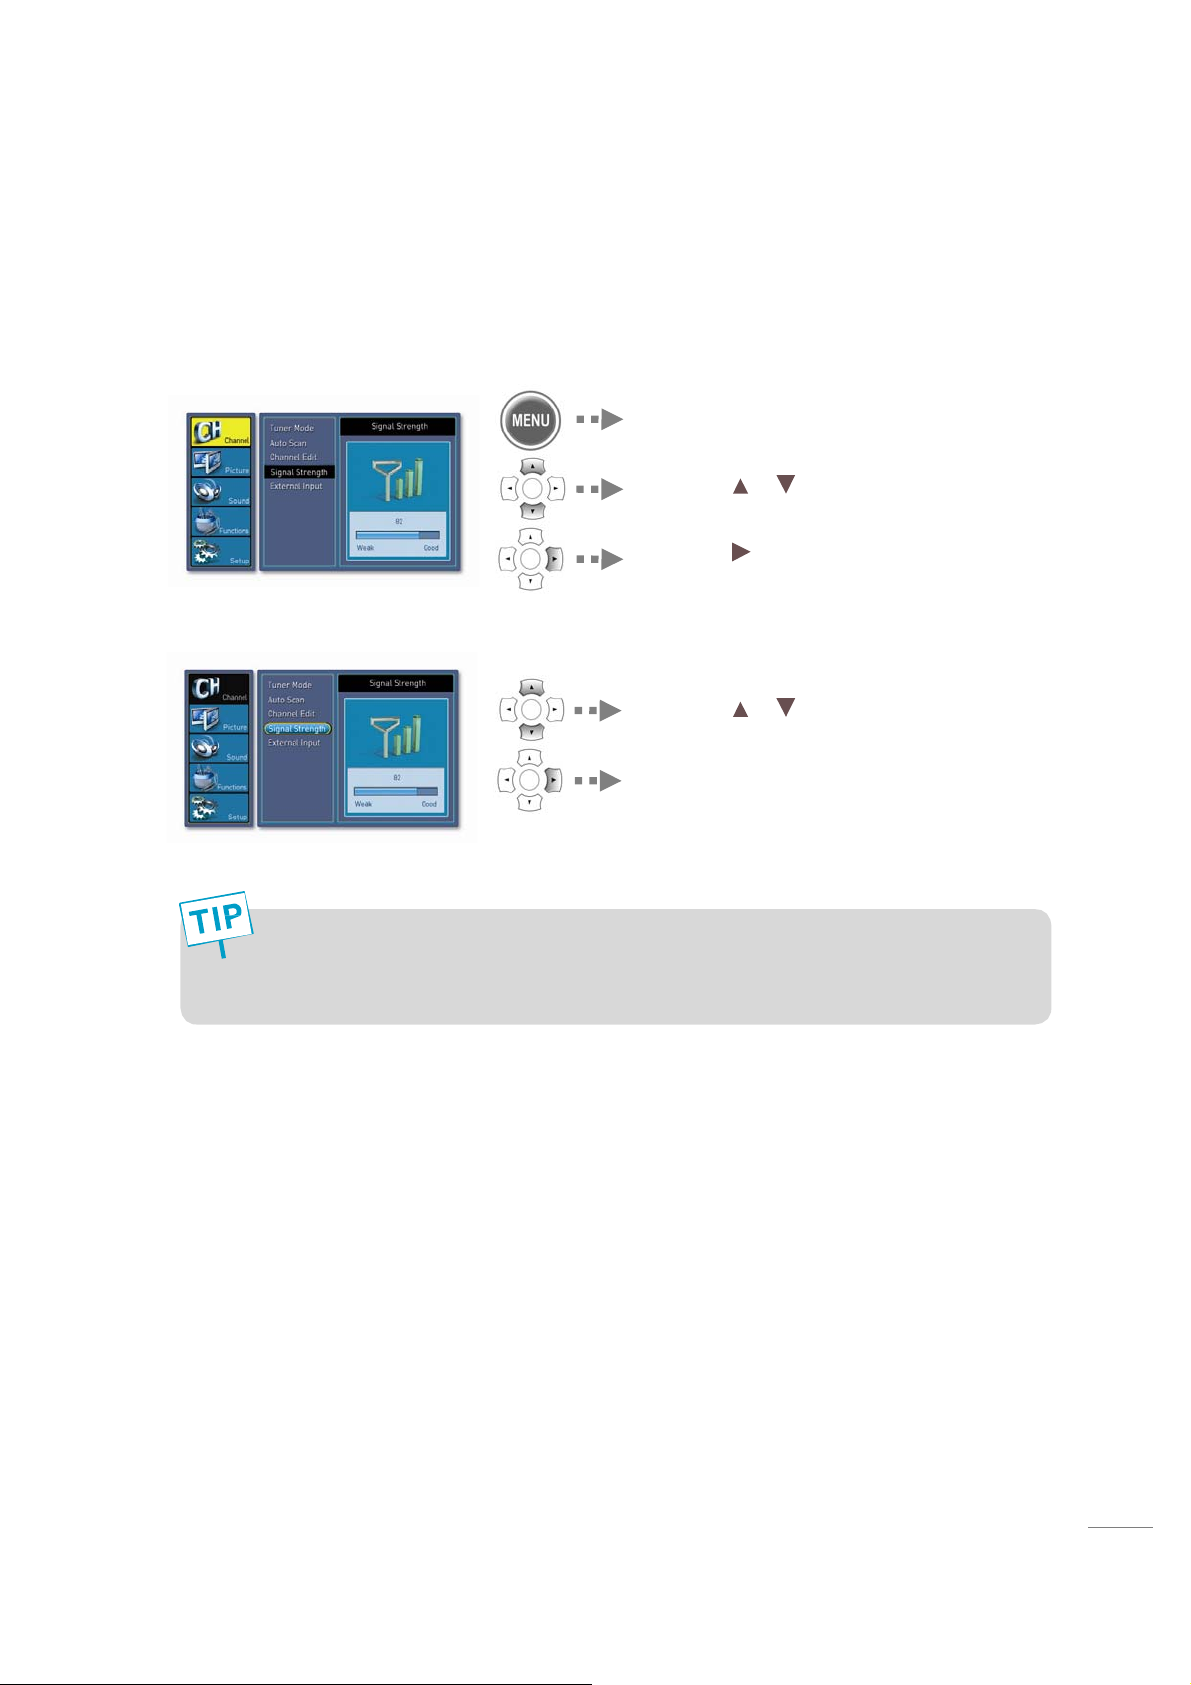
Displaying Signal Strength
p
The function is only for Digital TV channels.
1. Select “Channel” in the Menu
2. Select “Signal Strength”
Pressthe MENU button.
Press the
to highlight the “Channel” icon
Press the
Press the or on the remote control
to highlight the “Signal Strength” icon.
or on the remote control
or OK button.
Digital channels will either have excellent reception or none at all. It is quite unlike analog
tion, which can vary in reception quality from snowy to clear.
rece
21
Page 22
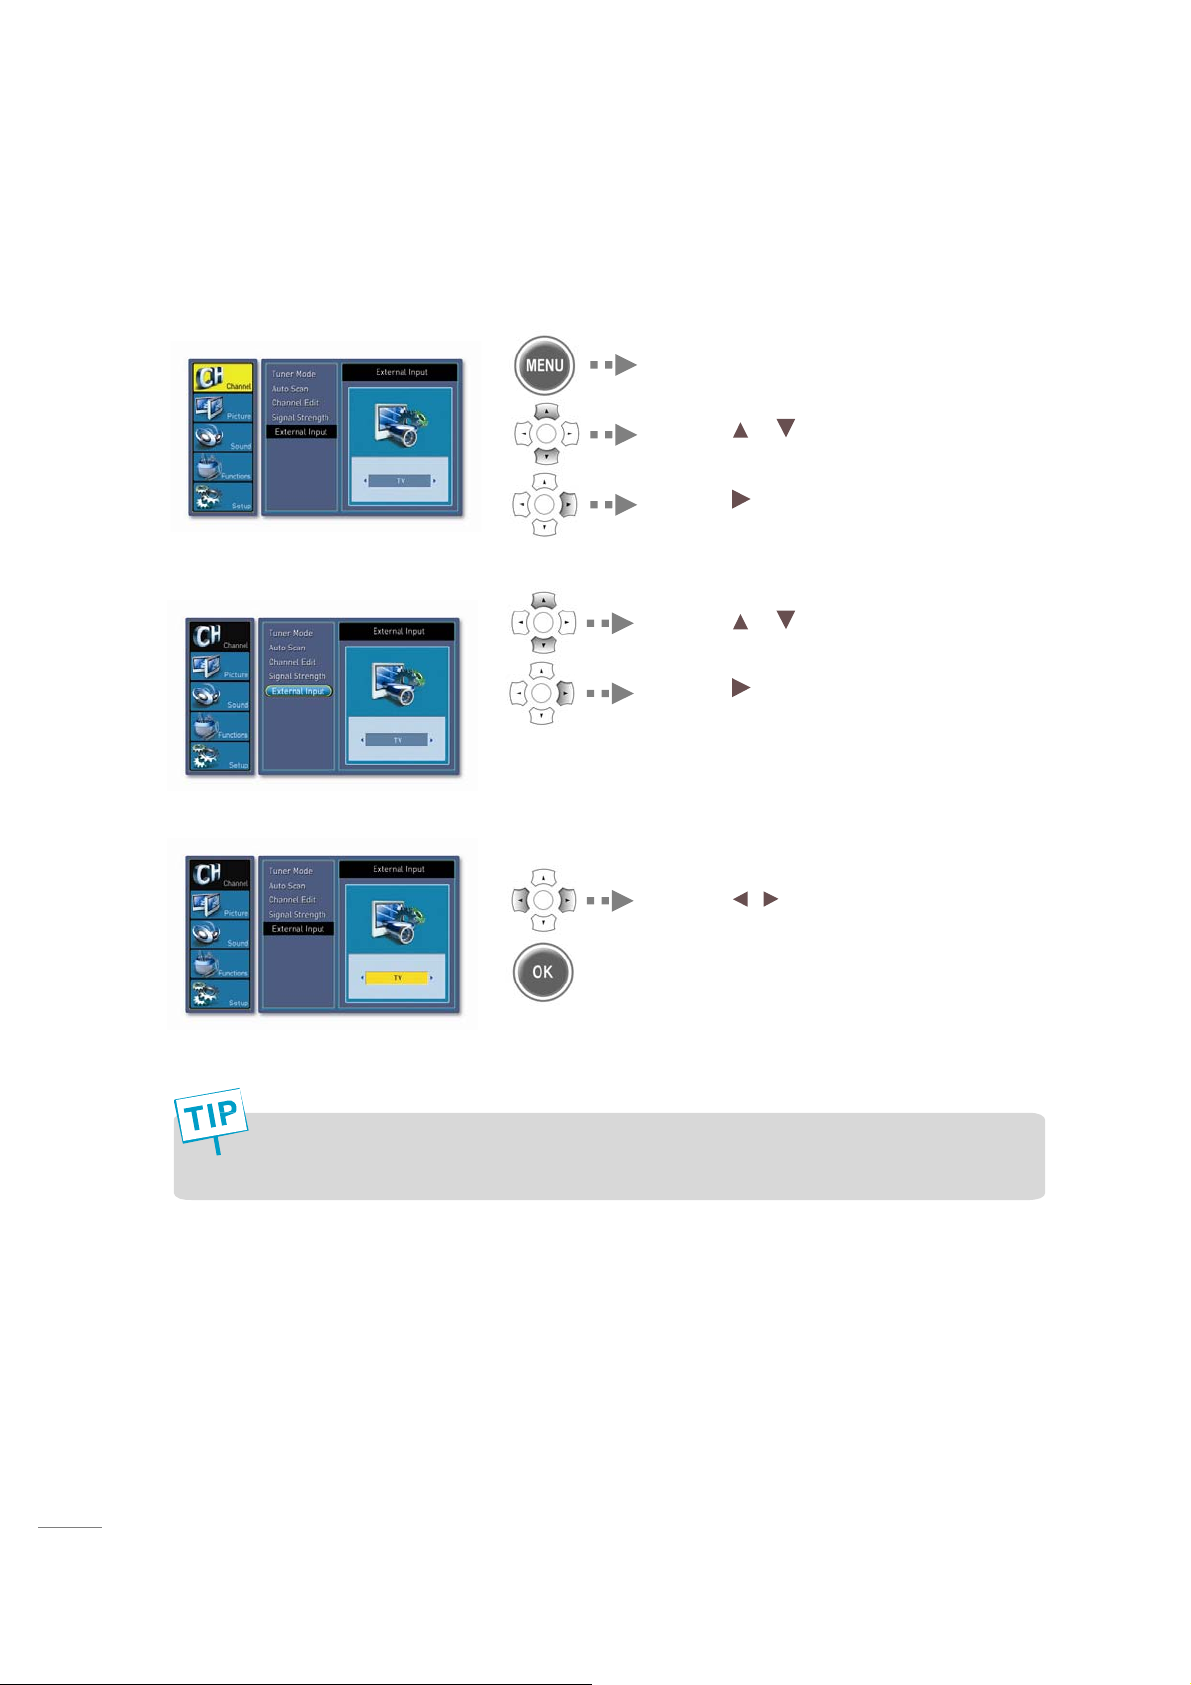
Setting the Input Mode
/
1. Select “Channel” in the Menu
2. Select “External Input”
3. External Input
Pressthe MENU button.
Press the
to highlight the “Channel” icon
Press the
Press the or on the remote control
to highlight the “External Input” icon.
Press the
or on the remote control
or OK button.
or OK button.
Pressthe
to adjust desired settings.
button on remote control
Press MENU button after the setting is done, and cursor goes to the previous Menu.
You can set the input mode quickly using SOUR C E button on the remote control
22
Page 23
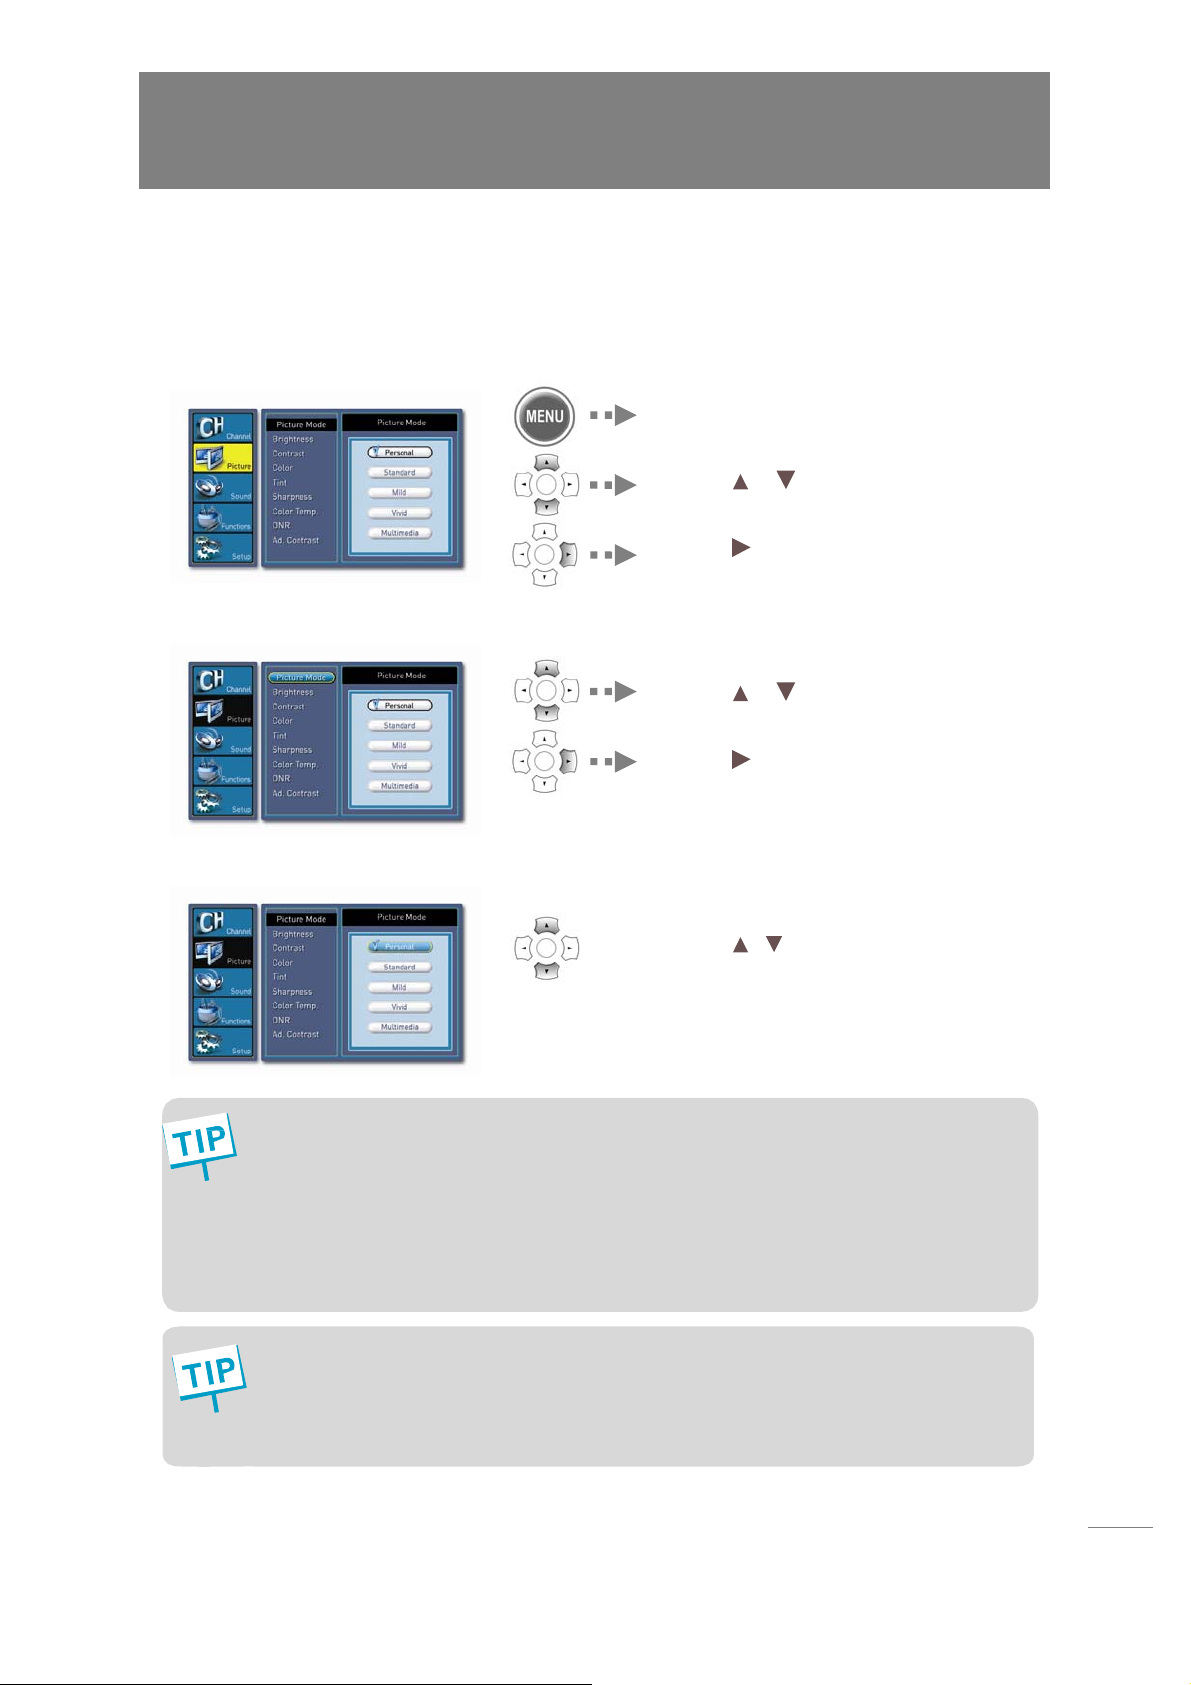
Using the Menu
Picture Settings
Adjusting Picture Mode
1. Select “Picture” in the Menu
2. Select “Picture Mode”
Pressthe MENU button.
Press the
to highlight the “Picture” icon.
Press the
Press the or on the remote control
to highlight the “Picture Mode” icon
Press the
or on the remote control
or OK button.
or OK button.
3. Picture Mode
The adjustment of Contrast, Brightness, Sharpness, Saturation and Tint, Color Temp,
DNR,Backlight Control and RGB is allowed only in the Personal mode.
Personal : When the user wants to directly set the values
Standard : Most video contents are appropriate to this mode.
Mild : Soft display.
Vivid : Clear and Vivid display.
Multimedia: Good for multimedia display.
User enjoy picture mode by factory in the favor of user. In the other mode but personal
mode, if user c hange , Brightness, Saturation, Contrast, Sharpn ess, Tint, Color Temp,
RGB, DNR and Backlight control, the picture mode will go to the custom mode
automatically.
Pressthe/ button on remote contro
to adjust desired settings.
23
Page 24
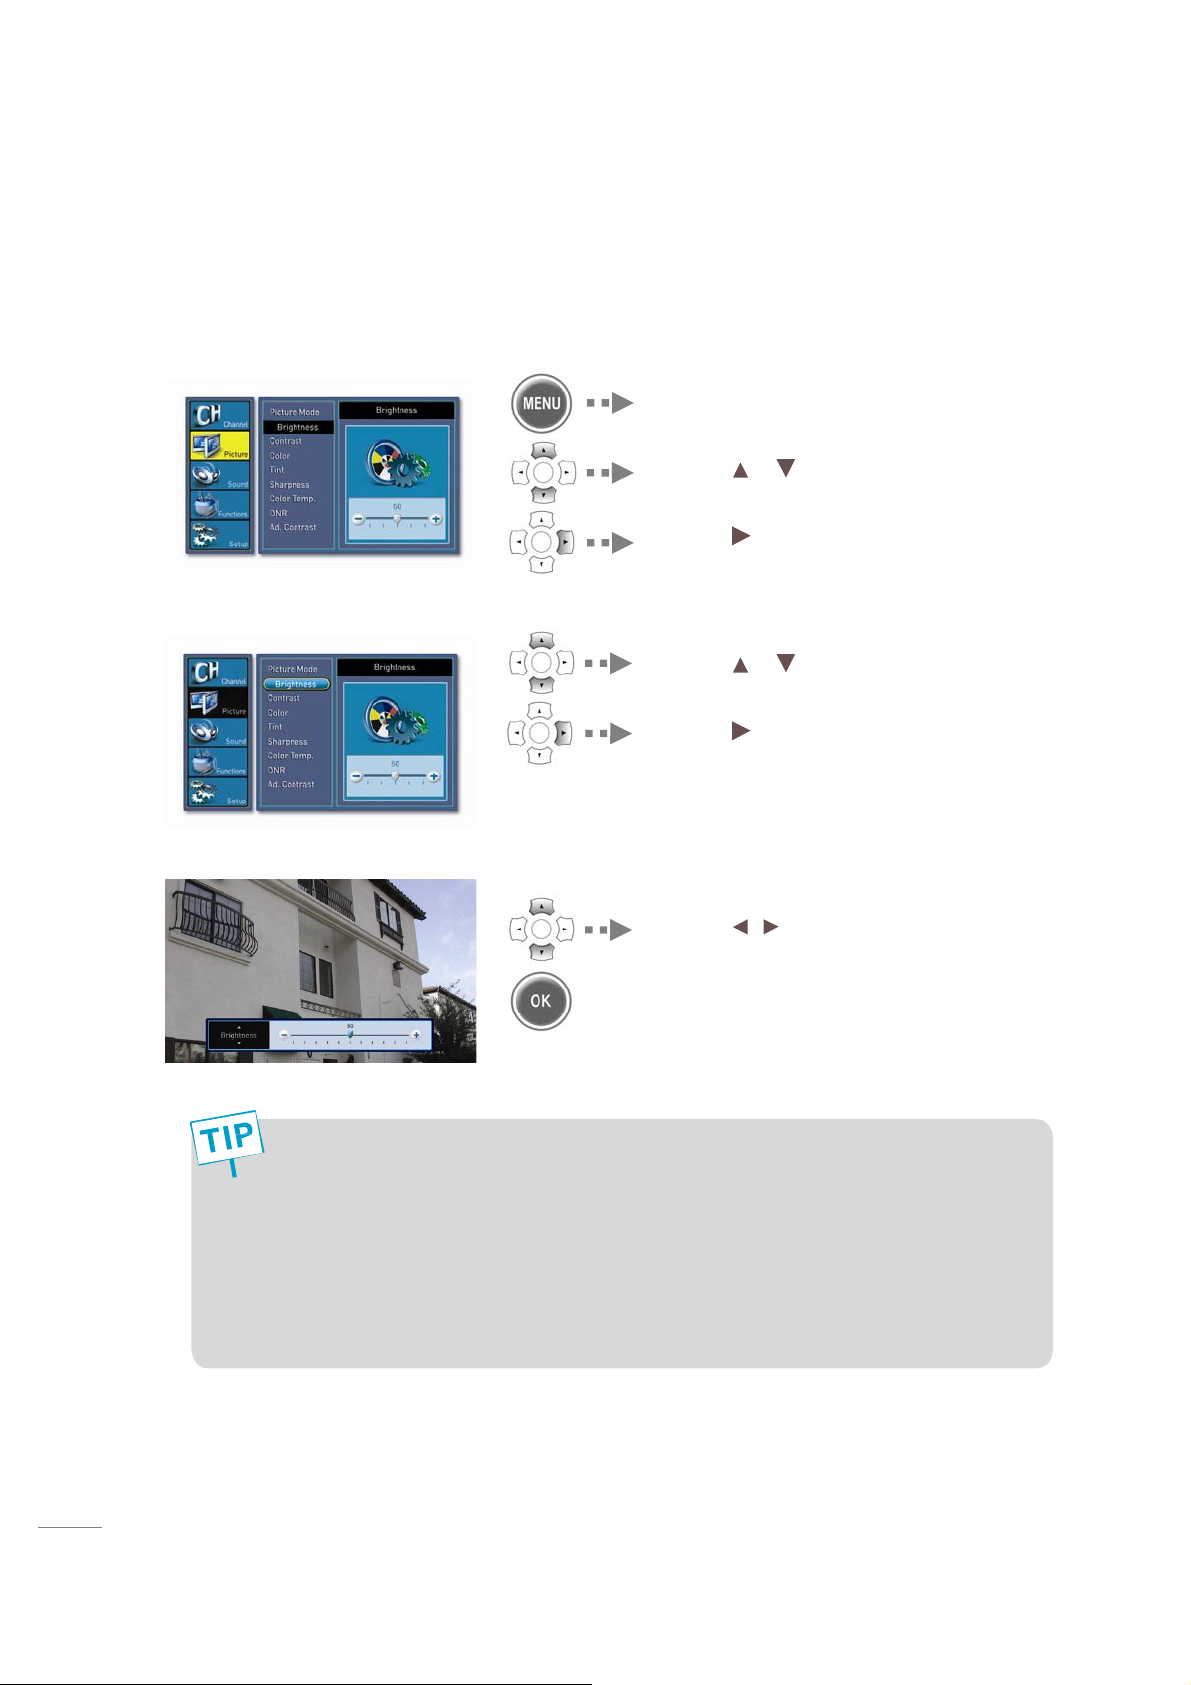
Setting the Desired Picture / DN R
(Dig
Users can manually adjust their desired pict u re.
1. Select “Picture” in the Menu
2. Select “Brightness”
3. Brightness
Pressthe MENU button.
Press the
to highlight the “Picture” icon
Press the
or on the remote control
or OK button.
Press the or on the remote control
to highlight the “Brightness” icon
Press the
or OK button.
Press the
to adjust desired settings.
/ button on remote control
Brightness: Adjust the brightness of the entire picture.
Saturation: Adjust colors into deeper or lighter colors.
Contrast: Adjust the brightness and darkness of object and background.
Sharpness: Adjust clarity of outline of objects.
Tint: Adjust colors naturally.
Color Temp.: Whenever You Press left or right button, the mode changes in following
DNR
order: NORMAL,
ital Noise Reduction): Reduce the Digital Noise.
WARM and COOL.
24
Page 25
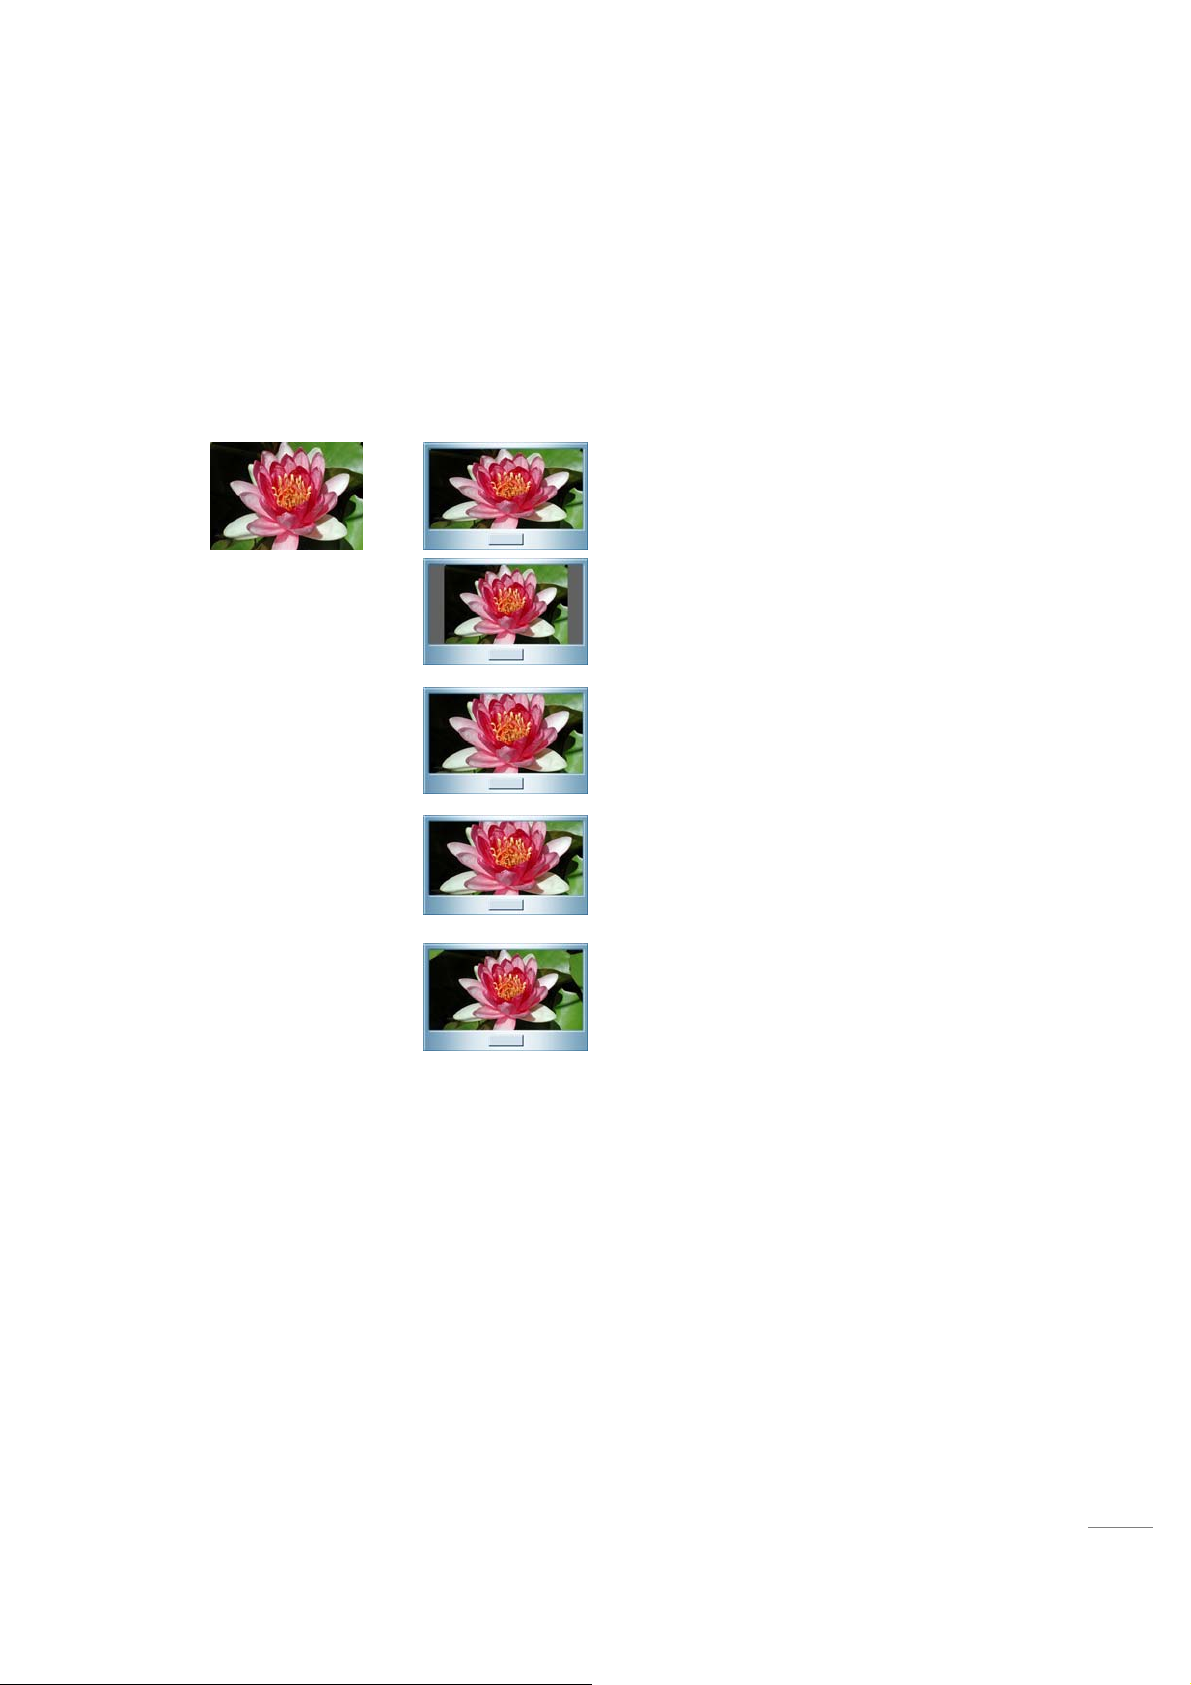
Selecting the Aspect Ratio
Users can manually adjust size of the screen.
n
When the broadcaster is transmitting a 4:3 feed.
>> 16:9, 4:3, Zoom1, Zoom2 and Panorama modes are available.
4:3 Source
16:9
4:3
If source is 4:3, side bar is added to
make 16:9 picture.
Zoom1
If source is 4:3, picture is cropped by
16:9 region.
Zoom2
Panorama
Picture is cropped 4:3 region and
nonlinearly stretched.
25
Page 26
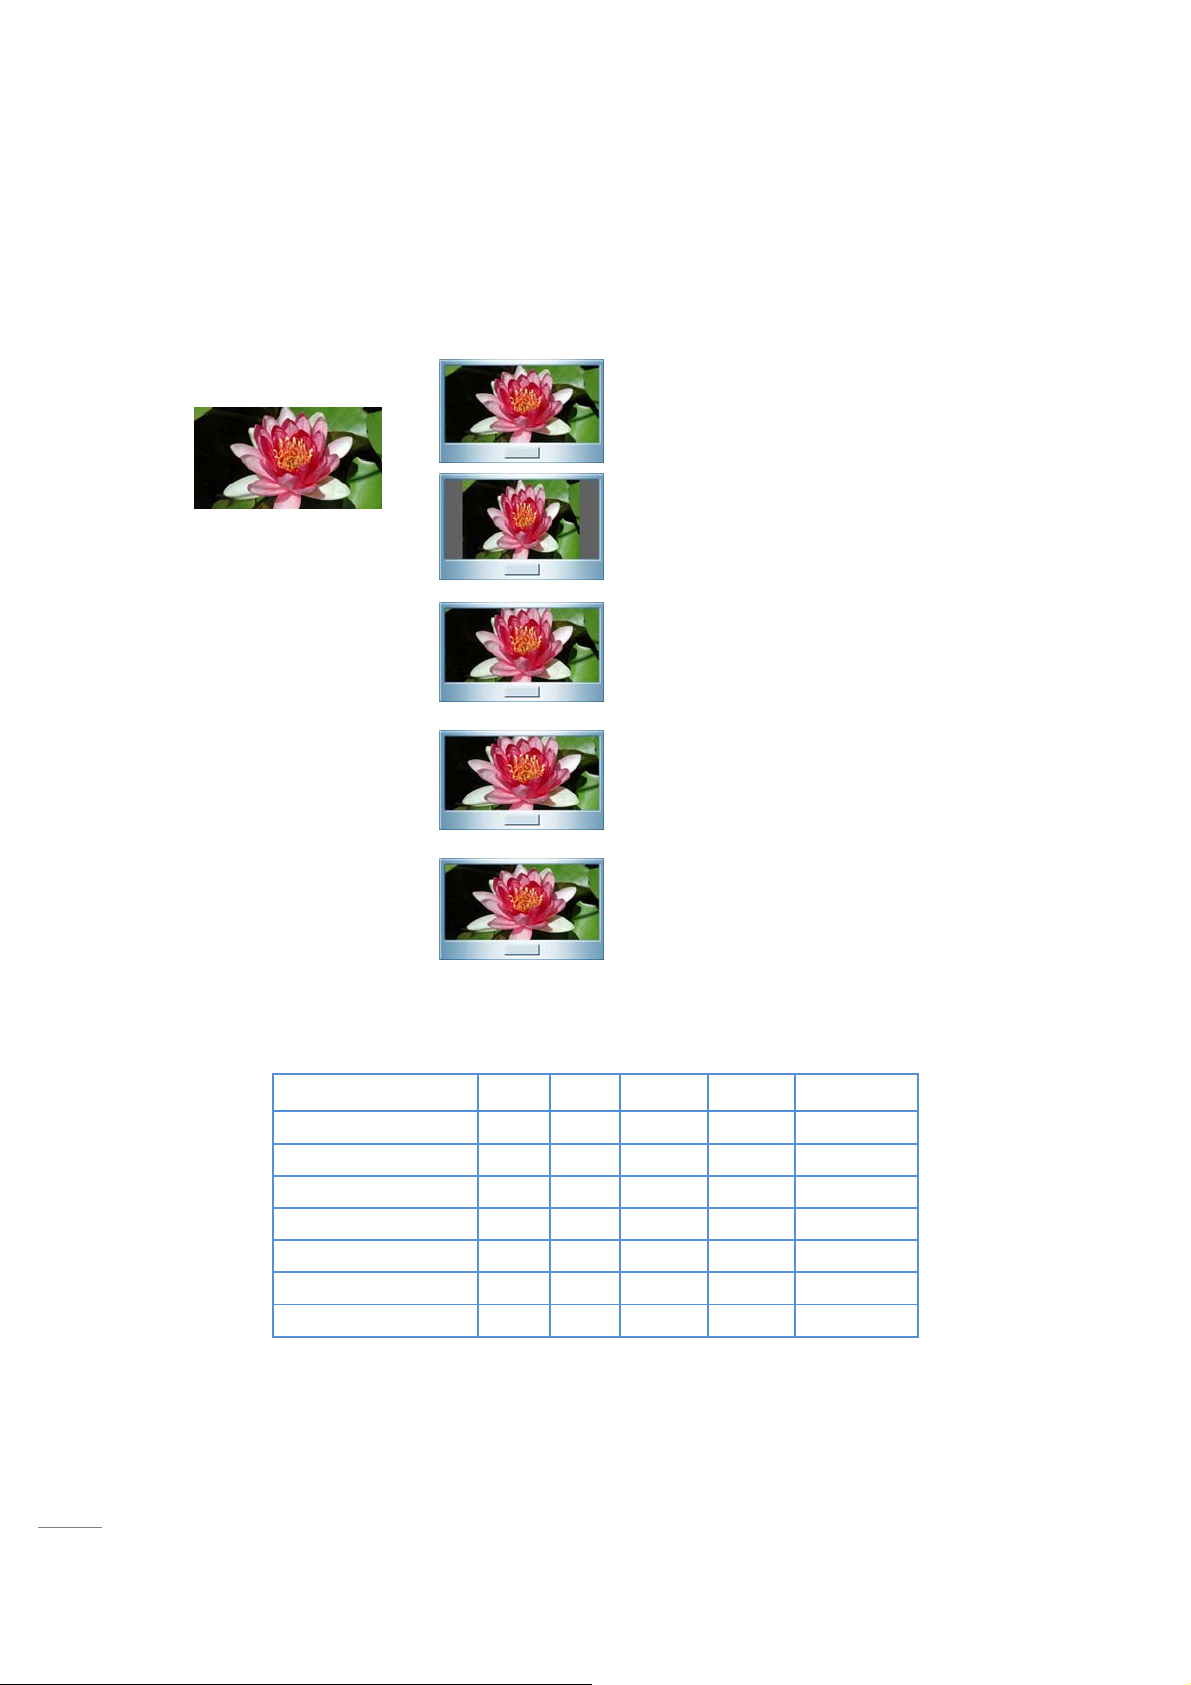
o When the broadcaster is transmitting a 16:9 feed.
>> 16:9, 4:3, Zoom1, Zoom2 and Panorama modes are available.
16:9 Source
16:9
Picture is linearly compressed to 75% on
the horizontal.
4:3
Zoom1
If source is 16:9, picture is linearly
stretched 133% on the vertical.
Zoom2
According to input sources, some picture modes are not supported. See below.
Panorama
Picture is cropped 4:3 region and
nonlinearly stretched.
Analog TV
Digital TV
AV1~2(Composite)
AV3(S-Video)
AV4~5(Component)
AV6(PC)
AV7~8(HDMi)
16:9 4:3 Zoom1 Zoom2 Panorama
0 0 0 0 0
0 0 0 0 X
0 0 0 0 0
0 0 0 0 0
0 0 0 0 0
0 0 X X X
0 0 0 0 X
26
Page 27
Using the Menu
Sound Settings
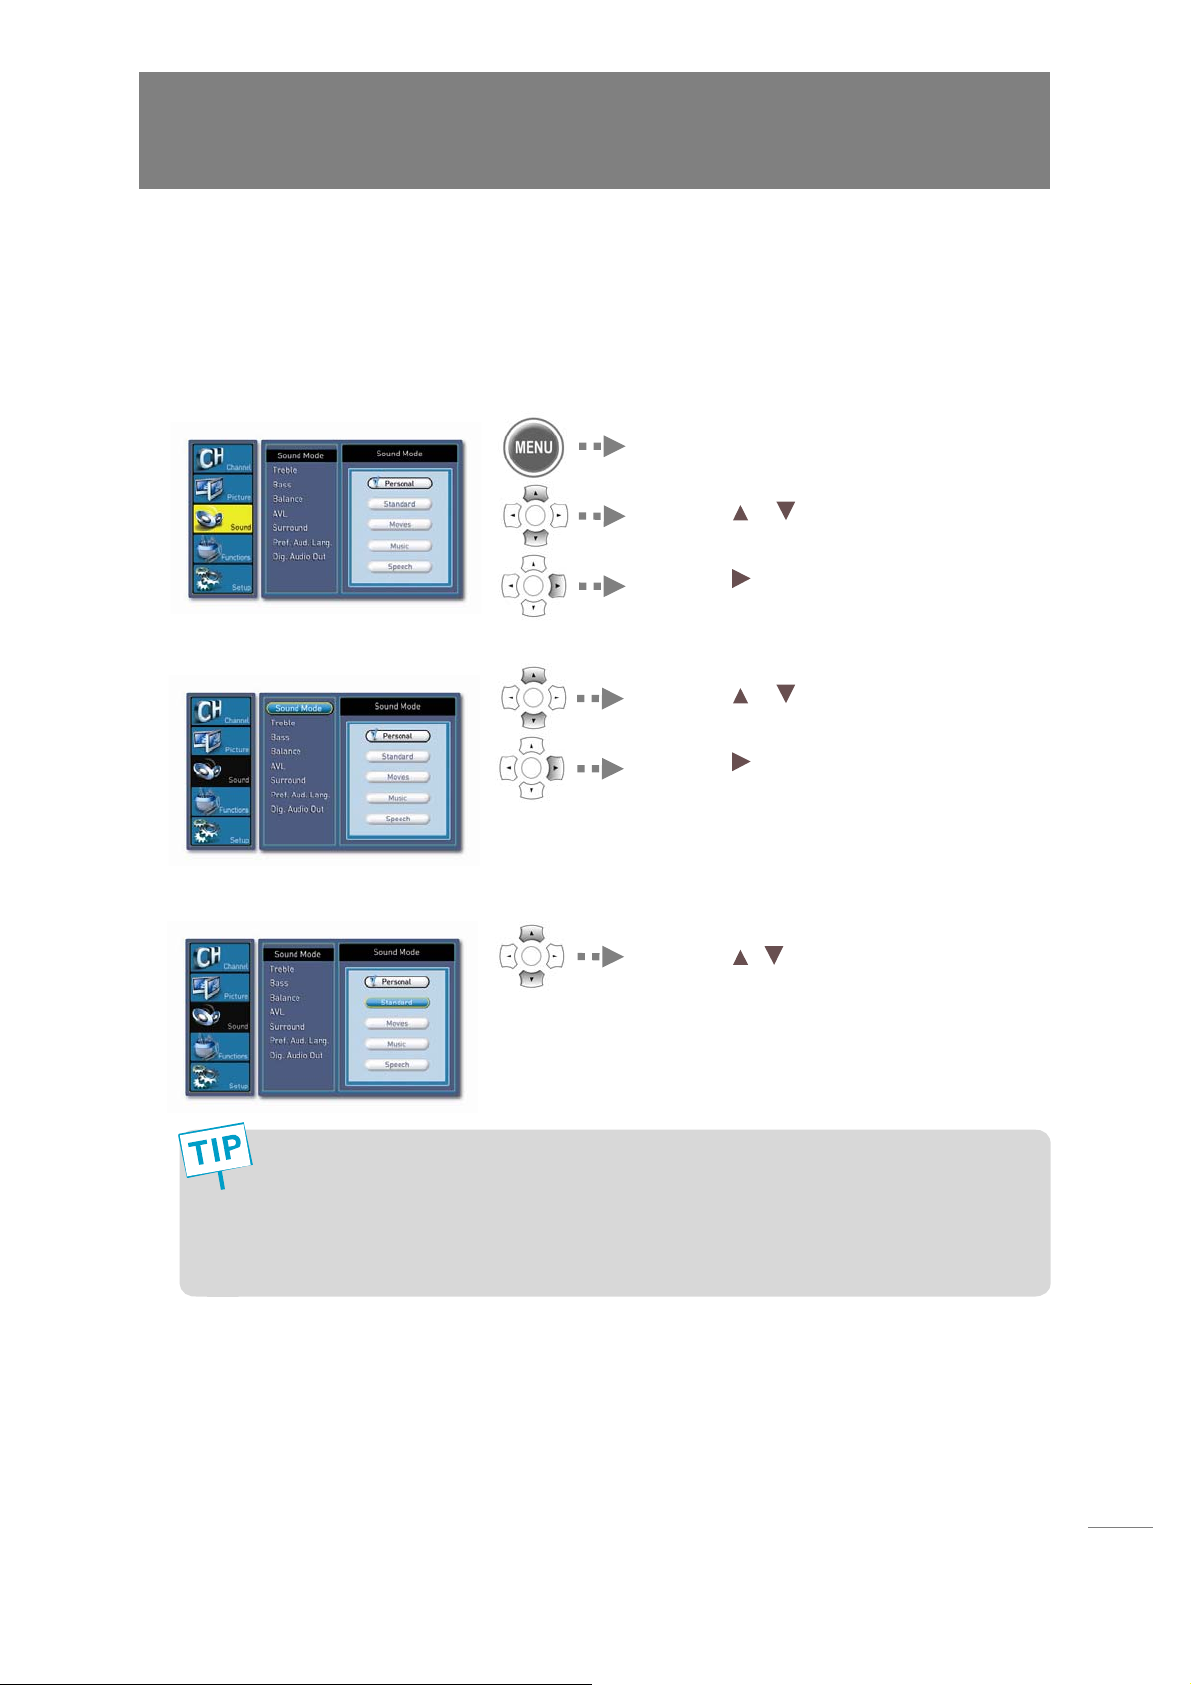
Selecting the Sound Mode
Users can adjust sound mode automatically.
1. Select “Sound” in the Menu
2. Select “Sound Mode”
Pressthe MENU button.
Press the
to highlight the “Sound” icon.
Press the
Press the or on the remote control
to highlight the “Sound Mode” icon.
Press the
or on the remote control
or OK button.
or OK button.
3. Sound Mode
Custom: When the user wants to set the sub menu item value.
Standard: General sound mode. This fits most audio contents.
Movie: Select Movies when watching movies.
Music: Select Music when watching music video.
Speech: Select Speech when watching news.
Press the / button on remote contro
to adjust desired settings.
27
Page 28
Adjusting the Desired Audio Mode
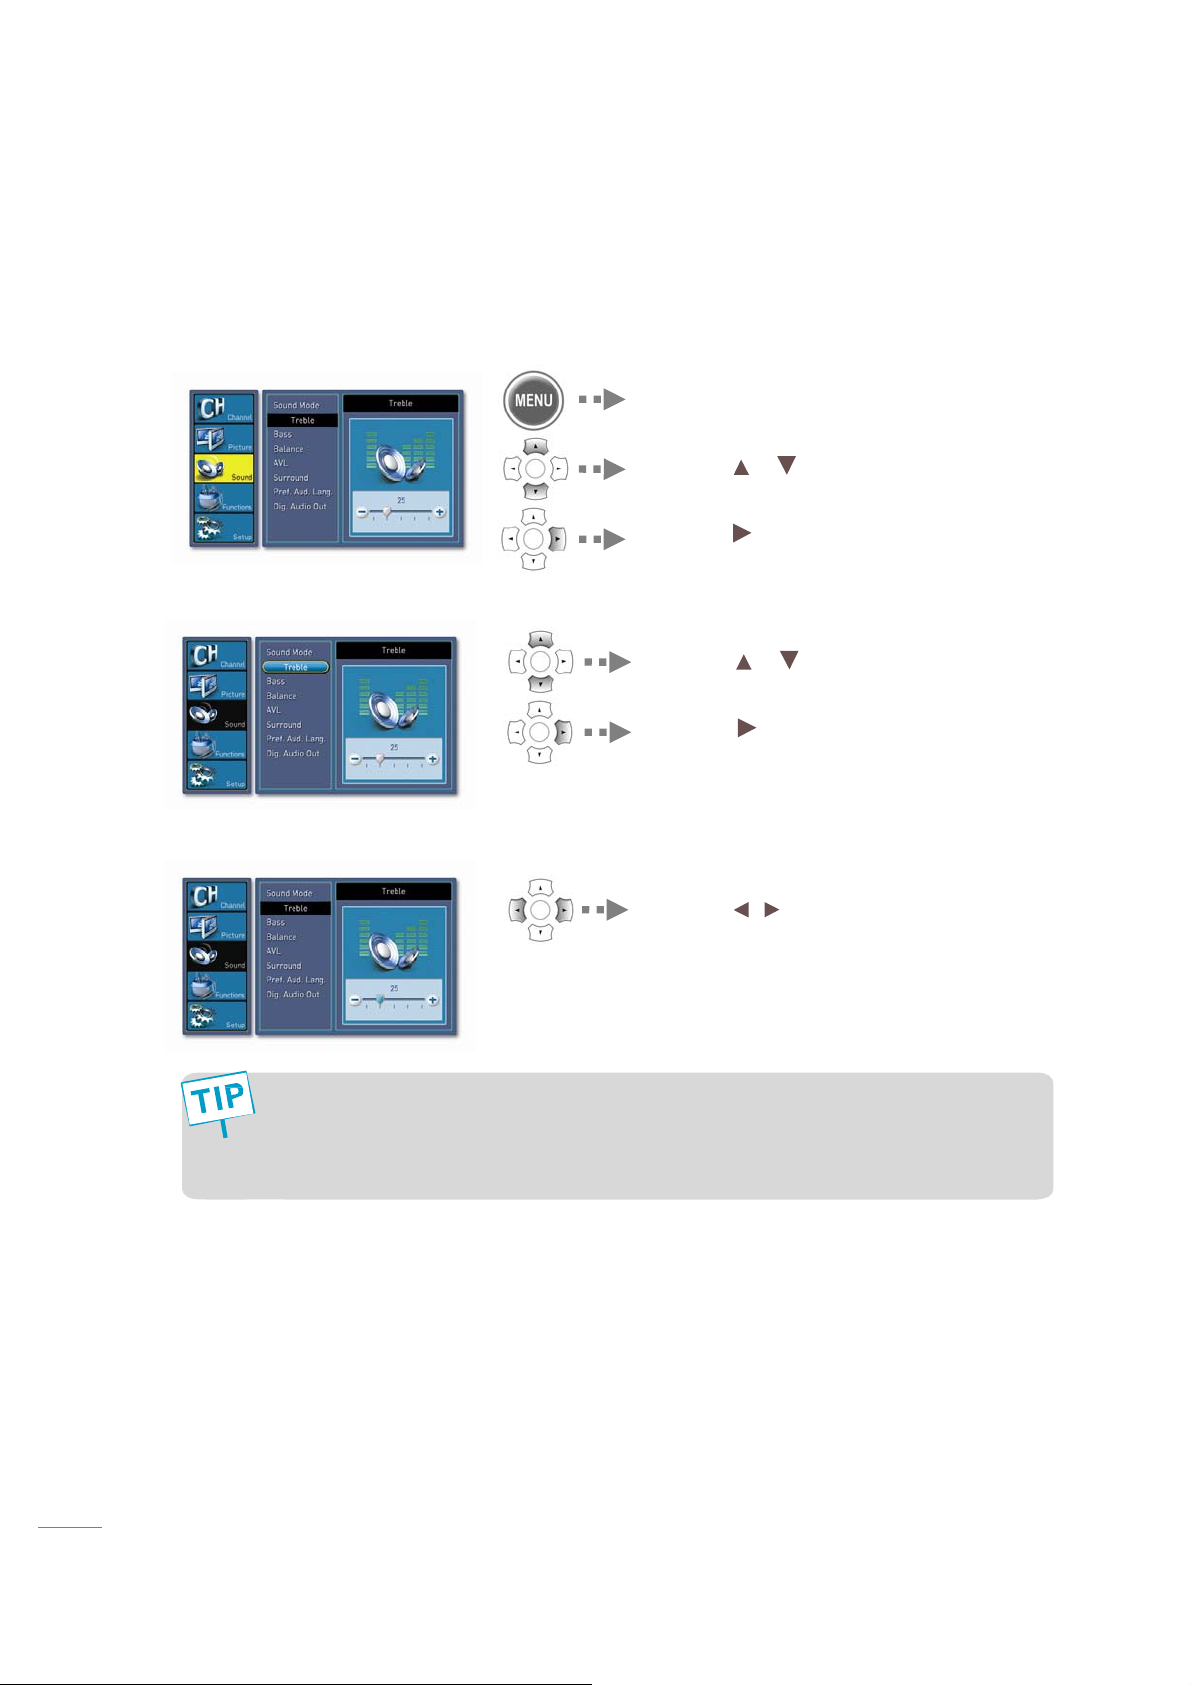
Users can adjust sound mode manually.
1. Select “Sound” in the Menu
2. Select “Treble”
3. Treble
Press the MENU button.
Press the
to highlight the “Sound” icon.
Press the
Press the or on the remote control
to highlight the “Treble” icon.
Press the
or on the remote control
or OK button.
or OK button.
Press the / button on remote co ntrol
to adjust desired settings.
Treble: Adjusts the range size of high sound.
Bass: Adjusts the range size of low sound.
Balance: Adjusts the balance of left and right speakers.
28
Page 29
Selecting the Automatic Volume Level (AVL)
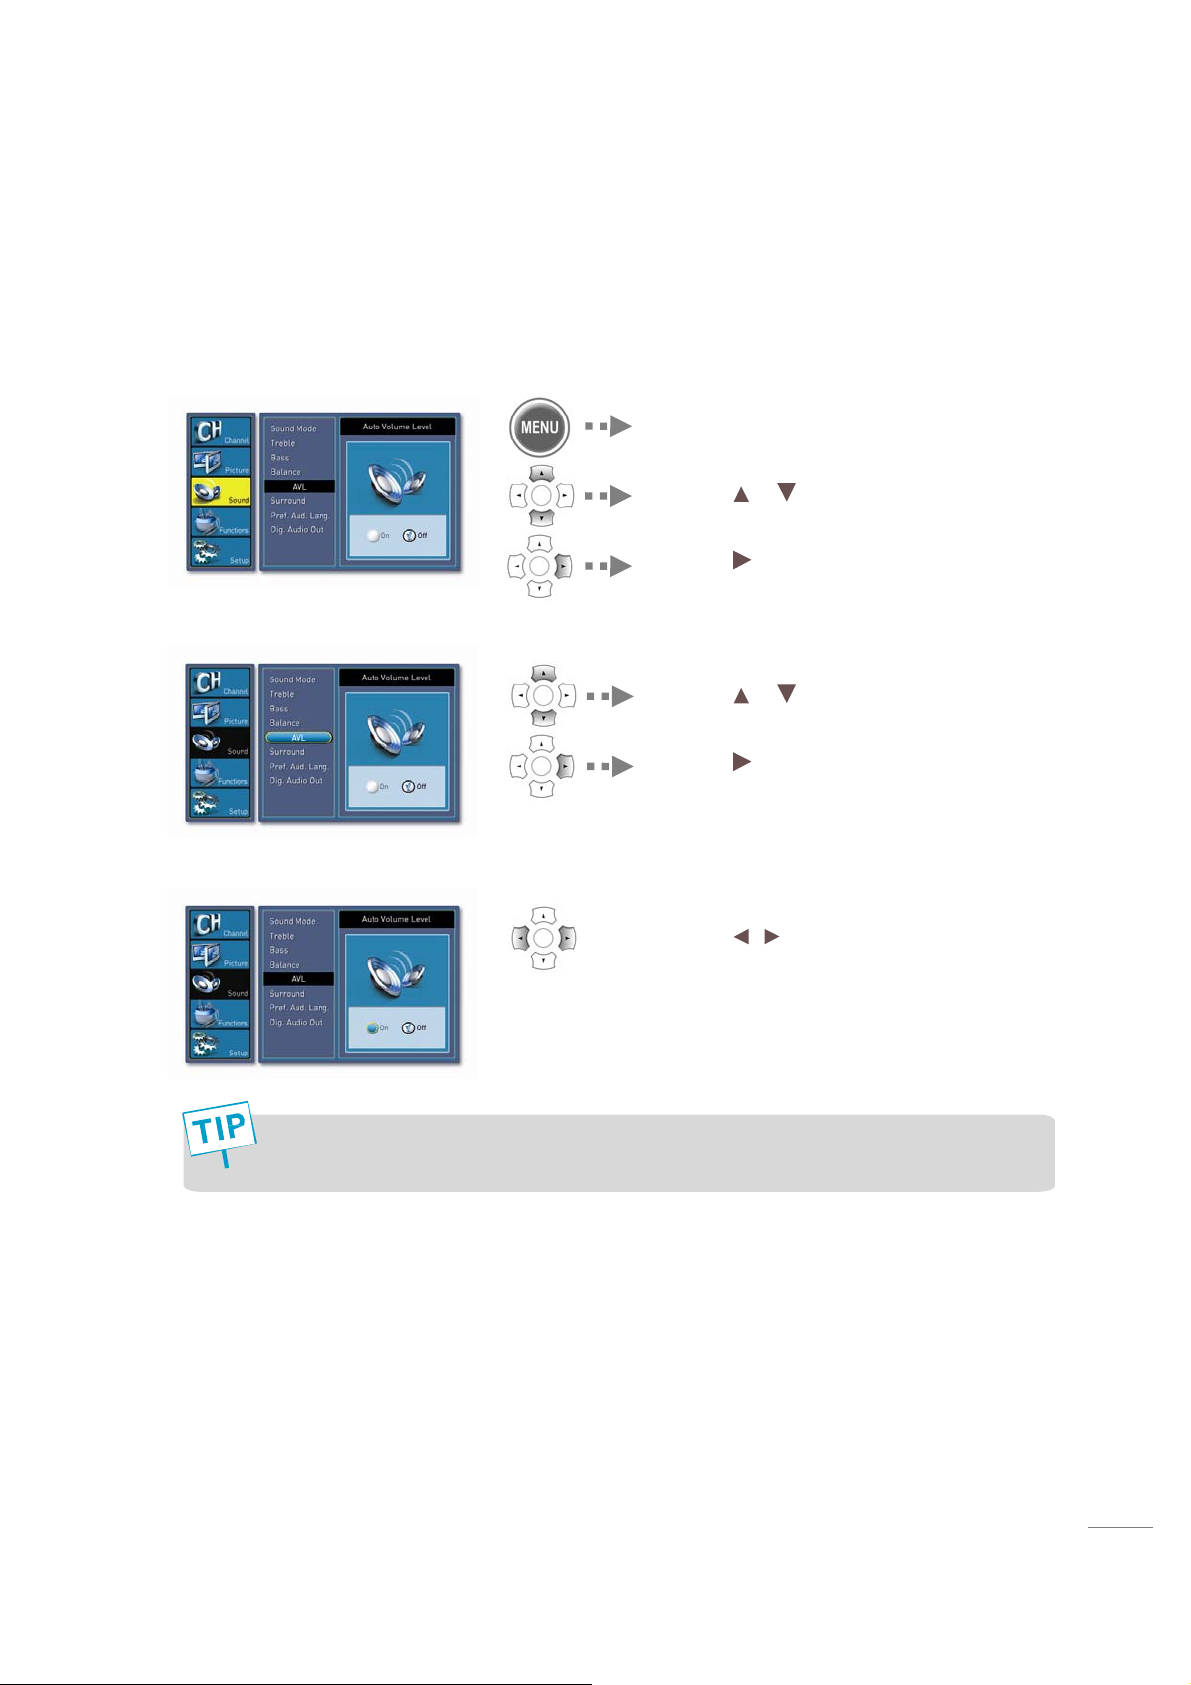
With this Automatic Volume Level, users can control the dynamic range for better listening
environment such as night -time listening mode.
1. Select “Sound” in the Menu
Press the MENU button.
Press the
to highlight the “Sound” icon.
Press the
or on the remote control
or OK button.
2. Select “AVL”
Press the or on the remote control
to highlight the “AVL” icon
Press the
or OK button.
3. AVL
Press the / button button to set to
the “On” or “Off.”
The default is “Off”.
29
Page 30
Setting Audio Language
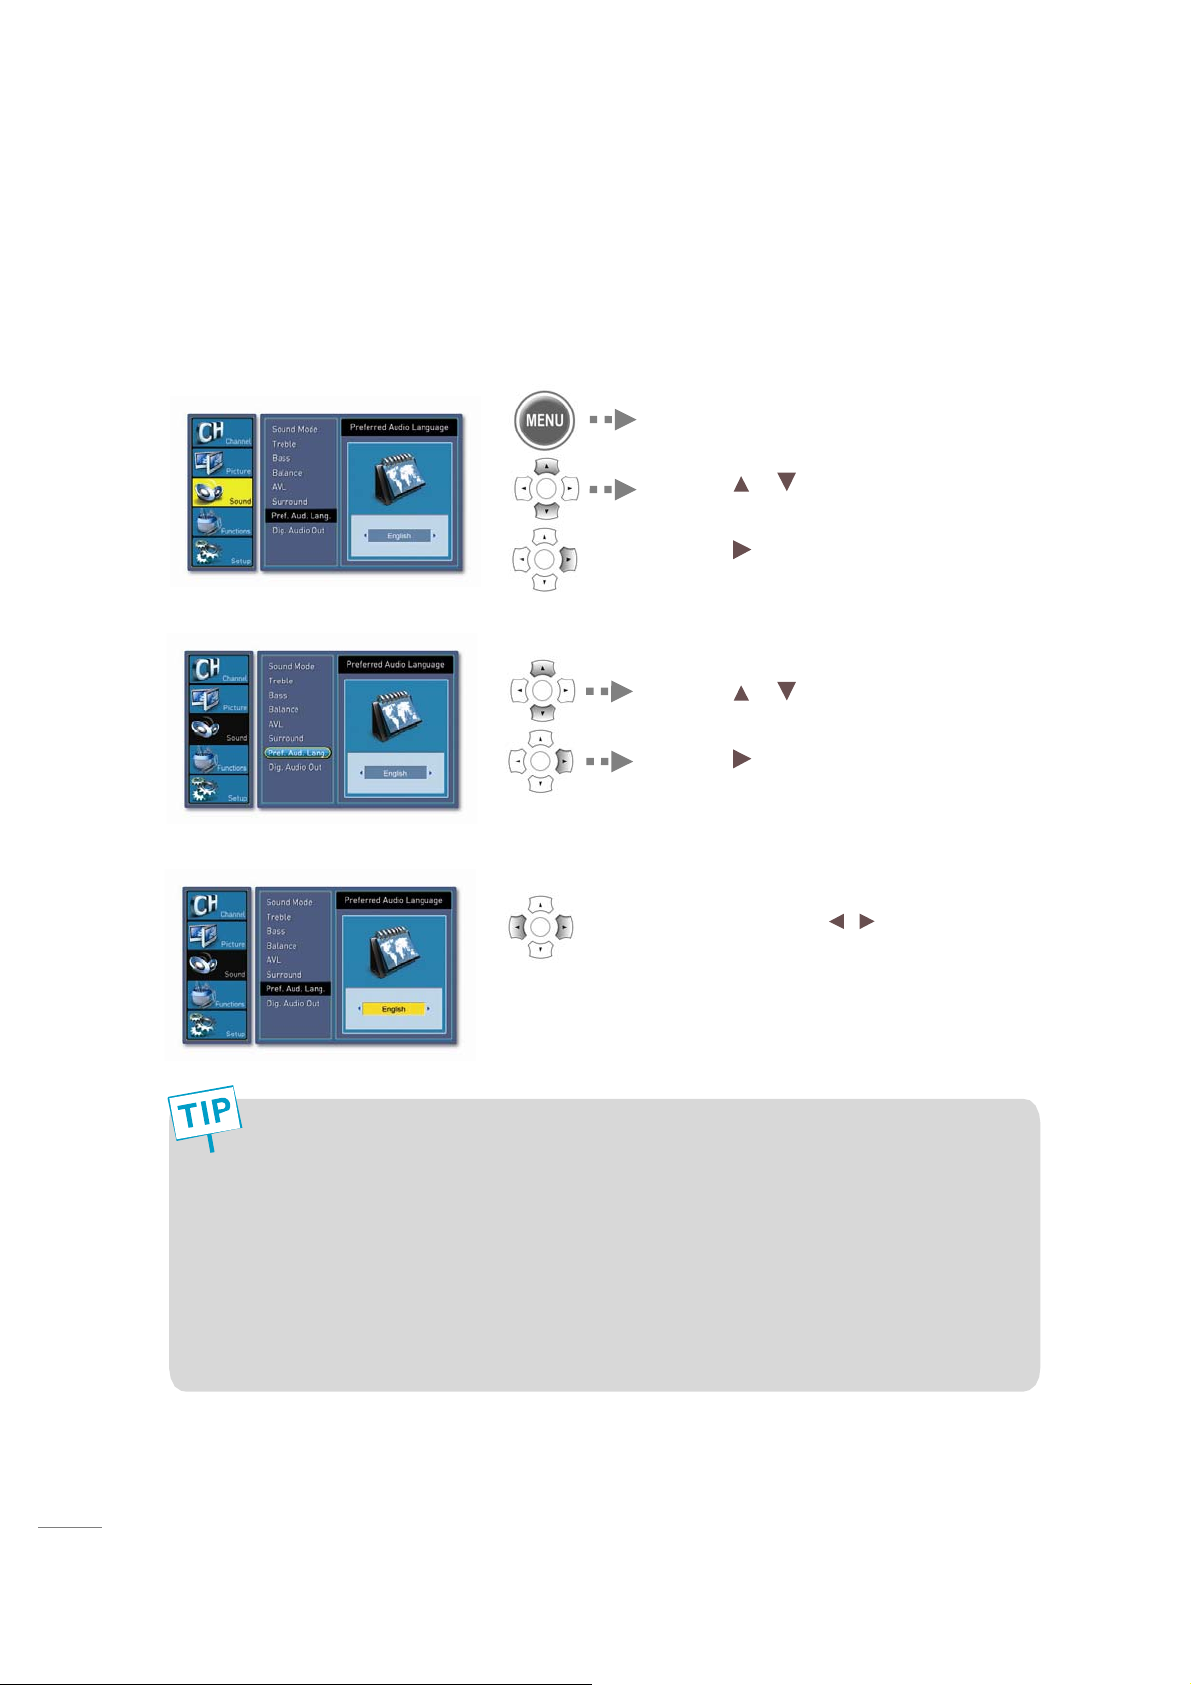
While watching a digital program, you can listen to foreign languag e if the program is supported
with foreign language.
1. Select “Sound” in the Menu
Press the MENU button.
Press the
to highlight the “Sound” icon.
Press the
or on the remote control
or OK button.
2. Select “Audio Language”
3. Audio Language
How to Directly Select Audio Language: Press the SAP button.
- You can select MONO, STEREO or SAP when receiving analog signals.
- You can select one of the languages listed you prefer when receiving digital signals.
- Whenever you press button, the available audio languages are shifted and heard
when receiving DTV signal.
- If selected default language is unavailable, the primary audio source will
- If broadcaster does not transmit language identifier or broadcasts another language
aside from English, Spanish or French, then available multiple tracks are shown as
Audio1, Audio2, etc.
Press the
to highlight the “AVL” icon.
Press the
Whenever you press / button, the
mode shifts in following order: English,
French, and Spanish.
or on the remote control
or OK button.
be heard only.
30
Page 31
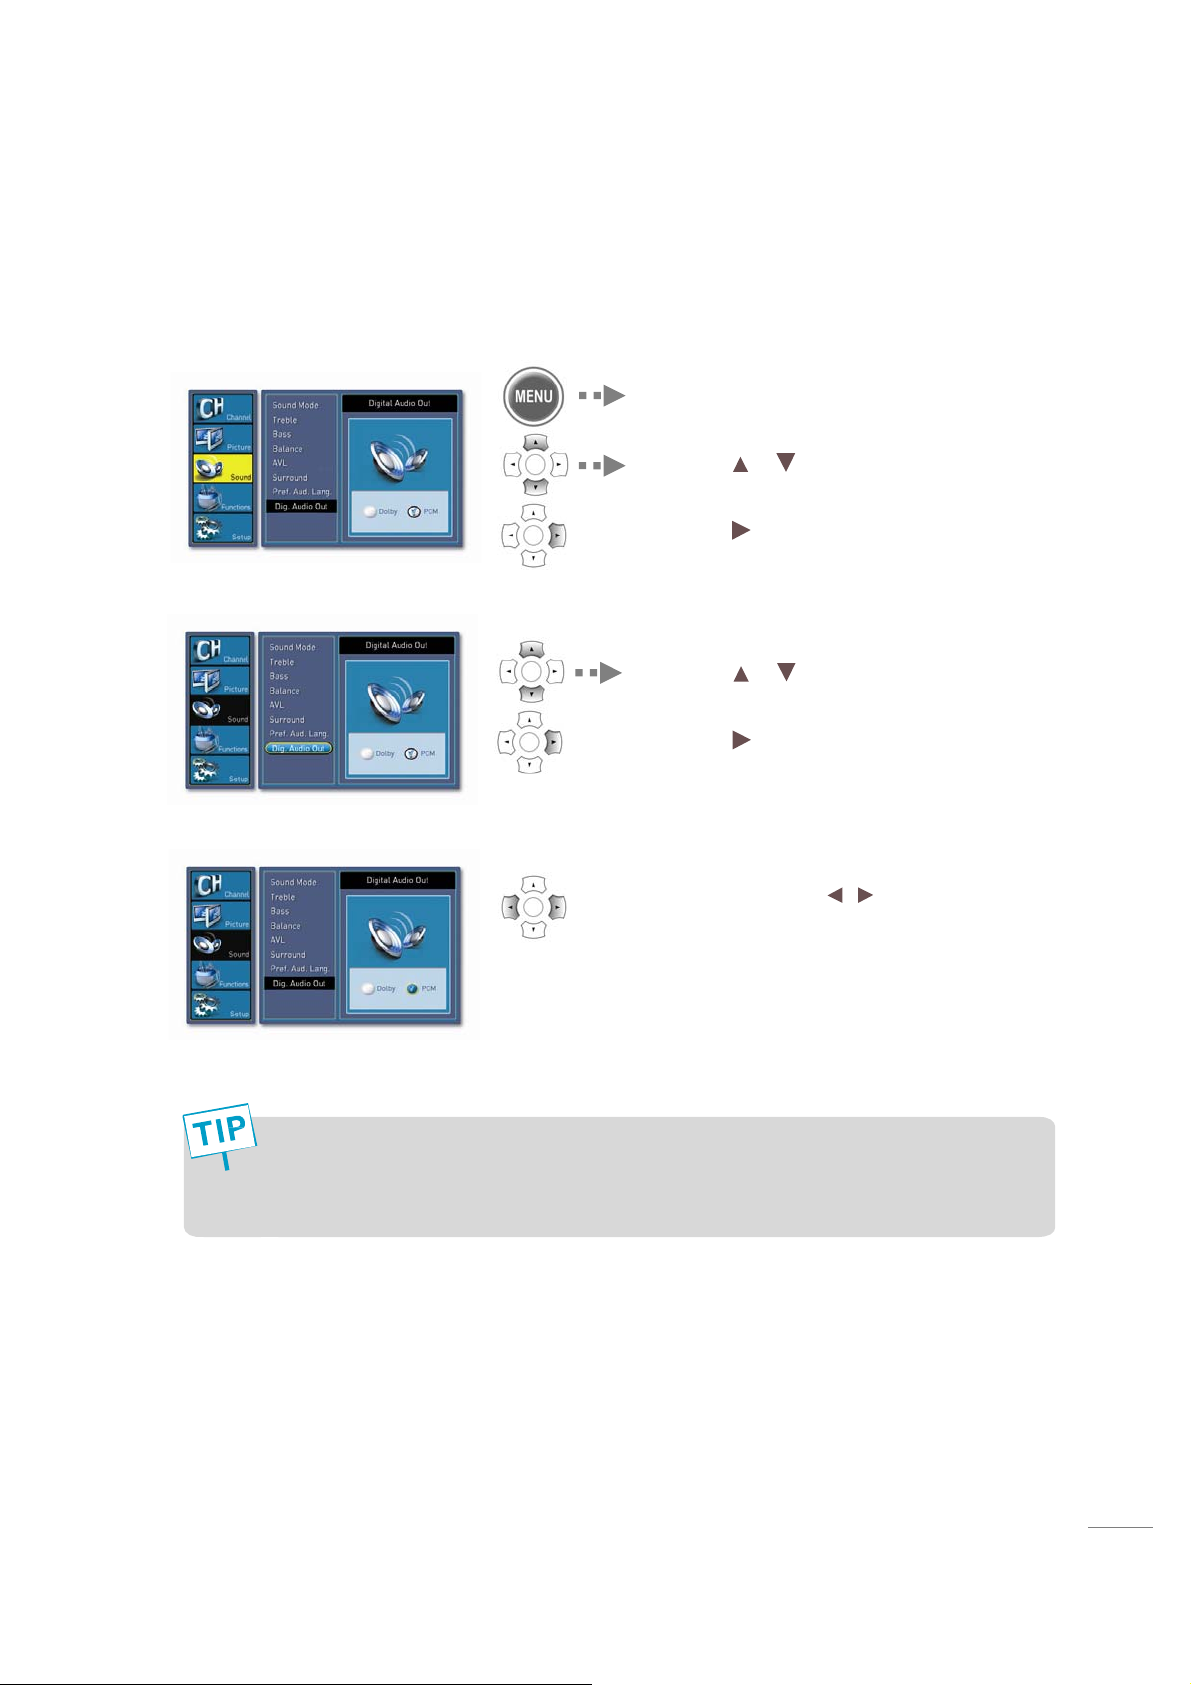
Setting the Digital Audio Output
The digital audio output term inal a llo ws yo u t o en joy digital sound.
1. Select “Sound” in the Menu
Pressthe MENU button.
Press the
to highlight the “Sound” icon.
Press the
2. Select “Digital Audio Out”
or on the remote control
or OK button.
3. Digital Audio Out
- Manufactured under license from Dolby Laboratories.
“Dolby Digital” and the double-D symbol are trademarks of Dolby Laboratories
- Dolby Digital is only available in Digital TV.
Press the
to highlight the “Digital Audio Out” icon
Press th e
Whenever you press / button, the
mode shifts in following order: Dolby
Digital and PCM.
or on the remote control
or OK button.
31
Page 32
Using the Menu
Functions
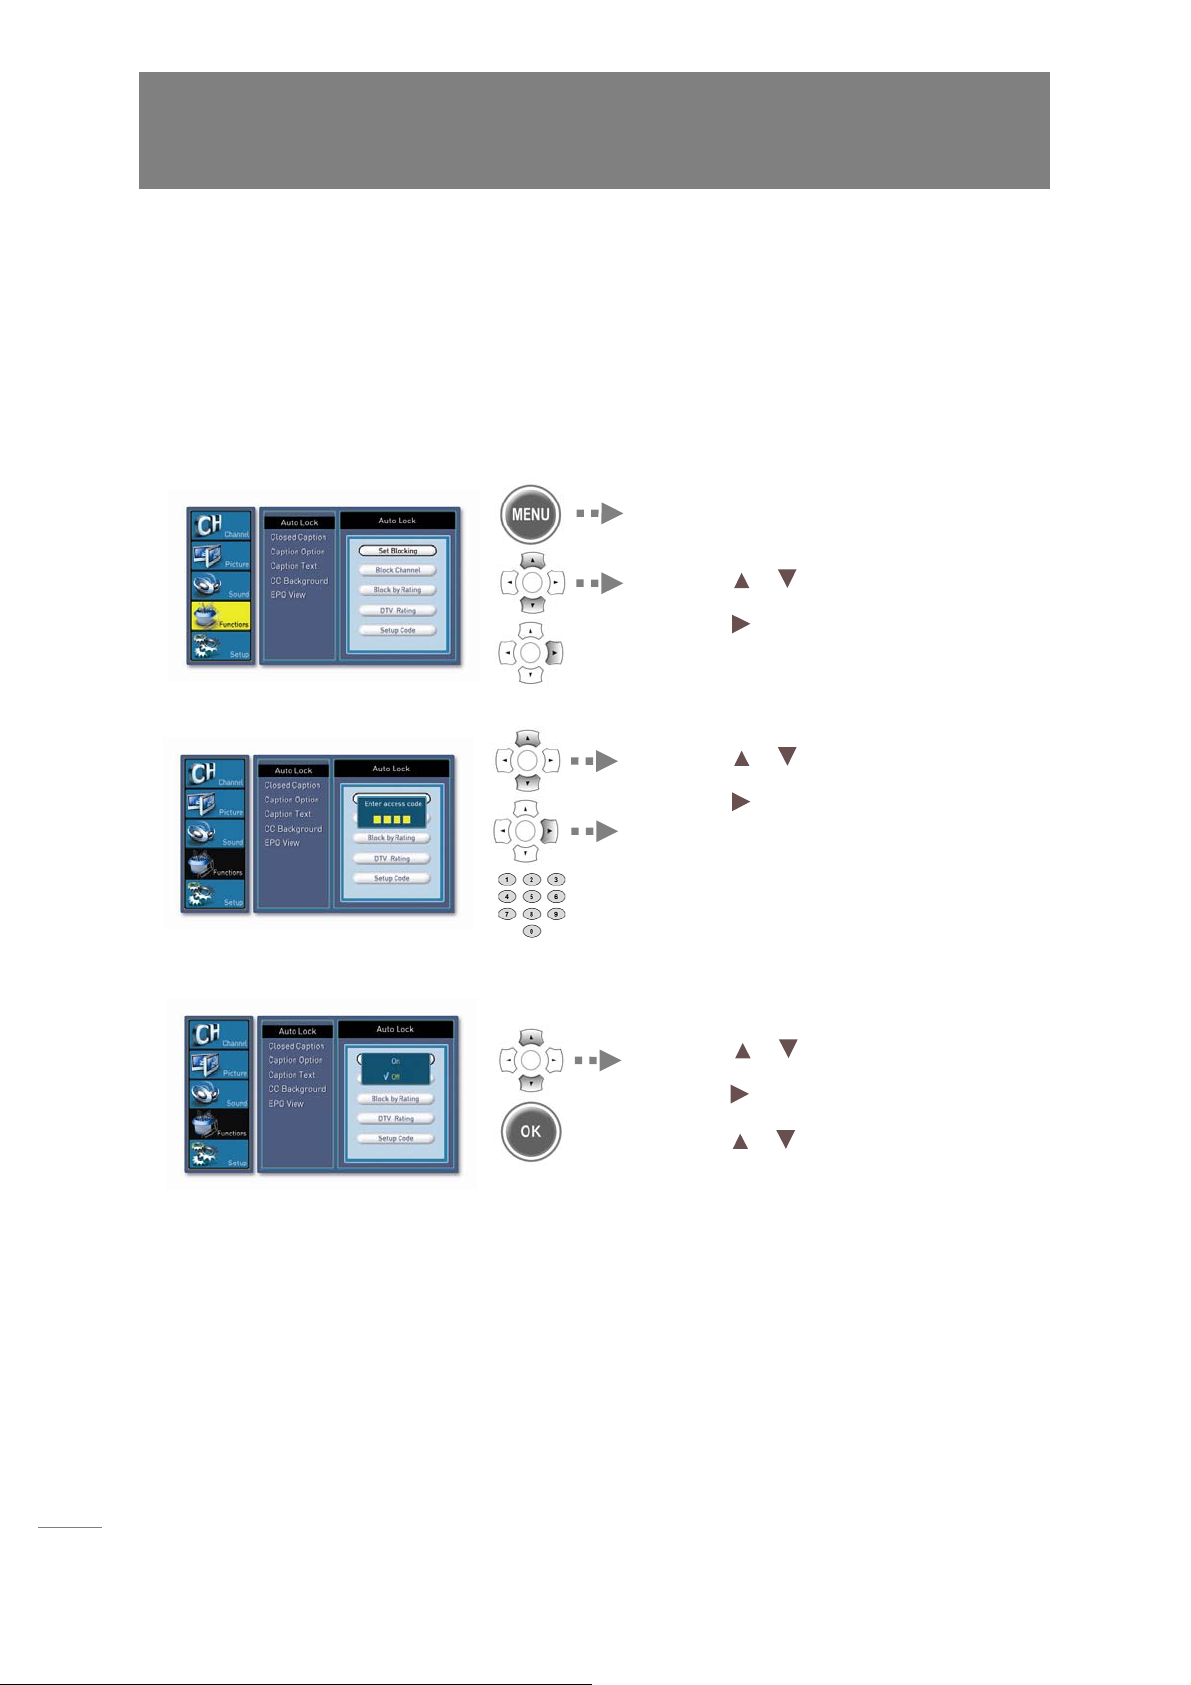
Setting the Auto Lock
This function is used to prevent from using the control buttons on the front top of the TV or
from connecting external d evices to the TV. You make sure to set a PIN number to use this
function.
1. Select “Function” in the Menu
Press the MENU button.
Press the
to highlight the “Function” icon and
press the
2. Select “Auto Lock”
or on the remote control
or OK button.
3. Set Blocking
Press the or on the remote control
to highlight the “Auto Lock” icon and
press the
Then the Enter PIN numbe r window
appears.
The default is 4 digits (0-0-0-0).
or OK button.
Press the or on the remote control
to highlight the “Set Blocking” icon and
press the
Press the
control to highlight “ON” or “Off” and
press the OK button to make a selection
or OK button.
or button on the remote
32
Page 33
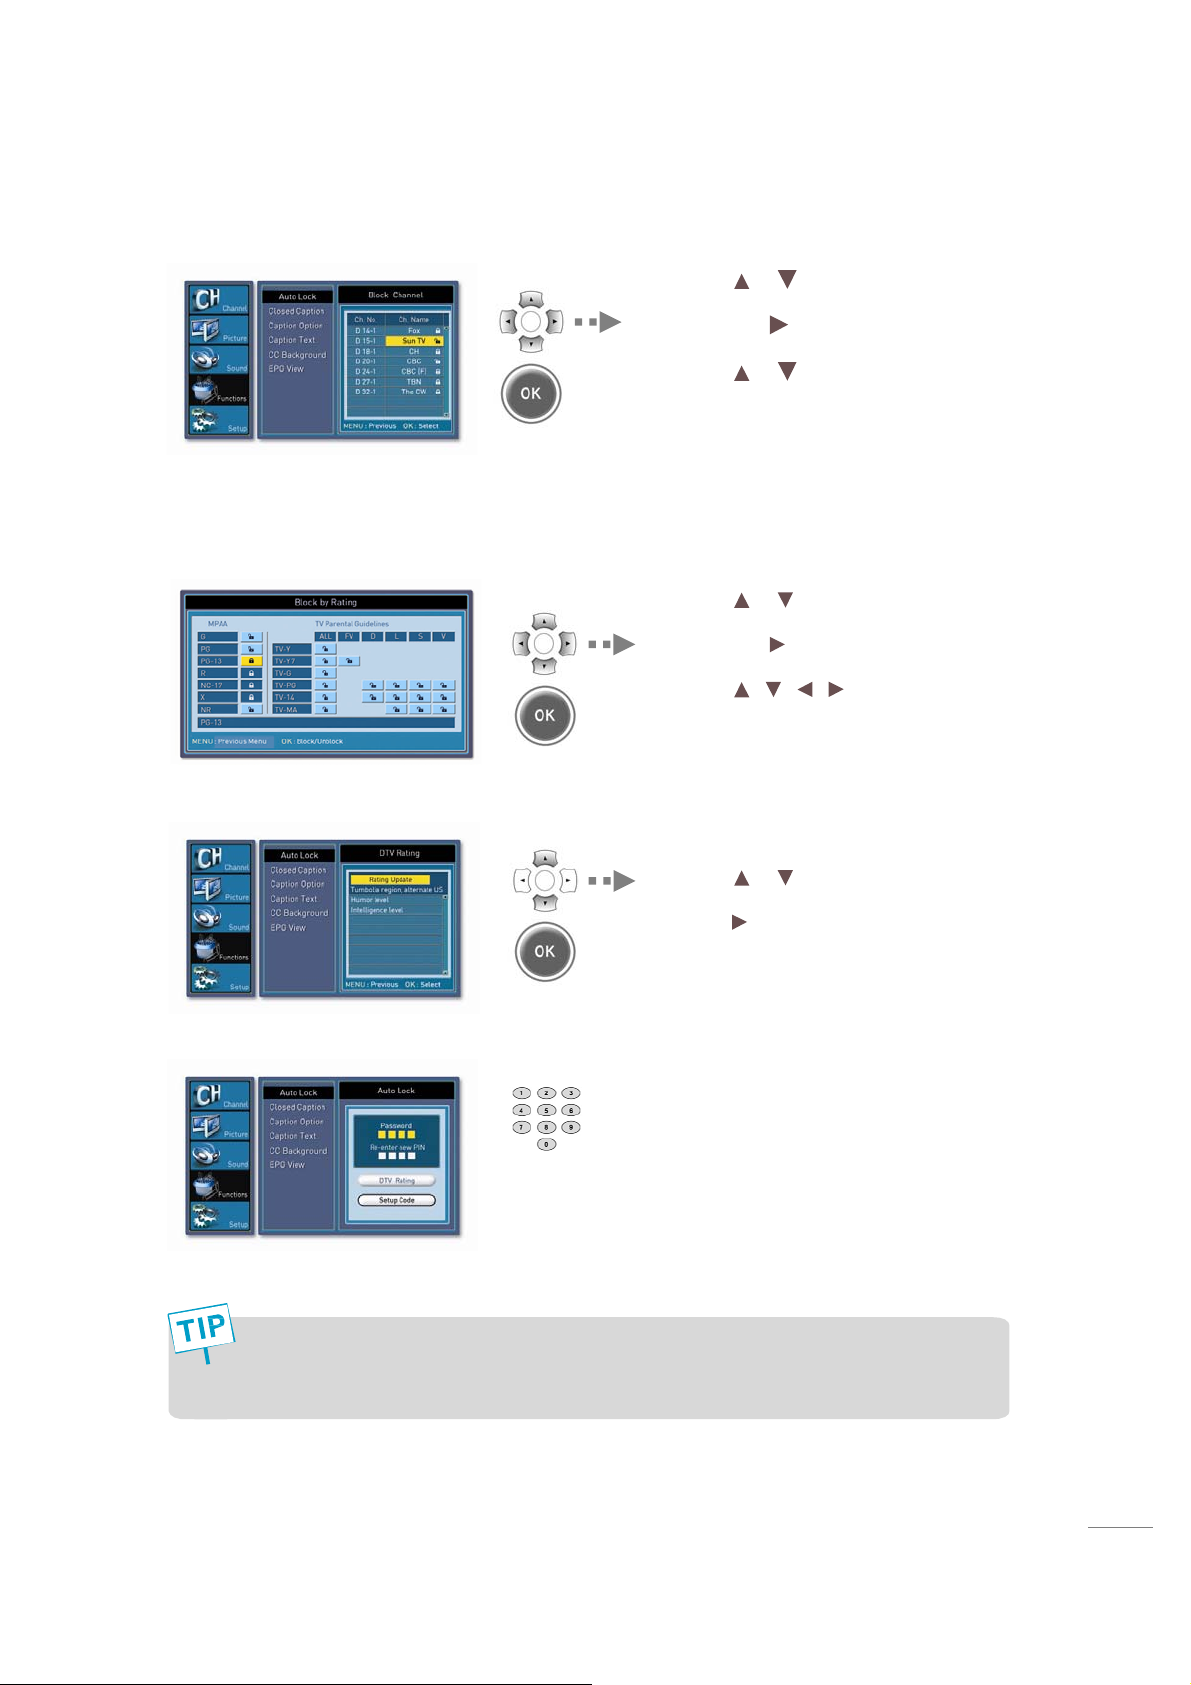
4. Channel Blocking
t
5. Block by Rating
6. DTV Rating
Press the or on the remote control
to highlight the “Channel Blocking” icon
and press the
Press the
item you want.
Press the OK button to lock or to unlock
the channel on cursor. If the item is
unlocked, such channel of the item is
blocked.
Press the or on the remote control
to highlight the “Block by Rating” icon
and press the
Press the
remote control to highlight the item that
you want to lock or unlock and press the
OK button.
or OK button.
or button to move to the
or OK button.
/ / / buttons on the
7. Setup Code
If you input correctly PIN in rating or channel blocking message box, blocking message box is no
shown until power off and on.
Press the or on the remote control
to highlight the “DTV Rating” icon and
press the
Enter and re-enter your new PIN by
pressing the NUMBER buttons on the
remote control.
or OK button.
33
Page 34

Setting Block by Rating
This (V-Chip) is used to block program viewing based on the ratings sent by th e broadcasting
station. The default setti n g is to allow all programs to be viewed. Viewin g ca n b e blocked by
the type of program and by the categories chosen to be blocked.
V-Chip rating and categories
Rating guidelines are provided by broadc ast in g statio ns. Most televis io n programs and
television movies can be blocked by TV Rating and/or Individual Categories. Movies that
have been shown at the theaters or direct-to-video movies use the Movie Ra ting System
(MPAA) only.
Ratings for Movies previously shown in theaters
Movie Ratings: - Blocking Off (Permits all programs)
- G (General audience)
- PG (Parental guidance suggested)
- PG-13 (Parents strongly cautioned)
- R (Restricted)
- NC-17 (No one 17 and under admitted)
- X (Adult only)
If you set PG-13 : G and PG movies will be available, PG-13, R, NC-17 and X
will be blocked.
Ratings for Television programs including made-for-TV movies:
- TV-G (General audience)
- TV-PG (Parental guidance suggested)
- TV-14 (Parents strongly cautioned)
- TV-MA (Mature audience only)
- TV-Y (All children)
- TV-Y7 (Children 7 years older)
TV Rating Children: - Age (applies to TV-Y, TV-Y7)
- Fantasy Violence (applies to TV-Y7)
TV Rating General : - Age (applies to TV-G, TV-PG, TV-14, TV-MA)
- Dialogue-sexual dialogue (applies to TV-PG, TV-14)
- U Language-adult language (applies to TV-PG, TV-14, TV-MA)
- Sex-sexual situations (applies to TV-PG, TV-14, TV-MA)
- Violence (applies
to TV-PG, TV-14, TV-MA)
34
Page 35
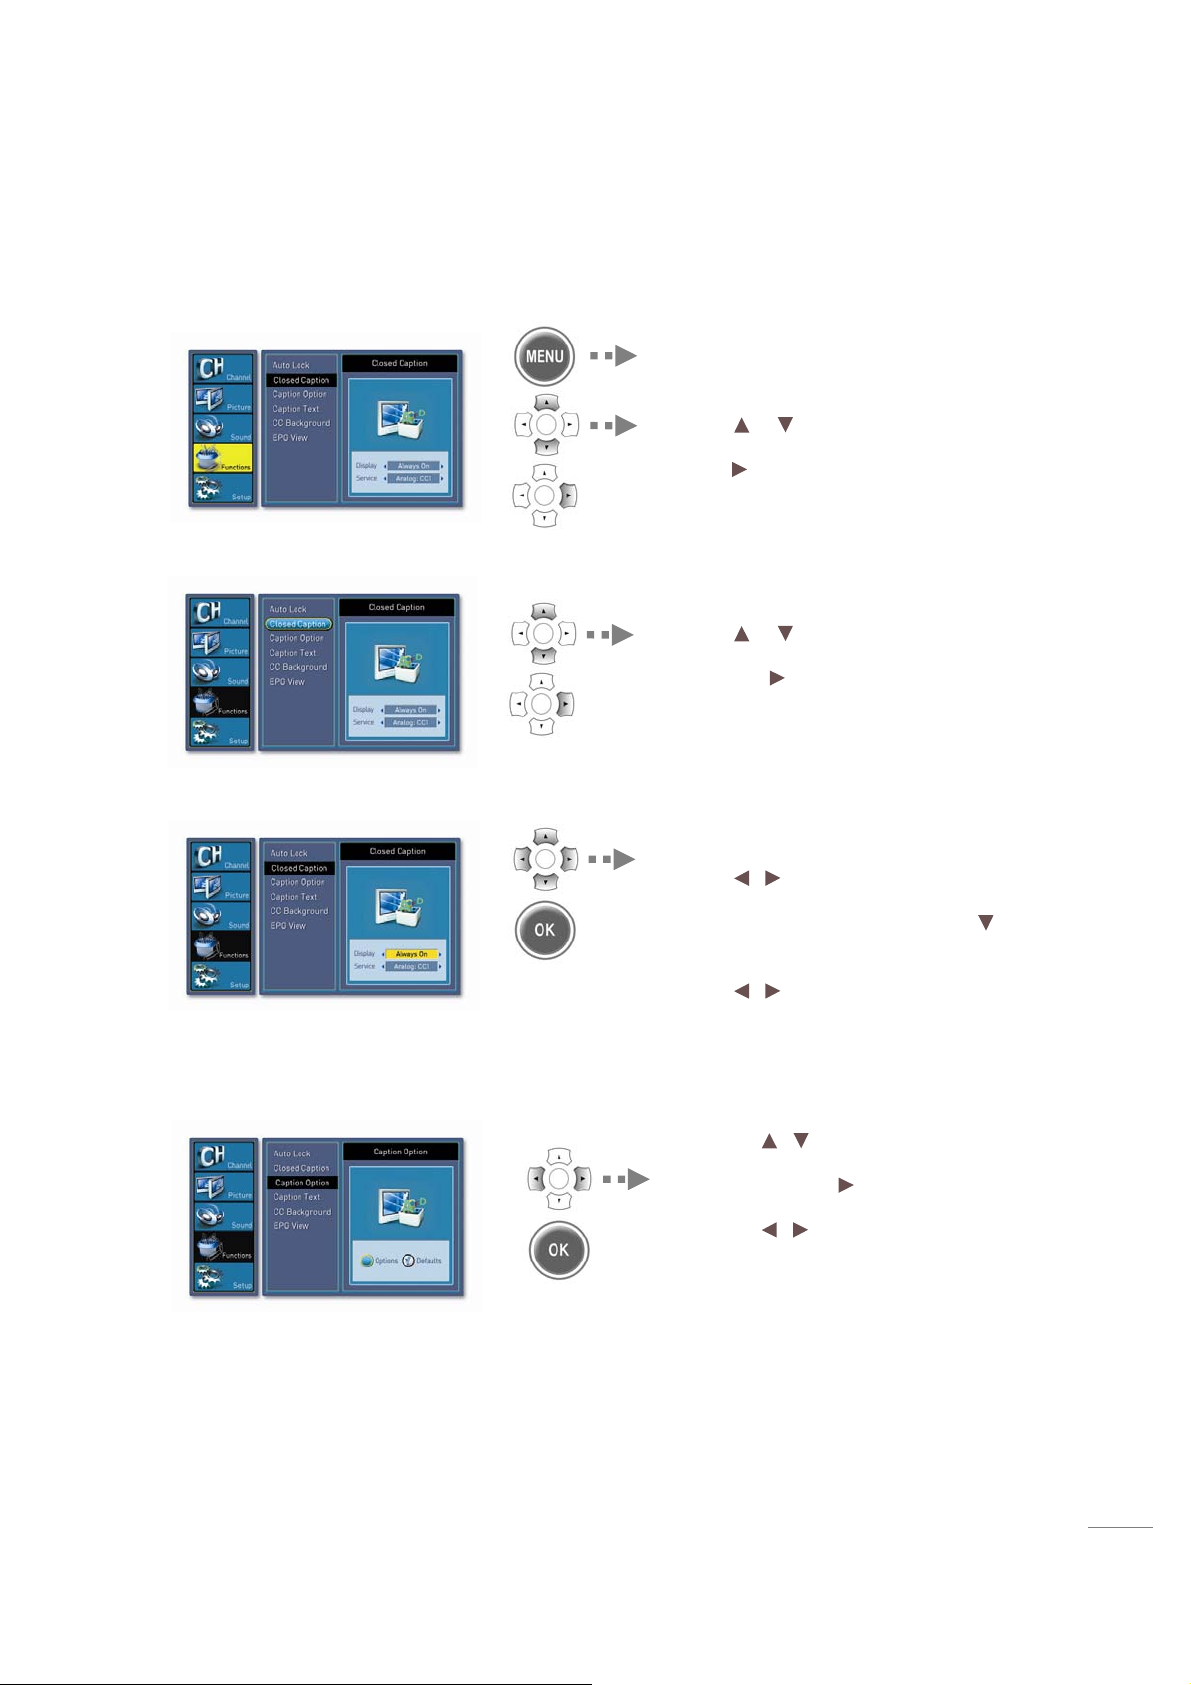
Setting the Closed Capti on
1. Select “Function” in the Menu
2. Select “Closed Caption”
3. Caption
Press the MENU button.
Press the
to highlight the “Function” icon and
press the
Press the or on the remote control
to highlight the “Closedn Caption” icon
and press the or OK button.
or on the remote control
or OK button.
4. Caption Option
Display mode is highlighted.
Press the
or ”Always On”.
If “Always on” was selected, press the
button on the remote control to highlight the
Service mode.
Press the
item. If “Off” was selected, you can’t select
Service mode.
Press the
control to highlight the “Caption option”
icon and press the
Press the
or “Default” and press the OK button to
make a selection.
/ butto ns to select “Off”
/ button to select the desired
/ button on the remote
or OK button.
/ button to select “Option”
35
Page 36
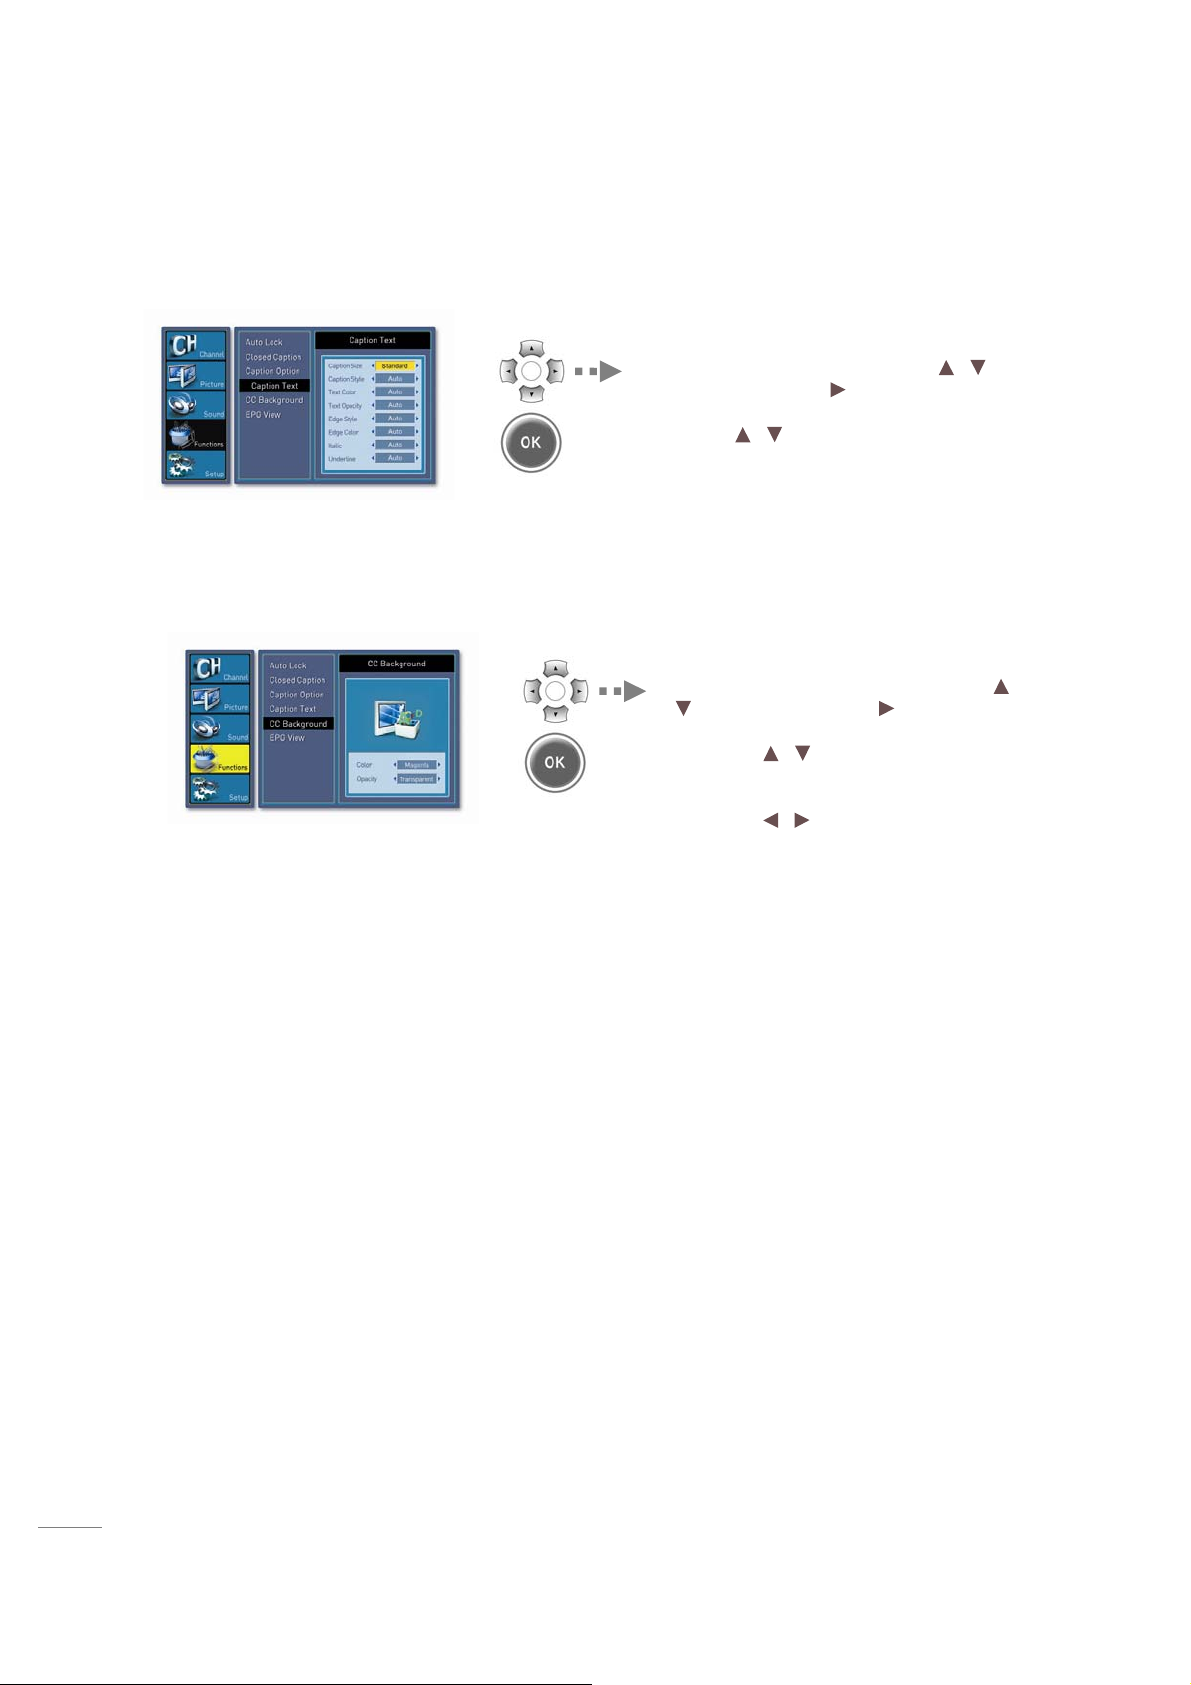
5. CaptionText
,
,
y
6. CC Background
In caption option, if “Options” is selected
“Caption Text” is highlighted.
To select Caption Text, press the
button and press the
Press the
Caption Size, Caption Style, Text Color,
Text Opacity, Edge Style, Edge Color,
Italic or Underline.
In caption option, if “Options” is selected
“CC Background” is highlighted.
To select CC Background, press the
button and press the or OK button.
Press the
“Color” or “Opacity”.
Press the
that
/ button to select the
/ button to select the
/ button to select the item
ou want.
or OK button.
/
/
36
Page 37

Viewing the Closed Caption
Choices in the closed caption menu are: CC Mode, Priority (Analog caption or Digital
caption), and Option.
1. CC MODE:
ON: Captioning information is al wa ys shown, when available.
OFF: No ca ptioning in formation i s displayed.
2. Priority:
You can choose whether the TV uses dig ital or analog captions for digital TV pr ograms that
have both or either.
- Analog (Caption) : You can select a closed caption mode, which is the m ode, or source, used
for displaying captioning inform a tion for analog channels or digital channels, if availa ble.
• Caption :
The form for the words that scroll across the bottom of the TV screen : usually the audio
portion of the program provided for the hearing impaired.
CC 1 : For video related information that can be displayed. Script can be in any language.
CC 2/3/4 : Other modes used for video related information.
• Text :
The term for the words that appear in a large black frame and almost cover the entire screen :
Usually message provided by the broad caster.
T 1 : Blanks out a large portion of the picture on the television screen, and display program
guide or any other information
T 2/3/4 : other modes that display information and blank out a large portion of the picture of the
TV screen.
currently being transmitted.
- Digital (caption) : You can select a closed caption, service mode(1-6) for digital channels.
- The service modes support MPEG-2 based transport sources Service 1 and Service2 are the
primary and secondary la nguages, respectively.
- Service3 and service4, 5, 6 are additional caption sources that may be available.
37
Page 38

3. Option:
Æ
Æ
Customized closed captioning for the digital caption by choosing the settings for the
following options:
1) cc Background
Color: Set the color of the cc Background
Auto Æ Black Æ White Æ Red Æ Green Æ Blue Æ Yellow Æ Magenta Æ Cyan
Opacity: Specify the opacity.
Auto Æ Soled Æ Flashing Æ Translucent Æ Transparent
2) Caption Text
Caption Size: Set the size of the words - Auto Æ Small Æ Standard Æ Large
Caption Style: Set the style of the words - Auto Æ St yle1 Æ Style2 Æ Style3 Æ Style4
Style5 Æ Style6 Æ Style7
Text Color: Choose a color for the text - Auto Æ Black Æ White Æ Red Æ Green Æ Blue
Æ Yellow Æ Magenta Æ Cyan
Text Opacity: Specify the opacity for the tex t - Auto Æ Solid Æ Flashing Æ Translucent
Transparent
Edge Style: Select Edge style for the text - Auto Æ None Æ Rai sed Æ Depressed Æ
Uniform Æ Drop Shadow
Edge color: Select Edge color for the text - Auto Æ Black Æ White Æ Red Æ Gree n Æ
Blue Æ Yellow Æ Magenta Æ Cyan
Italic: Convert the text in to italic - Auto Æ On Æ Off
38
Page 39
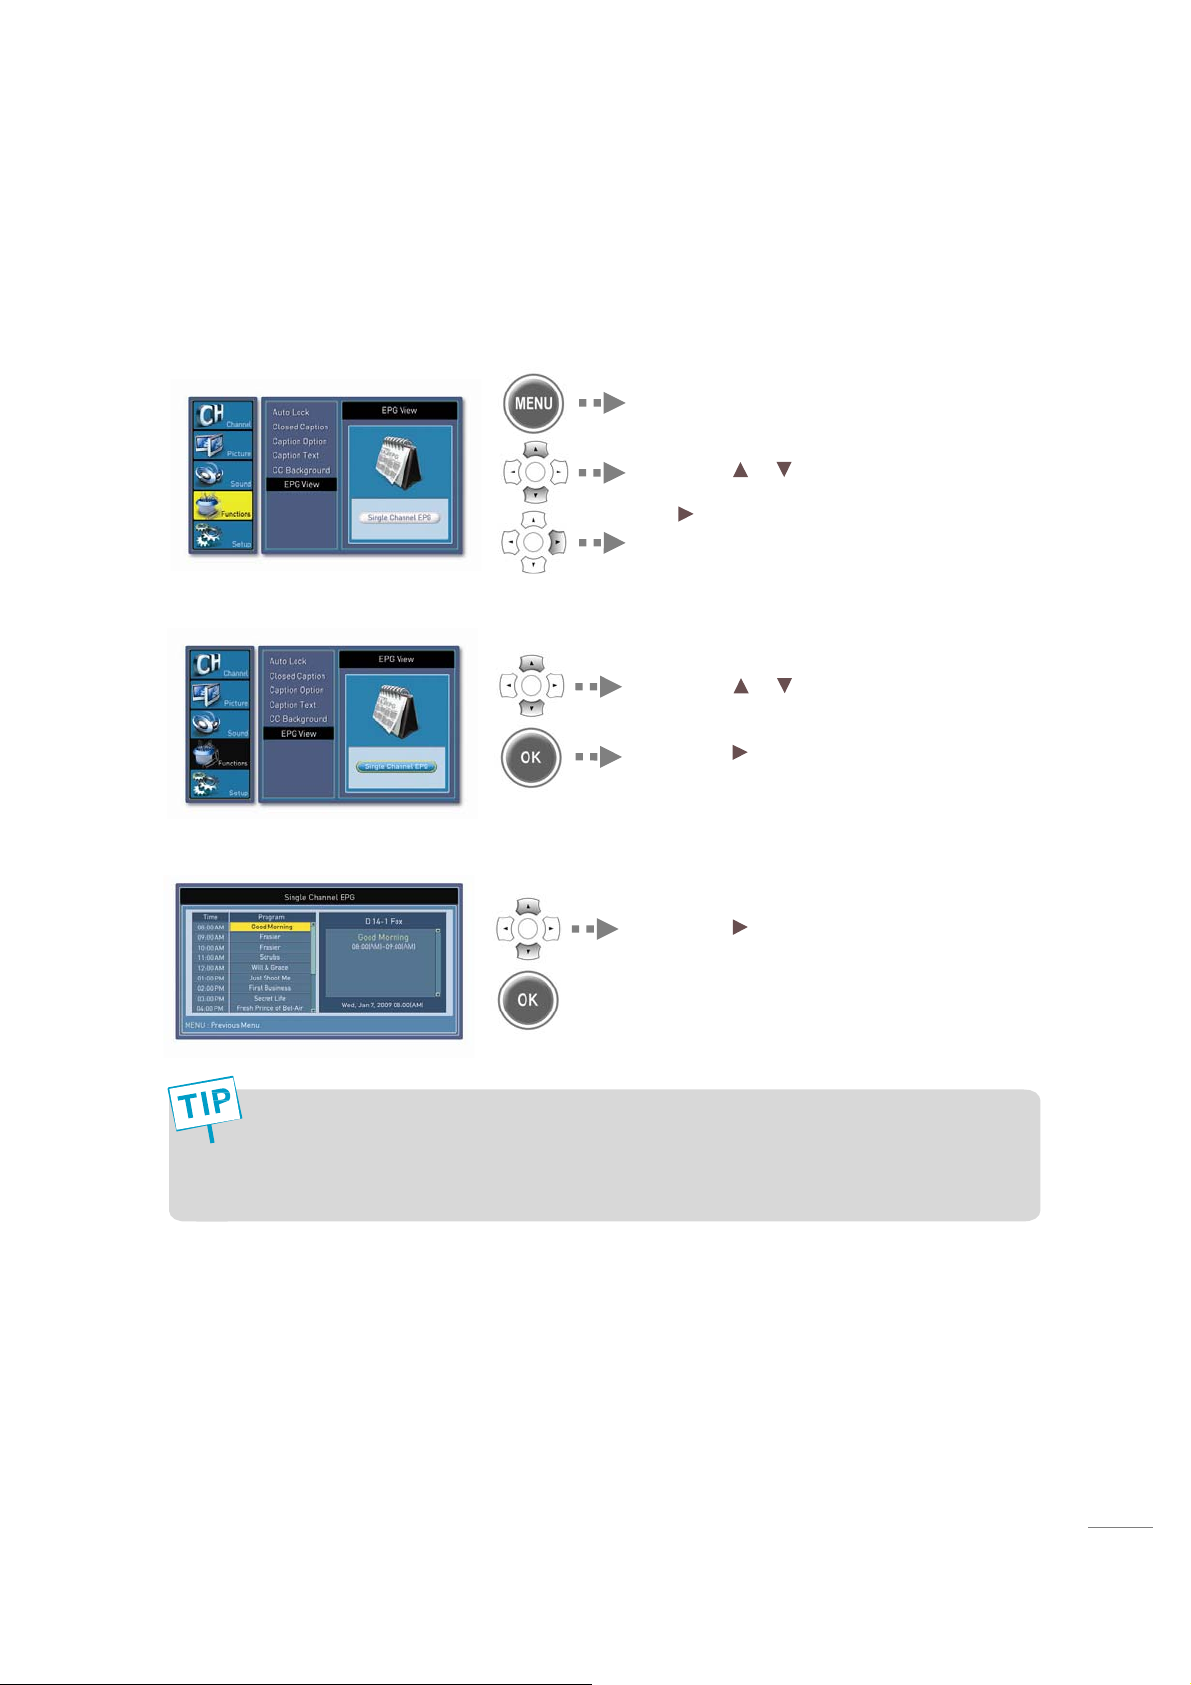
Setting the EPG View
This service is only for Digital TV Mode l.
1. Select “Function” in the Menu
2. Select “EPG View”
3. Single Channel EPG
Pressthe MENU button.
Press the
to highlight the “Function” icon and press
the
or on the remote control
or OK button.
Press the or on the remote control
to highlight the “EPG View” icon.
Press th e
or OK button.
Pressthe orOK button to see the EPG
Then you can get information on the
broadcasting time and program.
The EPG displays the channel that is in channel list.
The EPG will only work when you are watching digital channel.
If current time and time zone are not set correctly, program information is not displayed.
EPG displays only the programs within 12 hours from current time.
39
Page 40
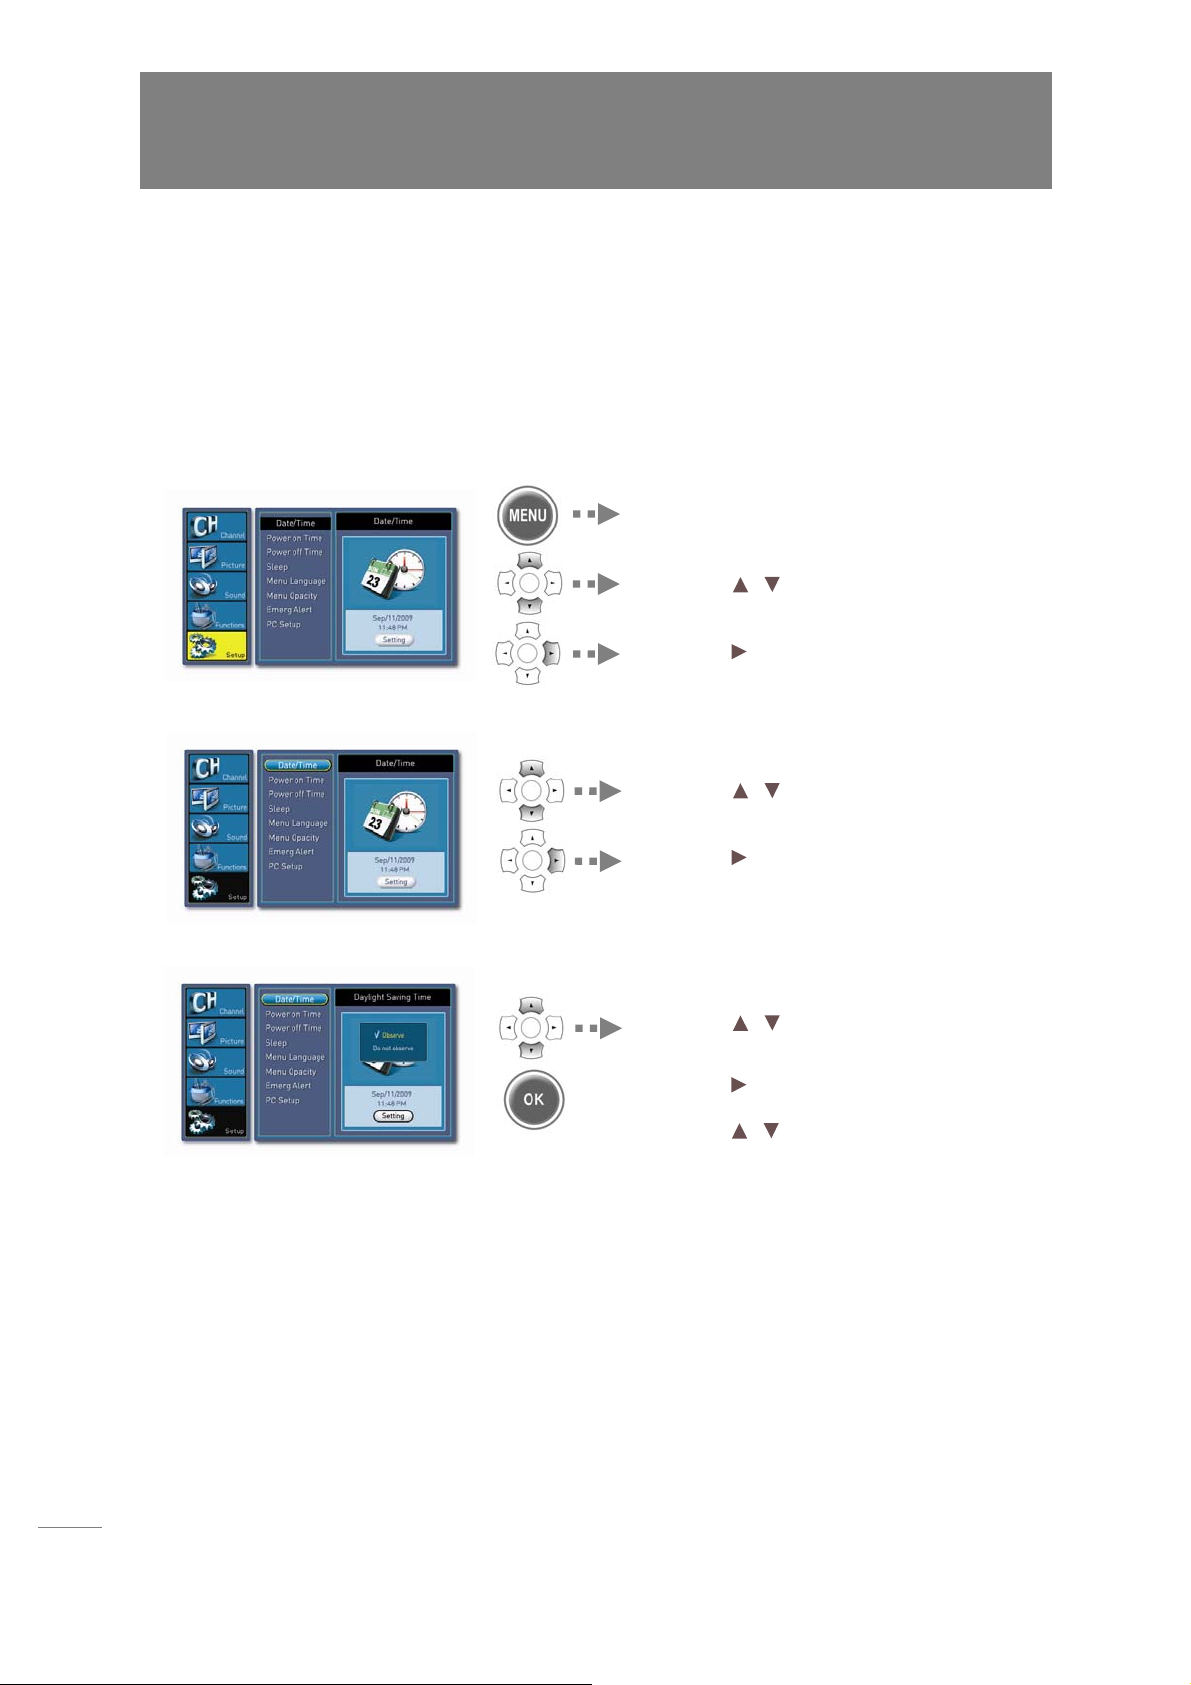
Using the Menu
Set up
Setting Date / Time
n Yes can automatically turn on or off the TV at a present time, to do this, you must set the time
it you wish to use the automatic on or off timers.
o Date/Time can be display ed differently as Auto mode because each broadcasting station
may send different time information by channel.
1. Select “Setup” in the Menu
Press the MENU button.
Press the
highlight the “S etup” icon.
Press the
2. Select “Date/Time”
/ on the remote control to
or OK button.
3. Daylight Saving
Press the / on the remote control to
highlight t he “D ate/Time” icon.
Press the
Pressthe/ button to move to
“Daylight Saving”.
Press the
“Daylight Saving”.
Press the
“Observe” or “Do not observe”.
or OK button.
or OK button to select
/ button to select
40
Page 41
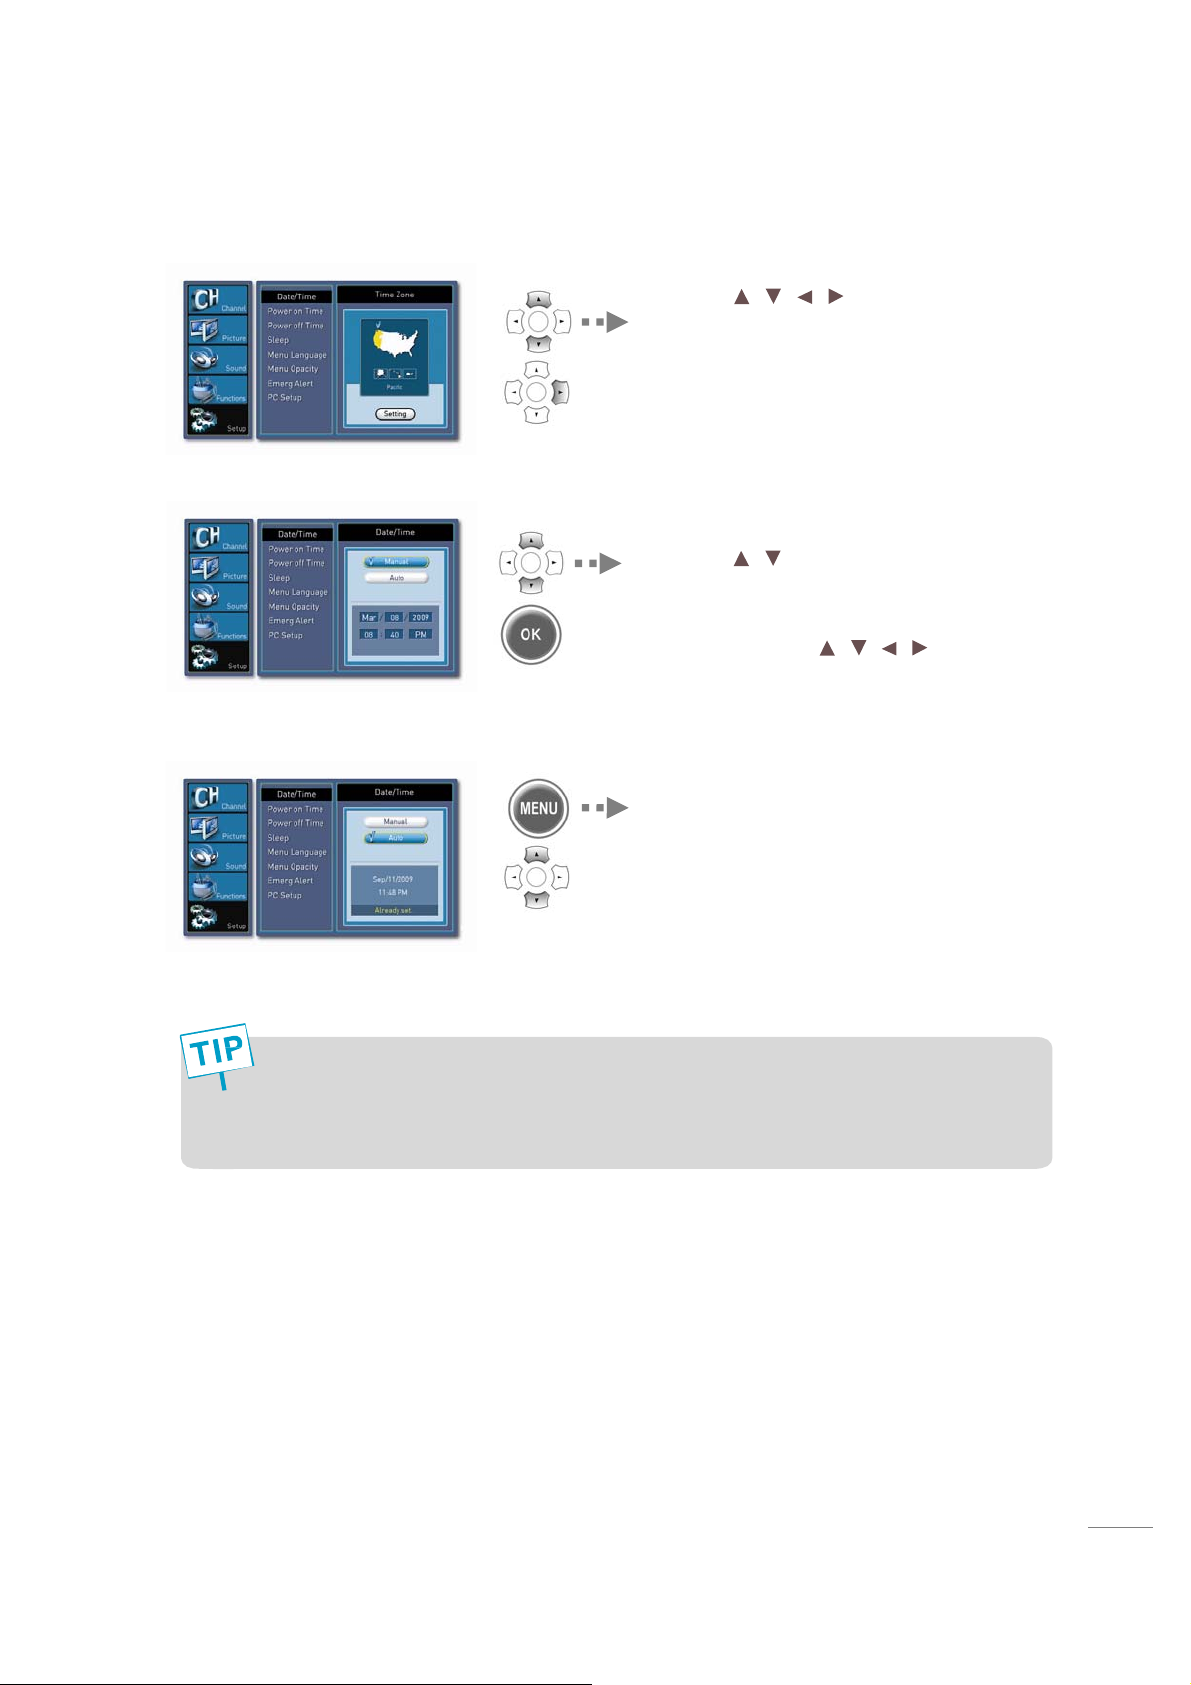
4. Setting the Time Zone
A
5. Manual
6. Auto
Press the / / / buttons on
the remote control to set Time Zone.
Whenever you press the buttons, Time
Zone is changed in following order Pacific,
Mountain, Central, Eastern, Alaska,
Hawaii, and Atalantic.
Press the / on the remote control
to highlight the “Date/Time” icon.
Press the OK button to set the current date
and time. Press the
set year, month, day, Hour, Minute and
AM/PM.
“Auto” is only for DTV channel
/ / / buttons to
Observe means daylight savings is dependent on broadcaster’s feed.
Manual time will be erased when power cord is unplugged or when power is not supplied.
uto time function will work correctly only if broadcaster is transmitting the valid
information.
41
Page 42
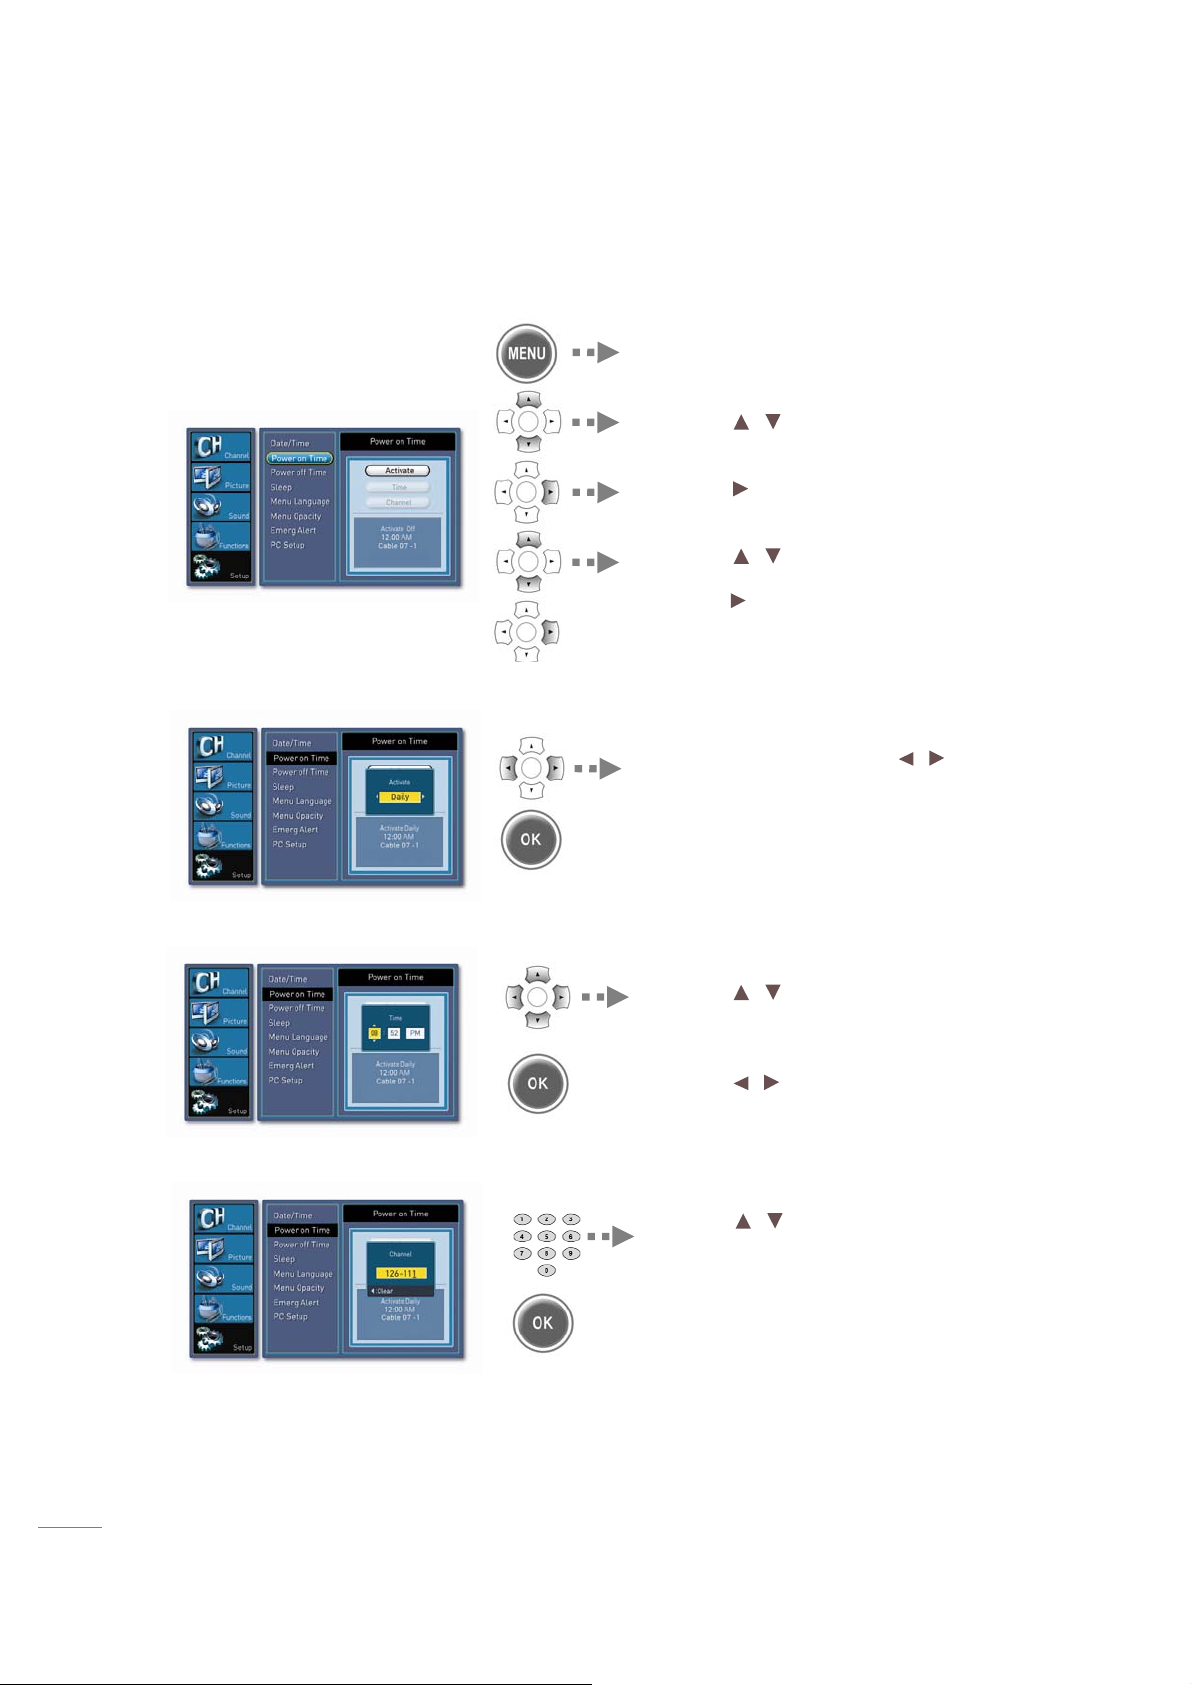
Setting Power on Time
1. Select “P o w e r on T i m e ”
2. Activate
Press the MENU button.
Press the
highlight the “Setup” icon.
Press the
Press the
highlight the “Power on Time” icon and
press the
/ on the remote control to
or OK button.
/ on the remote control to
or OK button.
Press the OK button to activate power on
time whenever you press the
the mode shifts in following order:
“Off”, “Daily”, “Once”.
If you select once or daliy in the “Activate”
You can set time and channel.
/ button,
3. Time
4. Channel
Press the/ button to select the “Time”.
Press the OK button to set Time. Press
numeric key to set Time. Press the OK
button to set.
Press the
Hour, minute and AM/PM.
Press the / buttons to select
channel.
Press the OK button to set channel.
Press numeric key to set channel
number.
Press the OK button to set.
/ button to move between
42
Page 43
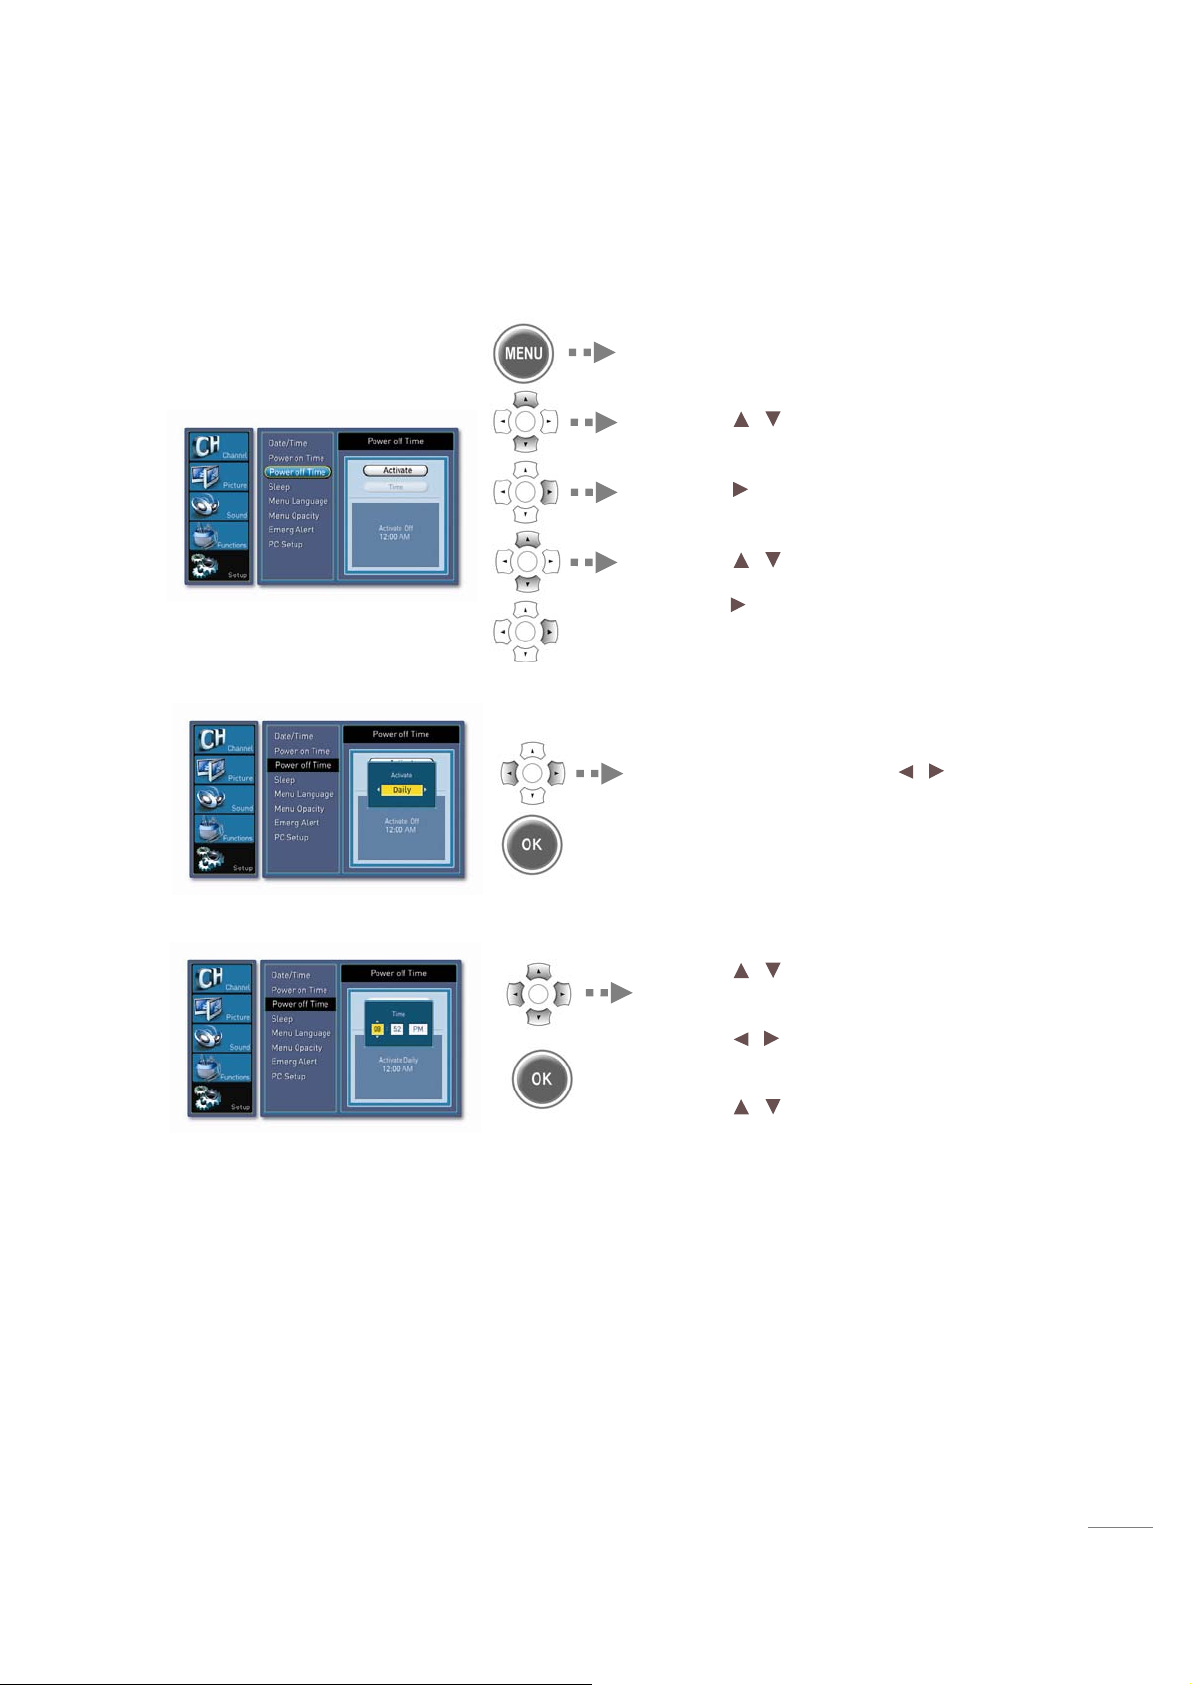
Setting Power off Time
o
1. Select “Po we r of f Time”
2. Activate
3. Time
Press the MENU button.
Press the
highlight the “Setup” icon
Press the
Press the
highlight the “Power off Time” icon and
press the
/ on the remote control to
or OK button.
/ on the remote control to
or OK button.
Press the OK button to activate power on
time whenever you press the
the mode shifts in following order:
“Off”, “Daily”, “Once”.
If you select once or daliy in the “Activate”
You can set time and channel.
/ button,
Press the / button to select time.
Press the OK button to set time.
Press the
Hour, minute and AM/PM.
Press the
minute and AM/PM. Press the OK button t
set.
/ button to move between
/ buttons to set Hour,
43
Page 44
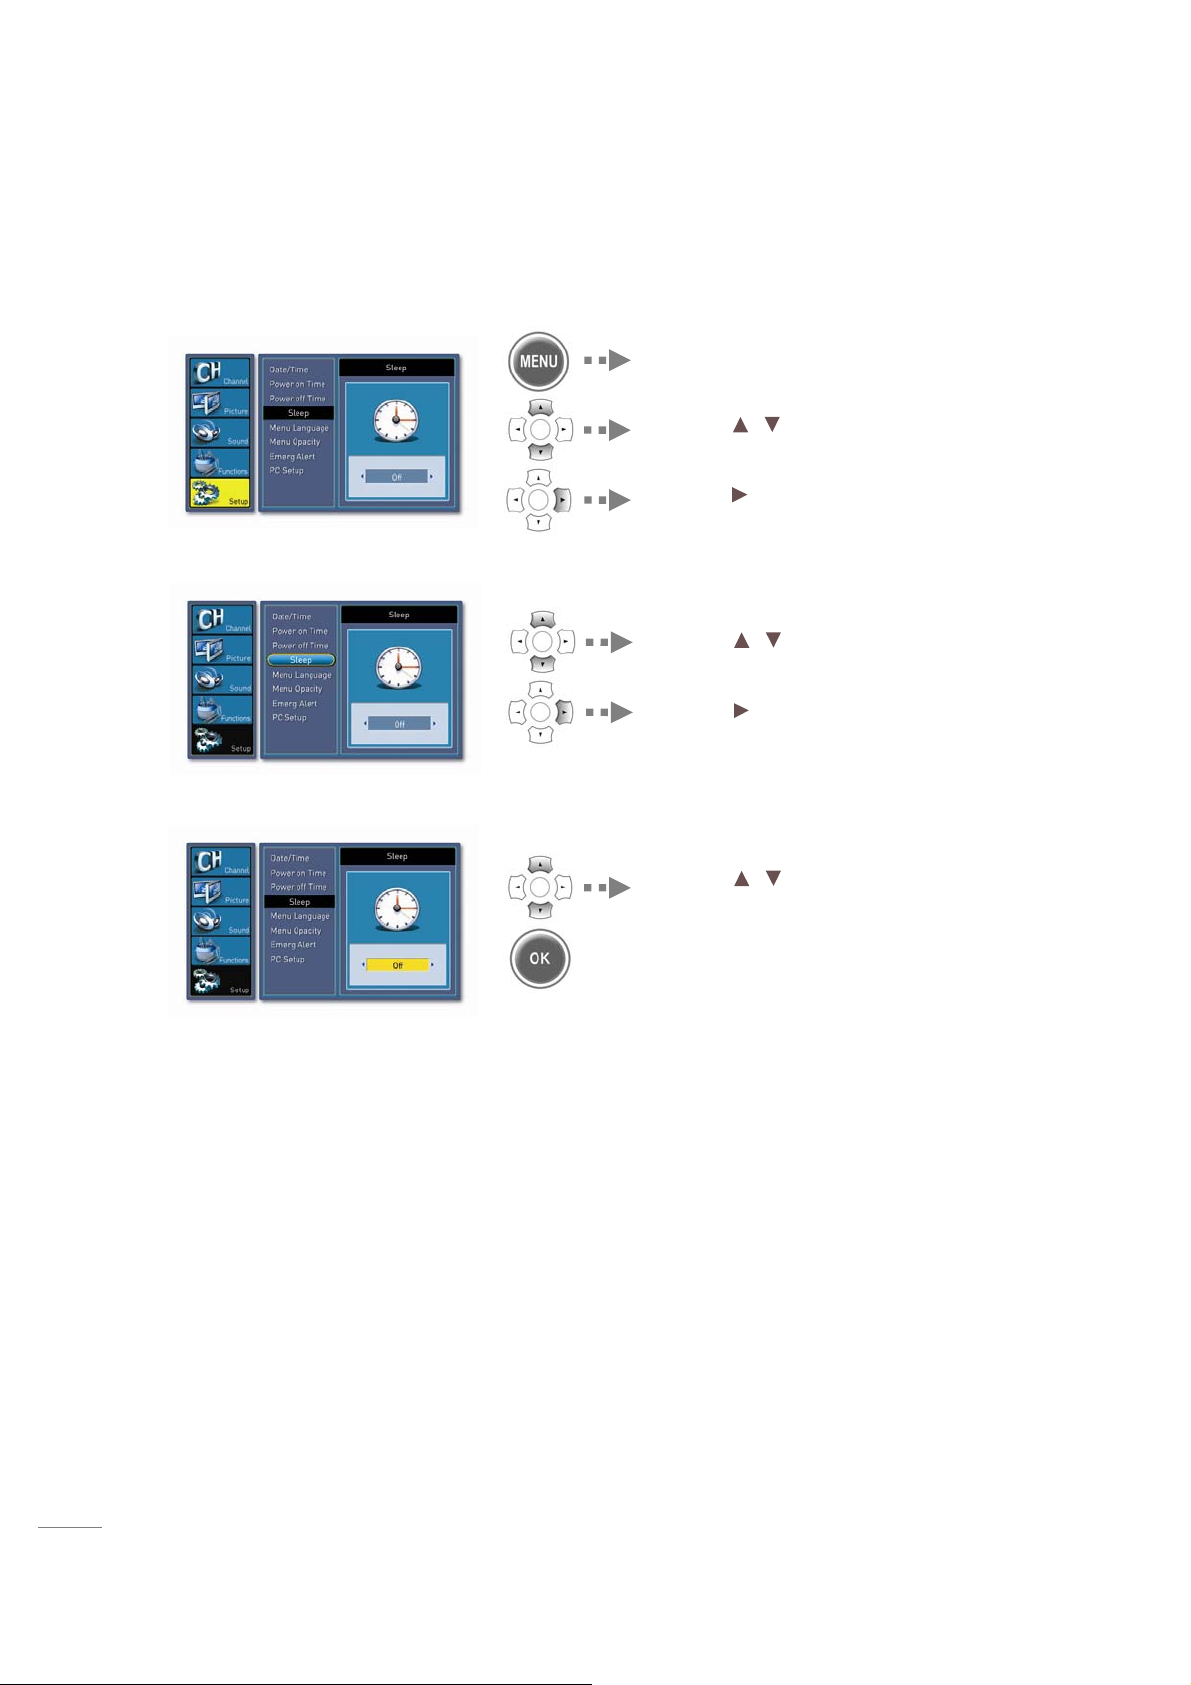
Setting Sleep Time
1. Select “Setup” in the Menu
2. Select “Sleep”
3. Sleep
Pressthe MENU button.
Press the
highlight the “S etup” icon.
Press the
Press the / on the remote control to
highlight the “Sleep” icon.
Press the
/ on the remote control to
or OK button.
or OK button.
Press the / button to select sleep time.
Whenever you press up or down button the
mode shifts in following order:
Off, 15 Minutes, 30 Minutes, 60 Minutes,
90 Minutes, 120 Minutes and press the OK
button.
44
Page 45
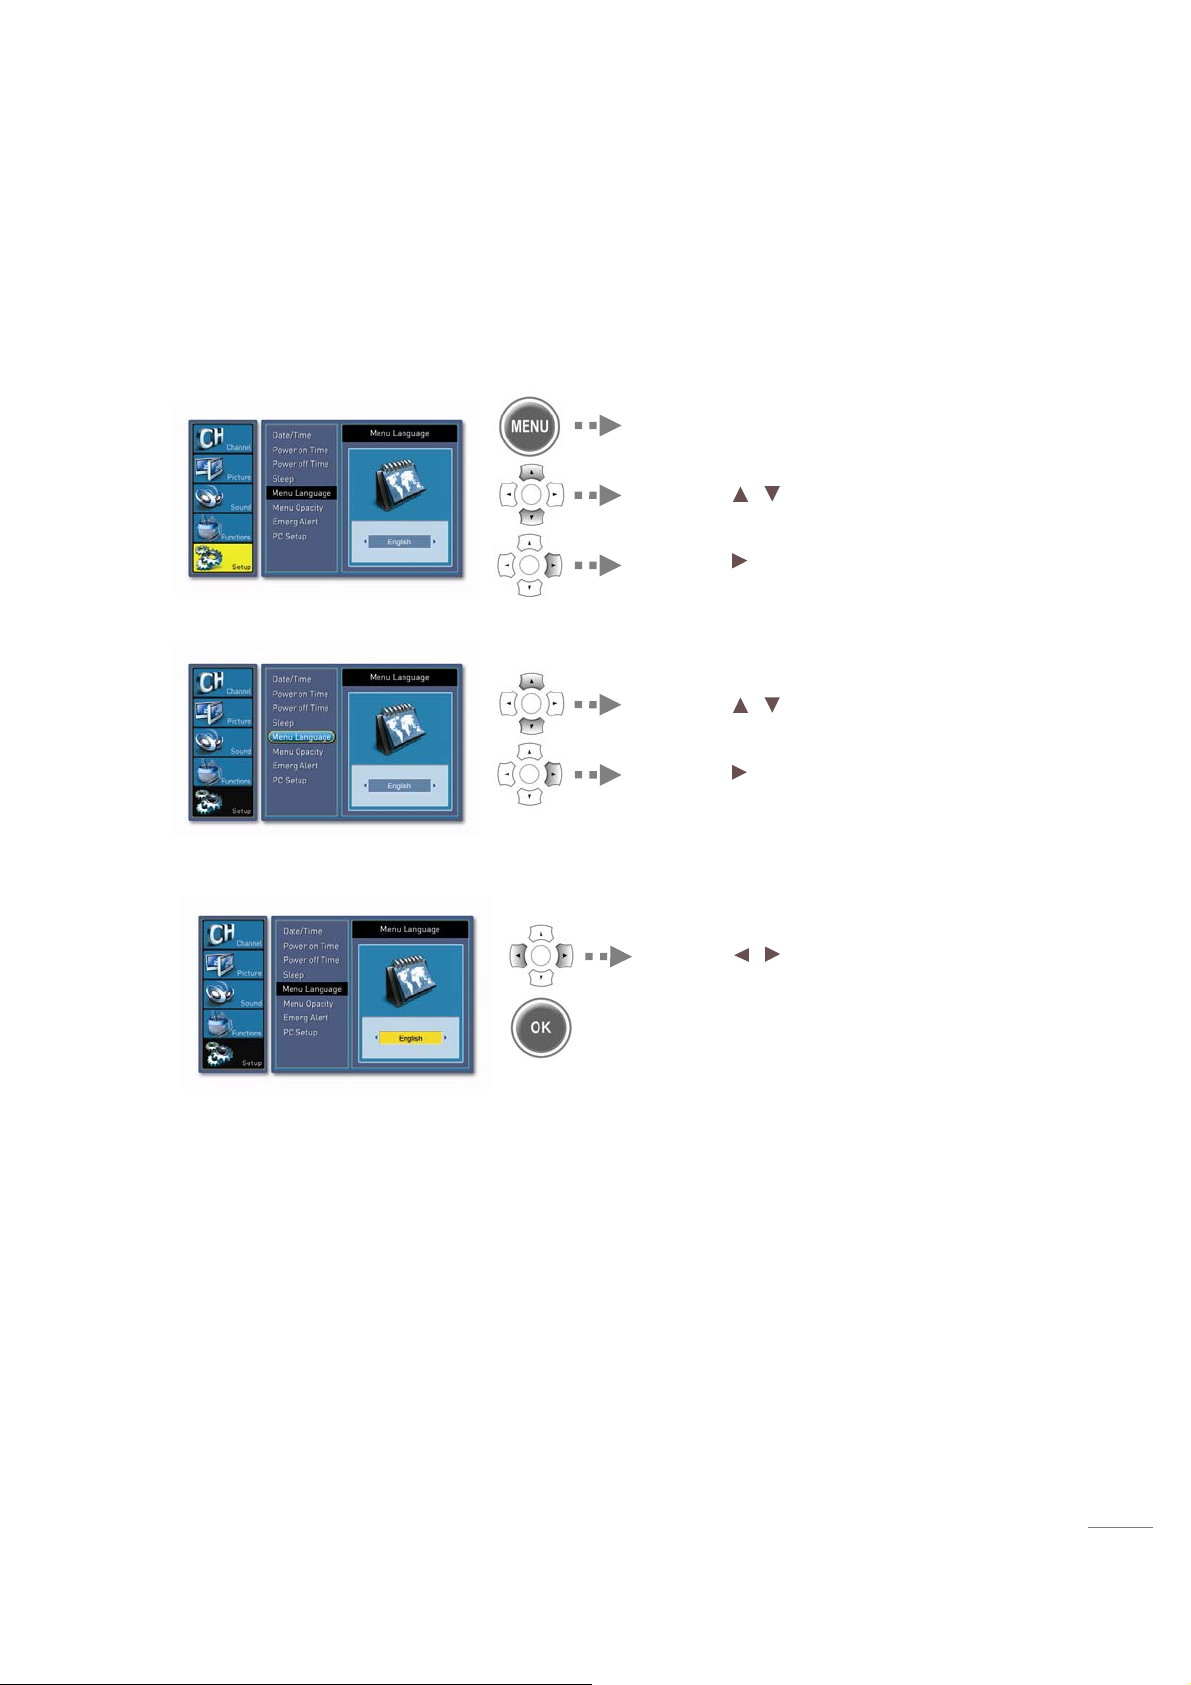
Selecting Menu Language
Users can select their language preference in o rder to display main men us and sub me nus,
etc.
1. Select “Setup” in the Menu
Pressthe MENU button.
Press the
highlight the “S etup” icon.
Press the
/ on the remote control to
or OK button.
2. Select “Menu Language”
Press the / on the remote control to
highlight the “Menu Language” icon.
Press the
or OK button.
3. Menu Language
Press the / button to set the
language, language shifts in following
order:
ENGLISH, FRANÇAIS, ESPAÑOL
45
Page 46
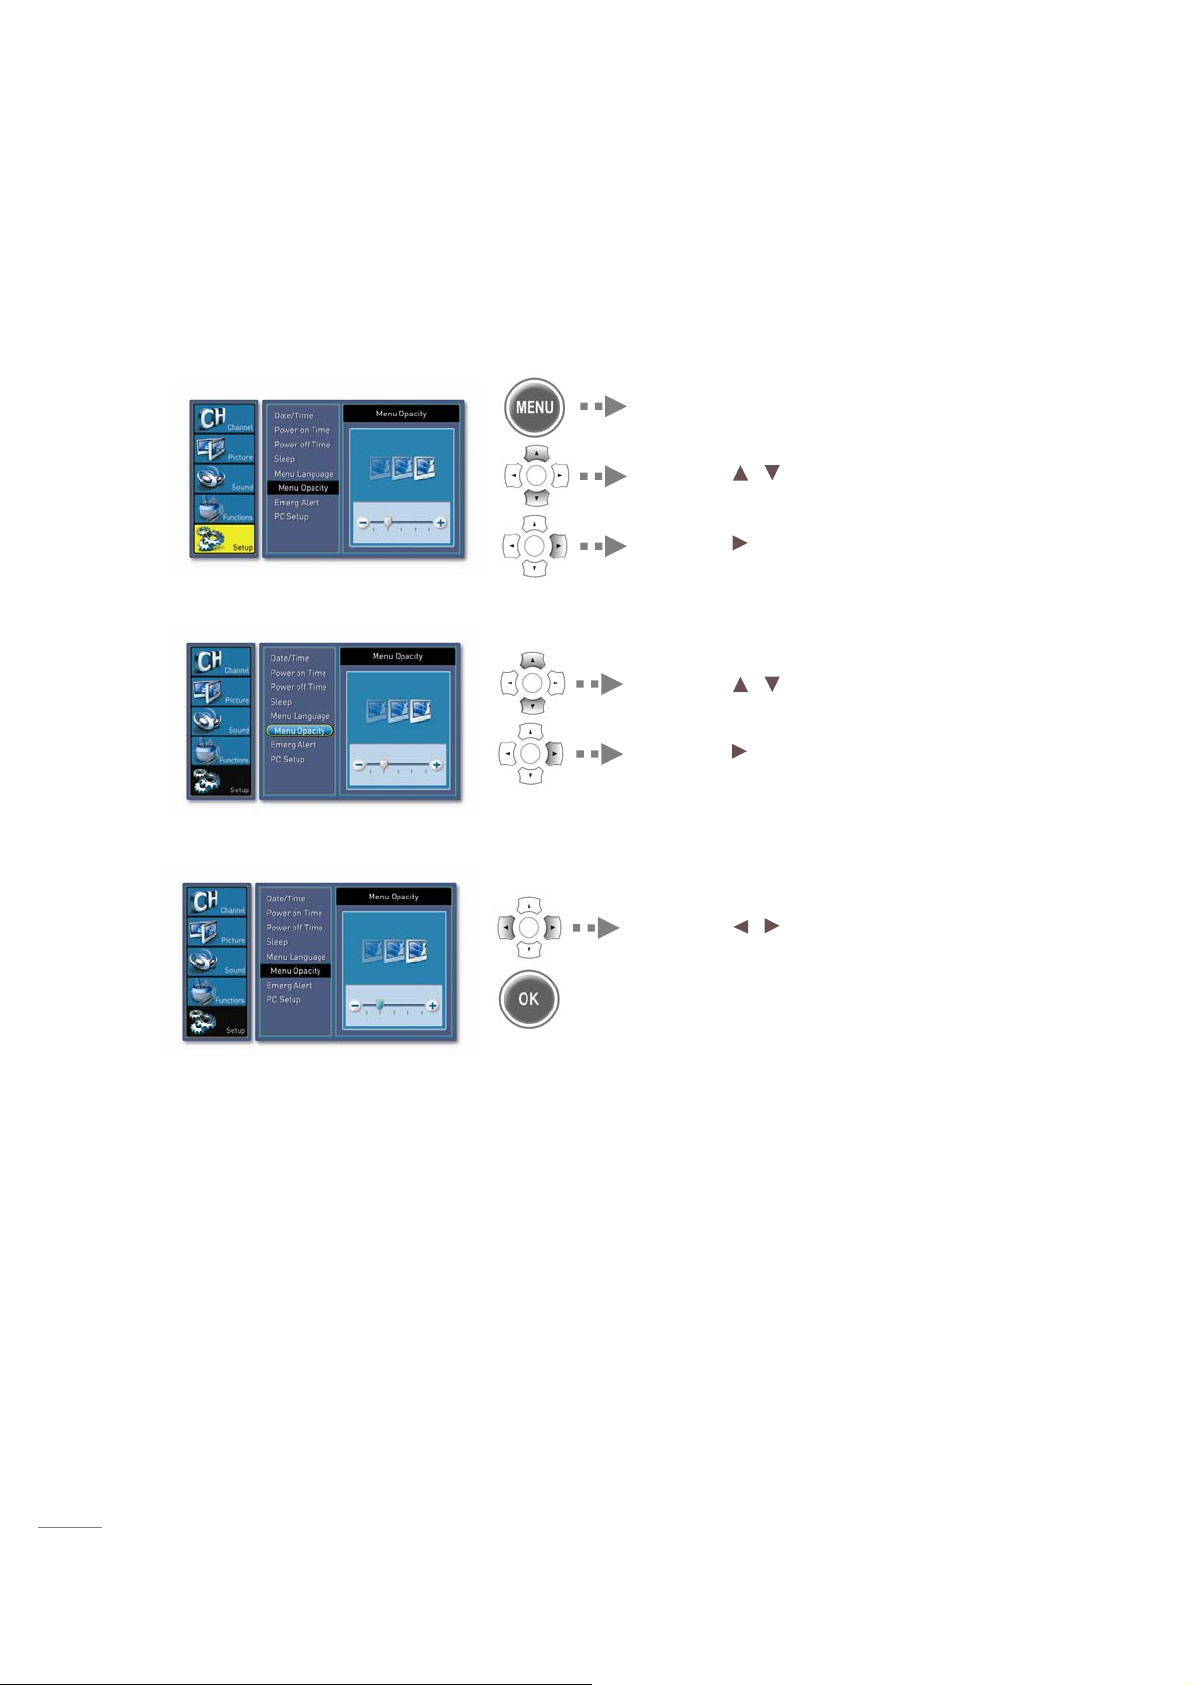
Setting Menu Opacity
Users can select their language preference in order to displ ay main menus and sub menus, etc.
1. Select “Setup” in the Menu
Pressthe MENU button.
Press the
highlight the “S etup” icon.
Press th e
/ on the remote control to
or OK button.
2. Select “Menu Opacity”
Press the / on the remote control to
highlight the “Menu Opacity” icon.
Press the
or OK button.
3. Menu Opacity
Press the / button to set menu
opacity you want.
46
Page 47
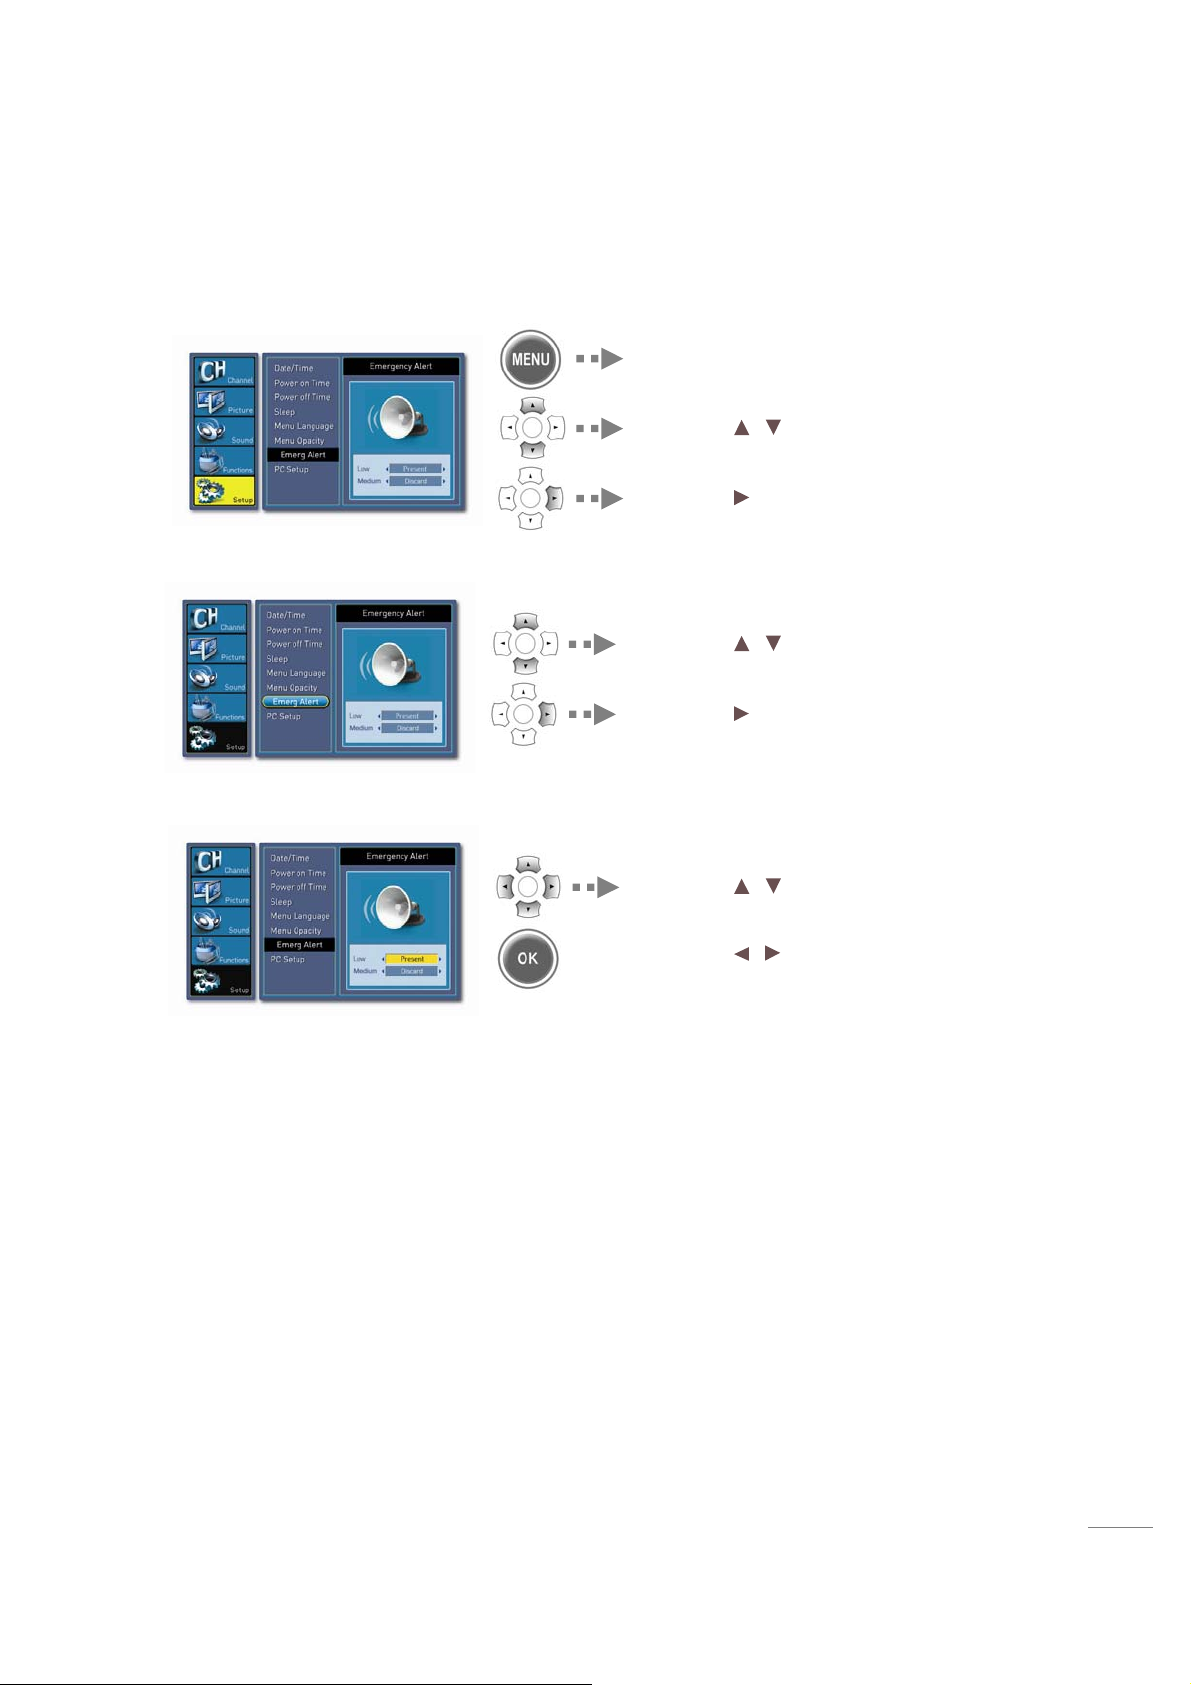
Setting Emergency Alert
/
1. Select “Setup” in the Menu
2. Select “Emerg Alert”
Press the MENU button.
Press the
highlight the “Setup” icon.
Press the
/ on the remote control to
or OK button.
Press the / on the remote control to
highlight the “Emerg Alert” icon.
Press the
or OK button.
3. Emergency Alert
Press the
“Medium”.
Press the
“Discard”.
/ button to move to “Low” /
/ button to select “Present”
47
Page 48
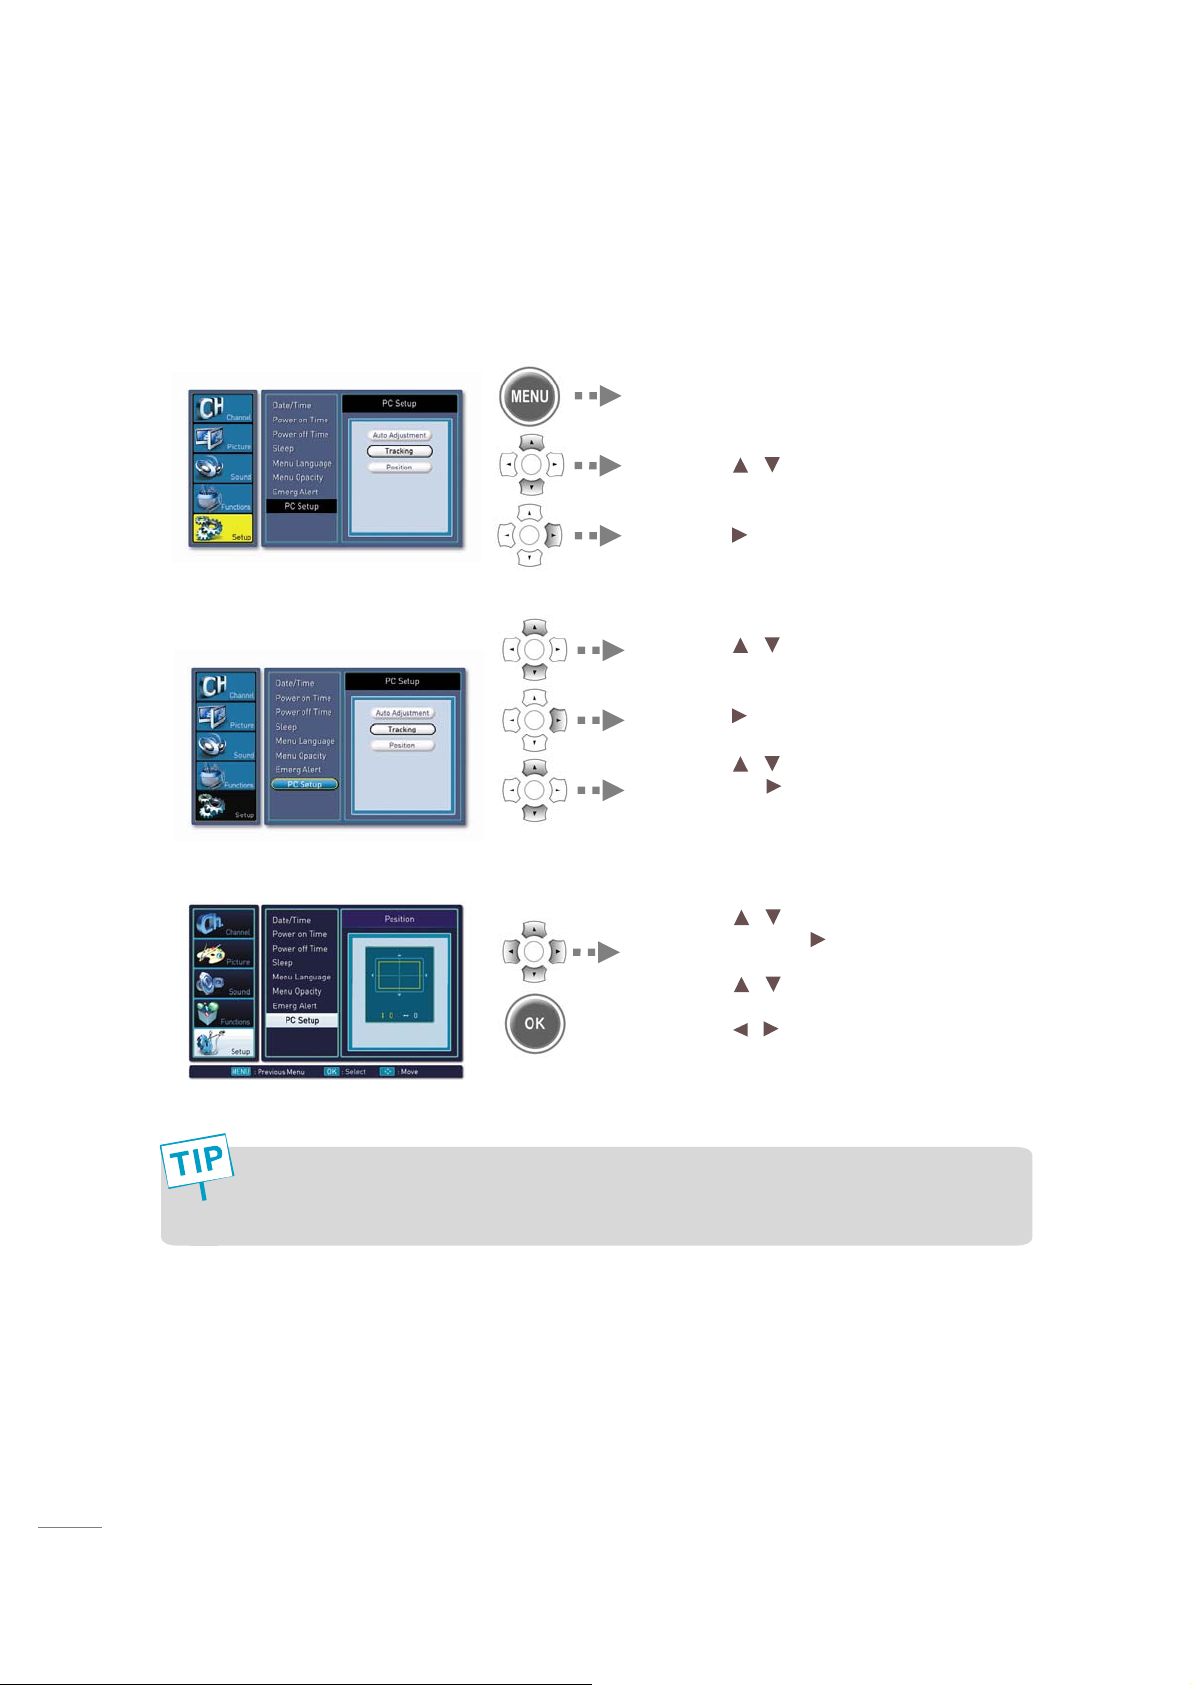
Setting PC Mode
This function is only available in PC mode.
1. Select “Setup” in the Menu
2. Select “PC Se tup”
3. PC Setup
Press the MENU button.
Press the
highlight the “S etup” icon.
Press the
Press the / on the remote control to
highlight the “PC Setup” icon.
Press the
Press the
and press the
adjustment.
/ on the remote control to
or OK button.
or OK button.
/ to move to “Auto Adjust”
or OK button to do auto
Press the / button to move to
position. Press the
select position.
Press the
position.
Press the
position. After setting press OK button to
exit.
/ button to adjust V / button to adjust H-
or OK button to
H. Position: To adjust the horizontal position of the picture.
V. Position: To adjust the vertical position of the picture.
48
Page 49
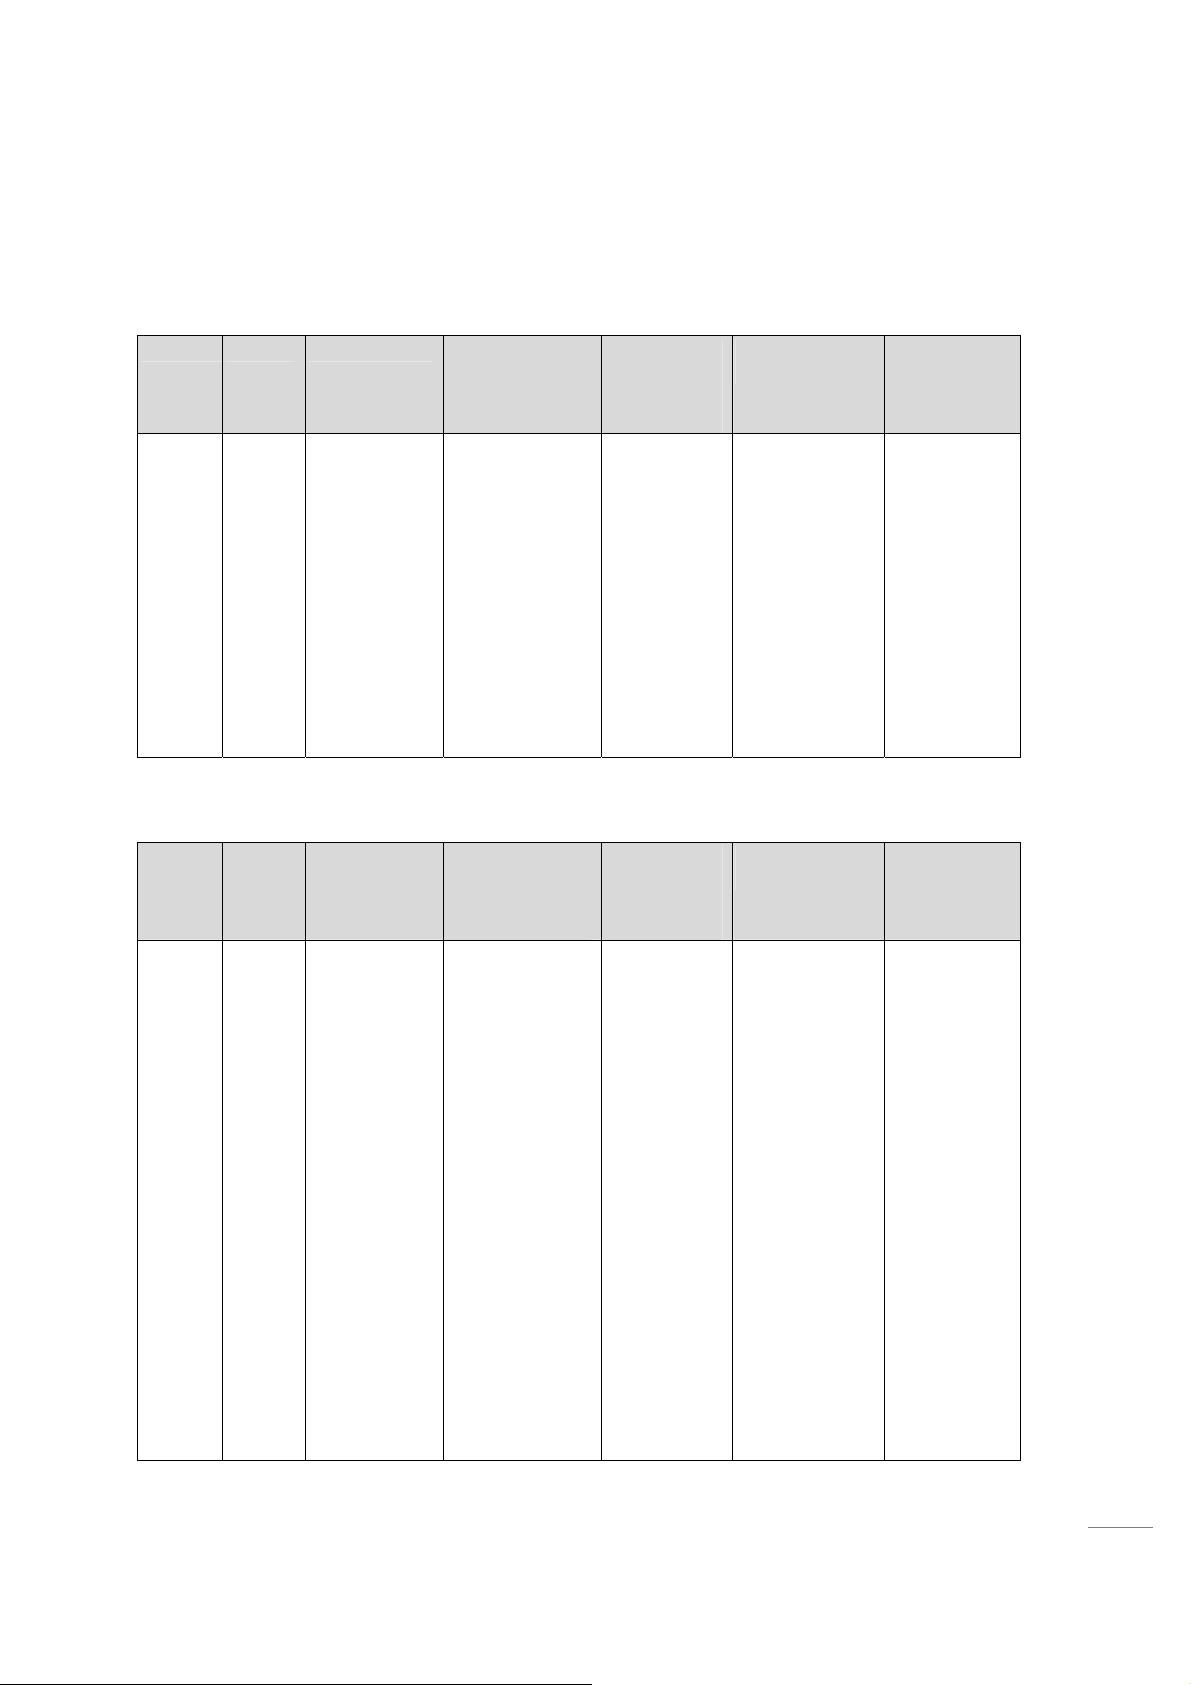
Support Timing Table
YPbPr
#item STD Resolution Pixel
Frequency
(MHz)
1
2
3
4
5
6
7
8
9
10
11
12
13
480i
480p
576i
576p
720p
720p
720p
1080i
1080i
1080i
1080p
1080p
1080p
704(720*480)
704(720*480)
720*576
720*576
1280*720
1280*720
1280*720
1920*1080
1920*1080
1920*1080
1920*1080
1920*1080
1920*1080
HDMI (DVI)
#item STD Resolution Pixel
Frequency
(MHz)
1
2
3
4
5
6
7
8
9
10
11
12
13
14
15
16
17
18
19
20
21
480i
480p
576i
576p
720p
720p
720p
1080i
1080i
1080i
1080p
1080p
1080p
VESA
VESA
VESA
VESA
IBM
VESA
704(720*480)
704(720*480)
720*576
720*576
1280*720
1280*720
1280*720
1920*1080
1920*1080
1920*1080
1920*1080
1920*1080
1920*1080
640*400
640*480
640*480
640*480
640*480
640*480
720*400
720*400
13.500
27.000
50.000
50.000
60.000
59.940
50.000
60.000
59.940
50.000
60.000
59.940
50.000
13.500
27.000
13.500
27.000
74.250
74.176
74.250
74.250
74.176
74.250
148.500
148.352
148.500
25.175
25.175
25.200
31.500
31.500
36.000
28.322
35.500
V.
Frequency
(Hz)
29.970
59.940
15.625
31.250
45.000
45.000
37.500
33.750
33.716
31.250
67.500
67.433
56.250
V.
Frequency
(Hz)
29.970
59.940
50.000
50.000
60.000
59.940
50.000
60.000
59.940
50.000
60.000
59.940
50.000
59.940
59.940
60.000
72.809
75.000
85.008
70.087
85.039
H. Frequency
(KHz)
15.734
31.470
H. Frequency
(KHz)
15.734
31.470
15.625
31.250
45.000
45.000
37.500
33.750
33.716
31.250
67.500
67.433
56.250
31.469
31.469
31.500
37.861
37.500
43.269
31.469
37.927
Remark
Remark
1440x480
1440x576
49
Page 50
22
23
24
25
26
27
28
29
30
31
32
33
34
35
36
VESA
VESA
VESA
VESA
VESA
VESA
VESA
VESA
VESA
VESA
VESA
VESA
VESA
VESA
VESA
800*600
800*600
800*600
800*600
800*600
1024*768
1024*768
1024*768
1024*768
1152*864
1280*960
1280*960
1280*1024
1280*1024
1280*1024
108.000
108.000
148.500
108.000
135.000
157.500
VGA (An alog RGB & DVI to HDMI)
36.000
40.000
50.000
49.500
56.250
65.000
75.000
78.750
94.500
56.250
60.317
72.188
75.000
85.061
60.000
70.069
75.025
84.997
75.000
60.000
85.002
60.020
75.025
85.024
35.156
37.879
48.077
46.875
53.674
48.363
56.476
60.023
68.677
67.500
60.000
85.938
63.981
79.976
91.146
#item STD Resolution Pixel
Frequency
(MHz)
1
2
3
4
5
6
7
8
9
10
11
12
13
14
15
16
17
18
19
20
21
22
23
24
25
26
27
VESA
VESA
VESA
VESA
VESA
VESA
IBM
VESA
VESA
VESA
VESA
VESA
VESA
VESA
VESA
VESA
VESA
VESA
VESA
VESA
640*350
640*400
640*400
640*480
640*480
640*480
640*480
640*480
720*400
720*400
800*600
800*600
800*600
800*600
800*600
1024*768
1024*768
1024*768
1024*768
1152*864
1152*864
1280*720
1280*768
1280*960
1280*960
1360*768
1360*768
108.000
108.000
148.500
109.001
31.500
25.175
31.500
25.175
25.200
31.500
31.500
36.000
28.322
35.500
36.000
40.000
50.000
49.500
56.250
65.000
75.000
78.750
94.500
94.500
74.501
79.499
72.000
V. Frequency
(Hz)
85.080
59.940
85.080
59.940
60.000
72.809
75.000
85.008
70.087
85.039
56.250
60.317
72.188
75.000
85.061
60.000
70.069
75.029
84.997
70.012
75.000
59.856
59.870
60.000
85.002
59.960
74.892
H. Frequency
(KHz)
37.861
31.469
37.861
31.469
31.500
37.861
37.500
43.269
31.469
37.927
35.156
37.879
48.077
46.875
53.674
48.363
56.476
60.023
68.677
63.851
67.500
44.772
47.776
60.000
85.938
47.368
60.288
Remark
VGA
VGA
VGA
VGA
VGA
SVGA
SVGA
SVGA
SVGA
SVGA
XGA
XGA
XGA
XGA
WXGA
WXGA
WXGA
WXGA
WXGA
WXGA
50
Page 51
28
29
30
31
32
33
34
35
VESA
VESA
VESA
VESA
1280*1024
1280*1024
1280*1024
1680*1050
1600*1200
1920*1080
1920*1080
1920*1080
108.000
135.000
157.500
146.250
162.000
138.500
148.500
148.352
60.020
75.025
85.024
59.954
60.000
59.934
60.000
59.940
63.981
79.976
91.146
65.290
75.000
66.587
67.500
67.433
UXGA
1080p
1080p
In Auto, if position may not fit on the screen, select the “Position” and manually adjust the
position.
51
Page 52
Selecting PIP/Dual Screen
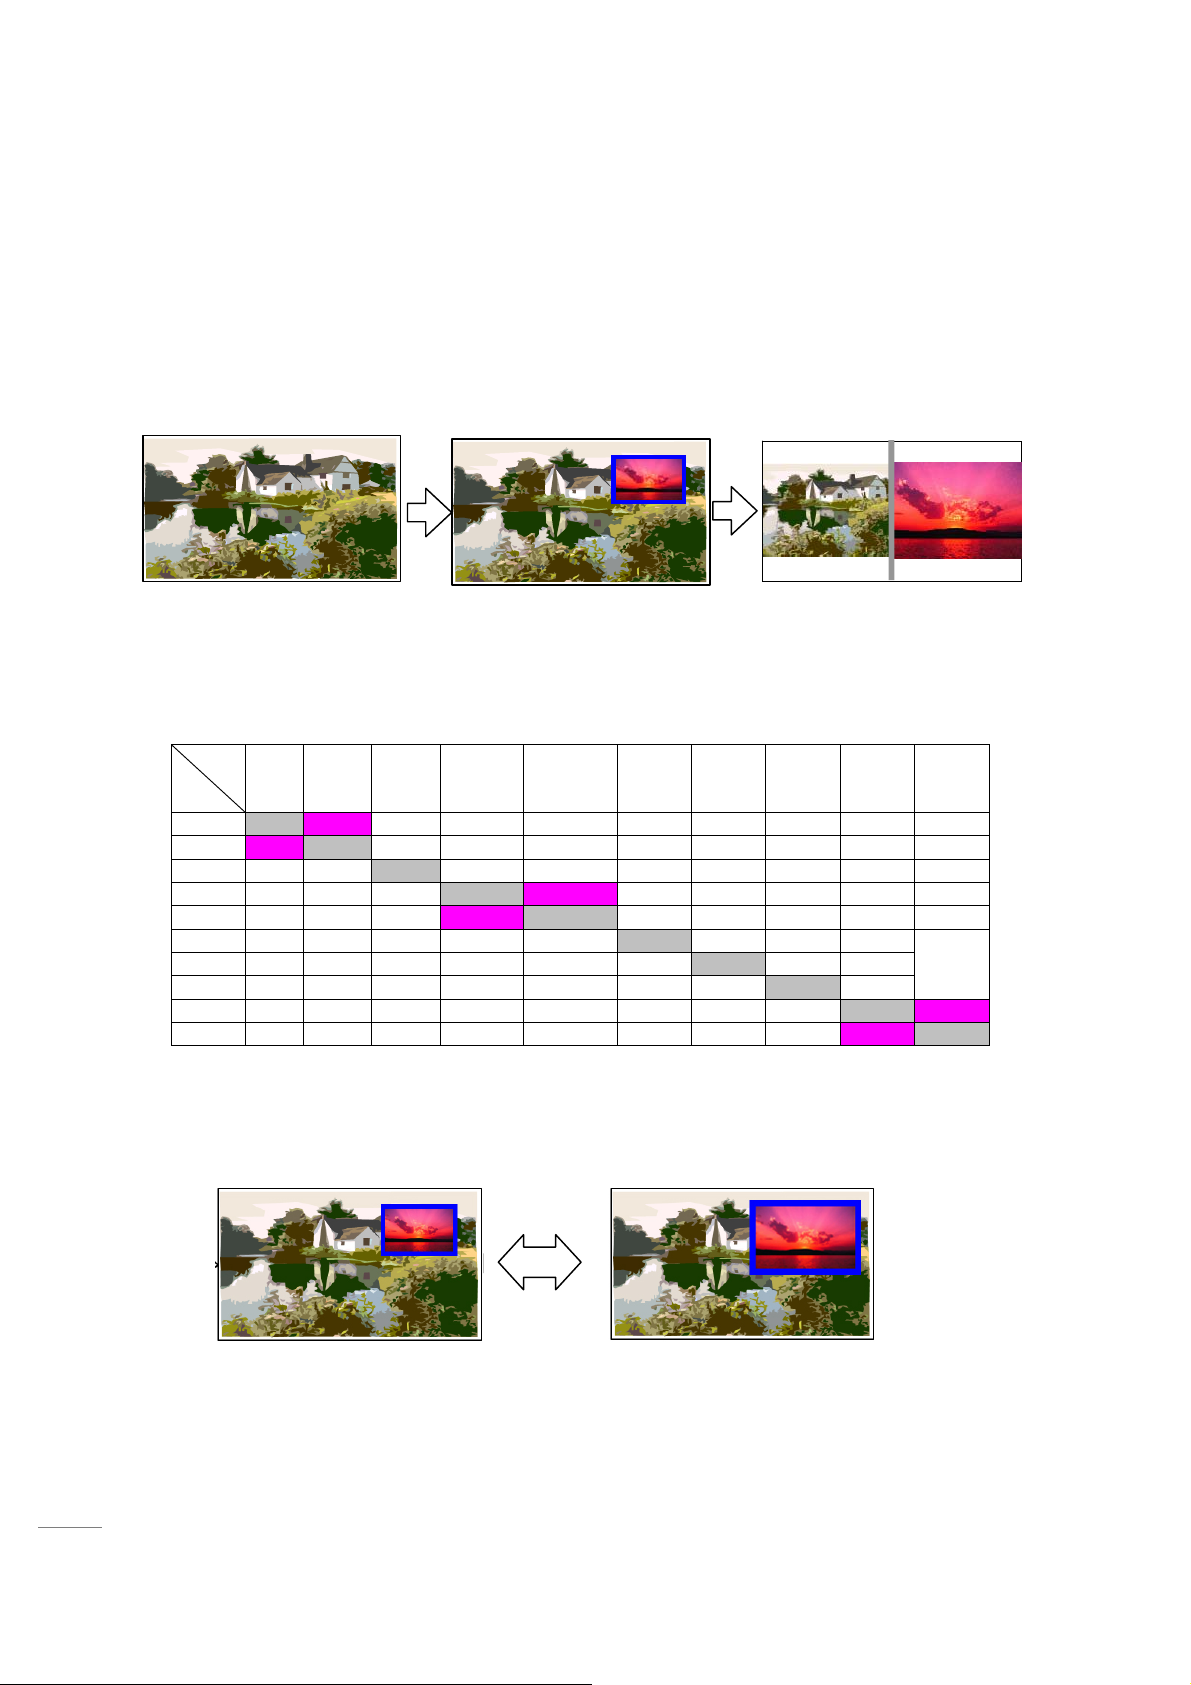
1. Select “PIP ON/OFF” Button
This key enables/disables PIP/Dual Screen mode. When PIP is enabled, the TV shows a
full screen of video with a pip window of video on top of it. When dual screen is selected,
the TV splits the screen into equally sized screens.
2. Select “PIP SOURCE” Button
You can change PIP/Dual Screen source. Below are all possible Main-PIP (Dual screen)
combinations. (Sup: supported / No: not supported)
PIP
NTSC
Main
NTSC
Digital
AV1
AV2
AV3
AV4
AV5
AV6
AV7
AV8
Digital
RF
N/A No Sup Sup Sup Sup Sup Sup Sup Sup
No N/A Sup Sup Sup Sup Sup Sup Sup Sup
Sup Sup
Sup Sup Sup
Sup Sup Sup
Sup Sup Sup Sup Sup
Sup Sup Sup Sup Sup Sup
Sup Sup Sup Sup Sup Sup Sup
Sup Sup Sup Sup Sup Sup Sup Sup
Sup Sup Sup Sup Sup Sup Sup Sup
RF
AV1
(CVBS)
N/A Sup Sup Sup Sup Sup Sup Sup
AV2
(CVBS)
N/A No Sup Sup Sup Sup Sup
No N/A Sup Sup Sup Sup Sup
AV3
(S-video)
AV4
(YPbPr)
N/A Sup Sup Sup Sup
AV5
(YPbPr)
N/A Sup Sup Sup
AV6
(VGA)
N/A Sup Sup
AV7
(HDMI)
(HDMI)
N/A No
No N/A
AV8
52
3. Select “PIP SIZE” Button
You can change PIP size in PIP state.
Page 53
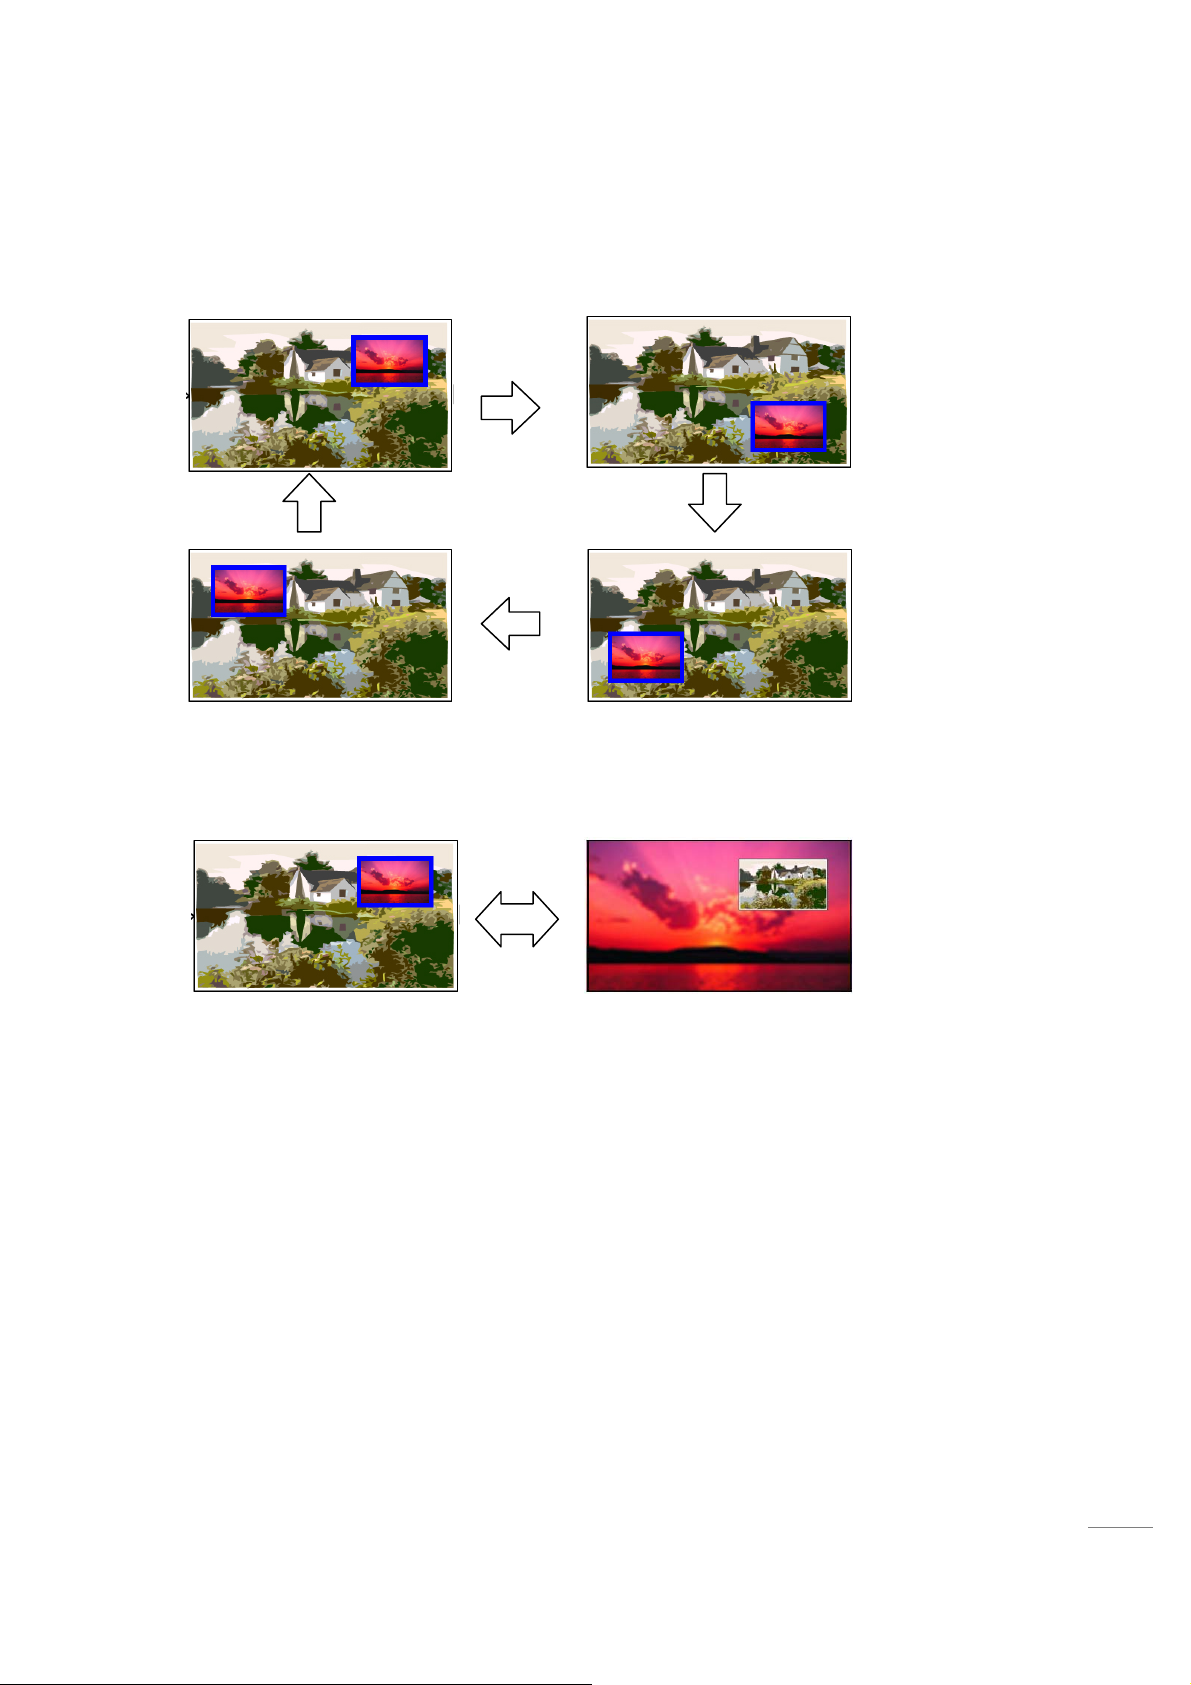
4. “PIP POSITION” Button
You can change PIP position in PIP state.
5. Select “PIP SWAP”
You can alter between the main source and the PIP source using this key.
53
Page 54
Other Information
Trouble Shooting
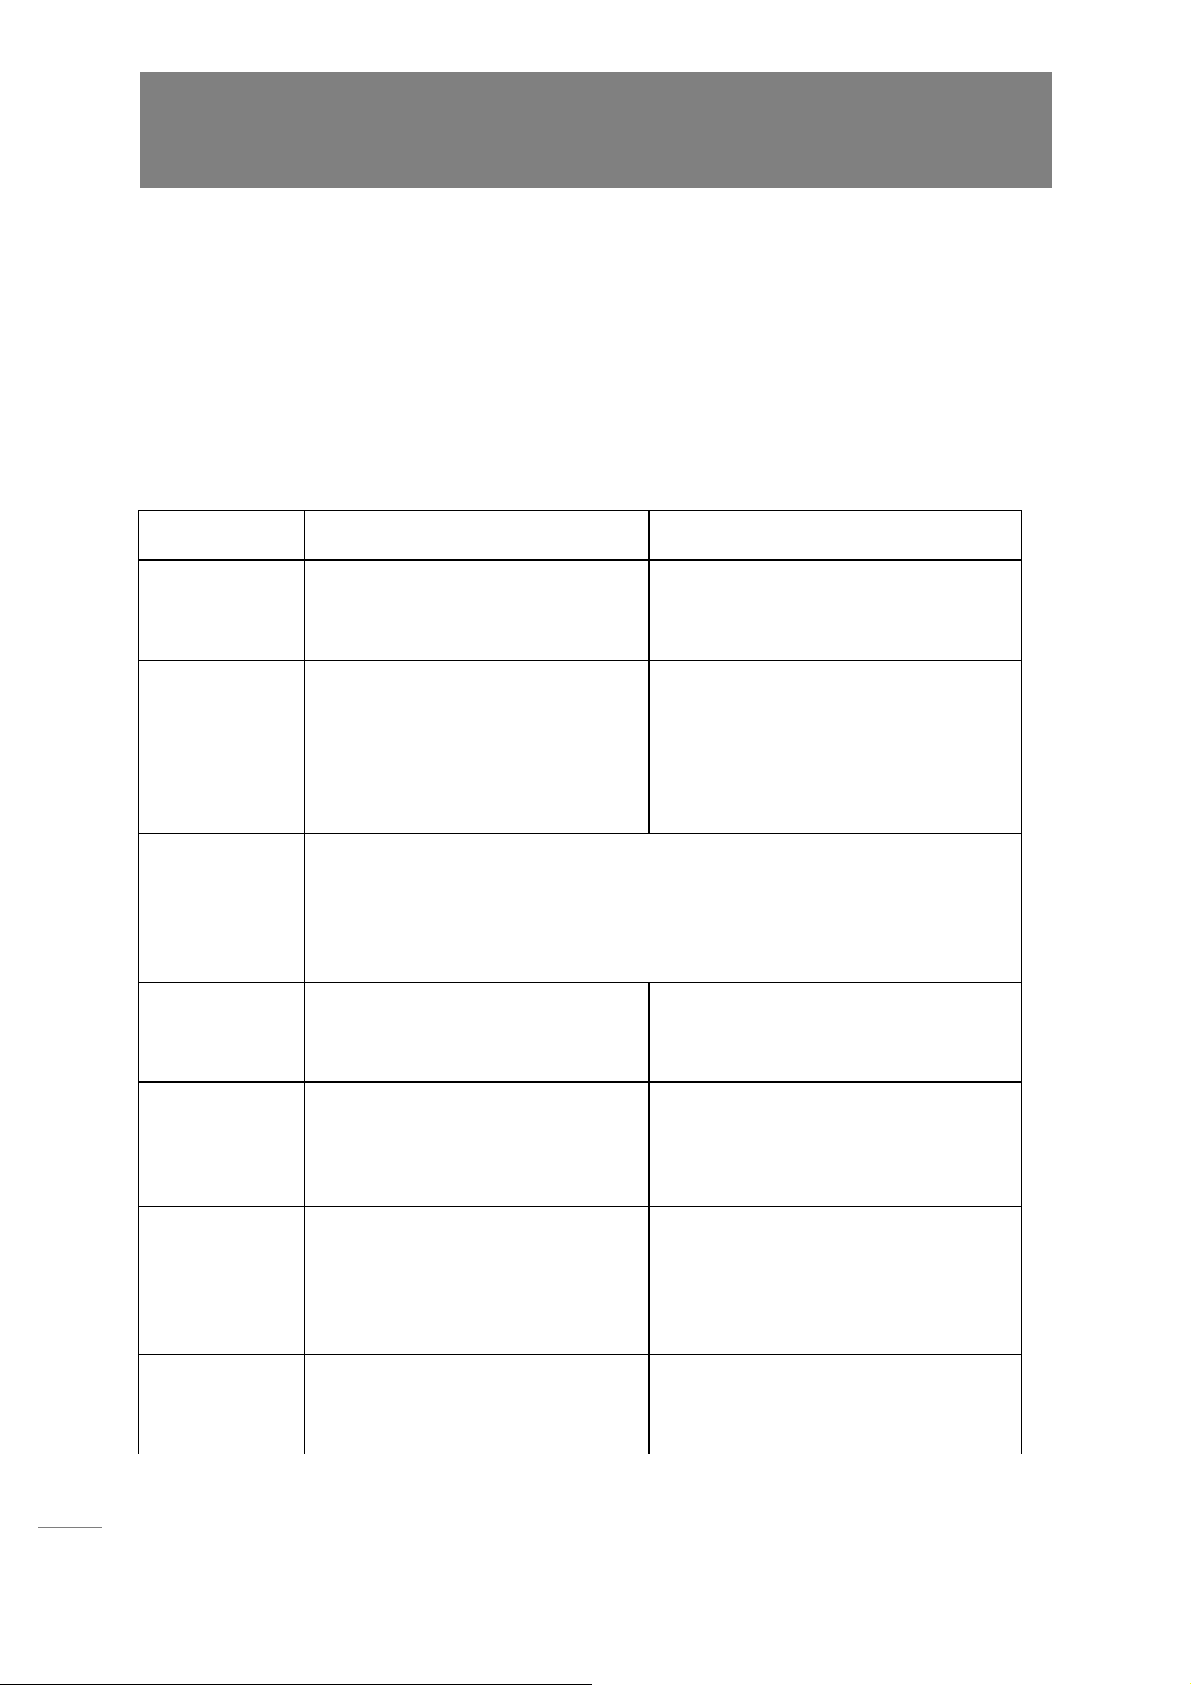
If the TV seems to have a problem, first try the following list of possible problems and
solutions before contacting a service center. If none of these troubleshooting tips apply, do
not attempt to service the product by yourself. Call dealer or your nearest service center.
The following symptoms may happen even if the TV has no problem. First try the following
list of possible problems and solutions before contacting a service center. First try the
following list of possible problems and solutions. If the symptom cont inues, turn th e TV off,
and call dealer or your nearest service center.
Symptom Possible Problem Possible Solution
The power LED
does not turn on.
The TV is turned
on, but there is no
picture on the
screen.
An afterimage is
generated when
continuously
watching a still
image.
No picture on the
screen.
A picture is
displayed on the
screen, but there
is no audio.
Remote control
malfunctions.
Noise is heard on
the radio.
Power connection problem.
The brightness is adjusted too low.
The fluorescent tube is out of order.
This is caused by an inherent property of LCD panels.
Depending on the number of valid pixels, there may be black or bright pixels.
These will be less than 0.005% of the sum of all pixels. This is not a problem.
Discordance between the external
device jack and the input switch
button location
The volume is adjusted to 0. Turn up the Volume button.
Mute is active. Press the Mute button again.
The audio cable is disconnected. Check the audio cable connectivity.
The polarity of the batteries installed
in the remote control is wrong. The
batteries installed in the remote
control have not been discharged
completely.
This may happen when you use a
radio near the TV.
Check the power cable connectivity to the
power connector. Press the power switch
again.
Adjust the brightness and the contrast so
that a picture is displayed brightly. The
florescent tube of a LCD TV has a
lifetime of about 50,000 hours.
To replace the fluorescent tube, contact a
service center.
Adjust the input switch location.
Reinstall the batteries pr operly.
Replace the batteries with new ones.
Noise may occur when you use a radio
near the TV. Keep some distance
between any radios and the LCD TV.
54
Page 55

No color in a
color picture.
Duplicated
pictures on the
screen.
Blurred or snowy
picture.
A “No input
signal” message
appears.
The entire screen
flickers.
The Color density is adjusted to 0 or
almost 0.
This may be caused by reflected
broadcasting signals when there is are
mountains, buildings, or trees near
your house.
The direction of the antenna is not
optimal.
The antenna cable is disconnected.
The Signal connection is incorrect.
The input signal is not supported by
the LCD TV.
Adjust the Color density to CENTER.
Check if there are any tall objects such as
skyscrapers near your house. Check that
the direction of the antenna is adjusted
correctly.
Check that the direction of the antenna is
correct.
Check that the antenna cable is connected
to the ANTENNA jack on the back of the
LCD TV.
Check the display cable connectivity.
Check the supported input signal
specifications.
Check the supported input signal
specifications.
Check the display cable specifications.
This product has been optimally set to
watch TV channels in the factory. There
may be flickering when you watch still
images from a PC. This is not a problem
of the product.
55
Page 56
Specification
r
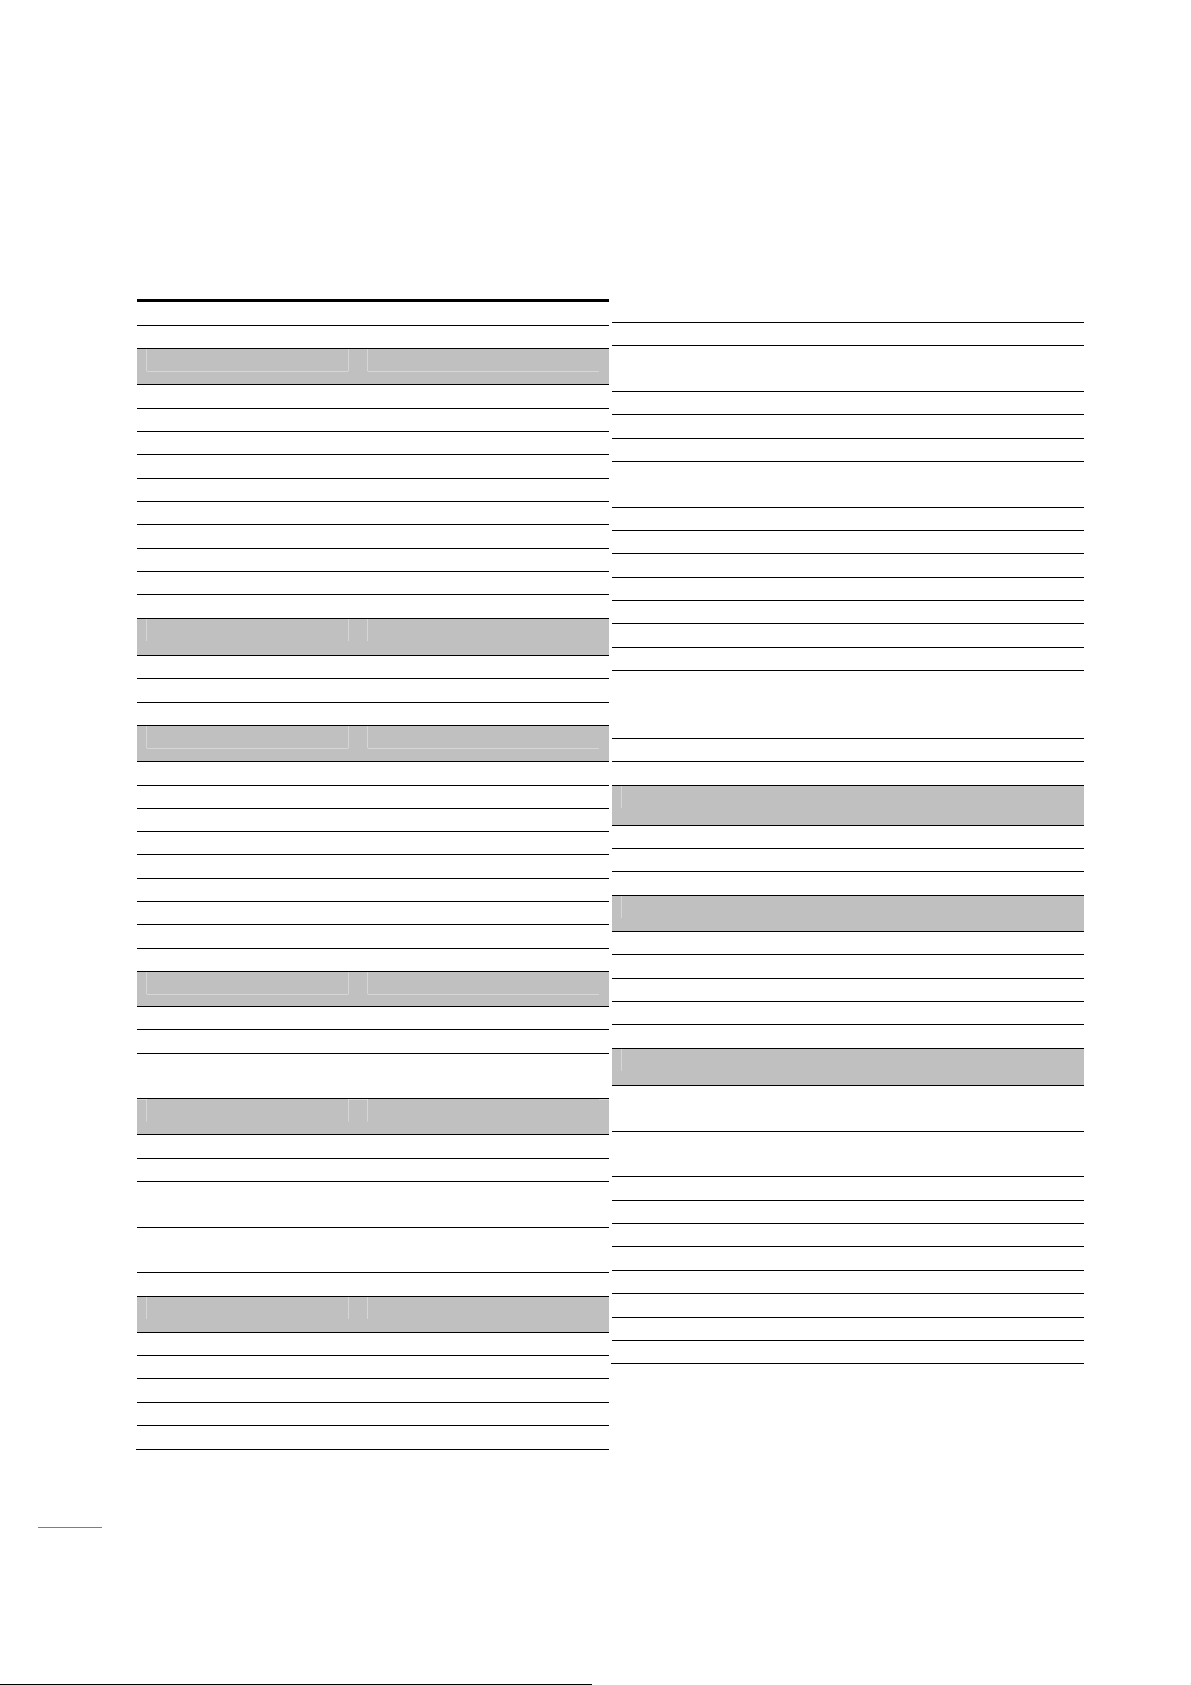
Model ES470FHD
Safety Agency
Display Feature
Display technology TFT-LCD
Screen size 47" 16:9
Display Resolution 1920 * 1080
Support resolution 1920 * 1080
Brightness 550 cd/m2
Contrast 10000:1
View angle 178 (H) / 178 (V)
Pixel pitch (H*V) 0.5415*0.5415 mm
Display color 1.07 Billion
Response time 6 ms
TV function
Tuner 1(Air/Cable)
NTSC VHF,UHF,CATV
ATSC VSB & Clear QAM
Input Terminal
Component video 2
Component audio 2
S-video 1
HDMI 2
VGA (D-Sub 15) 1
PC Audio 1
Composite (AV) 2
Composite (audio) 2
service port for software upgrade
Output Terminal
Composite (AV) 1
Composite (audio) L/R (RCA)
Digital audio out
(SPDIF)
Audio Processor
Speaker out (Max) 15W + 15W
MTS Mono, Stereo, SAP
Tone control Treble / Bass /
Sound mode Custom / STD / Movie /
SRS TruSurround XT
Video Processor
MPEG-2 video decoding MP@ML, MP@HL
Progressive scan Yes
NTSC 3D comb filter Yes
Picture mode Custom / STD / Mild / Vivid
Film mode detection Yes
Dolby digital, PCM
Balance
Music / Speech
Noise reduction Yes
HDTV compatibility Yes
OSD Language English, French,
Closed caption DTV CC, Analog CC
V-chip MPAA,TV rating, V-chip 2.0
Channel edit Yes
EPG Yes (single channel EPG for
Favorite channel Yes
Sleep timing Yes
OSD transparency setting Yes
EAS Yes (In-band EIA-814)
Channel lock Yes
Auto channel scan Yes
Time setting Auto, manual
Power saving Auto power off (If no input
Power on/off time Yes
Backlight control Yes
Power
Voltage / Frequency AC 110 - 220 V / 60 Hz
Power Consumption 250 W
Power Saving Mode
Accessories
Remote Control
Stand / Stand ba
Power Cord
AV Cable
USB Gender
Packing List
Dimension (W*H*D)
(with pedestal)
Dimension (W*H*D)
(without pedestal)
Carton (W*H*D ) 51.18*38.19*10.63 inch
20 ft 72 Sets
40 ft 144 Sets
40 ft HQ
G.W. 89.51 lbs
N.W. 75.18 lbs
Date of update 2008.02.19
Edition
Spanish
DTV)
signal is continue 15
minutes)
47.24*34.51*2.46 inch
47.24*35.49*11.81 inch
56
 Loading...