

Page 1

Essilor International (Compagnie Générale d'Optique) S.A.
Siège Social : 147, rue de Paris – 94227 Charenton-le-Pont Cedex France
712 049 618 RCS Créteil - www.essilor.com
User Manual
Mini Water
Filtering System
V1.2_13/06/2014
Page 2

User Manual - Neptune Mini Filtering System
______________________________________________________________________________
V 1.2
- 2 -
Page 3

User Manual - Neptune Mini Filtering System
______________________________________________________________________________
V 1.2
- 3 -
Intended application
• This device has been developed for the filtration of the water used to edge ophthalmic lenses. Do not use it
for any other reason.
General Safety
• Before putting the device into operation please read the safety instructions and the operation manual
carefully. That way all functions can be used safely and reliably.
• Keep this operation manual.
• In the case of handing over this device to someone else, this manual has to be passed on as well.
• Packaging materials are in no way toys. Prevent children from playing with the bags that are made out of
plastics. There is risk of suffocation.
• Keep children away from the materials included in the active carbon cartrige and the Zinc Ricinoleate
bottle. In case of inadvertent contact, wash skin and eyes with water.
• Do not try to open or repair the device yourself. Repairs should only be carried out by trained personnel.
Installation Conditions
• The device must be placed on a solid and stable subsurface.
• Do not run the device in a surrounding where water or liquid might enter. In case of ingress of water there
is a risk of electric shock.
• Make sure that all cables and tubes are arranged in a way that no one might stumble.
• The air in- and outlet of the anti-smell device must be kept entirely free.
Precautions against electric and magnetic dangers
• Make sure that the device is connected with a bus bar that provides the same voltage and frequency as
stated on the type plate and that it is grounded according to the local requirements.
• The device is only to be run with a voltage of 230 V or 110 V VAC (depending on the item number)
• The device has a maximum electric consumption of 400 W.
• To pull the plug, always pull the plug, not the cable.
• For a better protection against the dangers of electric current a special safety switch should be used if an
installation for that purpose is missing.
Cleaning and maintenance
• Before any cleaning or maintenance, switch the device off and disconnect it from the bus bar by pulling the
plug out of the socket.
• Never switch on the device during cleaning or maintenance.
In case of interferences
• Pull the plug immediately if cable or device is damaged.
• Do not induct any objects into the device. Conductor rails might be touched.
• If liquids or foreign substances get into the device, pull the plug immediately. The device should then be
checked before it is put into operation again.
• If a proper function is not possible even if the function is according to all articles of the operation manual,
the device has to be disconnected.
Besides these advices in the operation manual all local rules for accident prevention have to be
considered and followed.
Safety instructions
Page 4

User Manual - Neptune Mini Filtering System
______________________________________________________________________________
V 1.2
- 4 -
The operating principle of the system is simple.
The edger cooling water is contained in the back tank of the Neptune filtration unit. These 25 litres of polluted
water during the day by edging residues are pumped into the front tank of the system when starting the
filtration cycle.
The front tank includes a filter bag with a 45 litres capacity which will retain the grinding residues: the 25 litres
of water and, as the filtration cycles accumulate, up to 16 litres of residues, which is on average equivalent to
1200 lenses.
When sending polluted water into the filtering tank, a portion of
this water is used to clean the walls of the working tank and its
bottom. When all the water is pumped into the filtering tank,
the pump stops and approximately 2 liters of filtered clean
water returns from the filtering tank to the working tank. This
water is used again to clean the walls, the bottom and then
returns to the filtering tank.
This cycle will repeat 10 times and will last from 10 minutes to
1 hour depending on the quantity of residues in the bag. As the
bag will fill up with residues, the cycle time will lengthen, but the maximum time will always be 1 hour or less.
The number of cycles in the allocated time will therefore become shorter. It is this count that will determine the
moment for changing the bag.
Although the cycle varies from 10 minutes to 3 ~ 4 hours, the total powered time is about 10 minutes, which
represents an average energy consumption of 0.11 €.
Sortie de l’eau de la meuleuse
Arrivée de l’eau dans la meuleuse
Operating Principle
Start the cycle every day to prevent the accumulation of residues which will eventually
block the pumps
It is imperative
that one
of the
2 tanks
is always empty
of
water
so that
the system
works by a principle of communicating vessels!
Day Night
Cleaning and
filling of the
tank with
clean water
Filtering bag
Filtration tank Working tank
Page 5

User Manual - Neptune Mini Filtering System
______________________________________________________________________________
V 1.2
- 5 -
1. Unpack Neptune and remove all the polystyrene packaging
2. Check correct positioning of the 2 pumps.
1 Return pump
2 Main pump
3. Introduce the PVC grey wall into the dedicated slides. The cut
corner of the wall must be oriented toward the rear of the tray.
4. Insert the anti-foam plate
and lower it down to the
plastic stops.
The tube of the pump must
pass through the tube fixed
to the plate. See photos
5. Introduce the grid protecting
the sensor down in the front
tank. See photos.
6. Position the rear hydraulic plate..
Starting to use the
Neptune filtering system
The vertical
tube of the
plate
must
be introduced
into the vertical tube coming from the pump.
1
2
Page 6

User Manual - Neptune Mini Filtering System
______________________________________________________________________________
V 1.2
- 6 -
7. Connect the cleaning hydraulic
circuit to the vertical tube of the
return right pump. See photo.
8. Position the cover of the tank with the filtering bag. Check that the
bag is well open and "sticks" to the walls.
9. Insert the edger pump(s) into the back tank and position the back
cover.
10. Position the edging water receiver above the filtering bag.
11. Connect the tubes in their shanks
12. Check / modify the position of
the plastic plate supporting the
adaptor for the edger sewage
pipe and adjust he assembly.
Page 7

User Manual - Neptune Mini Filtering System
______________________________________________________________________________
V 1.2
- 7 -
13. Connect the control unit,
• Run the cable through a hole in the work bench
• Connect the cable to the box
• Place the box next to the edger
14. Connect Neptune to the mains.
15. Switch on the power switch on the front side of the filtration system
Neptune (diodes of the control box will flash and initialize).
16. Fill the tank of the working tank (rear tank) with 25 litres of water. The
green diode of the series of three diodes (MIN, OK, MAX) located on
the box should be lit. If there is not enough water, the lower red light
(MIN) is on, add water. If you put too much water, the upper red light
(MAX) lights up.
It is imperative to pull water out from the tank to return to the OK position
17. Set up the return drain (100mm diameter) between the edger and Neptune
18. Neptune is ready to be used
Page 8
User Manual - Neptune Mini Filtering System
______________________________________________________________________________
V 1.2
- 8 -
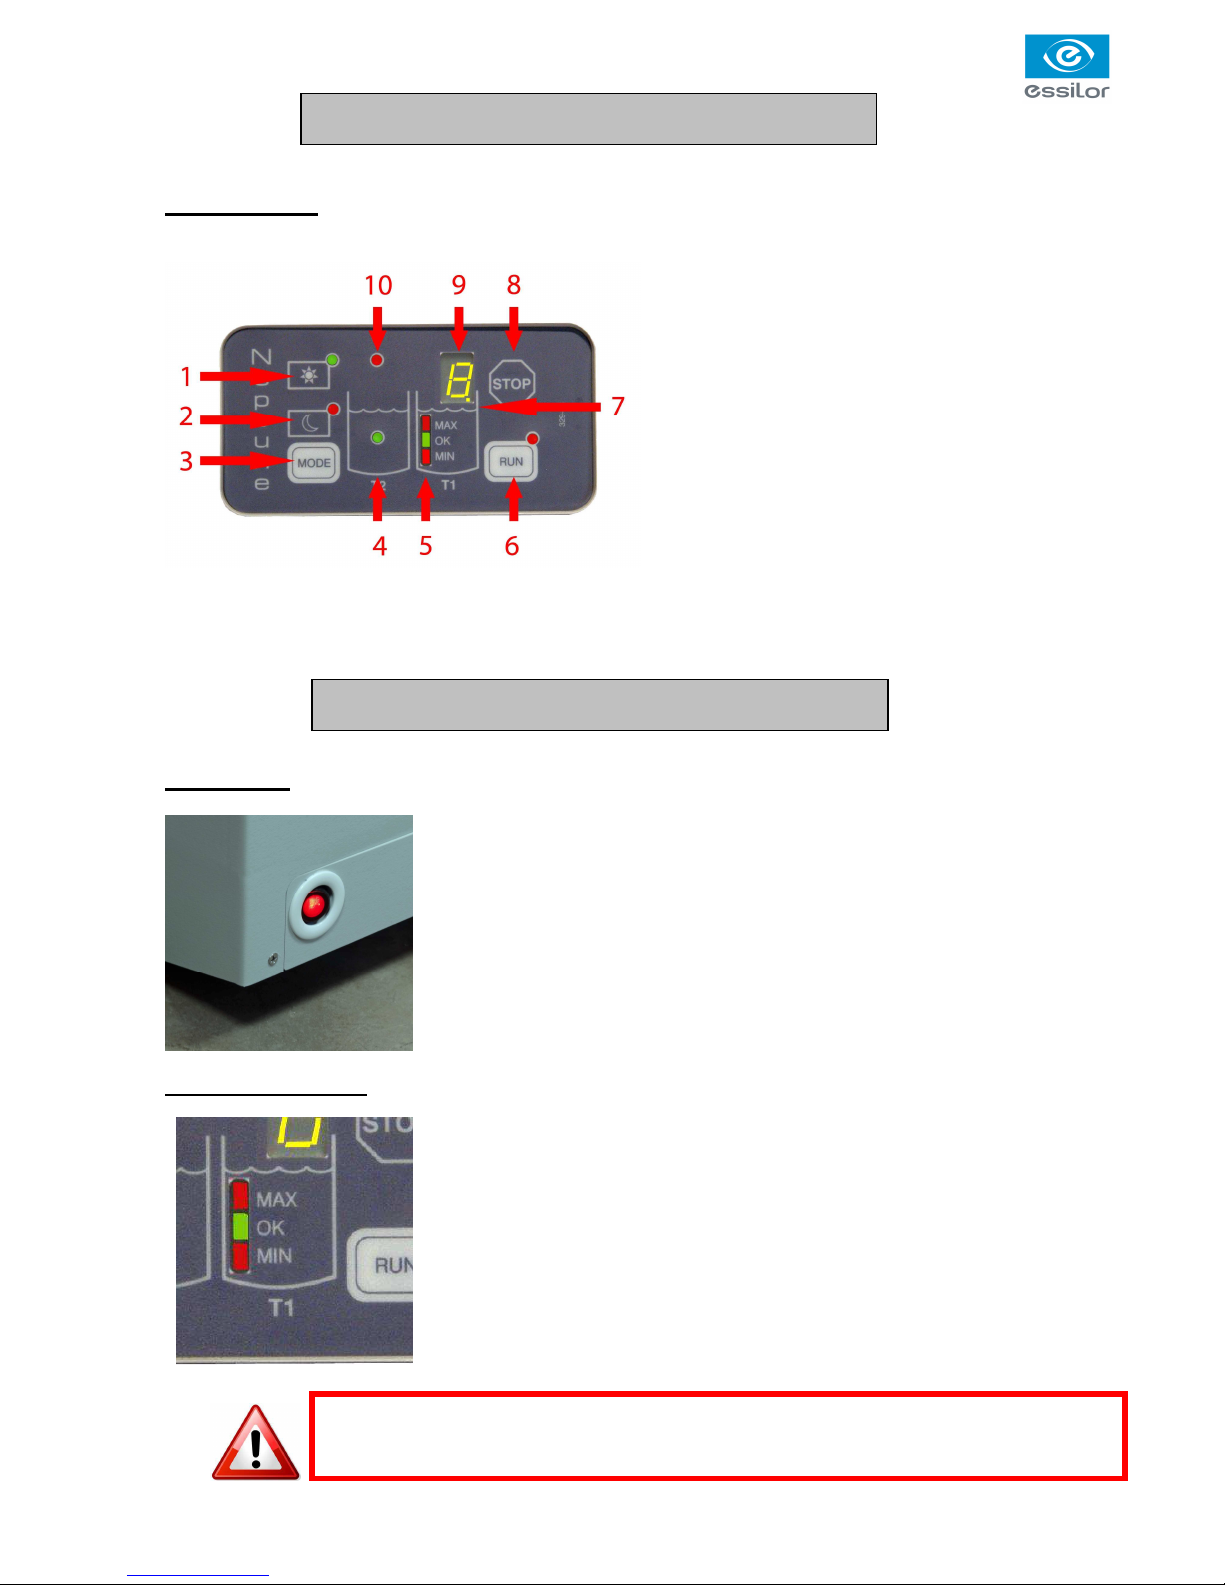
Control Unit
1. DAY mode switch and green LED indicator
2. NIGHT mode switch and red LED indicator
3. Inverter switch DAY/NIGHT
4. Filtering tank water presence green LED
indicator (T2)
5. Water level LED indicator in working tank (T1)
MIN - OK - MAX
6. RUN switch and red LED
7. Working tank water indicator
8. STOP switch
9. Cycle counter
10. ERROR LED
Operation
The master switch is located on the lower front side of the machine.
When pressed, all LED from the control panel will lit for initialisation. When
finished, only the DAY LED and the Water Level Indicator will remain lighted.
Water level control
Independantly from the selected mode, i.e. DAY or NIGHT, the T1 LED indicator
indicate the water level in the working tank
There are 3 positions:
1. Red upper LED: Too much water in the tank
2. Green middle LED: Water level is OK
3.
Red lower LED: Not enough water in the tank
Description
Use
Position
MAX,
red upper LED lit generates a system malfunction.
Excess water has to be removed from the tank to return to the middle green position
OK
Page 9

User Manual - Neptune Mini Filtering System
______________________________________________________________________________
V 1.2
- 9 -
Filtration Cycle start
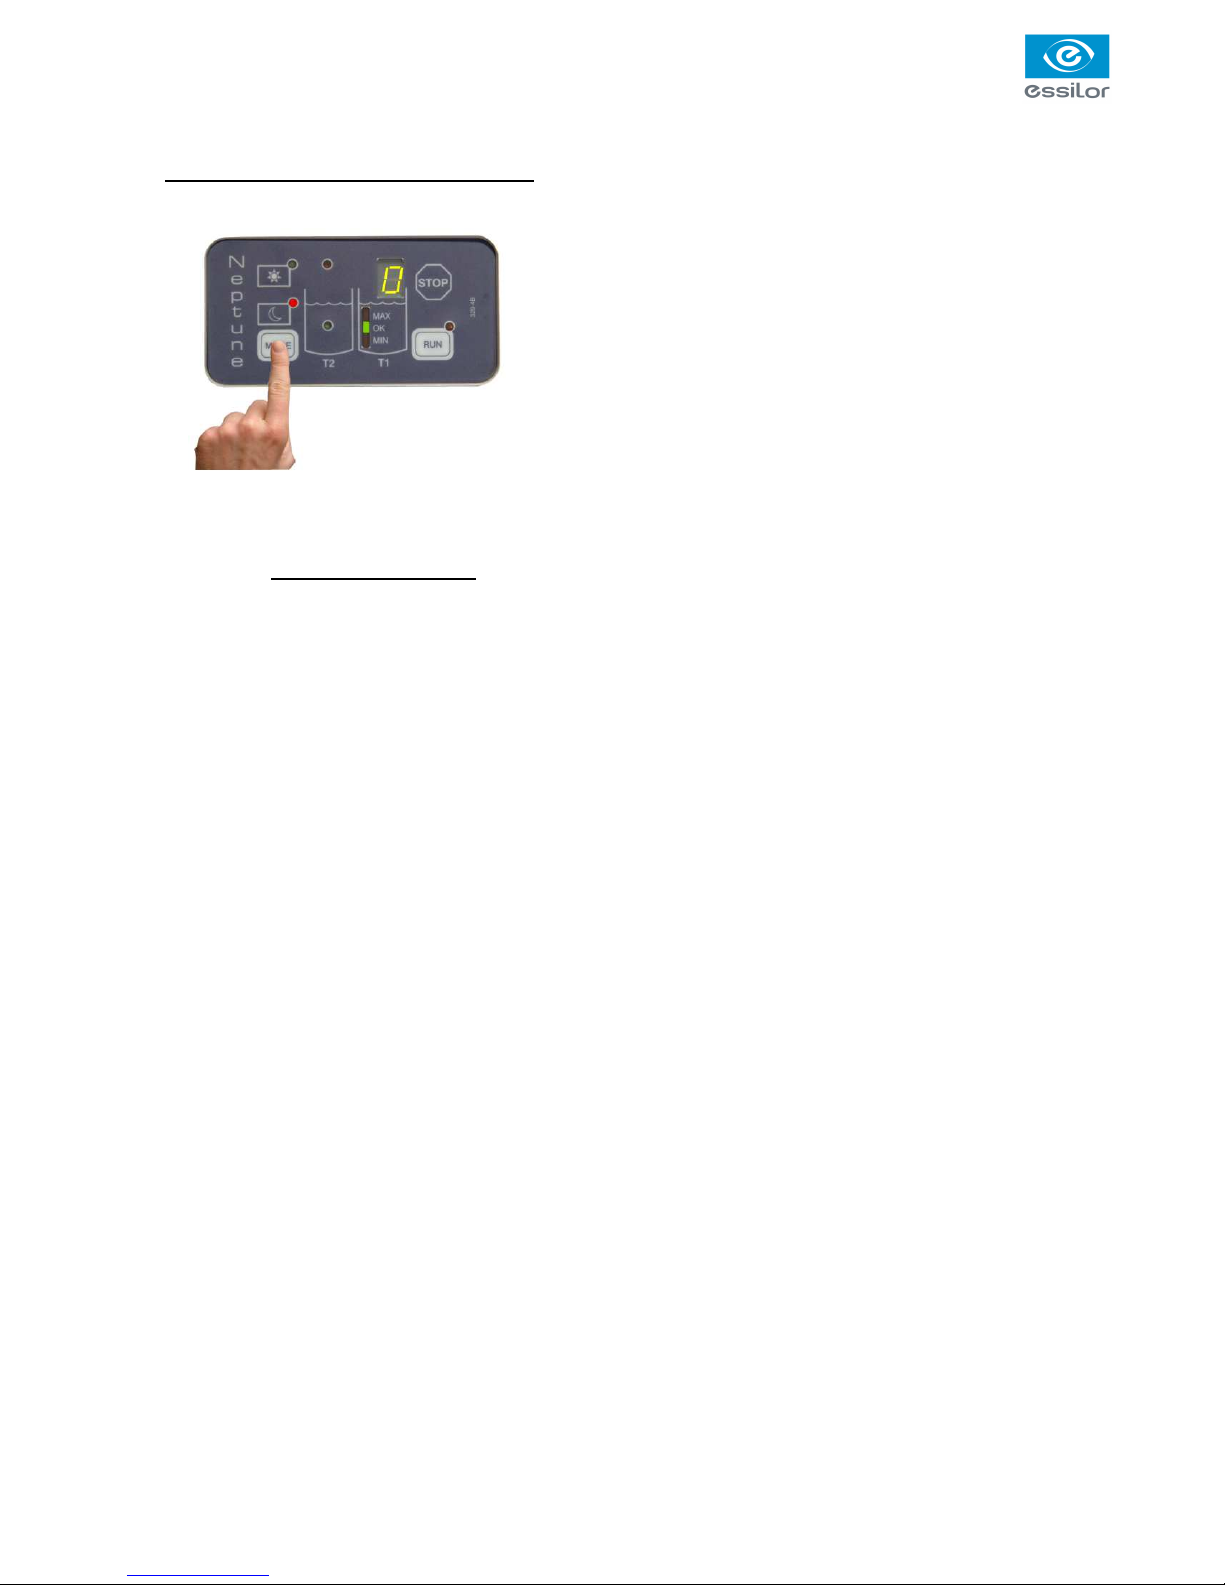
In the evening
• Move the handle to the left position - Night.
• Press the MODE switch every evening when closing the lab.
The NIGHT mode green LED lights.
• Press the RUN mode switch until the corresponding red LED
lights up. It confirms the starting of the filtering cycle (the pump
should start at this same moment).
The cycle will last from 1 hour to several hours depending of
the quantity of waste in the filter, hence the reason for starting
the cycle at the end of each the working day.
In the morning
This operation is essential to
filter the water and
clean the water receiver.
Move the handle to the right position
-
Day
-
when
the cycle is finished.
Page 10

User Manual - Neptune Mini Filtering System
______________________________________________________________________________
V 1.2
- 10 -
The cycle counter indicates the number of cycles that took place in 60 minutes with a maximum of 10 cycles..
When the filtering cycle is finished, a number from 0 to 9 or a letter P or G will be shown:
o
The counter indicates 3 or below, it is time to change the filtering bag.
o
The green dot 7 indicates presence of water in the working tank.
o The counter indicates P, it is an error message. The return pump in the filtering tank has been working
continuously for 8 hours. See maintenance section.
o
The counter indicates G, it is an error message. The main pump in the working tank has been working
continuously for 15 minutes. See maintenance section.
o
The counter indicates no number or letter: the cycle has been stopped willing or unwillingly (power
supply failure, etc...).
o The T2 LED indicates water in the filtering tank. During the filtering cycle it will turn on and off. This is
normal; it indicates that the water is filtered. This LED should never stay lit during the DAY use. If it is lit, it
indicates that water remains in the filtering tank.
This situation is abnormal:
1. Too much water in the tanks: as the tanks communicate trough a communicating hole in
their top, the filtering tank can never be emptied.
2. Edging residues have penetrated the filtering tank through the communication hole and
have potentially blocked the small pump located at the bottom of the filtering tank.
In both cases, remove the excess water, remove the filter assembly, clean the filtering tank and check the
return pump operation (TEST mode):
1. Press MODE switch to NIGHT
2. Press RUN and wait for the cycle start.
3. Press STOP
4. Press STOP again and maintain pressed. The return pump should start. If not, open it,
check the impeller, clean it and re-assemble.
Control box display
Page 11
User Manual - Neptune Mini Filtering System
______________________________________________________________________________
V 1.2
- 11 -
Delayed start of the filtration cycle
1. To enter the programming mode, hold down the MODE
switch (approx 2s.) until the LED counter blinks. It shows
the number of hours for the delayed start of the filtration
cycle.
2. To increase the number of hours, hold down the STOP
switch. To decrease the number of hours, hold down the
RUN switch.
3. Validate the program by holding the MODE switch for more
than 2 seconds.
DAY mode is ON, green LED is lit and the red NIGHT LED starts to blink.
The delayed start is engaged.
4. To visualize the remaining time before the programmed start, hold down the MODE switch for approx.
2 seconds. It is possible to increase / decrease this number with the STOP and RUN switches.
5. Powering off Neptune cancels all programs.
6. If NIGHT switch is voluntarily pressed, the red NIGHT LED stops blinking and the delayed start is
cancelled.
Page 12

User Manual - Neptune Mini Filtering System
______________________________________________________________________________
V 1.2
- 12 -
Changing the filtering bag
The bag has to be changed every 1200 lenses on average.
Do not clean it !
When the cycle counter indicates 3 or less, the filtering bag has to be
changed within a few days, i.e. next week end.
In order to operate this operation as much comfortable as possible, it is
better to plan it in advance:
• Do not start the filtering status the previous day so that the bag is as dry
as possible (less heavy…)
• Prepare a garbage bag of 100 litres (22 Gal).
• Lift the filtering assembly and place it directly in the garbage bag.
• Remove the upper screws.
• Remove the metallic frame.
• Remove the filter, close the garbage bag and place it in the domestic
garbage.
• Install the new filter, make sure that the metallic frame “clips” the bag”.
• Tighten the screws back.
• Before re-inserting the filtering assembly, clean if necessary the tank,
check that the pump is OK and that the water presence switch is free to
move.
• Check the position of the grid support. It must "protect" the sensor N°1.
• Take advantage of this operation to verify that the nozzles of the
hydraulic system are not blocked.
• Check water level after one complete cycle.
• Cycle counter should indicate 9.
Maintenance
Reminder :
The filtering bag is a consumable
, it should be
changed approximately every 1200 lenses.
Reusing a bag after cleaning it will cause a failure in the system.
Page 13

User Manual - Neptune Mini Filtering System
______________________________________________________________________________
V 1.2
- 13 -
Changing the water
In order to maintain the best performance of the filtering system, it is recommended to drain the water at least
once a year. Depending of the nature of the water and the amount of edged lenses, it might be necessary to
perform this operation more often.
Draining the water is simple and has to be done when
changing the filtering bag:
o Remove the water receiver.
o Connect the supplied pipe as shown on the photo.
o Connect the pipe to a bucket or a water drain.
o Enter the TEST mode (see page 16) and hold down the
RUN button to start transfering the water into the
bucket.
o When finished, press MODE to return to the DAY mode.
o Fill up the tank with fresh water. Pour a bottle of
SIDEROPTIC in the fresh water to decrease foam, the
"greasy film" adhering to the walls and prevent bacterial
growth. SIDEROPTIC is active until the water is not changed.
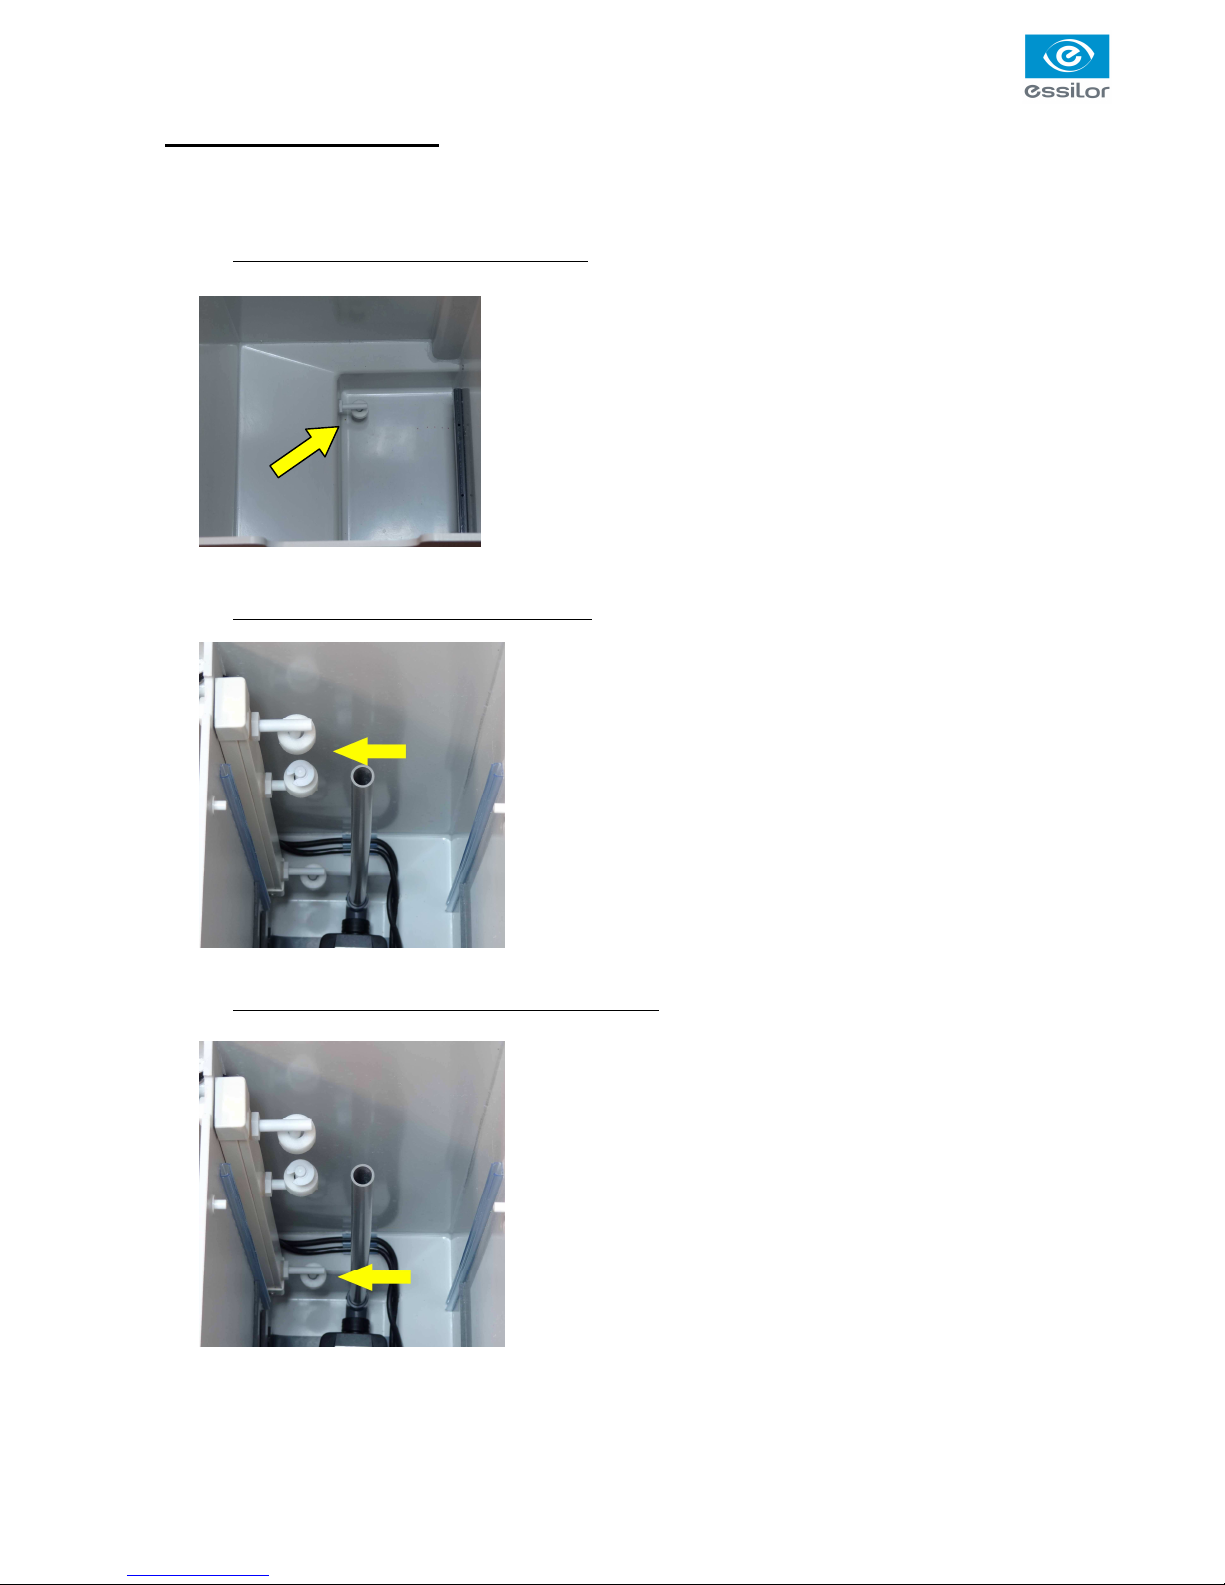
Hydraulic circuit cleaning
The hydraulic circuit can become clogged with edging particles, especially those of polycarbonate. At each
change of bag, check with the hand that the nozzles of the circuit are not blocked.
• Otherwise, clean nozzles as follows:
• Pull up the back cover
• Disconnect the cleaning hydraulic circuit.
• Check the nozzles
• if necessary, dislocate the pipes
(each pipe is glued at one end to
an elbow to facilitate reassembly of
the circuit). Clean the pipes with a
stiff wire.
•
Reassemble the circuit and set
it back in position.
Page 14
User Manual - Neptune Mini Filtering System
______________________________________________________________________________
V 1.2
- 14 -
Pumps and sensors tests
All components of Neptune can be individually tested to diagnose a possible breakdown
• Filtration tank bottom sensor – Sensor N°1
This sensor indicates the presence of water in the filtering
tank. Its signal triggers the start of the return pump.
Its correct operation is verified by moving it manually and
checking the lighting and the extinction of the corresponding
T2 diode of the control box.
Warning: this signal is delayed and reacts slowly to the moving
of the sensor.
• Working tank water sensors – Sensors N°2
These sensors indicate the water level in the working tank.
They are located on the left side of the tank.
When it indicates MAX, the water cannot be returned from
the filtration tank to the working tank in order to avoid the
overflowing of the working tank.
Its correct operation is verified by moving them manually up
and down and checking the lighting and extinction of the
three diodes T1 (MIN, MAX and OK) on the control box.
Warning: this signal is delayed and reacts slowly to the
moving of the sensors.
• Filtering tank water presence sensor – Sensor N°3
This sensor is located at the bottom of the working tank and
indicates the presence of water in it
Its correct operation is verified by moving it manually in upper
position and simultaneously checking the on/off light of the LED 7
on the control unit.
Warning: this signal is delayed and reacts slowly to the moving of
the sensor
Page 15

User Manual - Neptune Mini Filtering System
______________________________________________________________________________
V 1.2
- 15 -
TEST Mode - Main pump and return pump
Their correct operation can be checked:
o Press the MODE button to switch to DAY mode
o Start the cycle by pressing the RUN button until the
corresponding red LED lights (min 3 sec.)
o Stop the cycle immediately by pressing the STOP
button. NIGHT and DAY diodes blink.
o Hold the STOP button to test the return pump.
If the pump does not start, then proceed with its
cleaning.
o Hold the RUN button to test the main pump.
If the pump does not start, this is likely due to a locked
impeller. Remove debris of lenses or other materials that may be the cause.
Return pump
Main pump
Page 16

User Manual - Neptune Mini Filtering System
______________________________________________________________________________
V 1.2
- 16 -
Filtration (night) cycle does not start
The starting of the night cycle is controlled by the RUN button and the signal "presence of water" in the work
tank emitted by the water level sensor N°3 located at the bottom of the tank. With water, it must be set in the
high position.
1. Set TEST mode and check main pump.
2. Check that the sensor N°3 works: LED #7 should b e lit when there is water in the tank. If not, check
that the float is not affected in its movement by edging residues or obstacles.
The night cycle started normally and this morning the red light (RUN) is on and the counter shows the
letter "P".
The return pump from the filtering tank worked continuously for 8 hours.
• The water level is set to OK
Turn off power on the front side of the tank, wait several seconds and turn on again the tank. Monitor
the LED test on the control unit (they light up one after the other).
After this test, the control box must be in DAY mode, T2 LED off and water level OK. The cycle counter
will indicate a point, no number (no cycle has been achieved since power on).
If this is the case, the control software bugged during the cycle.
• T2 LED is on and the water level is on MIN
o Check the filter tank pump as previously said
o Check the hydraulic connection between the pump and working tank
o Ensure free movement of the water sensor in the filtering tank
The night cycle started normally and this morning the red light is on and the counter shows the letter
"G".
The working tank pump worked continuously for 15 minutes.
• Check that the floating sensorN°3 is not affected in its movement by edging residues.
• The impeller from the main pump is blocked.
Disassemble the body of the pump and remove the blocking material. Check the exhaust tube and
clean it with a stiff wire or a knitting needle.
The green T2 LED and the MAX LED are turned on although the filter cycle is finished
There is too much water in the entire system. Remove water from the working tank before restarting the cycle
at the end of the day. If necessary complete with water in the morning.
Beware; the filtering tank has probably been polluted by contaminated water from the working tank.
As soon as possible, while the filtering tank is empty after a filtration cycle (T2 LED off), remove the filtering
bag and clean the tank.
Answers to frequently asked questions (FAQ)
Page 17

User Manual - Neptune Mini Filtering System
______________________________________________________________________________
V 1.2
- 17 -
o Unplug the electrical plug from the socket.
o Unscrew the 2 screws on the front panel.
o Remove the cover.
o Unscrew the 4 screws of the electrical box.
o The fuse (2A/250V or 5A/110V) is indicated with the yellow arrow.
o Reassemble in the inverse sequence.
Accessing to the electrical box and fuses
Page 18

User Manual - Neptune Mini Filtering System
______________________________________________________________________________
V 1.2
- 18 -
Main Board Version 3
Control panel V3 (Filtering cycle counter)
Anti-smell electric board
This product is compliant with marking.
PRISME
3, sente à l'ane
27600 Saint Pierre la Garenne - FRANCE
 Loading...