

Page 1
www.essilor-instruments.com
User manual
Page 2

CONTENTS
I. INTRODUCTION 5
II. SAFETY CONSIDERATION 9
1. General cautions 10
2. Precautions regarding IT network 10
3. Electromagnetic compatibility 11
III. ACCESSORIES 15
IV. DEVICE 17
1. General description of product 18
2. Intended use defined 18
3. Classification defined, rule given 18
4. Classification of device 18
5. Usage of product 19
6. Mode of operation 19
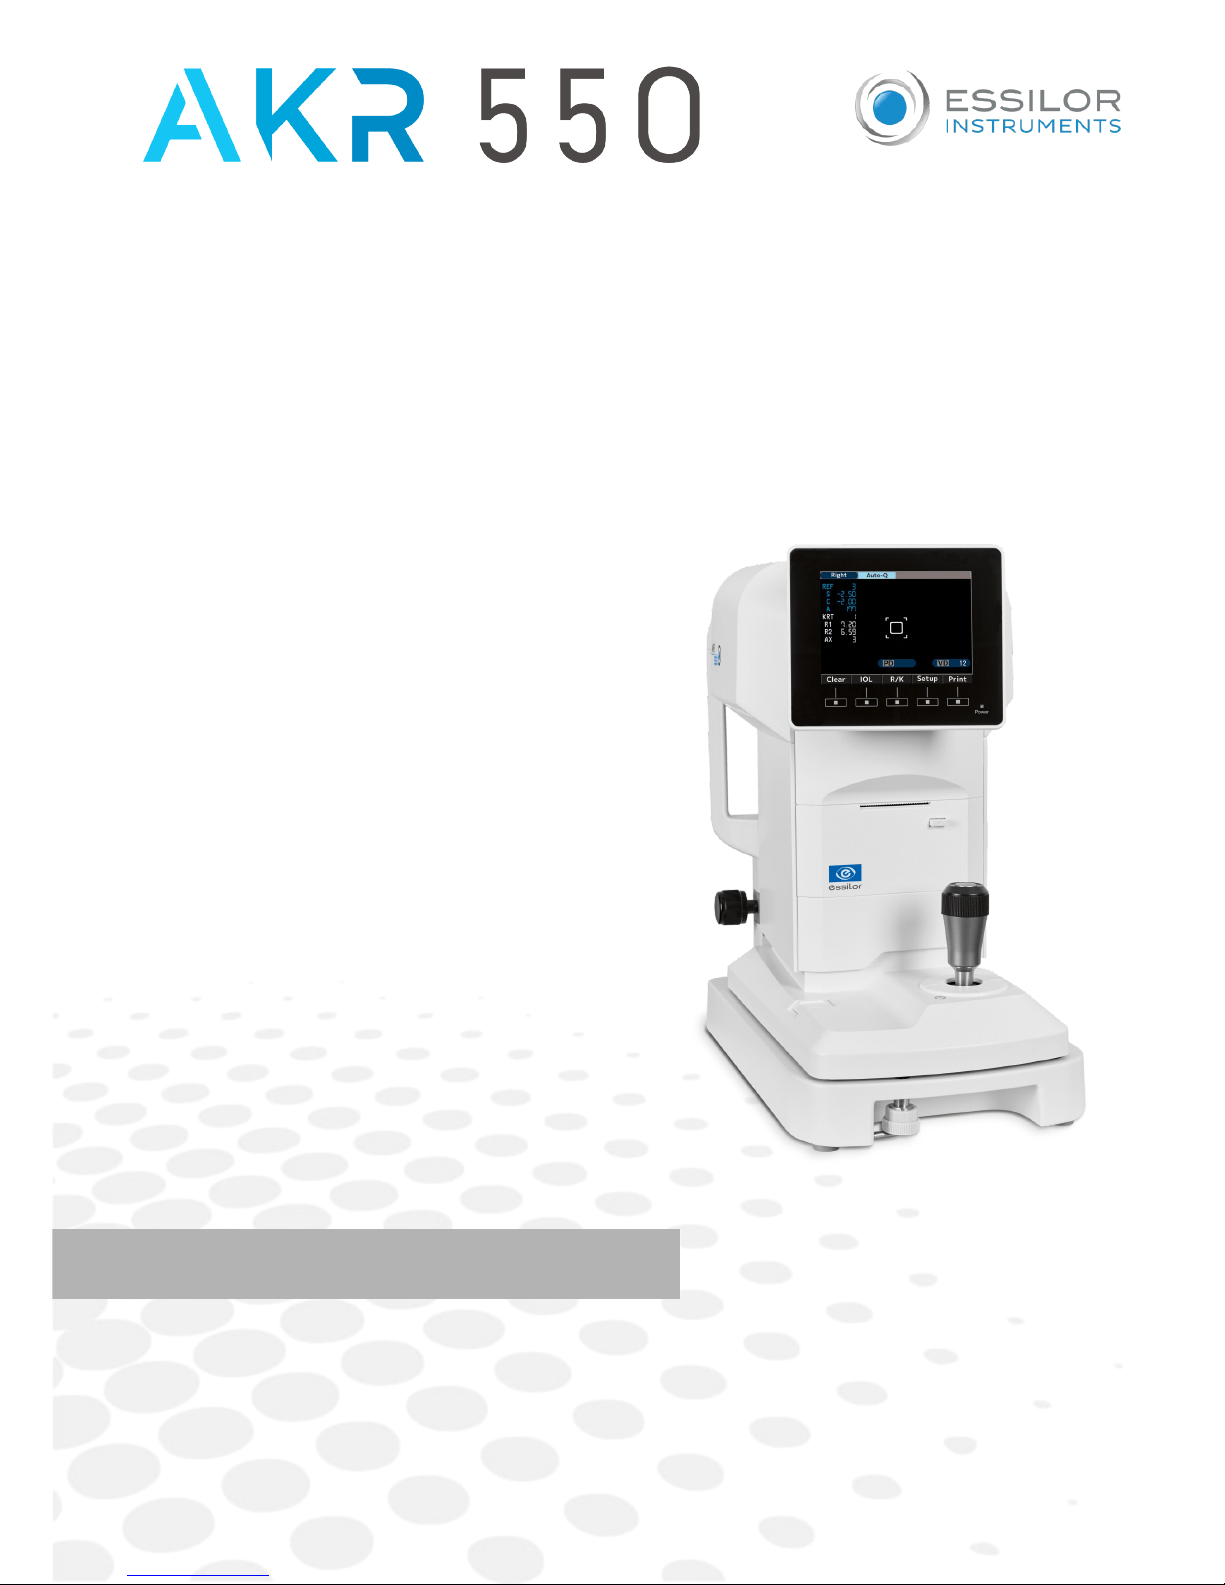
7. Parts identification 20
V. INSTRUCTIONS FOR USE 21
1. Conveyance 22
2. Installation 22
3. Connection / Wiring 23
4. Maintenance / Inspection 23
5. Disposal 24
VI. HOW TO USE 25
1. Operation procedure 26
2. Measurement flow 27
3. Measurement 28
a. Preparation for measurement 28
b. Power distribution 28
c. Standby 29
d. Preparation of examinee 30
e. Alignment 30
f. Measurement 34
g. Print-out of measurement result 35
4. Setting of setup screen 37
a. Number 40
b. Language 41
c. Customize 41
d. Date form 42
e. Message 43
f. Default setting 43
5. Scotopic Pupil Size (SPS) - measurement function 44
6. IOL measurement function 45
USER MANUAL> CONTENTS
Page 3

7. Low reliability mark display function 47
8. Output 47
9. Data screen function 48
10. Power saving function 50
11. Contact lens: measurement of base curve 50
VII. STORAGE AND MAINTENANCE 51
1. Reload of printer paper 52
2. Fuse replacement 53
3. Setting of chinrest liner 53
4. Storage of device 54
5. Confirmation of measurement accuracy 54
6. Periodical inspection and maintenance 55
VIII. TIPS FOR EFFECTIVE MEASUREMENT 57
IX. ERROR DISPLAY 59
X. MAIN TROUBLE AND TROUBLESHOOTING 61
XI. SPECIFICATIONS 63
USER MANUAL> CONTENTS
Page 4

I. INTRODUCTION
Page 5

The complete user manual is available on a web space.To access, please scan the QR code below
using a dedicated application.
Le manuel utilisateur complet est disponible sur un espace web. Pour y accéder veuillez scanner
le QR code ci-dessous à l'aide d'une application dédiée.
Die vollständige Bedienungsanleitung ist auf einem Speicherplatz verfügbar: Für den Zugriff
darauf scannen Sie bitte untenstehenden QR-Code mittels einer dafür vorgesehenen Anwendung.
El manual de uso completo está disponible en la web. Para acceder, escanee el código QR que se
encuentra a continuación con la ayuda de una aplicación.
Il manuale utente completo è disponibile su uno spazio Web. Per accedervi, scansionare il codice
QR seguente mediante un'applicazione dedicata.
Please read this manual thoroughly so that effective operation is ensured.
1. The information contained in this manual is subject to change without notice.
2. While reasonable efforts have been made in the preparation of this document to ensure its accuracy,
you should contact your local distributor immediately if any quarries arise due to editorial errors or
omissions etc.
3. If you find any imperfect collating or missing pages, contact your local distributor for replacement.
This manual includes important contents to prevent users or the others from harms and to use this device
safely. This device (AKR550) can objectively measure the refractive power of the eye.
Read this manual after understanding the symbols below and follow the instructions in use.
AKR550 - Auto Kerato Refractometer > V8 - 12-2017
6
USER MANUAL> I. INTRODUCTION
Page 6
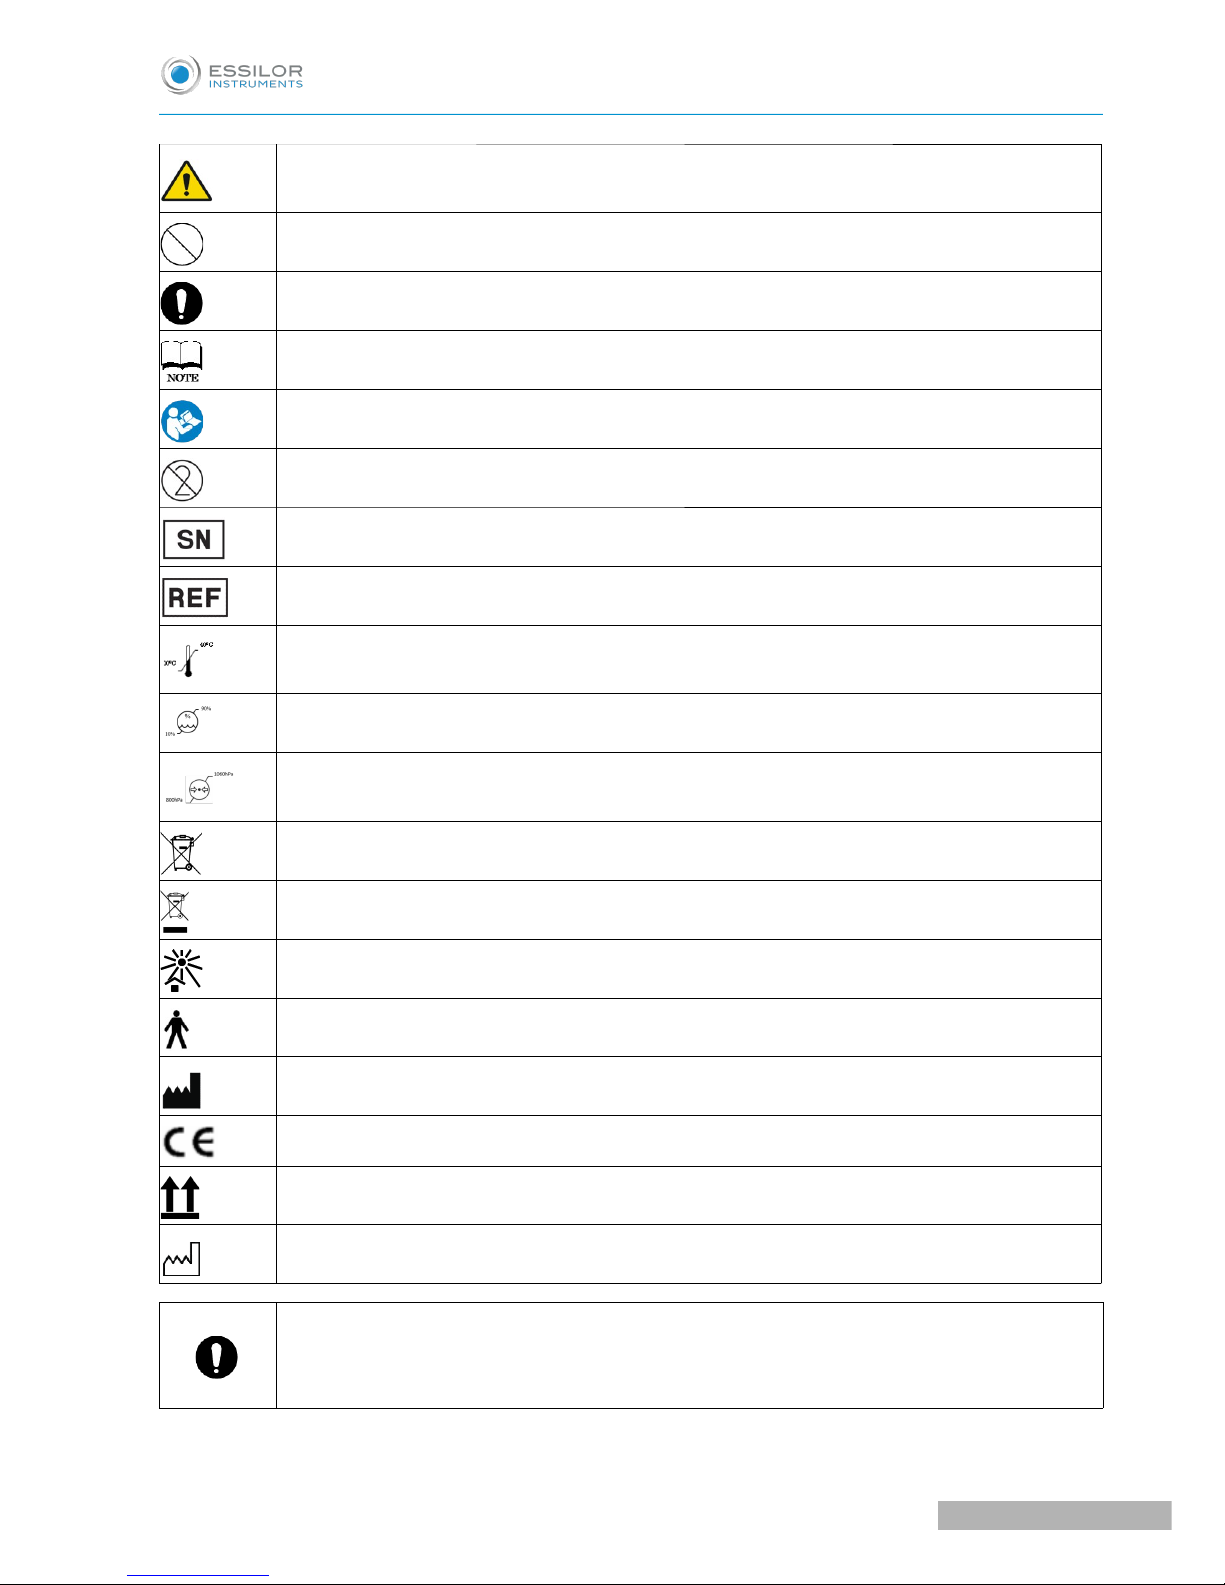
This symbol indicates that mishandling as a result of failure to comply with the indications can
result in “personal death or serious injury”
Denotes general ban or prohibition
General mandatory action
Additional information which is important to the text or useful/ convenient to know
Refer to operation manual
Do not reuse
Serial No.
Catalog number
Number on the left is the lower limit and the one on the right is the upper limit of the
temperature
Number on the left is the lower limit and the one on the right is the upper limit of the humidity
The number on the left is the lower limit and the one on the right is the upper limit of the
atmospheric pressure
EU Battery Directive
WEEE symbol
Avoid direct sunlight
This is the type B equipment
Symbol for “MANUFACTURER”
Symbol for Compliant with CE marking i.e. with applicable European directives
This way up
Manufacturing date (year)
This manual includes the information about basic operation, inspection and maintenance etc. of
AKR550.
This device and the contents of this manual comply with IEC60601-1.
USER MANUAL> I. INTRODUCTION
7
AKR550 - Auto Kerato Refractometer > V8 - 12-2017
Page 7

II. SAFETY CONSIDERATION
Page 8

1. GENERAL CAUTIONS
• It affects its measurement accuracy if fingerprints or dust etc. are on the optical parts, such as the
lens of the view window. Do not touch them with hands and avoid dust
• If fingerprints or dust are adhered on the optical parts, such as lens, wipe it gently with a soft cloth.
• Observe the following environmental conditions for use and storage.
Temperature Humidity Atmospheric pressure
Use
Storage /
Transportation /
• Avoid installation near TV or radio. The reception can be disturbed by electrical noise.
• If liquid is spilled on this device or a foreign substance is entered in it, unplug the power cord and
contact your local distributor.
Cut the power immediately and contact your local distributor if malfunction (noise, smoke etc.)
occurs. It can result in fire or injury if you keep using it.
• Do not attempt to disassemble it. It can result in malfunction or fire.
• If malfunction occurs, do not touch the inside of this device. Unplug the power cord and contact your
local distributor.
2. PRECAUTIONS REGARDING IT NETWORK
• This device can output the data to PC and so on through RS-232C interface.
• Connection of this device to an IT-network that includes other equipment could result in previously
unidentified risks to patients, operators or third parties.
• The responsible organization should identify, analyze, evaluate and control these risks.
• Subsequent changes to the IT-network could introduce new risks and require additional analysis.
• Changes to the IT-network include:
◦ Changes in the IT network configuration
◦ Connection of additional items to the IT-network
◦ Disconnecting items from the IT-network
◦ Update of equipment connected to the IT-network, and
◦ Upgrade of equipment connected to the IT-network
• Please contact your distributor about the detail of this device.
AKR550 - Auto Kerato Refractometer > V8 - 12-2017
10
USER MANUAL> II. SAFETY CONSIDERATION
Page 9

3. ELECTROMAGNETIC COMPATIBILITY
This product conforms to the EMC Standard (IEC 60601-1-2 Ed. 3.0: 2007).
1. This product needs special precautions regarding EMC and needs to be installed and put into service
according to the EMC information provided in this manual.
2. Portable and mobile RF communications equipment can affect medical electrical equipment.
3. The use of accessories, transducers and cables other than those specified, with the exception of
transducers and cables sold by the manufacturer of the equipment or system as replacement parts for
internal components, may result in increased emissions or decreased immunity of the equipment or
system.
4. The equipment or system should not be used adjacent to or stacked with other equipment. If adjacent
or stacked use is necessary, the equipment or system should be observed to verify normal operation
in the configuration in which it will be used.
5. The use of the accessory, transducer or cable with equipment and systems other than those specified
may result in increased emission or decreased immunity of the equipment or system.
Guidance and manufacturer's declaration – electromagnetic emissions
AKR550 is intended for use in the electromagnetic environment specified below.
The customer or the user of AKR550 should assure that it is used in such an environment.
Emissions test Compliance Electromagnetic environment – guidance
RF emissions CISPR 11 Group 1
AKR550 uses RF energy only for its internal function.
Therefore, its RF emissions are very low and are not
likely to cause any interference in nearby electronic
equipment.
RF emissions CISPR 11 Class A
AKR550 is suitable for use in all establishments other
than domestic and those directly connected to the
public low-voltage power supply network that
supplies buildings used for domestic purposes.
Harmonic emissions
IEC 61000-3-2
Class A
Voltage fluctuations/flicker
emissions
IEC 61000-3-3
Complies
RF emissions CISPR 14-1
RF emissions CISPR 15
USER MANUAL> II. SAFETY CONSIDERATION
11
AKR550 - Auto Kerato Refractometer > V8 - 12-2017
Page 10
Guidance and manufacturer's declaration – electromagnetic immunity
AKR550 Image Intensifier is intended for use in the electromagnetic environment specified below.
The customer or the user of AKR550 Image Intensifier should assure that it is used in such an environment.
Immunity test IEC 60601 test level Compliance level
Electromagnetic environment –
guidance
Electrostatic
discharge (ESD)
IEC 61000-4-2
6 kV contact
8 kV air
6 kV contact
8 kV air
Floors should be wood, concrete or
ceramic tile. If floors are covered
with synthetic material, the relative
humidity should be at least 30%.
Electrical fast
transient/burst
IEC 61000-4-4
2 kV for power
supply lines
1 kV for input/output
lines
2 kV for power
supply lines
1 kV for
input/output lines
Mains power quality should be that
of a typical commercial or hospital
environment.
Surge
IEC 61000-4-5
1 kV differential
mode
2 kV common mode
1 kV differential
mode
2 kV common mode
Mains power quality should be that
of a typical commercial or hospital
environment.
Voltage dips, short
interruptions and
voltage variations on
power supply input
lines IEC 61000-4-11
<5 % U
T
(>95 % dip in UT) for 0.5
cycle
40 % U
T
(60 % dip in UT) for 5
cycles
70 % U
T
(30 % dip in UT) for 25
cycles
<5 % U
T
(>95 % dip in UT) for 5 s
<5 % U
T
(>95 % dip in UT) for
0.5 cycle
40 % U
T
(60 % dip in UT) for 5
cycles
70 % U
T
(30 % dip in UT ) for 25
cycles
<5 % U
T
(>95 % dip in UT) for 5
s
Mains power quality should be that
of a typical commercial or hospital
environment. If the user of AKR550
image intensifier requires continued
operation during power mains
interruptions, it is recommended
that AKR550 image intensifier be
powered from an uninterruptible
power supply or a battery.
Power frequency
(50/60 Hz)
magnetic field
IEC 61000-4-8
3 A/m 3 A/m
If image distortion occurs, it may be
necessary to position AKR550
further from sources of power
frequency magnetic fields or to
install magnetic shielding. The
power frequency magnetic field
should be measured in the intended
installation location to assure that it
is sufficiently low.
NOTE: UT is the a.c. mains voltage prior to application of the test level.
AKR550 - Auto Kerato Refractometer > V8 - 12-2017
12
USER MANUAL> II. SAFETY CONSIDERATION
Page 11
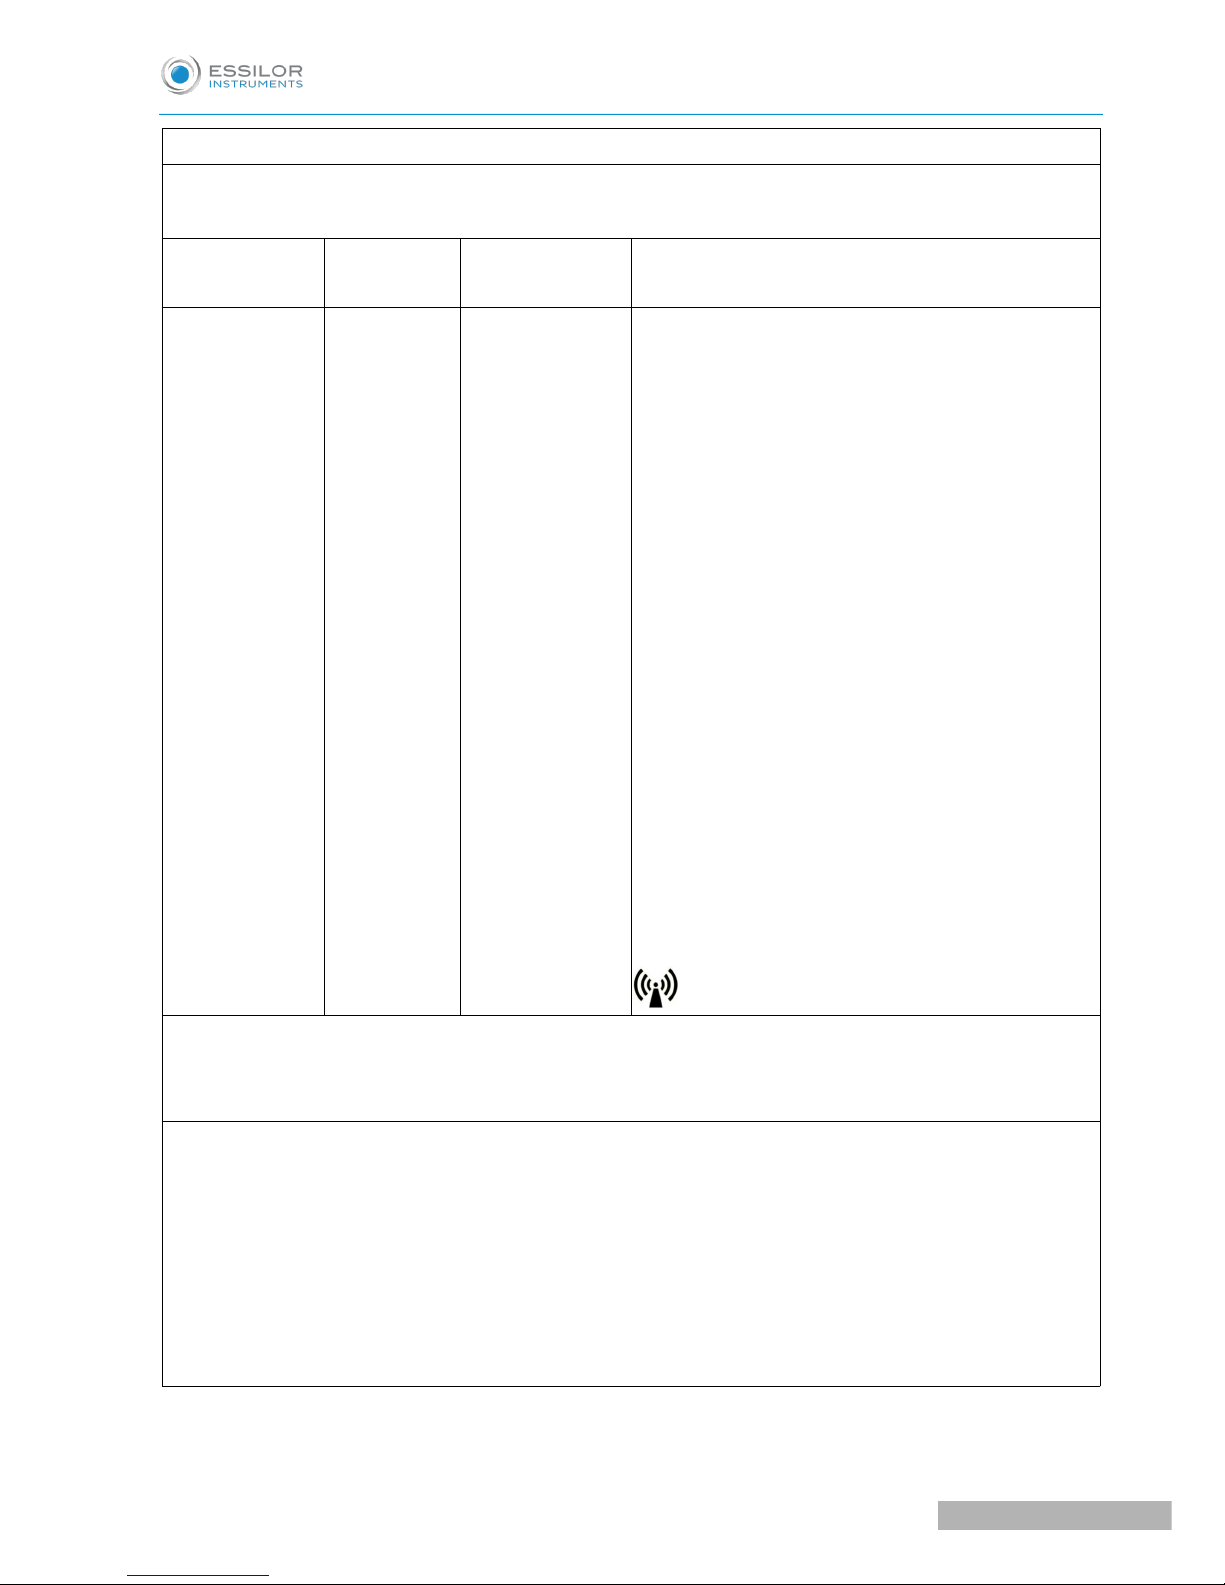
Guidance and manufacturer's declaration – electromagnetic immunity
AKR550 is intended for use in the electromagnetic environment specified below.
The customer or the user of AKR550 should assure that it is used in such an environment.
Immunity test
IEC 60601
test level
Compliance level Electromagnetic environment – guidance
Conducted RF IEC
61000-4-6
Radiated RF
IEC 61000-4-3
3 Vrms
150 kHz to 80
MHz
3 V/m
80 MHz to 2.5
GHz
3 Vrms
3 V/m
Portable and mobile RF communications equipment
should be used no closer to any part of AKR550,
including cables, than the recommended separation
distance calculated from the equation applicable to
the frequency of the transmitter.
Recommended separation distance
d= 1.2 √P
d= 1.2 √P 80 MHz to 800 MHz
d= 2.3 √P 800 MHz to 2.5 GHz
where P is the maximum output power rating of the
transmitter in watts (W) according to the transmitter
manufacturer and (d) is the recommended separation
distance in meters (m).
Field strengths from fixed RF transmitters, as
determined by an electromagnetic site surveya, should
be less than the compliance level in each frequency
range b.
Interference may occur in the vicinity of equipment
marked with the following symbol:
NOTE 1: At 80 MHz and 800 MHz, the higher frequency range applies.
NOTE 2: These guidelines may not apply in all situations. Electromagnetic propagation is affected by
absorption and reflection from structures, objects and people.
a
Field strengths from fixed transmitters, such as base stations for radio (cellular/cordless) telephones and
land mobile radios, amateur radio, AM and FM radio broadcast and TV broadcast cannot be predicted
theoretically with accuracy. To assess the electromagnetic environment due to fixed RF transmitters, an
electromagnetic site survey should be considered. If the measured field strength in the location in which
AKR550 is used exceeds the applicable RF compliance level above, AKR550 should be observed to verify
normal operation. If abnormal performance is observed, additional measures may be necessary, such as
reorienting or relocating AKR550.
b
Over the frequency range 150 kHz to 80 MHz, field strengths should be less than 3 V/m.
USER MANUAL> II. SAFETY CONSIDERATION
13
AKR550 - Auto Kerato Refractometer > V8 - 12-2017
Page 12

Recommended separation distance between portable and mobile RF communication equipment
and AKR550
AKR550 is intended for use in an electromagnetic environment in which radiated RF disturbances are
controlled. The customer or the user of AKR550 can help prevent electromagnetic interference by maintaining
a minimum distance between portable and mobile RF communication equipment (transmitters) and AKR550
are recommended below, according to the maximum output power of the communications equipment.
Rated maximum output power of
transmitter (W)
Separation distance according to frequency of transmitter
(m)
150kHz to 80MHz
d= 1.2 √P
80MHz to 800MHz
d= 1.2 √P
800MHz to 2.5GHz
d= 2.3 √P
0.01 0.12 0.12 0.23
0.1 0.38 0.38 0.73
1 1.2 1.2 2.3
10 3.8 3.8 7.3
100 12 12 23
For transmitters rated at a maximum output power not listed above, the recommended separation distance
(d) in meters (m) can be estimated using the equation applicable to the frequency of the transmitter, where
(P) is the maximum output power rating of the transmitter in watts (W) according to the transmitter
manufacturer.
NOTE 1: At 80 MHz and 800 MHz, the separation distance for the higher frequency range applies.
NOTE 2: These guidelines may not apply in all situations. Electromagnetic propagation is affected by
absorption and reflection from structures, objects and people.
AKR550 - Auto Kerato Refractometer > V8 - 12-2017
14
USER MANUAL> II. SAFETY CONSIDERATION
Page 13

III. ACCESSORIES
Page 14
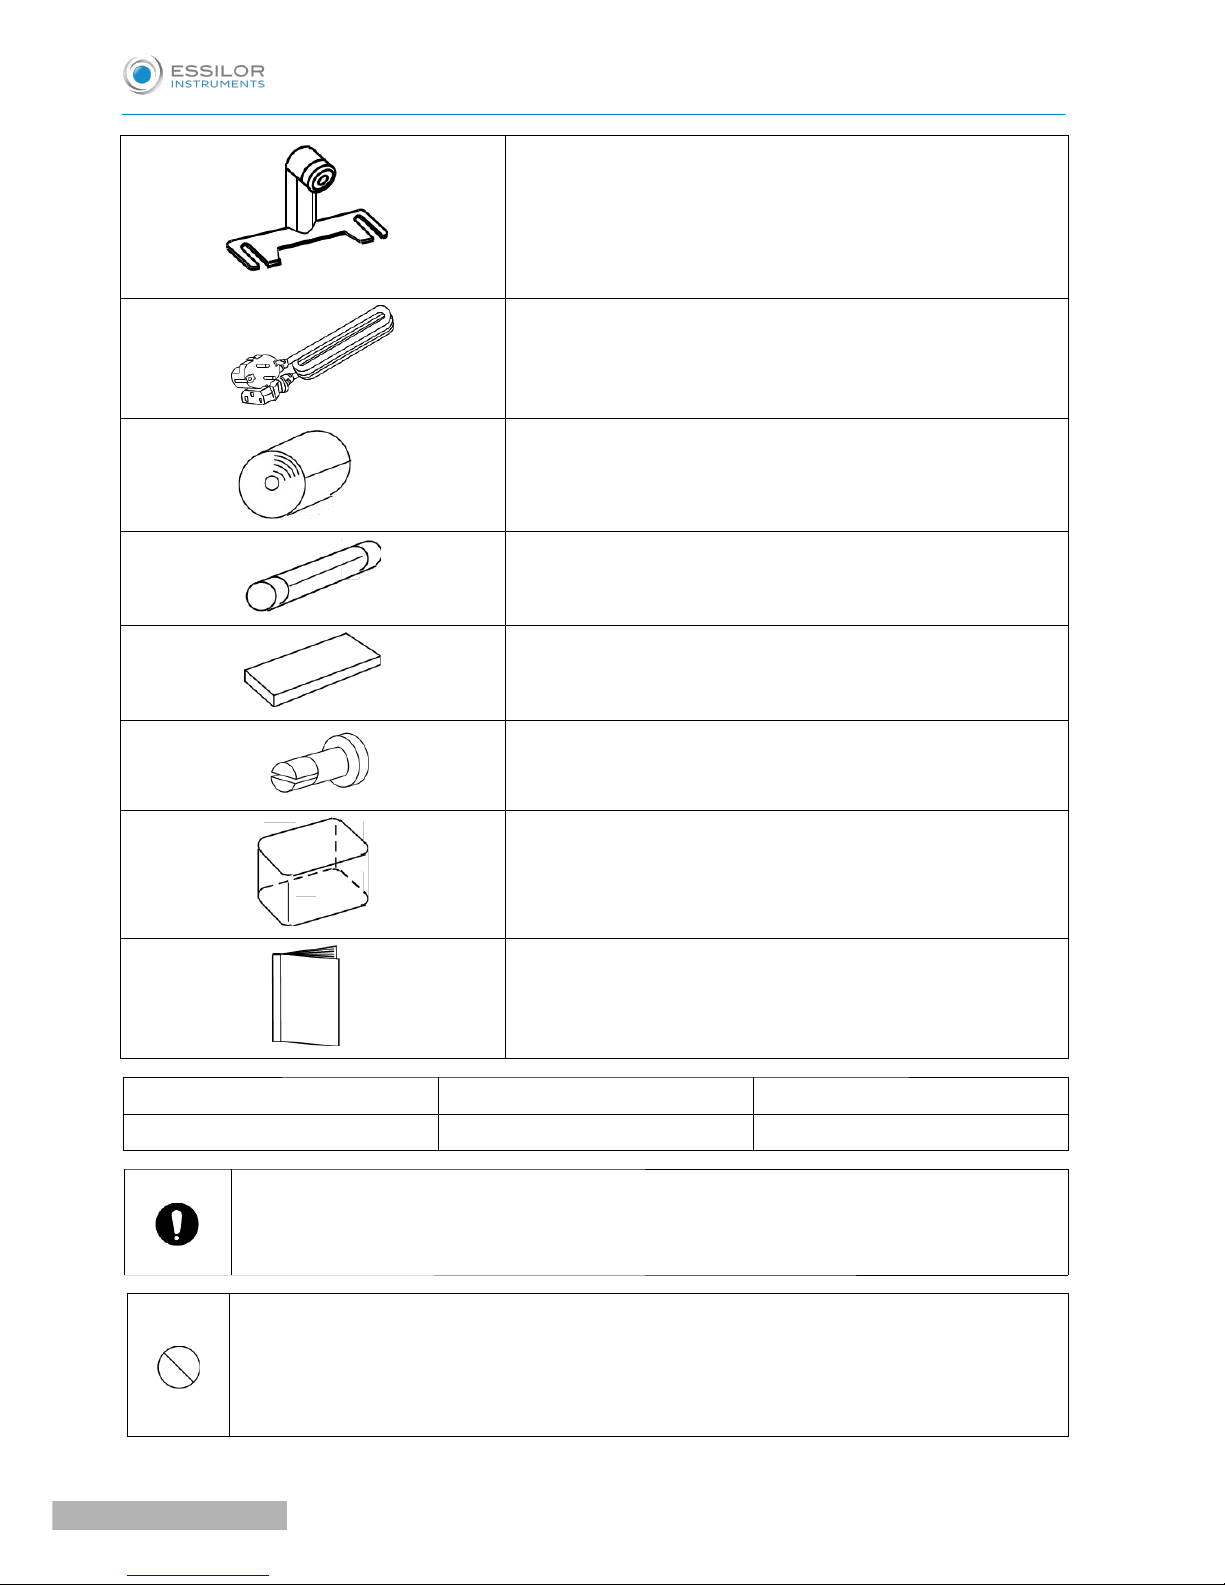
Model Eye: 1
With a contact lens holder
Diopter value is indicated on the sticker.
Power cord: 1
(2.5m)
Printer paper: 3
(Width: 58mm)
[2 included and 1 installed in the unit]
Fuse: 2
(T2A L 250V)
Chinrest liner: 1
(1,000 sheets)
Chinrest liner pin: 2
Dust cover: 1
Operation manual: 1
Name Model No. Length
Power cord KP4819YKS31A or equivalent 2.5m
Use only the accessories specified by us.
Use of the accessory (power cord) other than specified below may adversely affect other
instruments and/or cause malfunction of this device.
Extra care should be taken for storage of a model eye.
Do not store it at where it is dusty or high-temperature and humidity.
Avoid direct sunlight, high-temperature and humidity when storing the printer paper because it is
a thermal paper.
AKR550 - Auto Kerato Refractometer > V8 - 12-2017
16
USER MANUAL> III. ACCESSORIES
Page 15

IV. DEVICE
Page 16

1. GENERAL DESCRIPTION OF PRODUCT
This product (AKR550) aims to objectively measure the refractive power of the eye by using the light that is
projected to and reflected from the eyeground. It also aims to measure the radius of corneal curvature by
using the light that is projected to and reflected from the cornea.
As the feature of this device, the LCD is tilted to the vertical direction and horizontal direction so that the
angle can be adjusted.
As for safety consideration, see “5. Instructions for use” of this manual.
2. INTENDED USE DEFINED
This product (AKR550) aims to objectively measure the refractive power of the eye by using the light that is
projected to and reflected from the eyeground. It also aims to measure the radius of corneal curvature by
using the light that is projected to and reflected from the cornea.
Moreover, it can measure the pupil diameter by taking the image of the anterior eye of the examinee.
3. CLASSIFICATION DEFINED, RULE GIVEN
This product is the active device which does not belong to the category of the invasive/ non-invasive device
and does not intend the performances below.
Supply of energy / observation of physiological process/ irradiation of ionization radiation/ medication of
medicines etc.
Therefore, this is a class I medical device with a measuring function based on the rule 12 of MDD Annex IX.
4. CLASSIFICATION OF DEVICE
According to European directive on medical device, the AKR550 is a class I medical device.
It is marked 0459. Date of first marking is February 2016. The expected lifetime is 7 years.
Type of protection against electrical shock: Class I Equipment
Class 1 equipment is equipment in which protection against electric shock does not rely on basic insulation
only, but which includes an additional safety precaution in that means are provided for the connection of the
equipment to a protective earth conductor in the fixed wiring of the installation in which a way which
accessible metal parts cannot become live in the event of a failure of the basic insulation.
Degree of protection against electrical shock: Type B Equipment
Type B equipment provides an adequate degree of protection against electrical shock, particularly
regarding allowable leakage currents and reliability of the protective earth connection.
AKR550 - Auto Kerato Refractometer > V8 - 12-2017
18
USER MANUAL> IV. DEVICE
Page 17

Degree of protection against harmful intrusion of water (IEC 60529): IPX0
This product does not provide protection against intrusion of water.
(The degree of protection against harmful ingress of water defined in IEC 60529 is IPX0).
Classification by safety of use in air/ flammable anesthetic gas, oxygen or nitrous oxide/ flammable
anesthetic gas atmosphere:
• Equipment not suited for use in air/flammable anesthetic gas, oxygen or nitrous oxide/flammable
anesthetic gas atmosphere.
• This product should be used in an environment free of flammable anesthetic gas and other flammable
gases.
Classification by operation mode: Continuous operation with short-time loading.
5. USAGE OF PRODUCT
This product is for medical use which must be used under instructions of a doctor.
6. MODE OF OPERATION
This product is for continuous operation. It takes approx. 2 sec. for each measurement.
USER MANUAL> IV. DEVICE
19
AKR550 - Auto Kerato Refractometer > V8 - 12-2017
Page 18
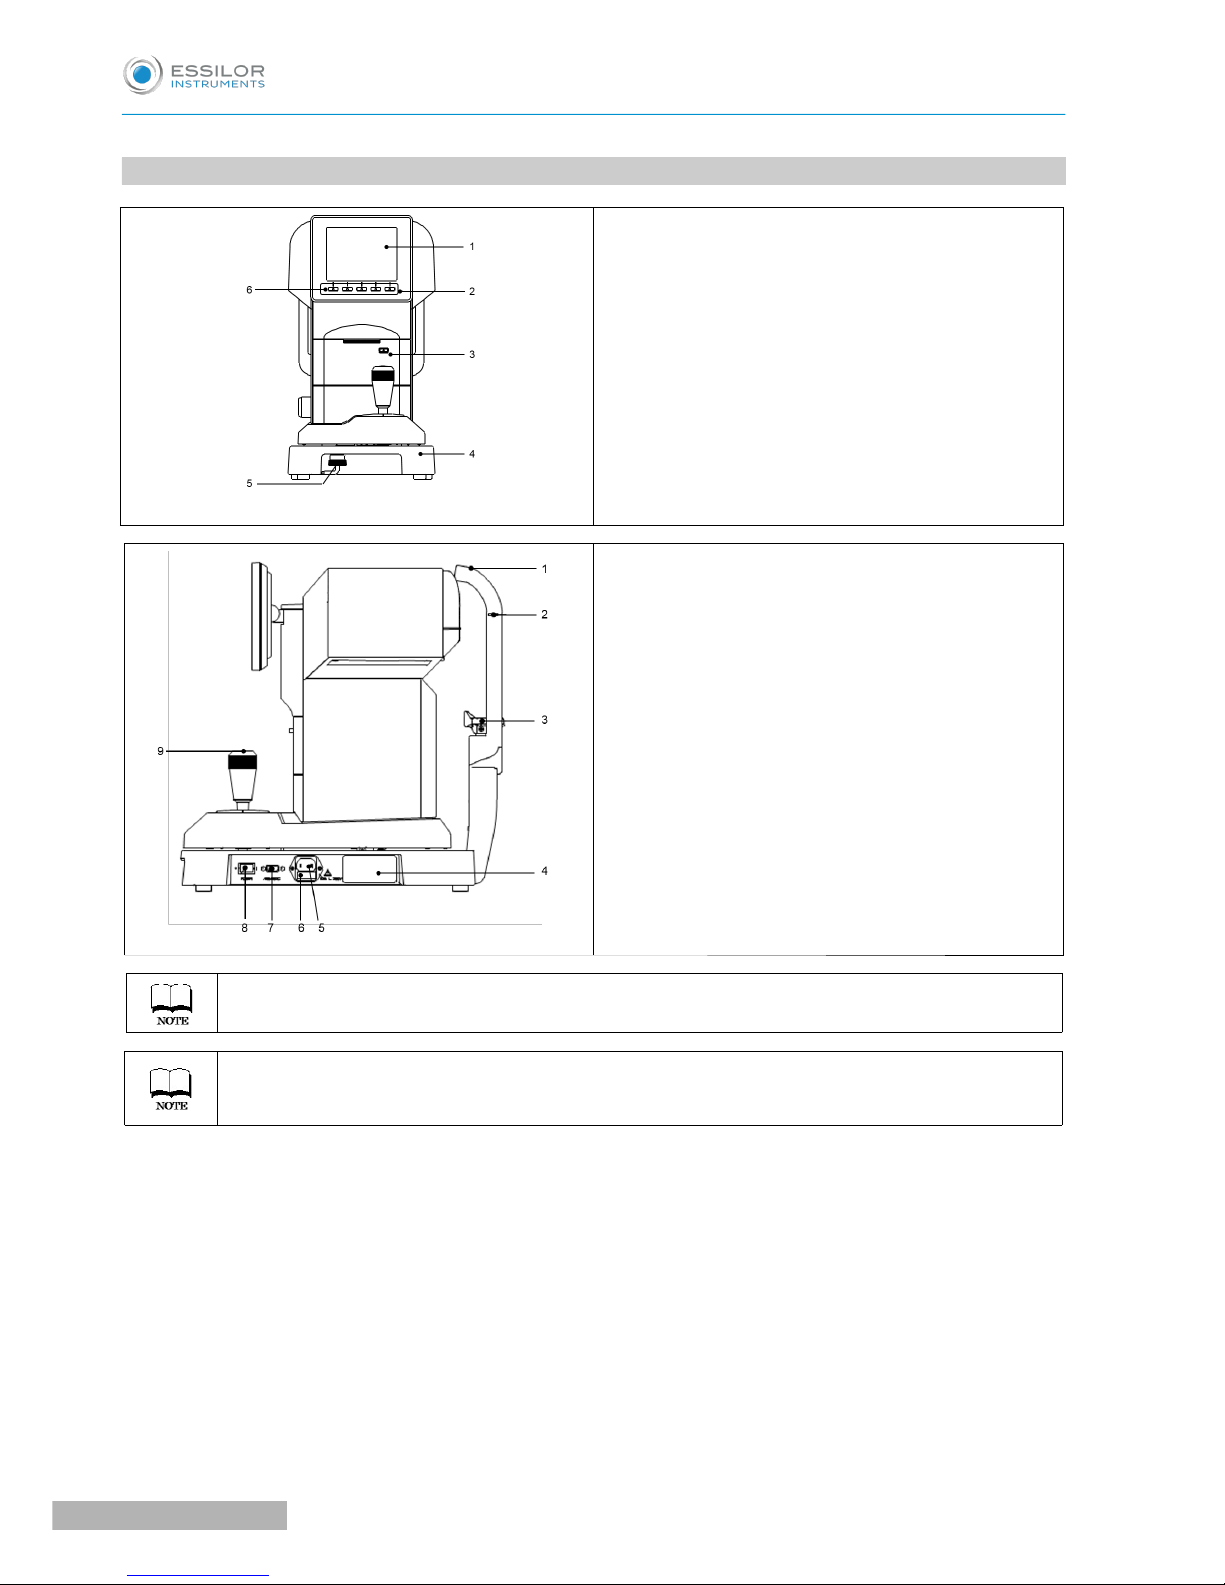
7. PARTS IDENTIFICATION
1. LCD monitor
2. Power indicator
3. Printer unit
4. Base unit
5. Slide lock
6. Operation switch
1. Headrest
2. Eye mark
3. Chinrest
4. Rating plate
5. Power inlet
6. Fuse holder
7. RS-232C terminal
8. Power switch
9. Measurement start switch
Applied parts are headrest and chinrest.
There is the parts list separated from this manual.
Also there is another parts list related to the safety.
AKR550 - Auto Kerato Refractometer > V8 - 12-2017
20
USER MANUAL> IV. DEVICE
Page 19

V. INSTRUCTIONS FOR USE
Page 20

1. CONVEYANCE
1. Before conveyance, move the main unit undermost, set it in the center of the base unit and secure it by
tightening the slide lock.
Side of examiner Side of examinee
1. Main unit
2. Base unit
3. Slide lock
4. Chinrest
5. Handle
2. The slide lock can be tightened by pushing it up and rotating it in counterclockwise direction.
3. At the time of conveyance, hold the back and front of the base unit (the cutout of the front side and the
handle under the chinrest) with both hands securely. Do not hold the headrest, chinrest or LCD monitor
because it can result in deformation or malfunction of them.
4. Do not drag the power cord with being attached to the main unit. It can result in malfunction of the device
caused by fall or drop, or personal injury if the cord is stuck or stepped on.
2. INSTALLATION
1. Do not expose the view window of the device directly to the sunlight or bright lighting from other sources.
Great care should be taken because the measurement cannot be carried out if the examinee is
exposed to strong light or glare during the measurement and his/her pupil contracts too small.
2. Do not operate it at the place where it is either dusty or grubby.
Environment with extremes in heat and humidity should also be avoided. In case of using the device, fulfill
the environmental conditions at the time of unpacking and use.
3. Keep away from the place which stores chemicals or which emits gas.
4. Keep away from the sites which may experience strong vibrations or sudden shocks.
5. It can result in malfunction if the device is accidentally overturns. Also, it is very dangerous if it is dropped
on your foot etc. Do not store it at the unstable or high place.
AKR550 - Auto Kerato Refractometer > V8 - 12-2017
22
USER MANUAL> V. INSTRUCTIONS FOR USE
Page 21

3. CONNECTION / WIRING
1. Connect the earth cable of the power cord to the earth terminal.
2. Do not damage the power cord (folding it small, pulling it or putting a heavy object on it etc.).
Also, do not remodel it.
Especially at the time of installation, keep enough space for the power cord to prevent it from being
damaged or failure.
3. If the cord is damaged (disconnection, failure of coating etc.), replace it with the new one.
It can result in electrical shock or fire.
4. Insert the power cord in the outlet and this device securely.
If it is not connected securely, it can result in fire or electrical shock.
5. Clean the power cord all the time to avoid dust or oil etc.
It can result in malfunction or fire if the terminal unit is not clean.
6. Check if the terminal unit is dirty when the power cord becomes hot.
If it is not dirty, replace it with the new one. It can result in fire or malfunction if you keep using it.
7. Use this device with the proper power-supply voltage.
If the power-supply voltage is excess, it can result in malfunction or fire.
8. Hold the plug unit when plugging in and out.
9. Do not touch the power plug with wet hands. It can result in electrical shock.
10.Plug out the power cord when it is not used for a long time.
4. MAINTENANCE / INSPECTION
1. This device is a precision optical device. Always handle it with care and do not drop it.
2. Do not touch the optical parts, such as a view window, with your hands and be sure to avoid dust because
its measurement accuracy could be adversely affected.
When dust or fingerprints are on the optical parts, wipe them off with a soft cloth gently. Take
great care when cleaning them because they are particularly sensitive and fragile.
3. If the measurement unit cover, main unit cover or operation panel is dirty, gently wipe it with a dry cloth.
For stubborn stains, a little water or neutral cleanser is recommended.
Avoid using organic solvents which will dissolve the water based paint on surface of the device.
4. Clean the chinrest and headrest with the neutral cleanser. For disinfecting the parts especially where the
examinee may contact such as the chinrest and headrest, use the ethanol for disinfection.
• Ethanol for disinfection contains 76.9 to 81.4vol% of ethanol (C2H6O) at 15°C (specific gravity).
Basically, it is not necessary to replace the chinrest and headrest rubber. They comply with ISO 10993-1.
5. If the device is not used for a long time, remove the power cord from the outlet.
6. When the device is not in use, protect it with a supplied dustproof cover.
If dust is adhered, it affects its measurement accuracy.
7. Never attempt to fix or remodel the device.
When the device fails to function properly, do not touch the inside.
Contact us or the place of purchase.
USER MANUAL> V. INSTRUCTIONS FOR USE
23
AKR550 - Auto Kerato Refractometer > V8 - 12-2017
Page 22

5. DISPOSAL
To avoid potential damage to the environment and possibly human health, this device should be
disposed of (i) for EU member countries – in accordance with WEEE (Directive on Waste Electrical
and Electronic Equipment), or (ii) for all other countries, in accordance with a local disposal and
recycling laws.
Separate the packaging materials and accessories according to the instructions of each local
government.
Battery users must not dispose of batteries as unsorted general waste, but treat properly. If a
chemical symbol is printed beneath the symbol shown above, this chemical symbol means that the
battery or accumulator contains a heavy metal at a certain concentration.
The lithium battery is used for the control board to store the information about the date and time.
Basically it is not necessary to replace it because it is rechargeable.
AKR550 - Auto Kerato Refractometer > V8 - 12-2017
24
USER MANUAL> V. INSTRUCTIONS FOR USE
Page 23

VI. HOW TO USE
Page 24

1. OPERATION PROCEDURE
The operation switches under the monitor correspond to the icons displayed on the bottom of the monitor.
For usual measurement, the operating switches correspond to the icons as shown below.
1. Clear switch
2. IOL switch
3. Measurement mode switch >
> >
4. Setup switch
1
5. Print switch
2
1
: Start method switching function: The start method (START items on the setup screen: Auto-
Quick/Auto/Manual) can be switched on the measurement screen by pressing and holding the setup
switch.
2
: Feed Function: It is switched to the feed function by pressing and holding the print switch and the
paper is fed.
Operation instructions of joystick
• When moving the joystick forward, the measurement unit
moves to the side of the examinee.
• When moving the joystick backward, the measurement unit
moves to the side of the examiner.
• When moving the joystick to the right or the left, the
measurement unit moves to the right or the left (respectively).
• When rotating the joystick to the right, the measurement unit
moves up and when rotating the joystick to the left, the
measurement unit moves down.
AKR550 - Auto Kerato Refractometer > V8 - 12-2017
26
USER MANUAL> VI. HOW TO USE
Page 25

2. MEASUREMENT FLOW
Procedure Process Reference section Relevant section
1
Prepare for measurement
6.3.1
2
Power distribution
6.3.2
3
Ask an examinee to ready for a
measurement
6.3.4
6.4 Setting of etup screen
7.2 Fuse replacement
7.3 Setting of chinrest liner
4
Alignment
6.3.5 8 Tip for effective measurement
5
Take a measurement
6.3.6 9 Error display
6
Print out the measurement result
6.3.7 7.1 Reload of printer paper
7
Switch right/left eye of the examinee
OR switch the examinee
Go to the procedure 3
8 Storage of the device 7.4
This device has the auto/manual measurement switch function. In case of the auto measurement, the
measurement is started automatically after alignment is achieved. In case of the manual measurement, on
the other hand, the measurement is started by pressing the measurement start switch.
The measurement can be started manually by pressing the measurement start switch even
when the setting of Start is either “Auto” or “Auto-Quick”.
USER MANUAL> VI. HOW TO USE
27
AKR550 - Auto Kerato Refractometer > V8 - 12-2017
Page 26

3. MEASUREMENT
a. Preparation for measurement
1. Main unit
2. Slide lock
3. Base unit
1. Do not place the device at where outside light exposes it directly from the examinee side.
2. Make sure that the printer paper, the fuse and the chinrest liner are installed properly.
3. Refer to “7.1 Reload of Printer Paper”, “7.2 Fuse Replacement” or “7.3 Setting of Chinrest Liner” of “7.
Storage and Maintenance” of this manual for the installation procedures of the parts of (2) above.
4. After distributing the power, rotate the slide lock of the main unit (under the base unit) and release
the main unit.
b. Power distribution
1. Make sure that the power switch of the main unit is OFF ( ).○
2. Insert the power cord in the power plug connector of the main
unit and insert the power plug in a socket.
: Always make sure that the cable is grounded.
: Do not use an additional power strip or an extension cord.
3. Turn on the power switch (|) of the main unit.
AKR550 - Auto Kerato Refractometer > V8 - 12-2017
28
USER MANUAL> VI. HOW TO USE
Page 27

c. Standby
When the power is turned on, the screen as shown below appears on the LCD monitor, which is ready for the
measurement.
1. Indication of right eye
2. Measurement start method
3. Mark of measurable minimum pupil diameter
4. Indication of left eye is indicated when
measuring the left eye
5. Reticle mark
6. Vertex distance
7. Pupil distance
Icon Function
Indicate the eye (right or left) in process of measurement.
Indicate the measurement start method.
Indicate the vertex distance.
It can be switched between 0, 10, 12, 13.5 and 15mm.
Clear the measurement results (values).
Switch ON and OFF of the IOL mode.
It switches the measurement mode. There are 4 measurement modes: refractive
and keratometry continuous measurement, refractive measurement, keratometry
measurement and scotopic pupil size measurement.
It is switched to the setup screen.
Display and print out the measurement result.
USER MANUAL> VI. HOW TO USE
29
AKR550 - Auto Kerato Refractometer > V8 - 12-2017
Page 28

d. Preparation of examinee
1. Clean the chinrest and dispose one chinrest liner on the top.
Clean the chinrest with the neutral cleanser when there is no chinrest liner.
For disinfecting the chinrest, use the ethanol.
• Ethanol for disinfection contains 76.9 to 81.4vol% of ethanol (C2H6O) at 15°C (specific
gravity).
2. Ask the examinee to put his/her chin on the chinrest. Adjust the height of the chinrest so that the
examinee's eye level is in line with the eye mark.
3. Uncomfortable posture may fatigue the examinee during the measurement. Adjust the chinrest or the
device to avoid it.
4. It affects its measurement accuracy if the examinee moves his/her head during the measurement. Ask
him/her to fix his/her forehead on the headrest and look at the target with a good posture.
5. Talk to the examinee fluently and try not to make him/her nervous.
Uncomfortable posture may fatigue the examinee during the measurement. Adjust the height of
the optical table or the chair to avoid it.
e. Alignment
There are 3 types of startup procedures (Auto Quick, Auto and Manual) for AKR550.
It can be switched in start of the setup screen.
AKR550 - Auto Kerato Refractometer > V8 - 12-2017
30
USER MANUAL> VI. HOW TO USE
Page 29

In case of Auto Quick or Auto
It starts measurement automatically when it brings the subject eye into focus.
1. Look for the subject eye by operating the joystick.
The Kerato ring appears as bringing it into focus.
If the eyelid is over the Kerato ring, urge the examinee to open his/her eye wider.
2. The alignment mark (+) will appear as aligning the reticle mark with the center of the pupil of the subject
eye and bringing it into focus. Operate the joystick in such a way that the alignment mark (+) comes to the
center of the reticle.
1. Reticle mark
2. Alignment mark
USER MANUAL> VI. HOW TO USE
31
AKR550 - Auto Kerato Refractometer > V8 - 12-2017
Page 30

3. Operate the joystick so as to bring it into focus as aligning the alignment mark (+) with the center of the
reticle mark. The measurement is started when alignment is achieved and the mark of the measurable
minimum pupil diameter is changed to green.
4. The measurement values are displayed when the measurement is finished. The arrows are displayed when
the specific times of measurement is finished. Move the main unit to the direction of the arrows and take a
measurement of the other eye.
AKR550 - Auto Kerato Refractometer > V8 - 12-2017
32
USER MANUAL> VI. HOW TO USE
Page 31

In case of Manual
1. Look for the subject eye by operating the joystick.
The Kerato ring appears as bringing it into focus.
If the eyelid is over the Kerato ring, urge the examinee to open his/her eye wider.
2. The alignment mark (+) will appear as aligning the reticle mark with the center of the pupil of the subject
eye and bringing it into focus. Operate the joystick in such a way that the alignment mark (+) comes to the
center of the reticle.
1. Reticle mark
2. Alignment mark
3. Operate the joystick so as to bring it into focus as aligning the alignment mark (+) with the center of the
reticle mark. Start the measurement when alignment is achieved and the mark of the measurable minimum
pupil diameter is changed to green.
USER MANUAL> VI. HOW TO USE
33
AKR550 - Auto Kerato Refractometer > V8 - 12-2017
Page 32

f. Measurement
The measurement start method is different depending on the setting.
Setting Measurement start method
The setting of Start is either “Auto-Quick” or “Auto”
The measurement is started automatically when
alignment is achieved.
The setting of Start is “Manual”
Start the measurement by pressing the start switch
when alignment is achieved.
1. Number of refractive measurement
2. Refractive measurement value
◦ S: Spherical value
◦ C: Cylindrical value
◦ A: Axis angle
3. Number of Kerato measurement
4. Kerato measurement value
◦ R1: Radius of curvature (Max.)
◦ R2: Radius of curvature (Min.)
◦ AX: Axis Angle
5. Photopic pupil diameter measurement result
6. Vertex distance
7. Pupillary distance - (Far vision)
8. Pupillary distance - (Near vision)
The PD value is indicated after the refractive power of both right and left eyes are measured.
The order of the eye to be measured is not important.
The NPD value is indicated only if the number of “W-D (cm)” on the Setup screen is set.
AKR550 - Auto Kerato Refractometer > V8 - 12-2017
34
USER MANUAL> VI. HOW TO USE
Page 33

g. Print-out of measurement result
The measurement result can be printed out by pressing the print switch after the measurements.
A maximum of the data for each eye can be saved and the most reliable value among them is indicated as
the optimum value. The optimum value is printed out only when more than three times of measurement is
taken for each eye. The format of the output (All, All/Eco, Eco or Off) can be set on Print REF/KRT on the
setup screen.
• All: Print out a maximum of ten data of the refractive measurement and Kerato measurement for
each eye.
• All/Eco:
◦ Print out a maximum of ten data of the refractive measurement for each eye.
◦ Print out only the optimum values for the Kerato measurement.
• Eco: Print out only the optimum values for all of the measurement.
• Off: Print out no data.
<Sample of Printout 1>
Print REF/KRT setting:Eco
1. Date and time of the measurement
2. Refractive measurement result (optimum value)
◦ SPH: Spherical value
◦ CYL: Cylindrical value
◦ AX: Axis angle
3. Kerato measurement result (optimum value)
◦ R1 : Radius of curvature (Max.)
◦ R2: Radius of curvature (Min.)
◦ AVE: Average of R1 and R2
◦ CYL: Cylindrical value
4. Pupillary distance
USER MANUAL> VI. HOW TO USE
35
AKR550 - Auto Kerato Refractometer > V8 - 12-2017
Page 34

<Sample of Printout 2>
Print REF/KRT setting: All
1. Message area
2. No. of examinee
3. Data of right eye
4. Refractive data
5. Photopic pupil size
6. Optimum values of the refractive measurement results
They are indicated when more than 3 times of measurements are taken for each eye
7. Spherical equivalent
8. Scotopic pupil size
9. Kerato data
AKR550 - Auto Kerato Refractometer > V8 - 12-2017
36
USER MANUAL> VI. HOW TO USE
Page 35

10. Optimum values of the corneal curvature radius
They are indicated when more than 3 times of measurements are taken for each eye
11. Residual astigmatism
12. PD for far vision
13. PD for near vision
Message area
It can print out the registered characters in the range of 24 characters/line × 2 lines in the message area.
Refer to the “Message” section of “4.4 Setting of Setup Screen” about registration of the characters.
4. SETTING OF SETUP SCREEN
The standard measurement mode is preset to be ready for use.
However, altering the setting can be done easily if necessary.
Press switch under the LCD monitor and display the setup screen.
1. Page No.
2. Setting contents
3. Setting item
4. Cursor of setting item
There are 24 setting items on the menu screen.
Select the item to be changed by pressing or and change it by pressing
.
After changing it, return to the measurement screen by pressing .
USER MANUAL> VI. HOW TO USE
37
AKR550 - Auto Kerato Refractometer > V8 - 12-2017
Page 36

Details of each setting item - [Screen 1]
• Step: Select the step for refractive measurement.
• VD: Select the corneal vertex distance.
• IOL: Select the function of the operation switch.
◦ IOL: Switch to the mode to measure.
◦ IOL. FL/CL: Switch the corneal vertex distance (frame value/ contact value).
• CYL: Select the sign of cylindrical value.
• Start:
Select the measurement start method.
◦ Auto-Quick: It starts measurement when the alignment is achieved. Take 1 time of Kerato
measurement and 3 times of refractive measurements continuously for each eye.
The result is printed out automatically when “Auto Print” is set as ON. (For the refractive
measurement, only one time of the fog control is done at the beginning).
◦ Auto: Take 3 times of Kerato measurements and refractive measurements continuously for each
eye.
The result is printed out automatically when “Auto Print” is set as ON. (For the refractive
measurement, the fog control is done every time).
◦ Manual: Measurements are taken every time the measurement switch is pressed.
• REF: Select the refractive measurement method. The setting is valid only when the measurement
start method is set as manual.
◦ Normal: A measurement is taken one time by pressing the measurement start switch.
◦ Quick: Continuous measurement is started as much as it is set by pressing the measurement
start switch one time. (Maximum of 10 times.) (For the refractive measurement, only one time of
the fog control is done at the beginning).
• KRT: Select the sign of Kerato measurement result.
◦ mm: Corneal Curvature radius
◦ - D: corneal astigmatism (-)
◦ +D: corneal astigmatism (+)
• Print REF/KRT: Select the format of print-out.
◦ All: Print out all of the measurement data.
(Maximum of 10 times for each eye).
◦ All/Eco: Print out all of the REF measurement.
(Maximum of 10 times for each eye).
Print out only the optimum values for the Kerato measurement.
◦ Eco: Print out only the optimum values.
◦ Off: No measurement result is printed out.
• Data Screen: Display the stored measurement results.
◦ On: Display the measurement results on the screen.
◦ Off: Display no measurement result on the screen.
• Auto Print: Select the print-out method.
This function is valid only when the setting of Start is either Auto-Quick or Auto.
◦ On: Activate the auto print function.
◦ Off: Invalidate the auto print function.
• Reliability: Select if displaying the low reliability mark on the measurement values or not.
◦ On: If it is judged that the measurement value possesses low reliability, display the low reliability
mark “*” on it.
◦ Off: No low reliability mark is displayed.
• Pupil Size: Set the function of the photopic pupil diameter measurement.
◦ On: Take a measurement of the photopic pupil diameter when taking a refractive measurement.
◦ Off: Photopic pupil diameter is not measured.
AKR550 - Auto Kerato Refractometer > V8 - 12-2017
38
USER MANUAL> VI. HOW TO USE
Page 37

Details of each setting item - [Screen 2]
• SE: Set the output of SE value.
◦ On: Output the representative value of SE on print-out, data screen and communication output
(XML format only).
◦ Off: No output of SE value.
• Rest: Select the output of residual astigmatism.
◦ On: Display the residual astigmatism.
◦ Off : No astigmatism is displayed.
• W-D (cm): Set the work distance.
The near pupil distance is automatically computed after the measurement and displayed on the
screen.
• Target: Select the brightness of the target.
◦ Bright: Brighten the target.
◦ Middle: Normal setting.
◦ Dark: Darken the target.
• Brightness: Adjust/ change the brightness of the LCD monitor.
• Save (min): Select the switchover time to activate the power saving function (unit is min.).
• RS-232C: Select the baud rate when sending the measurement data to the exterior computer.
• Buzzer: Set if activating the buzzer at the time of switching to the power saving function or not.
◦ On: Buzzer is on.
◦ Off: Buzzer is off.
• Option: It is switched to each option screen when selecting the item to be set on the option of the
setup screen.
The screen of each option and the details.
USER MANUAL> VI. HOW TO USE
39
AKR550 - Auto Kerato Refractometer > V8 - 12-2017
Page 38

a. Number
This function can set or change the number of the examinee, and select if displaying the number on the
monitor and the printout.
• Set: Set/change the number of the examinee.
(Maximum of 5 digits can be input).
• Print: Select if printing out the number of the examinee or not.
◦ Off: The number is not printed out.
◦ On: The number is printed out.
• Display: Select if displaying the number of the examinee on the screen or not.
◦ Off: The number is not displayed.
◦ On: The number is displayed.
Reset of the number of the examinee
If moving the cursor to “Reset” on “Set”, the “+” switch on the bottom is changed to “Reset”. So,
press the “Reset” switch to reset the number.
1. Move the cursor to the item to be set or changed by pressing or and
change it by pressing or .
2. Go back to the setup screen by pressing after the setting or the change.
AKR550 - Auto Kerato Refractometer > V8 - 12-2017
40
USER MANUAL> VI. HOW TO USE
Page 39

b. Language
This function can select the language displayed on the screen.
Selectable language: EN (English), CN (Chinese), FR (French), ES (Spanish), PT (Portuguese), IT (Italian),
GE (German).
1. Move the cursor to the item to be set by pressing and execute it by pressing
.
2. Go back to the setup screen by pressing after finishing the setting.
c. Customize
• Reset Screen: This function can delete the measurement values on the screen after printout.
◦ On: Delete the measurement values on the screen after printout.
◦ Off: Leave the measurement values on the screen after printout.
• Output: This function can select the output procedure of the measurement data.
◦ A: Standard.
◦ B: Output data common spec. of ophthalmic testing device.
(Established by Japan Ophthalmic Instruments Association)
USER MANUAL> VI. HOW TO USE
41
AKR550 - Auto Kerato Refractometer > V8 - 12-2017
Page 40

d. Date form
Select the display format of the date from the followings:
• YMD: Display the date as year/ month/day.
• DMY: Display the date as day/month/year.
• MDY: Display the date as month/day/year.
The screen above appears when selecting “YMD” and pressing .
1. Move the cursor to the item to be changed by pressing or and input the
date by pressing or .
2. Go back to the setup screen by pressing after finishing the setting.
AKR550 - Auto Kerato Refractometer > V8 - 12-2017
42
USER MANUAL> VI. HOW TO USE
Page 41

e. Message
This function is to input the message in the range of 24 characters/line × 2 lines and output it.
The message input screen appears by selecting “On” and pressing .
1. Select the characters by pressing or and input them by pressing
.
A space can be input by pressing .
2. Go back to the setup screen by pressing after finishing the setting.
f. Default setting
Reset the settings to the factory setting.
USER MANUAL> VI. HOW TO USE
43
AKR550 - Auto Kerato Refractometer > V8 - 12-2017
Page 42

5. SCOTOPIC PUPIL SIZE (SPS) - MEASUREMENT FUNCTION
This function is to measure the pupil size of the subject eye in the dark.
Switch to the SPS measurement by pressing the measurement mode switch on the front panel.
When measuring the scotopic pupil size, darken the room.
Indication of SPS measurement mode
<To print out the measurement results of SPS, R/K, REF and KRT at the same time>
The measurement results of SPS, R/K, REF and KRT can be printed out at the same time by
pressing the print button after the measurement of SPS when switching to SPS measurement mode
without printing out their measurement result with the setting of Auto Print “Off”.
Example of printout Example of data screen output
AKR550 - Auto Kerato Refractometer > V8 - 12-2017
44
USER MANUAL> VI. HOW TO USE
Page 43

6. IOL MEASUREMENT FUNCTION
When measuring the IOL (intraocular lens) implanted eye, the eye with a cataract, or the eye with the
scratches on the cornea, the measurement errors may occur and it is difficult to complete the measurement
with REF measurement.
In this case, it is easier to measure if moving the device closer to the examinee. Also these can be measured
with IOL mode.
1. Activate the IOL function by pressing the IOL switch on the front panel of the main unit and switch to the
IOL measurement mode.
At this time, the icon of the IOL measurement mode is indicated on the top of the monitor.
1. Indication of IOL measurement mode
2. Focus indicator
2. Catch the subject eye on the monitor by operating the joystick. As bringing the subject eye into focus, the
Kerato ring, the alignment mark “+” and the focus indicator appear.
3. Operate the joystick by following the guidance of the focus indicator and move the main unit to bring the
subject eye into focus.
4. It is in focus when the focus indicator turns to green. When it turns to green, take a measurement by
pressing the measurement switch.
Measurement is started automatically when the setting of Start is either Auto-Quick or Auto.
USER MANUAL> VI. HOW TO USE
45
AKR550 - Auto Kerato Refractometer > V8 - 12-2017
Page 44

Example of printout Example of data screen output
“I” is indicated on the left of the measurement value when measuring it in the IOL measurement
mode.
The IOL measurement mode is canceled by performing one of the followings:
1. Pressing the IOL switch one more time
2. Switching the measurement mode
3. Pressing the print switch
4. Turning off the power
When the measurement cannot be completed because of the errors with IOL mode.
There is a possibility that the measurement of the IOL (intraocular lens) implanted eye cannot be completed
because of the implanted IOL.
In this case, move the device closer to the examinee with keeping the alignment in-focus. It might help
curbing the influence and the measurement can be done.
The image of the eyeground is displayed by holding IOL or FL/CL switch for seconds.
AKR550 - Auto Kerato Refractometer > V8 - 12-2017
46
USER MANUAL> VI. HOW TO USE
Page 45

7. LOW RELIABILITY MARK DISPLAY FUNCTION
This device has the low reliability mark display function. The low reliability mark is displayed on the
measurement result which reliability is low when taking the refractive measurement with this function
activated. Consider the refractive measurement value with the low reliability mark as reference.
Example of printout Example of data screen output
8. OUTPUT
This device is connected to PC etc. by RS-232C.
Connecting diagram: RS-232C
Use the shielded wire for the connection cable to protect the output data from noise.
USER MANUAL> VI. HOW TO USE
47
AKR550 - Auto Kerato Refractometer > V8 - 12-2017
Page 46

Contact your local distributor about operation, connection method and output data etc.
The instruments which are connected to this device by RS-232C should comply with the safety
standard of IEC60601-1.
Do not touch the external connection terminal and examinee at the same time. It may cause
electric shock.
Select the baud rate of RS-232C from below.
Selectable baud rate Setting before shipment
115200 bps ○
38400 bps
9600 bps
In case of RS-232C, CHARACTER (data bit count), PARITY (check of transfer data) and STOP BIT
(exit code) are set as CHARACTER (8), PARITY (NONE) and STOP BIT (1) and cannot be changed.
9. DATA SCREEN FUNCTION
The measurement results can be displayed on the screen and checked by using the data screen function.
In case of displaying measurement results
1. Set “Data Screen” on the Setup screen as “On”.
In case that the setting of “Data Screen” is “On”, the measurement data of the right eye is
displayed regardless of the settings of “Print REF/ KRT”.
AKR550 - Auto Kerato Refractometer > V8 - 12-2017
48
USER MANUAL> VI. HOW TO USE
Page 47

2. It is displayed as shown by pressing the print switch after the measurement.
In case that the setting of “Auto Print” is “On”, it is displayed as shown on the left after completing
the measurement.
3. The screen is switched as below by pressing switch while the data is displayed.
4. When printing out the data displayed on the screen, press the print switch one more time.
5. It returns to the measurement mode by pressing switch.
USER MANUAL> VI. HOW TO USE
49
AKR550 - Auto Kerato Refractometer > V8 - 12-2017
Page 48

10. POWER SAVING FUNCTION
The power saving function is activated when leaving it on without any switch operations.
(Refer to “Save (min.)” of “6.4 Setting of Setup Screen” about the selection of the power saving function.)
The measurement mode is activated by pressing the switch (the switch on the front panel of the
measurement start switch).
11. CONTACT LENS: MEASUREMENT OF BASE CURVE
This device can measure the base curve of the hard contact lens.
The lens can be measured by placing it onto the contact lens holder of the model eye shown as below.
1. Put a small amount of water on the concave side of the contact lens holder.
2. Place the contact lens so that its convex side faces the holder.
1. Contact lens holder
2. Model eye
3. Contact lens
3. Confirm that the contact lens is firmly adhered to the holder with water and does not slip down. Then,
take a measurement by setting the model eye unit on the main unit.
AKR550 - Auto Kerato Refractometer > V8 - 12-2017
50
USER MANUAL> VI. HOW TO USE
Page 49

VII. STORAGE AND MAINTENANCE
Page 50

Do not perform any maintenance when used with a patient.
1. RELOAD OF PRINTER PAPER
Push on the printer door button to open the printer paper cover.
Pay attention to the direction of the paper rolled and set it in.
Set the paper as coming out toward the front from the upside.
Close the printer cover until it clicks.
If the cover is not closed completely, the error message appears and cannot print out.
1
2
3
AKR550 - Auto Kerato Refractometer > V8 - 12-2017
52
USER MANUAL> VII. STORAGE AND MAINTENANCE
Page 51

2. FUSE REPLACEMENT
Unplug the power cord from the unit before removing the fuse holder. You may be in danger of
electric shock if removing the fuse holder without unplugging the power cord.
When a fuse is blown, remove the fuse holder from the device for replacement.
Remove it by pushing the fuse holder and rotating it in counterclockwise direction.
Always use the specified fuse (T2A L 250V).
Fuse
3. SETTING OF CHINREST LINER
Set the chinrest liners onto the chinrest, and secure them with the chinrest liner pins.
1. Chinrest liner pins
2. Chinrest liners
3. Chinrest
For sanitary reasons, dispose the top chinrest liner after every patient.
• Comply strictly with above about the chinrest liners.
• For sanitary reasons, disinfect the chinrest with the ethanol for disinfection.
Ethanol for disinfection contains 76.9 to 81.4vol% of ethanol (C2H6O) at 15°C (specific
gravity).
USER MANUAL> VII. STORAGE AND MAINTENANCE
53
AKR550 - Auto Kerato Refractometer > V8 - 12-2017
Page 52

4. STORAGE OF DEVICE
1. Points to check for long-term storage
◦ Turn off the power
◦ Remove the power cord from the outlet
◦ Place the main unit undermost
◦ Secure the main unit by locking the slide lock of the main unit
◦ Put the dust cover on the main unit
2. Notes about the storage environment
Avoid storage under the following conditions:
◦ Where dust accumulates
◦ Where water may get on the unit
◦ Where temperature and humidity are high
◦ Where sunlight directly contacts
◦ Unstable and high place
Always follow the environment conditions for storage below.
Environmental conditions for storage
Check the items above in case that the device is not used or is stored for a long time.
If you use the device after long-term storage, operate it according to the instructions of “6.3.a
Preparation for Measurement”.
5. CONFIRMATION OF MEASUREMENT ACCURACY
It is extremely important to check operation and accuracy of the device with the supplied model eye.
We recommend checking its accuracy periodically.
If the measurement result of the model eye is within the tolerance listed below, the measurement is
considered as reliable and accurate. If the result exceeds the tolerance, contact your dealer immediately.
Model eye data
SPH CYL R
Indicated value ±0.25 0±0.25 Indicated value ±0.03
The precise value of the supplied model eye is indicated on the model eye stand (VD=12).
AKR550 - Auto Kerato Refractometer > V8 - 12-2017
54
USER MANUAL> VII. STORAGE AND MAINTENANCE
Page 53

Model eye
Setting of model eye
• Remove the contact lens holder and set the model eye carefully not to incline back and
forth and around.It cannot take CYL value data correctly if the model eye is inclined.
• Set the model eye at the position where an alignment mark is located at the center of
the reticle mark and the model eye comes into focus.
• When all of the conditions above are met, start the measurement.
6. PERIODICAL INSPECTION AND MAINTENANCE
To prevent malfunction and accidents and maintain to performance and reliability of the product, it is
recommended to request your distributor for the periodical inspection and maintenance once a year.
The periodical inspection and maintenance include inspection of the function and performance of the product,
and cleaning, adjustment and replacement of consumable parts if necessary.
It is recommended for the distributors to perform the cleaning of each part, performance check and accuracy
check at least once in a year.
• Cleaning of each part: exterior parts and optical system.
• Performance check: main unit and each switch.
• Accuracy check: measurement function of refractive power and corneal curvature radius.
USER MANUAL> VII. STORAGE AND MAINTENANCE
55
AKR550 - Auto Kerato Refractometer > V8 - 12-2017
Page 54

VIII. TIPS FOR EFFECTIVE MEASUREMENT
Page 55

1. Do not allow external light to directly penetrate the room.
2. Fluctuation of the measurement values may occur if the examinee looks something other than the
target. Urge the examinee to concentrate on the target set in front.
3. Talk to the examinee in a relaxed and friendly manner, so as to allay any fear or doubt they may
have.
4. Inappropriate height of the chinrest or the chair will cause the examinee fatigue. Adjust the (optional)
instrumental table to establish the most comfortable and convenient position for the examinee.
5. When the eyelash or eyelid interfere measurement, an error will occur in the measurement.
Urge the examinee to keep his/her eye open wider.
6. Tear residue or eye mucus, etc. trapped on the corneal surface may cause measurement errors.
Check the surface with the LCD monitor, and if you see something moving when the examinee blinks,
remove it before measurement.
7. When the pupil of the target eye is smaller than the minimum measurable pupil diameter, the device
cannot take measurements correctly.
If it is difficult to take measurements because the pupil is too small, darken the surroundings (room)
or the target to allow the pupil to dilate as much as possible.
8. If the examinee moves his/her head during the measurement, AXIS value will be adversely affected.
Ask him/her to maintain a correct posture.
AKR550 - Auto Kerato Refractometer > V8 - 12-2017
58
USER MANUAL> VIII. TIPS FOR EFFECTIVE MEASUREMENT
Page 56

IX. ERROR DISPLAY
Page 57

This device automatically evaluates measurement condition or result and indicates error messages if it is
invalid. An error messages also appear when abnormality is detected in its operational system.
When any error messages appear, always check the system with a supplied model eye. If it appears when no
abnormality in system is detected, check the measured eye for eye diseases or problems.
Message Cause Corrective action
RETRY
Failed to capture eye image
because the examinee blinks or
moves during measurement or
the examined eye has eye
diseases
Try alignment precisely and conduct
measurement again. Consult your dealer
immediately if the message appears again.
Do not try to repair it by yourself.
SPH OVER
Exceeded spherical
measurement range (-25 to
+25D)
(In case of VD=0, contact value)
/
CYL OVER
Exceeded cylindrical
measurement range (0 to ±10D)
(In case of VD=0, contact value)
/
ERR
Exceeded measurement value of
pupil diameter (2.0 to 8.5mm)
/
Target motor fault
Detected abnormality in motor
control system
Turn off the power and turn it back on.
Consult your dealer immediately if the message
appears again.
Do not try to repair it by yourself.
Focus motor fault
EEPROM fault Failure of initialization
Printer overheated Printer head is overheated
Turn off the power and turn it back on.
Consult your dealer immediately if the message
appears again.
Do not try to repair it by yourself.
Printer cover opened Printer cover is opened
Close the printer cover properly.
Turn off the power and turn it back on.
Consult your dealer immediately if the message
appears even after closing the cover.
Paper empty No printer paper
Set the printer paper.
Refer to “7.1 Reload of printer paper”.
AKR550 - Auto Kerato Refractometer > V8 - 12-2017
60
USER MANUAL> IX. ERROR DISPLAY
Page 58

X. MAIN TROUBLE AND TROUBLESHOOTING
Page 59

If a malfunction is found, refer to the table below to take the appropriate measures.
Never disassemble, modify or repair the device.
It can result in electrical shock.
Symptoms Causes and measures
The monitor and the power indicator
are not turned on.
• The power cord may not be properly connected.
Make sure to connect it securely.
• The fuse may be blown.
If so, replace it with the new one.
The fuse is blown when the power
switch is turned on.
• Contact your local distributor immediately.
The monitor display is suddenly
disappeared.
• The saving function may be activated.
Press any switch to deactivate the saving function.
The moving parts such as a joystick
are not moving appropriately.
• Do not move the part forcibly.
Contact your local distributor or service person.
It does not print out.
• Check if the papers are set.
Reload them if the papers are not set.
• The setting of Print REF/KRT may be set as OFF.
Change the setting.
The printer paper comes out but not
printing.
• The printer paper may be set in a wrong direction.
Set the paper properly.
The date setting is inaccurate.
• The battery in the device may be run out.
Keep the power on for 24 hours and recharge it.
Contact your local distributor immediately if the situation does not improve even after taking the measures
mentioned above.
AKR550 - Auto Kerato Refractometer > V8 - 12-2017
62
USER MANUAL> X. MAIN TROUBLE AND TROUBLESHOOTING
Page 60

XI. SPECIFICATIONS
Page 61

Refractive measurement range
Sphere (S): -30D to +22D
In case of VD=12
Step: 0.12/0.25D
Cylinder (C): 0 to ±10D Step: 0.12/0.25D
Axis angle (A): 1 to 180° Step: 1°
Corneal curvature radius
measurement
Radius of curvature: 5.0 to 10.0 mm
Step: 0.01mm
Corneal power: 33.75 to 67.5D
Corneal refractive n=1.3375
Step: 0.12/0.25D
Degree of corneal astigmatism: 0 to
±10D
Step: 0.12/0.25D
Axis angle: 1 to 180° Step: 1°
Pupil diameter measurement
Measurement range: φ2.0 to 8.5
mm
Step: 0.1 mm
PD measurement Measurement range: 85 mm Step: 1 mm
Vertex distance 0, 10, 12, 13.5, 15 mm
Minimum pupil diameter φ2.0 mm
Measurement time
Refractive measurement: Approx. 0.07 sec.
Corneal curvature radius: Approx. 0.07 sec.
Printer Thermal line printer (Paper width: 58mm)
Internal monitor 5.7 inches color LCD monitor
Shifting range of the measurement
unit
Back/forth ±22 mm
Right/left ±43 mm
Up/down ±17 mm
Vertical adjustment range of the
chinrest
±30 mm
Dimensions
(W) 240 mm
(D) 422 mm
(H) 430 mm
Weight Approx. 13kg
Output RS-232C
Power source
100 to 240V
50/60Hz
Consumption 60VA
Power saving function OFF, 3, 5, 10 min. (switchable)
The circuit diagram, parts lists, and description and instructions for calibration and testing are
available separated from this manual.
AKR550 - Auto Kerato Refractometer > V8 - 12-2017
64
USER MANUAL> XI. SPECIFICATIONS
Page 62

Essilor Instruments USA
8600 W. Catalpa Avenue, Suite 703
Chicago, IL 60656
Phone: 855.393.4647
Email: info@essilorinstrumentsusa.com
www.essilorinstrumentsusa.com
 Loading...