

Page 1
READ AND SAVE THESE INSTRUCTIONS
L
U
®
C
Evaporative
Humidifier
OWNERS
CARE
&
USE
MANUAL
Printed in U.S.A
Models:
826 800 White,
Two Speed
826 900 Ice and Snow,
Two Speed
821 000 White Two Speed
Digital Humidistat
821 990 White Two Speed
Digital Humidistat
Includes Hygrometer
US
SAVE THE ENVIRONMENT
RECYCLE APPROPRIATE MATERIALS
Patents: 5,037,583; 5,110,511; 5,133,904
To order parts and accessories call 1-800 547-3888
Other Patents Pending
French and Spanish
instructions included.
Se incluyen instrucciones
en Español y Francés.
Directives en français et
en espagnol compris.
586 4110 Rev. 5/04
Page 2

Important Safeguards
READ BEFORE USING YOUR HUMIDIFIER
1) This appliance has a polarized plug (one blade is wider than the other).
To reduce the risk of electric shock, this plug is intended to fit only one
way into a polarized 120-volt AC, 15-amp outlet. If the plug does not fit
fully in the outlet, reverse the plug. If it still does not fit, contact a
qualified electrician. Do not attempt to defeat this safety feature. If an
extension cord must be used, it should also accept the wide blade plug
and meet this electrical rating.
2) Do not place the cord under rugs, in traffic areas, or near heat sources.
3) Do not use the humidifier if the cord is damaged.
4) Always unplug the power cord before filling, cleaning, servicing, or
when the unit is not in use to prevent possible electrical shock.
5) Do not place the humidifier near loose drapes, combustible materials, or
heat-producing objects.
6) This humidifier is UL listed with Bemis by Essick Air brand evaporative
wicks in place. To maintain your UL safety listing, see your service
center for all repairs. Use only Bemis by Essick Air brand replacement
wicks and chemicals. To order parts, wicks and chemicals
call 1-800-547-3888.
7) Regular cleaning is required. Refer to the CARE AND MAINTENANCE
section in this manual.
Page 3

Introduction
1
2
3
4
5
Your Bemis by Essick Air humidifier adds invisible moisture to your home
by moving dry inlet air through a saturated wick. As air moves through
the wick, the water evaporates into the air, leaving behind in the wick
any white dust, minerals or dissolved and suspended solids. Because the
water is evaporated, there is no messy mist or spray
just clean and invisible moist air.
As the wick traps accumulated minerals from the water, its ability to
absorb and evaporate water decreases. W
wick at least once a year, preferably disposing of the used wick at the
end of the humidifying season and starting with a new one at the
beginning of the next humidifying season. In hard water areas, more
frequent replacement may be necessary to maintain your humidifier’s
efficiency.
CAUTION - W
or a similar strength product, whenever you refill the water reservoir to
eliminate bacteria growth. Follow the directions to determine the proper
amount to be added to the 6 gallon water reservoir. The evaporative wick
does not require the use of chelating agent type water treatments that are
intended for use in Rotobelt or Water Wheel type humidifiers. Your humidifier is provided with a 6 gallon water reservoir. The unit is designed to
have an output of 8 gallons per 24 hours. When the reservoir has emptied, the refill light will illuminate. The humidifier fan will automatically
shut off. For your safety, unplug humidifier every time it is refilled. If any
water spills on the motor chassis, wipe dry before
plugging in after filling
e recommend using Bemis by Essick Air Bacteria Treatment
e recommend changing the
, and no white dust,
Dry air is drawn into the humidifier
through the top and moisturized as it
passes through the wick. Then it is
fanned out into the room.
1) water reservoir
2) motor chassis
3) evaporative wick
4) dry air intake
5) moist air output
Locate your humidifier at least 4" away
from an inside wall, near an electrical
outlet. Do not position the unit directly in
front of a hot air duct or radiator.
Page 4

Assembly and Operation
1) Unpack humidifier from carton.
2) Remove all packaging materials. Check to see that you have the
following items before discarding packaging:
• Evaporative Wick
• Caster pack
• Lift rod assembly with styrofoam float
Installing Casters:
3) This unit comes equipped with four
casters for added convenience. To
install the casters, lift the chassis off of
the cabinet and place it on a flat, hard
surface where it will not be bumped.
4) Lift out the evaporative wick
frame assembly from the cabinet and
set it aside.
5) To prevent damage to the float and lift rod, untwist the lift rod retainer,
and remove the lift rod assembly from the humidifier cabinet. Do not
attempt to install casters before removing the lift rod assembly.
6) Turn the humidifier cabinet upside down.
7) Install the casters by inserting the caster shaft into the four small holes
positioned roughly 2 inches from each corner of the humidifier cabinet.
Push the casters into the cabinet as far as they will go. Do not force.
Follow this procedure for all four casters. Turn the cabinet right-side up
when done.
Assembling Humidifier:
8) Replace the float assembly and attached lift rod
into the boxed area on the bottom of the inside
of the cabinet. Slip lift rod into retainer ring
and twist to secure. The lift rod should be able
to freely move up and down about 3/8”. The
retainer ring should be located between the two
ribs on the lift rod.
Page 5

9) Replace the evaporative wick frame
assembly into the guides provided in the
bottom of the cabinet and the ribs along
the sides of the cabinet.
10) Place the chassis unit onto the cabinet
ensuring that the chassis seats correctly
into the front and back grooved
edges of the cabinet.
Note: This wavy line is the fill level
Filling the Humidifier:
indicator. Do not fill above this mark.
11) Before filling the humidifier with water,
be certain that the speed control switch
is turned off and that the humidifier is
unplugged. Fill the water reservoir
with cool, fresh, preferably unsoftened
water. If you have only softened water
available in your home, you can use it,
but you will notice a build up of
minerals on the evaporative wick much
sooner. Fill the humidifier to the level
indicated on the wick frame assembly
and “Fill to Here” decal on the cabinet
side wall. Do not overfill the humidifier.
The upper portion of the wick element
must remain exposed above the fill level
indicator mark. When the humidifier is full the float switch will allow
the humidifier to run. When the water level drops to the refill level, the
humidifier will automatically shut off and the “refill” indicator will
light. When first filled, reservoir capacity is 6 gallons.
wavy
line
12) We recommend using Bemis by Essick Air Bacteria Treatment every
time you refill the humidifier to eliminate bacteria growth. Add
bacteriostat according to the instructions on the bottle.
13) The air exit grille should be placed on the front of the humidifier in the
recessed area provided. Insert the bottom edge first.
14) Plug the cordset into the wall receptacle. Humidifier is now ready for
use. NOTE: If you have not filled the humidifier with water the unit
will not run.
Page 6
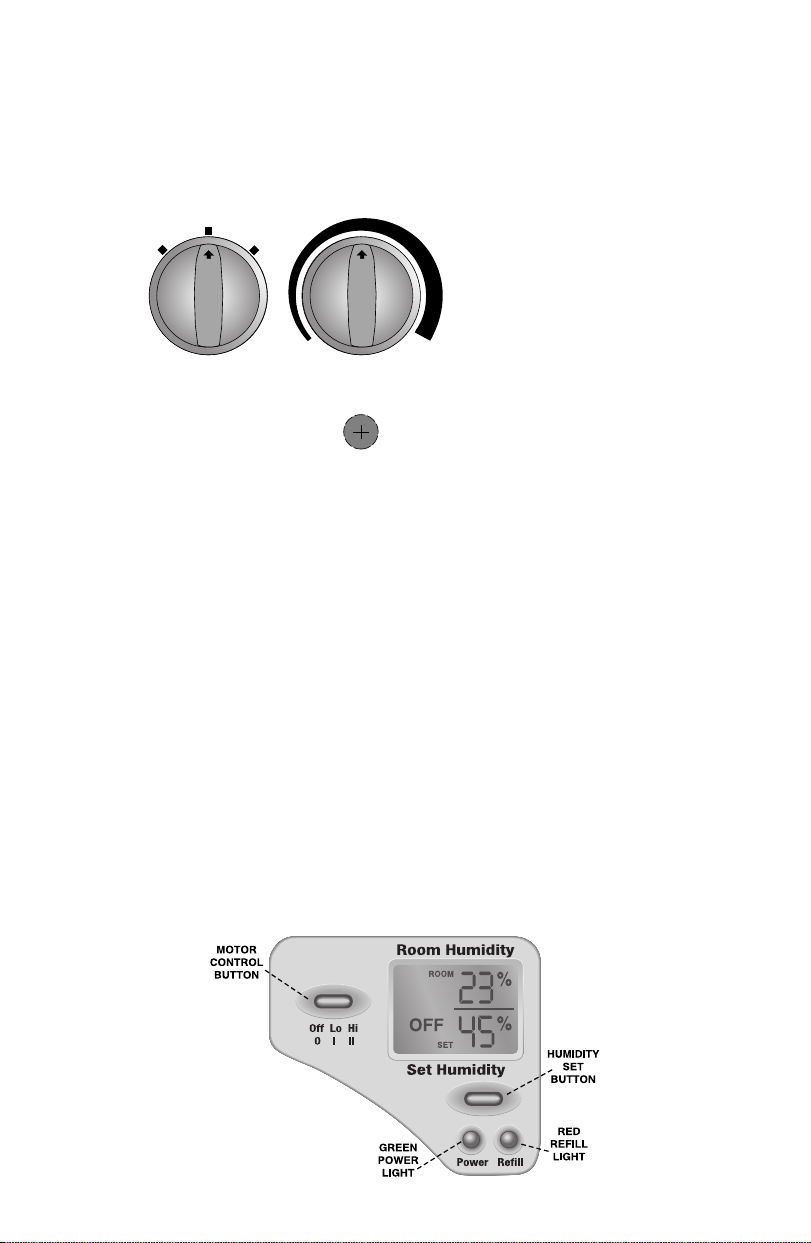
Controls - Models 826 Series:
15) Models 826 900 & 826 800 are equipped with a two speed fan
control switch. Use the low setting for quiet operation and the high
speed for maximum output.
low
off
high
low high
FAN HUMIDISTAT
EMPTY
Operation:
16) Both models have an automatic humidistat. The humidistat will turn the
humidifier on when the relative humidity in your home is below the
humidistat setting and will turn off the humidifier when the relative
humidity reaches the humidistat setting. For initial operation set the
humidistat in the middle “comfort zone” and adjust up or down from
there to achieve the desired humidity level. A suggested initial setting is
shown in the illustration above. When the humidifier is running, you will
feel cool, invisible, humid air exiting from the outlet grille.
Controls - Models 821 Series:
17) Models 821 000 and 821 990 are equipped with a two speed fan control
switch. Use the low setting for the quiet operation and the high setting for
maximum output. These models also have a digital humidistat and LCD display.
The Humidistat sensor continuously monitors the rooms Relative Humidity (% RH)
and displays that number at the top of the display. The desired humidity level (%
RH) can be manually adjusted between 30 and 90%, using the “Set Humidity”
button. This number is displayed at the bottom of the display. 45% RH is the
suggested initial setting.
Page 7

Operation:
18) The automatic humidistat will turn the humidifier on when the relative humidity in
your home is below the humidistat setting and will turn off the humidifier when
the relative humidity reaches the humidistat setting. When the humidifier is
running, you will feel cool, invisible, humid air exiting from the outlet grille.
19) When first plugged in, the display will show the current Room Humidity and will
default to 45% set humidity. If there is no water in the reservoir, the red “Refill”
indicator will be lit and the motor will not run. Unplug the humidifier and fill to
the water level specified.
20) When the reservoir has been filled to the “Fill to Here” marking on the
cabinet side wall, connect the power cord. The Refill indicator will not
be lit, and the motor speed can be set to desired LO or HI speed by
pressing the “OFF LO/HI” button. The green Power
lit. To change motor speed or to turn OFF, repeatedly press the “OFF
LO/HI” button.
21) If the room humidity is lower than the Set Humidity, the motor will run. If
higher than the Set Humidity, the motor will not run. The desired humidity
level can be changed with the “Set Humidity” button. Press the button
once, and the display will flash. Press the button repeatedly to increase
the Set Humidity in steps of 5% RH. When the desired humidity level is
reached, (between 30 - 90 % RH), release the button. If the button is
released and then held down while flashing, the display will
auto-advance rapidly through the range (30 - 90% RH). To exit the
auto-advance mode, release the button.
indicator will be
22) After the “Set Humidity” button has been inactive for three (3) seconds,
it will exit the Set Mode with the last programmed number remaining on
the display.
CAUTION: Under certain conditions, cold objects in the room, such as
windows and outside walls, may cause moisture to condense. Severe
condensation on window sills and walls may result in water damage.
When these conditions exist, a lower humidistat setting is recommended.
Page 8

Care and Maintenance
IMPORTANT: We recommend cleaning your humidifier every two weeks.
Follow Instructions.
Humidifiers provide comfort by adding moisture to dry, heated indoor
air. To get the most benefit from the humidifier and avoid product
misuse, follow all instructions carefully, specifically the operation, care
and maintenance guidelines. Please note this is an electrical appliance
and requires careful attention when in use. In addition, if you do not
follow the recommended care and maintenance guidelines,
microorganisms may be able to grow in the water within the
humidifier’s reservoir.
CAUTION: Disconnect power before cleaning or servicing unit.
1) Turn unit off by turning the humidistat and the fan speed switch to the
off position.
2) Unplug electrical cord from wall outlet.
3) Lift chassis unit with outlet grille from cabinet and place on a hard, flat
surface where it will not be bumped. Use care to avoid damage to the
internal float lever.
Cleaning the Water Reservoir:
4) Carefully lift the wick frame assembly from cabinet, allowing any
water to drain from the wick into the water reservoir. Place wick
assembly in sink to finish draining. Handle wick carefully, paper
is fragile when wet
5) Remove the lift rod and float assembly. (see Assembly Section for
instructions.)
6) Remove any remaining water in the reservoir. After the water is
removed, add 1 gallon of fresh warm water and 8 oz. of undiluted
white vinegar. Clean all interior surfaces using a soft brush and the
cleaning solution. Let the solution stand for 20 minutes. Remove the
solution and wipe out the bottom with a soft cloth dampened with
white vinegar to remove any remaining scale.
Page 9

7) Rinse thoroughly with clean warm water to remove scale and any
remaining cleaning solution before disinfecting the cabinet to prevent
potential growth of microorganisms that may cause respiratory
problems.
Disinfecting the Water Reservoir:
8) Fill the water reservoir with a mixture containing one teaspoon of
chlorine bleach and one gallon of water. Let the solution stand 20
minutes, swishing every few minutes. Wet all surfaces.
9) Empty the water reservoir after 20 minutes. Rinse it with water until the
bleach smell is gone. Dry with a clean cloth or paper towel.
10) Replace the wick assembly into the guides provided in the cabinet.
11) Replace lift rod float assembly.
12) Replace the chassis unit on to the cabinet, ensuring that the chassis
seats correctly into the front and back grooved edges of the cabinet.
13) Fill the reservoir to the full level mark with fresh water and replace
outlet grille.
14) Plug the cord back into a polarized 120 volt AC outlet.
15) Adjust the humidifier controls to the desired setting.
Evaporative Wicks:
We recommend replacing the evaporative wick at least once a season,
more often in areas with hard water. When the wick appears excessively
clogged with mineral deposits, discard it and restore your humidifier’s
efficiency with a new wick. Bemis by Essick Air evaporative wick number
1043 fits all 800 series console humidifiers. Call 1-800-547-3888 to order.
Only Bemis by Essick Air wicks guarantee the certified output of your
humidifier. Use of other wicks will void the warranty and may
reduce your humidifier’s output.
Frame Disassembly
Page 10

Replacing the Wick:
16) Remove the old wick from the frame by
carefully disengaging the fastening
hooks from the rear frame piece (see
illustration). Discard old wick. The new
wick is inserted into the front frame.
The wick will work correctly regardless
of the direction it faces in the frame
(there is no front, back, top, or bottom).
Once the wick is in the frame,
re-engage the frame hooks, to complete
assembly.
17) The frame then fits between the guide
ribs on both sides of the humidifier. (The wick and frame will cover the
vast majority of the width of the humidifier). The portion of the wick
frame which extends up farther than the rest of the frame is positioned
towards the front of the humidifier. (The wick will therefore be
positioned further towards the rear of the humidifier).
Summer Storage:
18) Clean unit as outlined above.
19) Discard the used wick.
20) Allow unit to dry thoroughly before storage. Do not store with water
inside the unit.
21) Do not store the unit in an attic or other high-temperature area.
22) Clean humidifier and install new Bemis by Essick Air evaporative wick
before the next season begins. Only Bemis by Essick Air evaporative
wicks guarantee the rated output of your humidifier. A convenient
order form for wicks and accessories is found in the back of this manual
WARNING: The top housing assembly contains no consumer serviceable
parts. To reduce the risk of electrical shock, do not attempt to open the
wiring cover. Electrical repairs must be made by an authorized Service
Center. Attempts to repair or replace electrical components will void your
warranty.
.
Page 11

Troubleshooting
1) Unit does not operate at any speed setting:
• Polarized cord must be fully inserted in wall outlet.
• Check refill switch operation, by unplugging unit, remove Motor
Chassis, place on side and move refill switch lever. If you do not hear
the switch “click” service may be required.
• Refill with water if necessary.
• Humidistat not set properly - set humidity to a higher level.
• Check the airflow path. Are there any obstructions preventing
movement of the fan blade?
• The motor contains a temperature-sensing fuse. If the motor becomes
overheated, the fuse may trip. Unplug the unit and contact the nearest
authorized service station. DO NOT ATTEMPT to repair the motor yourself.
2) Not enough humidity:
• This is an evaporative humidifier. The humidity is invisible
• Check the condition of the evaporative wick. Replace if clogged or
hardened with minerals.
• The water reservoir may be empty - refill.
3) Too much humidity:
When condensation becomes heavy on cold surfaces in the room, turn
the unit to a lower humidistat setting or increase the room temperature.
.
4) Water Leak:
The cabinet was overfilled. For your safety an overflow hole is
provided in rear of cabinet. Correct water level is marked on wick
frame and cabinet side wall.
5) Odor:
Clean and disinfect cabinet reservoir following CLEANING AND
DISINFECTING INSTRUCTIONS. Use Bemis by Essick Air Bacteria
Treatment to help eliminate unpleasant odors.
6) T
he electronic module on Model 821 Series is not consumer serviceable -
contact Bemis by Essick Air Customer Service for assistance.
Page 12

Accessories
Evaporative Wick
Model 1043. Replaceable wick
continuously wicks up moisture
as it filters out mineral deposits.
Reduces scale build-up in the
unit. Only Bemis by Essick Air
wicks are UL and AHAM
certified to provide the rated
performance from your
Bemis by Essick Air Humidifier.
Bacteria Treatment
No.1970 - 32 oz. Bacteria
Treatment. Controls bacteria
growth in humidifiers. Helps
eliminate unpleasant odors.
Page 13

HOME COMFORT DIVISION
ONE-YEAR LIMITED WARRANTY
The Bemis by Essick Air humidifier warranty covers defects in materials and workmanship for a period of one year from date of retail purchase. This warranty applies only
to the original purchaser of the product.
Within the first 12 months from date of purchase, Essick Air will repair or replace, at its
discretion, any defective part of the humidifier covered by this warranty.
This warranty gives you specific legal rights, and you may also have other rights which
vary from state to state or province to province.
This warranty does not cover damage resulting from misuse or abuse of the humidifier, accidents or alterations to the product, commercial use or damage during shipment.
Misuse includes malfunctions caused by negligence in cleaning or parts fouled with mineral deposits due to hard-water conditions. Alterations to the product include the substitution of non-Bemis by Essick Air brand components including, but not limited to, wicks.
If service becomes necessary, take or send the product to any Bemis by Essck Air
service center.
Essick Air Products, Inc.
5800 Murray Street
Little Rock, AR 72209
501.562.1094
Page 14

Page 15

To keep your humidifier in top working condition, use only Bemis by Essick Air replacement parts.
ACCESSORY ORDER FORM
Only Bemis by Essick Air replacement wicks guarantee your humidifier will maintain its original AHAM certified output.
Superwick for 400 & 600 Series
Console & Credenza Humidifiers.
Summer Protective
Dust Cover for 400 Series
Console Humidifiers
Superwick for 800 Series
Space Saver Console Humidifiers
• Filter only, frame not included
• Helps Eliminate Bacteria & Algae Build-up
• Strongly Recommended for Bemis Humidifiers
& All Other Evaporative Humidifiers
No. 1041
$15.99
No. H4000
$6.99
No. 1043
$12.99
Bacteria Treatment, 32 oz.
No. 1970
$5.99
Item # Description Qty Price Amount
1041 Superwick for 400 and 600 Series Console Humidifiers 15.99
1043 Superwick for 800 Series Space Saver Console Humidifiers 12.99
1045 Superwick for H12 Series Console Humidifiers 18.99
1051 Air Cleaner Filter for 400 and 600 Series Console Humidifier 17.99
1961 Cleaner for all Humidifiers, 32 oz. 3.99
1970 Bacteria Treatment, 32 oz. 5.99
H4000 Summer Protective Cover for 400 Series Console Humidifiers 6.99
1990 Digital Hygrometer/Comfort Sensor 25.99
Shipping Schedule
$0.00 - 19.99 . . $4.00
$20.00 - 49.99 . . $6.00
$50.00 - 99.99 . . $8.00
$100.00+ . . . $10.00
Source Code
BEM 110
Revised
05/03/04
CT RESIDENTS ADD 6% TAX
No. 1045
Superwick for H12 Series
Console Humidifiers
$18.99
No. 1051
Air Cleaner Filter for 400 & 600 Series
Console & Credenza Tabletop Humidifiers
$17.99
No. 1990
Digital Hygrometer/Comfort Sensor
$25.99
• Digitally monitors temperature &
humidity
No. 1961
Humidifier Cleaner, 32 oz.
$3.99
• Helps Remove Lime Scale
• Aides in Cleaning Your Humidifier
TOTALMERCHANDISE
SHIPPING & HANDLING
TOTAL INVOICE AMOUNT
Unit
Name
Address
City State Zip Code
Phone number
Email address
Enclosed is my:
Check or Money Order (US Currency) payable to:
BEMIS BY ESSICK AIR
Visa/MasterCard American Express Discover
Card #:
Signature:
Expiration Date:
Web Orders: www.bemis-parts-store.com
Telephone Orders: • Call toll free 1-800-547-3888
Mail Orders: BEMIS BY ESSICK AIR CONSUMER SERVICES
ORDERS ARE SHIPPED WITHIN 24 HOURS.
If outside the continental USA, call for FREIGHT CHARGES.
• $15.00 minimum telephone orders
20 Constitution Boulevard, South
P.O. Box 884
Shelton, CT 06484-0884
Page 16

Page 17

LEER Y CONSERVAR ESTAS INSTRUCCIONES
L
U
®
C
Humidificador
Vaporizador
MANUAL
CUIDADO
Y USO
POR EL
PROPIETARIO
Impreso en EE.UU.
Modelos:
826 800 Blanco,
Dos Velocidades
826 900 Hielo y Nieve,
Dos Velocidades
821 000 Blanco, Dos Velocidades,
Humidistato Digital
821 990 Blanco, Dos Velocidades,
Humidistato Digital,
incluye Medidor de
humedad
US
PROTEJA EL MEDIO AMBIENTE
RECICLE LOS MATERIALES APROPIADOS
Patentes 5,037,583; 5,110,511; 5,133,904
Otras patentes pendientes
Para ordenar repuestos y accesorios llamar al 1-800 547-3888
Page 18

Pautas Importantes de Seguridad
LEER ANTES DE UTILIZAR SU HUMIDIFICADOR
1) Este artefacto tiene un enchufe polarizado (una espiga es más ancha que la
otra). Para disminuir el riesgo de descarga eléctrica, este enchufe está
diseñado para encajar tan solo de una forma en un tomacorriente
polarizado de 120 voltios CA, de 15 amp. Si el enchufe no encaja
completamente en el tomacorriente, intentar conectarlo en sentido contrario.
Si a pesar de eso no encaja, contactar a un electricista calificado. No intentar
burlar esta característica de seguridad de manera alguna. Si tiene que utilizar
un cordón de extensión, éste también debe aceptar el enchufe con espiga
ancha y debe tener el voltaje adecuado.
2) No colocar el cable debajo de alfombras, en áreas de tráfico, ni cerca de
fuentes de calor.
3) No utilizar el humidificador si el cable está dañado.
4) Para prevenir la posibilidad de choques eléctricos, siempre desenchufar la
unidad de la corriente antes de llenarla, limpiarla, darle servicio o cuando no
esté en uso.
5) No colocar el humidificador cerca de cortinas sueltas, materiales combustibles
u objetos que produzcan calor.
6) Este humidificador está aprobado por UL cuando tiene instalado el
filtro/mecha vaporizadora marca Bemis by Essick Air. Para mantener la certificación UL, visitar su estación de servicio para todas las reparaciones.
Utilizar únicamente mechas de repuesto y químicos marca Bemis by Essick Air.
Para ordenar repuestos y químicos llamar al 1-800-547-3888.
7) Se recomienda limpiar con regularidad. Referirse a la sección de CUIDADO
Y MANTENIMIENTO en este manual.
Page 19

Introducción
1
2
3
4
5
Su humidificador Bemis by Essick Air agrega una humedad invisible a su hogar
haciendo pasar el aire seco a través de la mecha saturada de agua. A medida
que el aire pasa a través de la mecha humedecida, el agua se va vaporizando en
el aire dejando atrás cualquier polvo blanco, minerales o sólidos disueltos y suspendidos en la mecha que a su vez sirve de filtro. Debido a que el agua se evapora, no existe niebla o r
invisible.
A medida que el filtro/mecha vaporizador atrapa los minerales acumulados en el
agua, su capacidad para absorber y vaporizar agua va disminuyendo.
Recomendamos cambiar el filtr
preferiblemente desechando el filtro/mecha usado al final de la temporada en que
se necesita humedad adicional, y comenzando con uno nuevo la siguiente
temporada que requiere humedad adicional. En áreas con aguas duras el
reemplazo puede ser necesario con más frecuencia para conservar la eficiencia de
su humidificador.
PRECAUCIÓN - Para eliminar el desarrollo bacteriano, recomendamos usar
Bactericida Bemis by Essick Air, o un producto de potencia similar cada vez que se
rellene el reservorio de agua. Seguir las instrucciones para determinar la cantidad
apropiada que debe añadirse al reservorio de 6 galones (23 litros) de agua. El
filtro/mecha no requiere de agentes anticalcificantes para el tratamiento de agua
cuyo uso está destinado a humidificadores tipo Correa Rotatoria o Rueda de
Agua. Su humidificador está provisto de un reservorio para agua de 6 galones
(23 litros). La unidad está diseñada para producir 8 galones (30 litros) de
humedad cada 24 horas. Cuando el reservorio se haya vaciado, la luz
indicadora para el relleno de agua se encenderá. El ventilador del humidificador
se apagará automáticamente. Para su seguridad, desenchufe el
humidificador cada vez que lo rellene. Si el agua se derrama
sobre el chasis del motor, séquelo frotándolo
con un trapo antes de volverlo a enchufar.
El aire seco ingresa al humidificador a través
de la parte superior y se humedece a medida
que pasa por el filtro/mecha. Después el
aire humedecido es distribuido en la
habitación por el ventilador.
1) reservorio del agua
2) chasis del motor
3) filtro/mecha vaporizador
4) entrada de aire seco
5) salida de aire húmedo
Ubicar el humidificador a 4” de distancia de
una pared interior, cerca de un tomacorriente
eléctrico. No colocar la unidad frente a ductos
de aire caliente o a radiadores.
ocío sucio ni polvo blanco, tan solo aire húmedo limpio e
o/mecha por lo menos una vez por año,
el
Page 20

Ensamblaje y Operación
1) Sacar el humidificador de la caja.
2) Retirar todos los materiales de embalaje. Revisar para ver si se tiene
los siguientes artículos antes de descartar el material de embalaje.
• Filtro/mecha
• Paquete de ruedas giratorias
• Levantar la varilla con el flotador de
Instalación de las Ruedas:
3) Ésta unidad viene equipada con cuatro
ruedas giratorias para una mayor
comodidad. Para instalar las ruedas,
levantar el chasis del gabinete y
colocarlo sobre una superficie plana y
sólida donde no se vaya a golpear.
4) Levantar el bastidor con el filtro/mecha
evaporadora y colocarlo a un lado.
5) Para evitar dañar el flotador y la varilla
elevadora, desenroscar el retén de la
varilla elevadora y retirar el conjunto de la varilla elevadora del
humidificador. No intentar instalar las ruedas antes de retirar el
conjunto de la varilla elevadora y flotador.
6) Colocar el gabinete del humidificador en posición invertida.
7) Instalar las ruedas insertando su eje en uno de los cuatro orificios
pequeños ubicados aproximadamente a 2 pulgadas (5 centímetros) de
cada esquina del gabinete del humidificador. Presionar la rueda
dentro del orificio tanto como sea posible. No forzarla. Seguir este
procedimiento para las cuatro ruedas. Cuando haya terminado,
colocar de nuevo el gabinete en la posición correcta.
styrofoam
Ensamblaje del Humidificador:
8) Colocar de nuevo el ensamble del flotador con
la varilla elevadora adherida dentro del área
encuadrada en el fondo del gabinete. Deslizar
la varilla elevadora dentro del anillo de retén y
enroscarla hasta asegurarla. La varilla debe
quedar con libertad para moverse hacia arriba
y hacia abajo aproximadamente 3/8” (1.00
cm). El anillo de retén debe quedar ubicado
entre las dos costillas de la varilla elevadora.
Page 21

9) Colocar de nuevo el bastidor con el
filtro/mecha vaporizador dentro de las
guías provistas en el fondo del gabinete y a
lo largo de las paredes interiores.
10) Colocar el chasis dentro del gabinete
asegurándose que el chasis se asiente
correctamente dentro de los bordes
ranurados de la parte anterior y posterior
del gabinete.
línea
ondeada
Llenado del
Nota: Esta línea ondeada es el indi-
Humidificador:
11) Antes de llenar con agua el humidificador,
asegurarse que el control de velocidad esté
apagado, y que el humidificador esté
desconectado. Llenar el reservorio con
agua fría, fresca, preferiblemente no
ablandada. Si tan solo tiene disponible
agua ablandada en su casa puede
utilizarla, pero notará una acumulación más
rápida de minerales en el filtro/mecha
vaporizador. Llenar el humidificador hasta
el nivel indicado en el filtro/mecha y hasta
la calcomanÌa “Fill to Here” en la pared
lateral del gabinete. No llenar el
humidificador en exceso. La porción
superior del elemento del filtro/mecha debe
permanecer expuesto por encima de la marca indicadora del nivel de
llenado. Cuando el humidificador esté lleno, el interruptor del flotador
permitirá que el humidificador funcione. El humidificador se apagará
automáticamente y el indicador “rellenar” (vacío) se iluminará cuando el nivel
de agua caiga al nivel de relleno. El tanque tendrá una capacidad de 6
galones (22,7 Lt.) cuando se llene por primera vez.
12) Para eliminar el desarrollo bacteriano, recomendamos usar Bactericida Bemis
by Essick Air cada vez que rellene el humidificador. Agregar bactericida sigu
iendo las instrucciones en la botella.
13) La rejilla de salida de aire debe colocarse en la parte frontal del humidificador
en el área ranurada provista. Insertar primero el borde inferior.
14) Enchufar el cable en el tomacorriente de la pared. El humidificador está listo
para ser utilizado. NOTA: Si no ha llenado el humidificador con agua, la
unidad no funcionará.
cador del nivel de llenado. Al llenar
de agua no exceder esta marca.
Page 22

Controles - Modelos de la Serie 826:
Luz Roja:
Rellenar
Botón
Control
Motor
Lur Verde:
Encendido
Botón
Regulador de
Humedad
15) Los modelos 826 900 & 826 800 están equipados con un control
para las dos velocidades del ventilador. Usar la velocidad baja
(LOW) para una operación silenciosa y la velocidad alta (HIGH) para
su producción máxima.
low
off
high
FAN HUMIDISTAT
low high
EMPTY
Operación:
16) Ambos modelos tienen un humidistato automático. El humidistato
arrancará el humidificador cuando la humedad relativa de su casa
esté por debajo del nivel fijado en el humidistato, y apagará el
humidificador cuando la humedad relativa alcance el nivel fijado en el
humidistato. Para la operación inicial, fijar el humidistato en el medio
de la “zona de confort” y desde ese nivel ajustar hacia arriba o hacia
abajo hasta obtener el nivel de humedad deseado. En la ilustración
anterior se muestra el nivel inicial sugerido. Cuando el humidificador
esté funcionando, sentirá aire húmedo fresco e invisible saliendo por la
rejilla.
Controles - Modelos de la Serie 821:
17) Los Modelos 821 000 y 821 990 están equipados con un control de
dos velocidades para el ventilador. Usar la velocidad baja (LOW)
para una operación silenciosa y la velocidad alta (HIGH) para
producción máxima de humedad. Estos modelos también tienen un
indicador digital de cuarzo lÌquido (LCD) para la humedad. El sensor
del humidistato verifica constantemente la humedad relativa de la
habitación y la indica con un valor numérico (%RH). El nivel de
humedad (%RH) deseado puede regularse manualmente entre 30 y
90% con el botón “Set Humidity” (regular humedad). Ese valor
numérico aparece en la parte inferior del indicador. Se sugiere una
graduación inicial de 45% RH.
Page 23

Operación:
18. El humidistato automático arrancará el humidificador cuando la
humedad relativa de la habitación esté por debajo del nivel fijado en
el humidistato, y apagará el humidificador cuando la humedad
relativa alcance el nivel fijado en el humidistato. Cuando el
humidificador esté funcionando se sentirá aire húmedo, fresco e
invisible saliendo por la rejilla.
19) Cuando se enchufa por primera vez, el indicador digital indicará la
Humedad Relativa de la habitación en ese momento y se
autoprogramará a una humedad de 45%. Si el tanque no tiene
agua, se encenderá la luz roja indicadora “Refill” (rellenar) y el motor
no funcionará. Desenchufe el humidificador y rellene el tanque al nivel
especificado.
20) Cuando se ha llenado el tanque hasta la marca “Fill to Here” en la
pared lateral del gabinete y enchufe el cordón al tomacorriente. La luz
roja indicadora “Refill
la velocidad del motor a la velocidad deseada LO (baja) o HI (alta)
presionando el botón “OFF LO/HI”. La luz verde indicadora “Power”
(encendido) se prenderá. Para cambiar la velocidad del motor o para
apagar la unidad, presione el botón “OFF LO/HI” repetidamente.
21) Si la humedad de la habitación es menor a la que se ha regulado, el
motor arrancará, de lo contrario no arrancará. El nivel de humedad
deseado puede modificarse con el botón “Set Humidity” (Regulador de
Humedad). Presione el botón una vez y el indicador destellará intermitentemente. Presione el botón repetidamente para aumentar la
humedad relativa (RH) 5% cada vez y suéltelo al llegar al nivel
deseado (entre 30 y 90%). Si se suelta el botón y luego se presiona
cuando está intermitente, el indicador avanzará rápidamente por el
rango de 30 a 90% (RH). Para salir del modo de avance automático,
suelte el botón.
22) Después que el botón “Set Humidity” (Regulador de Humedad) ha
estado inactivo por tres (3) segundos, saldrá del modo “Set Humidity”
(Regular humedad) manteniendo el último valor de humedad relativa
programado en el indicador.
PRECAUCIÓN: Bajo ciertas condiciones, los objetos fríos en la
habitación, tales como ventanas y paredes exteriores pueden hacer
que la humedad se condense. La condensación severa en marcos de
ventanas y paredes puede causar daño por agua. Cuando existan
éstas condiciones, se recomienda fijar el humidistato en un nivel más bajo.
” (rellenar) no se encenderá y se puede graduar
Page 24

Cuidado y Mantenimiento
IMPORTANTE: Recomendamos limpiar su humidificador cada dos semanas.
Seguir las Instrucciones.
Los humidificadores proporcionan confort añadiendo humedad al aire
seco y caliente en recintos encerrados. Para obtener el mayor
beneficio de su humidificador y evitar su mal uso, seguir
cuidadosamente todas las instrucciones, en particular las instrucciones
de operación, cuidado y mantenimiento. Por favor tomar nota que
este es un artefacto eléctrico y requiere de atención cuidadosa cuando
está en uso. Además, si no sigue las instrucciones de cuidado y
mantenimiento recomendadas, existe la posibilidad de que los
microorganismos se desarrollen en el agua dentro del reservorio del
humidificador.
PRECAUCIÓN: Desconectar la energía eléctrica antes de limpiar o darle
servicio a la unidad.
1) Apagar la unidad girando el control de velocidad del ventilador a la
posición de apagado (OFF).
2) Desconectar el cable de electricidad del tomacorriente en la pared.
3) Levantar el chasis con la rejilla de salida sacándola del gabinete y
colocarla sobre una superficie sólida y plana donde no vaya a
golpearse. Ser muy cuidadoso para evitar dañar la varilla interna
de flotación.
Limpieza del Tanque de Agua:
4) Levantar cuidadosamente el bastidor con el filtro/mecha, permitiendo
que el agua del filtro drene al reservorio. Colocar el bastidor con el
filtro/mecha en un sumidero hasta que termine de drenar. Manipule la
mecha cuidadosamente, el papel es frágil cuando está mojado.
5) Retirar el conjunto de la varilla elevadora y flotador. (Para las
instrucciones ver la Sección de Ensamblaje).
6) Eliminar cualquier residuo de agua en el tanque. Después de evacuar
el agua, añadir 1 galón (3,75 Lt.) de agua fresca tibia y 8 Onz.
(236 ml.) de vinagre blanco puro. Limpiar todas las superficies
interiores utilizando un cepillo suave y la solución limpiadora. Dejar
que la solución repose por 20 minutos. Retirar la solución y limpiar el
fondo con un paño suave sumergido en vinagre blanco para remover
las calcificaciones que hayan quedado.
Page 25

7) Antes de desinfectar el gabinete para evitar que se desarrollen
microorganismos que pueden causar problemas respiratorios, enjuagar
el reservorio de agua completamente con agua fresca tibia para
eliminar cualquier residuo de calcificaciones y de solución limpiadora.
Desinfección del Tangue de Agua:
8) Llenar el reservorio con una mezcla conteniendo una cucharada
pequeña de blanqueador de cloro y un galón de agua. Dejar que la
solución repose por 20 minutos, moviéndola a intervalos de varios
minutos. Mojar todas las superficies.
9) Vaciar el reservorio de agua después de 20 minutos. Enjuagarlo con
agua hasta que el olor a blanqueador haya desaparecido. Secar con
un paño limpio o con toallas de papel.
10)Volver a colocar el bastidor del filtro/mecha en las guías ubicadas
dentro del gabinete.
11)Volver a colocar el ensamble del flotador y varilla elevadora.
12)Volver a colocar el chasis dentro del gabinete, asegurándose que se
asiente correctamente en los bordes ranurados anterior y posterior del
gabinete.
13)Llenar el deposito con agua fresca hasta la marca para el nivel de
llenado y colocar la rejilla de salida.
14)Volver a enchufar el cordón en un tomacorriente polarizado de 120
voltios CA.
15)Ajustar los controles del humidificador al nivel deseado.
Filtro/Mecha Vaporizador:
Recomendamos reemplazar el filtro/mecha por lo menos una vez por
temporada, y más frecuentemente en áreas con aguas duras. Cuando
el filtro/mecha se encuentre excesivamente obstruido con depósitos
minerales, desecharlo para recuperar
la eficiencia de su humidificador con
un nuevo filtro/mecha marca
Bemis by Essick Air número 1043
que es compatible con todos los
humidificadores de consola. Llamar
1-800-547-3888 para ordenar.
Solamente los filtros/mecha Bemis by
Essick Air garantizan la capacidad
de su humidificador. El uso de otros
filtros/mecha anulará la garantía y
puede reducir la capacidad de su
humidificador.
Desmontaje del bastidor
Page 26

Reemplazo del
Filtro/Mecha
16) Sacar la mecha vieja del bastidor
desenganchando cuidadosamente los
seguros de la parte posterior del
bastidor (ver la ilustración). Desechar
la mecha vieja e insertar la nueva en el
bastidor frontal. El filtro/mecha
funcionará correctamente sin importar
la dirección del mismo en el bastidor
(no existe parte anterior, posterior,
superior o inferior). Una vez que el
filtro/mecha esté en el bastidor, asegurar de nuevo los ganchos de
fijación, para completar el ensamblaje.
17) Luego el bastidor se encaja entre las guías en ambos lados del
humidificador. (El filtro/mecha y el bastidor cubrirán la mayor parte
del ancho del humidificador). La porción del bastidor del filtro/mecha
que sobresale del resto se coloca hacia la parte frontal del
humidificador. (El filtro/mecha quedará colocado más cerca de la
parte posterior del humidificador).
Almacenamiento Durante el Verano:
18) Limpiar la unidad como se indicó anteriormente.
19) Eliminar el filtro/mecha usado.
20) Permitir que la unidad se seque por completo antes de almacenarla.
No almacenar la unidad si tiene agua en su interior.
21) No almacenar la unidad en áticos u otras áreas donde existan altas
temperaturas.
22) Limpiar el humidificador e instalar el nuevo filtro/mecha evaporizador
Bemis by Essick Air antes que comience la siguiente temporada.
Solamente los filtros/mecha evaporizadores Bemis by Essick Air garan
tizan la capacidad nominal de su humidificador. En la parte posterior
de este manual puede encontrar un formulari para
ordenar filtros/mecha y accesorios.
ADVERTENCIA: La parte superior de la caja no contiene partes a las
cuales el cliente pueda dar mantenimiento. Para reducir el riesgo de
descarga eléctrica, no intentar abrir la cubierta del cableado eléctrico.
Las reparaciones eléctricas deben ser realizadas por una Estación de
Servicio autorizada. Los intentos para reparar o reemplazar
componentes eléctricos anularán su garantía.
Page 27

Diagnóstico de Problemas
1) La unidad no funciona en ningún nivel de velocidad:
• El cordón polarizado debe insertarse completamente en el
tomacorriente de la pared.
• Inspeccionar si el interruptor por el relleno de agua está actuando.
Desenchufe la unidad, saque el chasis del motor, póngalo a un lado y
mueva la palanca del interruptor del nivel de agua. Si no se escucha
un “clic”, el interruptor podría necesitar servicio.
• El Humidistato no está bien regulado, graduarlo a un nivel más alto.
• Revisar el recorrido del flujo del aire. ¿Existen obstrucciones que
eviten el movimiento de las aspas del ventilador?
• El motor contiene un fusible sensible a la temperatura. Si el motor se
sobrecalienta, el fusible puede desconectar la unidad.
Desenchufar la unidad y ponerse en contacto con la estación de
servicio autorizada más cercana. NO INTENTAR reparar el motor
usted mismo.
2) No produce suficiente humedad:
• Este es un humidificador vaporizador. La humedad es invisible.
• Revisar el estado del filtro/mecha vaporizador.
Reemplazarlo si está saturado, o endurecido por los minerales.
• El reservorio de agua puede estar vacío, rellenarlo.
3) Demasiada humedad:
Cuando la condensación se vuelve excesiva sobre las superficies frías
de la habitación, bajar el nivel de humedad en el humidistato o
aumentar la temperatura de la habitación.
4) Fugas de agua:
Se ha llenado el gabinete con demasiada agua. Para su seguridad, el
gabinete tiene un orificio de desfogue en la parte posterior. El nivel
adecuado de agua está marcado en el bastidor de la mecha y en la
pared lateral del gabinete.
5) Olor:
Limpie y desinfecte el tanque del gabinete siguiendo las
INSTRUCCIONES PARA LA LIMPIEZA Y DESINFECCIÓN a
continuación. Para ayudar a eliminar los olores desagradables,
recomendamos usar el Tratamiento Bactericida Bemis by Essick Air.
6) El módulo electrónico en los modelos de la serie 821 no contiene
piezas a las cuales el usuario pueda darles servicio. Llame al Dpto. de
Servicios al Cliente de Bemis by Essick Air para pedir asistencia.
Page 28

Accesorios
Filtro/Mecha
Evaporizador
Modelo 1043. El Filtro/Mecha
reemplazable absorbe agua
continuamente y la convierte en
vapor mientras va filtrando los
residuos minerales. Reduce la
acumulación de calcificaciones
en la unidad. Solamente los
filtros/mecha Bemis by Essick Air
están certificados por UL y
AHAM para obtener el
rendimiento certificado de su
Humidificador Bemis by Essick Air.
Tratamiento para
Bacterias
Tratamiento para Bacterias
No. 1970 - 32 onz. (0.95 lt).
Controla el desarrollo de
bacterias en los humidificadores.
Ayuda a eliminar los olores
desagradables.
Page 29

DIVISIÓN DE CONFORT PARA EL HOGAR
GARANTÍA LIMITADA DE UN AÑO
La garantía del Humidificador Bemis by Essick Air cubre defectos de materiales y de
mano de obra por un período de un año a partir de la fecha de compra al por menor. Esta
garantía se aplica únicamente al comprador original del producto.
Dentro de los primeros 12 meses a partir de la fecha de compra, Essick Air reparará
o reemplazará, a su discreción, cualquier parte defectuosa del humidificador cubierto por
esta garantía.
Esta garantía le otorga derechos legales específicos, y usted podría tener otros derechos los cuales varían de un estado a otro y de una provincia a otra.
Esta garantía no cubre los daños ocasionados por mal uso o abuso del humidificador,
accidentes o alteraciones al producto, uso comercial o daño durante el envío. El mal uso
incluye los malos funcionamientos ocasionados por negligencia en el procedimiento de
limpieza, o partes obstruidas con depósitos minerales debido a la presencia de condiciones
de agua dura. Las alteraciones al producto incluyen la sustitución de componentes con
otros de marca diferente a Bemis by Essick Air, incluyendo pero no limitándose a los filtros/mecha vaporizadores.
Si es necesario hacerle servicio, llevar o enviar la unidad a cualquier Estación de
Servicio Bemis by Essick Air.
Essick Air Products, Inc.
5800 Murray Street
Little Rock, AR 72209
501.562.1094
Page 30

Para mantener su humidificador en condiciones óptimas de operación, use sólo repuestos Bemis by Essick Air. Sólo las mechas
FORMULARIO PARA ORDENAR ACCESORIOS
de repuesto Bemis by Essick Air garantizan que su humidificador mantenga la capacidad original certificada por AHAM.
Supermecha para humidificadores de consola
Supermecha para humidificadores Ahorradores
• Ayuda a eliminar la bacteria y la acumulación de algas.
y credenza Serie 400 y 600.
Forro antipolvo para
humidificadores
de consola serie 400
de Espacio de consola Serie 800.
• Sólo el filtro, no incluye el marco.
• Se recomienda para los humidificadores Bemis
y todos los otros humidificadores vaporizadores.
No. 1041
$15.99
No. H4000
$6.99
No. 1043
$12.99
Bactericida, 946ml (32 Onz.)
No. 1970
$5.99
Art. Descripción Cant. Precio Monto
No. 1045
Supermecha para humidificadores
de consola Serie H12.
$18.99
No. 1051
Filtro de aire para humidificadores de
consola y de mesa Serie 400 y 600.
$17.99
No. 1990
Hidrómetro digital/Sensor de confort
$25.99
- Monitorea en forma digital la
No. 1961
Limpiador de humidificadores, 946ml (32 Onz.)
$3.99
• Ayuda a quitar el sarro acumulado.
• Ayuda a limpiar el humidificador.
temperatura y humedad.
Unidad
1041 Supermecha para humidificadores de consola y credenza Serie 400 y 600. $ 15.99
1043 Supermecha para humidificadores Ahorradores de Espacio de consola Serie 800. $ 12.99
1045
Supermecha para humidificadores de consola Serie H12 $ 18.99
1051 Filtro de aire para humidificadores de consola y de mesa Serie 400 y 600 $ 17.99
1961 Limpiador de humidificadores, 946ml (32 Onz.) $ 3.99
1970 Bactericida, 946ml (32 Onz.) $ 5.99
H4000 Forro para proteger humidificadores de consola serie 400 contra el polvo en el verano $ 6.99
1990 Hidrómetro digital/Sensor de confort $ 25.99
Tarifas para despachos
$0.00 - 19.99 . . $4.00
$20.00 - 49.99 . . $6.00
$50.00 - 99.99 . . $8.00
$100.00+ . . . $10.00
Source Code
BEM 110
Revised
05/03/04
Residentes de CT agregar impuesto de 6%
Total por la mercadería
Flete y Manipuleo
Total de la factura
Nombre:
Dirección:
Ciudad: Estado/Prov.: Cod. Postal
Numero de teléfono:
Correo-e:
Ajunto mi:
Cheque u órden de Pago (en moneda de EE.UU.) a la orden de:
BEMIS BY ESSICK AIR
Visa/MasterCard American Express Discover
Tarjeta No.:
Firma:
Fecha de Expiración:
Órdenes por internet: www.bemis-parts-store.com
Órdenes por teléfono: • Llamar gratis al 1-800-547-3888
Órdenes por correo: BEMIS BY ESSICK AIR CONSUMER SERVICES
Las órdenes se despachan dentro de las 24 horas.
Para fuera de los EE.UU. Continental, llamar a preguntar por los cargos por flete.
• Órdenes mínimas de $15.00
20 Constitution Boulevard, South
P.O. Box 884
Shelton, CT 06484-0884
Page 31

LIRE ATTENTIVEMENT CES DIRECTIVES
L
U
®
C
ET LES CONSERVER.
Humidificateur
évaporateur
GUIDE
D'UTILISATION
ET
D'ENTRETIEN
DU PROPRIÉTAIRE
Imprimé aux É.-U.
Modèles :
826 800 Blanc
à deux vitesses
826 900 Glace et Neige
à deux vitesses
821 000 Blanc, deux vitesses,
humidstat numérique
821 990 Blanc, deux vitesses,
humidistat numérique,
avec hygromètre
US
PROTÉGER L'ENVIRONNEMENT
RECYCLER LES MATIÈRES APPROPRIÉES.
Brevets :5,037,583; 5,110,511; 5,133,904
Autres brevets en instance.
Pour placer une commande de pièces et d'accessoires, composer le : 1-800 547-3888
Page 32

Mesures de sécurité importantes
LIRE ATTENTIVEMENT AVANT D'UTILISER
L'HUMIDIFICATEUR
1) Cet appareil est muni d'une fiche polarisée (une lame est plus large que
l'autre). Pour réduire les risques de chocs électriques, cette fiche a été
conçue pour s'insérer, d'une seule façon, dans une prise polarisée de 120
volts c.a., d'une puissance de 15 ampères. Si la fiche ne s'insère pas
complètement dans la prise, retourner la fiche. Si elle ne s'insère toujours
pas, communiquer avec un électricien qualifié. Ne pas tenter de contourner
cette caractéristique de sécurité. Si l'utilisation d'une rallonge
nécessaire, celle-ci doit également accepter la lame large de la fiche et se
conformer aux valeurs nominales d'électricité mentionnées.
2) Ne pas placer le cordon électrique sous un tapis, dans un endroit passant
ou près d'une source de chaleur.
3) Ne pas utiliser l'humidificateur si le cordon est endommagé.
4) Afin de réduire le risque de chocs électriques, toujours débrancher le
cordon d’alimentation avant de remplir, de nettoyer ou d’entretenir
l’appareil ou encore lorsque celui-ci n’est pas utilisé.
5) Ne pas placer l'humidificateur près de rideaux longs, de matières
combustibles ou d'objets dégageant de la chaleur.
6) Cet humidificateur est approuvé par le UL avec le filtre à mèche d’évaporation de marque Bemis by Essick Air en place. Pour maintenir votre classifi
cation UL, voir le centre de service de la région pour toute réparation.
N’utiliser que les produits chimiques et les filtres à mèche de marque Bemis
by Essick Air en remplacement. Pour placer une commande de pièces,
de filtres à mèche ou de produits chimiques, composer le 1-800-547-3888
7) Un nettoyage régulier est requis. Consultez le chapitre intitulé SOINS ET
ENTRETIEN de ce guide.
est
Page 33

Introduction
1
2
3
4
5
L'humidificateur de Bemis by Essick Air ajoute une humidité invisible dans la
maison en faisant passer l'air sec à travers un filtre à mèche saturé d'eau. Au
fur et à mesure que l'air passe à travers le filtre à mèche, l'eau s'évapore dans
l'air en laissant derrière toutes poussières blanches, minéraux et solides dissous
ou en suspension. Étant donné que l'eau est évaporée, il n'y a aucune vaporisa
tion d'eau ni bruines salissantes et aucunes poussièr
l'air humidifié, propre et invisible.
Au fur et à mesure que le filtre à mèche d'évaporation emprisonne et accumule
les minéraux contenus dans l'eau, sa capacité d'absorption et d'évaporation
diminue. Nous r
par an; de préférence, en éliminant le filtre à mèche usé à la fin de la saison
d'humidification et en commençant la saison d'humidification suivante avec un
nouveau filtre à mèche. Dans les régions où l'eau est dure, un remplacement
plus fréquent peut être nécessaire pour maintenir l'efficacité de l'humidificateur.
MISE EN GARDE : Nous recommandons l'utilisation
bactéries Bemis by Essick Air Bacteria Treatment ou d'un produit similaire à
chaque remplissage du réservoir afin d'éliminer la croissance éventuelle de bactéries. Suivre les directives pour déterminer la quantité appropriée à ajouter au
réservoir de 22,74 L (6 gallons). Le filtre à mèche ne requiert pas l'emploi de
traitements de l'eau du genre utilisant des agents de chélation qui sont conçus
pour les humidificateurs munis d'un centrifugeur ou d'une roue hydraulique.
L'humidificateur est muni d'un réservoir de 22,74 L (6 gallons). L'appareil a été
conçu avec une sortie de rendement de 30,32 L (8 gallons) aux 24 h. Lorsque
le réservoir est vide, la lampe-témoin de remplissage s'allume. Le ventilateur de
l'humidificateur s'arrête automatiquement. Pour plus de sécurité, débrancher
l’humidificateur avant chaque remplissage. Si de l’eau est renversée sur le châssis du moteur, l’éponger avant de rebrancher
l’humidificateur après le remplissage.
L'air sec est tiré à l'intérieur de
l'humidificateur en passant par le dessus
de l'appareil. L'air est humidifié au fur et
à mesure qu'il passe à travers le filtre à
mèche d'évaporation. Il est ensuite
poussé à l'extérieur par le ventilateur.
1- Réservoir
2- Châssis du moteur
3- Filtre à mèche d'évaporation
4- Entrée de l'air sec
5- Sortie de l'air humidifié
Placer l'humidificateur à au moins 10,2
cm (4 po) d'un mur intérieur, près d'une
prise de courant. Ne pas placer
l'humidificateur directement devant une
bouche d'air chaud ou d'un radiateur.
ecommandons de changer le filtre à mèche au moins une fois
es blanches; il n'y a que de
du traitement contre les
-
Page 34

Assemblage et Fonctionnement
1) Déballer l'humidificateur.
2) Enlever toutes les matières d'emballage. Vérifier pour s'assurer que
tous les articles suivants sont compris avant de jeter l'emballage :
• Filtre à mèche d'évaporation
• Ensemble de roues
• Assemblage de la tige de soulèvement avec flotteur en styrofoam
Installation des roues :
3) Cet appareil est fourni avec quatre
roues par souci de commodité. Pour
installer les roues, retirer le châssis du
boîtier et le placer sur une surface
plane et dure, là où il n'y a aucun
danger de s'y heurter.
4) Retirer du boîtier le montage du filtre à
mèche d'évaporation et le mettre de
côté.
5) Pour éviter de causer des dommages au flotteur et à la tige de
soulèvement, défaire le garde de la tige de soulèvement et enlever
l'assemblage de la tige de soulèvement du boîtier de l'humidificateur.
Ne pas tenter de poser les roues avant de retirer l'assemblage de la
tige de soulèvement.
6) Retourner l'humidificateur à l'envers.
7) Installer les roues en insérant une tige de roue dans les quatre petits
orifices situés à 5,08 cm (2 po) environ de chaque coin du boîtier de
l'humidificateur. Enfoncer les roues aussi loin que possible. Ne pas
forcer. Suivre cette étape pour les quatres roues. Remettre le boîtier à
l'endroit une fois terminé.
Assemblage de l'humidificateur :
8) Replacer l'assemblage du flotteur et fixer la tige
de soulèvement dans le compartiment situé au
fond du boîtier. Glisser la tige de soulèvement
dans l'anneau de garde et faire un tour pour
fixer. La tige de soulèvement devrait pouvoir se
déplacer librement de haut en bas (Jeu de 0,95
cm (3/8 de po) environ). L’anneau de garde
devrait se trouver entre les deux rainures de la
tige de soulèvement.
Page 35

9) Remettre le montage du filtre à mèche
d'évaporation dans les guides situés au
fond du boîtier et dans les nervures, sur
les parois du boîtier.
10) Placer le châssis dans le boîtier en
s'assurant qu'il est adéquatement inséré
dans les rainures avant et arrière du
boîtier.
Ligne
ondulée
Remplissage de
l’humidificateur :
11) Avant de remplir l'humidificateur d'eau,
s'assurer que le bouton de réglage de
vitesse est en position d'arrêt et que
l'humidificateur est débranché. Remplir
le réservoir avec de l'eau fraîche de
préférence, une eau non adoucie. S'il
n'y a que de l'eau adoucie de
disponible à la maison, celle-ci peut
être utilisée mais l'accumulation de
minéraux sur le filtre à mèche se
formera beaucoup plus rapidement.
Remplir l’humidificateur au niveau
indiqué sur le montage du filtre et
jusqu’à l’autocollant « Fill to here » sur
la paroi latérale du boîtier. Ne pas trop
remplir l’humidificateur. La partie
supérieure du filtre à mèche doit demeurer exposée, au-dessus de la
marque d'indication du niveau d'eau. Une fois l'humidificateur rempli,
le commutateur-interrupteur de flottation permettra le fonctionnement
del'humidificateur. Lorsque le niveau d'eau s'abaisse au niveau
deremplissage, l'humidificateur s'éteint automatiquement et la
lampe-témoin "refill" s'allume. Lors du remplissage initial, la capacité
du réservoir est de 6 gallons.
12) Nous recommandons d'utiliser le traitement contre les bactéries Bemis
by Essick Air Bacteria Treatment à chaque remplissage de l'humidifica
teur afin d'éliminer la croissance éventuelle de bactéries. Ajouter le
bactériostat selon les directives inscrites sur la bouteille.
13) La grille de sortie d'air doit être placée à l'avant de l'humidificateur
dans l'espace renfoncé. Insérer le bas d'abord.
14) Brancher le cordon dans la prise murale. L'humidificateur est prêt à
fonctionner. REMARQUE : Si l'humidificateur n'est pas rempli d'eau, il
ne fonctionnera pas.
Remarque : La ligne ondulée
représente la marque d'indication
du niveau d'eau pour le remplissage.
Ne pas remplir au-delà de
cette marque.
Page 36

Réglages - Modèles série 826 :
off
low
high
FAN HUMIDISTAT
low high
EMPTY
VOYANT ROUGE
DE REMPLISSAGE
BOUTON DE
RÉGLAGE
DU MOTEUR
VOYANT VERT
DE MISE
EN MARCHE
BOUTON DE
RÉGLAGE
DE L’HUMIDITÉ
15) Les modèles 826 900 et 826 800 possèdent un bouton de réglage à
deux vitesses pour le ventilateur. Utiliser la vitesse faible pour un mode
de fonctionnement silencieux ou une vitesse plus élevée pour un
rendement maximal.
Fonctionnement :
16) Les deux modèles sont munis d'un hygrostat automatique. L'hygrostat
met l'appareil en marche lorsque l'humidité relative de la pièce est
inférieure au réglage établi et éteint l'appareil lorsque l'humidité relative
atteint le taux d'humidité voulu. Pour le fonctionnement initial, régler
l'hygrostat au milieu, à la « zone de confort » et à partir de là, ajuster un
peu plus haut ou un peu plus bas pour atteindre le taux d'humidité
voulu. Le réglage initial suggéré est montré dans le schéma plus haut.
Lorsque l'humidificateur est en fonction, un air frais, invisible et humide
se dégage de la grille de sortie.
Réglages - Modèles série 821 :
17) Les modèles 821 000 et 821 990 sont munis d’un commutateur de
commande du ventilateur à deux vitesses. Utilisez le réglage bas pour
un fonctionnement silencieux et le réglage élevé pour un débit au
maximum. Ces modèles sont également dotés d’un humidistat
numérique et d’un afficheur ICD. Le senseur de l’humidistat surveille
en tout temps l’humidité relative (% RH) de la pièce et affiche le résultat
dans le haut de l’afficheur. Le niveau d’humidité désiré (% RH) peut
être réglé manuellement entre 30 et 90 % à l’aide du bouton
« Set Humidity ». Le numéro est indiqué au bas de l’afficheur. Le
réglage initial suggéré est de 45 % RH.
Page 37

Fonctionnement :
18) L’humidistat automatique met l’humidificateur en marche lorsque
l’humidité relative dans la pièce tombe sous le niveau voulu (selon le
réglage sur l’humidistat) et l’arrête lorsque l’humidité relative atteint le
niveau voulu. Lorsque l’humidificateur est en marche, vous sentirez de
l’air frais, invisible et humide émanant de la grille de sortie d’air.
19) Lorsque l’humidificateur est initialement branché, l’afficheur indique le
niveau d’humidité actuel dans la pièce et passe par défaut au
réglage de 45 % d’humidité. Si le réservoir ne contient pas d’eau,
l’indicateur rouge marqué “ Refill “ s’allume et le moteur ne démarre
pas. Il vous faut alors débrancher l’humidificateur et le remplir
jusqu’au niveau d’eau précisé.
20) Après le remplissage du réservoir jusqu’à la ligne « Fill to here » sur la
paroi latérale du boîtier, brancher le cordon d’alimentation.
L’indicateur « Refill » ne sera plus allumé et la vitesse du moteur pourra
être réglée au niveau BAS (« LO ») ou ÉLEVÉ (« HIGH ») en appuyant
sur le bouton « OFF LO/HI ». L’indicateur vert de mise en marche
s’allumera. Pour changer la vitesse du moteur ou pour arrêter
l’humidificateur, appuyer à plusieurs reprises sur le bouton
« OFF LO/HI ».
21) Si l’humidité dans la pièce est inférieure au niveau d’humidité réglé
dans l’humidistat, le moteur se mettra en marche. Si elle y est
supérieure, le moteur ne se mettra pas en marche. Le niveau désiré
d’humidité peut être changé à l’aide du bouton de réglage de
l’humidité (« Set Humidity »). Appuyer une seule fois sur le bouton
pour faire clignoter l’afficheur. Appuyer sur le bouton à plusieurs
reprises pour faire hausser le niveau d’humidité en tranches de 5 %
d’humidité relative (« RH »). Lorsque le niveau d’humidité désiré est
atteint (entre 30 % et 90 % RH), relâcher le bouton. Si le bouton est
relâché et ensuite tenu enfoncé pendant que clignote l’afficheur,
l’afficheur avancera rapidement dans la gamme des réglages de
niveaux (10 - 90 % RH). Pour sortir du mode d’avance rapide,
relâcher le bouton.
22) Si le bouton de réglage d’humidité demeure inactif pendant trois (3)
secondes, le mode de réglage est annulé et l’humidificateur demeure
au dernier mode programmé apparaissant sur l’afficheur.
MISE EN GARDE : Dans certaines conditions, les surfaces froides
dans la pièce telles que les fenêtres et les murs extérieurs peuvent
provoquer la condensation de l'humidité. Une forte condensation sur le
bord des fenêtres et les murs peut causer des dégâts d'eau. Dans un tel
cas, il est recommandé d'abaisser le réglage de l'hygrostat.
Page 38

Soins et Entretien
Important : Nous recommandons de nettoyer l'humidificateur aux deux
semaines. Suivre les directives.
Les humidificateurs fournissent du confort en ajoutant de l'humidité à
l'air sec d'une pièce chauffée. Afin de tirer le maximum d'avantages de
l'humidificateur et d'éviter une mauvaise utilisation du produit, suivre
attentivement toutes les directives, particulièrement celles qui portent sur
le fonctionnement, les soins et l'entretien de l'appareil. Il est à noter que
l'humidificateur est un appareil électrique; par conséquent, il doit être
utilisé avec précautions. De plus, le fait de ne pas suivre les directives
recommandées dans les Soins et Entretien de l'appareil risque de
favoriser la croissance de micro-organismes dans l'eau du
réservoir de l'humidificateur.
MISE EN GARDE : Débrancher l'appareil avant tout nettoyage ou entretien.
1) Éteindre l'appareil en tournant le bouton de réglagede l'hygrostat et
de la vitesse du ventilateur en position d'arrêt.
2) Débrancher le cordon électrique de la prise murale.
3) Retirer le châssis avec la grille de sortie du boîtier et les placer sur une
surface plane et dure, là où il n'y a aucun danger de se heurter contre
ces pièces. Agir avec précautions afin d'éviter tout dommage au levier
du flotteur interne.
Nettoyage du réservoir d’eau :
4) Soulever délicatement le montage du filtre à mèche du boîtier tout en le
laissant s'égoutter dans le réservoir d'eau. Placer le montage du filtre à
mèche dans l'évier pour compléter la vidange de l'eau. Manipuler
soigneusement le filtre à mèche : le papier mouillé est
délicat.
5) Enlever l'assemblage de la tige de soulèvement et du flotteur (Voir les
directives dans le chapitre portant sur l'Assemblage).
6) Vider toute eau restante dans le réservoir. Une fois l’eau vidée, ajouter
1 gallon d’eau fraîche tempérée et 8 oz de vinaigre blanc non dilué.
Une fois l'eau vidangée, ajouter une solution de 3,79 L (1 gallon)
d'eau pure et tiède et d'une tasse (8 oz) de vinaigre blanc pur.
Nettoyer toutes les surfaces internes à l'aide d'une brosse à poils
souples et de la solution nettoyante. Laisser agir la solution pendant 20
minutes. Enlever la solution et essuyer le fond de l'appareil avec un
chiffon doux préalablement mouillé de vinaigre blanc afin d'éliminer
toute tracede calcaire.
Page 39

7) Rincer abondamment avec de l'eau pure et tiède pour éliminer le
calcaire et la solution nettoyante avant de désinfecter le boîtier afin de
prévenir la croissance éventuelle de micro-organismes qui peuvent
créer des problèmes respiratoires.
Désinfection du réservoir d’eau :
8) Remplir le réservoir d’eau avec un mélange contenant une cuillérée à
thé de produit à blanchir au chlore et un gallon d’eau. Laisser agir la
solution pendant
20 minutes, en remuant de temps à autre. Mouiller toutes les surfaces.
9) Vider le réservoir après 20 minutes. Rincer avec de l'eau jusqu'à
disparition de l'odeur de chlore. Essuyer avec un chiffon propre ou un
essuie-mains.
10) Replacer le montage du filtre à mèche dans les nervures qui se trouvent
dans le boîtier.
11) Remettre l'assemblage de la tige de soulèvement et du flotteur.
12) Replacer le châssis dans le boîtier en s'assurant qu'il repose
parfaitement dans les rainures avant et arrière du boîtier.
13) Remplir le réservoir d'eau fraîche jusqu'à la marque indiquant le plein
niveau et remettre la grille de sortie.
14) Rebrancher la fiche dans une prise polarisée de c.a. de 120 volts.
15) Régler l'hygrostat au taux désiré.
Filtre à mèche d'évaporation :
Nous recommandons de remplacer le filtre à mèche au moins une fois
par saison et plus souvent, dans les régions où l'eau est dure. Lorsque
le filtre à mèche semble excessivement obstrué par des dépôts de
minéraux, le jeter et rétablir l'efficacité de l'humidificateur en mettant
un filtre à mèche neuf. Le numéro 1043 de filtre à mèche
d'évaporation de Bemis by Essick
Air convient à tous les humidifica
teurs à console. Pour placer une
commande, composer le
1-800-547-3888. Seule l'utilisation
de filtres à mèche de Bemis by
Essick Air garantit le rendement
certifié à la sortie de votre
humidificateur. L'utilisation de
mèches autres que de Bemis by
Essick Air annule la garantie et peut
réduire le rende ment à la sortie de
l'humidificateur.
Démontage du châssis
Page 40

Remplacement du
filtre à mèche :
16) Retirer l’ancien filtre à mèche du
montage en dégageant soigneusement
les crochets du montage à l’arrière du
montage (voir l’illustration). Jeter
l’ancien filtre à mèche. Le nouveau
filtre s’insère dans la partie avant du
montage. Le filtre à mèche fonctionne
adéquatement, peu importe le sens qui
lui est donné dans le montage (il n'y a
pas de haut, de bas, d'avant ni
d'arrière). Une fois que le filtre à mèche est en place, refermer les cro
chets du montage pour terminer l’assemblage.
17) Le montage s'ajuste entre les nervures situés sur les côtés de
l'humidificateur. (Le filtre à mèche et le montage couvre presque toute
la largeur de l'humidificateur). La partie surélevée du montage se place
à l'avant de l'humidificateur. (Le filtre à mèche est, par conséquent,
placé un peu plus vers l'arrière de l'humidificateur).
Entreposage lors de la saison estivale :
18) Nettoyer l'appareil tel qu'indiqué plus haut.
19) Jeter le filtre à mèche usé.
20) Laisser sécher l'appareil complètement avant l'entreposage. Ne pas
entreposer avec de l'eau dans l'appareil.
21) Ne pas entreposer l'appareil dans le grenier ou dans un endroit où la
température est élevée.
22) Nettoyer l'humidificateur et installer un nouveau filtre à mèche de
Bemis by Essick Air avant le début de la saison suivante. Seule l'utilisa
tion de filtres à mèche d'évaporation garantit le rendement certifié à la
sortie de l'humidificateur. Un bon de commande pour les mèches et
accessoires se trouve à l'arrière de ce guide.
AVERTISSEMENT : Le dessus du boîtier ne comprend aucune pièce
pouvant faire partie du service après-vente. Pour réduire les risques de
chocs électriques, ne pas tenter d'ouvrir le couvercle sous lequel se
trouve le montage des fils. Toute réparation électrique doit être faite par
un centre de service autorisé. Toute tentative de réparation ou de
remplacement des composants électriques de cet appareil annule la garantie.
Page 41

Guide de dépannage
1) L'appareil ne fonctionne pas quel que soit le réglage :
• La fiche polarisée doit être complètement insérée dans la prise murale.
• Vérifier le fonctionnement du commutateur de remplissage :
débrancher l’humidificateur, retirer le châssis du moteur, le placer sur
le côté et faire bouger le levier du commutateur de remplissage. Si
le commutateur n’émet pas de « clic », des réparations pourraient
s’avérer nécessaires.
• Le moteur comprend un fusible sensible à la chaleur. Si le moteur
surchauffe, le fusible peut sauter. Débrancher l'appareil et
communiquer avec un centre de réparation autorisé le plus proche.
NE PAS TENTER de réparer soi-même le moteur.
• L’humidistat ne se règle pas convenablement - régler l’humidité à un
niveau plus élevé.
2) Humidité insuffisante :
• Cet appareil est un humidificateur à évaporation. L'humidité est invisible.
• Vérifier l’état de la mèche d’évaporation. Si elle est bouchée ou
durcie sous l’effet des minéraux, la remplacer.
• Le réservoir peut être vide - le remplir.
3) Trop d'humidité :
• Lorsque la condensation devient trop lourde sur les surfaces froides de
la pièce, tourner le bouton de réglage de l'hygrostat pour abaisser le
taux d'humidité ou augmenter la température de la pièce.
4) Fuite d’eau :
• Le boîtier a été trop rempli. Pour votre sécurité, une orifice de
déversement se trouve à l’arrière du boîtier. Le niveau d’eau
adéquat est indiqué sur le montage du filtre à mèche et sur la paroi
latérale du cabinet.
5) Odeur :
• Nettoyer et désinfecter le réservoir du boîtier en suivant les directives
à cet effet. Utiliser la formule de traitement Bemis by Essick Air
Bacteria Treatment pour éliminer les odeurs malsaines.
6) • Le module électronique du modèle de série 821 ne peut pas être
entretenu ou réparé par le consommateur - communiquer avec le
service à la clientèle de Bemis by Essick Air pour obtenir l’assistance
voulue.
Page 42

Accessoires
Filtre à mèche
d'évaporation
Le modèle 1043. Le filtre à
mèche d'évaporation
remplaçable dégage
continuellement de l'humidité tout
en captant les dépôts de
minéraux. Il réduit l'accumulation
de calcaire dans l'appareil. Seuls
les filtres à mèche Bemis by Essick
Air fournissent le rendement certi
fié par l'UL et le AHAM pour
l'humidificateur de Bemis by
Essick Air.
Traitement contre les
bactéries
Traitement contre les bactéries
No: 1970-32 oz.
Contrôle la croissance des
bactéries dans les humidificateurs.
Aide à éliminer les odeurs
désagréables.
Page 43

DIVISION DU CONFORT À LA MAISON
GARANTIE LIMITÉE DE UN AN
La garantie sur l'humidificateur Bemis by Essick Air porte sur tous défauts dans la matière
ou la fabrication et ce, pour une période de un an, à compter de la date d'achat chez le détaillant. Cette garantie ne s'applique que pour l'acheteur d'origine de ce produit. Dans les 12 premiers mois de la date d'achat, Essick Air répare ou remplace, à sa discrétion, toute pièce
défectueuse comprise dans cette garantie.
Cette garantie vous donne des droits particuliers. Il se peut que vous ayez d'autres droits
qui varient d'un état à l'autre ou d'une province à l'autre.
Cette garantie ne couvre pas les dommages causés par une mauvaise utilisation, un
emploi abusif, un accident ou des modifications portées sur le produit, une utilisation
commerciale ou des dommages subis lors du transport. Une mauvaise utilisation comprend
un mauvais fonctionnement de l'appareil dû à de la négligence dans le nettoyage ou à des
pièces souillées de dépôts de minéraux en raison de la dureté de l'eau. Les modifications
portées au produit comprennent la substitution pour des éléments autres que ceux de marque
Bemis by Essick Air y compris, mais sans limiter, les filtres à mèche.
Pour toute réparation, apporter ou envoyer le produit à n'importe quel Centre de service Bemis
by Essick AIr.
Essick Air Products, Inc.
5800 Murray Street
Little Rock, AR 72209
501.562.1094
Page 44

Pour maintenir votre humidificateur en excellente condition, n’utilisez que les pièces de rechange de Bemis by Essick Air.
BON DE COMMANDE POUR LES ACCESSOIRES
Seules les mèches de rechange de Bemis by Essick Air peuvent assurer que votre humidificateur maintienne sa capacité
de rendement à la sortie qui est homologuée par l’AHAM.
No : H4000
6,99 $
No : 1043
No : 1041
15,99 $
12,99 $
No : 1970
5,99 $
Superwick pour les humidificateurs à console
et à credenza des séries 400 et 600.
Housse de protection contre la poussière
durant l’été pour les humidificateurs à
console de la série 400.
Superwick pour les humidificateurs
à console compact « Space Saver ».
• Filtre seulement, structure non comprise.
Traitement contre les bactéries, 32 oz
• Favorise l’élimination de la prolifération des bactéries et du fongus.
• Produit fortement recommandé pour les humidificateurs de Bemis
et autres humidificateurs à évaporation.
No : 1045
Superwick pour les humidificateurs à
console de la série H12.
18,99 $
No : 1051
Filtre Air Cleaner pour les humidificateurs de table
à console ou crédenza des séries 400 et 600.
17,99 $
No : 1990
Hygromètre numérique/Senseur Confort
25,99 $
No : 1961
Nettoyeur pour humidificateur, 32 oz
3,99 $
• Favorise l’élimination de calcaire.
• Facilite le nettoyage de l’humidificateur
Article no: Description Quant. Prix Coût
1041 Superwick pour humidificateurs à console de séries 400 et 600 15,99 $
1043 Superwick pour humidificateurs à console compact “Space Saver” 12,99 $
1045 Superwick pour humidificateurs à console de série H12
18,99 $
1051 Filtre Air Cleaner, pour humidificateurs à console de séries 400 et 600 17,99 $
1961 Nettoyeur pour tous humidificateurs, 946 mL (32 oz) 3,99 $
1970 Traitement contre les bactéries, 946 mL (32 oz) 5,99 $
H4000 Housse de protection contre la poussière durant l’été pour humidificateurs à console de série 400 6,99 $
1990 Hygromètre numérique/Senseur Confort 25,99 $
Tarif d’expédition
$0.00 - 19.99 . . $4.00
$20.00 - 49.99 . . $6.00
$50.00 - 99.99 . . $8.00
$100.00+ . . . $10.00
Source Code
BEM 110
Revised
05/03/04
COÛT TOTAL DE LA MARCHANDISE :
TAXE DE 6 % POUR LES RÉSIDENTS DU CT :
FRAIS DE TRANSPORT ET DE MANUTENTION :
MONTANT TOTAL DE LA FACTURE :
Nom :
Adresse :
Ville : Province : Code postal :
Tél No :
Adresse élect :
Vous trou verez ci-joint mon :
Chéque ou mandat poste (en devises américaines) á l'ordre de :
BEMIS BY ESSICK AIR
Visa/MasterCard American Express Discover
Carte no :
Signature :
Date d’échéance :
Commandes sur le Web : www.bemis-parts-store.com
Commande par téléphone : • Composez sans frais le : 1-800-547-3888
Commande par correspondance : BEMIS BY ESSICK AIR CONSUMER SERVICES
• Les commandes par téléphone doivent être d'un minimum de 15 $.
20 Constitution Boulevard, South
P.O. Box 884
Shelton, CT 06484-0884
LES COMMANDES SONT EXPÉDIÉES DANS LES 24 H.
À l’extérieur des É-U., communiquez avec nous pour connaître les frais de fret.
Page 45

Authorized Repair and Service Stations
For a list of service stations authorized to make both in-warranty and
out-of-warranty repairs to Bemis by Essick Air humidifiers, go to the
humidifier section of our web site http://www
e-mail: info@essickair
retailer for accessories and parts. If unable to obtain them from
your local source, call or write:
.com. Contact your local service station or
.essickair.com or
Estaciones Autorizadas para Reparaciones y Servicio
Para una lista de estaciones servicio autorizadas para reparar
humidificadores Bemis by Essick Air tanto bajo la garantía como
fuera de ésta, visite la sección de humidificadores en nuestro sitio
en la internet http://www.essickair.com or e-mail: info@essickair.com
contáctese con la estación de servicio local o lugar de ventas al
detalle de accesorios y repuestos. Si no le es posible obtenerla de
sus fuentes locales, llámenos o escríbanos a:
Centres autorisés pour réparations et service
Pour obtenir une liste des centres de service autorisés à effectuer
les réparations sous garantie et hors garantie des humidificateurs
Bemis by Essick Air, rendez vous à la section « Humidificateurs »
de notre site Web au
e-mail: info@essickair.com. Pour l’achat d’accessoires et de pièces,
communiquez avec votre centre de service le plus près. S’il vous
est impossible d’en faire l’achat auprès de votre ressource locale,
appelez-nous ou écrivez-nous au:
http://www.essickair.com
or
Bemis by Essick Air Customer Service
20 Constitution Boulevard, South
P.O. Box 884
Shelton, CT 06484-0884
Phone: 800-547-3888
Page 46

Essick Air Products
5800 Murray Street
Little Rock, AR 72209
501.562.1094
 Loading...