

Page 1
ESSICKAIR
The Cool One
Owner’s Manual
Model #’s
SI-500S , SI-500D
SI-700D , SI-700S
SI-500S12 , SI-500D12
SI-700S12 , SI-700D12
SINGLE INLET
Horizontal And Down Discharge
Evaporative
Air Cooler
Read & Save This
Instruction Manual!
Our Mission:
We Will Respond to Our Customers With High Quality Products
and Service, While Eliminating Waste From Our Processes.
P/N 70093
REV 4/02
Page 2
Evaporative Cooling
Evaporative cooling uses the principle of evaporation to lower the air temperature. Hot, dry air is passed through wetted
filters and is converted to refreshingly cooled air. Essick Coolers make the best use of the evaporative process by
controlling the flow of water, spreading the water evenly over the filters, and keeping a steady stream of cooled air
entering your home. It is exhausted out open windows or doors, carrying heat, smoke and odors along with it. Essick
evaporative coolers are 80% less costly to operate than refrigerated air conditioners.
Cautions: To prevent harm to yourself and others, and to avoid damage to your cooler, PLEASE follow these guidelines.
SAFETY GUIDE LINES & CAUTIONS
When Installing When Operating When Servicing
Make sure that unit is installed on a sound
structure that will support the full operating
weight of the cooler. See page 5.
Before attempting to transport cooler to the roof.
Separate fan section from wet section to reduce
weight. Always plan a safe method of
transporting cooler to installation site without
damage to the cooler or injury to yourself.
Do Not connect power to cooler before
installation is complete.
Wear gloves and protective eyewear when
installing or servicing.
Make sure that cooler circuit is equipped with a
(slow blow) breaker large enough to support the
full amperage of the cooler.
To reduce the risk of fire or electrical shock, DO
NOT use this fan with any Solid-state speed
control device.
This cooler is equipped with an automatic
thermally protected motor. If it shuts off on its
own for any reason, it can restart without
warning.
Be sure to disconnect unit from power
source before servicing. If not, it can be
turned on from inside the house and start
unexpectedly.
Never drain water onto your roof. Water
residue could cause you to slip or may stain
your roof.
If the motor shuts off because of thermal
overload, check into the problem
immediately. If allowed to continue,
permanent damage will occur.
Tools and supplies needed for installation
Pliers
Screwdrivers
Adjustable wrenches
Tubing cutter
5/32 hex key wrench
Level
Electric drill
Drill bits
Hammer
Duct tape
Caulk
Sheet metal screws
ECR-6 wall switch
Safety glasses
Wiring supplies – It is recommended that a licensed
electrician do all electrical work.
Ductwork – A local sheet metal shop can supply ductwork.
¼” water line
Saddle valve or faucet adapter
Roof stand (if cooler is roof mounted)
Roof flashing and pitch
Mounting
1. Prepare duct to fit model used (500 series coolers 17 ¾” square; 700 series 19 ¾” square).
2. Cut opening in wall or roof to fit duct. If wall studs or roof joists are cut, reinforce them.
3. Mount the duct in the opening. The duct will fit inside the cooler opening. The duct length from roof to bottom of cooler
should be a minimum of 4” at the closest point, so there is access to the water drain.
4. Install flashing around roof opening to prevent water entry. Use pitch to seal the seams.
5. Measure cooler and layout mounting location.
6. Mount cooler to stand or pad. Cooler must be level front to back and left to right. Note: It is best that the fan section
end of the cooler face up the roof to achieve a lower profile and allow better access to the drain.
7. Be sure to securely fasten all four corners of cooler to stand or pad.
8. Caulk duct to the cooler to prevent air leakage.
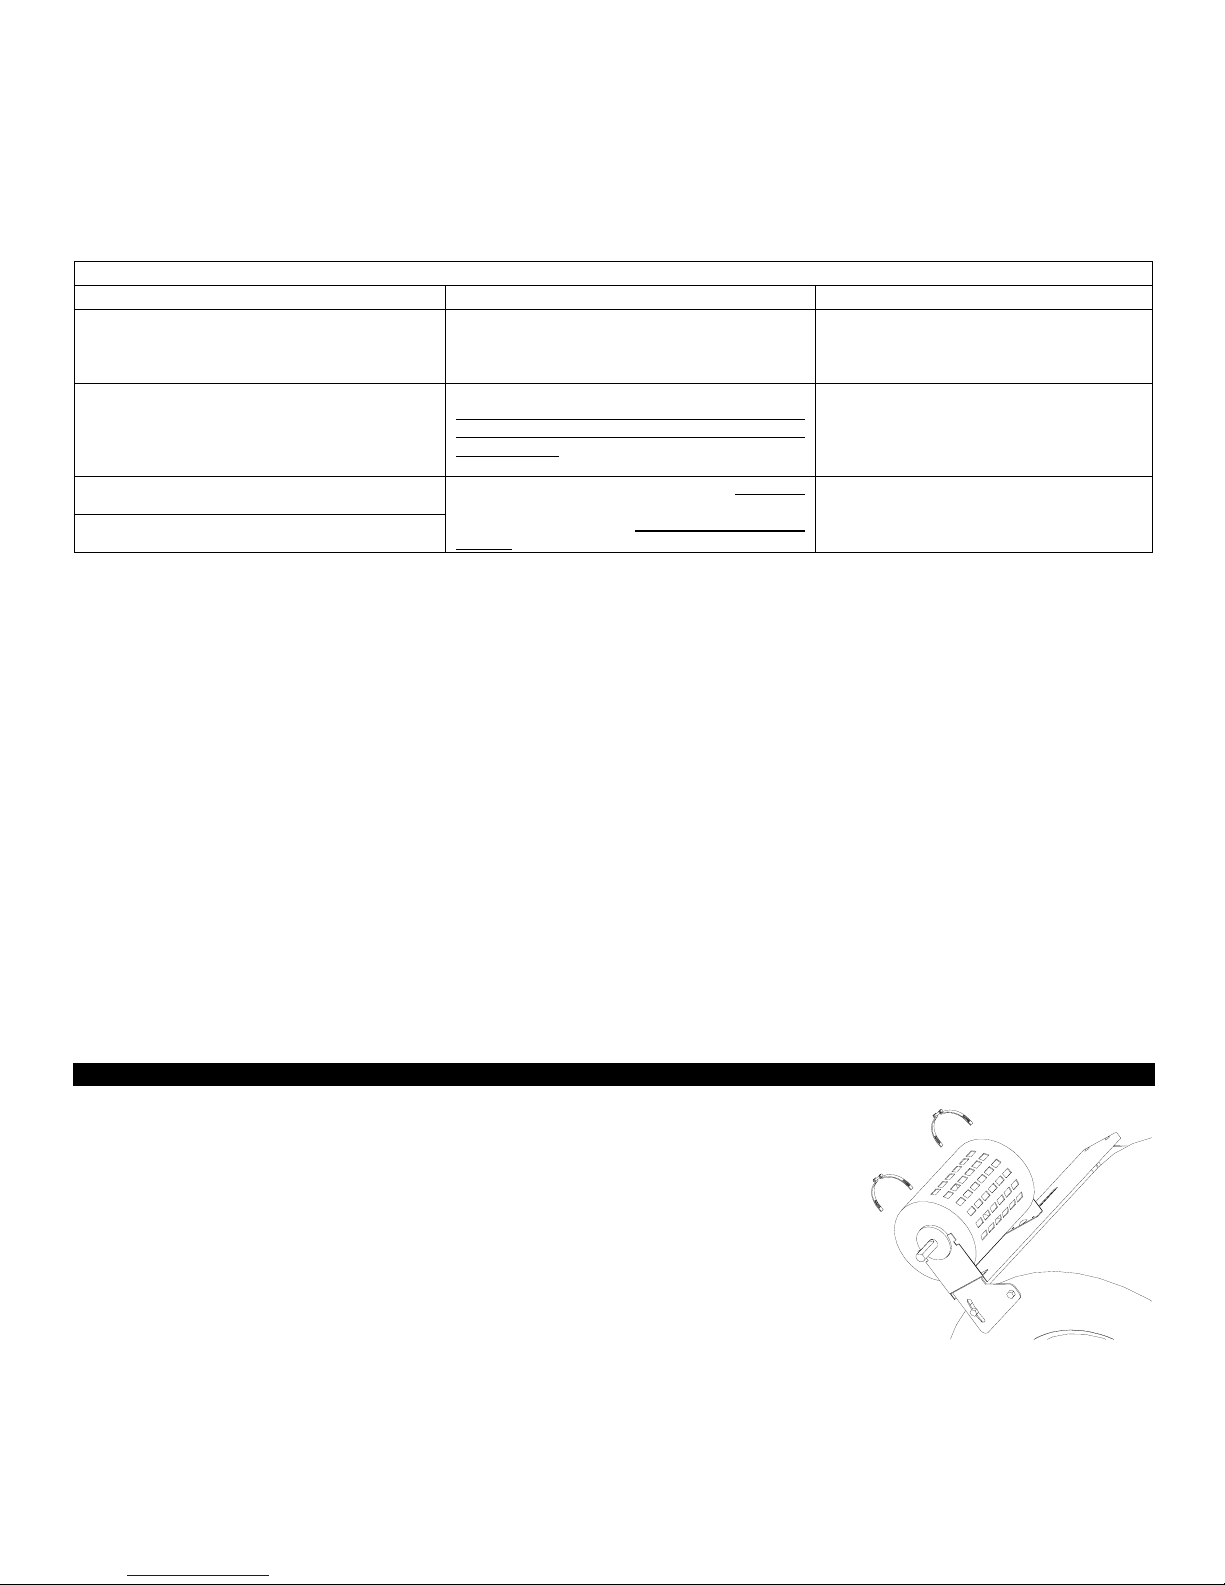
Motor mounting
Warning: Do Not energize the cooler until the installation is complete.
1. Place the motor into the cradles. Be sure that the cradles fit into the groove in the
motor grommets.
2. Secure with the saddle clamps provided in the installation package. DO NOT
OVERTIGHTEN.
2
Page 3
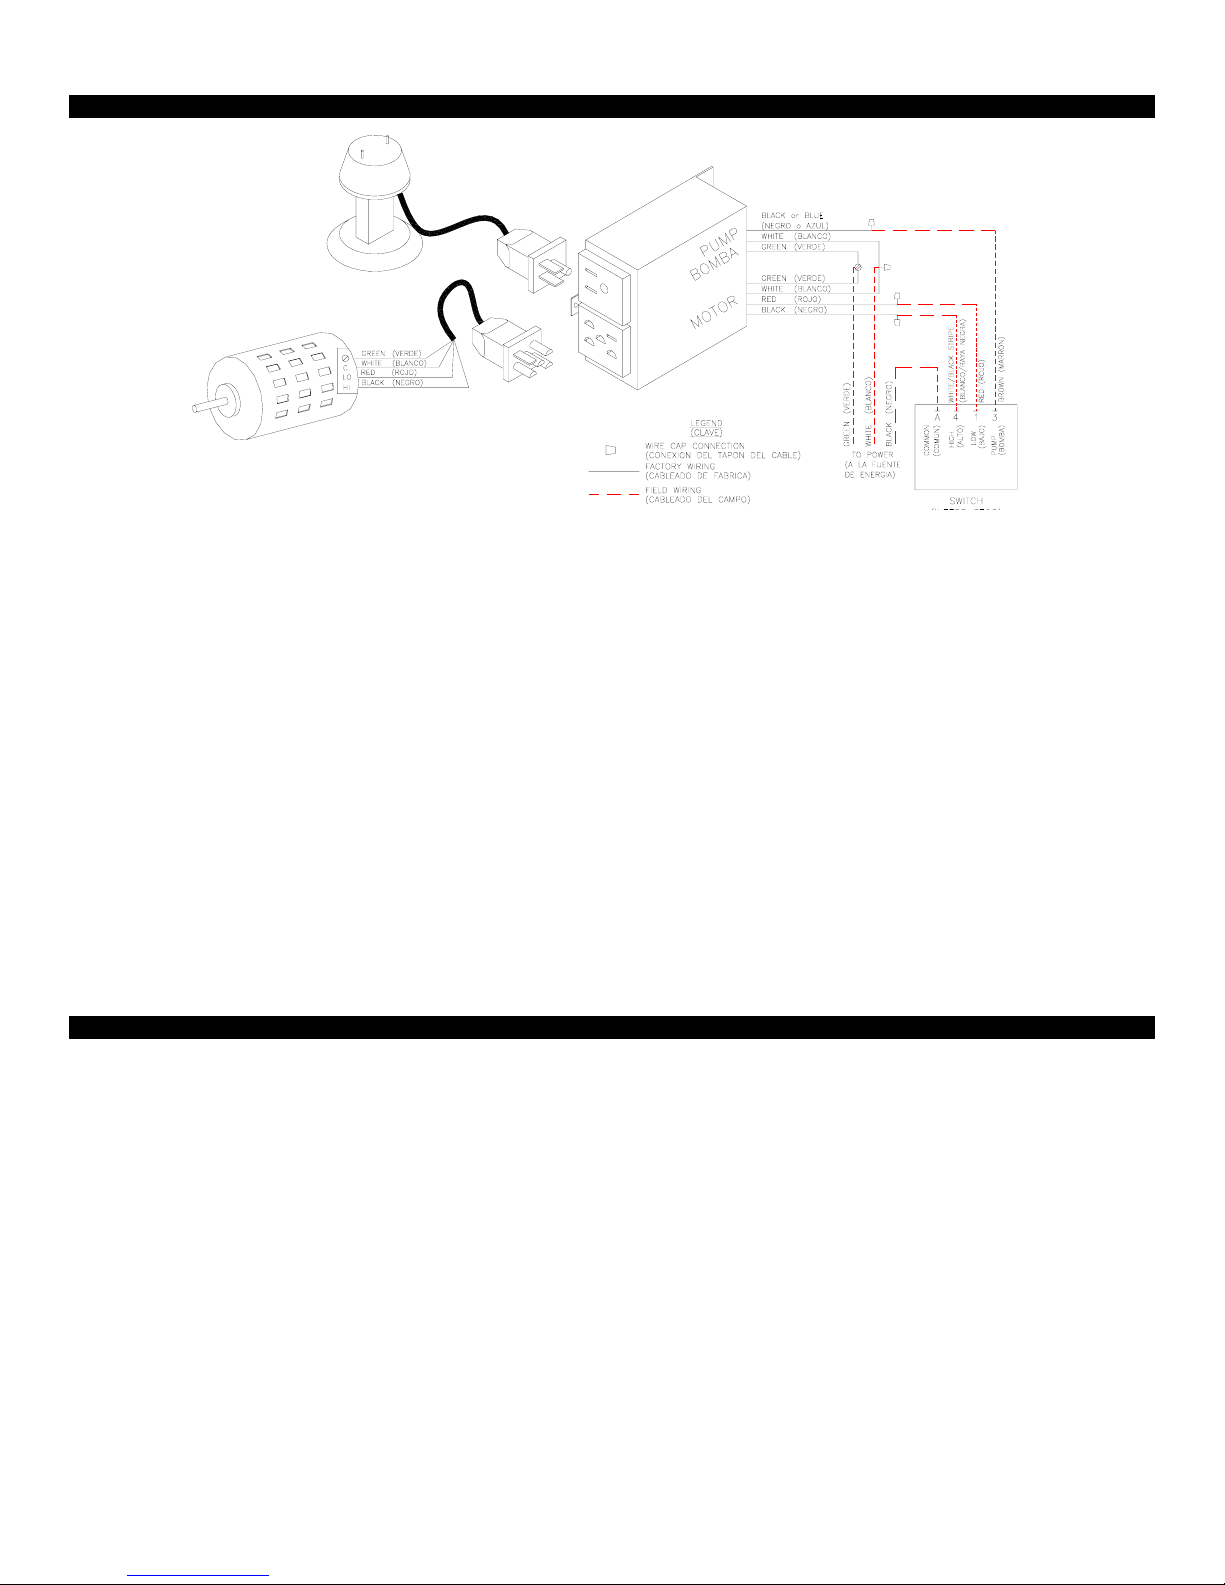
Electrical connections
CAUTION: Disconnect all electrical power at the breaker or fuse box before you begin to install or service any cooler.
Wiring for this cooler must comply with any and all applicable codes. It is recommended that a licensed electrician
install any required wiring.
To remotely operate this unit, use an ECR-6 switch. It is equipped with 2 cooling positions, 2 vent positions and a pump
only position to wash or pre-wet the pads.
The junction box mounts in the corner post of the fan section. Receptacles are provided for the motor and pump.
All wiring connections must be made inside the junction box. See wiring diagram below.
Motor pulley installation
1. Loosen both set screws on the pulley. Use 5/32” hex key Allen wrench.
2. Slide the pulley onto the motor shaft with the threaded side out.
3. Install the belt and align the motor pulley and blower pulley.
4. Align the set screw on the motor side of the pulley with the flat portion of the motor shaft and tighten.
Motor pulley adjustment
1. Turn the outside jaw of the motor pulley clockwise until the pulley is fully closed.
2. Align the outside set screw with the nearest flat spot on the threaded portion of the pulley. This is the zero position.
3. Turn the outside jaw of the pulley counterclockwise 3 full turns. Align set screw with a flat on the threaded portion of the
pulley and tighten. This step will ensure that your cooler will run without overloading the motor. Further adjustment
may be required.
Warning: if set screw is tightened onto threads, damage will occur and pulley will no longer be able to be adjusted.
When the installation is complete and all panels are in place, check the motor amperage using clamp-on type ammeter.
Since all the cooler access panels must be in place to get a true reading, check amperage at a disconnect box, breaker or
fuse box.
4. Find out the amperage from the motor nameplate.
5. Clamp ammeter around the incoming white lead.
6. Start the cooler on HI VENT.
7. If amperage is less than motor nameplate rating, loosen the outer set screw of motor pulley, then turn the outer jaw of
the pulley clockwise ½ turn and tighten the outer set screw. Recheck the amperage and repeat step if necessary.
8. If amperage is more than motor nameplate rating, loosen the outer set screw of motor pulley, then turn the outer jaw of
the pulley counterclockwise ½ turn and tighten the outer set screw. Recheck the amperage and repeat step if
necessary.
9. Proper belt tension is crucial to efficient operation and motor and belt life. See the maintenance section for instructions
on achieving proper belt tension.
3
Page 4

Install overflow and drain
1. Slide rubber washer onto drain bushing and place through hole in reservoir from the top side.
2. Secure it from below with the lock nut. Make sure rubber washer does not twist while tightening,
which could cause it to leak. Hand tighten first and then tighten ¾ turn further with proper tool. Do
not over tighten.
3. Thread the plastic overflow tube into the drain bushing and hand tighten until snug.
Note: If leakage occurs after reservoir is filled, further snug the fitting until leakage stops. Plumber’s
tape or thread putty may be used if necessary.
Float valve installation
1. Place the threaded portion of the Float Valve through the hole provided in the Corner Post from the
Reservoir
inside.
2. Slip the Fiber Washer over the threaded portion outside the corner post and secure
with the Nut. Be sure the Float does not turn while you are tightening the Nut.
3. Slip the Float Tube onto the float so that the key hole is just behind the water inlet
and the float rod is able to move up and down freely. The object is to contain any
spray.
Water line connection
1. Find the closest outside water faucet, and install a Water Connection Kit (not
included with cooler) as shown. If an exterior faucet is not available, locate the
closest cold water pipe and install a saddle valve assembly.
2. Route tubing to cooler. Place Compression Nut and Ferrule over end of tubing. Insert the tubing into float valve and
tighten Compression Nut to secure.
Note: Tightening a compression fitting will cause that fitting to leak. It is best to secure
the connections, turn on the water, and then snug the fitting until leaking stops.
Ferrule
Adjusting water level and float
In order for the float to shutoff the flow of water at the desired level, you must adjust the
float.
Faucet
1. Fill reservoir to ½” below top of overflow tube.
2. Bend float rod down, slightly, until adequate pressure is achieved and float shuts off
completely.
Note: Never use “soft water” from water softening equipment. This water is very corrosive and will cause damage to your
cooler. Using a water softener in conjunction with this cooler will void the warranty. Use of caustic cleaners or other
harsh chemicals will also void the warranty.
Start-up inspection
Before starting the cooler, make sure all installations are correct. Be sure that:
1. Cooler is grounded and electrical connections are safe
ECR-6 switch operation
and secure.
2. Cooler is level and duct is sealed
3. Blower wheel does not rub the housing.
4. Water supply is turned on.
5. Drain fitting and water connections are secure and do
Switch setting Blower motor Pump
Off Off Off
Pump Only Off On
not leak.
6. Float is adjusted to the proper level.
7. Important: motor pulley is set at the correct diameter. If
not, motor can overheat and fail.
8. Belt tension is OK.
Low Vent Low Off
High Vent High Off
Low Cool Low On
9. Pulley alignment is OK.
10. Check switch for proper operation.
High Cool high On
4
Page 5

Trouble shooting
Problem Cause Solution
Motor cycles on and off
Water draining from overflow
Motor pulley set too large
Excessive belt tension
Blower shat frozen
Float improperly adjusted
Lime build up in float valve
Adjust motor pulley
Adjust belt tension
Lubricate or replace bearings
Adjust float
Clean or replace float
Blower shakes Belt or pulley loose Adjust or tighten
Fails to start
Not cooling
No electrical power
Blown fuse or popped circuit breaker
Water supply turned off
Blocked water distributor
Check power
Replace or reset
Check water supply
Clean distributor
Maintenance
Caution: turn off all electrical power to the cooler before opening or attempting service of any kind
The motor is equipped with automatic thermal protection. If it shuts off for any reason, it can start back up without warning!
Occasionally inspect your cooler for leaks, loose belt, blocked water lines, correct belt
alignment or excessive residue build up on the pads.
Belt tension
1/2" to 3/4"
Deflection
At the proper tension, the belt will deflect ½” to ¾” when 3 to 5 pounds of pressure is
applied to the belt approximately half way between the blower and motor pulleys.
Adjust the belt tension using the motor bracket do not change the diameter of the pulley
in order to adjust the belt tension.
Lubrication
Lube the oil cups on the blower bearing. Use SAE20 or SAE30 Non-Detergent
oil. Oil the
blower motor only if oil holes exist.
End of season
1. Drain and clean the reservoir. Do not get water on the blower motor or pump motor.
2. Remove the belt and hang it from the motor pulley.
3. Remove the pads and clean carefully.
4. Remove water distributor and hose out with garden hose. Use a small nail to clean any
deposits from the water holes.
Pad Replacement
Lime build up can occur in the water reservoir and on the pads. Clean this off at least
once per season. If any rust or bare metal spots occur on the cabinet, the metal should be
sanded, primed and painted with good quality paint.
1. Remove wet section top.
2. Remove water distributor assembly.
3. Remove and discard old pads.
4. Install new pad set. Refer to diagram below or pad installation instructions
for correct orientation.
5. Ensure that water distributor pad is centered over cooler pads.
Tapa de la Seccion de Agua
Water Distributor
Distribuidora de Agua
Water Distributor Pad
Filtro que Distribuidora
Wet Section Top
de Agua
6. Carefully replace water distributor; ensure pads are not damaged while
replacing assembly.
7. Replace wet section top.
Red Stripe
Rojo Raya
Model
SI500-S 153 224
SI500-D 153 224
SI700-S 184 255
SI700-D 184 255
Weight
Dry Operating
5
Page 6

Replacement Parts
6
Page 7

No. Description
Fan section
1
Access Panel
2
Blower Housing
3
Blower Brace
4
Blower bearing
5
Motor
6
Motor pulley
7
Motor mount
8
Blower Pulley
9
10
11
12
13
14
15
16*
17*
18
19
20
21
22*
23*
24*
25*
26
27*
28
29
30
31
32
33
Blower wheel
Blower belt
Set collar
Blower shaft
Float valve
Float tube
Wet section top
Wet section housing
Water hose
Pump bracket
Pump
Water distributor tube
Water distributor
Pad media set
Water shield set
Pad support tray
Overflow kit
Reservoir
Inlet Screen
Electrical junction box
Motor plug
Pump plug
Blower cutoff
Water distributor pad
Descripci∧n
Seccion del abanico 1 70018 70001 70023 70038
Panel de acceso 2 70005 70005 70027 70027
Caja del ventilador 1 70021 70014 70034 70040
Conjinette del ventilador 2 70151 70045 70151 70045
Abrazedera del ventilador 2 30289 30289 30288 30288
Motor 1 *** *** *** ***
Polea del motor 1 70170 70170 583041 583041
Montaje del motor 1 70154 70154 70125 70125
Polea del ventilador 1 583013 583013 30314 30314
Rueda del ventilador 1 30322 30322 70120 70120
Banda del ventilador 1 582090 582009 4L690 582001
Collar fijo 1 524331 524331 524331 524331
Eje del ventilador 1
Valvula flotadora 1 524198 524198 524198 524198
Tubo flotador 1 70132 70132 70132 70132
Tapa de seccion del agua 1 70009 70009 70009 70009
Estructura de la seccion de agua 1 70006 70006 70028 70028
Manguera del agua 1 70196 70196 70197 70197
Abrazadera de la bomba 1 70067 70067 70067 70067
Bomba 1 506674 506674 506674 506674
Tubo del distribuidor del agua 1 70116 70116 70116 70116
Distribuidor del agua 1 70043 70043 70043 70043
Juego de filtros 1 70054 70054 70055 70055
Juego de protectores del agua 1 70095 70095 70098 70098
Bandeja para sostenerlos filtros 1 70010 70010 70010 70010
Equipo de desbordimiento 1 70613 70613 70613 70613
Deposito 1 70053 70053 70053 70053
Alambrera 1 70012 70012 70031 70031
Caja de union electrica 1 70130 70130 70130 70130
Enchufe del motor 1 595098 595098 595098 595098
Enchufe de la bomba 1 595121 595121 595121 595121
Tapon de la caja del ventilador 1 504280 504280 70124 70124
Filtros del distribuidor del agua 1 70155 70155 70155 70155
Qty SI500S SI500D SI700S SI700D
30238-02 30238-02 30238-01 30238-01
*** Speak with Essick Air Products representative for specific motor requirements.
*For units with 12” media, refer to table below for Wet Section parts.
No. Description
Wet section top
16*
Wet section housing
17*
Water distributor
22*
Pad media set
23*
Water shield
24*
Pad support tray
25*
Reservoir
27*
Descripci∧n
Qty
Tapa de seccion del agua 1 70877 70877 70877 70877
Estructura de la seccion de agua 1 70907 70907 70879 70879
Distribuidor del agua 1 70872 70872 70872 70872
Juego de filtros 1 70912 70912 70875 70875
Juego de protectores del agua 2 70909 70909 70874 70874
Bandeja para sostenerlos filtros 1 70887 70887 70887 70887
Deposito 1 70871 70871 70871 70871
SI500S-12 SI500D-12 SI700S-12 SI700D-12
7
Page 8

Limited Warranty
This warranty is extended to the original purchaser only
of an evaporative cooler installed and used under normal
conditions. It does not cover damages incurred during shipping or through accident, neglect, or abuse by the owner.
Essick Air Products does not
authorize any person or representative to assu
me any other or dierent liability in connection
with this product.
Terms and conditions of warranty
This warranty includes lifetime limited coverage on water reservoir against any leakage due to defects in material. From
date of installation, if any original comp onent part provided by Essick Air Products fails due to defect in material or factory
workmanship only, Essick Air Products will provide the replacemen t parts as follows:
Cabinet components for one year from date of installation
Evaporative media for ve years from date of installation
Exclusions from this warranty
Essick Air Products is not responsible for incidental or consequential damage resulting from any malfunction.
Essick Air Products is not responsible fo r any damage occurring from the use of
water softeners, chemicals, descale
material, or if a higher horsepower motor than what Essick Air Products recommends is used in the unit.
Essick Air Products is not responsible for th e cost of service calls to diagnose caus e of trouble, or labor charge to repair
and/or replace parts.
How to obtain service under this warranty
Contact the Dealer where you purchased t
he evaporative cooler. If for any reason you are not satised with the response
for the Dealer, contact Customer Service Department: Essick Air Products Inc. 5800 Murray Street, Little Rock, Arkansas
72209. 1-800-643-8341.
8
 Loading...