

Page 1
OWNER’S
CARE
&
USE
MANUAL
EVAPORATIVE
HUMIDIFIER
MODELS:
821 000, WHITE- DIGITAL CONTROL
• Automatic Humidistat
• Refill light with Automatic Shutoff
• 2-Speed Fan with Quiet Setting
for Nighttime Use
• Easy to clean, removable power pack
SAVE THE ENVIRONMENT
RECYCLE APPROPRIATE MATERIALS
To order parts and accessories call
1-800-547-3888
French and Spanish
Instructions included.
Se incluyen instrucciones
En Español y Francés.
Directives en Français et en
espagnol compris
1B72115 4/2011 Printed in China
READ AND SAVE THESE INSTRUCTIONS
Page 2

2
General Safety Instructions
READ BEFORE USING YOUR HUMIDIFIER
DANGER: means if the safety information is not followed someone will be seriously
injured or killed.
WARNING: means if the safety information is not followed someone could be
seriously injured or killed.
CAUTION: means if the safety information is not followed someone may be injured.
1. To reduce the risk of fire or shock hazard, this humidifier has a polarized plug
(one blade is wider than the other.) Plug humidifier directly into a 120V, A.C.
electrical outlet. Do not use extension cords. If the plug does not fully fit into the
outlet, reverse plug. If it still does not fit, contact a qualified electrician to install
the proper outlet. Do not change the plug in any way.
2. Keep the electric cord out of traffic areas. To reduce the risk of fire hazard, never
put the electric cord under rugs, near heat registers, radiators, stoves or heaters.
3. Always unplug the unit before moving, cleaning or removing the fan assembly
section from the humidifier, or whenever it is not in service.
4. Keep the humidifier clean.
5. Do not put foreign objects inside the humidifier.
6. Do not allow unit to be used as a toy. Close attention is necessary when used
by or near children.
7. Never use your humidifier while any part is missing or damaged in any manner.
8. To reduce the risk of electrical hazard or damage to humidifier, do not tilt, jolt or
tip humidifier while unit is running.
9. To reduce the risk of damage to humidifier, unplug when not in use.
10. To reduce the risk of accidental electrical shock, do not touch the cord or
controls with wet hands.
11. To reduce the risk of fire, do not use near an open flame such as a candle or
other flame source.
12. Note the warning below.
WARNING: To reduce risk of fire, electric shock, or injury always unplug unit
before servicing or cleaning.
INTRODUCTION
Your Essick Air evaporative humidifier adds invisible moisture to your home by
moving dry inlet air through a saturated wick. As air moves through the wick, the
water evaporates into the air, leaving behind any white dust, minerals, or dissolved
and suspended solids. Because the water is evaporated, there is just clean and
invisible moist air.
As the evaporative wick traps accumulated minerals from the water, its ability to
absorb and evaporate water decreases. We recommend changing the wick at the
beginning of every season. In hard water areas, more frequent replacement may
be necessary to maintain your humidifier’s efficiency.
Use only Essick Air brand replacement wicks and chemicals. To order parts,
wicks and chemicals call 1-800-547-3888. The 800 Series humidifiers use Essick
Air wick # 1043. Only the Essick Air evaporative wick guarantees the certified
output of your humidifier. Use of wicks other than Essick Air brand may void your
warranty as well as the certification of output and may reduce the output
of your humidifier.
Page 3

3
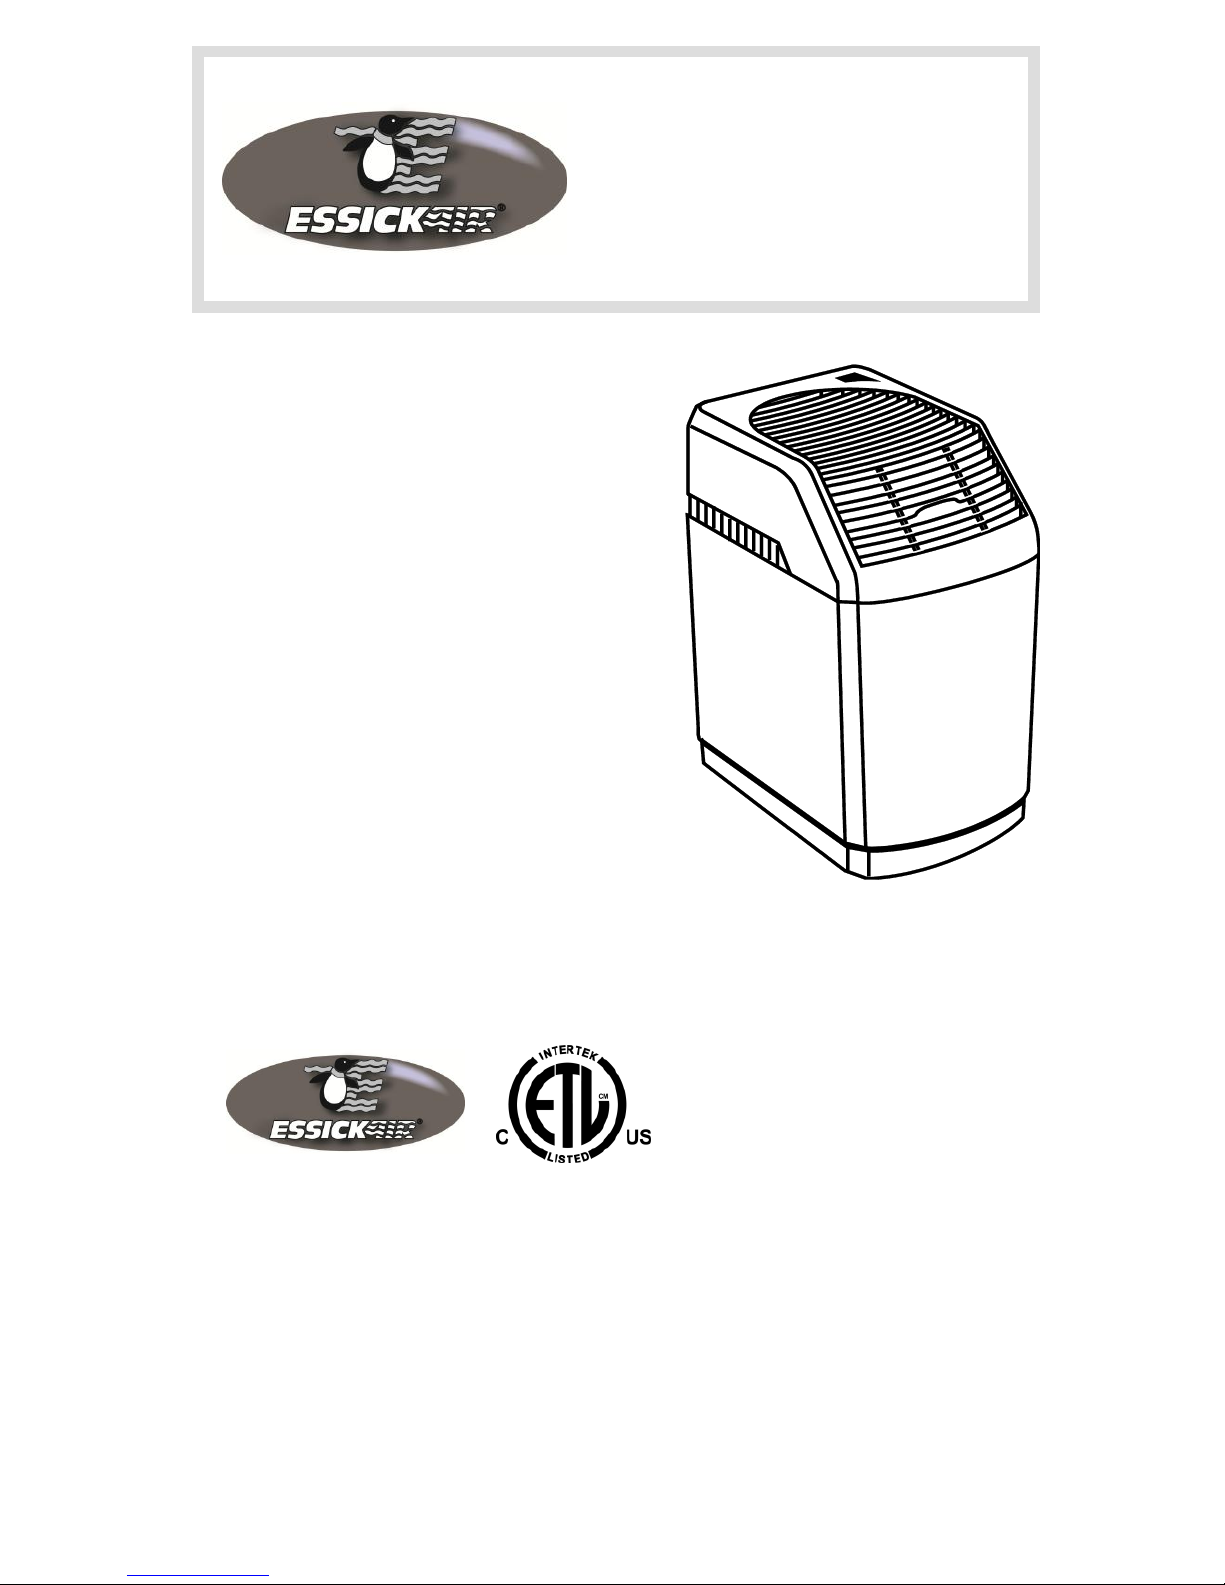
HOW YOUR HUMIDIFIER WORKS
CAUTION: Do NOT position the unit directly in
front of a hot air duct or radiator. Do NOT place
on soft carpet.
ASSEMBLY, CONTROLS & OPERATION
1. Unpack humidifier from carton.
2. Remove all packaging materials. Check to see that you have all of the
following items removed from the boxes accessory kit and cabinet before
discarding the packaging:
♦ Evaporative wick & Wick Retainer ♦ Caster kit
♦ Lift rod assembly with Styrofoam float ♦ Manual
CASTERS
3. Turn the emptied cabinet upside down. Insert each caster stem into one of
the four caster holes on the corner of the humidifier bottom. The casters
should fit snugly and be inserted until the stem shoulder reaches the cabinet
surface.
4. Turn the cabinet right side up.
EVAPORATIVE WICK
5. Replace the float assembly and attached lift
rod into the boxed area on the bottom of the
inside of the cabinet. Slip lift rod into retainer
ring and twist to secure. The lift rod should
be able to freely move up and down about
3/8”. The retainer ring should be located
between the two ribs on the lift rod.
6. Place the wick assembly back into the
guides provided in the bottom of the
cabinet and the ribs along the sides.
7. Place the chassis unit onto the cabinet
ensuring that the chassis seats correctly
into the front and back grooved edges.
Dry air is drawn into the humidifier though
the back and moisturized as it passes
through the evaporative wick. It is then
fanned out into the room.
LEGEND:
1. Water reservoir 3. Evaporative wick
2. Chassis/power pack 4. Dry air intake
(motor/fan assembly) 5. Moist air output
Page 4
4
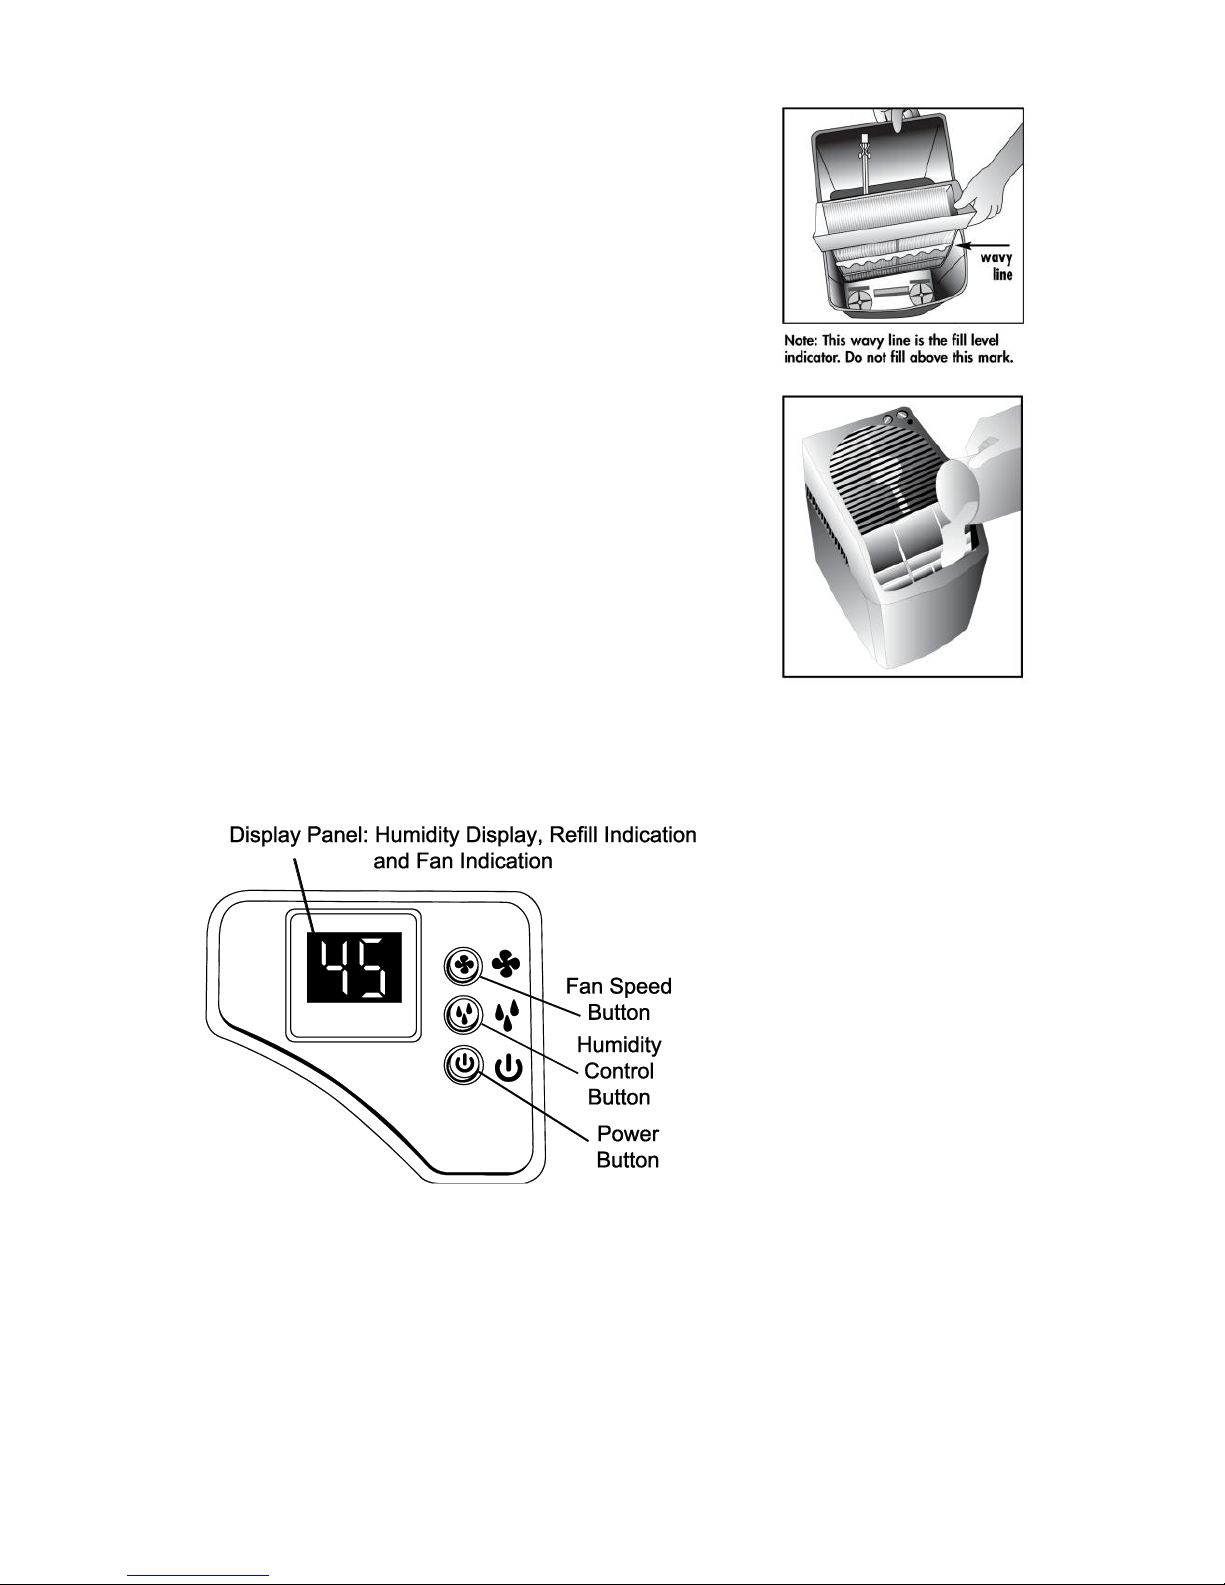
IMPORTANT FILLING INFORMATION
CAUTION: Before filling, ensure unit is turned
OFF and unplugged.
8. With the power off, fill the water reservoir with
water to the level indicated on the wick frame
assembly and “Fill to Here” decal on the
cabinet side wall. Do not overfill. When first
filled, the reservoir capacity is 6 gallons.
NOTE: When the reservoir is being filled for the
first time, the dry wick absorbs water, requiring
more water on the first fill up than subsequent
fillings.
NOTE: When the unit becomes empty, the control
display will flash “F” for refill and automatically
shuts off the motor.
9. Turn power off, refill, then, turn unit on again.
NOTE: We recommend using Essick Air
Bacteriostat Treatment when you refill the water
reservoir to eliminate bacterial growth. Add
bacteriostat according to the instructions on the
bottle.
OPERATION
The digital controller has a display that provides information on the status of the
unit. Depending on which function is being accessed, it displays relative
humidity, fan speed, set humidity and indicates when the unit is out of water.
Note: Place the unit at
least FOUR inches away
from any walls or
curtains. Unrestricted
airflow into the unit will
result in the best
efficiency and
performance.
1. Plug cord into wall receptacle. Your humidifier is now ready for use.
FAN SPEED
2. Press the power button and select fan speed: F1 (low) or F2 (high).
NOTE: When excessive condensation exists, a lower speed setting is
recommended.
Page 5

5
HUMIDITY CONTROL
NOTE: This unit has an automatic humidistat that cycles the humidifier on and off
as required to maintain the selected setting.
3. At initial startup the relative humidity of the room will be displayed.
4. Each time you push the Humidity Control Button the setting will increase in
5% increments. At 65% set point, the unit will operate continuously.
OTHER INDICATIONS
5. The control will display a flashing “F” when the water reservoir is empty.
When the unit is completely out of water, the motor will shut off. Follow the
directions under IMPORTANT FILLING INSTRUCTIONS
6. This humidifier has a check filter reminder timed to appear after 720 hours of
operation. When the Check Filter (CF) message is displayed, disconnect the
power cord and check the condition of the filter. The CF function will reset
after the unit is plugged back in.
CARE AND MAINTENANCE
Cleaning your humidifier regularly helps eliminate odors and bacterial
and fungal growth. Ordinary household bleach is a good disinfectant and can
be used to wipe out the humidifier cabinet after cleaning. We recommend
cleaning your humidifier at least once every two weeks to maintain optimum
environmental conditions for your home.
We also recommend using Essick Air Bacteriostat Treatment each time
you refill your humidifier to eliminate bacterial growth. Add bacteriostat
according to the instructions on the bottle. Please call 1-800-547-3888 to order
Bacteriostat Treatment reference part number 1970.
1) Turn off unit completely and unplug from outlet.
2) Lift out the power pack.
3) Roll or carry the base to cleaning basin. Lift wick from the base allowing
the water to drain. Remove float assembly. Rinse wick under fresh water
only. Do not use soap, detergent, or any other cleaners on the wick.
Leave in sink to drain.
REMOVING SCALE
4) Empty any residual water from the reservoir. Fill reservoir ½ full of water
and add 8 oz. (1 cup) of white vinegar. Let stand 20 minutes. Then pour
out the solution.
5) Dampen a soft cloth with white vinegar and wipe out reservoir to remove
scale. Rinse the reservoir thoroughly with fresh water to remove scale and
cleaning solution before disinfecting.
DISINFECTING UNIT
6) Fill the reservoir ½ full with water and add 1 teaspoon of bleach. Wet all
surfaces on cabinet. Let solution stay for 20 minutes, then rinse with water
until bleach smell is gone. Dry with clean cloth. The outside of the unit
may be wiped down with a soft cloth dampened with fresh water.
7) Refill unit and re-assemble per ASSEMBLY instructions.
SUMMER STORAGE
1) Clean unit as outlined in Care & Maintenance section.
2) Discard used wick and any water in the reservoir and allow to dry
thoroughly before storage. Do not store with water inside reservoir
3) Do not store unit in an attic or other high-temperature area, as damage will occur.
4) Install new filter at beginning of season.
Page 6

6
ESSICK AIR PRODUCTS
HUMIDIFIER WARRANTY POLICY
EFFECTIVE APRIL 1, 2010
SALES RECEIPT REQUIRED AS PROOF OF PURCHASE
FOR ALL WARRANTY CLAIMS.
This product is warranted against defects in workmanship and materials as listed below:
One year from the date of sale on factory installed components.
Two years from the date of sale on motor.
Thirty (30) days on replacement components.
This warranty does not apply to filters or wicks which are customer replaceable parts.
This warranty applies only to the original purchaser of the product when it is purchased from a
reputable retailer/dealer.
This warranty does not apply to damage from accident, misuse, alterations, unauthorized repairs,
unauthorized use, mishandling, unreasonable use, abuse, including failure to perform reasonable
maintenance, normal wear and tear, nor where the connected voltage is more than 5% above
the nameplate voltage, nor to the equipment or products being improperly installed or wired or
maintained in violation of this Owner’s Manual.
Alterations include the substitution of name brand components including, but not limited to wicks
and bacteria treatment.
THIS PRODUCT IS NOT INTENDED FOR COMMERCIAL USE. THIS IS THE SOLE AND
EXCLUSIVE WARRANTY GIVEN BY MANUFACTURER WITH RESPECT TO THE PRODUCTS
AND, TO THE MAXIMUM EXTENT PERMITTED BY LAW, IS IN LIEU OF AND EXCLUDES ALL
OTHER WARRANTIES AND CONDITIONS, EXPRESS OR IMPLIED, ARISING BY
OPERATION OF LAW OR OTHERWISE. INCLUDING WITHOUT LIMITATION,
MERCHANTABILITY AND/OR FITNESS FOR A PARTICULAR PURPOSE.
No employee, agent, dealer or other person is authorized to give any warranties or conditions on
behalf of the manufacturer. The customer shall be responsible for all costs incurred in the
removal or reinstallation and shipping of the product for repairs.
Within the limitations of this warranty, purchaser with inoperative units should contact
customer service @ 800-547-3888 for paperwork and instructions on the return of the unit
for repair.
Notice:This warranty will be null & void if purchaser attempts to repair or replace any
parts which are mechanical or electrical.
A copy of the sales receipt is required before authorization to return a unit for repair is approved.
The manufacturer will repair or replace the product, at its discretion, with return freight paid by
the manufacturer. It is agreed that such repair or replacement is the exclusive remedy available
from the manufacturer and that TO THE MAXIMUM EXTENT PERMITTED BY LAW, THE
MANUFACTURER IS NOT RESPONSIBLE FOR DAMAGES OF ANY KIND, INCLUDING
INCIDENTAL AND CONSEQUENTIAL DAMAGE OR LOSS OF PROFITS OR REVENUES.
The warranty gives the customer specific legal rights, and the customer may also have other
rights which vary from province to province, or state to state.
Page 7

7
MANUAL DE
CUIDADOS
Y
USO DEL
PROPIETARIO
LEA Y GUARDE ESTAS INSTRUCCIONES
HUMIDIFICADOR
VAPORIZADOR
MODELOS:
821 000, BLANCO: control digital
Humidistato automático
Luz de llenado con apagado
automático
Ventilador de 2 velocidades con
funcionamiento silencioso para uso
nocturno
Ruedas giratorias EZ
Fácil de limpiar, unidad de fuerza
removible
CUIDE EL MEDIOAMBIENTE
RECICLE LOS MATERIALES APROPIADOS
Para solicitar piezas y accesorios, llame al 1-800-547-3888
French and Spanish
Instructions included.
Se incluyen instrucciones
en español y francés.
Directives en Français et en
espagnol compris
Este producto utiliza la mecha
#1043.
1B72115 4/2011 Impresso en China
Page 8

8
Instrucciones generales de seguridad
LEER ANTES DE USAR SU HUMIDIFICADOR
PELIGRO: significa que si no se respeta la información de seguridad, alguien
puede resultar seriamente herido o muerto.
ADVERTENCIA: significa que si no se respeta la información de seguridad,
alguien podría resultar seriamente herido o muerto.
PRECAUCIÓN: significa que si no se respeta la información de seguridad,
alguien puede resultar herido.
1. Para reducir el riesgo de incendio o descarga eléctrica, este humidificador
posee un enchufe polarizado (una espiga es más ancha que la otra).
Enchufe el humidificador directamente a un tomacorriente eléctrico de 120
V de CA. No utilice extensiones. Si el enchufe no encaja completamente
en el tomacorriente, inviértalo. Si aún así no encaja, contacte a un
electricista calificado para que instale el tomacorriente adecuado. No
cambie el enchufe de ninguna manera..
2. Mantenga el cable fuera de las áreas de tránsito. Para reducir el riesgo de
peligro de incendio, nunca coloque el cable debajo de alfombras, cerca de
fuentes de calor, radiadores, cocinas o calentadores.
3. Siempre desenchufe el humidificador antes de moverlo, antes de limpiarlo
o cada vez que el humidificador no esté funcionando.
4. Mantenga el humidificador limpio.
5. No coloque objetos extraños dentro del humidificador.
6. No permita que la unidad se utilice como un juguete. Se debe prestar
atención cuando lo utilizan niños o cuando se lo utiliza cerca de niños
7. Nunca utilice su humidificador cuando le falte una parte o una parte esté
dañada en alguna forma.
8. Para reducir el riesgo de peligro eléctrico o daño al humidificador, no lo
mueva, sacuda ni incline mientras la unidad esté en funcionamiento.
9. Para reducir el riesgo de daños en el humidificador, desenchúfelo cuando
no lo esté utilizando.
10. Para reducir el riesgo de descargas eléctricas accidentales, no toque el
cable ni los controles con las manos húmedas.
11. Para reducir el riesgo de incendio, no lo utilice cerca de una fuente de
fuego abierta, como una vela u otra fuente.
12. Preste atención a la etiqueta de advertencia que aparece adjunta.
ADVERTENCIA: para reducir el riesgo de incendio, descargas eléctricas o
lesiones siempre desenchúfelo antes de efectuar reparaciones o de limpiarlo.
INTRODUCCIÓN
Su humidificador vaporizador Essick Air agrega una humedad invisible a su
hogar moviendo el aire seco que entra a través de un filtro/mecha saturado.
A medida que el aire pasa a través del filtro/mecha, el agua se evapora en el
aire, dejando atrás cualquier polvo blanco, minerales o sólidos disueltos y
suspendidos. Como el agua se evapora, queda solamente aire húmedo limpio
e invisible.
A medida que el filtro/mecha atrapa los minerales acumulados del agua, su
capacidad de absorber y evaporar el agua se reduce.
Page 9

9
Recomendamos cambiar el filtro/mecha al comienzo de cada temporada. En
áreas con agua dura, pueden ser necesarios cambios más frecuentes para
mantener la eficiencia del humidificador.
Usar solamente repuestos para filtros/mecha y productos químicos marca Essick
Air. Para solicitar repuestos, filtros/mecha y productos químicos, llamar al 1-800547-3888. Los humidificadores de la serie 800 usan mechas Essick Air Nº 1043.
Sólo la mecha vaporizadora Essick Air garantiza el rendimiento certificado de su
humidificador. El uso de filtros/mecha que no sean marca Essick Air peut annuler
su garantía, así como la certificación del rendimiento, y puede reducir el
rendimiento de su humidificador.
FUNCIONAMIENTO DE SU HUMIDIFICADOR
PRECAUCIÓN: NO deja la unidad directamente
en frente a tuberías de aire caliente o radiadores. NO ubicarlo sobre
moquettes blandas.
ENSAMBLAJE, MANDOS Y OPERACIÓN
1. Sacar el humidificador de la caja.
2. Retirar todos los materiales de embalaje. Verificar que se hayan sacado
todas las partes que aparecen a continuación del kit de accesorios de las
cajas y del gabinete antes de deshacerse de los embalajes:
RUEDAS
3. Poner el gabinete vacío de cabeza para abajo. Inserte una de las ruedas en
cada uno de los agujeros de las ruedas en las cuatro esquinas del
gabinete.Las ruedas deben encajar bien justas
y se deben insertar hasta que el tope del eje
llegue a la superficie del gabinete.
4. Poner el gabinete de pie.
FILTRO/MECHA EVAPORADOR
5. Volver a colocar el conjunto del flotador y la
varilla de elevación adherida en el área
compacta que se encuentra en el fondo de la
parte interna del gabinete. Deslizar la varilla de
elevación hacia el anillo de retención y torcer
para asegurarla. La varilla de elevación deberá
poder moverse libremente hacia arriba y hacia
abajo alrededor de 3/8''. El anillo de retención
deberá estar ubicado entre las dos nervaduras
de la varilla de elevación.
♦ Kit de ruedas ♦ Mecha evaporador y marco de la meche
♦ Conjunto de varilla de elevación con flotador de poliestireno ♦ Manual
El aire seco entra al
humidificador por la parte
trasera y se humidifica a
medida que pasa por el
filtro/mecha evaporador.
Después se expulsa al
ambiente por medio del
ventilador.
LEGEND:
1. Depósito de agua
2. Chasis (conjunto de
motor y ventilador)
3. Filtro/mecha evaporador
y mecha de retención
4. Depόsito de aqua
5. Entrada de aire seco
6. Salida de aire húmedo
Page 10

10
6. Colocar nuevamente el conjunto del filtro/mecha en las guías del fondo del
gabinete y las nervaduras que se encuentran a los lados.
7. Colocar el chasis en el gabinete asegurándose de que el
mismo se asiente correctamente en los bordes ranurados
delanteros y traseros.
PRECAUCIÓN: Desenchufar la unidad antes de llenarla,
limpiarla o efectuar reparaciones en ella. Siempre
mantener la rejilla seca.
8. Llenar con agua el depósito de agua hasta el nivel
señalado en el conjunto de la estructura del filtro/mecha y
la etiqueta “Fill to Here” (Llenar hasta aquí) que se
encuentra en la pared lateral del gabinete. No sobrepasar
esta marca. Al llenar por primera vez, la capacidad del
depósito es de 6 galones.
OBSERVACIÓN: Cuando se llene el depósito por primera
vez y el filtro/mecha esté aún seco llevará cerca de 20
minutos vaciar la botella en el depósito. Después de que se
haya vaciado el depósito, debe llenarse nuevamente para
lograr el tiempo máximo de funcionamiento.
OBSERVACIÓN: Cuando el depósito esté vacío, el ventilador del humidificador se
apagará automáticamente pero volverá a encenderse de manera automática
cuando el depósito se llene nuevamente
9. Apague la impresora, vuelva a llenar, a continuación, apague la unidad de nuevo.
OBSERVACIÓN: Recomendamos usar el Tratamiento bacteriostat Essick Air
siempre que rellene el depósito de agua para eliminar el crecimiento de bacterias.
Añadir el bacteriostat de acuerdo con las instrucciones del embalaje
OPERACIÓN
Dependiendo del modo seleccionado, el panel de control mostrará humedad
relativa, velocidad de ventilador, humedad deseada e indica cuándo unidad es
fuera de agua.
OBSERVACIÓN: El
humidificador debe ubicarse
a por lo menos CUATRO
pulgadas de las paredes o
cortinas, y lejos de fuentes
de calor. El flujo de aire
irrestricto en la unidad
mejora su eficiencia y el
desempeño.
1) Enchufar el cable al
receptáculo de la pared.
Su humidificador está
pronto para el uso.
LA VELOCIDAD DEL VENTILADOR
2) Pulse el botón de encendido y seleccione la velocidad del ventilador: F1 (baja)
y F2 (alta).
OBSERVACIÓN: Cuando haya condensación excesiva, se recomienda usar una
velocidad más baja.
Page 11

11
CONTROL DE LA HUMEDAD
OBSERVACIÓN: La modelo tienen un humidistato automático. El humidistato
prenderá el humidificador cuando la humedad relativa de su hogar sea inferior a la del
humidistato y lo apagará cuando la humedad relativa alcance la del humidistato.
3) En la instalación inicial se visualizará la humedad relativa del ambiente.
4) Cada vez que pulse el botón de control de humedad, se aumentará la
configuración en incrementos del 5%. En el punto de ajuste de 65%, la unidad
funcionará constantemente.
Otras Indicaciones
5) La exhibición del control indicará que cuándo el depósito es vacío con una "F que
destella". Cuando la unidad está totalmente fuera de agua, el motor apagará.
6) Este humidificador tiene un recordatorio de verificación del filtro que aparecerá
después de las 720 horas de uso. Cuando aparece el mensaje de Verificación de
filtro (CF, por sus siglas en inglés), desenchufe el cable y verifique el estado del
filtro. El mensaje CF se reiniciará cuando se vuelva a conectar el humidificador.
CUIDADOS Y MANTENIMIENTO
Limpiar el humidificador regularmente ayuda a eliminar olores y el crecimiento de
bacterias y hongos. El blanqueador doméstico común es un buen desinfectante y se
puede usar para repasar la base del humidificador y la botella/depósito después de
limpiarlos.
Recomendamos limpiar el humidificador por lo menos una vez cada dos semanas para
mantener las condiciones ambientales ideales en su hogar.
También recomendamos usar el Tratamiento antibacteriano Essick Air cada vez
que rellene su humidificador para eliminar el crecimiento bacteriano. Añadir el
bactericida de acuerdo con las instrucciones del embalaje. Para solicitar el Tratamiento
bacteriostat (referencia Nº 1970), llame al 1-800-547-3888.
1. Apagar la unidad completamente y desenchufarla del tomacorriente.
2. Levantar el chasis.
3. Hacer rodar o llevar la base hasta la pileta de limpieza. Levantar el filtro/mecha de
la base dejando drenar el agua y retirar el conjunto del flotador del filtro/mecha.
Enjuagar la mecha solamente con agua limpia. No usar jabón, detergente ni
cualquier otro producto de limpieza sobre la mecha. Dejarla escurrir en la pileta.
REMOCIÓN DE SARRO
4. Vaciar el agua del depósito y de la botella de agua. Llenar el depósito hasta la mitad
con agua y añadirle 8 onzas (1 taza) de vinagre blanco a cada uno. Dejar reposar
durante 20 minutos. Después vaciar.
5. Humedecer un paño suave con vinagre blanco y frotar el depósito para retirar el
sarro. Enjuagar la botella de agua y el depósito cuidadosamente con agua limpia
para remover el sarro y la solución de limpieza antes de desinfectarlos.
DESINFECCIÓN DE LA UNIDAD
6. Llenar el depósito con agua hasta la mitad y agregarle una cucharadita de
blanqueador a cada uno. Humedecer todas las superficies del gabinete. Dejar
reposar la solución durante 20 minutos, después enjuagar con agua hasta que el
olor a blanqueador se haya ido. Secar con un paño limpio. Se puede repasar la
parte exterior de la unidad con un paño suave humedecido con agua limpia.
7. Rellenar la unidad y reensamblarla de acuerdo con las instrucciones de
ENSAMBLAJE.
ALMACENAMIENTO DURANTE EL VERANO
1. Limpiar la unidad como se describe en la sección Cuidados y Mantenimiento.
2. Desechar los filtros/mecha usados y el agua que pueda quedar en el depósito o
botella y dejar secar bien el gabinete antes de guardarlo. No guardarlo con agua
dentro del depósito o botella.
Page 12

12
3. No almacenar la unidad en sótanos o áreas con alta temperatura, que se
produzcan daños.
4. Instalar un nuevo filtro al comienzo de la temporada.
GARANTÍA DEL ESSICK AIR PRODUCTS HUMIDIFICADOR
VÁLIDA AL 1 DE ABRIL DE 2010:
SE REQUIERE EL RECIBO DE VENTA COMO PRUEBA DE LA COMPRA
PARA TODOS LOS RECLAMOS DE GARANTÍA.
PARA CUALQUIER RECLAMO RELACIONADO CON LA GARANTÍA ES NECESARIO
PRESENTAR EL RECIBO COMO PRUEBA DE COMPRA.
Este producto posee garantía por defectos en la fabricación y en los materiales según se detalla a
continuación:
Un año desde la fecha de venta para los componentes instalados en fábrica.
Dos años desde la fecha de venta para el motor.
Treinta (30) días para las piezas de repuesto.
Esta garantía no es aplicable a filtros o mechas que el cliente pueda reemplazar.
Esta garantía es aplicable solamente al comprador original del producto siempre que haya adquirido
el producto en una tienda o un distribuidor de buena reputación.
Esta garantía no es aplicable a productos que se hayan dañado como consecuencia de accidentes,
uso indebido, alteraciones, reparaciones no autorizadas, uso no autorizado, manipulación incorrecta,
uso no razonable, abuso, incluida la falta de mantenimiento razonable, el desgaste normal o cuando
la tensión de conexión supera en más de 5% aquélla especificada en la placa del fabricante.
Asimismo, esta garantía tampoco es aplicable al equipo o a los productos que fueran instalados,
conectados o sometidos a mantenimiento de forma incorrecta sin seguir las especificaciones de este
Manual del Usuario.
Las alteraciones que puede sufrir el producto incluyen la sustitución de componentes de marca,
incluido el tratamiento de bacterias y mechas.
ESTE PRODUCTO NO FUE DISEÑADO PARA USO COMERCIAL. LA PRESENTE ES LA ÚNICA
GARANTÍA QUE OFRECE EL FABRICANTE CON RESPECTO A LOS PRODUCTOS Y, HASTA EL
GRADO MÁXIMO PERMITIDO POR LA LEY, REEMPLAZA A CUALQUIER OTRA GARANTÍA,
POR ESCRITO O TÁCITA, QUE OPERE DE PLENO DERECHO O DE OTRA FORMA. SE
INCLUYE, SIN LIMITACIONES, LA COMERCIABILIDAD Y/O APTITUD PARA UN PROPÓSITO EN
PARTICULAR.
Los empleados, agentes, distribuidores u otras personas no se encuentran autorizados a brindar
garantías o condiciones en nombre del fabricante. El cliente será responsable por todos los costos
relacionados con el retiro o la reinstalación y el envío del producto para su reparación.
Dentro de las limitaciones de esta garantía, el comprador que posea unidades que no
funcionen correctamente debe contactarse con el servicio de atención al cliente al 800-5473888 para recibir los documentos y las instrucciones a fin de realizar la devolución de la
unidad para su reparación.
Aviso: Esta garantía se anulará si el comprador intenta reparar o reemplazar cualquier pieza
mecánica o eléctrica.
Es necesario presentar una copia del recibo de compra para que se apruebe la autorización de
devolución de la unidad para su reparación. El fabricante reparará o reemplazará el producto, según
lo crea conveniente, y se hará cargo de los gastos de envío de la devolución al cliente. Se acuerda
que la reparación o el reemplazo son las únicas soluciones que el fabricante tiene disponibles.
ASIMISMO, HASTA EL GRADO MÁXIMO PERMITIDO POR LA LEY, EL FABRICANTE NO SE
HACE RESPONSABLE POR LOS DAÑOS DE CUALQUIER TIPO, INCLUIDOS DAÑOS
INCIDENTALES Y EMERGENTES, O LA PÉRDIDA DE GANANCIAS O INGRESOS.
Esta garantía le confiere al cliente derechos específicos. Además, el cliente puede gozar de otros
derechos que varían según la provincia o el estado.
Page 13

13
GUIDE
D’UTILISATION
ET D’ENTRETIEN
DU PROPRIÉTAIRE
HUMIDIFICATEUR
ÉVAPORATEUR
LISEZ ATTENTIVEMENT CES DIRECTIONS
ET CONSERVEZ-LES
French and Spanish
Instructions included.
Se incluyen instrucciones
En Español y Francés.
Directives en français et
en espagnol comprises
1B72115 4/2011 Imprimé en China
MODÈLES :
821 000, BLANC – Commande numérique
Hygrostat automatique
Indicateur lumineux de remplissage avec
arrêt automatique
Ventilateur à 2 vitesses avec mode
silencieux pour la nuit
Roulettes « EZ Roll »
Facile à nettoyer, bloc alimentation amovible
PROTÉGEZ L’ENVIRONNEMENT
RECYCLEZ LES MATÉRIAUX APPROPRIÉS
Série 800
Ce produit utilise à
méche réf.1043
Page 14

14
Instructions Générales De Sécurité
À LIRE AVANT D’UTILISER VOTRE HUMIDIFICATEUR
DANGER: Signifie que si les informations de sécurité ne sont pas suivies, des
blessures graves ou fatales s'ensuivront.
AVERTISSEMENT: Signifie que si les informations de sécurité ne sont pas suivies,
des blessures graves ou fatales pourraient survenir.
ATTENTION: Signifie que si les informations de sécurité ne sont pas suivies, des
blessures pourraient survenir.
1. Afin de réduire le risque d’électrocution, cet humidificateur a une prise à deux
têtes (l'une des fiches est plus large que l'autre). Brancher directement
l’humidificateur dans une prise de courant alternatif 120 V. Ne pas utiliser de
rallonges électriques. Si la prise ne rentre pas, la brancher en sens inverse.
Si cela ne rentre toujours pas, contacter un électricien pour installer la prise
murale adéquate. Ne pas modifier la prise.
2. Èloignez le cordon électrique d’une zone de passage. Pour diminuer le risque
d’incendie, ne mettez jamais le cordon électrique sous un tapis, à proximité
d’une bouche d’air, d’un radiateur, d’un four ou d’un appareil de chauffage.
3. Toujours débrancher l’humidificateur avant de le déplacer. Enlever le
système de ventilation avant de nettoyer ou de faire réparer l’humidificateur.
4. L’humidificateur doit toujours rester propre.
5. N’introduisez pas de corps étrangers dans l’humidificateur.
6. Cet appareil n’est pas un jouet. Une surveillance est nécessaire si cet
appareil est utilisé par ou près d’un enfant.
7. Ne vous servez en aucun cas de votre humidificateur en cas de pièce
manquante ou endommagée.
8. Pour réduire le risque d’électrocution ou d’endommagement de
l’humidificateur, ne l’inclinez pas, ne le secouez pas et ne le faites pas
basculer tant qu’il est en marche.
9. Pour réduire les risques d’endommagement, débranchez l’humidificateur
lorsque vous ne vous en servez pas.
10. Pour réduire le risque de choc électrique accidentel, ne touchez pas le cordon
ou les commandes avec les mains mouillées.
11. Pour réduire le risque d’incendie, ne l’utilisez pas près d’une flamme, comme
une bougie ou autre source de flamme.
12. Observez l’étiquette en dessous.
AVERTISSEMENT : Pour diminuer le risque d’incendie, de choc électrique ou
de blessure, débranchez toujours l’appareil avant l’entretien ou le nettoyage.
INTRODUCTION
L’humidificateur évaporateur de Essick Air ajoute une humidité invisible dans la
maison en faisant passer de l’air sec à travers un filtre à mèche saturé d’eau.
Au fur et à mesure que l’air passe au travers du filtre à mèche, l’eau s’évapore
dans l’air en laissant derrière toutes poussières blanches, minéraux et solides
dissous ou en suspension. Étant donné que de l’eau est évaporée, il n’y a que
de l’air humidifié, propre et invisible.
Au fur et à mesure que la mèche d’évaporation emprisonne et accumule les
minéraux contenus dans l’eau, sa capacité d’absorption et d’évaporation d’eau
diminue. Nous recommandons de changer le filtre à mèche au début de
chaque saison d’humidification. Dans les régions où l’eau est dure, un
remplacement plus fréquent peut être nécessaire afin de maintenir l’efficacité
de votre humidificateur.
Page 15

15
N’utilisez que les produits chimiques et les filtres à mèche de marque Essick Air
en remplacement. Afin de placer une commande de pièces, de filtres à mèche
ou de produits chimiques, composez le 1-800-547-3888. Les filtres à mèche de
numéro 1043 de Essick Air conviennent à tous les humidificateurs de la série
800. Seuls les filtres à mèche d’évaporation de y Essick Air garantissent le
rendement certifié à la sortie de votre humidificateur. L’utilisation de filtres à
mèche autres que les Essick Air peut annuler la garantie, la certification de la
valeur à la sortie et peut réduire la sortie de votre humidificateur.
FONCTIONNEMENT DE L’HUMIDIFICATEUR
MISE EN GARDE : Ne placez PAS l’humidificateur directement devant une
bouche d’air chaud ou d’un radiateur. Ne le placez PAS sur de la moquette ou
des tapis mous.
ASSEMBLAGE, RÉGLAGE ET FONCTIONNEMENT
1. Retirez l’humidificateur du carton d’emballage.
2. Retirez tous les matériels d’emballage. Vérifiez, afin de vous assurer, que tous
les articles suivants ont été retirés de la trousse d’accessoires et du boîtier se
trouvant dans le carton, avant de jeter l’emballage :
♦ Nécessaires de roulettes ♦ Ensemble de la tige avec le flotteur en
polystyrène ♦ Filtre à mèche d’évaporation et de retenue mèche ♦ Manuel
LES ROULETTES
3. Retournez le boîtier de l’humidificateur vide à l’envers. Insérez une tige de
roulette dans chacun des quatre orifices situés aux quatre coins de la base de
l’humidificateur. Les roulettes doivent bien
s’ajuster et être enfoncées jusqu’à ce que
l’épaule de la tige atteigne la surface du boîtier.
4. Retournez le boîtier à l’endroit.
FILTRE À MÈCHE D’ÉVAPORATION
5. Remettez en place l’ensemble du flotteur et fixez la
tige dans l’emplacement de la boîte dans le fond à
l’intérieur du boîtier. Faites glisser la tige dans
l’anneau de retenue et tordez afin que ce soit bien
fixé. La tige doit pouvoir monter et descendre
librement d’environ 1 cm. L’anneau de retenue doit
être situé entre les deux nervures de la tige.
6. Remettez en place l’ensemble du filtre à mèche
en s’alignant dans les repères au fond du boîtier
et des nervures sur les côtés.
7. Placez le châssis dans le boîtier en vous assurant qu’il est correctement
encastré dans les montures à l’avant et à l’arrière.
LEGEND:
1. Réservoir d’ eau
2. Châssis (montage du
moteur et du ventilateur)
3. Filtre à mèche
d’èvaporation
4. Réservoir d’eau
5. Entrée de l’air sec
6. Sortie de l’air humidifié
L’air sec est tiré à
l’intérieur de
l’humidificateur en
passant par l’arrière. Il
est humidifié au fur et à
mesure qu’il passe à
travers du filtre à
mèche d’évaporation.
Il est ensuite poussé à
l’extérieur dans la
pièce.
Page 16

16
RENSEIGNEMENTS IMPORTANTS SUR LE REMPLISSAGE
MISE EN GARDE : Avant de remplir l’humidificateur
avec de l’eau, assurez-vous que l’interrupteur de est
en position d’arrêt et que l’humidificateur est
débranché.
8. Remplissez le réservoir avec de l’eau jusqu’au niveau
indiqué sur le montage du cadre du filtre à mèche et
jusqu’au niveau de l’autocollant avec la phrase « Fill to
here » (remplir jusqu’ici) qui se situe sur la paroi de
côté. Ne remplissez pas plus. La capacité du récipient
est de 23 litres (6 gallons) pour le premier remplissage.
REMARQUE :
Lorsque le réservoir est rempli pour la
première fois, la mèche sèche absorbe l'eau,
nécessitant plus de plus d'eau pour la première fois le
plein que pour les remplissages subséquents.
REMARQUE : Votre humidificateur est muni d’un
réservoir d’eau. Lorsque le réservoir est vide, le
ventilateur de l’humidificateur s’arrête
automatiquement .
9. Coupez l'alimentation, de remplissage et de mettre
l'appareil sous tension
REMARQUE : Nous recommandons l’utilisation du
traitement contre les bactéries Essick Air Bacteriostat
Treatment à chaque remplissage du réservoir d’eau afin d’éliminer la
croissance des bactéries. Ajoutez le bactériostat selon les directives inscrites
sur le récipient d’eau.
FONCTIONNEMENT
La commande numérique affiche des renseignements sur l'état de l'appareil. Il
peut montrer l'humidité relative, vitesse de ventilateur, humidité choisie et
indique quand l'unité est hors de l'eau.
NOTE:
L’humidificateur doit être
placé à au moins DIX centimètres
(4 po) de tout mur ou des rideaux
et loin de toute bouche d’air chaud.
Un débit d’air libre qui entre dans
l’appareil assure une meilleure
efficacité de rendement.
1. Branchez le cordon d’alimentation sur la prise murale. Votre humidificateur est
maintenant prêt à être utilisé.
VITESSE DE VENTILATEUR
2. Appuyez sur le bouton d'alimentation et de sélectionner la vitesse du
ventilateur: F1 (basse) et F2 (élevé).
REMARQUE : En cas de condensation importante, un réglage sur une
moindre vitesse est recommandé.
Page 17

17
CONTRÔLE DE L'HUMIDITÉ
REMARQUE : Ce modéle est équipé d'un hygrostat automatique qui
déclenche ou éteint l'humidificateur selon les besoins pour maintenir le taux
d'humidité choisi .
3. Au premier démarrage, le taux d'humidité relative de la chambre sera
affiché.
4. Le réglage augmentera de 5 % chaque fois que vous appuierez sur la touche de
réglage du taux d'humidité. À partir d'une valeur de réglage de 65 %, l'appareil
fonctionnera sans arrêt. La lettre F clignotante indiquera que le réservoir est
vide.
AUTRES INDICATIONS
5. Lors de chaque bouteille vide, la commande numerique affiche un
clignotant "F." Lorsque l'appareil est complètement vide, le moteur
s'éteint.
6. Cet humidificateur a un système de rappel de vérification de filtre
temporisé pour apparaître après 720 heures de fonctionnement. Quand le
message de Vérification de Filtre (CF) est affiché, débranchez le cordon
d'alimentation et vérifiez l'état du filtre. Le message CF est remis à zéro
lorsque l'humidificateur est rebranché.
MISE EN GARDE : Débranchez l’appareil avant le remplissage, le
nettoyage et l’entretien. Maintenez toujours la grille sèche.
SOINS ET ENTRETIEN
Le fait de nettoyer régulièrement votre humidificateur aide à éliminer les
odeurs et la croissance de bactérie et de fongus. Normalement, l’eau de
javel est un bon désinfectant et peut être utilisée dans le plateau et les
récipients/réservoirs d’eau après nettoyage.
Nous recommandons de nettoyer l’humidificateur au moins une fois toutes les
deux semaines afin d’obtenir de votre humidificateur des conditions optimales
pour l’environnement.
Nous recommandons, également, l’utilisation du traitement contre les
bactéries Essick Air Bacteriostat Treatment à chaque remplissage du
récipient d’eau afin d’éliminer la croissance éventuelle des bactéries.
Ajoutez le bactériostat selon les directives inscrites sur le récipient d’eau.
Veuillez composer le 1-800-547-3888 afin de passer commande du traitement
contre les bactéries Bacteriostat Treatment portant le référence numéro 1970.
1. Éteignez l’appareil complètement et débranchez-le.
2. Soulevez le châssis.
3. Faites rouler ou transportez la base vers un évier. Soulevez la mèche de la
base en laissant l’eau s’égoutter et retirez l’ensemble du flotteur de la
mèche. Rincez le filtre à mèche sous de l’eau fraîche uniquement.
N’utilisez pas de savon, de détergent ni d’autres nettoyeurs sur le filtre à
mèche. Laissez-le s’égoutter dans l’évier.
Page 18

18
DÉTARTRAGE
4. Videz l’eau contenue dans le réservoir et le récipient d’eau. Remplissez de
moitié le réservoir avec de l’eau et rajoutez une tasse. (8 oz) de vinaigre
blanc dans chacun des deux. Laissez agir pendant 20 minutes. Videz la
solution.
5. Mouillez un chiffon doux avec du vinaigre blanc et essuyez le récipient pour
enlever les dépôts. Rincez abondamment le récipient et le réservoir avec
de l’eau fraîche pour enlever les dépôts et la solution nettoyante avant de
désinfecter.
DÉSINFECTION DE L’APPAREIL
6. Remplissez de moitié le réservoir avec de l’eau et rajoutez 1c. d’eau de
javel dans chacun des deux. Mouillez toutes les surfaces du boîtier.
Laissez agir la solution pendant 20 minutes, puis rincez avec de l’eau
jusqu’à ce que l’odeur de l’eau de javel ait disparue. Séchez avec un
chiffon doux. Vous pouvez essuyer les parois extérieures de l’appareil à
l’aide d’un chiffon doux mouillé avec de l’eau fraîche.
7. Remplissez l’appareil et remontez-le selon les directives de
l’ASSEMBLAGE.
ENTREPOSAGE L’ÉTÉ
1. Nettoyez l’appareil tel qu’indiqué dans le chapitre portant sur les « Soins et
l’entretien ».
2. Jetez les filtres à mèche usés et toute eau dans le réservoir ou dans le
récipient. Laissez le boîtier sécher complètement avant de le ranger.
N’entreposez pas l’appareil avec de l’eau dans le récipient.
3. N’entreposez pas l’appareil dans un grenier ou dans un endroit où la
température est élevée, ou des dommages peuvent survenir.
4. Installez un nouveau filtre à mèche avant le début de la saison.
Page 19

19
Essick Air Products
POLITIQUE DE GARANTIE SUR LES HUMIDIFICATEURS
– EN VIGUEUR À COMPTER DU 1ER AVRIL 2010 :
RÉCÉPISSÉ DE VENTE REQUIS COMME PREUVE D’ACHAT POUR TOUTES LES
RÉCLAMATIONS AU TITRE DE LA GARANTIE.
Ce produit est garanti contre les défauts de main-d’œuvre et de matériaux de la façon indiquée ci-
dessous :
Un an à compter de la date de vente sur les composants installés en usine.
Deux ans à compter de la date de vente sur le moteur.
Trente (30) jours sur les composants de remplacement.
La présente garantie ne s’applique pas aux filtres ou aux mèches qui sont des pièces remplaçables
par le client.
La présente garantie ne s’applique qu’à l’acheteur d’origine du produit lorsqu’il est acheté auprès
d’un détaillant / revendeur réputé.
La présente garantie ne s’applique pas aux dommages provenant d’un accident, d’une mauvaise
utilisation, de modifications, de réparations non autorisées, d’une utilisation non autorisée, d’une
manipulation incorrecte, d’une utilisation déraisonnable, d’un abus, y compris un manquement à
effectuer l’entretien raisonnable, de l’usure normale, ni là où la tension se de branchement dépasse
de plus de 5 % la tension indiquée sur la plaque d’identification, ni à un équipement ou des produits
installés, câblés ou entretenus incorrectement en violation de ce mode d’emploi.
Les modifications comprennent la substitution de composants de marque, y compris de façon non
limitative les mèches et les traitements antibactériens.
CE PRODUIT N’EST PAS DESTINÉ À UN USAGE COMMERCIAL. CECI EST LA SEULE ET
EXCLUSIVE GARANTIE DONNÉE PAR LE FABRICANT EN CE QUI CONCERNE LES PRODUITS
ET, DANS TOUTE LA MESURE AUTORISÉE PAR LA LOI, REMPLACE ET EXCLUT TOUTES
AUTRES GARANTIES ET CONDITIONS, EXPRESSES OU IMPLICITES, QU’ELLES DÉCOULENT
PAR VOIE DE DROIT OU AUTREMENT,. Y COMPRIS DE FAÇON NON LIMITATIVE LA QUALITÉ
MARCHANDE ET/OU L’ADAPTATION À UN USAGE PARTICULIER
Aucun employé, agent, revendeur ou autre personne n’est autorisé à donner une garantie ou
condition quelconque au nom du fabricant. Le client sera responsable de tous les coûts encourus
pour le retrait ou la réinstallation et l’expédition du produit pour réparations.
Dans les limites de la présente garantie, un acheteur dont un appareil ne fonctionne pas doit
contacter le service clientèle au 800-547-3888 pour obtenir les documents et les instructions
pour envoyer l’appareil pour réparations.
Nota :La présente garantie sera nulle et non avenue si l’acheteur tente de réparer ou de
remplacer toute pièce qui soit mécanique ou électrique.
Une copie du récépissé de vente est requise avant qu’une autorisation de renvoi d’un appareil pour
réparations ne soit approuvée. Le fabricant réparera ou remplacera le produit, à sa seule discrétion,
avec les frais de port de renvoi à l’acheteur payés par le fabricant. Qu’il est convenu que cette
réparation ou ce remplacement constitue le recours exclusif est disponible auprès du fabricant et
que, DANS TOUTE LA MESURE AUTORISÉE PAR LA LOI, LE FABRICANT N’EST PAS
RESPONSABLE DES DOMMAGES D’AUCUNE SORTE, Y COMPRIS LES DOMMAGES
ACCESSOIRES ET INDIRECTS OU LA PERTE DE PROFITS OU DE REVENUS.
La garantie donne au client des droits juridiques spécifiques et ce dernier peut également avoir
d’autres droits qui varient d’une province à l’autre ou d’un état à l’autre.
Page 20

20
5800 Murray St.
Little Rock, AR 72209
1-800-547-3888
 Loading...