

Page 1
operation of this machine before using it. If you or your operator(s) cannot read
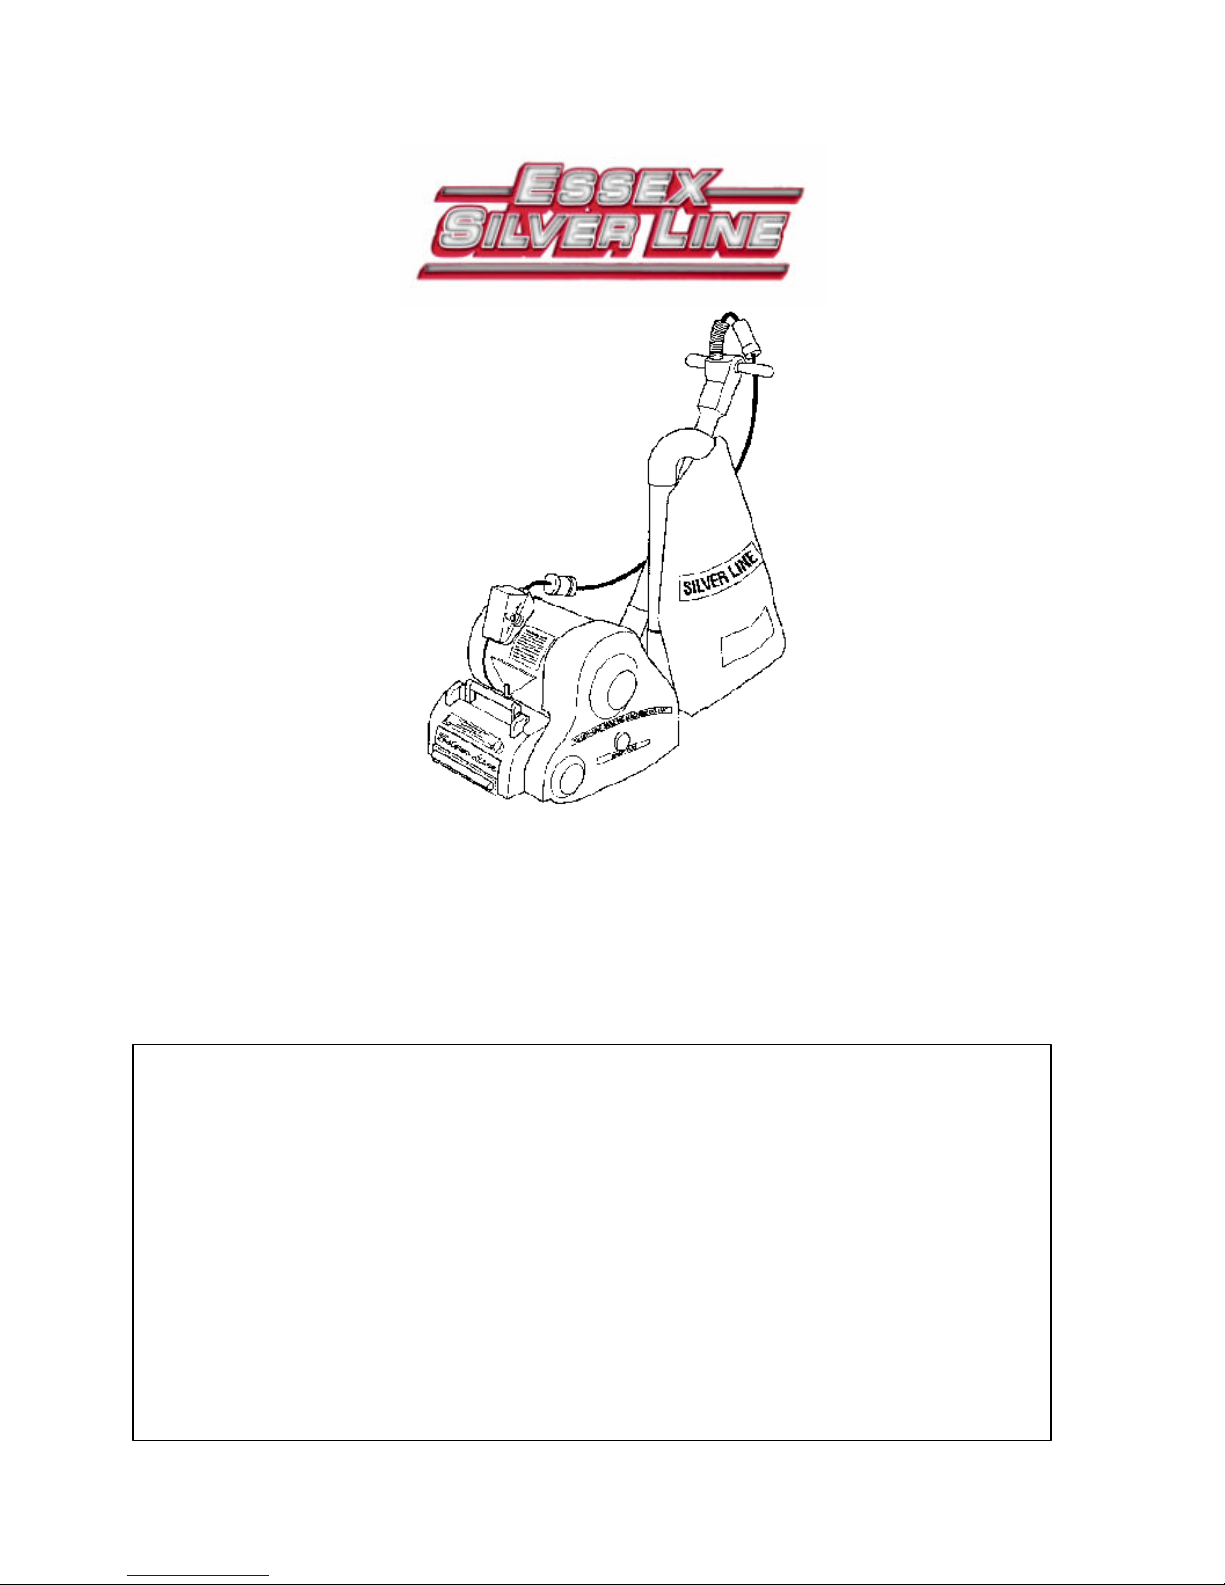
Silver-Line SL-8, SL8V2
Online Operator’s Manual
Read This Book
This book has important information for the use and safe operation of this machine. Failure to read this book
prior to operating or attempting any service or maintenance procedure for your Silver -Line machine could
result in injury to you or to other personnel: damage to the machine or to other property could occur as well.
You must have training in the
English, have this manual explained fully before attempting to operate this machine.
All directions given in this book are seen from operator’s position at the rear of the machine.
Essex Silver -Line Corporation, 1118 Lakeview Ave. PO Box 40, Dracut, MA 01826
www.essex-silver-line.com
(Revised 11/07)
1
Page 2

The Silver-Line SL-8, SL8V2 Floor Sander
(Suggestions for Care & Operation…Parts List)
Introducing:
Your new Silver-Line SL-8 floor sander is engineered with both the user and dealer in mind.
To the renter the SL -8 offers ease of handling, quiet, dust-free sanding and results that look
professional. For the dealer the SL -8 offers years of easy, low cost maintenance.
Inspect:
Check the shipping cartons for any signs of damage and inspect the ma chine and its parts
for any possible damage. Please note that the handle and dust tube sockets are in good working
order. They have been inspected and there are no cracks at the time of shipping. Please take care
when assembling so as to not break these pieces when installing their perspective parts.
Assemble:
Assemble the machine by inserting the dust tube and the handle/switch tube assemblies in
their respective sockets and tighten the retaining screws. Do not over tighten and cause
breakage! Put the dust tube elbow on the dust tube and tie the dust bag on the elbow. When you
install the switch handle assembly make sure the switch is facing up.
Voltage:
Use this sander only on house current, (never use 220 volt). The SL -8 uses 14 amps while
operating. When additional extension cords are required use only 12/3 heavy -duty cord. Be sure
that the machine is switched OFF and is resting on the back of the chassis before plugging it into
the proper current.
Dust Collecting:
The dust collection system will be most efficient when the bag is emptied when it is 1/3 to
½ full. Remember to remove all sawdust from the house.
Sanding Drum:
The sanding drum that is installed on your new SL -8 has been dynamically balanced and
leveled in our factory to assure and even 8” cut. See directions inside to install paper.
Wiring:
Please check the wiring and cords before using or renting this machine
Questions:
Please call us @ 1 800 451-5560 or email our website www.essex-silver-line.com if we can
answer any questions.
Warranty:
Please fill out the enclosed warranty card, tear at the perforation and mail the proper
section to our Dracut, MA plant.
2
Page 3

SL-8 Floor Sander Parts List
Part # Description Cost Part # Description Cost
SL80 Essex Video SL839 Switch Housing
SL81 Fan Housing SL839A Switch Housing Tube Screw
SL81A Fan Housing Screws SL840 Switch Housing Cover
SL82 Fan (Exhaust) SL840A Toggle Guard (Canada)
SL83 Fan Shaft SL841 Switch Housing Cover Screw
SL84 Fan Pulley SL842 Wood Handle
SL85 Exhaust Fan Key SL843 Wood Handle Retaining Screw
SL85A Fan Pulley Key SL844 Handle Tube Socket
SL86 Exhaust Fan Washer SL844A Handle Tube Socket Screw Set
SL87 Exhaust Fan Nut SL844B Holding Strap (Canada)
SL88 Fan Bearing (6203) SL845 Handle Tube Socket Screws
SL89 Fan Bearing Retaining Ring SL846 Handle Tube
SL810 Fan Pulley Washer SL847 Handle Tube Cord w/Terminals
SL811 Fan Pulley Nut SL848 Handle Tube Cord Twist Lock
SL812 Idler Pulley Bearing (6201) SL849 Handle Tube Grommet
SL813 Idler Pulley SL850 Switch Housing Strain Reliever
SL814 Idler Arm SL851 Switch Handle Twist Lock (#4720C)
SL815 Idler Arm Retaining Plate SL8-51A Switch Handle Cord w/Terminals
SL816 Idler Arm Retaining Plate Screws SL852 Switch
SL817 Idler Arm Spring SL853 Dust Tube Socket
SL818 Idler Stud SL854 Dust/Handle Tube Screw
SL819 Idler Stud Washer SL855 Dust Tube Socket Screw
SL820 Idler Stud Nut SL856 Dust Tube
SL821 Idler Arm Spring Screw SL857 Dust Bag Elbow
SL831 Drum Bearing #6203 SL858 Dust Bag
SL832 Drum Bearing Boot SL859 Wheel Shaft
SL833 Drum Pulley SL860 Wheel Shaft Collars
SL833X Drum Pulley (Australia) SL861 Rubber Wheels
SL834 Drum Pulley Washer SL862 Wheel Level Disc
SL834F Flat Washer SL863 Wheel Shaft Washer
SL834X Drum Pulley Washer (Export) SL864 Wheel Shaft Nut
SL835 Drum Pulley Nut SL865 Dust Pan
SL839 Switch Housing SL867 Dust Pan Screw
SL839A Switch Housing Tube Screw SL868 Dust Pan Spring Pin
SL840 Switch Housing Cover SL869 Drum Cover
SL840A Toggle Guard (Canada) SL869A Drum Cover Guard (Polyurethane)
SL841 Switch Housing Cover Screw SL870 Bumper Pin
SL839 Switch Housing SL871 Rubber Bumper
SL839A Switch Housing Tube Screw SL872 Bumper Screw
SL840 Switch Housing Cover SL873 Drum Cover Spring Pin
SL840A Toggle Guard (Canada) SL874 Paper Bender
SL841 Switch Housing Cover Screw SL875 Paper Bender Screw
3
Page 4
SL842 Wood Handle SL876 Lift Handle Stud (L)
SL843 Wood Handle Retaining Screw SL877 Lift Handle Stud (R)
SL-8 Floor Sander Parts List
Part # Description Cost Part # Description Cost
SL877A Lift Handle Stud Spring Pin SL8107 Motor Brushes
SL878 Lift Handle Tubing SL8107A Brush Spring Only
SL879 Lift Handle Stud Screw SL8108 Motor Bearings
SL-880 Sander Chassis (w/881 & 882) SL8109 Motor Armature
SL880A Spring Pin Belt Cover SL8109R Armature (Rebuilt/Exchange)
SL881 Drum Bearing Cap (Closed End) SL8110 Motor Field
SL882 Drum Bearing Cap (Open End) SL8111 Dynafan Belt
SL883 Drum Bearing Cap Screws SL8112 Dynafan Drum
SL884 Pulley & Belt Cover SL8113 Motor Adjusting Bracket (Dyna)
SL885 Pulley Belt Locking Screw SL8114 Motor Brushes (Dyna)
SL886 1HP Baldor Motor (Ind/Rep) SL8115 Motor Bearings (Dyna)
SL886A SL8 Motor Exchange SL8116 Motor Pulley (Dyna)
SL886R Motor (Rebuilt) SL8117 Motor Fan Belt (Master)
SL887 Motor Adjusting Bracket Triangle SL8118 Motor Drum Belt (Master)
SL887A Motor Adjusting Bracket Screw SL8119 Motor Adjusting Bracket (Master)
SL887B Motor Adj. Bracket Screw Washer SL8120 Motor Brushes (Master)
SL888 Motor Adjusting Screw SL8121 Motor Bearings (Master)
SL888A Motor Adjusting Screw Nut SL8122 Motor Pulley (Master)
SL888B Cap for Motor Ajusting Screw SL8123 SL-8 Drum Recovery
SL889 Drum Motor Pulley SL8124 Gold Line Recovery
SL889X Drum Motor Pulley (Australia) SL8125 Pro-8 Drum Recovery
SL890 Fan Motor Pulley SL8126 Pro-10 Drum Recovery
SL891 Motor Pulley Key SL8127 Pro-12 Drum Recovery
SL892 Motor Hinge Pin SL8128 Drum Paper Cam Wrench
SL892A Cotter Pin (Mtr Hinge) SL8129 Electrical Box Bottom (Baldor)
SL893 Motor Hinge Bracket SL8130 Electrical Box Top (Baldor)
SL894 Motor Hinge Spacer SL8131 Electric Box Complete
SL895 Motor Cord w/Term. SL8131A Motor Cord Connector
SL896 Motor Cord T-Lock (Male) #4720C SL8132 Motor Brush Cover & Gasket
SL897 25' Cord w/Twist Lock (F) SL8111A Fan Idler Assembly
SL898 Twist Lock (Female) #4729C SL8222 Drum Assembly
SL899 Straight Pin Plug (Male) #1447 SL8333 Handle Assembly
SL899A Straight Pin Plug (Female) SL8444 Wheel Assembly
SL8100 25' Cord Only SL8555 Drum Cover Complete
SL8101 Drum Belt (Baldor) 4L290 SL8666 Motor Assembly (Baldor)
SL8101X Drum Belt (Export) SL8666(50hz) Motor Assembly (50hz) (Baldor)
SL8102 Fan Belt (Baldor) 3L310 SL8ND Drum (New)
4
Page 5
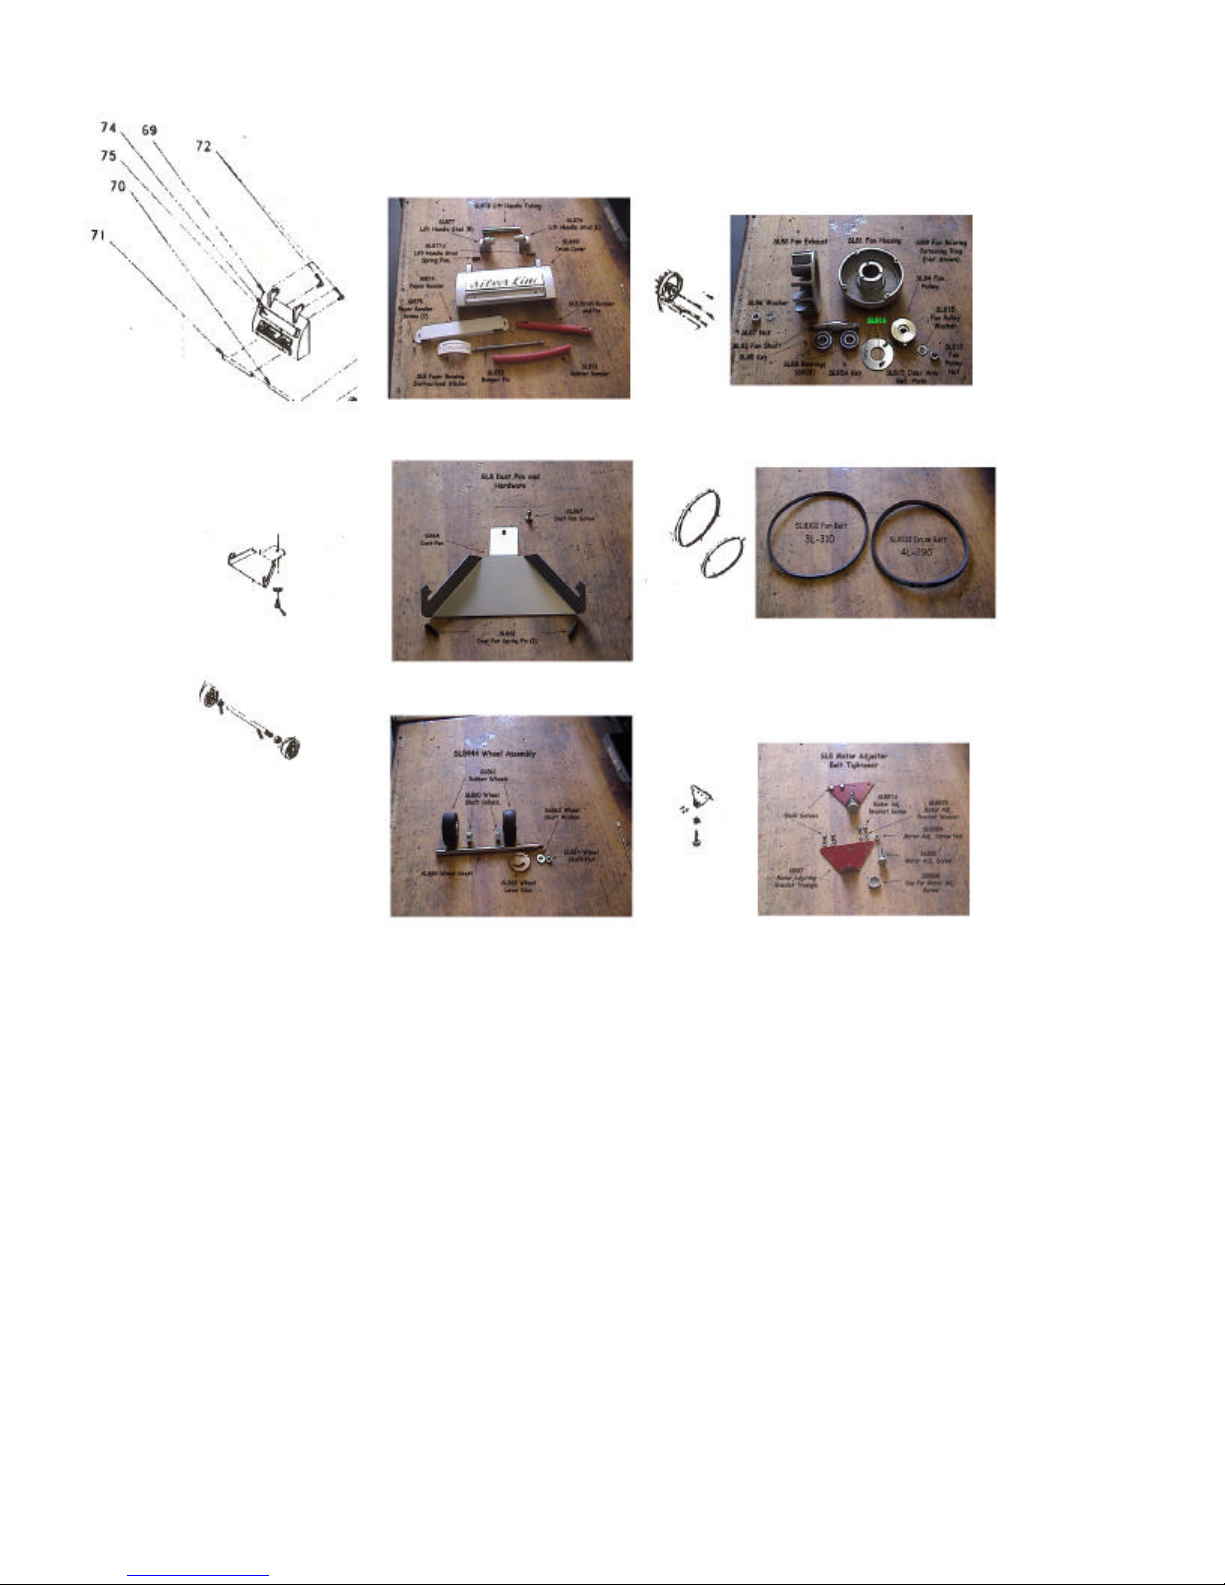
SL8103 Drum Cap Screw Wrench SL80W ESL Video Waterborne
SL8104 Fan Housing Screw Wrench
SL8105 Dust Handle Tube Socket Wrench
SL8106 Motor Cooling Fan
SL8106A Motor Cool Fan Guard
SL8106B Cooling Fan Guard Screws
Installation of paper on the
5
Page 6
Silver-Line SL-8 Floor Sander
Turn off the sander & unplug from outlet
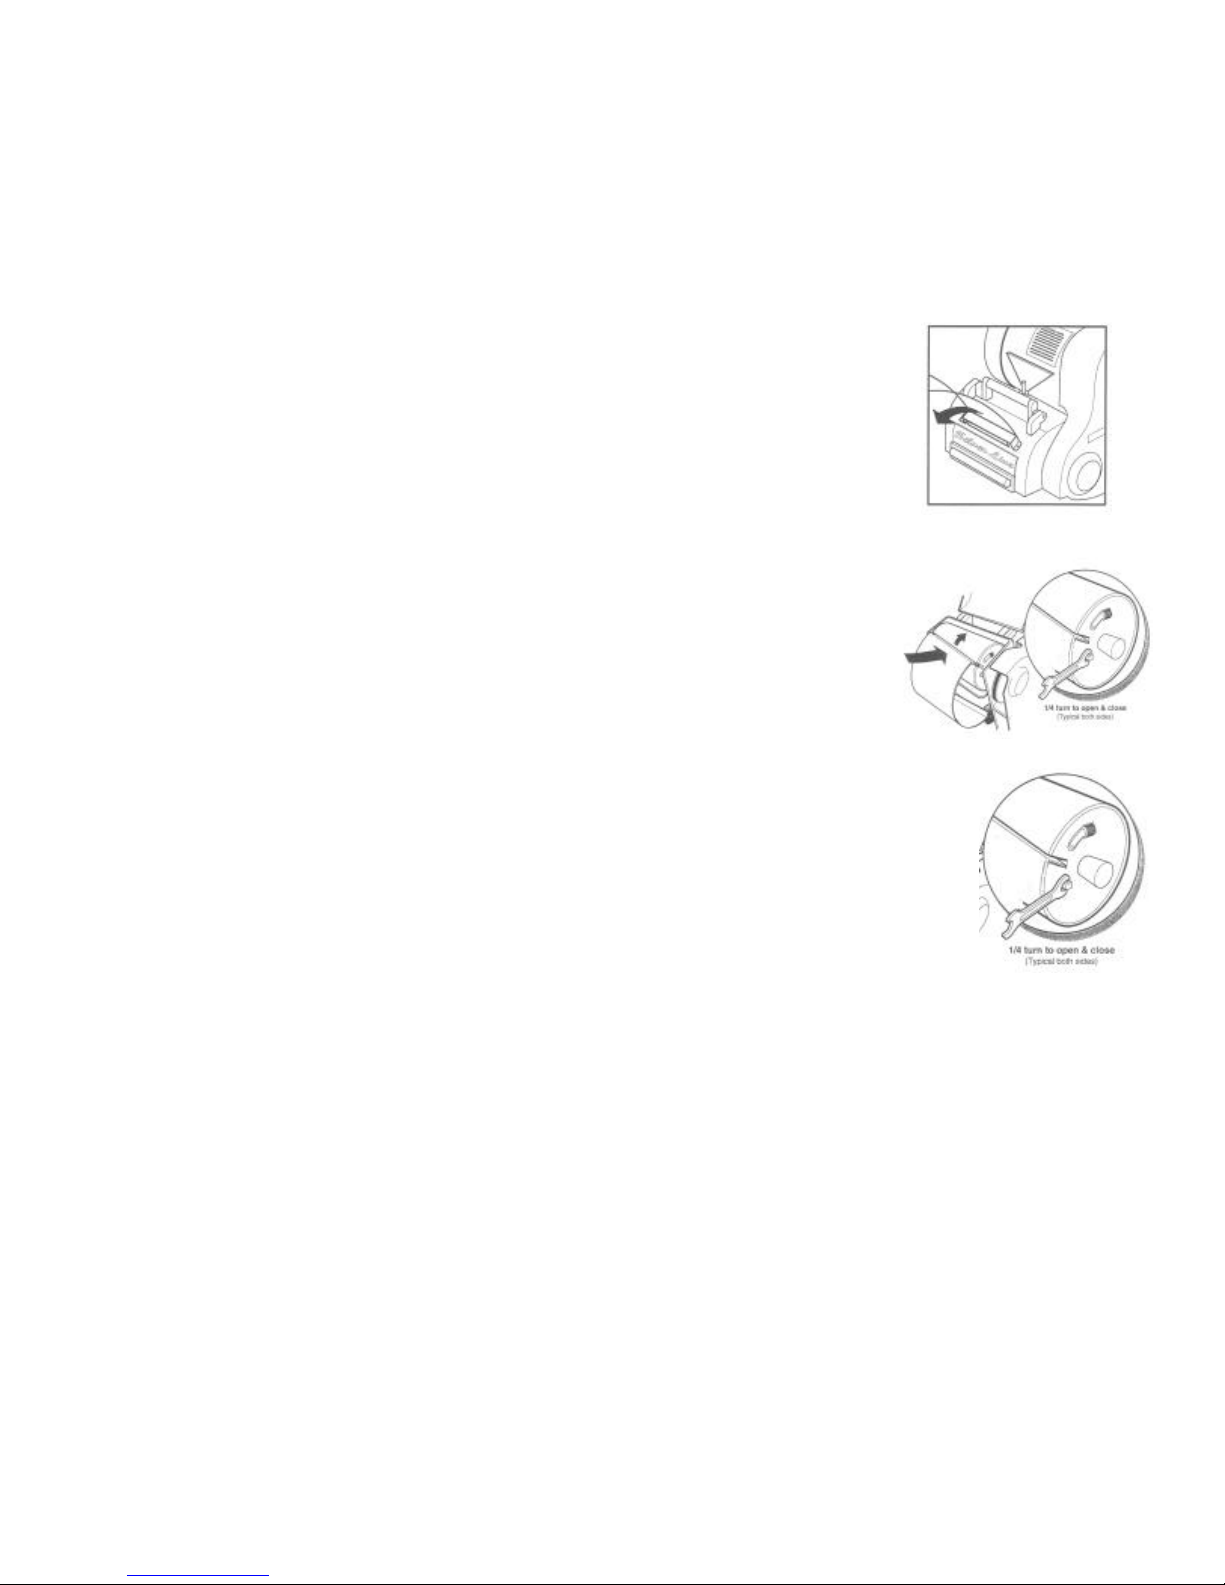
Bend the Silver-Line SL-8 sheet in the paper bender located on the drum cover (pictured)
Tilt the SL-8 back onto the handle and lift the drum cover for easy installation
Roll the drum until the paper slot is facing you and adjust the cams so the arrows
printed on the cams are facing you. The left arrow should point down, while the
right arrow points up.
Insert one end of the paper into the slot (pictured) and turn the drum around so
that the paper wraps around the drum. Insert the other end into the slot a nd
push both ends into the slot until the paper is snug on the drum.
When using 20 grit or coarser paper, insert the top of the sheet first and
then install the bottom half, it will insert easier.
Using a 7/16” open wrench turn the left cam down ¼ tu rn, than turn the right
cam up ¼ turn (pictured). As you turn the second cam you will see the paper
pull tight into the drum. You must turn both cams a full ¼ turn to secure
the paper.
Turning the cams more than the ¼ turn will not make the paper any tighter on the
drum, ¼ turn on each cam is all you need to attach the sheet. Turning the cams too
much can cause the cams to come completely around and loosen the paper.
Lower the drum cover and return the sander to its upright position resting on the rear
of the chassis.
Plug the machine into an outlet, turn it on and slowly lower the drum to the surface being sanded as
you walk forward. Lift the drum off the floor as you reach the end of the room, walk backwards on
the same path and lower the drum to sand the floor as you return to the other end of the room.
Sand in both directions with the Silver -Line SL-8 floor sander!
To remove used paper, reverse the process.
For very coarse paper, (12 & 16 grit) it may be necessary to remove grit to insert the paper into the
slot. First, bend the paper as instructed. Second, put on safety glasses and remove the grit by
placing the paper on a hard surface (grit up) and hammering the grit off the flaps until manageable.
Continue installation of the paper.
6
Page 7

Installation of Hook & Loop Sandpaper on the
Silver-Line SL-8V2 Floor Sander
No Tools Required!
Turn off the sander & unplug from outlet
Tilt the SL-8V2 back onto the handle and lift the drum cover for easy installation
Roll the drum around until you locate the metal paper installation slot.
Holding the paper with the grit side out (hook towards the drum), insert the leading edge into the
slot. Slide the paper side to side in the slot to ensure it is bottomed out. For proper alignment, the
edge of the paper must make contact with the bottom of the slot across the full eight inches (8”).
Roll the drum towards the floor and press the paper to the drum, attaching the hook and loop.
Pressing the firmly to the drum.
Press along the whole length of paper, making certain the paper goes on the drum evenly.
The back edge of the paper should end at the metal slot.
Lower the drum cover and return the sander to its upright position resting on the rear of the
chassis.
Plug the machine in to an outlet, turn it on and slowly lower the drum to the surface being sanded as
you walk forward. Lift the drum off the floor as you reach the end of the room, walk backwards on
the same path and lower the drum to sand the floor as you return to the oth er end of the room.
Sand in both directions with the Silver -Line SL-8V2 floor sander!
To remove used paper, pull straight off from edge.
7
Page 8

What to check on your
Silver-Line SL-8 Floor Sander
To keep it running like new!
The Drum: The soft resi lient rubber drum of the SL -8 is a wear item that should be
checked to ensure your customers the best sanding action. There are several ways to check a drum
to see if it is in good shape.
a. The easiest way would be to see how the paper fits on the drum. It should fit
tightly over the drum, square on the sides.
b. Check the cut on the floor. The drum should make a straight 8” cut, not heavier on
either side. If it does not give the correct cut, adjust the wheels to allow the
proper cutting action. If the drum is coned shape, replace the drum.
c. Finally, measure the drum with our measuring string. Wrap the string around the
drum, insert it through the loop, pull snug and see if the loop ends up in the red
mark. If it does, too much rubber has worn off the drum and it needs replacing.
d. If the circumference of the drum is 17 ¼” or less, replace it.
The Dust Pan: The dustpan (#65) wears on the front edge and ears from the loose
abrasives being vacuumed up. If your dustpan is not attached to the pins, reatta ch it. If it is too
worn, replace it with a new one. Your SL-8 ahs the best vacuum system available to the rental
market, but a good dustpan is very necessary for proper functioning.
The Wheels: Look at both wheels when you check the drum. If the w heels get out of
round the machine will not cut properly. Replace the wheels on your machine.
The Belts: Check the belt tension on your SL -8, both belts should be tight, if not adjust
them using the motor adjusting screw (#88) located on the front of the motor.
The Dust Bag: It may not seem like a big deal, but your dust bag is important. A bag that
is too old or repaired too many times will not collect the dust properly. An worn bag can also give
the wrong impression to your customers about how you keep up your equipment.
Follow these simple maintenance steps and rent
The World’s Finest Floor Sanders
In the Best Possible Condition!
8
Page 9

Wiring Diagram
SL-8 Sander
Ground (Green)
Power (White)
Power (Black)
14/3 STO Wire #52
15 amp Twist lock #51 Male
Ground Wire (green)
attached to back o f switch
housing #39, below cover
Notes:
Wrap entire lower portion of toggle switch and terminal connections with electrical tape.
In the twist lock, the black wire attaches to the gold terminal
In the twist lock, the white wire at taches to the silver terminal
# 52 Toggle
Switch
Power cord down
handle to twist lock
15 amp twist lock #48
Female
Essex Silver-Line Corporation
1118 Lakeview Ave. PO Box 40
Dracut, MA 01826
Phone (978) 957-2116, Fax (978) 957-6989, Toll Free 800 451-5560
9
www.essex-silver-line.com
Page 10

Troubleshooting your SL-8:
Problem: The SL-8 is not holding paper correctly.
Solution: Clean out cam slot for full operation!
To improve the cam action of the SL -8 drum, follow these easy instructions:
1) Look for sawdust built up between the cam and the aluminum end cap, opposite the pulley.
2) Put a piece of coarse paper (#20) on the drum. This will force the cams, pawls and springs
away from the end cap.
3) Using a straightened paper clip and an air compressor, clean out the area between the cam
and end cap. REMOVE ALL THE BUILT UP SAWDUST!
4) Remove the paper and check to see if the cam is touchi ng the end cap.
5) Repeat the process if the cam is not touching the end cap.
This process should be don on a regular basis to assure 100% pressure from the cams, pawls and
springs. If the cams are moving properly and there is still a problem holding pa per, then it is time
to recover the drum. We recommend completing a drum exchange every 2 -3 years, depending on
use. See page 7 for additional information on the drum.
Call us at 1 800 451-5560 to order a drum exchange. We will send a drum assembly to your
location, and charger your company a core charge. Upon receipt and recovery of your drum we will
issue a credit of the core charge and bill your company for the recovery fee.
10
Page 11

SL-8 Drum Removal & Reinstallation!
One of the advantages of your SL-8 sander is the soft rubber drum. It’s more forgiving than a
hard rubber surface so your customers can achieve better results and it is easy to maintain!
Essex Silver-Line Corporation suggests you change the rubber on you SL -8 drum every two to three
years. The rubber wears down as the machine is rented and used.
You can remove the drum and send it to us in our Dracut, MA plant for recovery or simply call us for
a drum exchange. We send a reconditioned drum to you and send yours back to us for recovery.
Removal & Reinstallation Instructions:
1) Unplug the machine from power.
2) Remove the Pulley belt cover screw (#85)
3) Remove the Pulley Belt Cover (#84)
4) Remove the Drum Belt (#101)
5) Lean the machine back onto its handle. Be careful to hold the motor so it does not slam back
into the handle. The belt that holds it forward has been removed.
6) Using a ¼” socket wrench remove the four (4) bolts (#83) holding the two Drum Bear Caps in
place (#s 81 & 82).
7) Remove the Drum Bear Caps (#s 81 & 82).
8) Remove the drum unit.
9) Reinstall the refurbish or recovered drum assembly. Line up the boots with the chassis and push
in the assembly.
10) Reinstall the Drum Bear Caps.
11) Reinstall the Drum Bear Cap Screws.
12) Lean the machine back down to its upright position, be careful of the motor again!
13) Reinstall the belt and adjust the belt tension using the motor adjusting screw (#88).
14) Level the drum and reinstall the belt cover and belt cover screw.
Leveling/Adjusting the Cut on the SL -8
Remove the belt guard to expose the wheel level disc.
Test the cut:
Install a piece of fine paper on the drum; lower the drum onto a flat surface making a cut.
The cut should be 8” across in an even fashion. If it is not, you need to loosen the nut on the axle
and rotate the wheel level disc to one side. Gradually move the disc towards to the other end of
the slot, testing the cut as you move the disc. Continue till you make an even 8” cut.
When the machine makes th e proper cut, tighten the nut and reinstall the belt guard.
11
Page 12

Proper Application & Use of
Silver-Line Abrasives
12, 16, 20* grit Sheets & Discs
For removing old surface coatings and leveling uneven floors
36, 40* grit Sheets & Discs
For intermediate sanding of floors following rough sanding.
For initial sanding of moderately worn floors
60*, 80, 100* grit Sheets & Discs
For finish sanding of all floors prior to applying new coatings
For removing light scratches, sanding marks and minor surface damage
60, 80, 100, 120, 150 & 180 grit Sandscreens
For removing fine scratch marks prior to applying new coatings
For light sanding between surface coatings
*Indicates most popular rental grits for sanding floors. 60 & 100 grit should be used in succession
for proper finish. Never skip more than two grits when sanding a floor.
Example: Do not jump from 36 grit to 80 or 100 grit
Always start your sanding project with the highest possible grit that will cut and level your floor.
If the grit will not cut the finish or level the floor, go down one grit size to complete the cut!
White* Thick Nylon Pads
Buffing, for polishing floors where highest luster is desired
Green Thick Nylon Pads
Scrubbing, for general duty scrubbing and spot removal on floors
Black Thick Nylon Pads
Stripping, for heavy duty wet stripping of floors
* White pads should be used under the padlocks when using sandscreens on rotary
and orbital polishers. They are used for driving sandpaper on Orbital Polishers.
12
Page 13

Wood Floor Refinishing
Floor Sanded
Bring this level
The Silver-Line Way
(Visit our website www.essex-silver-line.com under consumer tips for complete information)
Job Preparation:
Remove the furniture, wall hangings, etc. Clear the room out!
Remove the old carpet, carpet pad and carpet strip (where necessary)
Locate & Reserve only Silver-Line Sanders & Edgers from your local rental store
Watch the Silver-Line “How to” Video
Inspect the floor for and remove…
Staples from the carpet pad
Nails from the tackstrip
Nails protruding from the floor (countersink these nails)
Make sure you are very diligent when completing this task, protect the rental machine!
You may be liable for damage to the drum and disc pad on the rental equipment!
Protect the rest of your house from sawdust, sweep the floor and vacuum, and pick up the equipment!
Sanding the Floor:
What are you trying to accomplish during this project? First, you want to level the floor, and remove the old finish. The
remaining cuts or passes are to remove the scratch marks made by the previous cuts. Do not skip too many grits when
sanding the floor, as the finer grits may not be able to remove the heavier scratches.
Start the process with the highest grit possible to complete the first cut, leveling and removing the finish. If a 36 or 40
grit will accomplish the task, then do not use 20 grit or heavier. If it seems to be taking too long, drop down and use the
heavier grit. By doing this you will probably save time.
Break the room down into two sections, 1/3 to 2/3 and sand the larger area first. Complete the 2/3 section and turn around
to sand the remaining 1/3. Do this with all the grits. Offset where you stop and start the sanding so you do not end up with
a line across your floor at the end of the project.
2/3
Sand Second
Use the SL-8 sander for the main section of the floor and then follow with the SL-7 edger. This method will allow you to set
the level you want in the main section of the floor and than bring it out to the edge of the room with the SL-7.
To use the Silver-Line SL-8 correctly, you sand forward and backward on the same line with the SL-8 sander. Be sure to lift
up on the handle with enough force to keep the drum pressure constant on the floor. Feather the sander so the drum comes
off the floor while moving forward or backward when you reach an area that you need to stop.
The following grits are recommended for a professional looking sanding job. Again, you want to start with the least
aggressive grit to complete the leveling and finish removal and proceed up through the grits.
20, 36 or 40, 60 and finally 100
Sand First
Level w/SL-8
1/3
to wall w/SL-7
13
Page 14

Installation of paper on the
Silver-Line SL-8 Floor Sander
Turn off the sander & unplug from outl et
Bend the Silver-Line SL-8 sheet in the paper bender located on the drum cover
(pictured)
Tilt the SL-8 back onto the handle and lift the drum cover for easy installation
Roll the drum until the paper slot is facing you and adjust the cams so the arr ows
printed on the cams are facing you. The left arrow should point down, while the
right arrow points up.
Insert one end of the paper into the slot (pictured) and turn the drum around so
that the paper wraps around the drum. Insert the other end int o the slot and
push both ends into the slot until the paper is snug on the drum.
When using 20 grit or coarser paper, insert the top of the sheet first and
then install the bottom half, it will insert easier.
Using a 7/16” open wrench turn the left c am down ¼ turn, than turn the right
cam up ¼ turn (pictured). As you turn the second cam you will see the paper
pull tight into the drum. You must turn both cams a full ¼ turn to secure
the paper.
Turning the cams more than the ¼ turn will not make th e paper any tighter on the
drum, ¼ turn on each cam is all you need to attach the sheet. Turning the cams too
much can cause the cams to come completely around and loosen the paper.
Lower the drum cover and return the sander to its upright position res ting on the rear
of the chassis.
Plug the machine into an outlet, turn it on and slowly lower the drum to the surface being sanded as
you walk forward. Lift the drum off the floor as you reach the end of the room, walk backwards on
the same path and lo wer the drum to sand the floor as you return to the other end of the room.
Sand in both directions with the Silver -Line SL-8 floor sander!
To remove used paper, reverse the process.
For very coarse paper, (12 & 16 grit) it may be necessary to remove gri t to insert the paper into the
slot. First, bend the paper as instructed. Second, put on safety glasses and remove the grit by
placing the paper on a hard surface (grit up) and hammering the grit off the flaps until manageable.
Continue installation of the paper.
14
Page 15

Note: If you trip a beaker or blow fuse, turn off the equipment off, then reset the breaker or
replace the fuse.
Note: Remove all sawdust from the house as you empty the dust bags. Empty your sander bags
when they are ½ full, this will help with the dust pick up. Sawdust can be flammable and you do not
want it in your house.
Note: When using the SL -7 edger, sand from right to left and let the edger do the work. A
properly aligned edger, with a disc pad in good condition will function well without the user exerting
additional pressure. Let the edger do the work; don’t put extra pressure on the machine. Work at
a pace you are comfortable with, and take frequent rests.
If the cutting action of you sander seems to slow or diminish, it is probably time to change the sandpaper. In an effort to
save money, don’t try to extend the life of the paper, replace it as needed. If you skimp on the amount of paper you use on
this project it will affect the end result. Don’t look at the cost at the time of sanding, but rather over the life of the floor.
Replace abrasives to get the same type of cut across the floor.
After you sand the floor with the SL-8 & SL-7 it is time to scrape corners, door jambs, etc. Use our 12 wood handle scraper
with a 1” Red Devil blade, available from the rental store, to accomplish this task. Hand sand the areas you scraped.
If you have areas such as baseboard heat, radiators or toekicks that could not be reached by the SL-7, use the Silver-Line
U2 underradiator sander to clean up these areas. It uses 5” PSA discs and is also available at the rental store.
When your done sanding your floor return your sanders to the rental store. Remember to return the cords, wrenches, bags
and unused supplies.
Note: After sanding you should screen the floor before you apply any finish or stain to achieve the
best possible finish. A professional floor sander will screen his work; spend the time and money to
screen your floor.
Essex Silver-Line Corporation
PO Box 40
1118 Lakeview Ave.
Dracut, MA 01826
(978) 957-2116, Fax (9780 957-6989
Toll Free 800 451-5560
www.essex-silver-line.com
15
Page 16

Essex Silver-Line Corporation
Limited One Year Warranty
Essex Silver-Line Corporation warrants the floor sanding equipment for a period of
one year from the date of original purchase. We will repair or replace at our
option, any part or parts of the products under this warranty which examination
proves to be defective in workmanship or materials during the warranty period.
For repair, return machine or parts to Essex Silver -Line Corporation
transportation prepaid. This warranty does not apply to repair or replacement
required due to misuse, abuse, normal wear and tear and/or repairs attempted or
made by other than our service center. For the purpose of this warranty, damage
16
Page 17

resulting from accident, use of defective or inadequate wiring at the installation in
which used, improper cleaning or operation, fire, floods or act of God, are not
covered. No other warranty implied or expressed is offered and under no
circumstances shall Essex Silver -Line Corporation be liable for an incidental or
consequential damage.
Essex Silver-Line Corporation
PO Box 40
1118 Lakeview Ave
Dracut, MA 01826
(978) 957-2116, Fax (978) 957-6989
Toll Free 800 451-5560
www.essex-silver-line.com
17
 Loading...