

Page 1
essex inc.
P a t t e r n P e r f e c t
version 3.1
MENU
SYSTEM
OWNER’S MANUAL
Page 2

PatternPerfect Owner’s Manual
TABLE OF CONTENTS
Overview 2
Selecting a Style 3
Selecting a Yarn Type 4
Selecting a Beam 5
Updating the Style List 6
Testing 8
Troubleshooting 9
Spare Parts 10
Page 3
OVERVIEW
The Essex Inc. PatternPerfect System is designed to make the creeling process simple, improve creeling accuracy, and reduce time spent creeling by providing a visual indication (green LED) of the correct
position for each yarn package.
Creeling diagrams for each style and/or beam are stored in the PatternPerfect Style Database. Upon
selecting a style, a beam (if applicable) and a yarn type, the proper creel configuration will automatically
load and the proper LEDs will light, showing where the yarn packages should be placed.
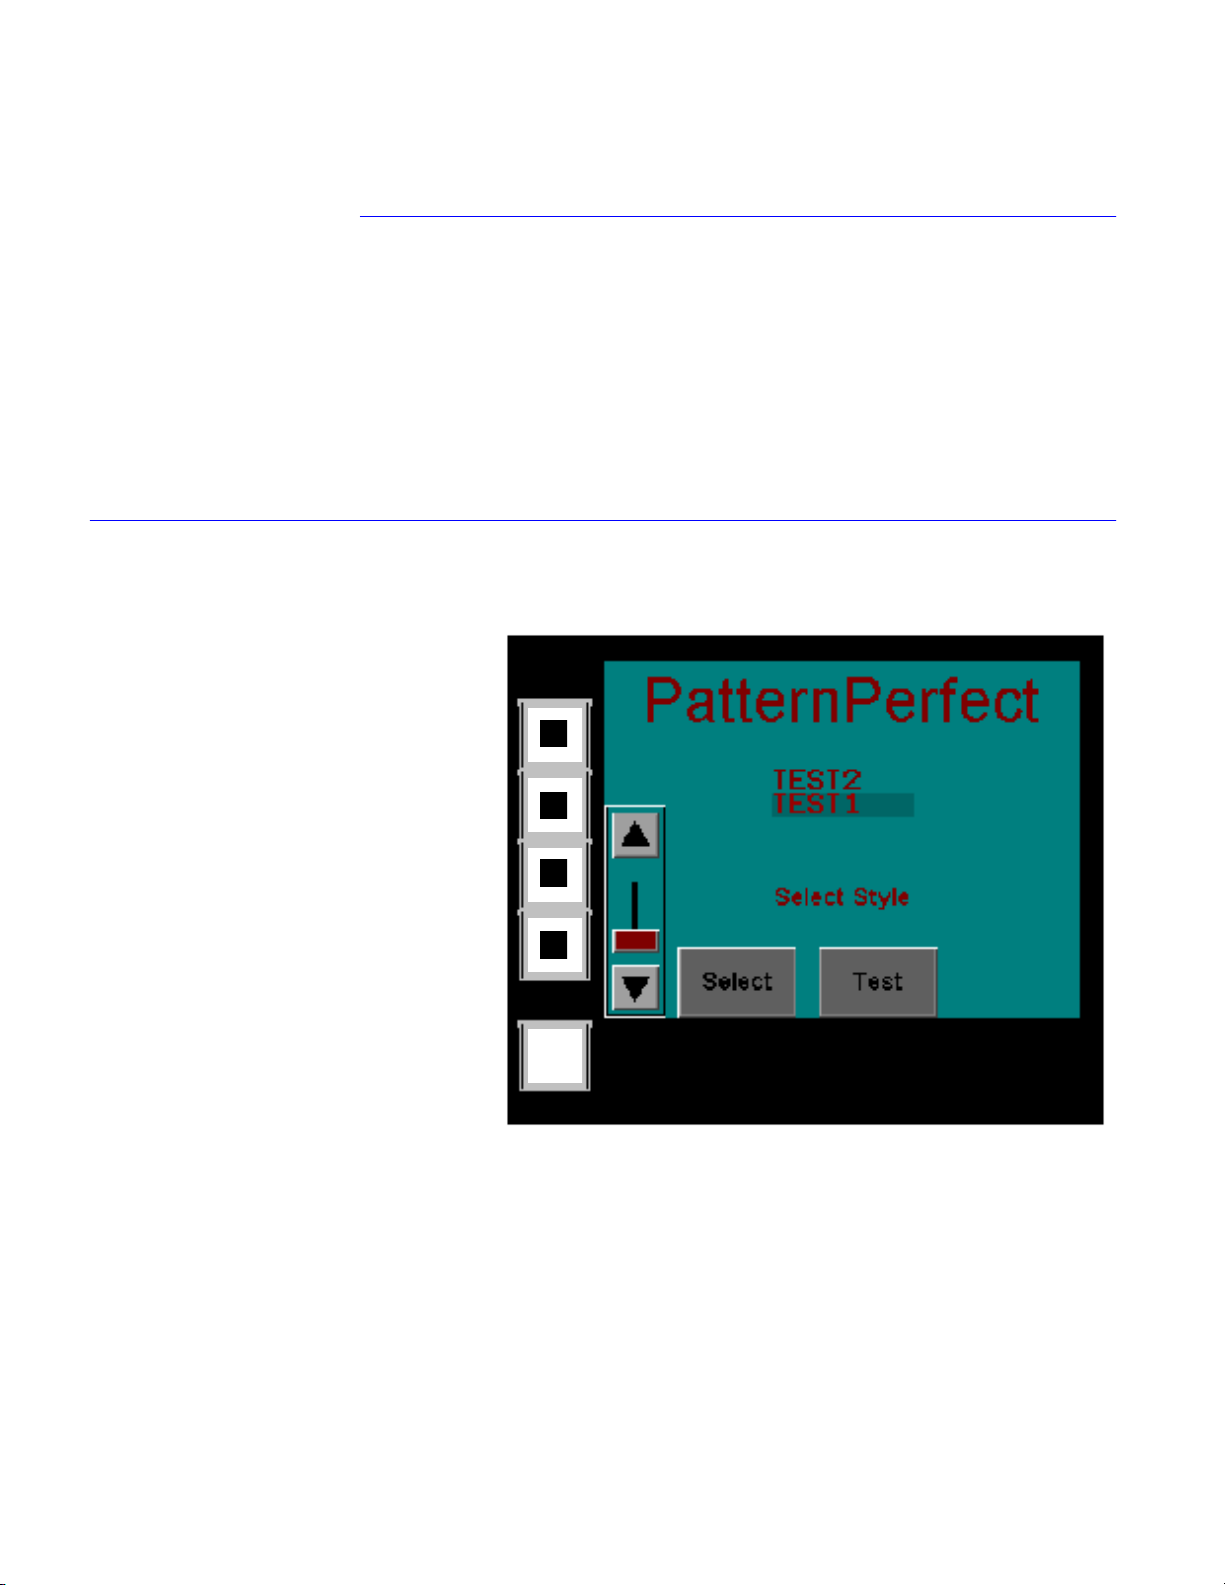
PatternPerfect System Touch Screen Layout
push-
buttons
pattern database FTP server address
touch sensitive screen
2
MENU
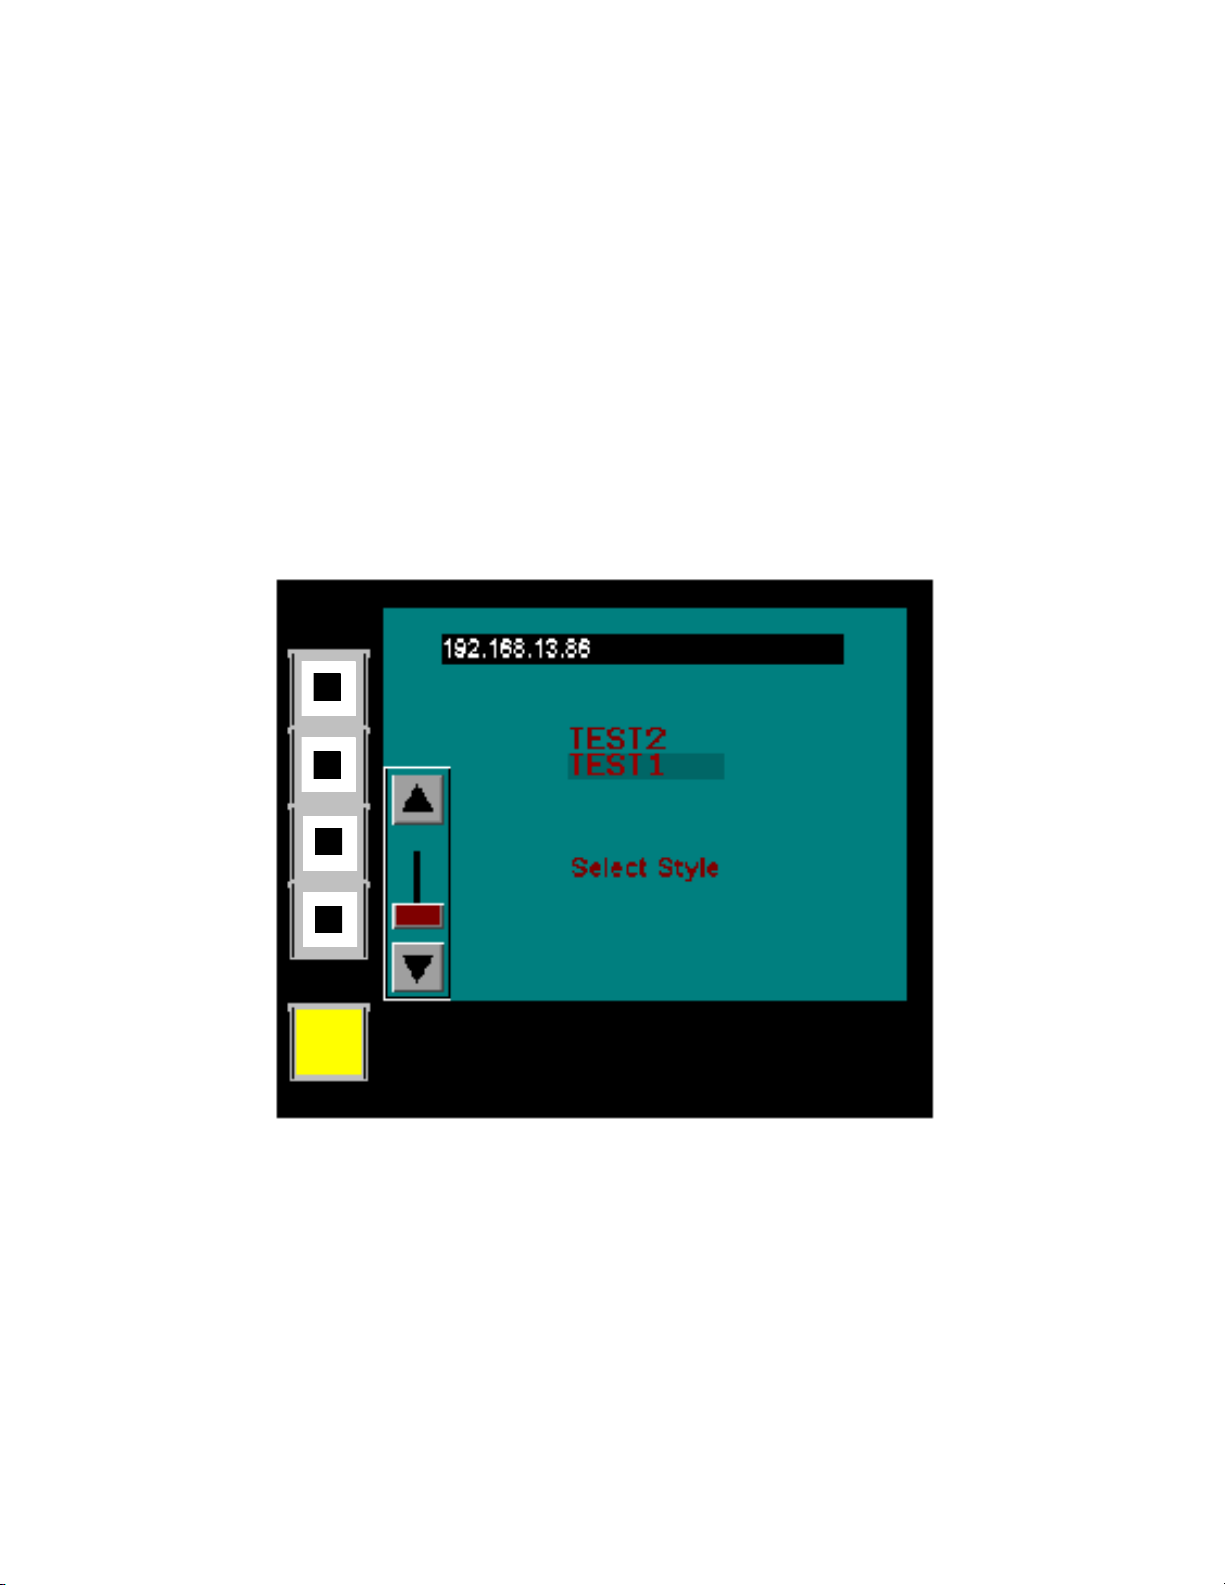
Upon power-up the Start-Up screen will momentarily appear. The Main/Style Selection screen will
automatically display after all communication connections are established, indicating that the system is
ready for use.
The Main/Style Selection screen of the system can be obtained at any point in the system by pressing
the MENU pushbutton.
START UP SCREEN
Page 4
SELECTING A STYLE
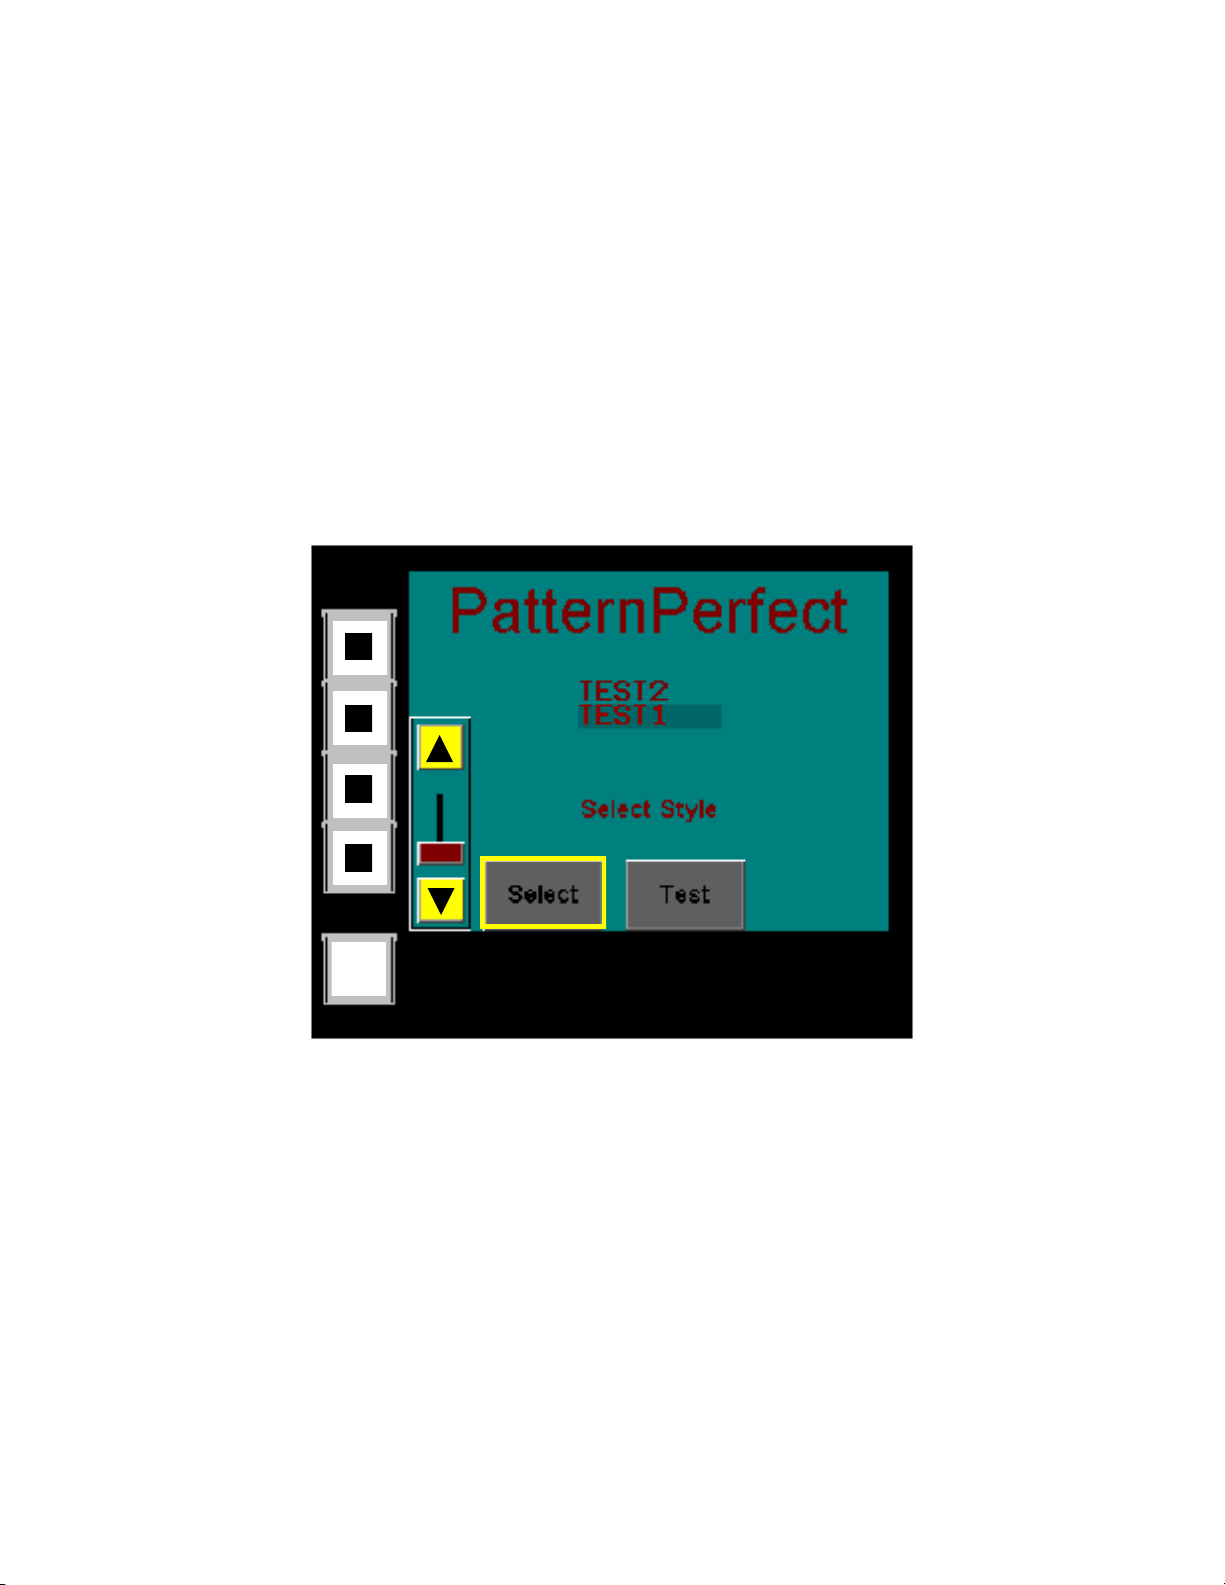
To select a style to begin creeling, first locate the slider on the Main or Style Selection page. By pressing the up or down arrow buttons on the slider, the list of styles located in the middle of the screen will
scroll. These are the styles as pre-defined in the PatternPerfect database. When the desired style is
highlighted press the Select button at the bottom of the page. If the system is equipped with an optional
scanner, simple scan the barcode which represents the desired style, and style selection occurs automatically and is complete.
Main / Style Selection Screen
style name
slider bar
MENU
MAIN/STYLE SELECTION SCREEN
Upon selecting a style, either the Beam Selection screen or the Yarn Selection screen will automatically
display depending on which is applicable to the system.
To return to the previous screen in order to choose a different style, press the MENU pushbutton.
3
Page 5
SELECTING A BEAM
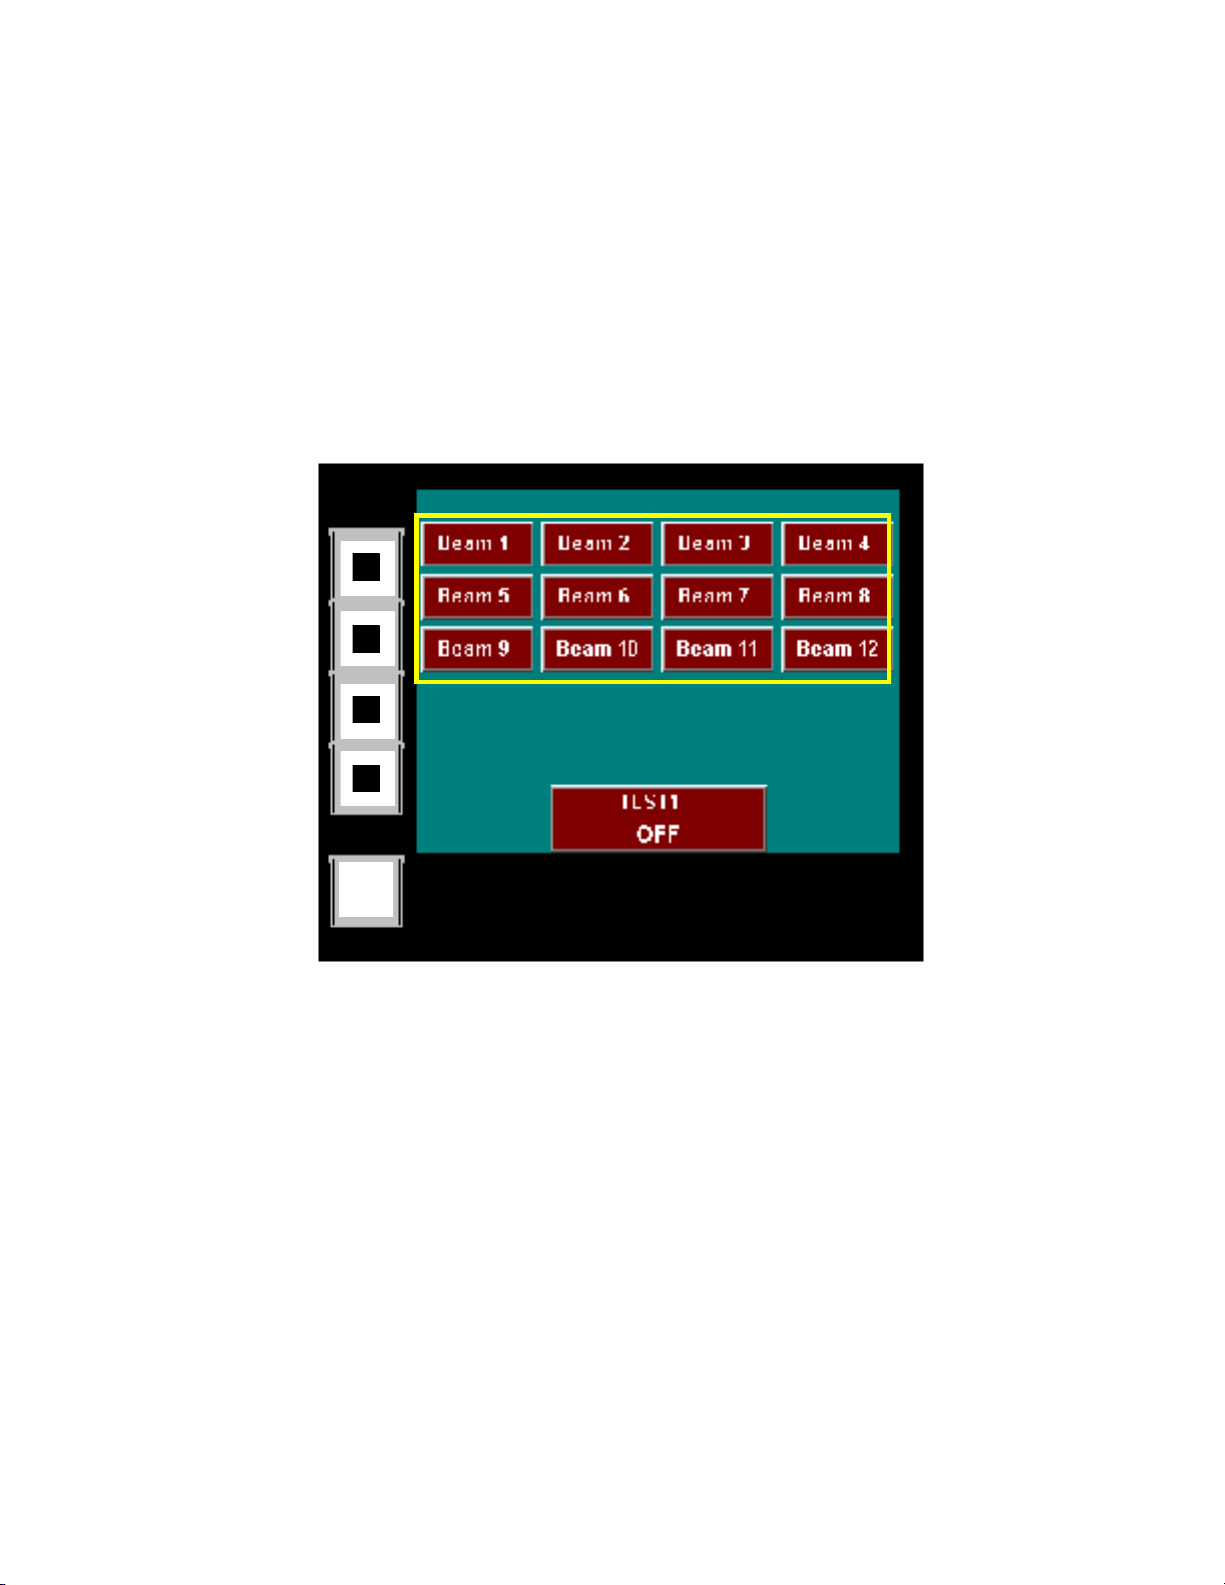
Once a style has been selected, one or more Beam buttons will display on the Beam Selection screen, if
the system is designed for a Warper application. These buttons correspond to the beams necessary for the
chosen style. To select a beam to creel press the desired Beam button. If the system is designed for a
Tufting machine, this option will not be available.
Beam Selection screen
MENU
BEAM SELECTION SCREEN
Upon selection of a beam, the Yarn Type Selection screen will automatically display.
To return to the Main / Style Selection screen in order to choose a different style, press the MENU
pushbutton.
4
Page 6
SELECTING A YARN
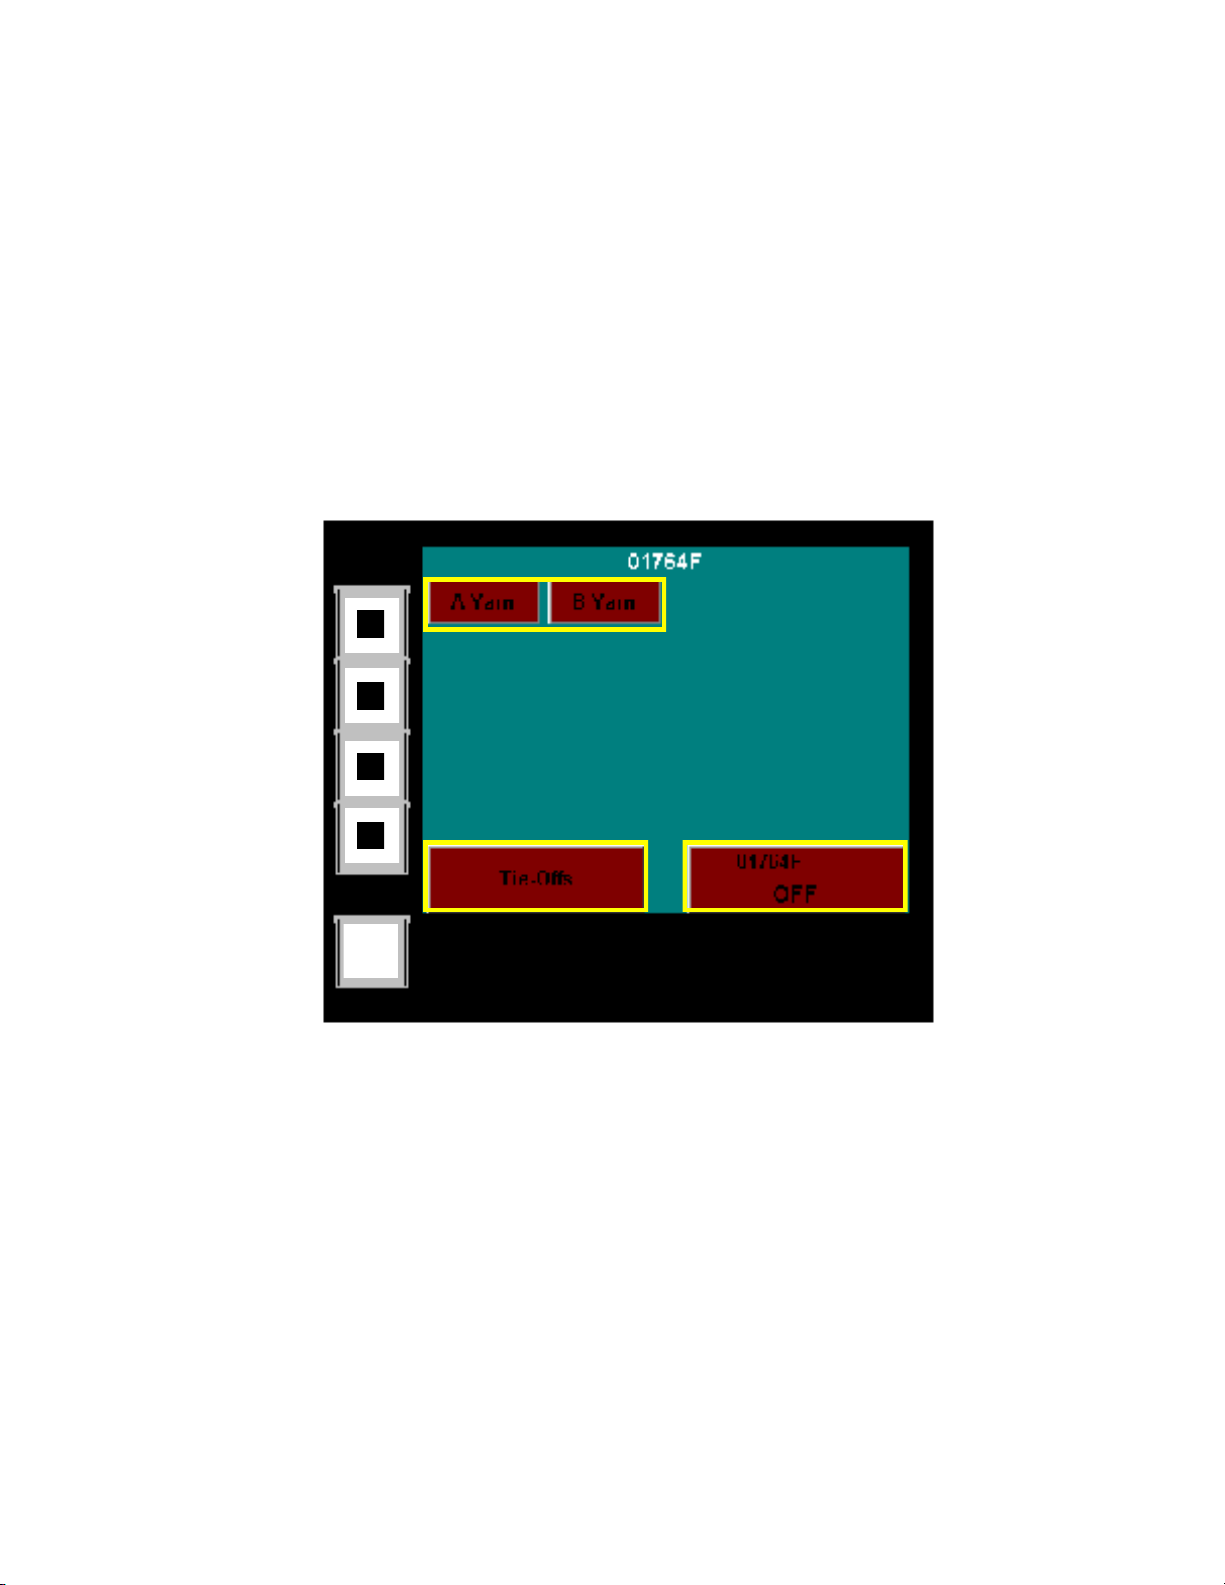
If the PatternPerfect system is designed for a Tufting machine the necessary yarns will display as alpha-
betically indicated buttons upon selecting a style, or for a Warper system they will display after selecting
a beam. To creel a yarn select the corresponding Yarn button, and the green LED position indicators
will light. Place the yarn packages in the appropriate positions and select the next yarn until all yarn
packages for this style are in position.
Yarn Selection screen
selected style name
MENU
YARN SELECTION SCREEN
The Tie-Offs button, located at the bottom of the page, indicates the positions which are not part of the
selected style. Press the Tie-Offs button to light the LED indicators which should have no yarn packages.
To indicate creeling completion, press the Style OFF button, which will return the Main/Style Selection
screen.
To return to the Main / Style Selection screen at any time, press the MENU pushbutton.
5
Page 7
UPDATING THE STYLE LIST
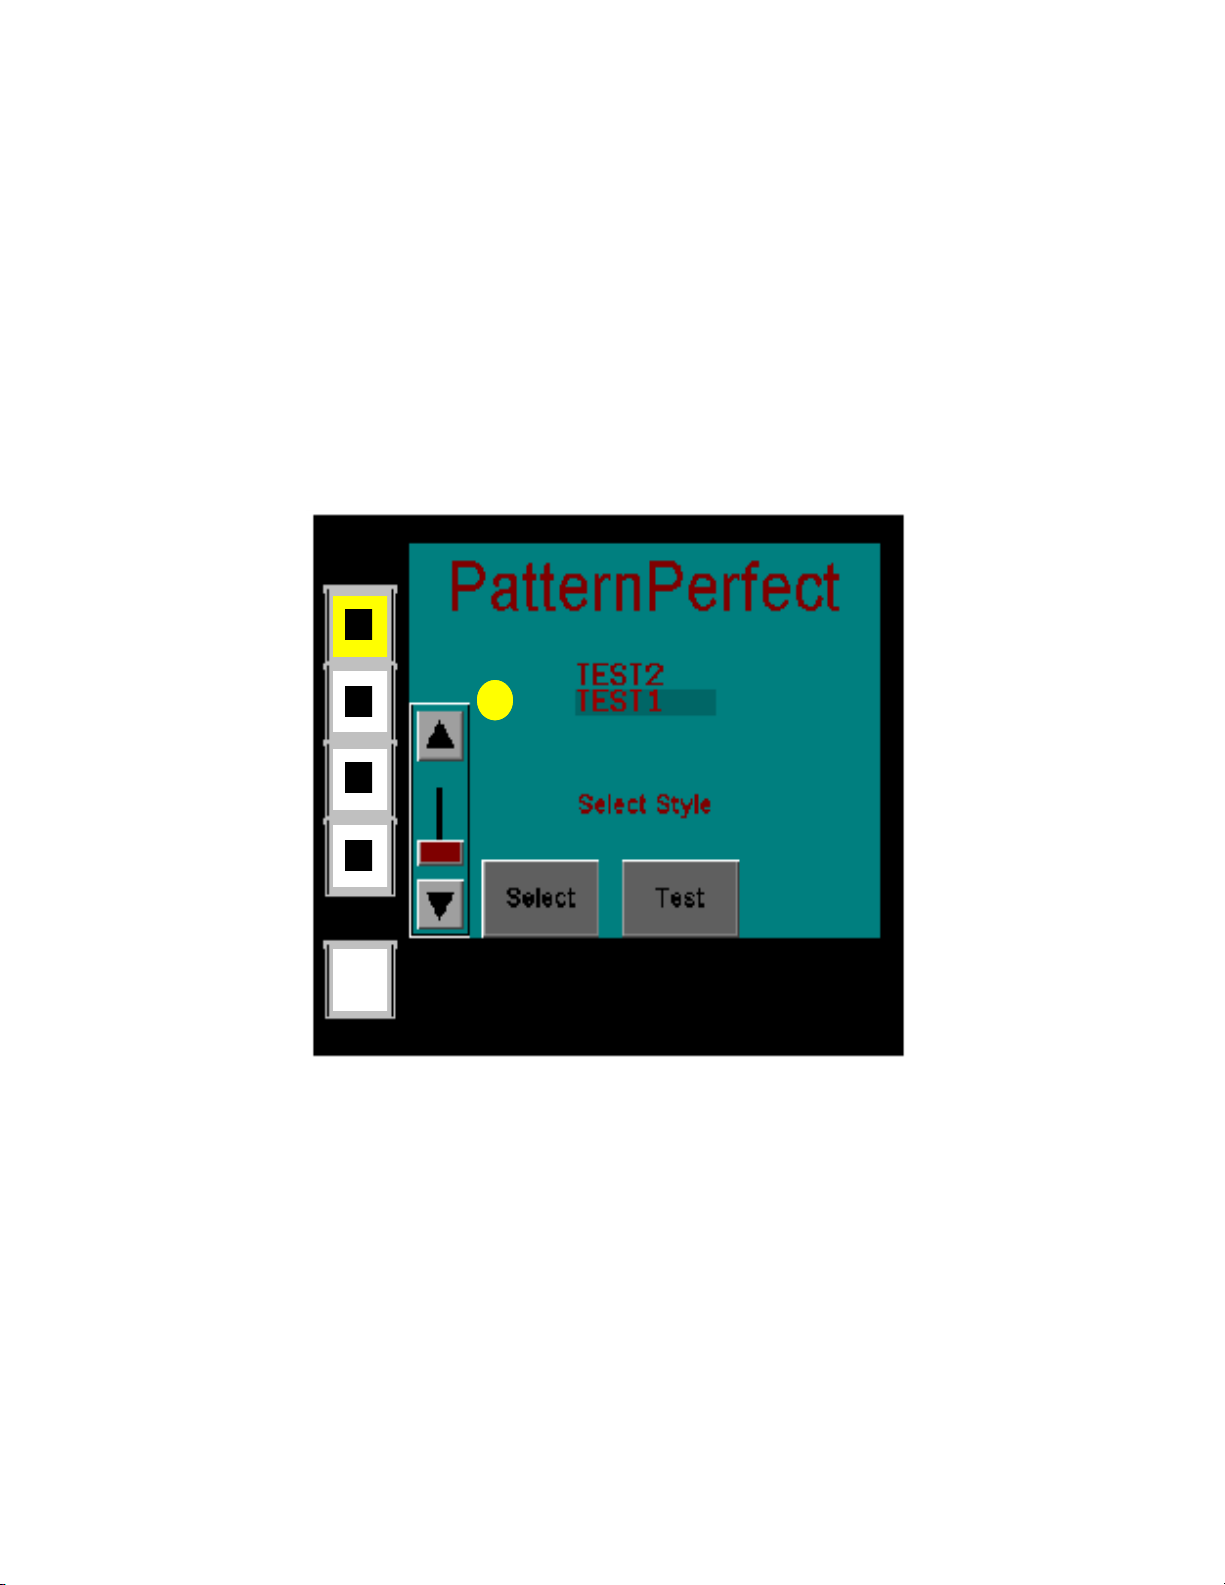
Whenever new styles are added to the plant database, the PatternPerfect database should be refreshed, so that the new styles are included and accessible. Begin the refresh process by pressing the
top pushbutton on the main screen. A hidden button will become available, although it will remain invisible, just off the upper right-hand corner of the slider (as shown below). Press this button to access the
refresh procedure.
Main / Style Selection Screen
hidden button
6
MENU
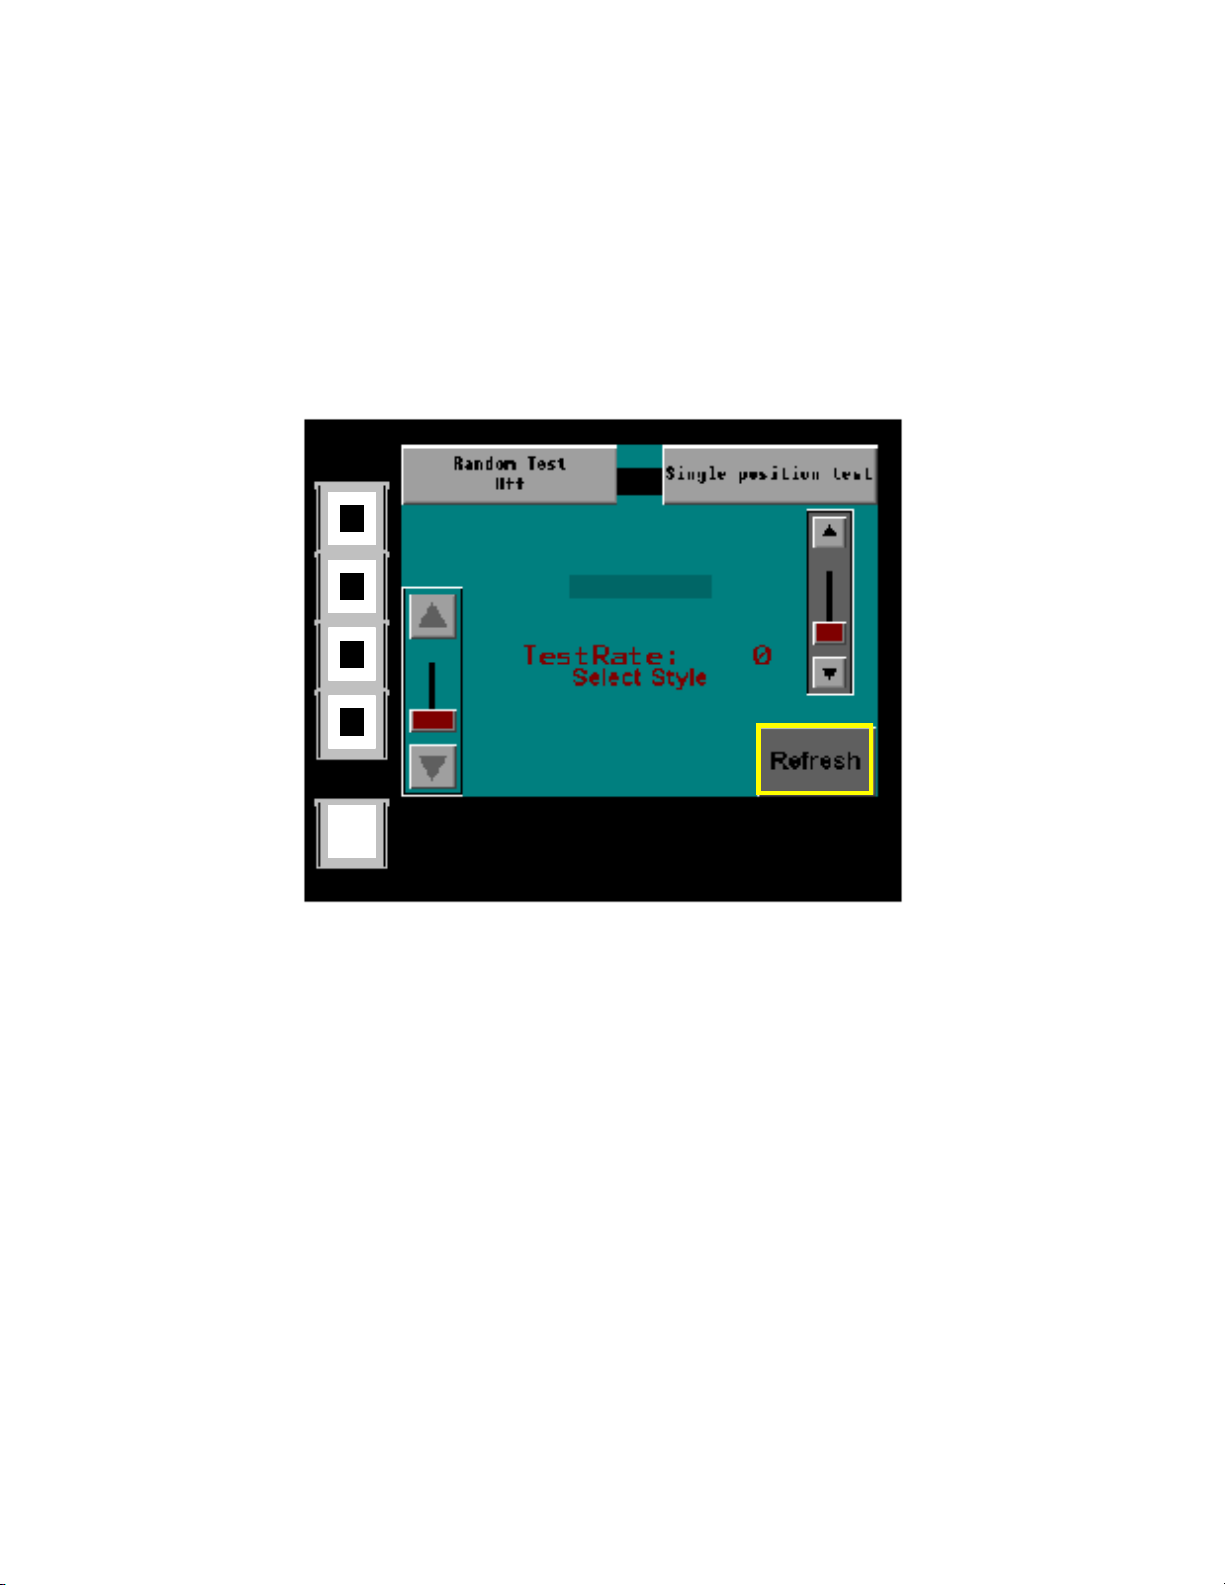
Upon pressing the hidden button, the Testing/Refresh Style screen will appear.
MAIN/STYLE SELECTION SCREEN
Page 8
UPDATING THE STYLE LIST
continued
Testing/Refresh Style Screen
MENU
MENU
TESTING/REFRESH STYLE SCREEN
To initiate the refresh process press the Refresh button. The PatternPerfect style database will update
to include any new style information contained in the customer style database.
Upon refresh completion, the Main/Style Selection screen will automatically appear.
To return to the Main/Style Selection screen without refreshing, press the MENU pushbutton.
7
Page 9
LED TESTING
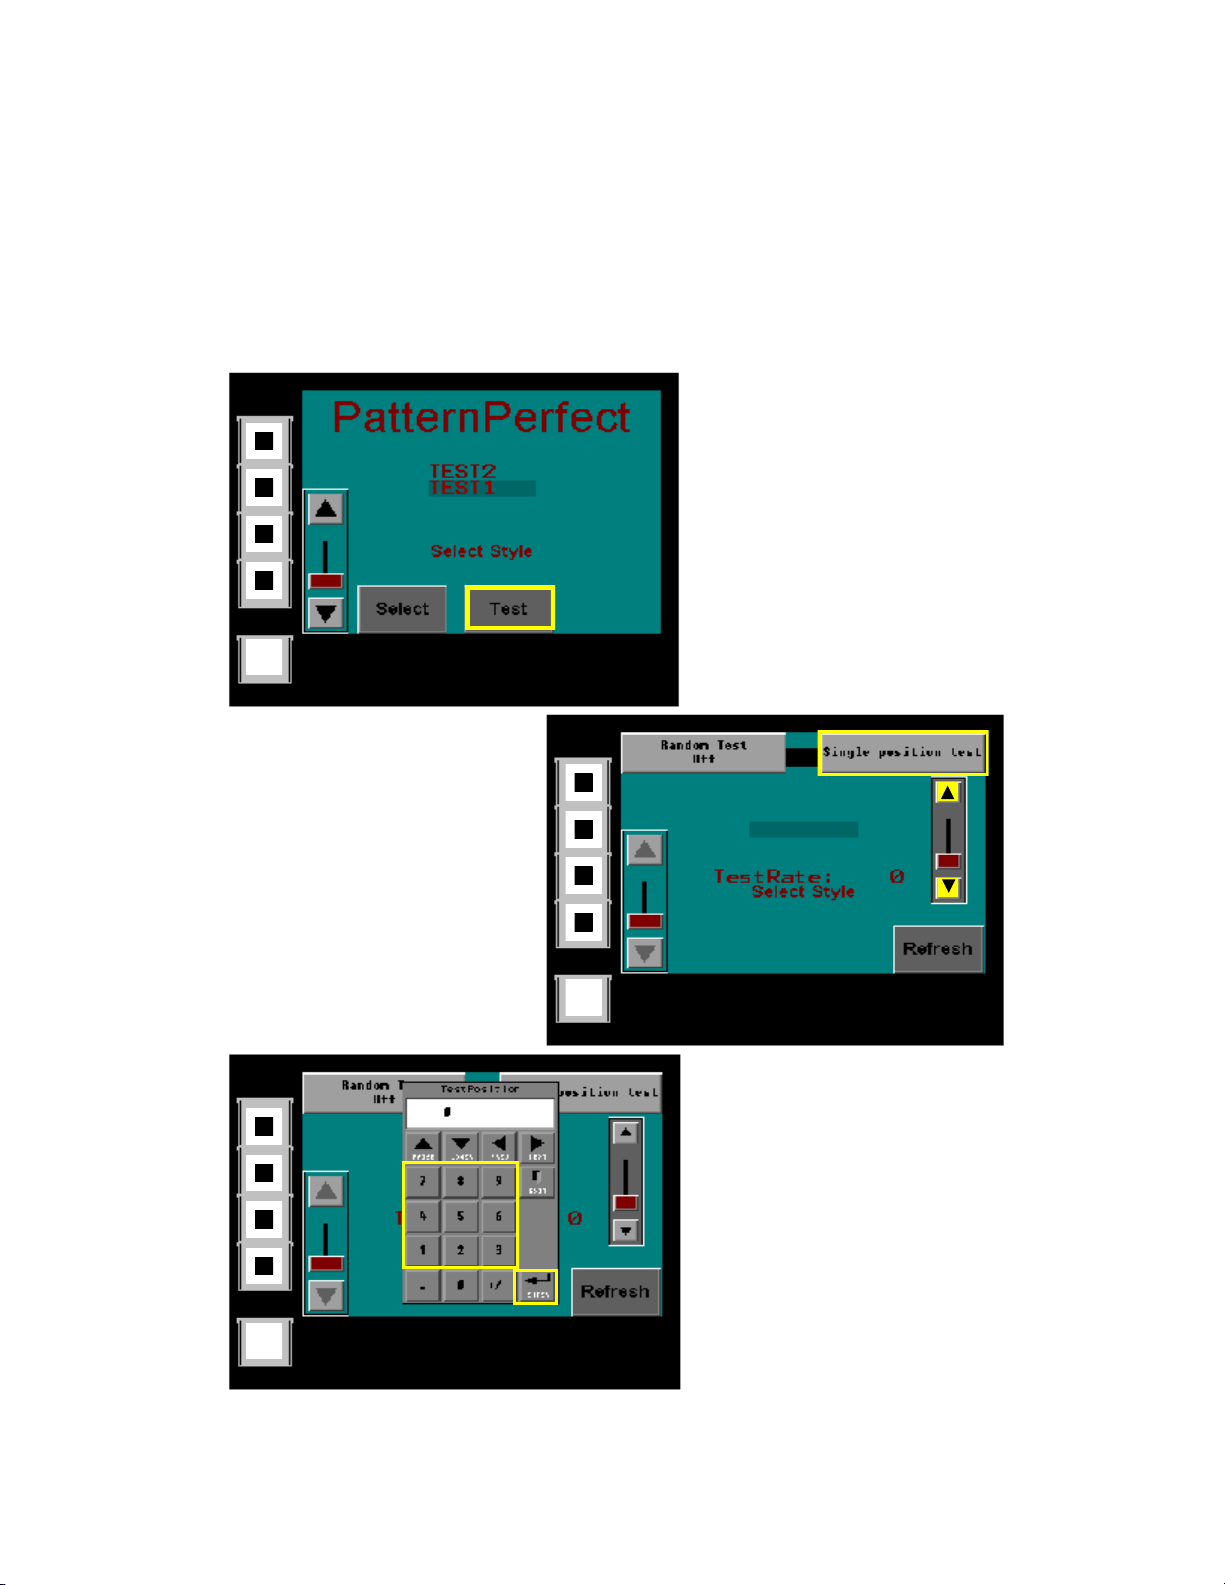
The PatternPerfect system should regularly be tested for LED functionality. Access the test options
from either the Main/Style Selection screen or the Testing/Refresh Style screen.
To test all LED positions:
Press the Test button on the Main/Style
Selection screen to turn all the LED Indi-
cators in the system on. Press the Test
button a second time to turn all the lights
off.
MENU
MAIN/STYLE SELECTION SCREEN
To adjust the rate at which the lights
appear for testing purposes, find the
Testing/Refresh Style screen as
indicated on page 5. Use the rate slider
to set the test speed, with “0” being the
fastest.
rate
slider
MENU
Single position
MENU
To return to the Main/Style Selection screen, press the MENU pushbutton.
selection numeric
entry pad
TESTING/REFRESH STYLE SCREEN
To test a single LED position:
Press the Single Position Test button on
the Testing/Refresh screen to turn on a
particular LED. A numeric entry pad will
automatically display. Enter the needle position number and press the Enter button to
light the corresponding LED. To turn the
LED off press the OFF button that will automatically display.
8
Page 10
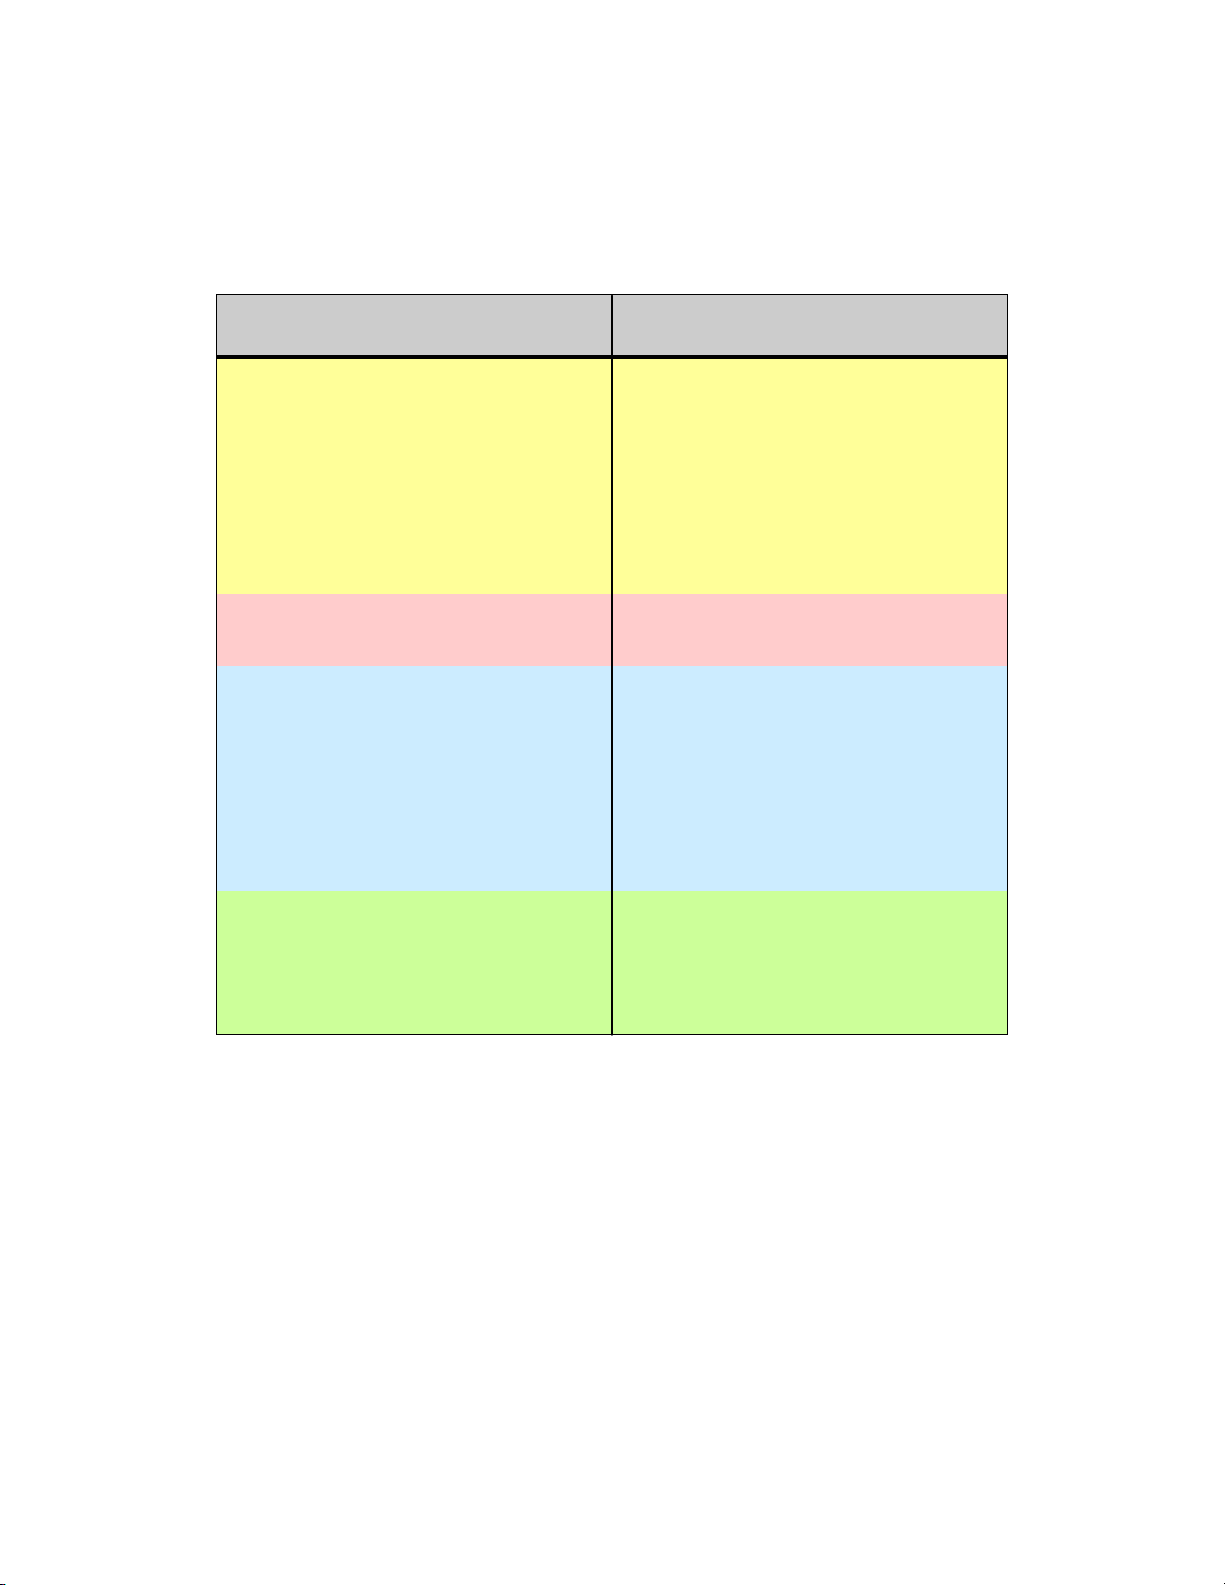
TROUBLESHOOTING
PROBLEM SOLUTION
communication failure during data refresh
procedure, indicated by “connection failed,
data not updated” message
single LED does not light during testing procedure
LED does not light when expected during
creeling
whole module does not light during testing
or creeling
power system OFF / ON
check that the database FTP server ad-
dress displayed on the Start-Up screen
is valid
check to make sure Ethernet connec-
tions between the Essex PatternPerfect
System and the in-plant network are
intact and repair if necessary
replace LED
replace LED socket
run Test procedure and if LED does not
work during testing see above for single
LED replacement
run Test procedure and if LED does
work during testing contact Essex technical support to diagnose in-plant pattern database problem
check Ethernet module cable for dam-
age and replace with standard Ethernet
cable if necessary
check in-line module coupler for dam-
age and replace if necessary
Essex Technical Support:
336-761-1112
866-851-1076
9
Page 11

SPARE PARTS
Item # Description Unit Price
24.15.000.LED led ea 1.10
24.15.000.LED.S led socket ea 1.50
24.15.000.LED.L led lens ea 1.10
24.15.1071 in-line module coupler ea 3.50
24.15.G306 6” PatternPerfect touch screen ea 1750.00
24.15.G150 6amp 24vdc power supply ea 94.50
24.15.G050 2.1amp 24vdc power supply ea 60.00
24.15.6232 ethernet bus coupler ea 420.00
24.15.6282.2 32 point ethernet output ea 350.00
10
Page 12

essex inc.
PO Box 20784 Winston-Salem, NC (ph) 336.761.1112 (fax) 336.499.6237. (email) [email protected]
 Loading...