

essential
chest of drawers
user guide
IMPORTANT - READ CAREFULLY AND KEEP FOR FUTURE REFERENCE
пдзгЯет чсЮузт
Bedienungsanleitung
guide de l’utilisateur
Instrukcja obs³ugi
руководство п ользовател я
instrucciones
kullaným kýlavuzu
important notes
2
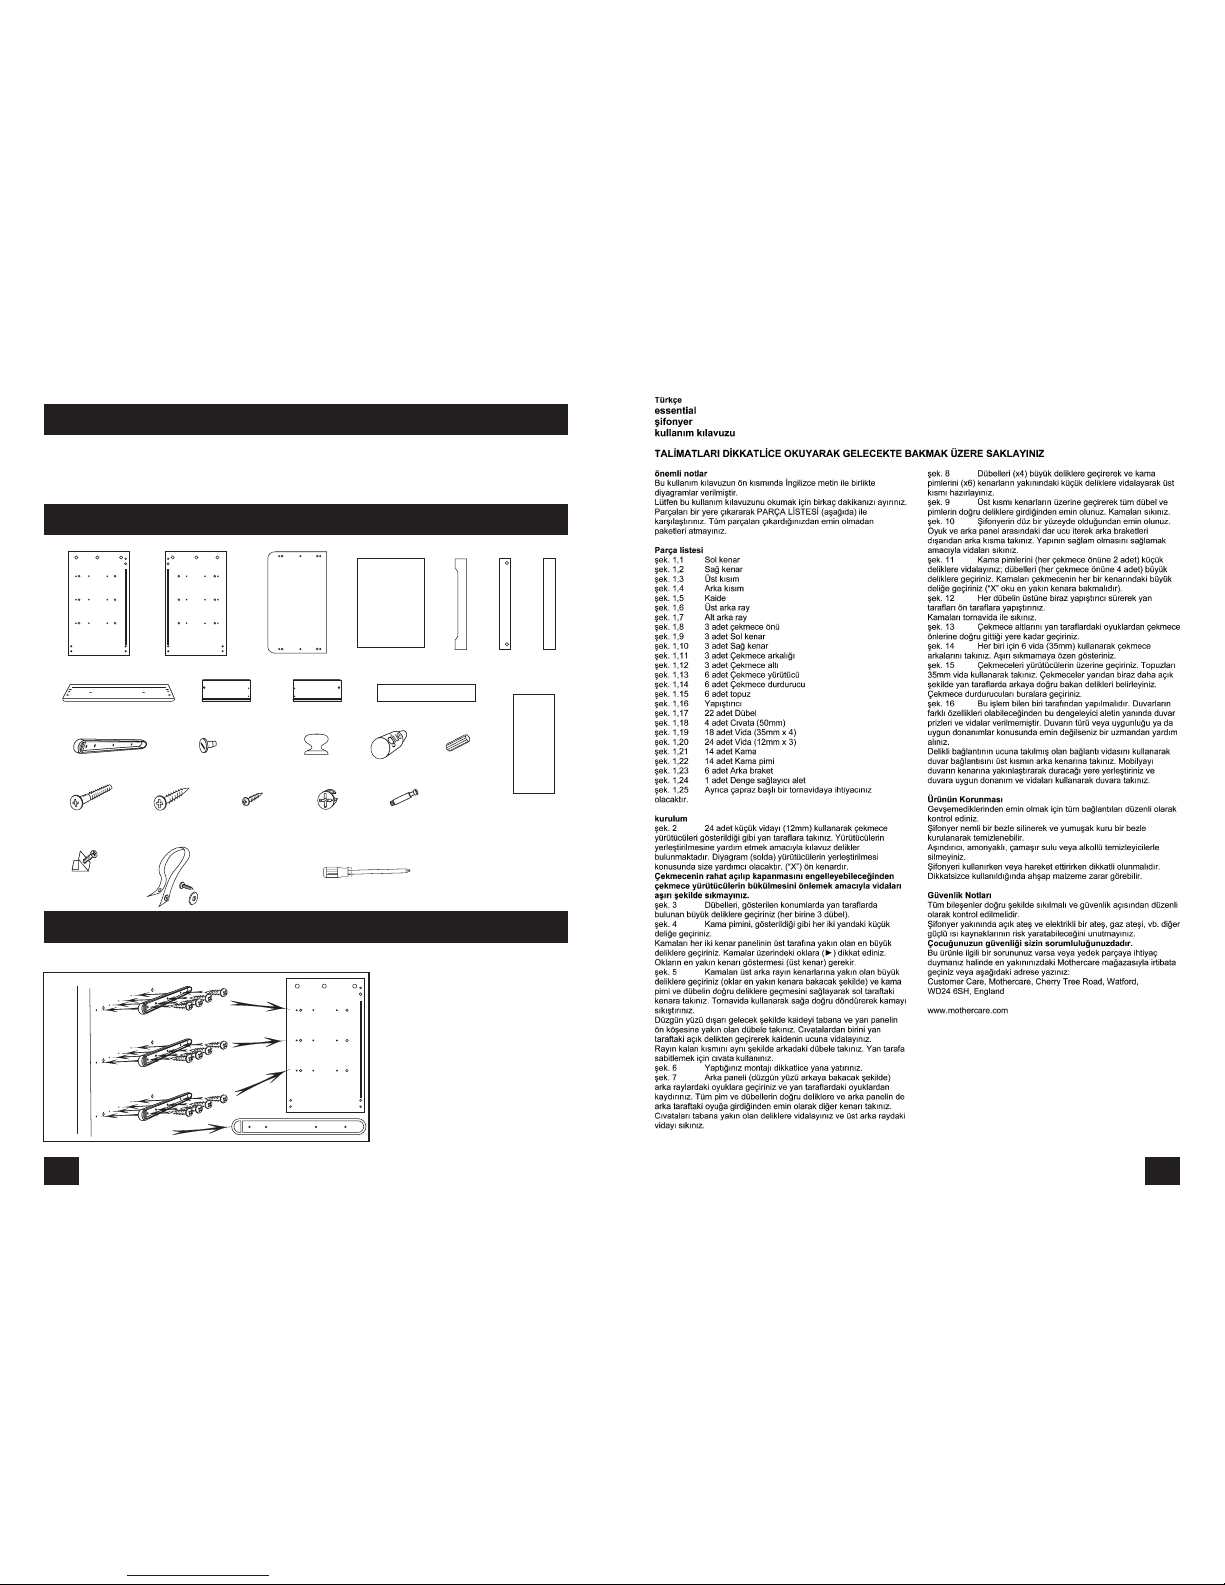
parts check list
Please take a few minutes to read this user guide.
Lay the parts out on the floor and compare to the parts checklist (below). Do not discard any
packaging until you are sure that you have all the parts.
fig
1.1
fig
1.2
fig
1.3
fig
1.4
fig
1.5
fig
1.8
fig
1.9
fig
1.10
Left side
Top
Back
Plinth
You will also need
a cross-head screwdriver.
Right side
fig
1.11
fig
1.12
fig
1.13
fig
1.14
fig
1.15
assembly
fig 2
fig
1.6
Upper
rear
rail
fig
1.7
Lower
rear
rail
3 drawer fronts 3 Left sides 3 Right sides 3 Drawer backs
3 Drawer
bottoms
6 Drawer runners 6 Drawer stops 6 Knobs
fig
1.16
Glue
fig
1.17
22 Dowels
fig
1.18
4 Bolts
(50mm)
fig
1.19
18 Screws
(35mm x 4)
fig
1.20
24 Screws
(12mm x 3)
fig
1.21
14 Cams
fig
1.22
14 Cam pins
fig
1.23
6 Back
brackets
1 Anti-topple
device
fig
1.24
fig
1.25
X
Using the 24 small screws (12mm),
attach the drawer runners to the
sides as shown. There are pilot
holes to help position the runners.
The diagram (left) will help you
with orientation of the runners. ("X")
is the front edge.
Avoid over tightening the screws,
to prevent warping of the drawer
runners, that may cause the
drawer to not run smoothly.
15
14
3
fig 3
Insert dowels into the large holes in
the sides, in the positions shown, (3
dowels in each).
fig 4
Screw a cam pin into the small
hole, as shown, on each side.
Insert cams into the largest holes,
near the top of both side panels.
Notice the arrows ( ) on the cams.
These need to point towards the
nearest edge (the top edge).
fig 5
Insert cams into the large holes
near the ends of the upper rear rail,
(arrows pointing towards the
nearest edge), and attach to the
left hand side, allowing the cam pin
and dowel to enter the correct
holes. Using a screwdriver, tighten
the cam, by giving a turn to
the right.
Attach the plinth, best face
outwards, to the dowel near the
bottom and front edge of the side
panel. Screw a bolt through the
open hole in the side and into the
end of the plinth.
Attach the remaining rail in a similar
manner to the dowel at the rear.
Use a bolt to secure to the side.
fig 6
Turn the assembly, very carefully
onto the side.

4 13
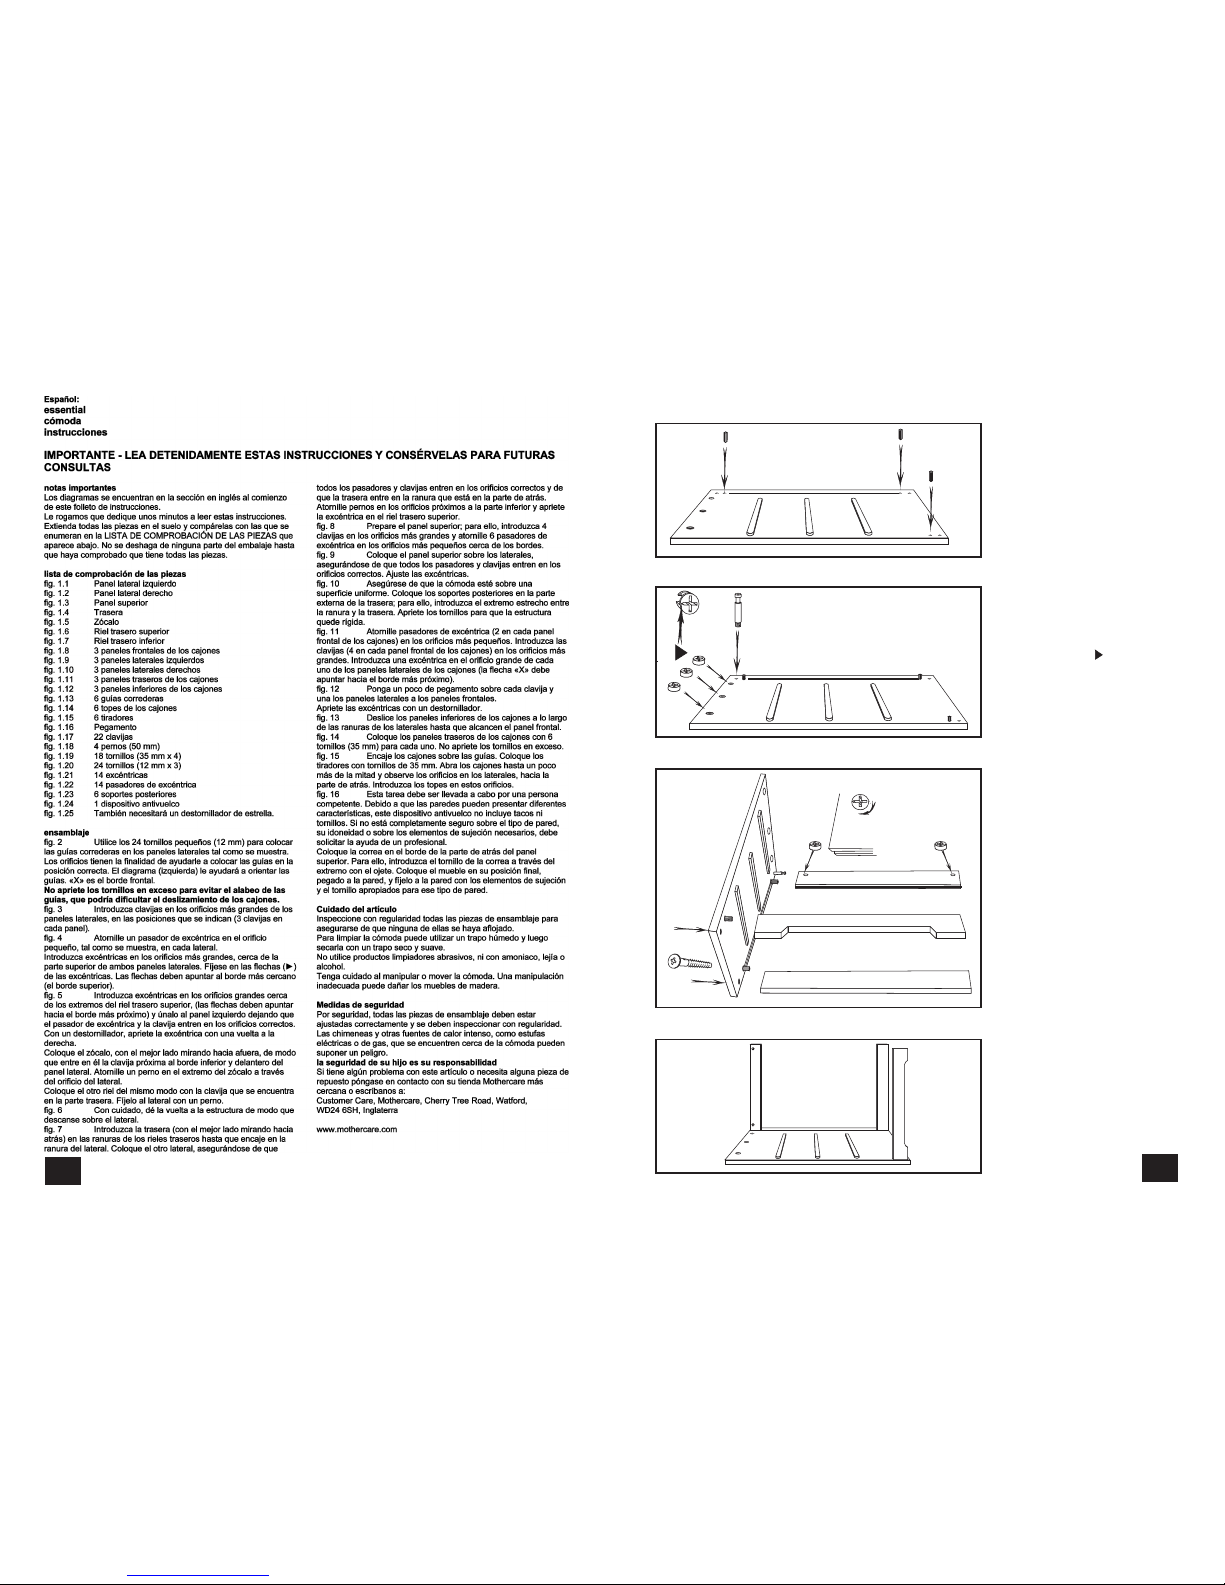
fig 8
Prepare the top by inserting
dowels (x4) into the larger holes
and screwing cam pins (x6) into the
smaller holes near the edges.
fig 9
Lower the top onto the sides,
ensuring that all the pins and
dowels enter the correct holes.
Tighten the cams.
fig 7
Insert the back panel (best face
towards the rear) into the grooves
in the rear rails and slide it down
into the groove in the side.
Attach the other side, taking care
that all the cam pins and dowels
enter the correct holes and that the
back panel enters the groove at
the rear.
Screw bolts into the holes near the
bottom and tighten the cam in the
rear upper rail.

12 5
Make sure the chest is on a level
surface. Attach the back brackets
to the outside back, pushing the
narrow end between the groove
and the back panel. Tighten the
screws to make the structure rigid.
fig 10
Screw cam pins, (2 in each drawer
front), into the smaller holes; insert
the dowels, (4 in each drawer
front), into the larger holes.
Insert cams in the large hole in
each drawer side (the arrow "X"
must point to the nearest edge).
X
fig 12
Put a little glue onto each dowel
and attach the sides to the fronts.
Tighten the cams with a
screwdriver.
fig 13
Slide the drawer bottoms into the
grooves in the sides, as far as they
will go, into the drawer fronts.
fig 11

6 11
fig 14
Attach the drawer backs using 6
screws (35mm) for each. Do not
over tighten.
fig 16
This work is only to be carried out by a
competent person. Because of the diverse
nature of walls, wall plugs and screws have not
been supplied with this anti-topple device. If
you are at all unsure of the type or suitability of
the wall, or of the appropriate fixings for it, seek
professional advice.
Attach the wall strap to the rear edge of the
top, using the strap screw, inserted through the
end of the strap with the eyelet. Place the
furniture in its final position, adjacent to the
wall, and fix to the wall, using fixing and screw
appropriate for that wall.
fig 15
Engage the drawers on the
runners. Attach the knobs using
35mm screws. With the drawers a
little more than half way open,
notice the holes in the sides,
towards the back. Insert the
drawer stops into these.
Periodically check all fittings to ensure that none have come loose.
The chest can be cleaned by wiping with a damp cloth and drying with a soft dry cloth.
Never clean with abrasive, ammonia based, bleach based, or spirit type cleaners.
Take care when handling or moving the chest. Careless handling can damage wooden furniture.
All Assembly fittings should be tightened properly and regularly checked for security.
Be aware of the risk of open fire and other sources of strong heat, such as electric bar fires, gas
fires, etc. in the near vicinity of the chest.
safety notes
care of your product
your child's safety is your responsibility
If you have a problem with this product or require replacement parts,
please contact your nearest Mothercare store or telephone the
Mothercare customer care line on 08453 30 40 30
Alternatively write to: Customer Care, Mothercare, Cherry Tree Road,
Watford, Herts. WD24 6SH
www.mothercare.com

10 7

8 9
 Loading...