

ESSENCORE KLEVV CRAS C700 series, KLEVV CRAS C700 M.2, KLEVV CRAS C700 RGB M.2 Installation Manual
KLEVV NVMe M.2 SSD
INSTALLATION
GUIDE
CONTENTS
OVERVIEW
SYSTEM REQUIREMENTS
BEFORE YOU BEGIN
SSD HANDLING PRECAUTIONS
DESKTOP INSTALLATION
- Install Migration Tool
- Migrate Your Data
- Swap or Install Your Drives
- Change the Boot Order of the Drives from BIOS
LAPTOP INSTALLATION
- Install Migration Tool
- Migrate Your Data
- Swap Your Drives
WARRANTY AND TECHNICAL SUPPORT
Ver. 1.0

Overview
This guide explains how to install a KLEVV M.2 Solid-State Drive (KLEVV NVMe M.2 SSD)
in a desktop or notebook computer.
System Requirements
System Requirements for KLEVV CRAS C700 NVMe SSD installaon
An available M.2 slot that supports NVMe SSD on your motherboard or PC.
1.
(You may need to consult your owner’s manual or contact your motherboard or
PC manufacturer for detailed information)
* Please make sure that your motherboard or PC has enough physical space to
support KLEVV CRAS C700 series NVMe SSD.
Model
CRAS C700 M.2 NVMe SSD
CRAS C700 RGB M.2 NVMe SSD
System BIOS is capable of supporting NVMe SSD. (You may need to
2.
consult your owner’s manual or contact your motherboard or
PC manufacturer for detailed information)
Windows 8.1 and Windows 10 with native support for NVMe SSDs.
3.
Windows 7 does not natively support PCIe NVMe SSDs. To use or install
Windows 7 on a NVMe SSD, please consult with Microsoft for more information.
Dimension Remark
80 (L) x 22 (W) x 2.8 (H) mm
80 (L) x 24 (W) x 22 (H) mm
Double-Sided
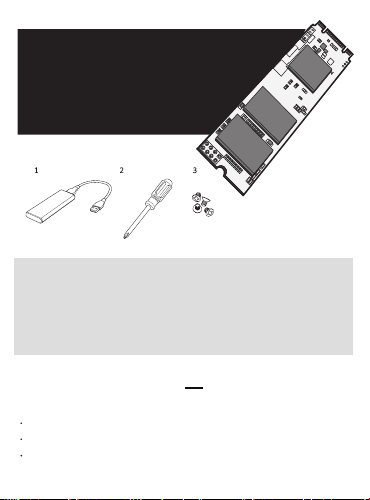
Before You Begin
Conrm you have the following
hardware for installation
* These tools are not included in the package.
You may need to prepare by yourself.
Hardware Item
1 USB to NVMe M.2 2280 adaptor
and USB cable
2 Screwdriver
3 Screws
Required For
Laptop/desktop computers
to migrate your data
Laptop/desktop computers
Laptop/desktop computers
SSD Handling Precautions
Observe the following before beginning the installation:
Handle the SSD with care. Do not touch the gold connectors.
To minimize static electricity, touch the computer case before handling the SSD.
Do not remove the encasement, labels or disassemble the SSD
; these actions void the SSD warranty.
 Loading...