

Page 1
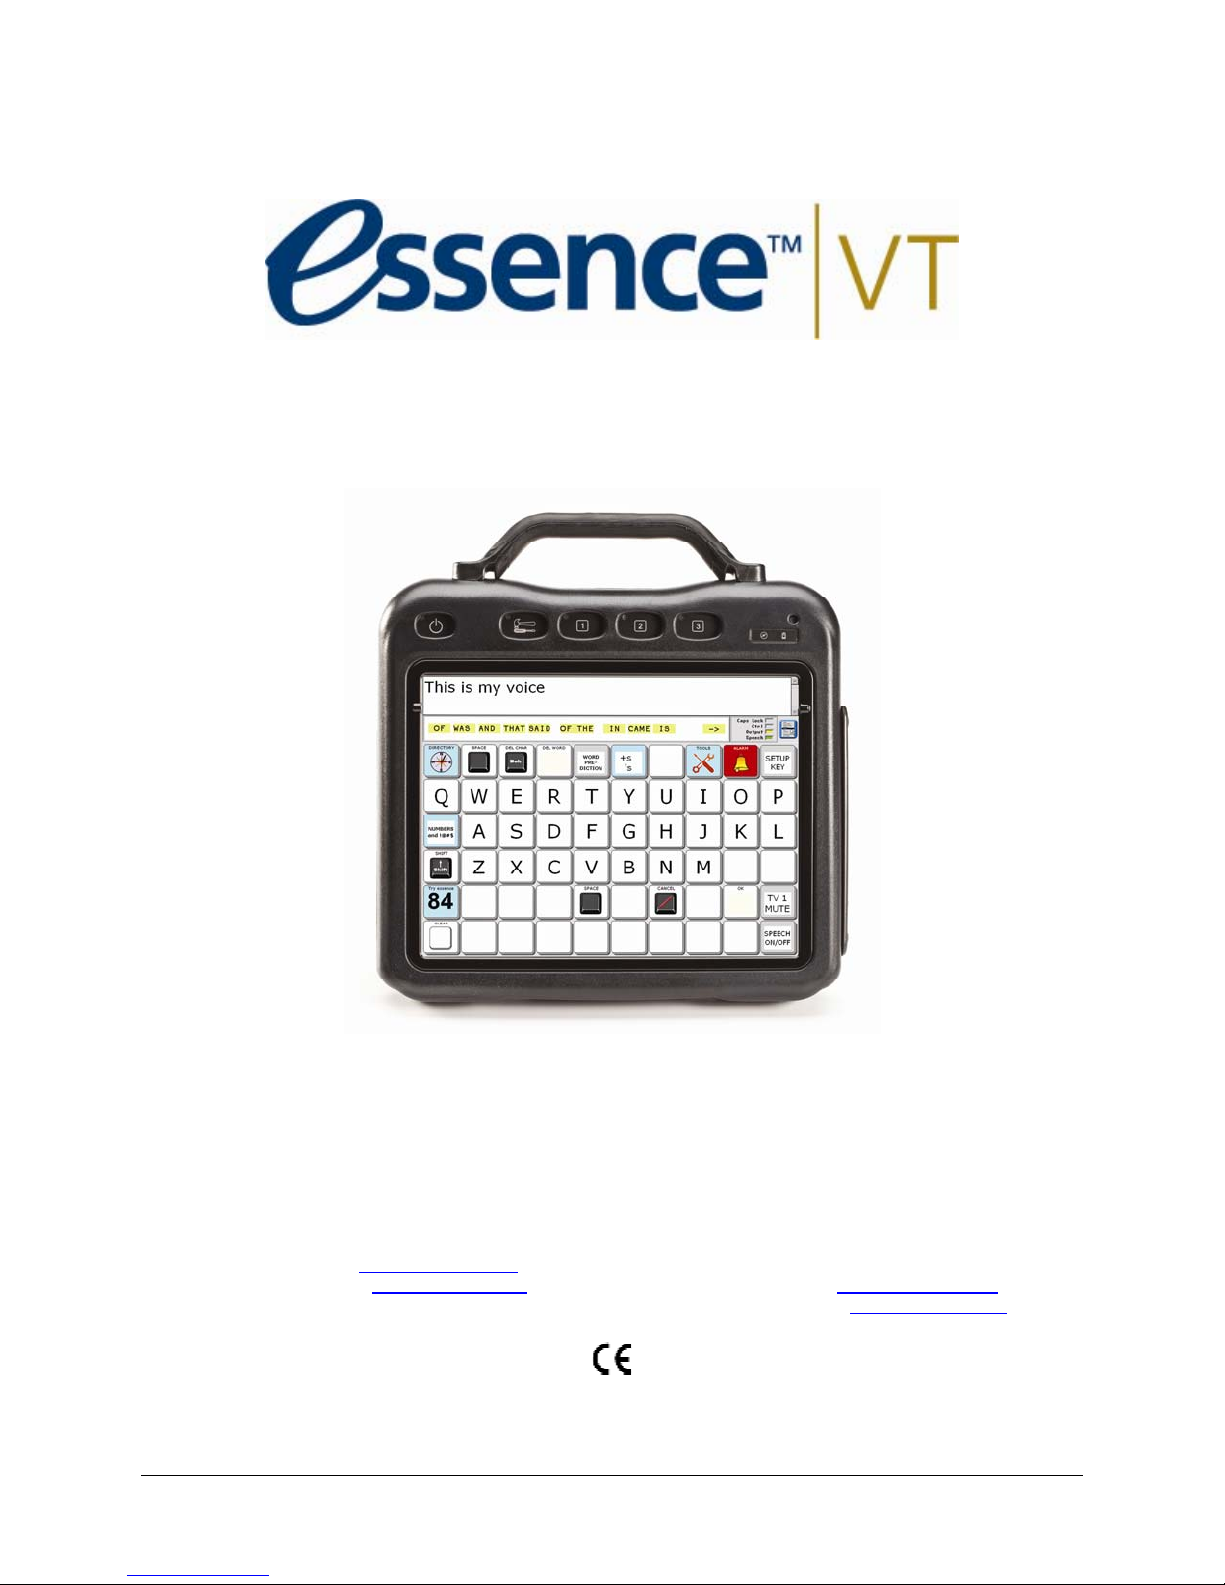
Easy Start
PRC HEADQUARTERS PRC INTERNATIONAL
1022 Heyl Rd • Wooster, OH 44691
Telephone: (330 262-1984 • (800) 262-1984 Minerva Business Park
Fax: (330) 263-4829 Lynch Wood, Peterborough, Cambridgeshire
E-mail Address: [email protected]
Web Site Address: www.prentrom.com
Web Site Address: www.liberator.co.uk
Liberator Ltd
PE2 6FT UK
Fax: +44 845 2661155
E-mail Address: [email protected]
Essence|VT Easy Start
15059v1.01
Page 2
Data can be uploaded from this unit to a personal computer for storage on a hard disk, CD, or other storage medium. Be sure to make multiple
copies of all important data to protect against accidental loss.
Essence, Vantage, WordCore, Language Activity Monitor (LAM), Memory Transfer Interface (MTI) and PRC Infrared Receiver (IRR) are
trademarks of Prentke Romich Company. ECOpoint is a product developed by PRC in collaboration with Tobii Technology(AB)
PCS Symbols are a product of Mayer-Johnson.
Clarity Symbols are a product of Liberator, Ltd.
Fonix-DECtalk Text-to-Speech software is a copyright of Fonix Corporation; all rights reserved.
RealSpeak Text-to-Speech is a trademark of Nuance Communications, Inc.
AT&T Natural Voices is a trademark of AT&T Corporation.
Acapela speech technologies licensed from the Acapella Group.
Non-English text-to-speech supplied by the Acapela Group and RealSpeak Text-to-Speech, a trademarked product of Nuance Communications, Inc.
Windows, Windows Explorer, Windows Media Player, Microsoft Outlook, Microsoft Word, Windows WordPad and Microsoft PowerPoint are registered
trademarks of the Microsoft Corporation.
IBM is a registered trademark of International Business Machines.
Tracker is a trademark of Madentec, Inc.
Headpointing technology by Madentec
IntelliTools is a registered trademark of IntelliTools, Inc.
HeadMouse is a trademark of Origin Instruments, Inc.
Bluetooth Wireless Technology is a registered trademark. The Bluetooth word mark and logos are owned by the Bluetooth SIG, Inc. and any use of
such marks by PRC is under license. Other trademarks and trade names are those of their respective owners.
WordQ is a trademark of Bloorview MacMillan Children's Centre
Paint Shop Pro software is copyrighted by JASC Software, Inc.Inmage Viewer/32 is shareware from SB Software.
Digital photos of the devices courtesy of Doug Miller
ELECTRONIC INTERFERENCE INFORMATION
This device complies with Part 15 of the FCC Rules. Operation is subject to two conditions: (1) this device may not cause harmful interference, and (2)
this device must accept any interference received, including interference that may cause undesired operation.
Warning! Changes or modifications to this product which are not authorized by Prentke Romich Company could exceed FCC limits and negate your
authority to use this product.
This equipment has been tested and found to comply with the limits for a Class B digital device, pursuant to Part 15 of the FCC Rules. These limits are
designed to provide reasonable protection against harmful interference in a residential installation. This equipment generates, uses and can radiate
radio frequency energy and, if not installed and used in accordance with the instructions, may cause harmful interference to radio communications.
However, there is no guarantee that interference will not occur in a particular installation. You can determine whether this product is causing
interference in your radio or television by turning this product off. If the interference stops, it was probably caused by this product or one of its
accessories. You can attempt to correct the interference by using one or more of the following measures:
Turn the television or radio antenna until the interference stops.
Move this product to one side or the other of the television or radio.
Move this product farther away form the television or radio.
Plug this product into an outlet that is on a different circuit from the television or radio; that is, this product should be controlled by different circuit
breakers/fuses from the television or radio.
If necessary, contact a Prentke Romich Company service technician for assistance.
Bluetooth Adapter, ECOpoint
These devices comply with Part 15 of the FCC Rules. Operation is subject to the following two conditions: (1) these devices may not cause
harmful interference, and (2) these devices must accept any interference received, including interference that may cause undesired
operation. The Bluetooth device contains FCC-ID POOWML-C40. Bluetooth QD ID B013848
This Class B digital apparatus meets all requirements of the Canadian Interference-Causing Equipment Regulations. Cet appareil numérique de la
classe B respect toutes les exigences du Règlement sur le matériel brouiller du Canada.
CE ENVIRONMENTAL INFORMATION: Use: 0o - 45o C; Storage: (-20o) - 50o C; 95% maximum relative humidity @ ambient temperatures less than
o
40
C.
CLASS 1 LED PRODUCT –The Tracker Headpointing option falls within the limits of a Class 1 LED product as specified by CENELEC EN 60825-1,
Amendments 1 and 2.
Attention! Consult accompanying documents.
This device is not intended to be an emergency call device or sole communication aid.
Warnings!
When operating this device in a medical environment, do not use with any product that is not medically approved. Follow all rules
for appropriate cell phone and, if necessary, wireless device use.
Any mounts used should be fitted by a qualified person. Failure to install the mounting system according to the manufacturer's
instructions may result in an injury to the user.
©Prentke Romich Company 2010. All rights reserved. Under copyright laws this manual may not be copied, in whole or in part, without the written
consent of the Prentke Romich Company.
Essence|VT Easy Start
ii
Page 3

Table of Contents
First Steps........................................................................................................ 5
Turn the Essence|VT ON................................................................................................. 6
Select a Key Size............................................................................................................. 7
If Your Display Screen Goes Dim or Dark ................................................................... 10
The DIRECTORY Page ................................................................................................ 11
Let's Get Started ............................................................................................................ 13
Choose a Spelling Keyboard ......................................................................................... 15
Choose an Access Method............................................................................................. 17
To Change the Access Method Settings and Save the Changes.................................... 19
Choose a Voice.............................................................................................................. 21
You are Ready to Communicate.................................................................................... 24
Add to your Communication Power............................................................. 25
Using the SAVE TEXT Key to Add Messages to a Key .............................................. 26
Word Prediction............................................................................................................. 31
Abbreviation Expansion................................................................................................ 35
Notebooks...................................................................................................................... 40
Using Notebooks ........................................................................................................... 41
Customizing Essence.................................................................................... 47
Using the SETUP Key to Add Messages to Keys......................................................... 48
Recording Messages...................................................................................................... 54
To Hide Keys................................................................................................................. 56
Swap Keys..................................................................................................................... 58
Create Your Own Page.................................................................................................. 61
Link Your New Page..................................................................................................... 66
Add Digital Pictures to Essence Photo Albums............................................................ 71
Saving Memory ............................................................................................................. 79
Special Features............................................................................................ 83
Reminders...................................................................................................................... 84
The Alarm...................................................................................................................... 90
Program TV Remote Controls....................................................................................... 92
The Toolbox ................................................................................................................ 102
Getting More Information........................................................................... 107
Getting More Information/Help................................................................................... 108
TABLE OF CONTENTS
iii
Page 4

iv
Page 5

First Steps
FIRST STEPS
Essence|VT Easy Start
5
Page 6
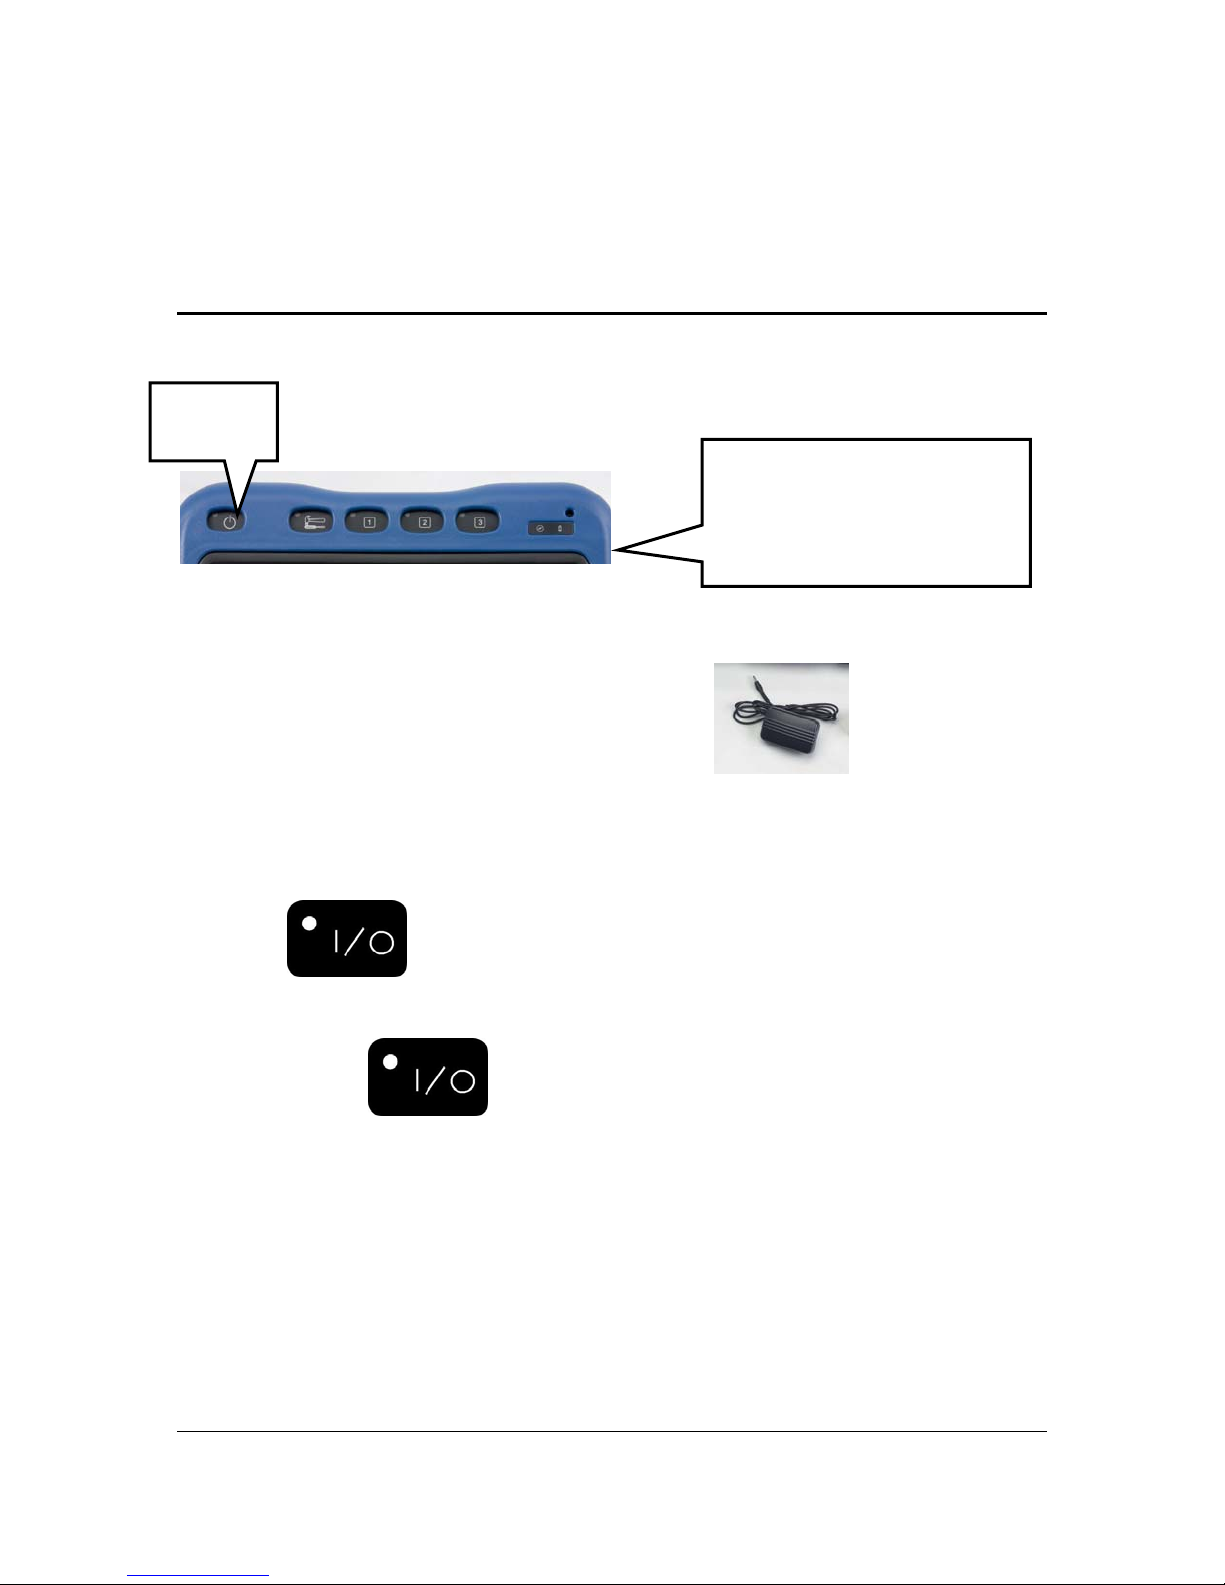
Turn the Essence|VT ON
ON/OFF
key
The battery charger jack is
the small hole on the right
side of the case just above
the connector panel.
Plug the small end of the battery charger cable
into the battery
charger jack on the right side of the case. Plug the other end into a working
electrical outlet.
Press the
button on the top front of the case.
The LED on the
key will light and within a few seconds you will
see the Welcome page.
FIRST STEPS
Essence|VT Easy Start
6
Page 7
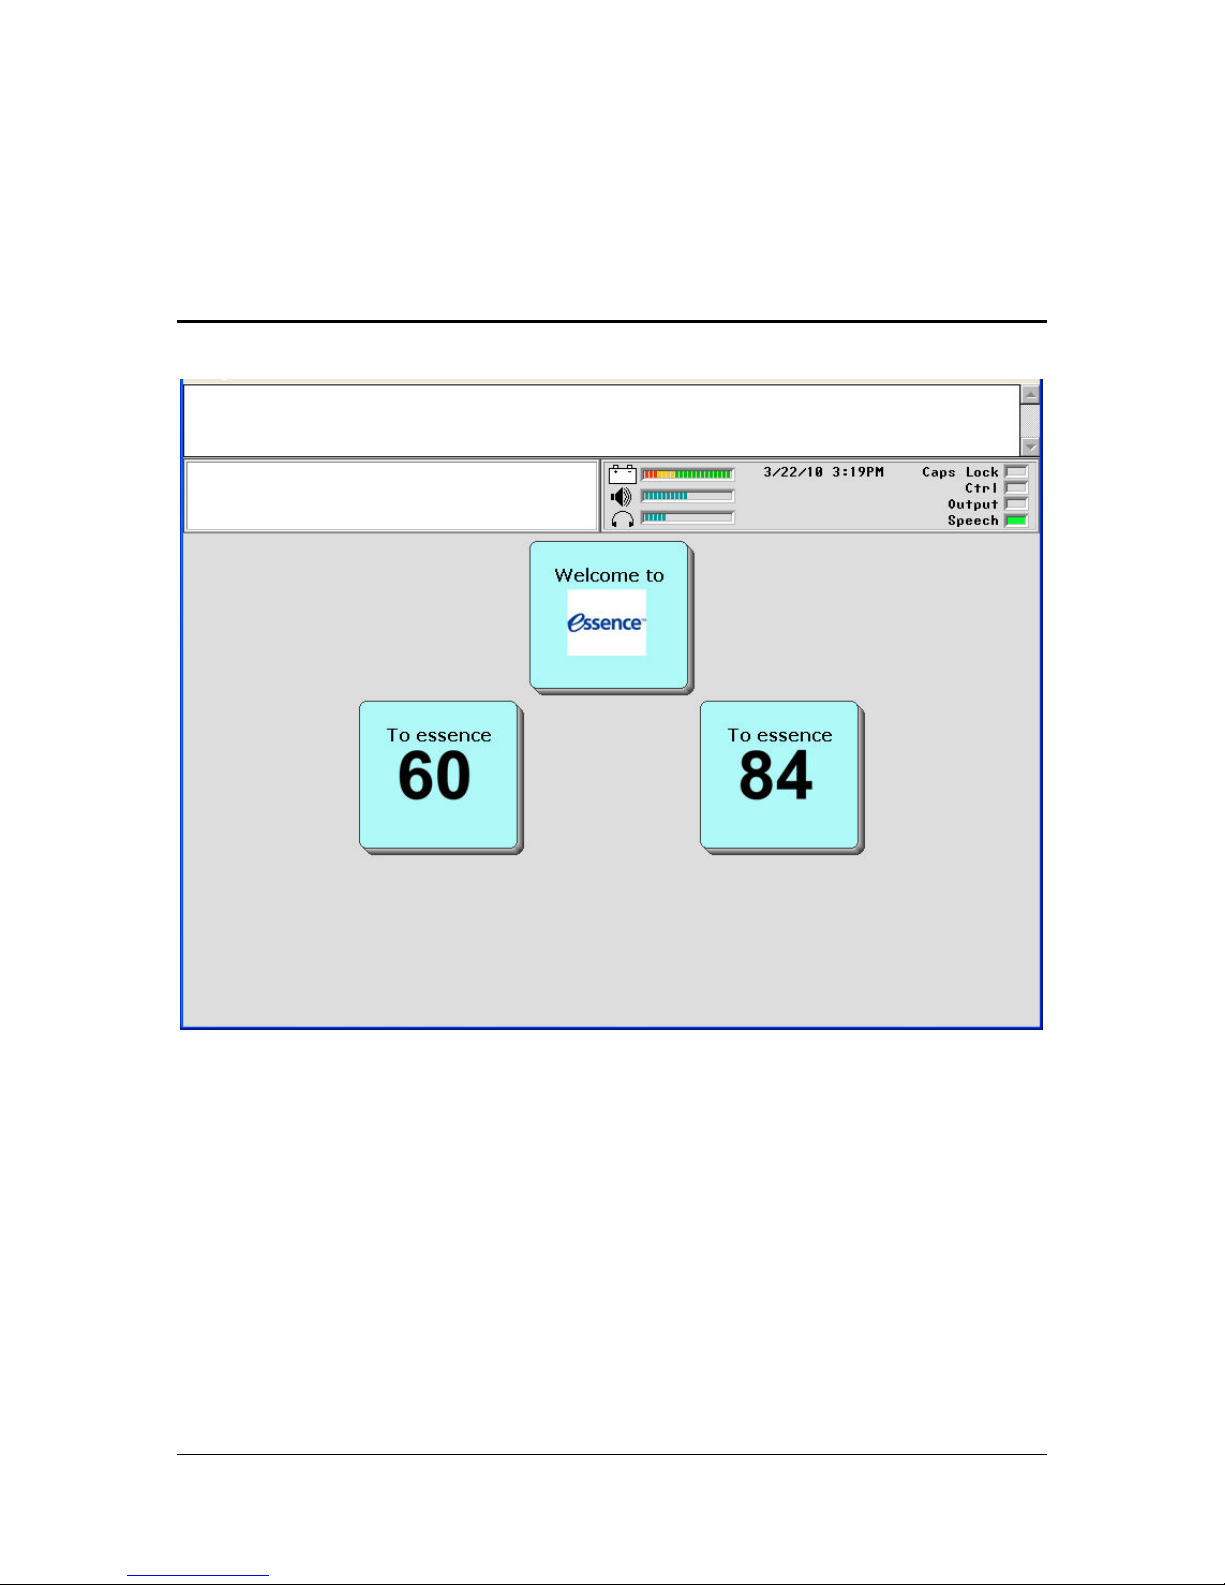
Select a Key Size
Choose 60 or 84 to test the key sizes.
60 takes you to a simple keyboard with 60 keys on it.
84 takes you to a simple keyboard with 84 keys on it.
A 60 key size is a little larger than the 84 key size.
FIRST STEPS
Essence|VT Easy Start
7
Page 8
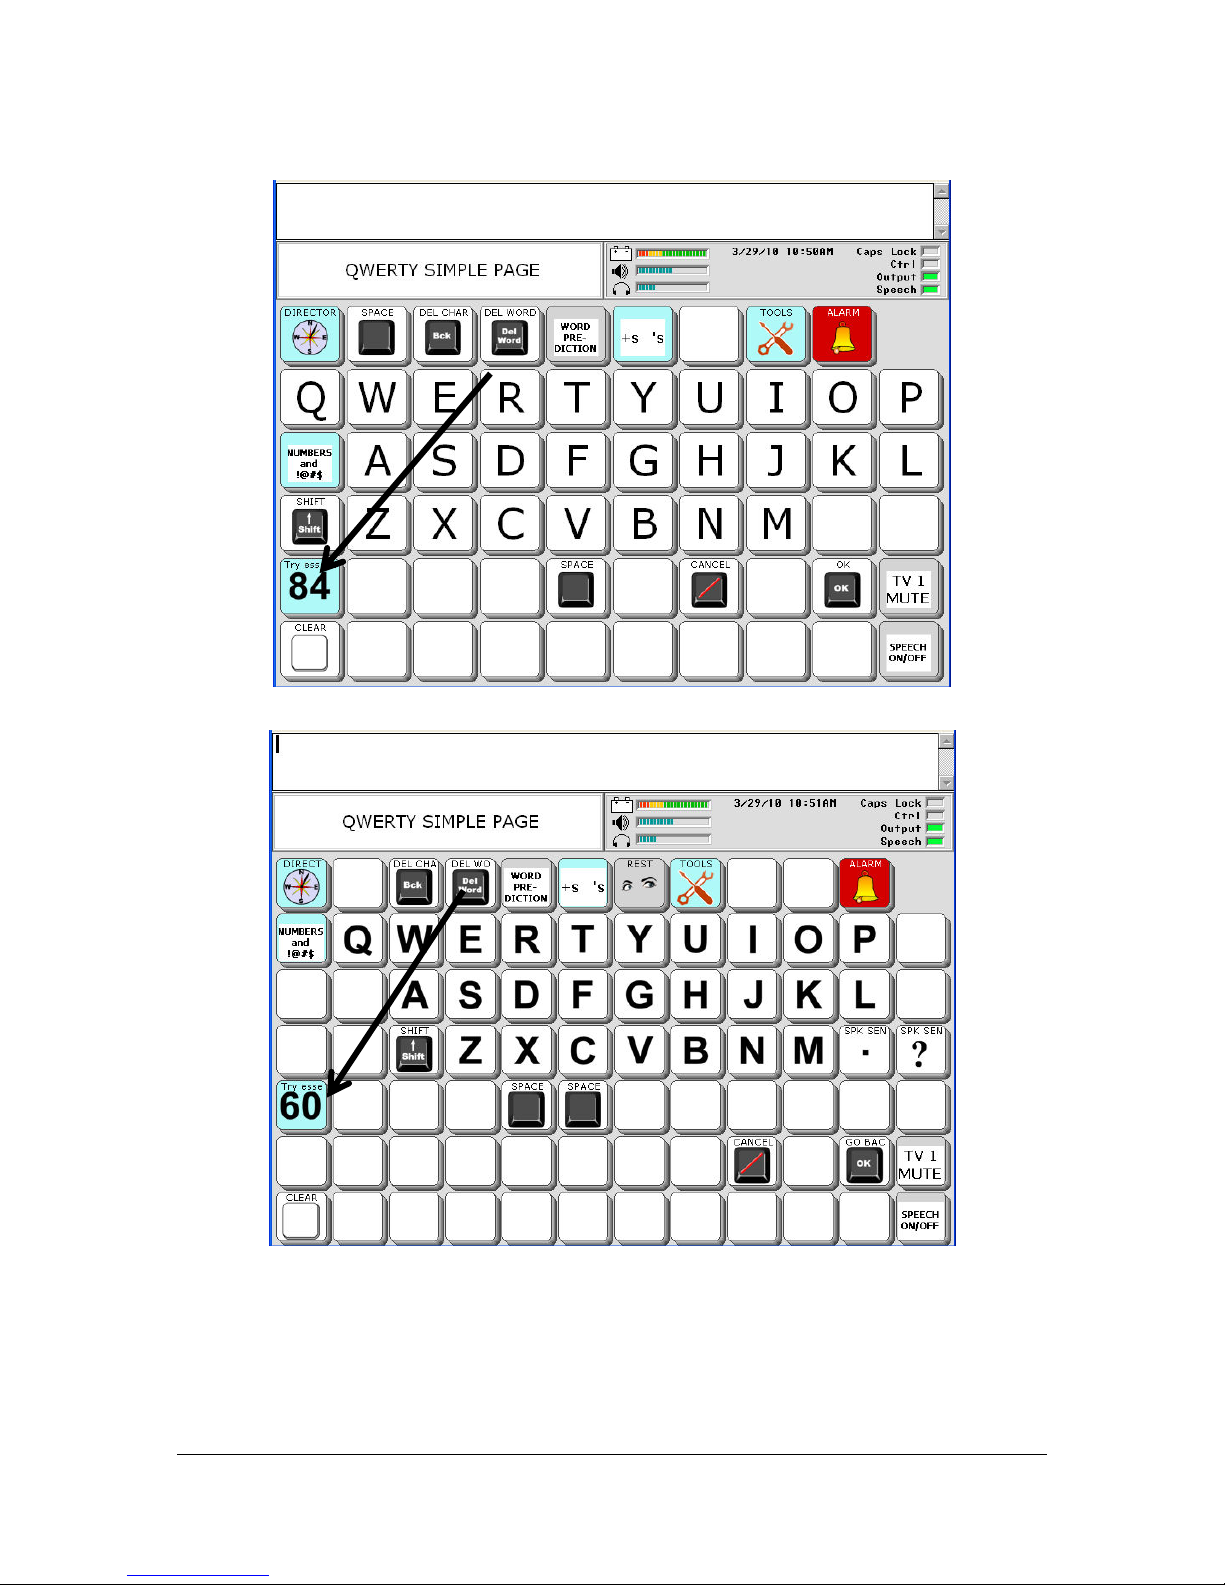
60 Simple QWERTY
84 Simple QWERTY
You can try both key sizes by selecting the Try essence 84 or Try essence
60 key found on each keyboard. Pick the one that is right for you.
FIRST STEPS
Essence|VT Easy Start
8
Page 9
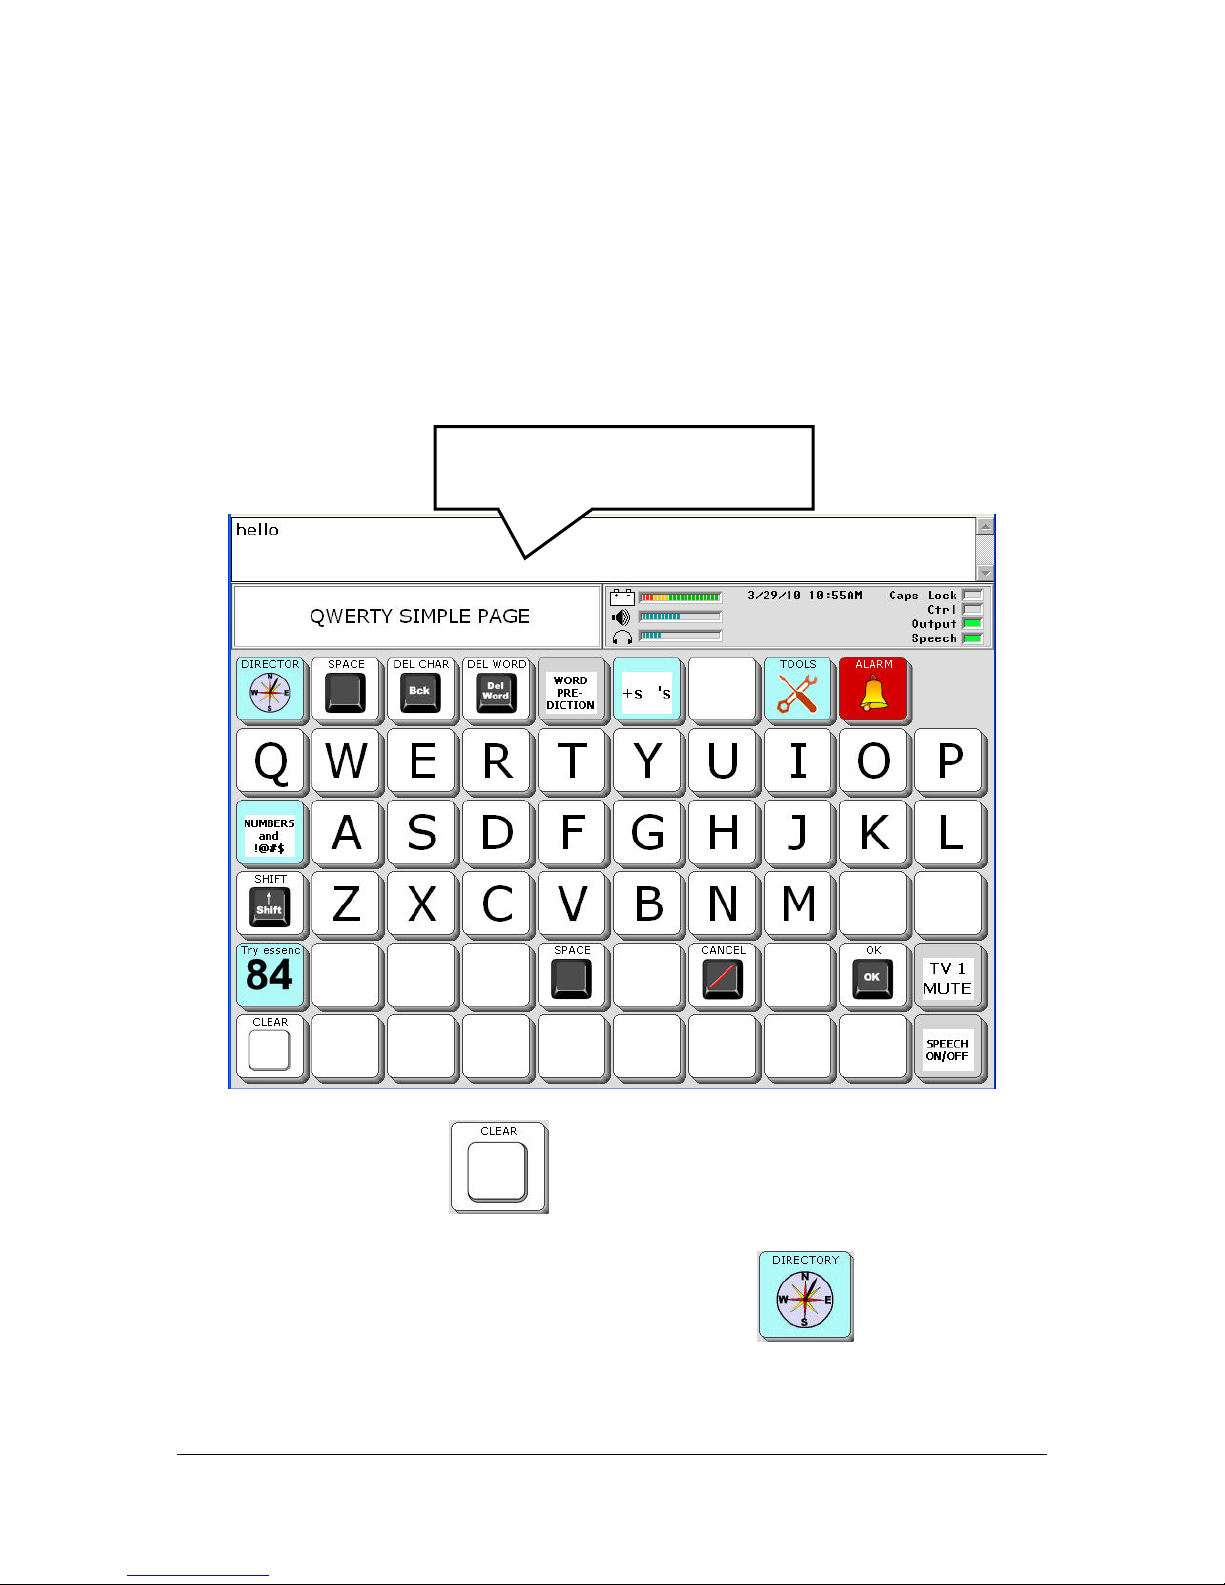
Spell a Message
Before you return to the DIRECTORY, you might like to spell a message to
speak.
Type a message on the keyboard.
To hear the message spoken, press or select the Text Display Area where
your message appears.
Press or select in this area to
hear your message spoken.
Select the CLEAR key
When you are ready, select the DIRECTORY key
DIRECTORY.
. This clears the Text Display Area.
to return to the
FIRST STEPS
Essence|VT Easy Start
9
Page 10
If Your Display Screen Goes Dim or Dark
If your display screen goes dim or dark and looks like it is off:
Your device has been pre-set to turn off (sleep mode) if you haven't made
any key activations for two minutes. The backlight on your display will
become dim. You can touch the screen or activate a switch to turn the device
back on (wake it up). If you do not wake up the device, eventually the
backlight will go out and the display will be dark. Again, just touch the
screen or activate your switch to wake up your device. It may take a minute
or two to wake up.
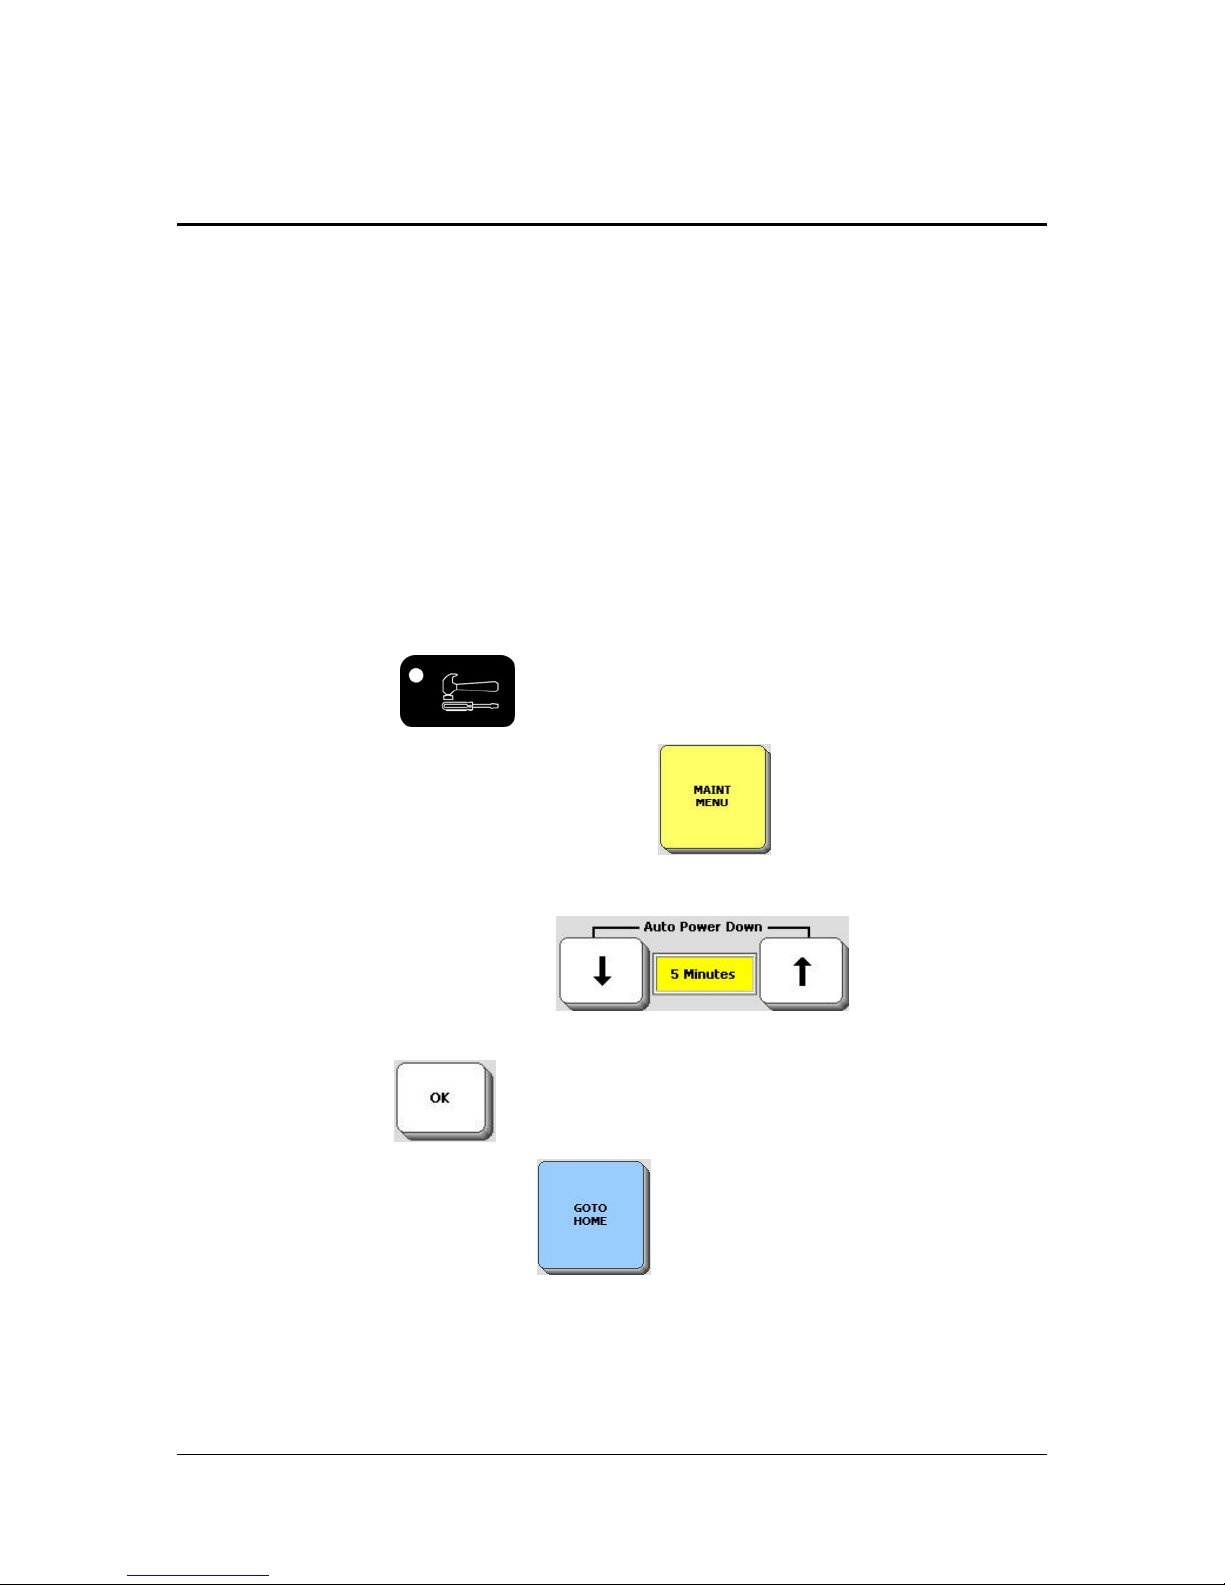
If you need more time to elapse before the screen goes to sleep, you can
change from two minutes to five or ten minutes by doing the following:.
Select the TOOLS
key on the front the case.
Select the MAINTENANCE MENU key
In the Auto Power Down option
keys to select the time you want.
Select the OK key
in the bottom right corner of the menu.
Select the GO TO HOME key
on your screen.
use the arrow
in the upper right corner.
You are back at the DIRECTORY page and ready to continue.
FIRST STEPS
Essence|VT Easy Start
10
Page 11
The DIRECTORY Page
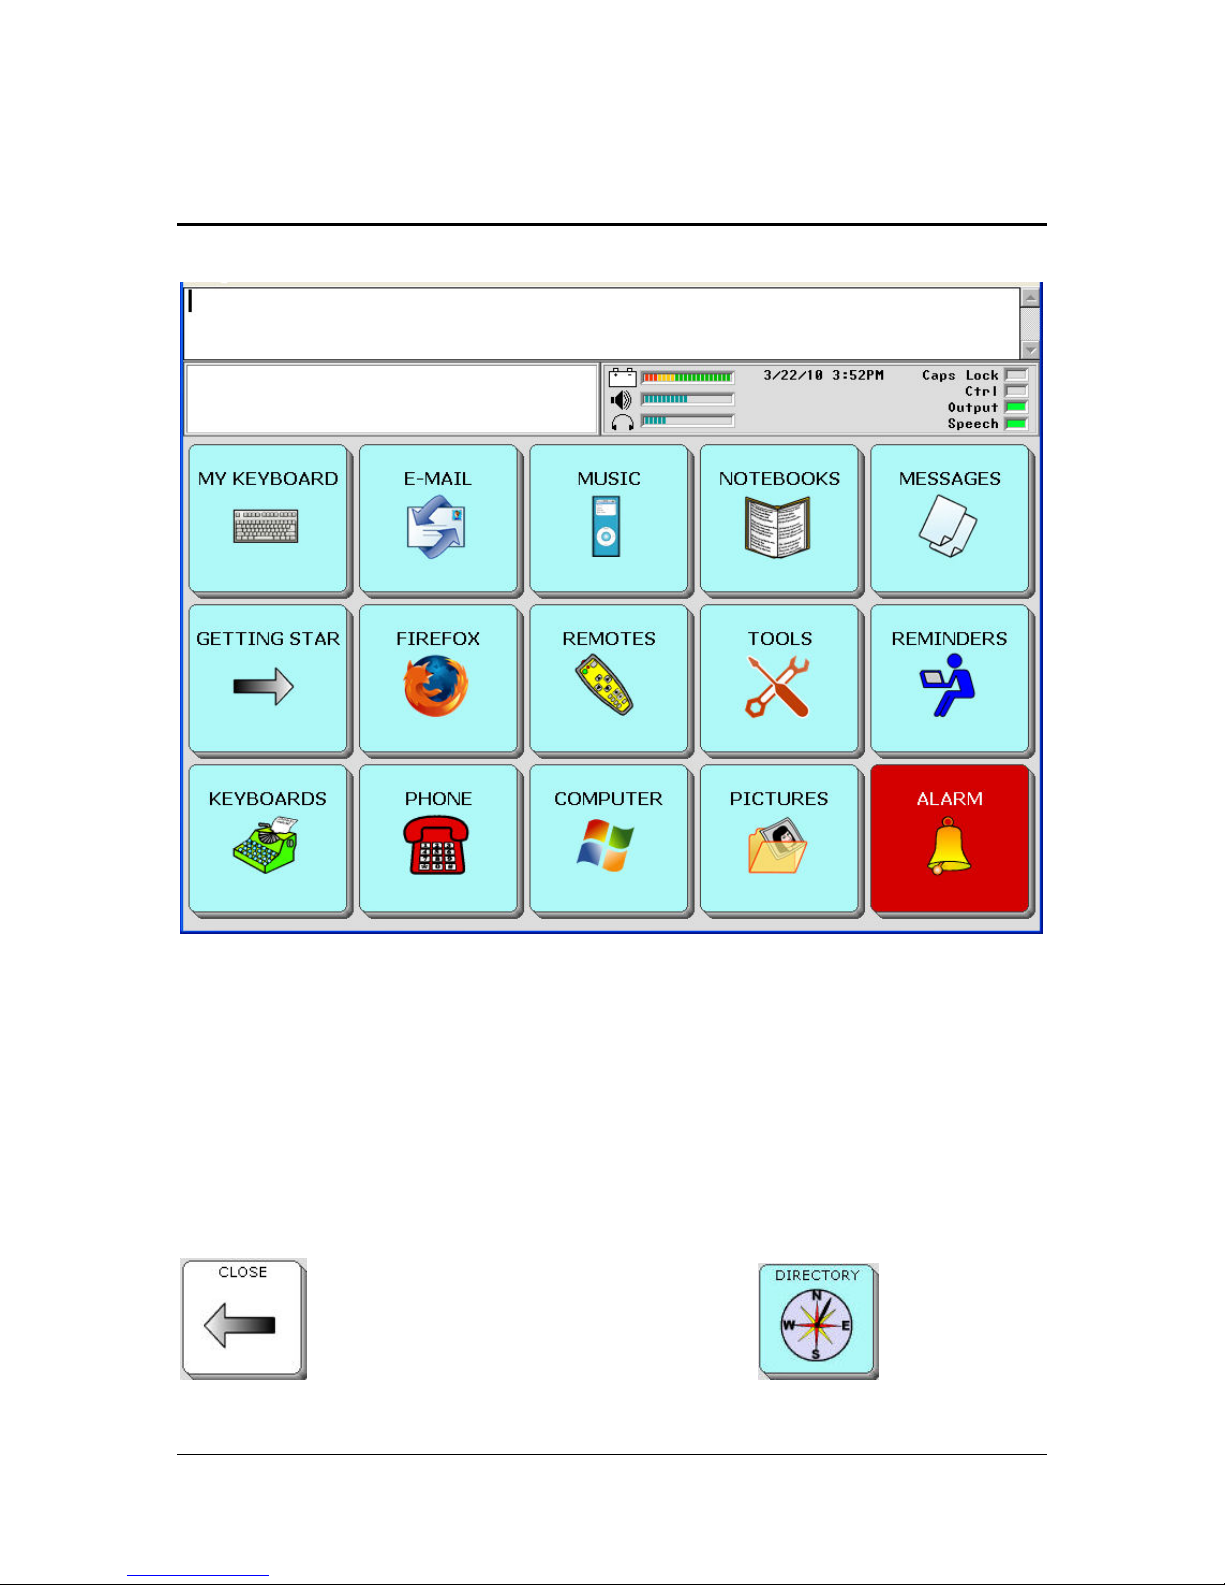
The DIRECTORY page gives you access to the applications in the Essence
program.
For now, you may choose any key on this page to look at what's available in
Essence.
To return to the DIRECTORY from an page, select the key in the top left
corner of the page. This may be a CLOSE key with a Left Arrow on it
or you may see the DIRECTORY key .
FIRST STEPS
Essence|VT Easy Start
11
Page 12
If the key in the upper left corner is the CLOSE key , select it
until you see the DIRECTORY key
.
FIRST STEPS
Essence|VT Easy Start
12
Page 13
Let's Get Started
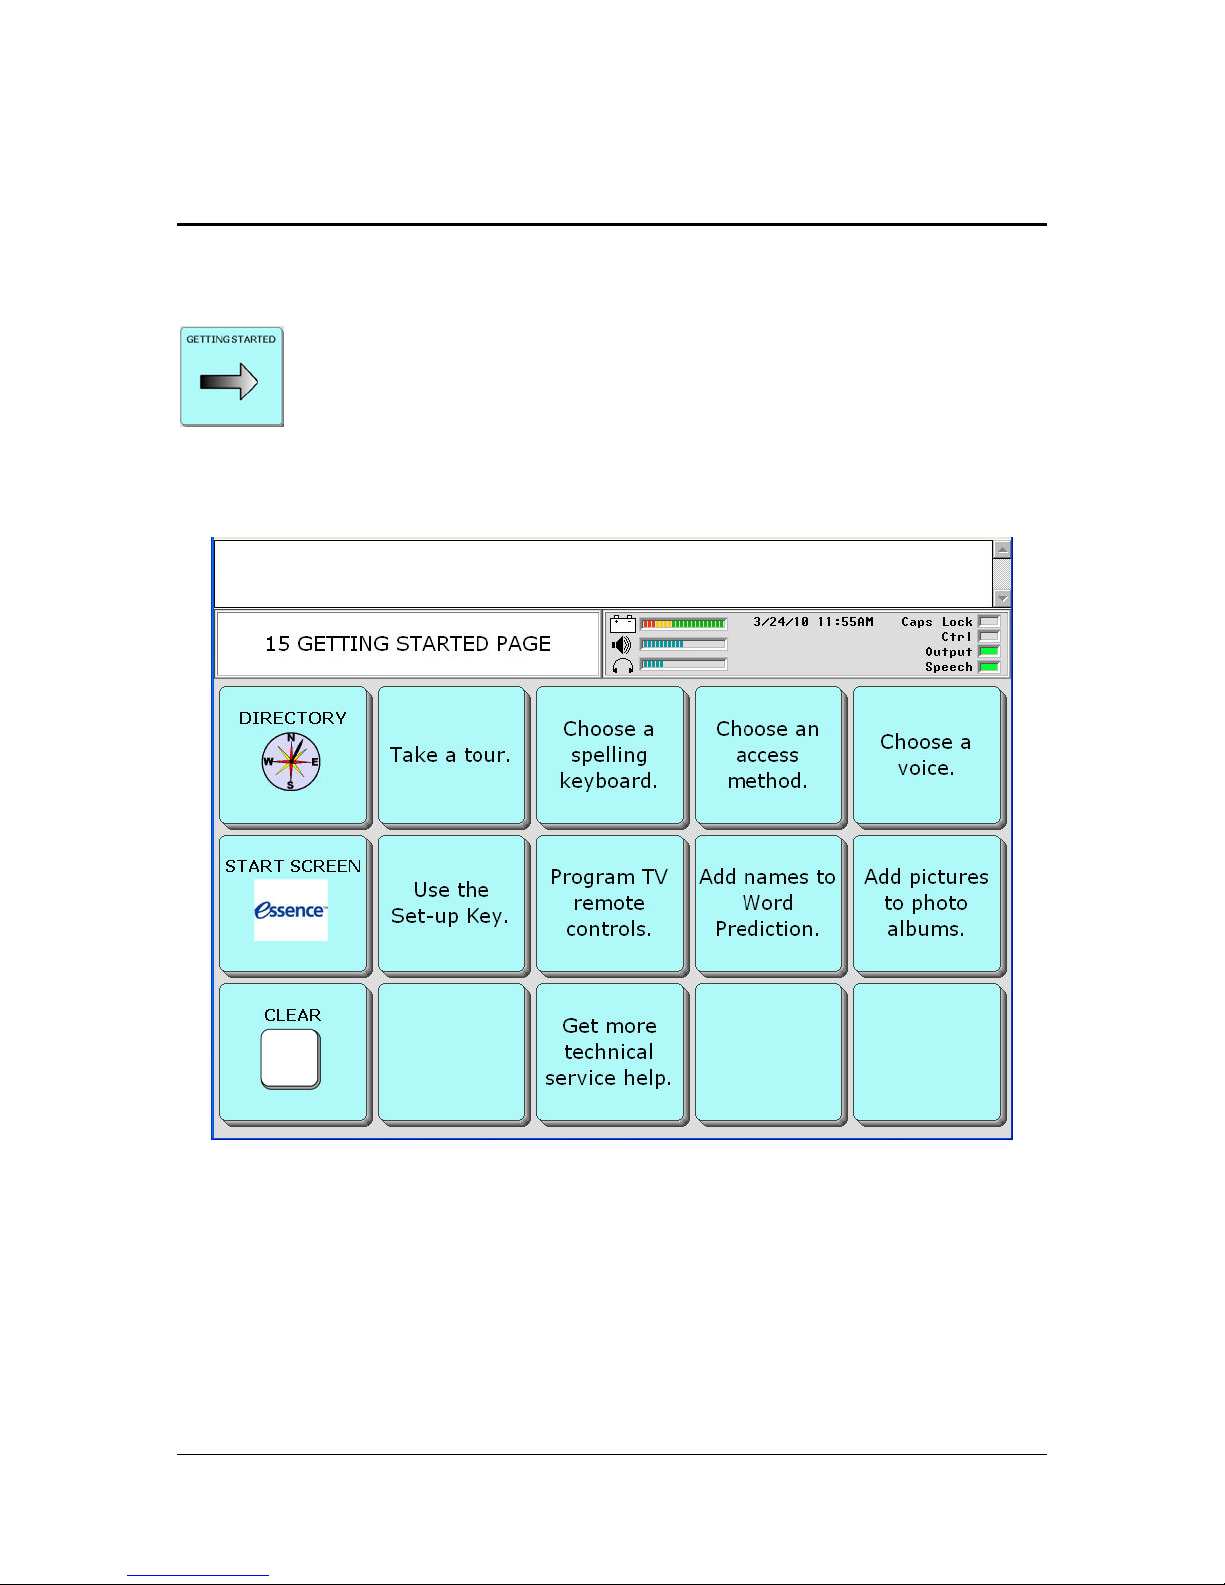
On the DIRECTORY page, select the GETTING STARTED key
.
You see the GETTING STARTED page:
The keys on this page help you to customize the settings of your device so
that it works the way you want it to. You will also learn some of the basic
programming that you will need to get started.
You will find short videos explaining many of these options on a CD that
came in the box with your device. You can watch these videos on your
computer.
FIRST STEPS
Essence|VT Easy Start
13
Page 14
If you are thinking about selecting an option on the DIRECTORY page but
would like to know more about it first, go to this GETTING STARTED
page, select the key you want and read about the option you are interested in.
In this Easy Start we will be using both the GETTING STARTED page
and the DIRECTORY page.
For now, select the DIRECTORY
key to return to the
DIRECTORY.
We will learn about some of the DIRECTORY options.
FIRST STEPS
Essence|VT Easy Start
14
Page 15
Choose a Spelling Keyboard
Earlier, you selected a key size (60 or 84). Now you need to select a spelling
keyboard that is comfortable and easy for you to use. Your spelling
keyboard page will be the page you use most often.
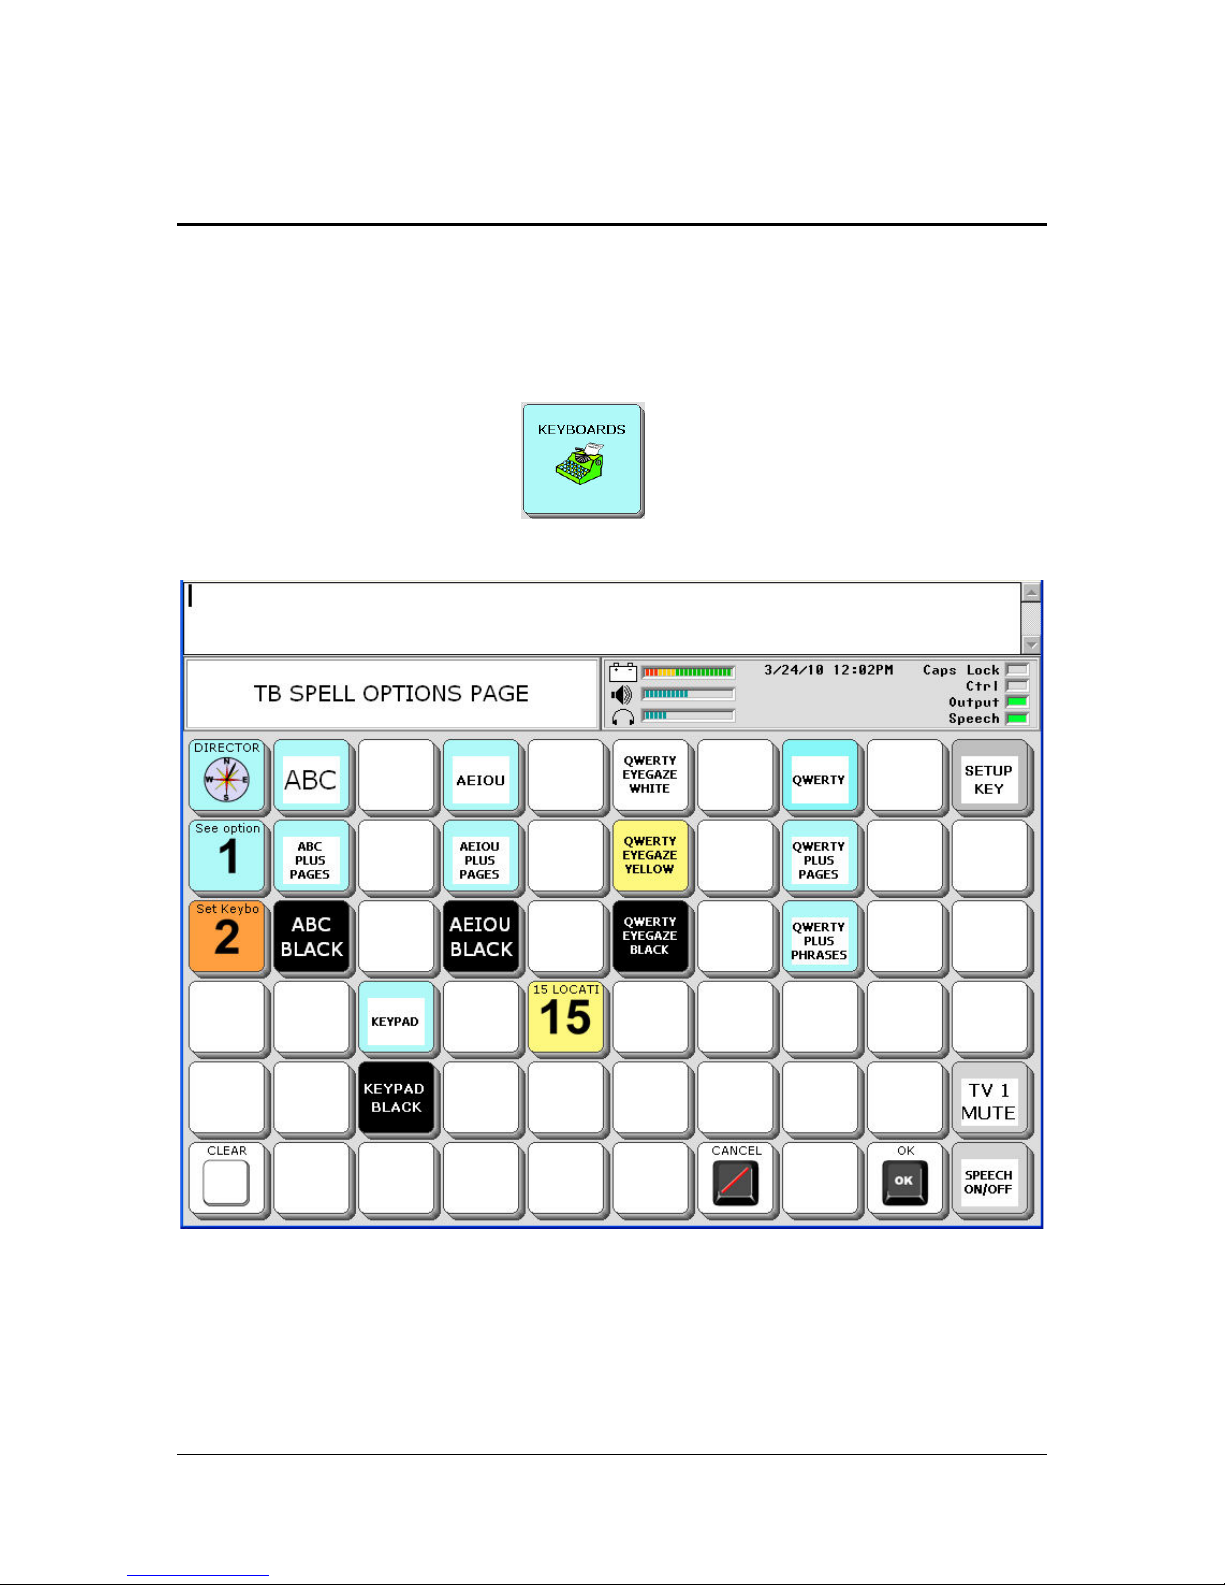
Select the KEYBOARDS key
.
The Keyboard SPELL OPTIONS page contains the different spelling
keyboards that are available for you to use. They will all be in the key size
you selected earlier (60 or 84).
FIRST STEPS
Essence|VT Easy Start
15
Page 16
Select the #1 key to see some directions for using this page.
All the keyboards have the alphabet, numbers and some of the same options
on them. Find a keyboard that makes it easy for you to spell and that has the
options you want.
The EYEGAZE keyboards just have labels on the keys, no pictures. For
example, the TOOLS key just has the word TOOLS on it.
Each keyboard (except 15 LOCATION SPELL) has an OK key.
The key will look like one of these. They all take you back one page.
Select the OK key to take you back to the keyboard SPELL OPTIONS
page. Continue to select keyboards until you find one you like.
To return to SPELL OPTIONS from the 15 Location Spell keyboard,
select the MESSAGES key; then the DIRECTORY key; then the
KEYBOARD OPTIONS key.
When you have decided on the keyboard you want to use, return to the
SPELL OPTIONS page. Select the orange #2 key
, then select the
keyboard key you want to use. This will be your default keyboard.
To clear text from your Text Display Area, select the CLEAR key
When you are ready, select the DIRECTORY key
FIRST STEPS
Essence|VT Easy Start
16
.
Page 17
Choose an Access Method
"Access Method" means the way you make selections on your device. You
may touch the screen, scan with a switch, or select with your eyes. There are
many way to access your VT. There are some Access Methods already set
up for you. You can also customize the settings for many different access
methods and then save the settings so you can use them over and over.
On the DIRECTORY page, select the TOOLS key
On the TOOLS page select the ACCESS METHOD key
.
.
FIRST STEPS
Essence|VT Easy Start
17
Page 18
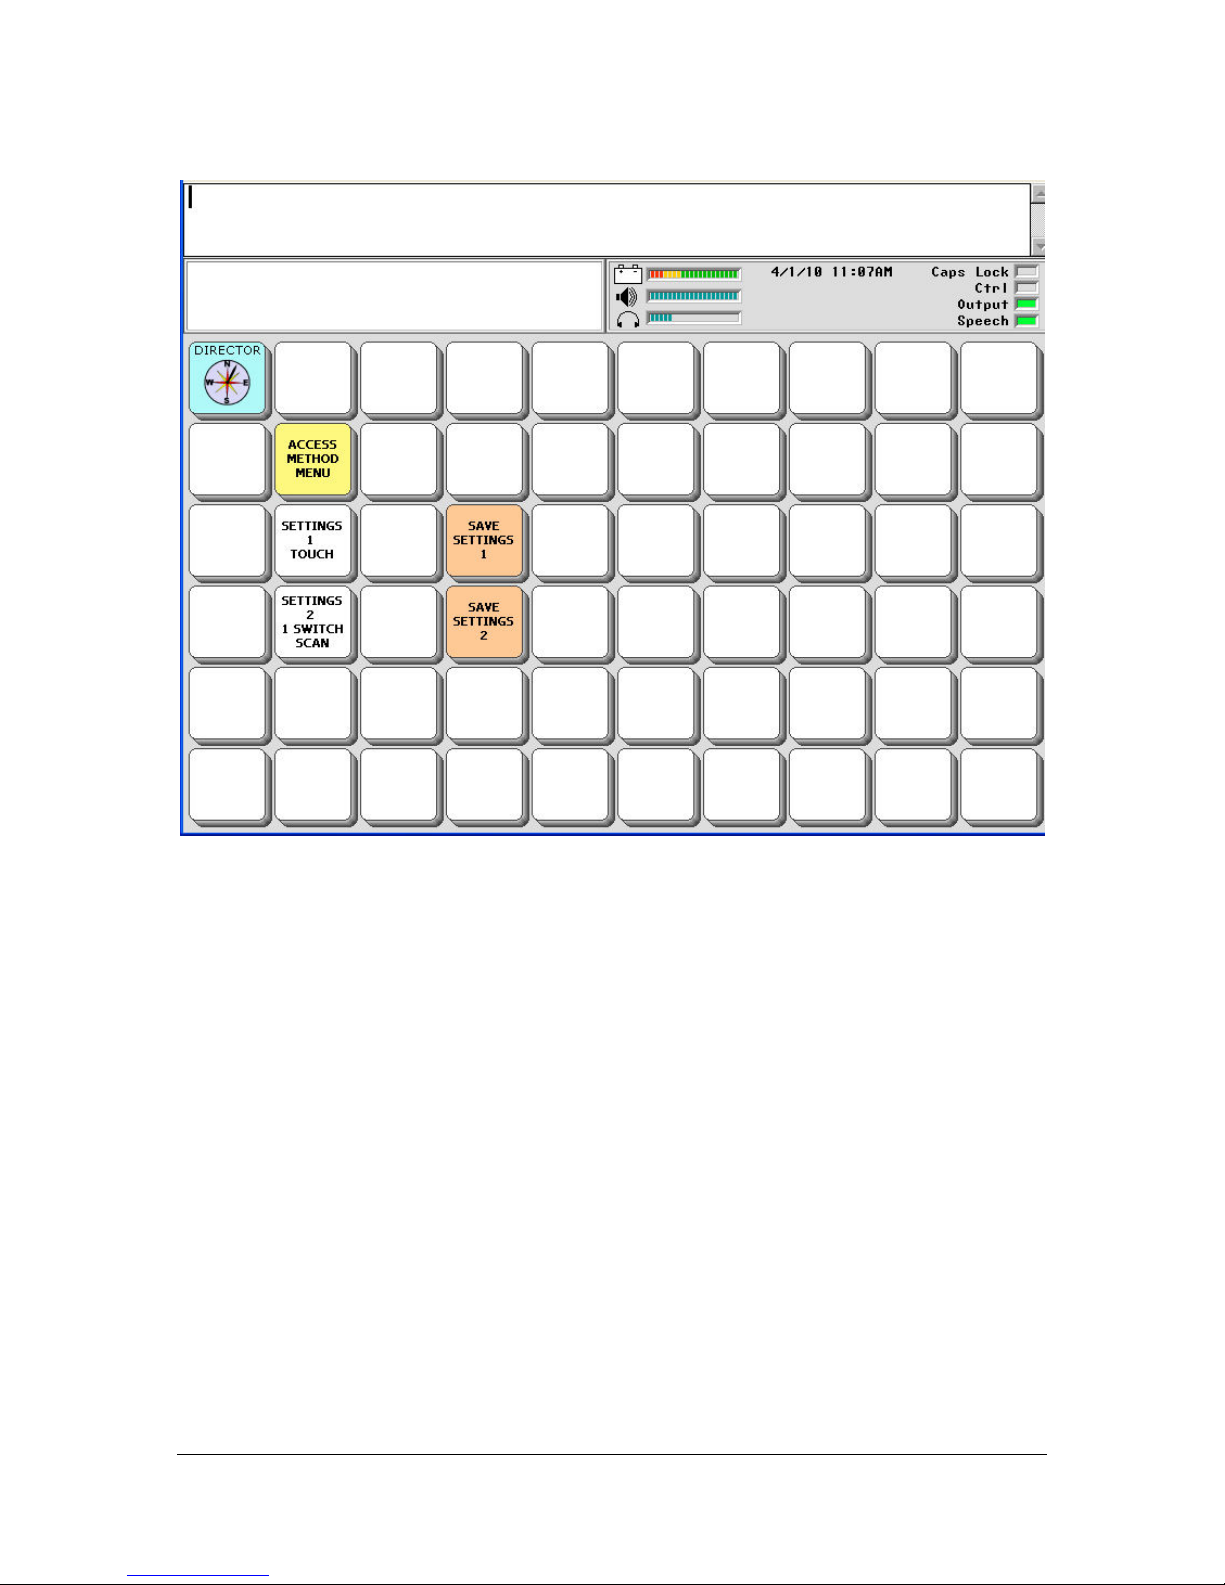
The SETTINGS 1 key is ready for Touch access. If you can make
selections by touching your device screen, you can use this Setting.
The SETTINGS 2 key is ready for 1-Switch Scanning. If you need to use a
switch to make selections, use this option.
Select one of the settings and try it out. You will be asked if you want to
switch to Settings 1. Answer YES.
You may find that these preset settings are not quite right for you. You can
change the default settings until you find the right mix for you. Then you can
save those settings by selecting the SAVE SETTINGS 1 or 2 keys.
We recommend that you ask a clinician who is familiar with the Access
Method you want to use to help you set it up.
FIRST STEPS
Essence|VT Easy Start
18
Page 19
To Change the Access Method Settings and Save the
Changes
We recommend that you ask a clinician to help with this, especially if
you are using scanning.
1. Select the Settings key you want (1 or 2).
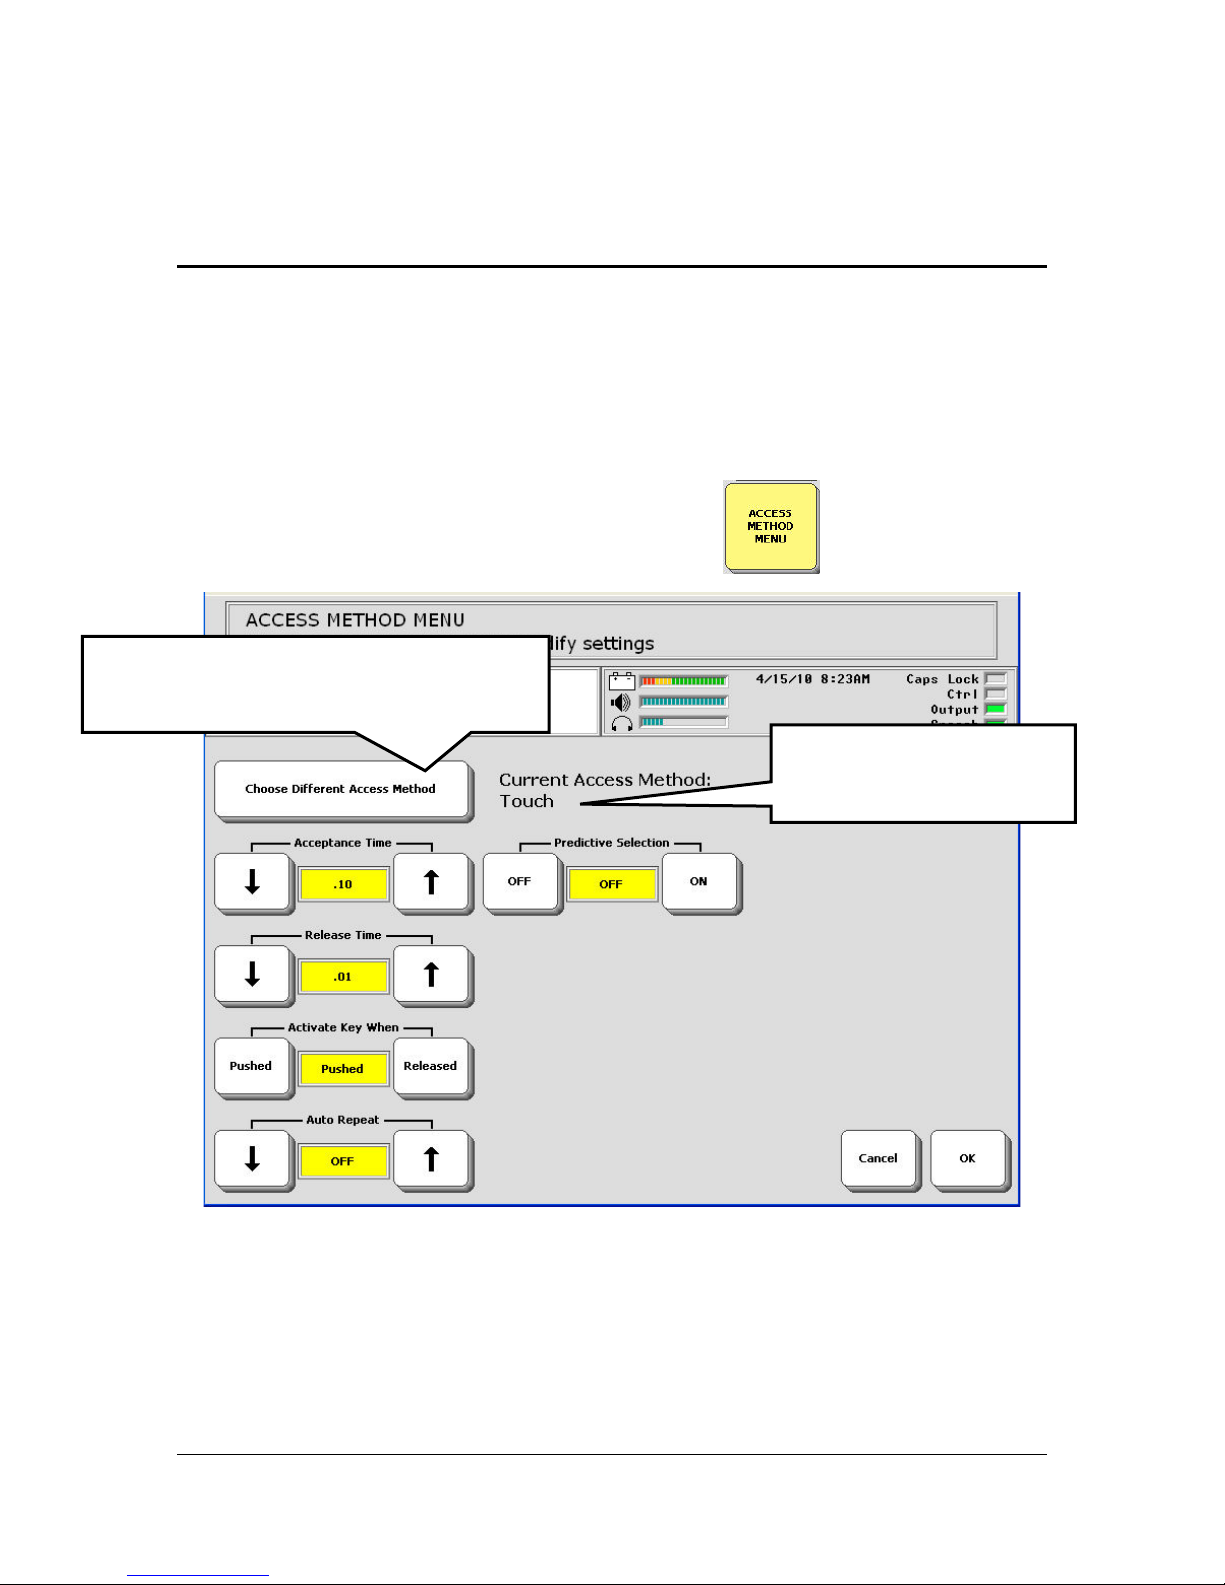
2. Select the ACCESS METHOD MENU key
Select Choose Different Access
Method to go to the method you want.
This tells you the current
Access Method.
If the method you see is not the one you want, select the Choose Different
Access Method key to go to the method you want.
3. Select the options you want to change.
FIRST STEPS
Essence|VT Easy Start
19
Page 20
4. When you have things set the way you want, select the OK key .
5. Now select the orange SAVE SETTINGS key that matches the settings
you are saving (#1 or #2)
.
If you select an Access Method that is different from the label on the
Settings keys, just remember the number on the key you selected.
Learn more about the different Access Methods in the Essence|VT
Operator's Manual at http://talknow.prentrom.com
.
FIRST STEPS
Essence|VT Easy Start
20
Page 21
Choose a Voice
You can choose the voice you want to use.
On the DIRECTORY page, select the GETTING STARTED key
.
On the GETTING STARTED page, select the Choose a Voice key
.
FIRST STEPS
Essence|VT Easy Start
21
Page 22
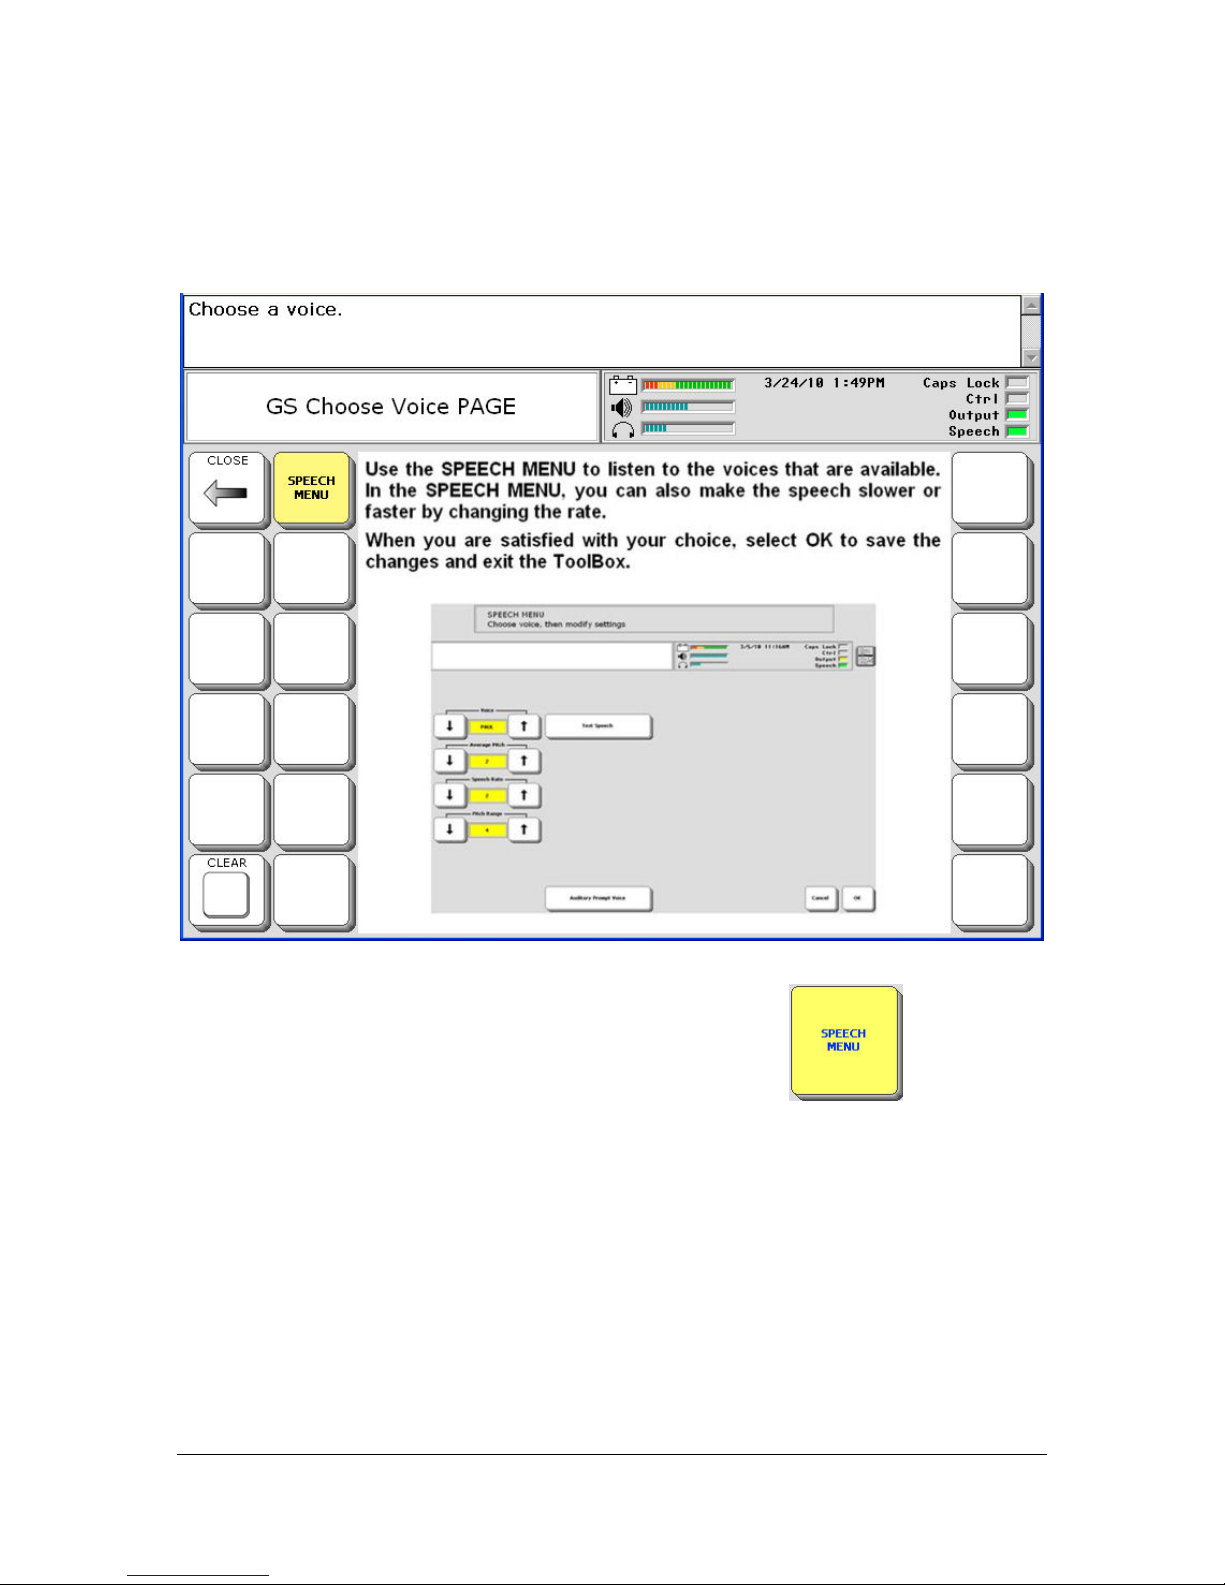
You see a page that explains about choosing a voice.
On this page, select the yellow SPEECH MENU key
FIRST STEPS
Essence|VT Easy Start
22
.
Page 23
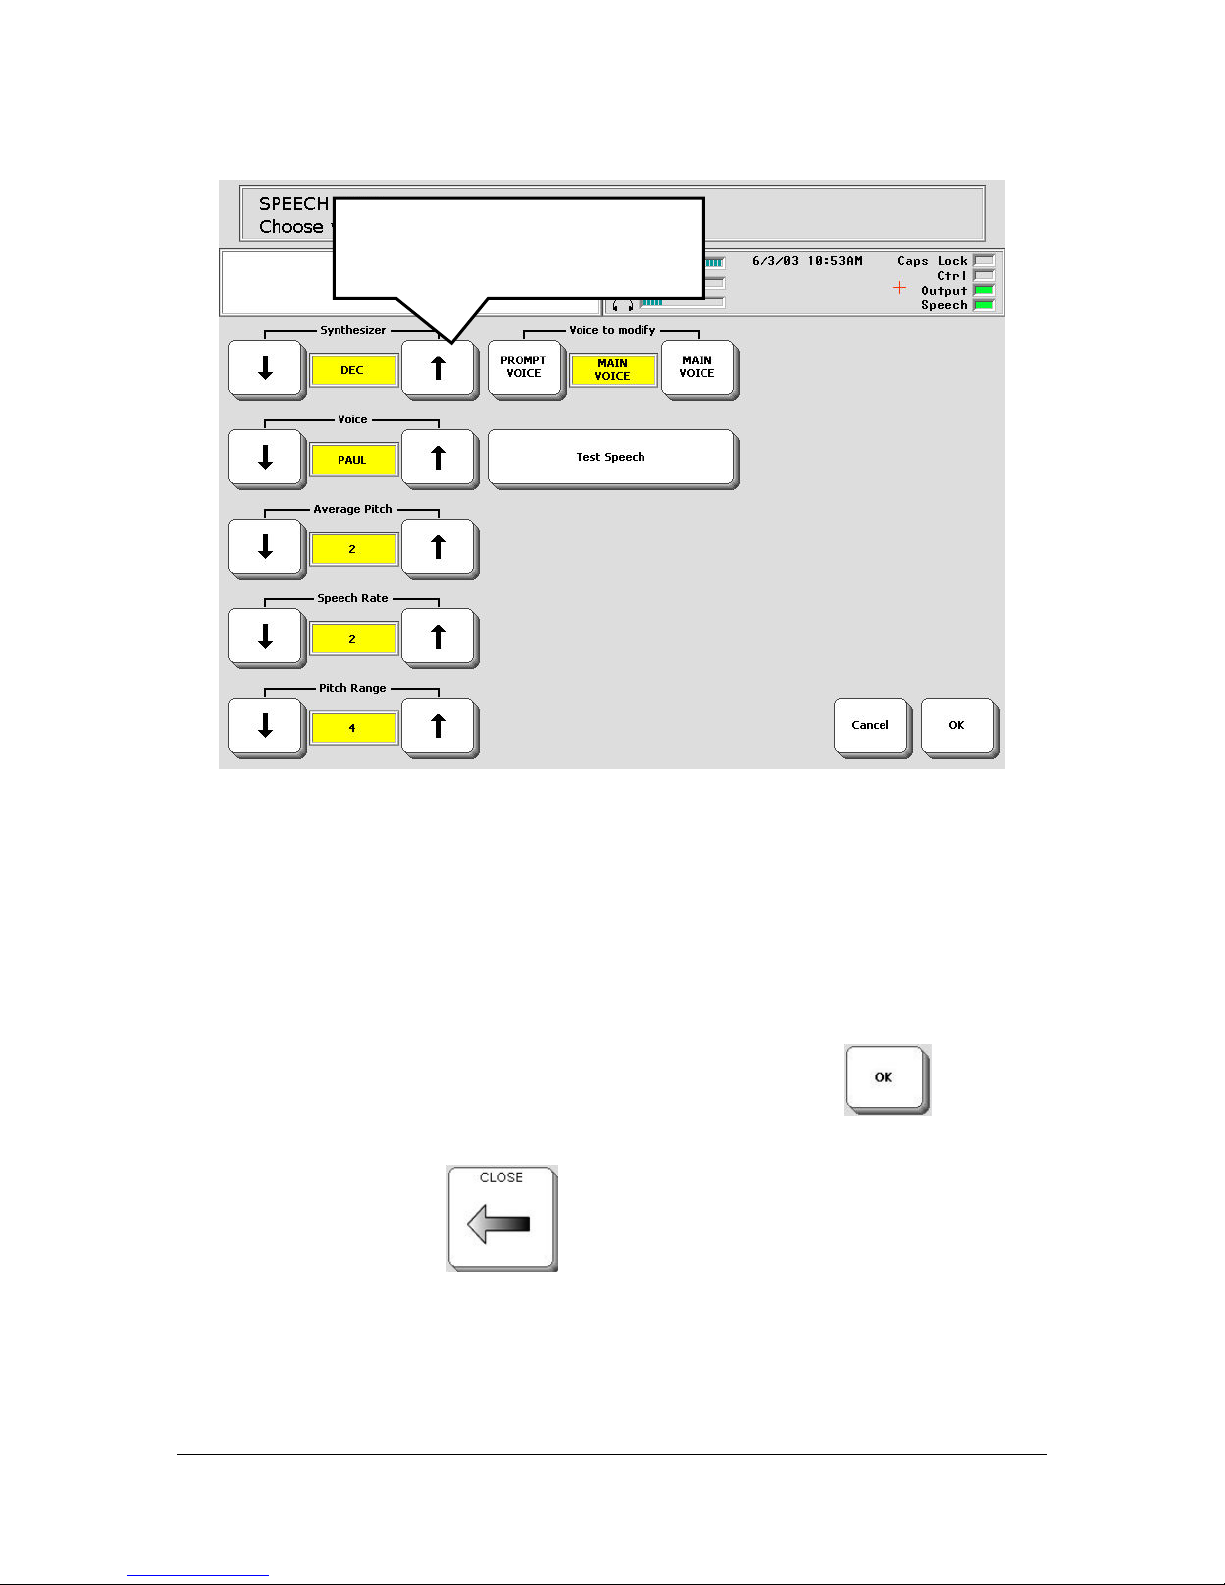
Us the Up and Down arrows
until the selection you want
appears in the yellow box.
Use the Voice option to select a voice. Listen to it by selecting the Test
Speech key.
You may not need to change other options, but if you do:
Use the Rate key to make the speech somewhat slower or somewhat faster.
Use the Pitch and Range options to change the sound of the voice.
When you are satisfied with your voice, select the OK key
in the
bottom right corner of the screen.
Select the CLOSE key
. You are returned to the GETTING
STARTED page.
FIRST STEPS
Essence|VT Easy Start
23
Page 24
You are Ready to Communicate
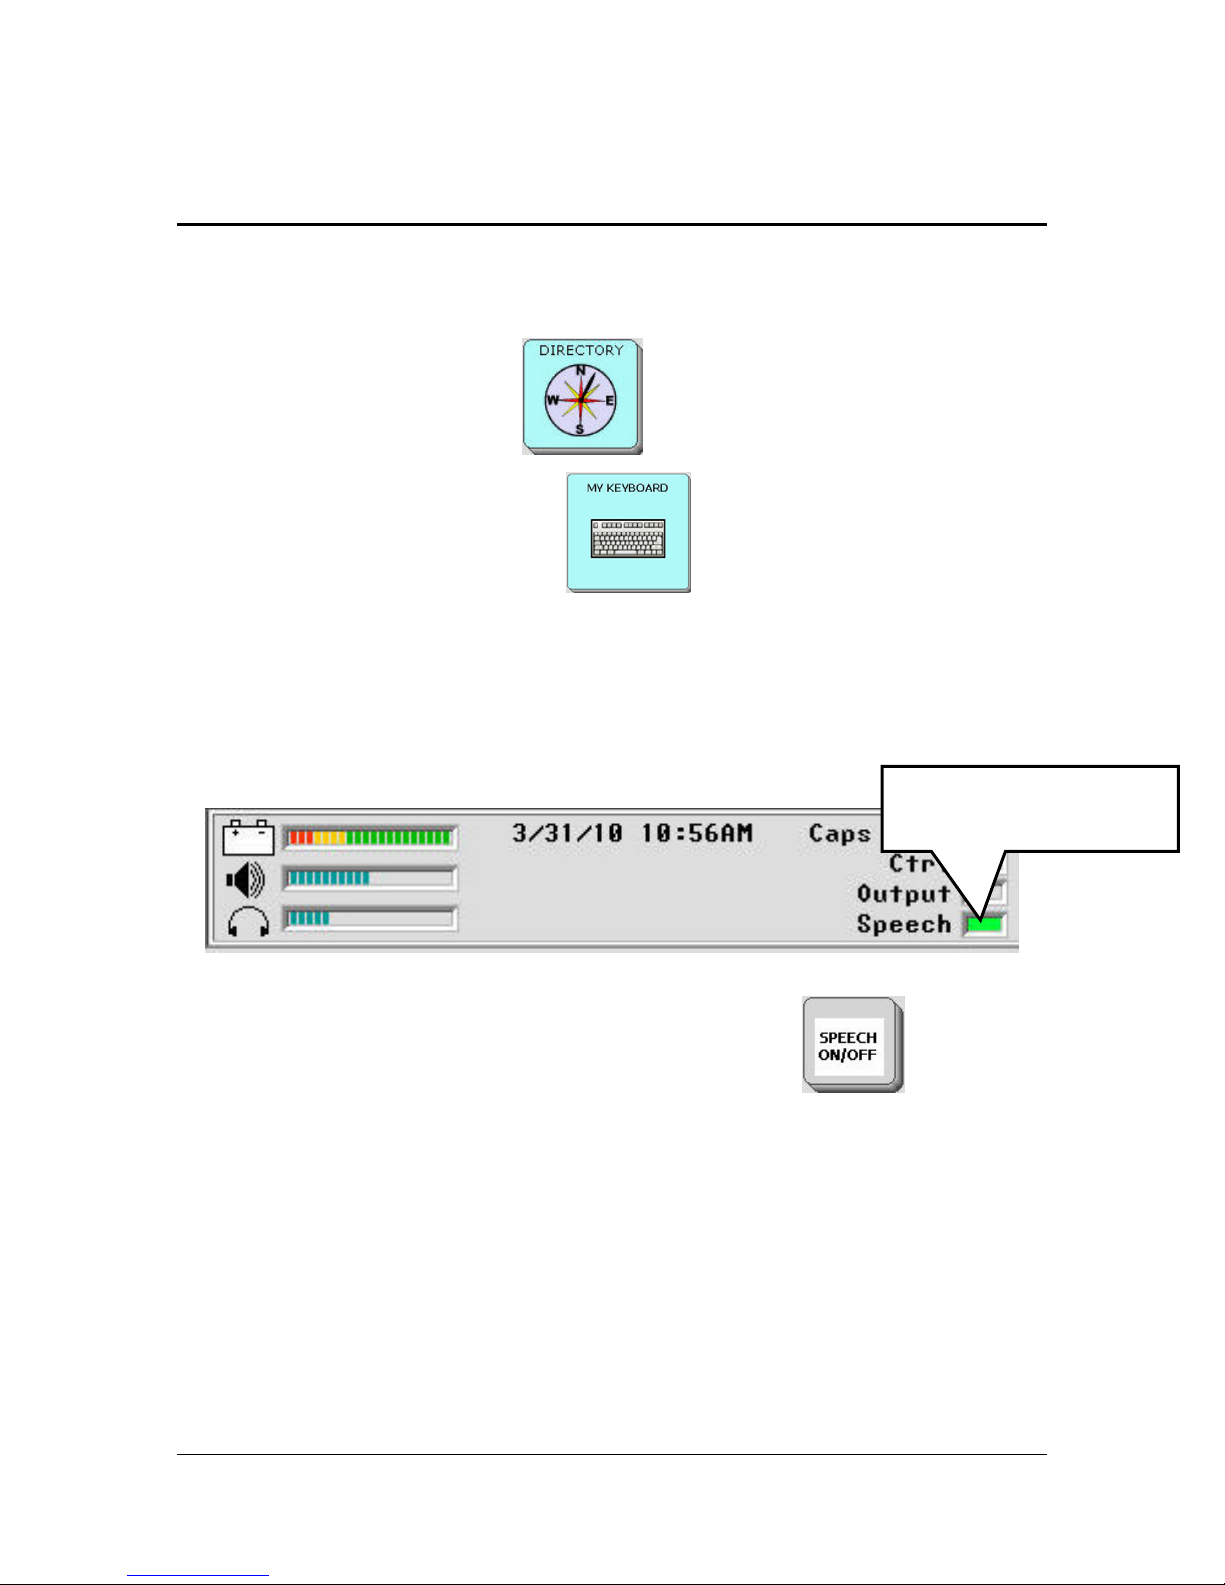
You have set up your keyboard, access method and voice.
Select the DIRECTORY key
Select the MY KEYBOARD key
to return to the DIRECTORY.
to go to the keyboard you
selected.
Make sure your Speech key is ON. Look in the Status Display Area of your
VT. If the small LED next to Speech is green, your speech is on.
When Speech is ON,
this light is green.
Status Display Area
If the light is not lit, select the SPEECH ON/OFF key
usually the key in the lower right corner of your keyboard. Now check to see
that the LED is lit in the Status Display Area.
Now start typing what you want to say.
which is
FIRST STEPS
Essence|VT Easy Start
24
Page 25

Add to your Communication Power
ADD TO YOUR COMMUNICATION POWER
Essence|VT Easy Start
25
Page 26
Using the SAVE TEXT Key to Add Messages to a Key
The SAVE TEXT key allows you to type something into your Text Display
Area and then save it immediately to a key.
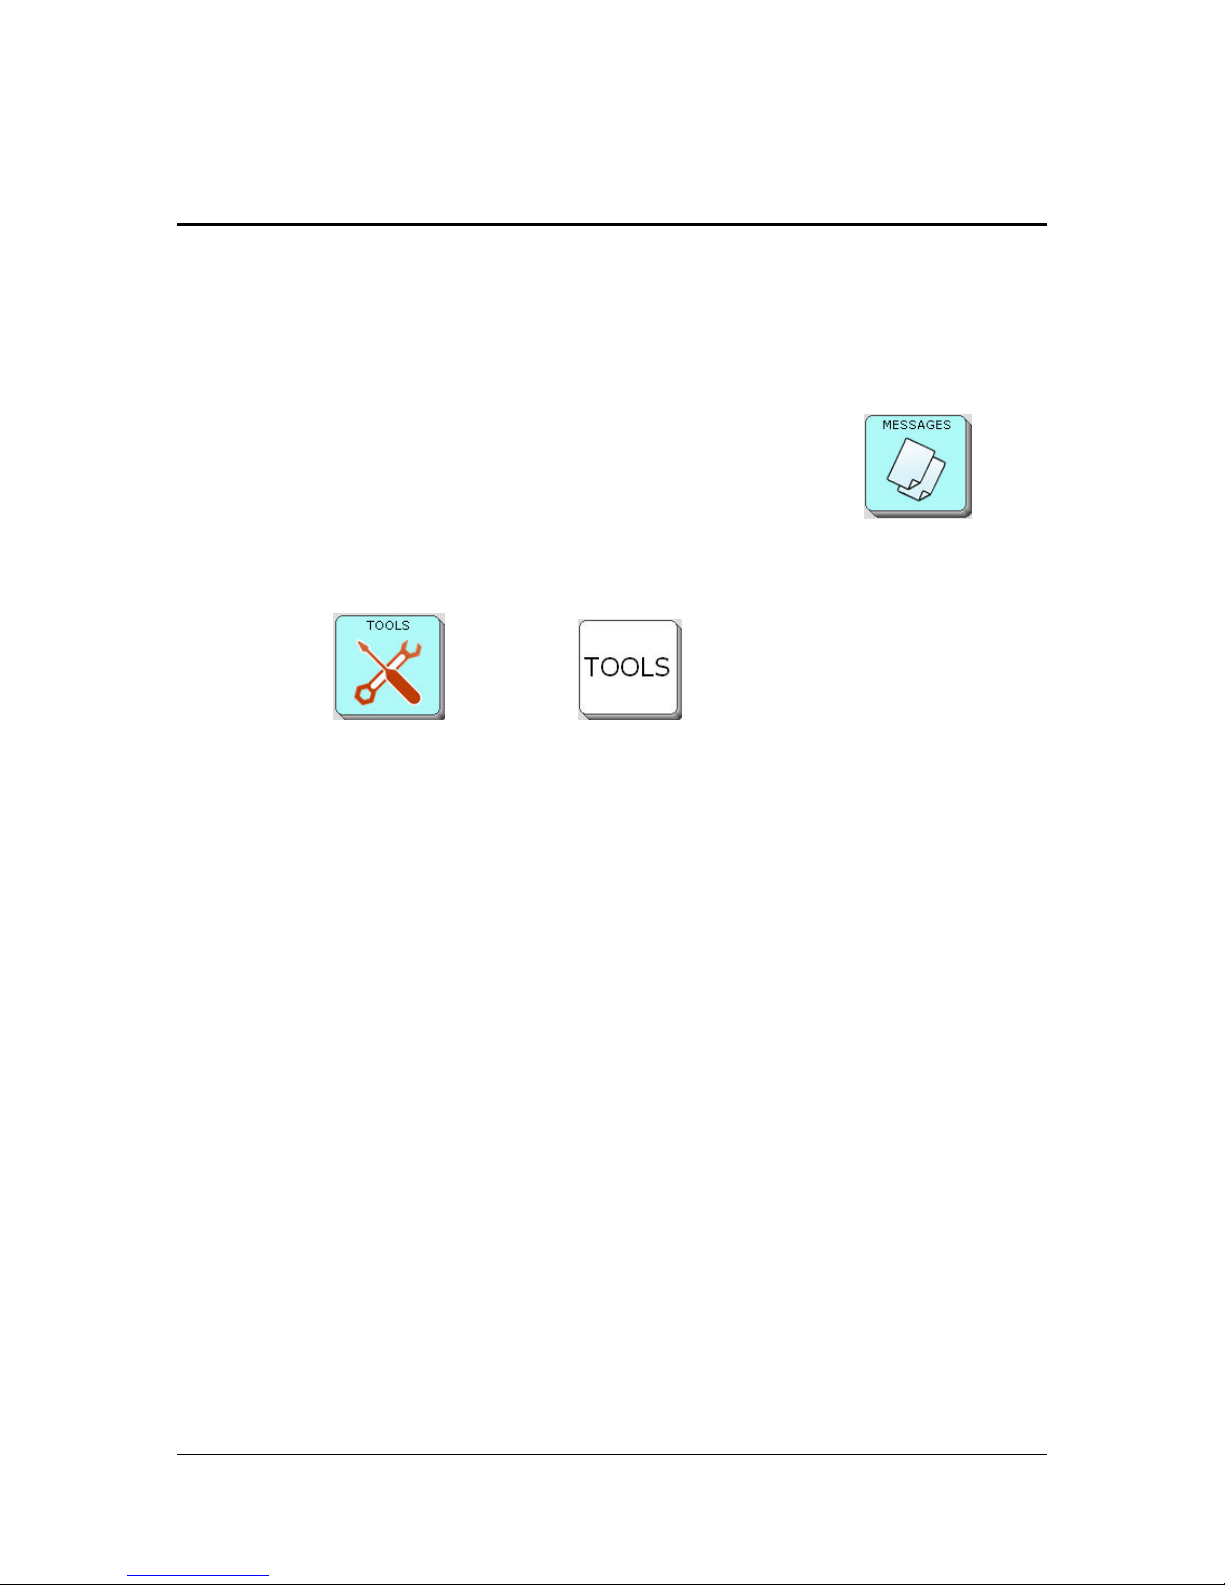
Most of the Essence|VT keyboards have a MESSAGES key
.
If you do not see it on your keyboard, select the TOOLS key which may
look like this
or like this .
Then look for the MESSAGES key and select it.
ADD TO YOUR COMMUNICATION POWER
Essence|VT Easy Start
26
Page 27
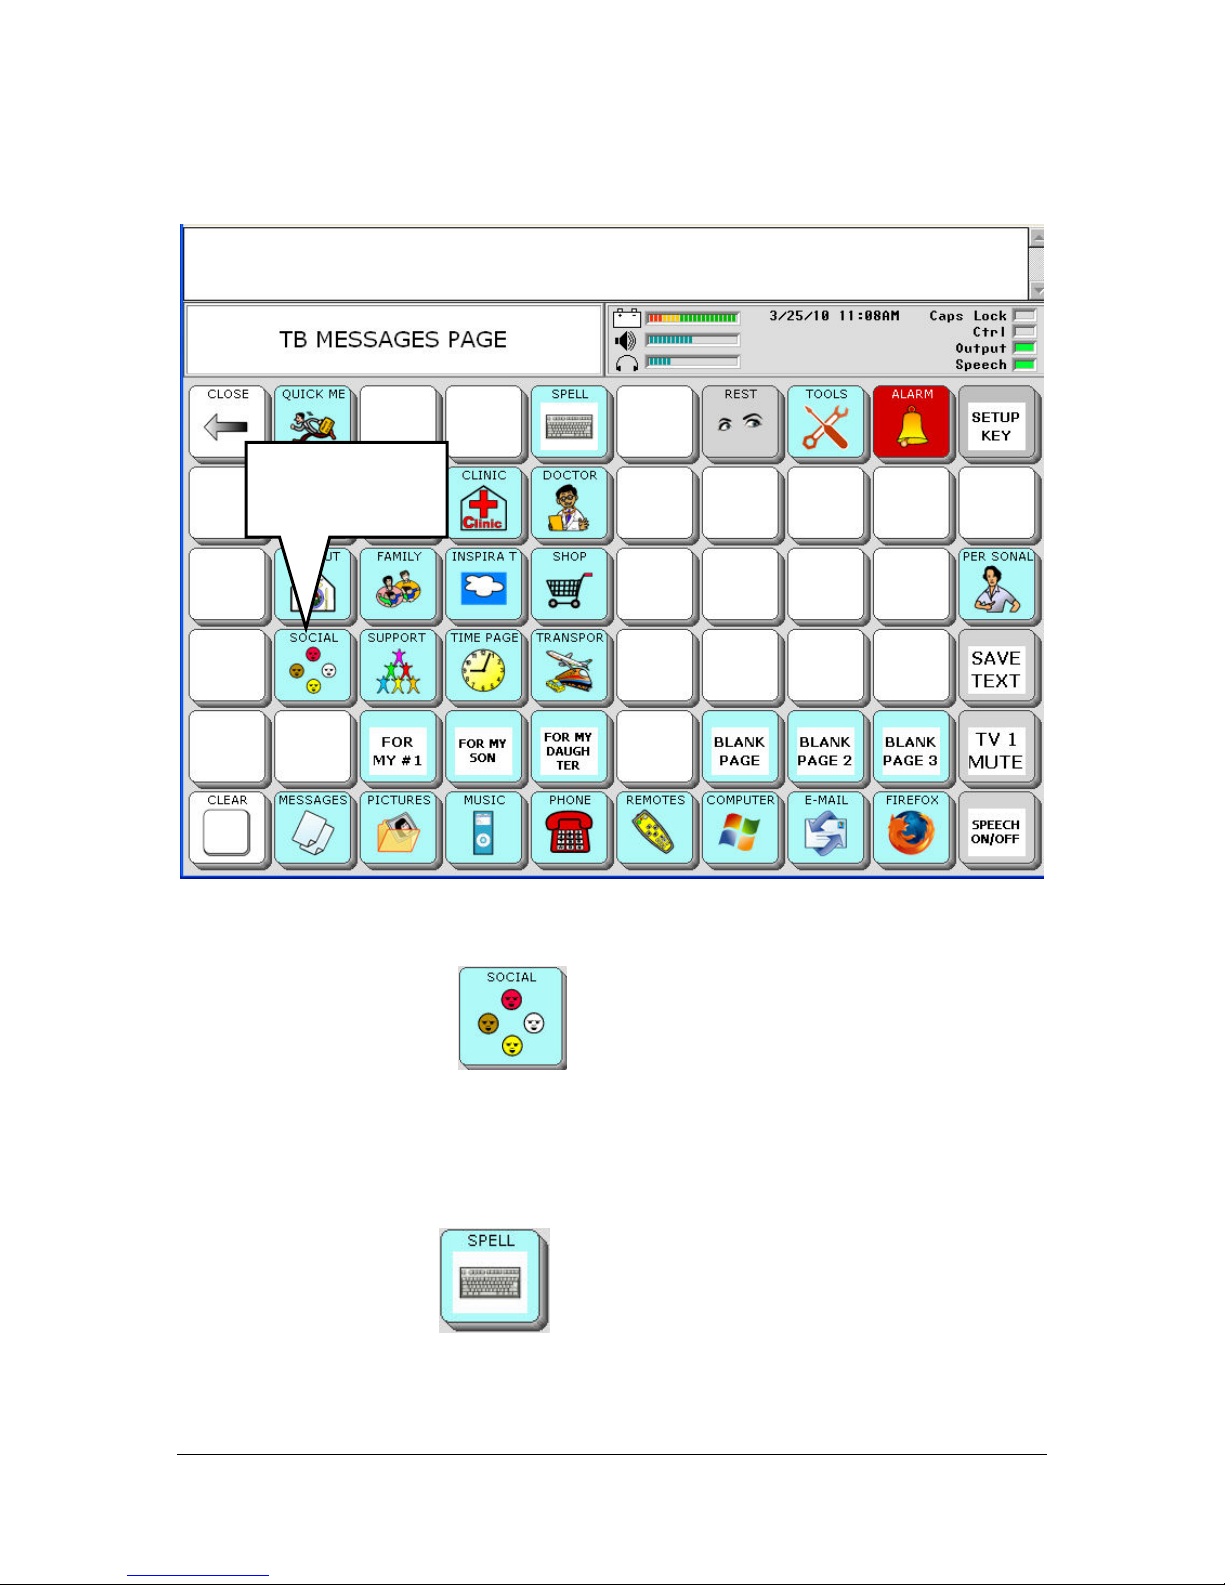
You see a MESSAGES page.
Select the
SOCIAL key.
Let's add a message to the SOCIAL page.
Select the SOCIAL key
. You see the SOCIAL page.
In order to spell a message for a key on this page, you need to go to your
spelling keyboard.
Select the SPELL key which will take you to your keyboard.
ADD TO YOUR COMMUNICATION POWER
Essence|VT Easy Start
27
Page 28
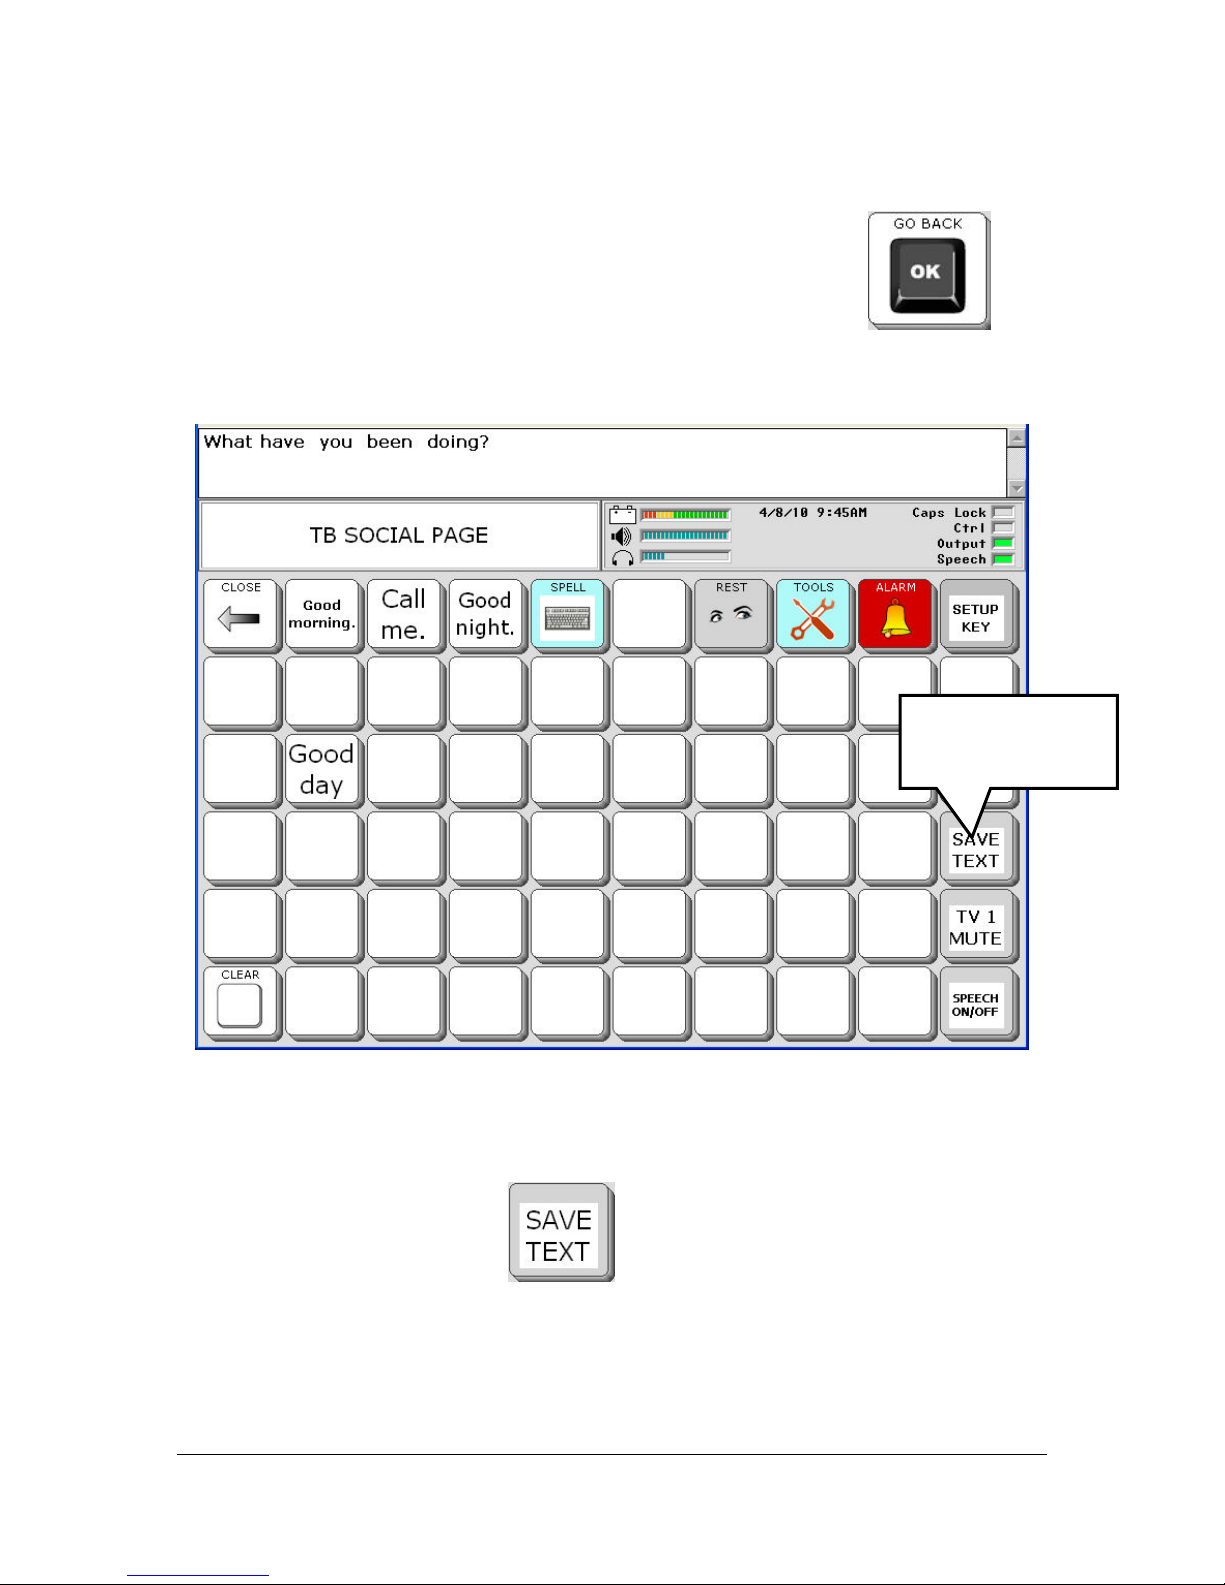
On your spelling keyboard, enter the message, "What have you been doing?"
When you have finished typing, select the OK (go back) key
return to the SOCIAL page.
to
1. Select
SAVE TEXT.
Now let's add your message to a key so you won't have to type it every time
you want to use it.
Select the SAVE TEXT key
.
ADD TO YOUR COMMUNICATION POWER
Essence|VT Easy Start
28
Page 29
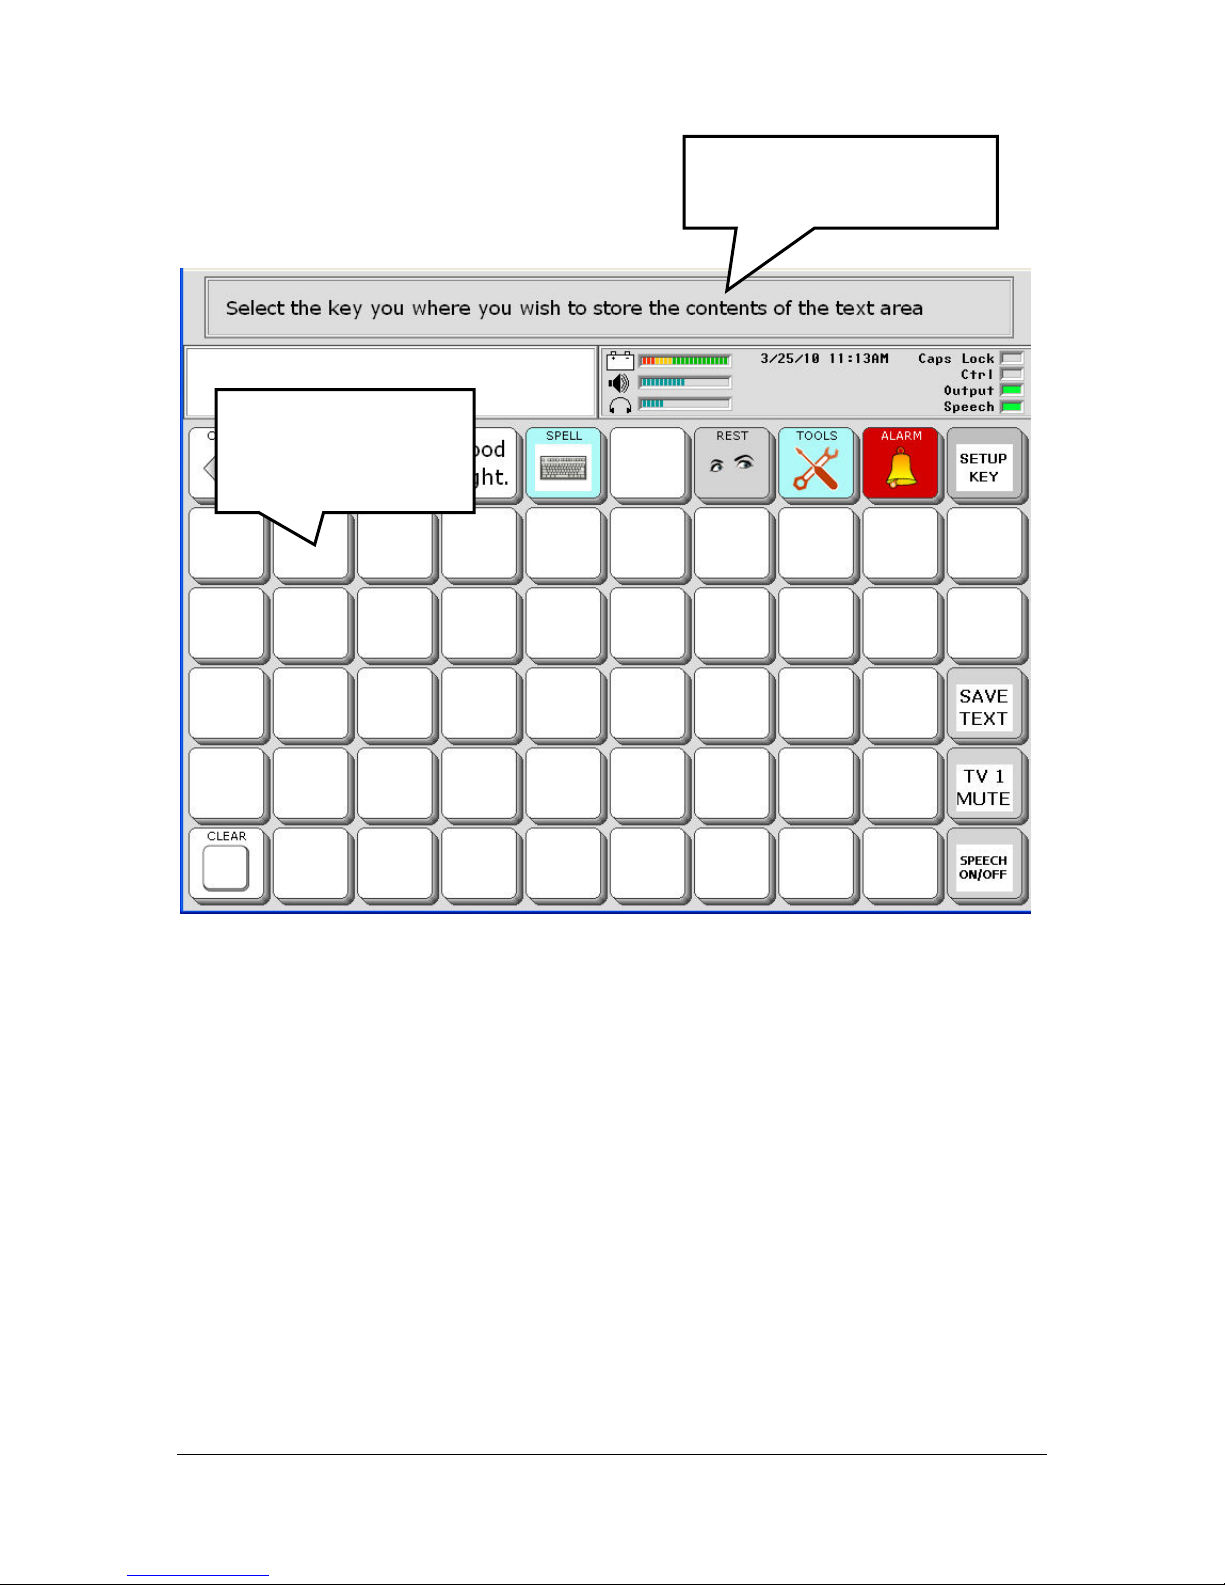
In the Text Display Area you see:
2. Select any blank
key where you want
the text to go.
Directions are in the Text
Display Area
Select any blank key where you would like to store your message.
ADD TO YOUR COMMUNICATION POWER
Essence|VT Easy Start
29
Page 30
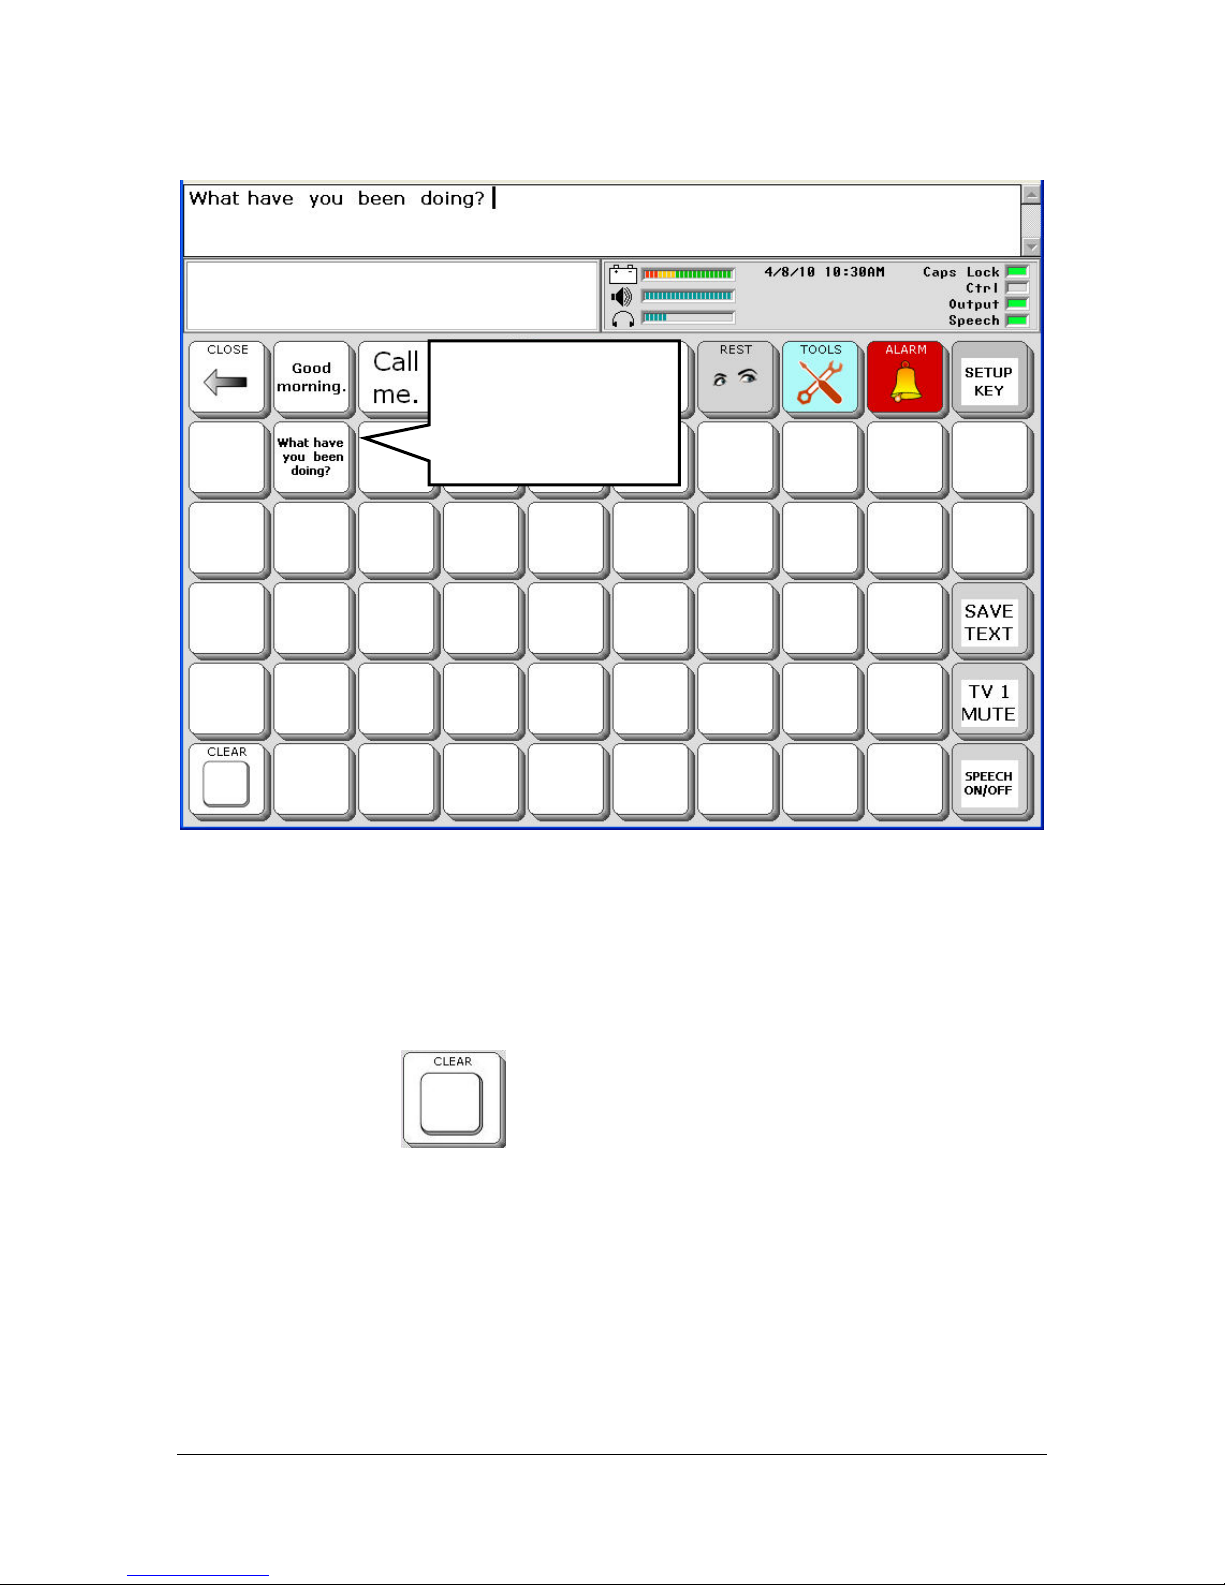
Your text has been
added to the key.
Select it to hear the
message.
The message has been saved to the key you selected.
The SAVE TEXT key is a shortcut way to add text messages to a key.
Select the CLEAR
to clear your display of text.
The next few pages show you another way to add messages to keys that will
let you add pictures, a color, sound effects, etc., to the key, too.
ADD TO YOUR COMMUNICATION POWER
Essence|VT Easy Start
30
Page 31
Word Prediction
When Word Prediction is On, your Essence|VT will predict words that you
might want to say based on the letters you have begun to spell. Predicted
words appear below the text area in your device.
Add Names to Word Prediction
With Essence, there is no "Names" page. The best way to speak the names
of people you know is to add the names to your Word Prediction Dictionary.
This way, when you start to spell the first few letters of a name, the name
will appear in the Word Prediction list on your display and you can select it.
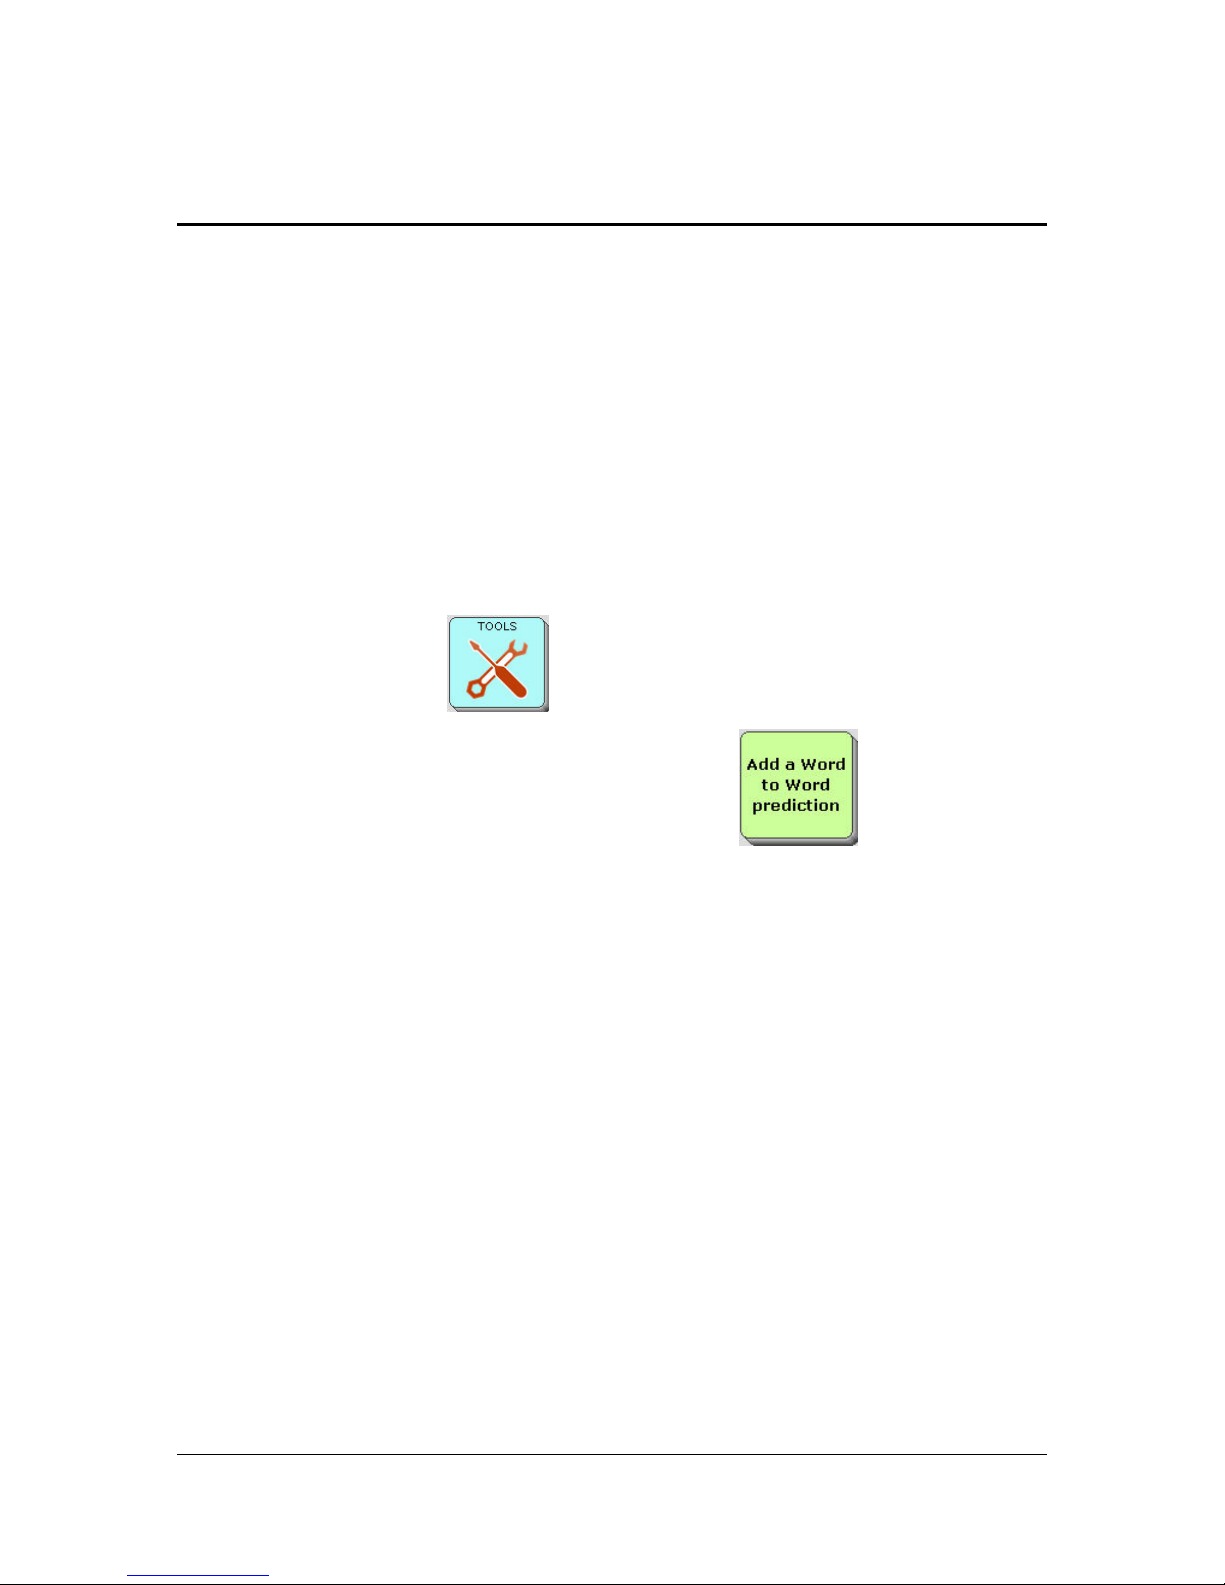
Select the TOOLS key
from your Keyboard page.
Select the Add a Word to Word Prediction key
You see the WORD PREDICTION MENU.
.
ADD TO YOUR COMMUNICATION POWER
Essence|VT Easy Start
31
Page 32
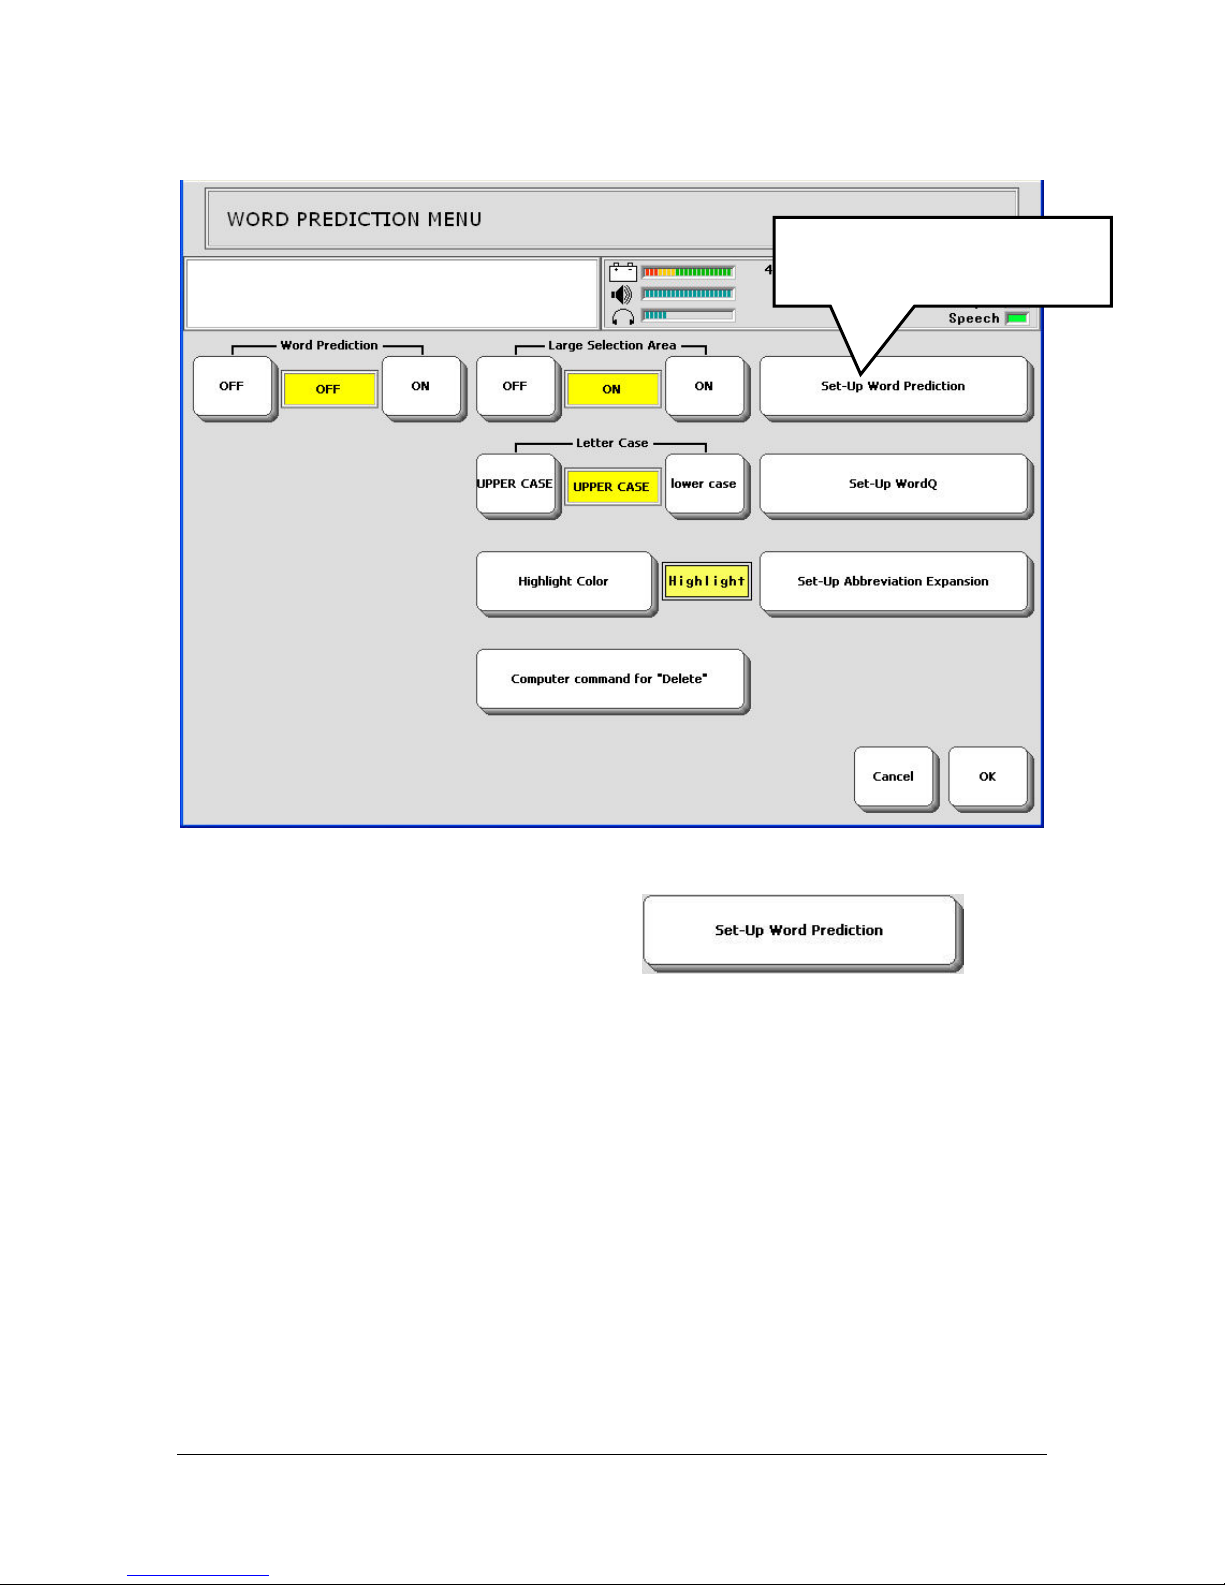
Select Set-Up Word
Prediction.
Select the Set-Up Word Prediction key
You see the PRC Word Prediction Menu.
ADD TO YOUR COMMUNICATION POWER
Essence|VT Easy Start
32
Page 33
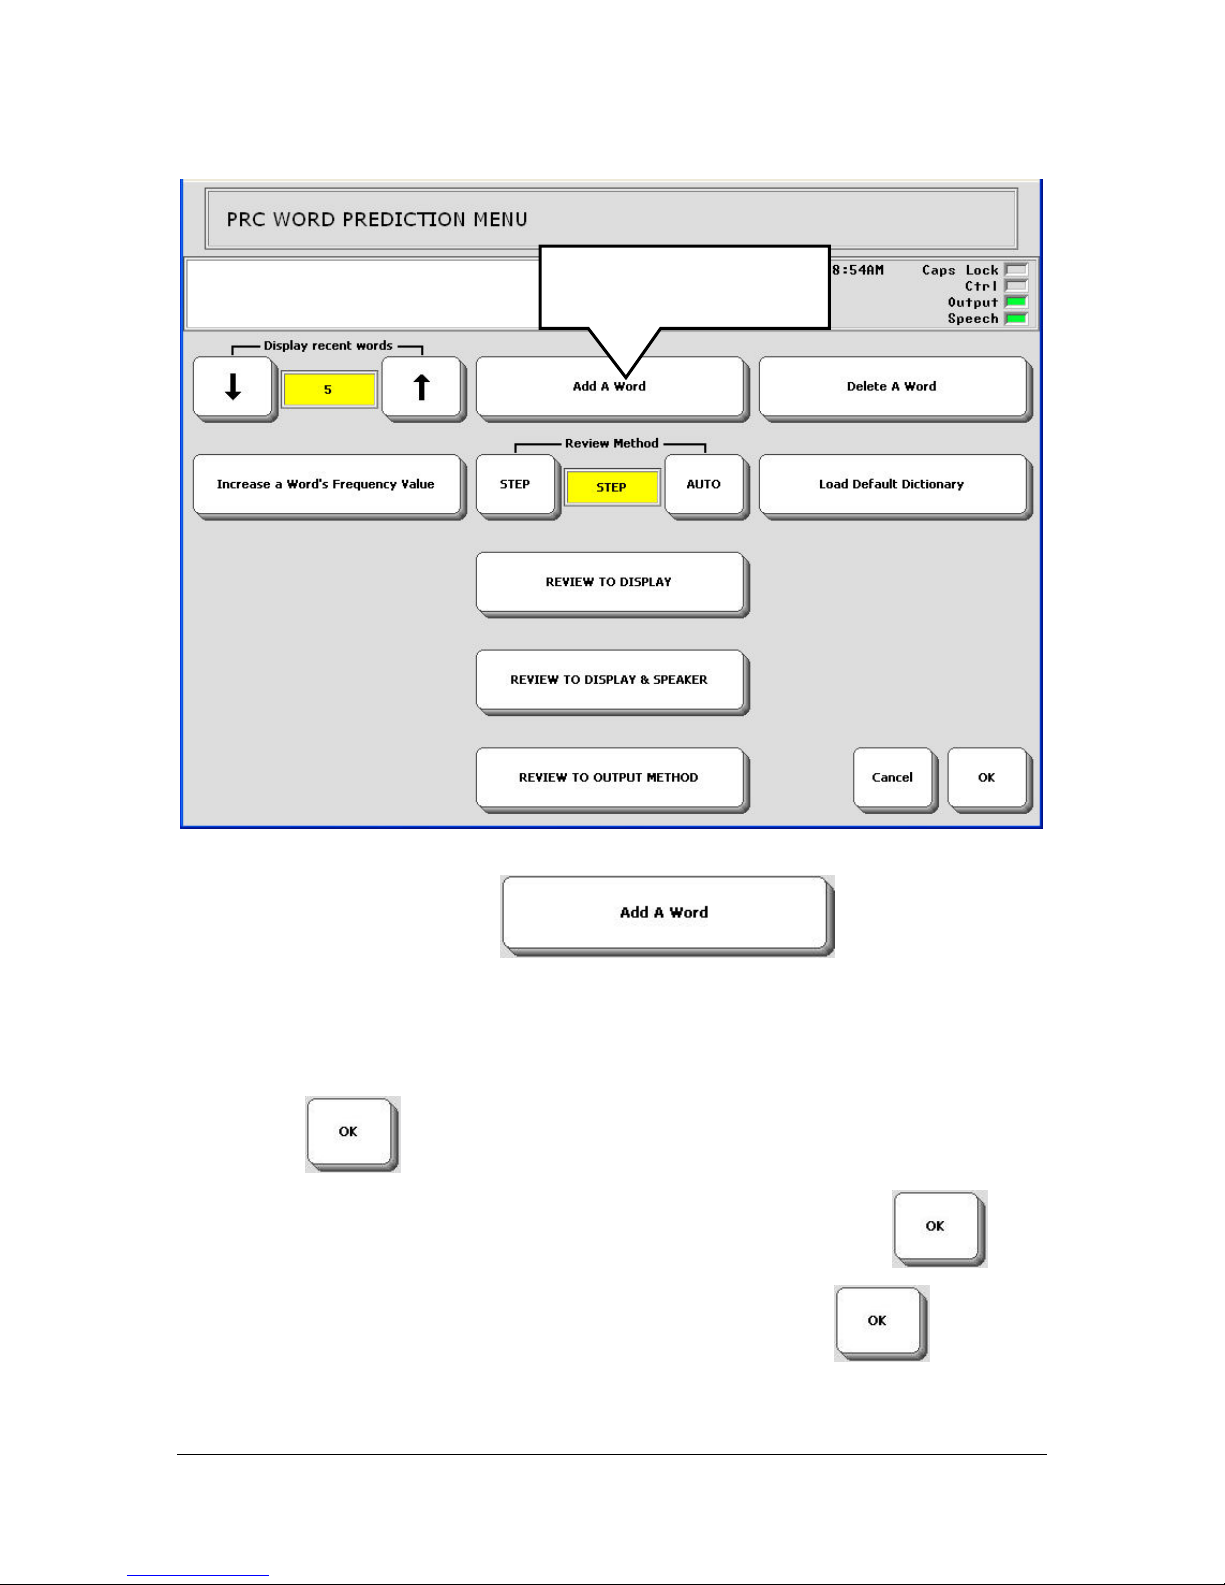
Select Add a Word.
Select the Add a Word key .
Type in the name you want to add. (We are adding the name "Nancy".) Spell
it correctly.
Select OK
You see the PRC WORD PREDICTION MENU. Select OK
You see the WORD PREDICTION MENU. Select OK.
when you are finished.
.
ADD TO YOUR COMMUNICATION POWER
Essence|VT Easy Start
33
Page 34
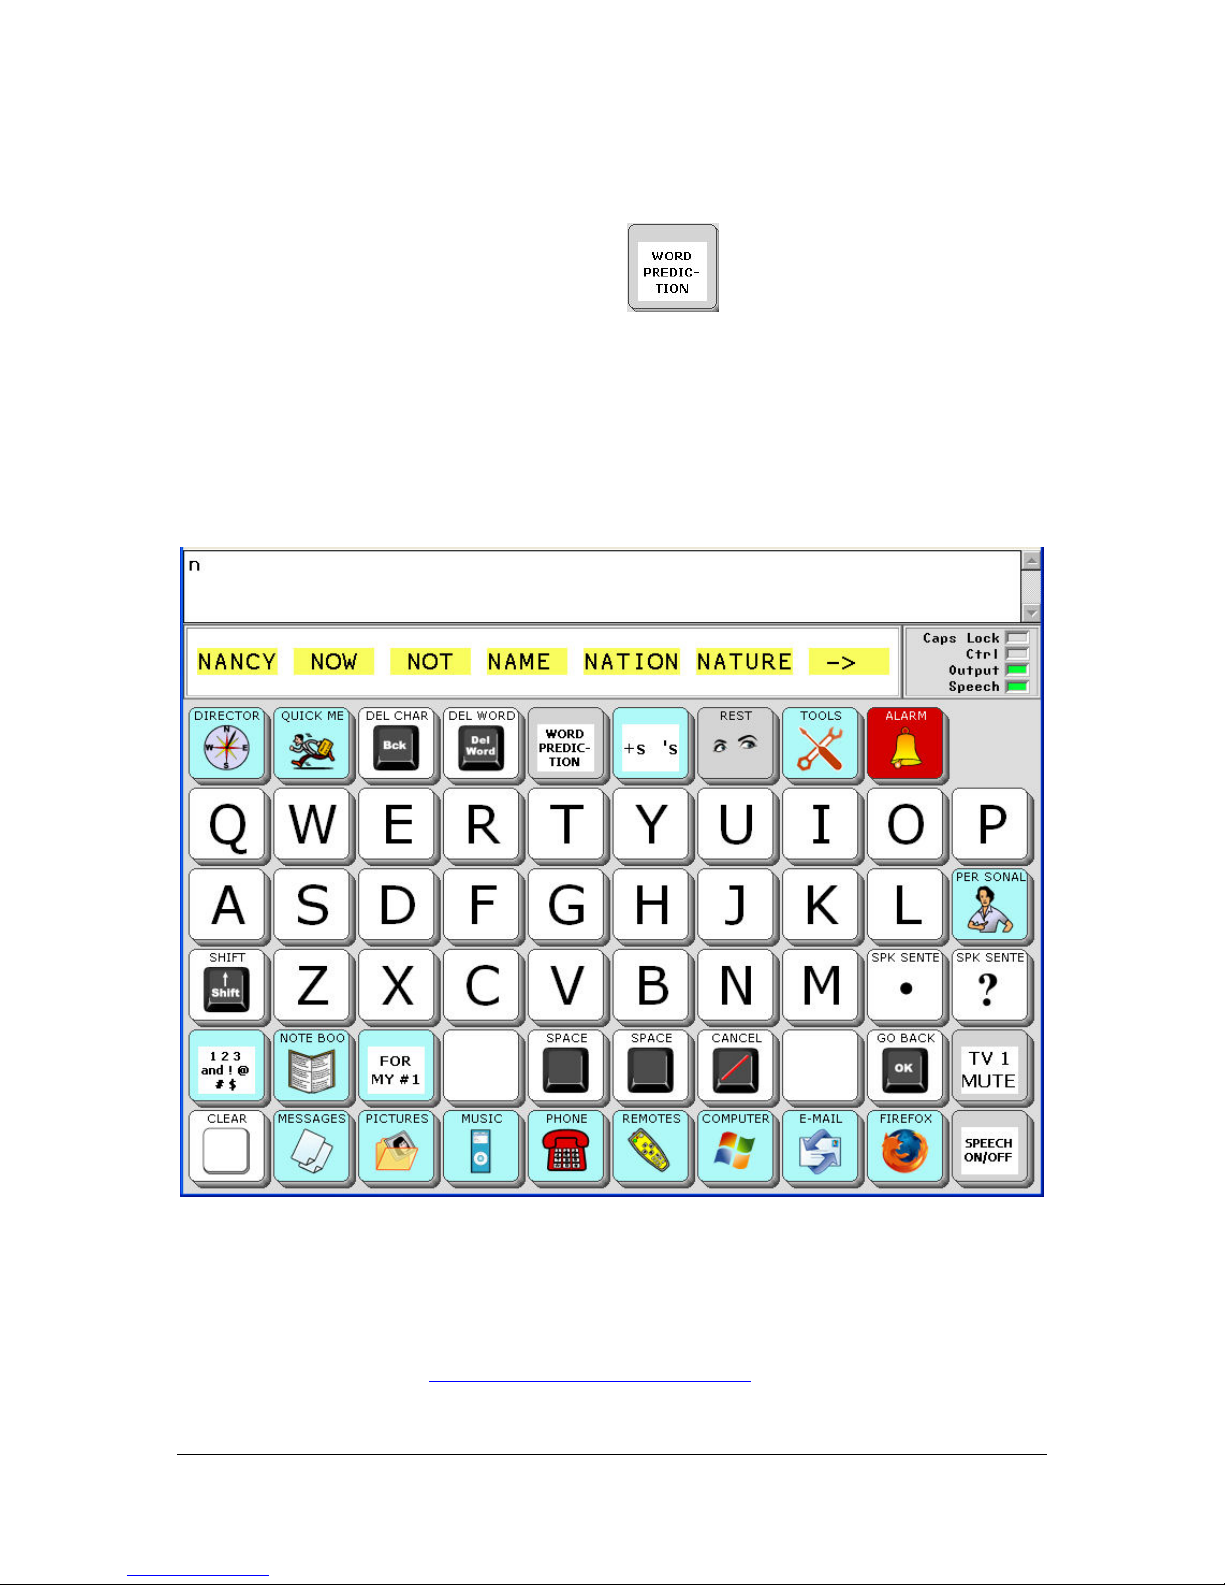
You see your Keyboard page.
Select the WORD PREDICTION key
. This turns Word Prediction
On.
Now begin to spell the name you just added to the Word Prediction
Dictionary.
Notice you only had to type "n" and "Nancy" appeared in the Word
Prediction list where you can select it.
Learn more about the WORD PREDICTION MENU in the Essence|VT
Operator's Manual at http://talknow.prentrom.com
.
ADD TO YOUR COMMUNICATION POWER
Essence|VT Easy Start
34
Page 35
Abbreviation Expansion
Abbreviation Expansion is an option in the WORD PREDICTION MENU.
Abbreviation expansion allows you to type abbreviations of words you use
in many contexts, such as your name and address, greetings, or phrases like
"I don't know" or "In my opinion", etc. You enter the abbreviation, then the
whole word or phrase.
For example, you might tell the VT to type and speak "I don't know" when
you enter the abbreviation "idk", or to type and speak your name when you
enter your initials.
Any abbreviation expansion you enter will override any matching
abbreviation or word of the same letters that is already in your Essence|VT.
For example, if you enter "add" as the abbreviation for your address,
whenever you type "add" you will get your address instead of the word
"add". Use something like "adr" or "ads" instead so the word "add" is still
available for you to use.
As with Word Prediction, you use a menu to add abbreviations to the VT.
To use Abbreviation Expansion
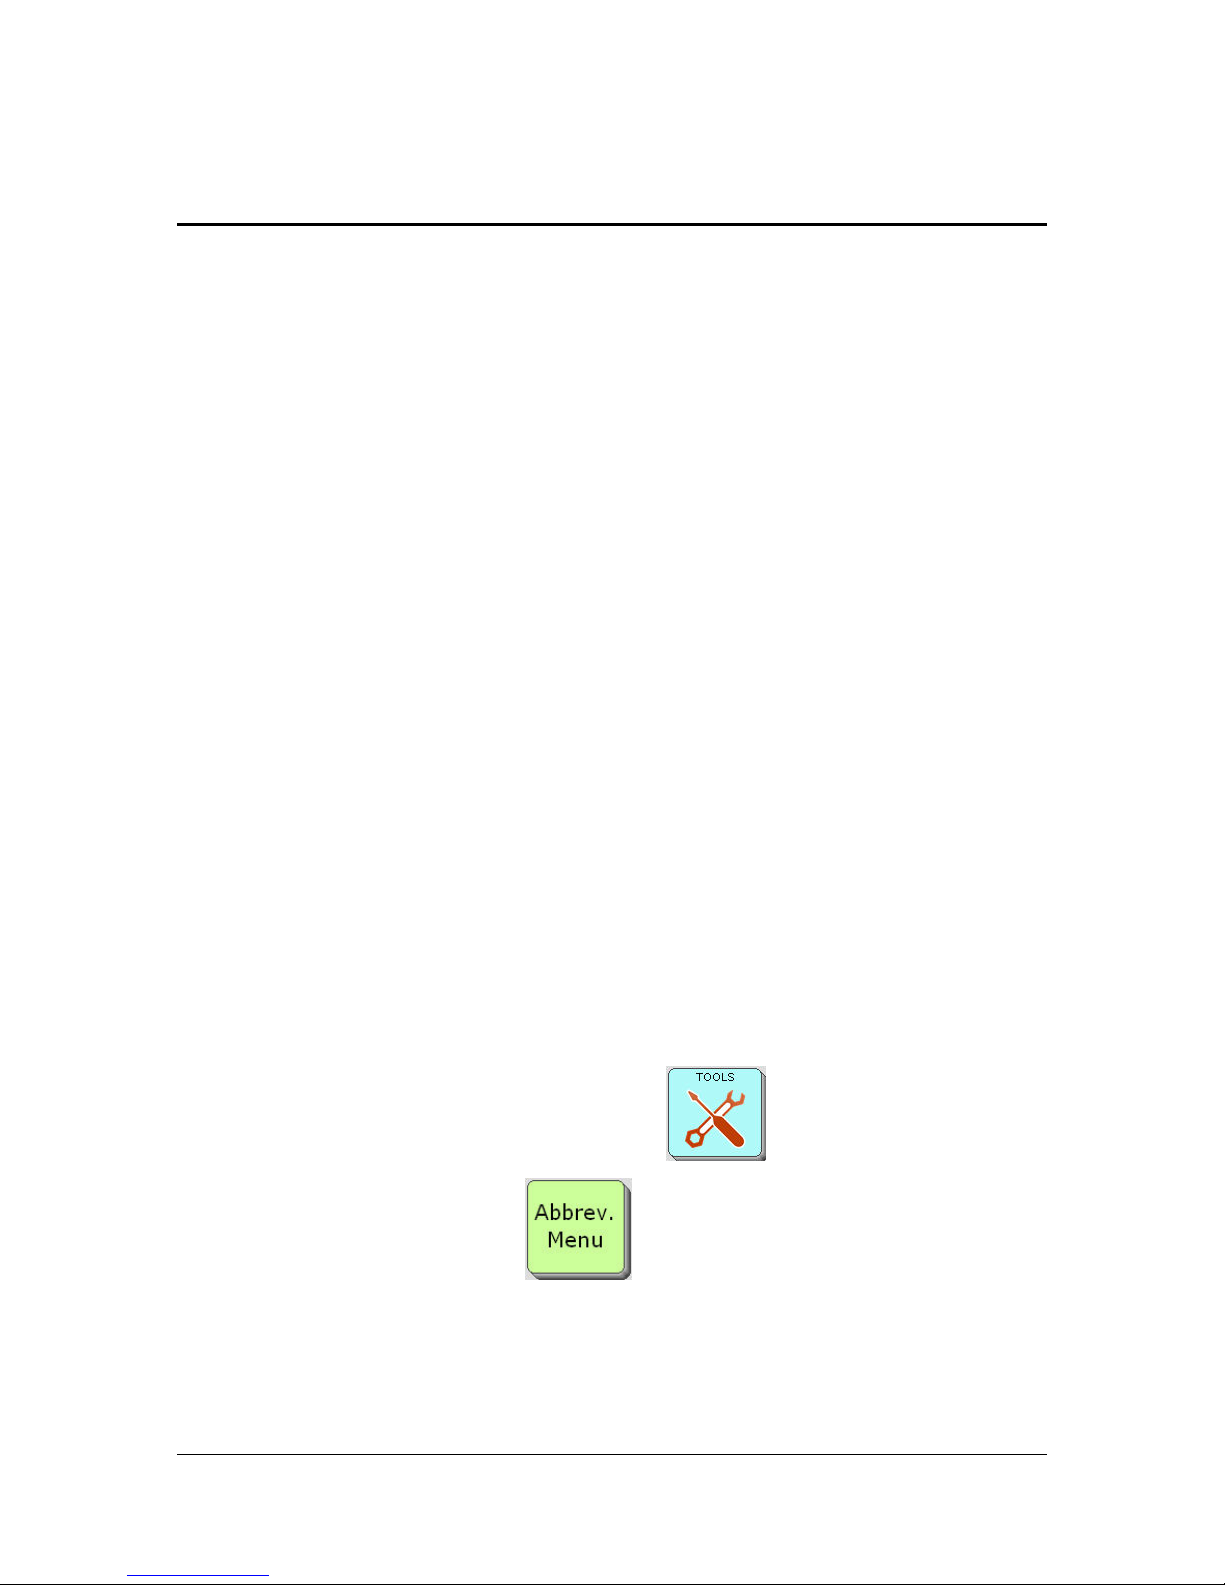
On your Keyboard, select the TOOLS key
Select the Abbrev. Menu key
.
You see the WORD PREDICTION MENU.
ADD TO YOUR COMMUNICATION POWER
Essence|VT Easy Start
35
Page 36
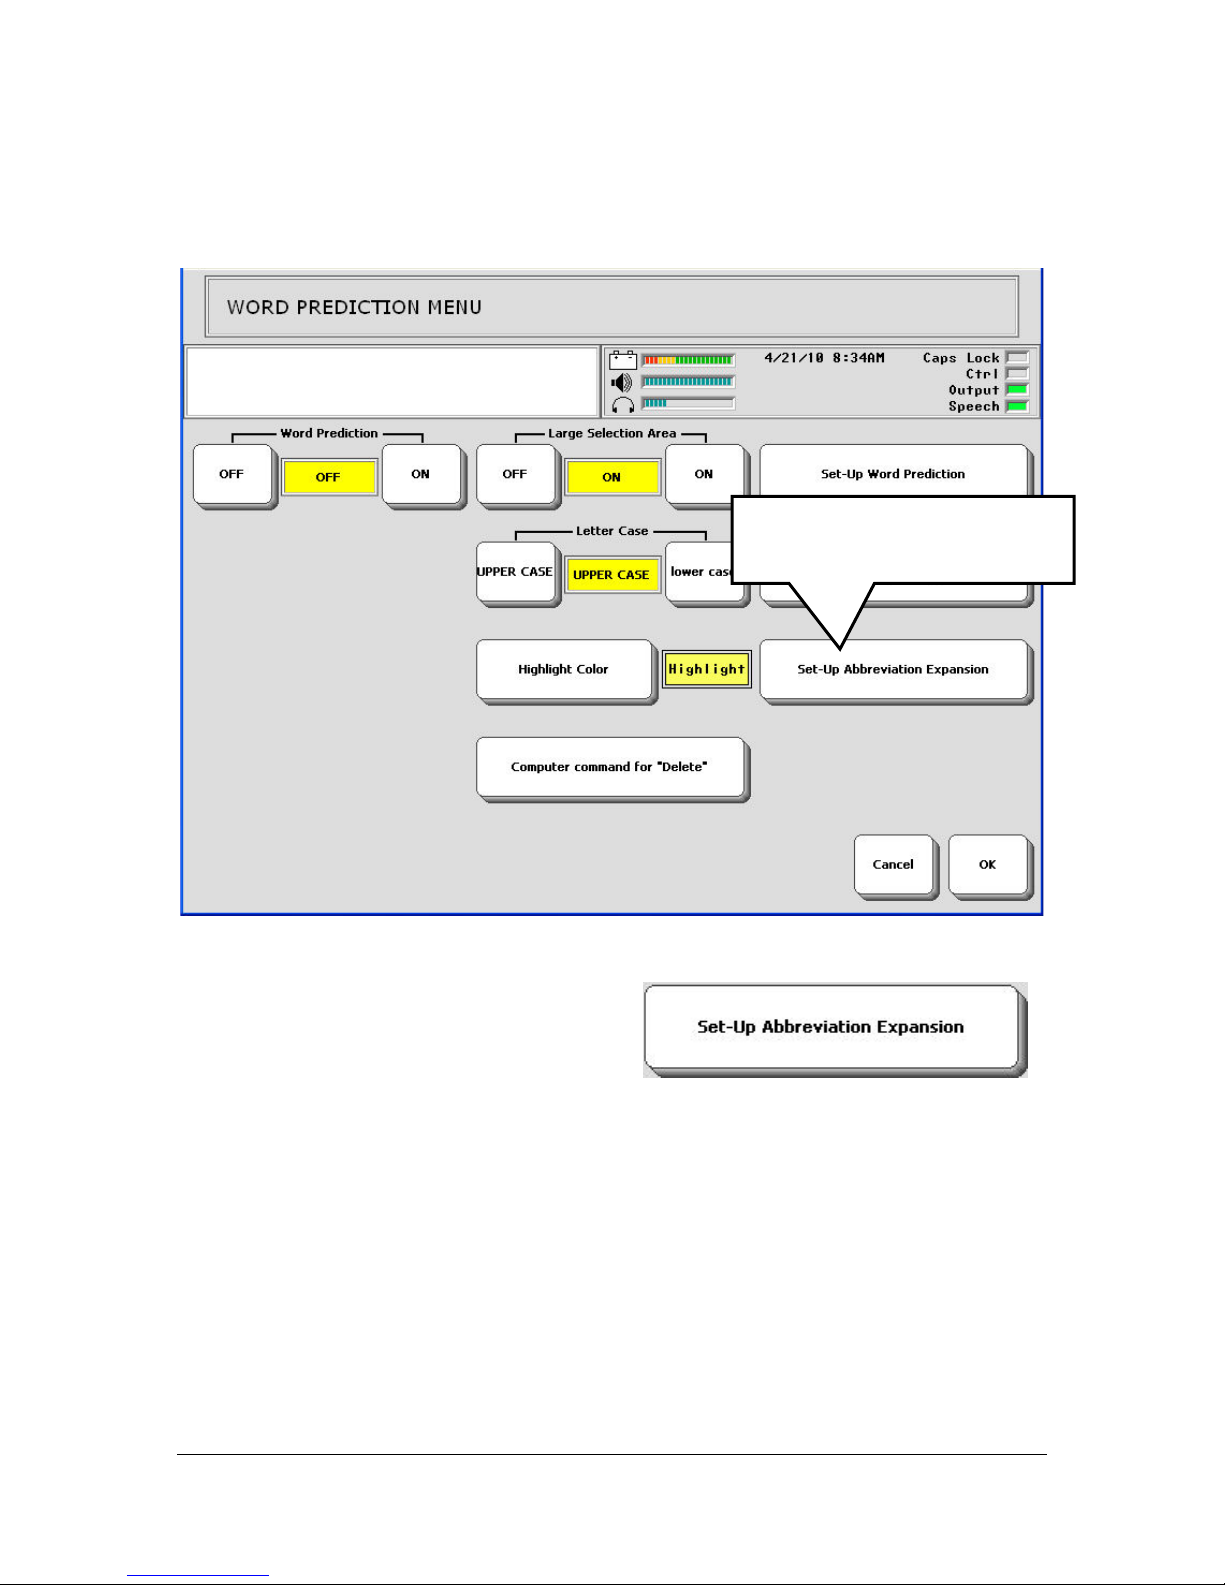
Select Set-Up Abbreviation
Expansion.
Select Set-Up Abbreviation Expansion
ADD TO YOUR COMMUNICATION POWER
Essence|VT Easy Start
36
.
Page 37
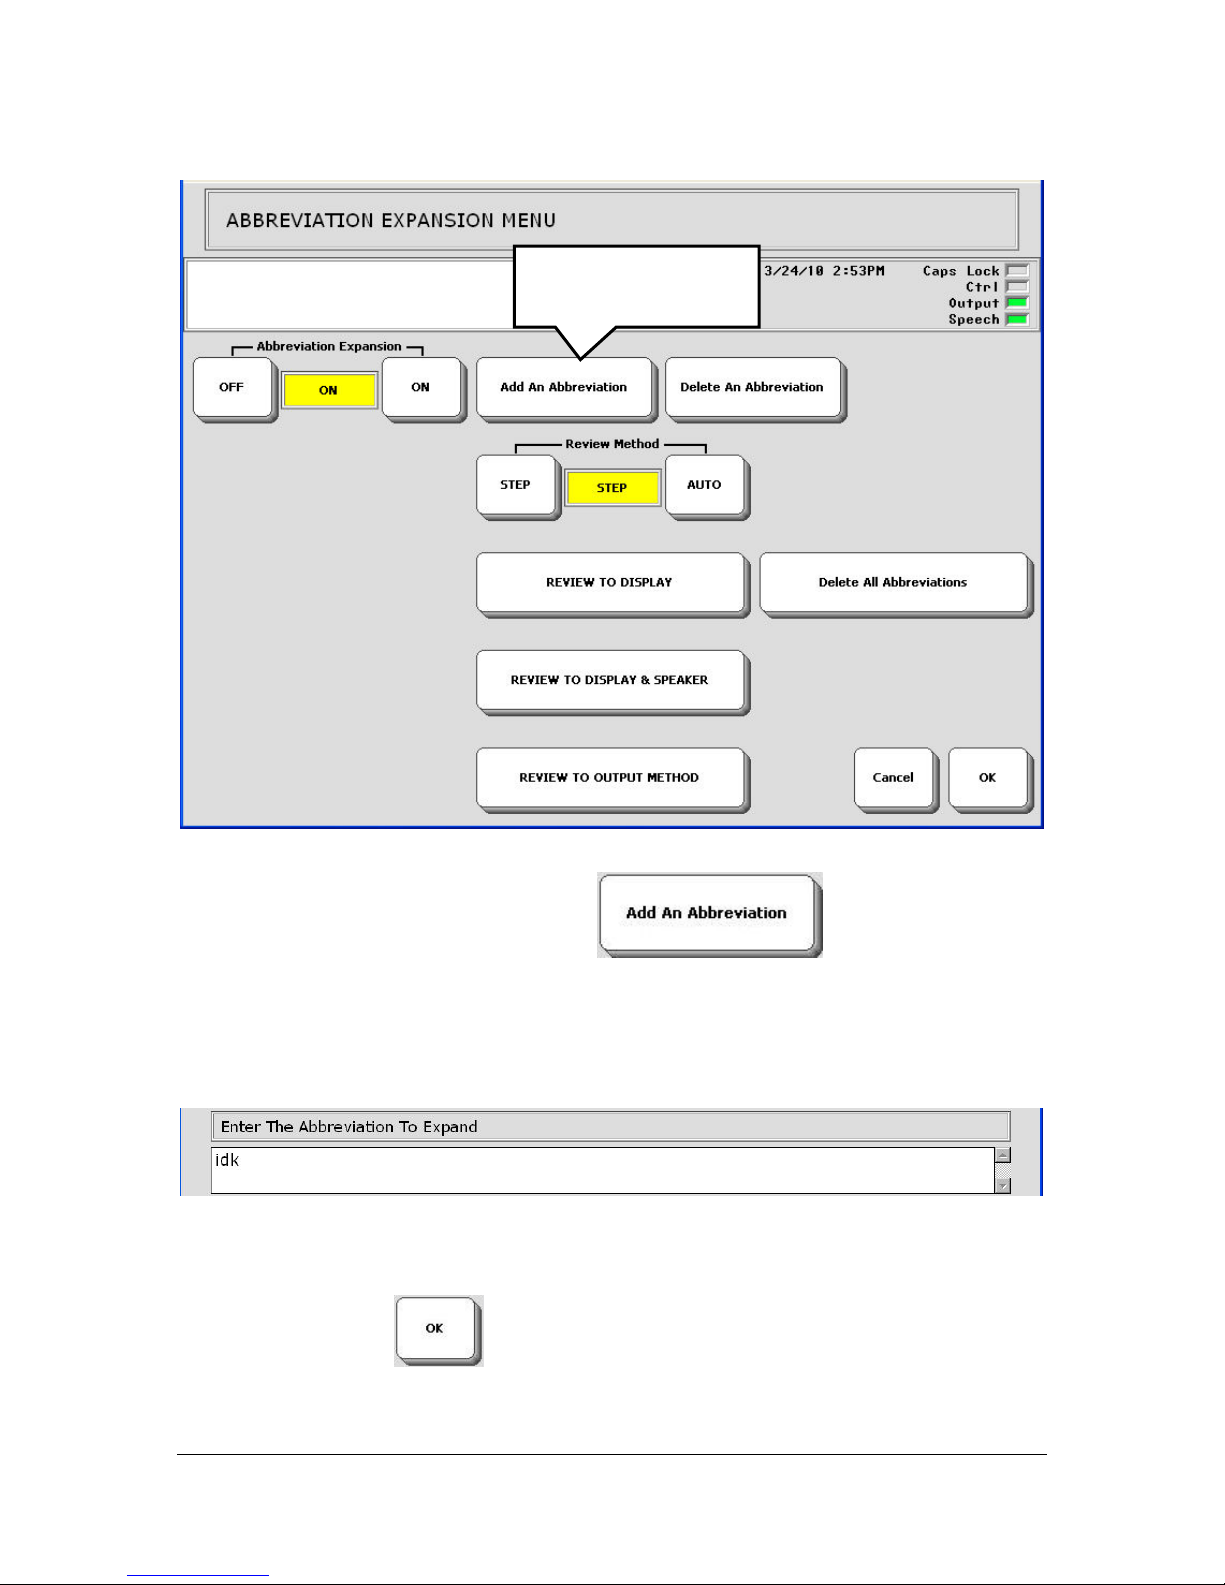
Select Add an
Abbreviation
Select the Add an Abbreviation key
.
You see a spelling page.
Type the letters for your abbreviation. In this example we used "idk"
Select the OK key
ADD TO YOUR COMMUNICATION POWER
Essence|VT Easy Start
37
Page 38
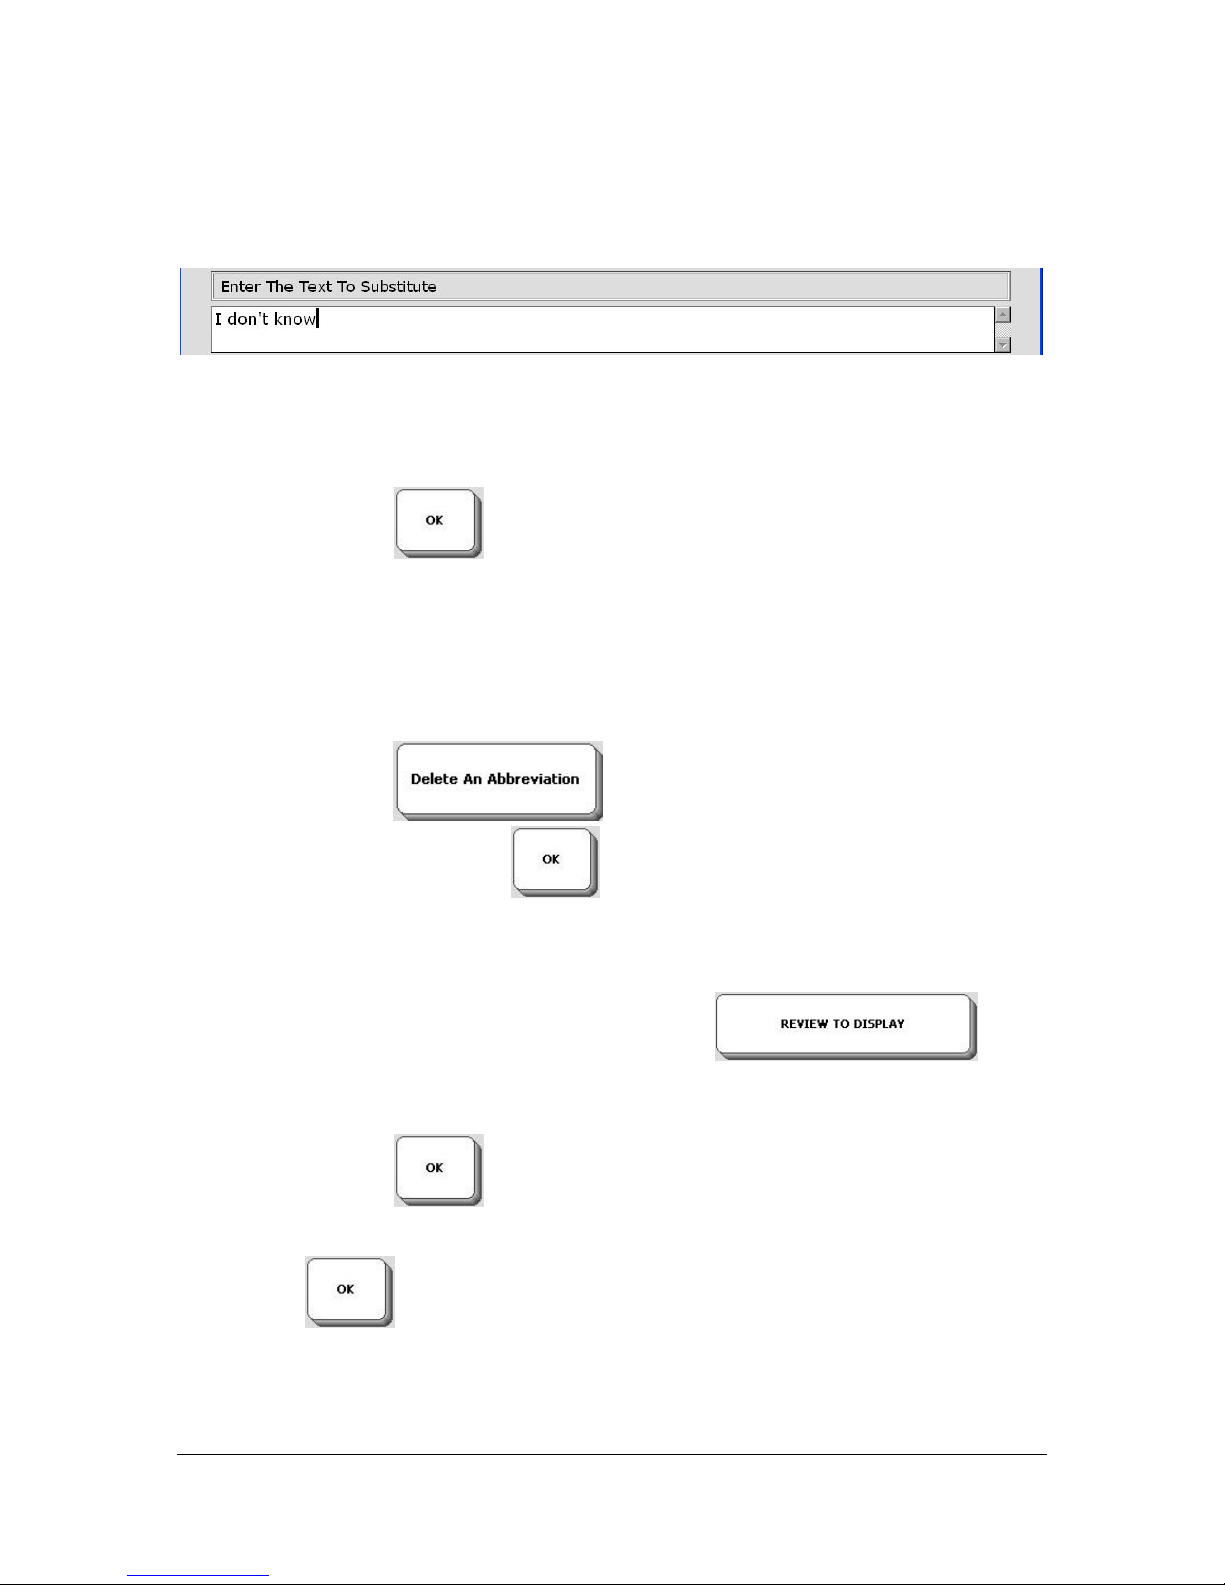
You are now asked to enter the text for the abbreviation.
Enter the word or words for your expanded abbreviation. In this example we
want "idk" to stand for "I don't know." Type "I don't know."
Select the OK key
You return to the Abbreviation Expansion Menu.
To delete an abbreviation and its expansion select the Delete An
Abbreviation key
delete and select the OK key
, type in the abbreviation you want to
. The abbreviation and its expansion
will be deleted.
If you select the REVIEW TO DISPLAY key
can see all the abbreviations you have added to your device.
, you
Select the OK key to exit the ABBREVIATION EXPANSION
Menu.
Select OK
again to exit the WORD PREDICTION Menu.
ADD TO YOUR COMMUNICATION POWER
Essence|VT Easy Start
38
Page 39

If you are not there, go to your Spelling Keyboard.
Type "idk".
Your device should spell and speak, "I don't know."
Learn more about the WORD PREDICTION menus in the Essence|VT
Operator's Manual at http://talknow.prentrom.com
.
ADD TO YOUR COMMUNICATION POWER
Essence|VT Easy Start
39
Page 40

Notebooks
Notebooks are very handy when you want to write large amounts of text.
Here are some reasons you might use a Notebook:
Taking notes in a meeting or class;
Keeping a diary or journal;
To-do or shopping lists;
Speeches you are asked to give or papers you will present;
Writing out points you want to cover during a phone call, vist or medical
appointment.
You can save what you write in a Notebook, open and close a Notebook,
edit what you have written, transfer a Notebook to a computer using a USB
drive. You can also tell your VT to speak your Notebook.
ADD TO YOUR COMMUNICATION POWER
Essence|VT Easy Start
40
Page 41
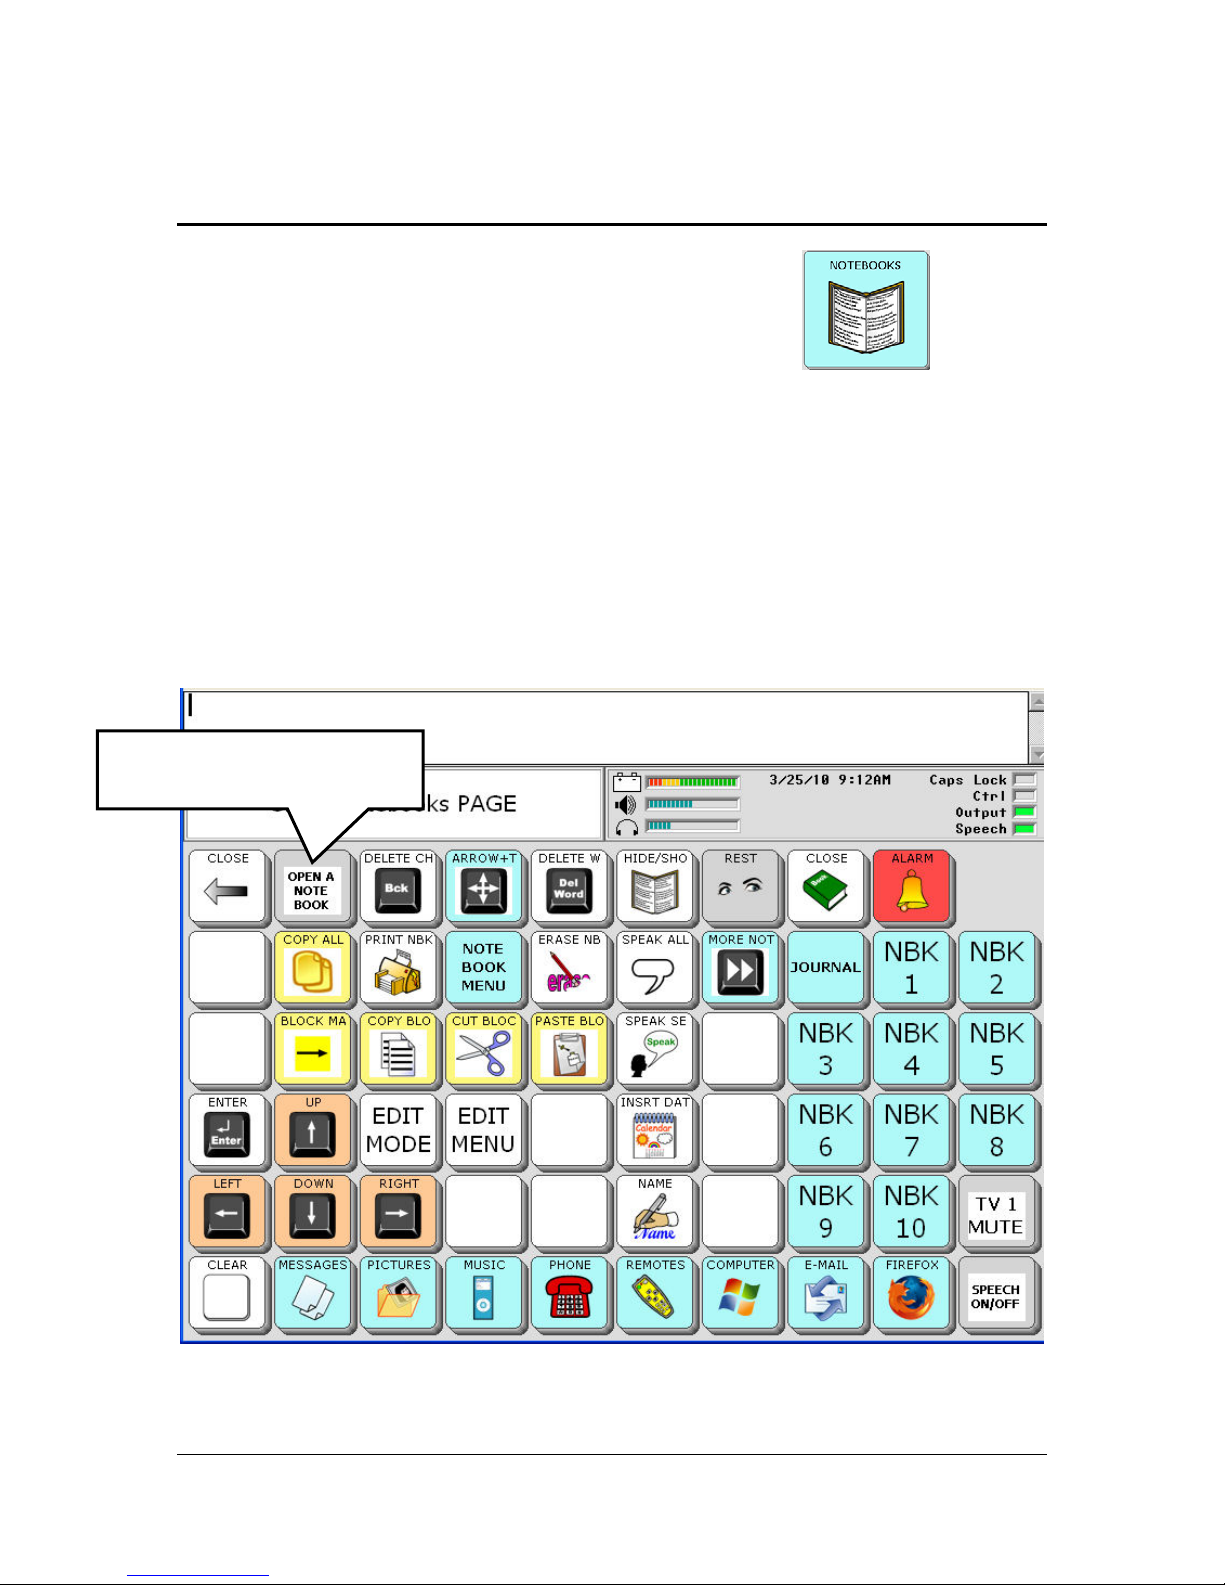
Using Notebooks
On your keyboard page, select the NOTEBOOKS key .
If your keyboard does not have a NOTEBOOKS key, you can go to the
DIRECTORY page and select the NOTEBOOKS key.
You see:
Select Open a Notebook.
ADD TO YOUR COMMUNICATION POWER
Essence|VT Easy Start
41
Page 42
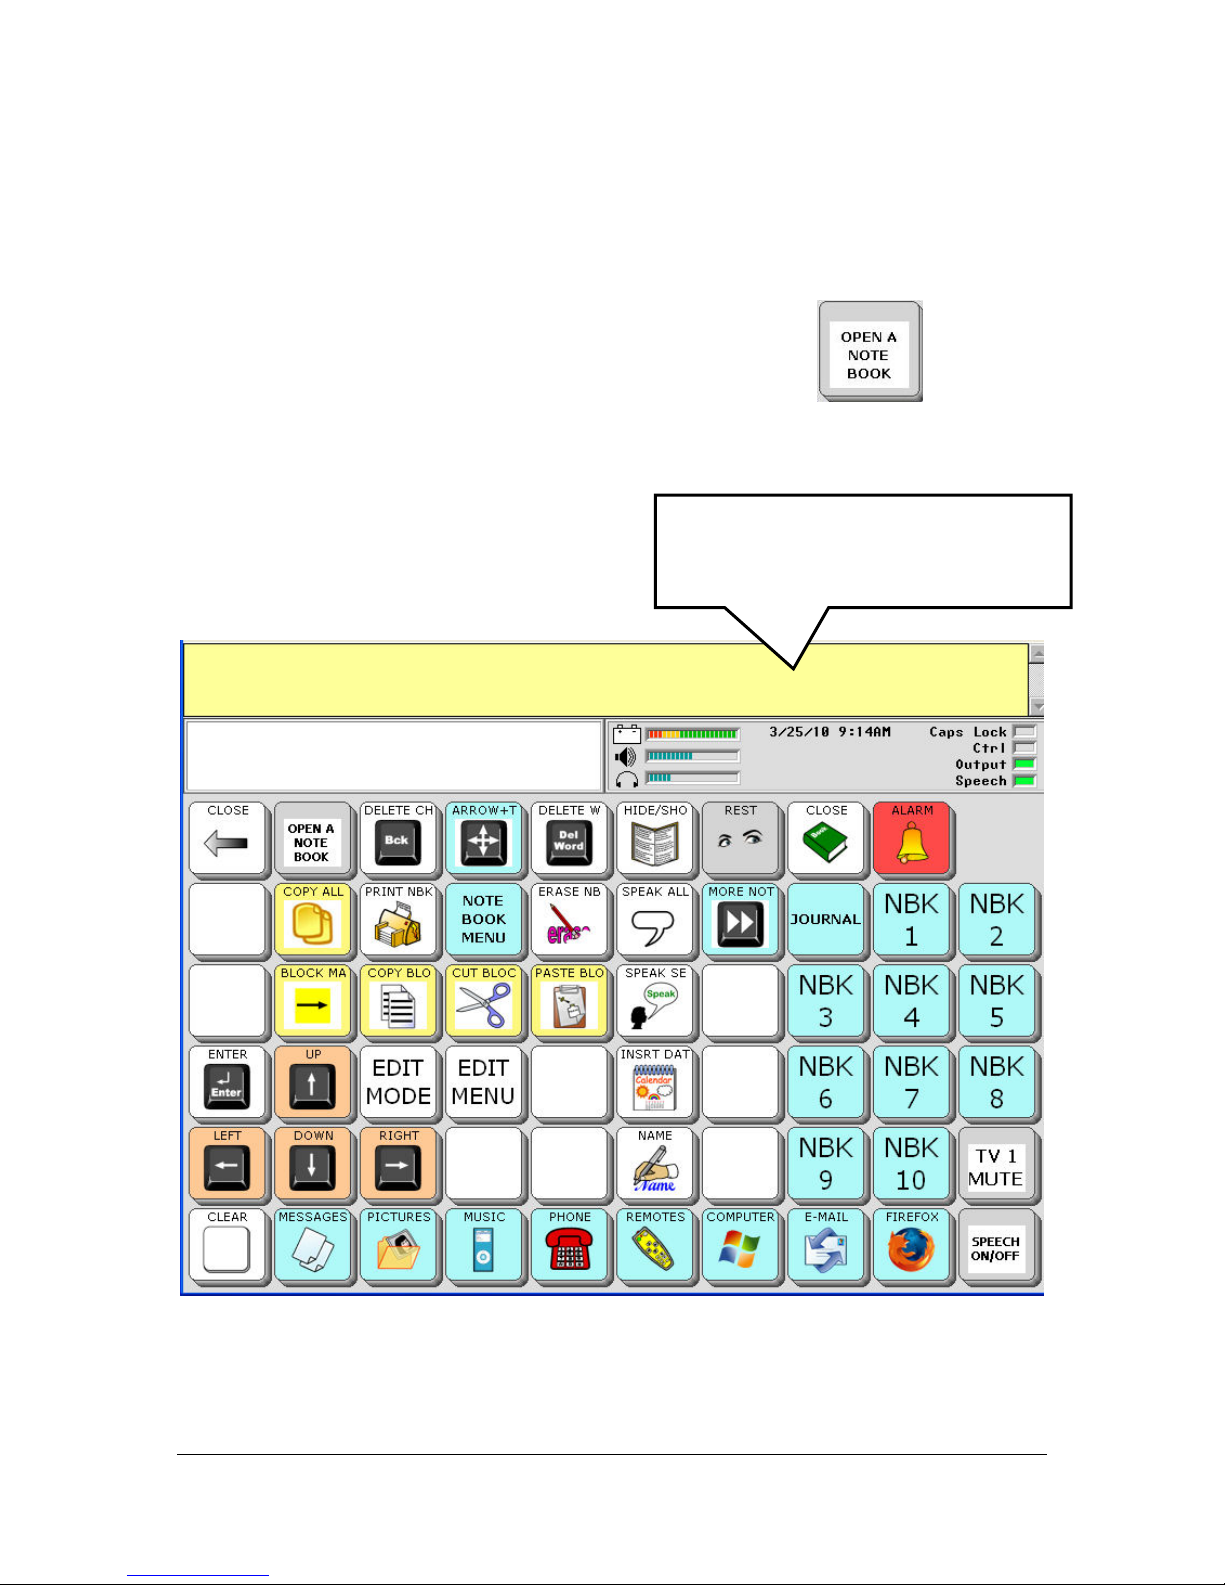
Using this page allows you to access all the options and functions in a
Notebook.
To open a Notebook, select the OPEN A NOTEBOOK
You see a list of all the Notebooks that are available to use.
For now, select the Notebook 1 key.
When a Notebook is open, this area
is yellow.
You see your NOTEBOOK page.
key.
Notice that the Text Display Area is now yellow. Yellow indicates that
you are using a Notebook.
ADD TO YOUR COMMUNICATION POWER
Essence|VT Easy Start
42
Page 43
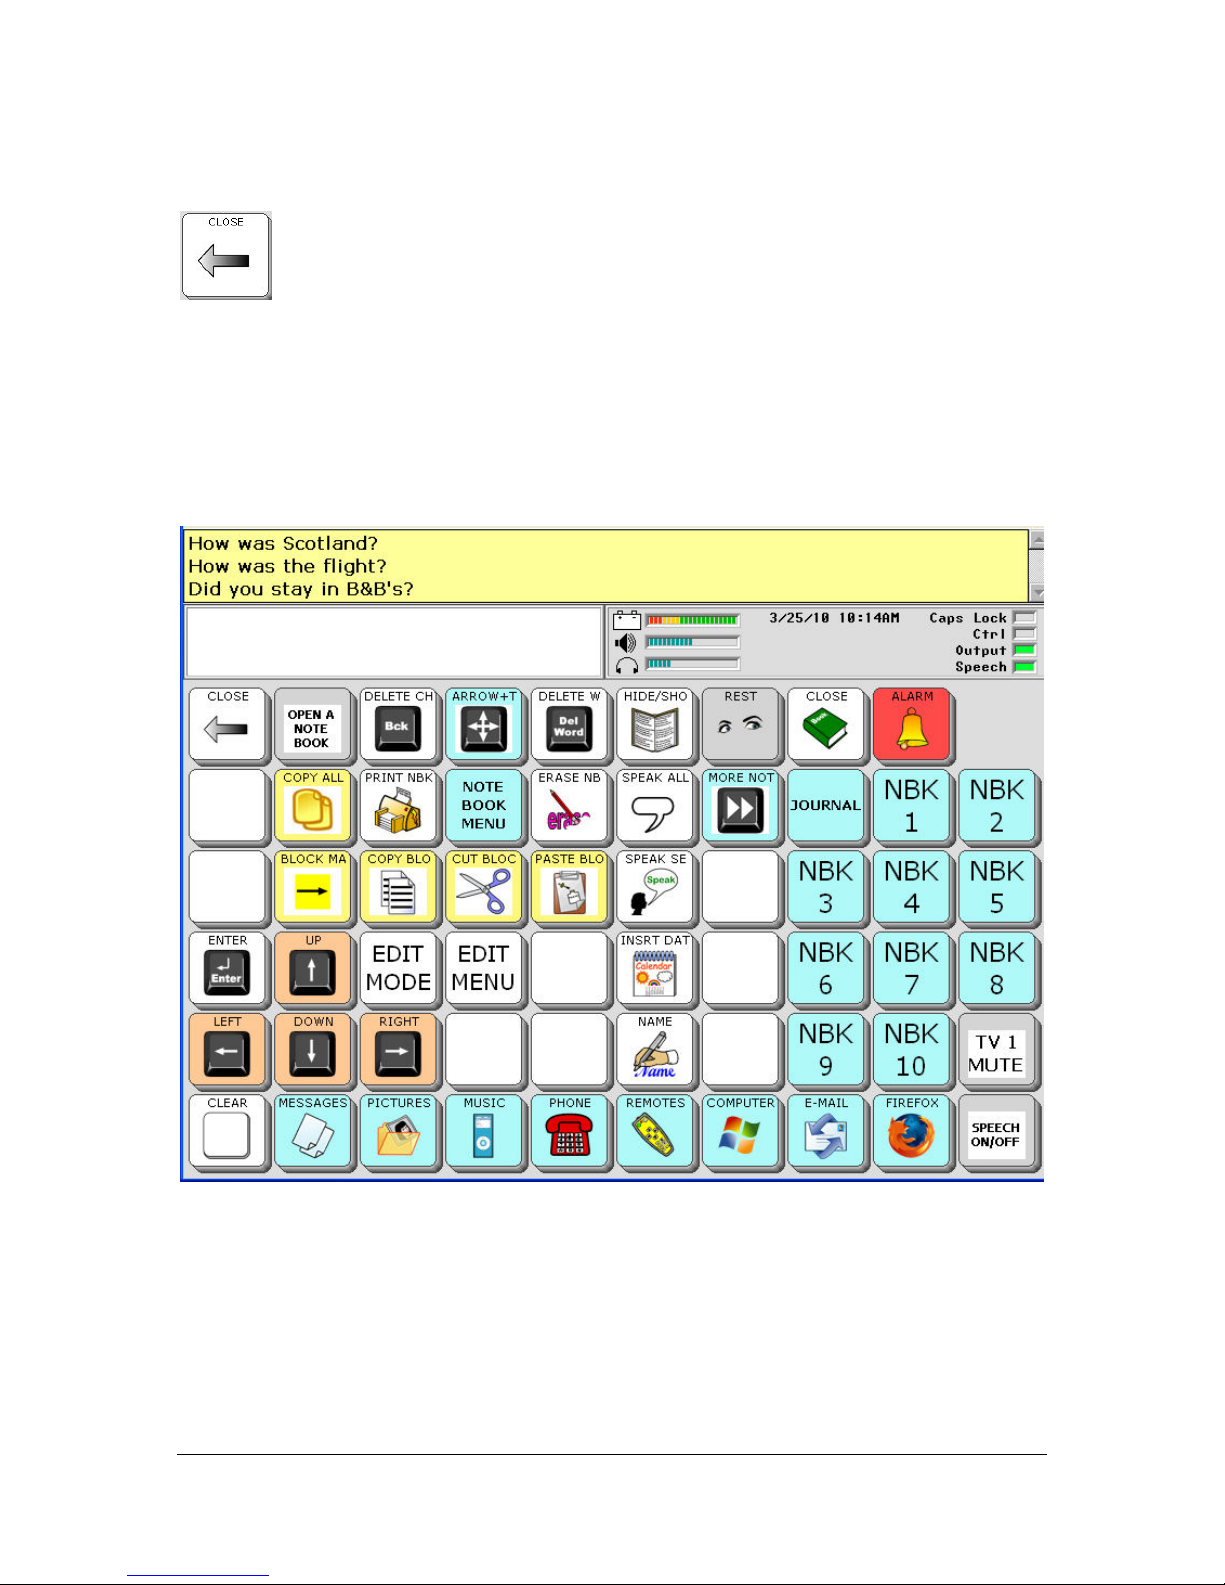
To write in your Notebook, go to your keyboard page. (Select the CLOSE
key to go back to your spelling keyboard.)
Using your keyboard, type some text into your Notebook and then select the
NOTEBOOKS key again from your overlay or from the DIRECTORY.
Use the UP, DOWN, RIGHT and LEFT arrow keys to move through the
text in your Notebook.
The EDIT MODE key allows you to navigate through your text characterby-character, word-by-word, or sentence-by-sentence.
ADD TO YOUR COMMUNICATION POWER
Essence|VT Easy Start
43
Page 44
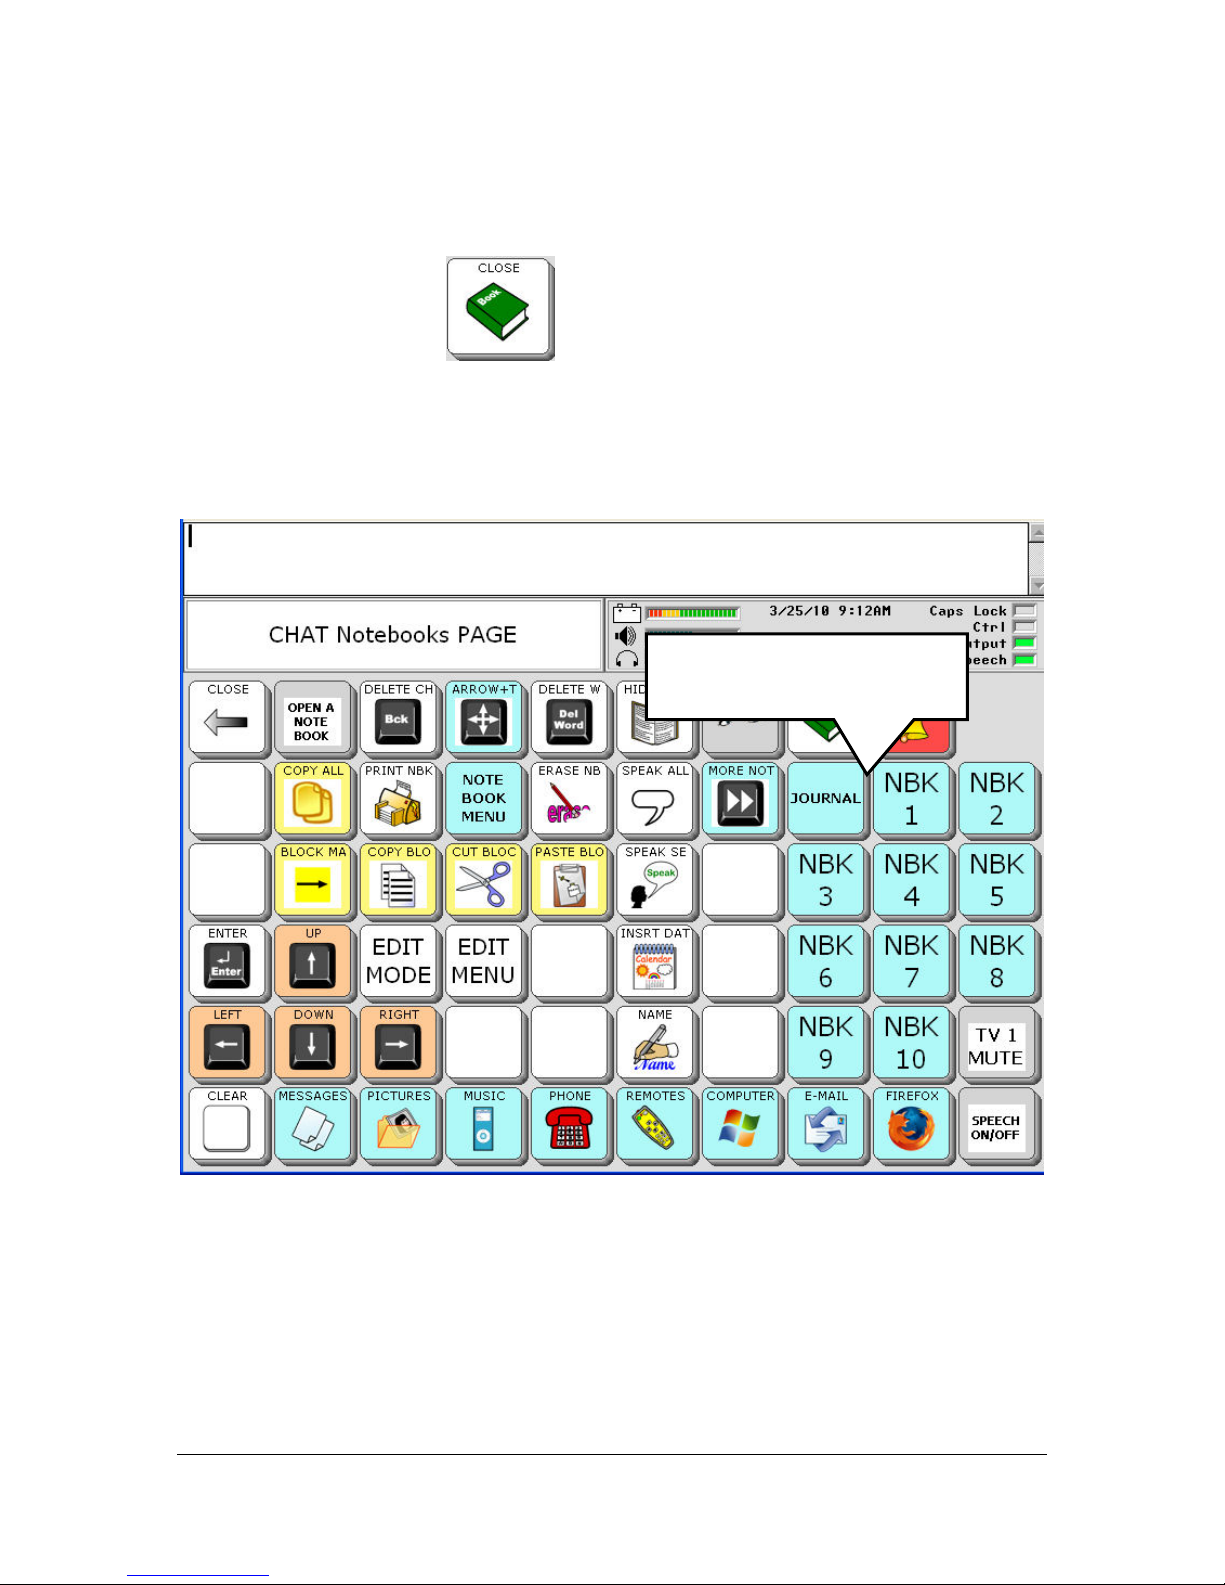
EDIT MENU allows you to highlight and cut text, copy text and/or paste
text somewhere else.
Select the CLOSE key
to close your Notebook. If you have
written in your Notebook while it has been open, when you select the
CLOSE key, you will see a yellow box asking if you want to save changes.
Answer YES to keep any new text or NO to delete it.
Short-cut keys to opening
a Notebook.
Notice on the right side of the Notebook page, there are a number of blue
keys with the letters NBK and a number on the key. These blue keys are a
shortcut to opening the pre-stored Notebooks.
ADD TO YOUR COMMUNICATION POWER
Essence|VT Easy Start
44
Page 45
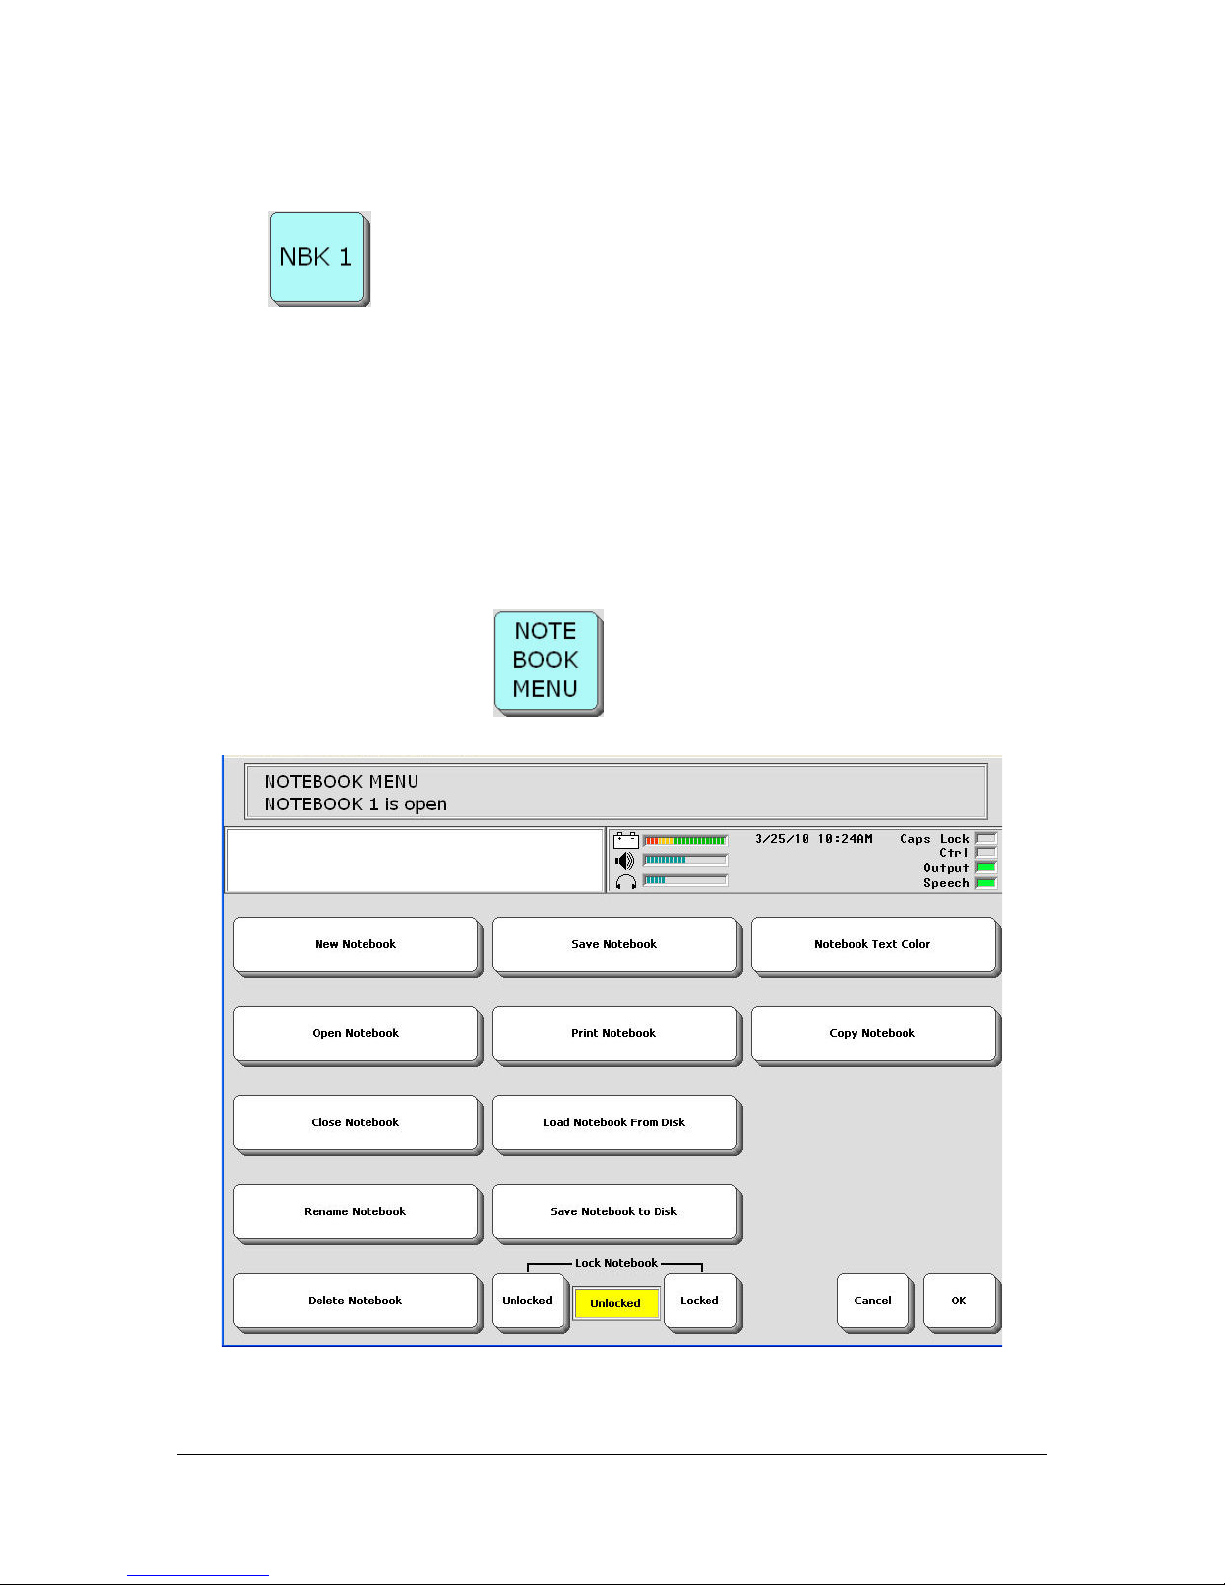
When you select one of these keys you will open that Notebook. Let's select
NBK 1
.
You see that this is the Notebook you used earlier with all your text in it.
Notice that when a Notebook is open, the Text Display Area is yellow.
When you close it, the Text Display Area returns to white.
About the NOTEBOOK MENU
The NOTEBOOK MENU
gives you more Notebook options.
ADD TO YOUR COMMUNICATION POWER
Essence|VT Easy Start
45
Page 46
Many of these option are already on your NOTEBOOKS page.
If you want to open a new Notebook and give it a title, or save a Notebook
to a USB drive or load a Notebook from a USB drive into your device, you
will use this menu.
Select OK to close the NOTEBOOK MENU.
Select the CLOSE key
to close your Notebook
You can find out more about Notebooks and the NOTEBOOK MENU in
the Notebooks chapter of the Essence|VT Operator's Manual at
http://talknow.prentrom.com
.
Learn more about NOTEBOOKS in the Essence|VT Operator's Manual
at http://talknow.prentrom.com
.
ADD TO YOUR COMMUNICATION POWER
Essence|VT Easy Start
46
Page 47

Customizing Essence
CUSTOMIZING ESSENCE
Essence|VT Easy Start
47
Page 48
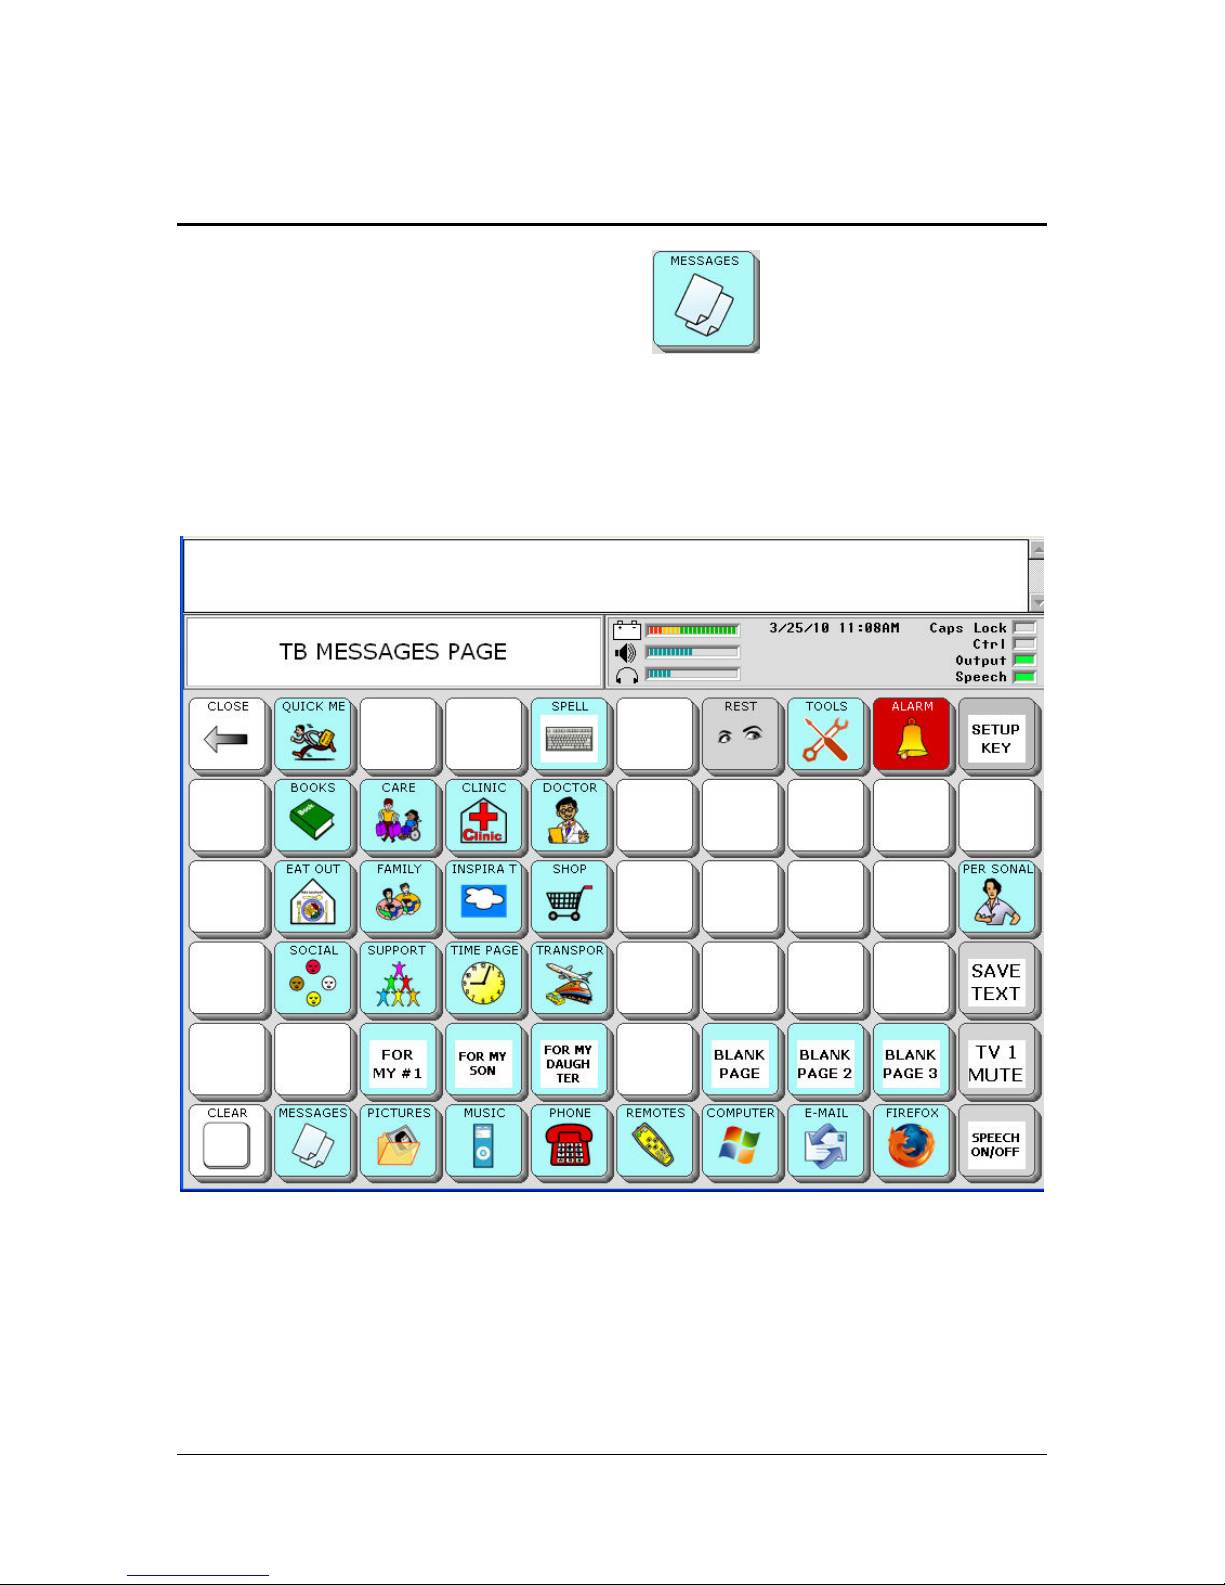
Using the SETUP Key to Add Messages to Keys
Most keyboards have a MESSAGES key . If you do not see this
key on your keyboard, look for the TOOLS key, then the MESSAGES key.
When you select the MESSAGES key you see:
This page contains keys that will take you to pages that already have
messages you might need on them. You can add your own messages to these
pages or you can create your own pages of messages.
CUSTOMIZING ESSENCE
Essence|VT Easy Start
48
Page 49
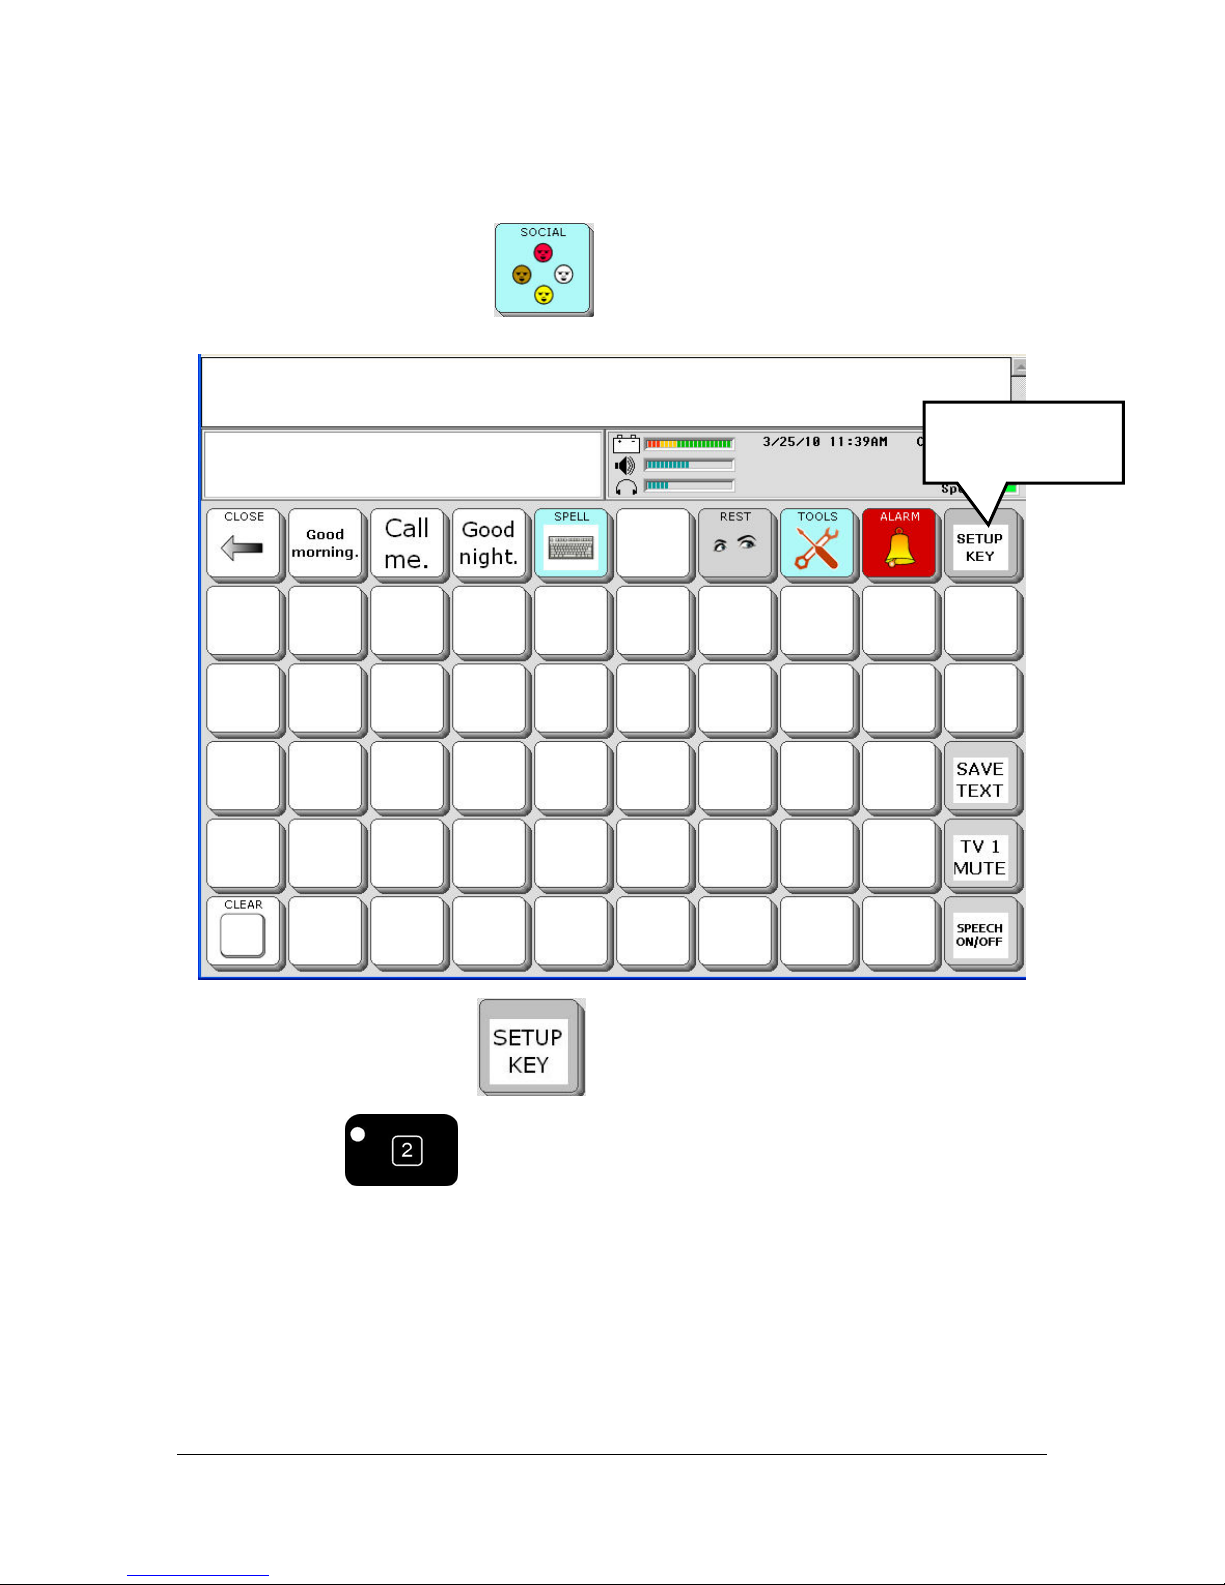
Let's add a message to the SOCIAL page.
Select the SOCIAL key
.
Select the
SETUP key.
Select the SETUP key .
The #2 key on the front of your device case has also been
programmed as the SETUP key. If you are on a page that does not have a
SETUP key, you can always select the #2 key.
Select a blank key on the SOCIAL page where you would like to put a
message.
CUSTOMIZING ESSENCE
Essence|VT Easy Start
49
Page 50
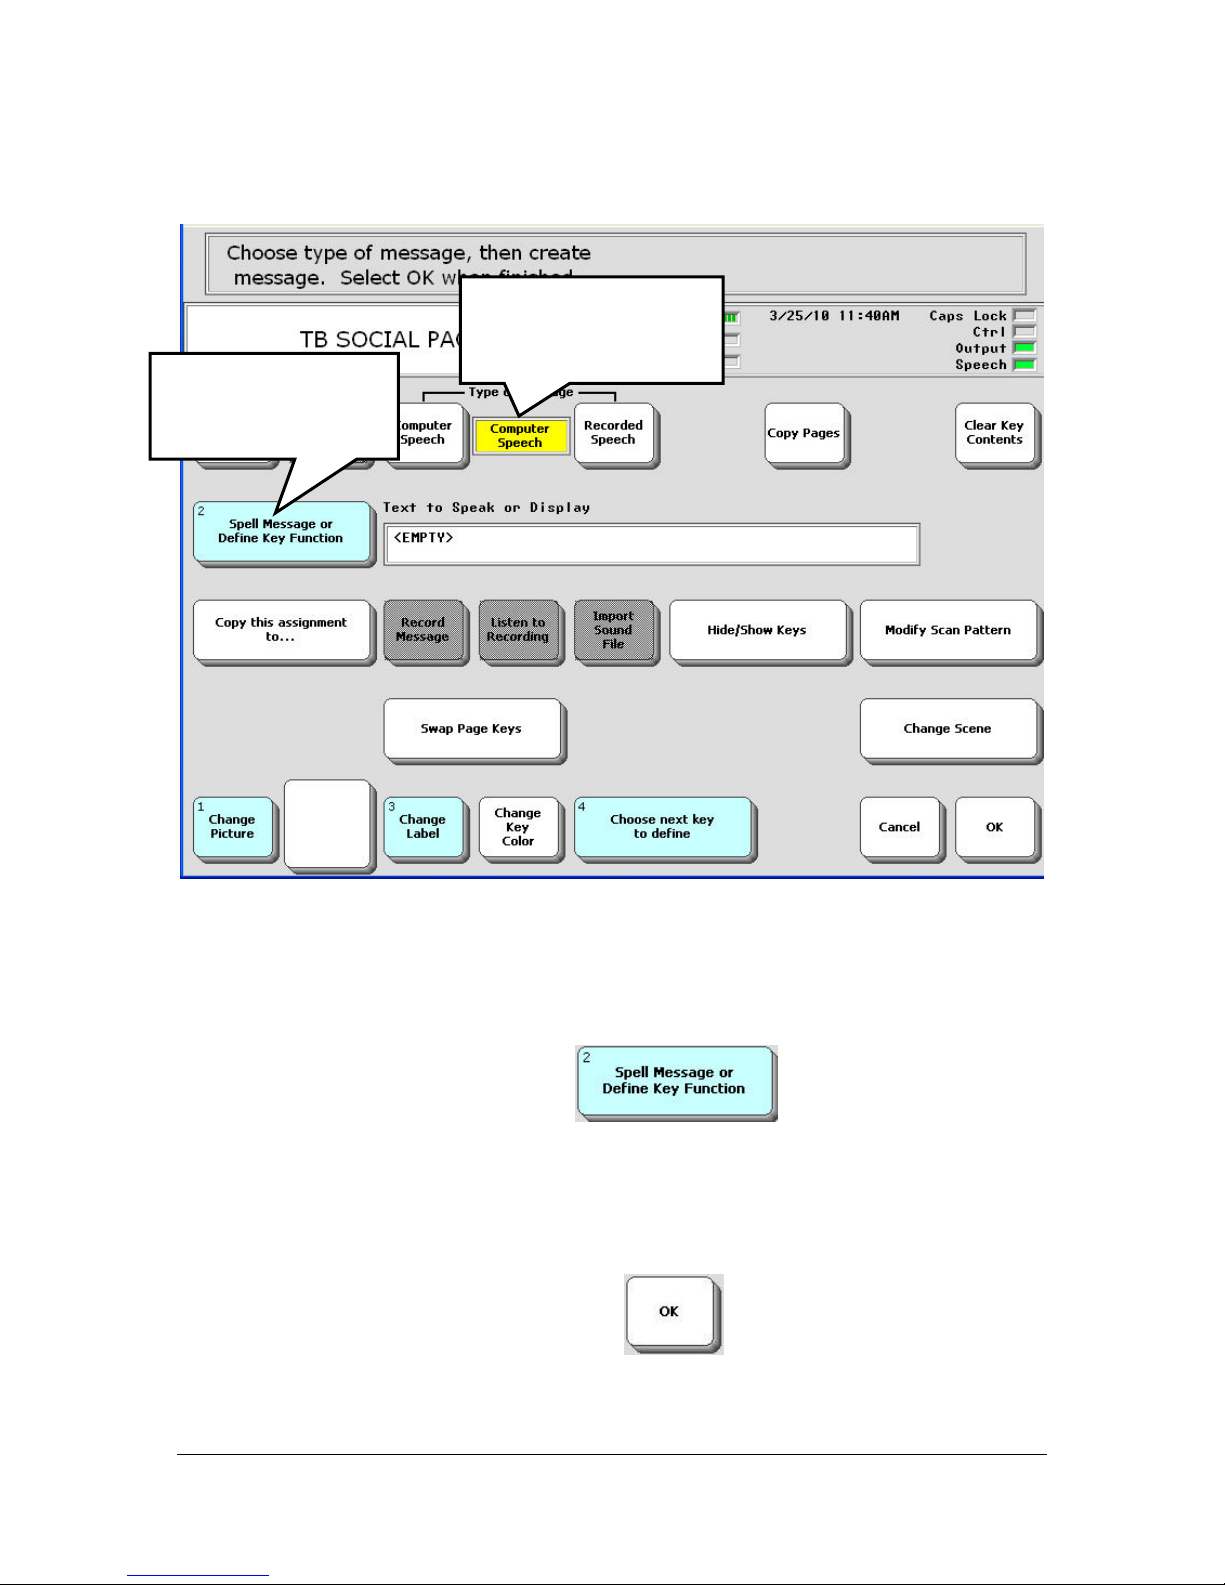
You see:
Select the Spell
Message…
Key.
Computer Speech
should be visible in
the box.
Let's add the message, "Today had been pretty good."
Make sure that Computer Speech is selected in the Type of Message
option.
Select the Spell Message…key
You see a spelling page.
Spell "Today has been pretty good."
When you have finished, select OK
on the spelling page.
CUSTOMIZING ESSENCE
Essence|VT Easy Start
50
Page 51
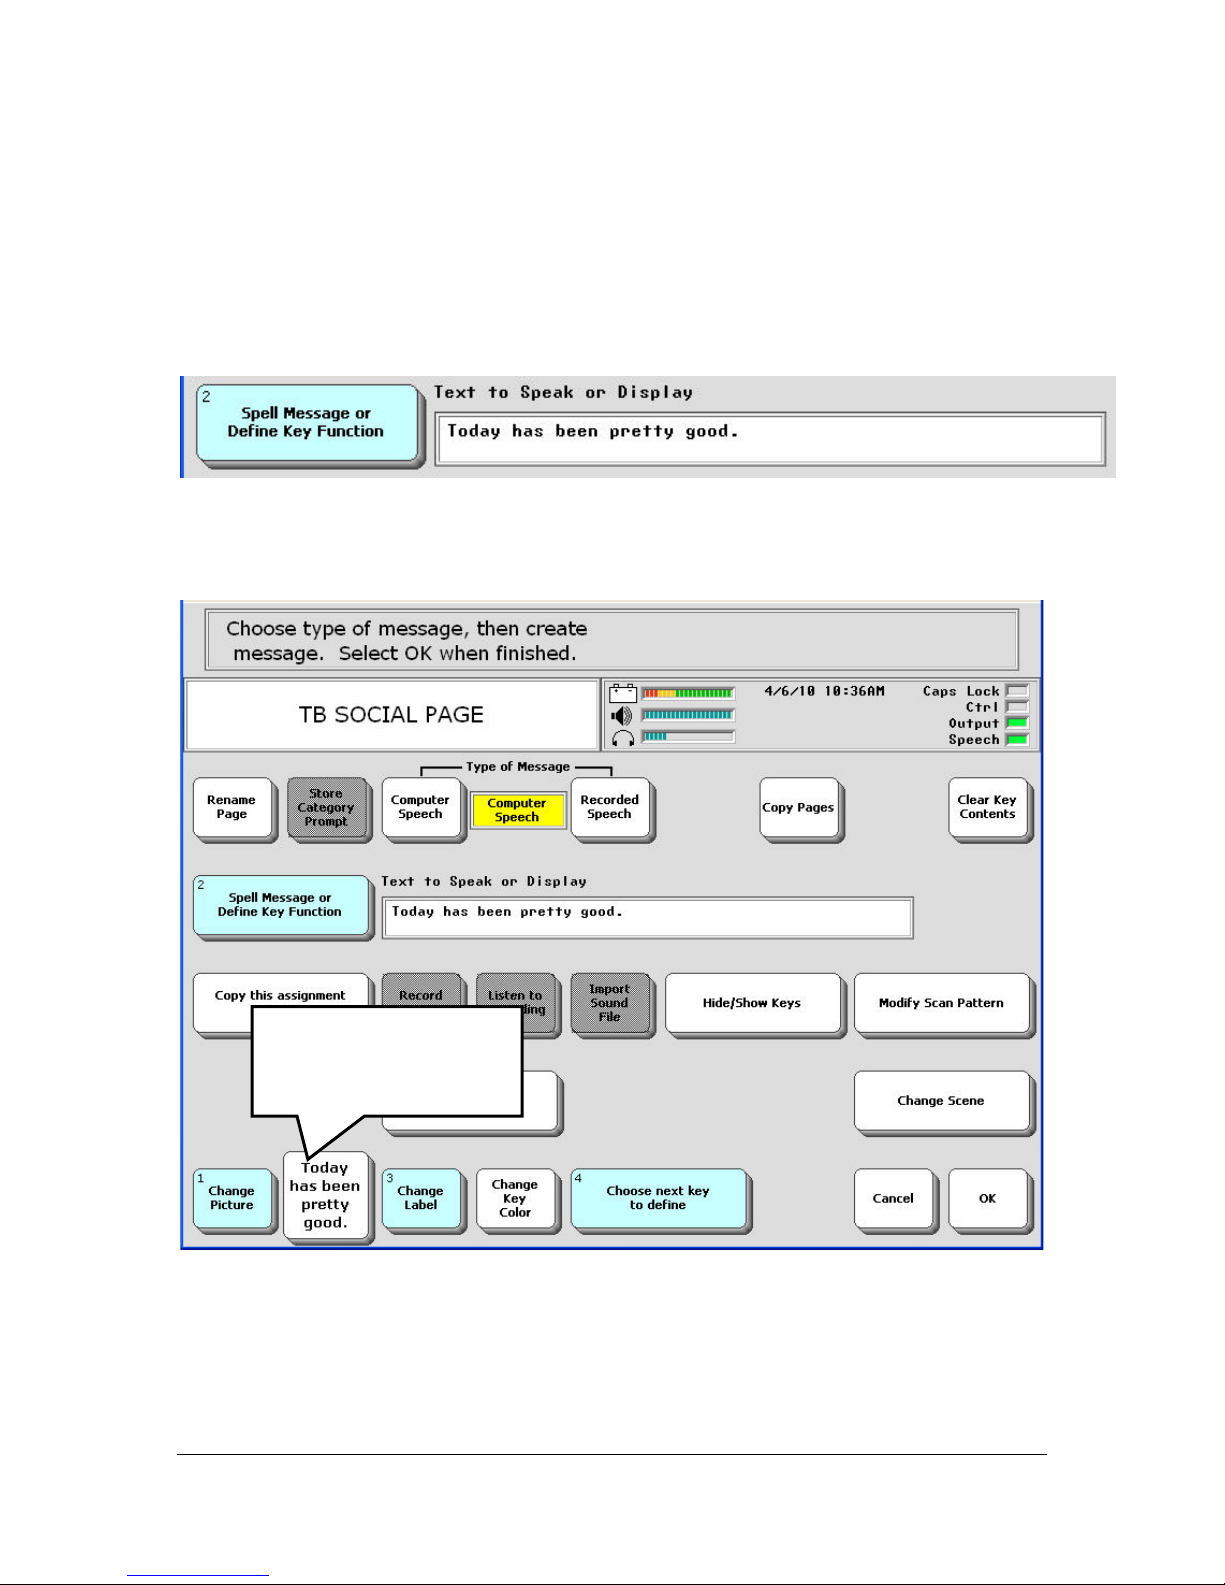
You return to the Setup menu and see your message. If it is not what you
want or if you made a mistake, just select the Spell Message… key and start
over.
Notice your example key now has the new message on it.
Your message
appears as the label
on the key
You can leave it that way, or you can select the Change Label key to
change it if you want to.
CUSTOMIZING ESSENCE
Essence|VT Easy Start
51
Page 52
Select the Change Label key .
You see a spelling keyboard. Spell the label you want to use, perhaps Good
day" to help you remember what the message is. Select the OK key when
you are finished.
The Change Picture key allows you to add a picture to the key. The
Change Key Color key allows you to add color to the key.
If you want to add more messages to keys on this page, select the Choose
Next Key to Define key
When you are ready, select the OK key
the menu.
You return to the SOCIAL page.
and repeat these steps.
to save your work and exit
CUSTOMIZING ESSENCE
Essence|VT Easy Start
52
Page 53
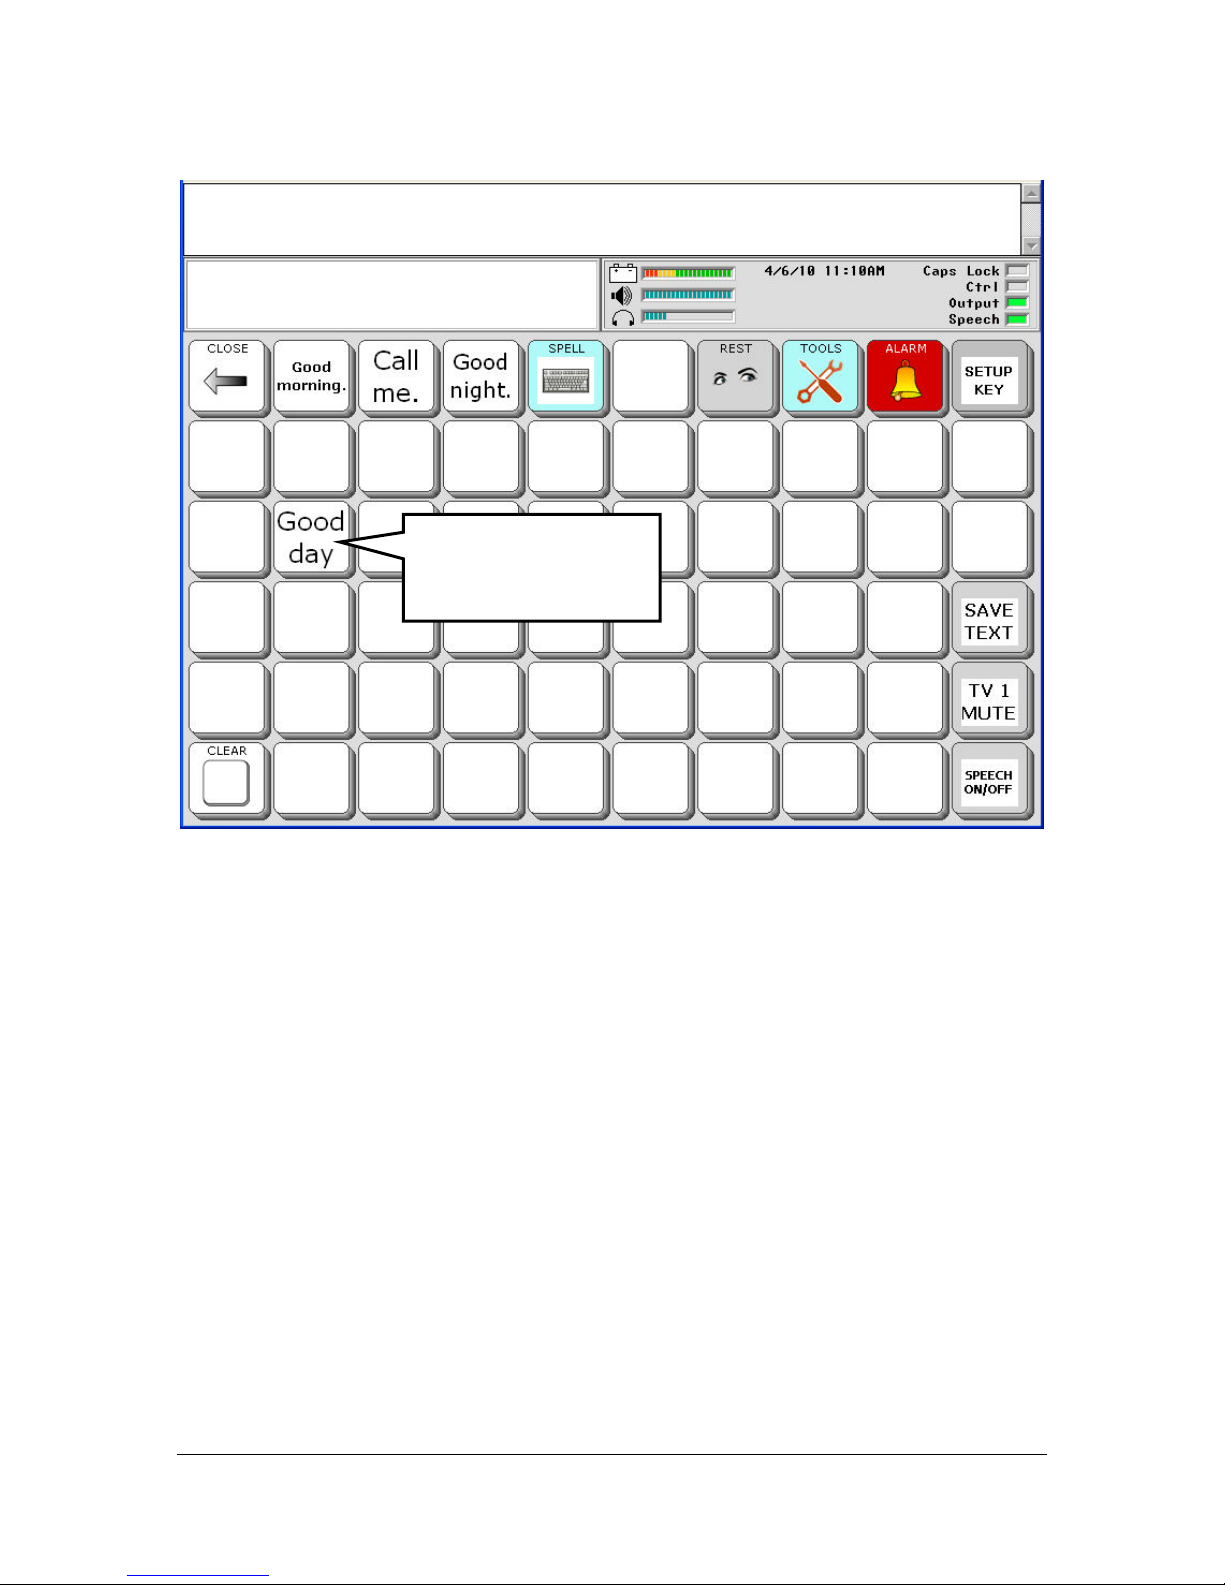
Select your new key
to hear the
message.
Your new key appears on the SOCIAL page. Select it to hear your message.
You can add messages this way to any keys on your pages.
CUSTOMIZING ESSENCE
Essence|VT Easy Start
53
Page 54
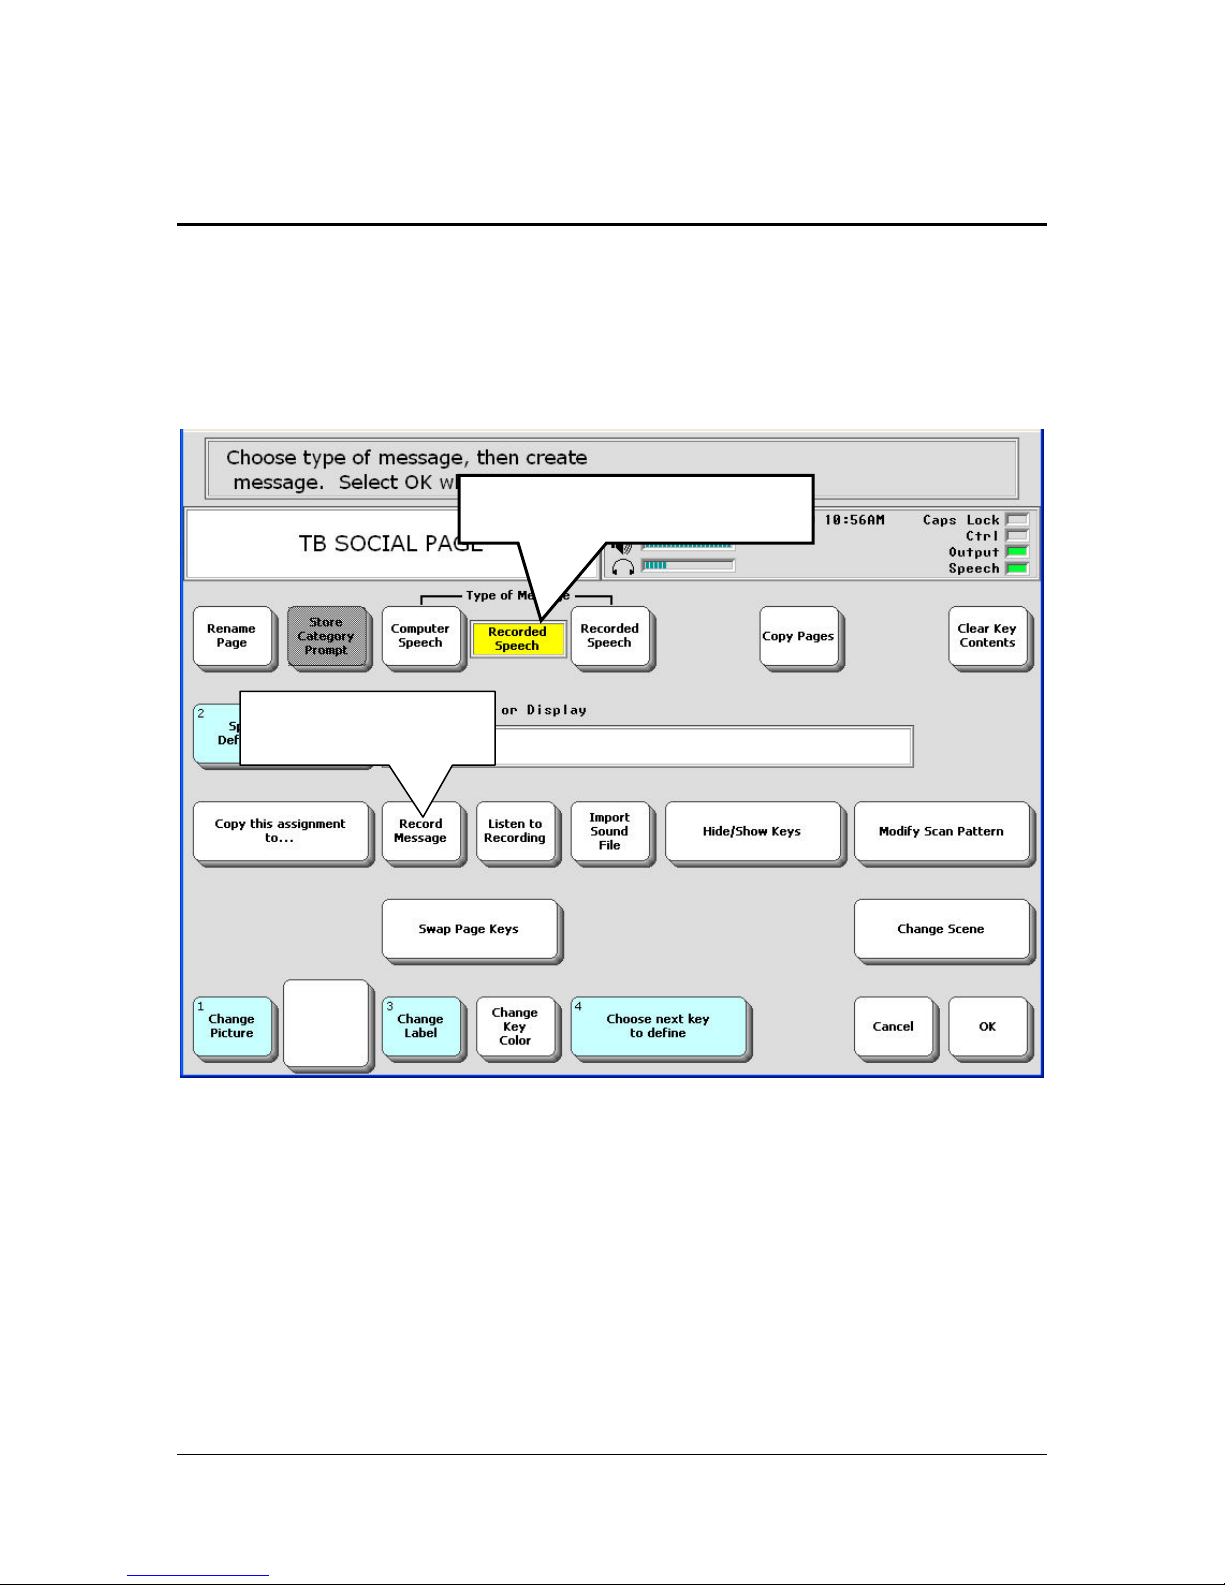
Recording Messages
Go to the page where you want to add a recorded message.
Select the SET UP key.
Select a key for your message.
Select Recorded Speech.
Select Record
Message.
Select Recorded Speech in the Type of Message option
Select the Record Message key.
If you have a sound file (mp3, wav, wma files) stored on a USB flash
drive you can add it to the key instead of making a recording. Select the
Import Sound File key and follow the directions on your display.
CUSTOMIZING ESSENCE
Essence|VT Easy Start
54
Page 55
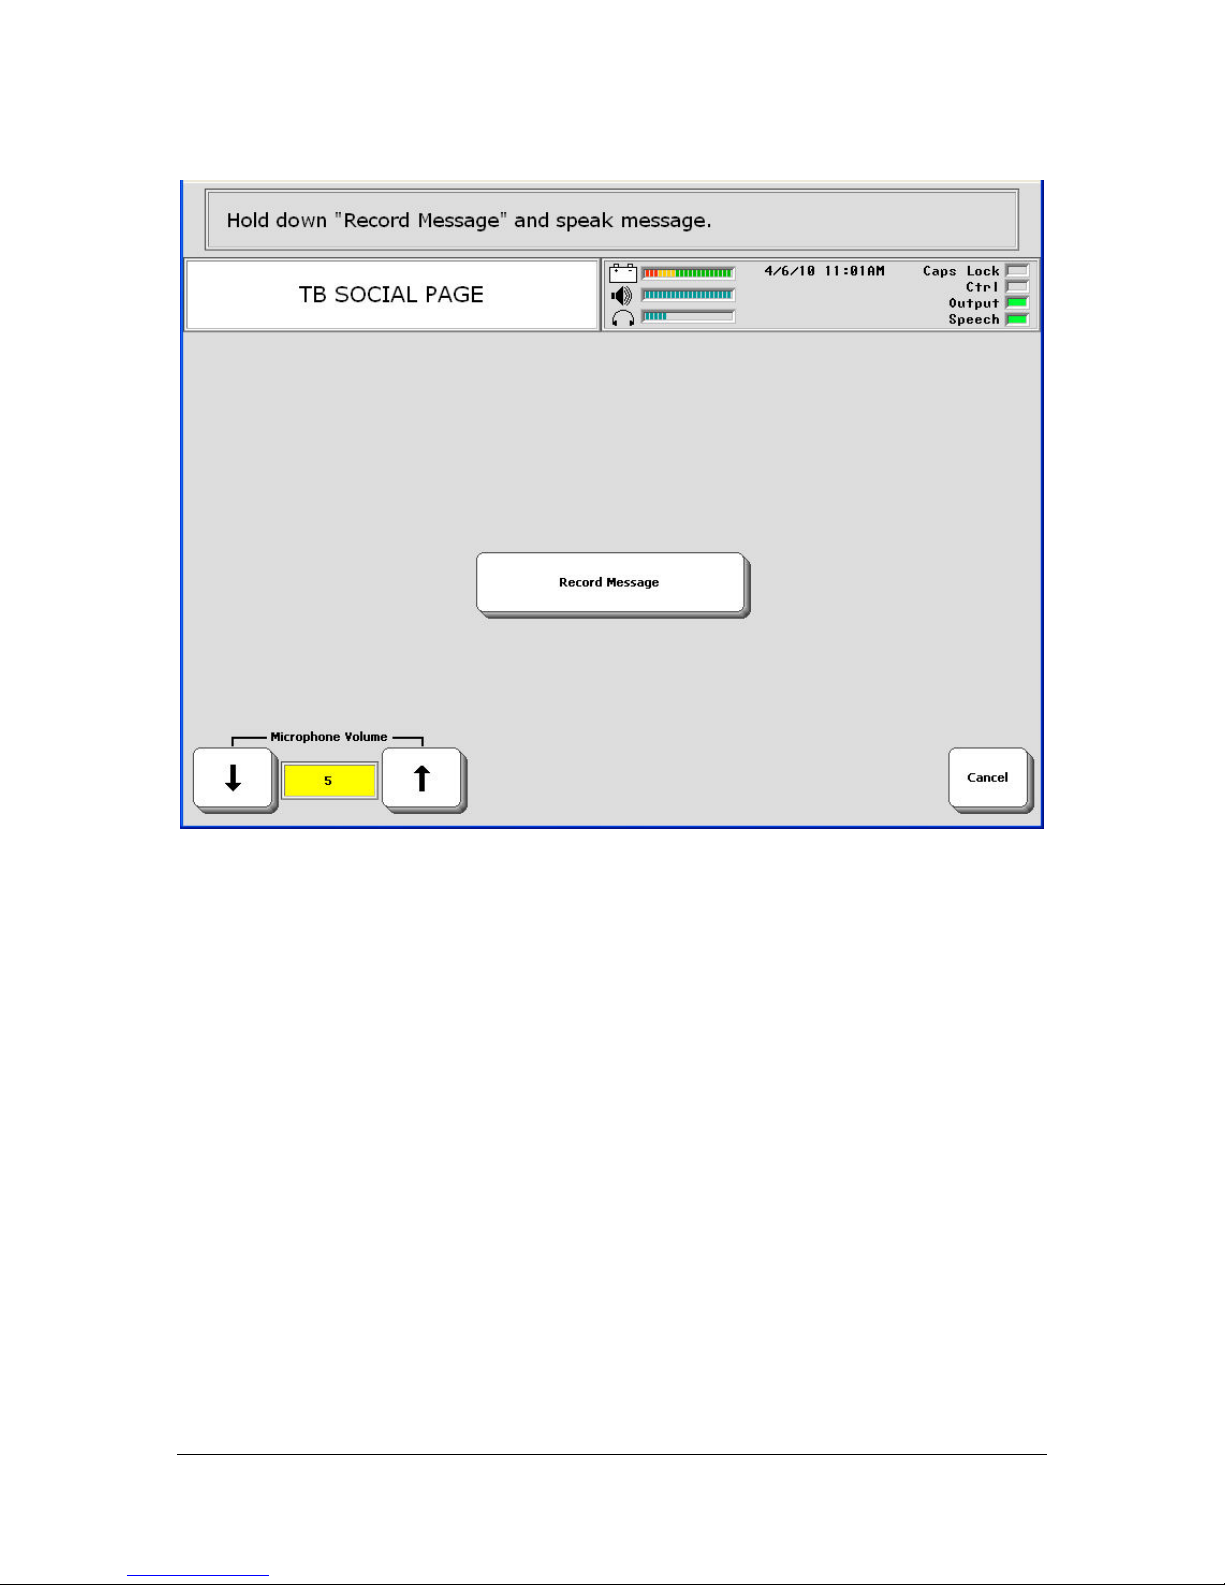
Press and hold the Record Message key while you speak your message.
When you have finished speaking, release the key.
Select the Listen to Recording key. If you do not like what you hear,
select the Record Message key again and re-record your message.
You can add a label and/or a picture to your key if you would like.
CUSTOMIZING ESSENCE
Essence|VT Easy Start
55
Page 56
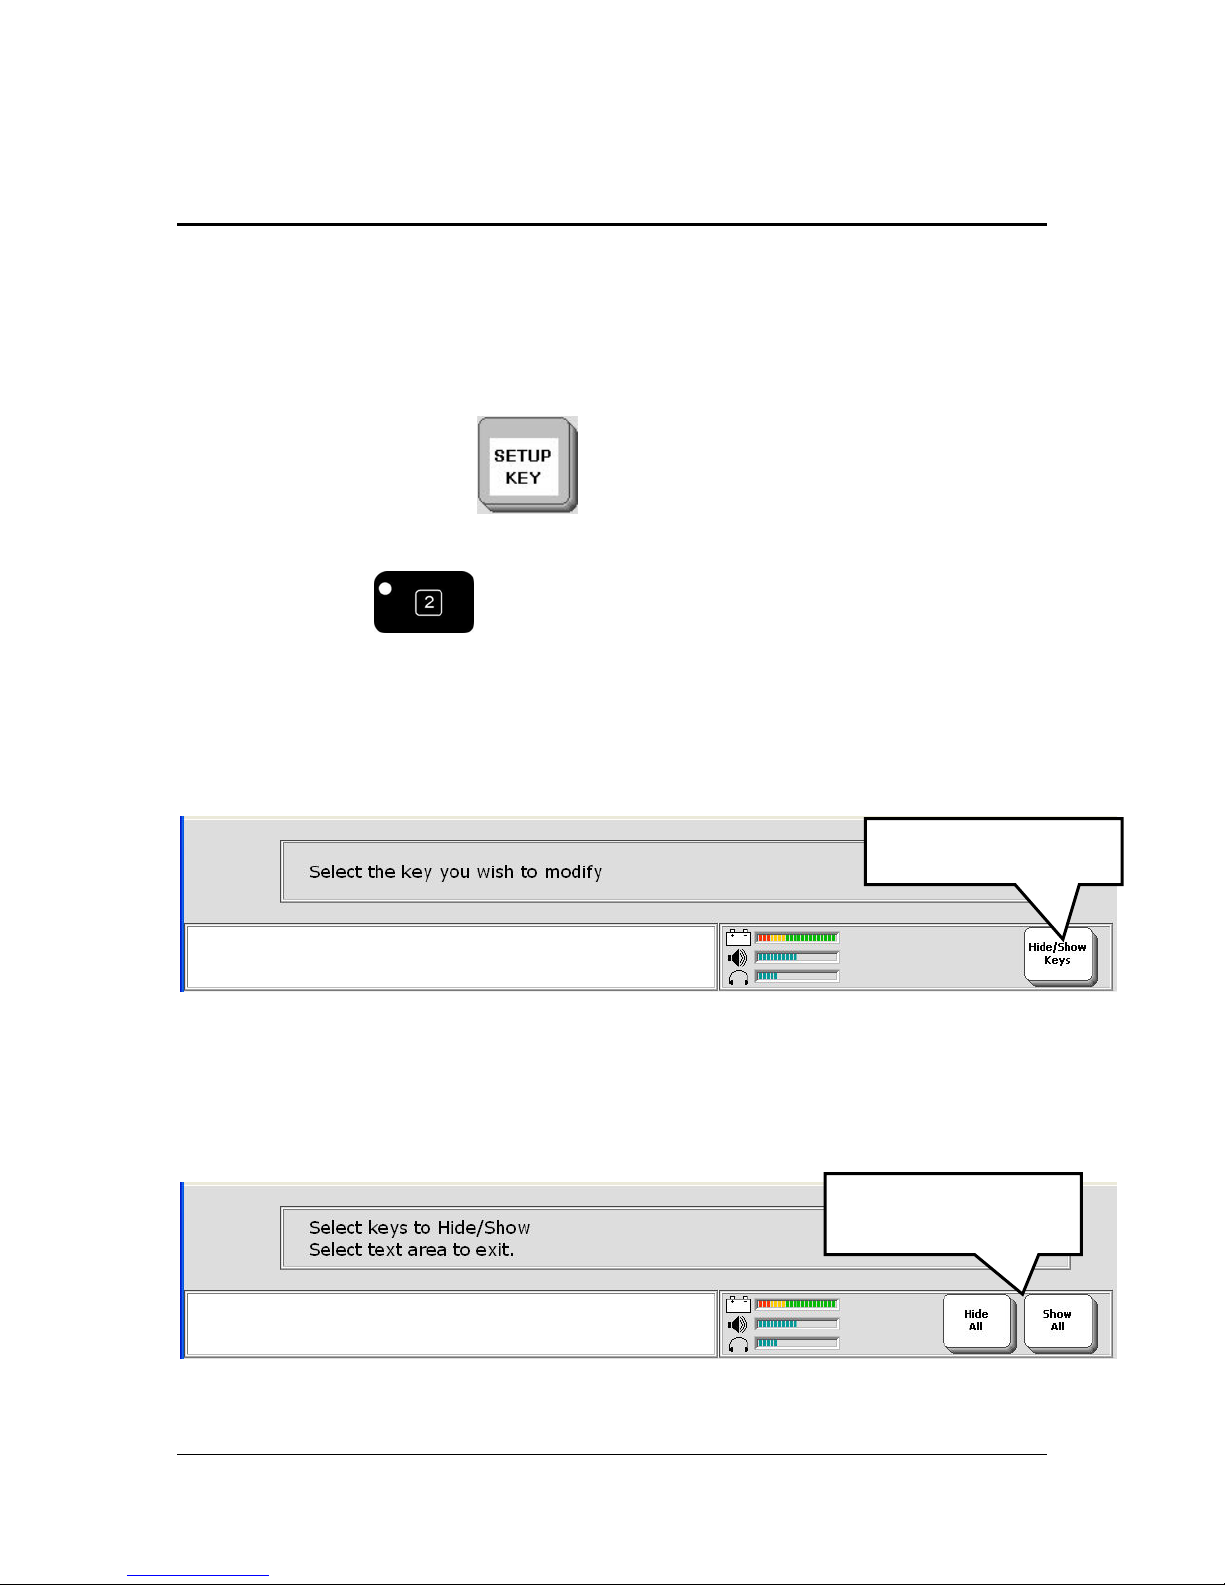
To Hide Keys
You may find that there are keys on your keyboard, or an a page, that you do
not use right now but might want later. You can hide these keys.
Go to the page where you want to hide keys.
Select the SETUP key
.
If you are on a page that does not have a SETUP key you can always
select the #2 key
programmed as the SETUP key.
You see the Hide/Show Keys key in the Status Display Area.
Select the Hide/Show Keys key.
on the front of the device case. This is
Hide/Show Keys
You see:
Hide All and Show
All
CUSTOMIZING ESSENCE
Essence|VT Easy Start
56
Page 57

You can use Hide All and Show All to hide ALL the keys on your
overlay or to show them all if you hid them earlier.
If you want to hide individual keys, start selecting them now. A hidden
key will become grayed out. Brightly lit keys are not hidden. Hidden
keys remain fully programmed and will work as usual if you Show them
again.
If you select a key to hide and then change your mind, just select it again
to show it.
When you have finished hiding keys select the Text Display Area to
exit Hide/Show mode.
CUSTOMIZING ESSENCE
Essence|VT Easy Start
57
Page 58
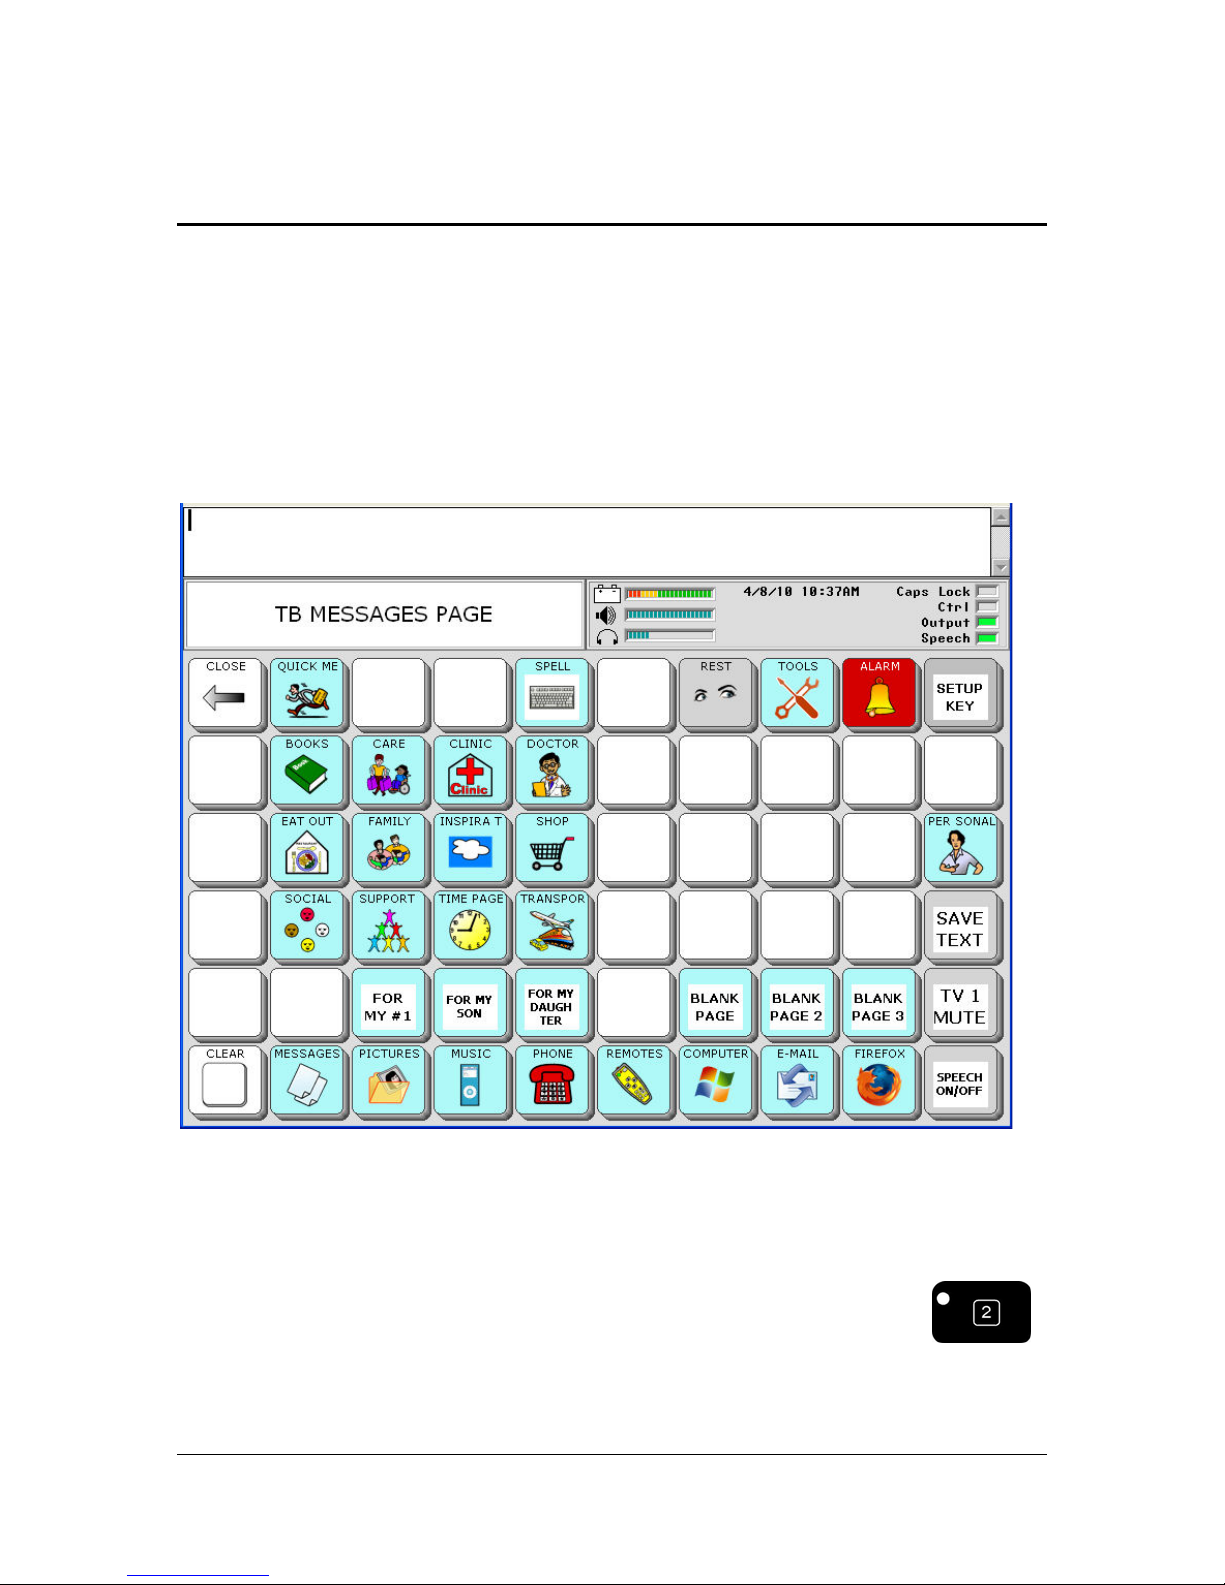
Swap Keys
You might not like where the keys are situated on a page. You can move
them around using the Swap Keys key in the Setup menu.
Let's swap some keys on the MESSAGES page.
Let's say that it is easier for you to use the top row of keys than the bottom
row. You'd like to move the PHONE key and the MUSIC key to the top
row where you can access them more easily.
Select the SETUP MENU key (remember you can also use the
key on the front of your device case to open the Setup menu.)
CUSTOMIZING ESSENCE
Essence|VT Easy Start
58
Page 59
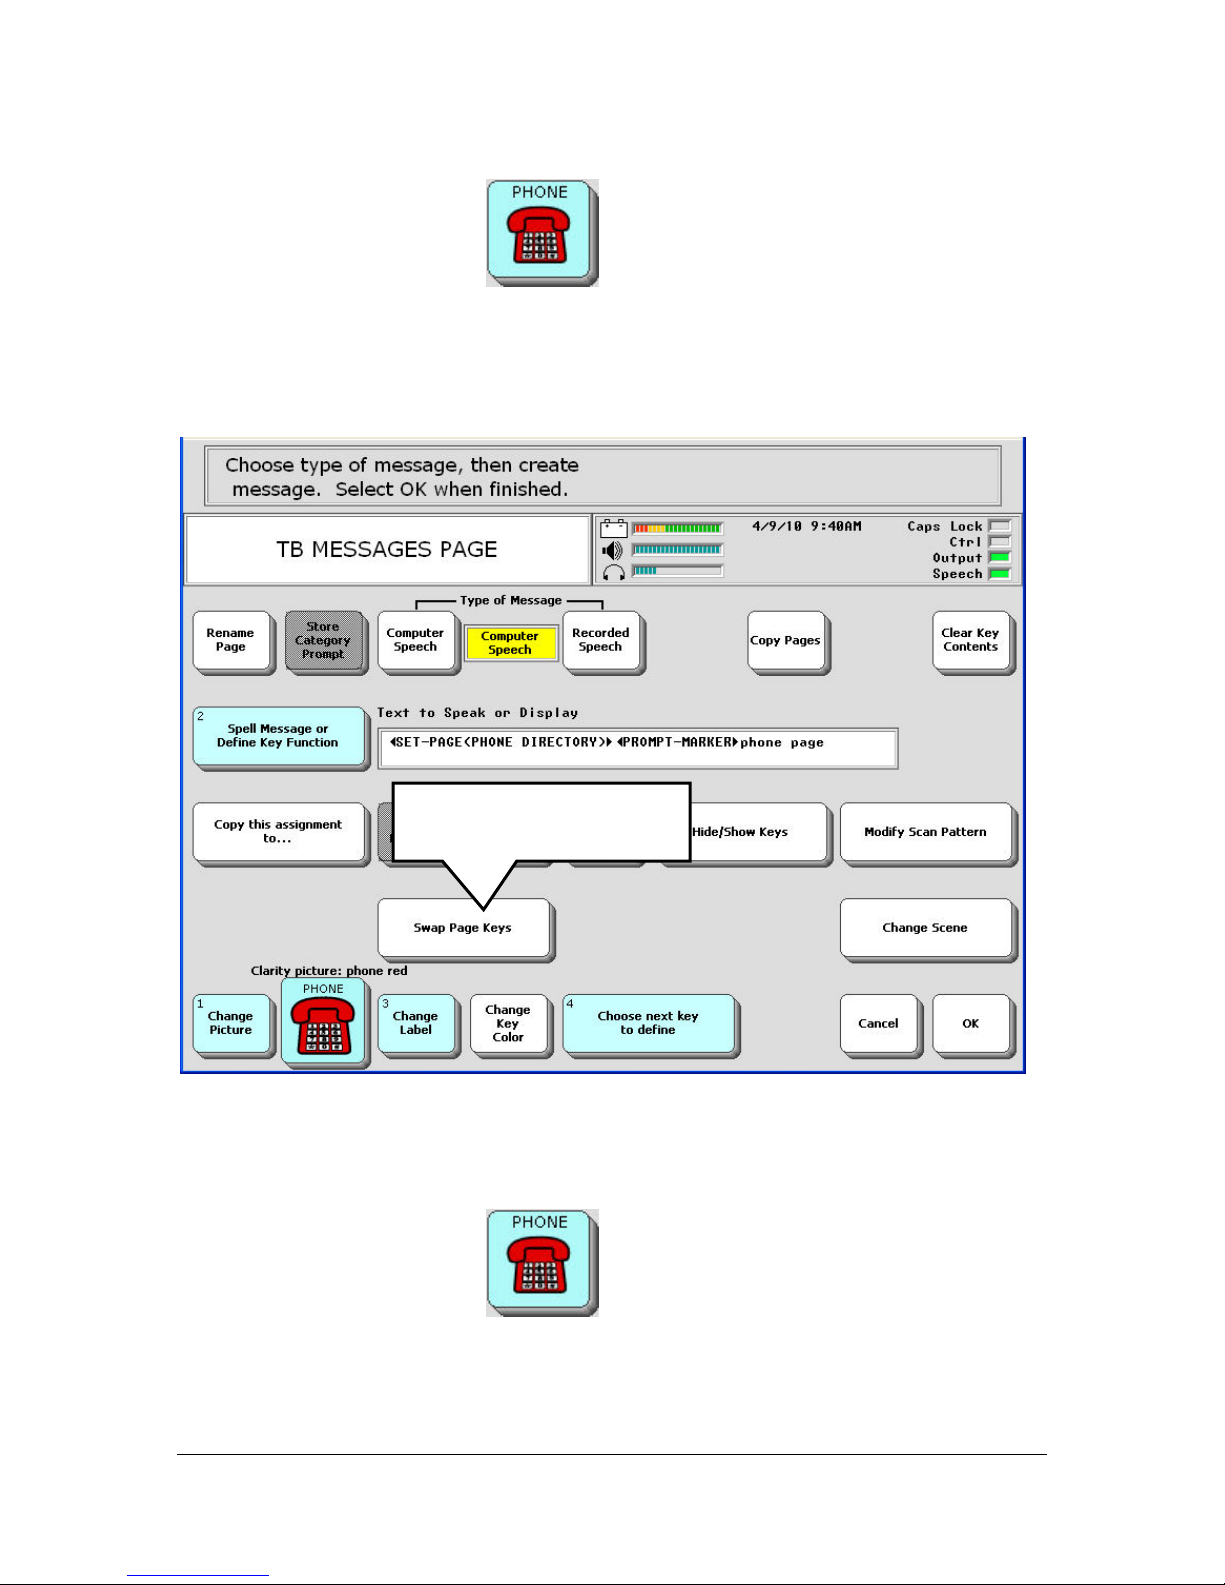
Select the PHONE key .
You see:
Select Swap Page Keys
Now select the Swap Page Keys key.
You return to your original page.
Select the PHONE key
The directions in the Text Display Area tell you select the key you want
to swap with, so select one of the blank keys in the top row.
.
CUSTOMIZING ESSENCE
Essence|VT Easy Start
59
Page 60
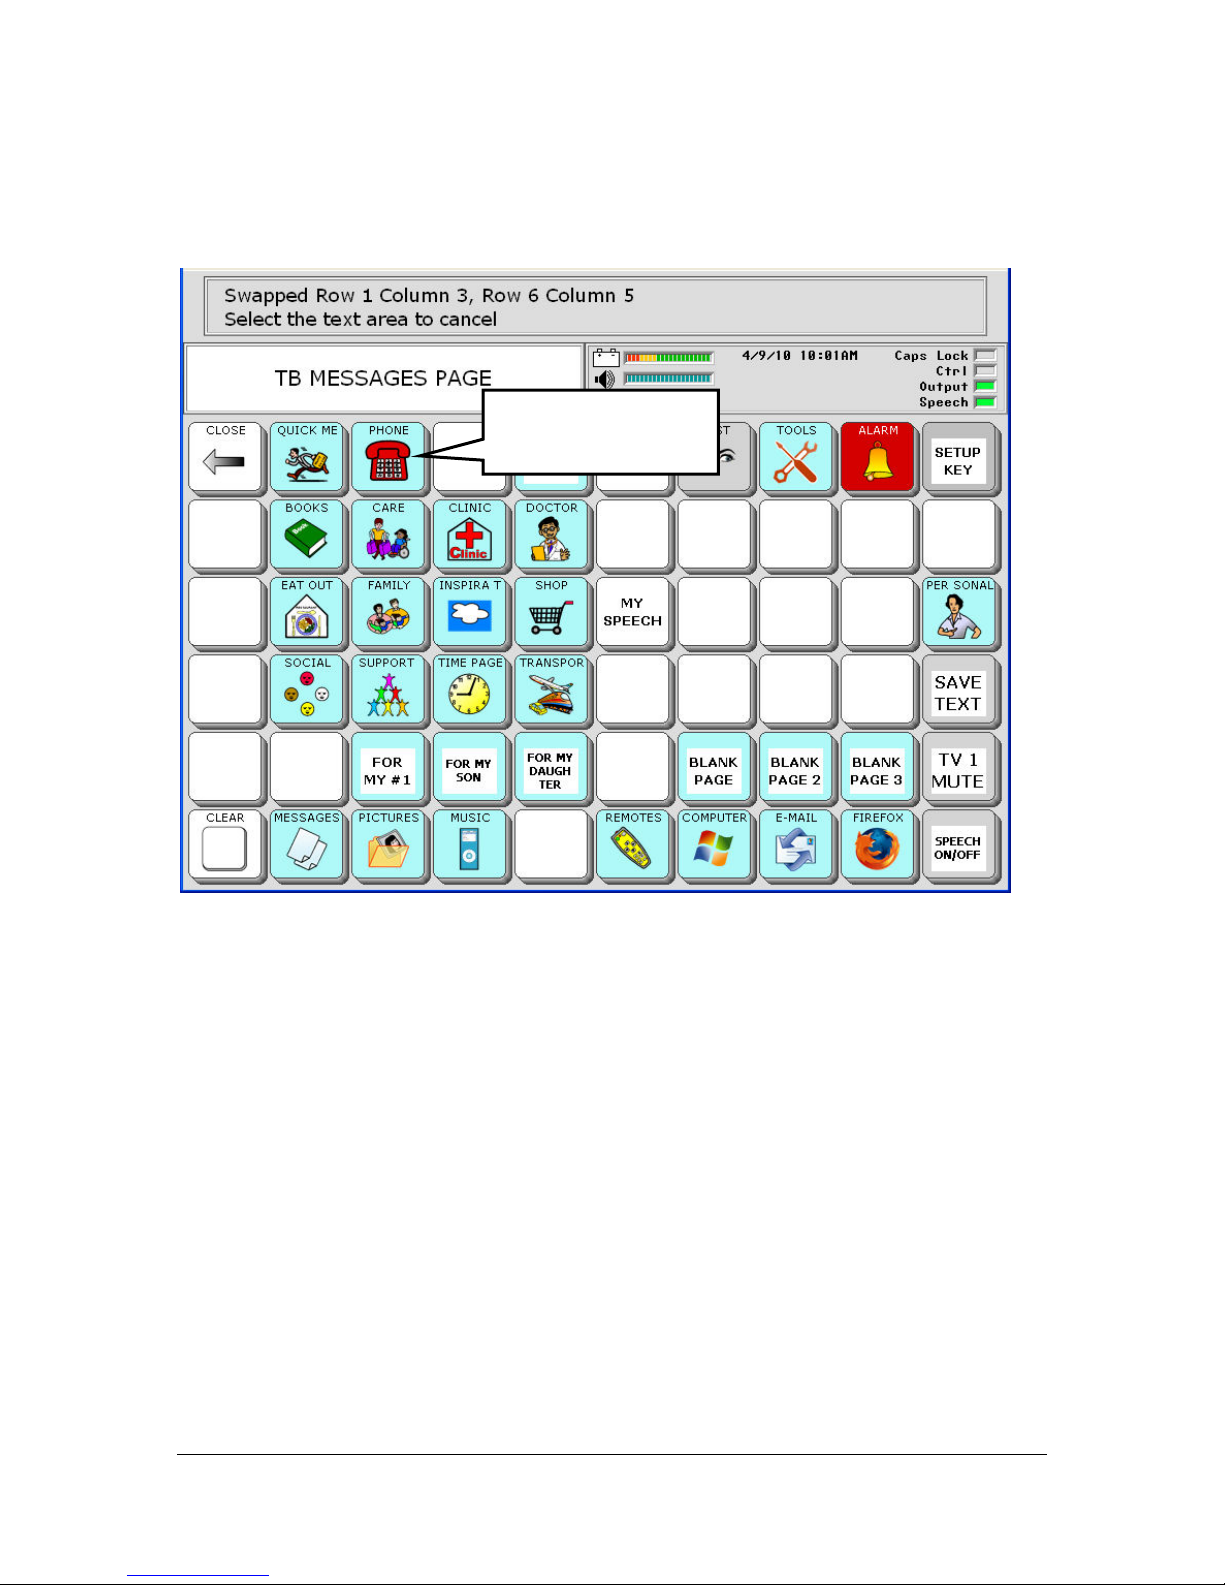
The keys are swapped.
PHONE has been
swapped.
You can continue to select keys to swap.
When you have finished, select the Text Display Area.
Select the OK key in the Setup menu to save your work and exit the
menu.
If you swap keys by mistake, select the Text Display Area, select Swap
Page Keys, and repeat the above steps until you have your keys placed
where you want them.
CUSTOMIZING ESSENCE
Essence|VT Easy Start
60
Page 61
Create Your Own Page
You can create pages that are centered around things that you want to talk
about. For example, you might attend a weekly meeting at your workplace
where you are always on the agenda. You could create a page for this
meeting.
To Create a Page
Select the Toolbox key
In the Toolbox, select the CREATE PAGE key
on the front of the VT case.
.
You see a spelling page. Spell the name for your page, perhaps "Dept.
Meeting".
You will need to remember the name of page later on, so you might
want to write it down.
Select the OK key
when you have finished typing.
You see:
CUSTOMIZING ESSENCE
Essence|VT Easy Start
61
Page 62
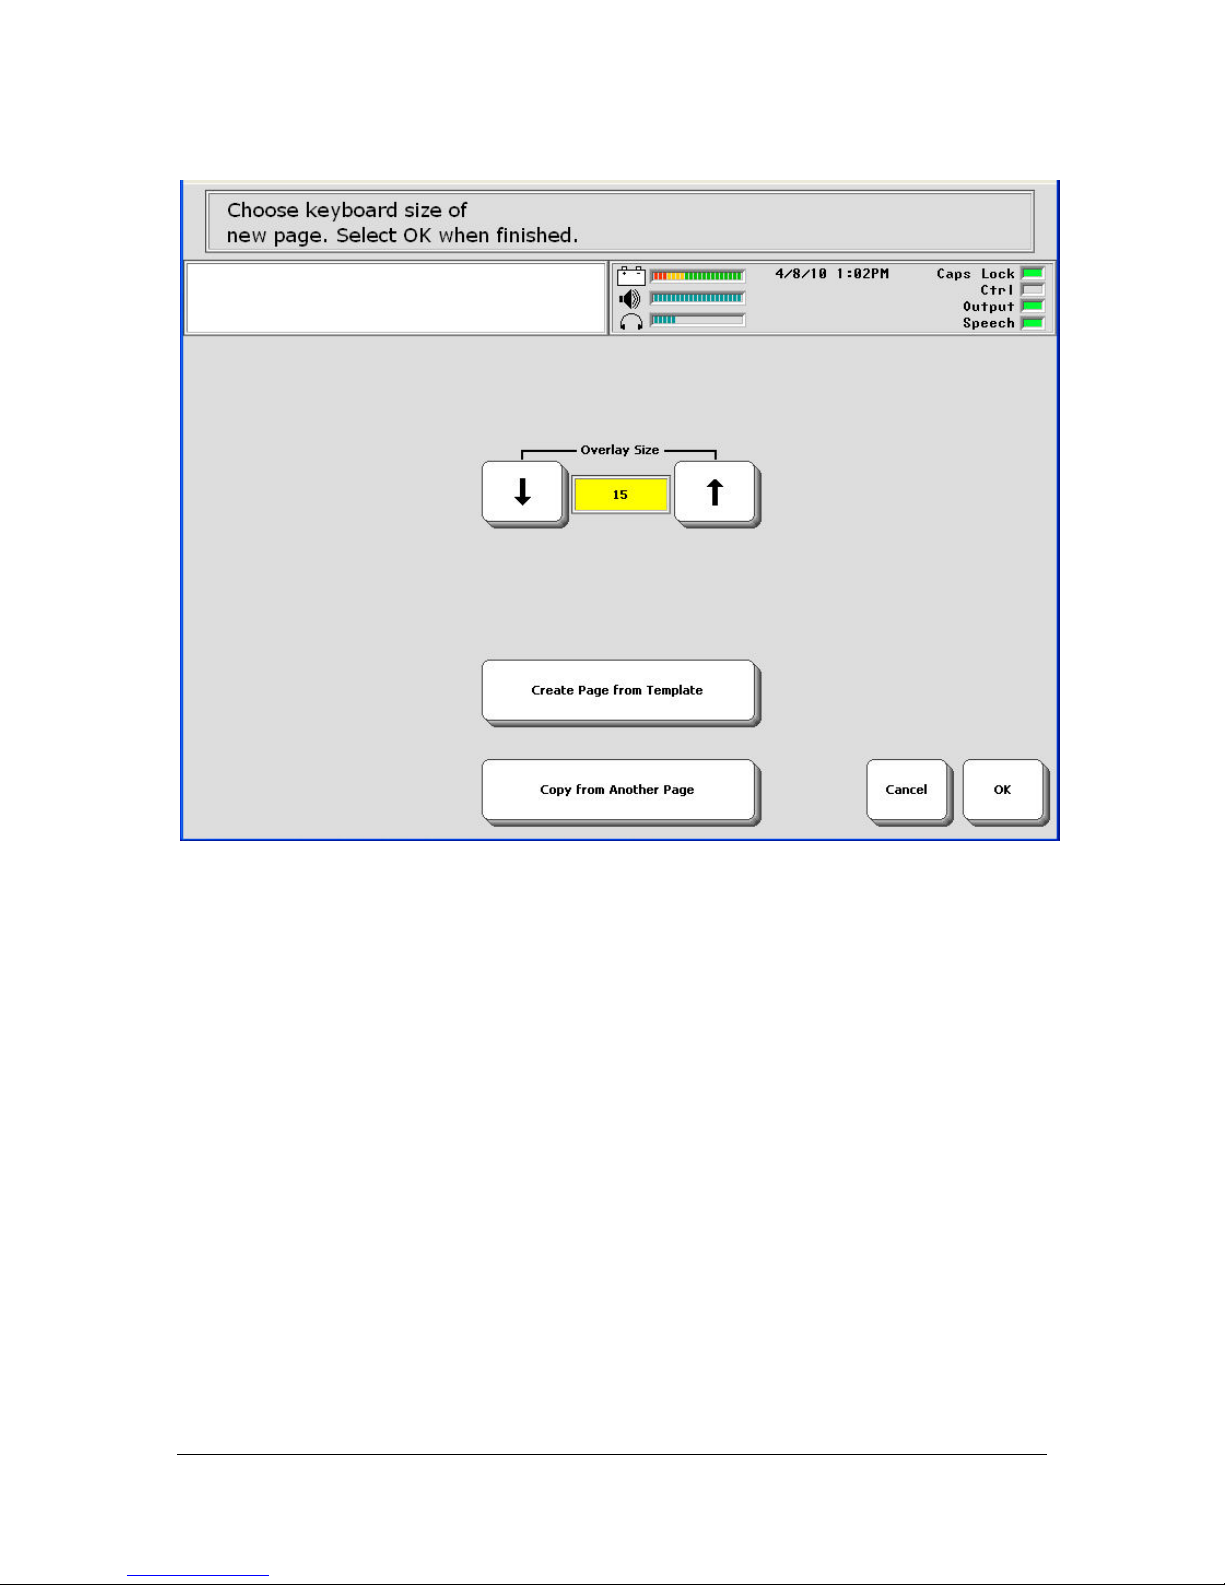
You can create a page using a template or by copying another page whose
setup you like. We will use a template.
Select the Create Page from Template key. When you select a template,
it will be in keyboard size you always use.
Use the Overlay Size option if you want to create a page completely from
scratch. If you select 60, for instance, you will see a page with 60 blank keys
on it.
You see:
CUSTOMIZING ESSENCE
Essence|VT Easy Start
62
Page 63
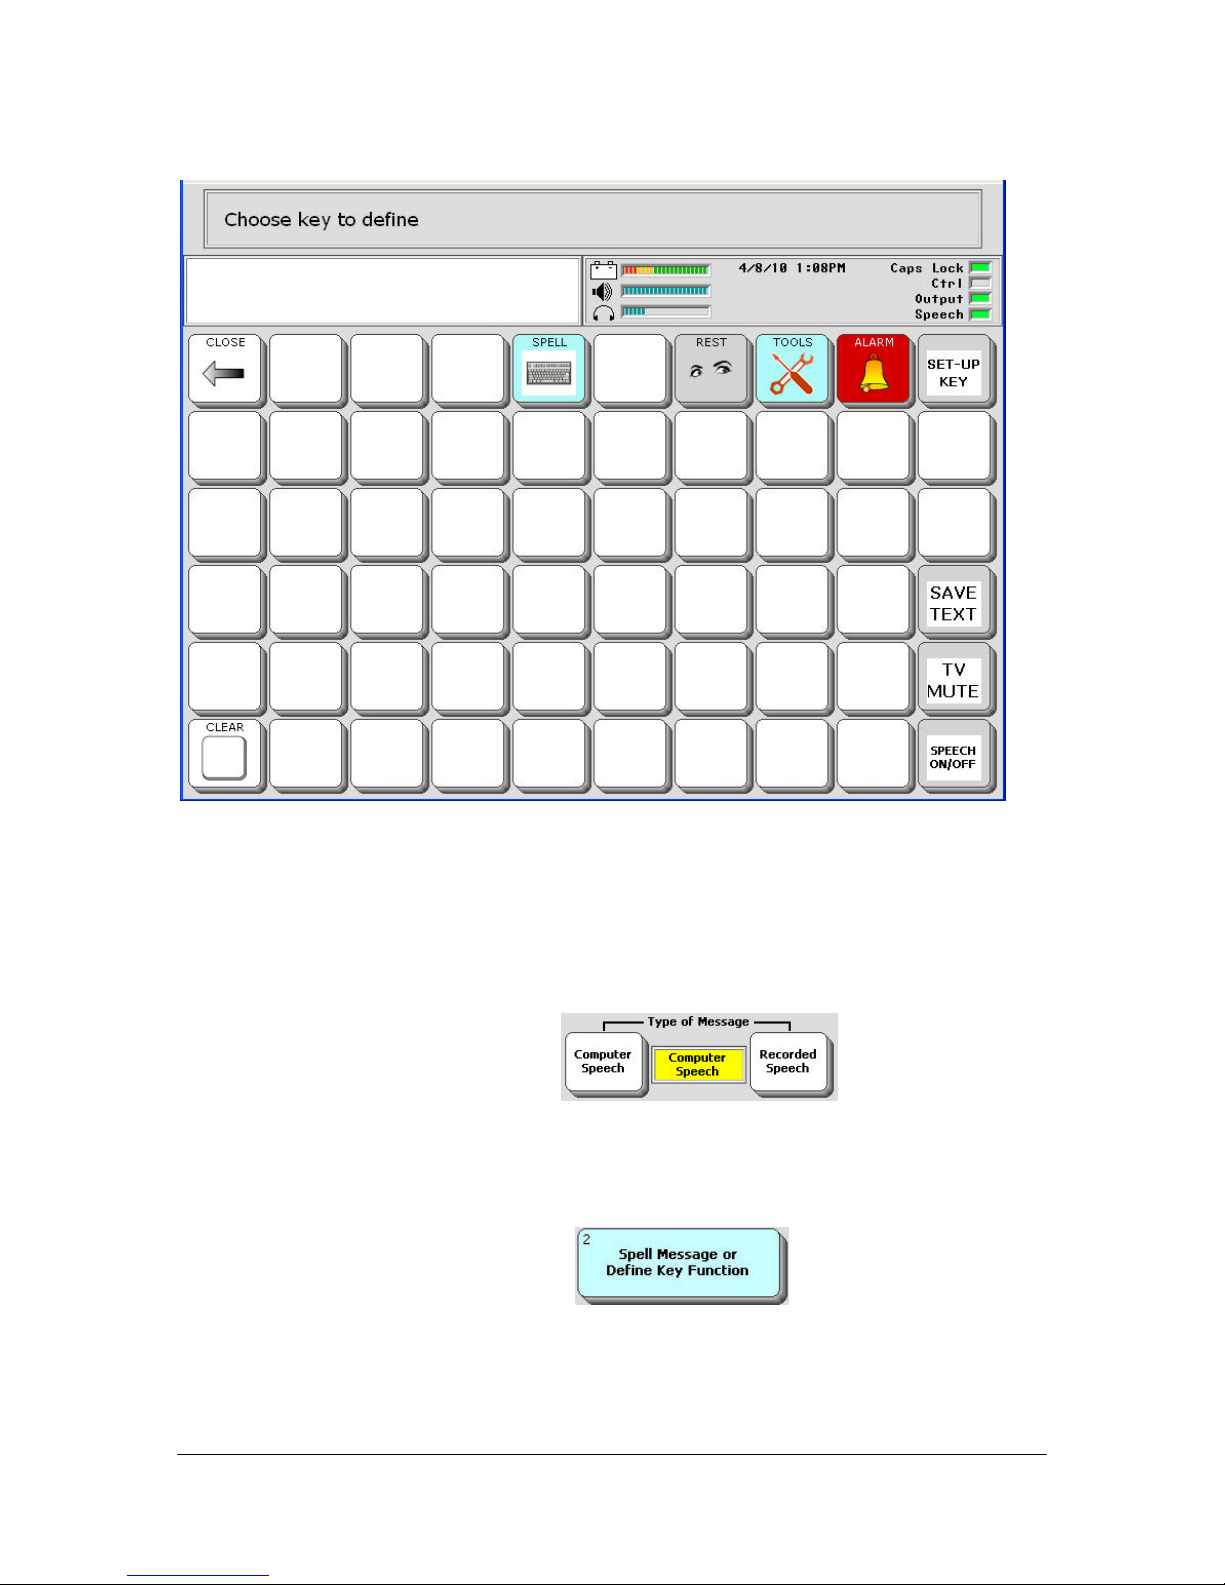
The 60 Template has all the normal keyboard keys already programmed for
you.
Select a blank key to define.
You see the Setup menu.
Make sure Computer Speech
the Type of Message option.
Perhaps there are snacks at this meeting. You can ask them to be passed to
you.
Select the Spell Message…key
Now you can type your message. For our example you might type,
"Please pass the donuts my way!"
option is set in
CUSTOMIZING ESSENCE
Essence|VT Easy Start
63
Page 64
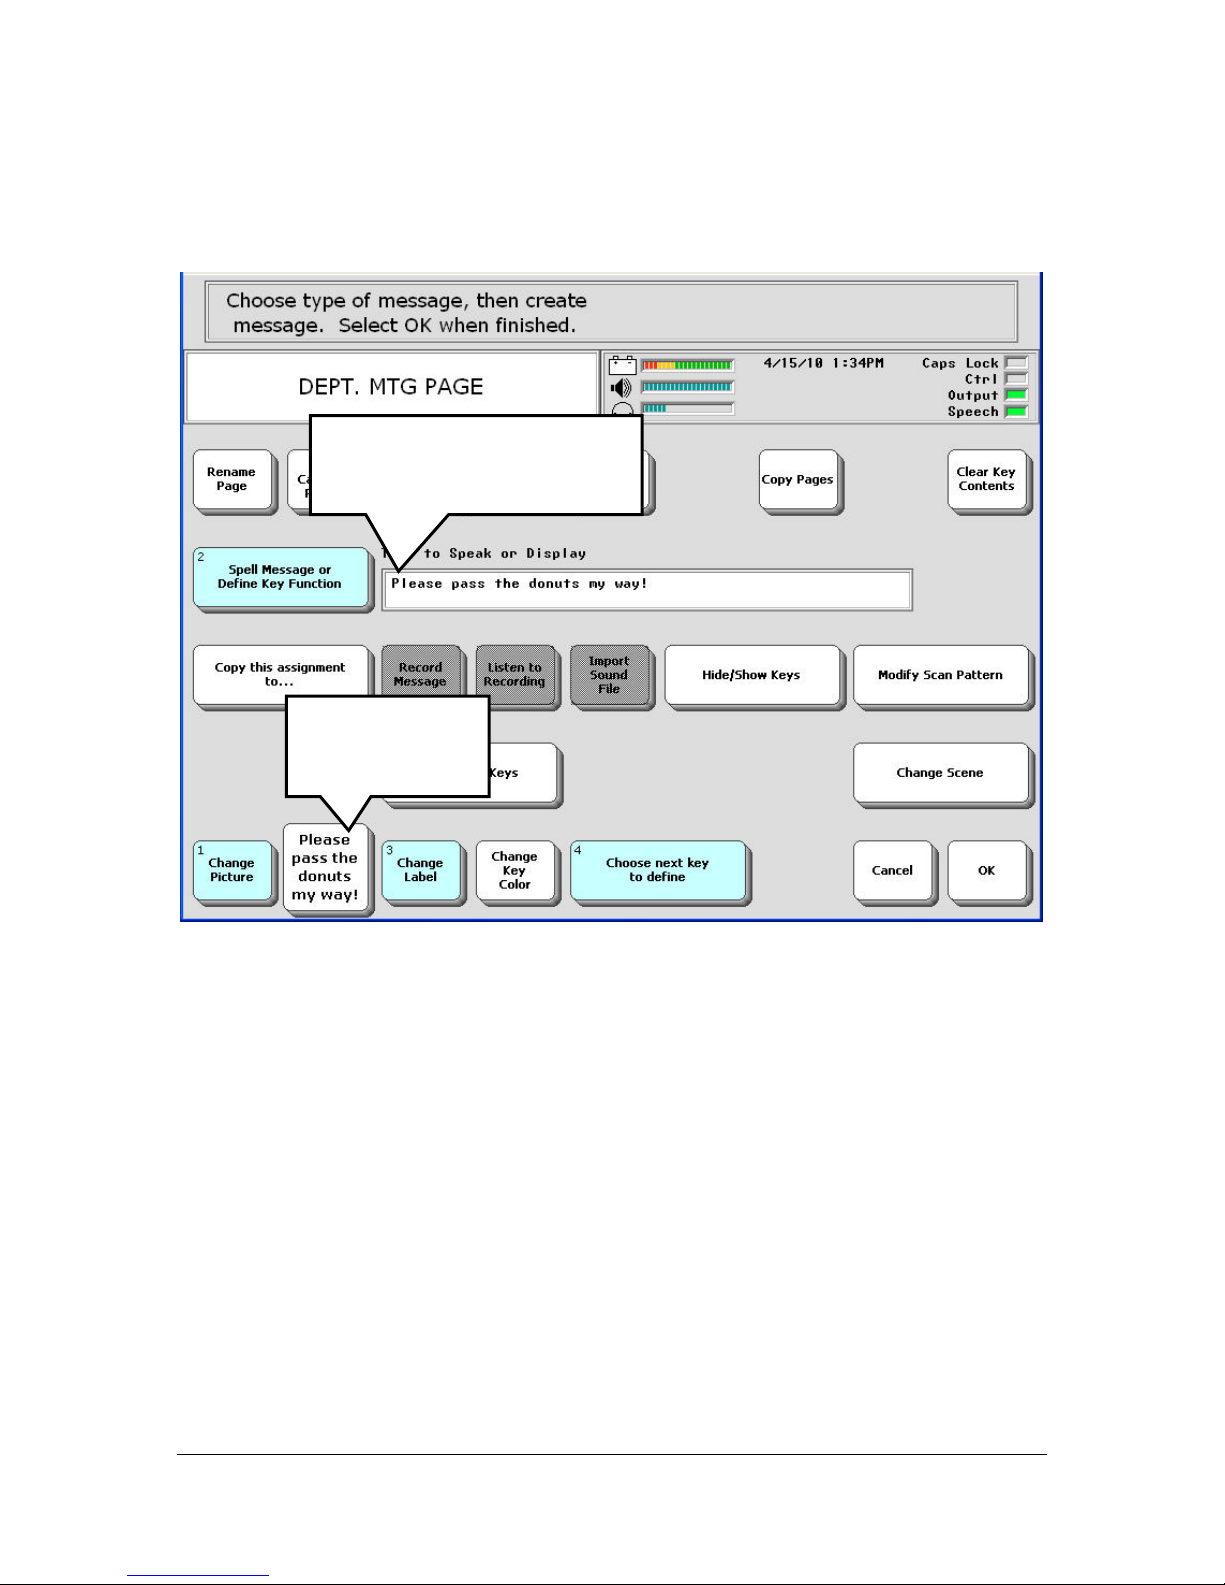
Select OK when you are finished.
You see:
If you don't like what you
wrote, you can select Spell
Message and start over.
Notice the label
on your key.
You see your message in the Text to Speak or Display area. If you
made mistakes or don't like what you wrote, you can select the Spell
Message…key again and start over.
Notice that the label on your key is quite long. Let's change the label.
Select the Change Label key.
Type a new label. Let's use, "donuts".
CUSTOMIZING ESSENCE
Essence|VT Easy Start
64
Page 65
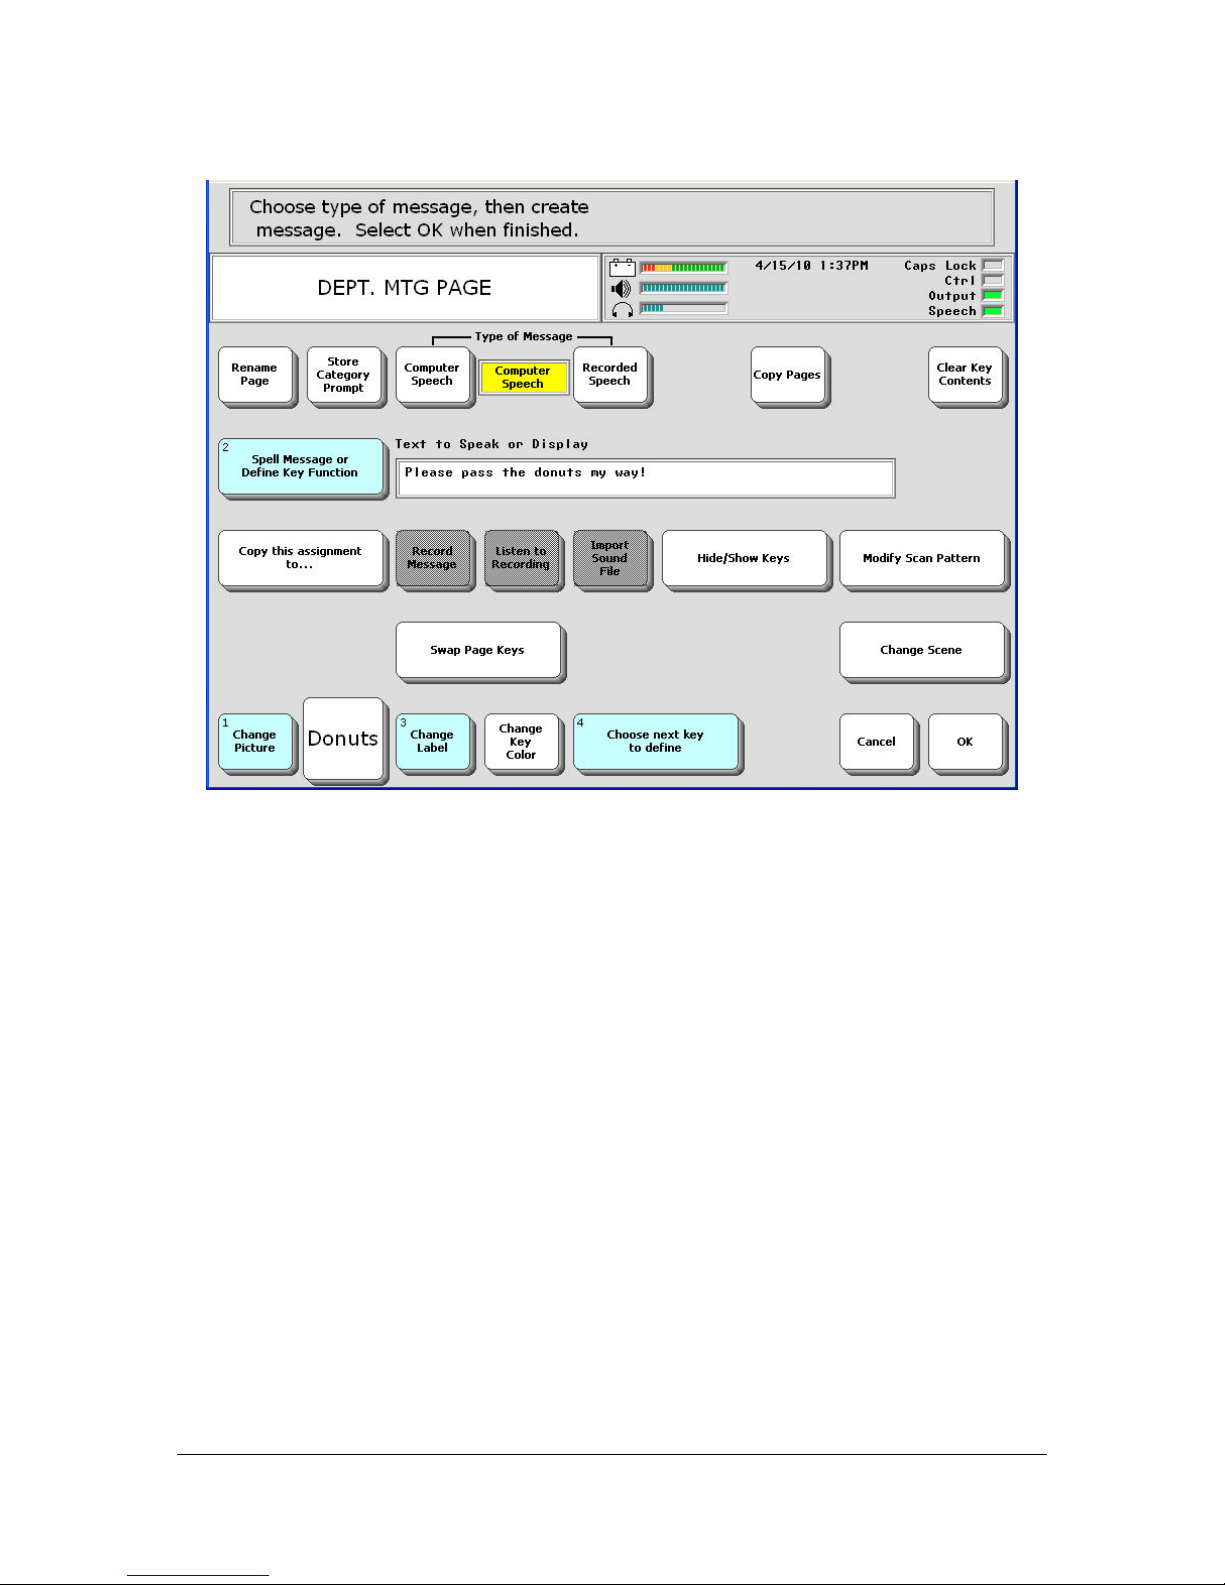
You can select the Change Picture key, then select Clarity and navigate
through the pictures to find one you might like to use on your key. For
now, we will leave the key as it is.
You can select Choose next key to define, and continue to store your
messages for your meeting under keys on your page. For this example,
let's select the OK key to exit this menu
You return to the Toolbox.
CUSTOMIZING ESSENCE
Essence|VT Easy Start
65
Page 66
Link Your New Page
You need to be able to access your new page, so let's put a link to your new
page on the MESSAGES page.
You can put a link on any page, but you must start by navigating to the
page where you want the link to go
Since you are in Toolbox, select the GO TO HOME key.
Select the MESSAGES key.
Select the SETUP key
Select a blank key on the MESSAGES page where you want to put your
link.
Select the Spell Message…key.
Link to Your New Page
You need to be able to access your new page, so let's put a link to your new
page on the MESSAGES page.
You can put a link on any page, but you must start by navigating to the
page where you want the link to go
Since you are in Toolbox, select the GO TO HOME key.
Select the MESSAGES key.
Select the SETUP key
Select a blank key on the MESSAGES page where you want to put your
link.
Select the Spell Message…key.
Select the PAGE LINK key
CUSTOMIZING ESSENCE
Essence|VT Easy Start
on the spelling page.
66
Page 67
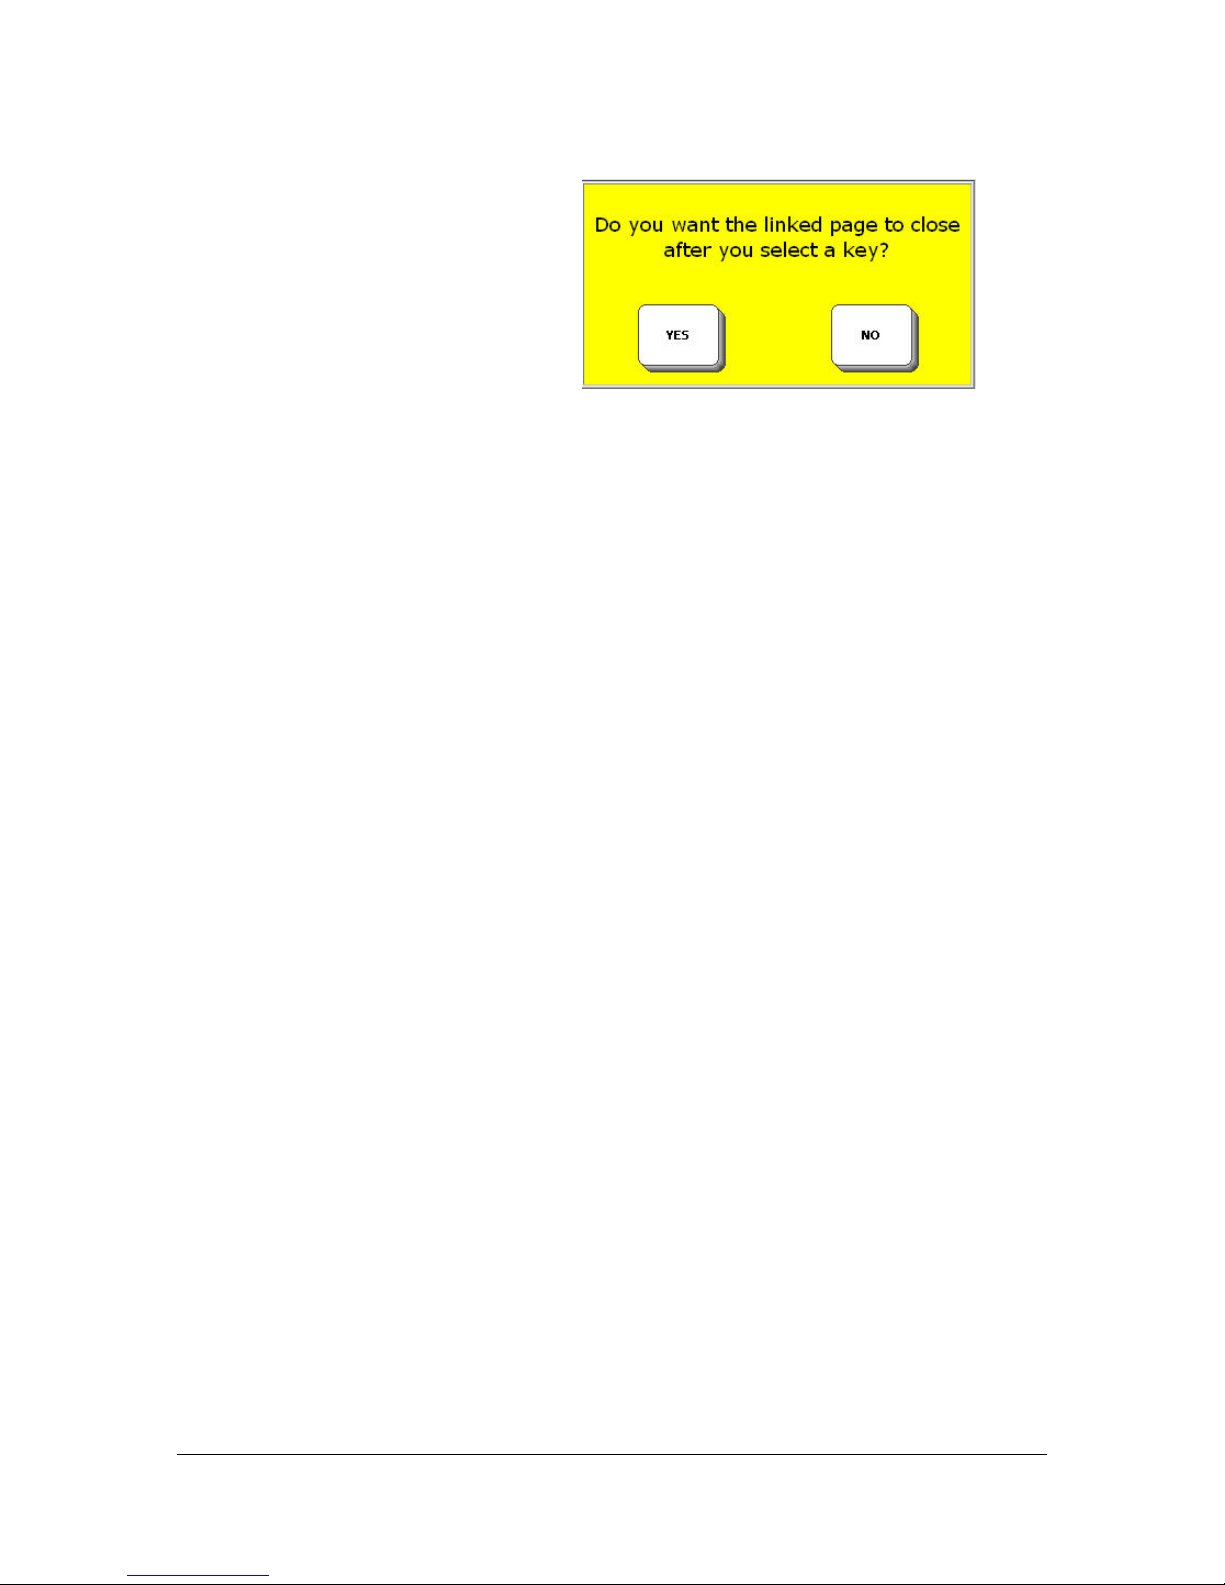
You see a yellow message box:
If you select YES, you will be able to go to your linked page, make one
selection, and then return automatically to your original page.
If you select NO, you will go to your linked Page and stay there.
Since your page contains messages for a whole meeting, you want to be able
to stay there, so select NO.
Now you see the Pages menu. This is where you need to remember the name
of your page.
The pages are listed alphabetically.
Use More Items until you see the name of your page, e.g., Dept. Mtg., then
select it. You can also select the Spell page to find key, spell the first few
letters of your page and select OK to find your page.
Select OK again.
CUSTOMIZING ESSENCE
Essence|VT Easy Start
67
Page 68
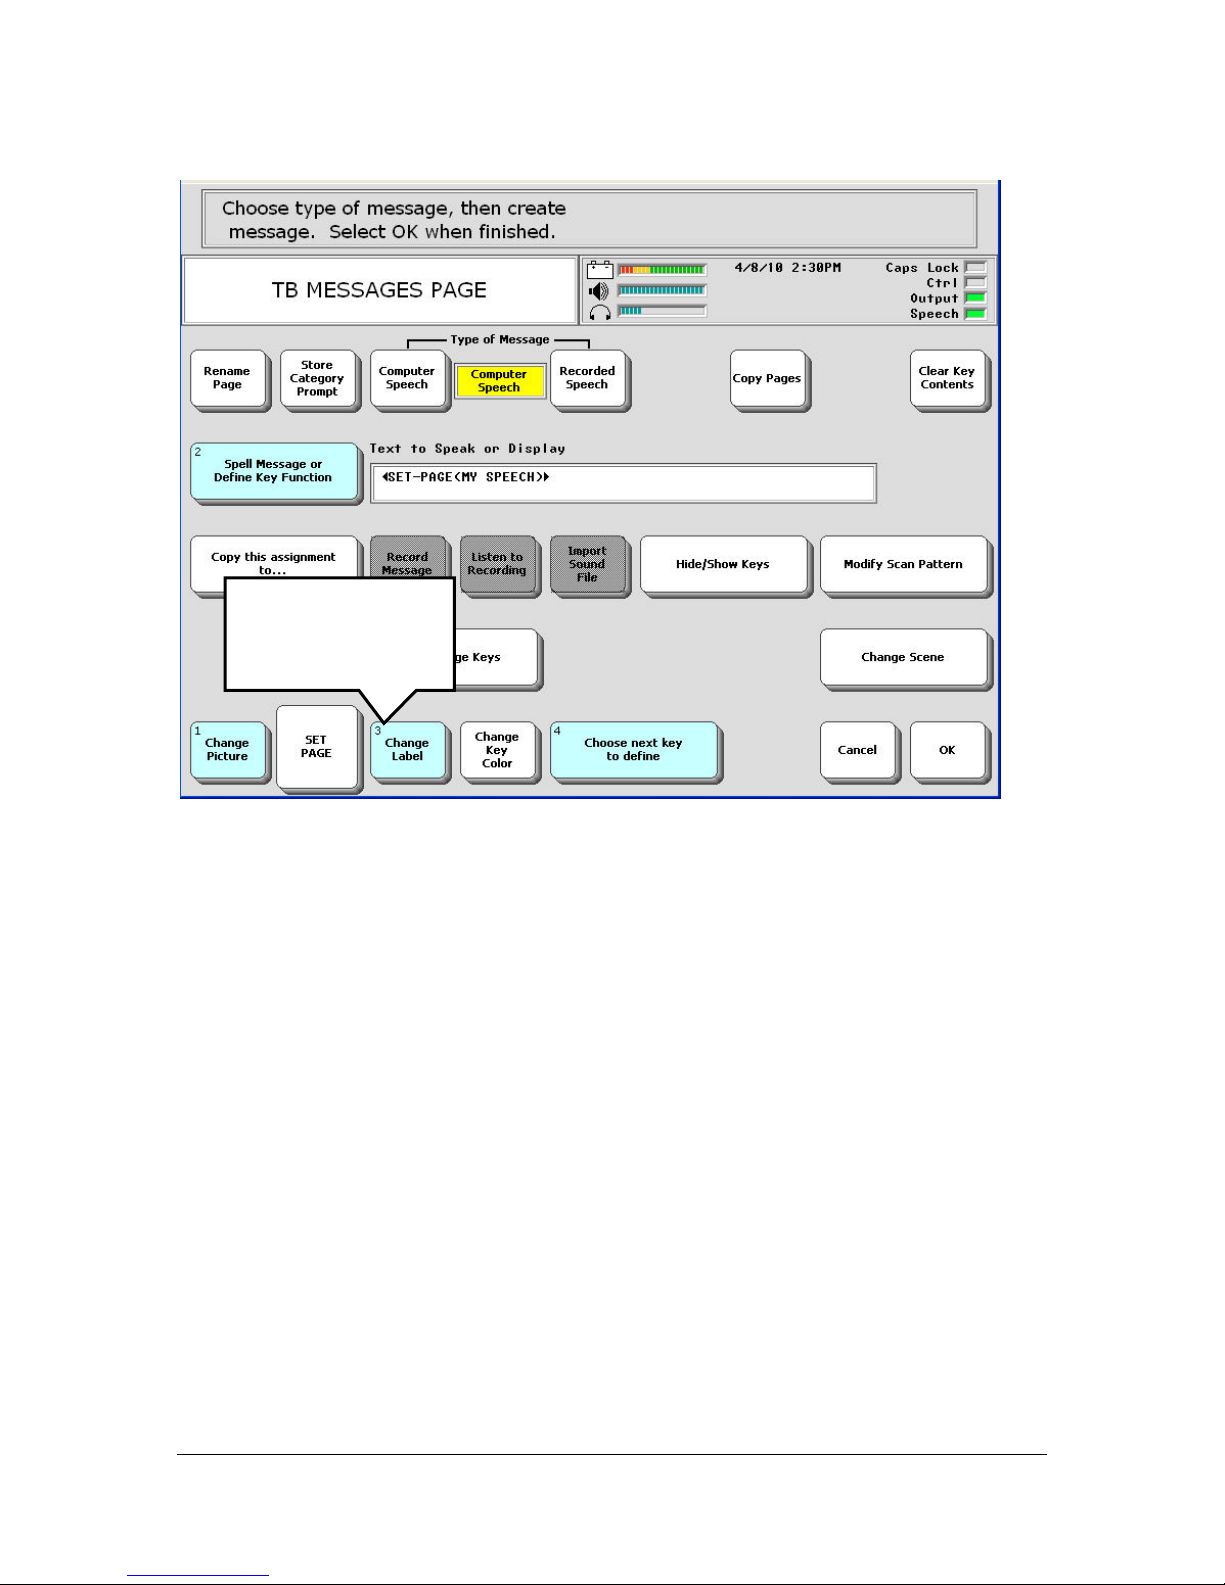
Change the label,
picture, color if
you want.
Now change the label to the name you want to use. Add a picture and/or
color if you want and then select OK.
CUSTOMIZING ESSENCE
Essence|VT Easy Start
68
Page 69
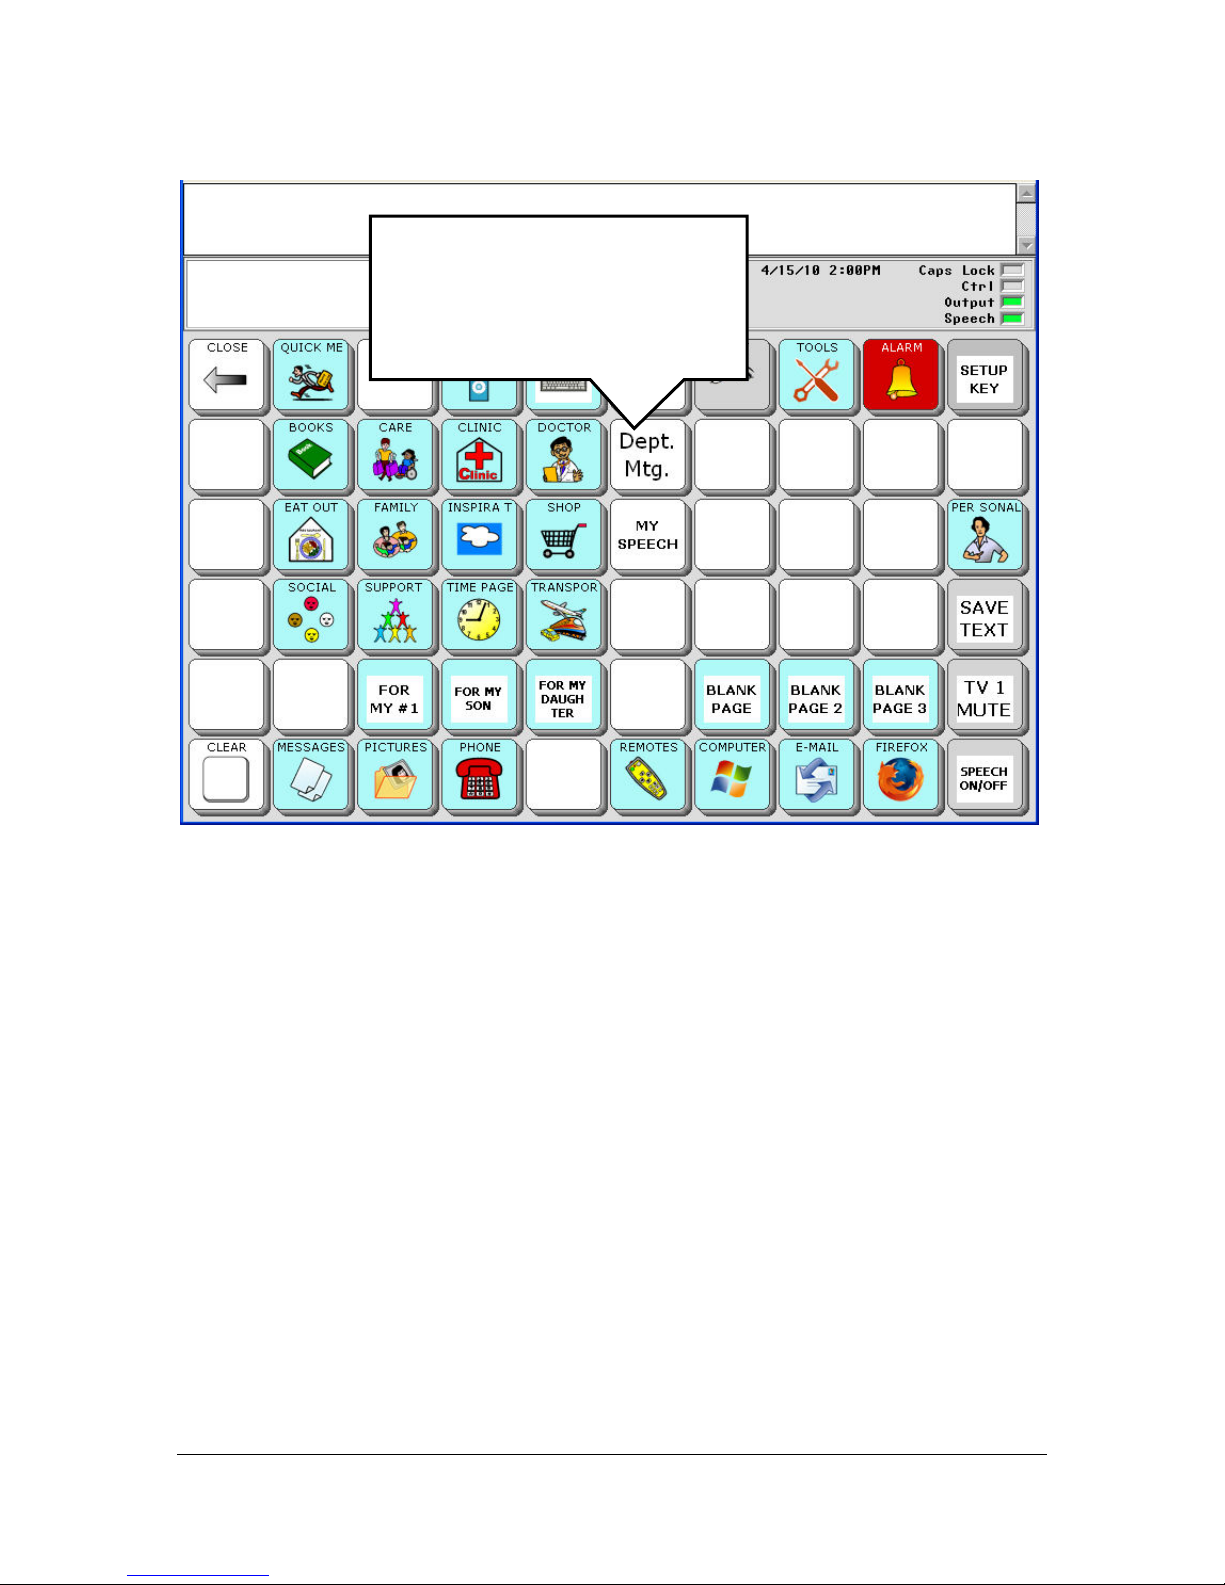
The link is now on the
MESSAGES page.
Select it to go to your Dept. Mtg.
page.
You now have a link to your Department Meeting page.
CUSTOMIZING ESSENCE
Essence|VT Easy Start
69
Page 70

Steps for Linking Pages
1. Go to the Page where you want to put your link.
2. Select the SET-UP key on that page.
3. Select the key where you want to put the link.
4. Select Spell Text for Message.
5. Select the PAGE LINK key on your spelling overlay.
6. If you select YES in the yellow box you will be able to go to your
linked page, make one selection, and then return automatically to your
original page.
If you select NO, you will go to your linked Page and stay there.
7. You see all of your pages. Select the page you want to link to.
8. Select OK.
9. You can now select an icon for the key, change the label, etc.
10. Select OK when you have finished.
CUSTOMIZING ESSENCE
Essence|VT Easy Start
70
Page 71
Add Digital Pictures to Essence Photo Albums
Before you can add pictures to albums on your VT, you must copy your
digital photos from your computer onto a USB flash drive.
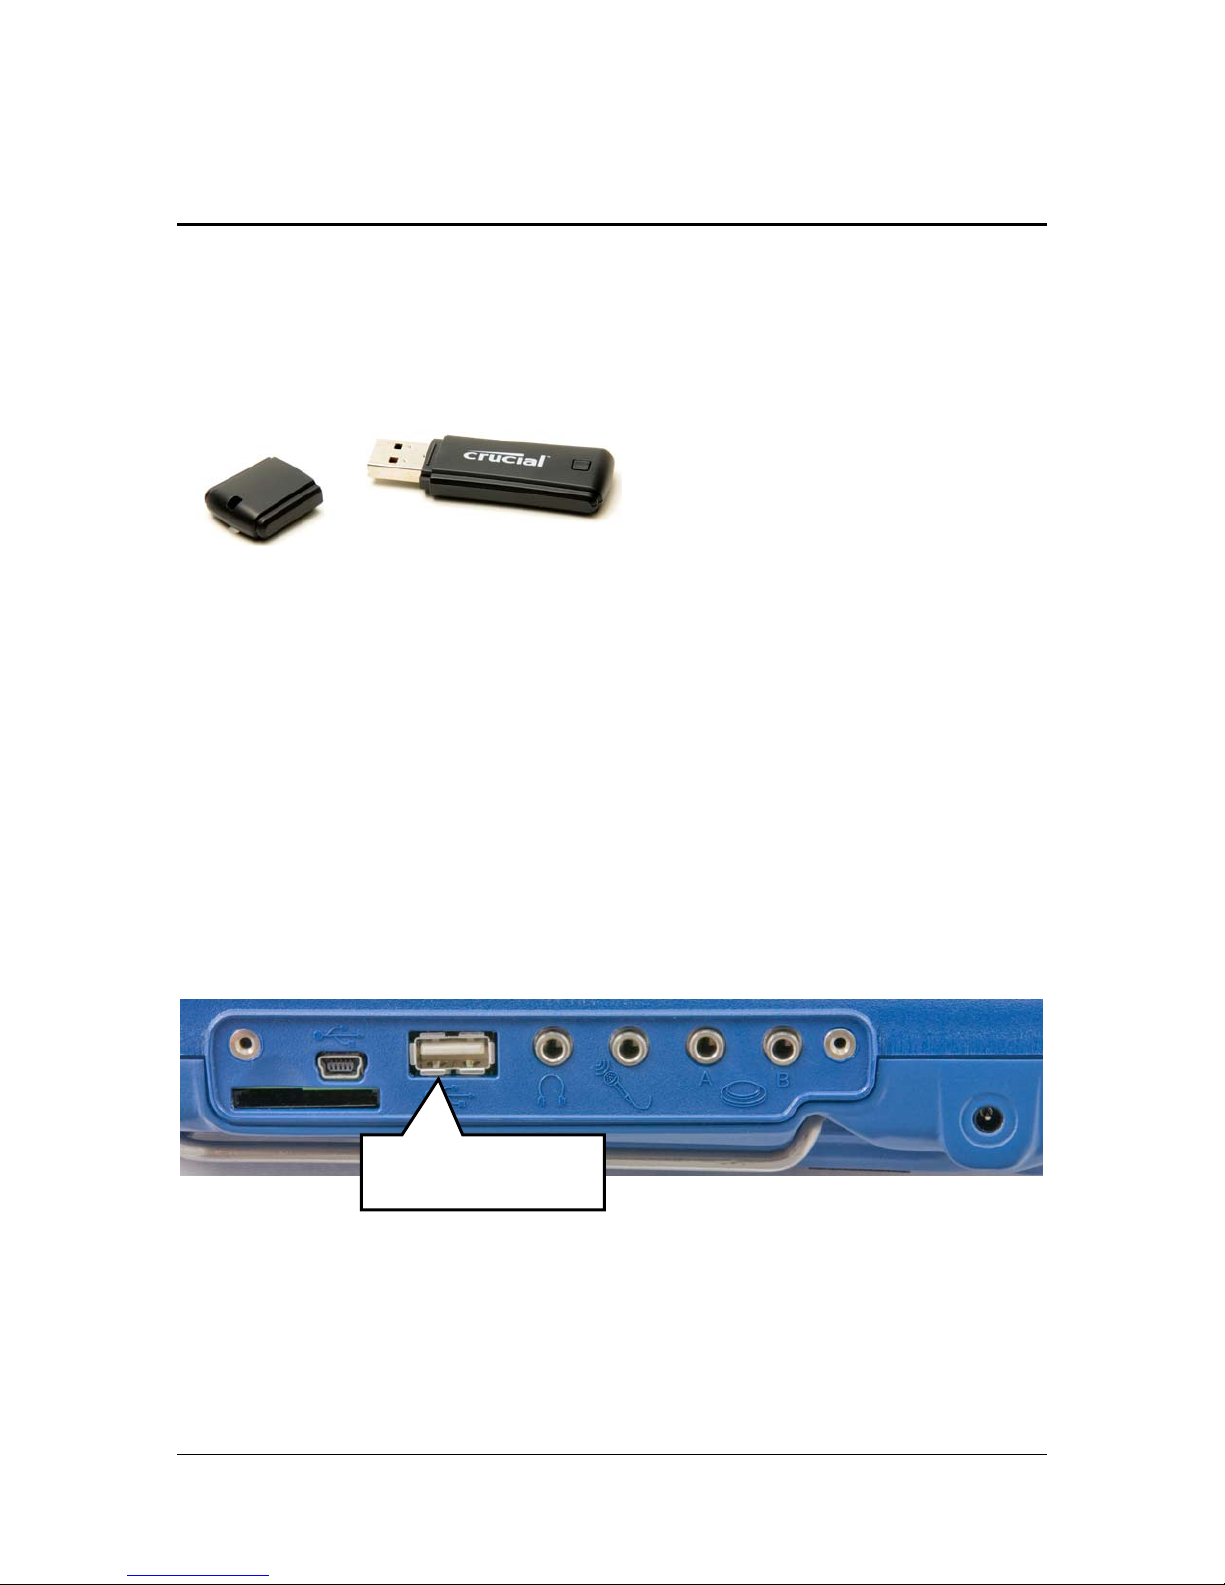
USB Flash Drive
On your computer
You received a USB flash drive in your Essence|VT box.
Plug the USB drive into the USB port on your computer.
On your computer, go to the folder where you keep your digital photos.
Copy the photos you want to your USB drive.
Remove the USB drive when you are finished.
On the VT
Standard USB port
Plug your USB drive into the standard USB port on the right side of the VT
case.
CUSTOMIZING ESSENCE
Essence|VT Easy Start
71
Page 72
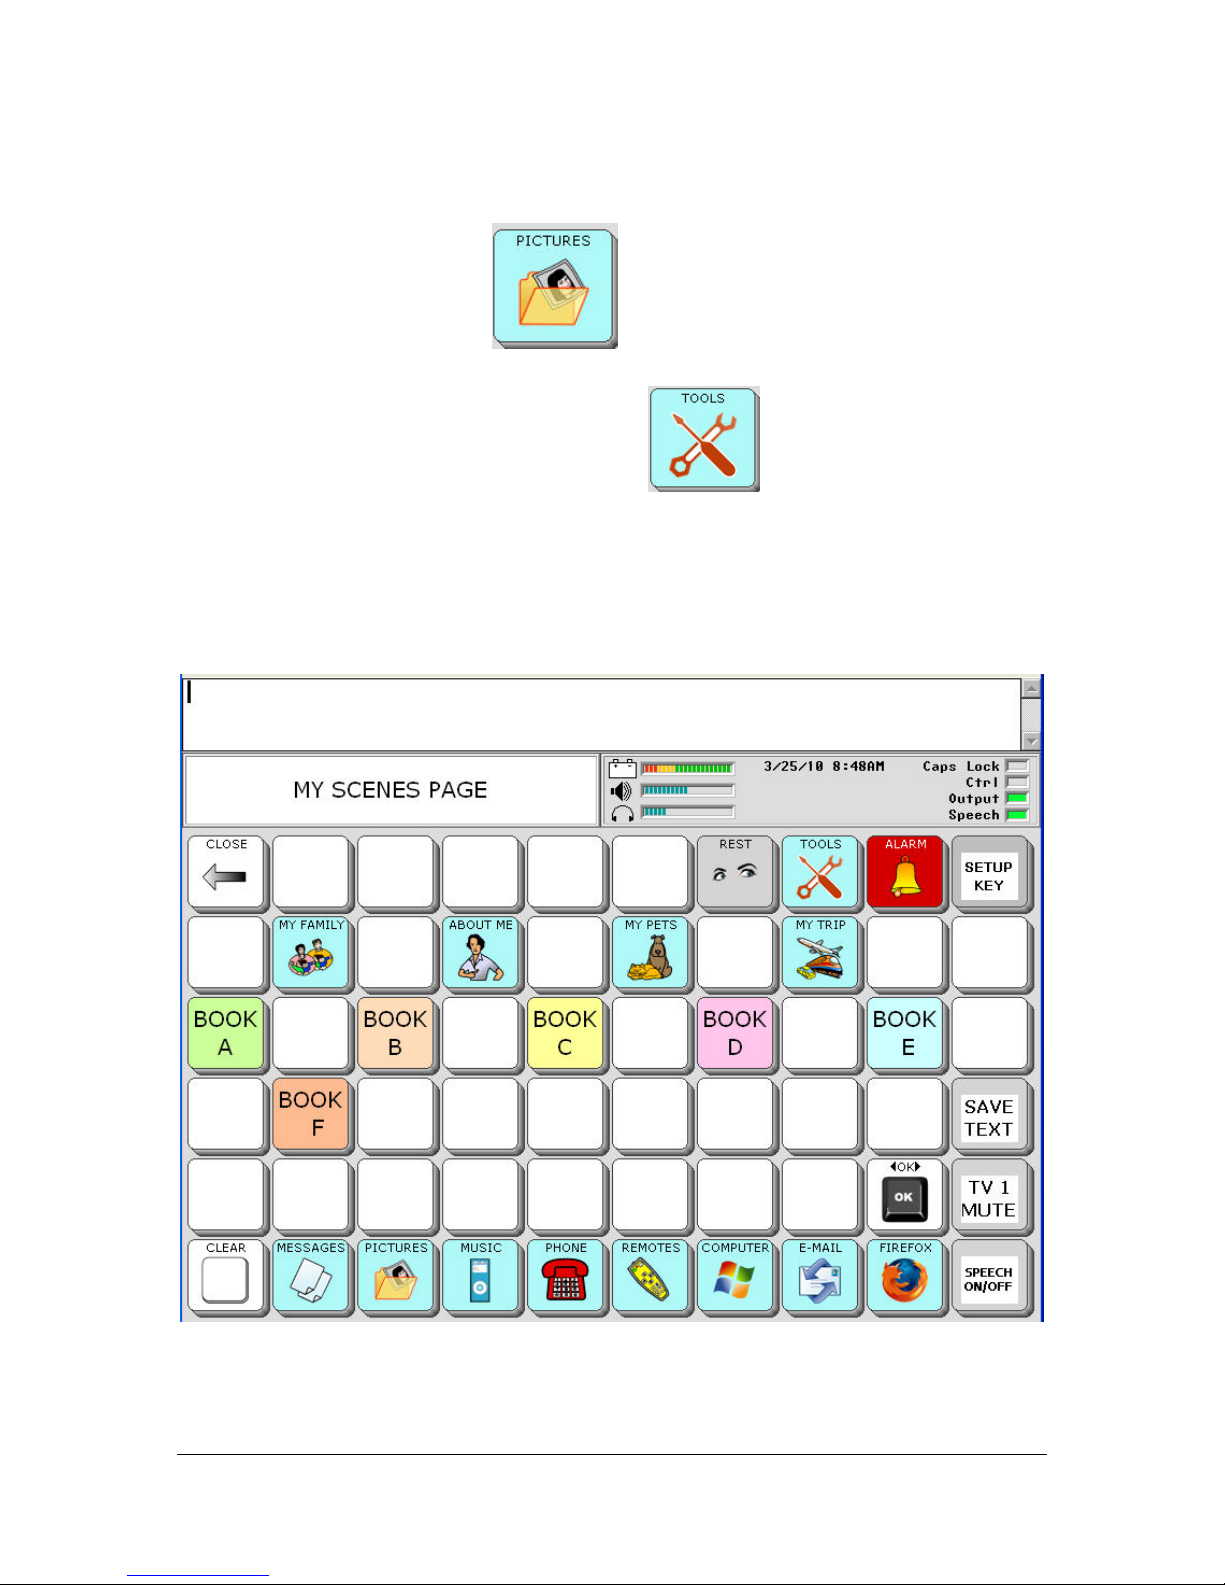
Select the PICTURES key
. You can find this key on the
DIRECTORY page. You may also find it on your Spelling Keyboard page.
You may have to select the TOOLS key on a Spelling Keyboard
and then select the PICTURES key.
You see the MY SCENES page which has some albums you can use.
CUSTOMIZING ESSENCE
Essence|VT Easy Start
72
Page 73
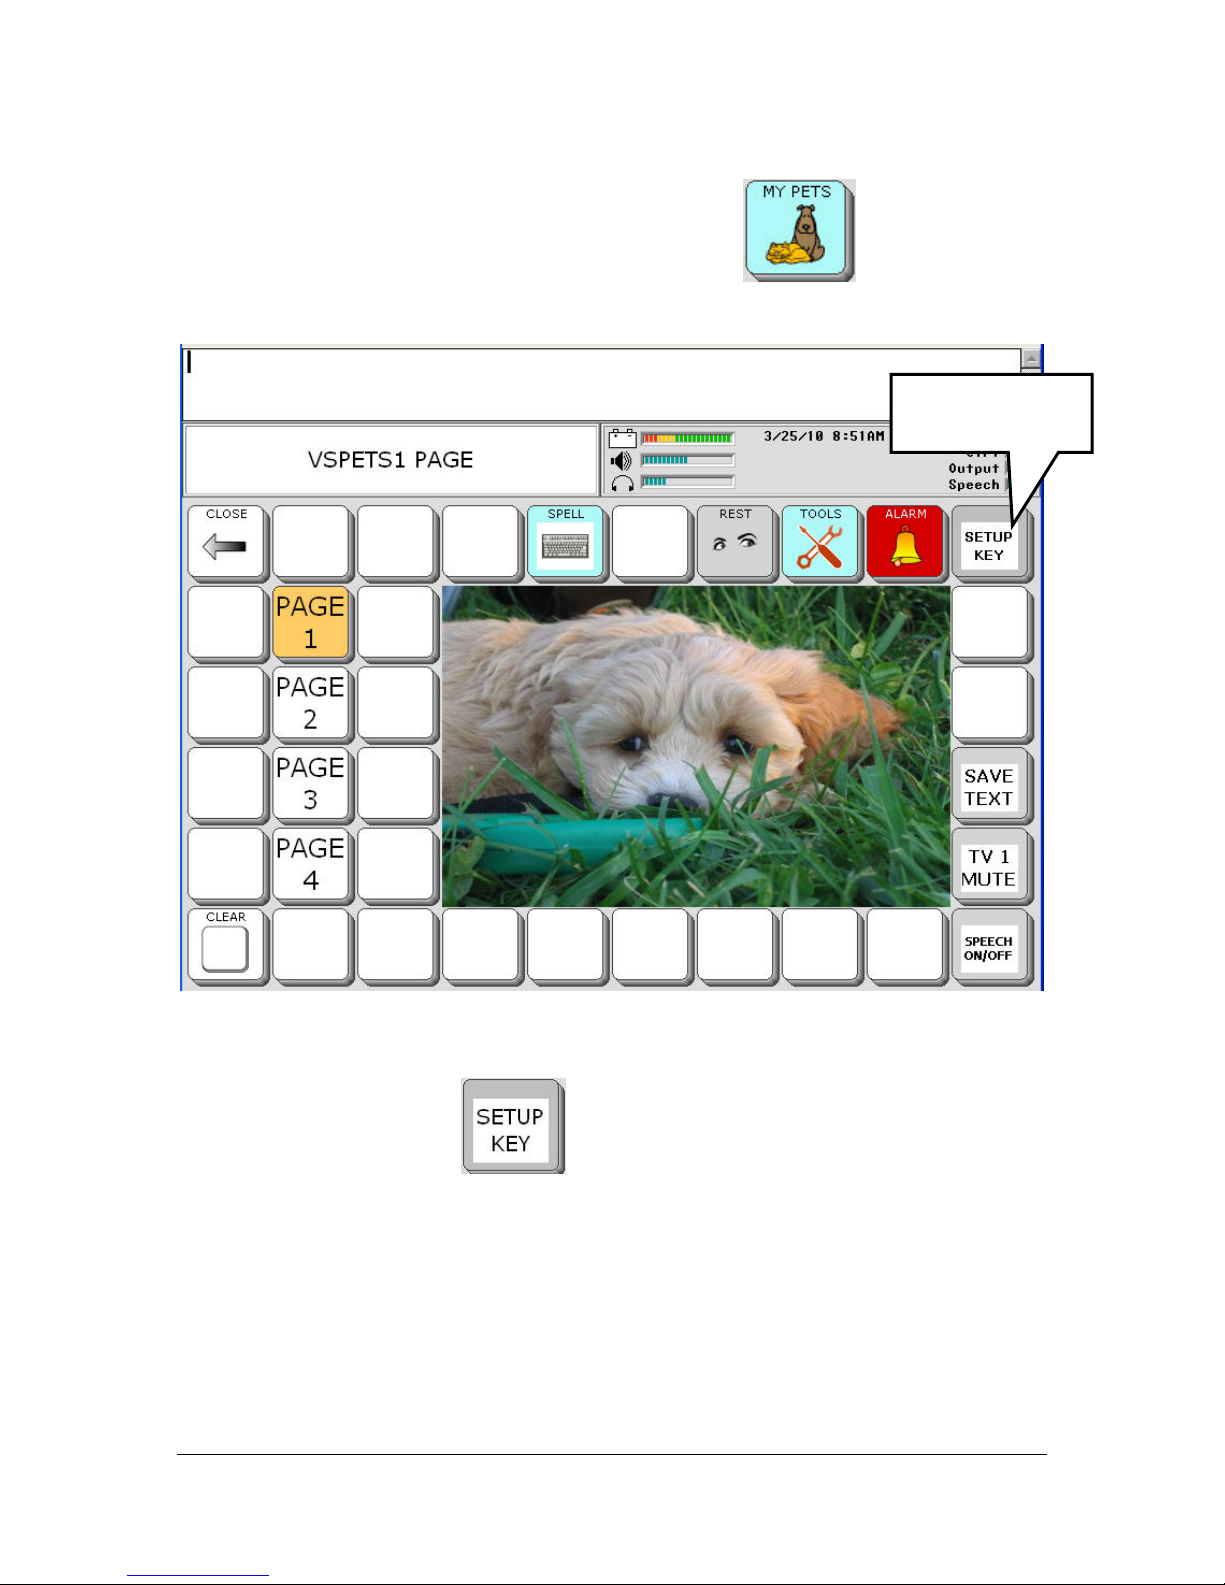
For this example, let's open the MY PETS album .
Select the
SETUP KEY
Let's add your family picture.
Select the SETUP KEY
in the top right corner.
Select any key to move to the next step.
CUSTOMIZING ESSENCE
Essence|VT Easy Start
73
Page 74
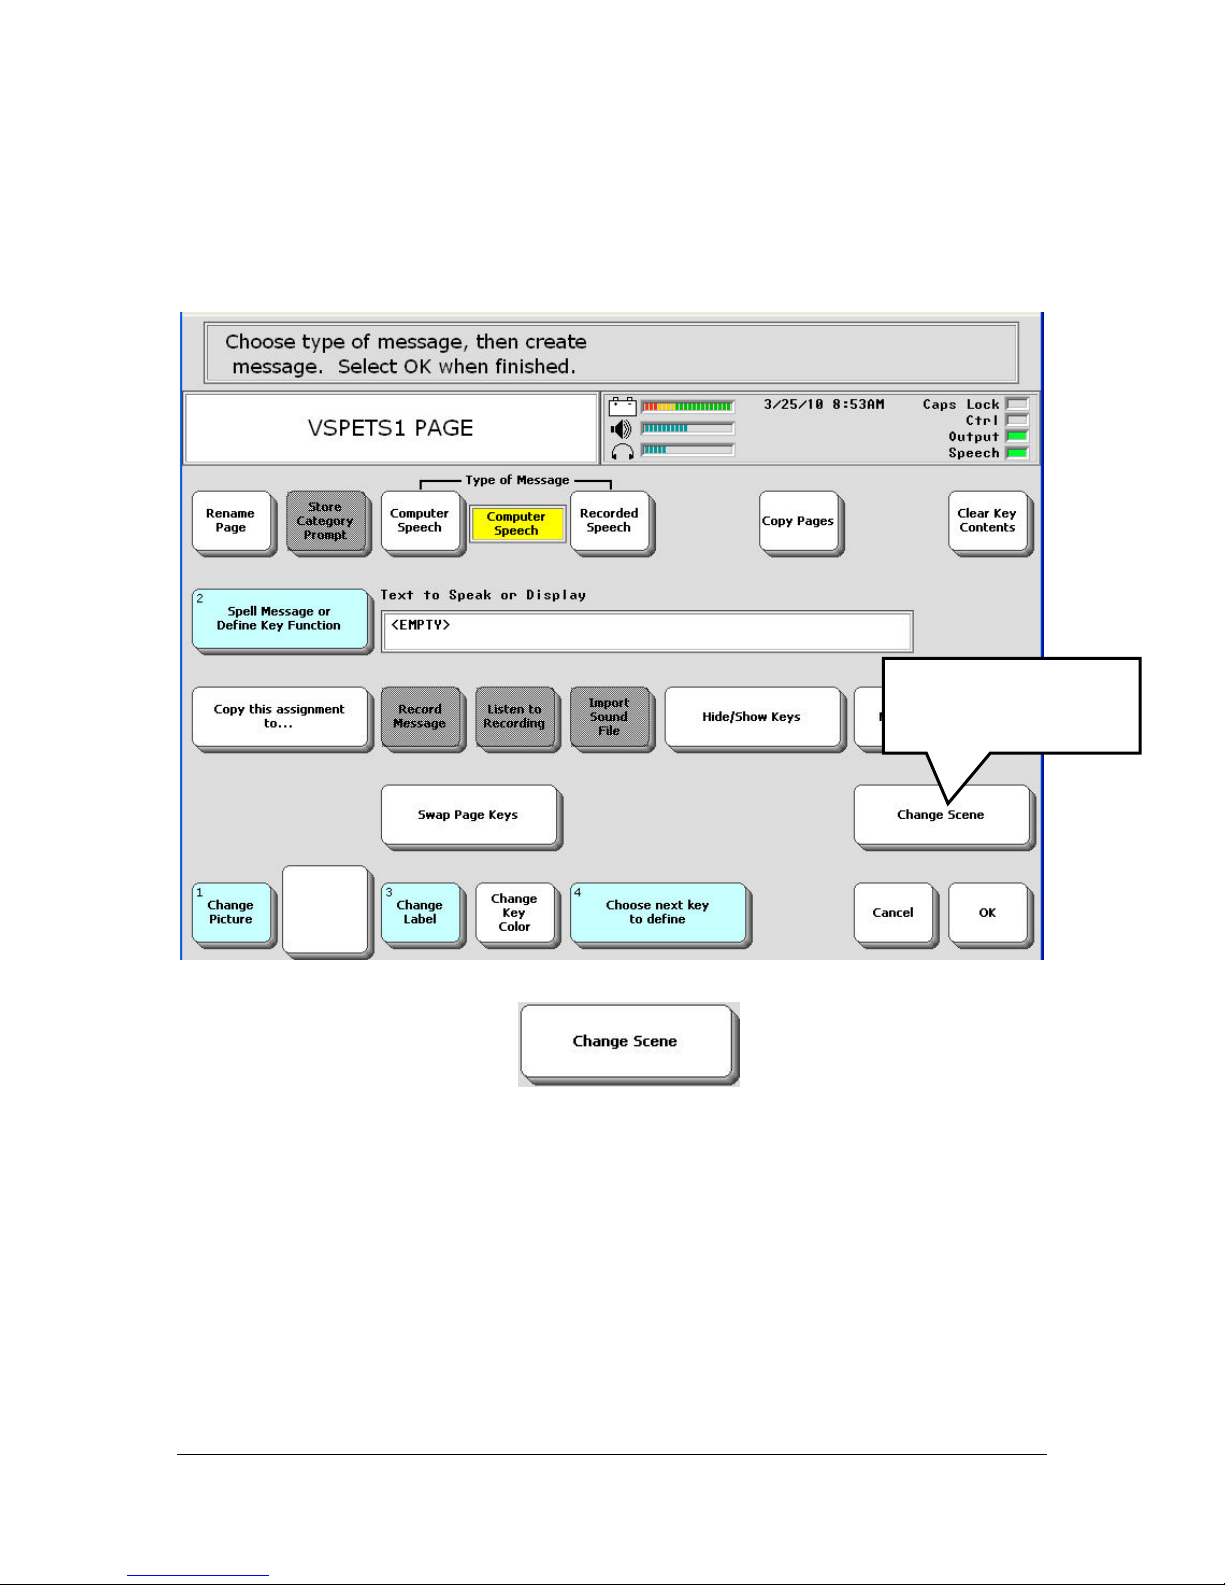
You see:
Select Change
Scene
Select the Change Scene key
CUSTOMIZING ESSENCE
Essence|VT Easy Start
74
Page 75
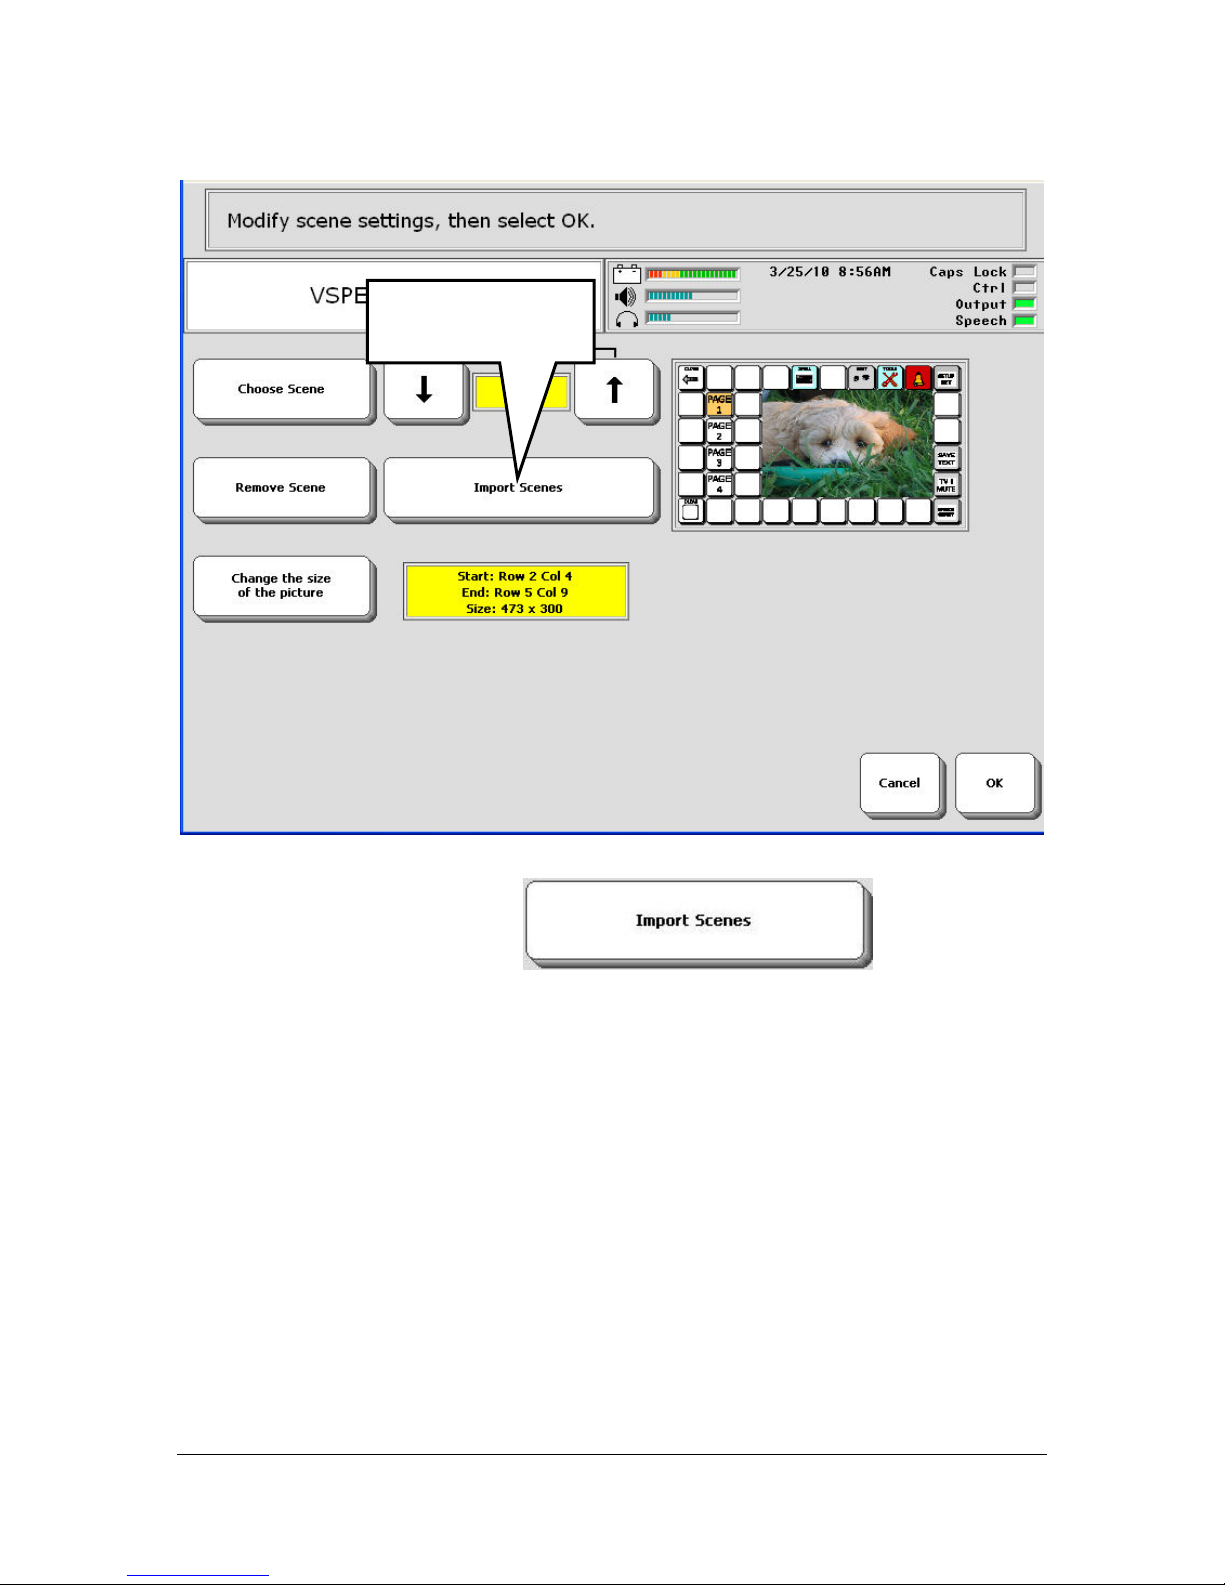
Select Import
Scenes
Select the Import Scenes key
.
CUSTOMIZING ESSENCE
Essence|VT Easy Start
75
Page 76
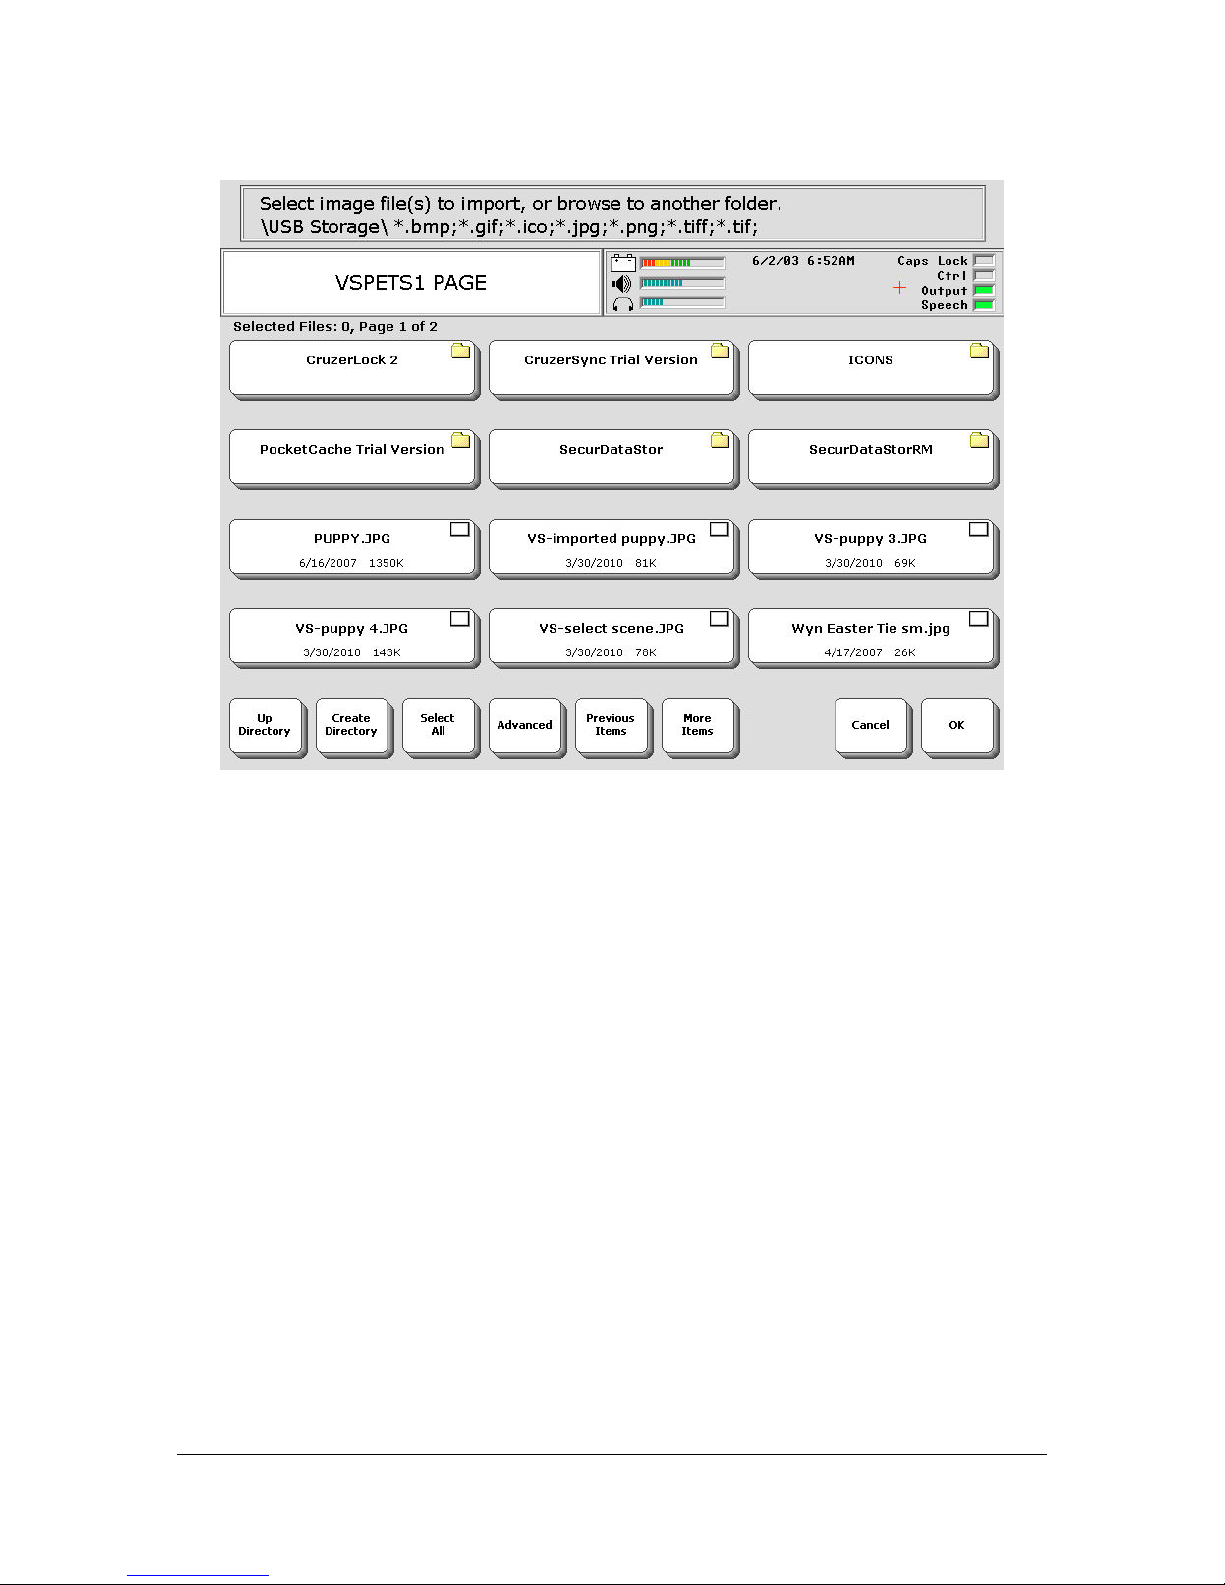
Your USB drive may have more, or less, files on it.
You see the contents of your USB drive. Select the picture you want to use.
When you select the picture, a check mark will appear in the small box in
the top right corner of the key.
Select the OK key when you are finished.
If you have a lot of files on your USB drive, you may need to select the
More Items key in the bottom row to find the picture you want.
CUSTOMIZING ESSENCE
Essence|VT Easy Start
76
Page 77
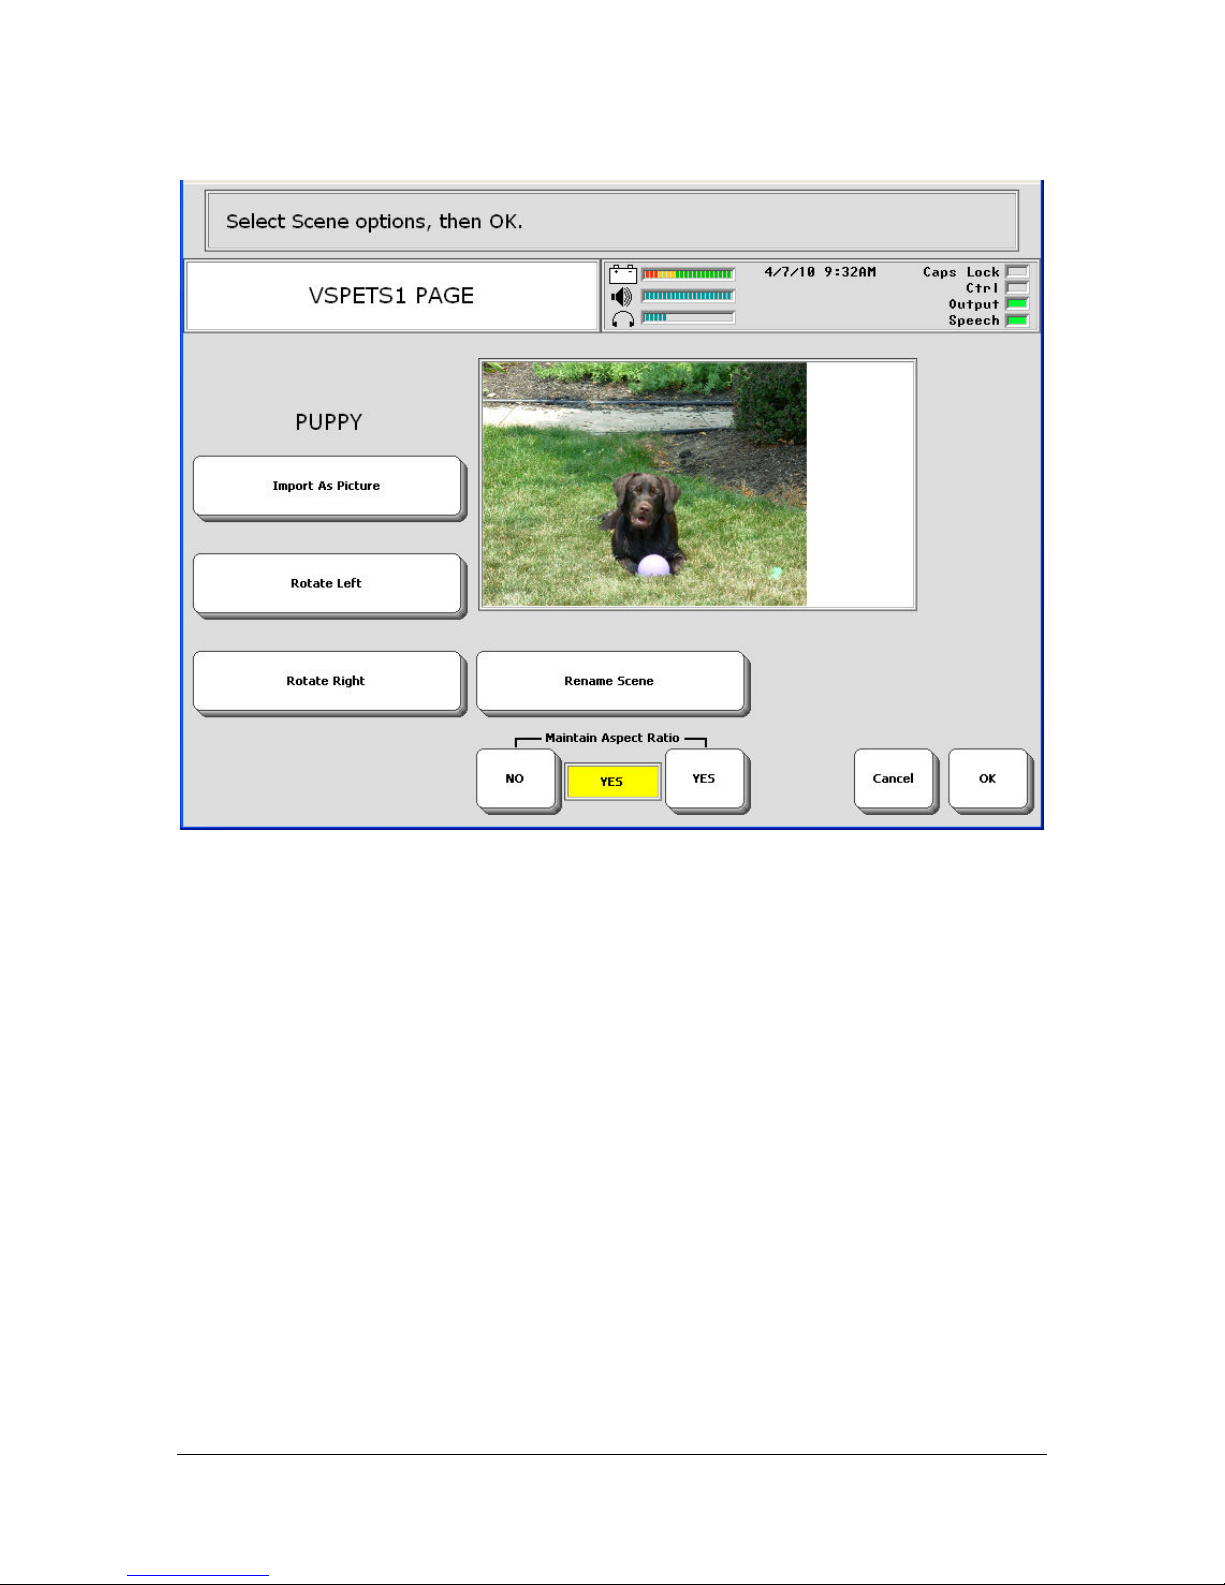
You see the picture you imported.
The keys on this page allow you to rotate the picture and rename it.
Aspect Ratio refers to the ratio between the width and height of the picture.
YES maintains this ratio; NO will stretch out the picture. Generally, you
will want this option to say YES.
Import As Picture means that the your device will re-create the picture so
that it will fit on a keyboard key. Later you can use the SET UP key on most
pages to add the picture to a key if you want.
For this example, just select the OK key.
You return to the main menu. Select the OK key to exit.
CUSTOMIZING ESSENCE
Essence|VT Easy Start
77
Page 78
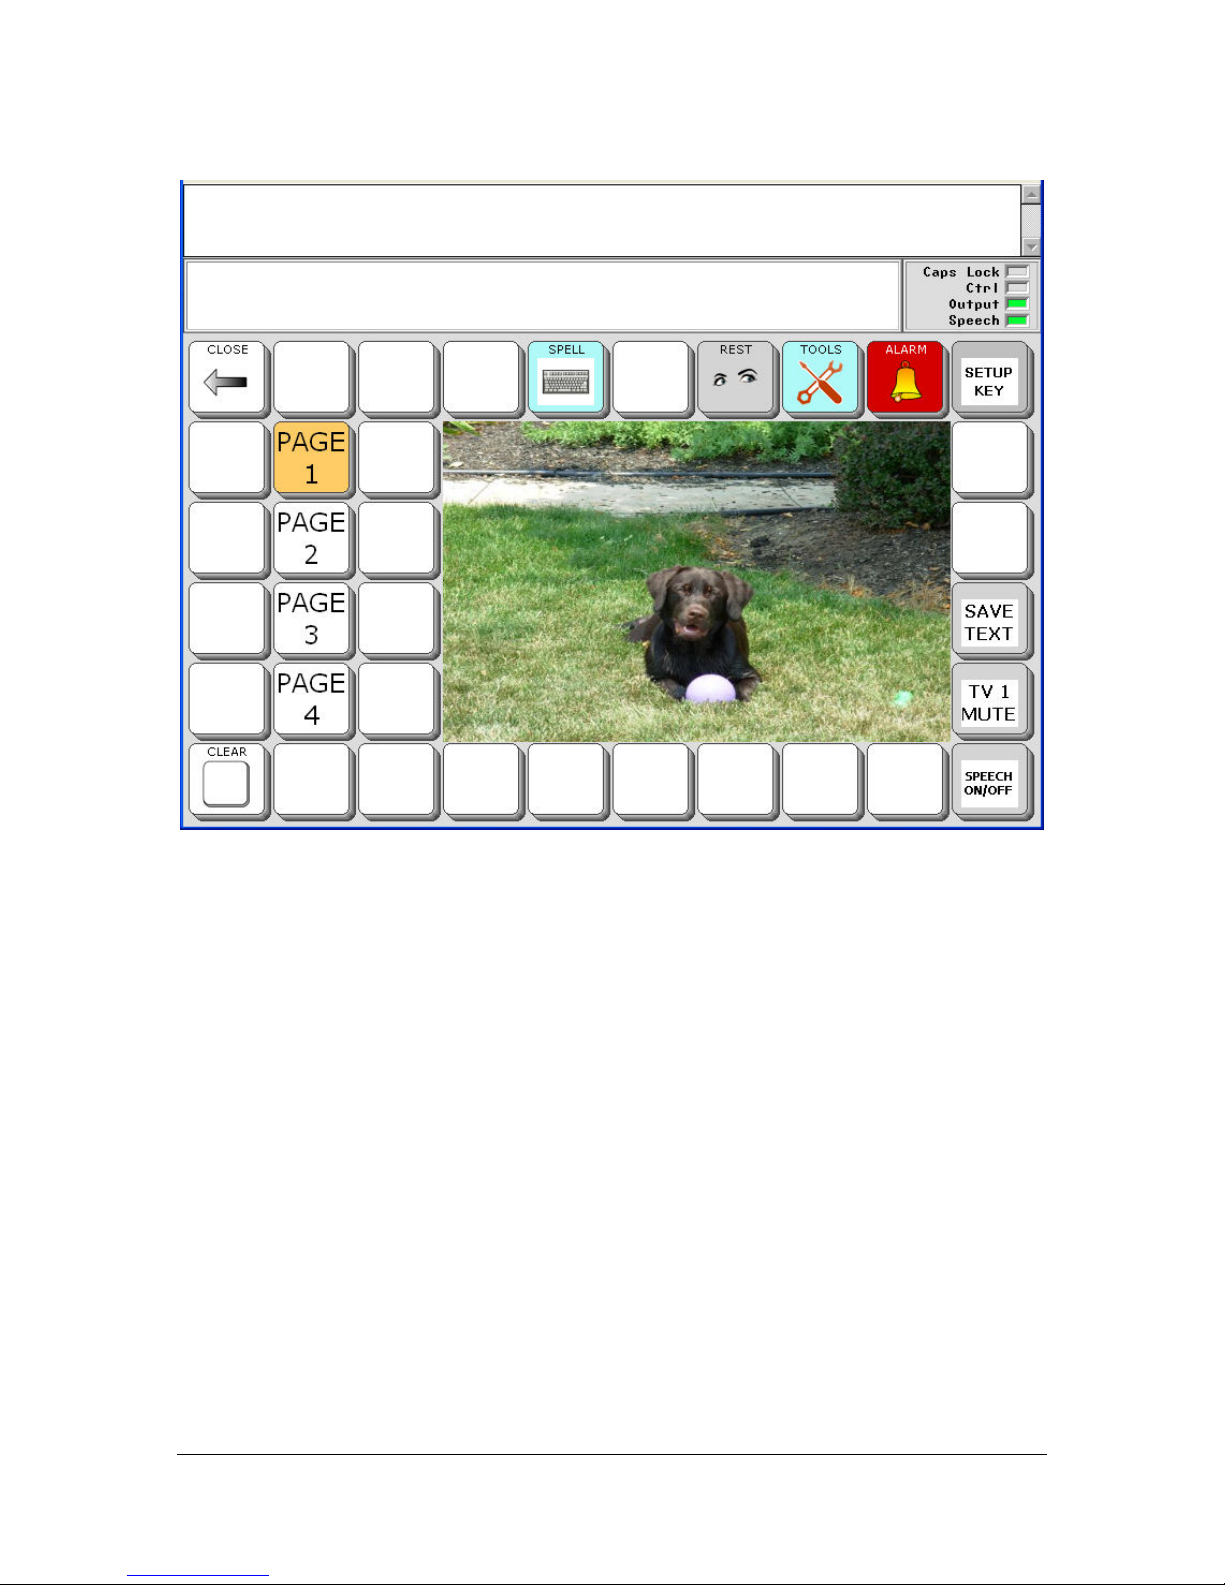
You are back on the MY PETS page. Your pet is now the first picture in the
album.
You can select the SETUP key again, then select a new key (or the PAGE 2
or PAGE 3, etc. key) and continue to add pictures to your album.
You can also add messages to your keys. See the directions for Using the
SETUP key to Add Messages to Keys beginning on page 48.
CUSTOMIZING ESSENCE
Essence|VT Easy Start
78
Page 79
Saving Memory
One of the most important things you can do after personalizing your
Essence|VT is to save its memory.
If, for some reason your device should lose power, or crash, you could lose a
great deal of customized work. Names or new words added to Word
Prediction, names and phone numbers added to the phone book (see the
Operator's Manual for information on this), remote control signals added to
your device, even messages you created yourself, may all be lost unless you
have saved your device's memory
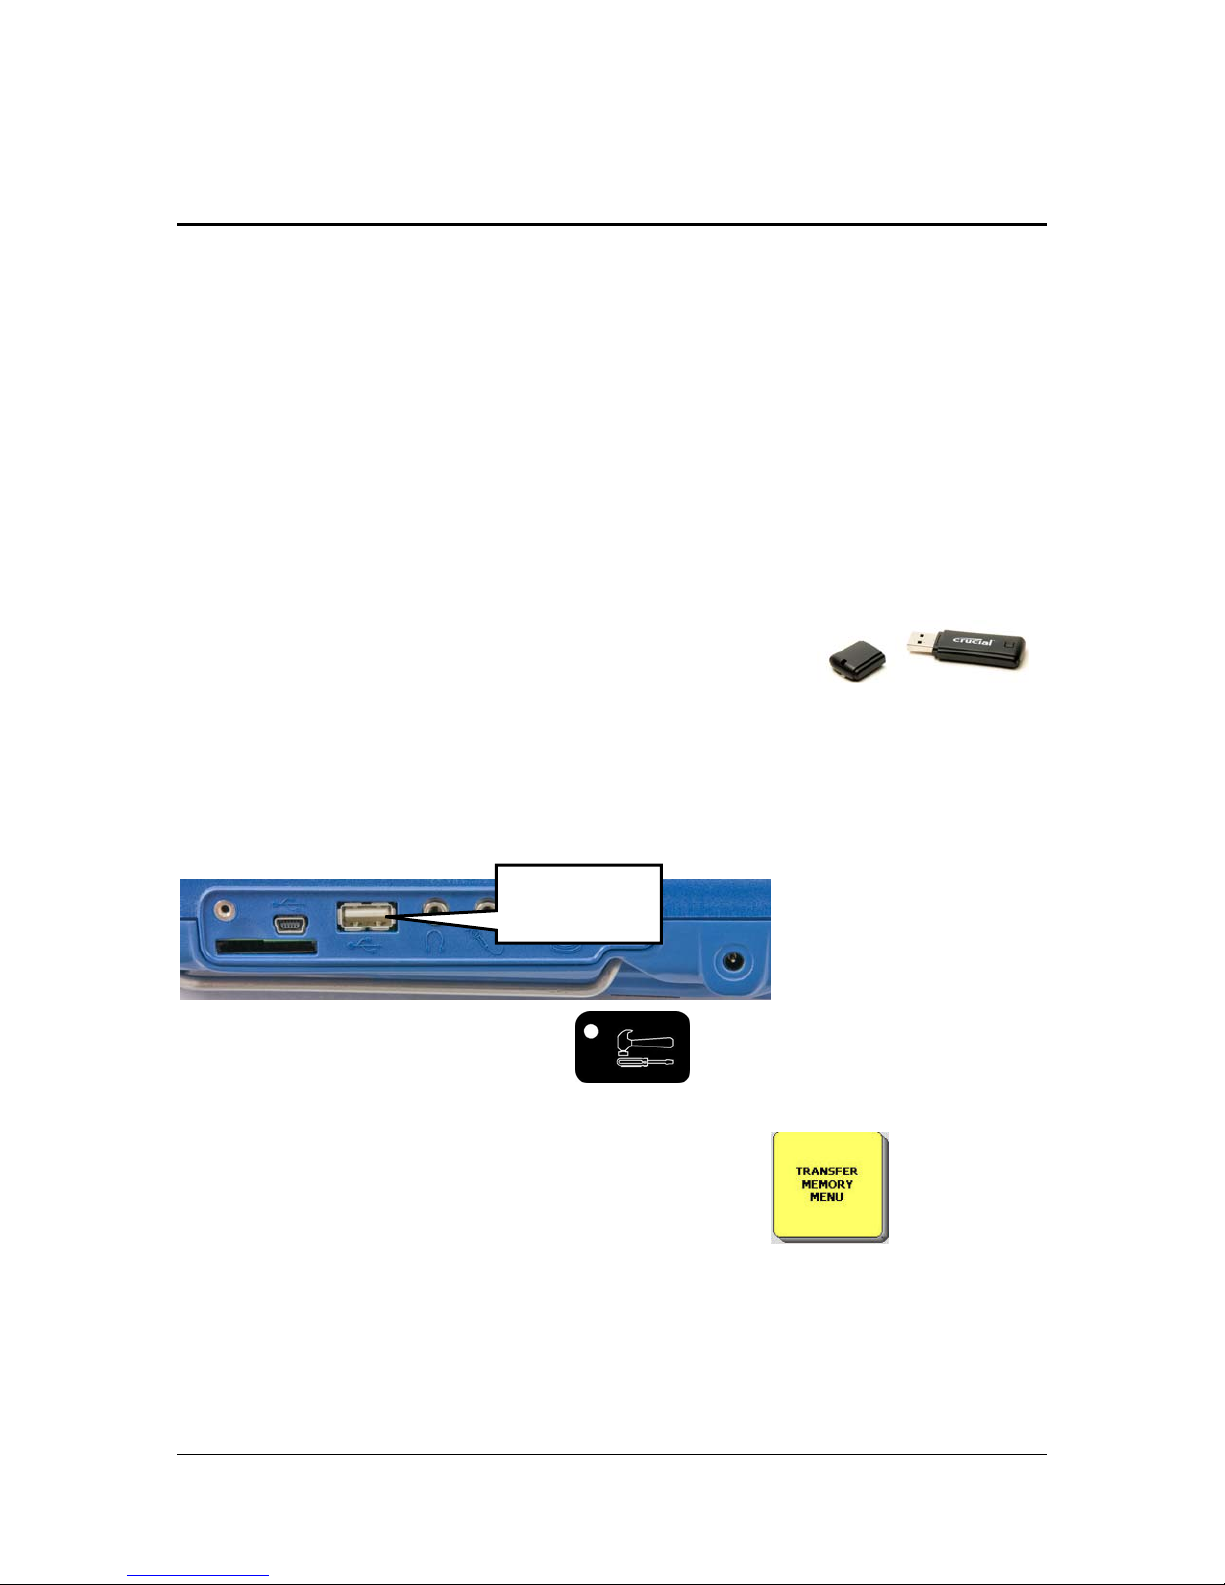
You received a USB drive in the box with your device.
Use this drive to back up your device memory.
Plug the drive into the rectangular port on the right side of device case.
USB port
Press or select the TOOLS key
on the top front of the device
case.
Select the TRANSFER MEMORY MENU key
.
You see:
CUSTOMIZING ESSENCE
Essence|VT Easy Start
79
Page 80
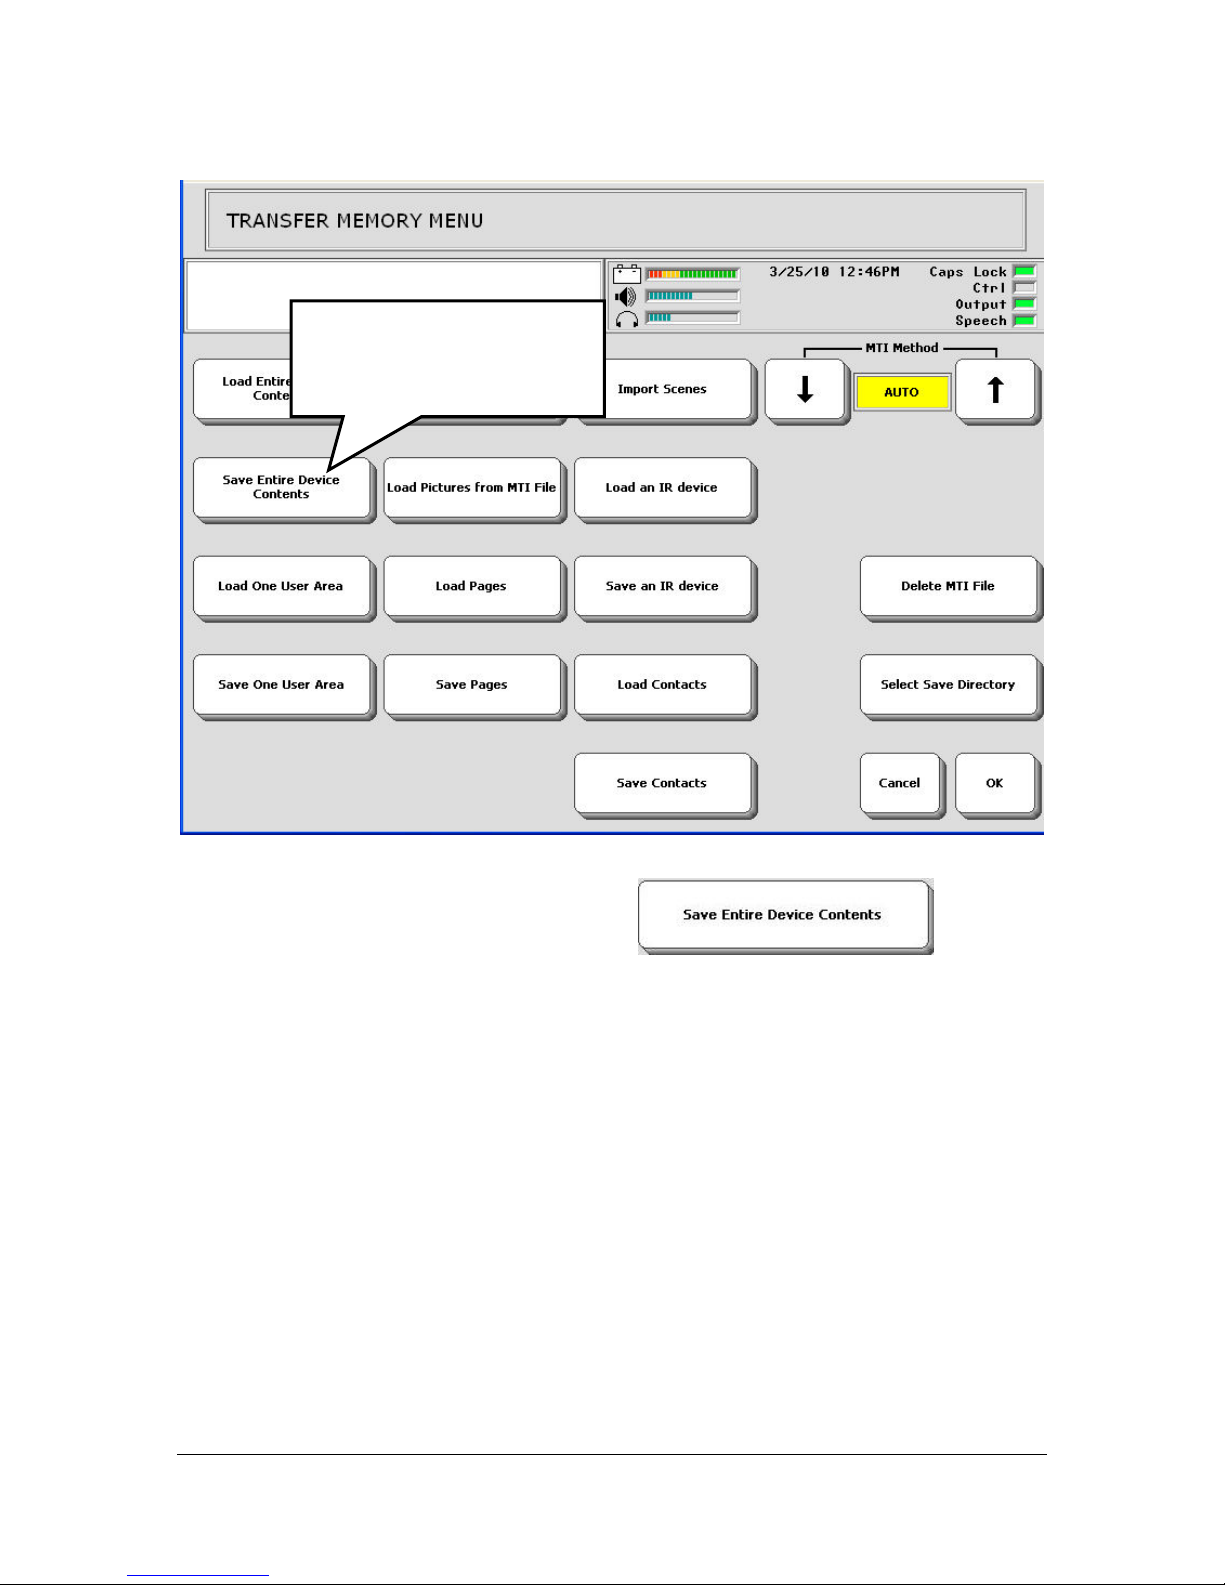
Select Save Entire
Device Contents.
Select Save Entire Device Contents
.
You can select to save only one area if you wish. The Essence program is
in User Area 1 (60) and User Area 2 (84).
CUSTOMIZING ESSENCE
Essence|VT Easy Start
80
Page 81
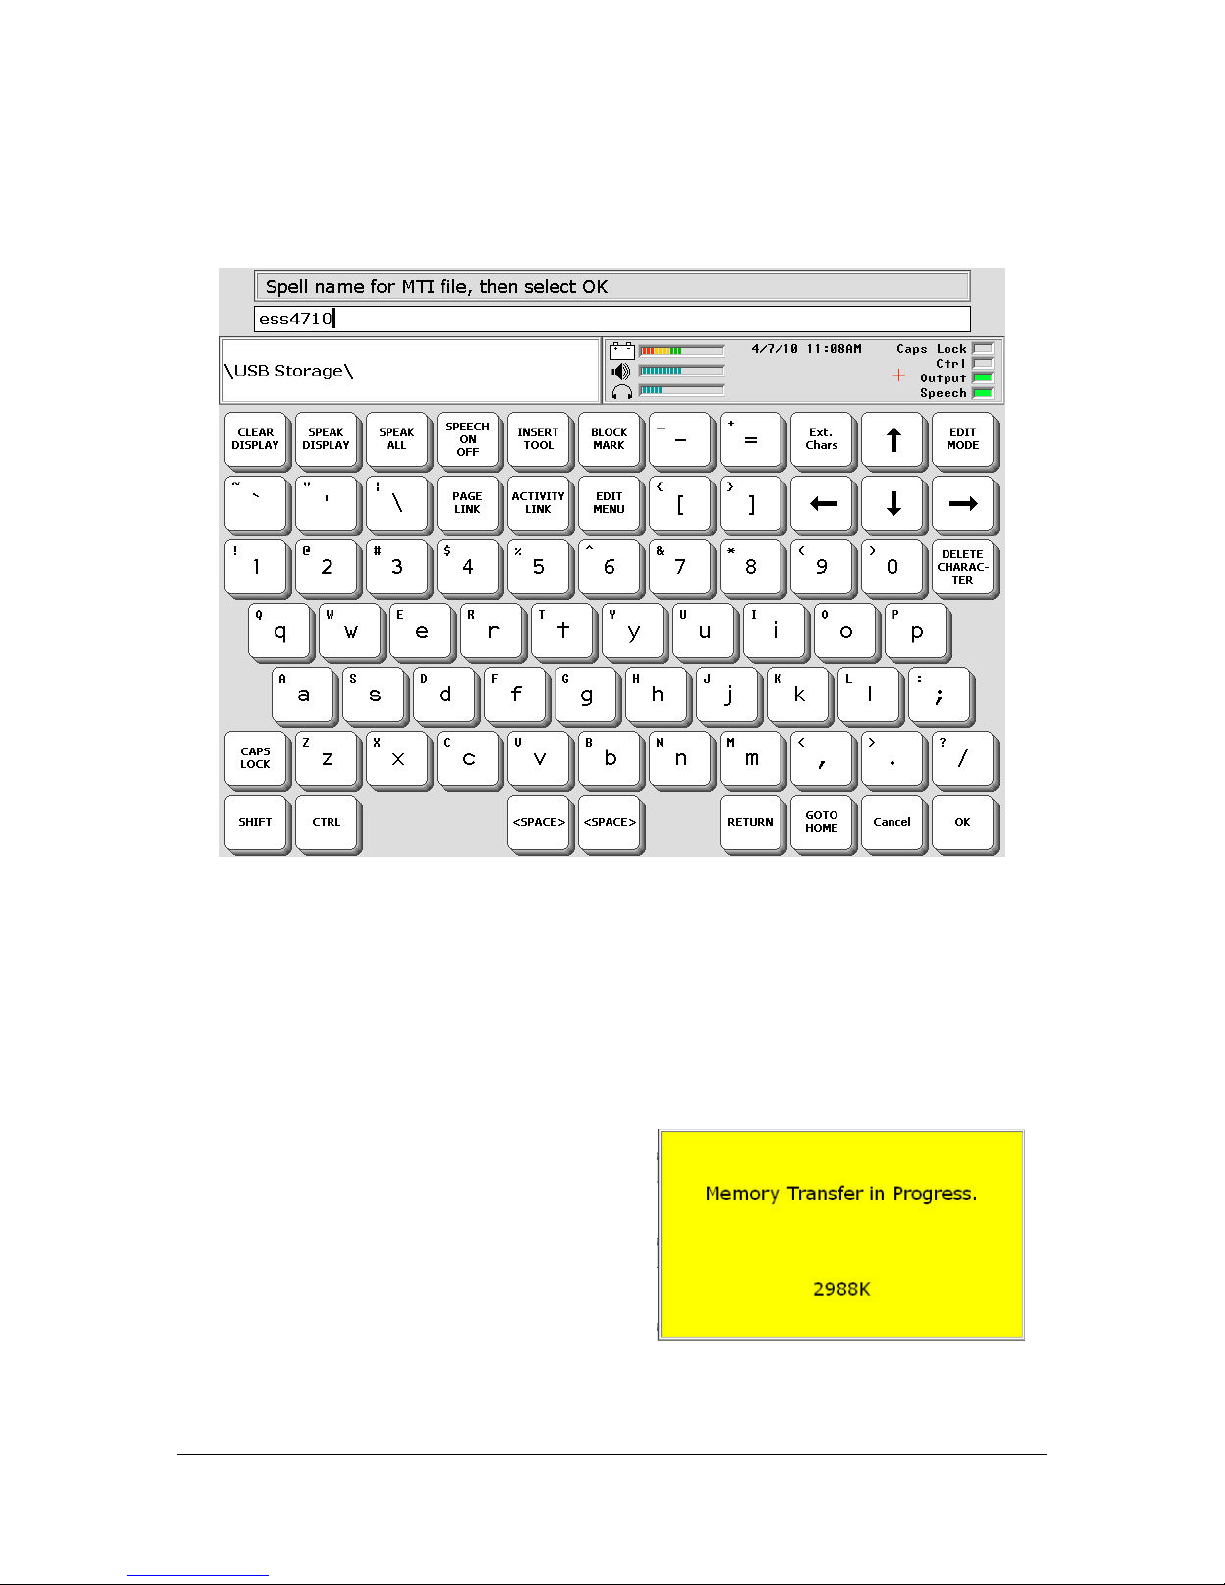
When you select to save an area or the whole device, you see:
Spell a name for your file. Select OK when you have finished.
We have used "Ess4710" which tells us that this is the Essence program
saved on April 7, 2010. If you have more than one MTI file on your USB
it's good to give them an identifying name and date so that, later, you don't
load older files back into your device.
During a transfer you see a yellow box
.
CUSTOMIZING ESSENCE
Essence|VT Easy Start
81
Page 82
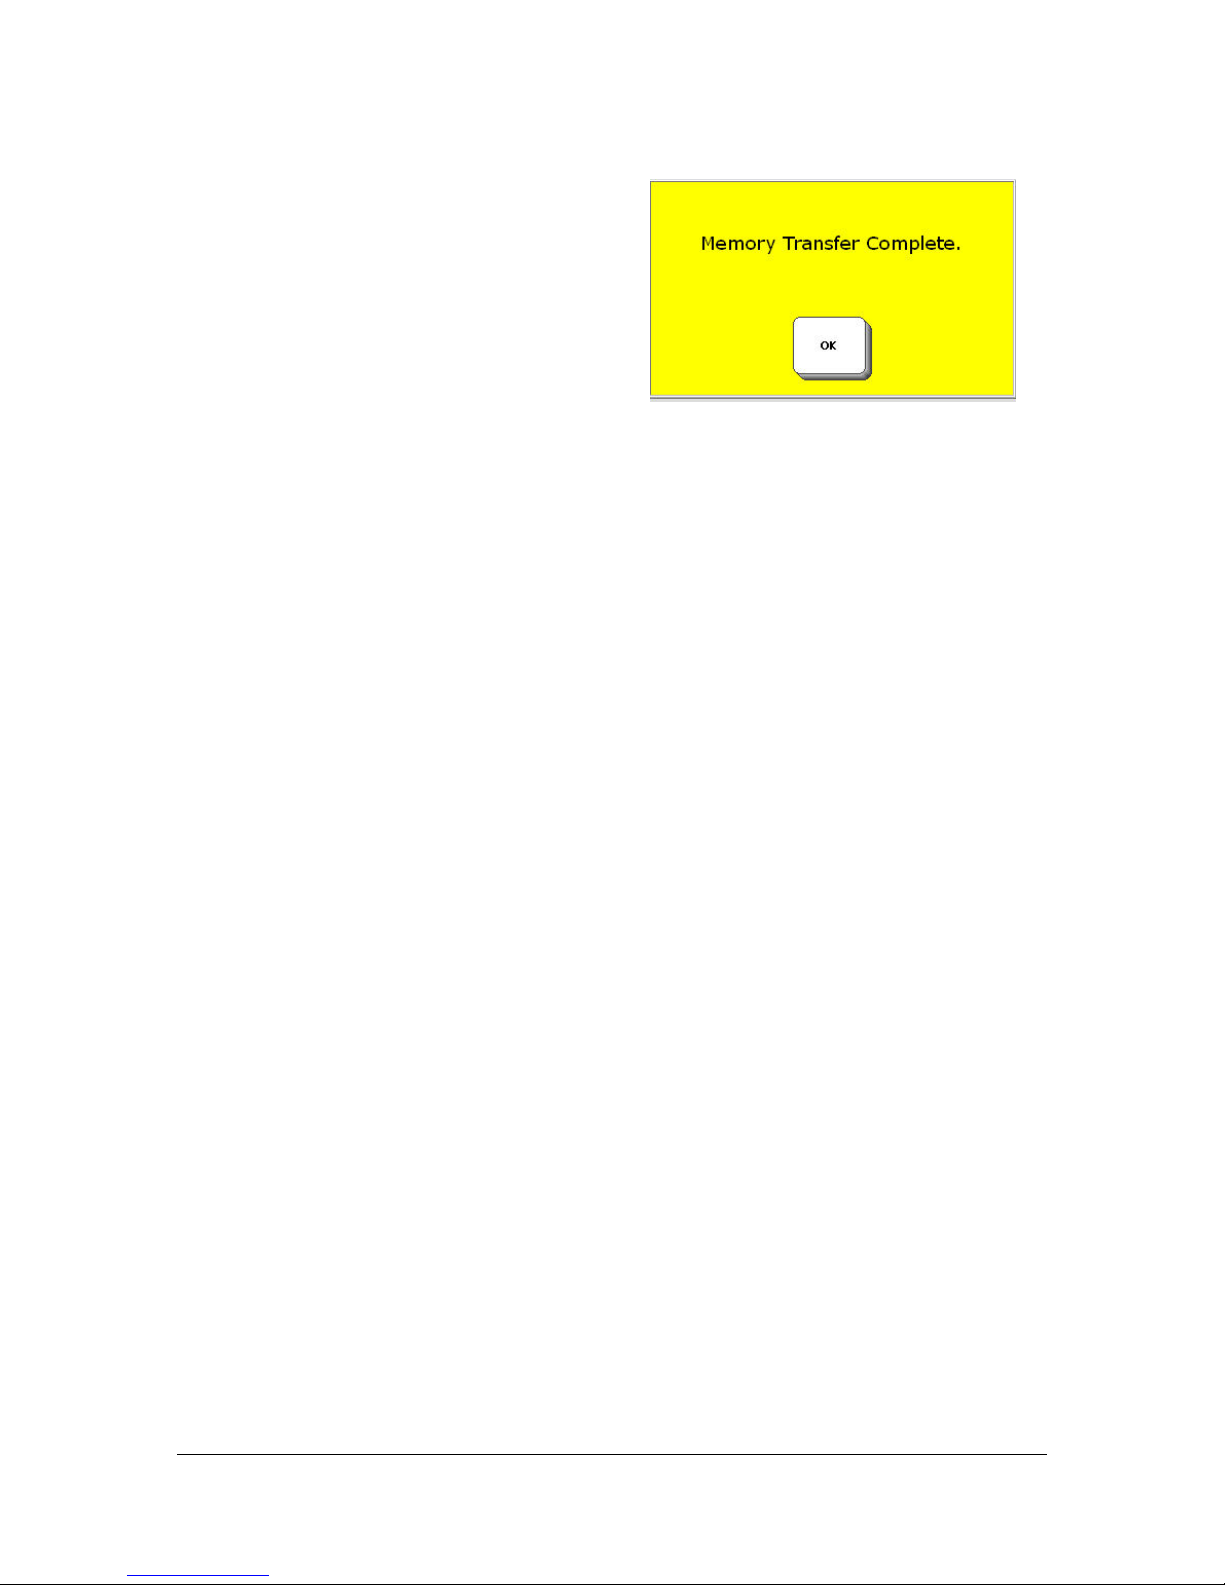
When the transfer is complete you see
Select OK in the yellow box.
Select the OK key to exit the TRANSFER MEMORY MENU.
Select OK or the GO TO HOME key to see the Essence DIRECTORY
page.
Unplug the USB drive from your device and keep it in a safe place.
Any time you make changes to your Essence|VT that you would like to
keep, back them up on your USB drive.
CUSTOMIZING ESSENCE
Essence|VT Easy Start
82
Page 83

Special Features
SPECIAL FEATURES
Essence|VT Easy Start
83
Page 84
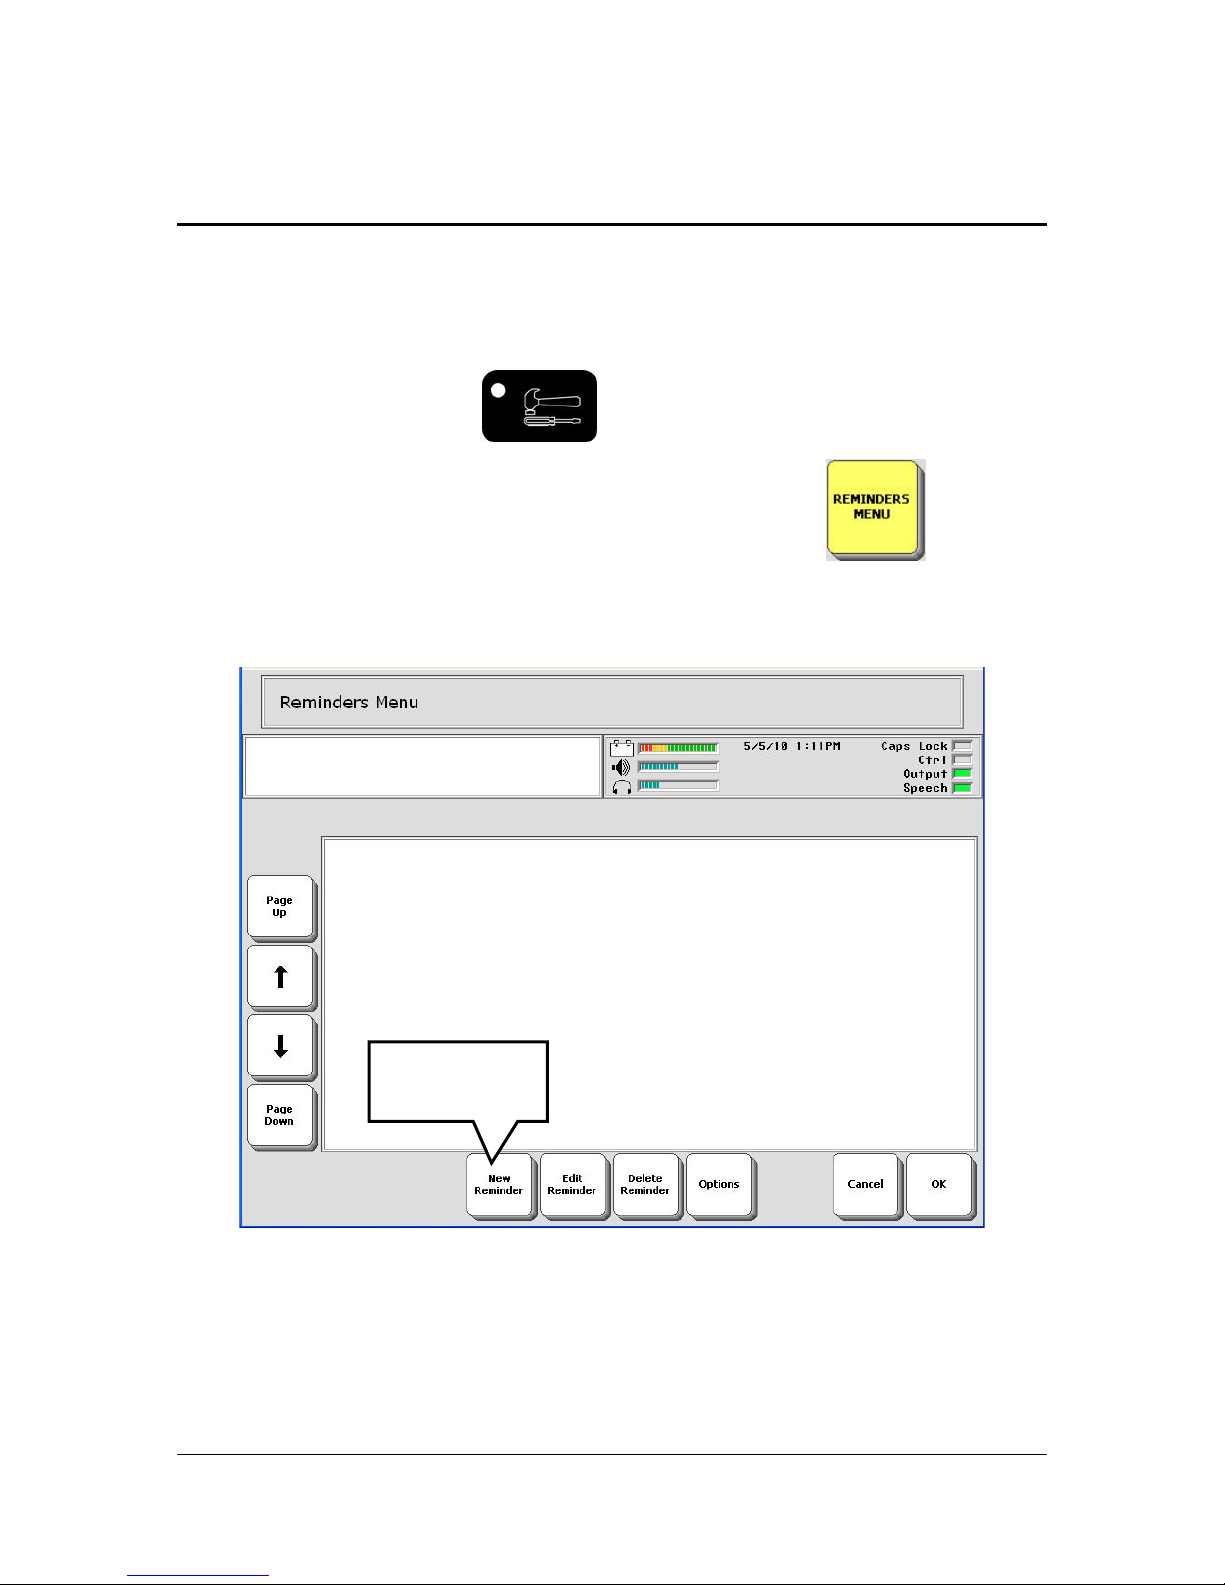
Reminders
You can set the Essence|VT to remind you when you have a meeting
scheduled, a birthday you want to remember, an appointment, etc.
Select the Toolbox key
on the front of the VT case.
In the Toolbox, select the REMINDERS MENU key
You see the first screen in the REMINDERS MENU.
.
Select New
Reminder.
Let's add a reminder that we have a meeting at 10:00 AM every Monday.
Select the New Reminder key.
SPECIAL FEATURES
Essence|VT Easy Start
84
Page 85
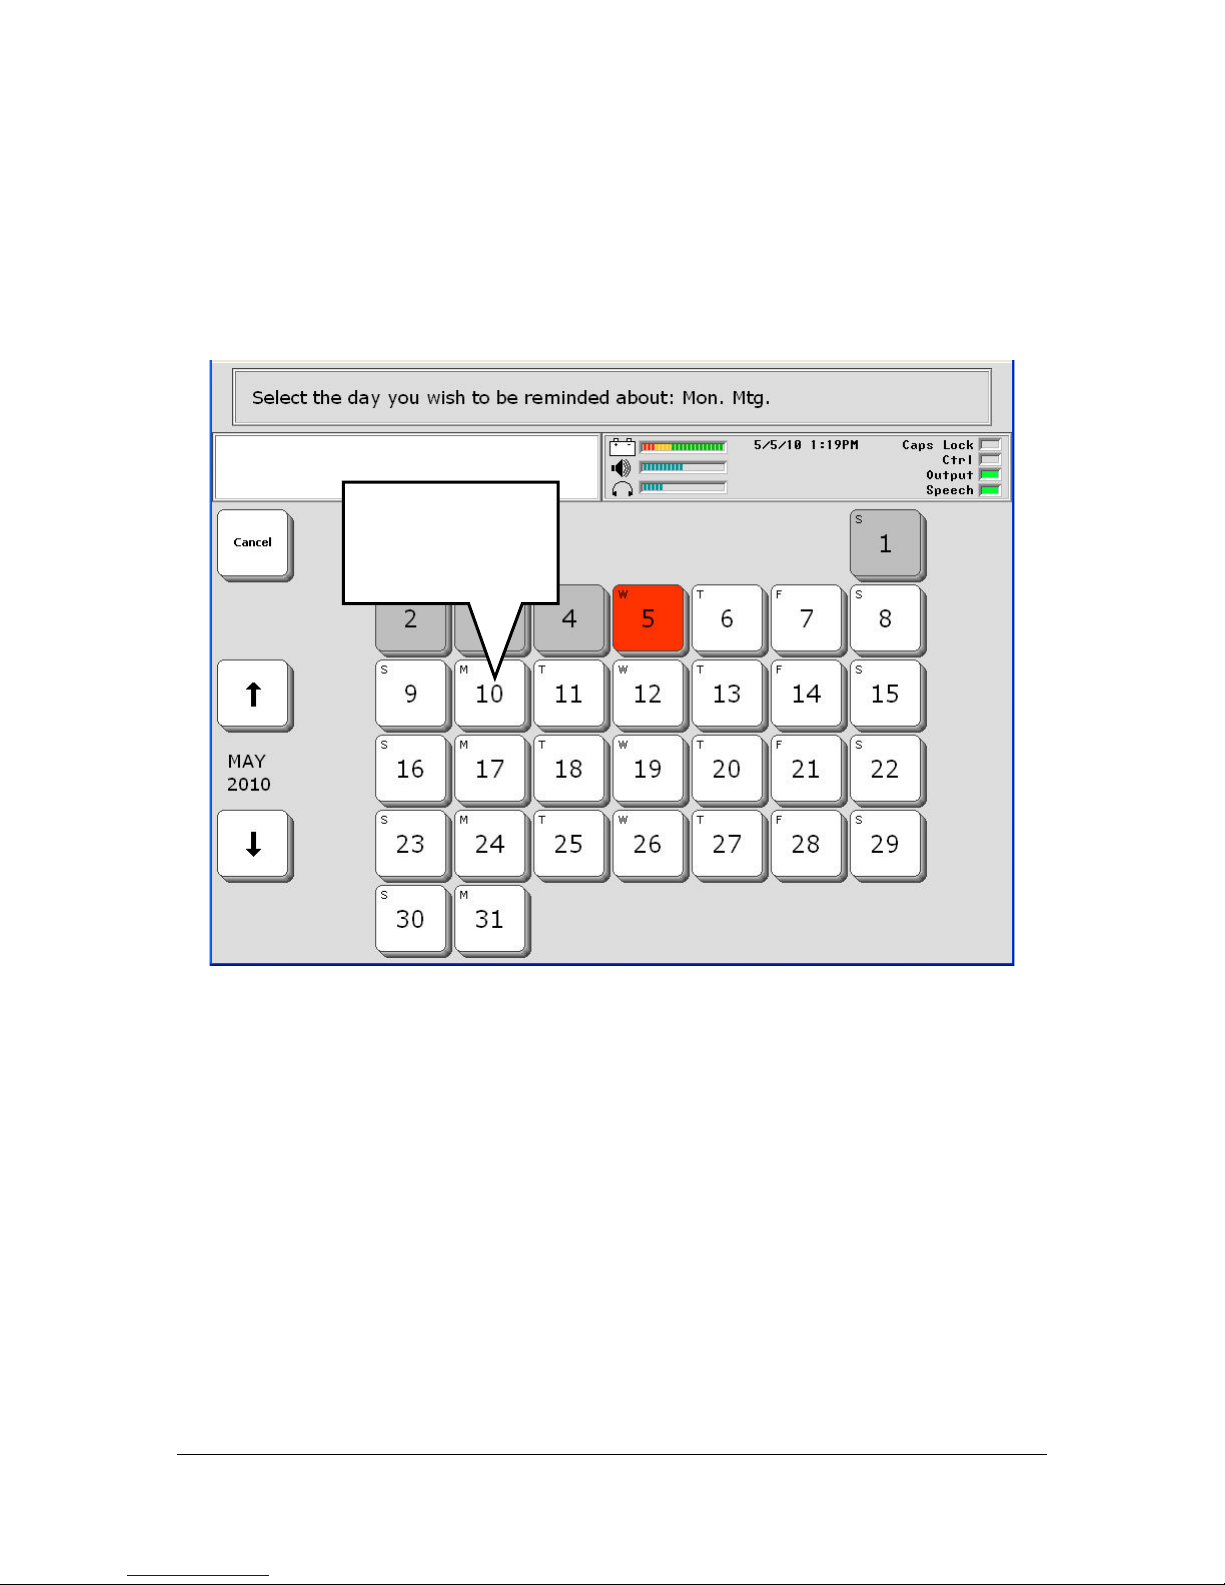
Type in the title for the reminder. For example, Mon. Mtg.
Select OK.
You see:
Select the day
you want to be
reminded about.
The key in red is the current day and date. If you want the current date, just
th
select the red key. For our reminder, let's pick Monday the 10
.
Select the M(onday)10 key.
On the next screen, select the time you want to be reminded about your
meeting. Since the meeting is at 10:00 AM, let's select 9:50 AM to be
reminded. It does not matter if you use the colon ( : ) key or not.
Check that the AM/PM key is marked correctly.
When you have entered the numbers, select OK.
SPECIAL FEATURES
Essence|VT Easy Start
85
Page 86
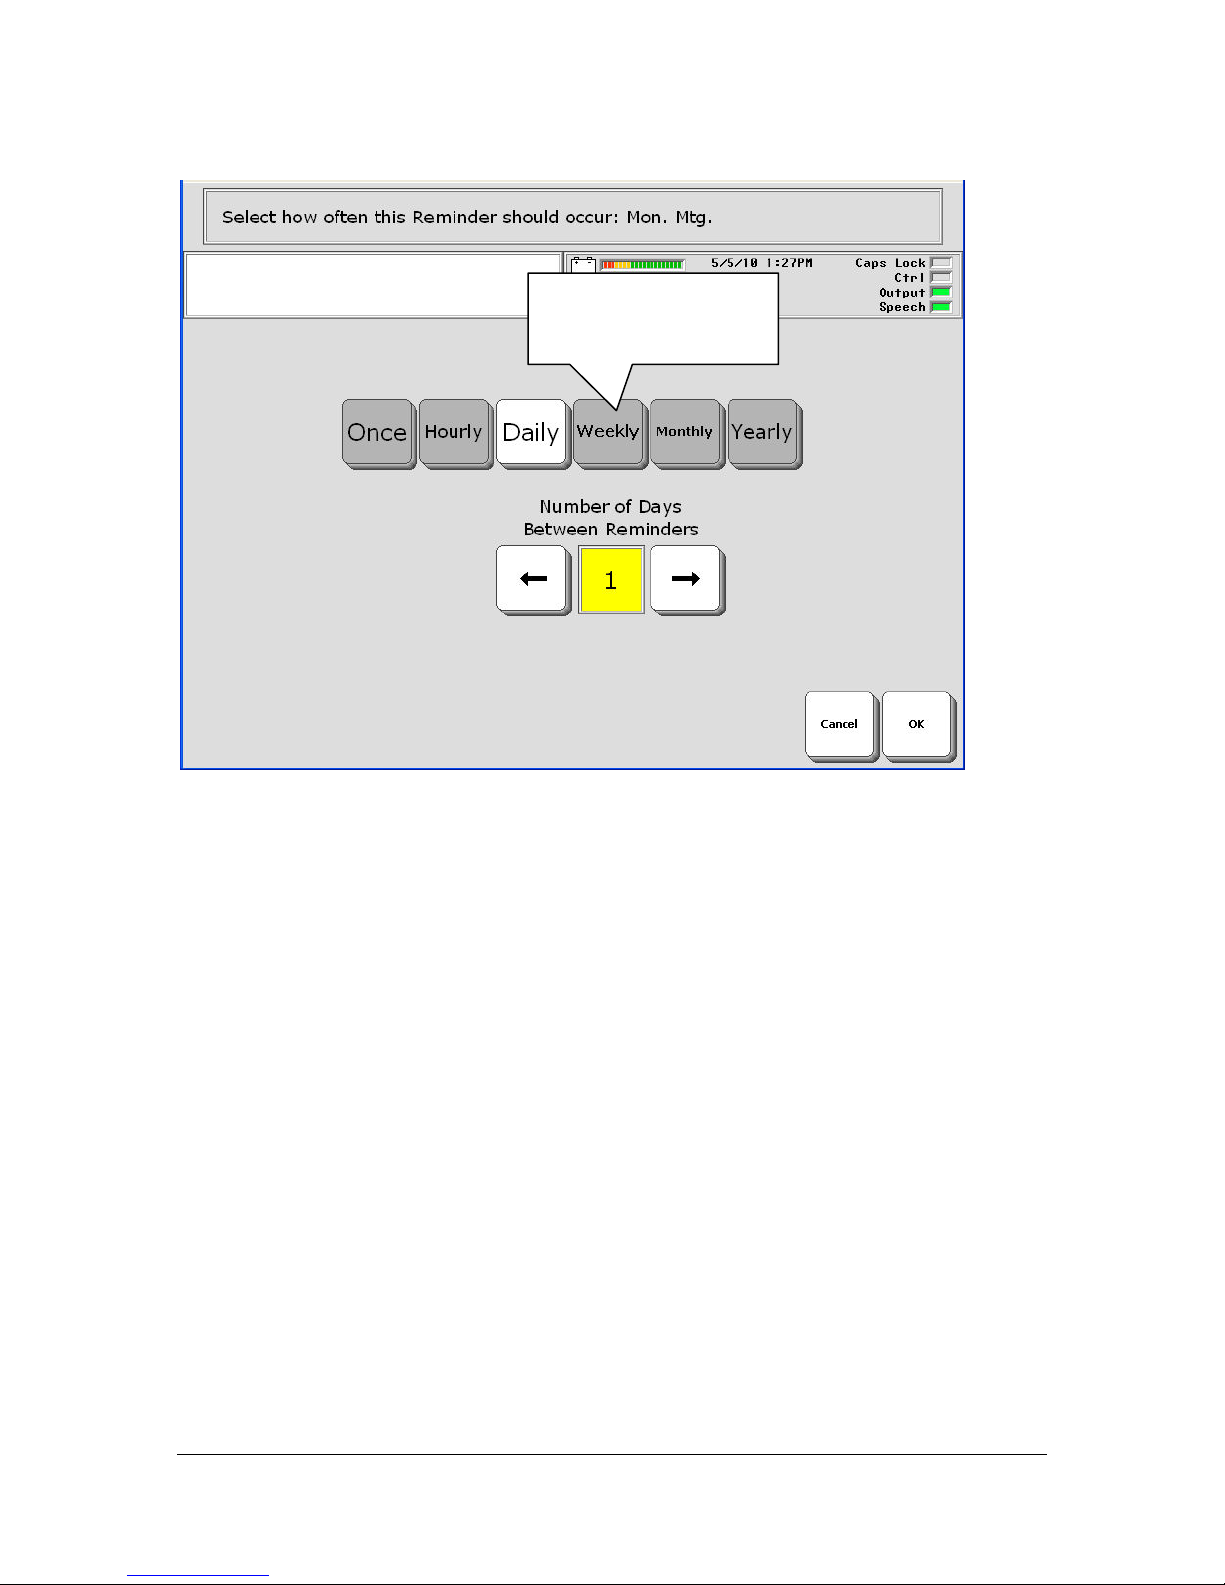
For our example,
select Weekly.
Now tell the VT how often it should remind you. For our example, our
meeting is every Monday and we will want a reminder every week.
Select the Weekly key.
Notice that the Number of Days option becomes Number of Weeks option.
SPECIAL FEATURES
Essence|VT Easy Start
86
Page 87
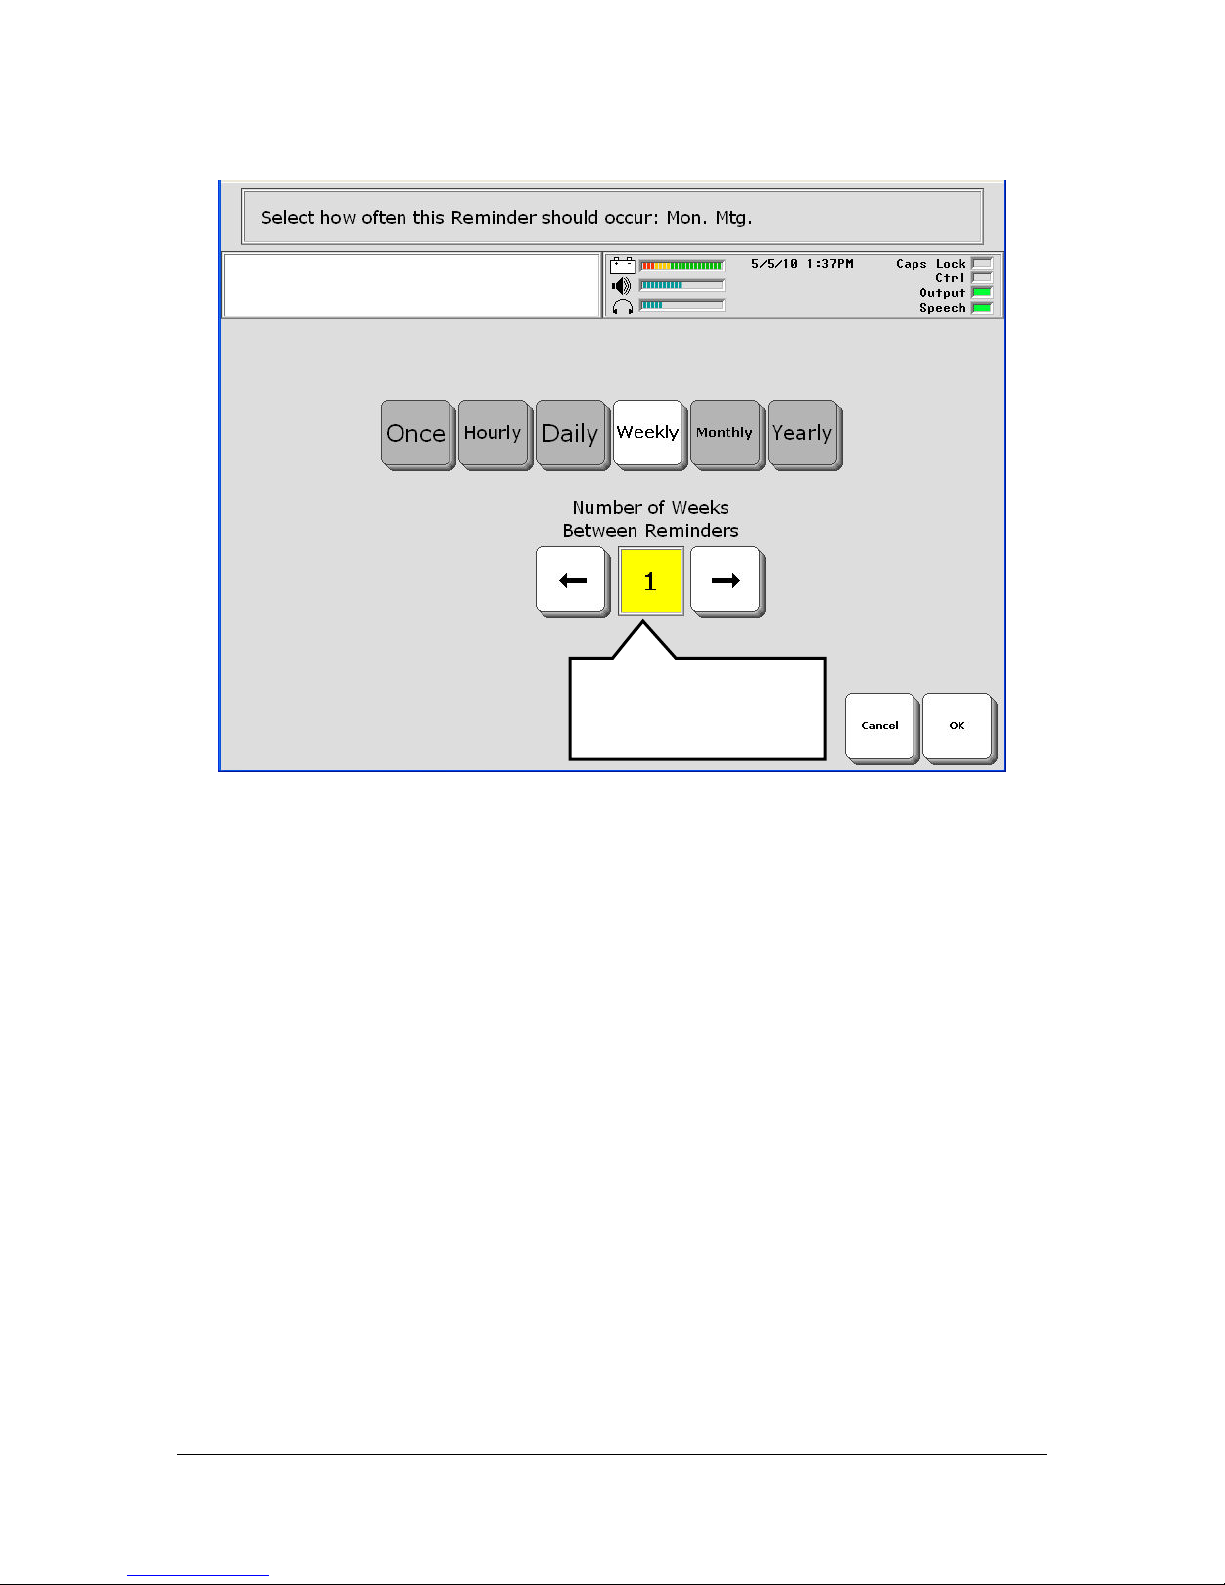
Select the Number
of Weeks Between
reminders.
Since our meeting is once a week, "1" is correct for the Number of
weeks Between Reminders.
Select OK.
SPECIAL FEATURES
Essence|VT Easy Start
87
Page 88
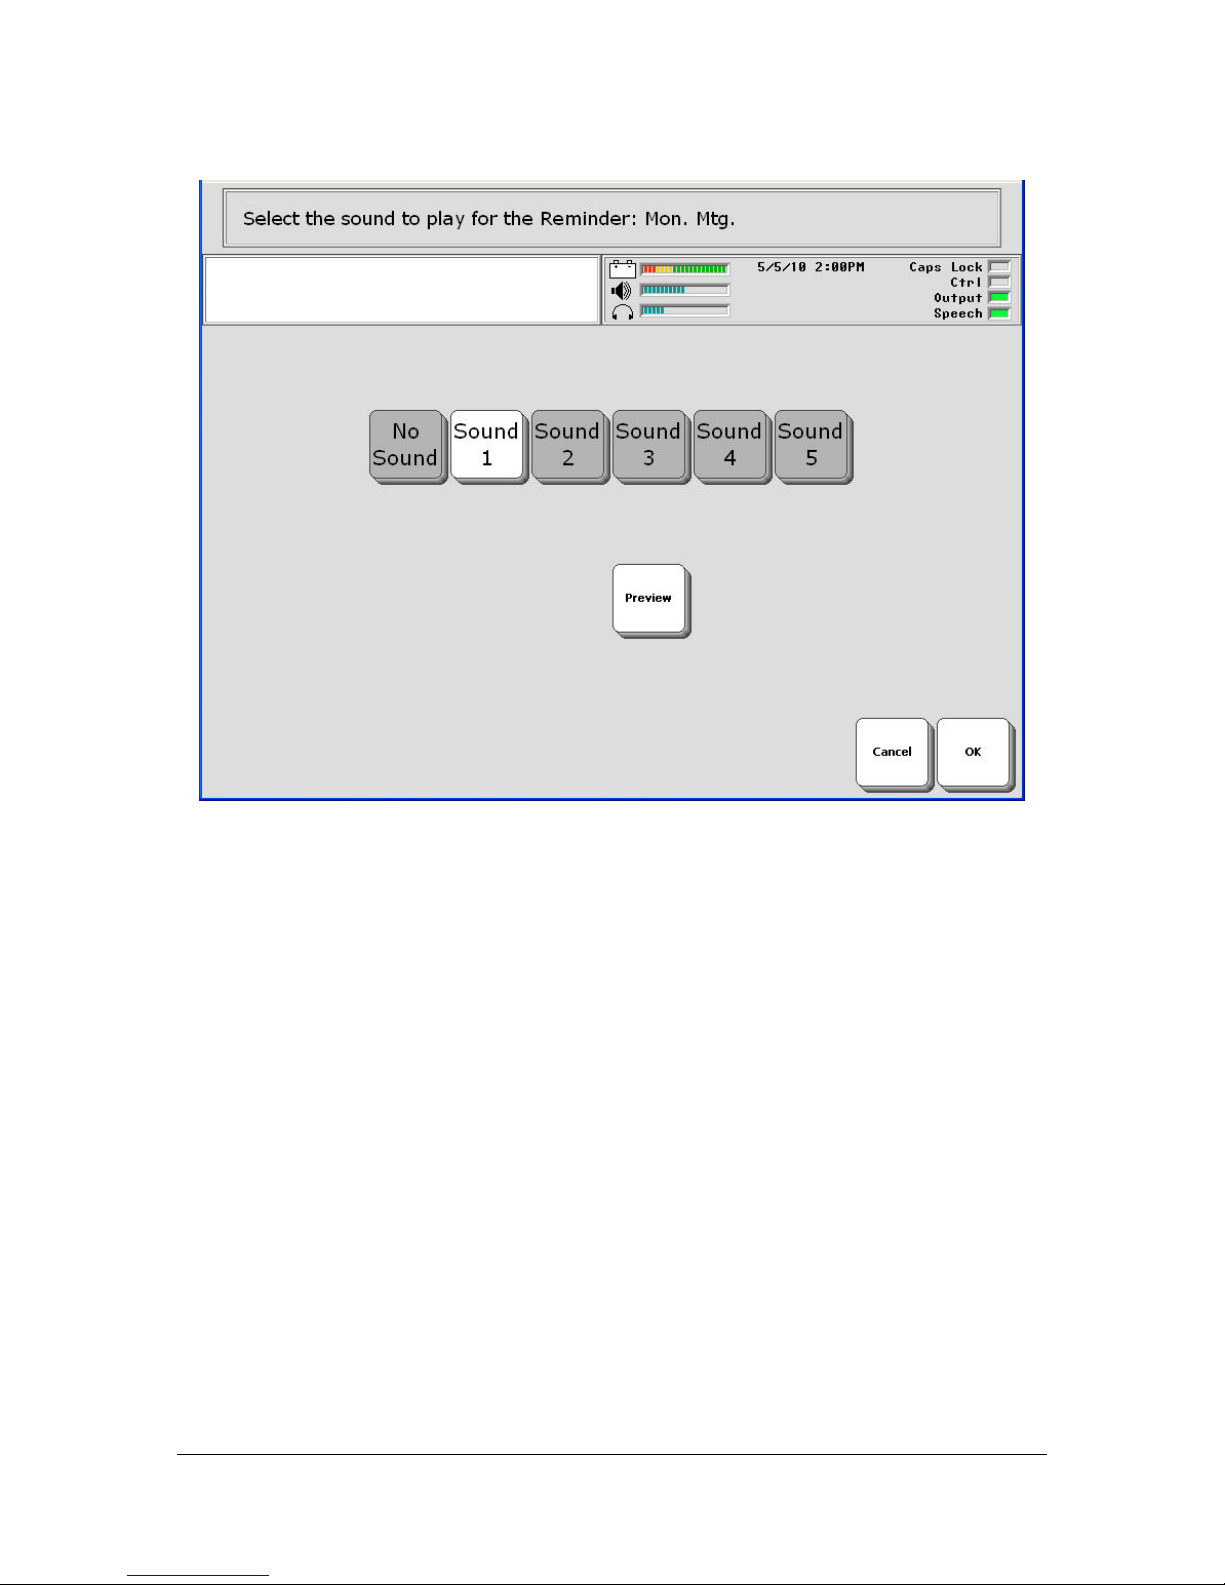
Select a "reminder sound" if you want one.
Select a Sound key then select Preview to listen to it. Select OK when
you are finished.
You see:
SPECIAL FEATURES
Essence|VT Easy Start
88
Page 89
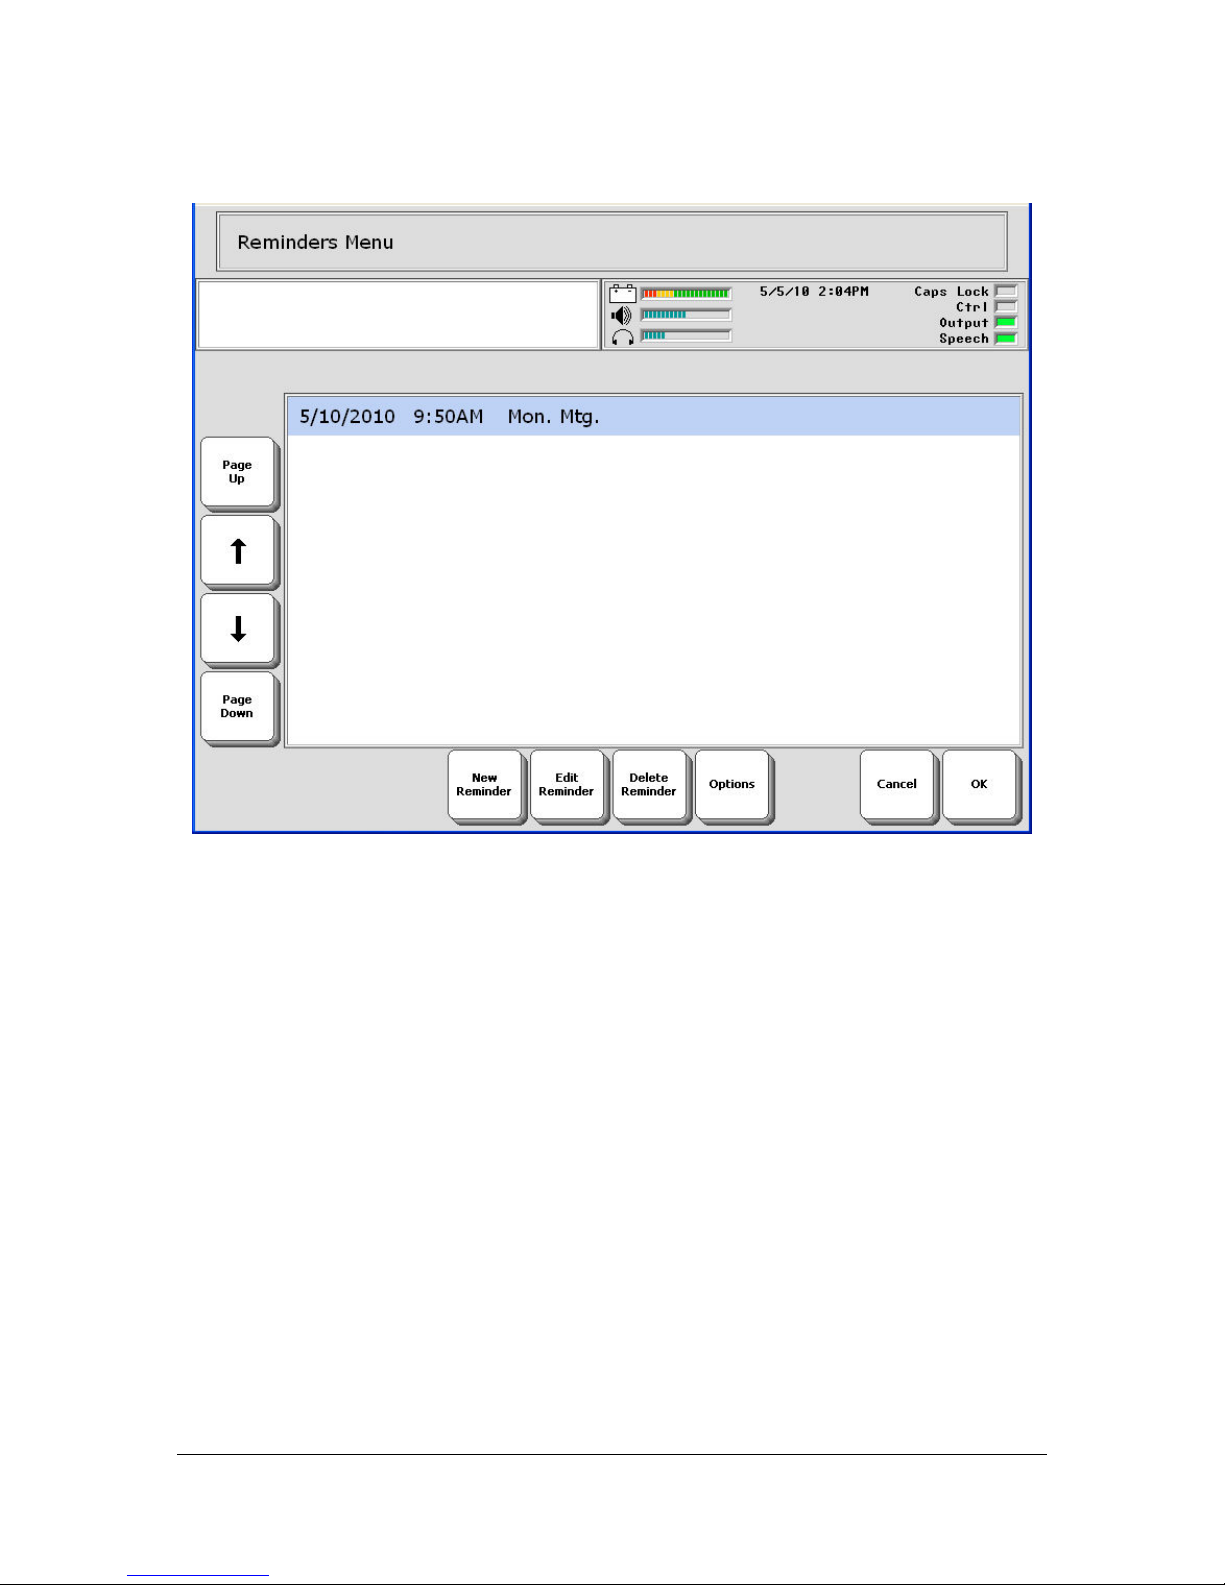
Your reminder has been entered.
At 9:50 AM on Mondays you will be reminded that you have a meeting to
go to.
The other keys in this menu let you edit a reminder and delete a reminder.
If you end up with a lot of reminders, you can scroll through them using the
keys to the left of the screen.
If you want the VT to automatically delete reminders that have expired,
select the Options key and select the automatic delete option. The VT will
monitor your Reminders and delete them as they expire.
Note: You may have an appointment every Tuesday and Thursday. In
order to be reminded of it, you must enter a reminder for Tuesday, and then
enter the same reminder for Thursday.
SPECIAL FEATURES
Essence|VT Easy Start
89
Page 90
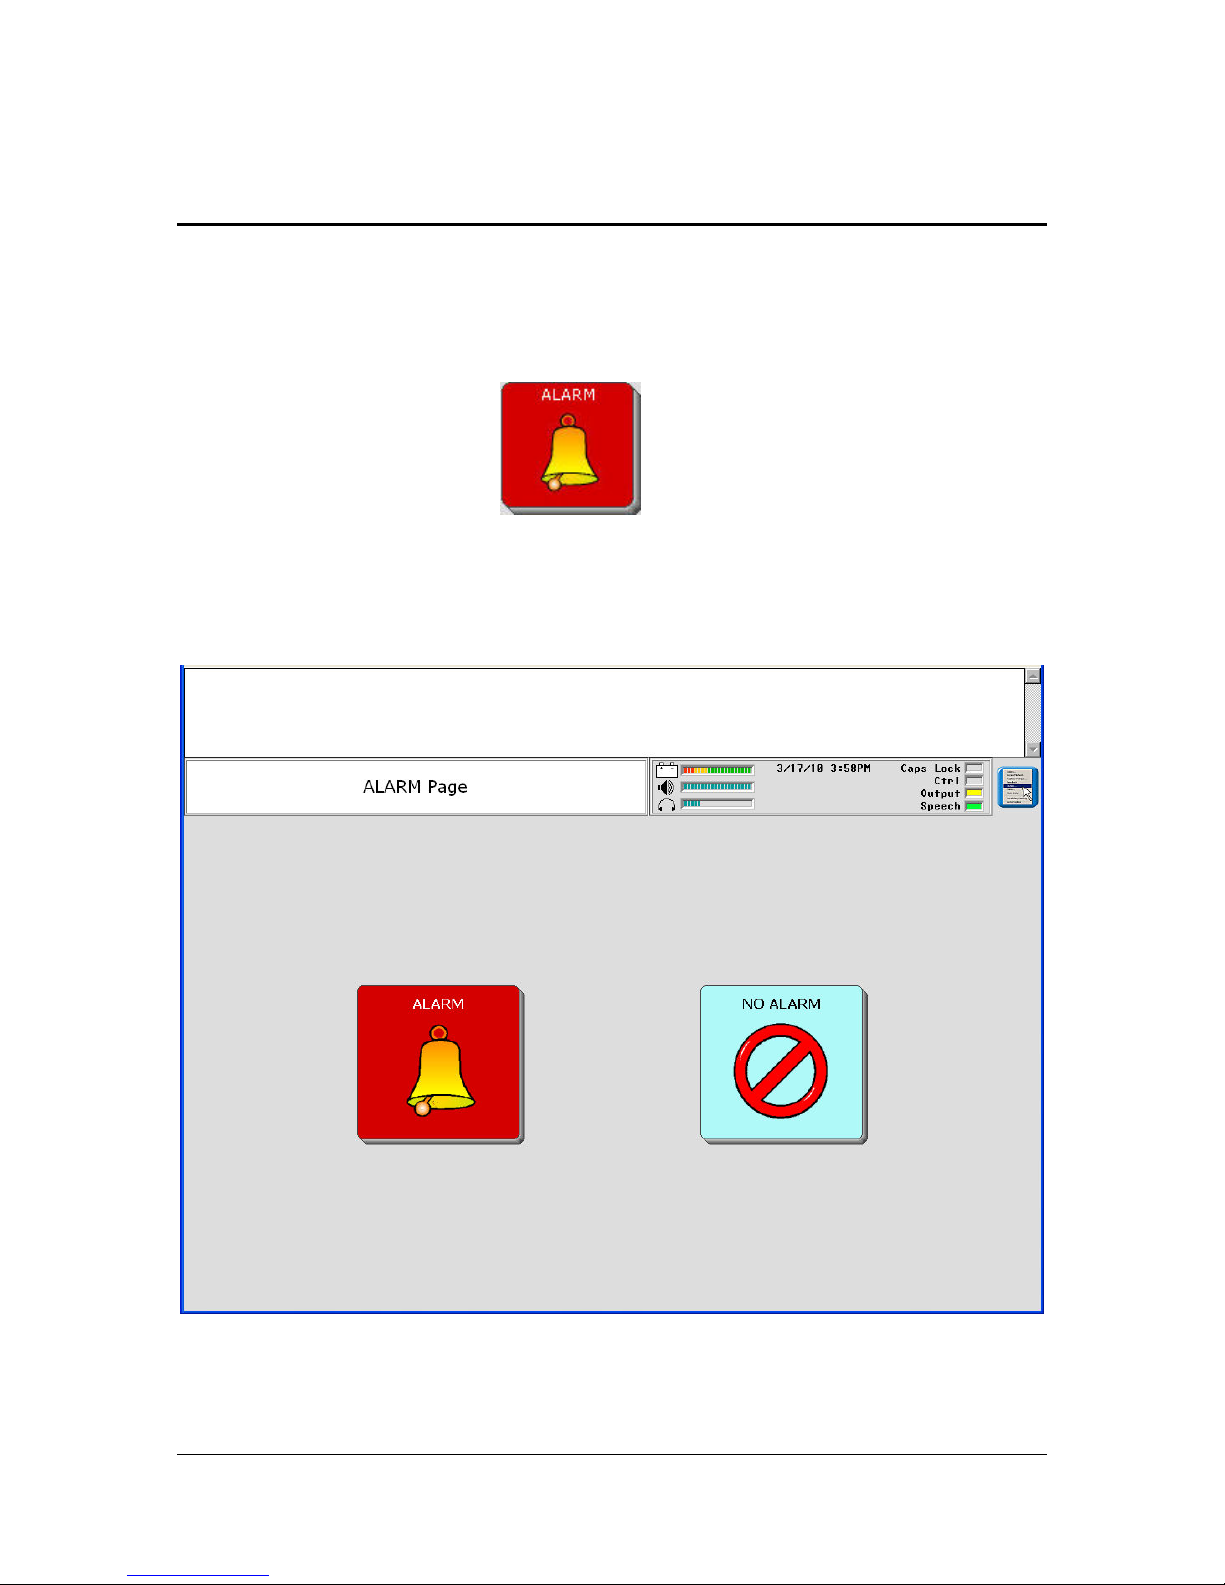
The Alarm
USE THIS KEY ONLY WHEN THERE IS A TRUE EMERGENCY!
There is a red ALARM key
on almost every page.
If you select this key you will immediately see this page:
SPECIAL FEATURES
Essence|VT Easy Start
90
Page 91
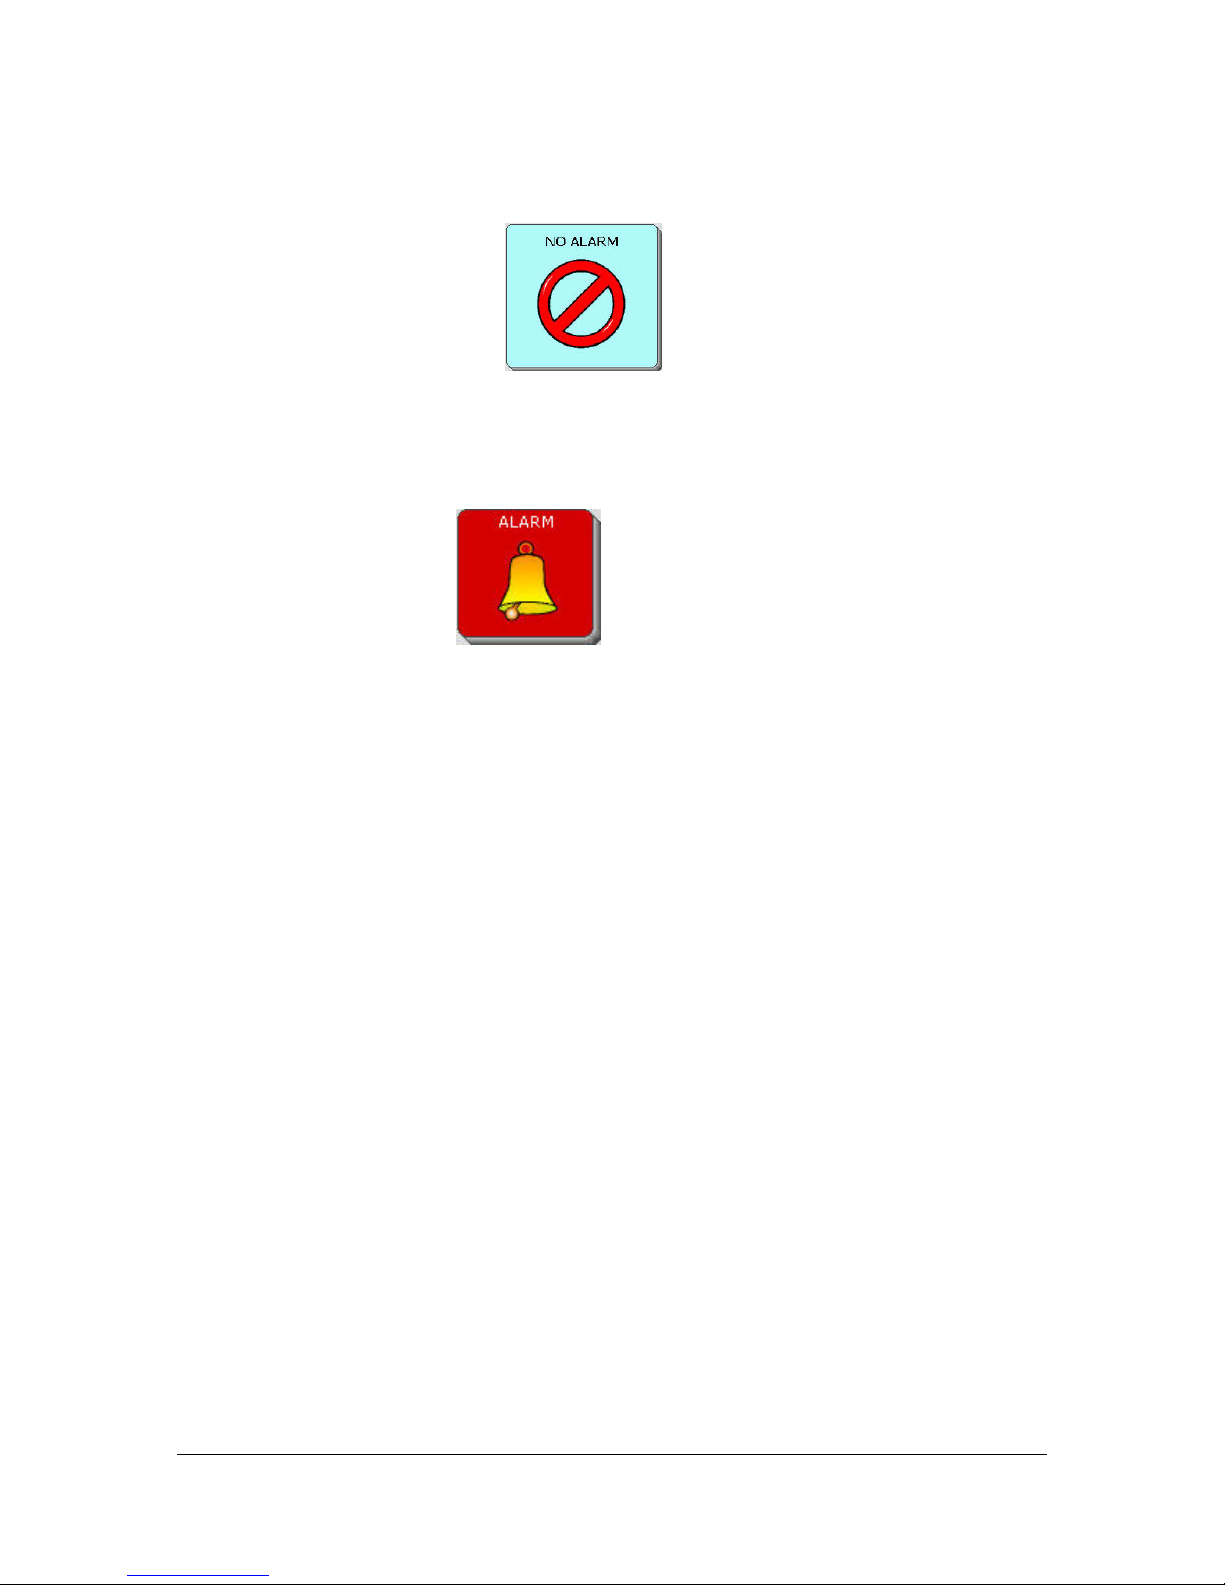
If you selected the alarm key by accident:
Select the NO ALARM key
. You will return to the previous
page.
If you really need the alarm:
Select the ALARM key
.
The alarm signals an emergency. It is piercing and intense and initially
startling to those who hear it.
It WILL bring you attention.
SPECIAL FEATURES
Essence|VT Easy Start
91
Page 92
Program TV Remote Controls
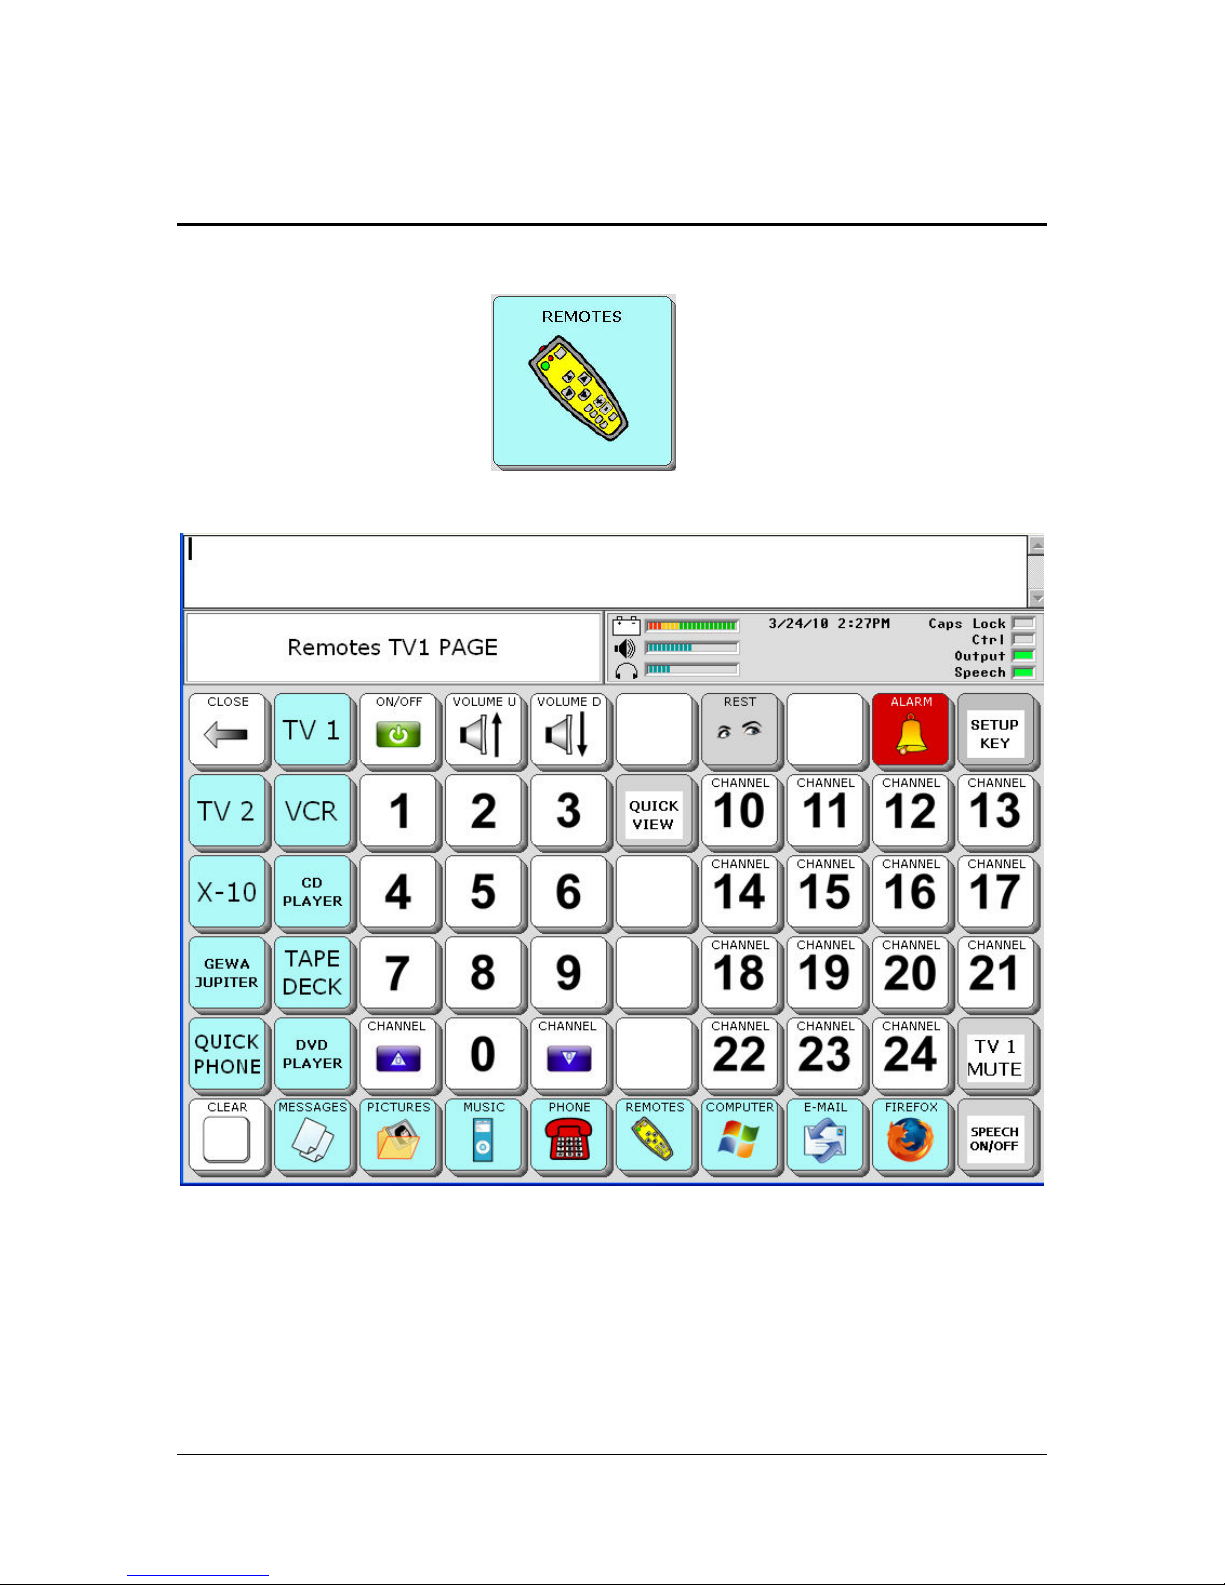
Select the REMOTES key
on the DIRECTORY page.
You see the Remote Control page for TV1. These keys are already
programmed with commands for infrared remote controls, but they are not
customized yet for your particular TV remote.
SPECIAL FEATURES
Essence|VT Easy Start
92
Page 93
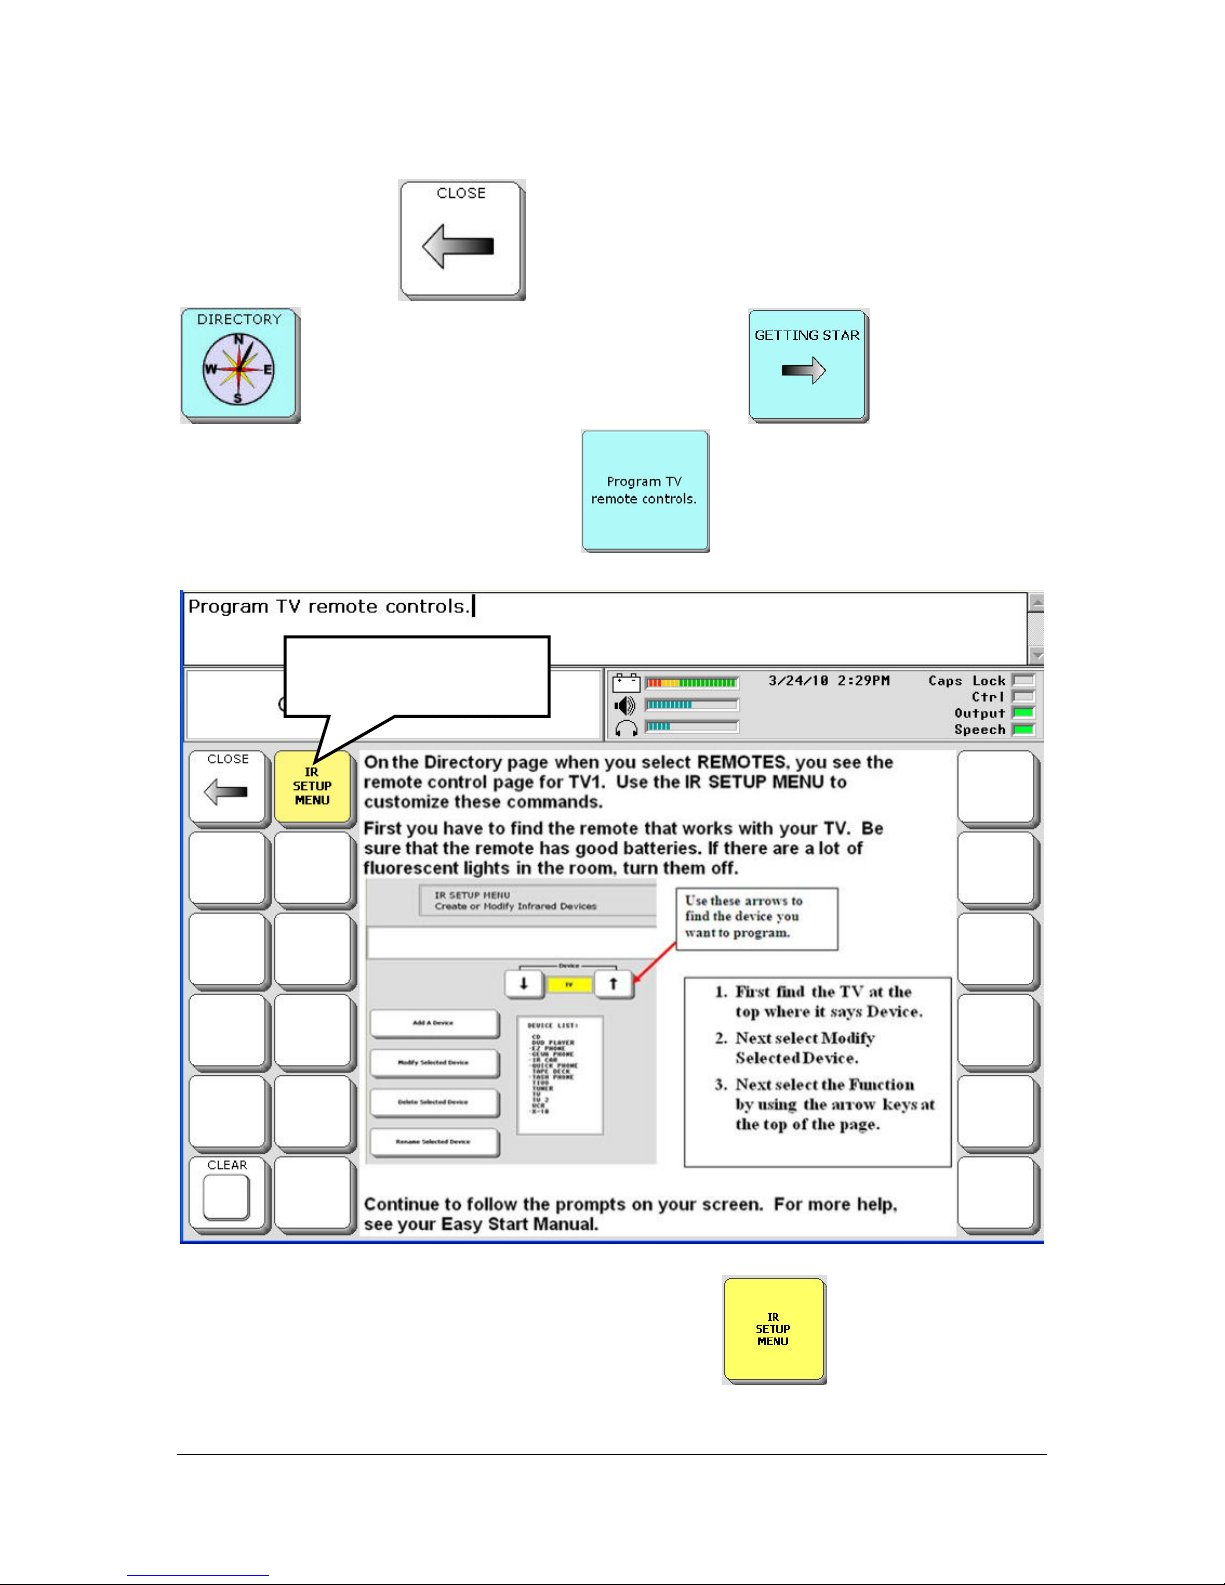
Select the CLOSE key. Select the DIRECTORY key
. Select the GETTING STARTED key . Select the
Program TV remote controls key
Select the IR SETUP
MENU key
.
On this page, select the IR SETUP MENU key
.
SPECIAL FEATURES
Essence|VT Easy Start
93
Page 94
Some Tips Before We Start
You will need your TV remote control.
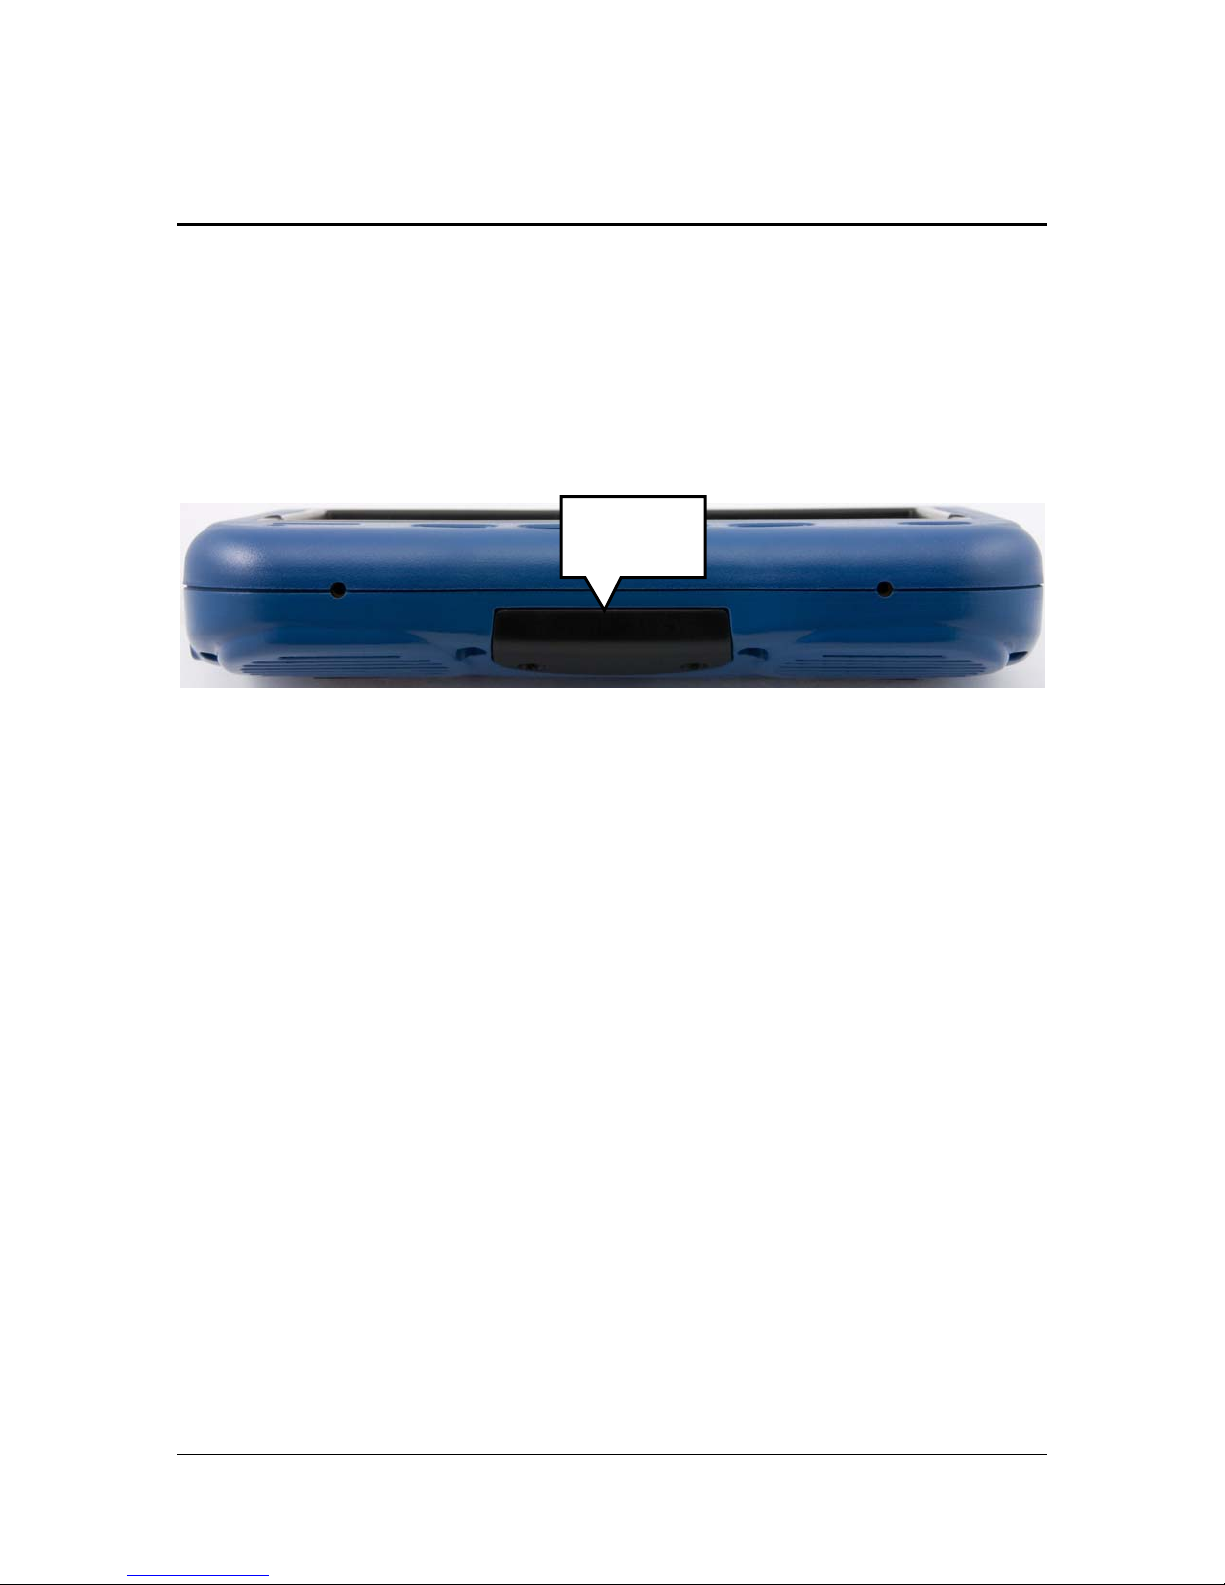
The infrared window is on the top back of the case beneath the handle.
You will point your remote control at this area when you send the remote
control signal.
IR
window
When sending signals to your VT, hold your remote control 6"-8" away
from the IR window.
Your remote control should have good batteries. If your device does not
accept the remote signals after one or two tries, the batteries in your
remote control may be too low. Replace the batteries in your remote
control before continuing.
Fluorescent lighting can interfere with remote control signals. If there are
a lot of fluorescent lights in the room, turn them off or change rooms for
programming.
You may have to teach a signal more than once before your
communication device accepts it.
SPECIAL FEATURES
Essence|VT Easy Start
94
Page 95
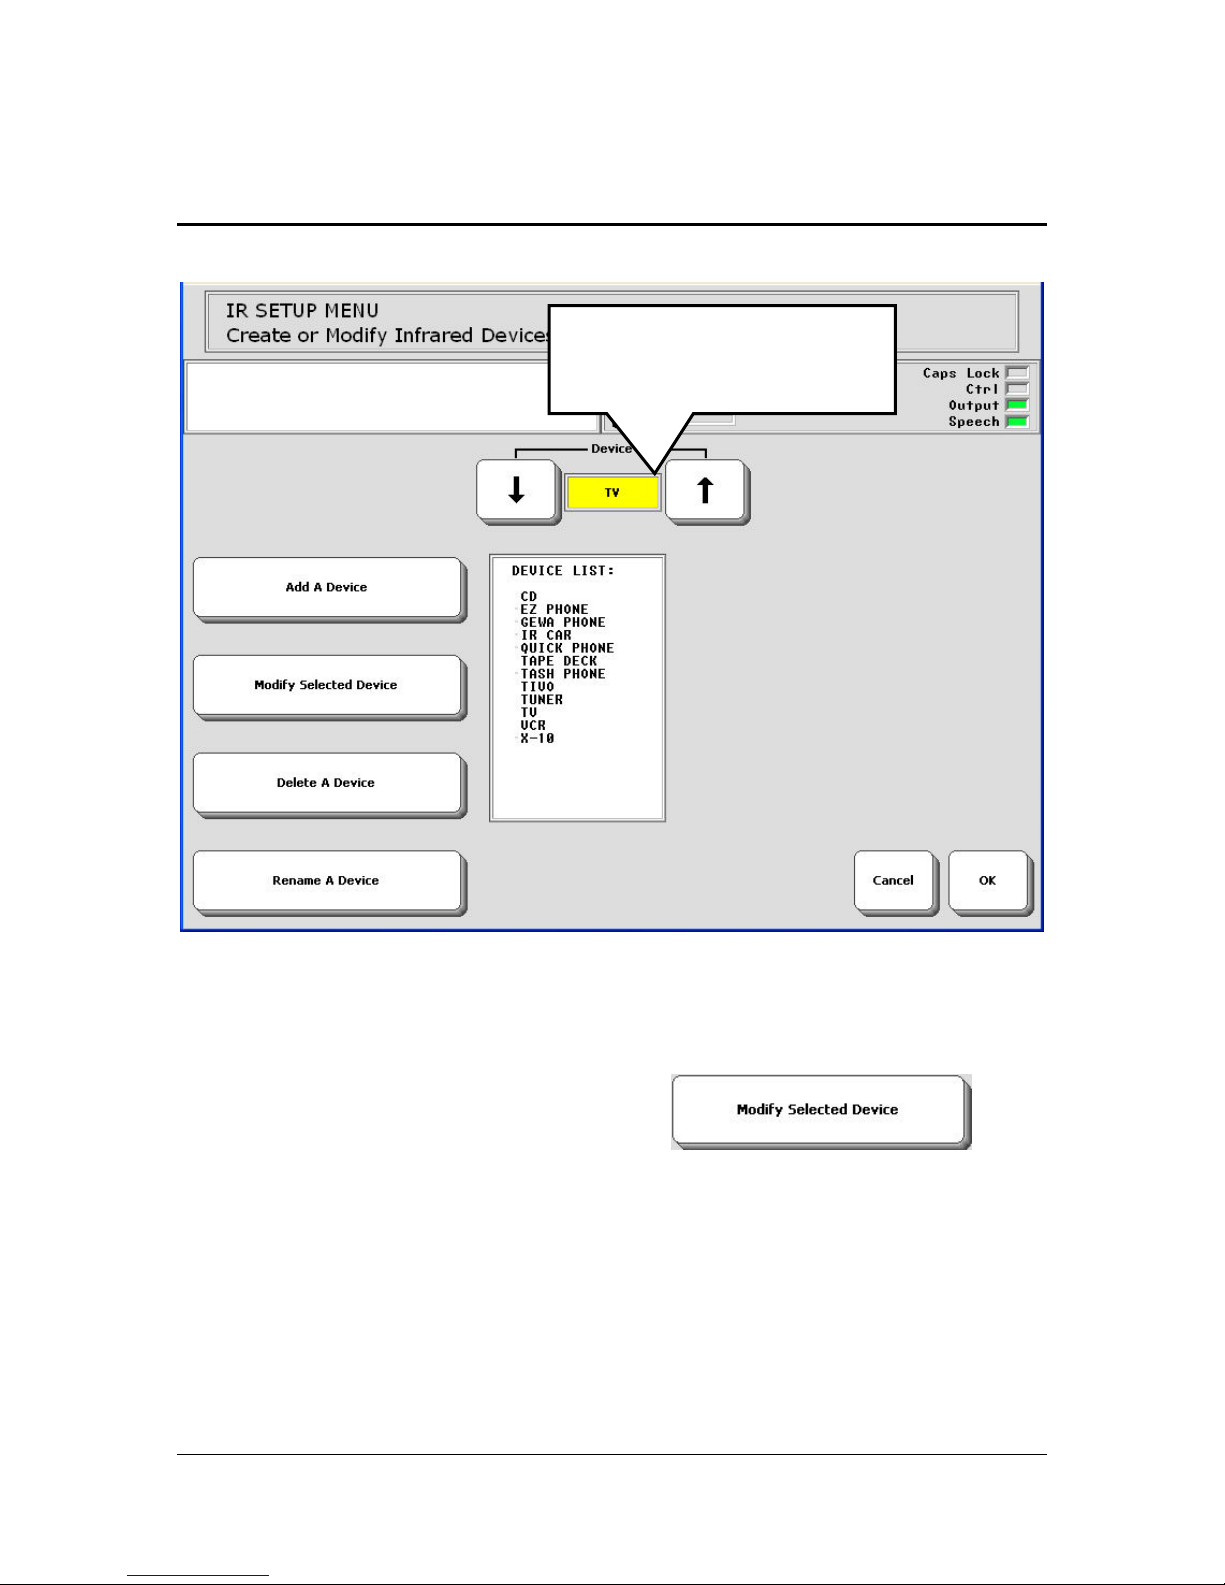
Program the TV POWER (On/Off) Function
Use the up and down arrows
until the device you want is
in the yellow box.
1. In the Device option, use the up and down arrows until you see TV in the
yellow box.
2. Select the Modify Selected Device key
.
SPECIAL FEATURES
Essence|VT Easy Start
95
Page 96
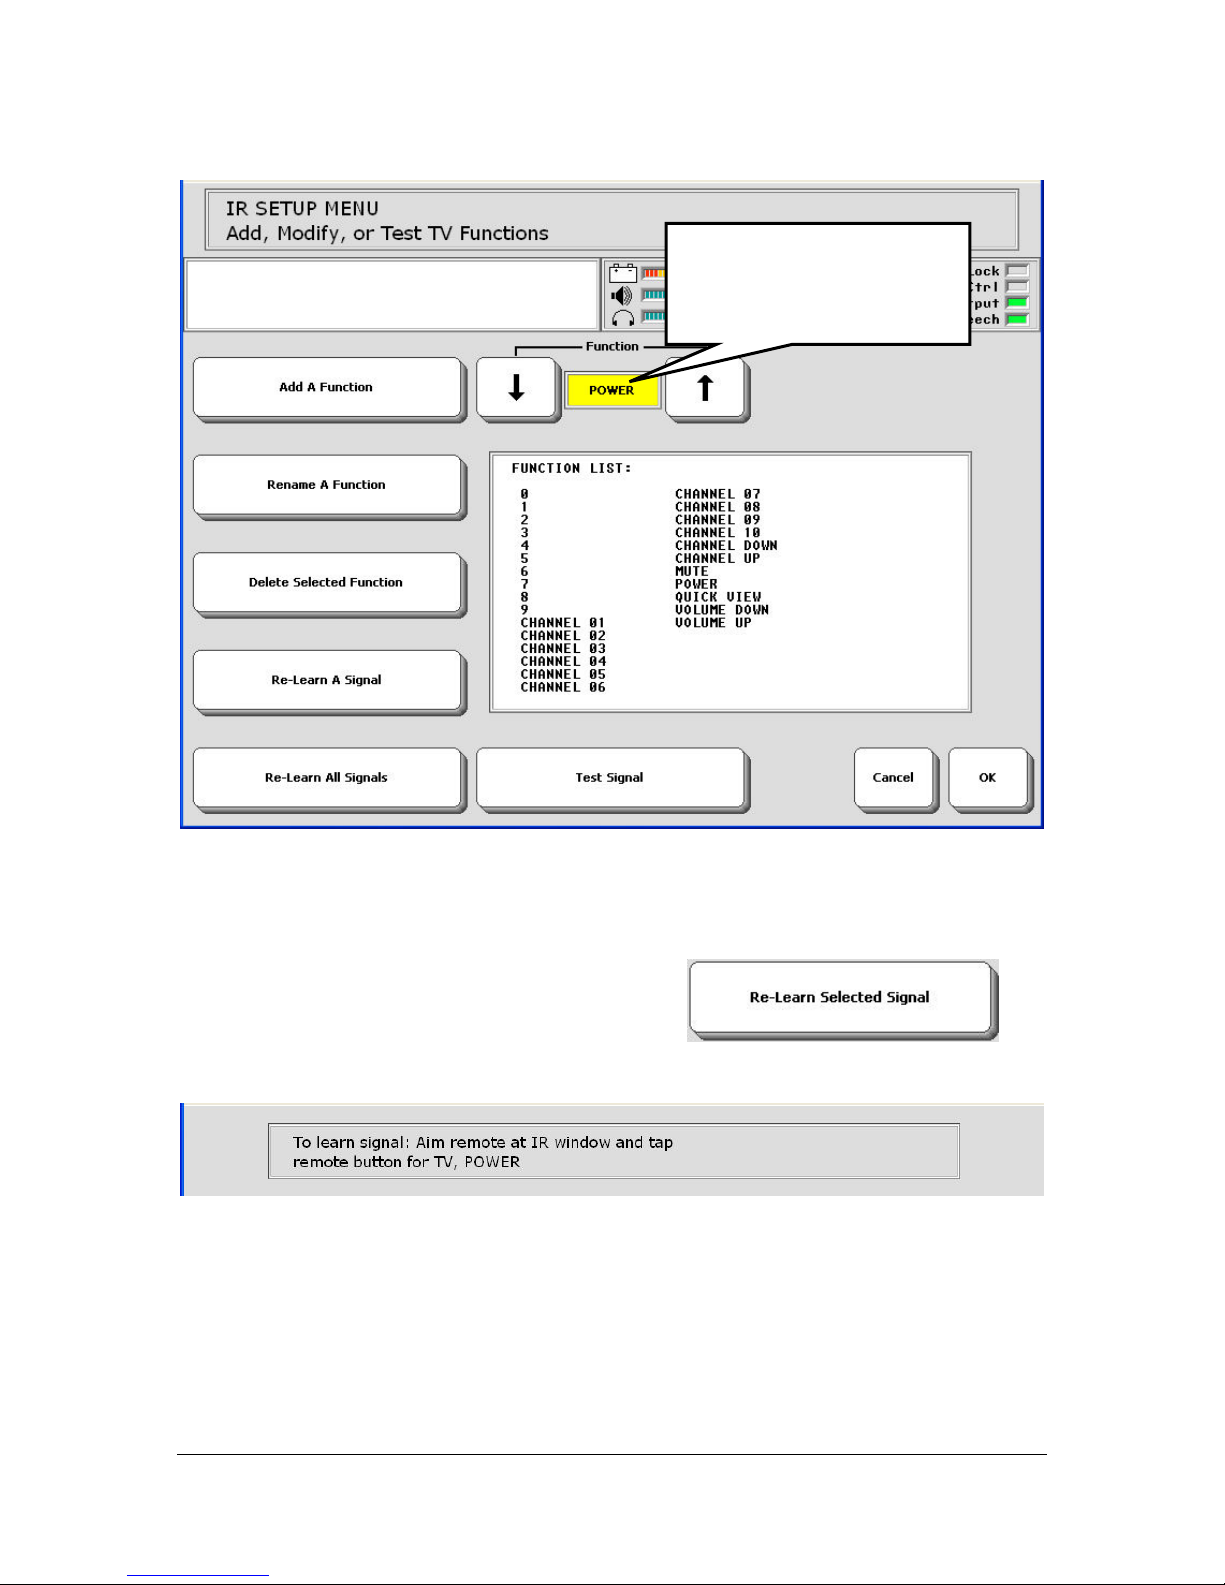
Use arrow keys until you
see the function you
want to teach.
3. In the Function option, use the arrow keys until you see the function you
want in the yellow box. In this example you want the POWER function
(TV On/Off).
4. Select the Re-Learn Selected Signal key
.
Follow instructions in the Text Display Area.
5. Aim your remote control at the IR window on the top back of your VT.
6. Press the "Power" (or On/Off) key on your remote control.
SPECIAL FEATURES
Essence|VT Easy Start
96
Page 97
7. Continue to follow the prompts on your display.
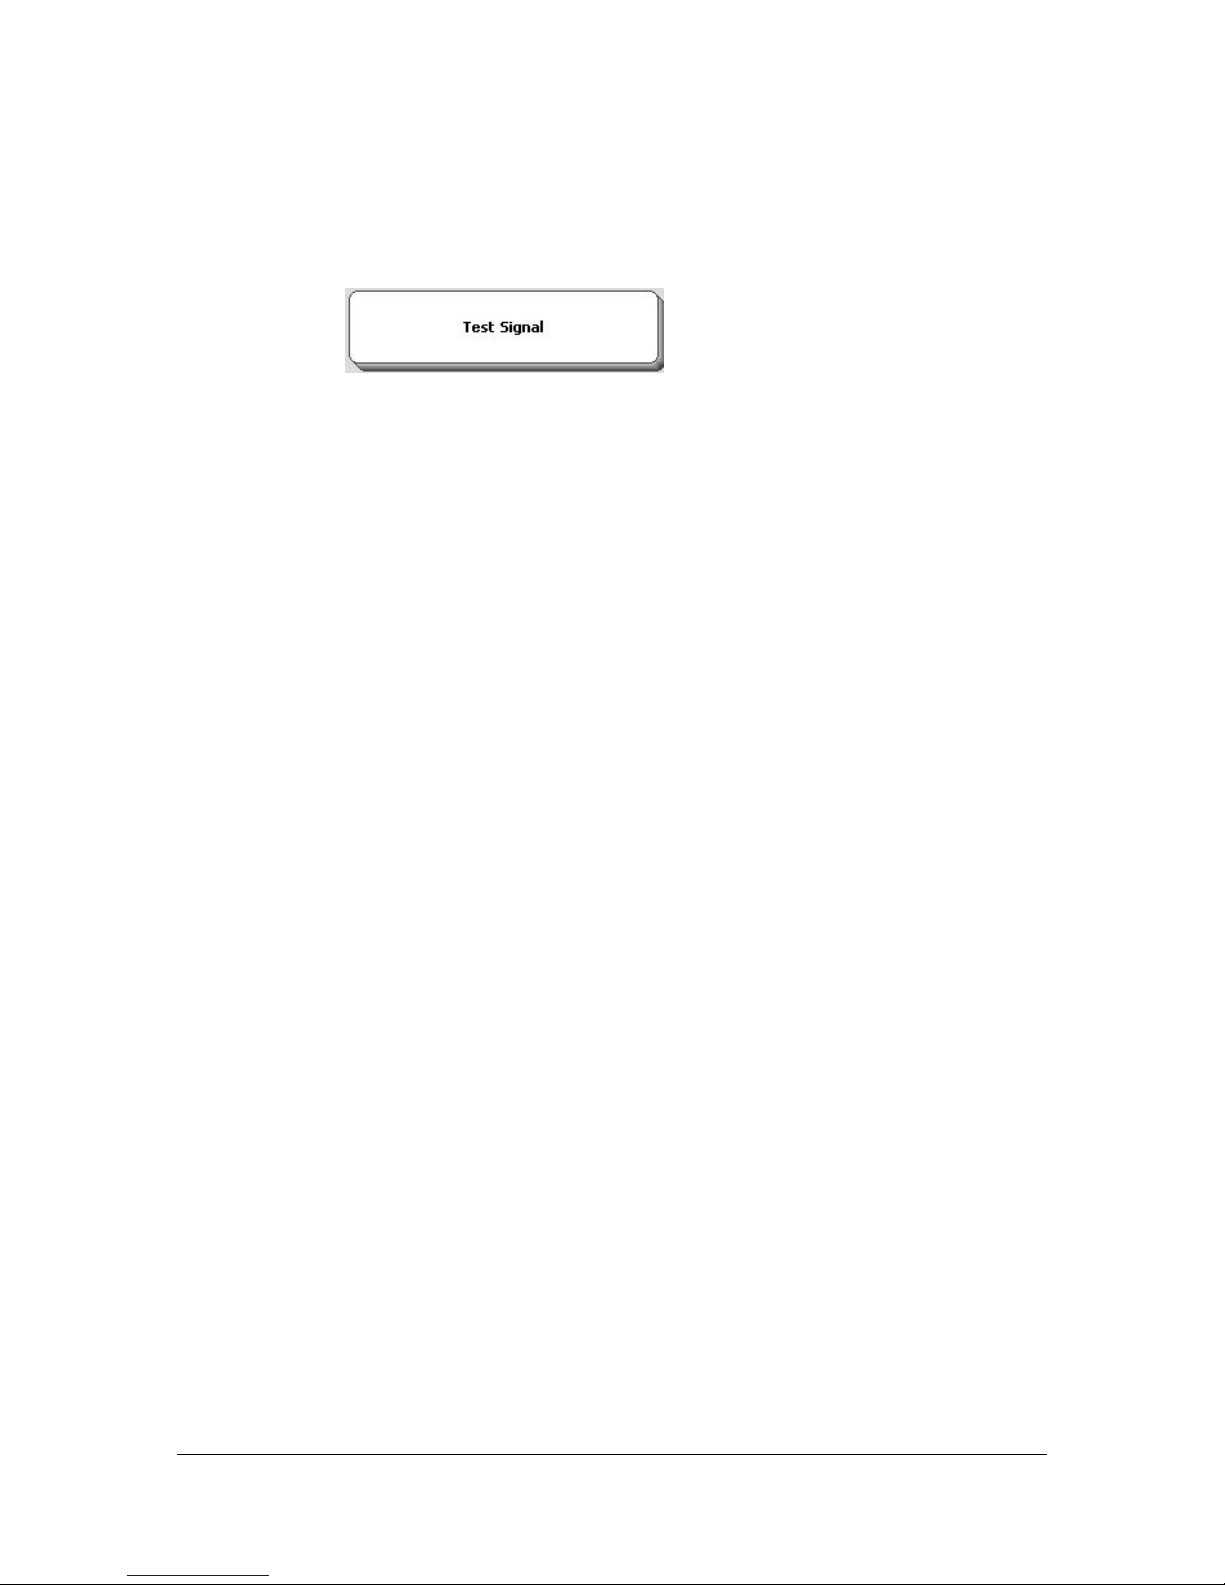
8. If you are near your TV, you can test the signal. The IR window on your
VT must be facing in the general direction of your TV. Select the Test
Signal key
in IR SETUP MENU on your
VT.
9. If your TV turns on and off, the VT has learned the command. If not,
repeat these steps.
Your TV POWER command is now customized and will work from the
REMOTES page in Essence.
Repeat these steps for each TV function, or any remotely controlled device
and function, that you want your communication aid to learn.
SPECIAL FEATURES
Essence|VT Easy Start
97
Page 98
Re-Learn All Signals
The Re-Learn All Signals key allows you teach
all the remote signals for a device at one time instead of one-by-one.
If you select this key in Step #4 instead of the Re-Learn Selected Signal
key, your VT will automatically step you though storing each function.
Have your remote control ready and know where the button is on it for each
function you want to teach the VT.
When you have finished teaching commands, select the OK key
the bottom right of the IR SETUP MENU. Now select the CLOSE
key
KEYBOARD key
. Select the DIRECTORY key . Select the MY
. You see the spelling keyboard page you
selected to use earlier in this process.
Depending on the spelling keyboard you selected, you may see a row of
keys (similar to the one below) depicting different pages:
in
SPECIAL FEATURES
Essence|VT Easy Start
98
Page 99
Or you may see a TOOLS key . You may see both the row and
the TOOLS key. Select the REMOTES key
from the Pages row
or select the TOOLS key and then select the REMOTES key.
The EYEGAZE keyboards just have labels on the keys, no pictures. For
example, the TOOLS key just has the word TOOLS on it.
SPECIAL FEATURES
Essence|VT Easy Start
99
Page 100
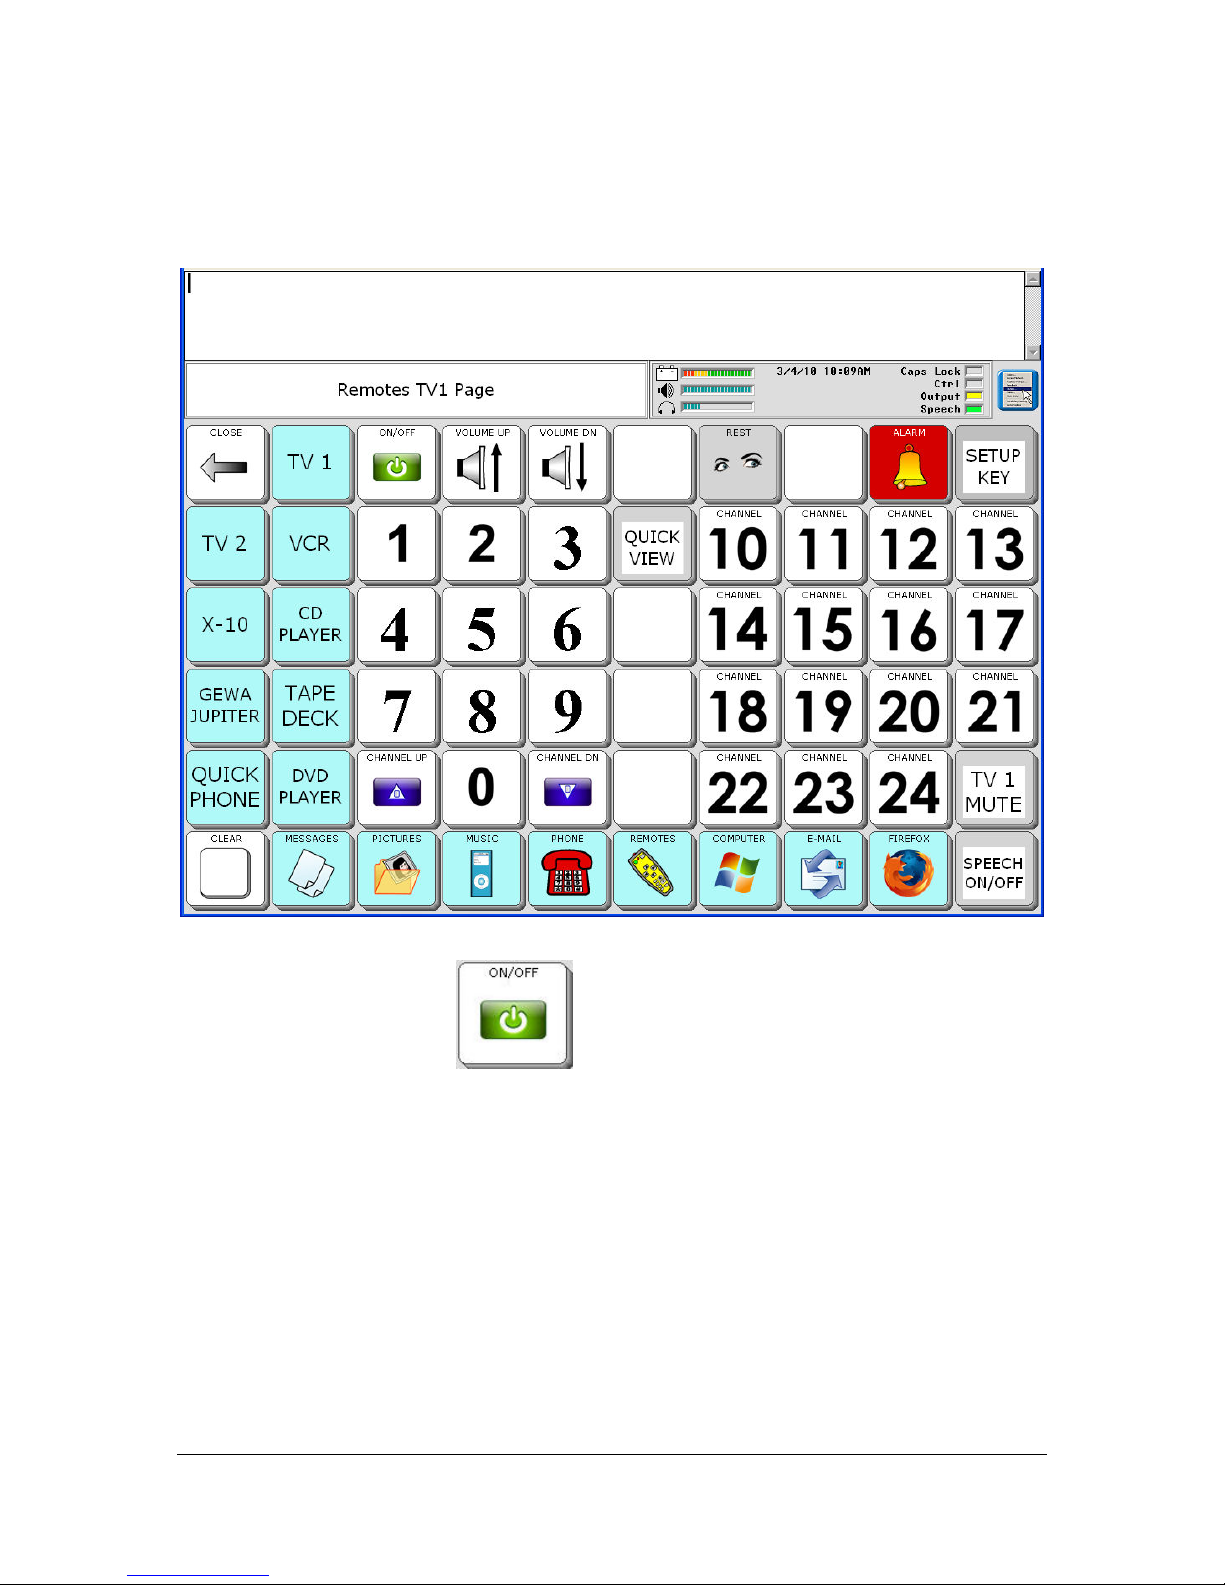
You see the REMOTES TV1 page.
Select the ON/OFF key
. Your TV should turn On or Off.
Remember the IR area of your communication aid should be facing in the
general direction of the device you want it to control.
From this page you can go to any other REMOTES page where you have
programmed remote control signals.
SPECIAL FEATURES
Essence|VT Easy Start
100
 Loading...