

Page 1
The Xyron 9” Creative Station is a Sticker Maker,
Laminator, Label and Magnet Maker all in one. Perfect
for so many of your craft, school, home and office projects,
it’s even safe enough for kids to use, requiring no heat,
batteries or electricity. The 9” width allows you to create
photo stickers, photo magnets, laminated recipe cards,
business cards, labels for jars and cabinets and many other
projects.
User Guide
9” Creative Station
™
Refill Cartridges Available*
*Refill Cartridges sold separately
Permanent
Adhesive
Repositionable
Adhesive
Two-Sided
Laminate
Laminate
Magnet
Permanent Adhesive
Strongest hold
For difficult surfaces
Repositionable Adhesive
Reposition multiple times
Best on smooth surfaces
Stick it. Unstick it. Restick it.
Safe for windows, painted walls and doors,
and it does not leave a residue on most
surfaces. Test in an inconspicuous area first.
Two-Sided Laminate
Preserve and protect documents
Allows you to cut right to the edge or
completely through the item you are
protecting. It will not separate!
Laminate/Magnet
Create magnets with a
Laminate finish
Matte
Laminate
Permanent
Adhesive
Matte Laminate/
Permanent Adhesive
Preserve and protect documents with a
Matte Laminate finish on the top and
Permanent Adhesive on the bottom
Perfect for:
Kid’s stickers, paper crafts, scrapbooking
and card making, school and home projects,
stenciling, vellum, games and photos
Perfect for:
Photos, paper crafts, scrapbooking and
card making, school and home projects,
home décor, vellum, rubber stamping,
and fabric, ribbon, metal and other
3-dimensional items
Perfect for:
Photos, business cards, frames,
school and home projects, shopping
and To-Do lists
Perfect for:
Photos, ID’s, recipe cards, kid’s artwork,
memorobilia, newspaper clippings,
bookmarks, business cards and tags
Perfect for:
Photos, paper crafts, scrapbooking,
card making, memorabilia, classroom aids,
food jar and packaging labels, displays,
signs, banners and labels
Part# 5720_RevB
The purchase or acquisition of this product does not confer the right or license to use the machine and
cartridges in the retroreflective field or to make or sell machines or cartridges for use in the retroreflective
field. May contain one or more of the following U.S. patents 5580417, 5735998, 5961779, 6244322, 6270612, RE37345
6602376, 6660120, 6672354, 6675854, 6698487, 6742428, 6810935, 6814693, 6832639, 6840298, 6843296, 7087280.
Other U.S. and foreign patents pending.
Visit www.xyron.com for more information and great project ideas
©2008 Xyron, Inc.
8465 N. 90th St. Suite 6
Pima Center
Socttsdale, AZ 85258
Warranty Information
Xyron, Inc. warrants that the Xyron® 9” Creative Station™ is free from defects in
material and workmanship for a period of one (1) year from the date of purchase.
Xyron, Inc. will repair or replace a defective product or part without charge, with proof
of purchase.If the product is damaged by neglect or misuse, the warranty is null and void.
To register your product online, please go to www.xyron.com and click on the product
registration tab. If you register online, we will send you a free inspirational DVD full
of great ideas!
Customer Service
We want you to be happy with your purchase of a Xyron product. If for any reason
you have a problem or a question, we would like to hear from you before you
consider returning it to the store where you bought it. In many cases, we will be
able to solve your problem or answer your question right over the phone; so please
contact Xyron Customer Service toll-free at 1-800-793-3523 or 1-480-443-9419
for help. You can also e-mail us at: customerservice@xyron.com
For customer service outside of the U.S.
Australia: 61 2 8899 8500; australiacustomers@esselte.com
New Zealand: 64 9 272 1600; nzcustomers@esselte.com
Page 2
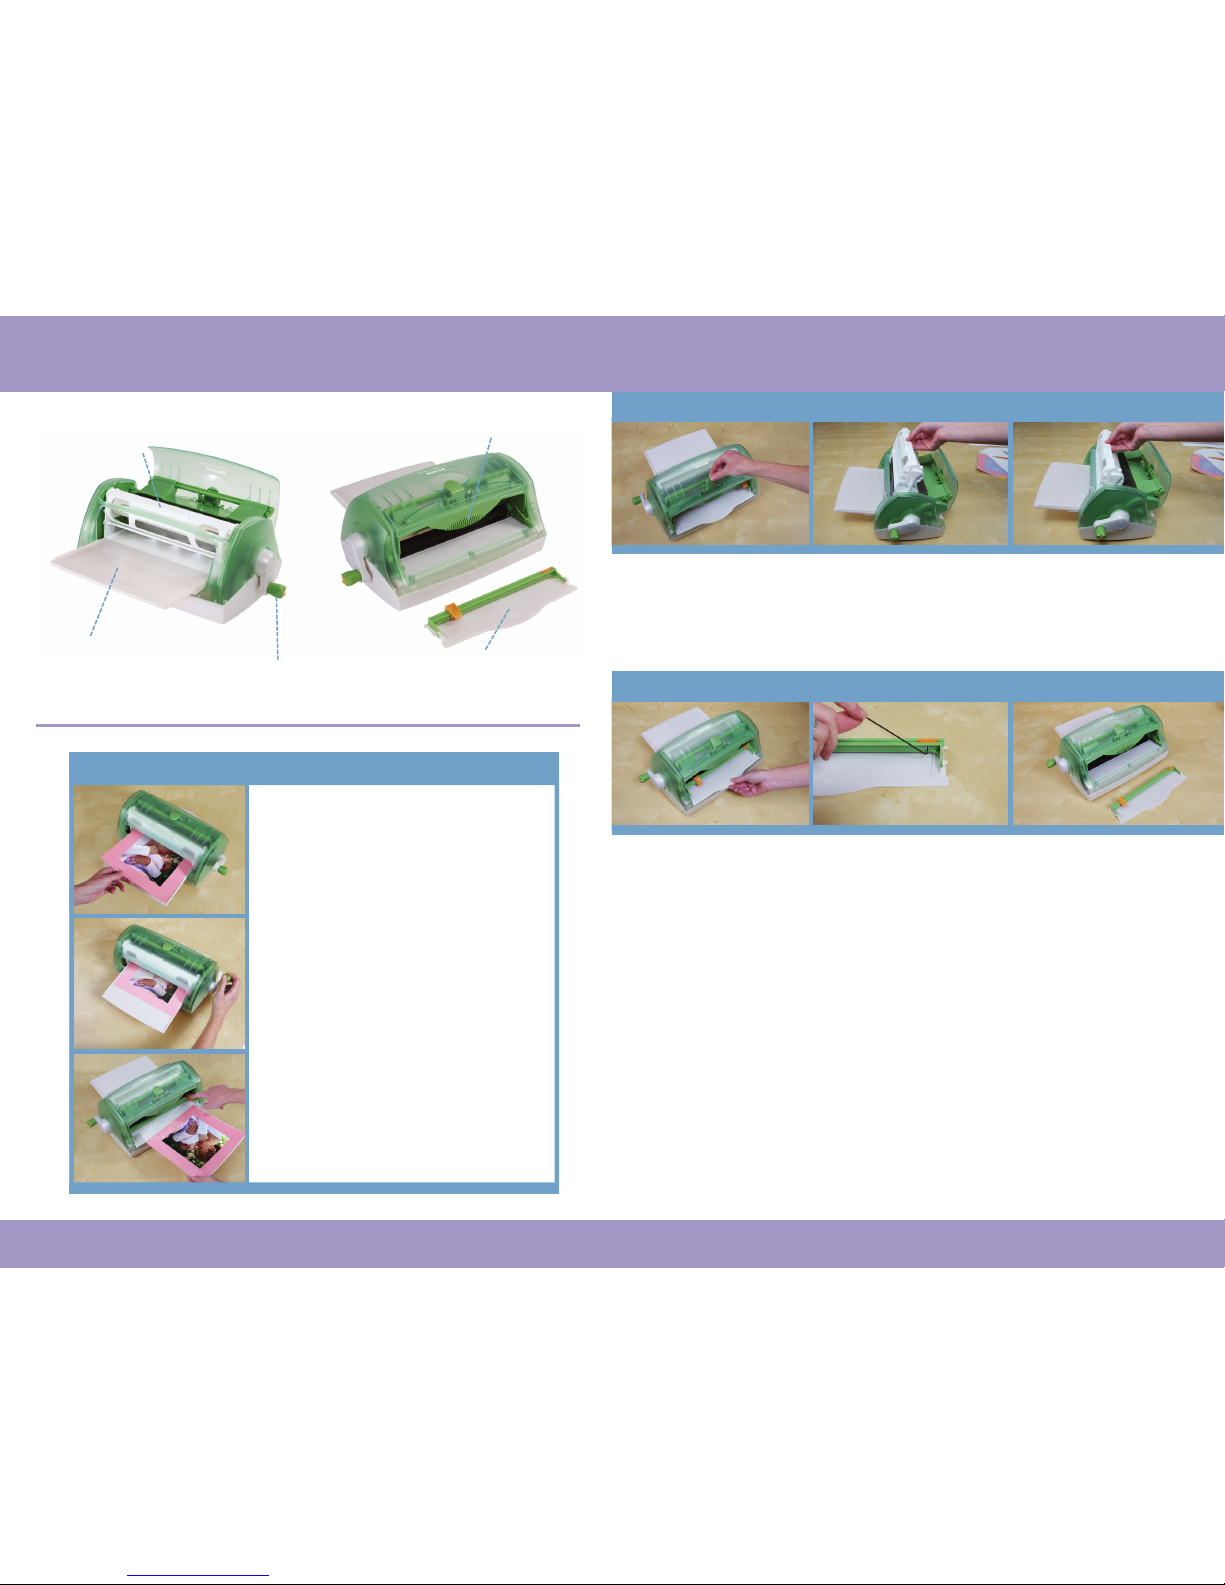
Handle: Advances
items through the
machine when turned
clockwise.
The Built-in Grip/Carry Handle:
Take your machine almost
anywhere.
The Input Tray: Used to feed
items into tray.
Patented Easy Loading Cartridge:
Allows you to change from adhesive
to laminate to magnet in just seconds.
Removable Cutter: Gives you
the freedom to trim your document
both in and out of the machine. Use
it for anything you need to take the
edge off!
Step One
Place item on feed tray.
Step Two
Guide item forward while slowly
turning knob clockwise until your
item comes out of the back of the
machine.
1. Open cartridge
compartment by lifting up
on latch.
Unloading Loading
2. Gently pull cartridge up
and out of machine.
1. Open lid. Slide cartridge into
tracks on machine sides with
exposed rolls of material facing
open lid cover. Close lid securely.
Advance film and trim.
1. Align cut tray sides with
the machine. Slide in the cut tray
with the cut bar resting on the
spring arms on the side of the
machine until it snaps and locks
into place.
Cut Tray Cut Blade
1. Loosen and remove the screw
in the cut bar with wrench. Remove
colored plastic insert and slide the
old blade off cut bar (safely discard
old blade).
2. Carefully slide new blade
onto cut bar. Note: Sharp
edge of blade should be
facing inward. Replace the
colored plastic insert and
secure with wrench.
Unloading & Loading
Replace the Cut Tray & Cut Blade
Basic Operation as easy as 1-2-3!
• For best results, turn the handle slowly.
• Burnish or rub around your adhesive items well before removing the top film.
• Arrange small items (without overlapping them) on the feed tray to maximize your cartridge
material use.
• Use items that are .10” thickness or less.
• If there is excess adhesive around edges of an item, simply wipe off with your fingers.
• Fabric Tips:
- Works well with most fabrics that do not have sizing
- For items that will be washed, stitch after adhering
- For best results, use Acid-Free Permanent Adhesive
• If machine rollers pick up adhesive after use, clean with isopropanol alcohol.
• Store your machine and cartridge between 40ºF and 70ºF
• To prevent curling on adhesive, remove the clear top mask first. Then lay your your document
upside down to remove the backing from the sticky side.
• Great to apply adhesive to your document before cutting on the Xyron
®
Wishblade®.
Visit www.xyron.com for more information.
Helpful Hints
Features & Functions
Step Three
Press down on cut blade and slide
to the left or right to cut.
Note: For a smooth cut, place your
finger all the way back to the back
of the cut blade holder. Remember
to burnish or rub well on adhesive
items before removing film.
 Loading...