


USER MANUAL
V 1.1
Smartest Gimbal Stabilizer for GoPro
®

TABLE OF CONTENTS
1. Par ts 3
2. Getting Started 6
3. Gimbal Mode 10
4. How to use the Remote Control 12
5. Calibration of Gimbal 13
6. How to use Low Angle 14
7. Firmware Upgrade 15
8. Technical Specs 15
9. Safety Instructions 16
10. Warranty Information 18
Join REMOVU Family
Website www.removu.com
Facebook.com/removuglobal
Instagram.com/removu
Twitter.com/removuglobal
Youtube.com/removu
1. Parts
ENGLISH
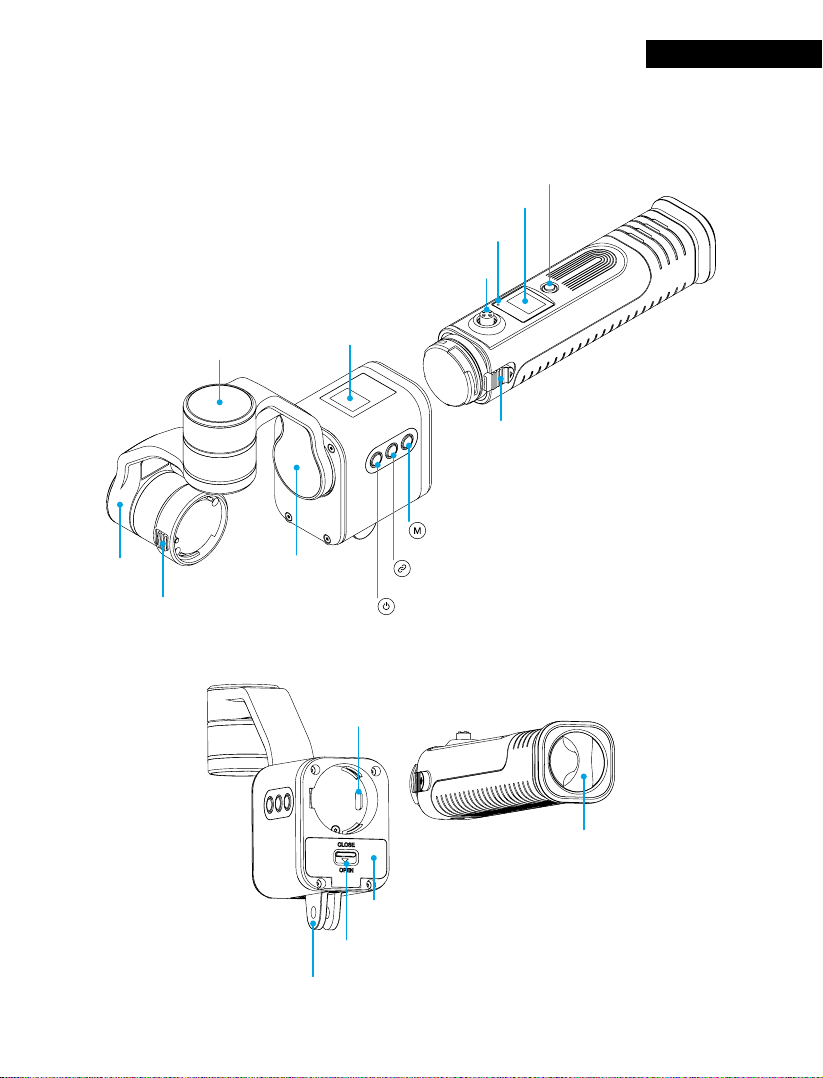
Part Names
Tilt Motor
Camera Detachable Switch
Roll Motor
OLED Display
Pan Motor
Micro USB Port
Power Button
OLED Display
Status Indicator
5-way Directional Keys
Handle Detachable Switch
Mode Button
Remote Control Pairing Button
Power Button
Joint Cradle
Ring for writ st strap
Battery Cover
Battery Cover Switch
3
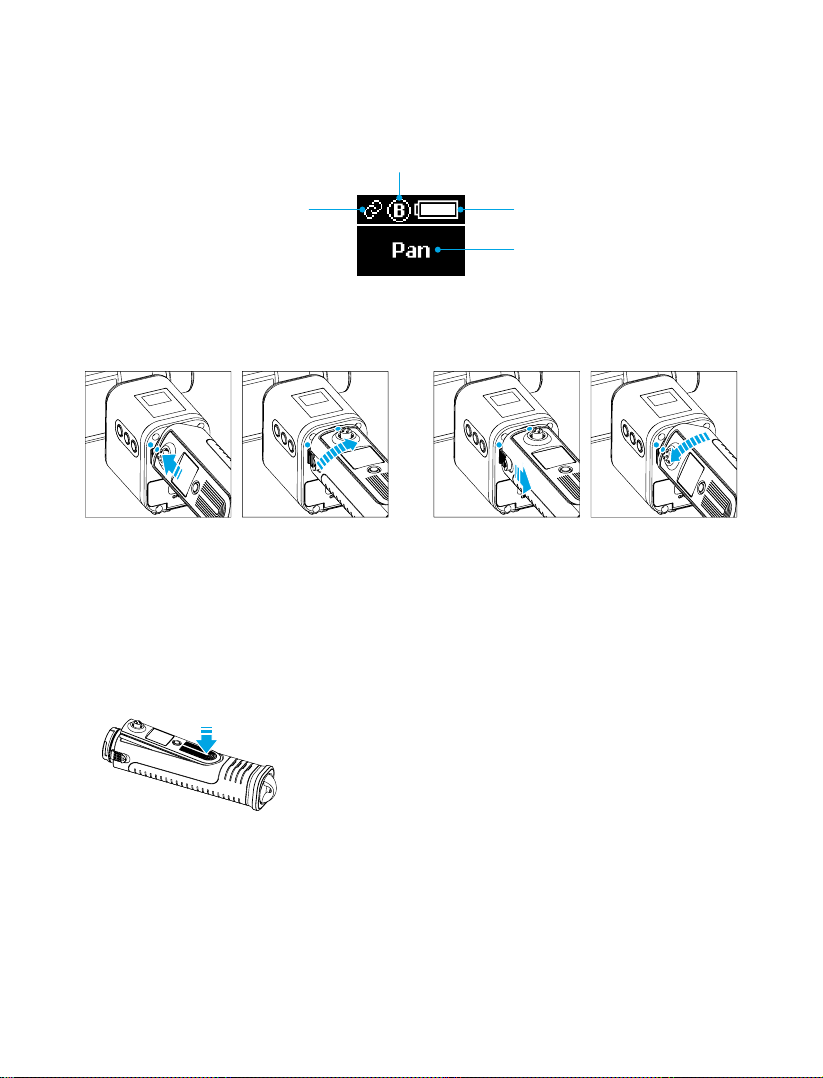
OLED Display Indicators
Status of BacPac Mode
Pairing Status
of the Remote Control
How to attach the handle to the S1
To attach the handle:
There are white dots located on the S1 and
the handle. Align the white dot on the handle
with the white dot on the S1 and then turn the
handle clock wise until the handle is locked.
How to remove the Remote Control
Firmly press on the bottom of the remote control until the
remote control pops up from the handle.
Battery Life
Gimbal Mode
To detach the handle:
While pushing down on the handle's det achable switch, turn the handle counter-clockwise.
4

How to detach the Cap on the S1 Handle
To detach, turn the cap on the S1 Handle counter-clock wise.
To attach, turn the cap on the S1 Handle clockwise.
How to store SD Card inside of the Cap on the S1 Handle
There are dual micro SD slots inside the cap on the S1 handle.
How to use the charger
Remote Control Chamber
LED Status Indicators
- Green LED: Bat ter y is Fully Charged
- Red LED: Battery is charging
Battery Chambers
Micro USB Port (DC-IN)
Note: Recommended use with a 5V/2A adaptor.
If you use adaptor that is less than 5V/2A , please charge only one S1 batter y.
If you use adaptor that is less than 5V/2A , please charge only one S1 batter y.
You CANNOT use gimbal and remote control while charging.
Note:
The gimbal and remote control operate only battery.
5

2. Getting Started
- Connect a compatible camera to the S1 gimbal. DO NOT turn the power on without a
camera connected to the S1 gimbal. It may cause malfunc tions.
- Turn the power on the camera before turning on the gimbal.
Warning
- Hold the gimbal steady while powering on the gimbal.
- After used S1 on the beach, please wash the S1 with running fresh water.
Do not dive S1 under the water.
2-1. HERO5 Users
Step 1. Insert the camera into the frame housing
Unhook the latch on the top right side of frame housing and slide the camera into frame housing.
Close the latch to secure.
Step 2. Turn the power on the camera
Cam's power can be turned ON/OFF using the but ton below the joint.
Step 3. "Wind Only" on MANUAL AUDIO CONTROL of HERO5
Please selec t "Wind Only" on MANUAL AUDIO CONTROL of HERO5 to use with S1.
Note: If you do not select this option or select
"Stereo Only", noise can be recorded.
6

Step 4. Mount Camera Housing
on to S1 Gimbal
There are white dots located on the S1 gimbal
and the housing. Align the white dot on the
housing with the white dot on the S1 gimbal and
then turn the housing clockwise until it is locked
into place.
Step 5. Attach the balance weight cap on the tilt motor
Note: If using S1 without the weight balance cap, it have
effect on operating and usage time. Please check
that weight balance cap is rmly attached to the S1
before operating the gimbal.
Step 6. Insert Battery into S1
Slide the Lock s witch to the open position and open the lid. Af ter inserting the battery, close the lid
and slide the Lock switch to the close position.
USB Port
Step 7. Powering On & Using BacPac Mode
1. Press and hold the power button for 1 second to turn the
device ON.
2. Press the M button for 3 seconds to activate BacPac Mode.
7

2-2. HERO3, 3+, 4 Users
Step 1. Insert the camera into the frame housing or the rainproof
housing
- Frame Housing: Unhook the latch on the top right side of frame housing and slide the camera into
frame housing. Close the latch to secure.
- Rainproof Housing: Place the camera inside the rainproof housing. Then, attach the bot tom of the
backdoor to the housing, then attach the top of the backdoor to the housing
until they click into place.
Step 2. Mount Camera Housing on to S1 Gimbal
There are white dots located on the S1 gimbal and the housing. Align the white dot on the housing
with the white dot on the S1 gimbal and then turn the housing clock wise until it is locked into place.
Frame Housing Rainproof Housing
8

Step 3. Insert Battery into S1
Slide the Lock s witch to the open position and open the lid. Af ter inserting the battery, close the lid
and slide the Lock switch to the close position.
Step 4. Powering On and Off
Press and hold the power button for 1 second to turn the device ON/OFF.
9

3. Gimbal Mode
Tilt axis
Pan axis
Tilt axis
Pan axis
Tilt axis
Pan axis
Pan Mode
Tilt and Roll are xed and camera is permit ted to
pan lef t or right.
Follow Mode
Camera is permitted to pan left or right and tilt up
and down, while Roll is xed.
Lock Mode
Camera stay s in its current orientation. All Pan /
Tilt / Roll are xed.
Changing Modes
- Gimbal modes can be changed by pressing the mode button.
Modes are cycled in the following order: Pan ► Follow ► Lock
10

How to use BacPac Mode
BacPac Mode is for using S1 with GoPro LCD Touch BacPac or Battery BacPac.
1. After attaching the BacPac to GoPro camera, place GoPro camera inside rainproof housing and
close the housing backdoor using extension backdoor.
2. In order to get the best performance, please attach the balance weight cap on the tilt motor.
Note: If using S1 without the weight balance cap, it have ef fect on operating and usage
time. Please check that weight balance cap is rmly attached to the S1 before operating the gimbal.
3. Press the M but ton for 3 seconds to activate BacPac Mode.
11
4. How to use the Remote Control
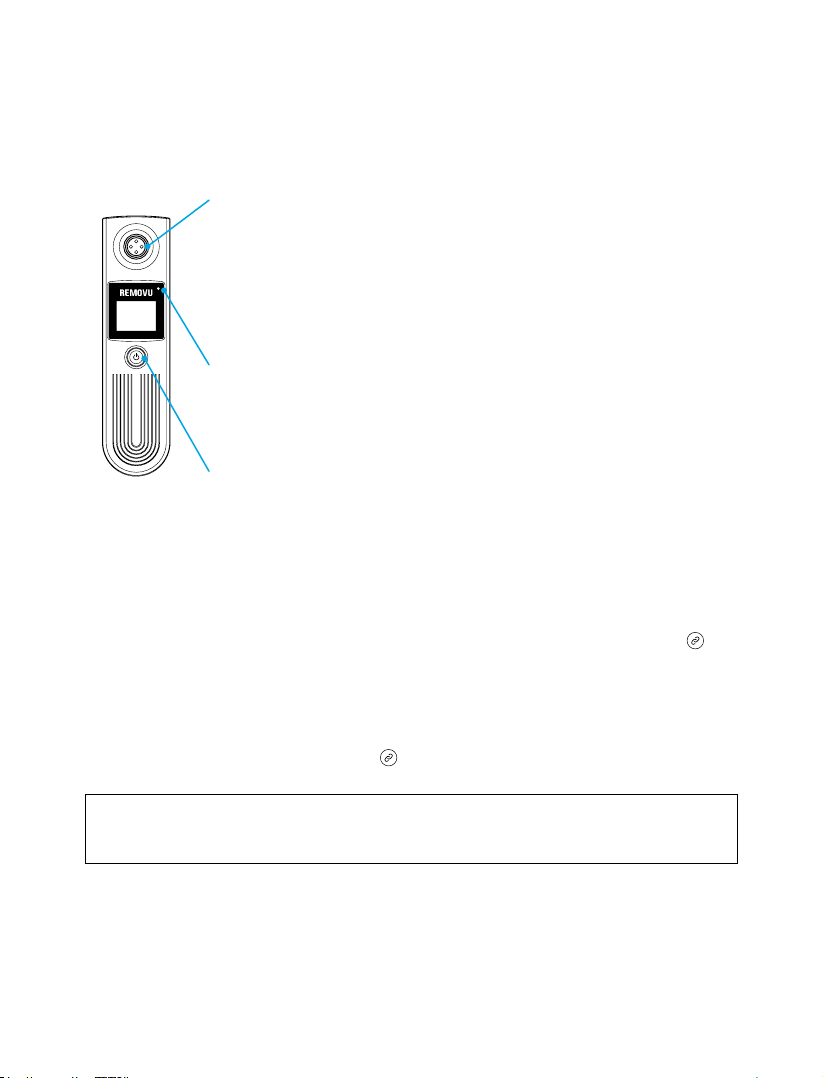
Part Descriptions
5-way Directional Keys
- Press and hold for 3 seconds to activate pairing mode so that the remote control can be paired with the S1 gimbal.
- To change the mode, press the button briey.
- Pan Mode: Gimbal can be operated by up or down direc tion keys.
Follow Mode: Gimbal can be operated by up or down direction keys.
Lock Mode: Gimbal can be operated by left, right, up or down direction keys.
Status Indicator
- Charging: Red LED
- Fully Charged: Blue LED
- Standby Mode: Blue LED ashes
Power Button
- Press and hold the power button for 3 seconds to turn the device ON/OFF.
Pairing
1. Connect a camera to the gimbal.
2. Turn the power on the gimbal.
3. After the gimbal has powered on, press and hold the pairing button for 3 seconds until the
ashes on the OLED display.
4. Turn the power on the remote control.
5. After the remote control has powered on, press and hold the 5 -way direction key for 3 seconds until
the OLED displays the pairing icon.
6. Once pairing is complete, the OLED display to indicate that the remote control and gimbal are
paired and connected. The remote control can now be used with the gimbal.
Note: You only need to follow the steps above once. Afterwards, the S1 and remote control
will connect automatically.
12
 Loading...