

Page 1
THIS APPLIANCE MUST BE COMMISSIONED BY A GAS SAFE REGISTERED ENGINEER
THE WARRANTY CARD MUST BE RETURNED TO ENSURE GUARANTEE VALIDITY
0
G
AS FIRED
C
OOKERS
OPERATING INSTRUCTIONS
OPERATING INSTRUCTIONSOPERATING INSTRUCTIONS
OPERATING INSTRUCTIONS
MODEL: GN & GD
Esse Engineering Limited, Long Ing, Barnoldswick, Lancas hire BB18 6BN
Website: http://www.esse.com On-line Store: http://www.e sseparts.com
02/10 (PP)
02/10 (PP)02/10 (PP)
02/10 (PP)
INSTR.CK
INSTR.CKINSTR.CK
INSTR.CK----GN/u
GN/uGN/u
GN/u
INFORMATION FOR USE WHEN ORDERING SPARES:
Model:__________________________________
Serial Number: ___________________________
Colour: _________________________________
Conditions of Guarantee
Your ESSE cooker is guaranteed against defects arising from faulty manufacture for three years, subject to the following express conditions:
• This cooker must be com missioned by your ESSE Dealer (or an authorised GAS SAFE engineer) upon installation. The details must
be recorded on the Co mmissioning Card and registered with ESSE by returning the completed card. The guarantee period com-
mences upon delivery of the cooker (subject to receipt of the correctly completed card).
• The cooker has been used for normal domestic purposes only, and in accordance with the manufacturer’s instructions.
• The cooker is serviced annually by the ESSE Dealer or authorised GAS SAFE engineer, and the Service Record completed.
• The cooker must not be serviced, maintained, repaired, taken apart or tampered with by any person not authorised by us.
• Any cooker or defective part replaced shall become the Company’s property.
Exclusions
This guarantee does not cover:
• Damage OR calls resulting from transportation, improper use or neglect.
• Parts deemed to be r eplaceable in the normal usage of t he cook er. T hese pa rts a re li sted he rewith: oven thermostat, gas
valve, p iezo ignition lead, pilot assembly, ti mer/programm er and cataly ser assembly .
• Enamel damage; the vitreous coating on your cooker is in effect an extremely thin layer of glass and as such displays all the characteristics
of glass. It can easily be damaged by impact, or by spillage of cold liquids onto a hot surface. Such damage cannot be covered under
this guarantee. (See also intermittent use of your cooker, below).
This guarantee is personal to the original purchaser and is non-transferable.
Intermittent Use of Your Cooker
In the event of intermittent use and prolonged shutdown, it should be noted that in some circumstances enamel may be displaced due to
ingress of damp. Whilst this is rare, it is most likely to occur in situations where the unused cooker remains in a unheated property. There is a
layer (known as the groundcoat) between the vitreous enamel surface and the cast iron. Groundcoat is porous and if exposed (e.g. after a
chip in the vitreous enamel coat), may allow damp to penetrate behind the vitreous enamel and spread through the groundcoat. Surface
oxidisation of the cast iron may thereafter occur, causing the vitreous enamel to fall off. Such damage will not be covered by your warranty.
We recommend that a light coating of petroleum jelly be applied to any damaged areas when the cooker is not in use to help keep out the
damp, in addition to following instructions in your Operating Manual.
Customer Care
In the event you should require spare parts, please order through your ESSE dealer.
Should you have cause for dissatisfaction with your coo ker, you should contact your ESSE dealer, who will, in most instances, be able to
offer you immediate assistance. You will be required to give the following details.
• Your name, address and postcode.
• Your telephone/contact details.
• Clear and concise details of the fault.
• Model and serial number of the cooker (found on the inside panel of the firebox/control door).
• Purchase date (please note that a valid purchase receipt or guarantee documentation is required for in-guarantee service calls).
We will then check that we have an accurately completed warranty card, if not then any work carried out will be charged.
We will access the na ture of the complaint and either send replacement parts for your dealer to fit, send an engineer to inspect & report, or
send an engineer to remedy. If the fault is not actually due to faulty workmanship but some other cause such as misuse or failure to install
correctly, a charge will be made to cover the cost of the visit and any new parts required, even during the warranty period. Home visits are
made between 08 30 - 17 00 hrs. Monday to Friday, and are arranged for either a morning or afternoon appointment.
GUARANTEE
Page 2
2
3
INTRODUCTION
We are pleased you have chosen an ESSE cooker. We would ask that you read the following operating
instructions very carefully.
Correctly installed and operated your ESSE cooker will give satisfactory service for many years.
We f eel c ertai n that you will enjoy the war mth and comfor t of yo ur ESSE cooker an d, p erhaps mor e
importantly, you will more than enjoy the superb quality of the cooking.
BON APPETIT!
IMPORTANT NOTES
The cooker must only be used in the manner described. Incorrect operation can lead to hazards.
This appliance must be used in manual mode only in an emergency. Normally an electricity supply is
required to operate in timer mode.
The ventilation arrangements will be made by the installer. Never alter these arrangements by blocking off
the permanent air vents provided by the installer.
Do not light the cooker if it is suspected that any part of the hot water system is frozen. Seek professional
help from a plumber.
Take care to avoid touching the viewing window or its immediate vicinity when the cooker is alight. These
parts may be hot.
If the cooker is operated under conditions where the combustion products spill from the flue terminal i.e.
if downdraught or flue blockage occurs, the special pilot fitted to the cooker will cause the burner to shut
down. If this occurs, consult your installer for remedial action.
TABLE OF CONTENTS
Introduction Page 2 Temperature Settings
Important Notes Page 2 The Programmer
Your Cooker Page 3 Using the Programmer
Before Using Your Cooker Page 4 Information and Advice
Operating the Burner Page 5 Tips from the ESSE Kitchen
The Hotplate Page 6 Guarantee
The Ovens Page 6
Page 7
Page 8
Page 9
Page 10
Page 11
Page 12
The use of a gas appliance results in the production of the heat and moisture in the room in
which it is installed. Ensure that the room is well ventilated.
Temperature in cabinet storage spaces above the appliance may be unsafe for storage of
some types of materials such as volatile liquids or aerosol sprays which can explode.
Model GN has no boiler; Model GD has a boiler for domestic hot water only.
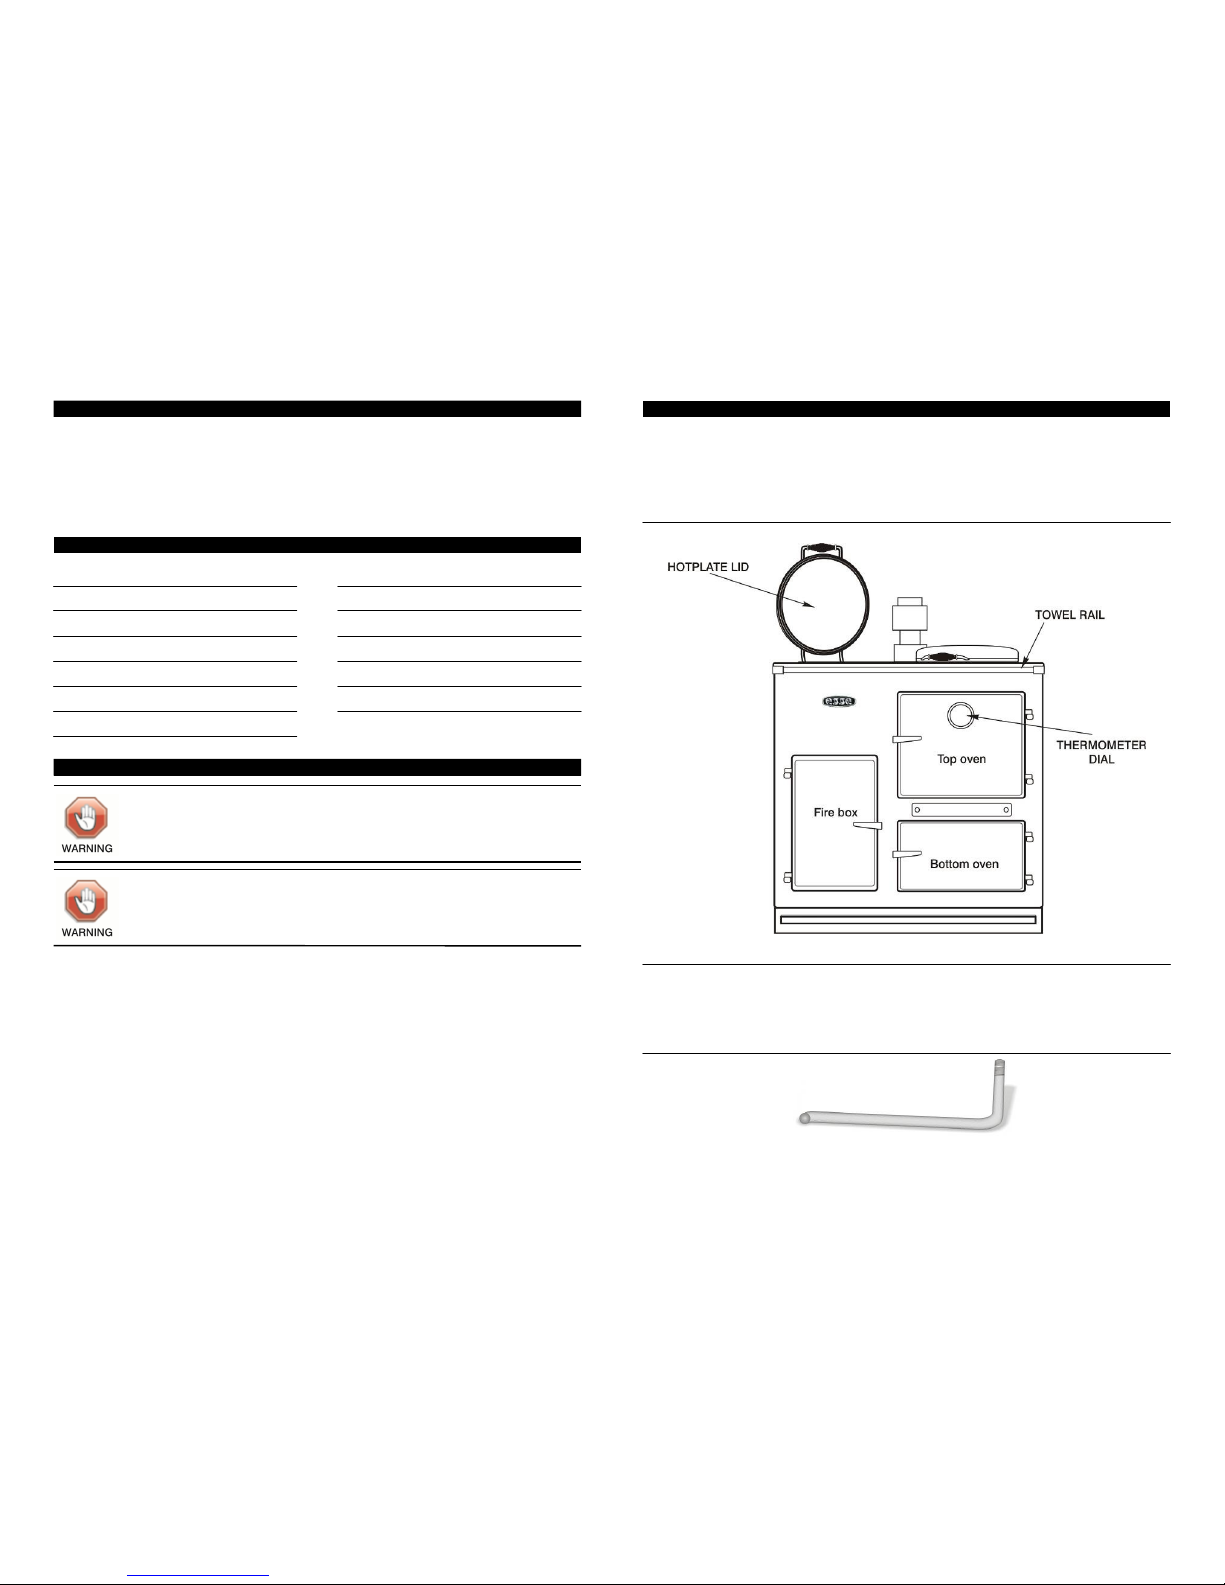
Your cooker is a combination appliance, providing hotplate, fast and slow ovens and where applicable,
hot water service. A single burner is located under the left hand end of the hotplate. There are two hinged
covers to conserve heat losses from the hotplate when it is not in use.
Fig. 1 - Your Cooker
Tools and Accessories
The following items are supplied with your ESSE cooker:
Hotplate lLifting tTools
Hotplate lLifting tTools Hotplate lLifting tTools
Hotplate lLifting tTools - For lifting off the hotplate.
Oven Accessories
Oven Accessories Oven Accessories
Oven Accessories - Roasting Tray, Baking Tray and Two Wire Shelves.
Fig. 2 - Lifting Tool
The hotplate lifting tools screw into the small holes near the end of the hotplate to provide a lifting handle
should it be necessary to remove the hotplate for any reason.
YOUR COOKER
Page 3
4 5
BEFORE USING YOUR COOKER
Check that the plasti c pr otectio n co ating has been r emoved from each hot plate cover , an d from th e
inside of the oven doors. This should have been done during installation but if the plastic has been left on
it will melt on firing the cooker and cause damage to the insulated covers.
The hotplate surface should be wiped with a dishcloth or similar, which has been soaked with hot water
and a detergent liquid. Finally dry off the hotplate with an absorbent material.
Nominal Heat Input
The nominal heat in put, based on the gross calorific value of the fuel, is 8.8kW. For propa ne, this
converts to 629g/hour.
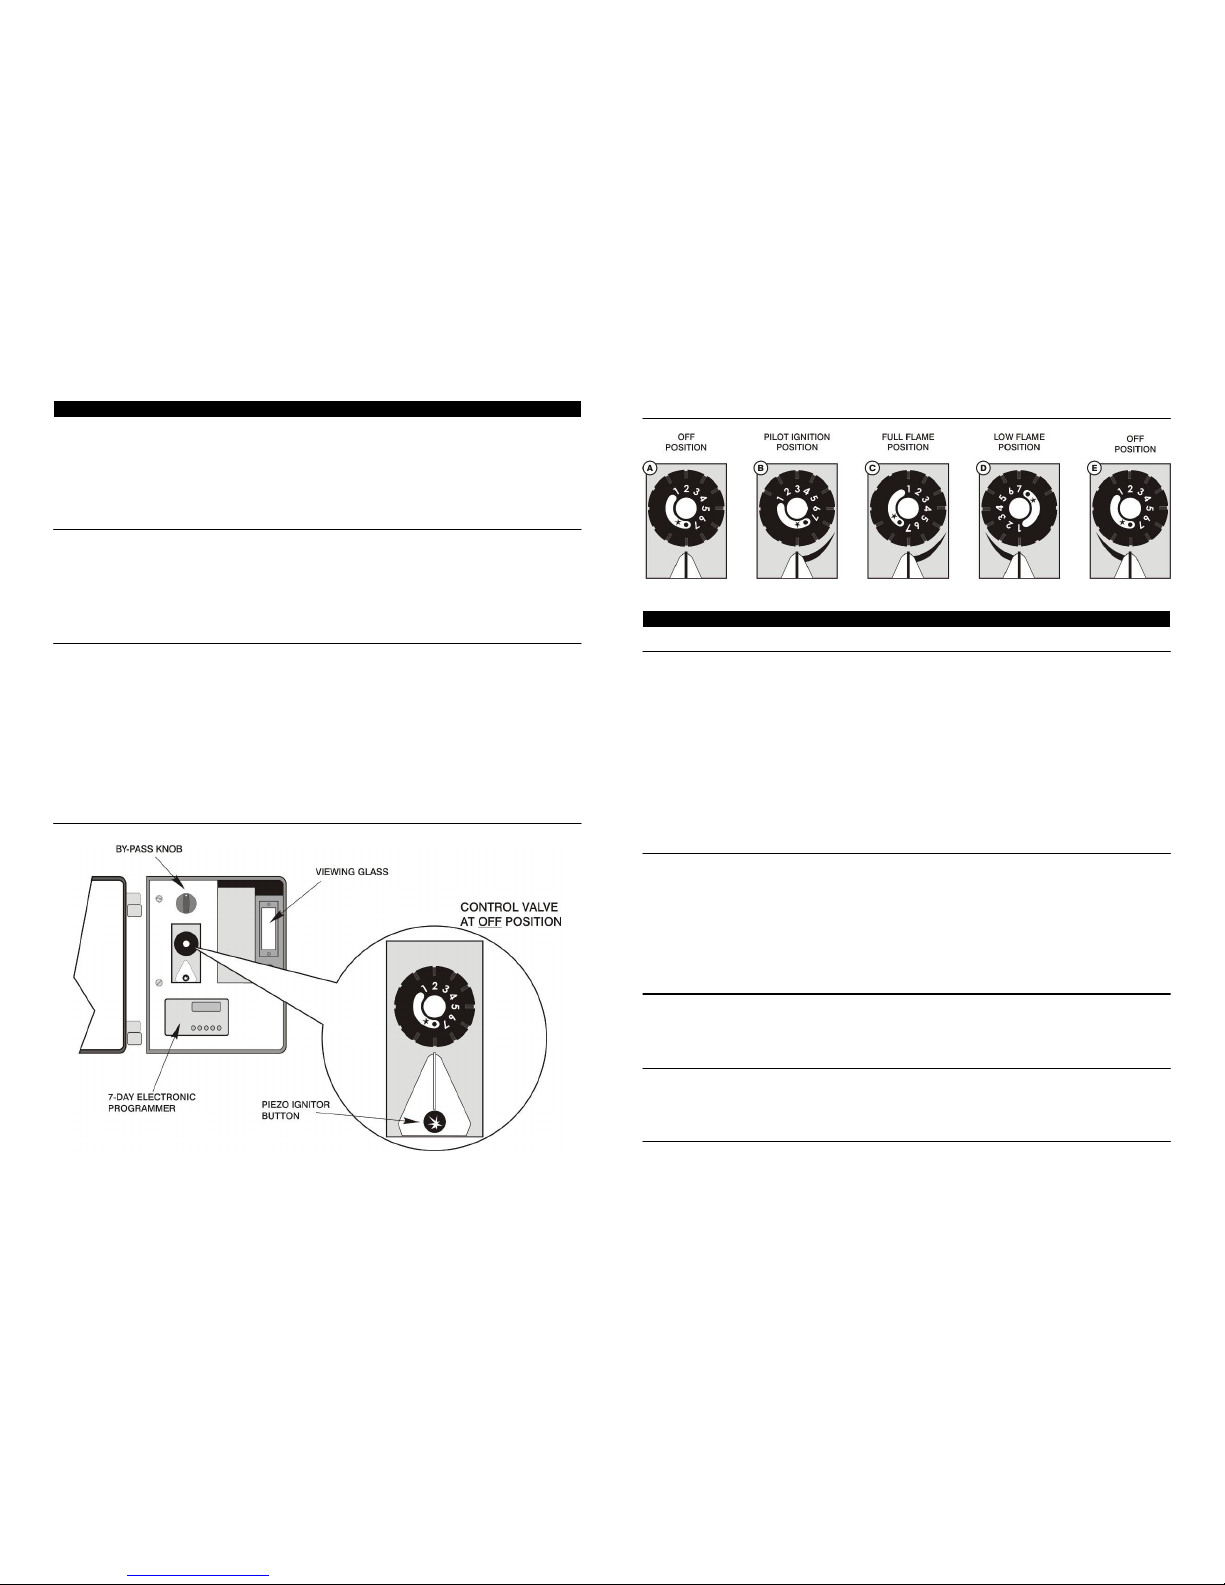
The cooker is controlled by a 7 - day electronic timer and a control valve. A by-pass valve is fitted for use
in event of electrical power not being available. The by-pass valve should normally be in the TIMER
TIMERTIMER
TIMER position.
These controls are located behind the Control/Firebox Door. (Fig 3).
Burner Control
The control system operates as follows:
•
The knob is turned to the lighting position, depressed and the pilot ignited by the igniter. With the
pilot alight, the knob is released and then turned to an ON
ONON
ON position.
•
The temperature of the oven is controlled by a thermostat located in the top oven. The control
valve contains a flame failure device that shuts off gas to the burner if the pilot is extinguished for
any reason.
Detailed operation of the control is dealt with later in these instructions under the appropriate headings
Fig. 3 - Gas Controls
To Light the Pilot
Open the Firebox/Control Door fully.
1) Turn control knob to PILOT IGNITION
PILOT IGNITION PILOT IGNITION
PILOT IGNITION position (Fig. 4b).
2) Press the knob fully downwards and hold it in.
3) Press igniter button fully downwards and release to obtain a spark (holding this button down
serves no purpose). Repeat until the pilot lights and flame can be seen through the viewing
glass.
4) Continue to hold the knob in for about 10 seconds (a slow count of 1 to 10) after the pilot ignites.
Release Knob.
If the pilot goes out - repeat steps 2 - 4
To Light the Burner
1. Ensure that the by-pass valve is in the TIMER
TIMER TIMER
TIMER position.
2. With the electronic timer calling for heat and with the pilot alight, turn control knob to FULL
FULL FULL
FULL
FLAME
FLAME FLAME
FLAME position,,,, and allow the cooker to heat up for about 45 minutes. If electrical power is not
available turn the by-pass valve to manual position to light the burner.
3. Turn the control knob to the pos ition r equired t o maintai n the oven tem peratu re - (see "The
Ovens" section - Page 6).
To Turn the Burner Off
Turn t he control knob to th e PILOT IGNITI ON
PILOT IGNITION PILOT IGNITION
PILOT IGNITION position (Fig. 4b) to leave the bur ner OFF
OFFOFF
OFF and th e pil ot
alight. Alternatively the burner may be controlled by the electronic timer. Turn the control knob to the OFF
OFF OFF
OFF
position for complete shutdown (Fig. 4e).
Hot Water Output
The domestic boiler model produces hot water whenever the burner is alight and the amount produced is
directly related to the oven temperature i.e. the maximum amount is produced at the highest oven temperature
and vice versa.
Oven Temperatures
The approximate temperature at the various knob setting positions are as shown in the OVEN TEMPERATURE
chart on Page 7.
OPERATING THE BURNER
Fig. 4 - Control Valve Knob Settings
Page 4

7
The hotplate is surface groun d and intended for use with machined base ut ensils . As heat passes
from t he hotplate to utensil almost directly by conduction, good contact is essential and a thin bottomed
utensil will result in poor heating performance, especially if the bottom is uneven.
The hottest part of the hotplate is the left hand end. The temperature of the hotplate depends on the oven
control setting. In general the higher the oven temperature the higher the hotplate temperature.
Always keep hotplate covers down except when using the hotplate.
The ovens are fitted with anti-pull out stops to prevent shelves from being pulled out accidentally. To
insert the shelf locate the open end of the shelf on the runners, lift up slightly at the front and push to the
rear to pass the stops, then fully back into the oven. To remove a shelf, pull forward until it stops, lift front
end and pull out of the oven.
The top oven has four runner positions for the shelves. The wire shelf is used when cooking two trays of
food at one time. Certain cooking operations can be carried out by placing dishes directly on the oven
bottom. The oven temperature is controlled thermostatically in accordance with the setting selected on
the cooker control knob. A thermometer in the door giv es an indica tion of the oven temperatur e, but
since it is in the door itself, the thermometer will react if the door is opened and the thermometer reading
may fall considerably. When the door is closed, the thermometer will recover slowly to indicate the oven
temperature. A rapid fall in thermometer reading therefore does not indicate that the oven temperature
has also done so. The bott om o ven takes its heat from the undersi de of the top oven , and is
approximately 3/5 of the top oven temperature.
THE HOTPLATE
THE OVENS
When lighting the burner for the first time or when the cooker is completely cold, there will
be some steam or condensation due to the mass of cold metal. During this warm up period
the hotplate covers should be raised to prevent condensation entering the covers.
Should the burner and pilot go out at any time, or are turned off by accident, wait at least
TWO MINUTES before attempting to relight the pilot flame. This period of time will ensure
that the safety device within the gas control has cooled and closed, preventing gas flowing
to the burner.
The hotplate must not be removed from the cooker, unless the controls are at OFF and the
cooker is isolated from the mains electricity supply.
Do not allow the cooker burner to run for prolonged periods with the top oven door open.
6
TEMPERATURE SETTINGS
Knob settings between any two numbers can be used if required.
The to p ov en wi ll r each operating t emperatures in about 60 mi nutes from cold or 3 0 to 45 minutes if
previously idling at low flame. The most economical control setting will be found by practical usage, but
obviously the lower the temperature setting the greater the economy of operation. The electronic timer
should be set to suit your requirements.
The equ iva len t gas cooke r 'Marks ' of ten quo ted in c ook ing instru cti ons are shown in the Oven
Temperature Chart.
Routine Servicing
Like any other gas appliance, the cooker must be regularly serviced by a qualified service engineer at
least once a year. This will ensure that the cooker remains in a first class and safe condition. Your installer
will normally be able to recommend where service can be obtained.
Oven Temperature Chart Knob Position Chart
The thermometer should be used as a general guide but may vary from the temperatures
indicated above. The thermostat will give repeatable oven temperatures when cooking.
Approxi mate equi valen t Celsius /Fahr enheit and ‘Gas Mar k’ (G. M.
G.M.G. M.
G.M. ) temperat ures are
indicated in the OVEN TEMPERATURE chart. If the oven temperatures are not repeatable,
this may indicate that the thermostat requires replacing.
On completion of the service, the engineer should fill in the Service Record section of the
Installation Instructions. As well as issuing you with the relevant Gas Safe paperwork for
your appliance.
Very Cool
Very CoolVery Cool
Very Cool
Cool
CoolCool
Cool
Moderate
ModerateModerate
Moderate
Moderately Hot
Moderately HotModerately Hot
Moderately Hot
Hot
HotHot
Hot
Very Hot
Very HotVery Hot
Very Hot
°FFFF
°C
G.M
G.MG.M
G.M.
225 110
¼
250 130 ½
275 140 1
300 150 2
325 170 3
350 180 4
375 190 5
400 200 6
425 220 7
475 240 9
450 230 8
Knob Position
1111
2222
3333
4444
5555
6666
7777
Approx. Top Oven °C
SIMMERING POSITIONS
125
155
185
215
250
Page 5
8
9
THE PROGRAMMER
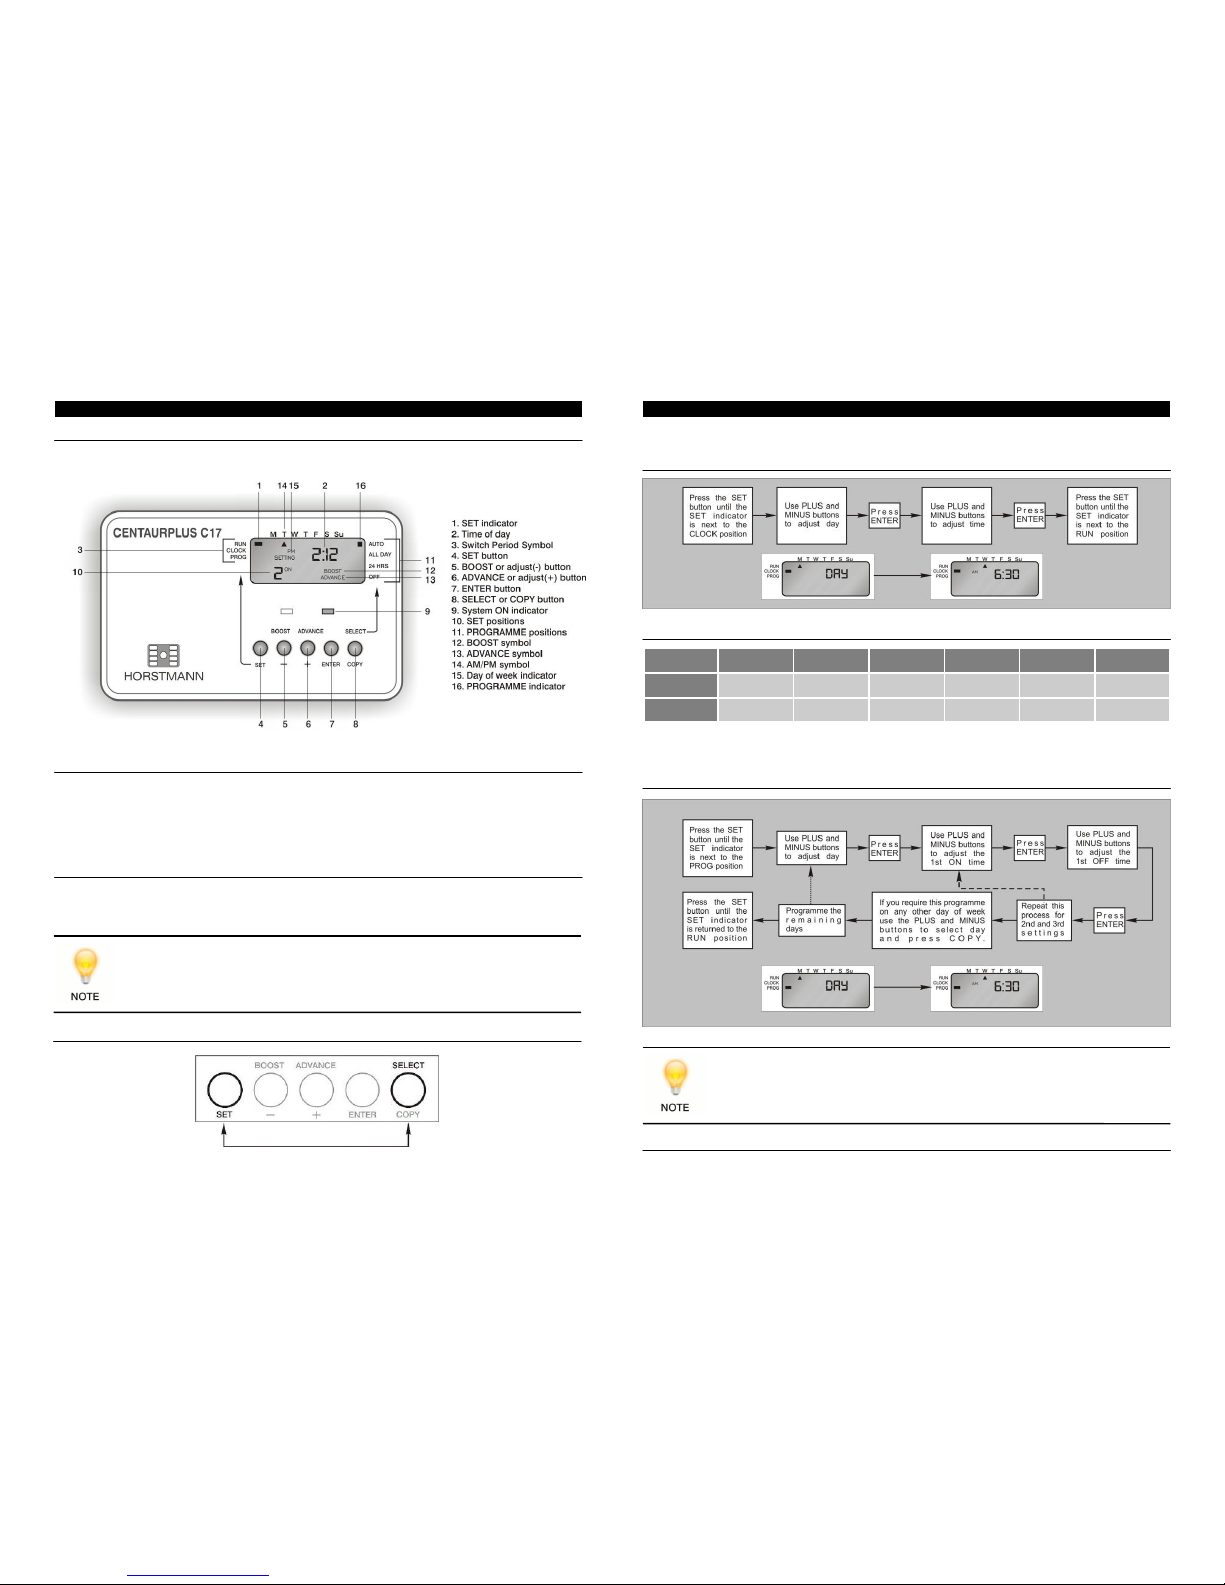
Fig. 5 - Front View of Single Channel Programmer
Operating Features
• 1 Hour Boost.
• Flexible 7-day Programmer.
• ADVANCE function gives instant ON/OFF override.
• Up to 3 ON/OFF periods per 24-hr operation.
• Programme options: Auto/All Day/24 Hr/OFF
Resetting the Programmer
Electronic equipment can in some circumstances be affected by electrical interference. If the programmer' s
display becom es frozen or scrambl ed; or if you wish to revert back to the defau lt time settings ,
please use th e following procedure.
Fig. 6 - Reset Combination
Press the SET and SELECT buttons together then release the buttons and the programmer
will return to pre-set (Fig.6).
The simple instructions below are designed to help with the programming of the unit.
Fig.7 - Setting Day and Time of Day
Default Time Setting Chart
The default factory settings are shown, however if you wish to change these proceed as instructed below.
Fig. 8 - Setting the ON and OFF Times
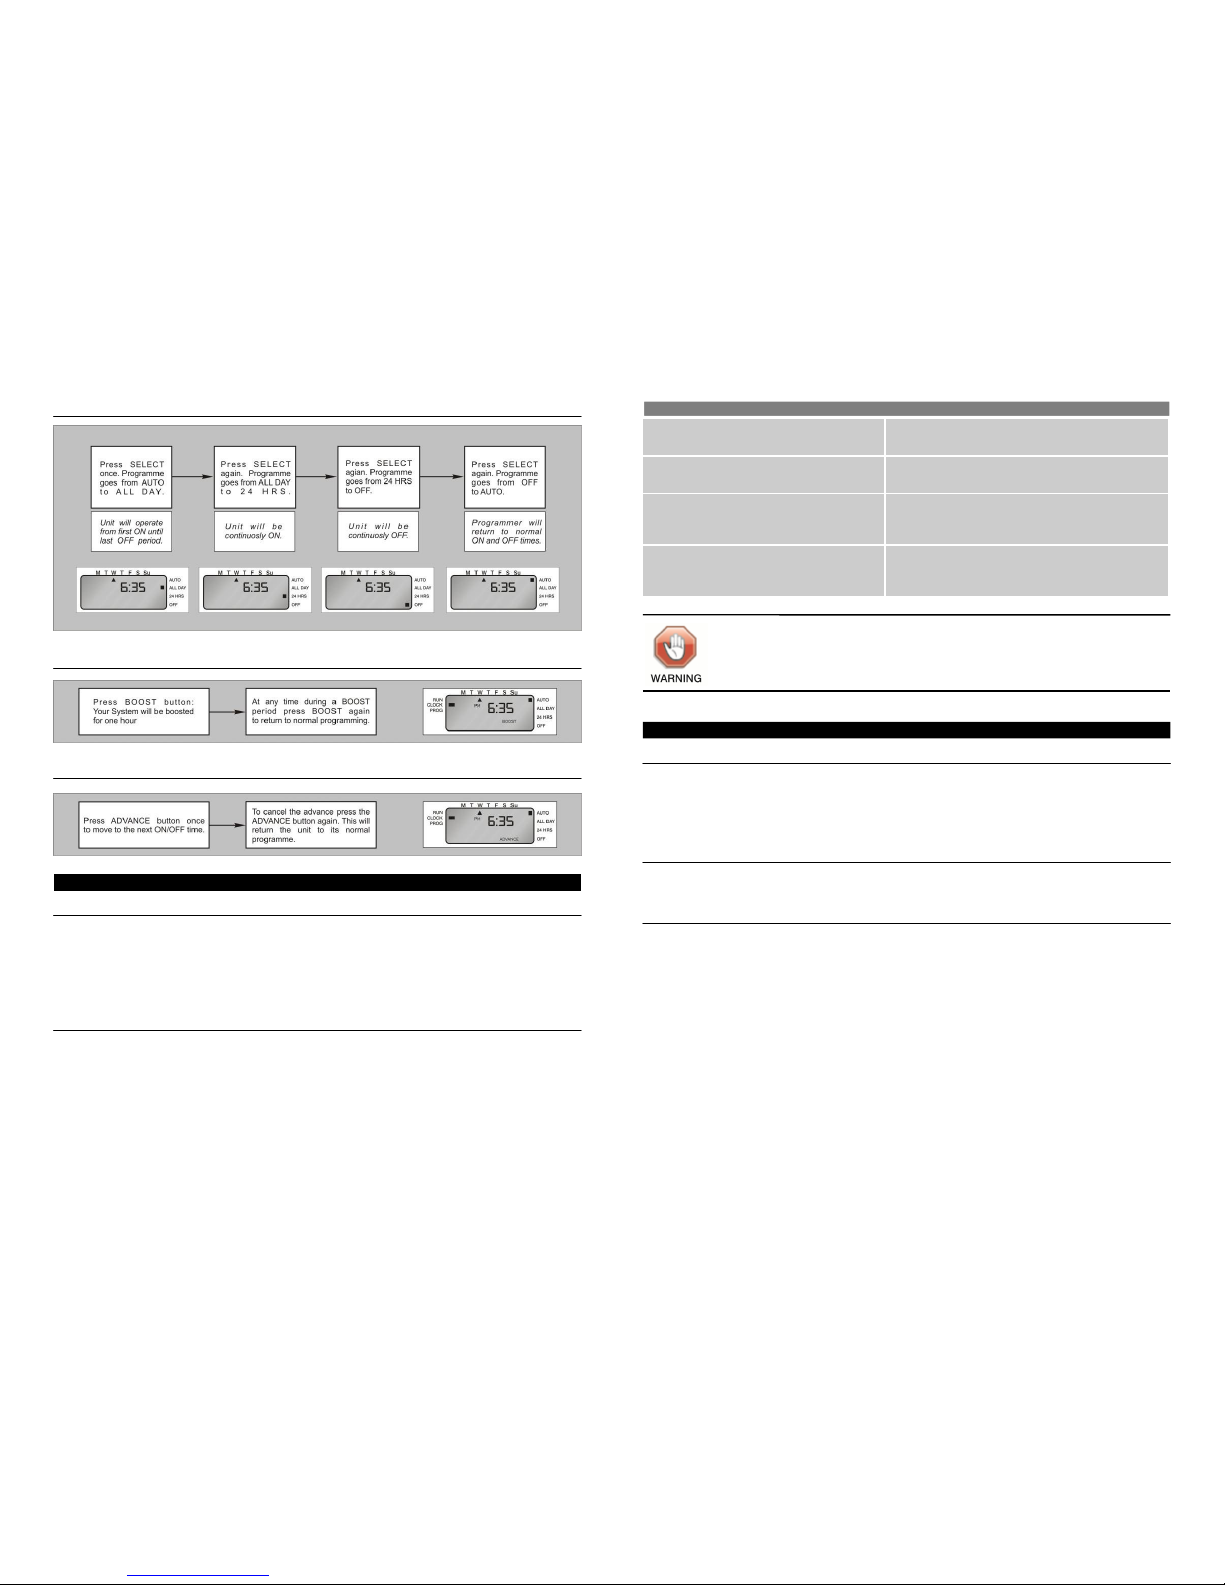
System Features
The SET indicator must remain in the RUN position for the following instructions. See Fig. 9.
If a period is not required it can be cancelled by setting the ON and OFF settings to the
same time, i.e.: ON 10.00AM, OFF 10.00AM
USING THE PROGRAMMER
1st ON 1st OFF 2nd ON 2nd OFF 3rd ON 3rd OFF
MON - FRI 6.30 AM 8.30 AM 12.00 PM 12.00 PM 4.30 PM 10.30 PM
SAT/SUN 7.30 AM 10.30 AM 12.00 PM 12.00 PM 5.00 PM 11.00 PM
Page 6
10
11
Fig. 9 - Special Features
Fig. 10 - 1 Hour Temporary Override
Fig. 11 - Advance Function - Brings Forward Next ON or OFF Operation
The Battery
The programmer is fitted with a non-rechargeable, long life battery, which will maintain the programmed
time settings for a minimum of ten months with the supply disconnected. This should be sufficient to power
interruptions during the life of the unit.
During power interruptions the display will be blank, after 3 days the current time of day will be lost. These
measures are to prolong the battery life.
Service and Repair
This pr ogramm er is NOT
NOT NOT
NOT u ser ser viceabl e. Ple ase do not d ismant le the unit. In th e unlikely ev ent of a
fault developing please refer to the Resetting the Programmer
Resetting the ProgrammerResetting the Programmer
Resetting the Programmer section on page 8. If this fails to resolve
the problem, please contact a local heating engineer or a qualified electrician.
INFORMATION AND ADVICE
The CentaurPlus programmer must only be removed from its backplate by either a qualified
electrician or heating engineer. The programmer plugs into a 6-pin backplate located on the
rear of the unit and is secured with two screws located on the bottom surface of the unit.
Undo these screws and pull forward and down in an arc motion.
QUESTIONS AND ANSWERS
The unit display has become frozen. This could be due to local electrical interference. Using
the RESET procedure may rectify the fault.
The indicator neon fails to illuminate. Using the RESET procedure may rectify the fault. If the
problem persists, the programmer will need replacing.
There is no display on the programmer. Try the RE SET procedure on page 8, i f this f ails to
rectify the problem, please have the mains supply
checked.
How do I know if the programmer is still under
warranty?
The CentaurPlus range comes with a 2 year guarantee
from the date of manufacture. This date is located on
the rear of the unit, indicated by a month over a year.
TIPS FROM THE ESSE KITCHEN
Enamel Cleaning
Enamel is simply a coloured glass coating added to the metal to give a durable and hygienic finish. It can be
damaged by scratching or by a sudden application of cold liquids onto its surface when hot. Clean with a cloth
and soapy water, preferably while cooker is still warm. Proprietary non-scratch liquid cleaners for enamelled
surfaces may be used. Spilled liquids should be removed as soon as possible. Fruit juices and other acidic
products can remove the gloss surface from the enamel if left for any period of time.
Pots and Pans
It is important to use pots and pans that have a ground base and are flat-bottomed on the hotplate.
Cookware made of stainless steel, cast iron, aluminium, glass and earthenware is suitable for your ESSE.
The Hotplate
The temperature versatility here is very important - the area of the hotplate over the left hand end burner
is the hottest, while the ar ea over the oven is c ooler. Qu ick boil on the for mer and then transfer for
simmering on the latter.
For deep fat frying , bring t o temper ature on t he 'right' side. I ntrod uce cold fo od and then r eturn to
temperature on the 'hotter' left side.
Cooking directly on the hotplate is another facility - griddle scones, burgers, sausages, steaks, and even
Welsh Rarebit can be cooked directly on the surface.
Meringues can be dried on a baking tray sitting on the hob overnight.
Additionally, by using a barbecue griller you can produce your own toasted sandwiches on the oven top.
The hotplate can be rubbed down with a proprietary cleaning pad if necessary, but normally should need
no attention unless spillage is allowed to harden on its surface.
Care must always be taken when handling foods in the home.
Always follow the b asic rules of food hygie ne to prev ent bacterial and microb ial growth and cross
contamination when defrosting, cooking, cooling and freezing foods.
 Loading...