

Page 1
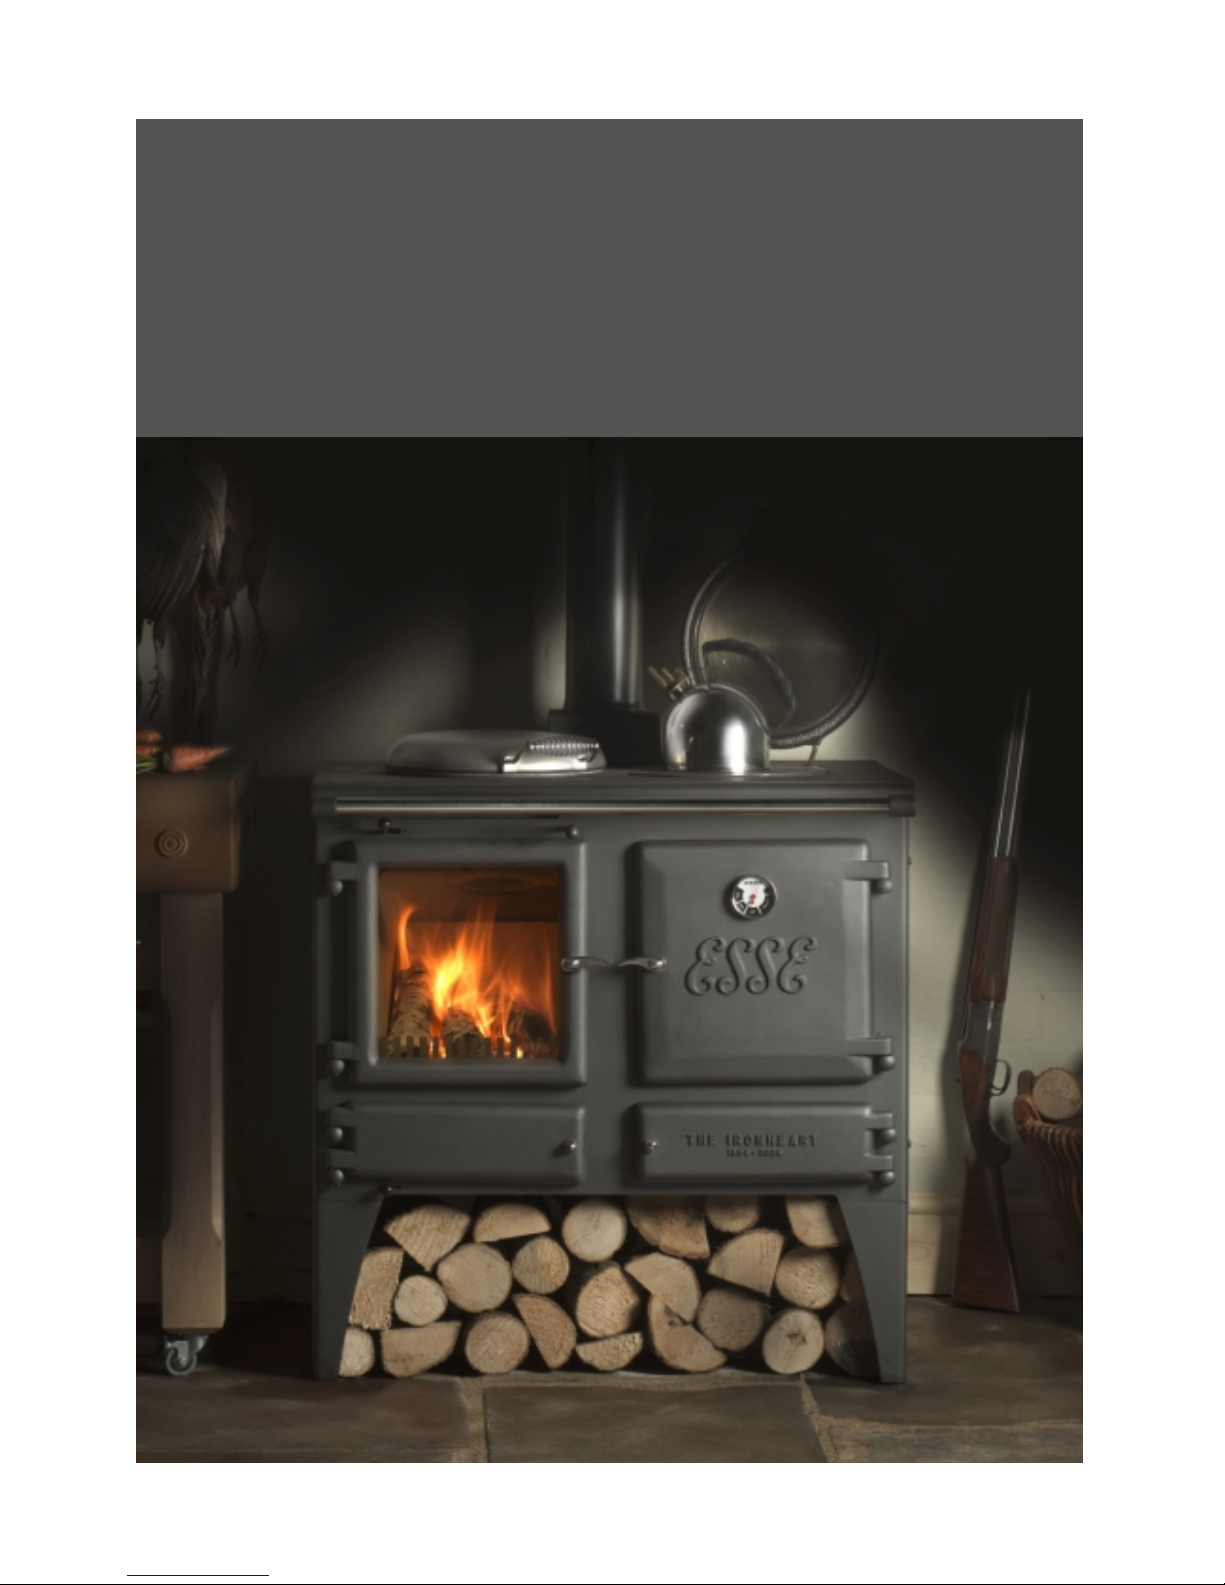
ESSE Cooking Stove
OPERATING & INSTALLATION INSTRUCTIONS
MODEL: CS1
Page 2
INTRODUCTION
CONTENTS
We are pleased that you have chosen an ESSE
cooking stove. We would ask you to read the
following instructions very carefully. Correctly
installed and operated, your ESSE cooking stove will
give satisfactory service for many years. We feel
certain that you will enjoy the warmth and comfort
of your ESSE cooking stove and, perhaps more
importantly, you will more than enjoy the superb
quality of the cooking.
OPERATING
Safety Notes Page 2
Your cooking stove Page 3
Lighting and Controlling the Fire Page 4
Correct Running Temperatures Page 5
Extended Burning Page 6
Types of Fuel Page 6
Operating the Oven and Hob Page 6
Cleaning the cooking stove Page 7
INSTALLATION
Chimney and Flue Information Page 9
Flue Draught Reading Page 10
Installing the cooking stove, Positioning
and Flue Connection Page 11
● Properly installed, operated and maintained, this
appliance will not emit fumes into the dwelling.
However occasional fumes from de-ashing and
re-fuelling may occur. Persistent fume emission is
potentially dangerous and must not be tolerated.
If fume emission does persist, open doors and
windows to ventilate the room. Let the fire burn
out or eject and safely dispose of fuel from the
appliance. Once the fire is cold, check the flue
and chimney for blockages and clean if required.
Do not attempt to relight the fire until the cause
of the fume emission has been identified and
corrected. Seek expert advice if necessary.
● Do not fit an extractor fan in the same room as
the appliance.
● An adequate air supply for combustion and
ventilation is essential. Air openings provided for
this purpose must not be restricted.
● It is important that flue ways are cleaned
frequently and the chimney swept regularly. Also
the cooking stove must be maintained in good
mechanical order. Regular sweeping means at
least once per year for smokeless fuel and a
minimum of twice per year for other fuels.
● If the chimney was previously used for an open
fire, it is possible that the higher flue gas
temperatures generated by the cooking stove
may loosen deposits that were firmly adhered to
the inner surface of the chimney and cause
blockage of the fluepipe. We recommend that in
such a situation a second sweeping of the chimney
should be carried out within one month of
regular use of the cooking stove after installation.
● Should it be likely that children, aged or infirm
people approach the fire, then a fireguard should
be used.
● Avoid the use of aerosol sprays in the vicinity of
the cooking stove when it is in operation.
Warning! The front of the cooking stove
becomes very hot when in use. Do not place towels
on the handrail when the cooking stove is alight.
OPERATING INSTRUCTIONSS
SAFETY NOTES
2
Page 3
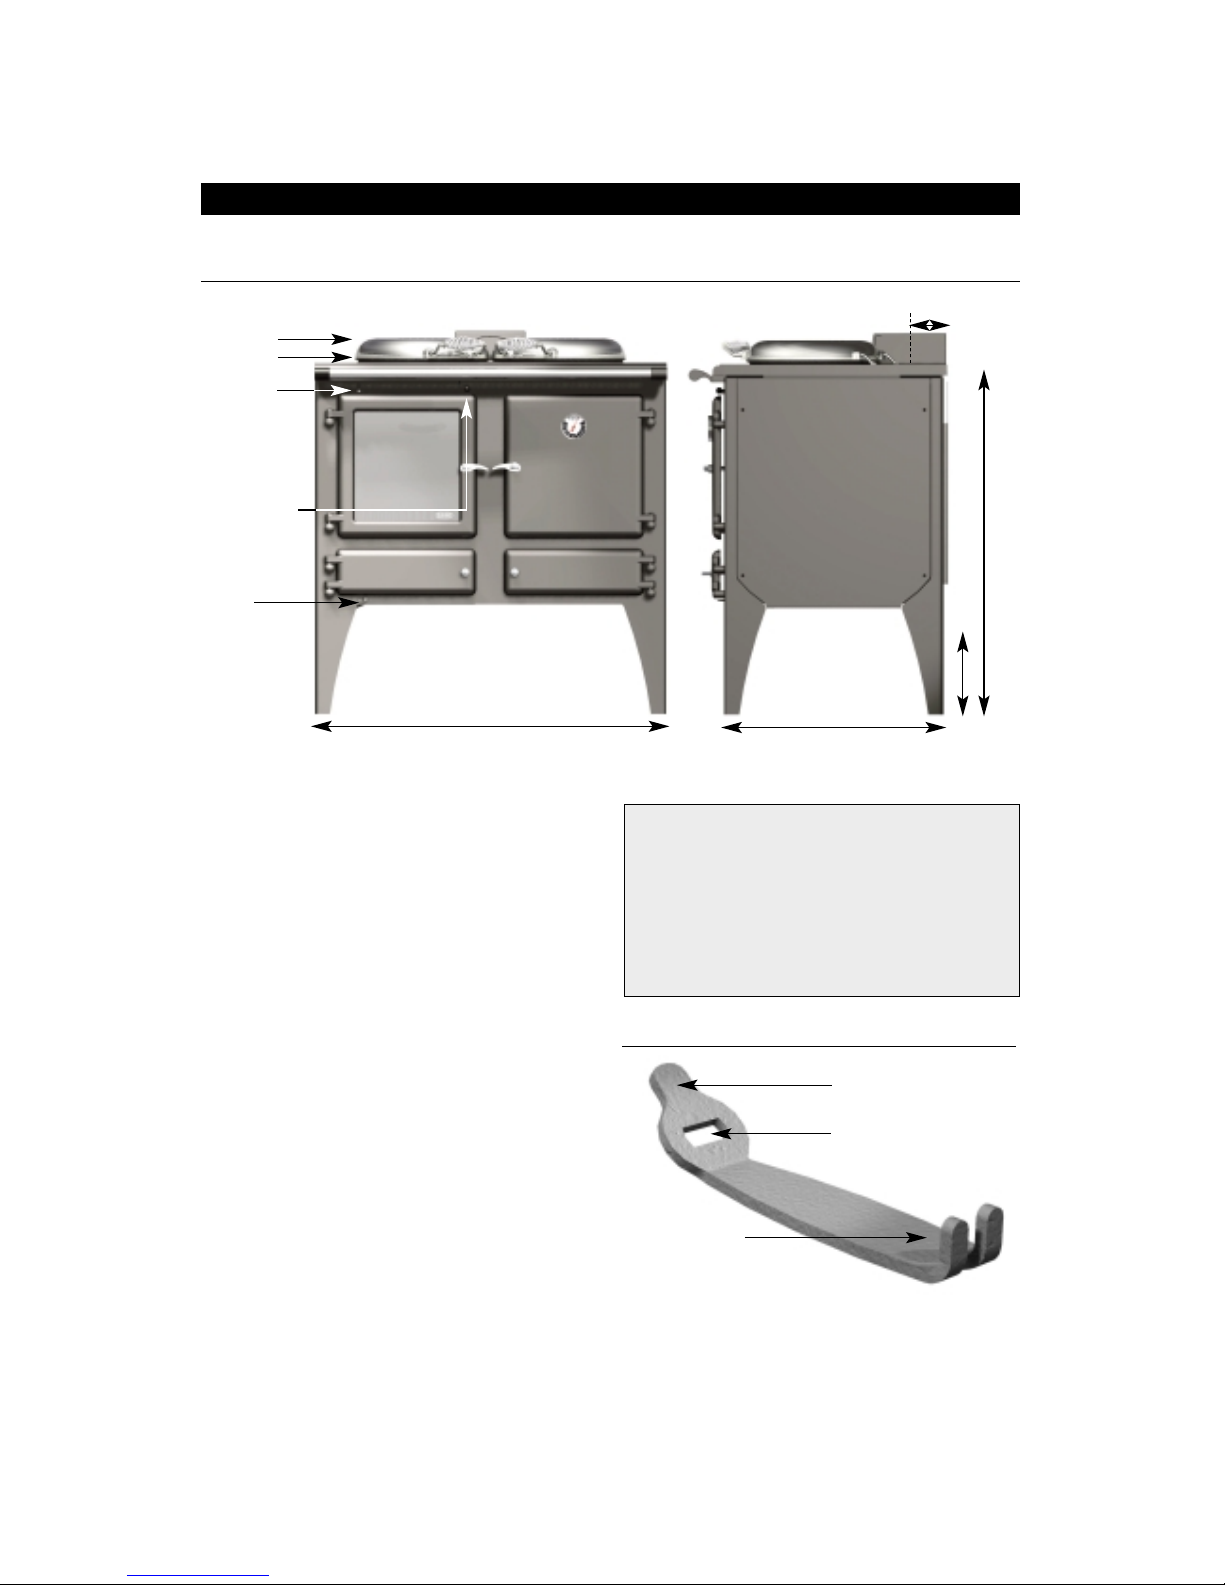
Figure 1 shows the cooking stove and its controls.
The large glass door on the left is the loading door
through which the fire is lighted and refuelled. The
small door at the bottom on the left is the ash door.
The large door to the right of the cooking stove is
the oven and the small door at the bottom right is
the oven flue access door.
Included inside your cooking stove is a multi
purpose-operating tool – for lifting the ash pan,
adjusting the primary and secondary air supply and
opening the doors.
The cooking stove is suitable for burning wood and
smokeless solid fuels.
Note: Ordinary bituminous house coal is
not recommended and must not be burned
in smoke control areas. Burning bituminous
house coal will result in a sooty cooking stove
and chimney, and the cooking stove glass will
require regular cleaning. Pure Petcoke should
also be avoided as the high temperatures this
fuel can produce may damage the cooking stove.
YOUR COOKING STOVE
The cooking stove - Fig.1
Oven door
900mm
Loading door
Flue access doorAsh door
Hob lids
Hob
Secondary
air control
(left to open)
Damper control
(pull out to open)
Primary
air control
(left to open)
600mm (Top casting)
85mm
Flue centre
900mm
271mm
(feet)
Use this to remove
the ash pan
Use this to open
the doors
Use this to adjust
the damper control
and air controls
Operating tool - Fig.2
3
Page 4
Back bricks
Baffle
Side bricks
Grates
Ashpan
Firebox parts - Fig.3
LIGHTING AND CONTROLLING THE FIRE
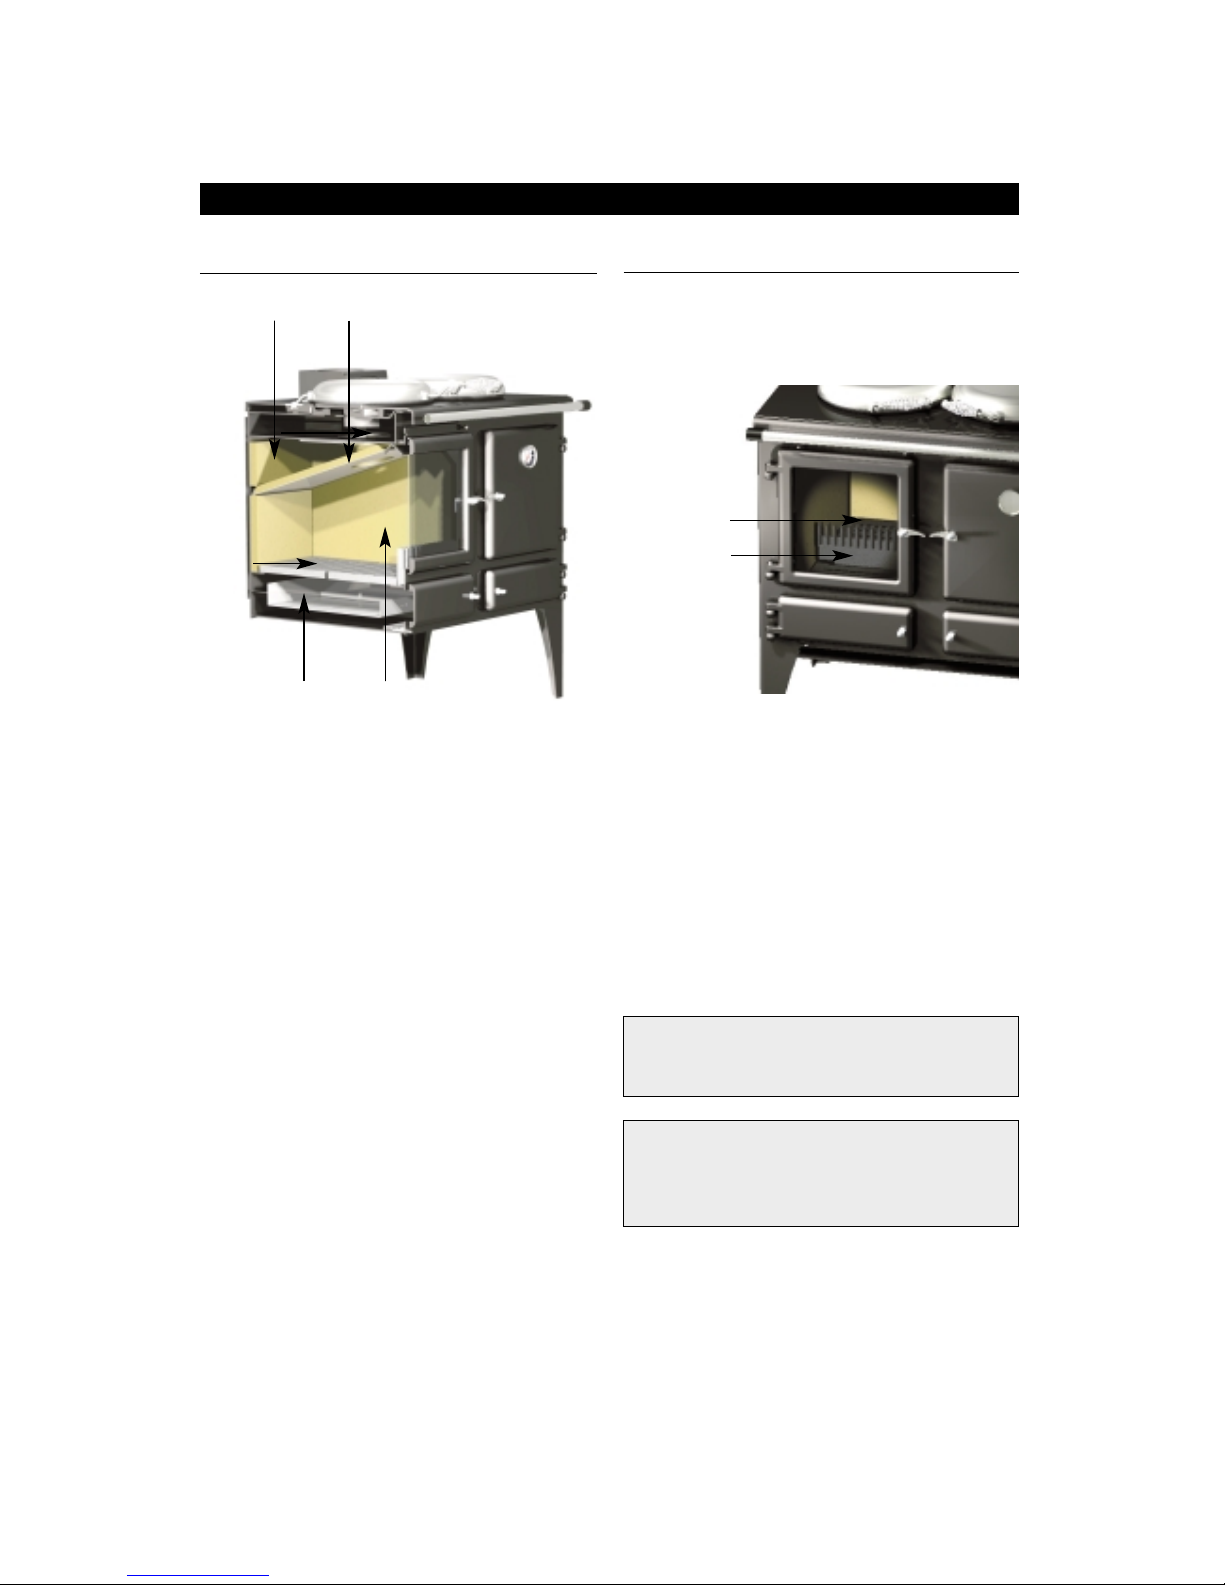
Before lighting ensure that all the internal
components are in the correct position. (See Figure
3
above).
Open the ash door on the bottom left of the
cooking stove by inserting the operating tool (See
Figure 2 on page 3) into the handle slot and turning
it in an anti-clockwise direction.
Figure 1 on page 3 shows the primary air control
lever on the left. Push the lever left to open and
right to close. To light the cooking stove the
primary air control should be fully open.
Open the loading door by lifting the handle either
manually or using the operating tool.
Figure 1 shows the secondary air control to the left
and the damper control to the right. As with the
primary air control, the secondary air control lever
should be pushed left to open and right to close.
The damper control is open when the knob is
pulled out and closed when it is pushed in.
To light the cooking stove the secondary air control
should be fully open and the damper control pulled
out. This will allow fumes to escape directly up the
flue whilst the cooking stove warms up.
Place some tightly rolled paper on top of some
crumpled paper on the base towards the back of
the cooking stove. On top of this, place some small
pieces of wood. Light the crumpled paper and
close the door.
Warning! When the cooking stove is running
the handle will become hot and the operating
tool alone should then be used.
Warning! The front of the cooking stove
becomes very hot when in use. Do not place
towels on the hand rail when the cooking stove is
alight and keep children and pets away.
Fuel placed at
the rear of the
firebox
Alternative flue bar positions - Fig.4
Fuelbar fits into
any of the grate
slots
4
Page 5

NOTES ON WOODBURNING
WOOD
Once the fire becomes established add some
larger pieces of wood. As the cooking stove comes
up to temperature close the primary air control.
The burning rate of the cooking stove can now be
regulated by the rate at which fuel is added and by
adjusting the secondary air control.
SOLID FUEL
Once the fire becomes established add some solid
fuel. The rate at which solid fuel burns can be
controlled by using the primary air control and by
the amount of fuel added. The secondary air
control will affect the burning rate to a lesser
degree than the primary, but it should be left open
where possible in order to keep deposits away from
the glass window.
Whichever fuel is used, the damper control may be
closed once the fire is established depending on
oven requirements (See Operating the Oven and
Hob on page 6).
Wood burns most efficiently when the air for
combustion is supplied from above the fire bed
rather than below. The air supplied above the fire
bed provides the oxygen necessary for the volatile
gases (smoke), given off by the wood as it heats, to
combust. This ensures that the gases are burnt and
used to heat the appliance instead of being wasted
up the chimney or condensing and forming tarry
deposits inside the cooking stove, in the flue or on
the loading door glass.
Running the cooking stove with the primary air
control open and the secondary air control closed
will provide oxygen for the wood to burn on the
fire bed but will not provide air for the volatile
gases above the fire bed to combust resulting in a
smoky inefficient fire.
With the above in mind the cooking stove should
ideally be run with the primary air inlet closed and
the secondary air control open whenever possible.
Another advantage of running the cooking stove
with the air wash open is that the air being drawn
into the cooking stove travels across the glass,
forming an air barrier between the glass and the
fire bed, helping to prevent smoke particles
sticking to the glass.
If the fire dies down too low, opening the primary
air control for a short period will revive it.
CORRECT RUNNING TEMPERATURES FOR WOOD BURNING
To get the best results from your cooking stove it is
recommended that a wood stove thermometer
(available from your cooking stove dealer) be fitted
to the flue pipe above the cooking stove, at eye
level if possible. The figures below show the
recommended temperature of the flue gases:
115 °C - 245°C (240°F – 475°F)
The flue gases should be in this temperature band
for the safest, most efficient and most economical
operation of your cooking stove.
Below 115°C (240°F)
This is below the condensation point of wood gases
and may cause the build up of tar in the chimney,
dirty the cooking stove glass and result in the
inefficient burning of fuel.
Above 245 °C (475°F)
Too hot. Heat will be wasted up the chimney.
Excess heat may damage the cooking stove or
ignite an existing accumulation of tar resulting in a
chimney fire.
5
Page 6

The temperature of the hob is graduated from left
to right. The left side is hotter and so is used for
boiling and the right side for simmering. The oven
door and the fire door are opened by lifting the
handle either manually or using the operating tool.
Both handles will become hot during operation
when a cloth or the operating tool provided is
recommended.
The oven and hob are heated directly by the fire. In
order to heat up the oven and hob the fire should
be lit as described above. Once the fire is
established the flue damper should be pushed in.
This will allow the hot fumes from the fire to circulate
around the inner cavity between the cooking stove
and the oven thus heating up both the hob and the
oven.
The hob lids can be left down when the hob is not
being used in order to keep the hotplates warm. In the
For best results use well seasoned hardwood such
as Oak, Ash, or Beech. Allow wood to dry out
under cover in well-ventilated conditions for at
least twelve months. Wood is ready for burning
when radial cracks appear in the end of the logs.
Burning wood that is not seasoned will result in tar
being deposited in the cooking stove, on the glass
and in the flueways.
This build up of tar is a hazard and if it ignites may
cause a chimney fire. Resinous softwood burns well
and gives a high output for short periods but is not
as efficient and does not last as long as hardwood.
PEAT
Peat is a fuel conveniently available in some areas
and should be burned in the same manner as wood.
ASH REMOVAL
Wood burns best on its own ash and a manageable
layer of ash on the grate is of benefit to the efficient
running of your cooking stove. To empty the ashes
from the ashpan below the grate, open the door on
the bottom left of the cooking stove using the
operating tool by inserting the tool into the slot
and turning anti-clockwise. Insert the tool into the
slot on the ash pan and pull forwards to remove.
Care should be taken when disposing of ashes that
are still warm. They should not be put into a plastic
receptacle or anything that might melt in contact
with heat.
TYPES OF WOOD FOR FUEL
OPERATING THE OVEN AND HOB
Loading a large amount of wood into the cooking
stove all at once will reduce the temperature inside.
If the temperature is too low, the gases given off
from the wood will be too low to combust,
resulting in a lot of smoke which will cover the
inside of the cooking stove, including the glass,
with soot. To combat this problem it is a good idea
to increase the temperature of the cooking stove
before loading by further opening the air inlets.
Load the wood and leave the air controls open
until the moisture is driven out of the wood and
the cooking stove is back up to an efficient
operating temperature. The air inlets can then be
reduced to hold the temperature of the cooking
stove. Loading the cooking stove little and often
will help keep the cooking stove temperature steady.
Note: The above text should be used as a guide
only. The ideal operation of your cooking stove
depends on a number of factors, which vary with
each installation, and so gaining experience
operating your cooking stove is the only way to
learn its best operation.
EXTENDED WOOD BURNING
6
Page 7

CLEANING THE COOKING STOVE
The cooking stove should only be cleaned when it
is cold. The exterior can be dusted with a firm brush.
Do not use a cloth, as this will drag on the paint
finish leaving lint on the surface.
As the cooking stove top is used for cooking,
normal wear and tear will occur. Spills should be
wiped up immediately with a damp cloth, but oven
cleaners should not be used on the hob surface.
The exterior of the cooking stove is painted with
high temperature cooking stove paint and from
time to time it may become necessary to renovate
the exterior by repainting. The surface must be
prepared by rubbing down with a wire brush. The
cooking stove paint will not key to the surface if
there are fat deposits or food particles on the area
to be resprayed. High temperature cooking stove
paints are available in aerosol form from your
cooking stove dealer. Do not use this paint until the
cooking stove is completely cold and always follow
the instructions on the container before starting to
paint. The usual precautions should be taken, such
as covering adjoining surfaces and protecting the
hob lids.
The hob lids are made from stainless steel. These
have been treated with oil at the factory to prevent
fingerprints and marks forming. The lids can be
wiped clean with a damp cloth and proprietary
stainless steel cleaners may be used. It is
recommended that after such cleaning, the lids be
again treated with oil by wiping over with a lint
free cloth. This will prevent fingerprints and
smears. Baby oil or similar is recommended for this
purpose.
The loading door glass should stay relatively clean
if the correct type of fuel is used as described
above, but from time to time this can be cleaned
when cold with a proprietary glass cleaner and a
dry cloth, or depending on soot build up, a nylon
pan scourer. Vinegar and newspaper may also
successfully be used.
up position they will allow more heat into the room.
To reduce the heat going to the oven when the
cooking stove is up and running, the flue damper
knob can be pulled out. This will allow the hot
fumes to escape directly up the chimney via the
boiling side of the hotplate, thus reducing the heat
to the oven but maintaining a hot hotplate.
To maintain a good cooking temperature in the
oven requires only a small amount of fuel. To
reduce the effective size of the firebox, the fuel bar
can be moved towards the back and thus used to
hold a smaller amount of fuel at the rear of the
firebox, see Figure 4 on page 4. This also has the
advantage of reducing the heat radiated through
the window, making life easier for the cook.
The temperature gauge on the oven door provides
an indication of the oven temperature. It should be
noted however that since the gauge is attached to
the door it will drop if the door is left open for any
prolonged period, in which case, the oven may be
hotter than is indicated on the dial. Once the door
is closed again the gauge will come back to
temperature.
7
Page 8
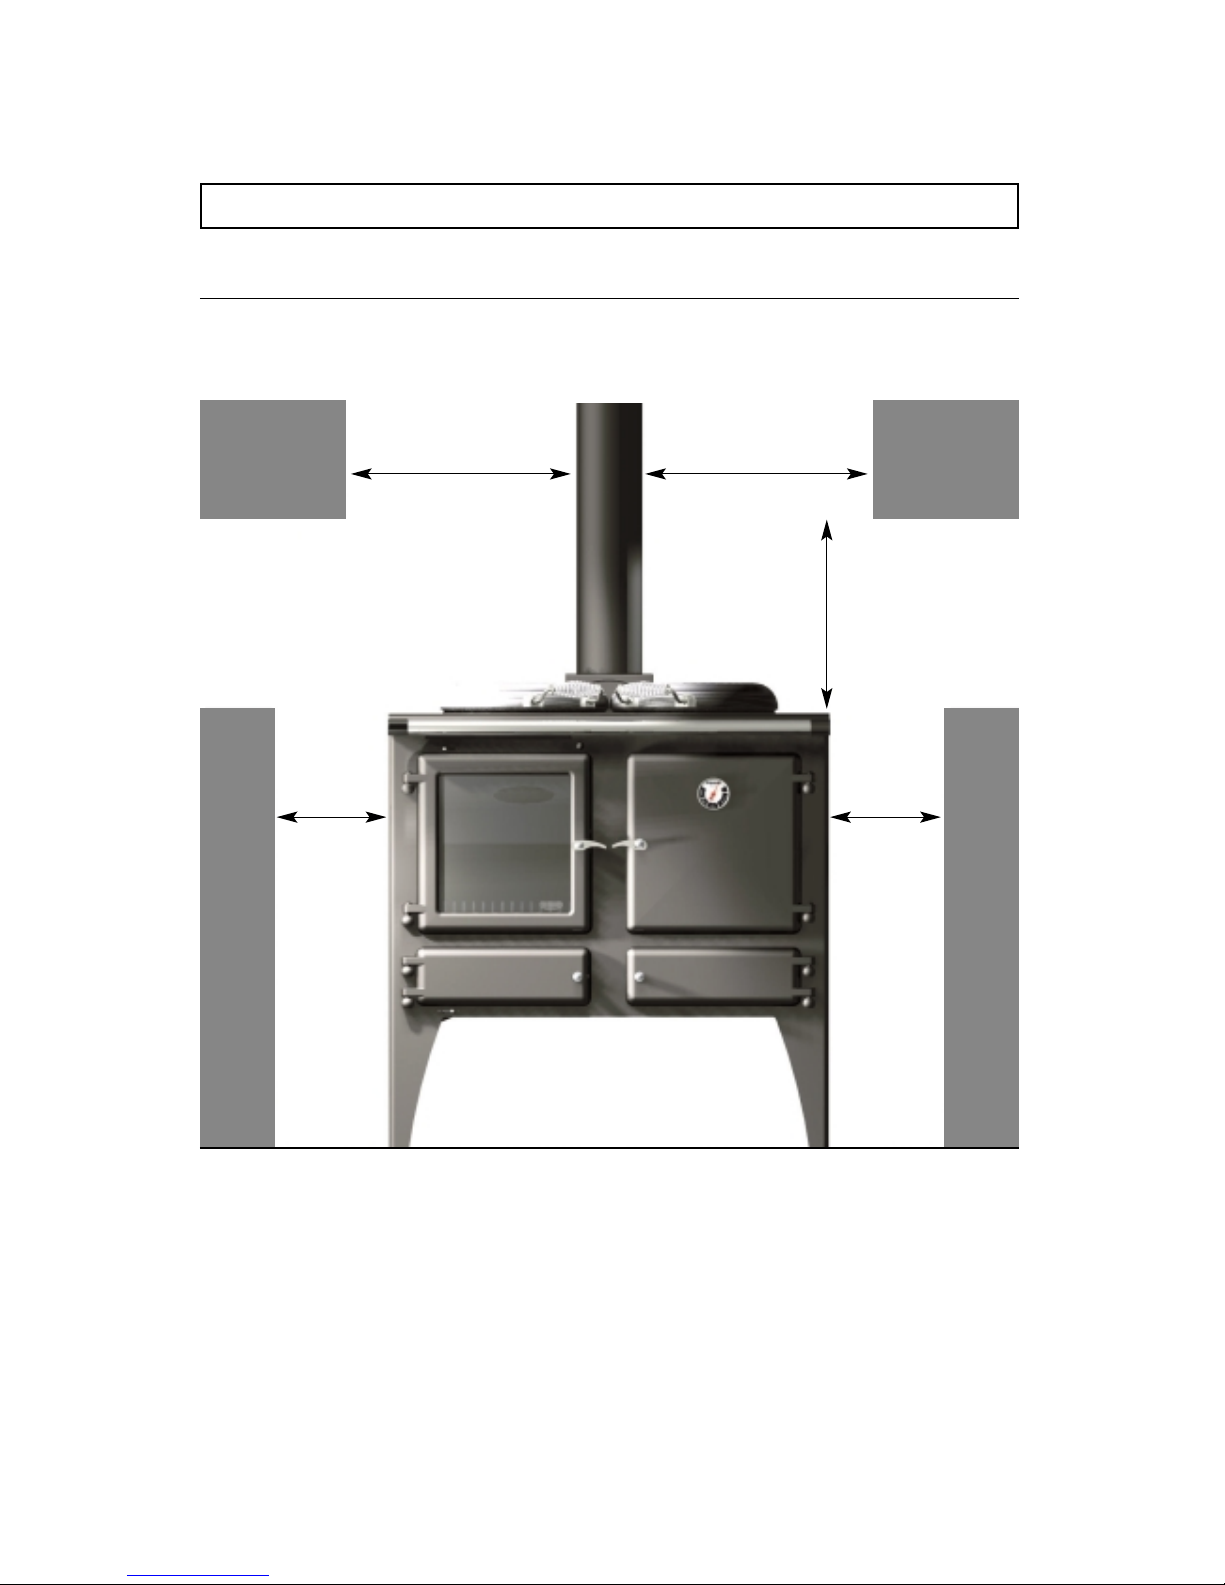
INSTALLATION INSTRUCTIONSS
200mm 200mm
200mm 200mm
416mm
min. clearance for hob lid
Clearances - Fig.5
Clearance to the back wall can be zero if non-combustible.
For a wall containing any combustible material the clearance should be 400mm.
8
Page 9

CHIMNEY AND FLUE
The installer has a responsibility under the Health
and Safety at Work Act 1974 to provide for the
safety of persons carrying out the installation.
Attention is drawn to the fact that fire cement is
caustic and hands must be washed thoroughly after
use. The appliance is heavy and care must be taken
during handling. Although the appliance does not
contain asbestos products, it is possible that
asbestos may be disturbed in existing installations
and every precaution must be taken.
These instructions give a guide for the installation
of the appliance but in no way absolves the installer
from responsibilities to conform to British
Standards, in particular BS8303 and BS6461,
relating to the installation of solid fuel appliances.
The installation should also comply with local
Building Regulations and Local Authority ByeLaws.
Any adjacent combustible material should be far
enough away from the cooking stove so as not to
rise 60°C above the room temperature when the
cooking stove is in operation. If necessary, any
adjoining walls should be protected from the
effects of heat.
The successful operation of the cooking stove relies
on the adequate performance of the chimney to
which it is connected. The chimney must:
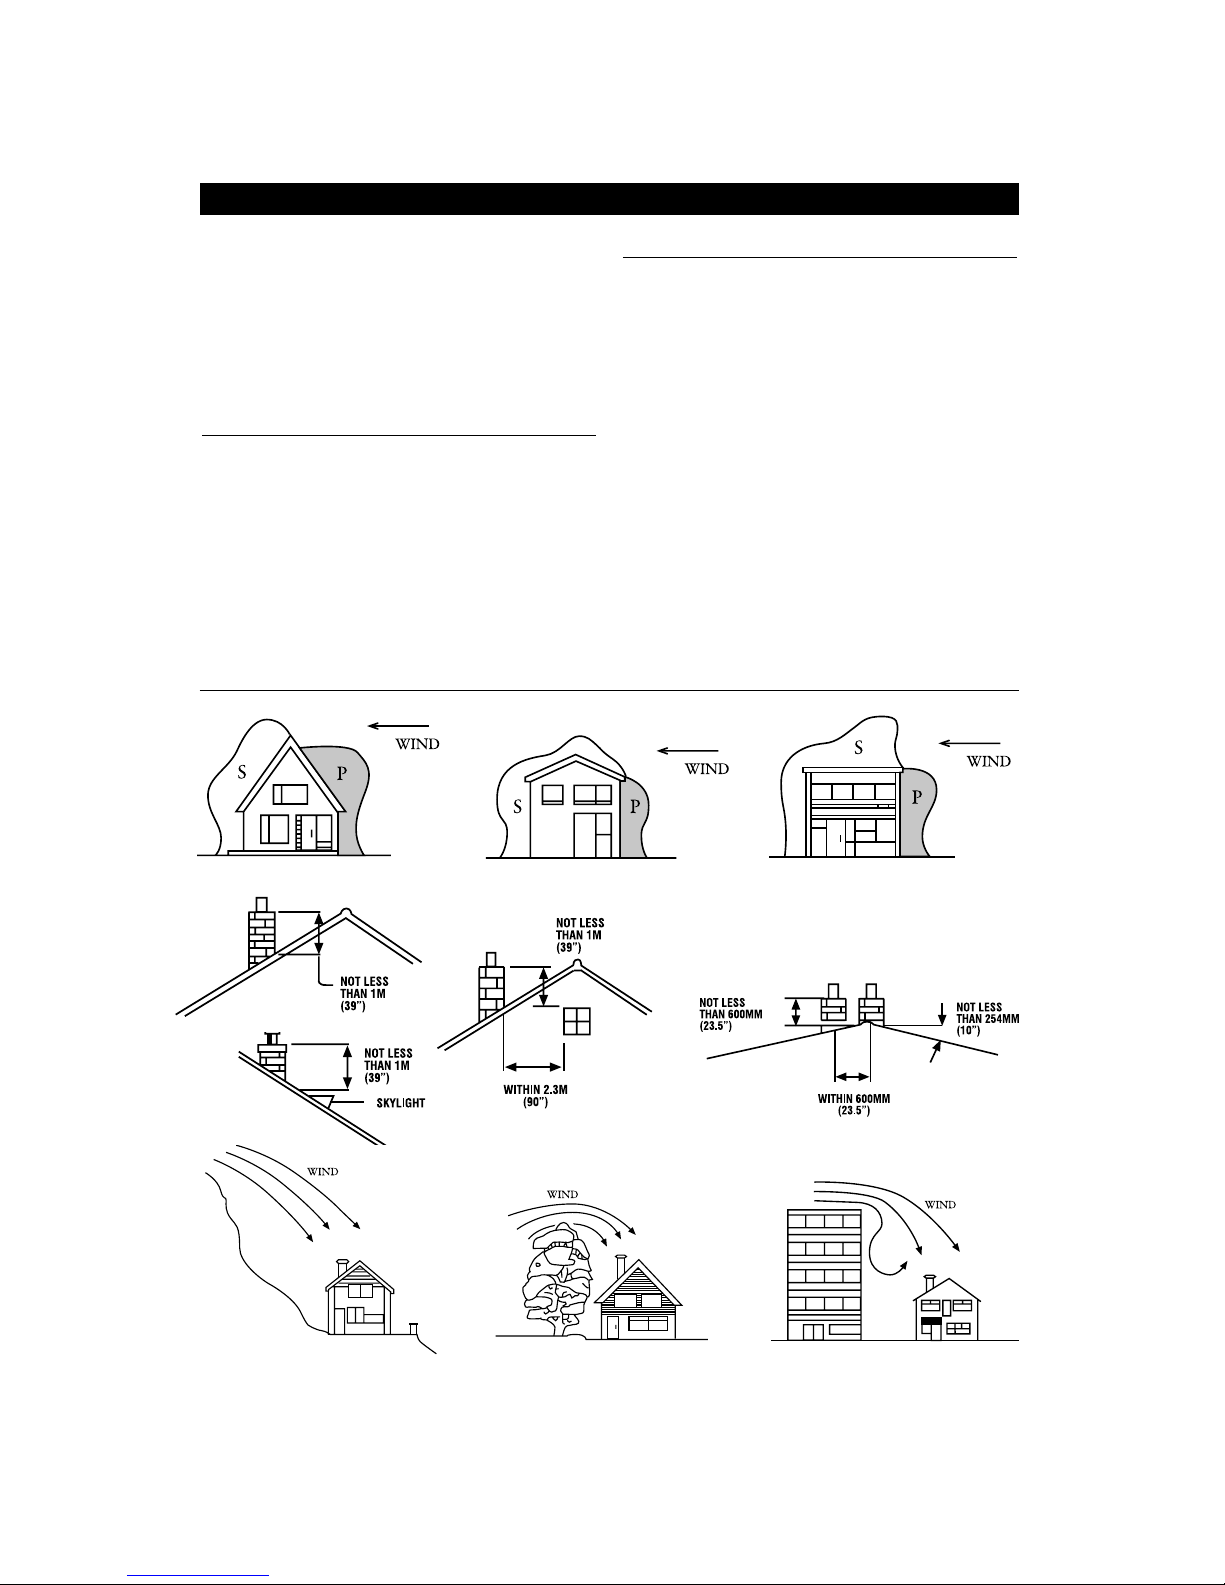
● Have an internal cross section of no less than 320
cm.sq (200mm dia.). (If a flue liner is used it
should be 6” diameter and suitable for solid fuel).
● Be a minimum 4.6m high from hearth level to pot.
● Be terminated at least 1m above roof level so
that the chimney does not terminate in a
pressure zone. See Figure 6 on page 10.
● Be free from cracks, severe bends, voids, and
obstructions.
● Be connected to this one appliance only.
● New chimneys must be built in accordance with
local building regulations.
● If the cooking stove is installed as a freestanding
appliance, it should not support any part of the
chimney.
● Voids in the chimney should be avoided as these
will prevent a steady flue draught. The cooking
stove flue pipe should pass beyond the
narrowing of the chimney.
● A flue/chimney access point may also be
required so that the state of the chimney can be
checked and any fallen soot removed.
● External flues must be insulated to prevent heat loss.
FLUE DRAUGHT
The chimney can be checked, before the cooking
stove is installed, with a smoke match. If the
chimney doesn’t pull the smoke it may suggest the
chimney needs attention (see the Flue Diagnosis
Table on page 11).
Note: This test is only a guide as an apparently
poor flue may improve once the cooking stove is
installed, lit and the flue is warmed. If, once the
cooking stove is installed, there is any doubt that
the chimney is providing an adequate draught, a
flue draught reading should be taken.
9
Page 10
FLUE DRAUGHT READING
Two flue draught readings should be taken, one
with the cooking stove at minimum firing rate
and one at maximum firing rate. The flue
draught test hole must be drilled in the flue pipe
as close to the cooking stove as possible and
before any flue draught stabiliser.
MINIMUM
The cooking stove should be lit and allowed to
warm the flue thoroughly. The air controls can
then be set so that the cooking stove burns on a low
setting. Allow the burning rate to become steady.
The flue draught reading should now be taken with
the primary air intake closed and the secondary air
control fully open.
MAXIMUM
The primary air intake can now be opened to allow
the cooking stove to burn at maximum rate. Give
the cooking stove some time for the burning rate to
become steady and then close the primary air
intake. Make sure the secondary air control is fully
open and take a flue draught reading immediately.
Ideally, the flue draught readings should range
between 1 mm wg (0.04 in wg) and 2.5 mm wg
(0.1 in wg).
Any readings significantly outside this range may
indicate the need for remedial action.
Chimney and Flue - Fig.6
10
Page 11
FLUE STABILIZER
A flue stabilizer can be fitted to reduce the draught
through the cooking stove if the flue draught is too
high. The flue stabilizer should be fitted in the
same room as the cooking stove, be the same size
as the flue pipe and be fitted no closer than 700mm
to the flue outlet of the appliance.
INSTALLING THE COOKING STOVE
POSITIONING
The overall dimensions of the cooking stove are
shown in
Figure 1 on page 3. Figure 4 on page 4
shows recommended distances between the
cooking stove and surrounding flammable
materials. As a rule, any surrounding flammable
material should not exceed 60°C above ambient
room temperature.
FLUE CONNECTION
The flue pipe used to connect the cooking stove to
the chimney is 6” (150mm) in diameter.
The flue connection is on the top of the cooking
stove, in the center at the back.
IMPORTANT INSTALLATION NOTES:
1. The installation must allow for adequate
chimney sweeping.
2. Avoid using bends greater than 45° to the
vertical. All flue pipe sections should be as close
to vertical as possible.
3. All joints in the flue system must be effectively
sealed.
4. All flue sockets must face upwards. On
completing the installation, check that all the
internal components of the cooking stove are
positioned correctly. Check: Grate, baffle, ash
pan, insulation bricks, fuel bar. See
Figure 3 on
page 4.
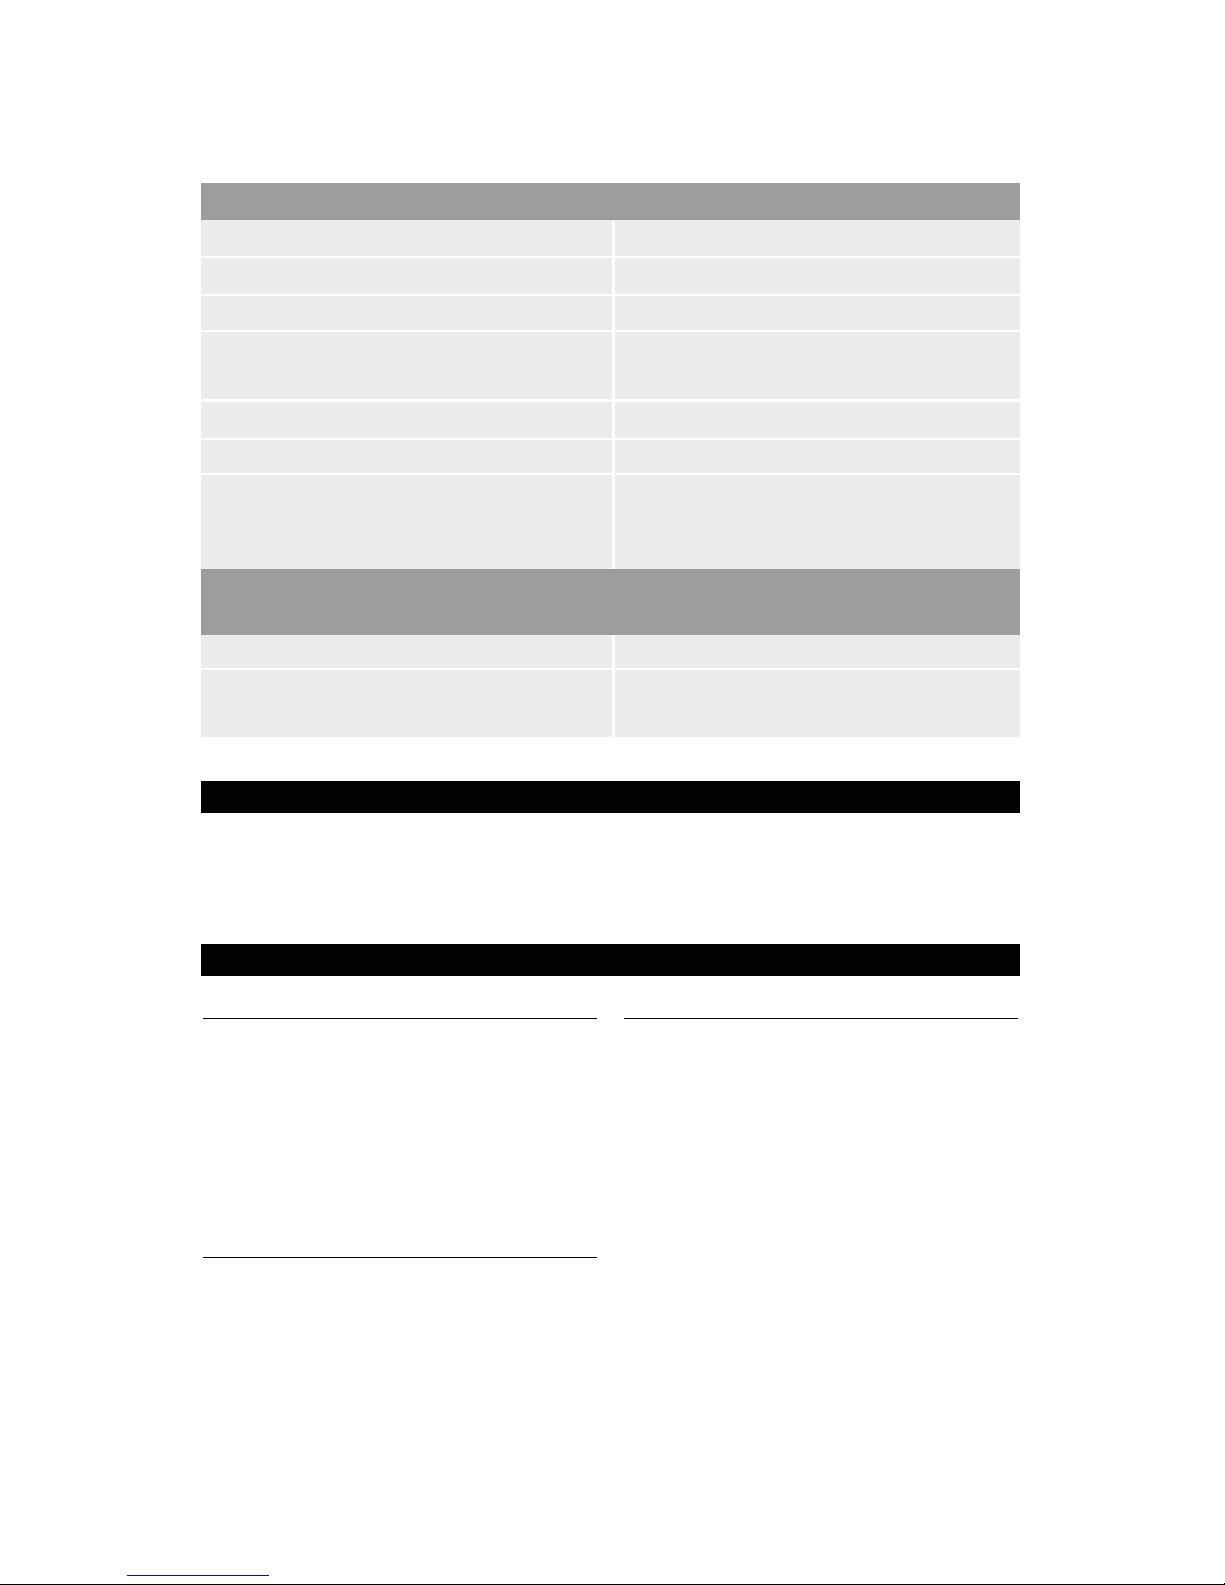
Low flue draught symptoms: difficult to light and smoke coming into the room.
Cause
Cold chimney
Chimney too short
Down draught
Chimney diameter too large
Chimney obstruction
Restricted air supply
High flue draught symptoms: fire difficult to control, fuel will not last, cooking stove too hot,
cooking stove damage, chimney fire
Cause
External wind conditions combined with
chimney terminal
Remedy
Fit stabilizer cowl. Fit flue draught stabilizer.
Remedy
Line the chimney
Extend the chimney
Relocate/extend chimney terminal. Fit an anti
down draught cowl
Line the chimney
Clear/sweep the chimney
Check for competing draughts (other chimneys,
extractor hoods/fans). Fit an air vent if the room
is sealed.
11
Page 12

Ouzledale Foundry Co. Limited, Long Ing, Barnoldswick, Lancashire BB18 6BN
Tel: 01282 813235 Fax: 01282 816876 Email: [email protected]
Website: http://www.esse.com
Model:
Serial Number:
Colour:
INFORMATION FOR USE WHEN ORDERING SPARES:
08/04
GUARANTEE
WHAT THIS GUARANTEE COVERS
Any defect arising from faulty workmanship during the normal use of the ESSE cooking stove.
CONDITIONS OF GUARANTEE
Your ESSE cooking stove is guaranteed against defects arising from faulty manufacture for 2 years subject to the
following express conditions:
1. A suitably qualified person must install the cooking stove. Upon installation the details must be recorded on the
warranty card enclosed and registered with ESSE by returning the completed card in the s.a.e. provided. The
guarantee is operative upon receipt of the correctly completed card.
2. The guarantee period commences upon receipt by ESSE of the warranty card.
3. The guarantee does not cover parts deemed to be replaceable in the normal usage of the cooking stove. These
parts are listed below:
Firebox linings, loading door glass, door seals.
HOW TO PROCEED WITH A COMPLAINT
If you have cause for dissatisfaction with your cooking stove, you should first contact your ESSE dealer who will, in
most instances, be able to offer immediate assistance. If you are unable to contact your dealer, you can get in touch
with us direct. We will then check that we have received an accurately completed warranty card. If not any work
carried out will be chargeable.
We will assess the nature of the complaint and either send replacement parts for your dealer to fit, send an engineer
to inspect and report or send an engineer to remedy. If the fault is not actually due to faulty workmanship but some
other cause such as misuse or failure to install correctly, a charge will be made to cover the cost of the visit and any
new parts required.
the ironheart
 Loading...