

Page 1
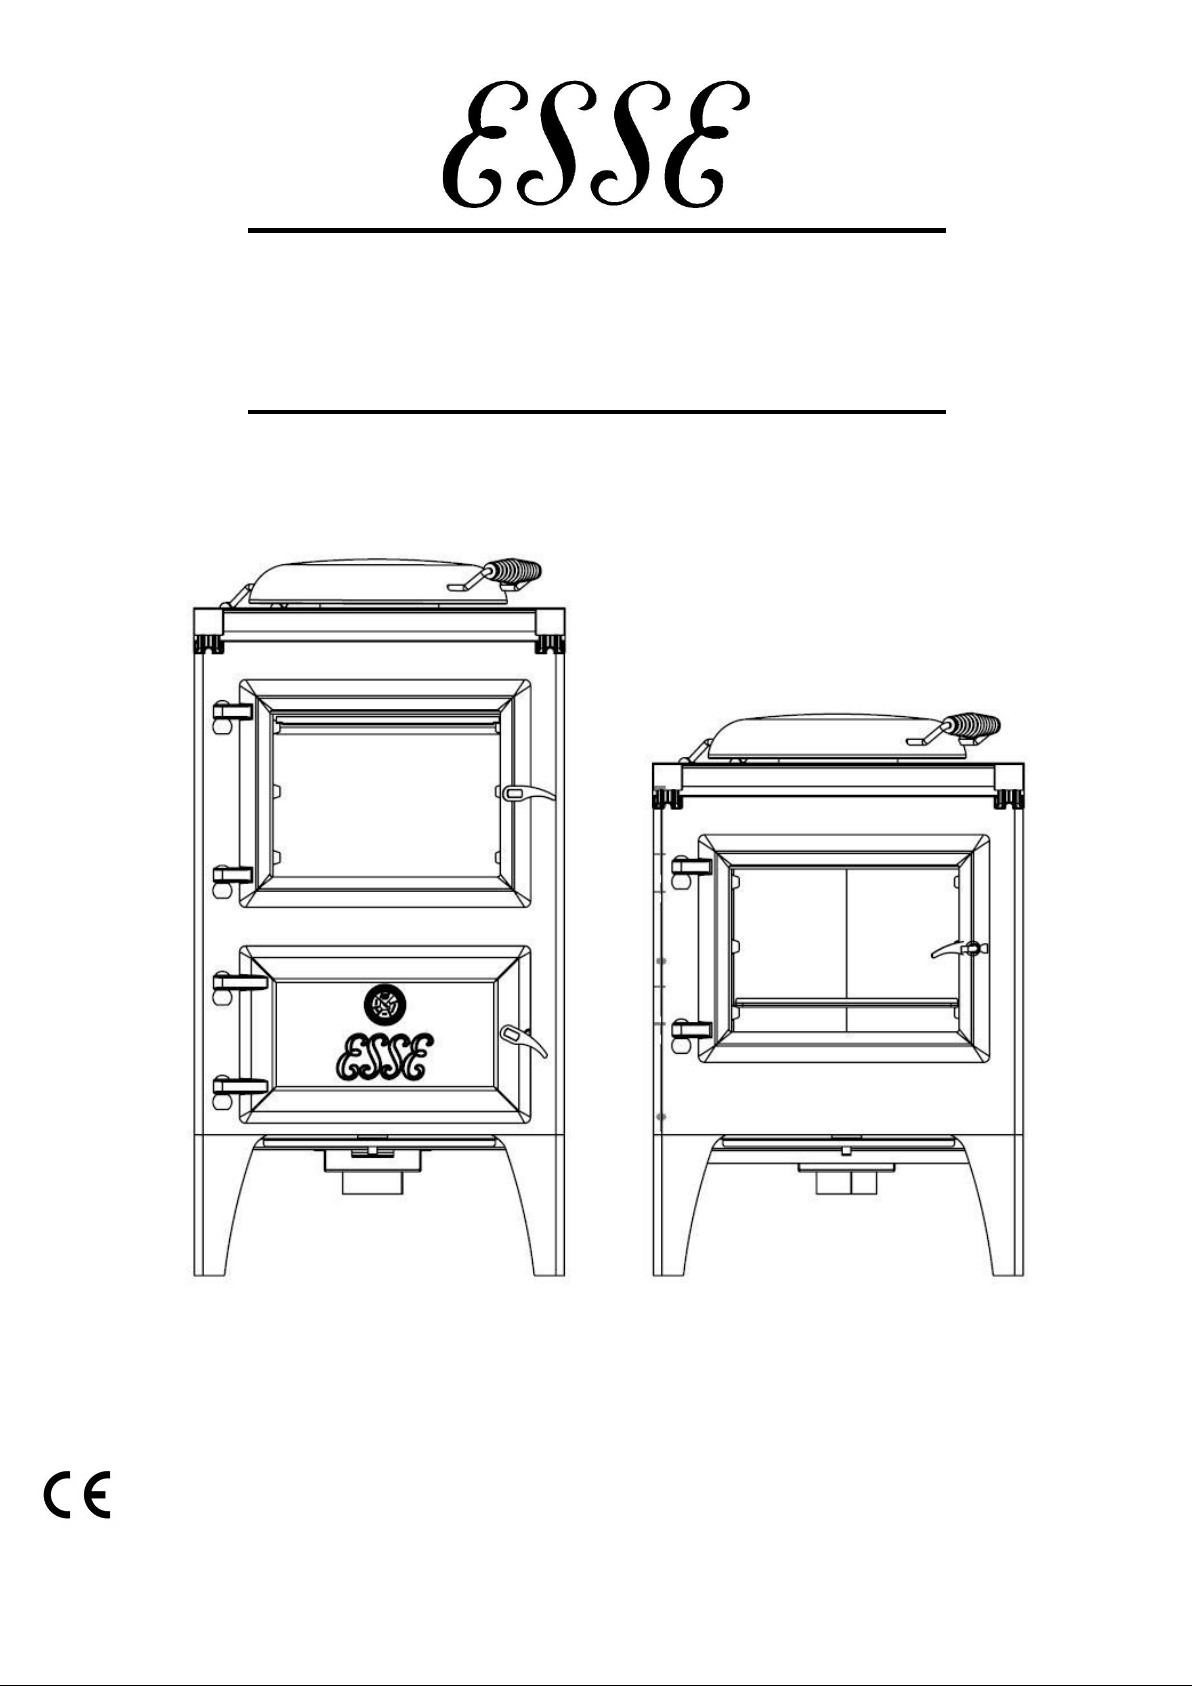
Bakeheart &
Warmheart
Wood Fired Cooking Stoves
THIS APPLIANCE MUST BE COMMISSIONED BY A REGISTERED INSTALLER OR PLUMBER
THE WARRANTY CARD MUST BE RETURNED TO ENSURE GUARANTEE VALIDITY
Page 2

SAFETY NOTES
o Properly installed, operated and maintained, this appliance will not emit
fumes into the dwelling. However, occasional fumes from de-ashing and
re-fuelling may occur.
o Persistent fume emission is potentially dangerous and must not be
tolerated. If fume emission does persist, open doors and windows to
ventilate the room. Let the fire burn out or eject and safely dispose of fuel
from the appliance. Once the fire is cold, check the flue and chimney for
blockages and clean if required. Do not attempt to relight the fire until the
cause of the fume emission has been identified and corrected.
o Seek expert advice if necessary.
o An adequate air supply for combustion and ventilation is essential. Air
openings provided for this purpose must not be restricted.
o Should it be likely that children, aged, or infirm people approach the
appliance whilst the fire door is open, then a fireguard should be used.
o Do not to sit or stand on the appliance or use it as a ‘step-stool’ for access
to cupboards or shelves etc. above the appliance.
o Avoid the use of aerosol sprays in the vicinity of the cooking stove when
it is in operation and do not heat any unopened airtight containers.
o Ensure that precautions are taken when deep fat frying, never leave the
appliance unattended and ensure you have fire safety equipment
available, such as a fire blanket, in case of emergency.
o When operating the cooking stove use the tools provided and follow
these instructions carefully.
o Attention is drawn to the fact that fire cement is caustic and hands must
be washed thoroughly after use.
o The appliance is heavy and care must be taken during handling.
o These instructions give a guide for the installation of the appliance but in
no way absolve the installer from responsibilities to conform to AS/NZS
Standards, in particular AS/NZS 2918:2018, relating to the installation of
solid fuel appliances. All local regulations including those referring to
national standards need to be complied with, when installing this
appliance.
Page 2
IH500AUS-I02-180219
Page 3

Table of Contents
SAFETY NOTES ........................................................................................... 2
INSTALLATION INSTRUCTIONS ........................................................................ 4
DATA LABELS ............................................................................................. 4
GENERAL SAFETY INFORMATION ................................................................ 5
DIMENSIONS AND CLEARANCES ................................................................. 6
TECHNICAL INFORMATION ......................................................................... 7
CHIMNEY AND FLUE INFORMATION............................................................ 8
INSTALLING THE APPLIANCE ..................................................................... 13
HOT WATER SYSTEM ................................................................................ 14
COMMISSIONING THE APPLIANCE ............................................................ 16
REPLACEMENT PARTS............................................................................... 16
COMMISSIONING CHECKLIST .................................................................... 18
OPERATIONAL INSTRUCTIONS ...................................................................... 19
INTRODUCTION........................................................................................ 19
BEFORE USING YOUR COOKING STOVE ..................................................... 19
YOUR COOKING STOVE............................................................................. 20
LIGHTING AND CONTROLLING THE FIRE .................................................... 22
NOTES ON WOODBURNING...................................................................... 23
LONG TERM SHUTDOWN ......................................................................... 24
FIREWOOD............................................................................................... 24
COOKING WITH THE COOK STOVE ............................................................ 27
EXTENDED WOODBURNING ..................................................................... 28
CLEANING AND MAINTAINANCE ............................................................... 29
CONDITIONS OF GUARANTEE ................................................................... 31
EXCLUSIONS............................................................................................. 31
CUSTOMER CARE ..................................................................................... 32
Servicing .................................................................................................. 33
Page 3
IH500AUS-I02-180219
Page 4
Bakeheart & Warmheart
INSTALLATION INSTRUCTIONS
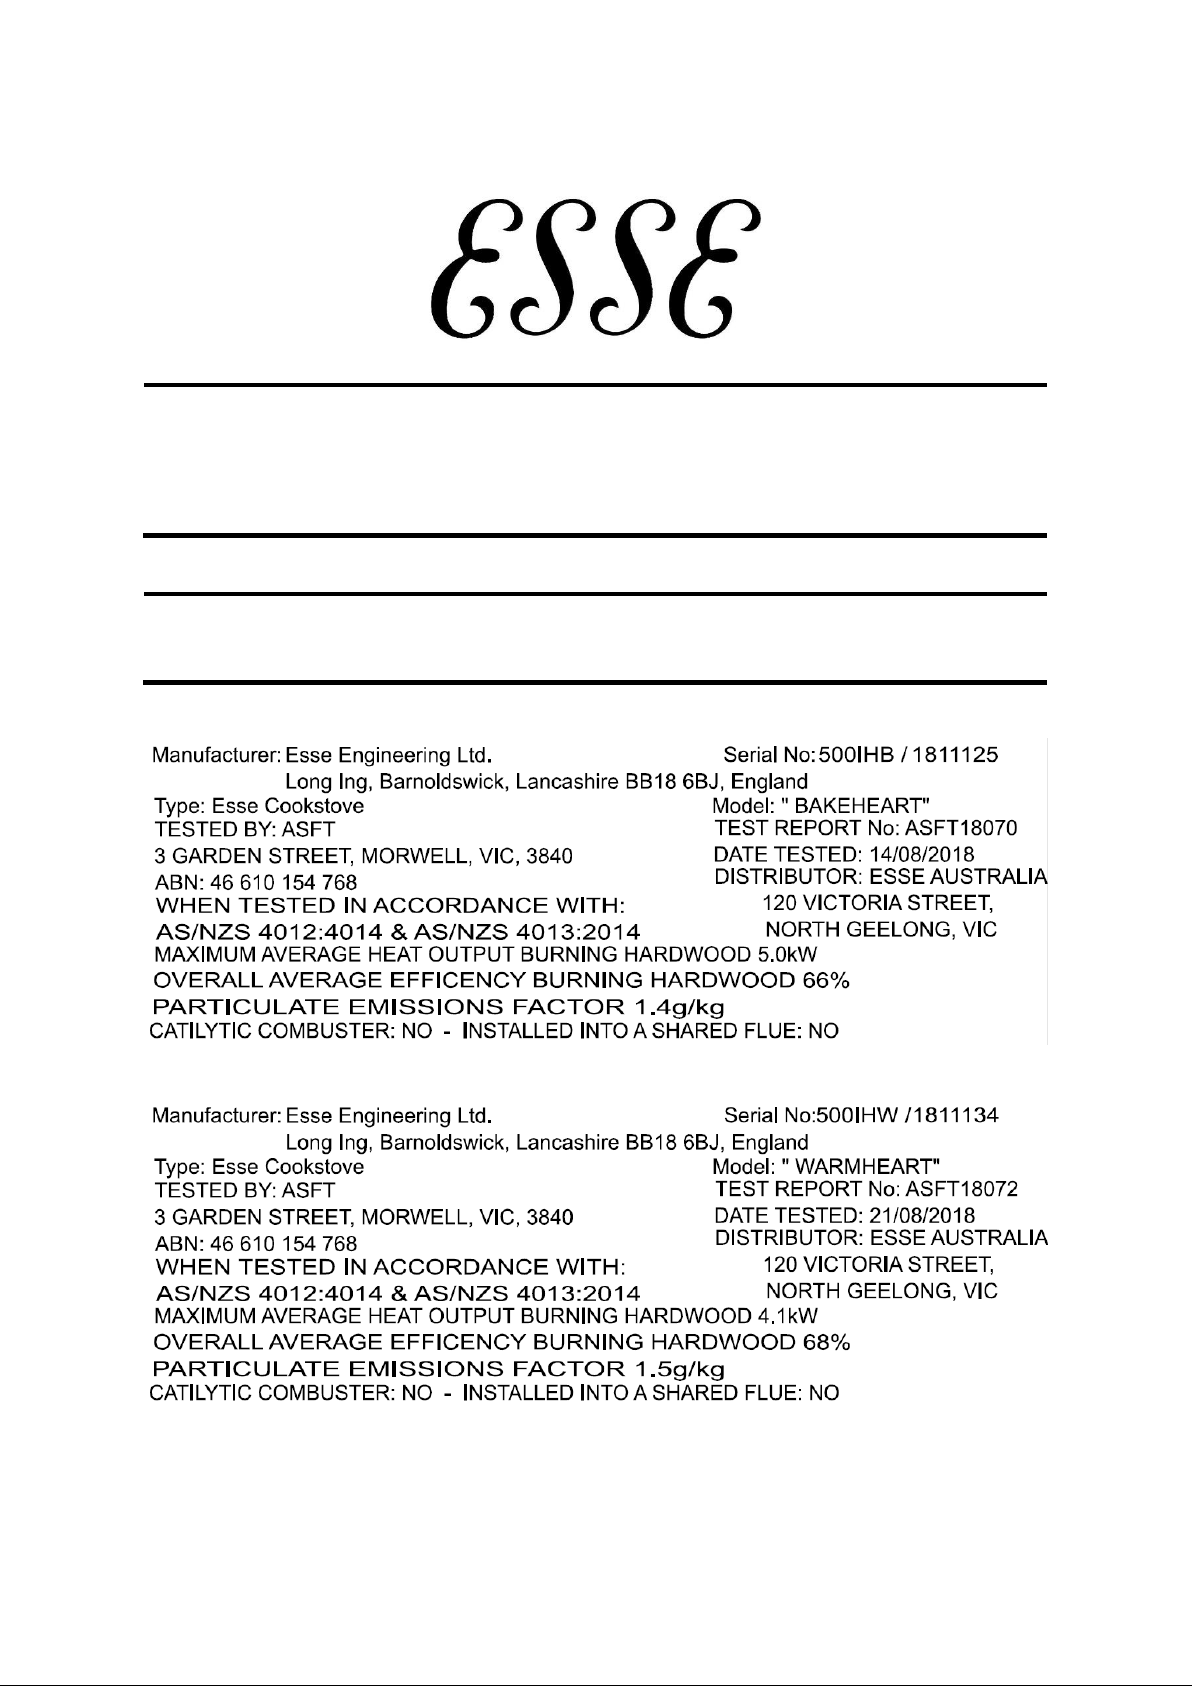
DATA LABELS
Figure 1 Bakeheart Data Label
Figure 2 Warmheart Data Label
Page 4
IH500AUS-I02-180219
Page 5

GENERAL SAFETY INFORMATION
Clearances from combustible materials are 130 mm from the sides and 225 mm
from the rear for the Bakeheart, and 350mm from the sides and 125mm from
the rear for the Warmheart.
Clearances from non-combustible materials are 25mm from the rear of the cook
stove and 10mm from the side fro both the Bakeheart and the Warmheart.
It is recommended that a smoke alarm and appropriate fire safety equipment
such as a fire extinguisher and fire blanket are installed in the kitchen as a safety
precaution and also a carbon monoxide detector.
An adequate air supply for combustion and ventilation is required. A purpose
provided air vent maybe necessary. Air openings provided for this purpose must
not be restricted. An external air kit is available.
Page 5
IH500AUS-I02-180219
Page 6
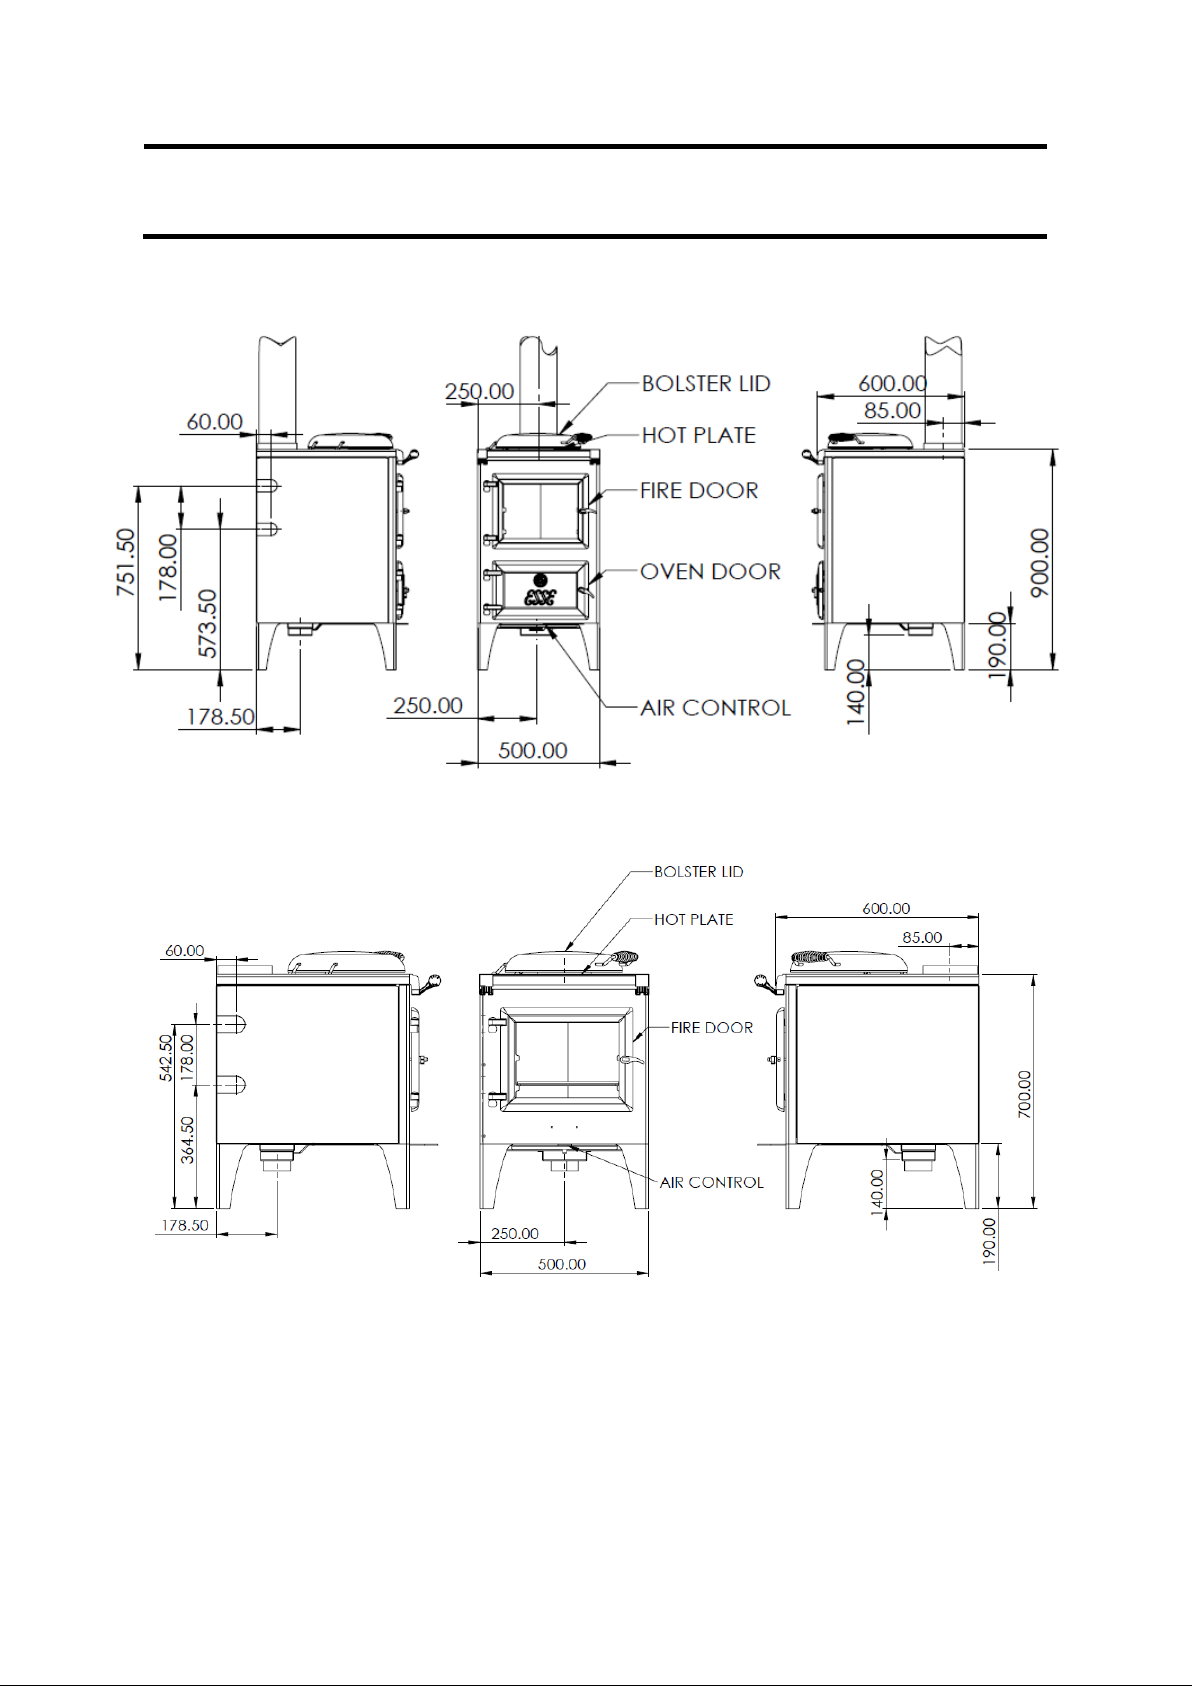
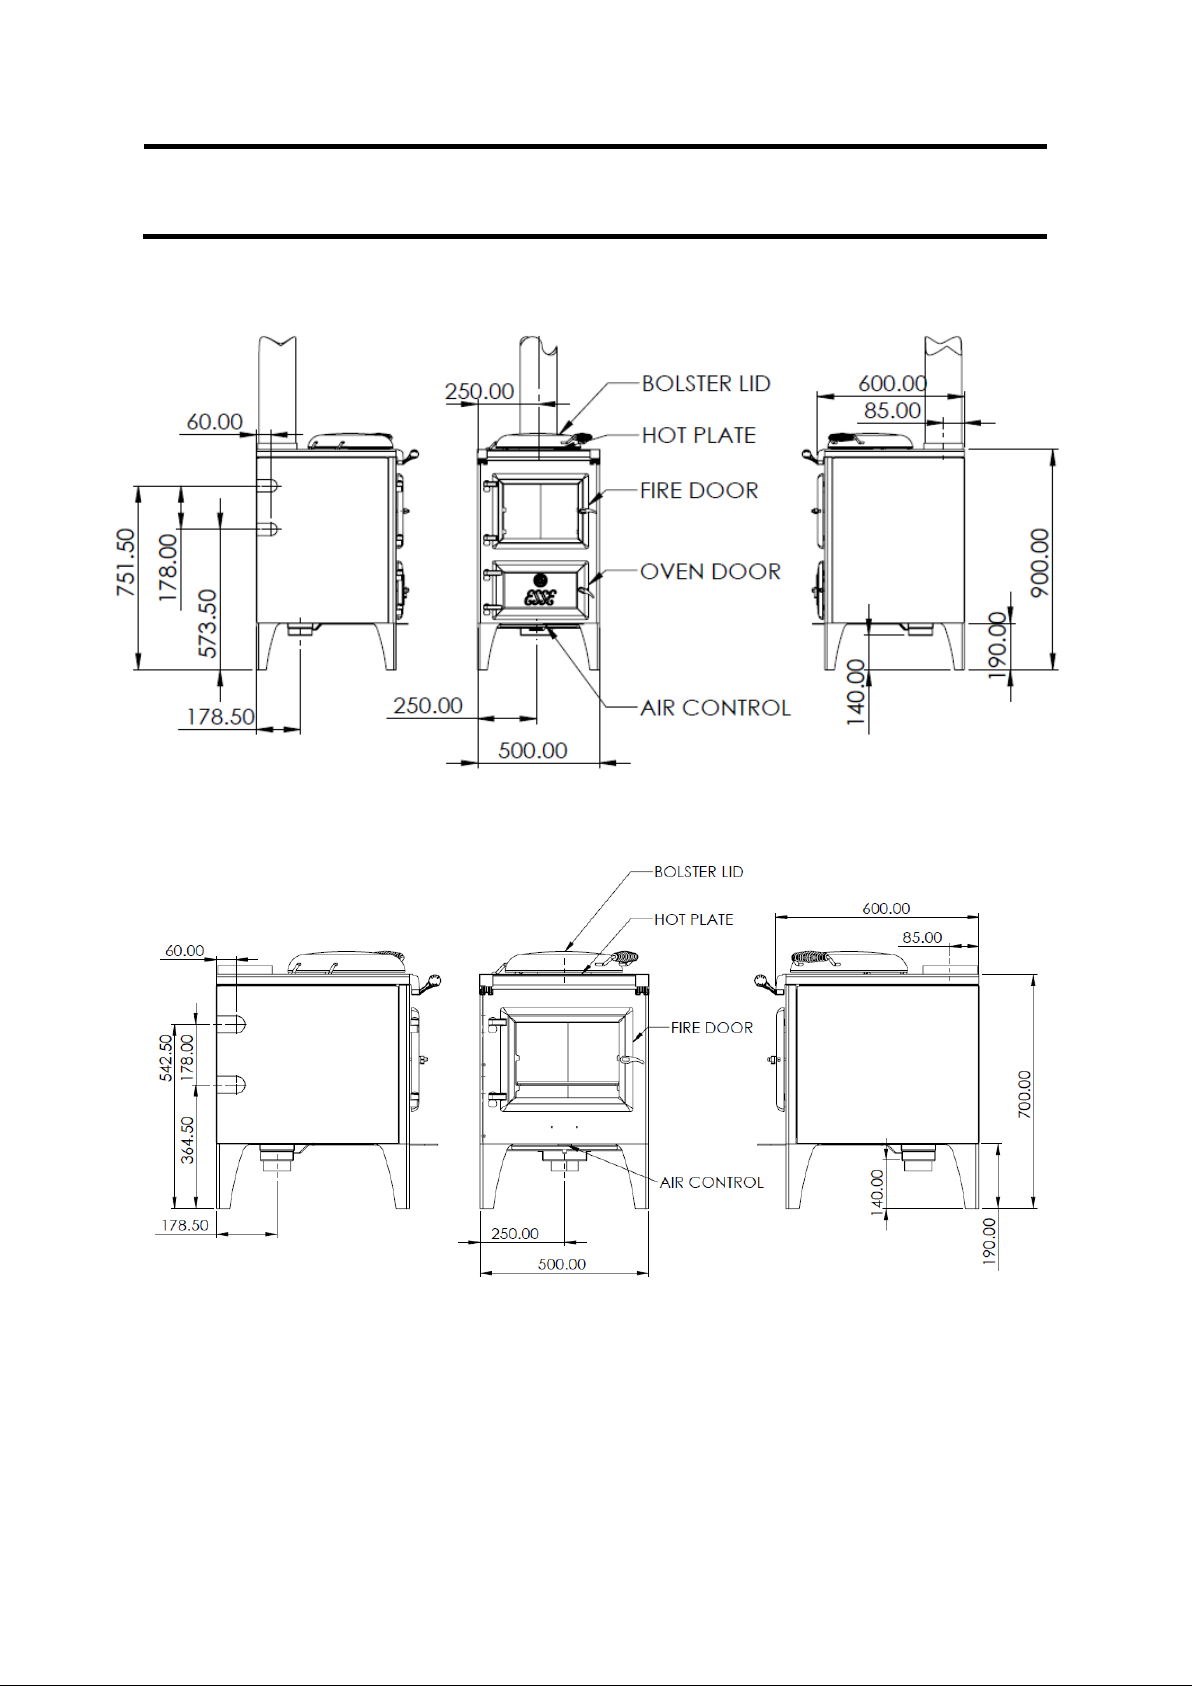
DIMENSIONS AND CLEARANCES
Figure 3 Bakeheart Cooking Stove
Figure 4 Warmheart Cooking Stove
Page 6
IH500AUS-I02-180219
Page 7
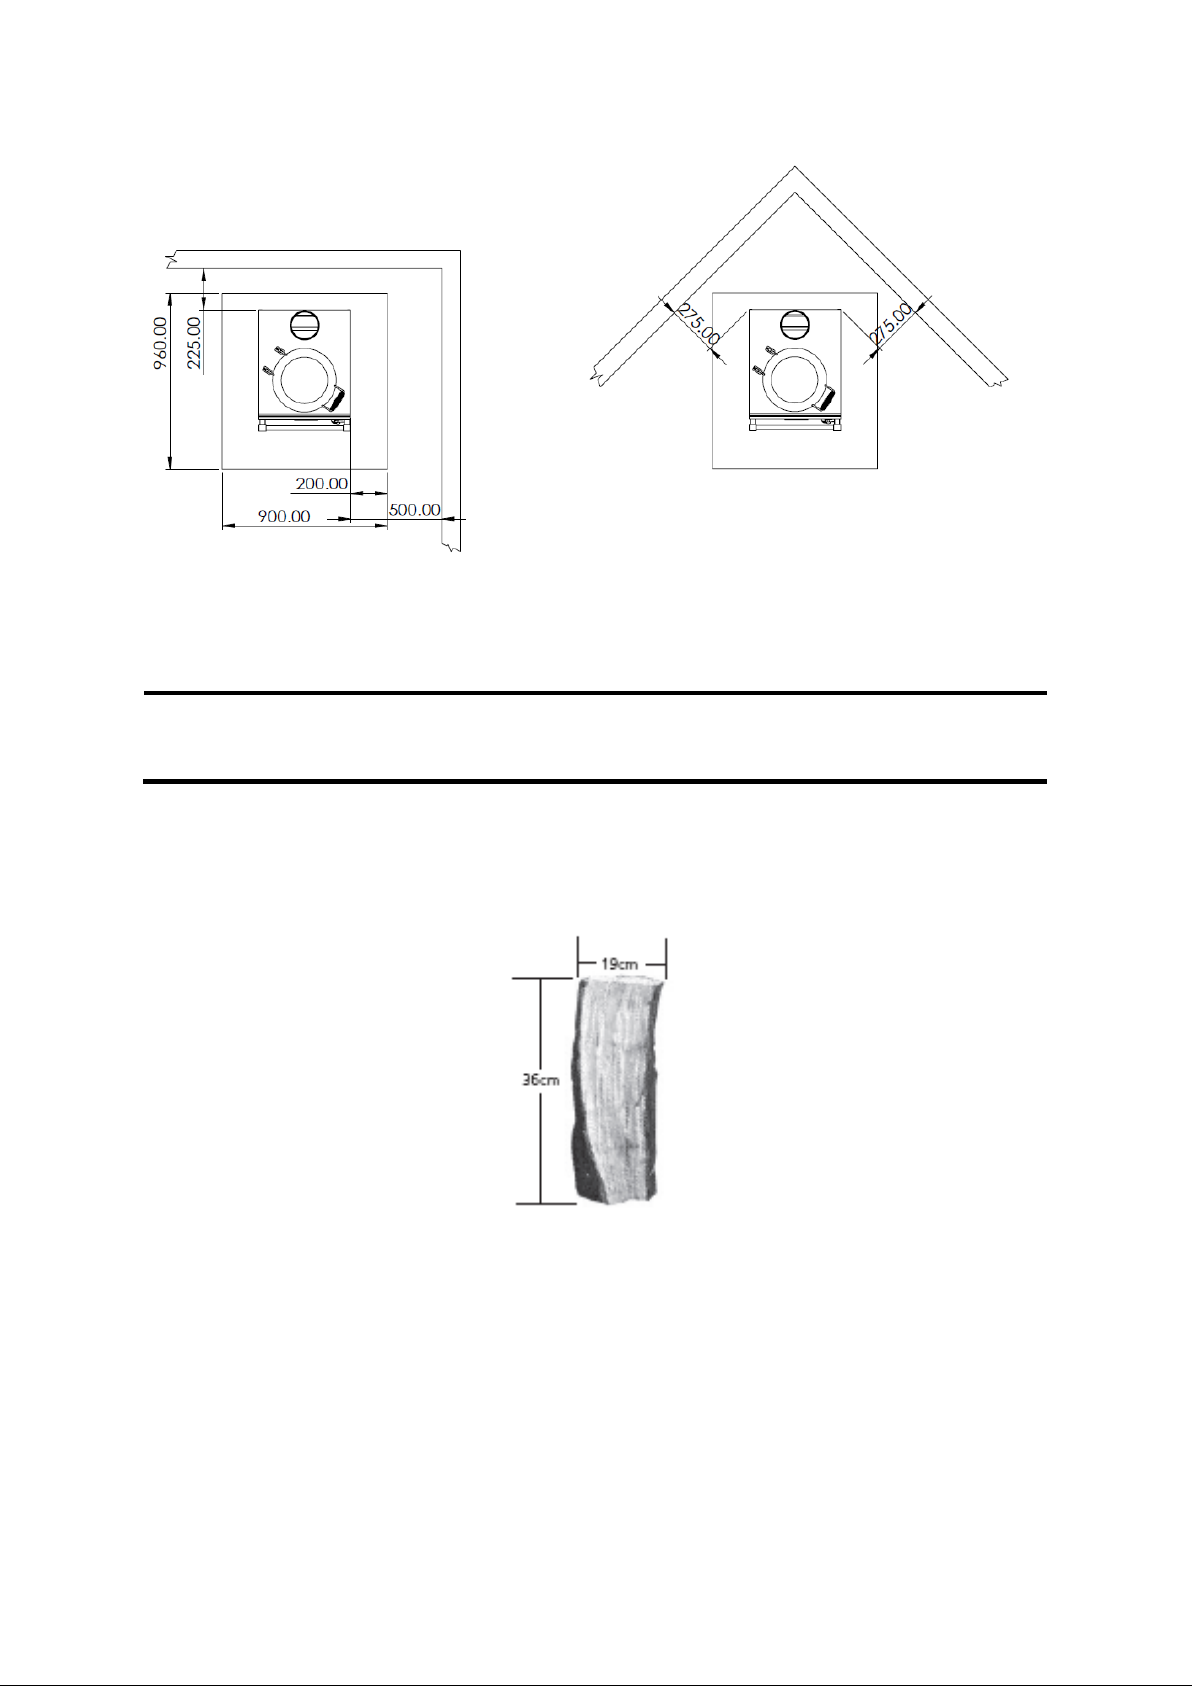
Figure 5 Bakeheart Minimum Clearance to Combustibles
TECHNICAL INFORMATION
Cut your logs to the approximate size shown in Figure 6 to minimise the need
for refuelling.
Figure 6 Approximate Size of Logs
Page 7
IH500AUS-I02-180219
Page 8

Technical Information
Nominal heat output
5.0kW
Minimum chimney draught
12Pa
Combustion air
requirements
29m3/h
Mean flue gas temperature
170oC
Weight of appliance
Bakeheart:
Warmheart:
192 kg
154 kg
Flue gas mass flow
10g/s
CHIMNEY AND FLUE INFORMATION
The successful operation of the cooking appliance relies on the adequate
performance of the chimney to which it is connected. The following chimney
guidelines must be followed:
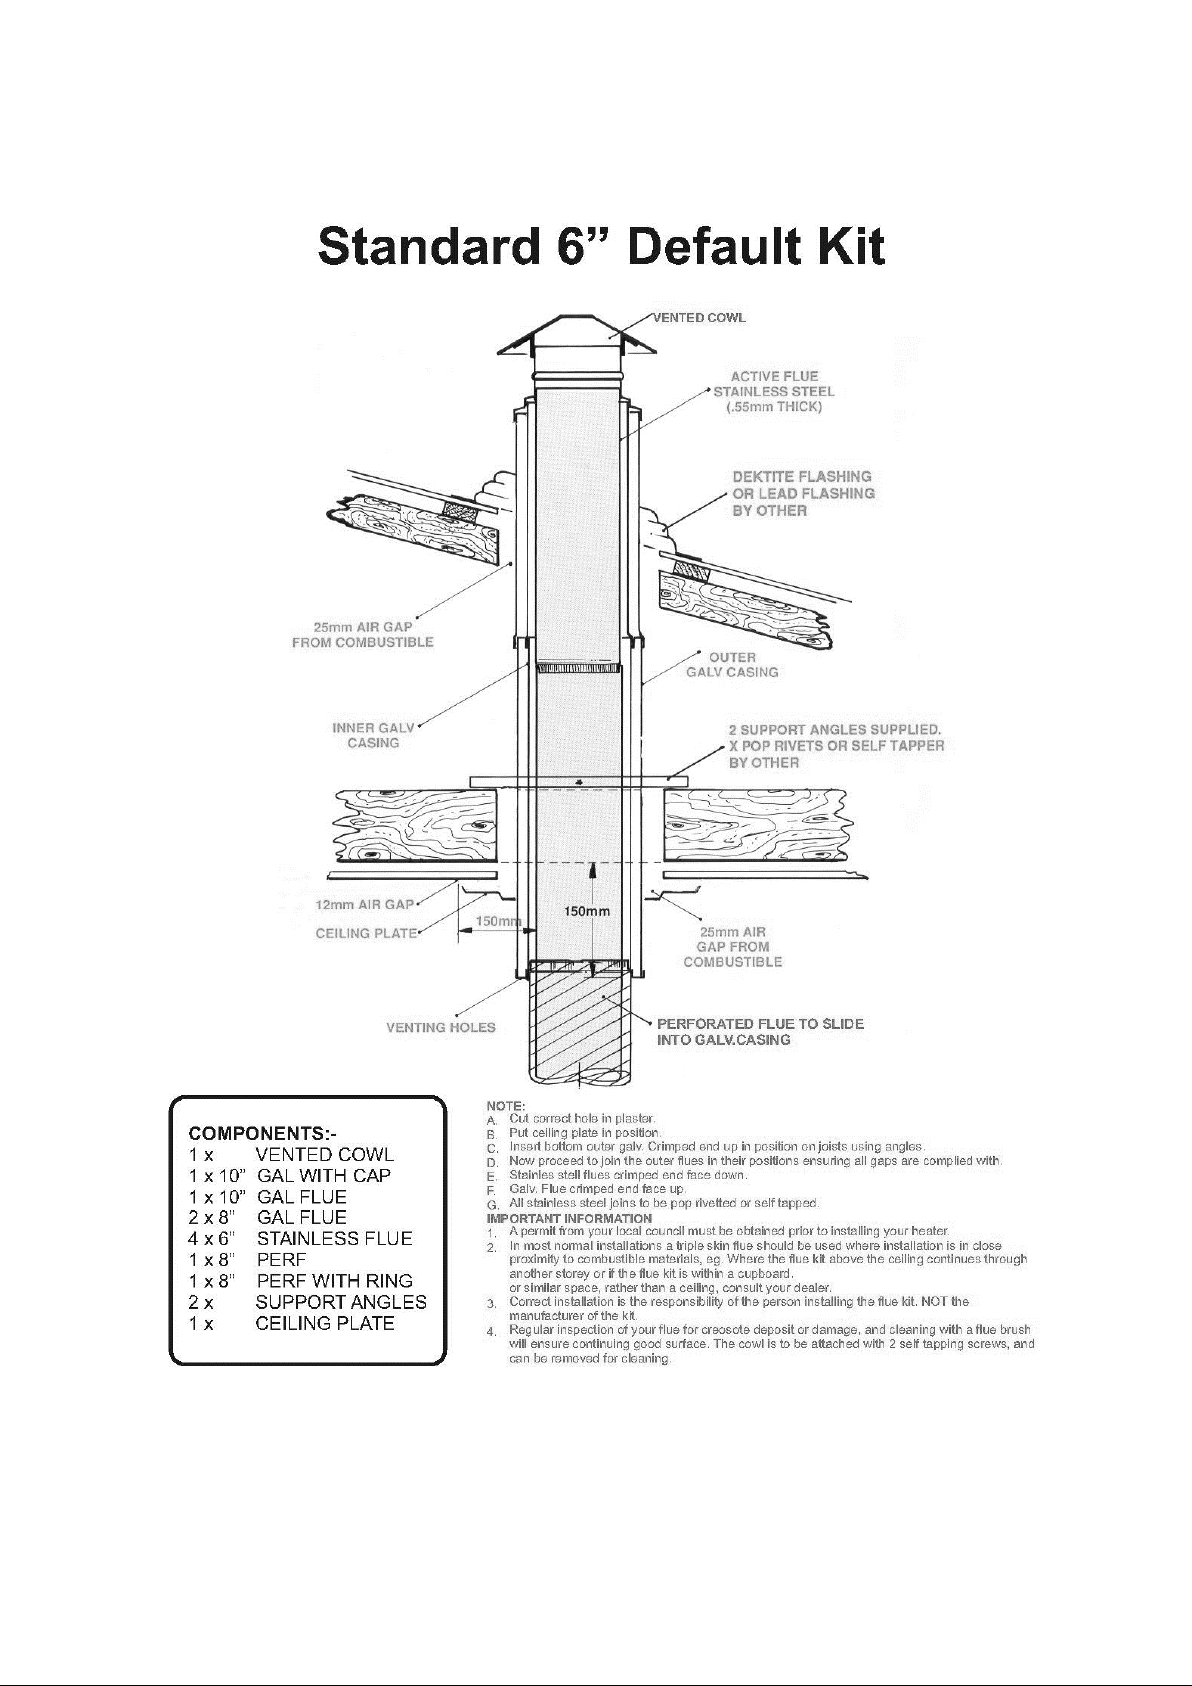
o It should have an internal cross section of no less than 320cm2 (200mm
dia.) (If a flue liner is used, it should be 150mm (6’’) diameter and be made
of suitable material for burning wood). A Flue with a diameter of 150mm
(6’’), is required to connect to the cooker.
o Voids in the chimney should be avoided, as these will prevent a steady
flue draught. The appliance flue pipe should pass beyond the narrowing
of the chimney.
o Terminate at least 1m above roof level so that the chimney does not
terminate in a pressure zone.
o If the appliance is installed as a freestanding appliance, it should not
support any part of the chimney.
o Be free from cracks, severe bends, voids, and obstructions.
o Be connected to this one appliance only.
o New chimneys must be in accordance with local regulations.
o The chimney must be capped to prevent ingress of rain.
o A flue/chimney access point is required so that the state of the chimney
can be checked and any fallen soot removed.
o External flues must be insulated to prevent heat loss.
o Do not fit an extractor fan in the same room as the appliance.
o Be a minimum 4.6m high from top of the cooker to the chimney pot.
Page 8
IH500AUS-I02-180219
Page 9

o It is recommended that an inspection hatch is fitted to the chimney as
NOTE
The chimney/flue to which this appliance is being connected must be swept
and examined for soundness prior to installation. Remedial action should be
taken if required, seeking expert advice if necessary. Where the chimney is
believed to have served an open fire installation it is possible that a higher
flue gas temperature from a closed appliance may loosen deposits that were
firmly adhered, with the consequent risk of flue blockage. It is therefore
recommended that the chimney be swept a second time within a month of
regular use after installation.
this will make future cleaning easier.
o A single wall starter length with a single to twin wall adapter will be
needed to use twin wall insulated flue. The stove will need to be moved
away from the wall to accommodate use of twin wall flue.
Flue Draught
The chimney can be checked before the appliance is installed with a smoke
match. If the chimney doesn’t pull the smoke, it may suggest the chimney needs
attention.
This test is only a guide as an apparently poor flue may improve once the
appliance is installed, lit and the flue is warmed. Once the appliance is installed
a flue draught reading should be taken as detailed below.
Two flue draught readings should be taken, one with the appliance at minimum
burning rate and one at maximum burning rate. The flue draught test hole must
be drilled in the flue pipe as close to the appliance as possible and before any
flue draught stabiliser.
Minimum reading: The appliance should be lit and allowed to warm the flue
thoroughly. Close the air controls, and ensure firebox door is fully closed. Allow
the burning rate to become steady. The flue draught reading should now be
taken; the minimum required is 12 Pascals [Pa] (0.05’’ w.g.).
Maximum reading: The air controls can now be opened to allow the appliance
to burn at maximum rate. Take a flue draught reading.
Ideally, the flue draught readings should range between 12Pa, 0.12mm (0.05’’
w.g.) and 25Pa, 2.5mm (0.1’’ w.g.). Any readings significantly outside this range
may indicate the need for remedial action. Low flue draught symptoms: difficult
Page 9
IH500AUS-I02-180219
Page 10

to light and smoke coming into the room. High flue draught symptoms: fuel
burns away very quickly, overfiring which may damage the appliance &
invalidate the warranty.
A flue stabiliser can be fitted to reduce the draught through the appliance if the
draught may exceed 25Pa. The flue stabiliser should be fitted in the same room
as the appliance and be the same size as the flue pipe. Consult building
regulations regarding additional ventilation.
A fan flue booster can also be fitted if the flue draught is poor. This should be
fitted according to the instructions supplied with the booster. An electrical
supply will be needed.
Page 10
IH500AUS-I02-180219
Page 11
Page 11
IH500AUS-I02-180219
Page 12
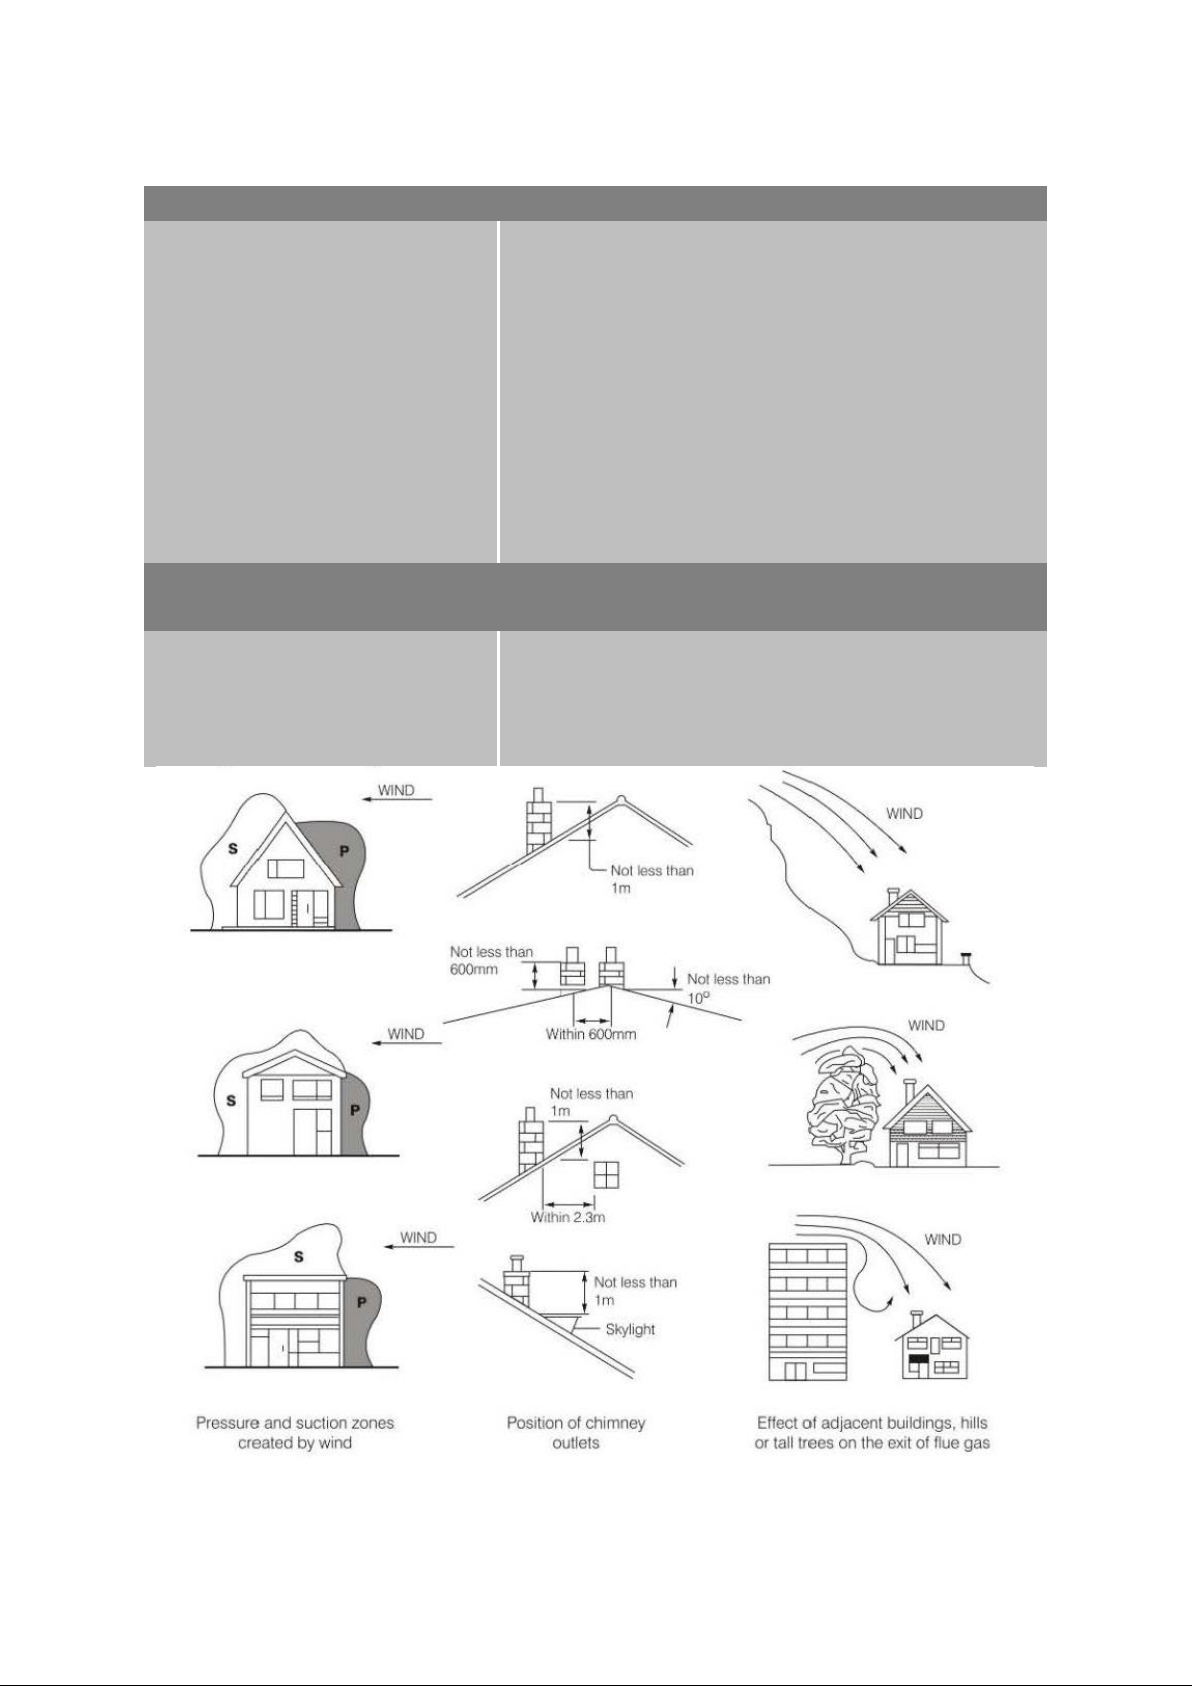
Table 1 Flue Draught Trouble Shoothing Guide
Low flue draught symptoms: difficult to light and smoke coming into room
CAUSE
REMEDY
Cold chimney
Line the Chimney
Chimney too short
Extend the chimney
Down draught
Relocate/extend chimney terminal. Fit an
anti-down draught cowl
Chimney diameter too large
Line the chimney
Chimney obstruction
Clear/sweep the chimney
Restricted air supply
Check for competing draughts (other
chimneys, extractor hoods/fans). Fit an air
vent if the room is sealed.
High flue draught symptoms: fire difficult to control, fuel will not last, stove
too hot, stove damage, chimney fire
CAUSE
REMEDY
External wind conditions
combined with chimney
terminal
Fit stabiliser cowl
Fit flue draught stabiliser
Figure 7 Chimney Location and Flue Performance
Page 12
IH500AUS-I02-180219
Page 13

INSTALLING THE APPLIANCE
Flue Connection
The flue pipe used to connect the appliance to the chimney is 6’’ (150mm) in
diameter. (The flue connection is on the top of the appliance, in the centre at
the back.)
Important Installation Notes
o The installation must allow access for adequate chimney sweeping and
flue cleaning.
o Avoid using bends greater than 45º to the vertical. All flue pipe sections
should be as close to the vertical as possible.
o All joints in the flue system must be effectively sealed.
o All flue sockets must face upwards. On completing the installation of the
appliance, the chimney, hearth and walls adjacent to the cooker must
conform to local or national regulations currently in force (AS/NZS
2918/2018).
o Air inlet grilles should be positioned so that they are not liable to blockage.
o An air extraction device shall not be used in the same room as the
appliance unless adequate additional ventilation is provided.
o A flue cleaning hatch should be fitted to provide access for cleaning the
flue and chimney.
o Check the appliance for soundness of seals between main components
and that all supplied parts and fittings are correctly fitted.
o Ensure the appliance is left operational and hand over the operating
instructions and operating tools supplied.
o Before leaving the installation demonstrate the operation of the
appliance to the user. Explain all controls and flue way access for cleaning.
Page 13
IH500AUS-I02-180219
Page 14

HOT WATER SYSTEM
A. If a boiler is fitted to this system it must be connected to a heating
system otherwise the warranty is void.
B. There are two connections, both 1” BSP Female on the left hand side.
Follow general notes below.
C. The D boiler is of mild steel construction for use on an open vented
indirect system. A domestic Stainless Steel boiler can be purchased from
your supplier for use on an open vented direct system if required.
D. General Notes on Water System: -
1. The cooker will produce hot water at differing rates depending on
how it is operated. Heating control is manual, no thermostat is
fitted.
2. The system must be designed to cope with loads between the
maximum and minimum output. There must be sufficient gravity
load to absorb 250L low pressure hot water output.
3. This unit is not approved for use with hydronic heating systems.
4. Whichever system is chosen the layout must follow established
heating engineering practice. To avoid trapping air in the boiler a
1” BSP connection must be used on the flow and return tapping,
and any reduction in pipe size thereafter being made on a vertical
rising pipe. The cooker must be level when fitted and the flow
pipe must rise from the boiler.
5. The cylinder and pipe work should be lagged to avoid heat loss.
6. The static head must not exceed 18 meters.
7. A drain cock should be fitted to the lowest part of the circuit.
8. The total water capacity of the boiler is 4 litres.
9. A heat leak radiator should be fitted to absorb any excess heat
that may be produced.
10.The system must be open vented.
11.It is recommended that the system is sealed with hemp & paste or
equivalent which can withstand temperatures exceeding 100oC
Page 14
IH500AUS-I02-180219
Page 15
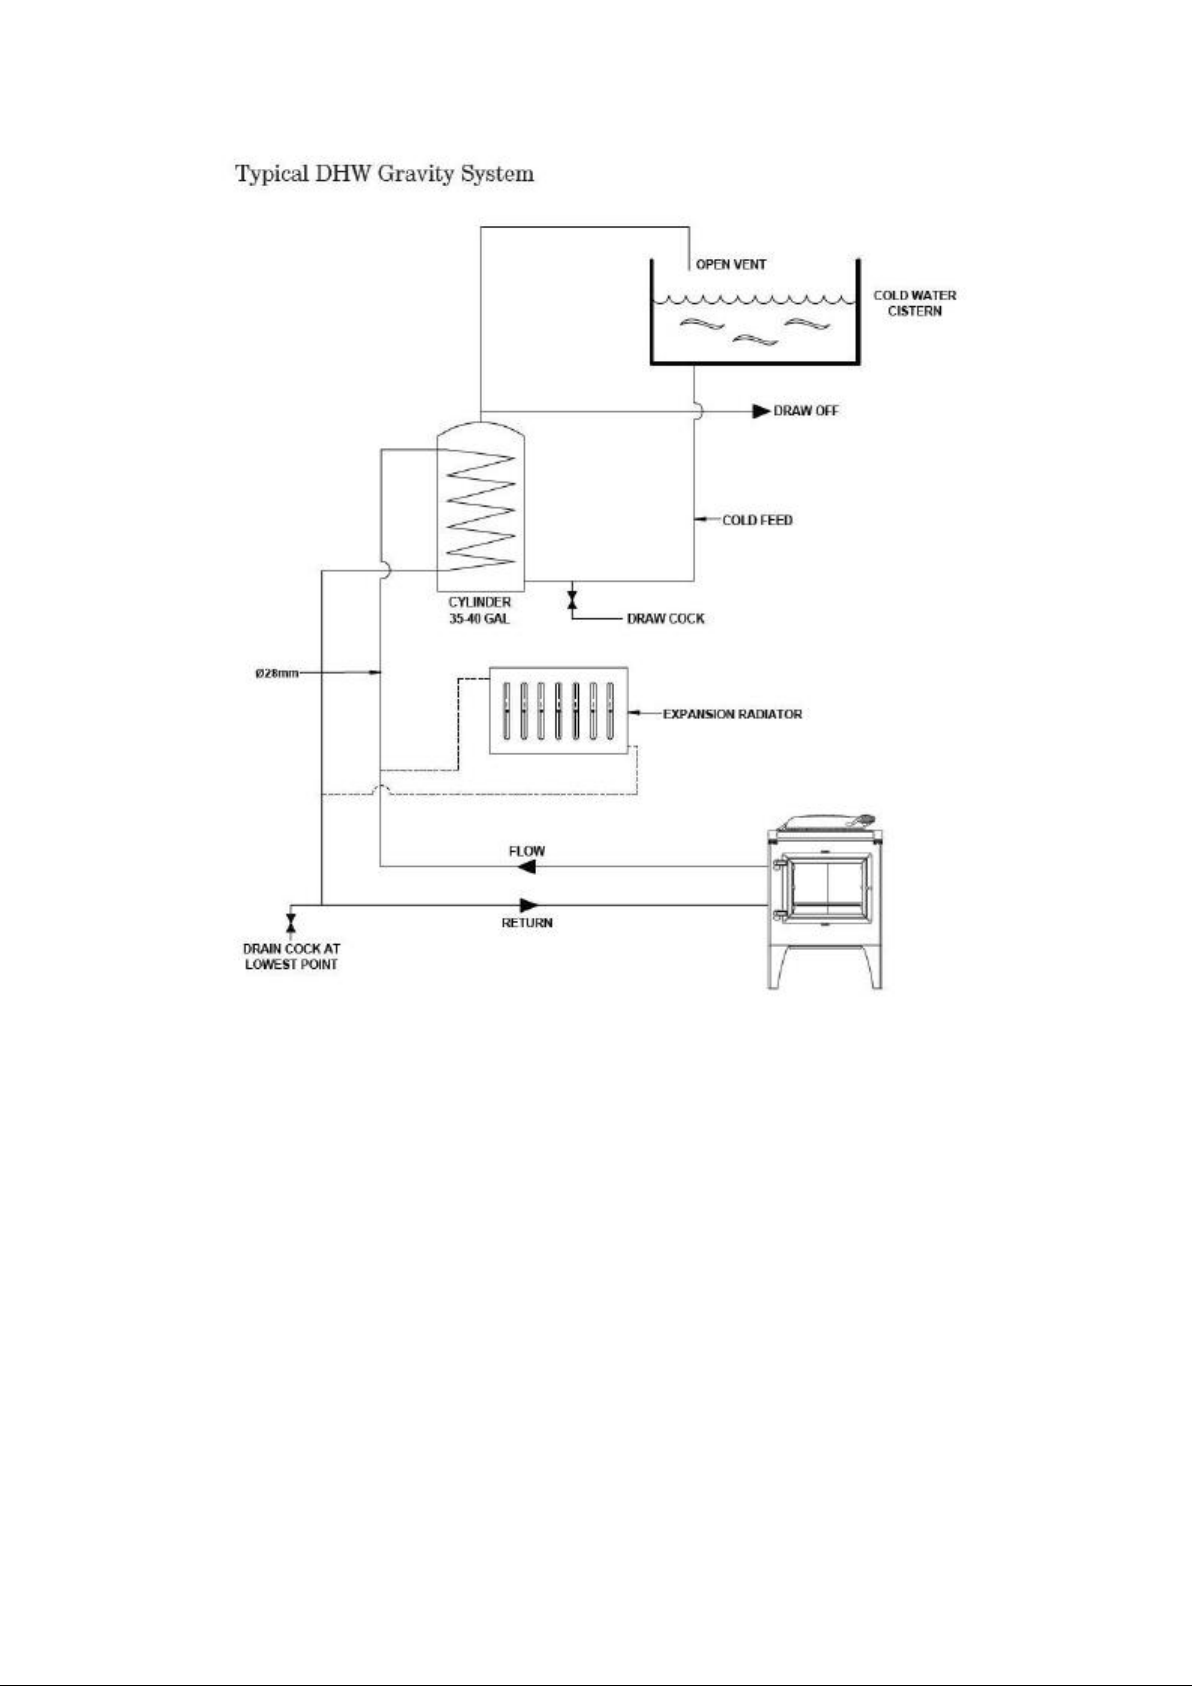
Figure 8 DHW Gravity Heating System
Page 15
IH500AUS-I02-180219
Page 16
COMMISSIONING THE APPLIANCE
REPLACEMENT PARTS
o Ensure the flue draught is compliant with AS/NZS 2918:2018
o Check ventilation
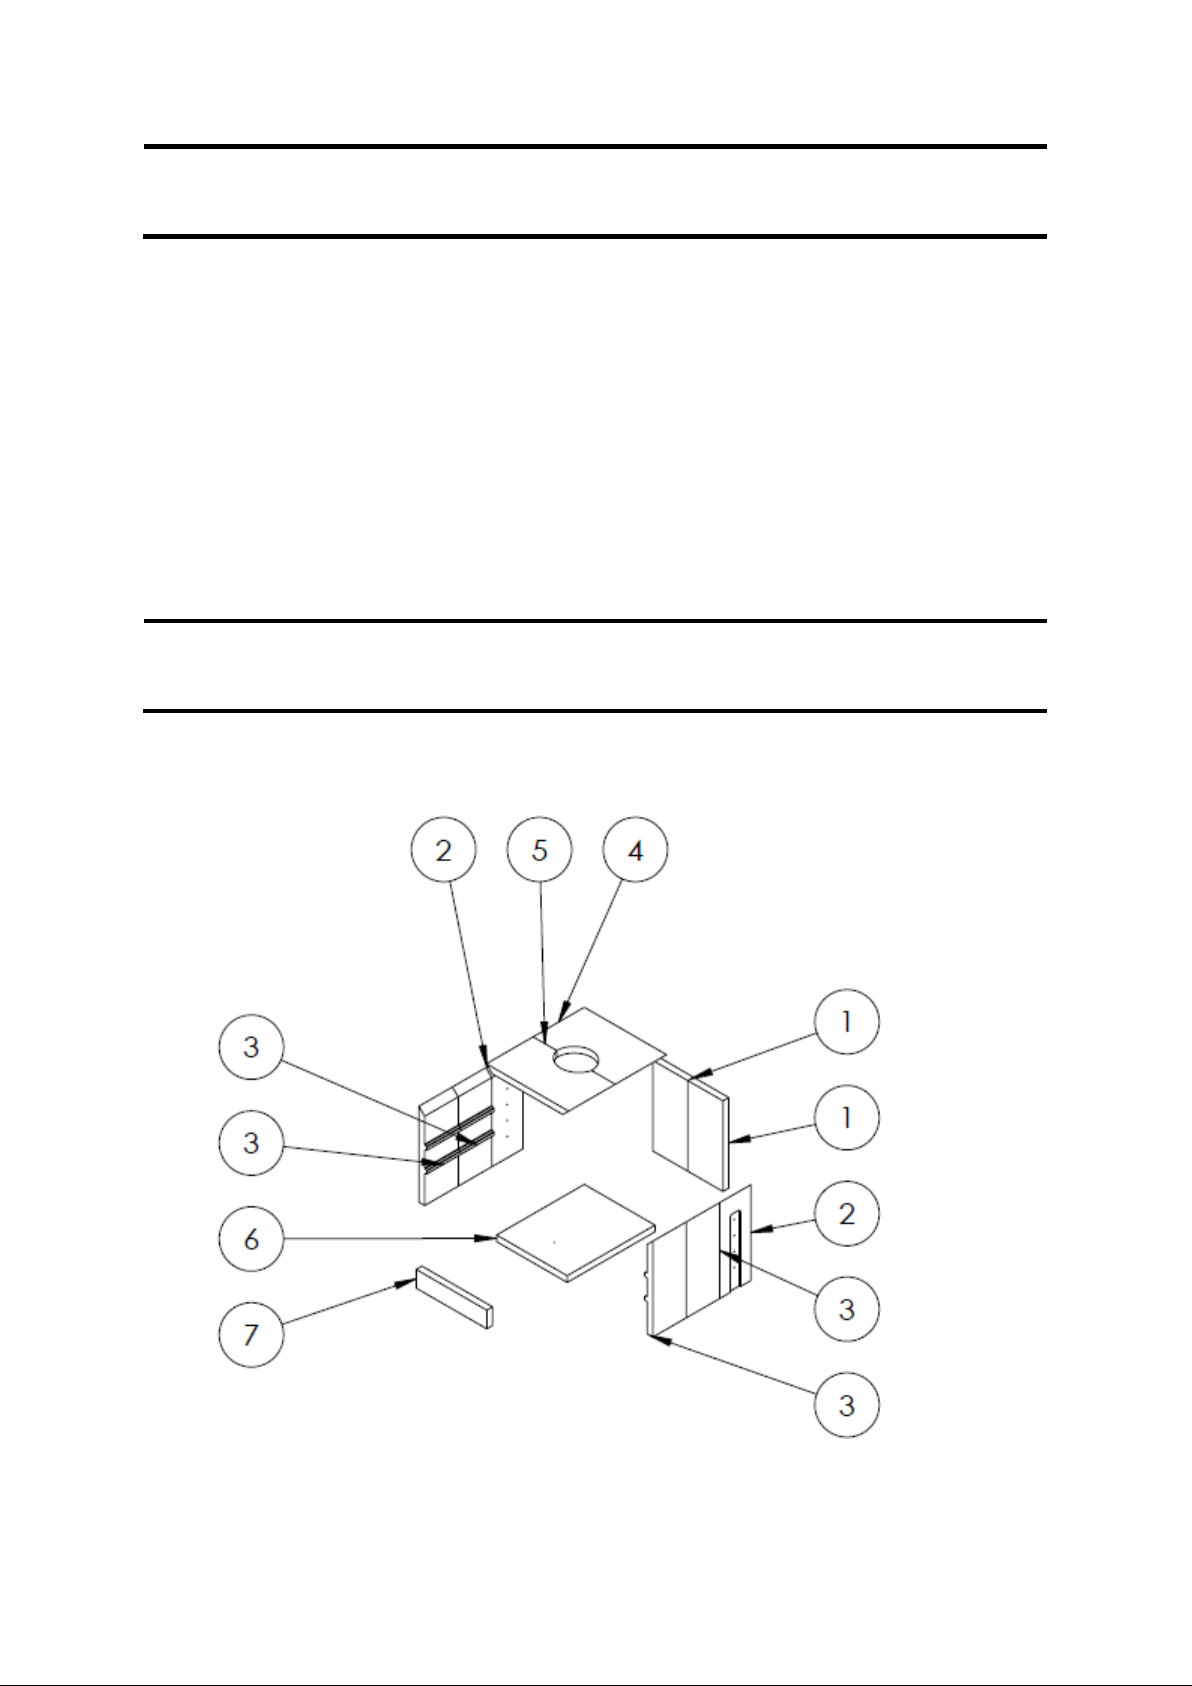
o Ensure fire bricks, baffles, and the after burner are in the correct position
o Check that all doors fit and seal correctly
o If applicable check plumbing circuit
o Check no extractor fan, other appliance or other flue interferes
o Complete commissioning card and return to ESSE to validate warranty
Figure 9 Firebrick Layout
Page 16
IH500AUS-I02-180219
Page 17

Table 2 Firebrick Part Numbers
Item No.
Part Number
Description
Qty.
1
990-009
Rear Brick
2
2
500-IH-226
Side Rear Brick
2
3
500-IH-227
Side Front Brick
4 4 990-004
Top Back Brick
1 5 500-IH-235
Top Front Brick
1
6
990-009B
Base Brick
1 7 990-009C
Front Brick
1
Fire Door Glass
Combustor
WCKCU-012
Side Brick
500-IH-226
Side Brick (with shelf runners)
500-IH-227
Top Front Brick
500-IH-235
Top Back Brick
990-004
Base Brick
990-009B
Rear Brick
990-009
Baffle
PLUS-010-7
Oven Shelf
PLUS-011-REV2
Page 17
IH500AUS-I02-180219
Page 18

COMMISSIONING CHECKLIST
Dealer the appliance was purchased from:
Name:
Address:
Telephone No:
ESSENTIAL information:
Date Installed
Model Description:
Serial No:
Installation Engineer:
Company Name:
Address:
Telephone No:
Commissioning Checks – to be completed and signed:
Has the use of the appliance,
operation and controls been
explained?
Yes
No
Instruction book handed to the
customer?
Yes
No
To assist with any potential guarantee claim please complete the following
information:-
To be completed by the installer.
Signature:………………………………………………..
Print Name:…………………………………………………
A CERTIFICATE OF COMPLIANCE OF INSTALLATION MUST BE SENT WITH THE
WARRANTY CARD
Page 18
IH500AUS-I02-180219
Page 19

Bakeheart & Warmheart
OPERATIONAL INSTRUCTIONS
INTRODUCTION
BEFORE USING YOUR COOKING STOVE
Thank you for choosing an ESSE cooking stove. Please read these instructions
carefully to ensure your safety and enjoyment whilst using this product.
Correctly installed and operated, your ESSE cooking stove will provide faithful
service indefinitely. We feel certain that like countless ESSE owners since 1854,
you will be truly satisfied by the warmth and comfort it will provide and the taste
of your food cooked within its oven.
Ensure that any plastic film used to protect surfaces has been removed (e.g.
from the inside of the oven door). The hotplate has been painted at the factory
to prevent rusting and therefore will require wiping with a damp cloth and
drying with a tea towel or kitchen roll.
During the first few operations of the cook stove there may be some ticking and
fumes emitted. This is normal and part of the initial expansion & material curing
process.
Page 19
IH500AUS-I02-180219
Page 20
YOUR COOKING STOVE
Figure 10 Bakeheart Cooking Stove
Figure 11 Warmheart Cooking Stove
Figure 10 and Figure 11 show the cooking stoves and their controls. The fire is
loaded, refuelled, and emptied through the large glass fire door.
Page 20
IH500AUS-I02-180219
Page 21
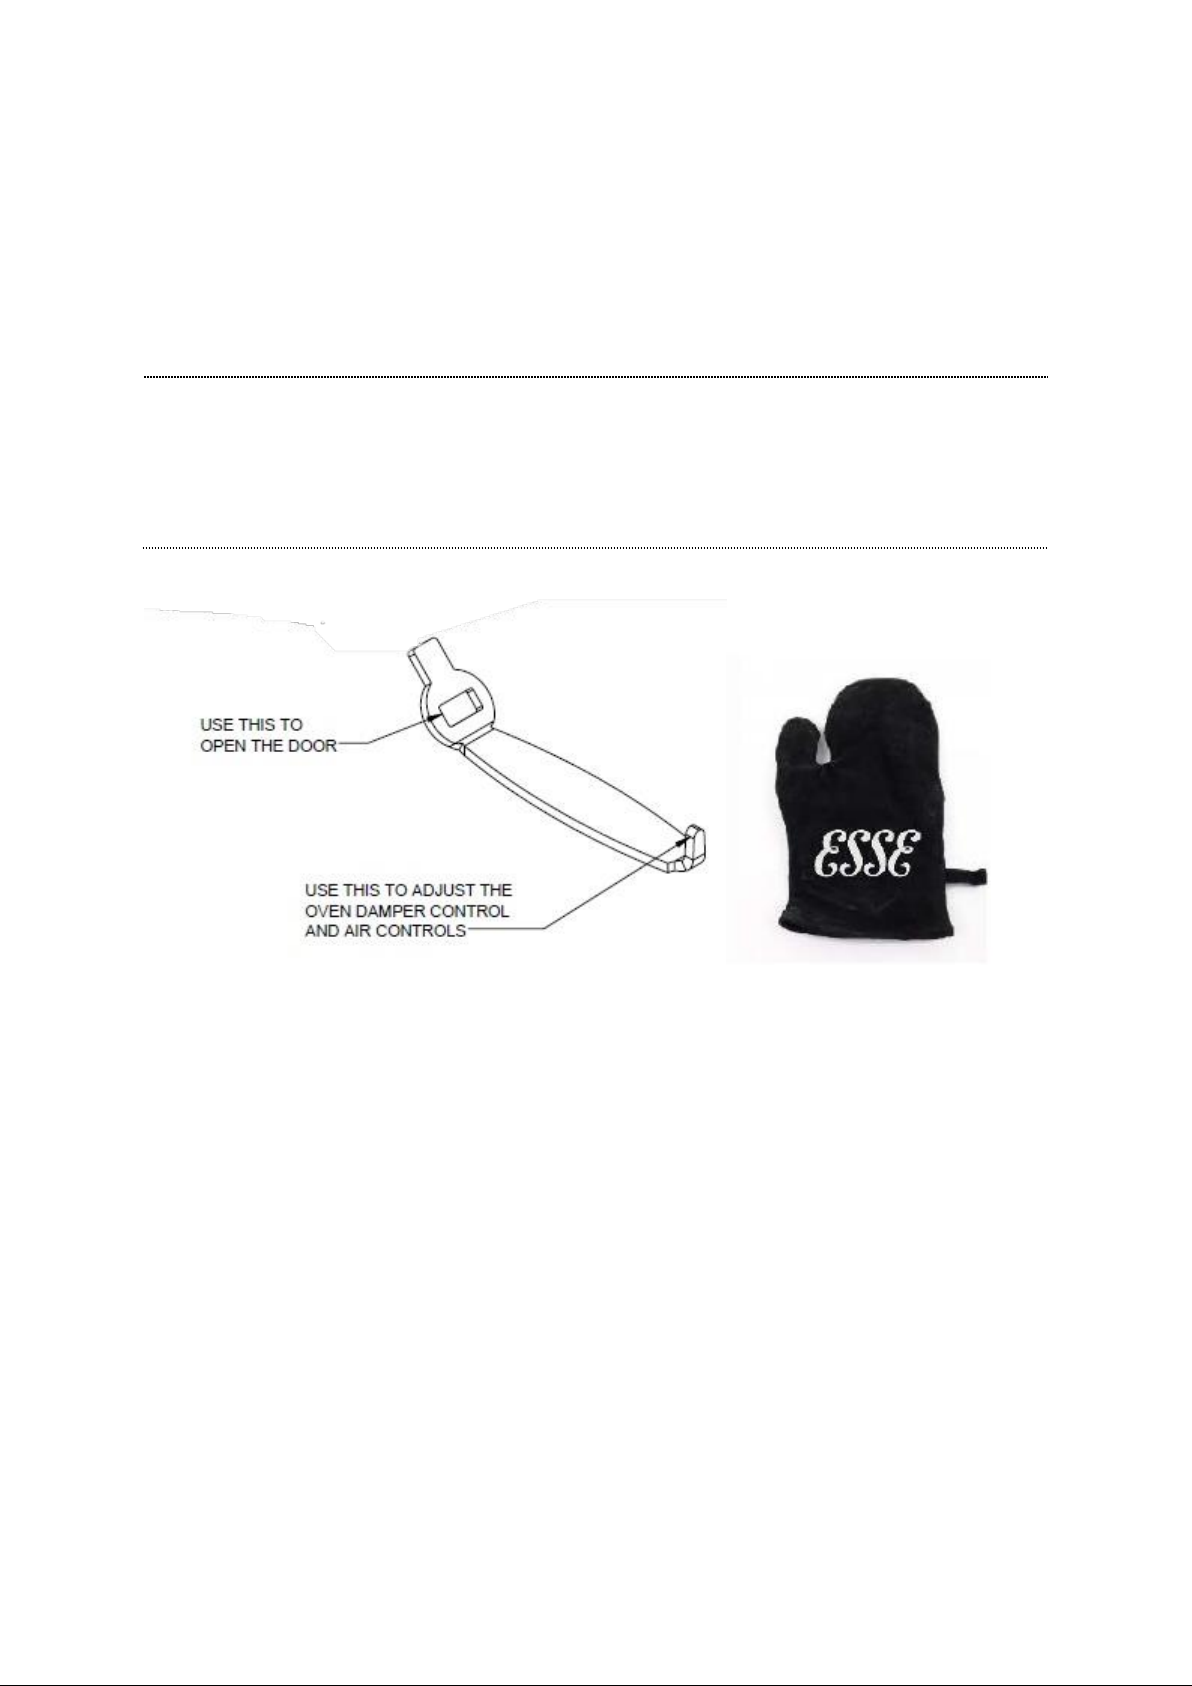
Included inside your cooking stove is a multi-purpose Operating Tool – for
WARNING
Do not place towels on the handrail, keep pets and children away and
ensure that any curtains near the appliance cannot ignite even when
displaced. Surfaces will be hot when in use.
An extractor fan MUST NOT be fitted in the same room as the appliance.
adjusting the air supply and operating the door. A glove is also provided to
protect the user’s hand. (Figure 3)
Figure 12 Operating Tool and Glove
Page 21
IH500AUS-I02-180219
Page 22

LIGHTING AND CONTROLLING THE FIRE
WARNING
When the cooking stove is running ALL HANDLES become hot and the
operating tool or glove provided should be used to open or close the doors
(Figure 12)
Before lighting the fire ensure that all vermiculite bricks are in the correct
position.
Ensure the air control is in the open position by moving the control to the right
hand position.
Figure 13 Air Control in Open Position
Open the fire door and place a firelighter in the centre of the firebox. Build a
small pyramid of kindling over the firelighter ensuring that the firelighter is still
reachable for lighting.
Place a two larger pieces of kindling across the stove, one each at the front and
rear either side of the pyramid. Place two more pieces front to back, light the
firelighter and repeat the pattern of alternating kindling until the firebox is two
thirds full.
Once the fire has been lit leave the door partially open to allow additional
airflow until the fire has become established. When the fire is established the
fire can be loaded with logs and the door can be fully closed. The air control can
be moved towards the closed position once the sooting has burnt off the
brickwork. The air flow can be reduced by moving the control to the left once
the fire has become established.
Page 22
IH500AUS-I02-180219
Page 23

The burning rate of the stove can now be regulated by the rate at which fuel is
NOTE
This appliance is not an incinerator and only dry well seasoned wood should
be used. Burning coal or other solid fuels such as treated wood is not
possible.
NOTES ON WOODBURNING
added and use of the air control. The maximum amount of fuel to be loaded
during normal operation is 2kg per hour in order to achieve nominal heat output.
If the cook stove is being used primarily to heat the room it is recommended
that the bolster lid is kept in the raised position to allow heat from the hotplate
to radiate into the room.
Wood burns most efficiently when the air for combustion is supplied from above
the fire bed. This air supplies the oxygen necessary for the volatile gasses given
off by the wood as it is heated to combust which increases efficiency and
reduces heat being wasted up the chimney.
Running the cooking stove with the air control open will provide oxygen for the
wood to burn on the fire bed and should be used to control the fire when lighting
or refuelling. The cooking stove should ideally be run with the air control in the
closed position for the majority of the time in use. If the fire appears to die down
too low then opening the air control slightly for a short period can help revive it.
Cold Flue
This is below the condensation point of wood gasses and may cause the buildup of tar in the chimney, dirty the fire door glass and result in the inefficient
burning of fuel.
When the flue is cold the fire will appear dull and residue will appear on the fire
door glass.
Correct Flue Temperature
This is the most efficient operation of your cooking stove.
Page 23
IH500AUS-I02-180219
Page 24

When the flue is at the correct temperature there will be rolling flames visible
LONG TERM SHUTDOWN
FIREWOOD
above the logs, any residue on the fire door glass will burn away.
Overheated Flue
Heat will be wasted up the chimney. Excess heat may damage the cooking stove
or ignite an existing accumulation of tar resulting in a chimney fire. In the event
of a fire, close the air controls on the appliance and call the fire brigade for
assistance.
If the cooking stove is to be shut down for long periods i.e. during summer
months or if the appliance is in a second home that is not used all the time,
precautions should be taken to avoid damage from condensation and corrosion.
First ensure that the cooking stove is fully cleaned and all ash removed. The
ovens and hotplate can then be treated with a light coating of flax oil to help
prevent moisture damaging the surfaces. The air control is to be left in the open
position (Figure 13), the doors slightly ajar, and the bolster lid left raised to allow
for ventilation.
Seasoning and Storing Firewood
Wood, which has recently been cut and is still full of sap and water is known as
"green" wood.
Green wood will generally burn poorly and inefficiently, because it can have over
20% water in its cells. It may be hard to light, smoulder, not put out any heat
and cause more than the usual amount of creosote to build up in your chimney.
So your aim should be to dry the wood out to below 20% moisture content, this
process is called seasoning. As the name implies, you should store your wood
Page 24
IH500AUS-I02-180219
Page 25

for a season or so, while it dries, but there are things you can do to speed up
seasoning by cutting the wood now rather than just before you use it.
Wood is composed of bundles of microscopic tubes that were used to transport
water from the roots of the tree to the leaves. These tubes will stay full of water
for years even after a tree is dead. This is why it is so important to have your
firewood cut to length for 6 months or more before you burn it, it gives this
water a chance to evaporate since the tube ends are finally open and the water
only has to migrate a small distance to escape. Splitting the wood helps too by
exposing more surface area to the sun and wind, but cutting the wood to shorter
lengths is of primary importance.
Here’s how you can tell whether your wood is ready or not: Well seasoned
firewood generally has darkened ends with cracks or splits visible, it is relatively
lightweight, and makes a clear "clunk" when two pieces are struck together.
Green wood on the other hand is very heavy, the ends look fresher, and it tends
to make a dull "thud" when struck.
What Type of Wood is Best?
The difference between 'hard' and 'soft' woods is the density of their cells or
fibres.
As a general rule, the deciduous trees (those that loose their leaves in the
autumn) are usually thought of as hardwoods and the evergreen trees (such as
pines, firs and larches) as the softwoods. But generalisations are of course
always subject to many exceptions. Some evergreens may well be harder than
some deciduous trees. Birch, for example, is not very hard at all. So we should
understand that there is a whole range of densities amongst our tree species,
including medium dense woods, which cannot be satisfactorily classed as hard
or soft.
Firewood tends to be sold by volume rather than weight. Assuming that the
wood is reasonably dry, the weight of a square metre of good hardwood may be
double of that of a square metre of softwood. This means that the same volume
of hardwood will provide you with more fuel to burn than an equal amount of
softwood, simply because it contains more substance.
(N.B. The price of hardwood will normally not be double that of softwood,
because it took the same amount of labour to prepare. So, if a trailer full of
Page 25
IH500AUS-I02-180219
Page 26

hardwood costs more than the same size trailer full of softwood, the more
expensive option may well be the most economical.)
The other advantage of good hard firewoods are that the cooker does not need
to be fed as often and the charcoal-beds made by the glowing wood may burn
more easily overnight.
However, the ideal situation would be to have a store of both hard and soft
woods, because the softer woods also have distinct advantages. They light more
easily than the slower burning hardwoods and if the softwoods are dry, they
create a hotter, more intense fire. The draught created by the hotter fire moves
the air up the chimney faster.
After reading the notes opposite about the burning process, you will understand
that means less pollution in the form of smoke and less creosote condensation
in your chimney.
The denser hardwoods tend to smoulder more easily when the fire is first lit, so
their flue gas temperature will be much cooler.
Because softwoods like pine and larch contain a lot of resins and pitch, a popular
misconception is that they will fur up the chimney with creosote more easily
than a hardwood like oak. This is not necessarily true at all. It is not the pitch
that is the problem, it's the water IN the pitch. Once the water in the wood has
evaporated, that pitch becomes high octane fuel. When dry, softwoods burn
extremely hot.
There is also the matter of seasoning to be considered. When you buy wood, it
will usually have been cut in the winter of the year you buy it. Hard woods tend
to take longer than softwoods to fully dry out.
Softwoods cut in the previous winter should, with proper storage, be ready to
burn the next autumn, whereas many hardwoods may take a bit longer than
that. Oak, for example, is very slow to dry out and ideally left for two years. It is
also possible to purchase pre seasoned wood or kiln dried wood.
Summarising we can say that it is always sensible to buy this year for next years
fuel supply and that it is very handy to have both soft and hardwoods. You can
use the softwoods to start a good fire and you will have additional control over
the fire (in addition to the cookers controls) by adding slower burning wood to
fast ones if you want to leave the cooker without tending it for a while.
Page 26
IH500AUS-I02-180219
Page 27
Alternatively you can add some fast burning softwood logs to the slower
NOTE
The above text is a guide only. The ideal operation of your cooking stove
depends on a number of factors which vary with each installation. Gaining
experience on your cooking stove is the only way to learn its best operation.
COOKING WITH THE COOK STOVE
hardwood logs to instantly revive a fire, which has been neglected.
All firewood should have the bark removed before burning and should not be
painted or treated as these can cause excessive smoke and tarring of the stove
as well as releaseing hazardous fumes when burnt.
The oven and hotplate are heated directly by the fire. In order to heat up the
oven and hotplate, the fire should be lit as described on page 22.
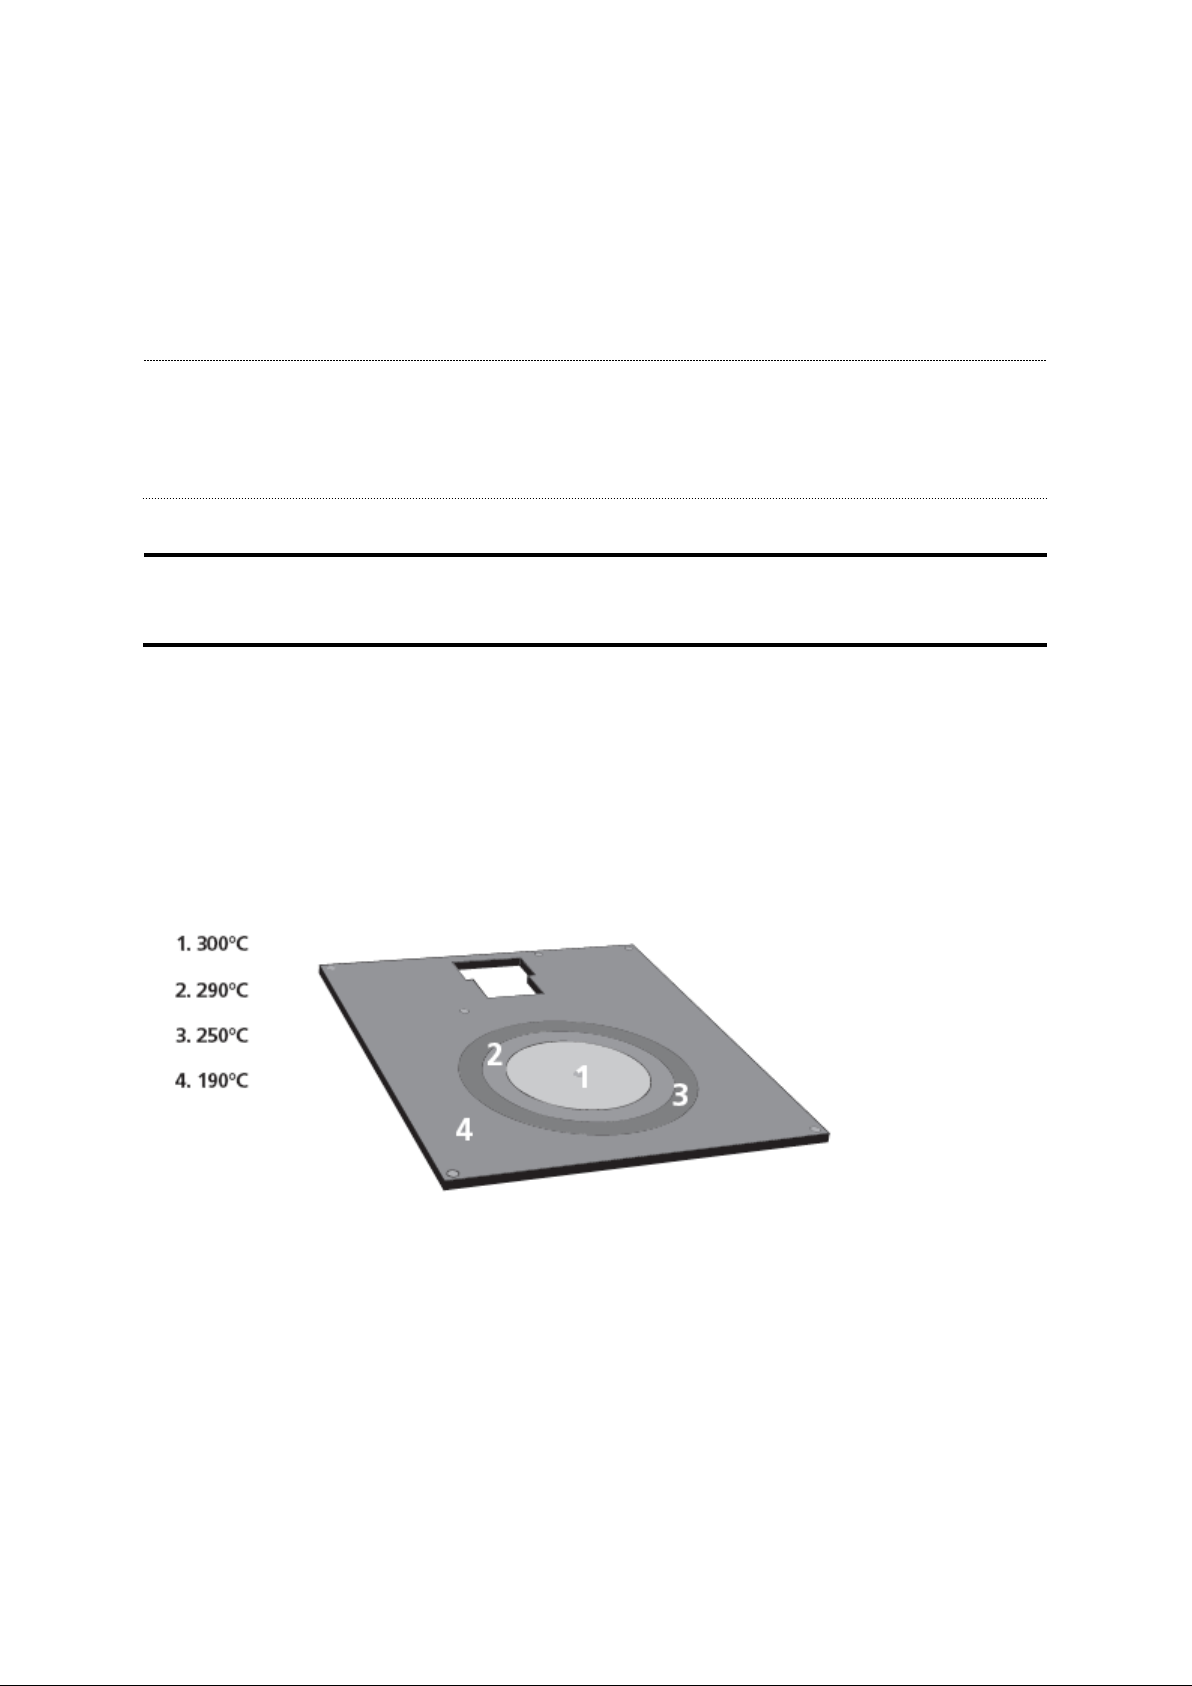
The temperature of the hotplate is graduated from the inside out, see Figure 14
for approximate temperatures. Machined base pans are essential as heat is
transferred to them via conduction.
Figure 14 Approx. Working Temperatures 30 Mins. After Refueling
Food may be cooked directly on the hotplate if desired. The bolster lid may be
left down when the hotplate is not in use in order to keep it at a cooking
temperature.
To increase oven temperatures, refuel the cooker and increase the burning rate
of the fuel by use of the air control, and regulate to the desired temperature.
Page 27
IH500AUS-I02-180219
Page 28
The cookers are equipped with a wire shelf which can be set to the desired
EXTENDED WOODBURNING
height on the side bricks in the firebox to cook over the embers. The shelf in the
Bakeheart oven has anti-pull out stops on the ends to prevent it from being
pulled out inadvertently; to remove a shelf, pull forward until the stop is
reached, then lift at the front and pull out of the oven. Use reverse procedure
to refit. If the shelves pull straight out then they are in back to front.
The temperature gauge on the oven door provides an indication of the oven
temperature. It should be noted however that since the gauge is attached to the
door, the indicated temperature will drop if the door is left open for a prolonged
period. Once the door is closed the dial will come back up to temperature after
a short delay.
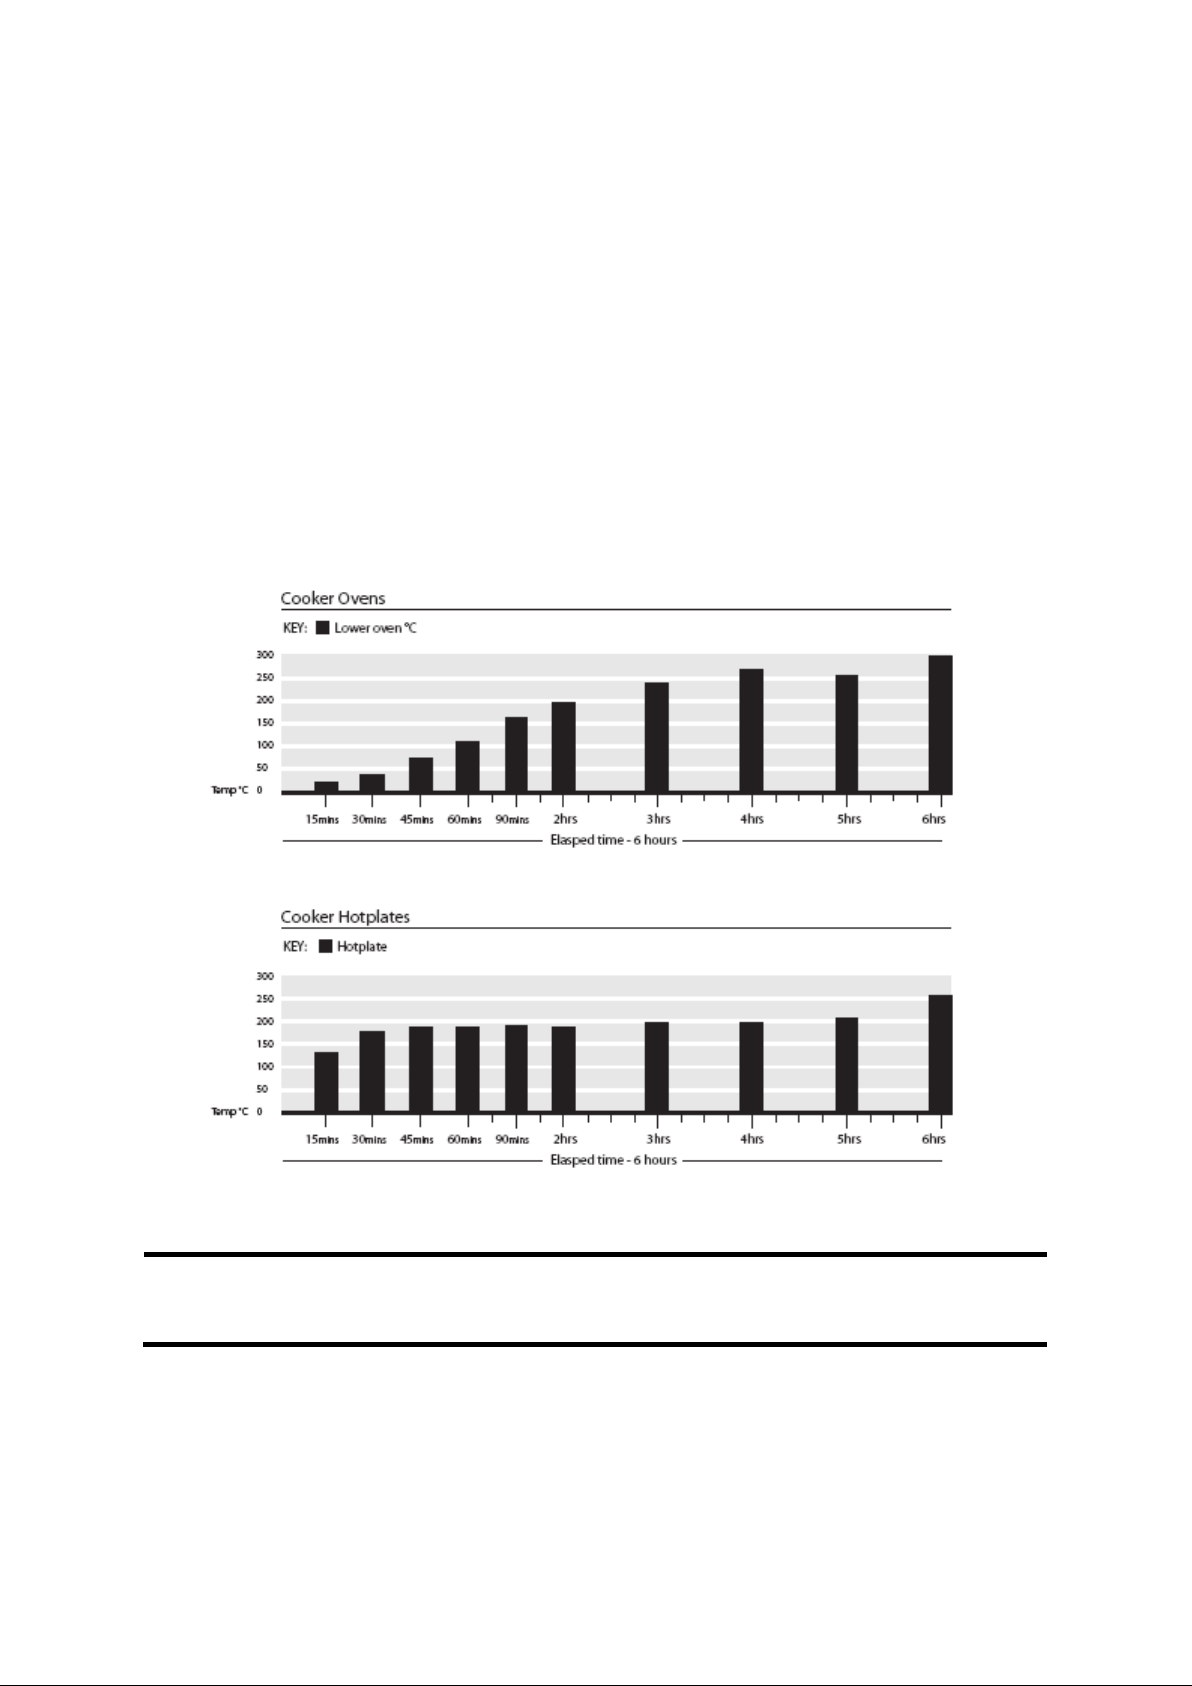
Figure 15 Estimated Heat-up Times
This appliance has been certified as a slow combustion stove. Loading a large
amount of wood into the cooking stove all at once will reduce the temperature
inside. If the temperature is too low, the gases given off from the wood will be
Page 28
IH500AUS-I02-180219
Page 29

too low to combust, resulting in a lot of smoke which will cover the inside of the
CLEANING AND MAINTAINANCE
cooking stove, including the glass, with soot.
In order to avoid adverse combustion conditions it is a good idea to increase the
temperature of the cooking stove before loading more wood by further opening
the air control. Load the wood (3kg+ for long extended burning) and leave the
air control open until the moisture is driven out of the wood and the cooking
stove is up to an efficient operating temperature (approximately 20 minutes).
The air control can then be closed to hold the temperature of the cooking stove.
The successful operation of your range cooker is entirely dependent on the
adequate performance (pull) of the chimney or flue to which it is connected. The
following maintenance guidelines will be pointless unless the flue is also
maintained and cleaned regularly. How often it needs cleaning will depend on
the quality and moisture content of the wood you burn but an annual clean is
recommended. A partially blocked or dirty flue can have disastrous implications
for an otherwise perfectly installed cooker.
A healthy flue draught should read between 12 – 25 pascals. A flue draught
reading below this value will result in poor smoky performance
Always carry out cleaning procedures when the cooker is unlit and has been
allowed to cool sufficiently to avoid burns. With time and experience you will be
able to gauge the intervals between cleaning more accurately. It will vary
depending on the quality of your firewood and performance of your flue. Take
time to get to know your cooker and inspect it at regular intervals for the first 6
months.
To clean the glass of any built up residue, special cleaning solutions can be used,
or a ball of newspaper dampened and passed through the ash can be used. Do
not use abrasive or chemically aggressive cleaning products on the glass as this
can weaken or stain it.
Page 29
IH500AUS-I02-180219
Page 30
If any of the chromed components become blue due to excess heat they can be
restored using a chrome cleaner.
When de-ashing the cooking stove only remove small amounts of ash leaving
ideally 30mm depth of ash in the bottom for best performance.
Figure 16 Under the Hotplate
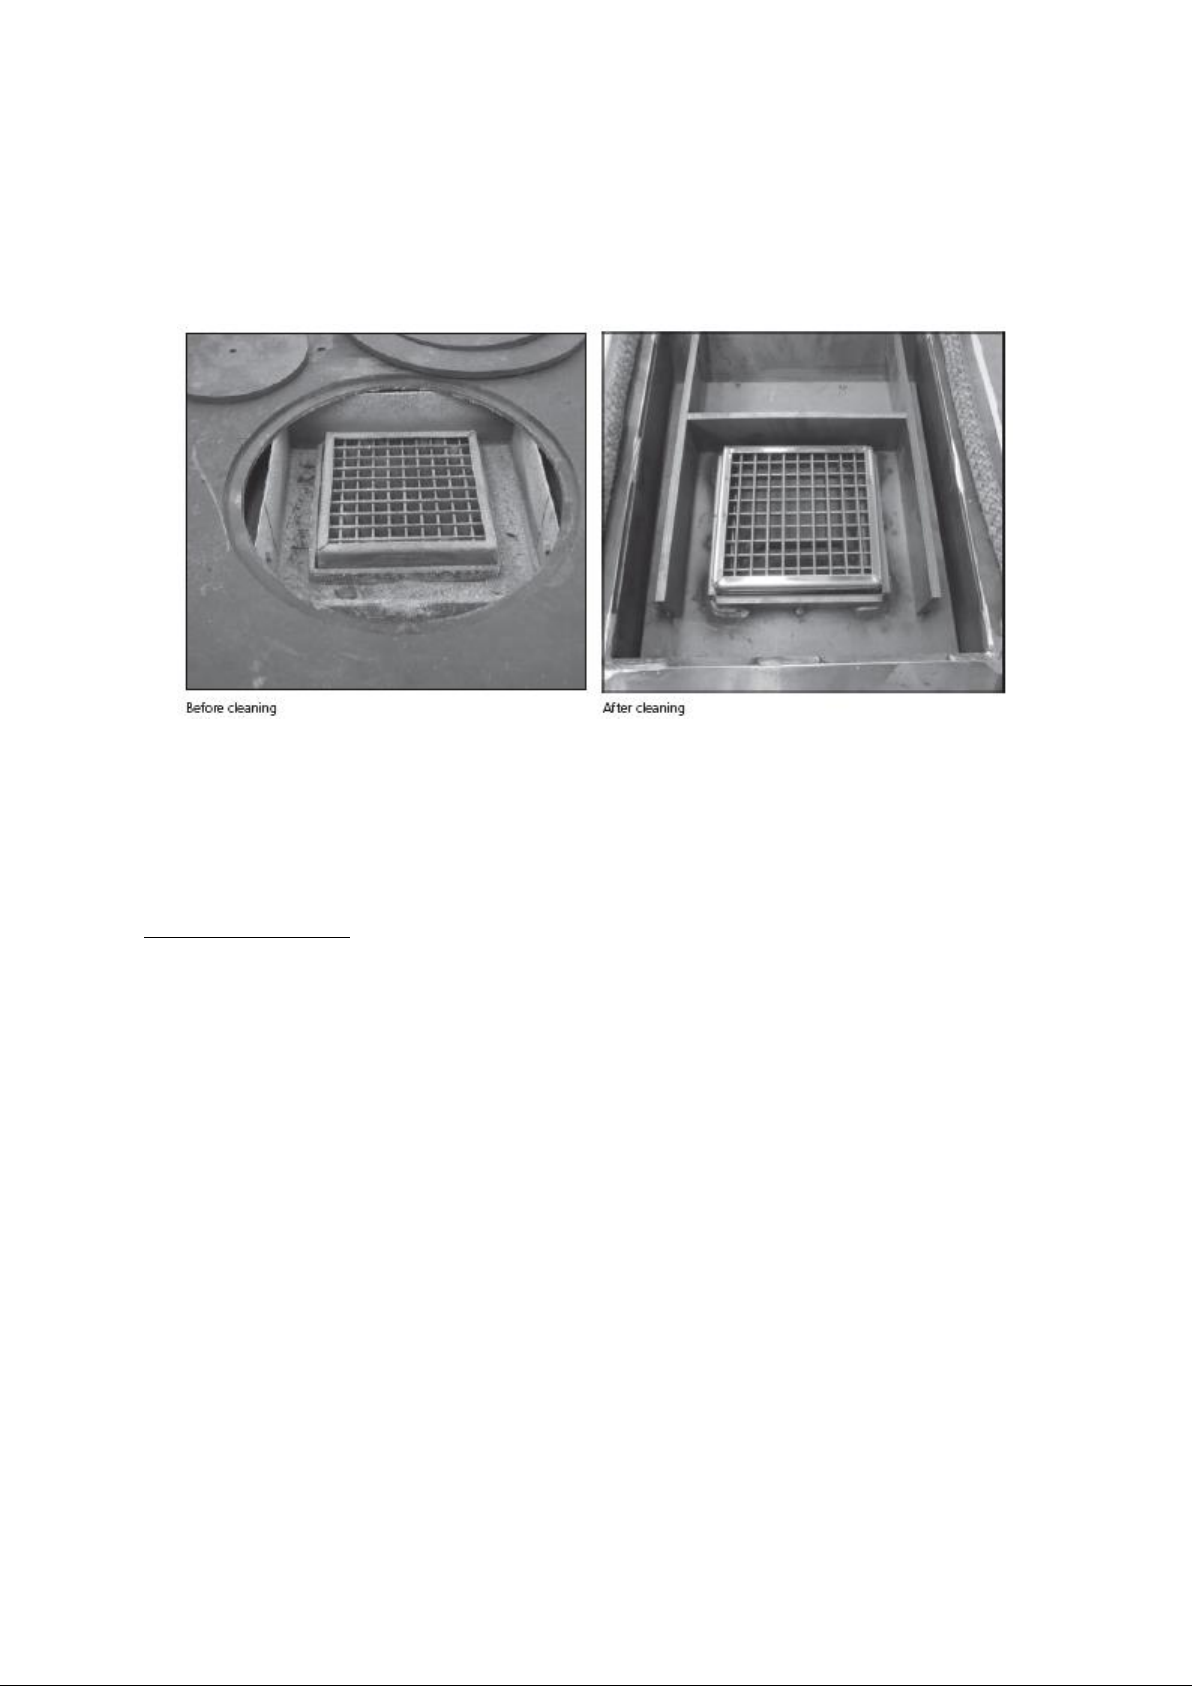
To clean the flue way of the cook stove the hotplate must be removed. To avoid
rust forming on the hotplate pans should not be stored on top of the cooker
when not in use.
Cleaning the Flue
It is recommended that the flue is cleaned at least every 12 months to maintain
a suitable flue draught and prevent poor performance of the cooking stove. It is
essential to maintain the integrity and cleanliness of the flue to ensure that your
cooker continues to perform at its best.
Page 30
IH500AUS-I02-180219
Page 31

CONDITIONS OF GUARANTEE
EXCLUSIONS
Your ESSE is guaranteed against defects arising from faulty manufacture for
2 years when supplied by an ESSE Specialist.
Upon registration of the warranty, ESSE will extend the guarantee period to
5 years from purchase. Your details must be registered with us by either
returning the completed warranty card or by completing registration on-line
at www.esse.com. The warranty must be registered within 1 month of
installation to qualify for the 5 year warranty.
The appliance must be only used for normal domestic purposes and in
accordance with our instructions, be correctly installed and serviced.
This guarantee does not cover:
o Installation
o Wear & tear
o Parts deemed to be replaceable in the normal usage of the cooker. These
parts are listed herewith: all firebricks, woodburning box, oven
accessories, hotplate and door seals, door glass.
This guarentee is personal to the original purchaser and not transferable.
Any stove or defective part replaced shall become the Company’s property.
Page 31
IH500AUS-I02-180219
Page 32

CUSTOMER CARE
In the event you should require spare parts, please order through your ESSE
dealer or by contacting Esse via telephone (01282 813235) or our website,
www.esse.com.
Should you have cause for dissatisfaction with your cooker, you should
contact your ESSE dealer, who will, in most instances, be able to offer you
immediate assistance. You will be required to give the following details.
o Your name, address and postcode.
o Your telephone/contact details.
o Clear and concise details of the fault.
o Model and serial number of the cooker (found on panel at rear).
o Purchase date (please note that a valid purchase receipt or guarantee
documentation is required for in-guarantee service calls).
We will then check that we have an accurately completed warranty card, if
not then any work carried out may be charged.
We will assess the nature of the complaint and either send replacement parts
for your dealer to fit, send an engineer to inspect & report, or send an
engineer to repair. If the fault is not actually due to faulty workmanship but
some other cause such as misuse or failure to install correctly, a charge will
be made to cover the cost of the visit and any new parts required, even
during the warranty period. Home visits are made between 08.30-1700 hrs
Monday to Friday, and are arranged for either a morning or afternoon
appointment.
Page 32
IH500AUS-I02-180219
Page 33

Servicing
Service Date:
Carried Out By:
Comments:
Service Date:
Carried Out By:
Comments:
Service Date:
Carried Out By:
Comments:
Service Date:
Carried Out By:
Comments:
Service Date:
Carried Out By:
Comments:
It is recommended that the cook stove is serviced annually by a qualified person.
These services can be recorded below.
Page 33
IH500AUS-I02-180219
Page 34

Service Date:
Carried Out By:
Comments:
Service Date:
Carried Out By:
Comments:
Service Date:
Carried Out By:
Comments:
Service Date:
Carried Out By:
Comments:
Service Date:
Carried Out By:
Comments:
Service Date:
Carried Out By:
Comments:
Page 34
IH500AUS-I02-180219
Page 35

Page 35
IH500AUS-I02-180219
Page 36

Australia
Distributed in partenership with Pivot Stoves
234-238 Moora bool Street
Geelong, VIC 3220
Phone (03) 5221 4485
Website and On-line Store www.pi vots tove.com.a u
 Loading...