

Page 1
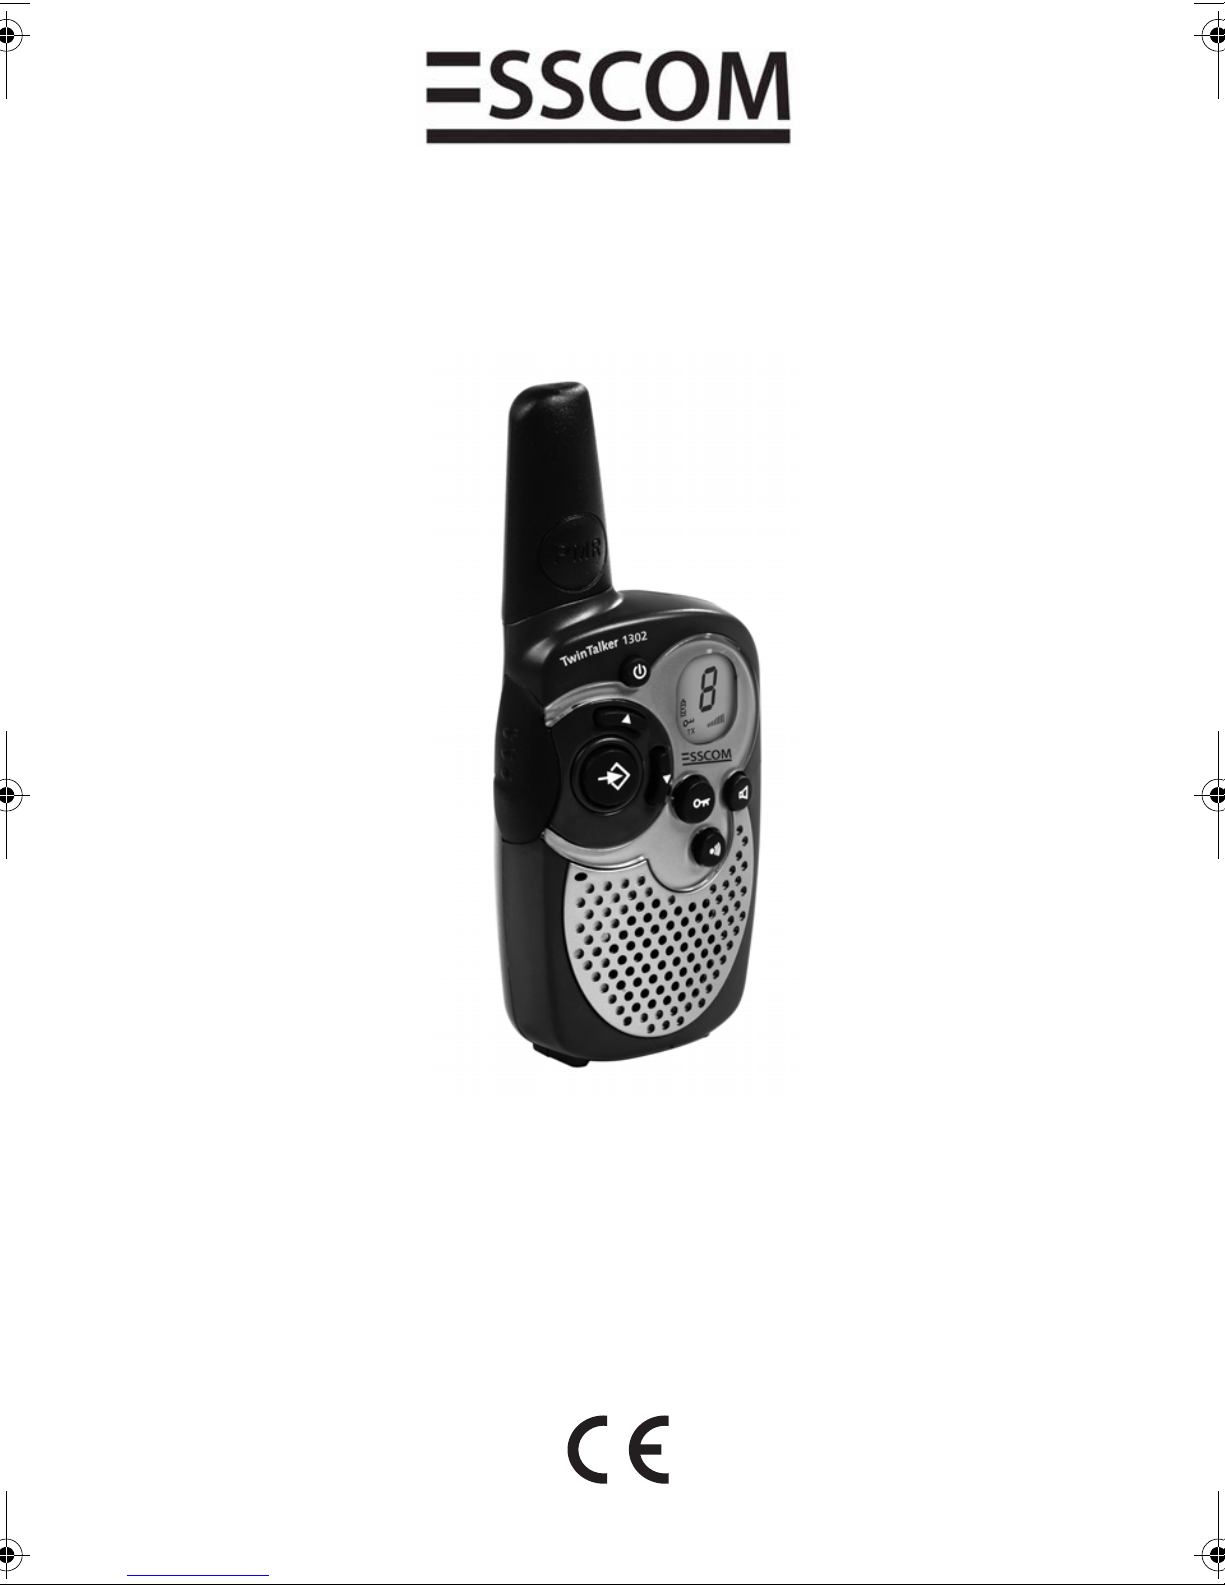
TWINTALKER 1302
DUO COMBI PACK
BEDIENUNGSANLEITUNG
MANUAL DE USUARIO
USER GUIDE
V1.0 - 11/09
Page 2

Este producto cumple con los requisitos esenciales y con el r esto de indicaciones relevantes de la
directiva R&TTE 1999/5/CEE.
Puede encontrarse la Declaración de conformidad en:
http://www.esscom.be/cedeclarations.asp
This product is in compliance with the essential requirements and other
relevant provisions of the R&TTE directive 1999/5/EC.
The Declaration of conformity can be found on:
http://www.esscom.be/cedeclarations.asp
Dieses Produkt entspricht den grundlegenden Anforderungen und anderen relevanten
Bestimmungen der R&TTE Richtlinie 1999/5/EWG.
Die Konformitätserklärung finden Sie an der folgenden St elle:
http://www.esscom.be/cedeclarations.asp
Page 3
ESSCOM TWINTALKER 1302 DUO COMBI PACK
ESPAÑOL
Restricción:
Compruebe las regulaciones locales antes de utilizarlo en un país distinto al
de adquisición. La norma podría estar prohibida.
Aunque no siempre es así, las zonas con ambientes potencialmente explosivos
suelen estar claramente marcadas. Entre ellas, se cuentan las zonas de repostaj e
como las situadas bajo cubierta en los barcos o las instalaciones de
almacenamiento o transferencia de sustancias químicas o combustible, zonas en
las que el aire contiene sustancias químicas o partículas como grano, polvo o
polvo metálico y cualquier otra zona en la que suela recomendarse apagar el motor
de los vehículos.
1 INTRODUCCIÓN
Gracias por adquirir la unidad ESSCOM T wintalker 1302. Se trat a de un aparato de radiocomunicación de baja potencia
que no tiene más costes de funcionamiento que los costes mínimos de recarga de las pilas.
El TwinTalker 1302 funciona con frecuencias de Radio Móvil Privada y puede emplearse en cualquier país en el que
esté autorizado el servicio como se indica en la caja y en este manual.
2 FINALIDAD:
Puede utilizarse con diversos fines profesionales o recreativos. Por ejemplo: para mantener la comunicación si se viaja
en dos o más coches, si se viaja en bicicleta o si se practica el esquí. Pu ede emplearse p ara mante nerse en cont acto
con los niños mientras juegan en el exterior, etc.
3 MARCA CE
Por medio de la presente TOPCOM EUROPE N.V. declara que el PMR cumple con los requisitos senciales y
cualesquiera otras disposiciones aplicables o exigibles de la Directiva 1999/5/CE.
4 INSTRUCCIONES DE SEGURIDAD
4.1 GENERAL
Lea atentamente la siguiente información acerca de la s eguridad y del uso apropiado. Familiarícese con todas las
funciones del aparato. Guarde este manual en un lugar seguro para futuras consultas.
4.2 LESIONES POR QUEMADURAS
• No tocar la an ten a si se daña la t apa; si una antena entra en contacto con la piel durante una tr ansmi sió n, pue de
provocar una pequeña quemadura.
• Las pilas pueden ocasionar daños como quemaduras al contacto de los terminales expuestos con cualquier
material conductor como joyas, llaves o cadenas, ya que el material puede completar un circuito eléctrico
(cortocircuito) y calentarse bastante. Tenga cuidado al manipular pilas cargadas, sobre todo si las mete con otros
objetos metálicos en un bolsillo, en un bolso o en otro lugar.
4.3 SEGURIDAD PERSONAL
• No coloque el dispositivo en la zona sit uada sobre un airbag ni en su radio de acción. Los airbags se inflan con
mucha fuerza. Si se coloca un comunicador en el radio de acción de un airbag y este se infla, el comunicador
puede salir propulsado con gran fuerza y causar lesiones graves a los ocupantes del vehículo.
• Mantener la radio a al menos 15 centímetros de los marcapasos.
• Apagar la radio en cuanto se produzcan interferencias con equipos médicos.
• No sustituya las pilas en un ambiente potencialmente explosivo. Durante la instalación o la retirada de las pilas
pueden producirse chispas y causar una explosión.
• Apagar el comuni cador siempre qu e se esté en una zona con u n ambiente pot encialmente explosivo. Las chisp as
en esas zonas pueden provocar explosiones o incendios que pu eden causar lesiones corporales e incluso la
muerte.
• No desechar nunca las pilas en el fuego, dado que pueden explotar.
ESSCOM TWINTALKER 1302 DUO COMBI PACK 3
Page 4
ESSCOM TWINTALKER 1302 DUO COMBI PACK
T
T
Si 2 o más usuarios presionan el botón a la vez, el receptor recibirá solo la
señal más fuerte y la/s otra/s señal/ es se suprimirá/n. Por lo tanto, solo se debe
transmitir una señal (presionar el botón ) cuando el canal está libre.
TPTT
4.4 RIESGO DE ENVENENAMIENTO
• Mantener las pilas fuera del alcance de los niños.
4.5 CUESTIONES LEGALES
• En algunos países, está prohibido utilizar el PMR mientras se conduce. Si es el caso, deje de conducir antes de
utilizar el aparato.
• Apagar la unidad en los aviones, cuando se solicite. Cualquier uso de ella debe cumplir las regulaciones de la
línea aérea o las instrucciones de la tripulación.
• Apagar la unidad en cualquier instalación en la que se solicite mediante avisos. Los hospitales o centros
sanitarios pueden usar equipos sensibles a la energía externa de RF.
• La sust itución o la modificación de la antena pueden afectar a las especifica ciones del PMR e infringir los
reglamentos CE. Las antenas no autorizadas también pueden dañar la radio.
4.6 NOTAS
• No toque la antena durante la transmisión, podría afectar al alcance.
• Quitar las pilas si no se va a utilizar el dispositivo durante mucho tiempo.
5 LIMPIEZA Y MANTENIMIENTO
• Limpie la unidad con un paño suave humedecido. No utilice productos de limpieza ni disolventes; podrían dañar
la carcasa, filtrarse y causar daños permanentes.
• Limpie los contactos de las pilas con un paño seco sin hilachas.
• Si se moja la unidad, apáguela y retire las pilas de inmediato. Seque el compartimiento de las pilas con un paño
suave para reducir al míni m o los po si b le s d añ o s . Dej e e l com part i mi en to de las pilas sin la tapa hasta el día
siguiente o hasta que se seque por completo. No vuelva a usar la unidad hasta que esté totalmente seca.
6 ELIMINACIÓN DEL DISPOSITIVO (MEDIO AMBIENTE)
Este producto no debe ser desechado en un contenedor normal al final de su vida útil, sino en un punto
de recogida destinado al reciclaje de equipos eléctricos y el ectrónicos. Tanto en el producto como en el
manual del usuario y en la caja se incluye este símbolo.
Algunos de los materiales del producto podrán reutilizarse, si los lleva a un punto de reciclaje. La
reutilización de algunas de las piezas o materias primas de estos productos supone una importante
contribución a la protección del medio ambiente. Si necesita más información sobre los puntos de
reciclaje existentes en su zona, póngase en contacto con las autoridades locales correspondientes.
7 USO DE UN DISPOSITIVO PMR
Para que la comunicación entre dispositivos PMR sea posible, estos deben estar en el mismo canal y dentro del
alcance (de hasta 5 km en campo abierto). Dado que utilizan bandas de frecuencias libres (canales), todos los
dispositivos activos comparten estos canales (8 en total). Por tanto, la privacidad no está garantizada. Cualquiera con
un PMR en el mismo canal puede escuchar cualquier conversación transmiti da a través de él.
Si desea comunicarse (transmitir una señal de voz), debe presionar el botón (Pulse para hablar). Una vez
presionado este botón, el dispositivo pasará al modo de transmisión y se podrá hablar a través del micrófono. Todos
los demás dispositivos PMR que se encuentren dentro del alcance, en el mismo canal y en el modo en espera (sin
transmitir) oirán el mensaje. Para poder responder a u n mensaje, hay que esperar a que la otra parte de je de transmitir .
Al final de cada transmisión, la unidad enviará un pi tido. Para responder , solo hay que presiona r el botón y hablar
a través del micrófono.
PT
PT
PT
4 ESSCOM TWINTALKER 1302 DUO COMBI PACK
Page 5
ESPAÑOL
8 INTRODUCCIÓN
ESSCOM TWINTALKER 1302 DUO COMBI PACK
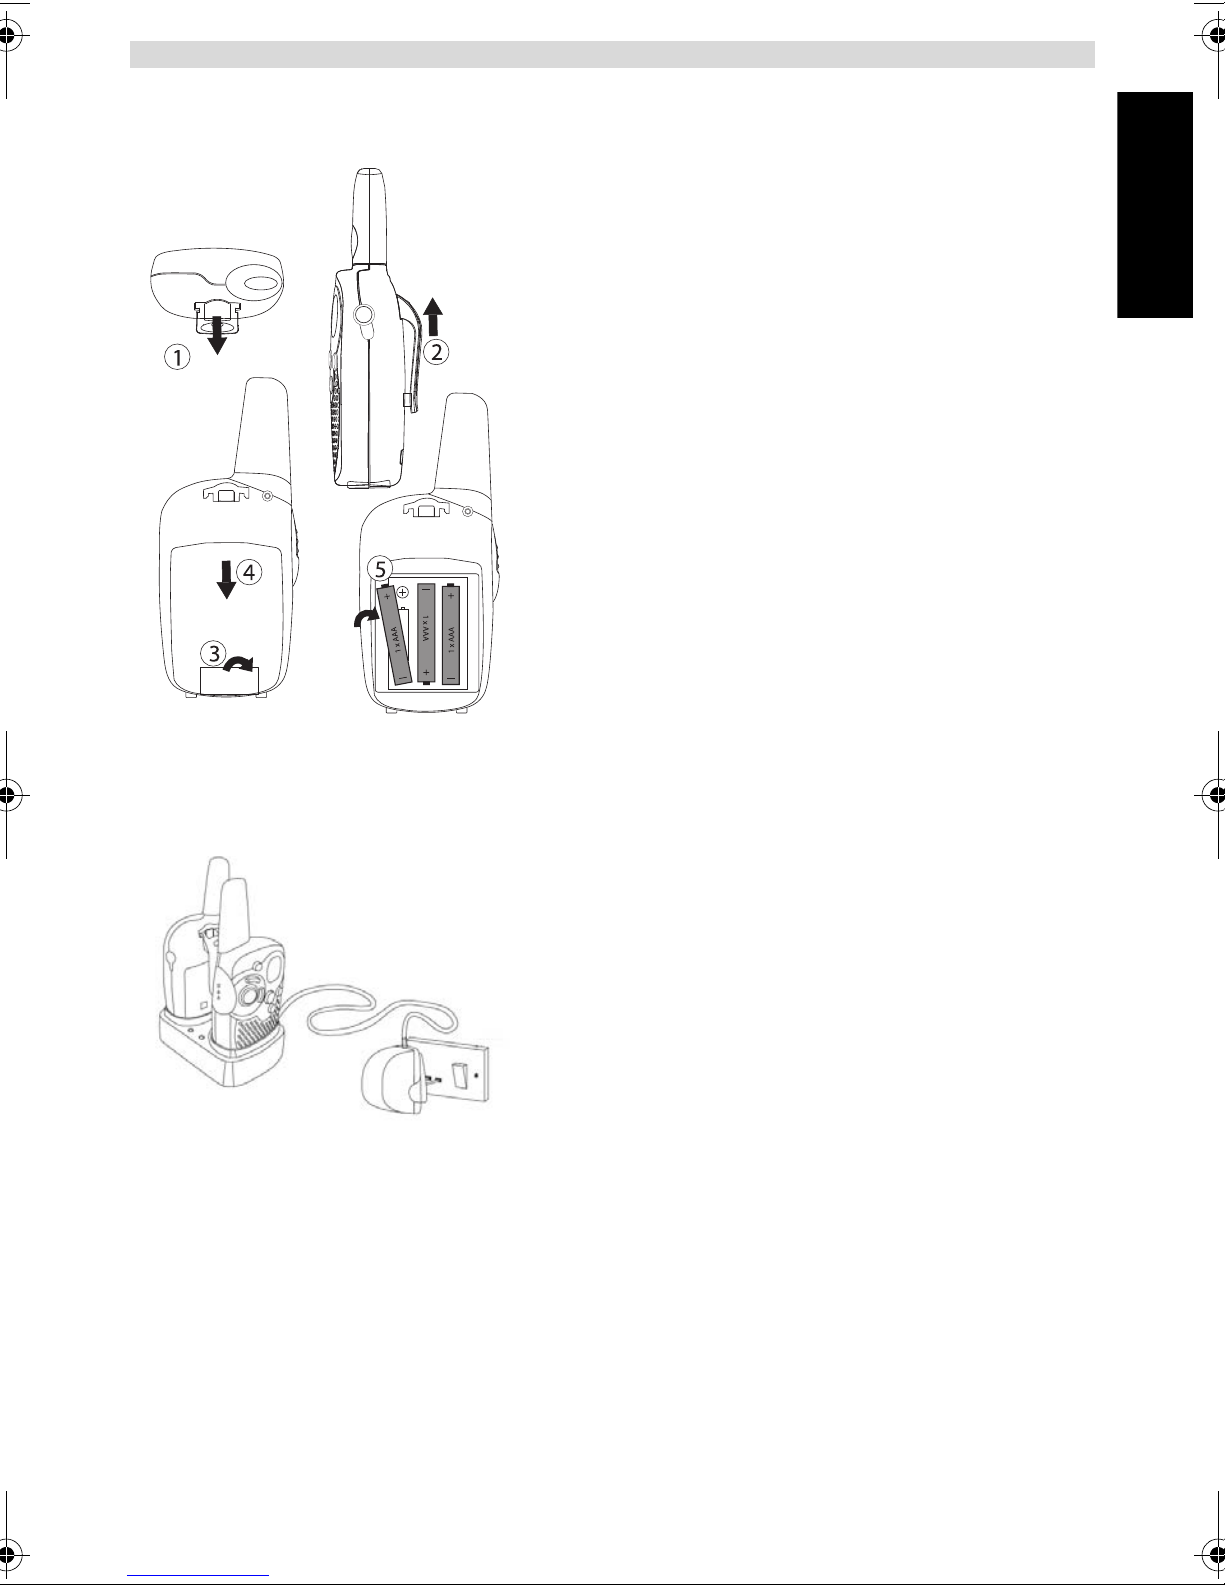
8.1 RETIRADA E INSTALACIÓN DEL CLIP DEL
CINTURÓN
1.Para extraer el clip del cintu rón (2), presiónelo hacia la antena
y tire de la pestaña (1).
2.Al volver a instalar el clip del cinturón un clic indicará que está
bien colocado.
8.2 INSTALACIÓN DE LAS PILAS
1.Retirar el clip del cinturón (§ 8.1).
2.Tire hacia abajo de la tapa de las pilas (3) y de sl íce l a
alejándola de la antena. (4)
3.Instale 3 pilas AAA recargables según la polaridad indicada.
4.Volver a instalar la tapa de las pilas y el clip del cinturón (§
8.1).
9 CARGA DE LAS BATERÍAS
Cuando estén instalados los pilas, el cargador de escritorio
proporciona la carga necesaria
1.Poner el cargador de escritorio en una superficie lisa.
2.Enchufar un extremo del adaptado r proporcionado en el
enchufe eléctrico y el otro extremo en el conector de la parte de
atrás del cargador de escritorio .
3.Poner la radio en el cargador como se indica.
4.El LED de carga se encenderá si está insertado adecuadamente y cargando.
Tardará unas 7 o 10 horas en cargarse las baterí as totalmente.
ESSCOM TWINTALKER 1302 DUO COMBI PACK 5
Page 6
ESSCOM TWINTALKER 1302 DUO COMBI PACK
T
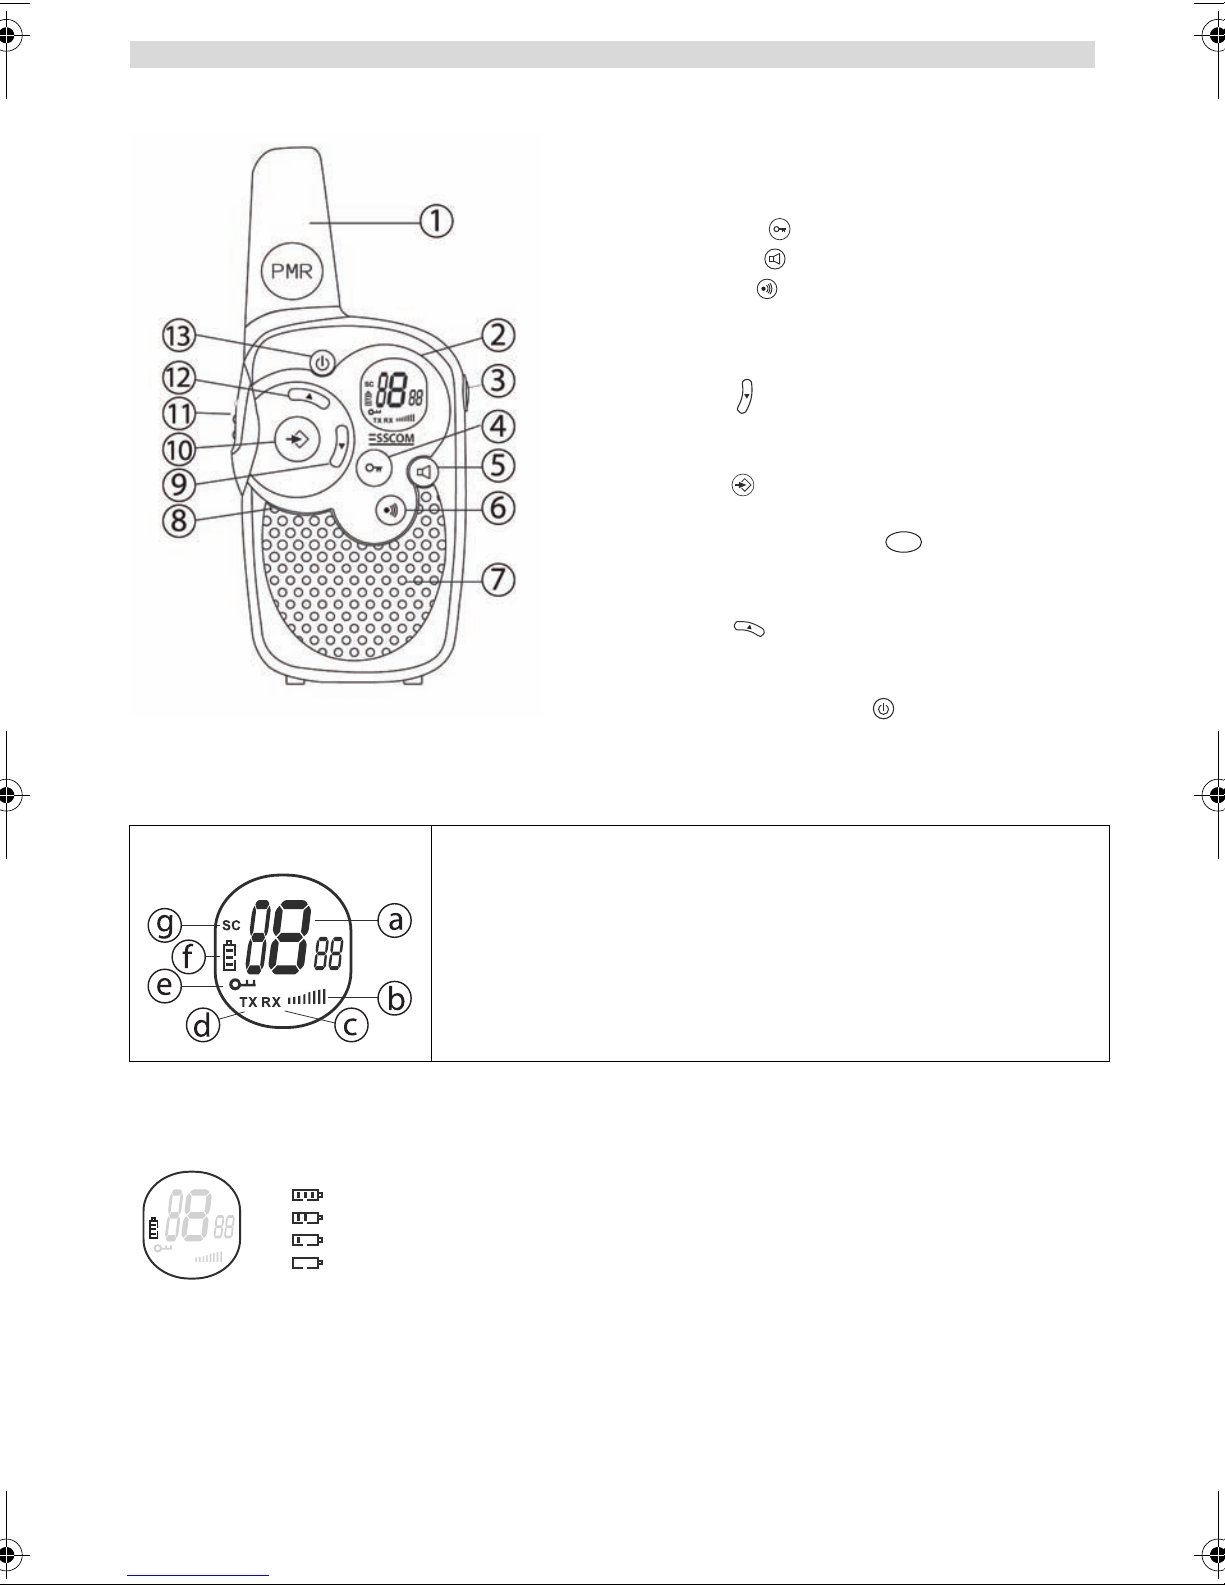
10 BOTONES
1. ANTENA
2. Pantalla LCD
3. Conector de ALTAVOZ / MICRÓFONO / CARGADOR
4. Botón de BLOQUEO
5. Botón de MONITOR
6. Botón de LLAMAR
- Transmitir un tono de llamada
7. ALTAVOZ
8. MICRÓFONO
9. Botón de BAJAR
- Bajar el volumen del altavoz
- Seleccionar el elemento anterior del menú
10. Botón de MENÚ
- Acceder al menú
11. Botón de PULSAR PARA HABLAR
PT
- Presionar para hablar o soltar para escuchar
- Confirmar un ajuste en el menú
12. Botón de SUBIR
- Subir el volumen del altavoz
- Seleccionar el elemento siguiente del menú
13. Botón de ENCENDER / APAGAR
1 1 INFORMACIÓN DE LA PANTALLA LCD
a. Número de canal
b. Volumen del altavoz
c. Icono RX - En pantalla cuando se recibe una señal
d. Icono TX - En pantalla cuando se transmite una señal
e. Icono de bloqueo - En pantalla cuando el teclado está bloqueado
f. Indicador de nivel de carga de las pilas
g. Icono de barrido - En pantalla cuando el modo de bar rido está activo
12 NIVEL DE CARGA DE LAS PILAS / INDICACIÓN DE CARGA BAJA
El NIVEL DE CARGA DE LAS PILAS lo indica el número de rectángulos presentes en el interior del icono de la PILA
en la pantalla LCD.
SC
TX RX
Cuando el NIVEL DE CARGA DE LAS PILAS es bajo, el icono de la PILA parpadea para avisar de la necesidad de
cambiar o recargar las pilas.
100 % de la carga
2/3 de la carga
1/3 de la carga
Batería agotada
6 ESSCOM TWINTALKER 1302 DUO COMBI PACK
Page 7
ESSCOM TWINTALKER 1302 DUO COMBI PACK
ESPAÑOL
Deseche las pilas en un contenedor especial para pilas y no en
la basura normal. No provoque cortocircuitos ni tire las pilas al
fuego. Retírelas si no va a utilizar el dispositivo durante mucho
tiempo.
Utilice el ADAPTADOR CA/CC únicamente con pilas recargables de tipo «AAA». No
cargue esta unidad si tiene instaladas pilas «AAA» alcalinas normales.
Para que otras personas puedan recibir una transmisión, deben
encontrarse en el mismo canal.
13 CARGAR PILAS RECARGABLES
El PMR se puede utilizar con 3 pilas alcalinas o recargables AAA NiMh.
Si se usan pilas recargables, se puede emplear un adaptador opcional pa ra cargarlas.
• Introduzca 3 pilas «AAA» recargables .
• Conecte la clavija pequeña del adaptador d e 7,5 V CC / 200 mA a la conexi ón del ALTAVOZ /
MICRÓFONO / CARGAD O R y el ot r o ex tr e m o a la toma de cor r ien te.
• Para cargar bien las pilas, asegúrese de que la unidad está apaga da. Ningún indicador
mostrará el estado de carga en el modo APAGADO.
NOTA: Las pilas tardan aproximadamente entre 7 y 10 horas en cargarse por
completo.
14 USO DEL TWINTALKER 1302
14.1 ENCENDIDO Y APAGADO DE LA UNIDAD
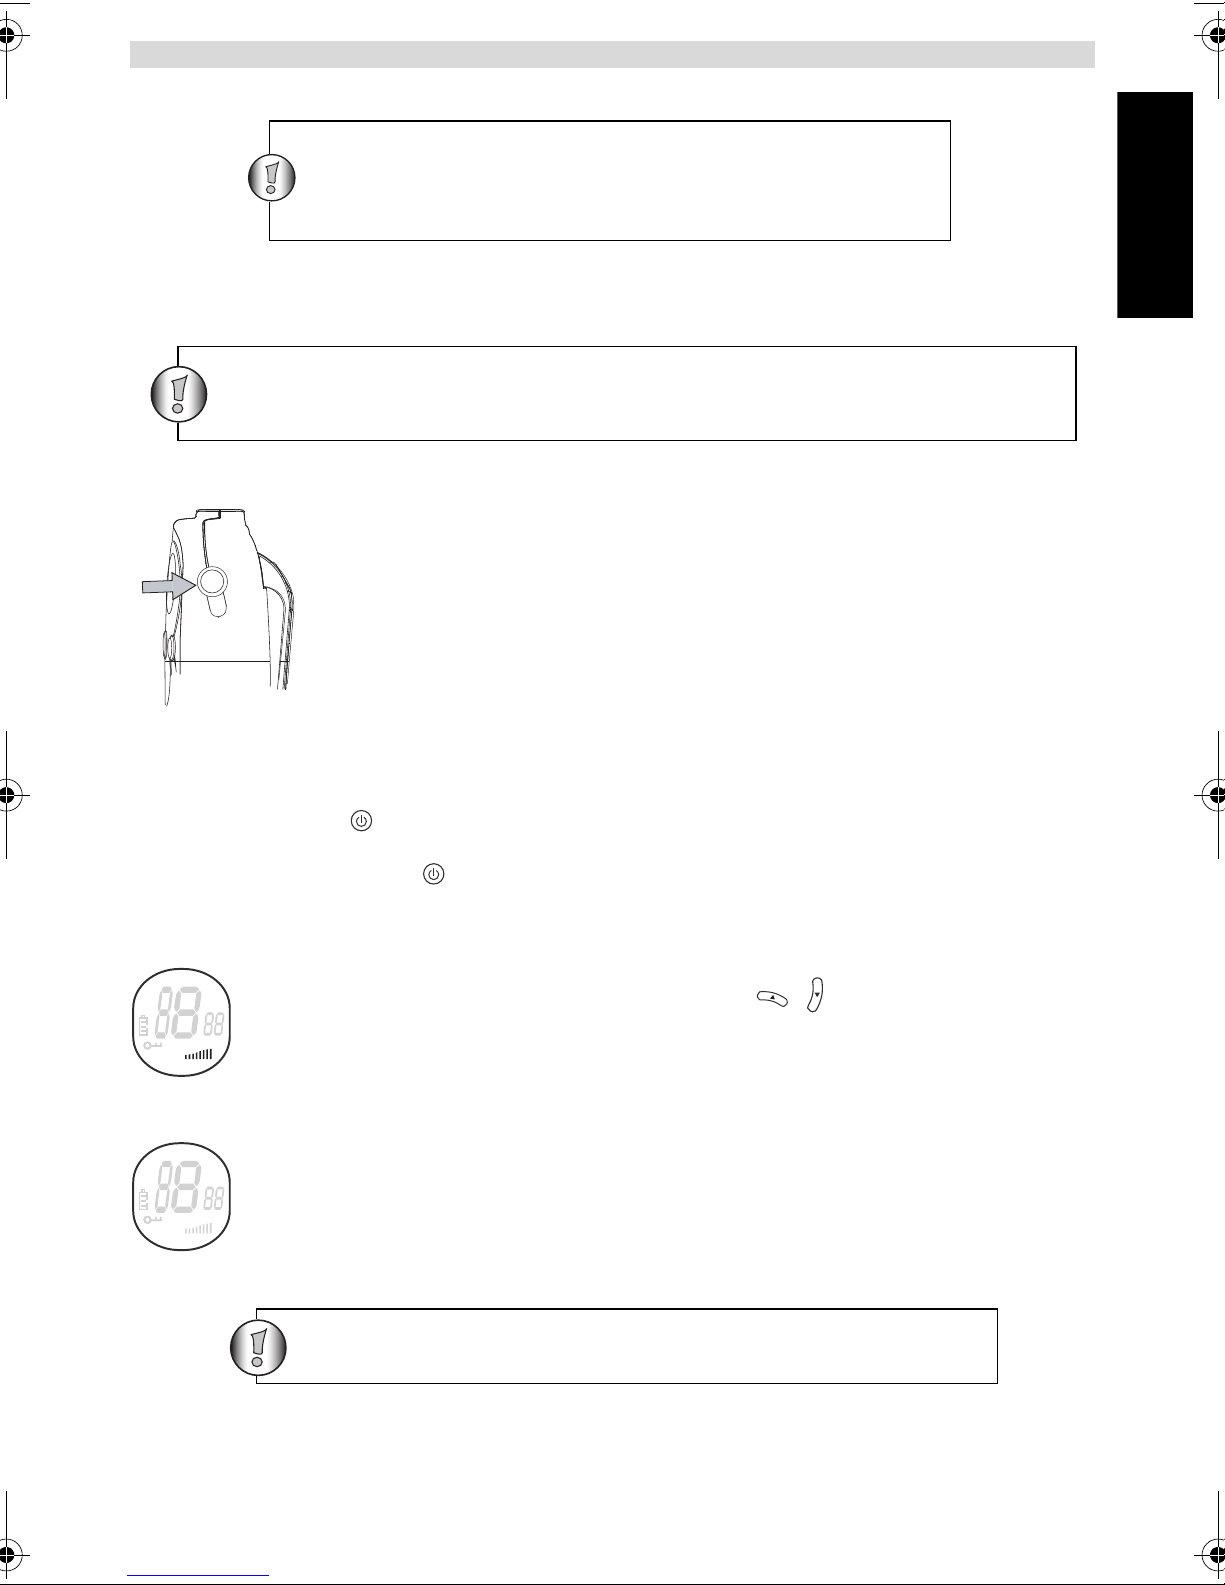
• Mantener presionado para activar la unidad. El aparato emitirá un pit i do y l a pantalla LCD mostrará el canal
actual.
• Volver a mantener presionado para desactivar la unidad. El aparato emitirá un pitido y la pantalla LCD se
apagará.
14.2 AJUSTE DEL VOLUMEN DEL ALTAVOZ
SC
TX RX
14.3 RECEPCIÓN DE UNA SEÑAL
SC
TX RX
El volumen del altavoz puede ajustarse utilizando los boto nes / . El nivel de volumen aparece en
la pantalla LCD.
Cuando está encendida pero sin transmitir, la unidad se encuent ra en modo de RECEPCIÓN. Cuando
se recibe una señal a través del canal activo, aparece el icono RX.
ESSCOM TWINTALKER 1302 DUO COMBI PACK 7
Page 8
ESSCOM TWINTALKER 1302 DUO COMBI PACK
T
T
T
T
14.4 TRANSMISIÓN DE UNA SEÑAL
SC
• Mantenga la unidad en posición vertical con el MICRÓFONO a 10 cm de la boca y hable a través
• Mantener presionado para TRANSMITIR.
PT
de él.
TX RX
• Soltar al terminar la transmisión.
PT
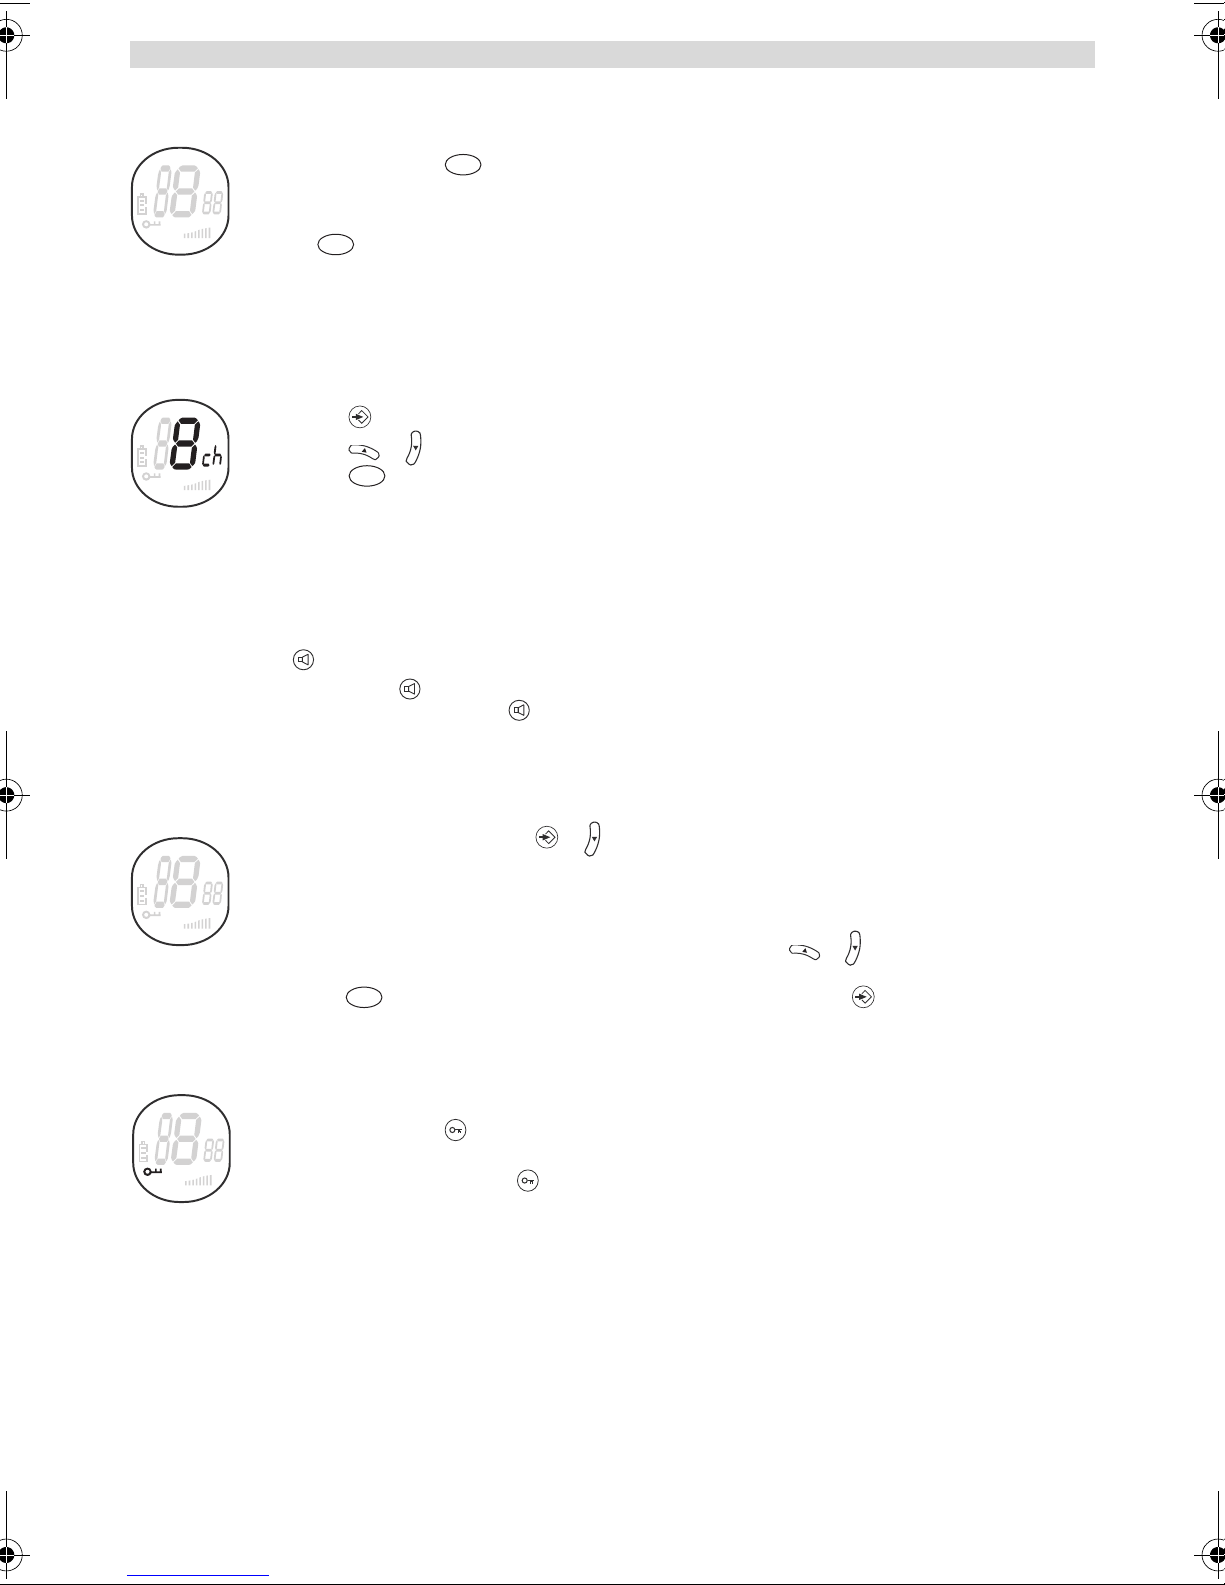
14.5 CAMBIO DE CANALES
El PMR tiene 8 canales disponibles.
Para cambiar de canal:
SC
TX RX
• Presionar una vez, el número del canal activo parpadeará en la pantalla LCD.
• Presionar o para cambiar de canal.
• Presionar para confirmar la selección del canal y volver al modo NORMAL.
PT
NOTA: Cualquier PMR configurado con el mismo canal podrá recibir y escuchar la conversación.
14.6 MONITOR
La función de MONITOR se puede utilizar para buscar señales más débiles en el canal activo.
• Pulse el botón para realizar un rastreo normal.
• Mantenga pulsado el botón . Suelte el botón después de 5 segundos. Ahora podrá rastrear continuamente el
canal hasta que pulse de nuevo el botón .
14.7 BARRIDO DE CANAL
El BARRIDO DE CANAL busca señales activas en un bucle continuo del canal 1 al 8.
• Mantenga pulsados los botones y durante 2 segundos.
SC
• Suelte los botones. El canal en pantalla cambiará mientras el dispositivo explora los canales.
• Si se detecta una señal activa (uno de los 8 canales), el BARRIDO DE CANAL se detendrá y se
TX RX
escuchará dicha señal.
• Si se detecta una señal activa (uno de los 8 canales) , presionar o para ignorar el canal actual
y continuar la búsqueda de otro canal activo.
• Presione para comunicarse a través del ca nal de la señal activa y para desactivar el barrido
PT
de canal.
14.8 BLOQUEO DE BOTONES
SC
TX RX
• Mantener presionado durante 2 segundos para activar o desactivar el modo de BLOQUEO DE
BOTONES. El icono correspondiente aparecerá en la pantalla LCD.
• Volver a mantener pre sionado para desactivar el BLOQUEO DE BOTONES.
8 ESSCOM TWINTALKER 1302 DUO COMBI PACK
Page 9
ESSCOM TWINTALKER 1302 DUO COMBI PACK
ESPAÑOL
T
TPTT
T
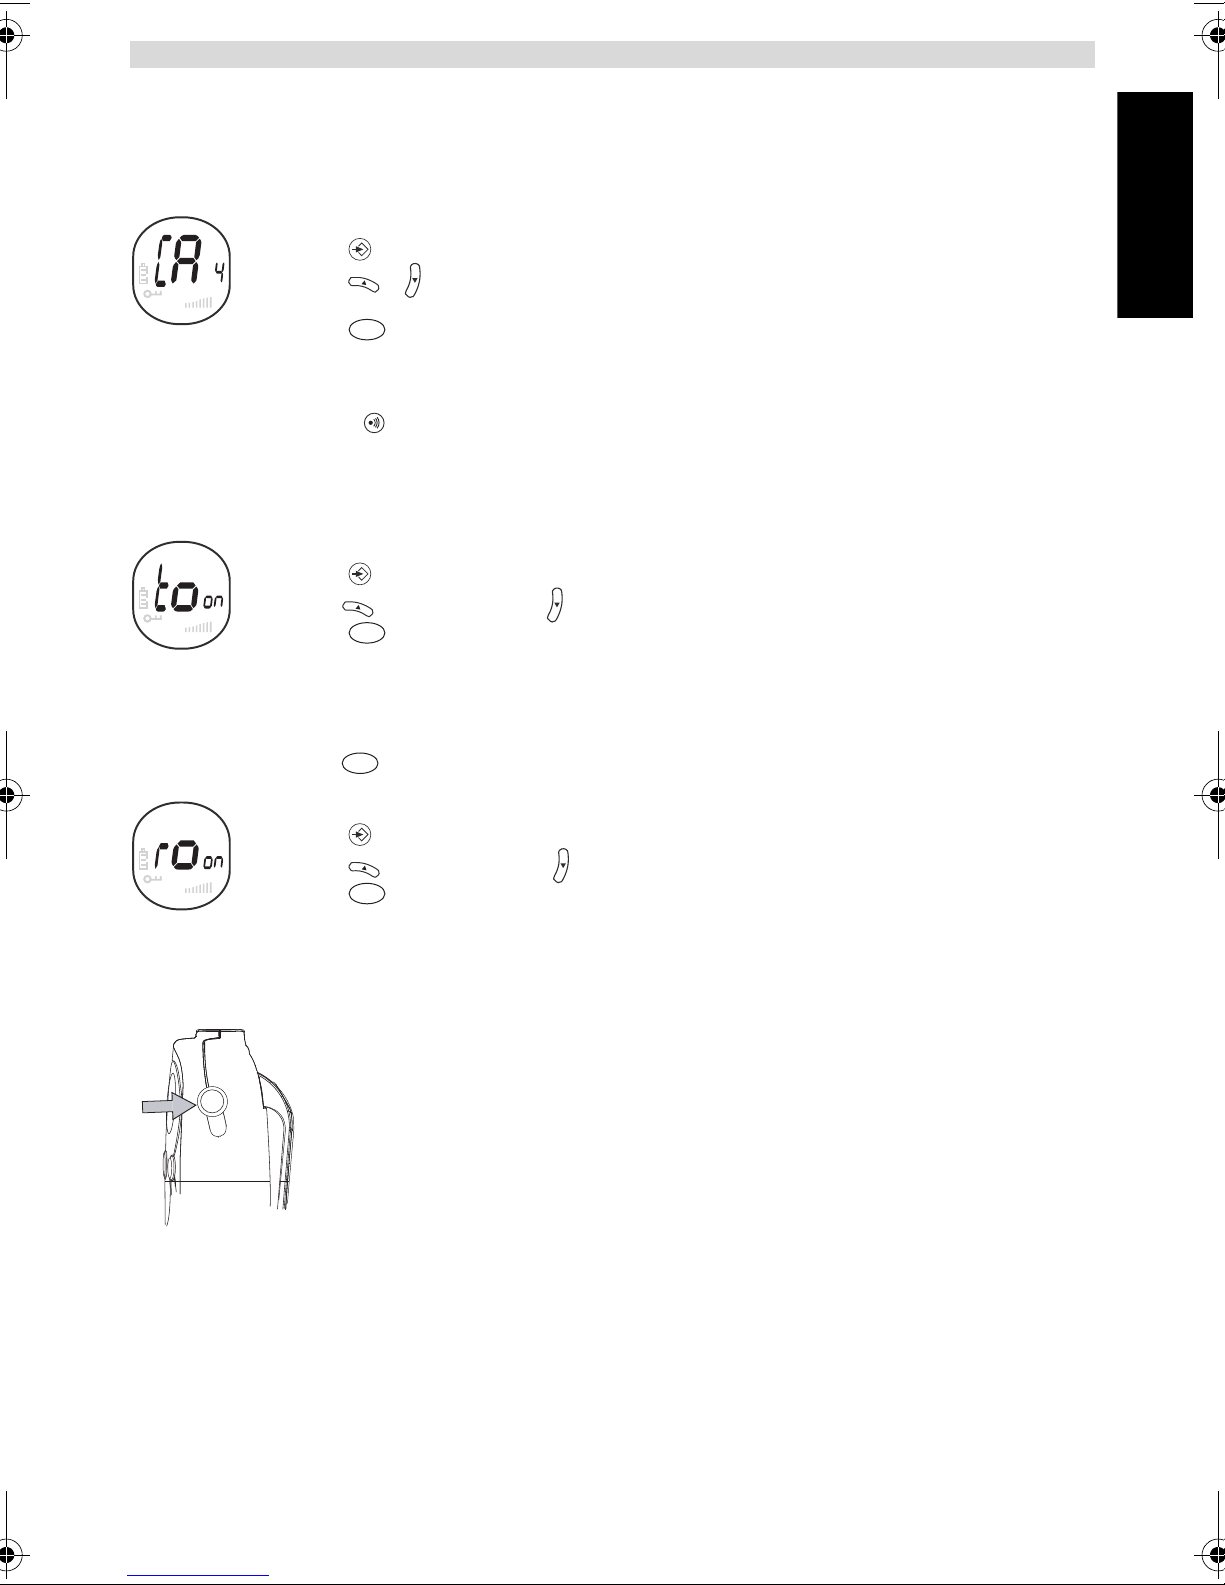
14.9 TONOS DE LLAMADA
El tono de llamada avisa a otros de su deseo de hablar.
a. Ajuste del tono de llamada
Pueden seleccionarse 5 tonos de llamada distintos.
SC
• Presionar 2 veces, aparecerá en pantalla CA.
• Presionar o para seleccionar otro tono de llamada, o seleccionar OFF para habili t ar los tonos
TX RX
de llamada.
• Presionar para confirmar la selección y volver al modo en espera.
PT
b. Envío de un tono de ll a m a da
Pulse brevemente el botón . El tono de llamada se transmitirá durante 3 segundos en el canal establecido.
14.10 ACTIVACIÓN Y DESACTIVACIÓN DEL TONO DE LAS TECLAS
Al presionar un botón la unidad emitirá un breve pitido.
Para establecer el to n o de la s te cl a s .
SC
TX RX
• Presionar 3 veces, aparecerá en pantalla «to».
• Presione para activar (ON) o desactivar (OFF) los tonos de las teclas.
• Presionar para confirmar la selección y volver al modo en espera.
PT
14.11 ACTIVACIÓN Y DESACTIVACIÓN DEL PITIDO ROGER
Una vez soltado el botón , la unidad enviará un pitido Roger para confirmar que se ha dejado de hablar.
Para establecer el pi tido Roger:
SC
• Presionar 4 veces, aparecerá en pantalla «ro».
• Presionar para activar (ON) o desactivar (OFF) el pitido Roger.
TX RX
• Presionar para confirmar la selección y volver al modo en espera.
PT
14.12 CONEXIÓN DE AURICULARES
El Twintalker 1302 puede utilizarse con un juego de auriculares con micrófono y altavoz
externos .
El conector se encuentra bajo la cubierta de goma protectora situada en la parte superior del
dispositivo. Para conectar el juego de auriculares con micrófono y altavoz externos, levante la
pestaña de goma y descubra el conector.
Inserte la clavija adecuada en el conector.
ESSCOM TWINTALKER 1302 DUO COMBI PACK 9
Page 10
ESSCOM TWINTALKER 1302 DUO COMBI PACK
15 ESPECIFICACIONES TÉCNICAS
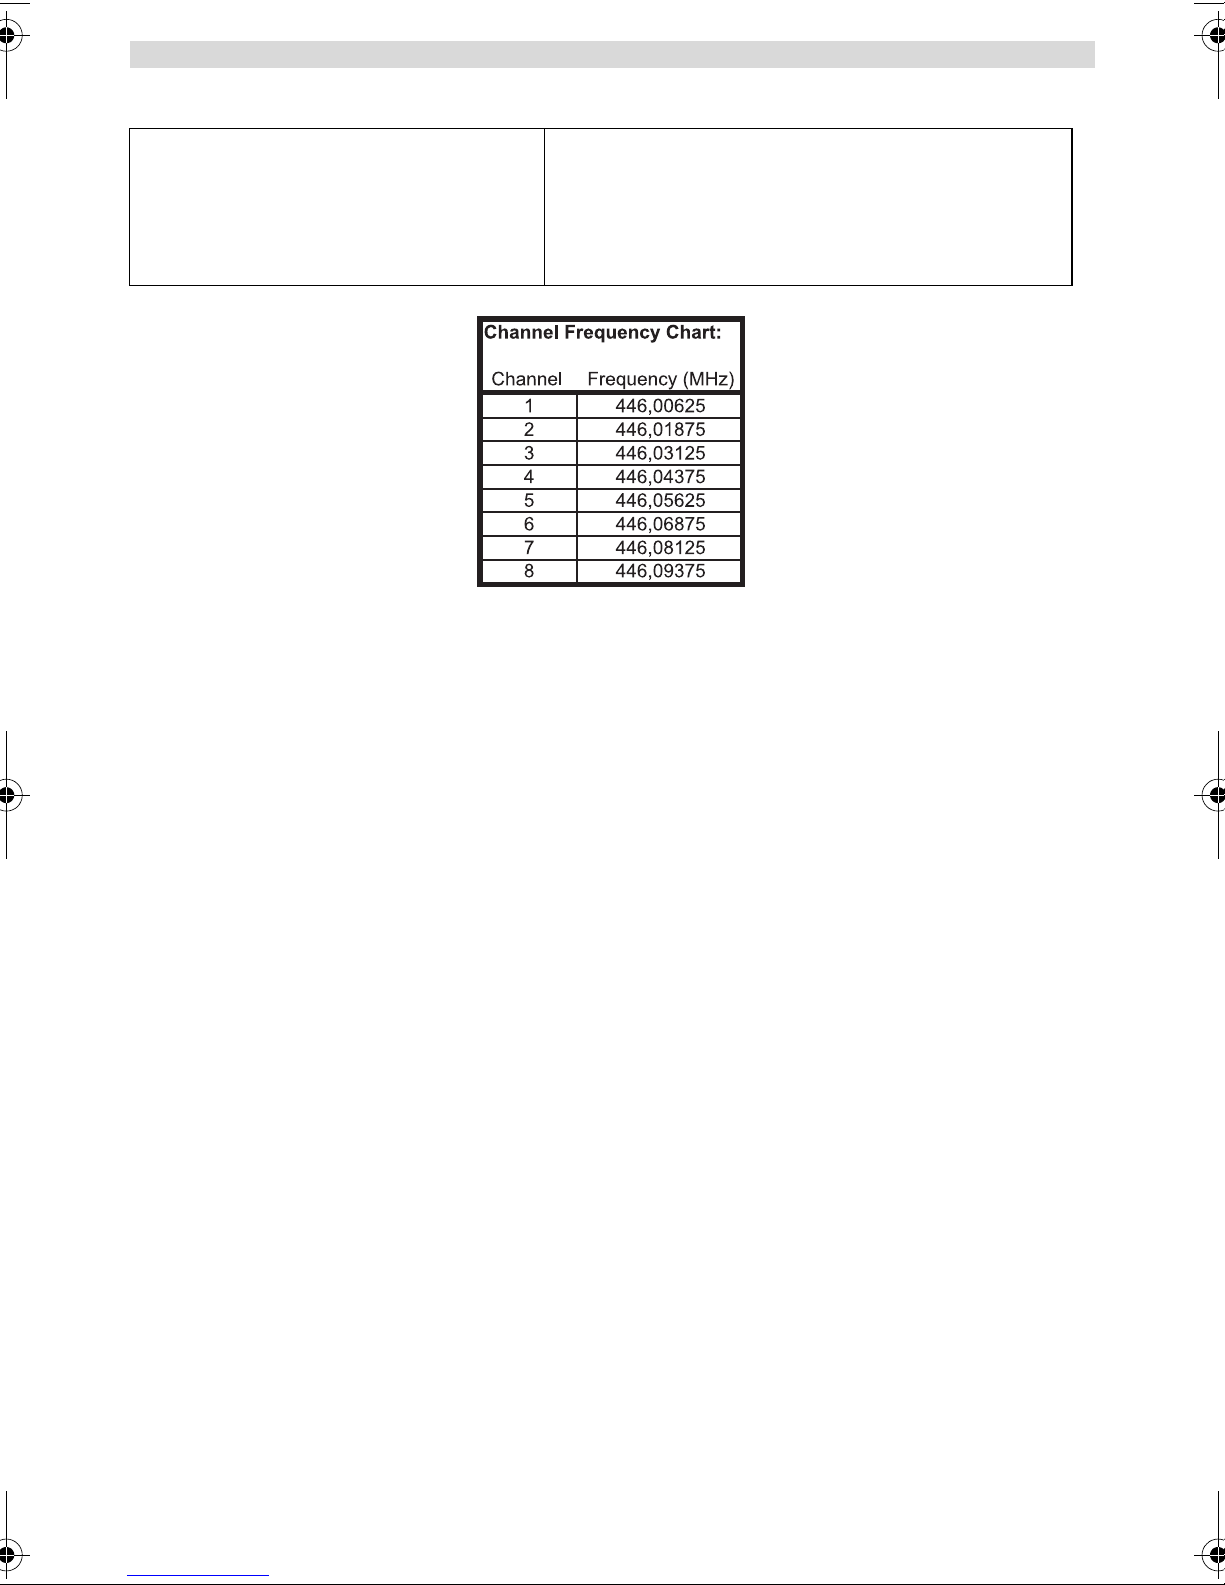
Canales
Frecuencia
Alcance
Pilas PMR
Potencia de tran sm i sión
Tipo de modulación
Separación de canales
16 GARANTÍA
8
446,00625 MHz - 446,09375 MHz
Hasta 5 km en campo abierto
3 x AAA recargables NiMH
=< 500 mW ERP
FM - F3E
12,5 kHz
16.1 PERÍODO DE GARANTÍA
Las unidades tienen un periodo de garantía de 36 meses. El período de garantía entra en vigor el día en que se
adquiere la nueva unidad. No existe ninguna garantía sobre las pilas estándar o recargables (tipo AA / AAA).
La garantía no cubre los consumibles n i los defectos que tengan un efecto insignificante en el funcionamiento o en el
valor del equipo.
La garantía debe demostrarse presentando el comproban te original de compra o una copia de este, en el que
constarán la fecha de la compra y el modelo de la unidad.
16.2 TRATAMIENTO DE LA GARANTÍA
Los aparatos averiados deberán remitirse a un servicio técnico oficial junto con un comprobante de compra válido y
una tarjeta de servicio técnico cumplimentada.
Si la unidad tiene una avería durante el período de garantía, el servicio técnico reparará sin cargo alguno cualquier
avería causada por defectos de material o fabricación, ya sea reparando o sustituyendo las unidades defectuosas o
partes de las mismas. En caso de sustitución, el color y el modelo pueden variar respecto a los de la unidad adquirida
inicialmente.
La fecha de compra inicial determinará el comienzo del período de garantía. El período de gara ntía no se ampliará en
caso de que el servicio técnico cambie o sustituya la unidad.
16.3 LIMITACIONES DE LA GARANTÍA
Los daños o defectos ocasionados por un tratamiento o funcionamiento incorrectos, así como los daños resultantes
del uso de piezas o accesorios no originales, no estarán cubiertos por esta garantía.
La garantía no cubre los daños ocasionados por factores externos tales como relámpagos, agua o fuego, como
tampoco los daños causados durante el transporte.
La garantía no será válida si el número de serie de las unidades se cambia, se elimina o resulta ilegible.
Cualquier reclamación de la garantía se invalidará si la unidad ha sido reparada, alterada o modificada por el
comprador.
10 ESSCOM TWINTALKER 1302 DUO COMBI PACK
Page 11
ESSCOM TWINTALKER 1302 DUO COMBI PACK
ENGLISH
Restriction:
Check the local regulations before using it outside the country where it was
purchased. The standard may be prohibited in this country.
Areas with potentially explosive atmospheres are often, but not always, clearly
marked. They include fuelling areas such as below deck on boats, fuel or chemical
transfer or storage facilities; areas where the air contains chemicals or particles,
such as grain, dust or metal powders; and any other area where you would
normally be advised to turn off your vehicle engine.
1 INTRODUCTION
Thank you for purchasing the ESSCOM Twintalker 1302. It’s a short range, low powered radio communication de vice
that has no running costs other than the minimal cost of re-charging the batteries.
The TwinTalker 1302 operates on Private Mobile Radio frequencies and can be u sed in any cou ntry where t he service
is authorised as indicated on the packing box and in this manual.
2 INTENDED PURPOSE:
It can be used for different professional as well as for recreational purposes. For example: to keep in contact during
travelling with 2 or more cars, biking, skiing. It can be used to keep in contact with your children when they are playing
outside, etc...
3 CE MARK
This product is in compliance with the essential requirements and other relevant provisions of the R&TTE directive
1999/5/EC. This is confirmed by the CE-mark.
4 SAFETY INSTRUCTIONS
4.1 GENERAL
Please read carefully through the following information concerning safety and proper use. Make yourself familiar with
all functions of the device. Keep this manual on a safe place for future use.
4.2 BURNING INJURIES
• If the cover of the antenna is damaged, do not touch because when an antenna comes in contact with the skin, a
minor burn may result when transmitting.
• Batteries can cause property damage such as burns if conductive material such as jewellery, keys or beaded
chains touches exposed terminals.The ma terial may complete an e lectrical circuit (short circuit) and become quit e
hot. Exercise care in handling any charged battery, particularly when placing it inside a pocket, purse or other container with metal objects.
4.3 PERSONAL SAFETY
• Do not place your device in the area over an air bag or in the air bag deployment are a. Air bags inflate with great
force. If a communicator is placed in the bag deployment area and the air bag inflates, the communicator may be
propelled with great force and cause serious injury to the occupants of the vehicle.
• Keep the radio at least 15 centimetres away from a pacemaker.
• Turn your radio OFF as soon as interference is taking place with medical equipment.
• Do not replace batteries in a potentially explosive atmosphere. Contact sparking may occur while installing or
removing batteries and cause an explosion.
• Turn your communicator off when in any area with a potentially explosive atmosphere. S parks in such area s could
cause an explosion or fire resulting in bodily injury or even death.
• Never throw batteries in fire as they may explode.
ESSCOM TWINTALKER 1302 DUO COMBI PACK 11
Page 12
ESSCOM TWINTALKER 1302 DUO COMBI PACK
T
T
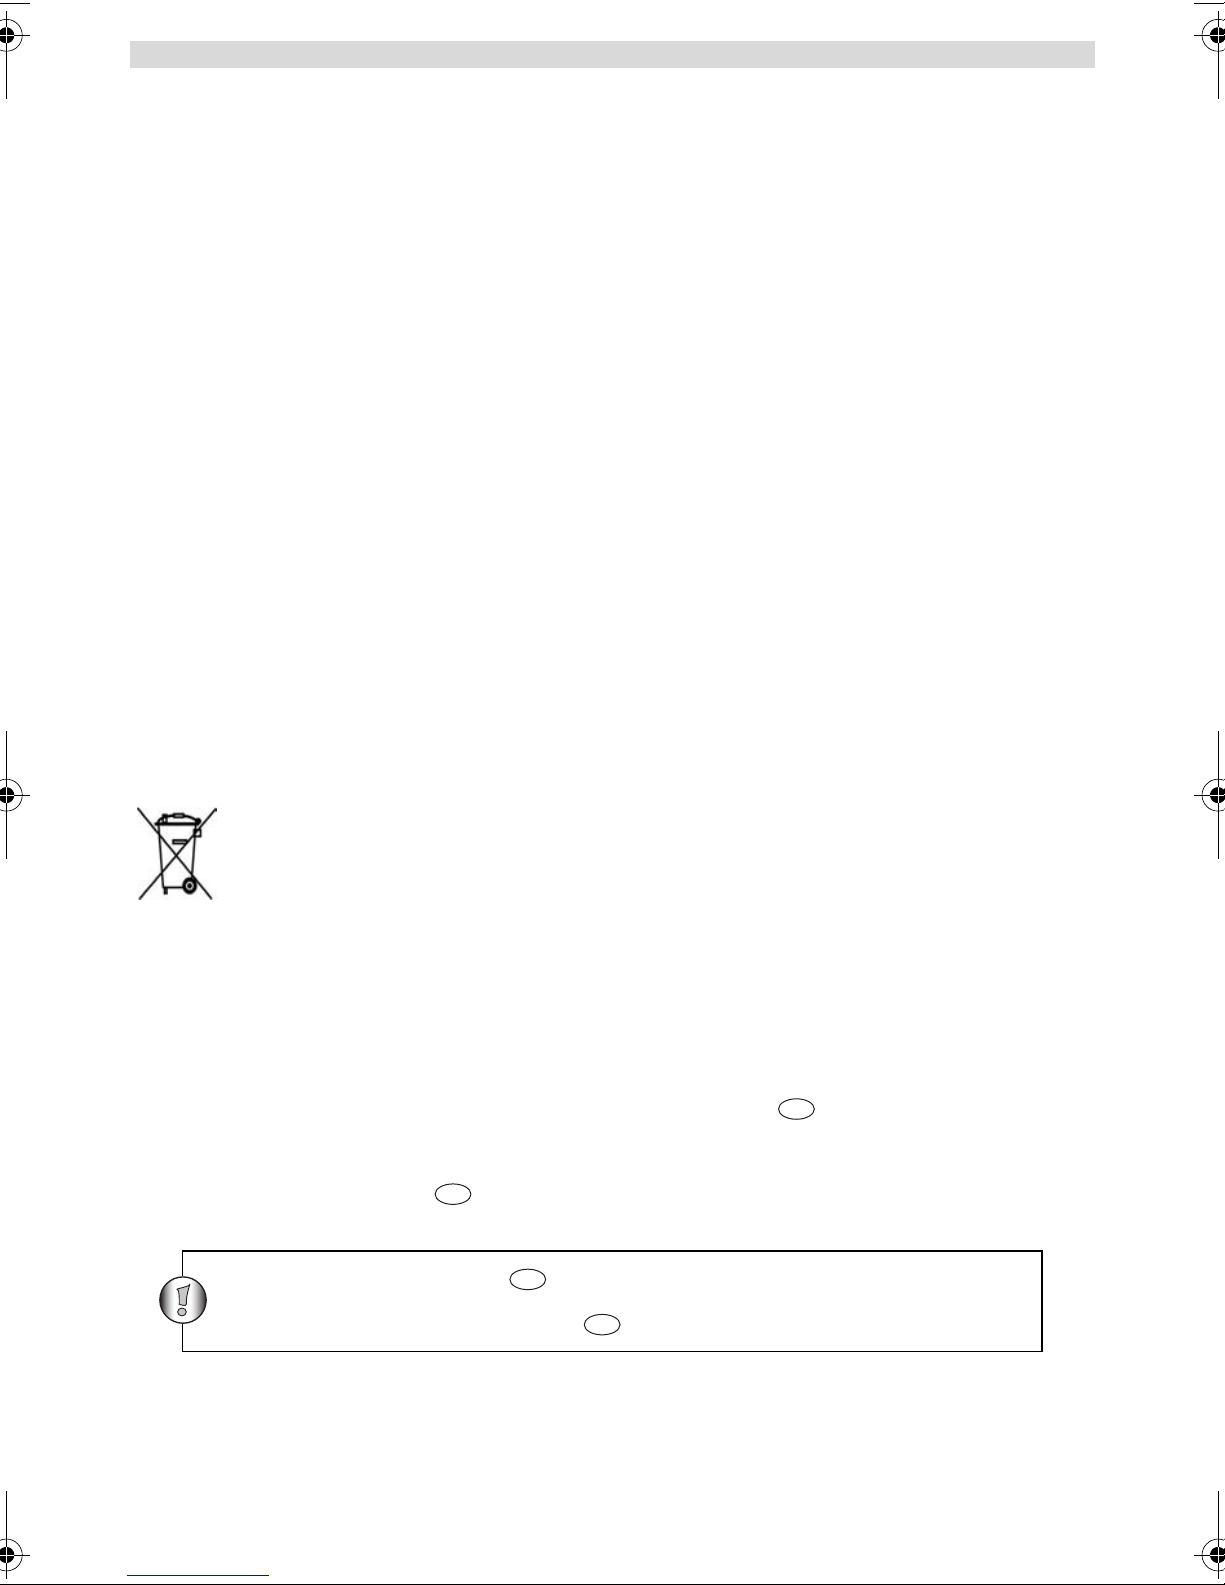
If 2 or more users press the - button at the same time the receiver will receive
only the stongest signal and the other signal (s) will be supressed. Therefore you
should only transmit a signal (press - button) when the channel is free .
T
T
4.4 POISONING DANGER
• Keep batteries away from small children
4.5 LEGAL
• In some countries it is prohibited to use your PMR while driving a vehicle. In this case leave the road before using
the device.
• Turn your unit OFF when on board an aircraf t when instruct ed to do so. Any use of the unit mu st be in accordance
with airline regulations or crew instructions.
• Turn your unit OFF in any facilities where posted notices instruct you to do so. Hospitals or health care facilities
may be using equipment that is sensitive to external RF energy.
• Replacing or modifying the antenna may affect the PMR radio specifications and violate the CE regulations.
Unauthorised antennas could also damage the radio.
4.6 NOTES
• Do not touch the antenna while transmitting, it could affect the range.
• Remove the battery if the device is not going to be used for a long period.
5 CLEANING AND MAINTENANCE
• To clean th e unit, wipe with a sof t cl oth dampened with water. Don’t use a cleane r or solvent s on the unit; they can
damage the case and leak inside, causing permanent damage.
• Battery contacts may be wiped with a dry lint-free cloth.
• If the unit gets wet, turn it off and remove the batteries immediately. Dry the battery compartment with a soft cloth
to minimize potential water damage. Leave the cover off the battery compartment overnight or until completely
dry . Do not use the unit until completely dry.
6 DISPOSAL OF THE DEVICE (ENVIRONMENT)
At the end of the product lifecycle, you should not throw this product into the normal household garbage
but bring the product to a collection point for the recycling of electrical and electronic equipments. The
symbol on the product, user guide and/or box indicate this.
Some of the product materials can be re-used if you bring them to a recycling point. By re-using some
parts or raw materials from used products you make an important contribution to the protection of the
environment. Please contact your local authorities in case you need more information on the collection
points in your area.
7 USING A PMR DEVICE
To communicate between PMR devices they need to be set al l on th e same chann el and within receiving ra nge (up to
max. 5 km in open field). Since these devices use free frequency bands (channels), all devices in operat ion share these
channels(total 8 channels). Therefore, pri vacy is not garanteed. Anybody with a PMR set to your channel can o verhear
the conversation.
If you want to communicate (transmitting a voice signal) you need to press the - button (Push to talk). Once this
button pressed, the device will go into transmit mode and you can speak into the microphon e. All other PMR devices
in range , on the same channel and in standby mode (not transmitting) will hear your message. You need to wait until
the other party stops transmittin g before you can reply to the message. At the end of each transmission the unit will
send a beep. To reply, just press the - button and speak into the microphone.
PT
PT
PT
PT
12 ESSCOM TWINTALKER 1302 DUO COMBI PACK
Page 13
ENGLISH
8 GETTING STARTED
ESSCOM TWINTALKER 1302 DUO COMBI PACK
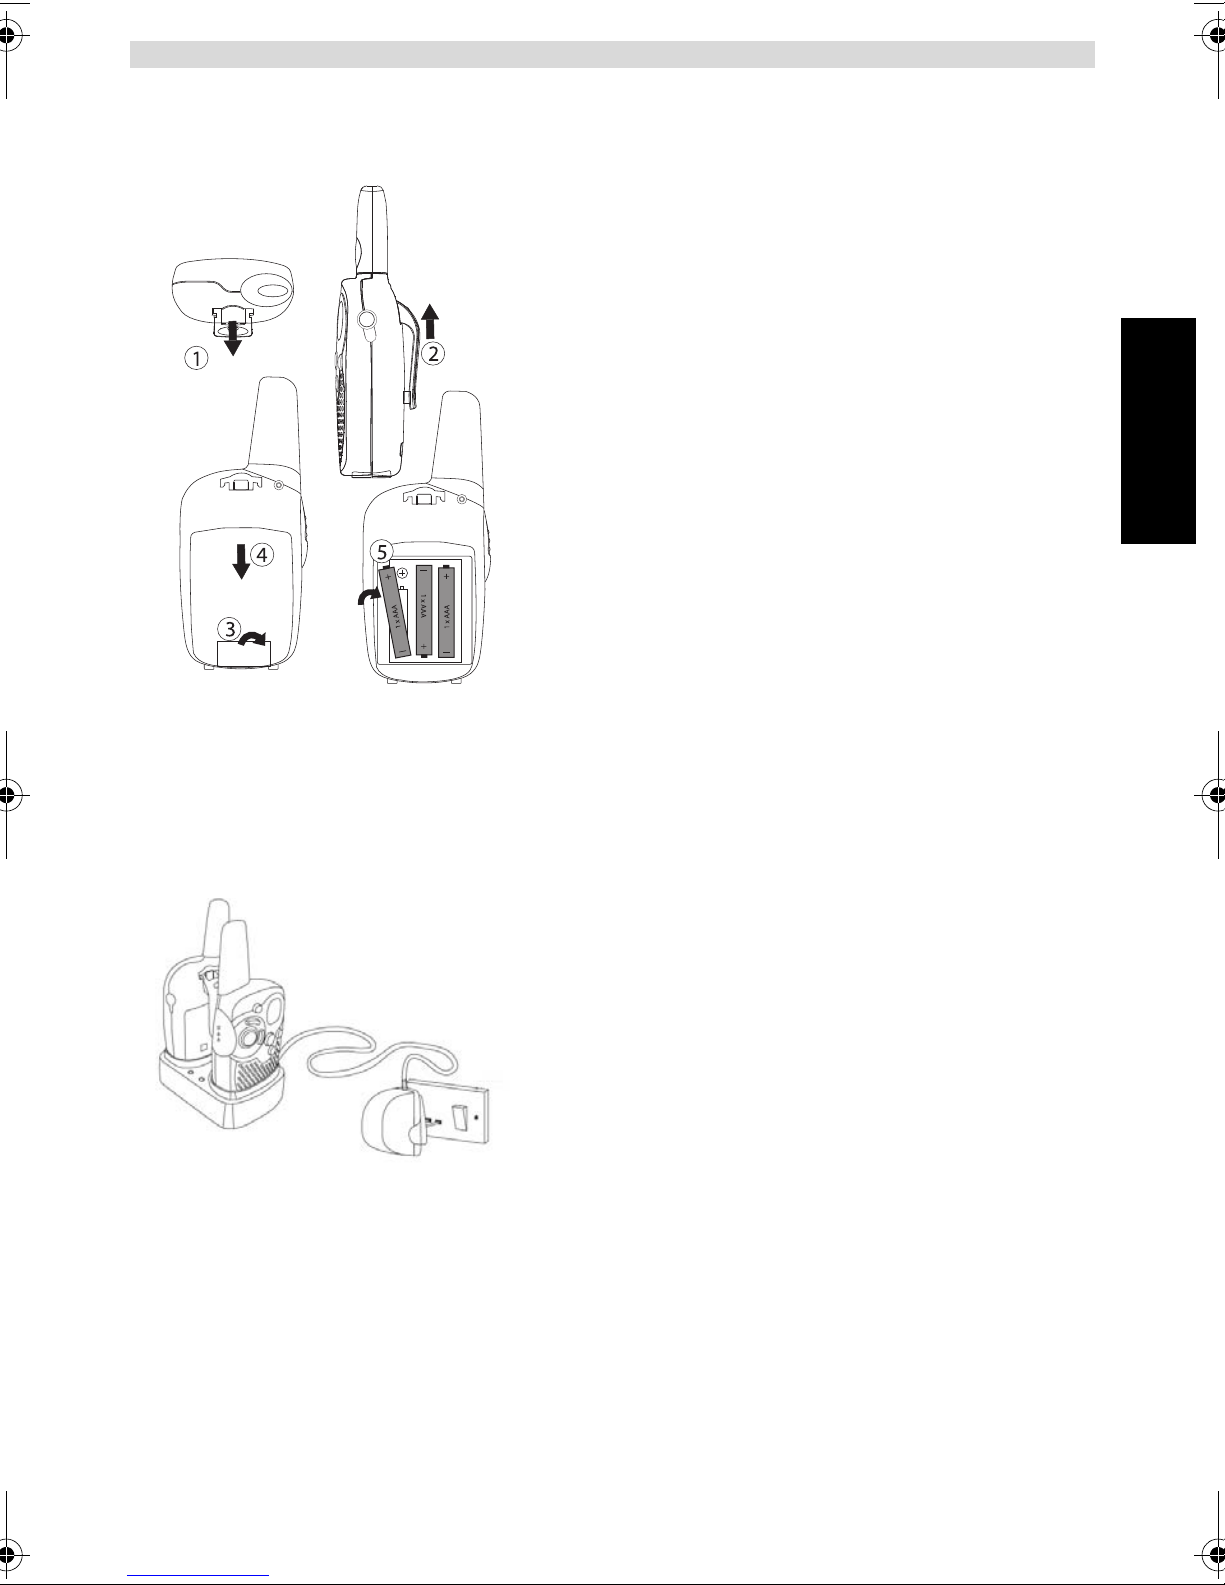
8.1 REMOVING/INSTALLING THE BELT CLIP
1.To remove the clip f rom the unit, push the belt clip (2) towards
the antenna, while pulling the clip tab (1).
2.When re-installing the belt clip, a cli ck in dicates the BeltClip is
locked into position.
8.2 BATTERY INSTALLATION
1.Remove the belt clip (§ 8.1).
2.Pull the battery door tab down (3) and slide the battery cover
away from the antenna. (4)
3.Install 3‘AAA’ rechargeable batteries following the polarity as
shown.
4.Re-install the Battery Cover and Belt Clip (§ 8.1).
9 CHARGING BATTERIES
When batteries are installed, the desktop charger provides drop-in
charging conveniency
1.Put the desktop charger on a flat surface.
2.Plug one end of the supplied adapter into t he electric socket and the
other end into the connector on the backside of the desktop charger.
3.Put the radio in the charger as indicated.
4.The charging LED will turn on if it’s properly inserted and charging.
It will take about 7 to 10 hours to fully charge the batteries
ESSCOM TWINTALKER 1302 DUO COMBI PACK 13
Page 14
ESSCOM TWINTALKER 1302 DUO COMBI PACK
T
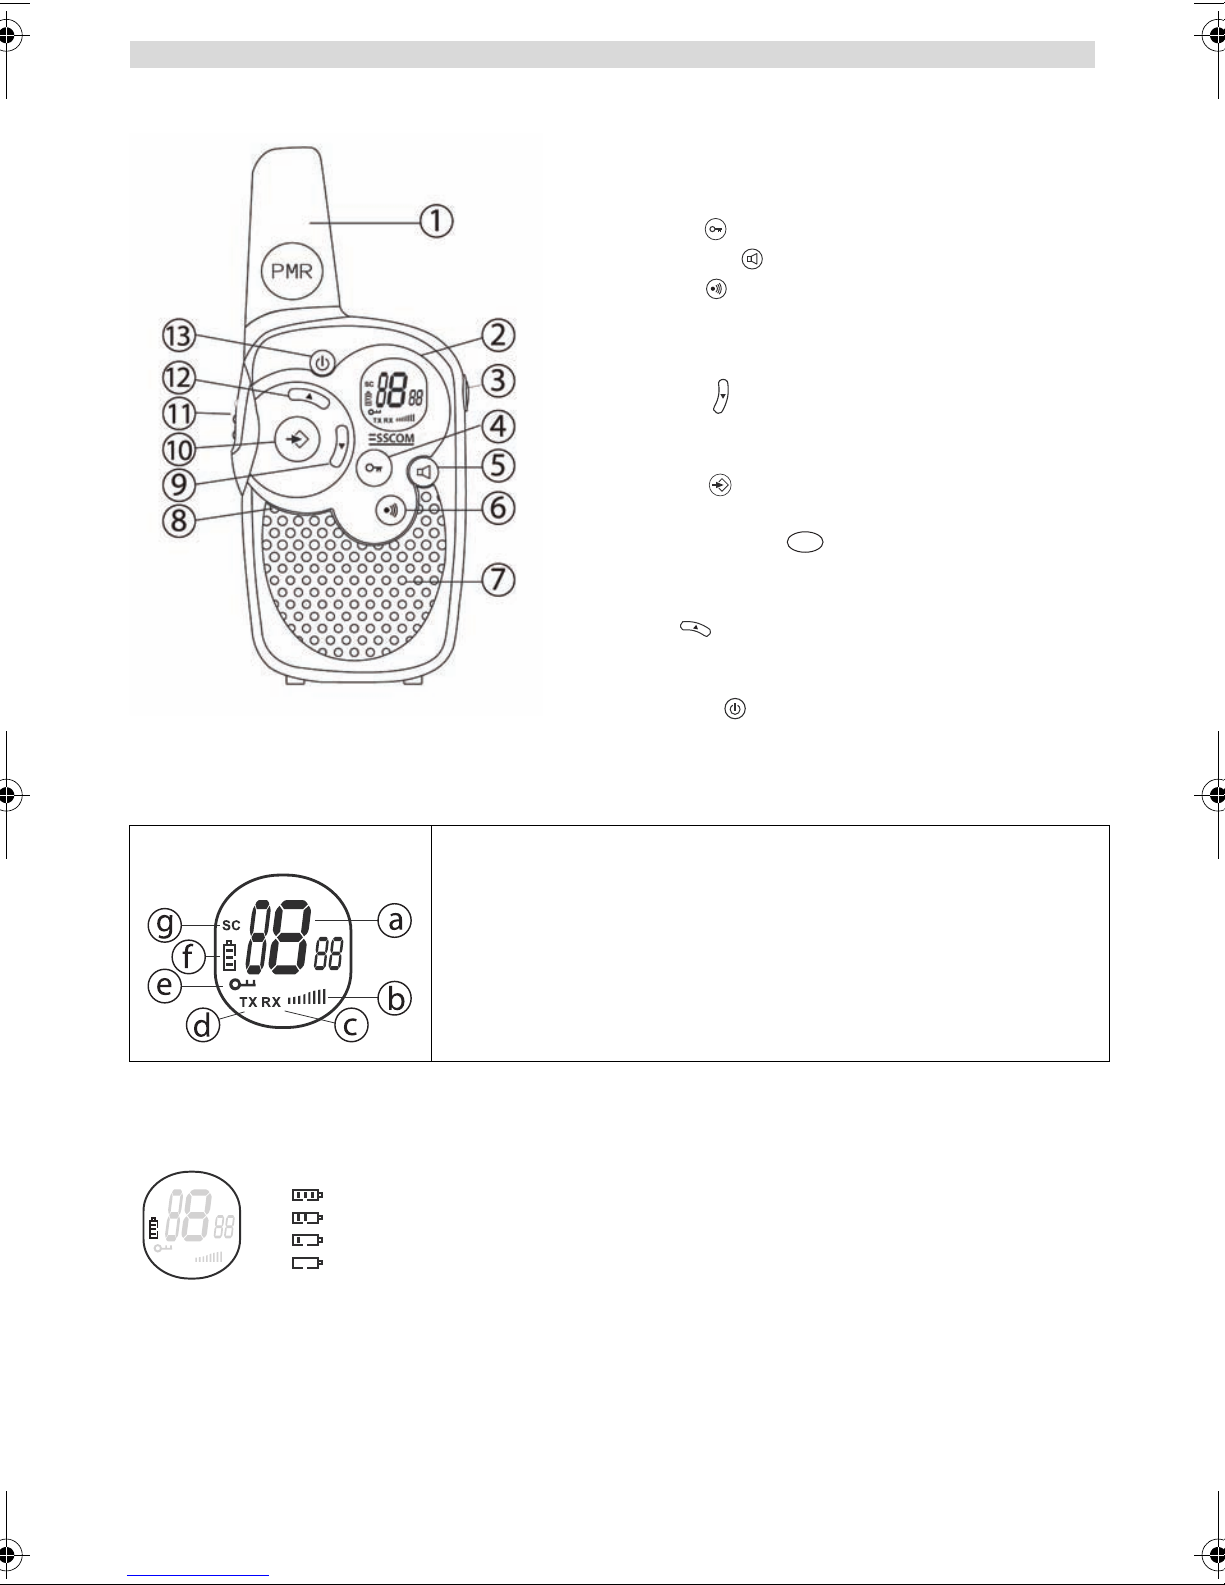
10 BUTTONS
1. ANTENNA
2. LCD Display
3. SPEAKER/MIC/CHARGER Connector
4. LOCK button
5. MONITOR button
6. CALL button
- Transmit a call tone
7. SPEAKER
8. MICROPHONE
9. DOWN button
- Decrease the speaker volume
- Select the previous item in the menu.
10. MENU button
- Enter menu.
11. PUSH TO TALK button
PT
- Press To Talk or release to listen
- Confirm a setting in the menu
12. UP button
- Increase the speaker volume
- Select the next item in the menu.
13. ON/OFF button
11 LCD DISPLAY INFORMATION
a. Channel number
b. Speaker Volume
c. RX icon - Displayed when receiving a signal
d. TX icon - Displayed when transmitting a signal
e. Lock icon - Displayed when the keypad is locked.
f. Battery charge level indicator
g. Scan icon - Displayed when scan mode is active
12 BATTERY CHARGE LEVEL/LOW BATTERY INDICATION
The BATTERY CHARGE LEVEL is indi cated by the number of squares present inside the BATTERY icon on the LCD
Screen.
SC
TX RX
When the BATTERY CHARGE LEVEL is low, the BATTERY icon will flash to indicate that the batteries nee d to be
replaced or recharged.
Battery Full
Battery 2/3 charged
Battery 1/3 charged
Battery empty
14 ESSCOM TWINTALKER 1302 DUO COMBI PACK
Page 15
ESSCOM TWINTALKER 1302 DUO COMBI PACK
ENGLISH
Dispose of bat te ries at a designated battery disposal unit and
not in the household waste. Do not short-circuit & dispose of in
fire. Remove the batteries if this device is not going to be used
for a long period.
Only use the AC/DC ADAPTER with “AAA” rechargeable batteries. Do not try to charge
this unit when regular “AAA” alkaline batteries are installed.
In order for other people to receive your transmission, they must be set
on the same channel.
TPTT
13 CHARGING RECHARGEABLE BATTERIES
The PMR can be used with 3 rechargeable NiMh AAA batteries.
When using rechargeable batteries you can use the optional adapter to charge.
• Insert 3 “AAA” rechargeable batteries .
• Plug the small plug of the 7,5 V DC / 200 mA adapter into the SPK/MIC/CHG jack and t he
other end in the electrical socket.
• Make sure that the unit is switched off in order to charge th e batteries properly. There is no
charge indicator during charging at OFF mode.
NOTE: It takes approximately 7 to 10 hours to fully charge the batteries.
14 USING THE TWINTALKER 1302
14.1 TURNING THE UNIT ON/OFF
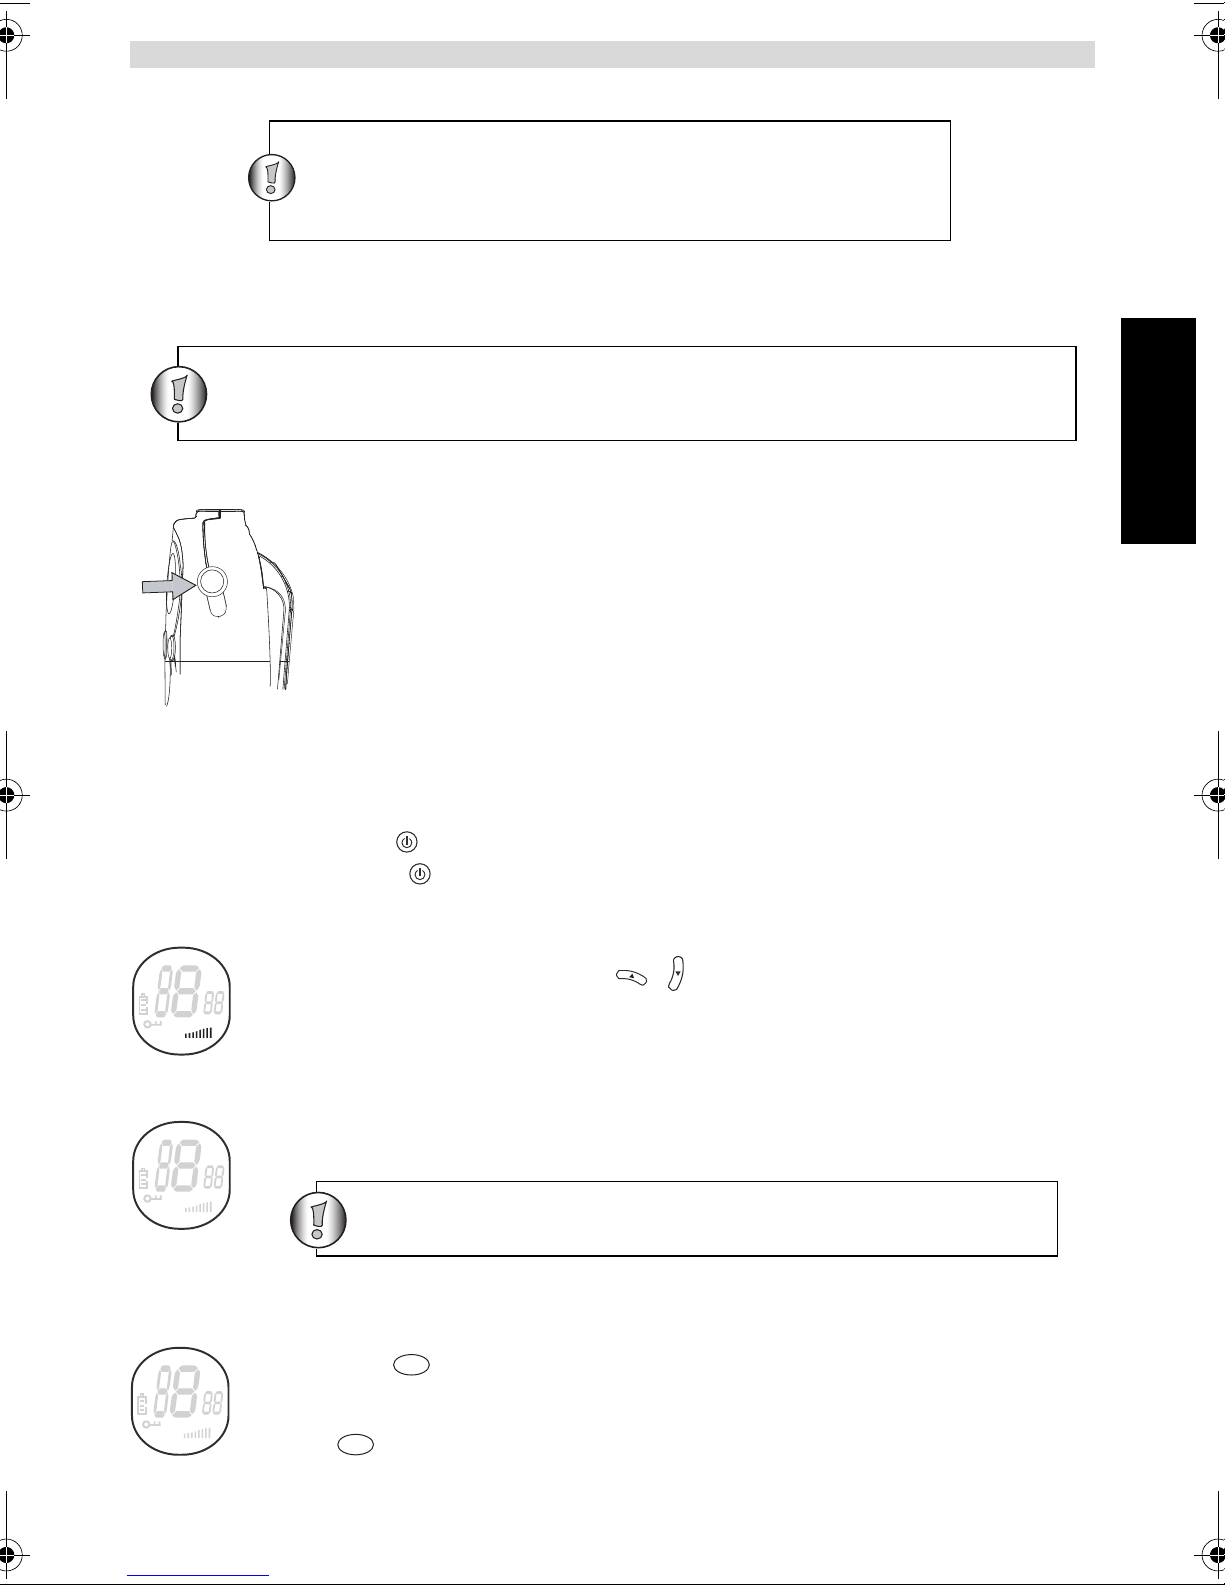
• To activate; press and hold . The unit will “beep” and the LCD Screen will display the current channel.
• To switch off; press and hold again. The unit will “beep” and the LCD Screen will turn blank.
14.2 ADJUSTING SPEAKER VOLUME
SC
TX RX
14.3 RECEIVING A SIGNAL
SC
TX RX
The Speaker Volume can be adjusted using / . The Speaker Volume level is displayed on the
LCD.
The unit is continuously in the RECEIVE mode when the unit is ON and not transmitting. When you
receive a signal on the current channel, the RX icon is displayed.
14.4 TRANSMITTING A SIGNAL
SC
• Hold the unit in a vertical position with the MICROPHONE 10 cm from the mouth and speak into the
microphone.
• Press and hold to TRANSMIT.
TX RX
• Release when you have finished transmitting.
ESSCOM TWINTALKER 1302 DUO COMBI PACK 15
PT
Page 16
ESSCOM TWINTALKER 1302 DUO COMBI PACK
T
T
T
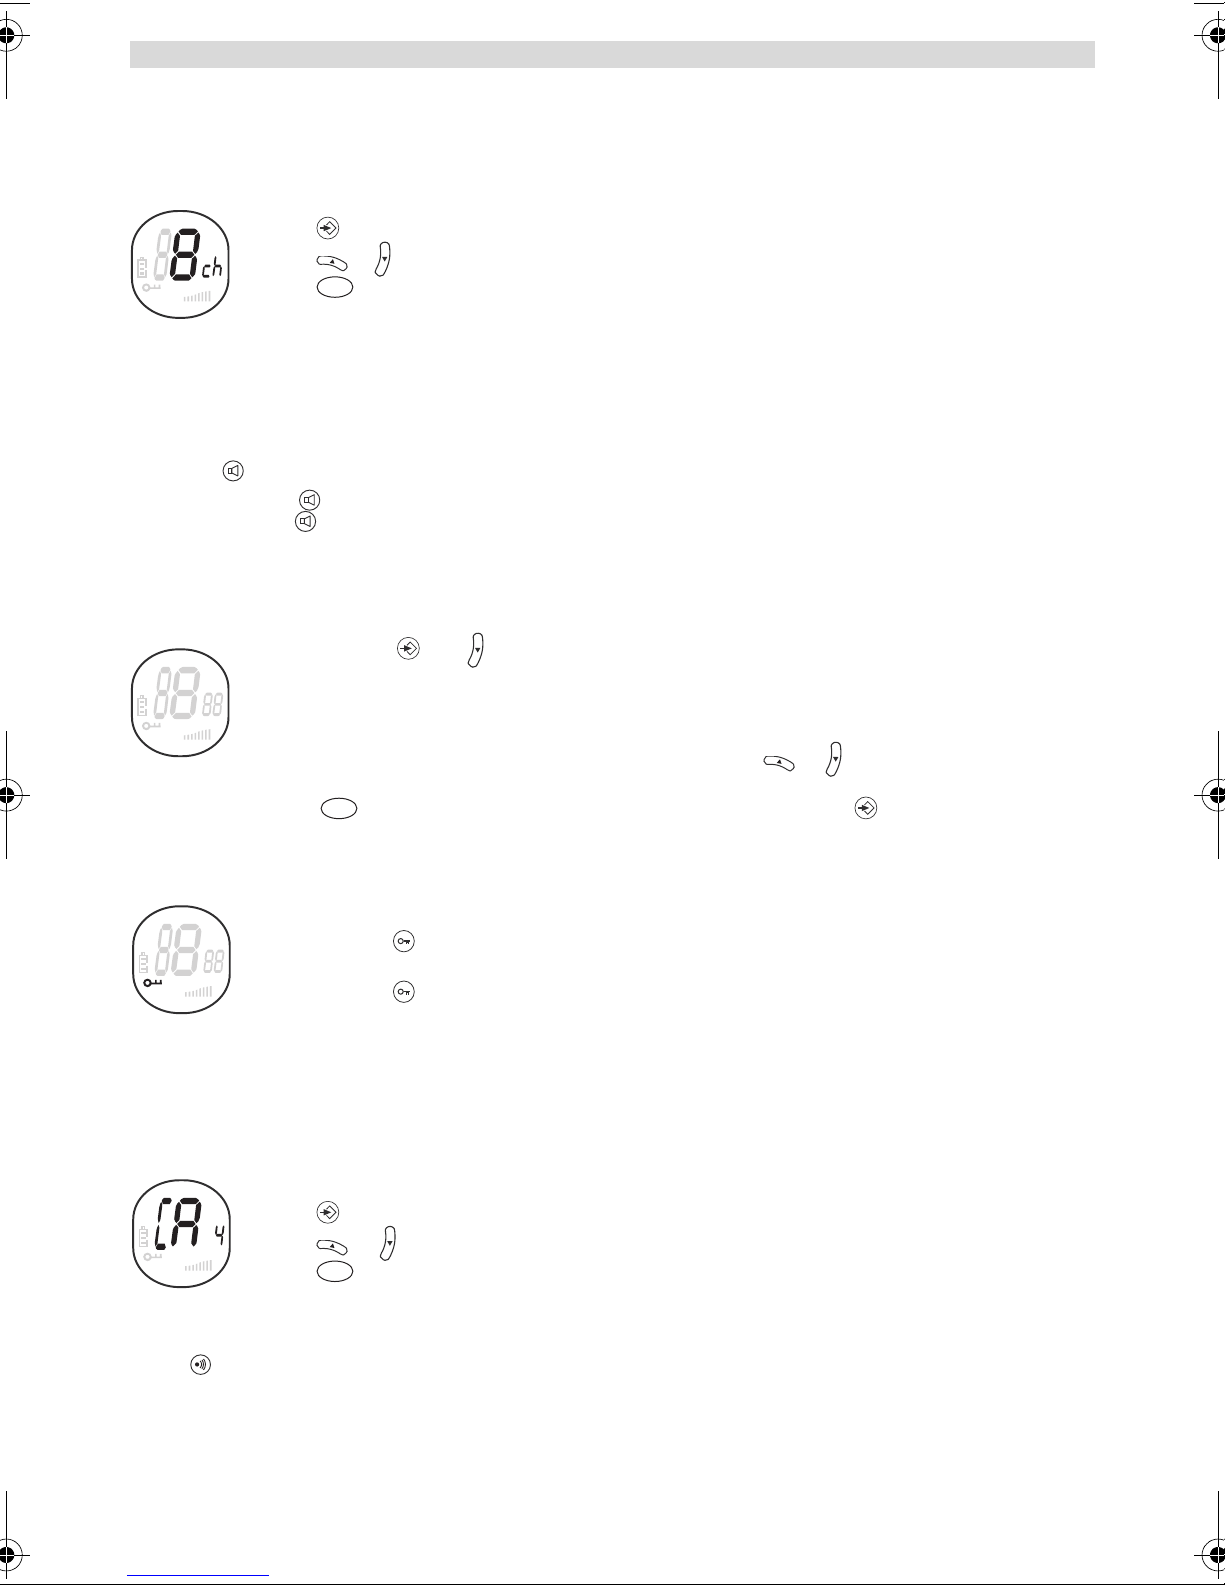
14.5 CHANGING CHANNELS
The PMR has 8 available channels.
To change channels:
SC
TX RX
• Press once, the current channel number flashes on the LCD Screen.
• Press or to change the channel.
• Press to confirm the channel selection and return to NORMAL mode.
PT
NOTE: Any PMR set on the same channel can receive and listen to the conversation.
14.6 MONITOR
You can use the MONITOR feature to check for weaker signals in the current channel.
• Press button for normal monitoring .
• Press and hold . After 5 seconds you can release the button. You are now continuous monitoring the channel
until you press again.
14.7 CHANNEL SCAN
CHANNEL SCAN performs searches for active signals in an endless loop from channel 1 to 8.
• Press and hold and for 2 seconds.
SC
TX RX
• Release the buttons.The channel on the display changes as it scans through the channels.
• When an active signal (one of 8 channels) is detected, CHANNEL SCAN pauses and you will hear the
active signal.
• When an active signal (one of 8 channels) is detected, press or to bypass the current channel
and continue to search for another active channel
• Press to communicate through the active signal channel or press to deactivate channel
PT
scan.
14.8 BUTTON LOCK
SC
TX RX
• Press and hold for 2 seconds to activate or deactivate the BUTTON LOCK mode. The BUTTON
LOCK icon is displayed on the LCD Screen.
• Press and hold again to deactivate BUTTON LOCK
14.9 CALL TONES
A call tone alerts others that you want to talk.
a. Setting the Call Tone
5 different Call Tones can be selected.
SC
TX RX
b. Sending a call Tone
Press briefly. The call tone will be transmitted for 3 seconds on the set channel .
• Press 2 times. CA will be displayed.
• Press or to select another call tone or select OF to enable call tones.
• Press to confirm your selection and return to the standby mode.
PT
16 ESSCOM TWINTALKER 1302 DUO COMBI PACK
Page 17
ESSCOM TWINTALKER 1302 DUO COMBI PACK
ENGLISH
TPTT
T
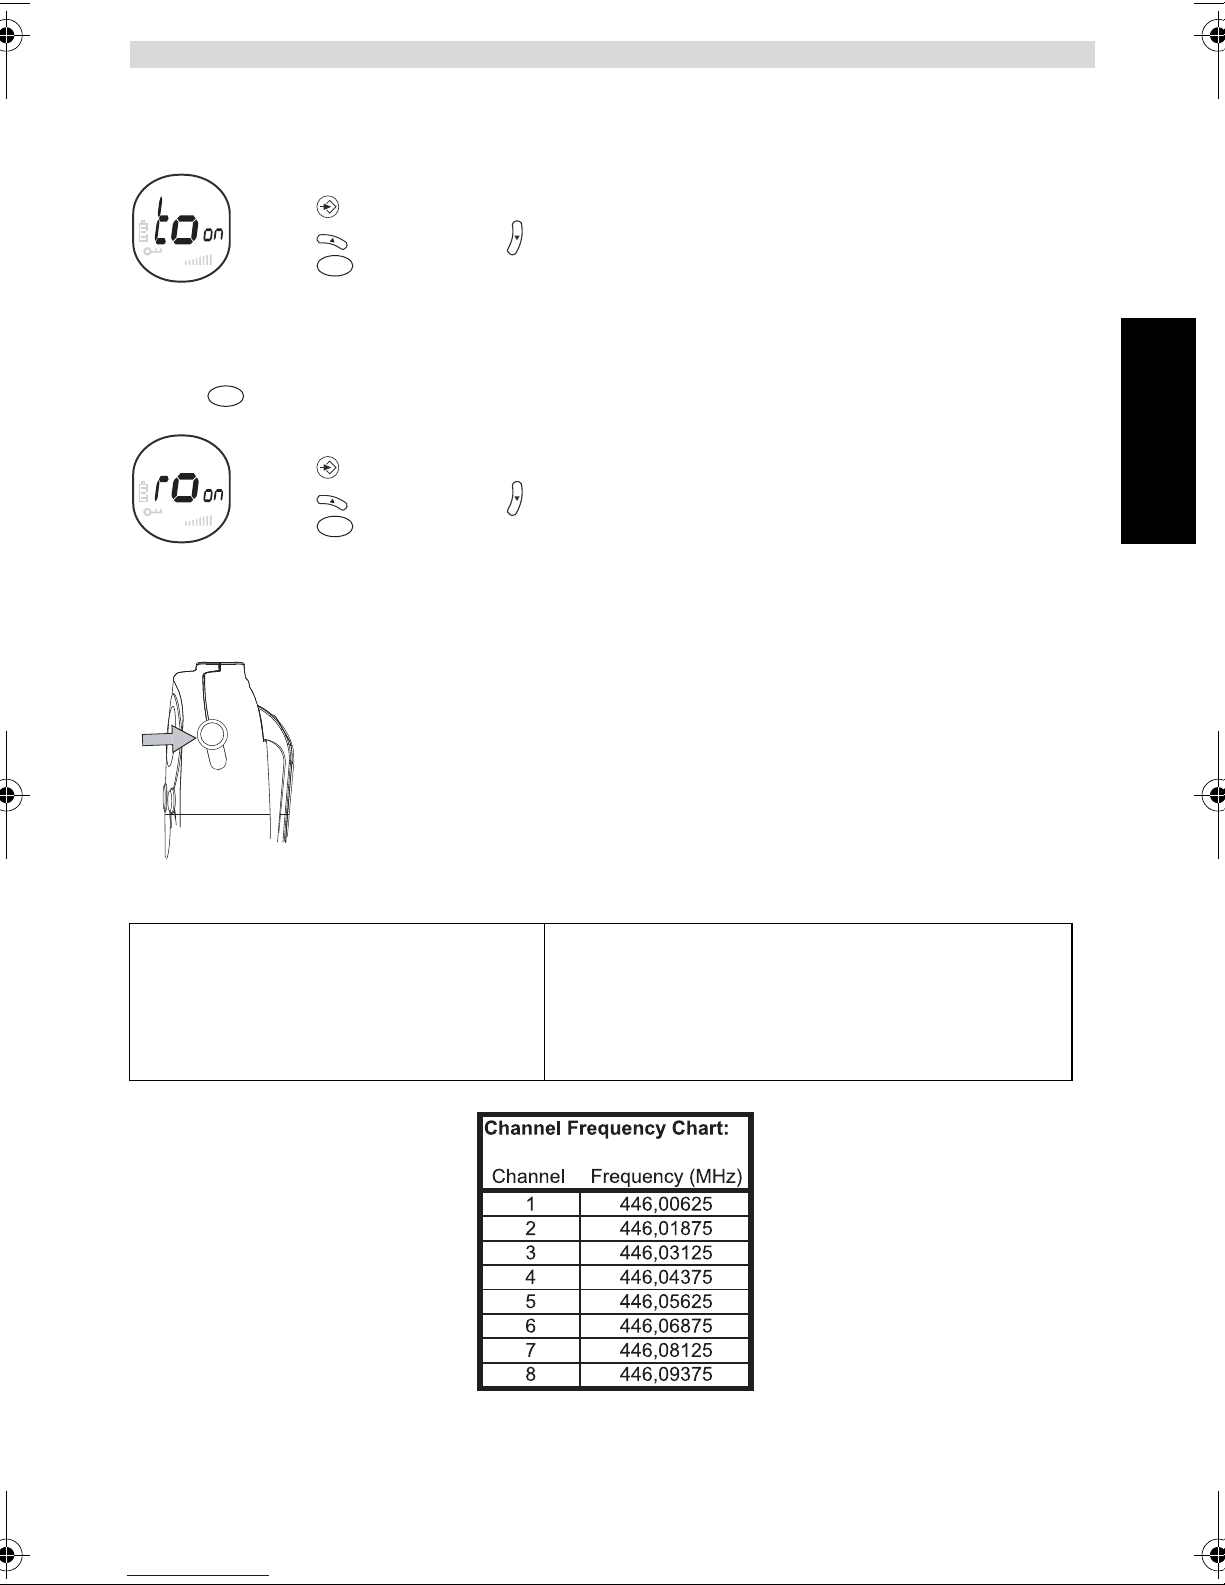
14.10 KEY-TONE ON/OFF
When a button is pressed, the unit will beep briefly.
To set the key-tone.
SC
• Press 3 times. ‘to’ will be displayed.
• Press to enable (ON) or disable the key-tone (OF).
TX RX
• Press to confirm your selection and return to the standby mode.
PT
14.11 ROGER BEEP ON/OFF
After the - button is released, the unit will send out a roger beep to confirm that you have stopped talking.
To set the Roger Beep.
SC
• Press 4 times. ‘ro’ will be displayed.
• Press to enable (ON) or disable the Roger-Beep (OF).
TX RX
• Press to confirm your selection and return to the standby mode.
PT
14.12 HEADSET CONNECTION
The Twintalker 1302 can be used with an external microphone and speaker .
The connector is located under the protective rubber cover on the top of the unit.To attach the
external speaker/microphone headsets or earpiece, lift the rubber flap on the top of the unit to
expose the connector.
Insert the appropriate plug into the connector.
15 TECHNICAL SPECIFICATIONS
Channels
Frequency
Range
Batteries PMR
Transmission Power
Modulation Ty pe
Channel spacing
8
446.00625MHz - 446.09375 MHz
Up to 5 km (Open field)
3 x AAA NiMh rechargeable
=< 500mW ERP
FM - F3E
12,5 Khz
ESSCOM TWINTALKER 1302 DUO COMBI PACK 17
Page 18

ESSCOM TWINTALKER 1302 DUO COMBI PACK
16 WARRANTY
16.1 WARRANTY PERIOD
The devices have a 36-month warranty period . The warranty p eriod st arts on th e day the new unit i s purchased. The re
is no warranty on standard or rechargeable batteries (AA/AAA type).
Consumables or defects causing a negligible effect on operation or value of the equipment are not covered.
The warranty has to be proven by presentation of the original or copy of the purchase receipt, on which the date of
purchase and the unit-model are indicated.
16.2 WARRANTY HANDLING
A faulty unit needs to be returned to an authorized service cent re including a valid purchase note and a filled in service
card.
If the unit develops a fault during the warranty period, the service centre will repair any defects caused by material or
manufacturing faults free of charge, by eithe r repairing or exchangi ng the faulty units or part s of the faulty units. In case
of replacement, colour and model can be different from the original purchased unit.
The initial purchase date shall dete rmine the start of the warranty period. The warran ty period is not extended if the unit
is exchanged or repaired by the service centre.
16.3 WARRANTY EXCLUSIONS
Damage or defects caused by incorrect treatment or ope rat ion a nd da mage re sulti ng f rom use o f non-or igina l part s or
accessories are not covered by the warranty.
The warranty does not cover damage caused by outside factors, such as lightning, water and fire, nor any damage
caused during transportation.
No warranty can be claimed if the serial number on the units has been changed, removed or rendered illegible.
Any warranty claims will be invalid if the unit has been repaired, altered or modified by the buyer.
18 ESSCOM TWINTALKER 1302 DUO COMBI PACK
Page 19
ESSCOM TWINTALKER 1302 DUO COMBI PACK
DEUTSCH
Einschränkungen:
Überprüfen Sie die örtlichen Bestimmungen, bevor Sie das Gerät in einem
Land benutzen, in dem es nicht gekauft wurde. Dieser Standard kann in
diesem Land verboten sein.
Explosionsgefährdete Bereiche sind oft, aber nicht immer, eindeuti g
gekennzeichnet. Dazu zählen Tankbereiche, z. B. unter Deck auf Schiffen,
Kraftstoff- oder Chemikalienüberführungen oder Aufbewahrungsbereiche;
Bereiche, in denen die Luft Chemikalien oder Teilchen enthält, z. B. Getreide, S taub
oder Metallpulver; alle anderen Bereiche, in denen Sie üblicherweise angewiesen
werden, Ihren Kraftfahrzeugmotor abzustellen.
1 EINLEITUNG
Vielen Dank, dass Sie sich zum Kauf des ESSCOM Twintalker 1302 entschieden haben. Es ist ein KurzstreckenFunkgerät, bei dem keine anderen Kosten außer den geringen Betriebskosten zum Aufladen der Batterien entstehen.
Der Twintalker 1302 sendet über Betriebsfunkfrequenzen (PMR) und kann in jedem Land benutzt werden, in dem
dieser Dienst, wie auf der Verpackung und in der Bedienungsanleitung beschrieben, erlaubt ist.
2 VERWENDUNGSZWECK
Der Twintalker kann sowohl für betriebliche als auch private Zwecke genutzt werden, z. B. als Kommunikationsmittel
zwischen zwei oder mehreren Autos, Radfahrern, Skifah rern. Oder Sie können ihn benu tzen, um mit Ihr en Kindern zu
sprechen, während diese draußen spielen usw.
3 CE-KENNZEICHNUNG
Dieses Produkt entspricht den grundlegenden Anforderungen und anderen relevanten Bestimmungen der R&TTERichtlinie 1999/5/EWG. Dies wird durch die CE-Kennzeichnung bestätigt.
4 SICHERHEITSHINWEISE
4.1 ALLGEMEIN
Lesen Sie die folgenden Sicherheitshinweise un d Angaben zum korrekt en Gebrauch sorgfältig durch. Machen Sie sich
mit allen Funktionen des Geräts vert raut. Bewahren Sie diese Bedienungsanleitung zur späteren Verwendung auf .
4.2 VERBRENNUNGSGEFAHR
• Berühren Sie nicht die Antenne, wenn der Antennenschutz beschädigt ist, da ein Kontakt der Antenne mit der
Haut während einer Übertragung zu kleineren Verbrennung führen kann.
• Batterien können Sachschäden, wie z. B. Verbren nungen, verursachen, wenn leitende Materialien, z. B.
Schmuck, Schlüssel oder Ketten mit freiliegenden Polen in Berührung kommen. Das Mater i al schließt unter
Umständen einen elektrischen Stromkreis (Kurzschluss) und wird dadurch entsprechend heiß. Seien Sie im
Umgang mit aufgeladenen Batterien vorsichtig, besonders, wenn Sie diese z. B. in einer Tasche, einem
Geldbeutel oder in einem anderen Behälter zusammen mit metalle nen Objekten aufbewahren.
4.3 VERLETZUNGSGEFAHR
• Legen Sie das Gerät nicht in den Bereich über einen Airbag oder in den Airbagauslösebereich. Airbags blasen
sich mit großer Wucht auf. Wenn sich das Funkgerät im Airbagauslösebereich befindet und der Airbag auslöst,
kann das Gerät mit großer Wucht durch das Fahrzeug geschleudert werden und schwere Verletzungen
verursachen.
• Halten Sie mit dem Funkgerät einen Abstand von mindestens 15 cm zu einem Herzschrittmacher ein.
• Schalten Sie Ihr Funkgerät sofort aus, wenn es Störungen an medizinischen Geräten verursacht.
• Tauschen Sie die Batterien niemals in einer explosionsgefährdeten Umgebung aus. Während des Einsetzens
oder Entfernens der Batterien kann Funkenschla g zu einer Explosion führen.
• Schalten Sie Ihr Funkgerät aus, wenn Sie sich in einer explosionsgefährdeten Umgebung befinden.
Funkenschlag in solchen Umgebungen kann eine Explosion oder Brand verursachen, was zu Verletzungen und
sogar zum Tod führen kann.
• Werfen Sie niemals Batterien ins Feuer , da diese explodieren könnten.
ESSCOM TWINTALKER 1302 DUO COMBI PACK 19
Page 20
ESSCOM TWINTALKER 1302 DUO COMBI PACK
T
T
Drücken zwei oder mehr Benutzer die -Taste gleichzeitig, so wird der
Empfänger nur das stärkste Signal empfangen. Alle anderen Signale werden
unterdrückt. Daher sollten Sie nur ein Signal übertragen (die -Taste drücken),
wenn der Kanal frei ist.
TPTT
4.4 VERGIFTUNGSGEFAHR
• Bewahren Sie Batterien für Kinder unzugänglich auf.
4.5 VORSCHRIFTEN
• In einigen Ländern ist es verboten, ein Sprechfunkgerät während des Führens eines Fahrzeuges zu benutzen.
Halten Sie in diesen Fällen an, bevor Sie das Gerät benutzen.
• Schalten Sie Ihr Gerät AUS, wenn Sie an Bord eines Flugzeuges entsprechende Anweisungen bekommen. Die
Benutzung des Geräts muss entsprechend den Bestimmungen der Fluglinie und den Anweisungen der
Besatzung erfolgen.
• Schalten Sie Ihr Gerät überall dort AUS, wo Hinweisschilder Sie darauf aufmerksam machen. Krankenhäuser und
Gesundheitseinrichtungen verwenden mögliche rweise Geräte, die empfindlich auf externe Hochfreq uenzen
reagieren.
• Das Ersetzen oder Verändern der Antenne kann die Betriebsfunkspezifizierung ändern und die CEBestimmungen verletzen. Nicht genehmigte Antennen können außerdem das Funkgerät beschädigen.
4.6 HINWEISE
• Berühren Sie nicht die Antenne während einer Übertragung, da dadurch die Reichweite beeinflusst werden kann.
• Entfernen Sie die Batterien, wenn das Gerät längere Zeit nicht verwendet wird.
5 REINIGUNG UND WARTUNG
• Reinigen Sie das Gerät mit einem weichen leicht feuchten Tuch. Verwenden Sie keine Reinigungs- oder
Lösungsmittel. Diese können das Gehäuse beschädigen und in das Gerät eindringen und so einen dauerhaften
Schaden verursachen.
• Die Batteriekontakte können mit einem trockenen flusenfreien Tuch abgewischt werden.
• Sollte das Gerät nass werden, schalten Sie es aus und entfernen Sie sofort die Batterien. Trocknen Sie das
Batteriefach mit einem weichen Tuch, um einen möglichen Wasserschaden zu minimieren. Lassen Sie das
Batteriefach geöffnet, bis es ko mplett trocken ist. Benutz en Sie das Gerä t erst, wenn es vollständig g etrockn et ist.
6 ENTSORGUNG DES GERÄTS (UMWELTSCHUTZ)
Am Ende der Lebensdauer des Produkts darf das Gerät nicht im normalen Hausmüll entsorgt werden.
Bringen Sie es zu einer Sammelstelle zur Aufbereitung elektr ischer und elektronischer Geräte. Das
Symbol am Produkt, in der Bedienungsanleitung und/oder Verpackung zeigt dies an.
Einige der Materialien des Produkts können wieder verwendet werden, wenn Sie das Gerät in einer
Aufbereitungsstelle abgeben. Mit der Wiederverwer tung einiger Teile oder Rohmaterialien aus
gebrauchten Produkten leisten Sie einen wichtigen Beitrag zum Umweltschutz. Wenden Sie sich bitte
an Ihre örtlichen Behörden, wenn Sie weitere Informationen über Sammelstellen in Ihrer Umgebung
benötigen.
7 BETRIEB EINES SPRECHFUNKGERÄTS
Um über Sprechfunkge räte kommunizie ren zu können, müssen diese au f den gleich en Kanal e ingestellt sein und sich
innerhalb der Empfangsreichweite befinden (bis zu max. 5 km im Freien). Da diese Geräte freie Kanäle verwenden,
teilen sich alle in Betrieb befindlichen Geräte diese Kanäle (insgesamt 8 Kanäle). Daher ist eine Privatsphäre nicht
garantiert. Jeder , der üb er ein S prechf unkgerät verfügt, das auf Ihren Kana l eingestellt ist, kann Ihr Gespräch mithören .
Möchten Sie kommunizieren (eine Sprechverbindung erzeugen), drücken Sie die -Taste (Sprechknopf). Sobald
diese Taste gedrückt ist, schaltet das Gerät in den Sendemodus und Sie können in das Mikrofon sprechen. Alle
Sprechfunkgeräte innerhalb der Reichweite, die auf denselben Kanal eingestellt sind und sich im Standby-Modus
befinden (nicht im Sendemodus) hören Ihre Nachricht. Sie müssen abwarten, bis die andere Seite die Übertragung
beendet, bevor Sie antworten können. Am E nde jeder Ãœbertragung sendet das G erät ein Tonsignal. Drücken Sie zum
Antworten die -Taste und sprechen Sie in das Mikrofon.
PT
PT
PT
20 ESSCOM TWINTALKER 1302 DUO COMBI PACK
Page 21
DEUTSCH
8 ERSTE SCHRITTE
ESSCOM TWINTALKER 1302 DUO COMBI PACK
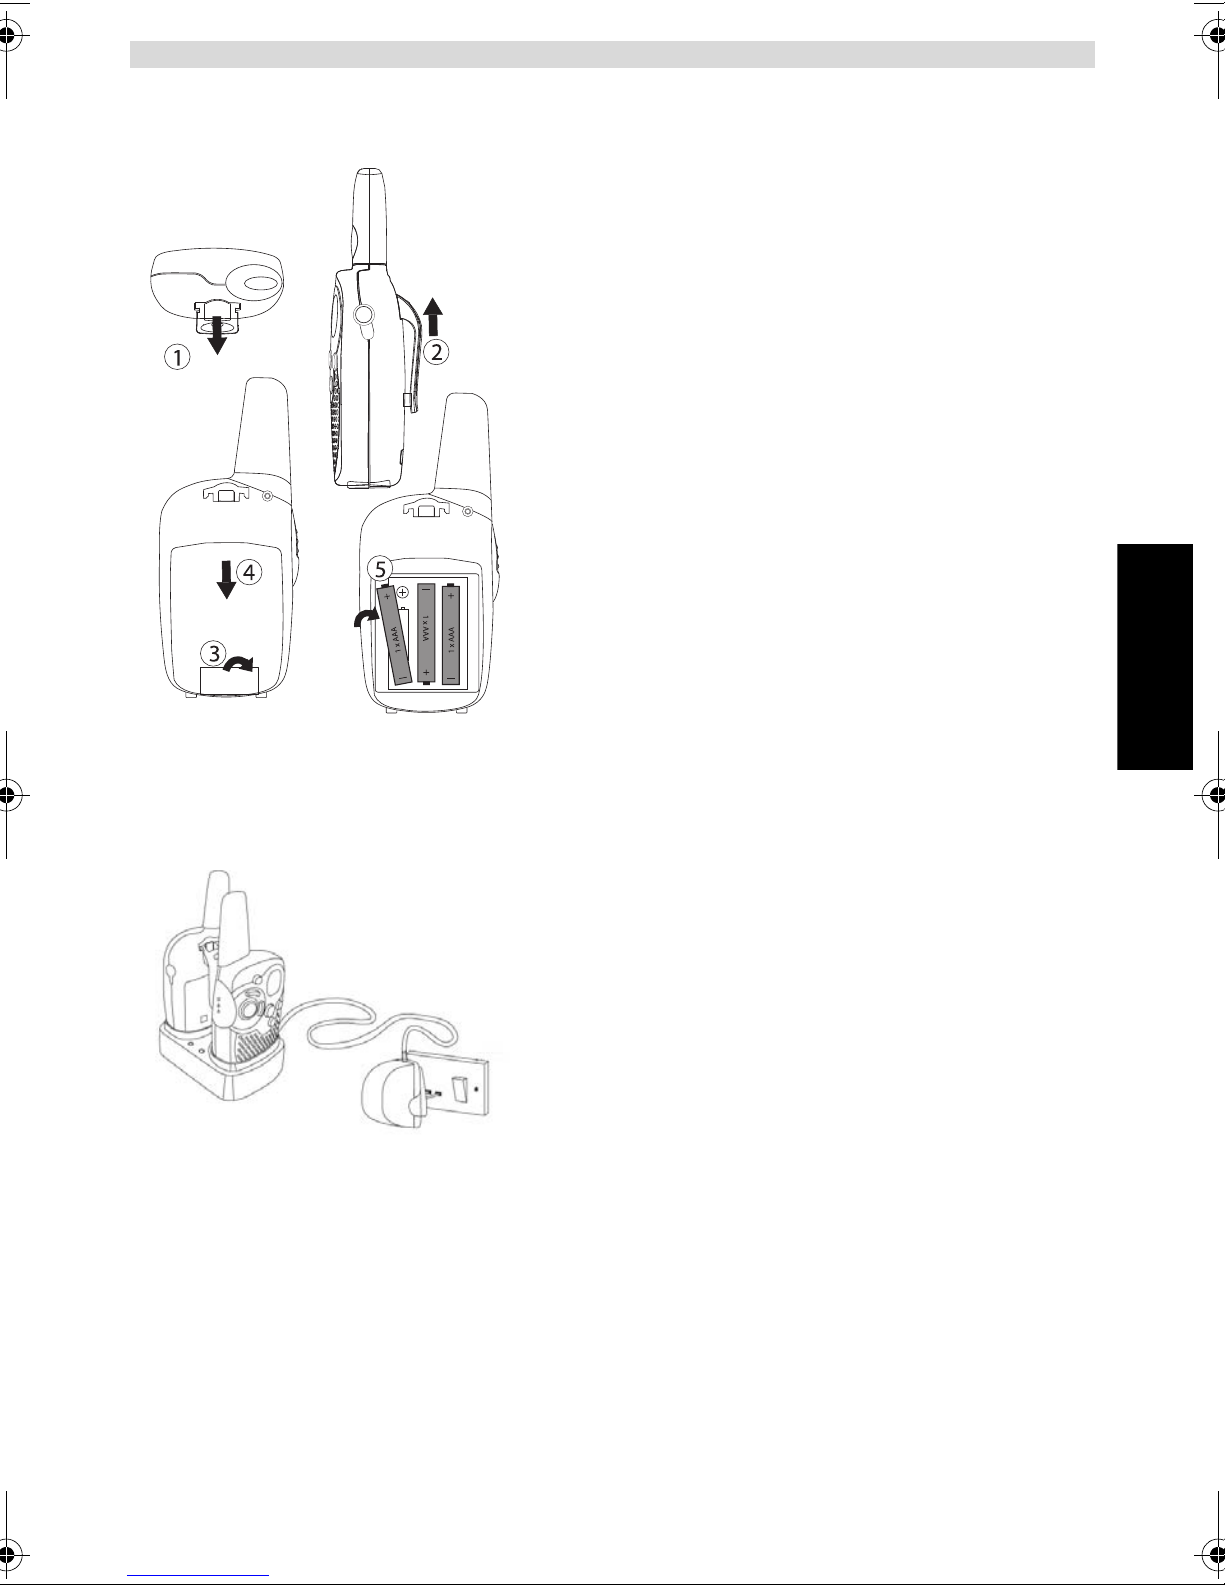
8.1 GÜRTELCLIP ENTFERNEN / BEFESTIGEN
1.Um den Gürtelclip vom Gerät zu entfernen, drücken Sie den
Gürtelclip (2) in Richtung Antenne, während Sie an der Lasche
des Clips ziehen (1).
2.Wenn Sie den Gürtelclip wieder montieren, zeigt ein Klicken
an, dass der Gürtelclip in ihrer Position eingerastet ist.
8.2 EINLEGEN DER BATTERIEN
1.Entfernen Sie den Gürtelclip (§ 8.1).
2.Ziehen Sie die Klappe der Batteriefachabdeckung (3) nach
unten und schieben Sie die Batteriefachabdeckung von der
Antenne weg. (4)
3.Legen Sie die 3„AAA“ wiederaufladba ren Batterien ein. Achten
Sie dabei auf die angegebene Polarität.
4.Montieren Sie die Batterieabdeckung und den Gürtelclip
(§ 8.1).
9 BATTERIEN AUFLADEN
Bei eingelegtem Batterien bietet das Tischladegerät den Vorteil des
schnellen Anschlusses zum Aufladen
1.Stellen Sie das Tischladegerät auf eine ebene Oberfläche.
2.Verb inden Sie ein Ende des mitgelieferten Adapters mit der
Steckdose und das andere Ende mi t dem Anschluss an der
Rückseite des Tischladegeräts .
3.Stellen Sie das Funkgerät wie angezeigt in das Ladegerät.
4.Die Lade-LED leuchtet auf, wenn das Gerät korrekt angeschlossen ist und auflädt.
Es dauert ungefähr 7 bis 10 Stunden um die Batterien vollständig
aufzuladen
ESSCOM TWINTALKER 1302 DUO COMBI PACK 21
Page 22
ESSCOM TWINTALKER 1302 DUO COMBI PACK
T
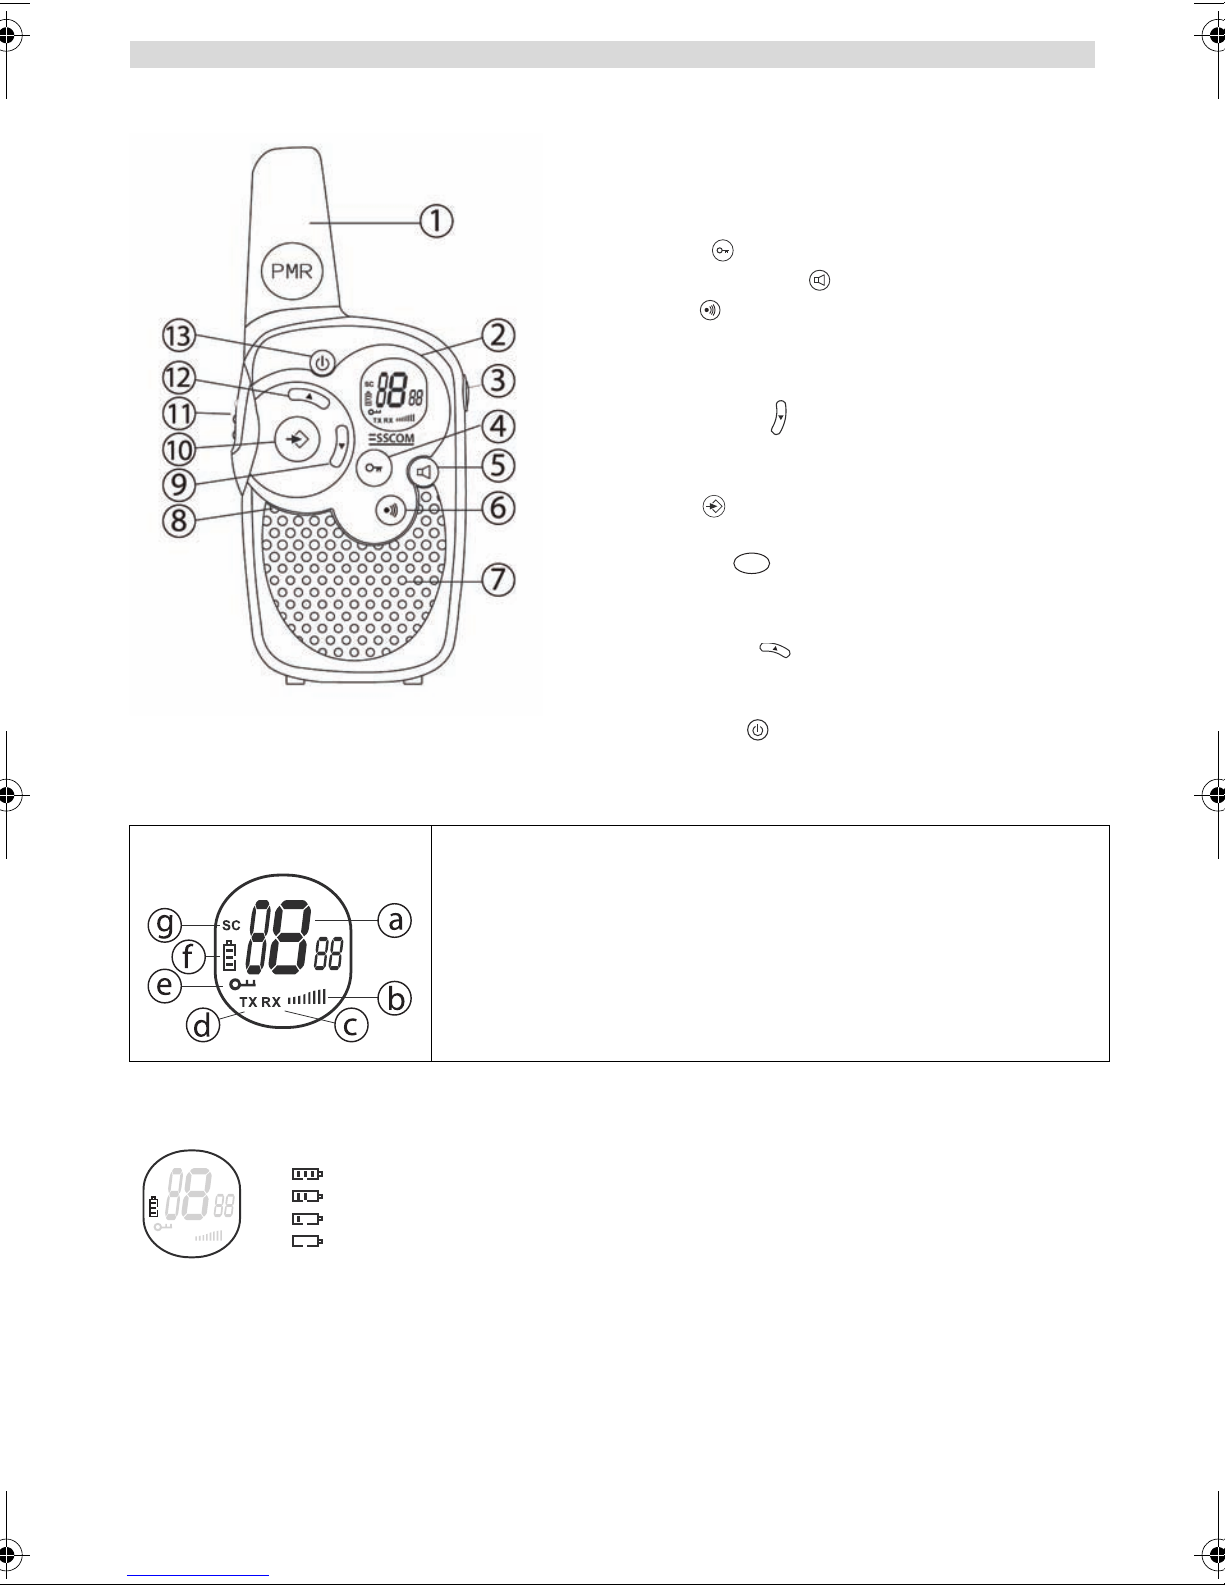
10 TASTEN
1. ANTENNE
2. LCD-Display
3. Anschluss für LAUTSPRECHER / MIKROFON /
LADEGERÄT
4. SPERR-Taste
5. ÜBERWACHUNGS-Taste
6. CALL-Taste
- Rufton senden
7. LAUTSPRECHER
8. MIKROFON
9. NACH-UNTEN-Taste
- Lautstärke leiser stellen
- Letzten Menüpunkt auswählen.
10. MENÜ-Taste
- Menü aufrufen.
11. SPRECHTASTE
PT
- Zum Sprechen drücken und zum Hören loslassen
- Eine Menüeinstellung bestätigen
12. NACH-OBEN-Taste
- Lautstärke lauter stellen
- Nächsten Menüpunkt auswählen
13. EIN-/AUS-Schalter
11 INFORMATION LCD-DISPLAY
a. Kanal
b. Lautstärke des Lautsprechers
c. RX-Symbol - Wird angezeigt, wenn ein Signal empfangen wird
d. TX-Symbol - Wird angezeigt, wenn ein Signal gesendet wird
e. Lock-Symbol - W i rd angezeigt, wenn die Tastatursperre akt i v ist
f. Batteriestandsanzeige
g. Scan-Symbol - Wird angezeigt, wenn der Scan-Modus aktiv ist
12 BATTERIESTANDSANZEIGE / ANZEIGE SCHWACHE BATTERIE
Der BA TTERIELADEZUSTAND wird mit der Anzahl der Quadrate im BA TTERIE-Symbol des L CD-Disp lays angezeigt .
SC
TX RX
Wenn der BATTERIELADEZUSTAND niedrig ist, blinkt das BATTERIE-Symbol und zeigt an, dass die Batterien
ausgetauscht oder aufgeladen werden müssen.
Batterie voll
Batterie 2/3 voll
Batterie 1/3 voll
Batterie leer
22 ESSCOM TWINTALKER 1302 DUO COMBI PACK
Page 23
ESSCOM TWINTALKER 1302 DUO COMBI PACK
DEUTSCH
Batterien müssen an den dafür vorgesehenen Sammelstellen
abgegeben werden und dürfen nicht im Hausmüll entsorgt
werden. Schließen Sie die Batterien nicht kurz und verbrennen
Sie sie nicht. Entfernen Sie die Batterien, wenn das Gerät
längere Zeit nicht verwendet wird.
Benutzen Sie nur den AC/DC-ADAPTER mit wiederaufladbaren „AAA“-Batterien”. Laden
Sie das Gerät niemals auf, wenn Sie gewöhnliche „AAA“- Alkalibatterien verwenden!
Damit Andere Ihre Übertragung empfangen können, müssen sie ihre
Geräte auf denselben Kanal eingestellt haben.
13 WIEDERAUFLADBARE BATTERIEN AUFLADEN
Das Sprechfunkgerät kann mit 3 wiederau fladbaren NiMh AAA Batterien verwendet werden.
Wenn Sie wiederaufladbare Batterien verwenden, können Sie zum Aufladen optional einen Adap ter benutzen.
• Legen Sie 3 wiederaufladbare „AAA“-Batterien ein.
• Stecken Sie den kleinen Stecker des Adapters 7,5 V DC / 200 mA in die SPK/MIC/ CHGBuchse und das andere Ende in die Netzsteckdose.
• Stellen Sie sicher, dass das Gerät ausgeschalte t ist, damit die Batterien richtig aufgeladen
werden. Beim Laden im AUS-Modus steht keine Batteriestandsanzeige zur Verfügung.
HINWEIS: Das vollständige Aufladen der Batterien dauert etwa 7 bis 10 Stunden.
14 VERWENDEN DES TWINTALKER 1302
14.1 DAS GERÄT EIN-/AUSSCHALTEN
• Zum Aktivieren: Halten Sie die Taste gedrückt. Das Gerät „piept“ und im LCD-Schirm wird der aktuelle Kanal
angezeigt.
• Zum Ausschalten: Halten Sie die Taste erneut gedrückt. Das Gerät „piept“ und der LCD-Schirm schaltet sich
aus.
14.2 LAUTSTÄRKE DES LAUTSPRECHERS EINSTELLEN
SC
TX RX
14.3 EIN SIGNAL EMPFANGEN
SC
TX RX
Die Lautstärke des Lautsprechers kann mit den Tasten und eingestellt werden. Die Lauts tärke
des Lautsprechers wird im LCD-Display angezeigt.
Das Gerät ist immer im EMPFANGS- Modus, wenn es eingeschaltet ist und nicht sendet. Wenn Sie im
eingestellten Kanal ein Signal empfangen, erscheint das RX-Symbol im Display.
ESSCOM TWINTALKER 1302 DUO COMBI PACK 23
Page 24
ESSCOM TWINTALKER 1302 DUO COMBI PACK
T
T
T
T
14.4 EIN SIGNAL SENDEN
SC
• Halten Sie das Gerät vertikal mit dem MIKROFON 10 cm vo m Mund entf ernt und sprechen Sie in das
• Halten Sie die Taste zum SENDEN gedrückt.
PT
Mikrofon.
TX RX
• Lassen Sie die Taste los, wenn Sie die Übertragung beendet haben.
PT
14.5 KANAL WECHSELN
Das Sprechfunkgerät hat 8 verfügbare Kanäle.
Zum Wechseln der Kanäle:
SC
TX RX
• Drücken Sie einmal. Der aktuelle Kanal blinkt im LCD-Display.
• Drücken Sie oder , um den Kanal einzustellen.
• Drücken Sie , um die Kanalwahl zu bestätigen und in den NORMAL-Modus zurückzukehren.
PT
HINWEIS: Jedes Sprechfunkgerät, das auf denselben Kanal eingestellt ist, kann Ihr Gespräch
empfangen und abhören.
14.6 ÜBERWACHUNG
Mit der ÜBERWACHUNGS-Funktion könn en Sie schwächere Signale im aktuellen Kanal suchen.
• Drücken Sie die -Taste für eine normale Überwachung.
• Halten Sie die Taste gedrückt. Nach 5 Sekunden können Sie die Taste freigeben. Sie überwachen nun
kontinuierlich den Kanal, bis Sie erneut drücken.
14.7 KANALSCAN
KANALSCAN sucht in einer Endlosschleife in den Kanälen 1 bis 8 nach aktiven Signalen.
• Halten Sie die -Taste und 2 Sekunden lang gedrückt.
SC
• Geben Sie die Tasten frei. Der Kanal auf dem Display ändert sich, da er in den Kanälen einen Scan
durchführt.
TX RX
• Wenn ein aktives Signal (in einem der 8 Kanäle) gefunden wird, wird KANALSCAN unterbr ochen und
Sie hören das aktive Signal.
• Wenn ein aktives Signal (in einem der 8 Kanäle) gefunden wird, drücken Sie oder , um den
aktuellen Kanal zu überspringen und die Suche nach einem anderen aktiven Kanal fortzusetzen.
• Drücken Sie , um über den aktiven Kanal zu kommunizieren oder drücken Sie , um den
PT
Kanalscan zu deaktivieren.
14.8 TASTATURSPERRE
SC
TX RX
• Halten Sie die Taste zum Aktivieren der TASTATURSPERRE 2 Sekunden gedrückt. Das Symbol
TASTATURSPERRE erscheint im LCD-Display.
• Halten Sie die Taste noch einmal gedrückt, um die TASTATURSPERRE zu deaktivieren.
24 ESSCOM TWINTALKER 1302 DUO COMBI PACK
Page 25
ESSCOM TWINTALKER 1302 DUO COMBI PACK
DEUTSCH
T
TPTT
T
14.9 RUFTÖNE
Ein Rufton macht Andere darauf aufmerksam, dass Sie sprechen möchten.
a. Einstellen der Ruftöne
5 verschiedene Ruftöne können ausgewählt werden.
SC
• Drücken Sie zweimal . CA erscheint im Display.
• Drücken Sie oder , um einen anderen Rufton auszuwählen oder wählen Sie OFF, um die
TX RX
Ruftöne zu deaktivieren.
• Drücken Sie , um die Auswahl zu bestätigen und in den Standby-Modus zurückzukehren.
PT
b. Einen Rufton senden
Drücken Sie kurz die Taste . Der Rufton wird 3 Sekunden lang auf dem eingestellten Kanal gesendet.
14.10 TASTENTON EIN/AUS
Wenn eine Taste gedrückt wird, piept das Gerät kurz.
Einstellen des Tastentons.
SC
TX RX
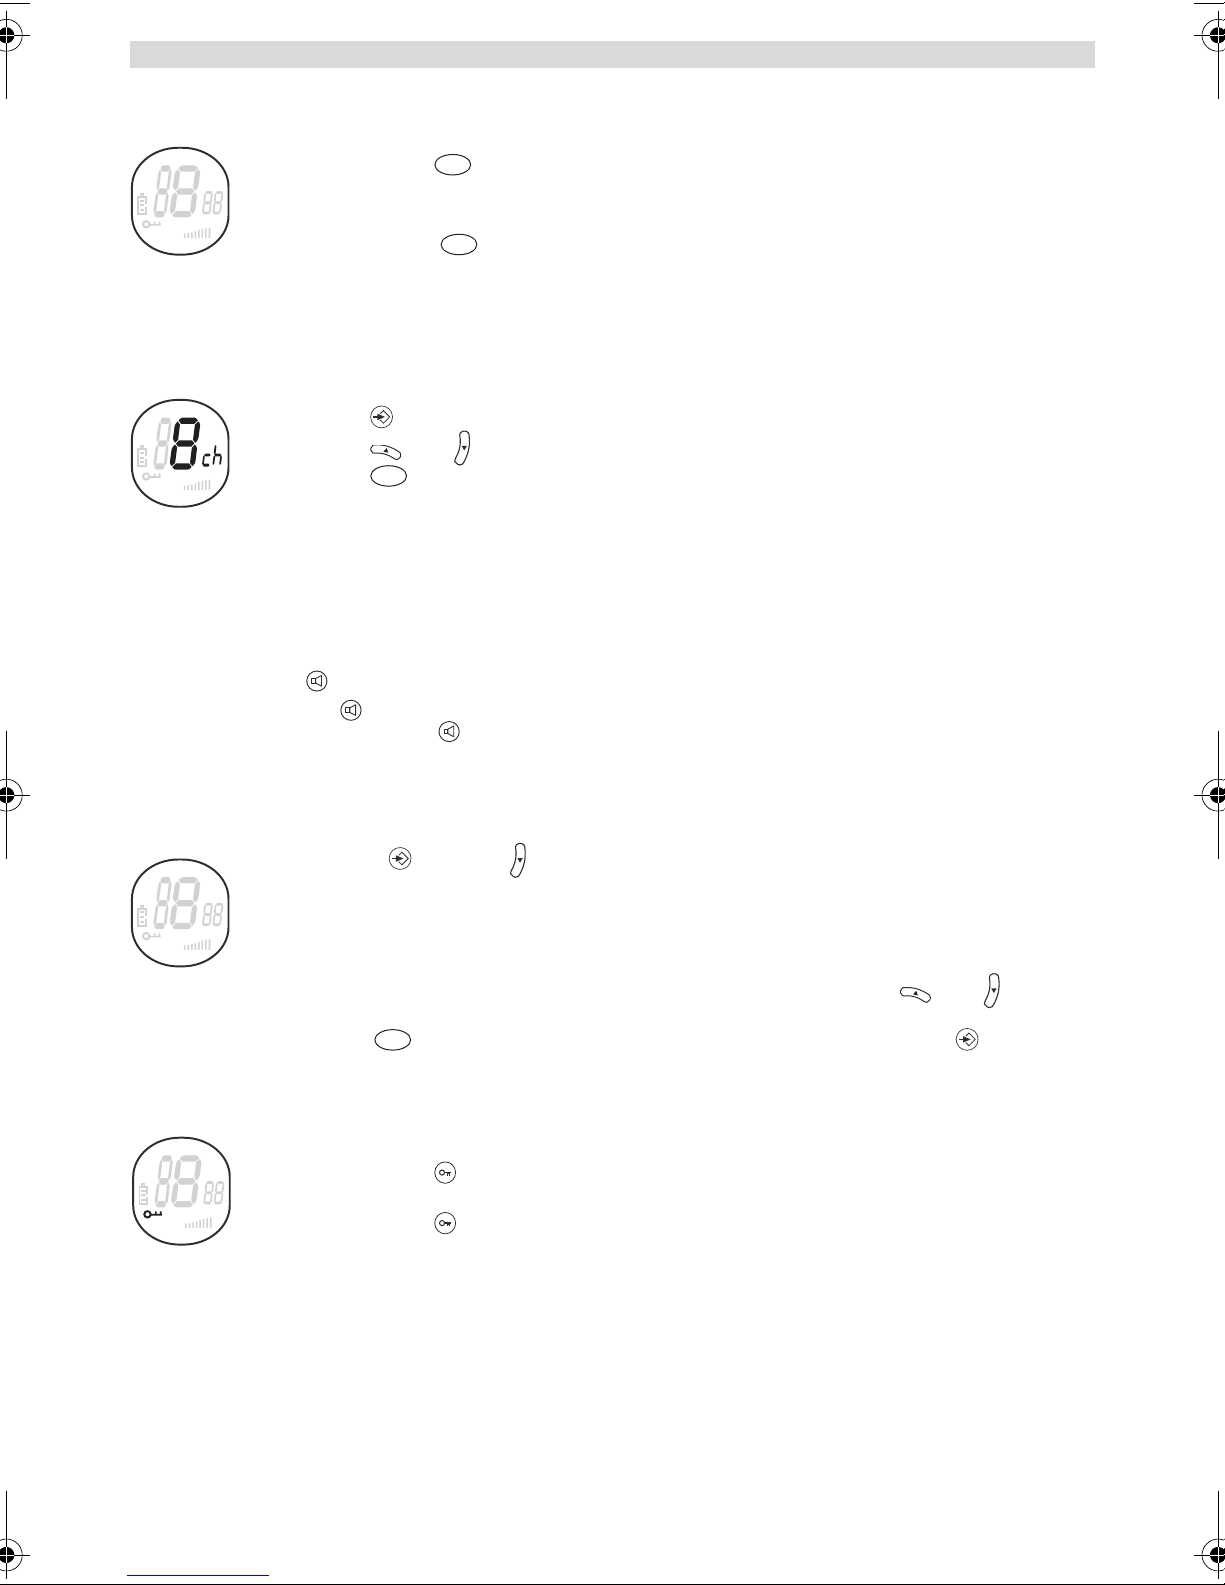
• Drücken Sie dreimal. ‘to’ erscheint im Display.
• Drücken Sie zum Aktivieren des Tastentons (ON) oder zum Deaktivieren (OFF).
• Drücken Sie , um die Auswahl zu bestätigen und in den Standby-Modus zurückzukehren.
PT
14.11 BESTÄTIGUNGSTON (ROGER BEEP) EIN-/AUSSCHALTEN
Nachdem die -Taste losgelassen wurde, sendet das Gerät einen Bestätigungston, dass Sie das Gespräch
beendet haben.
Einstellen des Bestätigungstons.
SC
• Drücken Sie viermal . ‘ro’ erscheint im Display.
• Drücken Sie zum Aktivieren des Bestätigungstons (ON) oder zum Deaktivieren (OFF).
TX RX
• Drücken Sie , um die Auswahl zu bestätigen und in den Standby-Modus zurückzukehren.
PT
14.12 KOPFHÖRER ANSCHLIESSEN
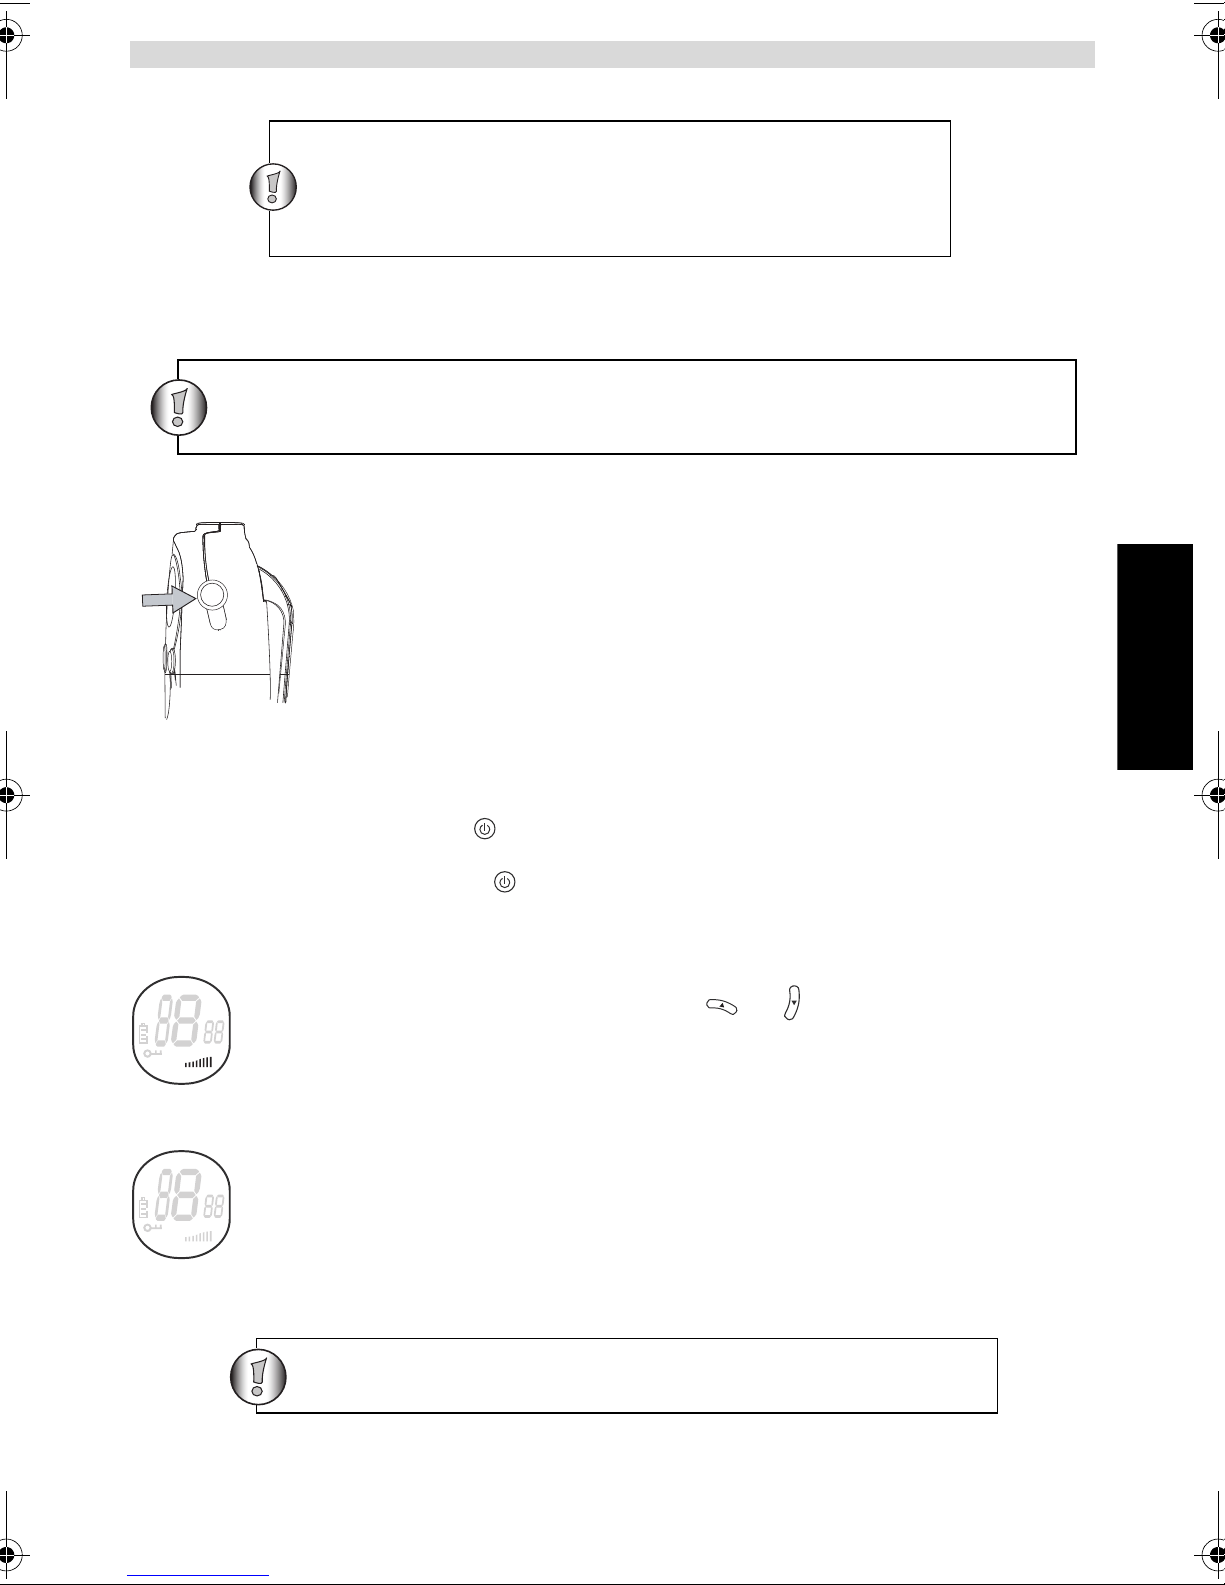
Der Twintalker 1302 kann mit einem externen Mikrofon und Lautsprecher verwendet werden.
Der Anschluss befindet sich unter der Gummischutzabdeckung oben auf dem Gerät . Zum
Anschluss des externen Lautsprechers, des Kopfhörers oder des Ohrhörers, heben Sie die
Gummilasche am Gerät an, um den Anschluss freizulegen.
Stecken Sie den entsprechenden Stecker in den Anschlu ss.
ESSCOM TWINTALKER 1302 DUO COMBI PACK 25
Page 26
ESSCOM TWINTALKER 1302 DUO COMBI PACK
15 TECHNISCHE DATEN
Kanäle
Frequenz
Reichweite
Batterien Sprechfunkgerät
Sendeleistung
Modulationstyp
Kanalabstand
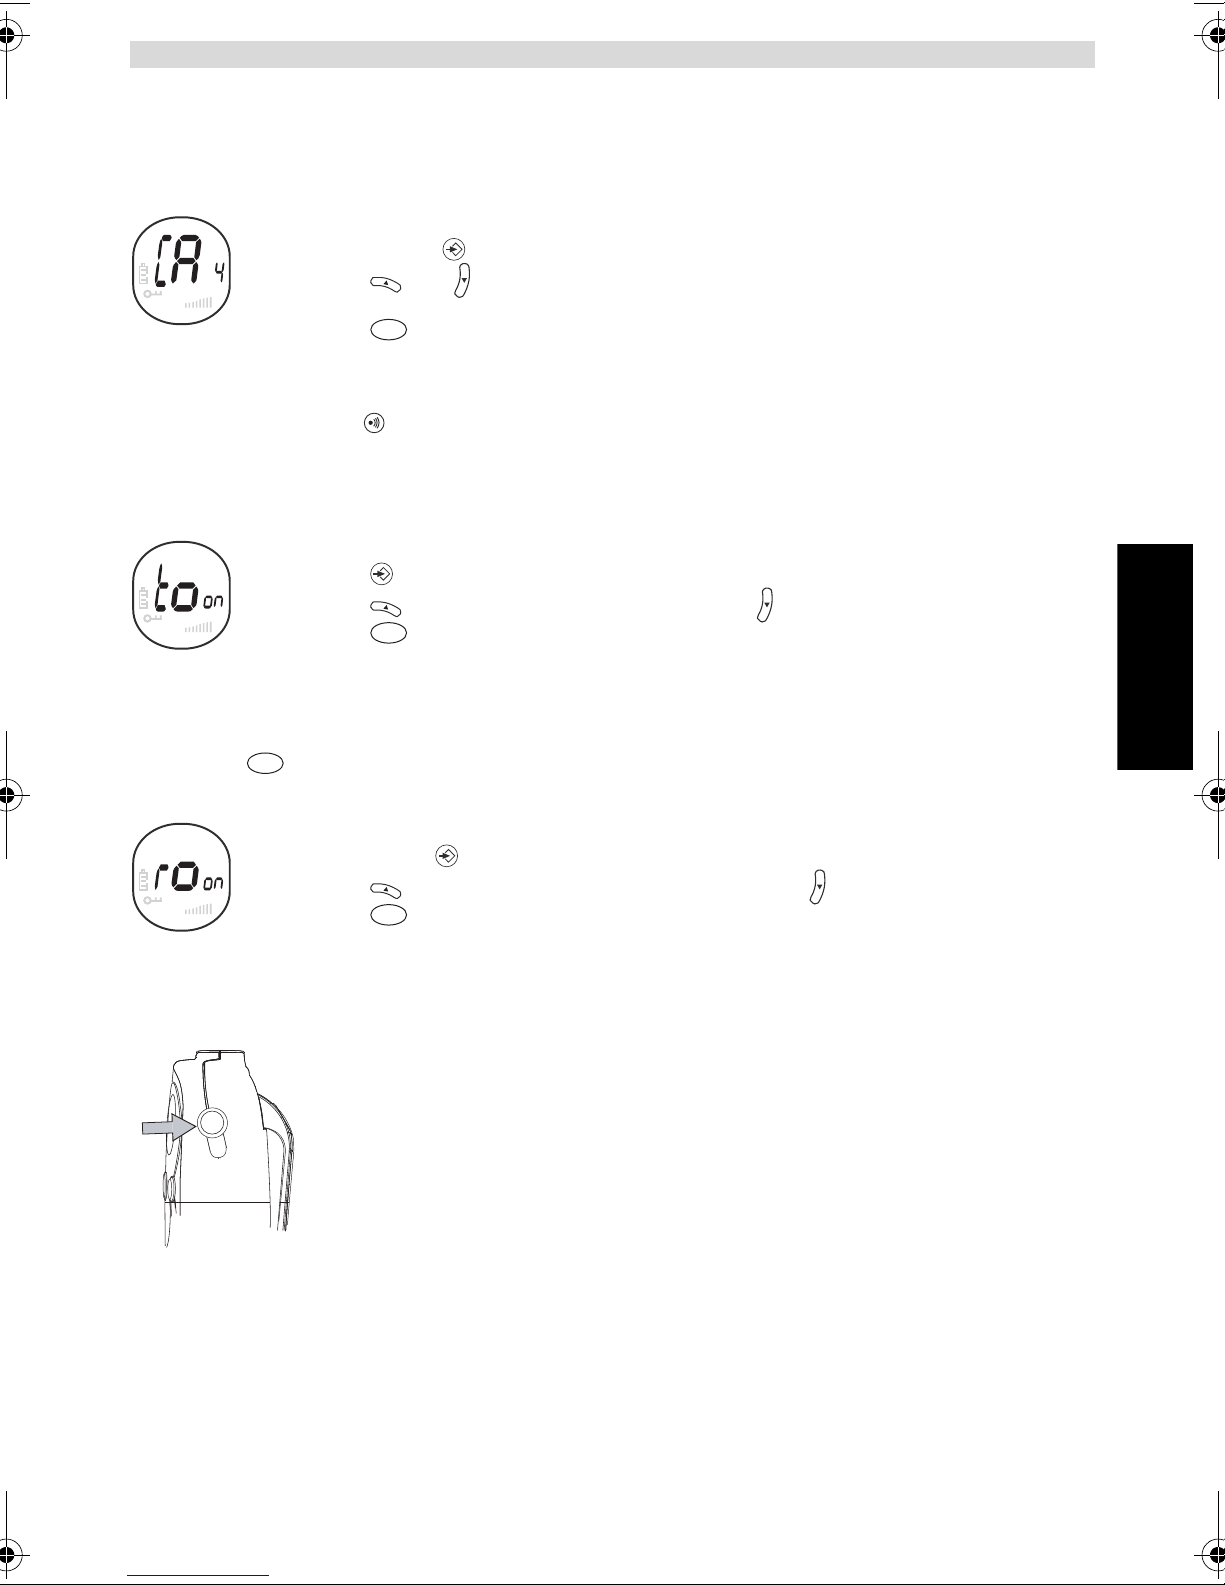
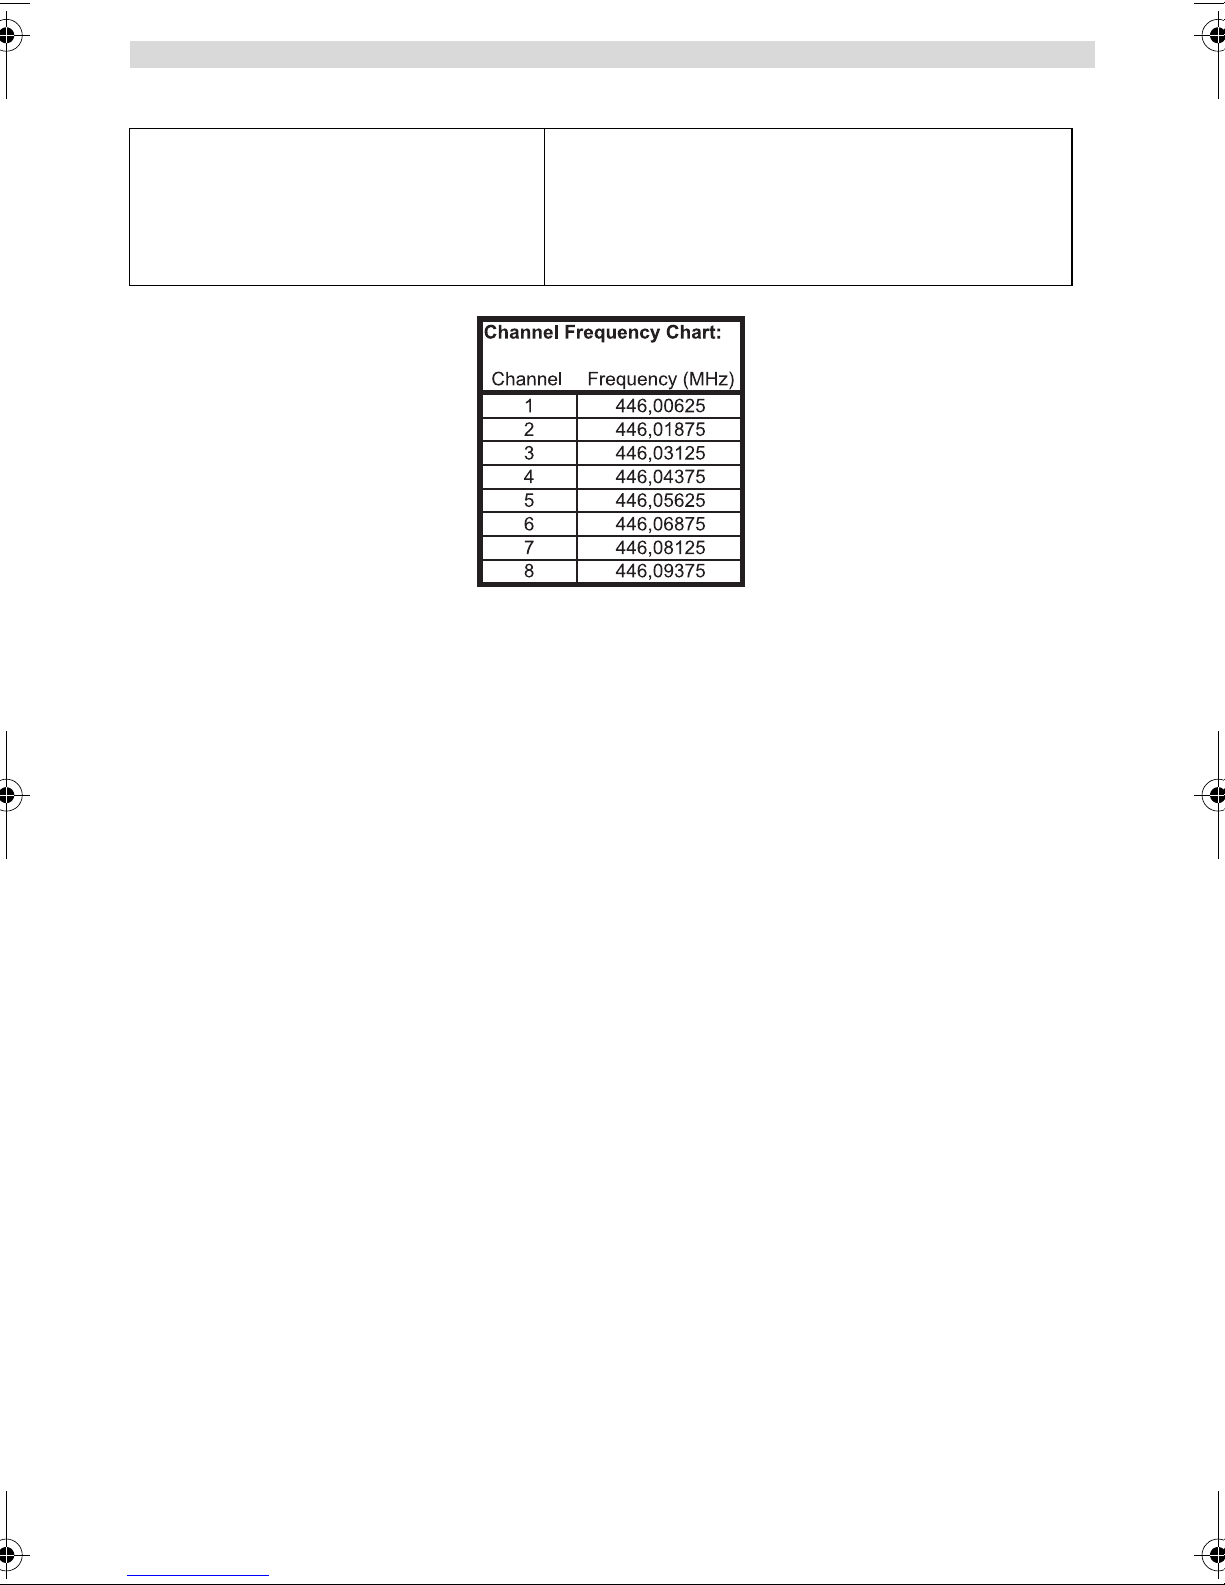
446,00625 MHz - 446,09375 MHz
Bis zu 5 km (im Freien)
3 x AAA NiMH wiederaufladbar
=< 500 mW ERP
8
FM - F3E
12,5 KHz
16 GARANTIE
16.1 GARANTIEZEIT
Die Geräte haben eine 36-monatige Garantiezeit. Die Garantiezeit beginnt an dem Tag, an dem das neue Gerät
erworben wurde. Die Garantie gilt nicht für normale Batterien oder wiede raufladbare Akkus (Typen AA/AAA).
Verschleißteile oder Mängel, die den Wert oder die Gebrauchstauglichkeit des Geräts nur unerheblich beeinflussen,
sind von der Garantie ausgeschlossen.
Der Garantieanspruch muss durch den Originalkaufbeleg oder eine Kop ie des Kaufbelegs, auf dem das Kaufdatum und
das Gerätemodell ersichtlich sind, nachge wiesen werden.
16.2 ABWICKLUNG DES GARANTIEFALLS
Senden Sie das fehlerhafte Gerät mit dem gültigen Kaufbeleg und einer ausgefüllten Se rvice-Karte an ein a utorisiertes
Service-Zentrum.
Tritt ein Gerätefehler innerhalb der Garantiezeit auf, übernimmt das autorisierte Service-Zentrum unentgeltlich die
Reparatur jedes durch einen Material- oder Herstellungsfehler aufg etretenen Defekts mittels Reparatur oder Austausch
des fehlerhaften Geräts oder von Teilen des fehlerhafte n Geräts. Bei einem Austausch können Farbe und Mod ell vom
eigentlich erworbenen Gerät abweichen.
Das ursprüngliche Kaufdatum bestimmt den Beginn der Garantiezeit . Die Ga rantiezeit verlä ngert sich n icht, wen n das
Gerät von autorisierten Service-Zentren ausgetau scht oder repariert wird.
16.3 GARANTIEAUSSCHLÜSSE
Schäden oder Mängel, die durch unsachgemäße Ha ndhabung oder unsachgemäßen Betrieb verursacht werden, sowie
Defekte, die durch die Verwendung von Nicht-Originalteilen oder -zubehör entstehen, werden nicht von der Garantie
abgedeckt.
Die Garantie deckt keine Schäden ab, die durch äußere Einflüsse entsta nden sind, wie z. B. Blitzeinschlag, Wasser,
Brände oder jegliche Transportschäden.
Wenn die Seriennummer des Geräts verändert, entfernt oder unleserlich gemacht wurde, kann keine Garantie in
Anspruch genommen werden.
Alle Garantieansprüche erlöschen, wenn das Gerät vom Käufer repariert, verändert oder umgebaut wurde.
26 ESSCOM TWINTALKER 1302 DUO COMBI PACK
Page 27

Page 28

TWINTALKER 1302
DUO COMBI PACK
MD6900321
www.esscom.be
 Loading...