

Page 1
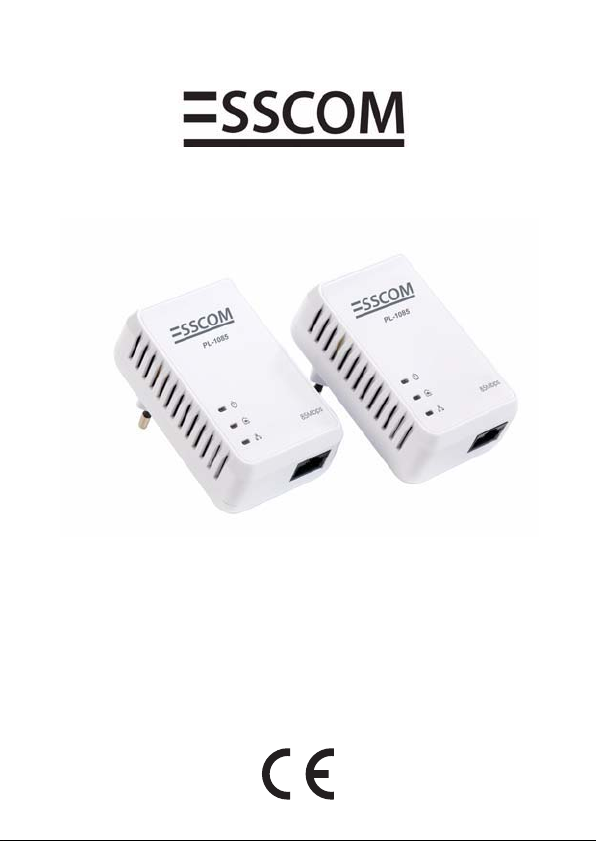
PL-1085
HANDLEIDING
MODE D’EMPLOI
BEDIENUNGSANLEITUNG
USER GUIDE
V1.0 - 09/09
Page 2
NL De in deze handleiding beschreven mogelijkheden worden
This product is in compliance with the essential requirements and other
relevant provisions of the R&TTE directive.
This is confirmed by the CE-mark.The Declaration of conformity can be
found on:
http://www.esscom.be/cedeclarations.asp
gepubliceerd onder voorbehoud van wijzigingen.
F Les possibilités décrites dans ce manuel sont publiées sous réserve
de modifications.
D Die in dieser Bedienungsanleitung umschriebenen Möglichkeiten,
werden vorbehaltlich Änderungen publiziert.
UK The features described in this manual are published with reservation to
modifications.
NL Het toestel voldoet aan de basiseisen van de R&TTE-richtlijn. Dit
wordt bevestigd door de CE-markering.
FR La conformité de l’appareil avec les exigences fondamentales de la
directive européenne R&TTE relative aux terminaux, est confirmée
par le label CE.
DE Die Übereinstimmung des Gerätes mit den grundlegenden
Anforderungen der R&TTE-Directive ist durch das CE-Kennzeichen
bestätigt.
UK The CE symbol indicates that the unit complies with the essential
requirements of the R&TTE directive.
Page 3
PL-1085
De PL-1085 is een op 85 Mbps gebaseerd Intellon HomePlugapparaat en wordt niet aanbevolen voor DSL-tv.
1 Inleiding
In theorie komt het maximale aantal PL-1085 - adapters in een
eengezinswoning overeen met 253 aansluitingen, maar in de praktijk mogen
er maximaal 10 apparaten gelijktijdig data versturen.
Netwerkbeveiliging
De PL-1085 -producten zullen onmiddellijk werken nadat u ze hebt uitgepakt
en bij u thuis in het stopcontact hebt gestoken, zelfs zonder installatie en
configuratie van enige software.
Gewoonlijk vormt de elektrische meter een fysieke barrière, doordat enkel
apparaten die op deze meter zijn aangesloten, deel kunnen uitmaken van het
netwerk en kunnen profiteren van de fasekoppeling.
We raden ten zeerste aan om gebruik te maken van de interne
apparaatencryptie van de PL-1085 Adapter. Deze is te configureren met
behulp van het PL-1085 Adaptor Configuration Utility.
Beperkingen
Onder optimale omstandigheden bedraagt de maximale kabelafstand tussen
twee PL-1085 - apparaten 200 meter.
De kwaliteit van de verbinding wordt echter beïnvloed door:
– slechte kwaliteit van elektriciteitskabels
– zekeringen
– bliksem-/overspanningsbeveiligingen
– multifasespanning: sommige huizen worden voorzien van 3-
fasespanning. De kwaliteit van de PL-1085 zal dramatisch afnemen
wanneer de apparaten op verschillende fasen worden aangesloten. In
sommige gevallen zal er helemaal geen communicatie mogelijk zijn!
– Sommige elektrische apparaten, zoals magnetrons, stofzuigers, oudere
laders voor laptops/mobiele telefoons, zullen tijdens het gebruik ruis op
het elektriciteitsnet veroorzaken.
NEDERLANDS
2CE-markering
De CE-markering op het toestel, de handleiding en de verpakking geeft aan dat
het toestel voldoet aan de basiseisen van de R&TTE-richtlijn 1995/5/EG.
3
Page 4
PL-1085
3 Veiligheidsinstructies
Voor uw eigen veiligheid dient u alle waarschuwingen en instructies te lezen
en op te volgen.
– Open het apparaat niet. Door het openen of verwijderen van de behuizing
kunt u worden blootgesteld aan gevaarlijke hoogspanningspunten en
andere gevaren. Servicewerkzaamheden aan het apparaat mogen
uitsluitend worden uitgevoerd door bevoegd onderhoudspersoneel. Neem
contact op met uw leverancier voor meer informatie.
– Gebruik het apparaat niet tijdens een onweersbui. Er bestaat gevaar op
elektrische schokken als gevolg van blikseminslag.
– Stel het apparaat niet bloot aan stof of agressieve vloeistoffen.
– Gebruik dit product niet in de buurt van waterbronnen.
– Zorg dat u de kabels op de juiste poorten aansluit.
– Bedek de ventilatiegaten op het apparaat niet.
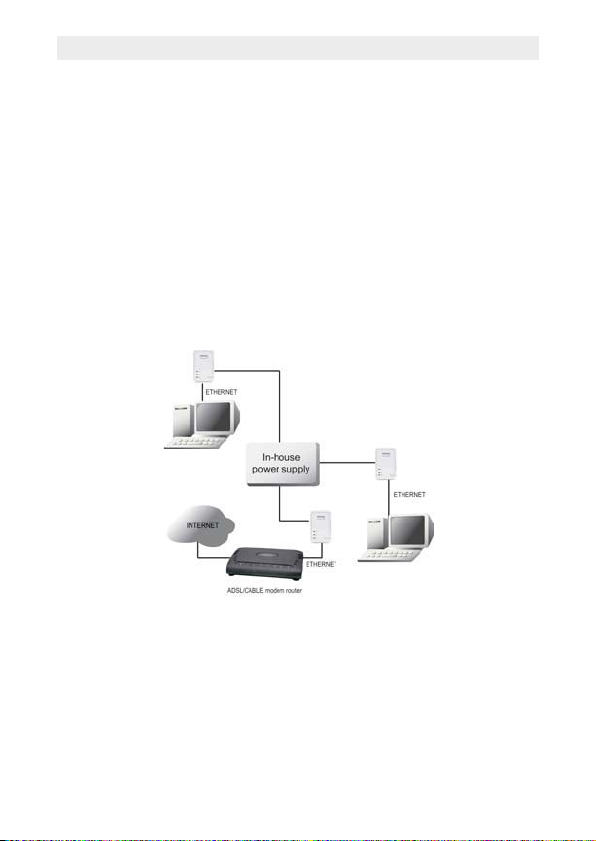
4 Veelgebruikte toepassingen
4
Page 5
PL-1085
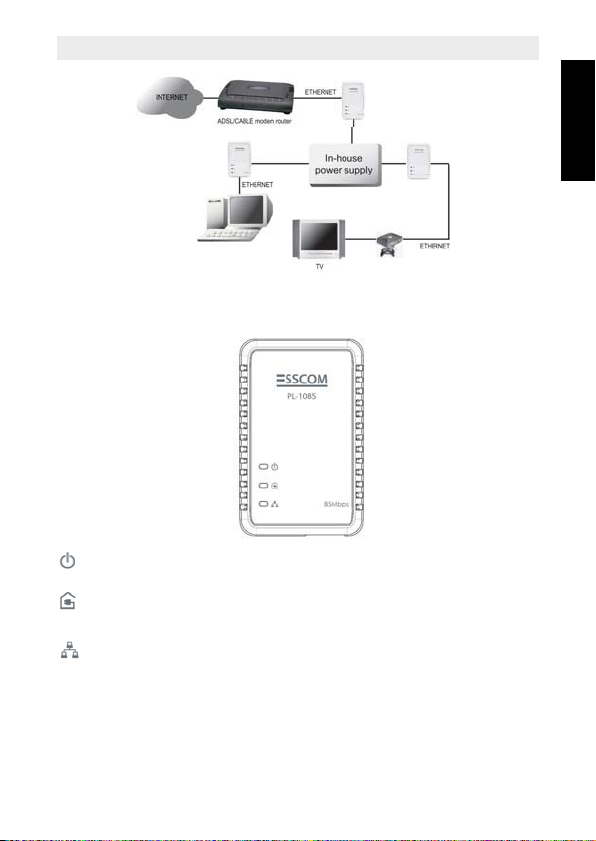
5 Leds en aansluitingen
Brandt wanneer het apparaat is aangesloten op het lichtnet.
Brandt wanneer het apparaat is gedetecteerd en verbonden met een
andere PL-1085-adapter in hetzelfde netwerk.
Licht op wanneer het apparaat is aangesloten op de ethernetpoort van de
computer of andere ethernetapparaten. Knippert tijdens het verzenden
van data.
ETHERNET: Dit is het verbindingspunt voor aansluiting op een computer of
andere apparatuur met een ethernetpoort.
NEDERLANDS
5
Page 6
PL-1085
6 Installatie hulpprogramma
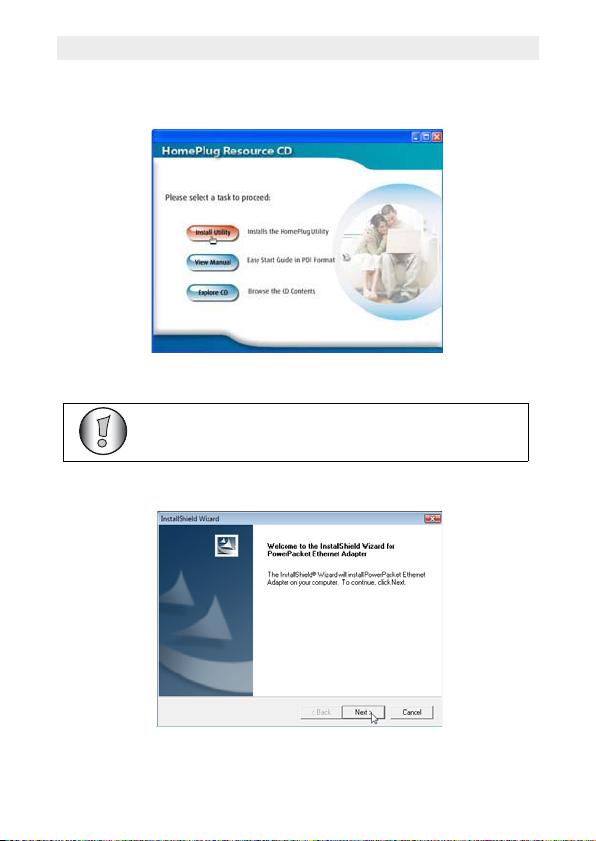
1. Zet de computer aan. Plaats de cd in het cd-rom-station. De cd wordt
automatisch gestart.
Klik op "Install Utility".
Als de cd niet automatisch start, kunt u het bestand
"install.exe" op de cd opzoeken en uitvoeren.
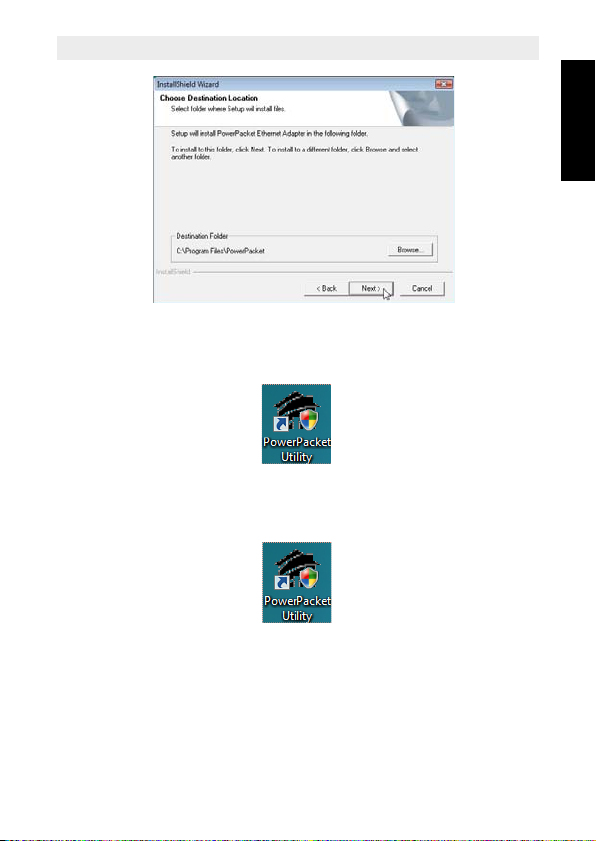
2. De InstallShield Wizard zal automatisch starten.
Klik op "Next".
6
Page 7
PL-1085
Klik op "Next " om de installatie te voltooien.
3. Na een succesvolle installatie zal er een pictogram op uw bureaublad
verschijnen:
7 Configuratie
Om het hulpprogramma te starten, dubbelklikt u op het pictogram PowerPacket
Utility op uw bureaublad.
NEDERLANDS
7
Page 8
PL-1085
7.1 Hoofdscherm
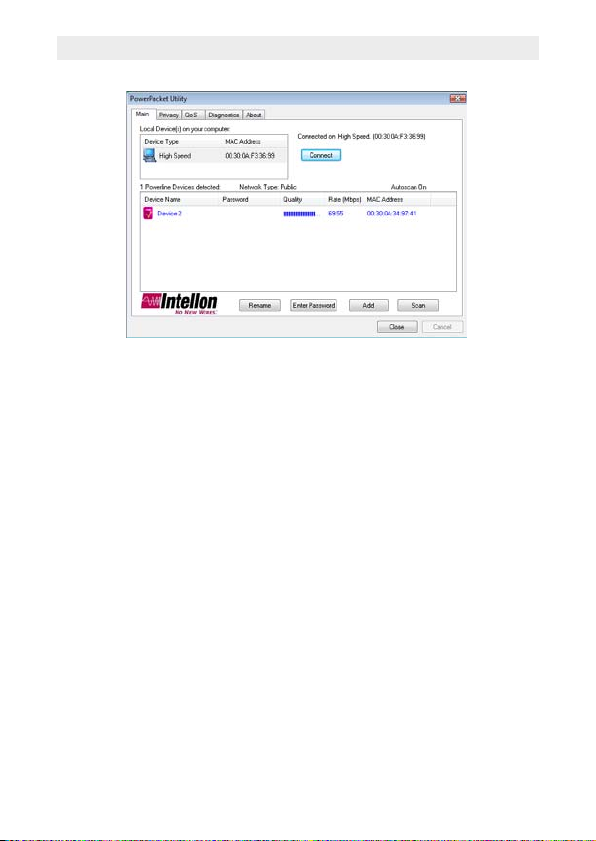
Het scherm Main toont een lijst met alle PL-1085 - apparaten die zijn
aangesloten op de computer waarop het hulpprogramma actief is.
Het bovenste paneel toont alle PL-1085-apparaten die zijn aangesloten op de
NIC (Network Interface Card) van de computer. In de meeste gevallen zult u
slechts één apparaat zien. Als er meerdere apparaten zijn aangesloten, kunt u
een apparaat selecteren en op de toets Connect klikken. Het statusgebied
boven de toets geeft aan dat uw pc is verbonden.
Het onderste paneel toont alle PL-1085 - apparaten die op het huidige
logische netwerk zijn gedetecteerd (externe apparaten). Boven dit paneel
staat aangegeven hoeveel externe apparaten er zijn gevonden, het type
logisch netwerk (Public of Private) en een berichtengebied met de
verbindings- en scanstatus.
Voor elk gedetecteerde apparaat wordt de volgende informatie weergegeven:
• Device Name: toont de standaardnaam van het apparaat. U kunt de naam
wijzigen door erop te klikken of via de toets Rename.
Optioneel wordt bij de naam een pictogram weergegeven. Er worden
verschillende pictogrammen gebruikt voor apparaten met hoge en lage
snelheden (14 Mbps of 85 Mbps).
• Password: toont het door de gebruiker ingevoerde wachtwoord voor het
apparaat (aanvankelijk leeg).
U kunt het wachtwoord invoeren door op de toets Enter Password te klikken.
Om het Password voor het apparaat in te voeren (vereist wanneer u een
privénetwerk creëert), selecteert u eerst het apparaat door op de naam in het
8
Page 9
PL-1085
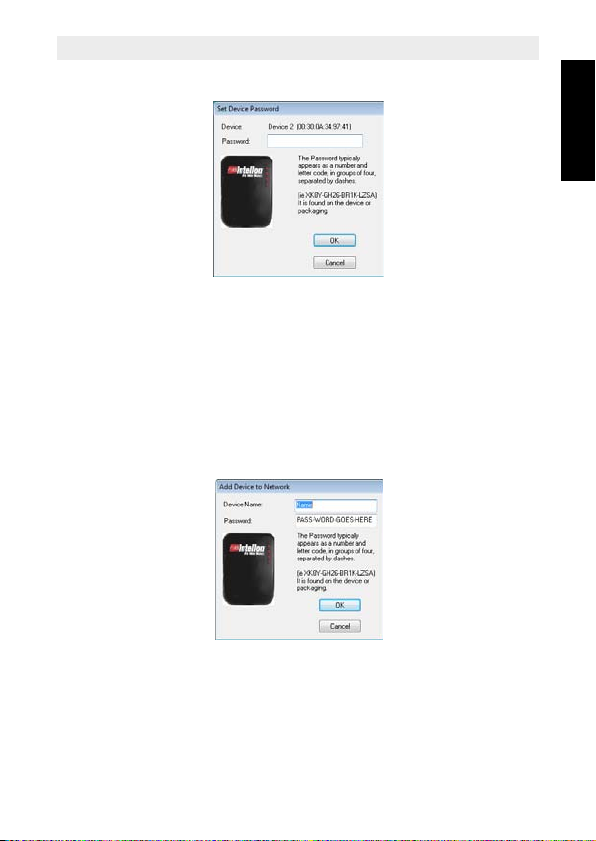
onderste paneel te klikken en vervolgens op de toets Enter Password te
klikken.
Het bovenstaande dialoogvenster zal verschijnen.
De geselecteerde apparaatnaam wordt weergegeven. Voer nu het
wachtwoord in. (Het wachtwoord is te vinden op het label onderaan op het
apparaat.) Klik op OK om het wachtwoord te bevestigen.
Er zal een bevestigingsvenster verschijnen als het wachtwoord juist is
ingevoerd.
De toets Add dient om een extern apparaat aan uw netwerk toe te voegen dat
niet in de lijst in het onderste paneel staat vermeld. Bijvoorbeeld een apparaat
dat momenteel tot een ander logisch netwerk behoort.
Wanneer u op Add klikt, verschijnt onderstaand dialoogvenster:
NEDERLANDS
Voer nu zowel een apparaatnaam als het wachtwoord in (het wachtwoord is te
vinden op het label onderaan op het apparaat).
Er zal een bevestigingsvenster verschijnen als het wachtwoord juist is
ingevoerd en het apparaat is gevonden.
• Quality: toont het kwaliteitsniveau van de verbinding tussen de externe
aansluiting en de aansluiting op uw computer.
9
Page 10
PL-1085
• MAC Address: toont het MAC-adres van het apparaat.
Opmerking:
Het apparaat moet aanwezig zijn op de elektriciteitsleiding (ingeplugd) om
bevestiging van het wachtwoord en toevoeging aan het netwerk mogelijk te
maken. Als het apparaat niet kan worden gevonden, wordt een
waarschuwingsmelding gegeven.
De toets Scan dient om onmiddellijk te laten zoeken naar PL-1085 - apparaten
die met de computer zijn verbonden. Standaard voert het hulpprogramma om
de paar seconden een scan uit, waarna het display wordt bijgewerkt.
7.2 Privacy
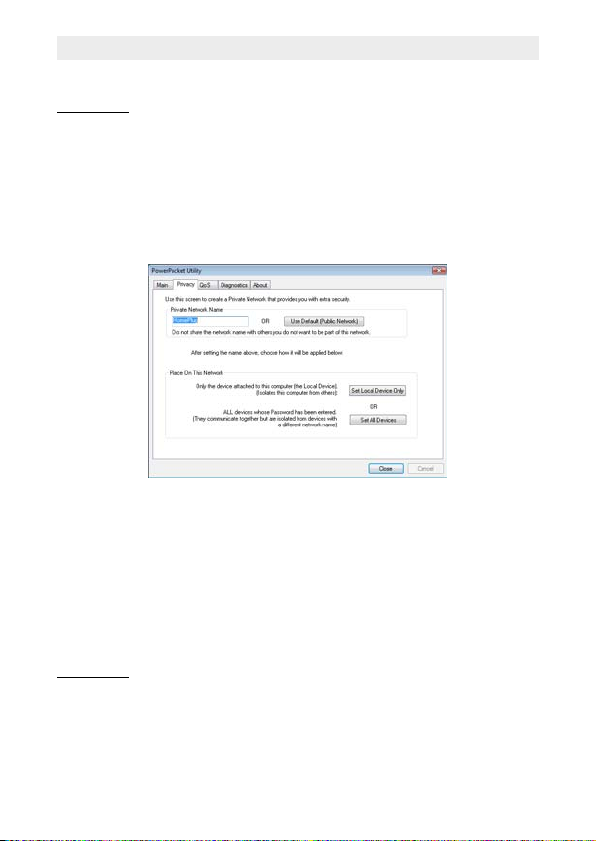
Het dialoogscherm Privacy dient voor het beheren van de beveiliging van het
lokale netwerk. Alle PL-1085 - apparaten worden geleverd voor een standaard
logisch netwerk (netwerknaam). Dit is gewoonlijk "HomePlug". Het
dialoogscherm Privacy stelt u in staat om van het netwerk een privénetwerk te
maken door de netwerknaam (het netwerkwachtwoord) van uw apparaten te
wijzigen. U kunt het netwerkwachtwoord altijd terugzetten naar de standaard
(HomePlug) door op de toets Use Default te klikken.
De Private Network Name bestaat uit 4 tot 24 alfanumerieke tekens, waarbij
onderscheid wordt gemaakt tussen hoofdletters en kleine letters.
Opmerking:
Wanneer u de netwerknaam wijzigt in iets anders dan HomePlug wordt het
netwerktype op het hoofdscherm weergegeven als "Private".
Klik op de toets Set Local Device Only om de netwerknaam (het
netwerkwachtwoord) te wijzigen voor het lokale apparaat dat rechtstreeks op
de computer is aangesloten.
10
Page 11
PL-1085
Nadat u dit hebt gedaan, zal geen van de apparaten die voor die tijd werden
weergegeven op het Main-paneel nog in staat zijn om te communiceren met
of te reageren op de computer.
Apparaten die eerder waren ingesteld op hetzelfde logische netwerk (dezelfde
netwerknaam) zullen in de apparatenlijst verschijnen nadat deze optie is
geselecteerd.
De toets Set All Devices dient om het logische netwerk voor alle
weergegeven apparaten in het Main-paneel te wijzigen. U moet het
wachtwoord van het apparaat hebben ingevoerd om het in te stellen voor het
nieuwe logische netwerk. Er zal een melding verschijnen om aan te geven of
deze actie succesvol was.
7.3 Kwaliteit van de dienst
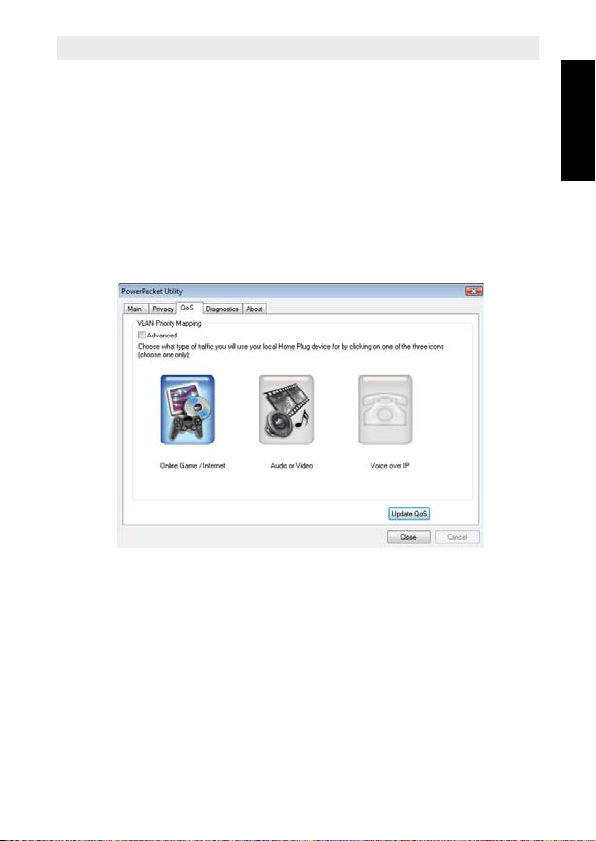
Quality of service (Qos) stelt u in staat om te bepalen welke toepassing een
gegarandeerde prioriteit ten opzichte van andere toepassingen moet krijgen.
Qos is niet standaard ingeschakeld.
Er zijn drie typen Qos beschikbaar:
• Online Game/Internet: als het apparaat wordt aangesloten op een
spelcomputer of een computer
• Audio or Video: als het apparaat wordt gebruikt voor audio-/
videostreaming
• Voice over IP: als het apparaat wordt aangesloten op een IP-telefoon
Selecteer de relevante toepassing en klik op Update Qos om te instellingen toe
te passen.
NEDERLANDS
11
Page 12
PL-1085
7.4 Scherm Diagnostics
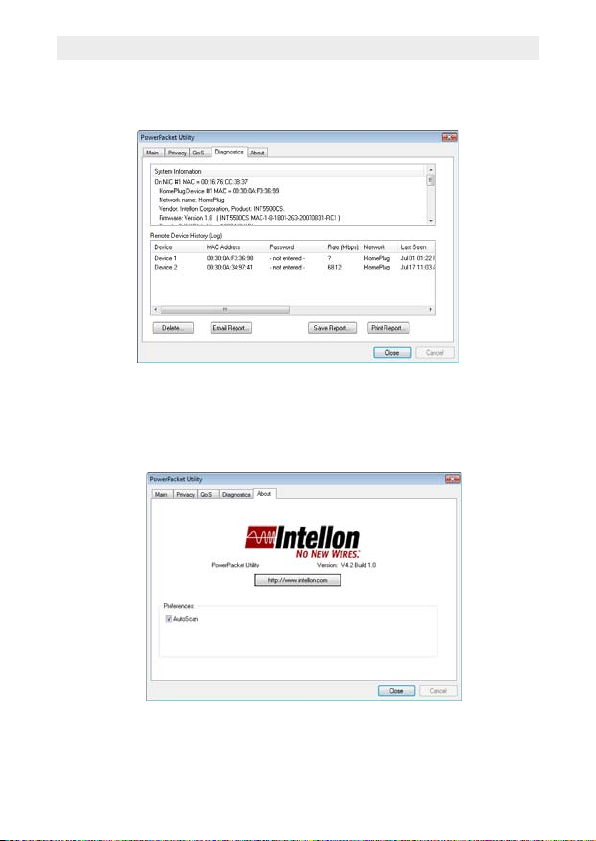
Het scherm Diagnostics toont systeeminformatie en de geschiedenis van alle
apparaten die zijn gedetecteerd.
Het bovenste paneel toont technische gegevens over de software en
hardware op de hostcomputer die wordt gebruikt om via HomePlug te
communiceren.Het onderste paneel bevat de geschiedenis van alle externe
apparaten die in de loop der tijd op de computer zijn gedetecteerd.
7.5 Scherm About
Het scherm About toont de softwareversie.
U kunt de functie Autoscan in- of uitschakelen door op het keuzevakje onder
het kopje "Preferences" te klikken.
12
Page 13

8Garantie
8.1 Garantieperiode
Op de toestellen wordt een garantie van 36 maanden verleend. De
garantieperiode gaat in op de dag waarop het nieuwe toestel wordt
gekocht. Er is geen garantie op standaard of oplaadbare batterijen (type
AA/AAA).
Kleine onderdelen of defecten die een verwaarloosbaar effect hebben op
de werking of waarde van het toestel zijn niet gedekt door de garantie.
De garantie moet worden bewezen door voorlegging van het originele
aankoopbewijs of kopie waarop de datum van aankoop en het
toesteltype staat.
8.2 Afwikkeling van garantieclaims
Een defect toestel moet, samen met een geldig aankoopbewijs en een
ingevulde onderhoudskaart, worden teruggestuurd naar een erkende
hersteldienst.
Als het toestel tijdens de garantieperiode een defect vertoont, zal de
hersteldienst eventuele defecten te wijten aan materiaal- of
productiefouten gratis herstellen, door defecte toestellen of onderdelen
van defecte toestellen ofwel te herstellen ofwel te vervangen. In het
geval dat het toestel wordt vervangen, kan de kleur en het model
verschillend zijn van het oorspronkelijk gekochte toestel.
De oorspronkelijke aankoopdatum is bepalend voor het begin van de
garantieperiode. De garantieperiode wordt niet verlengd als het toestel
wordt vervangen of hersteld door de hersteldienst.
8.3 Garantiebeperkingen
Schade of defecten te wijten aan onoordeelkundig gebruik of bediening
en schade te wijten aan het gebruik van niet-originele onderdelen of
accessoires worden niet gedekt door de garantie.
De garantie dekt geen schade te wijten aan externe factoren, zoals
bliksem, water en brand, noch enige transportschade.
Er kan geen garantie worden ingeroepen als het serienummer op het
toestel is gewijzigd, verwijderd of onleesbaar gemaakt.
Garantieclaims zijn ongeldig indien het toestel hersteld, gewijzigd of
aangepast werd door de koper.
PL-1085
NEDERLANDS
13
Page 14
PL-1085
Le PL - 1085 est un appareil Intellon HomePlug de 85 Mbps et
n'est pas recommandé pour une télévision par DSL.
1 Introduction
Une maison unifamiliale peut compter, en théorie, jusqu'à 253 connexions à
des adaptateurs PL-1085, mais, en pratique, guère plus de 10 appareils ne
doivent transférer des données simultanément.
Sécurité du réseau
Les produits PL-1085 fonctionnent immédiatement après avoir été déballés et
branchés sur une prise d'alimentation domestique, sans aucune installation ou
configuration de logiciel préalable.
Normalement, le compteur électrique forme une barrière physique, c.-à-d. que
seuls les appareils connectés à ce compteur peuvent faire partie du réseau et
bénéficier du couplage de phase.
Nous vous recommandons vivement d'utiliser le cryptage du dispositif interne
de l'adaptateur PL-1085. Celui-ci est configuré grâce à l'utilitaire de
configuration de l'adaptateur PL-1085.
Limites
Dans des conditions optimales, la distance maximale de câble entre deux
appareils PL-1085 est de 200 mètres.
Toutefois, la qualité de la connexion peut être influencée par :
– une mauvaise qualité du câblage électrique
– les fusibles
– des protections contre la foudre/les surtensions
– une installation électrique polyphasée : certaines maisons sont équipées
d'une installation électrique triphasée. La qualité du PL-1085 diminue
fortement lorsque les appareils sont connectés sur différentes phases.
Dans certains cas, il se peut même qu'aucune communication ne soit
possible !
– Certains équipements électriques, tels que fours à micro-ondes,
aspirateurs, anciens chargeurs d'ordinateurs portables/téléphones
mobiles, peuvent générer des interférences sur le réseau électrique en
cours de fonctionnement.
2Marque CE
Le symbole CE qui figure sur le produit, sur le mode d'emploi et sur la boîte
indique que l'appareil est conforme aux recommandations essentielles de la
directive R&TTE 1995/5/CE.
14
Page 15
PL-1085
3 Instructions de sécurité
Pour votre sécurité, lisez et respectez l'ensemble des avertissements et
instructions.
– N'ouvrez pas l'appareil. L'ouverture ou le retrait du couvercle de l'appareil
peut engendrer une exposition à des points dangereux de haute tension
ou comporter d'autres risques. L'appareil ne peut être révisé que par une
personne qualifiée. Contactez votre revendeur pour de plus amples
informations.
– N'utilisez pas votre appareil durant un orage. La foudre pourrait
provoquer un choc électrique.
– N'exposez pas votre appareil à la poussière ou à des liquides corrosifs.
– N'utilisez pas ce produit à proximité de sources d'eau.
– Veillez à connecter les câbles aux ports adéquats.
– N'obstruez pas les fentes de ventilation de l'appareil.
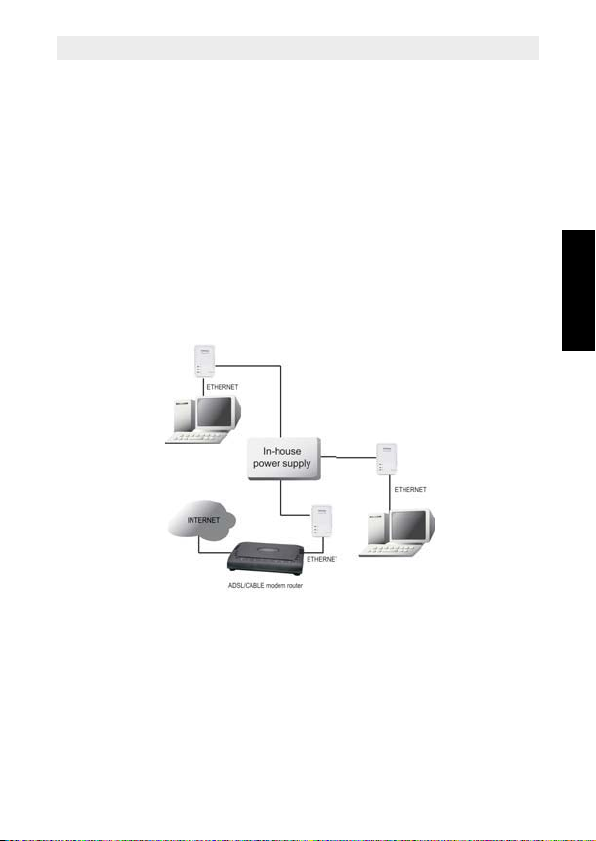
4 Applications courantes
FRANÇAIS
15
Page 16
PL-1085
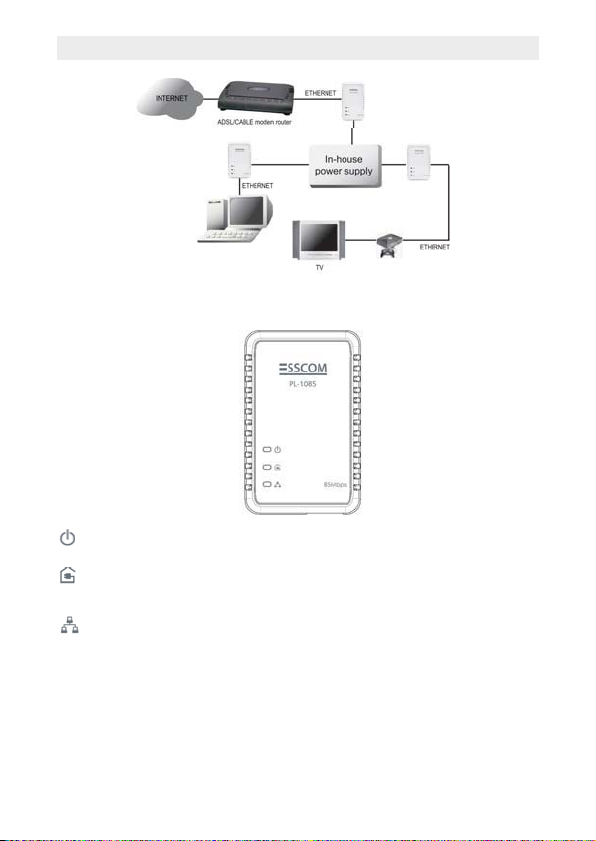
5 Voyants et connexions
allumé lorsque l'appareil est connecté à une prise d'alimentation secteur.
allumé lorsque l'appareil est détecté et connecté à un autre adaptateur PL-
1085 sur le réseau.
allumé lorsque l'appareil est connecté au port Ethernet de l'ordinateur ou
à d'autres dispositifs Ethernet. Clignotant pendant un transfert de données
ETHERNET :point de connexion de l'appareil à un ordinateur ou à d'autres
dispositifs disposant d'un port Ethernet.
16
Page 17
PL-1085
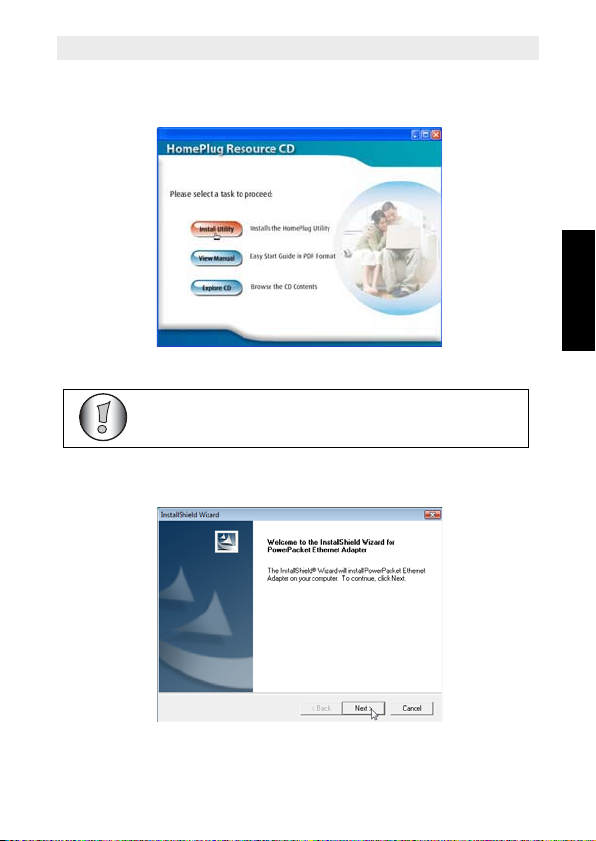
6 Installation de l'utilitaire
1. Démarrez l'ordinateur. Insérez le CD dans le lecteur de CD-ROM. L'écran
« Autorun » apparaît automatiquement :
Cliquez sur « Install Software ».
Si le menu « Autorun » ne démarre pas, vous pouvez
parcourir le CD et exécuter le programme « install.exe ».
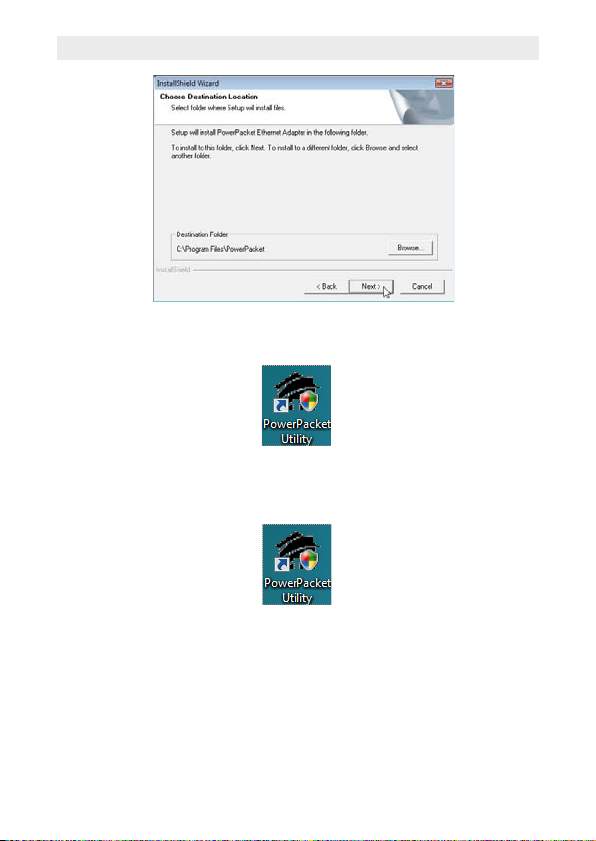
2. L'assistant d'installation démarre automatiquement.
FRANÇAIS
Cliquez sur « Next ».
17
Page 18
PL-1085
Cliquez sur « Next » pour terminer l'installation.
3. Si l'installation est réussie, une icône apparaît sur votre bureau :
7 Configuration
Pour démarrer l'utilitaire, double-cliquez sur l'icône « PowerPacket Utility » sur
votre bureau.
18
Page 19
PL-1085
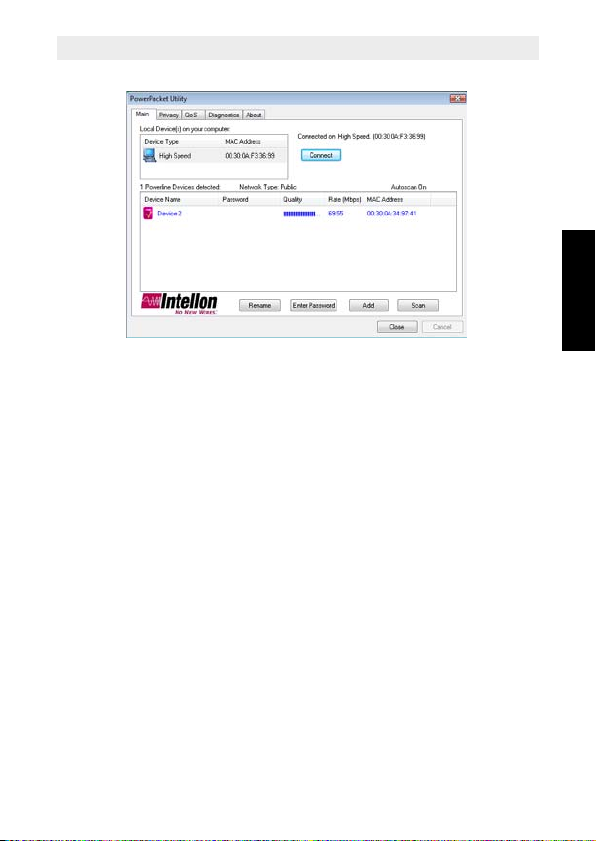
7.1 Onglet « Main »
L'écran « Main » affiche une liste de tous les dispositifs PL-1085 connectés à
l'ordinateur sur lequel l'utilitaire est actif.
Le panneau supérieur indique tous les dispositifs PL-1085 locaux connectés à
la carte réseau de l'ordinateur. Dans la plupart des cas, un seul dispositif est
affiché. Si plusieurs dispositifs sont connectés, vous pouvez en sélectionner
un et cliquer sur le bouton « Connect ». La zone d'état située au-dessus du
bouton indique que votre PC est connecté.
Le panneau inférieur affiche tous les dispositifs PL-1085 trouvés sur le réseau
logique actuel (dispositifs distants). Au-dessus de ce panneau, se trouvent le
nombre de dispositifs distants trouvés, le type de réseau logique (public ou
privé) et une zone de message indiquant l'état de la connectivité et du
balayage.
Pour chaque dispositif trouvé, apparaissent les informations suivantes :
• Device Name : indique le nom du dispositif par défaut. Vous pouvez changer
ce nom en cliquant sur celui-ci ou en utilisant le bouton « Rename ».
Une icône apparaît parfois avec le nom. Une distinction doit être faite entre les
icônes des dispositifs à faible et à grande vitesse (dispositifs de 14 Mbps ou
de 85 Mbps).
• Password : indique le mot de passe du dispositif fourni par l'utilisateur
(initialement laissé vierge).
Vous pouvez saisir le mot de passe grâce au bouton « Enter Password ».
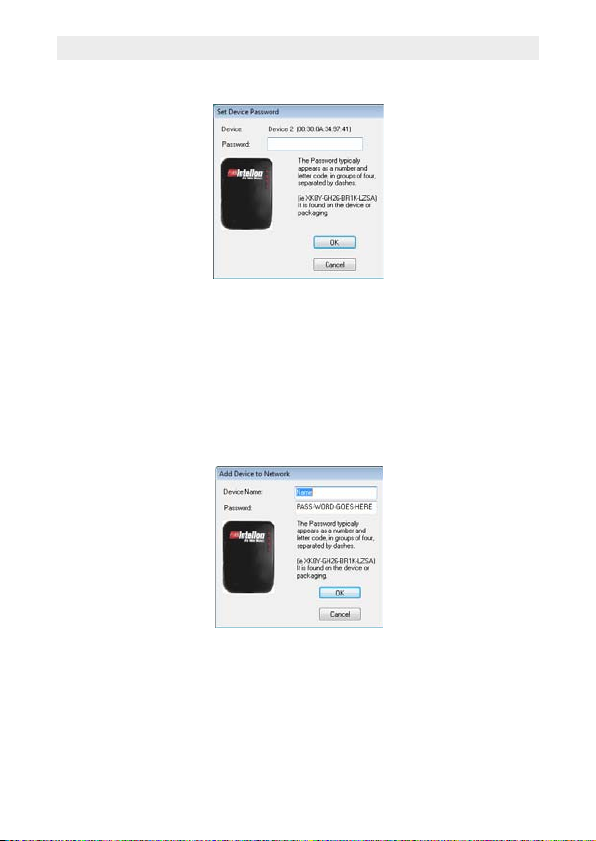
Pour saisir le mot de passe du dispositif (requis lors de la création d'un
réseau privé), sélectionnez tout d'abord le dispositif en cliquant sur son nom
FRANÇAIS
19
Page 20
PL-1085
dans le panneau inférieur et cliquez ensuite sur le bouton « Enter
Password ».
La boîte de dialogue ci-dessus apparaît.
Le nom du dispositif sélectionné est indiqué. Saisissez le mot de passe. (Le
mot de passe est indiqué sur l'étiquette située au bas de l'appareil). Cliquez
sur « OK » pour confirmer le mot de passe.
Une boîte de confirmation apparaît si le mot de passe est saisi correctement.
Utilisez le bouton « Add » pour ajouter, à votre réseau, un dispositif distant
n'apparaissant pas dans la liste du panneau inférieur. Par exemple, un
dispositif actuellement sur un autre réseau logique.
Lorsque vous cliquez sur « Add », la boîte de dialogue ci-dessous apparaît :
Saisissez le nom du dispositif et le mot de passe (le mot de passe est indiqué
sur l'étiquette située au bas de l'appareil).
Une boîte de confirmation apparaît si le mot de passe est saisi correctement et
si le dispositif est trouvé.
• Quality : indique le niveau de qualité de la connexion entre la fiche distante
et la fiche connectée à votre ordinateur.
20
Page 21
PL-1085
• MAC Address : indique l'adresse MAC du dispositif.
Remarque :
L'appareil doit être présent (branché) sur la ligne d'alimentation pour que le
mot de passe puisse être confirmé et ajouté au réseau. Si l'appareil ne peut
être localisé, un message d'avertissement apparaît.
Utilisez le bouton « Scan » pour effectuer une recherche immédiate des
dispositifs PL-1085 connectés à l'ordinateur. Par défaut, l'utilitaire effectue
automatiquement un balayage toutes les quelques secondes et met l'écran à
jour.
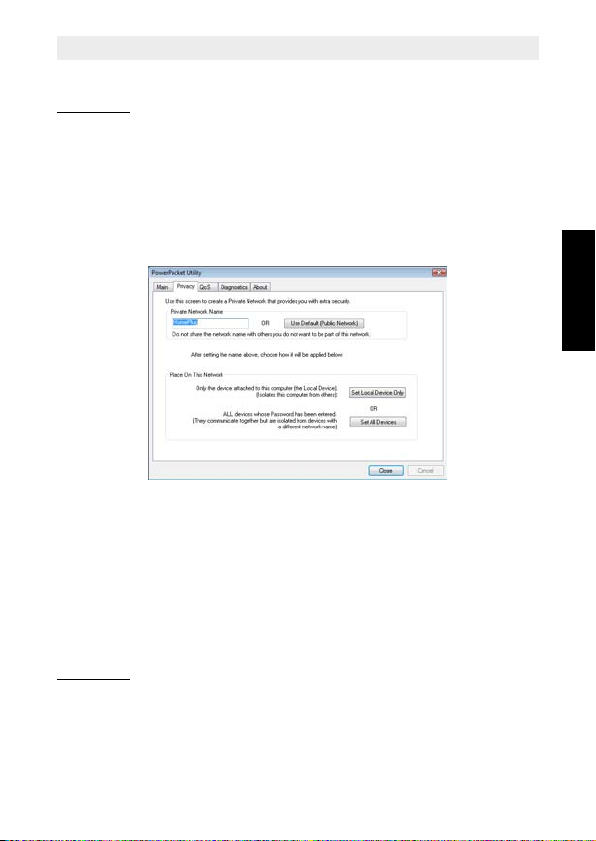
7.2 Onglet « Privacy »
Utilisez l'écran de dialogue « Privacy » pour gérer la sécurité du réseau local.
Tous les dispositifs PL-1085 sont livrés avec un réseau logique par défaut
(nom du réseau), qui est normalement « HomePlug ». L'écran de dialogue
« Privacy » vous permet de rendre votre réseau privé en changeant le nom du
réseau (mot de passe du réseau) de vos appareils. Vous pouvez toujours
réinitialiser le mot de passe du réseau par défaut (HomePlug) en cliquant sur
le bouton « Use Default ».
Le nom du réseau privé se compose de 4 à 24 caractères alphanumériques
sensibles à la casse.
Remarque :
Une modification du nom du réseau en un autre, différent de « HomePlug »
engendre l'affichage du type du réseau sur l'écran principal comme Privé.
Cliquez sur le bouton « Set Local Device Only » pour modifier le nom du
réseau (mot de passe du réseau) du dispositif local connecté directement à
l'ordinateur.
FRANÇAIS
21
Page 22
PL-1085
Après quoi, tous les dispositifs auparavant visibles sur le panneau principal
seront incapables de communiquer ou de répondre à l'ordinateur.
Les dispositifs précédemment configurés avec le même réseau logique
(même nom du réseau) apparaissent dans la liste de dispositifs après
sélection de cette option.
Utilisez le bouton « Set All Devices » pour modifier le réseau logique de tous
les dispositifs apparaissant sur le panneau principal. L'utilisateur doit avoir
saisi le mot de passe de l'appareil pour le configurer dans le nouveau réseau
logique. Un message de notification apparaît pour signaler la réussite de cette
opération.
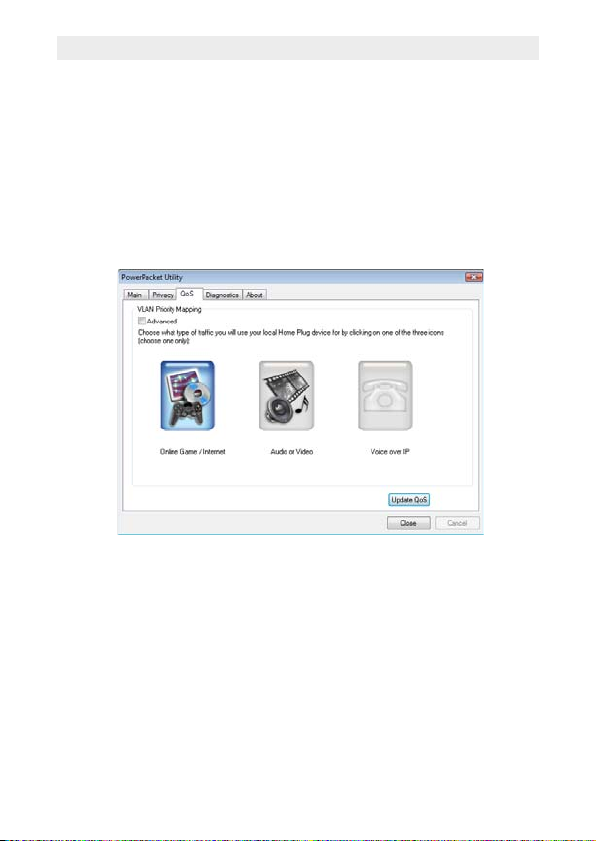
7.3 Onglet « Quality of Service »
L'écran « Qos » vous permet de déterminer quelle application se verra
garantir la priorité sur d'autres.
La fonction Qos n'est pas activée par défaut.
Trois types de Qos sont disponibles :
• Online Game/Internet : si le dispositif est connecté à une console de
jeux ou à un ordinateur.
• Audio or Video : si le dispositif est utilisé pour une diffusion audio/vidéo.
• Voice over IP : si le dispositif est connecté à un téléphone IP.
Sélectionnez votre application et cliquez sur « Update Qos » pour appliquer
ces paramètres.
22
Page 23
PL-1085
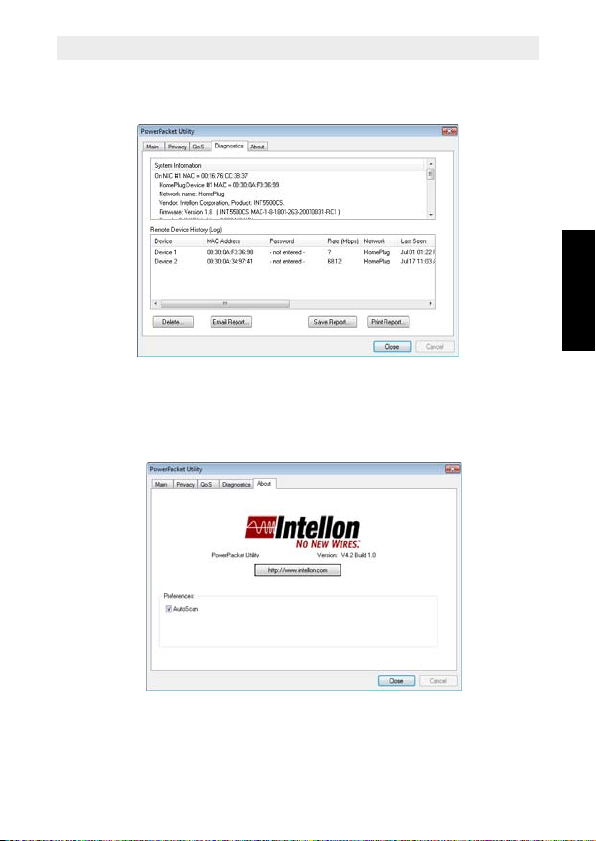
7.4 Onglet « Diagnostics »
L'écran « Diagnostics » indique des informations sur le système et un
historique de tous les dispositifs trouvés.
Le panneau supérieur contient des données techniques relatives au logiciel et
au matériel de l'ordinateur hôte utilisé pour communiquer avec HomePlug.
Le panneau inférieur contient un historique de tous les dispositifs distants
trouvés sur l'ordinateur, dans le temps.
7.5 Onglet « About »
FRANÇAIS
L'écran « About » indique la version du logiciel.
Vous pouvez activer ou désactiver la fonction « Autoscan » en cliquant sur la
case à cocher située sous la colonne « Preferences ».
23
Page 24

PL-1085
8Garantie
8.1 Période de garantie
Les appareils bénéficient d'une période de garantie de 36 mois. La
période de garantie prend effet le jour de l'achat du nouvel appareil. Il n'y
a aucune garantie sur les piles standard ou rechargeables (de type AA/
AAA).
Les accessoires et les défauts qui ont un effet nuisible sur le
fonctionnement ou la valeur de l'appareil ne sont pas couverts.
La garantie s'applique uniquement sur présentation du reçu d'achat
original ou une copie de celui-ci sur lequel figurent la date de l'achat et
le modèle de l'appareil.
8.2 Mise en œuvre de la garantie
Tout appareil défectueux doit être retourné à un centre de service aprèsvente agréé, accompagné d'un ticket d'achat valable et d'une fiche de
service dûment complétée.
En cas de panne pendant la période de garantie, le centre de service
après-vente réparera gratuitement les dysfonctionnements dus à un vice
de matière ou de fabrication, en réparant ou en remplaçant les pièces ou
les appareils défectueux. En cas de remplacement, la couleur et le
modèle peuvent être différents de ceux de l'appareil acheté initialement.
La date d'achat initiale détermine le début de la période de garantie. La
période de garantie n'est pas prolongée si l'appareil est remplacé ou
réparé par le centre de service après-vente.
8.3 Exclusions de garantie
Les dommages et les pannes causés par un mauvais traitement ou une
utilisation incorrecte et les dommages qui résultent de l'utilisation de
pièces et d'accessoires non originaux ne sont pas couverts par la
garantie.
La garantie ne couvre pas les dommages causés par des éléments
extérieurs tels que la foudre, l'eau et le feu, ni les dommages provoqués
par le transport.
Aucune garantie ne pourra être invoquée si le numéro de série indiqué
sur les appareils a été modifié, supprimé ou rendu illisible.
Aucune garantie ne peut non plus être invoquée si l'appareil a été réparé
ou modifié par l'acheteur.
24
Page 25

PL-1085
1 Einleitung
Die maximale Anzahl an PL-1085 - Adaptern in einem Einfamilienhaus liegt
theoretisch bei 253 Verbindungen. In der Praxis sollten jedoch nicht mehr als
10 Geräte Daten gleichzeitig übertragen.
Netzwerksicherheit
Die PL-1085 - Produkte sind sofort nach dem Auspacken einsatzfähig und
können ohne jegliche Software-Installation und -Konfiguration sofort an das
Stromnetz in Ihrem Haus angeschlossen werden.
Normalerweise stellt der Stromzähler eine physische Barriere dar, d. h., nur an
diesen Zähler angeschlossene Geräte können Bestandteil des Netzwerks sein
und somit von der Phasenkopplung profitieren.
Wir empfehlen dringend, dass Sie die interne Geräteverschlüsselung des PL1085 - Adapters verwenden. Diese kann mit dem Konfigurationsprogramm
des PL-1085 - Adapters konfiguriert werden.
Einschränkungen
Unter optimalen Bedingungen kann der maximale Kabelabstand zwischen
zwei PL-1085 - Geräten 200 Meter betragen.
Die Verbindungsqualität kann jedoch von folgenden Faktoren beeinflusst
werden:
– Schlechte Qualität der Stromverkabelung
– Sicherungen
– Überspannungsschutz
– Mehrphasen-Elektrizität: In einigen Haushalten erfolgt die
Elektrizitätsversorgung als Drehstrom mit drei Phasen. Die
Verbindungsqualität von PL-1085 - Geräten nimmt dramatisch ab, wenn
die Geräte auf unterschiedlichen Phasen angeschlossen werden. In
einigen Fällen kommt überhaupt keine Kommunikation zustande!
– Einige elektronische Geräte, wie Mikrowellen, Staubsauger, ältere
Laptop-Modelle und Aufladegeräte für Mobiltelefone, erzeugen während
des Betriebs Geräusche im Netzwerk.
Das PL-1085 ist ein Intellon HomePlug-Gerät mit einer
Übertragungsrate von 85 Mbit/s, das nicht für DSL-TV
geeignet ist.
DEUTSCH
2 CE-Kennzeichnung
Das CE-Zeichen auf dem Gerät, der Bedienungsanleitung und der Verpackung
zeigt an, dass das Gerät die grundlegenden Anforderungen der R&TTERichtlinie 1999/5/EG erfüllt.
25
Page 26
PL-1085
3 Sicherheitshinweise
Lesen und befolgen Sie zu Ihrer eigenen Sicherheit alle Warnungen und
Anweisungen.
– Öffnen Sie nicht das Gerät. Durch das Öffnen oder Entfernen der
Geräteabdeckung können Sie sich einer gefährlichen Hochspannung
sowie anderen Gefahren aussetzen. Das Gerät kann nur durch
qualifiziertes Personal gewartet werden. Weitere Informationen erhalten
Sie von Ihrem Händler.
– Verwenden Sie das Gerät nicht während eines Gewitters. Es besteht die
Gefahr eines Stromschlags durch Blitzeinschlag.
– Setzen Sie das Gerät keinem Staub oder korrosiven Flüssigkeiten aus.
– Verwenden Sie das Produkt nicht in der Nähe von Wasserquellen.
– Stellen Sie sicher, dass die Kabel an die richtigen Ports angeschlossen
sind.
– Die Belüftungsschlitze des Geräts dürfen nicht blockiert sein.
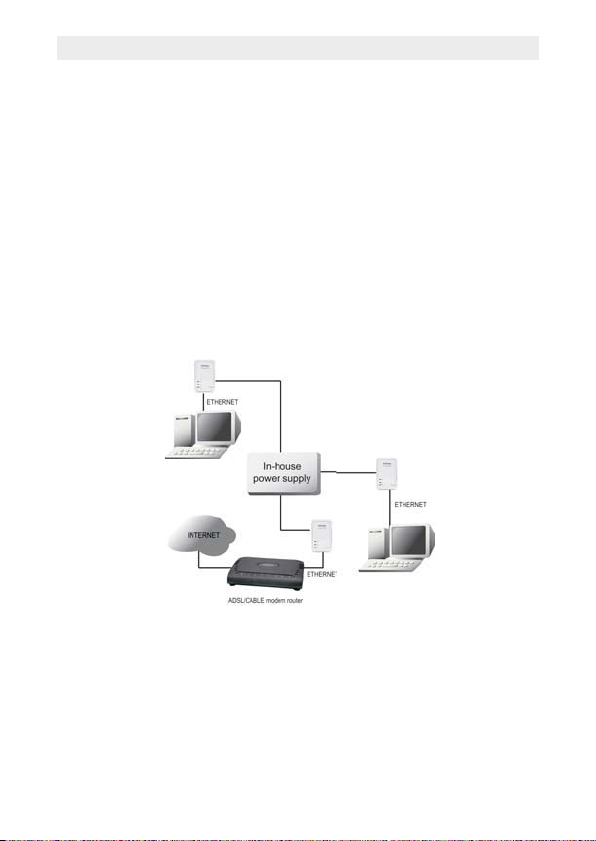
4 Typische Anwendungen
26
Page 27
PL-1085
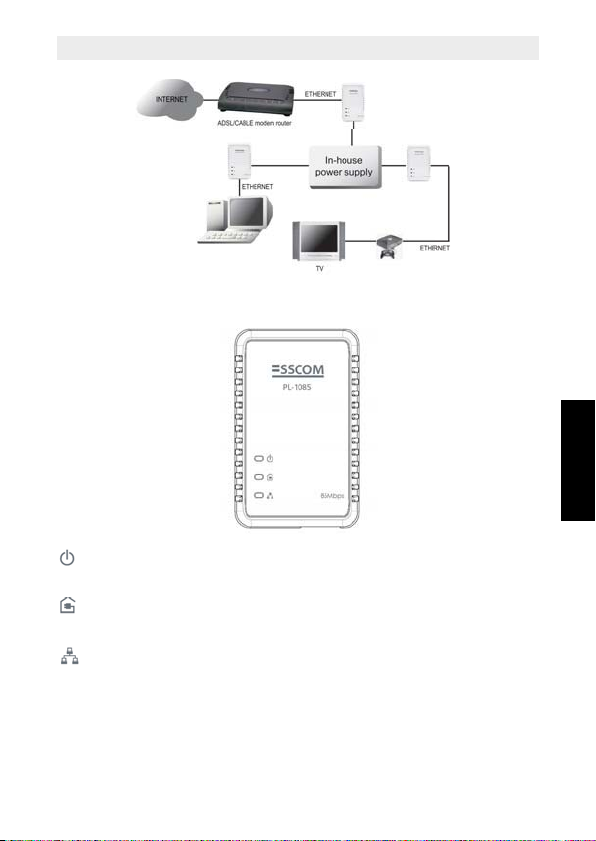
5 LEDs und Verbindungen
Eingeschaltet, wenn das Gerät an die Stromversorgung angeschlossen
ist.
Eingeschaltet, wenn das Gerät erkannt und mit einem anderen PL-1085 -
Adapter im Netzwerk verbunden ist.
Leuchtet auf, wenn das Gerät mit dem Ethernet-Port des Computers oder
mit anderen Ethernet-Geräten verbunden ist.
Blinkt während der Datenübertragung.
ETHERNET: Dies ist der Punkt für die Verbindung mit einem Computer
oder anderen Geräten mit Ethernet-Port.
DEUTSCH
27
Page 28
PL-1085
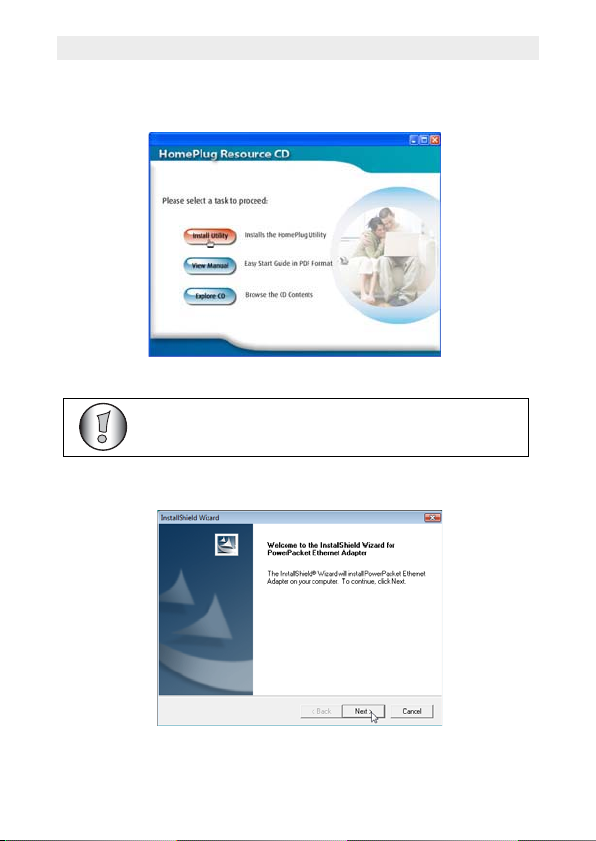
Wenn das Autorun-Menü nicht gestartet wird, können Sie die
CD durchsuchen und die Datei "install.exe" ausführen.
6 Installation
1. Schalten Sie den Computer ein. Legen Sie die CD in das CD-ROM-
Laufwerk ein. Das Autorun-Fenster wird automatisch angezeigt:
Klicken Sie auf "Install Utility".
2. Der Installationsassistent wird automatisch gestartet.
Klicken Sie auf "Next".
28
Page 29
PL-1085
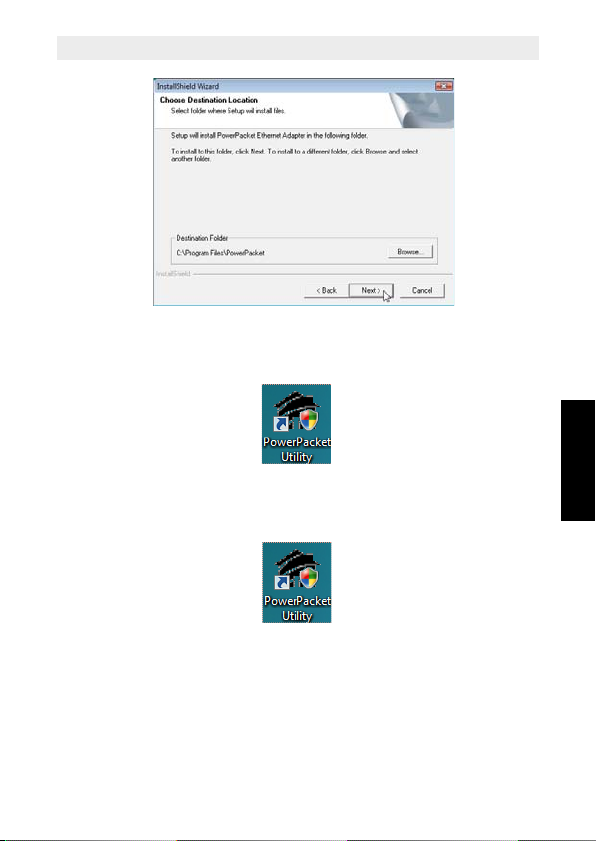
Klicken Sie auf "Next", um die Installation abzuschließen.
3. Nach der erfolgreichen Installation wird auf Ihrem Desktop folgendes Symbol
angezeigt:
7 Konfiguration
Um das Programm zu starten, klicken Sie auf das Symbol "PowerPacket Utility"
auf Ihrem Desktop.
DEUTSCH
29
Page 30
PL-1085
7.1 Bildschirm "Main"
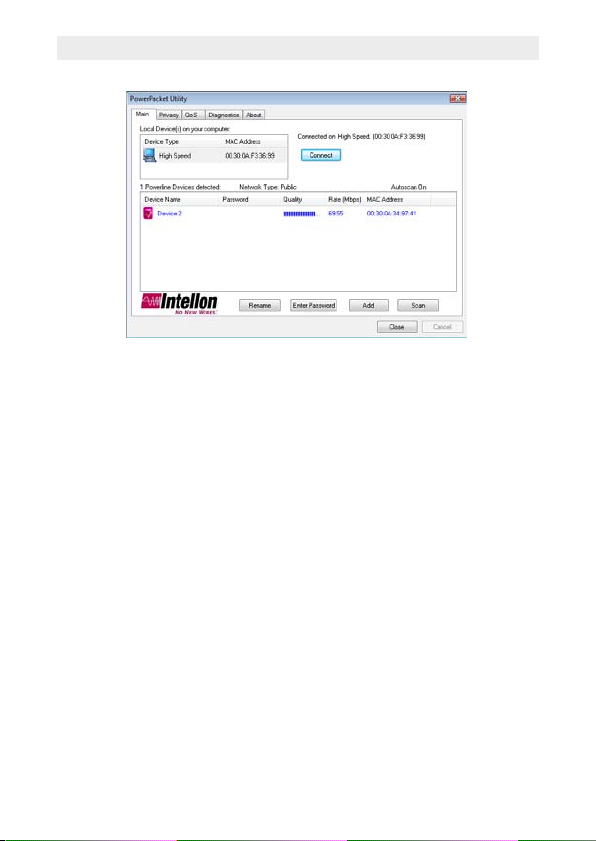
Der Bildschirm Main enthält eine Liste aller PL-1085 - Geräte, die mit dem
Computer verbunden sind, auf dem das Programm ausgeführt wird.
Im oberen Bereich werden alle mit der NIC (Network Interface Card) des
Computers verbundenen lokalen Geräte angezeigt. Für gewöhnlich ist das nur
ein Gerät. Wenn mehr als ein Gerät angeschlossen ist, können Sie das Gerät
auswählen und dann auf die Schaltfläche Connect klicken. Im Statusbereich
überhalb der Schaltfläche wird der Verbindungsstatus Ihres PCs angezeigt.
Der untere Bereich enthält alle PL-1085 - Geräte, die im aktuellen logischen
Netzwerk ermittelt wurden (Remote-Geräte). Über diesem Bereich werden die
Anzahl der gefundenen Geräte, der Typ des logischen Netzwerks ("Public"
oder "Private") sowie eine Meldung zum Verbindungs- und Scanstatus
angezeigt.
Für jedes gefundene Geräte wird die folgende Information angezeigt:
• Device Name: Gibt den Standard-Gerätenamen an. Sie können den Namen
ändern, indem Sie auf den Namen klicken oder die Schaltfläche Rename
wählen.
Optional kann auch ein Symbol mit dem Namen angezeigt werden. Es gibt ein
Symbol für Geräte mit geringer Geschwindigkeit und eines für Geräte mit
hoher Geschwindigkeit (Geräte mit 14 Mbit/s und Geräte mit 85 Mbit/s).
• Password: Gibt das vom Benutzer definierte Kennwort für das Gerät an
(ursprünglich leer).
Sie können das Kennwort über die Schaltfläche Enter Password eingeben.
Um das Kennwort für das Gerät anzugeben (erforderlich beim Erstellen eines
30
Page 31
PL-1085
privaten Netzwerks), wählen Sie das Gerät zunächst aus, indem Sie im
unteren Bereich auf den entsprechenden Namen klicken, und klicken Sie dann
auf die Schaltfläche Enter Password.
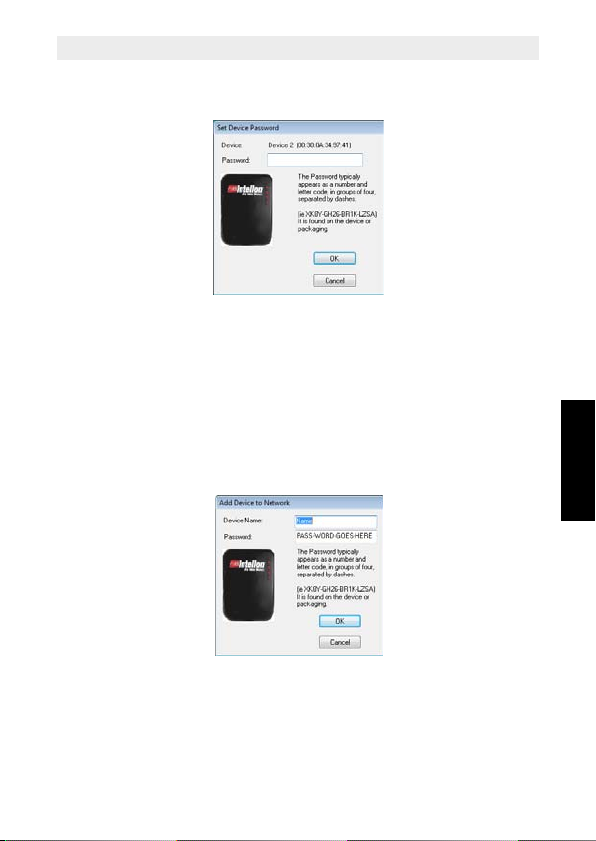
Es wird das oben dargestellte Dialogfeld angezeigt.
Es enthält den ausgewählten Gerätenamen. Geben Sie nun das Kennwort ein.
(Das Kennwort finden Sie auf der Unterseite des Geräts.) Klicken Sie auf OK,
um das Kennwort zu bestätigen.
Wenn das Kennwort richtig eingegeben wurde, wird ein entsprechendes
Bestätigungs-Dialogfeld angezeigt.
Über die Schaltfläche Add können Sie Ihrem Netzwerk ein Remote-Gerät
hinzufügen, das nicht in der Liste im unteren Bereich enthalten ist. Beispiel:
Ein Gerät, das sich aktuell in einem anderen logischen Netzwerk befindet.
Wenn Sie auf Add klicken, wird das folgende Dialogfeld angezeigt:
DEUTSCH
Geben Sie nun sowohl einen Gerätenamen als auch das entsprechende
Kennwort ein (das Kennwort finden Sie auf der Unterseite des Geräts).
Wenn das Kennwort richtig eingegeben und das Gerät gefunden wurde, wird
ein entsprechendes Bestätigungs-Dialogfeld angezeigt.
• Quality: Zeigt die Verbindungsqualität zwischen dem Remote-Stecker und
dem an Ihren Computer angeschlossenen Stecker an.
31
Page 32
PL-1085
• MAC Address: Gibt die MAC-Adresse des Geräts an.
Hinweis:
Das Gerät muss an die Stromversorgung angeschlossen sein, damit das
Kennwort bestätigt und zum Netzwerk hinzugefügt werden kann. Wenn das
Gerät nicht gefunden wurde, wird eine Warnmeldung angezeigt.
Über die Schaltfläche Scan können Sie schnell die mit dem Computer
verbundenen PL-1085 - Geräte durchsuchen. Standardmäßig führt das
Programm alle paar Sekunden einen Scan durch und aktualisiert die Anzeige
entsprechend.
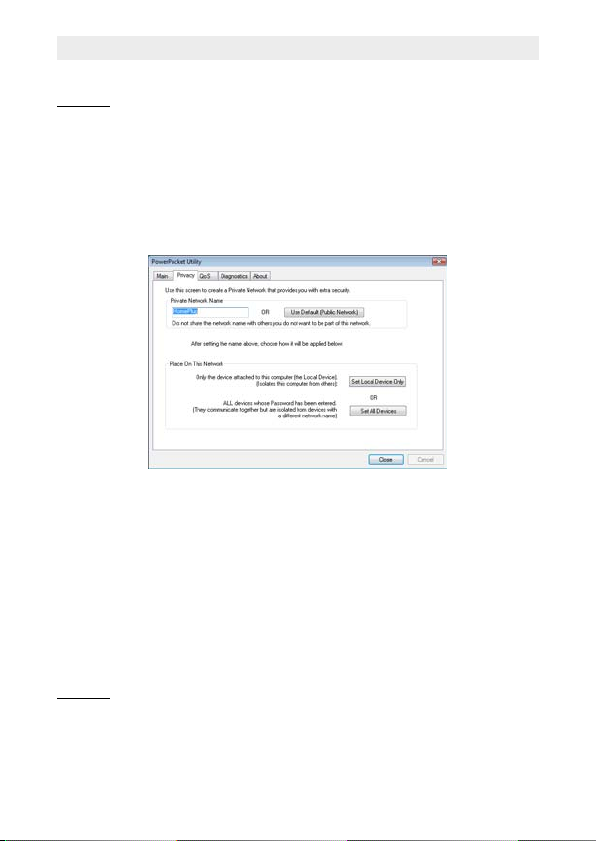
7.2 Privatsphäre
Im Dialogfeld Privacy können Sie die Sicherheit des lokalen Netzwerks
verwalten. Alle PL-1085 - Geräte werden mit einem standardmäßig
verwendeten logischen Netzwerk (Netzwerkname) geliefert (normalerweise
"HomePlug"). Über das Dialogfeld Privacy können Sie das Netzwerk in ein
privates Netzwerk umwandeln, indem Sie den Netzwerknamen
(Netzwerkkennwort) Ihrer Geräte ändern. Sie können das Netzwerkkennwort
auch jederzeit auf die Standardeinstellung (HomePlug) zurücksetzen, indem
Sie auf die Schaltfläche Use Default klicken.
Der Name des privaten Netzwerks (Private Network Name) setzt sich aus 4
bis 24 alphanumerischen Zeichen (unter Beachtung der Groß-/
Kleinschreibung) zusammen.
Hinweis:
Durch das Ändern des Netzwerknamens in einen anderen Namen als
HomePlug wird der Netzwerktyp im Bildschirm Main als "Private" angegeben.
Klicken Sie auf die Schaltfläche Set Local Device Only, um den
Netzwerknamen (Netzwerkkennwort) für das lokale Gerät zu ändern, das
32
Page 33
PL-1085
direkt mit dem Computer verbunden ist.
Anschließend können alle Geräte, die auf dem Bildschirm Main angezeigt
wurden, nicht mehr mit dem Computer kommunizieren.
Geräte, die zuvor mit demselben logischen Netzwerk (gleicher
Netzwerkname) eingerichtet wurden, sind nach Auswahl dieser Option in der
Geräteliste enthalten.
Über die Schaltfläche Set All Devices können Sie das logische Netzwerk für
alle im Bildschirm Main angezeigten Geräte ändern. Der Benutzer muss dabei
das Kennwort für das entsprechende Gerät angegeben haben, um es auf das
neue logische Netzwerk einstellen zu können. Eine Benachrichtigungsmeldung wird angezeigt, die angibt, dass der Vorgang erfolgreich war.
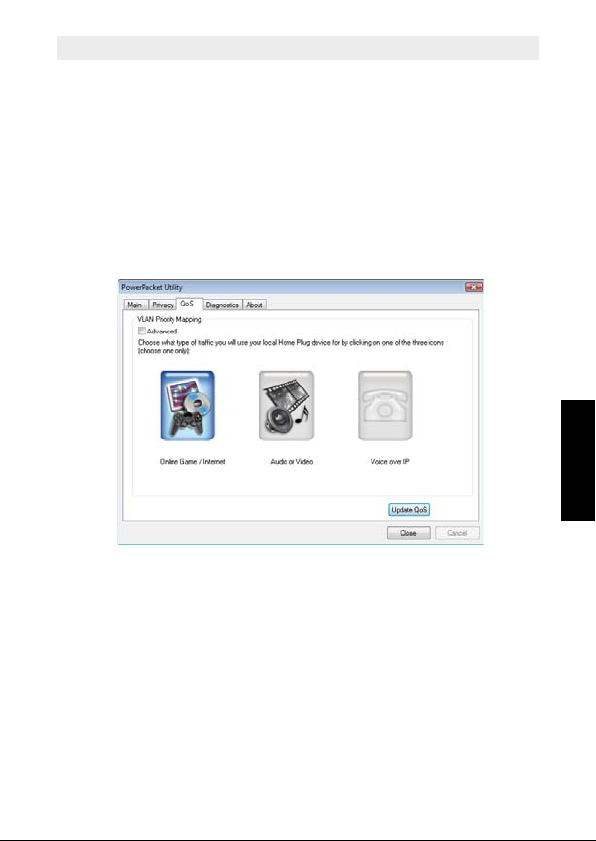
7.3 Quality of Service (QoS)
Mit Quality of Service (QosS) können Sie ermitteln, welche Anwendung über
andere Anwendungen priorisiert wird, um optimierte Dienste zu bieten.
QoS ist standardmäßig nicht aktiviert.
Es stehen drei Typen von QoS zur Verfügung:
• Online Game/Internet: Wenn das Gerät an eine Spielkonsole oder an
einen Computer angeschlossen werden soll.
• Audio or Video: Wenn das Gerät für Video- und Audioaufnahmen
verwendet werden soll.
• Voice over IP: Wenn das Gerät an ein IP-Telefon angeschlossen werden
soll.
Wählen Sie die gewünschte Anwendungsart aus, und klicken Sie auf Update
QoS, um die Einstellungen anzuwenden.
DEUTSCH
33
Page 34
PL-1085
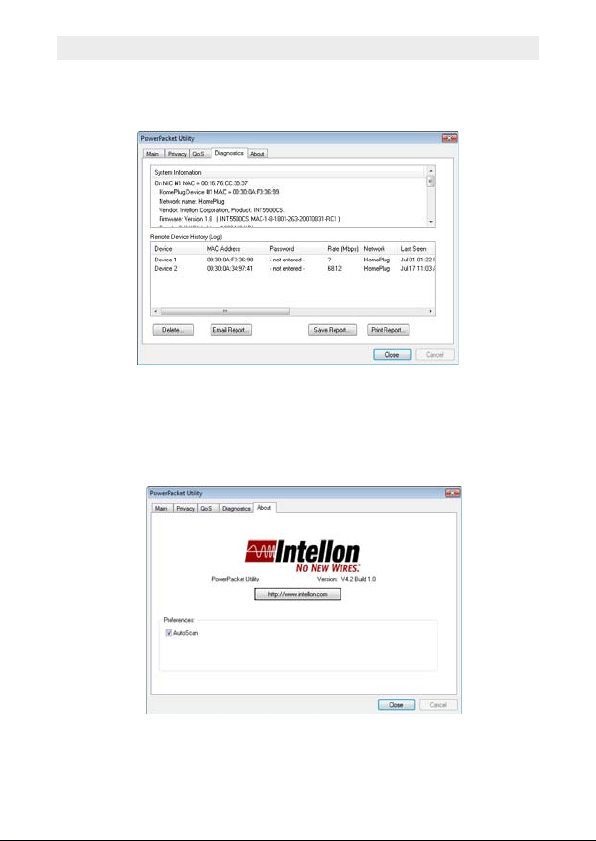
7.4 Bildschirm "Diagnostics"
Der Bildschirm Diagnostics enthält Systeminformationen sowie Verlaufsdaten
zu allen angezeigten Geräten.
Im oberen Bereich werden technischen Daten zu Software und Hardware auf
dem Host-Computer angezeigt, der für die Kommunikation über HomePlug
verwendet wird.
Der untere Bereich enthält Verlaufsdaten zu allen Remote-Geräten auf dem
Computer.
7.5 Bildschirm "About"
Im Bildschirm About wird die Softwareversion angezeigt.
Sie können die Funktion Autoscan aktivieren oder deaktivieren, indem Sie
unter Preferences auf das Kontrollkästchen klicken.
34
Page 35

8Garantie
8.1 Garantiezeit
Die Geräte haben eine 36-monatige Garantiezeit. Die Garantiezeit
beginnt an dem Tag, an dem das neue Gerät erworben wurde. Die
Garantie gilt nicht für normale Batterien oder wiederaufladbare Akkus
(Typen AA/AAA).
Verschleißteile oder Mängel, die den Wert oder die
Gebrauchstauglichkeit des Geräts nur unerheblich beeinflussen, sind
von der Garantie ausgeschlossen.
Der Garantieanspruch muss durch den Originalkaufbeleg oder eine
Kopie des Kaufbelegs, auf dem das Kaufdatum und das Gerätemodell
ersichtlich sind, nachgewiesen werden.
8.2 Abwicklung des Garantiefalls
Senden Sie das fehlerhafte Gerät mit dem gültigen Kaufbeleg und einer
ausgefüllten Rücksendekarte an ein autorisiertes Service-Zentrum.
Tritt ein Gerätefehler innerhalb der Garantiezeit auf, übernimmt das
autorisierte Service-Zentrum unentgeltlich die Reparatur jedes durch
einen Material- oder Herstellungsfehler aufgetretenen Defekts mittels
Reparatur oder Austausch des fehlerhaften Geräts oder von Teilen des
fehlerhaften Geräts. Bei einem Austausch können Farbe und Modell
vom eigentlich erworbenen Gerät abweichen.
Das ursprüngliche Kaufdatum bestimmt den Beginn der Garantiezeit.
Die Garantiezeit verlängert sich nicht, wenn das Gerät von autorisierten
Service-Zentren ausgetauscht oder repariert wird.
8.3 Garantieausschlüsse
Schäden oder Mängel, die durch unsachgemäße Handhabung oder
unsachgemäßen Betrieb verursacht werden, sowie Defekte, die durch
die Verwendung von Nicht-Originalteilen oder -zubehör entstehen,
werden nicht von der Garantie abgedeckt.
Die Garantie deckt keine Schäden ab, die durch äußere Einflüsse
entstanden sind, wie z. B. Blitzeinschlag, Wasser, Brände oder jegliche
Transportschäden.
Wenn die Seriennummer des Geräts verändert, entfernt oder unleserlich
gemacht wurde, kann keine Garantie in Anspruch genommen werden.
Alle Garantieansprüche erlöschen, wenn das Gerät vom Käufer
repariert, verändert oder umgebaut wurde.
PL-1085
DEUTSCH
35
Page 36
PL-1085
The PL-1085 is a 85Mbps based Intellon HomePlug device
and is not recommended for DSL TV.
1 Introduction
The maximum number of PL-1085 adaptors in a single-family house is theoretically 253 connections, but in practice no more than 10 devices should
be transferring data simultaneously.
Network Security
The PL-1085 products will immediately work after unpacking and plugging
them into the power connection of your home, even without any software
installation and configuration.
Normally the electric meter forms a physical barrier, i.e. only devices connected to this meter can be part of the network and benefit from the phase
coupling.
We strongly recommend that you use the PL-1085 Adaptor internal device
encryption. It is configured with the PL-1085 Adaptor Configuration Utility.
Limitations
In optimal conditions, the maximum cable distance between two PL-1085
devices can be 200 meters.
However, the connection quality will be influenced by :
– Bad quality of electricity cabling.
– Fuses.
– Lightning/overvoltage protections.
– Multiphase electricity : some homes have 3-phase electricity. The PL-
1085 quality will decrease dramatically when connecting the devices on
different phases. In some cases there will be no communication possible
at all !
– Some electrical equipment like microwave ovens, vacuum cleaners,
earlier laptop/mobile phone chargers will generate noise on the electrical
network during operation.
2CE Mark
The CE symbol on the unit, user guide and giftbox indicates that the unit
complies with the essential requirements of the R&TTE directive 1995/5/EC.
36
Page 37
PL-1085
3 Safety instructions
For your safety, be sure to read and follow all warning notices and instructions.
– Do not open the device. Opening or removing the device cover can
expose you to dangerous high voltage points or other risks. Only qualified
service personnel can service the device. Please contact your vendor for
further information.
– Do not use your device during a thunderstorm. There may be a risk of
electric shock brought about by lightning.
– Do not expose your device to dust or corrosive liquids.
– Do not use this product near water sources.
– Make sure to connect the cables to the correct ports.
– Do not obstruct the ventilation slots on the device.
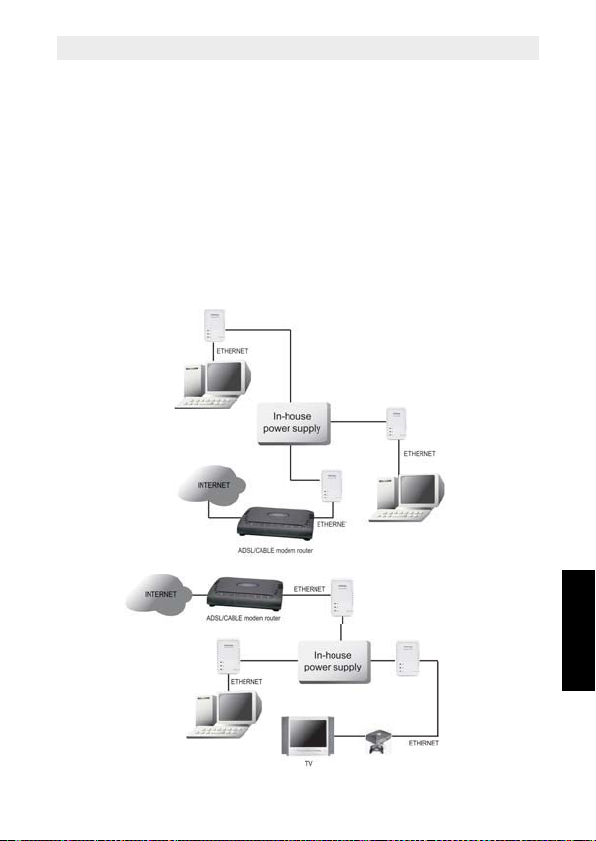
4 Typical applications
ENGLISH
37
Page 38
PL-1085
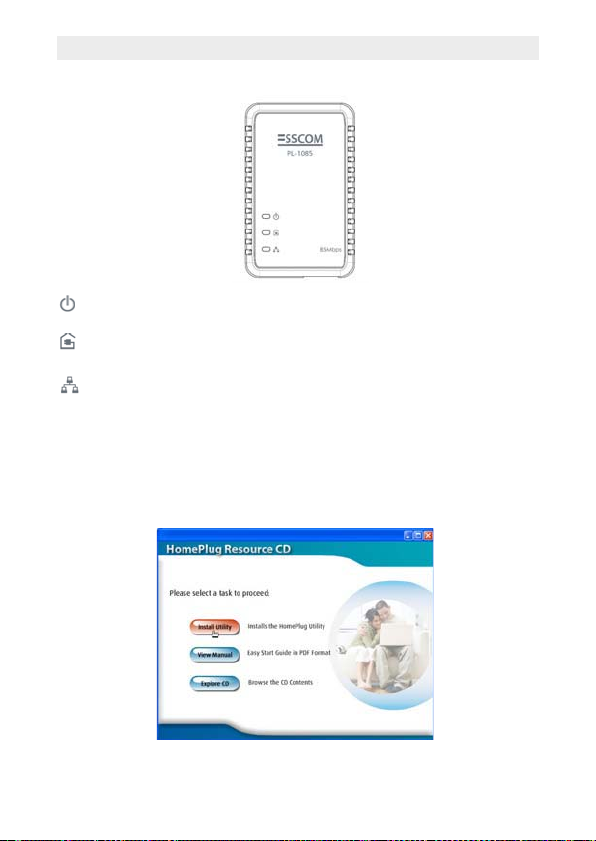
5 LED's and connections
On when connected to AC power supply.
On when detected and connected with another PL-1085 adaptor within the
network.
Lights up when connected to the Ethernet port of the computer or other
Ethernet devices. Blinks during data transfer.
ETHERNET: This is the connection point for connecting it to a computer or
other devices with Ethernet port.
6 Utility Installation
1. Turn on the computer. Insert the CD into the CD-ROM Drive. The Autorun
screen will automatically appear:
Click "Install Software".
38
Page 39
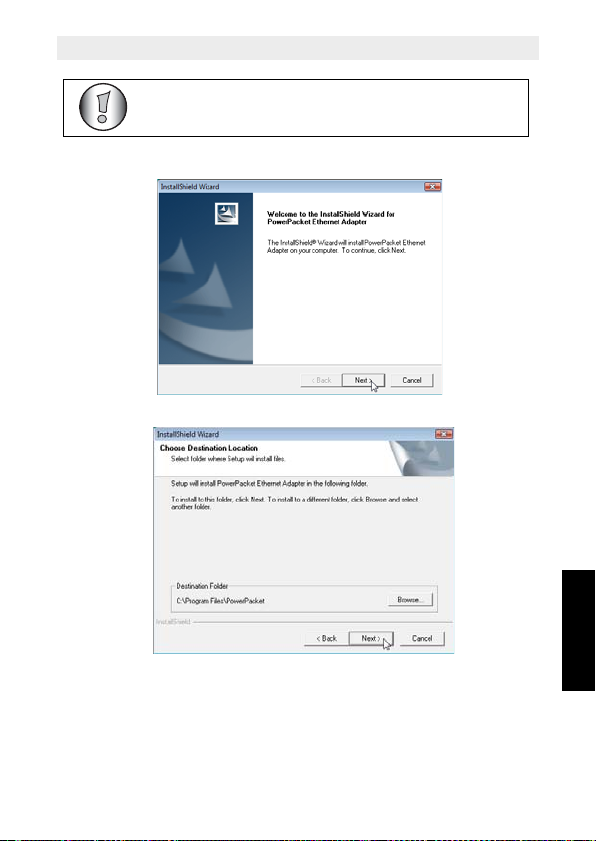
2. InstallShield Wizard will automatically start.
If the autorun menu does not start, you can browse the CD and
execute the “install.exe”
Click "Next".
PL-1085
Click "Next" to finish the installation.
ENGLISH
39
Page 40
PL-1085
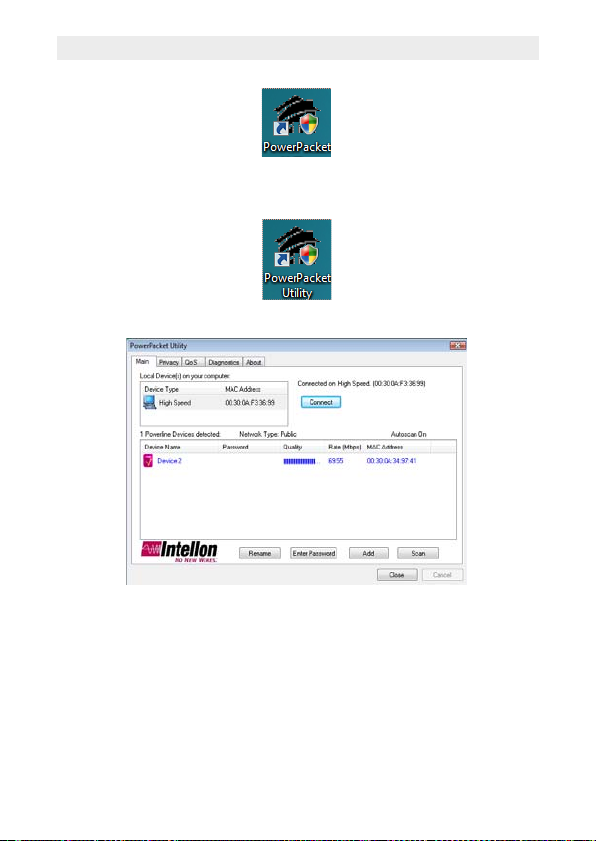
3. After successful installation an icon will appear on your desktop :
7 Configuration
To start the utility, double click the PowerPacket Utility icon on your desktop.
7.1 Main Screen
The Main screen provides a list of all PL-1085 devices connected to the
computer where the utility is running.
The top panel shows all local PL-1085 devices connected to the computer's
NIC (Network Interface Card). In most cases, only one device will be seen. If
more than one device is connected, you can select the device and click the
Connect button. The status area above the button indicates that your PC is
connected.
The lower panel displays all the PL-1085 devices, discovered on the current
logical network (remote devices). Displayed above this panel is the number of
40
Page 41
PL-1085
remote devices found, the type of logical network (Public or Private), and a
message area that reports the connectivity and scan status.
The following information is displayed for each device discovered :
• Device Name : shows the default device name. You can change the name
by clicking the name, or by using the Rename button.
An icon is optionally shown with the name. A distinction in icons is made
between low-speed and high-speed devices (14 Mbps or 85 Mbps devices)
• Password : shows the user-supplied device password (initially left blank).
You can enter the password by using the Enter Password button.
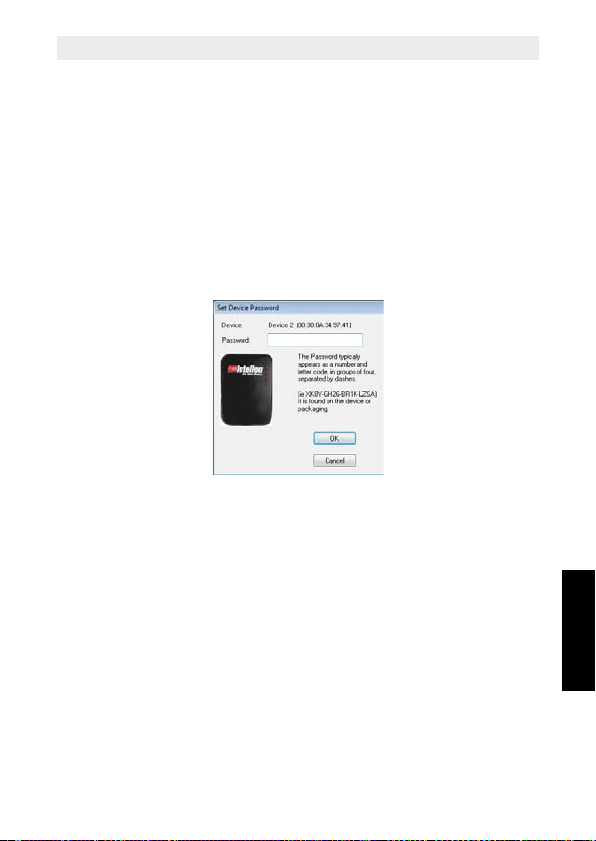
To enter the Password of the device (required when creating a private network), first select the device by clicking on its name in the lower panel and
then click on the Enter Password button.
Above dialog box will appear.
The selected device name is shown. Now enter the password. (The password
is located at the bottom label of the device). Click OK to confirm the password.
A confirmation box will appear if the password was entered correctly.
The Add button is used to add a remote device to your network that is not on
the displayed list in the lower panel. For example a device currently on another
logical network.
ENGLISH
41
Page 42
PL-1085
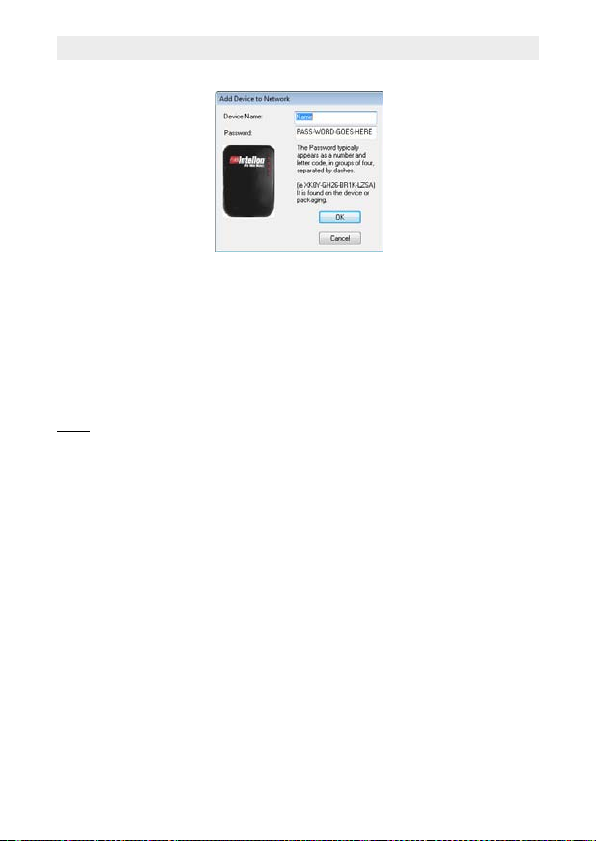
When you click Add, below dialog box will appear :
Now enter both a device name and the password (The password is located at
the bottom label of the device).
A confirmation box will appear if the password was entered correctly and if the
device was found.
• Quality : shows the connection quality rate between the remote plug and the
plug connected to your computer.
• MAC Address : shows the device's MAC address.
Note:
The device must be present on the power line (plugged in) in order for the
password to be confirmed and added to the network. If the device could not be
located, a warning message will be shown.
The Scan button is used to perform an immediate search of the PL-1085
devices connected to the computer. By default the utility automatically scans
every few seconds and updates the display.
42
Page 43
PL-1085
7.2 Privacy
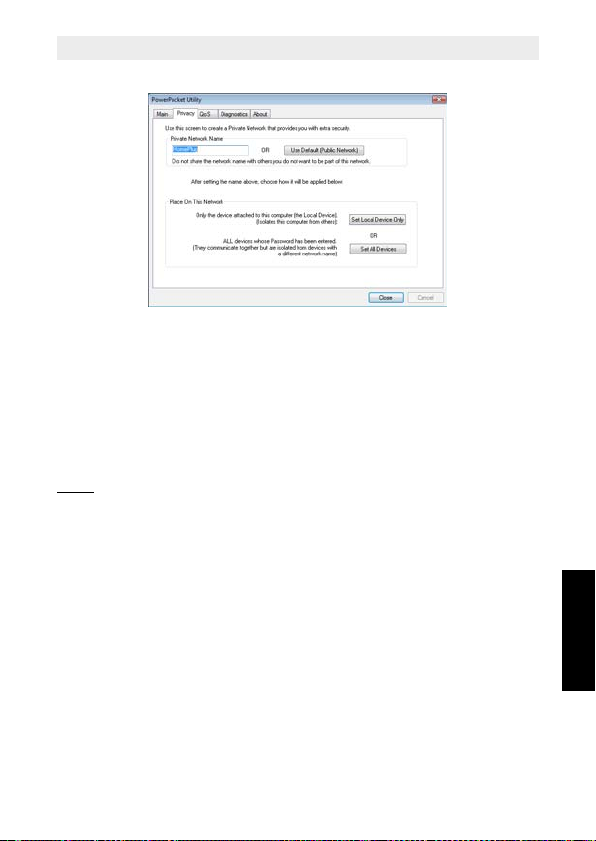
The Privacy dialog screen is used for managing the security of the local
network. All PL-1085 devices are shipped using a default logical network
(network name), which is normally "HomePlug". The Privacy dialog screen
allows you to make the network private by changing the network name
(network password) of your devices. You can always reset the network
password to default (HomePlug) by clicking on the Use Default button.
The Private Network Name is composed of 4 up to 24 alphanumeric case-sensitive characters.
Note :
Changing the network name to any other name other than HomePlug will
show the network type on the main screen as Private.
Click the Set Local Device Only button to change the network name
(network password) for the local device connected directly to the computer.
After doing this, all the devices seen on the Main panel prior to this will no
longer be able to communicate or respond to the computer.
Devices previously set up with the same logical network (same network name)
will appear in the device list afterward selecting this option.
The Set All Devices button is used to change the logical network of all
devices that appear on the Main panel. The user must have entered the
device's Password in order to set it to the new logical network. A notification
message will appear to report the success of this operation.
ENGLISH
43
Page 44
PL-1085
7.3 Quality of Service
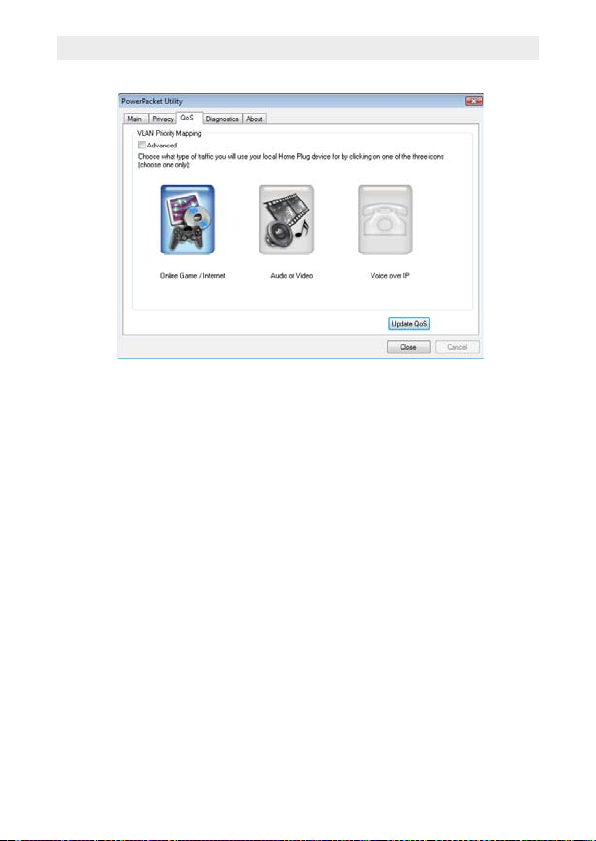
Quality of service (Qos) allows you to determine which application will be
given a guaranteed priority over other applications.
Qos is not enabled by default.
There are three types of Qos available :
• Online Game/Internet : if the device will be connected to a gaming
console or a computer
• Audio or Video : if the device is used for audio/video streaming
• Voice over IP : if the device is connected to an IP phone
Select your application and click Update Qos to apply the settings.
44
Page 45
PL-1085
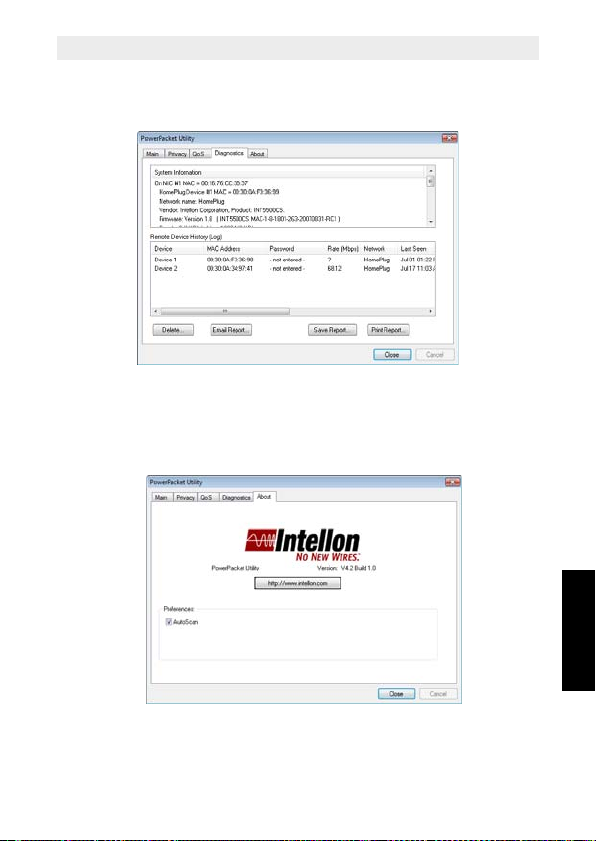
7.4 Diagnostics Screen
The Diagnostics screen shows system information and a history of all
devices seen.
The upper panel shows technical data concerning software and hardware on
the host computer used to communicate over HomePlug.
The lower panel contains a history of all remote devices seen on the computer,
over time.
7.5 About Screen
The About screen shows the software version.
You can activate or deactivate the Autoscan feature by clicking on the checkbox under the 'Preferences' column.
ENGLISH
45
Page 46

PL-1085
8Warranty
8.1 Warranty period
The devices have a 36-month warranty period. The warranty period
starts on the day the new unit is purchased. There is no warranty on
standard or rechargeable batteries (AA/AAA type).
Consumables or defects causing a negligible effect on operation or value
of the equipment are not covered.
The warranty has to be proven by presentation of the original or copy of
the purchase receipt, on which the date of purchase and the unit-model
are indicated.
8.2 Warranty handling
A faulty unit needs to be returned to an authorized service centre
including a valid purchase note and a filled in service return card.
If the unit develops a fault during the warranty period, the service centre
will repair any defects caused by material or manufacturing faults free of
charge, by either repairing or exchanging the faulty units or parts of the
faulty units. In case of replacement, colour and model can be different
from the original purchased unit.
The initial purchase date shall determine the start of the warranty period.
The warranty period is not extended if the unit is exchanged or repaired
by the service centre.
8.3 Warranty exclusions
Damage or defects caused by incorrect treatment or operation and
damage resulting from use of non-original parts or accessories are not
covered by the warranty.
The warranty does not cover damage caused by outside factors, such as
lightning, water and fire, nor any damage caused during transportation.
No warranty can be claimed if the serial number on the units has been
changed, removed or rendered illegible.
Any warranty claims will be invalid if the unit has been repaired, altered
or modified by the buyer.
46
Page 47

PL-1085
ENGLISH
47
Page 48

NL Het toestel vernietigen (milieu)
Op het einde van de levenscyclus van het product mag u dit product niet
bij het normale huishoudelijke afval gooien, maar moet u het naar een
inzamelpunt brengen voor de recyclage van elektrische en
elektronische apparatuur. Dit wordt aangeduid door het symbool op het
product, in de handleiding en/of op de verpakking.
Sommige materialen van het product kunnen worden hergebruikt als u ze naar
een inzamelpunt brengt. Door onderdelen of grondstoffen van gebruikte
producten te hergebruiken, levert u een belangrijke bijdrage tot de
bescherming van het milieu. Wend u tot uw lokale overheid voor meer
informatie over de inzamelpunten in uw buurt.
FR Recyclage de l’appareil (environnement)
Au terme du cycle de vie de ce produit, vous ne devez pas jeter le produit dans
les déchets ménagers ordinaires mais le déposer dans un point de collecte
pour le recyclage des équipements électriques et électroniques. Le symbole
sur ce produit, guide d’utilisation et / ou l’emballage indique ceci.
Certains matériaux du produit peuvent être réutilisés si vous les déposez dans
un point de recyclage. En réutilisant certaines pièces ou matières premières
des produits usagés, vous apportez une contribution importante à la protection
de l’environnement. Veuillez contacter vos autorités locales pour toute
information supplémentaire sur les points de collecte dans votre région.
DE Entsorgung des Geräts (Umweltshutz)
Am Ende der Lebensdauer des Produkts sollten Sie dieses Produkt nicht in den
normalen Hausmüll werfen, sondern bei einer Sammelstelle für die
Aufbereitung von elektrischen und elektronischen Geräten abgeben. Das
Symbol am Produkt, in der Gebrauchsanweisung und/oder Verpackung weist
Sie darauf hin.
Einige der Materialien des Produkts können wiederverwertet werden, wenn
man sie in einer Aufbereitungsstelle abgibt. Mit der Wiederverwertung einiger
Teile oder Rohmaterialien aus gebrauchten Produkten liefern Sie einen
wichtigen Beitrag zum Umweltschutz. Wenden Sie sich bitte an Ihre örtlichen
Behörden, wenn Sie weitere Informationen über die Sammelpunkte in Ihrer
Umgebung benötigen.
UK Disposal of the device (environment)
At the end of the product lifecycle, you should not throw this product into the
normal household garbage but bring the product to a collection point for the recycling of electrical and electronic equipments. The symbol on the product, user
guide and/or box indicate this.
Some of the product materials can be re-used if you bring them to a recycling
point. By re-using some parts or raw materials from used products you make
an important contribution to the protection of the environment.
Please contact your local authorities in case you need more information on the
collection points in your area.
Page 49

Technical Data
Protocol/Standards
• HomePlug 1.0 specification, IEEE 802.3 10/100 Ethernet (100Mbps) and
IEEE 802.3u Fast Ethernet Compliant
• 10/100 Mbps AutoMDI/MDIx Support
• 85Mbps / 14Mbps Homeplug 1.0 compatible
Modulation Support
• OFDM 256/64/16, DQPSK, DBPSK and ROBO Modulation Scheme
Frequency Band
• 4.3 Mhz to 20.9 Mhz band
Quality of Service
• Forward Error Correction (FEC) support
• Channel Adaptation ensures that signal integrity is maintained even under
harsh noise environment
• CSMA/CA with prioritization and ARQ for reliable delivery of Ethernet
packets via Packet
Encapsulation
• Four Level prioritized random access method
• Segment bursting and contention-free access ensures high throughput
while maintaining low latency response and jitter performance
Security Support
• 56 bit DES Encryption with key management for secure powerline communications (Utilize Windows 98SE, 2000, ME, XP to enable encryption)
Hardware
• Intellon INT5500 Integrated Single-chip Powerline Network Transceiver
• Intellon INT1200 Analog Front End IC
Platform Support
• OS Independent with TCP/IP protocol installed
Power Supply
• Switch Mode 90V-264V Supply for Europe/UK/US/Australia plugs
LED Indicators :
• 1 x Power LED
• 1 x Powerline Activity Status LED
• 1 x Ethernet Link/Activity Status LED
Temperature
• Operating : 0° to 40° Celsius
• Non-Operating : -25° to 70° Celsius
Humidity
• Operating : 30% to 80% Relative Humidity (Non-Condensing)
• Non-Operating : 30% to 95% Relative Humidity (Non-Condensing)
Page 50

Page 51

Page 52

MD100316
visit our website
www.esscom.be
 Loading...