

Page 1

mobile video
Page 2
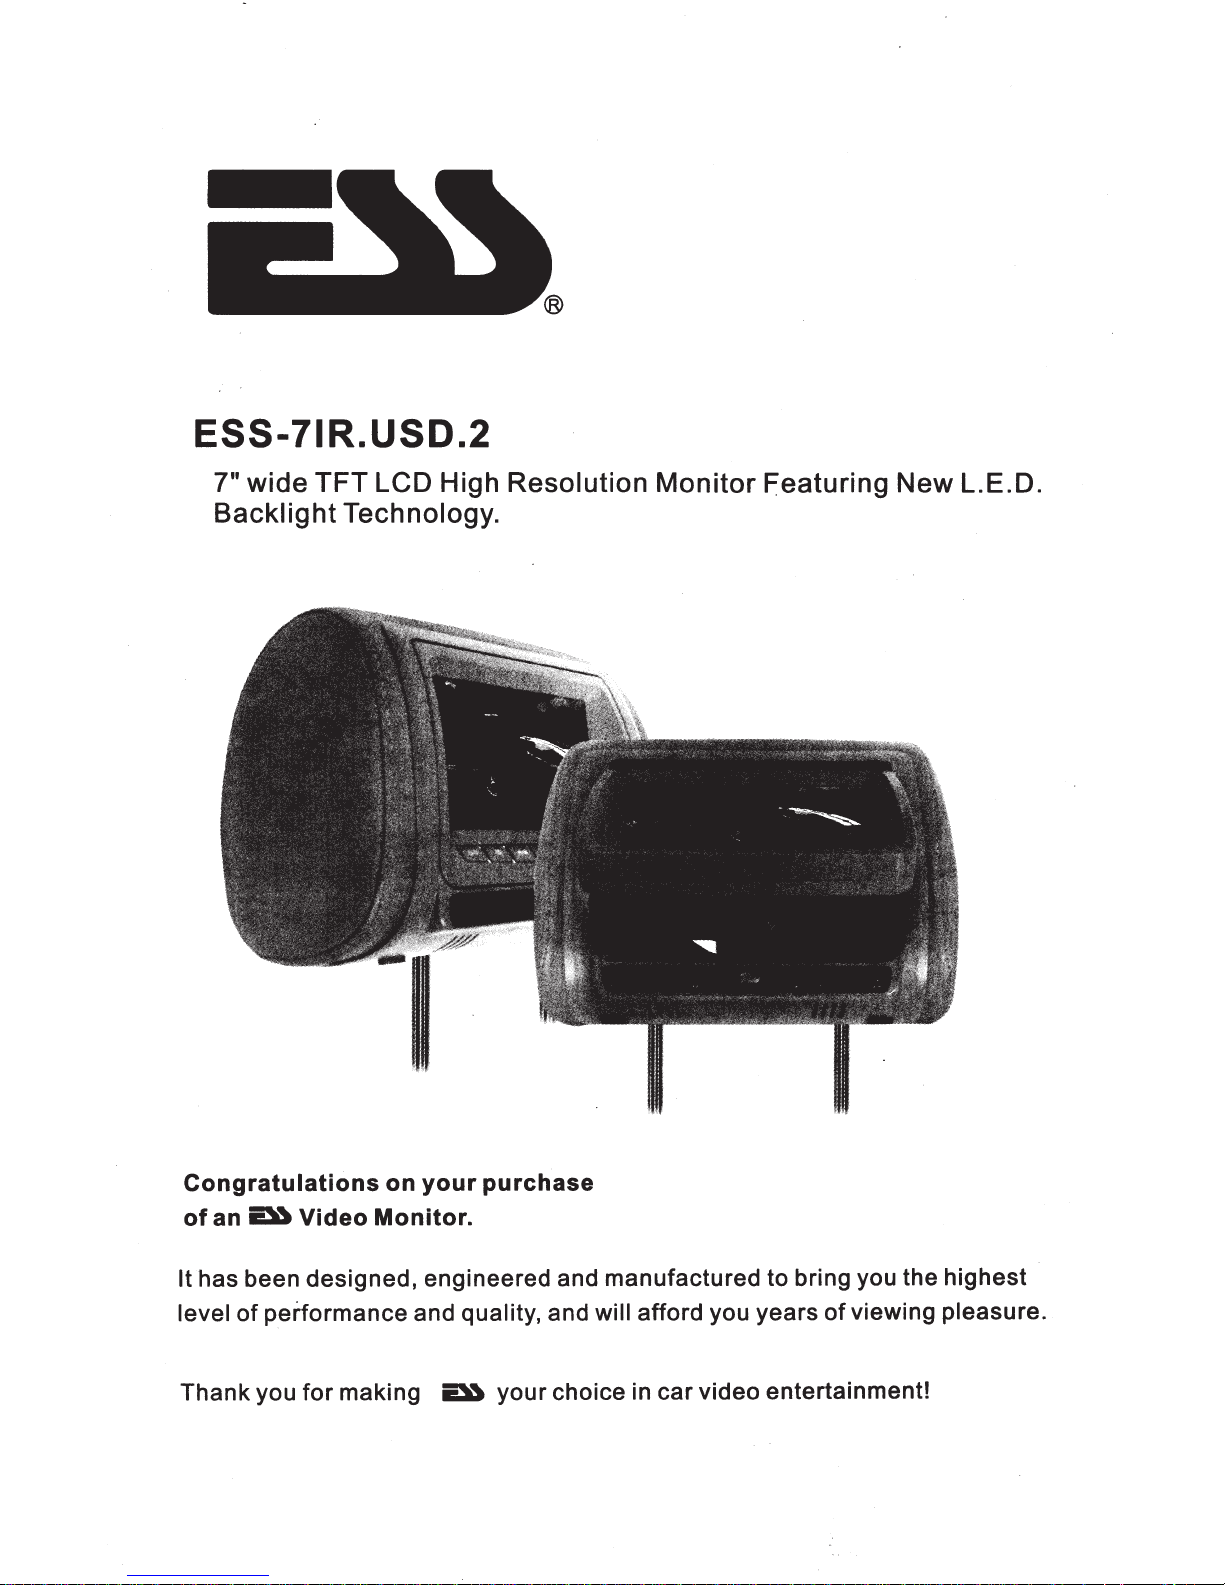
ESS-71R.USD.2
wide TFT
7"
LCD
High Resolution
Backlight Technology.
Monitor
Featuring New L.E.D.
Congratulations
~Video
an
of
has been designed, engineered and manufactured to bring you the highest
It
performance and quality, and will
of
level
Thank you
for
on
Monitor.
making
your
~
purchase
viewing pleasure.
afford you years
your choice in car video entertainment!
of
Page 3

DVD
CONTENTS
1. DVD
Front
~-
Features
Panel
Controls
- - - - - - - - - - - - - - - - - - -
- - - - - - - - - - - - - -
-
·-
- 3
·~
2
Installation
3.
Remote
4.
5. OSD
6. DVD
Disc
7.
Handling
8.
Safety
9.
Troubleshooting
10.
Control
Operation
Operation
Compatibility
Precautions
11.Technical
---Operation
- - - - - - - - - - - - - - - - - -
- - - - - - - - - - .- - - - - - - - -
Discs-
- - - - - - - - - - - - - - - - - - - 9
Specifications-----------
MONITOR CONTENTS
12.MONITOR
13.Warnings---
Features-
~-------
---
--
--
- - -
--
---
- - - 4
- - - - - - - - - - - - 6
~
------------
---
- ---·
- - - - - - - - - - - - - - - - -
- - - - - - - - - - - - - - - - - -
--
-
--------------
-
--
·
~-----------
· 7
- 8
9
10
11
12 ·
13
14
14.ProductStructure
15.Structure
6.Accessories-
1·
.Remote
17
18.0SD
function
19.1nstallation
- - - - - - - .- - - - - - - - - - - - - - - - 15
- - "-
control
- - - - - - -. - - - - - - - - - - - - -
----
------
-,
~-
~
--
- - - - - - - - - - - - - - - - 15
-
- - - - - - - - - -
- - - -
--
-
--
-
~---
- - - - - - - 16
--
----
- - - 17
-14
16·
1
Page 4

DVD Features:
• Built-in DVD
• LED
backlit
• Cover colors
vehicle
. • Pole distance adjustable from 4"-7"
• Free
tilt
• Mini USB
Player
panels
easily
interior
compatible with DVD/VCD/MP3/MP4/CD-R/CD-RW/DIVX
for
exceptional picture quality, high efficiency and long life
interchangeable
(all 3 colors included)
mechanism allows
port
and SD/MMC card slot
apart
for
adjustment to optimal viewing angle
• Automatically selects PAL/NTSC system
jack
for
• Front 3.5 mm
headphones
• 2 A/V inputs
One 3.5 mm front input
One wired RCA
• 1 A/V RCA
input
output
jack
• Wireless remote control
• Built-in dual-channel speaker
between
for
music, image and video files
black, grey and tan to match
for
universal
fit
• Built-in FM
• Built-in dual
transmitter
channeiiR
transmitter
Ch A: 2.3MHz(left)-2.8MHz(right)
B:
Ch
• 7"(16:9)
3.2MHz(left)-3.8MHz(right)
TFT
LCD display
• Resolution:480(H) X 3(RGB) X800(W)
of
• Number
• Brightness: 400 cd/m
• Power supply: DC +12V
Pixels: 1,152,000
2
(1
0.6V-15.8V).
• Power consumption: 12W
·Operating
• Dimensions: 11" x 6" x 14
temperature:-10°C to +60°C.
%"
• Weight: 3. 7 lbs.
2
Page 5

Front
Panel Controls
Cover
switch-+----------.
AV2-----'I
SD/MMC/MS
,...--------------Power
----+-+-__.
~---------Menu
/Source
select
,..--------Play/Stop
....-----
Previous
I Next
I -
jj'="'="~"'"'-"""'"==''"'"".''="=~zz~'o"'-~""-~"'"'-""'•"="'="""""·"="-''"'~""""---co=<Oz=zc~-ooooo'o"""'""-==z=-,,"~'~"·="'~~"·===o~=c="'-""""·=l===<o"c"o=z"'-'<-'"~"'"~"'""l"=
Adjustment
+
'
'*o~~·'!\
Le~-~
® 1 e 1 e 1 e 1 0 LBJ
~-. ~-~-----~---
)i
!;
tJ
fl
)'
---
-
--
-----
------~
.
--
'-----9'7"T"---t-ttt--
. -
---
'
-~--,..,----~-
,.....____
----
__ ,
---
----..----
_____
,
__
_
D V D Driver
!1
J--r
3
Page 6

Installation
First
with
right
Installation
Step
Step
Step
Step
check
the
subject
tools.
1.
Remove
2.
Choose
3.
Connect
4.
Properly
fo make
sure
the
appearance
vehicle. Before you begin,
steps:
original
the
correct
the
position
~----------------~
pillow
power
the
installation
cord and
pillow.
the
\
and
choose
steel
Video
installation
the
tube
size, to
cable.
specifications
right
accessories
ensure
proper
match
and
fit.
Note:
The
appearance
Please
Connecting
12mm
Remote
User's
choose
diameter
controller
manual
135-185mm--
and installation
the
correct
Power
steel
appearance
Line
tube
specifications
and
installation
1
2
1
1
are
12mm steel tube
not
suited
for
specifications.
all
vehicles.
4
Page 7

The
headrest
DVD
player has an AV input
port and an output. The input port
can connect with
The
AV
output
port can connect to
other
sources such as GPS,
other
displays.
TV Box, Game TV-Box etc.
)>
<:;
c.
CD
0
0
c:
,....
"'C
c:
,....
)>
c:
c.
0
r;:u
CD
.....,.
,....
Or+
c:
,....
"'C
c:
,....
c:
a.
0
-·
cc
::r
0
c:
,....
"'C
c:
,....
5
G)CJ)>)><
z
0
c: c:
()
a.a.a.
-·
+
....J..ooo
1\J;:ur-
<-·CD
cc
:::rr+c:
,....
_::::J
::::J"'C
"'C
c:
,....
-·
"'C
.....,.
-
c:
,....
-·
CD
::::J
,....
Page 8
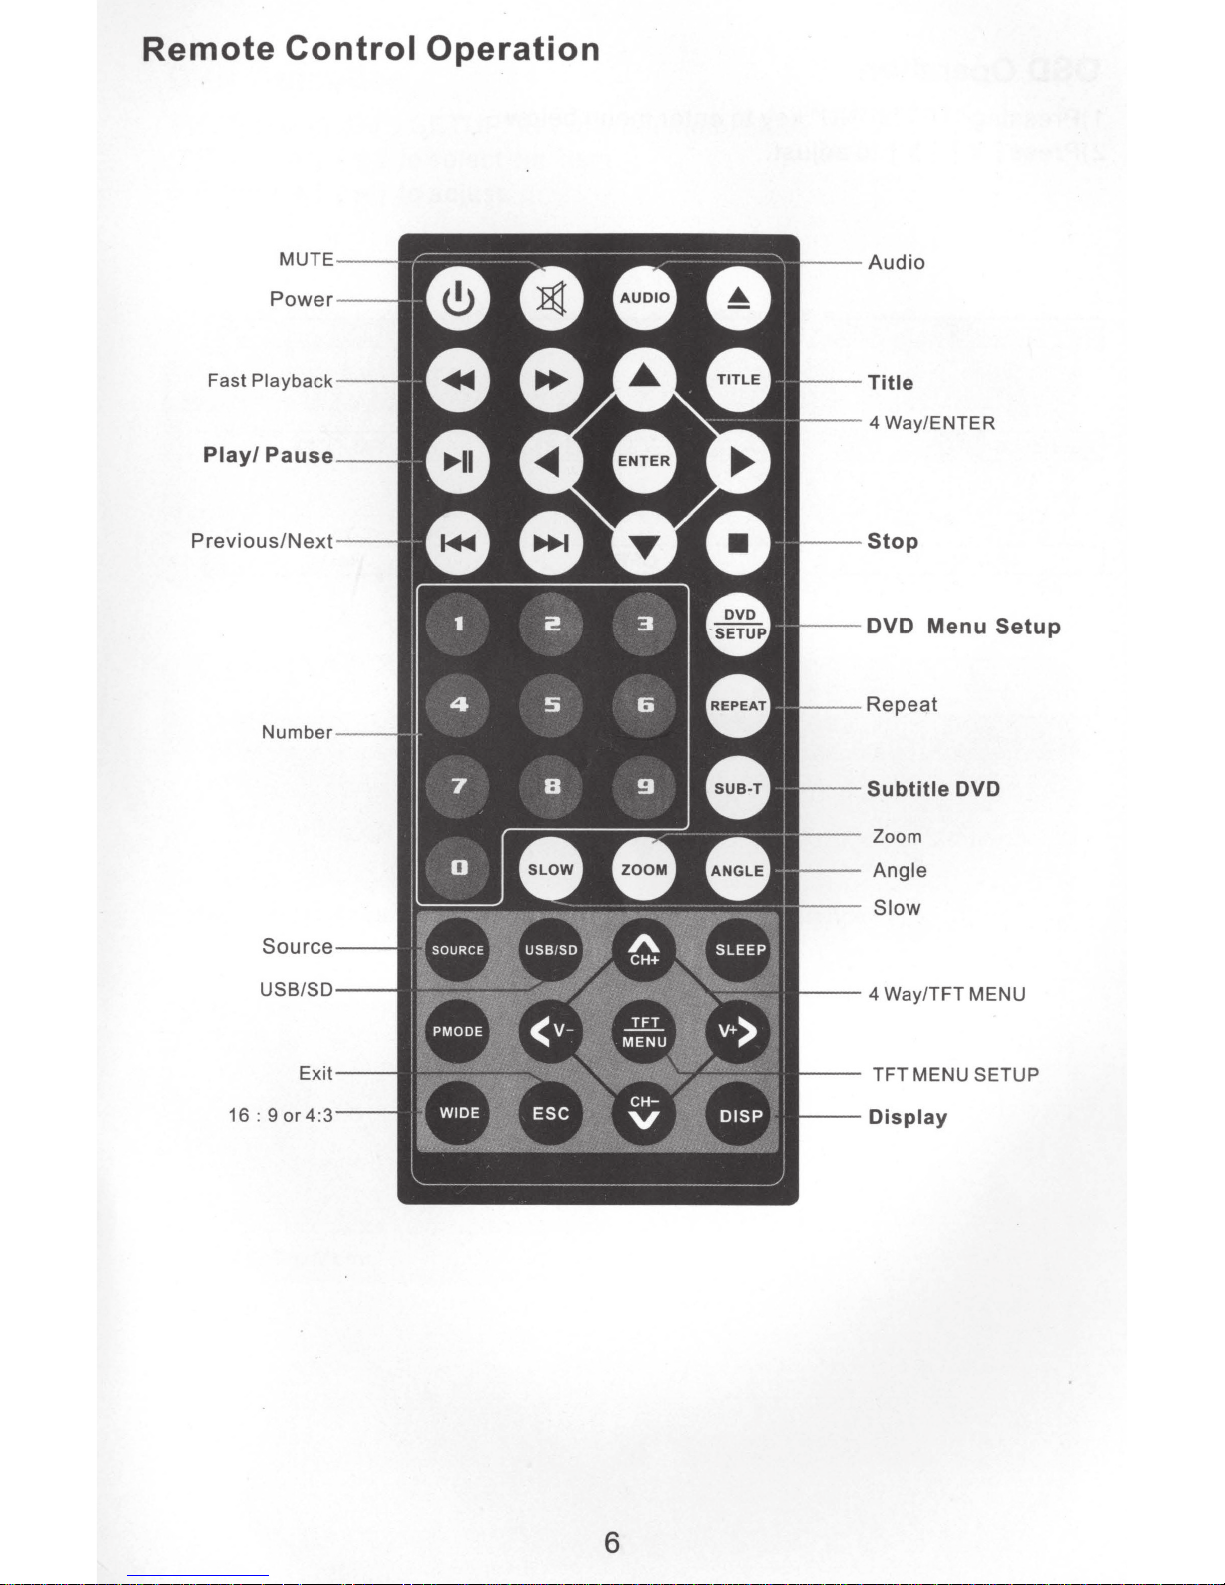
Remote
Control
MUTE
--
Operation
--
Audio
Power
Fast
Playback
Play/
Pause
Previous/Next
Number
--
--
__
--
--
r---
'----
--
--
r---
r---
r--r---
Title
4
Way/ENTER
Stop
DVD
Menu
Repeat
Subtitle
Zoom
Angle
Setup
DVD
Source--
USB/SO--
Exit--
16: 9or4:3--
1---
--
--
1---
Slow
4
Way/TFT
TFT
MENU
Display
MENU
SETUP
6
Page 9
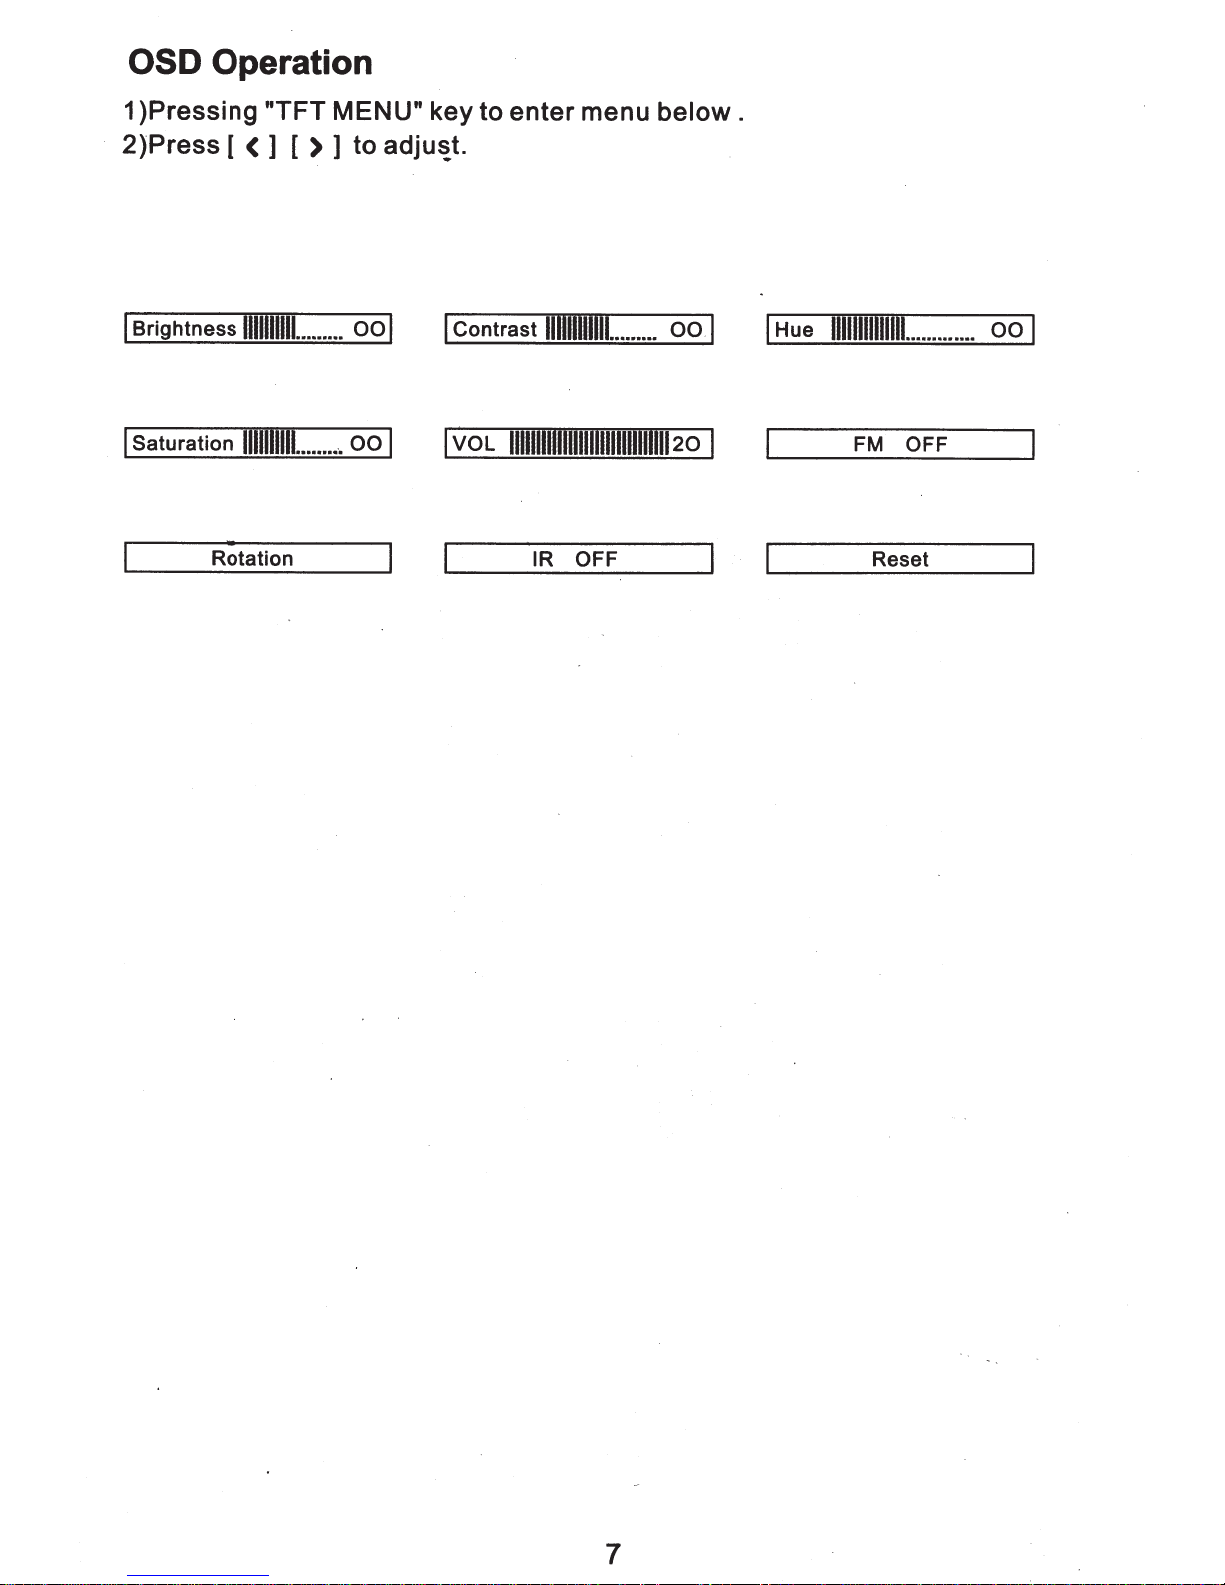
OSD Operation
1 )Pressing "TFT MENU" key to
·
2)Press [
I
Brightness
I
Saturation
< ] [ ) ]
1111111111..
1111111111
..........
Rotation
.......
to
adju~t.
00
00
I I
I I
Contrast
VOL
enter
11111111111111111111111111111120
menu
111111111111.........
IR OFF
below.
00
I I
I
Hue
11111111111111.............
FM
Reset
OFF
00
I
7
Page 10
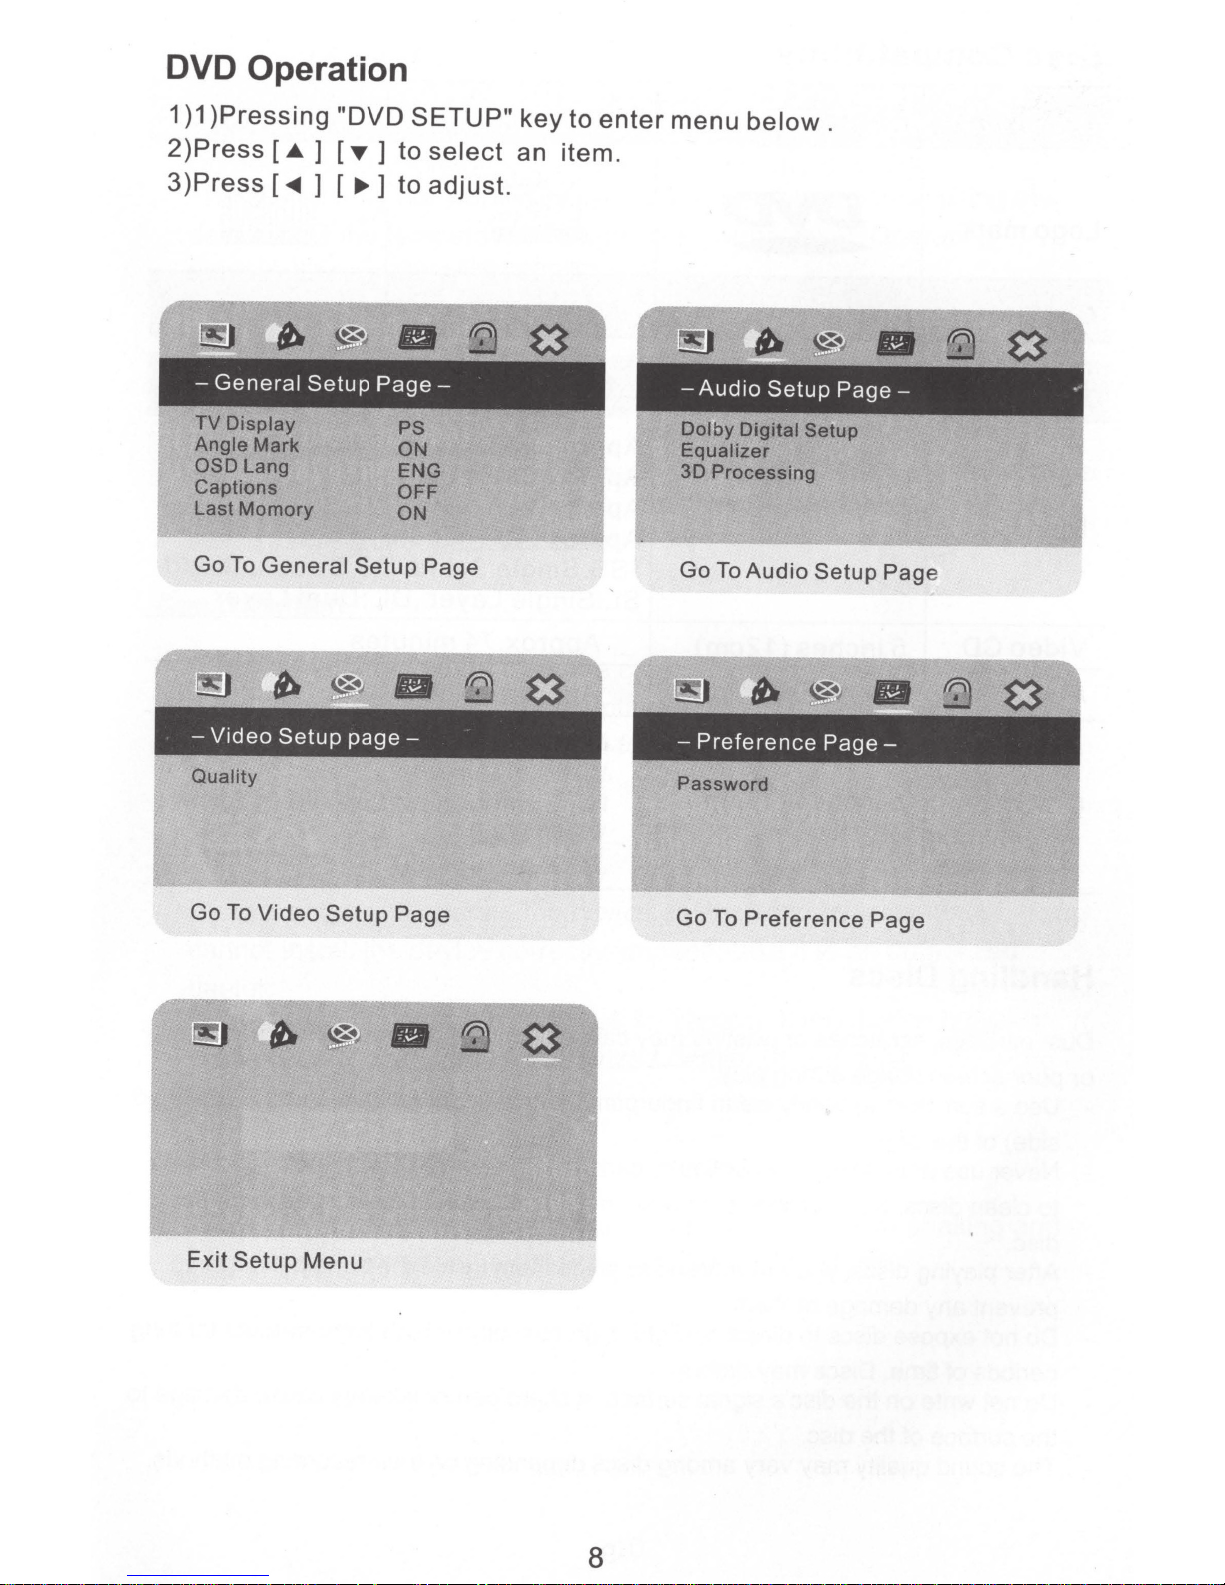
DVD Operation
1
)1
)Pressing
2)Press
3)Press
TV
Display
Angle
Mark
OSDLang
Captions
Last Momory
Go
To
[.A
[
General
<IIIII
"DVD
]
[
..-
] [
]
to
IJII.]
to
PS
ON
ENG
OFF
ON
Setup
SETUP"
select
adjust.
Page
key
to
enter
an item.
menu
Dolby Digital Setup
Equalizer
30
Go
below.
Processing
To
Audio
Setup
Page
-Video
Quality
Go
To
Exit
Setup
Setup
Video
Menu
page-
Setup
Page
Password
Go
To
Preference
Page
8
Page 11

Disc
Compatibility
Logo
Disc
Video
Audio
mark
type
CD
CD
CD-ROM
inches
5
inches
5
inches
5
inches
5
(12cm)
(12cm)
(12cm)
(12cm)
mJo@©
IPIGITAL VIDEO
Approx.133
Approx.242
Approx.266
Approx
*SS:Single
SL:Single
Approx.74
Approx.74
Mp3
WAV:
MPG: motion
VOB:
JPG:
.484
Layer
music
:
music
DVD file
picture
I
mJo@©
IDIOITALAUDIO
minutes(SS/SL)
minutes(SS/DL)
minutes(DS/SL)
minutes(DS/DL)
Sided
,DS:Double
,DL :Dual
minutes
minutes
file
file
picture
file
file
I
Sided,
Layer
Handling
particles,
Dust
poor screen image during
or
- Use a soft
side)
- Never use anti-static spray or
to
disc.
- After
prevent any damage to them.
- Do not expose discs to direct sunlight,
periods
- Do not write on the disc's
the surface
- The sound
of
clean
playing
Discs
scratches or twisting may cause sound disruption, poor sound
play.
gently clean
cloth
the disc
discs.
time. Discs may deform.
of
to
Such chemical solvents may damage the
discs, you are advised to
signal
the disc.
of
quality
may vary among discs depending on their recording methods.
fingerprints and dust on the data surface
liquid, benzene, thinner or other
surface. A sharp pen or ink may cause damage to
quality
(polished
chemical solvents
the
plastic surface
place them inside their original
high humidity or high temperatures for
of
cases to
long
9
Page 12
Safety Precautions
- This device is designed to be operated with a
- Do not
- The device may not work in high
device until
temperature range: 14°F-122°F)
allow
any foreign substance to get into the disc slot.
low temperatures. Stop using the
or
the temperature returns to a
normal level. Operating
DC 12V grounded system.
Cleaning
- When
may get damaged.
- Since chemical solvents may damage the surface
them for cleaning.
- Use a
cleaning the device, do not make contact with water. The device
clean
and dry
cloth
to clean.
Condensation
the car during a rainy
- When turning the heater on
moisture may condense on the optical lens. If
in
this occurs, the device
the unit, do not use
of
humid day,
or
such a case, it is
not function properly.
may not read the disc and
advised to remove the disc from the
will
device· until the unit is dried.
In
Installation and Repairs
- Please install and operate the device as specified by this
cannot
dealer.
- Do not open the device by yourself for repairs.
work properly, take it to an authorized dealer. (If you disassemble the
unit, you
install
Video/Audio
- When driving on a rough road the unit is prone to severe shaking and
may experience video/audio problems. This is inevitable.
the device correctly yourself, take it to an authorized
the device does not
If
void the warranty).
will
Trouble
manual. If you
10
Page 13
Troubleshooting
Fault
No
power
No
picture
Remote
does
work
not
Reason
Yellow wire should be
+source;
12v
connected to the ACC;
should be
red
wire
connected
Fuse burned
Power
cable
disconnected
NoAV
Video lines
input
disconnected
Battery is blocked by
protective
paper
Pointed in wrong
connected
should be
to
black
the
wire
ground
out
is
direction
to
Resolution
Connect
power
correctly
Change fuse
Connect
power
correctly
Input
video
Reconnect
video
Remove
lines
paper
Point remote to
remote
sensor
Can't
play
Distortion
Disc
No
power
Bad
Disc loaded
Disc is
Fast
forward/backward
disc
incorrectly
dirty
Change
Replace
Re-insert
Clean
batteries
disc
disc
disc
This is normal
11
Page 14

Technical
Specifications
panel
Screen size 7
Pixel
Temperature
Back
light
Brightness
Color
Playable
system
discs
Resolution
S/N
Isolation
Audio
Video
Input/Output
Input/Output
Power
supply
Power
Product
Dime.nsions
TFT
LCD
Inches
(16:9)
800 X 3 (RGB) X
Operation:14
oF-
LED
400 cd
1m
2
PAL/NTSC
DVD,
VCD,
~500
~90dB
~65dB
CD,
MP3,
1.6V±20o/o
1V p-p ±20%
DC
12V
::s;
12W
11"x6"x14%
480
122
CR-R,
oF;
Storage:-22
CD-RW,
oF
DVD-R,
-167
DVD-RW
oF
Net
weight
Note:
The design and
3.71bs
specifications
are
subject
to
change
without
notice.
12
Page 15

MONITOR
Features :
• LED
and long life
•
Cover
to match
• Pole
• Free
•
Automatically
•
Built-in
•
Front
• 2
One
One
•
Wireless
•
Built-in
•
Built-in
Ch A:
backlit
colors
vehicle
distance
tilt
mechanism
front
3.5mm
A/V
inputs
3.5mm
wired
2.3MHz(left)-2.8MHz(right)
RCA
remote control
dual-channel
dual
panels
easily
adjustable
selects
3.5mm AV
jack
front
channeiiR
for
interchangeable
interior
allows
for
input
input
exceptional
(all 3
PAL/NTSC
input
headphones
jack
speaker
transmitter
colors
from 4"-7"
for
adjustment
jack
picture
between black,
included)
apart
system
quality, high
for
to optimal viewing
efficiency
grey
universal fit
and tan
angle
Ch B:
•
7"(16:9)
• Resolution:
•
Number
• rightness: 400 cd/m2
Power
•
•
Power
•
Operating
•
Dimensions:
• Weight:
3.2MHz(left)-3.8MHz(right)
TFT
LCD
480(H) X 3(RGB) X 800(W)
of
Pixels: 1,152,000
supply: DC + 12V ( 1
consumption: 12W
temperature:-1 0°C to +60°C
11" x 6" x 14 %"
2.9
lbs.
display
0.6V-15.8V)
13
Page 16

A
...,.
Read
...,.
This product is composed
and
this
shall
manual
not be dissembled unless approved
Warning
before
using
of
this
product.
precision components
or
authorized by us, otherwise we
shall
not provide any
maintenance
...,.
Protect the product from moisture and shock
I
~
-
-
-
~
-
I
-~--~~~--
,·\
"Thank
long-term
operations
term service
to
install
you for your purchase of our
trouble
manual
of
free operation of the product,
before using the monitor.
your product, please
this product into your vehicle for
Product
mobile
have one
video product.
To
you."
structure
To
please
further ensure the
of
our authorized
read_
the
ensure
following
long-
dealers
Page 17

Structure
In-----+-~
AV 2
Menu------------~
-----.
Adjustment
Source
Power
Select.
on/off
-
t--------
Earphone
,....-------Adjustment
,.....---System
Mode
+
Mirror
ACCESSORIES
Description
Power
1 .
Pole Diameter Spacers
2.
3 . Remote Control
4 . Users
Cable
Manual
Quantity
1PC
2PCS
1PC
1PC
15
Page 18

Connection
Method
. I
Audio
Audio
Remote
I
Right
1.Power
2.AV1 ,AV2
3.Adjustment+
Video in
Left
Input
Input
DC+12V
GND
control
On/Off
Switch
o
~~
0
~~~=~
6.Adjustment-
5.Menu
-
~---
---=
1.
Power/on/off
3.Adjustment+
4.Exit
5.Menu
6.Adjustment-
OSD
The
"+"to
-
OBRIGHT
1111111111111111111111111.............
u
TINT 20
1111111111111111111111111.............
I
SOURCE
function
following
select
menus
will
appear
the one you want.
20
......
.....
I
......
.....
I
when pressing
<J
CONTRAST 20
1111111111111111111111111
~VOLUME
1111111111111111111111111........................
....................... ·
IIR
"MENU"
I
20
I I
G>
COLOR 20
1111111111111111111111111
MODE
ITcoN
button,press
........................
"+"
16:91
LD
I
I
I
LANGUAGE
ENGLISH
I
I
RESET
16
Page 19

Install the
pillow
Headrest
fig 2
system
(+12V)
line
ed
line (ground)
Black
Yellow
line (signal
connection
The
Sound
circuit
As shown in Fig.
sound
connect
system(red
A/V
the
Installation
of
Connect
to
line
headrest
the
+12V
the
+,black
power
line
monitor
of
ground),and
to
is very simple.
the
then
input. Hide the connection in the base
of
seat.
Remove the
1.
Install
2.
headrest
the
original
headrest in the car.
(max. interval: 8inch;min
interval between
the
tubes
tubes
You can
pulling
by
inward
of
the original
of
adjust
pushing
or
outward see Fig 3
or
pillow
pillow
monitor
the posts
monitor.
interval:4
holes so
coincides
pillow
headrest.
Adjust
that
out
steel
the
inch)
tube in
according to the
or
the interval between steel
with
that
between
steel
Headrest fig 3
17
Page 20

9855
Joe
Vargas
Way
S. El
Monte,
CA
91733
Office:626-443-8324
Toll-Free:
Limited
a)
in materials and workmanship Defective products will be repaired at the
Products that are no longer in production may
This warranty does not cover product that has been modified, subjected to abuse or neglect, damaged
by improper installation, damaged
technician. Any damages resulting from legal action for breach
be
limited to the cost
It
is
liability for coincidental damages
replacement shall
original warranty period. This warranty
Before returning this product for warranty service, purchaser must contact
Authorization Number(RA#). Purchaser must provide proof and date of product purchase. and must
include the vehicle's mileage at time of delivery.
products are warranted
of
the original purchase price
agreed that the remedy provided
be
considered a transaction under the original warranty, and does not extend the
t9
the original owner for one year f This warranty covers perfects
in
is
excluded. Should
shipping or serviced by someone other than a
on
this document
is
non-transferable.
Warranty
be
replaced with a newer version
of
the video unit only. As a condition of this warranty.
is
the sole remedy under this warranty. All
~
replace your product under warranty, this
1-888-377-8720
~
of
express or implied warranties shall
~
headquarters.
of
similar design.
~
authorized
to obtain a Return
- - - - - - - - - - - - - - DETACH HERE - - - - - - - - - - - - - -
PLEASE
NAME
FILL
CARD
IN
TO
THE
THE
INFORMATION
ADDRESS
ON
REQUESTED
THE
REVERSE
AGE
AND
SIDE.
MAIL
THIS
ADDRESS
CITY
ESS
DEALER
STATE
NAME
ZIP
VEHICLE INFORMATION
WHO
INSTALLED
THE SYSTEM?
cos
VIDEO SYSTEM?
SERIAL
NUMBER
Page 21

mobile
video
 Loading...