

Page 1

DS850®
Operator’s Guide
Document Version 4.0
Software Version 2.10
Published: February 26, 2014
Page 2

ES&S Document Manual, All rights reserved. Printed in the USA. 2014 by Election Systems
& Software, LLC, 11208 John Galt Blvd., Omaha, NE 68137-2364.
This document, as well as the product described in it, is furnished under license and may be
used or copied only in accordance with the terms of such license. The content of this
document is furnished for informational use only, is subject to change without notice, and
should not be construed as a commitment by Election Systems & Software, Inc. Election
Systems & Software, Inc., assumes no responsibility or liability for any errors or inaccuracies
that may appear in this document. Except as permitted by such license, no part of this
publication may be reproduced, stored in a retrieval system, or transmitted, in any form or by
any means, electronic, mechanical, recording, or otherwise, without the prior written
permission of Election Systems & Software, Inc.
Disclaimer
Election Systems & Software does not extend any warranties by this document. All product
information and material disclosure contained in this document is furnished subject to the
terms and conditions of a purchase or lease agreement. The only warranties made by Election
Systems & Software are contained in such agreements. Users should ensure that the use of
this equipment complies with all legal or other obligations of their governmental jurisdictions.
All ES&S products and services described in this document are registered trademarks of
Election Systems & Software. All other products mentioned are the sole property of their
respective manufacturers.
Proprietary Information
ES&S has identified and appropriately marked relevant portions of this document, which it
considers confidential and proprietary. We request confidential treatment by the EAC of such
information and would expect that such information is exempt from required disclosure. In
the event that a third party requests disclosure of information which ES&S considers
confidential and proprietary, we would ask that the EAC notify ES&S of such requested
disclosure in order to provide us with an opportunity to seek exemption from disclosure.
The document sections referenced below contain Election Systems and Software, Inc. (ES&S)
confidential information, which is provided for the sole purpose of permitting the recipient,
to evaluate the ES&S Voting System submitted herewith. The following sections are
designated as “Proprietary and Confidential” by Election Systems & Software.
Proprietary Document Section Description
N/A N/A
Page 3

Table of Contents 1
Table of Contents
Introduction............................................................................................. 1
Chapter 1: DS850 Overview .................................................................................... 2
ES&S Elections..................................................................................................... 3
Jurisdictional Nomenclature .................................................................... 3
Election Definition.................................................................................... 3
Election Security....................................................................................... 3
Provisional Voting .................................................................................... 4
Facilities, Furnishings, and Fixtures Required for DS850 Operation ..................... 5
Locks and Seals.................................................................................................... 5
Using USB Media Devices.................................................................................... 7
Adjusting the DS850 Workspace......................................................................... 8
Adjusting the Tilt of the Screen ............................................................... 8
Adjusting the Input and Output Trays ..................................................... 9
Raising and Lowering the DS850’s Cart Extension................................ 10
Uninterruptible Power Supply (UPS).................................................................. 10
Installing New Firmware .................................................................................... 10
Contacting ES&S for Technical Support............................................................ 11
Contacting ES&S for Supplies ........................................................................... 11
General Timeline for Election Preparation ....................................................... 13
Operations Support Frequently Asked Questions ............................................ 13
System Acquisition Procedures ......................................................................... 14
Visual Inspection .................................................................................... 14
Physical Inspection ................................................................................. 14
Acceptance Checklist 16
Chapter 2: Safety Information ............................................................................... 17
Important Safety Instructions............................................................................. 17
Power Sources........................................................................................ 17
Ventilation .............................................................................................. 17
Water and Moisture ............................................................................... 18
Cleaning ................................................................................................. 18
Heating................................................................................................... 18
Power Cord Protection .......................................................................... 18
Servicing................................................................................................. 18
Damage Requiring Service..................................................................... 18
Radiation Protection .............................................................................. 19
Specifications and Cautions............................................................................... 20
Chapter 3: DS850 User Interface........................................................................... 21
Operating Status Icons ...................................................................................... 21
Scanning Menu .................................................................................................. 22
Election Menu.................................................................................................... 23
Reports Menu .................................................................................................... 24
System Menu ..................................................................................................... 25
EVS5200_DOC_SOP_DS850
Software Version 2.10
Published: February 26, 2014
Page 4

Table of Contents 2
Set Date/Time ........................................................................................ 26
Firmware ................................................................................................ 26
Antivirus ................................................................................................. 28
User Access ............................................................................................ 28
Hardware Menu ................................................................................................. 30
Screen Calibration.................................................................................. 30
Printers ................................................................................................... 30
Audio...................................................................................................... 33
Camera................................................................................................... 33
Transport................................................................................................ 33
Interface ................................................................................................. 36
Locking the Scanner........................................................................................... 43
Election Tasks ........................................................................................ 46
Chapter 4: DS850 Election Workflow .................................................................... 47
Chapter 5: Pre-Election Day Tasks......................................................................... 48
Pre-Election Maintenance ................................................................................... 49
Clean the Rollers .................................................................................... 49
Clean the Cameras................................................................................. 49
Clean the Scanner Case ......................................................................... 50
Clean the Touch Screen......................................................................... 50
Installing the UPS................................................................................................. 51
Connecting the Scanner to the UPS .................................................................. 52
Connecting the External Printers....................................................................... 53
Setting Up the Audit Log Printer.......................................................................... 54
Setting Up the Report Printer.............................................................................. 55
Turning On the UPS........................................................................................... 56
Starting the Scanner .......................................................................................... 57
Select a Precinct..................................................................................... 58
Checking the Connection Between the UPS and the Scanner.......................... 61
Clearing and Initializing the Scanner ................................................................. 61
Loading the Election Definition ......................................................................... 63
Setting the Date/Time ....................................................................................... 66
Logic and Accuracy Testing............................................................................... 69
Configuring the Scanner.................................................................................... 71
Processing Mode .................................................................................. 72
Bin Sorting.............................................................................................. 74
Audit Log ............................................................................................... 79
Batch/Bin Reporting............................................................................... 79
Results Access ........................................................................................ 81
Precinct Labels................................................................................. 83
Ballot Images.......................................................................................... 86
Network ................................................................................................. 88
Multifeed Stop ....................................................................................... 88
Chapter 6: Election Day Tasks ............................................................................... 90
Special Instructions for Processing Folded Ballots ............................................ 90
EVS5200_DOC_SOP_DS850
Software Version 2.10
Published: February 26, 2014
Page 5

Table of Contents 3
Scanning............................................................................................................. 91
Scanning the Ballots/Cards.............................................................................. 91
Out-Stacked Ballots ............................................................................... 94
Save the Current Batch .......................................................................... 96
Delete the Current Batch....................................................................... 98
Sorting On/Off Feature ..................................................................................... 99
Sorting On............................................................................................ 100
Sorting Off ........................................................................................... 101
Not Processed Ballot Report ........................................................................... 101
Printing Election Reports ................................................................................. 102
Exporting Data................................................................................................. 103
Export Results ...................................................................................... 104
Export Files .......................................................................................... 107
Backup.................................................................................................. 110
Export Audit Log.................................................................................. 113
Clearing Election Results ................................................................................... 115
Clear All Results ................................................................................... 115
Clear a Precinct’s Results ..................................................................... 116
Chapter 7: Post-Election Day Tasks ..................................................................... 119
Shut Down and Power Off the Scanner........................................................... 119
Turn Off the UPS.............................................................................................. 120
Perform Scanner Maintenance ........................................................................ 120
Perform UPS Maintenance............................................................................... 121
Recommended Steps to Prepare the DS850 for Storage ............................... 121
Appendix ............................................................................................. 122
Chapter 8: Reports .............................................................................................. 123
Zero Report........................................................................................................ 124
Results Report.................................................................................................. 126
Batch/Bin Report.............................................................................................. 129
Precincts Processed Report ............................................................................. 130
System Readiness Report ................................................................................ 132
Ballot Style Counts Report............................................................................... 134
Chapter 9: DS850 Network ................................................................................. 136
View, Set and Test Network IP Address and Folder Path ............................... 136
Chapter 10: System Messages............................................................................. 138
Viewing Messages ........................................................................................... 138
System Error Recovery..................................................................................... 138
Numeric Messages ............................................................................................ 139
Chapter 11: Menu Structure ................................................................................ 184
Scanning Menu .................................................................................... 184
Election menu ..................................................................................... 185
Reports menu....................................................................................... 186
System menu........................................................................................ 187
EVS5200_DOC_SOP_DS850
Software Version 2.10
Published: February 26, 2014
Page 6

Table of Contents 4
Hardware menu.................................................................................... 188
Chapter 12: Troubleshooting............................................................................... 189
Abnormal Scan Termination ............................................................................ 189
Loss of Power To the Facility ........................................................................... 189
Chapter 13: Revision History ............................................................................... 190
EVS5200_DOC_SOP_DS850
Software Version 2.10
Published: February 26, 2014
Page 7

Part 1: Introduction
The Introduction contains the following chapters:
Chapter 1: DS850 Overview
Chapter 2: Safety Information
Chapter 3: DS850 User Interface
Part 1: Introduction 1
EVS5200_DOC_SOP_DS850
Software Version 2.10
Published: February 26, 2014
Page 8

Chapter 1: DS850 Overview
The ES&S DS850 is a high-speed, computerized, digital image-based scanner and
tabulator with ballot sorting capabilities. The ES&S DS850 is designed to process all of
the ballot types supported by the ES&S election management system, including folded
(absentee) ballots.
Chapter 1: DS850 Overview 2
The DS850 accurately records all votes as marked by the voter and is capable of
meeting or exceeding the 1.5 million mark test as stated in Volume 1, Section 2.1.1 of
the 2005 VVSG. Voter accumulation records are saved on the machine’s hard drive and
can be transferred from the hard drive to a USB flash drive.
The DS850 is capable of supporting multiple election models. In a traditional central
count model, voting takes place at various locations within a precinct, and when the
polls close, the ballots are physically transported to a central location, then scanned and
tabulated using the ES&S DS850. In a traditional precinct count model, ballots are
scanned during election day on an ES&S precinct scanner and tabulated once the polls
are closed. In this precinct-based model, the central count scanner is used to process
early voting and absentee ballots by scanning the ballots in the days up to and including
election day and subsequently tabulating them when the election is closed. In an all
mail-in model, all ballots are physically collected via mail to one or more central
locations and scanned up until the polls close on election day, at which time they are
tabulated.
This manual and the ES&S DS850 System Maintenance Guide are intended to help you
develop election procedures. However, election laws and procedures vary from state to
state, and your procedures must be in compliance with the laws and procedures that
apply to your jurisdiction.
EVS5200_DOC_SOP_DS850
Software Version 2.10
Published: February 26, 2014
Page 9

ES&S Elections
Jurisdictional Nomenclature
Terminology for the lowest-level common geopolitical civil division differs by state and
country. In this manual and other ES&S documentation, the entity is referred to as a
precinct.
As a company with accounts across the country and around the world, ES&S recognizes
that certain jurisdictions use terms other than precinct. Some examples of the terms
used by other jurisdictions are Election District (or ED), Borough, Province, Division, and
District. These terms and others may be substituted for precinct depending upon the
particular jurisdiction. However, for consistency, ES&S uses the term precinct
throughout its documentation.
Election Definition
Chapter 1: DS850 Overview 3
Using ElectionWare, election coders program a custom election definition onto a USB
flash drive for each DS850 used in your jurisdiction. An election definition contains all of
the candidates, contests, and ballot variations that the scanner will process at the
polling place. It also contains the user-defined codes that must be entered on the
scanner to perform various functions. The election definition provides default values for
configuration settings, some of which can be modified on the scanner after the election
definition is loaded.
Note: Screen text that ends with an ellipsis (…) indicates that more characters were entered
for the text in ElectionWare than the DS850 can display
Election Security
All ports for connecting USB and Ethernet devices are located behind lockable doors.
Each of these locations contains a provision for a wire seal for an additional level of
security. See Locks and Seals for information on the placement of the locks and seals.
Access to various system screens require entry of a code to prevent unauthorized access
to certain system functions.
The DS850 records errors and major events and tags these incidents with the date and
time the incident occurred based on the DS850’s real-time clock settings. Audit log
information can be exported to a USB flash drive inserted into a USB port on the DS850.
The Zero Report, which is printed before polls are open on Election Day, is used to
indicate no tampering has been done to the vote totals.
EVS5200_DOC_SOP_DS850
Software Version 2.10
Published: February 26, 2014
Page 10

Chapter 1: DS850 Overview 4
Election officials using the DS850 must provide physical security measures or implement
procedures that limit access to the DS850 during the election period to authorized
personnel only. The election period encompasses the time the election definition is
loaded onto the system to the time final, official election results are produced and
validated.
Provisional Voting
In paper ballot-based systems, provisional ballots are handled procedurally. Voters are
allowed to vote a paper ballot that is segregated from valid Election Day ballots. After
the election, each provisional ballot envelope is authenticated against the appropriate
criteria and either allowed or not allowed. Those ballots found to be valid are then
opened and included in the Election Day totals according to processes defined by your
jurisdiction’s requirements. For example, some jurisdictions may hand-count provisional
ballots and manually enter them into Election Reporting Manager (ERM), while others
may create a separate election group and scan the ballots using a precinct or central
scanner such as the DS850.
EVS5200_DOC_SOP_DS850
Software Version 2.10
Published: February 26, 2014
Page 11

Chapter 1: DS850 Overview 5
Facilities, Furnishings, and Fixtures Required for DS850 Operation
The following facilities, furnishings, and fixtures are required to operate the DS850:
ES&S recommends using the metal cart available for the DS850 for easier setup and
movement of the machine, which weighs approximately 200 pounds. The metal cart
weighs 190 pounds.
The DS850 is intended for indoor use only. During tabulation, ES&S recommends
the DS850 should be operated in a room measuring a minimum of 10 feet by 10
feet.
The DS850 can be operated in any temperature controlled facility, with
temperatures from 50 degrees Fahrenheit to 95 degrees Fahrenheit. Operational
humidity during operations should be between 10 and 88 percent RH. The DS850 is
not protected against harmful ingress of moisture.
A standard 110V outlet must exist in the facility for power cord plug in. The DS850’s
input rating is 120V~50/60 Hz 8.0A single phase or 240V~50/60 Hz 8.0A dual phase.
The main supply voltage fluctuations are not to exceed plus or minus 10 percent of
the rated supply voltage range. To ensure 2 hours of uninterruptible power you must
use an Uninterruptible Power Supply (UPS) with the DS850.
The storage temperature for the DS850 is from -4 degrees Fahrenheit to 140
degrees Fahrenheit.
Reference: See Chapter 2: Safety Information for a complete list of the DS850 specifications
and cautions.
Locks and Seals
ES&S recommends the lock and seal placements described below to physically lock
down the DS850 and prevent system tampering.
The rear of the scanner is
secured by locking both
door locks. A
tamper-evident tape seal
can be used for
additional security.
EVS5200_DOC_SOP_DS850
Software Version 2.10
Published: February 26, 2014
Page 12

The DS850 data ports on the right side of the
DS850 are all behind clear access doors that can
be protected by both locks and seals.
The DS850 data ports on the left
side of the DS850 are all behind a
clear access door that can be
protected by both a lock and a
seal.
Chapter 1: DS850 Overview 6
Note: See Election Security in this chapter for more information.
EVS5200_DOC_SOP_DS850
Software Version 2.10
Published: February 26, 2014
Page 13

Using USB Media Devices
USB Media Devices are used to clear and initialize the DS850, load an election definition
into the DS850, create an archive, and export data that has been saved to the DS850’s
internal memory. The ES&S EQC Media Device flash drive is used clear all data from the
machine and load the encryption keys that are needed to load and run the election. The
ES&S Election Definition Media Device flash drive is used to load the election definition
into the scanner. ES&S Election Definition Media Device flash drives and blank ES&S
Media Device flash drives and can be used to create an archive and to export data.
Reference: See Clearing and Initializing the Scanner, Loading the Election Definition, and
Exporting Data for more information on these processes.
Note: If you choose to use USB Media Devices, it is strongly recommended that you
use fully-formatted USB Media Devices rather than the Quick-formatted or cleared
(all files deleted) flash drives. The fully-formatted flash drives work faster and are
more reliable. If you have any questions about formatting your flash drives contact
ES&S.
Chapter 1: DS850 Overview 7
The picture on the right shows a typical USB
flash drive.
Before inserting a USB flash drive, remove
the protective plastic cap to expose the USB
connector.
EVS5200_DOC_SOP_DS850
Software Version 2.10
Published: February 26, 2014
Page 14

The ES&S EQC Media Device flash
drive, the ES&S Election Definition
Media Device flash drive, and a blank
ES&S Media Device flash drive can be
inserted into any one of the USB
ports on the DS850. Never force a
USB flash drive into a USB port.
Adjusting the DS850 Workspace
You can make several manual adjustments to the DS850 workspace to improve usability,
including adjusting the tilt of the screen, changing the length of the input and output
trays, and raising and lowering the side of the DS850’s cart.
Chapter 1: DS850 Overview 8
Adjusting the Tilt of the Screen
You can tilt the screen forward
to achieve a potentially better
viewing angle by gently
pulling the top of the screen
outward. The picture on the
right shows a screen that has
been pulled forward.
EVS5200_DOC_SOP_DS850
Software Version 2.10
Published: February 26, 2014
Page 15

Chapter 1: DS850 Overview 9
Adjusting the Input and Output Trays
You can adjust the length of the input and output trays to accommodate different sized
ballots.
The input tray can be extended to provide a
solid support for longer ballots. Use the round
opening to pull the extension to the right for
longer ballots. Slide the extension to the left
for shorter ballots. The picture on the right
shows the input tray extended for longer
ballots.
It is also important that the output trays (or
bins) be adjusted to the proper length before
the ballots are scanned. If the output trays are
set for ballots that are longer than the ones
being scanned, the ballots might overshoot
the trays as they come through the transport.
If the output trays are set for ballots that are
shorter than the ones being scanned, the ballots will jam up in the trays.
Adjusting the output trays consists of
changing the length of the trays and the
position of the output tray paper stops. Each
of the output trays, like the input tray, has an
extension with a round opening in it. You can
use the opening to pull the extension to the
left for longer ballots, and you can slide the
extension to the right for shorter ballots.
There are markings on the output trays to
help you adjust them to the correct length
for the ballots. The picture on the right
shows an output tray set for 17” ballots.
After you adjust the length of the output
trays, set a sample ballot in each of them.
Then slide the output tray paper stops so that
there is approximately 10 mm between the
stop and the end of the ballot. The picture at
the right shows the output tray paper stops.
EVS5200_DOC_SOP_DS850
Software Version 2.10
Published: February 26, 2014
Page 16

Raising and Lowering the DS850’s Cart Extension
To use the DS850 cart extension, lift up on the
extension until it is level and push up on the
brackets on both sides (as shown in the picture
on the right) until they lock into place.
To lower the extension, simultaneously press
the release button on the inside of the bracket
and press down on the hinge of the bracket.
Repeat this process with the other bracket and
carefully lower the extension. The extension
must not be allowed to drop as to prevent
damage to the extension and the cart.
Uninterruptible Power Supply (UPS)
Chapter 1: DS850 Overview 10
You must use an Uninterruptible Power Supply (UPS) with the DS850. The UPS will
provide continuous power to the machine and to prevent the DS850 and the attached
printers from being damaged in case of a power surge. .
Note: The DS850 was certified using an external UPS to comply with electrical test
requirements in the VVSG. The DS850 must be operated with an external UPS to be in a
certified configuration.
Reference: See Chapter 5: Pre-Election Day Tasks for information on installing the UPS,
attaching the DS850 and printers to the UPS, turning on the UPS, and checking that the UPS
is communicating with the DS850.
Installing New Firmware
A certified ES&S Technician will usually install new firmware on the DS850. If you have
been instructed to install the new firmware an ES&S Support Representative will assist
you in the process.
Warning: Contact an ES&S Technician for instructions to return your DS850 to an earlier
firmware version. Do not use an earlier firmware update Compact Flash card to revert a
DS850 firmware version back to an earlier version.
Note: The Compact Flash card must be a minimum of 1 GB.
EVS5200_DOC_SOP_DS850
Software Version 2.10
Published: February 26, 2014
Page 17

Contacting ES&S for Technical Support
This manual should aid you in accomplishing most tasks. However, if you need
additional assistance, or if you encounter a processing problem or system error, ES&S’
technical support staff can provide advice and help you resolve the situation.
When you contact ES&S for technical support, be near your equipment. In addition, be
prepared to provide the following information to the support representative:
The version number of the product you are using.
The exact wording of any messages that appeared.
A description of what happened when the problem occurred.
Support representatives are available Monday through Friday, between 8:00 A.M. and
7:00 P.M. CST.
Contact an ES&S Support Representative
Chapter 1: DS850 Overview 11
Telephone Number (USA &
Canada):
Telephone Number (International): 402-593-0101
Fax: 402-593-8107
Address: Election Systems & Software
Note: ES&S’ support services are subject to ES&S’ prices, terms, and conditions in place at
the time the service is used.
Contacting ES&S for Supplies
ES&S recommends that you keep the supplies listed below on hand for each DS850.
You can order these items from ES&S by calling (877) 377-8683. Allow four weeks for
delivery.
877-377-8683
11208 John Galt Blvd.
Omaha, NE 68137 USA
8.5” x 11”, continuous feed, one-part paper for the audit log printer: ES&S
recommends that the printer paper be carbon-less to avoid smearing. If you will be
using ERM the same type of one-part paper can be used for both the ERM and
DS850 continuous-feed printers. Quantity: two boxes.
8.5” x 11”, standard laser printer paper for the laser printer. Quantity: two
boxes.
Pressurized air cans: Used to clean the sensors. Quantity: two.
EVS5200_DOC_SOP_DS850
Software Version 2.10
Published: February 26, 2014
Page 18

Chapter 1: DS850 Overview 12
Cloth and isopropyl alcohol: Used to clean the rollers. Quantity: one bottle.
Small white adhesive labels, ½ inch wide: Use these labels to cover stray marks on
the ballots. Only use labels from ES&S. Quantity: 12 sheets.
USB flash drives: These must be FAT32 formatted drives. Depending on the number
of ballots processed, you may need multiple drives to transfer all of the ballot image
data. Election results data will fit on a single drive. The minimum size is 1GB and the
maximum is 8 GB. Quantity: 6
Warning: The flash drives you use in the DS850 must be used for the election process
only. Using the drives for anything other than the election process violates security
practices.
Marking Devices: Although the DS850 reads a wide variety of marking devices,
ES&S recommends that you use the following devices:
VL Ballot Pen (ES&S part # 6100).
The pen is a BIC Grip roller ball with black
ink and a 0.7 mm tip.
Absentee Pen (ES&S part #00500)
Easily fits into an envelope for mailing.
Absentee Pencil (ES&S part # 00540)
Red, 0.125 point
Audit log printer ribbon (ES&S part # 4778)
Quantity: 1 per printer
Report Printer Toner Cartridge (ES&S part # 6826)
Quantity: 1 per printer
Touch screen cleaning kit.
EVS5200_DOC_SOP_DS850
Software Version 2.10
Published: February 26, 2014
Page 19

Chapter 1: DS850 Overview 13
General Timeline for Election Preparation
General Timeline for Election Preparation
90 Days Submit site support request to ES&S
63 Days All forms are due to ES&S (excluding Candidate forms)
56 Days Candidate forms due to ES&S
46 Days Last day to give ballot proofs to counties (strictly for military or overseas
voting)
45 Days Absentee Voting begins
42 Days Certification deadline
28 Days All ballot proofs must be signed off
21 Days Last day to deliver Election Day ballots
20 Days Advance or early voting begins
18 Days Last day for ES&S to ship coding materials
10 Days Software installation for pre-election procedures
1 Day Early voting ends
Reference: Refer to the Personnel Deployment and Training Requirements document for
more information.
Operations Support Frequently Asked Questions
How is the system purchased?
You can purchase the DS850 by contacting your ES&S representative.
How is the system installed?
You can install new firmware to the DS850 by following the steps in the ES&S
implementation plan. See Installing New Firmware for more information.
How can I verify the system?
You can verify the system in the following ways:
• Compare the serial numbers on the hardware to the numbers on the purchase
order.
• Compare the firmware version to the version listed on the purchase order.
• The Acceptance Checklist will aid in the verification of the system.
What training is required?
EVS5200_DOC_SOP_DS850
Software Version 2.10
Published: February 26, 2014
Page 20

Training is determined at the time the system is purchased.
What checklist should be followed?
Use the Acceptance Checklist to ensure that the system has been delivered and is
performing as expected.
System Acquisition Procedures
Use the Acceptance Checklist to ensure that the system has been delivered and is
performing as expected. The following is a descriptive list of the DS850 acceptance
testing criteria.
Visual Inspection
Ensure that there are no scratches or gouges on any part of the unit.
Verify that all labels are placed in their appropriate place and in their correct
orientation.
Chapter 1: DS850 Overview 14
Check the wheel locks on the table to ensure the cart rolls freely in the unlocked
position and does not when the wheels are locked.
Inspect the table’s folding extensions and drawer for proper operation.
Verify all locks and doors have a smooth function and are locked.
Open the rear door on the scanner and check for any loose connections or damaged
parts.
Ensure that all belts, transport rollers, and protective guards are in place.
Physical Inspection
Install the UPS, connect the printers and the scanner to the UPS, set up the printers,
and then turn on the UPS and the scanner. See Chapter 5: Pre-Election Day Tasks for
instructions.
Observe that both printers and the DS850 power on. If an election has been loaded,
at the Login screen, enter the Election Code.
Verify that the AC power icon is present in the upper right-hand corner of the screen
and that it indicates that the power connection is plugged in.
Verify that a red “X” is not displayed on the printer icons.
Perform Touch Screen calibration by selecting the Hardware menu and then pressing
Screen Calibration. Touch the circle in the upper left-hand corner. When the screen
with a circle in the lower right-hand corner appears, touch that circle. Touch the next
screen in multiple places to verify that the pointer (x) will follow the touch points.
Then press the Save & Exit button.
EVS5200_DOC_SOP_DS850
Software Version 2.10
Published: February 26, 2014
Page 21

Chapter 1: DS850 Overview 15
Verify that the DS850 firmware version matches the certified version for your
jurisdiction. To do so, select the System menu and then press Firmware. COTS
firmware versions that the system can report will also be displayed.
Test each of the USB ports on the DS850 by using the following procedure:
• Press Election to access the Election menu.
• From the Election menu, press Setup to access the Setup screen.
• On the Setup screen, press Clear and Initialize. This displays the Searching for
EQC Media Device pop-up screen.
• Insert the ES&S EQC Media Device flash drive into one of the scanner’s USB
ports. The previous pop-up screen is temporarily replaced by a Detecting
inserted device pop-up screen. When the scanner recognizes the ES&S EQC
Media Device flash drive, the Qualification Code screen appears.
• Press Cancel and move the USB flash drive into another unused USB port.
• Repeat the steps above for each unused USB port, except for the last one, to
ensure that each USB port on the scanner is functioning correctly. On the last
port, clear and initialize the scanner. See Clearing and Initializing the Scanner for
instructions.
Check the date and time displayed at the top of each screen to ensure the date and
time are correct. If necessary, change the time and date. See Set Date/Time for
instructions on modifying the scanner’s system date and time.
Load the election definition into the scanner. See Loading the Election Definition for
instructions.
Load the ES&S test deck of ballots onto the input tray of the scanner.
Scan the test deck of ballots. See Scanning for instructions.
Save the election results to a USB flash drive. See Exporting Data for instructions.
Print the election results reports and compare them to the reports provided by ES&S
to verify that the scanner is reading the ballot marks accurately. See Printing Election
Reports for instructions on printing reports. See Chapter 8: Reports for more
information and examples of the reports.
Verify that the scanner can detect when power to the UPS is lost. See Checking the
Connection Between the UPS and the Scanner for instructions on checking whether
the scanner can detect when power to the UPS is lost.
Power down both printers and the scanner, then power down the UPS. See Shut
Down and Power Off the Scanner for instructions on how to shut down and power
off the scanner. See Turn Off the UPS for instructions on turning off the UPS.
Place the dust cover over the scanner, and ensure it is free of tears and rips.
EVS5200_DOC_SOP_DS850
Software Version 2.10
Published: February 26, 2014
Page 22

Chapter 1: DS850 Overview 16
Acceptance Checklist
Shown below is an example of the Acceptance Checklist for the DS850.
EVS5200_DOC_SOP_DS850
Software Version 2.10
Published: February 26, 2014
Page 23

Chapter 2: Safety Information
When used properly, the DS850 is safe and effective. The following symbols, used
throughout this manual, indicate when hazards may occur during normal operation of
the scanner. Read the warnings and proceed with caution when you carry out potentially
hazardous scanner operations.
Warning Icons
Symbol Definition
Electrical Shock Danger: This symbol indicates a danger of electric shock. There are high
voltages present inside the enclosure of DS850 scanner. To reduce the risk of fire or electric shock, do not attempt to open any enclosures or gain access to areas for which you
have not been trained. Only ES&S qualified personnel should open enclosed areas of the
scanner.
Warning: This user caution symbol indicates that damage to the scanner or injury to the
user could occur if the proper procedures are not followed. Carefully follow all instructions and proceed with caution when this symbol is associated with a set of instructions.
Chapter 2: Safety Information 17
Caution: Keep fingers, hands, and loose clothing clear of the areas where this symbol is
displayed.
Important Safety Instructions
Please read all safety instructions before operating the DS850. Carefully follow all
instructions and heed all warnings.
Power Sources
Operate this product only from the type of power source indicated in this manual. Make
sure that the installation complies with applicable sections of the National Electric Code.
Consult your local building code before installing. See Facilities, Furnishings, and
Fixtures Required for DS850 Operation for more information.
Ventilation
Slots and openings in the case of the DS850 are included to provide adequate
ventilation for the unit. These openings must remain clear. Do not block or cover any
openings in the DS850 case; otherwise, the unit could overheat. Do not operate the
DS850 in an enclosed housing not approved by ES&S.
EVS5200_DOC_SOP_DS850
Software Version 2.10
Published: February 26, 2014
Page 24

Chapter 2: Safety Information 18
Water and Moisture
Warning: Do not place containers with liquids such as coffee, water, or soda on or
around the DS850. Do not operate the equipment in a damp environment. Store the
DS850 in a cool, dry place.
Cleaning
Follow the instructions in the Pre-Election Maintenance section of this manual for
cleaning the DS850. Use only the cleaning solutions approved by ES&S. Cleaning
instructions are also provided in the DS850 System Maintenance Manual.
Heating
Do not install this product near heat sources such as radiators, air ducts, areas subject to
direct sunlight, or other products that produce excessive heat.
Power Cord Protection
Route or install the power supply cord for this product in such a manner to protect it
from being walked over or pinched. Make sure you power down the unit completely
before connecting or disconnecting the power cord. Before moving the unit, shut down
and power off the DS850, and then turn off the UPS. The UPS should be unplugged
from the wall outlet and safely stowed before moving. You should take care not to pinch
the power cord when locking the power switch access door.
Servicing
Electrical Hazard: Electrical Shock Danger: Do not attempt to service the scanner
unless specifically instructed to do so by ES&S. Do not attempt to gain access to
areas of the unit where dangerous voltages are present. Only qualified ES&S
technicians should service the DS850.
Damage Requiring Service
Unplug the DS850 and call ES&S to consult a qualified service technician under the
following conditions:
When the power cord is damaged.
If liquid has been spilled into the scanner casing.
If the scanner does not function normally while following instructions in this manual.
EVS5200_DOC_SOP_DS850
Software Version 2.10
Published: February 26, 2014
Page 25

Chapter 2: Safety Information 19
If the product is damaged in any way.
When the scanner displays a negative change in performance.
Warning: Adjust only the controls specified in this manual. Improper adjustment of other
controls may result in damage to the scanner and could require work by an ES&S
technician to restore the scanner to normal operating condition.
Radiation Protection
The DS850 meets or exceeds Federal Communication Commission standards for
protection against generated or induced electromagnetic radiation, and no additional
safety precautions are required.
EVS5200_DOC_SOP_DS850
Software Version 2.10
Published: February 26, 2014
Page 26

Specifications and Cautions
Indoor Use Only
Ordinary Protection (not protected against harmful ingress of moisture)
The rear door of the DS850 must be locked at all times during normal use. Store
the keys to the door in a secure location while you are using the DS850.
Warning: Weight: 200 lbs - 2 person lift.
Electrical input rating: 120V~ 50/60Hz 8.0A single-phase power or 240V~ 50/
60Hz 8.0A dual-phase power. Consult a licensed electrical contractor for proper
electrical connections.
Chapter 2: Safety Information 20
Pollution Degree 2 for the ambient environment
Operating relative humidity: 10% to 88% RH, non-condensing
Operating temperature: 50 degrees Fahrenheit to 95 degrees Fahrenheit
Maintenance: For applicable maintenance items, refer to the DS850 System
Maintenance Guide.
Warning: The interior of the DS850 is not accessible to the user. Service operations inside the electrical enclosure must be done by trained and authorized
personnel.
Transport and storage conditions: -4 degrees Fahrenheit to
140 degrees Fahrenheit
EVS5200_DOC_SOP_DS850
Software Version 2.10
Published: February 26, 2014
Page 27

Chapter 3: DS850 User Interface
This chapter describes the DS850 user interface. The screens that make up the DS850
user interface are displayed on the DS850 touch screen. The top-center line of text on
each screen identifies the current screen. The menus for the DS850 user interface are
listed below and described on the pages which follow.
Scanning Menu
Election Menu
Reports Menu
System Menu
Hardware Menu
A menu can be displayed by selecting the corresponding tab along the left side of the
screen. See Chapter 11: Menu Structure for diagrams showing the screen hierarchy for
each of the menus. The diagrams are intended to help you quickly identify how to
access a particular screen.
Chapter 3: DS850 User Interface 21
The date and time are displayed in the upper right-hand portion of each screen.
Displayed below the date and time are the icons that indicate the operating status of
the DS850. See Operating Status Icons for a description of each icon.
A help menu is available on the DS850. If Help is available for the screen that
is being displayed, the button will be located in the upper right corner of the
screen. Select the Help icon to display the help text for that screen and the
functions that are performed from that screen.
Unauthorized access to the user interface can be can be prevented by locking the
scanner.
Reference: See User Access and Locking the Scanner for more information on preventing
unauthorized access to the user interface.
Note: Make sure that the camera lid and rear panel are closed before you attempt to perform
any function that engages the DS850’s motors, such as scanning ballots, running hardware
menu tests, and clearing the transport. The scanner does not allow functions that engage the
motors to be performed when the camera lid or rear panel is open.
Operating Status Icons
Described below are the operating status icons that appear in the upper right-hand
corner of the screens that are displayed on the scanner’s touch screen.
EVS5200_DOC_SOP_DS850
Software Version 2.10
Published: February 26, 2014
Page 28

Chapter 3: DS850 User Interface 22
Battery Power - This icon is used for the Uninterruptible Power Supply (UPS). If
the scanner is not using a UPS, this icon is not displayed on the screens. If the
scanner is plugged into the UPS, the UPS is plugged into a wall outlet, and the
UPS is fully charged, then the solid green Battery Power icon appears on the screen. If
the UPS is then unplugged from the wall outlet (or the wall outlet loses power,) then the
scanner is running off the UPS Battery Backup System, and the icon will change color to
indicate the extent to which the battery is charged: Green for 80-100 percent charged,
Yellow for 60-80 percent charged, Orange for 40-60 percent charged, and Red for 20-40
percent charged. A message will also appear if the scanner is on/off battery, you will
need to press OK to clear this message.
AC Power - This icon indicates whether the DS850 is connected to AC power. If
the scanner is plugged into the UPS, the UPS is plugged into a wall outlet, and
the UPS is fully charged, then the AC Power icon has its two connectors
connected. If someone disconnects the UPS from the wall outlet, the AC Power icon has
its two connectors separated.
Election Definition - This icon indicates whether an election definition is loaded
onto the DS850. An orange check mark in the lower left-hand corner of the icon
indicates that an election definition is loaded; a red “X” in the lower left-hand
corner indicates that an election definition is not loaded.
Dot Matrix Printer - This icon indicates whether the DS850 is connected to a dot
matrix log printer. If there is a red “X” in the lower left-hand corner of the icon,
the printer is not connected; otherwise, it is connected.
Laser Printer - This icon indicates whether the DS850 is connected to a laser
printer. If there is a red “X” in the lower left-hand corner of the icon, the printer is
not connected; otherwise, it is connected.
Scanning Menu
Use the Scanning menu to scan ballots and to clear the ballot transport path.
Press Scan Ballots to begin the ballot scanning process or to select your precinct.
See Scanning for additional information on these processes.
Press Clear Transport to clear the ballot transport path.
EVS5200_DOC_SOP_DS850
Software Version 2.10
Published: February 26, 2014
Page 29

The following is an example of the Scanning menu.
Chapter 3: DS850 User Interface 23
Election Menu
Use the Election menu to load an election definition, view election setup information,
export election results, and to set your scanner configuration options.
EVS5200_DOC_SOP_DS850
Software Version 2.10
Published: February 26, 2014
Page 30

The following is an example of the Election menu.
Chapter 3: DS850 User Interface 24
Press Configuration to set your scanner’s configuration options. See Configuring
the Scanner for information on setting your scanner’s configuration options.
Press Results to access the Results screen. From the Results screen, you can export
the poll place collection data, the election definition and the audit log. The Results
screen is also used to clear election results. You can clear all election results or the
election results for only a selected precinct.
Press Setup on the Election menu to view election setup and ballot count
information, clear and initialize the scanner, and load an election definition.
Reports Menu
Reference: See Exporting Data and Clearing Election Results for more information on the
Results screen.
Reference: See Clearing and Initializing the Scanner and Loading the Election Definition for
more information on the Setup screen.
Use the Reports menu to print or preview reports. See Chapter 8: Reports for additional
information on the various reports that are available and for the steps to follow to
preview or print the reports.
EVS5200_DOC_SOP_DS850
Software Version 2.10
Published: February 26, 2014
Page 31

The following is an example of the Reports menu.
Chapter 3: DS850 User Interface 25
System Menu
The System menu lists the following options:
Set Date/Time
Firmware
Antivirus
User Access
EVS5200_DOC_SOP_DS850
Software Version 2.10
Published: February 26, 2014
Page 32

The following is an example of the System menu.
Chapter 3: DS850 User Interface 26
Set Date/Time
The Set Date/Time option allows you to change the date, time, or both on the DS850.
Note: The scanner’s date and time settings cannot be changed when the scanner contains
ballot data.
Reference: See Set Date/Time for the steps that must be taken to change the scanner’s
system date and time.
Firmware
Press Firmware on the System menu to access the Firmware screen. On the Firmware
screen, you can see the version of the firmware loaded onto the DS850 and other
information about the machine.
Reference: For detailed instructions on loading new firmware, refer to the ES&S DS850
System Maintenance Guide.
EVS5200_DOC_SOP_DS850
Software Version 2.10
Published: February 26, 2014
Page 33

The following is an example of the Firmware screen.
Chapter 3: DS850 User Interface 27
Note: The Load and Validate buttons refer to future functionality that is not currently
available on the DS850.
EVS5200_DOC_SOP_DS850
Software Version 2.10
Published: February 26, 2014
Page 34

Chapter 3: DS850 User Interface 28
Antivirus
Note: This section refers to future functionality that is not currently available on the DS850.
User Access
When an election definition is loaded into the scanner, the firmware on the DS850 sets
the User Access feature to enabled. When User Access is enabled, a user can lock the
scanner. When the scanner is locked, no function can be performed from the touch
screen, such as modifying configuration settings or scanning ballots, until the Election
Code is entered and the scanner is unlocked. Once an election definition has been
loaded, you can disable the User Access feature from the User Access screen, if you
wish to do so. When User Access is disabled, the scanner cannot be locked.
Reference: See Locking the Scanner for the steps that must be followed to lock the scanner.
If an election definition has been loaded, the User Access setting determines the screen
that is displayed when the scanner is started. If an election definition has been loaded
and User Access is enabled, the Startup screen is displayed when the scanner is started.
If an election definition has been loaded and User Access is disabled, the Scan Ballots
screen is displayed when the scanner is started. (If an election definition has not been
loaded, the Setup screen is displayed when the scanner is started.)
Reference: See Starting the Scanner for the steps to follow to start the scanner.
EVS5200_DOC_SOP_DS850
Software Version 2.10
Published: February 26, 2014
Page 35

Chapter 3: DS850 User Interface 29
Follow the steps listed below to change the User Access setting:
1. Press User Access on the
System menu to display the
User Access settings screen.
Note: If an election definition
has not been loaded onto the
scanner and you press User
Access on the System menu, a
pop-up screen will appear
indicating that an election
must be loaded in order to
access this screen.
2. Press Edit on the User Access
settings screen to change the
user access setting.
3. When prompted, enter the
Administration Code and
press Accept.
4. When the User Access
selection screen appears,
highlight the desired option
(Disabled or Enabled) by
pressing on it. Then press
Save to save the change, or
press Cancel to cancel it.
EVS5200_DOC_SOP_DS850
Software Version 2.10
Published: February 26, 2014
Page 36

Hardware Menu
The Hardware menu lists the following options:
Screen Calibration
Printers
Audio
Camera
Transport
The following is an example of
the Hardware menu.
Chapter 3: DS850 User Interface 30
Screen Calibration
Press Screen Calibration to calibrate the scanner’s touch screen.
Reference: Refer to the ES&S DS850 System Maintenance Manual for further information on
calibrating the scanner’s touch screen.
Printers
The Printers option on the Hardware menu allows you to print test pages on the report
and log printers.
Follow the steps below to print test pages on these printers:
1. From the Hardware menu, press Printers.
EVS5200_DOC_SOP_DS850
Software Version 2.10
Published: February 26, 2014
Page 37

2. When the Printers screen
appears, press either
Report Printer or Log
Printer.
If you select Report Printer,
the Report Printer screen
appears. On the Report
Printer screen, press Print
to print a test page on the
report printer. When you
are finished, press Back.
Chapter 3: DS850 User Interface 31
A test page, similar to the
one below, prints from the
report printer:
EVS5200_DOC_SOP_DS850
Software Version 2.10
Published: February 26, 2014
Page 38

Chapter 3: DS850 User Interface 32
If you select Log Printer, the
Log Printer screen appears.
On the Log Printer screen,
use the Form Feed and Line
Feed buttons to advance the
paper in the log printer to
the point at which you want
printing to begin. Then press
Print to print the test report
on the log printer. When you
are finished, press Back.
EVS5200_DOC_SOP_DS850
Software Version 2.10
Published: February 26, 2014
Page 39

Chapter 3: DS850 User Interface 33
A test page, similar to the one below, prints from the log printer:
Audio
Note: This section refers to future functionality that is not currently available on the DS850.
Camera
From the Camera screen, you can calibrate the camera and adjust the camera’s
threshold, adaptive tolerance, and despeckle settings. These tasks should only be
performed by trained personnel.
Reference: See the ES&S DS850 System Maintenance Guide for more information on the
tasks that can be performed from the Camera screen.
Transport
From the Transport screen, you can set the ballot transport settings, as well as exercise
individual components of the DS850 transport. The Transport screen lists the following
options:
EVS5200_DOC_SOP_DS850
Software Version 2.10
Published: February 26, 2014
Page 40

Interface
Command Entry
Tests
Pick Delay
Note: If a hardware failure occurs, the scanner will be in a Limited Functionality mode and
some features may not be available.
Follow the steps below to access the Transport screen:
1. Press Transport on the Hardware menu.
2. When prompted, enter the
Administration Code.
Chapter 3: DS850 User Interface 34
After you successfully enter
the Administration Code, the
Transport screen is displayed.
Warning: Adjustments to
ballot transport settings
should only be made by
trained technicians.
EVS5200_DOC_SOP_DS850
Software Version 2.10
Published: February 26, 2014
Page 41

Chapter 3: DS850 User Interface 35
Pick Delay
The Pick Delay option is used to change the number of ballots that are picked for
scanning in a given period of time. The value in the Pick Delay field specifies the number
of seconds that the pick mechanism waits before grabbing the next ballot from the
input tray. For example, if the pick delay is set to 15 seconds, only four ballots will be
picked for scanning in one minute.
Increasing the pick delay value reduces the number of ballots that are picked for
scanning in a given period of time; decreasing the pick delay value increases the
number of ballots that are picked for scanning in a given period of time.
Follow the steps below to change the DS850’s pick delay setting:
1. Press Pick Delay on the Transport screen.
2. When the Pick Delay settings
screen appears showing the
current pick delay setting,
press Edit.
3. When the Pick Delay selection
screen appears showing the
current setting and the up and
down arrows, press the up
arrow to increase the pick
delay, or press the down arrow
to decrease the pick delay. The
numbers change more quickly
if you hold down on the up or
down arrow. The maximum
pick delay is 30 seconds.
4. After you select a new pick
delay, press Save to save the
new setting, or press Cancel to
cancel the change.
EVS5200_DOC_SOP_DS850
Software Version 2.10
Published: February 26, 2014
Page 42

Interface
The Interface screen lists the following options:
Sensor Status
Pick One Ballot
Trays
Motors
Diverters
Export Log
The following is an example of
the Interface screen.
Chapter 3: DS850 User Interface 36
Sensor Status
Note: This section refers to future functionality that is not currently available on the DS850.
Pick One Ballot
Note: This section refers to future functionality that is not currently available on the DS850.
EVS5200_DOC_SOP_DS850
Software Version 2.10
Published: February 26, 2014
Page 43

Chapter 3: DS850 User Interface 37
Trays
Use the Trays option to raise or lower the input tray or the bottom output tray. Press
Trays on the Interface screen to display the Trays screen. Press the up arrow in the Input
Tray field to raise the input tray, or press the down arrow in that field to lower it. Press
the up arrow in the Output Tray field to raise the bottom output tray, or press the down
arrow in that field to lower it. When you are finished, press Back. The DS850 will reset
itself, which clears the paper path and returns the trays to their original positions.
The following is an example of the
Trays screen.
Motors
Use the Motors option to start and stop
the DS850’s transport motors. Press
Motors on the Interface screen to
display the Motors screen. In the
Transport Motors field on the Motors
screen, press Start to start the
transport motors, or press Stop to stop
the transport motors. When you are
finished, press Back.
The following is an example of the
Motors screen.
Diverters
Press Diverters on the Interface screen to display the Diverters screen. On the Diverters
screen, press Test on the Top Bin, Middle Bin, and Bottom Bin fields to flip the position
of the corresponding diverters. When you are finished, press Back. The DS850 will reset
itself, which clears the transport path.
EVS5200_DOC_SOP_DS850
Software Version 2.10
Published: February 26, 2014
Page 44

Chapter 3: DS850 User Interface 38
The following is an example of the
Diverters screen.
Export Log
Use the Export Log option to export the interface log to a blank ES&S Media Device
flash drive, if this report is requested by ES&S Technical Support.
Note: The Export Interface Log is used by highly skilled engineers and technicians to analyze
the operation of the BAP Image Systems (BAPis) interface to the camera on the DS850.
Follow the steps listed below to export the contents of the interface log to a USB flash
drive:
1. Insert a blank ES&S Media Device flash drive into one of the USB ports on the
DS850.
2. On the Interface screen, press
Export Log. The following is an
example of the screen that is
displayed when the interface log
has been exported successfully.
3. Remove the ES&S Media Device
flash drive, and then press Done
to close the Export Interface
Log screen.
EVS5200_DOC_SOP_DS850
Software Version 2.10
Published: February 26, 2014
Page 45

Chapter 3: DS850 User Interface 39
Command Entry
Use the Command Entry screen to manually send commands to the transport.
Follow the steps below to send a command via the Command Entry screen:
1. Press Command Entry on the Transport screen.
2. When the Command Entry screen appears, enter a Command code in the text box
and press Send to manually send the command.
Warning: Use of this screen should be limited to ES&S Certified Technicians. See the
ES&S DS850 System Maintenance Manual for additional information.
The following is an example of the
Command Entry screen.
Tests
Use the Tests screen to display the
last saved ballot and to print the
Mark Code and Digital Readings
reports. To access the Tests screen,
press Tests on the Transport
screen. The Tests screen lists the
following options:
Display Ballot
Gate Flipper
Reports
The following is an example of the
Tests screen.
EVS5200_DOC_SOP_DS850
Software Version 2.10
Published: February 26, 2014
Page 46

Display Ballot
Press Display Ballot on the
Tests screen to display the last
ballot scanned and saved on
the DS850.
The following is an example of
a displayed ballot.
Use the Hide Controls button to hide the Flip Sides, arrow, and zoom buttons. When
you press the Hide Controls button, it becomes the Show Controls button. Press the
Show Controls button to re-display the Flip Sides, arrow, and zoom buttons.
Chapter 3: DS850 User Interface 40
Use the button with a plus sign (+) to zoom in; use the button with
a minus sign (-) to zoom out.
Use the Flip Sides button to view the other side of the displayed
ballot.
Use the forward arrow to go to the next ballot and the back arrow to go to the previous
ballot.
Use the forward arrow to go to the last ballot in the batch and the back arrow go to the
first ballot in the batch.
Use the arrow buttons to position the ballot on the screen.
Use Export Current to send the .tif image (front and back) for the currently displayed
ballot, along with the associated Mark Code and Digital Reading reports, to USB media.
(If using ExpressVote cards the Bar Code Report will be exported).
Use Export Batch to send the .tif images (front and back), for all ballots in the run in
which the currently displayed ballot resides, along with the associated Mark Code and
Digital Reading reports, to USB media. (If using ExpressVote cards the Bar Code Report
will be exported).
EVS5200_DOC_SOP_DS850
Software Version 2.10
Published: February 26, 2014
Page 47

Chapter 3: DS850 User Interface 41
Gate Flipper
Note: This section refers to future functionality that is not currently available on the DS850.
Reports
Use the reports option to print the following reports:
Mark Code - contains the mark code data from the scanner’s image processor for
the last ballot scanned and saved on the scanner.
Digital Readings - contains the reading data from the scanner’s image processor for
the last ballot scanned and saved on the scanner.
Barcode Report - contains data from the scanner’s image processor for the last card
scanned and saved on the scanner. It converts the barcodes on the card to a series
of digits.
Note: ES&S Technicians use these reports to analyze scanner performance.
Note: If the last ballot scanned was out-stacked, then the Mark Code and Digital Readings
reports will not work because a ballot image was not saved for the last ballot scanned.
Follow the steps below to print the reports:
1. Press Reports on the Tests
screen to display the Reports
screen.
2. On the Reports screen, highlight
the desired report by pressing
on the report title and then press
Print.
Note: The Zero, Results,
Batch/Bin, Precincts
Processed, and System
Readiness reports are not
available from this Reports
screen. They are printed
from the Reports menu. See
Chapter 8: Reports for more
information on accessing
and printing those reports.
3. Press Done when you are finished printing reports.
EVS5200_DOC_SOP_DS850
Software Version 2.10
Published: February 26, 2014
Page 48

Chapter 3: DS850 User Interface 42
EVS5200_DOC_SOP_DS850
Software Version 2.10
Published: February 26, 2014
Page 49

Chapter 3: DS850 User Interface 43
Ballot Number DS850 assigned scan number
Barcode Number of selection barcodes on the card
Master Barcode <internal precint id><internal ballot id><write-in count><total selection barcode count>
Selections each row indicates the position of the candidate/response on the corresponding ballot.
<column><row><side><sheet number>
Locking the Scanner
If an election definition has been loaded on the scanner and if User Access is enabled,
you can lock the scanner to prevent unauthorized users from modifying the scanner
configuration or performing other scanner functions from the touch screen.
Follow the steps listed below to lock the scanner:
EVS5200_DOC_SOP_DS850
Software Version 2.10
Published: February 26, 2014
Page 50

1. Press Exit in the lower
left-hand corner of the screen
to display the Exit screen.
2. From the Exit screen, press
Lock Scanner to access the
Lock Scanner screen
.
Note: If an election definition is not loaded or if User Access is disabled, the Exit screen does
not include the Lock Scanner button. See the User Access section for information on enabling
and disabling User Access.
Chapter 3: DS850 User Interface 44
3. On the Lock Scanner screen,
press Lock to lock the
scanner, or press Cancel to
leave the scanner unlocked.
If you press Lock, the
Scanner Locked screen
appears. See the steps
below for an example of the
Scanner Locked screen.
EVS5200_DOC_SOP_DS850
Software Version 2.10
Published: February 26, 2014
Page 51

Follow the steps below to unlock a locked scanner:
4. From the Scanner Locked
screen, press Unlock.
5. When prompted, enter the
Election Code and then press
Accept.
Chapter 3: DS850 User Interface 45
If you press Exit on the Exit screen,
the Exit screen closes and the
Scanning menu is displayed.
Reference: See Shut Down and Power Off the Scanner for an explanation of how the
Shutdown Scanner button on the Exit screen is used.
EVS5200_DOC_SOP_DS850
Software Version 2.10
Published: February 26, 2014
Page 52

Part 2: Election Tasks
This part of the manual contains instructions for the tasks that must be performed
before, on, and after Election Day. It includes the following chapters:
Chapter 4: DS850 Election Workflow
Chapter 5: Pre-Election Day Tasks
Chapter 6: Election Day Tasks
Chapter 7: Post-Election Day Tasks
Part 2: Election Tasks 46
EVS5200_DOC_SOP_DS850
Software Version 2.10
Published: February 26, 2014
Page 53

Chapter 4: DS850 Election Workflow 47
Chapter 4: DS850 Election Workflow
The following is the DS850 election workflow. Click on the hyperlinks to view additional
information on the referenced steps.
1. Perform the Pre-Election Maintenance.
2. Install the UPS; see Installing the UPS.
3. Connect the scanner to the UPS; see Connecting the Scanner to the UPS.
4. Connect the printers to the scanner and the UPS; see Connecting the External
Printers.
5. Set up the printers; see Setting Up the Audit Log Printer and Setting Up the Report
Printer.
6. Turn on the UPS; see Turning On the UPS.
7. Power on the printers and the scanner; see Starting the Scanner.
8. Clear and initialize the scanner; see Clearing and Initializing the Scanner.
9. Load the election definition; see Loading the Election Definition.
10. Perform Logic and Accuracy Testing to verify that the DS850 properly reads ballot
marks.
11. Make any desired modifications to the processing mode, bin sorting, audit log
printing, and batch/bin reporting configuration options; see Configuring the
Scanner.
12. Place the ballots on the input tray and begin scanning ballots; see Scanning.
13. After you have finished scanning the ballots, you can print reports; see Printing
Election Reports. You can also export election results, ballot images, and the audit
log; see Exporting Data.
14. When you are finished printing reports and exporting data, you can clear the
election results; see Clearing Election Results
15. When the election results have been cleared, perform the post-Election scanner and
UPS maintenance tasks; see Perform Scanner Maintenance and Perform UPS
Maintenance.
16. When the post-Election maintenance tasks have been completed, shut down and
power off the scanner; see Shut Down and Power Off the Scanner.
17. After the scanner has been shut down and powered off, turn off the UPS; see Turn
Off the UPS.
EVS5200_DOC_SOP_DS850
Software Version 2.10
Published: February 26, 2014
Page 54

Chapter 5: Pre-Election Day Tasks
This chapter describes the tasks that must be performed to prepare the UPS, printers,
and scanner for scanning ballots on Election Day. It provides instructions for performing
the following preparatory tasks:
Pre-Election Maintenance
Installing the UPS
Connecting the Scanner to the UPS
Connecting the External Printers
Setting Up the Audit Log Printer
Setting Up the Report Printer
Turning On the UPS
Starting the Scanner
Checking the Connection Between the UPS and the Scanner
Clearing and Initializing the Scanner
Chapter 5: Pre-Election Day Tasks 48
Loading the Election Definition
Setting the Date/Time
Logic and Accuracy Testing
Configuring the Scanner
EVS5200_DOC_SOP_DS850
Software Version 2.10
Published: February 26, 2014
Page 55

Pre-Election Maintenance
In order to keep the scanner in working order, perform routine maintenance before each
election. Before performing the following maintenance steps, ES&S recommends that
the unit be fully powered off using the proper shutdown procedures. Maintenance to
any component inside the scanner requires that the power plug be unplugged from the
scanner. Such maintenance should be done only by trained technicians.
Warning: Make sure you power the scanner down completely and power off and
unplug the UPS before connecting or disconnecting the power cable. Remove the
power cord before moving the scanner. Place the power cord near an easily accessible
unobstructed power outlet.
Clean the Rollers
Required Tools: Dry cotton cloth, isopropyl alcohol
Required Staff: Personnel trained by ES&S
Required Time: 30 minutes
Chapter 5: Pre-Election Day Tasks 49
The rollers move each ballot, picked from the input tray, over the transport path,
through the scan area (upper and lower camera housing), and into one of the three
output bins (the top, middle, or bottom bin). If the surfaces of the rollers are dirty or
discolored, clean them.
To clean the rollers, apply isopropyl alcohol to a cotton cloth and clean the visible
surfaces of the rollers, turning them as you clean to expose most of the surface area of
the rollers.
Caution: Keep fingers, hands, and loose clothing clear of the rollers.
Clean the Cameras
Required Tools: Dry cotton cloth, pressurized air can
Required Staff: Personnel trained by ES&S
Required Time: 5 minutes
To clean the cameras, wipe them with a dry, cotton cloth, or use a pressurized air can to
clean out any debris or paper dust collected during scanner operation. It is important to
hold the can upright so that you do not expel propellant onto the sensors.
EVS5200_DOC_SOP_DS850
Software Version 2.10
Published: February 26, 2014
Page 56

Chapter 5: Pre-Election Day Tasks 50
Clean the Scanner Case
Required Tools: Soft cotton cloth, mild detergent solution
Required Staff: Personnel trained by ES&S
Required Time: 5 minutes
Warning: Before cleaning the scanner case, disconnect the unit from its power source.
Do NOT use full strength or harsh detergents, liquid cleaners, aerosols, abrasive pads,
scouring powders, or solvents, such as benzene or alcohol. Liquids should never be
applied directly to the scanner. Use a soft cotton cloth lightly moistened with a mild
detergent solution. Ensure that the surface cleaned is fully dry before reconnecting the
power.
Clean the Touch Screen
Required Tools: ES&S touch screen cleaning kit
Required Staff: Personnel trained by ES&S
Required Time: 5 minutes
Spray the cloth with the cleaning solution and gently wipe the screen until clean. Then
use a dry section of the cloth to dry any remaining cleaning solution from the screen.
EVS5200_DOC_SOP_DS850
Software Version 2.10
Published: February 26, 2014
Page 57

Installing the UPS
Installation of the UPS involves connecting the bottom battery connector to the top
battery connector.
Follow the steps below to install the UPS:
1. Move the UPS so that the front panel of the UPS
hangs over the edge of the table as shown in the
picture on the right.
Chapter 5: Pre-Election Day Tasks 51
2. Press down on the front panel and then
slide it off as shown in the picture on the
right.
EVS5200_DOC_SOP_DS850
Software Version 2.10
Published: February 26, 2014
Page 58

3. Insert the bottom battery connector
into the top battery connector. The
picture below on the left shows the
two connectors before they are
connected; the picture below on the
right shows the two connectors after
they have been connected.
4. Replace the front panel.
5. Move the UPS to the spot where you
want it to be when the scanner is
operating.
6. Plug the UPS into a power outlet.
Chapter 5: Pre-Election Day Tasks 52
Connecting the Scanner to the UPS
Plug one end of the DS850’s power cord into the left side of the DS850, just below the
power switch. Plug the other end of the power cord into one of the bottom receptacles
on the UPS that provides battery backup. Connect the data communication cable to the
UPS and one of the USB ports on the DS850. The data communication cable is used by
the UPS to let the DS850 know when the UPS is operating on battery power.
EVS5200_DOC_SOP_DS850
Software Version 2.10
Published: February 26, 2014
Page 59

Connecting the External Printers
The DS850 uses a dot matrix printer to print the continuous audit log and a laser printer
for printing reports. Both printers can be attached to any USB connection on the side of
the scanner. ES&S recommends that the printers be connected to the USB port next to
the power switch on the left side of the scanner. This will allow the security door to be
closed after connecting the printers. In addition, the audit log printer power cord should
be connected to the battery backup power of the UPS, and the report printer power
cord should be connected to the UPS power jack that has surge protection only.
Connecting the laser printer power cord to the battery backup of the UPS will overload
it.
Reference: Refer to the printer manuals for specific instructions on operating the printers.
Follow the steps below to connect the external printers:
Chapter 5: Pre-Election Day Tasks 53
1. Plug the printer cables into the external USB
printer ports located next to the power switch
on the left side of the scanner.
2. Plug the other end of the printer cables into the
printer ports on the back of the printers.
3. Connect one end of the printer’s power cords to
the backs of the printers.
4. Connect the other end of the
printers’ power cords to the
UPS as shown below.
Note: The power cord
from the audit log
printer should be
connected to the
battery backup power of
the UPS, and the power
cord from the report
printer should be
connected to the UPS
power jack that has
surge protection only.
EVS5200_DOC_SOP_DS850
Software Version 2.10
Published: February 26, 2014
Page 60

Setting Up the Audit Log Printer
The dot matrix printer is used to print the continuous audit log. Before using the printer,
make certain that there is plenty of paper in the printer and that the printer is connected
to the UPS and powered on.
The following is an example of a dot matrix printer.
Chapter 5: Pre-Election Day Tasks 54
Follow the steps below to configure the dot matrix printer using the buttons on the
front panel of the printer:
1. Verify that there is plenty of paper in the printer.
2. Verify that the printer is powered on.
3. Press and hold SHIFT and then press SEL to enable the menu.
4. Release SHIFT.
5. Press LF. The printer control emulation is displayed on the printer.
6. Press TEAR repeatedly until the “Epson FX” mode prints.
7. Press and hold SHIFT, and then press SEL to save the setting.
EVS5200_DOC_SOP_DS850
Software Version 2.10
Published: February 26, 2014
Page 61

Setting Up the Report Printer
The laser printer is used to print reports. Before using the printer, make certain that the
printer is connected to the power jack that has surge protection only on the UPS, there
is paper in the printer and it is powered on.
The following is an example of a laser printer.
Chapter 5: Pre-Election Day Tasks 55
EVS5200_DOC_SOP_DS850
Software Version 2.10
Published: February 26, 2014
Page 62

Turning On the UPS
Before turning on the UPS, make sure that the UPS is plugged into a power outlet. Then
press the power switch, as shown in the picture below. The green light visible at the top
of this unit indicates that the UPS is powered on and that utility power is powering
battery backup outlets.
Note: The first time the UPS is powered up, it will take eight hours for it to reach its full
charge.
Chapter 5: Pre-Election Day Tasks 56
EVS5200_DOC_SOP_DS850
Software Version 2.10
Published: February 26, 2014
Page 63

Starting the Scanner
To start the scanner, flip the power switch on the left side of the DS850 to the on
position. A pop-up screen will display telling you to touch the screen if you want to
calibrate it. The next screen that displays depends on whether an election definition has
been loaded into the DS850, and if an election definition has been loaded, whether
User Access is enabled or disabled.
If an election definition has not
been loaded on the scanner, the
screen that appears when the
scanner is started is the Setup
screen. The Setup screen allows
you to either clear and initialize
the scanner or load an election
definition. The following is an
example of the Setup screen.
Chapter 5: Pre-Election Day Tasks 57
Reference: See Clearing and Initializing the Scanner and Loading the Election Definition for
the steps to follow to perform these procedures.
If an election definition has
been loaded on the scanner
and User Access is enabled, the
screen that appears when the
scanner is started is the Startup
screen. From the Startup
screen, press Login if you are
ready to scan ballots for the
loaded election, press Setup to
load a different election
definition, or press Shutdown
to shut down the scanner. The
following is an example of the
Startup screen.
If you press Login from the
Startup screen, you will be
prompted to enter the Election Code. Enter the Election Code and then press
Accept. The next screen that is displayed is the Scan Ballots screen.
EVS5200_DOC_SOP_DS850
Software Version 2.10
Published: February 26, 2014
Page 64

If an election definition has
been loaded on the scanner
and User Access is disabled,
the screen that appears when
the scanner is started is the
Scan Ballots screen. If you are
ready to scan ballots, place the
ballots in the input tray and
press Start. The following is an
example of the Scan Ballots
screen.
Note: If the election is By Style or if the Processing Mode is set to Single Precinct, you will
have to select a precinct before you can begin scanning the ballots. See Select a Precinct for
more information. If the Processing Mode is set to Mixed Precinct, you will not need to select
a precinct before you can scan ballots. The Select Precinct button will be the only available
button until you select a precinct.
Chapter 5: Pre-Election Day Tasks 58
Reference: See Scanning for the steps to follow to perform the procedure. See Select a
Precinct for instructions on selecting a precinct.
Select a Precinct
If an election is By Style or if the Processing Mode is set to Single Precinct, you must
select a precinct before you can scan ballots.
Follow the steps below to select a precinct:
1. Press Select Precinct
.
Reference: See Scanning for an
example of the Scan Ballots
screen showing the Select
Precinct button.
2. Enter the precinct number or
name and then press Search or
just press Search.
EVS5200_DOC_SOP_DS850
Software Version 2.10
Published: February 26, 2014
Page 65

You can enter the precinct
name or the first few letters of
the precinct to narrow your
search. Use the keyboard to
type in the first few letters,
numbers or the precinct name
then press Search. Then go to
Step 3.
Note: You do not have to enter a precinct number or name in the search field in order to
perform a search. You can leave the field blank and press Search. Entering a number in the
field simply helps to narrow the search.
Chapter 5: Pre-Election Day Tasks 59
You can also search the entire
list of precincts on the DS850
by selecting Search. Then go
to Step 3.
EVS5200_DOC_SOP_DS850
Software Version 2.10
Published: February 26, 2014
Page 66

3. The Select Precinct results
screen appears. Select the
desired precinct by pressing on
it and then press Next. If the
precinct you want to select is
not listed, press Back to
perform another search.
4. The Select Precinct
confirmation screen appears,
press Next to confirm your
selection. If you are not
satisfied with your selection,
press Back to review the list of
search results, or press Search
to start a new search.
Chapter 5: Pre-Election Day Tasks 60
Once you have selected the
correct precinct and pressed Next.
You will be returned to the Select
Precinct screen. Under Current
Selection, it will show the precinct
you selected. i
EVS5200_DOC_SOP_DS850
Software Version 2.10
Published: February 26, 2014
Page 67

Chapter 5: Pre-Election Day Tasks 61
Checking the Connection Between the UPS and the Scanner
The DS850 uses a USB connection to the UPS so that the DS850 can detect when
external power is lost to the UPS.
Follow the steps below to test the UPS:
Note: These steps assume that the scanner has been connected to the UPS, the UPS
has been turned on, the scanner has been powered on, and the AC Power icon
indicates that external power is being applied to the UPS.
Reference: See Connecting the Scanner to the UPS, Turning On the UPS, and Starting the
Scanner to verify the assumptions listed in the note above.
1. Disconnect external power from the UPS.
2. Verify the DS850 screen indicates that external power has been lost. (The two
connectors in the AC Power icon should be disconnected.)
3. Reconnect external power to the UPS.
4. Verify that the screen indicates external power has been applied. (The two
connectors in the AC Power icon should be connected.)
Reference: See Operating Status Icons for more information on the AC Power icon.
Clearing and Initializing the Scanner
You must clear and initialize the DS850 prior to loading the election definition. The clear
and initialize process clears all data from the machine and loads the necessary
encryption keys to load and run the election.
Follow the steps below to clear and initialize the scanner:
1. Press Election to access the Election menu.
EVS5200_DOC_SOP_DS850
Software Version 2.10
Published: February 26, 2014
Page 68

2. From the Election menu, press
Setup to access the Setup
screen.
3. On the Setup screen, press Clear
and Initialize. This displays the
Searching for EQC Media Device
pop-up screen.
4. Insert a valid (for the election)
EQC Media Device flash drive
into one of the scanner’s USB
ports. The previous pop-up
screen is temporarily replaced by
a Detecting inserted device
pop-up screen. Then, the
Qualification Code screen
appears.
Reference: See Using USB Media Devices for instructions.
Chapter 5: Pre-Election Day Tasks 62
5. Enter the Qualification Code
and then press Accept.
EVS5200_DOC_SOP_DS850
Software Version 2.10
Published: February 26, 2014
Page 69

6. When the Clear and Initialize
screen appears notifying you
that the system has found valid
EQC media for the election,
press Yes to continue, or press
No if you do not want to
proceed. If you press Yes, a
pop-up screen appears briefly
to inform you that the DS850 is
being cleared and initialized.
7. The following screen appears
when the DS850 has been
successfully cleared and
initialized. Remove the EQC
Media Device flash drive from
the scanner’s USB port and then
press Done.
Chapter 5: Pre-Election Day Tasks 63
Loading the Election Definition
You must clear and initialize the DS850 prior to loading the election definition. The clear
and initialize process clears all data from the machine and loads the necessary
encryption keys to load and run the election.
Election coders create the USB flash drives containing the current election information
for every new election. If ES&S is coding your election, they will send the drives to you.
Follow the steps below to load the election definition:
1. Press Election to access the Election menu.
EVS5200_DOC_SOP_DS850
Software Version 2.10
Published: February 26, 2014
Page 70

2. From the Election menu, press
Setup to access the Setup
screen.
3. On the Setup screen, press
Load Election. This displays the
Searching for Election Definition
Media Device pop-up screen.
4. Insert a valid (for the election)
Election Definition Media
Device flash drive into one of
the scanner’s USB ports. The
previous pop-up screen is
temporarily replaced by a
Detecting inserted device
pop-up screen. Then, the
Election Code screen appears.
Chapter 5: Pre-Election Day Tasks 64
Reference: See Using USB Media Devices for instructions.
5. Enter the Election Code and
then press Accept.
EVS5200_DOC_SOP_DS850
Software Version 2.10
Published: February 26, 2014
Page 71

6. When the Load Election screen
appears notifying you that the
system has found valid
Election Definition media for
the election, press Yes to start
the election definition load
process, or press No to stop it.
If you press Yes, a pop-up
screen appears briefly to let
you know that the election
definition is being loaded.
7. The following screen appears
when the election definition
has been loaded successfully.
Remove the Election Definition
Media Device flash drive
containing the election
definition and store it in a safe
place. Then press Done.
Chapter 5: Pre-Election Day Tasks 65
EVS5200_DOC_SOP_DS850
Software Version 2.10
Published: February 26, 2014
Page 72

Setting the Date/Time
The Set Date/Time option allows you to change the date, time, or both on the DS850.
Note: The scanner’s date and time settings cannot be changed when the scanner contains
ballot data. Therefore, if the scanner’s date and time are incorrect, change them before you
begin scanning ballots.
Follow the steps listed below to change the date on the DS850:
1. Press Set Date/Time on the System menu to access the Date/Time screen.
2. Press Change Date to change
the date on the scanner. The
Set Date settings screen
appears displaying the current
system date.
Chapter 5: Pre-Election Day Tasks 66
3. Press Edit on the Set Date
settings screen to change the
current system date.
EVS5200_DOC_SOP_DS850
Software Version 2.10
Published: February 26, 2014
Page 73

4. When prompted, enter the
Administration Code and then
press Accept.
5. When the Set Date selection
screen appears, use the up and
down arrows to modify the
settings for month, day, and
year.
Chapter 5: Pre-Election Day Tasks 67
6. After you have modified the
system date settings, press
Next to display the Set Date
confirmation screen, or press
Cancel to cancel the change.
7. On the Set Date confirmation
screen, review your changes.
Then press Save to save the new
settings, Cancel to cancel them,
or Back to return to the previous
screen.
Follow the steps listed below to change the time on the DS850:
EVS5200_DOC_SOP_DS850
Software Version 2.10
Published: February 26, 2014
Page 74

1. Press Set Date/Time on the
System menu to access the
Date/Time screen.
2. Press Change Time to change
the time on the scanner. The Set
Time settings screen appears
displaying the current system
time.
3. Press Edit on the Set Time
settings screen to change the
current system time.
Chapter 5: Pre-Election Day Tasks 68
4. When prompted, enter the
Administration Code and then
press Accept.
EVS5200_DOC_SOP_DS850
Software Version 2.10
Published: February 26, 2014
Page 75

5. When the Set Time selection
screen appears, use the up and
down arrows to modify the
settings for hours and minutes
and to change the indicator to
AM or PM.
6. After you have modified the
system time settings, press Next
to display the Set Time
confirmation screen, or press
Cancel to cancel the change.
7. On the Set Time confirmation
screen, review your changes.
Then press Save to save the new
settings, Cancel to cancel them,
or Back to return to the previous
screen.
Chapter 5: Pre-Election Day Tasks 69
Logic and Accuracy Testing
Perform logic and accuracy testing as required by your jurisdiction’s procedures and
applicable laws. Logic and accuracy testing includes zeroing totals, scanning the ballot
test deck, and checking reports.
A hand counted test deck for each election is available from ES&S. A test deck is a stack
of sample ballots that are marked and scanned at ES&S. The reports included with the
test deck contain accurate results for the election definition sent to your jurisdiction.
Use the test deck to verify your election definition and to test scanner operation. Be
sure to follow your local election laws regarding election testing.
The steps listed below are provided as a guide to help you develop a procedure for
logic and accuracy testing that meets the requirements of your jurisdiction.
1. Clear and initialize the scanner; see Clearing and Initializing the Scanner.
EVS5200_DOC_SOP_DS850
Software Version 2.10
Published: February 26, 2014
Page 76

Chapter 5: Pre-Election Day Tasks 70
2. Load the election definition; see Loading the Election Definition.
3. Print the Zero Report to verify that ballot totals are all zeros.
4. Scan the test deck of ballots; see Scanning.
5. Print the Results Report.
6. Compare your reports to the ones provided by ES&S to verify that the scanner is
operating properly.
7. Clear the election results; see Clearing Election Results.
8. Print the Zero Report to verify that ballot totals are all zeros.
Note: If you turn off bin sorting for logic and accuracy testing, be sure to set the bin sorting
options as required for your election after the testing has been completed. See Bin Sorting
for information on turning off bin sorting.
Reference: See Chapter 8: Reports for more information on the Zero and Results reports.
EVS5200_DOC_SOP_DS850
Software Version 2.10
Published: February 26, 2014
Page 77
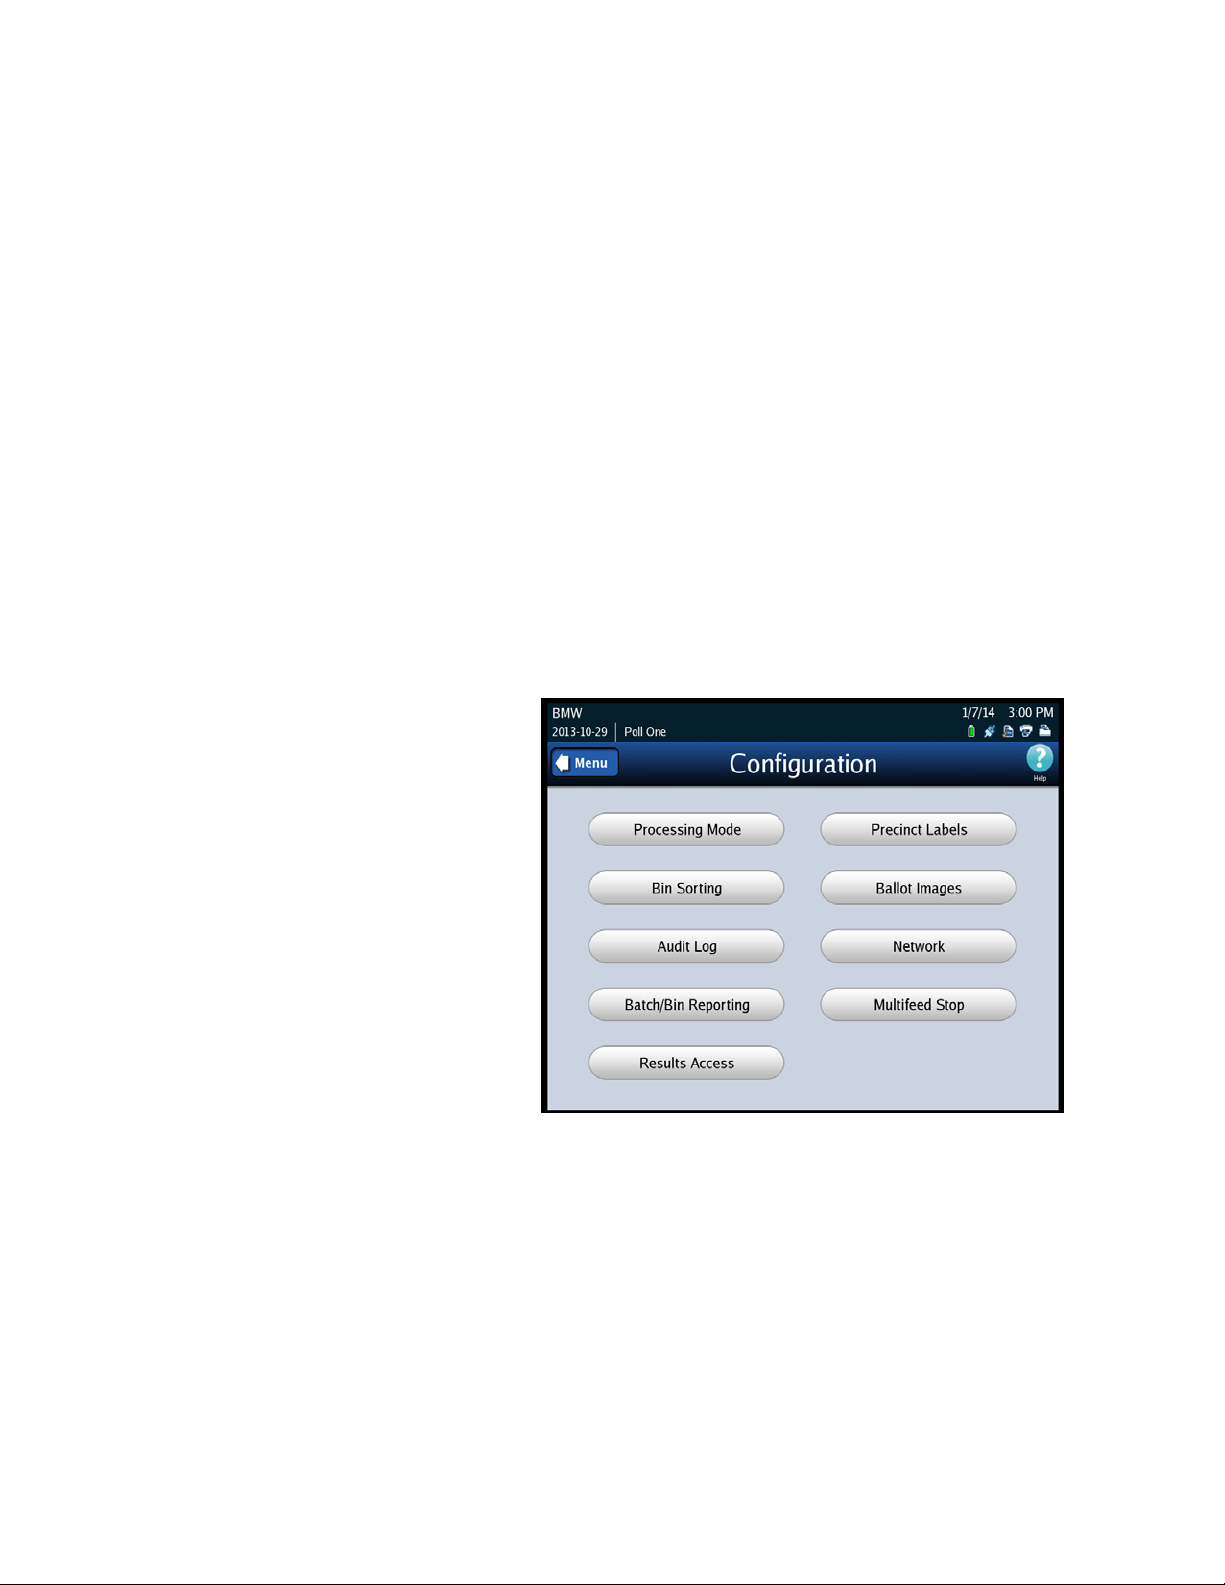
Configuring the Scanner
Use the Configuration screen to change the DS850’s configuration settings from the
default settings established in ElectionWare. This screen can be accessed by selecting
Configuration from the Election menu screen. The following items are listed on the
Configuration screen:
Processing Mode
Bin Sorting
Audit Log
Batch/Bin Reporting
Results Access
Precinct Labels
Ballot Images
Network
Multifeed Stop
Chapter 5: Pre-Election Day Tasks 71
The following is an example
of the Configuration screen.
EVS5200_DOC_SOP_DS850
Software Version 2.10
Published: February 26, 2014
Page 78

Chapter 5: Pre-Election Day Tasks 72
Processing Mode
Reference: Default settings for the processing mode are part of the Election Definition
defined in ElectionWare. See the ES&S ElectionWare User Guides for information on
modifying Election Definition settings.
Note: If the election definition from ElectionWare specifies a By Style election, the
processing mode can only be changed in ElectionWare and there are no available
options on the Processing Mode screen.
The two processing modes that can be used for an election are described below:
Precinct Selection Off- Every ballot has the precinct information coded into the
ballot ID.
Single Precinct - Every ballot has the precinct information coded into the ballot ID.
The user is prompted to enter the precinct number prior to scanning ballots. After
the user enters the precinct number, the scanner diverts any ballot that is outside of
that precinct to the top (out-stacked), Not Processed bin.
Follow the steps below to change the Processing Mode:
1. Press Processing Mode on
the Configuration screen to
access the Processing
Mode settings screen.
2. Press Edit on the
Processing Mode settings
screen.
EVS5200_DOC_SOP_DS850
Software Version 2.10
Published: February 26, 2014
Page 79

3. When prompted, enter the
Election Code and then press
Accept.
4. When the Processing Mode
selection screen appears,
highlight the desired
Processing Mode by pressing
on it. Then press Save to save
the new Processing mode
setting, or press Cancel to
cancel the change.
Chapter 5: Pre-Election Day Tasks 73
EVS5200_DOC_SOP_DS850
Software Version 2.10
Published: February 26, 2014
Page 80

Chapter 5: Pre-Election Day Tasks 74
Bin Sorting
There are two options on the Bin Sorting screen: Sort Settings and Scan Screen Sort
Options.
Sort Settings
The Sort Settings option allows you to specify which output bin the ballots will be
diverted to. It also allows you to specify whether undervotes, overvotes, crossovers,
blank ballots, and ballots with unclear marks are to be processed.
Note: ElectionWare provides the ability to set bin sorting in the Election Definition.
If you want to use settings that are different from the ones in the Election Definition, you can
use the bin sorting screens to change the settings on the scanner.
If the Sorting on/off feature is enabled, you can override the default settings for bin sorting in
the Election Definition, as well as any changes that have been made using the Bin Sorting
screens, by turning sorting off from the Scan Ballots screens. When the Sorting on/off feature
is enabled, there is a button on the scan ballots screens that allows the user to turn sorting on
or off. The middle bin is not able to be changed and will always follow the ElectionWare
defaults
Write-In
Overvote
Undervote
Blank Ballots
Reference: See the ES&S ElectionWare Volume IV: Deliver User’s Guide for additional
information on ElectionWare.
See Scan Screen Sort Options for instructions on how to enable and disable the Sorting on/
off feature.
See Sorting On/Off Feature for information on the impacts of turning sorting off.
A write-in space appears on the ballot as a voting target next to a
blank line that a voter uses to fill in the name of a write-in
candidate. To vote for a write-in candidate, a voter writes the name
of the candidate on the write-in line and marks the ballot target
that corresponds to the line.
Ballots having more than the allowed number of votes cast for one
or more contests
The election definition can designate one or more contests as an
“undervote-contest”. This option out-stacks any scanned ballot
that has a designated undervote contest that was undervoted. This
option does not out-stack blank ballots
This option out-stacks ballots that do not contain any votes, have
been marked with a non-standard marking device for the DS850, or
have been marked improperly (for example, the voter circled the
candidate’s name instead of filling in the appropriate oval).
EVS5200_DOC_SOP_DS850
Software Version 2.10
Published: February 26, 2014
Page 81

Chapter 5: Pre-Election Day Tasks 75
Unclear Marks
Cross Over
Unable to interpret a mark in an oval position on the ballot.
In an Open Primary, this option out-stacks ballots with votes for any
multiple party candidate.
Invalid ID
Sorts ballot that are not associated with the current election or a
ballot style that is not associated with any of the election precincts.
Unreadable
Not able to read or interpret the ballot. Example: Marks on the
code channel, torn ballot
When the DS850 scans a ballot, it gathers two images (front and back) and a cast vote
record from the ballot. A ballot is normally scanned within a batch of ballots.The cast
vote records of ballots diverted to the bins that have been processed are selected for
inclusion in the collection process. The cast vote records of ballots diverted to the Not
Processed bin are selected for exclusion from the collection process. These ballot
images and cast vote records are then saved to the scanner’s internal memory when the
batch is saved.
Reference: See Exporting Data for information on exporting the vote results and ballot
images to USB flash drives.
Follow the steps below to configure the sort settings:
1. Press Bin Sorting on the Configuration screen. The Bin Sorting options screen
opens.
2. On the Bin Sorting options
screen, press Sort Settings.
EVS5200_DOC_SOP_DS850
Software Version 2.10
Published: February 26, 2014
Page 82

3. The Sort Settings screen will
show the current selections,
which were setup in
ElectionWare for each bin. Press
Edit to change the settings for
each bin.
4. When prompted, enter the
Election Code and then press
Accept.
Chapter 5: Pre-Election Day Tasks 76
5. To change the options for the
bin sorting, press the Option
Button under each ballot
exception to sort the ballots to
the bin of your choice. You can
only choose one bin per ballot
exception. Press Save to save
the settings and return to the
Sort Setting View screen.
EVS5200_DOC_SOP_DS850
Software Version 2.10
Published: February 26, 2014
Page 83

Chapter 5: Pre-Election Day Tasks 77
Note: The Cross Over option is only applicable for an open primary election.
Note: For Logic and Accuracy Testing, you may be required to turn off bin sorting
prior to scanning the test deck. Bin sorting is turned off when the Ballots With
Write-ins option is set to Process and none of the ballot types for the Ballots Not
Processed option are selected. When logic and accuracy testing has been completed,
make certain the bin sorting options are set as required for your election.
Scan Screen Sort Options
The Sort Option allows you to enable or disable the Sorting on/off feature. When the
Sorting on/off feature is enabled, the Sorting on/off button is displayed in the top
portion of the main scan ballots screen with Sorting On. When the Sorting on/off feature
is disabled, the Sorting on/off button is not displayed on the main scan ballots screen,
however Sorting remains on. By default, the Sort Option is disabled.
Reference: See Sorting On/Off Feature for information on the impacts of turning sorting off.
Follow the steps below to modify the Sort Option setting:
1. Press Bin Sorting on the Configuration screen. The Bin Sorting options screen
opens.
2. On the Bin Sorting options
screen, press Scan Screen Sort
Options. The Scan Screen Sort
Options settings screen is
displayed.
EVS5200_DOC_SOP_DS850
Software Version 2.10
Published: February 26, 2014
Page 84

3. On the Sort Option settings
screen, press Edit.
4. When prompted, enter the
Administration code and then
press Accept. The Sort Option
selection screen is displayed.
Chapter 5: Pre-Election Day Tasks 78
5. On the Sort Option selection
screen, highlight the desired
option (Disabled On Scan
Screen or Enabled On Scan
Screen) by pressing on it. Then
press Save to save the new
setting, or press Cancel to
cancel the change.
EVS5200_DOC_SOP_DS850
Software Version 2.10
Published: February 26, 2014
Page 85

Audit Log
Activity on the DS850 is recorded to
the audit log, and the DS850 prints
the contents of the audit log to the
attached dot matrix printer.
ElectionWare provides the settings
for the audit log printing function in
the election definition. There are
settings that are provided which
enable audit log printing and
prevent the user from disabling it.
The user also has the option to set
the ability to enable or disable the
Real Time Audit Log on the DS850.
Chapter 5: Pre-Election Day Tasks 79
Reference: See the ES&S ElectionWare Volume IV: Deliver User’s Guide for additional
information on ElectionWare.
Batch/Bin Reporting
The Batch/Bin Reporting screen allows you to change the number of copies of each
Batch/Bin report to be automatically printed whenever a user saves a scanned batch of
ballots. Together, the following three Batch/Bin reports identify the resulting bin
disposition of each ballot within the saved batch:
• Not Processed
• Processed with Write-ins
• Processed
Note: ElectionWare provides the default settings for batch/bin reporting in the election
definition. By default, no batch/bin reports are printed automatically when the user saves a
scanned batch of ballots. If you want reports to print automatically when you save a batch of
scanned ballots, you must use the Batch/Bin Reporting screen to specify the number of
reports you want printed.
EVS5200_DOC_SOP_DS850
Software Version 2.10
Published: February 26, 2014
Page 86

Chapter 5: Pre-Election Day Tasks 80
Reference: See the ES&S ElectionWare Volume IV: Deliver User’s Guide for additional
information on ElectionWare.
Reference: The Batch/Bin reports can also be printed from the Reports menu. See Chapter 8:
Reports for instructions on how to preview and print the reports and for an example of a
Batch/Bin Report.
Follow the steps below to change the number of copies to be automatically printed for
each report:
1. Press Batch/Bin Reporting on
the Configuration screen to
access the Batch/Bin Reporting
settings screen.
2. When the Batch/Bin Reporting
settings screen appears, press
Edit to modify the current
settings.
3. When prompted, enter the
Election Code and then press
Accept.
EVS5200_DOC_SOP_DS850
Software Version 2.10
Published: February 26, 2014
Page 87

4. When the Batch/Bin Reporting
selections screen appears, use
the up and down arrows to
change the number of copies to
be printed for each report type:
Top Bin, Middle Bin and Bottom
Bin.
5. When you are finished, press
Save to save the changes, or
press Cancel to cancel the
changes.
Results Access
Chapter 5: Pre-Election Day Tasks 81
The Results Access option will allow jurisdictions to restrict access to the Results Report
and vote collection process before polls have closed. This option will restrict access to
the following DS850 screens:
Reports selection screen option - Results Report
Results menu screen options
• Export Results
• Export Files
• Backup menu screen option - Collection
1. From the Election Menu select Configure.
2. Select Results Access.
EVS5200_DOC_SOP_DS850
Software Version 2.10
Published: February 26, 2014
Page 88

3. On the Results Access screen
press Edit to update your option.
4. Enter the Administration
Code.
Chapter 5: Pre-Election Day Tasks 82
5. Select one of the following options:
• Unlocked - Results Report and vote process options are available.
• Locked - The following options are restricted from use:
The Reports selection screen option - Results Report
Results menu screen options
• Export Results
• Export Files
• Backup menu screen option - Collection
Note: If the user attempts to use any of the locked functions they will receive a message
informing them that these options are unavailable.
6. Press Save to save your current option.
EVS5200_DOC_SOP_DS850
Software Version 2.10
Published: February 26, 2014
Page 89

Chapter 5: Pre-Election Day Tasks 83
Precinct Labels
The Precinct Labels section will allow you to change the name of how a precinct is
labeled on the scanner. You will be able to change the name to your jurisdictions
preference (example: borough, ward, etc...). For example, if you change the name to
borough, it will replace “precinct” on the screens and reports.
1. Select Precinct Label on the Configuration screen to access the Precinct Labels
settings screen.
2. When the Precinct Labels screen comes up, you will have the following choices:
Change Singular Label - this will change any of the labels that are singular text.
Change Plural Label - this will change any of the labels that are plural.
Singular Label
3. Press Change Singular Label
to change the singular text.
4. Press Edit to change the text
of the label.
EVS5200_DOC_SOP_DS850
Software Version 2.10
Published: February 26, 2014
Page 90

5. Enter the preferred name into
the field by using the
on-screen keyboard. After you
have completed entering the
name press Save.
6. Confirm that the name is
correct, if it is correct select
the Menu button. This will
return you to the Precinct
Labels screen.
Chapter 5: Pre-Election Day Tasks 84
EVS5200_DOC_SOP_DS850
Software Version 2.10
Published: February 26, 2014
Page 91

Change Plural Label
1. Press Change Singular Label to
change the singular text.
2. Press Edit to change the text of
the label.
Chapter 5: Pre-Election Day Tasks 85
3. Enter the preferred name into
the field by using the
on-screen keyboard. After you
have completed entering the
name press Save.
EVS5200_DOC_SOP_DS850
Software Version 2.10
Published: February 26, 2014
Page 92

4. Confirm that the name is
correct, if it is correct select
the Menu button. This will
return you to the Precinct
Labels screen.
Ballot Images
Chapter 5: Pre-Election Day Tasks 86
1. Select Ballot Images on the
Configuration screen to access
the Ballot Images settings
screen.
EVS5200_DOC_SOP_DS850
Software Version 2.10
Published: February 26, 2014
Page 93

2. Press Edit to update the selections.
3. You will be able to select from
one of the following options:
• None
• All Processed Images
• Processed Write-In Images
Only
4. After you make your
selection, press Save to
save your selection, or
press Cancel to exit.
Chapter 5: Pre-Election Day Tasks 87
EVS5200_DOC_SOP_DS850
Software Version 2.10
Published: February 26, 2014
Page 94

Network
Note: See Chapter 9: DS850 Network for instructions on using a network.
Multifeed Stop
1. Select Multifeed Stop on the
Configuration screen to access
the Ballot Images settings
screen.
Chapter 5: Pre-Election Day Tasks 88
2. Press Edit to select you option
to turn on or off the multifeed
detection.
EVS5200_DOC_SOP_DS850
Software Version 2.10
Published: February 26, 2014
Page 95

3. Press On or Off to select the
option you would like. To save
the selection press Save.
This is an example of the error
screen you will see if you have the
Multifeed Stop Option on. You will
get this error when multiple ballots
are fed through the scanner at the
same time.
Chapter 5: Pre-Election Day Tasks 89
EVS5200_DOC_SOP_DS850
Software Version 2.10
Published: February 26, 2014
Page 96

Chapter 6: Election Day Tasks 90
Chapter 6: Election Day Tasks
This chapter contains instructions for the following Election Day tasks:
Scanning
Printing Election Reports
Exporting Data
Clearing Election Results
Reference: Before you begin the Election Day tasks, see Chapter 5: Pre-Election Day Tasks to
make certain that all pre-election tasks have been completed.
Special Instructions for Processing Folded Ballots
This section covers instructions on how to process folded ballots.
1. Remove the ballot from the envelope
and unfold it.
2. Back fold the crease on each fold in the
ballot.
3. Start running ballots by laying them flat
in small stacks of about 25 to 50 ballot.
Slowly increase the stack size if the
scanner successfully processes smaller
ballot batches without issues. Maximum
stack size for folded ballots should not
exceed 150 ballots.
EVS5200_DOC_SOP_DS850
Software Version 2.10
Published: February 26, 2014
Page 97

Scanning
This section covers the following:
Scanning ballots
Handling out-stacked ballots
Saving a batch of ballots
Deleting a batch of ballots
Using the Sorting on/off feature
Scanning the Ballots/Cards
Warning: The ballot scanning process assumes that the scanner has been powered on, all
pre-Election Day tasks have been completed, the election definition has been loaded, the
user has the authority to scan ballots, and the scanner has been calibrated.
Chapter 6: Election Day Tasks 91
Note: Before you attempt to scan ballots/cards make sure that the camera lid and rear panel
are closed. The scanner does not allow functions that engage the motors to be performed
when the camera lid or rear panel is open.
1. On the touch screen, press
Scanning to display the
Scanning menu.
EVS5200_DOC_SOP_DS850
Software Version 2.10
Published: February 26, 2014
Page 98

2. Press Scan Ballots from the
Scanning menu. The Load
Ballots screen appears. As
shown below, in Mixed Precinct
mode all of the buttons in the
bottom portion of the screen
are dimmed. However, in By
Style and Single Precinct
modes, the Select Precinct
button would be available.
3. Load the ballots\cards as
described below.
a. Adjust the length of the
input and output trays to
accommodate the ballots.
Reference: See Adjusting the Input and Output Trays for instructions on how to adjust the
trays.
Chapter 6: Election Day Tasks 92
b. Slide the ballot guide out of the curved
opening in the input tray, as shown in the
picture on the right.
c. Place the ballots in the input tray. The ballots can be in any orientation.
Note: ES&S recommends using a jogger to separate the ballots and to align the ballot stack
before you place the ballots in the input hopper. If the ballot stack is slightly curved, place the
stack in the input hopper with the convex side up. If the scanner cannot read a ballot because
of its condition or because of the way in which it is fed into the scanner, the scanner will not
process the ballot and will out stack the ballot to the Not Processed (top) bin.
EVS5200_DOC_SOP_DS850
Software Version 2.10
Published: February 26, 2014
Page 99

d. Slide the ballot guide back toward the
opening until it rests gently against the
ballot stack as shown in the picture on the
right.
5. Once the ballots have been
loaded, the Scan Ballots screen
appears. Press Start to begin
scanning.
.
Chapter 6: Election Day Tasks 93
Note: If you are required to select a precinct and have not yet done so, the Start button will
be dimmed. The only button that you will be able to use is the Select Precinct button. Press
Select Precinct and follow the steps listed in the Select a Precinct section to search for and
select a precinct. After you have selected a precinct, you will be able to scan ballots.
While the ballots are being
scanned, the Scanning screen is
displayed. Only the Stop
button is available on this
screen; the other buttons are
dimmed.
Note: If you need to stop the
machine before the input
tray is empty, press Stop to
stop scanning. The number
of ballots that have been
scanned will be displayed in
the Current column.
EVS5200_DOC_SOP_DS850
Software Version 2.10
Published: February 26, 2014
Page 100

Chapter 6: Election Day Tasks 94
After the ballots have been
scanned, the Scan Ballots
screen is re-displayed. This
time, only the Save button is
available; the other buttons are
dimmed. The Current column
on the screen indicates the
number of ballots in each bin,
as well as the total number of
ballots scanned.
At this point, you can do any one of the following:
• Save the current batch; see Save the Current Batch.
Note: If ballots have been out-stacked to the top (not processed) bin, you have the option of
generating the Not Processed Ballots report. You can also remove the ballots from the bin
and reset the top bin quantity to zero, before you save the batch. The removed ballots can
later be reviewed or re-scanned.
Reference: See Out-Stacked Ballots for additional information.
• Delete the current batch; see Delete the Current Batch.
• Load more ballots into the input tray. The Scan Ballots screen will be displayed.
Press Start to scan the additional ballots. When the ballots have been scanned,
the Scan Ballots screen will be displayed again, and the numbers in the Current
column will be updated.
Warning: If any of the output hoppers are full or nearly full and you wish to scan more
ballots into the batch, make sure that you keep any ballots you remove from the output bins
segregated from other batches. Ballots removed but not yet saved as part of a batch must
all be segregated by the bin from which the ballots were removed.
Out-Stacked Ballots
The following is an example of the Current column on
the scan ballots screen, showing seven ballots
out-stacked to the top (not processed) bin.
EVS5200_DOC_SOP_DS850
Software Version 2.10
Published: February 26, 2014
 Loading...