

Espow RM, RMVB, DIVX User Manual

——————————————————————————————
Copyright © 2010 www.espow.com
All Rights Reserved
RM/RMVB/DIVX
Media Player User’s Manual

- 1
-——————————————————————————————————————————
Copyright © 2010 www.espow.com
All Rights Reserved
CONTENTS
Introduction………………………………………………………………….2
Warning………………………………………………………………………2
1. Product Specification…………………………………………………….4
1.1 Function List…………………………………………………………….4
1.2 Parameter List…………………………………………………….…….5
1.3 Quick Install……………………………………………………………..7
2. Key Functions of Remote Controller…………………………………..10
3. User Guide………………………………………………………………14
3.1 Main Interface……………………………………………………….…14
3.2 Main Menu……………………………………………………………..15
3.3 Video Play………………………………………………………….…..16
3.4 Music play………………………………………………………….…..19
3.5 Photo play……………………………………………………….……..20
3.6 Text (E-Book)…………………………………………………………..23
3.7 File List……………………………………………………….…………25
3.7.1 File Folder Operation………………………………………….…….25
3.7.2 File Management……………………………………………………26
3.8 Settings………………………………………………………………...30
3.9 Software Upgrade…………………………………………………….32
4. FAQ………………………………………………………………………34

- 2
-——————————————————————————————————————————
Copyright © 2010 www.espow.com
All Rights Reserved
INTRODUCTION
This guide shows you how to use and set up your product. Please
read it carefully before operation the unit for you can exactly
understand the using skill.
We repair the damaged goods not caused by users. Body cases
are not included in repair. This warranty does not cover damage
due to accident. Misuse abuse or negligence and it doesn’t extend
to any modification, conversion and alteration.
In order to improve the function and capability of our products, we
reserve the rights to improve it without notice.
WARNING
1. To prevent fire and electric shock, don’t expose the unit to the
moist or rain places. Don’t splash the unit with water or other
liquid.
2. Strong shock may damage the HDD. Please backup your data,

- 3
-——————————————————————————————————————————
Copyright © 2010 www.espow.com
All Rights Reserved
we are not responsible for the data lose.
3. Keep the unit away from magnetic devices, which may cause
damage of the data stored in the unit.
4. Please don’t interrupt the transfer progress while upload or
download file by an USB cable, otherwise the data may be
damaged.
5. The player will generate heat during work, so it is
recommended the user to put it at a ventilative place to
dissipate the heat, which is good for its steady operation.
6. We may improve the function and capability of the product
without notice.

- 4
-——————————————————————————————————————————
Copyright © 2010 www.espow.com
All Rights Reserved
Chapter I Product Specification
1.1 Function List
◆ Video play: Supporting RM, RMVB, MPEG1(VCD), MPEG2(VOB),
MPEG4(DIVX, XVID), AVI, DAT, MJPEG, etc video formats.
Photo play: Supporting multi-picture preview and slide show in full
screen. Slide show supports verious kinds of special effects. It
supports JPEG, BMP, TIFF, GIF and other photo formats.
Music play: Supporting WMA, MP3, WAV and other music
formats.
Optional hang-up subtitle: Supporting *.TXT、*.PSB、*.SMI、*.SRT、
*.SUB、*.ASS、*.SSA, only suit for AVI format hang-up subtitle.
It supports USB HOST 2.0 interface and hot swap of devices, and
can directly display the files in USB devices such as U disk, HDD
enclosure, digital camera, digital video and card reader.
Support power supply bu USB (optional).
It has high-speed USB 2.0 interface (up to 480MB/s) and can
serve as, without external power supply, mobile hard disk. User
can directly access and manage the content in the built-in hard
disk through computer (optional).
File management functio n: Without connecting it with computer,

- 5
-——————————————————————————————————————————
Copyright © 2010 www.espow.com
All Rights Reserved
user can do file copy or deletion within the built-in hard
disk(optional), USB device or card, or among them.
Multi TV display modes: HDV 720P progressive, NTSC interlace,
NTSC progressive, PAL progressive, NTSC composite, PAL
composite.
Firmware upgrade: It is carried out through copying special files to
the external memory card, which is convenient and fast.
It supports SATA HDD, capacity from 20GB-500GB (IDE hard disk
optional).
It supports SD, SDHC, MMC, MS cards (CF, XD optional); can
play all the video, audio, photo file, interview text and manage files
in the above mentioned cards.
It supports remote control.
Language support: Simplified Chinese (or Traditional Chinese),
English.
It supports time selection play.
It supports background music.
It supports continue to play video when power cut off (manual)
1.2 Parameter List

- 6
-——————————————————————————————————————————
Copyright © 2010 www.espow.com
All Rights Reserved
Power Supply Positive voltage for inside and negative voltage for
outside.
Remote
Controller
Full-function infra-red remote controller, with panel
display in Chinese and English.
Video Output
AV out,YpbPr, HDMI
Audio Output Supporting Stereo output
File System FAT32, NTFS
Photo Format
JPG、BMP、TIFF、GIF
Music Format
MP3、WMA
Format
RMVB、AVI、MPG、MPEG、
M2V、DAT、VCD、DVD
TV-Mode
Video code
MPEG1、MPEG2、MPEG4(DIVX,
XVID)、MJPEG、RMVB
Audio code
MP3、MPEG、AC、AC3、WMA
Resolution
480i、576i、480P、576P、720P
USB Power Support power supply by USB (optional)
USB2.0 USB2.0 interface with transmission rate of 480Mbps
(computer being connected).
USB HOST USB2.0 host interface with transmission rate of
480Mbps.It supports devices with USB interface, such

- 7
-——————————————————————————————————————————
Copyright © 2010 www.espow.com
All Rights Reserved
as USB hard disk, digital camera, photographic
camera and USB card reader.
Work
Condition
Work temperature: +5~+50 °C, humidity < 90%
Storage temperature: -20~+70 °C, humidity < 95%
1.3 Quick Install
Please confirm the type of your TV set before use.
Please perform the following steps for a common TV set:
Connect the TV set by AV wire. In this condition, the YPbPr AV wire with
is in no use.
Step 1: Connect the TV set.
Please insert the AV wire in the AV interface on the player, and
respectively insert the lotus form plugs at the other end of the AV wire in
the input interfaces on TV set by color.
After the TV set is successfully connected, insert the configured power
adapter (switch to ON position for the player with switch), and switch
the TV set to AV mode, and then it can output.

- 8
-——————————————————————————————————————————
Copyright © 2010 www.espow.com
All Rights Reserved
Step 2: Settings
The HD media player defaults that the output to TV set is normal. If you
find any normality, switch to normal display state by pressing the
TV-Mode key on the remote controller.
Please perform the following steps for a HDTV set:
It is recommended you to connect the TV set by the YPbPr AV wire with
green, blue and red lotus form plugs so as to enjoy better AV effect. To
generate sound, you should insert the red and white plugs
(representing right and left sound tracks) of AV wire in the
corresponding interfaces on TV set when you use YPbPr AV wire.
Step 1: Connect the TV set.
Insert the green, blue and red plugs at one end of YPbPr AV wire in
corresponding YPbPr interfaces on TV set, and at the same time insert
the red and white plugs (representing right and left sound tracks) in
corresponding interfaces on TV set, and insert the headset-type plugs
of the two AV wires in YPbPr and AV interfaces of the player.
Take note not to connect the yellow lotus form plug of the AV wire

- 9
-——————————————————————————————————————————
Copyright © 2010 www.espow.com
All Rights Reserved
to the TV set, or the video effect may be affected.
After the TV set is successfully connected, insert the configured power
adapter (switch to ON position for the player with switch), and switch
the TV set to YPbPr input port, and then it can output.
Step 2: Settings
The HD media player defaults PAL composite output mode. If the color
on TV YPbPr displays abnormal, in the main menu interface, press the
TV-MODE key on the remote controller to perform switch and set the
display resolution as 720P (1280×720), and then you will see normal
display (please confirm that your TV set supports 720P HD display
mode.)
Press the SET key on the remote controller to set the Screen Display
Ratio in the settings menu as that matching your TV dimension ratio.
Please set it as 4:3 for the TV set in dimension ratio of 4:3, and 16:9 for
the TV set in dimension ratio of 16:9.
Please connect HDMI cable with your TV (which support HDMI
function), then switch the TV to HDMI mode when you need HDMI
function. It’s very convenient.

- 10
-——————————————————————————————————————————
Copyright © 2010 www.espow.com
All Rights Reserved
Now, all the installation settings are finished, and then you can fully
enjoy the unlimited fun brought by the HD media player.
Chapter II Key Functions of Remote Controller
Refer to the following table and pictorial view for the key values and
functions of remote controller, and user can select corresponding key
as actual need.
Key Value Key Function
Power
Supply
Stand by/switch on
Mute Enable/disable the mute
TV-Mode Shortcut key used to switch to output mode
NTSC-PAL-720P. It is available only in main interface
and settings page.
Movie Shortcut key to enter movie playing page layout
Music Shortcut key to enter music playing page layout
HD Shortcut key to switch 720P output mode
Photo Shortcut key to enter photo playing page layout
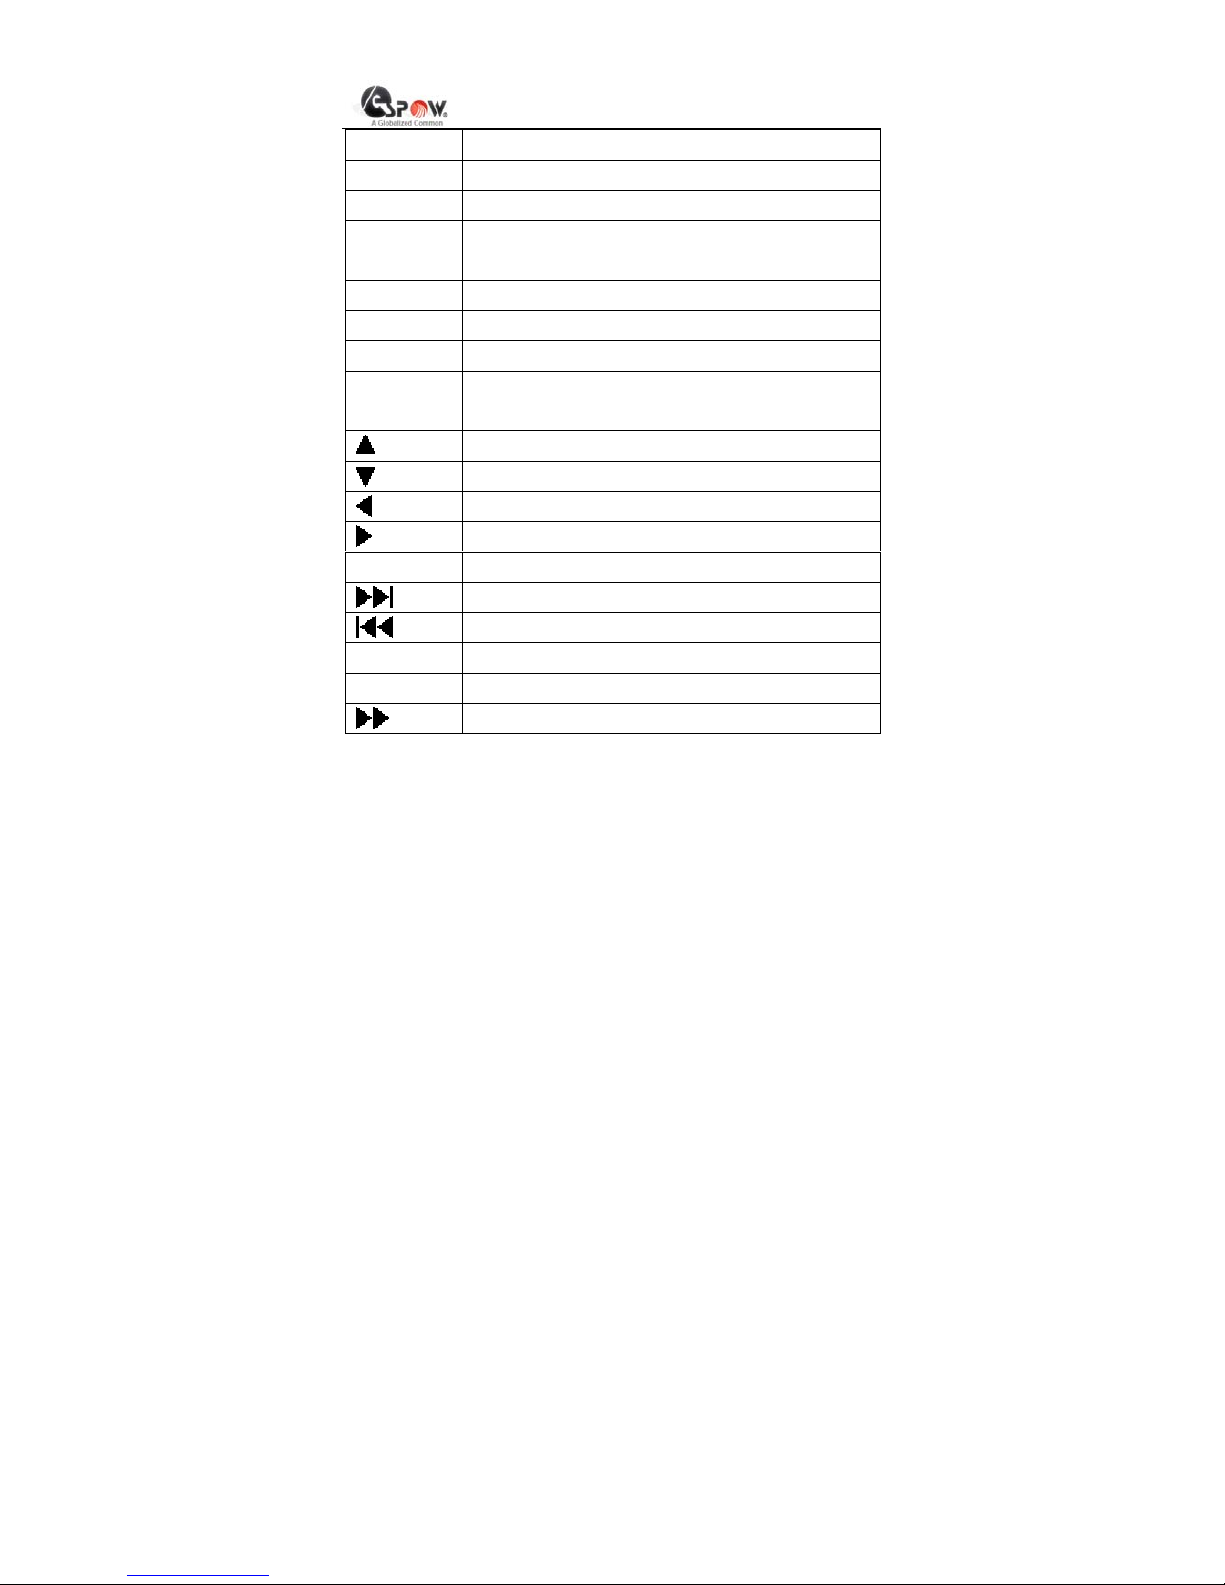
- 11
-——————————————————————————————————————————
Copyright © 2010 www.espow.com
All Rights Reserved
E-book Shortcut key to enter E-book reading page layout
P/N Shortcut key to switch PAL and NTSC
Preview Shortcut key to enter previewing page layout
Angle For each press, the photo will rotate 90 degrees
clockwise.
16:9 Output switch between 16:9 menu and 4:3 menu.
Zoom Zoom image
Set Shortcut key to enter SET page layo ut
OSD Under File Management page, copy or delete the
selected files.
Direction key, up
Direction key, down
Direction key, left
Direction key, right
OK Select and confirm
Next page, Next song
Previous page, Previous song
Volume + Add volume
Volume - Depress volume
Fast Forward

- 12
-——————————————————————————————————————————
Copyright © 2010 www.espow.com
All Rights Reserved
Select and play/pause
Rewind
Background Background music
Stop/Back Select and stop/back
Subtitle Select the subt itle language for movie (only support
AVI format hang-up subtitle)
Sound Track Switch the sound track for AV play
 Loading...