

Page 1

User Guide
Version 1.2
November 2017
© Copyright 2015 - 2017 Espial Group Inc. Espial is a registered trademark, and the Espial logo and all Espial product names are trademarks of Espial Group Inc. All other trademarks belong
to their respective owners. All rights reserved.
Page 2

Page 3

iv
Contents
Welcome
Media Player Orientation.....................4
The Main Menu Layout ...................... 6
Horizontal Categories .........................7
Vertical Lists ...................................... 8
Action Menus .................................... 9
Mini TV ............................................ 10
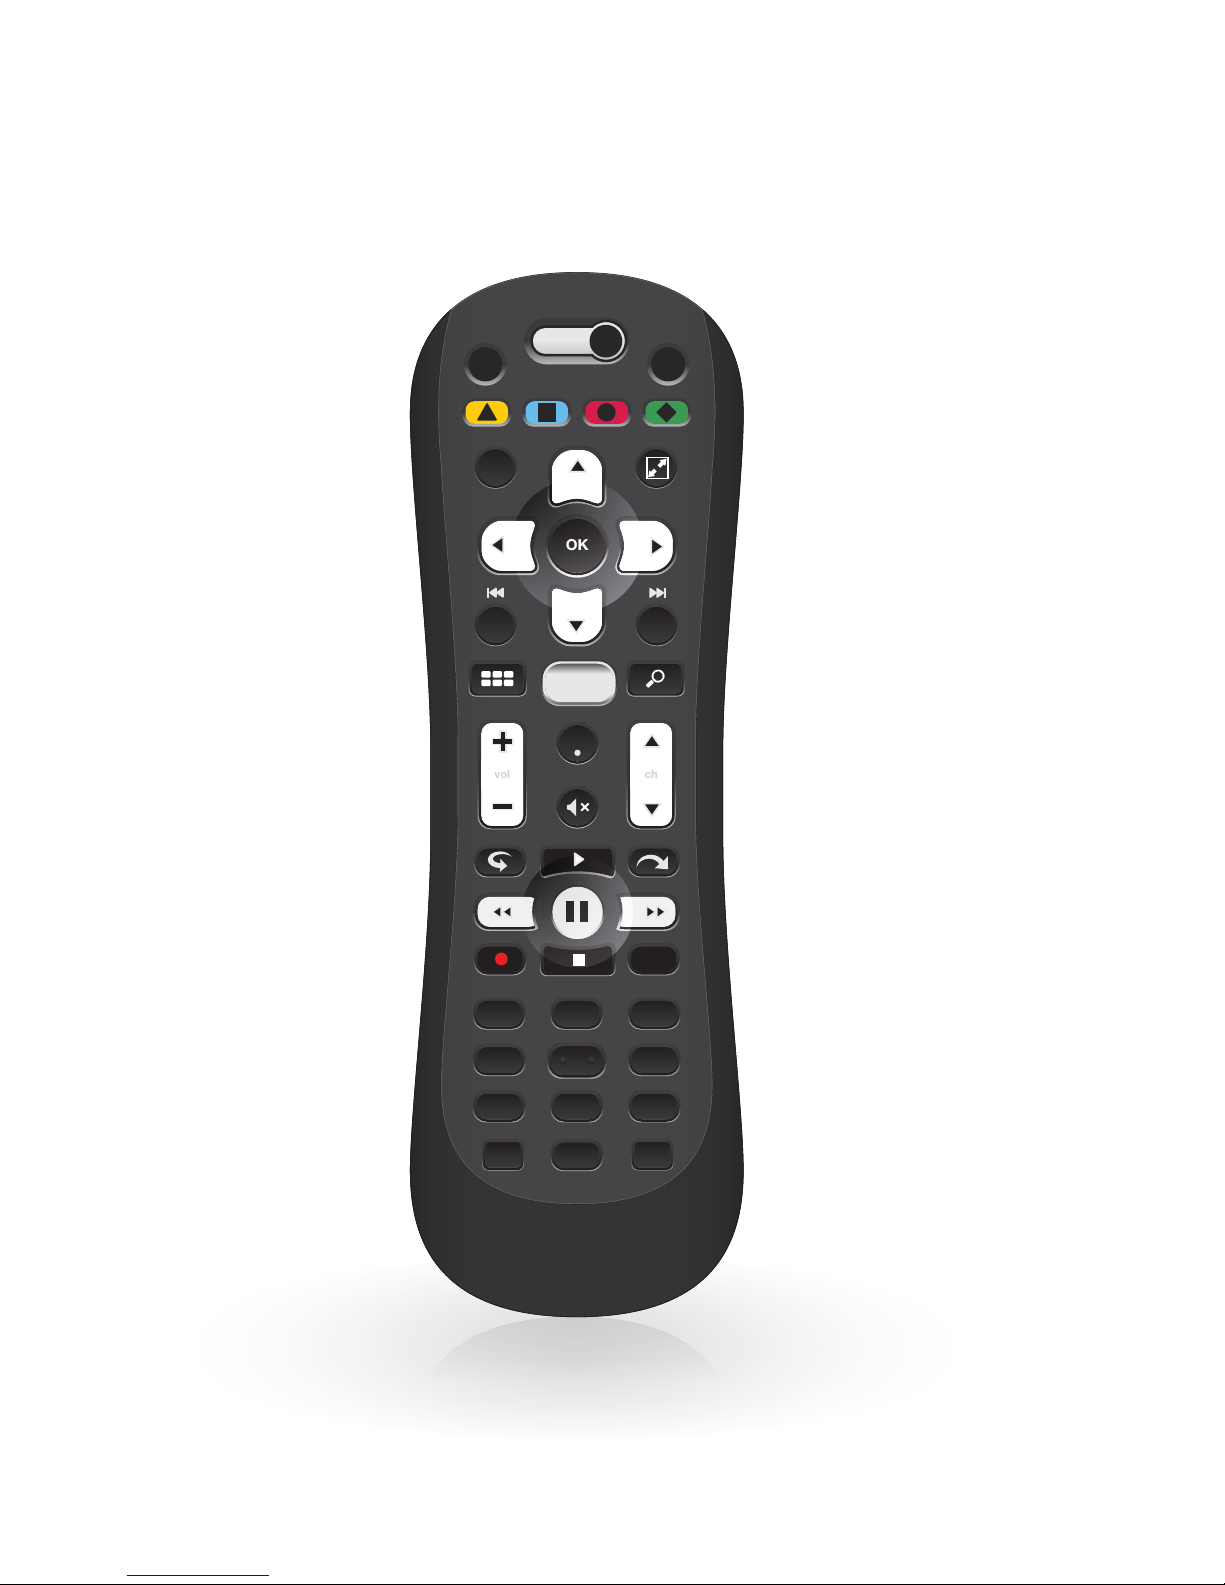
Remote Control
Using Your Remote ..........................14
Using Your Advanced Remote ......... 19
Pairing the Remote .......................... 21
Full Screen TV
Flip Bar .............................................24
Controlling Live TV ........................... 30
TV Roaming ...................................... 31
Player Bar ....................................... 32
Screen Saver ................................... 33
Recorded TV
Intro to Recorded TV ....................... 36
Recording Options .......................... 38
Scheduler ........................................ 40
TV Channels
TV Channels - Layout ...................... 46
Recording Icons .............................. 48
Channels Action Menu .....................51
Recording a Show ............................54
Options for Scheduling Recordings . 55
Change Time Slot ............................ 58
Grid Guide ....................................... 59
DVS .................................................61
Search
Intro to Search ..................................64
Find By Title .................................... 65
Find By Keyword ............................. 66
Find By Category..............................67
Search Options ............................... 68
On Demand
Elevate On Demand ........................ 72
VOD Library ..................................... 73
VOD Options ................................... 73
PIN Entry ......................................... 73
My Rentals .......................................74
Home Network
Getting Started ................................ 78
Playing Media .................................. 80
Adding to Favorites ........................... 81
Player Controls ................................ 82
Pay Per View
Finding Pay Per View Programming . 86
The Pay Per View Category ..............87
Purchasing Pay Per Vew Programming
........................................................ 88
Using a Purchase PIN ...................... 89
Follow Me TV
™
Page 4

v
The Elevate Follow Me TV™ Mobile App
........................................................ 92
Downloading the Mobile App (Pairing)
........................................................ 93
Downloading the Mobile App (Single
Sign-On) ...........................................94
Using Foolow Me TV ....................... 95
Settings
Parental Controls ............................. 98
Working with your PIN ................... 100
VOD/PPV PIN ................................ 100
Locking and Unlocking Programs ...101
Menu Customization ..................... 102
Recording Space........................... 103
Access to Media Player ................. 103
TV Setup ........................................104
Sound Effects .................................104
Front Panel .....................................104
Aspect Ratio .................................. 105
Recording Defaults ........................ 106
External Hard Drive........................ 106
Audio Output ................................. 106
Elevate Skill for Alexa ...................... 107
Grid Guide ..................................... 108
Channel List .................................. 108
Tips ............................................... 108
Phone ........................................... 109
Skip ............................................... 109
Local Network Status .................... 109
Wireless Network Setup ................ 110
Messages
Receiving Messages .......................114
Elevate Phone
Call Indicators ................................ 118
Call List ......................................... 119
Call Options ................................... 120
Filters
Intro to TV Filters ............................124
Favorites
Favorites ....................................... 128
Apps
Netflix ............................................ 132
YouTube ........................................ 133
More Apps .....................................134
Page 5

2
Welcome
Congratulations on choosing Elevate. Let’s get started with all
your system can do.
Page 6
4
Media Player Orientation
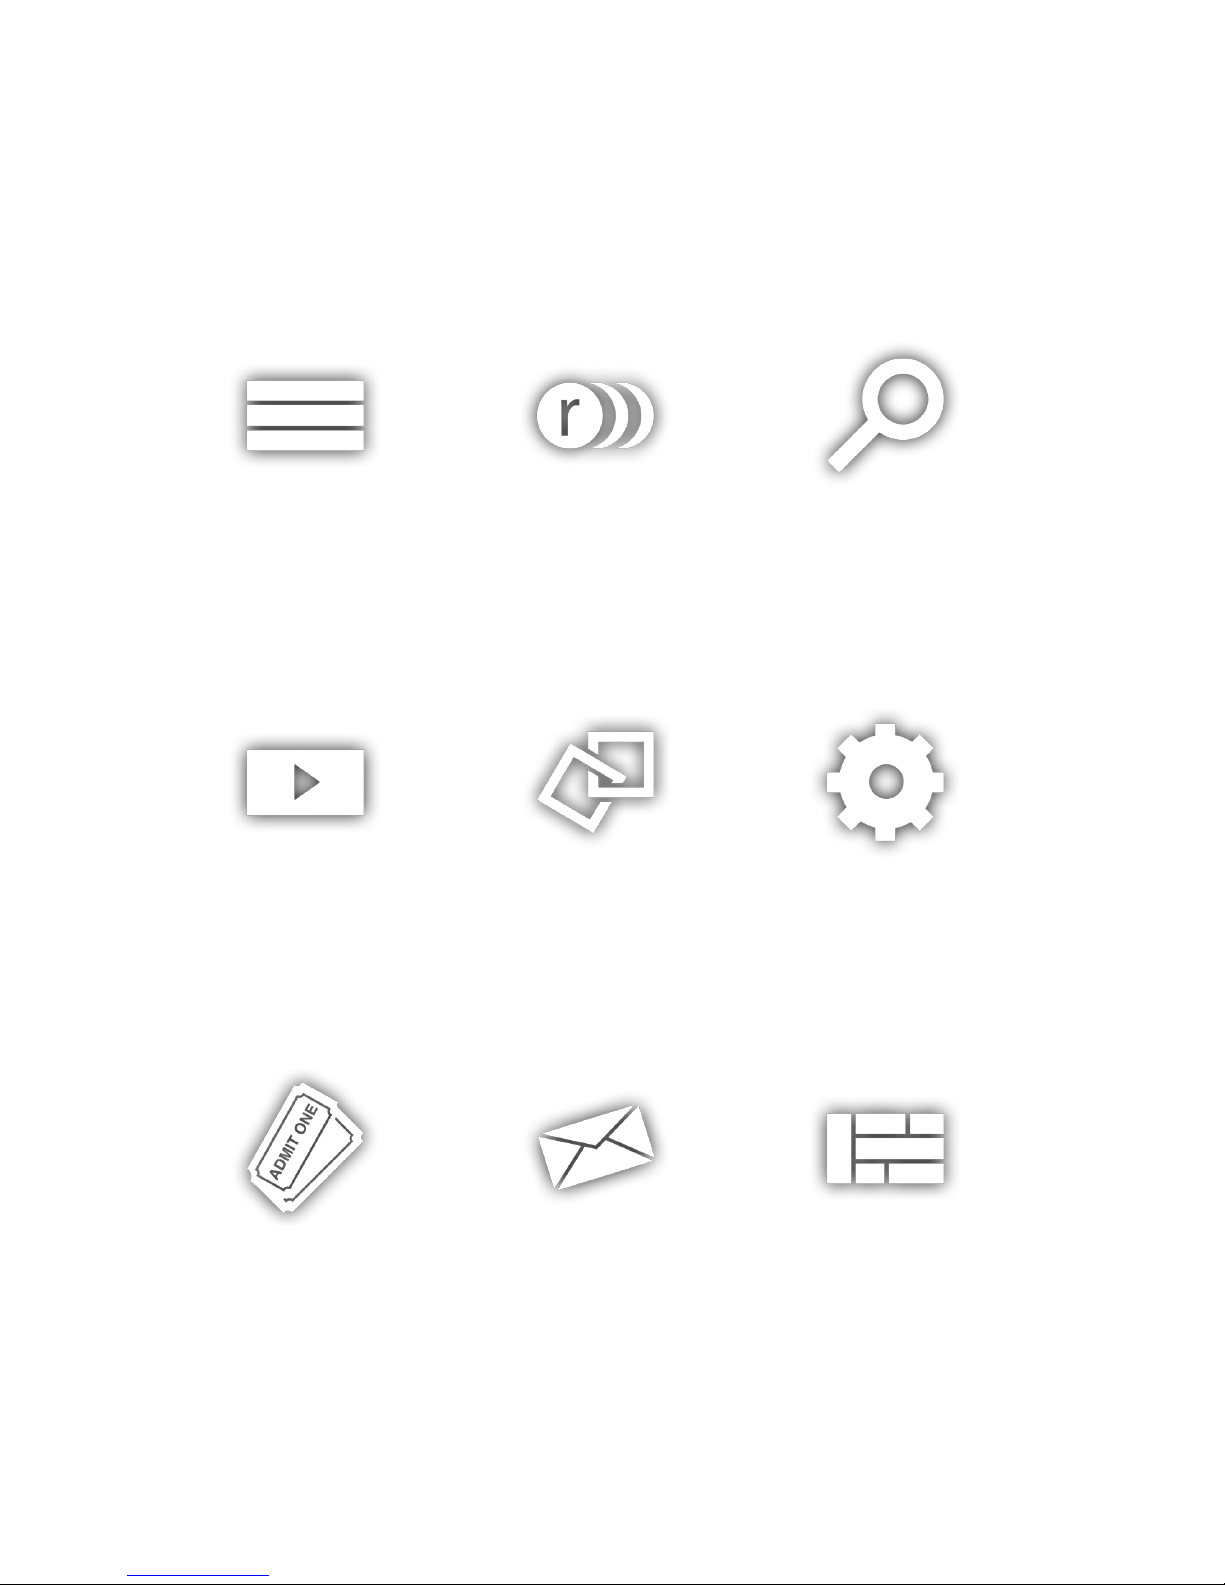
The media player experience starts with pressing the
MENU button on the remote. You’ll then see the top
level of the main menu, a horizontal band that runs
across the middle of the screen and gives access to
all of the main menu options.
Channels
A vertical menu that lists
all available channels.
Recorded TV
All of the programs
you’ve recorded in one
spot.
Search
Options to search
for programs by title,
keyword, or by category.
Home Network
An easy way to enjoy
media stored on your
computer from the
comfort of your TV.
On Demand
A library of all available
VOD titles, listed by category for easy access.
Settings
A category that allows
you to customize your
media player.
Messages
Provides key updates on
topics such as account
information or feature
upgrades.
Pay Per View
A filter that displays
pay per view (PPV)
programming.
Grid Guide
Enable the Grid
Guide to see your TV
programming in a
traditional time grid
format.
Page 7

5
Phone
A list of recent phone
calls from your incoming
lines.
TV Music
A collection of TV music
channels to match your
taste and mood.
Sports
A filter that displays all
available sports content.
Kids
Access all children’s
programming in one
consolidated list.
News
A filter that displays all
of the 24-hour news
channels and current
news programming.
Movies
A filter that displays
all available movies,
including live and
recorded TV as well as
VOD.
HDTV
A filter that displays all of
the available high-definition content.
Favorites
A filter that lets you add
your favorite TV, video,
photo, and music con-
tent to one convenient
place.
Apps
A filter that gives you
access to a variety of
applications, right on
your TV.
Page 8

6
6
4
5
3
2
1 7
The Main Menu Layout
1. TIME
The current time, so you know how
long before your show begins.
2. CURRENT CHANNEL
Displays the channel that is playing
in the Mini TV. If the program is
recorded, an icon will display the
current status - i.e., play or pause.
3. MINI TV
Lets you keep watching your
program while you browse.
4. FOCUS
The current selection is in the focus
area of the menu. When cards are
in focus, they appear raised and
highlighted.
5. VERTICAL LIST
Contains all of the items in the
horizontal category in focus.
6. ACTION MENU
Depending on the item in focus,
this area either provides more
information about that item or a
selection of choices for that item.
7. CARD
Items in vertical lists are called cards.
8. CATEGORY
Items in the horizontal band are
called categories. When a category
is in focus, the name of the category
appears in the top of the focus area.
(See next page; here the Channels
category is in focus.)
Page 9
7
8
Horizontal Categories
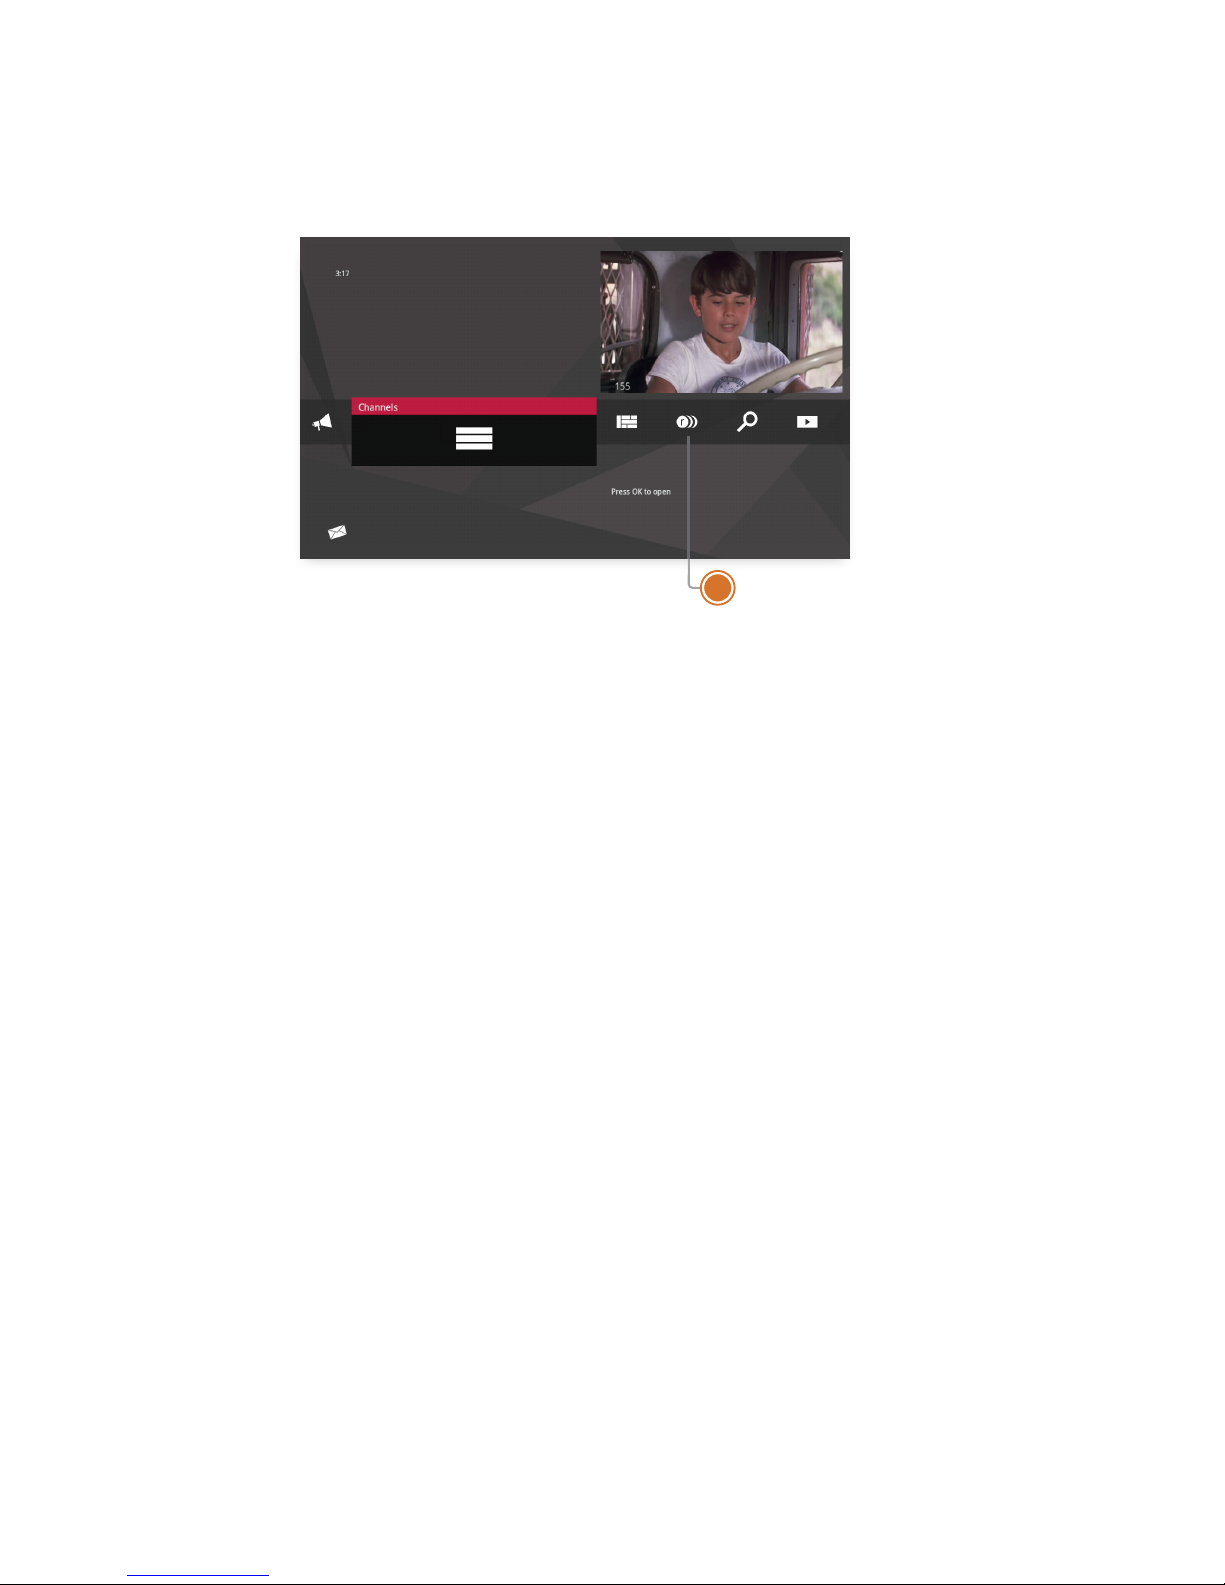
Once you’ve pressed the MENU button to bring up the main menu, the top-level
choices will appear in a horizontal band; use the left and right arrow buttons to
browse through your choices. There are a couple of features to be aware of with
the horizontal categories.
1. Press OK to Open a Category
When you bring a horizontal card into focus, “Press OK to open” appears in
the lower right of the pane. When a card is in focus and you press OK on your
remote control, all of the choices in that category card will open in a vertical list.
2. Navigation Fade Back
Once you bring a card into focus after navigating with the left or right arrow
buttons, the horizontal navigation fades. Simply pressing the left or right arrow
buttons again will bring the categories on the horizontal menu back as you
navigate. When you stop on a card, the categories on the horizontal menu will
again fade.
Page 10
8
Vertical Lists
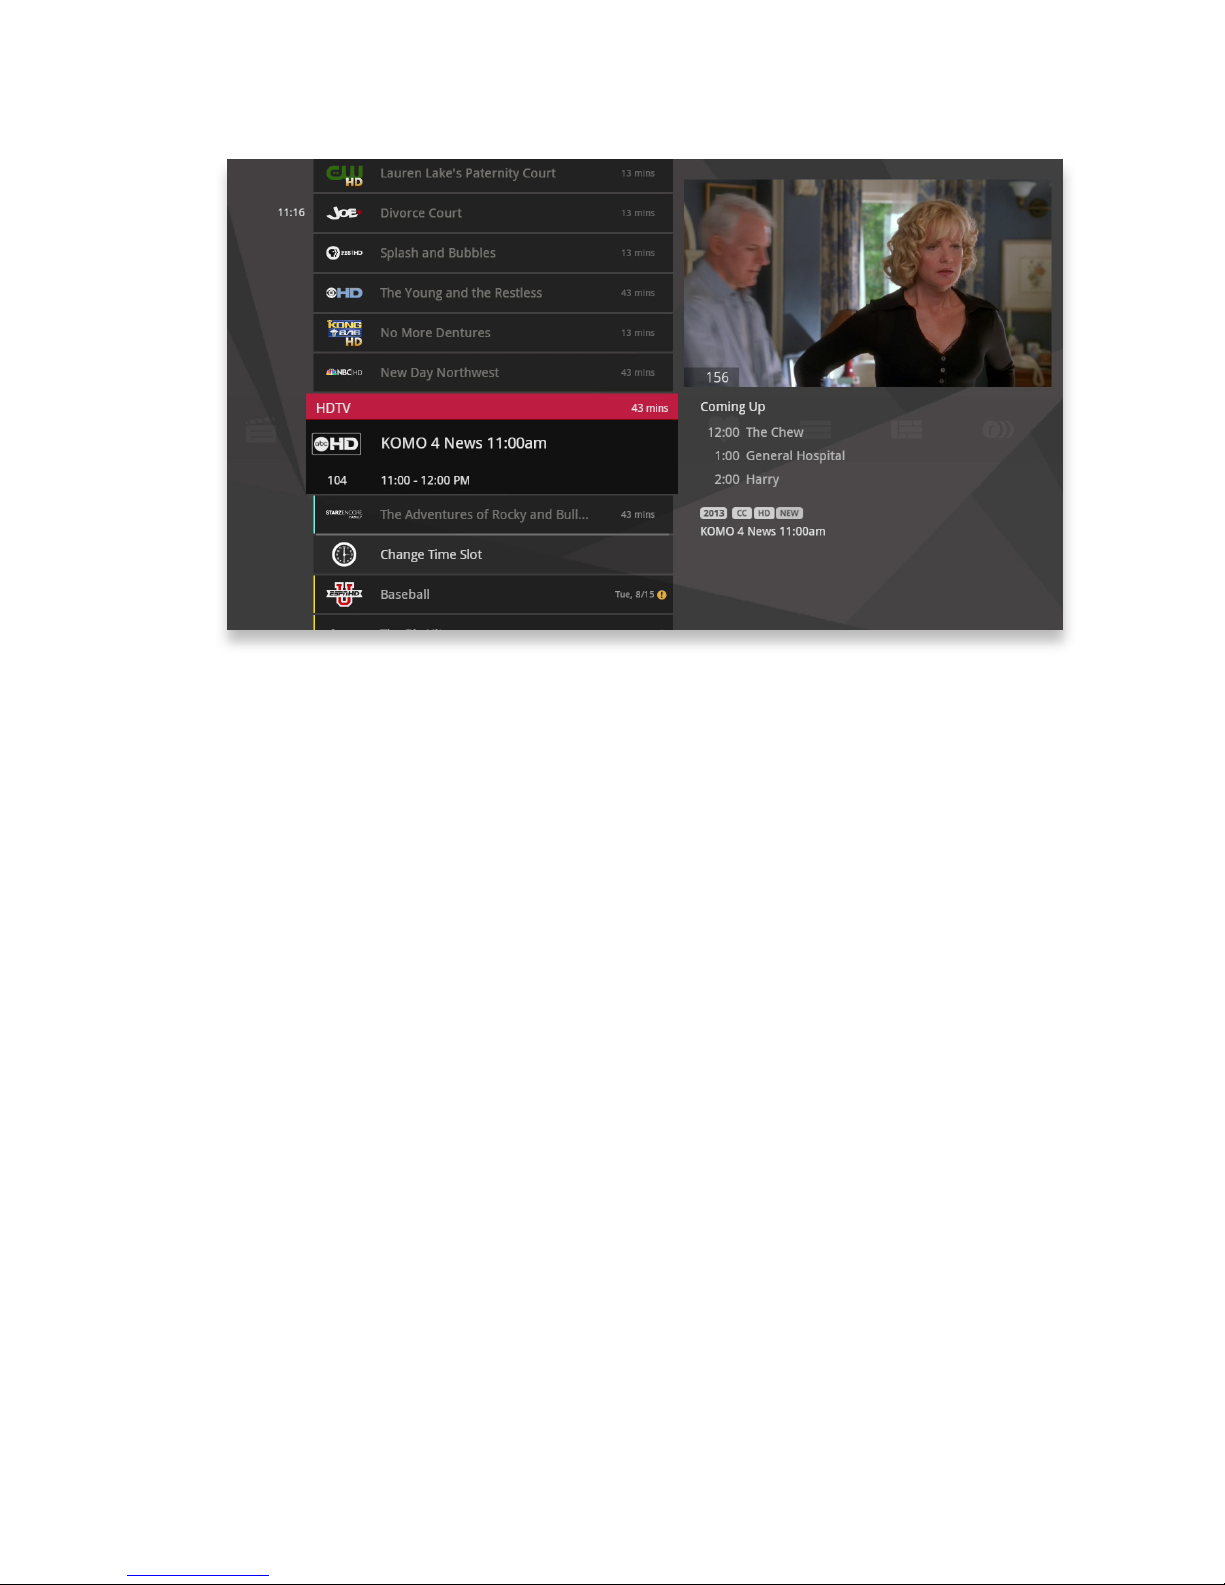
End of List Marker
A brighter gray line that defines the beginning and end of a vertical list.
Option Card
Some categories contain cards that allow you to take action on the entire vertical
list. Pressing OK on these option cards will reveal all of the actions available. Option
cards will differ in appearance from the rest of the cards in the list. In some areas of
the main menu, such as Find by Category, the option card will allow you to access
a deeper level of the menu.
Turbo Scroll
If you hold down an arrow button, you can increase your browsing speed. The
icons will help you quickly recognize media as it scrolls by.
Page 11

9
Action Menus
When you press info with an item in focus, you’ll get a list of options for that item in
an action menu.
Use the up and down arrow buttons to scroll through your action menu options.
Action menus have a focus, just like the main menu. To select an option, bring it
into focus and press OK.
To close the action menu, either select close or press the left arrow button.
Page 12
10
Mini TV
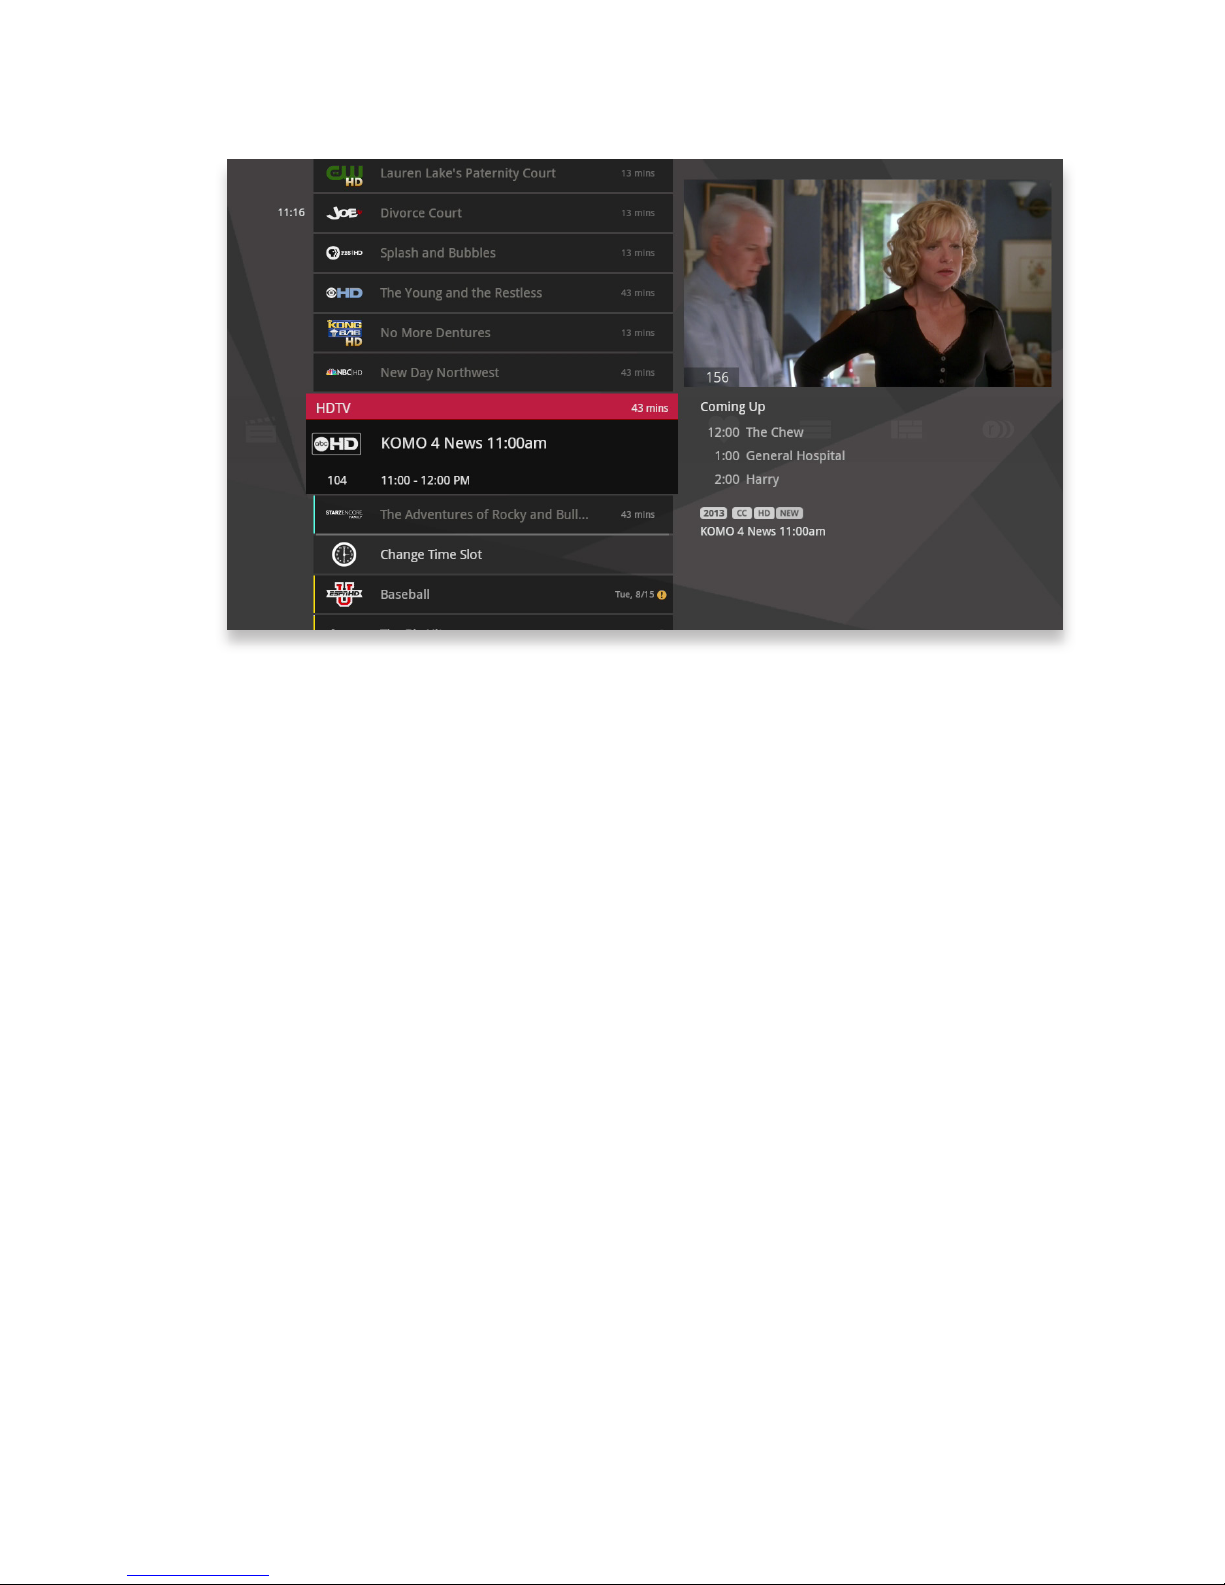
The Mini TV lets you keep an eye on what you’re watching while you’re browsing
the menu. The Mini TV will show you what’s currently playing, whether it’s a movie,
TV program, or Jukebox album.
• To enjoy the media in the Mini TV full-screen, press the zoom button on your
remote control.
• To watch Live TV regardless of what’s playing in the Mini TV, press LIVE TV.
Page 13

12
Remote Control
The remote control makes using your media player easy to use
while giving advanced users full control.
Page 14
14
0
clear enter
7 8 9
pqrs tuv wxyz
4
ghi
5
jkl
6
mno
1
2
abc
3
def
vol ch
last
mute
rec
pause
play
rew fwd
stop
skipreplay
menu
back next
OK
info zoom
ticker
live
TV
A
B
C
D
0
clear enter
7 8 9
pqrs tuv wxyz
Using Your Remote
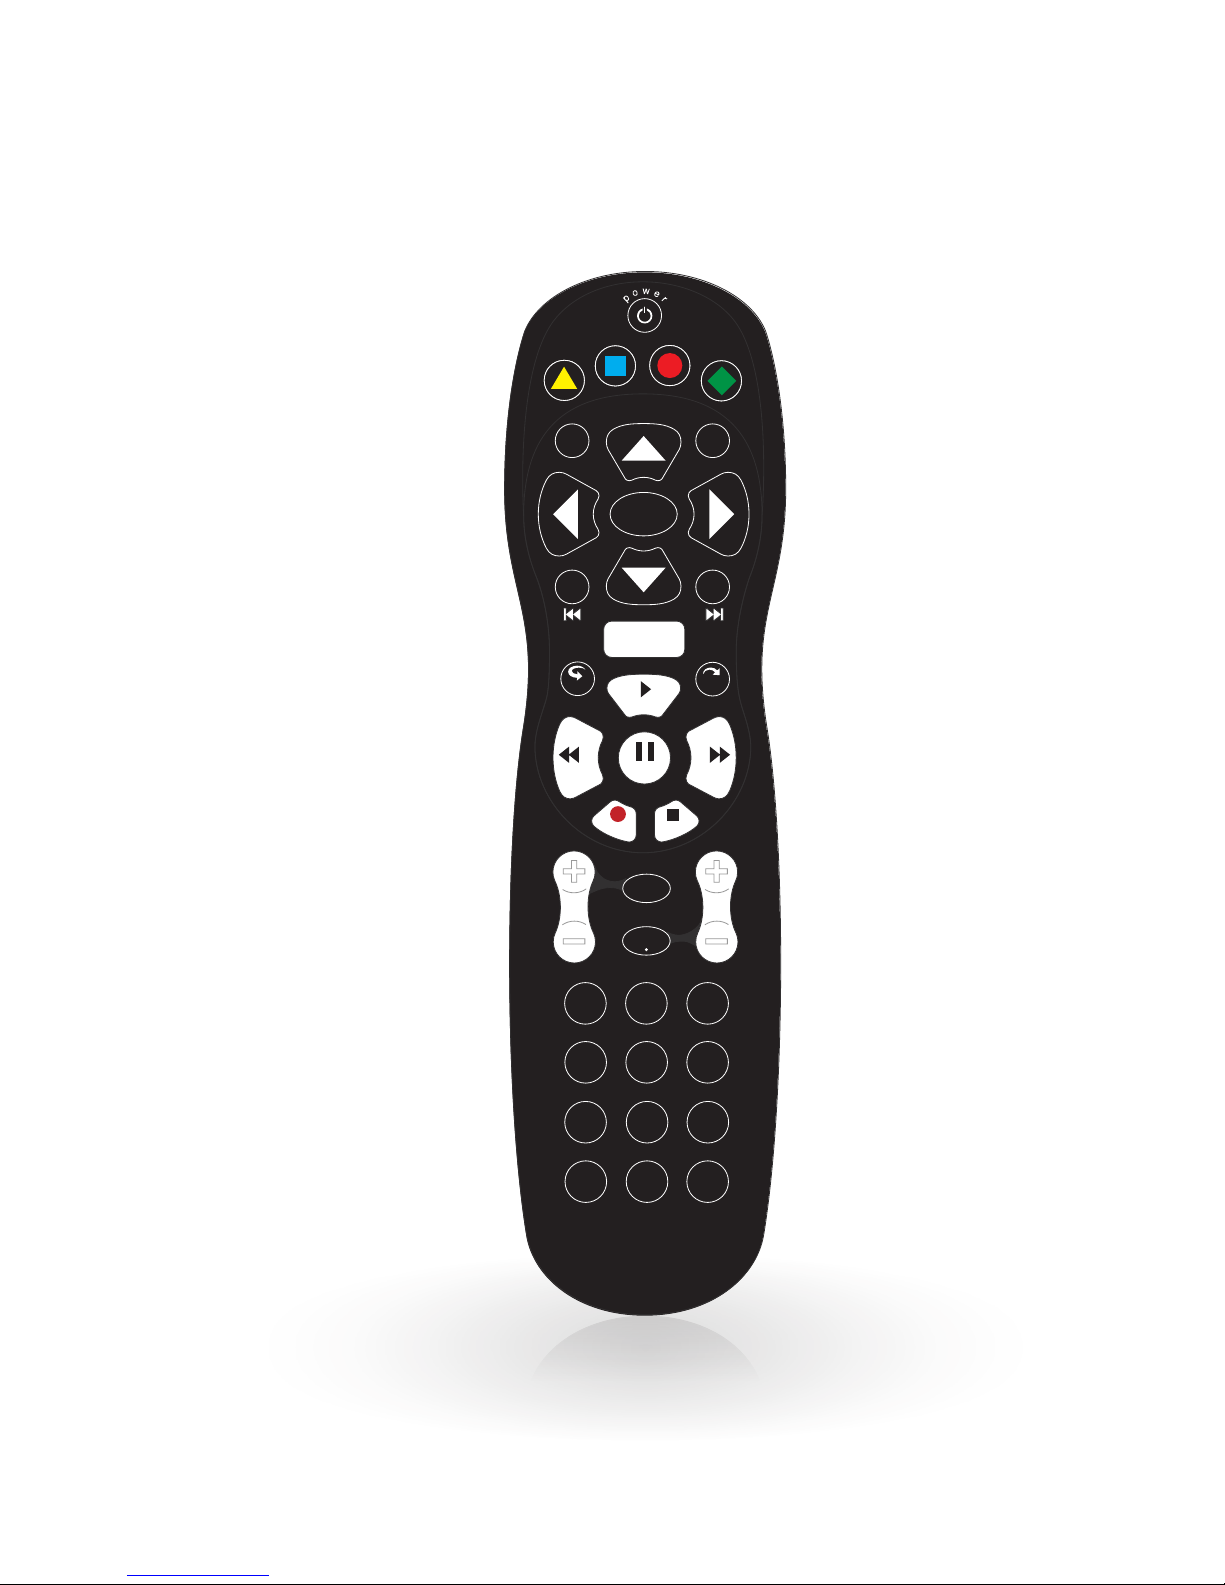
Your remote will automatically allow you to control the menu.
Page 15
15
A
B
C
D
4
3
2
1
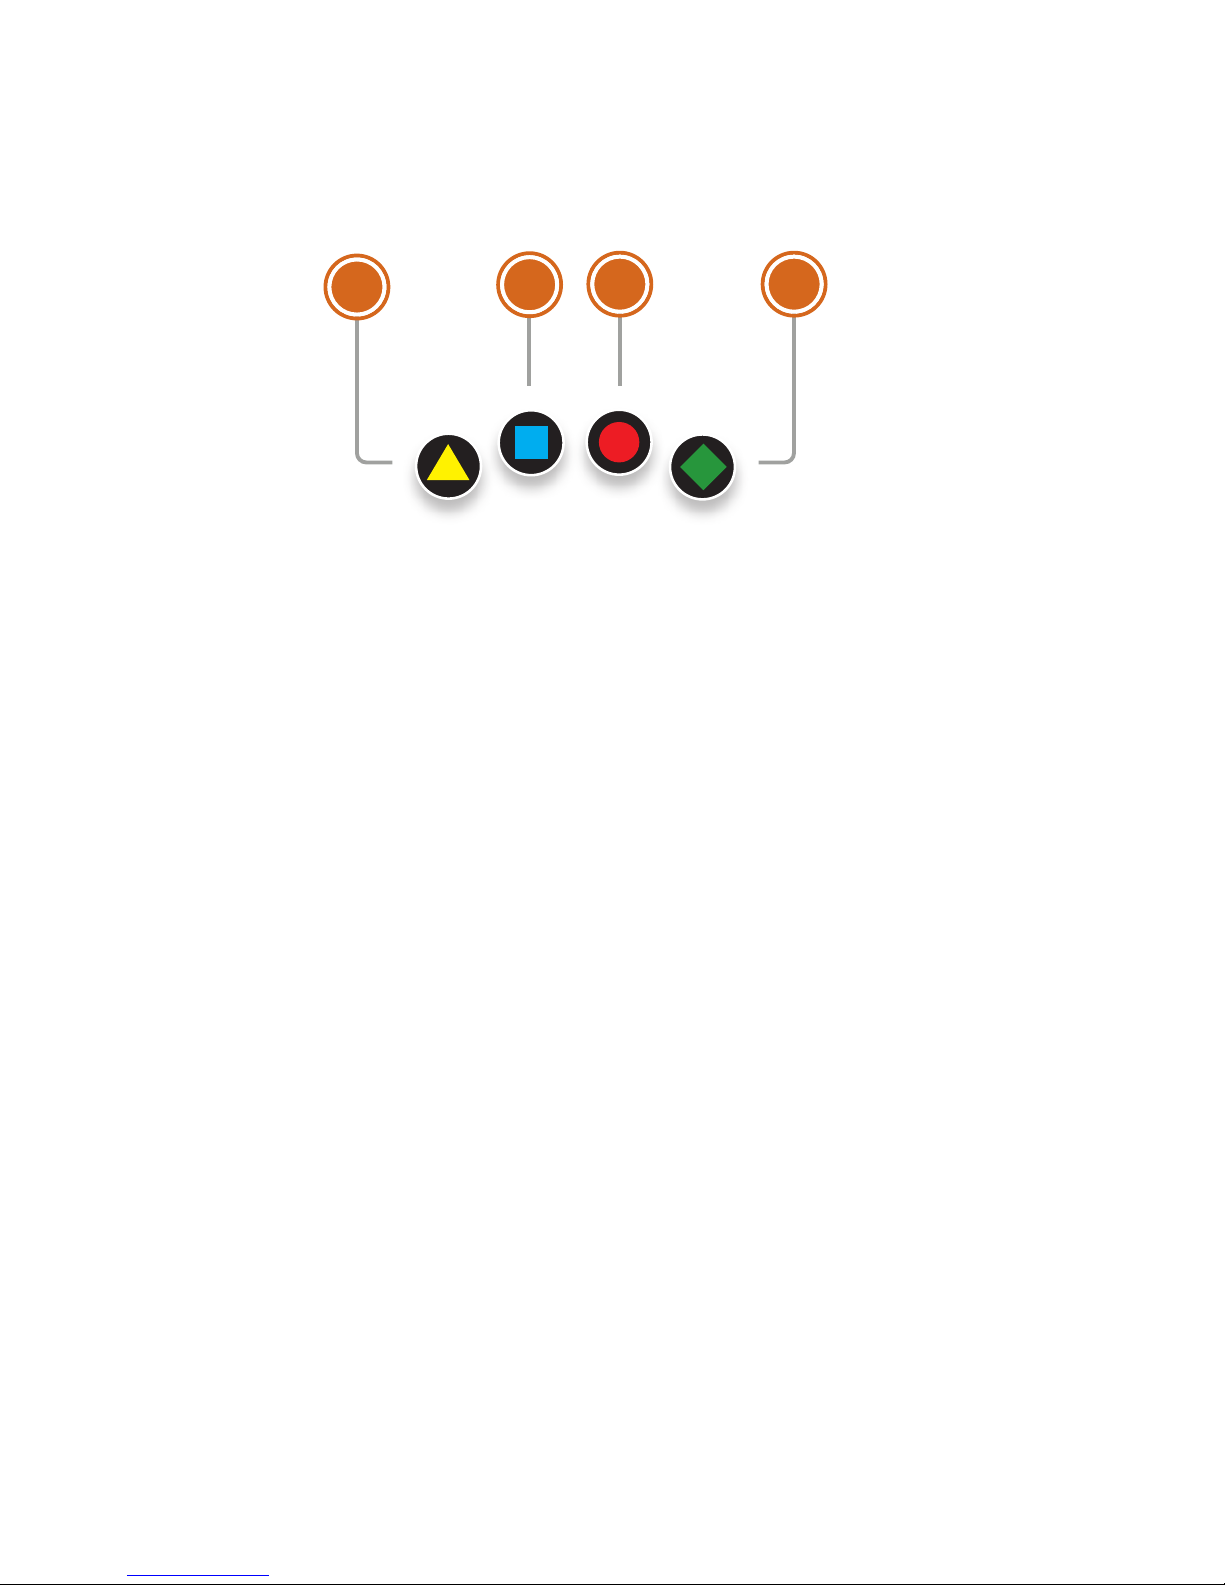
Shortcut Buttons
1. DVR
Goes to the Recorded TV category.
2. VOD
Goes to the Video On Demand
category.
3. GRID
Activates the traditional Grid Guide
view of TV programming.
4. LIVE TV
Goes to full-screen, live TV,
regardless of what’s currently in
focus.
Page 16
16
back next
info zoom
OK
0
clear enter
7 8 9
pqrs tuv wxyz
4
ghi
5
jkl
6
mno
1
2
abc
3
def
43
65
1
2
7
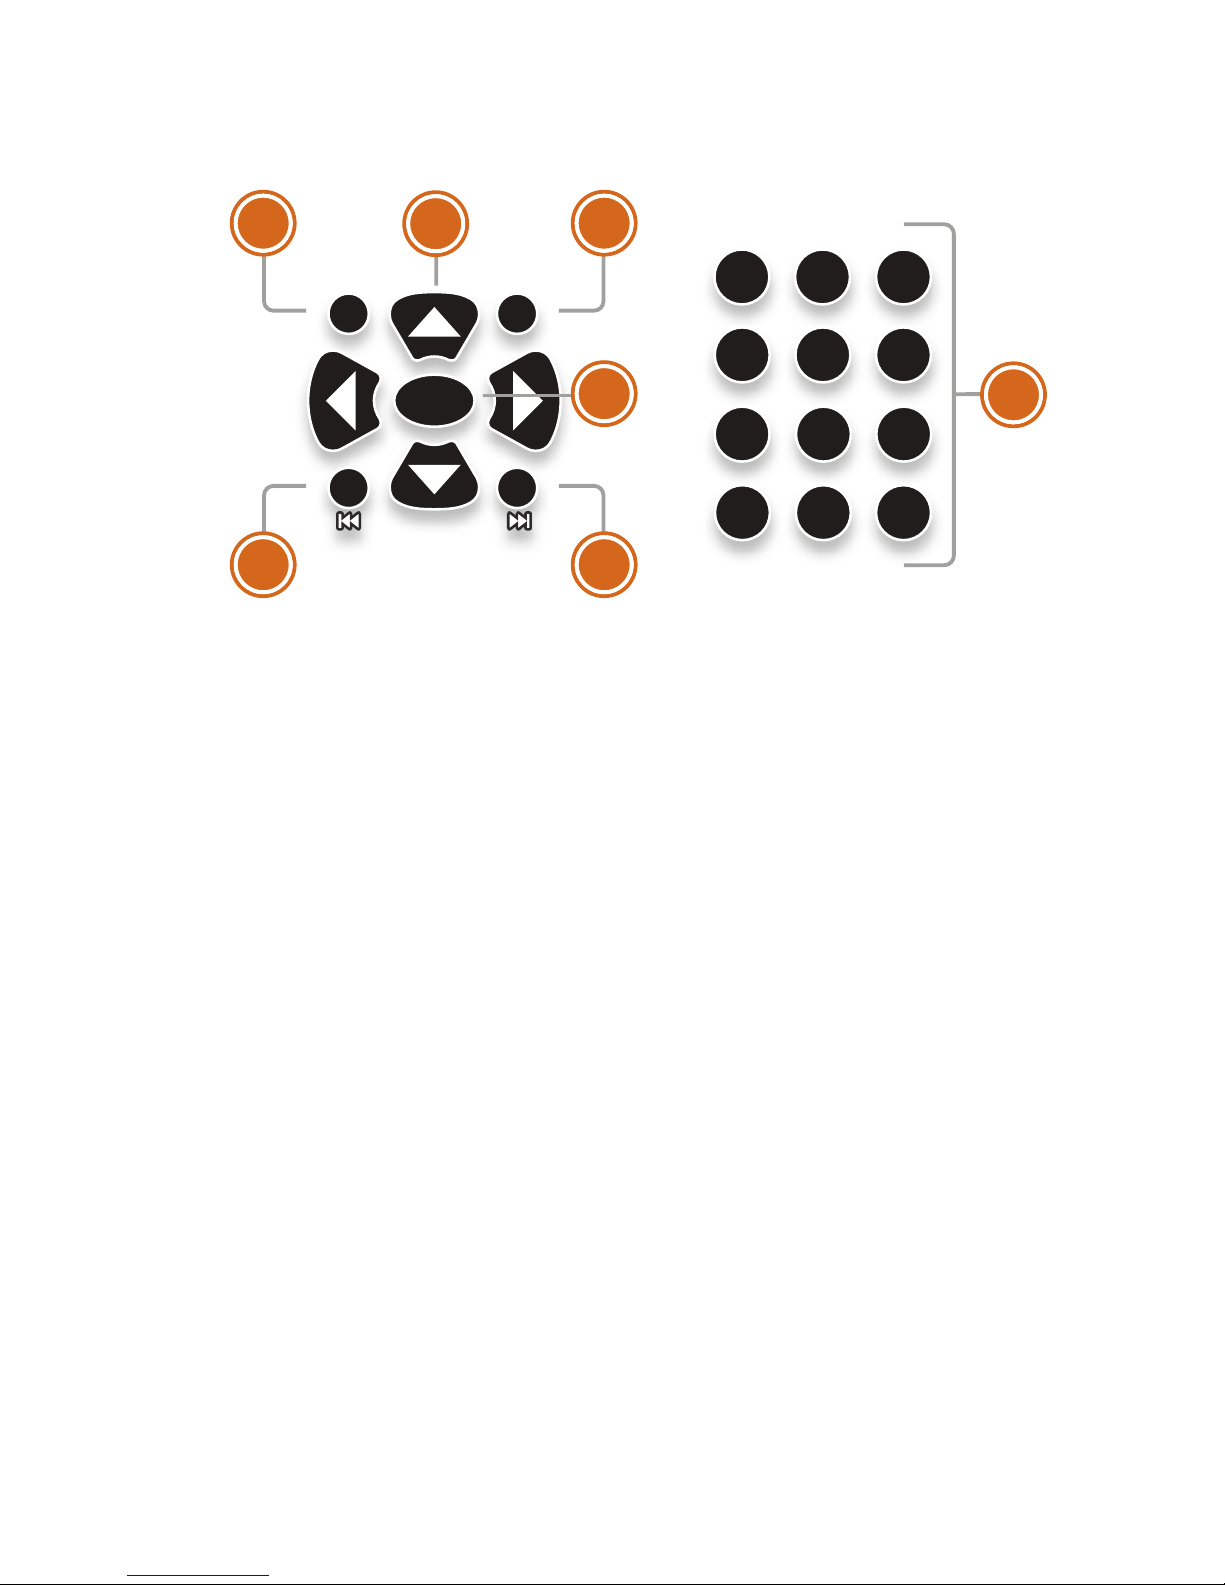
Menu Navigation
1. ARROWS
Moves the horizontal or vertical
bands one card backward or
forward. Holding them down
activates Turbo Mode and increases
your browsing speed.
2. OK
Begins playing the item in focus
or executes an option in an action
menu.
3. BACK
Takes a vertical list displaying TV
programming back to the previous
half hour. Also pages back through
an info note and backs out of a
second-level menu.
4. NEXT
Takes a vertical list displaying TV
programming forward to the next
half hour. Also pages forward
through an info note.
5. INFO
Brings up an action menu of options
related to the item in focus
6. ZOOM
Alternates between full screen and
the main menu with Mini TV.
7. NUMBER KEYS
Entering numbers will take you
directly to the corresponding
channel.
Page 17
17
rec
pause
play
rew fwd
stop
skipreplay
menu
9
87
65
4 3
2
1
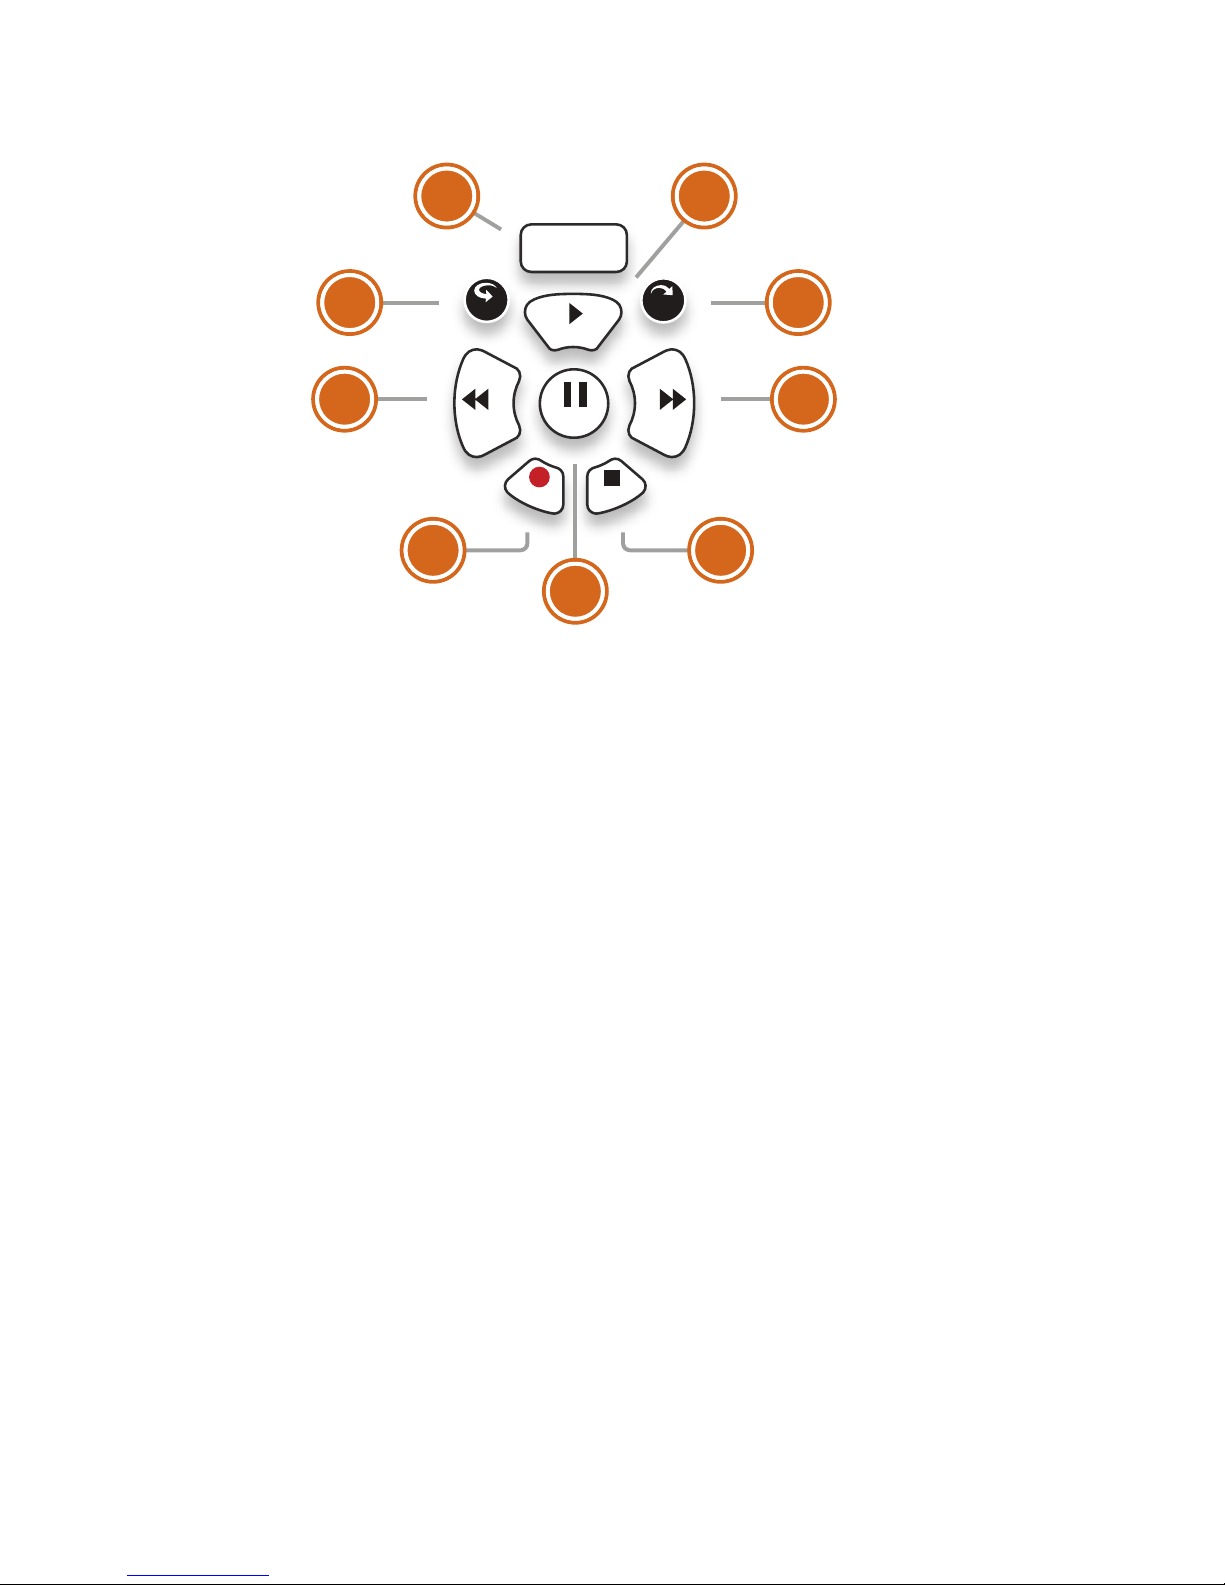
Player Controls
Control your recorded or live program with the following buttons:
1. MENU
From wherever you are, MENU
returns you one step at a time
toward the top level of the main
menu.
2. PLAY
Begins playing the TV show or
media file in focus. Also allows you
to view the show at the point of fastforwarding or rewinding.
3. SKIP
Skips forward the number of
seconds that you predefine in
settings. Also takes a vertical list of
TV programming forward in time 24
hours.
4. REPLAY
Rewinds seven seconds. Also takes
a vertical list of TV programming
back in time 24 hours.
5. REWIND
Press up to three times (for three
speeds) to rewind the show.
6. FAST-FORWARD
Press up to three times (for three
speeds) to fast-forward.
7. RECORD
Press RECORD while watching a
show or with a show in focus to
record.
8. STOP
Exits out of a recorded show or
stops a recording in progress if
you’re watching that show full
screen.
9. PAUSE
Pauses the show you are watching.
Page 18

18
Infrared Receiver
When a button on the remote is pressed, the infrared signal is sent to an IR receiver.
The receiver then sends commands to electronic components. For the remote to
send its signals to the system’s IR receiver, it must have a clear view of the front panel.
Subchannel Separator
Many networks broadcast multiple digital subchannels. For example, some networks
broadcast four standard definition subchannels identified using a decimal point (such
as 09, 09.1, 09.2, and 09.3). When using the arrow buttons to navigate the electronic
program guide, these channels appear in order in the channels listing. To access
these subchannels directly using the remote buttons, use the
LAST
button (which
also has a dot) on the number pad to represent the decimal point.
For example, to go directly to channel 09.2, on the remote control number pad press
0, 9, LAST, and then 2.
Page 19
19
0
7 8 9
4
5
6
1 2 3
enter
delete
VOD
ch
ch
last
vol
vol
nextback
OK
info
A
B C
D
setupinput
off
on
replay skip
clear
menu
exit to liveTV
0
7 8 9
enter
delete
clear
Using Your Advanced Remote
Your remote will automatically allow you to control the menu.
Page 20
20
VOD
3
2
1
Advanced Remote
The Advanced Remote is a wireless keyboard remote with a mouse feature. RF
technology lets you use the remote with the media player hidden from view. To
order an Advanced Remote, call your cable provider.
The front of the Advanced Remote has the same functionality as the regular remote
with the following additions:
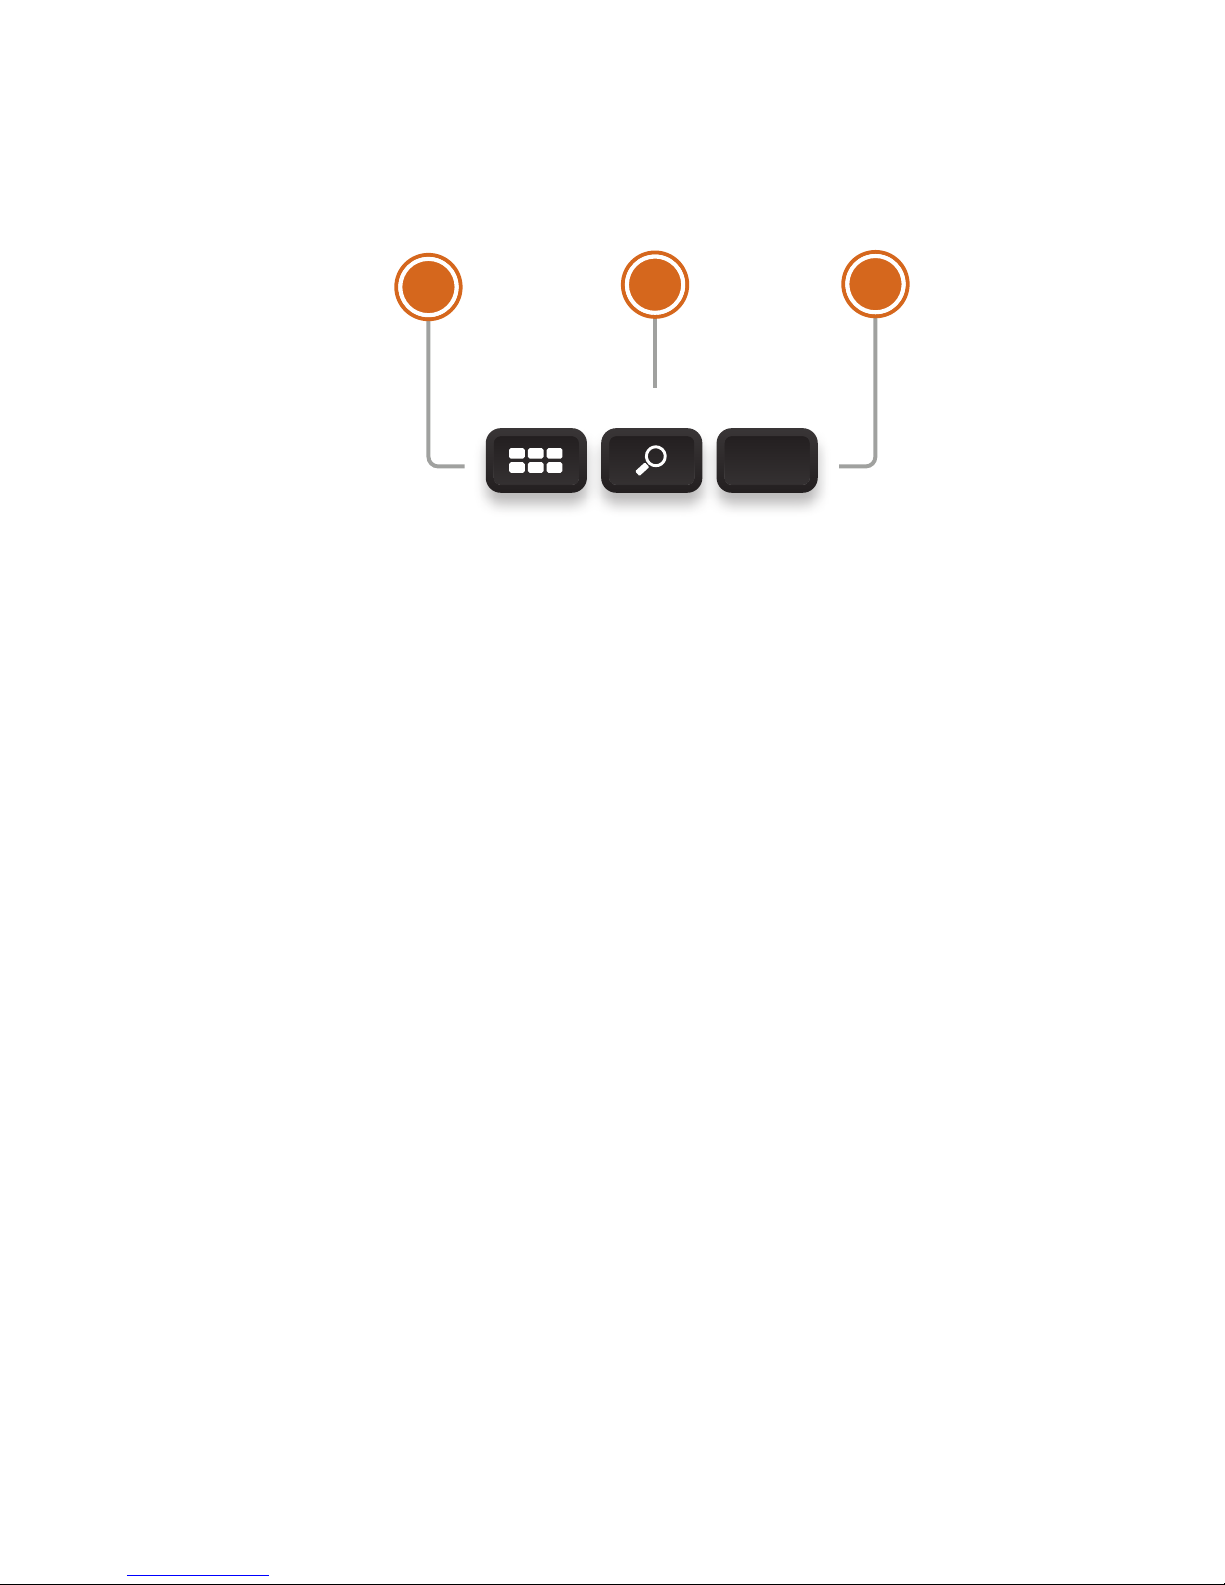
1. APPS
The apps button takes you directly
to the Apps category.
2. SEARCH
The search button takes you directly
to the search-by-title feature.
3. VOD
The VOD button goes directly to the
Video On Demand category.
On the back of the Advanced Remote, you’ll find a keyboard block that makes it
easy to enter text. You’ll also find mouse functionality.
Page 21

21
Pairing the Remote
Once you have your Advanced Remote, you’ll need to pair it with a media player for
full functionality.
Pairing the Remote
Before you pair the Advanced Remote, it will function in IR mode, which means
that not all of the buttons will work, and you will need an unobstructed path to the
media player when you press buttons.
If your remote came with a USB dongle, insert it into either a front or back
USB port of the media player. Wait until you see a message confirming that the
dongle has been detected. This takes approximately 30 seconds.
2.
Point the remote at the media player and press and hold the Up arrow and
SETUP keys until the remote Power button blinks rapidly.
3.
After a few seconds, you should see two slow remote Power button blinks,
indicating that the remote has successfully paired.
Page 22

22
Full Screen TV
With the mini guides available in full-screen TV, the media
player makes channel surfing fun.
Page 23
24
Coming UpOn Now
Flip Bar
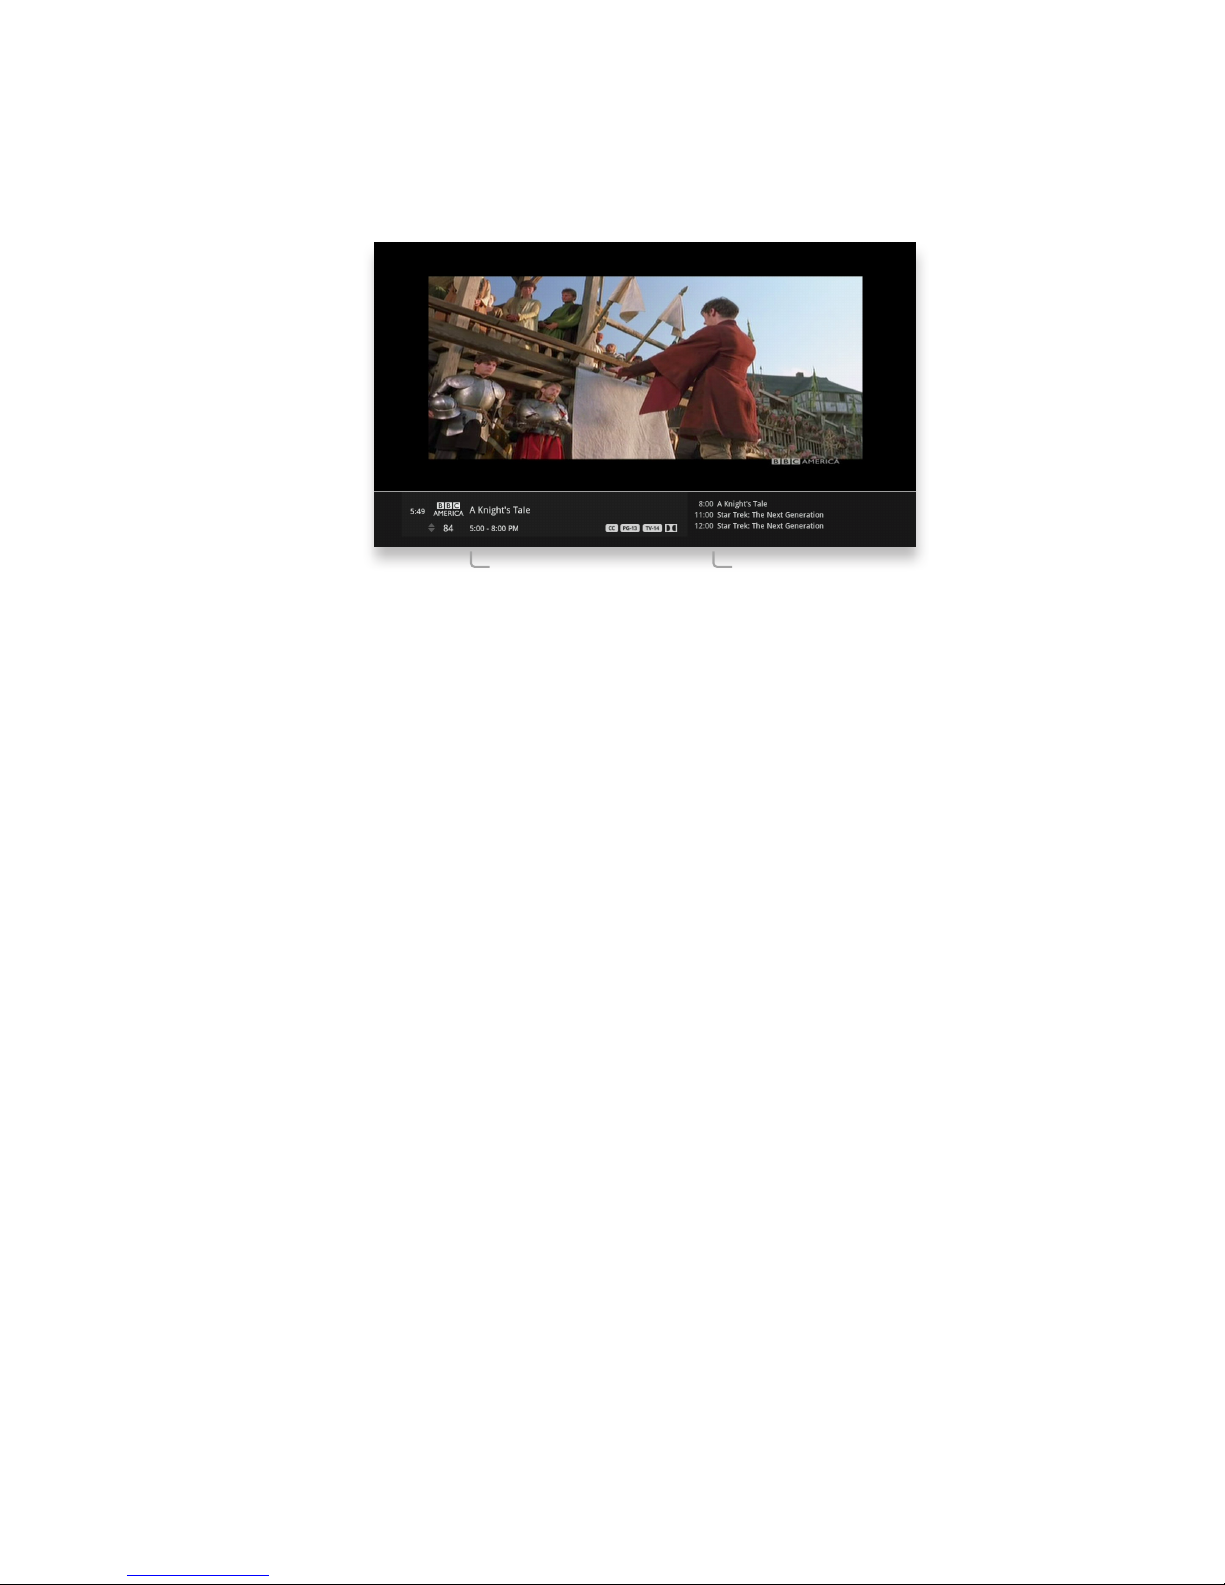
When you’re watching full-screen TV, the Flip Bar is your mini menu. Pressing an
arrow or the OK button or changing the channel will bring up the Flip Bar, giving
you program information about what you’re watching, what’s on next, and what’s
on other channels.
The main panel of the Flip Bar gives you the program name, air time, and channel.
Use the up and down arrows to change the channel displayed in the Flip Bar
without leaving the program you’re watching.
On the right, you’ll see what’s coming up next for the channel displayed in the
Flip Bar. You can see further into the future by pressing the right arrow button to
highlight that panel and then use the up and down arrow buttons to scroll through
programming.
The Flip Bar will automatically disappear after five seconds, but you can make it go
away by pressing CLEAR.
Page 24
25
76
5
4
3
2
1
Flip Bar - Layout
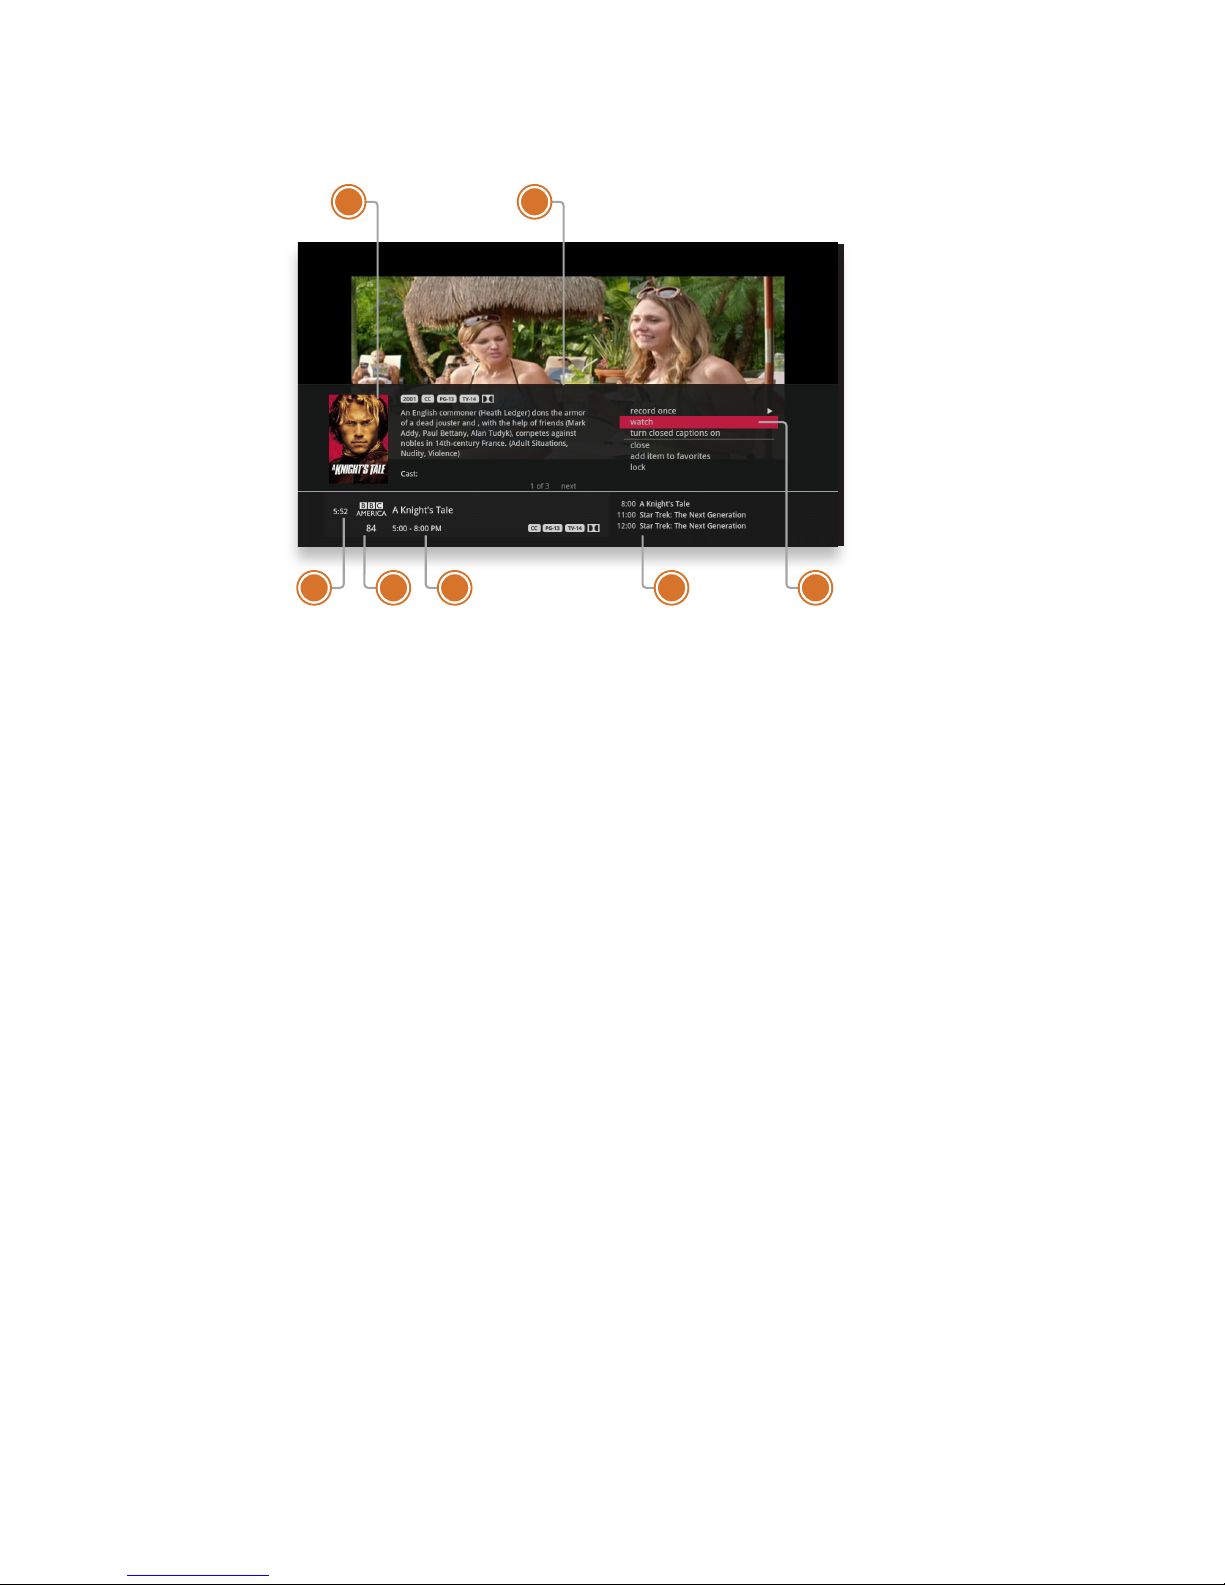
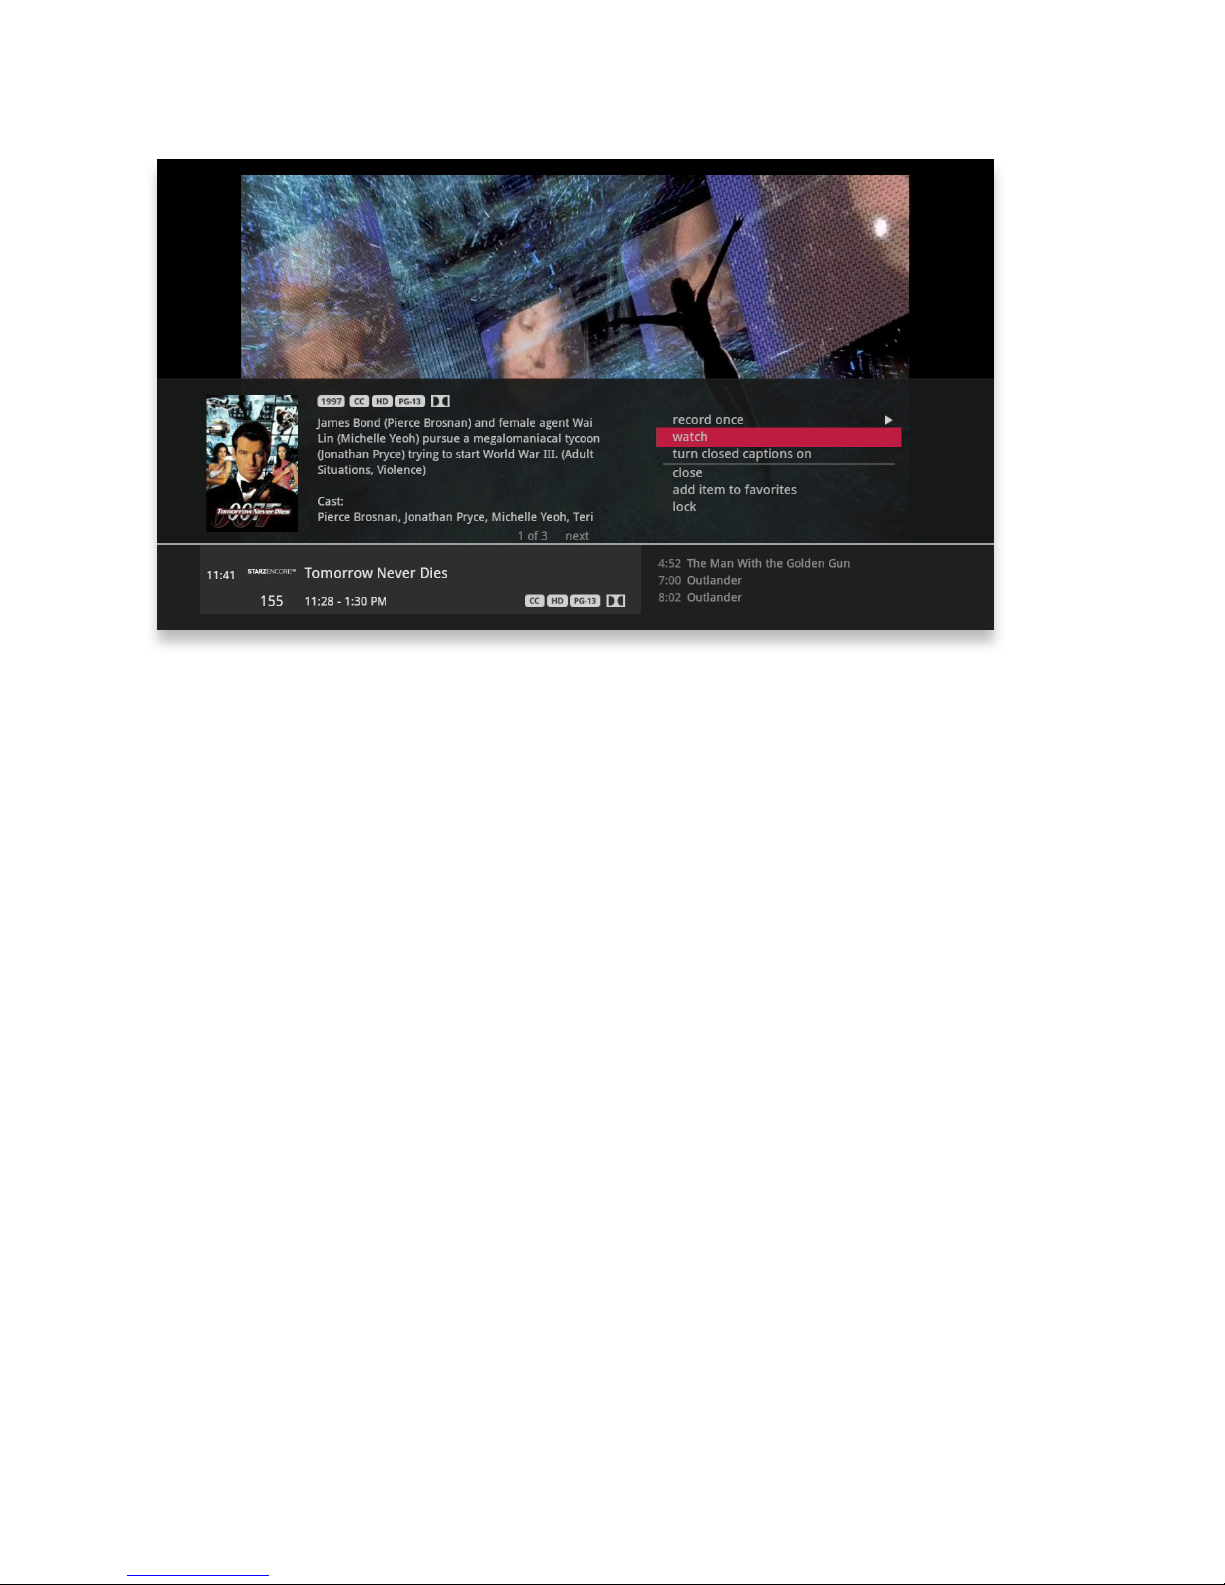
If you press info with the Flip Bar visible, you’ll get more information about the
show displayed, as well as options for that show.
1. Poster Art
Poster of show selected.
2. INFO PAGES
Press NEXT or BACK on your
remote to page through the show
information.
3. CLOCK
The current time.
4. LOGO AND CHANNEL NUMBER
The logo and channel number of the
selected show.
5. PROGRAM SCHEDULE
The time the program begins and
ends.
6. COMING UP
Displays the next three shows
coming up on the selected channel.
7. ACTION MENU
The list of options available for the
selected show.
Page 25
26
What’s On Next
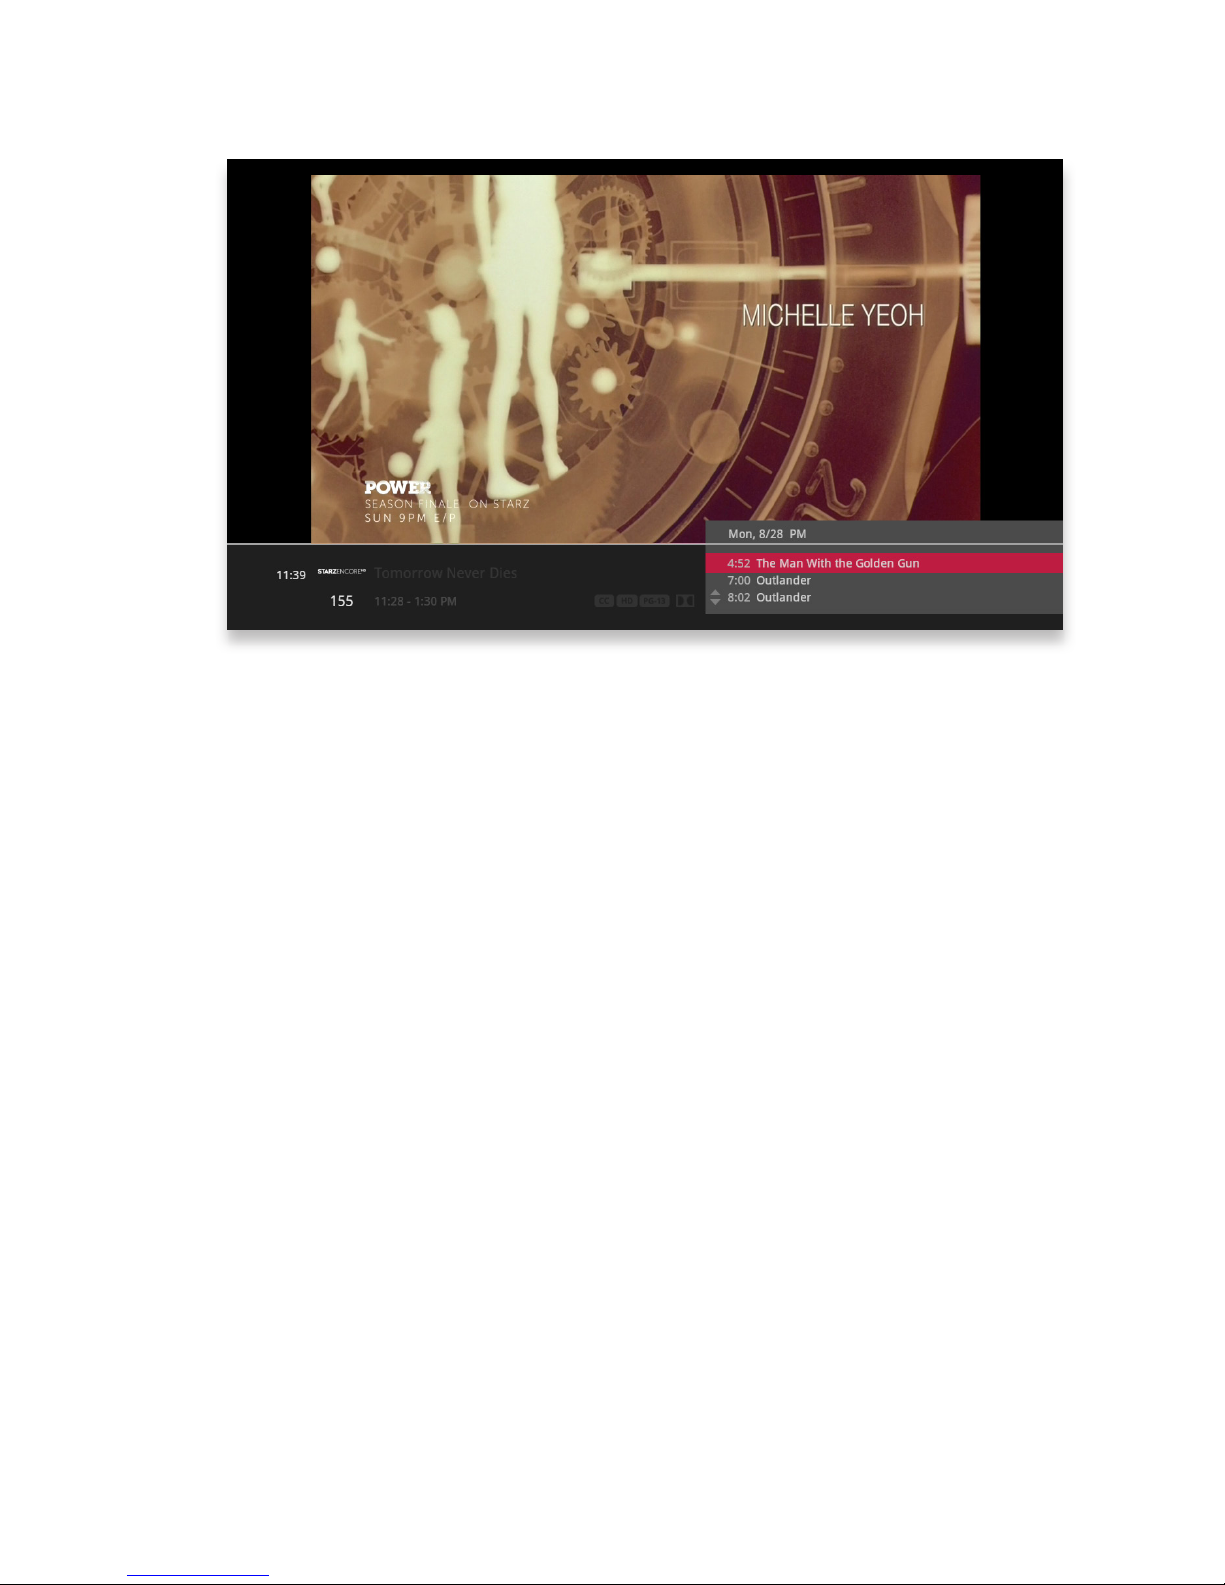
The Flip Bar also has the capability to display up to two weeks of upcoming
programs for each channel.
Press the right arrow to highlight the Coming Up Panel, and then the up and down
arrows will let you browse through programming.
See All Times
One of the options you’ll see in a show’s action menu is See All Times. Select it
to see a list of all of the times that the selected show airs. Select the Back card to
return to your original show listing.
PROGRAM INFO NOTES
Just like in the main menu, you can press info with the Flip Bar displayed to bring
up an action menu, which will give you more detailed information on the selected
show.
Page 26
27
Flip Bar Options
Pressing info with the Flip Bar up will bring up an action menu for the Flip Bar’s
show.
The options available are the same options available in the Channels Menu with
the addition of closed captioning controls, which makes it easy to toggle closed
captions on and off.
Page 27
28
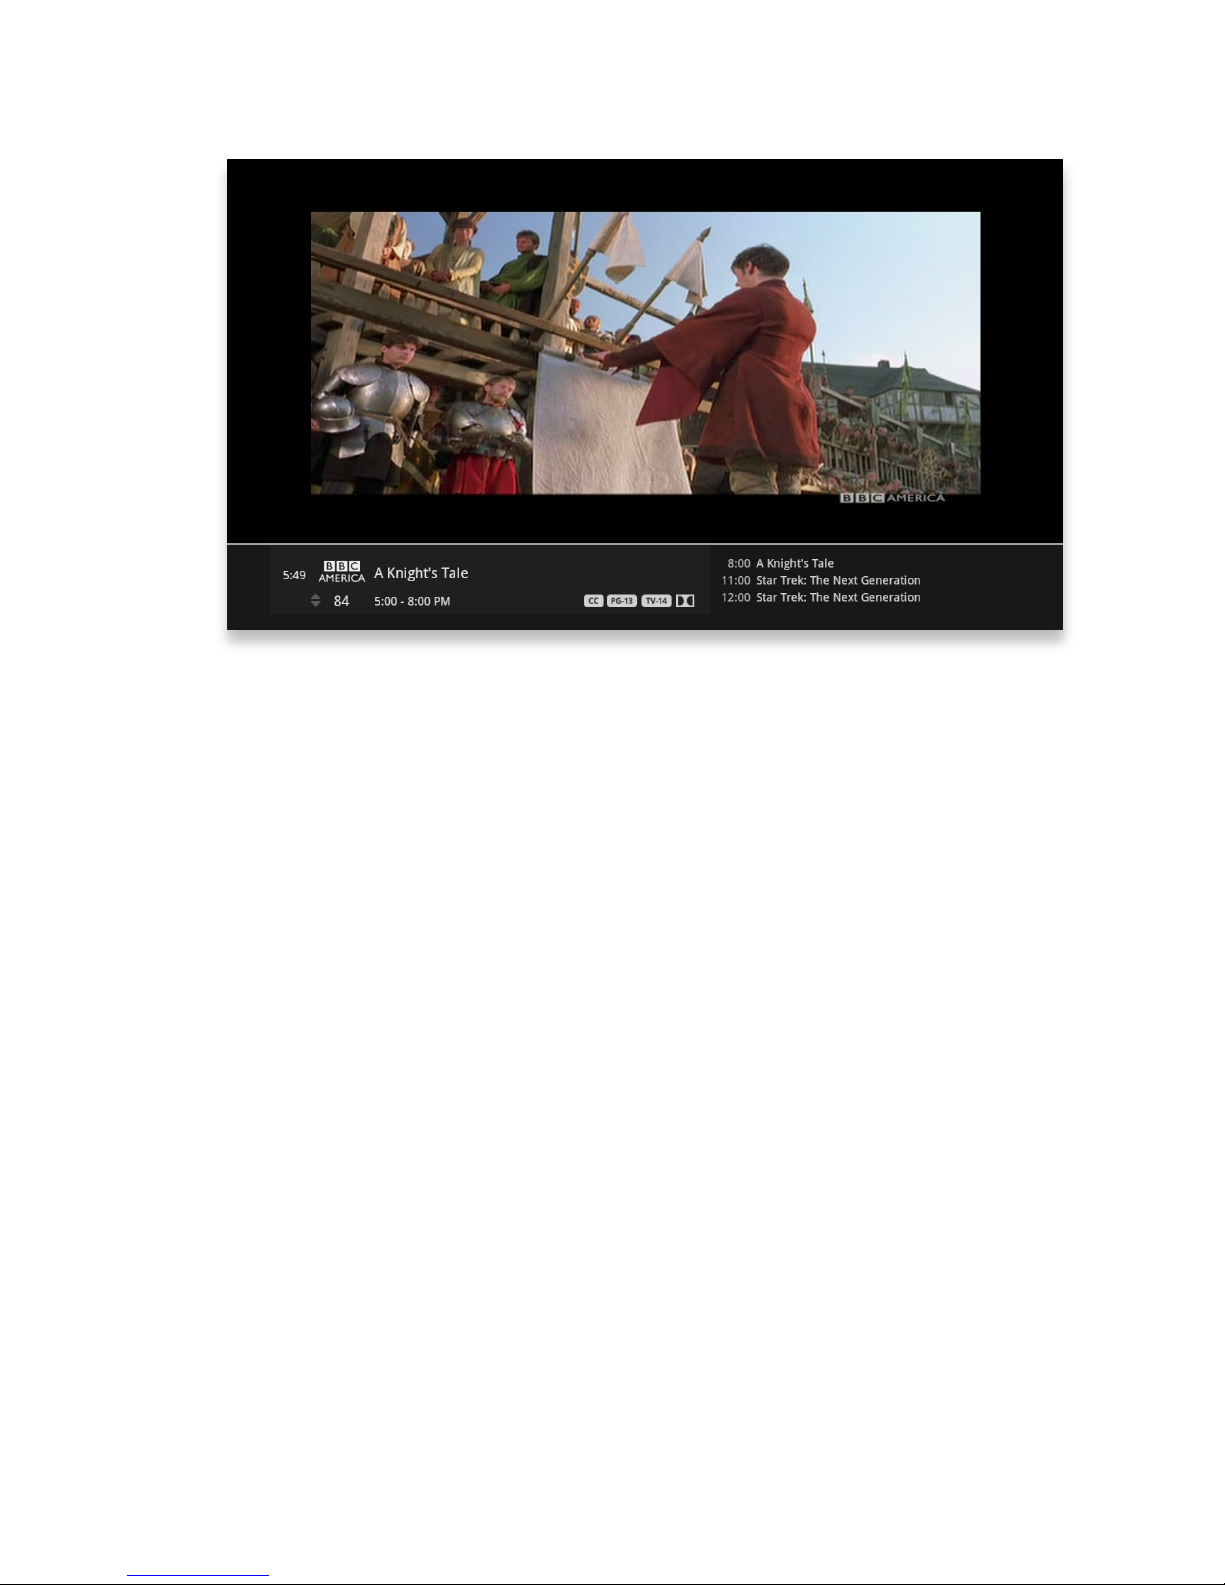
Flip Bar Without Wi-Fi
You can connect to the IP815 media player using either Wi-Fi or a wired connection.
When connecting over Wi-Fi, the red Wi-Fi icon displays under the clock. If the Wi-
Fi icon is not displayed, Wi-Fi is not connected.
Page 28
29
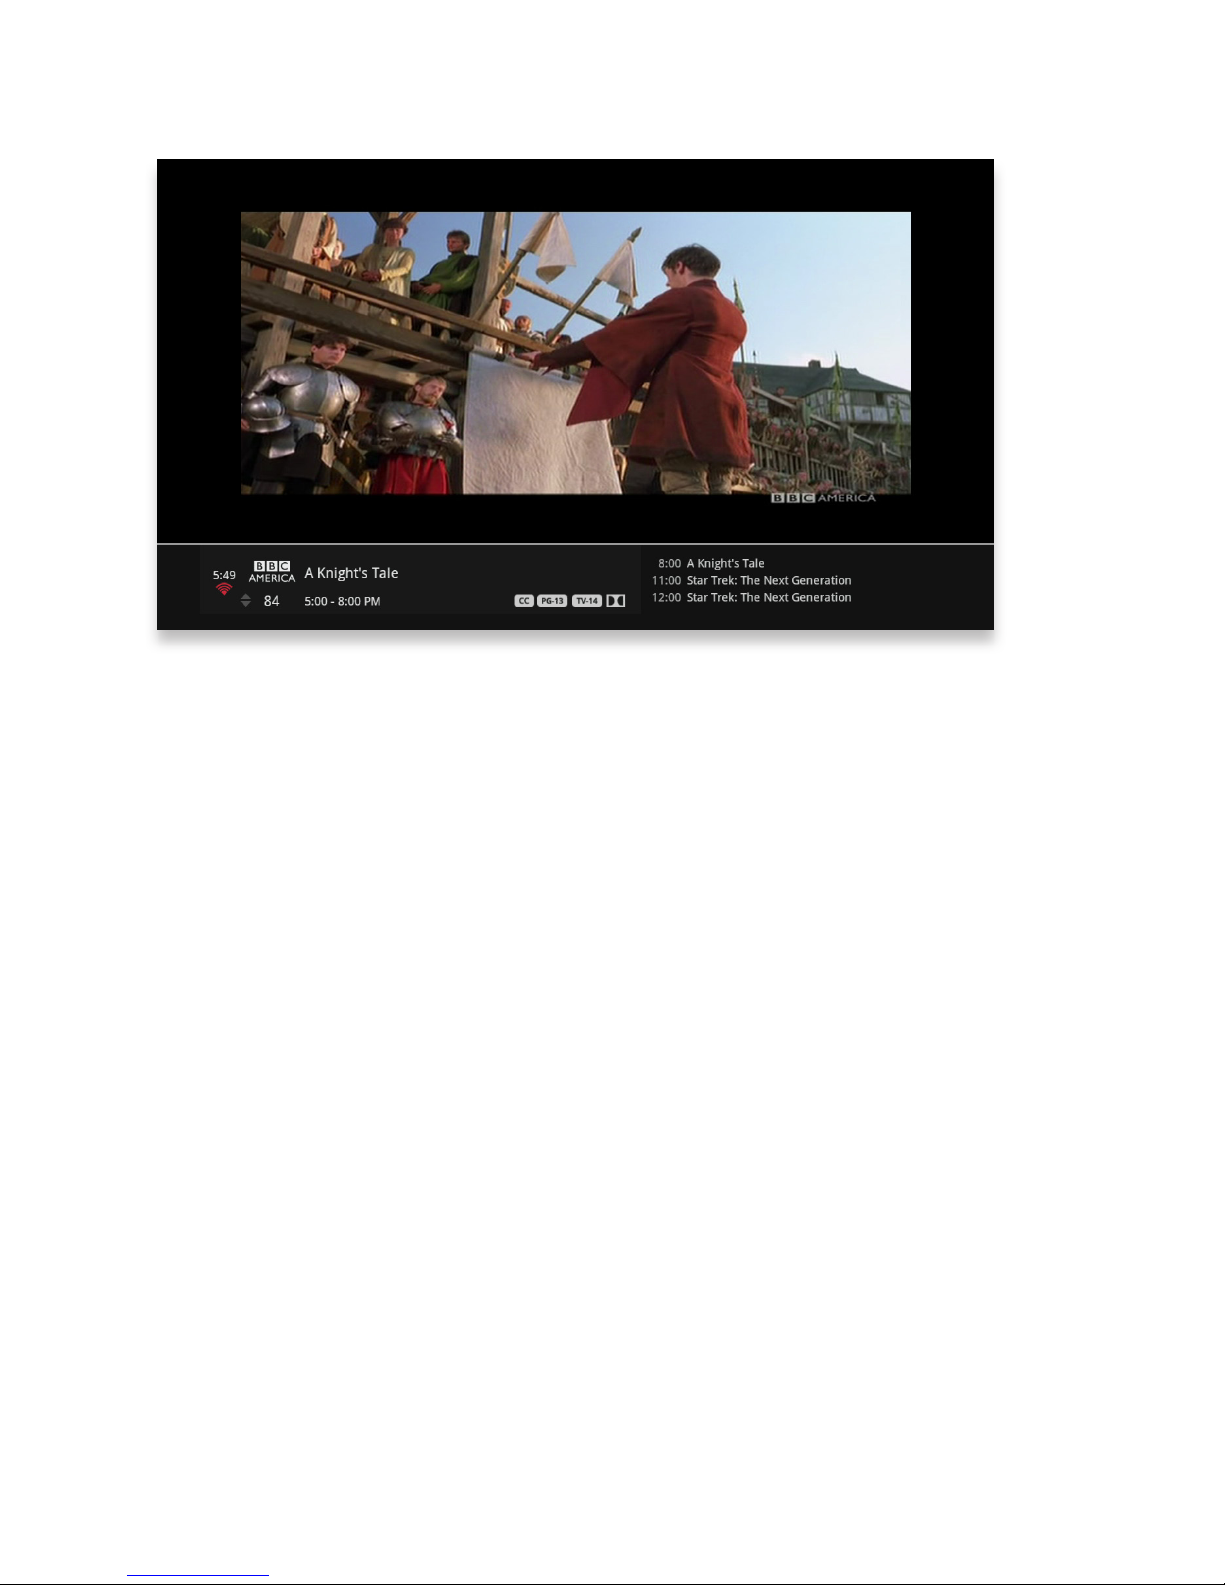
Flip Bar With Wi-Fi
When the IP815 media player is connected over Wi-Fi, the red Wi-Fi icon displays
under the clock. You can check Wi-Fi signal strength under Wireless Network
Setup in the Settings menu.
Page 29
30
rec
pause
play
rew fwd
stop
skipreplay
back next
Controlling Live TV
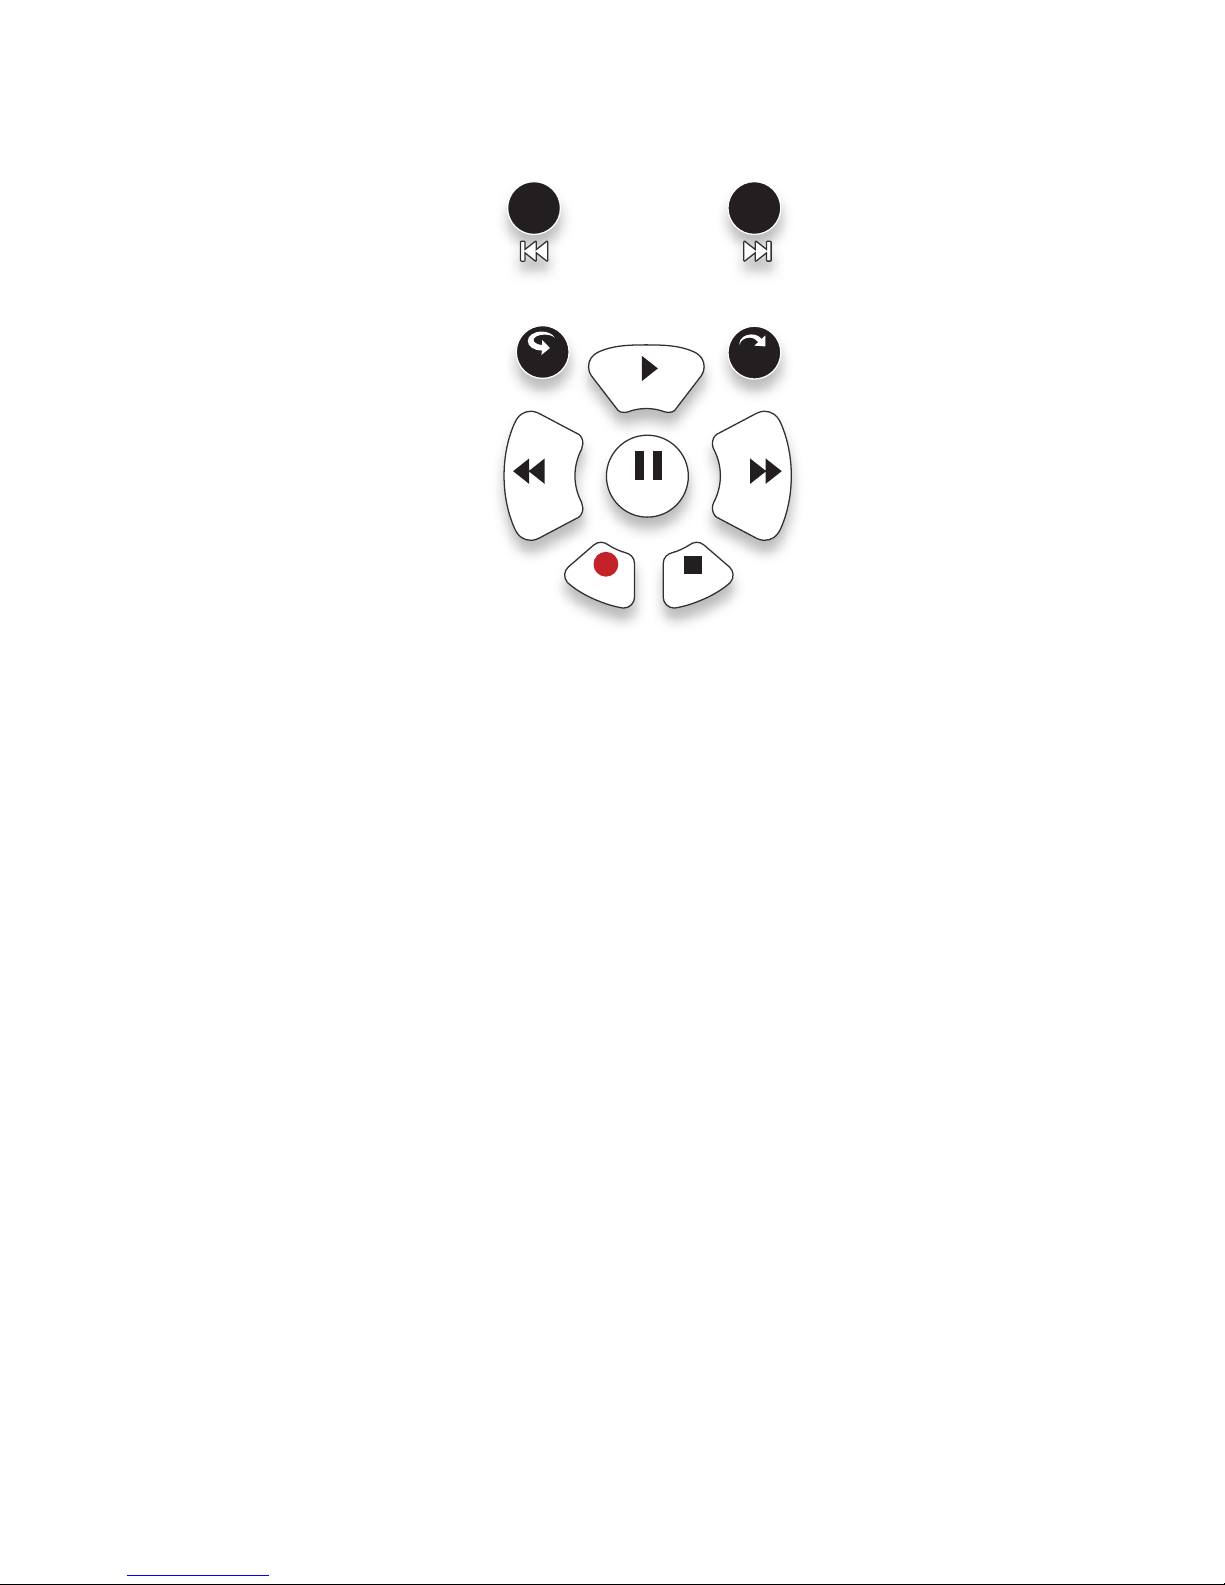
• Press PAUSE to alternate between pausing and resuming the show you’re
watching.
• Press REWIND up to three times (for three speeds) to rewind the show.
• Press FORWARD up to three times (for three speeds) to fast-forward the show
up to the point of broadcast.
• Press PLAY to stop fast-forwarding or rewinding or resume from a pause.
• Press LIVE TV to view the point of broadcast for the last channel you watched.
• Press REPLAY to view the previous 7 seconds of the show.
• Press SKIP to skip forward in the show up to the moment of broadcast. You
can decide how many seconds to skip with this button in the Settings menu.
• Press PAUSE and then FORWARD once to activate slow motion.
• Pressing RECORD to record the entire contents of the temporary memory or
buffer for the show you are watching.
• Press PAUSE and then SKIP to advance forward one frame.
Page 30
31
Controlling Live TV
THE BUFFER
When you start watching a show, your media player will start storing it in temporary
memory, called a buffer. The amount of temporary memory varies, but it is never
less than 30 minutes for standard definition or 10 minutes for HDTV.
TV Roaming
With TV Roaming, you can pause a show in one room and resume it in another.
Once you press pause, if you switch to another room and choose to watch the
same show, it automatically plays at the point you left off.
Page 31
32
6
5
3 4
2
1
Player Bar
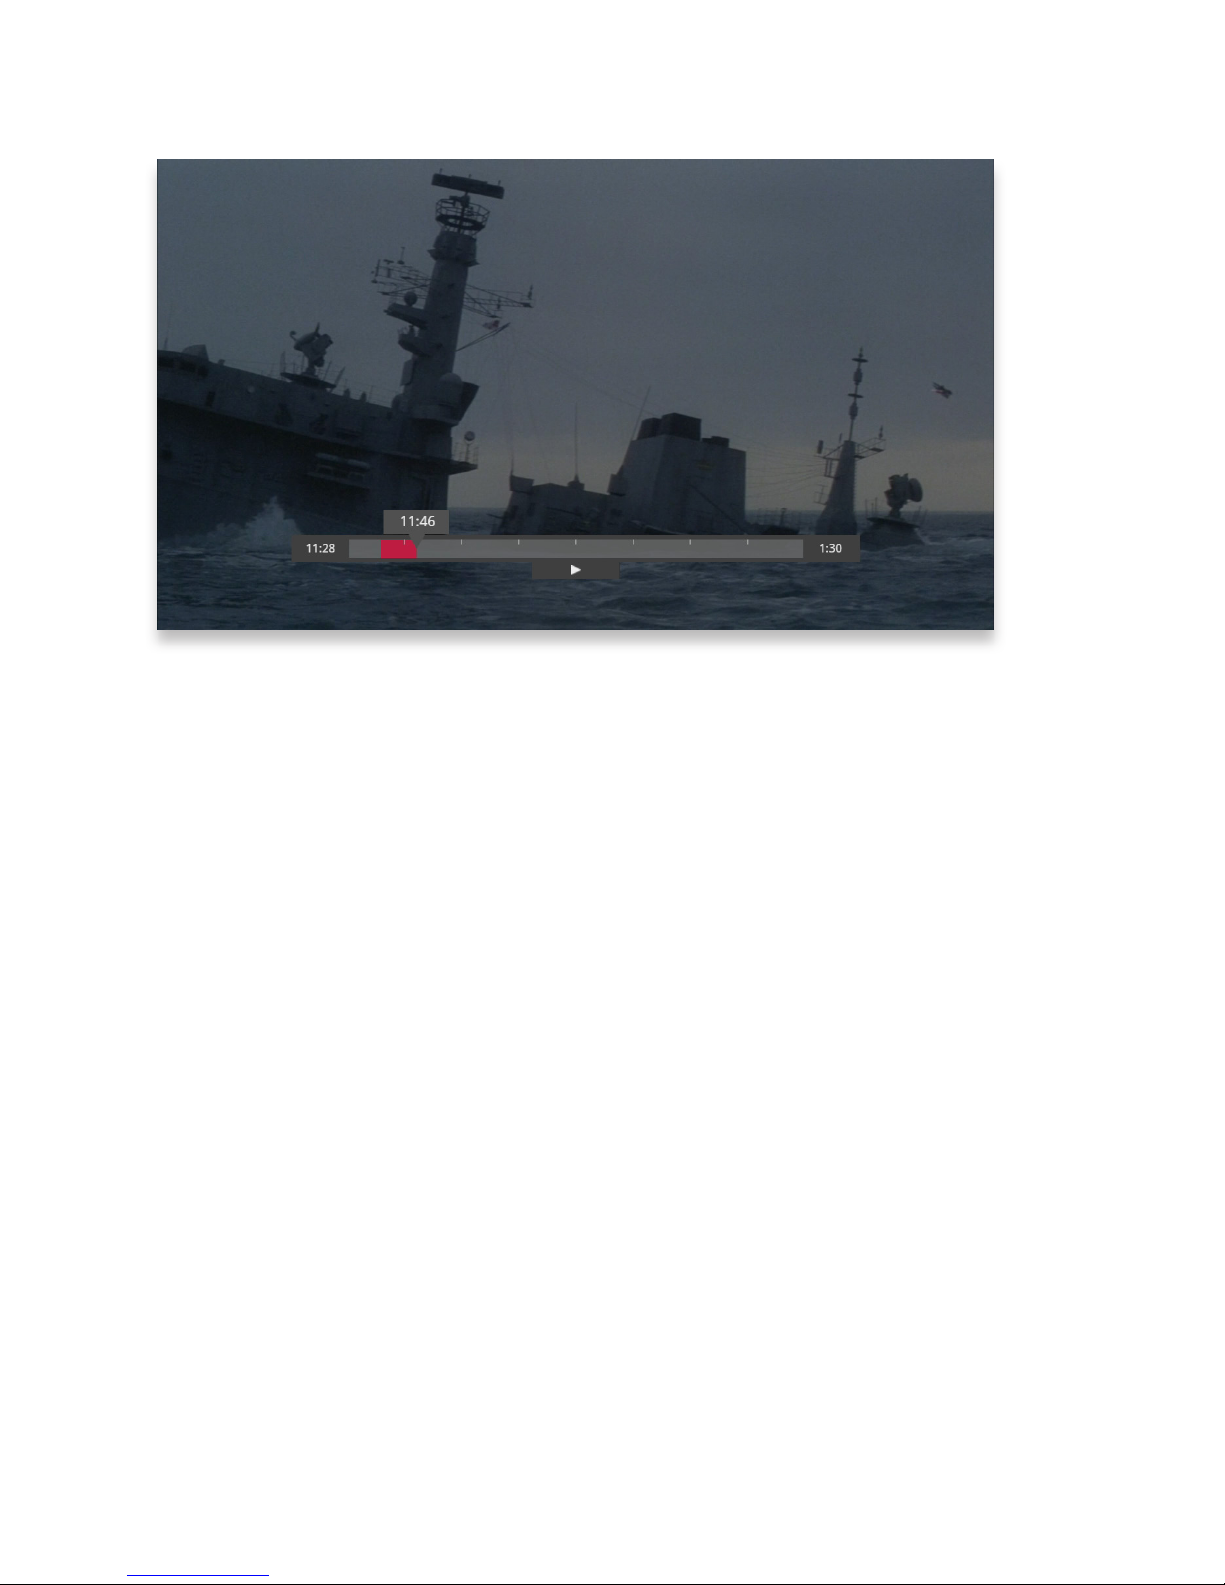
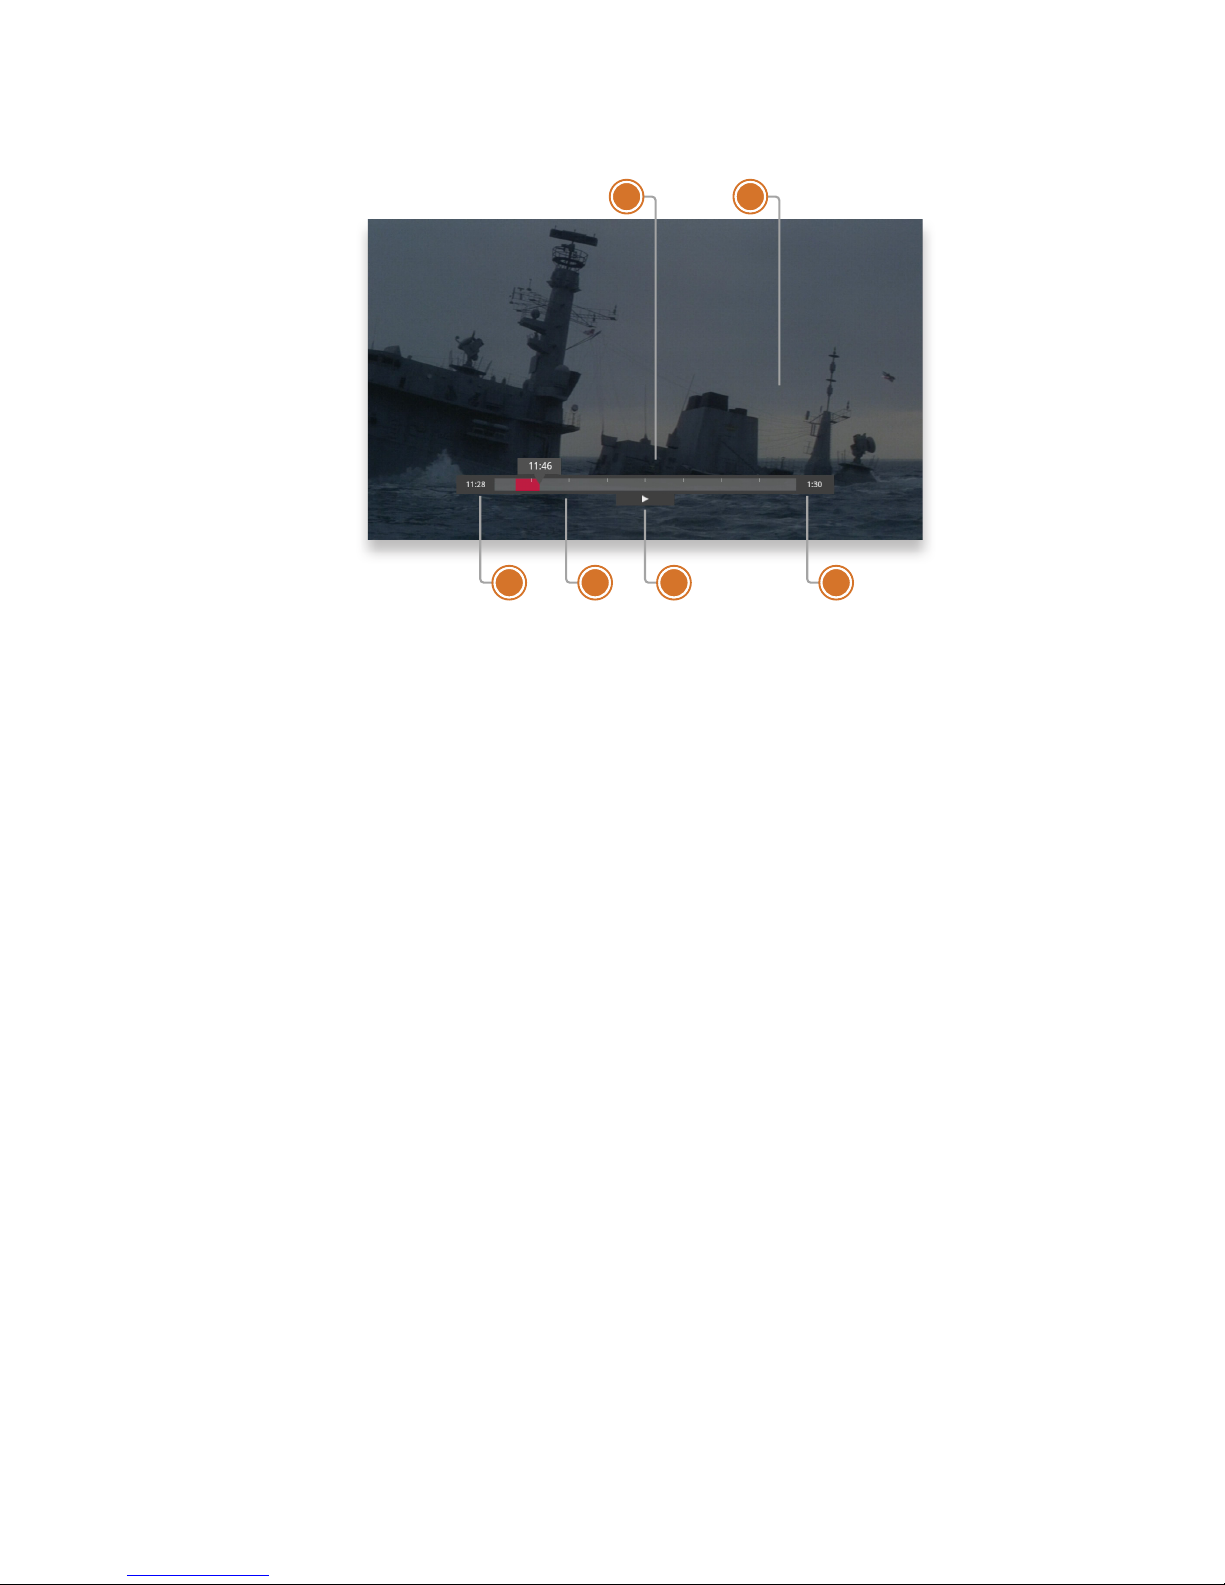
Whenever you press one of the player control buttons, you’ll see the Player Bar,
which gives you status information about the program you’re currently watching.
You’ll see a version of the player bar no matter what type of media you’re enjoying,
whether it’s recorded or live TV, photos, or music.
1. CURRENT TIME
The current time or point in the
current program.
2. PROGRAM
The current live or recorded program
being played back.
3. SHOW START TIME
The start time of the recorded or
Live TV program.
4. STORED IN MEMORY
While watching live TV, this area (the
buffer) displays the part of the show
recorded in temporary memory.
While watching recorded TV, it
shows the entire contents of the
show available for viewing.
5. PLAYER BAR STATE
The current state of the program
controls, such as play, pause,
rewind, and fast-forward.
6. SHOW END TIME
Displays the end time of the Live
TV program or the duration of a
recorded TV program.
Page 32
33
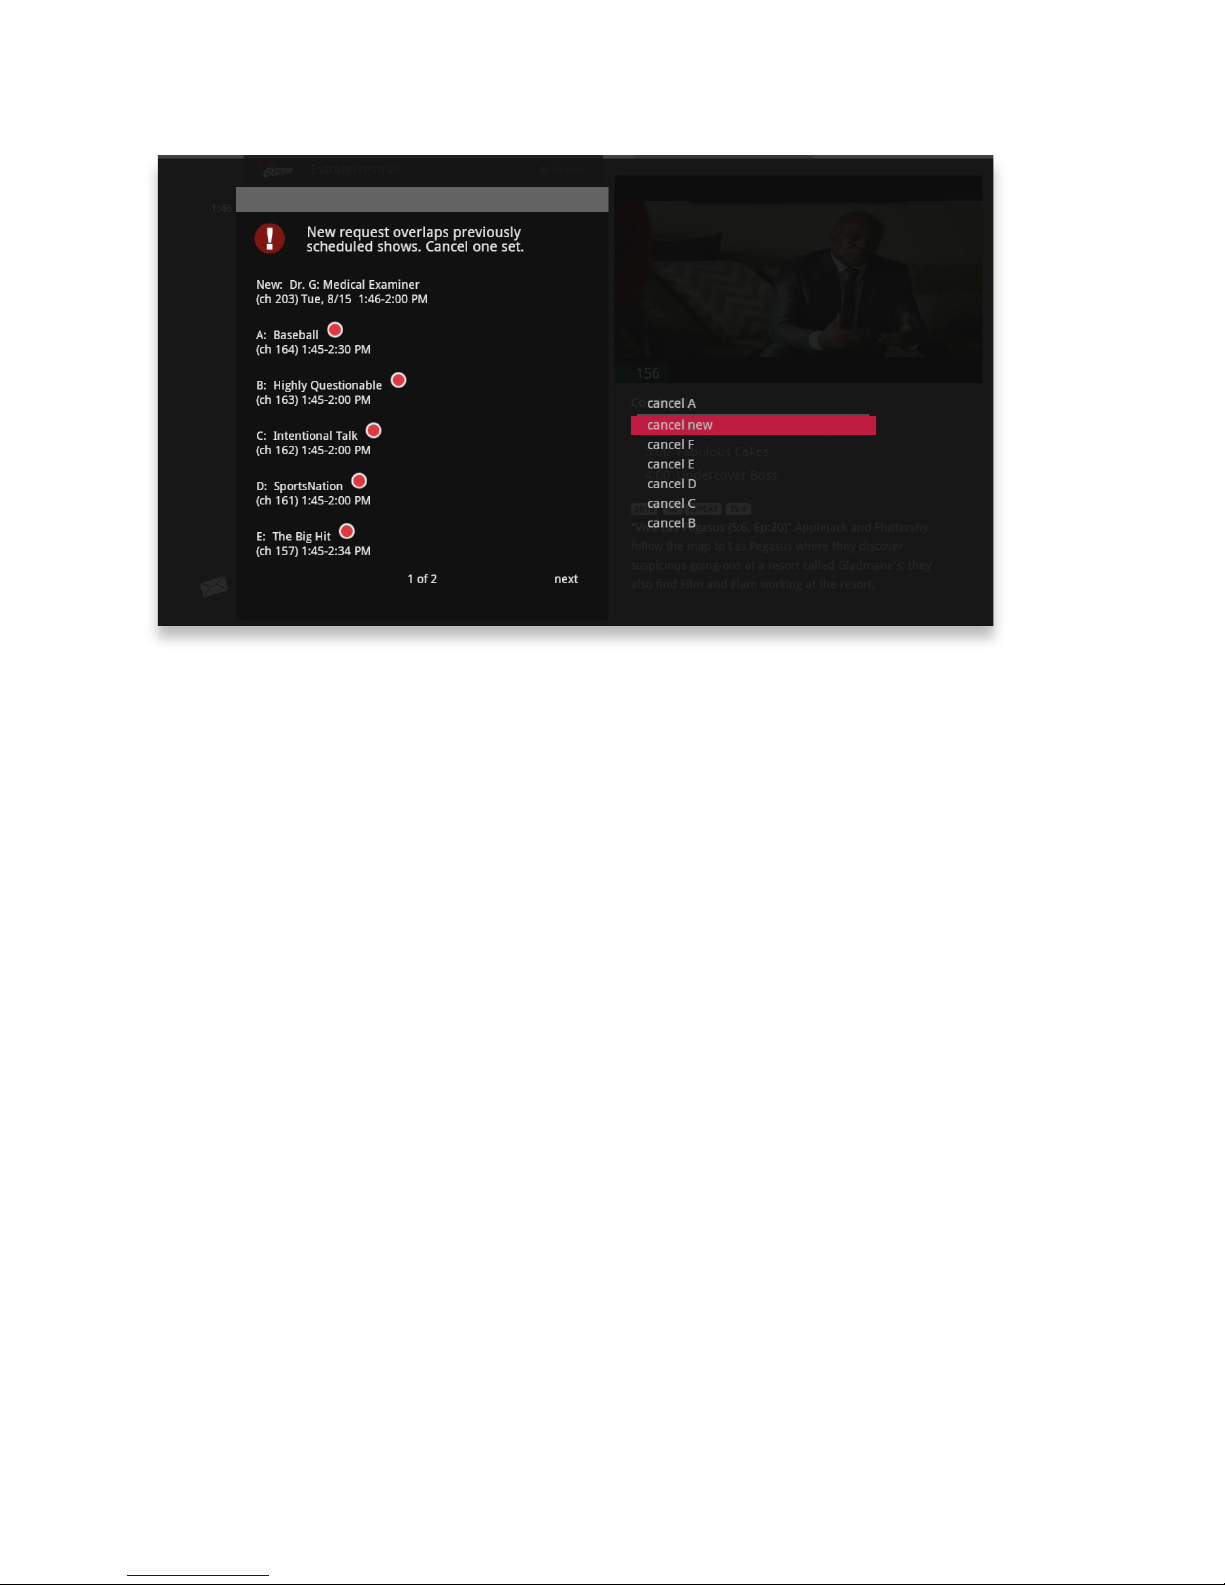
Automatic Conict Detection
You may see a conflict detection note while you’re watching full screen TV, which
indicates that you have more programs set to record than available tuners.
The conflict detection note will allow you to decide which programs you would like
to cancel and which you would like to continue recording.
Screen Saver
If there has been no activity for more than 30 minutes while browsing the main
menu, the media player will change to full screen TV with the last-watched channel
playing to help extend the life of your TV screen.
If live TV has been playing on the same channel for five hours without any input
from the remote, the screen saver will be displayed.
To return to the main menu, press the MENU button.
Page 33

34
Recorded TV
Your media player makes it easy to watch and manage your
recordings from one place in the main menu: Recorded TV.
Page 34
36
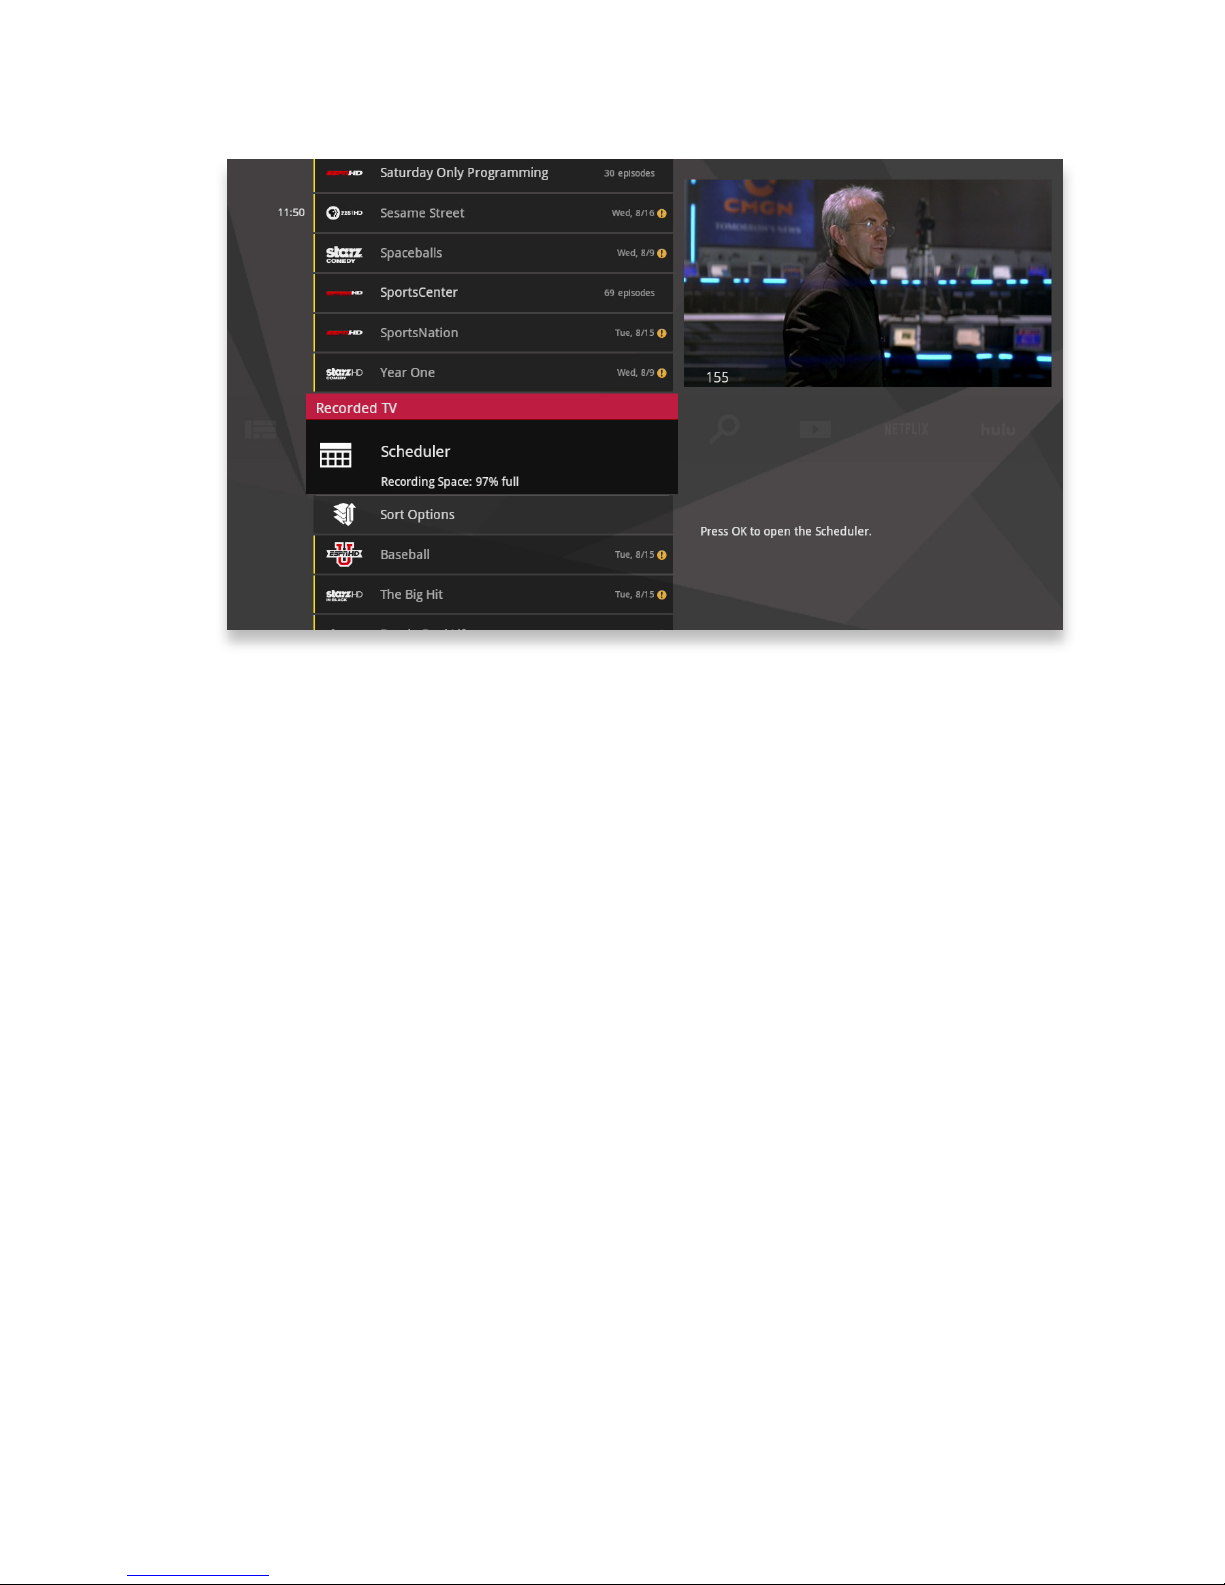
Intro to Recorded TV
In the horizontal menu, you’ll find the Recorded TV category. All of the recorded
and currently-recording shows are listed in the vertical band in alphabetical order.
Episodes of a series are grouped into folders; you’ll see the individual episodes
in the preview panel to the right. To watch a show, select it, and press OK. And
if you’ve already watched part of the show, you can choose whether to resume
where you left off or start over from the beginning.
Page 35
37
7
6
4 5
3
2
1
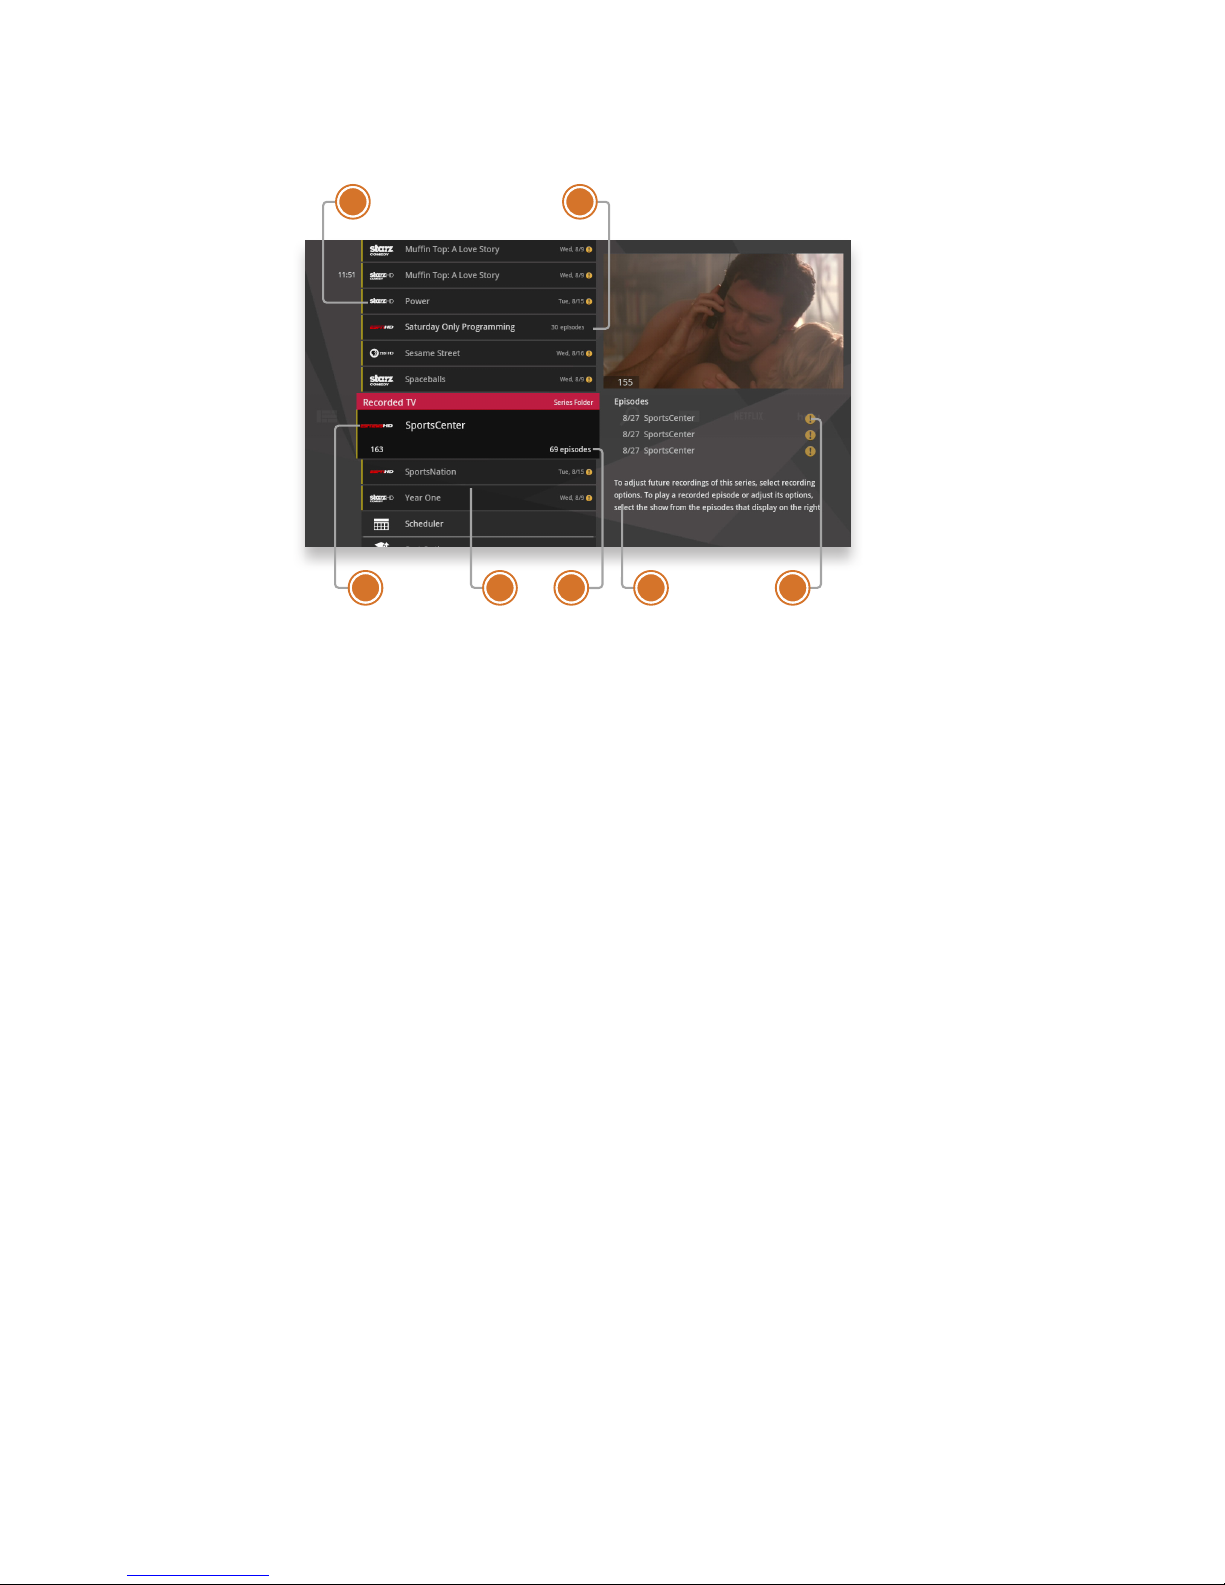
Recorded TV - Layout
1. CHANNEL LOGO
Displays the channel of the recorded
show.
2. RECORDED SHOW ICONS
Let you know if the show is in
danger of deletion or protected
against deletion.
3. FOCUS
Displays the channel number, logo
and an indication of whether a
show is part of a series. Folders that
contain multiple episodes in a series
also display the number of episodes.
4. OPTIONS
Allows you to view and edit the
global recording options.
5. EPISODES OR DURATION
If the item in focus is a folder
containing episodes in a series,
focus lists the number of episodes.
If it’s an individual show, it lists the
show’s duration.
6. INFORMATION
With a folder containing episodes
in a series in focus, this area shows
the current recording options for
the series. With a single recorded
program in focus, this area shows a
summary of the show information.
7. SERIES
Individual episodes in a series are
shown in the preview panel. Press
the right arrow button and select an
episode to see that episode’s action
menu.
Page 36
38
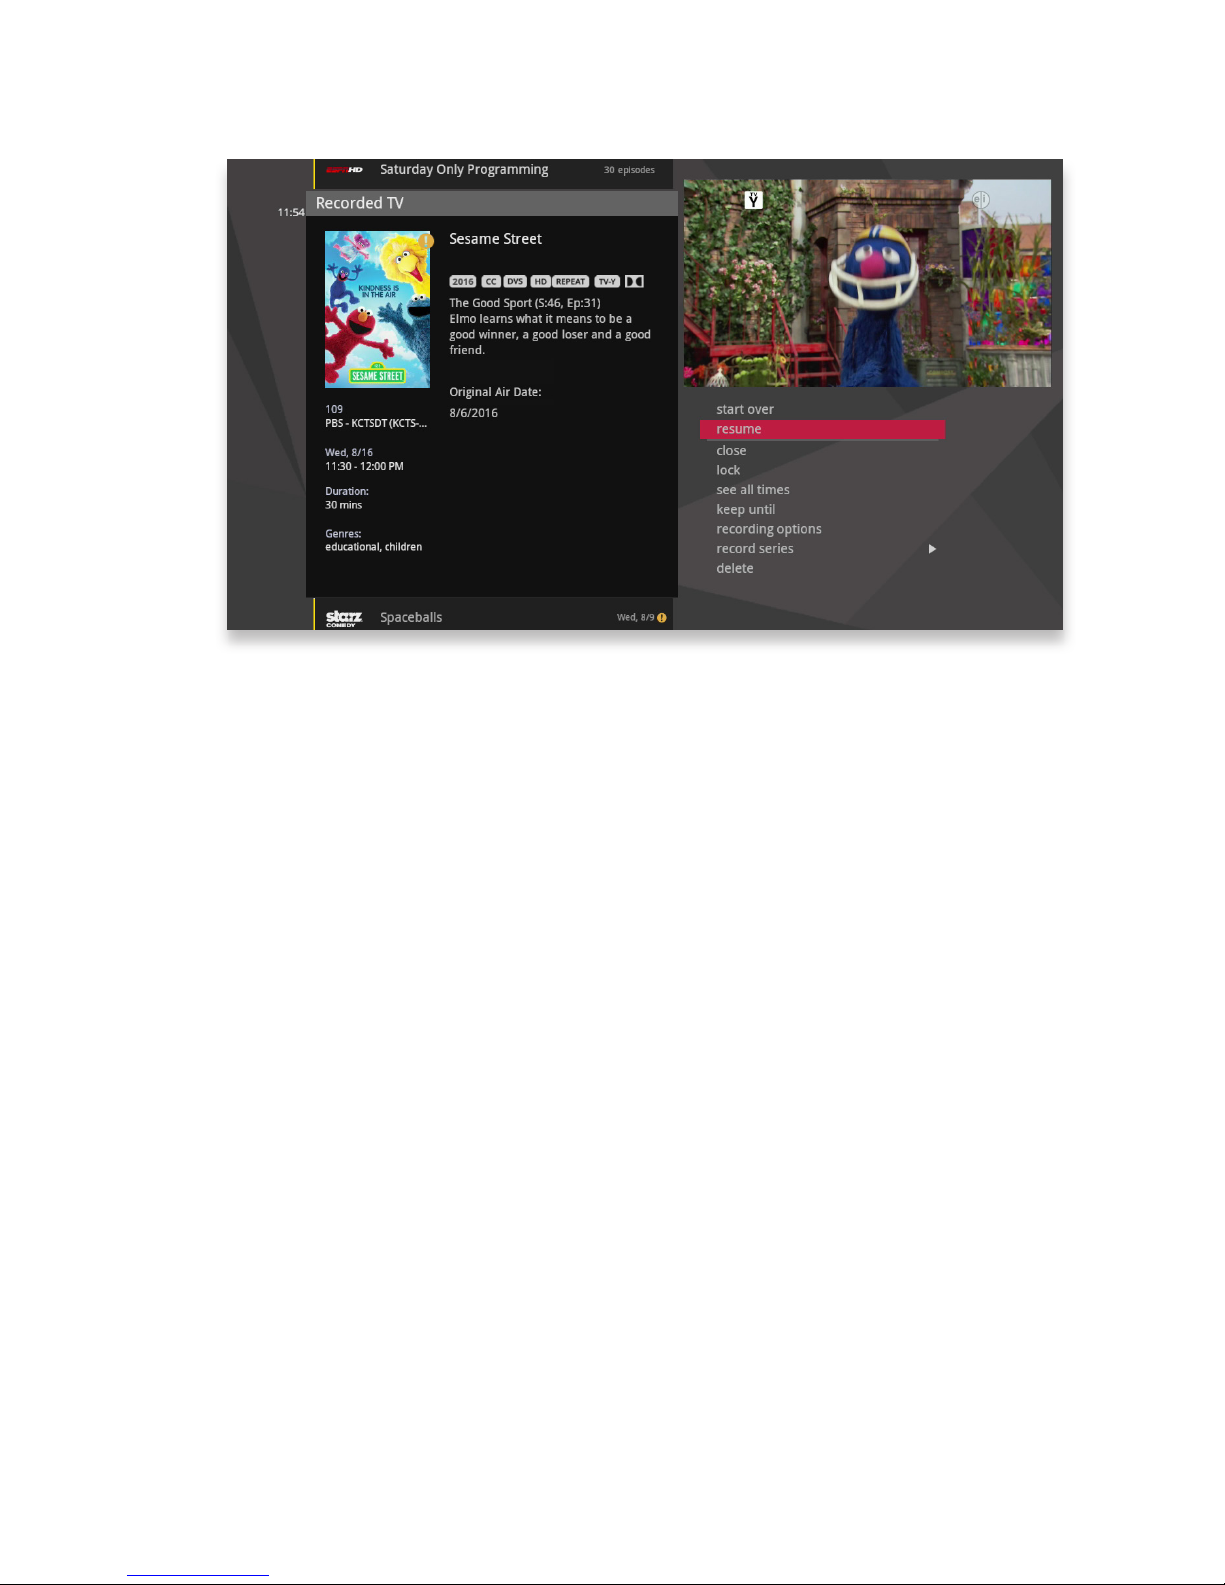
Recording Options
When you press info with a recorded program in focus, you’ll get the following list
of options in the action menu:
• Play/Start Over - Launches the program full screen from the beginning.
• Resume - This option only appears if you’ve watched a portion of the program
and will launch the program full screen from the point you left off.
• See all times - Displays all of the times that particular show airs.
• Delete - Removes the program from Recorded TV.
• Recording options - Lets you access the recording options menu.
• Keep Until - Your media player will automatically delete the oldest shows in your
Recorded TV folder as you need the room for new recordings. Keep Until lets
you set the program to be deleted at the point of your choosing.
• Lock - Prevents someone from watching the recorded program without a PIN.
• Record Series - you’ll get this option if you only have a single episode recorded.
Page 37
39
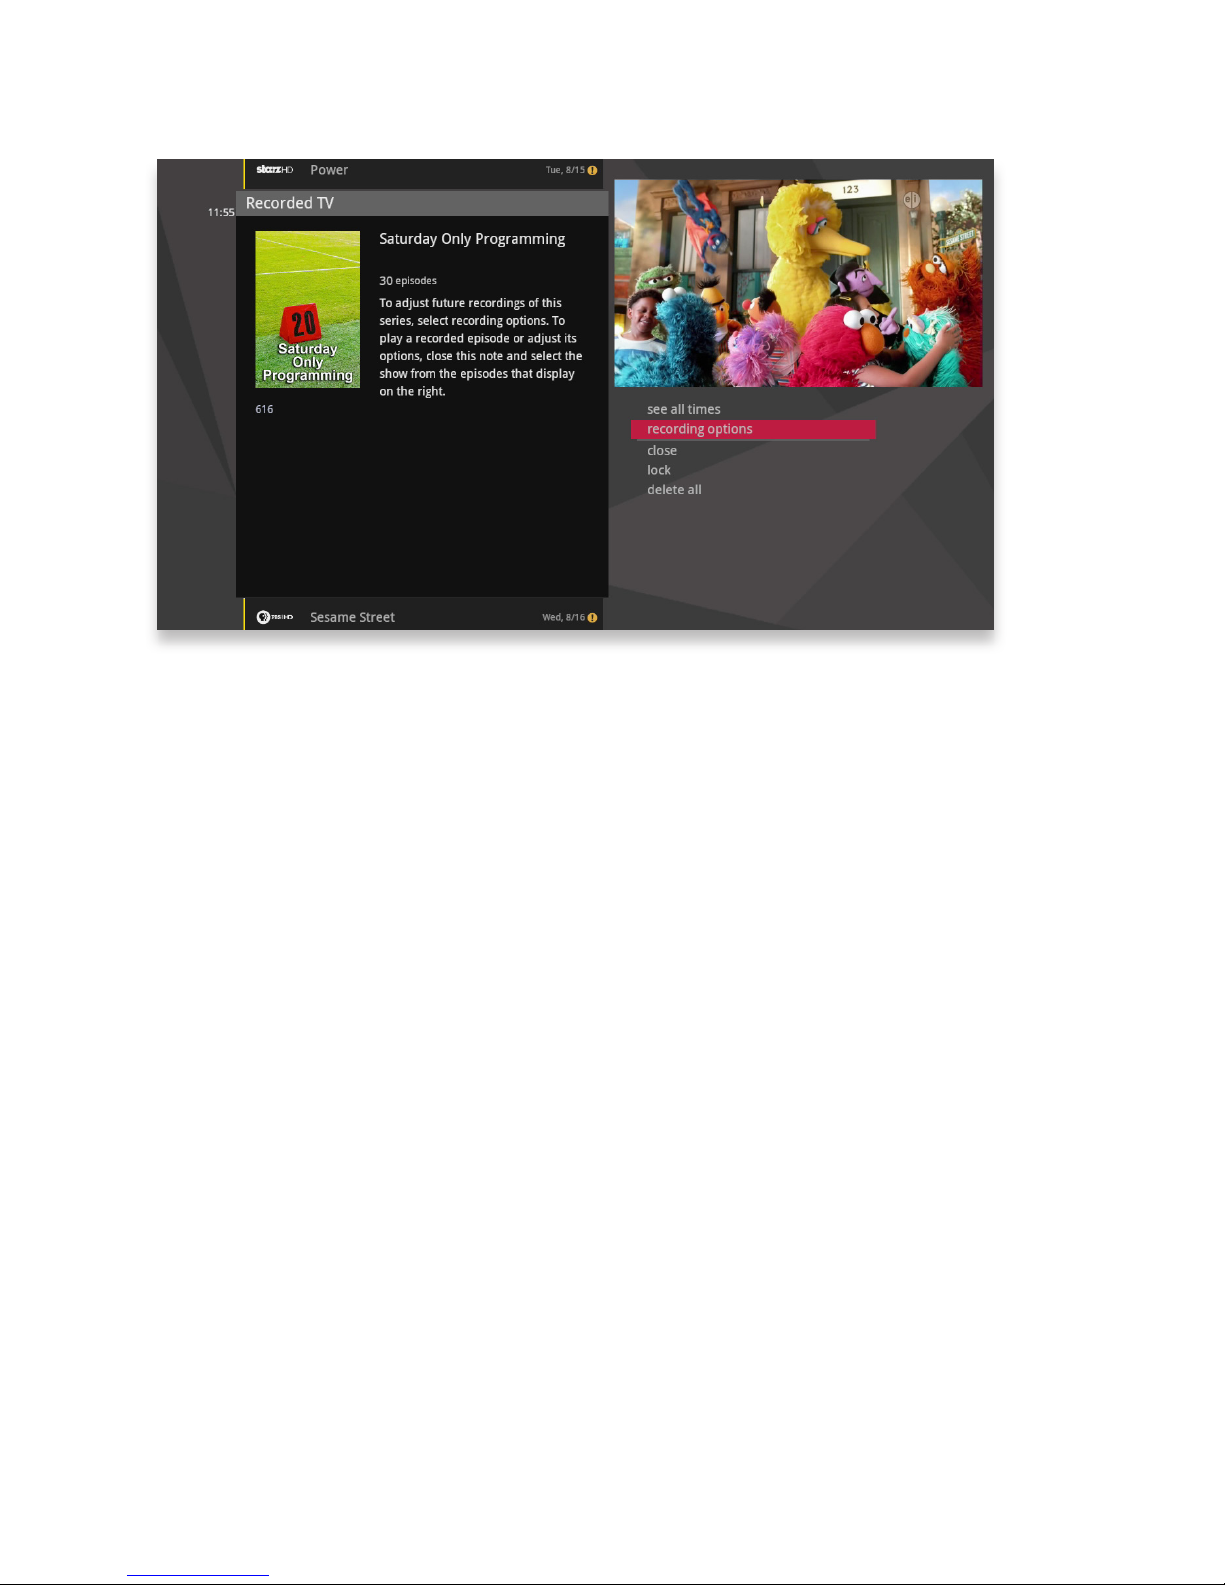
Folder Options
If you bring a folder of episodes into focus and press OK, you’ll see the following
options:
• see all times
• record series
• lock
• delete all
Page 38
40
Scheduler
Sort Options
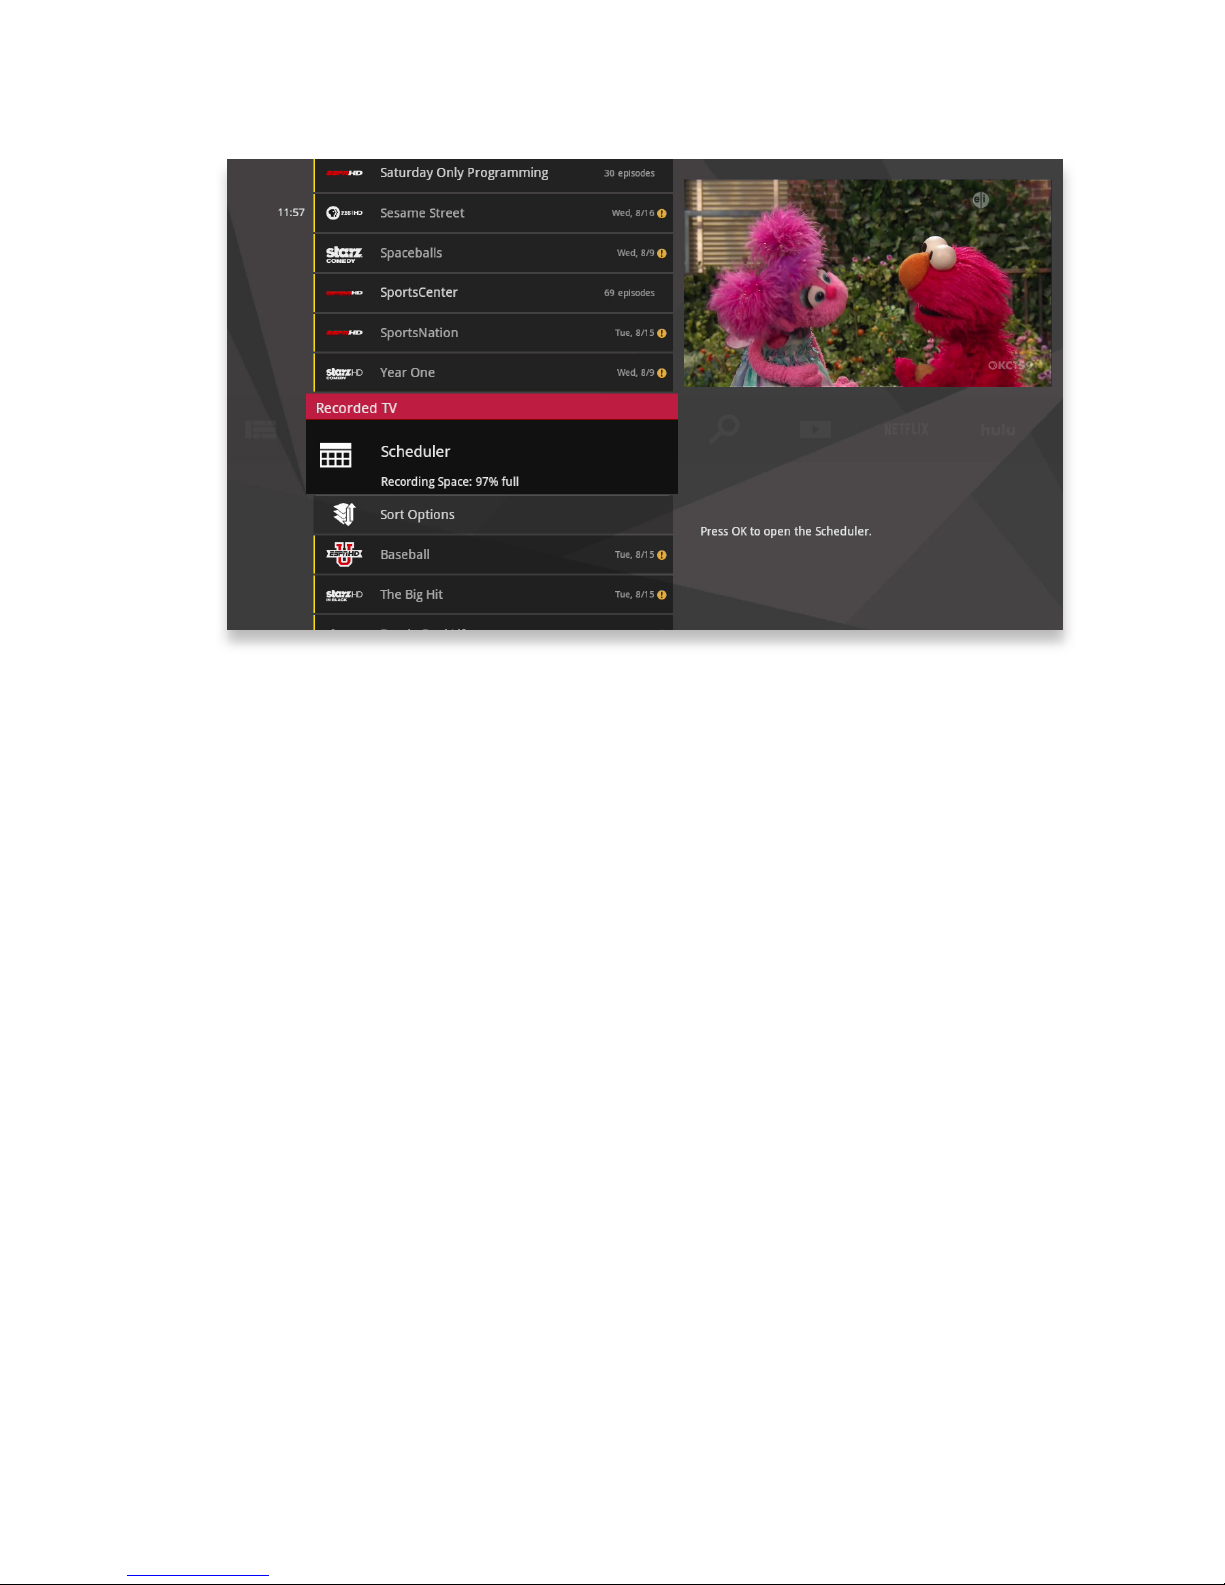
The Scheduler shows the recording space status. Select the Sort Options card
to sort your recorded TV shows by program title or date. You can also choose
whether recordings appear in ascending or descending order.
With the Recorded TV Scheduler card in focus, click OK; then scroll right or left
using the remote control. This allows you to view:
• Scheduled Shows (scheduled for recording)
• Scheduled Series (scheduled for recording)
• Deleted (recordings you have deleted)
• Canceled (scheduled recordings you canceled)
• Recording Space (remaining)
• Recording Defaults
Canceled and Deleted
When you chose to record one show over another due to a conflict, (or someone
in your household does) sometimes it’s hard to remember why that canceled show
isn’t showing up in Recorded TV. Your media player keeps a list of shows that you
have scheduled that will not record as well as shows that did not record. The
shows above focus have not aired yet, while the shows below focus have already
aired.
Page 39
41
Scheduled to Record
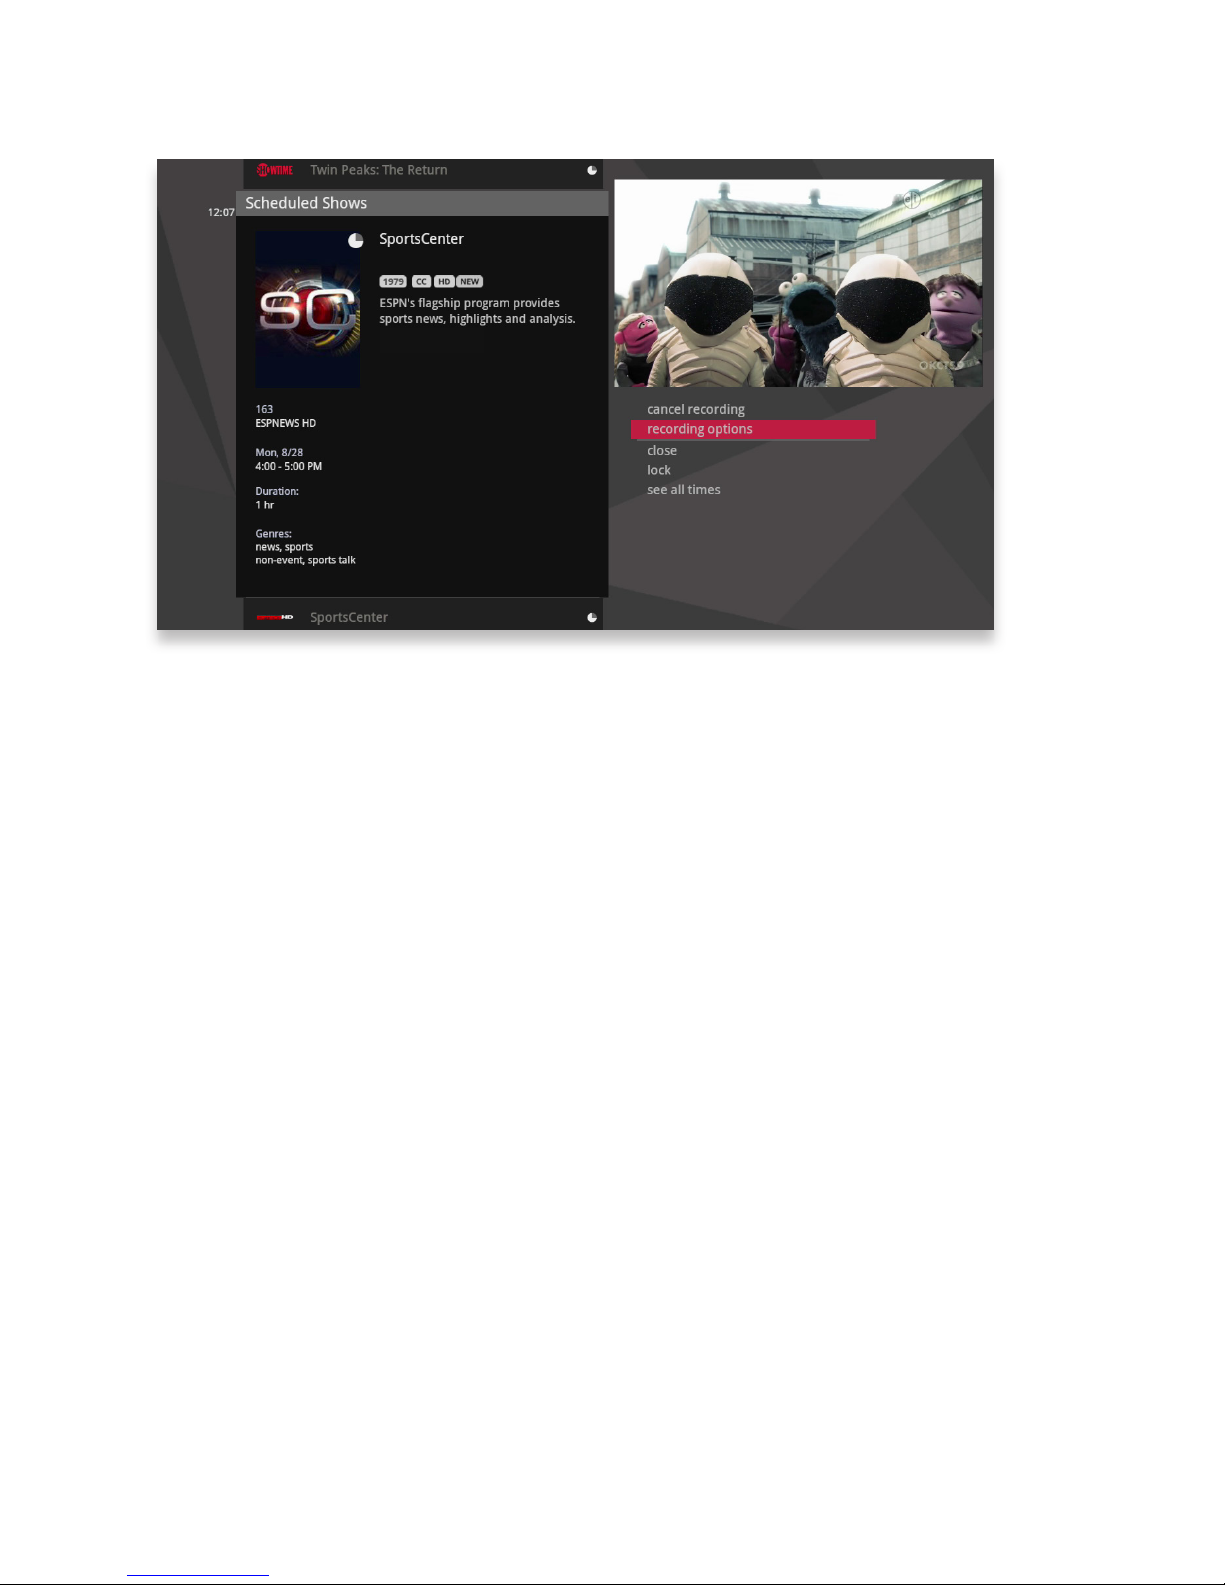
You can confirm that a show is set to record by selecting Scheduled Shows or
Scheduled Series. You can also cancel a recording and access your recording
options for each show. Just pick the show you want to manage and press info on
your remote control.
Page 40
42
Recording Defaults
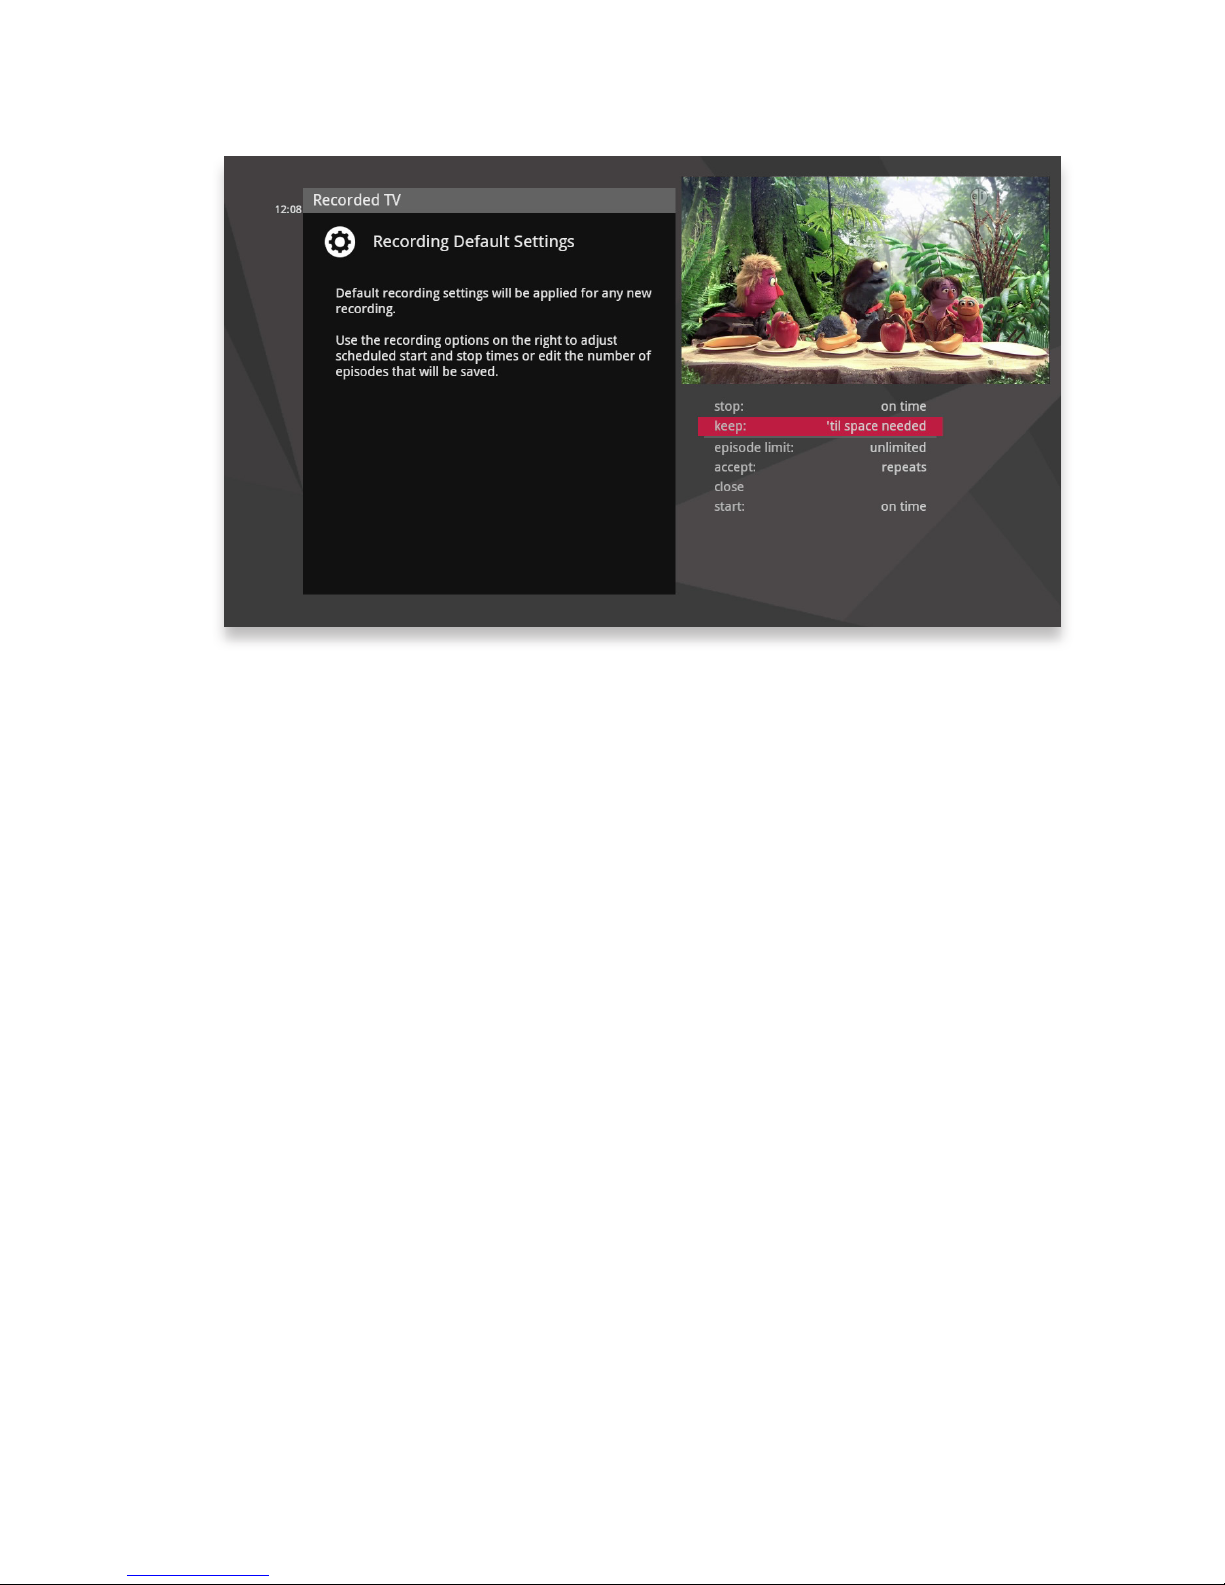
In Recording Defaults, you can set your preferences for the following settings,
which will then be applied each time you record a show:
• Keep - Decide how long shows will be stored.
• Episode Limit - Determine how many episodes of a series to keep at once.
• Accept - Decide whether you’ll record first-run or repeats for a series request.
• Start - Start programs early or late.
• Stop - Stop programs early or late.
Page 41
43
Recording Space
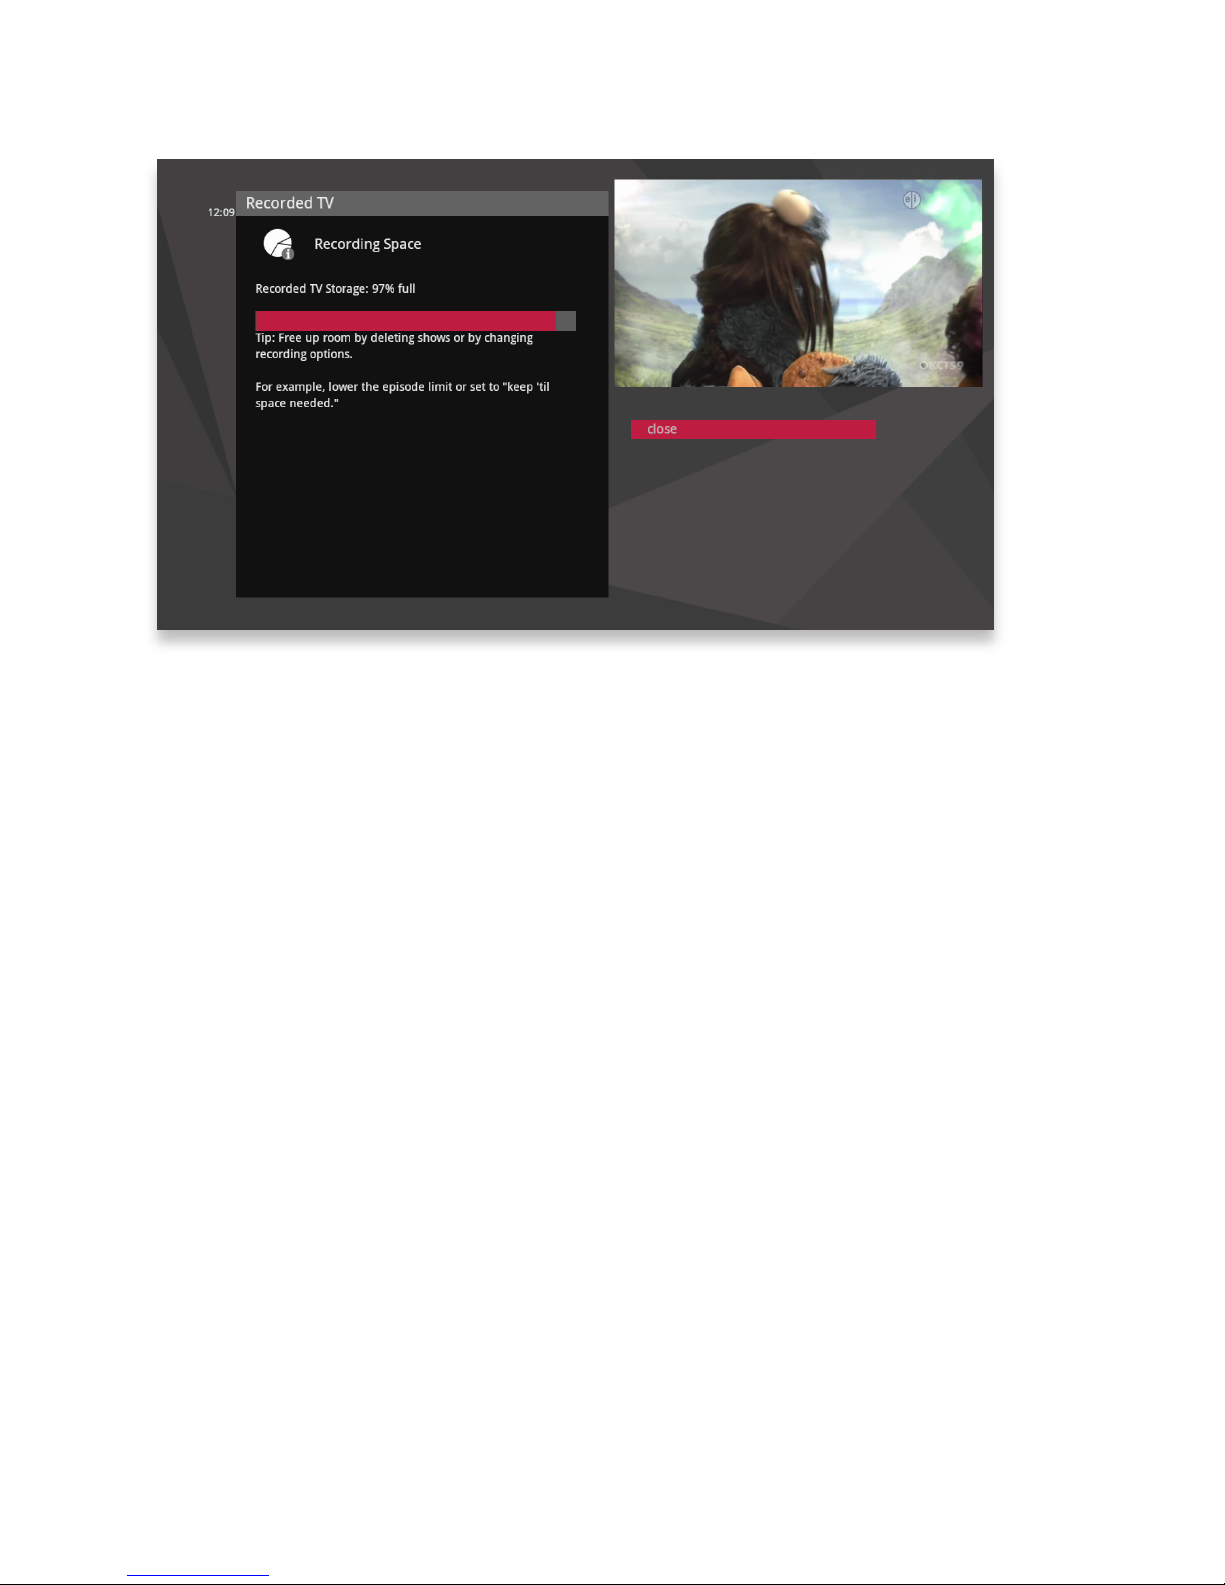
The storage meter lets you know how much space you have left for more recorded
programs. Recording Space is located in two places: in the Settings and in
Recorded TV.
Again, to locate this, with the Recorded TV Scheduler card in focus, click OK; then
scroll right or left using the remote control until Recording Space is in focus and
click OK.
External Hard Drive
To expand the space you have for recorded programs, you can connect one
external hard drive at a time to the rear eSATA port on the media gateway.
When selecting an external drive, keep in mind that your media gateway only
supports eSATA storage devices marketed or certified for DVR use.
Page 42

44
TV Channels
With all of the channels available these days, it’s tough to
know what all of your options are. The TV Channels category
makes it easy to find what you want to watch.
Page 43
46
87
65
4
3
2
1
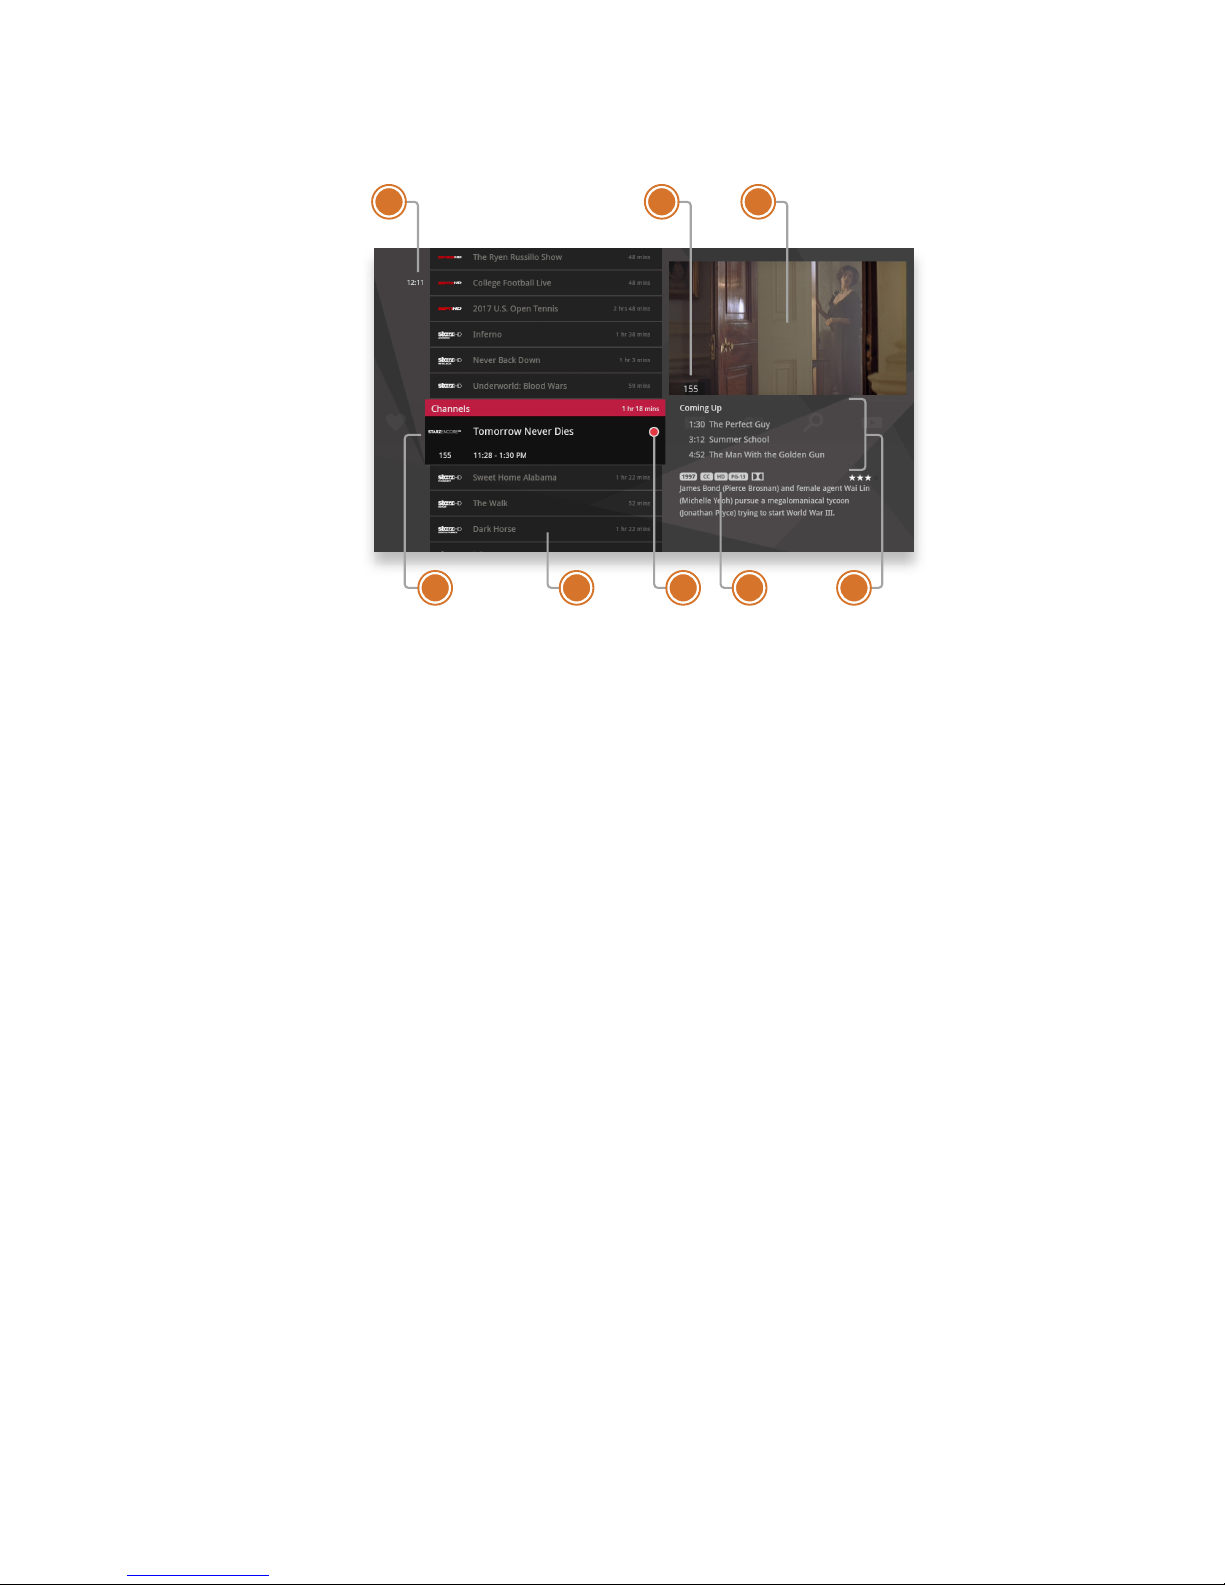
TV Channels - Layout
1. TIME
The current time, so you know how
long before your show begins.
2. CURRENT CHANNEL
Displays the channel that is playing
in the Mini TV. If the program is
recorded, an icon will display the
current status - i.e., play or pause.
3. MINI TV
Even when channel surfing, Mini TV
always keeps you in the action.
4. FOCUS PROGRAM
Pressing info on this item brings up
an action menu.
5. AVAILABLE TV PROGRAMS
Displays all of the programs available
in your TV lineup that are currently
airing.
6. RECORDING ICON
Displays an icon if the show is
recording or scheduled to record.
7. INFORMATION PANEL
Displays program information about
the show in focus.
8. PROGRAM INFORMATION
Displays the next three upcoming
shows that will air on the channel in
focus.
Page 44
47
7 6 5 4
321
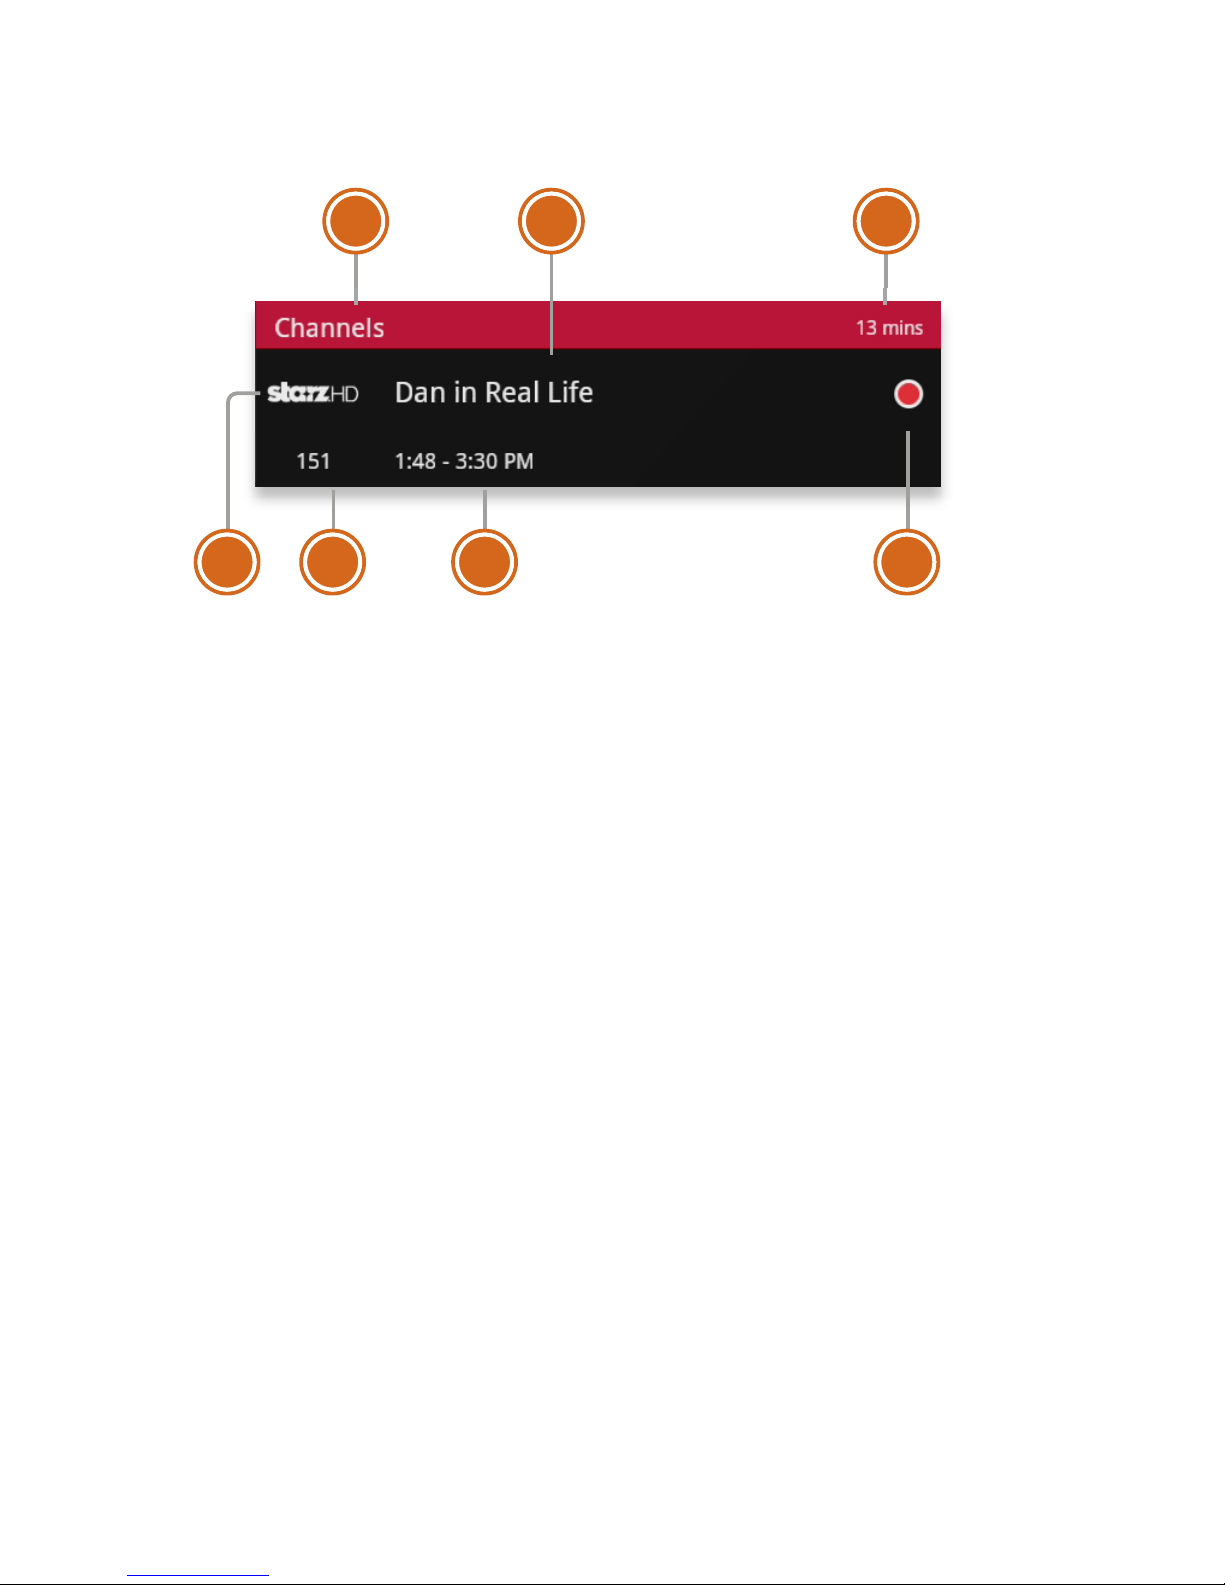
TV Channels - Focus
Different areas of the card provide more information about the TV program in focus.
1. CATEGORY
The name of the category moved
into focus.
2. SHOW TITLE
The name of the program in focus.
3. SHOW LENGTH
The selected program’s remaining
duration.
4. RECORDING ICON
Displays an icon here if the selected
program is currently recording or
scheduled to record.
5. PROGRAM SCHEDULE
Displays the selected program’s air
time.
6. CHANNEL NUMBER
The selected program’s channel
number.
7. CHANNEL LOGO
Displays the channel logo for the
selected program.
Page 45
48
Scheduled
to Record
Recording
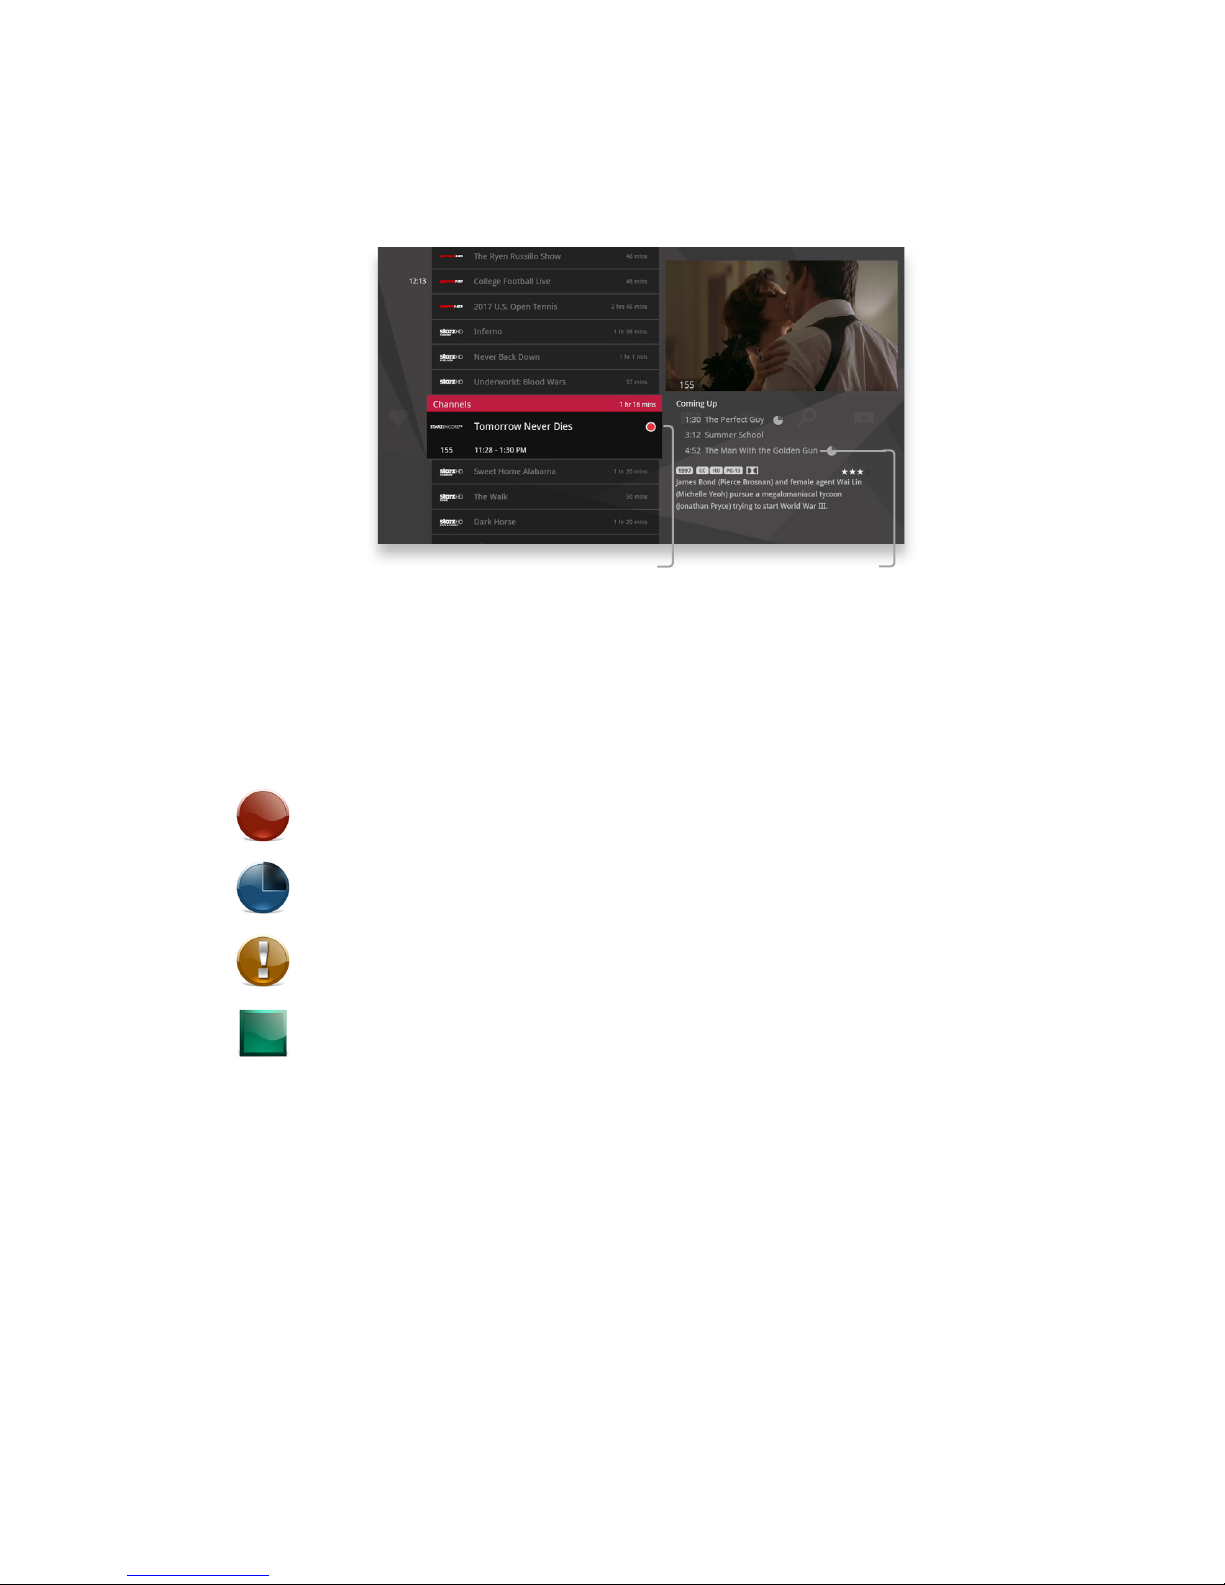
Recording Icons
Your media player includes the following recording icons for DVR status at a glance.
The following icons appear on focus cards and vertical cards throughout the main
menu:
The show is recording right now.
The show is scheduled to be recorded.
The show is recorded and may be deleted when space is needed for
newer shows.
The show will not delete and can only be deleted manually.
Page 46
49
Arrow right to view the Preview Panel
➡
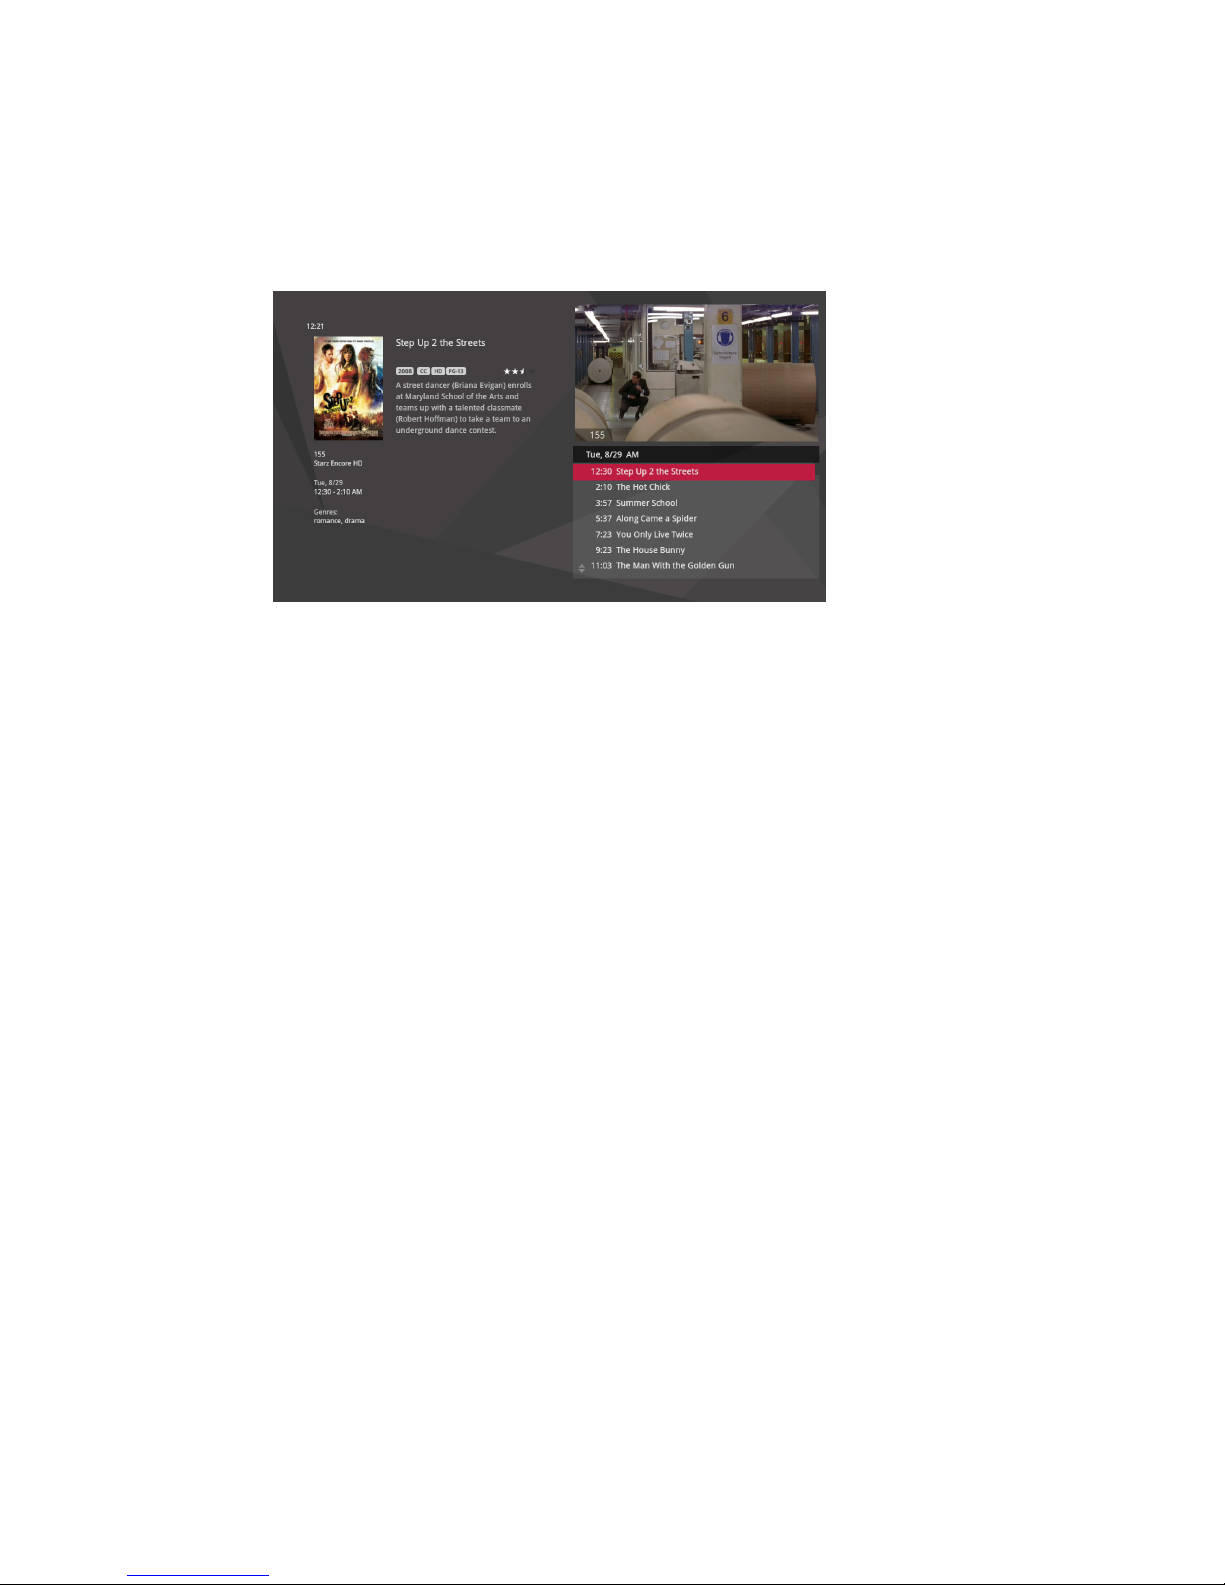
Preview Panel
Channels, like all horizontal categories that contain TV programming, have a
preview panel that displays upcoming programs for the channel in focus. Press the
right arrow button to select the panel, and then use the up and down arrows to
browse through up to two weeks of programming for that channel.
For a shortcut back to the present time, press the MENU button.
If you see a show you would like to record, press the RECORD or info button.
Page 47
50
65
4
3
2
1
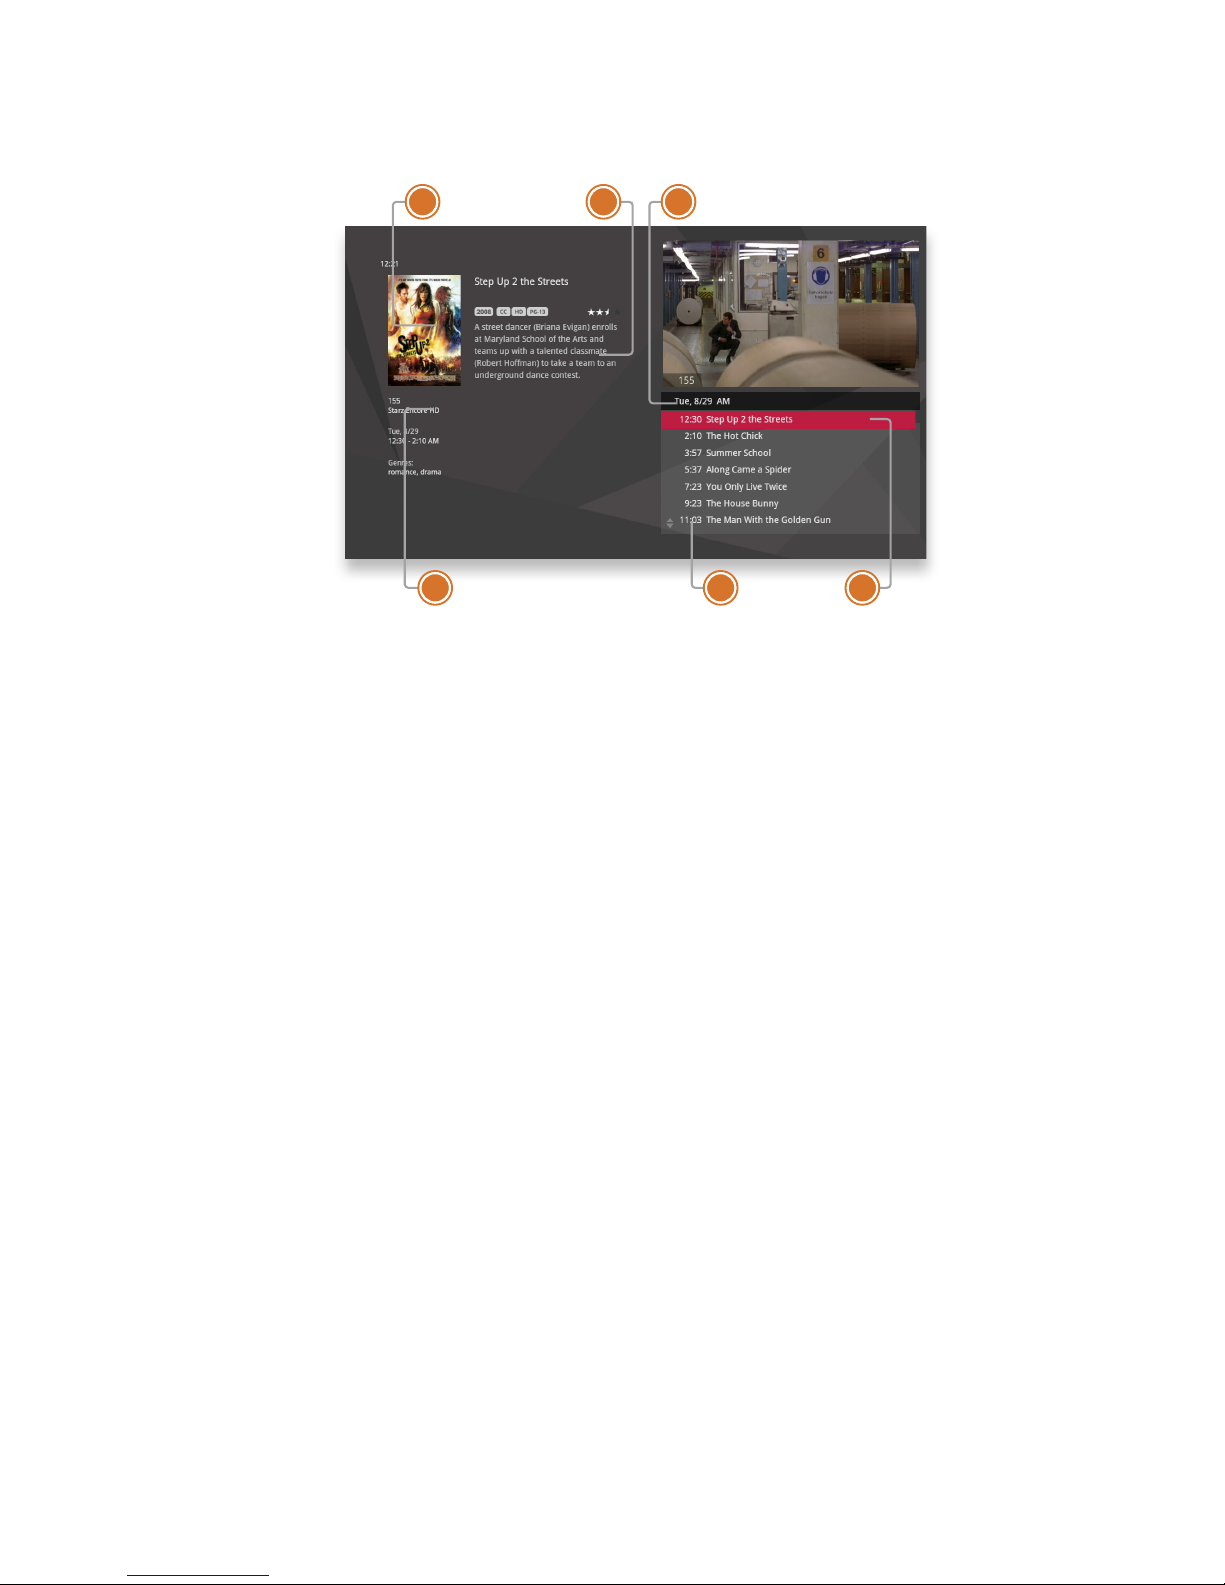
Preview Panel - Layout
1. POSTER ART
Poster of the selected show.
2. PROGRAM INFORMATION
Detailed show information, such
as title, rating, whether it’s a repeat,
cast and crew.
3. TIMESLOT
Indicates the day and time that the
preview panel is currently displaying.
4. CHANNEL INFORMATION
The current channel.
5. TIME
Displays the time corresponding to
each show.
6. SELECTED SHOW
The currently-selected show.
Pressing info on the selected show
brings up an action menu with
options.
Page 48
51
765
4
3
2
1
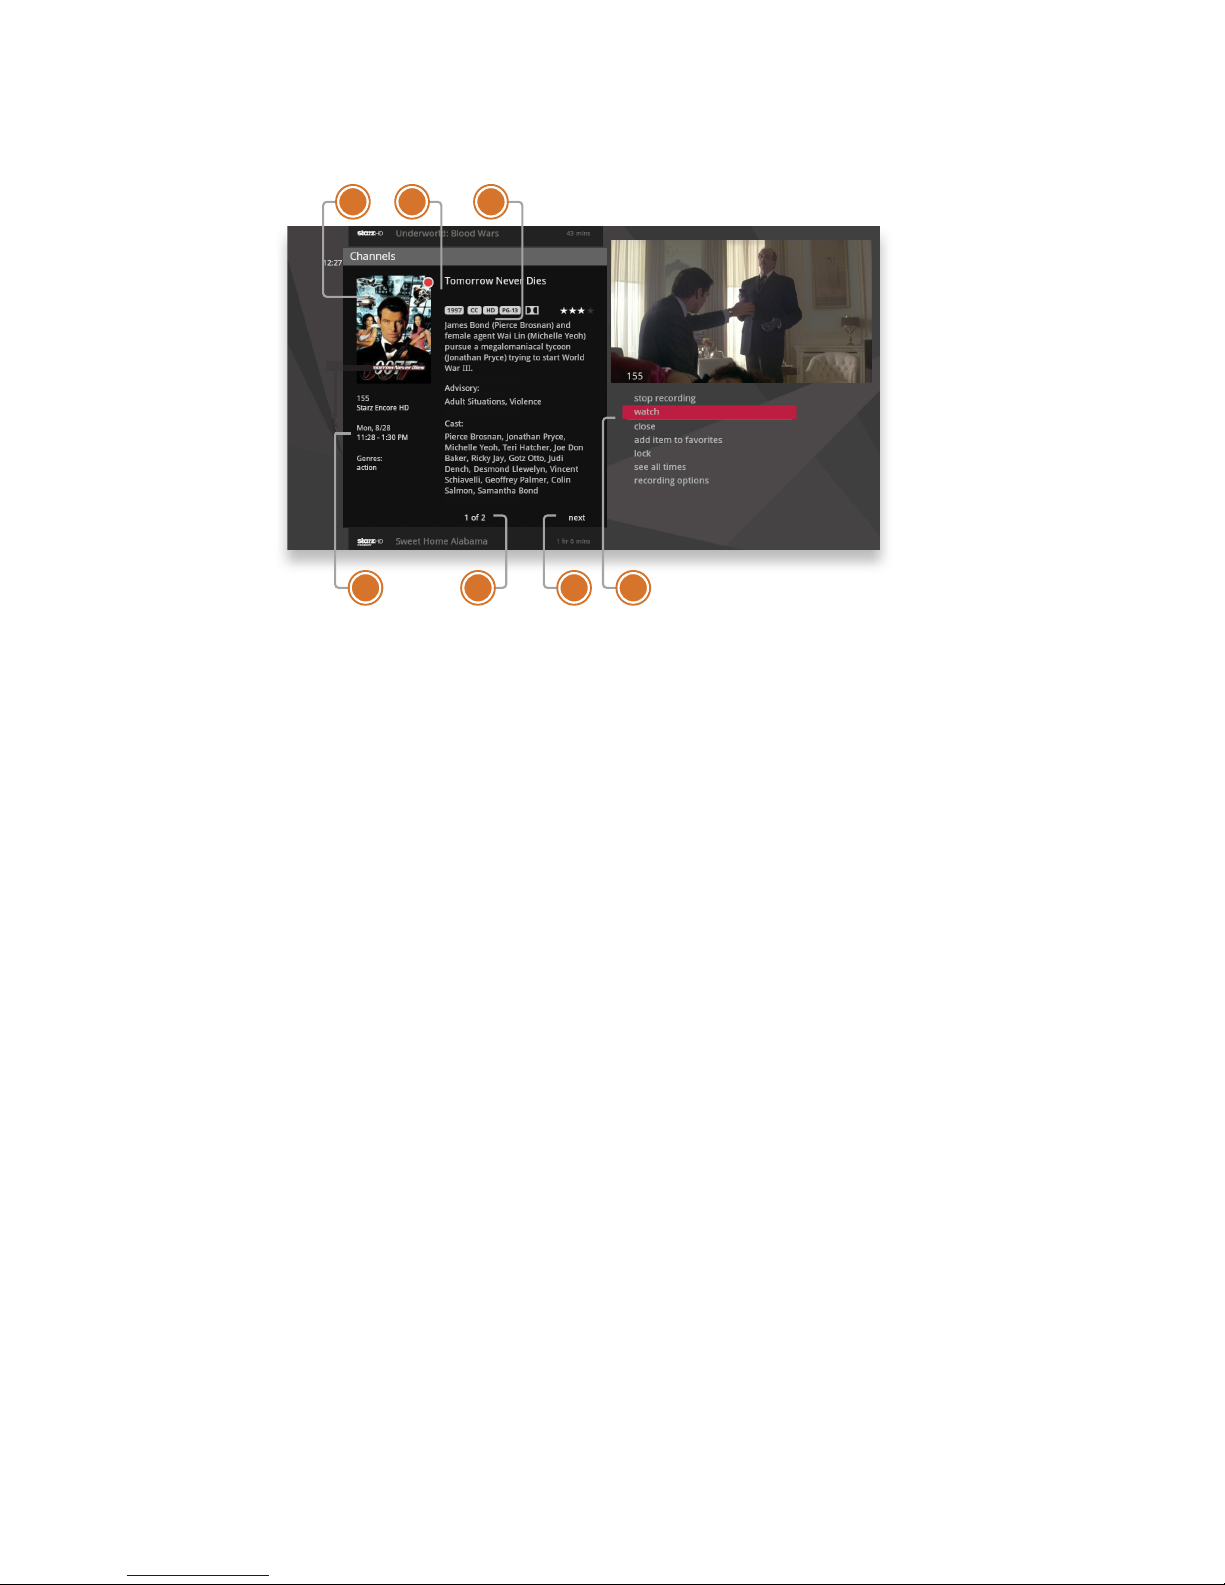
Channels Action Menu
Pressing info with a show in focus brings up an action menu with all of the options
for that show.
1. POSTER ART
Poster art for the show.
2. SHOW TITLE
The name of the program or item.
3. PROGRAM INFORMATION
Additional show information, such
as show title, repeat, cast and crew.
4. PROGRAM SCHEDULE
Time program begins and ends.
5. NOTE PAGES
Number of pages of program
information.
6. NEXT & BACK
Use the BACK and NEXT buttons
to page through the note.
7. OPTIONS
The list of options available for the
selected TV program.
Page 49
52
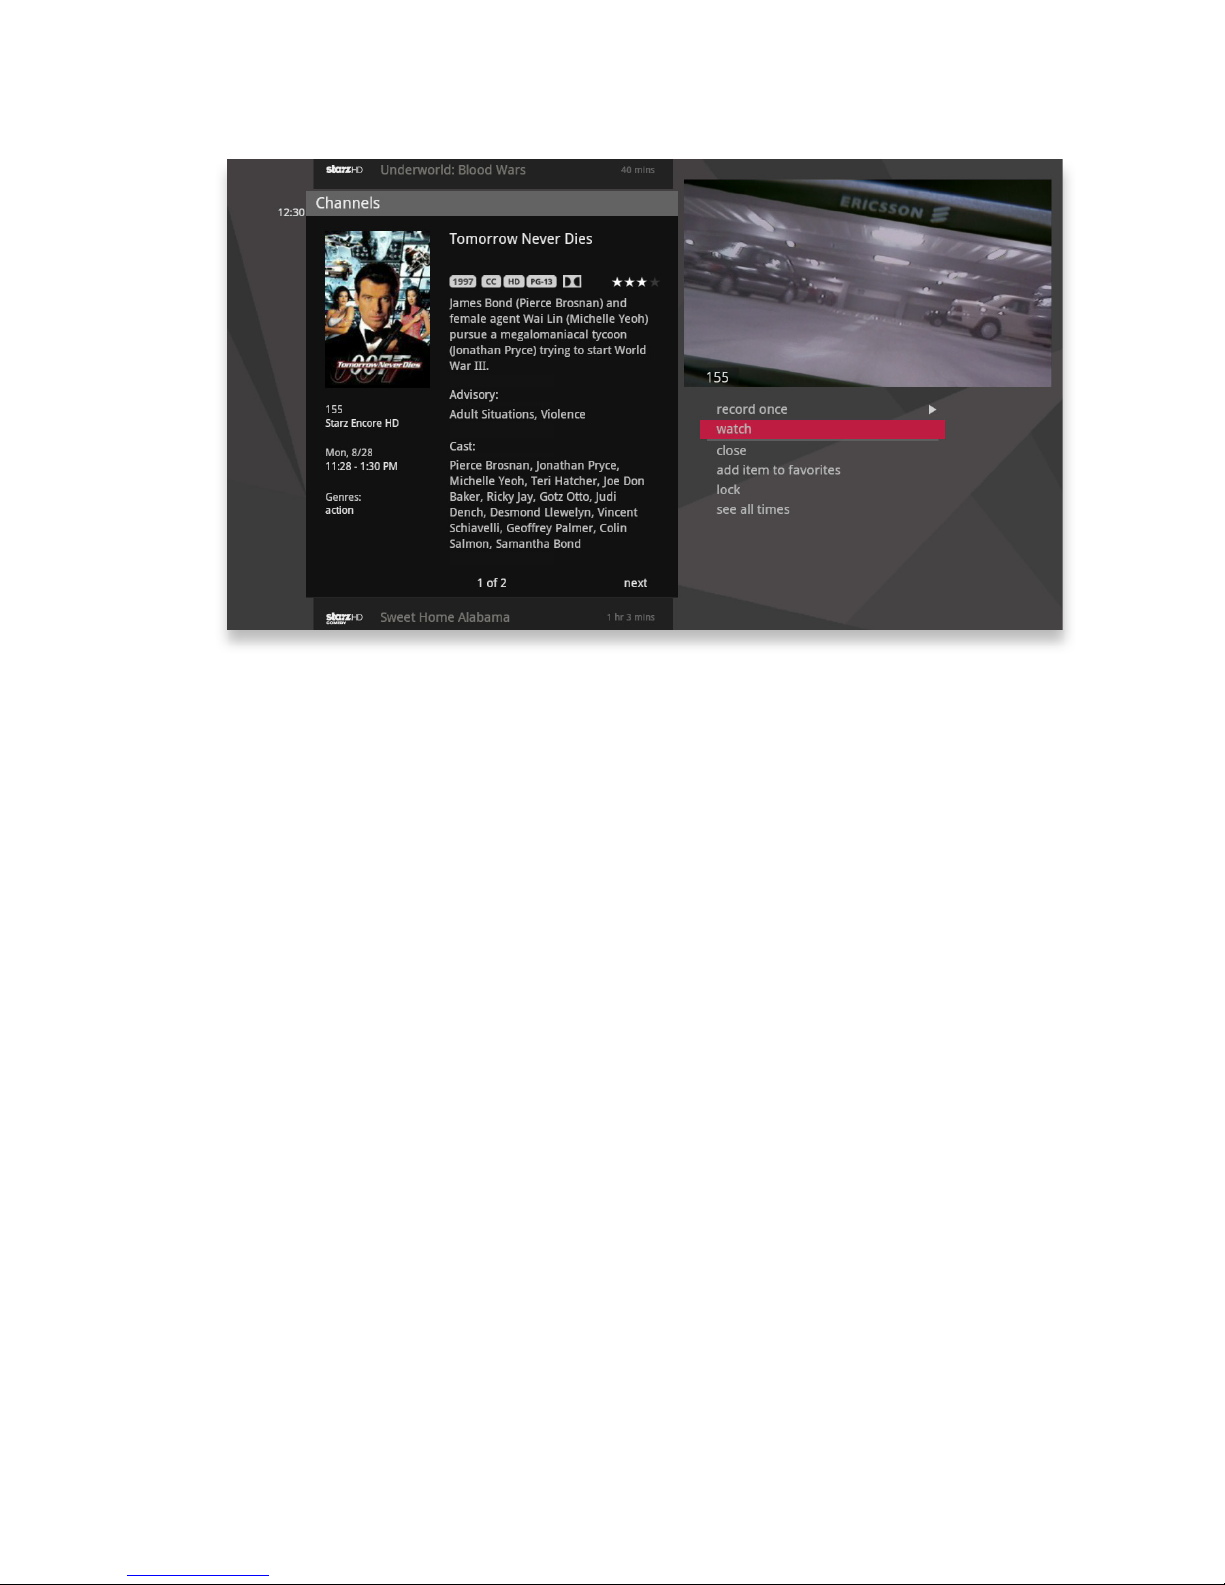
Action Menu Options
If the show you’re watching is currently airing, you’ll see the following
options in the action menu:
• record once - Records only the currently-airing episode of the program,
including the portion in the live TV buffer.
• watch - plays the program in full-screen TV.
• add item to favorites - Adds the channel to your Favorites category.
• lock - Activates Parental Controls for the selected channel.
• see all times - Presents a list of all of that program’s air dates/times.
• record series - Sets the entire series of that program to record. You’ll only see
this option if the show is part of a series.
Page 50

53
If the show will air in the future, you’ll see:
•
record once
•
add to favorites
•
lock
•
see all times
•
set reminder - Allows you to set a reminder that will appear before the show airs.
•
record series
If the show is currently recording, you’ll see:
•
stop recording - Stops recording the current show, but does not delete the
portion already recorded.
•
watch
•
add to favorites
•
see all times
•
recording options - Gives you a list of elements to alter about the way the
program will record.
If the show is scheduled to record, you’ll see:
•
recording options
•
cancel recording - Removes the program from the recording lineup.
•
add to favorites
•
lock
•
see all times
Page 51
54
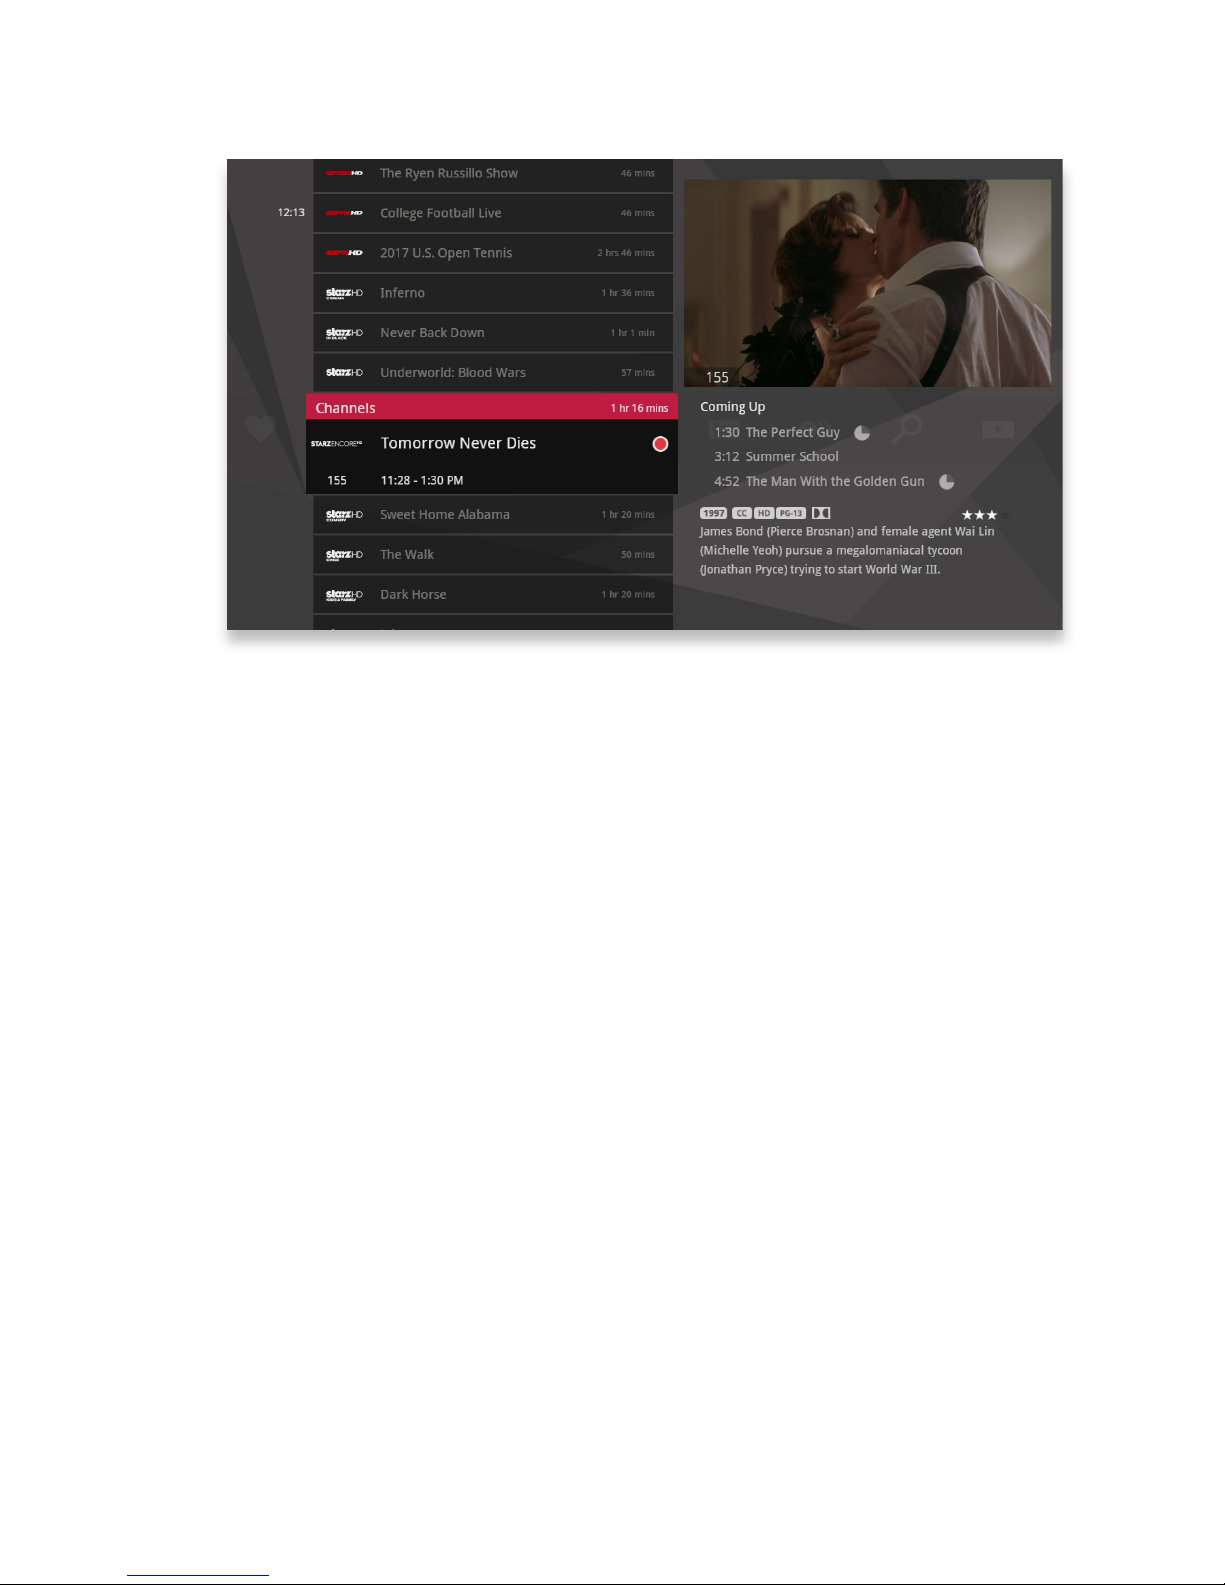
Recording a Show
The easiest way to record an individual show is to press the record button with that
show in center focus.
If you want to record a series, just press info and select record series from the
action menu.
Page 52
55
Options for Scheduling Recordings
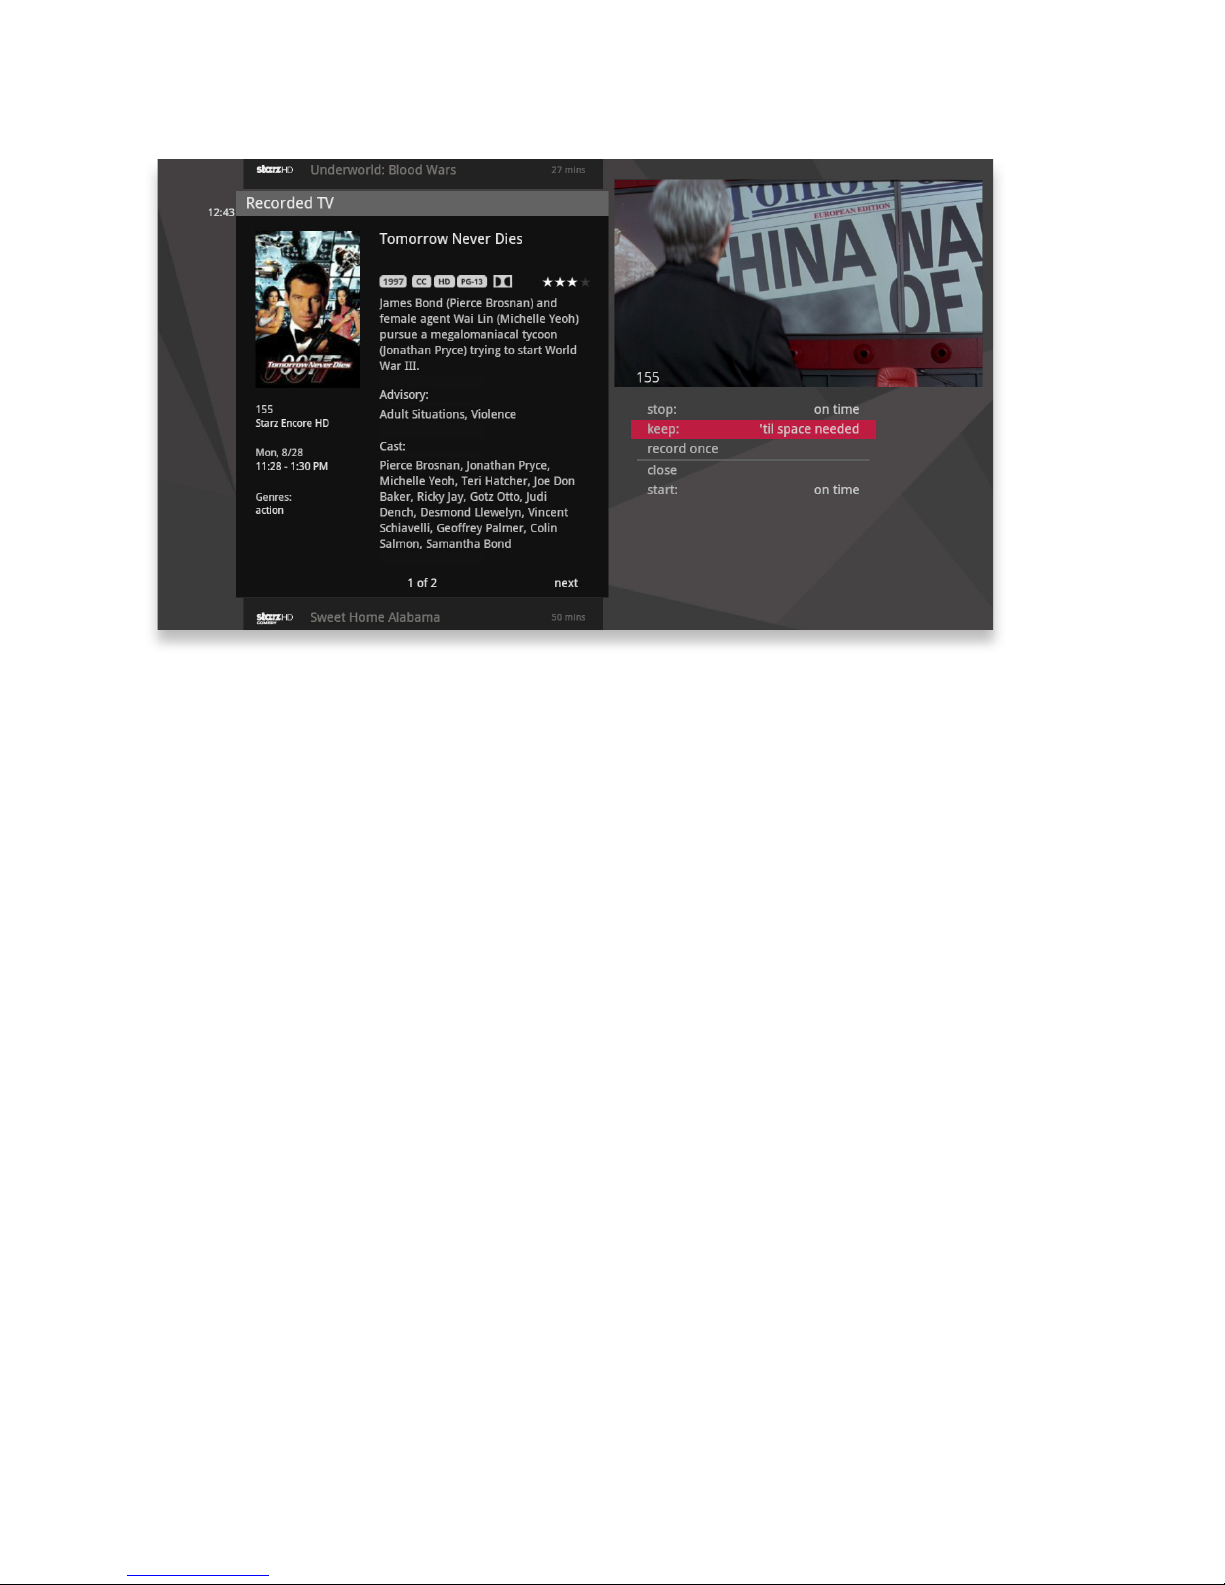
If you have record once or record series selected, you’ll see an arrow to the right that
allows you to access recording options. You can also access recording options from
the action menu of a show that’s currently recording or scheduled to record.
Scheduled to Record
Recording options for a single episode scheduled to record:
• keep - Lets you decide when the show will be deleted.
• get series - Sets the entire series to record.
• stop - Allows you to set the recording to stop early or late.
• start - Allows you to set the recording to start early or late.
Recording options for a series scheduled to record:
• keep
• series options - Allows you to set recording preferences for the entire series.
• stop
• start
Page 53
56
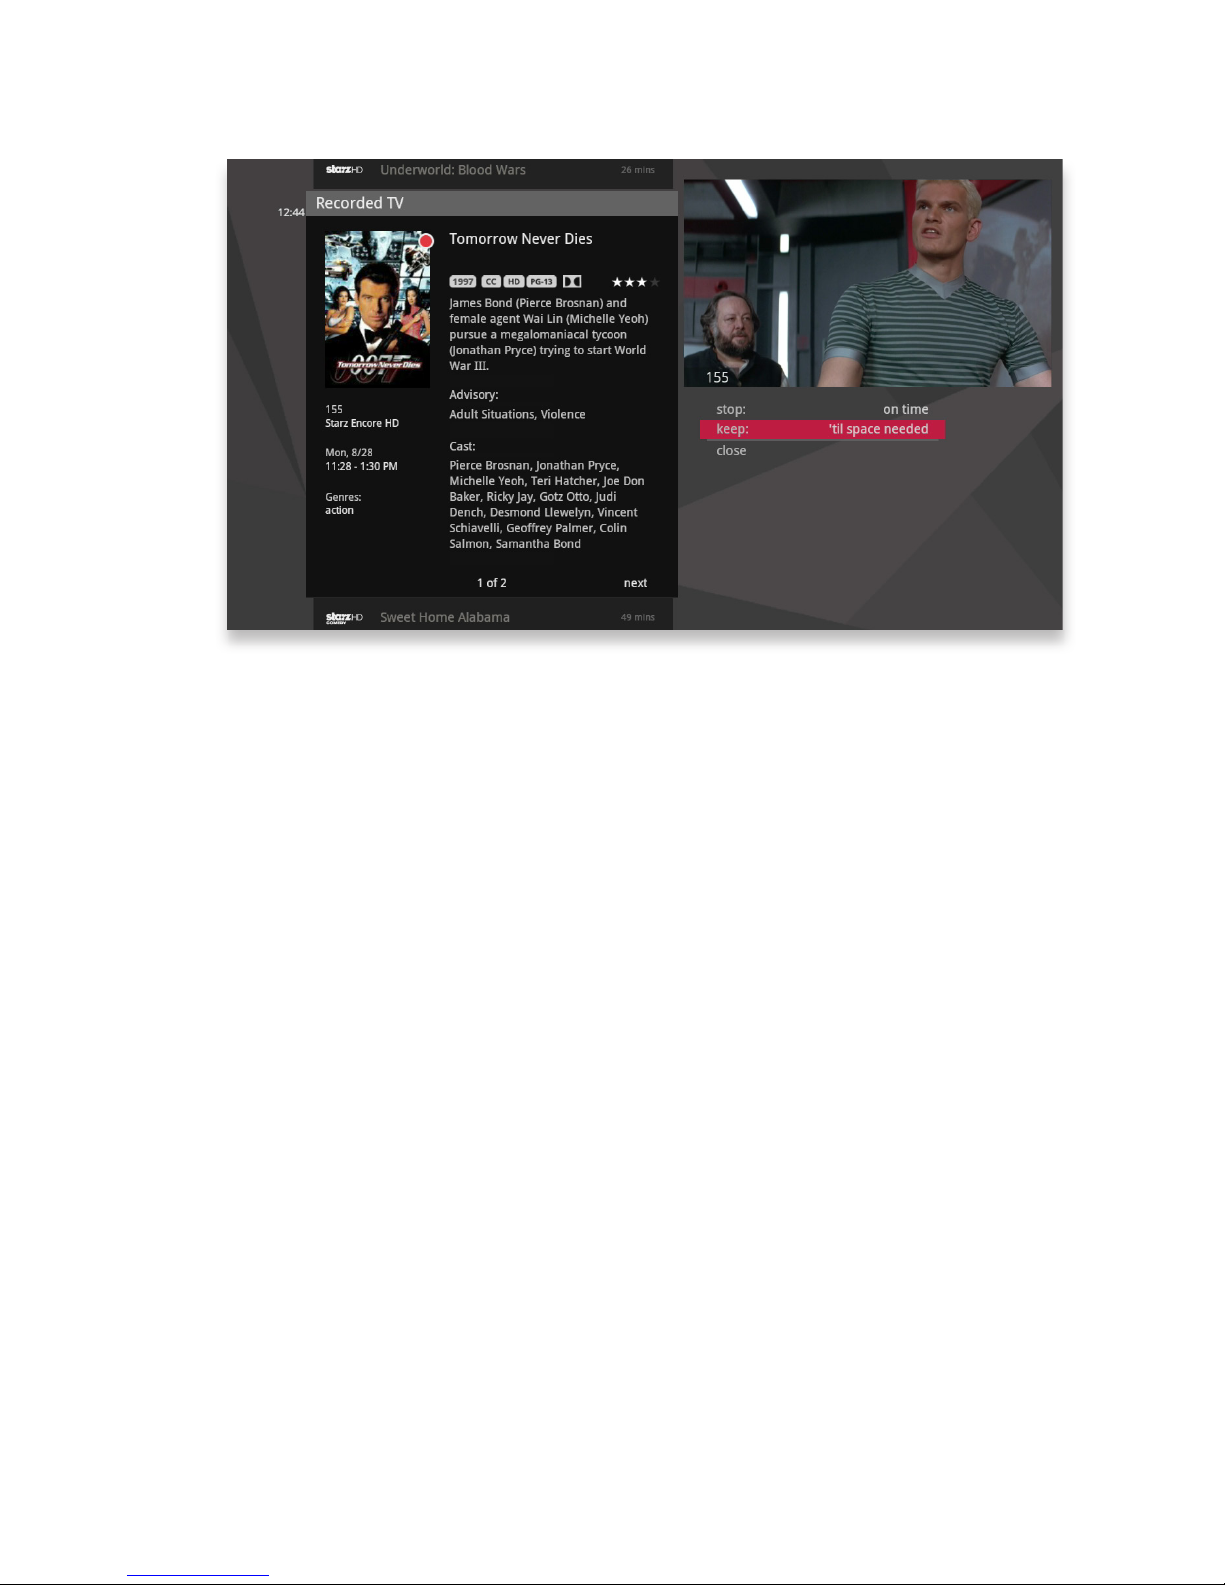
Currently Recording
Recording options for a single episode currently recording:
• keep
• get series
• stop
Recording options for a series currently recording:
• keep
• series options
• stop
Series Options
• keep
• episode limit - Determines how many episodes will be stored automatically.
• accept - Determines whether you’ll accept first-run only or repeat episodes.
• timeslots - Lets you record only epsiodes airing at a certain timeslot.
• priority - Sets the priority order of your series recordings.
• cancel series - Cancels the scheduled recordings.
• start
• stop
Page 54
57
Conict Management
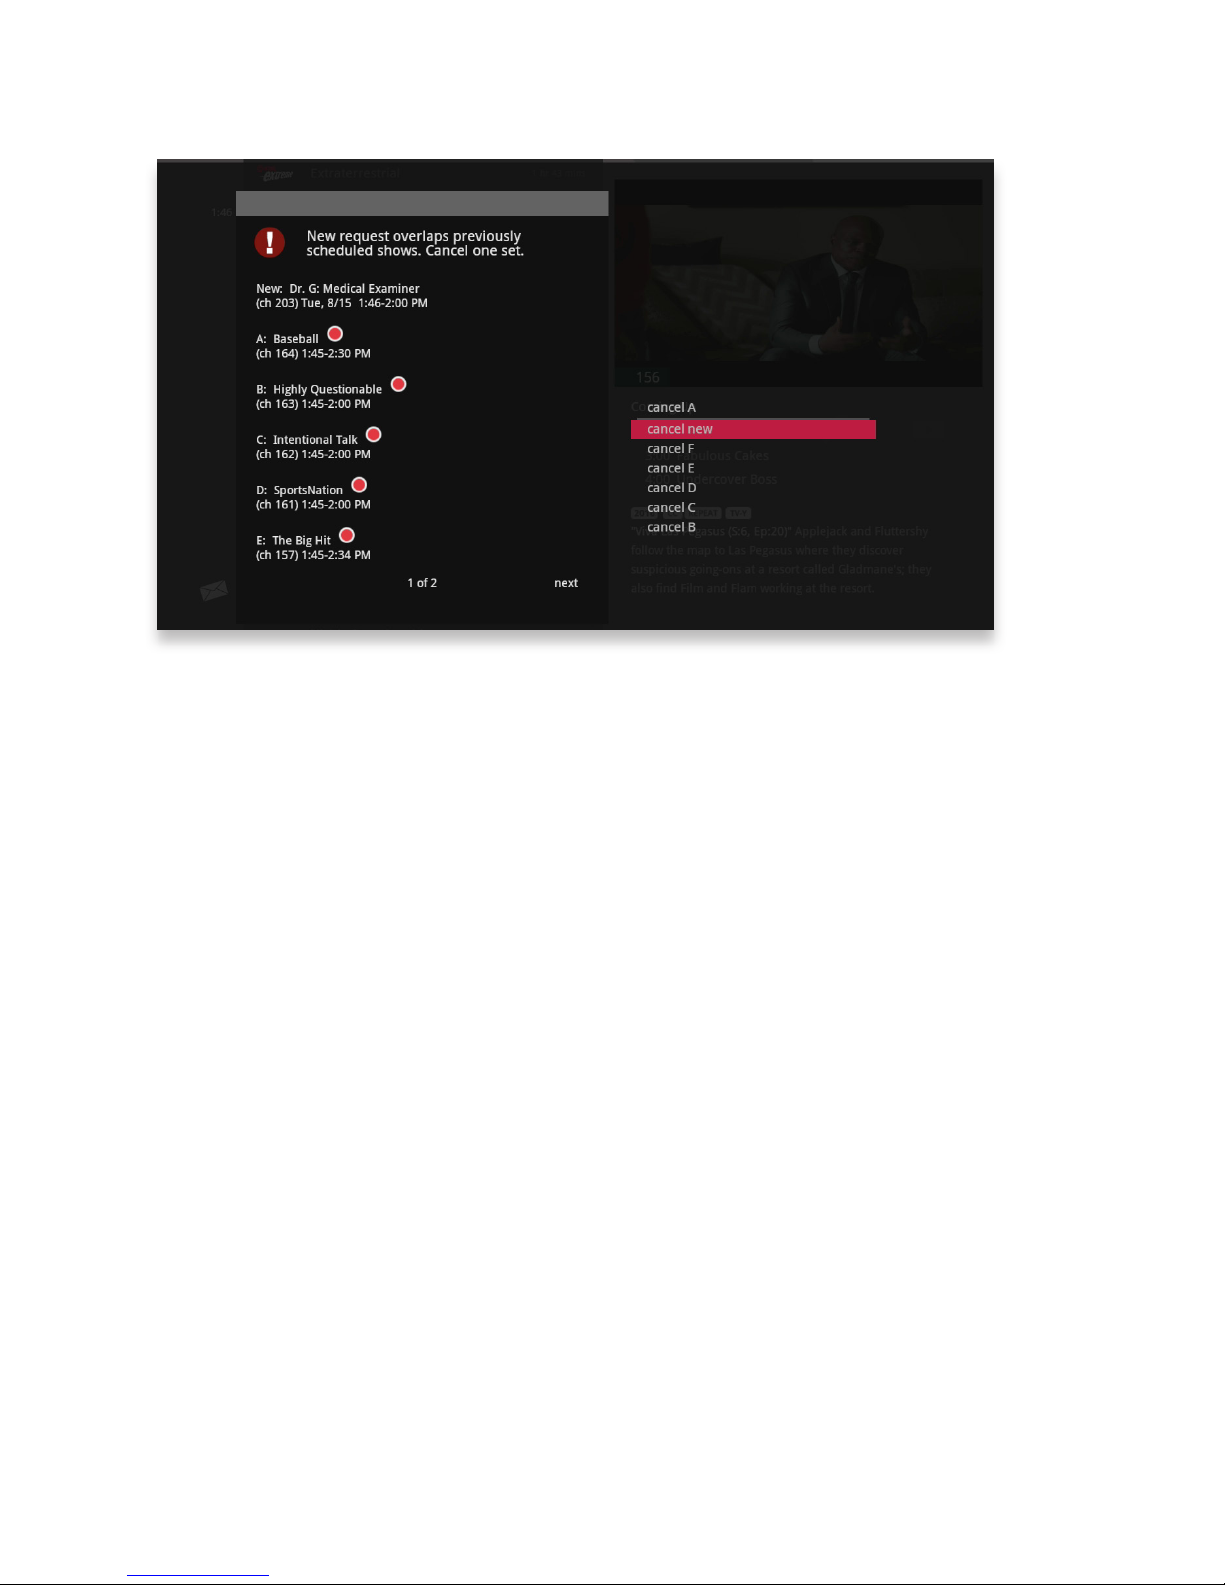
Your media gateway comes with six tuners, which means that you can record or
watch up to six shows at once. In the event there is a tuner conflict, such as when
you have six recordings scheduled and are watching another live show, your DVR
will bring up an action menu that outlines your options and lets you make a choice.
Space Management
Shows are automatically stored on your media gateway until more room is needed.
You can protect shows from deletion from the Recorded TV category; see the
following chapter for details.
When you schedule a new show to record, your media player will check to make
sure that your media gateway hard drive has enough room.
If your hard drive does not have enough room for the new recording, you’ll receive
a message informing you that when the new show airs, some recordings may need
to be deleted in order to make room for the new show.
If all of your current recordings are protected against deletion, you’ll get a message
that your show may not be recorded.
Page 55
58
Change Time Slot
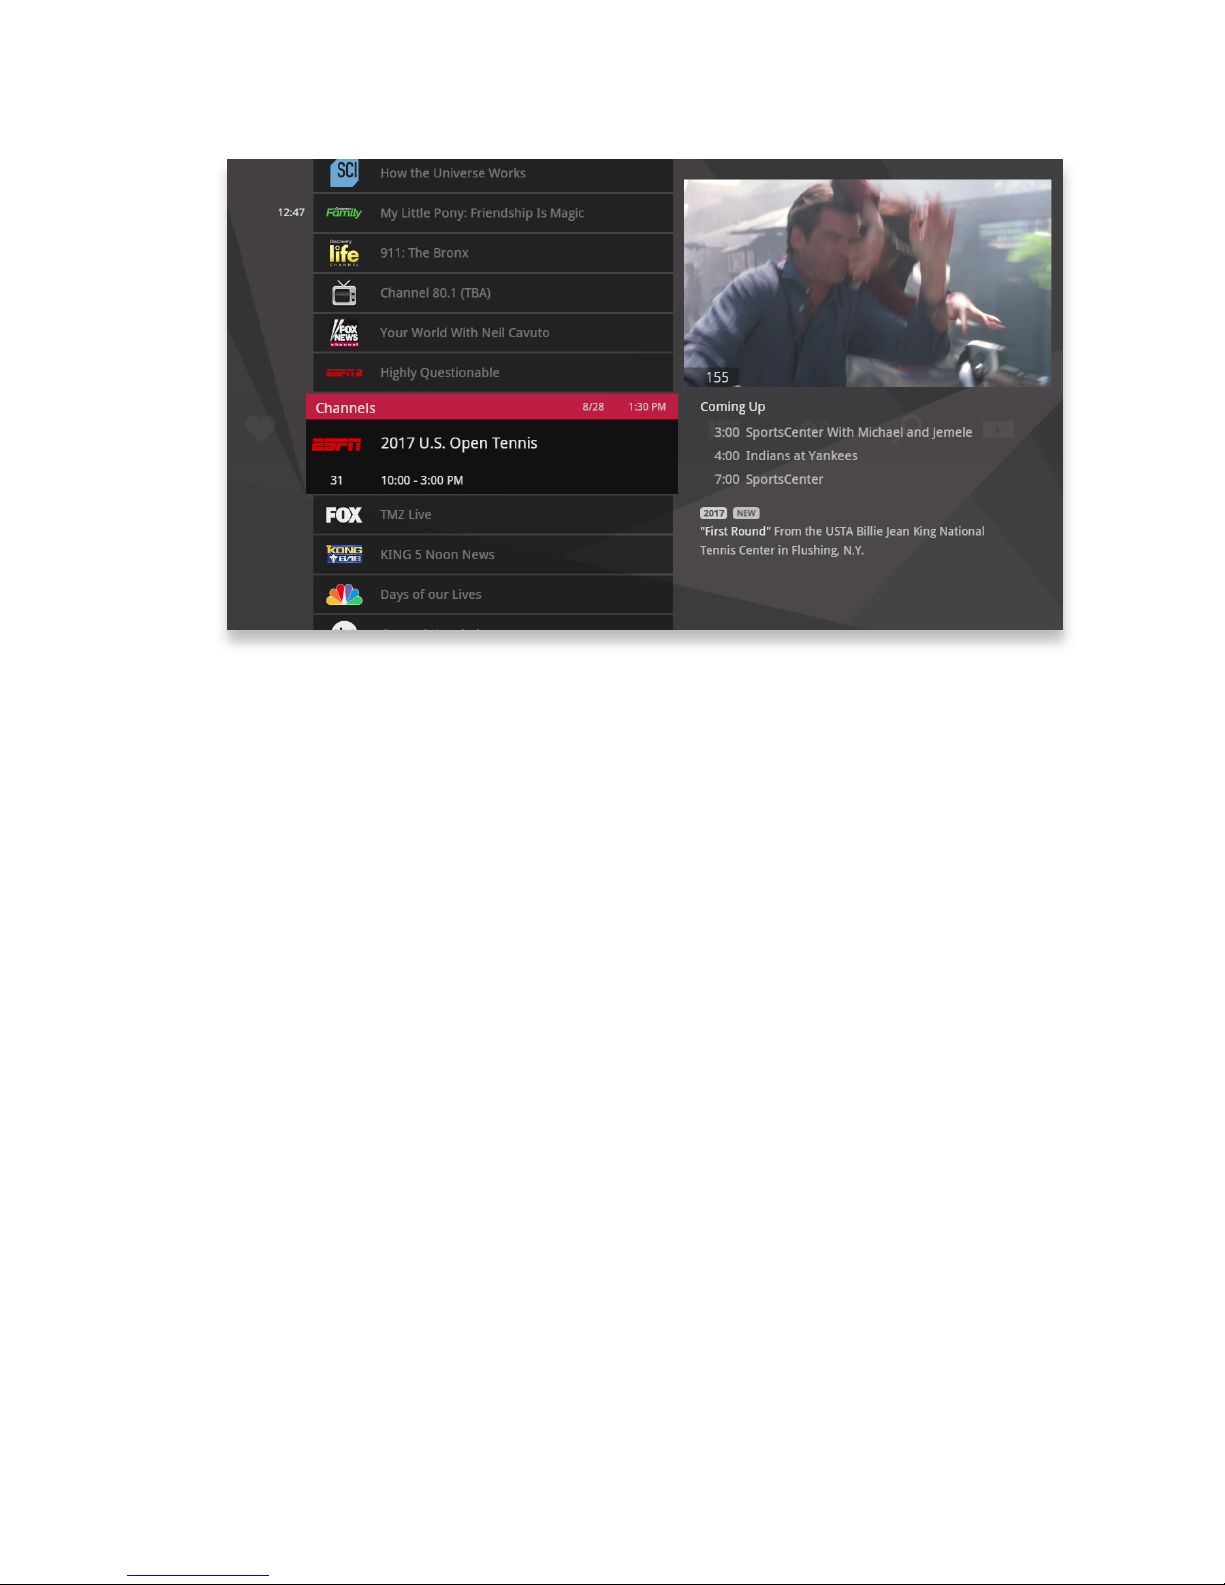
If you want to compare what’s on in the future across multiple channels, start from
TV Channels, press the NEXT button, and the entire vertical list will show the next
half hour’s programming.
You can use the NEXT button to view up to two weeks of upcoming shows. The
BACK button will take you one half hour earlier. The SKIP button advances the
category forward 24 hours, and the REPLAY button goes back 24 hours. If you
browse to another TV category, like a filter or TV Favorites, the time slot will be
maintained. To return to the current time, just press the MENU button.
You can also use the Change Time Slot card to move the category to a future time
slot. With that card selected, press the right arrow. Use the up and down arrows
to select a time slot, and press OK. The vertical band will now display the time slot
you selected.
Page 56
59
Grid Guide
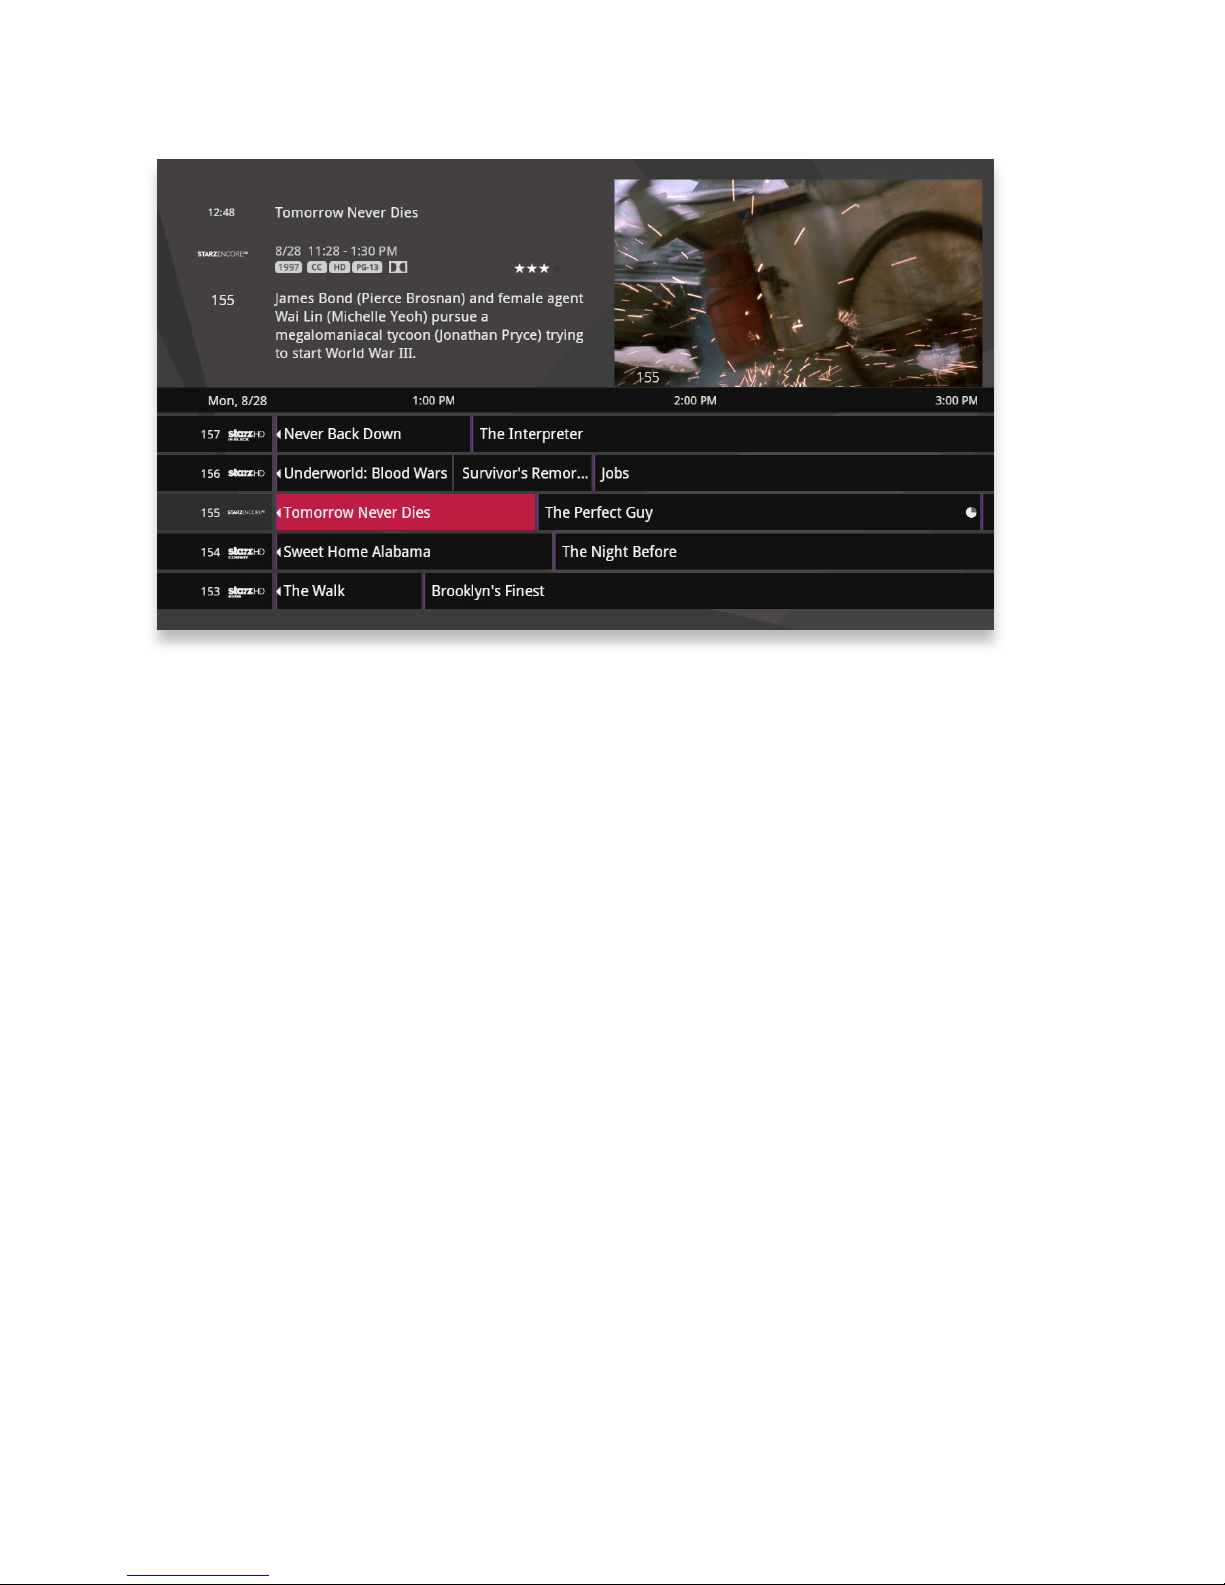
The media player offers an optional Grid Guide view for people who prefer to find
programming in that layout. You’ll see the Grid Guide card below focus when you
first enter TV Channels. Bring it into focus, and press OK.
The Grid Guide works similarly to the rest of the main menu:
• Arrow buttons navigate the guide.
• info brings up a list of options.
• SKIP will cycle forward 24 hours; REPLAY will cycle back 24 hours.
• BACK and NEXT will move through the guide in 30 minute increments.
• ZOOM will alternate between the guide and full screen TV.
• If you are looking at the present time in the guide, MENU will return you to the
main menu.
• Black shows indicate currently-airing programs; gray shows will air in the future.
• OK tunes to the show if it’s currently airing; brings up an action menu if it’s on in
the future.
Page 57
60
Grid Guide Genres
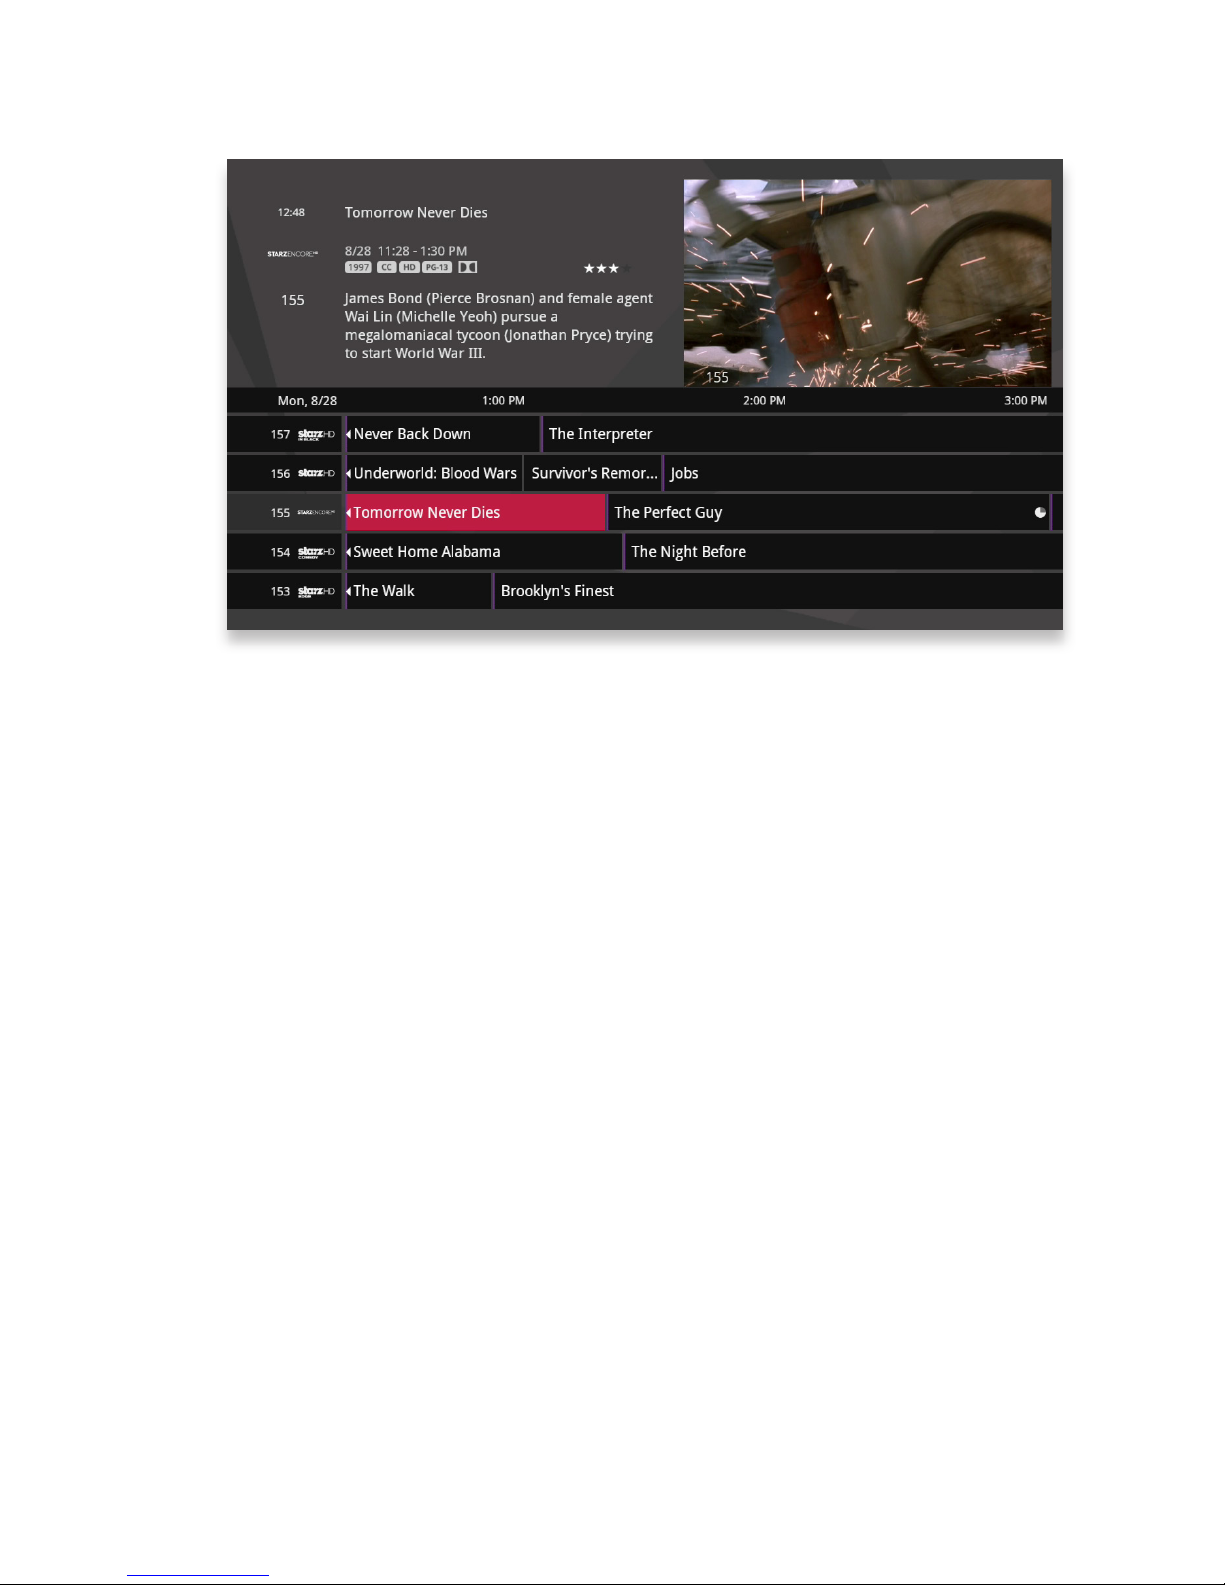
The Grid Guide has four different types of programming that are easy to spot by color:
• Movies - purple
• Sports - green
• Children’s - orange
• News - blue
Page 58
61
DVS
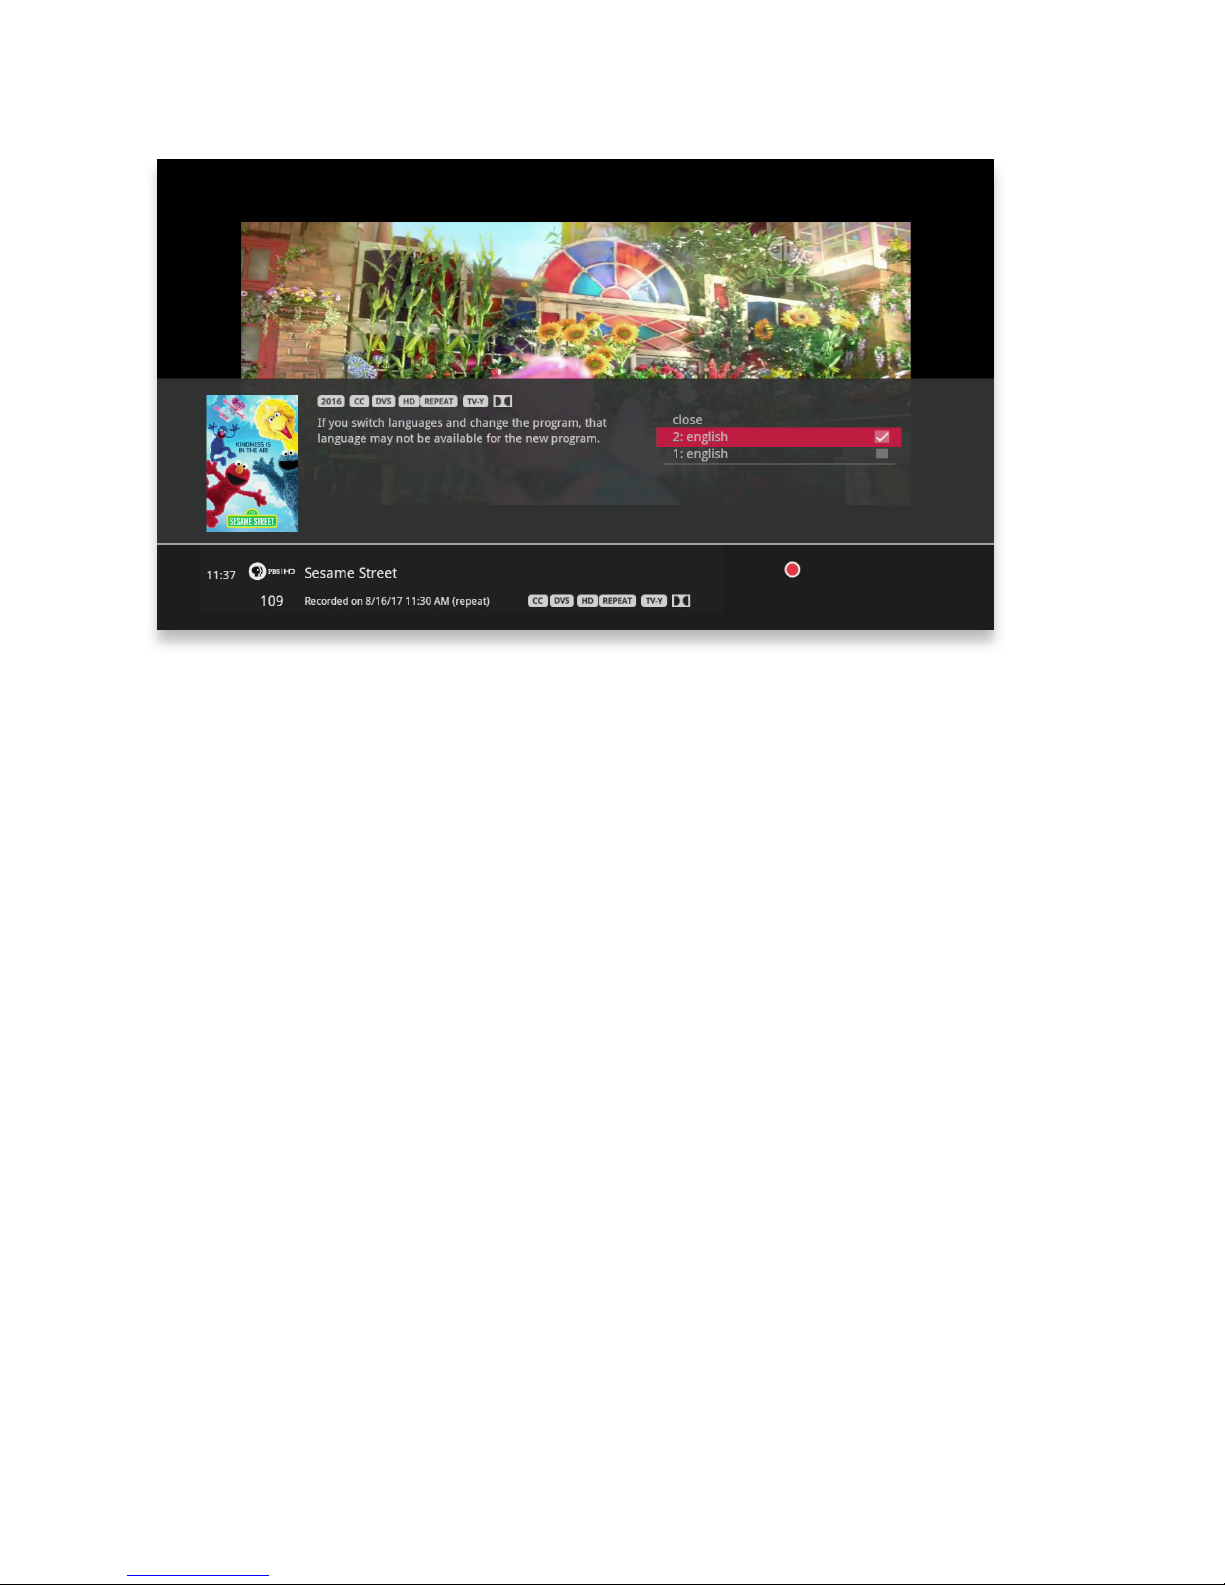
Descriptive Video Service (DVS) provides narrated descriptions of the key visual
elements of programs to audiences with vision impairments without interfering with
the audio dialog. To turn on DVS, while watching a live or recorded show with DVS:
1. Press info (on your remote control).
2. In the action menu, select audio language.
3. Select 2: english and press OK.
Page 59

62
Search
Sometimes you know the title. Sometimes you just know what
night it’s on. Sometimes you’re in the mood for a certain type
of show. The media player has you covered to help you find
what you’re looking for.
Page 60
64
Intro to Search
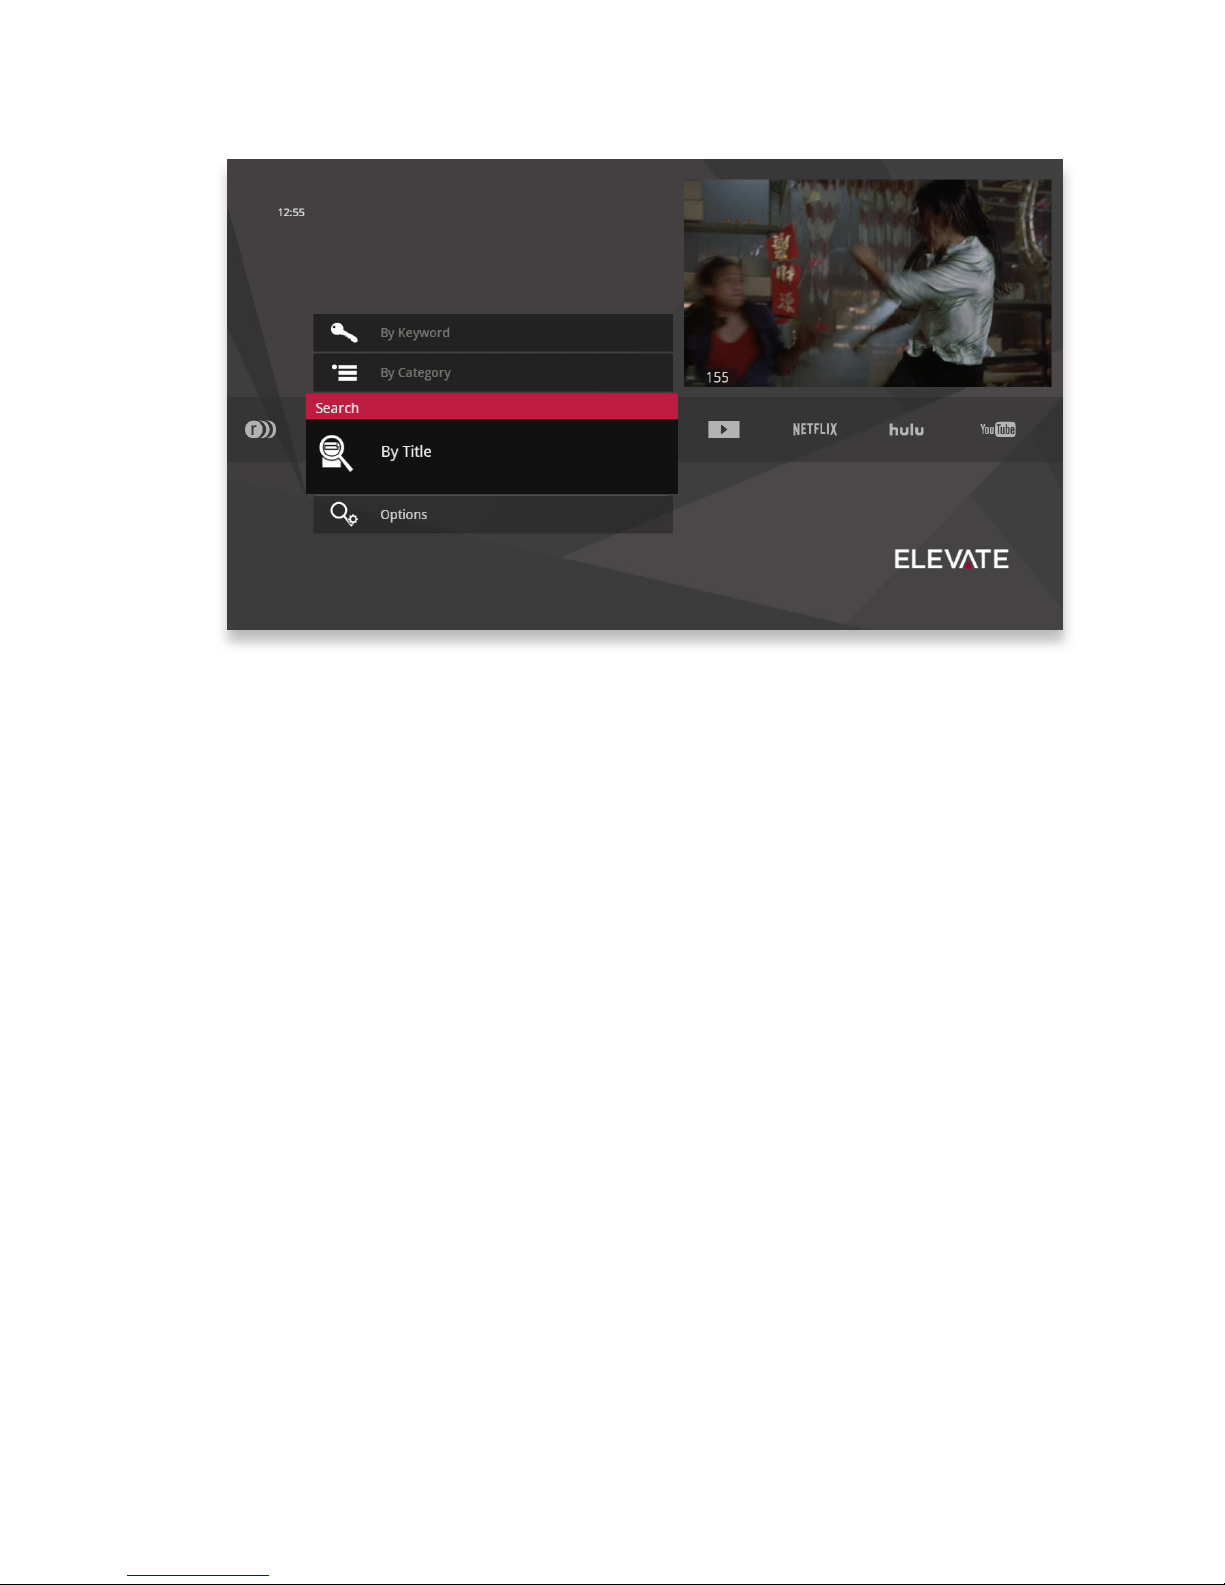
The Search category in the main menu contains three different ways to search for
programming: By Title, By Keyword, and By Category.
When you use any of these three options to search for a show, the results will
return shows that are currently airing, airing sometime in the future, On Demand
programming, and shows that you have recorded.
You’ll be able to tell what type of show you’re looking at by the color of the card:
• Current shows and VOD shows have a black background
• Future shows are blue-gray
• Recorded shows are yellow
• PPV shows are teal-blue
Page 61
65
87
6
5
4
2 3
1
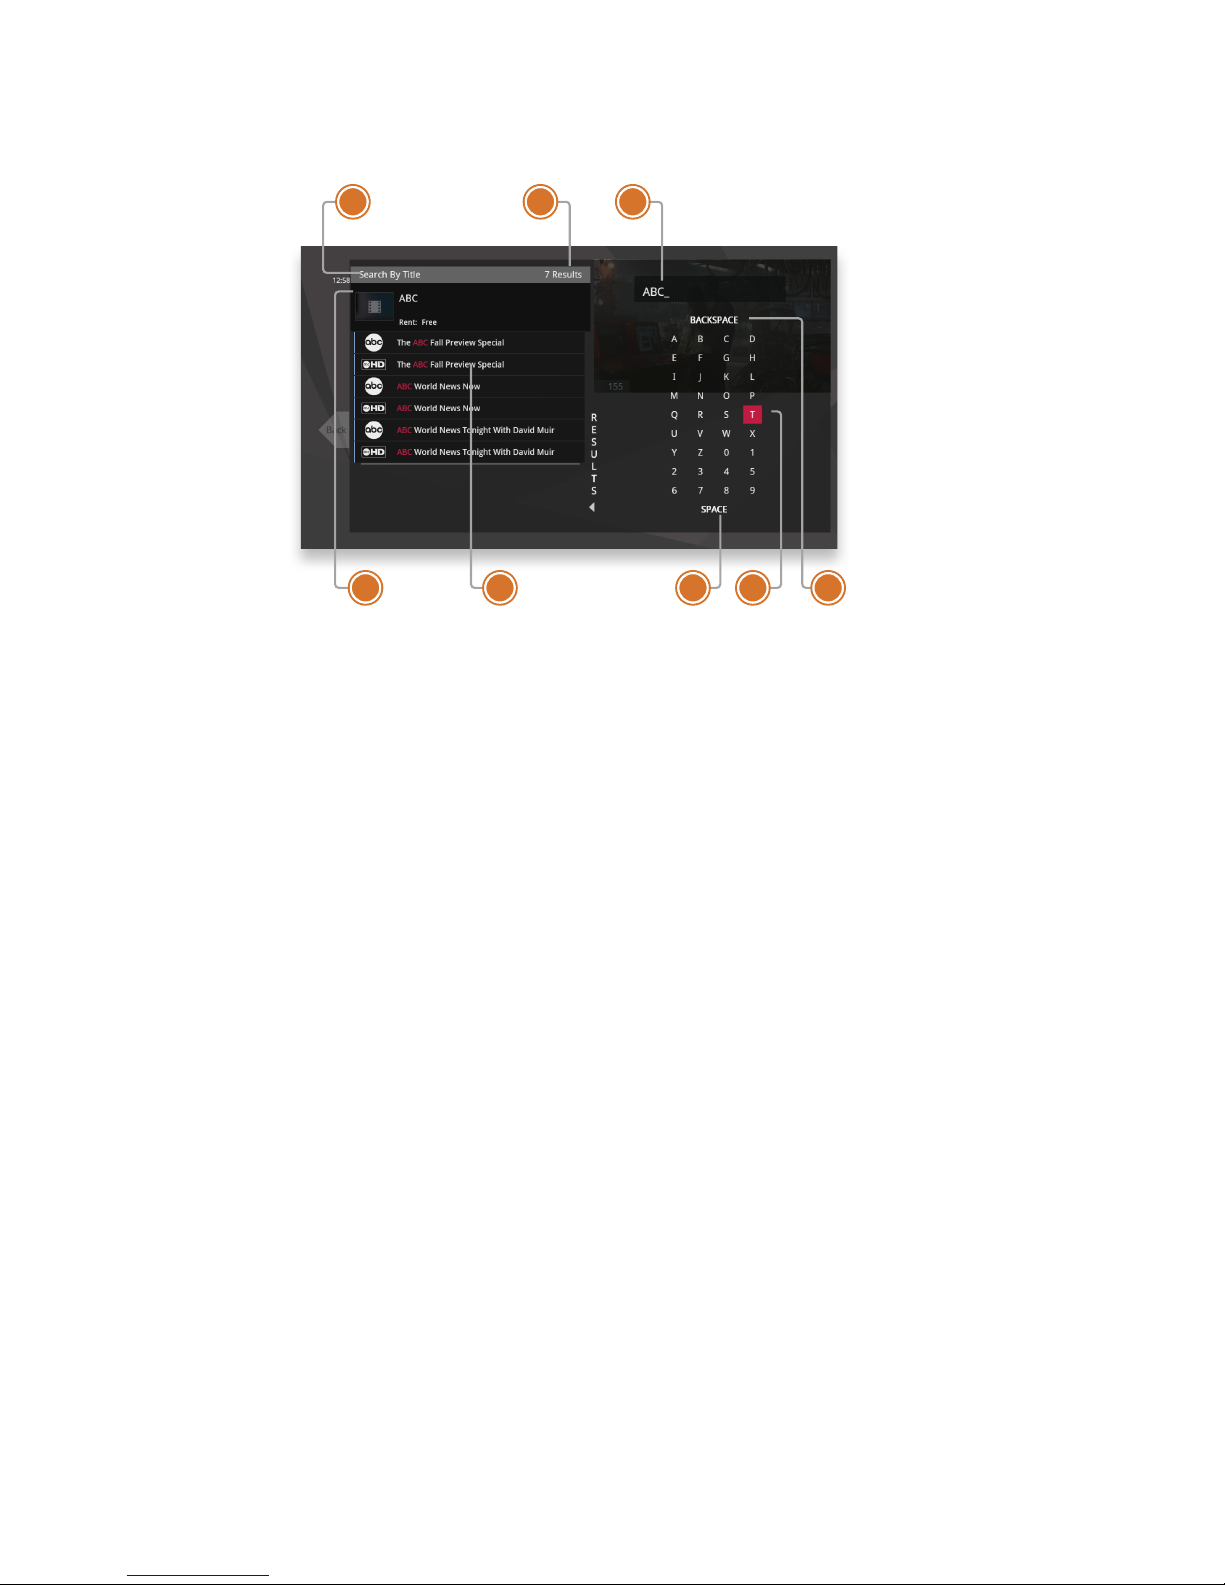
Find By Title
When you select Find By Title, a screen opens where you can enter your title and
browse results. Use the arrow buttons to navigate the onscreen keyboard; to enter
a letter, press OK with that letter highlighted. To browse the list, press the left arrow
until that panel is in focus.
1. SEARCH TYPE
This bar describes the type of
search you’re doing.
2. SEARCH RESULTS
Number of search results. As you
enter characters on the right, the
list on the left will filter down to only
display shows that match your entry.
3. SEARCH BOX
As you select characters, the
characters are entered in the search
box.
4. FOCUS
The details for the channel and show
are displayed in the focus card.
5. VERTICAL LIST
The vertical list fills with shows that
match your criteria. Pressing the up
or down arrows brings these shows
into focus.
6. SPACE
Use a space to separate words in
your search entry.
7. SELECTOR
To enter a letter, move the selector
to it, and press OK; each character
is entered into the search box. You
can use texting-style letter entry as
a shortcut.
8. BACKSPACE
Removes a character from the
search box.
Page 62
66
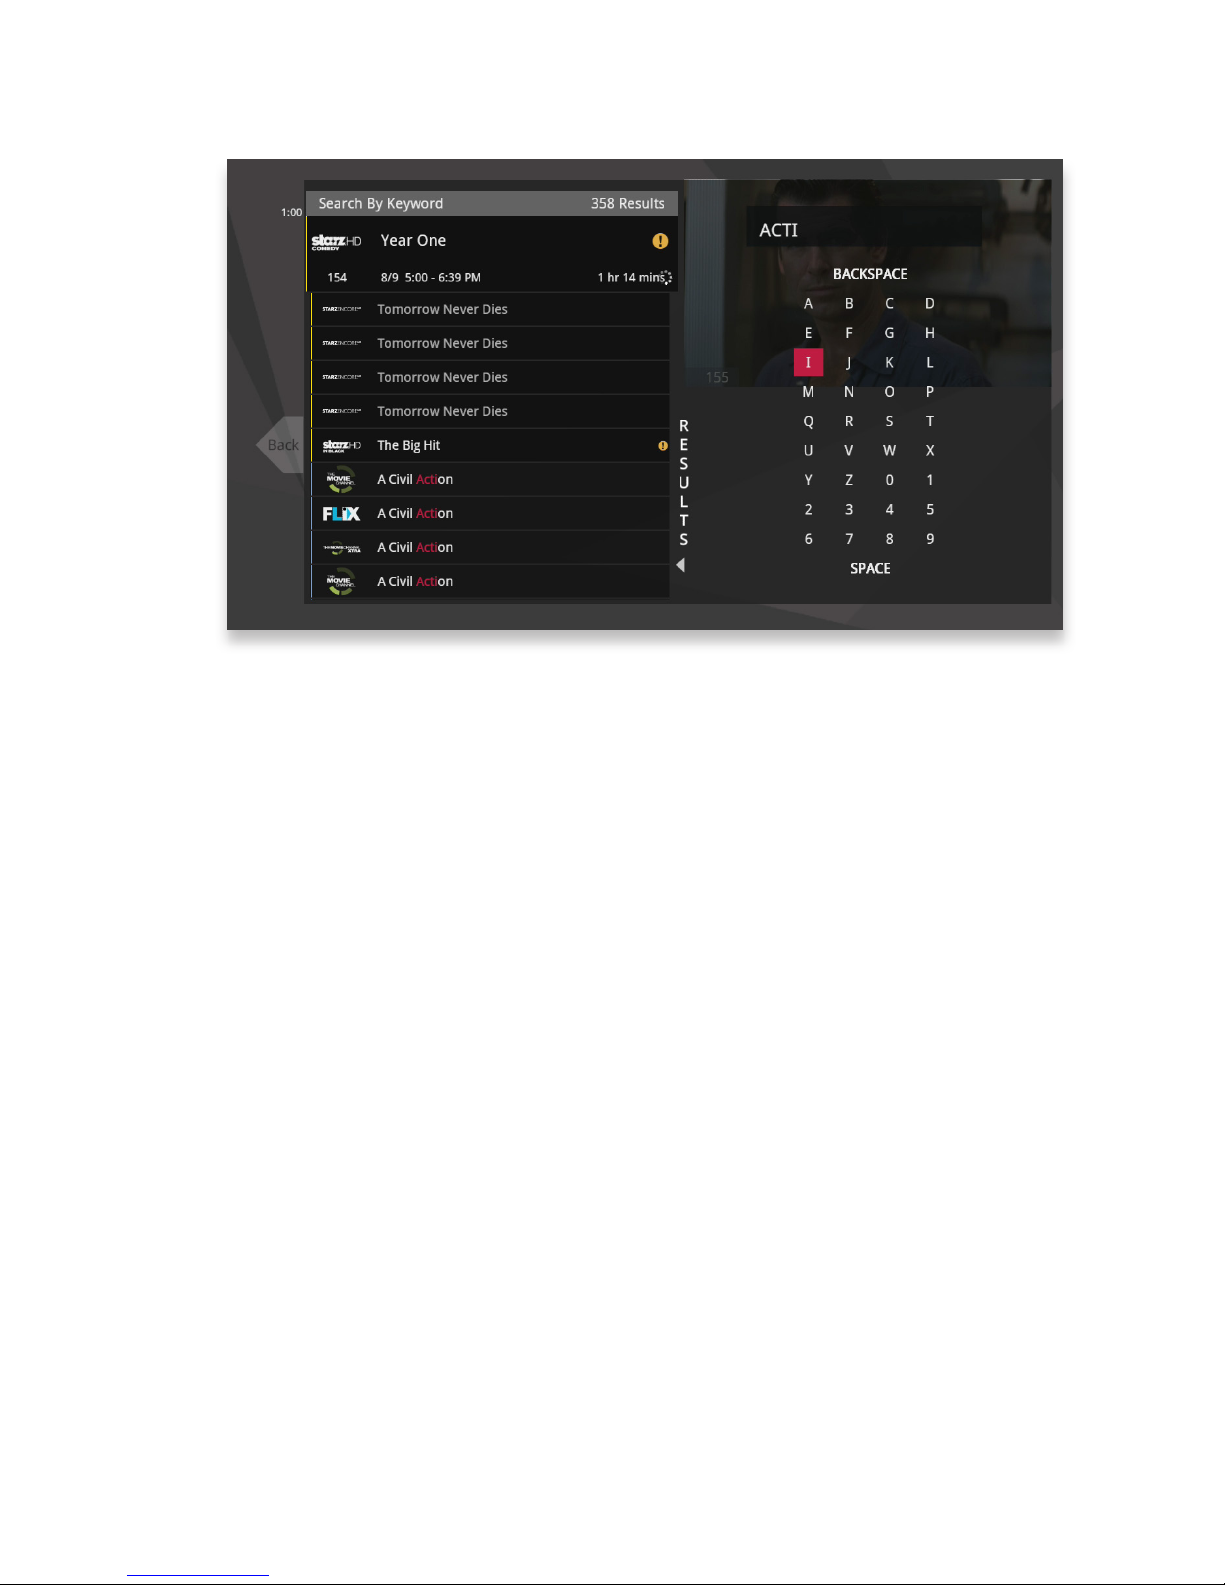
Find By Keyword
A Keyword search lets you search for any word contained in a show’s program
information. For example, if you know the actor in a show, but can’t remember the
title, you can search on the actor’s name, and all programs featuring that actor will
appear in the list.
To search by keyword, enter each letter by selecting it and pressing OK. You’ll see
results on the left filter down with each letter you enter. Press the left arrow and use
the up and down arrows to scroll through them.
SEARCHING TIP
Did you know that you can use your remote control keypad like a mobile phone
keypad?
For example, by pressing 222 on your remote control you will enter the letter C. By
pressing 33, you will enter the letter E.
• CLEAR - Clears the entire entry
• 0 - Enters a space
• 1 - Enters a backspace
Page 63
67
2
1
5
34
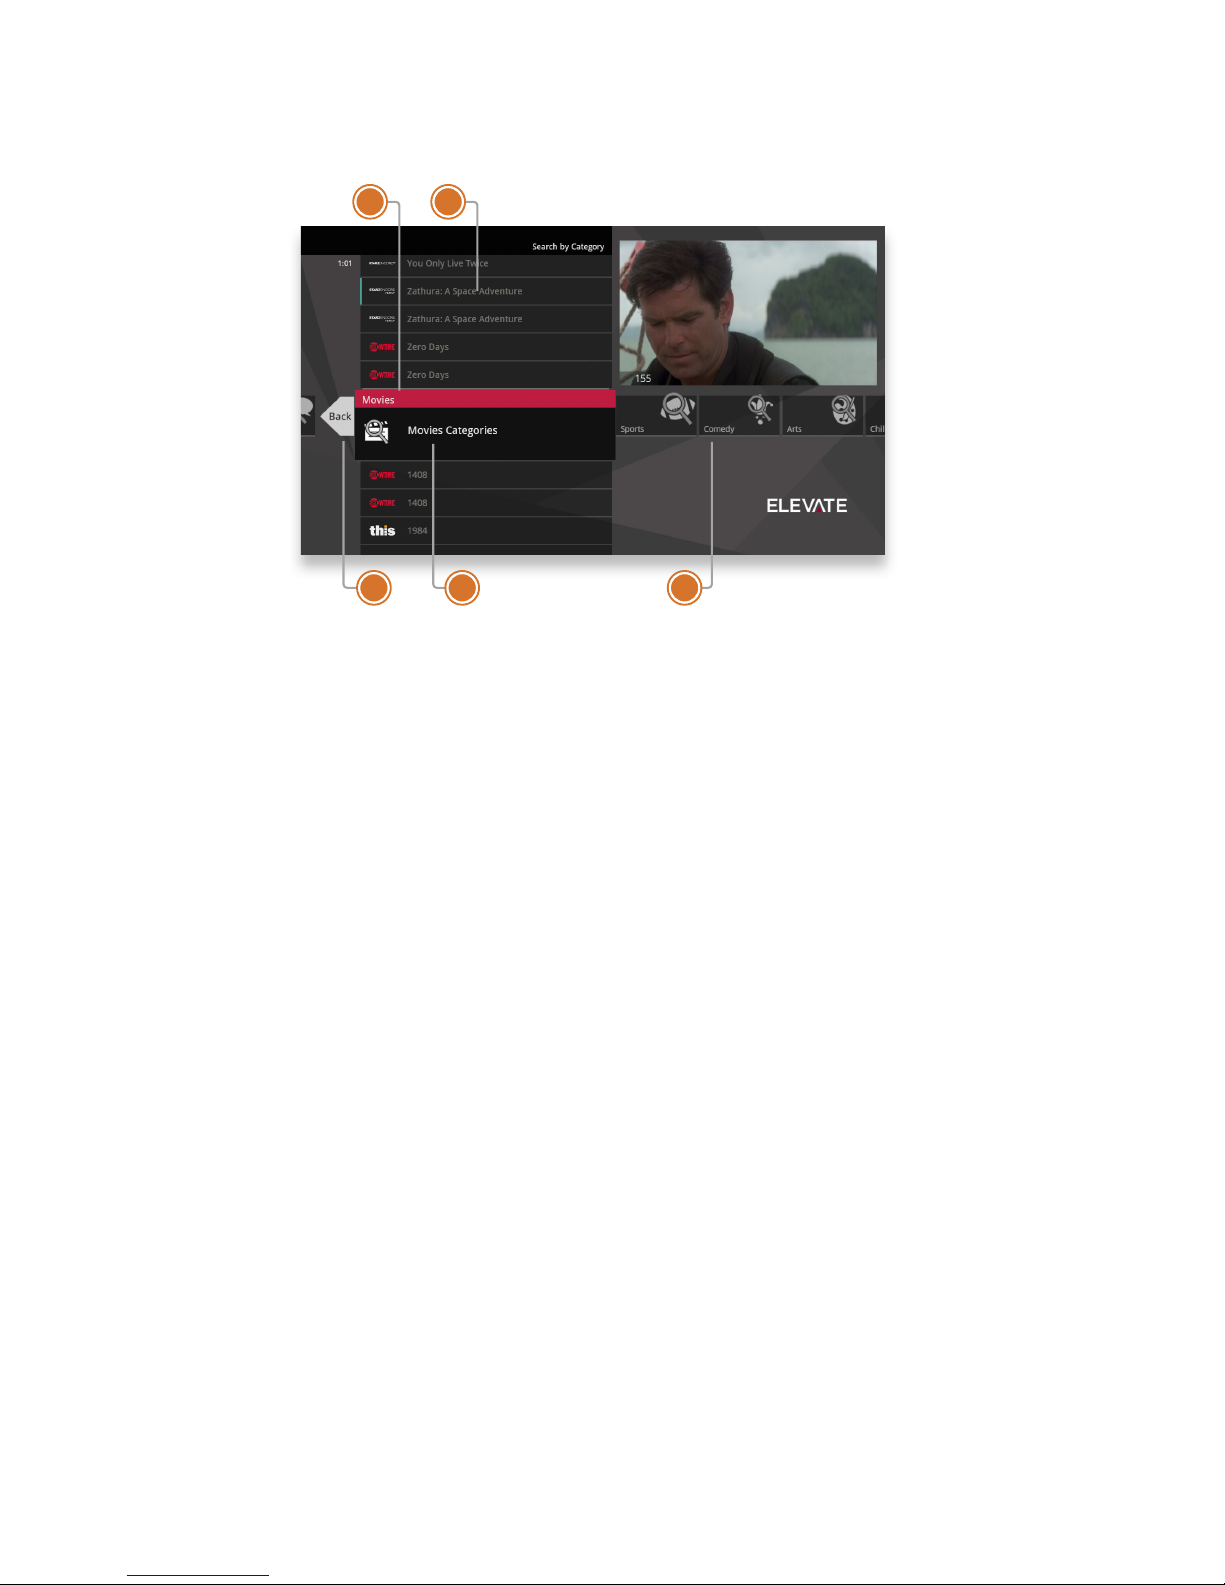
Find By Category
If you’re in the mood for a certain type of show, Find by Category gives you a way
to browse for what you’re looking for. When you press OK with Find by Category
selected, you’ll see a list of categories along the vertical band, and a list will display
the shows in each category. An Option card in each category will take you one level
deeper in the menu and allow you to browse subcategories.
1. CATEGORY
Category describes the type of
search you’re currently doing.
2. SHOW CATEGORY
The different types of shows run
along the horizontal band.
3. SHOW LIST
Each show airing over the next 24
hours that falls into the selected
category.
4. SUB CATEGORY OPTION CARD
Each category will contain a card
labeled “Press OK to see more...”
Selecting this card will take you to
another screen with subcategories
along the horizontal band.
5. BACK CARD
Select this card and press OK to go
back up one level in the menu.
Page 64
68
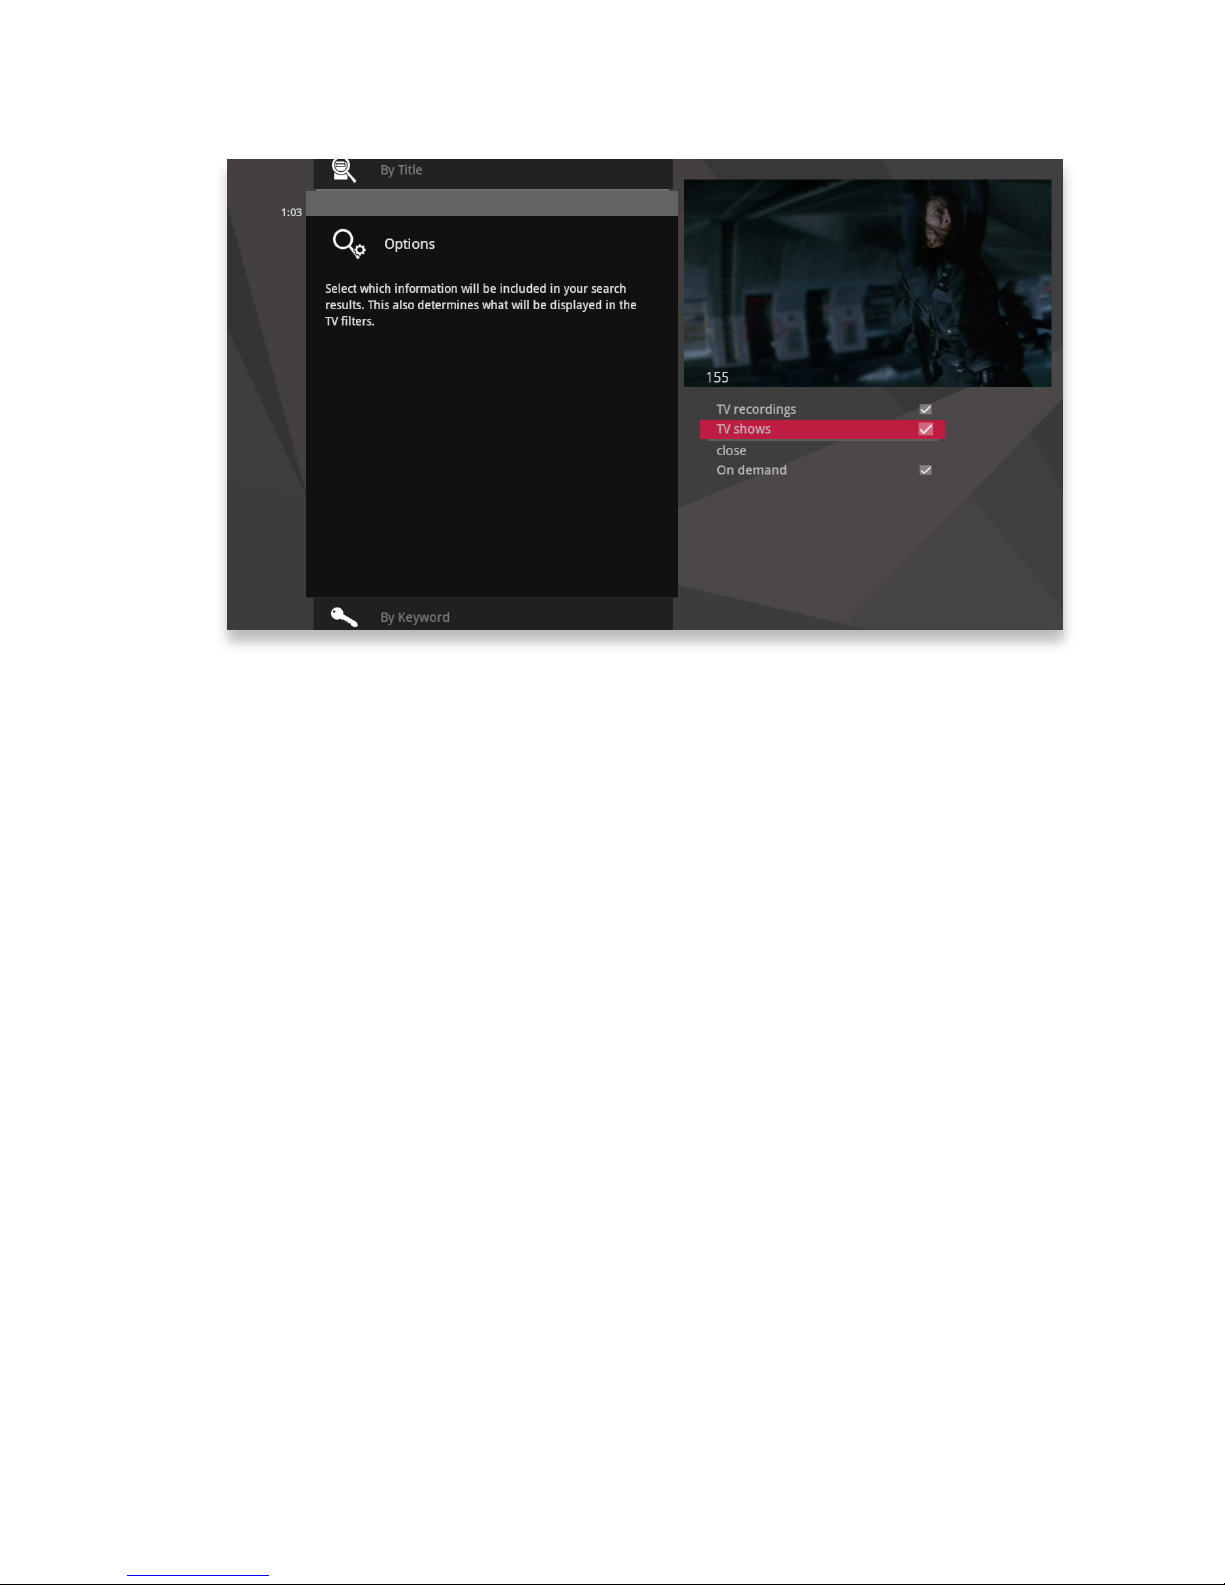
Search Options
The Search Options card allows you to choose which type of content is displayed in
both Search results and in the TV Filters.
To customize the type of content that appears in both areas, select Options and
press OK to clear the check box for the type of content you would like to remove.
You can remove:
• TV Recordings - Programs you’ve recorded with your DVR.
• TV Shows - Live TV shows from Elevate’s line-up.
• VOD - Programs from Elevate’s Video On Demand library.
Page 65

70
On Demand
Elevate’s Video On Demand selection gives you a vast library
of great programming to choose from and an easy way to
search through it all.
Page 66
72
Elevate On Demand
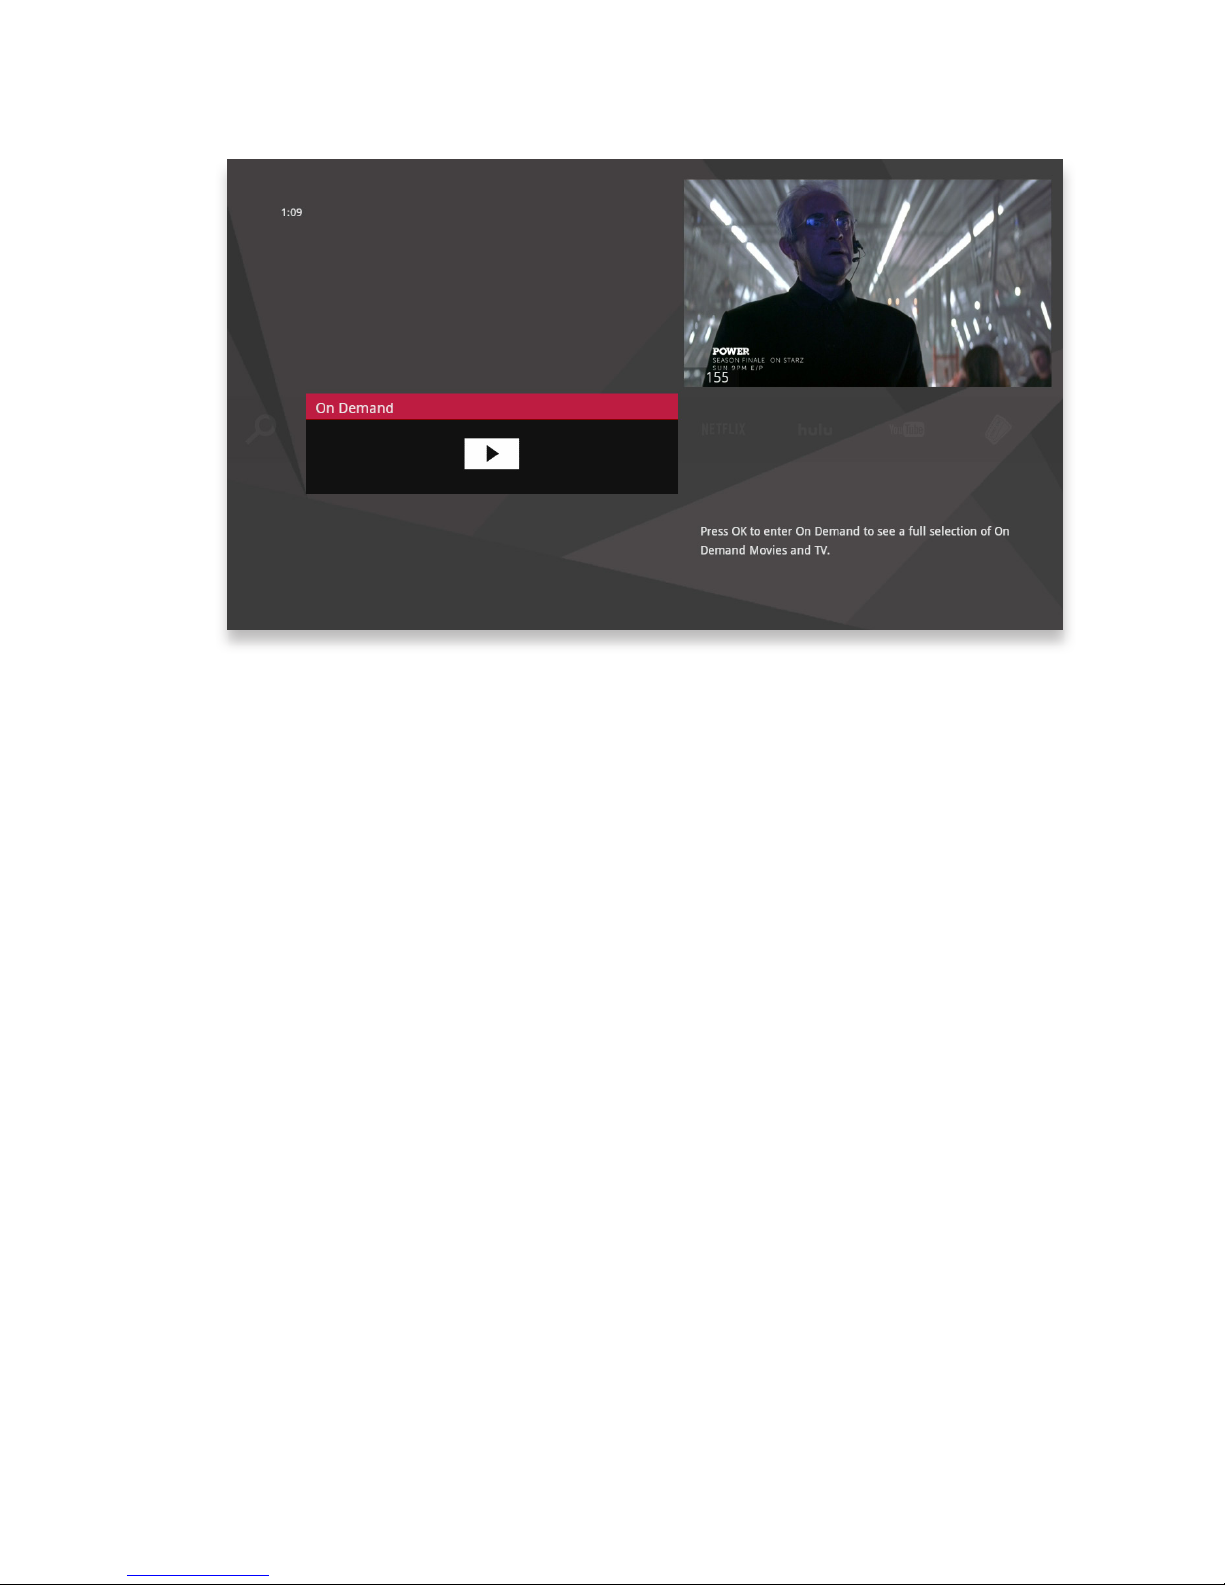
Pressing OK with the On Demand card in focus opens the Elevate Mosaic VOD
Library where you’ll find all VOD content in one place, organized by category.
Page 67
73
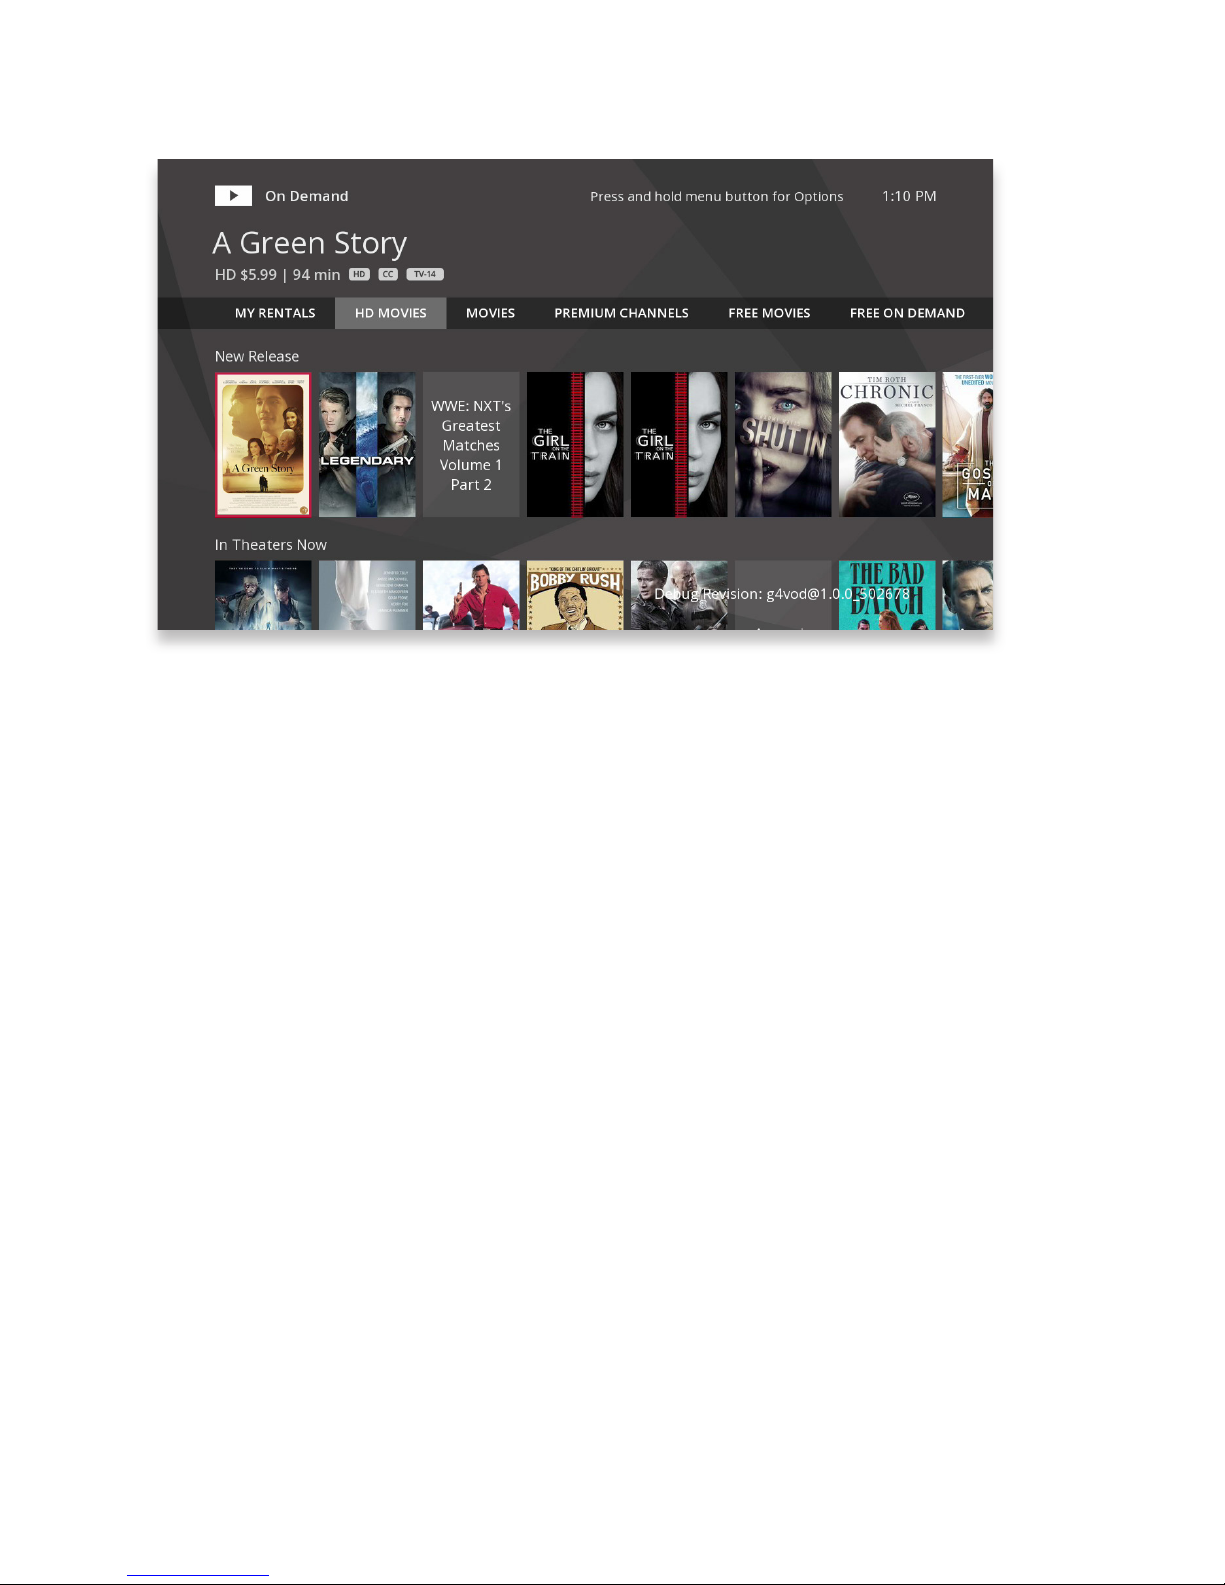
VOD Library
When you enter the Elevate VOD library, you’ll see a list of movie categories.
VOD Options
When you see a program you like, press OK, and you’ll get the following list of
options:
• preview - Plays the trailer for the selected movie.
• lock - Applys Parental Controls to block access to that channel.
• buy - Purchases the movie (if it’s not free) so that you can watch it immediately.
PIN Entry
The first time you try to purchase a VOD program (or purchase a PPV program or
set Parental Controls), you’ll be prompted to create a PIN that you will then enter
before you make additional purchases.
You can turn the PIN prompt off from the Parental Controls section of the Settings
category. See the “Settings” chapter for details.
Page 68
74
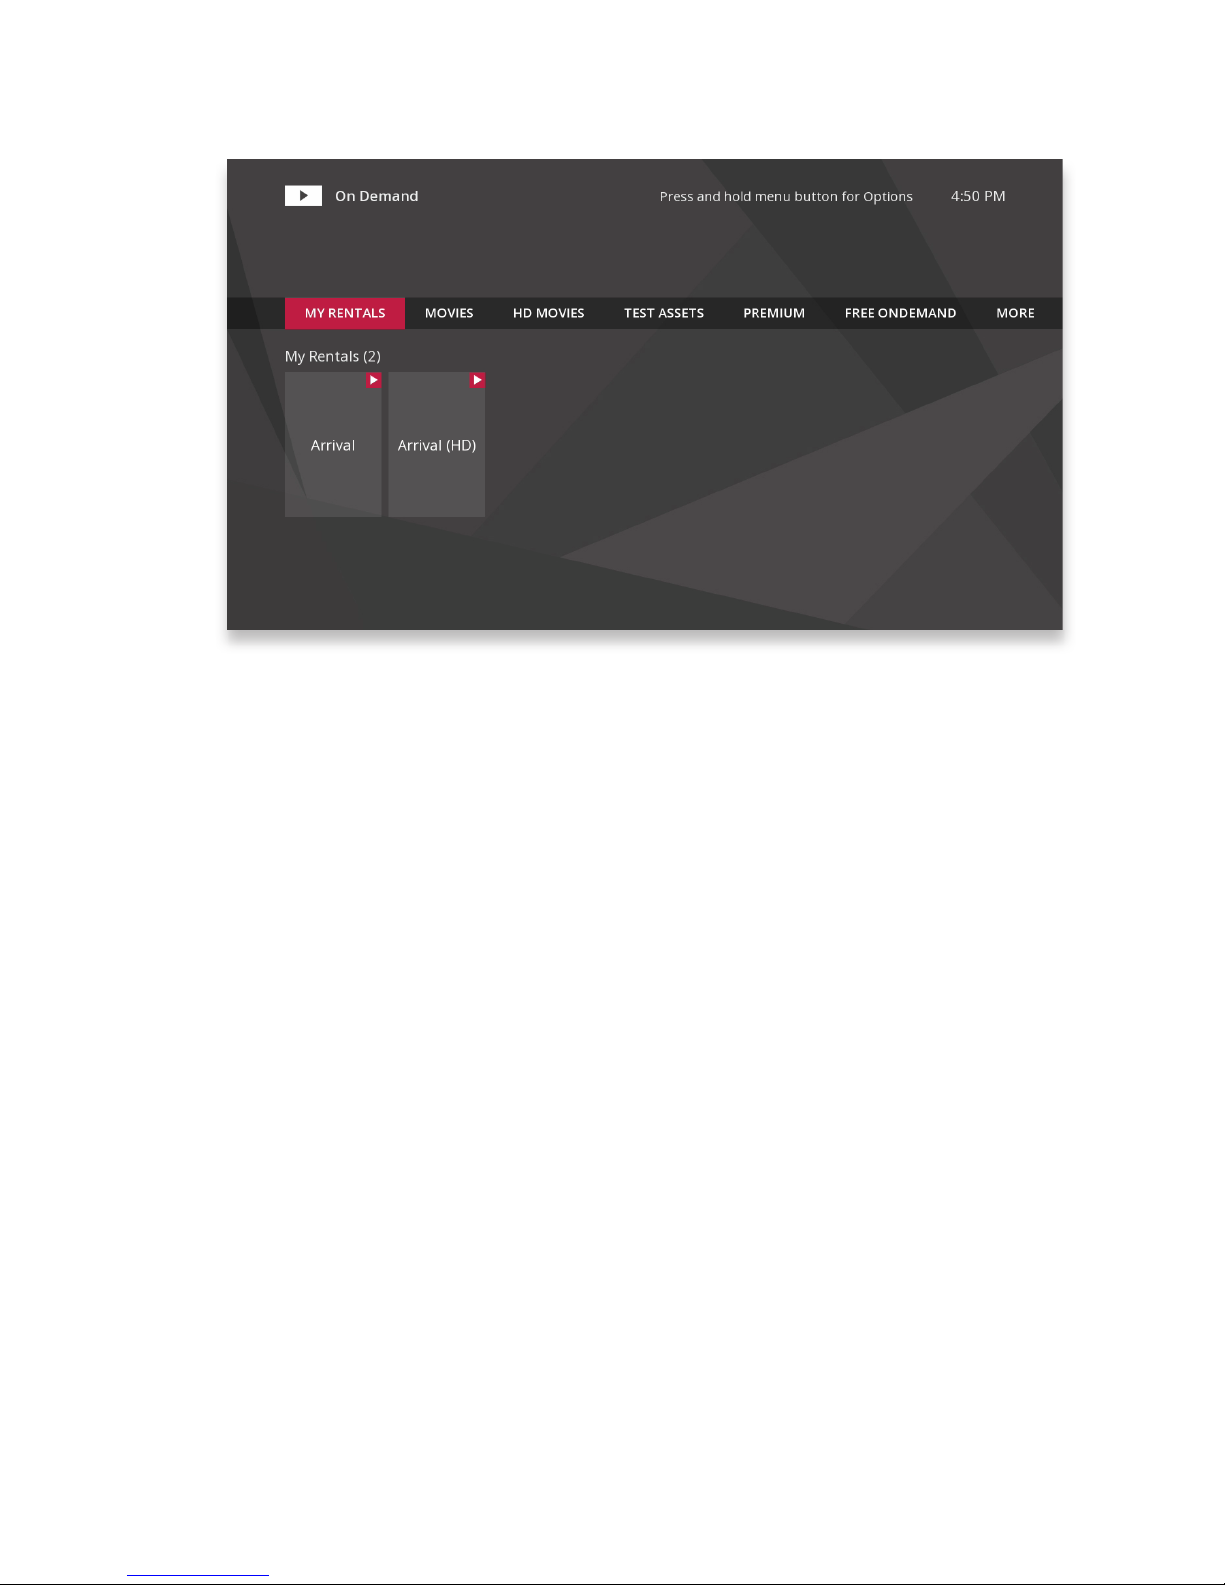
My Rentals
When you select the My Rentals card, you’ll see a list of all of the movies you’ve
currently rented along with a My Adult Rental card (if you’ve rented adult rentals).
Selecting the adult rental card will take you to a list of any adult movies you may
have rented.
Movies will continue to appear in this list until the rental has expired. You can begin
watching a movie by pressing OK.
If you begin watching a movie on one media player, you can watch that movie in
another room in the exact place you left off by pressing info and choosing resume.
If the media player in the new room has that selection locked with Parental Controls,
you’ll need to enter the PIN to resume watching.
Page 69

76
Home Network
With Elevate you can access your computer’s music, video,
and photos, on your full-size TV, from the comfort of your living
room.
Page 70

78
Getting Started
Home Network allows you to stream media from any server in your home, such as
your computer, to your media player. Because Home Network is DLNA®-based, it is
completely plug and play; if your computer is connected to your home network and
has a DLNA server, you should automatically see that computer listed in the Home
Network category of the main menu.
To make sure that Home Network will function properly, ensure:
• Your computer is set up to share content according to your server’s instructions.
• Your server software is not blocked by a Firewall.
DLNA Servers
Although any DLNA server will work with Home Network, the following
DLNA servers have been fully tested with your media player.
• Windows Media Player
• TVersity Media Server
• Windows Media Connect
• Twonky Media Manager
• Media Mall PlayOn
Page 71
79
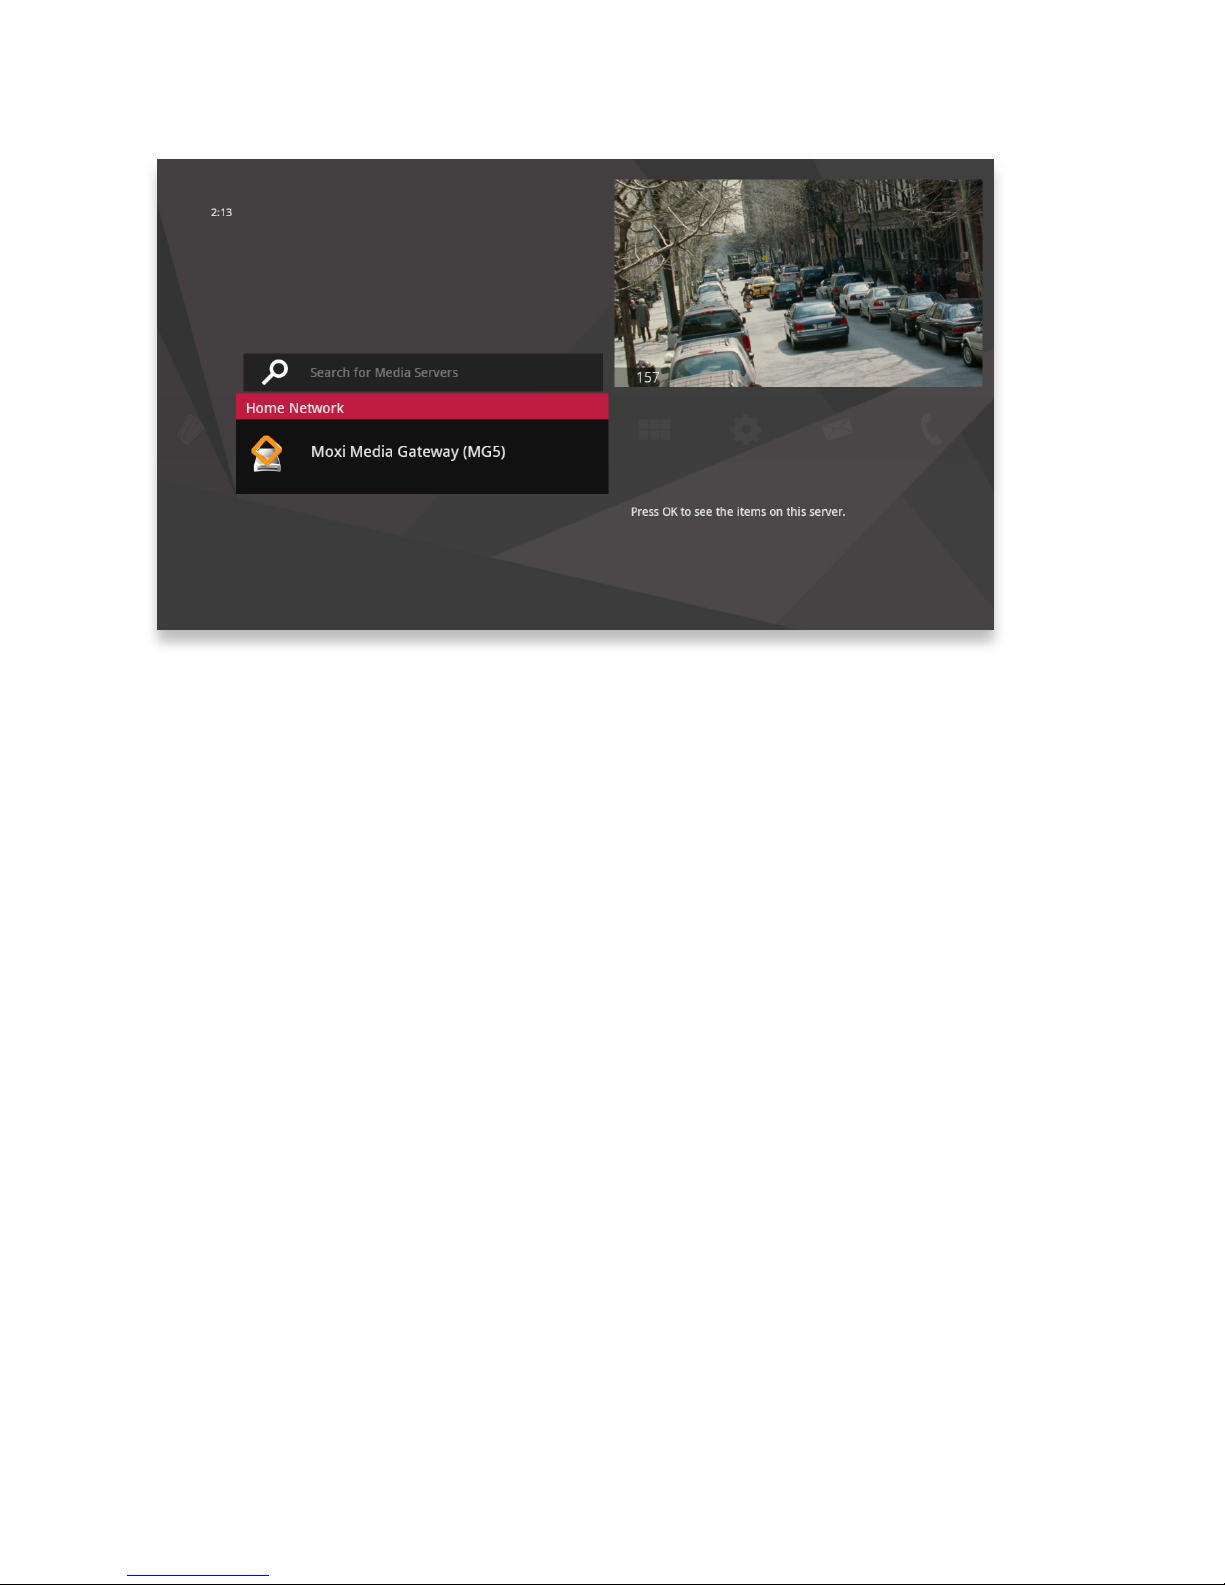
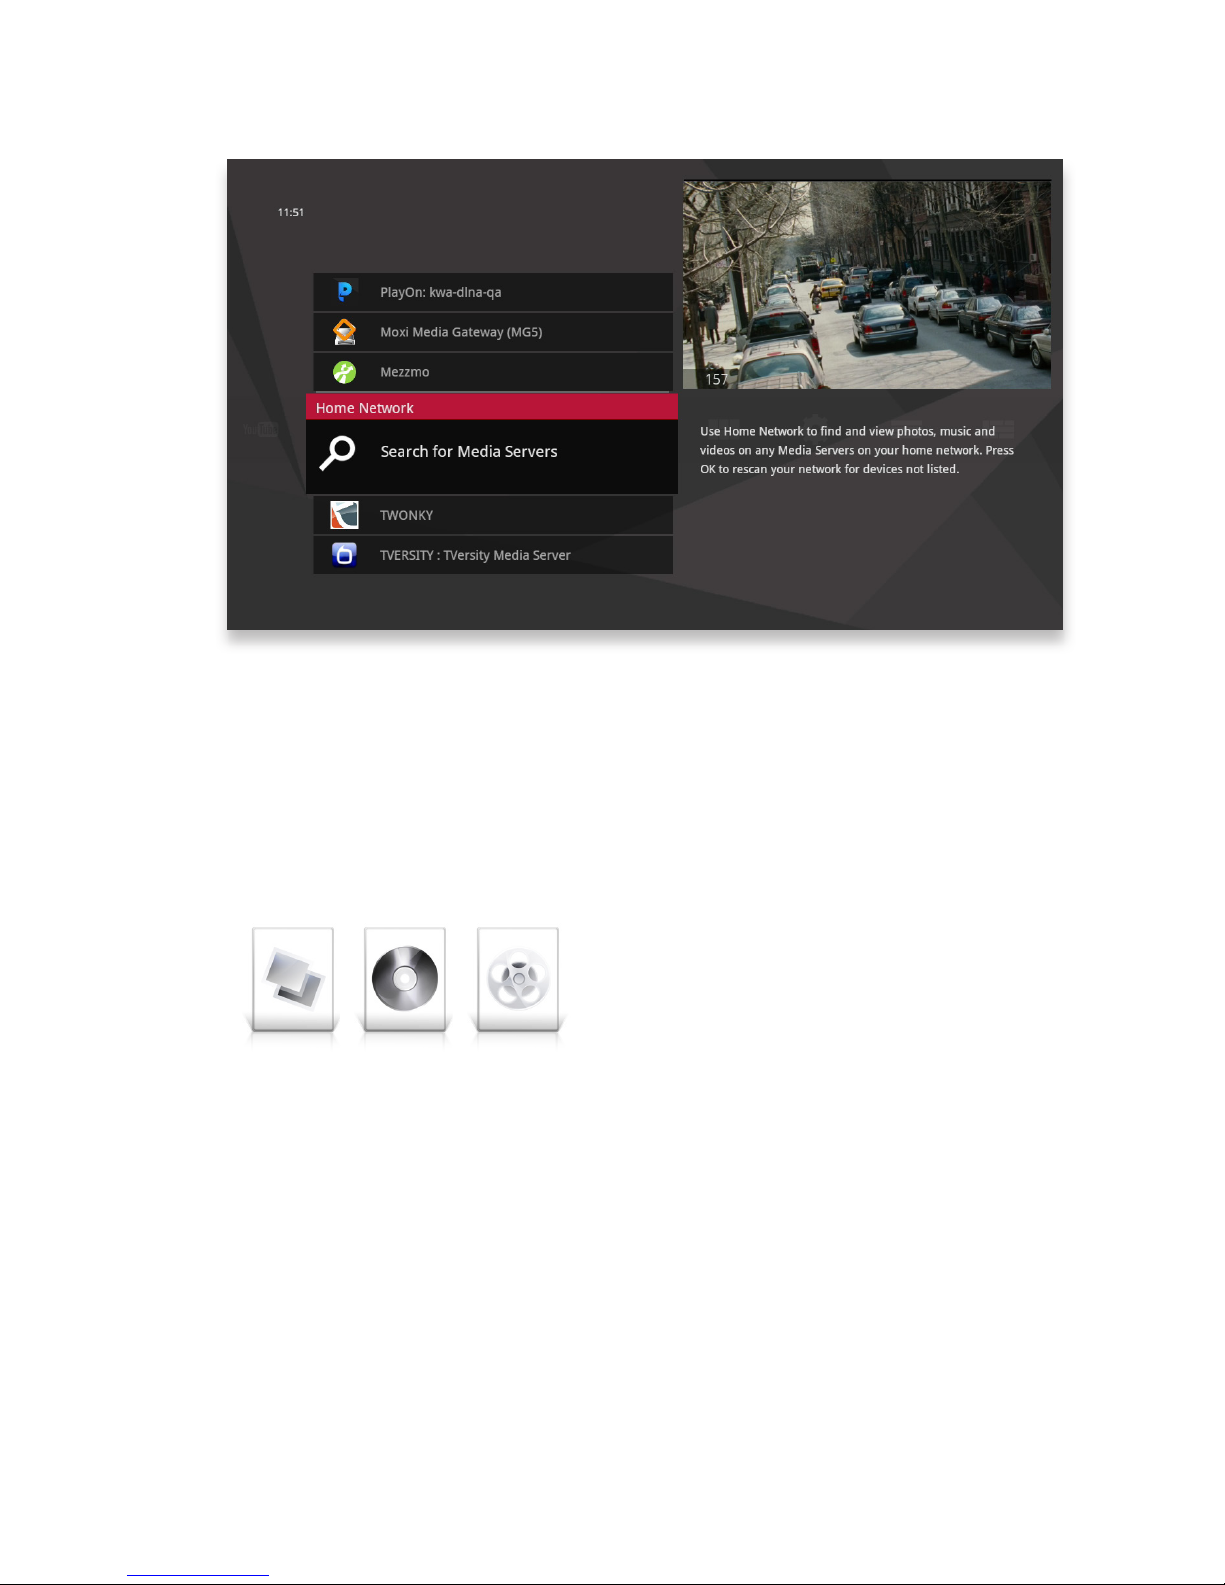
When you first bring the Home Network card into focus, you’ll see all of your
connected devices. If one isn’t showing up, select Search for Media Servers and
select Search. If connected properly, any new devices will then appear.
Page 72
80
Playing Media
• To access your content, choose the device that interests you, and press OK.
• To open a folder of content, press OK.
• If you have an individual file selected that you would like to play, press OK.
• If you have a folder selected, and you would like to view a list of options for the
content of that folder, press info.
Supported Files
• Photo: JPEG, GIF*, BMP* and PNG* files
• Music: MP3, WMA, and AAC (unprotected files), and LPCM files
• Video: MPEG-1, MPEG-2, MPEG-4, H.264, and WMV files
*These file types are available through DLNA® servers that support transcoding.
Content that is protected by Digital Rights Management (DRM) will not be accessible..
Page 73
81
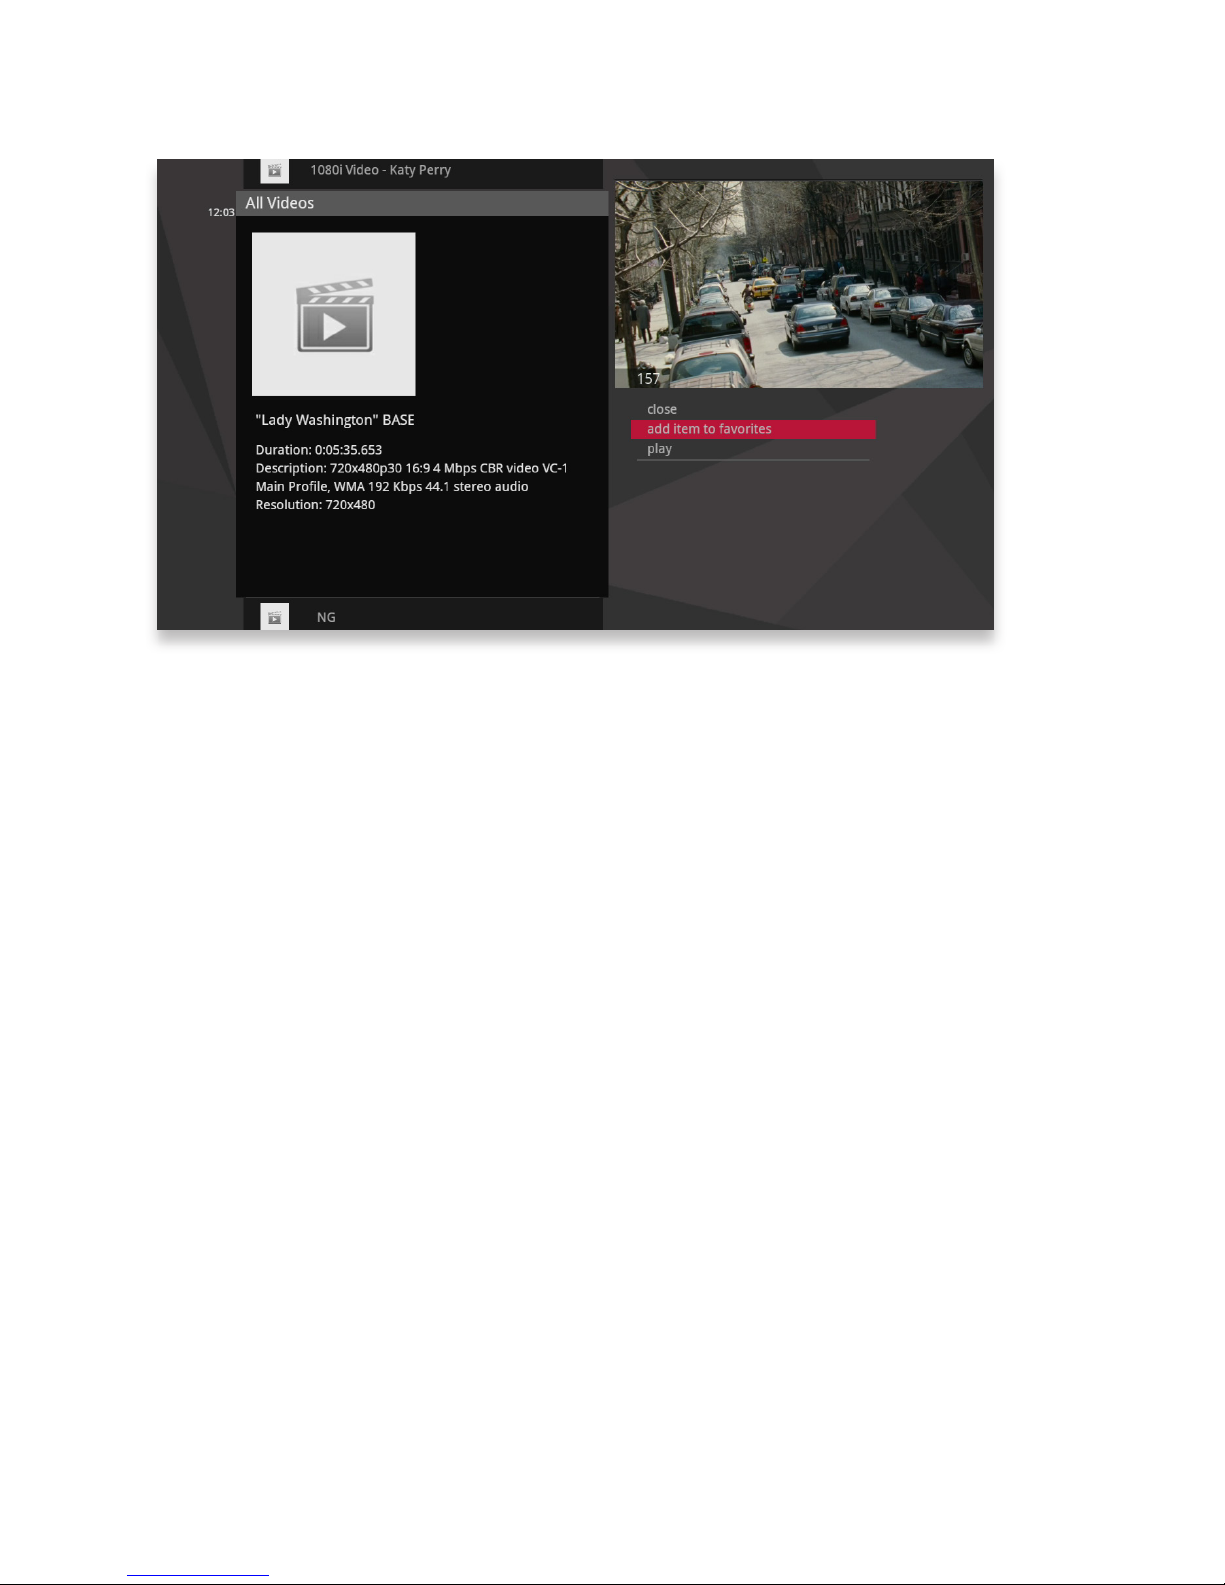
Adding to Favorites
For easy access, you can add content to the Favorites category in the main menu.
Press info with a folder or item selected, with the exception of individual songs,
select add item to favorites, and press OK. The content will then appear in the
Favorites category.
Page 74
82
rec
pause
play
rew fwd
stop
skipreplay
back next
Player Controls
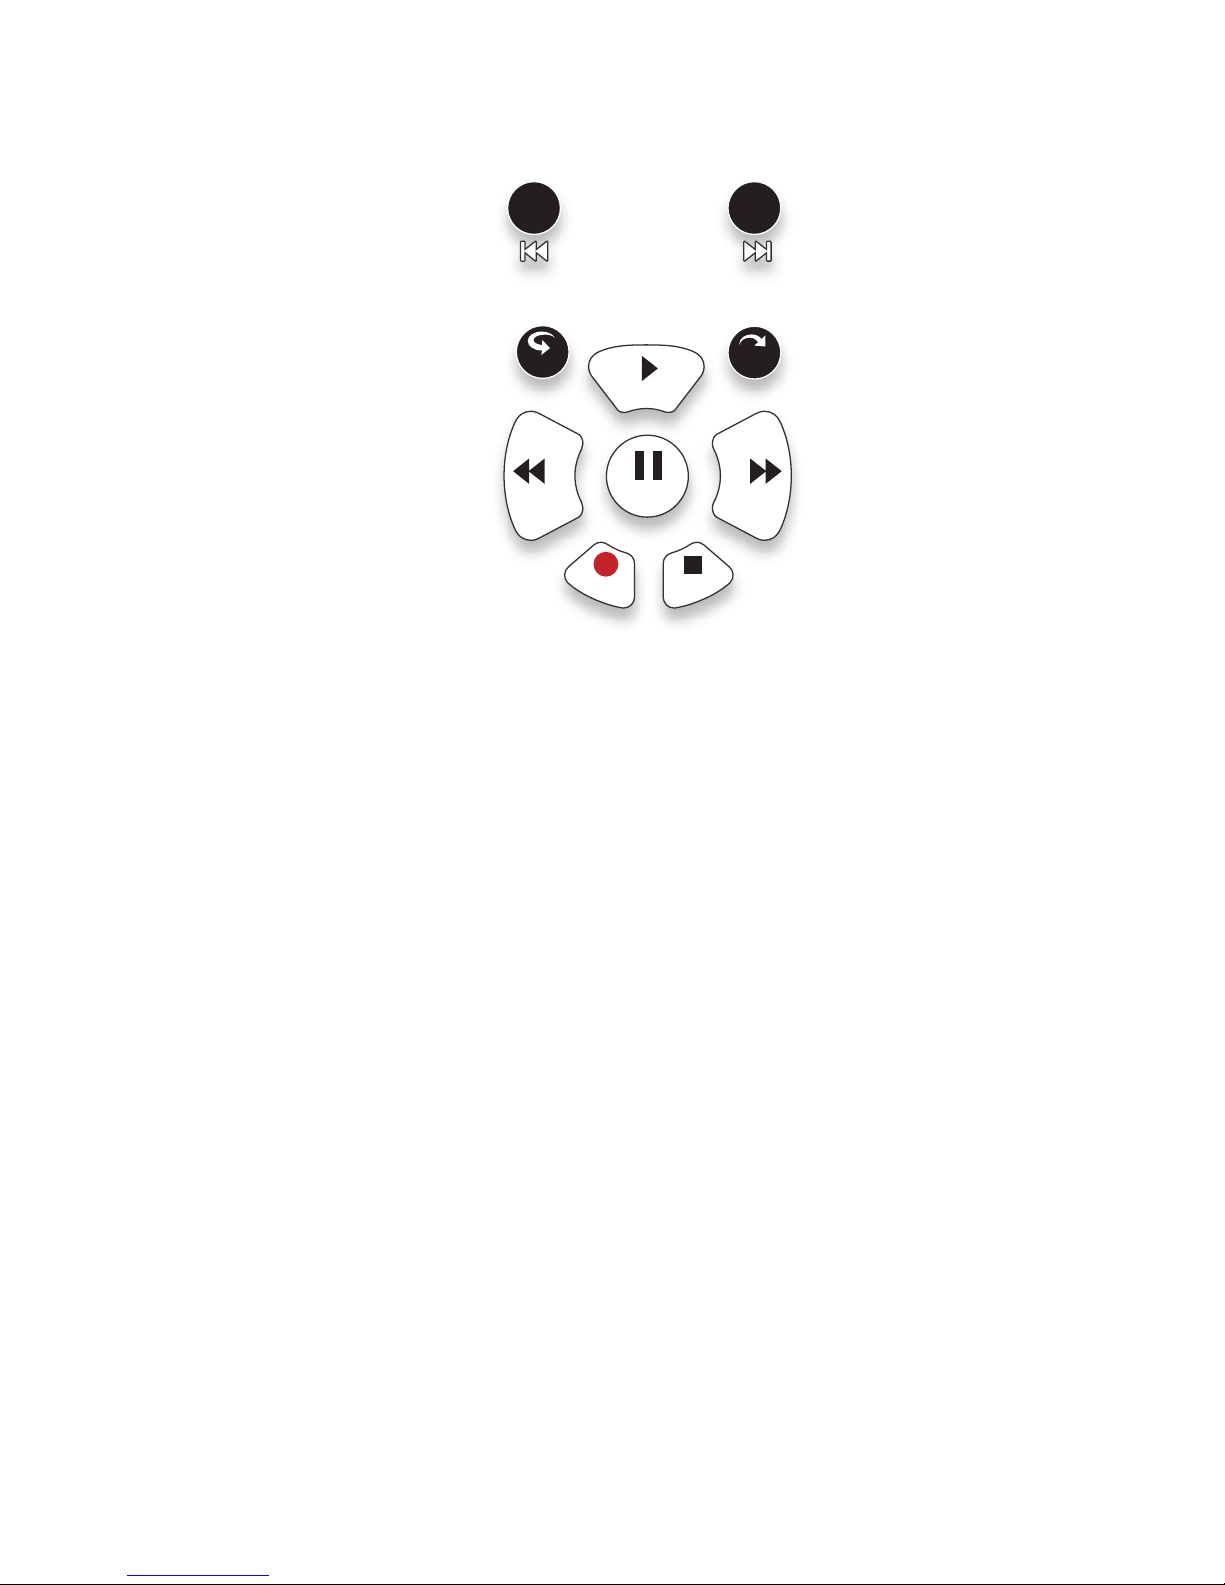
Once you are enjoying a piece of media, the following player controls can be used:
Slideshow
• PAUSE
• PLAY
• BACK
• NEXT
• SKIP
• REPLAY
• STOP
Music
• PAUSE
• PLAY
• STOP
• BACK
• NEXT
Video
• PLAY
• PAUSE
• STOP
Page 75

84
Pay Per View
Watch premium programming with easy access to Pay Per
View.
Page 76
86
Finding Pay Per View Programming
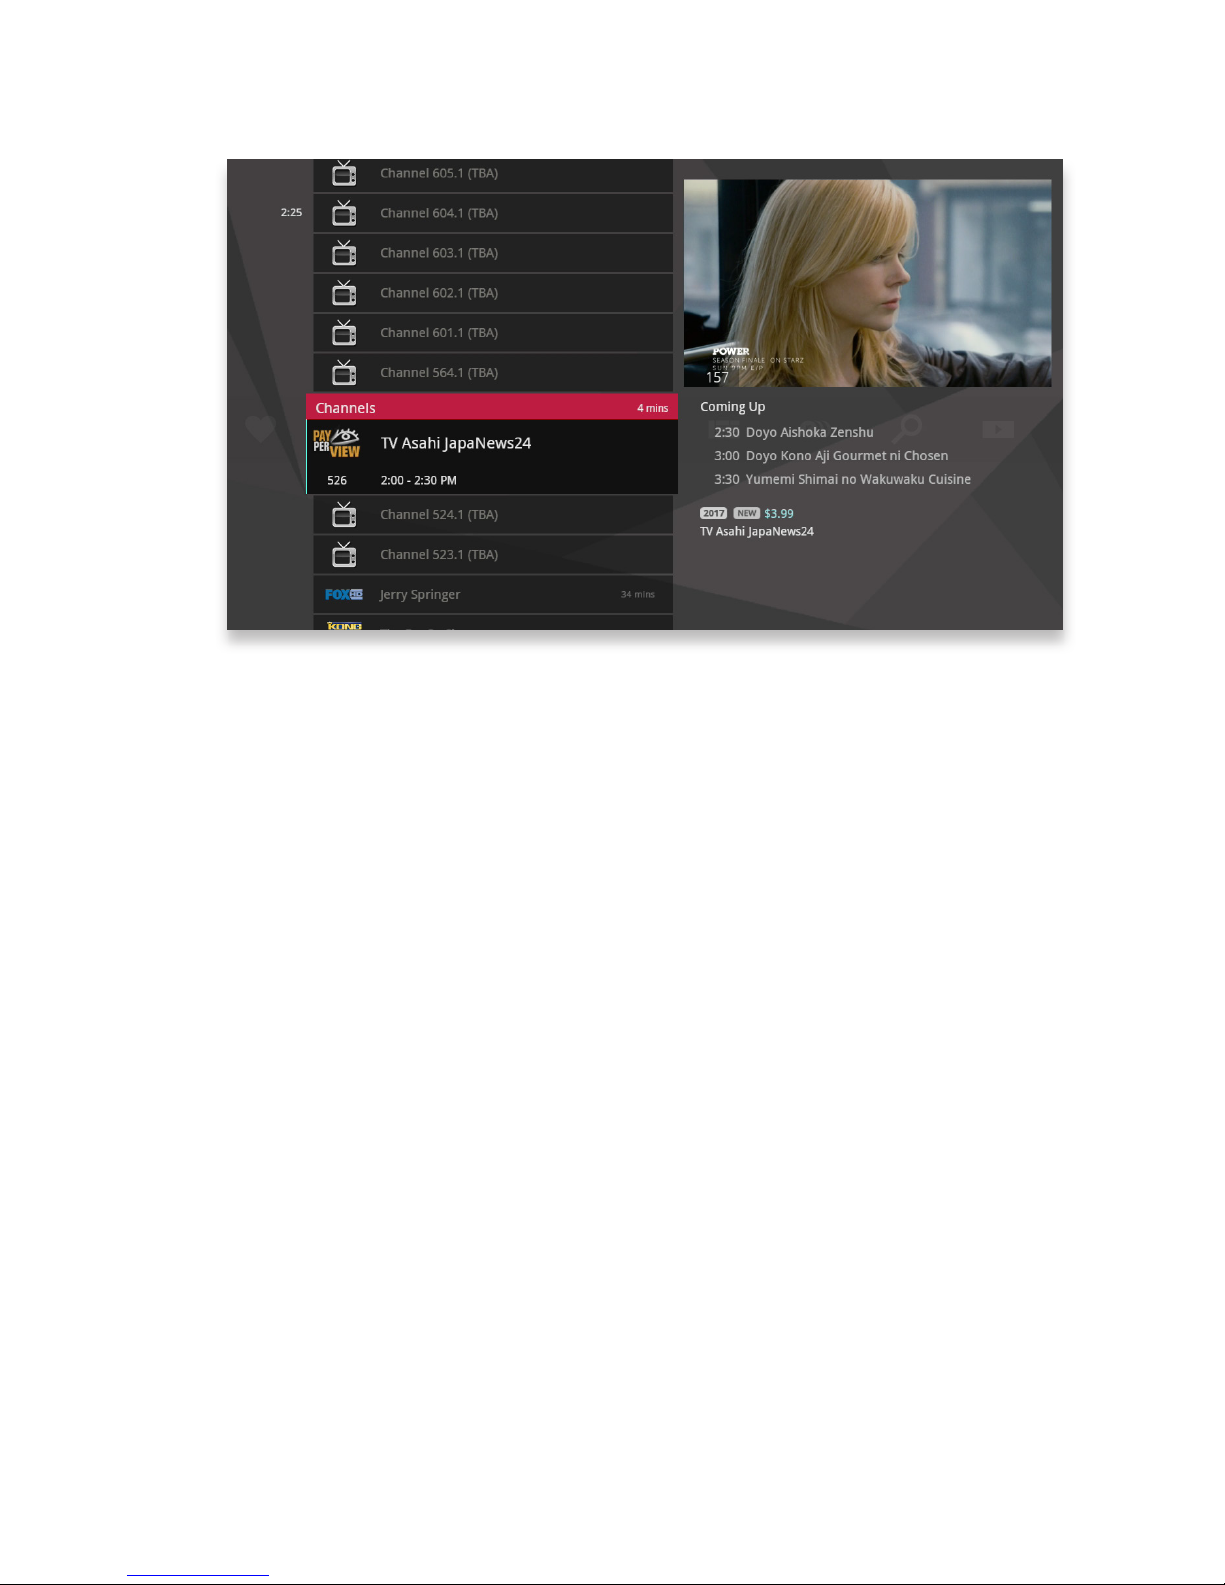
You’ll find PPV programming the same way you look for regular programming: by
browsing the Channels and Filter categories or by doing a search.
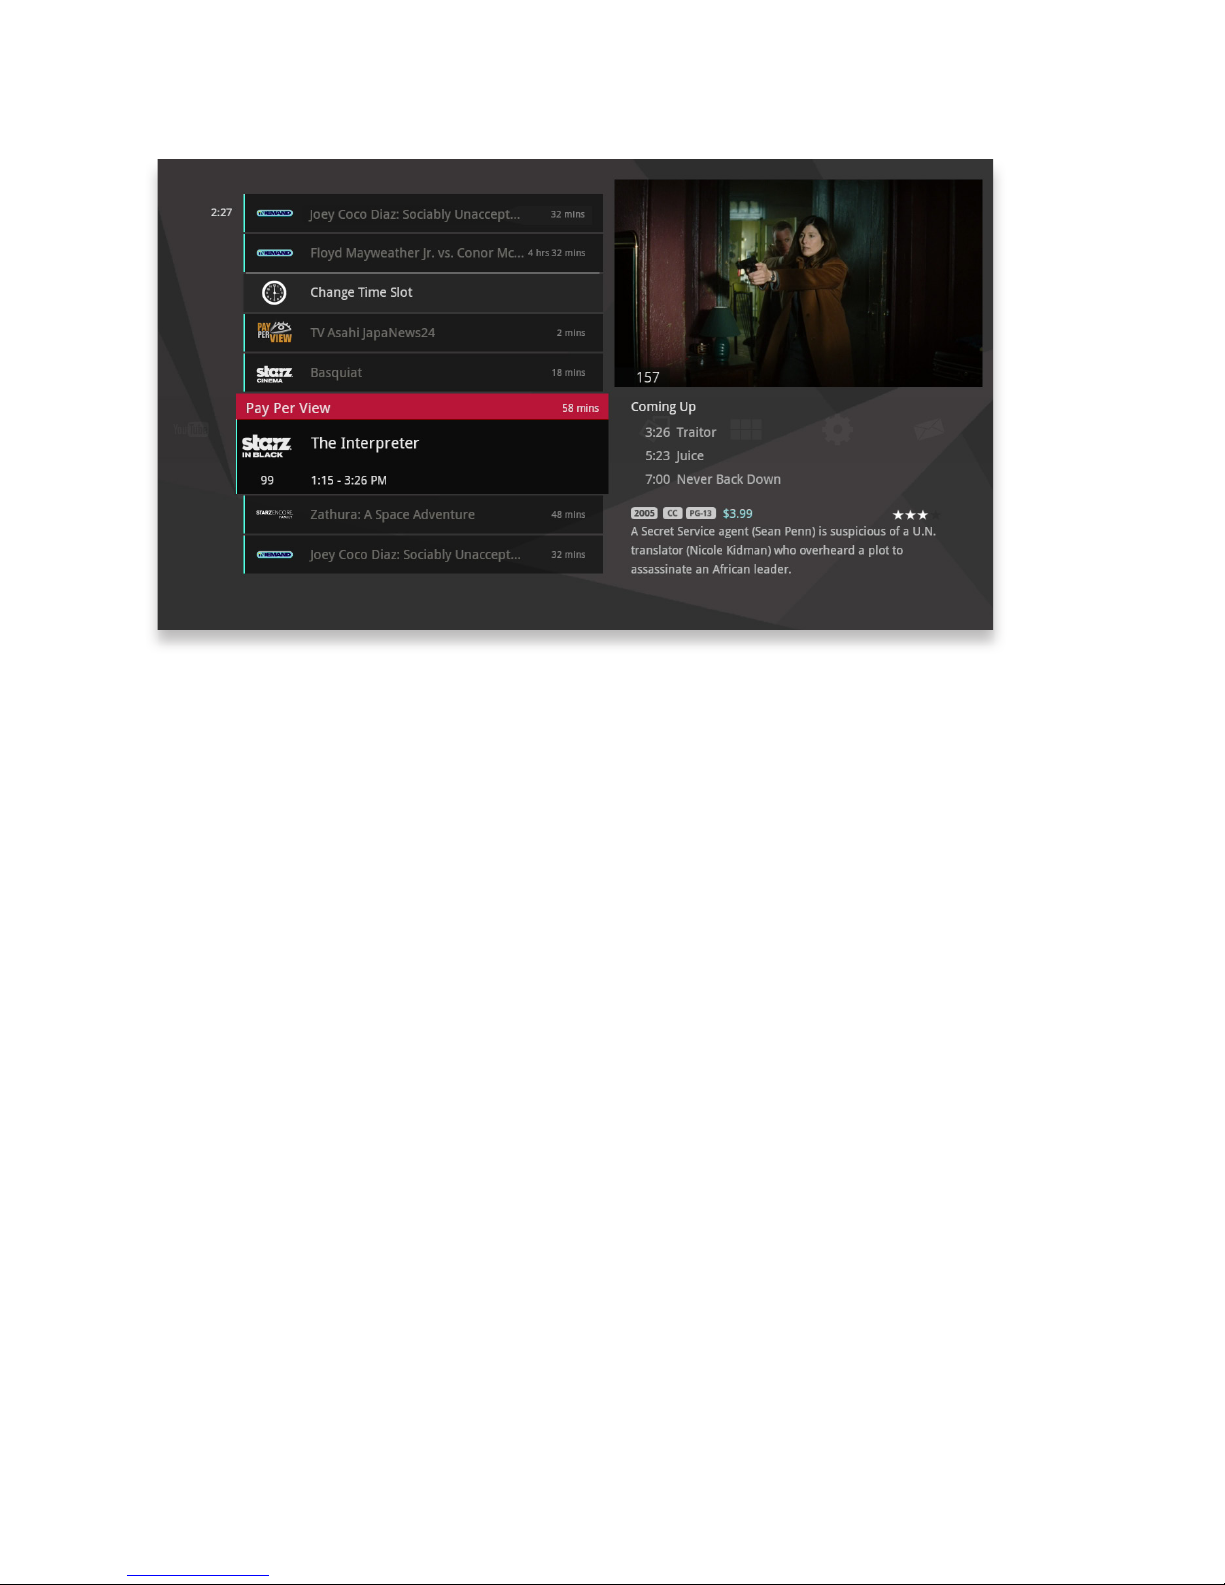
Throughout the user interface, you’ll be able to spot PPV programming easily
because its cards’ left border are a different color, and it’s labeled with the Pay Per
View logo. There is also a purchase price listed for each program.
Page 77
87
The Pay Per View Category
You can also view PPV content on the Pay Per View category. If you bring the Pay
Per View card into focus and press OK on your remote control, a vertical menu
appears showing all of the PPV content.
Page 78
88
Purchasing Pay Per Vew Programming
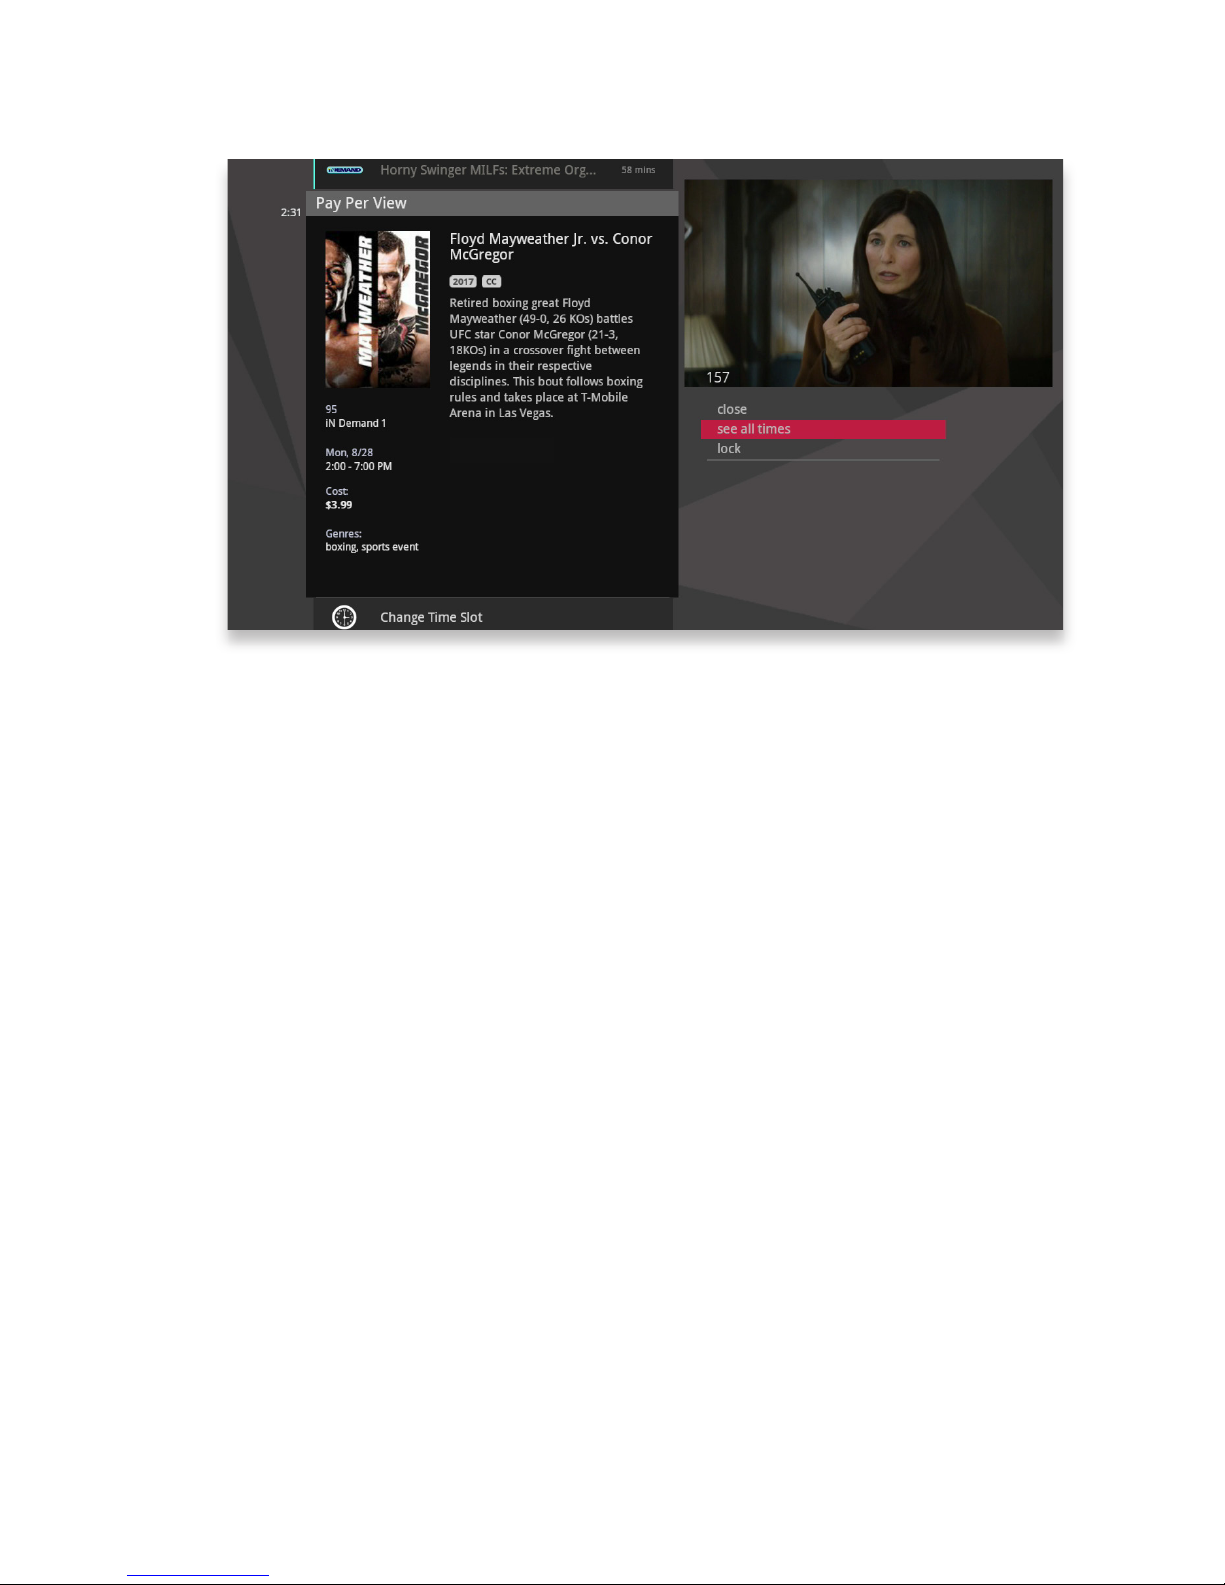
When you see a PPV program that interests you, just press OK. You’ll then see an
action menu with your purchase options. You’ll also be able to lock content with a
Parental Control option.
Page 79
89
Using a Purchase PIN
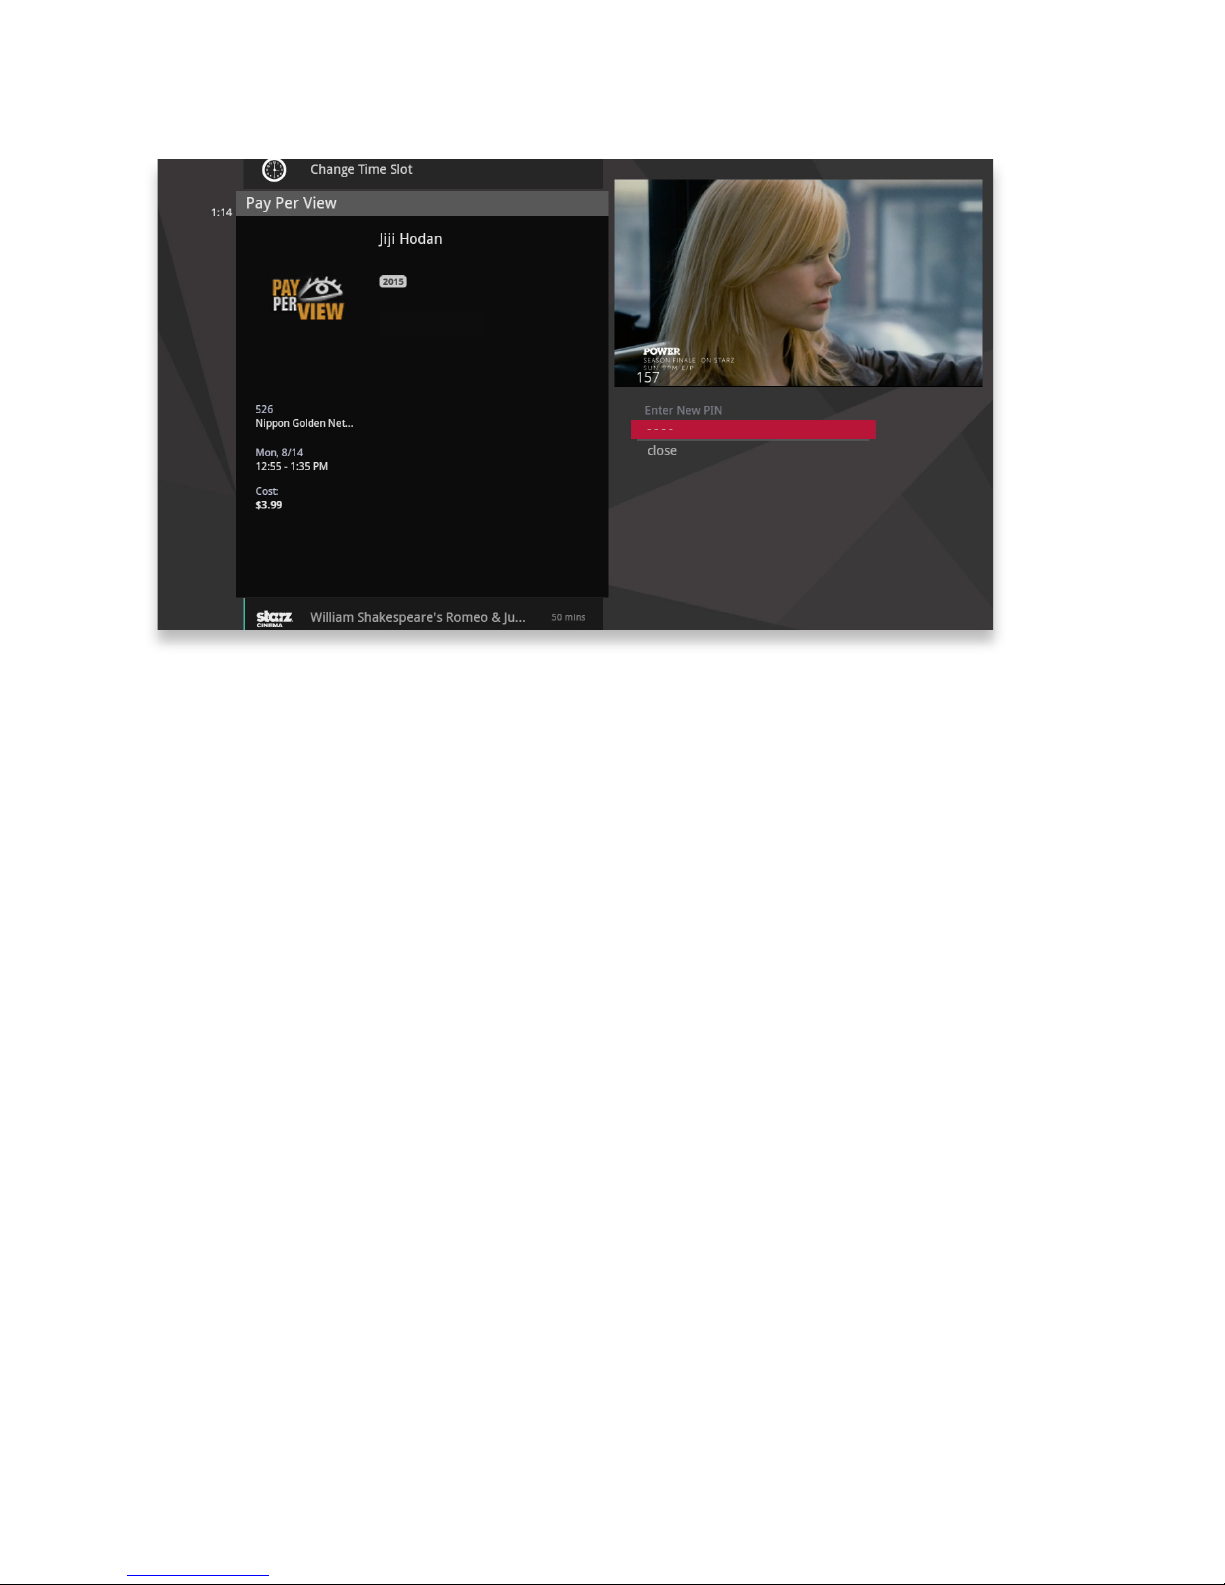
The first time you try to purchase a PPV or VOD program (or set Parental Controls)
you’ll be prompted to create a PIN that you will then enter before making additional
purchases.
You can turn the purchase PIN prompt off from the Parental Controls section of the
Settings category. See the “Settings” chapter for details.
Page 80
90
Follow Me TV
™
Watch live or recorded content on your mobile device and use
your mobile device as a remote control for your media player.
Page 81
92
The Elevate Follow Me TV™ Mobile App
The Elevate Follow Me TV Mobile App lets you:
• With the use of an MS4000 Media Streamer, watch live or recorded content on
your mobile device.
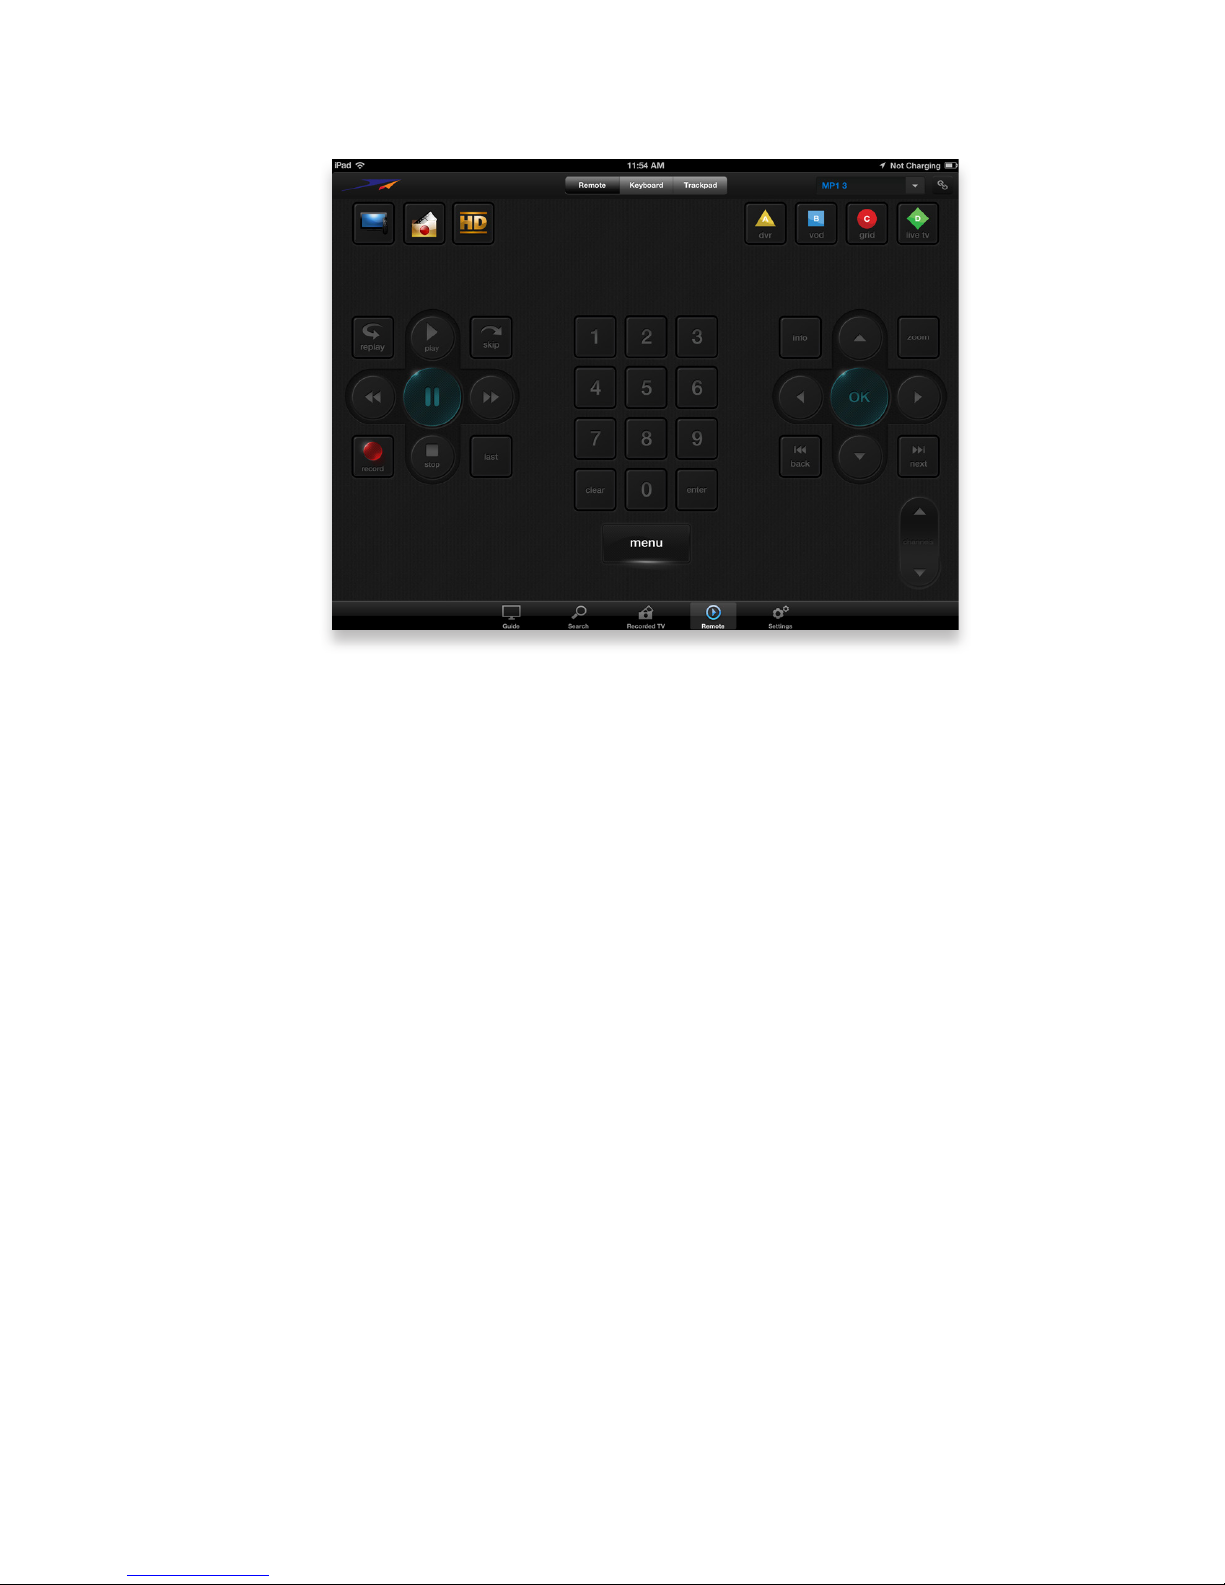
• Use your tablet or phone as a remote control for your media player (shown
above).
• Browse programming in an easy-to-filter grid guide.
• Search programming by a variety of criteria.
• Schedule and manage recordings.
Page 82
93
Downloading the Mobile App (Pairing)
You can find the Follow Me TV Mobile App on Google Play™ and the App Store.
Once you’ve downloaded the Follow Me TV Mobile App, you’ll need to pair it with
your media player. You can do that in three easy steps:
1. Go to the Mobile App card in the Settings area of your media player. Choose
add.
2. Open the Elevate Follow Me TV Mobile App on your device.
3. Enter the code displayed on the screen of your media player into the Elevate
Follow Me TV Mobile App.
The rest happens automatically. When you see the success message, you’re ready
to use your Elevate Follow Me TV Mobile App.
Page 83
94
Downloading the Mobile App (Single Sign-On)
You can find the Follow Me TV Mobile App on Google Play™ and the App Store.
Once you’ve downloaded the Follow Me TV Mobile App, you’ll be able to sign in to
the app using the same username and password you use to sign in to your cable
provider’s website.
Page 84
95
Using Foolow Me TV
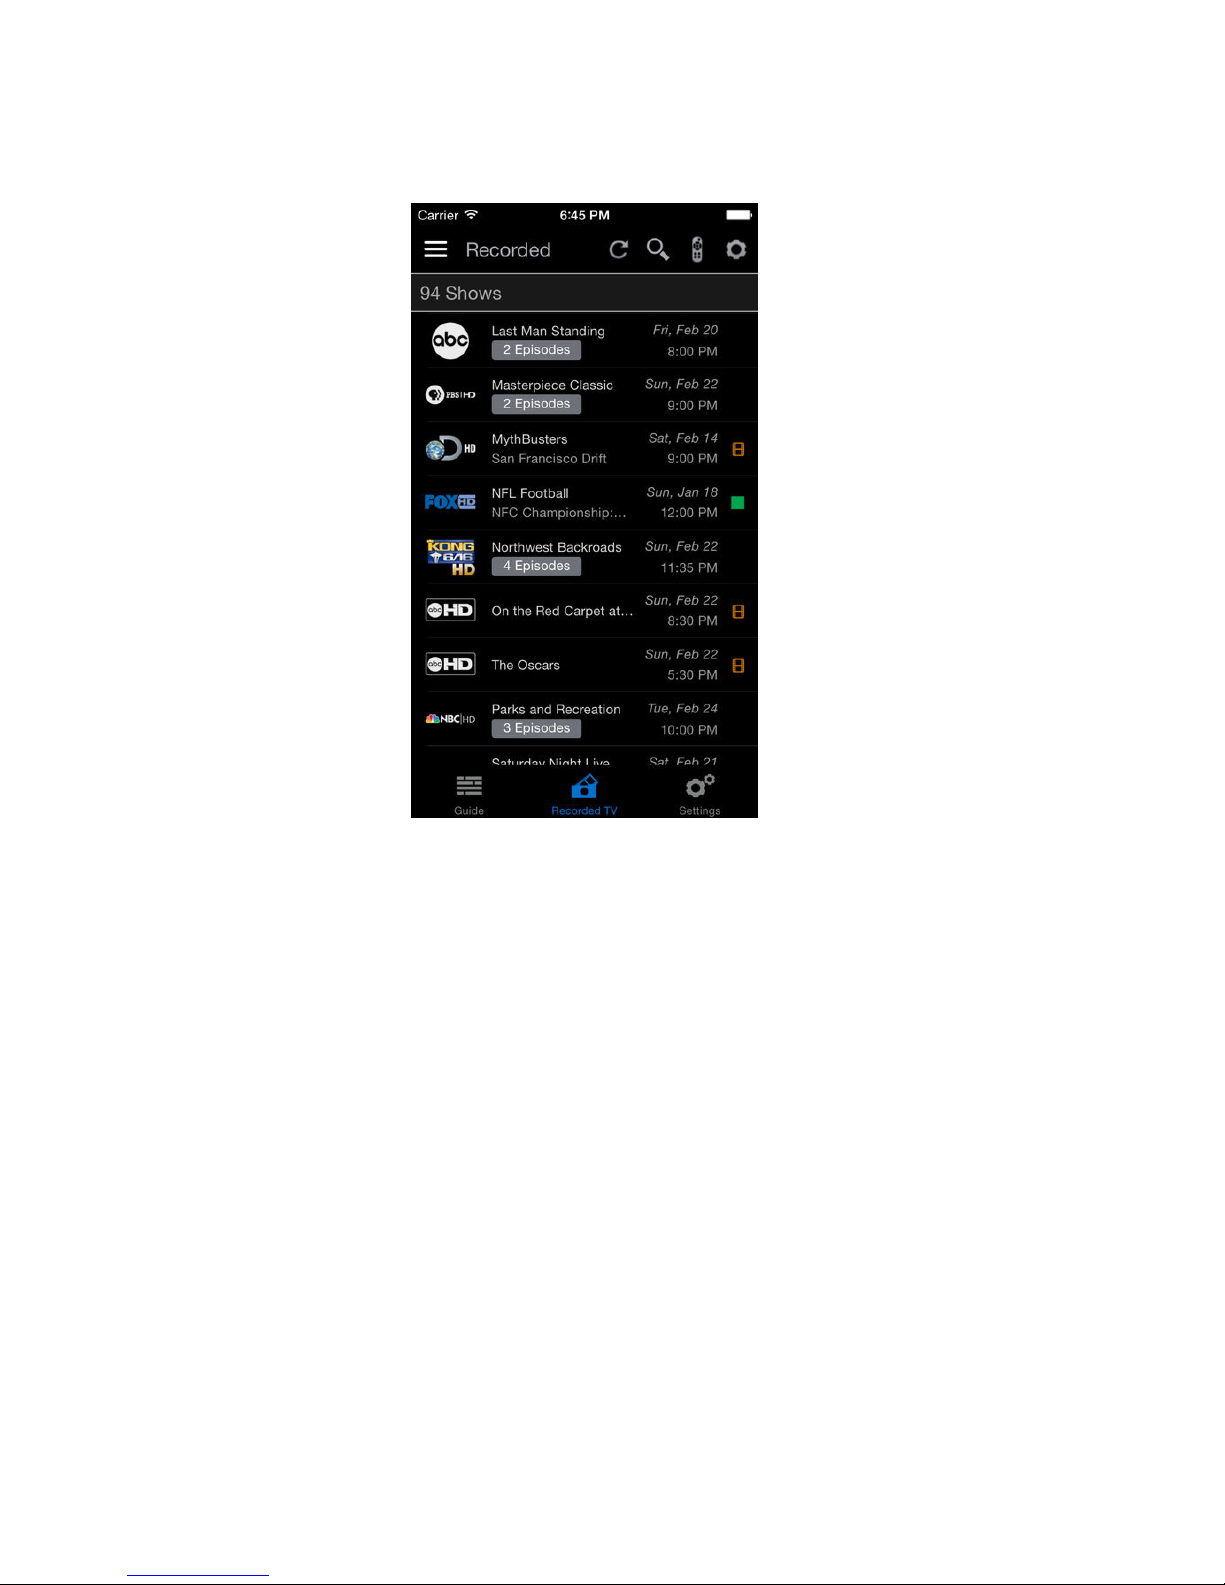
Once you’ve downloaded the Follow Me TV Mobile App, you’ll be able to sign in to
the app using the same username and password you use to sign in to your cable
provider’s website. Now you can watch your recorded shows or Live TV right from
your mobile device.
Page 85

96
Settings
Settings allows you to customize your media player to your
preferences.
Page 86
98
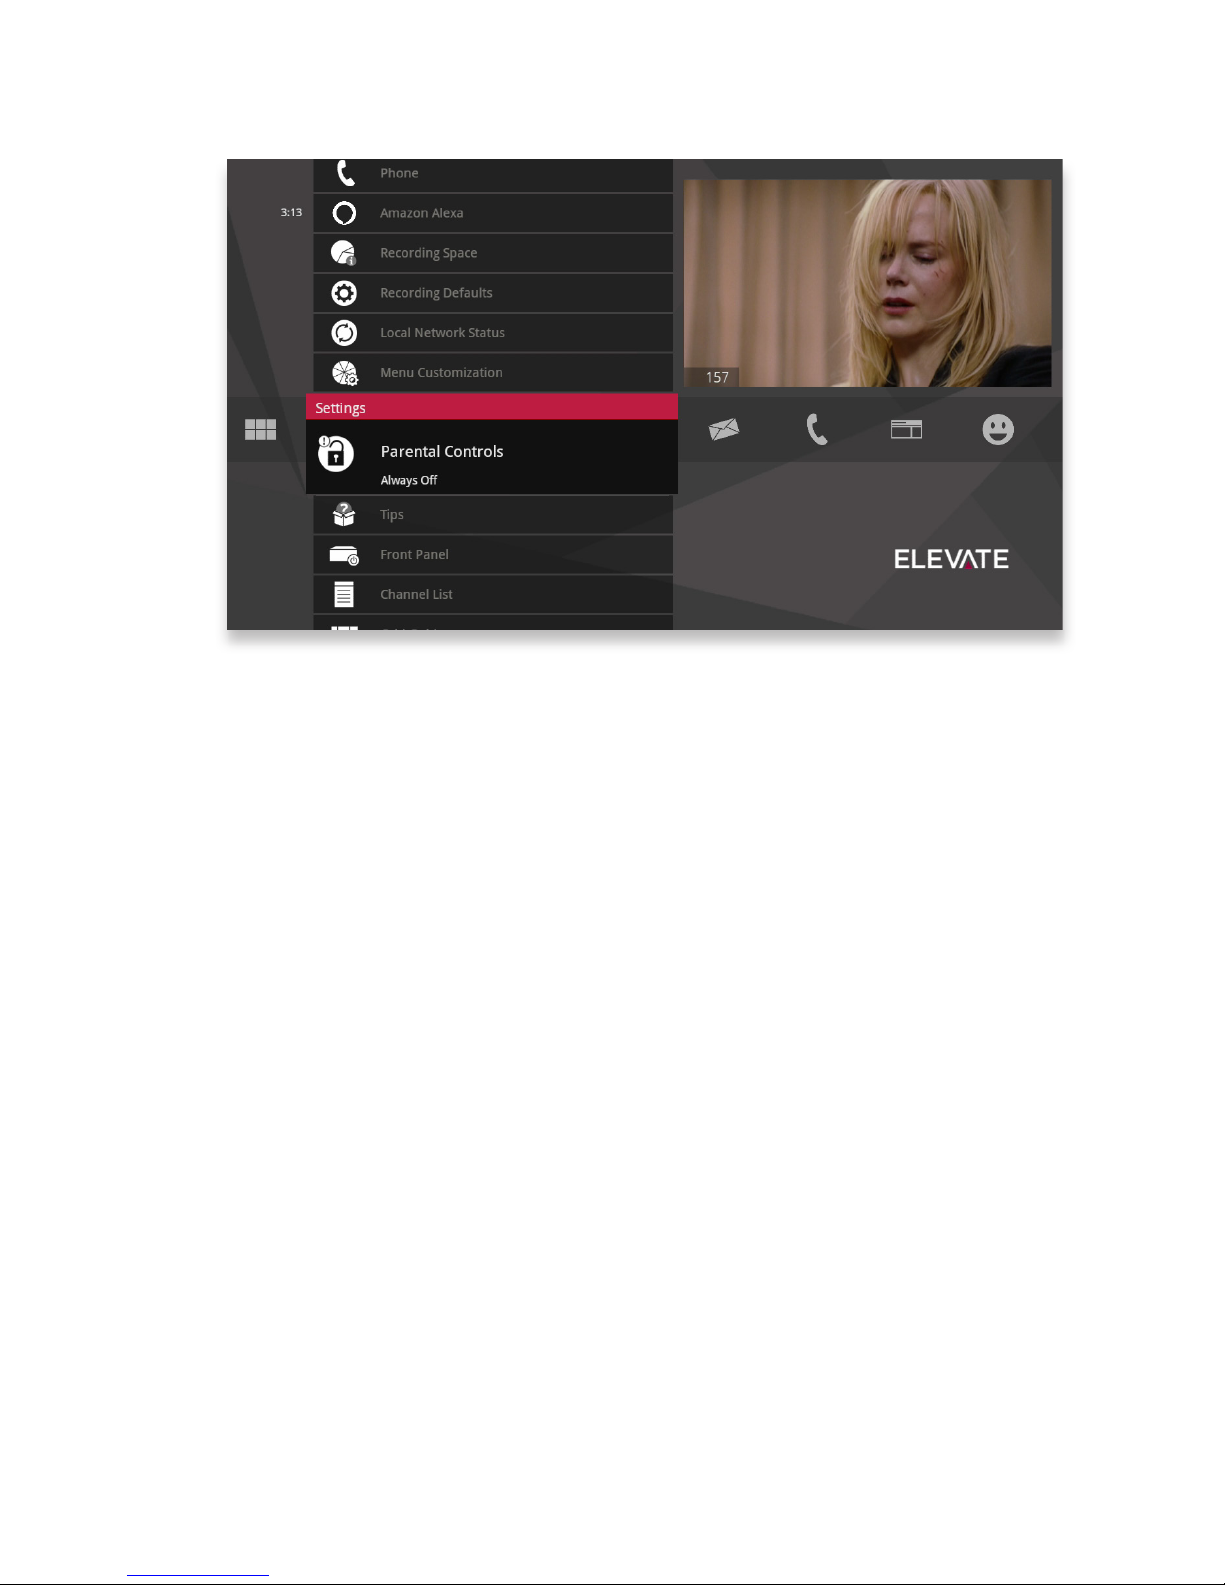
Parental Controls
Settings provides robust Parental Controls, including the ability to lock shows by:
• TV Rating
• Movie Rating
• Channel
In addition, you can lock out individual shows, including recorded programs, from
action menus for each show in the main menu. The system records scheduled
shows that are blocked by parental controls, but you must enter the PIN before you
can watch them.
Parental Controls also allows you to turn on the option to have a PIN prompt before
any VOD or PPV purchase.
Page 87
99
5
4
3
21
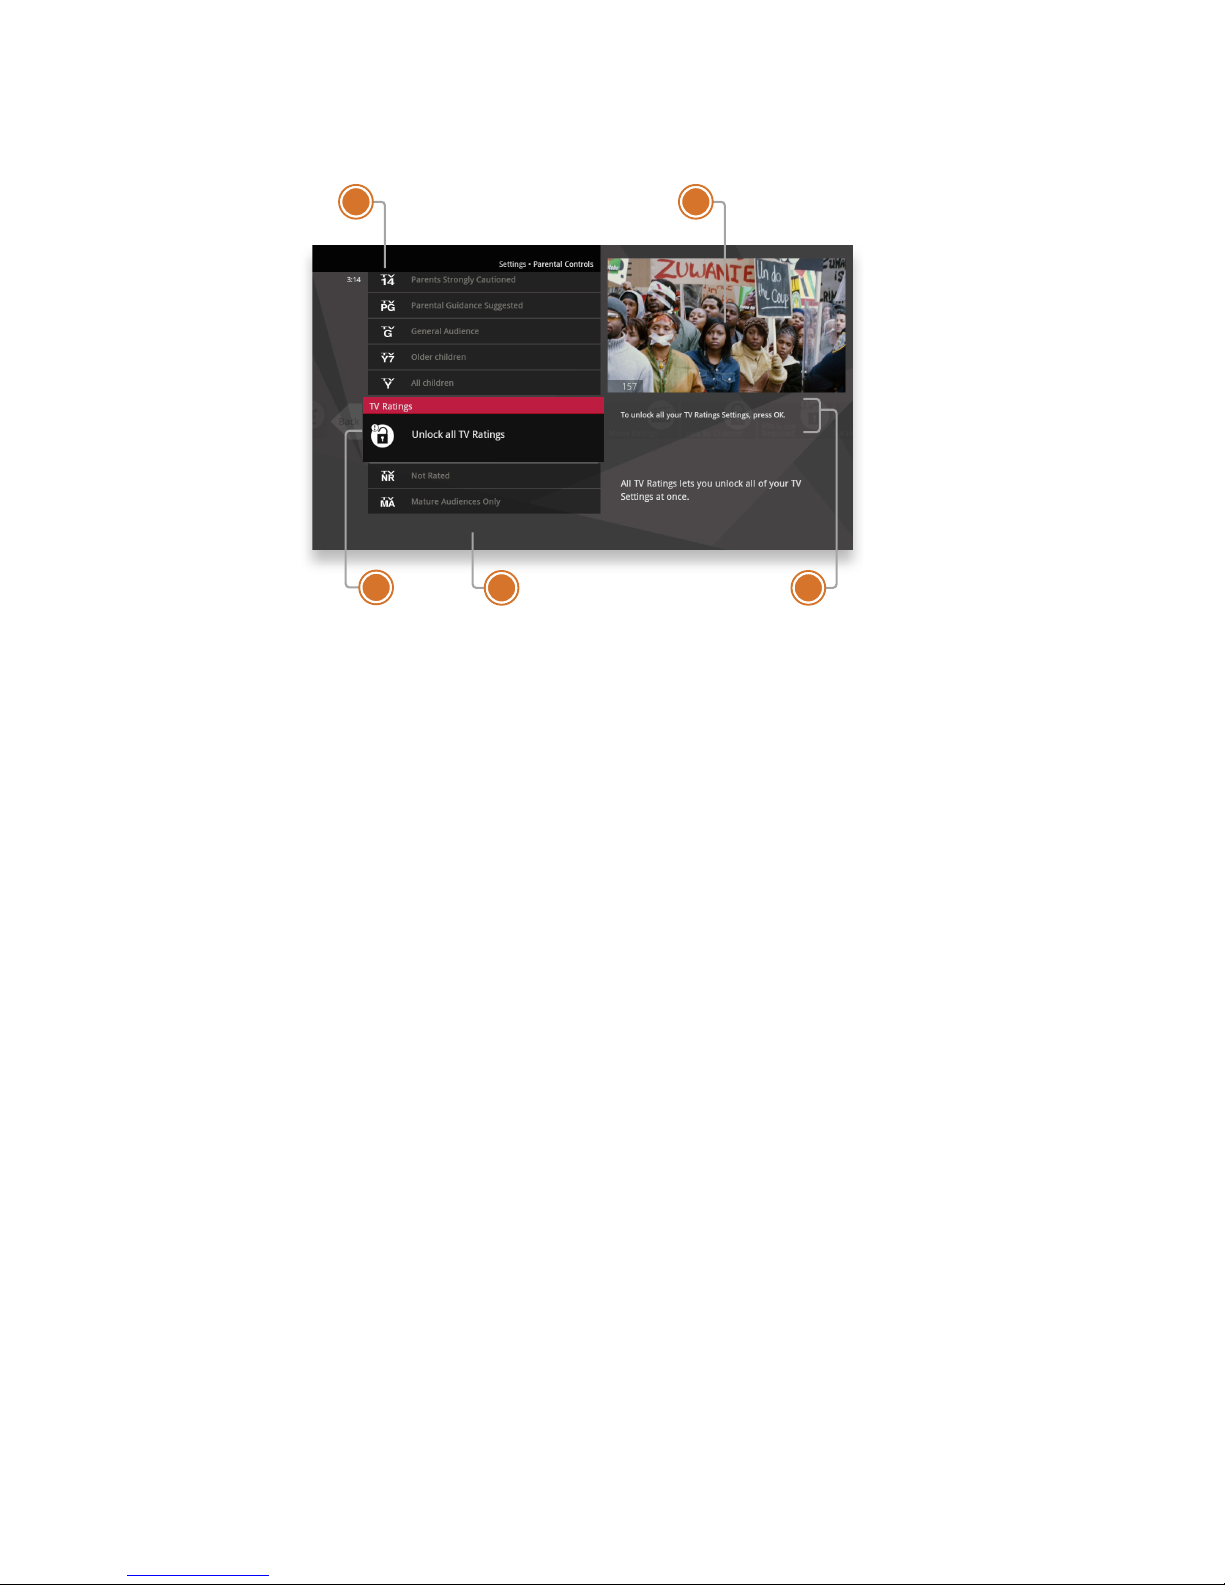
Parental Controls Layout
1. RATING
You can lock individual ratings by
pressing OK on the focus. Locking
a rating locks all higher ratings
above it.
2. MINI TV
Your current program, if unlocked,
will continue to play in the Mini TV.
3. LOCK ICON
The Lock icon displays if the item is
locked.
4. CATEGORY TITLES
Category titles display the parental
control category.
5. HELP
Help explains details about actions
to take.
Page 88

100
Working with your PIN
Creating a PIN
1. The first time you use Parental Controls (or purchase a PPV or VOD program),
the system asks you to create a PIN.
2. In the Settings category, scroll to the Parental Controls card and press OK.
3. Press the numbers on the remote to enter a four-digit PIN and then enter the
PIN again to confirm it.
4. Select close.
Changing a PIN
1. In the Settings category, scroll to the Parental Controls card, and press OK.
2. Select settings, use the left arrow to scroll left to the Change PIN card, and then
press OK.
3. Enter the old PIN, enter the new PIN, and then enter the new PIN again to
confirm it.
If You Forget Your PIN
1. Go to www.moxi.com, log in to your account, and click on the device whose
PIN you want to reset.
2. When the selected device’s summary screen appears, a Reset PIN button
displays at the bottom left. Click the Reset PIN button.
3. When the PIN reset is complete, a confirmation note appears. Parental Controls
are now unlocked.
4. Go to the Elevate menu and create a new PIN in order to re-lock Parental
Controls.
VOD/PPV PIN
You can choose to turn off the PIN prompt before a VOD or PPV purchase from the
Parental Control section. Select the On Demand/Pay Per View card and press OK
to turn the PIN prompt on or off.
Page 89

101
Locking and Unlocking Programs
Locking by Channels or by Rating
1. In the Settings category, scroll to the Parental Controls card, and press OK.
2. Choose settings. You’ll be taken to the Parental Controls menu. Use the right
arrow to choose either TV Ratings, Movie Ratings or Lock By Channel.
3. Each card contains a list of the rating systems or a list of channels. Scroll to the
format or channel you want to control.
Lock the rating or channel by choosing it, and then pressing OK on the remote.
When you lock a rating, all ratings for more restrictive content are also locked. For
example, if you lock the TVPG rating, then the TV14 and TVMA ratings are also
locked automatically, because these ratings are for more mature audiences than
TVPG. When unlocking, the reverse is also true.
If the V-Chip in your TV is enabled, you may see a black screen after tuning to a
channel with blocked content. No Elevate menu, flip bar, sound effects, or any
other audio or video are shown or heard. To correct this, change to an unblocked
channel, or disable all V-Chip functions and use the parental control features
provided by the Elevate system to regulate viewing.
Turning Off Parental Controls
To unlock or change all parental control settings, go to the Settings category, scroll
to the Parental Controls card, and then press OK. Follow these instructions to
unlock selected items:
1. Press OK with any locked program in focus.
2. Enter your PIN to unlock all programming temporarily or choose more options to
only unlock the current channel.
Unlock for a Specied Amount of Time:
1. In the Settings category, scroll to the Parental Controls card, and press OK.
2. Select settings (within Parental Controls), scroll to the Set Relock Timer card,
and press OK.
3. Enter your PIN, if prompted.
4. Select the unlock duration between one and six hours.
5. Once set, the Parental Controls category card displays the selected relock time.
Page 90
102
Menu Customization
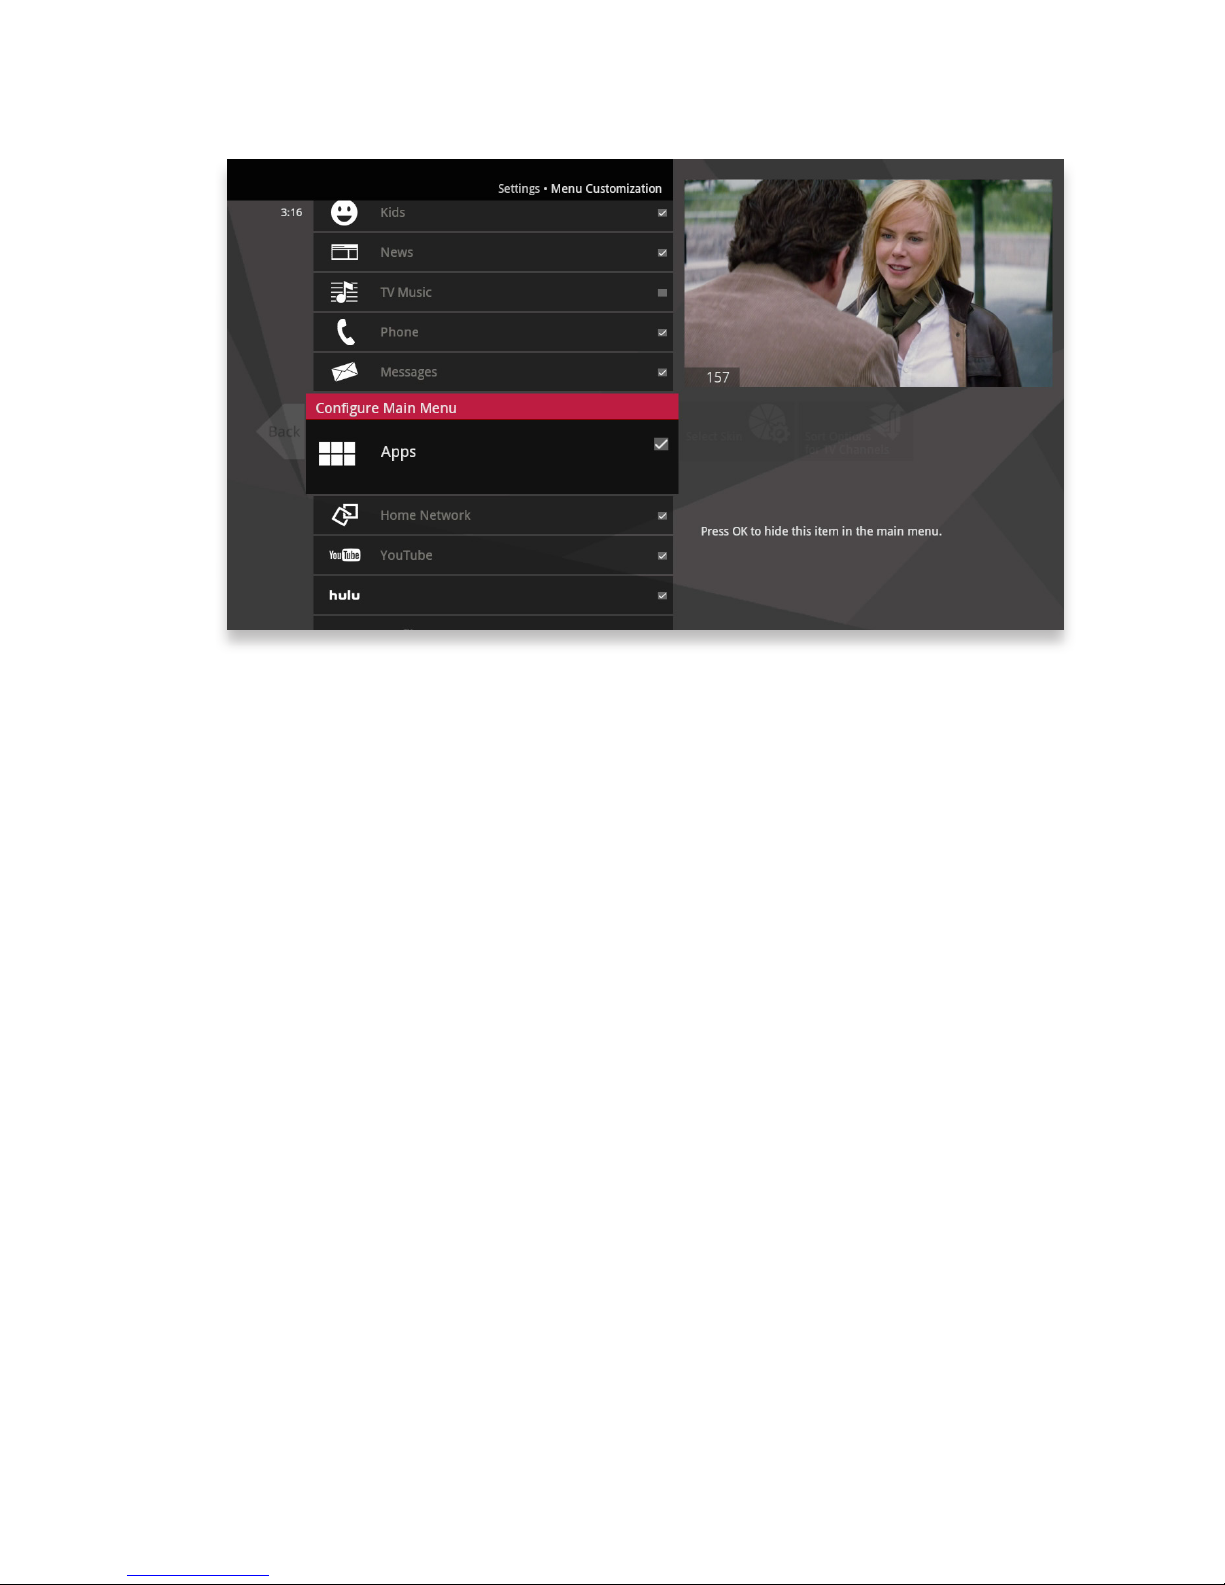
The Menu Customization feature in Settings allows you to configure your main
menu and choose how TV Channels display.
Congure the Main Menu
The main menu configuration section allows you to toggle each category on or off
for menu display. There are some categories, like Settings, that cannot be turned
off.
Sort Options for TV Channels
This feature allows you to choose whether the TV channels sort in ascending menu
up the vertical list or descending menu down the list.
Page 91
103
Recording Space
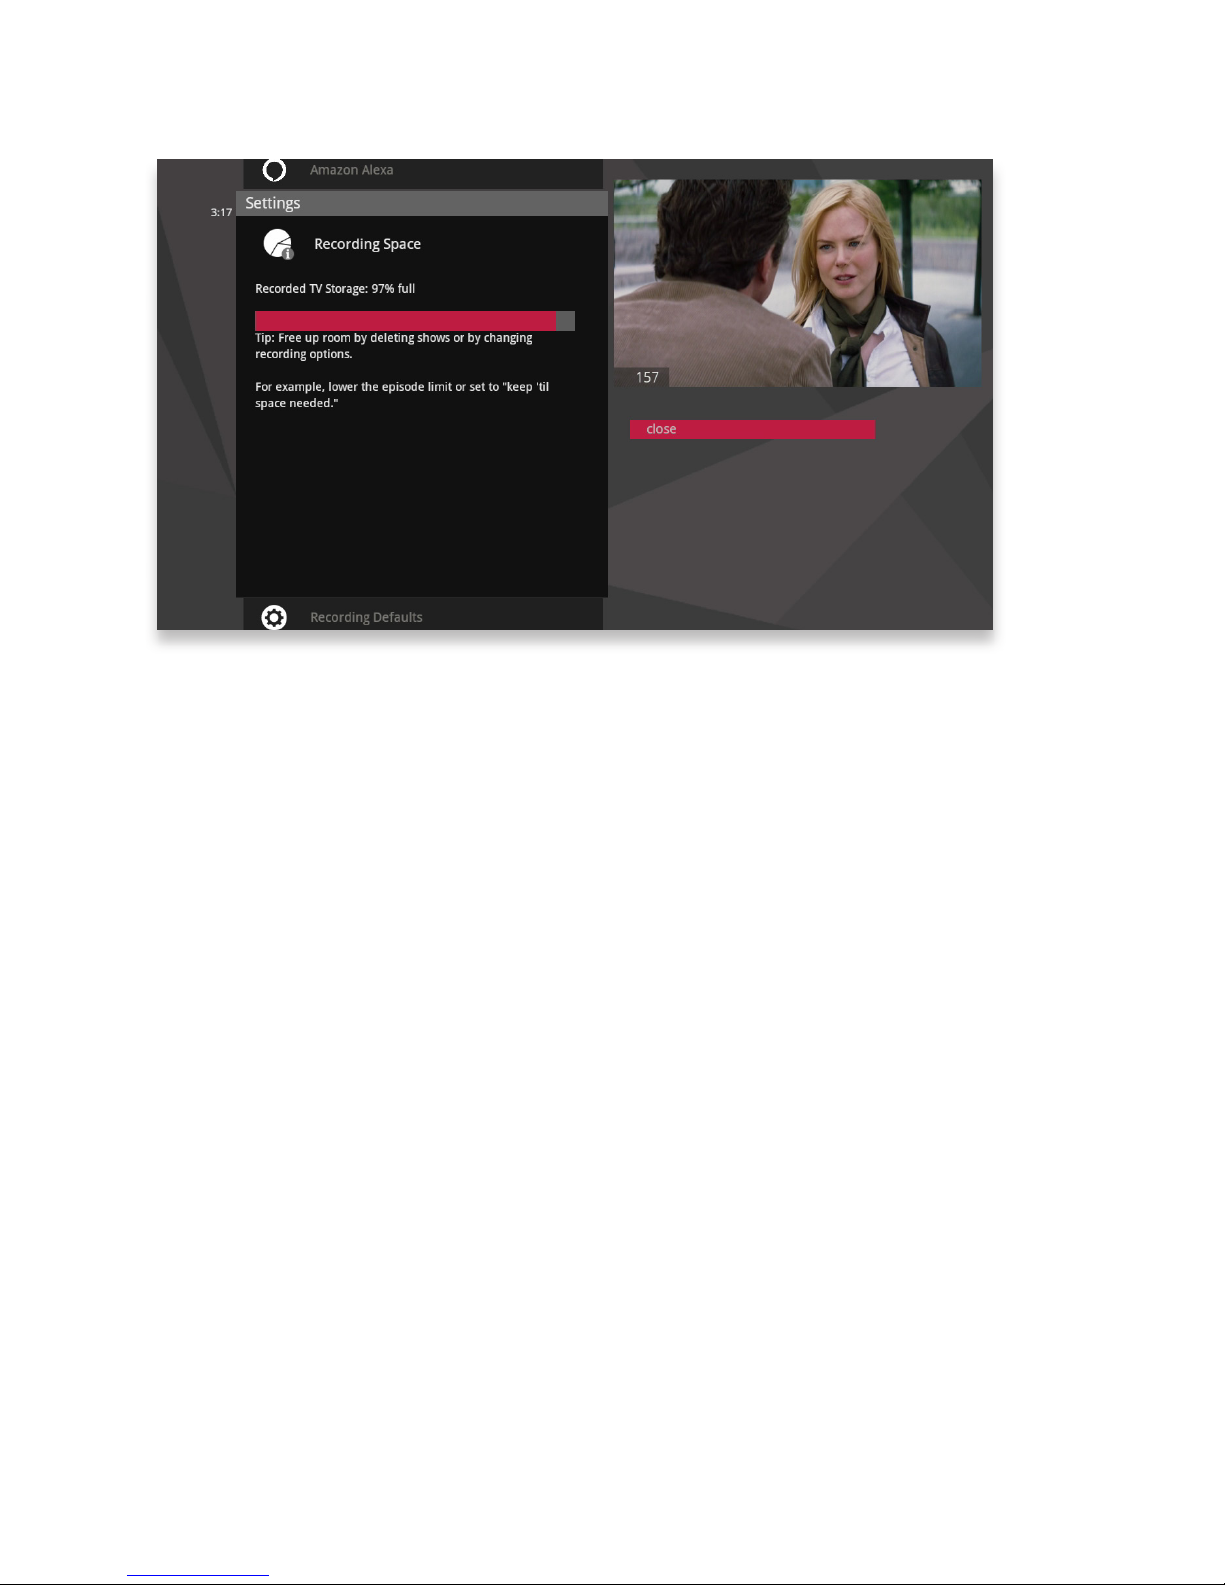
The Recording Space card displays the amount of Recorded TV storage space
used by recorded shows. In Settings, navigate to the Recording Space card and
press OK.
Mobile App
The Elevate Follow Me TV App allows you to use your tablet or smartphone as
a remote control for your media player. The Elevate Follow Me TV App card in
Settings helps you set up the application once you’ve downloaded and installed it
on your mobile device.
Access to Media Player
This setting allows you to turn off your media player’s ability to be controlled by an
alternate device, like your iPad.
Page 92
104
TV Setup
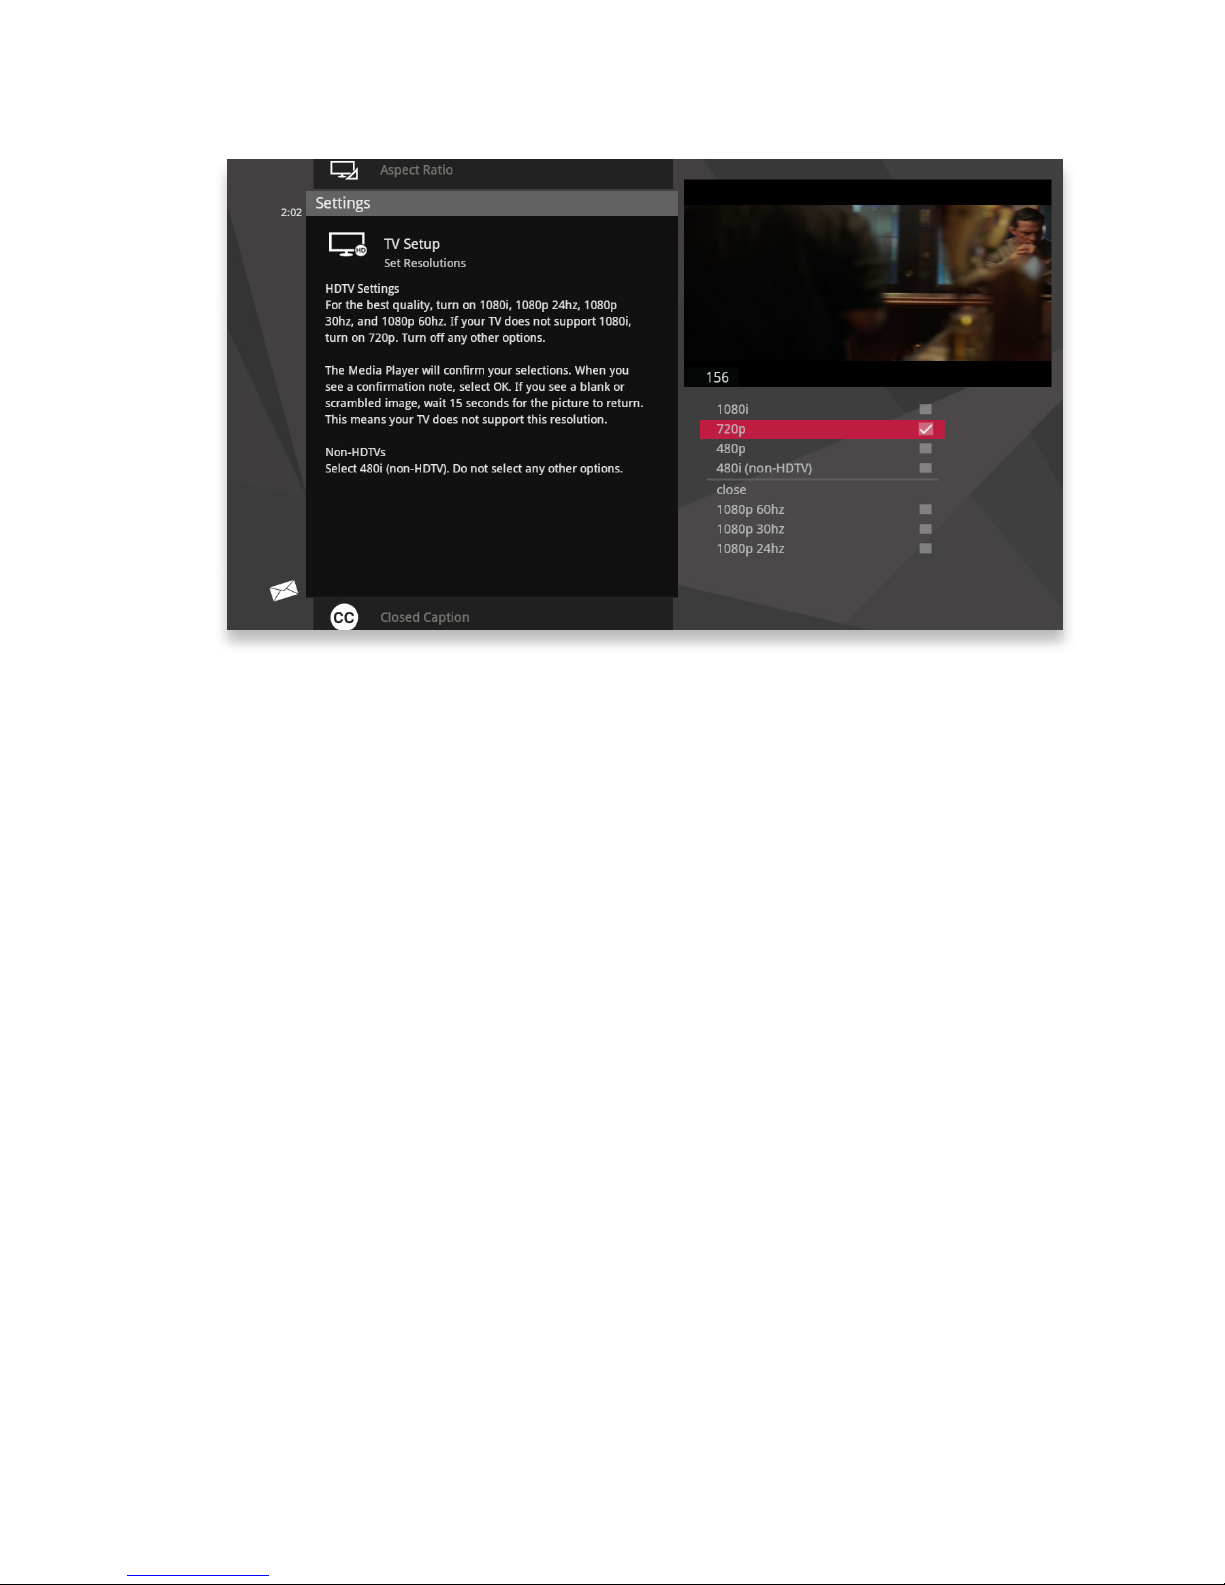
If you have connected the media player to your TV with an HDMI cable, your TV
Setup should automatically select the correct resolution.
If you are using alternate cables, including an HDMI-to-DVI cable, you should
select the highest video resolution supported by your TV. The Elevate system
automatically adjusts the video output to match the broadcast format and the
selections set in the TV Setup card. The video resolution options are 480i (non-
HDTV), 480p, 720p (default), 1080i, and 1080p.
If your TV is standard-definition (SD), make sure 480i is the only box checked. All
other video resolutions will be output at 480i. You can still watch HD channels and
they may look considerably better than their SD counterparts.
Sound Effects
Allows you to set the volume level of the media player sound effects, including
turning them off completely.
Front Panel
For media players that have a front panel, this setting allows you to set the
brightness level.
Page 93
105
Aspect Ratio
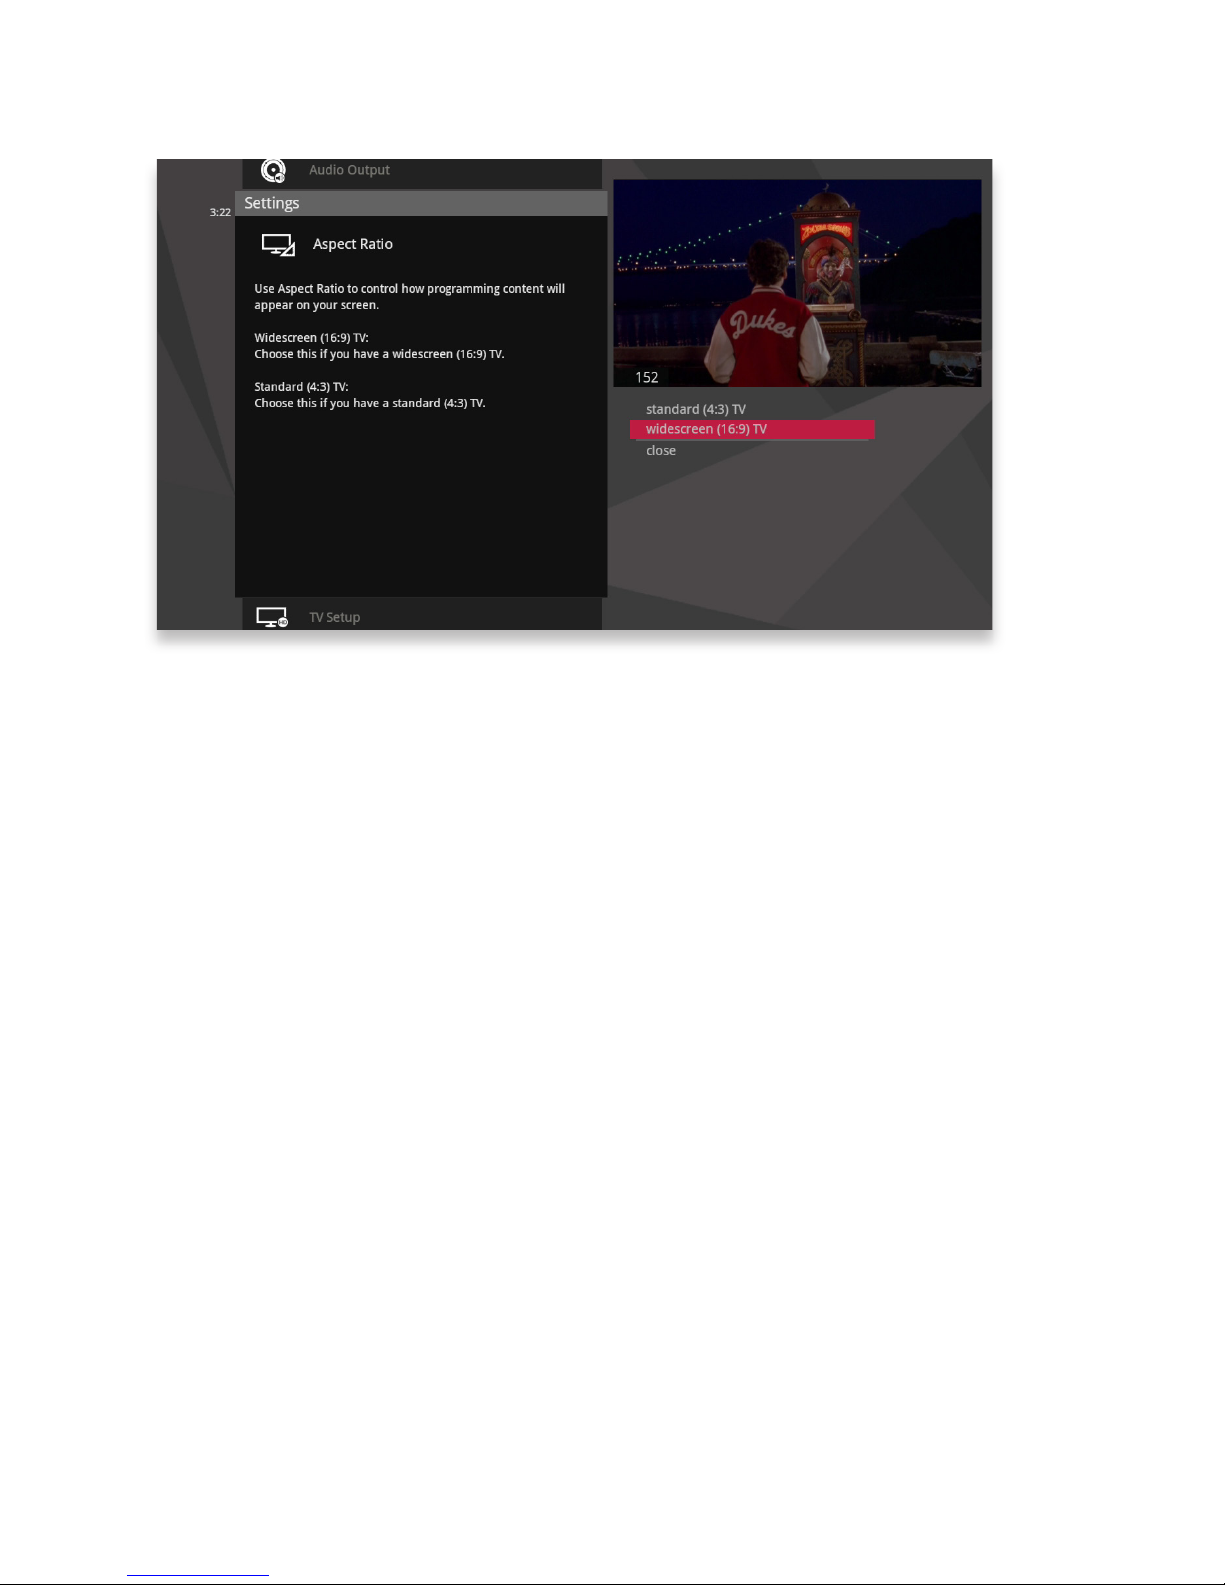
Use the Aspect Ratio card in Settings to control how programming content appears
on your TV. For standard-definition (SD) TVs, choose Standard (4:3) only. You’ll
then be asked to choose how you want HD content to display on your TV, either by
letterboxing (putting black pillars on the top and bottom of the content) or cropping
the content to fit.
For Widescreen TVs, determine how standard content displays on your TV by first
choosing Widescreen (16:9) and then selecting maintain (displays standard content
as-is), or stretch (stretches the standard content to fill the TV screen).
Page 94
106
Recording Defaults
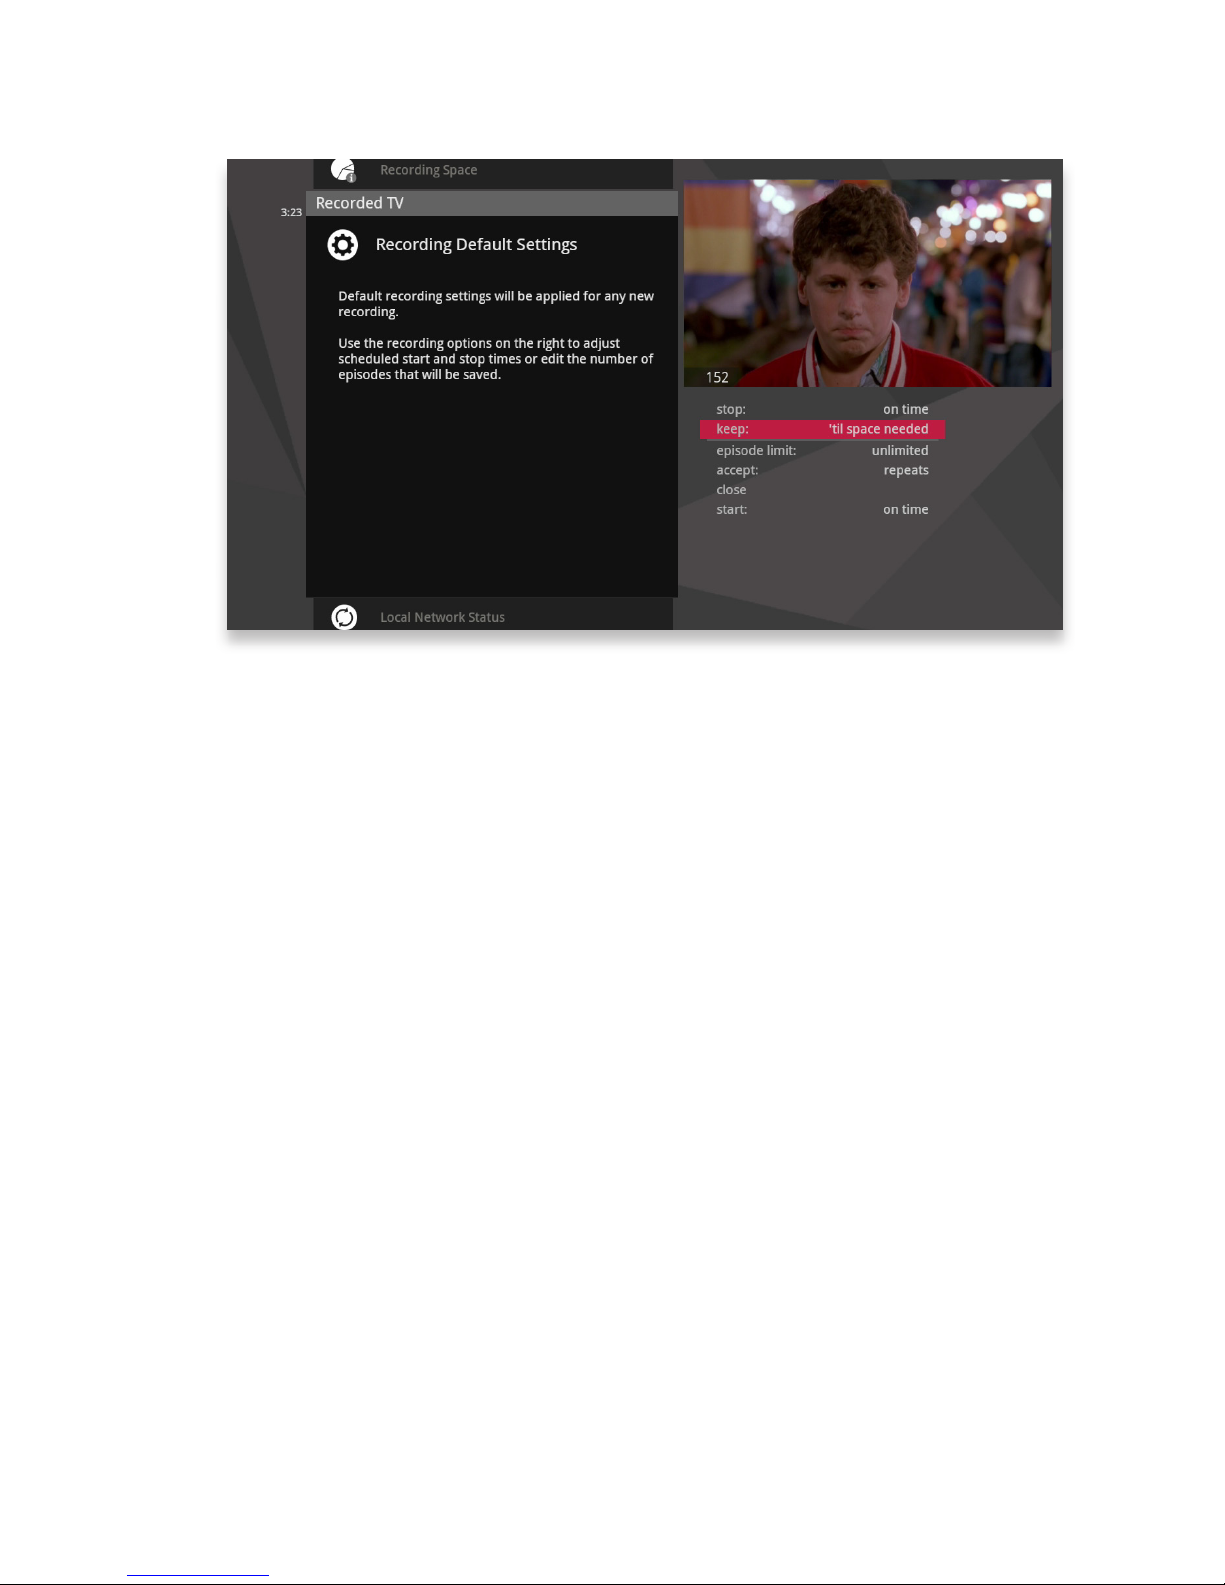
Recording Defaults provides access to the same settings that are available in
Recorded TV. See the “Recorded TV” chapter for details.
External Hard Drive
When you plug in an external hard drive, this setting will help you initialize setup, as
well as provide options for disconnection.
You may connect one external hard drive at a time to the rear eSATA port on the
media gateway.
Audio Output
Use the Audio Output card in Settings to identify the type of connection to audio
equipment. Choose from the options that the Elevate system can output: Dolby®
Digital/D+, stereo, or mono. Depending on the broadcast content and your audio
receiver’s capabilities, sound effects may not be heard when selecting Dolby Digital
as the audio output mode.
Advanced Settings
Use the Advanced Settings to change the audio range compression level. Setting
higher compression levels will limit the volume of loud sounds. Setting compression
to off will deliver a theater quality audio experience.
Page 95
107
Elevate Skill for Alexa
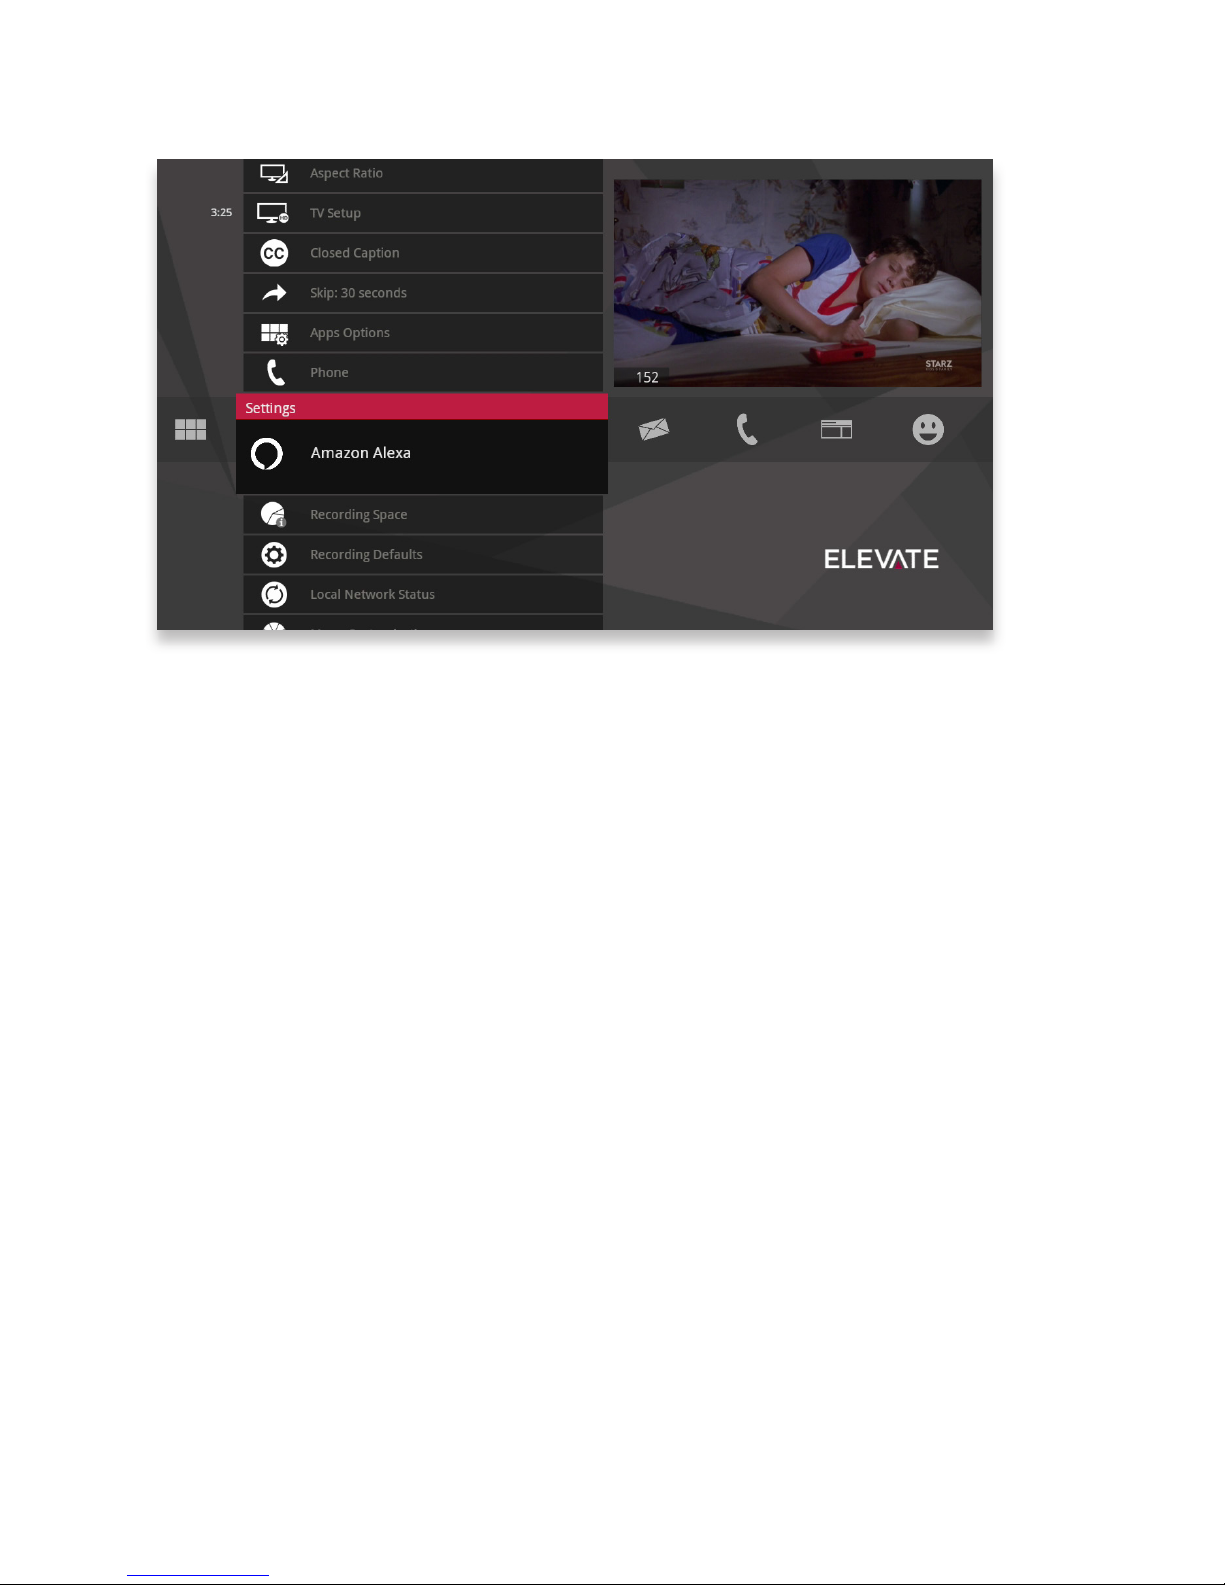
Enjoy next generation voice-controlled television on the Elevate platform with
Amazon Alexa. It takes only a few simple steps to set up. Here are just a few
things you’ll be able to do with voice commands:
• Search for the show or genre you want: “Alexa, find the Matrix”; “Alexa find
action”; “Alexa, find Tom Hanks.”
• Change the channel, for instance, “Alexa, tune to NBC.”
• Play DVR recordings.
• Control playback: “Alexa, pause”; “Alexa, fast forward 40 minutes,” and so
on.
Page 96
108
Grid Guide
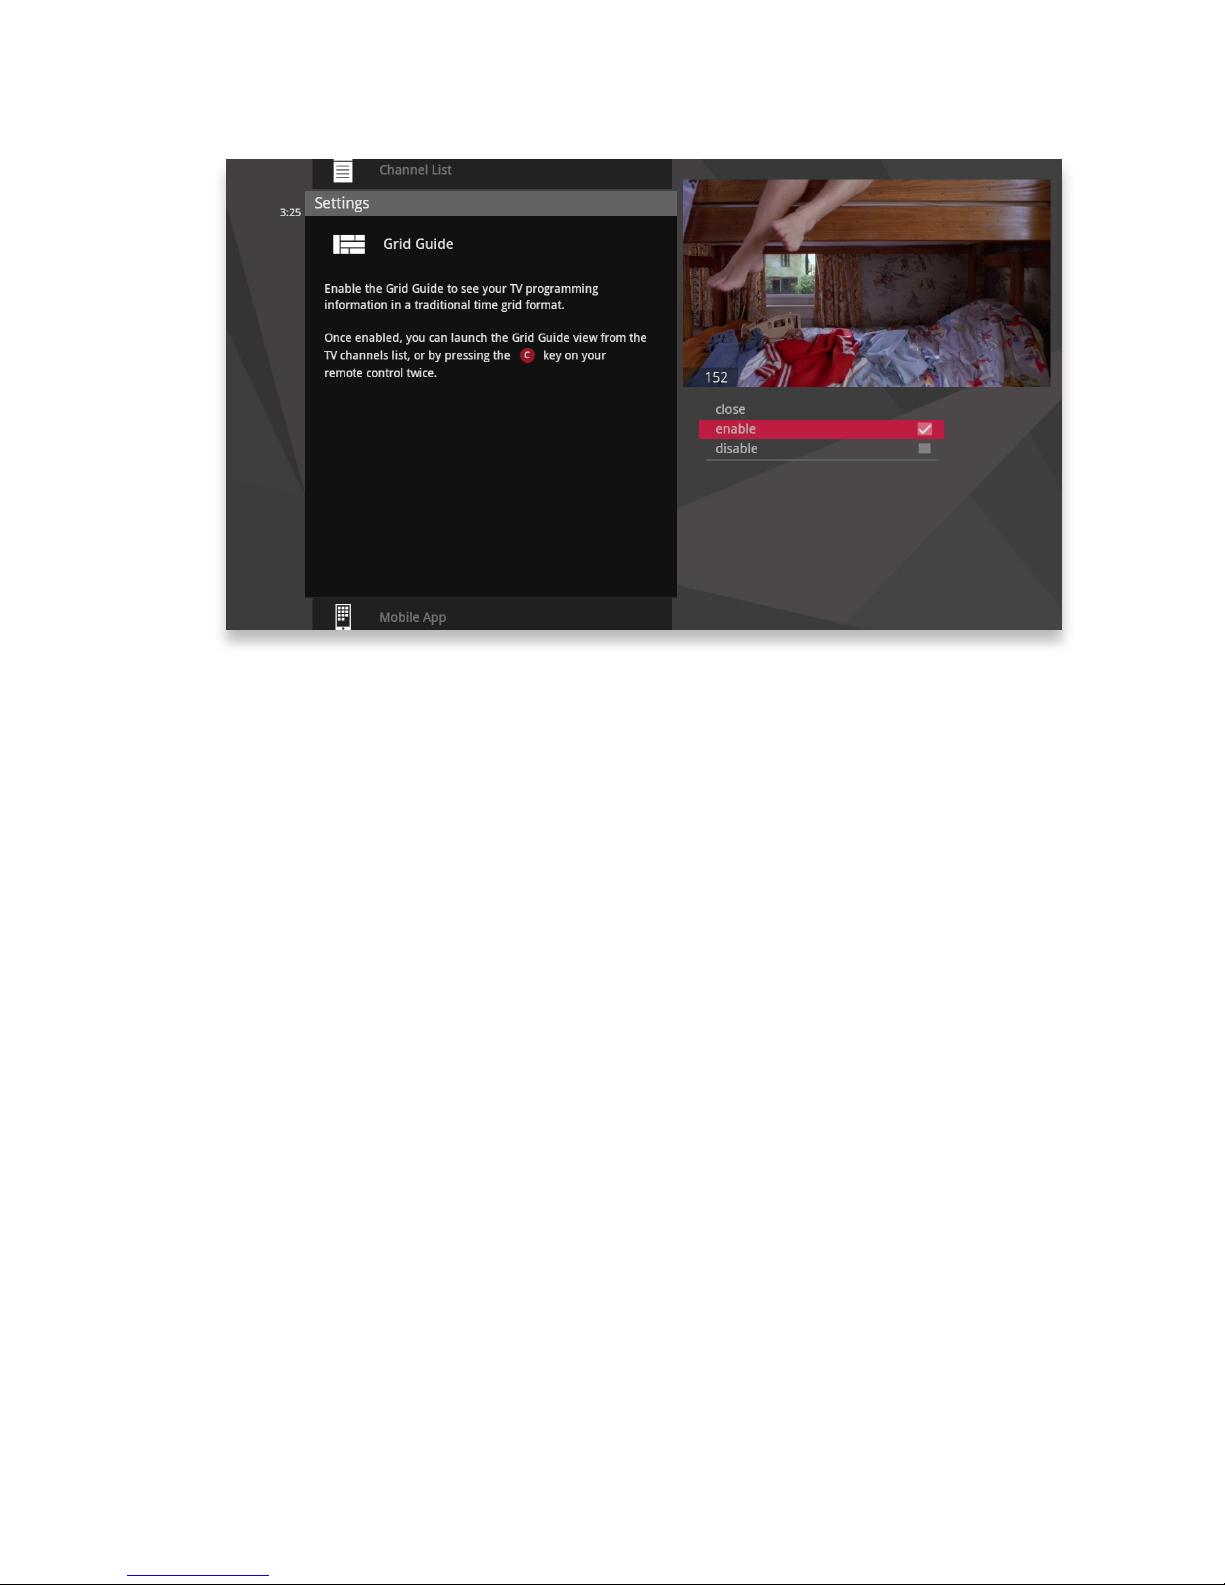
The Grid Guide setting allows you to enable or disable the Grid Guide application.
Channel List
You can remove channels from displaying in the Elevate Main Menu by scrolling
to the desired channel and pressing OK to select or de-select the channel. If a
channel appears in your Channel List that you do not subscribe to, you can remove
it here.
Tips
This category provides information on using your Elevate features. To read a tip,
scroll to one that interests you and press OK.
Page 97

109
Phone
Your Elevate system comes with Caller ID services. When you first begin using the
media player, on-screen caller ID is turned on by default. When you press OK with
the phone card in Settings selected, you’ll be able to turn off both the Caller ID and
Call List features for each individual phone line.
You’ll see each phone line listed along the horizontal band, with the options for
each in the vertical. To turn a feature off, press OK to clear it.
You’ll also be able to customize the display time for call indicators that appear when
you have an incoming call.
Skip
Pressing the SKIP button on the remote moves you forward in recorded or stored
programs in set increments. In Settings, navigate to the Skip card and press OK.
Select the increment you want to apply to the SKIP button on your remote.
Local Network Status
Local Network Status will provide information on your network connection and
allow you to reconnect or refresh that connection.
Page 98
110
Wireless Network Setup
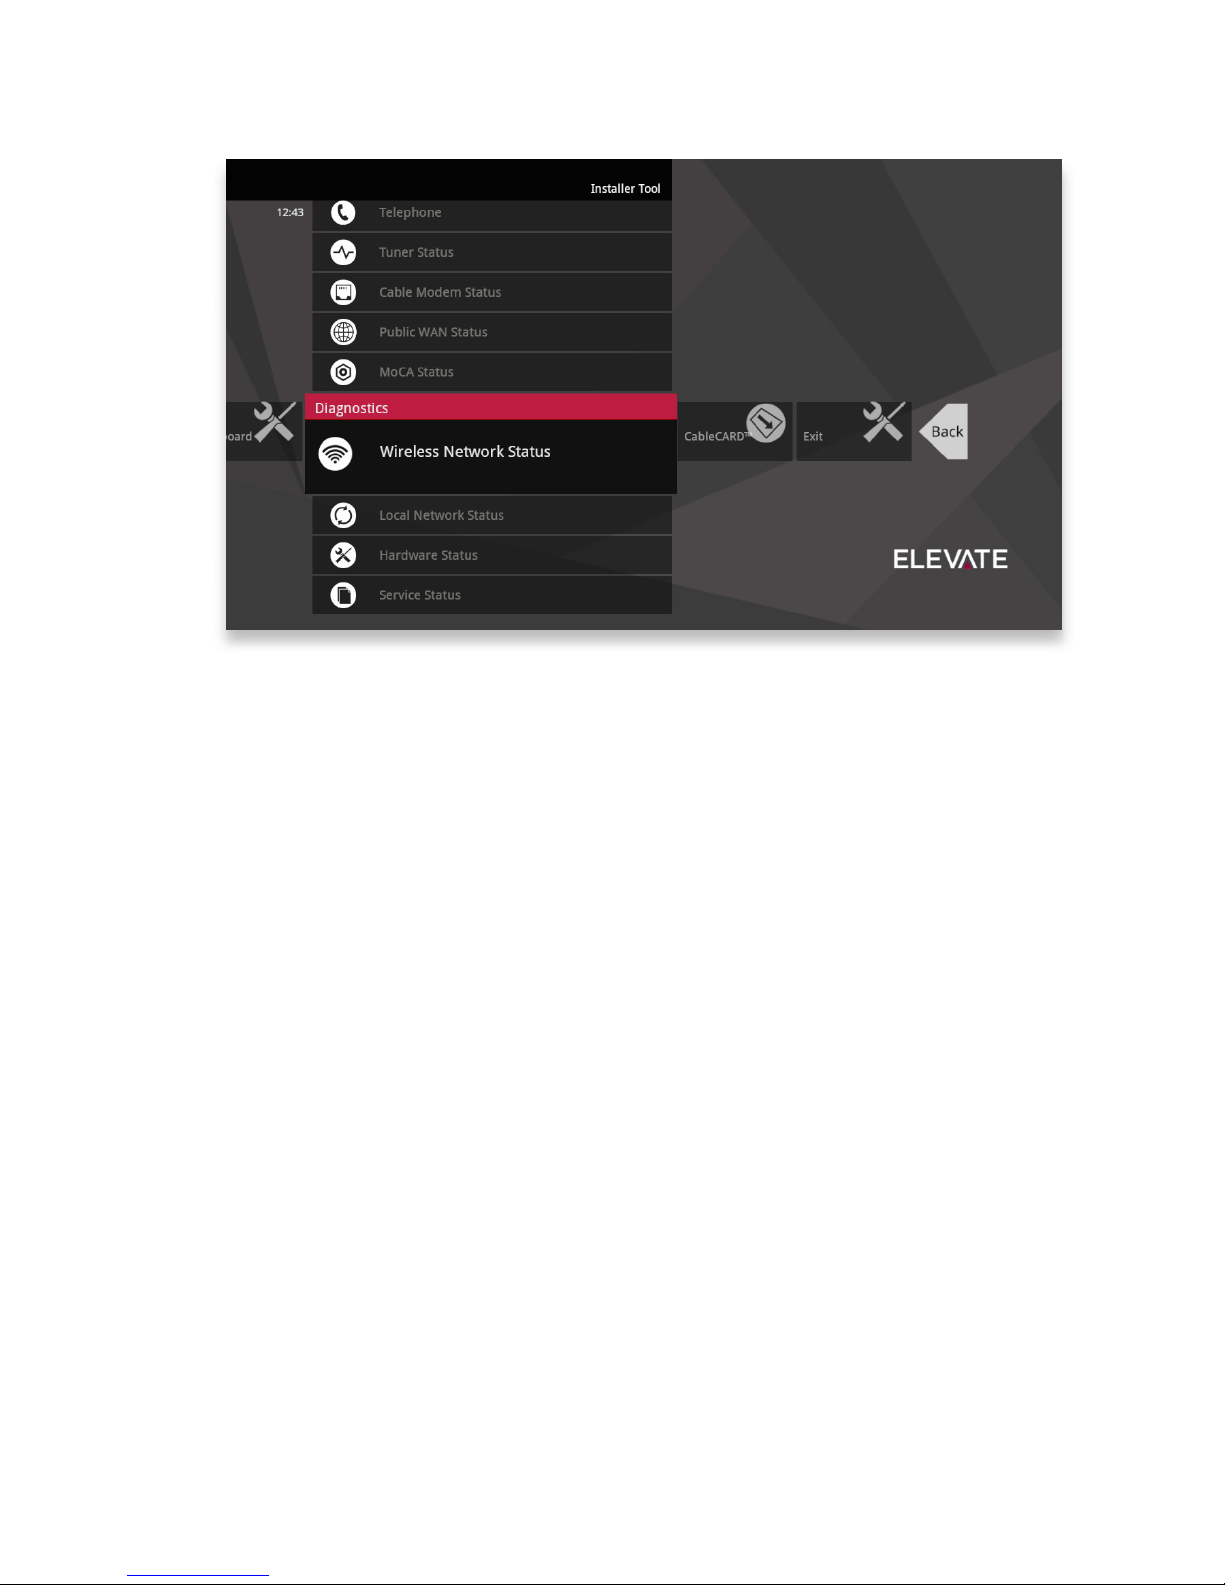
The Wireless Network Setup card provides you with instructions on connecting an
IP815 to your Wireless network (Wi-Fi). Once connected via Wi-Fi, the Wireless
Network Setup card will display the Status, Wireless Network Name (SSID), Signal
Strength and Bitrate for any connected IP815 (up to two IP815 devices may be
wirelessly connected at a time). It is recommended that any Wi-Fi connected IP815
have a minimum of “Good” Signal Strength and Bitrate while playing video through
your wireless network. The Wireless Network Setup card also displays information
about the media gateway bands and you can disconnect the IP815 Wi-Fi connection
from the card.
Page 99

112
Messages
You’ll receive a new message whenever there is information
from your cable provider, like the availability of a new feature.
Page 100
114
Receiving Messages
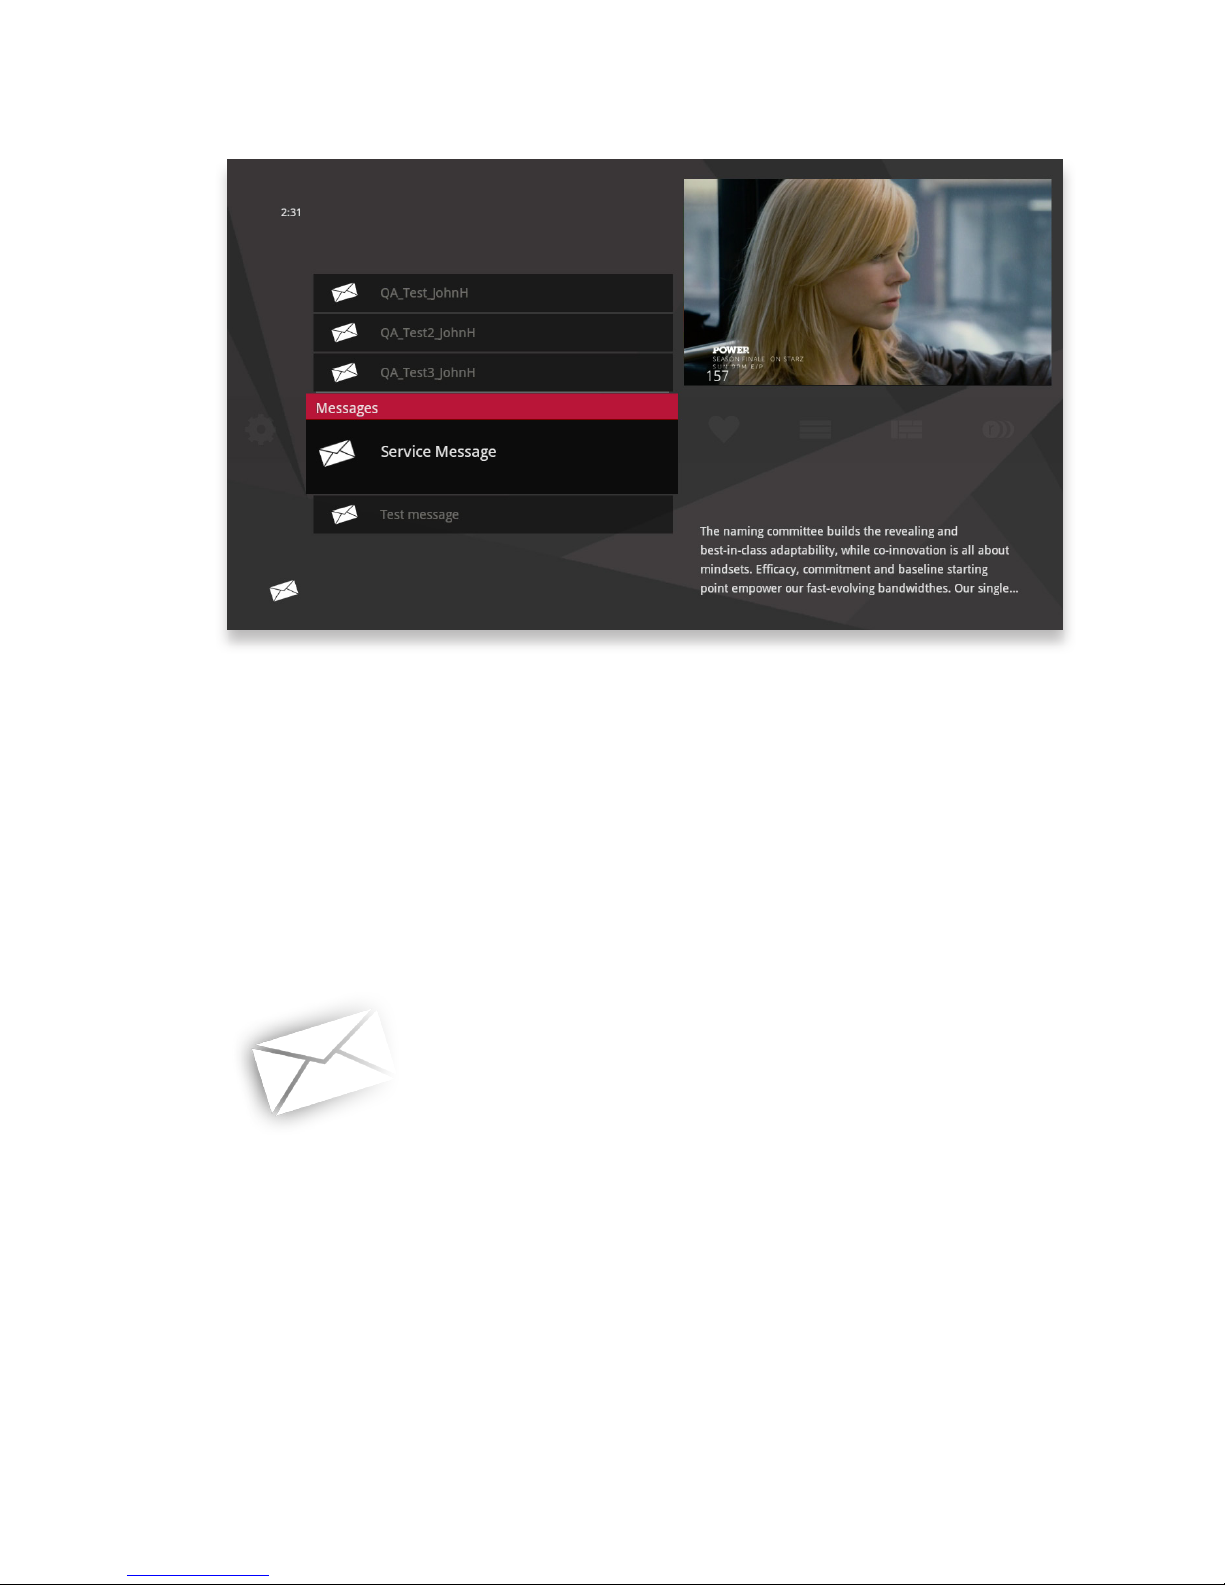
In order to view the Messages category, use the Menu Customization feature in Settings to toggle Messages on. (See the section on Menu Customization in the Settings
chapter.) Then the Messages category will be located in the main menu. Bring the
Messages category into focus and press OK on your remote control. Your messages
will appear in the vertical band. Press OK to view each message.
Use the NEXT and BACK buttons to page through the message.
Once you have read the message, you can choose to close the message, mark it as
unread, or delete it.
New Message
When you receive a new message, a mail icon appears at the bottom left of your
main menu.
As soon as you have read all your messages, the icon will disappear.
 Loading...