

Page 1
Hydronic 10/ Hydronic M (Water Heater)
Espar Heater Systems
P/N 20 2900 81 01 24 0B 02.2007 Subject to Change Printed in Canada
HHyyddrroonniicc 1100
25 2081 05 - 12 Volt
25 2044 05 - 24 Volt
TTeecchhnniiccaall DDeesscc rriippttiioonn
IInnsstt aallllaattiioo nn IInn ssttrr uuccttiioonnss
OOppeerraattiinngg IInnssttrruuccttiioo nnss
MMaaiinntteennaannccee IInnssttrruuccttiioonnss
TTr
roouubblleesshhoooottiinngg aanndd RR eepp aaiirr IInnssttrruuccttiioonnss
PPaarrttss LLiisstt
Espar Products, Inc.
6099A Vipond Drive
Mississauga, Ontario
Canada L5T 2B2
(905) 670-0960
(800) 387-4800 Canada & U.S.A.
(905) 670-0728 Fax
www.espar.com
HHyyddrroonniicc MM
25 2160 05 - 12 Volt
25 2161 05 - 24 Volt
25 2227 05 - 24 Volt
*
*
Page 2
This publication was correct at the time of going to print. However, Espar Inc. has a policy of continuous improvement
and reserves the right to amend any specifications without prior notice.
Table of Contents Page
Introduc tio n
Heater Warnings ........................................................ 3
Introduction ........................................................ 4
Specifications ........................................................ 4
Heater Components ........................................................ 5
Principal Dimensions ........................................................ 6
Installation Procedures
Heater Location ........................................................ 7
Heater Mounting ........................................................ 7
Heater Plumbing ........................................................ 8
Fuel System ........................................................ 9
Electrical Connections ........................................................ 11
Exhaust/Intake Connections ........................................................ 12
Operating Switches ........................................................ 13
Heater Operation
Pre-Start Procedures ........................................................ 17
71........................................................pU-tratS
71........................................................gninnuR
Switching Off ........................................................ 17
Safety Equipment ........................................................ 17
Operational Flow Chart ........................................................ 18
Wiring Diagram
(12V-24V boxed) ....................................................... 19
Wiring Diagram (12V-24V boxed-Universal) ........................................................ 20
Wiring Diagram (Engine heat only) ........................................................ 21
Wiring Diagram Universal ........................................................ 22
Maintenance,
Periodic Maintenance ........................................................ 23
Troubleshooting &
Basic Troubleshooting ........................................................ 23
Repairs
Self Diagnostic Troubleshooting ....................................................... 23
Fault codes/Description/Repair ........................................................ 24
Fuel Quantity Test ........................................................ 28
Repair Steps ........................................................ 28
Resistance Values ........................................................ 28
Heater Components
Parts Diagram ........................................................ 32
Description & Part #’s ........................................................ 33
Parts Diagram - Boxed units ........................................................ 36
Description & Part #’s ........................................................ 37
Parts Diagram - Universal ........................................................ 40
Description & Part #’s ........................................................ 41
Parts - Accesories ........................................................ 42
Description & Part #’s ........................................................ 43
Special Notes
Note:
Highlight areas requiring special attention or clarification.
Caution
:
Indicates that personal injury or damage to equipment may occur unless specific guidelines are followed.
Warning
:
Indicates that serious or fatal injury may result if specific guidelines are not followed.
Page 3

3
IInnttrroodduuccttiioonn
• Correct installation of this heater is necessary to ensure
safe and proper operation.
Read and understand this manual before attempting to
install the heater. Failure to follow all these instructions
could cause serious or fatal injury.
• Heater must be turned off while re-fueling.
• Do not install heater in enclosed areas where combustible fumes may be present.
• Do not install heaters in engine compartments of gasoline powered boats.
• Install the exhaust system so it will maintain a minimum
distance of 50mm (2”) from any flammable or heat sensitive material.
• Ensure that the fuel system is intact and there are no leaks.
• Route the heater exhaust so that exhaust fumes cannot
enter any passenger compartments.
• If running exhaust components through an enclosed
compartment, ensure that it is vented to the outside.
• The use of Espar coolant heaters requires that the
coolant in the system to be heated contains a proper
mixture of water and antifreeze to prevent coolant from
freezing or slushing.
• If the coolant becomes slushy or frozen, the heater’s
coolant pump cannot move the coolant causing a blockage of the circulating system. Once this occurs, pressure
will build up rapidly in the heater and the coolant hose
will either burst or blow off at the connection point to the
heater.
• This situation could cause engine damage and/or personal injury. Extreme care should be taken to ensure a
proper mixture of water and antifreeze is used in the
coolant system.
• Refer to the engine manufacturer’s or coolant manufacturer’s recommendations for your specific requirements.
WWaarrnniinngg TToo IInnssttaalllleerr
WWaarrnniinngg -- EExxpplloossiioonn HHaazzaarrdd
WWaarrnniinngg -- FFiirree HHaazzaarrdd
WWaarrnniinngg -- AAsspphhyyxxiiaattiioonn HHaazzaarrdd
WWaarrnniinngg -- SSaaffeettyy HHaazzaarrdd oonn CCoooollaanntt HHeeaatteerrss
UUsseedd WWiitthh IImmpprrooppeerr AAnnttiiffrreeeezzee MMiixxttuurreess
HHeeaatteerr WWaarrnniinnggss
CCaauuttiioonn
:
During electrical welding work on the vehicle
disconnect the power to the heater in order to
protect the control unit.
NNoottee::
All measurements contained in this manual contain metric and approximate SAE equivalents in
brackets eg 25mm (1”).
Direct questions to Espar Heater Systems:
CCaannaaddaa && UU..SS..AA.. 11--880000--338877--44880000
This publication was correct at the time of print.
However, Espar has a policy of continuous improvement and reserves the right to amend any specifications without prior notice.
Page 4
4
IInnttrroodduuccttiioonn
EEssppaarr’’ss HHyyddrroonniicc 1100 CCoooollaanntt HHeeaatteerr
Quality engineered to provide a dependable means of heating,
the Espar Hydronic 10 is a diesel fired coolant heater capable of
between 1.5 kW to 9.5 kW/hr (5,100 to 32,400 BTU/hr). The
heater can be purchased either in a weather resistant box to protect it from the elements and provide for ease of installation or in
the universal form.
This light weight and compact coolant heater offers an affordable
heating solution to many applications. The Hydronic 10 is ideal
for pre-heating the engines of class 7 and 8 trucks, off-road
equipment, buses, boats and in Fuel + Hydraulics in conjunction
with appropriate heat exchangers.
The heater pumps coolant from the engine, heats it and returns it
to the engine. It features automatic heat regulation while being
fuel and power efficient. Since the heater runs on diesel fuel and
12 or 24 volt power, it is able to perform this completely independently of the vehicle engine. A temperature regulating switch in
the unit regulates the coolant temperature between a low of 68°C
(154°F) and a high of 85°C (185°F) by automatically cycling the
heater.
The Hydronic 10 can be operated from the vehicle cab by an
on/off switch, a pre-select timer or a combination of both.
A flame sensor, temperature regulating sensor and overheat
sensor are among the safety features which makes the Hydronic
10 a safe and dependable heating system.
HHyyddrroonniicc 1100 SSppeecciiffiicc aatt iioonnss
HHeeaatt oouuttppuutt ((±±1100%%))
9.5 kW (32,400 BTU/hr)
-- BBoooo sstt
7.5 kW (25,600 BTU/hr)
-- HHiigghh
3.2 kW (10,900 BTU/hr)
-- MMeeddiiuumm
1.5 kW (5,100 BTU/hr)
-- LLooww
CCuurrrreenntt ddrra
aww ((±±1100%%)) 1122VVoolltt 2244VVoolltt
10.4 -
BBoooosstt --
5.2 amps
6.3 -
HHiigghh --
3.2 amps
3.5 -
MMeeddiiuumm --
1.8 amps
2.9 -
LLooww --
1.5 amps
FFuueell ccoonnssuummppttiioonn ((±±1100%%))
1.2 l/hr (0.32 USgal/hr)
BB ooooss tt
0.9 l/hr (0.24 USgal/hr)
HHiigghh
0.40 l/hr (0.11 USgal/hr)
MMeed
diiuumm
0.18 l/hr (0.05 USgal/hr)
LLooww
OOppeerraattiinngg VVoollttaaggee RRaannggee
MMii nniimmuumm VVoollttaaggee
10 V (20V on 24 volt systems)
MMaaxxiimmuumm VVoollttaagg ee
15 V (30 V on 24 volt systems)
CCoooollaanntt ppuummpp ffllooww ((±±1100%%))
1400 Litre/hr
370 U.S. Gal/hr
CCoooolla
anntt TTeemmppeerraattuurree RRaannggee ((±±55%%))
68-85°C (154-185°F)
OOvveerrhheeaatt ccoooollaanntt tteemmppeerraattuurree sshhuuttddoowwnn ((±±55%%))
115°C (240°F)
WWeeiigghhtt
6.5 kg. (14.3 lbs.)
CCoonnttrroollss aavvaaiillaabbllee
On/Off switch, 99hr. timer or 7 day timer.
NNoottee::
The heater is equipped with a high voltage
cutout as well a low voltage cutout.
Page 5
5
IInnttrroodduuccttiioonn
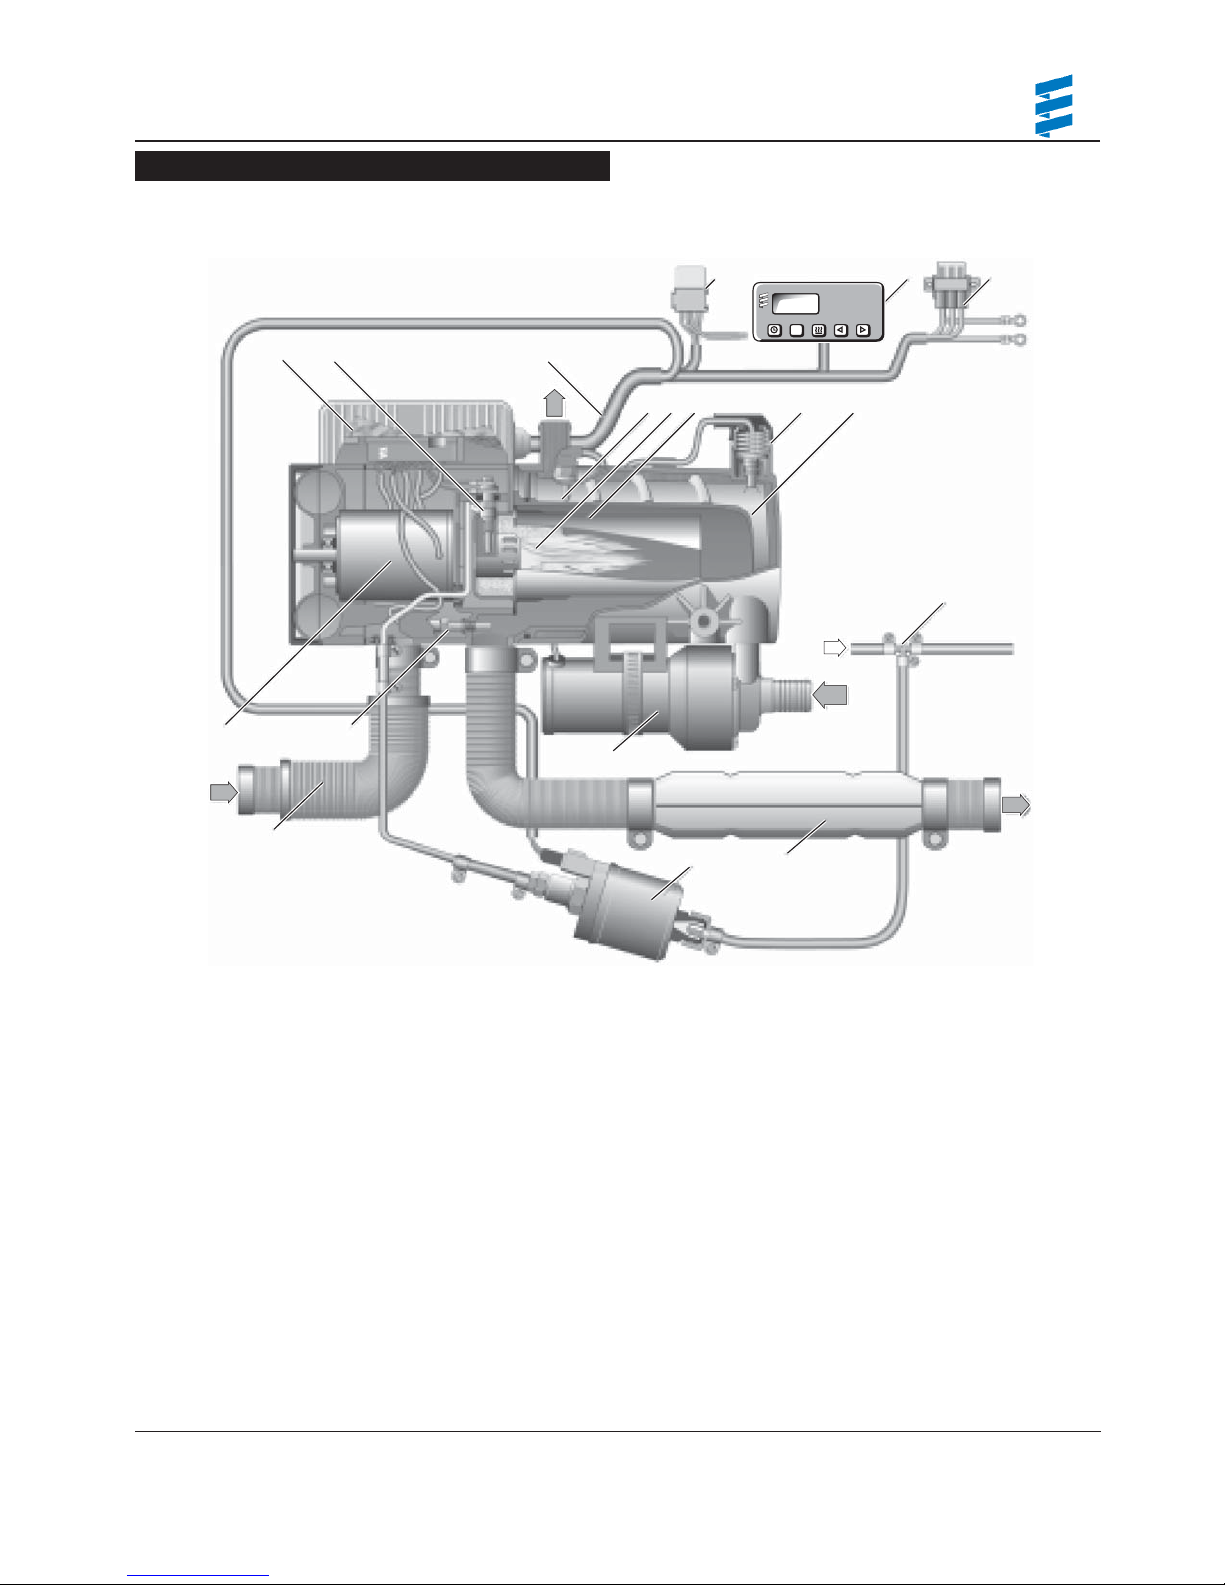
HHeeaatteerr CCoommppoonneennttss
1 Combustion motor
2 Flame sensor
3 Combustion chamber
4 Control unit
5 Heater plug
6 Temperature sensor
7 Flame tube
8 Heat exchanger
9 Overheating switch
10 Water pump
11 Exhaust silencer
12 Combustion air silencer
13 Fuel feeder pump
14 Fuel branch piece
15 Cable tree
16 Fuse bracket
17 Relay for switching on the vehicle’s fan
18 Automatic switch
WWEE == WWaatteerr iinnlleett
WWAA == WWaatteerr oouuttlleett
VV == CCoommbbuussttii oonn aaiirr
BB == FFuueell
AA == FFuummeess
45
12
V
15
17 18 16
we
09:20
P
+
–
67 9 8
V
3
14
B
WE
10
A
12
13
11
Page 6
6
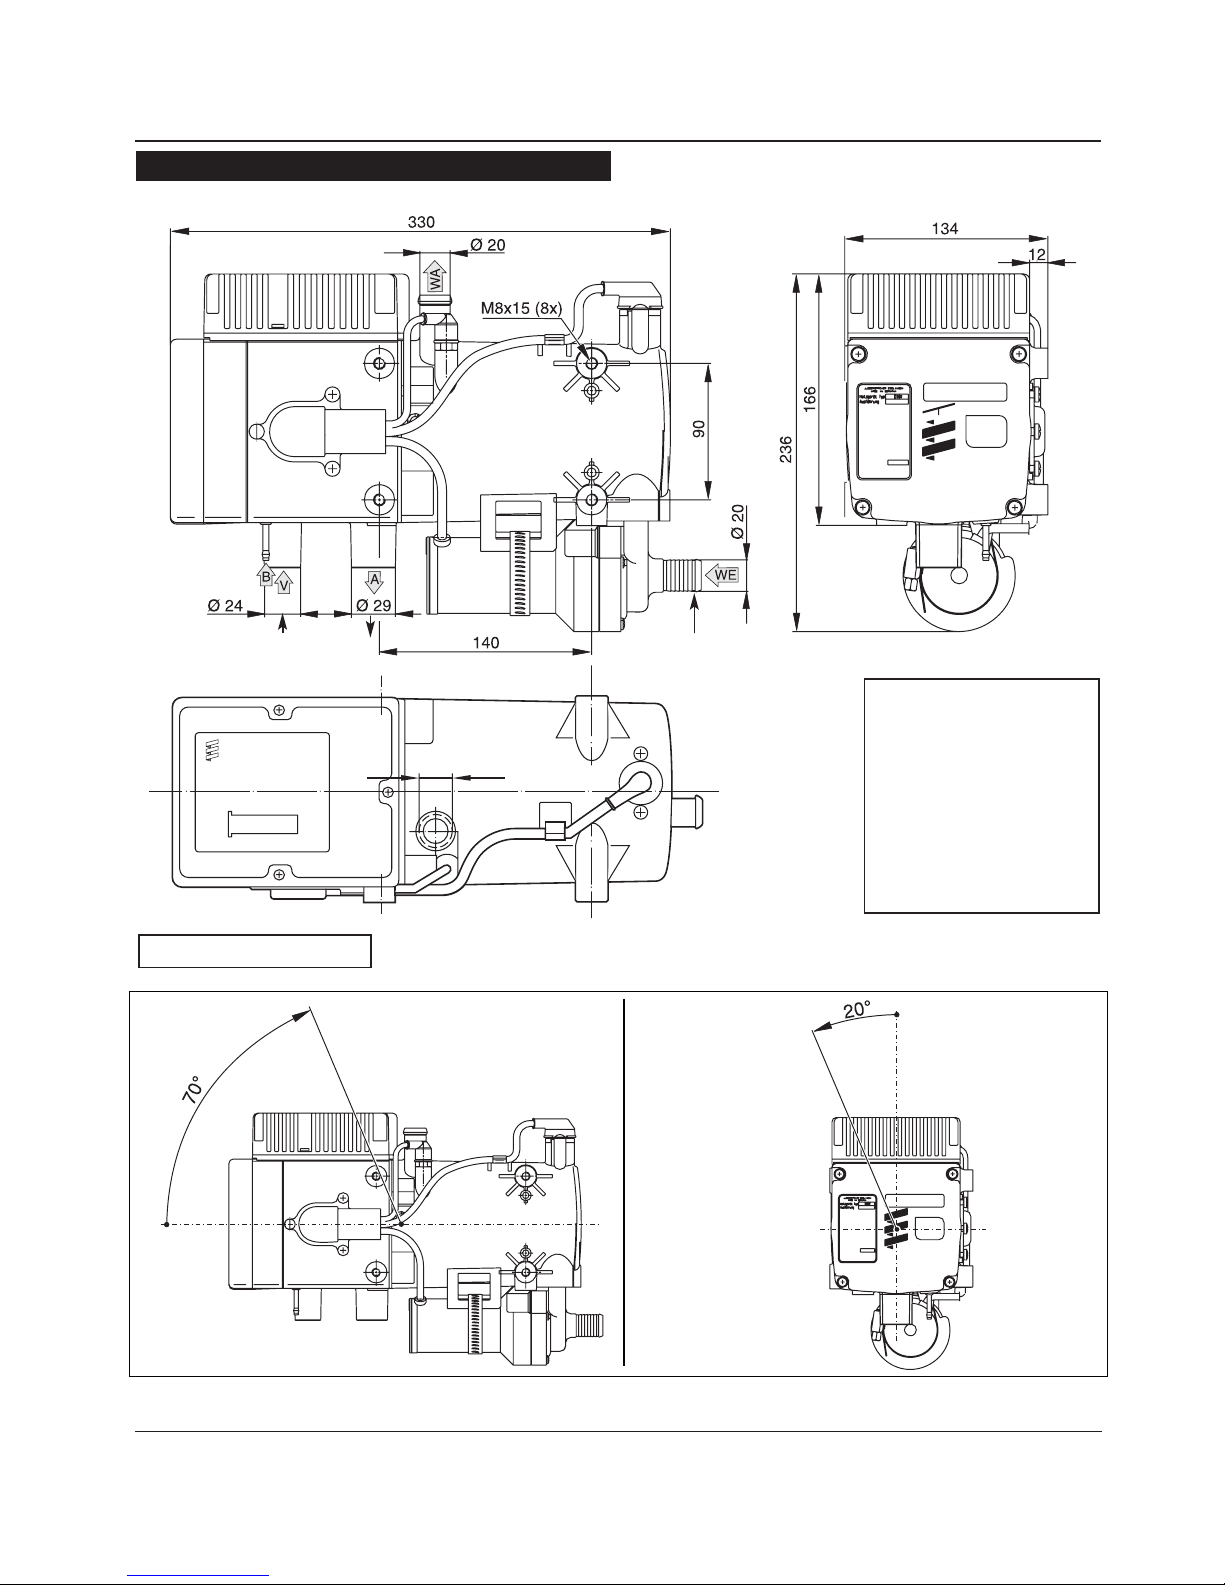
IInnttrroodduuccttiioonn
PPrriinncciippaall DDiimmeennssiioonnss
* All measurements in millimeters
25.4 mm = 1”
Minimum installation distance
(clearance) to open the lid and to
dismount the glow pin and the
control unit.
Minimum installation distance
(clearance) to take in heating air.
Permissible installation positions
Combustion air
Exhaust air
Water Inlet
HYDRONIC 10
*
20.2
Espar
HYDRONIC 10
Page 7

7
IInnssttaallllaattiioonn PPrroocceedduurreess
PPrriinncciippaall DDiimmeennssiioonnss -- BBooxxeedd VVeerrssiioonn
Always mount the heater in a protected area. Eg: storage
compartment, engine compartments, step box or battery box.
Espar recommends you use the boxed unit. Boxed heaters
can be mounted by utilizing one of the existing brackets. See
following page.
When mounting the heater adhere to the following conditions:
• Situate the heater below the normal coolant level of the engine.
• Guard against excessive road spray.
• Keep coolant hoses, fuel lines and electrical wiring as
short as possible.
Mount the heater using the four (4) shock mounts provided
and one of the following mounting methods:
• Use the
CCrroossss FFrraammee MMoouunnttiinngg TTrraayy
to mount the
heater behind the cab and on top of the frame rails.
• Use the
SSiiddee MMoouunntt BBrraacckkeett
to mount the heater on the
side of the frame rail.
• Use a spare step box or battery box.
• Use the saddle bracket and hardware provided
CCaauuttiioonn::
Guard the heater against excessive road
spray to avoid internal corrosion.
HHeeaatteerr LLooccaattiioonn
HHeeaatteerr MMoouunnttiinngg
CCrroossss FFrraammee MMoouunnttiinngg TTrraayy
P/N CA0 10 028
P/N CA0 10 022 with hardware
SSiiddee MMoouunntt BBrraacckkeett
P/N CA0 10 057
Espar Heater Systems
Page 8
8
IInnssttaallllaattiioonn PPrroocceedduurreess
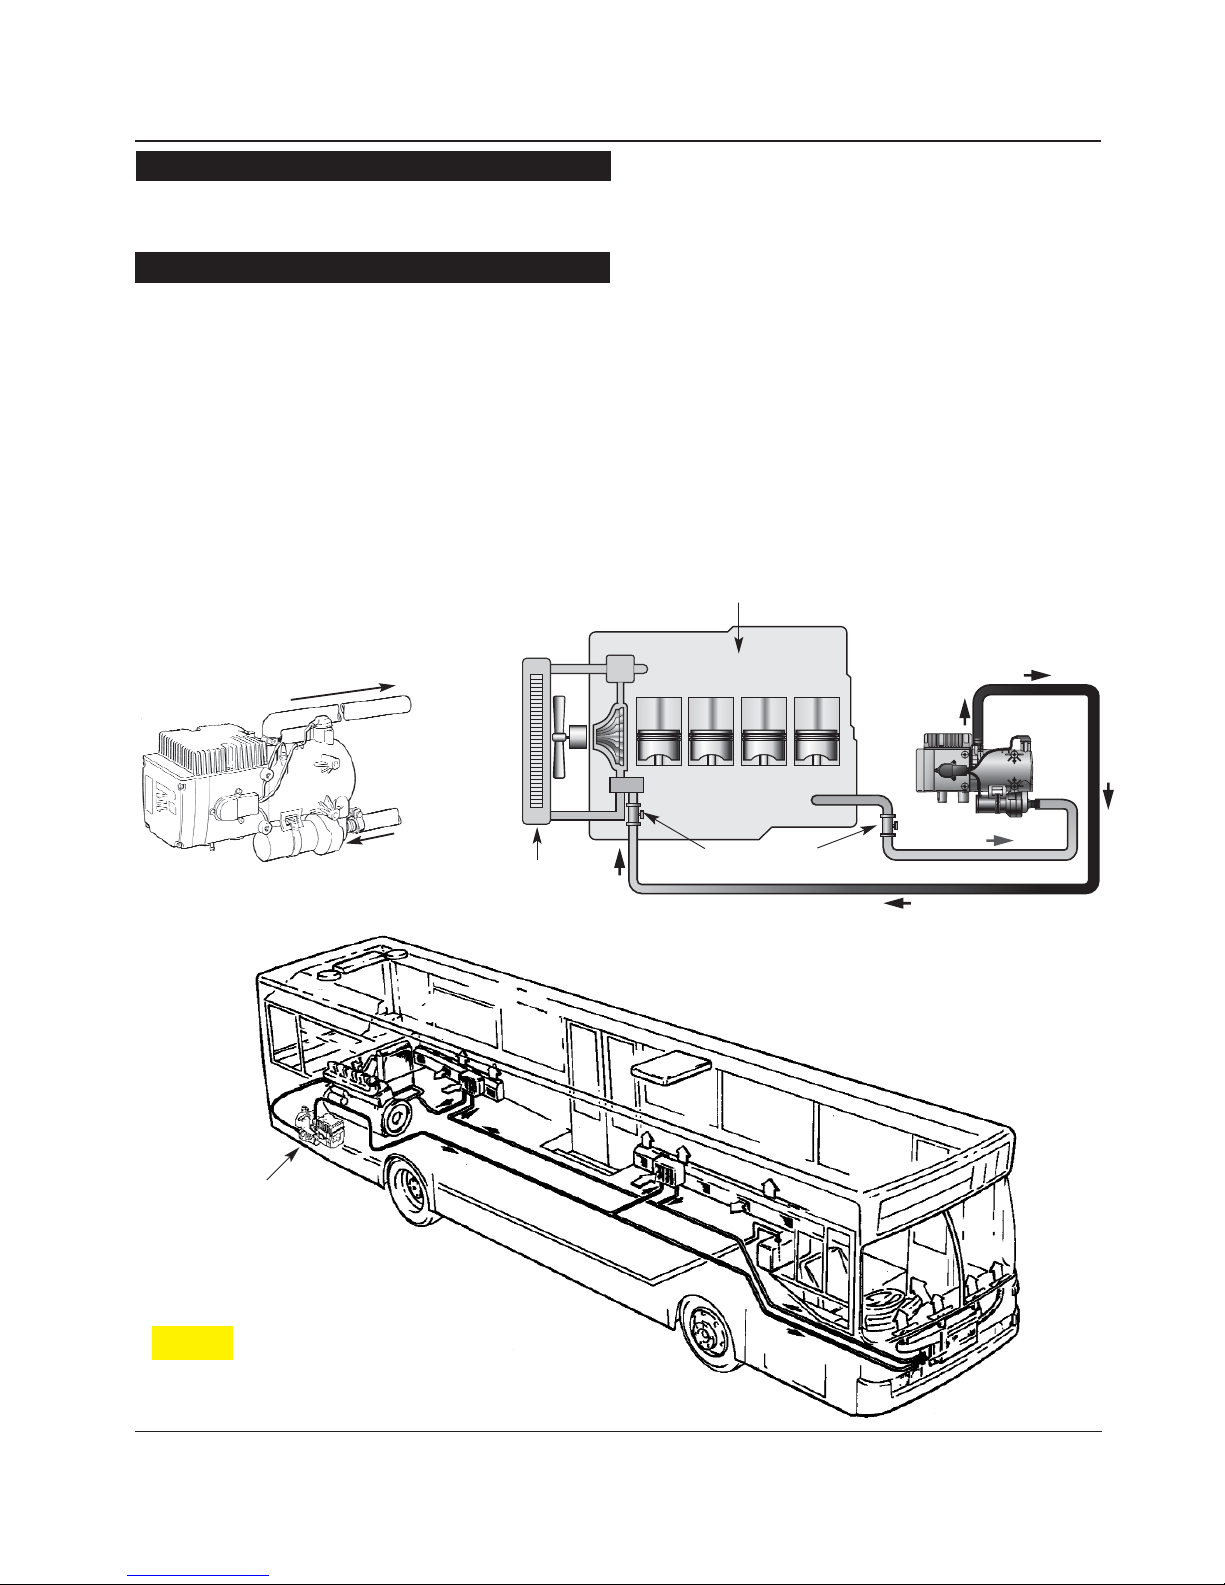
HHeeaatteerr PPlluummbbiinngg
Engine
Radiator
Shut-off valves
(Optional)
Hydronic 10
Water
Heater
The heater is incorporated into the engine’s cooling system for
engine preheating
Follow these guidelines and refer to the engine plumbing diagram shown below.
• Install hose fittings into the engine block for pick-up and
return lines.
• Use existing holes in the engine block (ie. remove
blanking plugs when possible).
• Use shut off valves to ensure the system can be isolated
from the engine when not in use. Alternatively “T” piece
connectors in existing coolant hoses can be used if no
blanking plugs are available
• Provide 20mm (3/4” ) hose barbs for hose connections.
• Use 20mm (3/4” ) hoses to ensure adequate coolant flow.
• Keep the pick up and return points as far apart as
possible to ensure good heat distribution.
• Take the coolant from a low point on the engine to reduce
aeration in the system.
• Ensure proper direction of coolant flow by taking coolant
from a high pressure point in the engine and returning it
to a low pressure point. (ie. pickup from back of block and
return to the suction side of the engine's water pump).
• Ensure adequate flow rate through the heater by
comparing the incoming and outgoing coolant
temperatures while the heater is running. If the rise in
temperature exceeds 10°C (18°F), coolant flow must be
increased by modifying the plumbing.
• Ensure the heater and water pump are installed as low as
possible to allow the purging of air.
• If a bunk heat exchanger is incorporated into the system,
proper plumbing layouts must be followed.
CCaauuttiioonn::
The coolant must contain a minimum of 10%
antifreeze at all times as a protection against
corrosion. Fresh water will corrode internal heater
parts.
Hydronic10
water heater
WWaatteerr iinn
WWaatteerr oouutt
EEnnggiinnee PPlluummbbiinngg
HYDRONIC 10
*
Page 9

9
IInnssttaallllaattiioonn PPrroocceedduurreess
FFuueell SSyysstteemm
FFuueell SSyysstteemm TToolleerraanncceess
FFuueell LLiinnee
NNoottee::
Butt joints and clamps on all connections.
• Route fuel lines from the fuel pick-up pipe to the heater.
• Use fuel lines provided.
• Other sizes or types of fuel lines may inhibit proper fuel flow.
• Make proper butt joints using clamps and connector pieces
as shown
• Use a sharp utility knife to cut plastic fuel lines to avoid burrs.
NNoottee::
Fuel line limits must not be exceeded.
Ensure that the following conditions are met.
Bottom of the fuel metering pump must be within
a height of 2’6” of the bottom of the fuel pick-up pipe.
Fuel metering pump must be within a total
distance of 6’6” from the fuel pick-up pipe.
Pressure Runs of less than 1.3 mtrs (50”) use
only 3.5mm rubber (360 75 300)
The Hydronic 10 boxed unit is most commonly provided with
the fuel metering pump mounted inside the box. This is to
reduce installation time and to protect the pump from corrosion.
If specifications cannot be met the pump must be mounted
externally. See illustration for connections and specifications. All
parts necessary to do the installation are included in the kit as
shown.
1. Fuel Pick-Up Pipe
2. 11mm Clamp
3. 5.0mm Fuel Line
4. Fuel Metering Pump
5. 9mm Clamp
6. 3.5mm Rubber Connector
7. 2.0mm White Plastic Fuel Line
See notes if length is less
than 1.3 mtr (50”)
Right Wrong
Correct
Bubble
Wrong
MAX. 2’6”
FUEL
TA N K
MAX. 6’6”
1
2
MAX. 6’6”
*
HYDRONIC 10
6
5
MAX. 20’
6
7
5
4
2
3
Page 10
10
IInnssttaallllaattiioonn PPrroocceedduurreess
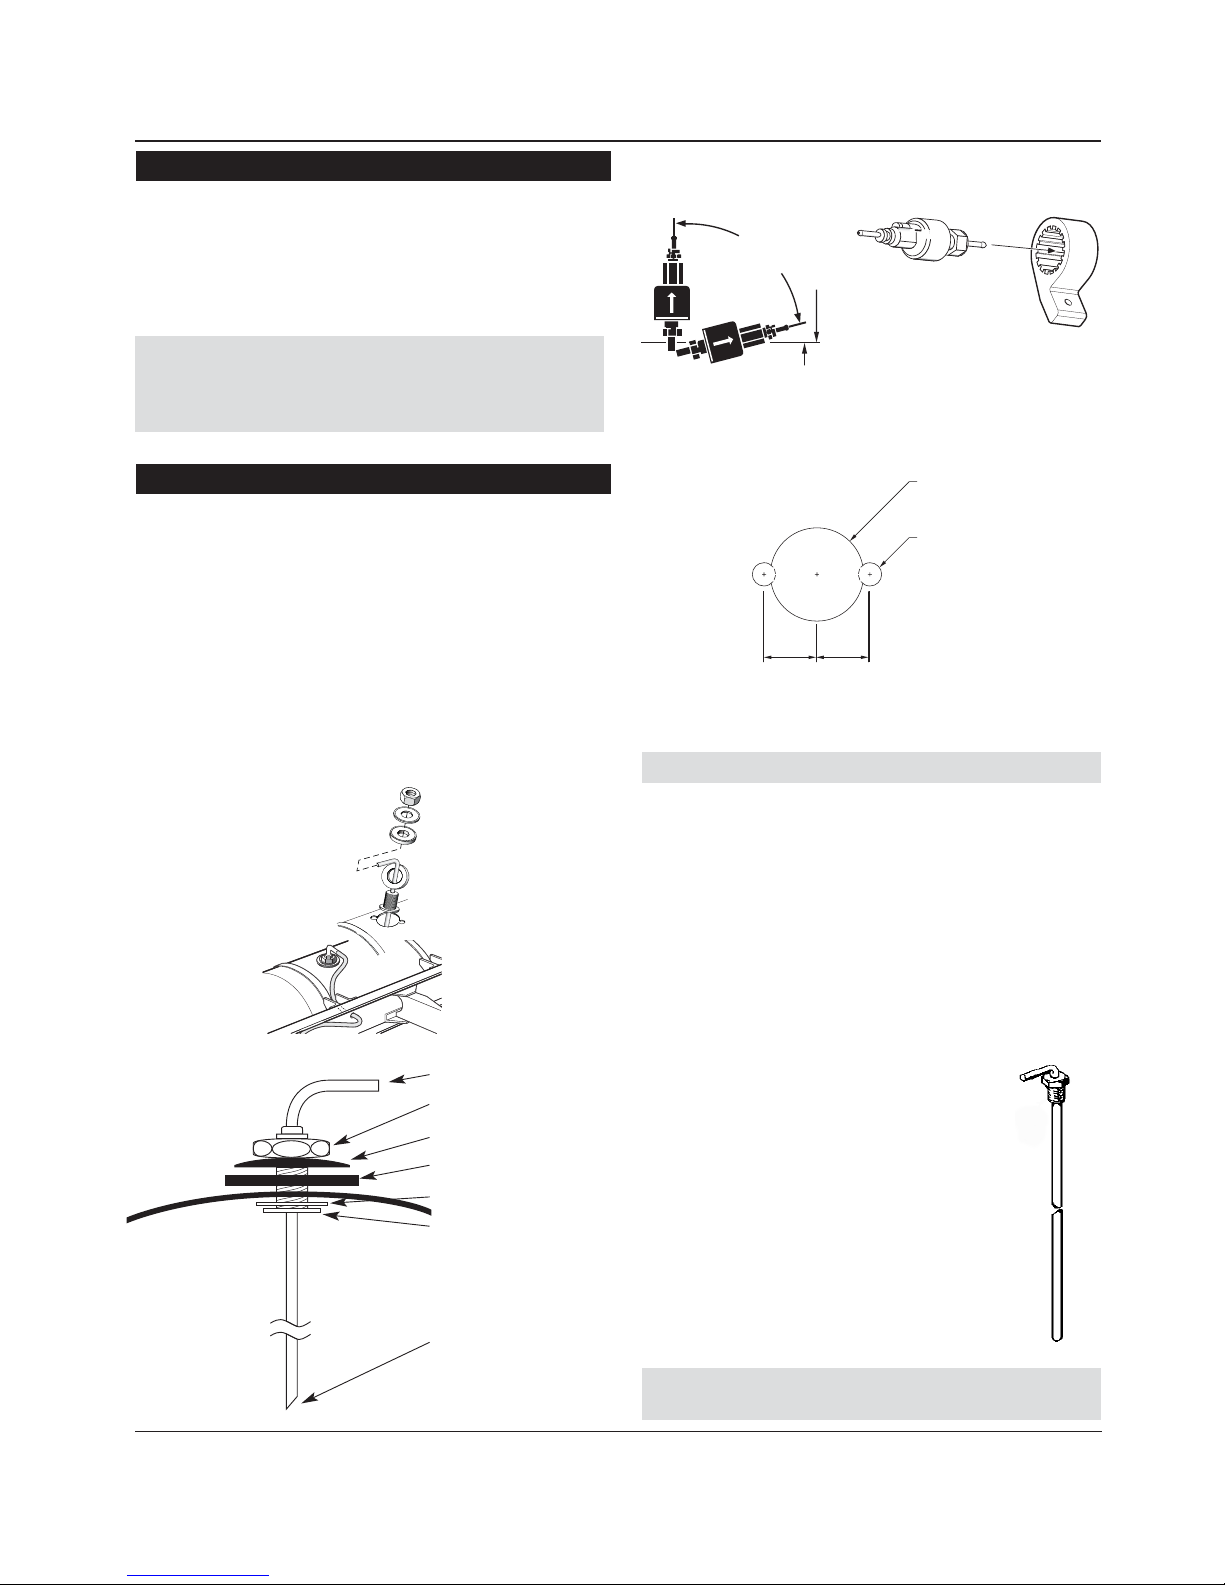
FFuueell MMeetteerriinngg PPuummpp IInnssttaallllaattiioonn
NNoottee::
Drill the two (1/4”) holes first.
(( OOppttiioonnaall PPiicckk--UUpp PPiippee wwiitthh NNPPTT ffiittttiinngg ))
• Remove an existing plug from the top of
the fuel tank.
• Cut the fuel pick-up pipe to length.
• Secure the fuel pick-up pipe into position
using the combined NPT compression
fitting as shown
NNoottee::
NPT fittings are available in various sizes
(Refer to parts section).
Fuel Pick-Up Pipe
Nut
Sheet Metal Washer
Rubber Gasket
Steel Safety Washer
Holding Tabs
Allow 4” from fuel pick-up
to tank bottom. Allow
only 1” for flat bottom
tanks.
End tip of the fuel pick-up
pipe should have angle
so as to avoid picking up
dirt and
subsequent blockage
FFuueell PPiicckk--UUpp PPiippee IInnssttaallllaattiioonn ((SSttaannddaarrdd PPiicckk--UUpp))
• Choose a protected mounting location close to the pump
and heater. A spare fuel sender gauge plate provides an
ideal mounting location.
• Drill the mounting holes as shown.
• Cut the fuel pick-up pipe to length.
• Mount the fuel pick-up pipe as shown
• Lower the fuel pick-up pipe (with reinforcing washer) into
the tank using the slot created by the two 0.6cm (1/4”)
holes.
• Lift the assembly into position through the 2.5cm (1”) hole.
• Assemble the rubber washer, metal cup washer and nut.
NNoottee::
Proper mounting angle of the pump is necessary
to allow any air or vapor in the fuel lines to pass
through the pump rather than cause a blockage.
If the pump needs to be mounted externally follow these guidelines:
• Choose a protected mounting location close to the fuel
pick-up pipe and heater.
• Using the bracket and rubber mount provided, install pump
as shown.
FFuueell PPiicckk--UUpp PPiippee IInnssttaallllaattiioonn
((SSttaannddaarrdd PPiicckk--UUpp))
15° to
vertical
1.5 cm 1.5 cm
9 / 16” 9 / 16”
15°
Ø 2.5 cm (Ø 1.0”)
Ø 0.625 cm
(2 HOLES)
(
Ø 1 / 4”)
Page 11
11
IInnssttaallllaattiioonn PPrroocceedduurreess
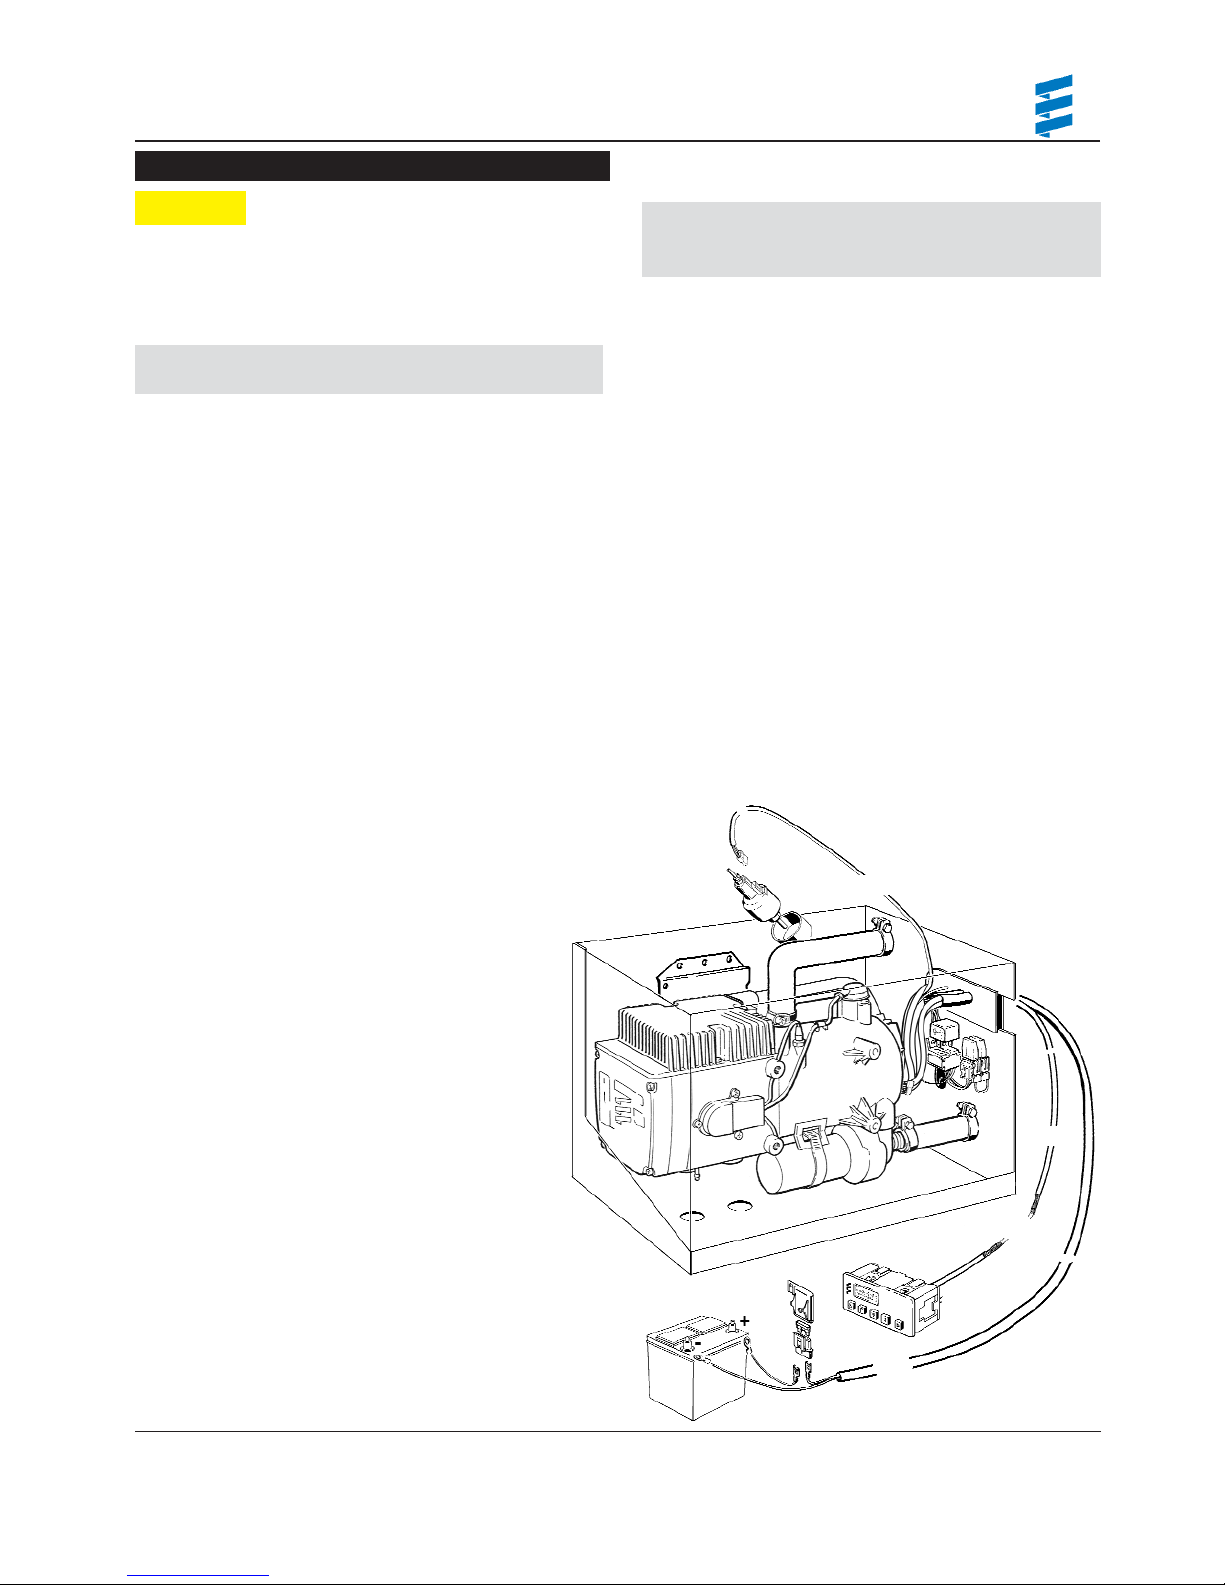
EElleeccttrriiccaall CCoonnnneeccttiioonnss
NNoottee::
All harnesses should be cut to length.
All exposed electrical connections should be
coated with protective grease.
• 2 core harness (red, brown).
• Connect red wire to fuse link and terminal.
• Attach ring terminal to vehicle battery (+).
• Connect brown wire to vehicle battery (-) using
ring terminal provided.
• Insert fuse. (15A-24V, 20A-12V)
• 4 core harness (red/yellow, brown, yellow, blue/white)
• Run to location of switch. Make terminal connections
at switch. Espar has 3 available switches. See switch
instructions for more information.
• 2 core harness (green, green).
• Fuel Metering Pump Harness is pre-connected when
box is provided with pump pre-mounted.
• If mounted externally, connect wires to fuel metering
pump using connector and terminals supplied, boots
provided with the heater-(no polarity required ).
77 DDaayy TTiimm eerr
77 DDaayy TTiimm eerr
sswwiittcchh hhaarr nneessss
AA
BB
CCaauuttiioonn::
To avoid potential short circuit damage during
installation, insert 20 amp fuse into the power
harness after all electrical connections are
complete.
AA)) PPoowweerr HHaarrnneessss......................................................................................................................................
BB)) SSwwiittcchh HHaarrnneessss.
...................................................................................................................................
CC)) FFuueell MMeetteerriinngg PPuummpp HHaarrnneessss......................................................................................
CC
Shown is a Hydronic 10 boxed version,12 volt with StandardPower, Switch, Fuel Metering Pump harnesses and optional 7 day
timer.
Other timers or switch options are available.
NNoottee::
Wire must be inserted into fuse holder prior to
terminating.
Page 12

12
IInnssttaallllaattiioonn PPrroocceedduurreess
EExxhhaauusstt CCoonnnneeccttiioonn
The exhaust is hot, keep a minimum of 5cm (2”) clearance
from any heat sensitive material. Failure to comply with this
warning could result in serious injury.
A 30 mm flexible tube exhaust pipe with a length of 1M long is
supplied with the kit for the exhaust. An exhaust clamp is needed
to secure the exhaust to the the heater.The exhaust hose cannot
be any longer than 2 m. Connect the exhaust as follows:
• Connect the exhaust pipe to the exhaust port on the
heater and attach with clamp provided. Feed the exhaust
pipe through the silicone (white) grommet on the bottom of
the box.
• Run exhaust to an open area to the rear or side of the
vehicle so that fumes can not build up and enter the
passenger compartment or the heater combustion air intake.
• Install exhaust pipe with a slight slope or drill a small hole
in the lowest point to allow water to run off. Any restriction
in exhaust will cause operational problems.
• Route the exhaust pipe from the heater using holders provided.
CCaauuttiioonn::
Run exhaust so that it cannot be plugged
by dirt, water or snow. Ensure the outlet does
not face into the vehicle slip stream.
Route exhaust beyond the skirt of the cab and outside of the
frame area. Route exhaust so that the exhaust fumes cannot
enter the passenger compartment. Failure to comply with
this warning could result in Asphyxiation.
Universal versions only:
Combustion air must be drawn in from the outside. The combustion air opening must be kept free at all times.
• Connect the air intake pipe to the intake port on the
heater and secure with clamp provided.
CCaauuttiioonn::
Do not install the intake opening facing the
vehicle slipstream. Ensure that the opening
cannot become clogged with dirt or snow
and that any water entering the intake can
drain away.
Flexible Exhaust
& Air intake hose
cannot be any
longer than
Max 2M (80”)
Holding clamps
Exhaust & Intake
Clamps
End Sleeve
Air Intake Hose -
oonn llyy uusseedd
oonn uunniivv eerrssaall vveerrss ii oonnss
IInnttaakkee CCoonnnneeccttiioonn
WWaarrnniinngg:: AAsspphhyyxxiiaattiioonn HHaazzaarrdd WWaarrnniinngg:: FFiirree HHaazzaarrdd
NNoottee::
1. Exhaust hose cannot be any longer than 2m.
2. Minimum lenght 14”.
3.
AAvvooiidd eexxhhaauusstt lleennggtthhss ooff 33..55 ttoo 55 fftt lloonngg..
Page 13
13
IInnssttaallllaattiioonn PPrroocceedduurreess
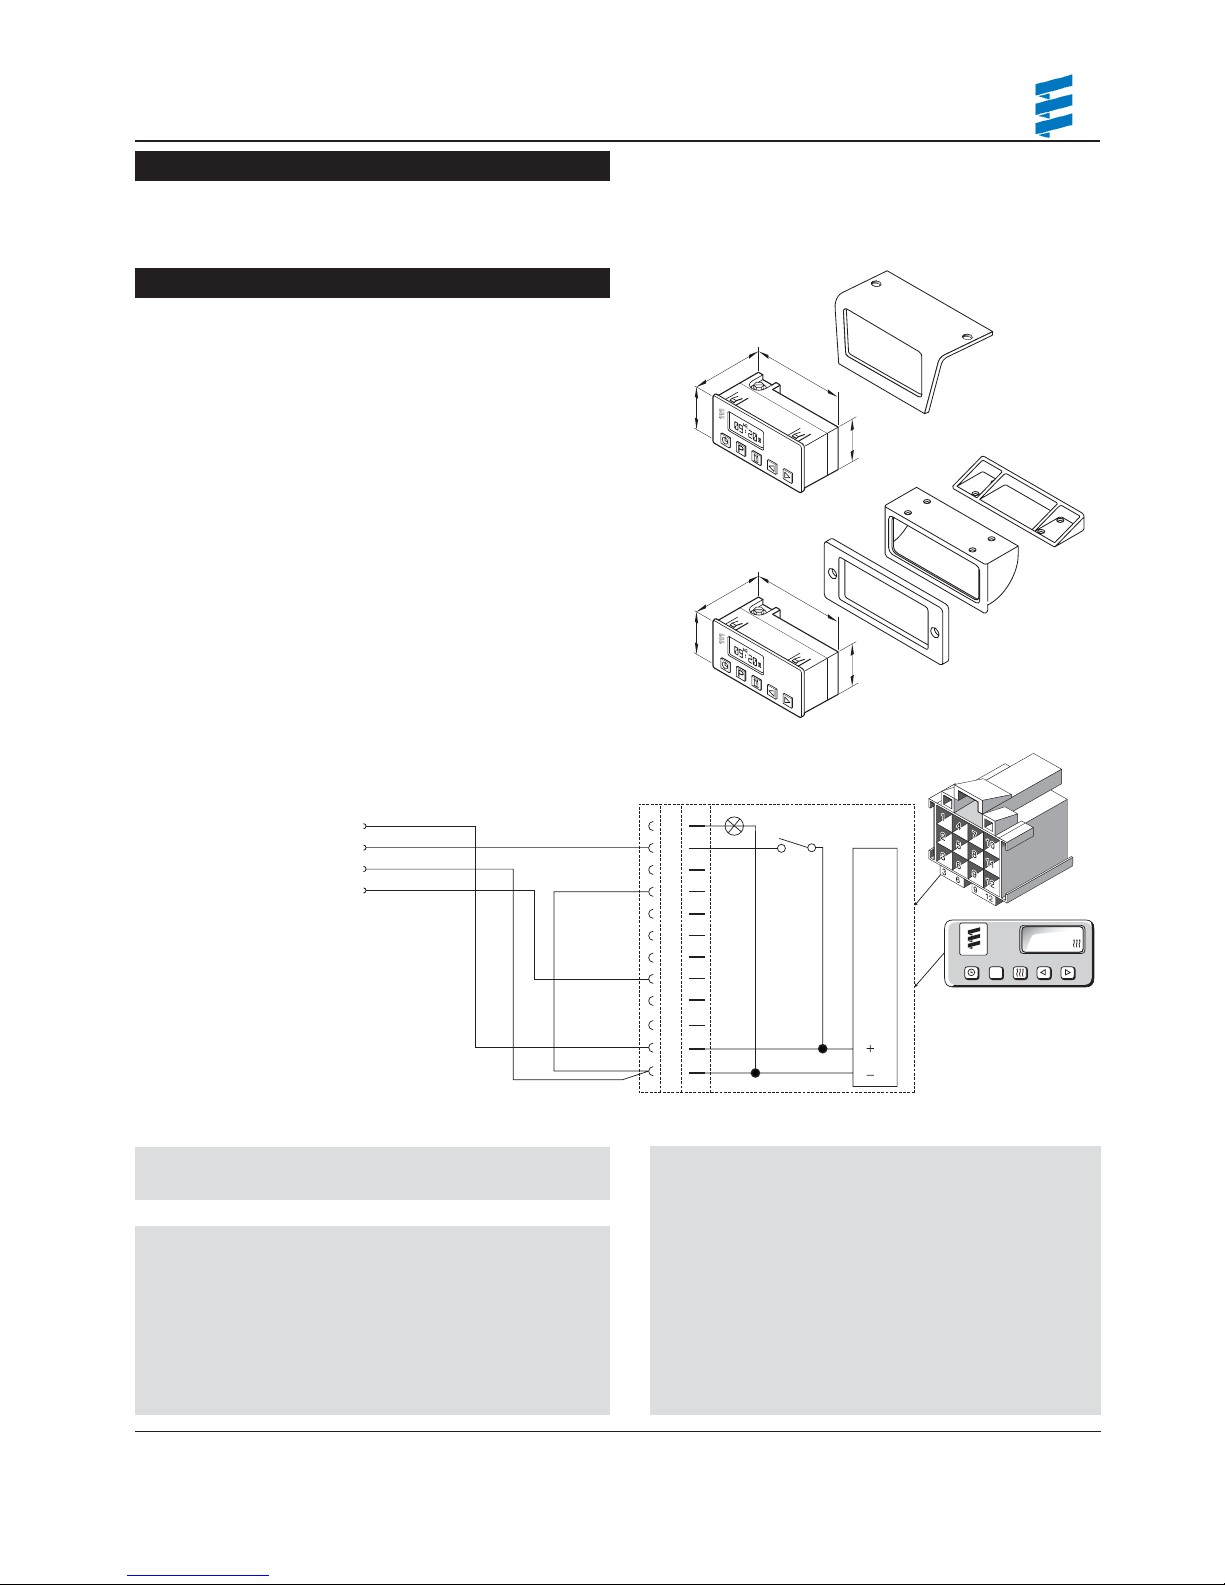
OOppeerraattiinngg SSwwiittcchheess
NNoottee::
If installing a remote starter, refer to remote starter
instructions before terminating wires.
A Push/Pull switch, or a 7 Day Timer are available for the
heater. Both are discussed on the following pages. Connect the
operating switch as follows.
The 7 Day Timer has been designed to provide a simple means
to control the operation of the heater system and to include the
capability for diagnostics. This timer connects to the diagnostic
circuit of the heater. The timer then displays any heater fault
codes in three digit number form automatically. The timer allows
for pre-selection of turn on time, up to 7 days in advance, as
well as an option for run times up to 2 hours before automatically turning off. In addition, there is an on/off switch for manual
operation. By default the timer is pre-set by Espar to operate for
two hours. Refer to instructions provided with timer for setting
options.
• Mount bezel into dash and insert timer or use Espar’s
optional mounting bracket and secure to dash.
• Use hardware supplied for connections.
• Connect the switch harness to the connector at the heater
and run harness to switch location. (Harness should be
neatly routed and secured under dashboard).
• Cut harness to length and terminate wires. Attach using
connectors provided.
• Refer to timer instructions for other wiring options.
OOppttiioonn ##22::
Operate heater continuously - connect
wire from ignition circuit to terminal
#10. See also multifunction (7 day)
timer in instructions.
NNoottee::
An alternative to connecting the black wire to
the vehicle ignition accessories “On” circuit
may also be considered for some applications where extended run times are desired.
Connecting the black wire with the red wire
will enable the heater to run continuously
whether the heater is switched on manually
or through the preset function.
aa))
Power from battery “+”
bb))
Switch control to the heater
cc))
Power from battery “-”
dd))
Diagnostic from heater
Mounting Bracket
(optional)
P/N CA0 10 061
Bezel
P/N 25 1482 70 01 00
CA1 00 135 (12v / 24v)
MMuullttiiffuunnccttiioonn
aa))
bb))
cc ))
dd))
OOppttiioonn ##11::
Dash lights to timer - connect wire
between dash lights circuit and timer at
terminal #1.
NNoottee::
The timer display is automatically illuminated
while the heater is operating. Connecting the
grey wire to the vehicle dimmer switch will allow
the timer display to illuminate with the vehicles
dash lights.
Red
Yellow
Brown
Blue
Yellow
Blue
43
40
43
40
TRS
DIAG
84
40
84
40
MO
1
2
18:00
3
P
Red
Brown
12 11 10 9 8 7 6 5 4 3 2 1
Page 14
The 7 Day Timer has been
designed to provide a simple
means to control the operation
of the heater system and to
include diagnostics capability.
This timer connects to the diagnostic circuit of the heater. The
timer then displays any heater
fault codes in three digit number
form automatically. The timer
allows for pre-selection of turn
on time, up to 7 days in
adv
ance, as well as an option for
run times up to 2 hours before
automatically turning off. In addi-
tion, there is an on/off switch for
manual operation. By default the
timer is pre-set by Espar to operate for two hours.
1 Mount bezel into dash and
insert timer or use Esparí s
optional mounting bracket and
secure to dash.
2 Use hardware supplied for
connections.
3 Connect the switch harness to
the connector at the heater and
run harness to switch location.
(Harness should be neatly routed and secured under dashboard).
4 Cut harness to length and ter-
minate wires. Attach using connectors provided.
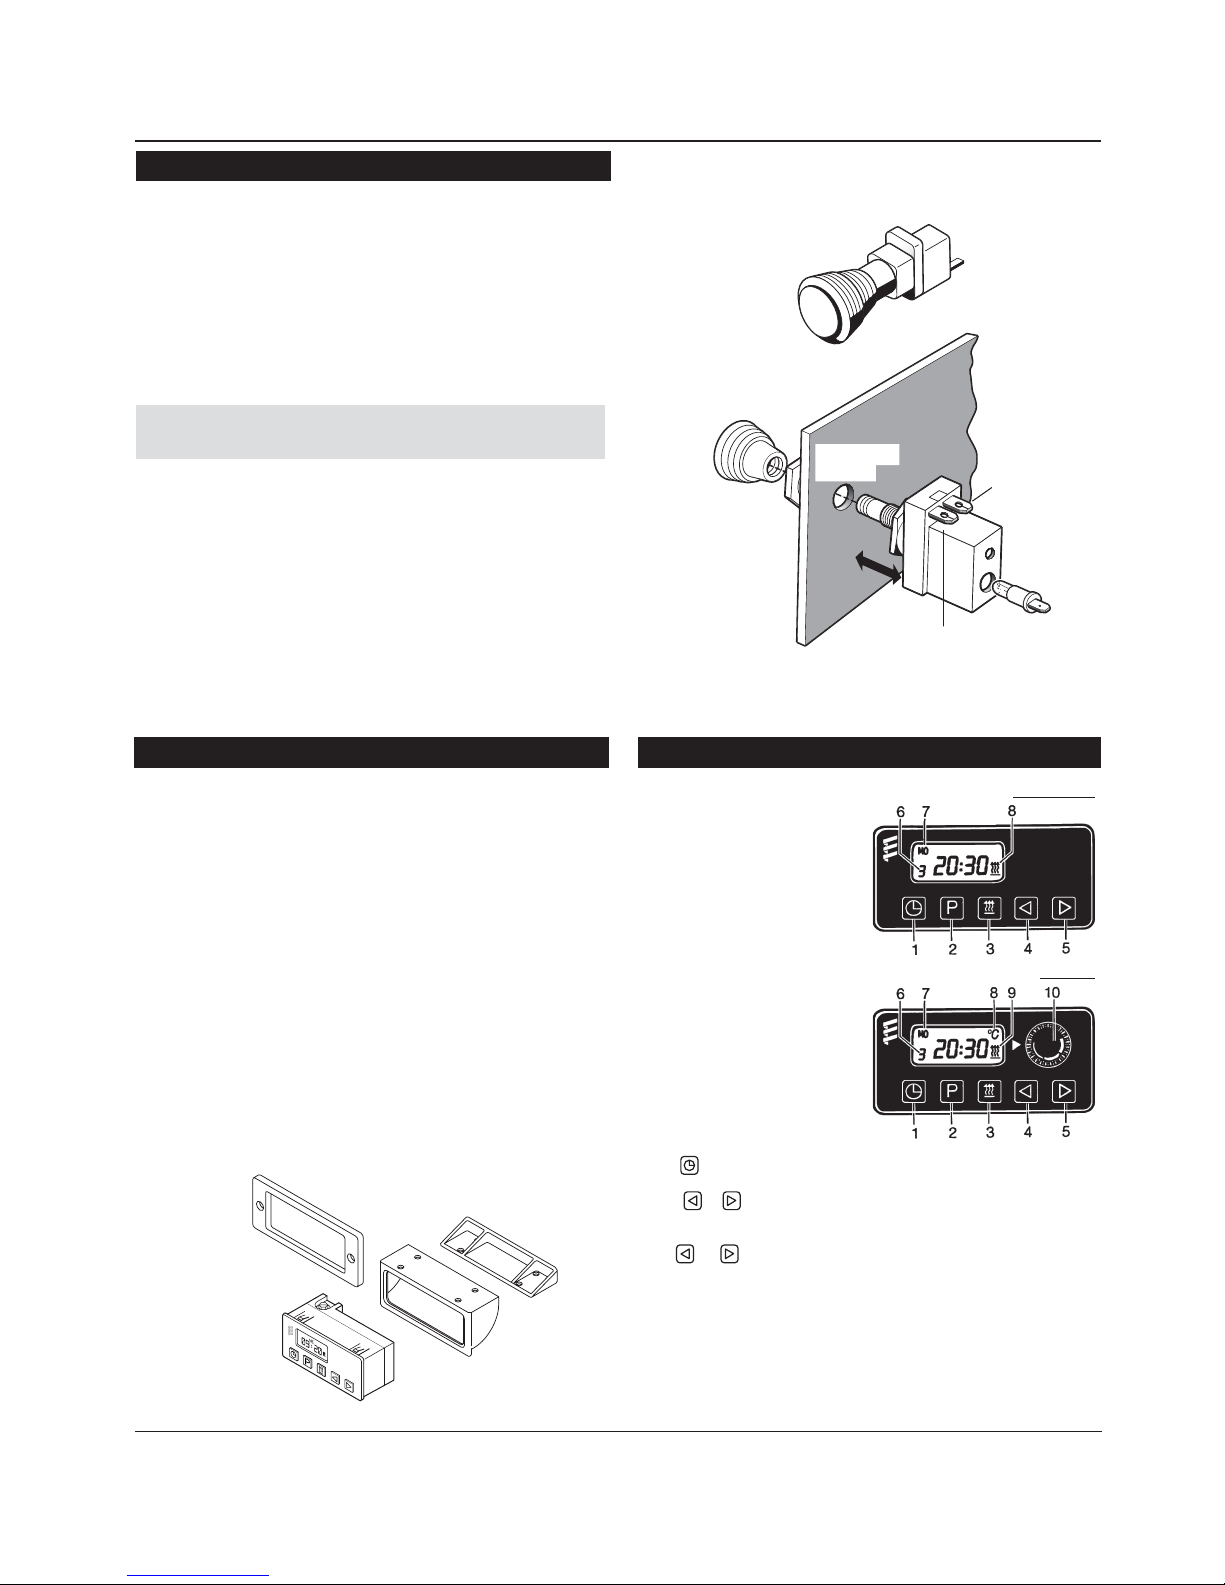
1 Time set
2 Preheat time set
3 Heater “On”
4Backward scan
5Forward scan
6 Memory location
7 Time and day display
8 Air temperature display
(optional)
9Heater “On” symbol
10 Temperature set
(air heater only)
Note: Upon connection to power the
entire timer display will begin to flash.
The heater will not function until the
time is programmed.
Setting Time and Weekday
Push button once. 12:00 will begin to flash (this will occur upon
initial hook up to power).
Using or set the present time of day (24 hour clock).
When the time stops flashing the time has been stored.
The weekday will now begin to flash.
Use or to set the present weekday.
When the weekday stops flashing the weekday has been stored.
When the vehicle ignition is turned “on” the time display will appear
.
When the vehicle ignition is turned
“off” the timer display will go off
after 15 seconds.
Coolant Heater
Air Heater
14
IInnssttaallllaattiioonn PPrroocceedduurreess
PPuusshh//PPuullll SSwwiittcchh
MMoo uunnttiinngg BBrraa cckk eett && BBeezzeell
P/N 25 1482 70 01 00
Mounting Bracket
Bezel
77 DDaayy TTiimmeerr IInnssttrruuccttiioonnss
OOppeerraattiinngg IInnssttrruuccttiioonnss
• Mount switch in a location where it is easily accessible
• Mount using hardware supplied
• Connect the switch harness to the connector at the heater
and run the harness to the switch location
• Cut harness to length at the switch and install terminals
• Connect wiring as described below
NNoottee::
Wired described the switch light glows when
pulled out and is off when pushed in.
Brown- 31 Power from battery “-”
Red- K(15) Power from battery “+”
Yellow-15(K) Switch control to the heater
Blue/White Diagnostic from heater (disregard - tape end
and tie off to the side)
P/N CA1 00 003 (12v)
P/N CA1 00 004 (24v)
Ø
14.5mm
Ø
9/16”
K (15)
31
15 (K)
Page 15

15
IInnssttaallllaattiioonn PPrroocceedduurreess
SSuubbttiittllee RRiigghhtt PPaaggee
Changing the Time or Day
77 DDaayy TTiimmeerr IInnssttrruuccttiioonnss
Push and hold button until the time display begins to flash.
Continue to set the time as listed in setting time and weekday.
Using the Timer with the Vehicle Ignition “Off”
Push button.
will appear on the display as well as the operation countdown timer.
The running time is factory set to a maximum of 120 minutes. This
running time can be reset once or permanently as desired.
Adjusting Preheat Time Once
Press button.
The will appear in the display and the preselected run time will
appear in the display (maximum time of 120 minutes).
Use the or to adjust the desired run time.
Adjusting the Heater Preheat Time Permanently
(Maximum Preheat Time of 120 minutes)
Push and hold (about 3 seconds) until the display lights up and
flashes. Release button.
Use or to set the new fixed preheat time.
When the display goes off the new prehea
Note: At the end of a preheat cycle the timer will turn the heater off.
The heater will complete a cool down cycle and turn itself off.
Using the Heater Manually with the Vehicle Accessory “On”
Push button.
The symbol will appear in the display next to the time of day.
The time of day will remain displayed during ignition on operation.
The heater will function continually as long as the vehicle ignition is “on”.
When the vehicle ignition is turned “off” the heater will continue to
operate for an addtional 15 minute
The run time can be altered by pressing the or buttons.
The heater can be turned off by pressing button.
t time is set.
s.
To Use Preset Start Times
Press the button until the desired memory location
appears in the display.
The heater will start at the day and time displayed.
The display will go off in 15 seconds. The memory location
number will stay displayed (1, 2 or 3).
Note: When preset is chosen this symbol will flash red.
To Turn Heater “Off” - All Modes
Press the button once.
The heat signal to the he
The heater will do a normal cooldown and turn itself “off”.
Note: When the vehicle ignition is turned “on” the time of day and day of
the week will appear in the timer display. This will stay on as long as the
vehicle ignition is “on”.
Note: When the vehicle lights are turned “on” the timer backlight will come
“on” also.
Note: An outside temperature sensor is available as an option
Wiring Connections at connector
Terminal 1 Power from vehicle dash lights - grey wire
Terminal 2 Heater switch wire - yellow wire
Terminal 4 Connect to vehicle ground - brown wire
Terminal 6 Temperature setting “+” (air only) - grey/red wire
Terminal 8 Heater diagnostic lead - blue wire or blue/white wire (air)
Terminal 9 Temperature setting “-” (air only) - brown/white
Terminal 10 To vehicle “ACC” accessory for continuous overnight use
Terminal 11 Positive power from heater - red “+”
Terminal 12 Ground lead from heater - b
erminal 3,5,7 Left blank, not required
T
P
ater will be turned “off”.
rown “-”
Set Preheat Times into Memory
P
Press button until the desired memory location is shown in the
display (Three memory locations are available).
Using the or buttons set the desired preheat start time of day.
When the time stops flashing the time of day is set.
Using the or button
When the day of the week stops flashing the day is set.
s set the desired day of the week.
Page 16

16
NNootteess
Page 17

NNoottee::
During operation the heater continually senses the
input voltage from the batteries, if the input
voltage drops to approximately 10.5V (20V on a
24 volt system) or rises above 15V (30V on a 24
volt system) the heater will automatically shut
down.
• When the heater is switched off, manually or automatically,
it starts a controlled cool down cycle.
• The fuel metering pump stops delivering fuel and the flame
is extinguished.
• The combustion air blower and water pump continue to run
for 130 seconds to cool down.
• The heater shuts off.
The control unit, overheat sensor and flame sensor continually
monitor heater functions and will shut down the heater in case
of a malfunction.
• The control unit ensures electrical circuits (fuel pump,
combustion air blower etc.) are complete prior to starting
the heater.
• If the heater fails to ignite within 90 seconds of the fuel
pump being started, the starting procedure will be
repeated. If the heater again fails to ignite after 90 seconds
of fuel being pumped, a “no start safety shutdown” follows.
• If the heater flames out during operation, the heater
automatically attempts to restart. If the heater fails to ignite
within 90 seconds of fuel delivery, or ignites but flames out
again within 10 minutes, “flame out” shutdown follows. After
troubleshooting the problem, the heater can be started again
by switching the heater off and then back on.
• Overheating due to lack of water, a restriction or a poorly
bled coolant system results in an “overheat shut down”.
• If at any time the voltage drops below 10.5V (20V on a 24
volt system), or rises above 15V (30V on a 24 volt system),
a “high/low voltage” shutdown follows (after a 20 second
delay).
17
HHeeaatteerr OOppeerraattiioonn
Upon completion of installation prepare the heater as follows:
• Check all fuel, electrical and plumbing connections.
• Refill the engine coolant.
• Bleed air from the coolant system by running the engine
and refilling the antifreeze as needed. Resecure heater hose.
• Run engine to further bleed the system
• Top up engine coolant.
Once switched on, the following sequence occurs:
• Control unit does a systems check ( flame sensor,
temperature, safety thermal sensor and various other
control unit checks).
• Water pump starts circulating coolant fluid.
• Combustion air blower starts.
• Glow pin begins to preheat 20-30 secs.
• After about 20-30 seconds the Fuel Metering Pump starts
delivering fuel and the combustion air blower ramps up gradually.
• Once ignition takes place the flame sensor alerts the
control unit and the control unit shuts off the glow pin
(ignition time: 1.5 - 2 minutes).
NNoottee::
If the heater fails to start the first time it will
automatically attempt a second start. If
unsuccessful the heater will shut down completely.
NNoottee::
On initial start up the heater may require several
start attempts to self prime the fuel system.
Once ignition is successful the following operations take place:
• Heater runs in full heat mode and the temperature is
monitored at the heat exchanger.
• Once the coolant reaches 72°C (162°F) the heater will
start to cycle down between levels (High,Medium,Low).
• If the coolant temperature continues to rise, the heater
will automatically switch off. This occurs when temperature
reaches 85°C (185°F).
• The water pump will continue to circulate coolant to allow
the heater to monitor engine temperature
• The heater will automatically re-start once coolant
temperature reaches 68°C (154°F).
• The heater continues to run as described above until it is
switched off, either manually, automatically by a timer or
heater malfunction shutdown.
NNoottee::
If the heater should flame out while in running
mode, it will automatically attempt one restart. If
successful it will continue to run, if not it will turn
itself off.
PPrree--SSttaarrtt PPrroocceedduurreess
SSttaarrtt UUpp
RRuunnnniinngg
SSwwiittcchh OOffff
SSaaffeettyy EEqquuiippmmeenntt
The heater must be switched off while any fuel tank
on the vehicle is being filled.
The heater must not be operated
in garages or enclosed areas.
WWaarrnniinngg::
Page 18

18
HHeeaatteerr OOppeerraattiioonn
OOppeerraattiioonnaall FFllooww CChhaarrtt
OOppeerraattiioonn PPrrooffiillee
SSttaarrtt uupp sseeqquueennccee
Vehicle Blower 55°C
On Power - 7300 rpm
Power - High 72°C High - 5600 rpm
High - Medium 78°C Medium - 3000 rpm
Medium - Low 79°C Low - 1800 rpm
Low - Off 85°C
Off - Medium 68°C
Medium - High 68°C
Low - Medium 73°C
High - Power 53°C
CCoonnttrrooll tteemmppeerraattuurreess SSppeeeedd ooff bblloowweerr mmoottoorr
CCoooollaanntt TTeemmppeerraattuurree CCoonnttrrooll PPrrooffiillee
90
80
70
Power
Power
Power
High
High
High
Medium
Mittel
Medium
Medium
Low
Low
Off
Off
68°
85°
79
78
72
53
55
68
73
Power
Power
Power
Max. Operation in Heat Levels
Power = 2 h ( 15 min. High)
High
Medium
Low = 20 h ( Off then On)
Generally = 40 h (Off then On)
Glow pin cycle for 40 sec.
After 4 h if no heater off-on cycle
High
High
High
Medium
Mittel
Medium
Medium
Time
Low
Low
Off
Off
68°
85°
79
78
72
53
55
68
73
60
Temperature in C
50
40
30
20
10
0
-10
Operating
Mode
Water Pump
System
Pre-heat Pre-heat
Check
Off
STARTING PHASE
Ignition
Attempt
2nd. attempt
Ignition
Attempt
2nd. attempt
RUNNING PHASE SHUT DOWN PHASE
Controlled
Heating
OnOnOnOnOn On
After
Glow
On
Cool
Down
Stand by
if in stand by
Off
or
Off
On:
Blower
Glow
Pump
Pin
Fuel
Time
Off
Off Off Off Off Off
Off
1- 3 sec.
80 sec.
Note: During the controlled heating cycle, if the coolant temperature exceeds 85°C(185°F) the heater will cycle off.
On
OnOnOnOn
On On
80 sec
Up to
90 sec.
Heater will automatically restart in high mode once coolant temperature reaches 68°C(154°°F)
.
If Required
On
Up to 90 sec.
OnOnOnOff
Off
High/Low
Operation
until switched off
manually or automatically
20 sec.
OffOn
On
On
On
Off
Off
2.5 min.
Glow plug
Speed of blower motor
(rpm)
8
Blower motor
Metering pump
Frecuency of
metering pump (Hz)
8
6
4
2
0
0 20 40 60 80 100 120 140 160 180 200
Time (s)
6
4
2
0
Page 19

19
HHeeaatteerr OOppeerraattiioonn
HHyyddrroonniicc 1100 WWiirriinngg DDiiaaggrraamm -- 1122 VVoolltt ++ 2244 VVoo lltt
2255 22008811 0055 -- 1122VV
2255 22004444 0055 -- 2244VV
1.1 Blower motor
1.2 Glow pin
1.5 Overheat sensor
1.12 Flame sensor
1.13 Temperature sensor
2.1 Control unit
2.12 Water Pump
2.2 Fuel metering pump
2.7 20 amp main fuse
2.7.1 5 amp switch fuse
3.2.9 7 day timer, push/pull switch
or 99hr. timer
5.1 Battery
a) Optional - supply for vehicle blower
b) Power
c) Diagnostics
d) Switch
e) Ground
h) Optional - LED for flashing code
2.2
2.1
RED
GREEN
GREEN
1 2 3 4 5 6 7 8 9 10 11 12 13 14
PINK
BLUE
GREY
BLACK
1 2 3 4 5 6 7 8 9 10 11 12 13 14 15 16 17 18
ORANGE
VIOLET
WHITE
GREEN
YELLOW
RED
BROWN
B1
S1
RED
BROWN
2.7
B5
2.7.1
RED
5.1
RED
RED/YELLOW
BLUE/WHITE
YELLOW
BROWN
3.2.9
Optional
Diagnostic
LED
YELLOW
BLUE
h)
Push/Pull switch
b
c
d
e
RED
YELLOW
BROWN
3.1.1
0
0
K (15)
15 (K)
31
7 Day timer
Red
Yell ow
Brown
Blue
Grey
Black
TRS
Brown
DIAG
12 11 10 9 8 7 6 5 4 3 2 1
1.2 1.5
WHITE
BROWN
BLUE
BLACK/RED
2.12
BLUE
BROWN/BLACK
3
7
141213
YELLOW
1
4
GREY
8
YELLOW
B1
GREY
RED
VIOLET
GREEN
ORANGE
1.121.13
ORANGE
1.1
1232527291011121314151617
18
B5
Page 20

20
HHeeaatteerr OOppeerraattiioonn
HHyyddrroonniicc 1100 WWiirriinngg DDiiaaggrraamm -- 1122 VVoolltt ++ 2244 VVoolltt -- UUnniivveerrssaall HHaarrnneessss
2255 22008811 0055 -- 1122VV
2255 22004444 0055 -- 2244VV
1.1 Blower motor
1.2 Glow pin
1.5 Overheat sensor
1.12 Flame sensor
1.13 Temperature sensor
2.1 Control unit
2.12 Water Pump
2.2 Fuel metering pump
2.5.7 Vehicle blower relay
2.7 20 amp main fuse (12V)
2.7.1 5 amp switch fuse
2.7.5 15 amp blower fuse
3.2.9 7 day timer, push/pull switch
or 99hr. timer
5.1 Battery
a) vehicle blower step switch
b) vehicle ignition terminal
c) external control (water pump)
d) diagnostics
e) switch
f) power
g) ground
h) LED for flashing code
2.5.7
2.2
RED
BLACK
BLACK/VIOLET
RED/GREY
BROWN/WHITE
3.2.9
RED/YELLOW
BLUE/WHITE
YELLOW
BROWN
2.7.2
acb
GREEN
GREEN/GREY
RED/WHITE
BROWN
1 2 3 4 5 6 7 8 9 10 11 12 13 14
PINK
BLUE
GREY
BLACK
ORANGE
VIOLET
WHITE
GREEN
YELLOW
RED
RED
RED
B1
S1
BROWN
2.7.1
2.7
BROWN
b
c
d
e
Red
Yellow
Brown
Blue
5.1
Diagnostic
YELLOW
BLUE
Push/Pull switch
RED
YELLOW
BROWN
K (15)
7 Day timer
TRS
3.1.1
0
0
15 (K)
31
LED
h)
2.1
1.2 1.5
1 2 3 4 5 6 7 8 9 10 11 12 13 14 15 16 17 18
WHITE
BROWN
BLUE
BLACK/RED
2.12
BLUE
BROWN/BLACK
3
7
141213
YELLOW
RED
GREY
GREY
VIOLET
GREEN
YELLOW
ORANGE
ORANGE
1.121.13
1
4
8
B1
1232527291011121314151617
B5
1.1
Brown
Optional
Grey
Black
DIAG
12 11 10 9 8 7 6 5 4 3 2 1
18
B5
Page 21

21
HHeeaatteerr OOppeerraattiioonn
HHyyddrroonniicc MM WWiirriinngg DDiiaaggrraamm -- 1122 VVoolltt aanndd 2244 VVoolltt -- EEnnggiinnee HHeeaatt OOnnllyy
1.1 Blower motor
1.2 Glow pin
1.5 Overheat sensor
1.12 Flame sensor
1.13 Temperature sensor
2.1 Control unit
2.12 Water Pump
2.2 Fuel metering pump
2.7 20 amp main fuse (12V)
2.7.1 5 amp switch fuse
3.2.9 7 day timer, push/pull switch
or 99hr. timer
5.1 Battery
a) vehicle blower step switch
b) vehicle ignition terminal
c) external control (water pump)
d) diagnostics
e) switch
f) power
g) ground
h) LED for flashing code
LED
2255 22116600 0055 -- 1122VV
2255 22222277 0055 -- 2244VV
2.2
RED
BLUE
WHITE
GREEN
BROWN
C4C3C2C1B4B3B2B1A4A3A2
g)
2.1
8 9 2 7 11 17 3 6 14 18 15 16 10 13 5 4 1 12
BLUE
BLUE
WHITE
BROWN
BLACK/RED
BROWN/BLACK
YELLOW
b)
YELLOW
GREY
GREY
RED
YELLOW
B1
A1
VIOLET
GREEN
ORANGE
BLACK
BROWN
B5
BROWN
RED
2.7
D
BROWN
C
A
RED
B
2.7.1
Optional
RED
BROWN
Red
Yellow
Brown
Blue
Grey
Black
5.1
Diagnostic
LED
YELLOW
3.1.1
0
0
K (15)
h)
15 (K)
31
a6)
l)
k)
a2)
a3)
a4)
a5)
BLUE
25 2227 05 only
Push/Pull switch
RED
YELLOW
BROWN
7 Day timer
TRS
Brown
DIAG
12 11 10 9 8 7 6 5 4 3 2 1
1.2 1.5
B1
B1
2.12
B5
1.121.13
1.1
B3
Page 22

22
HHeeaatteerr OOppeerraattiioonn
HHyyddrroonniicc MM WWiirriinngg DDiiaaggrraamm -- 1122 VVoolltt aanndd 2244 VVoolltt -- UUnniivveerrssaall HHaarrnneessss
2255 22116600 0055 -- 1122VV
2255 22222277 0055 -- 2244VV
1.1 Blower motor
1.2 Glow pin
1.5 Overheat sensor
1.12 Flame sensor
1.13 Temperature sensor
2.1 Control unit
2.12 Water Pump
2.2 Fuel metering pump
2.5.7 Vehicle blower relay
2.5.18 Relay, changeover water circuit.
2.7 20 amp main fuse (12V)
2.7.1 5 amp switch fuse
2.7.5 15 amp blower fuse
3.2.9 7 day timer, push/pull switch
or 99hr. timer
5.1 Battery
5.10 Vehicle fan
a) vehicle blower step switch
b) vehicle ignition terminal
c) external control (water pump)
d) diagnostics
e) switch
f) power
g) ground
h) LED for flashing code
2.5.7
2.5.18
2.2
5.10
RED
BK/VT
BLACK
RED
BLUE
WHITE
GREEN
BROWN
C4C3C2C1B4B3B2B1A4A3A2
g)
2.1
8 9 2 7 11 17 3 6 14 18 15 16 10 13 5 4 1 12
BLUE
BLUE
WHITE
BROWN
BLACK/RED
BROWN/BLACK
YELLOW
b)
YELLOW
BROWN
GREY
GREY
RED
YELLOW
B1
A1
VIOLET
GREEN
ORANGE
BLACK
B5
BROWN
RED
BROWN
RED/YELLOW
2.7
c) c)
RED
BROWN
D
BROWN
C
A
RED
B
2.7.12.7.1
Optional
Optional
5.1
Red
Yell ow
Brown
Blue
Grey
Black
Diagnostic
LED
YELLOW
3.1.1
0
0
K (15)
h)
15 (K)
31
a6)
l)
k)
a2)
a3)
a4)
a5)
BLUE
25 2227 05 Only
Push/Pull switch
RED
YELLOW
BROWN
7 Day timer
TRS
Brown
DIAG
12 11 10 9 8 7 6 5 4 3 2 1
1.2 1.5
B1
B1
2.12
B5
1.121.13
1.1
B3
Page 23

23
SSuubbttiittllee RRiigghhtt PPaaggee
MMaaiinntteennaannccee,, TTrroouubblleesshhoooottiinngg && RReeppaaiirrss
PPeerriiooddiicc MMaaiinntteennaannccee
• Check coolant hoses, clamps, and make sure all valves
are open. Maintain the engine manufacturers recommended coolant level and ensure that the heater is properly bled
after service on or involving the coolant system.
• Visual check of all fuel lines for leaks. Check and if
necessary replace fuel filter inserts.
• Visual check of electrical lines and connections for corrosion.
• Run your heater at least once a month during the year
(for a minimum of 15 minutes).
• Maintain your batteries and all electrical connections in
good condition. With insufficient power the heater will
not start. Low and high voltage cutouts will shut the
heater down automatically.
• Use fuel suitable for the climate (see engine manufacturers
recommendations). Blending used engine oil with diesel
fuel is not permitted.
In the event of failure there are several items which
should be checked first before any major troubleshooting
is done.
CChheecckk ::
• Fuses.
• Electrical lines and connections
• Interference in Combustion air and Exhaust pipes.
• Fuel in the tank.
• Battery voltage
• Coolant flow
The heater is equipped with self diagnostic capability. You can
retrieve information on the heaters last 5 faults using the Espar
7 day timer or Espar’s Fault Code Retrieval Device.
Espar’s 7 day timer has a fault code
retrieval device built into the unit. This
function automatically activates if the
heater is experiencing problems.
• Fault codes appear on the LCD display screen
• Codes can then be translated from the charts on the
following pages.
• See instruction sheet that comes with the timer
Symbols seen on the display
face are as follows:
AAFF
Actual fault.
FF11--FF55
Up to five stored faults can be accessed.
The AF and F1 are the same number.
This sign is displayed when the heater is in operation.
DDIIAAGG
The word (Diagnostic) will come on when the
diagnostic number is requested.
000000
Three digit diagnostic fault code number.
• Disconnect the main harness from heater and insert
adapter cable harness between them
• Connect adapter cable to the cable loom of the Fault code
retrieval device
• Start diagnostic unit - switch heater on from switch
• Switch the fault code retrieval device on and wait 10 seconds.
• Press the "D" button.
• Wait 3-5 seconds for the current fault code to appear
(AF).
• To review the previous faults use the arrow buttons
(F1= Most Recent, F5= Oldest).
• To erase the faults that are in memory press both "L"
keys at the same time.
• See the fault code chart on following pages for code
number descriptions.
FFaauulltt ccooddee rreettrriieevvaall ddeevviiccee
P/N CA1 05 020
FFaauulltt ccooddee
rreettrriieevvaall
ddeevvii ccee
hhaarrnneessss
P/N CA1 05 030
Rounded end
or CA1 05 044
Squared end
TTrroouubblleesshhoooottiinngg
BBaassiicc TTrroo uu bblleesshhoooottiinngg
SSeellff DDiiaaggnnoossttiiccss
MMuullttiiffuunnccttiioonn
FFaauulltt CCooddee RReettrriieevvaall DDeevviiccee
EEqquuiippmmeenntt FFaaccee aanndd CCoonnttrroollss
HHooookk UUpp
IInnssttrruuccttiioonnss::
LDL
WERFEN
y
man
e
G
NICHT
10
in
ade
M
05
0
ONIC
1
0
24 V
0
2
HYDR
2 530
2
Page 24

24
MMaaiinntteennaannccee,, TTrroouubblleesshhoooottiinngg && RReeppaaiirrss
FFaauulltt CCooddee FFaauulltt DDeessccrriippttiioonn CCaauusseess // RReeppaaiirr FFaauulltt SSiiggnnaall // FFllaasshhiinngg CCooddee
000 Normal Operation
001 Advanced warning - overvoltage Check to see if voltage between pins 13 and 14 of control
unit (external plug) is greater than 15 V or 30V.
002 Advanced warning - undervoltage Check to see if voltage between pins 13 and 14 of control
unit(external plug) is less than 10 V or 20V
010 Overvoltage shutdown Check voltage between pins 13 and 14 at the control unit
(external plug) is greater than 15 V or 30V. Check vehicle
charging system.
011 Under voltage shut down Check voltage between pins 13 and 14 at the control unit
(external plug) is less than 10 V or 20V. Check batteries
and connections.
012 Overheating Check for possible causes of overheat, check water
through flow (water circuit), sensor.Temperature at
temperature sensor is greater than 115°C. Impedance at
temperature sensor < 400Ω. Check difference at the
control unit, dismantle the control unit, disconnect the
internal plug from the control unit and measure the
difference between pins 5 and 8.
Overheat sensor values: 150 kohms at -25°C
10 kohms at +25°C.
013 Excessive temperature at flame sensor Flame sensor signals temperature of greater than 700°C.
Difference at flame sensor > 3400 ohms. Check the
impedance at the control unit (internal plug), dismantle
the control unit, disconnect the internal plug from the
control unit and measure the impedance between pins 10
and 12. Flame sensor values: 900 ohms at -25°C
1100 ohms at +25°C.
014 Possible overheating detected Difference of measured values at temperature sensor
>70°C (difference evaluation) Check temperature sensor
and overheating sensor, open heater slide valve and
check water throughflow. Check the impedance between
5 and 8 at the control unit (internal plug). Over
temperature sensor values: 150 kohms at -25°C
10 kohms at +25°C.
88 sseeccoonnddss
Page 25

25
MMaaiinntteennaannccee,, TTrroouubblleesshhoooottiinngg && RReeppaaiirrss
FFaauulltt CCooddee FFaauulltt DDeessccrriippttiioonn CCaauusseess // RReeppaaiirr FFaauulltt SSiiggnnaall // FFllaasshhiinngg CCooddee
015 Too many overheats The control unit is interlocked after three successive
overheats (error codes 012, 013 and 014). Eliminate the
case of the overheat. Cancel the interlock by clearing the
error memory with the diagnostic unit/PC.
020 Open circuit - glow pin Check glow pin (nominal value: 2 ohms), replace if
necessary. Check pin 4(white) on the control unit
021 Short circuit - glow plug (internal plug) leading to glow plug to terminal 3 (brown)
for continuity/short-circuit. If O.K.-> replace control unit.
033 Combustion air blower motor Speed deviation for longer than 60 seconds. Nominal
values: 5600 rpm (full-load), 1850 rpm (part load)
* Check burner motor: apply supply voltage to motor.
Connect + to 1.5 black and - to 1.5 orange. Motor does
not turn —> replace burner motor with integrated sensor.
* Check sensor supply. Switch on heater and measure
voltage between output 13 (0.25 red) and 14 (0.25 green)
at the control unit (internal plug). Nominal value: 8 V. If
deviation —> replace control unit.
* Check sensor: Measure voltage between terminal 15
(0.25 violet) and 14 (0.25 green) with an analog voltmeter
when the blower is running. Nominal value: 4 V (+ 0.3 V)
average value (8 V square-wave signal). If deviation —>
replace motor with integrated sensor. If sensor signal is
O.K., then the speed controller is defective —> Change
control unit.
037 Water pump is not working Check water pump (driven externally).
042 Water pump short-circuit Check water pump and leads.
043 Short circuit at external components Check terminal 2 (1 green) of control unit (external plug)
for short-circuit. Check connected components (max.
current 6A), replace them if necessary.
047 Short circuit - fuel metering pump Check terminal 1 (1 blue) of control unit (external plug)
and leads up to metering pump for short-circuit/
interruption. Check the metering pump. Nominal value:
048 Open circuit - fuel metering pump approx. 20 ohms. Replace if necessary.
88 sseeccoonnddss
Page 26

26
MMaaiinntteennaannccee,, TTrroouubblleesshhoooottiinngg && RReeppaaiirrss
FFaauulltt CCooddee FFaauulltt DDeessccrriippttiioonn CCaauusseess // RReeppaaiirr FFaauulltt SSiiggnnaall // FFllaasshhiinngg CCooddee
050 Too many no start attempts The control unit is interlocked after it has been switched
on 10 times in succession (=20 failed starts) without
flame detection (fault code 052). Check the fuel supply,
glow plug, exhaust piping, combustion air piping and
flame sensor. Cancel the interlock by clearing the error
memory with the diagnostic unit/PC.
051 Faulty flame recognition Flame sensor signals a temperature of greater than
80ºC despite 4 minutes of cooling with cold air.
Impedance at flame sensor > 1300 ohm. If no
combustion takes place —> check the flame sensor,
replace it if necessary. Flame sensor values:900 ohms
at -25°C, 1100 ohms at +25°C.
052 No start safety time exceeded No flame was detected during the start-up phase.
Flame sensor value of less than 90∞C (1350 ohms).
Check the fuel supply, glow plug, exhaust piping, com
bustion air piping and flame sensor. Flame sensor
values: 900 ohms at -25°C, 1100 ohms at +25°C.
053 Flame cutout in boost mode Heater has started (flame detected) and indicates flame
loss in a power setting. Check fuel flow rate, blower
054 Flame cutout in high mode speed, fuel supply, exhaust pipe and combustion air
056 Flame cutout in medium mode piping. If combustion is O.K., check flame sensor,
056 Flame cutout in low mode replace if necessary. Flame sensor values:900 ohms
at -25°C, 1100 ohms at +25°C.
059 Water temperature rises to quickly Check water circulation (012) and temperature control
sensor (060/061).
060 Temperature control sensor interruption Control sensor signals temperature value outside
measurement range. Check the connecting leads (0.35
yellow). For this purpose, dismantle the control unit,
061 Short circuit - temperature control disconnect the internal plug from the control unit and
measure the impedance between 9 and 11. Impedance
between terminals 9 and 11 of the control unit (internal
plug): greater than 10 kohms (in the event of
interruption) less than 100 ohms (in the event of short
circuit).Temperature sensor values: 650 ohms at -25°C,
1000 ohms at +25°C.
88 sseeccoonnddss
Page 27

27
MMaaiinntteennaannccee,, TTrroouubblleesshhoooottiinngg && RReeppaaiirrss
FFaauulltt CCooddee FFaauulltt DDeessccrriippttiioonn CCaauusseess // RReeppaaiirr FFaauulltt SSiiggnnaall // FFllaasshhiinngg CCooddee
064 Open circuit - flame sensor Flame sensor signals temperature value outside
measurement range. Check the connecting leads (0.35
green). Impedance between terminals 10 and 12 of the
065 Short circuit - flame sensor control unit (internal plug): greater than 50 kohms (in the
event of interruption) less than 100 ohms (in the event
of short-circuit). Flame sensor values:
900 ohms at -25°C, 1100 ohms at +25°C.
071 Open circuit - overheat sensor Overheat sensor signals temperature value outside
measurement range. Check the connecting leads (0.35
072 Short circuit - overheat sensor blue). Impedance between terminals 5 and 8 of the
control unit (internal plug): greater than 700 kohms
(in the event of interruption) less than 100 ohms (in the
event of short-circuit). Overheat sensor values:
150 kohms at -25°C, 10 kohms at +25°C.
090 Control unit defect (internal fault) Internal control unit error in microprocessor/memory
detected. Replace control unit.
093 Control unit defective(RAM error)
094 Control unit defective(EPROM fault)
097 Control unit defective (power failure)
88 sseeccoonnddss
Page 28

28
MMaaiinntteennaannccee,, TTrroouubblleesshhoooottiinngg && RReeppaaiirrss
FFuueell QQuuaannttiittyy TTeesstt
The fuel Quantity should be tested if the heater has difficulty
starting or maintaining a flame.
NNoottee::
Measure the fuel quantity when the battery is
sufficiently charged. At least 11V/22V and at
most 13V/26V should be applied at the control
unit during measurement.
• Pull the fuel line from the heater and insert into a
graduated measuring glass (size: 25cm3).
Espar # 5520005.
• Switch the heater on, when fuel delivery is uniform
(approximately 63 seconds after switching on), the fuel
line is full and bled.
• Switch the heater off and empty the measuring glass.
• Switch heater on.
• Fuel delivery stars automatically approximately 63
seconds after switching on.
• After 105 seconds of fuel delivery, it will shut off
automatically.
• Wait for restart.
• Fuel pump is automatically switched off
after another 75 seconds.
• Switch off the heater.
• Measure the fuel in the measuring glass.
NNoommiinnaall vvaalluuee:: 1188 mmll±± 1100%%
If the quantity is less than the tolerance, replace the fuel
metering pump.
11
Control unit HYDRONIC 10 (on installation of control
unit, grease the gasket with sealing paste).
11
Control unit HYDRONIC 10 (on installation of control
unit, grease the gasket with sealing paste).
PPrreeppaarraattiioonn
RReeppaaiirr SStteeppss
DDiissaasssseemmbbllyy // AAsssseemmbbllyy
MMeeaassuurreemmeenntt
EEvvaalluuaattiioonn
TTeemmppeerraattuurree sseennssoorr --2255°°CC 665500
oohhmm ss
2255°°CC 11000000
oohhmm ss
FFllaammee sseennssoorr
--2255°°CC 990000
oohhmm ss
2255°°CC 11110000
oohhmm ss
OOvveerrhheeaatt sseennssoorr
--2255°°CC 115500 KK
oohhmm ss
2255°°CC 1100 KK
oohhmm ss
GGll ooww PPiinn ~~22 oohhmmss
FFuueell MMeetteerriinngg PPuummpp ~~2200oohhmmss
CCoooollaanntt PPuummpp vvaarriieess wwiitthh mmoottoorr ssppeeeedd
CCoommbbuussttiioonn AAii rr BBllo
owweerr vvaarriieess wwiitthh mmoottoo rr ssppeeeedd
RReessiissttaannccee VVaalluueess
11
Control unit
22
Glow pin cable
33
Glow pin
44
Overheat sensor / temperature sensor
55
Cover Blower
66
Flame sensor/heat exchanger fastening screws
77
Housing including heat exchanger, dismantled
88
Burner
99
Burner dismantled
1100
Heat exchanger
1111
Heat exchanger dismantled
Page 29

29
MMaaiinntteennaannccee,, TTrroouubblleesshhoooottiinngg && RReeppaaiirrss
44
Overheat sensor / temperature.
55
Cover Blower (on installation of the cover, clean the sealing surface and apply liquid seal).
22
Glow plug cable HYDRONIC 10.
22
Glow plug cable HYDRONIC M.
33
Glow plug HYDRONIC 10.
33
Glow plug HYDRONIC M.
Page 30

30
MMaaiinntteennaannccee,, TTrroouubblleesshhoooottiinngg && RReeppaaiirrss
66
Flame sensor / heat exchanger fastening screws.
77
Housing including heat exchanger, dismantled.
99
Burner dismantled.
88
Burner.
1100
Heat exchanger.
1111
Heat exchanger dismantled.
Page 31

31
NNootteess
Page 32

32
HHeeaatteerr CCoommppoonneennttss
HHyyddrroonniicc 1100 aanndd HHyyddrroonniicc MM PPaarrttss DDiiaaggrraamm
HYDRONIC 10
25 2081 05 - 12 volt
25 2044 05 - 24 volt
HYDRONIC M
25 2160 05 - 12 volt
25 2161 05 - 24 volt
25 2227 05 - 24 volt
30
18
24
17
12
10
11
31
15
24
32
33
(FCRD Adapter)
RFEN
WE
y
an
CHT
em
NI
10
V
e in G
d
24
Ma
NIC
RO
YD
302 00 10 05
H
5
22
31
28
4
3
19
25
5
14
28
9
16
32
15
27
13
2
26
7
8
22
22
29
21
23
1
20
6
Page 33

Model #
RReeff.. NNoo.. DDeessccrriippttiioo nn PPaarrtt NNuummbbeerr
HHyyddrroonniicc 1100 // MM -- 1122 && 2244 vvoolltt -- DDiieesseell && GGaassoolliinnee vveerrssiioonnss
DDeessccrriippttiioonn && PPaarrtt ##’’ss
33
HHeeaatteerr CCoommppoonneennttss
25 2044 05 24V
25 2081 05 12V
1 Outer casing 25 1997 01 00 02 • • • • •
2 Combustion air blower with cover 25 1815 99 15 00 •
25 1816 99 15 00 •
25 2160 99 15 00 •
25 2161 99 15 00 • •
3 Burner assembly 25 2044 99 11 00 • • •
25 2161 99 11 00 • • •
4 Flame tube and burner 25 2044 11 01 00 • • • • •
5 Seal 25 1816 99 11 07 • • • • •
6 Water pump 25 1815 25 01 00 • •
25 1816 25 01 00 • • •
7 Temperature Sensor 25 1816 99 01 11 • •
25 1816 99 01 11 • • •
8 Overheat sensor 25 1997 99 41 00 • • • • •
9 Flame sensor 25 1816 01 03 00 • • • • •
10 Glow pin 12V 25 1996 99 01 01 • •
24V 25 1997 99 01 01 • • •
11 Seal 25 2044 01 00 12 • • • • •
12 Glow plug cable 25 2044 01 04 00 • • • • •
13 Heat exchanger 25 1816 06 00 01 • • • • •
14 Cover 25 2044 01 00 11 • • • • •
15 Screw 100 61 317 • • • • •
16 Washer 171 22 118 • • • • •
17 Seal 25 1816 01 00 04 • • • • •
18 Seal 25 1816 01 13 00 • •
19 Sleeve 25 1816 01 00 12 • • • • •
20 Clamp 10 2065 05 00 70 • • • • •
21 O-ring 22 1000 70 00 01 • • • • •
22 O-ring 22 1000 70 00 09 • • • • •
23 O-ring 22 1000 70 00 03 • • • • •
24 Fillister head bolt 109 10 107 • • • • •
25 Spring washer 171 22 101 • • • • •
26 Taptite screw 109 10 153 • •
109 10 104 • • •
27 Taptite screw 109 10 106 • • • • •
28 Taptite screw 109 10 107 • • • • •
29 Clip 156 22 021 • • • • •
30 Indented Hexagon nut 171 19 254 • • • • •
25 2160 05 12V
25 2227 05 24V
25 2161 05 24V
Page 34

Model #
RReeff.. NNoo.. DDeessccrriippttiioo nn PPaarrtt NNuummbbeerr
HHyyddrroonniicc 1100 // MM -- 1122 && 2244 vvoolltt -- DDiieesseell && GGaassoolliinnee vveerrssiioonnss
DDeessccrriippttiioonn && PPaarrtt ##’’ss
34
HHeeaatteerr CCoommppoonneennttss
31 Control unit 12V 25 2081 99 50 03 •
24V 25 2044 99 50 07 •
12V 22 5301 00 10 01 •
24V 22 5302 00 10 01 •
24V 22 5302 00 10 04 •
32 Twist tie 209 31 080 • • • • •
33 Retrieval harness for fault code device (FCRD Adapter) CA1 05 030 • •
CA1 05 044 • • •
25 2044 05 24V
25 2081 05 12V
25 2160 05 12V
25 2227 05 24V
25 2161 05 24V
Page 35

35
NNootteess
Page 36

36
HHeeaatteerr CCoommppoonneennttss
HHyyddrroonniicc 1100 aanndd HHyyddrroonniicc MM PPaarrttss DDiiaaggrraamm ffoorr BBooxxeedd UUnniittss
1
2
5
7
17
8
53
52
25
25
25
26
25
28
14
9
10
11
12
50
13
23
24
2424
18
20
21
21
42
44
51
45
43
22
2222
19
24
27
27
31
12
12
13
1313
32
33
34
35
41
38
39
36
37
3737
16
6
6
29
3
4
4
4
4
46
47
48
49
303030
40
Page 37

Model #
25 2044 05 24V
25 2081 05 12V
RReeff.. NNoo.. DDeessccrriippttiioo nn PPaarrtt NNuummbbeerr
HHyyddrroonniicc 1100 // MM BBooxxeedd -- 1122 && 2244 vvoolltt -- DDiieesseell && GGaassoolliinnee vveerrssiioonnss
1 Hydronic 10 heater 12V • •
24V • • •
2 Heater mounting bracket 25 1816 80 00 01 • • • • •
3 Molded hose 20 2900 60 10 23 (CA0 11 023) •••••
4 Spring loaded clamp 17-32mm 556 00 13
(CA1 10 046) •••••
5 Flexible Exhaust w/ end cap 25 1816 80 08 00 • • • • •
6 Bolts 5/16x1/2 #18 stainless 559 00 07 (CA3 00 102-001) •••••
7 Box Base 20 2900 40 90 01
(CA0 10 069-001) •••••
8 Fuel metering pump 25 1894 45 00 00 • •
25 1963 46 00 00 • • •
9 FPM rubber ring 20 1449 00 10 01 • • • • •
10 Fuel metering pump holder 20 1156 20 00 11 • • • • •
11 Clamp 11mm 10 2063 08 10 98 • • • • •
12 Bulk head hose connector 3/4” 20 2900 60 10 11 (CA0 11 011) •••••
13 Washer Bulkhead 559 00 86
(CA3 00 311) •••••
14 Connector 206 31 290 • • • • •
15 Dust Cap - bulkhead fitting 556 00 03 (CA0 11 016) •••••
16 Grommet 20 2900 60 10 61
(CA0 11 061) •••••
17 Silicon Seal - exhaust 25 1216 88 03 01 • • • • •
18 Blower relay block 203 00 085 • • • • •
19 Relay 203 00 065 • •
203 00 066 • • •
20 Fuse holder 204 31 004 • • • • •
21 Fuse Inserts 5 amp 204 00 079 • • • • •
15 amp 567 00 53
(CA1 07 002) •••••
20 amp 567 00 55 (CA1 07 005) •••••
22 Fuse holder cover 204 31 005 • • • • •
23 Fuel hose 360 75 350 • • • • •
24 Hex bolt M6x12 559 00 08 (CA3 00 103) •••••
25 Clamp 9mm 10 2068 00 90 98 • • • • •
26 Fuel hose 3.5mm 360 75 300 • • • • •
27 Hex nut 559 00 64
(CA3 00 208) •••••
28 Plastic fuel line 2mm 090 31 117 • • • • •
29 Grommet 20 1280 09 01 03 • • • • •
30 Washer 6mm 559 00 84
(CA3 00 308) •••••
31 Screw M3x30 559 00 25 (CA3 00 115-001) •••••
32 Bolt M8x16 559 00 37 (CA3 00 137) •••••
DDeessccrriippttiioonn && PPaarrtt ##’’ss
25 2160 05 12V
25 2227 05 24V
25 2161 05 24V
37
HHeeaatteerr CCoommppoonneennttss
Page 38

Model #
25 2044 05 24V
25 2081 05 12V
RReeff.. NNoo.. DDeessccrriippttiioo nn PPaarrtt NNuummbbeerr
HHyyddrroonniicc 1100 // MM BBooxxeedd -- 1122 && 2244 vvoolltt -- DDiieesseell && GGaassoolliinnee vveerrssiioonnss
33 Washer 8mm 559 00 85 (CA3 00 309) •••••
34 Nut hex 8mm 559 00 65 (CA3 00 209) •••••
35 Bolt M8x50 559 00 31
(CA3 00 128) •••••
36 Washer fender 5/16”x1.25 559 00 80 (CA3 00 305) •••••
37 Shock mount 8mm CA0 00 061-001 • • • • •
38 Washer for Shock CA3 00 333-001 • • • • •
39 Threaded washer 559 00 99
(CA3 00 333) •••••
40 Spring washer 8mm 559 00 78 (CA3 00 302) •••••
41 Hex nut 8mm 559 00 65
(CA3 00 209) •••••
42 Fuse holder cover 20 2900 60 70 09
(CA1 07 009) •••••
43 Fuse holder base 567 00 55 (CA1 07 005) •••••
44 Ring terminal 3/8” awg 10-12 267 01 78 (CA1 90 014) •••••
45 Box cover 20 2900 40 00 70
(CA0 10 070) •••••
46 Exhaust clamp 30-33mm 152 10 061 • • • • •
47 Coolant hose for boxed unit 20 2900 60 10 23 (CA0 11 023) •••••
48 Clamp “P” 34mm 152 10 043 • • • • •
49 End sleeve 25 1785 80 02 00 • • • • •
50 Harness boxed 12V FMP in 20 2900 70 09 10
(CA1 60 910) •
24V FMP in (CA1 60 912) •
12V FMP out 25 1801 80 02 00
(CA1 60 911) •
24V FMP out 25 1864 80 00 02 (CA1 60 913) •
24V FMP out 20 2900 70 10 02 (CA1 60 1002) ••
12V FMP in 20 2900 70 10 06
(CA1 60 1006) •
12V FMP out 20 2900 70 10 07 (CA1 60 1007) •
24V FMP in 20 2900 70 10 08 (CA1 60 1008) ••
51 Power pig tail 12V 20 2900 70 09 20 (CA1 60 901-002) •
24V 20 2900 70 10 01
(CA1 60 901-001) •
52 Cup sieve 20 1312 00 00 06 • • • • •
53 Fuel connection piece 20 1621 45 00 02 • • • • •
DDeessccrriippttiioonn && PPaarrtt ##’’ss
25 2160 05 12V
25 2227 05 24V
25 2161 05 24V
38
HHeeaatteerr CCoommppoonneennttss
Page 39

39
NNootteess
Page 40

40
HHeeaatteerr CCoommppoonneennttss
HHyyddrroonniicc 1100 // MM PPaarrttss DDiiaaggrraamm -- UUnniivveerrssaall VVeerrssiioonn -- DDiieesseell && GGaassoolliinnee vveerrssiioonnss
29
32
35a
32
31
35
30
11a
18
16
18
15
19
19
14
19
19
20
13
32
24
21
22
33
23
34
26
32
25
33
10
9
17
28
11
5
8
34
20
33
27
12/12a
6
4
3
2
7
Page 41

Model #
RReeff.. NNoo.. DDeessccrriippttiioo nn PPaarrtt NNuummbbeerr
HHyyddrroonniicc 1100 // MM -- UUnniivveerrssaall VVeerrssiioonn -- DDiieesseell && GGaassoolliinnee vveerrssiioonnss
DDeessccrriippttiioonn && PPaarrtt ##’’ss
41
HHeeaatteerr CCoommppoonneennttss
25 2044 05 24V
25 2081 05 12V
1 Universal harness 25 1816 80 07 00 • •
25 1816 80 06 00 •
1a Universal harness 25 2160 80 07 00 • • •
2 Cable 20 1668 80 05 00 • • • • •
3 Fuse holder bottom 204 31 004 • • • • •
4 Fuse holder cover 204 31 005 • • • • •
5 Fuse inserts 5 amp 204 00 079 • • • • •
15 amp 567 00 53 (CA1 07 002) • •
20 amp 567 00 55 (CA1 07 005) • •
25 amp 204 00 089 • • • • •
6 Relay 203 00 065 • •
203 00 066 • • •
7 Ring terminal 3/8” awg 10-12 567 01 78 (CA1 90 014) • • • • •
8 Twin leaf spring contact awg 12 206 73 033 • •
206 73 058 • • • • •
9 Socket housing 206 31 290 • • • • •
10 Female terminals 206 00 182 • • • • •
11 Seal 206 75 022 • • • • •
12 Tie cables 5 x 200 559 00 03 (CA1 00 005) • • • • •
12a Tie cables 5 x 360 25 1816 80 02 00 • • • • •
13 Fuel metering pump 25 1894 45 00 00 • •
25 1963 46 00 00 • • •
14 Fuel connection piece 20 1621 45 00 02 • • • • •
15 Cup sieve 20 1312 00 00 06 • • • • •
16 Fuel line 090 31 108 • • • • •
17 Fuel hose 360 75 350 • • • • •
18 Fuel hose-pressure side 360 75 300 • • • • •
19 Clamps 10 2063 00 90 98 • • • • •
20 Clamp (suction side) 10 2063 01 10 98 • • • • •
21 “P” clamp 152 10 040 • • • • •
22 Metal rubber buffer 20 1185 00 00 01 • • • • •
23 Angle 20 1348 03 00 04 • • • • •
24 Intake silencer 25 1786 80 02 00 • • • • •
25 Exhaust (flexible) 25 1816 80 08 00 • • • • •
26 Flexible spiral tubing 360 61 580 • • • • •
27 End sleeve 25 1785 80 02 00 • • • • •
28 Muffler 25 1806 80 01 00 • • • • •
29 Coolant hose 20 1673 80 00 01 • • • • •
30 Coolant hose 20 1673 80 00 03 • • • • •
31 Connection piece 25 1534 88 00 01 • • • • •
32 Clamps 10 2065 02 00 32 • • • • •
33 Hose clamps 152 10 061 • • • • •
34 Muffler clamps 152 10 049 • • • • •
35 Round Socket housing 25 1766 65 02 00 • •
35a Square Socket housing 22 1000 31 93 00 • • •
25 2160 05 12V
25 2227 05 24V
25 2161 05 24V
Page 42

42
HHeeaatteerr CCoommppoonneennttss
HHyyddrroonniicc 1100 AAcccceessoorriieess
30
3
5
30
8
(FCRD Adapter)
1
2
9
(FCRD Adapter)
10
4
6
18
7
19
11
12
30
33
13
14
15
17
26
29
31
32
20
21
22
23
24
16
25
27
28
Page 43

Model #
RReeff.. NNoo.. DDeessccrriippttiioo nn PPaarrtt NNuummbbeerr
HHyyddrroonniicc 1100 // MM AAcccceessssoorriieess
DDeessccrriippttiioonn && PPaarrtt ##’’ss
43
HHeeaatteerr CCoommppoonneennttss
25 2044 05 24V
25 2081 05 12V
1 7 day timer bezel 25 1482 70 01 00 • • • • •
2 Bracket for 7 day timer 20 2900 40 01 58 • • • • •
3 Complete 7 day timer bracket kit with bezel and bracket 25 1482 70 01 00 • • • • •
4 7 day timer 25 2900 70 02 30 • • • • •
5 Fuse link power harness 12V
(CA1 60 901-002) 20 2900 70 09 20 • •
24V
(CA1 60 901-001) 20 2900 70 10 01 • • •
6 Push / Pull switch 12V
(CA100 003) 567 00 07 • •
24V
(CA100 004) 567 00 08 • • •
7 Bulb (push/pull switch) 12V 207 00 005 • •
24V 207 00 006 • • •
8 Fault code harness adapter (CA1 05 030) 20 2900 70 50 30 • • • • •
9 Fault code harness adapter
(CA1 05 044) 20 2900 70 50 44 • • • • •
10 Fault code retrieval device (CA1 05 020) 20 2900 70 50 20 • • • • •
11 Bolt M8x50 (CA3 00 128) 559 0031 • • • • •
12 Fender Washer 5/16 CA0 00 305 • • • • •
13 Shock
(CA0 00 061-001) 554 0007 • • • • •
14 Special Washer for Shock (CA3 00 333-001) 559 0100 • • • • •
15 Threaded nut / washer (CA3 00 333) 559 0099 • • • • •
16 Lock washer 8mm
(CA3 00 302) 559 0078 • • • • •
17 Nut 8mm (CA3 00 209) 559 0065 • • • • •
18 Side mount bracket (CA0 10 057) 20 2900 40 00 57 • • • • •
19 Cross frame mounting tray (CA0 10 022) 20 2900 40 00 28 • • • • •
20 90° bulkhead hose connector
(CA0 11 037) 20 2900 60 10 37 • • • • •
21 Washer - bulkhead (CA3 00 086) 559 00 86 • • • • •
22 Water thermostat 3x18 330 00 160 • • • • •
23 Reducing piece 20x18mm 20 1645 89 00 06 • • • • •
24 Connecting pipe 20 1534 88 00 01 • • • • •
25 Clamp 20mm - 32mm 10 2065 02 00 32 • • • • •
26 Coolant hose 90° 20 1673 80 00 01 • • • • •
27 T-piece 20x20x20mm 20 1673 80 11 00 • • • • •
28 Coolant hose 180° 20 1673 80 00 03 • • • • •
29 Fuel pick up pipe
(CA0 12 058) 20 2900 20 20 58 • • • • •
30 Gasket
(CA0 12 040) 552 00 14 • • • • •
31 Single pick up with ring fitting 25 1864 80 00 02 • • • • •
32 Custom straight pick up 16”
(CA0 00 030) 552 00 01 • • • • •
33 Compression fittings 1/4” NPT (CA0 12 044) 20 2900 20 20 44 • • • • •
3/8” NPT
(CA0 00 031) 552 00 02 • • • • •
1/2” NPT
(CA0 12 006) 552 00 06 • • • • •
25 2160 05 12V
25 2227 05 24V
25 2161 05 24V
Page 44

A member of the Worldwide
EEbbeerrssppääcchheerr
Group of Companies
2nd Printing - February 2007
Printed in Canada
P/N: P/N 20 2900 81 01 24 0B
EEssppaarr PPrroodduuccttss,, IInncc..
6099A Vipond Drive
Mississauga, Ontario
Canada L5T 2B2
(905) 670-0960 Canada
(905) 670-0728 Fax
(800) 387-4800 Canada & U.S.A.
www.espar.com
 Loading...