

Page 1

Quick Start
MS-9 Laser Scanner
This guide is designed to get your scanner up and running
quickly. When connected to a host computer with Windows™
operating system (2000 or above), you can use ESP (Easy
Setup Program) to configure and control your MS-9 Laser
Scanner. In addition to ESP, you can send commands to your
scanner by serial command and by the scanner’s embedded
menus.
For a full explanation of the MS-9’s commands and features,
refer to the
representative.
P/N 83-210047 Rev D 1
Help section of ESP
or contact your Microscan sales
Page 2

FREE EXTENDED WARRANTY OFFER
www.microscan.com/3year
Standard Warranty: One Year
All Microscan products are backed by a one-year
standard warranty. Full warranty details are online at
www.microscan.com/warranty.
Extended Warranty: Three Years
Register this product online with Microscan to receive
complete extended warranty coverage for three years.
LIMITED TIME OFFER: ACT NOW!
To receive a FREE extended warranty, product MUST
be registered by the end-use installation facility within
four months of the date of manufacture. Online registration
is available at www.microscan.com/3year.
2 MS-9 Laser Scanner Quick Start Guide
Page 3
Step 1 —Check Required Hardware
Hardware Required
Scanner
Host
Network
TriggerPower
6
1
2
3
5
4
POWE
R
4060802
0
100
%
STA-
TUS
GOOD
READ
Caution: If using your own power supply, be certain that it is wired
correctly and supply voltage is 10 to 28VDC. Incorrect wiring or voltage can cause software or equipment failures.
•(1) MS-9 Laser
Scanner, FIS0911-XXXXG
•(2) A Host
Computer
•(3) Null Modem
Configuration
Cable, 61-
300026-01, DB25 Plug to DB-9
Socket, 6 foot. If
using another
host cable, be
certain it does
not have RTS/CTS connected to the host.
•(4) IB-131 Interface Box, 99-400005-02
•(5) Power Supply, 97-100004-05 (120V), 97-100004-06 (240V)
•(6) Object Detector (optional), 99-4400021-03
MS-9 Laser Scanner Quick Start Guide 3
Page 4

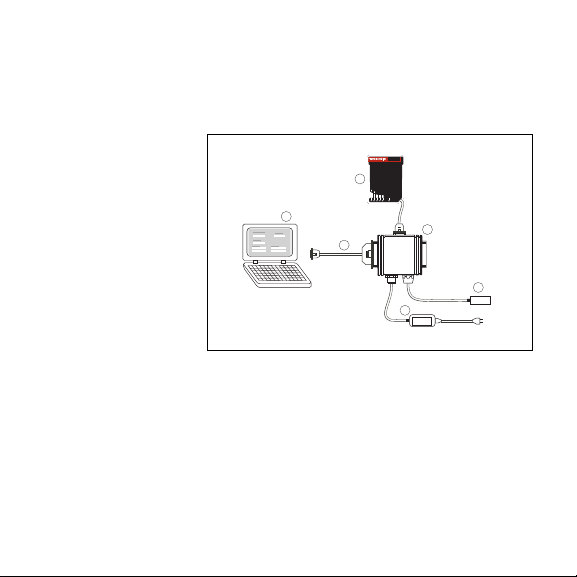
Step 2 —Connect the System
Hardware Configuration
Scanner
Host
Network
TriggerPower
6
1
2
3
5
4
POWE
R
4060802
0
100
%
STA-
TUS
GOOD
READ
Caution: Be certain all cables are connected BEFORE applying
power. Always power down BEFORE disconnecting cables.
1. Connect the scanner
(1) to the IB-131
Interface Box (4).
2. Connect the IB-131
(4) at the “HOST” 25pin connector to the
Host Computer (2)
via a Null Modem
Configuration
Cable.
3. Connect the Power
Supply (5) to the IB131’s “POWER” con-
nector.
4. Apply power to the system.
1. When wiring the IB-131 to a Host Computer that has a 25-pin connector, cross pins 2 and
3. When wiring the IB-131 to a Host Computer that has a 9-pin connector, do NOT cross
pins 2 and 3.
4 MS-9 Laser Scanner Quick Start Guide
1
Page 5

Step 3 —Install ESP
(ESP stands for Easy Setup Program.)
With your scanner connected to a host computer with Windows™
operating system (2000 or above), you can use ESP for configuration
and control.
If downloading from your “Microscan Tools” CD:
1. Insert your “Microscan Tools” CD in your computer’s CD drive.
2. Choose ESP Software from the main menu.
3. Launch Setup.exe under ESP and follow the prompts.
If downloading from the web:
1. Go to www.microscan.com
2. Create a new account or, if you are already a member, enter
your user name and password.
3. Click the Download Software link and extract the latest version
of ESP to a directory of your choice. Note where your ESP.exe
file is stored on your hard drive.
4. At the end of the install process, the following icon should
appear on your desktop:
5. Click the ESP icon to start the program.
MS-9 Laser Scanner Quick Start Guide 5
Page 6

Step 4 —Select Scanner Model
When you start the
program, this menu
will appear:
1. Select MS-9
Laser from the
menu and click
OK. If you do
not want to
make this selection every time
you load ESP,
uncheck “Show
this window at
Startup”.
2. Select the
default name
(MS-9 Laser-1,
for example) or type in a file name of your choice and click OK.
3. Click Yes when the connect dialog appears.
Note: If you need to select another model later, you can find it in App
Mode under Model on the menu bar.
6 MS-9 Laser Scanner Quick Start Guide
Page 7

Step 5 —Autoconnect
1. In the Connecting... dialog, if your communications port is not
the default COM1, use the pull down arrow to change your communications port.
2. Click the Start button.
When connected, the scanner’s settings will be loaded into ESP
and the CONNECTED message will appear in a green box in the
status bar at the bottom right of your screen.
3. If the connection fails, enable a different Com Port, check connections, and try again.
Tip
: If you do not see the
at the bottom of your dialog, try expanding the
MS-9 Laser Scanner Quick Start Guide 7
CONNECTED
or
DISCONNECTED
ESP
window horizontally.
message
Page 8

Step 6 —Position Symbol and Scanner
Pitch
axis
Bar code
label
Tilt
axis
Skew
axis
Scan line
Scanner
Scanner/Symbol Positioning
1. Set up a symbol at the scanning distance you will be using in
your application.
Note: If using an I 2/5 symbol, verify that the number of characters in
the symbol being scanned matches the symbol length enabled for
the I 2/5 symbol type (default is 10 and 6).
2. Avoid bright light or IR light from other sources, including other
readers.
3. Pitch the symbol or reader at a minimum of ±15° to avoid specular reflection (the return of direct, non-diffused light).
8 MS-9 Laser Scanner Quick Start Guide
Note: Code 39 is the default symbol type enabled. If you are uncertain as to your symbology type, enable all symbologies by selecting
the Auto Discriminate macro in Term in al mode.
Page 9

Step 7 —Test Read Rate
Code 39 Test Symbol
You can also find test symbols packaged with your Microscan Tools CD.
If you don’t have a test symbol, print out this page and use the symbol here for testing. With this test you can learn the percentage of
decodes per images captured by observing the active LEDs (20%
through 100%) on the top of the scanner.
By ESP
After connecting to the reader, ESP will open in Setup Mode.
1. Click the Test button in Setup Mode to begin the read rate test.
2. Follow the instructions on the Setup Mode screen.
3. To end the read rate test, click the Stop button.
Note: If the reader is in the default Continuous Read mode, it will
read and beep repeatedly as long as a readable symbol remains in
the read range, and as long as the Read Cycle configuration has not
changed.
By Serial Command
Send a <C> to begin the read rate test.
Send a <J> to end the read rate test.
MS-9 Laser Scanner Quick Start Guide 9
Page 10

Step 8 —Configure the Scanner
By ESP
To change reader settings, or to access the Utilities or Te rmin al win-
dow, click the App Mode button.
To return to Setup Mode, click the Setup Mode button.
By Serial Command
From your terminal program or the Te rmi nal screen in ESP, you can
enter serial commands and configuration and utility commands.
Note: You can learn the current setting of any parameter by inserting
a question mark after the number, as in <K100?>. To see all K com-
mands, send <K?>.
10 MS-9 Laser Scanner Quick Start Guide
 Loading...