

Page 1
4 CHANNEL WIRE FREE FULL HD CCTV SYSTEM
USER MANUAL
www.espuk.com
FHDV4KBWF
FHDV4RWF
FHDVC4FBWF
FHDV4KBWF Manual.indd 1 21/12/2016 13:26:34
Page 2

CONTENTS
NVR Description ................................................... 3
Basic Operations ................................................... 5
Record Setup ...................................................... 8
Playback Recording ............................................... 10
Transferring to USB ............................................... 11
Pairing Additional Cameras ........................................ 12
Remote Viewing ................................................. 13
Help Guide ....................................................... 18
This manual is designed to be used as a quick start guide alongside the informative general user
interface (GUI) of the NVR.
2
Quick Notes;
• The Cameras supplied in the kit are preregistered to the NVR.
• Cameras supplied separately will need to be registered to the NVR.
• The NVR will require a connection to a monitor to be programmed.
• Please format the pre-installed Hard Drive during setup.
• Although the system utilizes the latest in Wire Free technology the NVR and
cameras will require a power supply each.
IMPORTANT NOTICE
• Please read this manual and keep for later use
• Do not use accessory devices not recommended by the manufacturer
• Please use the power adapter equipped for the unit
• Please do not touch any control parts not mentioned in the manual.
Incorrect adjustment of a control part not mentioned in the manual may
damage the machine
• Ensure air ventilation around the unit and do not cover or block the vent hole
• Do not place the unit in direct sunlight or near a heat source
FHDV4KBWF Manual.indd 2 21/12/2016 13:26:34
Page 3
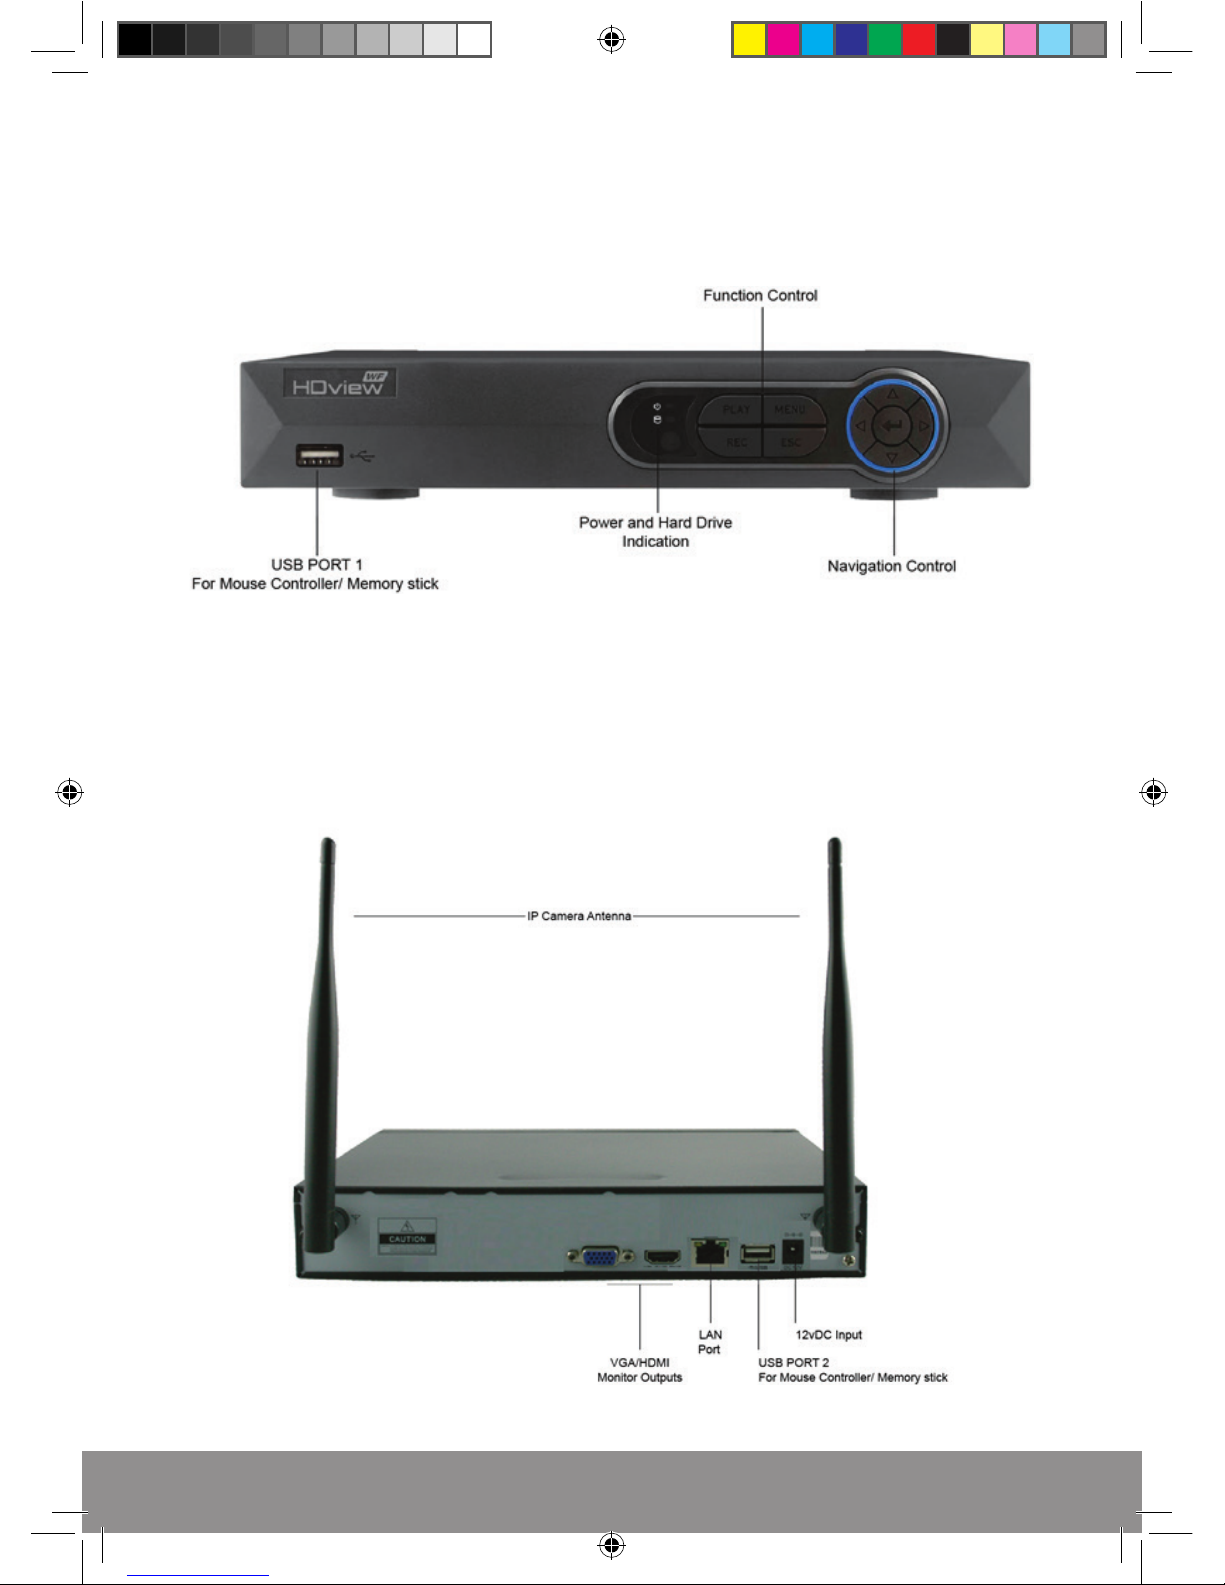
3
REAR PANEL
NVR DESCRIPTION
FRONT PANEL
FHDV4KBWF Manual.indd 3 21/12/2016 13:26:34
Page 4
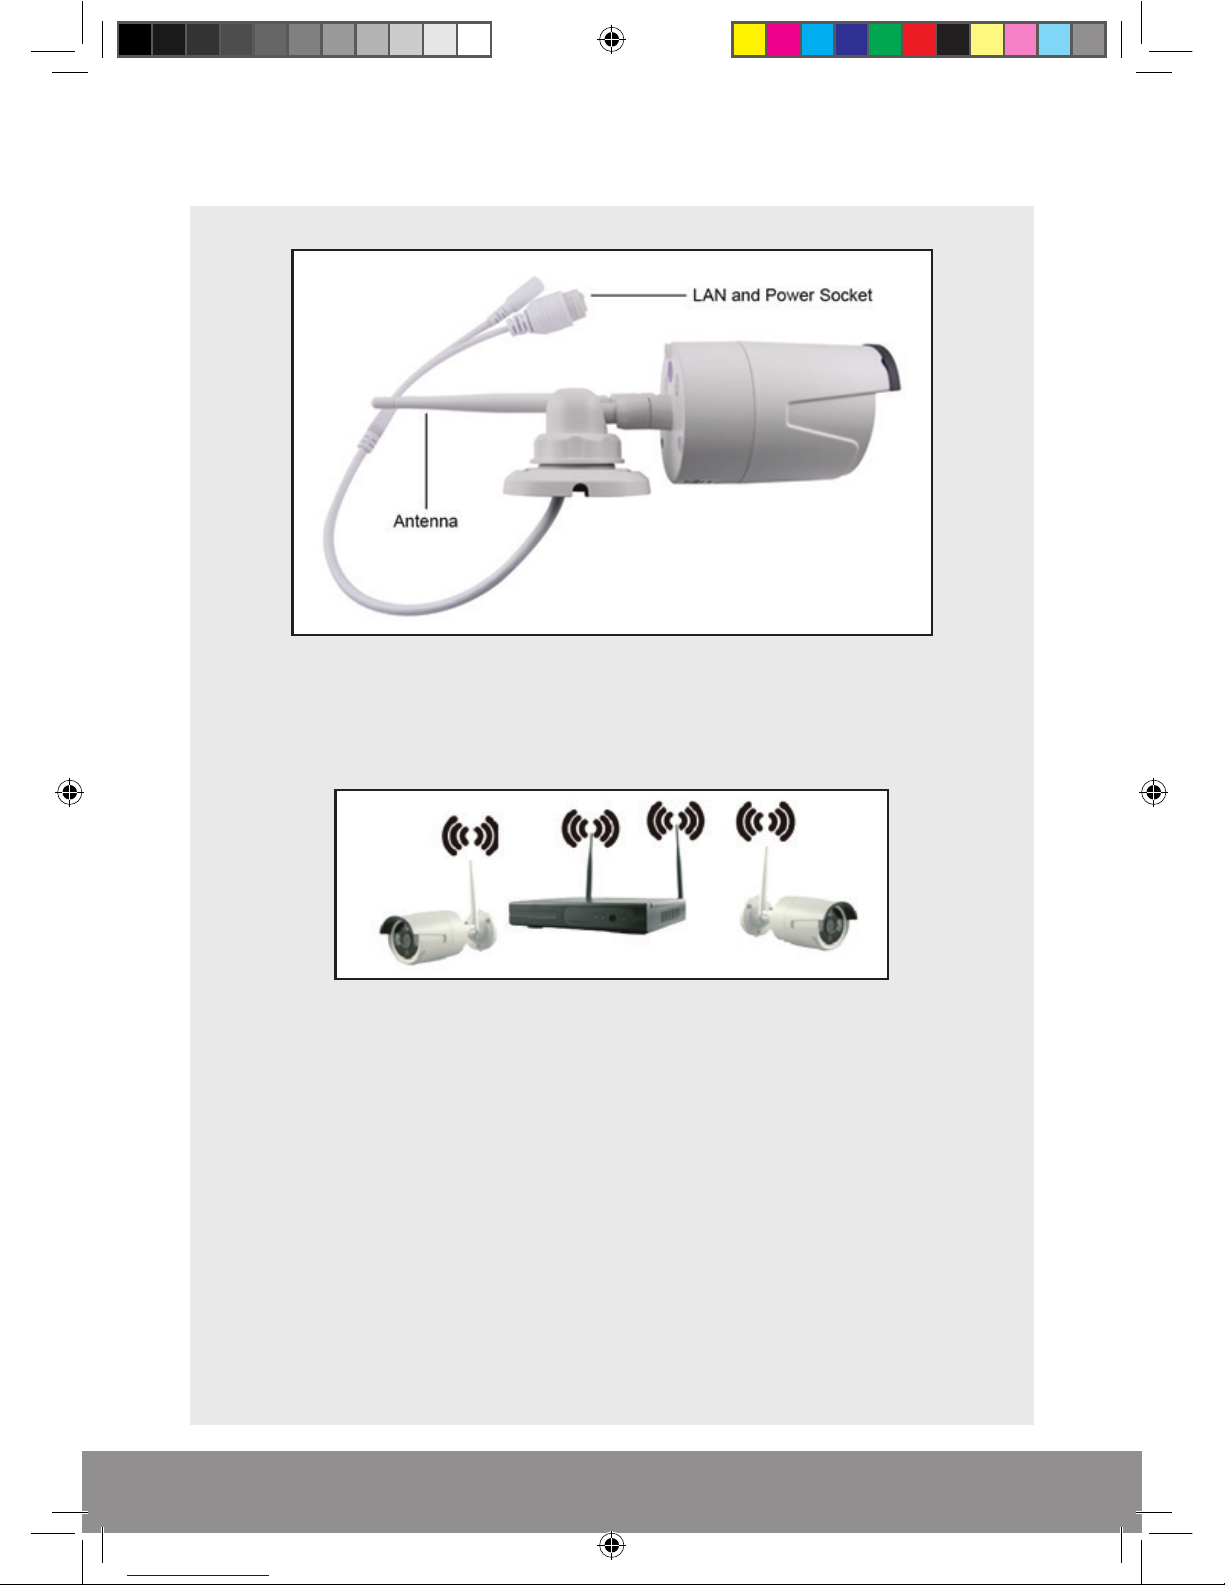
4
IP CAMERA DESCRIPTION
Wire Free Technology
The stated Open field range of 150M is across an open field. Any line of
transmission obstruction will reduce the useful range.
When siting units consider minimising the number of walls, trees, doors, hills within
landscaping or other solid objects that exist along the line of transmission.
Avoid a line of transmission that follows the whole length of a wall rather than
directly through it.
A small adjustment to the position of either transmitter or receiver can make a
huge difference to performance.
Avoid siting transmitter or receiver units in close proximity to other wire free
equipment such as routers, baby monitors or sources of electrical energy such as
microwave ovens, very high voltage cable etc..
Although the housing of the IPC is weatherproof, the LAN port and power
connection require weatherproof housing.
For best wire free signal insure system antennas run parallel;
FHDV4KBWF Manual.indd 4 21/12/2016 13:26:34
Page 5
5
BASIC OPERATIONS
CONNECTION TO A MONITOR
The NVR has a HDMI and VGA output to connect to a monitor. Please select the
appropriate connection and select the correct input channel on the monitor.
POWER ON
Plug the power supply to the DC12V terminal and Switch On from the rear panel.
POWER OFF
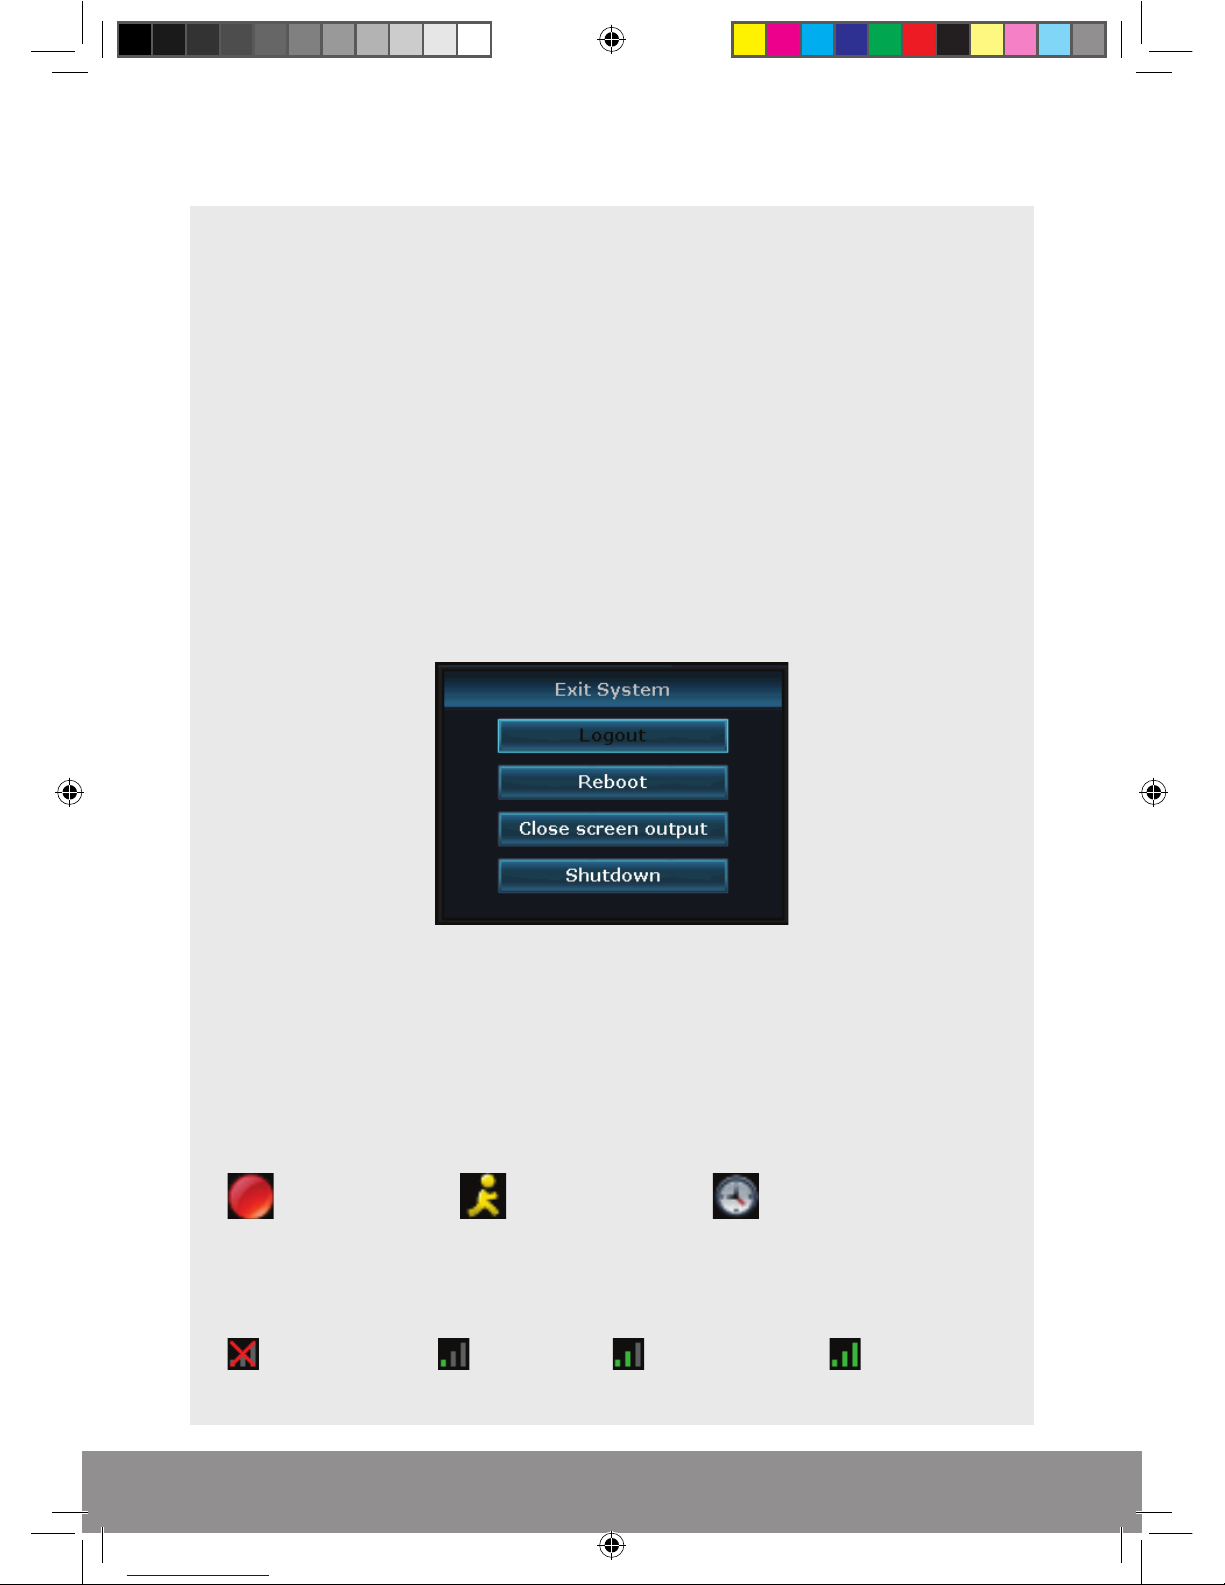
Turn off the NVR at the mains power source after selecting the power off option
from the Shortcut Menu/ Exit System.
LIVE VIEWING
On start up the NVR will display a divided screen. Using the Mouse Control, double
click on any image to bring to full screen. Double click again to return to that main
divided screen.
The recording status and alarm status are indicated by the following icons:
Each channel with a paired camera will also display the signal strength;
Recording Motion Detect Time defined recording
Disconnected Low Signal Average Signal High Signal
FHDV4KBWF Manual.indd 5 21/12/2016 13:26:34
Page 6
6
TO ACCESS THE MENU
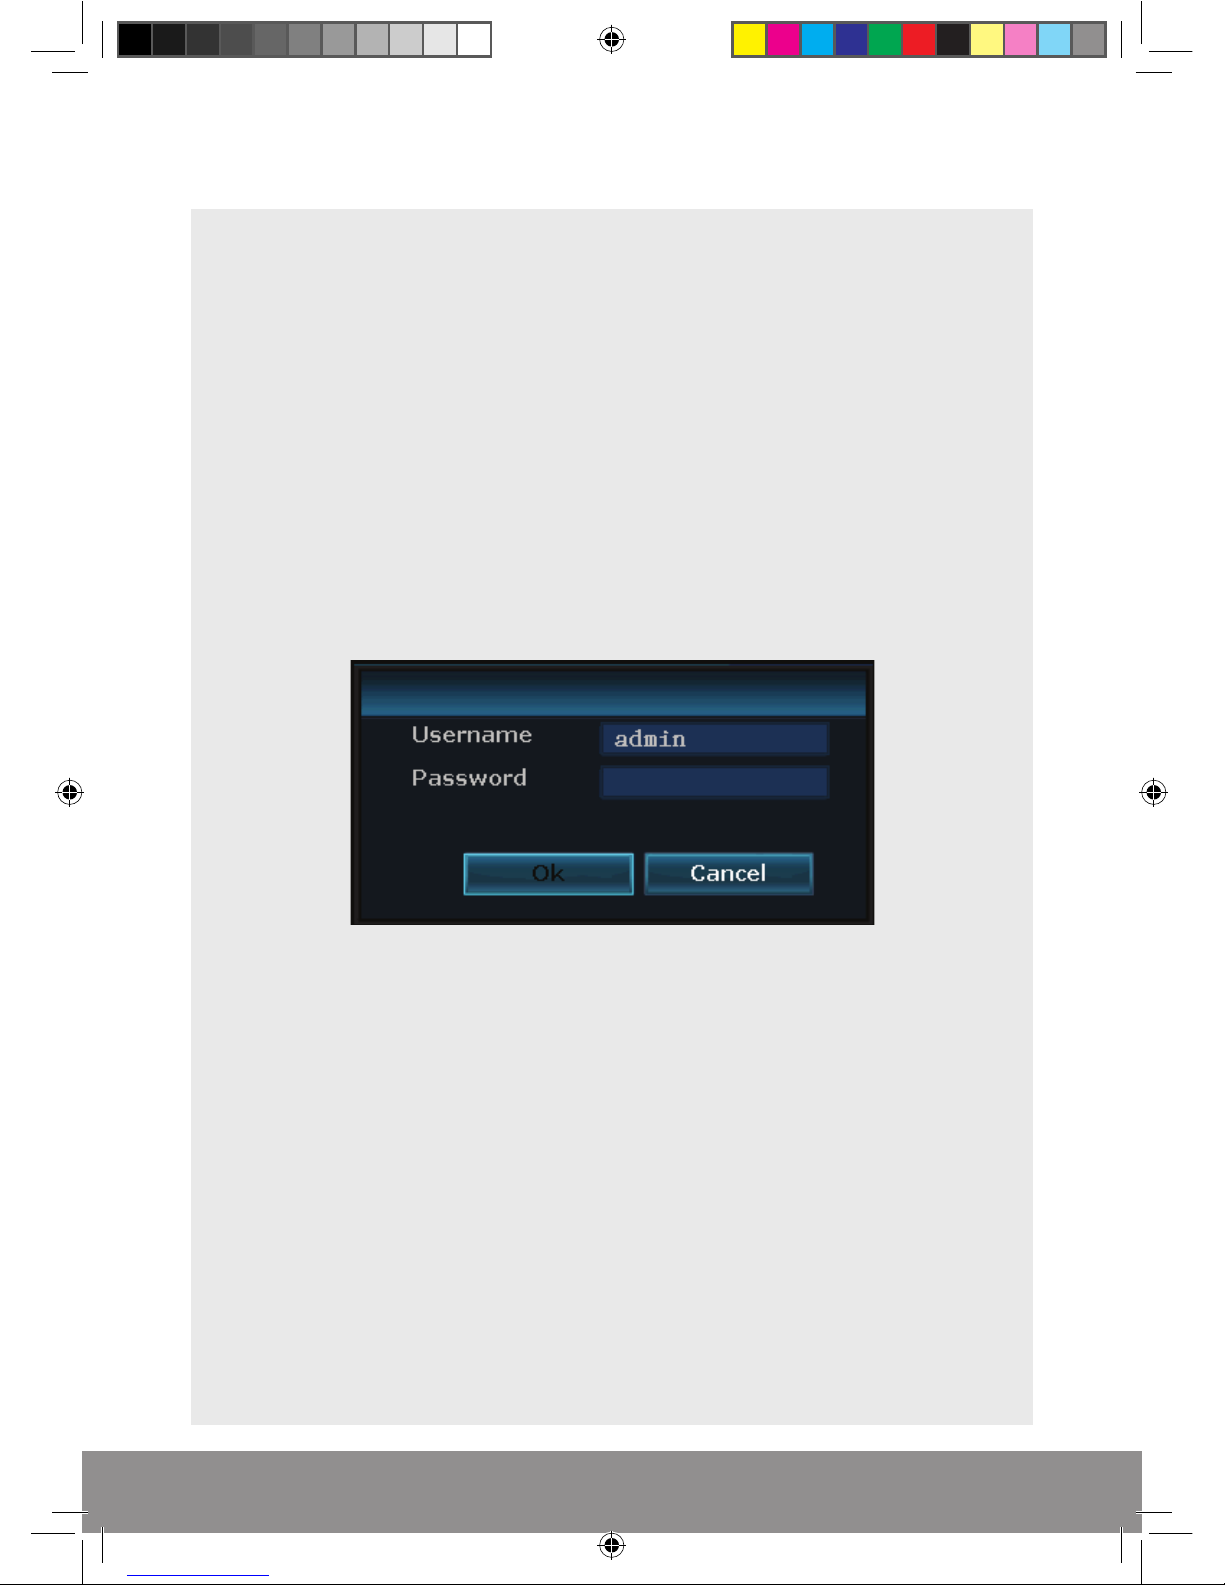
Right click the mouse anywhere on screen to activate the Shortcut Menu.
Selecting Main Menu option will automatically display the System Login screen.
The default settings are:
User Name: Admin
Password: ‘leave blank’
Once logged in, right click to access menu selections.
An opportunity to change the password is provided within the settings menu. Please
note if an incorrect password is entered three times the NVR alarm will activate. If a
wrong password is entered five times the system will lock out. To reset the system
turn the main power off and back on after 5 minutes.
FHDV4KBWF Manual.indd 6 21/12/2016 13:26:34
Page 7

7
SHORTCUT MENU
Right-clicking on the live camera screen will activate the Shortcut Menu where the
most regularly used settings can be found.
Before first use, please Format the Hard Drive (HDD)
Enter the Short Cut menu;
>Select System Setup
>Select General Setup
>Select HDD Setup
>Highlight HDD
>Select the option to Format.
The unit is now ready to record
FHDV4KBWF Manual.indd 7 21/12/2016 13:26:35
Page 8

8
RECORD SETUP
RECORD CONFIGURATION
Manual RecordAs default the unit will be set to manual record, the cameras are recording
continuously and the HDD will automatically overwrite the oldest data available.
To access the menu enter the Shortcut Menu and select Manual Record.
Motion and Schedule Record-
Access the Shortcut Menu > System Setup > record set up
Channel
Select 1–4
Weekday
Select day off
Schedule1-4
Each camera has the ability to have 4 different record schedules in 1 day.
Time; continuous record for the time period set.
Motion; only records motion triggers picked up by the system.
NB. When entering the ‘Record
Setup’ the default screen will
always start with a display of the
settings for Channel 1 and the
current day’s schedule.
FHDV4KBWF Manual.indd 8 21/12/2016 13:26:35
Page 9

9
Additional Motion Record Settings
Once a camera has been set to ‘Motion’ in the schedule enter the Video Detection
menu to define parameters;
From the System Setup menu enter Channel Setup > Video Detection.
Select required channel and ensure option is enabled before adjusting the on
screen settings.
FHDV4KBWF Manual.indd 9 21/12/2016 13:26:35
Page 10

10
RECORDING PLAYBACK
The NVR records all camera footage to the internal Hard Drive.
To access the footage enter the Shortcut Menu >Video Playback.
Manual search allows the user to define the exact point of when to begin playback.
NB. Practice playing back footage to familiarize with the process before an incident occurs.
NB. As default the record resolution is set to 1080p. For best performance in this resolution
it is recommended that only one channel at a time is selected for playback.
FHDV4KBWF Manual.indd 10 21/12/2016 13:26:35
Page 11

11
TRANSFERRING A RECORDING TO USB
To extract footage from the Hard Drive please insert a USB memory stick (8GB
MAX.) into a free USB port on the NVR.
Enter the Shortcut Menu > Video Back up,
Define, search and select the required footage before selecting backup.
The NVR will place an AVI file on the USB Memory stick.
NB. Practice backing-up footage to familiarize yourself with the process before an
incident occurs.
NB. The AVI file will enable playback via a PC using AVI players such as Windows Media
Player and DIV-X.
FHDV4KBWF Manual.indd 11 21/12/2016 13:26:35
Page 12
12
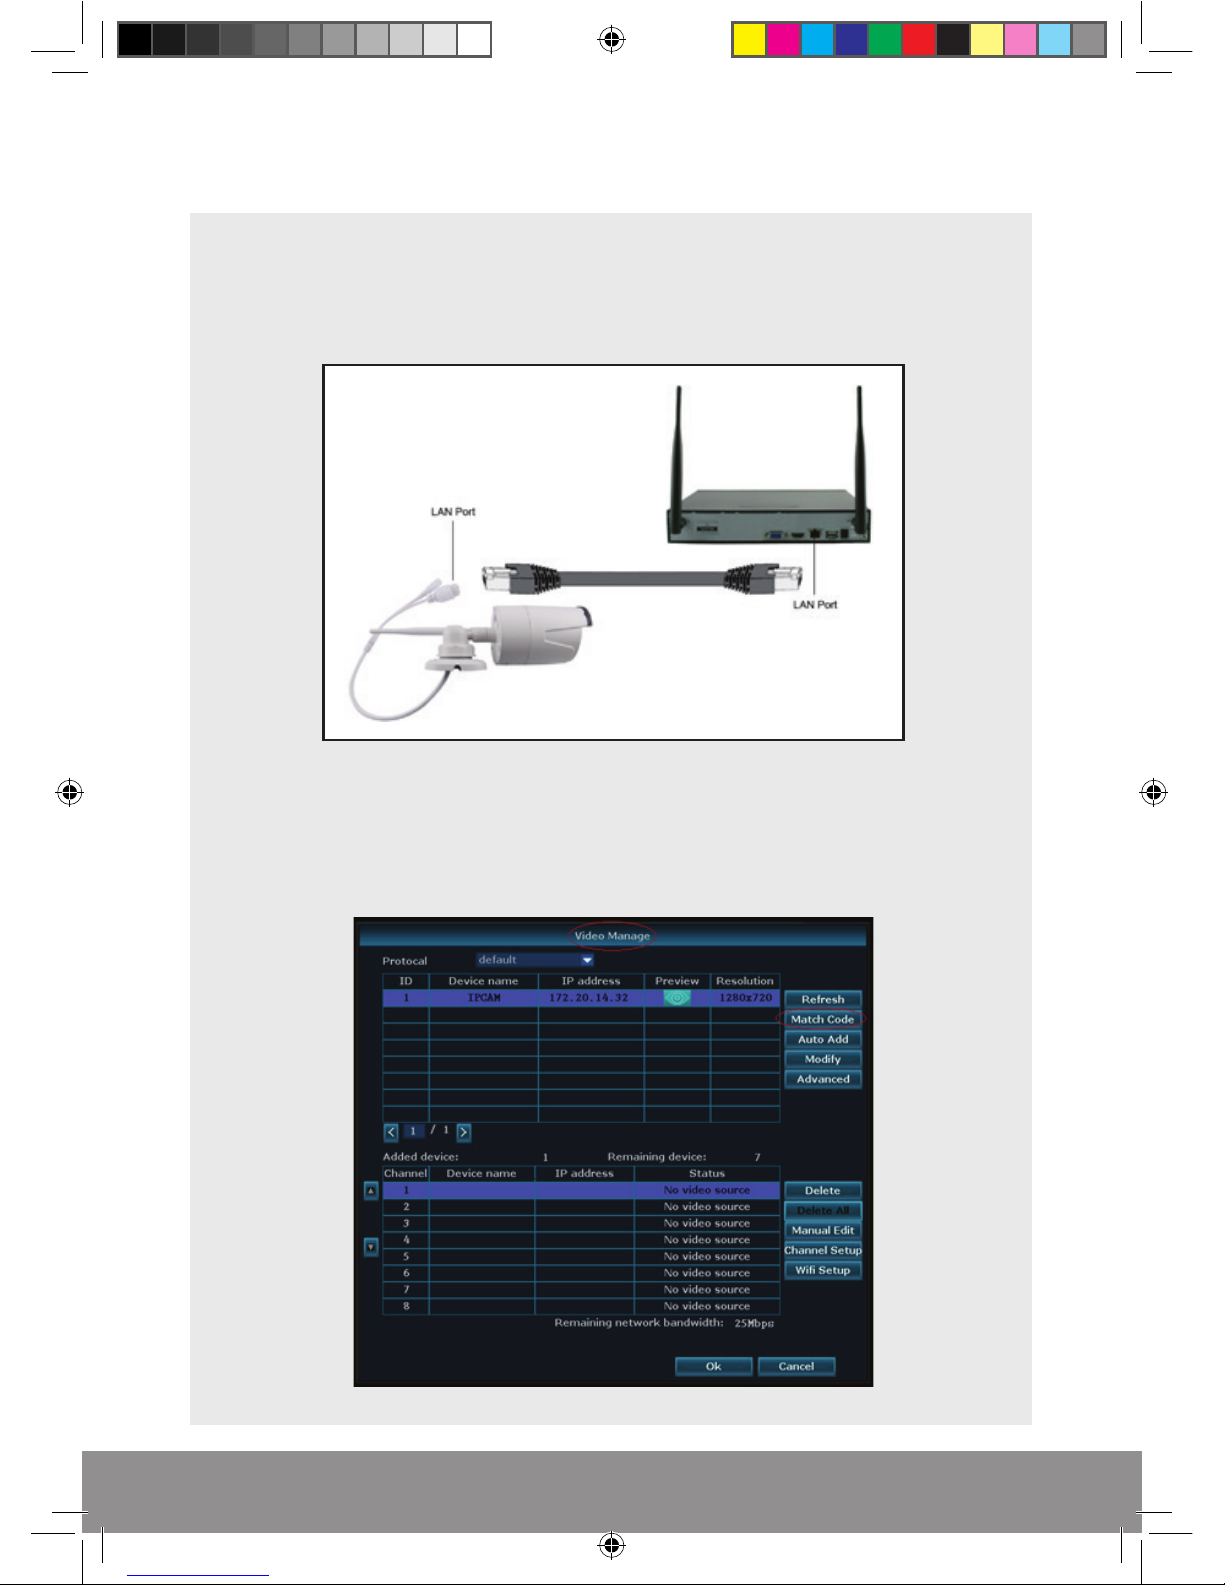
PAIRING ADDITIONAL CAMERAS
The NVR is supplied with 2 pre-registered cameras, to add an additional camera;
Connect the additional Camera to the NVR using the LAN port on the NVR using
the supplied network cable;
With the power on to both devices enter the Short Cut menu on the NVR and
select Video Manage
Select ‘Match Code’, after 60 secs ‘Match Code Successfully’ will appear.
Auto add, and the camera will be visible on the preview screen.
FHDV4KBWF Manual.indd 12 21/12/2016 13:26:35
Page 13

13
REMOTE VIEWING
Networking should always be carried out by a competent/qualified engineer,
specifically when adjusting settings on the router which is sometimes required for
remote viewing.
To remote view the NVR using the recommended APP or PC platform.
A cable from the LAN port on the rear of NVR to a spare LAN port on the router is
required, then reboot the NVR.
Once the NVR has been added to the network there are different methods to view
the system remotely:
Smart-phone APP (IOS/Android)
Connect network cable from the NVR to router > Select Fast Network from the
Shortcut menu of the NVR
The network status should state ‘Healthy Network’, if not please ensure DHCP is
enabled in the Network Menu and reboot the NVR, check connections and replace
network cable if necessary.
Download the ESP HDview WF APP for Android or IOS;
FHDV4KBWF Manual.indd 13 21/12/2016 13:26:36
Page 14

14
Register a user account and log-in;
Select ‘Add device by ID; Enter the Cloud ID by selecting the
scan symbol;
Scan the QR code on the NVR’s ‘Fast Network’ Page;
Select the ‘Plus’ symbol;
FHDV4KBWF Manual.indd 14 21/12/2016 13:26:36
Page 15

15
Enter the remaining details and
select ‘Submit’;
The system will now be
accessible;
PC/Laptop Software: CMS (Central Management Software) that is supplied on the
CD supplied with the NVR (Windows compatible)
Install the CMS file to and open;
Select Settings;
FHDV4KBWF Manual.indd 15 21/12/2016 13:26:36
Page 16

On the ‘Settings’ page select ‘Add Device’;
The ‘Add Device’ menu will open;
Select By ID
Enter the Cloud ID of the NVR, which can be found on the NVR’s ‘Fast Network’ page.
Proceed to enter the rest of the details including NVR password, user defined ‘Device
Name’ and select Confirm.
16
FHDV4KBWF Manual.indd 16 21/12/2016 13:26:36
Page 17

The System’s details will appear on the ‘Preview’ page, select to view cameras;
NOTE: ESP are unable to guarantee that every device will be compatible with the
NVR and software supplied. Specific models of phone, tablet or other device, the
hardware it contains, the service provider, the types of data services offered and
specific phone / device plan will all affect the performance of PC / mobile device
for remote
17
FHDV4KBWF Manual.indd 17 21/12/2016 13:26:36
Page 18

18
Help Guide
In the event of trouble with the system please follow the troubleshooting
guide. If further problems persist please contact the installer / supplier.
The NVR will not boot up normally
a. The incorrect power supply is being used
b. The power supply is not producing the required voltage
c. Is the socket for the power supply plugged in and switched on?
Connection issue with the monitor
a. The monitor cable is not correctly connected or damaged
b. The incorrect power is applied to NVR / Monitor
c. The correct input channel has not been selected on the monitor
There are no cameras displayed on the monitor
a. The camera power supply is not correctly connected or damaged
b. The camera signal is poor
c. There is a connection issue with the monitor
I cannot find the video files in Playback mode
a. Recording did not take place in the specified time range
b. The recording parameters have not been programmed correctly /
switched off
c. The recording information has been overwritten
d. Hard drive cannot be detected
NVR cannot detect hard disk
a. The NVR’s power supply is not correctly connected or damaged
b. The NVR has an incorrect power supply
c. The HDD has not been connected correctly
d. An incorrect HDD has been installed
The images appear unstable during playback
a. The recommend setting for 1080p playback is 1 channel only
Network connection issue
a. Network is not stable
b. NVR is not networked correctly
FHDV4KBWF Manual.indd 18 21/12/2016 13:26:36
Page 19

19
FHDV4KBWF Manual.indd 19 21/12/2016 13:26:36
Page 20

Elite Security Products
Unit 7, Target Park, Shawbank Rd
Lakeside, Redditch B98 8YN
www.espuk.com
Telephone: 01527 51 51 50
Fax: 01527 51 51 43
email: info@espuk.com
E&OE - Errors and omissions excepted. I16
FHDV4KBWF Manual.indd 20 21/12/2016 13:26:36
 Loading...