

Page 1

COMBINED SENSOR DETECTOR
CSD212
OPTICAL SMOKE AND RATE-OF-RISE
Installation Manual No: 18020743
ATTENTION: This manual is subject to change without notice!
Read carefully this installation instructions before installing the device!
GENERAL DESCRIPTION:
The CSD212 is a special kit for using in intruder alarm systems. The kit includes the
combined sensor fire detector CSD-2 and relay base DB-12L/U (12V).
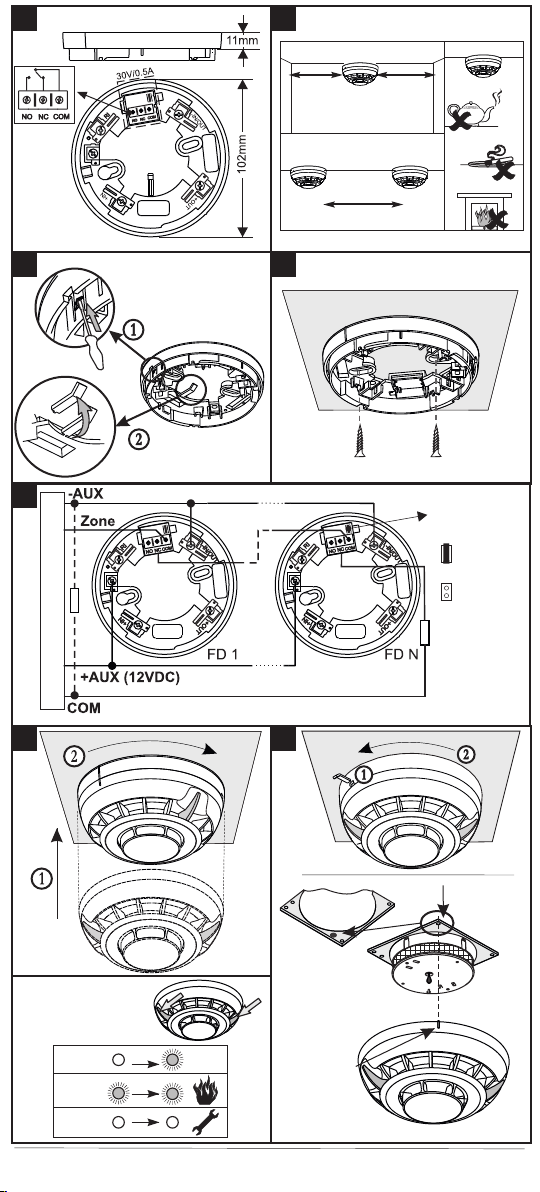
INSTALLATION
1. Choose the proper place for installation of the fire detector. Refer to the given
installation instructions.
Note: Do not install the detector near sources of steam, condensation or smoke
and close to natural heat sources.
2. If you want to “lock” the detector to the base remove the little “tooth” (with the
triangle shape) and break the plastic key off the base. Keep the plastic key in safe place
to be able to open the detector later.
3. Mount the relay base on the ceiling of the protected premises using fixings
according the mounting surface.
4. Connect the detector base to the intruder alarm panel using the wiring diagram.
ATTENTION: Disconnect the main power supply before installing the detector!
5. Insert the detector into the base and rotate clockwise until it drops into place.
Continue to rotate the detector until it locks to the base - a click is heard.
6. If the detector has been locked to the base, when open it for a service schedule
maintenance and cleaning you have to use the plastic key. Light press with the plastic
key into the base opening and at the same time rotate the detector head counterclockwise.
ATTENTION: To clean the wire mesh you have to remove the detector’s PCB and
then carefully to disassemble the smoke chamber from it. Clean the wire mesh
and mount the chamber back on the PCB as observe the arrows - they have to
coincide, then slightly press the chamber to the detector’s PCB. Next you have
to mount the PCB back to detector’s plastic body. Find the color dot sticker on
the PCB and orientate it to the mark on the plastic body (visible from the
outside). The hole next to the color dot have to coincide with the pin on the
plastic body. Gently press downwards to fix the PCB in place.
TESTING THE DETECTOR
To test the detector use a smoke probe:
1. Apply power to the detector.
2. Wait for 30 sec.
3. Exert influence on the fire detector by smoke generator (Dispenser) or by aerosol
simulator of smoke to test the optical part; or use heat tester (Cordless Heat Detector
Tester or Heat Tester 110V>240V) at distance of 20 cm to test the heat part. Within 8
sec the fire detector will enter in fire condition. Both LEDs will light up.
4. Power off the detector for 2 sec. minimum. After resetting the detector will enter in
duty mode and the LEDs will light off.
SERVICE MAINTENANCE
1. Inspection for visible physical damage - weekly.
2. Operational test in real conditions - monthly.
3. Check and clean dust contamination - six months.
4. Check and clean base and head contacts and connections - annually.
TECHNICAL SPECIFICATIONS
Operating Voltage Range 9 - 30 VDC (Nom.12/24VDC)
Average current consumption in quiescent state. . . . . . . < 50µA
Alarm state current: . . . . . . . . . . . . . . . . . . . . . . . . . . . . . 18 mA / 9V;
29mA / 12V;
32mA/ 15V
Class (for the heat part, in accordance with EN54-5/7) . . A1/R
Protected area (in accordance with EN54-5/7) . . . . . . . . up 120m²
Installation height (in accordance with EN54-5/7) . . . . . . up 16m
Output in alarm state at terminal RI . . . . . . . . . . . . . . . . . 20mA (max)/ -3.3V
(Towards terminals +IN /+OUT/)
Degree of protection . . . . . . . . . . . . . . . . . . . . . . . . . . . . IP30
Wire Gauge for terminals. . . . . . . . . . . . . . . . . . . . . . . . . 0.4mm ё 2.0mm
Operational temperature range . . . . . . . . . . . . . . . . . . . . -10 C ё +60 C
Relative humidity resistance . . . . . . . . . . . . . . . . . . . . . . (93 ± 3)% @ 40 C
Dimensions (incl. base) . . . . . . . . . . . . . . . . . . . . . . . . . . ø102mm, h 48mm
Weight (incl. base) . . . . . . . . . . . . . . . . . . . . . . . . . . . . . . 160g
. . . . . . . . . . . . . . . . . . . . . . . . .
2 2
° °
1293-CPD-0120
°
Distributor: Elite Security Products Ltd, Unit 7 Target Park, Shawbank Road
Lakeside, Redditch B98 8YN, UK http://www.espuk.com
Manufacturer: Teletek Electronics JSC, 14 Srebarna Str., 1407 Sofia, Bulgaria, http://www.teletek-electronics.com
Page 2
Base BD-12L/U
!
1
2
4
+12V
100K*
Intruder Alarm Panel
>30cm
<5m - FHD-2, RHD-2, PSD-2
3
+12V +12V
<7m - CSD-2
>30cm
Jumper for
Latch/Unlatch
operation mode
Latch Mode
The jumper
is set.
Unlatch Mode
The jumper
is removed.
EOL
1K
*ATTENTION: When the EOL-module is only a capacitor, IT IS OBLIGATORY
TO CONNECT a 100K resistor in parallel at the beginning of the line!
5
6
PCB from
above
Dot Mark
LED
Indication
Blinking
Light on
Light off
Distributor: Elite Security Products Ltd, Unit 7 Target Park, Shawbank Road
Lakeside, Redditch B98 8YN, UK http://www.espuk.com
Manufacturer: Teletek Electronics JSC, 14 Srebarna Str., 1407 Sofia, Bulgaria, http://www.teletek-electronics.com
8 sec
OK
Mark on the
outside of
the plastic
body
 Loading...