

Page 1
Q U I C K G U I D E S E T U P
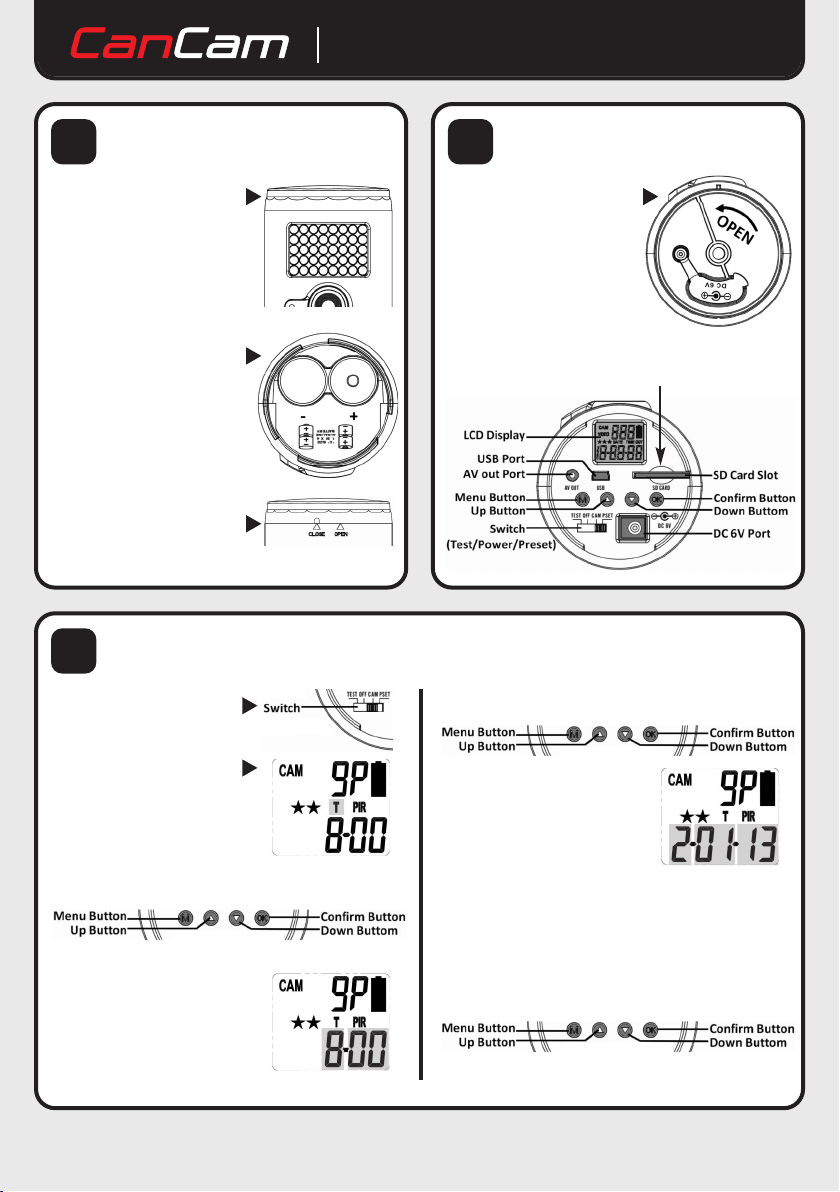
Insert batteries
1
Unscrew the top lid of the
•
anCam to access the
C
battery compartment
• Install 4 “C” cell batteries
with the correct polarity (+/-)
as indicated in the battery
compartment
• Screw the lid back on using
the guidance notch on the lid
to secure correctly
Set the time and date
3
• Turn the switch to CAM to
adjust the time and date
setting
• After the initial test display,
the internal LCD screen will
display a blinking ‘T’ and the
default time
• Press the [OK] button to start the time settings
Load SD Card
2
Unscrew the bottom of the
•
anCam to access the LCD,
C
ports and controls
• Insert the SD card into the SD card slot
• The next display shows the default date
• Adjust the Month using [UP]
or [DN] button and press [OK]
• Adjust the Day using [UP] or
[DN] button and press [OK]
• Adjust the Year using [UP] or
[DN] button and press [OK]
• Press the [UP] or [DN] button
to adjust the Minute setting
and press [OK] to confirm
• Press the [UP] or [DN] button
to adjust the Hour setting
press [OK] to confirm
• Once complete, the word - dEL - will flash, this allows
the SD Card to format
• Press [OK] then press [DN] and press [OK].
SD card is now formatted
• Press the [M] button to exit time and date setting
Page 2
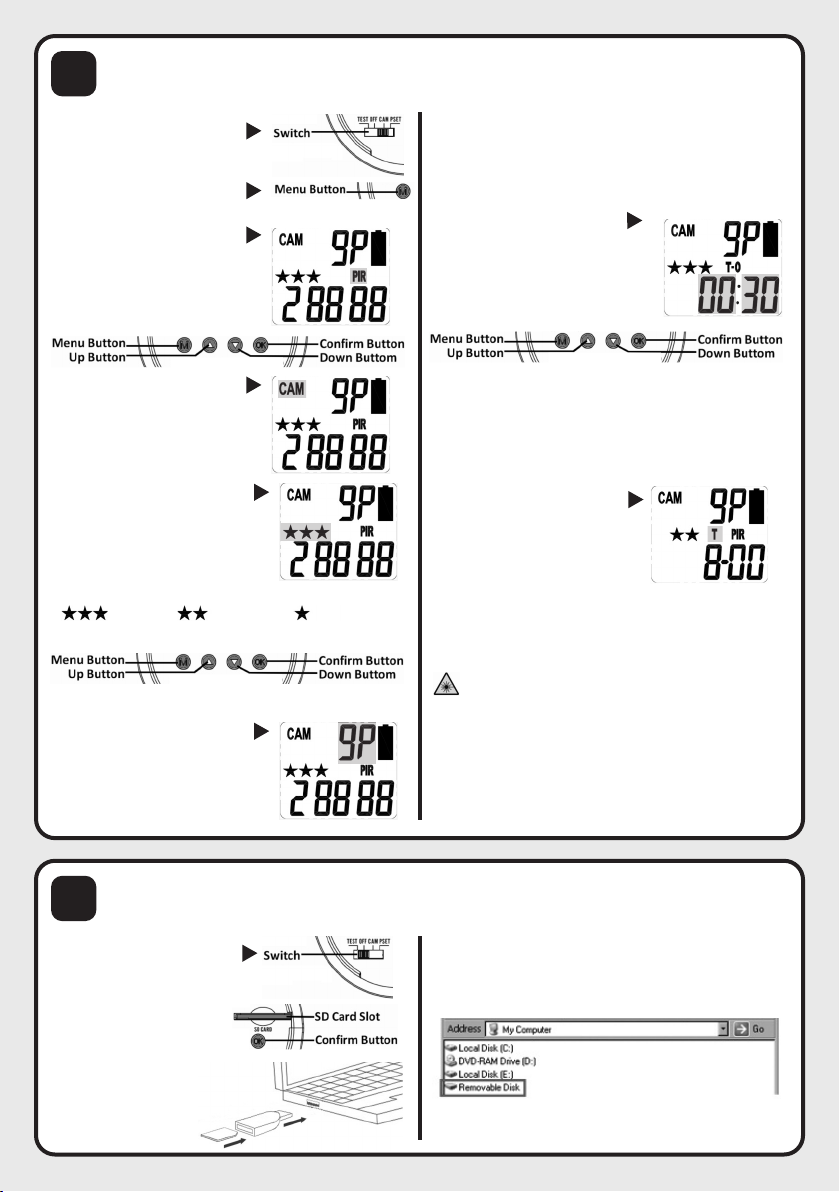
Record mode In this mode the CanCam will record when the PIR is triggered by movement
4
• Turn the switch on the base
of the CanCam to CAM
• Press the [M] button within
30 seconds to enter the menu
• Use the [Up] and [DOWN]
utton until PIR is flashing on
b
he LCD screen and Press [OK]
t
• The next screen will display
the camera’s capture type.
Still image type is selected as
default, this is displayed as
‘CAM’ on the LCD. Press [OK]
• The next option is image
resolution/quality denoted by
the number of stars
• To adjust the default value
Press [OK] then [UP] or [DN]
to adjust the image resolution;
8Mp resolution
• Press [OK] to confirm selection
• The next option is ‘Burst Mode’.
This option shows how many
images are to be taken when
the PIR is triggered, the option
is between 1-9 images
5Mp resolution 3Mp resolution
• To adjust the default value Press [OK] then Press [UP] or
[DN] to change value
Press [OK] to confirm selection
•
• The final option is the ‘Time
ut’ setting. This programs a
O
period of time between
possible PIR triggers
• To adjust the default value Press [OK] then Press [UP] or
[DN] to increase or decrease the minute value and
pressing [OK] to confirm
• Adjust the seconds interval using [UP] or [DN] then
pressing [OK] to confirm
• The screen will then return to
the time / date setting screen
• Press [OK]
• Press the [M] button to exit.
After 30 seconds warm up time the unit will then flash the
laser beam for a further 45 seconds to assist in the
installation
Please avoid laser beam pointing at your eyes
After this period has elapsed the LCD will display a counter of
how many files have been created on the SD card.
Viewing files
5
• Turn the switch on the base
of the CanCam to OFF
• Press down on the
SD card to eject
• Insert SD card into SD card
reader and insert the SD
card reader into the USB
socket of a PC/Laptop
• On a Windows PC/Laptop find and open the option for
‘My Computer’
• Find and open ‘Removable Disk’
• This will show the contents of the SD card, click on a file
to view content
Page 3

V A N D AL R E S I S T A N T S U R V E I LL AN C E SY S T E M
1. Mark out fixing centres
(use a spirit level). Use
the appropriate method
of fixing for theparticular
mounting surface of
your installation.
3. Insert the Camera
so the lens and
sensors line up with
the relevant slots.
2. If installing into a
vehicle, insert the
foam layer to
reduce vibration.
4. Using the security
screws provided,
secure the two
tabs together.
Elite Security Products
Unit 7, Target Park, Shawbank Rd
Lakeside, Redditch B98 8YN
Telephone: 01527 515150
email: info@espuk.com
www .esp uk.c om
 Loading...