

Page 1

APMONG Manual.qxp_Layout 1 28/01/2016 11:44 Page 1
APMONWG | APMONBG
-
COLOUR VIDEO DOOR ENTRY MONITOR
USER MANUAL
www.espuk.com
Page 2

APMONG Manual.qxp_Layout 1 28/01/2016 11:44 Page 2
2
Page 3

APMONG Manual.qxp_Layout 1 28/01/2016 11:44 Page 3
Contents
Monitor Functions Overview . . . . . . . . . . . . . . . . . . . . . . . . . . . . . . . . . . . . . . . . . . . . . . . . . . . . . . . . . . . . . . . . . . . 4
Installation . . . . . . . . . . . . . . . . . . . . . . . . . . . . . . . . . . . . . . . . . . . . . . . . . . . . . . . . . . . . . . . . . . . . . . . . . . . . . . . . . . . 5
Master / Slave Setup . . . . . . . . . . . . . . . . . . . . . . . . . . . . . . . . . . . . . . . . . . . . . . . . . . . . . . . . . . . . . . . . . . . . . . . . . . 6
Setting Address ID - Only required for apartment systems . . . . . . . . . . . . . . . . . . . . . . . . . . . . . . . . . . . . . . 7
Setting the Time and Date . . . . . . . . . . . . . . . . . . . . . . . . . . . . . . . . . . . . . . . . . . . . . . . . . . . . . . . . . . . . . . . . . . . . . 8
Monitor Image and Talk Volume Adjustment . . . . . . . . . . . . . . . . . . . . . . . . . . . . . . . . . . . . . . . . . . . . . . . . . . . . 9
Changing Monitor Ringtone . . . . . . . . . . . . . . . . . . . . . . . . . . . . . . . . . . . . . . . . . . . . . . . . . . . . . . . . . . . . . . . . . . 10
Monitor Ringtone Volume Adjustment . . . . . . . . . . . . . . . . . . . . . . . . . . . . . . . . . . . . . . . . . . . . . . . . . . . . . . . . 11
Preview Door Station’s Camera Image . . . . . . . . . . . . . . . . . . . . . . . . . . . . . . . . . . . . . . . . . . . . . . . . . . . . . . . . 12
Inner Call - Calling to another monitor on the system or within the apartment . . . . . . . . . . . . . . . . . . . 13
Intercom Call - Calling to another monitor for multiple occupancy system . . . . . . . . . . . . . . . . . . . . . . . 14
SD Card Record and Viewing Options . . . . . . . . . . . . . . . . . . . . . . . . . . . . . . . . . . . . . . . . . . . . . . . . . . . . . . . . . 15
Monitor Installation Setup - Setting the monitor as a Guard Unit . . . . . . . . . . . . . . . . . . . . . . . . . . . . . . . 16
Guard Unit Facility - Calling to a monitor set to ‘Guard Unit’ mode . . . . . . . . . . . . . . . . . . . . . . . . . . . . . . 17
Restore Monitor Settings to Default . . . . . . . . . . . . . . . . . . . . . . . . . . . . . . . . . . . . . . . . . . . . . . . . . . . . . . . . . . 18
System Cabling
All system cabling (excluding mains 240vAC supply) has been tested with Cat5E UTP PVC cable.
Part Number - A8NFORCE5EUTP
Find this product online:
elandcables.com | Cables & Accessories | LAN Cable | Cat 5E UTP PVC Cable
3
Page 4

APMONG Manual.qxp_Layout 1 28/01/2016 11:44 Page 4
Monitor Functions Overview
A
The visitor presses
the call button on
the door station
Door Station Preview
Menu Exit Button
B
A chime will sound
from the monitor
Menu/Enter Menu Navigation Buttons Power Indication Microphone
C
The visitor’s image will
appear on screen
D Then choose between these 2 options
Press the ‘Talk’
button and
begin conversation
Lock Release
(For Lock1 and Lock2 )
Talk Button
Press the
‘Talk’ button
to end call
Press the ‘Lock’ button
and select Lock1 or
Lock2 to release
4
Page 5
APMONG Manual.qxp_Layout 1 28/01/2016 11:44 Page 5
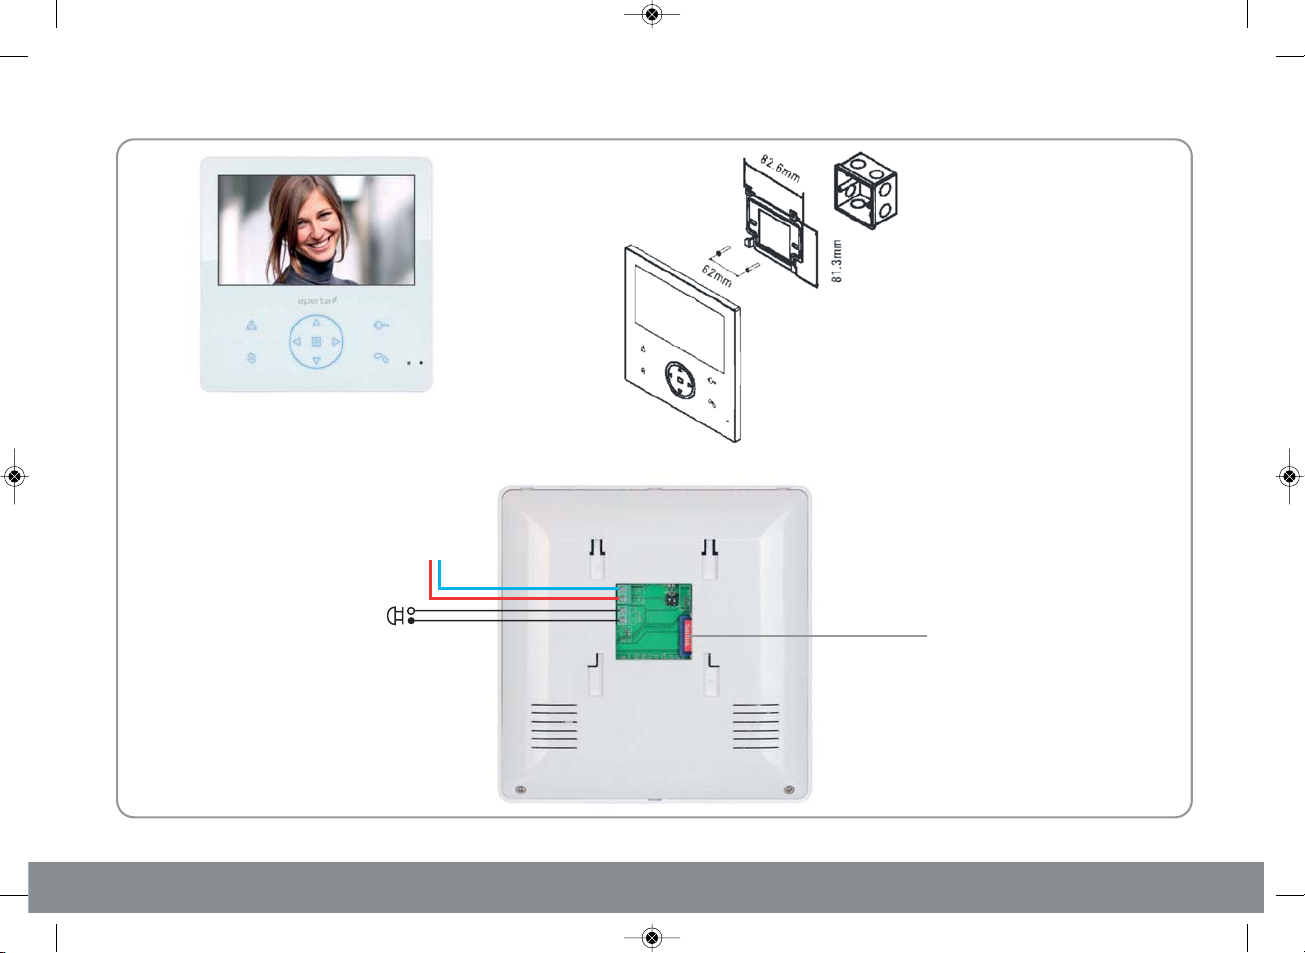
Installation
Site the indoor monitor to suit application.
Connect a normally open switch to
trigger the monitor’s door bell facility
System
Connections
Monitor
Rear View of Monitor
BUS
Monitor
Mounting
Bracket
1-Gang Mount Box
(if required, not supplied)
Surface mount the bracket of the monitor or if
required onto a 1-gang mount box (not supplied).
Make the system connections to the back of the
monitor as per below and then slide the monitor onto
the bracket using the hooks to hold firmly in place.
SD card slot (32GB Max.)
Records visitor images
5
Page 6
yeen will displascr
tup The Installation Se
y
d
y f
ion
ess and hold the Pr
p
’
m
on
B
, af
0
The time will appear
,
e posit
n
t’ butt
h
‘Righ
tu
stan
e the monito
te
omple
tup will be c
the se
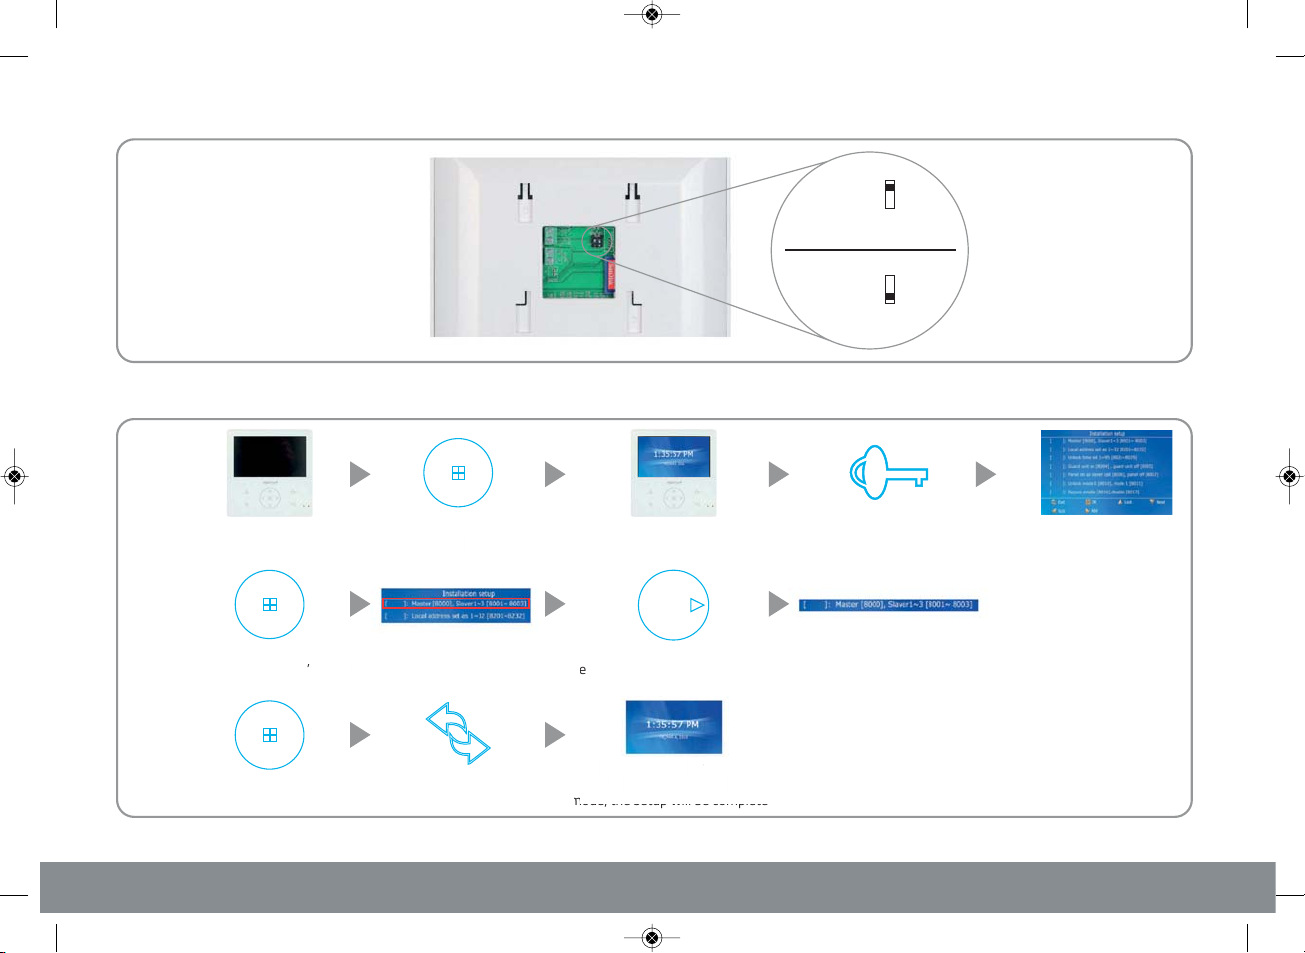
APMONG Manual.qxp_Layout 1 28/01/2016 11:44 Page 6
e SetupvMaster / Sla
tupwitch SeS
stem: yor villa sF
stem:yt sor apartmenF
ther monitors on the sameAll o
STER. t as a MAOnly 1 monitor is se
VE.t to SLAe sether monitors arAll o
STER.ess ID has 1 MAddrEach A
VE.t to SLAe seess ID arddrA
ON
STER =MA
1
OFF
ON
VE =SLA
1
OFF
enu SetupM
A
In standb
ess the ‘MPr
mo
’
o
ev/Slaselect ‘Master
’
The time will appear
ess the
on to c
ge
a
C
enu’ ess the ‘MPr
e vbutton to sa
ess ‘Exit’ Pr
o times tw
sec
r will r
ter 1
rn to
y
6
Page 7

y
w
scr
lla
yill d
la
t
t
g
s
ess the
Pr
e
s
,
0
The time will appear
e
A
s
te e
y standb
0
C
ed number appears equirthe r
enu’ button when ess the ‘MPr
APMONG Manual.qxp_Layout 1 28/01/2016 11:44 Page 7
A
B
ddrSetting A
ess ID - Onl
y modeIn standb
’
wness the ‘DoPr
ocal Ato select ‘L
r
enu’ button ‘M
ess ‘Exit’ Pr
o times tw
The time will appear
es
the ‘Righ
o chan
ddr
e
tup will be cmode, the se
styor apartment sed fequir
t’ button
ess ID numb
after 1
turn to
eonds the monitor will rsec
ompl
ems
r
ess and hold the Pr
ondsor 5 secy feK
ess number will change The addr
essed. t’ button is pras the ‘Righ
om 01-32ess ID frddrSelect an A
The Insta
een
up
isp
7
Page 8

t
e
h
y
e
ess thePr’ePr
tup
the
a
ill displa
te
will be c
mode, the se
hligh
butt
v
P
ill displ
butto
APMONG Manual.qxp_Layout 1 28/01/2016 11:44 Page 8
Setting the Time and Da
A
mod
B
ss t
e ‘Righ
up is hig
’
C
e the ‘Righ
butt
e
the ‘Up or Do
on to change
The time will appear
scr
w
n
’
r
a
enu’ buttoness the ‘M
e changes vto sa
’
n
ess ‘Exit’ Pr
o times tw
will displ
w
after 10
8
Page 9

APMONG Manual.qxp_Layout 1 28/01/2016 11:44 Page 9
Monitor Image and Talk Volume Adjustment
A
Brightness
Colour
Contrast
Talk Volume
Scene
Return
B
In standby mode
Brightness
Colour
Contrast
Talk Volume
Scene
Return
Press the
‘Preview’ button
Press ‘Down’ button
to select option
The image from the door
station will appear
Press ‘Right or Left ’ button
to adjust the option
Press the
‘Menu’ button
Return
Once adjusted,
Press ‘Down’ to ‘Return’
The adjustment menu will appear
down the right handside of the screen
Press the ‘Menu’ button then ‘Exit’
to complete setup
9
Page 10

mode
o
a
the ‘M
ac
hligh
butto
ill displ
en ‘Door S
p
e
ess Med and prequirstation r
a
enu
ess Mand pr
APMONG Manual.qxp_Layout 1 28/01/2016 11:44 Page 10
Changing M
A
B
ss the ‘Righ
Pr
ng Se
Run
C
ddrselect the A
onitor Ringt
’
up is hig
’ button to wnse the ‘Up or DoU
‘
ne
enu’ button ‘M
ess the Pr
ess the Pr
nu’
ess the Pr
The time will appear
The Ring Se
n
en w
Pr
a
essPr
enu’ button
‘L
nge the ringtone op
t’ button eft or Righ
’
‘
tion
m
es tone o
iv
ill displ
tup menThe Ring S
u also
10
Page 11

mode
m
a
M
hligh
til U
u
ill displ
‘
butto
o
ill displa
‘M’
M
APMONG Manual.qxp_Layout 1 28/01/2016 11:44 Page 11
onitor Ringtone VM
olu
djustment
e A
A
ess the Pr
The time will appear enu’ button ‘M
ess the Pr
enu’ button ‘M
ill displ
B
un
s the ‘Righ
esPr
’
up is hig
ess the Pr
n
n
tup ser Sewing UolloThe f
yeen w
ascr
ng
’ to select wness ‘DoPr
and prode
enu’ ess
The Ring
w
C
se the ‘Righ
’
’ wnse the ‘Up or DoU
alue button to change v
ess the ‘MPr
enu’ butt
e changes vto sa
n
11
Page 12

mode
C
‘
a
M
hligh
‘M
ill displ
th
‘M
ct camera
APMONG Manual.qxp_Layout 1 28/01/2016 11:44 Page 12
s
’tationview Door SePr
amera Image
A
B
un
s the ‘Righ
esPr
onitor is hig
’
ess the Pr
M
enu’ button
ess the Pr
enu’ button
The time will appear
wing
en w
a
ess the Pr
enu’ button ‘M
’ button to wn
en
wenu’ to vie
ill displ
12
Page 13

mode
o
‘
o
p
‘Do
hligh
ill displa
scrrThe I
t
t
APMONG Manual.qxp_Layout 1 28/01/2016 11:44 Page 13
Inner Call - Calling to an
ther monitor on the s
A
stem
y
ess the Pr
M
enu’ button
The time will appear
ess the Pr
enu’ button ‘M
will dis
la
B
un
s the ‘Righ
esPr
m is hig
’
ess the Pr
enu’ button
een w
n
o activ
enu’ button‘M’ thenwn
e an Inner Call
a
C
stem yAll s
monitors will ring
Onc
the i
onitor hase one M
’ button pr
nner call can begin
essed
13
Page 14

mode
o
‘
eo
p
h
n
o
butto
ill displa
scrrThe I
c
ac
T
i
ir
M
APMONG Manual.qxp_Layout 1 28/01/2016 11:44 Page 14
om Call - Calling t
cInter
another monitor f
A
or multipl
oc
ycupancy s
B
s the ‘Righ
esPr
un
C
se the ‘Up or D
U
button to select the A
onitor rof
’
m is highg
w
ess the Pr
M
enu’ button
ess the Pr
nu’
n
ID
r
The time will appear
een w
n
n on
s selected equ
enu’ ess the ‘MPr
ess ID ddre A
ess the Pr
enu’ button ‘M
enu’ buttoness the ‘MPr
om menu cteress the Inc
has pr
the call can begin
‘
will dis
la
er eivece the call rOnc
14
Page 15

mode
h
w
‘
p
T
n
p
d D car
tos ge of pho
w vie
mode
butto
the
The time will appear
t
highligh
Car
ow the
deo filessto
p
do
S
sto
r
the
dele
p
do
n
p
the SD
n
p
g
v
APMONG Manual.qxp_Layout 1 28/01/2016 11:44 Page 15
A
B
M
orecd RSD Car
ess the ‘Rig
is
d and Vie
ing Options
ess the Pr
’
r
nd
nu’
‘M
en will displa
ess the Pr
’
enu’ button on th
nd
‘
to- taking’ and
‘
n and select this o
ternal memo
in
enu’ button on th
‘
rw pho
n and select this o
vi
enu’ button on th
‘
n
M
on the
r
will dis
is o
Video-
y stora
is o
D car
n
is o
n to
n
la
tio
tio
d
tio
15
Page 16

u
G
4]
w
lla
button is pr
Righ
la
Unit On [800
ess the
Pr
0
g
will be c
pg
APMONG Manual.qxp_Layout 1 28/01/2016 11:44 Page 16
M
onitor Installation Set
A
y modeIn standb
B
’
wness the ‘DoPr
Guarto select ‘
’
C
enu’ buttoness the ‘MPr
p - Setting the monitor as a
enu’ button ‘M
ess ‘Exit’ Pr
sec
The time will appear
t’ buttoness the ‘RighPr
after 1
uar
y
nitd U
ess and hold the Pr
ill change as the
’
‘
The Insta
ondsor 5 secy feK
een
up
ill disp
16
Page 17

mode
‘
p
‘Do
hligh
ill displa
scrrThe I
d Unit’
‘Di
h
APMONG Manual.qxp_Layout 1 28/01/2016 11:44 Page 17
acility - Callnit Fd UGuar
A
d ing to a monitor set to ‘Guar
nit’ modeU
ess the Pr
M
enu’ button
The time will appear
ess the Pr
enu’ button ‘M
will dis
la
B
un
s the ‘Righ
esPr
m is hig
’
ess the Pr
enu’ button
een w
n
enu’ button’ then ‘Mwn
ect Call Guarate
r
C
t to Only monitors se
ode will ring d Unit’ MGuar‘
eOnc
t
d Unit has the Guar
’ button pr
e call can begin
essed
17
Page 18

mode
h
‘
p
r
o
oThe f
ted
hligh
will displa
scr
Se
R
e to Default
M
APMONG Manual.qxp_Layout 1 28/01/2016 11:44 Page 18
onitor Settinge MestorR
s to Default
A
Pr
’
M
The time will appear
ess the Pr
enu’ button ‘M
will dis
la
B
ss the ‘Rig
Pr
ser Se Uun
t’ button
up is hig
Pr
’
wing
ll
P
’ to select wn
‘D
’
C
enu’ ess the ‘MPr
onfirm button to c
18
Page 19

APMONG Manual.qxp_Layout 1 28/01/2016 11:44 Page 19
19
Page 20

APMONG Manual.qxp_Layout 1 28/01/2016 11:44 Page 20
Elite Security Products
Unit 7, Target Park, Shawbank Rd
Lakeside, Redditch B98 8YN
Telephone: 01527 51 51 50
Fax: 01527 51 51 43
email: info@espuk.com
E&OE - Errors and omissions excepted. A16
www.espuk.com
 Loading...