

USER MANUAL
Translation of the original version
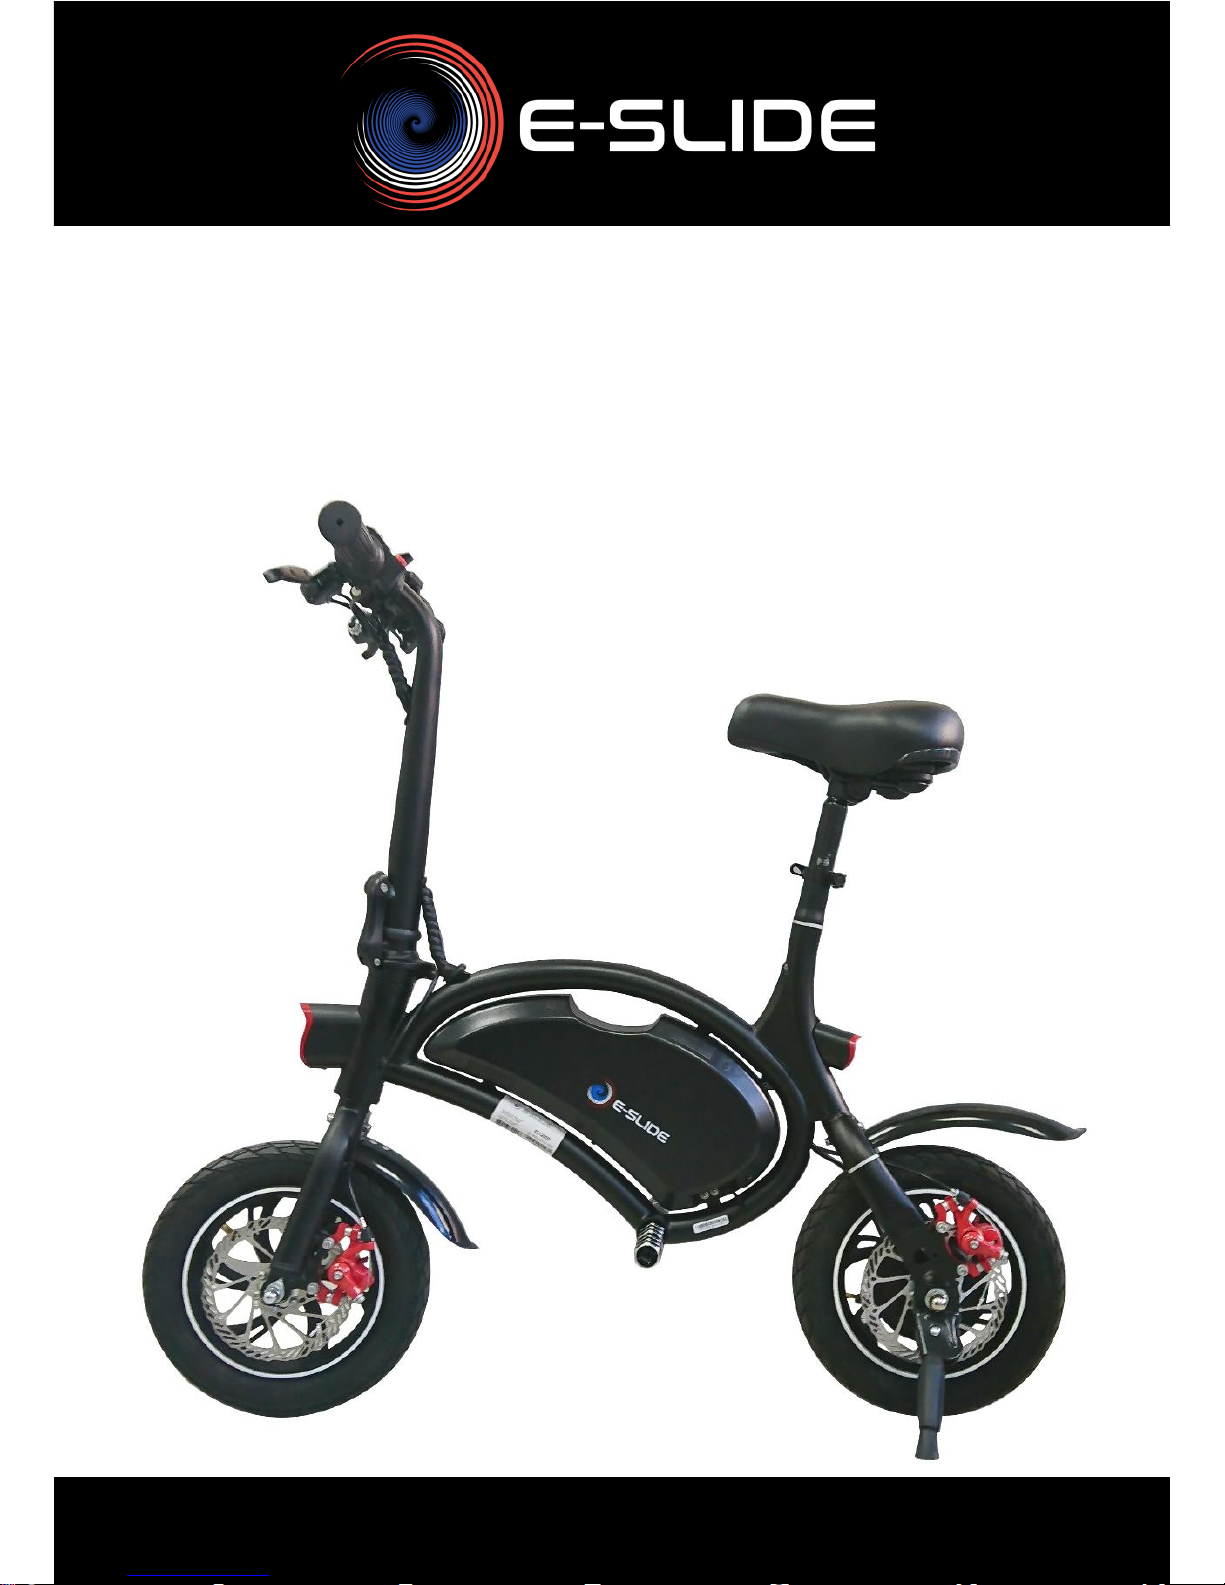
BALANCE BIKE ELECTRIC FOLDING 12 inch
ESLIDE ES1200D

Page2
1. Warnings / Residual risks / Precautions for use
a. Warnings / Precautions for use
b. Residual risks
c. Handling / Transport / Storage / Battery
i) Handling / Transport / Storage
ii) Battery
2. Product Description
a. Description / Presentation
b. Mounting accessories
i) Mounting the footpads
ii) Seat assembly
iii) Assembling the fenders
c. Technical characteristics (technical table)
3. Functions
a. Pin System: Folding / Unfolding the Handlebar
i) Pin System : Unfolding the Handlebar
ii) Pin System : Folding the Handlebar
b. Loop system : Folding / Unfolding the Handlebar
i) Loop system : Unfolding the Handlebar
ii) Loop system : Folding the Handlebar
c. Charge the battery of the balance bike
i) Description of the charging of the battery
ii) Loading steps
iii) Warnings on charge
d. Functions
i) Position Parking
ii) Turning on / turning on the balance bike
iii) Front / Rear lighting
iv) Buzzer
Content of the manual

Page3
v) Start / Driving
vi) Mode CRUISE CONTROL
vii) Braking
4. Cleaning / Maintenance / Repairs
a. Cleaning
b. Brakes : maintenance / settings
i) Adjusting brake cable tension
ii) Brake Caliper Adjustments
c. Wheels
i) Inflation
ii) Wheel Alignment
iii) Warnings on shocks
5. Logotype information used
6. Legal indications
Imported by DPA EUROPE
Gildo Pastor Center - 7 Rue Gabian, 98000 MONACO - MONACO
User manuals in Spanish, Dutch and French are available on the
website www.dpa-europe.com.

Page4
1. Warnings / Residual risks / Precautions for use
a) Warnings / Precautions for use
- Do not lend your electric balance bike to anyone who is not
familiar with the device.
- When using the Balance Bike please wear suitable clothing
and all necessary protective equipment: helmet, knee pads,
elbow guards and other protections.
- Do not drive after consuming alcohol or drugs.
- This article is not a toy.
- You must take out an insurance policy for this type of device
in the case of damage or injury caused to a third party but also
in the event of injury to the user. Please inquire with your
insurer.
- This device may be used by persons 14 years of age or older
and by persons with reduced physical, sensory or mental
abilities, if properly supervised by an adult, and instructions for
the use of They have been given the device safely and the
cleaning and maintenance of the balance machine can only be
done by a trained adult.
- Do not allow people under 14, the elderly and pregnant women
to use the balance bike.
- Children should not play with the balance bike. Cleaning and
maintenance by the user should not be done by children without
supervision or training.
- In the event of an accident, please stay on the spot and wait
for help.
- This device is designed for personal enjoyment, it is forbidden
to use it to transport people.
- Users should not exceed the weight indicated in the maximum
weight specifications, otherwise the driver could fall and get
hurt, or even damage the balance (stability) function of the
device.
- To ensure the safety of all, the device must be able to stop at
any time.

Page5
- Do not be distracted while driving, answering the phone,
listening to music or doing any other activity.
- This device is allowed to run only on private roads and is
tolerated on pedestrian routes at a maximum speed of 6km / h
according to local regulations, please make sure of these
different regulations.
- Please use this device only in authorized locations, if this
location requires permission, please request it.
- Do not use the product on the roadway. The device is not an
approved device.
- Do not drive in dimly lit places and in the dark.
- Avoid obstacles, smooth surfaces, snow, ice and unstable
surfaces.
- Avoid irregular objects such as rolling on a branch, rubbish,
pebbles, paved streets.
-Used on accidental passages or use too long could cause
many vibrations of the body that can trigger some pain, use this
balance bike in a reasonable way to limit these risks.
- Avoid narrow spaces or spaces with obstacles.
- Does not allow driving on slippery roads in rainy weather
- Avoid steep slopes.
- Do not roll in sand, puddles, mud, or other wet, damp or
rugged surfaces as this may damage the electronic
components of the unit.
- It is forbidden to use the electric balance bike in dangerous
places, with the presence of flammable gases, vapors, liquids,
dusts which could cause a fire or an explosion.
- The device must be used only with the power supplied with
the device, if the power supply is defective please return the
device to the seller. The device must be powered only under the
very low safety voltage corresponding to the marking of the
device.
- In case of damage to the external power cable, it must be
replaced by a cord available from the manufacturer, you must
Page6
under no circumstances disassemble the device or modify the
components of this product.
- Do not open the device, if the device is defective or
malfunctioning, contact the seller immediately, do not try to
repair it yourself.
While driving, you may be exposed to unexpected hazards or
dangerous situations, which may result in serious injury, please
exercise caution and caution.
b) Residual risks
The correct use of the balance bike respecting the good safety
conditions, does not exclude certain risks of injury and
material damage.
Residual risk
Details
Mechanicals
Cut
Training or imprisonment (caused by
hair, clothing, etc. caught by a
moving parts)
Crushing
Risks of friction or abrasion
Loss of stability
Pinching and jamming due to
handling
Collision
Thermal
Explosions
Harmful to health due to hot or cold
surfaces

Page7
Vibrations
Strong vibrations can be harmful to
your health in case of prolonged use,
or if the product is not used and
maintained in accordance with the
instructions
Materials from the
environment
Inhalation of dust and noxious fumes
Formation of dust and explosive
fumes
Hydraulic fluids on the track
Damage to property and persons
resulting from the projection of
objects.
Ergonomic
Repetitive injuries
Bad posture
Non-use of personal protective
devices
Battery failure
Unexpected restoration of power
supply after a failure
c) Handling / Transport / Storage / Battery
i) Handling / Transport / Storage
When handling and / or transporting the balance bike, avoid
any physical or electrical shock.
When handling, the Balance Bike must be in the "parking"
position (kickstand in the open position, on a flat, sloping or

Page8
uneven surface), the charger must be unplugged and the
Balance Bike must be off (off).
During transport, the Balance Bike must be off (off), stand
closed, right on its wheels, properly packaged and protected to
avoid shocks or accidental start-up, this may cause
malfunctions of the device, see a significant deterioration of
the device or the battery.
Store the balance machine in a cool, ventilated, clean and dry
place, in the "parking" position (kickstand in the open position,
on a flat, sloping or uneven surface), when the charger is
disconnected and As the balance machine is off (off), the
storage location must not be subject to large temperature
differences.
Do not store the balance bike outdoors without protection, the
balance bike should not be stored in the harsh weather, and
prolonged exposure to the sun will damage the components
and the battery.
The Balance Bike can be stored / handled at temperatures
between 5 ° C and 45 ° C. Storage / handling temperatures
should not exceed these.
The Balance Bike can be transported at temperatures
between -20 ° C and 60 ° C, transport temperatures must not
exceed them.
The storage without use must not exceed 2 months, it will fully
charge the balance bike every 2 months to prevent the battery
of the balance bike is damaged.

Page9
ii) Battery
Your balance bike contains a high capacity Lithium-Ion battery,
for a safe use please follow the following instructions:
- The battery cover must not be disassembled by someone who
is not authorized.
- Only an authorized person can open the battery cover.
- Do not use the balance bike in the following cases:
o Overheating / smoke / strong smell
o Substance leaking at the battery location
- The battery used in the device contains hazardous
substances.
- Do not insert anything into the battery cover.
- Only an authorized person can change the battery.
- If the battery is defective or damaged, contact a Takara electric
cycle specialist who can disassemble the balance bike and
change the battery.
- The balance bike equipped with a battery must not be close to
a fire or a source of heat.
- The balance bike equipped with a battery must not be
immersed in an acid or alkaline liquid.
- Only charge the balance machine at temperatures between 5
° C and 45 ° C and use it only at temperatures between -20 ° C
and 60 ° C.
- To maintain the longevity of the battery of the balance bike,
respect the charging cycle, do not exceed the maximum
charging time, regularly recharge the balance bike.
- When not in use for a long time you must charge the balance
bike completely every 2 months.
- The battery of your balance bike is recyclable and must be
recycled or disposed of according to local regulations.

Page10
- Therefore the battery of your balance bike should not be
disposed of as a household waste and should NEVER be
incinerated as there is a risk of explosion.
- Please contact local authorities for recycling practices in your
jurisdiction.
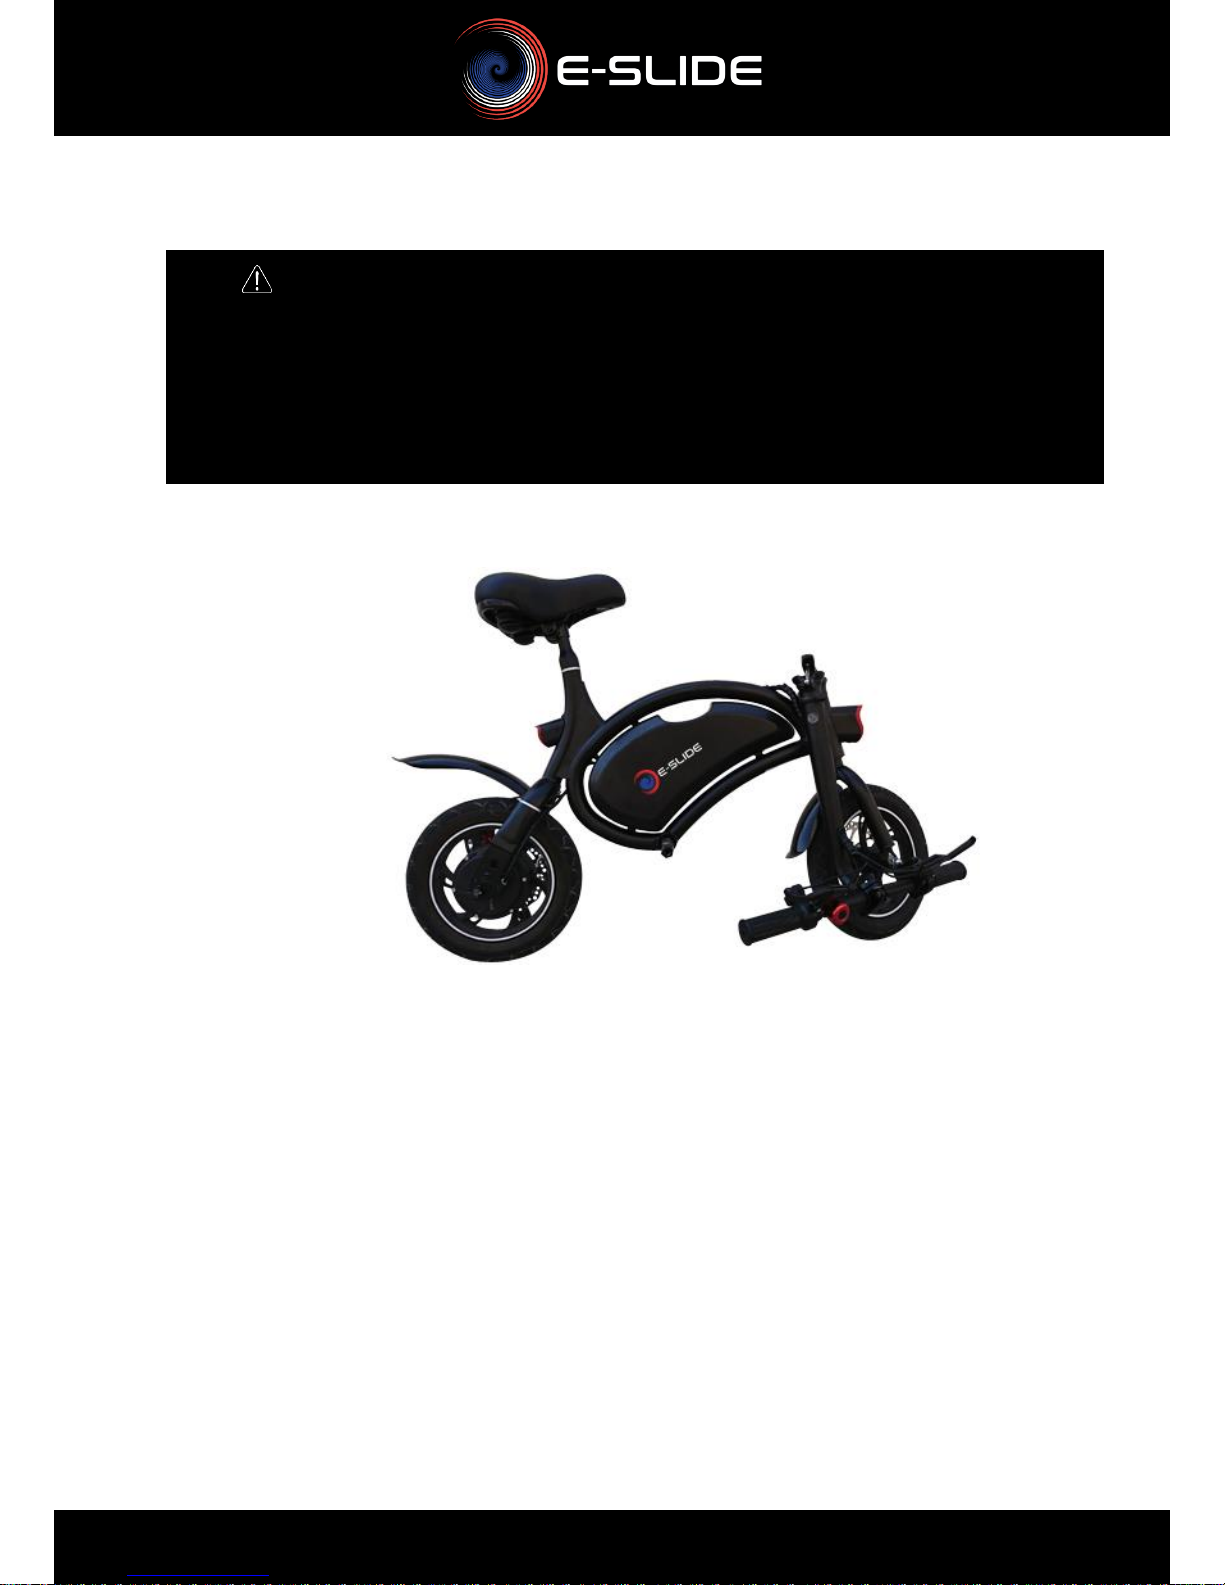
2) Product Description
a) Description / Presentation
You have just purchased a ESLIDE model ES1200 electric
bike.
This new type of mobility, entirely electric and non-polluting,
will allow you to perform leisure activities smoothly and without
fatigue. Its 12-inch wheels equipped with disc brake allow you
to enjoy your leisure comfortably and safely.
This product must be used on private road. Prohibition of
traffic on roads open to the public.
The power of its engine will allow you to climb gentle slopes
without effort, the capacity of the battery will allow you to enjoy
your balance bike throughout the day.
When using the Balance Bike, please wear appropriate
clothing, shoes, and all necessary protective equipment:
helmet, knee pads, elbow pads and other protections.
Do not use your electric balance machine until you have read
this manual and become familiar with the device.
Before using this electric balance machine, familiarize yourself
with its operation, it will allow you to keep this device in the
best possible conditions.
This manual can help you learn how to safely operate this
electrical appliance.
This manual includes all instructions and notes for use; please
read carefully and follow these instructions.

Page11
List of product elements
19
1 2 3 25
5
6
7 7 8 9 10
11
12
13
13
14
15
16
17
18
4
20
22
21
23
24
26
27
28
29
30
32
33

Page12
* Spare parts available for 2 years on www.dpa-europe.fr
N°
Nom
Réf.
Pièces détachées *
1
Left brake handle
ES1201
x
2
Right brake handle
ES1202
x
3
Start button
ES1203
x
4
Folding buckle
ES1204
5
Front lighting
ES1205
x
6
Tire
ES1206
x
7
Front & rear brake disc
ES1207
x
8
Front mudguard
ES1208
x
9
Frame
ES1209
10
Footrest
ES1210
x
11
Inner tube
ES1211
x
12
Crutch
ES1212
x
13
Brake caliper
ES1213
x
14
Rear mudguard
ES1214
x
15
Rear lighting
ES1215
x
16
Saddle
ES1216
x
17
Seat height adjustment buckle
ES1217
x
18
Battery location
ES1218
19
Fork
ES1219
20
Front and rear light button
ES1220
x
21
Brake cable
ES1221
22
Brake cable
ES1222
23
Battery charge level indicator
ES1223
24
Throttle grip
ES1224
x
25
Handlebar folding ring
ES1225
26
Handle
ES1226
x
27
Buzzer
ES1227
28
Drums
ES1228
x
29
Front rim
ES1229
x
30
Engine with rear rim
ES1230
x
31
Charger
ES1231
x
32
Digital display
ES1232
x
33
Handlebar
ES1233

Page13
Seat
Fenders
Footrests
AC charger
Accessories
Manual
BEFORE
AFTER

Page14
WARNING FITTING FOOT FEET
Make sure that the Balance Bike is in the "parking" position
(kickstand in the open position, on a flat, sloping or uneven
surface), that the charger is unplugged and that the Balance
Bike is off (off).
b) Mounting accessories
i) Mounting the footrests
Unpack the footrests. Take the first footrest and screw it clockwise
onto the indicated support. Take the second footrest and screw it
clockwise on the indicated support :
WARNING ASSEMBLY / DISASSEMBLY
When mounting the elements you must comply with the
following instructions and the precautions to take, if you do
not comply with these instructions it could cause a
malfunction of the device and cause a loss of balance
(stability), a fall or an accident.
Page15
A WARNING
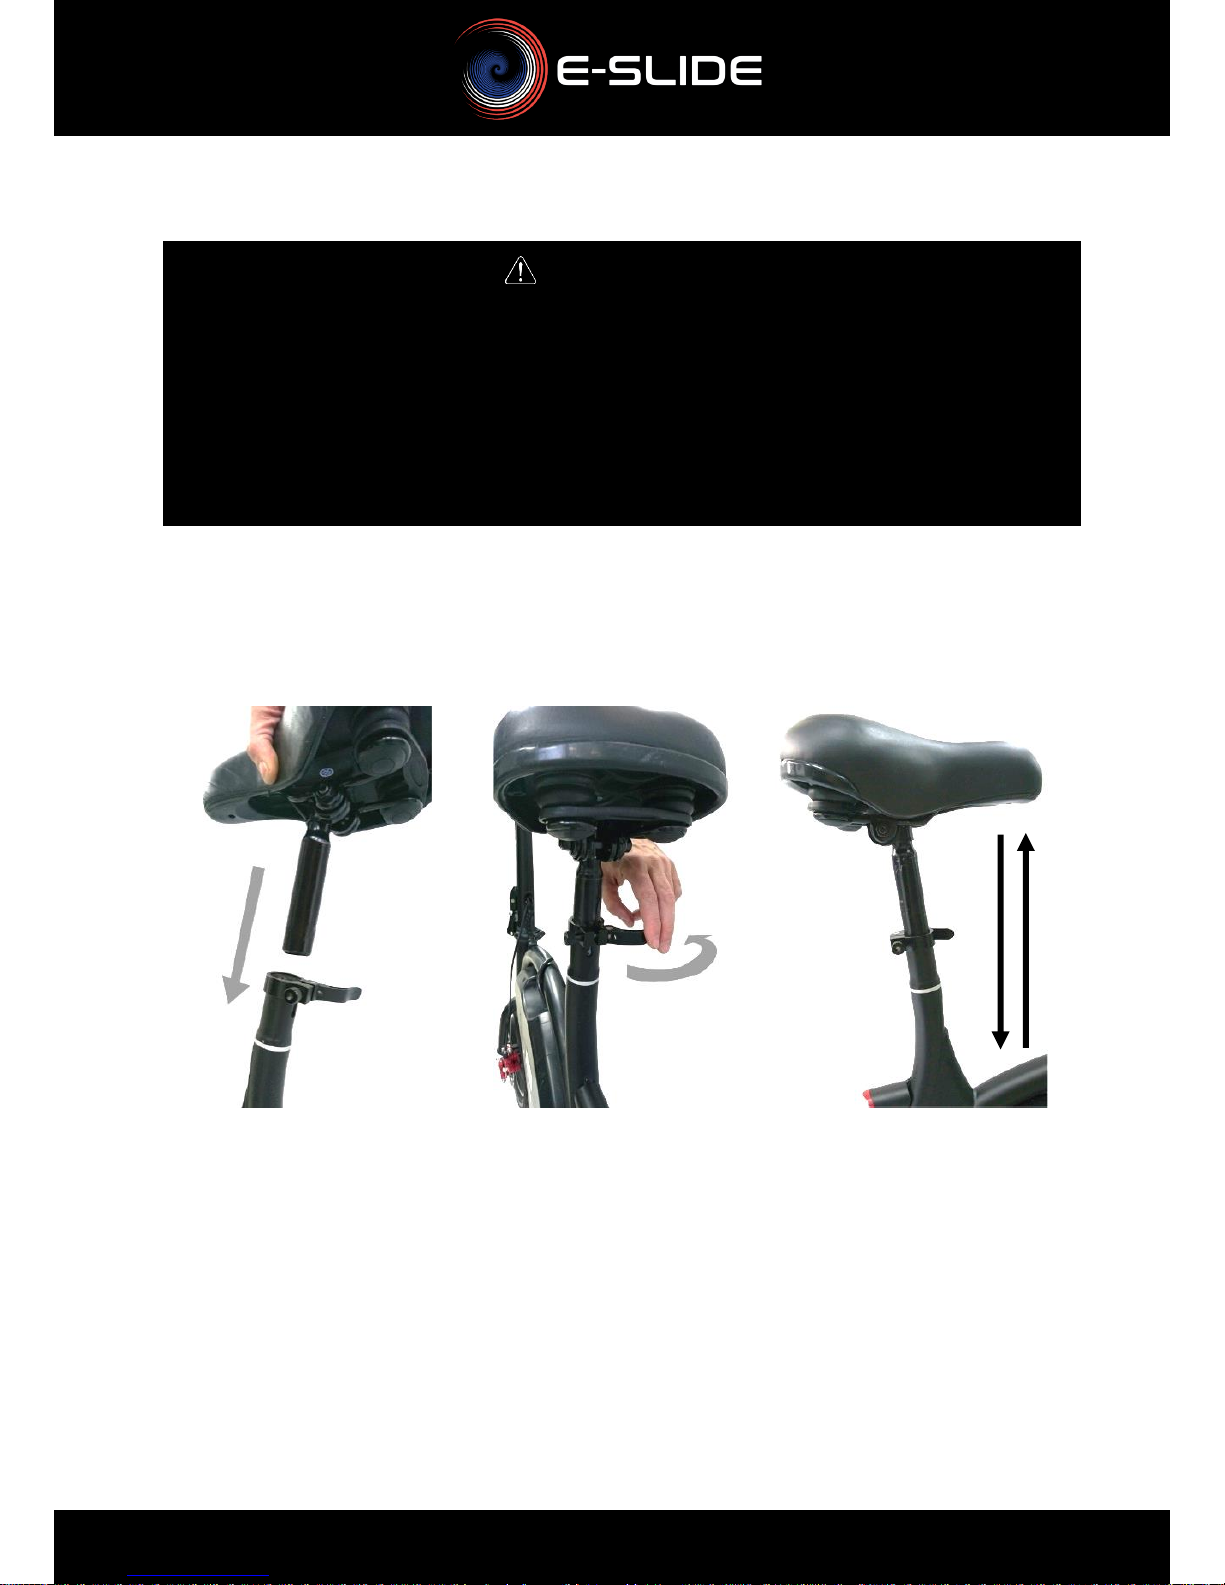
ASSEMBLY / DISASSEMBLY OF THE SEAT
Make sure that the Balance Bike is in the "parking"
position (kickstand in the open position, on a flat, sloping
or uneven surface), that the charger is unplugged and that
the Balance Bike is off (off).
ii) Seat assembly
Remove the tube frame protection, and unlock the buckle, take the
saddle and unpack it, insert the saddle end into the frame tube, re-lock
the buckle.
iii) Mounting the fenders
Inserting the
saddle
Tightening the
saddle down
Seat adjustment
upwards

Page16
WARNING
ASSEMBLY / DISASSEMBLY OF MUDGUARDS
Make sure that the Balance Bike is in the "parking"
position (kickstand in the open position, on a flat, sloping
or uneven surface), that the charger is unplugged and
that the Balance Bike is off (off).
WARNING
Be sure to follow the user manual and settings described
in this manual.
It is important to prevent any mounting errors.
Unpack the mudguards, the smaller one is fixed at the front
using the screw and nut provided, the larger one is fixed at the
back using the screw and the nut provided.
Front fender mounting :
Rear fender assembly :

Page17
c) Technical characteristics
Height and
weight
PARAMETERS
STANDARD DATA
Materials
Aluminum alloy / steel
Size (folded)
1080*430*490mm
Size (unfolded)
1080*430*1140mm
Wedge height
200mm
Wheel size
12 inch
Frame color
Black
Shipping weight
18.7kg
Product weight
15.7 kg
Performances
Maximum load
120kg
Maximum speed
24km/h ≈
Distance
15-18km
Slope
7.2°
Sealing
IP54
Technical
Standards
Operating
temperature
Between -10 and 45°C
Drums
6.0Ah
Max motor power
0.35kW
Basic engine power
0.25kW
Voltage of the
charger
42V
Loading time
4-5 hours
Braking system
Front and rear disc brakes
The total value of vibrations, which are exposed
the hand-arms, does not exceed 2,5 m / s² (estimate).
Page18
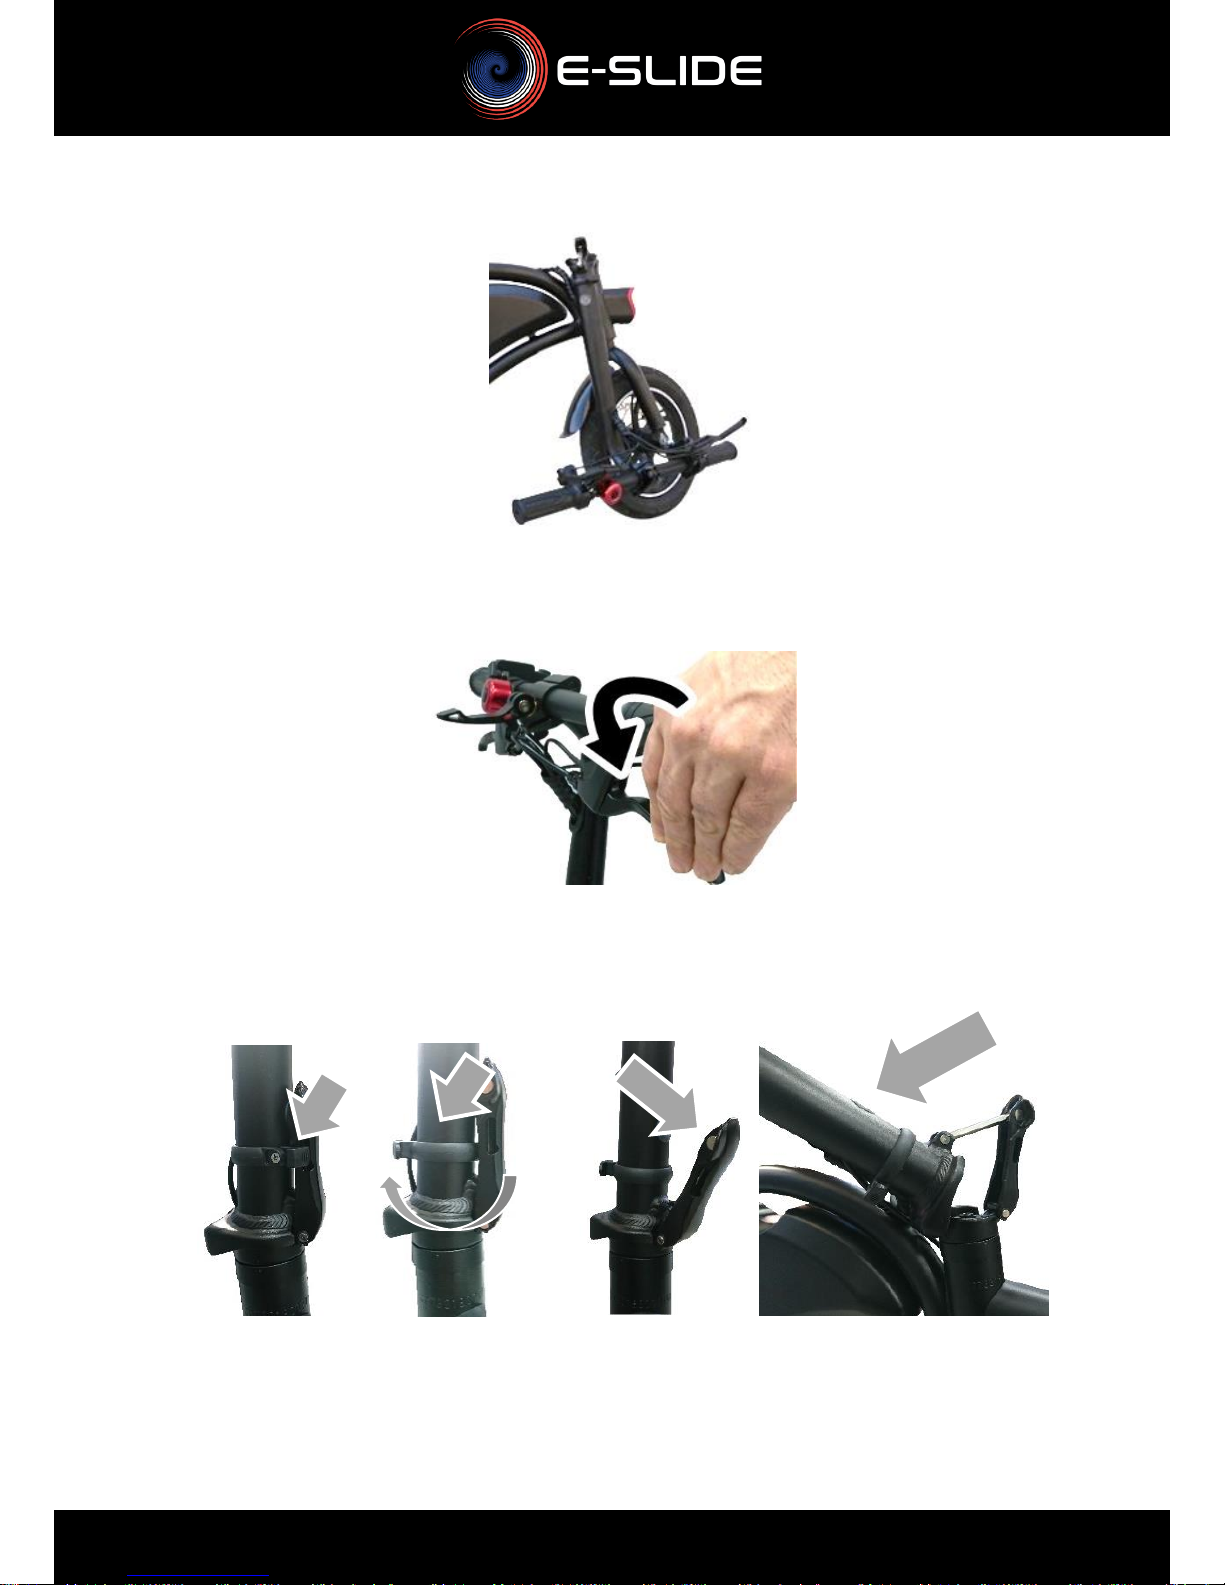
The folding / unfolding system may be different depending on the
product. There are 2 folding / unfolding systems:
- Pin system - Loop system
You will find below the details of the steps for each system.
3) Functions
a) Pin system : Folding / unfolding the handlebar
i) Pin system : unfolding the handlebar
- After unpacking the product, raise the steering column
(photos n ° 1 & 2 / p20)
- Lock the folding loop (photo n ° 3 / p20), the safety pin will
automatically position itself in the closed position.
- Unlock the handlebar locking buckle (photo n ° 4 / p20)
- Position the handlebars so that the brake handles are
horizontal (photo n ° 5 / p20)
- Re-lock the handlebar locking buckle (photo n ° 6 / p20)
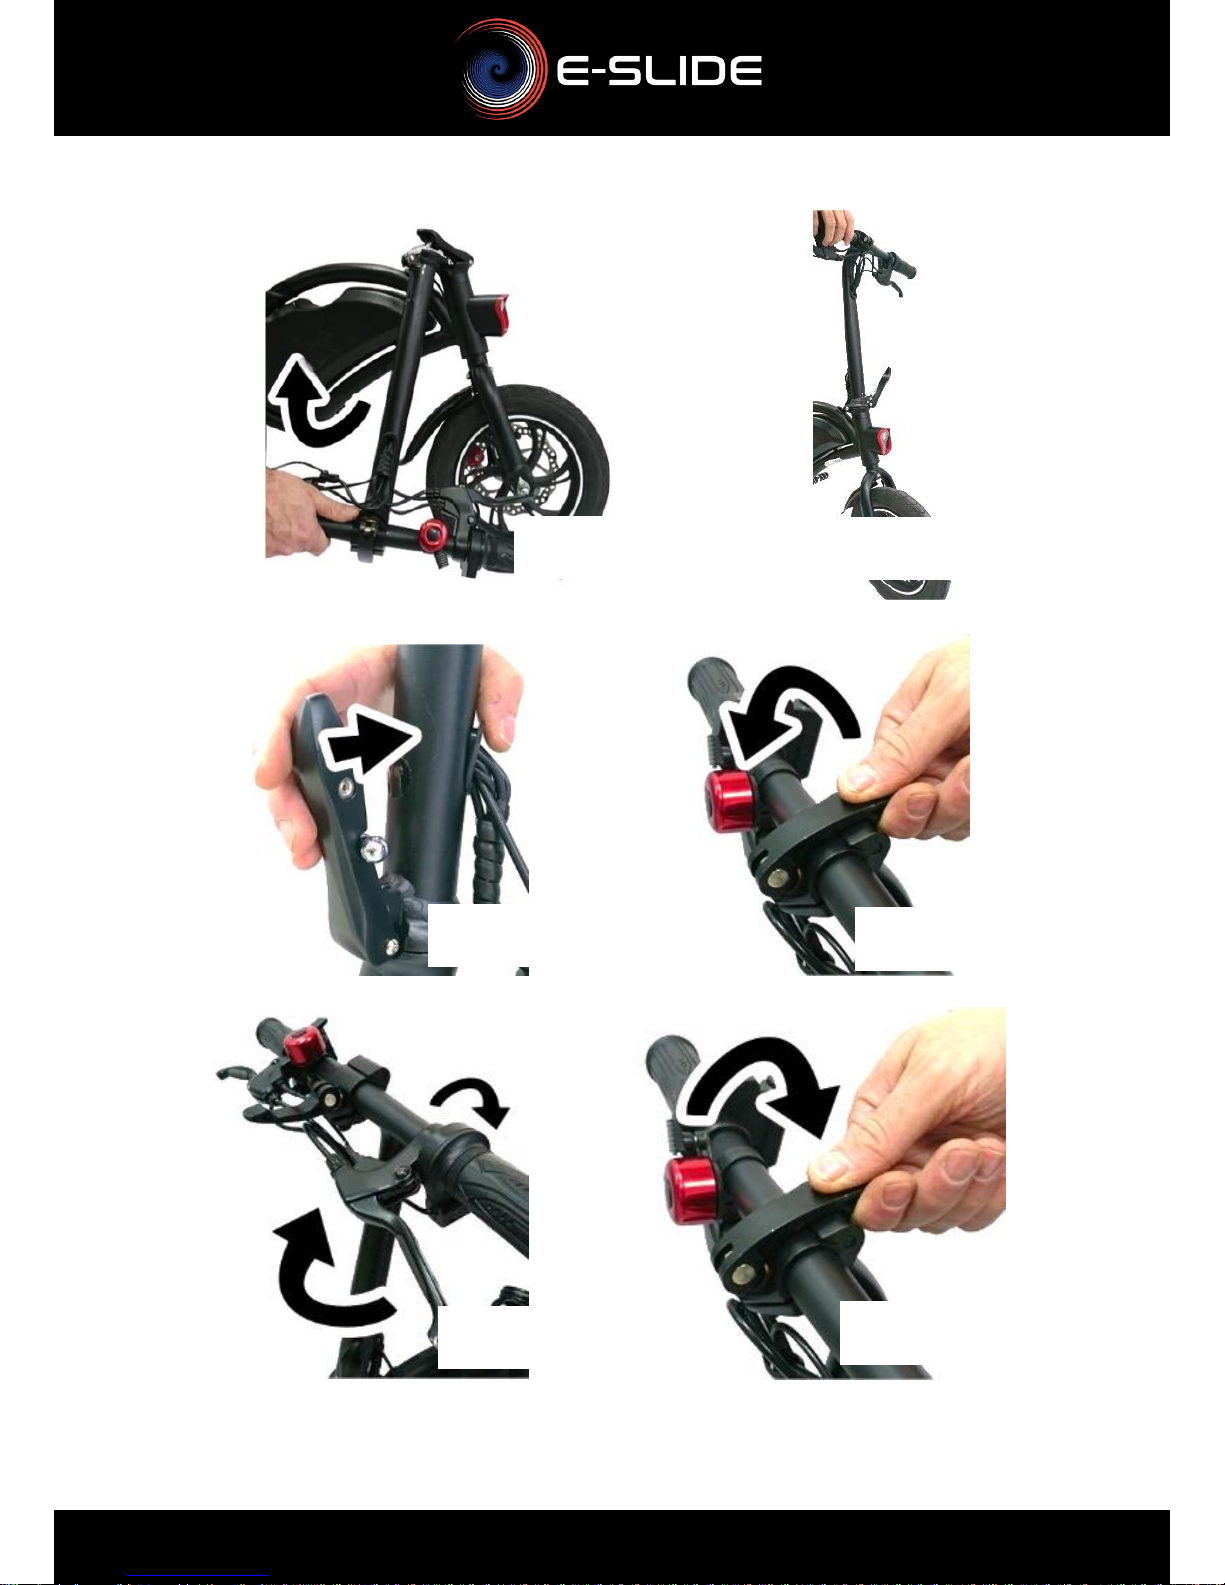
Page19
Pin System: Unfolding Detail
Photo n°1
Photo n°2
Photo n°3
Photo n°4
Photo n°5
Photo n°6
Page20
ii) Pin System: Unfolding Detail
- Unlock the handlebar locking buckle (photo n ° 4 / p20).
- Position the handlebars so that the brake handles are
vertical.
- Re-lock the handlebar locking buckle (photo n ° 6 / p20).
- Unlock the safety pin up in the open position and unblock the
folding loop AT THE SAME TIME:
- Then bend the steering column.
Page21
WARNING FOLDING / UNFOLDING HANDLEBAR
Make sure that the Balance Bike is in the "parking"
position (kickstand in the open position, on a flat, sloping
or uneven surface), that the charger is unplugged and that
the Balance Bike is off (off).
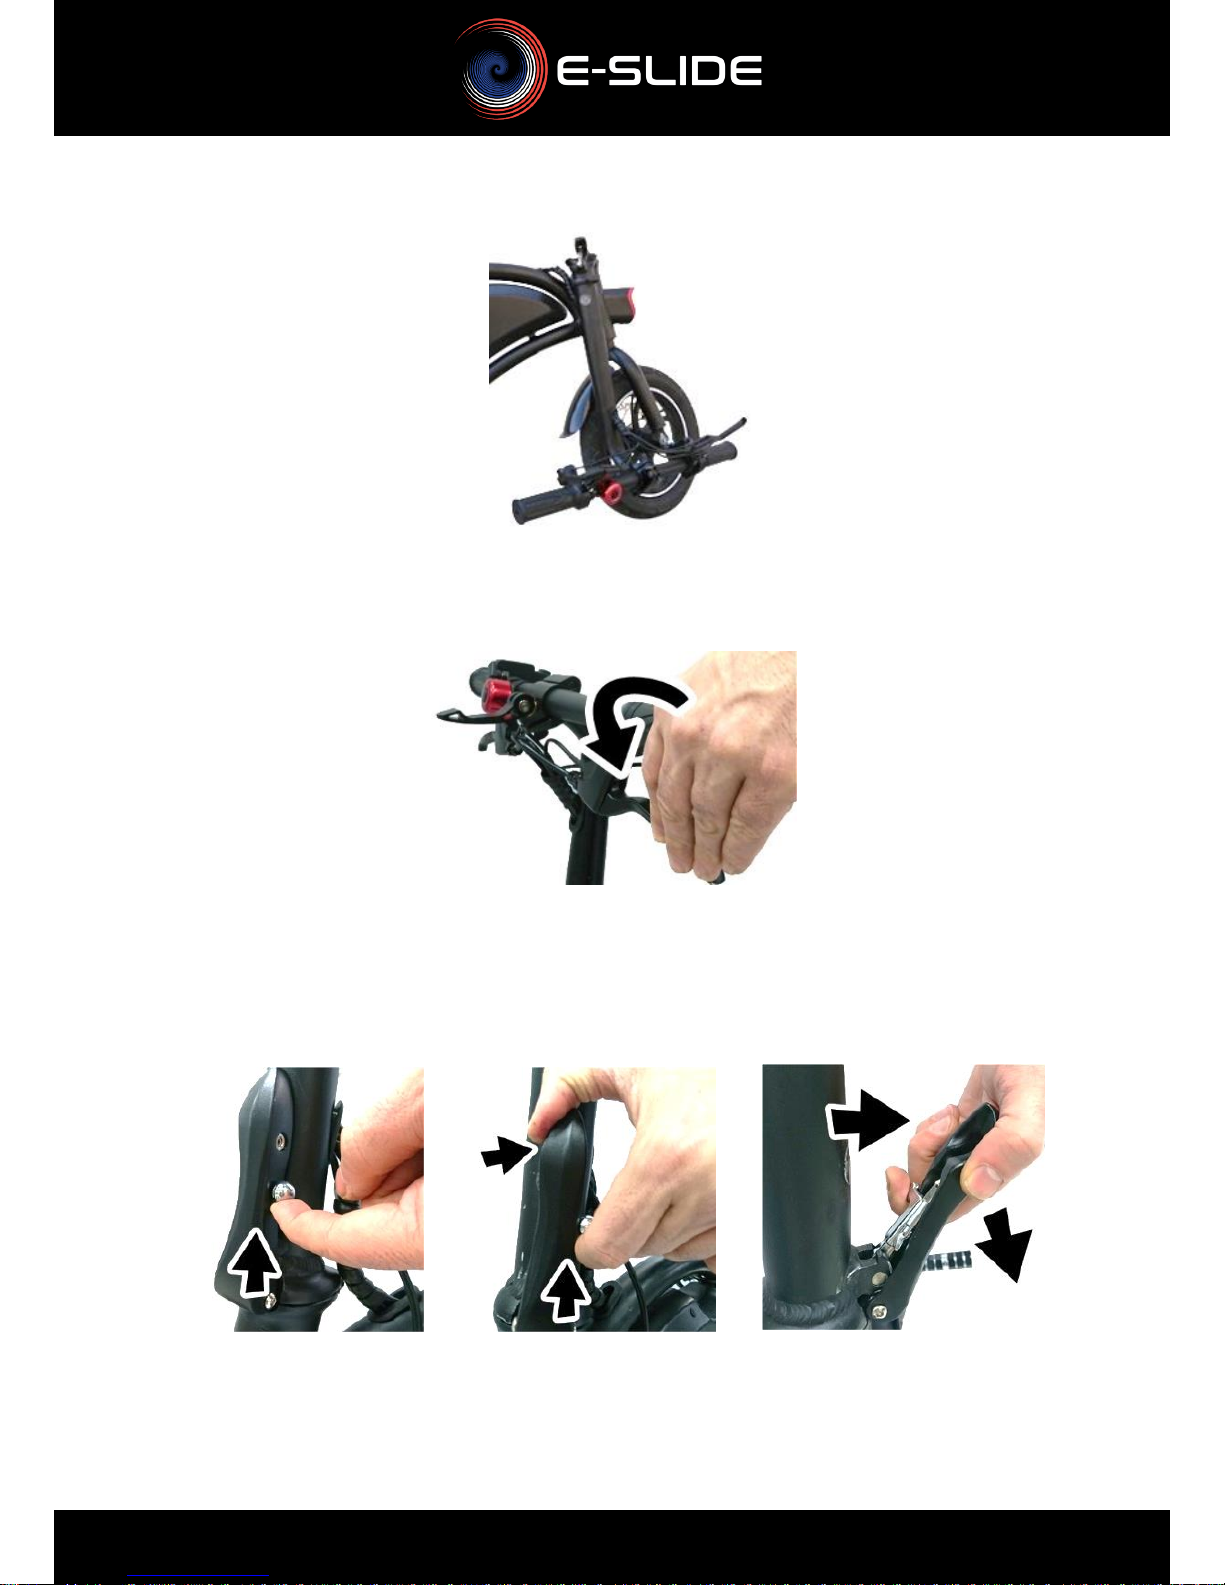
b) Buckle System: Folding / Unfolding the Handlebar
i) Buckle System: Unfolding the Handlebar
- After unpacking the product, raise the steering column (photo
n ° 1 p23)
- Raise the folding loop (pictures n ° 2 and 3 p23)
- Turn the safety pin so that it is positioned in the notch
provided on the folding loop to block and secure the system.
(photo n ° 4 p23)
- Unlock the handlebar locking buckle (photo n ° 5 / p23)
- Position the handlebars so that the brake handles are
horizontal (photo n ° 6 / p23)
- Re-lock the handlebar locking buckle (photo n ° 7 / p23)
Page22
Unfolding detail
Photo n°1
Photo n°2
Photo n°3
Photo n°5
Photo n°5
Photo n°7
Photo n°4
Page23
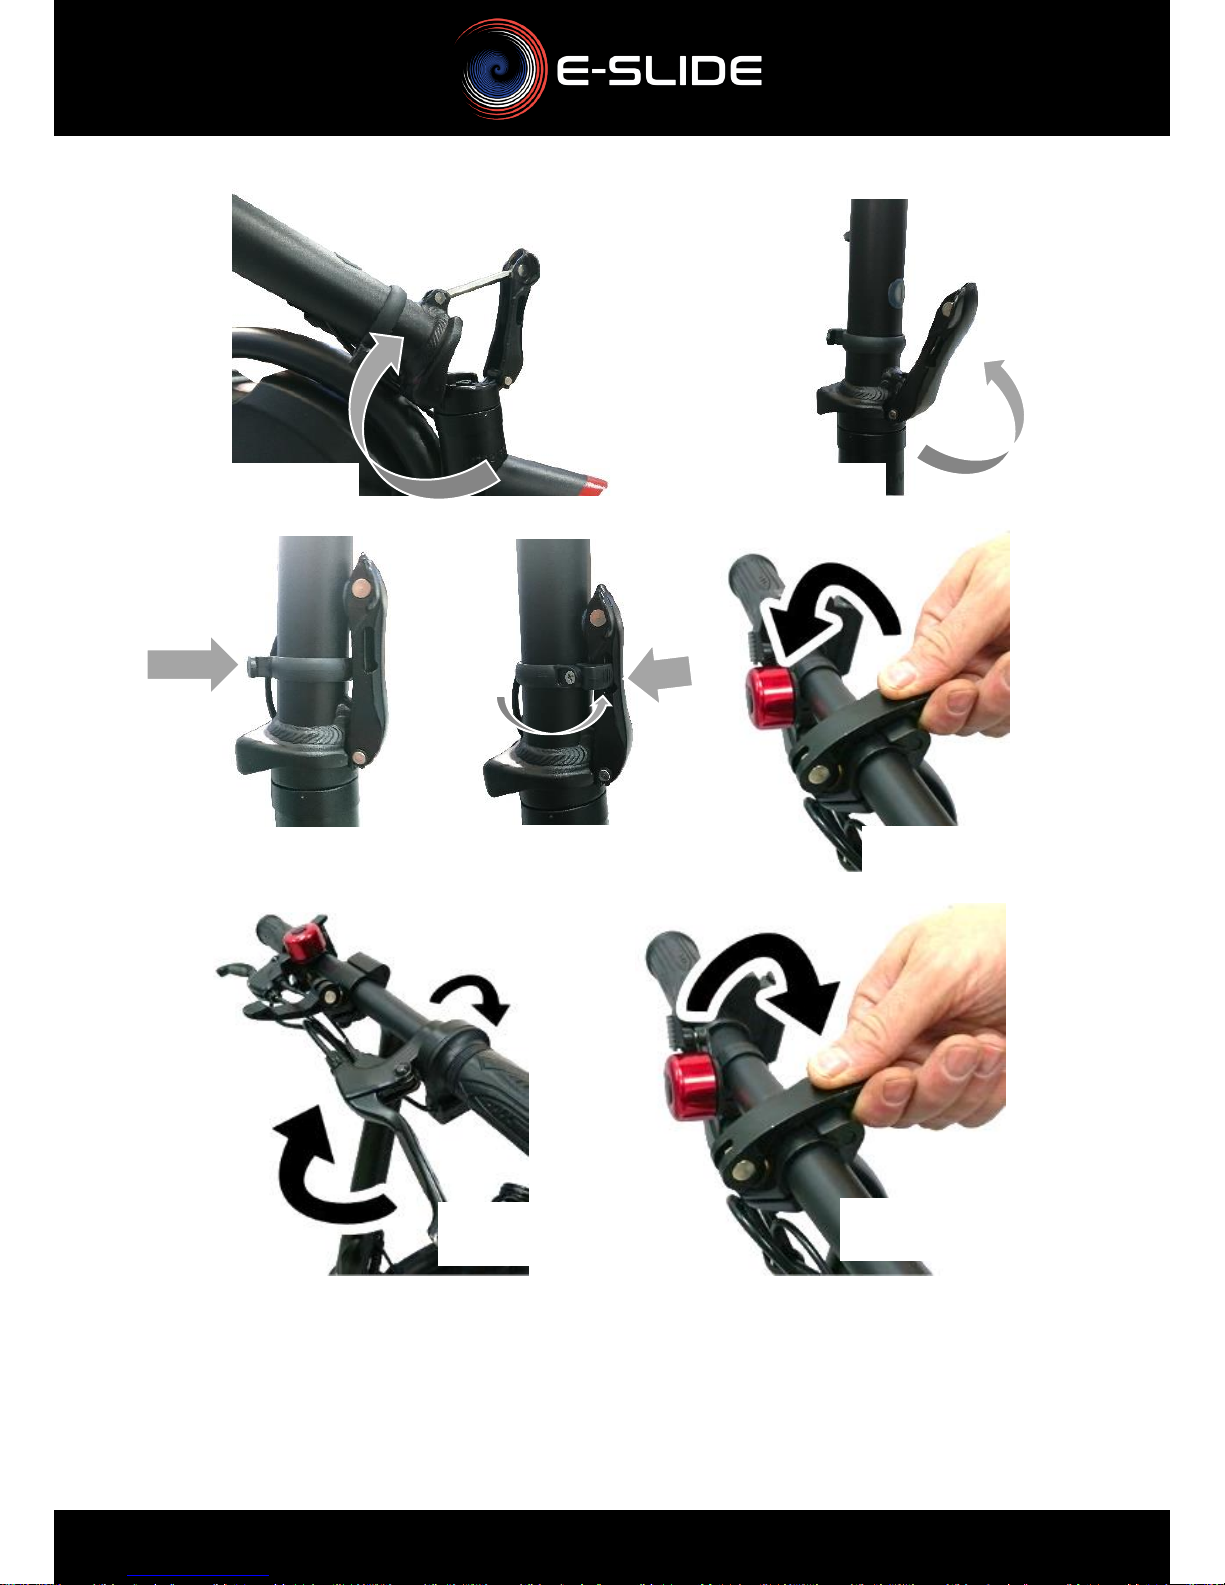
ii) Buckle System: Handlebar Folding
- Unlock the handlebar locking buckle (photo n ° 5 / p23).
- Position the handlebars so that the brake handles are
vertical.
- Re-lock the handlebar locking buckle (photo n ° 7 / p23).
- Unlock the safety pin by turning it to the left, lower the folding
buckle:
- Then bend the steering column.
Page24
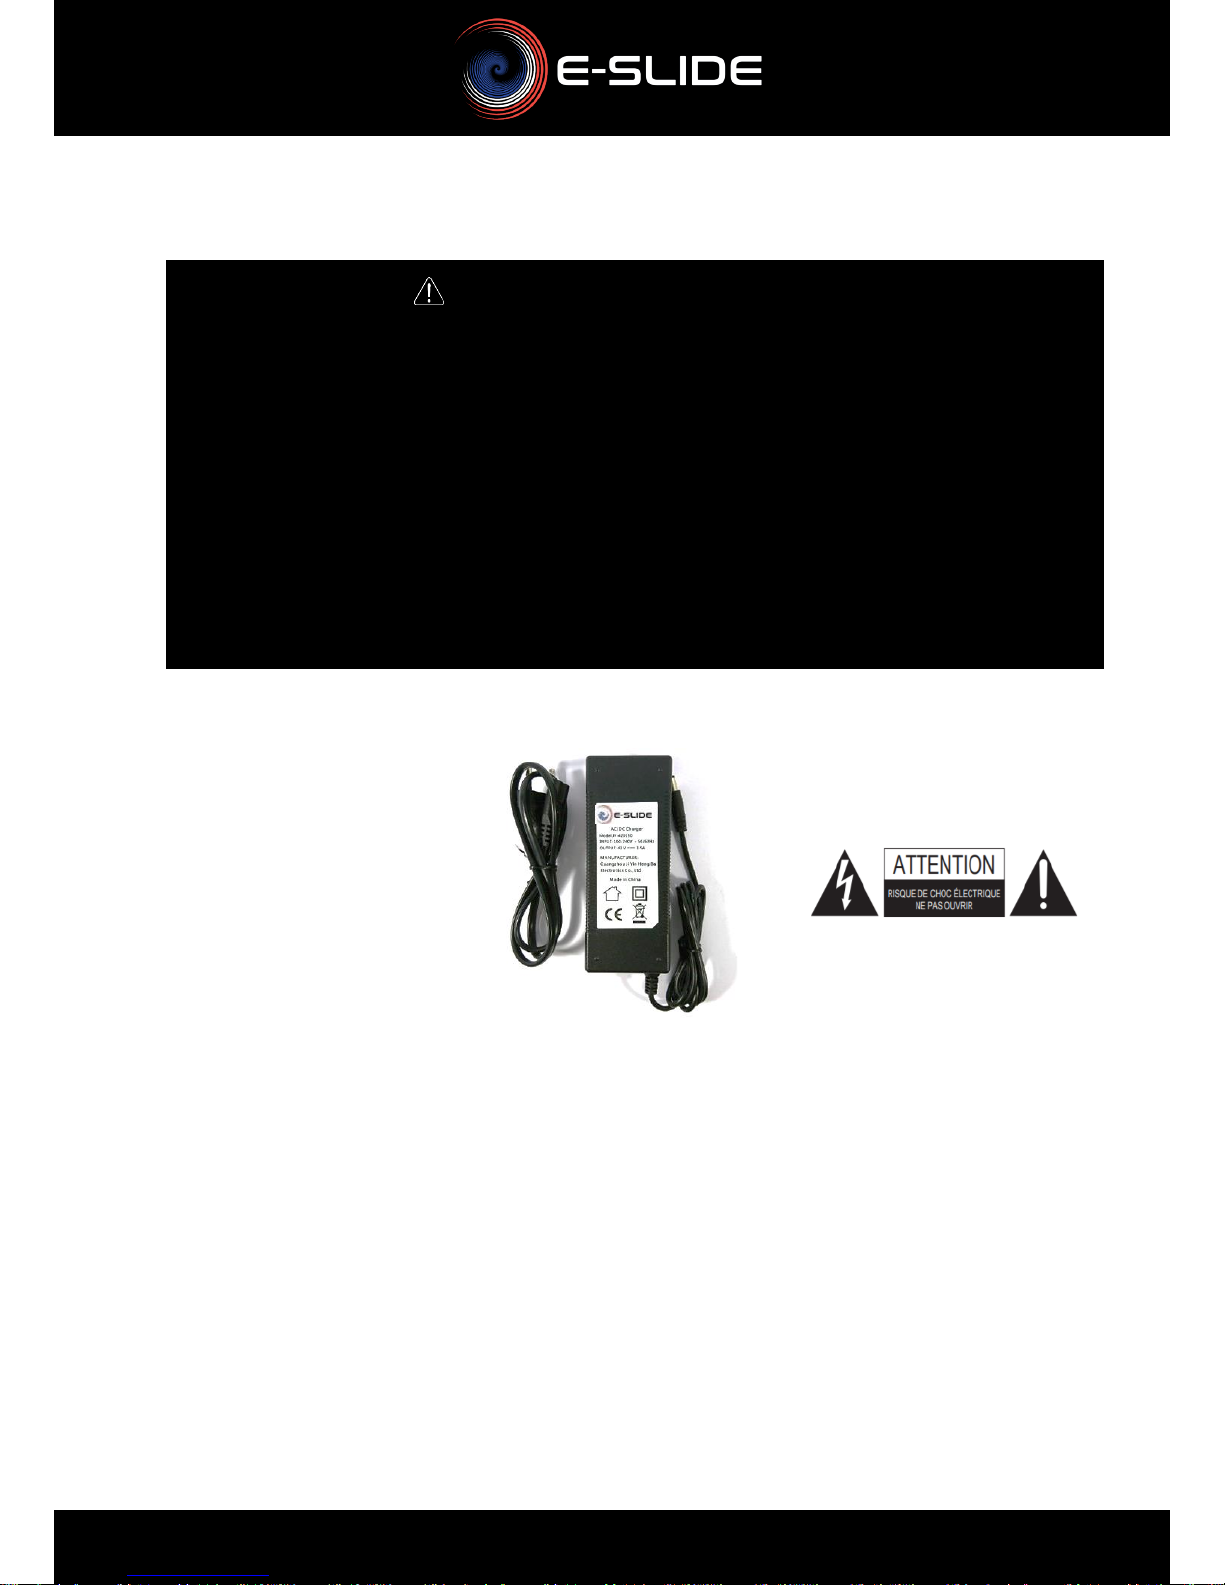
WARNING OF CHARGING
Make sure that the Balance Bike is in the "parking"
position (kickstand in the open position, on a flat surface,
neither sloping nor rough), that the Balance Bike is off
(off). DO NOT ABSOLUTELY TURN THE DRAISIAN ON
DURING THE LOAD CYCLE, that the Balance Bike is in a
dry place, away from the sun, rain, that the Balance Bike
and the charging port are completely dry, do not use a
standard 220Volt outlet.
c) Charge the battery of the balance bike
i) Description of the charging of the batterye
- Connect the power cable to the charger.
- Open the charging port cover and the charging port
sealing plug (photo # 1 / p26).
- Connect the charger cable with the male charging port
to the charging socket on the balance machine (photo #
2 / p26 - version 01 or 02 depending on the type of
connection of your product).
- Connect the power cable to the standard 220Volt
socket (photo n ° 3 / p26).
220V
Page25
IMPORTANT FOR COMPLETE LOAD
The VOL indicator on the digital display must be at 42 in
order for the charge of the balance bike to be complete.
- Once connected, check the digital display for
BATTERY & VOLTAGE charge levels:
- To disconnect after charging, please disconnect the
power cable from the 220V socket.
- Then disconnect the charging cable (photo n ° 3 / p26).
- Close the waterproof plug of the charging port and
close the charging port cover (photo n ° 1 / p26).
Photo n°1
Photo n°2
Version 01
Photo n°3
3 1 2
Photo n°2
Version 02
1 - Press 2 X on the Function button
of the digital display
2 - The VOL indication will appear in
place of ODO. The balance bike
should be 42 for a full charge.
3 - Check that the load bars are
complete.

Page26
Loading steps
- You must correctly disconnect the charging port and
the power cable as seen in the previous step (See
point i - description of the charging - photo n ° 3 / p26).
ii) Warnings on the load
Please keep the loading environment clean and dry.
Please use a 220Volt standard outlet.
Make sure that the charging port of the balance bike and charger are
dry. If the charging port is wet, do not charge the balance bike.
The MAXIMUM charging time should not exceed 6 hours, if it is
exceeded it will affect the longevity of the battery, too long charging
time could cause overheating and thus increase the risk of fire or
explosion.
RED
GREEN
- After properly connecting
the charging port and the
power cable, the charger
indicator light will turn
red.
- After 4-5 hours the
charging cycle will be
complete, the indicator light
of the charger will change
from red to green.

Page27
WARNING PARKING POSITION
The balance bike must be placed in "parking" position on
a flat surface, neither sloping nor uneven.
You must ALWAYS unplug the charger from the balance machine
and the power outlet after a full charge cycle to avoid overheating and
do not alter the life of the battery, so do not leave the charger and the
balance connected. continuous (whole day), this could increase the
risk of fire or explosion.
ABSOLUTELY NOT leave the balance bike charge unattended at
night.Il ne faut pas laisser la draisienne en charge sans
surveillance.
People under 14 years of age or with reduced physical, sensory
or mental abilities can not manage the balance charge.
NEVER TURN THE DRAISIAN ON DURING THE LOAD CYCLE.
d) Functions
i) Position Parking
To put the balance bike in the parking position, you must make sure that
the balance bike is off (no lights / charge indicators on), then you have to
open the stand to be able to keep the balance bike upright without human
assistance.

Page28
WARNING START UP
Make sure that the Balance Bike is in the "parking"
position (kickstand in the open position, on a flat, sloping
or uneven surface), folding ring, safety pin, tightening ring
tightly closed, that the loader unplugged and the Balance
Bike is off (off).
The balance bike must be placed in "parking" position on
a flat surface, neither sloping nor uneven.
ii) Turning on / turning on the balance bike
To turn on your balance bike you have to activate up the ON button
on the left of the handlebar with the pictogram , the button will
remain in the up position.
On power-up, an electronic anti-start system will prevent you
from operating the accelerator during the lighting of the
balance bike as follows:
- Press the power button
*** Start-up security ***
- The digital display turns on.
*** End of boot safety ***

Page29
- Possibility of operating the accelerator
- It is impossible to operate the accelerator before the ignition
process is completed, that is to say before the end of the antistart electronic security.
This electronic immobilizer anti-start will allow you not to
operate the accelerator as the power of the balance bike,
thereby limiting the risk of falling at the start.
iii) Functions of the digital display
iv) Front / Rear Lighting
CENTER BUTTON: toggles different data
from the display
ODO : Total distance traveled
DIS : Distance traveled from the current trip
VOL : Voltage of the battery
(For a maximum load, must be 42 )
UP AND DOWN BUTTONS
NON-FUNCTIONAL / NON-ACTIVE

Page30
WARNING STARTING
Make sure that the Balance Bike is in the "parking"
position (kickstand in the open position, on a flat, sloping
or uneven surface), folding ring, safety pin, tightening ring
tightly closed, that the loader unplugged and the Balance
Bike is off (off).
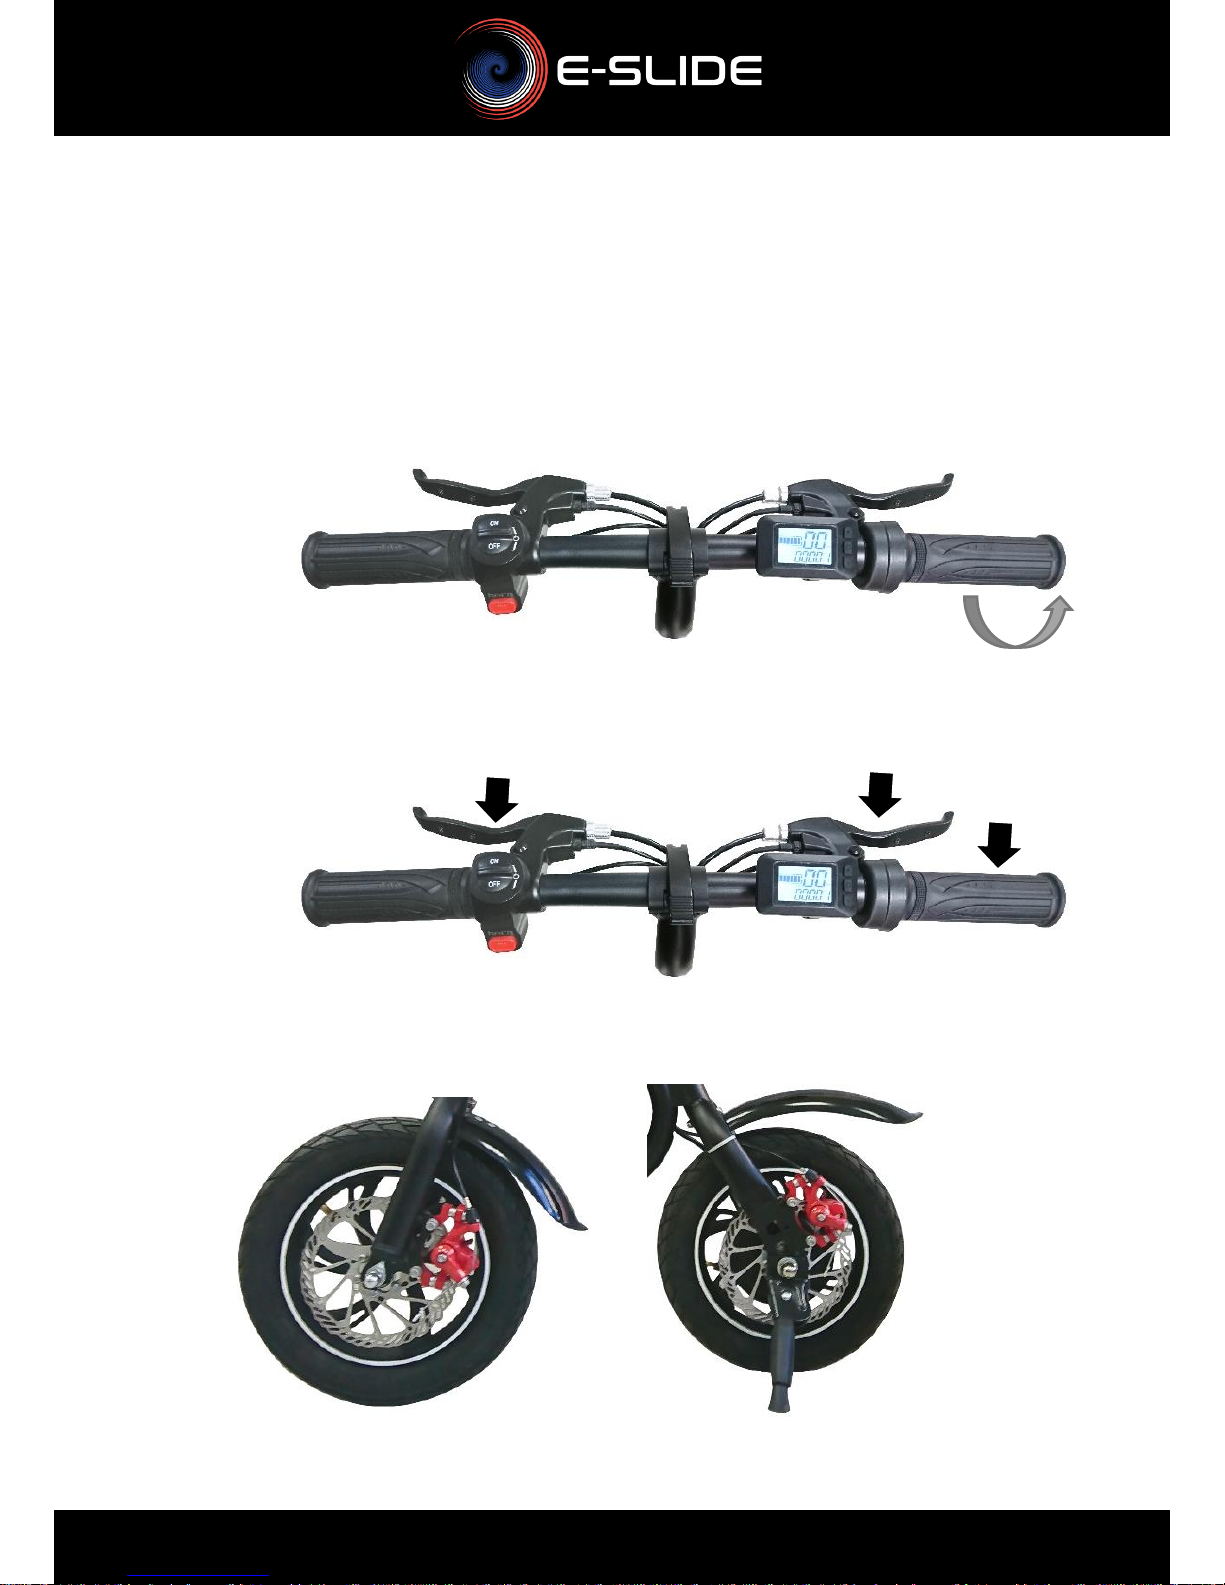
Front / rear lighting: press the RED button on the left of the
handlebar for 3 seconds to switch on the headlights. A second
press of 3 seconds on this push button will turn off the front
and rear lights.
NB: If you turn off the balance, the headlights will turn off
automatically.
Brake / rear lighting: the action on either brake handle will
flash the rear light.
v) Buzzer
The red horn button on the left side of the handlebars will
allow you to signal your presence to others.
vi) Start / Driving
1. Sit on the saddle of the balance bike.
2. Put your Balance Bike in the On position.
3. Raise the kickstand and place both feet on the ground to
maintain stability (stability) before starting.

Page31
WARNING DRIVING
Do not turn the handlebar abruptly as this may increase
the risk of falls, as well as damage the steering column of
the balance bike.
Control your speed! You must adapt your speed to your
area of use, NEVER push the balance bike to its maximum
speed because you could lose control of your device and
cause an accident. In addition, do not accelerate during
descents to always be master of the balance bike.
4. Gently turn the throttle grip on the right side of the
handlebar.
5. The balance bike will move, you can accelerate to gain
speed.
6. After a few meters, you can put your feet on the toes, the
balance bike will be in balance position (stability).
7. To turn right, turn the handlebar to the right, to turn left, turn
the handlebar to the left.
8. If you release the accelerator the balance bike will slow
down to a complete stop, it will be necessary to put feet on
the ground to not lose the balance (stability).
9. The use of right and left brakes is discussed in the next
section.
10. Return the balance machine to the "parking" position when
it is completely stopped.
Page32
vii) Mode CRUISE CONTROL (Cruising speed)
viii) Braking
Front disc brake
Rear disc brake
Cruise control mode allows you to lock the balance bike at
maximum speed without having to accelerate.
To activate it, keep the accelerator at maximum for 5s.
To disable Cruise control, simply press the brake or throttle.

Page33
WARNING BRAKING
The use of the brake must be done smoothly, do not press
too hard on the brakes to avoid slippage or tilting.
It is not possible to operate the accelerator during the
action of one of the brake handles because the action of
the brake handles cuts the engine, this being intended to
prevent the risk of slippage and limit chances of losing
control of the balance bike.
The balance bike is equipped with two disc brakes for a safe
use experience.
The brake handle on the right handlebar activates the front
brake.
The brake handle on the left of the handlebar activates the
rear brake.
During the action of one of the brake handles this cuts the
electric motor preventing the effect of slippage and allowing a
faster and softer braking.

Page34
CLEANING WARNING
Make sure that the Balance Bike is in the "parking"
position (kickstand in the open position, on a flat, sloping
or uneven surface), that the charger is unplugged and that
the Balance Bike is off (off). Make sure that the charging
port is protected by the rubber plug, to avoid damaging
the device by introducing water.
WARNING BRAKES
Make sure that the Balance Bike is in the "parking"
position (kickstand in the open position, on a flat, sloping
or uneven surface), that the charger is unplugged and that
the Balance Bike is OFF (off).
Please check the brakes before use. Pay attention to the
brake voltage and use the supplied key if they are too
loose or too tight.
4) Cleaning / Maintenance / Repairs
a) Cleaning
- Clean with a damp cloth to remove dust and dirt.
- Do not use industrial cleaners or solvents as this may
damage the surfaces.
- Do not use alcohol or ammonia-based cleaners as this may
damage the components.
b) Brakes: maintenance / adjustments
i) Adjustment of brake cable tension
The manipulations are identical for the front and rear brakes.
To tighten or loosen the brakes use the supplied wrench,
unscrew the nuts on the cables placed on the brake shoes and
pull the cable slightly to shorten or lengthen it according to the
desired action:
Page35
- Shorten the cable will release the brake voltage :
- Extending the cable will tighten the brake voltage :
- Tighten the screw with the key while holding the cable
to the desired length:
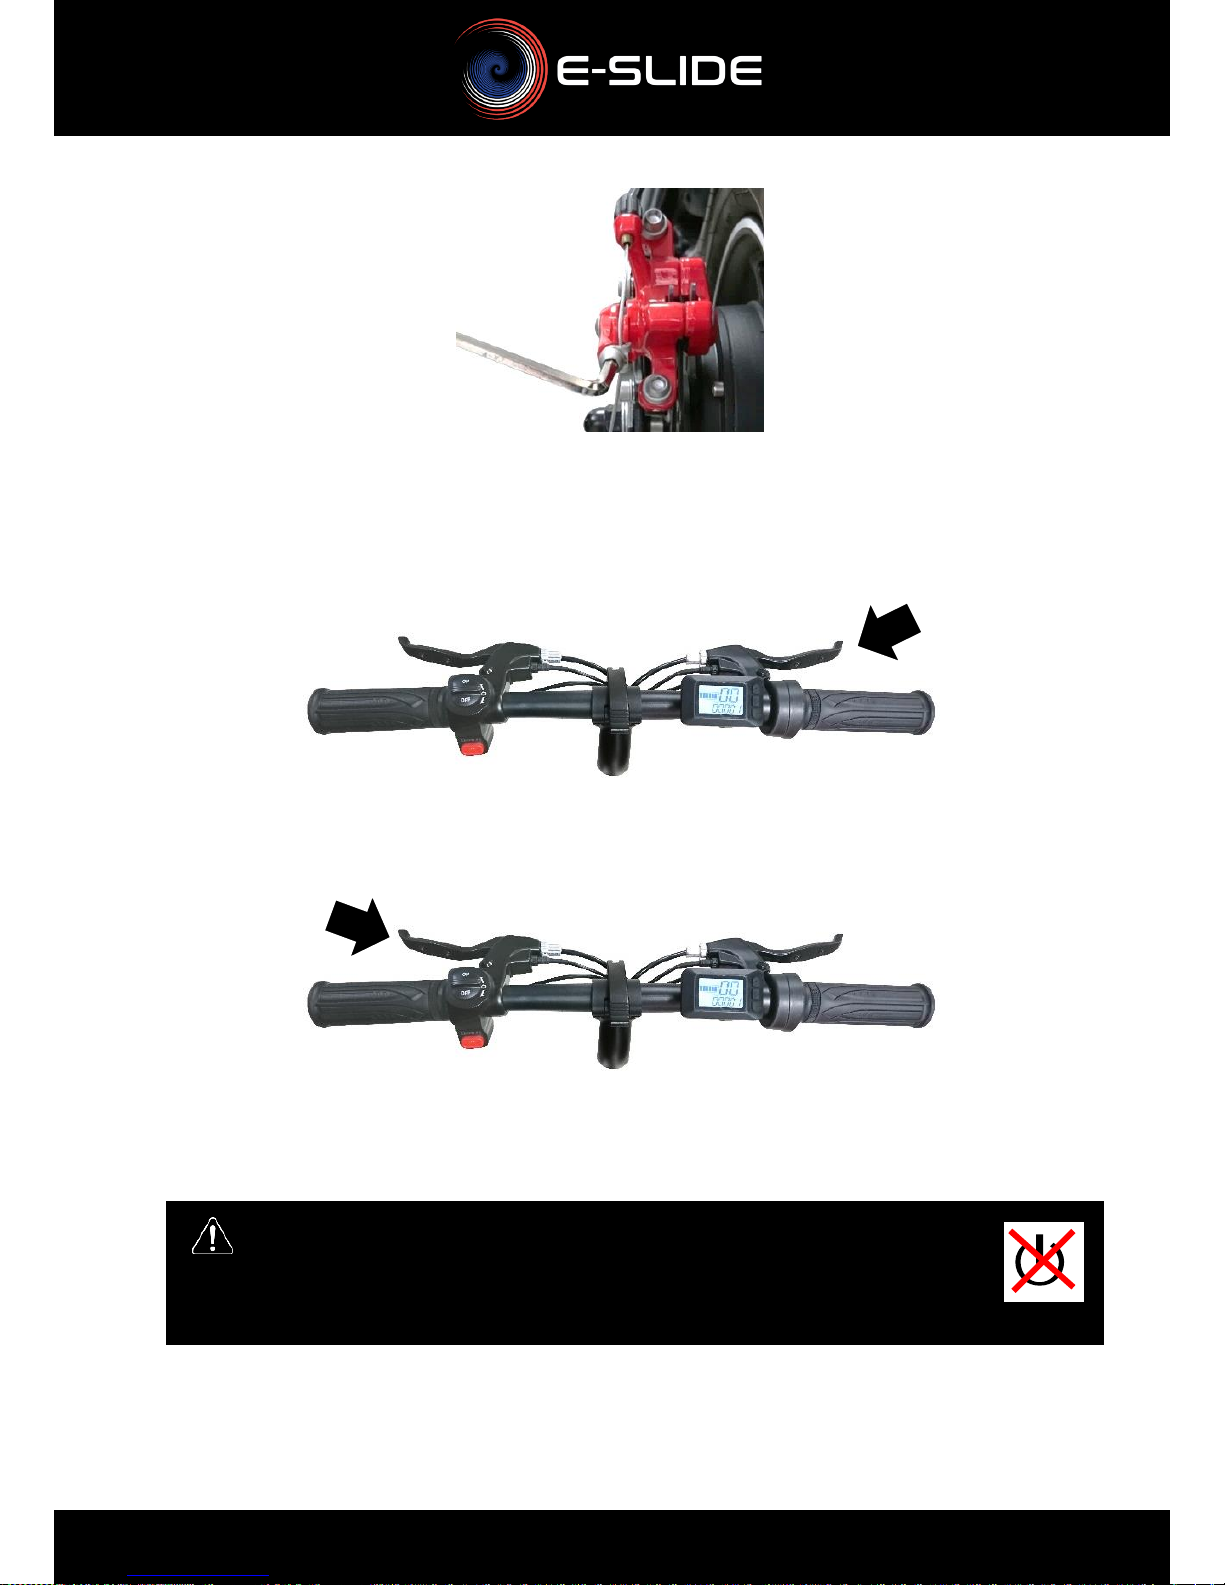
Page36
- Test the cable tension with the corresponding brake
handle :
Right brake handle => front brake.
Left brake handle => rear brake.
- The tension in the handle should be neither too strong nor too loose.
WARNING THE DRAISIAN MUST ALWAYS
REMAIN OFF DURING BRAKE ADJUSTMENTS.

Page37
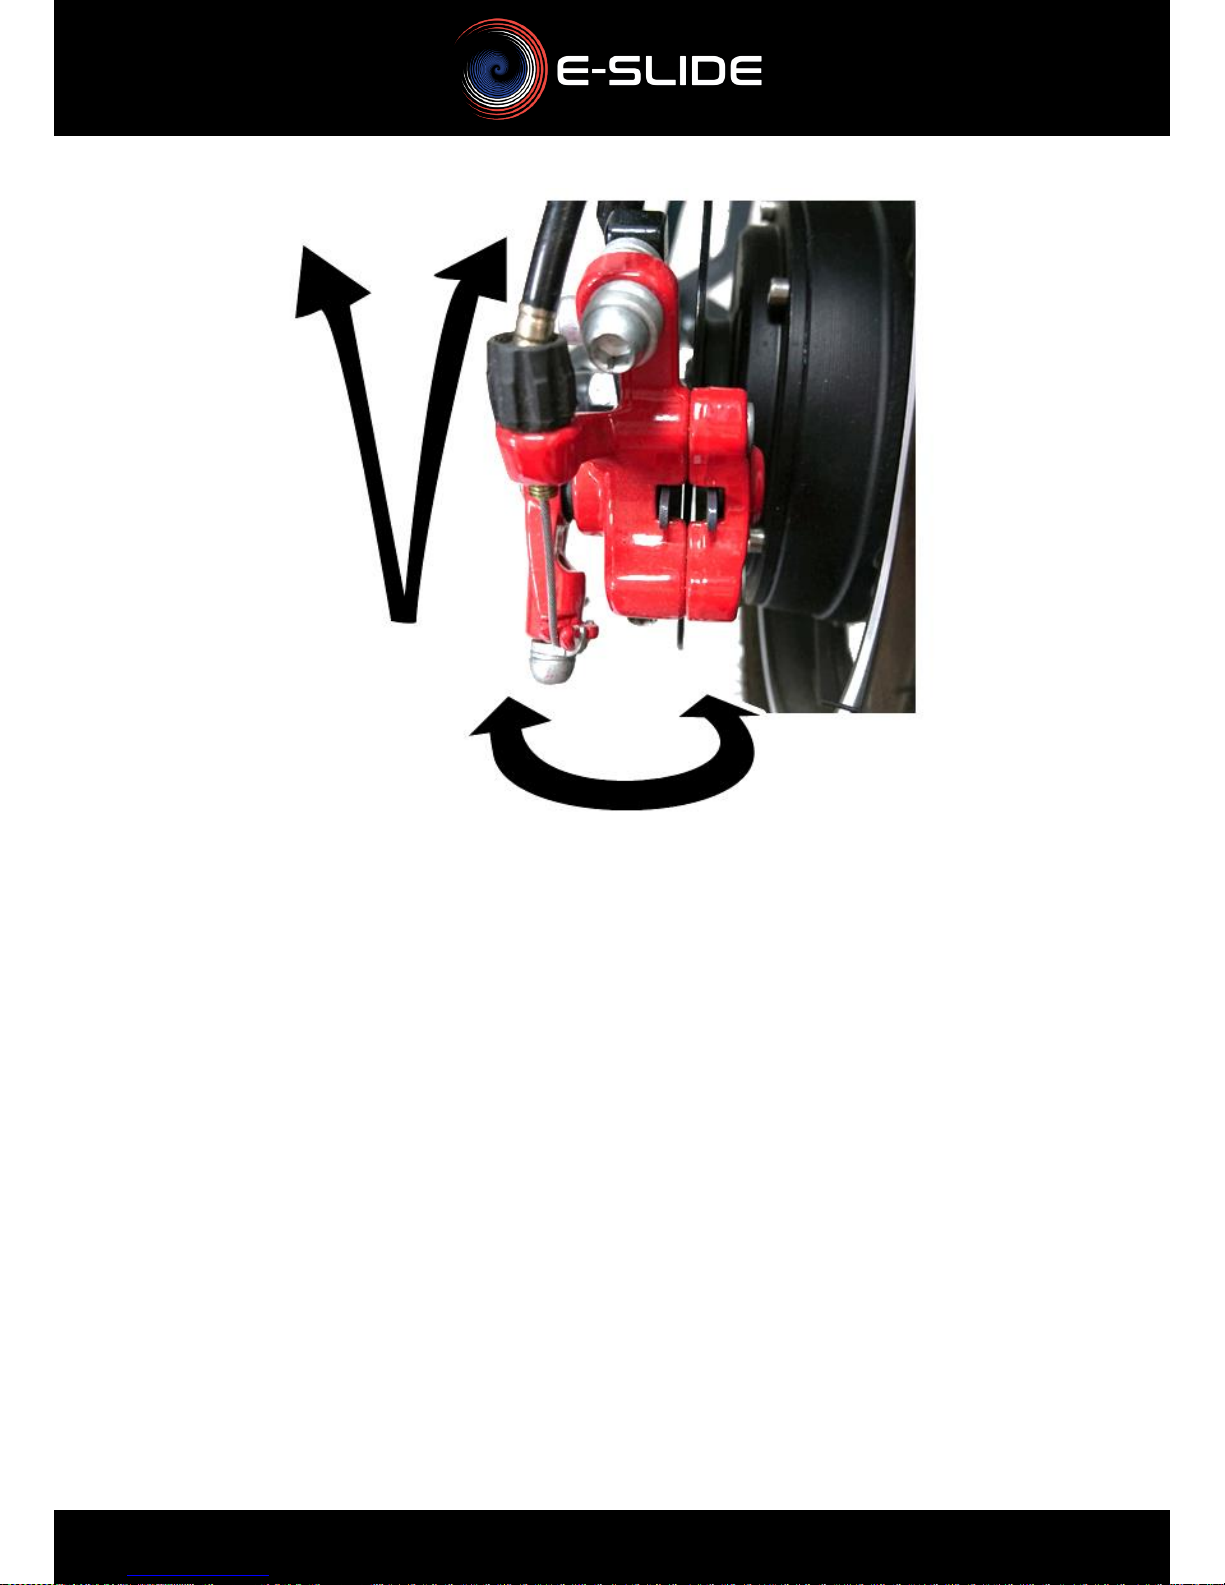
BRAKING TEST
Raise the balance wheel, manually turn the wheel
corresponding to the brake you just adjusted.
While the wheel rotates, operate the brake handle, stopping
wheel rotation should be instantaneous.
If the stop is not immediate, braking will not be optimal.
Repeat the procedure.
BRAKE HANDLE
MUST NOT TOUCH
THE HANDLE OF THE HANDLEBAR.
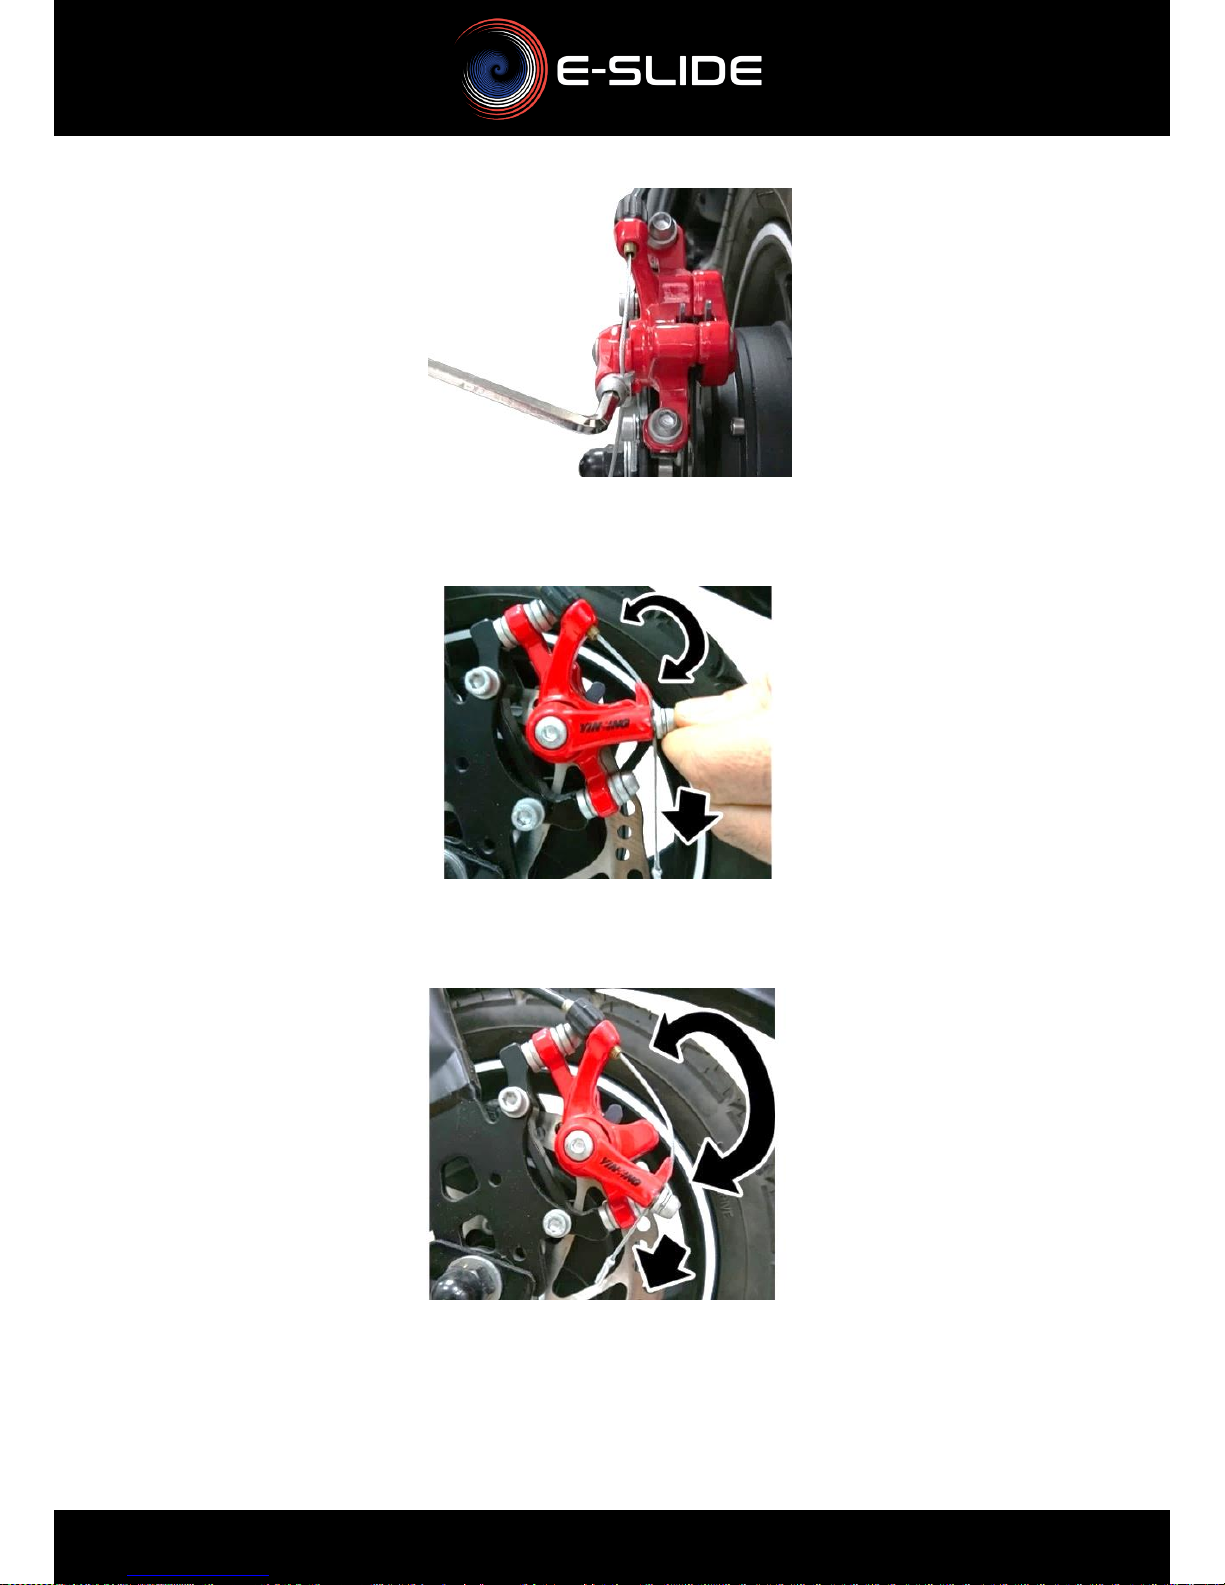
ii) Brake Caliper Adjustments
When dismounting the front or rear wheels, it is essential
to adjust the brake calipers.
To adjust the disc and brake calipers, use the supplied key.
The disc must be perfectly aligned between the pads as below.
You can check by looking over the stirrup.

Page38
- To make the settings:
- Loosen the screws (pictures n ° 2 and 3 p39). The
stirrup must be able to move transversely when it is
handled.
- Align the disc and the pads so that the space is
parallel and identical from left to right of the disc.
You will need to move the brake caliper from left to
right and up and down to find the correct position.
Photo n°2
Photo n°3
Photo n°1
Page39
- If the adjustment is correct, tighten the screws slowly so
as not to lose the position.
- Tighten the brake handle corresponding to the brake
caliper you have just adjusted and then release.
- Visually check the alignment (photo n ° 1 / p39)
- If it is not optimal, repeat the procedure.
- If the alignment is visible, have an assistant turn the
wheel. The wheel must rotate without forcing or making
noise during its rotations.
Page40
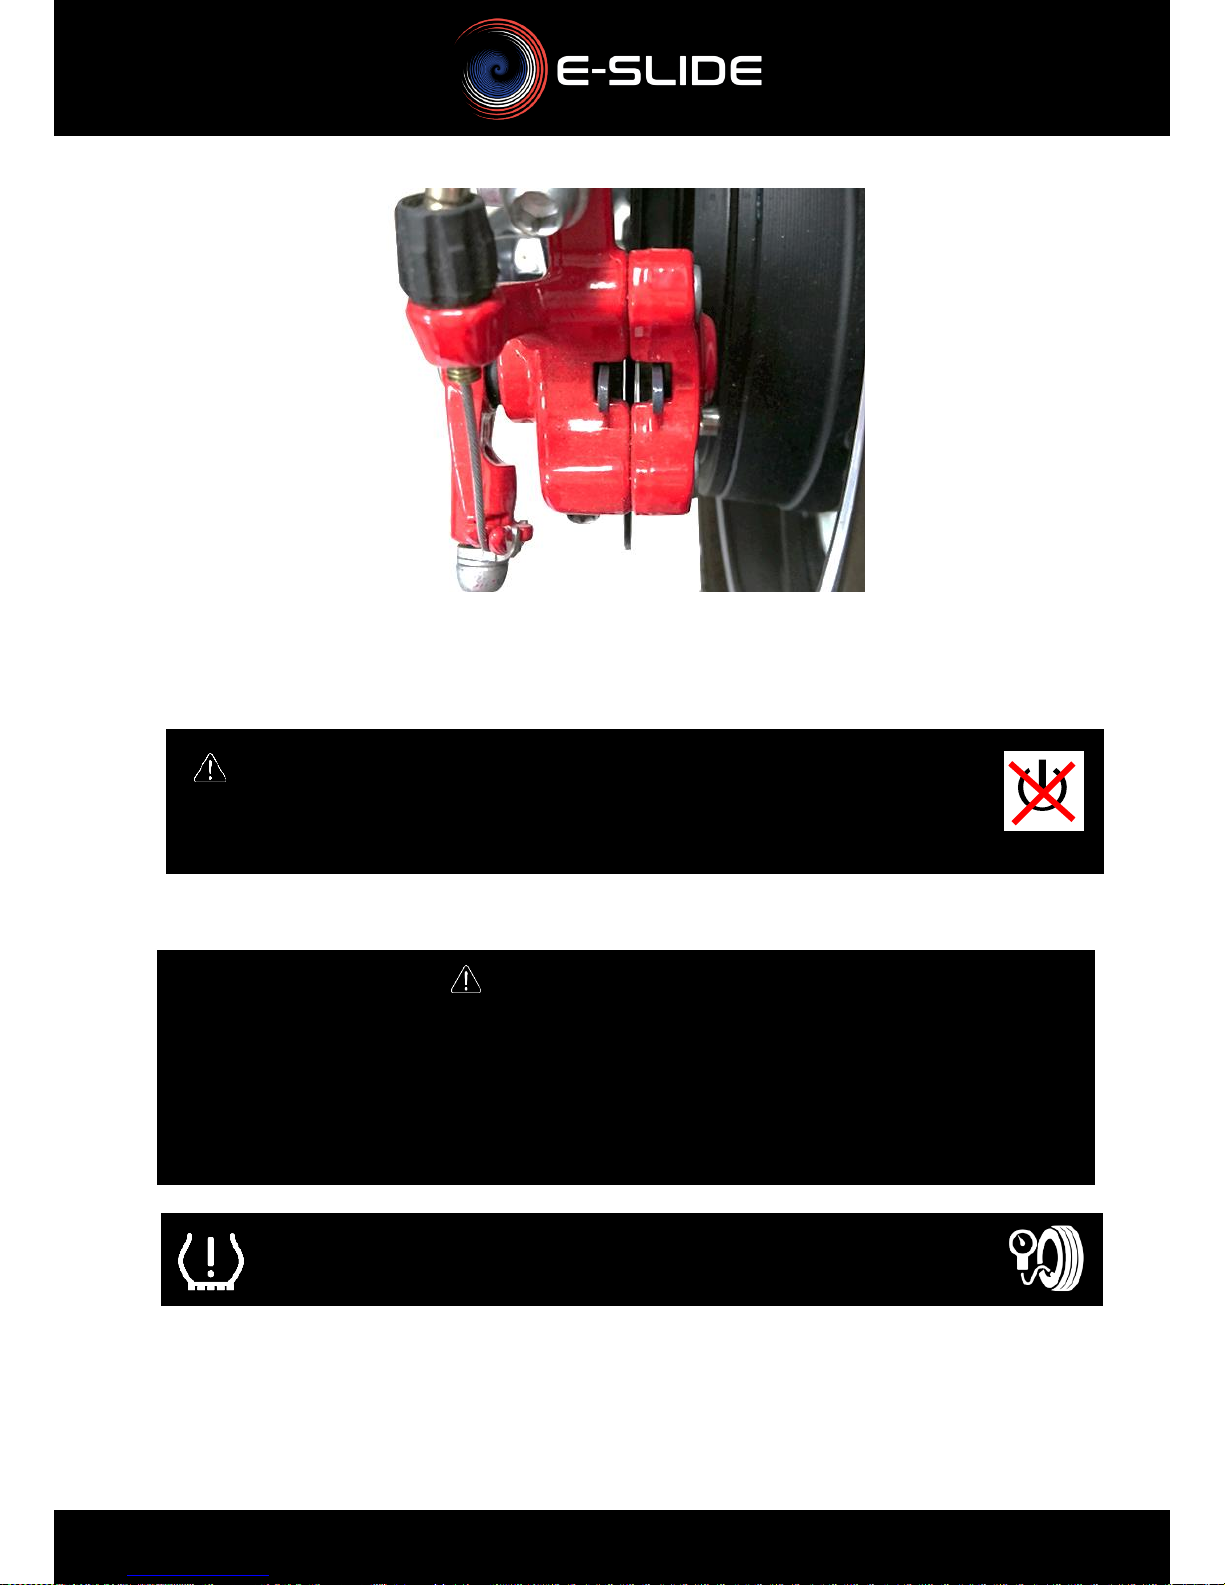
WARNING WHEELS
Make sure that the Balance Bike is in the "parking"
position (kickstand in the open position, on a flat, sloping
or uneven surface), that the charger is unplugged and that
the Balance Bike is off (off).
PRESSURE : 2.2 Bars
- If the wheel seems to force or make friction
noises, repeat the procedure.
ATTENTION LA DRAISIENNE DOIT TOUJOURS RESTER
HORS TENSION PENDANT LES REGLAGES DES FREINS.
c) Wheels
i) Inflation
The manipulations are identical for the inflation of the front and rear wheels.
WARNING THE DRAISIAN MUST ALWAYS
REMAIN OFF DURING SETTINGS.
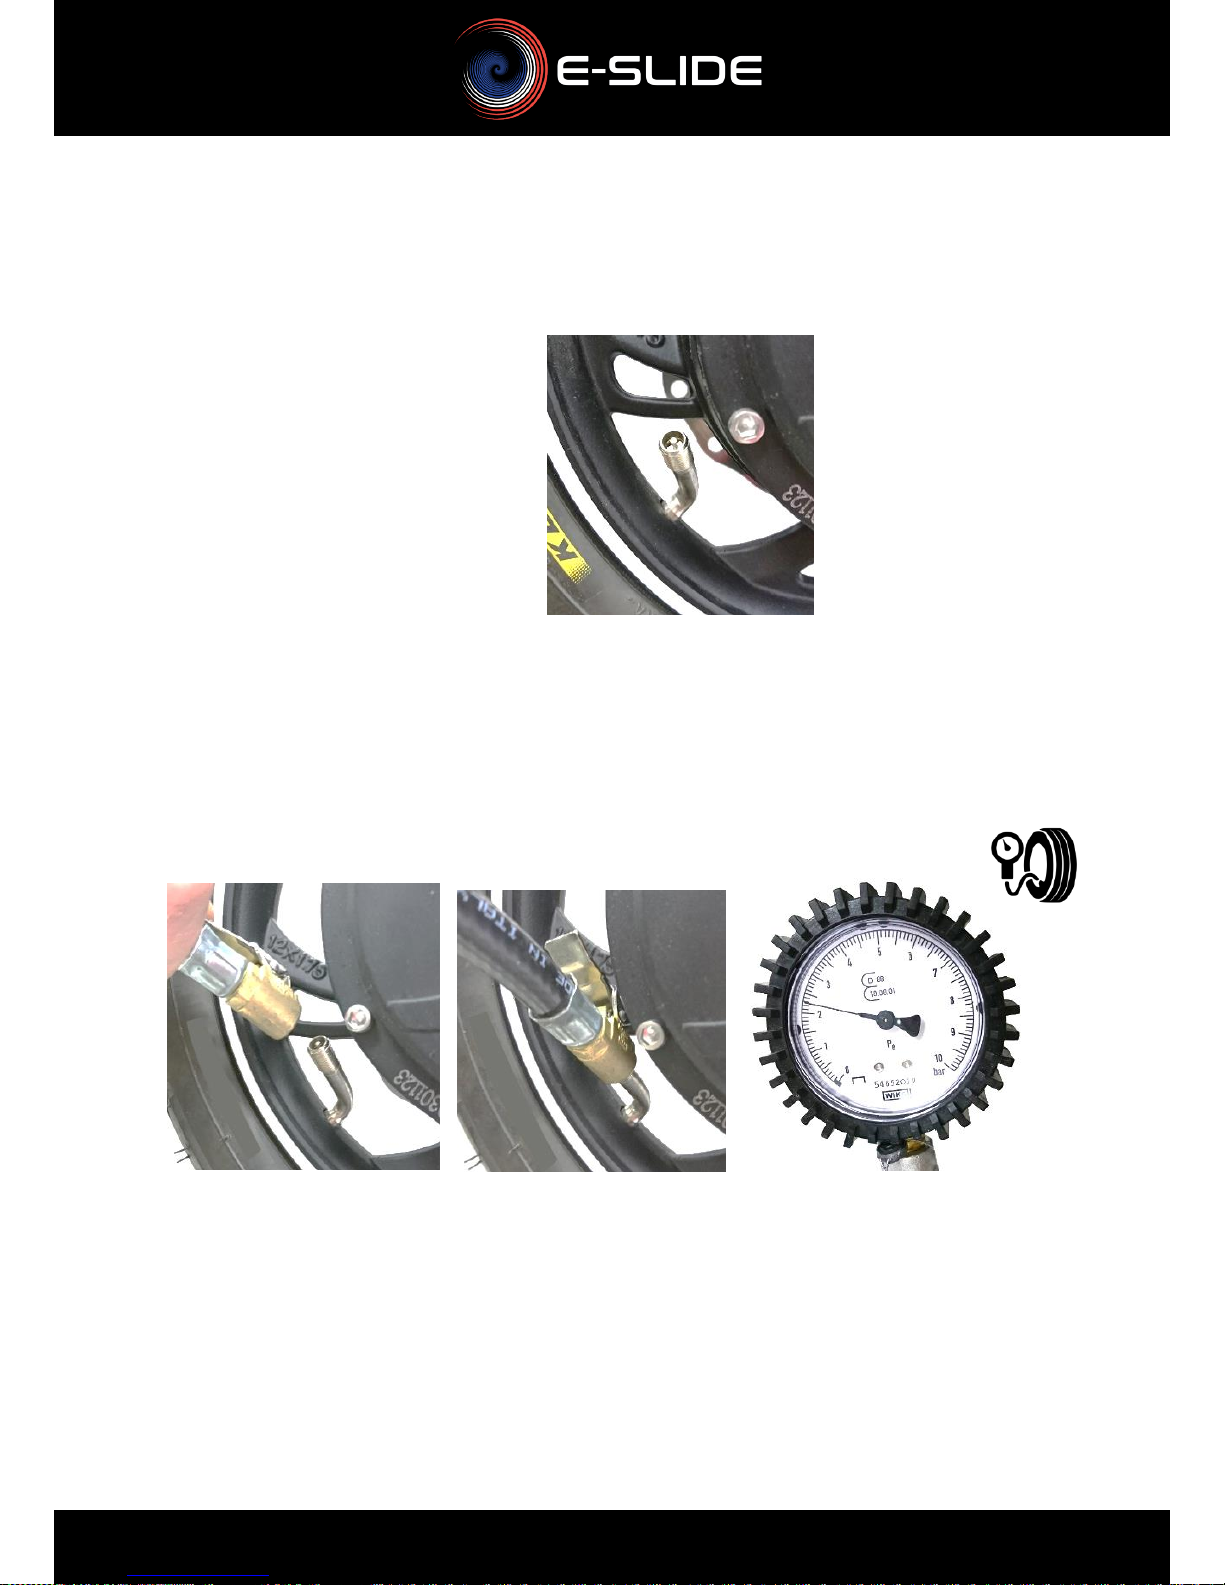
Page41
- Make sure that the beak of the inner tube is perpendicular
to the rim (see picture below) to avoid pinching the tube
and / or premature wear of the tube.
- Use a suitable inflator, type car inflator to check the
tire pressure and if necessary inflate the tube.
- Remove the nozzle cap from the tube, insert the
nozzle of the inflator, inflate the tire, screw the cap
of the nozzle of the tube.
The pressure must be 2.2 Bars in each wheel.

Page42
ii) Wheel Alignment
The two wheels must be perfectly aligned with the frame, if this is not the
case, do not use the balance bike, the wheels could be veiled, the frame, the
fork or the twisted axis of direction making the use of the dangerous balance
bike.
In one of these cases, use a person authorized to perform the necessary
repairs.
If the wheels are aligned, you can use your balance bike normally.

Page43
iii) Warnings on shocks
If you suffer a shock on one of the wheels of your balance
bike, it could result in:
▪ Abolish the tube
▪ Absorbing the rim of the wheel
▪ To sail the wheel
▪ Twist the fork
▪ Abolish the steering axis
▪ Twist the frame
Thus a significant impact on one of the wheels may have
consequences on the possibility of using the balance bike, it
will therefore appeal to a person authorized to make a
diagnosis on the overall condition of your balance bike.
If your bike suffers a big shock on its wheels no longer use the
balance bike and have a diagnosis by a professional.
5) Informations logotypes utilisés
Wearing personal protective equipment
Read the user manual
WEEE The product is not disposable in a conventional
bin. This must be brought to a specific collection point.
Product Class II - Product with reinforced insulation
without accessible metal parts.
Product Class III - Product supplied with very low
voltage Safety
inflation
Power / ignition

Page44
6) Legal indications
Imported by: DPA EUROPE
Gildo Pastor Center - 7 Gabian Street, 98000 MONACO
Copyright ® 2019 DPA EUROPE, this manual and all the
information indicated in it are the property of DPA
EUROPE, any partial or complete copy of this document
exposes the offender to prosecution.
Time / Duration
CAUTION - DANGER electric current
ATTENTION / IMPORTANT
CAUTION-Risk of electric shock / Do not openDANGER
Meaning High (up)
Fragile
Fear moisture - keep away from moisture.
Product charger only for indoor use

Page45
Declaration of conformity
We, DPA EUROPE, Gildo Pastor Center - 7 Rue Gabian,
98000 MONACO, declare that this declaration of conformity is
established under our sole responsibility:
Brand: ESLIDE Reference: ES1200
Type: DRAISIENNE ELECTRIQUE PLIABLE
To which this declaration refers, it complies with the essential
requirements and other relevant provisions of EC Directive
2014/30 / EU and the MD 2006/42 / EC machine directive in
application of the following relevant harmonized standards:
-EN 55014-1: 2017 and EN 55014-2: 2015
-EN 61000-3-2: 2014 and EN 61000-3-3: 2013
-EN ISO 12100: 2010
-EN 60204-1: 2006 + A1: 2009 + AC: 2010
As well as the essential requirements of the ROHS directive
2011/65 / EU of the directive LVD 2014/35 / EU and the
REACH regulation.
DPA Europe can not be held responsible for changes made by
the user and their consequences, which could affect in
particular the conformity of the product with the CE marking,
any unauthorized modification of the product cancels this
declaration of conformity.
Nice, the 10th of October 2018
Roger-David Lellouche, General Manager
 Loading...