

Page 1
GetEskimo.com
GetEskimo.com
ASSEMBLY INSTRUCTIONS & PARTS
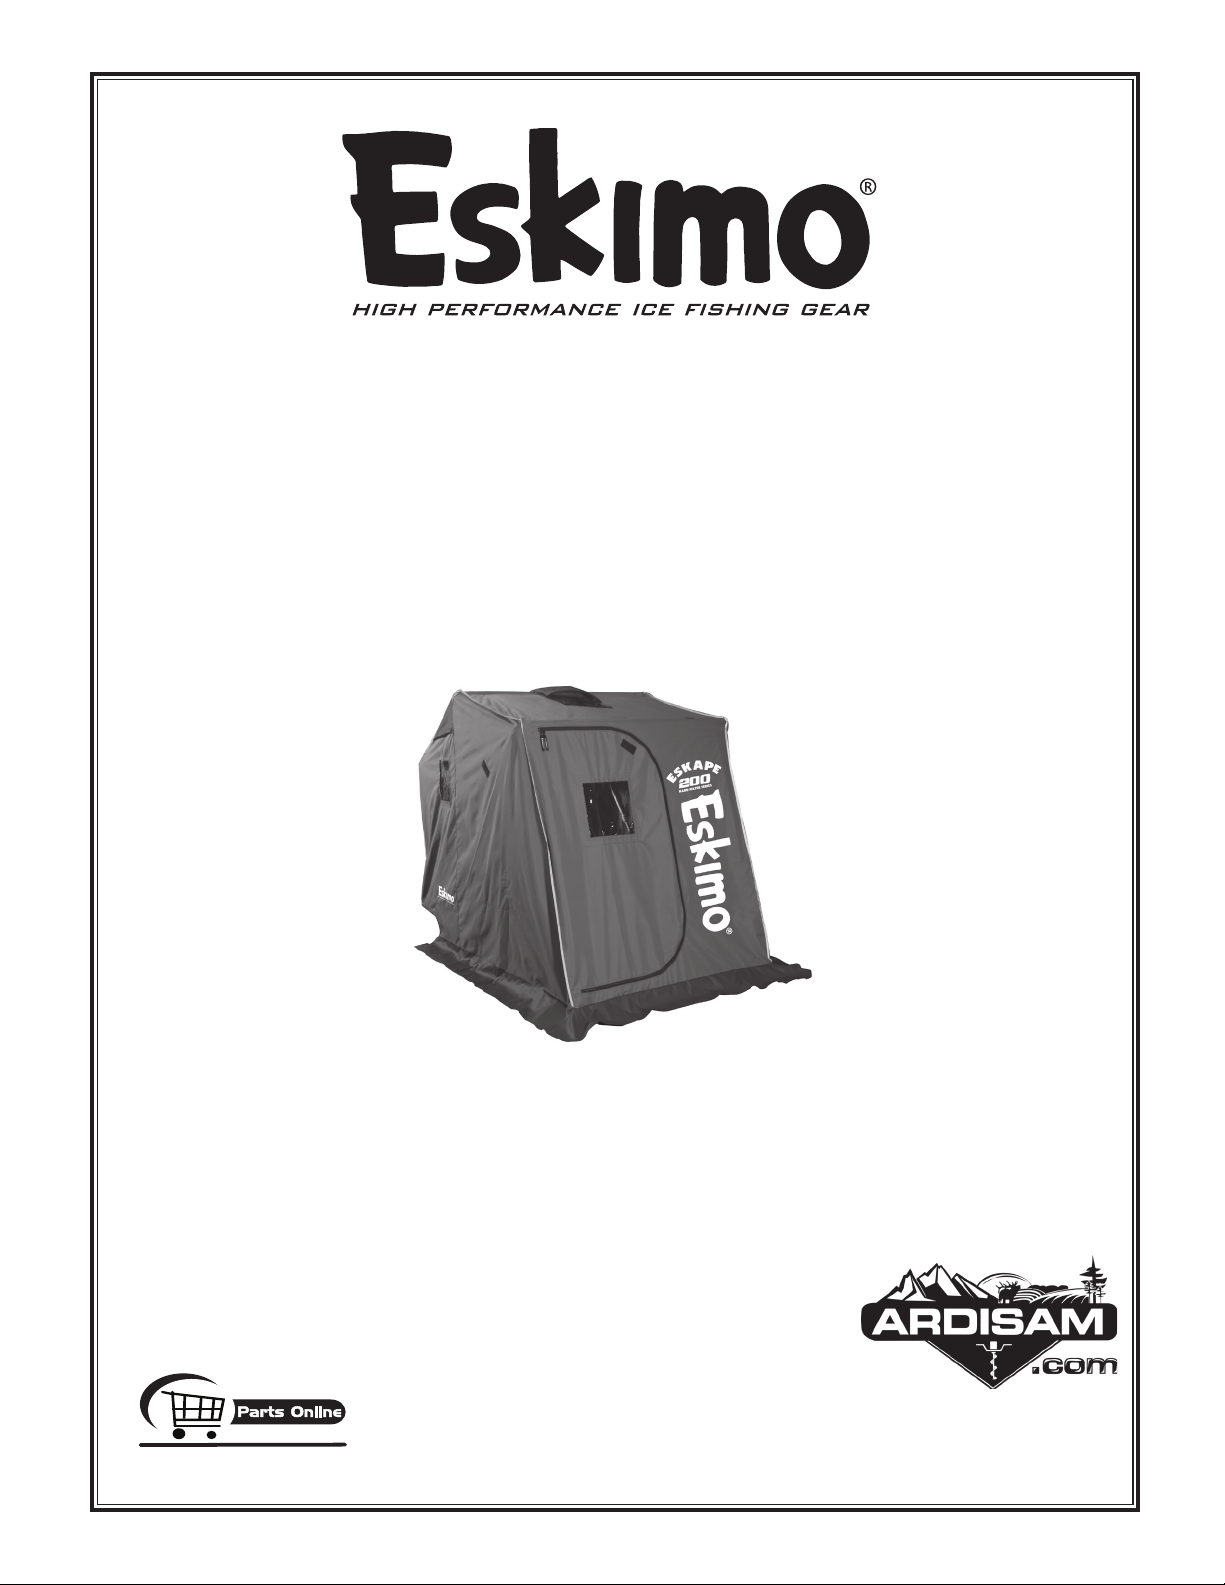
Eskape 200 Ice Shelter
MODEL 69161
OM69161
Rev. 7/7/08
© 2008 Ardisam, Inc.
All Rights Reserved.
Page 2
GetEskimo.com
HIGH PERFORMANCE ICE FISHING GEAR
®
Eskape™ 200 Hardwater Series (69161)
Eskimo Ice Shelters are engineered with you the high performance ice angler in mind. We appreciate your purchase of one of our high
performance portable ice shelters. Follow these simple instructions and your ice shelter will provide you many years of trouble-free
pleasure. Save these instructions for future reference.
If for any reason you have a problem with your product, DO NOT return to the retailer, contact the Eskimo customer service depart-
ment at 1-800-345-6007 or by email at [email protected] for assistance.
CONTENTS
Introduction & Registration .............................................................. 2
Important Safety Precautions .......................................................... 3
Assembly, Set-up & Take-down Instructions ................................. 4-9
Standard Accessories.................................................................... 10
Long Term Storage ........................................................................ 10
Parts ......................................................................................... 11-13
FAQ’s (Frequently Asked Questions) ............................................. 14
Warranty ........................................................................................ 15
Optional Accessories ..................................................................... 16
REGISTRATION
Record the model number and serial number (if applicable) in the space provided for easy reference. Fill out and mail the registration
card located in the parts packet. Warranty is valid only if the completed registration card is received by Ardisam, Inc. within 30 days
of purchase.
OWNERSHIP RECORDS
Place of Purchase:
Place of Purchase Address:
City: State/Province: Zip Code/Postal Code:
Model Number: Serial Number:
Date of Purchase:
Notes:
Page 2
1-800-345-6007
Page 3
HIGH PERFORMANCE ICE FISHING GEAR
®
GetEskimo.com
Eskape™ 200 Hardwater Series (69161)
IMPORTANT SAFETY PRECAUTIONS
This tent is made with flame resistant fabric which meets CPAI-84 specifications. It is not fire proof. The fabric will burn if left in continuous contact with
any flame source.
The application of any foreign substance to the tent fabric may render the
flame resistant properties ineffective.
Heat sources burn oxygen and emit carbon monoxide. Use caution with
heaters and vent properly.
This symbol points out important safety instructions
which if not followed could endanger your personal
safety. Read and follow all instructions in this
manual.
• Do not use candles, matches or open flames of any kind in or near this
shelter.
• Do not cook inside this shelter.
• Exercise extreme caution when using fuel-powered lanterns or heaters
inside this shelter.
• Do not refuel lamps, heaters or stoves inside this shelter.
• Extinguish or turn off all lanterns before leaving this shelter.
• Do not smoke in this shelter.
• Do not store flammable liquids inside this shelter.
WARNING
READ, UNDERSTAND AND FOLLOW ALL ASSEMBLY,
SAFETY, SET-UP & USE INSTRUCTIONS PROVIDED
BEFORE EACH USE. FAILURE TO FOLLOW ALL WARN
INGS AND INSTRUCTIONS COULD RESULT IN SERI
OUS INJURY OR DEATH.
KEEP ALL FLAME AND HEAT SOURCES AWAY FROM
THIS TENT FABRIC.
DUE TO TRAFFIC ON LAKES, ICE FISHING CAN BE HAZ
ARDOUS AT NIGHT. IF YOU CHOOSE TO FISH AT NIGHT
OR IN CONDITIONS WITH POOR VISIBILITY, BE SURE
TO TAKE PRECAUTIONS.
NEVER LEAVE THE ICE SHELTER UNATTENDED.
SECURELY ANCHOR THE ICE SHELTER TO THE ICE IN
HIGH WIND CONDITIONS.
LUBRICATE THE SLIDE POLES WITH WD-40
ICONE SPRAY AT LEAST SEASONALLY. DO NOT USE
OIL OR GREASE AS A LUBRICANT.
® OR A SIL-
-
-
-
1-800-345-6007
Page 3
Page 4
GetEskimo.com
HIGH PERFORMANCE ICE FISHING GEAR
®
Eskape™ 200 Hardwater Series (69161)
ASSEMBLY INSTRUCTIONS
Tools Needed - two 7/16” wrenches, one 3/8” wrench, one Phillips screwdriver
and a rubber mallet.
ASSEMBLY NOTE: This ice shelter should be assembled in a garage or basement setting due to the time and length of assembly.
Identify and familiarize yourself with all parts and hardware before
assembly. Allow 1-3 hours for assembly.
ASSEMBLY NOTE: The use of a cordless drill with socket will
make assembly of your ice shelter much quicker. Be sure to set
the drill speed low so you do not over tighten any nut and bolt
combinations.
ASSEMBLY NOTE:
ter, it should be mounted to the sled before assembly of the ice
shelter for convenience.
IMPORTANT ASSEMBLY TIP: DO NOT FULLY TIGHTEN ANY NUT
AND BOLT COMBINATIONS UNTIL ALL BOLT-ON PARTS ARE
ASSEMBLED TOGETHER! FINGER TIGHTEN ONLY! THIS WILL
HELP HOLE ALIGNMENT OF ALL PARTS.
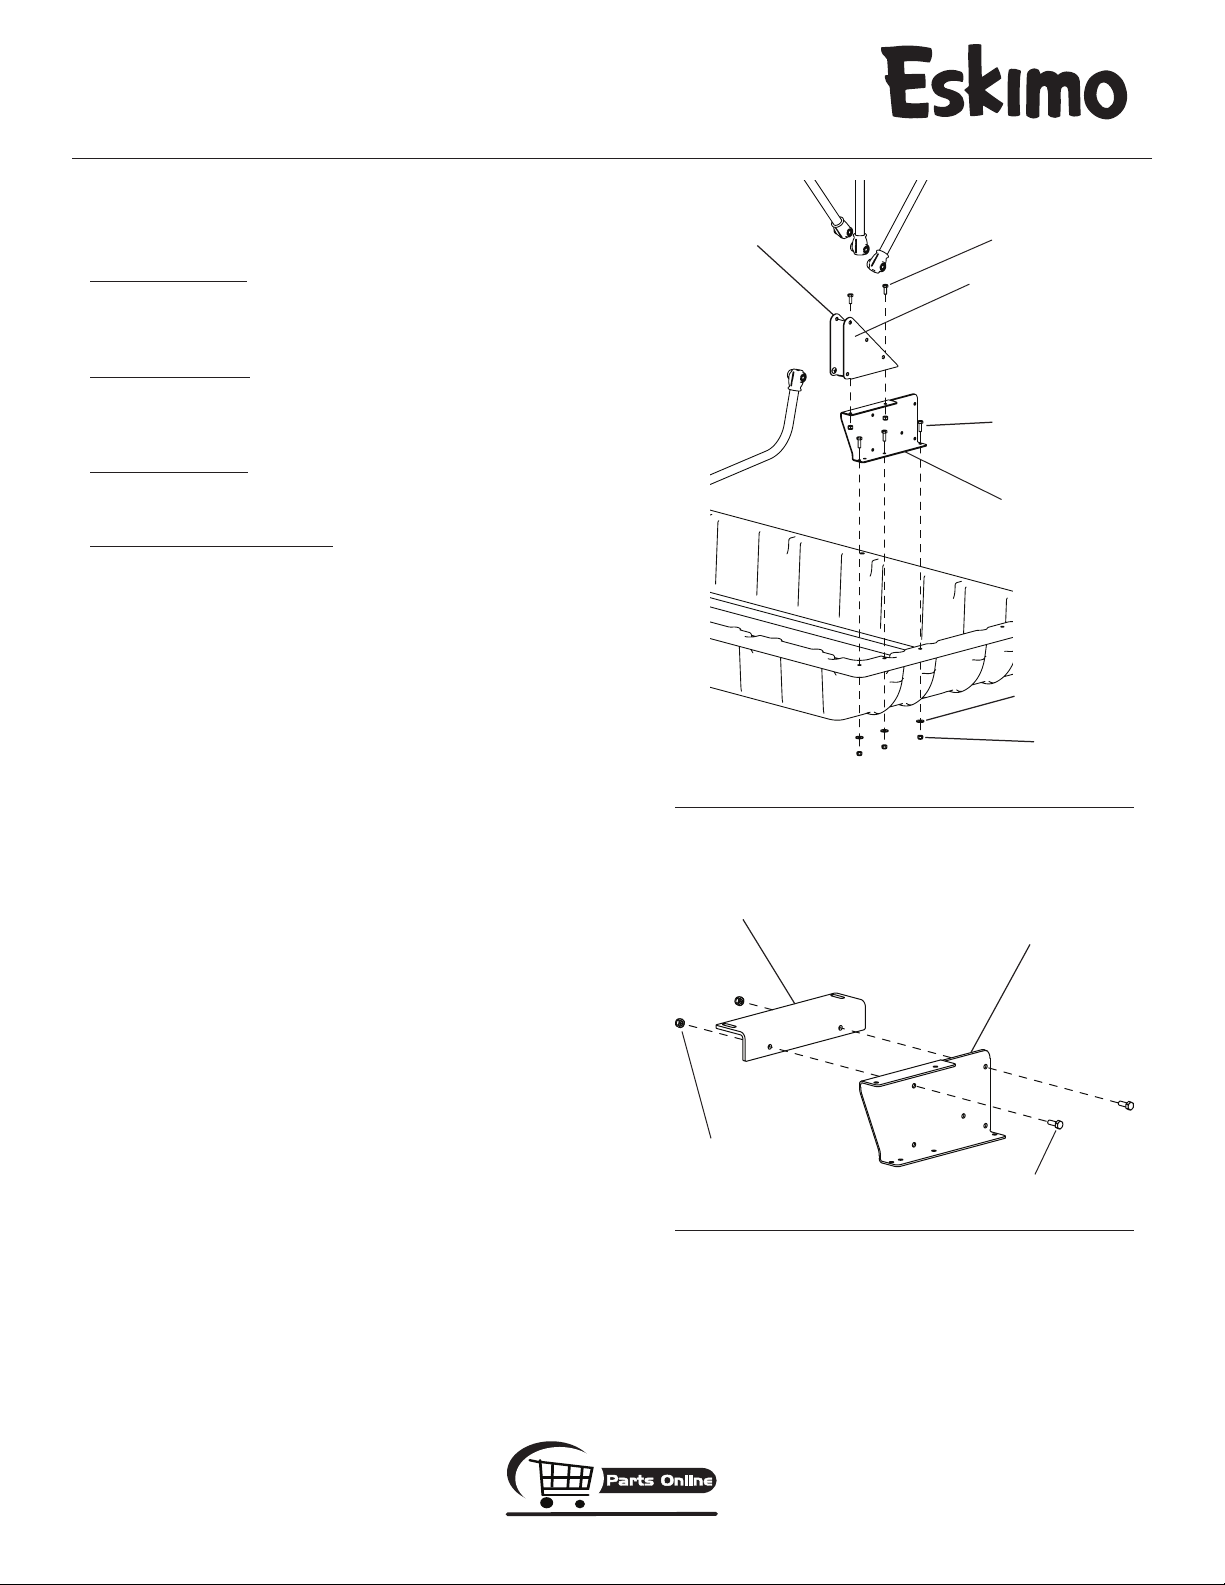
1. Attach the left hinge riser (68052) to the left front upper lip of sled using
(3) provided 1/4-20 x 7/8” hex head bolts, nyloc nuts and washers. SEE
FIGURE 1.
2. Attach the left hinge assembly (68144) to the top of left hinge riser using
(2) provided 1/4-20 x 3/4” hex head bolts and nyloc nuts. SEE FIGURE
1.
NOTE: Be sure hinge assembly is orientated as shown in FIGURE 1,
with high sides of hinges placed to the front of sled and bottom “J”
hinge pole to the inside.
3. Attach the right hinge riser (68053) to the right front upper lip of sled using
(3) provided 1/4-20 x 7/8” hex head bolts, nyloc nuts and washers.
4. Attach the right hinge assembly (68143) to the top of right hinge riser
using (2) provided 1/4-20 x 3/4” hex head bolts and nyloc nuts.
NOTE: Be sure hinge assembly is orientated as shown in FIGURE 1,
with high sides of hinges placed to the front of sled and bottom “J”
hinge pole to the inside.
5. Attach (2) seat kit mount brackets (68304) to each hinge riser using (4)
provided 1/4-20 x 3/4” hex head bolts and nyloc nuts. SEE FIGURE 2.
If a Tracking Kit is purchased with the shel-
left hinge
FIGURE 1 (left side shown)
seat mount bracket
(2) 1/4” x 3/4” bolts
high side of hinge
(3) 1/4” x 7/8” bolts
left hinge riser
(3) 1/4” washers
(3) 1/4” nuts
hinge riser
Page 4
(2) 1/4” nuts
(2) 1/4” x 3/4” bolts
FIGURE 2 (left side shown)
1-800-345-6007
Page 5
HIGH PERFORMANCE ICE FISHING GEAR
®
GetEskimo.com
Eskape™ 200 Hardwater Series (69161)
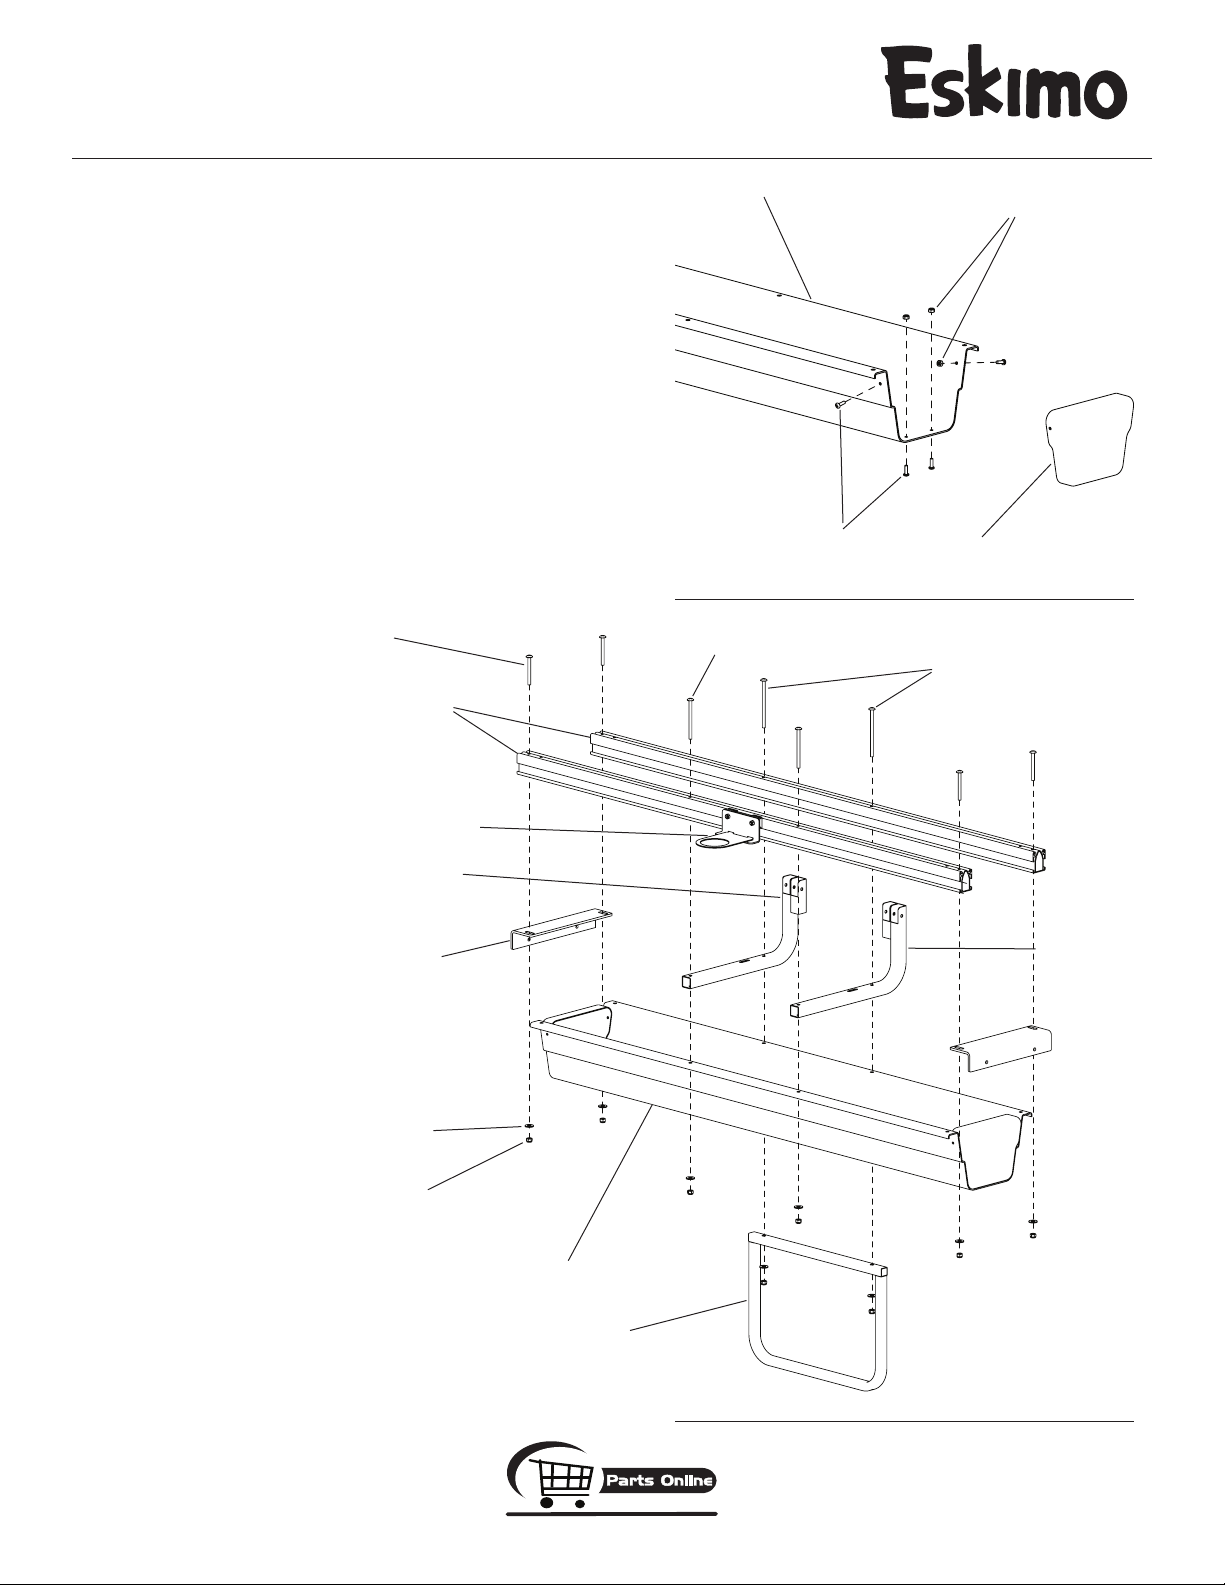
6. Slide the pre-assembled rod holder assembly (68449) into the T-slot of
either bench seat rail. Doing so makes this bench seat rail the front rail
and will be positioned beneath your legs during use.
7. Attach (2) bench seat rails (68301) to the top side of seat kit mount brackets
using (4) provided 1/4-20 x 2-1/2” bolts, nyloc nuts and (4) washers. SEE
FIGURE 3A.
Make sure the rail with the rod holder assembly is in front,
so it will be positioned beneath your legs during use.
8. Attach (2) storage tray end caps (68156) to each end of the storage tray
(68157) using (8) provided 10-24 x 5/8” bolts, and nyloc nuts. SEE FIGURE
3B.
9. Attach the seat brace (68024), the left backrest bracket (68310), the right
backrest bracket (68323) and the plastic storage tray to the center set of
holes on bench seat rails using (2) provided 1/4-20 x 3-1/2” Phillips truss
head bolts, (2) 1/4-20 x 4-1/2” Phillips truss head bolts, (4) nyloc nuts and
(4) washers. SEE FIGURE 3A. The long bolts should be used in the rear
holes since the added length is needed to go through the seat brace.
NOTE: Seat brace will fit under the lip of plastic storage tray.
(4) 1/4” x 2-1/2” bolts
bench seat rails
plastic storage tray
(8) 10-24 nuts
(8) 10-24 x 5/8” bolts
storage tray end caps
FIGURE 3B (left side shown)
(2) 1/4” x 3-1/2” bolts
(2) 1/4” x 4-1/2” bolts
rod holder assembly
right backrest bracket
seat mount brackets
all washers are 1/4”
all nuts are 1/4”
left backrest
bracket
plastic storage tray
seat brace
1-800-345-6007
FIGURE 3A
Page 5
Page 6
GetEskimo.com
HIGH PERFORMANCE ICE FISHING GEAR
®
Eskape™ 200 Hardwater Series (69161)
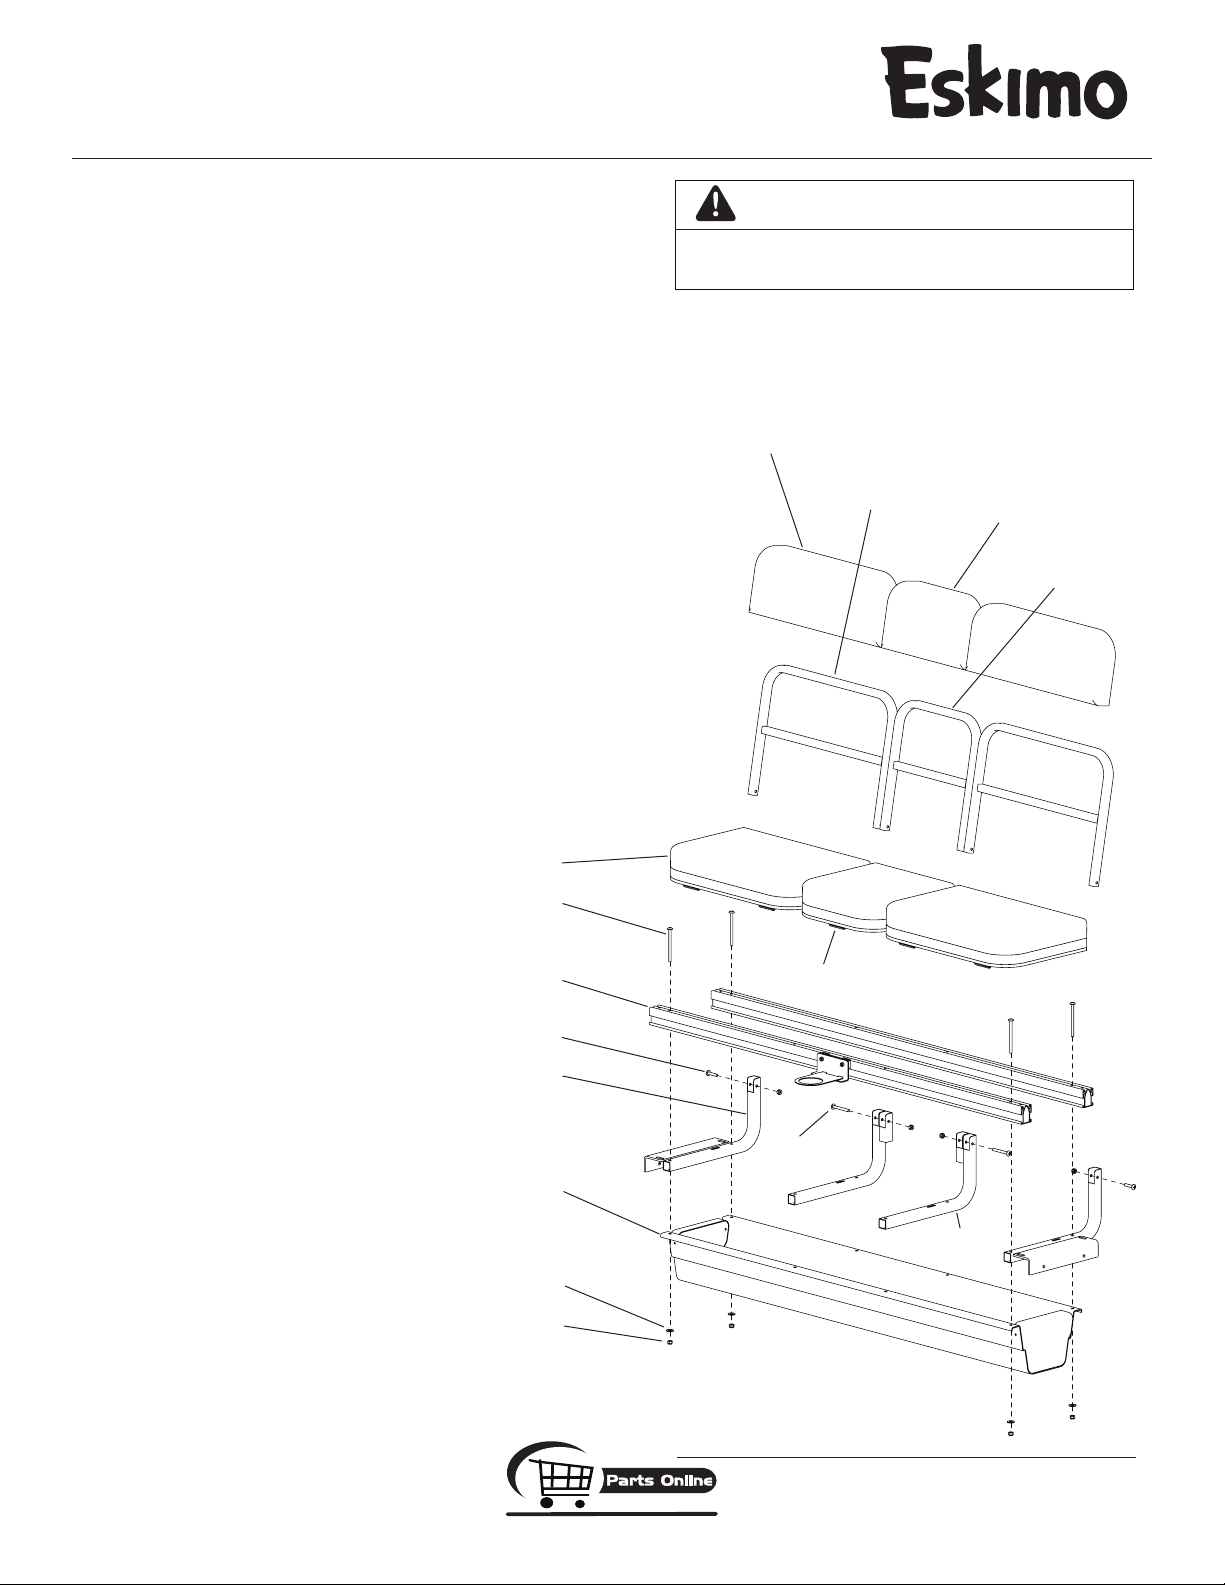
10. Attach the (2) outer backrest brackets (68322) and the plastic storage
tray to the bench seat rails using (4) provided 1/4-20 x 3-1/2” Phillips
head bolts, nyloc nuts and washers. SEE FIGURE 4.
11. Attach the (2) 19” padded seat assemblies (68153) and the (1) 12” pad
ded seat assembly (68004) to the curled lip of front bench seat rail by
hooking the curled end of seat bracket into the curled end of bench seat
rail. Seats should be positioned so they will flip upwards to the front so
you can access gear underneath the seats in the storage tray.
NOTE: Do not force the seat bracket into the bench seat rail. Loos
ening the seat bracket and adjusting the position of it from front
to back will allow for the adjustment needed to hook the seat into
the seat rail. You may want to keep it loose while you hook the seat
into the seat rail and then retighten the seat bracket afterwards.
You may even need to remove the seat brackets from the seat and
hook them into the seat rail individually, then reattach the seat to
the seat brackets.
Once your shelter is completely assembled, you can adjust the seat
bracket position on the seat using the slots for desired positioning.
Doing this will allow you to adjust how much travel the seats will
have when flipping up.
12. Attach the (2) 19” metal backrest frames (68342) and the (1) 12” metal
backrest frame to the backrest brackets using (2) provided 1/4-20 x 1-1/4”
Phillips head bolts, (2) 1/4-20 x 2-1/4” Phillips head bolts and (4) nyloc
nuts. SEE FIGURE 4.
13. You may now tighten all nut & bolt assemblies. Be sure not to over
tighten or crush tubing when tightening!
14. Attach (2) removable 19” backrest cushions (68154) and (1) removable
12” backrest cushion (68008) to the backrest frames and secure with
Velcro.
(2) 19” padded seats
WARNING
-
-
BE SURE SEAT PAD & BUCKLES ARE SECURELY AND CORRECTLY ATTACHED TO PREVENT ACCIDENTAL REMOVAL!
(2) 19” backrest cushions
(2) 19” backrest
frames
(1) 12” backrest cushion
(1) 12” backrest
frame
Page 6
(4) 1/4” x 3-1/2” bolts
(1) 12” padded seat
bench seat rails
(2) 1/4” x 1-1/4” bolts
(2) outer backrest brackets
(2) 1/4” x 2-1/4”
bolts
plastic storage tray
(2) backrest
brackets
all washers are 1/4”
all nuts are 1/4”
FIGURE 4
1-800-345-6007
Page 7
HIGH PERFORMANCE ICE FISHING GEAR
®
GetEskimo.com
Eskape™ 200 Hardwater Series (69161)
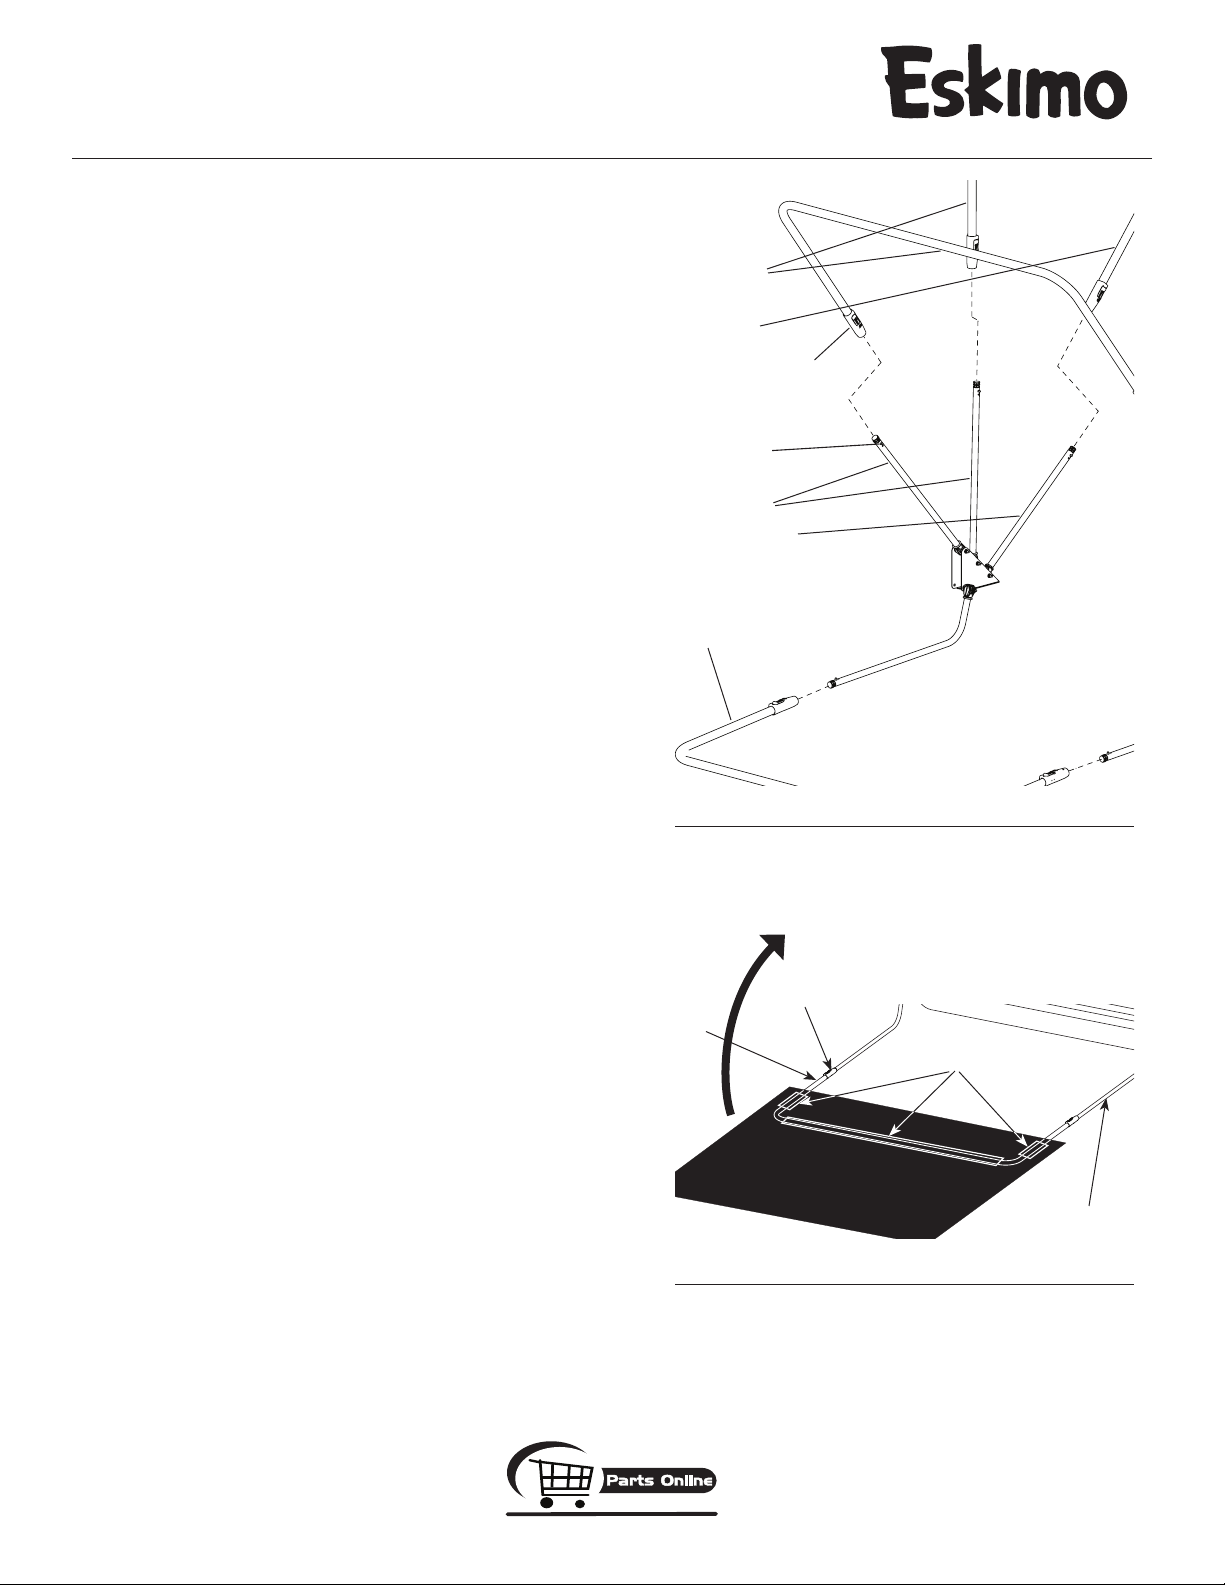
15. Insert rear hinge upright pole from each hinge into the (1) rear top cross
brace pole (68352 which measures approximately 59.45” x 25.14”).
Making sure the lever side of large, red QRS pole clip is inline with the
push button of hinge poles, push the snap buttons inward to allow cross
brace pole to go over hinge poles and slide them to their shortest height
(transport mode). SEE FIGURE 5.
16. Insert (2) hinge upright poles from each hinge and insert them into the
(2) top cross brace poles (68117 which measure approximately 59.45”
x 28.14”). Making sure the lever side of large, red QRS pole clip is inline
with the push button of hinge poles, push the snap buttons inward to
allow cross brace pole to go over hinge poles and slide them to their
shortest height (transport mode). SEE FIGURE 5.
NOTE: The (3) top cross brace poles are taller and wider than the
bottom cross brace pole. The (1) top, rear cross brace pole is shorter
in height than the other 2 top cross brace poles.
NOTE: If cross brace poles are not assembled correctly, added
tension will be applied to the fabric skin.
17. Unfold skin and locate the Eskimo Eskape 200 logo near the zippered
door, which is the front of the shelter. With front of shelter skin laying
face down on the ground in front of the shelter, locate the (3) fabric
sleeves sewn to the bottom seam on front side of shelter. Slide bottom
cross brace pole (68106 which measure approximately 55.21” x 26.64”)
through the (3) fabric sleeves. Insert (1) hinge “J” pole from each hinge
into the bottom cross brace pole. Making sure the lever side of large,
red QRS pole clip is inline with the snap button of hinge “J” poles, push
the snap buttons inward to allow cross brace pole to go over “J” poles.
Snap into place for the “in-use position.” SEE FIGURE 6.
NOTE: Snap button should align with lever side of large, red QRS
pole clip in cross brace pole. If not, you have feed the cross brace
pole through fabric sleeves incorrectly and the cross brace will
need to be flipped over.
18. Drape the rest of the shelter skin over the shelter sled, seats and poles
and position it the best you can.
top cross
brace poles
rear top cross
brace pole
red QRS pole clips
snap buttons
upright poles
rear upright pole
bottom cross
brace pole
FIGURE 5 (right side shown)
Pull skin back over the
rest of the ice shelter.
1-800-345-6007
snap button
bottom cross brace pole
(3) fabric sleeves
hinge “J” poles
FIGURE 6
Page 7
Page 8
GetEskimo.com
HIGH PERFORMANCE ICE FISHING GEAR
®
Eskape™ 200 Hardwater Series (69161)
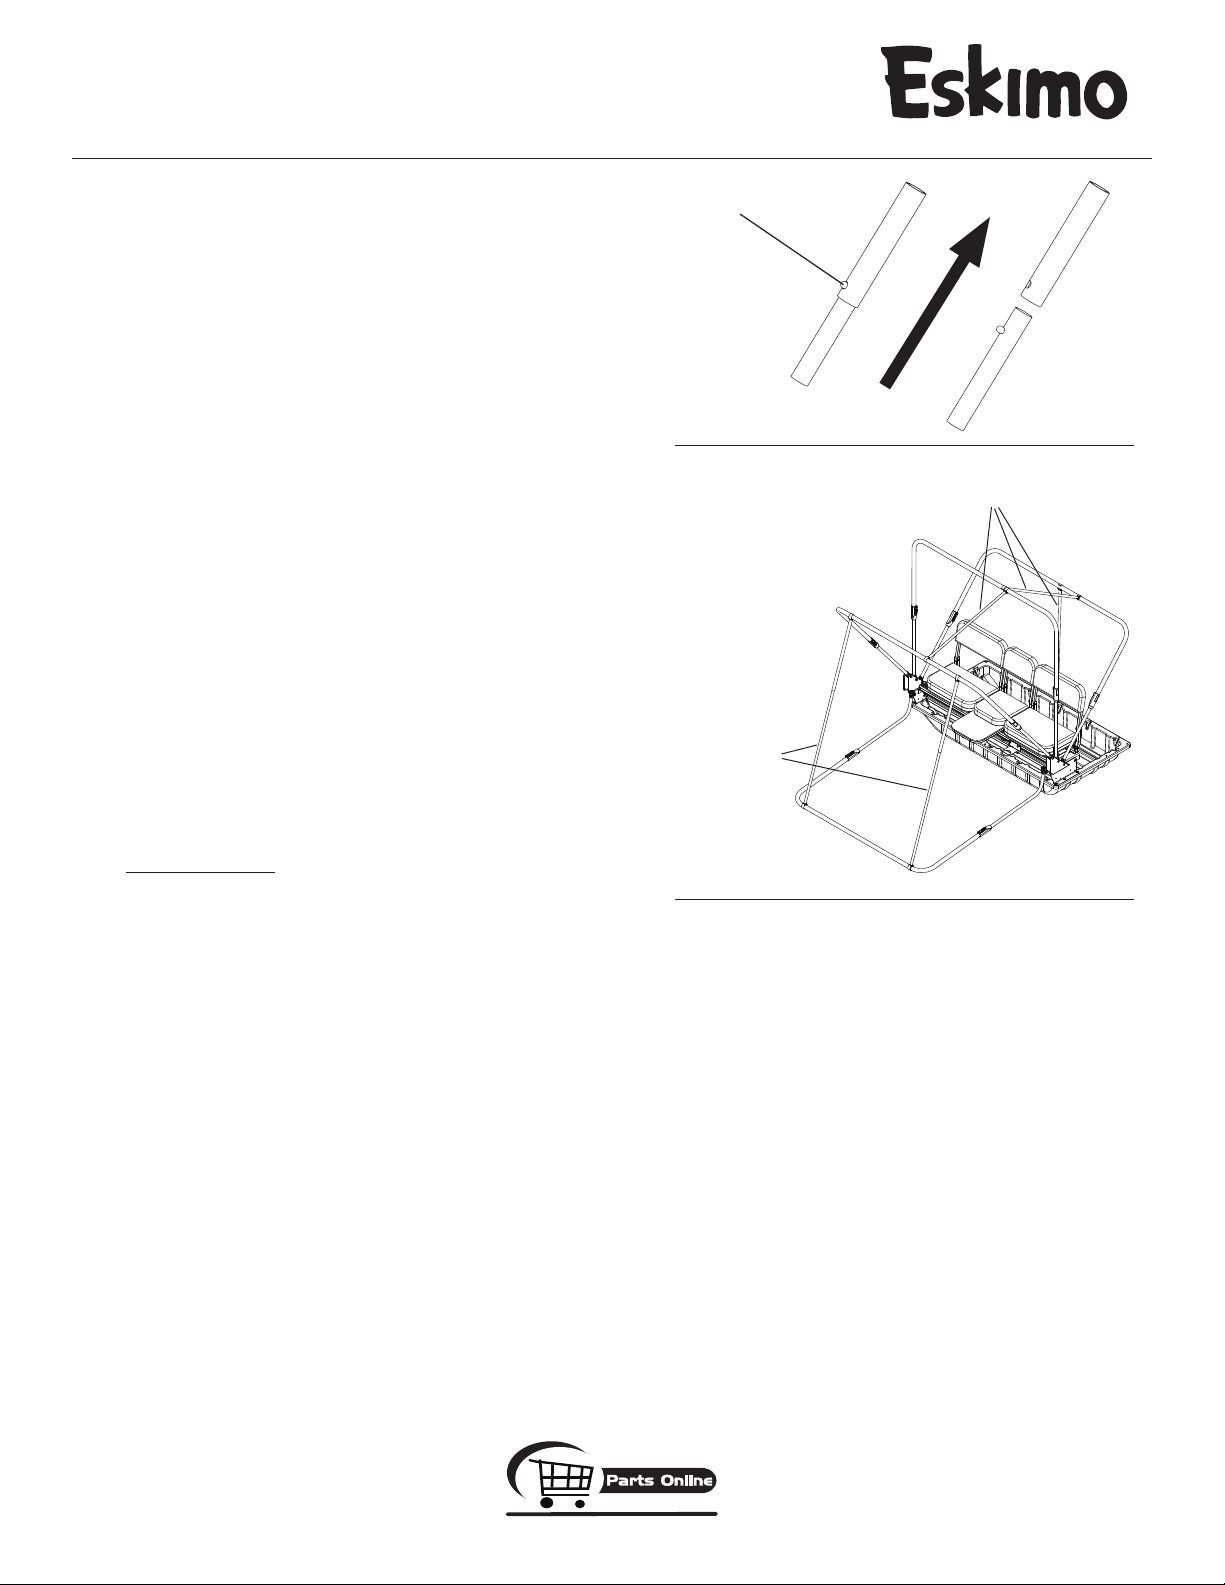
19. Assemble the two sets of door spreader poles (68046 & 68148) by sliding
male half into the female half and snapping in place with snap button.
SEE FIGURE 7.
20. Unzip door and move to the inside of shelter and extend the (3) top cross
brace poles and snap into place. Place back spreader pole with stud,
both roof spreader poles and both door spreader poles into position by
snapping C-clip over cross brace poles. For back spreader pole, simply
place end with stud into pre-drilled hole in back lip of sled. Attach all
Velcro loops to cross brace poles. SEE FIGURES 7 & 8.
21. Move to outside of shelter. Find the center of the edge trim and line it up
with the center of sled lip on back side of shelter. Pull down on the skin
evenly over the sled lip until it is snug.
NOTE: When pulling skin tight, DO NOT lift the bottom cross brace
pole off the ground. Bottom cross brace pole should always contact
the ground. Make sure you have all spreader poles in place before
applying edge trim to assure proper tension to the fabric skin.
Temporarily press the edge trim over the skin and sled lip. Using a rubber
mallet may be helpful to press over the sled lip.
22. Secure edge trim in place using #6 3/8” sheet metal screws.
NOTE: Screws should be spaced apart evenly. This step does mean
you will put very small holes in your skin to keep the edge trim
and skin securely attached to sled lip. This will in no way affect the
performance of your shelter.
23. Push ends of 8’ tow rope through hitch tab or holes provided at the
front of sled and knot each end to secure. This tow rope is designed for
manual pulling by hand only. Do not tow behind a motorized vehicle with
rope. For high speed towing, you should purchase the Eskimo Tow Hitch
accessory.
IMPORTANT NOTE: If purchasing a tow hitch for your Eskimo ice
shelter, it is highly recommended that you also purchase a high
speed tracking kit to help extend the life of your sled and prevent
unnecessary damage. Failure to do so may result in voiding of your
warranty.
snap button snapped
in place
FIGURE 7
spreader poles
door spreader
poles
FIGURE 8
Page 8
1-800-345-6007
Page 9

HIGH PERFORMANCE ICE FISHING GEAR
®
GetEskimo.com
Eskape™ 200 Hardwater Series (69161)
SET-UP & USE INSTRUCTIONS
SET-UP: From the outside or inside of shelter, depending on your
preference, start with the bottom cross brace pole and pull out all
cross brace poles and snap into place. As you pull out each cross
brace pole and snap into place, flip all cross braces over to the in use
position. Secure all spreader poles in between all cross brace poles
by snapping C-clips over cross brace poles.
By removing the back spreader pole and the top back spreader pole,
you can flip the shelter half way back and use it as a wind break on
nice days.
TAKE-DOWN:
shut. Remove all spreader poles and place in bottom of sled. Starting with the rear cross brace pole, press the QRS pole clips in and
retract all cross brace poles to their shortest length. Work from the
rear cross brace to the front cross brace that lies on the ground/ice.
Flip all poles back into the transport position. Use extreme caution
when flipping poles for transport position and make sure no part of
the skin gets pinched, caught or stuck between any poles or in any
pinch points. Fold excess skin inside sled when complete.
NOTE: Use extreme caution so you don’t rip or tear any portion of the skin, especially around the hinges or any pinch point
areas.
Close all window covers, vent covers and zip door
1-800-345-6007
Page 9
Page 10
GetEskimo.com
HIGH PERFORMANCE ICE FISHING GEAR
®
Eskape™ 200 Hardwater Series (69161)
STANDARD ACCESSORIES
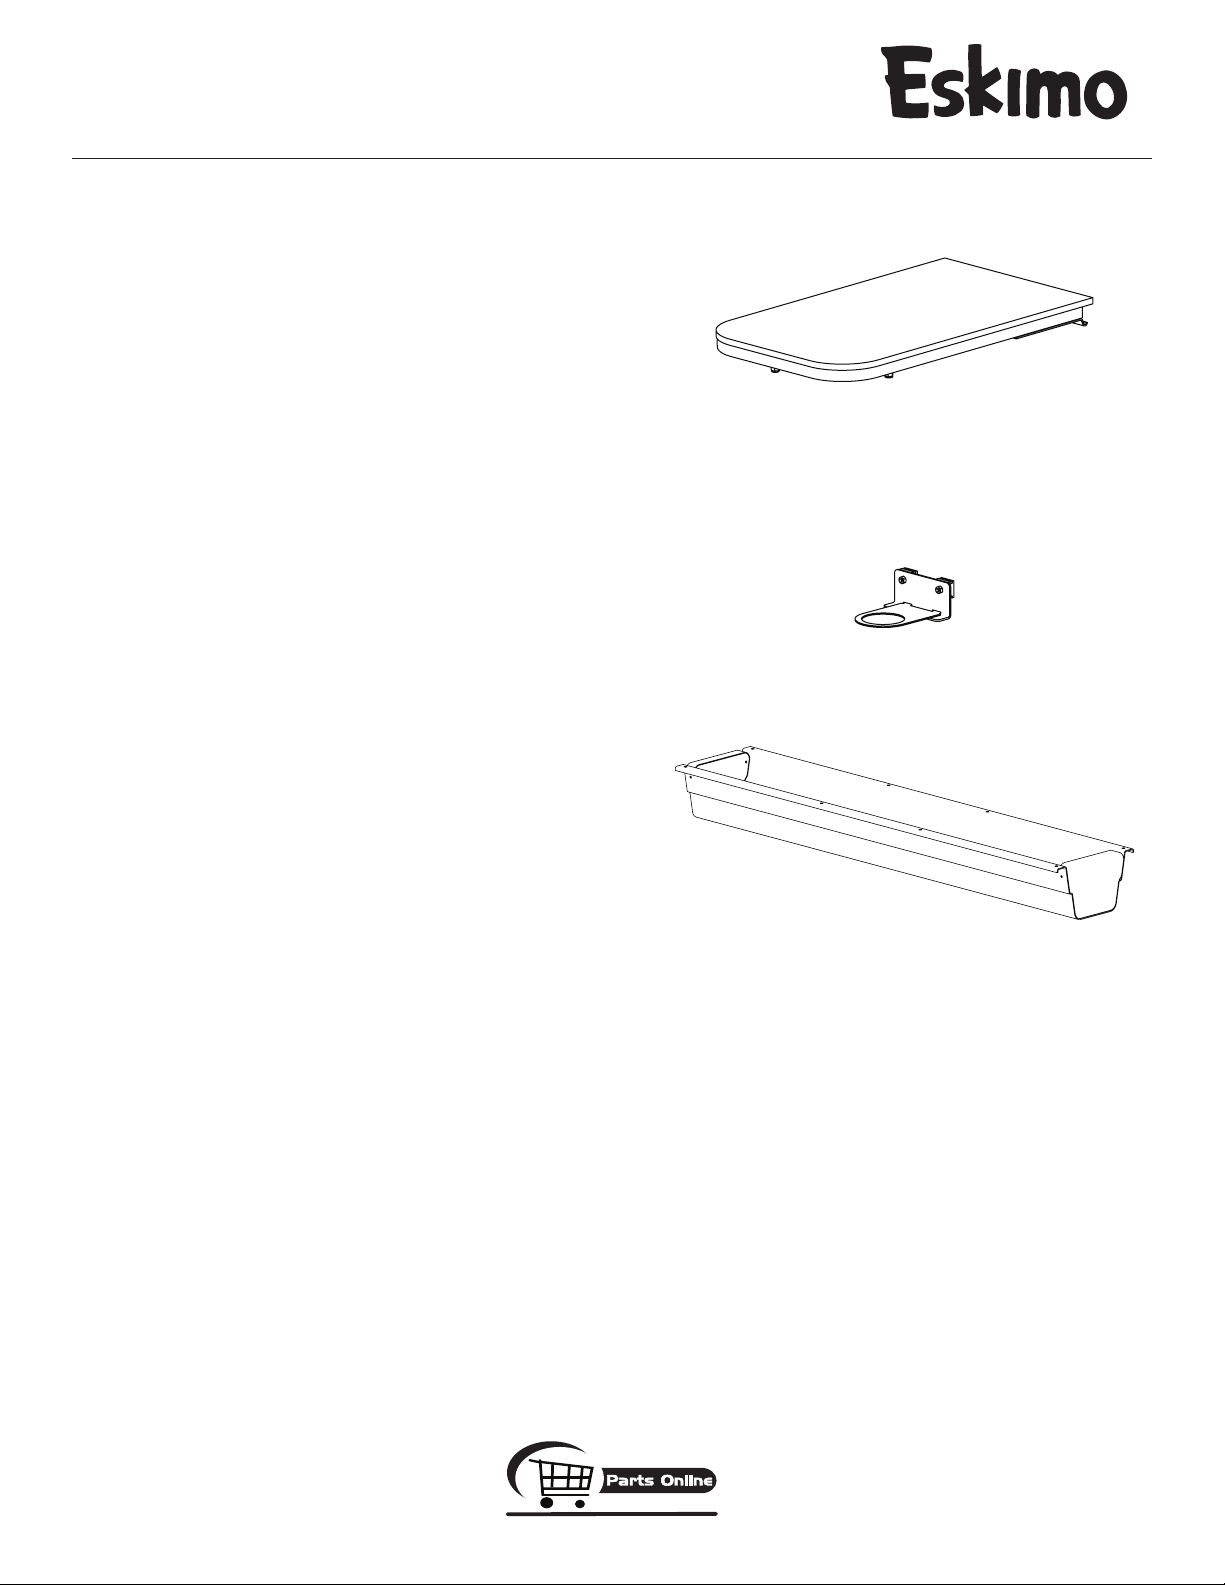
REMOVABLE GEAR TABLE
This gear table is designed to lock into the curled lip of the rear aluminum bench seat rail. It works just like the flip up seats, as you can flip
the table up and access gear underneath. Most anglers will remove
the center seat and put the table in so it is accessible to two anglers
at once, however, the table can certainly be positioned anywhere
along the bench seat rail, even to one end against the side of the
shelter if desired. Simply remove one of the seats from the aluminum
bench seat rail and replace it with the table. The table should always
be removed during transport so it does not get damaged and so a
travel cover accessory can snugly fit over the shelter for transport.
REMOVABLE ROD HOLDER
Depending on which model you have, your shelter has come standard with at least one rod holder assembly. This is designed to fit in
the T-slot portion of the front aluminum bench seat rail. With the builtin plastic slides, the rod holder can easily be positioned anywhere
along the bench seat rail. The round hole design allows you to set
your rod and any position desired. By turning your rod in the hole and
by sliding the assembly in the seat rail, you will be able to find your
most desired position. Rod holder(s) should always be removed during transport so the do not get damaged and so a travel cover accessory can snugly fit over the shelter for transport. Simply unhook the
plate from the mount. The mount can stay in the bench seat rail.
STORAGE TRAY
The exclusive built-in storage tray runs the entire length of the bench
seat so you have ample storage of rods, bait, beverages, the removable rod holders and more. Its left open for you to customize to your
liking. If you want to add foam blocks, or partitions, it can easily be
done yourself so you can customize it just the way you want. The durable design will protect your small gear from the large gear you may
be storing in the ice shelter sled like buckets or ice augers.
LONG TERM STORAGE
• Always make sure your ice shelter is completely dry before storing for long periods of time. Storing your ice shelter when damp
or wet may cause mold and mildew damage.
• Remove skin, padded seats and padded backrests from ice shelter sled and poles. Clean all salt, moisture and debris from your
shelter skin.
• Store skin, padded seats and padded backrests in a cool, dry
place away from rodents.
• Clean all salt, moisture and debris from the sled and poles of your
shelter. Wipe down poles with WD-40® or similar types of silicon
to deter from corrosion.
NOTE: Before attaching skin for use, re-wipe the poles to
remove excess WD-40® or silicon substance to deter from
damage to your skin.
• Store poles and sled in a cool, dry place.
gear table
rod holder
storage tray
Page 10
1-800-345-6007
Page 11
HIGH PERFORMANCE ICE FISHING GEAR
®
GetEskimo.com
18
7
19
8
14
11
15
15
5
5
12
6
10
12
9
13
16
4
2
3
1
27
17
21
22
21
26
24
25
20
20
20
23
24
Eskape™ 200 Hardwater Series (69161)
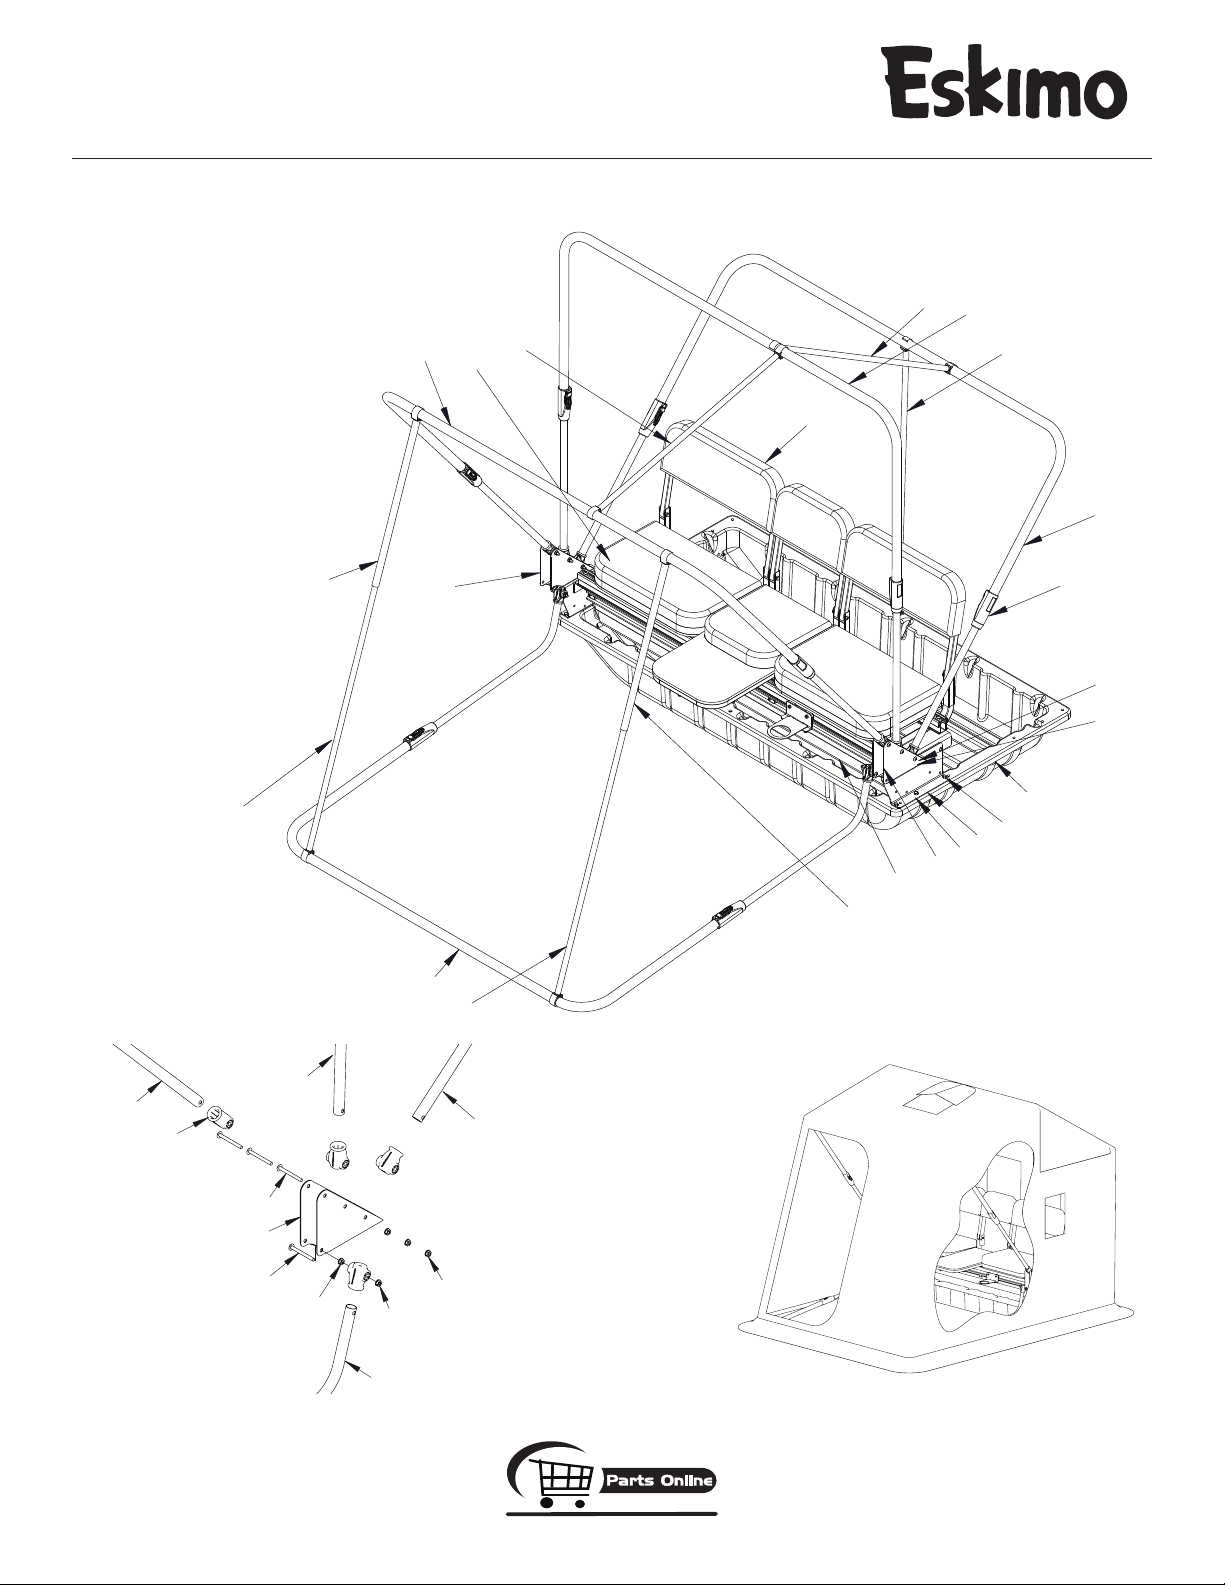
ESKAPE 200 PARTS
RIGHT SIDE
1-800-345-6007
Eskape 200 assembledEskape 200 hinge assembly (right side shown)
LEFT SIDE
Page 11
Page 12
GetEskimo.com
HIGH PERFORMANCE ICE FISHING GEAR
®
Eskape™ 200 Hardwater Series (69161)
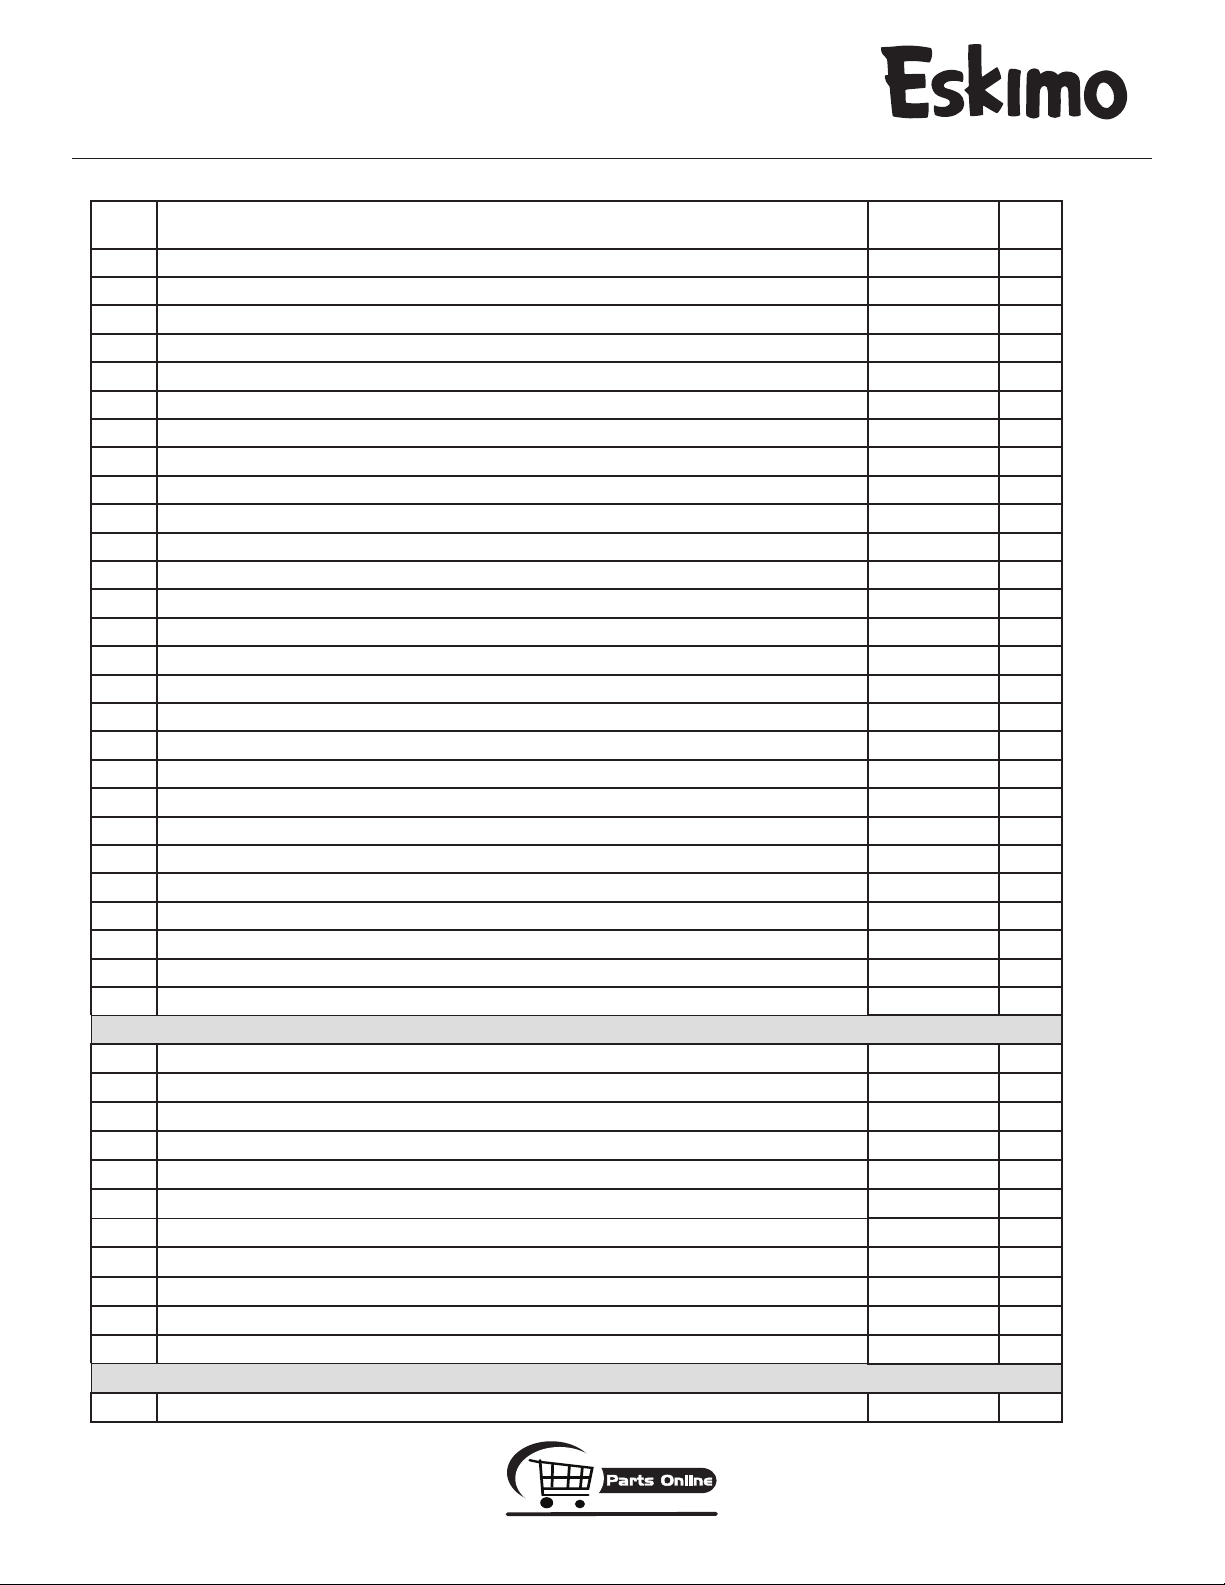
PARTS LISTS
REF.
NO. DESCRIPTION PART NO. QTY.
1 BOLT, 1/4-20 X 3/4” HH GR5 8930 4
2 WASHER, 1/4” 48261 6
3 NUT, 1/4-20 HEX NYLOCK 67538 10
4 BOLT, 1/4-20 X 7/8” HHCS GR5 67541 6
5 POLE ASSEMBLY, SPREADER FEMALE (INCLUDES ONE .875” LARGE CLIP) 68046 2
6 POLE ASSEMBLY, SPREADER 36” (INCLUDES TWO .706” LARGE CLIPS) 68033 1
7 POLE ASSEMBLY, SPREADER 40.10” (INCLUDES ONE .706” LARGE CLIP & ONE .706” STUD) 68037 1
8 RISER, LEFT HINGE 68052 1
9 RISER, RIGHT HINGE 68053 1
10 POLE ASSEMBLY, SPREADER 34” (INCLUDES TWO .706” LARGE CLIPS) 68087 1
11 POLE, BOTTOM CROSS BRACE 68106 1
12 POLE, TOP CROSS BRACE 68117 2
13 HINGE ASSEMBLY, RIGHT 68143 1
14 HINGE ASSEMBLY, LEFT 68144 1
15 POLE ASSEMBLY, SPREADER MALE (INCLUDES ONE .706” LARGE CLIP) 68148 2
16 BOX, ROD HOLDER 68157 2
17 SEAT KIT (SEE PAGE 13 FOR PARTS) 69299 1
18 POLE, REAR CROSS BRACE 68352 1
19 SLED 68380 1
20 NUT, 1/4-20 TOP LOCK FLANGED BLK 48752B 10
21 BOLT 1/4-20 X 2-1/2” PHILLIPS TRUSS HD 67430 8
22 HINGE, DOUBLE SIDED HOLE 68050 2
23 POLE ASSEMBLY, J-POLE 68055 2
24 POLE ASSEMBLY, MIDDLE & FRONT UPRIGHT 68056 4
25 POLE ASSEMBLY, REAR UPRIGHT 68068 2
26 CAP, POCKET POLE 68060 8
27 CLIP, QRS POLE 68061 8
ITEMS BELOW NOT SHOWN
- CAP END, ROD HOLDER BOX 68156 2
- SCREW, 10-32 X 1/4” PAN HD 68136 8
- CLIP, LARGE .875” 68064 2
- CLIP, LARGE .706” 68063 7
- STUD, .706” 68309 1
- TOW ROPE 67589 1
- SCREW, #6 X 3/8” PHILLIPS TRUSS HD 69629 13
- SHELTER SKIN, RED 68019 1
- EDGE TRIM, 1/4” CUT TO 93.5” 69654 1
- WINDOW REPLACEMENT, 8” X 12” 69531 2
- WINDOW REPLACEMENT, 13.5” X 13.5” 69534 5
REPAIR PARTS
- PATCH KIT, RED 69742 -
Page 12
1-800-345-6007
Page 13
HIGH PERFORMANCE ICE FISHING GEAR
®
GetEskimo.com
3
7
16
14
10
4
2
21
12
18
9
19
12
18
11
11
8
6
5
13
1
15
17
22
16
20
Eskape™ 200 Hardwater Series (69161)
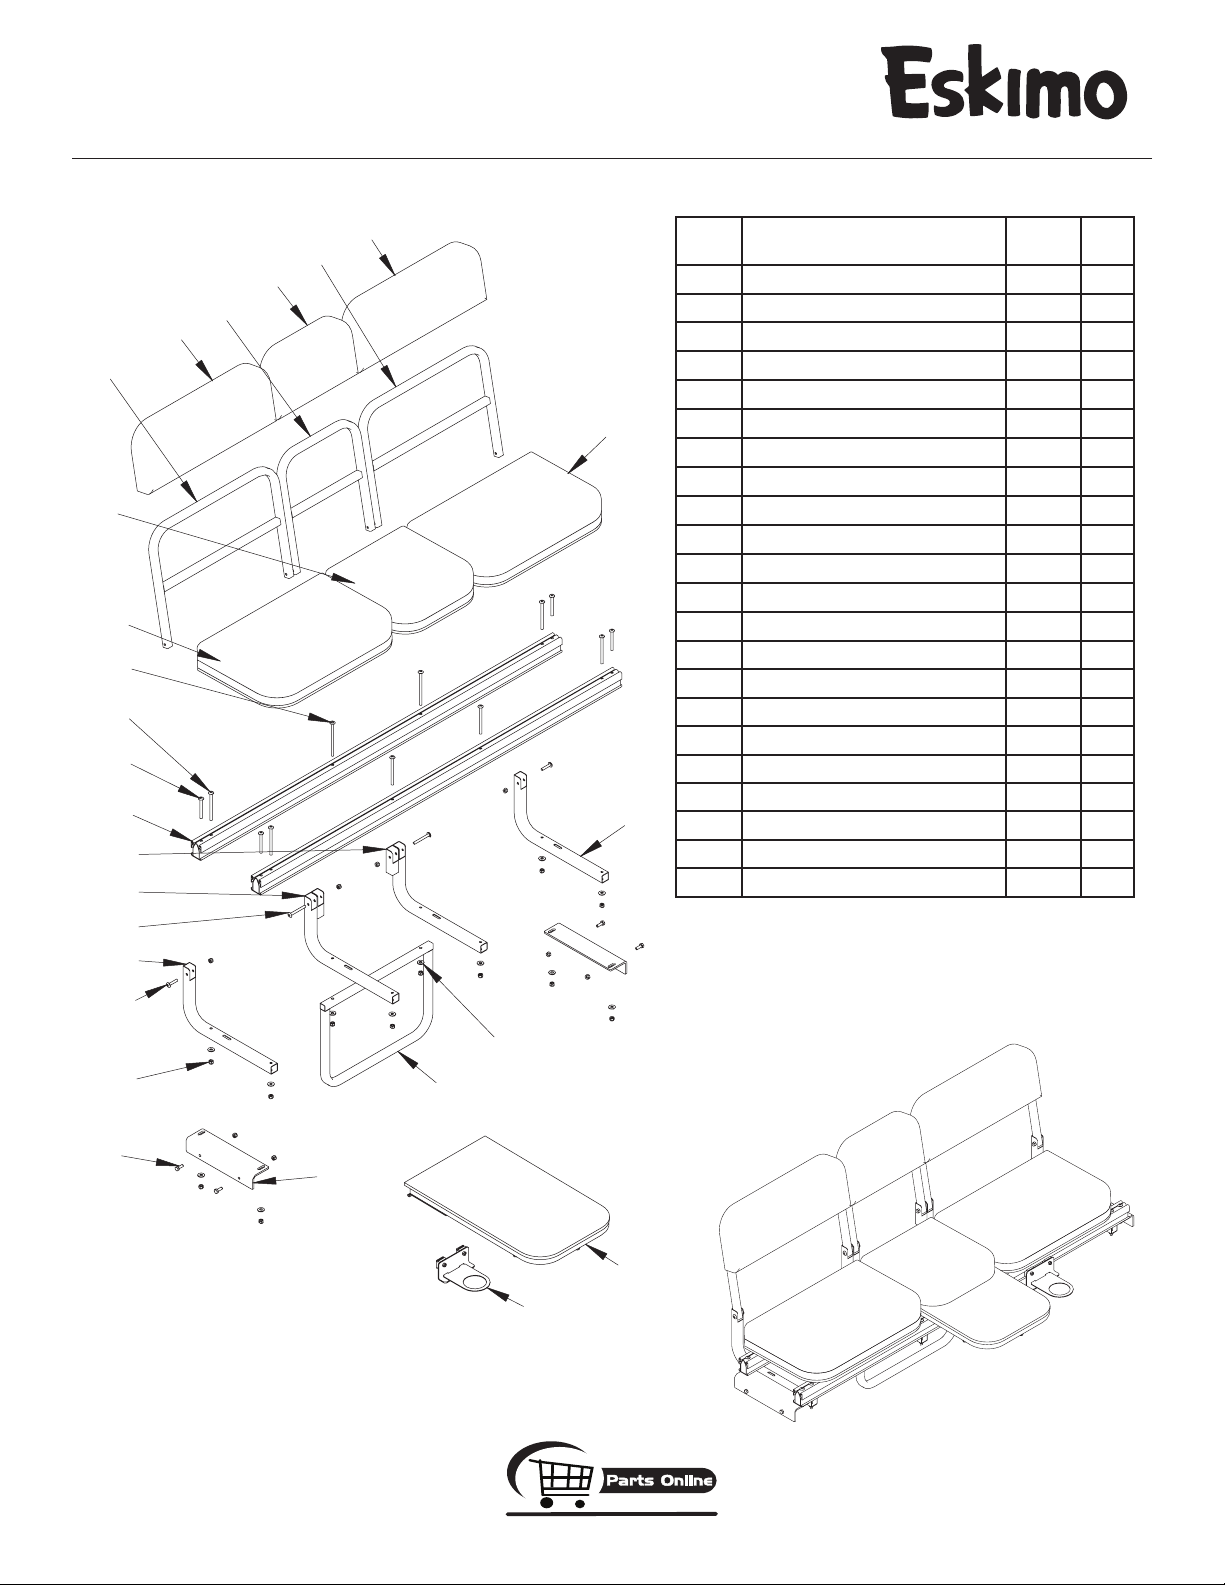
ESKAPE 200 SEAT PARTS
REF.
NO. DESCRIPTION
1 BOLT 1/4-20 X 3/4” HH GR5 8930 4
2 WASHER 1/4” 48261 12
3 BOLT, 1/4-20 X 1-1/4” PTH GR2 67400 2
4 BOLT 1/4-20 X 3-1/2” PTH GR5 67402 6
5 BOLT 1/4-20 X 4-1/4” PTH GR5 67403 2
6 BOLT 1/4-20 X 2-1/2” PTH GR5 67430 4
7 NUT 1/4-20 HEX NYLOC 67538 20
8 SEAT ASSEMBLY, 12” RED 68004 1
9 BACKREST PAD, 12” RED 68008 1
10 SEAT BRACE WELDMENT 68024 1
11 SEAT ASSEMBLY, 19” RED 68153 2
12 BACKREST PAD, 19” RED 68154 2
13 RAIL, BENCH SEAT 68301 2
14 BRACKET, SEAT MOUNT 68304 2
15 BRACKET, BACKREST LEFT 68310 1
16 BRACKET, BACKREST OUTER 68322 2
17 BRACKET, BACKREST RIGHT 68323 1
18 BACKREST WELDMENT, 19” 68342 2
19 BACKREST WELDMENT, 12” 68345 1
20 TABLE 68447 1
21 ROD HOLDER ASSEMBLY 68449 1
22 BOLT 1/4-20 X 2-1/4” PTH GR5 69279 2
PART
NO. QTY.
1-800-345-6007
Page 13
Page 14

GetEskimo.com
HIGH PERFORMANCE ICE FISHING GEAR
®
Eskape™ 200 Hardwater Series (69161)
FAQ’S: (Frequently Asked Questions)
• How can I keep mice and other rodents from damaging my ice shelter?
During the off season, you should always remove your ice shelter skin, padded seats and padded backrests from the sled and
poles and make sure it is dry. Fold skin up, store items in a large plastic container with lid and store in a cool, dry place. The use of
moth balls or dryer sheets may be helpful also.
• My poles are noisy and don’t run as smooth as they did originally. Is there a fix?
Applying WD-40® or a similar type of silicon spray works well for lubricating the poles for easier operation and also deters from cor-
rosion. You should do this maintenance at least seasonal, especially before storing for long term periods. Wipe off excess lubricant
so it does not damage your ice shelter skin. Using a rod with a cloth attached to the end of it, apply the WD-40® or silicon lubricant
to the rag and wipe the inside of the large poles so they have a lubricated surface for the hinge poles to slide on.
• My zipper functions roughly or freezes up from snow/ice. How can I fix this?
You can try a silicon spray to help lubricate it, or purchase an actual Zipper Lube® brand lubricant found in many sporting goods
stores, in the camping section. Either way, use with caution and wipe off excess lubricant so it does not damage your ice shelter
skin.
• For attaching the edge trim to my skin and sled, do I actually drill holes through the skin?
Yes, this is the best way to make a seal between the skin and sled. It also keeps the edge trim securely in place and will not fall off
during transport. If you remove the skin from the poles and sled during the off season, the skin will go back on the same way and
you should be able to use the same holes for the screws as you did the previous season.
• The edge trim is hard to put on the sled lip, is there a secret?
You should apply the edge trim to the sled lip at room temperature which makes it more pliable. The use of a rubber mallet will
help too.
• Why are my windows turning cloudy when they get wet?
Sometimes if your windows get extremely wet, the moisture can penetrate the windows which gives them a cloudy appearance.
This can easily be remedied by removing the windows and bringing them into a warm environment (indoors) and letting the moisture retreat from the window which will clear them back up to the original appearance.
• I have a tear in my skin, how do I repair it?
You can call or e-mail us to purchase a patch kit which consists of a 12” x 12” piece of skin material and an adhesive to apply the
patch to the tear area. This should be done at room temperature. Allow at least 24 hours for adhesive to set to assure proper adhesion.
• My shelter lets some water come through it, how can I remedy that?
You may purchase a seam sealer or silicon spray to help seal the seams to help repel water, such as Camp Dry® which can be
found in many sporting goods stores, in the camping section. See Important Safety Precautions on page 3. Eskimo ice shelters
are not water proof.
• I can see small pin holes in my shelter skin, why?
The coating on the inside of shelter skin is done to help darken the interior. The pin holes are normal and may increase from normal
exposure to the elements or from normal wear and tear. This will not affect the performance of the ice shelter in any way and is
normal.
• I can see cracks on the inside of my shelter skin, why?
This is also normal due to exposure to the elements and normal wear and tear. When you fold your shelter for transport, lines and
creases develop in the fabric. This will not affect the performance of the ice shelter in any way
• Will my ice shelter leak from the small pin holes in skin?
Many variables can come into play. It depends on the outside air temperature, the air temperature inside the shelter, how much heat
you are using inside shelter, etc. Some leaking could occur due to condensation, but that is normal. This can be controlled better
by using the numerous air vents, windows and doors that are on your shelter.
• Do I have to have a tracking kit to tow my ice shelter?
For high speed towing behind a snowmobile or ATV, we highly recommend you purchase a high speed tracking kit so you do not
cause unnecessary or premature damage to your ice shelter sled. If you are only going to pull your ice shelter by hand, a high
speed tracking kit is not necessary, but does make it easier to pull.
• Can I wash my ice shelter skin?
You can use a mild bleach and water solution to get rid of mold or mildew. If you are just wanting to wash your skin, you can use a
mild soap and water mixture. Do not machine wash your skin.
Page 14
1-800-345-6007
Page 15
HIGH PERFORMANCE ICE FISHING GEAR
®
GetEskimo.com
Eskape™ 200 Hardwater Series (69161)
WARRANTY
ONE YEAR LIMITED WARRANTY
Ardisam, Inc., a manufacturing company, warrants this Eskimo Ice Shelter to be free from defects in the material or workmanship
for a period of one year from the date of purchase. During the one year warranty of this product, Ardisam will furnish 100%
parts and labor to correct any defect caused by faulty material or workmanship. The warranty does not cover cracked
windows, tent tears, or bent poles due to high wind conditions or unattended use. Warranty work must be sent directly
to Ardisam, Inc. or to an authorized service center. To obtain warranty service and/or replacement instructions, you must
have prior approval before shipping package by calling our customer service department at 1-800-345-6007 for a
return material authorization number (RMA#). All items must be shipped prepaid. Ardisam, Inc. will at no charge, repair
or replace, at their discretion, any defective part which falls under the conditions stated above. Ardisam retains the right to
change models, specifications and price without notice. This product if used as intended, will give you years of trouble free
service. We hope you will enjoy the quality of our products for years to come. For replacement parts, phone 1-800-345-
6007 or go online to GetEskimo.com.
This warranty applies to the original owner with a proof of purchase and is not transferable. It supersedes all other warranties
either expressed or implied and all other obligations to liabilities on our part. Ardisam, Inc. does not assume, and does not
authorize any other person to assume for us, any liability in connection with the sale of our products. The warranty applies
only to products which have not been subjected to negligent use, misuse, alteration, accident or repairs made by anyone
not certified by Ardisam, Inc. This guarantee is void unless the warranty card is properly filled out and received by Ardisam,
Inc., within 30 days of purchase.
Eskimo, A Division of Ardisam, Inc.
1360 First Avenue; P.O. Box 666
Cumberland, Wisconsin 54829
1-800-345-6007 · Fax (715) 822-4180
E-mail: [email protected]
1-800-345-6007
Page 15
Page 16
GetEskimo.com
GetEskimo.com
ACCESSORY CHART
ITEM # DESCRIPTION MSRP*
69195 High Speed Tracking Kit, Eskape 200 $59.99
69171 Travel Cover, Eskape 200 $55.99
69106 Tow Hitch, Eskape 200 $49.99
* Prices shown do not include shipping & handling charges.
All prices are subject to change without notice. When ordering from manufacturer,
there is a $10.00 minimum order.
For replacement parts, phone 1-800-345-6007 or
go online to www.GetEskimo.com
Visit www.ardisam.com and discover more innovations
that will benefit you throughout the year.
Eskimo, Division of Ardisam, Inc.
1360 First Avenue; P.O. Box 666
Cumberland, Wisconsin 54829
1-800-345-6007 · Fax (715) 822-4180
E-mail: [email protected]
 Loading...