

Page 1
103 rue Louvain Ouest, H2N 1A3, Montreal
USER GUIDE WASH 3.5 | Version 1.0
USER GUIDE WASH 3.5
Version 1.0, 14-02-2019
Page 2

103 rue Louvain Ouest, H2N 1A3, Montreal
USER GUIDE WASH 3.5 | Version 1.0
Contents
1. Wash 3.5 presentation and characteristics ..................................................................................3
1.1 Description use ................................................................................................................................... 3
1.2 Electrical charateristics ....................................................................................................................... 3
1.2.1 Description ................................................................................................................................... 3
1.2.2 Key features ................................................................................................................................. 3
1.2.3 Working temperature .................................................................................................................. 3
1.2.4 Water protection .......................................................................................................................... 3
1.2.5 Physical and body ......................................................................................................................... 3
1.2.6 Electrical specs ............................................................................................................................. 3
1.2.7 Communication protocol .............................................................................................................. 3
1.2.8 Coverage ...................................................................................................................................... 4
Warning .....................................................................................................................................5
2.
2.1 Security ........................................................................................................................................... 5
2.2 Label ................................................................................................................................................ 5
3. Material needed .........................................................................................................................5
4. Installation .................................................................................................................................6
4.1 Installation ......................................................................................................................................6
4.2 Orientation ......................................................................................................................................6
4.3 Connections ....................................................................................................................................7
5. Wash 3.5 menu......................................................................................................................... ..8
5.1 Home screen ....................................................................................................................................9
5.2 Change channel ................................................................................................................................9
5.3 See temperature ....... ......................................................................................................................9
5.4 Flip screen ...........................................................................................................................................9
5.5 Change Pro2 to Auto ...........................................................................................................................9
6.
Troubleshooting ....................................................................................................................... .10
6.1 Front LED status indicator ..............................................................................................................10
6.2 Visualizing infrared .........................................................................................................................11
Page 3

103 rue Louvain Ouest, H2N 1A3, Montreal
USER GUIDE WASH 3.5 | Version 1.0
Length
8 in/200 mm
Width
8 in/200 mm
Height
10 in/260 mm
Weight
7.8 kg/17.5 lbs
External I/O
Neutrik PowerCon in/out
Neutrik 5pol XLR in/out
Casing
Blacm aluminium case
In/out voltage
AC: 100-240 V nominal, 50/60 Hz
Max power
125 W
PixMob PRO2 Infrared:
IR Out
940 nm
IR Range
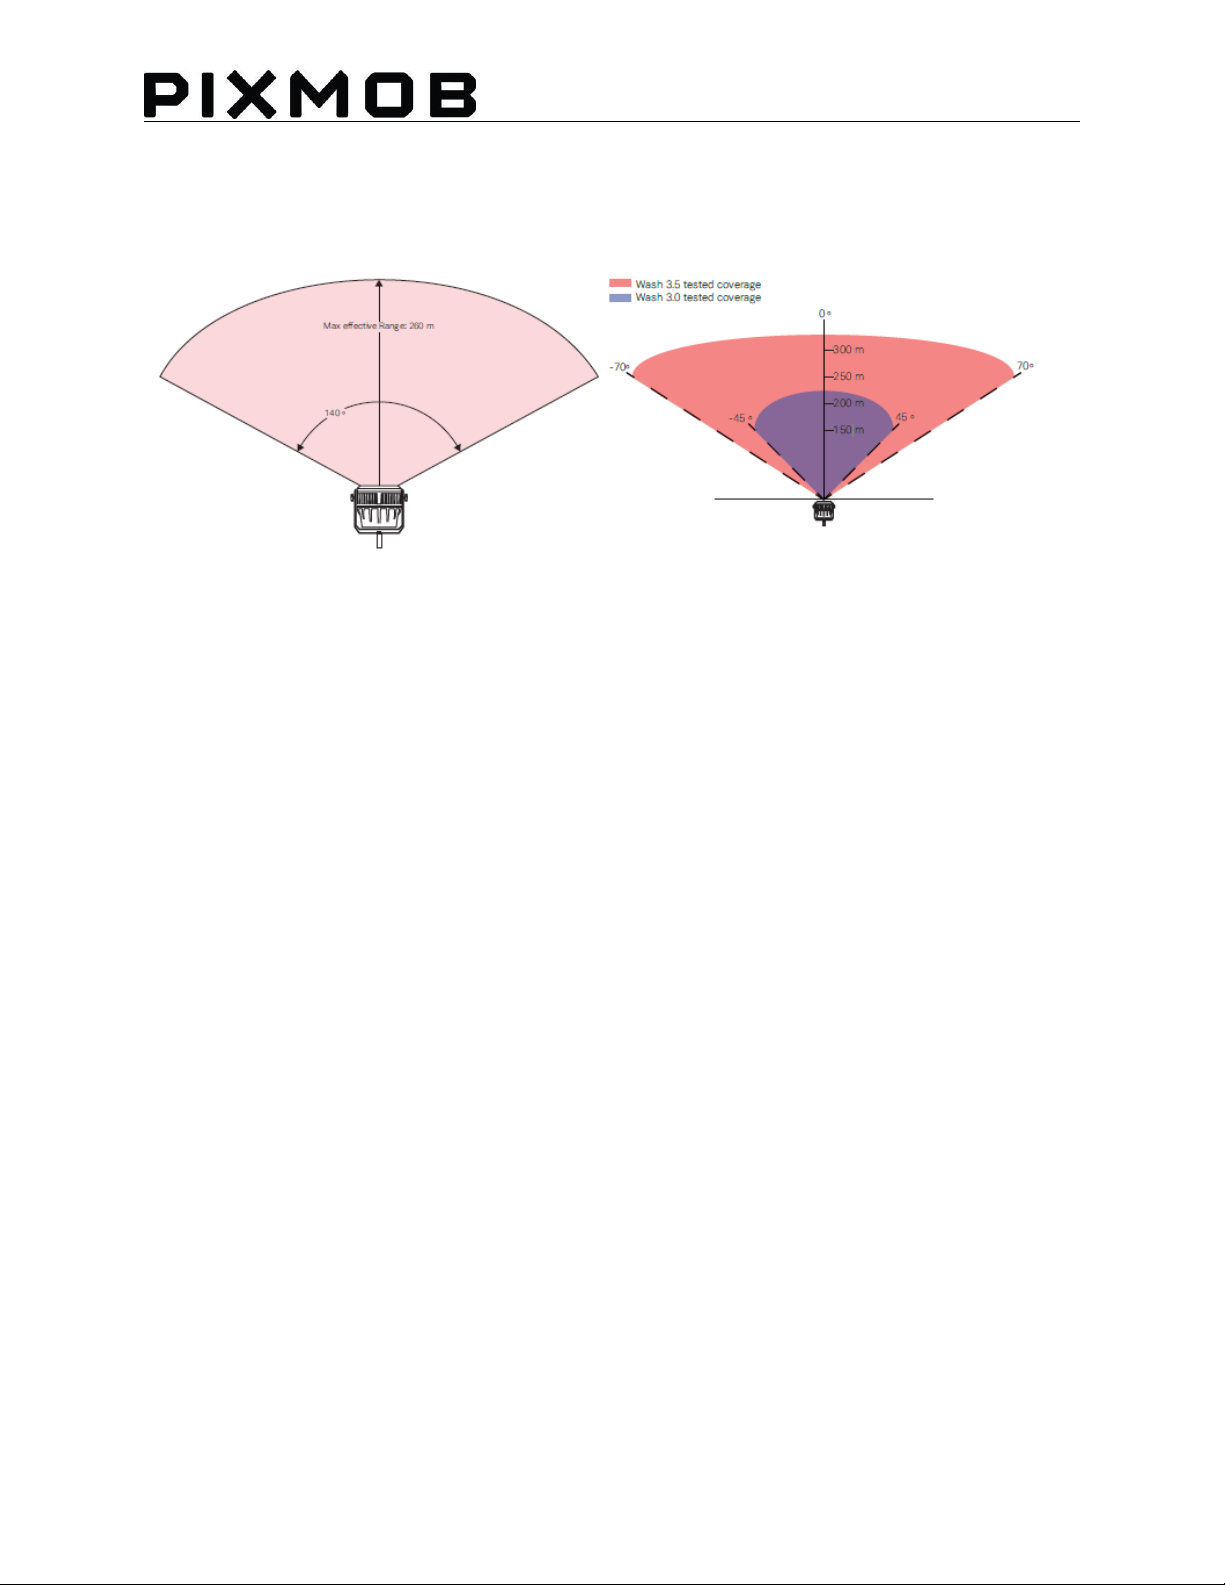
260 m/850 ft at 0° angle
IR Spread
140°
1. Wash 3.5 presentation and characteristics
1.1 Description use
A WASH is an infrared transmitter that controls PixMob luminous objects wirelessly. Similary to a LED
flood light, it is controllable by a lighting through DMX. The operational frequency 20 MHz.
1.2 Electrical charateristics
1.2.1 Description
Our most powerful infrared light fixture built to flood a venue with signal. Output PixMob PRO2
protocol to control wearable devices for mass crowd effects.
1.2.2 Key features
-PixMob PRO2 architechture
-Standard professional lighting rigging yoke
-DMX512
1.2.3 Working temperature
-20 ° to 60 °C
-5 ° to 140 °F
1.2.4 Water protection
IP64
1.2.5 Physical and body
1.2.6 Electrical specs
1.2.7 Communication protocol
Page 4
USER GUIDE WASH 3.5 | Version 1.0
1.2.8 Coverage
103 rue Louvain Ouest, H2N 1A3, Montreal
Page 5

103 rue Louvain Ouest, H2N 1A3, Montreal
USER GUIDE WASH 3.5 | Version 1.0
2. Warning
2.1 Security
-Use green glass lenses when you are near a functional WASH during operating and testing. The Maximum
distance to be near an operation WASH without glasses is 3 ft/1 m with a direct view.
-Specifications of the green glass:
-Green Glass lenses (not tinted)
-Standard: ANSI Z87.1-2003
-Marking Z87+
-Color: Shade 3.0 IR
-Recommendation: 3M™ Nassau Rave™ Protective Eyewear 14459-00000-20 Shade 3.0 IR Lens
2.2 Label
3. Material needed
-1 WASH power cable (Powercon)
-1 DMX XLR5 pin cable
-1 PixMob WASH (with cheeseborough clamp or c-clamp and safety cable)
Page 6
103 rue Louvain Ouest, H2N 1A3, Montreal
USER GUIDE WASH 3.5 | Version 1.0
4. Installation
4.1 Installation
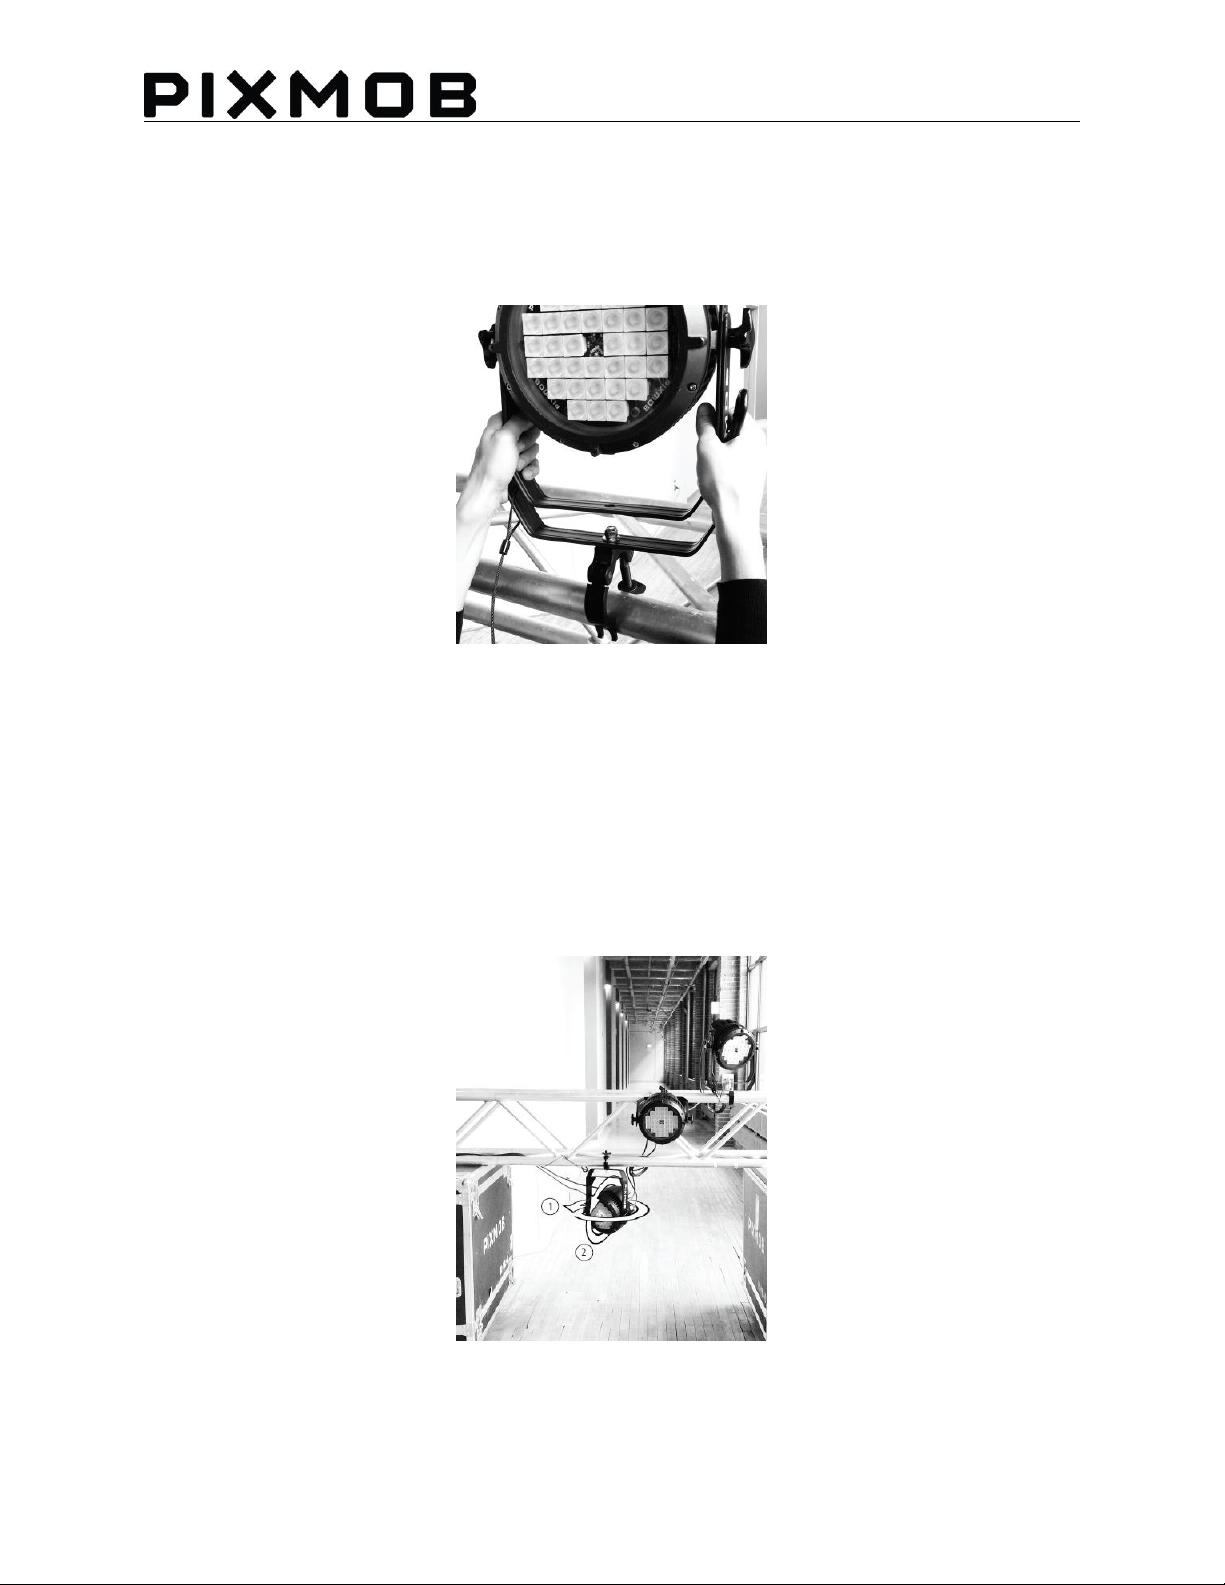
Open the cheeseborough clamp or c-clamp and put the Wash on the lighting truss. Secure the Wash with
the safety cable first and then fasten the cheeseborough clamp or c-clamp.
4.2 Orientation
For best coverage, it is important to orient the WASH properly. IR signals behave like normal light, so
shadows, occlusion and reflections need to be considered. WASH emit IR in a cone shape with a beam
angle of 60º. We recommend always thoroughly testing the coverage before any show.
You can adjust the orientation of the Wash along two axes:
1. Use the screw on the cheeseborough clamp or c-clamp to orient the beam of IR.
2. Use the yoke clamps to adjust the head of the Wash.
Page 7
103 rue Louvain Ouest, H2N 1A3, Montreal
USER GUIDE WASH 3.5 | Version 1.0
4.3 Connections
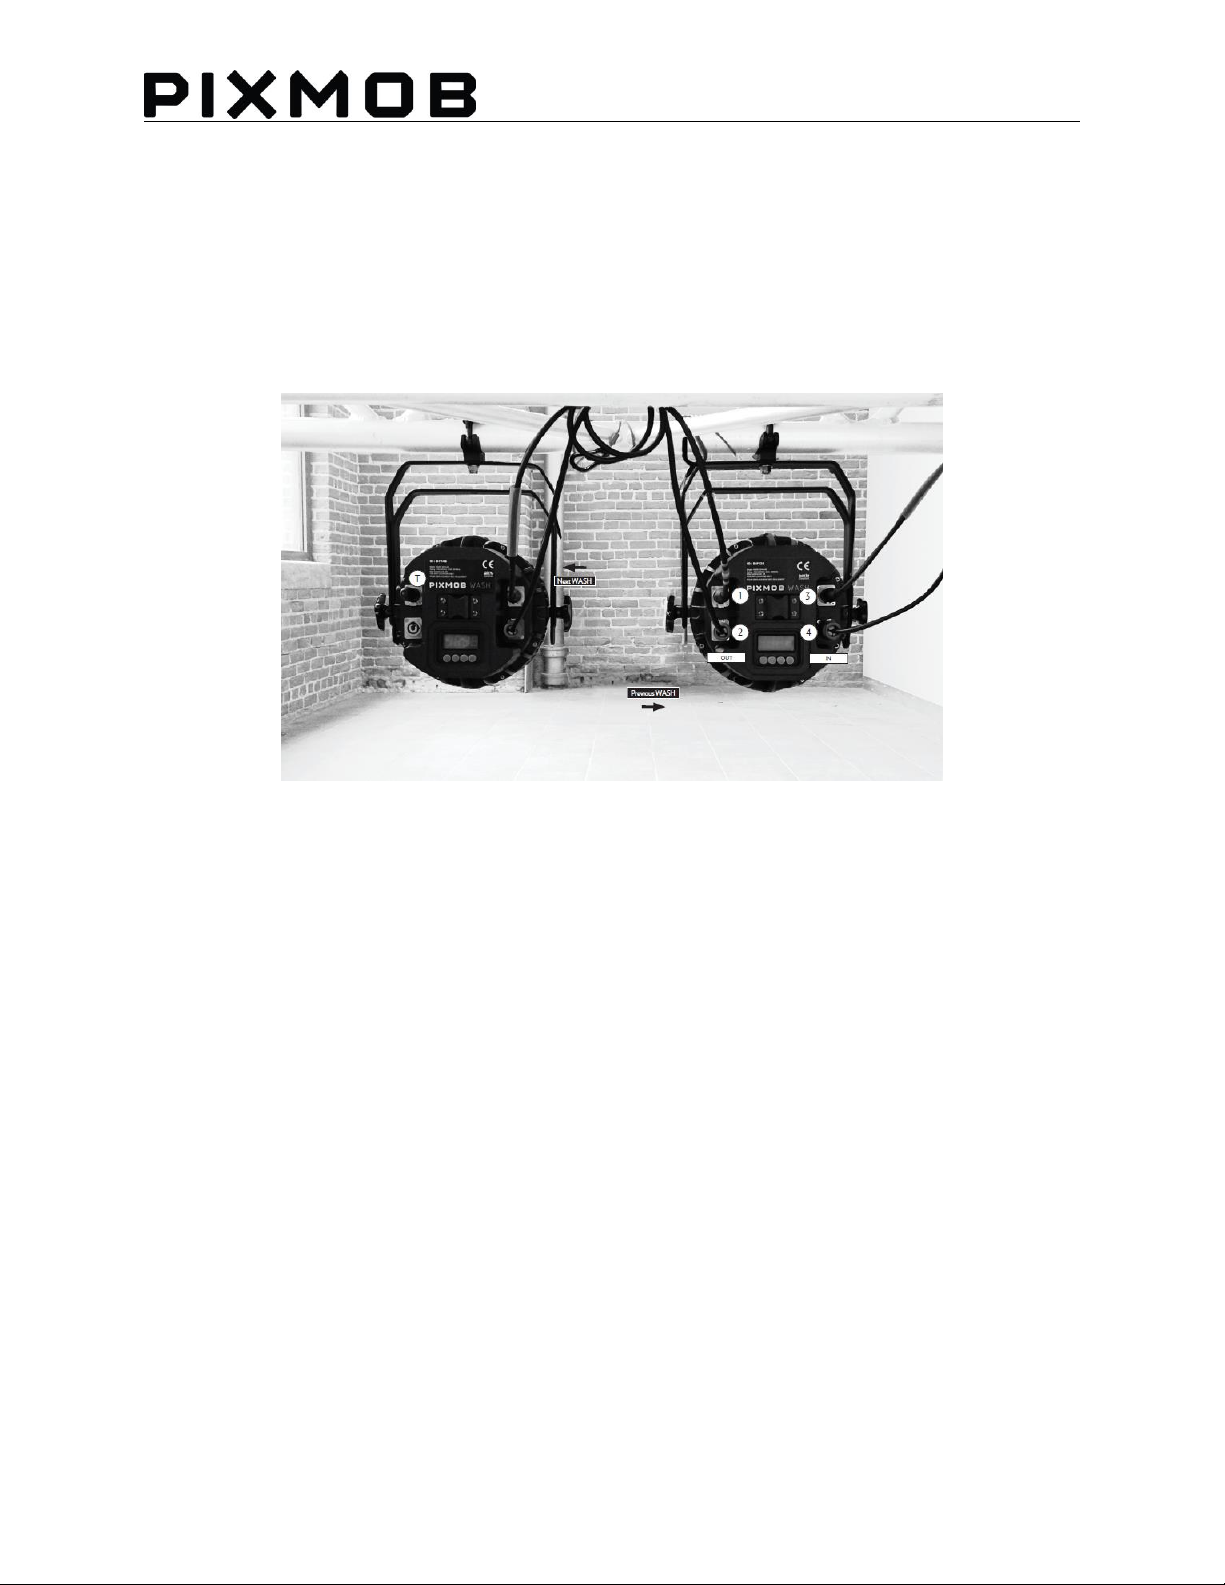
This picture shows the process to follow when you have more than one Wash to set up. (Daisy chain)
• For electrical reasons, do not connect more than 4 WASHs in a serie.
• All the WASHs on the same line must be connected to one dedicated DMX line in order to respect our
frame rate of 15 fps.
• We recommend putting a 120 ohm DMX terminator on the DMX out on the last WASH in the line.
• We recommend putting a 25MHz ferrite on DMX and Power cable, the closest to the casing.
1. DMX OUT
2. POWERCON OUT
3. DMX IN
4. POWERCON IN
T. 120 ohm DMX TERMINATOR
• Do not connect DMX over ethernet network.
• Do not connect DMX over wireless technology.
Page 8
103 rue Louvain Ouest, H2N 1A3, Montreal
USER GUIDE WASH 3.5 | Version 1.0
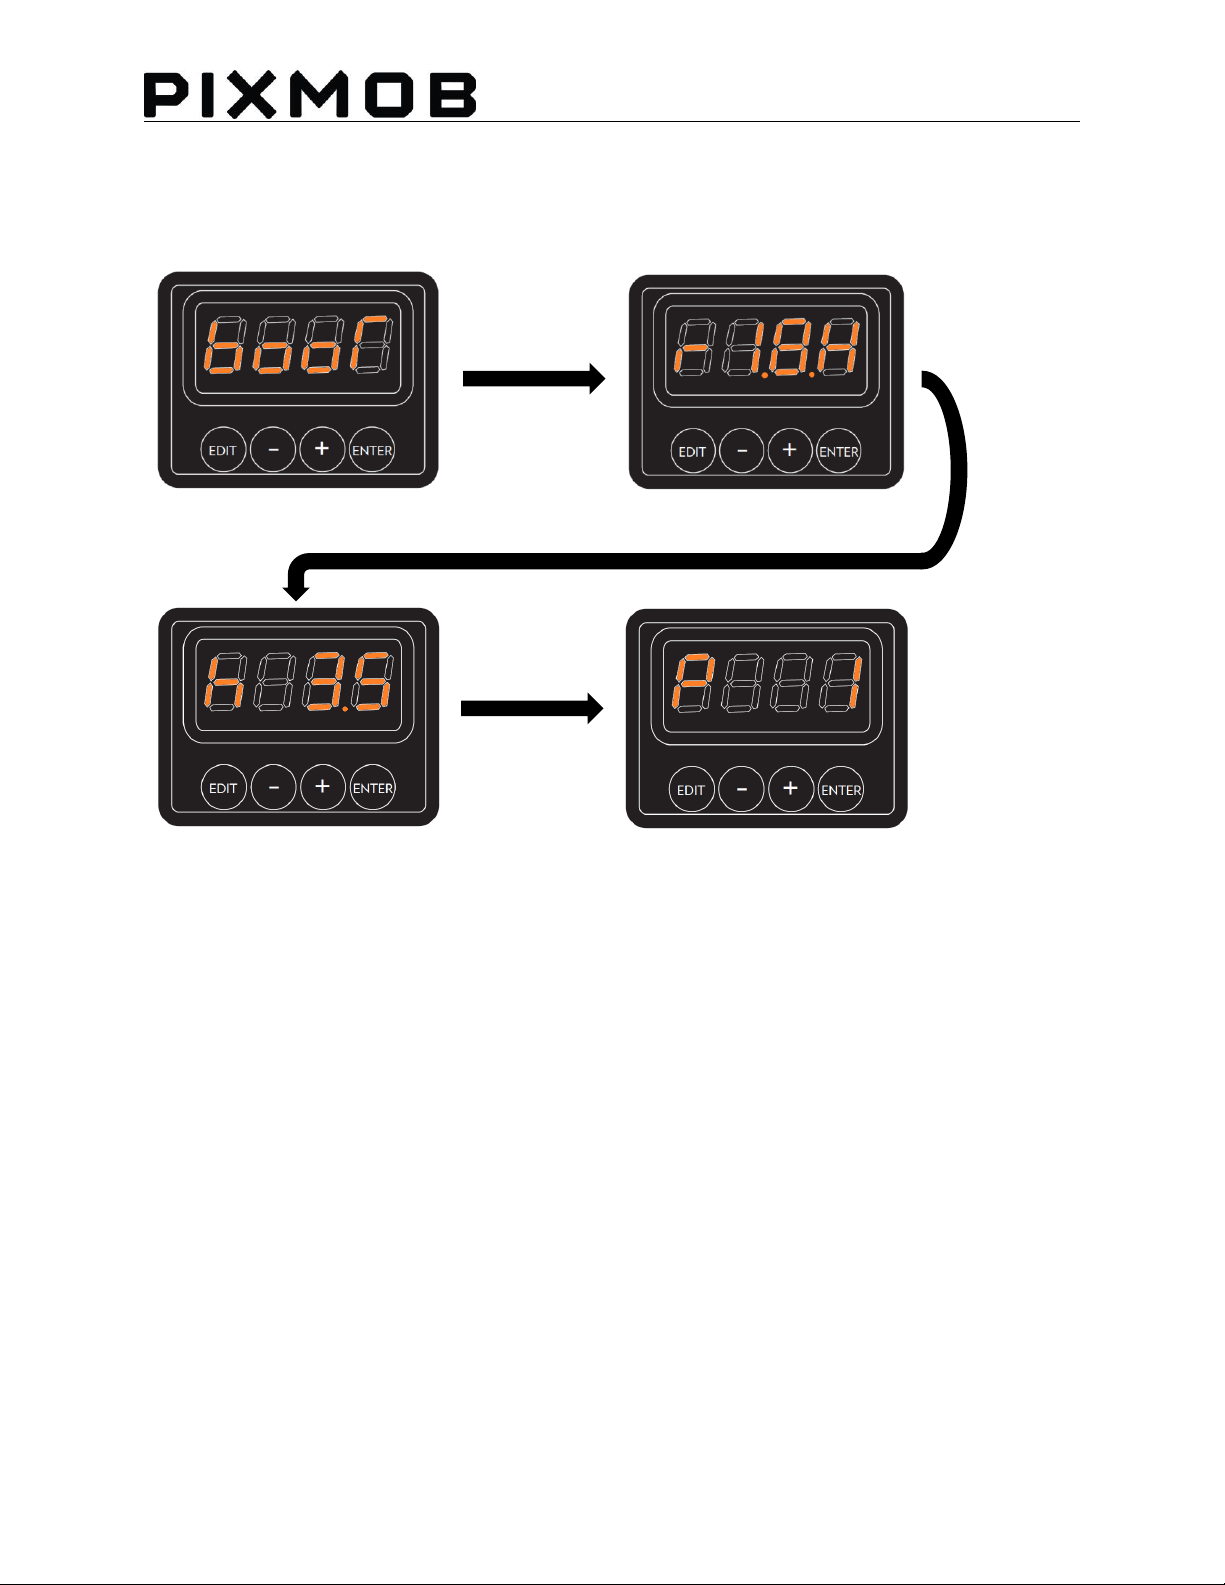
Boot screen
Firmware version
Hardware version
Channel (1 to 512)
5. Wash 3.5 menu
5.1 Home screen
When the WASH 3.5 is power up, these 4 screens show up with an interval of 1-2 seconds.
5.2 Change channel
To change the channel you need to:
-Hold the EDIT button for more than 3 seconds
-Press + or – to change the channel
-Press on ENTER to select the channel
If you hold + or -, it will increase or decrease by 10. If you don’t press ENTER after you select the channel,
it will automatically come back to the previous menu with the previous channel.
Page 9
103 rue Louvain Ouest, H2N 1A3, Montreal
USER GUIDE WASH 3.5 | Version 1.0
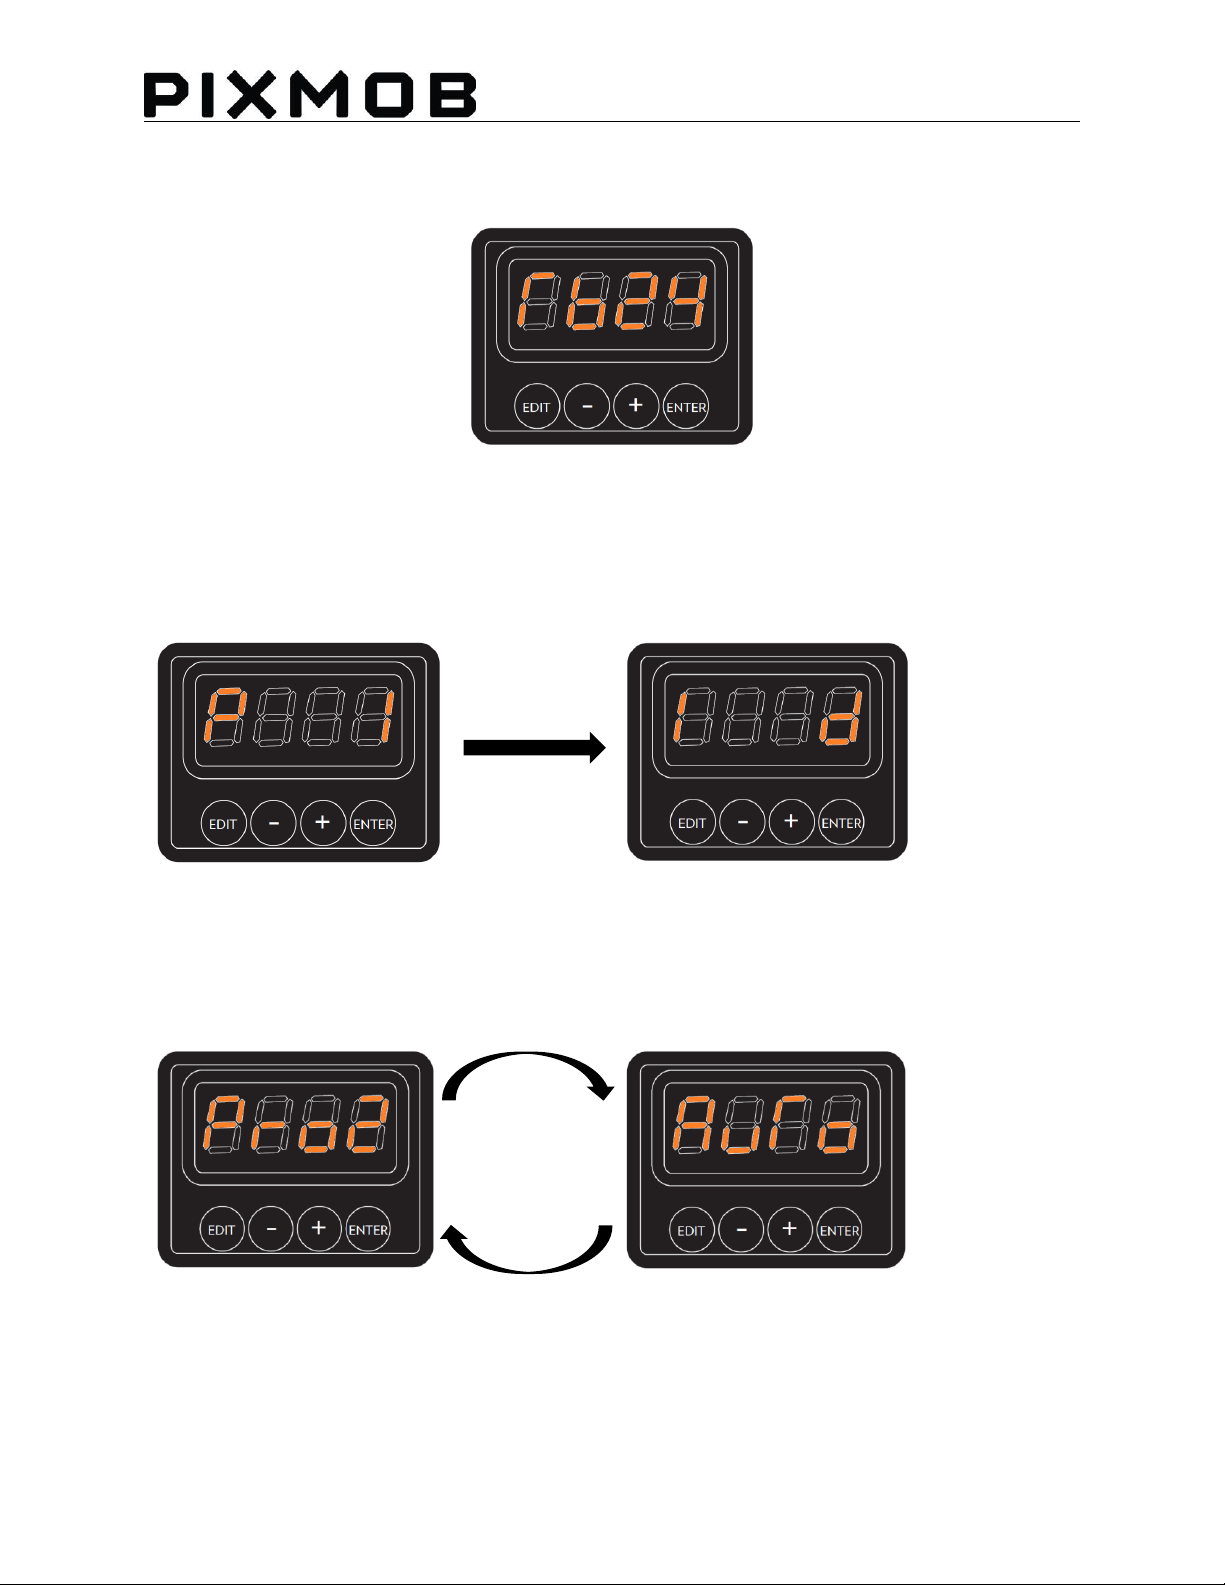
Normal screen
Flip screen
Pro2 screen
Auto screen
5.3 See temperature
Hold EDIT and – at the same time for 3 seconds and the Temperature should appear.
tb24 means temperature 24C
5.4 Flip screen
To flip the screen, hold + and – at the same time for 3 seconds. The screen should flip.
5.5 Change Pro2 to Auto
To change the protocol from Auto to Pro2, hold EDIT and ENTER at the same time for 3 seconds. The
screen should switch from Pro2 to Auto continually. Press ENTER when you want to select.
Page 10
103 rue Louvain Ouest, H2N 1A3, Montreal
USER GUIDE WASH 3.5 | Version 1.0
6. Troubleshooting
6.1 Front LED status indicator
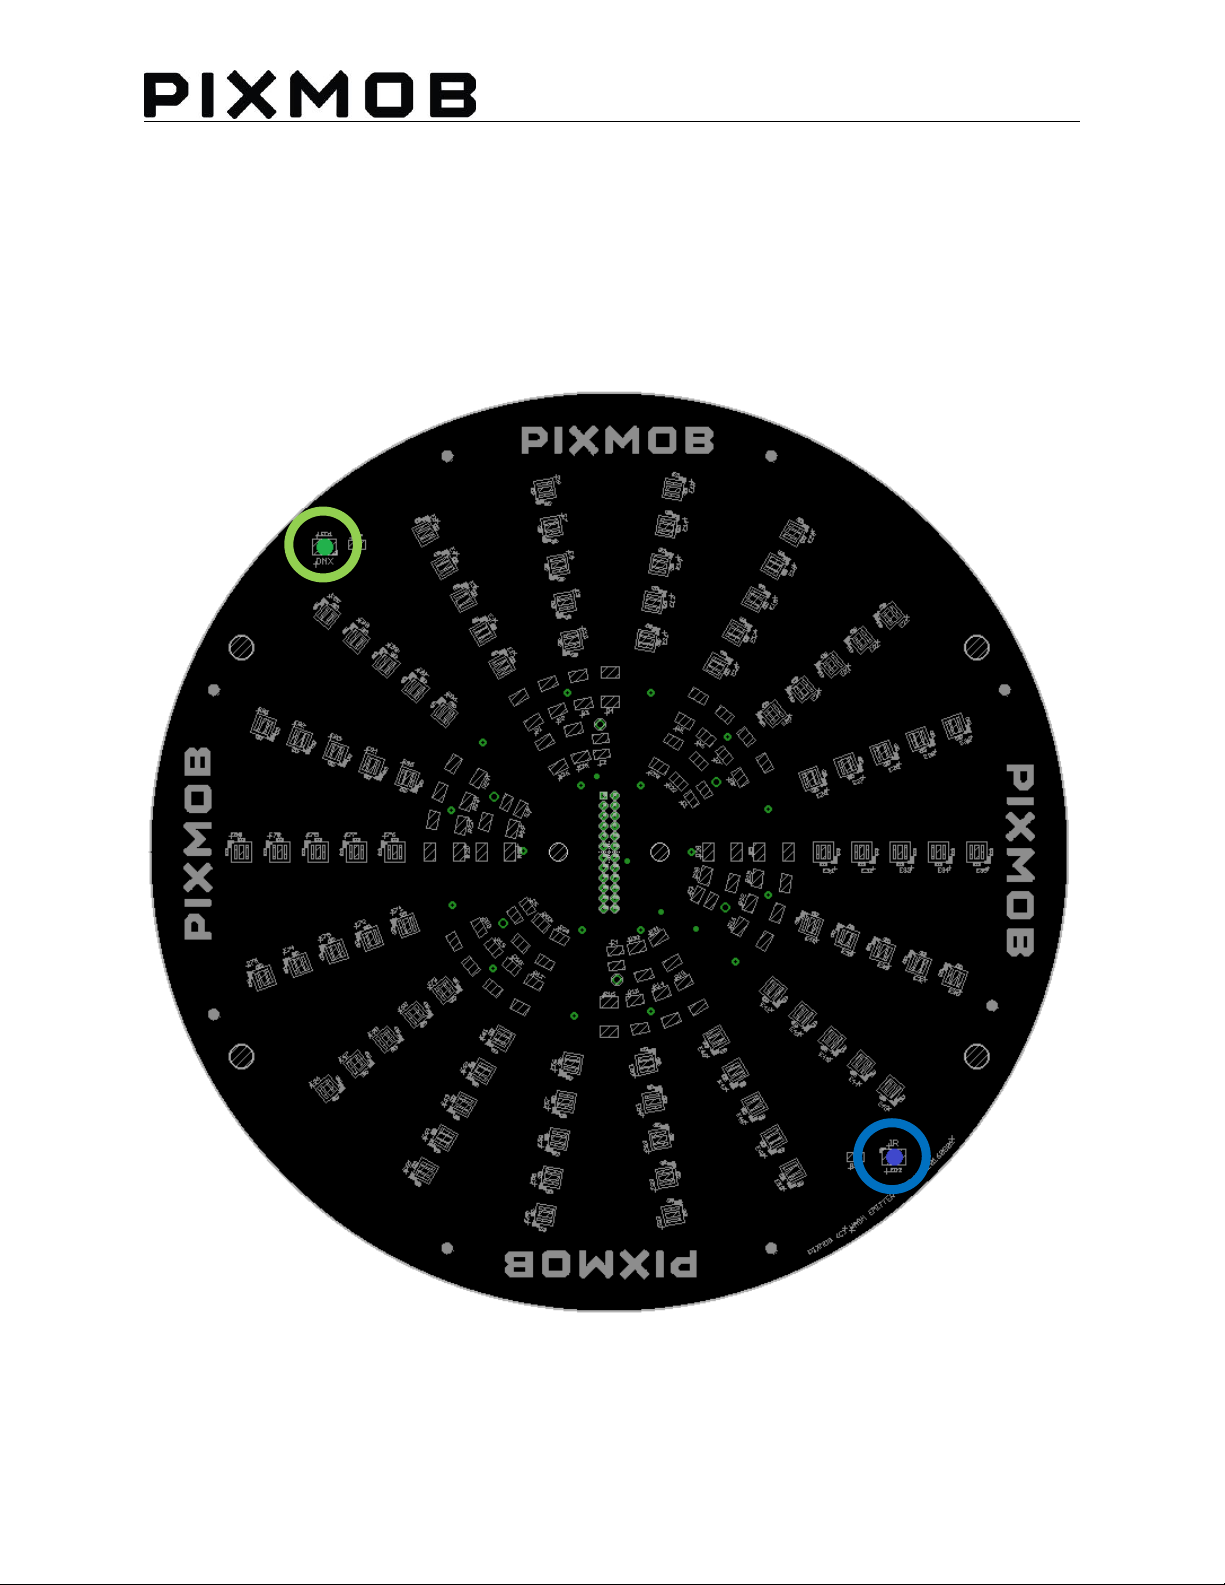
Once the Wash is properly connected, you should see the two (green and blue) LED status indicator
illuminate at the front of the Wash.
1. Blinking green (DMX); Receiving DMX
2. Fast blue blinking (IR); Output PixMob IR signal
Page 11
103 rue Louvain Ouest, H2N 1A3, Montreal
USER GUIDE WASH 3.5 | Version 1.0
6.2 Visualizing infrared
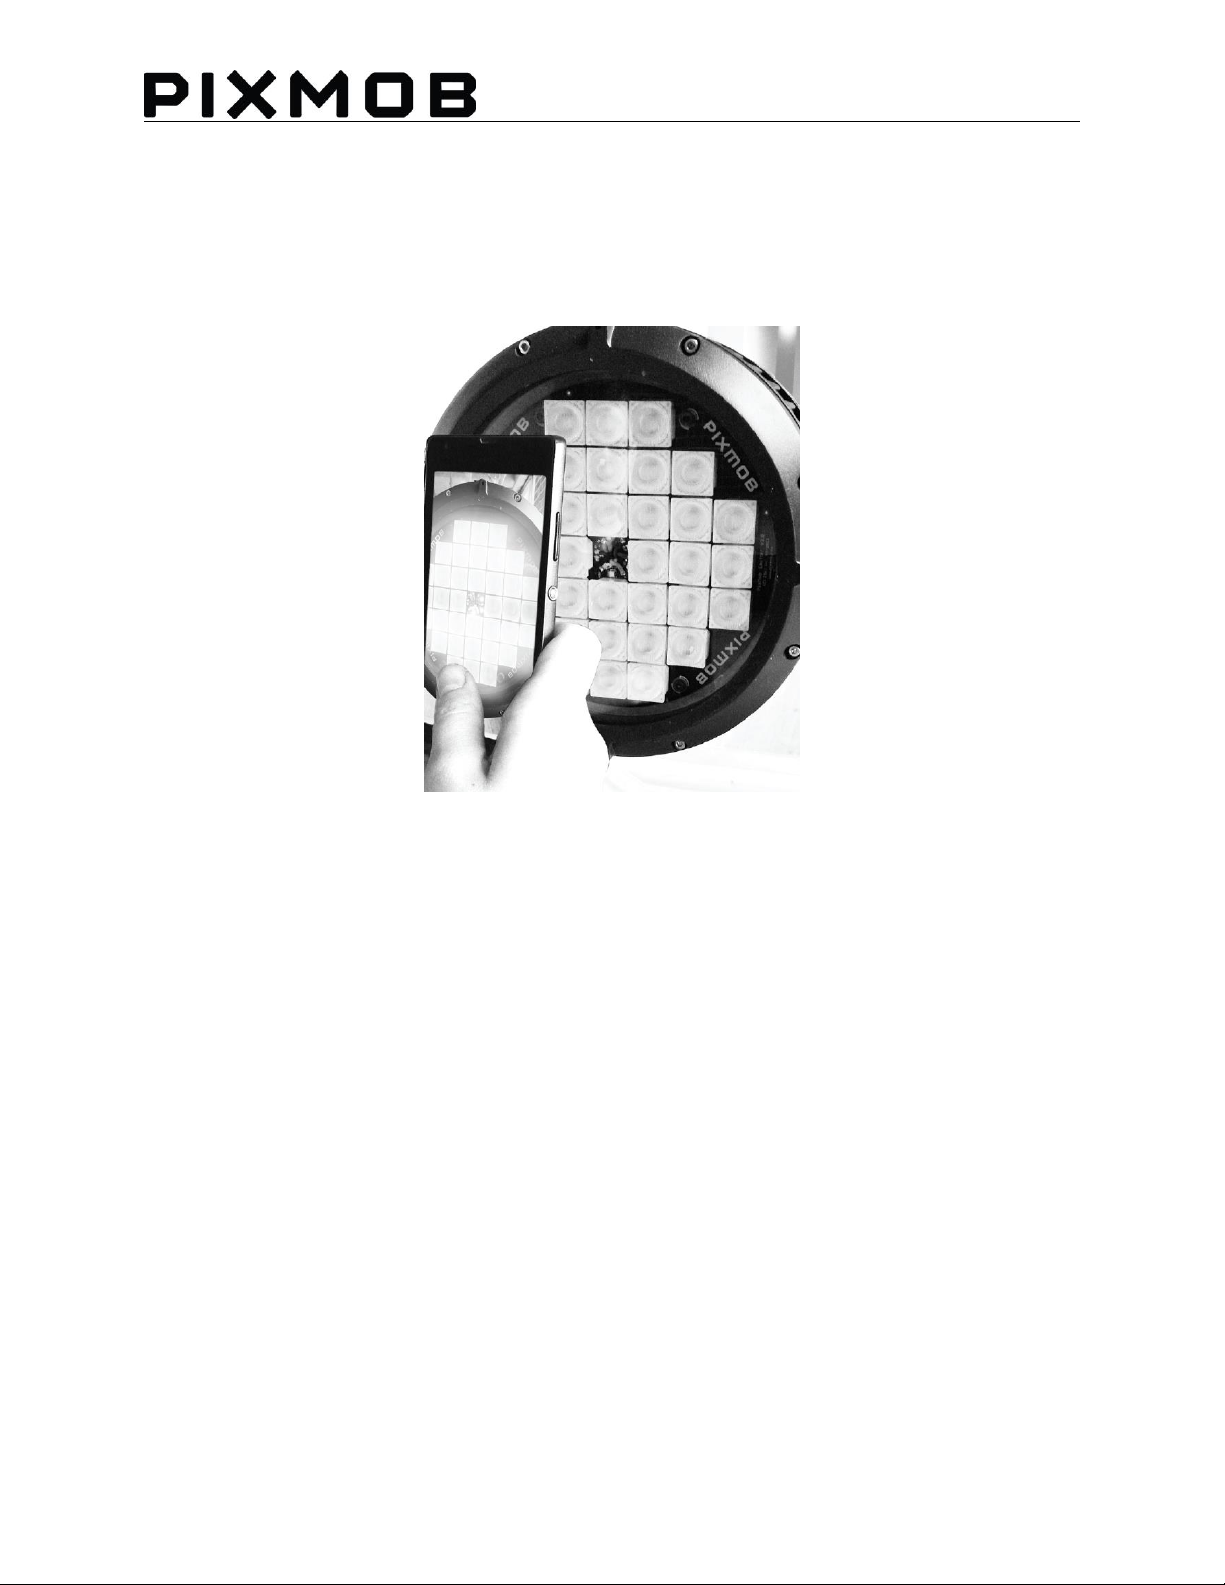
Before checking the IR LED, use the protective glasses against IR. After that, to see if all IR LED are ok you
can use:
1- The WASH power meter to detect if one or more IR LED are burned or damaged.
2- Your telephone, open the camera and check it some IR LED are not power.
 Loading...