

ESI Phone IVX X-Class, IVX E-Class User Manual

ESI Feature Phone
User’s Guide
FOR IVX X-Class • IVX E-Class
0450-0366
Rev. M
For on-line help, visit www.esiusers.com.

About ESI
ESI (Estech S ystems, Inc.) is a privately held corpo ration based in P l ano, Texas. Founded in 1987, ES I
designs and bui l ds innovative telecommunications p roducts for busi nesses like yours. Because of t hei r
powerful com bi nation of val ue and feature s, ESI products are consi st ently recog ni zed by industry
publications and leader s.
Copyright © 2006 ESI (Estech Systems, Inc.).
IVX is a registered trademark, and Esi-Dex, Quick Groups, Quick Moves, Virtual Mailbox Key, AutoPage, Quick Page
and Verbal User Guide are trademarks, of ESI. Act! is a registered trademark of Symantec Corporation. Goldmine is a
trademark of Goldmine Software Corporation. Microsoft, Windows, NT and Outlook are registered trademarks of Microsoft
Corporation. Intel is a registered trademark of Intel Corporation. Panasonic and DBS are registered trademarks of Matsushita
Electric Corporation of America.
Information contained herein is subject to change without notice.
ESI products are protected by various U.S. Patents, granted and pending.
ESI is an ISO 9001:2000-certified company. Visit ESI on the Web at www.esi-estech.com.

Contents
Introduction...............................................................................................................................................................A.1
48-Key Feature Phone ................................................................................................................................................................................A.2
24-Key Feature Phone ................................................................................................................................................................................A.4
12-Key Feature Phone ................................................................................................................................................................................A.5
ESI Cordless Handsets ...............................................................................................................................................................................A.6
Connecting your ESI phone ........................................................................................................................................................................A.7
Help mode (Verbal User Guide)..............................................................................................................................B.1
User programming: An introduction......................................................................................................................C.1
User programming menu ............................................................................................................................................................................C.1
Voice mail operation................................................................................................................................................D.1
VOICE MAIL key..........................................................................................................................................................................................D.1
Personal greetings .......................................................................................................................................................................................D.1
Leaving messages . . ..................................................................................................................................................................................D.2
AutoPage......................................................................................................................................................................................................D.3
Moving and deleting a message.................................................................................................................................................................D.3
Off-premises “reach me”..............................................................................................................................................................................D.3
Message retrieval.........................................................................................................................................................................................D.4
Live recording...............................................................................................................................................................................................D.7
Off-premises message delivery ..................................................................................................................................................................D.8
Message Recycle Bin (u n- de l e te )...............................................................................................................................................................D.9
Status indicator lamp....................................................................................................................................................................................D.9
Optional voice mail feature: Guest mailboxes ........................................................................................................................................ D.10
Optional voice mail feature: Group/broadcast mailboxes......................................................................................................................D.12
Optional voice mail feature: Cascade notification mailboxes ................................................................................................................D.13
Optional voice mail feature: Q & A mailboxes ........................................................................................................................................ D.15
ESI Feature Phone operation..................................................................................................................................E.1
Display...........................................................................................................................................................................................................E.1
Caller ID ........................................................................................................................................................................................................E.1
Keys...............................................................................................................................................................................................................E.2
Dial tone........................................................................................................................................................................................................E.4
Basic phone use...........................................................................................................................................................................................E.4
Direct station selection.................................................................................................................................................................................E.5
Transferring an outside call . . . ...................................................................................................................................................................E.5
Transferring an internal call . . . ...................................................................................................................................................................E.7
Conference calling .......................................................................................................................................................................................E.8
Call forwarding..............................................................................................................................................................................................E.9
Call waiting..................................................................................................................................................................................................E.12
Hold/exclusive hold operation ...................................................................................................................................................................E.13
Paging.........................................................................................................................................................................................................E.15
Call pickup...................................................................................................................................................................................................E.15
Optional features ........................................................................................................................................................................................E.16
Special keys..............................................................................................................................................................F.1
Esi-Dex..........................................................................................................................................................................................................F.2
Override ring.................................................................................................................................................................................................F .9
Message monitor mode (live call screening) ...........................................................................................................................................F.10
Personal greeting reminder.......................................................................................................................................................................F.10
Headset operation......................................................................................................................................................................................F.10
Outside dial tone preference .....................................................................................................................................................................F.11
Line keys.....................................................................................................................................................................................................F.11
Optional features ........................................................................................................................................................................................F.12
Remote IP Feature Phone....................................................................................................................................... G.1
1. Channel availability display ....................................................................................................................................................................G.1
2. Channel queue display........................................................................................................................................................................... G.1
3. Paging limitation......................................................................................................................................................................................G.1
4. No 911/emergency calls.........................................................................................................................................................................G.1
Troubleshooting........................................................................................................................................................................................... G.2
Using Esi-Link...........................................................................................................................................................H.1
Overview.......................................................................................................................................................................................................H.1
Location Keys...............................................................................................................................................................................................H.1
Programmable feature keys and Esi-Link: an introduction.......................................................................................................................H.2
Dialing an Esi-Link location..........................................................................................................................................................................H.3
Using feature keys with Esi-Link.................................................................................................................................................................H.4
Other Esi-Link features................................................................................................................................................................................H.7

ACD agent operat i on.................................................................................................................................................I.1
Programming the agent log-on/off key ........................................................................................................................................................I.1
Wrap mode ....................................................................................................................................................................................................I.2
LED indicator..................................................................................................................................................................................................I.2
Display indications.........................................................................................................................................................................................I.3
While logged on: no DND, monitor mode, call forward, or programming................................................................................................I.4
Call waiting.....................................................................................................................................................................................................I.4
ACD administrator key..................................................................................................................................................................................I.5
Analog stations............................................................................................................... ..........................................J.1
Caller ID.........................................................................................................................................................................................................J.1
Placing calls ..................................................................................................................................................................................................J.1
Transferring calls ..........................................................................................................................................................................................J.2
Conference calling........................................................................................................................................................................................J.2
Call forwarding................................................................................................................ ..............................................................................J.3
Call waiting....................................................................................................................................................................................................J.3
Call hold.........................................................................................................................................................................................................J.3
Paging............................................................................................................................................................................................................J.4
Call pick-up....................................................................................................................................................................................................J.4
Voice mail operation from an analog station..............................................................................................................................................J.4
Analog station programming........................................................................................................................................................................J.7
Index

User’s Guide Introduction
Introduction
Accessing the r i ch E S I feature set is simple and easy through the straightforward design of each of t he
various ESI Feature Phones. E ach f eature has been designed for ease of use while providi ng
capabilities needed in an advanced business phone.
You will be able to learn man y of the features by simply using your phone; and this ESI Feat ure Phone
User’s Guide will introduce you to the wi de variety of features offered by your ESI phone system and
how to use your ph one effectiv el y t o achieve maxim um benef i ts.
What it covers
This User’s Guide covers the use of:
• 48-Key Featur e Phone (Digital, TAPI, IP and Remote I P )
• 24-Key Digital Feature P hone
• 12-Key Featur e P hone
• ESI Cordles s Handset (Digital, IP, and Remot e I P)
• 60-Key Expansion Console and S econd Expansion Console
...with the following ESI phone systems:
1
• IVX X-Class (I V X 256x and IVX 128x)
• IVX E-Class (I V X 128e and IVX 72e)
How it’s arranged
• Section A — Phone illustrations
• Section B — User help
• Section C — User p rogramming
• Section D — Voi ce mai l operation
• Section E — Phone ope ration
• Sections F through K — Special key s and f eatures
1
Of the systems covered in thi s User’s Gu id e, the Se cond Expansion Console works with only IVX X-Class.
A.1

Introduction User’s Guide
r
l
l
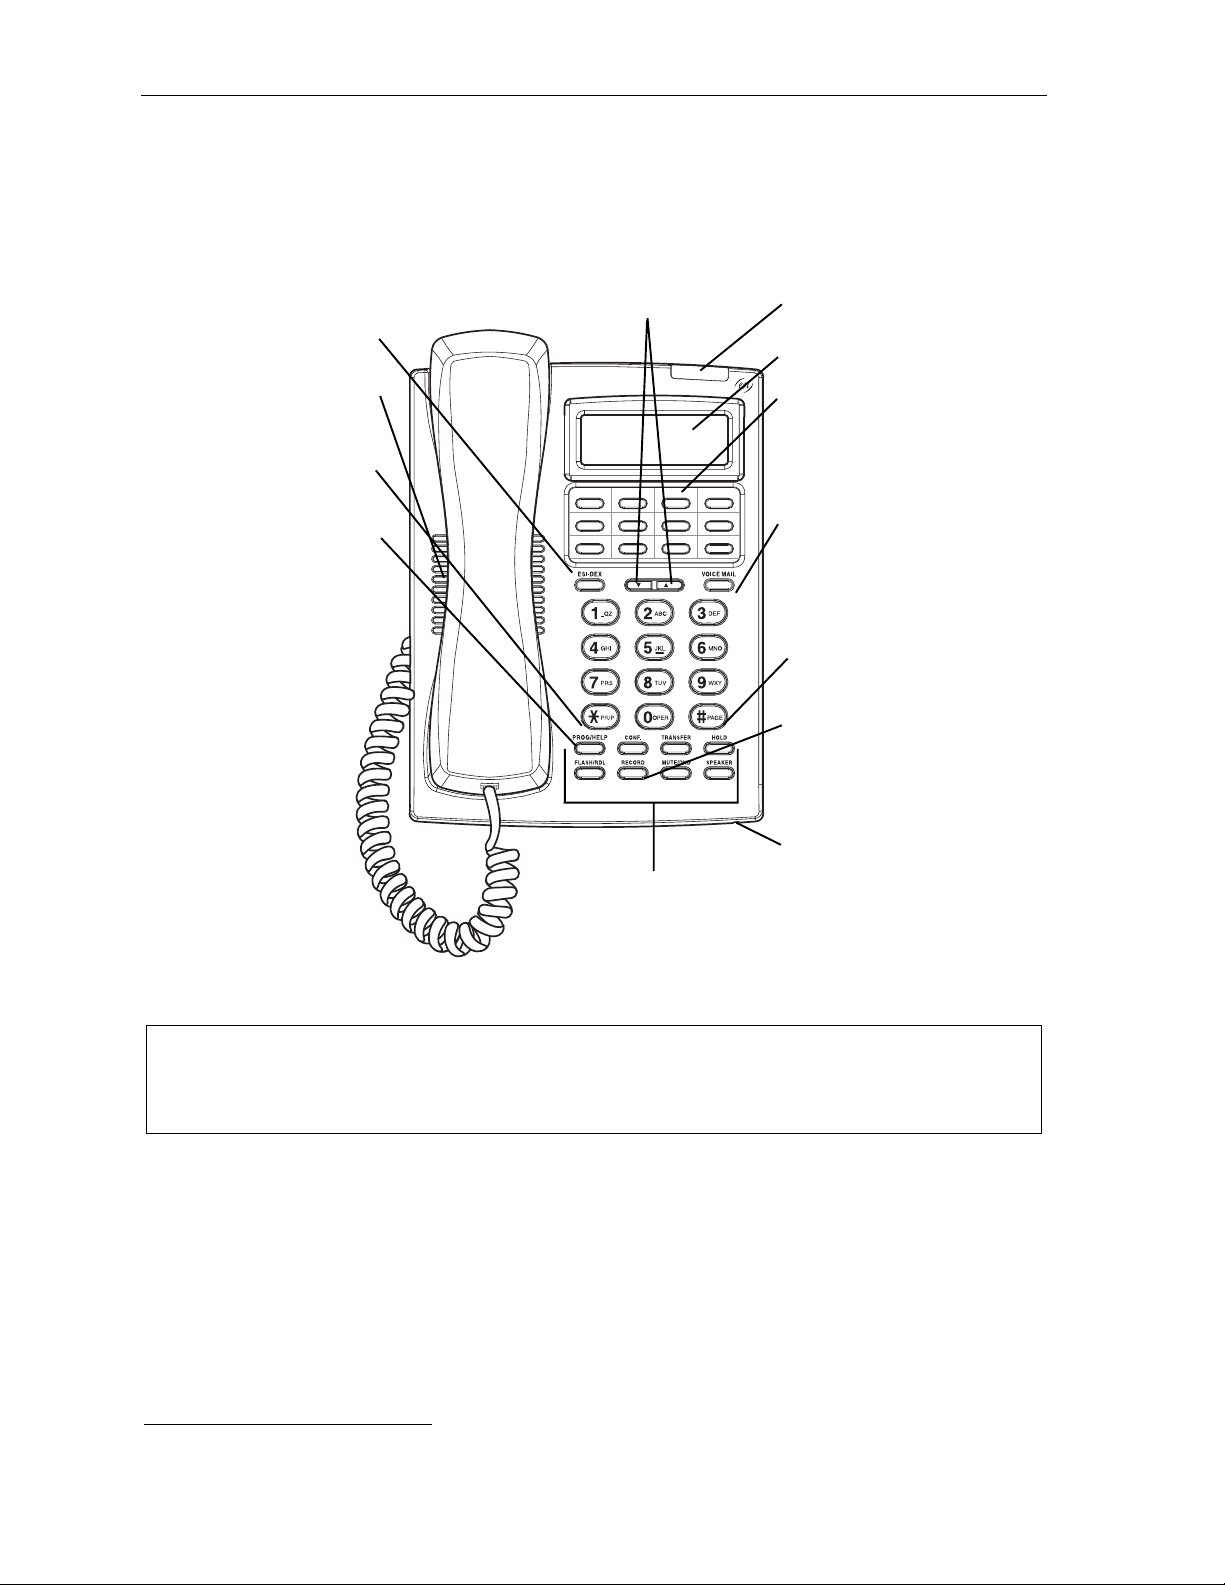
48-Key Feature Phone
The 48-Key Feature Phone has a vari et y of programmable and built-in features. It comes in m ul tiple
versions: Digital; TAPI; IP ; and Rem ote IP. Addi t i onal ly, it supports up to two opti onal Expans i on
Consoles (see next page).
which are described throughout this User’s Guide. The 48-Key Feat ure Phone’s buil t-in voic e m ai l
features and voice prompts ma ke it easy to prog ram and use.
PROGRAM
soft feature key
P/UP (pickup) key
(pg. C.2)
HELP key fo
access to Verba
User Guide
and tutoria
(pg. B.1)
Speaker
(pg. E.15)
1
All version s of the 48-Key Feature Phone offer the same basic features
Status indicator
lamp (pg. D.9)
Volume/scroll keys
ESI-DEX
RECORD key
Fixed feature keys
(pg. E.2)
buil t-in spea kerphone
PAGE key
Microphone for
3-line, 56- c h ar ac t er display
soft feature key
(pg. F.2)
Context-specific
key to select
displayed optio ns
VOICE MAIL
key (pg. D.1)
(pg. D.7)
30 program mable
feature keys
(pg. C.2)
(pg. E.15)
Hint: On any of thes e ESI phone varieties (in cluding the Expansion Consoles), you can perf orm direct
programming by holding down a programmable feature key for at least two seconds (similar to how
you mi ght pro gram a car radio button). This isn’t applicable t o the fixed-f eatur e keys which, as thei r
name impl ie s, ar e al re ad y pro gr am me d.
1
Of the systems covered in thi s User’s Gu id e, the Se cond Expansion Console works with only IVX X-Class.
A.2
User’s Guide Introduction
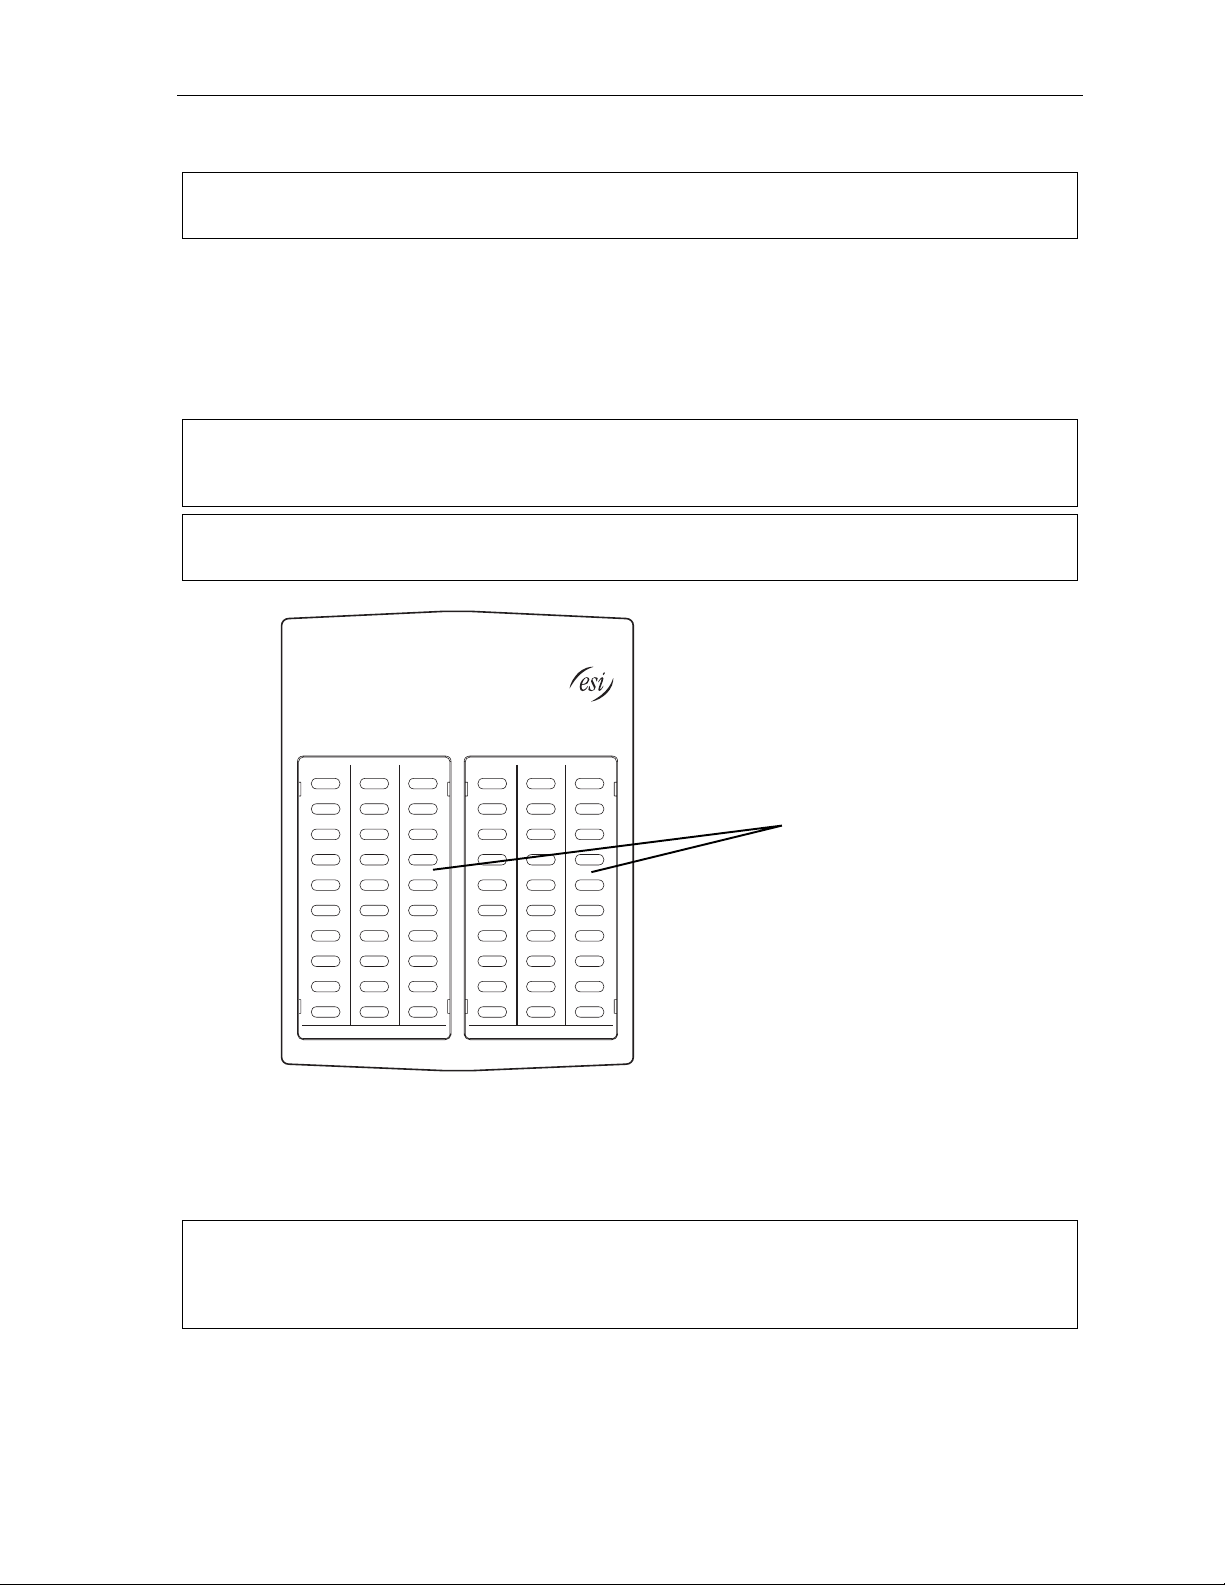
Optional Expans io n C onsole s f or us e wi th t he 48 -K ey Fea tur e P hone
Note: Of the systems covered in thi s User’s Guide, the Second Expansion Console works with only
IVX X-Class.
Your ESI 48-Key Feature Phone can support up to two optional Expansion Consoles, for a possible total
of 120 additional programmable feature keys.
The 60-Key Expa nsion Con sole connects directly to the phone, while the Second Expansion Console
connects to the first Console.
You program ea ch E xpa nsion Console’s keys just as you do the progr am m abl e f eature keys on your
ESI Feature Phone, using either dire ct or t raditional programming (see page C.2).
Note: Only one ke y can exist per extensi on, feature or op er ation. If y ou pr ogr am a second key for the same
extension, featur e or operation, this aut omatically eras es the first k ey so programmed, thus ma king it
available for a new extension, feature or op eration.
Hint: You may find it easier to write in the n ames on the over lay before you program the ke ys and at tach t he
overlay to the Console.
60 program mable
feature keys
(pg. C.2)
in two banks
of 30 each
Hint: On any of these phone varieties (including the Expansion Consoles), you can perform direct
programming by holding down a programmable feature key for at least two seconds (similar to how you
might progr am a car r adio but ton). This isn’t appli cable to the f ixed- feature keys which, as their name
impli es, ar e al re a dy pro gr a mme d.
A.3
Introduction User’s Guide
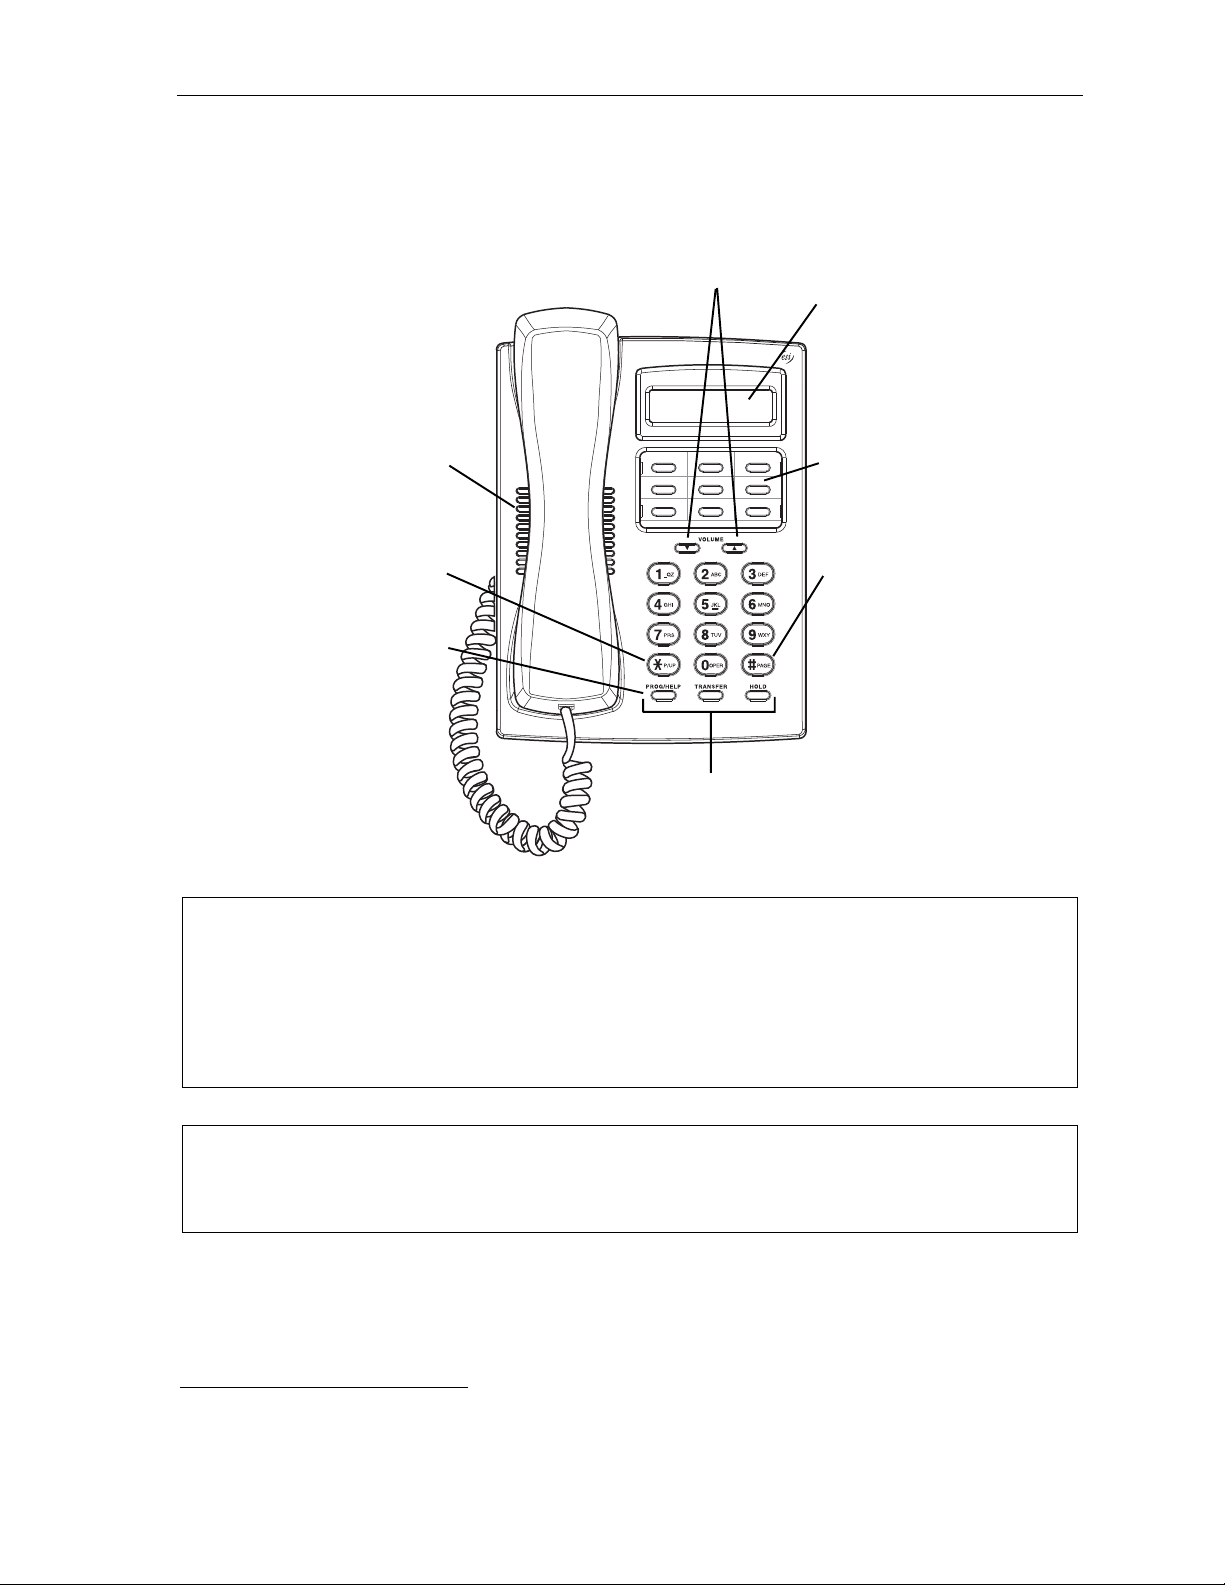
24-Key Feature Phone
The 24-Key Feature Phone has featu res similar t o t hose of the 48-Key Feature P hone. However, the
24-Key Feature Phone is available only as a digital model and doesn’t support TAPI, IP, ESI’s VIP family
of software applications
Feature Phone’s built-i n voice mail f eat ures and voic e prompts make it ea sy to program an d us e.
1
, or the Expansion Consoles. As is true for t he 48-Key Feature P hone, the 24-Key
ESI-DEX key (pg. F.2)
P/UP (pickup) key
PROG/HELP combo key
for phone pr o gra mming
(pg. C.2) and access to
Verbal User Guide
and tutorial (pg. B.1)
Speaker
(pg. E.15)
Volume/scroll keys Status indicator
2-line, 32-character display
12 programmable
VOICE MAIL key (pg. D.1)
PAGE key (pg. E.15)
RECORD key (pg. D.7)
Microphone for
Other fixed feature keys
(pg. E.2)
lamp (pg. D.9)
feature keys (p. C.2)
buil t-in spea kerphone
Hint: On any of these ESI phone varieties (including the Expansion Consoles), you can perform direct
programming by holding down a programmable feature key for at least two seconds (similar to how you
might progr am a car r adio but ton). This isn’t appli cable to the f ixed- feature keys which, as their name
impli es, ar e al re a dy pro gr a mme d.
1
For information concerning these software applications, see the ESI Web site at www.esi-estech.com.
A.4
User’s Guide Introduction
12-Key Feature Phone
The 12-Key Feature Phone includes the basic, most commonly used phone features. This simplified
model is avail abl e only as a digital model and doesn’t support TAPI, IP, ESI’s VIP family of software
applications
1
, the Expansion Consoles, speakerphone o peration2, or Esi-Dex.
P/UP (pickup) key (pg. E.15)
PROG/HELP combo key
for phone pr o gra mming
(pg. C.2) and access to
Verbal User Guide
and tutorial (pg. B.1)
Speaker
Volume/scroll keys
1-line,
9 programmable
PAGE key (pg. E.15)
Fixed feature keys
(pg. E.2)
16-char ac t er dis p lay
feature keys (pg. C.2)
Note: The following features aren’t avai lable on a 12-Key Feature Phone:
• Cert ain spe cial keys and f eatur es (see “Special keys,” p age F.1).
• Esi-Dex.
• ACD operation.
Additi onall y: to use voice mail, conference calling an d mute/ D ND on a 12-Key Feature Phone, you
must program these features into pro gramma ble feature k eys (see “Programmable fe ature keys,” page
C.3, and “Optional featur es,” page F.12).
Hint: On any of these phone varieties (including the Expansion Consoles), you can perform direct
programming by holding down a programmable feature key for at least two seconds (similar to how you
might progr am a car r adio but ton). This isn’t appli cable to the f ixed- feature keys which, as their name
impli es, ar e al re a dy pro gr a mme d.
1
For information concerning these software applications, see the ESI Web site at www.esi-estech.com.
2
The 12-Key Feature Phone doesn’t have a hands-free microphone, and therefore can’t serve as a true two-way speakerphone.
Its speaker plays pages.
A.5
Introduction User’s Guide
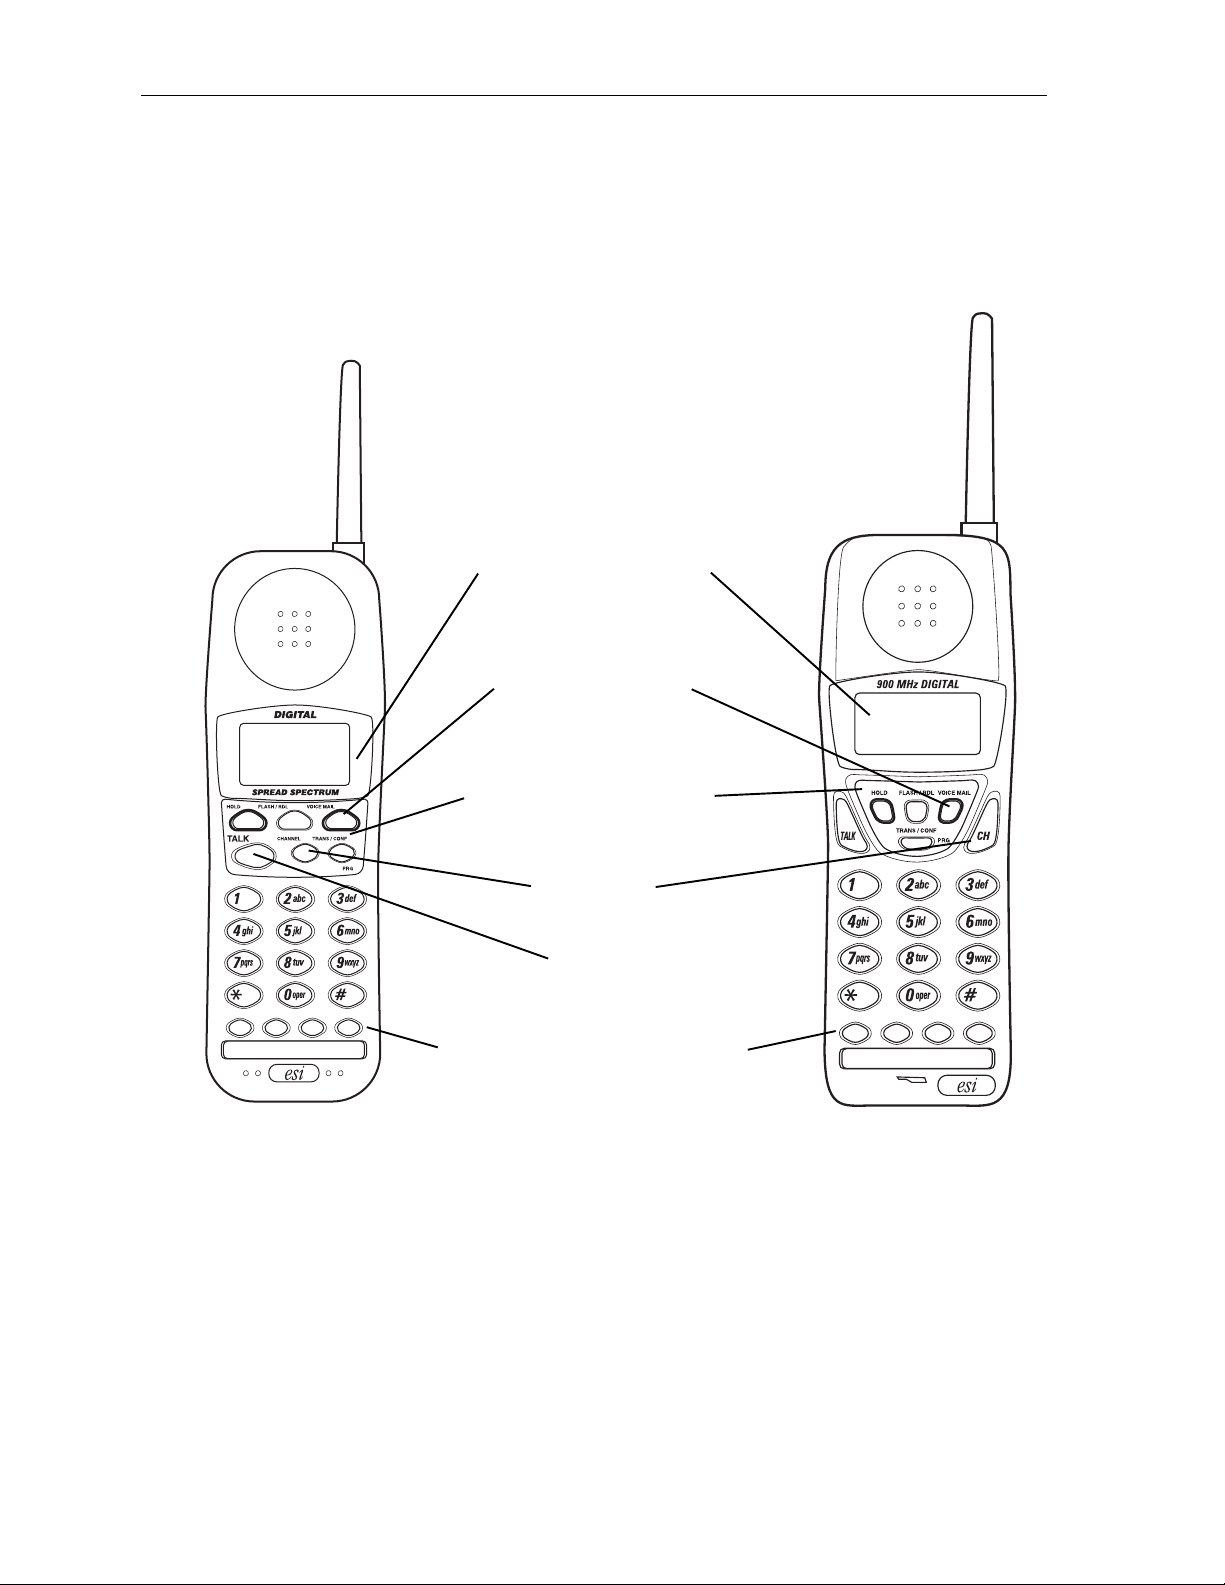
ESI Cordless Handsets
ESI’s digit al Cordless Handsets come in t wo m odels — small and large — but each offers the same
features. Note that they do not have the following features foun d on some ESI desktop phones:
speakerphone, Esi-De x support (o r ESI-DEX key), Call er ID key, Virtual Mai l box Key support , or Verbal
User Guide (or HELP key). Each model comes with a charger/AC adapter, base station, belt cli p,
battery pack, and wall mount .
Two-lin e, 3 2- c har ac t e r dis play;
third line contains status icons
VOICE MAIL key (pg. D.1 )
Other fixed feature keys (pg. E.2)
Four programmable feature keys (pg. C.2)
Compact model Heavy-duty model
CHANNEL key
TALK key
A.6
User’s Guide Introduction
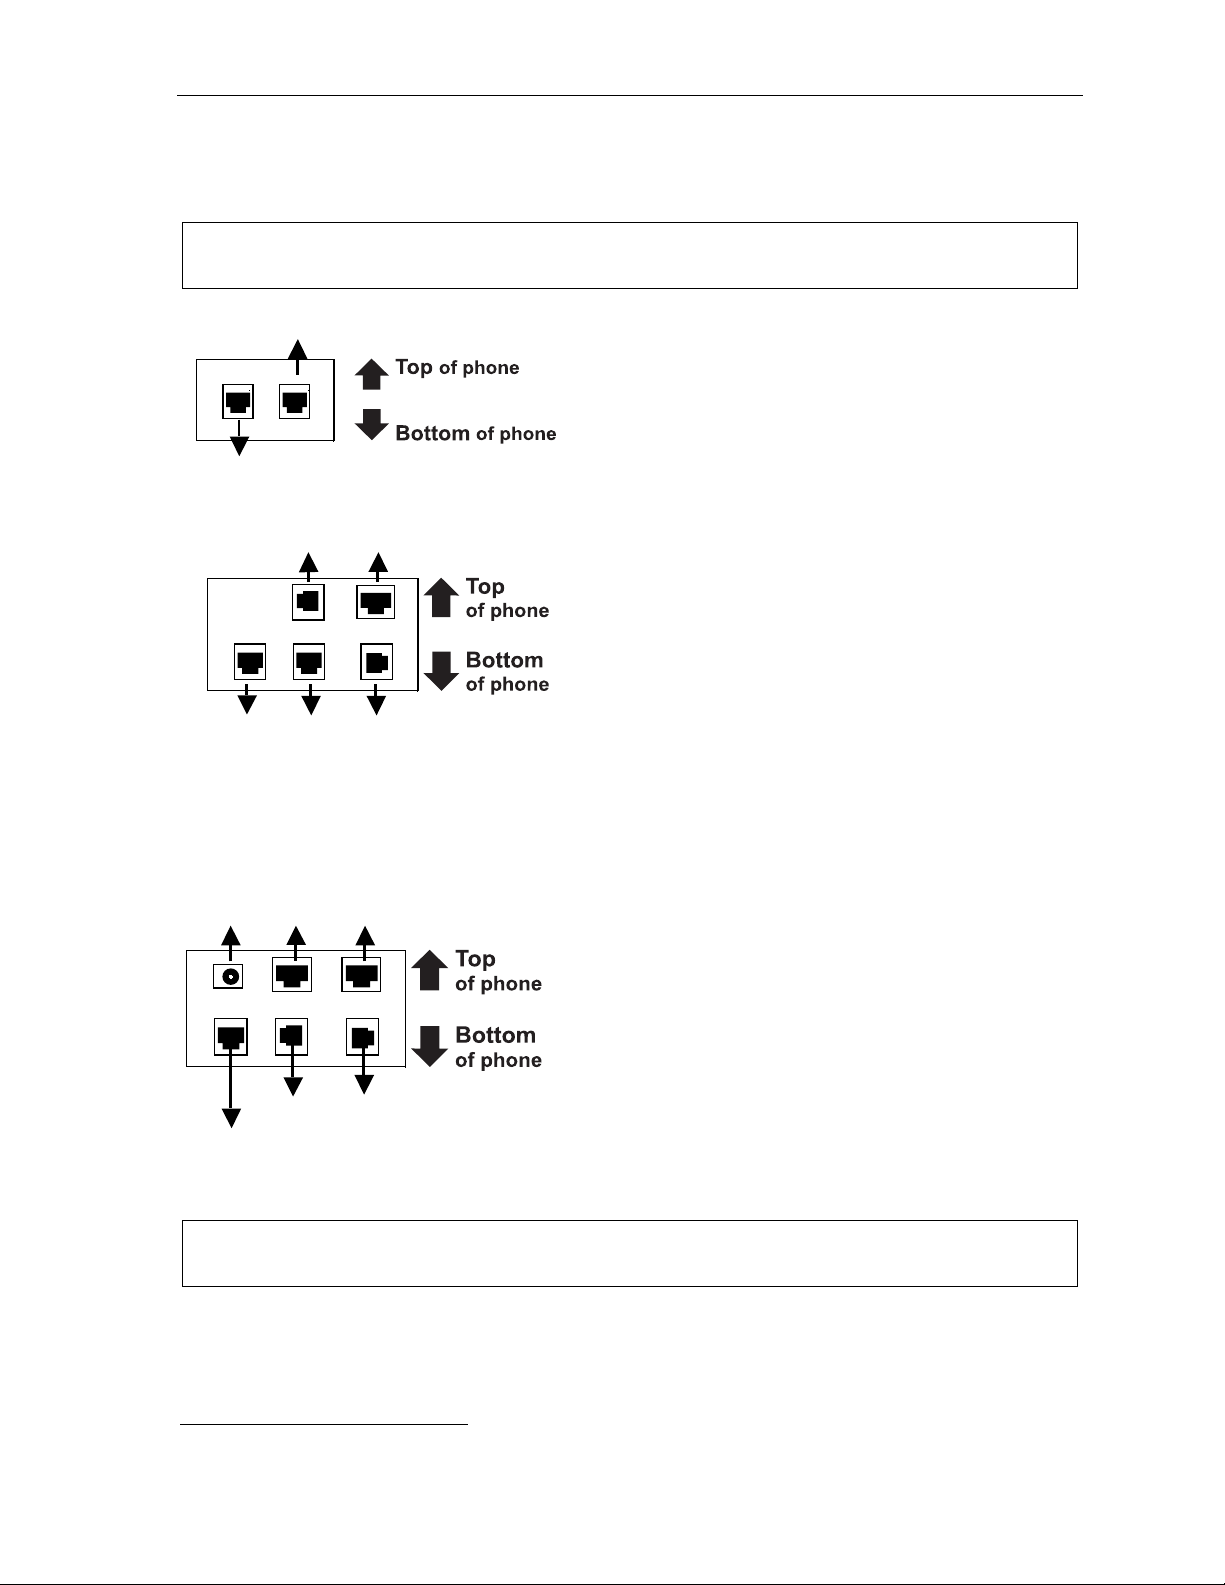
Connecting your ESI phone
Depending on which ESI phone y ou have, use the ap propriate di agram (below ) to connect it. Each
diagram represents the pan el on the phone’s underside.
Note: The “Top of phone” and “Bottom of phone” references in these di agrams show t he corr ect ver tical
orient ation of the ph on e — i.e., the part with the display is the top.
Line cord
to wall
Handset
To
headset
(TAPI)
to PC
12-Key Featur e P hone
24-Key Featur e P hone
• Connects like a basic phone.
• Handset plug s into right -side jac k.
• Line cord plugs into left-side ja ck.
48-Key Digi tal Fe atur e P hone
In addition to how the 24-Key Feature Phone connects
to the handset and line cord, note the pres ence of a
headset jack
1
, as well as the f ol lowing information:
To power
supply
To 60-Key
Console
To 60-Key
Console
Line cord
to wall
Connectors on bottom of
48-Ke y Digit al Feature Ph one
To
LAN
Handset
(headset jack shown)
To
PC
Handset
To
headset
• TAPI versio n i ncludes a cable f or connecti ng t o your
PC’s serial port.
• 60-Key Expansion Console cable (incl uded with each
Console) uses standard RJ-11 tel ephone connectors.
48-Key IP Featur e P hone
48-Key Rem ote IP Feature P hone
In addition to t he details m ent i oned previously for
the 48-Key Digital Feature Phone, each IP Feature
Phone include s:
• A power supply t hat is unswitc hed (i.e., alway s-on AC
outlet) and plugs into the phone.
• An Ethernet cab l e, which conn ects the
phone to a PC (or, if no PC i s prese nt, directly to a
router, switch or hub) to ac hi eve connectivity to a local
area network (LAN).
Note: When the ph one is i n the hi ghest upright positio n, use the wall -mount hook located under the handset
to secure th e handset when you’re not using the phone.
1
On 48-Key Feature Phones shipped by ESI to its Resellers on or after March 1, 2004.
A.7
Introduction User’s Guide
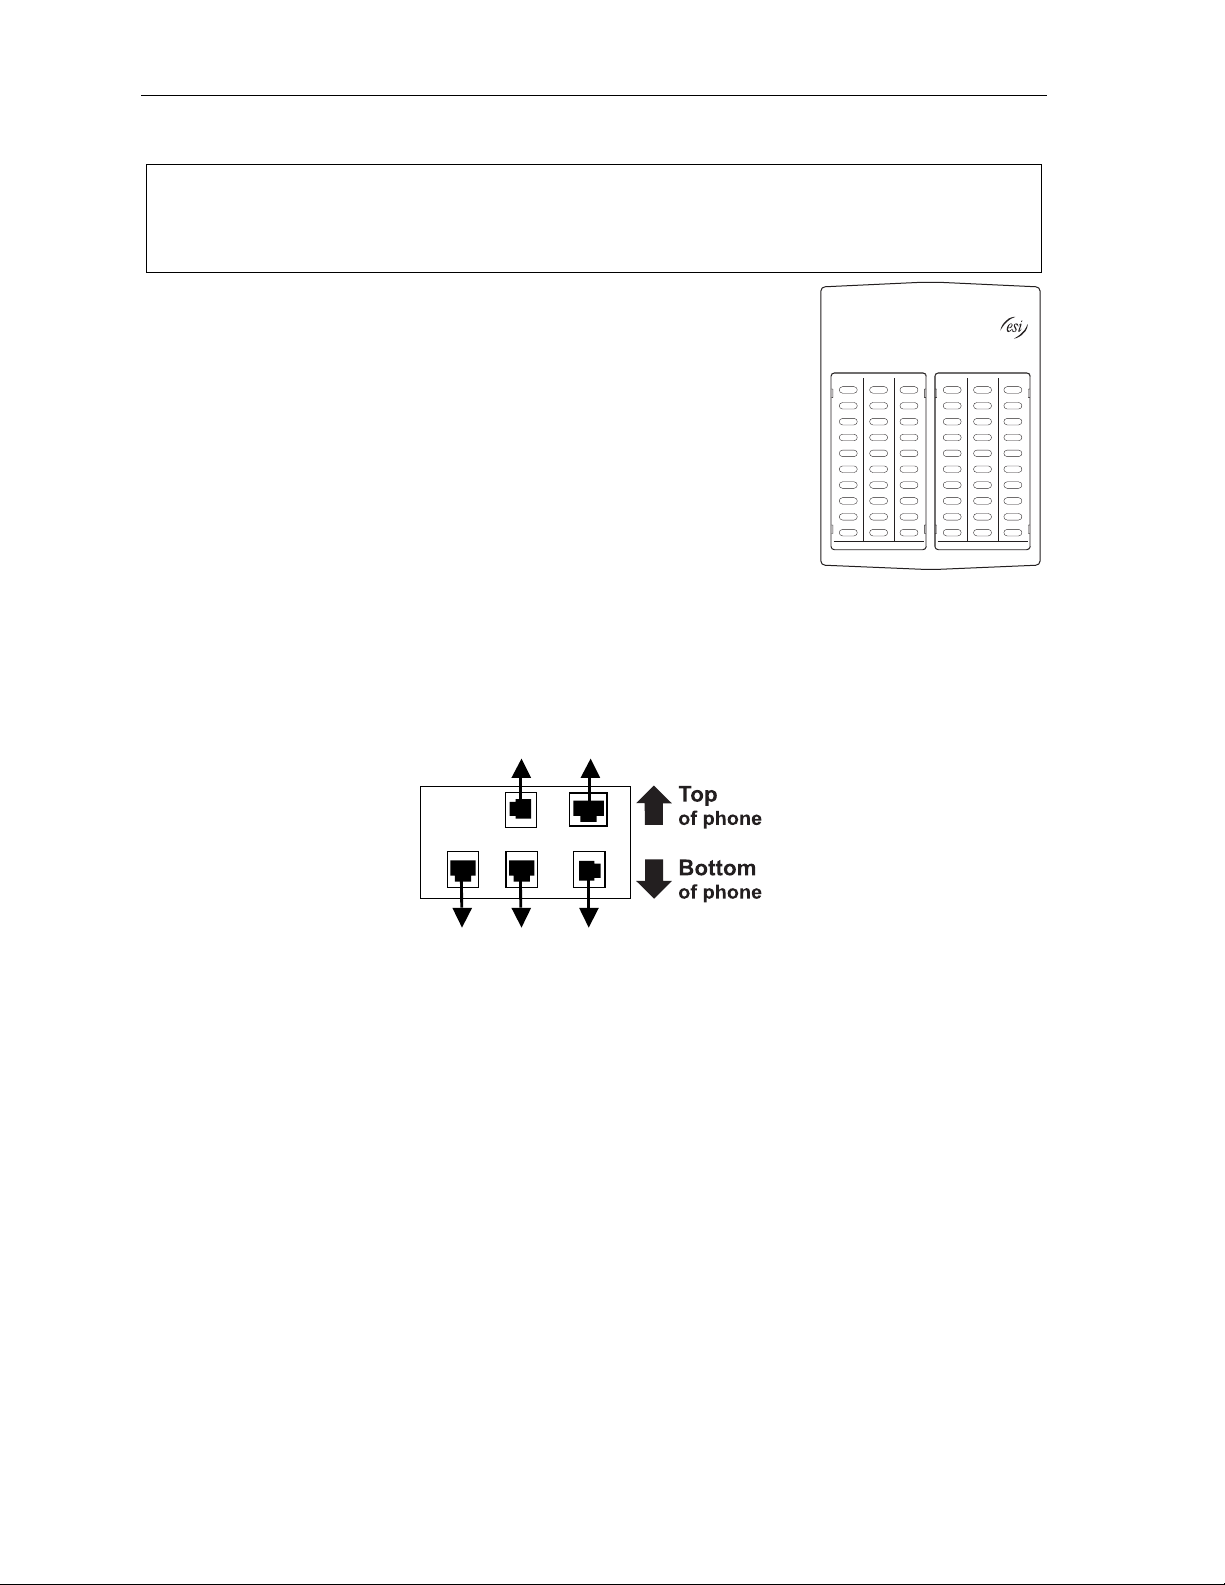
60-Key Expansion Console connection
Notes: The 60-Key Exp ansi o n Cons ol e can be co n ne cte d t o only a 48 -Ke y Feat ur e Ph on e.
If connecting both a 60-Key Expansion Console and a Second Expans ion Console to a 48-Key Feature
Phone, see “Second E xpansi on Console co nnection,” p age A.9.
1. The 60-Key Expansion Console (right) i ncludes an expansion cable.
Connect one end of t he expansion cable to the appropriate con nect or
on the bottom of the Feature Phone (below).
Then, connect t he other end of the expansion cabl e to the 60-Key
Expansion Consol e.
2. To keep cabling out of the way, thread t he expansion ca bl e i nt o the
slots on the bottom of the phone and 60-Key Expansion Console.
3. Program the keys on the 60 -K ey E xpansion Cons ol e using the same
procedure a s with the 48-Key Feature Phone (press PROGRAM 2).
4. If necessary, remove t he clear plastic overl ay from the keys on t he
Expansion Consol e.
5. For maximum convenience, label the paper overlay to s how how
the keys are p rogrammed (your Installer or System Administrat or can do this w i t h E SI software).
6. Install the labeled paper overlay on the 60 -K ey E xpansion Console.
7. Install the clear plastic overlay over the paper o ve rl ay, to protect it.
8. Use the provided Velcro
side of the 48-K ey Feature Phone.
®
tape to at t ach the left side of the 60-Key Expansio n Console to the ri ght
(TAPI)
To
headset
to PC
A.8
To 60-Key
Console
Line cord
to wall
Connect or s o n bott om of 48- K e y Digi tal
Feature Phone; TAPI model shown
Handset
User’s Guide Introduction
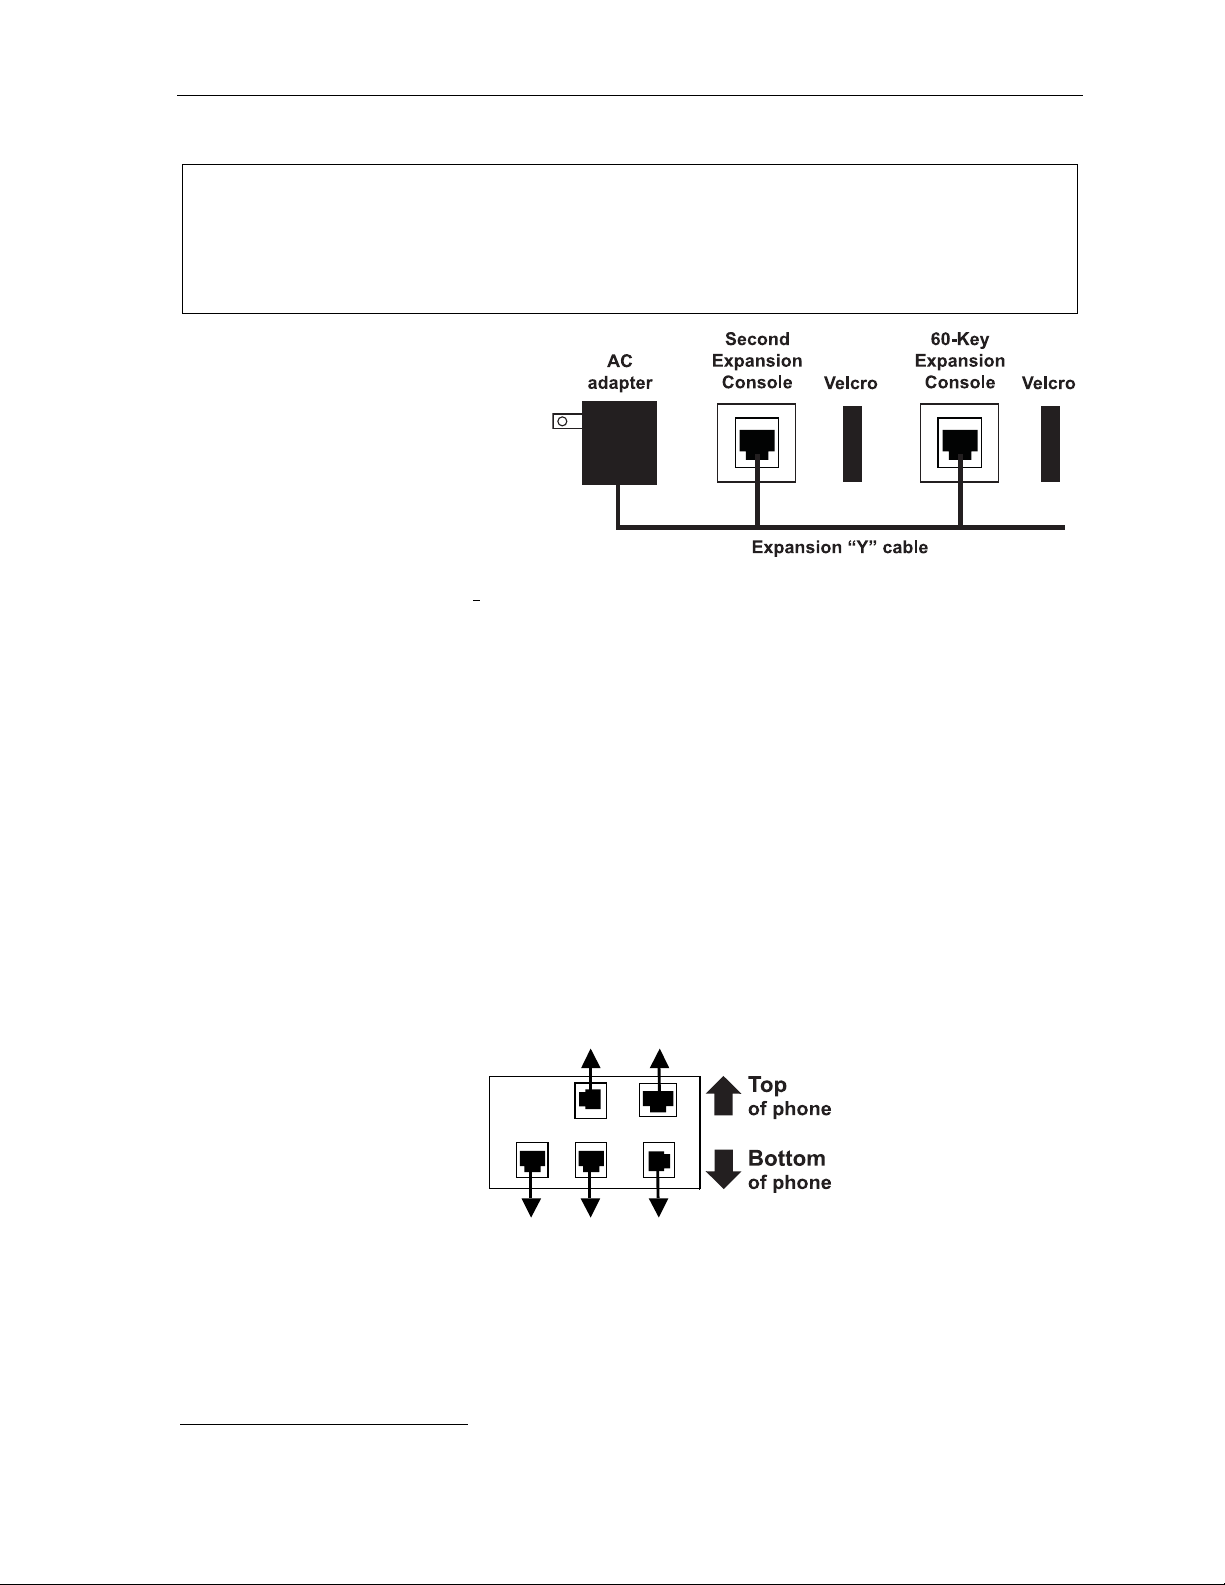
Second Expansion Console connection
Notes: If connecting only one Exp ansion Console to a 48-Key Feature Phone, see “60-Key E xpansi on
Console c on nect i on, ” pa ge A. 8.
The Second Ex pansion Console connects to the 60-Key Expansion C onsole and cannot connect
directly to the 48-Key Feature Phone (which is the only phone to which you can connect a 60-Key
Expans ion Console).
1. The Second Expansion Console
(which is ph ysically id ent i cal to a
60-Key Expansion Console )
includes an expansion “Y” cable
1
(right)
. Lay out the cable across the
back of the equi pm ent so t hat the
AC adapter is on left and the en d of
the cable is on the right.
2. Connect the right e nd of the
expansion “Y” cable to the
appropriat e c onnector on the bot tom
of the 48-Key Feature Phone (
3. Then, connect the expan sion “Y” cable’s middle plug to the 60-K ey Expansion Console, the left
plug to the Second Expansion Console, and the AC ad apter to an appropriate 110 VAC outlet to
provide power to the Seco nd E xpansion Console (above).
4. To keep cabling out of the way, thread the expansion “Y” cable into t he slots on the bot tom of the
phone and the two Expansion Consoles.
5. Program the keys on the two Expansion Consoles using the same procedure as with the 48-Key
Feature Phone (press PROGRAM 2).
6. If necessary, remove t he clear plastic overlay from the keys on the two 60-Key Expansion Consol es.
7. For maximum convenience, label the paper overlay to s how how the keys are programmed (your
Installer or System Administrator can do this with ESI software).
8. Install the labeled paper overlays on the two 60-Key Expansion Consoles.
9. Install the clear plastic overlays over the paper overlays, to protect them.
10. Use the provided Velcro
side of the 48-K ey Feature Phone, and the right side of the 60-Key Expansion Console t o t he l eft
side of the Second E xpansion Console).
below).
®
tape to attach the left side of the 60-K ey Expansion Console to the ri ght
(TAPI)
To
headset
to PC
To 60-Key
Console
1
This diagram shows the backs of the Expansion Consoles.
Line cord
to wall
Connect or s o n bott om of 48- K e y Digi tal
Feature Phone; TAPI model shown
Handset
A.9

Introduction User’s Guide
ESI Cordless Handset connection
Each ES I Cordless Handset comes with:
• A charger/cradle to charge the H andset.
• An AC adapter for use with only the charger.
• A base station to provide a di gi t a l interface between the ESI phone syst em and E SI Cordless
Handset. T his base station is line-powered and thus needs no A C power.
• Wall-mount(s), a belt clip, and a Quick Reference Gu ide.
Base station installation
Due to each site’s unique characterist ics, the range and distance informat i on we’ll provide herein is
only approximat e.
Characteristics that positively affect performance:
• The base station should be installed so it has a clear line-of- sight with the Co rdl ess Handset.
• The base station antenna shoul d always be pointed in its uppermost vertical position.
Don’t install the base station:
• Close to a wall, especial l y one with metal studs.
• Next to a device that emits RFI
flourescent l i ght fixture, or fax machi ne.
1
or EMI2 — e.g., a televi sion, radio, computer , com put er printer,
• Next to any other 900 MHz device — e.g., a hand-held invento ry control device.
• In a ceiling t hat has foil-backed insulati on.
• Behind doors that typically are close d, tinted wi ndows, one-way glass, or other areas that l i m it or
cut off transmission to the Cordless Handset.
Base stations must be instal l ed at least 10 feet apart, regardless of whether the base station is for the
small-model or large-model Cordl ess Handset. Don’t install more t hen six base stat ions in one area
(such as a network room). Ch oose a location at l east 30 feet away if m ore than six base stations are
needed in a buil di ng. A base stati on requires only a line cord to the phone system; AC power isn’t
needed because t he base station receives power from the phon e system via the li ne cord.
Once the base stat i ons are instal l ed and the Cordl ess Handsets charged, change each Handset’s
channel by pressing its CH key . Each Handset should have its own channel. There are 30 available
channels on the small Cordless Handset and 10 on the l arge Cordless H andset.
Note: Feed back may result if t he Cordl ess Handset is within three inc hes of an ESI desktop Featur e Phone.
1
Radio frequency interference.
2
Electromagnetic interference.
A.10

User’s Guide Help mode (Verbal User Guide)
Help mode (Verbal User Guide)
Your ESI phone s ystem ’s Help mode (also called the Verbal User Gu i de) — a carefully conceived
combination of spoken inform ation, display readouts an d even key illum i nat ion when app ropriate — is a
powerful tool to help you learn how to use the system’s many features.
Notes: As expl ained on page E.2, each of th e two smaller Featur e Phones, 12-Key and 24-Key, has a combo
PROG/HELP key.
The ESI Cordless Handsets have no access to the Verbal User Guide and, therefore, no HELP key.
Tutorial
When your stati on is idle, press HELP, and then follo w the spoken Help menu to:
• Learn how to use the phone • Hear a descripti on of how any key is used
• Learn how to use voice mail features • Hear a complete t utorial on ph one operation
Help during st ation program m i ng
To hear a detailed descript i on of a function you wish to program, press HELP whi le programming it.
Help during a call
Press HELP while on a call and this will pl ac e the call on hold, whe reupon you can use Hel p mode to
hear a description of the function you wish to perform. When you exit Help mode, you will be
reconnected to the call.
While you are either in He lp mode or programming your phone, your station will be temporarily pla ced in
DND (see “MUTE/DND,” page E.3). Anyone calling your station while you a re in DND will be f orwarded
to your mailbox (or othe r destinati on set by the instal ler).
Exiting Help mode
To exit Help mode, simply hang up.
Visit www.esiusers.com f or up-to-date h el p.
B.1

Help mode (Verbal User Guide) User’s Guide
(This page included for pagination purposes only.)
B.2

User’s Guide User programming: An introduction
User programming: An introduction
Voice prompts will play menu and sub-menu options to access the desired feature. You don't have to wait
for the enti re prompt to be played. Therefore, once you’ve become familiar with the prompts (co nsult
“User program m i ng m enu overview,” below), you can quickly set any frequently used featu re.
Program m ing hel p
During any of the programmi ng st eps, press HELP to hear a mo re detailed descriptio n of the featu re
and related p rogramming options.
Exiting pr ogr am m ing mode
To exit programming mode, si mp ly hang up.
User programming menu
Overview
1 Select personal greeti ng
1 Record
2 Delete
3 Hear
2 Programmabl e feat ure key s
(Station keys, line keys, speed-dial keys,
other feature keys)
3 Station options
1 Call waiting/background announce
2 Personal greeting reminder
4 Outside dial tone preference
5 Hands-free answer
6 Message monitor
7 Power-saving mode
4 Station audibles
1 Station ring tone
2 Station ring volume
3 Message ring
4 Secondary ring tone
5 Secondary ring volume
1
5 Password
1 Enter
2 Delete
3 Hear
4 Security level
6 External message notification
1 Delivery options
2 Phone delivery
3 Pager notification
4 Urgent message
7 Person al Ca ll Rou t ing
1 Entry settings
2 Exit settings
3 Quiet time settings
9 Un-delete
2
Note: Selectio ns 3, 5 and 6, as well a s the background ann ounce function under “Stat ion options” (see page
E.12), are not available on a 12-Key Feature Phone.
1
For use with only ESI Cordless Handsets.
2
Available only if your phone system is using ESI Presence Management. If you’re not sure whether it is, consult your System
Administrator. For more information about ESI Presence Management, visit www.esi-estech.com/presence.
C.1

User programming: An introduction User’s Guide
1 Select personal gre eting
Select the desired greetin g — 1, 2 or 3. The system will play the current greeting, followed by
prompts to re-record, delete or hear again — or select the current greeting by pressing #.
1 Record personal greeting
Begin recordi ng at the tone. P ress 1 to stop. T he new personal greet i ng automatically replaces
the previous greeting.
2 Delete personal greeting
When prompted, press 2 again to c onf i rm deletion.
Warning: Y our mailbox is disabled if no personal greeting exists. Never delete all of your existing
personal greetings before you record at least one new one.
3 Hear current personal greeting
2 Pr ogramm able feature keys
There are two methods for pe rf orm i ng programm i ng of your phone:
• Direct programming — Select the ke y y ou want to prog ram , and hold it down for at least t wo
seconds. This not only init iates programm ing but also let s you immediately program t hat specific key .
• T raditional programm i ng — P r ess PROGRAM. T he Verbal Help Guide will speak to you,
walking you through the ful l m enu, during which you can choo se t he appropriate option.
Direct pr ogr amm i ng ex ampl e:
You wish to set one of the keys to dial a c o-work er, whose extension is 105. Hold down th e key
for at least two seconds. This automatically puts you i n feature key programming. Follow the
prompts to enter 1 0 5. (This has allo wed you to ski p two st eps — pr essing PROGRAM and
selecting a m enu option — t hat you’d have had to perform if using t raditional programming.)
C.2

User’s Guide User programming: An introduction
How the programmable feature keys can be set
• Line keys — Programming a line number (1 through 84) into a programmable feature key makes it
a line key , which provides the appropriat e l am p i nformation and manual outside-line access.
• Stati o n keys — If the digits entered con st i t ute a three-digit number, the programmable feature
key will become a station key, providing the appropriate lamp informatio n and easy access or
transfer. Three-digit numbers ente red can be:
— User extensio ns — Group mailboxes (500–516 )
— Department pi l ot num bers — Cascade paging mailboxes (520 –529)
— Guest/info mailboxes — System speed dial n um bers (600–699)
— Q & A mailboxes (490–499)
• Sp eed -dial keys — In addi t i on to programmi ng a programm abl e feature key wit h a system
speed-dial number, you can create personal speed-dial keys for automatic diali ng of frequently
called outsi de num bers. If you program 9 (or 8 or 71–76) pl us a p hone number , the
programmable feature ke y be com es a speed-dial key. When you program a speed-dial key,
there's no need t o insert a pau se af ter the 9 (or 8 or 71–76). Use the scroll ke y to ente r spe cia l
character s f or dialing (s ee page C.6 fo r m ore details.) The speed-dial num ber can be up t o 24
characters long.
Note: You can al so program Location Keys for use with Esi-Link. See page H.1 for more information.
• Other f eature keys — If you ent er a feature co de, the program m able feature key will serve as
an enable/disable key for t hat feature. The Install er m ay have programmed certain stations for
accessing addit i onal featu res (see “Optional featu res,” page F.12); consult your System
Administrator to dete rmi ne your access.
Keys’ LED activity during programming
Key type a nd LED indi c a t ion
Station key or
Mode
Currently being programmed and
previously assigned
Currently being programmed and
previously unassigned
Programm ing mode — Was assig ned or
viewe d in current sessi on
Assigned in a previous pr ogr ammi ng session
and not yet viewed in current session
Never assigned and not yet viewed in
current se ssi o n
Note: Each ESI Cord l ess Ha nd s et has o nly on e LED c olor — red — with si mi l ar bli n ki ng rates.
Virtual Mailbox Key
Flashing re d Flashing gr een Flashing amber
Flashing red Flashing red Flashing red
Blinki ng r ed Blinki ng gr e en Blinki ng am ber
Solid r ed Solid green Solid amber
Off Off Off
Line key
Feature k ey
or spe ed-dial key
C.3

User programming: An introduction User’s Guide
3 Station optio ns
The station options sub-menu (PROGRAM 3) lets you activate or deactivate several features your
station can p rovide. At each opt ion sub-menu, 1 e nables the option and 0 disables i t . (Each option
listed below is explai ned elsewhere in this manual, as noted.)
1 Call waiting/background announce
See page E.12 for call waiting and page E.12 for background announce.
Note: Backgro u nd an no unc e is not avai l a ble on a 12- Ke y Feature Phone.
2 Personal greet ing reminde r
See page F.10.
3 Headset ope ration
See page F.10.1
Note: Not available on a 12-Key Feature Phone.
4 Outside dial tone preference
See page F.11.
5 Hands-free answer
Note: With an ESI Cordless Handset, use of this feature requires a headset.
See page E.3.
Note: Not available on a 12-Key Feature Phone.
6 Message monitor
See page F.10.
Note: Not available on a 12-Key Feature Phone.
7 Power-saving mode
Note: Applicable to only an ESI Cordless Handset.
Allows you to enable or di sable an ESI Cordless Handset ’ s power-savin g mode. Enabling t hi s
mode helps achieve full bat t e ry life. However, if full-time status monitoring i s required, yo u can
disable this mode. In power -saving mode, t he phone syst em bl ock s all status updates
Cordless Ha ndset when the Handset has b een i dle for 30 seconds. Pre ssing the Cordless
Handset’s keys or rece iving an incoming call on it will discontinue power-saving mode.
Note: When the handset has received no calls or status updates2 for five minutes, the Cordless
Handset enters deep-sleep mode. During it, the display is blank and the LEDs don’t light up.
If the system sends any updates to the Cordl ess Handset, it will discontinue deep-sleep mode.
2
to the
1
Not necessary with Generation II system. If unsure which system you have, consult your System Administration.
2
For example: If you have a programmable feature key set as a station key for someone’s extension, the system updates your
Cordless Handset based on that extension’s current status (busy, idle, do-not-disturb, or — with optional ESI Presence
Management — off-premises).
C.4

User’s Guide User programming: An introduction
4 Station audibles
The station audibles program m i ng provides control of t he f ol l owing audible items.
Note: Only the third setting, message ring, is applicable to the ESI Cordless Handset.
1 Station ring tone
You can select from six possi ble tones to hel p distinguish it from other nearby ringing phones.
Press
2 Station ring vol um e
Press or to set the desired ringer volume (r ange: off t o hi gh), then press # to accept it.
3 Message ring
When enabled, this feature wi ll periodically generate a short ring tone at your station as an
additional al ert that you have new message s.
Your phone has a secondary ring tone you’ll hear (if yo ur phone system has been programm ed
accordingl y by your Instal l er) when call waiting occ urs — i.e., a second call rings in for you while
you’re already on another one — on live- ri ng calls. T he following two parameters let you adjust how
it sounds.
or to select a to ne, then press # to accept it.
Note: (48- Ke y and 24-Key Feature Pho nes only)
If the ringer volume is turned off, the status indicator lamp will not “flutter” when an incoming or
recall ed call is presented to the phone (see “Stat us indicator lamp,” page D.9).
4 Secondary ring tone
You can select from six possi ble tones to hel p distinguish it from other nearby ringing phones.
Press
or to select a to ne, then press # to accept it.
5 Secondary ring volume
Press or to set the desired ringer volume (r ange: off t o hi gh), then press # to accept it.
5 Password
1 Enter new password
Your password m ay c onsist of 2–8 digi ts followed b y # (0 cannot be the first di git). Ent ering only
0 as the password wi ll turn off the password requirement.
2 Delete current password
Resets the pa ssword to the def ault pass word.
3 Hear current password
Displays and pl ays back the cu rrent password.
4 Password security level
Selection Result
0 No passwor d required for access from any phone
1 Password requir ed only for re m ote access, ei ther off-premise s or from other
stations within the system
2 Password always required
C.5

User programming: An introduction User’s Guide
6 Exter nal message notification
Note: To use this feature, a 12- Key Feature Phone must have a voice mail key assigned.
1 Delivery options
1 Delivery to phone number only
2 Notify pager only
0 No off-premises delive ry
2 Phone delivery
1 Enter phone number
Enter the pho ne num ber (24 digits, maximum) f ollowed by #. Do not include an outsid e l i ne
access code (i.e., don’ t add 9, 8 or 71–76) before the number.
Use the scroll key to enter sp ecial charact ers; use the
also can use the scroll keys to view the number after it’s saved. To change the number, you
must delete it and then re-e nter it as desired.
2 Delete phone number
Deletes the c urrently programmed phone number.
3 Display current phone number
Displays the currently programmed pho ne num ber.
scroll key to backspa ce . Y o u
3 Pager notification
1 Enter pager number
Enter the pag er num ber (24 di gi t s, m axim um) followed by #. Do not include an out side line
access code (i.e., don’ t add 9, 8 or 71–76) before the number.
Use the scroll key to enter sp ecial charact ers; use the
also can use the scroll keys to view the number after it’s saved. To change the number, you
must delete it and then re-e nter it as desired.
2 Delete pager number
Deletes the c urrently programmed pager number.
3 Display curren t pag er nu m b er
Displays the currentl y programmed pager num ber.
4 Urgent message activation
1 Urgent messages on ly
Only urgent messages will be delivered.
Note: Remember to say in your p ersonal greet ing t hat cal lers s hould press 2 to mark a
messag e as urg ent. ( For mor e on p ers on al gr e eti ng s, see pag e D.1.)
2 All new messages
Any new message will be delivered.
scroll key to backspa ce . Y o u
C.6

User’s Guide User programming: An introduction
7 Personal Call Routing
For details, consult the E S I Presence Management User’s Guide (ESI part # 0450-0793).
Note: This function is available only i f your phone system is using ESI Presence Management. If y ou’re
not sure whether it is, consult your S ystem Administrator. For more information about ESI
Presence Management, visit www.esi-estech.com/presence.
9 Message Recycle Bin (un-delete)
The most recently deleted message will be played first. Press 9 to move to the next message.
Press 8 to restore the message to your mailbox as a new mess age.
C.7

User programming: An introduction User’s Guide
(This page included for pagination purposes only.)
C.8

User’s Guide Voice mail operation
Voice mail operation
Your phone system provides accurate and timely mess ages. Others will become more comfortable
leaving you voi ce messages if you promptly r etrieve and respond to your messages.
VOICE MAIL key
For direct a cc ess to all voice mail features, such a s picking up messages or transferring directly
to mailboxes:
• On a 48-Key or 24-Key Feature Phone — Use the blue V OICE MAIL key. It will blink whenever you
have one or more new message s, and t he display will sh ow you how many new and old message s
are stored f or you on the ESI phone system.
• On a 12-Key Feature P hone — Assign key c ode 579 to a programm abl e f eature key (see
“Programmable feature keys,” page C. 2, and “Optional feature s,” page F . 12). Until this has been
done for your phone, your mailbox is disabled. (When you try t o access a disabled mailbox, t he
system will notify you that it’s disabled.) You still can retrieve previously left message s and a ccess
user programm i ng, but the mailbox won’t be able to recei ve new voice mess ages. Therefore, to
enable the mail box, assign ke y code 579 to a program mable feature key.
• On an ESI Cordl ess Han dset, use the blue-outli ned VO ICE MAIL key. The display, directly above
the VOICE MAIL key, will show an “envelope” icon when you have one or more new messages.
Personal greetings
To program your pe rsonal greetings, press PROGRAM 1. Initially, your mailbox h as a generic
greeting: “You have reached the mailbox f or extensio n xxx. Dial 0 to reach the operator or begin
recording at the tone.” You can record up to three different personal greetings in your own voice
indicating your availability to ret urn calls.
Examples
Sample greeting 1: Hi, this is [name]. I’ m away fr om my desk or on the phone right now; so please either dial
zero to reach our operator, or leave me your name, number an d m essage at the tone and
I’ll get back to you as soon as I can.
Sample greeting 2: Hi, this is [name]. I’m out of the office. You may dial 1 2 2 for my assistant or, if you
prefer, you may leave me a voice message at the tone — I’ll check in regularly — or, if it’s
import ant, ei t her di al 4 to reach me on m y cell phone or dial 2 to le ave me an urgent
message that will page me automatically.1
Sample greeting 3: Hi, this is [name]. I’m away from my desk at the moment. To have me paged, dial 3.To
reach the operator, dial zero. Otherwise, leave your name and phone number at the beep
so I can return your call.1
(Continued)
1
These sample greetings refer to certain features which may not be activated for your extension; consult your System
Administrator for additional information, if necessary.
D.1

Voice mail operation User’s Guide
Depending on aut o at tendant u sage a nd your person al preferences, you may wish to includ e one or
more of these opt i ons in your pe rsonal greetings:
Option Instruction
0 T o reach the operator
1 T o skip directly to the record t one (or “beep”)
2 To mark this message as urgent (see “Urgent messages,” page D.9)
3 T o page (internally) the person f or whom the caller is leaving a voice mail message
4 T o perform off-prem ises “reach- m e” (se e “Off-premi ses ‘r each- m e,’” page D.3)1
8 T o the main greeting (if your system is using the auto attendant)
XXX An extension number of anoth er us er
Note: Option 3 is a vailable only when per so na l gr eeting 3 has been r ecor d ed; a nd opt i on 4 i s
available on ly when personal greeting 2 has been recorde d.
You can change an y personal greet i ng as often as n ecessary, by just recording over a previously
recorded pe rsonal greeting.
Warning: Do not delete all of your perso nal gr eeting s; make sure at least one always remains. Delet ing al l
the greetings will turn off your mailbox.
Personal greeting keys
You can program a programmable f eat ure key as a personal greeting key fo r any one of the t hree
personal gre et i ngs (see page F.14). Once created, this short c ut can then be used t o activate t he
associated personal greeting (the key’s LED will glow green and the greeting played as confirmation).
Note: To re-record this greeting, press RECORD while the conf irmat ion is playing and follow the prompts (on
a 12-K ey Feature Pho ne, whi ch has no RECORD key; press PROG /HELP 1 3 1 from idle).
Leaving messages . . .
If you call anot her station that is DND, busy or does not answer — or if you call a special m a ilbox (such
as a guest or group mailbox) — you will be transferred to the mailbox. You can skip the mailbox’s
personal gre et i ng by pressin g 1; this takes you directly to the recor d tone.
. . . directly in another user’s mailbox
The procedure for going directly to another user’s mailbox2 without ring i ng his/her extension depends
upon whether you have that us er’s extension set as one of your statio n keys:
• If you do, pres s VOICE MAIL and then the pers on’s station key.
• If you don’t, press VOICE MAIL and TRANSFER and then dial t he extension num ber.
Either will connect you directly to that user’s personal greeting.
. . . in several users’ mailboxes using a Quick Gr oup
You can leave a direct message i n several use rs' mailboxes at t he same time by pressing VOICE MAIL
and the desired station key s — t hus creating a Quick Group. You can also move message s or
recording s t o a Quick Group in the same m anner.
Notes: You can use onl y station keys to s elect the additional mai lboxes for Quick Groups.
If you have a department programmed as a station key, pressing VOI CE MAIL a nd then the
department’s station key will leave a message for all members of the department.
1
If your system is using ESI Presence Management, consult the ESI Presence Management User’s Guide (ESI part # 0450-0793)
to learn about additional, special functionality that may be available to you. If you’re not sure whether your system is using
ESI Presence Management, consult your System Administrator. For more information about ESI Presence Management,
visit www.esi-estech.com/presence.
2
You also can leave messages in mailboxes (such as guest mailboxes) that don’t have extensions associated with them.
D.2

User’s Guide Voice mail operation
AutoPage
This feature lets you have outside callers internally page you aft er t hey’ve been f orwarded to your voice
mailbox and are listening to your personal greeting (see “Personal greetings,” page D.1). You must have
personal greeting 3 selected and it must tel l callers to press 3 for this feature. If the caller dials 3
during the pe rsonal greeting, he/she is placed on hold; the system then p ages you by name, f ol l owed by
the phrase “You have a call on line” and the li ne on which t he call is on hold (e.g., “John Doe, you have
a call on line 21”). If you don’t answe r t he page within a programmed interval, the caller is forwarded
back to your ext ension/voice mailbox.
Note: This feat ure is a ctive if your administrator authorizes your station for it, you ha ve set your mailbox to
play personal greeting 3, and a di rectory nam e is recorded for your station.
Sample persona l greeting 3 fo r AutoPage:
“Hello. This is Rick. I’m currently unable to receive your call. To have me paged throughout the buil ding,
please pr e ss 3 now. Otherwise, plea se leave me a mes sage after the tone and I wi ll return your call as soon
as possible.”
Moving and deleting a message
When you move a message, the system accesses another submenu to determine whether you want t o
move and delete a message, or mo ve and save it. After you press 6 to move a message, the prompt will
ask whether y ou wish to:
• Move the message but also save a copy of i t i n your voic e m ai l box
or
• Move the message and delete it from y our mailbox.
1
Off-premises “reach me”
After a caller has been forwarded to your voice mailb ox and is listening to your personal greet i ng, this
feature allows the caller to b e fo rwarded t o a numbe r outside the system — i.e., a regular phone number
rather than an ext ension.
Note: This feat ure is a ctivated onl y if your Syst em Adm inistrator enables it on your station.
You must have perso nal greeting 2 selected and it m u st tell calle rs to pre ss 4 for this feature.
To use this feature, follow these steps:
1. From your ESI Feature Phone, press PROGRAM 6 2 1 and enter the t el ephone numbe r t o which
you want call s f orwarded when you’re of f -premises.
2. Record and activate personal greeti ng 2. Be sure to tell the caller to press 4 during the greet i ng to
be connected to yo ur al ternate phone. (See the sampl e greeting, below.)
When you receive a call forwarded in this fashion, you’ll be prompted to “press any key” to accept the call.
If you don’t a nsw er the call, the caller is returned t o yo ur voice mailbox on the ESI phone system.
Off-premi ses “reach-me ” is availabl e on guest mailboxes, as well.
Sample persona l greeting 2 for off-premises “reac h m e”:
“Hello. This is Rick. I’m currently out of the office. To attempt to reach me on my mobile phone,
please press 4 now. Otherwise, please leave me a me ss age after the tone and I will return your
call as soon as possible.
”
2
1
This feature is activated only if the Installer enables it on your system.
2
This is also the same number used for message notification phone delivery (see “Off-premises message delivery,” page D.8).
D.3
Voice mail operation User’s Guide
Message retrieval
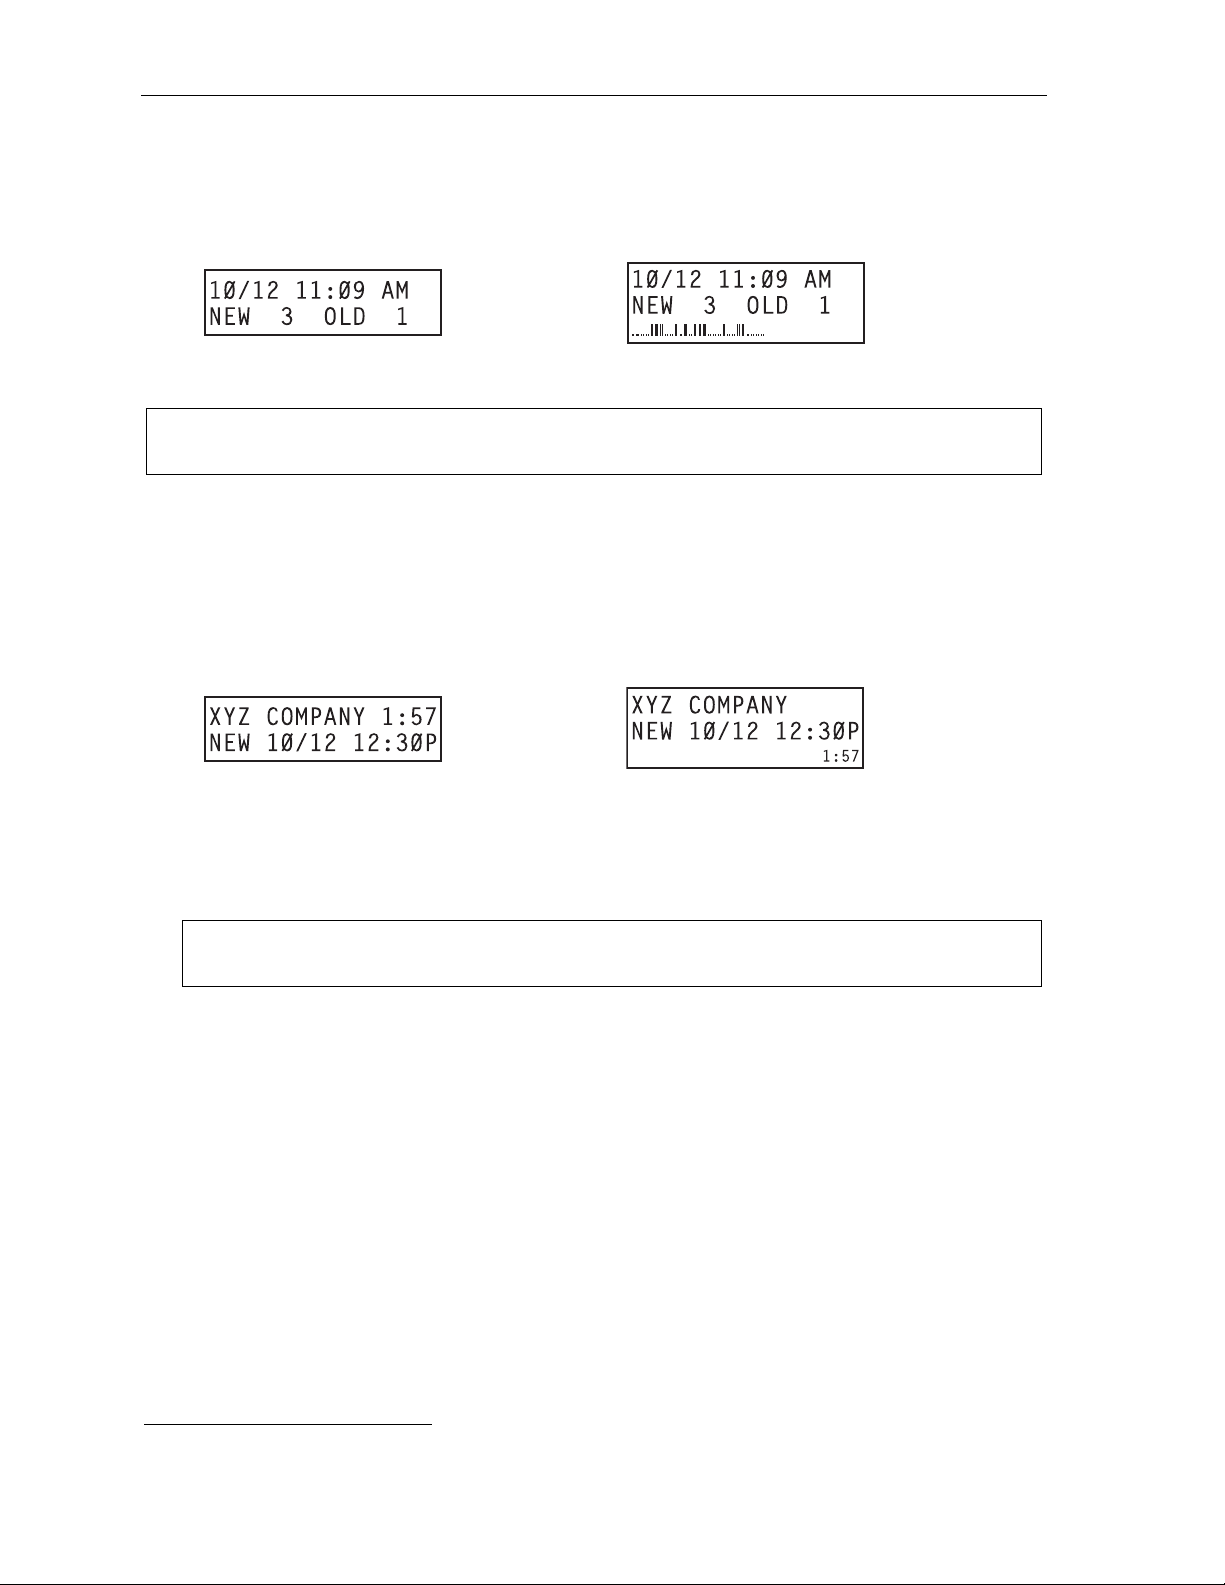
Message(s) waiting display
If you have at least one new message, t he VOICE MAIL key will blink (on a 24- or 48-Key Feature
Phone) and your display will show the n umber of new and old messages in your mailbox.
1
Cordless
Handset or
24-Key
Feature Phone
48-Key
Feature Phone
On an ESI Cordle ss Handset, an “envelope” icon on the display also appea rs when you have at l east
one new message.
Note: Message st atus information (shown i n the example s above as NEW 3 OLD 1) appe ars o n a 24- Key
or 48-Key Feat ure Phone only when n ew messages exi st.
Retrieving voice mail messages fr om your ESI Featur e Phone
1. Press VOICE MAIL.
2. Enter your passwo rd i f required (you may change the requirement for a password in user
programming menu 5; see "Passwo rd,” page C.5).
3. The ESI phone system will start playback of messages with the oldest new message and continue
until all mes sages are play ed. The display will show the ori gination of t he m essage, the count down
duration of the message, whet her new or old, and t he time/date of when the message was left.
Cordless
Handset or
24-Key
Feature Phone
4. At the end of each message, the ESI phone syst em prompts you for i nstructions (see the cha rt ,
“Keys’ fun ct i ons during voice mail messag e retrieval,” next page). Once you’ve lea rned these
prompts, you can proceed more r api dly by pressi ng one of the appropriate keys any time dur ing a
message or duri ng a prompt.
5. To exit playbac k of m essages, simply hang up your pho ne.
48-Key
Feature Phone
(also shows
running playback
time in reverse)
Note: I f you hang up during playback of a message, the system saves that message and all others
not deleted.
1
A 12-Key Feature Phone will display only the date and time.
D.4

User’s Guide Voice mail operation
New message skip
When listening to new messages, press 9 twice (wi t hin two se conds) to save a message as new. This
message will be pl ayed again as a n ew m e s sage the next t i m e you access your voice mail.
Note: When you press 9 once to save t he message as ol d, t here i s a short delay bef or e the system t ells you it
has saved the message. To bypass this delay after pressing 9, just press # to hear the next message.
Keys’ functions during voice m ail message retr ieval fr om an ESI Feature P hone
Key Functi on nam e Description
1 Pause Pauses for on e minute or until y ou pre s s 1 again.
2 Time an d date/
number t oggle
3 Reply Replies to the ori ginator of a message (pos sible only if message came f rom
4 Back up
(rewind)
T oggles the b ottom l ine of the display between the messag e’s time/date and the
caller’s number.
another user in the system). Record your repl y at the t one and then press 1 to stop,
after which the system returns you to your mailbox and the message to which you
were replying.
• If pressed during mess age playbac k, rewinds 4 seconds for each key- press.
• If pressed after the playback has f inished, returns to beginning of message.
5 Fast forward Advances pla yback 4 seconds for each key-press.
6 Move Moves a copy of the message to anot her user’s m ailbo x.
7 Delete Deletes the m essage from the mail box (see “Mes sage Recycle Bin,” page D.9).
9 Save Saves the message (it will play as an old message the next time you
9 9 Save as new Skips over a new message and leaves it as a new message (i.e., it will be played
REDIAL Auto-callback Exits your mai lbox without erasing the message, and then automatically dials
ESI-DEX Store If Caller ID is present, saves to your Personal Dex for later use.
# Leave
a message
Check
other box
(Not available from an analog phone or off-premises location.)
You may move th e copy with or without an i ntrodu ction.
After t he move , the system returns you to your mailbox and the original message.
retrieve messages).
as a new message the next time you pick up messages). You must pres s the 9
key twice within two seconds.
1
the numb er .
(Not available from an ESI Cordless Handset, 12-Key Feature Phone, analog phone,
or off-premises location.)
Lets you record a message in another mailbox. At the prompt , ent er the d esire d
mailbox number.
Checks m essages in a nother mailbo x (may require a password, depending on
the mailbox’s setting; see “Password,” page C.5).
(Not available from an analog phone or off-premises location.)
Retrieving voice mail messages using anoth er user ’s ESI Feature P hone
1. Press VOICE MAIL and then .
2. Dial your extension num ber.
3. Follow the procedure s described in “Retrievi ng v oi ce mail me ssa ges from your ES I F eature Phone”
(page D.4).
1
A local call may not be dialed correctly depending on the limitations of the local dialing plan. You may need to dial some of these
calls manually.
D.5

Voice mail operation User’s Guide
Virtual Mailbox Ke y
(Not available on ESI Cordless Handset or 12-Key Feature Phone.)
If you frequently pick up your messages from anot her user’s E SI Feature P hone or have others help pick up
your messages, you may want to program a programmable feature key on that phone as a Virtual Mailbo x
™
Key
for your mailbox. When you have new messages, the key will blink, press it to automatically connect
to your mailbox. This feature does not affect your ability to pickup messages from your own phone.
Note: Assign to t he programmable ke y the following — VOICE MAIL and then eith er your extension
number or your voice mail box number (se e “Programmable feature keys,” page C.2).
Retrieving messages from an off-pr emises location
You can pick up mes sages when away from t he office or from an analog station. Since th e display is not
available to you, message handling will operate slightly differently.
To retrieve your message from a remote location:
1. If the auto attendant’s main greeting answers you r call, pres s
and enter your mailbox number. If
the operator o r another user answers your c al l, have the person transfer you (by pre ssi ng VOICE
MAIL and
, then pressing your station key [or entering your mailbox number] and then hanging up).
2. If required, ente r your passwo rd.
3. The ESI phone system will anno unce the number of ne w and old messages, and will start playba ck
of messages start ing with the oldest new me ss age and continue u ntil all me ssa ges and recordi ngs
have played or you press
to disconnect.
For more inf orm ation, see page C.6.
Additional functions available during off-premises voice mail message retrieval
Key Function Description
2 Hear time/date Pauses the message, plays the time/date when the message was left and resumes.
5 Access user
programming
8 Main greeting Goes to the main greeting.
0 Operator Transf ers you to the operator.
# To ot her mailbox To leave a m essage in another user’s mailb ox.
Disconnect Disconnects you from the system. Always press before hanging up (if you press it
Acces s certain user -programmable features.
Note: Fast forward is not available from a remote location.
during message pla yback, the system will sa ve the playing m essage and any other
currently unsaved messages in your mailbox).
D.6
 Loading...