

Page 1

ESI Phone
User’s Guide
FOR THE ESI-50L Communications Server
Covering these current ESI phone models:
ESI 60 Business Phone • ESI 40 Business Phone
48-Key Feature Phone • 24-Key Feature Phone • ESI Cordless Handset II
. . . and these legacy ESI phone models:
12-Key Feature Phone • [Original] ESI Cordless Handset
0450-1135
Rev. F
For on-li n e he lp , vi sit www.esi-estech.com/users.
About ESI
ESI (Este c h Syst em s, Inc. ) i s a priv at el y hel d cor porati on ba se d in Pla no, T exas. Fo und ed in 19 87, ESI de sig n s and
builds innovative telecommunic ations produ cts for businesses like yours. B ecause of their powerful com bination of
value and features, ESI pr oducts are con sistently recognized by industry public ations and leaders.
Copyright © 2011 ESI (Estech Systems, Inc.).
Esi-Dex, Quick Groups, Quick Moves, Virtual Mailbox Key, AutoPage, Quick Page and Verbal User Guide
are trademarks of ESI. Microsoft, Windows and Outlook are registered trademarks of Microsoft Corporation.
Information contained herein is subject to change without notice. ESI products are protected by various U.S. Patents,
granted and pending. Visit ESI on the Web at www.esi-estech.com.
Page 2

Contents
Introduction.............................................................................A.1
ESI 60 phone.........................................................................A.2
ESI 40 phone.........................................................................A.3
48-Key Feature Phone................................ ...........................A.4
Optional Expansion Consoles................................................ A.5
24-Key Feature Phone................................ ...........................A.6
12-Key Feature Phone (legac y produ ct).................................A.7
ESI Cordless Handset II.........................................................A.8
Connecting your ESI phone...................................................A.9
Help mode (Verbal User’s Guide)......................................B.1
User programming: An introduction ................................C.1
User programming menu.......................................................C.1
Voice mail operation.............................................................D.1
VOICE MAIL key....................................................................D.1
Personal greetings.................................................................D.1
Leaving messages . . ............................................................D.2
AutoPage...............................................................................D.3
Moving and deleting a message............................................D.3
Off-premise s “reach -me ”........................................................D.3
Message retrieval................................................................ ...D.4
Live recording........................................................................D.8
Off-premises me ssage deli ver y................................ ..............D.9
Message Recycle Bin (un-delete)........................................D.10
Status indicator lamp...........................................................D.10
Setting up twinning ................................ ...............................D.11
Optional voice mail feature: Guest mailboxes......................D.12
Optional voice mail feature: Group/broadcast mailboxes..... D.14
Optional voice mail feature: Cascade notification mailboxesD.16
Optional voice mail feature: Q & A mailboxes......................D.18
ESI phone operation.............................................................E.1
Display...................................................................................E.1
Caller ID.................................................................................E.1
Keys.......................................................................................E.2
Dial tone.................................................................................E.4
Basic phone use....................................................................E.5
Direct station sele ctio n...........................................................E.6
Transferring an outside call . . ...............................................E.6
Transferring an internal call . . ...............................................E.8
Conference calling.................................................................E.9
Call forwarding.....................................................................E.10
Call waiting..........................................................................E.13
Hold/exclusive hold operation..............................................E.14
Paging.................................................................................E.16
Call pickup...........................................................................E.16
Optional features................................ ..................................E.17
Special keys............................................................................F.1
Esi-Dex..................................................................................F.2
Override ring..........................................................................F.9
Message monitor mode (live call s creening ) .........................F.10
Personal greeting reminder..................................................F.10
Headset operation................................................................F.10
Outside dial tone preference................................................F.13
Line keys..............................................................................F.13
Optional features..................................................................F.14
Analog stations .....................................................................G.1
Caller ID................................................................................G.1
Placing calls.......................................................................... G.1
Transferring calls...................................................................G.2
Conference calling................................................................. G.2
Call waiting............................................................................G.3
Call hold................................................................................G.3
Paging...................................................................................G.3
Call pick-up ................................................................ ...........G.3
Voice mail operation from an analog station..........................G.4
Analog station progr amming..................................................G.6
Index
Page 3

User’s Guide Introduction
Introduction
Acces sin g the ri ch ESI f eat ure set i s sim pl e and ea s y thr ou gh the st raightf or war d d esi gn of each of th e vari ou s
ESI phones. Each feature has been designed for ease of use while providing capabilities needed in an advanced
busine ss ph o ne.
You will be able to learn many of the features by simply using your phone; and this ESI-50L User’s Guide will
introduce you to the wide variety of features offer ed by yo ur ESI system and how to use your phone effectively to
achieve maximum benef its.
What it covers
This User’s Guide covers the use of the following with your ESI system:
• ESI 60 phone (digital version)
• ESI 40 phone (digital version)
• 48-Key Digit al Fe ature Phon e
• 24-Key Digit al Fe ature Phon e
• 60-Key Expansion Console and Second E xpansion Console
• ESI Cordless Handset II (digital version)
• [Legacy] 12- Key Digital Feature Phone
• Analog station
How it’s arranged
• Section A — Intr oduct i on an d ph on e illustr ati o n s
• Section B — User help
• Section C — User programming
• Section D — Voice mail operation
• Section E — Phone operat ion
• Section F — Special keys and features
• Section G — Analog stations
Important: If you’re using a 48-Key Feature Phone, please note that this phone has separate PROGRAM and HELP
keys, rather than the combo PROG/HELP key found on the other models supported by your ESI system.
Therefore, you should press PROGRAM if programming your phone and the instructions tell you to press
PROG/HELP; or, similarly, you should press HELP if the instructions tell you to press PROG/HELP to obtain
assistance from the Verbal User Guide described herein (see page B.1).
Voice mail options
Your ESI-50L system c omes wit h ESI’ s award- winning voice mail, i ncluding an a utomated attendant and a
dedicated mailbox for eac h station.
The automated attendant provides up to 100 bran ches that con veniently rout e callers to their desire d exten sions
or departments, or even dest inations outside the s ystem.
Some fe atures are ena bled by the In staller or System Administr ator. Consult your System Administ rator if you
are unsure ab out what features are available.
A.1
Page 4
User’s Guide Introduction
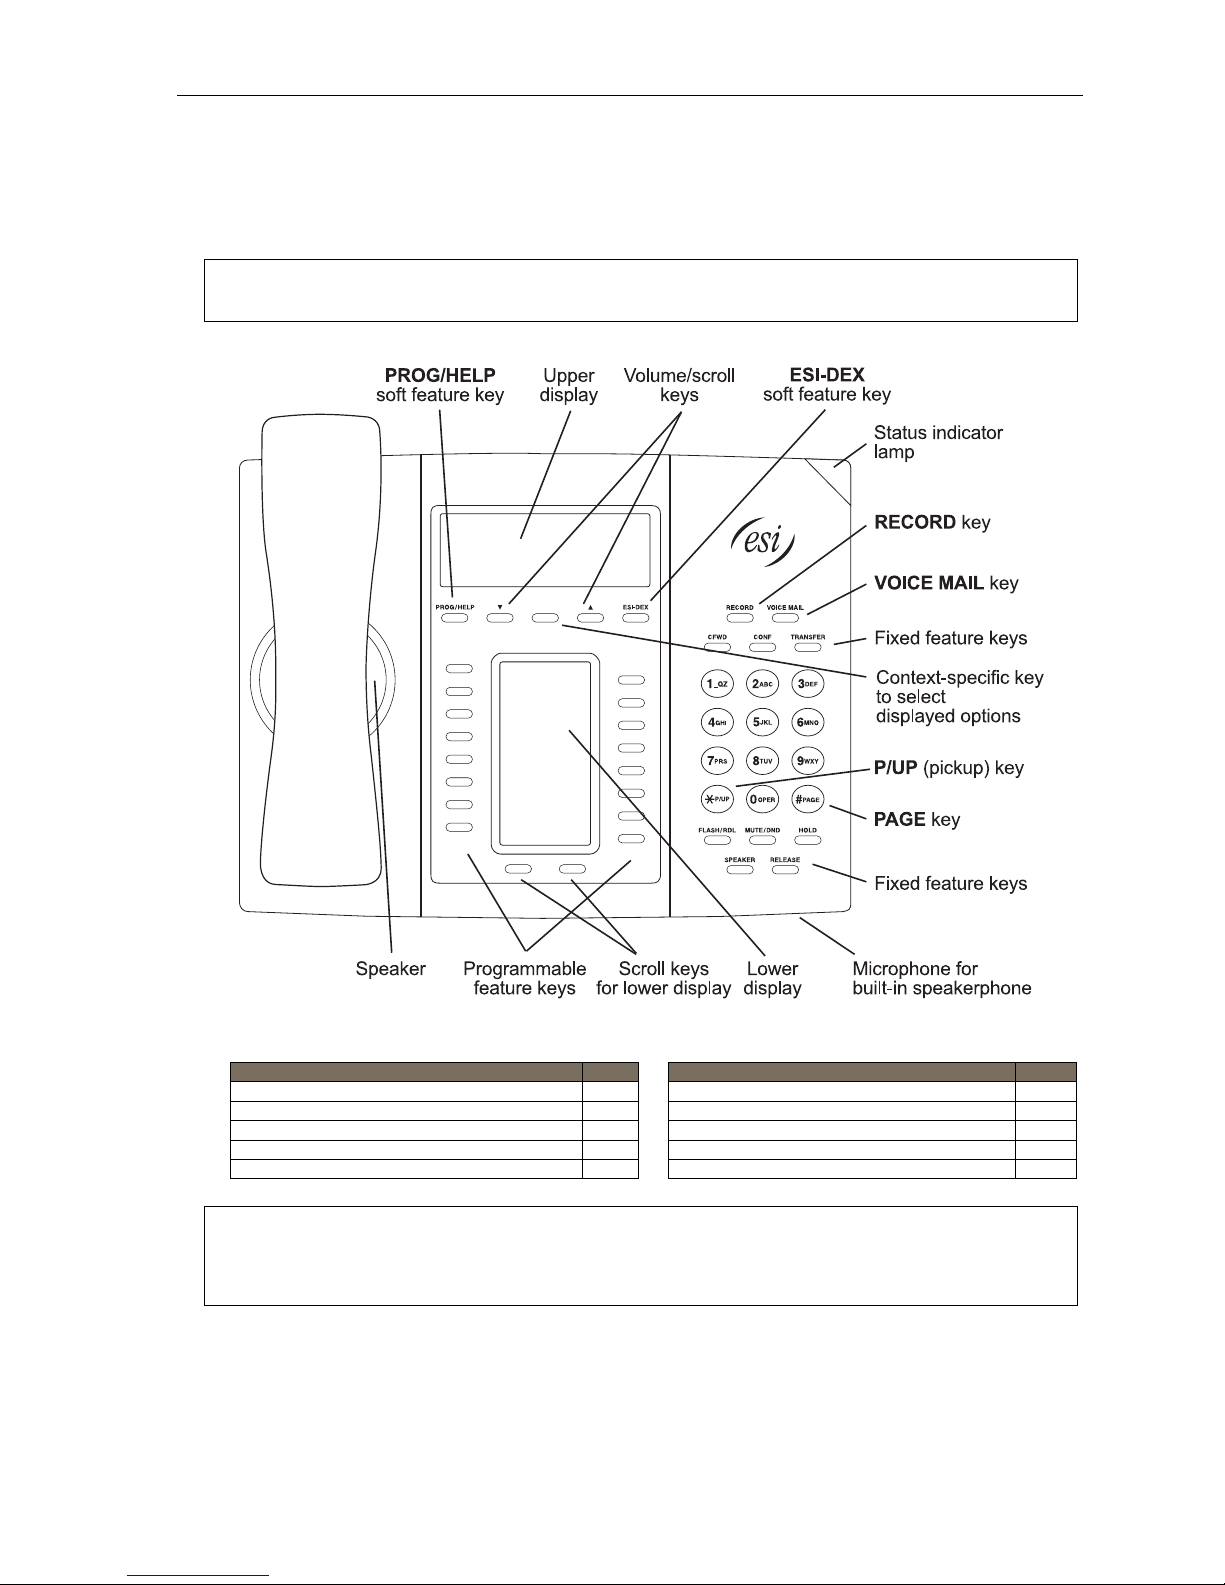
ESI 60 phone
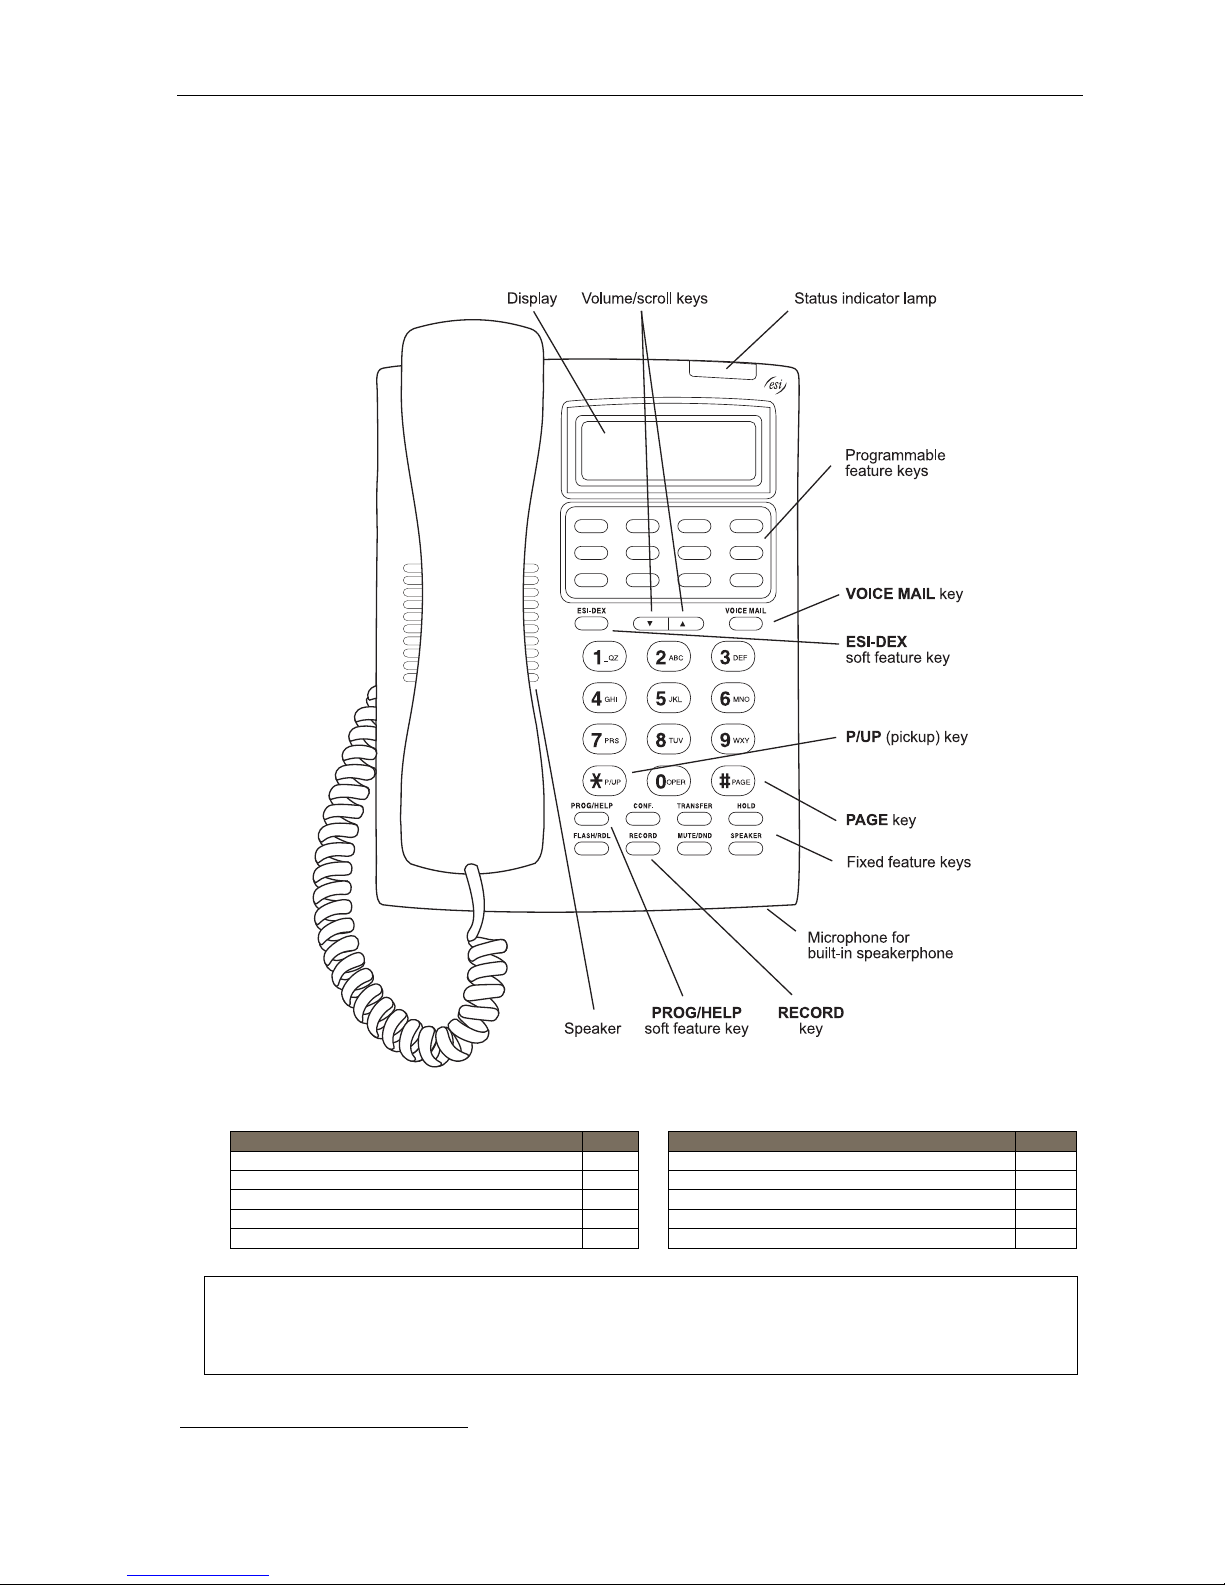
The ESI 6 0 p hone has a variety of programmable and built-i n features. The model that works with your system is
the ESI 60D (a digital phone). It support s up to two optional Expansi on Consoles (see pa ge A.5). The ESI 60
models offer s the sam e basic f eatures whi ch are descr ibed thr oughout this User’s Guide. The ph one’s built -in voice
mail features and voice prompts make it easy to program and use.
Note: Depending on your angle of view, you will notice differences in the contrast levels of the upper and lower
displays. This is normal .
Items referenced elsewhere
Item Page Item Page
PROG/HELP soft feature key C.2 Verbal User Guide and tutorial B.1
P/UP (pickup) key E.16 Status indicator lamp D.10
Fixed feature keys E.2 ESI-DEX soft feature key F.2
VOICE MAIL key D.1 RECORD key D.8
Programmable feature keys C.2 PAGE key E.16
Hint: On any of these ESI phone varieties (including the Expansion Consoles), you can perform direct
programming by holding down a programmable feature key for at least two seconds (similar to how you
might program a car radio button). This isn’t applicable to the fixed-feature keys which, as their name
implies, are already programmed.
A.2
Page 5
User’s Guide Introduction
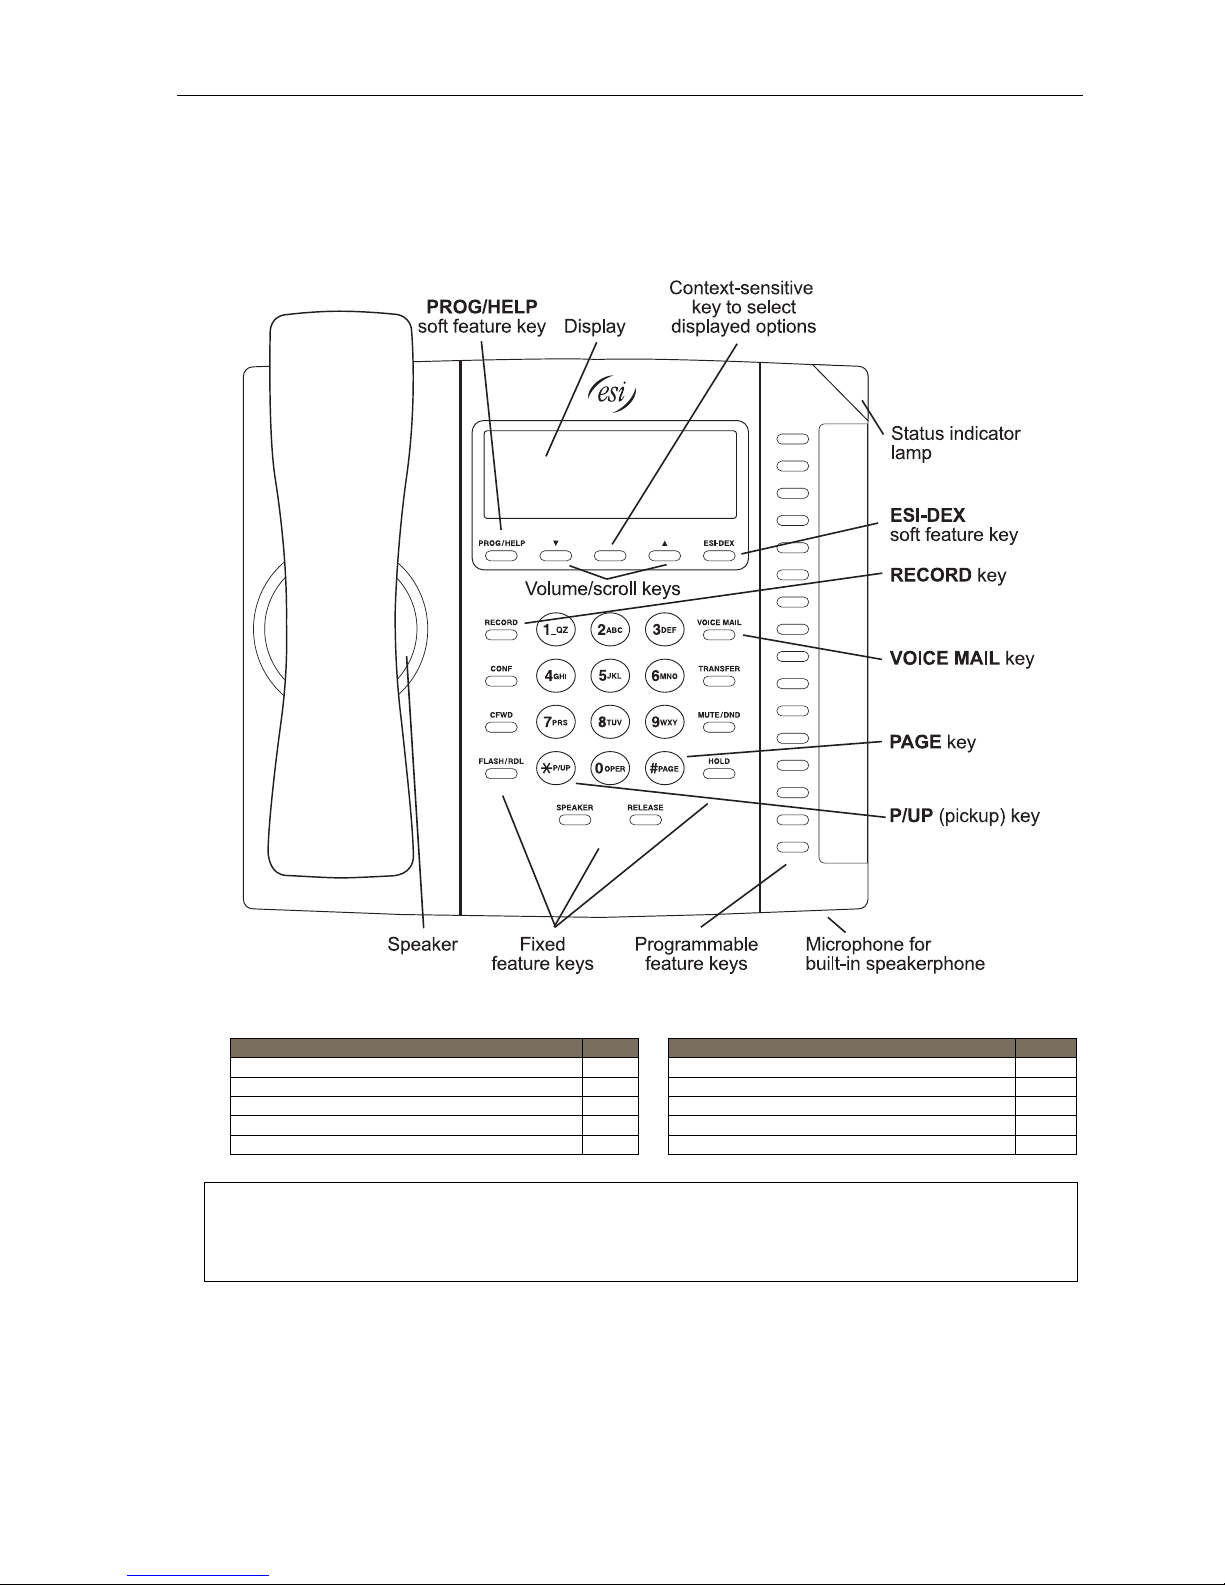
ESI 40 phone
The ESI 4 0 p hone has a variety of programmable and built-in features. The model that works with your system is
the ESI 40D (a digital phone). It supports up to two optional Expansion Consoles (see page A.5). The ESI 40 offer s the
same basic featur es which ar e descr ibed t hroughout t his User’s Guide. The phone’s built-in voice mail features and
voice prompts make it easy to pro gram and use.
Items referenced elsewhere
Item Page Item Page
PROG/HELP soft feature key C.2 Verbal User Guide and tutorial B.1
P/UP (pickup) key E.16 Status indicator lamp D.10
Fixed feature keys E.2 ESI-DEX soft feature key F.2
VOICE MAIL key D.1 RECORD key D.8
Programmable feature keys C.2 PAGE key E.16
Hint: On any of these ESI phone varieties (including the Expansion Consoles), you can perform direct
programming by holding down a programmable feature key for at least two seconds (similar to how you
might program a car radio button). This isn’t applicable to the fixed-feature keys which, as their name
implies, are already programmed.
A.3
Page 6
User’s Guide Introduction
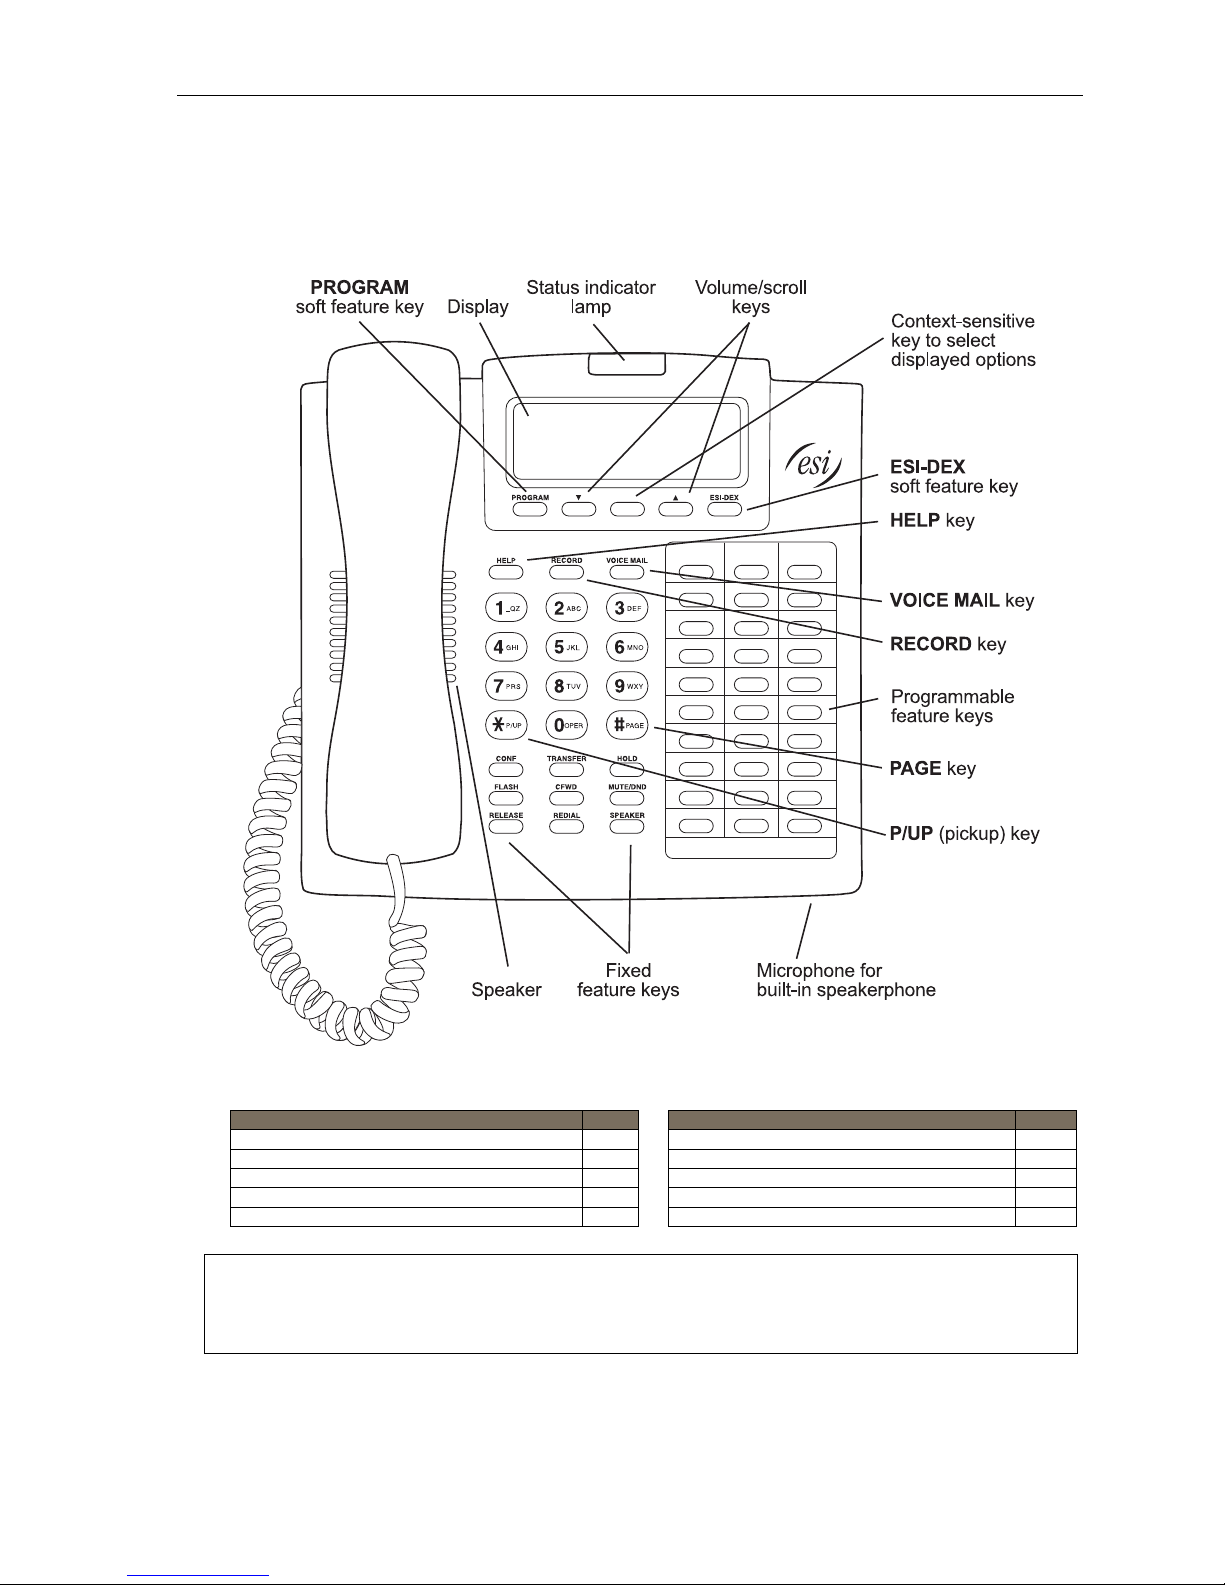
48-Key Feature Phone
The legacy 48- K ey Feat ur e Pho ne has a var iety of programmabl e and b ui lt-in featur es. Your system c an us e only
the digital version. This phone supports up to two optional Expansion Consoles (see page A.5). The 48 -Key Feat ure
Phone offer s the same basic f eatur es whi ch are descr ibed t hroughout thi s User’s Guide. The phone’s built-in voice mail
features and voice pr ompts ma ke it ea sy t o pr ogra m and use.
Items referenced elsewhere
Item Page Item Page
PROGRAM soft feature key C.2 HELP key for Verbal User Guide and tutorial B.1
P/UP (pickup) key E.16 Status indicator lamp D.10
Fixed feature keys E.2 ESI-DEX soft feature key F.2
VOICE MAIL key D.1 RECORD key D.8
Programmable feature keys C.2 PAGE key E.16
Hint: On any of these ESI phone varieties (including the Expansion Consoles), you can perform direct
programming by holding down a programmable feature key for at least two seconds (similar to how you
might program a car radio button). This isn’t applicable to the fixed-feature keys which, as their name
implies, are already programmed.
A.4
Page 7
User’s Guide Introduction
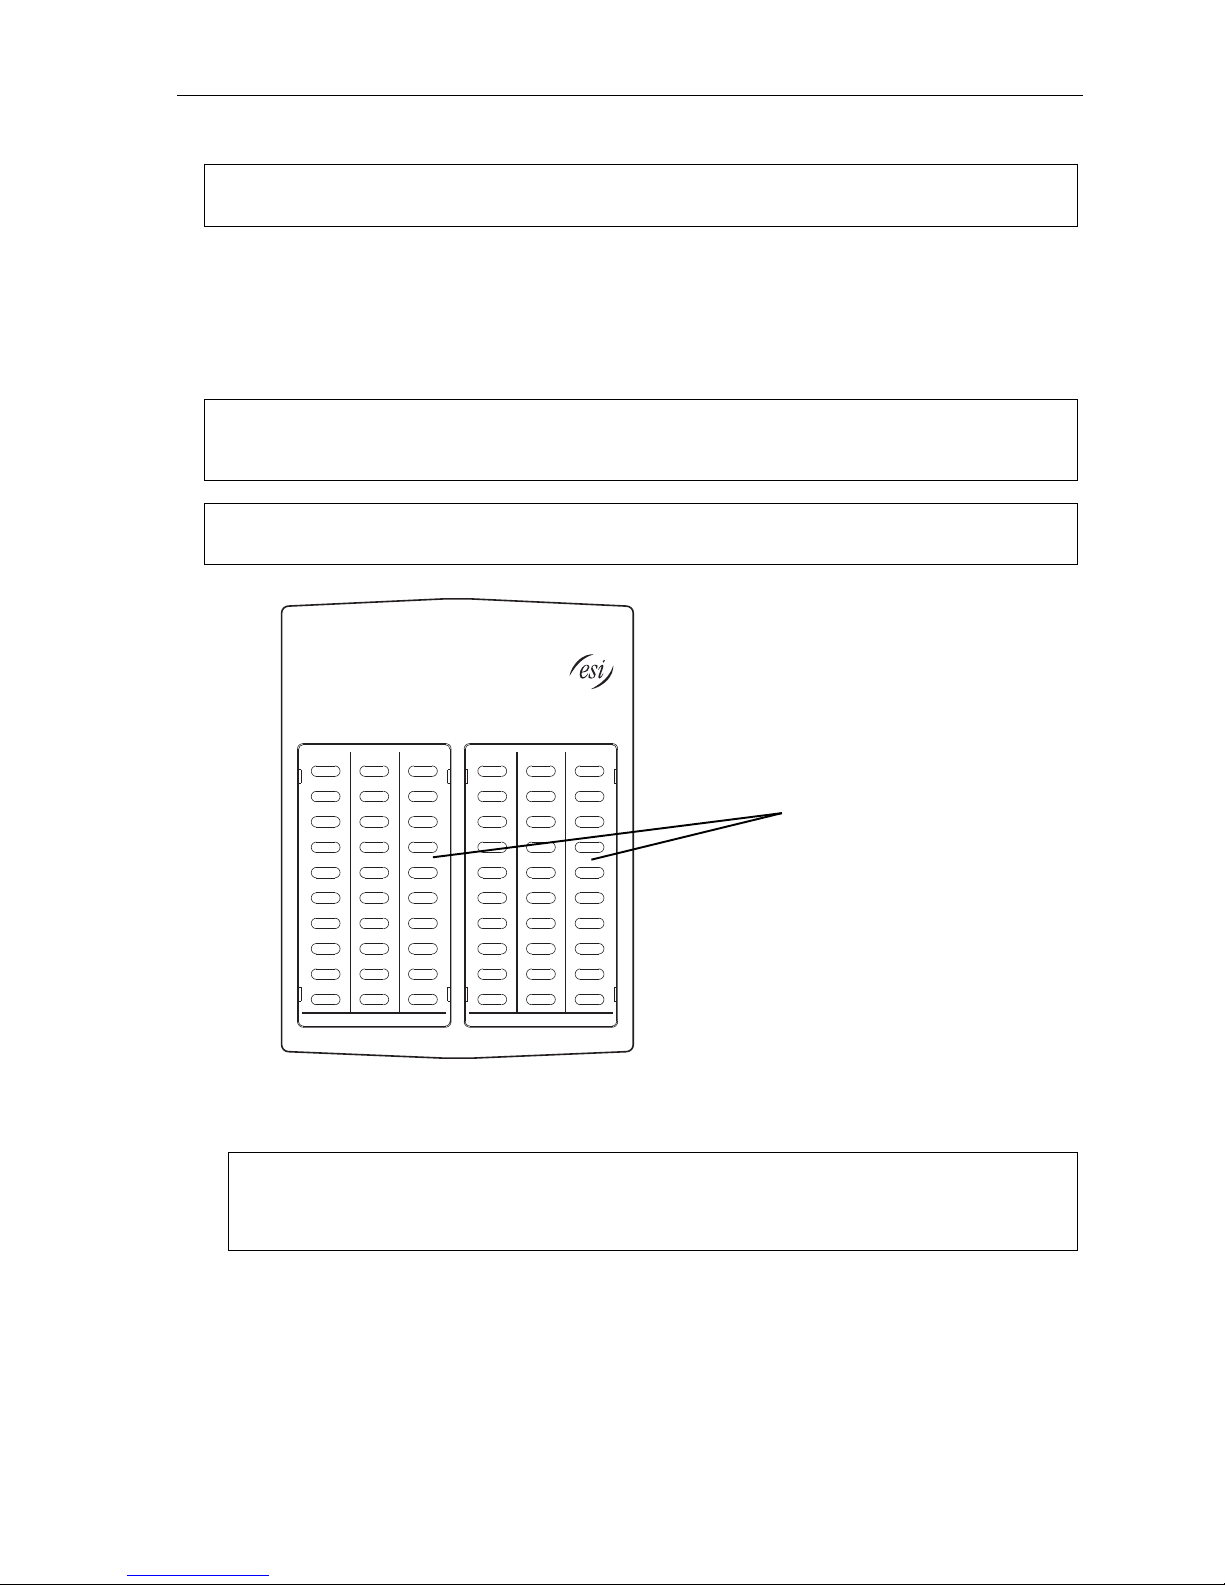
Optional Expansion Consoles
Note: Your Installer or System Administrator must enable Expansion Console support for your extension before
you can use one or both Expansion Consoles.
The ESI 60, ESI 40, and 48-Key Feature Phone each can suppor t up to two optional Expansion Consoles, for
a possible total of 120 ad ditional programmable feature keys.
The 60- K ey Ex pansion Consol e connects directly to the phone, while the Second Ex pan si on Con sol e
connects to the first Console.
You pr ogram each Expansion Console’s keys just a s you do the programm able feature keys on your ESI phone,
using eit her di re ct or tra di ti onal pr ogrammi ng (se e pa ge C. 2) .
Note: Only one key can exist per extension, feature or operation. If you program a second key fo r the same
Hint: Y ou may find it easier to write in the names on the overlay before you program the keys and attach the
extension, feature or operation, this automatically erases the first key so programmed, thus making it
available for a new extension, feature or operation.
overlay to the Console.
60 program m able
feature keys
(pg. C.2)
in two banks
of 30 each
Hint: On any of these ESI phone varieties (including the Expansion Consoles), you can perform direct
programming by holding down a programmable feature key for at least two seconds (similar to how you
might program a car radio button). This isn’t applicable to the fixed-feature keys which, as their name
implies, are already programmed.
A.5
Page 8
User’s Guide Introduction
24-Key Feature Phone
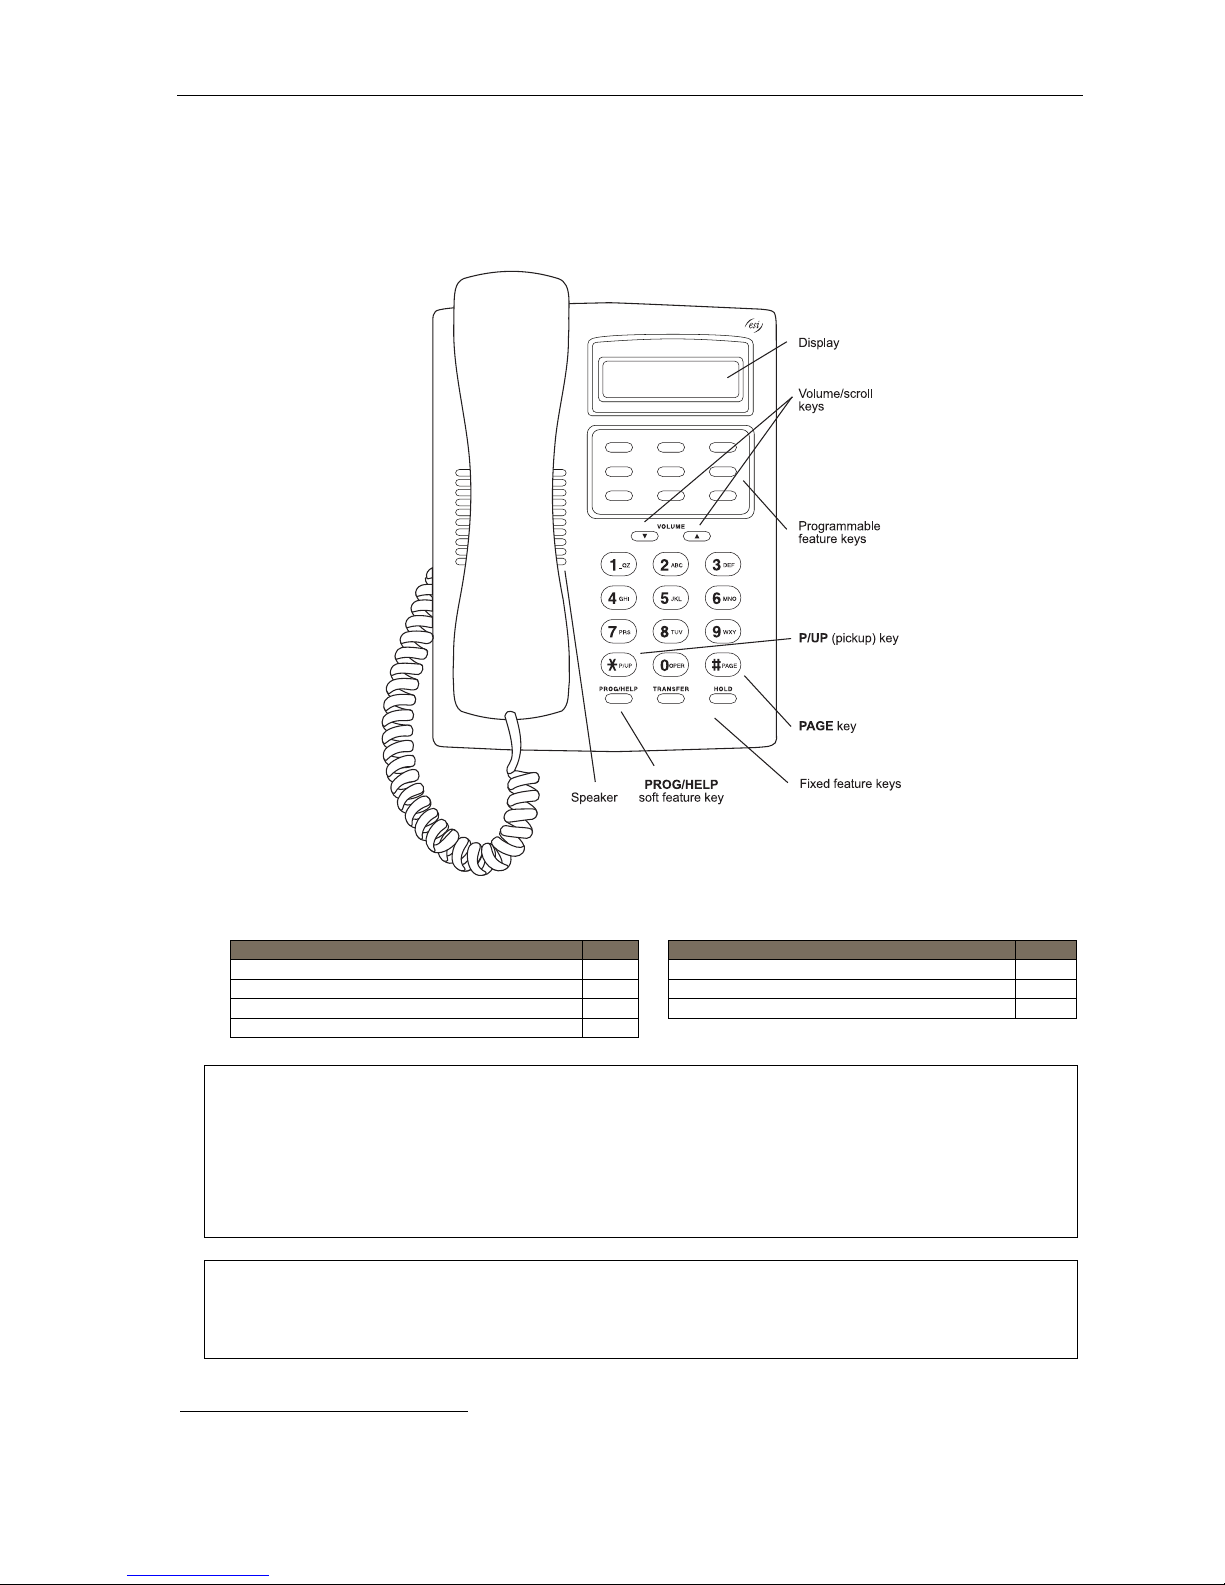
The 24- K ey Fe ature Phone has features similar to those of the ESI desktop phones mentioned earlier.
However, the 24 -Key F eature Phone doesn’t support IP, ESI’s VIP family of software applications
1
, or the
Expansion Consoles. As is true for the ESI phones mentioned earlier, the 24-Key Feature Phone has built-in voice
mail features and voice prompts that make it eas y to program and use.
Items referenced elsewhere
Item Page Item Page
PROG/HELP soft feature key C.2 Verbal User Guide and tutorial B.1
P/UP (pickup) key E.16 Status indicator lamp D.10
Fixed feature keys E.2 ESI-DEX soft feature key F.2
VOICE MAIL key D.1 RECORD key D.8
Programmable feature keys C.2 PAGE key E.16
Hint: On any of these ESI phone varieties (including the Expansion Consoles), you can perform direct
1
For information concerning these software applications, see the ESI Web site at www.esi-estech.com.
programming by holding down a programmable feature key for at least two seconds (similar to how you
might program a car radio button). This isn’t applicable to the fixed-feature keys which, as their name
implies, are already programmed.
A.6
Page 9
User’s Guide Introduction
12-Key Feature Phone (legacy product)
The legacy 12- K ey Feat ur e Pho ne , still i n use on many installed ESI systems, includes the basic, most
commonl y use d pho n e feat ur es. T his si mp li fi ed m odel do esn’ t su pp or t IP, ESI’s VIP family of software
applications
1
, the Expansion Conso les, speakerphone op eration2, or Esi-Dex.
Items referenced elsewhere
Item Page Item Page
PROG/HELP soft feature key C.2 HELP key for Verbal User Guide and tutorial B.1
P/UP (pickup) key E.16 Status indicator lamp D.10
Fixed feature keys E.2 PAGE key E.16
Programmable feature keys D.1
Note: The following features aren’t available on a 12-Key Feature Phone:
Hint: On any of these ESI phone varieties (including the Expansion Consoles), you can perform direct
1
For information concerning these software applications, see the ESI Web site at www.esi-estech.com.
2
The 12-Key Feature Phone lac ks a hands-free microphone, and therefore can’t serve as a true two-way speakerphone. Its speaker plays pages.
• Certain special keys and features (see “Special keys,” page F.1F.1).
• Esi-Dex.
• ACD operation.
Additionally: to use voice mail, conference calling and mute/DND on a 12-Key Feature Phone, you must
program these features into programmable feat ure keys (see “Program mable feature keys,” page C.3, and
“Optional features,” page F .14).
programming by holding down a programmable feature key for at least two seconds (similar to how you
might program a car radio button). This isn’t applicable to the fixed-feature keys which, as their name
implies, are already programmed.
A.7
Page 10
User’s Guide Introduction
ESI Cordless Handset II
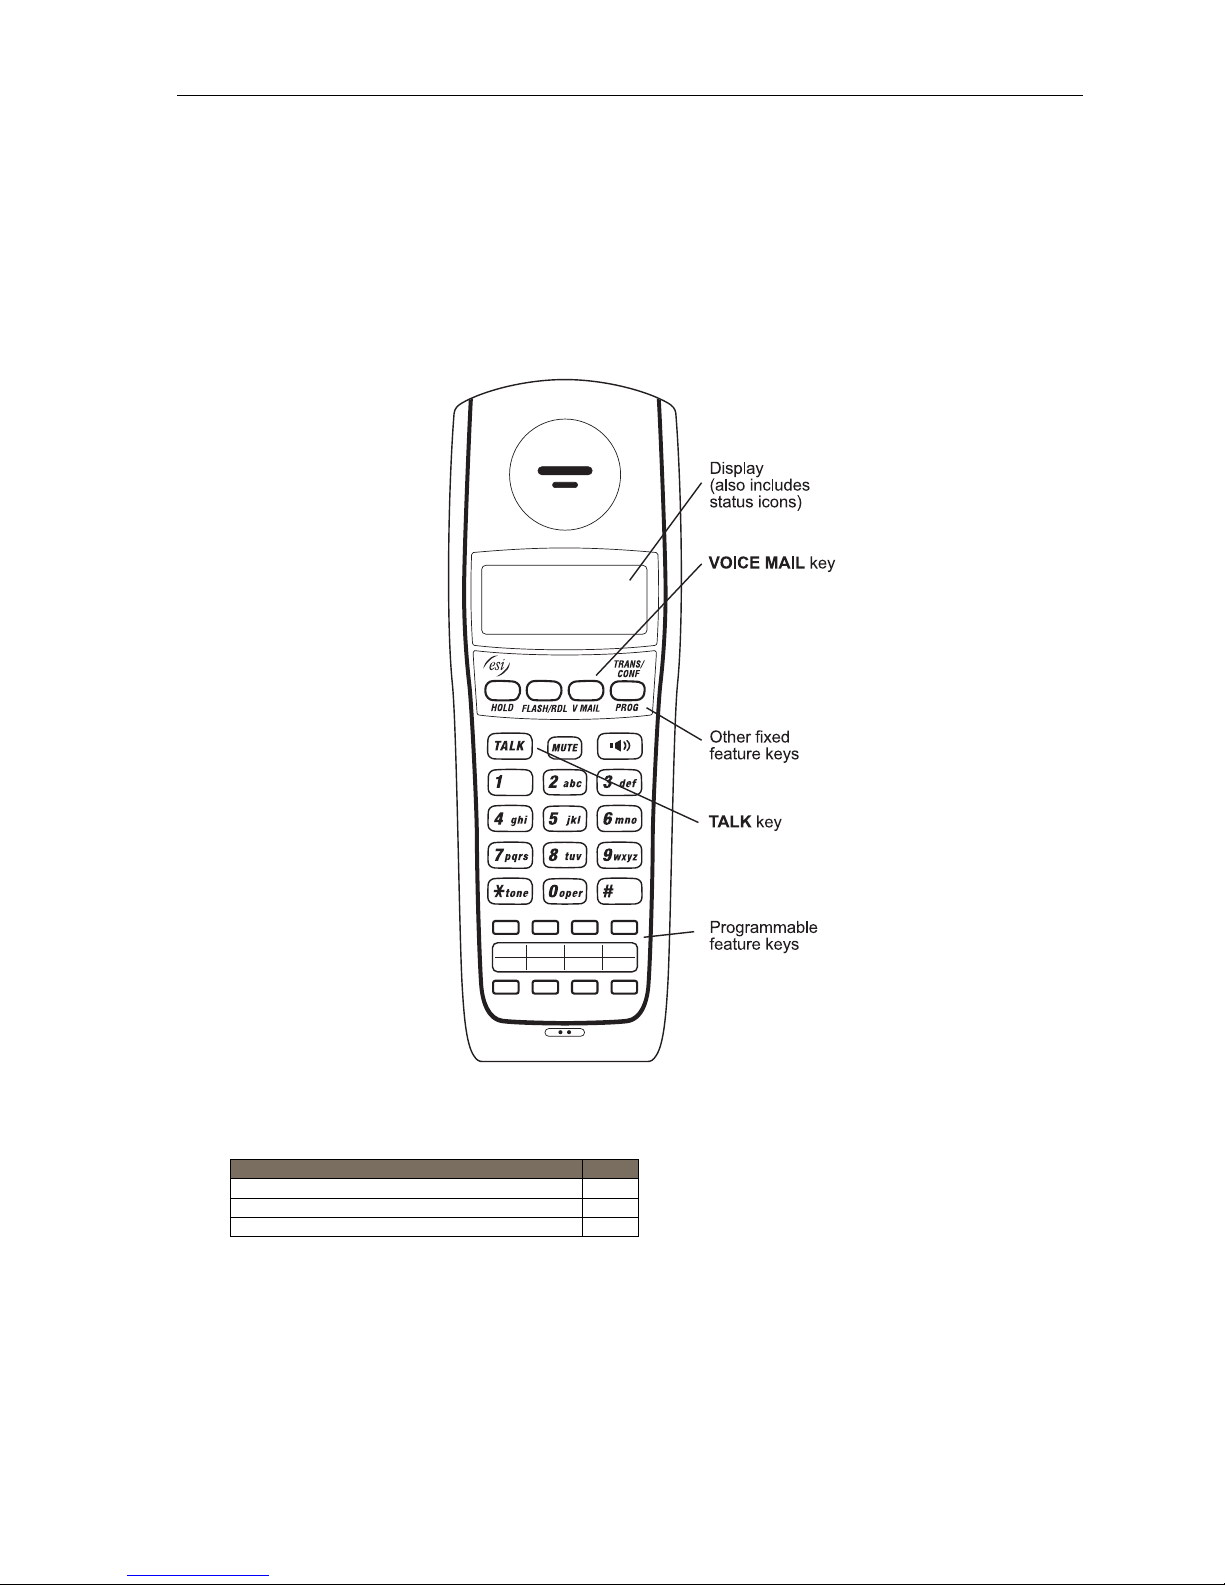
ESI’s Digital Cordless Handset II gives y ou most of the s ame features found in the 24 -Key F eature Phone, but in
a compact, portable form. Note that it does not hav e the following f eat ur e s fou nd on som e ESI de s kto p pho nes:
Esi-Dex support (or ESI-DEX key), Caller ID key, Virtual Mailbox Key support, or Verbal User Guide.
Each ESI Cordless Handset II comes with a char ger/ AC adapt er, base stati on, bel t cl i p, battery pack, and wall mount.
Dependi ng o n your i n stal l at io n, your loc at io n may ha v e one or m ore opt i o nal ESI Cordless Handset Repeaters
so you can more easily stay in communication with your ESI system while you travel throughout the facility. If
you are unsur e about whether your location has this capability , contact your S ystem Administrator.
Items referenced elsewhere
Item Page
Programmable feature keys C.2
VOICE MAIL key D.1
Fixed feature keys E.2
A.8
Page 11
User’s Guide Introduction
Connecting your ESI phone
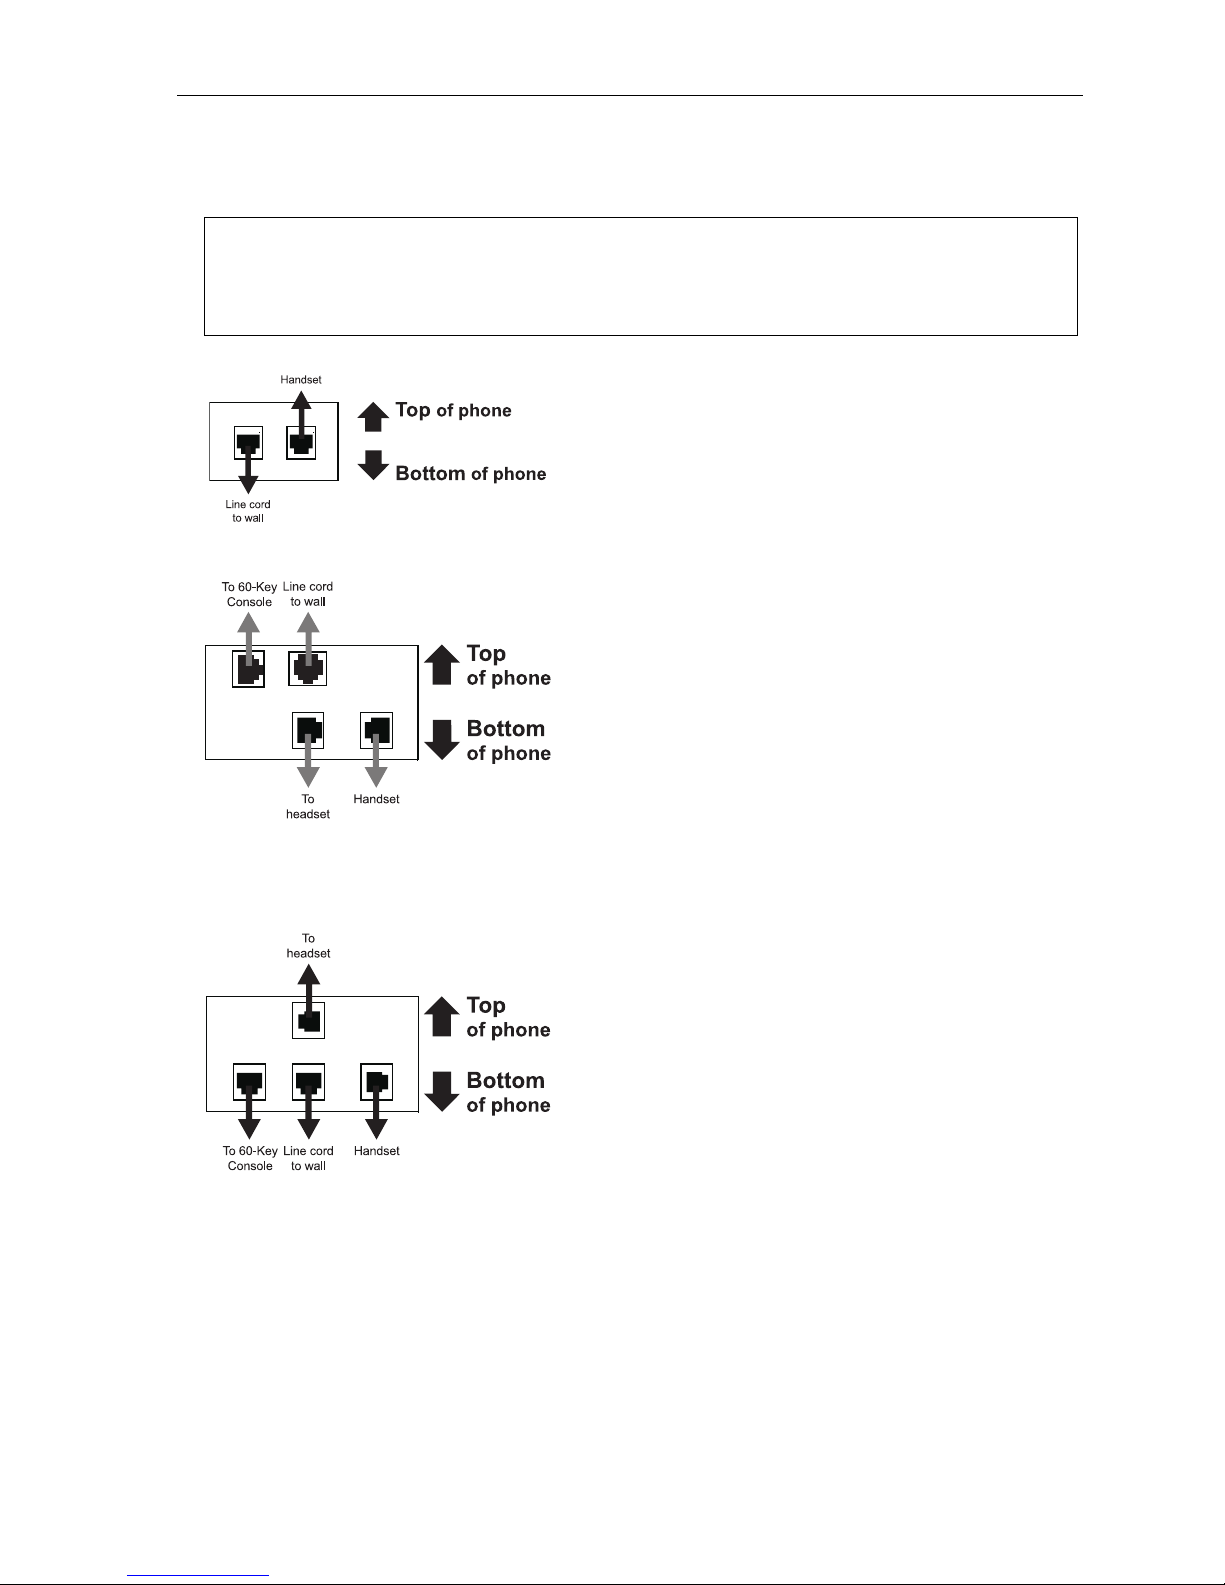
Depending on which ESI phone you have, use t he appr opriate diagram (below) to connect it. Eac h diagram
represents the panel on th e phone’s under side.
Notes: The “Top of phone” and “Bottom of phone” references in these diagrams show the correct vertical
orientation of the phone — i.e., the part with the display is the top.
When the phone is in the highest upright position, use the wall-mount hook located under the handset to
secure the handset when you’re not using the phone.
24-Key Featur e P hone
12-Key Featur e P hone
• Connects like a basic phone.
• Handset plugs into right-side jack.
• Line cord plugs into left -side jack.
(legacy product)
ESI 60 (digital version)
ESI 40 (digital version)
In addit ion to how the 24-Key Feat ure Phon e connects to
the handset and line cord, note that each phone i n this
group acc ept s a 60 -Ke y Ex pa nsi o n Con sol e ca bl e
(incl ude d wit h eac h Cons ol e) whi ch u se s sta nd ard RJ - 11
teleph on e co nne ct or s.
48-Key Digita l Fea tur e P hone
In addit ion to how the 24-Key Feat ure Phon e connects
to the handset and line cord, note that this phone
accepts a 60-Key Ex pansion Consol e cable (included
with each Co ns ol e) whi c h uses standar d RJ-11
teleph on e co nne ct or s.
A.9
Page 12
User’s Guide Introduction
60-Key Expansion Console connection
Notes: Your Installer or System Administrator must enable Expansion Console support for your extension before
you can use one or both Expansion Consoles.
The 60-Key Expansion Console can be connected to an ESI 60, ESI 40, or 48-Key Feature Phone.
If connecting both a 60-Key Expansion Console and a Second Expansion Console to a 48-Key Feature
Phone, see “Second Expansion Console connection,” page A.11.
1. Unplu g the line cord f rom your ESI ph one.
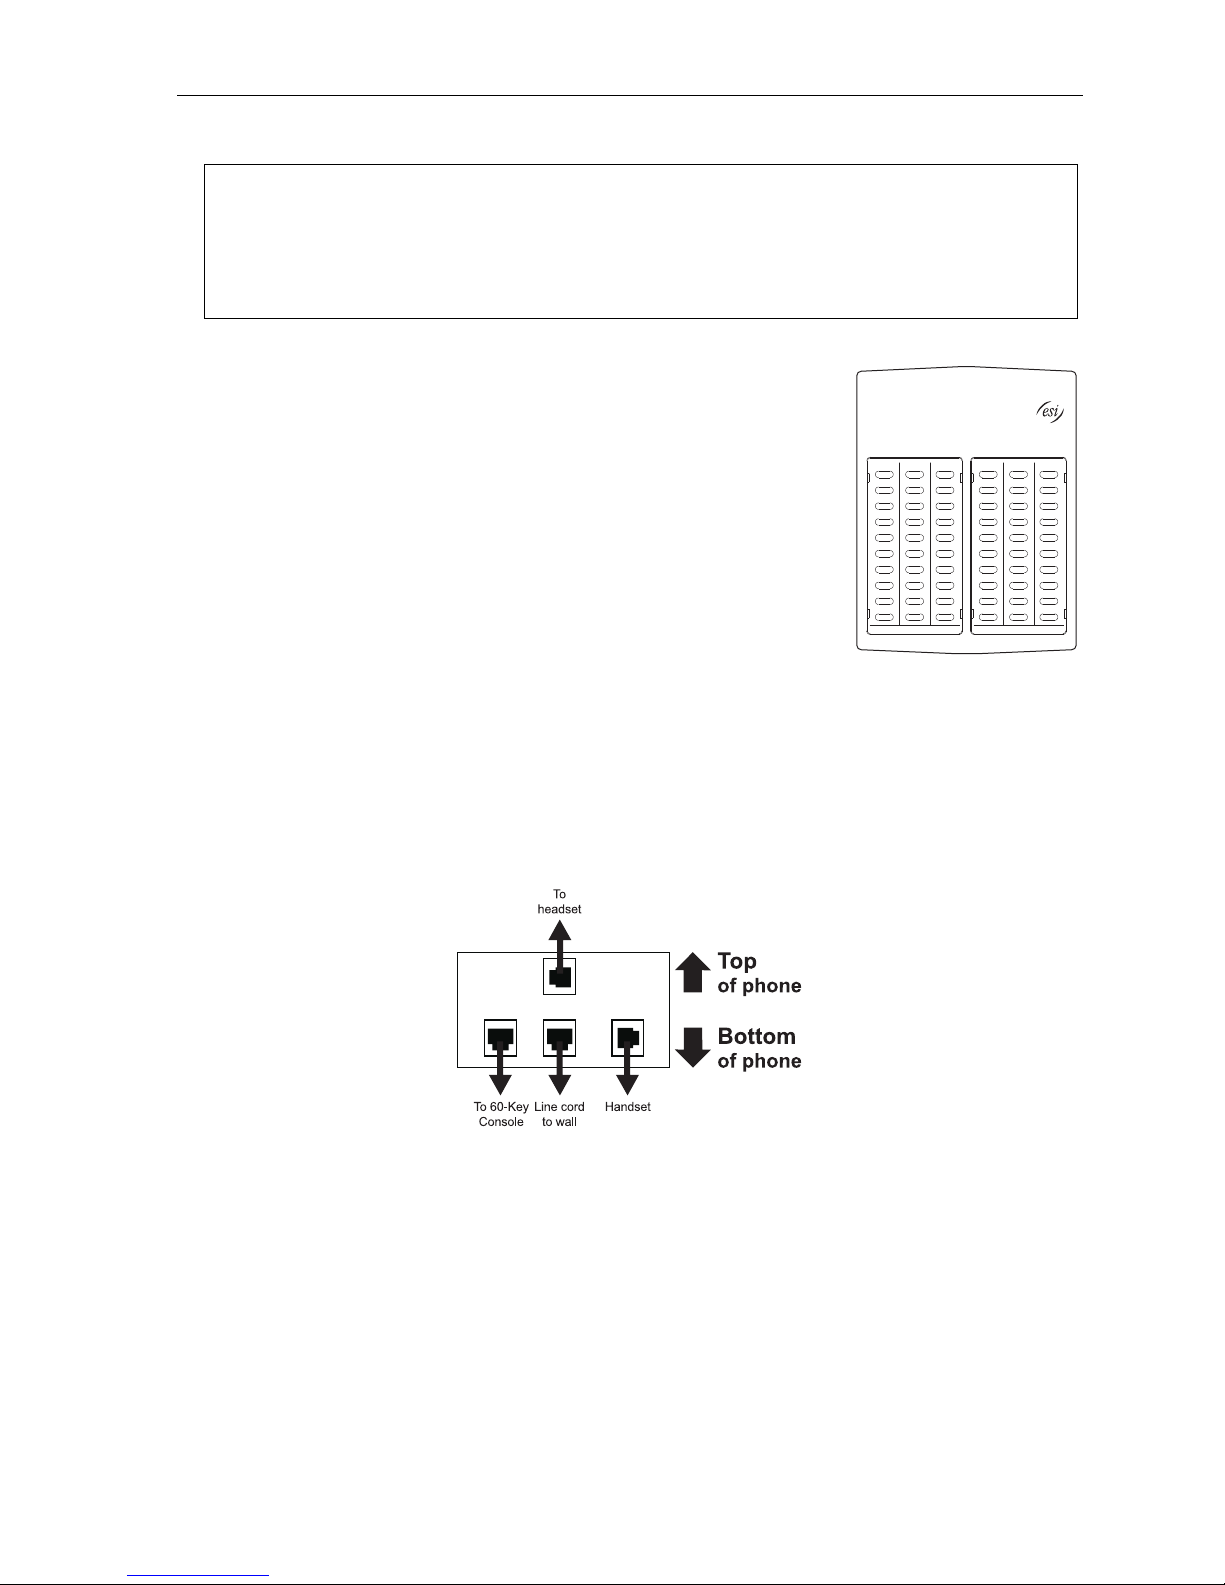
2. The 60-Key Expansion Console (right) include s a six-cond uctor
expansi on ca bl e . Connect one end of the expansion cable to the
appropr i at e co nnector on the bo ttom of the ESI pho ne (below).
Then, connect the other end of the expansion cable to the 60-Key
Expansion Con sole.
3. To keep cabling out of the way, thread the expa nsion cable into the
slots on t he bottom of the phone a n d 6 0 -K ey Exp a nsi o n C o nso l e .
4. Progr am the ke ys on the 60-Key Expansion Consol e using the same
procedure as w ith the phone (press PROG/HELP 2).
5. If ne cessary, r em ove the clear plastic overlay from the keys on the
Expansion Con sole.
6. For maximum convenience, label t he paper overlay to show how
the keys are programmed (your Installer or System Administrator can do this with E S I software).
7. Inst all the labeled paper overla y on the 60-Key Ex pa nsi o n Console.
8. Install the clear plastic overla y over the paper overlay, to pr otect i t.
®
9. Use th e provided Velcro
tape to attach the left s ide of the 60-Key Expansion Console to the r ight side of
the ESI phon e.
10. Plug the line cord ba ck into your ph one.
Connectors on bottom of phone
A.10
Page 13
User’s Guide Introduction
Second Expansion Console connection
Notes: Your Installer or System Administrator must enable Expansion Console support for your extension before
you can use one or both Expansion Consoles.
The Second Expansion Console can be connected to a 60-Key Expansion Console that is connected to an
ESI 60, ESI 40, or 48-Key Feature Phone. If connecting only one Expansion Console to one of these phone
models, see “60-Key Expansion Console connection,” page A.10; the Second Expansion Console connects
to the 60-Key Expansion Console and cannot connect directly to the ESI phone.
1. Unplu g the line cord f rom your ESI ph one.
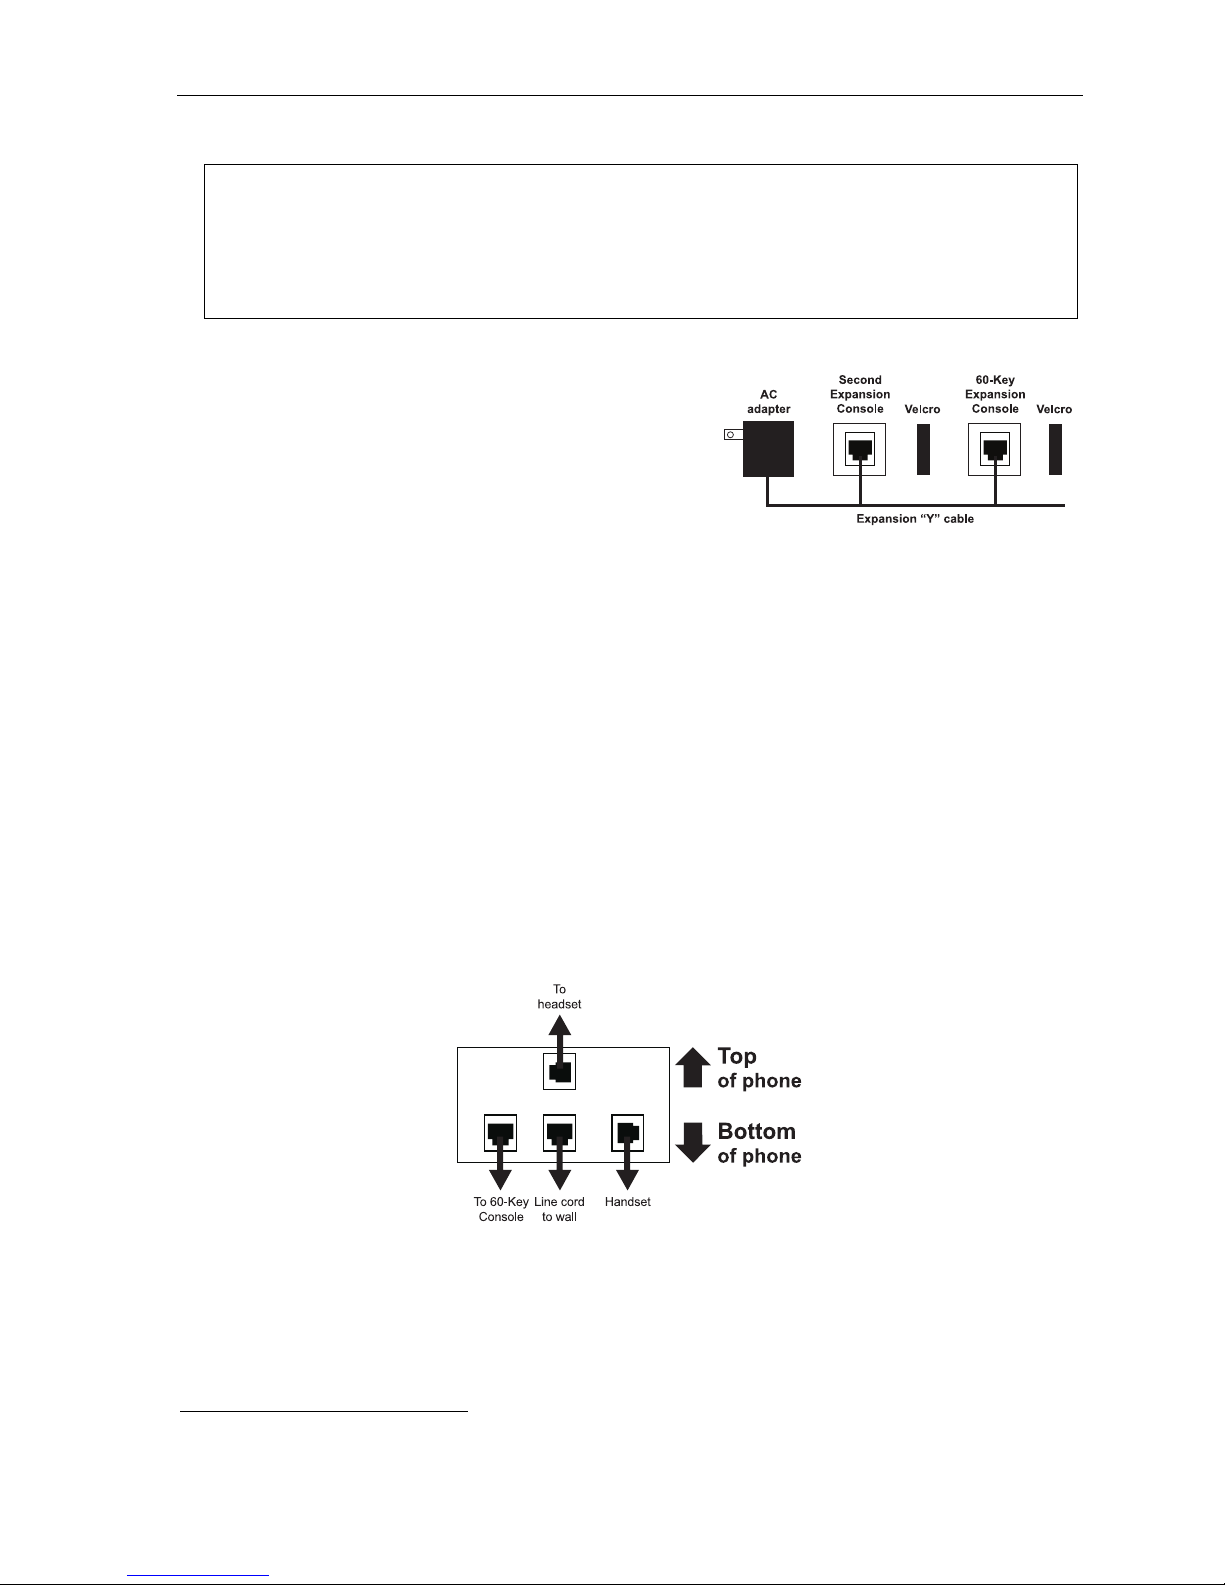
2. The Second Ex pansio n Consol e
“Y” cable (right)
2
. Lay out the cable across the back of
1
includes an expansion
the equipment so that the AC adapter is on lef t and the
end of the cable is on the right.
3. Connect the right end of the expansion “Y” cable to the
appropr iate conn ect or on the bot t om of your ESI ph one
(below).
4. Then, connect the expansion “Y” cable’s middle plug to the 60-Ke y Expansion Console, the left plug to
the Second E xp an si on Co ns ole, and t he AC adapter to an app ropriat e 110 VAC outlet to provide power to
the Second E xp an si on Co nsol e (above).
5. To keep cabling out of the way, thread the expansion “Y” cable into the slots on the bottom of the phon e
and the two Exp ansion Consol es.
6. Progr am the ke ys on the tw o Expansion Consoles using t he same procedure as with the phone (press
PROG/HELP 2).
7. If ne cessary, remove the clear plastic overlay from the keys on the two 60-Ke y E xpa nsi on Co ns oles .
8. For maximum convenience, label t he paper overlay to show how the ke ys are programmed (your Installer
or System Administr ator can do this with ESI soft ware).
9. Inst all the labeled paper overlays on the two 60-Key Expansion Consoles.
10. Install the clear plastic ov er la y s over the paper overlays, to protect them.
11. Use the provided Velcro
®
tape to attach the left side of the 60-Key Expansion Console to the right side of the
phone, and the ri ght si de of the 60 - Key Expansion Consol e t o the l eft si de of the Second Expansion Con sol e).
12. Plug th e line cord ba ck into your ESI phone.
Connectors on bottom of Console-compatible ESI digital phone
1
It’s physically identical to a 60-Key Expansion Console; consult your Installer if you have trouble determining which one it is.
2
This diagram shows the backs of the Expansion Consoles.
A.11
Page 14

User’s Guide Introduction
ESI Cordless Handset II connection
Each ESI Cordless Handset II comes with:
• A charger/cradle to charge the Handset.
• An AC adapter for use with onl y the charger.
• A base statio n to provide a digital interface between the ESI system and ESI Cordless Handset II.
This base station is line-powered and thus needs no AC power.
• Wall-mount(s), a belt clip, and a Quick Referenc e Gui d e.
Base station installation
Due to each site’s unique characteristics, the range and distance information we’ll provide herein is
only approxi mate.
Characteri stics that positively af fect performance:
• The bas e station sho uld be installed so it has a clear line-of-sight with the Cordless Hand set II.
• The base stati on a nt e nna sh oul d al wa ys be pointed in i ts up per m ost v ert i cal po sit io n.
Characteristics that negatively affect performa nce:
• Large amou nts of metal sh el vi ng ( su ch as in ma nuf acturi ng or ware h ou se are a s).
• Close proximity to ( within one mile of) a r adio tower .
• Concrete walls that divid e spaces where Cordless Handsets II are used (assum ing the base stations are
in one location).
Don’t install the base station:
• Close to a wall with met al st u ds.
• On a metal wall.
• Next to a device that emits RFI or EMI
fluorescent l ight fixtur e, or fax machine.
• In a ceiling that has foil-backed insulation.
• Behind doors that typically are closed, tinted windows, one-way glass, or other areas that limit or
cut off transmission to the Cordless Handset II.
Base stations must be installed at least 10 feet apart. Don’t in stall more than six base stations in one area
(such as a net work room ). Choose a lo cation at least 30 feet away if more than six base stati ons ar e needed
in a building.
A Digit al Cordless Handset II base st ation requir es only a line cord to t he ESI s ystem; AC power isn’t needed
becau se the ba se station receives power f rom th e system via the line cord.
1
— e.g., a televisio n, radio, com puter, computer prin ter,
Note: Your facility may be equipped with one or more optional Cordless Handset II Repeaters. For more
information about this, consult your System Administrator or your Certified ESI Reseller.
1
RFI is radio frequency interference. EMI is electromagnetic interference.
A.12
Page 15
User’s Guide Help mode (Verbal User’s Guide)
Help mode (Verbal User’s Guide)
Your ESI system’s Help mode (also called the V erbal User’s Guide) — a careful ly c on cei v ed combinati o n of
spoke n information, displ ay rea douts and even key illum ination when appro priate — is a powerful to ol to help
you learn how to use the syst em ’s many feat ures.
Notes: As explained on page A.1, your ESI phone has a combo PROG/HELP key unless it is a 48-Key Feature
The ESI Cordless Handsets have no access to the Verbal User Guide (and, thus, no key to invoke it).
Phone (which has separate PROGRAM and HELP keys). Under the circumstances described in this
section, the PROG/HELP key will invoke Help mode.
Tutorial
When your station is idle, pre ss PROG/HELP, and then follow the spoke n Help menu to:
• Learn how to use t he phon e • Hear a descri ption of how any ke y is use d
• Learn how to use voi c e mail f e atures • Hear a complet e tut or i al on ph on e op erat i on
Help during st ation program m i ng
T o hear a detailed description of a function you wish to program, press PROG/HELP whi le pr o gram mi n g it.
Help during a c al l
Press PROG/HELP while on a call and this will place the call on hol d, whereupon y ou can us e Help mode to
hear a description of the function you wish to perform. When you exit Help mode, you will be reconnected to
the call .
While you are either in Help mode or programming your phone, your station will be temporarily placed in DND
(see “MUTE/DND,” page E.4). Anyone calling your station while you are in DND will be forwarded to your
mailbox (or other destination set by the Installer).
Exiting Help mode
T o exit Help mode, simply hang up.
For on-li ne h el p, visit www.esi-estech.com/users.
B.1
Page 16

User’s Guide User programming: An introduction
User programming: An introduction
Voice prompts will play menu and sub-menu options to access the desired feature. You don't have to wait for the
entire prompt to be played. Therefore, once you’ve become familiar with the prompts (consult “User
programming menu” on the next page), you can qui ckly set any frequently used feature.
Program m ing hel p
During any of the programming steps, press PROG/HELP t o hear a more detailed description of the featur e
and related programming opt ions.
Exiting pr ogr am m i ng mode
To exit programming mode, simply hang up.
User programming menu
Overview
1 Select personal greeting
1 Record
2 Delete
3 Hear
2 Programmabl e feat ure key s
(Station keys, line keys, speed-dial key s, other featur e key s)
3 Station options
1 Call waiting/background announce
2 Personal greeting reminder
4 Outside dial tone preference
5 Hands-free answer
6 Message monitor
7 Power-saving mode
1
4 Station audibles
1 Station ring tone
2 Station ring volume
3 Message ring
5 Password
1 Enter
2 Delete
3 Play back
4 Security level
6 External message notification
1 Delivery options
2 Phone delivery
3 Pager notification
4 Urgent message
6 Twinning programming
1 Enable/disable
2 Select destination
7 Person al Ca ll Rou tin g2
1 Entry settings
2 Exit settings
3 Quiet time settings
9 Un-delete
Note: Selections 3, 5 and 6, as well as the background announce function under “Station options” (see page
E.13), are not available on a legacy 12-Key Feature Phone. In addition, selection 6 6 (twinning
programming) is not available on an ESI Cordless Handset.
1
For use with only ESI Cordless Handsets.
2
Available only if your system is using ESI Presence Management. If you’re not sure whether it is, consult your System Administrator. For more
information about ESI Pres ence Management, visit www.esi-estech.com/presence.
C.1
Page 17
User’s Guide User programming: An introduction
1 Select personal greeting
Select t he d esir ed gr e eting — 1, 2 or 3. The system will play the current greeting, followed by prompts to rerecord, del et e or he ar agai n — or select the curr ent gre et in g b y pres si ng #.
1 Record personal greeting
Begin recording at t he tone. Press 1 to stop. The new personal greeting automatically replaces the
previous greeting.
2 Delete personal greeting
When prompted, press 2 again to confirm deletion.
Warning: Your mailbox is disabled if no personal greeting exists. Never delete all of your existing personal
greetings before you record at least one new one.
3 Hear current per s onal greeti ng
2 Programmable feature keys
There are two methods for programming of your p hone:
• Dir ect pr o gramm i ng — Select the key you want to pr ogram, and hol d it dow n for at least t wo seconds.
This not onl y in it iates programmi ng but also lets y ou imm edi at e l y program that sp e cif ic k ey.
• Traditional programming — Press PROG/HELP. The Verbal User’s Guide will speak to you, walking
you through the full menu, during which you can c hoose the appro priate option.
Direct programming example:
How the programmable feature keys can be set
• Line keys — Programming a line number (1 through 16) into a programmable feature key make s it a
• Station keys — If the digits ent ered co nstitute a thr ee-digit number, the pro grammable feature key
You wish to set one of the keys to dial a co-worker, whose extension is 105. Hold down the key for at
least two seconds. This automatically puts you in feature key programming. Follow the prompts to enter
1 0 5. (This has allowed you to skip two steps — pressing PROG/HELP and selecting a menu option —
that you’d have had to perform if using traditional programming.)
line key, whi ch provides the appro priate lamp information and manual out side-line access.
will become a station key, providing the appropriate lamp information and easy access or transfer.
Three- di git nu mb ers e nt er ed ca n be:
— User extensions — Cascade mailboxes
— Department numbers — System speed-dial numbers
— Guest/info mailboxes
Note: The ranges for each will depend upon your specific system installation. Contact your System
(Continued)
Administrator for more informati on.
C.2
Page 18
User’s Guide User programming: An introduction
• Speed-dial keys — In addition t o program m ing a program m able feature key with a system speed-dial
number , you can cr eat e personal speed-dial keys for automatic diali ng of frequently called outside
number s. If you program 9 (or 8 or 71–76) plu s a phone numbe r, the programm able feature key
become s a spe ed- di al k ey. When you program a spee d- di al ke y , there's no ne e d to ins er t a pau se
after the 9 (or 8 or 71–76). The speed-dial number can be up to 24 characters long. Use the up scroll
key () to enter special char a ct er s in a di al str i n g.
You enter names for extensio ns, dep ar tm ent s, bran c h IDs, CO li nes, an d guest mai lb ox es by
pressing the dial pad key t hat corres ponds t o the ch aracter to be e ntered. The ke y’s possible entries
will change each time the key is pressed, and the display will show this. When the desired character
appears on the displ ay, press # to confirm; the cursor will move to the next character position. You may
move t h e cursor left (to correct an entry) by pressing the left scroll key (
space) by pr e s sin g th e ri ght scroll ke y (
Key Options Key Options
0 0, - (hyphen), _ (underline) 7 P, R, S, 7
1 Q, Z, 1, “_” (space) 8 T, U, V, 8
2 A, B, C, 2 9 W, X,Y, 9
3 D, E, F, 3
4 G, H, I, 4
5 J, K, L, 5 # [Enter]
6 M, N, O, 6 # # Ends the name
Example: To enter a B, press 2 twice (the possible options to scroll through are A, B, C and 2). When B is
displayed, press # to conf irm ; th e cur so r wi ll mo ve to the n e xt ch a racter to be ent er ed. To complet e
the name, press # #.
).
(left scroll key) Backs up and erases
(right scroll key) Adds a space
) or move right (to add a
• Other feature ke ys — If you enter a feature code, the programmable feature key wi ll serve as an
enable/disable ke y for that feature. The In staller may ha ve programme d certain stations for accessin g
additi onal features (see “Optional features,” page F. 14); consult your System Administrator t o
determi n e yo ur ac ce s s.
Keys’ LED activity during programming
Mode
Currently being programmed and
previously assigned
Currently being programmed and
previously unassigned
Programming mode — Was assigned or viewed in
curren t se ss i on
Assigned in a previous programming session and
not yet viewed in current session
Never assigned and not yet viewed in
curren t se ss i on
Note: Each ESI Cordless Handset has only one LED color — red — with similar blinking rates.
Station key or
Virtual Mailbox Key
Flashing red Flashing green Flashing amber
Flashing red Flashing red Flashing red
Blinking red Blinking green Blinking amber
Solid red Solid green Solid amber
Key type and LED indication
Line key
Off Off Off
Feature key
or speed-dial key
C.3
Page 19
User’s Guide User programming: An introduction
3 Station optio ns
The station options su b- m en u (PROG/HELP 3) lets you activate or deactivate several features your station
can provide. At each option sub-m enu, 1 enable s the option and 0 disable s it. (Ea ch opt i on li st ed b elo w is
explained elsewhere in this manua l, as noted.)
1 Call waiting/background announce
See page E.13 for call waiting and page E.13 for background announce.
Note: Background announce is not available on a legacy 12-Key Feature Phone.
2 Personal greeti ng rem inder
See page F.10.
3 [Unused]
4 Outside dial tone preference
See page F.13.
5 Hands-free answer
Note: With an ESI Cordless Handset, use of this feature requires a headset.
See page E.3.
Note: Not available on a legacy 12-Key Feature Phone.
6 Message monitor
See page F.10.
Note: Not available on a legacy 12-Key Feature Phone.
7 Power-saving mode
Note: Applicable to only an ESI Cordless Handset.
Allows yo u to ena bl e or di sable an ESI Cordless Hand s et’ s p ower-s a vin g mod e. Ena bli ng t hi s mode he l ps
achiev e full b att er y lif e. Ho we ver, if full -t im e status monit oring is re quired, you ca n dis ab le t hi s mode. I n
power-savin g mode, t he system blocks all status updat es
been idle for 30 seconds. Pressing the Cordless Handset’s keys or receiving an incoming call on it will
discontinue power-saving mode.
Note: When the handset has received no calls or status updates1 for five minutes, the Cordless Handset
1
to the Cordles s Handset when t he Hands et has
enters deep-sleep mode. During it, the display is blank and the LEDs don’t light up. If the system
sends any updates to the Cordless Handset, it will discontinue deep-sleep mode.
1
For example: If you have a programmable feature key set as a station key for someone’s extension, the system updates your Cordle s s Handse t
based on that extension’s current status (busy, idle, do-not-disturb, or — with optional ESI Presence Management — off-premises).
C.4
Page 20
User’s Guide User programming: An introduction
4 Station audibl es
The station audibles programming provides co ntrol of the following audible i tems.
Note: Only the third setting, message ring, is applicable to the ESI Cordless Handset.
1 Station ri ng t one
You can select from six possible t ones to help disti nguis h it fro m other nearby ringing phones.
Press
2 Station ri ng v olume
Press and to set the desired ringer volume (range: off to high), then press # to accept it.
or to select a tone, then press # to accept it.
Note: On an ESI desktop phone with a status indicator lamp, if the ringer volume is turned off, the status
indicator lamp will not “flutter” when an incoming or recalled call is presented to the phone (see
“Status indicator lamp,” page D.10).
3 Message ring
When enabled, this feature will periodically generate a short ring tone at your station as an additional alert
that you ha ve ne w messa ge s.
5 Password
1 Enter new password
Your password may consist of 2–8 digits followed by # (0 cannot be the first digit). Entering only 0 as the
password will turn off the password requirement.
2 Delete current password
Resets the password to the default password.
3 Hear current password
Displays and plays back the current passw ord.
4 Password security level
Selection Result
0 No password required for access from any phone
1 Password required only for remote access, either off-premises or from other stations within the system
2 Password always required
C.5
Page 21

User’s Guide User programming: An introduction
6 External message notification
Note: To use this feature, a legacy 12-Key Feature Phone must have a voice mail key assigned.
1 Delivery options
1 Delivery to phone number only
2 Notify pager only
3 Call first and then page
4 Call and page at the same time
0 No off-premises deli very
2 Phone delivery
1 Enter phone number
Enter the phone number (24 digits, maximum) followed by #. Do not include an outside line access
code (i.e., don’t a dd 9, 8, or 71–76) before the number.
Use the scroll key to enter special characters; use the
the scroll keys to view the number after it’s s aved. To change the number, you must delete it and then
re-ent er it as d esired.
scroll key to bac kspace. You al so can use
2 Delete phone number
Delete s the cur r ent l y pr o gramm ed p ho ne nu mb er.
3 Display current phone number
Displays the c urrently programmed phone number.
3 Pager notification
1 Enter pager number
Enter the pager number (24 digits, maximu m ) foll owed by #. Do not include an outside line access
code (i.e., don’t add 9, 8, or 71–76) before the number.
Use the scroll key to enter special characters; use the
the scroll keys to view the number after it’s s a ved. To change the num ber, you must delete it and then
re-ent er it as d esired.
2 Delete pager number
Deletes the currently programmed pager n umber.
3 Display current pager number
Displays the c urrently programmed pager n um ber .
(Continued)
scroll key to bac kspace. You al so can use
C.6
Page 22
User’s Guide User programming: An introduction
4 Urgent message activation
1 Urgent messages only
Only urgent messages will be delivered.
Note: Remember to say in your personal greeting that callers should press 2 to mark a message as
urgent. (For more on personal greetings, see page D.1.)
2 All new messages
Any new message will be delivered.
5 (Unused)
6 Twinning programm ing
Note: This feature is not available on an ESI Cordless Handset.
1 Enable/disable
2 Twinning destination
7 Personal Call Routing
1 ESI Presence Management settings
For addit io n al detai l s, con sul t t he ESI Presence Management User’s Guide (ESI part # 045 0- 0 793) .
Note: This function is available only if your phone system is using ESI Presence Management. If you’re not
sure whether it is, consult your System Administrator. For more information about ESI Presence
Management, visit www.esi-estech.com/presence.
1 Entry settings
2 Exit settings
3 Quiet time settings
(Continued)
1 Select personal gr eeting
2 Set message delivery
1 Call handling (voice mail/call forwarding)
2 Select personal gr eeting
3 Set message deliver y
1 Select day
2 Select quiet “on” time
3 Select quiet “off” time
C.7
Page 23

User’s Guide User programming: An introduction
2 ESI Cellular Managem ent set t i ngs
For addit io n al det ai l s, co n sult the ESI Cell ular Management User’s Guide ( ESI par t # 0450 -1189).
Note: This function is available only if your phone system is using ESI Cellular Management. If you’re not
sure whether it is, consult your System Administrator. For more information about ESI Cellular
Management, visit www.esi-estech.com/BT.
1 PIN setting
2 Voice mail setting
3 Cell phone audibles
1 Ring tone setting
2 DTMF playback setting
4 Shared line setting
5 Bluetooth settings
1 Cell phone pairing
2 Delete setting
3 Cell phone line setting
4 Auto-Connect setting
9 Message Recycle Bin (un-delete)
Your 10 most recently deleted messages will be played first. Press 9 to move to the next message. Press 8 to
restor e the m ess a ge t o your mai l bo x as an ol d mes sa ge.
C.8
Page 24

User’s Guide Voice mail operation
Voice mai l operation
Your ESI system provides accurate and timely messages. Others will become more comfortable leaving you
voice m essage s if you prompt ly retrieve and respond to your messages.
VOICE MAIL key
For dire ct ac ce s s to all voice mail f e atures, suc h as pi cking up mess ages or tra n sf err i ng di re ctl y to mai l bo xes:
• On an ESI 60 — Use the blue VOICE MAIL key. It will blink whene ver you ha v e one or mor e new
messag es, a nd t he upper display will show you how many new and old messages are stored for you on the
ESI system. Once you press VOICE MAIL, the lower display will update to show your eight most recent
messag es, with each new message appearing in a bold font. Use the scroll keys below the lower display
to see the next eight messages (press th e left scroll key to scroll down and the right scroll ke y t o scr ol l up).
• On an ESI 40, 48-Key Fe ature Phone, or 24-K ey Fe at ur e Ph on e — Use the blue VOICE MAIL ke y . It will
blink whenever you have one or more new messages, and the display will show you how many new and old
messag es ar e st ore d for you on t he ESI sy stem.
• On a le gacy 12- Ke y Fe atur e Ph one — Assign key co de 579 to a programmable feature key (see
“Programmabl e feature key s,” pp. C.2–C.3, and “Optional features,” page F.14). Until this has been done
for your phone, your mai lbox is disa bled. (When you try to access a disabled mailbox, the system will
notify you that it’s disabled.) You still can retrieve previously left messages and access user programming,
but the mailbox won’t be abl e to receive new voic e messages. Therefore, to enable the mailbox, assign k ey
code 57 9 to a programmable feature key.
• On an ESI Cordless Handset, use the blue-outl ined VOICE MAIL key. The displ ay, dir ectl y abov e t he
VOICE MAIL key , will show an “envelope” icon when you have one or more new messages.
Personal greetings
T o program your perso nal gre et in gs, press PROG/HELP 1. Initially , your mai lbox h as a gener ic greeting: “You
have reached t he mailbox for exten sion xxx. Dial 0 to r each th e operator or begin recording at the tone.” You
can record up to three different personal greetings in your own voice indicating your availability to return calls.
Examples
Sample greeting 1:
Sample greeting 2:
Sample greeting 3:
(Continued)
Hi, this is [name]. I’m away from my desk or on the phone right now; so please either dial zero to reach
our operator, or leave me your name, number and message at the tone and I’ll get back to you as soon
as I can.
Hi, this is [name]. I’m out of the office. You may dial 1 2 2 now for my assistant or, if you prefer, you may
leave me a voice message at the tone — I’ll check in regularly — or, if it’s important, either dial 4 now to
reach me on my cell phone or dial 2 now to leave me an urgent message th at will page me aut omatically.1
Hi, this is [name]. I’m away from my desk at the moment. To have me paged, dial 3 now.To reach the
operator, dial zero. Otherwise, leave your name and phone number at the beep so I can return your call.1
1
These sample greetings refer to c e rtain features which may not be activated for your extension; consult your System Administrator for additional
information, if necessary.
D.1
Page 25
User’s Guide Voice mail operation
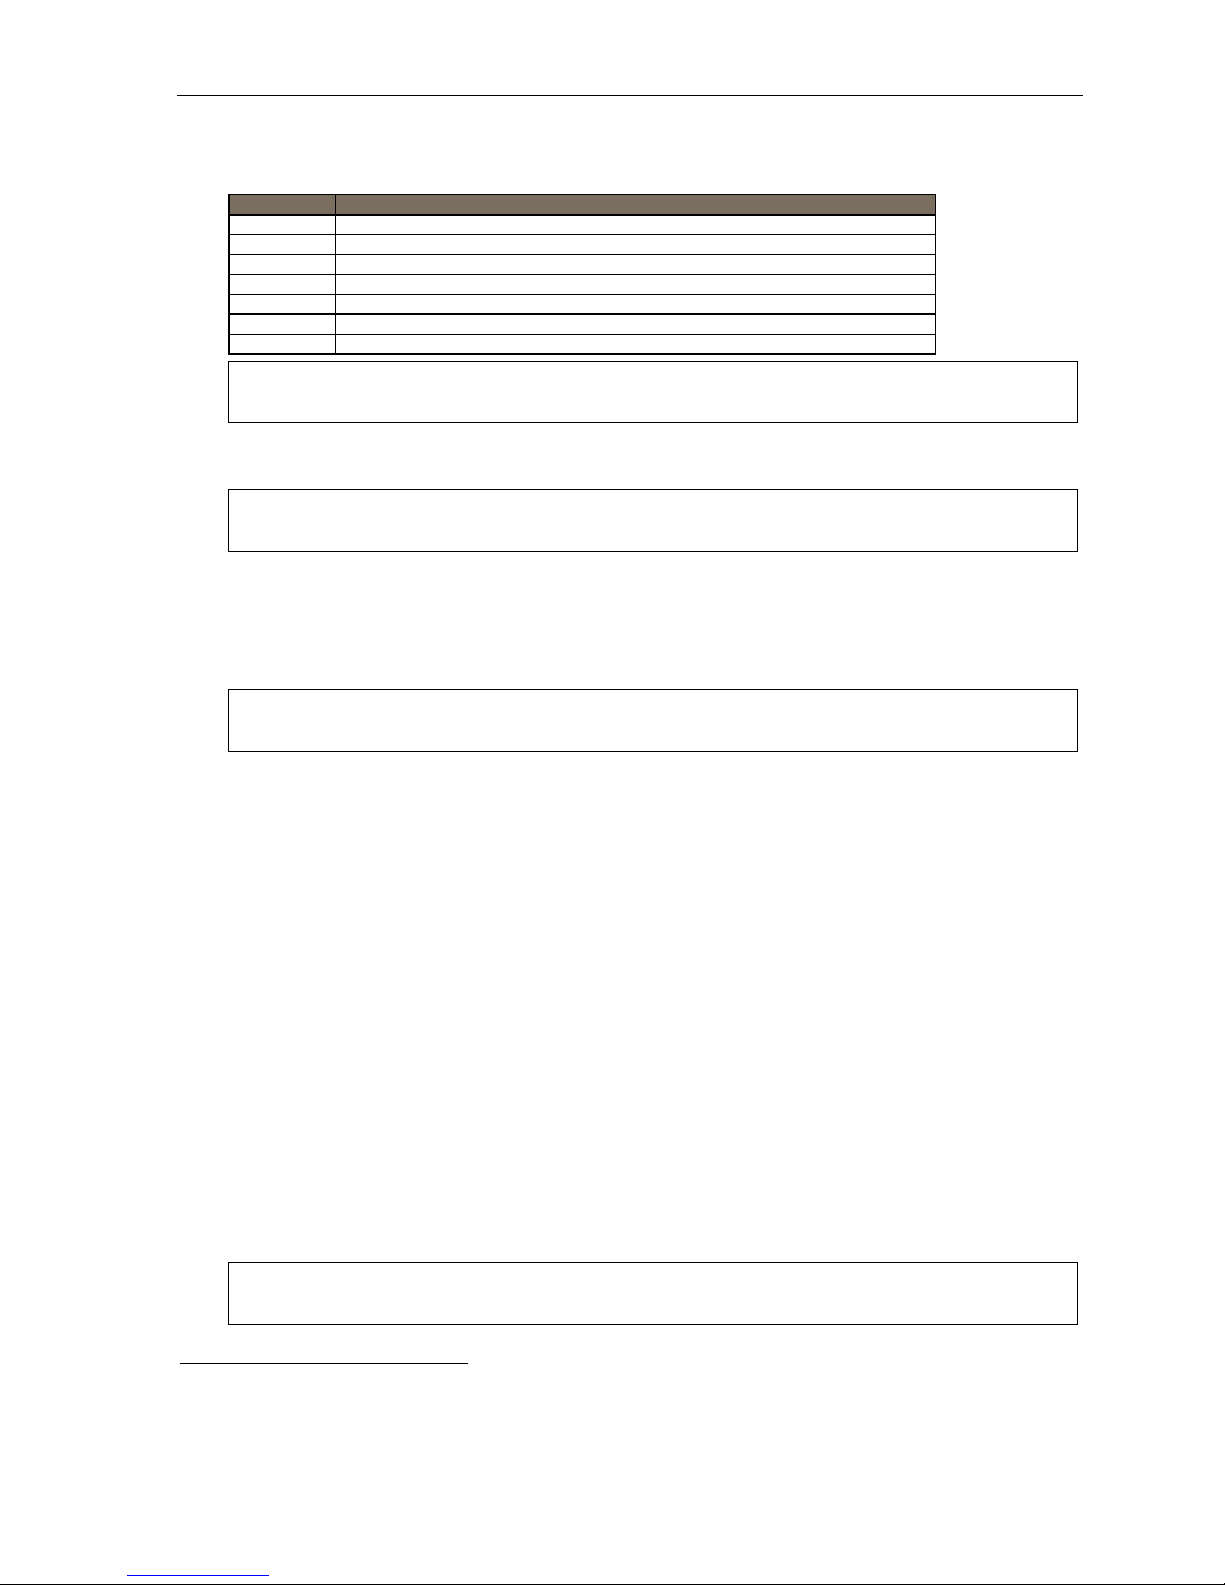
Dependi ng o n auto at t end a nt usa g e and yo ur personal pr ef er e nc es, you may wish to include one or more of
these options in your personal greetings (e ach option must be pre ssed dur ing greeting playback, before the
beep, to be activated):
Option Instruction
0 To reach the operator
1 To skip directly to the record tone (or “beep”)
2 To mark this message as urgent (see “Urgent messages,” page D.10)
3 To page (internally) the person for whom the caller is leaving a voice mail message
4 To perform off-premises “reach-me” (see “Off-premises ‘reach-me,’” page D.3)1
8 To the main greeting (if your system is using the auto attendant)
XXX An extension number of another user
Note: Option 3 is available only when personal greeting 3 has been recorded and is active; and option 4 is
available only when personal greeting 2 has been recorded and is active.
You can change any per sonal greeting as often as necessar y, by just recording over a previously recorded
personal greeting.
Warning: DON’T delete all of your personal greetings; make sure at least one always remains. Deleting all the
greetings not only doesn’t revert to the initial default greeting, it also will turn off your mailbox.
Personal greeting keys
You can program a programmable feature key as a personal greet i ng k ey for any one of the three per sonal
greetings (see page F.16). Once created, this shortcut can then be used to activate the associat ed personal
greeting (the key’s LED will glow green and the greeting played as confirmation).
Note: To re-record this greeting, press RECORD while the confirmation is playing and follow the prompts (on a
legacy 12-Key Feature Phone, which has no RECORD key, p re ss PR OG/ HEL P 1 3 1 while the phone is idle).
Leaving messages . . .
If you call another station that i s DND, bu sy or does not answer — or if you call a special mailbox (such as a
guest mailbox) — you will be transferred to the mailbox. You can skip the mailbox’s personal greeting by
pressing 1; thi s takes you directly to the record tone.
. . . directly in another user’s mailbox
The procedur e for going directly to another user’s mailbox2 without ringing his/her extension depends upon
whether you ha ve that user’s extension s et as on e of your station keys:
• If you do, press VOICE MAIL and then the pers on’s station key.
• If you don’t, press VOICE MAIL and TRANSFER and then dial the extension number.
Either will connect you directly to that user’s personal greeting.
. . . in several users’ mailboxes using a Quick Group
You can leave a direct mess age in s everal users' mailboxes at the sa m e time b y pres sing VOICE MAIL an d
entering the desired extensions — thus creating a Q uick Group. You can also move messages or recordings
to a Quick Group in the same manner. A Quick G roup can contain up to 65 extensions, including those within
a department. To enter each extension into a Quick Group, use your E SI phone’s dialpad or press a
program mable featur e key t o which the ext ension has been assigned.
Note: If you have a department programmed as a station key, pressing VOICE MAIL and then the
1
If you r sy stem i s usin g ESI Pre sen c e Man age me nt , con sul t the ESI Presence Management User’s Guide (ESI part # 0450-0793) to learn about
additional, special functionality that may be available to you. If you’re not sure whether your system is using
ESI Presence Management, consult your System Administrator. For more information about ESI Presence Management,
visit www.esi-estech.com/presence.
2
You also can leave messages in mailboxes (such as guest mailboxes) that don’t have extensions associated with them.
department’s station key will leave a message for all members of the department.
D.2
Page 26

User’s Guide Voice mail operation
AutoPage
This feat ur e l ets y ou ha ve out si de c all er s i nternall y pa ge you after th ey’ v e been forwarde d to y ou r voi c e ma ilb o x
and are listeni ng t o your personal greet ing ( see “Personal greet i ngs,” page D.1) . You must have personal
greeti ng 3 sel ected and it must tell callers to press 3 for this feature. If the cal ler dials 3 during the per son al
greeti ng, he/she i s placed on hold; the system then pages you by name, follo wed by the phras e “You have a call
on line” and t he line on whic h the call is on hold (e.g., “John Doe, you have a call on line 21”). If you do n’t answer
the page within a programmed interval, the caller is f orward ed back t o your e xtension/voice mailbox.
Note: This feature is active if your administrator authorizes your station for it, you have set your mailbox to play
personal greeting 3, and a directory name is recorded for your station.
Sample person al greeting 3 f or AutoPage:
“Hello. This is Rick. I’m currently unable to r eceive your c all. To have me paged throughout the building,
please pr e ss 3 now. Otherwise, plea se leave me a message after the tone and I wi ll ret urn your call as soon
as possible.”
Moving and deleting a message
When you move a messag e, the system accesses another sub m enu to d etermine wheth er you want to move
and delete a message, or mov e and sav e it. After you press 6 to move a message, the prompt will ask whether
you wi sh to:
• Move t he message but also save a copy of it in your voice mailbo x
or
1
• Move the message and delete it from your mailbox.
Off-premises “reach-me”
After a caller has been forwarded to your voice mailbo x and is listening to your personal greeting, this fea ture
allows the caller to be forwarded to a number outside the system — i.e., a regular phone number rather than an
extension.
Note: This feature is activated only if your System Administrator enables it on your station.
You must have personal greeting 2 selected and it must tell callers to press 4 for this feature.
T o use this feature, follow these steps:
1. From your ESI phone, press P ROG/ HELP 6 2 1 and enter the tel ephone number to whi ch you want calls
forwar de d when yo u’ re off- premises.
2
2. Record and a cti vat e p ers on al gr e eti ng 2. Be s ure t o tell the c al l er to pr e ss 4 during the greeting to be
conne cted to your alternate phon e. (See the sample greeting, below.)
When you receive a call forwarded in this fashio n, you’ll be prompted to “press any key” to accept the call.
If you don’t answer the call, the caller is returned to your voice mailbox on the ESI system.
Off-premises “reach-me” is avai lable on guest mailboxes, as well.
Sample person al greeting 2 for of f-premises “reach me”:
“Hello. This is Rick. I’m currently out of the office. To attempt to reach me on my mobile phone, please press 4
now. Otherwise, please leave me a message after the tone and I will return your call as soon as possible.”
1
This feature is activated only if the Installer enables it on your system.
2
This is also the same number used for message notification phone delivery (see “Off-premises message delivery,” page D.9).
D.3
Page 27
User’s Guide Voice mail operation
Message retrieval
Message(s) waiting display
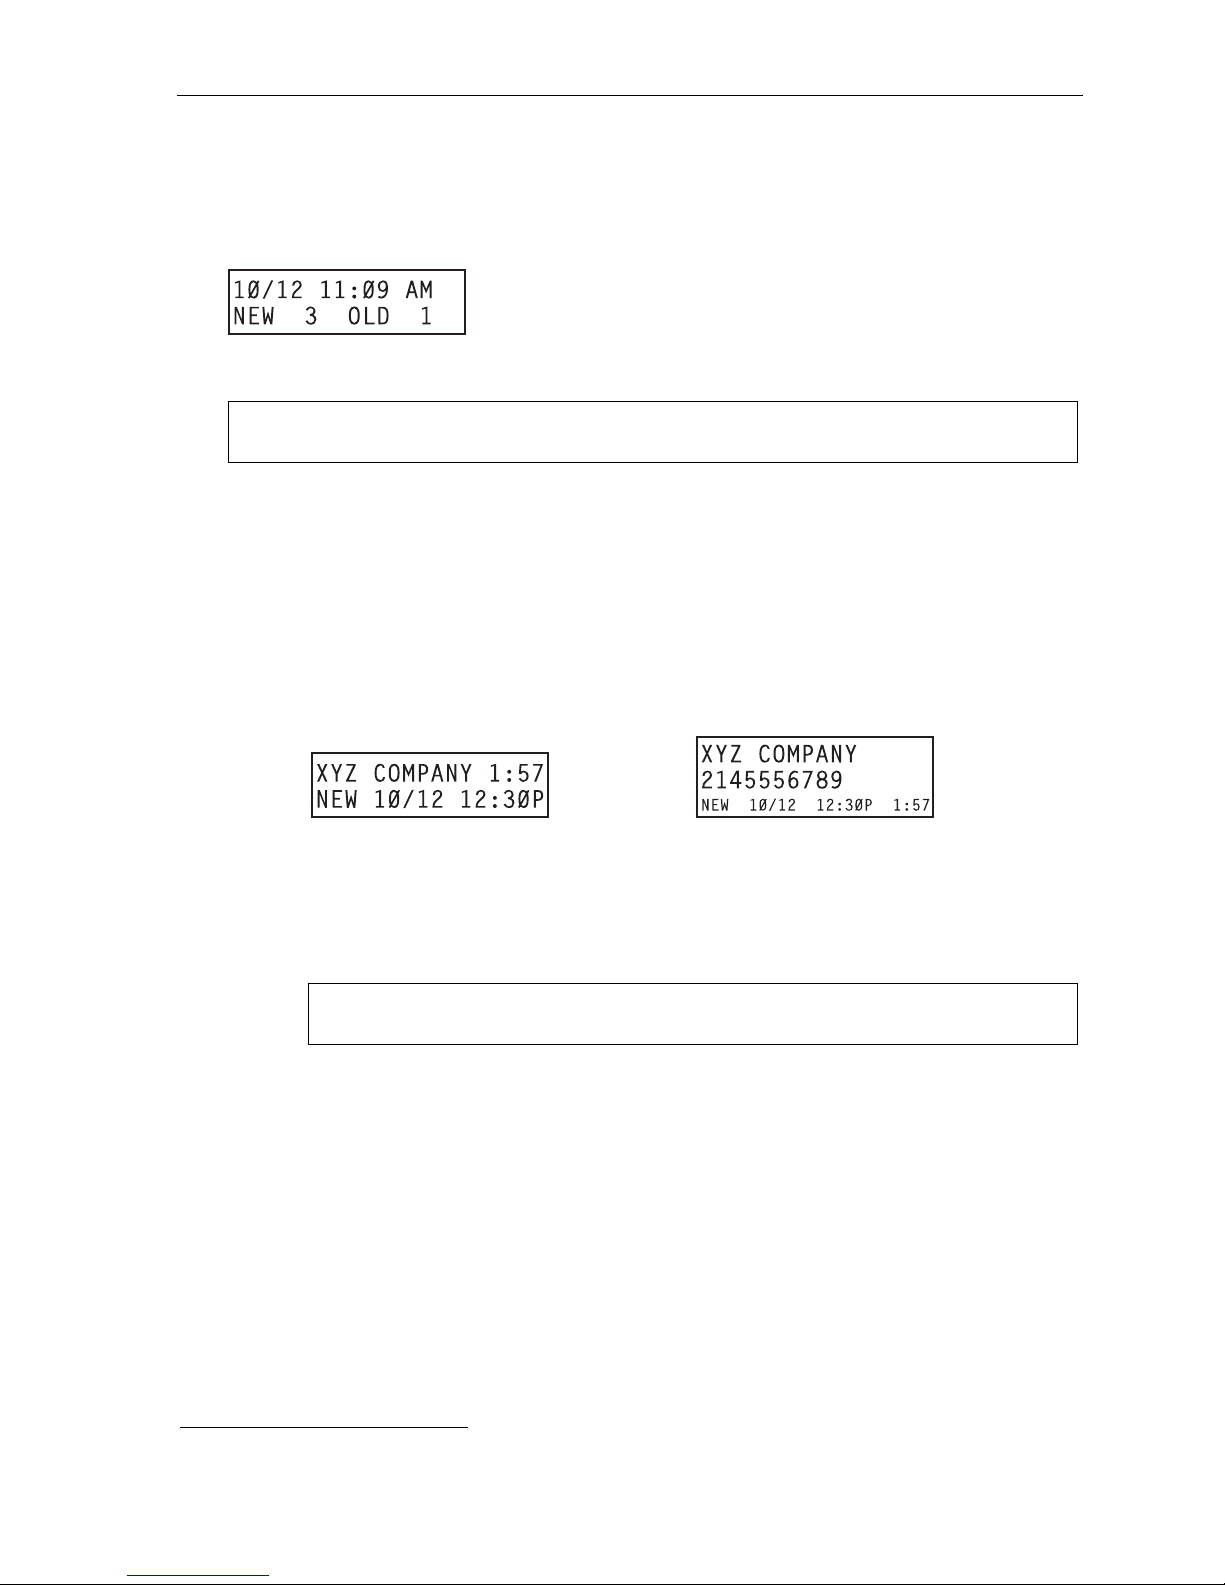
If you have at l east one new message, your ESI deskt op phone’s VOI CE MAIL key will bli nk (except on a l egacy
12-Key Feature Phone) and your display will show the number of new and old messages in your mailbox.
On an ESI Cordless Ha ndset, an “env elope” icon on the display also app ears when you have at least one
new messa ge.
Note: Message status information (shown in the example above as NEW 3 OLD 1) appears on an ESI
desktop phone (except on a legacy 12-Key Feature Phone) only when new messages exist.
Retrieving voice mail messages from your ESI phone
If using an ES I phone othe r than the ES I 6 0
1. Press VOICE MAIL.
2. Enter your passwor d if r equired (you ma y change the requirement for a password in user
programming menu 5; see "Password,” page C.5).
3. The ESI system will start playback of messages with the oldest new message and continue until all
messages are played. The display will show the origination of the message, the countdown duration
of the message, wheth er new or old, and the ti me/date of when the message was left .
ESI phone with two-line display ESI phone with three-line display (also shows
4. At the end of each message, the ESI syste m prompt s you for instructions (see the ch art, “Keys’
functi ons dur ing voice mail message retr ieval,” page D.6) . Once y ou’ve learned these prompts, you
can proceed more rapidly by pressing one of the appropriate keys an y time d uring a message or
during a pr om pt.
5. To exit playba ck of m ess ag es, sim ply hang up your pho n e.
running playback time in reverse)
1
Note: If you hang up during playback of a message, the system saves that message as new and
1
A 12-Key Feature Phone will display only the date and time.
all others not deleted.
D.4
Page 28
User’s Guide Voice mail operation
If using an ESI 60 Business Phone
Note: If you’re using an ESI 60D (digital) phone, there will be a two- to three-second delay in display
performance when you enter or exit the visual voice mail feature described below. (There is no such
delay in display performance in using visual voice mail on an ESI 60IP phone.)
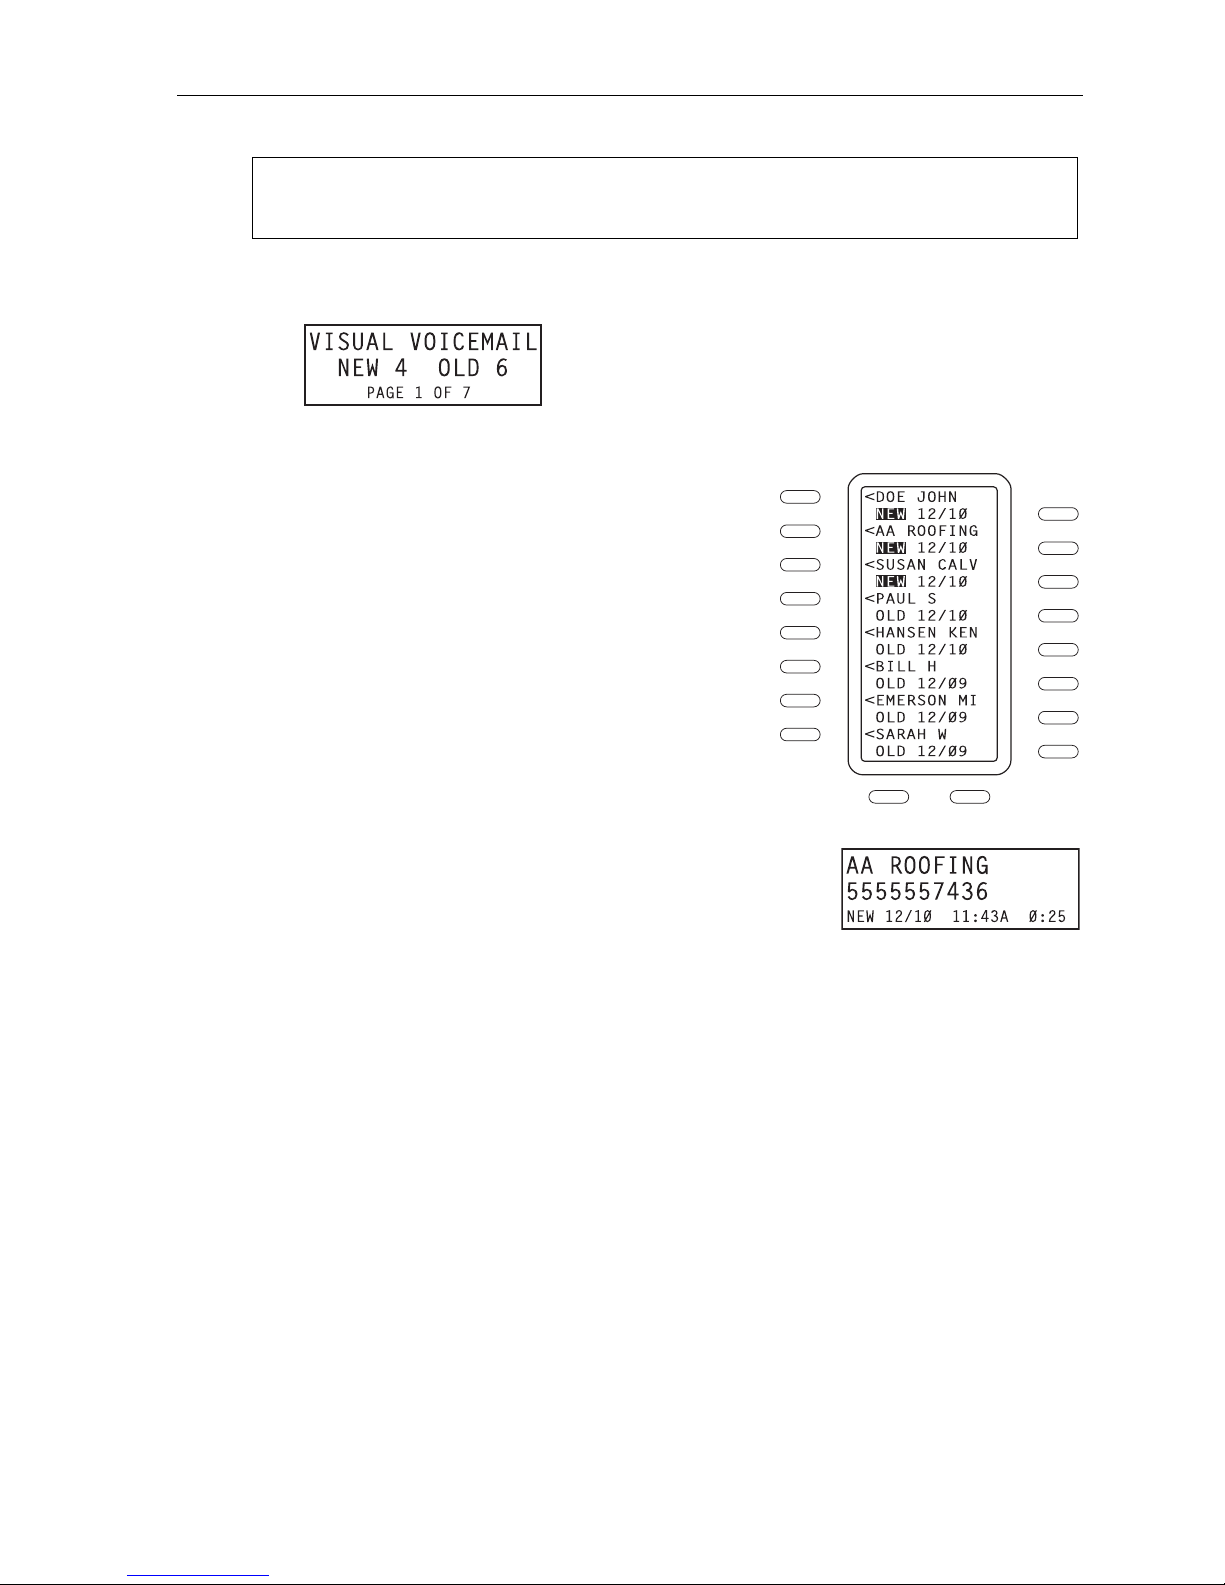
1. Press VOICE MAIL.
The first time you press VOIC E MAIL (or whenev er you press t he scroll keys to move to a different
page of voice mail messages or recordings), the upper display will show:
2. Enter your passwor d if required ( you may change the re quirem ent for a passw ord in user
programming menu 5; see "Password,” page C.5).
3. You’ll see that the phone’s lower display has updated to
display your eight most recent voice m ail mes sages, w ith
each new messa ge highlighted.
Use the scroll keys below the lower display to see t he
next eight me ssages ( press the left scroll key to s crol l
down and the right scroll key to scroll up).
4. You’ll also notice that each message is associated with
two programmable feature keys — one on t he left side
and one on the right si de.
For each me ssa ge, pre s sin g either pr ogr am ma ble fe at ur e
key up d ates the upper displa y’s first two lines with the
message’s full Caller ID information.
What else happens will depend on which of the two
program ma bl e feature key s yo u pres s:
• Pressing the right-side programmable feature key causes
the message’s time stamp to appear on the upper di spl a y’ s
third line.
• Pressing the left-sid e program mable featur e key causes the
message to begin playing.
5. To select the next voice m ail message, press t he appro priate programmable feature key.
D.5
Page 29
User’s Guide Voice mail operation
New message skip
When listening to new messages, press 9 twic e (within two seconds) to save a message as new. This
message will be played again as a new message the next time you access your voice mail.
Note: When you press 9 once to save the message as old, there is a short delay before the system tells you it
has sa ve d the message. To bypass this delay after pressing 9, just press # to hear th e next message.
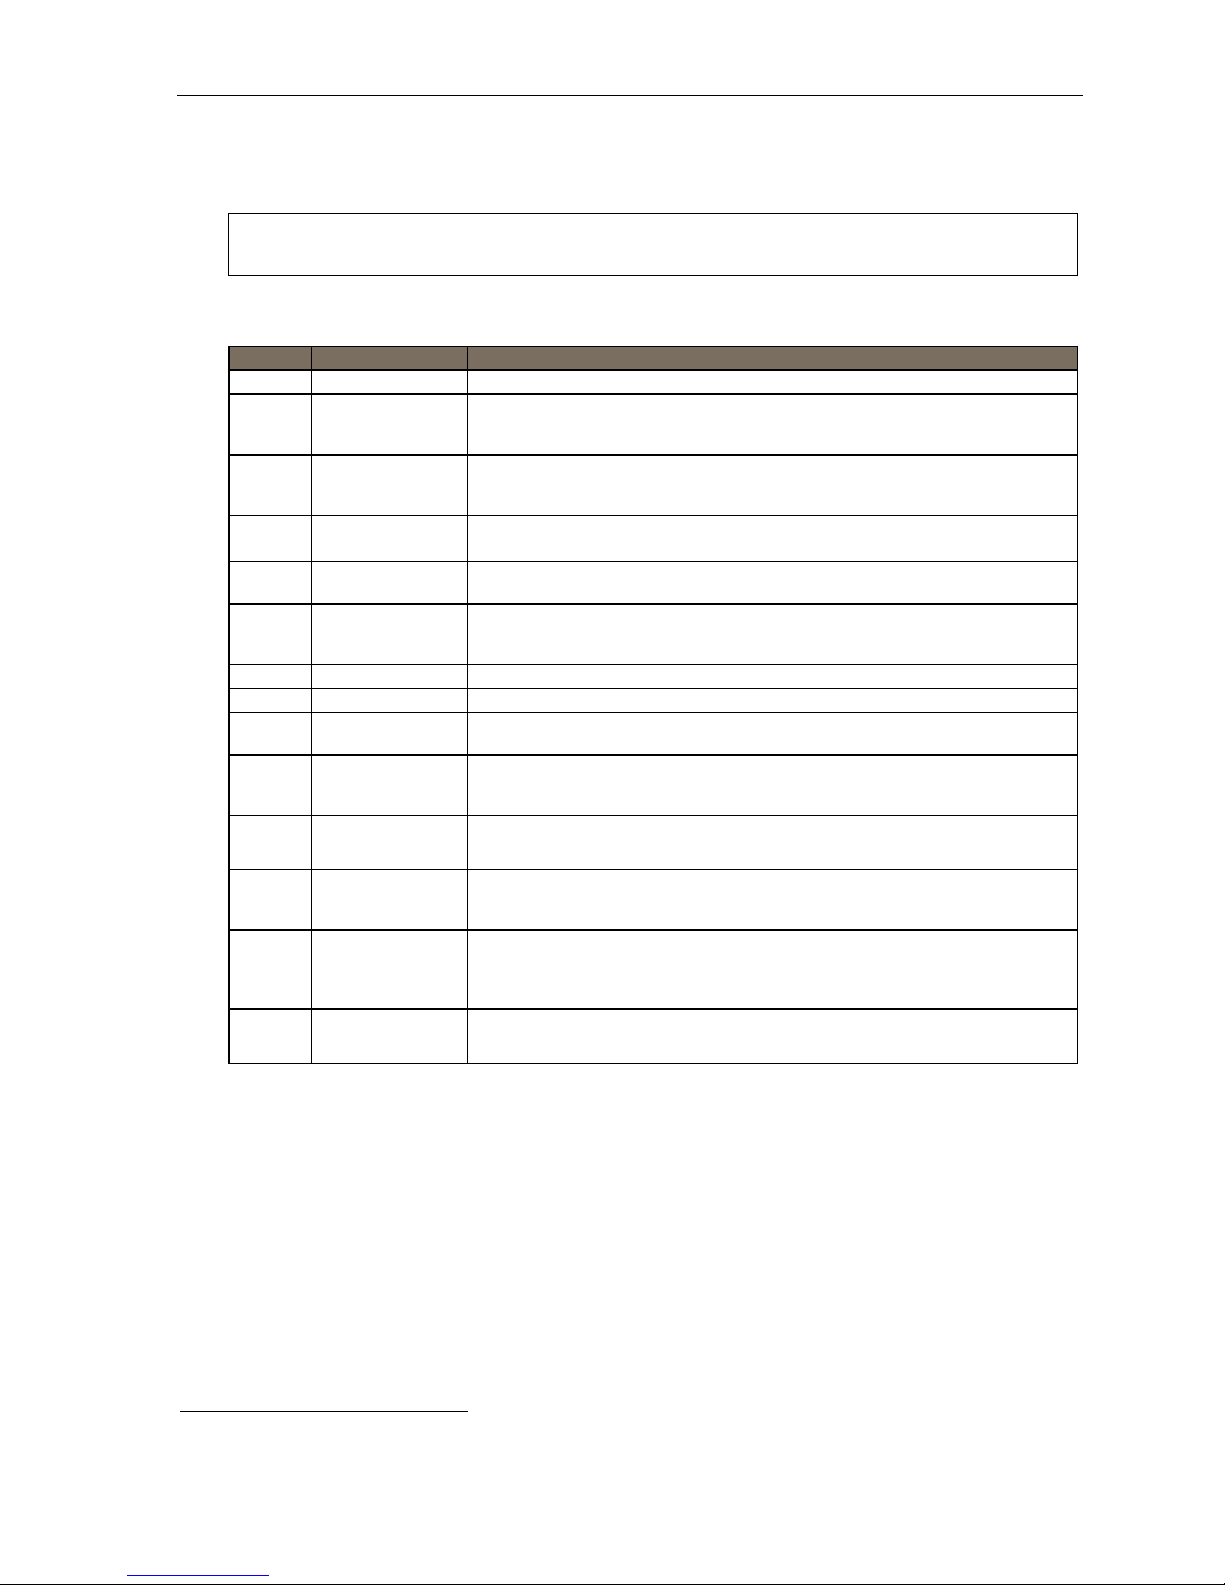
Keys’ functions during voice m ail m essage retr ieval from an ES I phone
Key Function name Description
1 Pause Pauses for one minute or until you press 1 again.
2 Time and date/
number toggle
3 Reply Replies to the originator of a message (possible only if message came from another
4 Back up
(rewind)
5 Fast forward Advances playback 4 seconds for each key-press.
6 Move Moves a copy of the message to other users’ mailboxes.
7 Delete Deletes the message from the mailbox (see “Message Recycle Bin,” page D.10).
8 Fast-forward Fast-forward to end of message.
9 Save Saves the message (it will play as an old message the next time you
9 9 Save as new Skips over a new message and leaves it as a new message (i.e., it will be played as a
REDIAL Auto-callback Exits your mailbox without erasing the message, and then automatically dials
Toggles the bottom line of the display between the message’s time/date and the
1
caller’s number.
(Not available from an analog phone or off-premises location.)
user in the system). Record yo u r rep l y at th e tone and then p ress 1 to st op , a fter which
the system returns you to your mailbox and the message to which you were replying.
• If pressed during message playback, rewinds 4 seconds for each key-press.
• If pressed after the playback has finished, returns to beginning of message.
(Not available from an analog phone or off-premises location.)
You may move the copy with or without an introduction.
After the move, the system returns you to your mailbox and the original message.
retrieve messages). [See also the Note above this ta ble.]
new message the next time you pick up messages). You must press the 9 key twice
within two seconds.
the number.
2
(Not available from an analog phone or off-premises location.)
ESI-DEX Store If Caller ID is present, saves to your Personal Dex for later use.
#
Leave
a message
Check
other box
(Not available from an ESI Cordless Handset, legacy 12-Key Feature Phone, analog
phone, or off-premises location.)
Lets you record a message in one or more mailboxes. At the prompt, enter the desired
mailbox number. Press # and then enter up to 65 mailbox numbers, using the phone’s
dialpad and programmable feature keys. Mailboxes in a department count toward the
maximum of 65.
Checks messages in another mailbox (may require a password, depending on the
mailbox’s setting; see “Password,” page C.5).
Retrieving voice mail m essages using anothe r user ’s ES I phone
1. Press VOICE MAIL and the n .
2. Dial your ext en si on num ber.
3. Follow the procedures descr ibed in “Retrievin g voi ce mail m essage s from your ESI phone” (page D.4).
1
Applicable to 24-Key Feature Phone only.
2
A local call may not be dialed correctly depending on the limitations of the local dialing plan. You may need to dial some of these calls manually.
D.6
Page 30
User’s Guide Voice mail operation
Virtual Ma ilbox Key
(Not available on ESI Cordless Handset or legacy 12-Key Feature Phone.)
If you frequently pick up your messages from another user’s ESI phone or have others help pick up your
messages, you may want to pr ogram a programm able feature key on that phone as a Virtual Mailbox
™
for your mailbox. When you have new messages, the key will blink, press it to automatically c o n n e c t
Key
to your mailbox. This feature does not affect your ability to pickup messages from your own phone.
Note: Assign to the programmable key the following — VOICE MAIL and then your extension number or
mailbox number (see “Programmable feature keys,” page C.2).
Retrieving messages from an off-premises location
You can pick up messa ges when away from the offi ce or from an analog st ation. Since the display is not
available to you, message handling will operate slightly differently.
To retrieve your message from a remote location:
1. If the aut o attendant ’ s m ain gr eet i ng an sw er s your ca ll , pr es s
operator or another user a nswers your call, have the p erson transfer you (by pres sing VOICE MAIL
and then pressing your station key [or entering your mailbox number] and hanging up).
2. If required, enter your password.
3. The ESI system will announce the number of new and old messages, and will start playback of
messag es st ar ti n g wit h the ol dest n ew mes sag e and c ontinue unti l al l mes s ag es and r ec ordings ha ve
played or you pre s s
to disconnect.
For more information, see page C.6.
Functions available during off-premises voice mail message retrieval
Key Function Description
2 Hear time/date Pauses the message, plays the time/date when the message was left and resumes.
3 Reply Replies to the originator of a message (possible only if message came from another
4 Back up
(rewind)
5 Access user
programming
user in the system). Record yo u r rep l y at th e tone and then p ress 1 to st op , afte r which the
system returns you to your mailbox and the message to which you were replying.
• If pressed during message playback, rewinds 4 seconds for each key-press.
• If pressed after the playback has finished, returns to beginning of message.
Access certain user-programmable features.
Note: Fast forward is not available from a remote location.
and enter your mailbox number. If the
7 Delete Deletes the message from the mailbox (see “Message Recycle Bin,” page D.10).
9 Save Saves the message (it will play as an old message the next time you
9 9 Save as new Skips over a new message and leaves it as a new message (i.e., it will be played as a
8 Main greeting Goes to the main greeting.
0 Operator Transfers you to the operator.
#
Leave
a message
# To other mailbox To leave a message in another user’s mailbox.
Disconnect Disconnects you from the system. Always press before hanging up (if you press it
retrieve messages). [See also the Note above this table.]
new message the next time you pick up messages). You must press the 9 key twice
within two secon ds.
Lets you record a message in one or more mailboxes. At the prompt, enter the desired
mailbox number. Press # and then enter up to 65 mailbox numbers, using the phone’s
dialpad and programmable feature keys. Mailboxes in a department count toward the
maximum of 65.
during message playback, the system will save the playing message and any other
currently unsaved messages in your mailbox).
D.7
Page 31
User’s Guide Voice mail operation
Live recording
(Not available on legacy 12-Key Feature Ph one.)
Note: To use this feature on an ESI Cordless Handset, it must have a programmable feature key set for key code
T o begin recording both sides of the conversation during a cal l, press RECORD. Recording will continue until
either you press RECORD again, the call is compl eted or the maxi mum recording length
582. (See “Optional features,” page F.14.) It then functions like the RECORD key described herein.
1
is reached (default is
10 min utes). To r esume recording, you must press RECORD again. Duri ng rec ording, the RECORD LED will
“flutter” (blink rapidly) green and RECORDING will appear on the display.
Note: The Installer may have programmed your system to insert a short tone every 15 seconds while recording.
You can record any convers ation, including a conference call2 or service observing call (see “Service observing, ”
page F.15). You also can make a personal recording — useful for recording personal reminders, in office
conversations or meetings — by lifting the handset or pressing SPEAKER and then pressing RECORD. Internal
dial tone will stop and recording of your station will begin until either RECORD i s pre ss ed a gai n or you ha ng up,
whichever occurs first.
Note: Interruptions in conversation may compromise the quality of the recording.
Quick Move™
The Quick Move feature is perfect for use by a receptionist or, ind eed, anyone who receives a call that would
be more appropriate for one or more other currently unavaila ble co-workers (for whom y ou have programmed
station keys on your phone). Let’ s say someone calls and wants to speak to o ne of yo ur co-workers. You say
that the co-worker isn’t there now but you’ll be happy to let the caller leave a voice message. However, the
caller protests that he do esn’t “want to talk to a recording” and wants you to write down t he message. Worse,
you know that some of your other co-workers will want to hear what this caller has to say.
But here’s all you have to d o: just press RECORD and then, while recording (and “ta king dow n” the m essage,
as far as the caller knows) , press the station keys for those to who m you wi sh to Qui ck Move t he mess age.
You can do this for as many stations as you have station keys programmed on your phone.
Each designated User’s mailbox will receive the recording as a new message, but your mailbox will not ha ve
the recor di n g. Thi s fe at ur e sav e s you a num ber of ste ps — i.e., you won’t nee d to acc ess your m ailbox and
move t he recording and del ete th e recording from your m ailbox.
Playback of recordings
If you have recorded conversations, they will play after your old messages, or you can access them directly
by pressi n g VOI CE MAIL, RECORD. This will play back the recordings, starting with the newest recording.
Recordings can be handled just like other messages (see next item).
1
Adjustable by only the Installer.
2
Upon playback, a recording of a conference call can sound garbled if more than one person at a time is speaking.
D.8
Page 32
User’s Guide Voice mail operation
Off-premises message delivery
T o program this, press PROG/ HELP 6.
Introduction
The ESI syst em ca n be pro gr am me d to deliver mes sage s t o an off - premises ph one or to page y ou wh en yo ur
voice m ailbox receives a message. You ca n set the phone n umber (cell p hone, h om e number, another
extension, etc. ), a delay time (the period that the system is to wait before attempting to deliver the message) ,
or the pager number.
The administrator can also set for your station the:
• Number to be called or paged
• Delay period
• Number of attem pt s
• Interval betwee n attempts (i n increm ents of 30 minutes)
• "Quiet period” which suspends message delivery for late night, etc.
If you have programmed both an off-premise delivery number and a pager number, the system will prompt
you to choose one of the following delivery options:
• Phone-only
• Pager-only
• No off-premises delivery
Note: If your system is u sing ESI Presence Management, your ESI Presence Management-related settings
(PROG/HELP 7 2) will supercede your settings here. Consult the ESI Presence Management User’s
Guide (ESI part # 0450-0793) to learn more about this information, and about additional, special
functionality that may be available to you. If you’re not sure whether your system is using ESI Presence
Management, consult your System Admi nist r at or. Fo r m o r e in f o rma t i on abou t ES I P re se n ce M an age m en t ,
visit www .esi-estech.com/presence.
Message delivery
. . . To a phone
Whenever your mailbox receives a new message, the system will call the number that you have
programmed and play the prompt: "You have messages. Please en ter your passw ord.” The prompt will
repeat three times before the sy stem ass umes that no one has an swered (i.e., because it has "heard” no
password) and disconnects.
Upon answ eri n g, enter your pa s swor d (if yo u hav e set y our pa ss wor d opt i on s for no p as sw ord, yo u must
enter 0 as your pas swo rd) .
Warning: A “” response instead of the password will cause the system to suspend calling you until it receives
You will then be connected to your mailbox and can proceed with normal remote operation (see
"Retrieving voice m ail messages from an off-premises locati on,” page D.7).
the next new message.
D.9
Page 33
User’s Guide Voice mail operation
. . . To an external pager
You can program pager notification to operate either as the sole notifi cation method or in conjunction
with phon e del i very.
You can have the system call and activate your ext ernal pager whenever the first new/urgent message is
left in your mailbox and repeat the page (at the interval programmed by the administrator) until all new
messages have been retrieved.
Note: You can toggle the feature on or off in user programming (PROG/HELP 6 1).
Refer to page C.6, option 6 (“ Exter nal mes sage notification”), for s pecific menu selections.
Urgent messages
You can have all new messages delivered or choose to have o nly ur gent messages delivered. If you hav e
enabled the urgent m essage f eature as part of user programming (PROG/HELP 6 4), you must i nclude, in
your pe rsonal greeting, instructions for t he caller to press 2 t o mark t he me s sage as urgent. (S ee “Ex amples:
Sample greeting 2” under “Personal greeti ngs” o n page D.1.) If you have new, urge nt messa ges, yo ur VOICE
MAIL key's LED will "flutter” (blink rapidly) and, when you retrieve your messages, the system will play urgent
messages ahead of other new messages.
Message Recycle Bin (un-delete)
The ESI system stores your 10 most recently deleted messages in a Message Recy cle Bin to allow you to
recover, or "un-delete,” messa ges that may have been deleted in error.
You acc ess the M essage Recycle Bin through user progra m m ing (PROG/HELP 9). Press 9 to advance through
deleted messages. Press 8 to restore a message to your mai lbox as an ol d message.
Status indicator lamp
(Not on ESI Cordless Handset or legacy 12-Key Feature Phone.)
The red status indicator lamp is located at the top of an ESI 60, ESI 40, 48-Key Feature Phone, or 24-Key
Feature Phone. The status indicator lamp indicates three conditions:
• Phone is off-hook — Light glo ws s ol id r ed.
• Phone is ringing — Light “flutters” continuously.
Note: The light won’t “flutter” if the ringer volume is turned off.
• Phone h as at least one n ew voice mail message — Li ght bl i nk s.
For example, if a user is wearing a headset, it can be difficult to know whether he/she is on a call. Therefore, just
look at the status indicator lamp — if it’s glowing solid red, the person is, indeed on a call.
Note: If more than one of these three conditions is true at the same station, the light will behave according to the
following priority: off-hook, then ringing, then new voice mail. Here’s an example. You have a new voice mail
message waiting, which makes the light blink. However, if the phone begins to ring, the light will “flutter”
continuously because ringing has a higher priority than new voice mail; and, if you then pick up the handset
or press SPEAKER to take the call, the light glows solid red because the off-hook condition has the highest
priority of the three conditions.
D.10
Page 34

User’s Guide Voice mail operation
Setting up twinning
Note This feature is available only if your extension is authorized for trunk-to-trunk transfers. If you’re not sure
With twinning, you can choose to h ave all calls that are directed to your extension ring an additional number,
which can be ei th er an int er nal ext e nsi o n or an out di al num b er.
When you receive a call twinned in this fashion, you’ll be prompted to “press 1” to accept the call. If you don’t
answer the call, the caller is returned to your voice m ailbox on the ESI system.
If you’re on a twinned call and ne ed to transfer the call back to the ESI system, just press 4 and you’ll b e given
inter nal dial tone; then enter the extension number of the person you want to reach and pres s #. If y ou need t o
retri eve the call, just press
whether it is, consult your System Administrator.
and you’ll be reconnected.
Enabling/disa bling twinning
To enable twinning, press PROG/ HELP 6 6 1 1 and t hen pr ess # to confirm.
To disable t winning, press PROG/ HELP 6 6 1 0 and then press # to confirm.
The default setting for twinning is disabled.
Twinning desti nati o n
T o select a twinning destination:
1. Press PROG/HELP 6 6 2.
2. Use a scroll key ( or
If you selected OUTDIAL, ski p to st ep 4.
3. (Thi s assumes you s elected EXTENSION in the previous step.) Enter an extension number of up to
four digits in length.
) to select either EXTENSION or OUTDIAL.
Note: Esi-Linked destinations are not supported.
4. (Thi s assumes you s elected OUTDIAL in step 2.) Enter a phone number of up to 24 digits in length; this
number must include an outside line access code (9, 8, or 71–76) before the number. To enter special
characters, backspace, a nd/or view the number after saving it, use a scroll key ( or
the num ber, you must f irst delete i t and then re-enter it as desired.
5. Press # to confirm.
The default setting for the twinning destination is OUTDIAL.
). To change
D.11
Page 35
User’s Guide Voice mail operation
Optional voice mail feature: Guest mailboxes
Important: This is a special, optional feature not explained in the tutorial. Be sure to get your guest mailbox number
A guest mailbox is per fe ct for s ome one su ch a s an out si de sa l esperson or man uf a ctur i ng em pl oy ee wh o
doesn’t have an internal extension assigned to him/her but still needs a mailbox. You can handle a guest
mailbox as if it were a regular extension (i.e., list it in the directory, assign a program m able feature key for
transfer to it, etc.).
Notes: A guest mailbox must have at least one personal greeting recorded to be activated and, thus, able to accept
If your system is using ESI P resen ce Managem en t, consult the ESI Presence Management User’s Guide (ESI
You also can use the off-premises “reach-me” feature (see page D.3) with a guest mailbox.
from the Adm inistrator.
messages.
part # 0450-0793) to learn about additional, special functionality that may be available to you.
If you’re not sure whether your system is using ESI Presence Management, consult your System
Administrator. For more information about ESI Presence Management, visit www.esi-estech.com/presence.
Personal gr eet ings
You can record up to three different greetings in your own voice indicating the availability to return calls. Also,
you ca n change the greetings as oft en as necessary by recording over a previously record ed greeting. (See
“Select personal greeting,” pag e D.1, to learn how to program these greetings.)
Personal gre etings
You can record up to three different personal greetings in your own voice indicating your availability to return
calls. Also, you can change the personal greetings as often as necessary by recording over a previously
recorded personal greeting. (See “Select personal greeting,” page D.1, to learn how to program these greetings.)
Retrieving guest mailbox m essages from an E S I phone
T o retrieve guest mailbox m essage s from a n ESI pho ne, follow the same procedure described in “Retrieving
voice mail messages u sing another user’s ESI phone” (page D.6), except th at you e nter your guest mailbox
number rather than a n extension num ber.
Keys’ functions during voice mail message retrieval
See the chart on page D.6.
Virtual Ma ilbox Ke y
See “Virtual Mailbo x Key,” page D.7.
D.12
Page 36
User’s Guide Voice mail operation
Program m ing your guest mail box fr om an ESI phone
Press PROG/HELP , then the mailbox number and then # to confirm. You will be prompted to: record the
greeti n g, ch an ge the p as sw ord, ent er an ext er nal pa gin g num b er , or exit b y h an gin g up.
You can record up t o three dif fer ent personal gr eeti ngs in your own voice indi cati ng your avail ability to return calls.
Tip: If necessary, review “Personal greetings,” page D.12 for options and sample greetings.
You can change any per sonal greeting as often as necessar y, by just recording over a previously recorded
personal greeting.
Warning: Do not delete all of your personal greetings; make sure at least one always remains. Deleting all the
Select the desired greeting number — 1, 2, or 3. The current greeting will be played followed by prompts to
re-re cor d, delete, hear agai n, or sel e ct as t he cur r ent gr eeti ng by pr e s sin g #.
greetings turns off your mailbox.
1 Record personal greeting
Begin recording at the tone, press 1 to stop. Th e new personal greeting aut om atically rep laces the
previous greeting.
Important: Your mailbox will work only if at least one personal greeting exists for it.
2 Delete personal greeting
When prompted, press 2 agai n to confirm deletion. (See “Impor tant” note, above.)
3 Hear current per s onal greeti ng
Password
See “5 Password,” page C.5.
Off-premises message delivery
See “Off-premises message deliver y, ” page D.9.
Message delivery to a phone or pager
See “Me ssage delivery,” page D.9.
Urgent messages
See “Urgent messages,” page D.10.
Message Recycle Bin (un-delete)
See “9 Message Recycle Bin,” page D.10.
D.13
Page 37
User’s Guide Voice mail operation
Optional voice mail feature: Group/broadcast mailboxes
Important: This is a special, optional feature not explained in the tutorial. Be sure to get your group mailbox number
Any user can use the Quick Groups™ feature to send a message to any combination of users (up to 65)
from the administrator.
without having to create specific group mailboxes. No programming is required to initiate Quick Groups.
Group mailboxes are used if the members of the group rarely change or if members want to be able to
easily leave messages for one another, etc.
Introduction to group mailboxes
Group mailboxes let you broa dcast a “master ” message to all members of a pre-def i ned gr o up of us er s (or
guest m ailboxes). W h en yo u record a master message in the grou p m ailbox, the ESI system instantl y copi es
it into the mai lbox of each member w ho has r ecorde d a perso nal greeting.
Note: A member can only delete or save his copy of a group message; the group mailbox will retain a saved
The master message remains in the group mailbox until all members have saved their copie s or deleted them
from their mailboxes.
Warning: If you delete the master message from the group mailbox, all remaining copies will automatically be
Example: You have left a group message reminding everyone in the group of a meeting for Friday. The following
group message until deleted by every member of the group.
deleted from the member's mailboxes.
Monday, if the message is still in the group mailbox (indicating that at least one of the persons has not
deleted the message), you can delete it from the group mailbox which will delete it from all member
mailboxes who have not yet heard the message and deleted from their mailbox.
You may give the group mailbox number and password to ot hers to allow them to also record master
messages. Sett ing “0” as the password elim inates the password requirement.
Introduction to the broadcast mailbox
For easily contacting all system users, the ESI system’s broadcast mailbox automatically consists of all
station mailboxes (not gu est mailboxes) wit h person al greetings recorded.
Leaving a group message
Call t he mailbox number and enter the appropriate passw ord (if required).
D.14
Page 38
User’s Guide Voice mail operation
Retrieving a group m ailbox m essage
Retrieving a group m ailbox message is simi lar to retrieving a message from a perso nal mailbox. The chart,
below, lists the options you receive d uring or after list ening to the message.
Key(s) Functi on nam e Description
3 Reply Gives spe cific caller s options 1 and 2 (see next two item s).
3 1 Reply to
message originator
3 2 Reply to
message originator
and group
4 Replay Returns to the beginning of the message.
6 Move/Copy Moves a copy of the message to another user’s mailbox. You may
7 Delete Deletes the message from the m ailbox (see “Message recycle bin,”
9 Save Saves the message (it will play as an old message the next time you
Leave a message Lets you record a mesage in another mailbox. At the prompt, e nter the
Replies to the origi nator of the m essage (possi ble only if the message
comes f rom another user in t he system ). At the tone, record your reply
and then pres s 1 to stop. The system will then return you to your
mailbox and the message to w hich you were r eplying.
Replies to the origi nator of the message and all member s of the group
(possible only if t he message comes from anot her user in the syst em ).
At the tone, r e cord your reply and then pre ss 1 to stop. The system will
then return you to your mailbox an d the message to which you were
replying.
move t he copy with or without an introduction. After the move, the
system returns you t o your mailbox and the original message.
page D.10) . [S ee Warning, below.]
retrieve messages.) [See Note, below.]
desired mailbox number.
Note: The master message remains in the group mailbox until all members have saved their copies or deleted
Warning: If you delete the master message from the group mailbox, all remaining copies will automatically be
Example: You’ve left a group message reminding everyone in the group of a meeting that will take place Friday.
them from their mailboxes.
deleted from the members’ mailboxes.
The following Monday, if the message is still in the group mailbox (indicating that at least one of the
members hasn’t deleted the message), you can delete it from the group mailbox — which will delete it
from all member mailboxes from which it hasn’t already been deleted.
Deleting a group message fr om the gr oup mailbox
Enter gr ou p mail b ox pro gr am min g by pr e ssi n g VOICE MAIL, , and the group mailbox number. You will
hear any pre vi ou sl y re cor d ed gr oup m ess ag e s not yet del et ed by al l m emb er s of the gr o up. Delete by
pressing 7. Exit by hanging up.
Program m ing a group mailbox
Press PROG/HELP followed by the group mailbox number. You will be prompted to record the mailbox
greeting, change the password, or edit the list of members. Exit by hanging up. F or frequent access t o leave
group m essages, program a group mailbox number a s a programmable feature key. (S ee “Programmable
featur e key s, ” pag e C. 2).
Virtual Ma ilbox Key
T o help monitor that all messages have been picked up, you can pr ogram a programmable feature key on
any ESI phone as a Virtual Mailbox Key for the group mailbox. When new messages exist, the key will
blink r apidly; press it to conne ct autom atically to the mailbox. Program the programmable feature key with
VOICE MAIL
followed by the mailbox number ( see “Programmable feature keys,” p age C.2).
D.15
Page 39
User’s Guide Voice mail operation
Optional voice mail feature: Cascade notification mailboxes
Important: This is a special, optional feature not explained in the tutorial. Be sure to get your cascade notification
mailbox number from the Administrator.
A cascade noti ficati on mai lb o x dials up to three designated numbers (of up to 24 digits each) in a sequence
called a cascade.
If a cascade notification mailbox receives a new message, the ESI system dials the first number for a set number
of times. If it receives no response, the ESI system then dials a second number for a set number of times. If,
again, there is no respons e, the ES I system dials the third number ; and the syst em then dials all t hree numbers,
in sequence, until someone does finally retri e ve the message. This is useful for a variety of individuals who must
be “on-call” after hours, such as doctors, plumbers, technical support representatives, wrecker dr ivers and
volunteer fire fighters.
Programming your cascade notification mailbox
Cascade mailbox options
You can program up to three external numbers, of up to 24 digits each, to b e called or paged whenever
the mailbox takes a new or urgent message. The system will dial the first number (for the number of times
liste d), then dial t he second paging number (for the n um ber of times listed), and finally dial t he third
number, continuin g in this sequence to call all three numbers unti l the message has bee n retri e ved.
1.
MB
533 2145553232 PHONE 2 2145554254 PHONE 3 2145555452 PAGER
T o program a cascade m ailbox, press PROG/HELP and the mailbox number, followed by #. Then, if
prompted, if enter t he pass w ord (the default password is the same as the mailbox number). If this is the
first time you’ve programmed the m ailbox, it will prompt you to record the mail box gre eting. Otherwise,
press 6 1 to enter programming of the following casca de mailbox options:
1. The mailbox number — Range: 533–542. [ Th en pre s s 1 to enter num ber pr o gr amming, and
2. First number — The number to be di ale d (without the CO line group).
3. Type — PHONE or PAGER. Use scroll keys to select.
4. Attempts — How many times the system will call before adding the second number.
5. Second number — The number to be dialed (without the CO line group).
6. Type — PHONE or PAGER. Use scroll keys to select.
7. Attempts — How many times the system will call before adding the third number.
8. Third numb er — The number to be dialed (without the CO line group).
2.
1st Number
3.
Type
4.
Attempts
5.
2nd Number
6.
Type
proceed to Step 2.]
Range: 0–99 (0 immediately p a ges all numbers). Default: 1.
Range: 0–99. Default: 1.
7.
Attempts
8.
3rd Number
9.
Type
Notes: Use the scroll key to enter special characters; use the scrol l ke y to back space. Press # to
confirm the inserted character and continue. Press # # to complete the entry.
To change the number, delete and then re-enter it.
D.16
Page 40

User’s Guide Voice mail operation
Cascade notification parameters
The cascade notification mailboxes will use the same CO line group and pager dialing pause as programmed
by the Installer.
Notification interval
To program the notification interval parameter for a cascade notification mailbox:
1. From the programming menu for that mail box, press 6 2.
2. Enter the num ber of m inutes for the interval between attempt s.
Range: 1–1440. Default: 30.
Notes: Enter only the number; do not include a line access code (such as 9). Use the scroll key to enter
special characters; use the scroll key to backspace. You also can use the scroll keys to view the
number after it’s saved. To change the number, you must delete it and then re-enter it as desired.
For those situations where more than one cascade notification mailbox is in operation, the ESI
system automatically sends the mailbox number to the display of a cell phone or digital pager, to
indicate which mailbox has new messages.
Retrieving cascade notification mailbox messages
Retrieving messages when off-premises
If using an off-premises phone
1. Your off-premises phone ring. When you answer, you’ll hear: “ You have new messages in
mailbox number [xxx]. Please enter your password. T o stop notification, press the
2. Enter the mailbox number and (if necessary) password. The system then will play any new
messag es in t he ca s cade n ot if ic at i on mai l bo x.
If using a pager
1. Call the main number.
2. If the auto attendant main greeting a nswers, press
If a live oper ator answers, have t he oper ator transfer you (by pres sing VOICE MAI L and
follo wed by entry of the cascade paging mailbox number).
Retrieving messages when usi n g an ESI phone
and the cascade p aging mailbox number.
key .”
,
Press VOICE MAIL and then enter the mailbox number.
Virtual Ma ilbox Ke y
See “Virtual Mailbo x Key,” page D.7.
Message Recycle Bin (un-delete)
See “Me ssage Re cycle Bin,” page D.10.
D.17
Page 41
User’s Guide Voice mail operation
Optional voice mail feature: Q & A mailboxes
Important: This is a special, optional feature not explained in the tutorial. Be sure to get your Q & A mailbox numbers
Q & A (question and an swer ) mailboxes allow you t o ask cal l e rs for mor e det ailed inf orm ation, suc h as on an
emplo ym ent qu estionnaire or a survey.
As a Q & A mailbox owner, you can record up to 10 quest ions. The system groups the individual answer s and
plays them back as a single message (separated by short beep tones). Normal message handling capability —
delete, save, etc. — appli es to all answ ers within the messa ge.
Note: Each answer can have a maximum length of a regular message as programmed by the Installer.
Include in the first quest ion instructions to co nclude each answer by pressing 1 or to pause for the next quest ion:
“Record your name at the tone, then press 1 or pause for the next question.” [Next:] “Recor d yo ur addr es s at the
tone…” [etc.]
At the conclusion the caller can be forwarded to another extension, mailbox, or automatical ly disconne cted.
Include in the last question the appro priate i nformation s uch as: “Thi s is the last question. After you have
finis hed, ple a se ha ng up… .”
Note: If the caller does not respond to two questions in a row, the call will be disconnected.
A Q & A mailbox is turned “on” only when at least one quest ion has been recorded. Deleting all its questi ons will
turn “off” the mailbox.
from the Adm inistrator.
Program m ing Q & A mai lboxe s
1. Press PROG/HELP followed by the Q & A mailbox number.
2. You will be prompted to do one of the following:
(a.) Record the questions
. . . or . . .
(b.) Change the password
. . . or . . .
(c.) Access previously deleted messages.
(See the following explanations.)
3. When finished, exit by hanging up.
(Continued)
D.18
Page 42

User’s Guide Voice mail operation
1 Select question
Select the desired question number, 1–10. the ESI system will play the question and give you the option to
perform one of the fol lowing:
1 Record question
Begin recording at the ton e; press 1 to stop. Th e new q uest io n aut om at ic al l y repl a ces t he ol d one wi th
that question num ber.
Note: The mailbox will not be enabled if no questions exist.
2 Delete question
When prompted, press 2 agai n to confirm deletion. If you delete a question in the middle of a li st
without replacing it, the playback numbers of the other messages will not change (this is important only
for your knowledge in programming, since the system itself won’t introduce each question to the caller
as “Qu estion 3,” “Question 6,” etc.).
Example: If you deleted question number 3 out of 5 questions, the system would play only questions 1, 2, 4,
and 5 to a caller. When you retrieve the playback, two beep tones will separate answers 2 and 4.
3 Hear current question
2 Password
The pas sword may consist of t wo to eight digits followe d by # (0 cannot be the first digit). If you prefer not
to have to enter a password, enter 0 as the entire passw ord.
9 Message Recycle Bin (un-delete)
The ESI system stores your most recently deleted 10 messages in a Mes sa ge Recy cl e Bin to l et you
recover, or "un-delete,” messa ges that may have been deleted in error. Press 9 to adva nce through
deleted messages. Press 8 to restore a message to your mailbox as an old message.
Retrieving messages from an ES I phone
Press VOICE MAIL, , and the mailbox number.
Virtual Ma ilbox Ke y
See “Virtual Mailbo x Key,” page D.7.
Retrieving messages when off-prem ises
1. Call the main number.
2. If the auto attendant mai n greeting ans wers, press
If a live oper ator answers, have t he oper ator transfer you (by pres sing VOICE MAI L and
entry of the mailbox number ).
and the Q & A mailbox number.
, followed by
D.19
Page 43
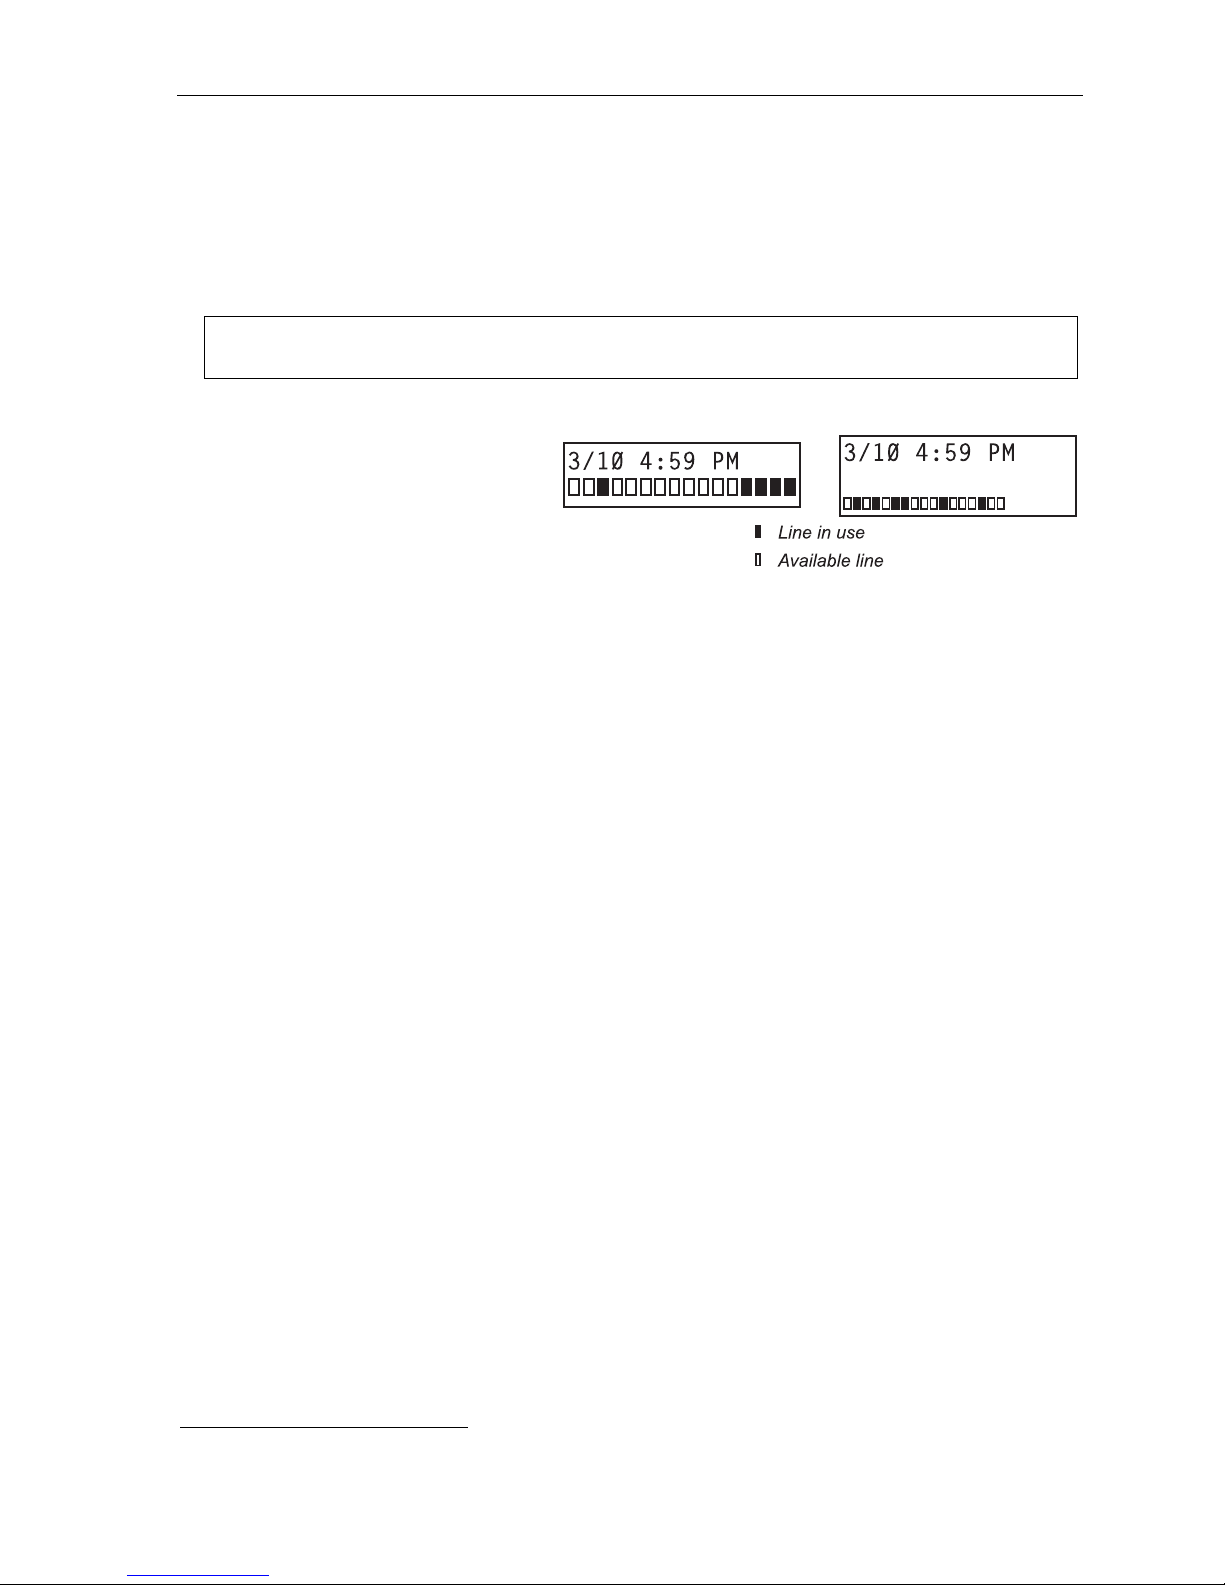
User’s Guide ESI phone operation
ESI phone operation
Display
When your phone (or station) is n ot in use, the display will show the current date and time, activated features
such a s DND (do n ot disturb; s ee “MUTE/DND,” page E.4), monitor mode, etc.), and — on an ESI desktop
phone (other than the lega cy 12- Key Feat ure Pho ne) — the syst em ’s current line usage.
Notes: An ESI Cordless Handset’s display is similar to that of the two-line display shown below; one difference is
Each block on the bottom li ne of the
display will represent an indivi du a l l i ne ( a s
in the examples, ri ght ). Incoming calls
usuall y are as si gn ed b egi nni n g wit h Li ne 1
at the f ar-left li ne indicator. Outgoing cal ls
are assi gn ed fr om t he hig he st num b er ed
line beginning at the far r ight.
As you u se your ESI phon e, its displa y
change s frequently to give you detailed information during call processing a nd voi ce mail operations.
Your ESI phone may come with an available backlit display, for higher readability under a wider variety of lighting
conditions. Although its contrast cannot be adjusted, its brightness can be a djusted while the ph one is idle by
pressing th e s cr oll ke ys (
or OFF.
that a Cordless Handset doesn’t show line usage.
Two-line display Three-line displa y
and ) and selecting AL W AYS ON HIGH, MEDIUM, LOW, WI TH ACTIVITY,
Caller ID
If you subscribe to Caller ID from your telephone service provider, the phone’s display will show an outside
caller ’s name and/or number.
such as UNAVAILABLE, PRIVATE or NO DATA SENT.
1
In som e instances, the ser vice provider can send only a general caller status —
1
If you don’t subscribe to Caller ID, the phone’s display will show which line is receiving the call, instead of the caller’s name or number.
E.1
Page 44
User’s Guide ESI phone operation
Keys
Programmable feature keys
The phone’s programmable feature keys have bee n pre-programmed by t he installer. The following chart
indicates the number of programmable feature keys on e ach ESI phone that your ESI system supports:
ESI phone model(s) Number of programmable feature keys
ESI 60 series 48
ESI 40 series 16
48-Key Feature Phone 30
24-Key Feature Phone 12
ESI Cordless Handset II 8
12-Key Feature Phone (legacy product) 9
ESI Cordless Handset (original; legacy product) 4
You may wish to add to or change some of these keys t o perf orm dif f erent f uncti ons explai ned thr oughout thi s
manual. Press PROG/HELP to verif y cur r ent s et ti n gs ( s ee “St at i on pro gr am min g, ” pa ge C. 1) .
Important: Each ESI Cordless Handset has a combination TRANS/CONF/PRG key that you should press when this
Note: To use voice mail, conference calling and mute/DND on a legacy 12-Key Feature Phone, or to use call
User’s Guide instructs you to press PROG/HELP.1
recording or do-not-disturb mode on an ESI Cordless Handset, you must program these features into
programmable feature keys (see “Optional features,” page F.14).
Fixed-feature keys
The fi x ed-f eature keys on th e pho ne are p er ma nent l y la be le d as to th eir us ag e. Th e FLASH/REDIAL and
MUTE/DND key on an ESI phone each have two purposes; your ESI system will govern this by permitting
only the appropriate function when either is pressed, depending o n the circumstances at that m oment. The
diff erent ph one m odels have som e dif f er ent fi x ed -featur e k ey s.
Phone overl ays
Each ESI phon e com es wi th o ne ov erlay for the pr ogr am m abl e fe at ure ke y s. To order addit i on al ov er la y s,
visit the DESI
based software, DESI Lite, which allows you to print on the overlays. For as sistance with DESI products,
contact DESI (the DESI Web site contains contact information) .
™
Web site, www.desi.com. While there, you may also want to download the free Windows-
1
Each Cordless Handset has no access to the system’s Verbal User Guide (“help mode”).
E.2
Page 45
User’s Guide ESI phone operation
Keys’ LEDs (lamps)
The LEDs (light-emitting diodes), or lam ps, associated with the programmabl e and fixed keys aid i n
determining the status of their functi on. In general:
• Green indicates a fun ction associated with your phone.
• Red indic at es an o cc ur re nc e at another st ati o n.
• Amber indicate s the station’s status, either in DND mode or :
— With ESI Presence Management
— With ESI Cellular Management
• A solidly lit lamp indicates in-use status.
• Blinking indicates an action, such as ringing or holding, is required; a fast blink calls for immediate action.
As an ex ample, a blinking red key is a call ringing at another station; blinking green signifies ringing at your
stati on. (Se e also “Line keys,” page F.13.)
1
, off-premises.
2
, not connected.
Note: Each ESI Cordless Handset has only red LEDs, and only on its programmable feature keys.
The illumination activity (such as blinking) otherwise is similar to that described above.
SPEAKER key and speakerphone oper ation
Note: The ESI Cordless Handset models and legacy 12-Key Feature Phone each lack a speakerphone.
For hands- f re e co nversati on, u se t he SPEAKER key. W hen an out side call rings, you can pr ess SPEAKER
to connect to the caller via your phone’ s built-in speak erphone. This lights the SPEAKER key’s LED. Or,
while using the handset, you can switch a call to the speakerphone by pressi ng SPEAKER and ha ngi ng up
the handset. (To revert to the handset from speakerphone mode, lift the handset agai n.) To perform group
listening — i.e., have a handset conversation along with th e call er ’ s voice broad c ast o ver your sp ea ker
press SPEAKER while on a han dset co nversation but do not hang up t he ha ndset .
Hands-free answer (internal calls only)4
Note: To use this feature on an ESI Cordless Handset, you must be using a headset.
You can progr a m your pho ne ei th er to ena ble or dis able hands-free answer — press PROG/HELP 3 5.
With hands-free enabled, an internal c all to your stat i on g en er at e s a shor t ri ng an d a doubl e c onne ct ton e,
then automatically connects the caller to your speakerphone. With hands-free disabled, an internal call to
your stat i on ge ner at e s a sin gle - ring caden ce; o utsi d e cal l s rin g wi th a dou ble - r i n g caden c e.
Volume/scroll keys
The tw o smaller keys labeled and , locat ed ju st abo ve t he dial pad, ser ve mul t i ple p ur p ose s:
• Adjusting the volume heard through the handset and speaker — Your phone will maintain the
chose n volume setti ng until you change it.
• Serving as scroll keys for operations, such as Esi-Dex or programming, that may show several entries
on the display.
• Controlling the display backlighting on an ESI desktop phone with an available backlit display —
The cho ices are alwa ys-on-low, always-on-me dium, always-on-high, on-with-activity, and off.
3
—
Note: Each ESI Cordless Handset lacks scroll keys, and thus doesn’t support features like Esi-Dex or
To control volume on a Cordless Handset, use the buttons on the Handset’s side.
1
For more information about this optional product, see www.esi-estech.com/presence.
2
For more information about this optional product and its lamp appearances, see www.esi-este ch.com/BT.
3
Group listening must be enabled by the Installer.
4
The 12-Key Feature P hone supports only hands-free listening. To answer , you must pick up the handset.
Virtual Mailboxes.
E.3
Page 46
User’s Guide ESI phone operation
MUTE/DND key
To disable your handset or speaker microphone during a conversation (either with the handset or speaker),
press MUTE/DND. While the mute function is activated, the MUTE/DND LED will blink rapidly and the display
shows “ M UTED.”
When your pho ne is idle and you wish to make sure its calls go straight to voice mail, press MUTE/DND to
toggle your phone in or out of DND (do-not-disturb) mode. The display will show DND and the MUTE/DND
LED will glow amber.
Notes: If you press MUTE/DND while your phone is ringing, this forwards the call to your voice mailbox (see
On each Cordless Handset, muting is handled by the side-mounted MUTE button. For DND capability,
If your system is using ESI Presence Management, your phone’s MUTE/DND key won’t turn amber
“Voice mail operation,” page D.1) and your station will be placed in DND.
assign key code 578 to a programmable feature key (see “Optional features,” page F .14).
when you exit the building using your electronic key; for more details, refer to the ESI Presence
Management User’s Guide (ESI part # 0450-0793). If you’re not sure whether your system is using ESI
Presence Management, consult your System Administrator. For more information about ESI Presence
Management, visit www.esi-estech.com/presence.
Soft feature keys
Soft feature keys are dynamic: when used, they consta ntly change yo ur ESI pho n e’ s st atu s. Thes e sof t
keys, located under the display, include ESI-DEX
spoke n and displaye d commands, they guide you through the use of Esi-Dex (page F.2), var ious
programming activities and controlli ng the volume of your p hone’s handset and speaker.
1
, PROG/HELP, and scroll keys ( and ).2 Along with
Dial tone
When you first lift your handset, you will hear an int ernal dial tone that allows you to call other stations or
perform other internal functio ns. T o gain an outside dial tone, dial 9 (or 8 or 71–76)
feature key that has been set as a line key. (A line key, when pressed, automatically gains an outside line.
Consult your System Administrator if you have questions.)
Note: On an ESI Cordless Handset, to receive:
• . . . internal dial tone, press TALK.
• . . . external dial tone, press 9 (or 8 or 71–76).3 (If the Handset is in sleep mode, press TALK first.)
3
or press a programmable
1
Not available on the 12-Key Digital Feature Phone or an ESI Cordless Handset.
2
Not available on an ESI Co rdless Handset.
3
What you dial to reach an outside line depend s on your system’ s partic ula r setup. If you’ re not sure, con sult your adminis trator.
E.4
Page 47

User’s Guide ESI phone operation
Basic phone use
Outside calls
To answer (double-ri ng cadence): Lif t t he ha nds et or pre ss SPEAKER. If using a Cordless Handset, either
press TALK or remove the Cordless Handset from its charging cradle.
To place: Lift the handset or pr ess SPEAKER. Then eit h er pr e ss an unl it li ne ke y or di al 9 (or 8 or 71–76)1 to
be assigned an outsi de dial tone. On a Cordless Handset, press TALK and dial 9 (or 8 or 71–76).
To hang up: Repl ace th e handset or press RELEASE or — i f using the speaker phone —
press SPEAKER. If usi ng a Cor d le ss Ha nd set , pres s TALK or put the Handse t in it s charging cr adle.
Internal calls
To answer (single-ring cade nce): I n hands-free mode, answer di rectly thr ough th e speakerphone or pick
up the handset . Or , to answer a ringi ng call, lift the handset or pre ss SPEAKER. If usi ng a Co rd le ss Ha nd set ,
either press TALK or remove the C ordless Handset from i ts ch arging cradle. (To receive a “hand s-freeanswer ” call on a Cor dless H andset, you must be using a headset.)
To place: Lift the handset and dial the extension number or press a station key (see “Direct station
selection,” page E.6). On a Cordless Han dset, press TALK or dial the extension.
To hang up: Replace the handset or press RELEASE or press the stat i on ke y ag ain or — if using the
speak er p hone — pre ss SPEAKER. If using a Cordless Handset, press TALK or put the Handset in it s
charging cradle.
1
Shortcut for either outside or internal calls on speakerphone-equipped ESI phones:
If you press a station key or dial an extension number, the system automatically activates
the speakerphone.
1
What you dial to reach an outside line depend s on your system’ s parti cula r setup. If you’ re not sure , consult your admini strator.
E.5
Page 48
User’s Guide ESI phone operation
Direct station selection
Programm ing s om e of the programmable feature keys (see p. C.2) as stati on keys will pro vide direct access to
those stations as w ell as providing lamp information as to their status. The station key s’ LEDs indicates the
status of the station as signed to each key:
If a station key’s LED is . . . The station assigned to that key is . . .
Unlit Available; currently unused
Red; steadily lit In use
Red; blinking Ringing from another call
Green; steadily lit Connected to you (including via voice mail)
Green; blinking Ringing from your call
Amber; steadily lit In DND mode1
Note: Each ESI Cordless Handset has only red LEDs, and only on its programmable feature keys.
The illumination activity (such as blinking) otherwise is similar to that described above.
T o call another station programm ed into one of y our st ation keys:
1. Press an avail ab le ( unli t) st at io n key.
2. The called station will sound a short ring followed by a double connect tone.
3. The system will activate the called station’s speakerphone (or the station will ring if that station’s user has
hands-free answer disabled).
4. To discon nect when finished, do one of the following:
• Replace the handset.
• If in hands-free mode, either press the station k ey agai n or press SPEAKER.
• Press RELEASE. (With a Cordl ess Handset, press TALK or put the Handset in its char ging cr adle. )
If you press a key for a station that’s in use (red; steadily lit), you will “camp onto” the stati on, where its phone’s
display will tell its user that you’re waiting (see “Call waiting,” page E.13).
If you press a key for a station that’s in DND (amber; steadily lit), you’ll be forwarded directly to the
perso n’s mai lbox.
Transferring an outside call . . .
. . . to another station
Blind transfer
1. While connected to an outside c all, press a station key (or press TRANSFER and then dial the
extension numb er) .
2. Hang up.
Note: If the called person doesn’t answer, the caller will be forwarded either to the called person’s mailbox
1
If your system is using ESI Presence Management, your phone’s MUTE/DND key won’t turn amber when you exit the b ui lding using you r ele ct roni c
key; for more details, refer to the ESI Presence Management User’s Guide (ESI part # 0450-0793). If you’re not sure whether your
system is using ESI Presence Management, consult your System Administrator. For more information about ESI Presence Management, visit
www.esi-estech.com/presence.
or another destination the Installer has programmed.
E.6
Page 49
User’s Guide ESI phone operation
Supervi s e d t ransfer — announcing the c a ller to the ca lled person
1. While connected to an outside c all, press a station key (or press TRANSFER and then dial the
extension numb er) and wait until the called person answers.
2. Announce t he caller (e. g. , “Hello; I’ve got Bill on the line and I’m transferring him to you now.”)
3. Hang up.
Note: If the transferred-to person doesn’t answer in step 1, press the station key again or press
FLASH/RDL (or FLASH on certain legacy phones) to be reconnected to the original caller.
. . . to another pho ne num be r (tr unk-to-tr unk tr ans fer )
Important: USE OF FEATURES, SUCH AS TRUNK-TO-TRUNK TRANSFER, THAT REQUIRE TRUNK-TO-TRUNK
Blind transfer
1. While connected to an outside call, press TRANSFER and then the line access code (9, 8, or 7),
2. Hang up. Now both out si de lines are co n nect e d via a tr unk - t o- t r unk co nn ection.
Note: If, at any point during the trunk-to-trun k transfer, you wish to return to the ori ginal call (e.g., perhaps
Supervi s e d t ransfer — announcing the c a ller to the ca lled person
1. While connected to an outside call, press TRANSFER and th e n the line a c c es s c o de ( 9 , 8, or 7); t hen
2. Announce the call er (e. g., “Hello; I’ve got Bill on the line and I’m transferring him to you now.”)
3. Hang up. Now bot h out side line s are co n ne cte d via a tr unk-t o-trunk co nn ection.
CONNECTIONS WILL INCREASE THE RISK OF TOLL FRAUD. IN NO EVENT SHALL ESTECH SYSTEMS, INC. BE
LIABLE FOR ANY DIRECT, INDIRECT, INCIDENTAL OR CONSEQUENTIAL DAMAGES WHATSOEVER
INCLUDING, BUT NOT LIMITED TO, FRAUDULENT TOLL CHARGES, LOSS OF BUSINESS PROFITS, BUSINESS
INTERRUPTIONS, OR ANY OTHER COSTS OR DAMAGES RELATED THERETO, ARISING FROM THE USE OF
THESE FEATURES.
and then the telephone number to which you wa nt to tr ansfer.
you received a busy signal at the remote end, or the recipient simply won’t take the call), just press
FLASH/RDL (or FLASH on certain legacy phones). This disconnects the se cond outside connect ion,
returning you to (and removing from hold) the original call.
dial the p hone nu mb er to whi ch you wa nt to tran sfer, and wait until the called person answers.
Note: If, at any point during the trunk-to-trun k transfer, you wish to return to the original call (e.g., perhaps
you received a busy signal at the remote end, or the recipient simply won’t take the call), just press
FLASH/RDL (or FLASH on certain legacy phones). This disconnects the se cond outside connect ion,
returning you to (and removing from hold) the original call.
E.7
Page 50

User’s Guide ESI phone operation
. . . to a voice mailbox
Transferring a caller to a mailbox to leave a message
1. While connected to an outside call, press VOICE MAIL an d t he appr o pri at e st ation key — or, if your
phone h as no st ation key programmed for this destination, press VOICE MAIL an d TRANSFER,
and then dial the extension number.
2. You and the caller will be connected to that user’s personal greeting. You may choose either to
hang up immediately or listen to a portion of the per sonal greeting (i. e., to assur e yourself t hat y ou
have placed t he caller into the correct mailbox).
Note: Regardless of when you hang up, the caller will hear the entire personal greeting. To insure the
privacy of the message, you will automatically be disconnected at the record tone.
Transferring a user to his/her own mailbox for message pickup
You can t ransfer a us er who’s calling from the o utside directly to his/her mailbox for m essage pick-up by
pressing VOICE MAIL
and the appropriate station key, or di aling the mailbox number and hanging up.
. . . to the main greeting
T o transfer an o ut si de c all er t o th e main gr e eting, pre s s VOICE MAIL and han g up.
Transferring an internal call . . .
. . . to another station
Blind transfer
1. While connected to an internal call, press TRANSFER and then either press a station key or dial an
extension numb er.
2. Hang up.
Supervi s e d t ransfer — announcing the c a ller to the ca lled person
1. While connected to an internal call, press TRANSFER and then either press a station key or dial an
exten si on nu mb er; then, wait until the c al le d per so n an sw ers.
2. Announce t he caller (e. g. , “Hello; I’ve got Bill on the line and I’m transferring him to you now.”)
3. Hang up.
. . . to another pho ne num ber
Blind transfer
1. While connected to an internal call , press TRANSFER foll owed by the li ne access code (9, 8, or 7)
and the telephone number to which you want to transfer.
2. Hang up.
Supervi s e d t ransfer — announcing the c a ller to the ca lled person
1. While connected to an internal call, press TRANSFER follo wed by t he line access code (9, 8, or 7)
and the telephone number to which you want to tra nsfer, and wait until the called p erson ans wers.
2. Announce the call er (e. g., “Hello; I’ve got Bill on the line and I’m transferring him to you now.”)
3. Hang up.
E.8
Page 51
User’s Guide ESI phone operation
. . . to a voice mailbox
Transferring a caller to a mailbox to leave a message
1. While connected to an internal call , press TRANSFER, then press VOI CE MAI L, and then press a
stati on k ey or di al an extensi on n umb er.
2. You and the caller will be connected to that user’s personal greeting. You may choose either to
hang up immediately or listen to a portion of the personal greeting (i. e., to assur e yo ur sel f t hat y ou
have placed t he caller into the correct mailbox).
Note: Regardless of when you hang up, the caller will hear the entire personal greeting. To insure
the privacy of the message, you will automatically be disconnected at the record tone.
Conference calling
T o create a co nfer e nc e call :
1. Establish the first call.
2. Press CONF
3. Place a seco nd c all as you nor m all y wo ul d.
4. Once connected to the second call, press CONF again to connect all of you together.
Notes: Repeat these steps to add each additional member to the conference.
If the newest added-on member does not an swer, press his/her station key again or press FLASH/RDL (or
FLASH on certain legacy phones) to return to the original conferees. If you plac e any incom ing c aller on HOLD
or exclusive HOL D (see “Hold/exclusive hold operation,” page E.14) , you ca n add that caller, as well, to the
conference b y pressing CONF, retrieving the call from hold (or exclusive hold) and pressing CONF agai n.
Any member of the conference can dr op out b y simply hangi ng up. However, when the stati on that created the
conference h angs up, all members in the conference ar e disconnected. Individual stations or lines connected to
the conference can be drop ped fr om the conference by pr essin g their stati on or line key (lit gr een).
1
to place the call on hold.
A maximum of 16 members can be in a single conference.
Speed-dial keys cannot be used during conferencing if you already have obtained phone line dial tone (also
known as CO dial tone).
Note: Your installer or System Administrator may have enabled trunk-to-trunk conferencing (unsupervised
Important: USE OF FEATURES, SUCH AS TRUNK-TO-TRUNK TRANSFER, THAT REQUIRE TRUNK-TO-TRUNK CONNECTIONS
conferencing) for your station. If so, the steps to initiating such a conference are the same as for
performing any other conference (see above); the difference is that you may hang up, thus exiting the
conference, but the remaining members won’t be disconnected. (If this feature isn’t enabled, your hanging
up disconnects all members.)
WILL INCREASE THE RISK OF TOLL FRAU D. IN NO EVENT SHALL ESTECH SYSTEMS, INC. BE LI ABLE FOR ANY
DIRECT, INDIRECT, INCIDENTAL OR CONSEQUENTIAL DAMAG ES WHATSOEVER INCLUDING, BUT NOT LIMITED
TO, FRAUDULENT TOLL CHARGES, LOSS OF BUSINESS PROFITS, BUSINESS INTERRUPTIONS, OR ANY OTHER
COSTS OR DAMAGES RELATED THERETO, ARISING FROM THE USE OF THESE FEATURES.
Privacy release
This feature makes i t easy to “conference-in” on a call: just press a line key assigned to the outside line the
call is using, and you’ll automatically join the call.
1
If you’re using an ESI Cordless Handset, use the TRANS/CONF/PRG key each time these instructions tell you to use CONF.
2
This feature may not be available on your system, depending on how it has been programmed. If you wish to enable this feature on your system,
contact you r S y st e m A d mi n ist ra t or.
2
E.9
Page 52

User’s Guide ESI phone operation
Call forwarding
Your station has been pre-programmed by the installer to “call-forward” your phone when it is busy or does not
answer (usually to your mailbox). In addition, you can temporari ly call-forward all of your calls to anoth er station
or another user’s ma ilbox.
Note: If the forwarded-to station is busy or does not answer a forwarded call, the call will be returned to
On an ESI 60, ESI 40, or 48-Key Feature Phone:
1. Press CFWD to use the call forwarding f eature.
2. To turn off call forwarding, press CFWD
On the 24-Key F eature Phone, an ESI Cordless Handset, or the legacy 12-Key Fe ature Phone:
1. Assign code 5 6 5 to a programmable feature key (see “Programmable feature keys,” page C.2). This will
make it a “call-forward all-calls” key.
2. Press the key you programmed in the pre vious step and dial the extension number ( or VOICE MAIL and
then the mailbox number) to which the system should forward all calls.
3. To turn off call forwarding, dial 5 6 5
If you frequentl y call-forwar d your phone, you can progr am a progr ammabl e feat ure key as a call for warding key to
automatically tur n forwarding o n and off. If you always forward to t he same extension, you can program a key
with bot h 5 6 5 and the ext ension number. (For m ore information, see “Programmable feature keys,” pp. C.2 –
C.3.) The call forwarding key will be solid green to indicate that it is active.
your mailbox.
.
without selectin g a destination and then hang up.
E.10
Page 53

User’s Guide ESI phone operation
Call forwa r ding/no -a nswe r
Note: The ESI Cordless Handsets and legacy 12-Key Feature Phone do not support call forwarding/no-answer.
One special for m of call for war ding your phone can do is cal l ed call forwar ding/no -answer . As the term implies,
it’s a forwarding that occurs only after a call to your extension goes unanswered; so, essentially, this gives you a
chance to answer the phone in case you’re there and wish to take the call, but automatically forwards as
programmed if you’re either away from your phone or just choose not to t ake th e call. You ca n set your phone
to call-for ward/no -answ er to an extension or mailbo x. For you to set this, either the extensi on must have an
assign ed ca ll - for w ar d/ n o- ans wer ke y assigned or yo u can di al 5 6 7 followed by the dest ination number.
When you set call for warding/no-answer :
• Outside calls coming into the extensi on will ring there for a predetermined time and t hen be forwarded t o a
designated e xtension or mailbox.
• If the call isn’t answered within a predetermined time, the caller will be routed to the original extension’s
voice m ailbox.
• If the extension is in DND mode, the call will be forwarded immediately to the extension or mailbox.
• If the extension is busy — i.e., off - hook on an ot her call — an d not i n DND mod e, cal l f orwarding/no-
answer will not be followed; instead, call waiting will be initiated (if allowed) and if the call is not answered,
will follow the fixed call forward setting (normally your voice mailbox).
To set or cancel call forwarding/no-answer:
1. Dial 5 6 7.
2. Enter the extension or mailbox to which you are forwarding.
3. Press # to confirm.
4. Press a scroll ke y ( or ) to select either ENABLE or DISABLE for call forwarding/no-answer.
5. Press # to confirm.
The call-forwarding/no-answer key will be lit solid green to indicate that call forwarding/no-answer is
active, and will not be lit if call forwarding/no-answer is disabled.
E.11
Page 54
User’s Guide ESI phone operation
Call forwa r ding/ of f -pr e mise s
Y ou m ay1 also be able to call-forward to an outside number. This is called cal l forwarding/off-premises. When
this i s set, outside calls that are dir ected to your e xtension will be forwarded to the outside number. If the call
isn’t a nswered
2
in time, the caller will be routed to the extension’s voice mailbox.
To set:
1. Press CFWD (or dial 5 6 5).
2.
Enter the number (incl uding the li ne grou p ac ce ss cod e , such as “9”) to which you’re forwarding.
3. Press # to confirm.
Example: To call forward to 214 555-4141, press CFWD (or dial 5 6 5 ) and dial 9 2 1 4 5 5 5 4 1 4 1 # .
To cancel:
1. Press the CFWD key (or dial 5 6 5)
2. Press
to cancel.
Call forwa r ding/no-answer/of f -pr e m ise s
Note: The ESI Cordless Handsets and legacy 12-Key Featur e Phone do not support call forwarding/no-answer.
You may1 also be abl e to cal l -forw ard/no- answ er to an outside (“off-premises”) number. This is called
call-forward/no-answer/off-premises. When this is set, outside calls that are directed to your extension will
ring for a predetermined ti me, and then be forwarded to the o utside number. If the call isn’t answere d
2
in time,
the caller wi ll be routed to the ext ensio n’s voice mailbox.
To set or cancel:
1. Dial 5 6 7 (or press an assigned call forwarding/no-answer programmable feature key; if necessary,
review the instructions on page E.11).
Enter the number (incl uding the li ne grou p ac ce ss cod e , such as “9”) to which you’re forwarding.
2.
3. Press # to confirm.
4. Press a scroll key ( or ) to select either ENABLE or DISABLE for call forwarding/no-answer.
5. Press # to confirm.
The call-forwarding/no-answer key will be lit solid green to indicate that call forwarding/no-answer is
active, and will not be lit if call forwarding/no-answer is disabled.
Note: If your system is using ESI Presence Management, consult the ESI Presence Management
User’s Guide (ESI part # 0450-0793) to learn about additional, special functionality that may be
available to you. If you’re not sure whether your system is using ESI Presence Management,
consult your System Administrator. For more information about ESI Presence Management, visit
www.esi-estech.com/presence.
1
Your system may not support this feature, or your extension may not be allowed to have this feature. Contact your ESI Reseller for more
information.
2
You must press 1 to answer the forwarded call (just as with off-premises “reach-me”; see page D.3).
E.12
Page 55
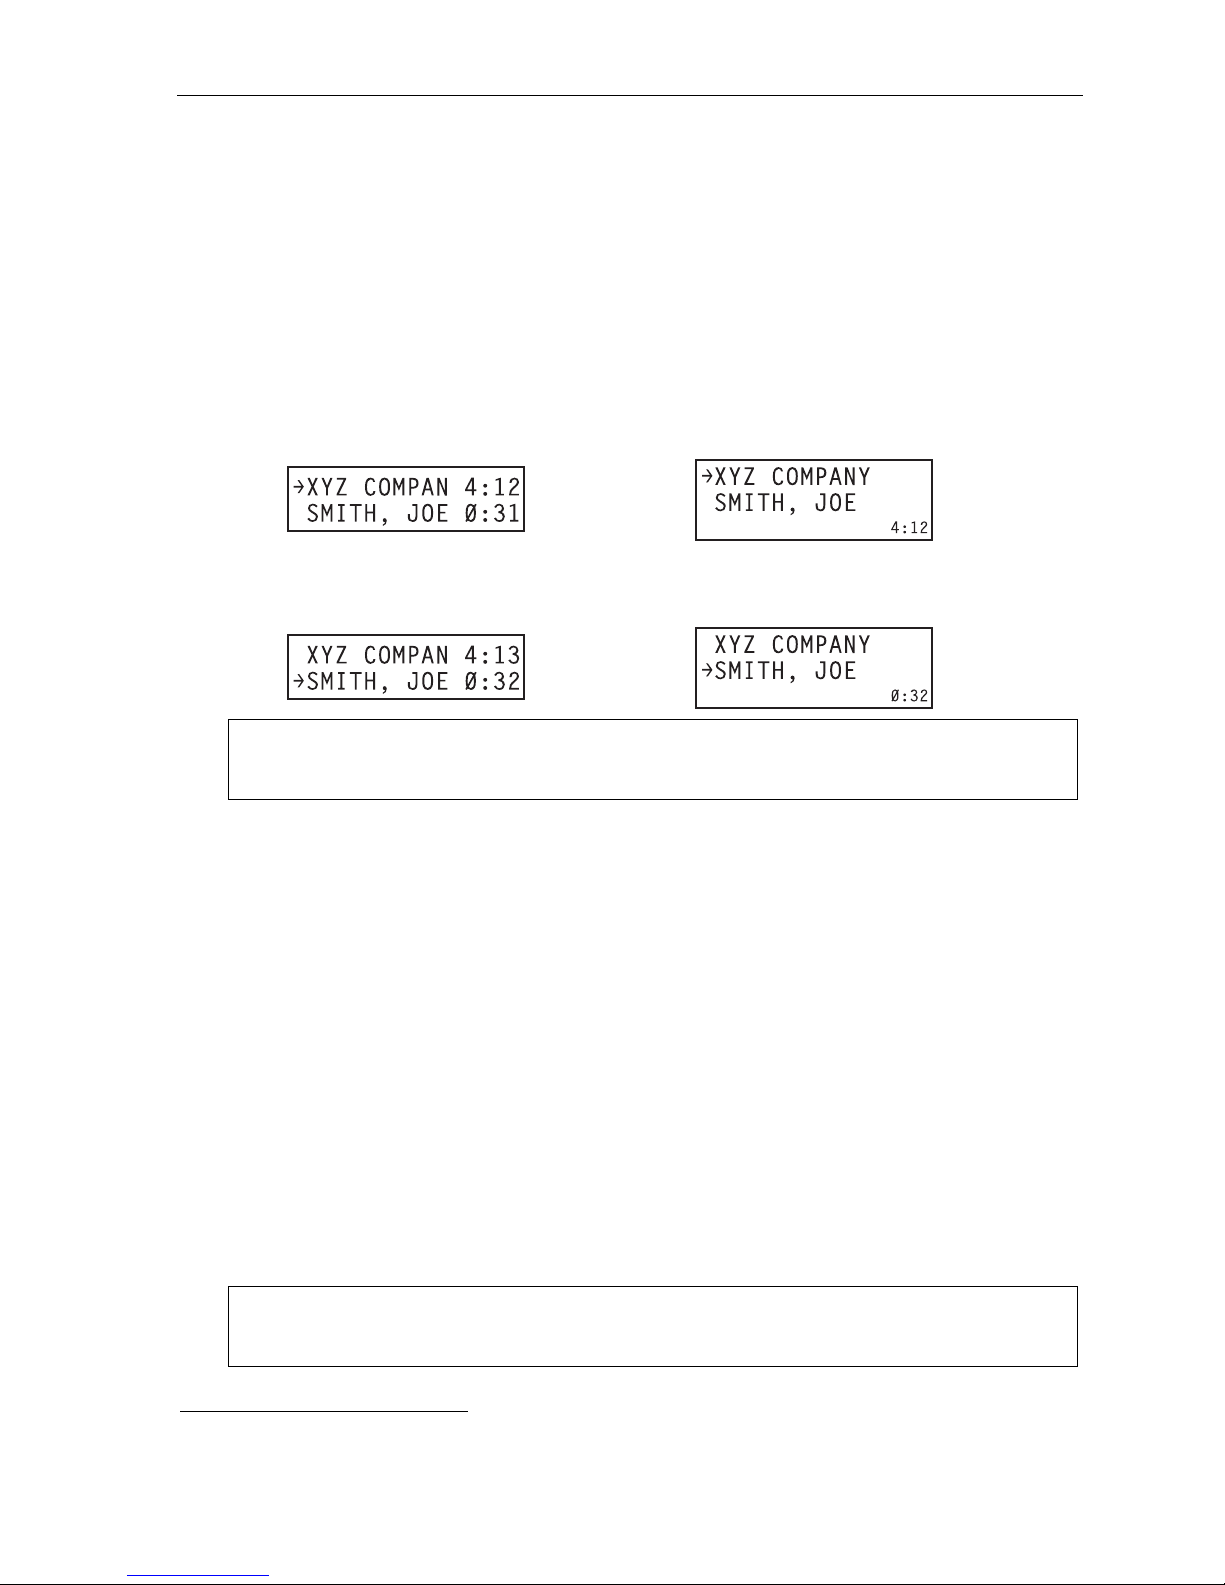
User’s Guide ESI phone operation
Call waiting
If you’v e en able d call waiting for your station ( PROG/ H ELP 3 1) a nd a s econd cal l c ome s i n whil e yo u’ re on another ,
a tone in your earpiece and the bottom line of your display will indicate that a second call is waiting. You can ignore
the waiti ng call and it will be transf er red t o your mail box (or other destinat ion set by the I nst all er). T o t oggle between
the two call s, pr es s FLASH/RDL (or FLASH on certai n le gac y ph on es) . To drop ei ther call, pr ess RELEASE
while connected to the call to be dropped: this discon nects it and automat ically re-con nects you to the other call.
Call waiting display
Be sure to check the display when y ou’re using c all wait ing. Initially , the fir st line shows the name or number
of your original call (depending on how the call was created) and the call duration. The second line shows the
name or number of the call waiting along with the duration of that call. The arrow on the display will move
between the first and second lines, indicating to which call you are connected.
1. You’re connected to XYZ Comp any, when you hear a beep and see that Joe Smi th is calling:
1
Here’s an example:
ESI phone
with two-line
display
ESI phone
with three-line
display
(In this exampl e, Joe’s call is being transferred to you; it’s been in the system for 31 seconds. )
2. You press FLASH/RDL (or FLASH on certain legacy phones) and ar e connected to Joe. Note how the
arrow moves t o indicate the change of connection:
ESI phone
with two-line
display
Note: If Caller ID is not used, the line number will appear instead of the caller’s name or number. If Caller ID is
used, in some instances the local telephone service provider will only show a general caller status such
as Unavailable, Private, or No Data Sent.
ESI phone
with three-line
display
Station-to-station call waiting
You can call, or transfer a call to, another station that i s in use (as indicated by the fact that its stati on key, if
one exists for it on your ESI phone, is glowing red). This generates a call waiting tone in the other station’s
earpiece and puts a call waiting i ndication on the bottom line of that station’s displ ay, as explained in “Call
waiti ng di spl ay” (above). If the person ignores the call waiting, your call or the transferred call will be
forwarded to the person’s mailbo x (or other destination set by the installer).
Background announce fea tur e
(Not available on legacy 12-Key Feature Ph one.)
During cal l wai t in g, you can also make a bri ef , pri v at e background announcement to the station's earpiece
(if its us er has en a bl ed th e ba ckgr o und an no u nce fe at ur e; se e “ Stat i on opt i on s,” pa ge C.4). A backgr o und
announ ce key must have been programmed at y our station (code 5 6 9; see pp. C.2–C.3).
1. Durin g call waitin g (as described previ ously), press and hold the programmed announce key to speak;
the key will glow green if b ackgro und annou nce is permit ted or red if i t isn’t permitted. The cal led station
will hear your voice over the outside person’s voice. The outside caller, however, cannot hear you. The
called person can r espond by pressing FLASH/RDL (or FLASH on cert ai n l egac y ph ones) , whi c h
places t he ori gi n al cal l on hold.
2. Release the k ey wh en y ou are fi ni sh ed s pe aki n g.
Note: This feature works only between ESI phones2 — and onl y i f (a. ) th e ca ll ed per son ha s all o wed ca l l waiting
1
A legacy 12-Key Feature Phone shows only the first caller. Even if you hang up from the first call, the second call’s Caller ID info won’t appear.
2
I.e., non-ESI analog phones on the system can neither send nor receive bac kground announcements.
and backgroun d anno un ce and (b.) the called person is using his/her handset. The background announce
key will be green (if these conditions are met), indicating that a background announce can be made.
E.13
Page 56
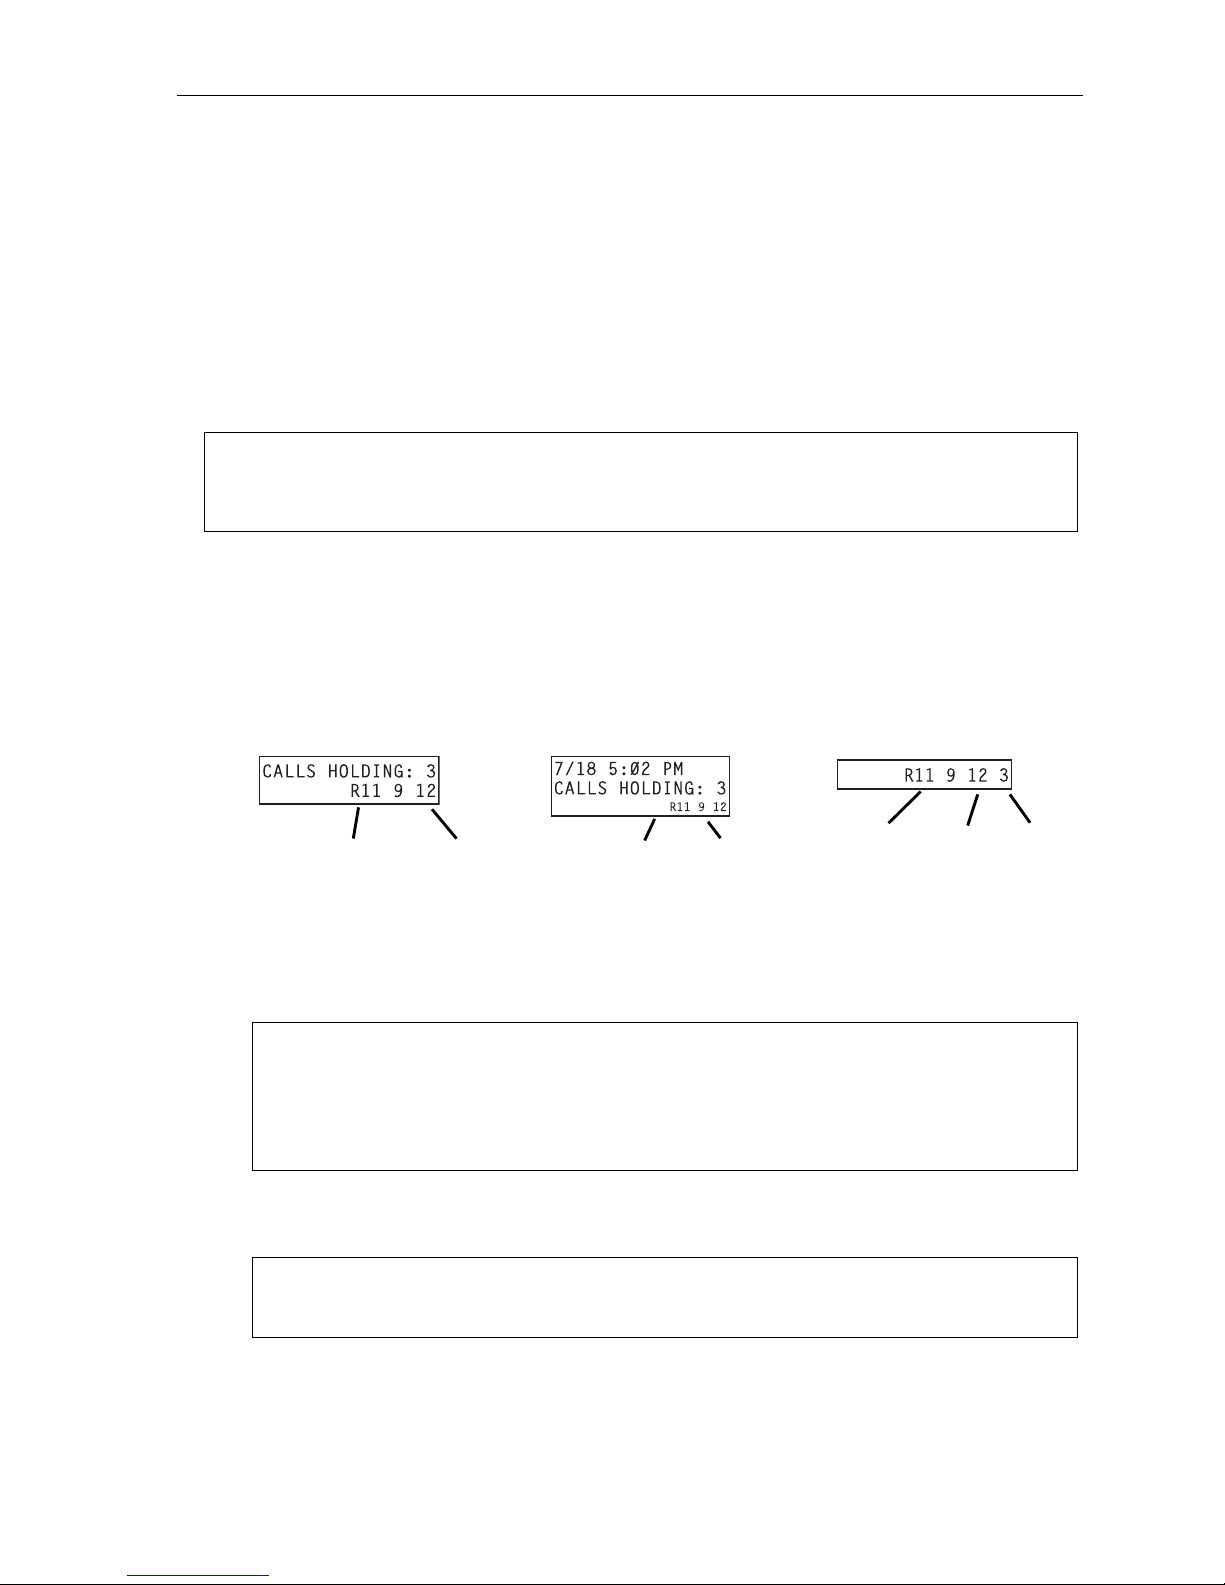
User’s Guide ESI phone operation
g)
g)
Hold/exclusive hold operation
The difference between hold and exclusive hold
Your ESI phone l ets y ou put a cal l (i nt er n al or out si de) on eit he r hold or exclusive hold.
Each puts a cal l i nto a st a nd by mo de, but her e’ s th e dif f er en ce betw e en t he two:
• Hold all ows anyone on the ESI system to retrieve the call . Users connected to out side calls can press
HOLD to place the call on hold. The s ystem identifies held calls as being in numeri cally identified lines —
e.g., “Line One,” “Line Four,” etc. Station cal ls that ar e put on hold are displayed a s “virt ual” li nes.
For example, if you need to transfer a call to another statio n and know the person is in the building but not
at his/h er de sk, you mi g ht page hi m/ her to pi ck up a “ call on Li n e One. ”
• Exclusive hold keeps the call only at the stati on wher e the us er pressed HOLD.
Note: The way the HOLD key operates will depend on how HOLD key operation was programmed by the Installer.
Hold
(If you’re unsure about which hold feature is activated when following the instructions, contact your System
Administrator.) For future reference, place a checkmark next to the feature that’s activated — either hold or
exclusive hold — when you follow the instructions.
Exclusive hold
To place a call on hold
While on a call , pr e ss HOLD to place the call on hold. The HOLD key LED will light solid red on your ESI
phone and will blink red on all other phones. Also, your ESI phone’s display will show the quant i ty , and
numerical line identifications, of the calls currently on hold throughout your ESI system:
ESI phone with
two-line display
Oldest (and recallin
Newest
ESI phone with
three-line display
Oldest (and recallin
Newest
12-Key Feature Phone
(legacy product)
Oldest (and Newest Calls
recalling) holding
To retrieve a held call
To retrieve a held call from the same ESI phone where it was put on hold, press HOLD again and dial the
appropriate line number (using the display for reference).
To retrieve a held call from any idle ESI phone on the system , press HOLD and dial the appropri ate line
number. After call retrieval, the ESI phone display will update to show lines currently holding calls.
Notes: If your phone has any line keys programmed (see page F.13), each will blink red when a call is on
If your phone has station keys programmed (see page C.2), each will slowly blink when a call
hold on its lines; in such cases, just press that line key to retrieve the held call. On the phone where
the call was originally placed on hold, such a line key will blink green.
involving its assigned station is placed on hold. If you were the one who placed it on hold, the blink
will be green; otherwise, the blink will be red. To retrieve the call, just press the station key.
After yo u pres s HOLD, the display will help you choose the line number to retrieve: the top row will show
how many calls are on hold and the second row will show all held calls in the system. Newly held calls are
added from th e right side of the second row.
Note: If more calls are on hold than the display can show, each side of the display’s second row will show an
arrow, indicating that more lines have calls on hold. Press the corresponding scroll key (either to
scroll to the left o r to scroll to the right) to view the other line numbers where calls are holding.
E.14
Page 57
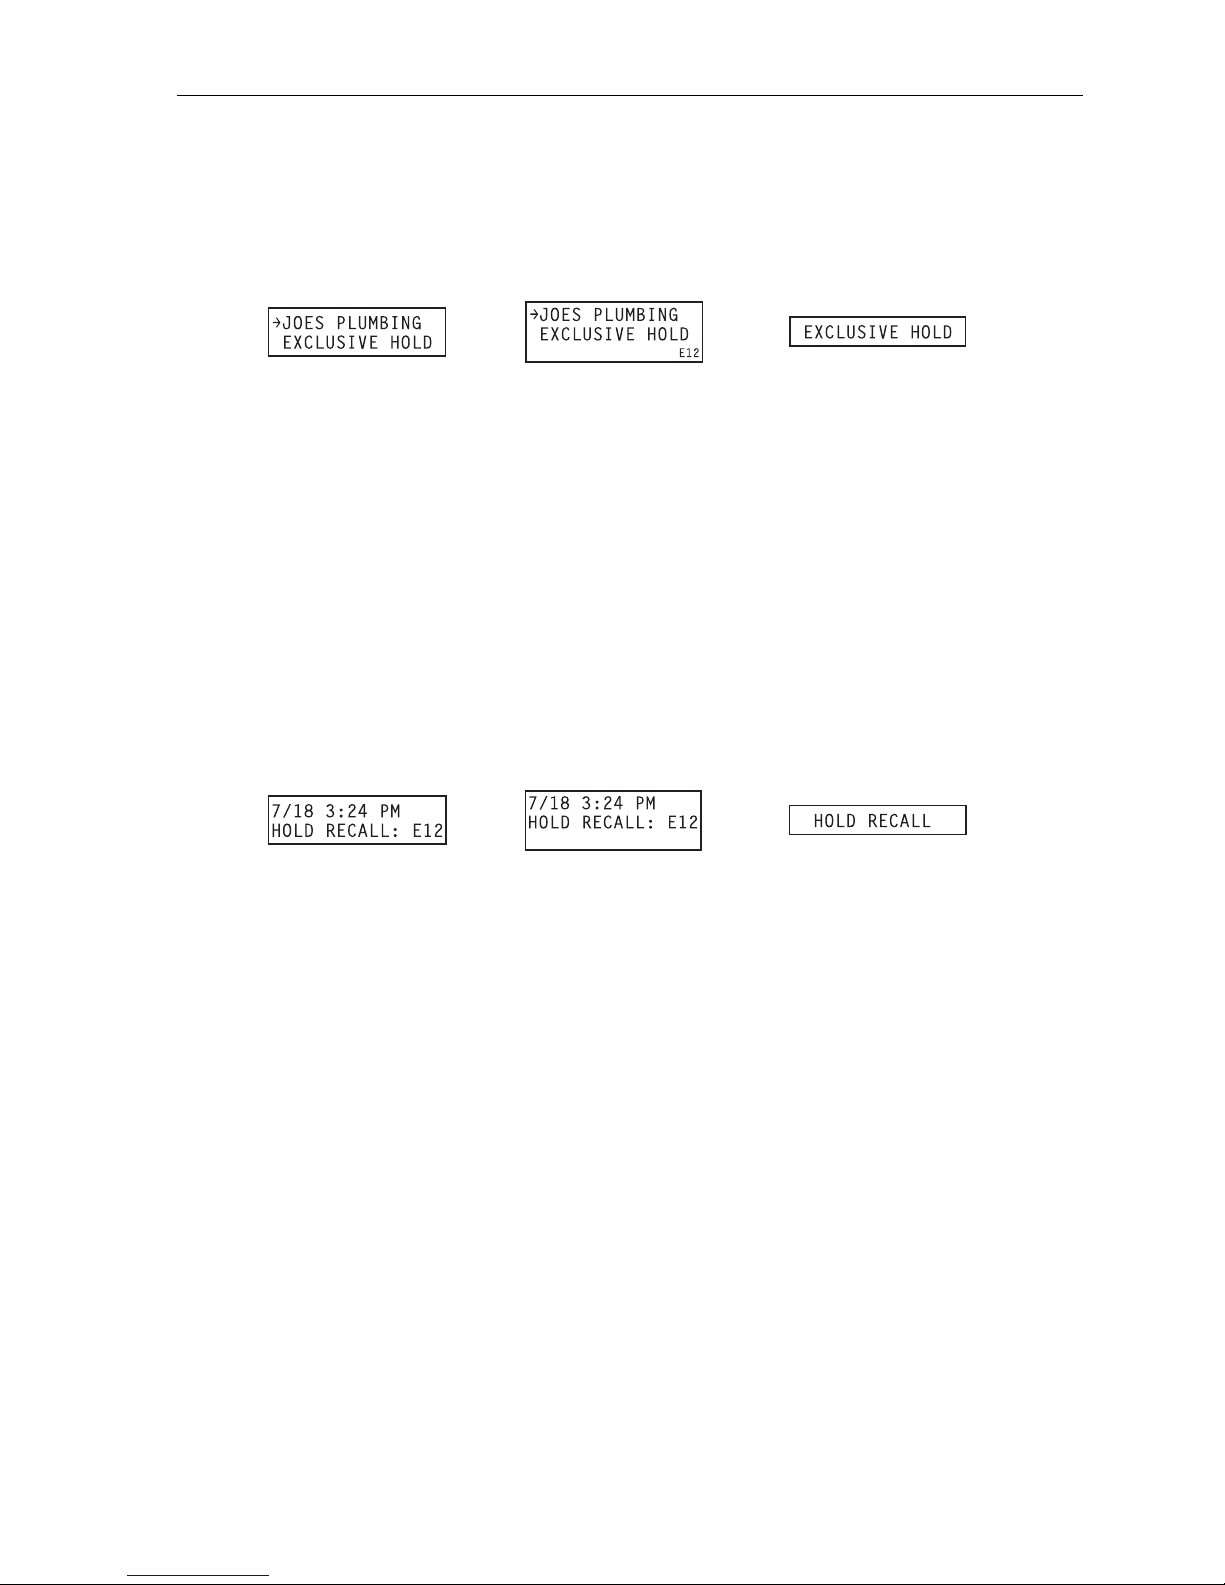
User’s Guide ESI phone operation
Hold
Exclusive hold
To place a call on exclusive hold
T o place a call on exclusive hold on an ESI phone, press HOLD for at least one second. The display will
briefly appear as follows . . .
ESI phone with
two-line display
. . . and then return to its normal state. This exclusive hold will cause the HOLD key to light solid red on
just that ESI ph one ( i. e., where t he key was pressed) a nd none other i n the s ystem.
To retrieve a call from exclusive hold
T o reconnect to a call from the ESI phone where the call was placed on exclusive hol d, you may do any of
the following:
(a.) From a phone idle state, press HOLD for at least one full second.
(b.) Press the blinking programmable feature ke y (see p p. C. 2–C.3) that you know i s pre-programmed
for that outside (or “virtual”) line or station. This will reconnect you immediately to the call.
(c.) Press HOLD bri efly and dial the appropriate lin e number. Only the ESI phon e wher e th e call was
placed on exclusive hold will display an “E” next to the line (identified by number) on which the call
is holding. ( That line numb er won’t appear on th e hold display on any other ESI phone, becau se no
other ESI phone can r etrieve that call.) I n the e xample b elow, the ESI phone has a call on exclusive
hold on line 12.
ESI phone with
two-line display
ESI phone with
three-line display
ESI phone with
three-line display
12-Key Feature Phone
(legacy product)
12-Key Feature Phone
(legacy product)
E.15
Page 58

User’s Guide ESI phone operation
Paging
Your ESI system can be programmed to allow paging throu gh an overhead paging sy stem and/or paging through
some (if pa ge zo nes ha v e bee n cre ated) or t he spe ak ers of all of th e sy stem ’ s ESI ph on es.
Overhead pagi ng
Stati on num ber 199 is designated as the overhead paging por t. If the ESI system has been connected to an
overhea d pa gin g sy st em , you c an pa ge b y dial i ng 1 9 9 and making your anno uncement after the tones. If
you frequently page, assign 1 9 9 to a programmable fe ature key (see pp. C.2–C.3).
Paging through phones
Press PAGE1 0 to page through the speakers of all of the ESI phones. Press PAGE and then enter a
programmed paging zone, such as 1 or 2 (see th e System Administrator for a list of page zones).
Pressing 0 pages all zones. The Installer may have added an overhead page system to one or m ore of these
page zones. The number of available zones will vary according to which ESI system you have.
Notes: Phones in use or in do-not-disturb mode will not carry a page through their speakers.
An ESI Cordless Phone carries a page only through a connected headset.
To page for pickup of an outs ide call
T o page someone to pick up an outside call:
1. Place the call on hold by pressing HOLD.
2. Verify the line number from the display.
3. Page the person and announce th e hold location for retrieval. For example:
“Sarah, you have a cal l on Line T w o — Sarah, Line Two, please.”
Call pickup
From your station, you can answer a call ringing at another station or department by pressing PICK UP2 and then
either dialing the extension or (i f the destination is programmed into on e of your k eys; see “Programmable featur e
keys,” pp. C.2–C.3) pressing the station key for the ringing station.
During night mode (see page F.14), if a night bell is in use instea d of the night auto attendant, pres s PICK UP 0
to access the ringing outside call.
1
The PAGE key is also the # key .
2
The PICK UP key is also the key.
E.16
Page 59

User’s Guide ESI phone operation
Optional features
Live outside call s
If your station has been de signated to receiv e live outsi de calls — i.e., those that have neither come through
the auto attendant nor been transferred — your ESI phone will:
(a.) Display that y ou are r eceiving an outside call.
(b.) Ring with a double cadence (internal calls ring with a single cadence).
While you’re on a call, additional live calls to your station will ring with a secondary ring.
T o answer any a ddit i on al calls, yo u must d o one of the following:
• Disconnect from the current call.
• Transfer th e current cal l .
• Place the curre nt call on hol d.
You can press RELEASE to drop a current call and automatically be conn ected to the ne xt ringing call.
Note: If your station is able to receive both live outside calls and calls transferred to you from the auto
attendant, you may wish to turn off call waiting at your station (to avoid confusion between a call waiting
tone in your earpiece and a secondary ring from a live outside call).
Operator station
If your station has been de signated as t he operator statio n, you will also receive calls when a caller dials 0 in
the auto att e nd ant or from a stat i on.
Your display will indicate that the call ringing is one of the following:
• A call for the operator — Someo ne dialed 0.
• A call for your extension — Someone dial your extension number.
As the operator, you m ay be responsible to manual ly ch ange the D ay/Night Mode of the s ystem; if so, you
must program a programmable feature key to perform this (initially, the upper left key will be the day/night
mode key). Each time the key is pressed the display will change: DAY , NGT, DAY2, NGT2, HDAY or AUTO.
If you select DAY ( day mode), N GT (night mode), DAY2 (day2 mode), NGT2 (night2 mode) or HDAY (holiday
mode), the system will operate in the selected mode until you manually change it again.
1
1
AUTO indicates tha t the syst em will f oll ow the day/ni ght mode ta ble s p rogram med by the Inst aller .
E.17
Page 60
User’s Guide Special keys
Special keys
FLASH/RDL
The FLASH/RDL key1 is used for both flash functions and redial functions.
Flash functions
While you’re on a cal l, pressing FLASH/RDL allows you to perform thes e flash functi ons:
• Getting a fresh dial tone without replacing the handset — When conn ect ed t o an out side line,
press FLASH/RDL to automatically disconnect and receive fresh outside dial tone. (See also
“RELEASE,” below.)
• Sending a flash ho ok sig nal — If operating behind Centrex
flash hook signal automatically to either the phone company’s central office or the host PBX. Either may
use this signal to pr ovide you with additi onal features.
• Toggling betw ee n calls — If you hear a call waiting tone while on a call, press FLASH/RDL to toggle
betwe en the t w o calls.
Redial functions
If your phone is idle, pressing FLASH/RDL allows yo u to aut o mati c ally call a stored name an d num ber as
shown b elow:
2
or a PBX, press FLASH/RDL to transmit a
To . . . Press FLASH/RDL . . .
Redial the last number called When your station is idle
. . . or . . .
After first lifting the handset or pressing SPEAKER
Automatically respond to a message During message playback with Caller ID
Note: If using an ESI Cordless Handset, you must assign the redial function to a programmable feature key
(see “Optional features,” page F.14).
RELEASE
The RELEASE key serves several purposes:
• If pressed when connected to a call through the handset, it disconnects the call and gives you internal dial tone.
• If pressed when you’re connected to a call via the speakerphone, it disconnects the call .
• If pressed during call waiting, it drops the current call and automatically connects to the waiting call.
Notes: The hookswitch also acts as a combination FLASH/RELEASE key (and is the o nly way to perform these
To hang up when using an ESI Cordless Handset, press TALK or put the handset in its charging cradle.
functions on a legacy 12-Key Feature Phone, which has neither a FLASH/RDL key nor a RELEASE ke y ).
To send a flash hook signal, quickly press the hookswitch once.
To release (disconnect), hold down the hookswitch for one second.
1
Certain legacy phones have separate FLASH and REDIAL keys.
2
A special service your phone comp any may offer. See your admin istrator for further details.
F.1
Page 61
User’s Guide Special keys
Esi-Dex
(Not available on ESI Cordless Han dsets or the legacy 12-Key Feature Phone. )
Esi-Dex (“easy Dex”) is a powerful feature that lets you access and auto-dial stored names and numbers. You may
acces s names and numbers fr om as many as four diff erent Dexes (i.e., indexes):
Dex Source
Personal Dex Names you’ve stored for your use (see “Adding names to your Personal Dex,” below)
Station Dex All station, department, and guest mailbox names programmed by the Installer
System Dex1 All system speed-dial names set up by the System Administrator
Esi-Dex prom pts displayed on an E SI phone with a three-line display
Prompt What it means
[Arrows] Move in the direction of the arrow as desired
BACK Moves backward to previous screen/record
DEL Deletes a specific name and/or number shown on the display
DIAL Dials the phone number
EDIT Edits information shown on the display
NEW Creates a new record in Esi-Dex
NEXT Moves to next record or programming prompt
PAUSE Inserts a three-second pause in a phone number (if required for proper dialing)
PER Selects Personal Dex
STA Selects Station Dex
STOR Stores a name and phone number
SYS Selects Sys tem Dex
1
The System Dex is available only if the System Administrator has programmed system-wide speed-dial numbers.
F.2
Page 62
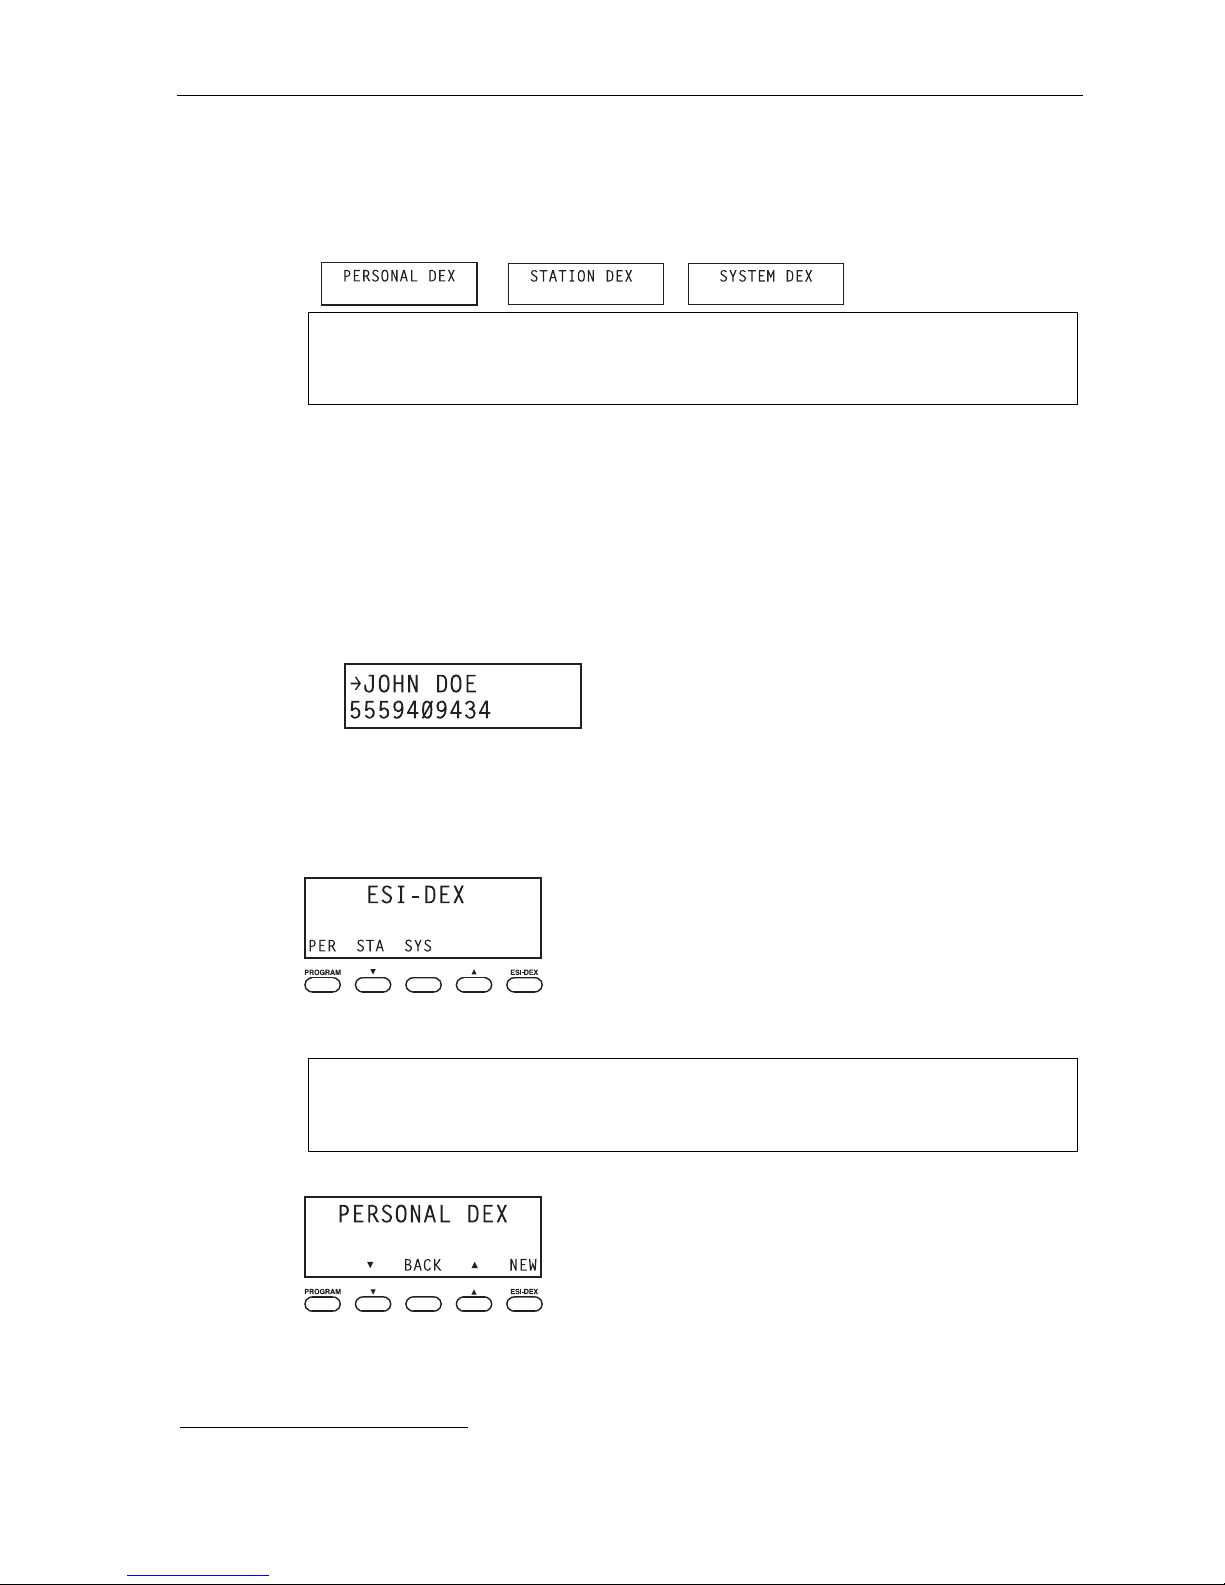
User’s Guide Special keys
Auto-dialing using Esi -Dex
. . . On an ESI phone with a two-line display
1. While your stati on is idle (or just af ter receiving internal dial tone), repeate dly press ESI - DE X to
select the desired Dex:
Notes: System Dex isn’t available on every system.
For the remainder of this example, we’ll assume you selected Personal Dex. However, the
procedure is the same for any of the other Dexes.
2. Choose the d esi r ed na me fr om th e sel e ct ed D ex, us in g one of two m eth od s.
Either:
(a.) Scroll — Press the scroll keys (
and ) to l ook up and down through the Dex until you find
the name (names will appear in the order in which they were stored in the Dex).
. . . Or . . .
(b.) Dial-by-name — Dial up to the first three characters
mailbox name. For exam ple: if you want to call John Doe, dial 5 6 4 (b ecause it spells J O H).
You’ll begin to see names that begin with those letters. You can then use the scroll keys (
) until you find the desired name and number.
and
1
of the exten sion, department, or guest
3. Press ESI-DEX again to di al t he n umb er.
. . . On an ESI phone wi t h a t hr e e-line displ a y
1. While your st ation is idl e (or just aft er r e cei vi ng di al ton e) , pr es s ESI- DEX . This causes the Esi-Dex
menu to ap pear , as shown:
2. Press a key to choose the appropriate D ex —Station Dex (STA), System Dex (SYS), or Personal
Dex (PER) — or press RELEASE to c ancel the procedure.
Notes: System Dex isn’t available on every system.
For the remainder of this example, we’ll assume you selected Personal Dex. However, the
procedure is the same for any of the other Dexes.
The display now reads:
(Continued)
1
You can also dial just one or two characters, and then press # to enter.
F.3
Page 63
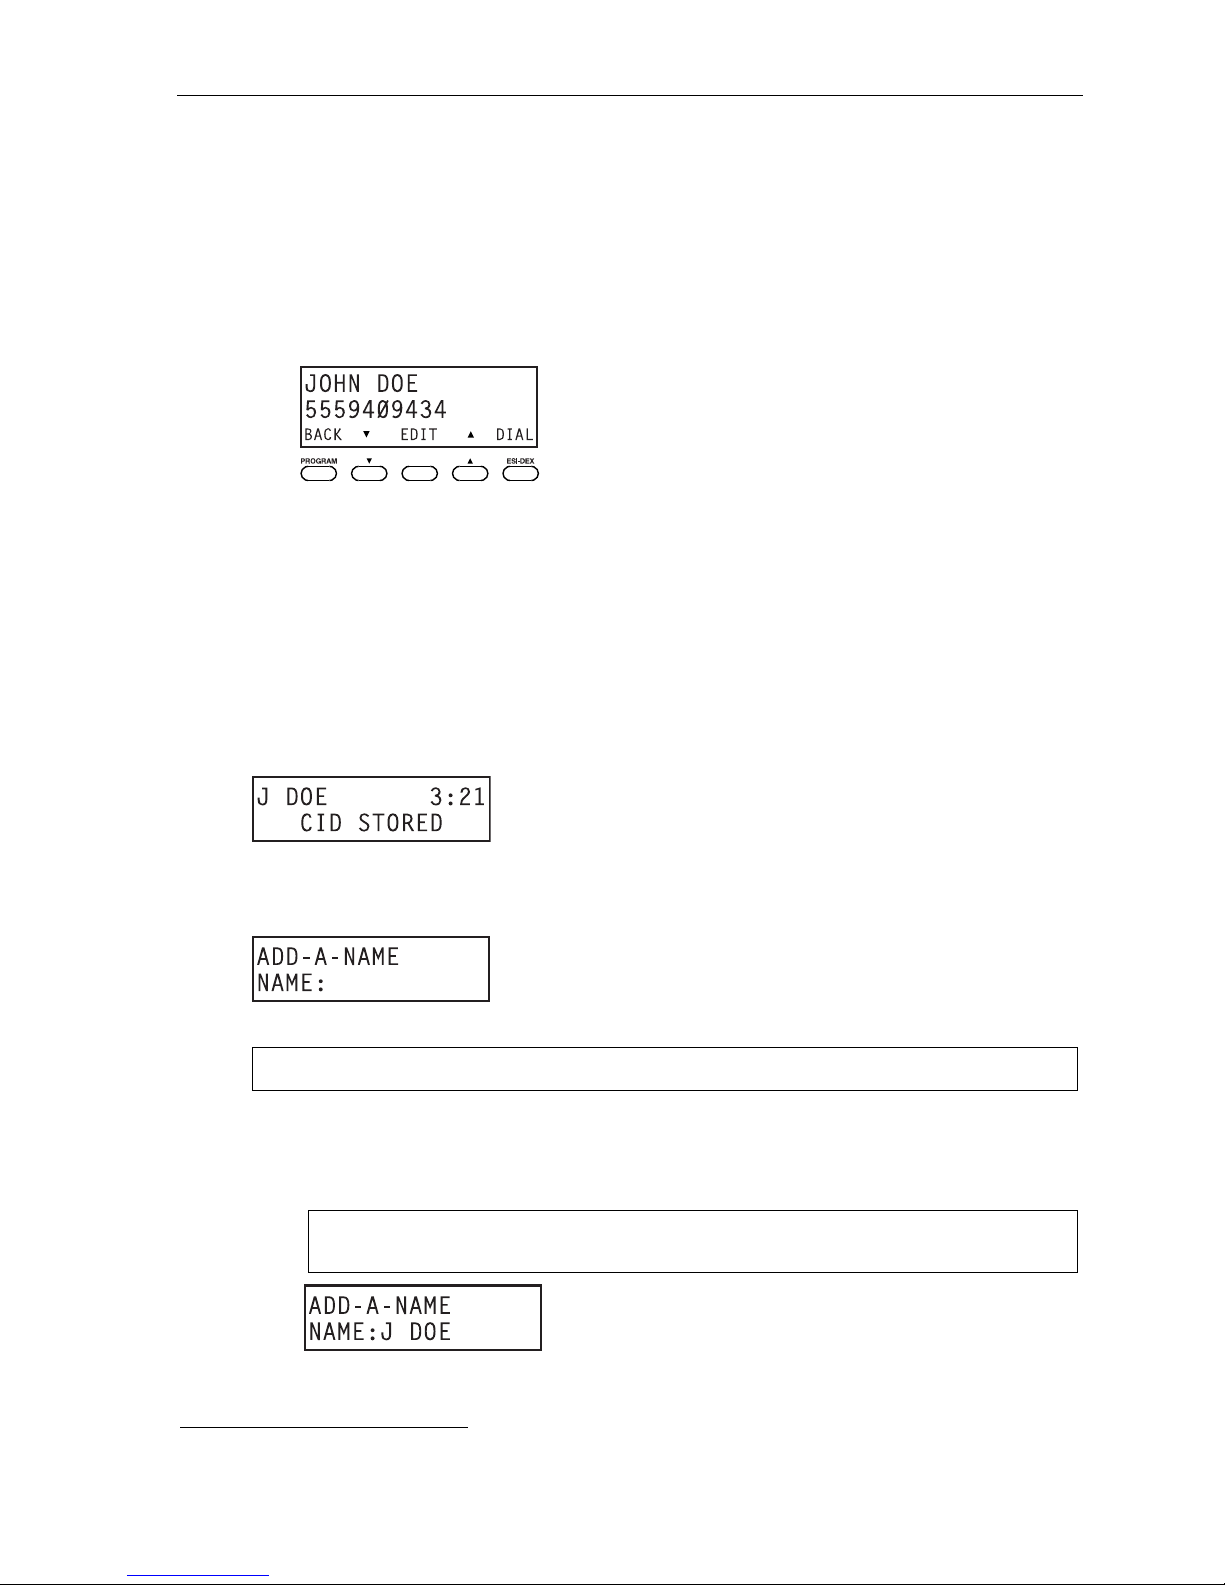
User’s Guide Special keys
3. Choose the d esi r ed na me fr om th e sel e ct ed D ex, us in g one of two m eth od s.
Either:
(a.) Scroll — Press the scroll keys (
and ) to l ook up and down through the Dex until you find
the name (names will appear in the order in which they were stored in the Dex).
. . . Or . . .
1
(b.) Dial-by-name — Dial up to the first three characters
of the extension, department, or guest
mailbox name. For exam ple: if you want to call John Doe, dial 5 6 4 (b ecause it spells J O H).
You’ll begin to see names that begin with those letters. You can then use the scroll keys (
) until you find the desired name and number.
and
4. Press DIAL to place the call.
Adding names to y o ur P er s onal D ex
You can add nam e s to your Pers o nal De x by usi ng ei t her the Caller ID method or the manual method. The
Caller ID method is t he same regardless of whether you’re using a ESI phone with a two-line display or an
ESI phone with a three -line displ ay; howe ver, the manual method is used differ ently on each p hone model.
Caller ID m e t hod ( on an ESI phone w ith a two- or t hree-line di s play)
Whenever a Caller ID name appears on your LCD display (while talking on an incoming call or during
message retrieval) press ESI-DEX to autom atically store the name and number in yo ur Pers onal De x. The
displ ay co nfi r m s:
Manual m et hod (on an ESI phone with a two-li ne di s play)
While your st ati on i s idle, pres s ESI-DEX until prompted to “ADD-A-NAME” . . .
. . . and then enter t he name and the number as prompted.
Note: If needed, press PROG/HELP fo r a ssistan ce .
1. To enter each character f or the name, press the dialpad k ey that includes the desired char acter.
The ke y’s pos sible character ent ries will change each time you press the key.
2. When the desired character appe ars, press # to confirm its entry. The cursor will move to the next
character position. Use
Example: To enter a B, press 2 twice (the possible options through which to scroll are A, B, C and 2).
(Continued)
1
You can also dial just one or two characters, and then press # to enter.
and (the scroll keys) to ba ck up or to insert a sp ace.
When B appears, press # to confirm and move to the next entry.
F.4
Page 64
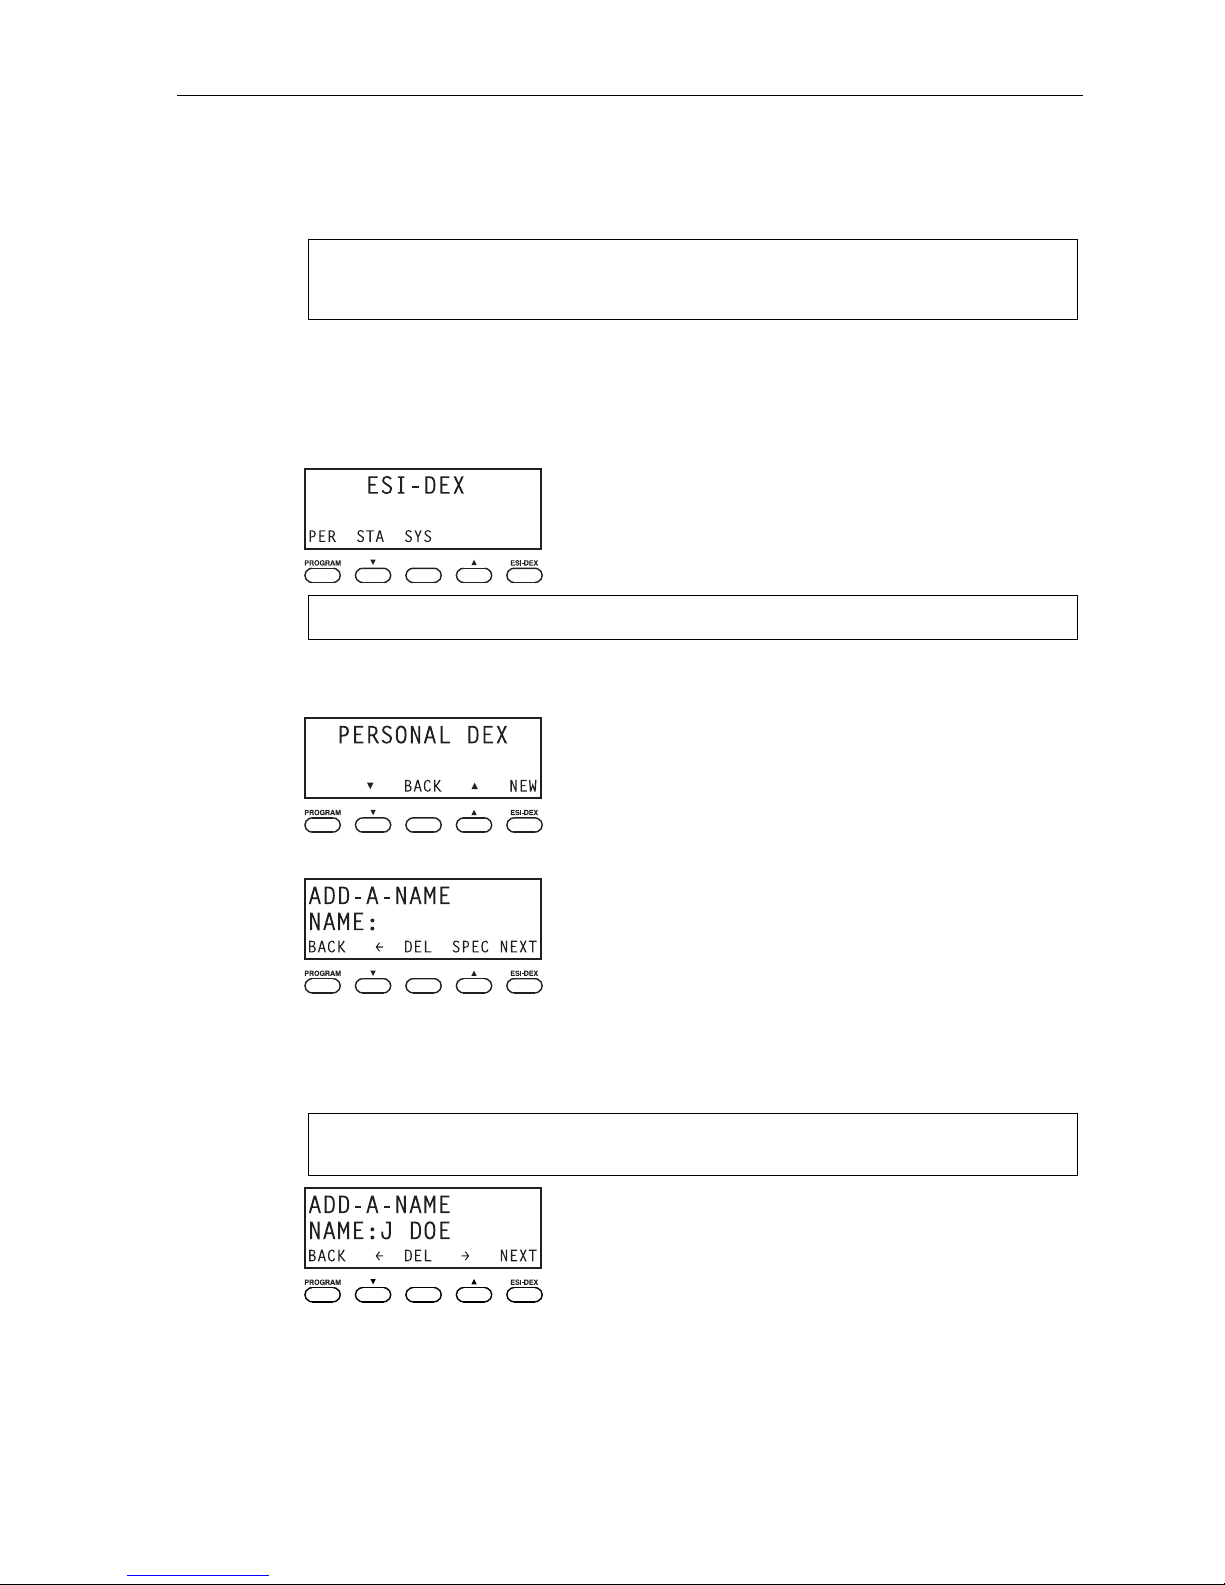
User’s Guide Special keys
3. Repeat steps 1–2 u n til t he name i s complete. The name may contain up to 12 ch aracters (a space
is a character, too).
4. Press # agai n when finish ed entering the name.
5. Now, enter the number — including, if necessary, the li ne access code 9 (or 8 or 71–76).
Note: Use the scroll key to enter special characters; use the scroll key to backspace. You also
can use the scroll keys to view the number after it’s saved. To change the number, you must
delete it and then re-enter it as desired.
6. Press # to confir m the e ntry.
Manual m e t hod (on an ESI phone wit h a thr e e-line display)
1. While your st ation is idl e (or just aft er r e cei vi ng di al ton e) , pr es s ESI- DEX . This causes the Esi-Dex
menu to ap pear , as shown:
Note: Your display may differ, depending upon the availability of certain Dexes on your system.
2. Press PER to choose the Personal Dex.
The display now reads:
3. Press NEW.
4. To enter each character f or the name, press the dialpad k ey that includes the desir ed char acter.
The ke y’s possible character entries will change each tim e you press the key .
5. When the desired character appe ars, press # to confirm its entry. The cursor will move to the next
character position. Use
Example: To enter a B, press 2 twice (the possible options to scroll through are A, B, C and 2). When B
6. Repeat step s 4–5 until the name is compl ete. The name may contain up to 12 characters (a space
is a character, too).
(Continued)
and (the scroll keys) to ba ck up or to insert a sp ace.
appears, press # to confirm and move to the next entry.
F.5
Page 65
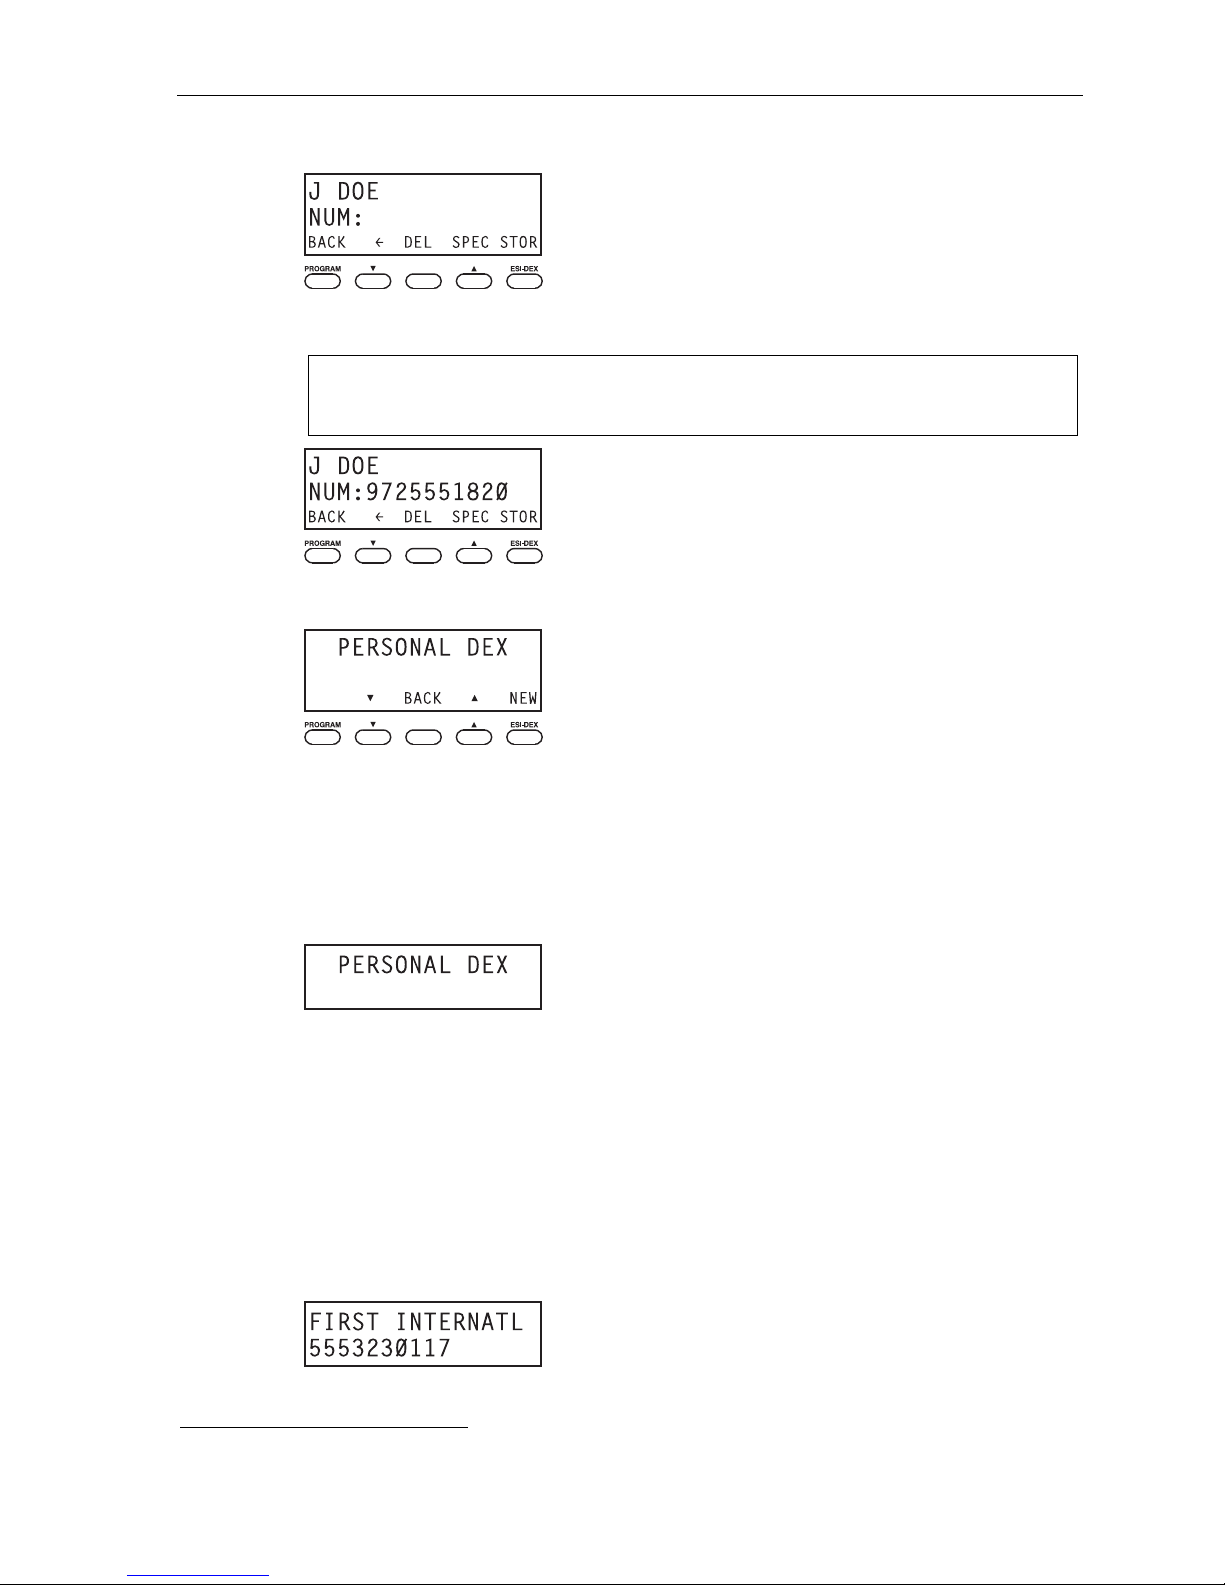
User’s Guide Special keys
7. Press NEXT when finished entering the name. You will see the display for entering the number that
goes with t he nam e you entered.
8. Enter the number — including, if necessary, the line access code 9 (or 8 or 71–76). To insert a two-
secon d pause, press PAUSE.
Note: Use the scroll key to enter special characters; use the scroll key to backspace. You also
can use the scroll keys to view the number after it’s saved. To change the number, you must
delete it and then re-enter it as desired.
9. Press STOR to confirm the entry, which the phone will show briefly before returning to the Personal
Dex di splay.
10. To make another name/number entry, repeat steps 3–9. To fini sh, press BACK.
Deleting nam es from your P ersonal De x
. . . On an ESI phone with a two-line display
1. While your station is idle (or just after receivi ng dial tone), repeatedly pres s ESI-DEX to select the
Personal Dex:
2. Choose the d esi r ed na me fr om the Personal De x, using one of t wo meth od s.
Either:
(a.) Scroll — Press the scroll keys (
the name (names will appear in the order in which they were stored in the Dex).
. . . Or . . .
(b.) Dial-by-name — Dial up to the first three characters
the li sting for First International Bank, dial 3 4 7 (because it spells F I R). You’ll begin to see
names t hat begin with those letter s. You can then use the scroll ke ys (
the desired name an d numb er.
3. When the desired name and number appears . . .
. . . delete the e ntry by pressing either
1
You can also dial just one or two characters, and then press # to enter.
and ) to l ook up and down through the Dex until you find
1
of the name. F or example: to bring up
and ) until you find
or HOLD.
F.6
Page 66
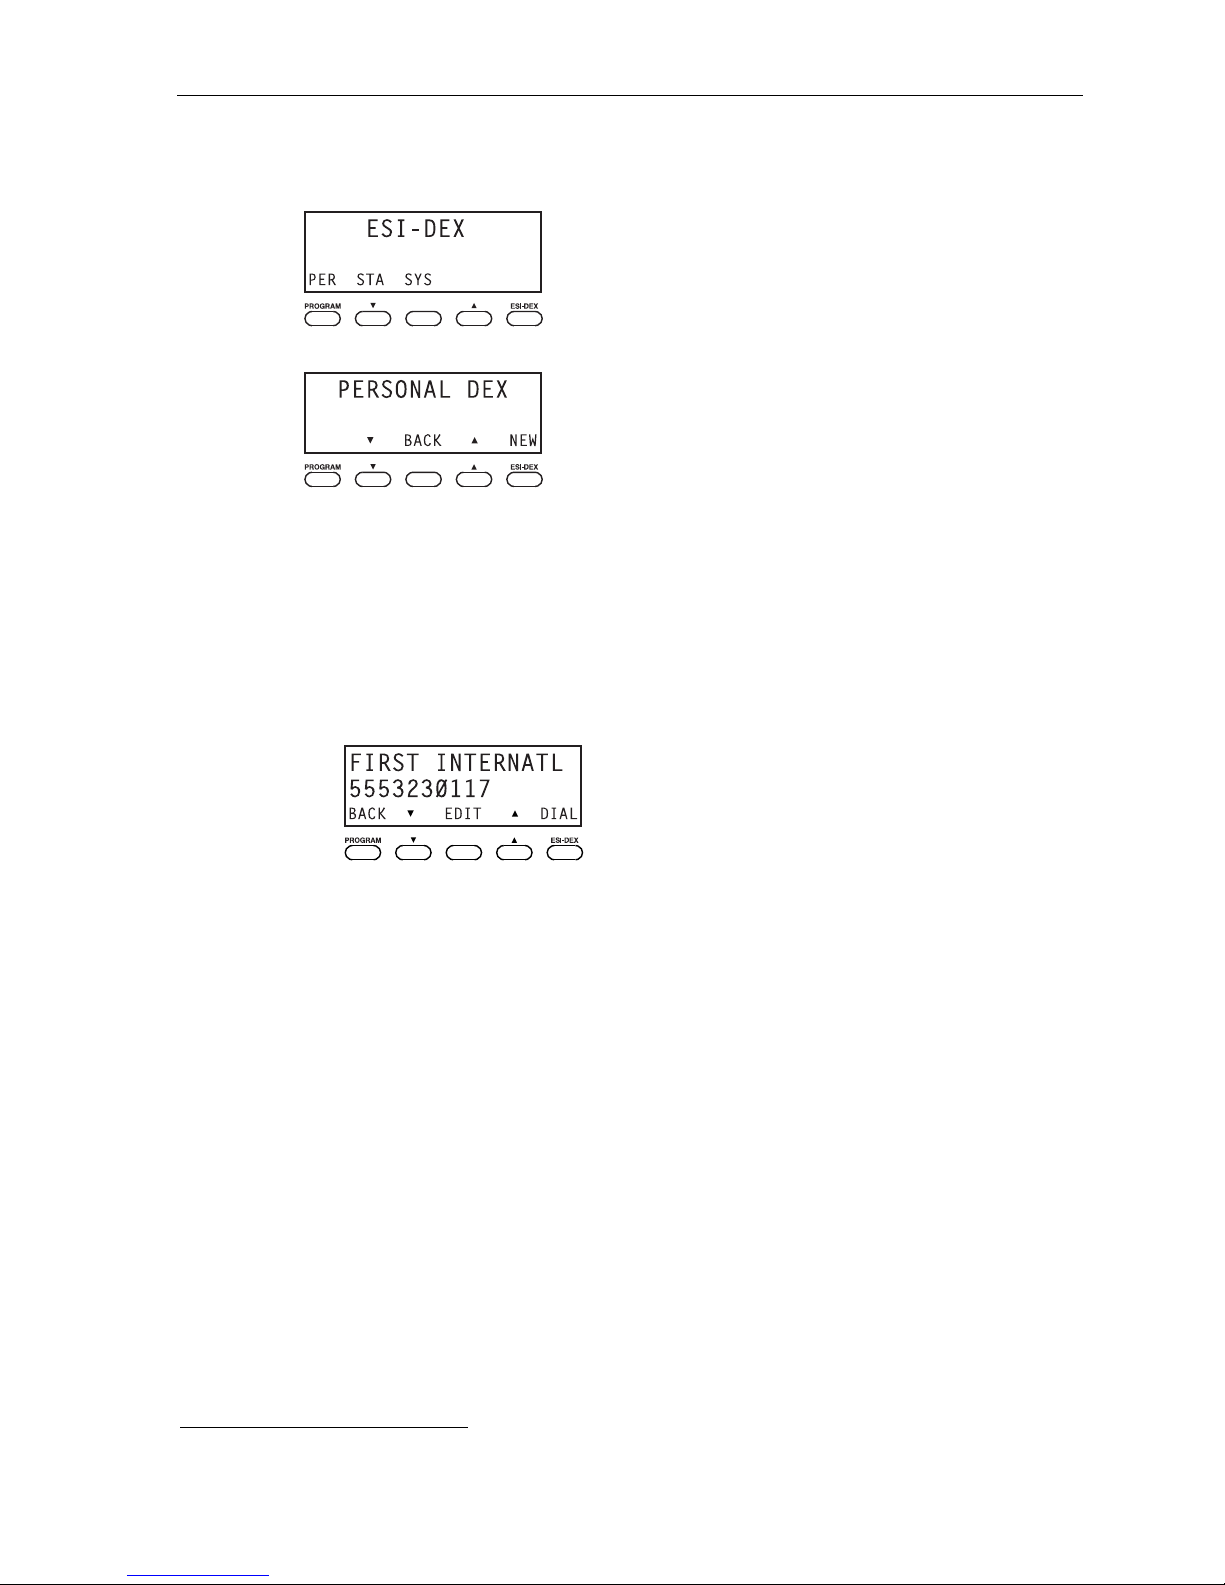
User’s Guide Special keys
. . . On an ESI phone wi t h a t hr e e-line displ a y
1. While your st ation is idl e (or just aft er r e cei vi ng di al ton e) , pr es s ESI- DEX . This causes the Esi-Dex
menu to ap pear , as shown:
2. Press PER to choose the Personal Dex.
3. Choose the desi r ed na me fr om th e Per so nal Dex, usi ng on e of t wo met h ods.
Either:
(a.) Scroll — Press the scroll keys (
and ) to l ook up and down through the Dex until you find
the name (names will appear in the order in which they were stored in the Dex).
. . . Or . . .
(b.) Dial-by-name — Dial up to the first three characters
1
of the name. F or example: to bring up
the li sting for First International Bank, dial 3 4 7 (because it spells F I R). You’ll begin to see
names t hat begin with those letter s. You can then use the scroll ke ys (
the desired name an d numb er.
4. Delete t he entry by pres si ng HOLD.
and ) until you find
1
You can also dial just one or two characters, and then press # to enter.
F.7
Page 67
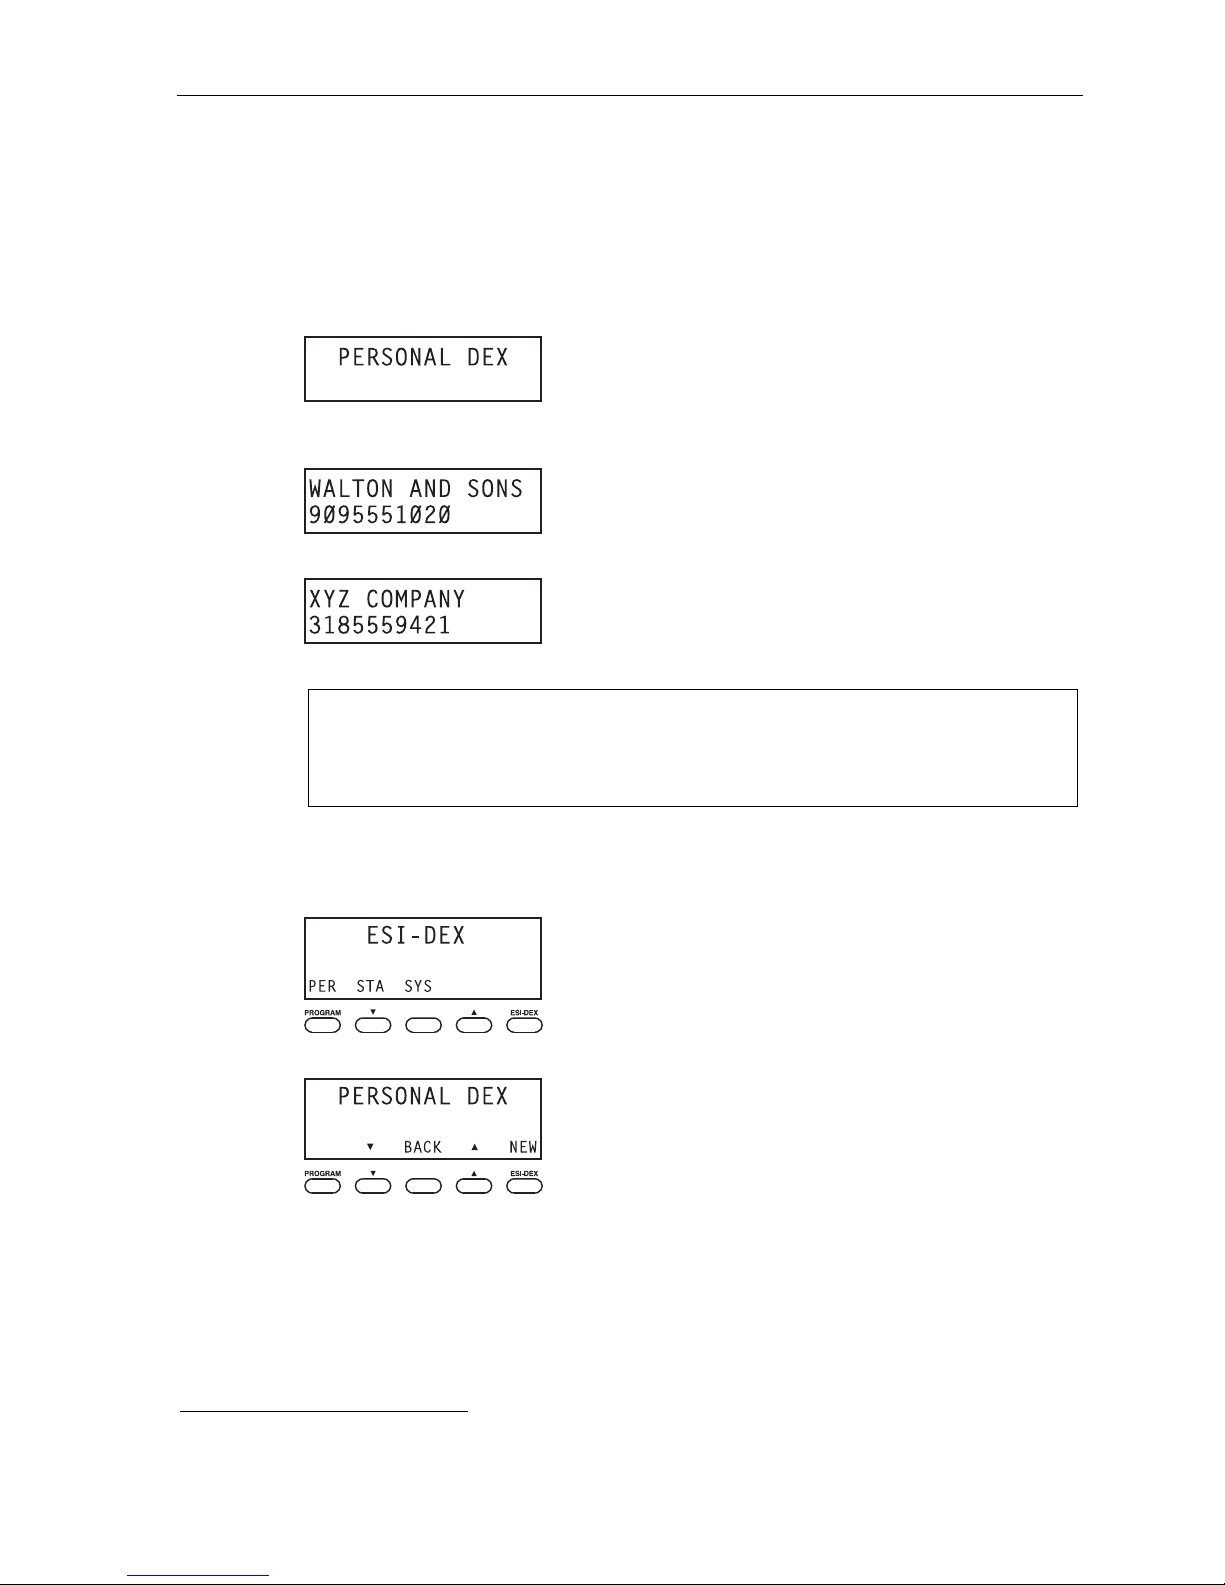
User’s Guide Special keys
Using Esi-Dex: An example
Let’s sa y yo u’r e on a call wit h the XY Z Comp an y — XYZ COMPANY appears on your dis pl ay — an d you
wish to save the name and number for future use. Just press ESI-DEX. Y our display will confirm that the
inform at i on ha s been st or ed.
for each model of ESI ph one.
. . . On an ESI phone wi t h a t w o- line display
1. Press ESI-DEX until you se e PERSONAL DEX on the display.
1
Then, to call the XYZ Company in the future, use Esi-Dex as described below
2. Enter 9 2 5 (W A L). The display will show the first stored name that starts with the character range
from WAJ to YCL.
3. Press the scroll keys (
and ) until XYZ COMPANY appears in the display.
4. Press ESI-DEX again. T his di al s the n umb er for t he XYZ Com pa ny.
Important: The number dialed (if stored from a Caller ID) will be the number for the actual line used by
the caller, and may be diffe re nt than the calle r ’ s listed num ber . Addit iona lly , some lo cal cal l s
may not be auto-dialed correctly, depending on the limitations of your area’s local dialing
plan. You may wish to create a manual listing for these. Consult your Administrator if you
need more help.
. . . On an ESI phone wi t h a t hr e e-line displ a y
1. While your st ation is idl e (or just aft er r e cei vi ng di al ton e) , pr es s ESI- DEX .
2. Press PER to select the Person al Dex.
(Continued)
1
If the number is already in your Personal Dex, the message ALREADY STORED will appear on the display . This indicate s
Esi-Dex has prevented storing the same number multiple times.
F.8
Page 68
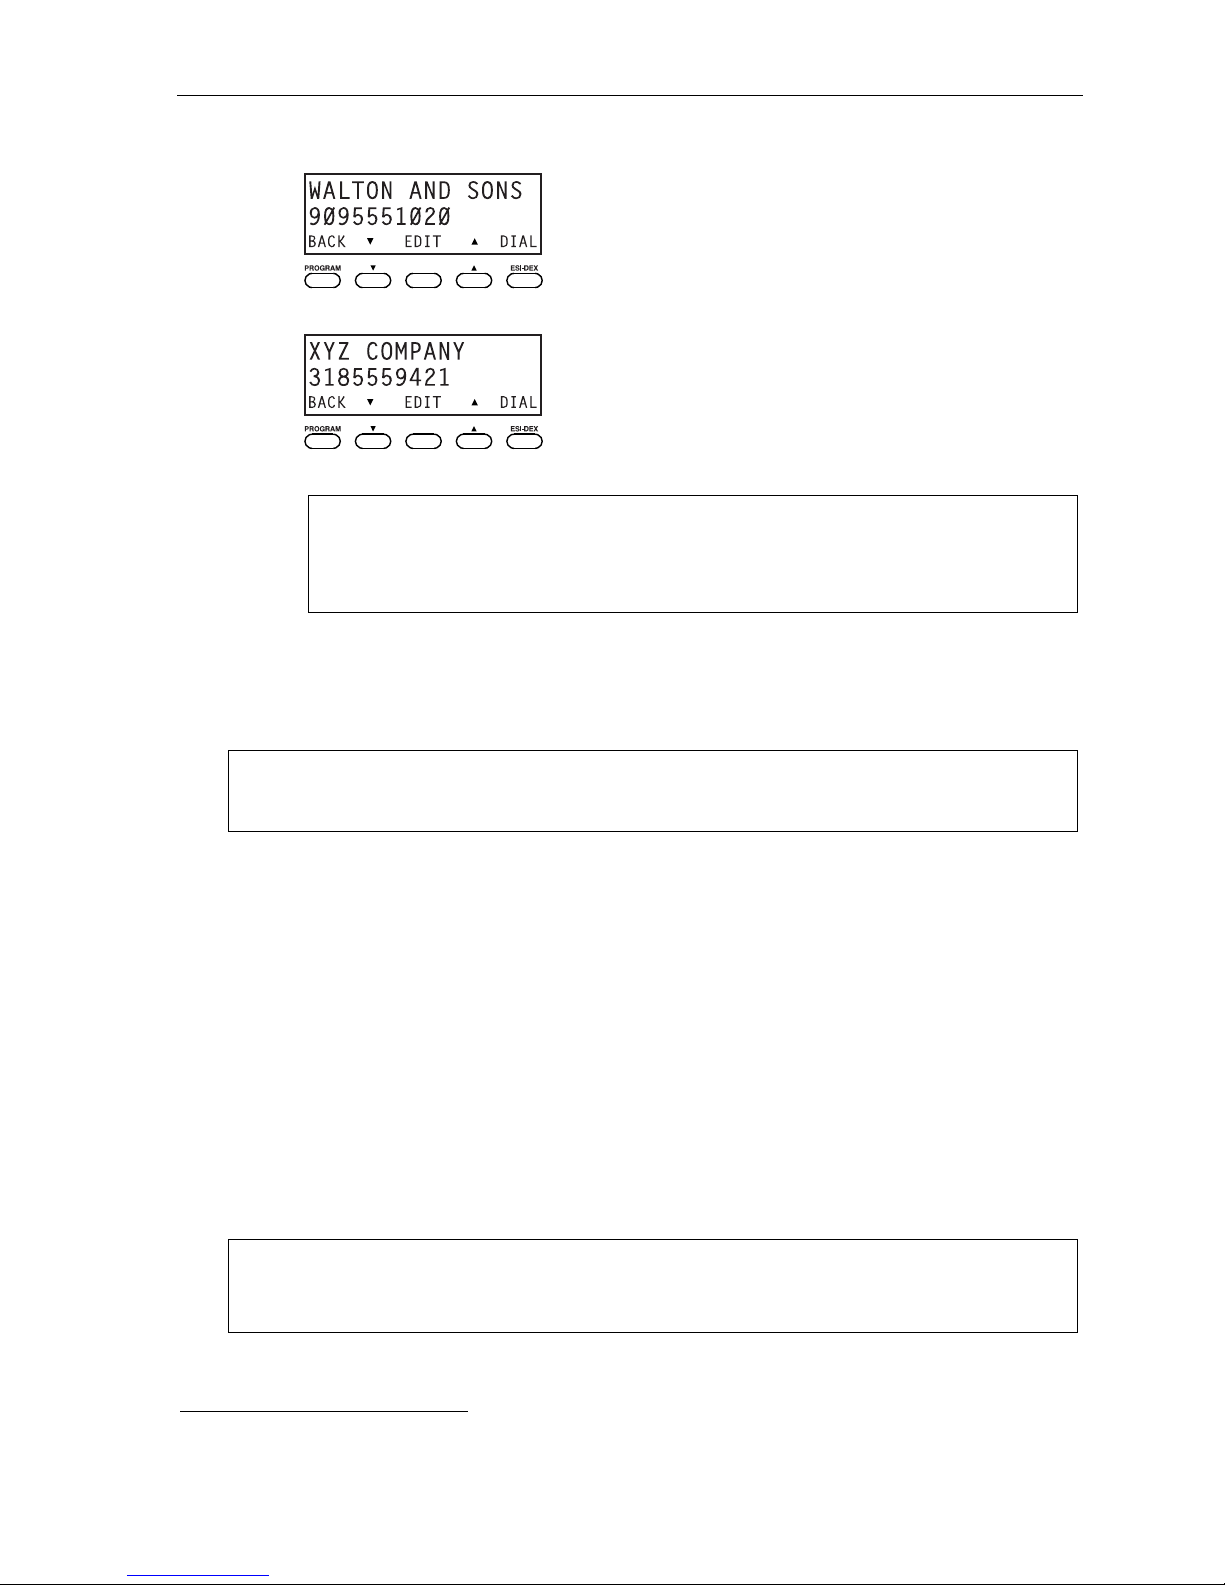
User’s Guide Special keys
3. Enter 9 2 5 (W A L). The display will show the first stored name that starts with the character range
from WAJ to YCL.
4. Press the scroll keys (
and ) until XYZ COMPANY appears in the display.
5. Press DIAL. This dials t he nu mb er for the XY Z Comp any.
Important: The number dialed (if stored from a Caller ID) will be the number for the actual line used by
the caller, and may be different than the caller’s listed number. Additionally, some local calls
may not be auto-dialed correctly, depending on the limitations of your area’s local dialing
plan. You may wish to create a manual listing for these. Consult your administrator if you
need further assistance.
System speed-dialing with Esi-Dex
If your administrator has progra mmed system speed-dial numbers, you can access one of these numbers
either via Esi-Dex, as explaine d in the foregoing discussion, or auto-dial it by dialing its corr esponding
three-digit access number.
Example: If an out -of -to wn fa cto ry lo ca tion ha s be en prog ramm ed a s syst em sp ee d-di al a cce ss nu mb er 60 5 , yo u can
lift the handset, receive internal dial tone, dial 6 0 5 and this will automatically dial the factory’s number.
You may also program 605 (in this e xample) as a programmabl e feature key (see page C.2).
Override ring
(Not available on th e legac y 12-Key Feat ure Phon e.)
The override ring feature lets you place a cal l — station-to-station or outside line — or leave a voice messag e
when another call is ringing.
Placing a ca ll us ing the ov er r i de r ing feature
First, pr o gram a feature key1 to be an Override Ring Key — by assigning to it the function code 5 8 0. Then,
to bypass an i ncoming station or l ine call:
1. Before you begin the call, press the Override Ring Key y ou programmed. When you do this,
don’t take the handset off-hook and don’t press either a pre-assigned headset key (see page F.15), a
preprogrammed line key or SPEAKER.
2. Once you receive dial tone, pick up the ha ndset a nd proc eed with your call as you n ormally would. The
incoming call will be rerouted to the forwarding destination (such as your voice mailbox) your Installer or
System Administrat or has s et for your station.
Notes: Any other feature ke ys not mention ed above wil l nei ther answer a call nor in itia te th e ove rride ring fe ature .
Use of the Override Ring Key also overrides any outside dial tone preference (see page F.13) that may
1
See “Programmable feature keys,” pp. C.2–C.3, for full details.
2
The override ring feature has no effect on calls ringing in from a hold recall or a queued line..
have been set for your station.
2
F.9
Page 69
User’s Guide Special keys
Message monitor mode (live call screening)
(Not available on 12 -Key F eature Phone.)
Message monitor mode, or live call scr ee nin g, lets you hear a caller leaving a m essage in your mailbox, just
as with your home answering machine. Y ou turn thi s feature on or off as part of user programming —
PROG/HELP 3 6. Whil e you hear the caller through your speaker, you have the foll owing options:
Option Result
Lift the handset You intercept the call
Do nothing The system records the message to your mailbox for your later retrieval
Press MUTE/DND Temporarily mutes your speaker (the system continues to record the message to your mailbox)
Note: During monitor mode, you will hear a call ring, then subdued ringing while the caller is hearing your personal
greeting, then their message. You can intercept the call at any time.
Personal greeting reminder
If you frequently change your personal greeting, use this option; it sets your station to remind you of your
current gre et i ng. The fi rst ti me yo u us e your pho ne aft er it has be en i dl e (for t he peri od y ou set in th i s f u n ct i o n),
the system automatically plays your current greeting (and gives you the option to change it). The range is 0 (no
reminder) to 500 hours. To set this, press PROG/HELP 3 2.
Example: If you change your personal greeting only when out of town for a few days, set the reminder interval to
72 hours; you’ll be reminded if your phone hasn’t been used for three days or if you’re away for a couple
of days. If you change your greeting several times a day, set the reminder for about 3 hours.
Headset operation
You can use a hea dset1 with your ESI phone. Unless you’re using an ESI Cordless Handset2, you mu st pro gram
one of your programmable feature keys to be a he ad set k ey
use to connect to or disconnect fr om a call. The key wi ll bli nk gr een when a call i s ringi ng and glow gr een when
connected. If you have a headset conn ect ed and the phone i s of f-hook, pr essi ng the scr oll keys (
adjust the headset volum e. After you ini tiate or answer a call us ing the headset key, lifting the phone’s handset
automatically takes you o ut of headset mode. To switch back to headset mode whil e on a call, press the headset
key ag ain and then pl ace the phone’ s handset on-hook.
Using a Bluetooth he adse t
If you are using a Bluetooth® heads et wit h your pho ne t hro ug h the us e of a n optio n al ESI Bl u eto oth He ad set
Interface, the following table indicates what the H eadset Interface’s LED indications mean:
If the LED is . . . This means the headset is . . .
Off Paired and connected
Glowing solidly Paired and not connected (out of range)
Blinking slowly Paired and attempting to connect
Blinking rapidly Neither paired nor connected
3
(see “Optional features,” pp. F.14–F.18) that you’ll
and ) will
(Continued)
1
Not all headsets are compatible with your ESI phone; contact your ESI Reseller for a list of compatible models.
2
Once a headset is plugged into an ESI Cordless Handset, audio is automatically transferred to the headset, so there is no need to program a
headset key i f using a Cordless Handset. For headset use with a Cordless Handset, ESI supports only the headset that’s sold spe ci f ically for th e
two Cordless Handset models. Contact your System Administrator for more information.
3
Not available on a legacy 12-Key Feature Phone.
F.10
Page 70
User’s Guide Special keys
Answer ing a call using a paired Bluetooth hea dset
Here is the procedure for answerin g a phone call wh en using a Bluetooth headset that is paired to your
ESI phone via the ESI Bluetooth Headset Interface.
Note: When an incoming call rings on the ESI phone, the headset will provide an audible ringing if the
headset supports this. This may cause a delay in the audio to the headset; some headset models
may not pass the audio through to the headset until the audible ringing has been completed.
1. When an incom ing call rin gs the ESI phone, tap the Bluetooth headset’s Call butt on1 or pr ess the
ESI phone’s programmed HEADSET key.
The HEADSET key on the ESI phone will glow green.
Note: If the Bluetooth headset moves out of range, the call will remain connected via the ESI
phone’s HEADSET jack but audio will be lost. When the Bluetooth headset moves back into
range, the Bluetooth connection will be re-established and audio will return.
2. When finished with the call , tap the Bluetooth headset’s Call button or press the ESI phone’s
HEADSET key.
Placi ng a n out bound cal l using a pai red Bluetoot h he adset
1. With the ESI phone idle, tap the Bluetooth headset’s Call button or press the ESI phone’s
programmed HEADSET key.
The ESI phone’s HEADSET key will glow green, and you’ll hear dial tone on the Bluetooth headset.
2. Dial the desired telephone number.
Notes: Special features such as voice commands, switching between calls, etc., using the Bluetooth
If the Bluetooth headset moves out of range, the call will remain connected via the ESI
headset button(s) won’t be supported (unless you’re using a Cellular Access key2).
phone’s HEADSET jack but audio will be lost. When the Bluetooth headset moves back into
range, the Bluetooth connection will be re-established and audio will return.
3. When finis hed with the cal l, tap the Bl uetooth headset ’s Call button or press the ESI phone’s
HEADSET key.
(Continued)
1
The name given to this button may vary by headset manufactu rer.
2
See the ESI Cellular Manageme nt User’ s Guide (ESI document # 0450-1189). ESI User’s Guides are available from
www.esi-est ech.com/users/downloads.
F.11
Page 71

User’s Guide Special keys
Cautions
In general
Bluetooth is an industrial specification for low- powere d, shor t-range wireless networking. It provides a
way to connect, and exchange information between, devices. Bluetooth is used not only in cellular phones
and hand set s but als o per so nal com put er s, as well a s other de vic e s such as video gam e con sol e s.
Blueto oth de vices use a gl ob all y re co gni z ed, s ec ure, un li cen s e d, shor t-r an ge r adi o fr eq ue n cy .
Bluetooth compatibility
Not all Bluetooth-e nabled headsets are alike, because different manufacturers implement Bluetooth
slight ly different ly. To minim ize such issues, a hea dset should comply with the Bluetooth 1.2 (or higher)
specification.
Still, even then, there can be difficulty in making Bluetooth devices interact. In particular, a Bluetoothenabled h ea ds et ma y:
• Fail to pair with the ESI Bluetooth Headset Interface.
• Turn off its Bluetooth capability by itself, due to either a power-saving setting or interference from
other devices.
• Suffer noisy or bad connections on calls. This can occur for a variety of reasons. The headset may
be too far awa y from the ESI Bluetooth Headset Interface, or it may encounter interference from
other Bl uet oot h de vi c e s (or ev en ot her obj e cts su c h as walls, appli an c es, and cordles s pho n es).
Some headsets t urn off while charging, causing the HEADSET LED to glow solidly. T o reconnect the
headset after charging, just turn the headset back on.
Here is a short list of he ad set s t hat ESI us ed while beta -t est in g the ESI Bl uet o oth He ad set Int er fa ce
(but this is not intended as an endorsement of any of these, nor as a statement that they will always
work prop er ly wit h it) . For a ddit i on al up dat e s, visi t www.esi-estech.com/BT.
• Jawbone 2
• Plantronics
– Explorer 520 and 34 0
– Voyager 925
• Samsung WEP200
• Motorola H700
• Cardo Scalia 700
• Jabra BT2020 a nd BT80 40
(To learn more about the ESI Bluetooth Headset Interfac e, visit www.esi-estech.com/BT.)
F.12
Page 72
User’s Guide Special keys
Outside dial tone preference
If you make mostly outside calls, you may find this setting helpful. It tells your station to connect automatically to
an available outside line; i.e., you don’t have to dial 9 (or 8 or 71–76) before th e phone nu mb er. Therefore, whe n
you lif t the handset or pre ss SPEAKER, you will immediately receive an outside dial tone from the highest-
number ed line available to you.
1
Notes: To place an internal call while in this mode, press the appropriate station key or (a.) press TRANSFER to
On a Cordless Handset, press TALK to receive internal dial tone.
switch to internal dial tone and (b.) then dial the extension number. Please note that, if you wish not to
transfer a caller but instead are only placing an internal call, you must press TRANSFER within the first five
seconds after going off-hook. Six seconds after you go off-hook, the ESI system considers the call to be a
transferred call.
Line keys
If some of your programmable feature keys have been progra m m ed as line key s (you c an program line keys by
using PROG/HELP 2), press an unlit key to access the line. An outside call tr ansfer red to your station can be
answer ed by si m ply lifting the han dset or pressing SPEAKER. You do not have to press the line key. The LED
indications for th e line keys are:
LED Line status LED Line status
Solid red In use Blinking green Ringing at your station
Solid green Connected to your station Slowly blinking red On hold by another station
Blinking red Ringing at another station Slowly blinking green Held by you
Notes: Dialing 9 (or 8 or 71–76) to be assigned a line automatically is always available.
Each ESI Cordless Handset has only red LEDs, and only on its programmable feature keys.
Privacy release
This feature makes i t easy to “conferen ce-i n” on a c all: j ust press a line key assigned to the outside line the
call is using, and you’ll automatically join the call.
The illumination activity (such as blinking) otherwise is similar to that described above.
2
Private line
If a private line has been assigned to your station, you must have a line key programmed (see pp. C.2–C.3)
in order to access it.
1
This aspect (i.e., that it’s always the highest line available to you) can’t be changed.
2
This feature may not be available on your system, depending on how it has been programmed. If you wish to enable this feature on your ESI
system, contact your System Admini strator.
F.13
Page 73
User’s Guide Special keys
Optional features
The followin g optional features may be accessible from your stat ion. See the Administ rator for details. In eac h
case, you must use a programmable feature key to serve as an on/off key for the feature (see “Programmable
feature keys,” pp. C.2–C.3).
Note: In the codes below, XXX = extension number..
Code Feature key Page
560 Manual day/night mode F.14 Y Y
561 Service observing F.15 Y Y
564 Head se t ke y F.15 Y
565 Call forward key F.15 Y Y Y
565XXX Forward to a destination F.15 Y Y Y
566 Redial F.15 Y
567 Call forward/no-answer key E.11 Y
568 Message monitor key F.10 Y Y
569 Background announce key F.15 Y Y
570 Conference E.9 Y
571 Personal Greeting 1 F.16 Y Y Y
572 Personal Greeting 2 F.16 Y Y Y
573 Personal Greeting 3 F.16 Y Y Y
574 Caller ID key F.16 Y
575 and 576 Virtual answer keys F.17 Y
577 QuickPage F.17 Y Y
578 Mute/DND F.17 (DND only) Y
579 Voice mail F.18 Y
580 Override ring key F .9 Y Y
582 Record F.18 Y
583 Quick Switch F.18 Y
584 Account codes F.19 Y Y Y
587 Loop key F.20 Y Y Y
599 Overhead page E.16 Y Y Y
ESI 60, ESI 40,
48-Key, 24-Key
ESI Cordless
Handset
(Legacy)
12-Key
Manual day/ni ght m ode (C ode 560)
You can use a programmable feature key to manually chan ge the sy stem’s m ain auto- attendant greeting,
incoming call destinations, and CO line group access.
among: DAY, NGT, DAY2, NGT2, HDAY (holiday) or AUTO.
Tip: To keep the system from being taken out of this mode, place it in auto and then delete the
Note: The System Administrator can also change the mode and/or re-record the holiday greeting remotely to
1
Depending on how the Installer has programmed your system, day and night mode for incoming calls and CO line group access may not change
upon use of this key.
2
AUTO indicates tha t the syst em will f oll ow the day/ni ght mode ta ble s p rogram med by the Inst aller .
programmable feature key’s programming.
handle unexpected closings, such as for inclement weather.
1
Each time the key is pressed, the display switches
2
F.14
Page 74
User’s Guide Special keys
Service observing (Code 561)
Your administrator may assign service observing capability to those users who need to monitor others’ calls
silently (e.g., in order to aid in quality assurance of call activity). To begin s ervice obser ving, press the
assign ed pr ogr a mma bl e fe ature key , foll owed by an ext e nsi o n num ber or stati on key. T o di s c on t i n ue
observing, press the station key again or hang up. As you observe another station’s incoming call, your display
shows t o whom that station is conne cted an d how lon g the call has lasted.
Note: The Administrator must authorize service observing for your station, and the Installer must program the
list of allowed extensions.
Headset key (Code 564)
Notes: Not available on legacy 12-Key Feature Phone.
It’s unnecessary to program this key on an ESI Cordless Handset; one simply plugs in or unplugs a
This key provides for easy connecting to/disconnecting from calls when operating in headset mode (see
“Head set operation,” page F.10). Pres s the ke y to receive di al tone or to answer a ringing call. Pres s the ke y
again or pr e ss RELEASE t o disconnect from the call.
headset as desired.
Call-forward key (Code 565 or 565XXX)
Note: Your ESI phone may have a dedicated call-forward key (CFWD).
If you frequently call-forward your phone (see “Call forwarding,” page E.1 0 ), you can program a
programmable featur e key as a call forwarding k ey to automatically turn forwarding on and of f. If you always
forward to the same extension, you can program a key with both 5 6 5 and the extension number.
Redial (Code 566)
Note: Legacy 12-Key Feature Phone only.
This redials the outbound number (i.e., not int er n al ext en si on) most re ce nt ly di al e d fro m your station.
Call-forward/no-answer key (Code 567)
Note: Not available on an ESI Cordless handset.
Enables or disables the call-forwarding/no-answer feature. When this feature is enabled and som eone calls
your station but receives no answer, the call will go to the destination you’ve programmed (for more details,
see pag e E.1 1). The difference between this feature (Code 567) and traditio nal call forwarding (Code 565) is
that, with t his feature, your phone act ually rings first before going to the selected destinat ion.
Message monitor key (Code 568)
Easily toggl e the mes sage moni tor mo de on or off wit h this key. (Otherwise, you can perform the toggle by
pressing PROG/HELP 3 6 and following the prompts.)
Background announce k ey (C o de 569)
During cal l wai t in g, you can also make a bri ef , pri v at e background announcement (see “Background
announ ce feature,” page E.13) to the stat ion's earpiece (if the s tation user has ena bled this feat ure). Hold
down t he key unt il you hear a beep, then begin tal king; release the key when finish ed.
(Continued)
F.15
Page 75
User’s Guide Special keys
Personal greeting keys (Codes 571–573)
These keys will provide for easy activation of one or more of your personal greetings (see “Personal
greetings,” page D.1). The key's LED will be green for the associated personal greeting that is active. These
keys can be used in place of or in conjunction with manu al activation of the greetings in program m ing mod e.
Caller ID key (Code 574)
Notes: Not available on an ESI Cordless Handset or legacy 12-Key Feature Phone.
This works only if you are receiving Caller ID service from your provider. Consult your Administrator,
Press this programmable feature key to see the stored Caller ID records for yo ur extension’s 25 most recently
received calls. Use the scroll keys ( / ) to view Caller ID information from different calls. (The system stores
Caller ID records for only extensions which have a Caller ID key assigned; so, when you first assign the key,
you’ll have no previous records through which to scroll.)
if needed.
Note: The Caller ID key will light only when there’s a missed call. Although voice mail messages’ Caller ID
information also is stored by the system, waiting voice mail lights only the VOICE MAIL key.
The phone display will also indicate each call’s classification as shown in this chart; also, if this is the first time
you’re seeing this particular call’s record,
Classification
Answered by the station ANS A
Missed call (abandoned call) MISS M
Went to your voice mailbox VM V
Answered by “other” means (call-forwarding, use of
someone else’s PICK UP key , etc.)
New record
appears to the left of this indication.
On third line of phone
with three-line display
RE R
On second line of phone
with two-line display
While a record is on the display, you may do the following:
• To dial the caller di spl ay e d, pres s FLASH/RDL (or REDIAL on certain legacy phones).
• To view the telephone number (rat her than the na m e), press 2.
1
• To delete a record, press 7 while the record is on the display.
• To store the record in your Per sonal Dex, press ESI-DEX.
To finish, press t he Caller ID ke y again (or pr ess RELEASE).
1
Not applicable to a 48-Key Feature Phone, which shows both the number and (if included in the Caller ID record) the name.
F.16
Page 76
User’s Guide Special keys
Virtual Answer Keys (Codes 575, 576)
Notes: This works only if call waiting is enabled for your station. Consult your System Administrator if needed.
Not available on ESI Cordless Handsets.
You can program a Virt ual An sw er Key to play a greeting to a caller when your e xtension is busy and route
the caller to a desired destination by pressing this key. Program a programmable function key with either 5 7 5
or 5 7 6. Prompts will instruct you in how to record the greeting and program the caller’s destination.
The destination ca n be either the default call waiting or another station; the s ystem t akes th e caller there after
playing the r ecorded gr eeti ng. Wi th call wai ting, the syst em pl aces the call er on hol d as call wai ti ng (“campi ng on”)
for your station; if the caller can’t wait, he/she may (a.) press 1 to re ach your voice m ail, ( b.) enter another
extension or (c.) press 0 to reach the Operator. With another station selected, the call is forwarded to the station.
T o record the greeting from an idle phone:
1. Press the chosen programmable function key; then press RECORD.
2. Follow the prompts t o record the greeting and program t he dest ination.
Sample greetings for Virtu al Answ er Keys:
“Hello. This is Har vey. I’m currently on another line, but I’d r eally like to s peak to you. Please hold and I’ll
be with you sh or tly. However, if you don’ t wi sh to wai t on ho ld, pr ess 1 to leave me a voice message. You
may also either dial another extension or press 0 to reach the Operator.”
“Hello. This is Bill. I’m currently on another line, but I have been notified of your call. I am sending your call
to our Sales D epartment administr ator for more immediate assistance. Please rem ain on the line as your
call i s bein g transferred. Thank you.”
Note: If a caller presses 1 to go to your voice mail, the call will go into that extension’s mailbox, regardless of
Here’s an example. The Installer has set the call-forwarding for extension 101 to go to mailbox 102. The
whatever call-forwarding settings your ESI Installer has made.
user at extension 102 uses a Virtual Answer Key to answer a call, and the caller presses 1 when
prompted to go to voice mail. That caller will go to mailbox 101 — not mailbox 102.
QuickPage (Code 577)
Normally used by an operator, t his key lets you quickly put on hold, and p age, a station user. While on an
outside-line call , you c an pres s a Quick P age key, then enter a station number (or press a program m able
featur e ke y pro gr am me d for an ext e nsi o n) and the s yst em wil l aut om at i cal l y page the person
1
, then forward
the call to the per s on’ s voice mail bo x if he/ s he do es n’t an swer.
Mute/DND key (Code 578)
This multi-mode key ’s function var ies, depending upon whether the phone is on a call or idle:
• If the phone is on a call (off-hook) — Mutes t he m icrophone so that the pers on on the other end of the
line can’ t he ar yo u.
• If phone is idle (on-hook) — Puts the phone into do-not-disturb (DND) mode, sending callers directly t o
your voice mai lbox
Note: When programmed on an ESI Cordless Handset, this key performs only the DND function; to mute or
“un-mute” an ESI Cordless Handset, use the keys on its side.
2
.
1
The system will access the paging zone for the extension and play the user’s name as recorded in the directory (if no name is recorded, it will page
by extension number) followed by the phrase “you have a call on hold” and the line on which the caller is parked — e.g., “John Doe, you have a call
on line 21.”
2
Or, alternati vely , to other routing ( such as the Ope rator or anothe r cowo rke r’s exte nsion ) set by the In staller .
F.17
Page 77
User’s Guide Special keys
Voice mail (Code 579)
Allows a legacy 12-Key Feature Phone (which lacks a dedicated VOICE MAIL key) to have voice mail access.
Warning: To use voice mail from a legacy 12-Key Feature Phone, you must assign this code to a programmable
feature key. Failing to do so will disable the mailbox. (When you try to access a disabled mailbox, the
system will notify you that it’s disabled.) You still can retrieve previously left messages and access user
programming, but the mailbox won’t be able to receive new voice messages. Therefore, to enable the
mailbox, assign key code 5 7 9 to a programmable feature key.
Override ring (Code 580)
The override ring feature lets you place a call — station-to-station or outside line — or leave a message when
another call is rin ging. For full details on use of this feature, see “Override ring,” page F.9.
Record (Code 582)
Note: Available for only ESI Cordless Handsets and the legacy 12-Key Feature Phone.
Press this key to record an y phone conversation — or, when the Cordless Handset is idle, to rec ord a
personal memo. For m ore details on using your ESI syste m ’s call recording features, refer to “Live recording,”
page D.8.
Quick Switch™ (Code 583)
Note: Not available on an ESI Cordless Handset or legacy 12-Key Feature Phone.
Important: For the Quick S wit ch fe a tur e to wor k, your Inst a lle r or System Adm ini st rat or mu st have p rogr am med a
relationship between your desktop extension and Cordless Handset. Program the key on the
desktop phone.
Press thi s key t o tr an sfer an a cti ve cal l between an ESI d es kto p pho ne and an ESI Cordl ess Ha nd s et (either
direction — to or from the ESI desktop phone).
Quick S witch ring opt ions
When bot h the d esktop extension and C ordless Handset are idle, press the Quick Switch key. Follow the
visual and au di ble pr o mpt s and u se t he scr oll k eys t o cha n g e the pr ogr am ma bl e opt io ns c on cer ni ng wh at
happen s when a caller dials (or is transferred to) either yo ur desktop pho ne or Cor dl e ss Ha nd set:
• RING DESKTOP — Only the desktop phone will ring.
• RING CORDLESS — Only the Cordless Handset will ring.
In either of the two cases above, re-routing (including to a voice mailbox) will follow the desktop phone.
The other choice is:
• NO RING OPT — If a caller dials (or i s transferred to) the desktop ph one, only that phone rings. If the
caller dials (or is t ransferred to) the Cordless Ha ndset, only the Cordless Handset rings. Re-r outing
follo ws whi c hever ph one r an g.
(Continued)
F.18
Page 78
User’s Guide Special keys
Performing Quick Switch
While you’re on a call, or whi le a c all is r inging to the desktop, the Quick Switch k ey on your desktop
phone glows sol id green; this in dicates that you can perfor m a Quick Switch. To t ransfer the call to yo ur
Cordle ss Hand s et:
1. Press the Quick Switch Key. This “blind-transfers” the call to the ESI Cordless Handset, causing it to
ring, while simultaneously disconnecting the desktop phone.
2. On the Cordless Handset, answer the ringing call by pressing TALK. Once again, the Quick Switch
key on the desktop phone glows green to indicate the ability to perform a Quick Switch.
3. When and if desired, press the Quick Switch key on the deskop phone. This “blind-transfers” the
call back to the desktop ph one, ca using it to ring, whil e simul taneou sly disconnecting the
Cordle ss Hand s et.
Of course, you can do this in exactly the reverse ord er — i.e., i f you start out with a call on yo ur Cordless
Handset, you can Quic k Switch it to your desktop phone and, if desired, back again.
Notes: If you transfer a call unintentionally, pressing FLASH/RDL (or FLASH on certain legacy phones)
If (a.) you’re on a call and (b.) another call comes in and (c.) you Quick Switch the active call to the
won’t retrieve the call. However, you can perform another Quick Switch or use the PICKUP key to
pick the call from the ringing extension (i.e., pre ss followed by the extension number).
other phone (desktop or Cordless) . . . the call-waiting caller will continue to ring and follow regular
system routing (such as to your voice mailbox) if not answered in some manner.
Account codes (Code 584)
The ac count co des key lets you assign an a ccount code to a specific call . The s ystem stores t his in a record
which your company can use for tracking purposes. This can be especially helpful in environments such as
legal offices, consultancies, advertising agencies and others where it is critical to confirm billable hours for
your clients.
Note: For exact codes to be used, consult your System Administrator.
During a call, press the key and enter a de signated acc ount co de. The c ode must be num erical only — i.e.,
between 0 and 9, only — and no more than 10 digi ts long.
For great er con ve nie n ce, yo u ca n as sig n fr equ e ntl y u sed acco unt code s t o programmable feat ure keys. In
each case, just program 5 8 4 followe d by the desired account code.
General informa t ion regar ding use of ac count codes
• Account codes are appli c abl e to o nly out side call s (not internal “i ntercom” c all s).
• You can ent e r more than one account code dur i ng t he s ame c onversati o n — part ic ul ar ly u sef ul in a
conference c all that involves multiple clients or customers.
• Neither an incoming caller or a person being called will hear the tones as you enter account codes.
• If you enter an incorrect account co de, just pr ess the account code key again and enter t he
desire d num ber.
• Pressing the account co de key won’t affect the recording of a call.
• It’s not n ecessary to enter an account code to place an out bound call.
• The system won’t prevent entry of an invalid a ccount code.
F.19
Page 79

User’s Guide Special keys
Loop key (Code 587)
A loop key allows for the appearan ce of any CO line that may be ringing a station, without the need for a
programmable featur e key t o be pro grammed as a CO line key . Up to six loop keys may be programmed
per stati o n.
Using a loop k e y
• Incoming outbound calls will appear on the first available loop key (if one or more loop keys are
programmed on the phone).
• Calls may be placed on exclusive hold simply by pre ssing the active loop key.
• If multip le calls are on loop keys, a user may toggle between th e calls by pre ssing a desired loop k ey.
(The call that was originally active on a loop key will be placed on exclusive hold.)
• Calls placed on exclusive hold on a l oop key c an be ret rieved from exclusive hold by only the station that
placed the call on e xclusive hold, and can be retrieved simply by pr essing the flashing loop key.
• If the HOLD key is used, the caller will be placed on system-wide (not exclusiv e) hold and the loop key
will return to an idle state.
Loop key LED indications
If the loop key LED is . . . The loop key call is . . .
Slowly blinking gre en Held by your stati on
Blinki ng gr e en Ringin g at your stat i on
Solid green Connected to your station
Slowly blinking red On Virtual Answ er hold
F.20
Page 80

User’s Guide Analog stations
Analog station s
If your station has been installed as a n analog station, it will be able to use only a standard-type telephone.
Because the phone isn’t integrated to the phone system (like the ESI phones), its operation and capabilities will
be diff erent .
1
Note: The following ESI-50L system features are not available to analog stations:
Tip: To use a non-ESI cordless phone in conjunction with an ESI phone, program a programmable feature key (or
• Account codes.
• Call forwarding.
• Call forwarding/no-answer.
• Call recordi ng.
• Caller ID key.
• DND.
• Exclusive hold.
• Call recordi ng.
• Overhead paging access (unless overhead paging is included in a paging zone).
• Redial from voice mail.
. . . as well as other optional features described in “Special keys” (page F.1).
use CFWD) to easily forward calls to the cordless phone when out of your office. Have the Installer program
the cordless phone’s station programming to forward unanswered calls to your ESI phone’s mailbox.
Using FLASH
A flash-hook, or FL ASH — a momentary break in the co nnection — is requi red to perform many of the st ation
operations below . You can g enerate a FLASH by momentarily depressing the hook switch (or, if your phone
is so equipped, press the special key on your phone).
Caller ID
If you subscribe to Caller ID from your telephone service provider, the Caller ID display will show an outside
caller ’s name and/or number.
such as UNAVAILABLE, PRIVATE, or NO DATA SENT.
On internal station-to-station calls, the Caller ID display will show the extension number as the calling number,
and the stat i on na me as t he cal ler ’ s nam e.
2
In some insta n ces, the service provider c an sen d onl y a ge ner al c aller stat us —
Note: Caller ID will not display with call-waiting.
Placing calls
When you first lift the handset you will hear internal dial tone. Dial 9 (or 8 or 71–76) to access an outside l ine and
dial the number. To place an internal call, simply dial the extension number, department number, etc.
1
If you're not sure about the installation of your station, contact your administrator.
2
If you don’t subscribe to Caller ID, the display will show (instead of the caller’s name or number) which line i s recei ving the call.
G.1
Page 81
User’s Guide Analog stations
Transferring calls
Transferring outside calls
While connected to an outside call, FLASH and dial the extension num ber. Hang up immediately to p erform a
blind t ransfer, wait until the called person answers, annou nce the caller and then hang u p. If the tran sferred- to
person does not answer, FLASH to be recon nected to the original call er.
Transferring a call to a mailbox
To transfer an outsi de call er to anot her user’ s mail box, FLASH and dial # and t he mail box number. Y ou and the
caller will be connected to that user’s personal gr eeting. You may cho ose to h ang up immediately or l isten to
a portion of the personal greeting to assure yourself that you have placed the caller into the correct mailbox. If
not, FLASH to e xit the mailbox and b e reconnected to the original ca ller.
Note: Regardless of when you hang up, the caller will hear the entire personal greeting. To insure the privacy
of the message, you will automatically be disconnected at the record tone.
Transferring a call to the main greeting
T o transfer an outside caller to the main greeting, FLASH, dial # and hang up.
Transferring a user to his/her mailbox
T o transfer t o his/her mailbox a u ser who's calling fr om the outside to pick up messages, FLASH , dial , and
the appropriate mailbox number an d hang up.
Conference calling
T o create a co nfer e nc e call :
1. Establish the first call.
2. FLASH twice (wait one seco nd between FLASHes) to place th e call on hold.
3. Place a seco nd c all as you nor m all y would.
4. Once connected to the second call, FLASH again to connect all of you together.
Notes: To add an additional member to the conference, FLASH once and then repeat steps 3–4.
A single conference can contain a maximum of 16 members.
To remove or disconnect a conference you’re in, just hang up (disconnect).
To cancel adding someone t o a conf erence, hang up if:
• The pho ne is ringing t he add- in member’s n umber.
• The add-in member answers the call (you will have only the opt ion to disconnect).
• You’re routed to a voice mailbox (if it’s a station -to-station call).
In all cases, when the analog station disconnects to cancel the add-in member, the call will ring back and
connect to the original station or outside line. You will be automatically reconnected to the three-member
conference w hen cancelling the ad dition of a four th member .
Note: Once you FLASH twice to create a new conference, you can’t toggle between calls or transfer a connection.
This is the same when adding a fourth member to an existing conference.
G.2
Page 82

User’s Guide Analog stations
Call waiting
T o enable call wai t i n g for yo ur st ation, pre s s XXX 5 3, where xxx represent s your analog station’s extension
number. Then, if someone calls you while you’re already on a call, you’ll hear a tone in your earpiece. FLASH to
toggle between the original call and the call waiting. To drop either call, hang up while connected to t he call to be
dropped. When your phone rings, lift the handset and you will be reconnected to the other caller.
Note: The ESI system doesn’t support call-waiting Caller ID on analog stations.
Call hold
This is used to place external callers1 on hold for retrieval from any stati on within the ESI system.
Putting a call on h ol d
While on an out si d e call , FLA SH an d dial . A short voice prompt will tell which line number the call is
using; you will then receive internal dial tone.
Retrievi ng a cal l fr om on hol d
From internal dial tone, dial and the line number where the call is on h old.
Dial
Hold recall
0 to answer t he oldest held call in the system.
If a held call is not retrieved during the period of time (set by the Installer), it will recall to your phone if your
station is idle. You will hear three short ring tones. Lift the handset; you will be connected to the held call.
If you are on a call when the recall occurs, you will hear a call waiting tone. To toggle between the two calls,
FLASH (or hang up, wait for ring, then answer).
Paging
This function al l ows for paging t hr ough an overhead pagi ng syste m and/or desi gnated avai labl e tel ephone speaker s.
Press # and 0 to access all av ai l abl e st ations.
Press # and 1, 2 or 3 to acces s a pr ogr amm ed pa gi ng zo ne.
Note: A page will not be sent to the speakers of phones in use.
Tip: To page for pick up of an outside call, put the caller on hold by dialing . A voice prompt will indicate
the line number. Then page the person and announce the line number for retrieval. For example: “John, you
have a call on line 1. John, pick up line 1, please.”
Overhead pagi ng
Stati on num ber 199 is designated as the overhead paging por t. If the ESI system has been connected to an
overhea d pa gin g sy st em , you c an pa ge by di aling 1 9 9 and making your anno uncement after the tones.
Call pick-up
A call ringing at another station can be picked-up by pre ssing and dialing the extension number. Dialing 0
will answer the longest ringing outside call.
1
An analog station can’t place an internal call on hold.
G.3
Page 83
User’s Guide Analog stations
Voice mail operation from an analog station
The ESI system will provide accurate and timely messages. Others will become more comfortable leaving you
voice m essage s if you pick-up and respond to your mess ages pr omptly.
Personal gr eet ings
Initially, your m ailbox has a ge neric greeting: “You have reached the mailbox for extension xxx, dial zero t o
reach the operator or begin recording at the tone.” You can record up to three differe nt personal greetings in
your ow n voice indicating your availability to return calls.
Sample greeting 1:
Sample greeting 2:
Sample greeting 3:
Hi, this is [name]. I’m away from my desk or on the phone right now; so please either dial zero to reach
our operator, or leave me your name, number and message at the tone and I’ll get back to you as soon
as I can.
Hi, this is [name]. I’m out of the office. You may dial 1 2 2 for my assistant or, if you prefer, you may
leave me a voice message at the tone — I’ll check in regularly — or, if it’s important, dial 4 to reach me
on my cell phone.1
Hi, this is [name]. I’m away from my desk at the moment. To reach the operator, dial zero. Otherwise,
leave your name and phone number at the beep so I can return your call.
Following is a list of options that you m ay wish to include in your personal greetings:
Option Instruction
0 To reach the operator
1 To skip directly to the record tone (or “beep”)
2 To mark this message as urgent (see “Urgent messages,” page D.10)
3 To page (internally) the person for whom the caller is leaving a voice mail message
4 To perform off-premises “reach-me” (see “Off-premises ‘reach-me,’” page D.3)2
8 To the main greeting (if your system is using the auto attendant)
XXX An extension number of another user
Note: Option 3 is available only when personal greeting 3 has been recorded; and option 4 is available only
when personal greeting 2 has been recorded.
Shortcut: When leaving a message in another mailbox, press 1 during the personal greeting to advance directly to
the record tone without having to listen to the remainder of the greeting.
You can cha nge th e per so nal gr eet i ng s as oft e n as nec es sar y by r ec ord in g over a pre vi ou sl y rec or de d
personal greeting.
Warning: Deleting your personal greeting will not revert to the initial default greeting, but will turn off your mailbox.
Message waiting indication
If you have new messages, you will hear a short prompt (“Y ou have ne w mes sa ges” ) followed by internal dial
tone w henever you lift the h andset to place a call. Y ou can choose to ret rieve your me ssages then, or place
the call .
Note: The ESI system doesn’t support any visual message-waiting indication on an analog station.
1
These sample greetings refer to certain features which may not be activated for your extension; consult your System Administrator for additional
information, if necessary.
2
If your system i s usin g ESI P res en ce Man age me nt , con su lt the ESI Presence Management User’s Guide (ESI part # 0450-0793) to learn about
additional, special functionality that may be available to you. If you’re not sure whether your system is using ESI Presence Management , consult
your System Administrator. For more information about ESI Presence Management, visit www.esi-estech.com/presence.
G.4
Page 84
User’s Guide Analog stations
Retrieving messages
You can pick up m es sa ge s fro m your st at i o n, whe n awa y fro m t he of f ice or from an ot her us er’ s ESI ph on e.
1. Lift the han dset, and then dial
you hear the Main Greeting, press
you by pressing VOICE MAIL
2. If required, enter your password. the ESI system will announce the number of new and old messages
and will start playback of messages with the oldest new message and continue until all messages and
recordings have played.
Voice-prompted instructions will be played at the end of each message. Once you've learned these prompts
(see the chart, “Functions available during analog station voice mail message retrieval”) you c an proc eed
more r apidly by pressing o ne of the following keys any time during the message or d uring a prompt.
Functions available during analog station voice mail message retrieval
followed by your extension number. If calling from the outside, when
and enter yo ur ext en sio n num ber; or have t he op er at or tr an sf er
and then ent ering your extension number.
Note: Functions tinted light gray, below, either change or are not available when you’re using an ESI phone
(see page D.6).
Key Function Description
1 Pause Pauses for one minute or until 1 is pressed again.
2 Hear time/date Pauses the message, plays the time/date of when the message was
left and resumes.
4 Back up (rewind) When pressed during message playback, rewinds 4 seconds for each
key press. If pressed after the message has finished, it returns you to
the beginning of the message.
5 Access user programming Accesses user programming menu.
6 Move Moves a copy of the message to another User’s mailbox.
To move the message without an introduction, press 6 when prompted.
To add an introduction, press 1 when prompted. When you’ve finished
your recording, press 1 to stop; You will be returned to the original
message in your mailbox.
7 Delete Deletes the message from the mailbox (see “Message Recycle Bin,”
page D.10).
8 Main greeting Goes to the main greeting (if your system is using the built-in auto
attendant).
9 Save Saves the message (it will be played as an old message the next time
messages are picked up).
9 9 Save as new Saves the message as new.
0 Operator Transfers you to the operator.
# Leave a message Lets you record a message in one or more mailboxes. At the prompt,
enter the desired mailbox number. Press # and then enter up to 65
mailbox numbers, using the phone’s dialpad. Mailboxes in a
department count toward the maximum of 65.
To disconnect Always press before hanging up (pressing it during message
playback saves the message and any other unsaved messages).
Retrieving messages from another user ’s ESI phone
Press VOICE MAIL and dial your ext e nsi on n umb er. Follow t he pro ce dur e s descr i be d on pa ge G .5.
G.5
Page 85
User’s Guide Analog stations
Analog station programming
After logging into your mailbox (pressing foll owed by the mailbox number), dial 5 to program.
1 Select personal greeting
Select t he de sir ed gr e eting numb er: 1, 2 or 3. The system will prompt to re-record, delete, hear, or select as
the curr ent gr e et i ng by pr es si ng #.
1 Record personal greeting
Begin recording at the tone; press 1 to stop. Th e new personal greeting aut om atically rep laces the
previous greeting.
Note: Your mailbox will be disabled if no personal greeting exists.
2 Delete personal greeting
When prompted, press 2 again to confirm deletion.
Warning: Don't delete all of your greetings. If you do, the system will turn off your mailbox until there is once
again at least one greeting.
3 Hear current per s onal greeti ng
3 Call waiting
1 Enable call waiting
0 Disable call waiting
5 Password
The password will apply to station programming, voice mail retrieval and certain other features
(when activate d) .
1 Enter new password
Your password m ay consist of 2–8 digits f ollowed by # (0 cannot be the first digit). Entering 0 (zero) as the
sole password will turn off the password requirement.
2 Delete current password
3 Hear current password
4 Password security level
Select one of the followin g passwor d levels.
Selection Result
0 No password required for access from any phone
1 Password required only for remote access, either off-premises or from other stations within the system
2 Password always required
G.6
Page 86
User’s Guide Analog stations
Off-premises message delivery
The ESI system can be program m ed to deliver messages to a n off-premises pho ne and/or to pa ge you when
your voice mailbox receives a message. You can set the phone num ber (cell phone, home number, another
extension, etc. ) or the pa ger nu mb er and a delay time (the period that the system is to wait before attempting
to deliver the mess age/pa ge).
Note: You must record and use Personal Greeting #2 for this feature.
The Admi nist r at or ca n al so set for your st ati o n the:
• Number to be called or pa ged
• Delay period before attempting messa ge delivery
• Number of attem pt s
• Interval betwee n attempts (in increments of 30 minutes)
• "Quiet period” which suspends message delivery for late night, etc.
If you have programmed both an off-premises delivery number and a pager number, the system will prompt
you to choose one of the following delivery options:
• Phone-only
• Pager-only
• No off-premises delivery
Phone delivery
Whenever it receives a new message into your mailbox, the system will call the number that you have
programmed and play the prompt “You have messag es; please enter your password.” The prompt will
repeat t hre e tim es before a ssuming that n o one ha s an swer e d an d dis co nne ct in g.
Upon an swering, enter your passwor d (if no password is set, you must enter 0). You will then be
conne cted to your mailbox and can proceed with norm al message ret rieval operation.
Note: A “” response instead of the password will cause the system to suspend calling until another new
message is received.
Pager notifica ti on
Pager notifi cation can be programmed to operate as the sole noti fication.
You can have the system call and activate your external pager whenever the first new message is left in
your ma ilbox and rep eat the page (at the interval programmed by the administrator) until all new
messages have been retrieved.
Note: Entering or deleting the phone number that is to be called for off-premises delivery or to activate your
pager will turn the feature on or off, respectively.
G.7
Page 87

User’s Guide Analog stations
6 Off-premises message delivery
1 Delivery options
1 Delivery to phone number only
2 Notify pager only
0 No off-premises deli very
2 Phone delivery
1 Enter phone number
Enter the phone number followed by # ( 24 di git s ma xim um ). Do not include an outside line access
code (i.e., don’t a dd 9, 8 or 7) before the number.
2 Delete phone number
Delete s the cur r ent ph on e number.
3 Hear current phone number
Plays bac k th e current phon e num ber.
3 Pager notification
1 Enter pager number
Enter the pager number followed by # (24 digits maxim um ). Do not include an outside line acce ss code
(i.e., 9, 8 or 7) b efore the number.
2 Delete pager number
Deletes the currently programmed pager n umber.
3 Hear current pager number
Plays back the currently programmed pager number.
9 Message Recycle Bin (un-delete)
Each user’s 10 most recently deleted messages will be stored in a Message Recycle Bin to allow the user to
recover messages that may h ave been deleted in error.
The most recently deleted message will be played first. Press 9 to move to the next message. Press 8 to restore
the me ssage to your mailbox a s an old m essage.
G.8
Page 88

Index
/ keys. See Volume/scroll keys
Analog stations
Off-pre m i ses de li v ery, G.7
Programming, G.6
Voice mail operations from, G.4
Attendan t op er a t io n, E.1 7
AutoPag e, D. 3
Backgro un d an no un c e, E.1 3
Backgro un d an no un c e key, F.15
Basic phon e u se , E .5
Blind transfer, E.6, E.7, E.8
Broadcast mailbox. See Group/broadcast mailboxes
Call forward key, F.15
Call forwarding, E.10
Call forwarding/ no- an sw er, E.11, E.12
Call forwarding/off-premises, E.12
Call pick-up, E.16
Call waiting, E.13
Backgro un d an no un c e, E.1 3
Station- to-stat ion, E .1 3
Caller ID, E.1
Analog stations, G.1
Caller ID key, F.16
Cascade notification mailbox programming, D.16
Conference calling, E.9
Analog stations, G.2
Day/night mode, F.14
Dial tone , E. 4
Preference, F.13
Dire ct station s e lect, E .6
DSS. See Direct stat i on s e lec t
Esi-Dex, F.2
Adding names to Personal Dex, F.4
Deletin g na me s from Per s on al De x, F.6
System spee d di a l ing, F.9
Exclusive hold. See Hold
Expansion Console, A.5, A.10
Secon d, A .11
Fixed feat ure keys, E. 2
FLASH/RDL key, F. 1
Group/broadcast mailboxes, D.14
Programming, D.15
Gues t mailboxes
Off-pre m i ses de li ver y, D.13
Phone del i ver y , D.13
Programming, D.13
Hands-fr e e an sw er , E.3
Headset key, F.15, G.1
Headset operation, F.10
Hold, E.14
Difference between hold and exclusiv e hold, E.14
Exclusive hold
Retrieving a call, E.15
Retrieving a held call, E.14
Interna l ca l l s, E.5
Blind transfer, E.8
Supervised transfer, E.8
Transferring, E. 8
Leaving messages, D.2
LEDs, E.3
Line keys , F.13
Live call screening (Message monitor mode), F.10
Live out sid e ca ll s , E. 17
Live recording, D.8
Mailboxes
Cascade notification, D.16–D.17
Manual day/night mode, F.14
Message monitor key, F.15
Message mo ni to r mo de ( liv e ca ll screening) , F.10
Message Recycle Bin (un-delete), C.8, D.10, D.13, D.17, D.19
Message retrieval, D.4
Off-pre m ise s de li ver y , D. 9
Urgent me ssa ges , D. 10
Message(s) waiting, D.4
MUTE/DND ke y, E.4
Off-pre m ise s del i ver y , D. 9, G.7
Operat or s ta ti on , E .1 7
Outs ide calls, E. 5
Blind transfer, E.6, E.7
Supervised transfer, E.7
Outside dial tone preference. See Dial tone
Paging, internal, E.16
Overhead paging port (199), E.16, G.3
Paging through phones, E.16
Zones, E.16
Password, C.5
Perso n a l Dex. See Esi-Dex
Personal greetings, D.1, F.10, G.4
Personal greeting keys, F.16
Reminder, F.10
Phone u se
Basi c, E. 5
Playba ck of rec ord i ng s. See Live recording
Programmable feature keys, C.2 , E.2
Programming
Cascade notification mailboxes, D.16
Group/broadcast mailboxes, D.15
Q & A mailboxes, D.18
Quick Groups, D.2
Quick Move, D.8
QuickPage, F.17
RECORD key, D.8
RELEASE key, F.1
Retrieving messages, D.4, D.6, D.9
Ring tone, C.5
Ring volum e, C.5
Scroll keys. See Volume/scroll keys
Second Expansion Console, A.11
Service observing, F.15
SPEAKER key, E.3
Speed-dial keys, C.3
Station keys, C.2
Station options, C.4
Station audibles, C.5
Ring tone, C.5
Ring volum e, C.5
Supervised transfer, E.7, E.8
Transferring an internal call, E.8
Twinning, D.11
Un-delete. See Message Recycle Bin
Urgent me s sage s , D. 10 , D.1 3
User programming
Exit ing pro gramming mode, C . 1
Programmable feature keys, C.2
Select personal greeting, C.2
VIP Softphone, F.1 8
Virtual A n sw er Ke y s, F.17
Virtual Mailbox Key, D.7, D.12
Voice mail
VOICE MAIL key, D. 1
Voice mail programming
Cascade notification mailboxes, D.16–D.17
Volume/scroll keys, E.3
www.esi-estech.com
 Loading...