

Page 1

Quick-Reference
User’ s Guide
0450-0630
Rev. B
Page 2

Contents
Introduction................................................................................................................................................... 1
VIP: A n ove rvie w...........................................................................................................................................2
Setting up VIP................................................................................................................................................ 6
Using VIP.....................................................................................................................................................13
VIP Call Control window: Quick overview ...................................................................................................................................................13
Unified messaging.........................................................................................................................................................................................15
Saving voice messages as .WAV files.........................................................................................................................................................17
Contact management....................................................................................................................................................................................18
Basic call commands....................................................................................................................................................................................19
Call activity folders in Outlook.......................................................................................................................................................................20
Station programming in VIP......................................................................................................................... 21
Customization............................................................................................................................................. 22
Customizing the Call Window command buttons......................................................................................................................................22
Customizing the VIP toolbar.........................................................................................................................................................................22
Troubleshooting .......................................................................................................................................... 23
Index
About ESI
ESI (Estech Systems, Inc.) is a privately held corporation based in Plano, Texas. Founded in 1987, ESI
designs and builds innovative telecommunications products for businesses like yours. Because of their
pow erful c ombi nation of value and features, E SI pro ducts are consistently recognized by in dustr y
publications and leaders.
Visit ESI on the Web at www.esi-estech.com.
Copyright © 2004 ESI (Estech Systems, Inc.). IVX is a registered trademark, and VIP (Visually Integrated Phone) is a trademark, of
ESI. Microsoft, Windows, NT, and Outlook are registered trademarks of Microsoft Corporation. Intel and Pentium are regis ter ed
trademarks of Intel Corporation. Information contained herein is subject to change without notice. Some features described herein
may not be available at initial product release. ESI products are protected by U.S. Patents No. 6,067,349 and 6,252,944, and
others pending. ESI is an ISO 9001:2000-certified company.
Page 3

VIP Quick -R e ference User’s Guide Introduction
Introduction
Combining the ad vanced cap ab ilit ies o f your ES I phone system with the pow er o f Microsoft
VIP (Visually Integrated Phone)
™
from ESI pro vides advanced call and message handling for today’s
busi ne ss customer s. VIP takes Outlook’s powerful applications and adds the missing critical application:
control of your telephone and voice mail. VIP lets you intelligently do the follow ing, and mo re :
• Manage your telephone calls — Handle incoming and outgoing calls to your stat ion
with various ESI syst e m feat ures.
• Man age you r voic e mail — View your voice and e-ma il mes s ages , live call recordings, and personal
memos i n one Outlook Inbox; prioritize each message by importance; and select for playback voice
mail messages, in any order. You also can resto re dele te d voice ma il mess ages .
• Manage your contacts — Keep your cont ac ts in a ce nt r al loca tion, including Outlook Contacts,
Station List, Company Speed-Dial List, Remote Location List, a nd the VIP Quick Call L ist.
• Log all your inbound and outbound calls — View and print a history of your station’s call activity.
• Program your phone from y o u r PC.
®
Outlook®,
1
, in conjunction
1
Your phone. In this and other ESI user documentation, we will use the term phone and station interchangably. To be precise,
station doesn’t necessarily mean the same as phone, but it’s easier to understand the concept that way.
1
Page 4
VIP: An overview VIP Quic k -Referen c e User’s Guide
p
VIP: An overview
Note: This section gives you a high-level overview of VIP’s features. For greater detail, refer to the
individual feature descriptions in the VIP Setup and User’s Guide (ESI #0450-0513).
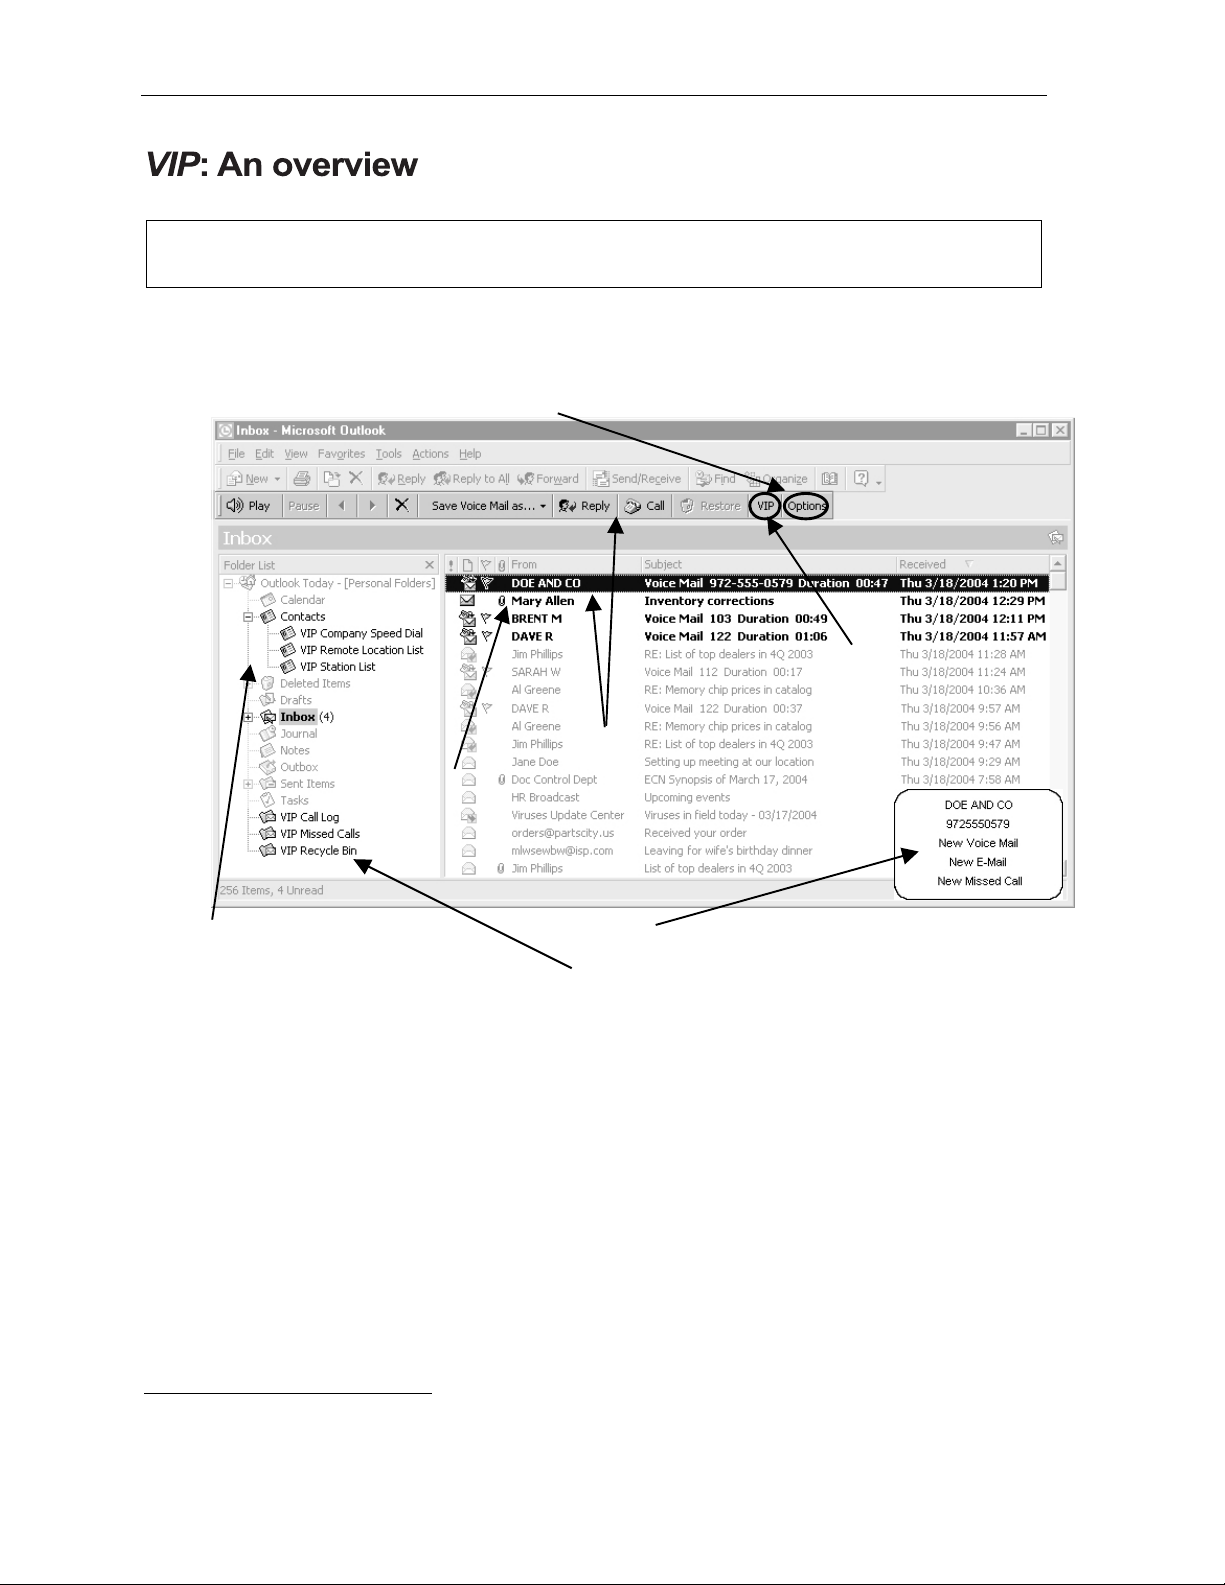
You access VIP’s fe atures through th e familiar Outlook in terface. This gives you a quick and convenient
way to manage your ca lls and con tacts, along with the Outlook features with which you’re already
familiar. The following illustration describes VIP’s features:
1. Options button, which sets VIP configuration and preferences
4. VIP button,
which launches
the Call Window
3. New e-mail
2. New voice m ai l
and VI P toolbar
5. Contacts, including
eed dial lists
s
6. Mini-alert
7. Call activity folders
1. The Options button on the toolbar launches a separate window where you must configure VIP with
your station (e xtension) number, mailbox password, the NSP IP Address , and por t numbe r.
1
You’ll
be prompted to select t he Options button when first installing VIP. You can also access other
standard Outlook options from this button.
2. In the Outlook Inbox shown above, a new voice mail ap pears in the list, along with the name and
number informa tion (C a ller ID2), message duration, and date.
Because the mess age is highlighted, the VIP toolbar is active, letting you Play, Delete, and Save
the voice mail. You can playback the mes s age th roug h the spe ak er (or hands e t , if it’s off-hook) of
the ESI 48-Key Fea tu re Phone assoc iated with the voice mailbox.
You also can return the person’s call (if the Caller ID data is available).
The VIP Advantage: You can view all your messages at once and choose which ones to play.
1
For network information, contact your ESI Reseller or System Administrator.
2
If you have subscribed to Caller ID service from your telephone service provider.
2
Page 5
VIP Quick -R e ference Use r’s Guid e VIP: An overview
3. E-mails will app ear in the Inbox, as they norma lly do.
The VIP advantag e: Now, both E-mails and voice ma ils appea r in
a single location fo r more efficient handling .
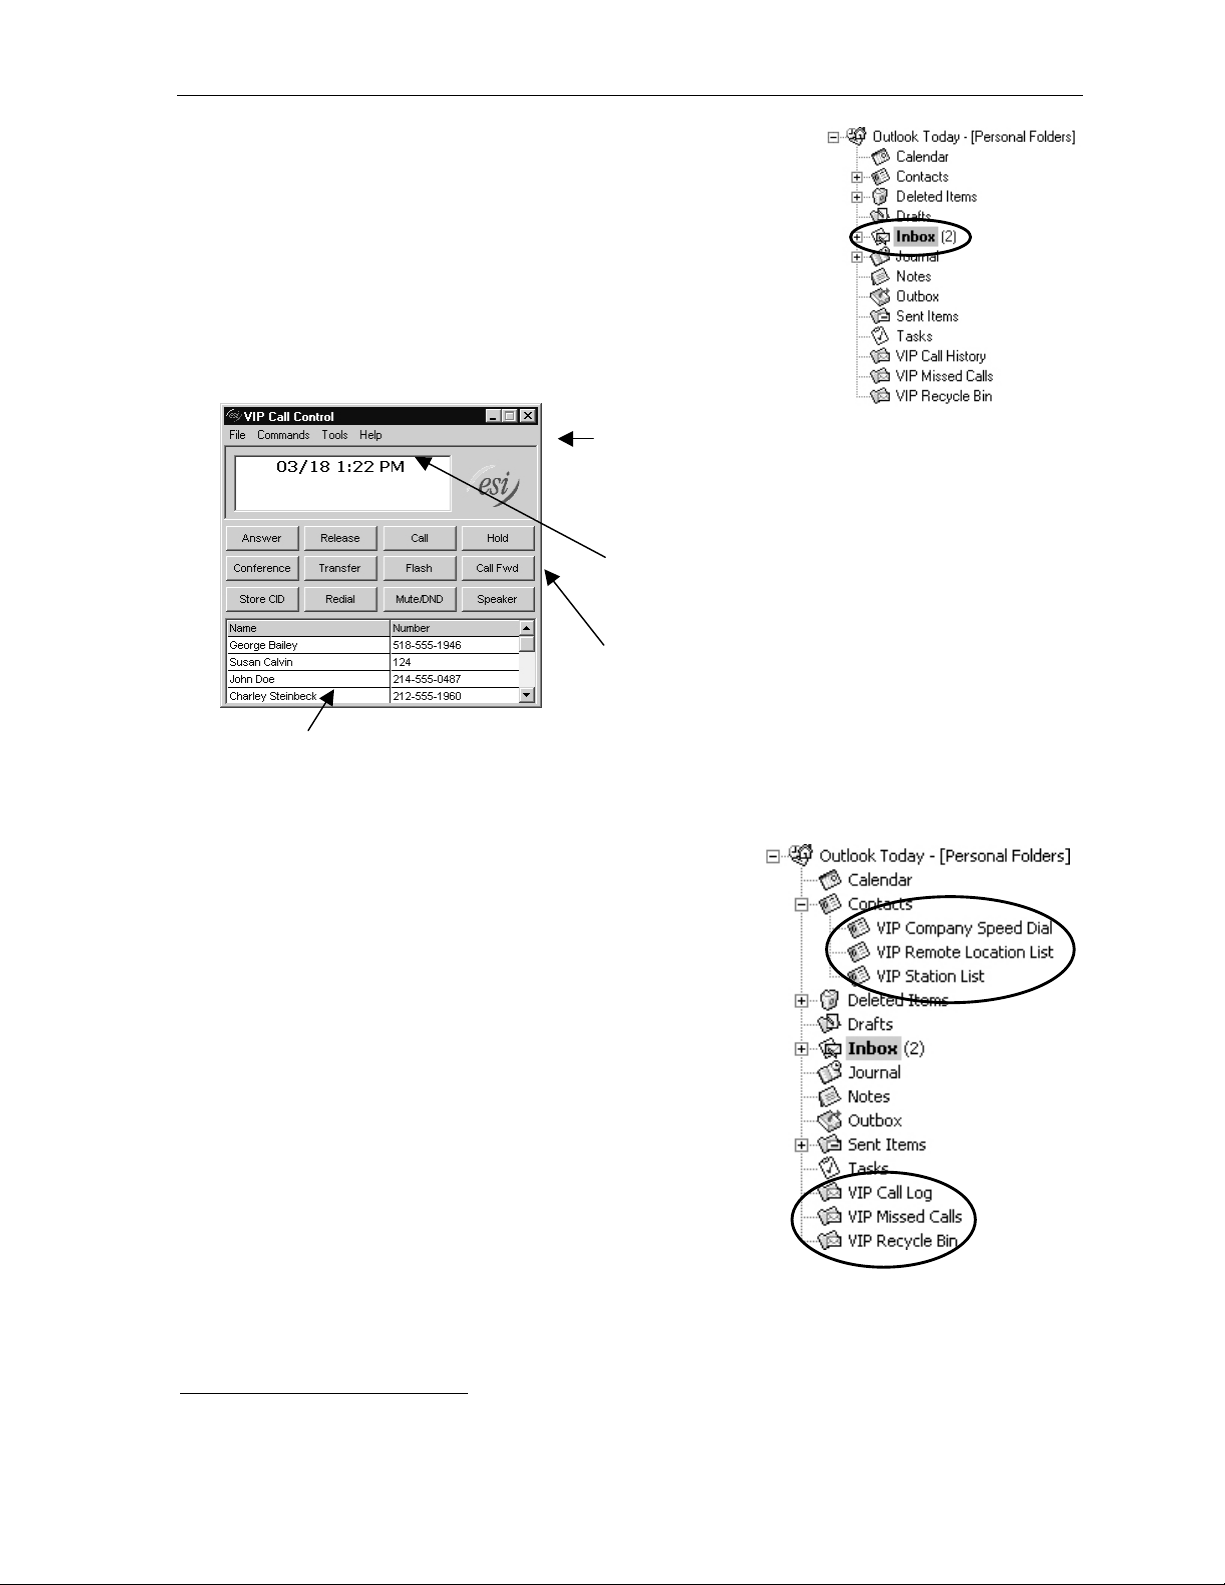
4. The VIP button on the toolbar launches the Call Window (shown
below). You use this window to make inbound and outbound calls,
and to access other common call-handling features you normally
use on your ESI phone.
The illustration below shows a typical Call Window feature
configuration, such as after first installing VIP on your computer.
The me nu bar contains the remaining call-handling
features (under Commands) that aren’t displayed on
command buttons. You’ll also find user help and user
phon e pro gr am ming, along wi t h ot her custom ization
options, under Tools on the me nu bar .
The two-line call s tatus display shows a variety of states,
such as: date and time (when your station is idle/on-hook);
Caller ID; call forward, etc. It also changes to a data entry
field so you can type in a phone numbe r to call.
The call command but ton area shows up to 12 buttons,
eight of whic h you can remove and/or replac e with ot her
call features. The four remaining buttons (top row) are
permanent and can’t be removed or replaced.
The VIP Quick Call lis t is a list of names you add by dragging-and-dropping names from your Outlook
Contacts and speed-dial lists. Once the list is populated, you can scroll through the alphabetical VIP contact
list, highlight the name, and double-click to place a call to that person.
The VIP advantag e: Call-handling is a mouse-click away.
5. The Contacts fold er inc lu des Outlook Contacts and up to
thr ee diff erent VIP lists: Company Speed Dia l, Re mo te Loca t ion
List, and Station List. The lists will automatically populate the
first time you install VIP. The Outlook Contacts folder remains
the same, conta in ing a lis t of pers ona l con t a cts. In addition,
VIP provid es you with up to three different speed-dial lists:
• Company Speed-Dial — All system speed-dials
(600-699 numbers) on the system.
• Remote Location List — All location numbers on
the s ystem.
2
1
• Station List — All stations (extensions) on the system.
The VIP advantag e: having a list of personal contacts,
employee contacts, pre-programmed speed-dial numbers,
and location numbers in one place in your Outlook menu.
1
Available only if either the Installer or the System Administrator has set up a System Dex.
2
Available only if your system is using Esi-Link. For more information, consult your System Administrator.
3
Page 6
VIP: An overview VIP Quic k -Referen c e User’s Guide
6. The mini-alert is a small “bubb le” that appears in the lower right-han d
corner of your screen to provide you with a variety of information.
You can perform the following actions when the mini-alert appears:
• Incoming call — Click the Caller ID informa tion. Th is takes you
to the Call Window, where you can handle the call.
• New voice mails messages or e-mails — Click New E-mail
or New Voice Mail. T his takes yo u to the Outlook In b ox,
where you can view your mess ages .
• Missed calls — Click New Missed Call . This takes you to the VIP Missed Calls fo l d er in
Outlook, wher e yo u can view a list of those calls.
The VIP advantag e: Without having to take yo ur eyes o f f you r work on-screen, you can make a
quick decision whether to (a.) pick up the call or (b .) kee p wor k ing and let the ca ller be t ransferred
automatically to you r voice ma ilbox.
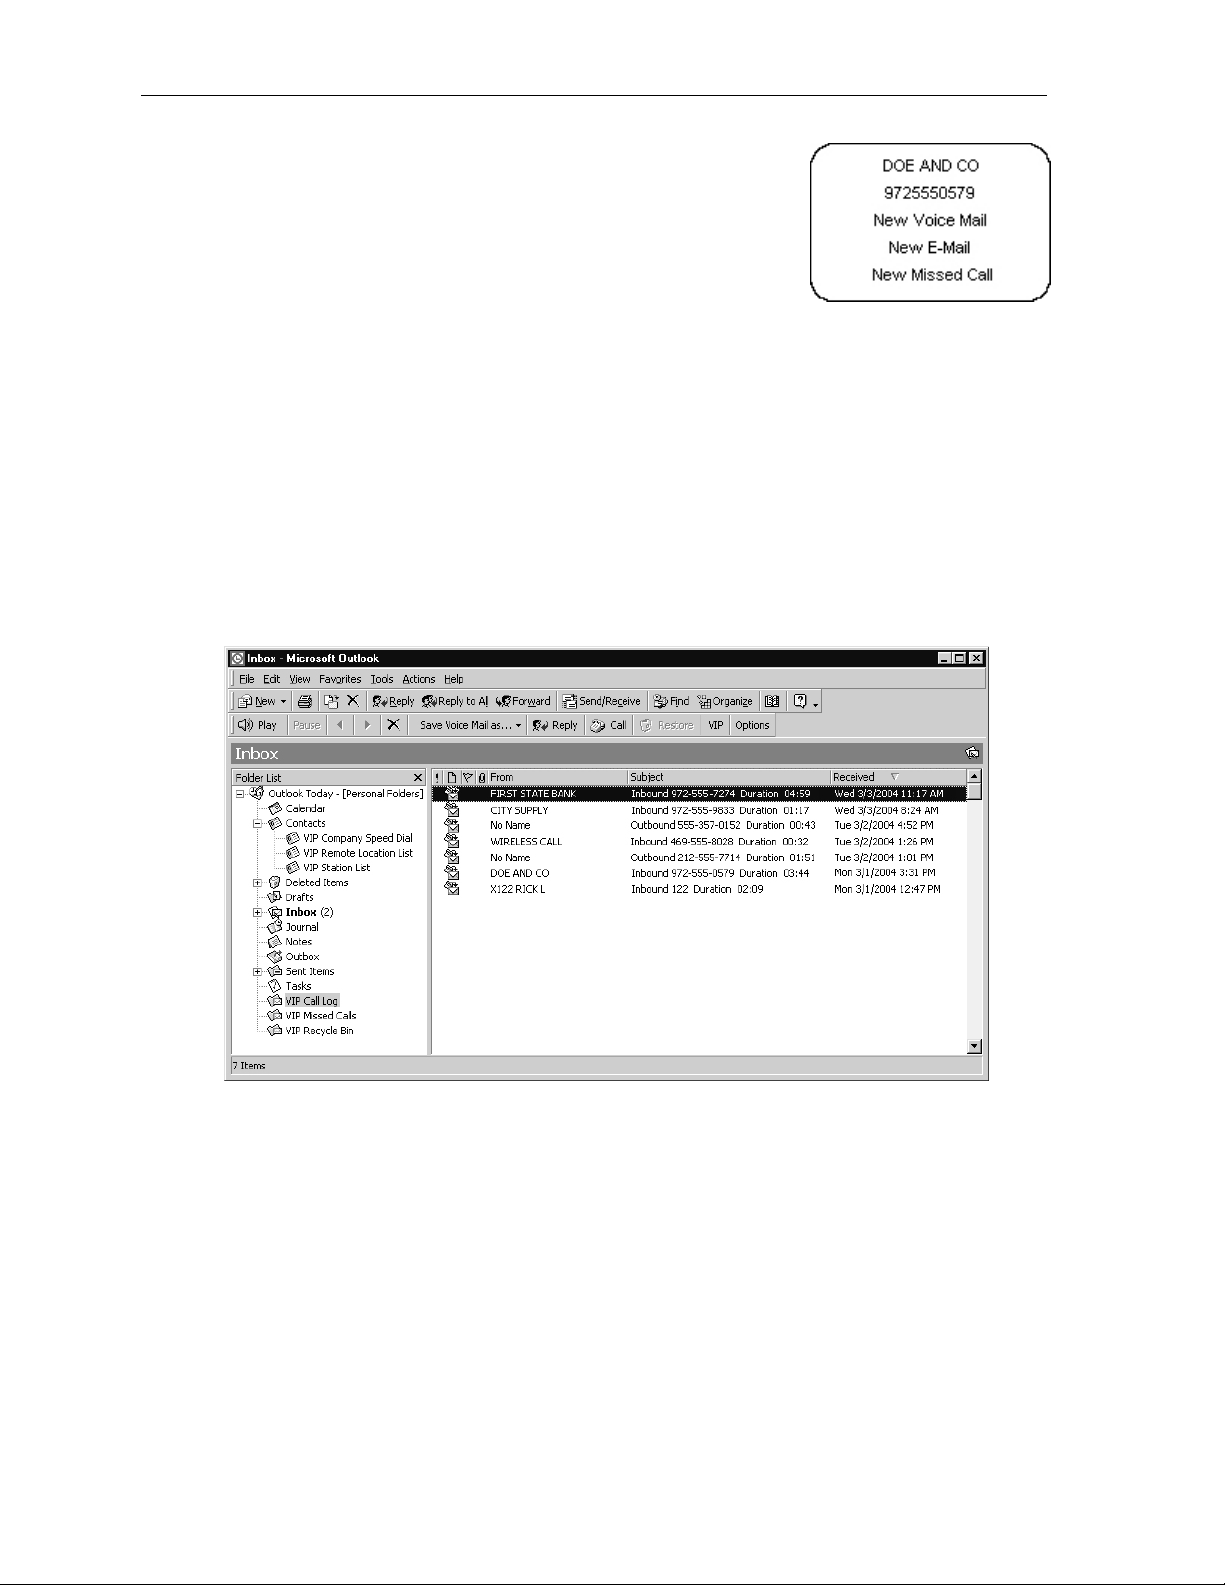
7. The Call Log, Missed Calls, and Recycle Bin folders , all of which automatically populate, require
no mainte nanc e, and contain speci fic inform ation:
(a.) Call Log (shown below) contains a viewable and printable list of incoming, ou tgoing, an d
tra nsfer red calls associated with your sta tion. You can also plac e an outbound call if the call
record provides Caller ID data.
(b.) Missed Calls contains an ongoing list of missed ca lls from yo ur sta t ion . You can place an
outbound call if the sp ec ific m iss ed -c a ll reco rd provides Caller ID data.
(c.) The Recycle Bin contains the last 10 voice mail messages that you deleted. You can play a
deleted message from the Recycle Bin or restore it to your Inbox. As with Call History and
Missed Calls, you can place an outbound call fro m the Recycle Bin if the record provides
Caller ID data.
4
Page 7

VIP Quick -R e ference Use r’s Guid e VIP: An overview
Overview example: Using VIP
Note: Phone system features mentioned below are explained in detail later on in this manual, as well as in
your ESI phone system’s specific documentation. Visit www.esiusers.com for more information.
The first time you open Outlook after you install VIP, you’ll be prompted to click the Options button on
the VIP toolbar to configure VIP. Once you’ve done so , click the VIP button on the same toolbar to
launch the Call Window, so you can make or receive calls.
Let’s say that a ca ll co mes in. When your phone rings, the Call Window and mini-alert show Caller ID
informat ion. You can h andle the incoming call i n s everal ways s uch as: answerin g the call (ANSWER);
using a virtual answer greeting (VIRTUAL ANSWER 1); or letting the phone ring and let the caller leave
a message in your voice mailbox. Y ou can use even more options — for example, listening to the caller
while he lea ves a message (MESSAGE MONITOR). If the caller leaves a message, you can select it by
loo king in your Ou tlook Inbox, h ighligh t ing the mess age, and then c licking PLAY on the VIP toolbar (you
also can just doub le-c lic k the mes s age) . While you’re in the Inbox, of course, you can also read any
new e-mails.
But what if the caller hears your greeting and decides not to leave a message? This would be a missed
call, which you can view in the Missed Calls fold er .
Throughout the day, you can handle your inco ming ca lls with the Call Window. You also can use
different command but tons to place outgoing calls.
Finally, let’s say it’s now time to leave work, and you want to set your mailbox to play a different greeting
because you’ll be out of tow n the next day. Just access us er progr a mmin g unde r Tools in the Call
Window . Unde r the Pers onal Greet i ngs tab, you see that greeting 2 is recorded (and you know it’s the
one needed to allow message notification to your cell phone), so you select it. Then, switch to the
External Message Notification tab and ensure that delivery to your cell phone is chosen, enter the
appropriate cell phone number, and click A pply to update your phone. Your phone is now set to handle
calls while you’re out of the office.
This is only a small example of what VIP can d o. However, you can see that VIP’s various elements
work together to ma ximize the usa bility and efficien cy of both yo ur ESI phone system and Outlook.
5
Page 8

Setting up VIP VIP Qui c k -Referen c e User’s Guid e
Setting up VIP
To install and configure VIP correctly, complete all of the following four s teps (e xp lained in detail
beginning below). Failure to do so may result in VIP’s not functioning properly.
1. Observe minimum ESI hardware and computer software requirements.
2. Install the VIP software.
3. Configure station and network op tions.
4. Set up Outlook dialing options and properties.
Step 1: Observe minimum ESI hardware
and computer software requirements
ESI hardware requirements
• One of the follow ing ES I phone systems, with installed Netw o rk Services Processor (NSP)
– IVX X-Class
– IVX E-Class
– IVX S-Class
• ESI Digital or [local] IP 48-Key Feature Phone
2
2
3
at the extension
1
:
Computer system requirements
Software
•
One of the follow ing opera t ing syst e ms:
– Windows
– Windows NT
• Microsoft Outlook 2000, 2002, or 2003.
Hardware
Intel® Pentium® II 400 MHz proces sor or bette r
•
• 128 MB of RAM
• 15 MB of hard dri ve free sp ace :
– 12 MB for installed so ftw a re
– 3 MB for temporary setup files
®
98, 2000, ME, or XP
®
4 with S er vice Pack 6 (w orkstati on only)
1
IVX X-Class has a built-in NSP.
2
Generation II systems only.
3
Currently, VIP doesn’t support Remote IP Feature Phones.
6
Page 9

VIP Quick -R e ference Use r’s Guid e Setting up VIP
Step 2: Install the VIP software
The ESI Reseller or System Administrator must enable your voice mailbox for VIP. If you aren’t sure if
your voice mailbox is enabled for VIP, please co ntact your Sy s tem Administrator.
Important: If you have a previous version of VIP on your system, uninstall it before installing this version.1
If you’re installing VI P on Windows NT, 2000, or XP, you must have Windows Administrator log-in
privileges before continuing. Consult your (phone) System Administrator if necessary.
Obtaining the VIP installer software fr om the W eb
ESI makes the VIP installer software available both on a CD-ROM and as a free download from ESI’s
User’s Guide We b si te .
2
If you get the CD-ROM, proceed to “T o insta ll VIP” (below). However, if you are
working with th e Web download, pleas e follow th ese inst ruct ions first.
1. Point your Web browser to www.esiusers.com/downloads. This will ta ke you to the “Dow nloadables”
page on ESI’s special Web site for users of its products.
2. Click the link for VIP software. Thi s i s a self-expanding archive file, VIP.exe. When your Web
browser a s ks whether you want to open or save the file, select save and pick a location on y our
PC where you can find the file again in subsequent steps.
3
3. Open Windows Explorer and navigate to the location where you saved VIP.exe in step 2.
Depending on your “Folders” settings in Windows , the file will appear as either “VIP” or “VIP. exe.”
3
4. Double-click VIP.exe to expand the needed files. One of them, Setup.exe,
is the VIP installer file .
To install VIP
1. Close Outlook — including any open messages, reminders, or other Outlook items, even if they
appear in separate windows.
2. If you haven’t done so already, assign a pas s w ord at you r phon e: pres s PROGRAM 5 1 and follow
the prompt instructions to set a password.
3. Access the CD or directory that contains the VIP installe r file, Setup.exe.
4. Double-click the VIP Insta ller file . This will cause the VIP Setup Wizard to appea r.
5. Follow the inst a llat ion ins truc tions disp laye d by the VIP Setup Wizard.
6. When the installation is complete, launch Outlook.
7. If this is the first time VIP has been installed on this PC, you will be prompted to select the VIP tab in
the Options window. Proceed to “Step 3: Configure station and network o ptions” (page 8).
To uninstal l V IP
1. Close Outlook — including any open messages, reminders, or other Outlook items, even if they
appear in separate windows.
2. Select Settings from the Windows Start menu.
3. Select Control Panel and double-click Add/Remove Programs.
4. Choose VIP.
5. Select Remove VIP and click Finish.
6. When prompted to confirm removal, click Yes.
1
This will not erase your settings, contacts, logs, etc.; they will reappear when you install the current version of VIP.
2
Your ESI phone system must be properly licensed before VIP will work with it. For more information about system licensing,
consult your Syste m Administrator o r ESI Reseller.
3
The “.exe” extender may not appear in some cases, depend i n g o n your Windows Folders settings in Explorer.
7
Page 10

Setting up VIP VIP Qui c k -Referen c e User’s Guid e
Step 3: Configure station and network options
This section contains configuration instructions — such as updating your extension and password
settings and entering network settings. If you’re installing VIP on your PC for th e first time, you’ll need
the following infor mation:
1. The location of the VIP program inst a ller file :
2. Your extension number:
3. Your voice mail password:
4. The NSP IP address:
. . .
5. P ort num ber prefix:
Set voice mail delivery
The configuration window will appear if this
is th e first time anyon e has in s talled VIP on
this PC. You also can manually launch the
configu ration window by clicking Options on
the VIP toolbar (or selec t Options from the
Tools menu ) and th en se lecting the VIP ta b
(see right).
1. Make sure that, under Delivery Opt io n,
Local is selected.
(Default: Local.)
2. Click Apply to make the other
necessary setup changes — or click
OK if you’re done.
(Continued)
1
1
For information on remote delivery, see “Advanced options” in the VIP Setup and User’s Guide (ESI #0450-0513).
8
Page 11

VIP Quick -R e ference Use r’s Guid e Setting up VIP
Set extension op tions
The ex tension and password y ou use for VIP must match your phone system extension and voice mail
passw ord. Th e con figur ation window should aut o matica ll y appe ar if th is is the firs t time inst alling VIP on
this PC. You can also can man ually launc h the configuration window by clicking Options on the VIP
toolbar (or se lec t Options from the T ools menu), then selecting the VIP tab.
To change your VIP e xt ensi o n
and password:
1. Click Extension Options. The VIP
Extension Options window appears.
2. E nter y our ext ensi on numb er and
current voice mailbox password in
the appropriate fields . Then c lick OK.
3. When the VIP configuration window
appears, click Apply to make more
changes — or clic k OK if you’re done.
Notes: If you use the phone to change
your mailbox password, you
must update your VIP settings
under Options.
If you’re not inst a lling VIP for
the first time and you change
your password via VIP user
progr am m i ng, you don’t have to
update Extension Options.
Set network opti ons
Contact your ESI Reseller or your System
Administrator if you’re unsure of your
network option information.
To set network options:
1. Click Network Options. The VIP
Network Options window appears.
2. Enter th e netw o rk info rmati o n for each
field. Then, click OK.
3. When the VIP configuration window appears ,
click Apply to make more changes — or
click OK if you’re done.
9
Page 12

Setting up VIP VIP Qui c k -Referen c e User’s Guid e
Step 4: Set up Outlook dialing options and properties
You will need to set up Outlook dialing rules in order to make calls from Outlook (or the VIP Quick Call
list in the Call Window ).
1. Click t he VIP button located on the VIP toolbar. You will see a progress bar while the PC retrieves
call proc essing data from the ESI phone sy stem. VIP software has now been initialized and a new
dialing line has been added to your PC.
2. Go to you r Outlook contacts folder.
Hig hlight any c ontact with a p hone num ber,
right-click, and select Call Contact.
The New Call dialog box will appear.
3. There are two items to set from the
New Call dialog b ox:
Dialing Options (below) and
Dialing Properties (page 11).
Dialing Options
1. In the New Call dialog box, cl ick Dialing
Options. The Dialing Options box
will appear.
2. At the bottom of the Dialing Options box,
there is a pull-down list under Connect
using line. Scroll through the list and
select ESI VSP IP Line, as shown.
3. Click OK.
10
Page 13

VIP Quick -R e ference Use r’s Guid e Setting up VIP
Dialing Pr ope r tie s
1. In the New Call dial og box ( s ee page 10) , click Dialing Properties. The Phone and Modem
Options dialog box will appear.
Note: Outlook 98 and Outlook 2000 have different views when openin g Di al i ng Properties. If using
Outlook 98, you will be ta ken directly to the My Loca t i ons tab, which is similar to the second
picture (below right).
2. If there are no loca t ions lis ted in the P hone and Modem Options dialog box, click New.
Otherwise, high light the loc ation listed and click Edit.
3. Next, enter the your location’s are a code.
4. E nter the out side li ne access number. This number is the same access code (9 is th e most
common) you use if dialing from the phone.
Notice that a sa mp le appe ars, to show you how a numb er will be dialed from Outlook. If this sample
doesn’t accurately represent how a number should be dialed, go back through the Outlook dialing
rules setup to ensure you’ve made all the appropriate selections. (If necessary, consult Outlook’s
on-line help, under Hel p in the Outlook menu bar.)
(Continued)
11
Page 14

Setting up VIP VIP Qui c k -Referen c e User’s Guid e
5. Now click t he Area Code Di aling Rules tab.
6. Click New to add area codes for your region/area.
Example: If you live in the are a of Da llas/Fort Worth,
T exas, you’ll want to add all the area codes
(at press time: 214, 469, 817, and 972)
within your region/area. Many cities or
areas will have only one area code.
7. To include the area when dialing, be sure to check
the appro pr iate box.
You are now finished. Click OK or Apply until no more
dialog boxes appear. (If given the choice between OK
and Apply, click Apply.)
12
Page 15

VIP Quick -R e ference Use r’s Guid e Using VIP
Using VIP
VIP Call Control window: Quick overview
The VIP Call Control window1 lets you perform most call-handling functions from your PC and can be
accessed from the VIP toolbar.
The VIP Call Control window (shown in id le mode , below) has four main component s :
• Menu bar — Giv es you acc ess to al l avai lable call
commands and use r he lp.
• Display — A three-line call stat us display si mil ar to
the phone’s display.
• Call-command buttons — Per form desired
call-handling functions.
• VIP Quick C all list — Includes an unlimited number
of contacts, listed alphabetically for easy call access.
Handling an inc om i ng cal l
You can be notifie d in several ways when a call ring s to y our extension:
• The VIP Call Control window moves to the fron t of your oth er
PC applications. Upon the first ring, you’ll see Caller ID information in
the displ ay.
• A mini-alert (shown, right) pops up in the lower right-hand corner
of your PC screen, in front of your other PC applications.
• As always, your phone still rings!
Note: Y ou can customize these options (see “Customization,” page 22).
(Continued)
1
Often called just “Call Window” in much of this document.
13
Page 16

Using VIP VIP Quick -Referen c e User’s Guide
Once you’re presented with an incoming ca ll, you can answer by lifting you r phone’s handset or by
clicking the VIP Call Control window’s Answer button (in the latter case , the audio will co me through
on your speakerphone). You also can click Speaker to answer on your speakerphone.
To hang up, click Release or hang up the handset. The VIP screen will return to its nor ma l idle display.
Incoming calls from . . .
. . . an extension.
. . .an outside line
(CO call).
Note: For all other ways to handle an incoming call, see “Advanced options” in the VIP Setup and User’s
Guide (ESI #0450-0513).
Placing an outb ound ca ll
You can generate an outbound call in several ways. The easiest way is just typing an extension or
number directly int o the display:
1. Put the cursor in the middle of the display.
2. Type in the desired extension or phone number
phone’s speaker, you’ll hear the phone dialing the number.
3. Once the call conn ec ts , pic k up the hands et to begin a conversa tion. Procee d normally with the call.
4. When th e c onve rsation i s over, click Release.
Note: Y ou can pick up the handset at any time, if you prefer not to have any sound come through the speaker.
If you call a number that’s answered by an automated attendant, you can enter required numbers (such
as an accou nt number; se e the exampl e below) from the PC keyboar d. For you to do so, the VIP Call
Window must be “on top of” all other running applications.
Example: Y ou’re typing in a Word document while VIP is dialing your bank. The bank’s automated attendant
answers and prompt s you to e n ter you r acco unt number. Any number you type on the keyboard will
be entered in the Word document rather than in the Call Window, because Word is “on top.” To
enter the number from the Call Window, click on it (if necessary , click on its box in the Windows
taskbar, usually found on the bottom of the Windows screen).
1
2
, and then press Enter on your keyboard. On the
1
Other available methods, described in the “Advanced options” section of the VIP Setup and User’s Guide (ESI #0450-0513),
involve using:
— The VIP Quick Call list.
— Speed-dial lists and Outlook Contacts.
— Voice mails and Call Log records.
2
If necessary, include a line access code (such as “9”) at the beginning of an outgoing call’s phone number.
14
Page 17

VIP Quick -R e ference Use r’s Guid e Using VIP
Unified messaging
When y ou open Outlook, VIP synchronizes with your voice mailbox on the phone system.
For example, new mes s ages (including voice ma il mess ages , li ve ca ll record ings, and personal memos )
left in your voice ma ilbox will appear as new voic e ma il n ot ifica t ions in you r Outlook Inbox.
Quick overview
• Each message notification header displays name and number information (Caller ID)
duration, date and t ime .
• A header shown in boldface indicates a new mes s age . Mess ages can be played in any order by
clicki ng the e-mail and then on Play; the message will be played through the spe ake r (o r, if it’s of fhook, the handse t) of th e E SI Feature Phone associated with the voice mailbox.
• After a mess age is playe d via VIP, your Fea ture Phone r emains connected to voice ma il for se vera l
seconds to allow you to ma nipulate the voice message from the phone. You can save, delete , or
move the message from your Feature Phone or yo ur VIP t oo lbar. If the message is neither saved nor
deleted, it is treate d as new. The last 10 deleted messages are moved to the VIP Recycle Bin (for
more information on the Recycle Bin, see page 20).
• If you need to place a call wh ile the phone is still connec ted to voice ma il, eith er (a .) c lick Release or
(b.) pick up the hands e t and the n hang up.
1
, message
1
If you have subscribed to Caller ID service from your telephone service provider.
15
Page 18

Using VIP VIP Quick -Referen c e User’s Guide
Using the toolba r
The VIP toolbar lets you eas ily manag e and prioritize voice ma il mess ages with familiar buttons . You
can customize the toolbar to display only the buttons you want (see “Customization,” page 22).
If a button is “grayed-out,” its function is unavailable. For example, the Reply button is accessible when
a selected voice ma il mess age is left by another sta t ion ( i.e. , an inside caller), but “grayed out” when a
message is left by an outside caller.
When a new voice message is left in your voice mailbox, you will see a new heading displayed in your
Outlook Inbox.
Toolbar r e fer ence guide
Button Name Function
Play
Stop
Plays the selected voice mail on your ESI Feature Phone’s speaker. (You can also play a
message by double-clicking the message as listed in the Outlook Inbox.) For privacy, pick up
the handset.
Stops a currently playing voice mail message. This button is available after pressing Play.
(You can also stop a voice mail message by hanging up or pressing SPEAKER on your
ESI Feature Phone.)
End Ends a call. Same function as hanging up. This button is available after pressing Call.
Pause Pauses a currently playing voice mail message.
Rewind Rewinds the currently playing voice mail message by four seconds.
Fast
Forward
Delete
Save Voice
Mail as...
Reply
Call
Restore
VIP
Options
Advances the currently playing voice mail message by four seconds.
Deletes the selected voice mail message notification. The message notification moves to
the VIP Recycle Bin folder in Outlook. You can restore up to the last 10 deleted messages.
Saves the selected voice mail message as “new” or “old” in your voice mailbox, or as a
.WAV file on the PC. The notification line for a new voice mail message is bold-faced.
Sends a voice-mail reply to the voice mailbox of the person who sent the message. You’ll
hear the originator’s greeting on the speaker of your phone (or pickup the handset). Leave
a reply message, and then either press SPEAKER or hang up. (Can only be used for
station-to-statio n calls.)
Initiates a callback to the inside or outside voice mail originator.
End.
Restores a deleted voice mail message as a saved (old) message. To restore a message
from the VIP Recycle Bin, highlight the message and press Restore. The message
notification moves to your Inbox with a status of Saved (old). The status is also reflected on
your phone’s display .
Displays the VIP Call Control w indow, from which the user can initiate an outbound call,
set up a conference, and perform many other call-handling features — entirely from the PC.
Displays the Outlook Options window. Click the VIP tab to display configuration options. You
can : customize the toolbar; confi gure extens ion, network, and delivery options; and set the email address for remote delivery of messages.
1
To end the call, press
1
Caller ID service is required for this feature to operate on outside calls.
16
Page 19

VIP Quick -R e ference Use r’s Guid e Using VIP
Saving voice messages as .WAV files
1. Highlight the desired voice mail mess age and click the Save Voice Mail as… button; t hen sel ec t
WAV File.
2. A VIP Message Manager status box (show n,
right) will appear to show the progress of the
voice mail message being converted into a
.WAV file. This is also the on ly oppo r tun ity you
have to cancel this archiving operation —
i.e., by clickin g Cancel.
3. You’ll know that VIP has completed the
archiving operation when the Open button is active (not “grayed-out,” as above) — or if the VIP
Message Manager status box closes when you select it.
You can now play the voice mail with Window Media Player
retr i eve th e file to att ach to an e- m ail.
1. If the VIP Message Manager status box is still open , you can c lick
Open to pla y the .WA V file with Wi ndows Media Player. You ca n also
click Messages to view all of your .WAV files (shown, right).
1
; you also can
Note: The fol der shown here — c:\Program Files\VIP\Messages
— is where VIP stores . WAV files.
2. Select a .WAV file. Right-click on it to see a pop-up menu .
3. Select Send T o, then Mail Recipient (shown, right). This will
resu lt in an Outlo o k e-mail message with the .WAV file already
attached. Y ou may wish to type in some more information
before sending the e-mail message — for example: “Hi, John.
I’ve att ached this voice ma il messag e so you ca n he ar this
customer’s comments.”
Note: VIP saves each .WAV file as a normal PC file, so you
also can copy and paste a .WAV file (from Windows
Explorer or even anoth er Outlook e-mail message) into
an e-mail m essage, as well as attach it fr om th e
c:\Pro gr am Files\V IP\Messag es folder [see step 1].
Notes:
The system can archive (save-as-. WAV) only one voice mail message at a ti me. If the syste m is busy with
this when you attempt to archive a message, you’ll receive a notification to retry the archiving operation.
A one-minute voice mail message takes approximately three minutes to archive.
Archiving voice mail messages from a remote (Esi-Link) location is not supported.
1
Or your PC’s other WAV-playing software, such as iT unes, WinAMP, or QuickTime — although we refer only to Windows Media
Player in this discussion.
17
Page 20

Using VIP VIP Quick -Referen c e User’s Guide
Contact management
The term c onta c t management re fers to h o w VIP groups and moves conta cts so the y are more easily
accessible to the user. VIP keeps contacts in several p laces:
• VIP Quick Ca ll lis t (attached to the Call Window) .
• Outlook Cont ac t s .
• Speed-dial lists — Company Speed Dial, Remote Location List, and Station List; these appear as
subfolders in the Outlook Contacts folder ( s ee “Con tacts su bfolders,” p. 18).
• Any voice mail message, call log records, or missed call records with Caller ID.
Contacts subfolders
The ESI phone sys tem p ro vides you with up to three diff eren t spee d-d ial lists in the form of sub folders in
Outlook Conta cts:
• Station List — All the stations (extens ions ) on the s yste m.
• Company Speed DIal — All the syste m-speed -d ials (600-699 numbers) on the system.
• Remote Location List — All the location numbers on the system.
Important: Don’t move or rename any of these three VIP speed-dial lists. If you do, the moved or renamed
list will no longer synch ron ize w ith the p ho ne s yste m.
2
1
These lists can’ t be ed ited . Each t ime you laun ch VIP, it retrieves upda ted lists from the phone sys te m.
To build information about an employee , simply dra g and drop that p erson’s ext ensio n from the Station
List into the regular Outlook Contacts folder. Here’s how:
1. Open the Sta tion List subfolder.
2. Highlight the desired name/contact and hold down the left mouse button.
3. Drag the name into the Contacts folder and, then, releas e the mouse button.
4. Open the Contacts fo lde r. You’ ll see th at th e st ation has been added to your reg u lar Contacts
page. Now you can add in forma t ion about this contact to its details page.
Use this same proced ure fo r the Company Spee d Dial list and Remote Loc ation List, as well as voice
mails and call log records.
Adding contacts to the Quick Call list
The VIP Quick Call lis t is loca ted in th e Ca ll Window .
To add contacts to the VIP list:
1. Open the Outlook Contacts folde r (o r a speed -d ial lis t s ubfolder).
2. Highlight any entry (including the speed-dial lists) in the opened folder and hold down the left
mouse button.
3. Drag the co ntact into the VIP list box; th en , release the mouse button.
If you have more than one phone nu mbe r for the con tac t you will be aske d to choos e a single
phone number to disp lay in t he VIP list. Therefore : if a contact has three phone nu mbe rs and you
want all three phone numbers in the VIP list , you must drag-and-drop that cont a c t three times.
Note: Outlook Contacts and VIP list contacts won’t automatically update each other. For example: if you
edit/ delete a VIP list contact, this won’t ed it/delete it in Outlook Contacts.
1
Available only if either the Installer or the System Administrator has set up a System Dex.
2
Available only if your system is using Esi-Link. For more information, consult your System Administrator.
18
Page 21

VIP Quick -R e ference Use r’s Guid e Using VIP
Calling from the VIP contact list
1. Highlight, and double-click, the desired name in the VIP contact list. VIP will automatically place the
extension or phone nu mber in the display as the phone is d ialing the number .
2. P roceed norm ally wi th the call.
3. Once the conversation is over, click Release (or, in the case of a hands-free conversation, Speaker).
Basic call commands
You can handle a call in a variety of ways, using VIP’s many different call commands. Here is a description
of the most bas ic call co mma nds ( you may a lso w ish to consult “Advanced call co mmands ” in t he VIP
Set up and Us er’s Guide, ESI part #0450-0513).
Notes: The Call Window can display a total of up to 12 call command buttons. Four of the 12 buttons —
Answer, Release, Call, and Hold — can’t be removed; however, you can change the remaining eight
command buttons to suit your own needs (see “Customization”, p.22).
Since there are more commands available than can fit in the Call Window, you can see a list of
availa ble commands by clicking Commands on the Call Wi ndow menu bar.
Answer
Clicking this butto n answ ers the phon e, us ing the spea k erph one . If you wish to have a more pri vate
conversation, just pick up the handset.
Call
Places a call once you have dialed a number by typing it in or clicking on a contact (either in Outlook or
VIP, including the Quick Calls lis t).
Hold, Exclusive Hold
You can plac e a c all on ei ther hold or exc lusi ve hol d. Each puts a call into a standby mode, but here’s
the difference between the two:
• Hold allows anyone on the ESI phone syste m to retr ieve the call. The sys tem iden t ifies held ca lls as
being in numerica lly iden t ified lines — e.g., “Line One,” “Line Four,” etc.
• Exc lusive hold keep s the call only at the station where the user placed the call on hold.
Placing a call on hold
While on an outs ide or Es i-L ink ca ll, c lick Hold to place the call on hold, or click Exc Hold to ma k e the
call available for only you t o pick up.
Retrieving a call from hold
Whi le th e phone is idle, click Hold; this presents you with a list of all currently held calls. To be
reconnected, just click the name (or phone line) you want to take off hold. The same action applies to
ret r iev al of exclusive holds by clicking Exc Hol d .
Note: The name shown in the ho ld lis t is from C a lle r ID. The phone number will be displayed instead if Caller
ID data either is blank, isn’t provided, or says, “UNAVAILABLE” or “UNKNOWN.”
19
Page 22

Using VIP VIP Quick -Referen c e User’s Guide
Release
VIP’s Release command button serves several purposes. If you click it . . .
• . . . When you’re conne c ted to a ca ll throug h t he hands et — It dis conn ec t s the ca ll and gives you
internal dial tone.
• . . . When you’re conne c ted to a ca ll via the spea ke rpho ne — I t disco nne cts t he ca ll.
• . . . During call-waiting — It drops the cur ren t ca ll and automatically conne cts to the waiting call.
Call activity fold ers in Outlook
Important: Don’t move or rename any of these three VIP call activity
folders. If you do, the moved or re na med fo lde r will n o lon ger
synchronize with the phone syst em .
VIP Call Log folder
Call Log is a unique f older w ithi n Outlook that keeps a lis t of basic phone
calls made fro m your extens ion — ou tbou nd , inbound , and transferred.
Here are the rules that VIP uses to determine which types of calls to include
in the Call Log records:
1. Inbound and outbound call records are generated only for calls between
a station and an outside line.
2. The duration of each call record represents the period during which the station controlled its portion
of a call. A record is completed (when the call ends) each time a station does any of the following:
• Disconnects.
• Places a call on hold.
• Transfers a call.
1
3. Periods when calls are on hold, in the auto attendant, leaving/retrieving voice mail or in an ACD
queue are not included in call records.
4. A new record begins when a station answers a call or a hold recall.
5. All stations in a conference generate records independently. If more than one outside line is
involved in a conference, each call record generated by that conference will be associated with only
the last line disconnected.
VIP Missed Calls Folder
The Missed Calls folder is similar to th e Call Log folder, except that Missed Calls includes a list of
only each call which fits bot h o f the following criteria:
(a. ) Yo u didn’t answer the c all.
(b.) The caller didn’t leave a message in your voice mailbox.
The M issed Ca lls fo lder ho lds an un limited number of Caller ID re cords.
VIP Recycle Bin folder
The Recycle Bin folder synchronizes with the ESI phone s ys tem’s Mess age Rec ycle Bin, which holds a list
of your 10 most recently deleted messages. If you wish, you can restore deleted messages; see the
description of the Restore button in the “Toolbar quick reference” table (page 16). The Voice Mail Recycle
Bin is created when you install VIP.
1
Automatic call distribution. For more information, see the VIP Setup and User’s Guide (ESI #0450-0513).
20
Page 23

VIP Quick -R e ference Use r’s Guid e Station programming in VIP
Station programming in VIP
VIP’s User Programming section lets you program your station from the PC instead of using your phone.
Accessing the User Pr ogr amming window
In the VIP Call Window’s menu bar, click T ools , and then on User Phone Programming. Y ou will be
presented with a User Programming window co mpos e d of six tabs. You can move freely through t he
tabs, choosing your desired options.
Sending chan ges to y o ur E SI Fea tur e Phone
When you make changes, click Apply (at the bottom of the User Programming window) to send
changes to your ESI phone . You can choose either to c lick Apply each tim e y ou make a change or
make several chan ges at onc e and then click Apply.
Note: Clicking Apply is the only way to update your phone’s programming.
Undoing changes
If you want to revert to the previous programming selections, click Cancel. This will undo only
those changes mad e since the last time you clicked Apply. (You can’t undo changes after you’ve
clicked Apply.)
Note: For more detailed information on this topic, consult the VIP Setup and User’s Guide (ESI #0450-0513).
21
Page 24

Customization VIP Quic k -Referen c e User’s Guide
Customization
You can customize the different areas of the VIP applicat ion .
Customizing the Call Window
To customize the VIP Call Window, click Options on the VIP toolbar in
Outlook, and then choose the VIP tab. This lets you make the
following settings.
• Call Window — Three separate checkboxes allow you to control
when the Call Window appears and whether VIP should
automatically launch when you launch Outlook.
• Mini-Alert — Chec k ing this opt ion pops th e M in i-Aler t forw ard to
notify you of inco ming ca lls , new voice mail messages, new emails, and new missed calls.
• When Idle — Depending on y our selection here, th e Call Window
will remain maximized or minimized, when your station is idle (i.e.,
has no call acti vity) .
• Shortcut keys — You can set a shortcut on your keybo ard fo r
answering, dialing, or releasing a call. Put your c ursor in the
appropriate fie ld and pres s the key you want to be the shortcut. Fo r
example: if you want F5 to be the shortcut for releasing a call, press
the F5 key on your PC ke yboa rd while your cursor is in the Re leas e
call field (don’t type in “F 5”).
• Quick Call List — If you don’t want to use the VIP Quick Call lis t
(thus making the Call Window smaller), unche ck this .
• General — Checki ng Do n o t disp l ay tool tips keeps small, helpful hints from appearing when you
hol d the cursor (mouse pointer) over specific VIP items. You may want to make this setting once you
have used VIP long enough to know your way around all the features you wish to use.
Customizing the Call
Window command buttons
The Customize Buttons choice lets you
select the call co mmand buttons you want to
appear in the Call Window. (Answer,
Release, Dial an d Hold are permanent
buttons.) You are allowed only e ight mo re
buttons in the Call Control window (the four
permanent plus eight optional give you a
total of 12). VIP w arns you if you choose
more than the maximum. (The remaining
options are still available under Commands
on the Call Window menu.)
Customizing the VIP toolbar
To customize the VIP toolbar in Outlook, click Options in Outlook and choose the VIP tab. This lets you
select the buttons to appear on the VIP toolbar .
22
Page 25

VIP Quick -R e ference Use r’s Guid e Troubleshooting
Troubleshooting
If you encounter difficulty with VIP, check the following items first:
• Doe s y our stat ion have a password s et (PROGRAM 5 1), and does it ma tch the one ente red in VIP
Extension Options?
• Did your System Administrator give your station acce s s to use VIP?
• Does the NSP IP address and port number that your installing ESI Reseller entered in the ESI phone
system match the one entered in VIP Network Options?
Repairing VIP
If you think VIP didn’t install correctly, run the Repair option. This will look for — and replace as needed
— any files that, if missing, would prevent VIP from wo rking corr ectly.
To repair VIP . . .
1. Close Outlook.
2. Select Settings from the Windows Start menu.
3. Select Control Panel and double-click Add/Remove Programs.
4. Choose VIP.
5. Select Re pair VIP and click Finish.
6. Click Close when prompted.
Note: For more detailed help with any difficulties you may have with VIP, consult the “Troubleshooting Chart”
in the VIP Setup and User’s Guide (ESI #0450-0513).
23
Page 26

Index
Call activity folders, 20
Configuration, 8–9
Contact management, 18
Customization, 22
Esi-Link, 3, 18
Extension options, 9
Speed-dial lists, 3, 18
Toolbar refe rence guide, 16
User information, 8
User Programming window, 21
VIP
Installing, 7
Repairing, 23
VIP Call Control window
Overview, 13
VIP Quick Call list, 13, 18, 22
Page 27

N O T E S
Page 28

www.esi-estech.com
 Loading...