

Page 1
USB Phono Preamp for
professional vinyl & tape transfers
User’s Guide
Page 2

ESI - Copyright © 2011
Revision 1, October 2011
www.esi-audio.com
Page 3

ESI PHONORAMA
INDEX
1. Introduction..................................................................................................................................4
2. Description of PHONORAMA ...................................................................................................4
2.1 Front Panel...........................................................................................................................................................4
2.2 Rear Panel............................................................................................................................................................4
2.3 Minimum System Requirements..........................................................................................................................5
3. Installation....................................................................................................................................5
3.1 Windows XP........................................................................................................................................................5
3.2 Windows Vista / 7................................................................................................................................................7
3.3 Mac OS X ............................................................................................................................................................8
4. PHONORAMA Control Panel.................................................................................................... 8
5. Audio Applications.......................................................................................................................9
5.1 Windows Multimedia setup............................................................................................................................... 10
5.2 Latency setting and ASIO applications under Windows....................................................................................10
6. BIAS SoundSaver Express........................................................................................................10
6.1 Installation under Windows...............................................................................................................................10
6.2 Installation under Mac OS X .............................................................................................................................12
6.3 Authorization.....................................................................................................................................................13
6.4 Audio Setup .......................................................................................................................................................15
7. Technical Specifications ............................................................................................................ 15
8. General Information..................................................................................................................16
3
Page 4
ESI PHONORAMA
1. Introduction
Thank you for choosing the ESI PHONORAMA.
The stylish USB audio adapter allows you to record, transfer and edit your record and tape
collection. Simply connect your turntable to the adjustable phono input and hook it up with a
ground connection wire, and then start recording.
The powerful audio restoration software BIAS SoundSaver Express for Mac and PC is included. It
allows you to easily record your audio collection with unparalleled results. Record signals, clean
them and then export them to iTunes, save them as uncompressed WAV files or export them as
MP3. Archiving your LPs and tapes has never been easier. This package delivers pro-quality results
at an affordable price.
PHONORAMA easily connects to your tape deck or CD player (Line In) and to your turntable with
either moving coil (MC) or moving magnet (MM) systems. It also easily connects to any modern
PC or Mac computer system.
2. Description of PHONORAMA
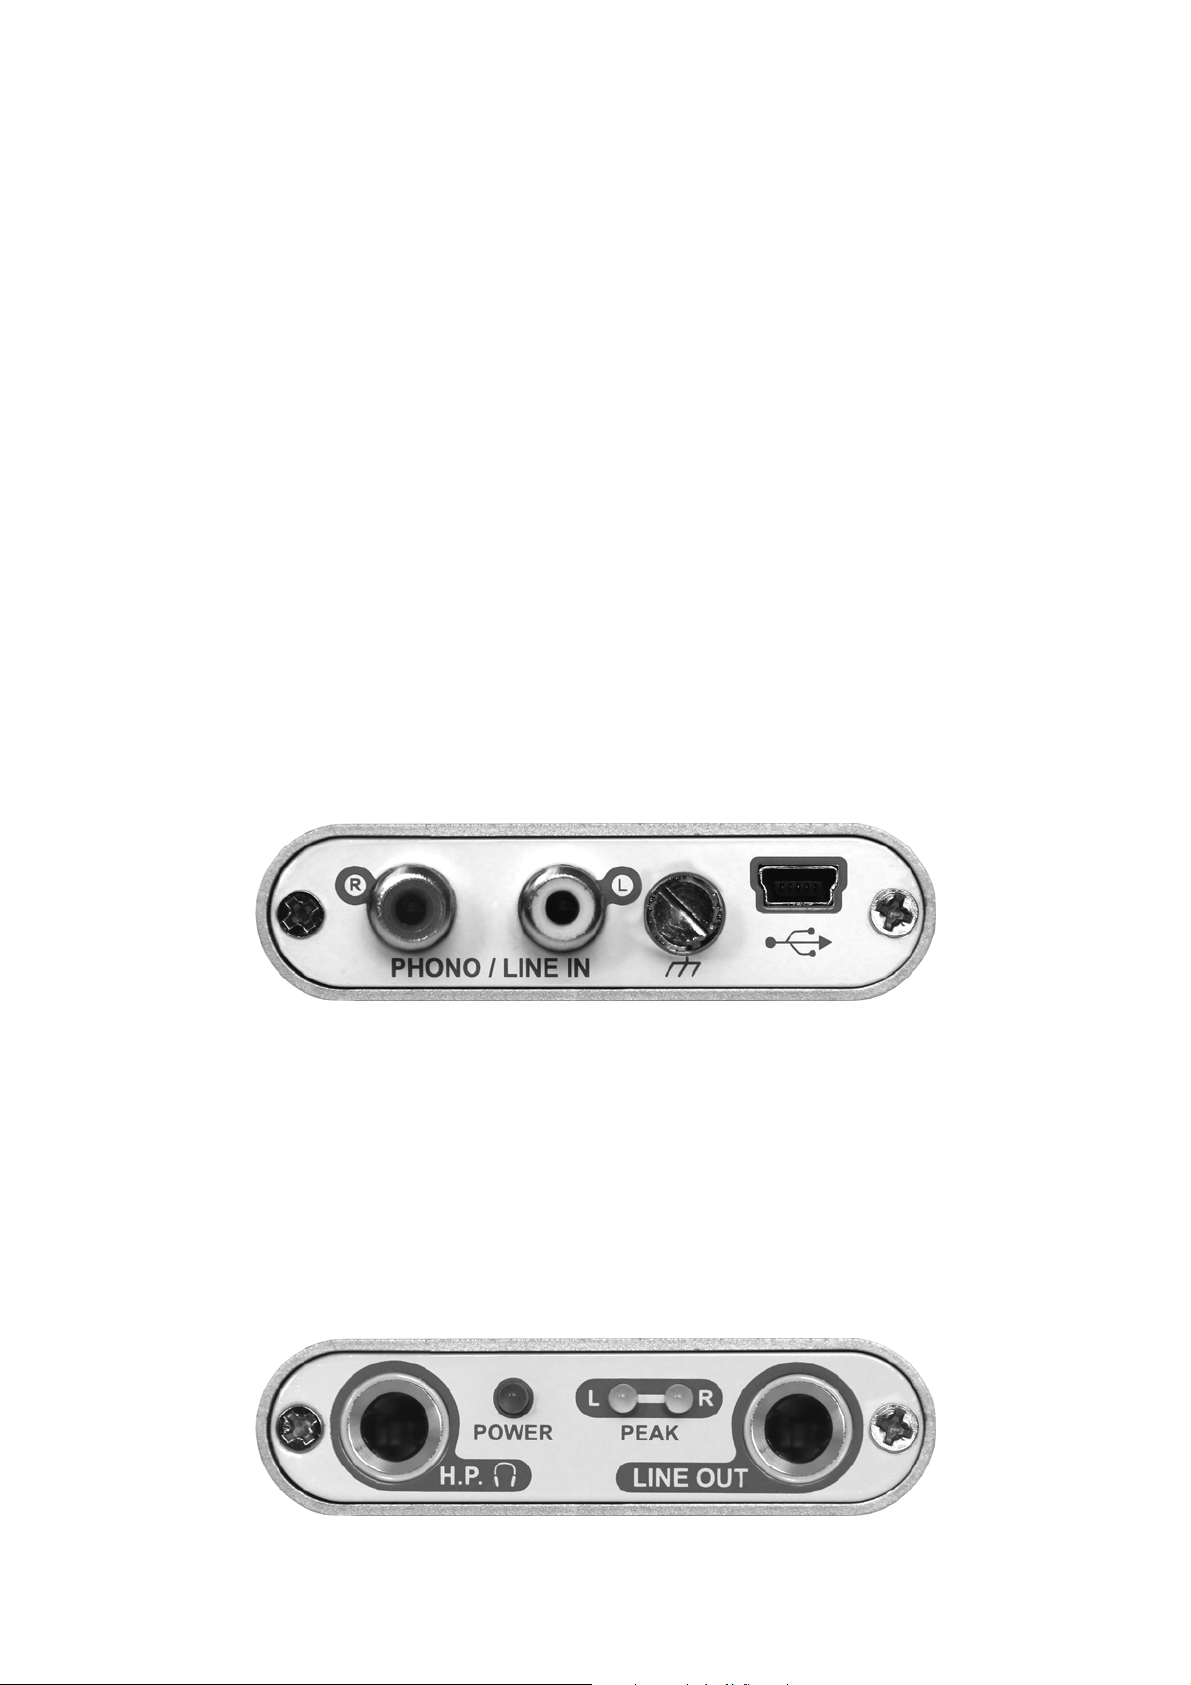
2.1 Front Panel
The front panel of PHONORAMA contains the following items from left to right:
- right (R) and left (L) channel of the phono & line in; connect this to the output of your tape deck
or turntable
- ground connection; use this connection screw to fix the ground lead of your turntable
- mini USB connector; use this connector to connect PHONORAMA to your PC or Mac using the
supplied USB cable
2.2 Rear Panel
4
Page 5

ESI PHONORAMA
The rear panel of PHONORAMA contains the following items from left to right:
- headphone; use this output to connect PHONORAMA to a pair of stereo headphones
- power LED; this LED will show the operation status of PHONORAMA
- left (L) and right (R) peak LED to show when the input signal of the phono & line input reaches
0dB input level
- line level output; use this output to connect PHONORAMA to your amplifier or active monitors
a using a 1/4" TRS stereo cable
2.3 Minimum System Requirements
PC
- Intel CPU (P4 or greater) or compatible AMD CPU with SSE instructions
- (min. 1.5 GHz processor recommended)
- Windows 7/Vista/XP (SP3)
- 2 GB RAM for Windows 7 / Vista or 1 GB RAM for Windows XP
- 55 MB available disk space
- hard drive with 8ms (or faster) access time
- 10MB/minute available disk space for recordings
- QuickTime 7 or greater
Mac
- G5 oder Intel Mac (mind. 1 GHz Prozessor empfohlen)
- Mac OS X 10.5 oder neuer
- 25 MB available disk space
- hard drive with 8ms (or faster) access time
- 10MB/minute available disk space for recordings
- QuickTime 7 or greater
3. Installation
Before installing the drivers of PHONORAMA, we recommend to check on the download section
of www.esi-audio.com for updated drivers.
3.1 Windows XP
Disconnect PHONORAMA before you install the driver if it has been connected already. Then
launch setup.exe from the Windows folder of the included Installation CD or from a download of a
recent driver from our website.
You will now see a dialog as shown on the left picture below. Click Next. You can define the target
directory for the installation now. Confirm it with Next.
5
Page 6

ESI PHONORAMA
The installer now informs you that the driver installation will start as shown on the left picture
below. Confirm this with Next. During the following process you will see a dialog box once or
several times that informs you that the driver software has not passed Windows Logo testing. Please
be assured that our drivers have been tested in various different ways and are OK to be used.
Confirm any such dialog with Continue Anyway.
You will now be prompted to connect the hardware on the next dialog that is shown below on the
left. Plug in PHONORAMA. Do not
again prompt you to confirm the Windows Logo testing dialog once or several times with Continue
Anway before the driver installation is finalized.
6
click Next yet. During the driver installation, Windows might
Page 7

ESI PHONORAMA
You can now finally click OK on the Information dialog. The installation is now finished. To
confirm this, please check if the ESI icon is displayed in the taskbar notification area as shown
below.
If yes, the driver installation has been completed successfully.
3.2 Windows Vista / 7
Disconnect PHONORAMA before you install the driver if it has been connected already. Then
launch setup.exe from the Windows folder of the included Installation CD or from a download of a
recent driver from our website.
When launching the installation, Windows Vista / 7 might prompt a security message. Make sure to
allow the installation. You will then see a dialog as shown on the left picture below. Click Next.
You can define the target directory for the installation now. Confirm it with Next.
The installer now informs you that the driver installation will start as shown on the left picture
below. Confirm this with Next. During the following process you will see a Windows Security
dialog box once or several times that asks you for confirmation to install the driver software.
Confirm any such dialog with Install.
7
Page 8

ESI PHONORAMA
You will now be prompted to connect the hardware on the next dialog that is shown below on the
left. Plug in PHONORAMA. Do not click Next yet. Instead, wait a few seconds for the automatic
device driver installation. You can monitor this in the task notification area where Windows Vista /
7 informs that the driver is installed via a bubble message box.
You can now finally click OK on the Information dialog. The installation is now finished. To
confirm this, please check if the ESI icon is displayed in the taskbar notification area as shown
below.
If yes, the driver installation has been completed successfully.
3.3 Mac OS X
Mac OS X already provides support for class compliant USB audio devices such as
PHONORAMA. This means that no software or driver needs to be installed to use PHONORAMA
under Mac OS X. Simply connect the unit with the supplied USB cable to your Mac and you can
start using it.
To make the usage more simple, we provide a control panel application that can be installed from
the included CD (Mac OS X folder) or downloaded on our website. To install it, open the .dmg file
and them drag the PHONORAMA Panel icon into your Applications folder.
Controlling some of the basic options of PHONORAMA under Mac OS X can also be done via the
Audio MIDI Setup utility from Mac OS X.
4. PHONORAMA Control Panel
This chapter describes the PHONORAMA Control Panel. To open the control
panel under Windows double click on the ESI icon in the task notification area.
Under Mac OS X you can launch the control panel from your Applications folder.
The following dialog shows the control panel:
8
Page 9

ESI PHONORAMA
The panel has the following functions and sections:
INPUT section: this section controls the input monitoring volume of the incoming signal from the
hardware. A pair of mono faders can be controlled together or individually depending on your
mouse position The Mute button at the bottom allows you to mute the signal. A red Mute button
indicates that the mute function is enabled. When disabled, the button is gray.
Left of the INPUT section is the Line In / MC / MM switch that allows you to select the recording
input source. When Line In is selected, a line level signal (e.g. from a tape deck) is expected. When
MC is selected, a turn table signal with a moving coil system is expected on the input instead. When
MM is selected, a turn table with a moving magnet system can be used.
OUTPUT section: this section controls the playback volume of the playback signal from your audio
applications. The pair of mono faders can be controlled together or individually depending on your
mouse position – perfect for stereo signals. The Mute button at the bottom allows you to mute
playback. A red Mute button indicates that the mute function is enabled. When disabled, the button
is gray.
Between INPUT and OUTPUT is the Mon button that enables the input monitoring. When enabled,
the input signal is audible via the output of PHONORAMA.
Under Mac OS X the Link button in the upper right corner defines if the channels are controlled
individually as mono or as stereo pairs.
5. Audio Applications
This chapter contains basic configuration examples for some popular software applications. Please
also refer to the manual of the audio software you use for detailed information.
9
Page 10

ESI PHONORAMA
5.1 Windows Multimedia setup
The Windows Multimedia setup is required if you want to use your PHONORAMA as the main
sound device for Windows multimedia applications. Go to My computer-> Control panel ->
Sounds and Audio Device Properties -> Audio. Select the PHONORAMA entry as your playback
device to make sure that all standard signals are played via the PHONORAMA hardware.
5.2 Latency setting and ASIO applications under Windows
Via Config > Latency in the Control Panel under Windows it is possible to change the latency
setting (also called “buffer size”) for the ASIO driver of PHONORAMA. A smaller latency is the
result of a smaller buffer size. Depending on the typical application (e.g. for playback of software
synthesizers) a smaller latency is an advantage. At the same time, the best latency setting indirectly
depends on the performance of your system. For recording applications, a typical latency buffer size
between 128 and 288 samples is standard. The default value is 256.
The Config > Buffer Number setting in the Control Panel provides an important fine tuning setting
that allows you to tweak system performance. Depending on your computer hardware, you might
need to adjust this setting if you have problems with noise or drop-outs during playback or
recording . Typically on a modern computer system a value of 4 or slightly more or less is perfect
but you might need to check what is best for your computer as every PC is different.
Note that these values have to be setup before launching any audio application using
PHONORAMA.
6. BIAS SoundSaver Express
PHONORAMA ships with SoundSaver Express from BIAS. Use this software to record and restore
your audio material from vinyl and tape.
Before using the software, you need to install it and activate / authorize the installation. This
requires an email address and an active internet connection for your system. Only with
authorization you can use the software.
6.1 Installation under Windows
To install the software under Windows, launch BIAS SoundSaver Express Installer.exe in the
SoundSaver Express folder of the included CD. Then follow the instructions on the screen. After a
short waiting time, the first dialog will be displayed which should be confirmed by clicking Next.
The following information page should also be confirmed with Next.
10
Page 11

ESI PHONORAMA
In the next dialog, choose I do accept the terns of the license agreement and confirm this with Next.
After that you can choose if you want to install SoundSaver Express completely or in portions only.
We recommend to select Complete and then proceed with clicking Next.
The next dialog asks you to proceed with the installation process by clicking Install. Now the files
will be copied to your system (which may take a while) and the finished installation will be
confirmed with the final dialog that you can close by clicking Finish.
11
Page 12

ESI PHONORAMA
The installation is now finished and you can launch SoundSaver Express via its entry in the
Windows start menu.
6.2 Installation under Mac OS X
For the installation under Mac OS X, open the file BIAS SoundSaver Express.dmg in the
SoundSaver Express folder of the included CD. Then launch the contained installer by double
clicking on it. Then follow the instructions on screen. The first two dialogs should each be
confirmed with Continue.
In the dialog that appears now, choose Continue again, so that you can confirm the license
agreement with Agree and proceed with the installation on your system.
12
Page 13

ESI PHONORAMA
The following dialog allows you to change the destination folder (Change Install Location). We
recommend the installation on the Macintosh HD partition by clicking Install. After the files are
copied (which can take some time), the installation will be completed – which can be confirmed
with Close.
Now the installation is completed and you can launch SoundSaver Express via its icon in the
Applications folder of your system.
6.3 Authorization
The activation & authorization process for SoundSaver Express is identical under Mac OS X and
Windows. When you launch it for the first time, the following message appears:
Once you click Authorize, the BIAS Authorization Manager will be opened, showing a list of BIAS
applications. Make sure to select and click on BIAS SoundSaver Express 1 in the list in the top
section:
13
Page 14

ESI PHONORAMA
Enter your email address under Email Address and then under Serial Number, enter the serial
number that is included on the postcard of the original retail box of PHONORAMA. Confirm this
with Submit.
Important: you need an active internet connection when you go through with this!
The program will now confirm the authorization with the following message:
After clicking OK, you can close the BIAS Authorization Manager with Done and then start using
SoundSaver Express together with PHONORAMA on your system.
If you intend to stop using SoundSaver Express on your system for a longer time, then it is
recommended to de-authorize the software with the BIAS Authorization Manager. This makes it
possible to use SoundSaver Express with the same serial number on a different computer. You can
use an installation of SoundSaver Express with one license and serial number max. on 2 authorized
systems simultaneously.
14
Page 15

ESI PHONORAMA
6.4 Audio Setup
After launching SoundSaver Express for the first time, you need to select PHONORAMA as audio
device. This makes sure that the application will not access the integrated audio hardware of your
PC or Mac instead.
To do that, click on Audio Settings ... under START and then select PHONORAMA (as USB audio
device) under Input and Output.
Now you can use SoundSaver Express to make your first recording by going through the steps and
dialogs listed on the top of the window after each other.
7. Technical Specifications
LINE IN
Type RCA
Max Input Level +8dBu max.
THD + N 0.0025% A-weighted
Impedance 10K ohm
MM
Type RCA
Gain 40dB
THD 0.03%
Impedance 47K ohm / 200pF
MC
Type RCA
Gain 60dB
THD 0.08%
Impedance 47K ohm / 200pF
ANALOG OUTPUT
Type Stereo TRS jack 1/4" x 2
Max Output Level +8dBu
THD + N 0.0022% A-weighted
Headphone Output Output Power
Impedance
CONVERSION
A/D Converter Type
Dynamic Range
S/(N+D) Ratio
D/A Converter Type
Dynamic Range
S/(N+D) Ratio
Interchannel Isolation
POWER
Power Consumption 1.1W (typical)
USB Bus Powered (500mA maximum)
100mW Max @32ohm
32~600ohm
24bit
102dB (@ -60dBFS A-weighted)
-92dB (@ 0dBFS, measurement method)
24bit
108dB (@ -60dBFS A-weighted)
-97dB (@ -1dBFS, measurement method)
100dB
15
Page 16

ESI PHONORAMA
8. General Information
Trademarks
ESI and PHONORAMA are trademarks of ESI Audiotechnik GmbH. Windows is a trademark of
Microsoft Corporation. Other product and brand names are trademarks or registered trademarks of
their respective companies.
The FCC and CE Regulation Warning
This device complies with Part 15 of the FCC Rules. Operation is subject to the following two
conditions : (1) this device may not cause harmful interference, and (2) this device must accept any
interference received, including interference that may cause undesired operation. Caution : Any
changes or modifications in construction of this device with are not expressly approved by the party
responsible for compliance, could void the user's authority to operate equipment.
Note: This equipment has been tested and found to comply with the limits for a Class A digital
device, pursuant to Part 15 of the FCC Rules. These limits are designed to provide reasonable
protection against harmful interference when the equipment is operated in a commercial
environment. This equipment generates, uses, and can radiate radio frequency energy and, if not
installed and used in accordance with the instruction manual, may cause harmful interference to
radio communications. Operation of this equipment in a residential area is likely to cause harmful
interference in which case the user will be required to correct the interference at his own expense. If
necessary, consult an experienced radio/television technician for additional suggestions.
Correspondence
For technical support inquiries, contact ESI support online at www.esi-audio.com.
Disclaimer
All features and specifications subject to change without notice.
Parts of this manual are continually being updated. Please check our web site www.esi-audio.com
occasionally for the most recent update information.
16
 Loading...