

Page 1

ESI nEar04
Contents
Contents _____________________________________________________________ 1
Introduction__________________________________________________________ 2
Features _____________________________________________________________ 2
1. Woofer _______________________________________________________________2
2. Tweeter_______________________________________________________________2
3. Sub-Frequency port ____________________________________________________2
4. Enclosure _____________________________________________________________ 2
5. Network & POWER AMPLIFIERS _______________________________________3
Installation___________________________________________________________ 3
1. Precautions____________________________________________________________ 3
2. TRS Balanced/Unbalanced Connection ____________________________________3
3. Connecting to the Corresponding Pre-Amplifier, Computer or Game Console
Outputs _________________________________________________________________ 4
Placing the nEar04 ____________________________________________________ 6
Technical Specifications ________________________________________________ 8
Block Diagram ____________________________________________________________9
Rear Panel_______________________________________________________________ 10
Front Panel & Side V iew ___________________________________________________ 11
Page 2

Introduction
ESI introduces nEar04 – a high fidelity dual amplified bookshelf type speaker set.
The nEar04 is designed to overcome all the typical limitations of conventional small sized
speakers by providing a 4 inch Polypropylene curved woofer cone and 1 inch natural Silk Dome
for the tweeter. The nEar04 inherits professional monitor speaker quality from ESI’s nEar05 and
nEar06 series. Sized only as compact bookshelf speaker for your desktop, nEar04 provides all
the reference level sound quality and enough power for your audio monitoring especially in a
digital audio production environment.
Features
1. WOOFER
Woofer unit is 4 inch in diameter with Polypropylene curved cone with high temperature voice
coil and damped rubber surround. It is designed to deliver balanced mid and low-frequency
response. This design is used to react against the input signal accurately; to deliver even
minimal input precisely minimizing distortion and eliminate any undesirable resonance can be
occurred with other material.
2. TWEETER
By employing specially developed 1” silk dome with magnetically shielded, it can deliver
distortion-free original sound and offer extremely natural sound. It minimizes reaction time by
using fabric silk for excellent delivery and also minimizes resonance by adapting ESI’s own
Internal Damping Technology.
3. SUB-FREQUENCY PORT
The hole in the rear panel is called a Sub-Frequency Port and is designed to discharge extreme
low frequencies
frequency.
. nEar04 is designed to take advantage of the port to generate extreme low
4. ENCLOSURE
Enclosure acts as important role as the other components. nEar04’s enclosure is designed to
2
Page 3

endure impacts from inside under extreme conditions. It employs high-density special MDF and
unique interior reinforcement to provide more stable performance.
5. NETWORK & POWER AMPLIFIERS
Network & Power Amplifiers for nEar04 are specially designed for its own woofer and tweeter.
Network distributes low, mid, and high frequency properly to units in order to reduce loss of
sound and distortion achieving natural balance of the sound.
Installation
For optimal performance of nEar04, read below thoroughly and carefully before starting
installation.
1. PRECAUTIONS
Handling
Do not grab the speaker driver units: nEar04 is packaged in box fitted tight, so your attention is
required when taking speakers out of the box. To avoid the possible damage to the speaker units,
hold both sides of the speaker to pull it out of the box. The speaker units should not be touched
to avoid damage even after it is out of the box.
Recommend to use high quality balanced or unbalanced cable for input connection.
Turn off the power of nEar04 and turn Volume Control of nEar04 to minimum before
connection.
Connection
Use the speaker wire included in the nEar04 package to connect the Right and Left Speakers via
the spring terminals.
2. TRS BALANCED/UNBALANCED CONNECTION
Assure that power switch of nEar04 is turned off and Volume Control of nEar04 is turned to
minimum. Connect the male side of TRS balanced or unbalanced cable to the TRS input of Left
speaker of nEar04. Refer to the following diagram.
3
Page 4
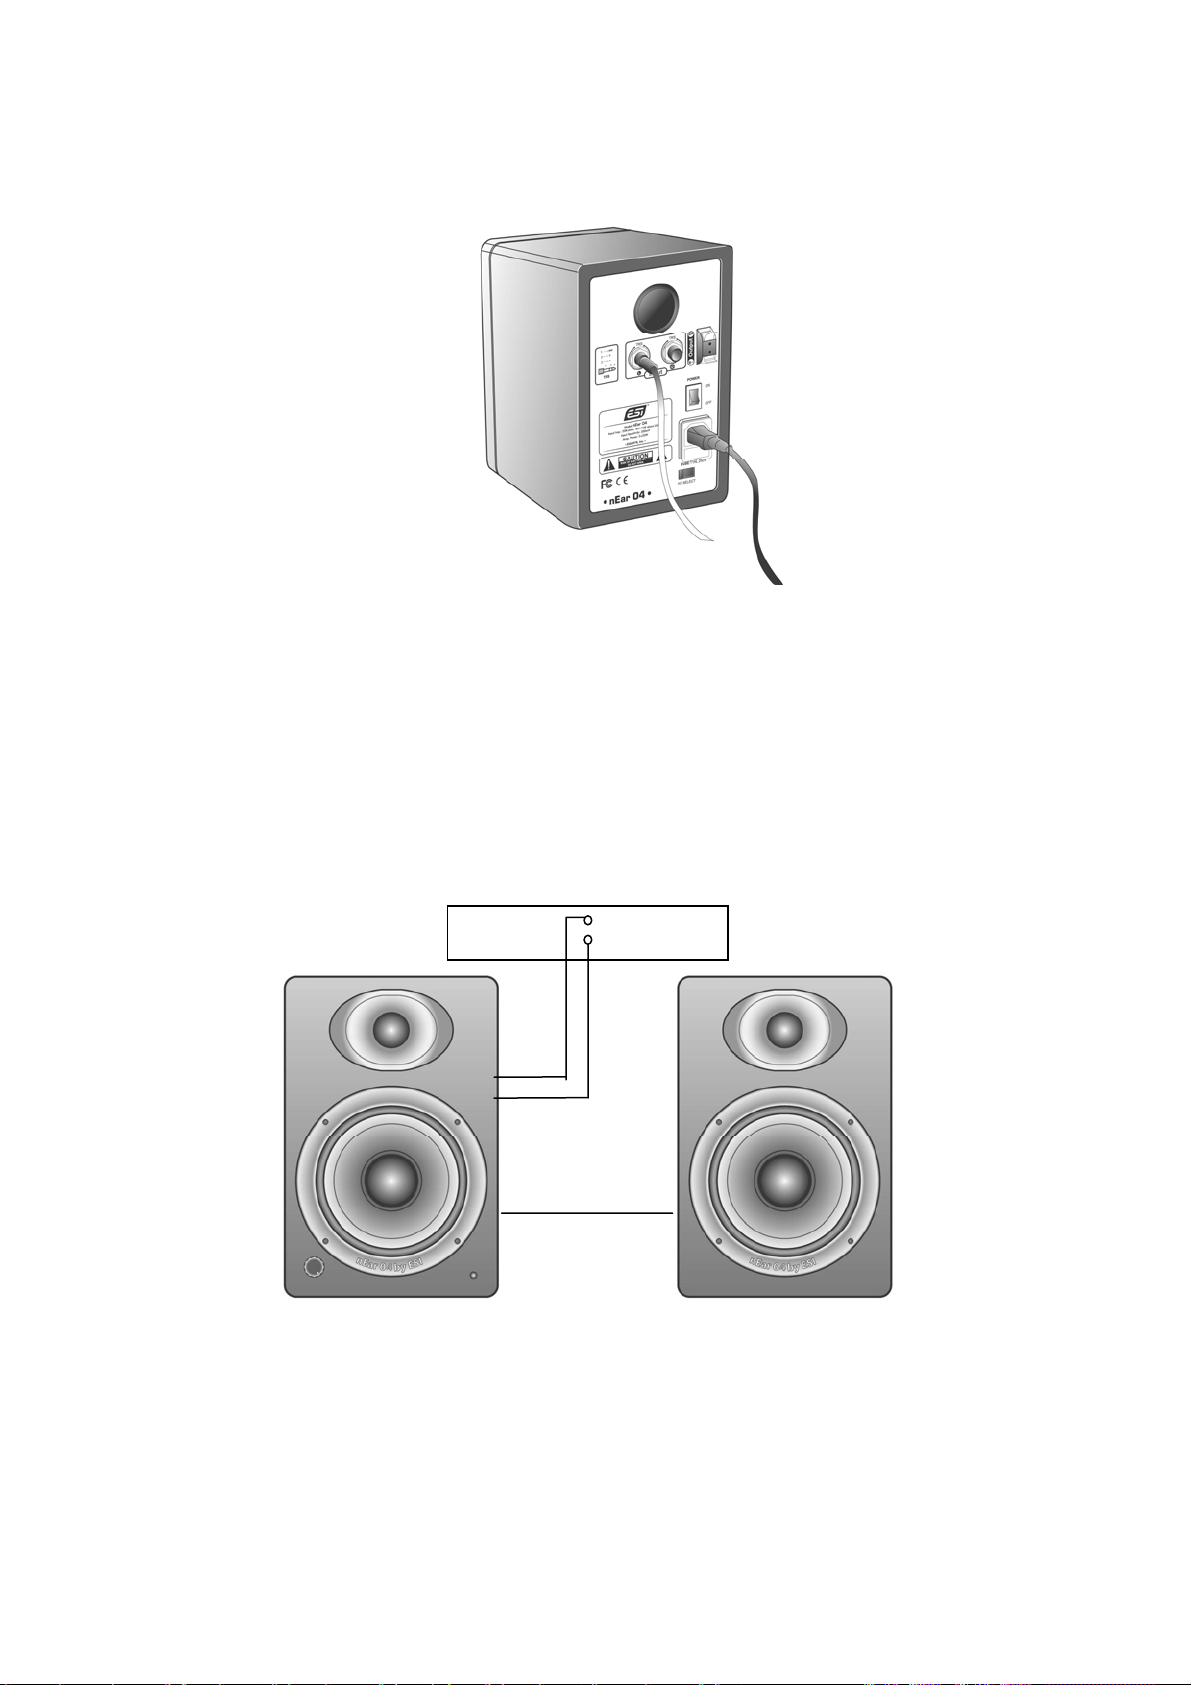
Power cord
< TRS Balanced or Unbalanced Connection>
3. CONNECTING TO THE CORRESPONDING PRE-AMPLIFIER, COMPUTER OR
GAME CONSOLE OUTPUTS
Before connecting, make sure its power is turned off.
Plug TRS balanced or unbalanced cable to the corresponding output connectors of preamplifier, computer or game console.
Pre-Amplifier
TRS cable
Speaker wire
< Connection to a Pre-amplifier >
4
Page 5

Computer
Sound Card
Audio Output
TRS cable
Speaker wire
< Connection to a Sound Card of Computer >
Game Console
TRS cable
Speaker wire
< Connection to a Game Console >
5
Page 6

Placing the nEar04
Placing the speakers is one of the most important procedures to monitor correct sound. To
monitor with nEar04 at its maximum capability, appropriate listening environment and correct
placement are required. Please, refer to the followings to place the nEar04 correctly.
1. BASICALLY, TWO UNITS AND THE LISTENER SHOULD ALIGN TO FORM A
REGULAR TRIANGLE
. REFER TO THE FOLLOWING DIAGRAM.
<Positioning>
2. THE HEIGHT OF UNITS, MORE PRECISELY, THE TOP OF THE WOOFER, SHOULD
COME UP TO WHERE YOUR EARS ARE IN NORMAL LISTENING ENVIRONMENT
REFER TO THE FOLLOWING DIAGRAM.
.
<Height of the units>
6
Page 7

3. PLACE THE NEAR04 VERTICALLY. PLACING NEAR04 HORIZONTALLY IS
NOT RECOMMENDED
.
<Placement of the units>
Remarks: DO NOT place any obstacles that may block the flow of air, which is medium of
the sound, or create reflected sound, especially, the material of high reflection tendency
including glass, mirror or metal. PLACE THOSE MATERIALS AWAY FROM THE
PATH OF THE SOUND FROM nEar04.
7
Page 8

Technical Specifications
-Type : Dual amplified Bookshelf (one side passive)
- LF Driver : 4 inch Polypropylene curved cone with high temperature voice coil and damped rubber
surround.
-HF Driver : 1 inch magnetically shield natural Silk Dome.
- Frequency Response: 100Hz - 22kHz
- Crossover Frequency: 4.1kHz
- Amplifier Power: 20W x 2
-S/N Ratio: > 100dB below full output, 20 kHz Bandwidth
-Input Connectors: 2 x TRS Balanced/ Unbalanced Input Connectors (L/R)
-Polarity: Positive signal at + input produce outward LF cone displacement
- Input Impedance: 20k ohms balanced, 10k ohm s unbal anced
- Input Sensitivity: 200 mV input produces full output wit h Volume control at maximum.
- Protection: RF interference, output current limiting, over temperature, turn-on/off
transient, subsonic filter, external mains fuse.
-Indicator: Power ON/OFF indicator on front panel
-Power Requirements: Factory programmed for either 115V ~5 0/60Hz, or
230V~50/60Hz
Power via detachable 3 circuit line cord.
-Cabinet: vinyl laminated MDF
-Dimension: 206mm(H) x 136mm(W) x 149mm(D)
Remarks: Above specifications are subject to change without notice.
8
Page 9

BLOCK DIAGRAM
LEFT SPEAKER
4.1kHz HF Crossover
1” HF Driver
TRS Input L
TRS Input R
Balanced
Input Amp
Vol um e
Balanced
Input Amp
RIGHT SPEAKER
Power Amp
Power Amp
2nd Order High Pass Filter
2nd Order Low Pass Filter
Speaker Term inal
4” LF Driver
4.1kHz LF Crossover
1” HF Driver
4.1kHz HF Crossover
2nd Order High Pass Filter
4” LF Driver
4.1kHz LF Crossover
2nd Order Low Pass Filter
9
Page 10

REAR PANEL
Notice: The below image shows the front panel of the left speaker. The right speaker’s rear
panel contains only a single speaker terminal, for connection to the speaker terminal of left
speaker.
1. TRS INPUT This jack accepts a TRS connector, wire either balanced or unbalanced.
For balanced wiring, a 3-conductor TRS plug is necessary. The INPUT CONNECTIONS wiring
chart of TRS connector is as following:
INPUT SIGNAL TRS CONNECTIONS
+ TIP
-
Shield Sleeve
RING
Unbalanced wiring works with either a 2 or 3-conductor TRS connector. A 2-conductor TRS
plug automatically ground the minus signal input, whereas a 3-conductor TRS plug wired
unbalanced provides the option of leaving the minus open or grounded. We recommend that you
ground the unused input.
10
Page 11

2. VENT PORT nEar04 is a Vented Box speaker system wit h a vent port on the rear panel.
3. SPEAKER TERMINALS The rear panel of both left and right speaker enclosures
contains a spring action speaker terminal. The included speaker wire should be used to connect
the terminal on the left speaker to the terminal on the right speaker.
4. POWER SWITCH When you push the power switch, the nEar04 will be turned on, and
the nEar04 will be turned off when you push the power switch again.
5. POWER RECEPTACLE and Ext. FUSE For plugging in detachable 3-circuit line
cord.
6. AC SELECT You can select either 110V or 230V AC power according to your
requirement.
FRONT PANEL & SIDE VIEW
206mm
HF Driver LF Driver
(Tweeter) (Woofer)
Volume Control
Power Indicator
136mm 149mm
11
Page 12

VOLUME CONTROL Use the Volume Control to set the proper output level of nEar04.
POWER INDICATOR Power ON/OFF indicator
Notice: The above picture is the front panel of left speaker. The right speaker’s front panel
doesn’t contains Volume control switch and Power indicator.
12
 Loading...