

Page 1

M8U ESI
INDEX
1. Introduction..................................................................................................................................2
Key Features.................................................................................................................................2
2. Description of M8U......................................................................................................................3
Front Panel ................................................................................................................................... 3
3. System Requirements .................................................................................................................. 5
PC.................................................................................................................................................5
Mac...............................................................................................................................................5
4. Installation.................................................................................................................................... 6
Hardware Installation...................................................................................................................6
Driver Installation under Windows XP........................................................................................ 6
Driver Installation under Mac OS X ............................................................................................ 8
Exclusive driver Installation under Windows ME, 2000 or XP...................................................8
5. Application Setup.......................................................................................................................12
PC...............................................................................................................................................12
Cubase SX................................................................................................................................ 12
Giga Studio .............................................................................................................................. 13
Reason......................................................................................................................................13
Sonar........................................................................................................................................14
Mac.............................................................................................................................................14
Cubase SX................................................................................................................................ 14
Nuendo..................................................................................................................................... 16
Logic........................................................................................................................................17
Reason......................................................................................................................................17
END USER WARRANTY ............................................................................................................18
v2 November 2005
* All specifications are subject to change without prior notice.
1
Page 2
M8U ESI
1. Introduction
Thank you for choosing ESI M8U.
The M8U is a convenient 8 in 8 out, 128 channels USB MIDI Interface for PC and Mac computers,
offering maximum MIDI connectivity.
M8U can even act as a stand-alone MIDI patch bay when it is not connected to a computer and
offers various MIDI Thru functions.
With ESI’s hardware based MIDI timing technology, M8U guarantees that your music will play
back exactly the way you played it.
M8U supports Plug-n-Play for easy installation.
Key Features
· 8 in 8 out MIDI (128 MIDI channels)
· perfect MIDI timing
· MIDI activity indicators for each port
· USB-powered; requires no external power supply (if you use a Notebook or USB hub, you may
need an external power power supply, depending on the situation)
· high-speed connection to USB-equipped PC or Apple computers
· several thru functions
· when disconnected from the PC, the unit operates as a stand-alone MIDI patch bay
· professional 19”single height rack mount
· optimized for Windows XP and Mac OS X, special drivers for Windows ME, 2000 and XP
available
2
Page 3
M8U ESI
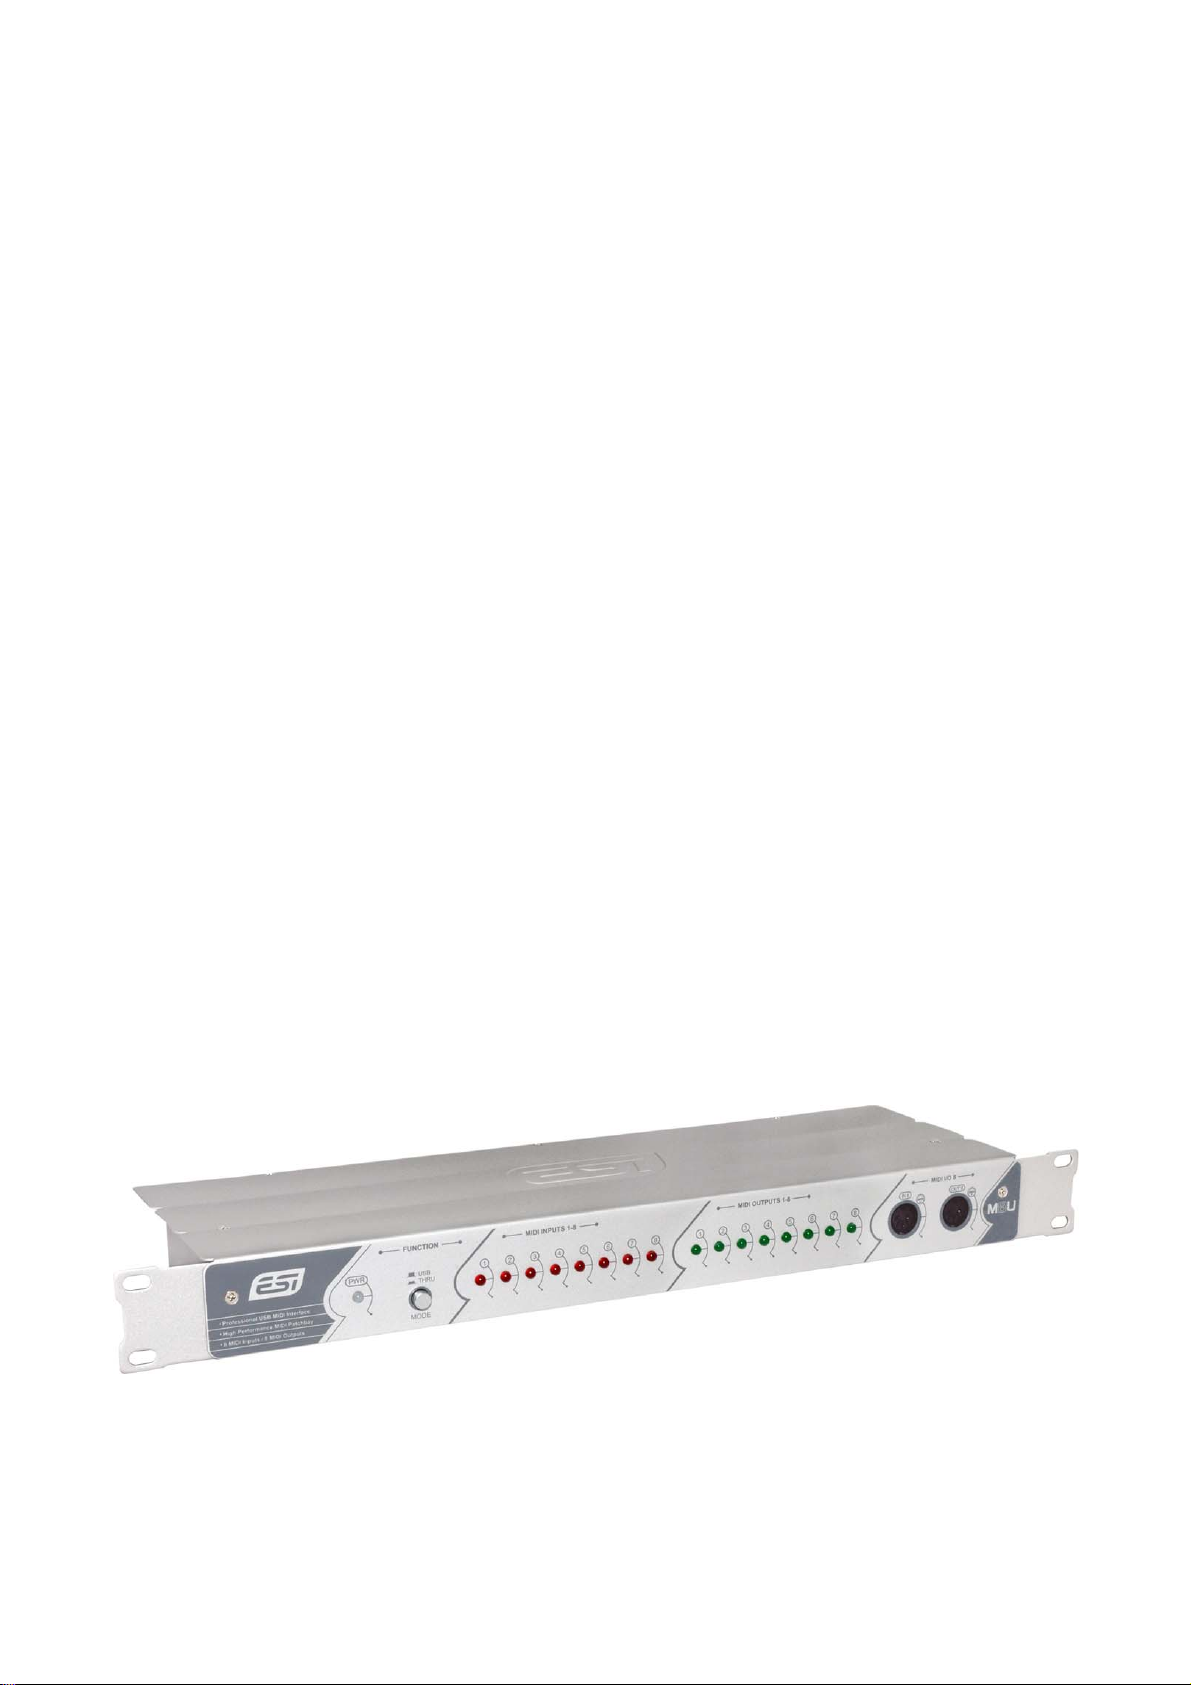
2. Description of M8U
Front Panel
Rear Panel
1. Power LED
2. USB/THRU switch
This is where you select USB mode or three kind of MIDI Thru mode(*).
USB mode: When you select this mode, M8U will be working as a basic MIDI interface. It’s the
normal mode. You can control MIDI in/ouput from your sequencer application. In addition, the
Power LED will be turned to red color. If you push the button again, you can go to the Thru
mode. If you want go back to the normal mode, always push to pull out the button.
Thru mode 1: Input and Output ports will be matched by 1:1. For example, MIDI data from
Input 2 directly goes to Output 2. All LED display will be turned on. After 2~3 seconds, LED
will be turned off again. Power LED will become green color.
Thru mode 2: The MIDI data from Input 8 goes to Output 1~8. LED Display Input 8 and Output
1~8 would be turned on. After 2~3 seconds, Output 1~8 will turned off (Input 8 remains to be
turned on). Output LED will be lit by signal. Power LED will become green color.
Thru mode 3: The MIDI data from Input 1 goes to Output 1~8. LED Display Input 1 and Output
1~8 would be turned on. After 2~3 seconds, Output 1~8 will be turned off (Input 1 remains to
be turned on). Output LED will be light by signal. In addition, Power LED will become green
color.
* The three Thru modes are changed in sequence whenever the button is pushed.
3
Page 4
M8U ESI
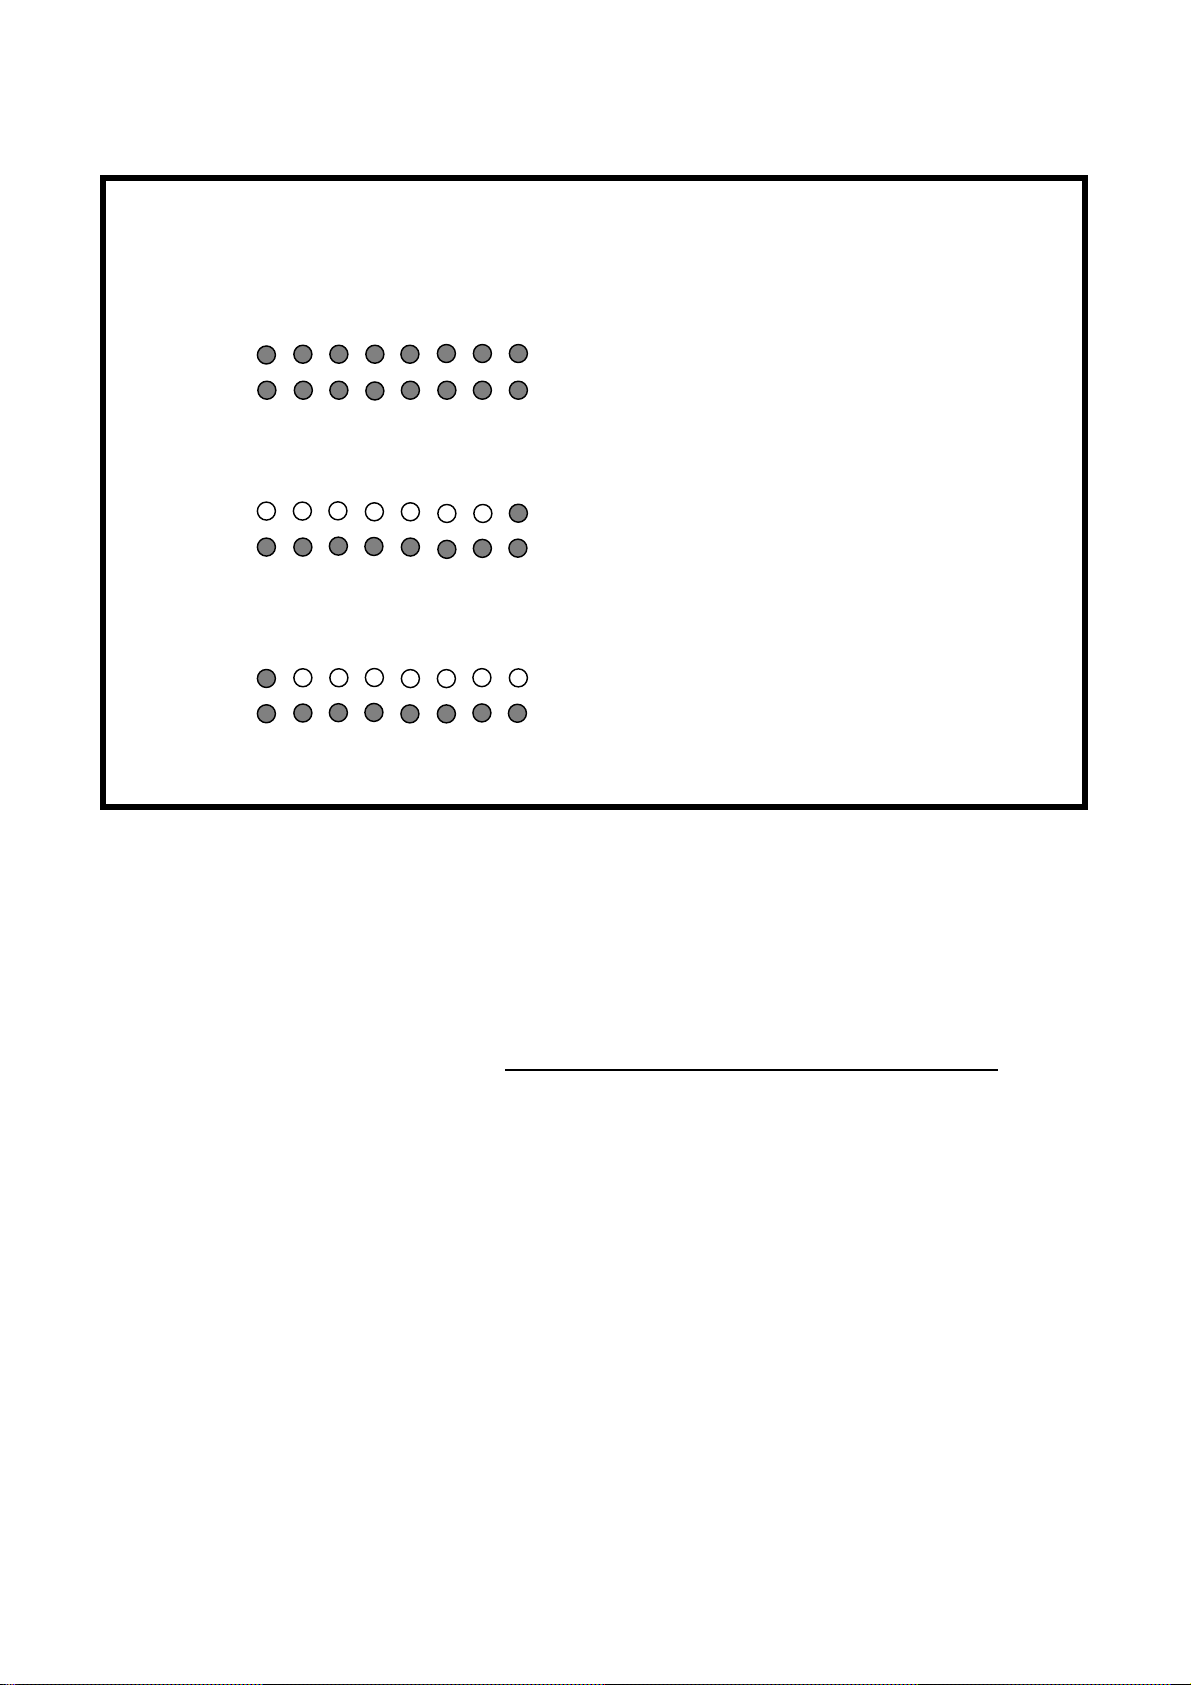
Normal
Thru 1
Thru 2
Thru 3
Function LED signal display
Basic MIDI interface
I/O port matching (1:1)
In 8 -> All MIDI Outputs
In 1 -> All MIDI Outputs In 1, Out 1~8 display will be turned on
All LED display will be turned on
After 2~3 seconds, LED will be turn off again
Flickering according to the signal
In 8, Out 1~8 display will be turned on
After 2~3 seconds, Out 1~8 LED will be turn off
again (In 8 will be remains to be turned on)
Flickering according to the signal
After 2~3 seconds, Out 1~8 LED will be turn off
again (In 1 will be remains to be turned on)
Flickering according to the signal
Caution: The Thru Mode works whether your computer is turned on or off.
3. MIDI IN LED display indicator
4. MIDI OUT LED display indicator
5. MIDI IN 1, 2, 3, 4, 5, 6, 7, 8 ports
6. MIDI OUT 1, 2, 3, 4, 5, 6, 7, 8 ports
7. USB connector
8. External power supply connector
When your computer does not supply enough power via USB or if you want to use M8U as
stand-alone device, you need to use an optional external power supply adapter (DC 9 ~ 15 V,
300mA) which is not included and connect it here.
(Output 8 is located both on front and rear side)
4
Page 5

M8U ESI
3. System Requirements
PC
· Windows XP, 2000 and ME,Windows XP operating system recommended
· Intel Pentium III CPU or equivalent AMD or compatible CPU
· motherboard with Intel or VIA chipset or compatible
· one available USB port
· UDMA66/100 7200rpm hard disk drive
· more than 256MB of RAM
· note that the system requirements depend more on your choice of audio software
Mac
· Mac OS X v10.2 or later only
· Macintosh with G3 or better processor (except the original PowerBook G3)
· one available USB port
· more than 256MB of RAM
note that the system requirem· ents depend more on your choice of audio software
* Caution
1. We don’t recommend using many USB devices with the M8U via USB hub at the same
time. It may cause Input data lose sometimes.
2. Some old mainboard that using OHCI (open host controller interface) may cause problem.
3. Check our web site http://www.esi-pro.com occasionally for the most recent update
information or technical issues.
5
Page 6

M8U ESI
4. Installation
If you use a Macintosh with Mac OS X or a PC with Windows XP, you can install the hardware
before you install or setup any drivers or applications. If you use a PC with Windows 2000 or ME,
you need to install the driver first (see below) and the the hardware.
Hardware Installation
Before you begin, make sure you have read your computer’s manual on installing USB devices.
Your computer’s manual should describe the precautions you should take.
Shutting down computer wouldn’t need for installing an USB device to the computer. However, we
will take it from the start to make sure you can follow every detail of installation.
1. Find the USB port on your computer. The USB port looks like shown below. You can usually
find it close to the PS/2 or serial ports on the back of a desktop computer system.
USB port on computer
2. Plug in the appropriate plug of the USB cable (so-called Series A plug) to the USB port of
computer. You will notice that USB ports on computer and M8U are different.
Series A plug
3. Connect the other end of the USB cable (the Series B plug) to the USB port of M8U.
Series B plug
Turn on the computer. You will see that the LED displays of M8U are lit. M8U gets power from the
computer via USB cable so you don’t need to attach any external power supply normally.
Series A Plug is used for those devices on which the external cable is permanently attached like
Mouse, Keyboard and USB hubs, etc.
Series B Plug is for devices that require detachable external cables and so is used for devices
like Printers, Scanners, Modems, Stand alone Hubs.
Driver Installation under Windows XP
After the hardware installation has been done properly, your PC with Windows XP or newer
versions of Windows will automatically detect the M8U and install a default driver. You don’t need
to install an additional driver for basic operation.
6
Page 7

M8U ESI
To check if the driver has been installed properly, go to Device Manager and check ‘USB Audio
Device’ under Sound, video and game controllers. Double click this device and check ‘ESI-M8U’
under USB audio device properties.
7
Page 8

M8U ESI
Driver Installation under Mac OS X
In Mac OS X 10.2 (Jaguar) or later, you can check if your M8U is recognized properly by using
Audio MIDI Setup application in Applications/Utilities folder. Launch the Audio MIDI Setup
application and click the MIDI Devices tab on the Audio MIDI Setup window. If the M8U is
recognized properly, the ESI-M8U icon will be appeared on the window.
Exclusive driver Installation under Windows ME, 2000 or XP
If you use Windows 2000 or Windows ME or if you use Windows XP and need best possible
performance, you can install the exclusive ESI driver for M8U on your system.
1. Windows XP (or newer)
Under Windows XP or newer, just plug the USB device and insert the ESI installation CD into your
CD-ROM drive. Then go to ESI folder -> M8U folder and run M8U.exe.
2. Windows 2000/ME
Don't plug the USB device before you install the driver, otherwise your system might crash / reboot.
Insert the ESI installation CD into your CD-ROM drive. Then go to ESI folder -> M8U folder and
run M8U.exe.
8
Page 9

M8U ESI
Driver Installation
Please follow the instructions on screen:
9
Page 10

M8U ESI
With Windows 2000 and XP installations, a message might appear stating “The software has not
passed Windows Logo testing to verify its compatibility with Windows XP.” Though the message
appeared, the driver is completely tested and verified by ESI and is safe to use. You can ignore the
message and just click ‘Yes’.
After finishing the driver installation, plug the USB device to your computer.
10
Page 11

M8U ESI
In the case of Windows 2000, you may see the following message again. Simply ignore the message
and just click ‘Yes’.
11
Page 12

M8U ESI
5. Application Setup
This chapter contains the basic setup for some software applications. For more detailed info, please
refer to the manual of the software.
PC
Depending on the installed driver (either the exclusice ESI driver for Windows ME, 2000, XP or the
default driver under Windows XP), the device names are either called ‘M8U’ or ‘USB Audio
Device’.
Cubase SX
In Cubase, set input and output as USB Audio Device or M8U, depending on the driver you are
using. Check the picture below.
12
Page 13

M8U ESI
Giga Studio
After launching GigaStudio, set input and output as USB Audio Device or M8U. Check the
following picture.
Reason
Go to Edit -> Preference -> MIDI and select USB Audio Device or M8U.
13
Page 14

M8U ESI
Sonar
After launching Sonar, Go to Option -> MIDI devices setting and select USB Audio Device or
M8U.
Mac
As long as the M8U is recognized by Mac OS X with no problem, all the applications that support
CoreMIDI should work fine with the M8U. Here are some examples of how to change application
settings for using the M8U.
Cubase SX
In Cubase, expand the MIDI section in the Inspector by clicking its tab.
In this section, you can choose a port (or all ports) for MIDI input.
14
Page 15

M8U ESI
In addition, you can choose a port for MIDI output.
15
Page 16

M8U ESI
Nuendo
In Nuendo, you can choose a port for a MIDI track in the Track List area.
16
Page 17

M8U ESI
Logic
In Logic, you can choose a port for a MIDI track in the instrument parameter box in Arrange
Window.
Reason
In Reason, open the Preferences window and you can choose a port for MIDI input in the MIDI
Page.
17
 Loading...