

Page 1

8-port USB 3.0 MIDI interface with USB hub
User’s Guide
Page 2
ESI M4U eX
Introduction
Thank you for choosing the ESI M4U eX.
M4U eX is a convenient and powerful 8-port USB 3.0 MIDI interface with automatic input and output detection,
standalone operation options and an integrated 3-port USB hub. With M4U eX you can obtain perfect MIDI
timing and performance.
This document is very short and the whole content is important to understand all functions of M4U eX. Please
take the time to read through it and do not hesitate to contact ESI if you have any questions.
Features
USB 3.0 MIDI interface
100% class compliant, works without the installation of a driver
USB bus powered
8 MIDI ports, 4 on the front and 4 on the back
automatic input and output detection, each port works as a MIDI input or a MIDI output
standalone operation possible
can be used as MIDI thru solution in standalone mode to send one MIDI signal to 7 outputs
can be used as MIDI merger in standalone mode to merge 7 MIDI signals to a single output
patches MIDI signals through to other ports even without a computer
3-port USB 3.0 hub with external 5V DC power supply to power USB devices
multiple units can be used with one computer at a time
downwards compatible to USB 2.0 with a USB 2.0 legacy mode
dimensions roughly 17.5cm x 12.0cm x 4.5cm
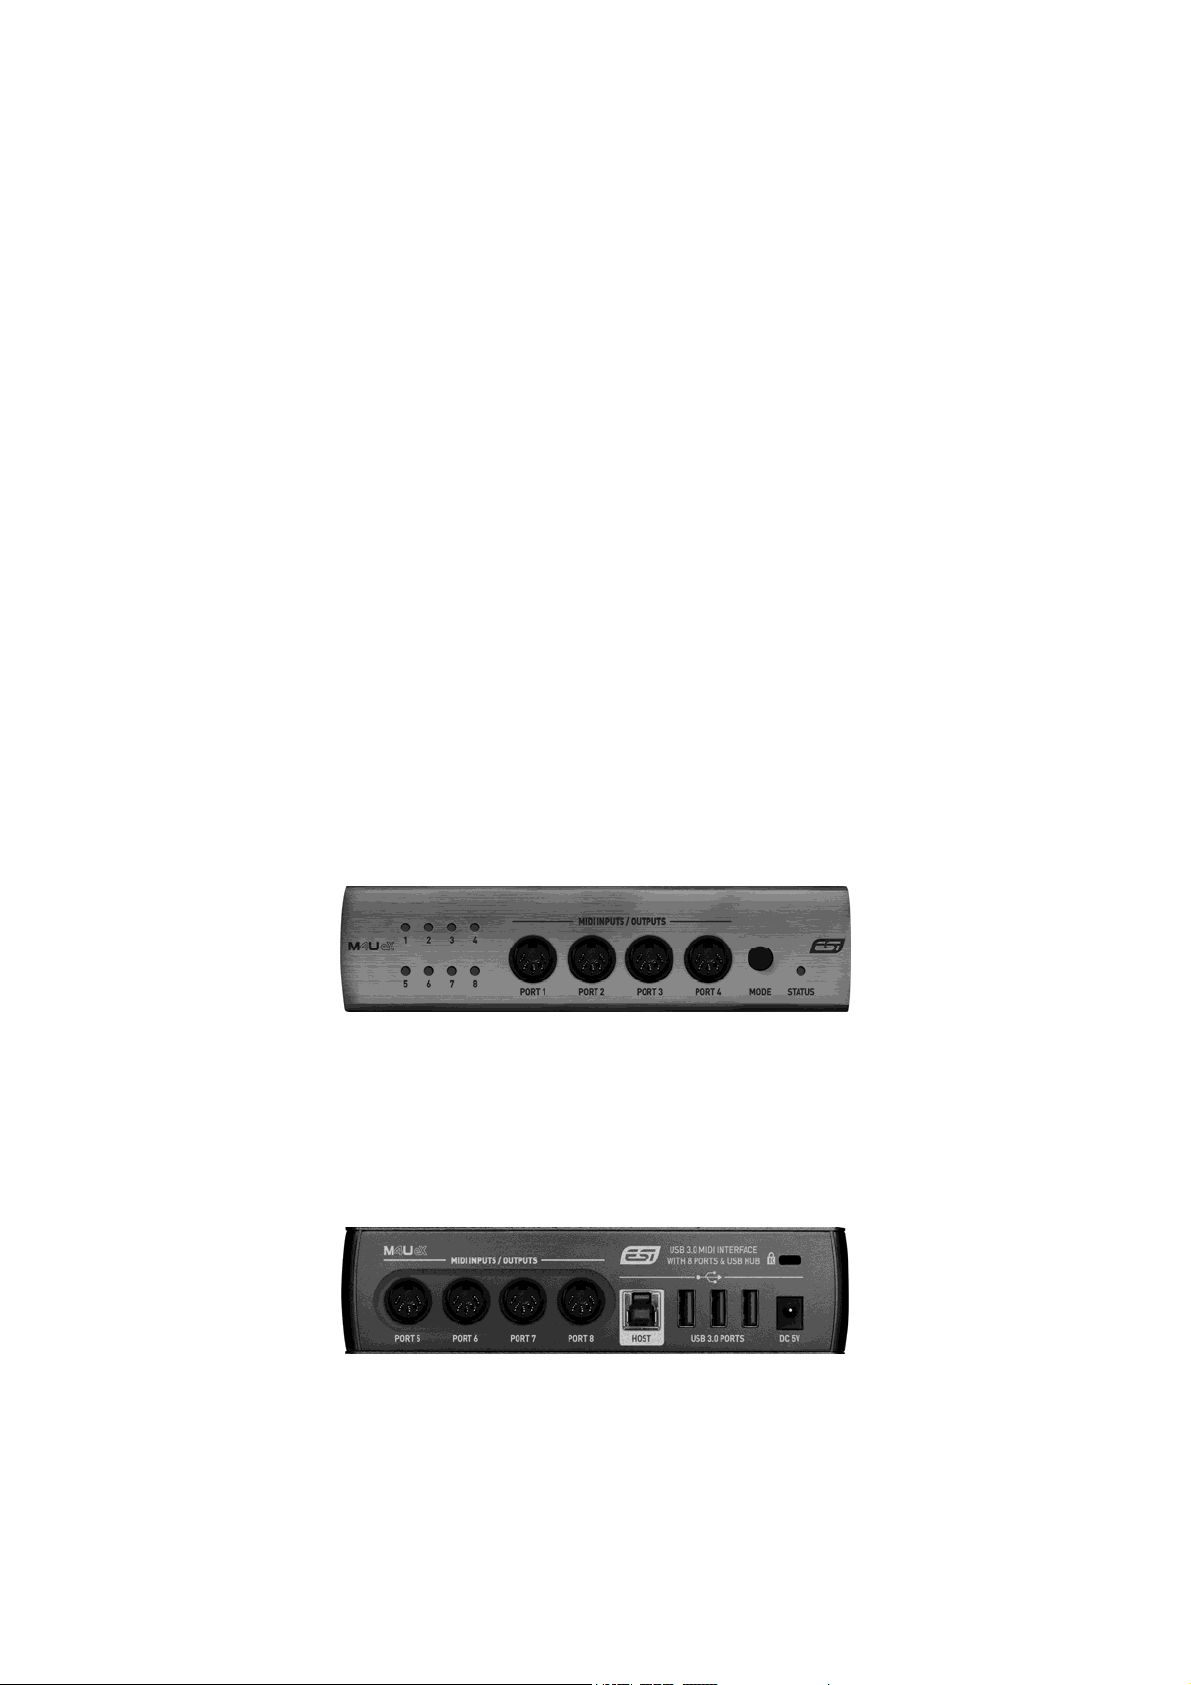
Front Panel
From left to right, the front panel features 8 LEDs that each can be either green (indicating that the corresponding
port is currently working as an input) or red (which means that the corresponding port works as an output). Next
to it are the MIDI ports number 1 to 4. On the right you can find the MODE button to select a standalone mode
(described below). Right of that is the STATUS LED: it is red when the unit is used as a standalone device (with
power supply connected) and green when it is connected to a computer via USB.
Rear Panel
The rear panel features MIDI ports number 5 to 8, next to the USB HOST connector which is used to connect
M4U eX to a computer. Right of it are the 3 USB 3.0 PORTS that allow you to connect and use any other USB
device with your computer (i.e. USB keyboard, USB memory, USB dongle, etc.) and a DC 5V connector to
connect M4U eX to the included power supply. To the very right top there is a standard laptop lock connector
that you could use to prevent the unit from being stolen.
2
Page 3

ESI M4U eX
Installation
Find the USB port on your computer. Make sure your computer is switched on. Connect the supplied USB cable
between the connector on the back of M4U eX and the USB port on your computer. No driver installation is
needed. If your computer has both USB 3.0 and USB 2.0 ports, you will achieve better performance when using
a USB 3.0 port. In most cases these are in blue color – check the manual of your computer for more details.
Also connect the included 5V DC power supply to M4U eX. The device will work as a MIDI interface only (with
the USB hub disabled), if you do not use this power supply. However, when you use the USB hub, it is important
to use the power supply as well to ensure that your other USB devices get enough power.
Usage in Applications
The MIDI ports of M4U eX automatically appear in your MIDI compatible software. Each port is displayed with
a device name with a number, starting from 1 and ending with 8. When you want to use a specific port as an
output, you need to select the device with the corresponding number and send data through it. You will then see
that the corresponding LED on the M4U eX front panel will be red. Make sure this port is connected to the MIDI
input of the device (i.e. sound module, synthesizer, etc.) you want to send the data to.
To use a port as an input, connect it to the MIDI output of a device (i.e. keyboard, etc.) and after receiving data,
you will see that the corresponding LED on the M4U eX front panel will turn green. The data of this device will
be sent through the MIDI device with the corresponding number in your application software. Please note that
many MIDI compatible software open all MIDI inputs simultaneously by default – more details can be found in
the documentation of the application.
Standalone Operation
M4U eX can also be used in standalone mode to route MIDI signals from inputs to outputs when it is not
connected by USB to a computer, but is used with the 5V DC power supply. This means that the USB 3.0 hub is
disabled when you use it as a standalone device. You can step through the modes that are described below by
pushing the MODE button on the front panel.
Pass-through (mode 1)
When the unit is in pass-through mode, you will see that always groups of two ports become an input (as indicated
by the corresponding LEDs being green), with the next two being an output (as indicated by the corresponding
LEDs being red). Signals will be routed from input 1 to output 3, input 2 to output 4, input 5 to output 7 as well
as input 6 to output 8. Based on your setup, this allows you for instance to keep M4U eX connected between your
MIDI devices and use your master keyboard to send signals to your sound generators, even when the computer
is turned off.
MIDI thru (mode 2)
When the unit is in MIDI thru mode, port number 1 becomes an input (as indicated by the LED number 1 being
green) and all other ports 2 to 8 are an output (as indicated by those LEDs being red). What happens now is that
any signal that goes in through port number 1 gets distributed and sent out identically through each other MIDI
port number 2 to 8. You can now distribute a single MIDI signal to up to 7 different devices.
MIDI merge (Mode 3)
When the unit is in MIDI merge mode, port number 8 becomes an output (as indicated by the LED number 8
being red) and all other ports 1 to 7 are an input (as indicated by those LEDs being green). What happens now is
that all MIDI signals that are going into any of the MIDI ports number 1 to 7, will be merged together and sent
out simultaneously through the output port 8. You can merge the signals from up to 7 MIDI devices and send
them to one single target this way. Note that SysEx data will only be transferred when it arrives through input
number 1 (which means that there is a priority) as merging other signals while a SysEx data stream is being
3
Page 4

ESI M4U eX
transferred would destroy the data and make it unusable. It is not recommended to use the device as a MIDI
merger when you need to transfer SysEx data continuously.
Additional Options
The M4U eX hardware has some additional options that can be changed via DIP switches that you can
find at the bottom of the unit. To change the settings, you need a thin ball pen or tiny screw driver or
maybe a needle. Options can only be changed when M4U eX is not connected to the computer and
also has no DC power, so disconnect those cables first before making any change.
Using multiple units on one computer (DIP switch 1)
To make it more convenient using multiple units of M4U eX with one computer, you can designate one M4U eX
to be the first (or 'A') device and another one to be the second (or 'B') device. Your computer will then remember
which device has used which ports, i.e. you never need to change the assignment between your software and the
physical MIDI ports even if one M4U eX gets temporarily disconnected or you connect the devices with different
USB ports or cables. This is not really a requirement in order to use multiple units (for instance, you can use more
than two M4U eX at one time even), however in complex setups that are changing from time to time, this is a
nice feature. Keep DIP switch number 1 on the OFF position (i.e. down) to designate the unit as 'A' and move it
up (ON position) to designate it as 'B'. When using two M4U eX, you would setup one as 'A' and one as 'B'.
MIDI running status option (DIP switch 2)
M4U eX allows you to enable the so-called MIDI running status by moving DIP switch number 2 into the ON
position (i.e. up). With MIDI running status, it is possible to remove certain status bytes in the MIDI transfer. If
the device you connect to M4U eX supports this, you could reduce the amount of transferred data with this and
possibly improve the performance. Consult the manual of your MIDI devices for more info and check details
about MIDI running status on www.midi.org before using this.
USB 2.0 legacy vs. USB 3.0 high performance mode (DIP switch 3)
M4U eX ships with the USB 2.0 legacy mode being enabled. This is a requirement as many older operating
systems, for instance Windows 7, only have limited USB 3.0 support, in particular for MIDI devices. In USB 2.0
legacy mode, the USB MIDI interface inside M4U eX works as a USB 2.0 device, rather than as a USB 3.0
device with higher performance. The USB 3.0 hub with the 3 ports is not affected by this setting.
To disable the USB 2.0 legacy and enable the USB 3.0 high performance mode, the DIP switch number 3 must
be moved to the ON position (i.e. up). You are enabling the USB 3.0 high performance mode this way, something
that is recommended for more modern operating systems such as Windows 10 and current versions of macOS.
General Information
Trademarks
ESI, M4U and M4U eX are trademarks of ESI Audiotechnik GmbH. Windows is a trademark of Microsoft
Corporation. Other product and brand names are trademarks or registered trademarks of their respective
companies.
Correspondence
For technical support inquiries, contact your nearest dealer, local distributor or ESI support online at www.esiaudio.com.
Disclaimer
All features and specifications subject to change without notice. Parts of this manual are continually being
updated. Please check our web site www.esi-audio.com occasionally for the most recent update information.
Copyright © 2018, All Rights Reserved, August 2018
4
 Loading...