

Page 1
ESI Feature Phone
User’ s Guide
FOR IP E-Class • IVX X-Class • IVX E-Class
Visit www.esiusers.com for up-to-date help.
0450-0366
Rev. E
Page 2

About ESI
ESI (Estech Systems, Inc.) is a privately held corporation based in Plano, Texas. Founded in 1987, ESI
designs and builds innovative telecommunications products for businesses like yours. Because of their
pow erful c ombinati on of value and f eatures, ES I products ar e c onsistent ly recognized by in dustry
publications and leaders.
Copyright © 2004 ESI (Estech Systems, Inc.).
IVX is a registered trademark, and Esi-Dex, Quick Groups, Quick Moves, Virtual Mailbox Key, AutoPage, Quick Page
and Verbal User Guide are trademarks, of ESI. Act! is a registered trademark of Symantec Corporation. Goldmine is a
trademark of Goldmine Software Corporation. Microsoft, Windows, NT and Outlook are registered trademarks of Microsoft
Corporation. Intel is a registered trademark of Intel Corporation. Panasonic and DBS are registered trademarks of Matsushita
Electric Corporation of America.
Information containe d herein is subject to change without notice.
ESI products are protected by U.S. Patents No. 6,067,349 and 6,252,944, and others pending.
ESI is an ISO 9001:2000-certified company. Visit ESI on the Web at www.esi-estech.com.
Page 3

Contents
Introduction................................................................................................................................................A.1
48-Key Feature Phone ................................................................................................................................................................................A.2
24-Key Feature Phone ................................................................................................................................................................................A.4
12-Key Feature Phone ................................................................................................................................................................................A.5
Connecting your ESI phone........................................................................................................................................................................A.6
He lp mode (Ver bal User Guid e)...................................................................................................................B.1
User pr ogra mmin g: A n introduction...........................................................................................................C.1
User programming menu ............................................................................................................................................................................C.1
Voice ma il operat ion...................................................................................................................................D.1
VOICE MAIL key..........................................................................................................................................................................................D.1
Personal greetings.......................................................................................................................................................................................D.1
Leaving messages . . ..................................................................................................................................................................................D.2
AutoPage......................................................................................................................................................................................................D.3
Moving and deleting a message.................................................................................................................................................................D.3
Off-premises “reach me”..............................................................................................................................................................................D.3
Message retrieval.........................................................................................................................................................................................D.4
Live recording...............................................................................................................................................................................................D.7
Off-premises message delivery ..................................................................................................................................................................D.8
Message Recycle Bin (un-delete)...............................................................................................................................................................D.9
Sta tus indicator lamp....................................................................................................................................................................................D.9
Optional voice mail feature: Guest mailboxes ........................................................................................................................................D.10
Optional voice mail feature: Group/broadcast mailboxes...................................................................................................................... D.12
Optional voice mail feature: Cascade paging mailboxes.......................................................................................................................D.13
Optional voice mail feature: Q & A mailboxes......................................................................................................................................... D.14
ESI Feature Phone operation......................................................................................................................E.1
Display...........................................................................................................................................................................................................E.1
Caller ID ........................................................................................................................................................................................................E.1
Keys...............................................................................................................................................................................................................E.2
Dial tone........................................................................................................................................................................................................E.4
Basic phone use...........................................................................................................................................................................................E.4
Direct station selection.................................................................................................................................................................................E.5
Transferring an outside call . . .....................................................................................................................................................................E.5
Conference calling .......................................................................................................................................................................................E.7
Call forwarding..............................................................................................................................................................................................E.8
Call waiting..................................................................................................................................................................................................E.10
Hold/exclusive hold operation...................................................................................................................................................................E.11
Paging.........................................................................................................................................................................................................E.13
Call pickup...................................................................................................................................................................................................E.13
Optional features........................................................................................................................................................................................E.14
Sp ecia l keys............................................................................................................................................... F.1
Esi-Dex...........................................................................................................................................................................................................F .1
Override ring..................................................................................................................................................................................................F.9
Message monitor mode (live call screening) ........................................................................................................................................... F .1 0
Personal greeting reminder....................................................................................................................................................................... F.10
Headset operation......................................................................................................................................................................................F .10
Outside dial tone preference ..................................................................................................................................................................... F.10
Line keys......................................................................................................................................................................................................F .1 1
Optional features.........................................................................................................................................................................................F.1 1
Re m ote IP Featu re Pho ne...........................................................................................................................G.1
1. Channel availability display.....................................................................................................................................................................G.1
2. Channel queue display............................................................................................................................................................................G .1
3. Paging limitation.......................................................................................................................................................................................G.1
4. No 911/emergency calls..........................................................................................................................................................................G.1
Troubleshooting............................................................................................................................................................................................G .2
Using Esi-Link............................................................................................................................................H.1
Overview.......................................................................................................................................................................................................H.1
Location Keys...............................................................................................................................................................................................H.1
Programmable feature keys and Esi-Link: an introduction.......................................................................................................................H.2
Dialing an Esi-Link location..........................................................................................................................................................................H.3
Using feature keys with Esi-Link.................................................................................................................................................................H.4
Other Esi-Link features................................................................................................................................................................................H.7
Dialing into an ESI IP Gateway...................................................................................................................................................................H.9
Page 4

ACD agent operation................................................................................................................................... I.1
Programming the agent log-on/off key.........................................................................................................................................................I.1
Wrap mode.....................................................................................................................................................................................................I.2
LED indicator..................................................................................................................................................................................................I.2
Display indications.........................................................................................................................................................................................I.3
While logged on: no DND, mo nitor mode or call forwa rd...........................................................................................................................I.3
Call waiting.....................................................................................................................................................................................................I.3
ACD administrator key..................................................................................................................................................................................I.3
Analog station s.......................................................................................................................................... J.1
Caller ID.........................................................................................................................................................................................................J.1
Placing calls ..................................................................................................................................................................................................J.1
Transferring calls...........................................................................................................................................................................................J.2
Conference calling........................................................................................................................................................................................J.2
Call forwarding..............................................................................................................................................................................................J.3
Call waiting....................................................................................................................................................................................................J.3
Call hold.........................................................................................................................................................................................................J.3
Paging............................................................................................................................................................................................................J.4
Call pick-up....................................................................................................................................................................................................J.4
Voice mail operation from an analog station ..............................................................................................................................................J.4
Analog station programming........................................................................................................................................................................J.7
Index
Page 5

User’s Guide Introduction
A
Introduction
Accessing the rich E SI fe ature se t is simp le and eas y thr ough the straightforward des ign of each of the
various ESI Fea ture Phones. Each feature has been des igned for ease of use while pr o viding
capabilities needed in an advanced business phone.
You will be able to lea rn man y o f the features by s imp ly using you r phone; and this ESI Feature Phone
User’s Guide will introdu ce you to the wide variety of features o ffe red by you r ES I phone s ys tem an d
how to use your phone effectively to achieve maximum benefits.
What it covers
This User’s Guide covers the use of:
• 48-Key Feature Phone (D igit a l, TAPI, IP and Remote IP)
• 24-Key Digital Feature Phone
• 12-Key Feature Phone
• 60-Key Expansion Console
...with the following ESI phone systems:
• IVX X-Class (IVX 256 x and I VX 128x)
• IVX E-Class (IVX 128e and IVX 72e)
• IP E-Class (IP 200e and IP 40e)
How it’s arranged
• Section A — Phone illustrations
• Section B — User help
• Section C — User programming
• Section D — Voice mail opera tion
• Section E — Phone operation
• Sections F through K — Special keys and features
.1
Page 6

Introduction User’s Guide
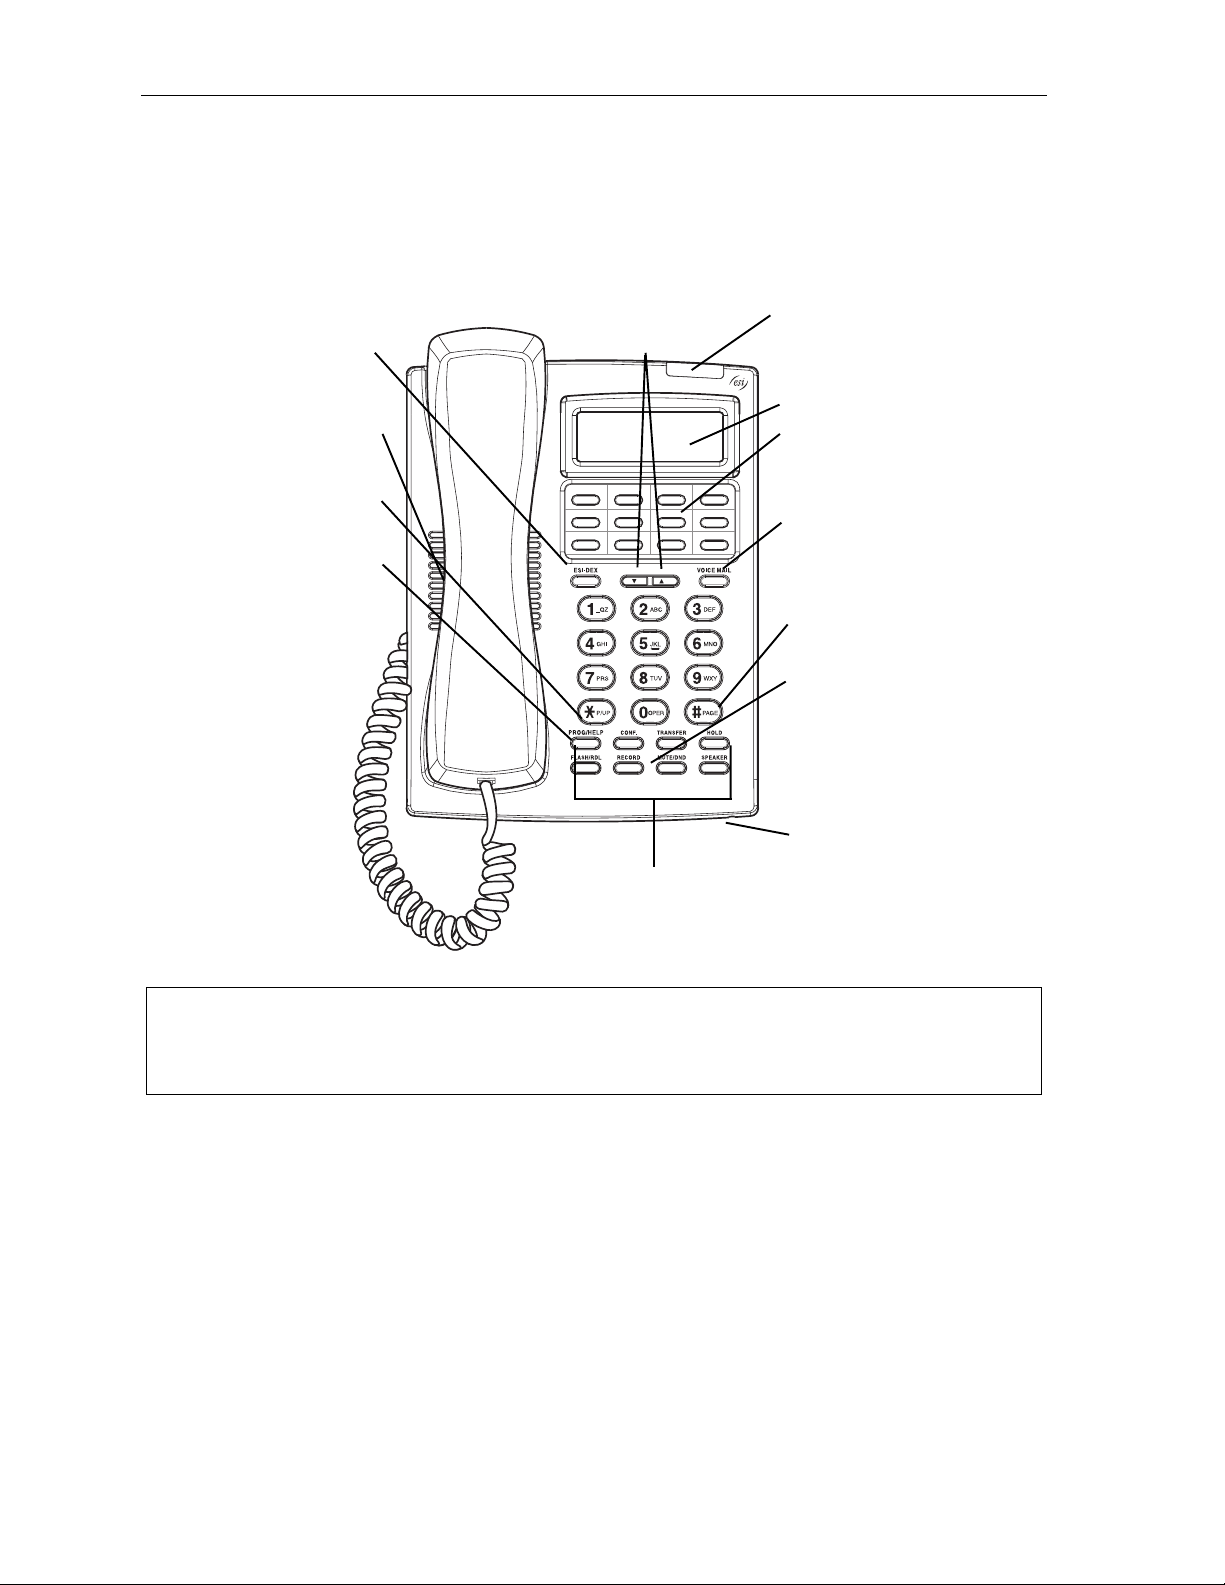
48-Key Feature Phone
The 48-Key Feature Phone has a variety of programmable and built-in features. It comes in four
versions: Digital; TAPI; IP; and Remote IP. Additionally, it supports the optional 60-Key Expansion
Console. All four versions of the 48-Key Feature Phone offer the same basic features which are
described hroughout this User’s Guide. The 48-Key Feat ure Phon e’ s built - in voice ma il feat ures and
voice prompts make it easy to program an d use.
PROGRAM
soft fe ature key
(pg. C.2)
HELP key for
access to Verbal
User Guide
and tutorial
(pg. B.1)
Speaker
Status ind ic ator
lamp (pg. D .9)
3-line, 56- c h ar acter dis p lay
Volume/scroll keys
ESI-DEX
soft feature key
(pg. F.1)
Context-specific
key to select
displayed options
P/UP
(pickup) key
(pg. E.10)
Fixed feature keys
(pg. E.2)
Microphone for
buil t-in speake rphone
VOICE MAIL
key (pg. D.1)
RECORD key
(pg. D.7)
30 program mable
feature keys
(pg. C.2)
PAGE key
(pg. E.10)
Hint: On any of these phone varieties (including the 60-Key Ex pansion Console), you can perform direct
programming by holding down a programmable feature ke y for at least two seconds (similar to how you
might program a car radio button). This isn’t applicable to the fixed-feature keys which, as their name
implies, are already programmed.
A.2
Page 7

User’s Guide Introduction
A
Optional 60-Key E xpansi o n C onsole f or use w ith the 48-K ey Fe at ur e P hone
The 60-Key Expansion Console adds 60 more programmable feature keys to your ESI Feature Phone.
You program the Expansion Cons ole’s k eys just as you do the programmable f eature keys on your ESI
Feature Phone , using eith er dire ct or traditional program ming (see page C.2).
Note: Only one key can exist per extension, feature or operation. If you program a second key for the same
extension, feature or operation, this automatically erases the first key so programmed, thus making it
available for a new extension, feature or operation.
Hint: You may find it easier to write in the names on the overlay before you program the keys and attach the
overlay to the Console.
60 program mable
feature keys
(pg. C.2)
in two banks
of 30 each
Hint: On any of these phone varieties (including the 60-Key Ex pansion Console), you can perform direct
programming by holding down a programmable feature ke y for at least two seconds (similar to how you
might program a car radio button). This isn’t applicable to the fixed-feature keys which, as their name
implies, are already programmed.
.3
Page 8
Introduction User’s Guide
4
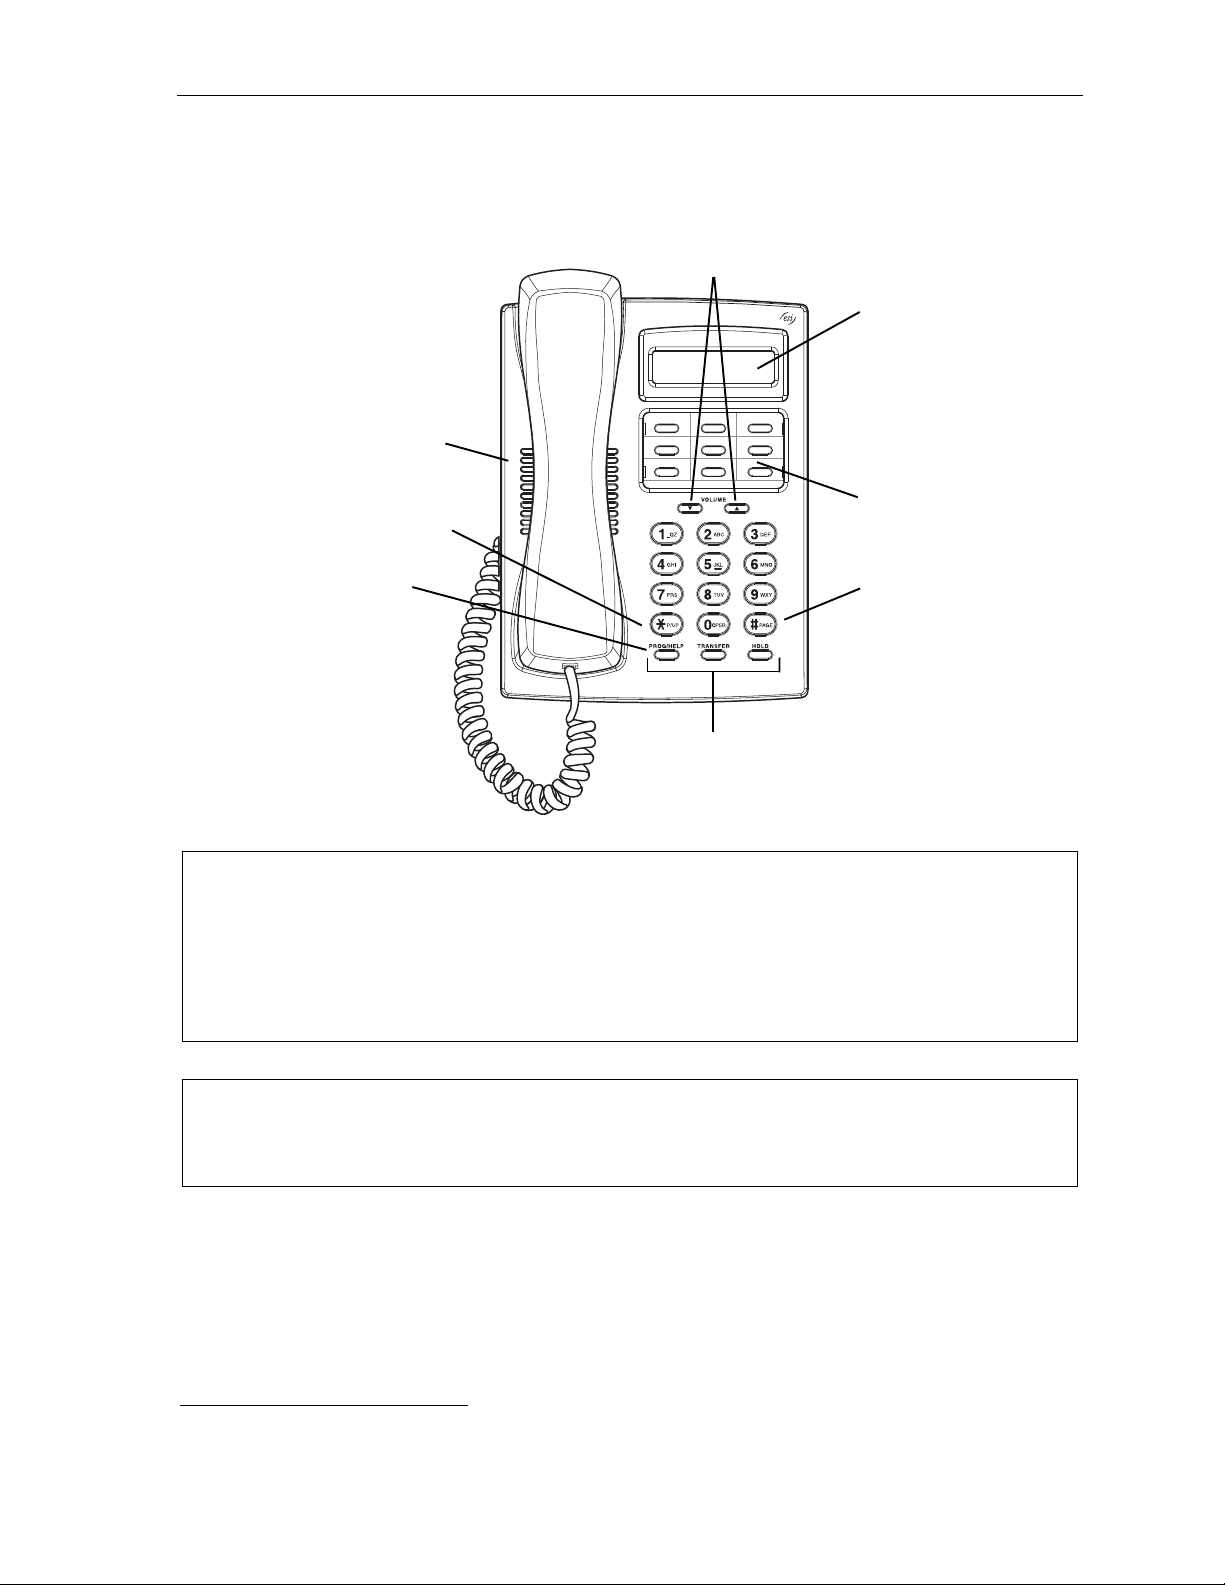
24-Key Feature Phone
The 24-Key Feature Phone has features similar to those of the 48-Key Feature Phone. However, the
24-Key Feature Phone is avai lable only as a digital model and doesn’t suppo r t TAPI, IP or the 60-Key
Expansion Conso le . As is true for the 48-Key Fe ature Ph one, the 24-Key Feature Pho ne’ s built-in voice
mail features and voice prompts make it easy to program and use .
ESI-DEX key (pg. F.1)
Speaker
P/UP (pickup) key
(pg. E.10)
PROG/HELP combo key
for phone pr o gramming
(pg. C.2) and access to
Verbal User Guide
and tutorial (pg. B.1)
Volume/scroll keys
Other fixed feature keys
(pg. E.2)
Status ind ic ator
lamp (pg. D .9)
2-line, 32- c h aracter display
12 program mable feature
keys (pg. C.2)
VOICE MAIL key (pg. D.1)
PAGE key (pg. E.10)
RECORD key (pg. D.7)
Microphone for
buil t-in speake rphone
Hint: On any of these phone varieties (including the 60-Key Ex pansion Console), you can perform direct
programming by holding down a programmable feature ke y for at least two seconds (similar to how you
might program a car radio button). This isn’t applicable to the fixed-feature keys which, as their name
implies, are already programmed.
A.
Page 9
User’s Guide Introduction
A
12-Key Feature Phone
The 12-Key Feature Phone includes the basic, most co mmo n ly used phone fea tures . This simplified
model is available only as a digital model and doesn’t support TAPI, IP, the 60-Key Expansion Console,
voice mail
1
or Esi-Dex.
Speaker
P/UP (pickup) key (pg. E.10)
Volume/scroll keys
1-line,
16-char ac t er d isp lay
9 programmable
feature keys (pg. C.2)
PROG/HELP combo key
for phone pr o gramming
(pg. C.2) and access to
Verbal User Guide
and tutorial (pg. B.1)
Fixed feature keys
(pg. E.2)
PAGE key (pg. E.10)
Note: The following features aren’t available on a 12-Key Feature Phone:
• Certain special keys and features (see “Special keys,” page F.1).
• Esi-Dex.
• ACD operation.
Additionally: to use voice mail, co nference calling and mute/DND on a 12-Key Feature Ph o ne , you
must program these features into programmable feature keys (see “Programmable feature keys,” page
C.3, and “O pt ional features,” pag e F.11).
Hint: On any of these phone varieties (including the 60-Key Ex pansion Console), you can perform direct
programming by holding down a programmable feature ke y for at least two seconds (similar to how you
might program a car radio button). This isn’t applicable to the fixed-feature keys which, as their name
implies, are already programmed.
1
The 12-Key Feature Phone doesn’t have a hands-free microphone, and therefore can’t serve as a true two-way speakerphone.
Its speaker plays pages.
.5
Page 10

Introduction User’s Guide
Connecting your ESI phone
Depending on which ESI phone you have, use the appropriate diagram (below) to connect it. Each
diagram represen t s the pa nel on the phone’s underside.
Note: The “Top of phone” and “Bottom of phone” references in these diagrams show the correct vertical
orientation of the phone — i.e., the part with the d isplay is the top .
Line cord
to wall
Handset
To
headset
(TAPI)
to PC
12-Key Featur e P hone
24-Key Featur e P hone
• Connects like a basic phone.
• Handset plugs into r ight-side jack.
• Line cord plugs into lef t-side jack.
48-Key Digi tal Fe atur e P hone
In addition to how the 24- Key F ea ture Ph one connects
to the handset and line cord, note the presence of a
headset jack
1
, as well as the following information:
To powe r
To 60-K ey
Console
To 60-K ey
Console
supply
Line cord
Connectors on bottom of
48-Key D ig it al Feature Ph one
To
LAN
To
headset
Handset
to wall
(headset jack shown)
To
PC
Handset
• T AP I version includes a cable for conne c t ing to you r
PC’s s er ial port.
• 60-Key Expansion Console ca ble (inc luded wit h each
Console) uses standard RJ-11 telephone connectors.
48-Key IP Feature Phone
48-Key Rem ote I P Feature Phone
In addition to the details mentioned previously for
the 48-Key Digital Feature Phone, each IP Feature
Phone includes :
• A power supply that is unswitched (i.e., always-on AC
outlet) and plugs into th e phon e.
• An Ethernet cable, which connects the
phone to a PC (or, if no PC is present, directly to a
router, switch or hub) to achieve connectivity to a local
area network (LAN).
Note: When the phone is in the highest upright position, use the wall-mount hook located under the handset
to secur e th e handset when you ’re not using the phon e.
1
On 48-Key Feature Phones shipped by ESI to its Resellers on or after March 1, 2004.
A.6
Page 11

User’s Guide Help mode (Verbal User Guide)
Help mode (Verbal User Guide)
Your ESI phone sys tem’ s Help mode (also called t he Verbal User Guide) — a carefully conceived
combination of spoken information, display readouts and even key illumination when appropriate — is a
powe r ful t ool to h elp you learn h ow to use th e s ystem’s many features.
Note: As explained on page E.2, each of the two smaller Feature Phones, 12-Key and 24-Key , has a combo
PROG/HELP ke y.
Tutorial
When y our st ation i s idle, press HELP, and then follow the spoken Help menu to:
• Learn how to use the phone • Hear a description of how any key is used
• Learn how to use voic e ma il fea tures • Hear a complete tut or ia l on phone operation
Help during st ation programm i ng
To hear a detailed de s c r iption of a functi on you wish to pr ogram , pres s HELP while programming it.
Help during a call
Press HELP while on a call and this will place the call on hold, whereupon you can use Help mode to
hear a description of the function you wish to perform. When you exit Help mode, you will be
reconnected to the ca ll.
While you are either in Help mode or programming your phone, your station will be temporarily placed in
DND (see “MUTE/DND,” page E.3). Anyone calling your station while you are in DND will be forwarded
to your mailbox (or other destination set by the installer).
Exiting Help mode
To exit Help mode, simply hang up.
Visit www.esiusers.com for up-to-date help.
B.1
Page 12

Help mode (Verbal User Guide) User’s Guide
(This page included for pagination purposes only.)
B.2
Page 13

User’s Guide User programming: An introduction
User programming: An introduction
Voice pr o mp ts will play menu and sub-menu options to access the desired feature. You don't have to wait
for the enti re prompt to be played. Therefor e, once y ou’ve becom e familiar with the prompt s (cons ult
“User programming menu overview,” below), you can quickly set any frequ ently used feature.
Program m ing hel p
During any of the programming steps, press HEL P to hear a more detailed description of the feature
and related programming options.
Exiting pr ogr am m ing mode
To exit programming mode, simply hang up.
User programming menu
Overview
1 Select personal greeting
1 Record
2 Delete
3 Hear
2 Programmabl e feat ure key s
(Station keys, line keys, speed-dial keys,
other feature keys)
3 Station options
1 Call waiting/background announce
2 Personal greeting reminder
4 Outside dial tone preference
5 Hands-free answer
6 Message monitor
4 Station audibles
1 Station ring tone
2 Station ring volume
3 Message ring
5 Password
1 Enter
2 Delete
3 Hear
4 Security level
6 External message notification
1 Delivery options
2 Phone delivery
3 Pager notificatio n
4 Urgent message
9 Un-delete
Note: Selections 3, 5 and 6, as well as the background announce function under “Station options” (see page
E.11), are not available on a 12-Key Feature Phone.
C.1
Page 14

User programming: An introduction User’s Guide
1 Select per sona l gr ee ting
Select the desired greeting — 1, 2 or 3. The syst e m w ill play the cu rrent greeting, followed by
prompts to re-record, delete or he ar again — or select the cur re nt gree t ing by pres s ing #.
1 Record personal greeting
Begin recording at the tone. Press 1 to stop. The new personal greeting automatically replaces
the previous greeting.
2 Delete personal greeting
When prompted, press 2 again to confirm deletion.
Warning: Y our mailbox is disabled if no pe rsonal greeting exists. Never delete all of your existing
personal greetings before you record at least one new one .
3 Hear current personal greeting
2 Programmable feature keys
There are two methods for performing programming of your phone:
• Direct programming — Select the key you want to program, and hold it down for at least two
seconds. This not only initiates programming bu t also lets you immediately pr ogra m that spec ific key .
• Traditional programming — Press PROGRAM. The Verba l He lp Gu ide will speak to you,
walking you through the full menu, during which you can choose the appropriate option.
Direct programming example:
You wish to set one of the keys to dial a co-worker, whose extension is 105. Hold down the key
for at least two seconds. This automatically puts you in feature key programming. Follow the
prompts to enter 1 0 5. (This has allowed you to skip two steps — pressing PROGRAM and
selecting a menu option — that you’d have had to perform if using traditional programming.)
C.2
Page 15

User’s Guide User programming: An introduction
How the programmable feature keys can be set
• Line keys — If a line number (1 through 66) is programmed, the programmable feature key
becomes a line key, providing the appropriate lamp information and manual outside-line access.
• Stati on keys — If the digits entered constitute a three-digit number, the programmable feature
key will become a station key, providing the appropriate lamp information and easy access or
tra nsfer. Three-digit numbers entered ca n be:
— User extensions (100–195 and 200–229) — Group mailboxes (500–516)
— Department pilot numbers (290–299) — Cascade paging mailboxes (520–529)
— Guest/info ma ilboxes (300–489) — System speed d ial numbers (600–699)
— Q & A mailboxes (490–499)
• Speed-dial keys — In addition to programming a programmable feature key with a system
speed-dial numbe r, you can create personal speed-dial keys for au toma t ic d ialing of freq uen t ly
called outside numbers. If you progra m 9 (or 8 or 71–76) plus a phone number, the
programmable feature key becomes a speed-dial key. When you program a speed-dial key,
there's no need to insert a pause after the 9 (or 8 or 71–76). Use the V scrol l k ey to e nter sp ecial
characters for dialing (see page C.5 for more details.) The speed-dial number can be up to 24
characters long .
Note: You can also program Location Keys for use with Esi-Link. S e e page H.1 for more info rmation.
• Other feature keys — If you enter a feature code, the programmable feature key will serve as
an enable/disab le ke y for that feat ure. The Installer may have prog ra m med certain stations for
accessing additional features (see “Optional features,” page F.11); consult your System
Admi nistrator to dete rmine yo ur access .
Keys’ LED activity during programming
Key type and LED indication
Mode
Currently being pr ogrammed and
previously assigned
Currently being pr ogrammed and
previously unassigned
Programming mode — Was assigned or
viewed in current session
Assigned in a previous programming session
and not yet viewed in current session
Never assigned and not yet viewed in
current session
Station key or
Virtual Mailbox Key
Flas hi ng r ed Flas hi ng green Flashing amber
Flashing red Flashing red Flashing red
Blinking red Blinking green Blinking amber
Solid red Solid green Solid amber
Off Off Off
Line key
Feature key
or speed-dial key
C.3
Page 16

User programming: An introduction User’s Guide
4
3 Stati on optio ns
The station options sub-menu (PROGRAM 3) lets y ou ac tivate or deactivat e s everal features your
station c an prov ide. At each optio n s ub-menu, 1 enables the option and 0 disables it. ( Each option
listed below is explained elsewhere in this manual, as noted.)
Note: These options are not available on the 12-Key Feat ure Phone.
1 Call waiting/background announce
See page E.10 for call waiting and page E.11 for background announce.
2 Personal greeting reminder
See page F.10.
4 Outsi de dial tone pr eferen c e
See page F.10.
5 Hands-free answer
See page E.3.
6 Message monitor
See page F.10.
4 Station audibles
The station audibles programming prov ides contr ol of the follo wing audible item s:
1 Station ring tone
You can select from six possible tones to help distinguish it from other nearby ringing phones.
Press W or V to select a tone, then press # to accept it.
2 Station ring volume
Press W or V to set the desired ringer volume (range: off to high), then press # to accept it .
3 Message ring
When enabled, this feature will periodically generate a short ring tone at your station as an
additional alert that you have new messages.
C.
Page 17

User’s Guide User programming: An introduction
5 Password
1 Enter new password
Your password may consist of 2–8 digits followed by # (0 canno t be t he firs t digit ). En ter ing only
0 as the password will turn off the password requirement.
2 Delete current password
Resets the p as s w ord to the de fau lt pas s w ord.
3 Hear current password
Displays and plays back the current password.
4 Password security level
Selection Result
0 No password required for access from any phone
1 Password required only for remote access, either off-premises or from other
stations within the system
2 Password always required
6 External message notification
Note: To use this feature, a 12-Key Feature Phone must have a voice mail key assigned.
1 Delivery options
1 Delivery to phone number only
2 Notify pager only
3 Call phone first, then page
4 Call and page at the same time
0 No of f- premises delivery
2 Phone delivery
1 Enter phone number
Ent er the phone number (24 digi ts, max imum) f ollowed by #. Do not inc lude an outsi de line
access co de (i.e., don’t add 9, 8 or 71–76) before the number.
Use the V scroll key to enter special characters; use the W scroll key to backspace. You
also can use the scro ll ke ys to view the number after it’s s aved. To change the numb er, you
must delete it and then re-enter it as desired.
2 Delete phone number
Deletes the currently programmed phone number.
3 Display current phone number
Displays the currently programmed phone number.
C.5
Page 18

User programming: An introduction User’s Guide
3 Pager notification
1 Enter pager number
Enter the pager number (24 digits, maximum) followed by #. Do not include an outsi de line
access co de (i.e., don’t add 9, 8 or 71–76) before the number.
Use the V scroll key to enter special characters; use the W scroll key to backspace. You
also can use the scro ll ke ys to view the number after it’s s aved. To change the numb er, you
must delete it and then re-enter it as desired.
2 Delete pager number
Deletes the currently programmed pager number.
3 Display current pager number
Di s play s the currentl y progr ammed pager number.
4 Urgent message activation
1 Urgent messages only
Only urgent messages will be delivered.
Note: Remember to say in your personal greeting that callers should press 2 to mark a
message as urgent. (For more on personal greetings, see page D.1.)
2 All new messages
Any new message will be delivered.
9 Message Recycle Bin (un-delete)
The most recently deleted message will be played firs t. Press 9 to move to the next message.
Press 8 to restore the mess age to you r ma ilbox as a new message.
C.6
Page 19

User’s Guide Voice mail operation
Voice mail operation
Your phone system provides accurate and timely messages. Others will become more comfortable
leaving you voice mes s ages if you promptly retrieve and respond to your mes s ages .
VOICE MAIL key
On a 48-Key or 24-Key Feature Phone, use the blue VOICE MAIL key for direct access to all voice
mail features, such as picking up messages or transferring directly to mailboxes.
Warning: T o use voice mail from a 12-Key Feature Phone, you must assign key code 579 to a programmable
feature key (see “Programmable feature keys,” page C.3, and “Optional features,” page F.11).
Failing to do so will disable the mailbox. ( When you try to access a disabled mailbox, the system
will notify you that it’ s d isable d .) You still can retrieve prev ious ly lef t messages and access use r
programming, but the mailbox won’t be able to receive new voice messages. Therefore, to enable
the mailbox, assign key code 579 to a programmable feature key.
Personal greetings
Initially, your mailbox has a generic greeting: “You have reached the mailbox for extension xxx.
Dial 0 to reach the operator or begin recording at the tone.” You can rec ord up to t hree different
personal gree tings in your ow n voice indicating your a vailab ility to re tu rn ca lls.
Examples
Sample greeting 1: Hi, this is [name]. I’m away from my desk or on the phone right now; so please either dial
zero to reach our operator, or leave me your name, number and message at the tone and
I’ll get back to you as soon as I can.
Sample greeting 2: Hi, this is [name]. I’m out of the office. You ma y dial 1 2 2 for my assistant or, if you prefer,
you may leave me a voice message at the tone — I’ll check in regularly — or, if it’s
import a nt, dial 2 now to leave me an urgent message that will page me automatically.
Sample greeting 3: Hi, this is [name]. I’m away from my desk at the moment. T o have me paged, dial 3.T o
reach the operator, dial zero. Otherwise, leave your name and phone number at the beep
so I can return your call.
Depending on auto attendant usage and your personal preferences, you may wish t o incl ude one or
more of these options in your personal greetings:
Option Instruction
0 To reach the operator
1 To skip directly to the record tone (or “beep”)
2 To mark th is mess age as urgent (see “Urgent messages,” page D.9)
3 To page the person for whom the caller is leaving a voice mail message
4 To perform off-premises “reach-me” (see “Off-premises ‘reach-me,’ page D.3)
8 To the main greeting (if your system is using the auto attendant)
You can change any personal greeting as often as necessary, by just recording over a previously
recorded personal greeting.
XXX An extensi on number of another user
Warning: Do not delete all of your personal greetings; make sure at least one always remains. Deleting all
the greetings not only doesn’t revert to the initial defau lt g reeting , it a lso will tu rn off your mailbox.
D.1
Page 20

Voice mail operation User’s Guide
Personal greeting keys
You can program a pr ogrammable f eature key a s a personal greeting key for any one of the three
personal gree tings (see page F.13). Once crea ted, this shortcut can then be used to act i vate the
associated personal greeting (the key’s LED will glow green and the greeting played as confirmation).
Note: To re-record this greeting, press RECORD while the confirmation is playing and follow the prompts (on
a 12-Key Feature Phone, which has no RECORD key; press PROG/HELP 1 3 1 fro m idle).
Leaving messages . . .
If you call another sta t ion tha t is DND , busy or does not ans wer — or if you call a special ma ilbox (such
as a guest or group ma ilbo x) — you will be transferred to the ma ilbo x. You can skip the ma ilbox’s
personal greeting by pressing 1; this t a kes you directly t o th e reco rd ton e.
. . . directly in another user’s mailbox
The procedure for going directly to another user’s mailbox without ringing his/her extension depends
upon whether you have that user’s extension se t as one of your station keys:
• If you do, press VOICE MAIL and then the person’s station key.
• If you don’t, press VOICE MAIL and TRANSFER and then d ial the extension number.
Either will connect you directly to that user’s personal greeting.
. . . in several users’ mailboxes using a Quic k Gr oup
You can leave a direc t mess age in several users' ma ilboxes at th e sa me time by pr es s ing VOICE MAIL
and the desired station keys — thus creating a Quick Group. Y o u can a lso move messages or
recordings to a Quick Group in the same manner.
Notes: You can use only station keys to select the additional mailboxes for Quick Groups.
If you have a department programmed as a station key, pressing VOICE MAIL and then the
department’s station key will leave a message for all members of the department.
D.2
Page 21

User’s Guide Voice mail operation
AutoPage
This feature lets you have outside callers internally page you after they’ve been forwarded to your voice
mailbox and are listening to your personal greeting (see “Personal greetings,” page D.1). You must have
personal greet in g 3 selec te d and it must tell callers to press 3 for this feature. If the caller dials 3
during the personal greeting, he/she is placed on hold; the system then pages you by name, followed by
the phrase “You have a call on line” and the line on which the call is on hold (e.g., “John Doe, y ou have
a call on line 21”) . If you don’ t answer the page within a prog ra m med inte r val, the ca ller is forw arde d
back to your extension/voice mailbox.
Note: This feature is active if your administrator authorizes your station for it, you have set your mailbox to
play personal greeting 3, and a directory name is recorded for your station.
Sample personal greeting 3 for A utoPage:
“Hello. This is Rick. I’m currently unable to receive your call. To have me paged throughout the building,
please press 3 now. Otherwise, please leave me a message after the tone and I will return your call as soon
as possible.”
Moving and deleting a message
When y ou move a messa ge, the system acce s ses another submenu to determi ne whether you want to
move and delete a message, or move and save it. After you pres s 6 to move a message, the pr o mpt will
ask whether you wish to:
• Move the message but also save a copy of it in your voice mailbox
or
• Move the message and delete it from your mailbox.
1
Off-premises “reach me”
After a caller has been fo rw arded to your voice mailbox and is lis tening to your personal gree ting, this
feature allows the caller to be forwarded to a number outside the system — i.e., a regular phone number
rather than an extension. You must have personal greeting 2 selected and it must tell callers to
press 4 for this feature. When the caller presses 4 during your greeting, the system forwards him/her to
the number set for “phone delivery” under “external message notification” (PROGRAM 6 2 — see pp.
C.5–C.6). If that number doesn’t answer, the caller is returned to your voice mailbox. When you receive
a forwarded call, you ’ll be prompted to “press any key” to accept the call.
Note: This feature is activated only if your administrator enables it on your station and you have set your
mailbox to play personal greeting 2.
Sample personal gr eeting 2 for off-premis es “reach me ” :
“Hello. This is Rick. I’m currently out of the office. To attempt to reach me on my mobile phone, please press 4 now.
Otherwise, please leave me a message after the tone and I will return your call as soon as possible.”
1
This feature is activated only if the Installer enables it on your system.
D.3
Page 22

Voice mail operation User’s Guide
4
Message retrieval
Message(s) waiting display
If you have at leas t one new message , the VOICE MAIL LED will blink and your display will show the
number of new and old messages in your ma ilbo x.
1
24-Key
Feature
Phone
Note: Message status (shown in the examples above as NEW 3 OLD 1 ) appears only when new messages exist.
48-Key
Feature
Phone
Retrieving voice mail messages fr om your ESI Featur e P hone
1. Press VOICE MAIL.
2. Enter your password if requ ire d ( you may cha nge the requirement for a pas s w ord in user
programming menu 5; see "P as s w ord,” p age C.5 ) .
3. The ESI phone system will start playbac k o f me ssages with t h e oldes t n ew message a nd c ontinue
until all messages are played. The display will show the origination of the message, the countdown
duration of the message, whether n ew or old, and the time/date of when the message was left.
48-Key
Feature Phone
(also shows
running playback
time in reverse)
24-Key
Feature
Phone
4. At the end of each mes s age , the ES I phone system prompts you for ins t ructions (s ee the cha rt,
“Keys’ functions during voice mail message retrieval,” next page). Once you’ve learned these
prompts, you can proceed more rapidly by pressing one of the appropriate keys any time during a
mess age or during a prompt .
Note: If, while picking up mess ages , y ou receive a call-waiting tone, hang up . When your phone rings,
lift the handset and you will be connected to the waiting ca ll. Alternatively, you may simply press
RELEASE (or quickly press the hookswitch) when you hear the call-waiting tone; this
automatically connec ts y ou to the wa iting call without your having to first hang up, then pick
back up, the handset.
5. To exit playback of messages, simply hang up your phone.
Note: If you hang up during playback of a message , the syste m save s that message and all oth ers
not deleted.
1
A 12-Key Feature Phone will display only the date and time.
D.
Page 23

User’s Guide Voice mail operation
New message skip
When listening to new messages, press 9 twi ce (within two seconds) to s ave a mess age as new. This
message will be played aga in as a new message the next time you acces s your voice mail.
Note: When you press 9 onc e to s a v e the message as old, there is a short dela y b efore the s y stem tells you it
has saved the message. To bypass this delay after pressing 9, ju st press # to hear the nex t message.
Keys’ functions d ur ing voice m ail m essage retr ieval from an ESI Feature P hone
Key Function name Description
1 Pause Pauses for one minute or until you press 1 again.
2 Time and date/
number to ggle
3 Reply Replies to the originator of a message (possible only if message
4 Back up (rewind)
T oggles the bottom line of the display between the message’s
time/date and the caller’s number.
came from another user in the system). Record your reply at the
tone and the n press 1 t o stop, after which the system returns you
to your mailbox and the message to which you were replying.
• If pressed during message playback, rewinds 4 seconds for
each key-press.
• If pressed after the playback has finished, returns to beginning
of message.
5 Fast forward Advances playback 4 seconds for each k ey- press.
6 Move Moves a copy of the message to another user’s mailbox.
7 Delete Deletes the message from the mailbox (see “Message Recycle
9 Save Saves the message (it will play as an old mess age the nex t time
9 9 Save as new Skips over a new message and leaves it as a new message (i.e.,
REDIAL Auto-callback Exits your mailbox without erasing the message, and then
ESI-DEX Store If Caller ID is present, saves to your Personal Dex for later use.
# Leave a message Lets you record a mess age in anothe r mailbox. At the prompt,
Check oth e r box Checks messages in another mailbox (may require a password,
(Not available from an analog phone or off-premises location.)
You may move the copy with or without an introduction.
After the move, the system returns you to your mailbox and the
original message.
Bin,” page D.9).
you re t r ieve messages).
it will be played as a new message the next time you pick u p
messages). You must press the 9 key twice within two seconds.
1
autom at i cally dials the number.
(Not available from an analog phone or off-premises location.)
(Not available from an analog phone or off-premises location.)
enter the desired mailbox number .
depending on the mailbox’s setting; see “Password,” page C.5).
Retrieving voice mail m essages using anothe r user’s ESI Featur e Phone
1. P ress VOICE MAIL and then .
2. Dial your extension number.
3. Follow the pro cedures described in “Retrieving voice mail mess ages fro m yo ur ESI Featu re Phon e”
(page D.4).
1
A local call may not be dialed correctly depending on the limitations of the local dialing plan. You may need to dial some of these
calls manually.
D.5
Page 24

Voice mail operation User’s Guide
Virtual Mailbox Key
(Not available on 12-Key Feature Phone.)
If you frequently p ick up yo ur messages from another user’s ES I Fea ture Phone or have others help pick up
your messages, you may want to program a programmable feature key on that phone as a Vir t ual Mail box
™
Key
for your mailbox. When you have new messages, the key will blin k , pres s it to automatically connect
to your mailbox. Th is featu re does not affect your ab ility to pic kup mes sages from your own phone.
Note: Assign to the programmable key the following — VOICE MAIL and then either your extension
number or your voice mailbox number (see “Programmable feature keys,” page C.2).
Retrieving messages from an off-pr emi ses location
You can pick up messages when away from the office or from an ana log station. Since the disp lay is not
available to you, message handling will operate slightly differently.
To retrieve your message from a remote location:
1. If the auto attendant’s main greeting answers you r ca ll, press and ent er your m ailbox number. If
the operator or another user answers your call, have the person transfer you (by pressing VOICE
MAIL and , then pressing your station key [or entering your mailbox number] and then hanging up).
2. If required, enter your password.
3. The ESI phone system will announce the number of new and old messages, and will start playback
of messages st ar ting w ith the oldes t new mes s age and c ont inue unt il a ll mes s ages and record ings
have played or you press to disconnect.
For more information, see pag e C.5.
Additional functions available during off-premises voice mail message retrieval
Key Function Description
2 Hear time/date Pauses the message, plays the time/date when the message was left and resumes.
5 Access user
programming
8 Main greeting Goes to the main greeting.
0 Operator Transfers you to the operator.
# To other mailbox T o leave a message in another user’s mailbox.
Disconnect Disconnects you from the system. Always press before hanging up (if you press it
Access c er tai n user-programmable features.
Note: Fast forward is not available from a remote location.
during message playback, the system will save the playing message and any other
currently unsaved messages in your mailbox).
D.6
Page 25

User’s Guide Voice mail operation
Live recording
(Not available on 12-Key Feature Phone.)
To begin recording bot h sides of the conver s ation durin g a c all, press RECORD. Recording will continue
until either you press RECORD again, the call is comple t ed or the maximum record limit
1
is reached
(default is 10 minutes). T o resume recording, you must press RECORD again. Du r ing record ing, the
RECORD LED will “flutter” (blink rapidly) green and the RECORDING will appear on the display.
Note: The Installer may have progra mmed your sys te m to inse rt a shor t tone every 15 seconds while recording.
You can record any conversation, in c luding a conference call or serv ice obs erving call (see “Serv ice
observing,” page F.12). You also can make a personal recording — useful for recording personal
reminders, in o ffice conversations or mee t ings — by liftin g the hands e t or pressing SPEAKER and then
pressing RECORD. Internal dial tone will stop and recording of your station will begin until either
RECORD is pressed again or you hang up, whichever occurs first.
Quick Move™
The Quick Move feature i s perfec t for u s e by a receptionist or, indeed, a nyon e who recei ves a call th at
would be more appropriate fo r one or more other curr ently unavailable co- worke rs (for whom yo u have
programmed station keys on your phone). Let’s say someone calls and wants to speak to one of your
co-workers. You say that the co-worker isn’t there now but you’ll be happy to let the caller leave a voice
message. Howe ver, the caller protests that he does n’ t “want to talk to a recording” and wan t s you to
write down the message. Worse, you know that some of your other co-workers will want to hear what
this caller has to say.
But here’s all you have to do: just press RECORD and then, while recording (and “taking down” the
message, as far as the calle r knows ) , press the sta t ion k eys for those to whom you wish to Quic k Mo ve
the message. You can do this for as many stations as you have station keys programmed on your phone.
Each designated user's mailbox will receive the recording as a new message, but your mailbo x w ill not
have the recording. This feature saves you a number of steps — i.e., you won’t need to access your
mailbox and move the re cording and delete the reco rding from your mailbo x .
Playba ck of re cordings
If you have recorde d conversations, they w ill play aft er y our old mess ages, or you can access them
directly by pressin g VOICE MAIL, RECORD . This will play back th e re co rd ings , sta rting with the newest
recording. Reco rd ings can be hand led just like other mess ages .
1
Adjustable by only the Installer.
D.7
Page 26

Voice mail operation User’s Guide
Off-premises message delivery
Introduction
The ESI phone system can be programmed to deliver messages to an off-premises phone and/or to
page you when you r voic e ma ilbo x re ce i ves a mes s age. Y ou can set the phone numbe r (ce ll phone ,
home number, another extension, etc.), a delay time (the peri od that the sy s tem is to wait before
attempting to de li ver the mess age) , and the pager number. You can fur the r set the system to deliver
only messages ma rked as urgen t (see "U rgen t mes s age s ,” page D.9).
The administr ator ca n also se t for your station th e:
• Number to be called or paged
• Delay period
• Number of attempts
• Interval between attempts (in increments of 30 minutes)
• "Quiet per iod” which s uspends mess age deliver y for lat e night, etc.
If you have programmed both an off-premises delivery number and a pager number, the system will
prompt you to choose one of the following delivery options:
• Phone-only
• Pager-only
• Phone, then pager — Attempts phone delivery until the maximum number of attempts has been tried,
then follows paging program ming.
• Phone and page at the same time
• No off-pre mises delivery
Message delivery
. . . To a phone
Whenever your ma ilbo x rece ives a new /u rgen t mes s age (see "Urge nt mess ages,” below), the system
will call the number that you have programmed and play the prompt: "You have messages. Please enter
your password. ” The prompt will repeat three times before the system assumes that no one has
answered (i.e., because it has "heard” no password) and disconnects.
Upon answering, enter your password (if you have set your password options for no password, you must
enter 0 as your password).
Warning: A “” response instead of the p as swo r d will cau se the s yste m to suspend calling you until it
receives the next new/ urgent mes sage.
You will then be connected to your mailbox and can proceed with normal remote operation (see
"Retrieving voice ma il mess ages fro m an of f-p re mis es lo ca t ion,” page D.6 ) .
D.8
Page 27

User’s Guide Voice mail operation
. . . To an external pager
You can program pager notification to operate either as the so le not ifica t ion me thod or in con junc t ion
with phone deli very.
You can have the system call and activate your external pager whenever the first new/urgent message
is left in your mailbox and repeat the page (at the interval programmed by the administrator) until all new
messages have been re trieved.
Note: Either entering or deleting the phone number to be called for off-premises delivery or activate your
pager1 will toggle the feature on or off.
Refer to page C .5 , opt ion 6 ( “Exter na l mes s age not ifica t ion” ), for specif ic menu se lec tions .
Urgent messages
You can have all new mess ages delivered or choose to ha ve on ly urgent messages delivered. If you
have enabled the urgent message feature as part of user programming (PROGRAM 6 4), you must
include, in your personal greeting, instruc tions fo r the ca ller to p ress 2 to mark the mess age as urg en t .
(See “Examples: Sample greeting 2” under “Personal greetings” on page D.1.) If you have new, urgent
messages, your VOICE MAIL key's LED will "flutter” (blink rap idly) and , w hen you r etrieve yo u r
mess a ges, th e syste m will play urgent messages ahead of other new messages.
Message Recycle Bin (un-delete)
The ESI phone system stores your most recently deleted 10 messages in a Message Recycle Bi n to
allow you to reco ver, or "un-de lete, ” mess ages that may have been deleted in error.
You access the Mes s age Re cy c le Bin through user programming (PROGRAM 9). Press 9 to advance
through deleted mes s ages . Press 8 to restore a message to your mailbox as an old message.
Status indicator lamp
(Not on 12-Key Feature Phone.)
The red status indicator lamp, located at the top of a 24-Key or 48-Key Feature Phone, indicates
three conditions:
• Phone is off-hook — Light glows solid red.
• Phone is ringing — Light “flutters” continuously.
• Phone has at l east one new voice mail message — Light blinks.
For example, if a user is wearing a headset, it can be difficult to know whether he/she is on a call.
Therefore, just look at the status indicator lamp — if it’s glowing solid red, the person is, indeed on a call.
Note: If more than one of these three cond itio ns is true a t the sa me station , the s ta t us in d icator la mp w ill
behave according to the following priority: off-hook, then ringing, then new voice mail. Here’s an
example. Y ou have a new voice mail message waiting, which makes the status indicator lamp blink.
However, if the phone begins to r ing, the st a tus ind icato r lamp will “flutter” continuously bec au se ring in g
has a higher priority than new voice mail; and, if you then pick up the handset or press SPEAKER to
take the call, the status indicator lamp glows solid red because the off-hook condition has the highest
priority of the three conditions.
1
If pager notification was enabled as described.
D.9
Page 28

Voice mail operation User’s Guide
Optional voice mail feature:
Guest mailboxes
Important: This is a special, optional feature not explained in the tutorial. Be sure to get your guest mailbox
numbe r from the Admin istrator.
Guest mailboxes (300–489) are perfect for personnel such as outside s ales or m anufacturing
personnel who do not have an internal extension assigned to them but still need a mailbox. You can
handle a guest mailbox as it were a regular e xtens ion (i.e., list it in the directory, assign a programmable
feature key for transfer to it, etc.).
Note: A guest mailbox must have at least one personal greeting recorded to be activated and, thus, able to
accep t me s sages.
Personal gr eeti ngs
You can record up to th ree different personal gre e t ings in you r own voice indicating your a vailab ilit y to
return calls. Also, you can change the personal greetings as often as necessary by recording over a
previously recorded personal greeting. (See “Select personal greeting,” page D.1, to learn how to
program these greetings.)
Retrieving guest mailbox m essages from an E SI Featur e Phone
To retrie ve guest ma ilbo x mess ages fro m an ES I Fea tur e Phon e, follow the same procedu re des cribed
in “Retrieving voice ma il mess ages us ing anot her use r’s ES I Fea ture Pho ne” (p age D. 5) , exce p t tha t
you enter your guest mailbox numbe r (in the range , 300 –489) rather than an extension number .
Key s’ functi ons during voice mail message retrieval
See the chart on page D.5.
Virtual Mailbox Key
See “Virtual Mailbox Key,” page D.6.
D.10
Page 29

User’s Guide Voice mail operation
Program m ing your gue st m a ilbox fr om an ESI Feature Phone
Press PROGRAM , then the mailbox number and then # to confirm. You will be prompted to: record
the greeting, change the password, enter an external paging number, or exit by hanging up.
You can record up to th ree different personal gre e t ings in you r own voice indicating your a vailab ilit y to
return calls. To record a personal greeting, press PROGRAM 1 and then follow the instructions you’ll hear.
Tip: If necessary, review “Personal greetings,” pp. D.10–D.10, for options and sample greetings.
You can change any personal greeting as often as necessary, by just recording over a previously
recorded personal greeting.
Warning: Do not delete all of your personal greetings; make sure at least one always remains. Deleting all
the greetings not only doesn’t revert to the initial defau lt g reeting , it a lso will tu rn off your mailbox.
Select the desired greeting number — 1, 2, or 3. The current greeting will be played followed by
prompts to re-record, delete, hear again, or select as the cur rent greeting by pressi ng #.
1 Record personal greeting
Begin recording at the tone, press 1 to stop. The new pers onal greeting automatically replaces
the previous greeting.
Important: You r mailb ox will work only if at least one pe rsona l g ree ting exists for it.
2 Delete personal greeting
When prompted, press 2 again to confirm deletion. (See “Important” note, above.)
3 Hear current personal greeting
Password
See “5 P assword,” page C.5.
Off-premises message delivery
See “Off-premises message deli very,” page D.8.
Message de livery t o a phone or pager
See “Message delivery,” page D.8.
Urgent messages
See “Urgent mess ages ,” page D.9.
Message Recycle Bin (un-delete)
See “9 Messag e Recycle Bin,” page D.9.
D.11
Page 30

Voice mail operation User’s Guide
Optional voice mail feature: Group/broadcast mailboxes
Important: This is a special, optional feature not ex plained in the tutorial. Be sure to ge t your group mailbox
numbe r from the administrator.
An importa nt note abo ut Qui ck G r oups
Any user can use the Quick Groups™ feature to send a mess age to any combination o f users ( fo r each
of whom a station key has been programmed) without having to create specific group mailboxes. No
programming is requ ired to initiate Quick Groups.Grou p mailboxes are used if the me mbe rs of the group
rarely change or if members want to be able to easily leave messages for one another, etc.
Introduction to group m a ilboxes
Group mailboxes let you broadcas t a “mast er ” mess age to all mem b ers of a pre-defined g r oup of
users (or guest mailboxes). When you record a master message in the group mailbox, the ESI phone
system instantly copies it into the mailbox of each member who has recorded a personal greeting.
Note: A member can only delete or save his copy of a group message; the group mailbox will retain a saved
group message until deleted by every member of the group.
The master message remains in the group ma ilbo x un t il all me mb ers have saved their copies or dele ted
them from their mailboxes.
Warning: If you delete the maste r me ssage from the group mailbox , all remaining copies will automatic a lly be
deleted from the member's mailboxes.
Example: You have left a group message reminding everyone in the group of a meeting for Friday. The
following Monday, if the message is still in the group mailbox ( indicating that at least one of the
persons has not de leted the message), you can delete it fro m the group mailbox which will dele te it
from all member mailboxes who have not yet heard the message and deleted from their mailbox.
You may give the group mailbox number and password to others to allow them to also record master
messages. Set ting “0 ” as the pas s w ord elimin ates the passw ord requ iremen t .
Introduction to the broadcast m ailbox
So that you may eas ily cont ac t all us ers on the sys te m, the E SI phone system’s Grou p Ma ilbo x 500
automatically consists of all sta tion us ers who ha v e pers onal greetings r e corded.
Leaving a group message
Call the mailbox numbe r and ent er the app ropriate pas s w ord (i f required).
Deleting a group message fr om the group m a ilbox
Ent er group mailbox pr ogram m ing by p r essi ng VOICE MAIL, , and the group mailbox number. You
will hear any previously recorded group messages not yet deleted by all members of the group. Delete
by pressing 7. Exit by hanging up.
Program m ing a gr oup m a ilbox
Press PROGRAM followed by the group ma ilbo x nu mbe r. You w ill be pro mp te d to re co rd the
mailbox greeting, change the password, or edit the list of members. Exit by hanging up. For frequent
access to leave group messages, program a group mailbox number as a programmable feature key.
(See “ Programm able featur e k eys,” page C.2).
D.12
Page 31

User’s Guide Voice mail operation
Virtual Mailbox Key
To help mon itor that a ll mes sages have been picked up, you can prog ra m a progr a mmable feature key
on any ESI Feature Ph one as a Virtual Mailbox Key for the group mailbox. When new messages exist,
the key will blink rap id ly; pres s it to conn ec t aut o matica lly to the mailbox. Prog ra m the prog ra mmable
feature key with VOICE MAIL followed by the mailbox number (see “Programmable feature keys,”
page C.2).
Optional voice mail feature: Cascade paging mailboxes
Important: This is a special, optional feature not explained in the tutorial. Be sure to get your cascade paging
mailbox numbe r from the Administrator.
A cascade paging mailbox pages up to thre e designated numbers (of up to 24 digits each) in a
sequence called a cascade.
If a cascade paging mailbox receives a new message, the ESI phone system will page the first number
for a set number of times. If it receives no response, the ESI phone sys tem then pages a second
number for a set nu mber of times. If, again, there is no respons e, the E SI phone system pages the th ird
paging number; and the system will then page all three pagers, in sequence, until someone does finally
ret r iev e the mess age. This is useful f or a variety of individuals who mu s t be “on-call ” after h ours, s uch
as doctors, plumbers, technical support representatives, wrecker drivers and volunteer fire fighters.
Programming your cascade paging mailbox
Press PROGRAM followed by the cascade pagi ng mailbox number. You will be prompted for
recordi ng mailbox greetings; password administrati on, programming t he pager numbers and intervals;
and accessing previously deleted messages.
To set the pager numbers, you will be prompted to enter each paging number an d the number of times
that it is to be page d be fo re the next paging number is als o page d.
Note: Enter only the paging number; do not i nclude th e line access code (9, 8 or 71–76). Use the V scroll
key to enter special characters; use the W scroll key to backspace. You also can use the scroll keys
to view the number after it’s saved. To change the number , you must delete it and then re-enter it
as desi re d.
Note: For those situations where more than one cascade paging mailbox is in operation, the ESI phone
system automatically sends the mailbox number to the display of a digital pager, to indicate which
mailbox has new messages.
Retrieving cascade paging mailbox messages
Retrieving messages when off-premises
1. Call the main number.
2. If the auto attendant main greeting answers, press and the cascade pag ing mailbox number.
If a live operator answ ers, have the operator trans fer you (by press ing VOICE MAIL and ,
followed by entry of the cascade paging ma ilbo x nu mber ).
Retrieving messages when usin g an ESI Feature Ph one
Press VOICE MAIL and then enter the ma ilbox nu mb er.
Virtual Mailbox Key
See “Virtual Mailbox Key,” page D.6.
Message Recycle Bin (un-delete)
See “Me ssage Recycle Bin,” page D.9.
D.13
Page 32

Voice mail operation User’s Guide
4
Optional voice mail feature: Q & A mailboxes
Important: This is a special, optional feature not ex plained in the tutorial. Be sure to ge t your Q & A mailbox
numbe r from the Admin istrator.
Q & A (question and answer) mailboxes all o w you to ask c allers for more detailed infor mation , such a s
on an employment questionn aire or a survey.
As a Q & A mailbox owner , you can re cord up to 10 questions. the sys tem gro up s the ind ividua l ans wers
and plays them back as a single mess age ( s eparated by short beep tone s ) . Normal me ssage handli ng
capability — delet e, save, etc. — applies to all ans w ers w ith in the mes s age .
Note: Each answer can have a maximum length of a regular message as programmed by the Installer.
Include in the firs t ques t ion inst ru ctions to co nc lude each answer by press ing 1 or to paus e fo r the next
question: “Record your name at the tone, then press 1 or paus e for th e next question.” [Next:] “Record
your address at the tone…” [etc.]
At the conclusion the ca ller can be forw arded to ano the r e xtens ion, ma ilbox, or automatically
disconnected. In c lude in the las t ques tion th e approp r iate info r ma tion su ch as : “This is the las t
question. After you have finished, please hang up….”
Note: If the caller does n o t respond to two q ues tions in a row, the call will be disconnected.
Q & A mailboxes are turned “on” only when questions have been recorded. Deleting all questions will
turn “off” the mailbox.
Programming Q & A mailboxes
1. Press PROGRAM followed by the Q & A mailbox number.
2. You will be prompted to do one of the following:
(a.) Record the questions
(b.) Change the password
or
(c.) Access previously deleted messages.
(See the fol lowing explanat ions.)
3. When finished, exit by hanging up.
(Continued)
D.1
Page 33

User’s Guide Voice mail operation
1 Sel e ct q uesti on
Select the desired question number, 1–10. the ESI phone system will play the question and give you the
option to perform one of the following:
1 Record quest ion
Begin recording at the tone; press 1 to stop. The new question automatically replaces the old
one with that question number.
Note: The mailbox will not be enabled if no questions exi st .
2 Delete question
When prompted, press 2 again to confirm deletion. If you delete a question in the middle of a
list without replac ing it , the playb ac k numbe rs of the other messages will no t change ( th is is
important only for your knowledge in programming, si nce the s ystem itself won’t introduce each
question to the caller as “Question 3,” “Question 6,” etc.).
Example: If you deleted question number 3 out of 5 questions, the system would play only questions
1, 2, 4, and 5 to a caller. When you retrieve the playback, two beep tones will separate
answer s 2 and 4.
3 Hear current question
2 Password
The password may consist of two to eight digits followed by # (0 cannot be the first digit). If you prefer
not to have to enter a password, enter 0 as the entire password.
9 Message Recycle Bin (un-delete)
The ESI phone system stores your most recently deleted 10 messages in a Message Recycle Bi n to
let you recover, or "un-delete ,” messages that may have been dele ted in er ror. Press PROGRAM 9 to
advance through delet ed mes s ages. Press 8 t o restore a message to your ma ilbo x as an o ld mes s age .
Retrieving messages from an ESI Featur e Phone
Press VOICE MAIL, , and the mailbox number.
Virtual Mailbox Key
See “Virtual Mailbox Key,” page D.6.
Retrieving messages when off-premises
1. Call the main number.
2. If the auto attendant main greeting answers, press and the Q & A mailbox number.
If a live operator answ ers, have the operator trans fer you (by press ing VOICE MAIL and ,
followed by entry of the mailbox number).
D.15
Page 34

Voice mail operation User’s Guide
(This page included for pagination purposes only.)
D.16
Page 35
User’s Guide ESI Feature Phone operation
4
ESI Feature Phone operation
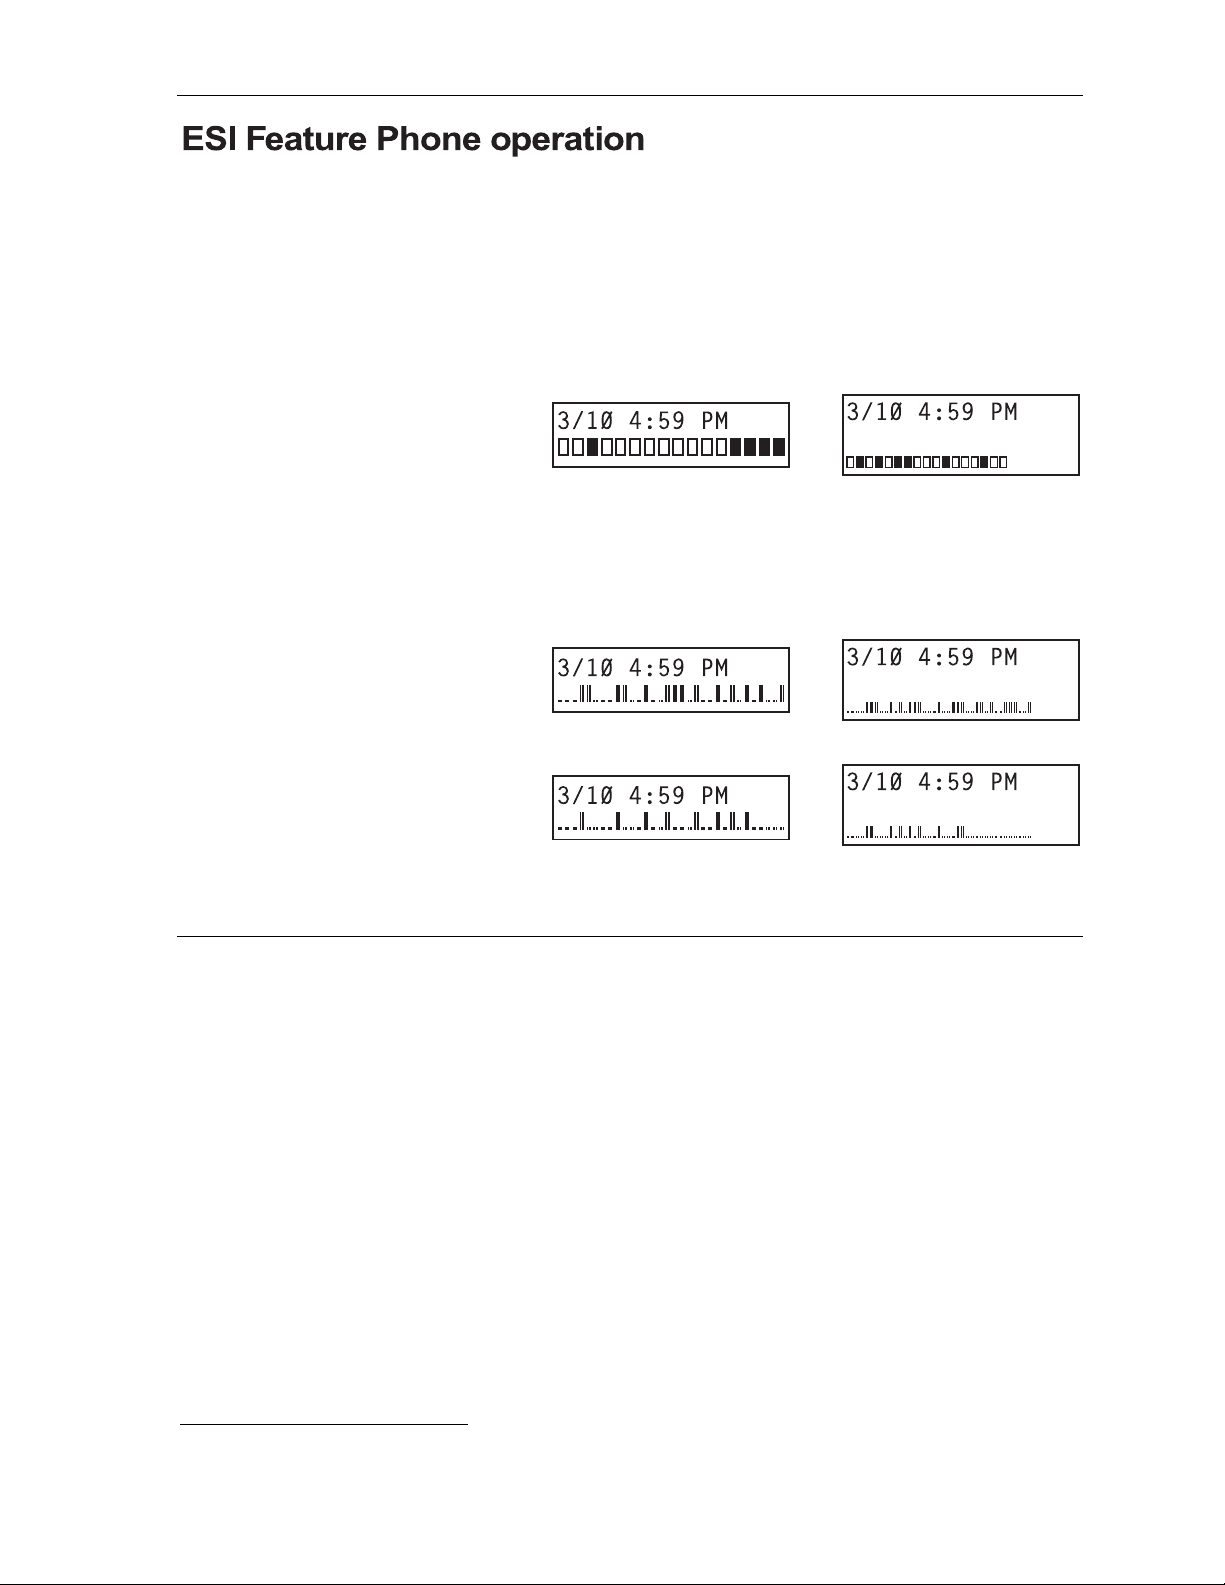
Display
When y our phone (or station) is not in us e, the display will show the curre nt date and time, activated
features such as DND (do not disturb; s ee “MUTE/DND,” page E.3 ) , monitor mode, etc .), and — on a
24-Key or 48-Key Feature Phone — the system’s current line usage. The line usage display you see will
depend on (a.) how many lines you have and (b.) which Feature Phone that you’re using.
• If your system has a smaller number
of lines (18 or fewer if you’re using a
48-Key Feature Phone; 16 or fewer if
you’re using a 24-Key Feature Phone),
each block on the bottom line of the
display will represent an individual line
(as in the examples, right). Incoming calls
usually are assigned beginning wi t h
Line 1 at the far-left line indicator.
Outgoing calls are assigned from the
highest numbered line beginning at the far right.
• If your system has a greater number
of lines (19 or more if you’re using a 48Key Feature Phone; 17 or more if you’re
using a 24-Key Feature Phone), the
bottom line of the display will provide an
approximate representation of the lines
in use (shown at right).
As you use your ESI Feature Phone, its
display changes frequently to give you
detailed information during call
processing and voice mail operations.
24-Key Feat ure Phone
with 16 or fewer lines
Line in use
Available line
-Key Feat ure Phone
2
with 17 or more lines
A high percentage of lines in use
Fewer lines in use
I Line in use
. Available line
48-Key Feature Phone
with 18 or fewer lines
48-Key Feature Phone
with 19 or more lines
A high percentage of lines in use
Fewer lines in use
Caller ID
If you subscribe to Caller ID from your telephone service provider, the phone’s display will show an
outside caller ’s name and/or number.
call er status — such as UNAVAILABLE, PRIVATE or NO DATA SENT.
1
If you don’t subscribe to Caller ID, the LCD will show which line is receiving the call, instead of the caller’s name or number.
1
In some instances, the servic e provider can send o nly a general
E.1
Page 36
ESI Feature Phone operation User’s Guide
Keys
Programmable feature keys
The phone’s pro grammable feature keys — nine on the 12-Key Feature Phone, 12 on the 24-Key
Feature Phone and 30 on the 48- Ke y Fea tu re Phone — ha ve been pre -progr ammed by the insta ller.
You may wish to add to or change some of these keys to perform different functions explained throughout
this manual. Press PROGRAM to verify current settings (see “Station programming,” page C.1).
Important: Each of th e two smal ler Feature Phones, 12- Key and 24-Key, has a combinatio n (“combo”)
PROG/HELP key, while the 48-Key Feature Phone has separate PROGRAM and HELP keys. If
you’re using a 12-Key or 24-Key Feature Phone, press PROG/HELP wherever this User’s Guide
instructs you to press either PROGRAM or HELP.
Note: To use voice mail, conference calling and mute/DND on a 12-Key Feature Phone, you must program
these features into programmable feature keys (see “Optional features,” page F.11).
Fixed-feature keys
The fixed-feature keys on the phone are per mane nt ly labe led as to their usage . The FLASH/REDIAL
and MUTE/DND key on either Feature Phone each have two purposes; your ESI phone system will
govern this by permitting only the appropriate function when either is pressed, depending on the
circumstances at that moment. The different phone models have some different fixed-feature keys.
Keys’ LED s (lam ps)
The L E D s (light-emit ting diodes), or lamps , ass oc iated wit h the programmable and fixed keys a id in
determining the sta tus o f the ir function. In general:
• Green indicates a function associated with your phone.
• Red indicates an occurrence at another station.
• A solidly lit lamp indicates in-use status.
• Blinking indicates an action, such as ringing or holding, is required; a fast blink calls for
immediate action.
As an example, a blinking red key is a call ringing at another station; blinking green signifies ringing at
your station. (See also “Line keys,” page F.11.)
E.2
Page 37

User’s Guide ESI Feature Phone operation
SPEAKER key and speakerphone oper ation
For hands-free conversation, use the SPEAKER key . When an outside call rings, you can press
SPEAKER to connect to the ca ller via your phone’s built - in spea ke rphon e. This lights the SPEAKER
key’s LED. Or, while using the handset, you can switch a call to the speakerphone by pressing
SPEAKER and hanging up the hands et. (To revert to the hands e t from sp eak erp hone mo de, lift the
handset again .) To perform group listening — i.e., have a handset c onversati on along with the caller’s
voice broadcast over your speaker
1
— press SPEAKER while on a handset conversation but do not
hang up the handset.
Hands-free answer (internal calls only)2
You can program your phone either to enable or disable hands-free answer — press PROGRAM 3 5.
With hands-free enabled, an internal call to your station generates a short ring and a double connect tone,
then automatically connects the caller to your speakerphone. With hands-free disabled, an in terna l call
to your station generates a single-ring cadence; outside calls ring with a double-ring cadence.
Volume/scr oll keys
The two smaller keys just above the dialpad labeled V and W serve two purposes:
• Adjusting the vo lume heard through the handset and speaker — Your phone will maintain the
chosen volume setting until you change it.
• Serving a s scroll keys for operations, such as Esi-Dex or programming, that may show several
entries on the display.
MUTE/DND key
To disable your handset or speaker microphone during a conversation (either with the handset or
speaker), press MUTE/DND. While the mute function is activated, the MUTE/DND LED will blink rapidly
and the di splay shows “MUTED.”
When y our phone is idle and you wish to ma ke sure it s c alls go s tra ight to voic e mail, pr es s MUTE/DND
to toggle your phone in or ou t o f DND (do -no t -d isturb ) m ode. The display will show DND and the
MUTE/DND LED will glow amber.
Note: If you press MUTE/DND while your phone is ringing, this forwards the call to your voice mailbox (see
“Voice mail operation,” pp. D.1–D.15) and your station will be placed in DND.
Soft feature keys
Soft feature keys are dynamic: when used, they cons tantly change your ES I Featu re Phon e’ s status.
These soft k eys, located under the display, include ESI-DEX, PROGRAM and scroll keys (W and V).
Along with spoken and displayed commands, th ey gu ide you through th e us e o f Es i-De x (p age F.1),
various progra mming ac t i vities and con t ro lling the volum e of you r phon e’s handset and speake r.
1
Group listening must be enabled by the Installer.
2
The 12-Key Feature Phone supports only hands-free listening. To answer, you must pick up the handset.
E.3
Page 38

ESI Feature Phone operation User’s Guide
4
Dial tone
When you first lift your handset, you will hear an internal dial tone that all ows you to call other statio ns
or perform other inte rna l func t ions . To gain an outside dial tone, dial 9 (or 8 or 7 1–76)
1
or press a
programmable fe ature ke y that has been se t as a line ke y. (A line key, when pressed, automatica lly
gains an outside line. Consult your Sys tem Adminis trato r if you have questions.)
Basic phone use
Outside calls
To answer (double-ring cadence): Lift the handset or press SPEAKER.
To p lace: Lift the handset or press SPEAKER. Then either press an unlit line key or dial 9 (or 8 or
71–76) to be assigned an outside dial tone.
To hang up: Rep lace the hands et or press RELE ASE or — if using the spea ke rpho ne —
press SPEAKER.
Important: If you’re using a VoIP-enabled system, be aware that your outside phone lines’ quality can affect
the audio quality of local and Remote IP Feature Phone(s). Due to the interface between
advanced, packet-based phone systems and the traditional public telephone network, a poorquality phone line can degrade audio quality, causing an echo on outside calls. An occasional
echo isn’t unusual and doesn’t necessarily indicate a problem with your system or lines; however,
if this problem occurs persistently, contact your Certified ESI Reseller for assistance.
Internal calls
To ans wer (single-ring cadence): In hands-free mo de, answ er directly thro ugh the sp eaker phone or pick
up the handset. O r, to answer a ringing call, lift the hand s et or press SPEAKER.
To p lace: Lift the handset and d ial the e xtens ion number or press a station key (see “Direct station
select,” below).
To hang up: Rep lace the hands et or press RELEASE or press the stati on key again or — if using the
speakerphone — press SPEAKER.
Shortcut for either outside or internal calls:
If you press a station key or dial an extension number, the phone system automatically activates
the speakerphone.
1
What you dial to reach an outside line depends on your system’s particular setup. If you’re not sure, consult your administrator.
E.
Page 39

User’s Guide ESI Feature Phone operation
Direct station selection
Programming so me of the prog ram mab le fe a ture ke ys (see pp. C.2–C.3) as station keys will provide
direct access to those stations as we ll as providing lamp informat ion as to the ir sta tus. The station ke ys’
LEDs indicates the status of the station assigne d to each k ey:
If a station key’s LED is . . . The station assigned to that key is . . .
Unlit Available; currently unused
Red; steadily lit In use
Red; blinking Ringing from another call
Green; steadily lit Connected to you (including via voice mail)
Green; blinking Ringing from your call
Amber; steadily lit In DND m o de
To call another station programmed into one of your s tation keys:
1. Press an available ( unlit ) station key.
2. The called station will sound a short ring followed by a double connect tone.
3. The phone system will activate the called station’s speakerphone (or the station will ring if th at
station’s user has hands-free answer disabled).
4. To disconnect when finished, do one of the following:
(a.) Replace the handset.
or
(b.) (if in hands-free mode) Press the sta t ion key aga in.
or
(c.) Pr ess RELEASE.
or
(d.) P ress SPEAKER (if in hands-free mode).
If you press a key for a station that’s in use (red; steadily lit), you will “camp onto” the station, where its
Feature Phone’s display will tell its user that you’re waiting (see “Call waiting,” page E.10).
If you press a key for a station that’s in DND (amber; steadily lit), you’ll be forwarded directly to the
person’s mailbox.
Transferring an outside call . . .
. . . to another station
Blind transfer
1. While conne c ted to an outside call, press a st at ion key ( or press TRANSFER and then dial the
extension number).
2. Hang up immediately to perfor m a blind transfer.
Note: If the called perso n does no t answer, the caller will be fo rwa rde d either to the calle d person’s
mailbox or another destination the Installer has programmed.
Supervised transfer — announcing the caller to the called person
1. Do not hang up (as in “Blind trans fer,” above) ; instead , w ait un til the ca lled pers on answ ers .
2. Announce the caller (e. g., “Hello; I’ ve got B ill on th e line and I’m transferring him to you now.”)
3. Hang up.
Note: If the transferred-to person does not answer in step 1, press the station key again or press FLASH
to be reconnected to the original caller.
E.5
Page 40
ESI Feature Phone operation User’s Guide
. . . to another pho ne num ber (tr unk -to -tr unk tr ans fer )
Important: USE OF FEATURES, SUCH AS TRUNK -TO-TRUNK TRANS FER , THAT REQUIRE TRUNK -TO-TRUNK CONNECTIONS
WILL INCREASE THE RISK OF TOLL FRAUD. IN NO EVENT SHALL ESTECH SYSTEMS, INC. BE LIABLE FOR ANY
DIRECT, INDIRECT, INCIDENTAL OR CONSEQUENTIAL DAMAGES WHATSOEVER INCLUDING, BUT NOT LIMITED
TO, FRAUDULENT TOLL CHARGES, LOSS OF BUSINESS PROFITS, BUSINESS INTERRUPTIONS, OR ANY OTHER
COSTS OR DAMA GES RELATED THERETO, ARISING FROM THE USE OF THESE FEATURES.
Blind transfer
1. While conne cted to an out side call, press TRANSFER and then the line access code (9, 8, or 71–
76), and then the te lephon e number to which you wan t to transfer.
2. Hang up immediately to perfo rm a blind transfer. Now both outside lines are connected via a trunk-
to-trunk connec tion.
Note: If, at any point during the trunk-to-trunk transfer , you wish to return to the origina l call (e.g., perhaps
you received a busy signal at the remote end, or the recipient simply won’t take the call), just press
FLASH. Th is disconnects the second outs ide conne ct io n, re tu rn i ng you to (and removing from ho ld)
the o riginal cal l.
Supervised transfer — announcing the caller to the called person
1. While conne c ted to an outside call, press TRANSFER and then the line access code (9, 8, or 71–
76, and then dial the telephone number to which you wa nt to transfer.
2. Don’t hang up; instead, wait unt il the ca lled person answers.
3. Announce the caller (e. g., “Hello; I’ve got Bill on the line and I’m transferring him to you now.”)
4. Hang up, completing the supervi sed transfer. Now both outside lines are connected via a trunk-totrunk connection .
Note: If, at any point during the trunk-to-trunk transfer , you wish to return to the origina l call (e.g., perhaps
you received a busy signal at the remote end, or the recipient simply won’t take the call), just press
FLASH. Th is disconnects the second outs ide conne ct io n, re tu rn i ng you to (and removing from ho ld)
the o riginal cal l.
. . . to a voice mailbox
Transferring a caller to a mailb ox to leave a message
1. Press VOICE MAIL a nd the ap propriate s tatio n k ey — or, if your phone has no station key
programmed for this des t ination, press VOICE MAIL and TRANSFER, and then dial the
extension number.
2. You and the caller will be connected to that user’s personal greeting. You may choose either to
hang up immedia te ly or lis ten to a por tion of the personal greeting (i. e. , to assure yourself that you
have p l a ced th e cal ler into the correct ma i lbox).
Note: Regardless of when yo u hang up , the c a ller will hear the entire personal gree ting . T o in su re the privac y
of the message, you w ill au to matic a lly be disconnected at the record tone.
Transferring a user to his/her own mailbox for message pickup
You can trans fer a user who’ s ca lling from the outside directly to his/her mailbo x for mes s age p ick-up by
pressing VOICE MAIL and the appropriate station key, or dialing the mailbox number and hanging up.
. . . to the main greeting
T o transfer an outside caller to the main greeting, press VOICE MAIL and hang up.
E.6
Page 41

User’s Guide ESI Feature Phone operation
Conference calling
To create a conference call:
1. Establish the first call.
2. P ress CONF to place the call on hold.
3. Place a se cond cal l as you normally would.
4. Once connected to the second call, press CONF again to connect all of you together.
Notes: Repeat these steps to add a fourth member to the conference.
A maximum t ota l of ei th er 16 members (E-Clas s sys tems) or 24 me mbers (IVX X-Class) can b e in
conferences within the system at any one time; however, no more than four members can be in a
single conference.
If the newest added-on members does not answer, press his/her station key again or press FLASH to
return to the original conferees. If you place any incoming caller on hold or exclusive hold (see
“Hold/exclusive hold operation,” page E.11), you can add that caller, as well, to the conference by
pressing CONF, retrieving t he call from hold (or exclu si ve hold) an d pressing CONF again.
Any m ember of the conference ca n drop out by simply hanging up. However, whe n the station that
created the conference hangs up, all members in the conference are disconnected. Individual stations
or lines connected to the confe re nce can be dr oppe d from the conference by pressing their station or
line key (lit green).
Note: Y our installer or System Administrator may have enabled trunk-to-trunk conferencing (unsupervised
conferencing) for your station. If so, the steps to initiating such a conference are the same as for
performing any other conference (see above); the difference is that you may hang up, thus exiting the
conference, but the remaining members won’t be disconnected. (If this feature isn’t enabled, your
hanging up disconn ects all members.)
Important: USE OF FEATURES, SUCH AS TRUNK -TO-TRUNK TRANS FER , THAT REQUIRE TRUNK -TO-TRUNK CONNECTIONS
WILL INCREASE THE RISK OF TOLL FRAUD. IN NO EVENT SHALL ESTECH SYSTEMS, INC. BE LIABLE FOR ANY
DIRECT, INDIRECT, INCIDENTAL OR CONSEQUENTIAL DAMAGES WHATSOEVER INCLUDING, BUT NOT LIMITED
TO, FRAUDULENT TOLL CHARGES, LOSS OF BUSINESS PROFITS, BUSINESS INTERRUPTIONS, OR ANY OTHER
COSTS OR DAMA GES RELATED THERETO, ARISING FROM THE USE OF THESE FEATURES.
Privacy release
This feature makes it easy to “conference-in” on a call: just press a line key assigned to the outside line
the call is using, and you’ll automatically join the ca ll.
1
1
This feature may not be available on your system, depending on how it has been programmed. If you wish to enable this feature
on your phone system, contact your System Administrator.
E.7
Page 42

ESI Feature Phone operation User’s Guide
Call forwarding
Your station has been pre-programmed by the installer to “call-forward” your phone when it is busy or
does not answer (usually to your mailbox) . In add it ion, y ou can te mp ora r ily call-fo rward all of your calls
to another stati on or another user’s mailbox.
On the 24-Key Fea ture Phone :
1. Dial 5 6 5.
2. Dial the extension number (or VOICE MAIL and then the mailbox number) to which the system
should forward a ll ca lls.
On the 48-Key Fea ture Phone , pres s CFW D to use the call for wardi ng feature.
1
To turn off call forwarding, press CFWD .
Note: If the forwarded-to station is busy or does not answer a fo rward e d call, the call will be returned to
your mailbox.
If you frequently call-forward your phone, you can program a programmable feature key as a call forwarding
key to automatically turn forwarding on and off. If you always forward to the same extension, you can
program a key with both 5 6 5 and th e extension number. (F or m ore inform ation, s ee “Program mabl e
feature keys,” pp . C .2–C. 3.) The call forwarding ke y will be so lid green to ind icate t ha t it is ac tive.
Call forwa r ding/no-a nswe r
One special form o f call fo rw ar d ing you r phone can do is called call forwarding/no-answer. As the
term implies, it’s a forwarding that occurs only after a call to your extension goes unanswered; so,
essentially, this gives you a chance to answer the phone in case you’re t her e and wish to take the call,
but automatica lly forw ards as programmed if you’re eith e r aw ay from your phone or just choose not to
take the call. You can set your phone to ca ll-forwar d/ no- ans w er to an extension or mailbox. For you to
set this, either the extension must have an assigned call-forward/no-answer key assigned or you can
dial 5 6 7 followed by the destination number.
When y ou set c all forwarding/ no-answer:
• Outside ca lls comin g into the extension w ill ring there for a prede ter mine d time and then be
forwarded to a designated extension or mailbox.
• If the call isn’t answered within a predetermined time, the caller will be routed to the original
extension’s voic e ma ilbo x.
• If the extension is in DND mode, the call will be fo rwarde d im med iat e ly to th e e xtens ion or mailbox.
• If the extension is busy — i.e., off-hook on another call — and not in DND mode, call forwarding/no-
answer will not be followed; instead , ca ll wa iting will be init ia ted (if allow ed) and if the call is not
answered, will fo llow the fixed ca ll fo rw ard se tting (norm ally you r voice ma ilbo x) .
To set or cancel call forwarding/no-answer:
1. Dial 5 6 7.
2. Enter the extension or mailbox to which you are forwarding.
3. P ress # to confirm.
4. Press a scroll key (S or T) to select either ENABLE or DISABLE for call forwarding/no-ans w er.
5. P ress # to confirm.
1
As an alternative, dial 5 6 5 without selecting a destination and then hang up
E.8
Page 43

User’s Guide ESI Feature Phone operation
Call forwarding/off-prem ises
You may1 also be able to call-forward to an outside number. This is called call forwarding/off-premises.
When this is set, outside calls that are directed to your extension will be forwarded to the outside
number. If the call isn’t answered
2
in time, the caller w ill be rou ted to th e e xtens ion’s voice mailbo x.
To set:
1. P ress CFWD (or dial 5 6 5).
2. Enter the number (in cluding the line group access code, such as “9”) to which you’re fo rward ing.
3. P ress # to confirm.
Example: To call forward to 214 555-4141, press CFWD (or dial 5 6 5) and dial 9 2 1 4 5 5 5 4 1 4 1 # .
To cancel:
1. P ress the CFWD key (or d ia l 5 6 5)
2. P ress to cancel.
Call forwarding/no-answer/off-premises
You may1 also be able to call-forward/no-answer to an outs ide (“off-premises”) number. This is called
call-forward/no-answer/off-premises. When this is set, outside calls that are directed to your
extension will ring fo r a prede ter mined time , and then be forwarded to the outside number. If the call
isn’t answered
2
in time, the caller will be routed to the extension’ s voice ma ilbo x.
To set or cancel:
1. Dial 5 6 7 (or press an assigned call forwarding/no-answer programmable feature key; if necessary ,
review the instruc tions on p age E .8).
2. Enter the number (in cluding the line group access code, such as “9”) to which you’re fo rward ing.
3. P ress # to confirm.
4. Press a scroll key (S or T) to select either ENABLE or DISABLE for call forwarding/no-ans w er.
5. P ress # to confirm.
Note: If your system is on a PRI (ISDN Primary Rate Interface) line, and an outside caller is forwarded
off-premises to you (e.g., your cell phone when you’re away from the office), you can view his Caller ID3
when you have set either call forwarding/off-premises or call forwarding/no-answer/off-premises.
1
Your system may not support this feature, or your extension may not be allowed to have this feature. Contact your ESI Reseller
for more information.
2
You must p ress 1 to answer the forwarded call (just as with off-premises “reach-me”; see page D.3).
3
For such external viewing of this data, the off-premises phone must have Caller ID service. (All cellular phones and service plans
include Caller ID service.)
E.9
Page 44

ESI Feature Phone operation User’s Guide
Call waiting
If you have enabled call waiting for your station (PROGRAM 3 1) and a second call comes in while yo u
are on another, you’ll hear a tone in your earpiece and the bottom line of your display will indicate that a
second call is wait ing . You can ignore the ca ll wait ing and it will be transferred to your mailbo x (or othe r
destination se t by the ins t a ller ).
To toggle between the two calls, press FLASH. To drop either call, press RELEASE while connected
to the call to be dropped : this disc onne cts the call and automa t ically re- con nec ts you to the ot her ca ll.
Call waiting display
Be sure to check the display when you’re using call waiting. Initially, the first line shows the name or number
of your original call (depending on how the call was created) and the call duration. The second line shows
the name or number of the call waiting along with the duration of that call. The arrow on the display will
move between the first and second lines, indicating to which call you are connected.
1. You’re connected to XYZ Company, when you hear a beep and see that Joe Smith is calling:
1
Here’s an example:
24-Key
Feature
Phone
48-Key
Feature
Phone
(In this example, Joe’s ca ll is be ing transferred to you; it’ s been in the system for 31 seconds.)
2. You press FLASH and are conne cted to Joe. Note how the arrow moves to indicate the chan ge
of connection:
24-Key
Feature
Phone
Note: If Caller ID is no t used, the L ine nu mber w ill ap pea r instead of the caller’s name or number. If Caller ID
is used, in some insta nces the local telephone ser v ice pro v ider will o n ly sho w a general caller sta tus
such as Unavailable, Private, or No Data Sent.
48-Key
Feature
Phone
1
A 12-Key Feature Phone will show only the first caller . Even if you hang up from the first call, the second call’s Caller ID
information will not appear.
E.10
Page 45

User’s Guide ESI Feature Phone operation
t
t
Station-to-station call waiting
You can call, or transfer a call to, another station that is in use (as indicated by the fact that its station
key, if one exists for it on your ESI Feature Phone, is glowing red). This generates a call waiting tone in
the other s tation’s earpiece and puts a call waiting indication on th e bottom line of that s tat ion’s display,
as explained in “Call waiti ng display” (above). If the person ignor es the call waiting, your call or the
transferred ca ll will be fo rw arded to th e perso n’s mailbox (or other des tinat ion se t by the ins taller).
Background announce fea tur e
(Not available on 12-Key Feature Phone.)
During call wait ing, you can also make a brief, private background announcement to th e sta tion's
earpiece (if its user has enabled the background announce feature; see “Station options,” page C.4).
A background announce key must have been programmed at your station by programming code 5 6 9
at a programmable feature key (see pp. C.2–C.3).
1. During call waiting (as described previously), press and hold the programmed announce key to
speak; the key w ill glow green if background annou nce is permitted or red if it isn’t permitte d. The
called station will hear your voice over the outside person’s voice. The outside caller, however,
cannot hear you. The called person can respond by pressing FLASH, which places the original call
on hold.
2. Release the key when you are finish ed speaking.
Note: The background announce feature works only b etween ESI Feature Phones1 — and only if (a.) the
called person has allowed call waiting and background announce and (b.) the called person is using
his/her handset. T he ba ckg round a nnou nce key will be green (if these conditions are met), indicating
that a background annou nce can be made.
Hold/exclusive hold operation
The difference between hold and exclusive hold
Your ESI Feature Ph one let s you pu t a ca ll on eithe r hold or exclusive hold. Ea ch puts a call into a
standby mode, but here’s the difference between the two:
• Hold
• Exclusive hold
Hold
To place a call on hold
While on an outs ide or Es i-L ink ca ll, pres s HOLD to place the call on hold. The HOLD key LED will light
solid red on your ESI Feature Phone and will blink red on all other phones. Also, your ES I Fea ture
Phone’s display will show the quantity, and numerical line identifications, of the calls currently on hold
throughout your ESI phone system:
1
I.e., non-ESI analog phones on the system can neither send nor receive background announcements.
2
On previous ESI systems, this feature was calle d park.
3
On previous ESI systems, this feature was calle d just hold.
2
allows anyone on the ESI phone sys tem to retrieve the call. Users c onnected to o utside (or
Esi-Lin k ) calls can press HOLD to place the cal l on hold. The system identi fies held calls a s b eing in
numerically ident ified lines — e.g., “Line One,” “ Line Four,” etc.
For example, if you need to transfer a call to another station and know the person is in the building
but not at hi s /her desk, y ou might page him/her t o pick up a “call on Line One.”
3
keeps the call only at the station where the user pressed HOLD.
24-Key
Feature
Phone
Oldest (and recalling) Newes
Oldest (and recalling) Newes
48-Key
Feature
Phone
Oldest (and Newest Calls
recalling) holding
12-Key
Feature
Phone
E.11
Page 46

ESI Feature Phone operation User’s Guide
To retrieve a held call
To retrieve a held call from the same ESI Feature Phone where it was put on hold, press HOLD again and
dial the appropriate line number (using the display for reference).
To retrieve a held call from any idle ESI Feature Phone on the system, press HOLD and di al the
appropriate line number . If re trie ving a ca ll from a different Esi-Link loca t ion , press HOLD foll owed by a
Esi-Link Location Key and then dial the appro pr iate line number from the Es i-L ink location (for more on
Esi-Link, see pp. H.1–H.9). Af ter ca ll re trieval, the Feature Phon e disp lay will update to show lines
currently holding calls.
Note: If your phone has any line ke y s p rog ramme d (see p p . C.2–C .3 ), ea ch will blink red when a call is on
hold on its lines; in such c ases , ju s t press that line key to retrieve the held call.
After you press HOLD, the display will help you ch oos e the line number to retrieve: the top row will
show how many calls are on hold and the second row will show all held calls in the system. Newly held
calls are added from the right side of the second row.
Note: If more calls are on hold than the display can show, each side of the display’s second row will show an
arrow, ind icating that more lines have calls on hold. Press the c orresp ond ing scro ll key (e ither W to
scroll to the left or V to s c ro ll to the right) to view the other line numbers where calls are holding.
Exclusive hold
To place a call on exclusive hold
To place an outside call on exclusive hold on an ESI Feature Phone, press HOLD for at least one
second. The disp lay will br ie fly appear as follows . . .
12-Key
Feature
Phone
24-Key
Feature
Phone
48-Key
Feature
Phone
. . . and then return to its normal state. This exclusive hold will cause the HOLD key to light solid red on
just that Feature Phone (i.e., where the key was pressed) and none other in the system.
To retrieve a call from exclusive hold
To reconnect to a ca ll fro m the ESI Feature Phone whe r e the ca ll was placed on exclusive ho ld, you
may do any of the foll o wing :
(a.) From a phone idle stat e, pres s HOLD for at least one full second.
(b.) Press the blinking programmable feature key (see pp. C.2–C.3) that you know is pre-programmed
for that outside line. This will reconn ec t you immediately to the call.
(c.) Press HOLD briefly and dial the appropriate outside line number. Only the ESI Feature Phone
where the call was placed on exclusive hold will display an “E” next to the line (identified by
number) on which the call is holding. (That line number won’t appear on the hold display on any
other ESI Feature Phone, because no other Feature Phone can retrieve that call.) In the example
below, the Feature Phone has a call on exclusive hold on line 9.
12-Key
Feature
Phone
24-Key
Feature
Phone
48-Key
Feature
Phone
E.12
Page 47

User’s Guide ESI Feature Phone operation
Paging
Your ESI phone system can be programmed to allow paging through an overhead paging system and/or
paging through some (if page zones have been created) or all of the system’s Feature Phone speakers.
Overhead pagi ng
Station number 199 is designated as the overhea d p a ging port. If the ESI phone system has been
connected to an overhead paging system, you can page by dialing 1 9 9 and making your announcement
after the tones. If you frequently page, assign 1 9 9 to a programmable feature key (see pp. C.2–C.3).
Paging through phones
Press PAGE 0 to pag e thro ugh all of the ESI Feature Phone spea kers. Press PAGE and then 1, 2, or 3
to access a programmed paging zone. (See the administrator for a list of page zones.) The Installer may
have added an overhead page system to one or more of these page zones.
Note: Phones in use or in do-not-disturb mode will not carry a page throug h their speake rs .
To p age for pickup of an outside call
To page someone to pick up an outside call:
1. Place t he call on hold by pressing HOLD.
2. Verify the line numb e r from the dis play.
3. Page the person and announce the ho ld loca tion for retrieval. For exa mp le:
“Sarah, y ou have a c all on Line Two — Sarah, Line Two, pleas e.”
Call pickup
From your station, you can answer a call ringing at another station or department by pressing and
then either dialing t he extension or (if the dest ination i s programmed i nto one of your keys; see
“Programmable feature keys,” pp. C.2–C.3) pressing the station key for the ringing station.
During night mode (see page F.12), if a night bell is in use instead of the night auto attendant, press
PICK UP 0 to access t he ring ing out side call.
E.13
Page 48

ESI Feature Phone operation User’s Guide
4
Optional features
Live outside call s
If your station has been designated to receive live outside calls — i.e., those that have neither come
through the auto attendant nor been transferred — your ESI Feature Phone will:
(a. ) Displ ay that y ou are receiving an outside call
(b.) Ring with a double cadence (internal calls ring with a single cadence).
While you’re on a call, additional live calls to your station will ring with a subdued ring.
To answer any additional calls, you must do one of the following:
• Disconnect from the current call.
• Transfer th e c urre nt call.
• Place the current call on hold.
You can press RELEASE to drop a current call and automatically be connected to the next ringing call.
Note: If your station is able to receive both live outside calls and calls transferred to you from the auto
attendant, you may wish to turn off call waiting at your station (to avoid confusion between a call waiting
tone in your earpiece and a subdued ring from a live outside call).
Operator station
If your station has been designated as the operator station, you will also receive calls when a caller
dials 0 in the auto attendant or from a station.
Your display will indicate that the call ring ing is one of th e fo llow ing:
• A ca ll for th e ope ra to r — So meon e dialed 0.
• A call for y our extensi on — Someone dial your exten sion number.
As the operator, you may be res ponsible to manually ch ange the Day /Night Mode of the system; if so ,
you must program a prog ra mma b le fea ture ke y to per for m this (initially, the upper left ke y will be the
day/night mode Key) . Each t ime the key is p ress ed the display will change: DAY, NGT, DAY2, NGT2,
HDAY or AUTO.
mode) or HOL (holiday mode) , the sys te m w ill oper a te in the se lec ted mode un t il you manua lly cha nge
it again.
1
If you select DAY (day mode), NGT (night mode), DAY2 (day2 mode), NGT2 (night 2
1
AUTO indicates that the system will follow the day/night mode tables programmed by the Installer.
E.1
Page 49
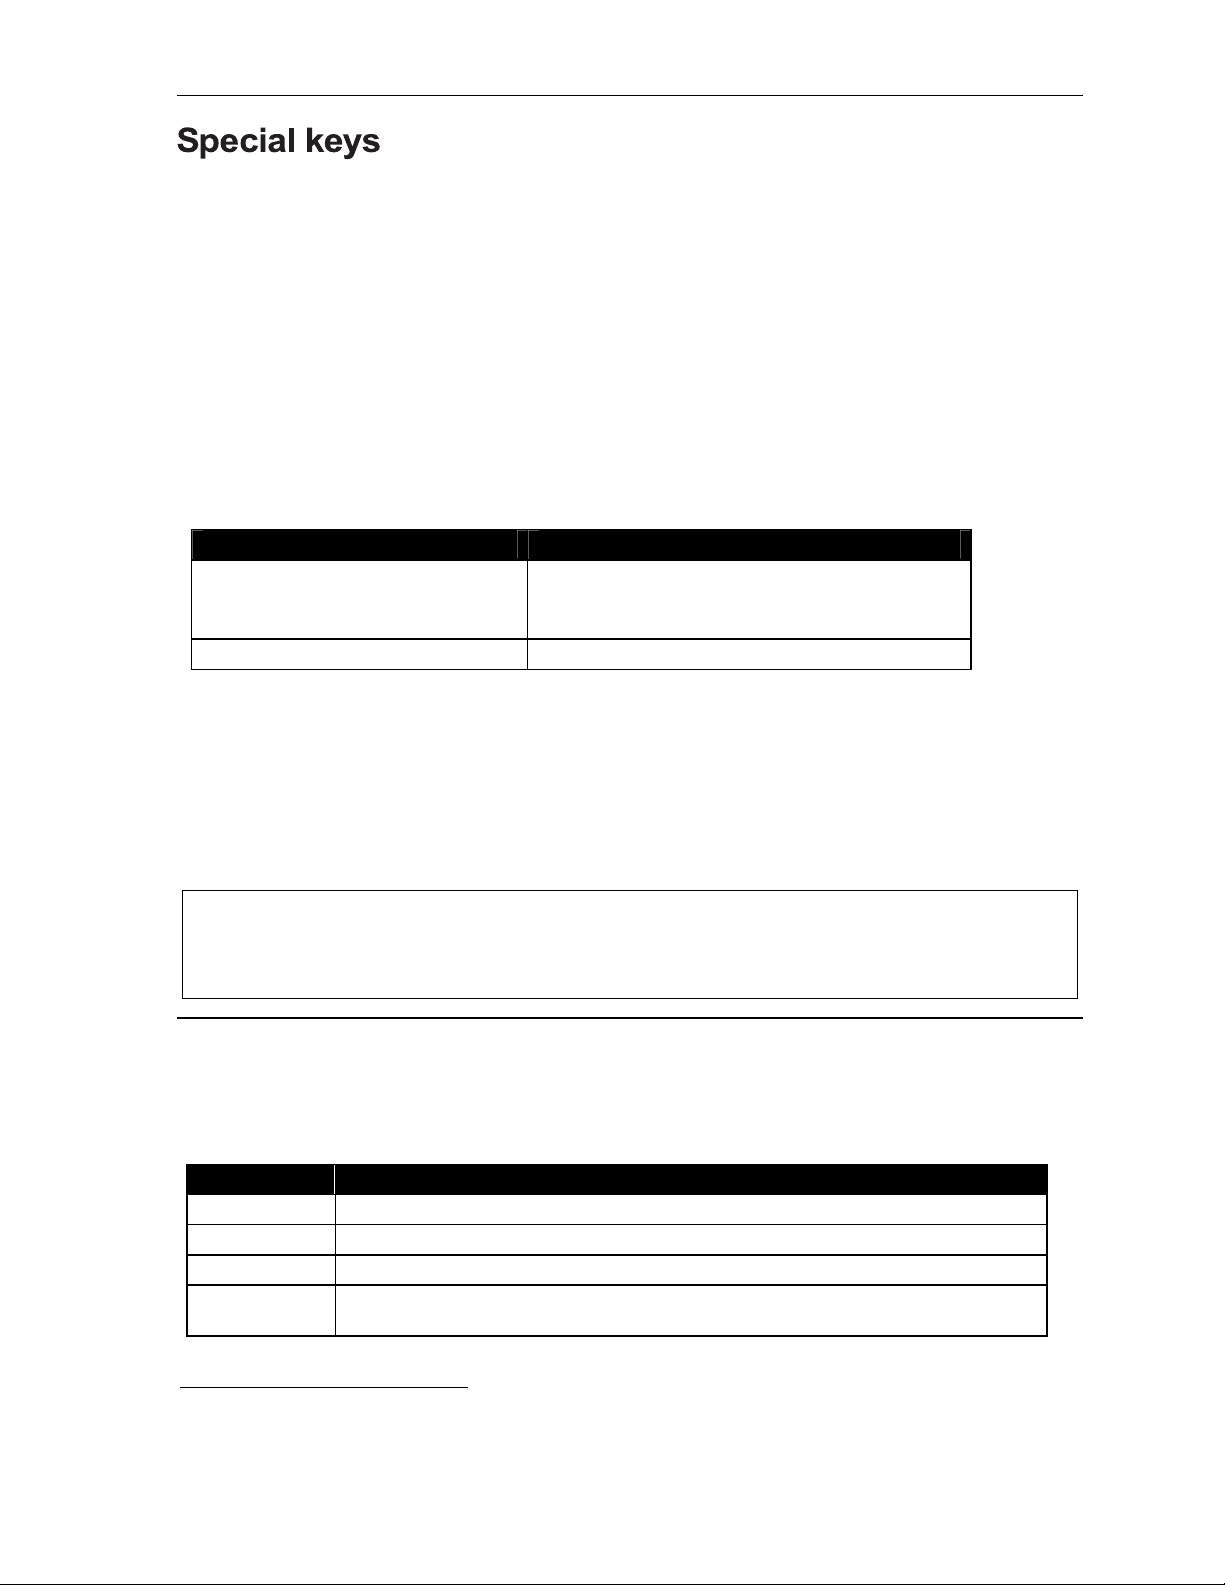
User’s Guide Special keys
Special keys
FLASH
The FLASH key serves several purposes:
• Getting a fresh dial tone without replacing the handset — When connected to an outside line, press
FLASH to automatically disconnect and receive fresh outs ide dial tone. (See also “RELEASE,” below.)
• Sending a flash hook signal — If operating behind Centrex
flash hook signal automatica lly to eithe r the phone company’s ce ntra l office or the host PBX. Either
may use this signal to provide you with additional features.
• Toggling between calls — If you hear a call waiting tone while on a call, press FLAS H to toggle
between the two ca lls.
REDIAL
The REDIAL key allows you to automatically call a stored name and number as shown below:
To ... Pre s s REDIAL ...
Redial the last number called When yo ur st a tion is id le
. . . or . . .
After first lifting the handset or pressing SPEAKER
Automatically respond to a message During message playback with Caller ID
1
or a PBX, press FLASH to tra nsmit a
RELEASE
The RELEASE key serves several purposes:
• If pressed when conn ec ted to a ca ll th rough the handset, it disc onne cts the call and gives you
internal dial tone.
• If pressed when you’re connected to a call via the speakerphone, it disconnects the call.
• If pressed during call wa it ing , it drops the current call and automatically connects to the waiting call.
Note: The hookswitc h also acts as a combinati on FLASH/RELEASE key (and is the only way to perform
these functions on a 12-Key Feature Phone, which has neither a FLASH k ey nor a RELEASE key).
T o send a flash hook signal, quickly press the hookswitch once.
T o release (disconnect), hold down the hookswitch for one second.
Esi-Dex
(Not available on 12-Key Feature Phone.)
Esi-Dex (“easy Dex”) is a powerful feature that lets you access and auto-dial stored names and numbers.
You may access names and numbers from as many as four different Dexes (i.e., indexes):
Dex Source
Personal Dex Names you’ve stored for your use (see “Adding names to your Personal Dex,” below)
Station Dex All station, department, and guest mailbox names programmed by the Installer
System De x2 All system speed-dial names set up by the System Administrator
Location Dex3 All location names on your Esi-Link network, which links to the Station Dex, programmed
by the Installer
1
A special service your phone company may offer. See your administrator for further details.
2
The System Dex is available only if the System Administrator has programmed system-wide speed-dial numbers.
3
The Location Dex is available on only Esi-Link-enabled systems.
F.1
Page 50
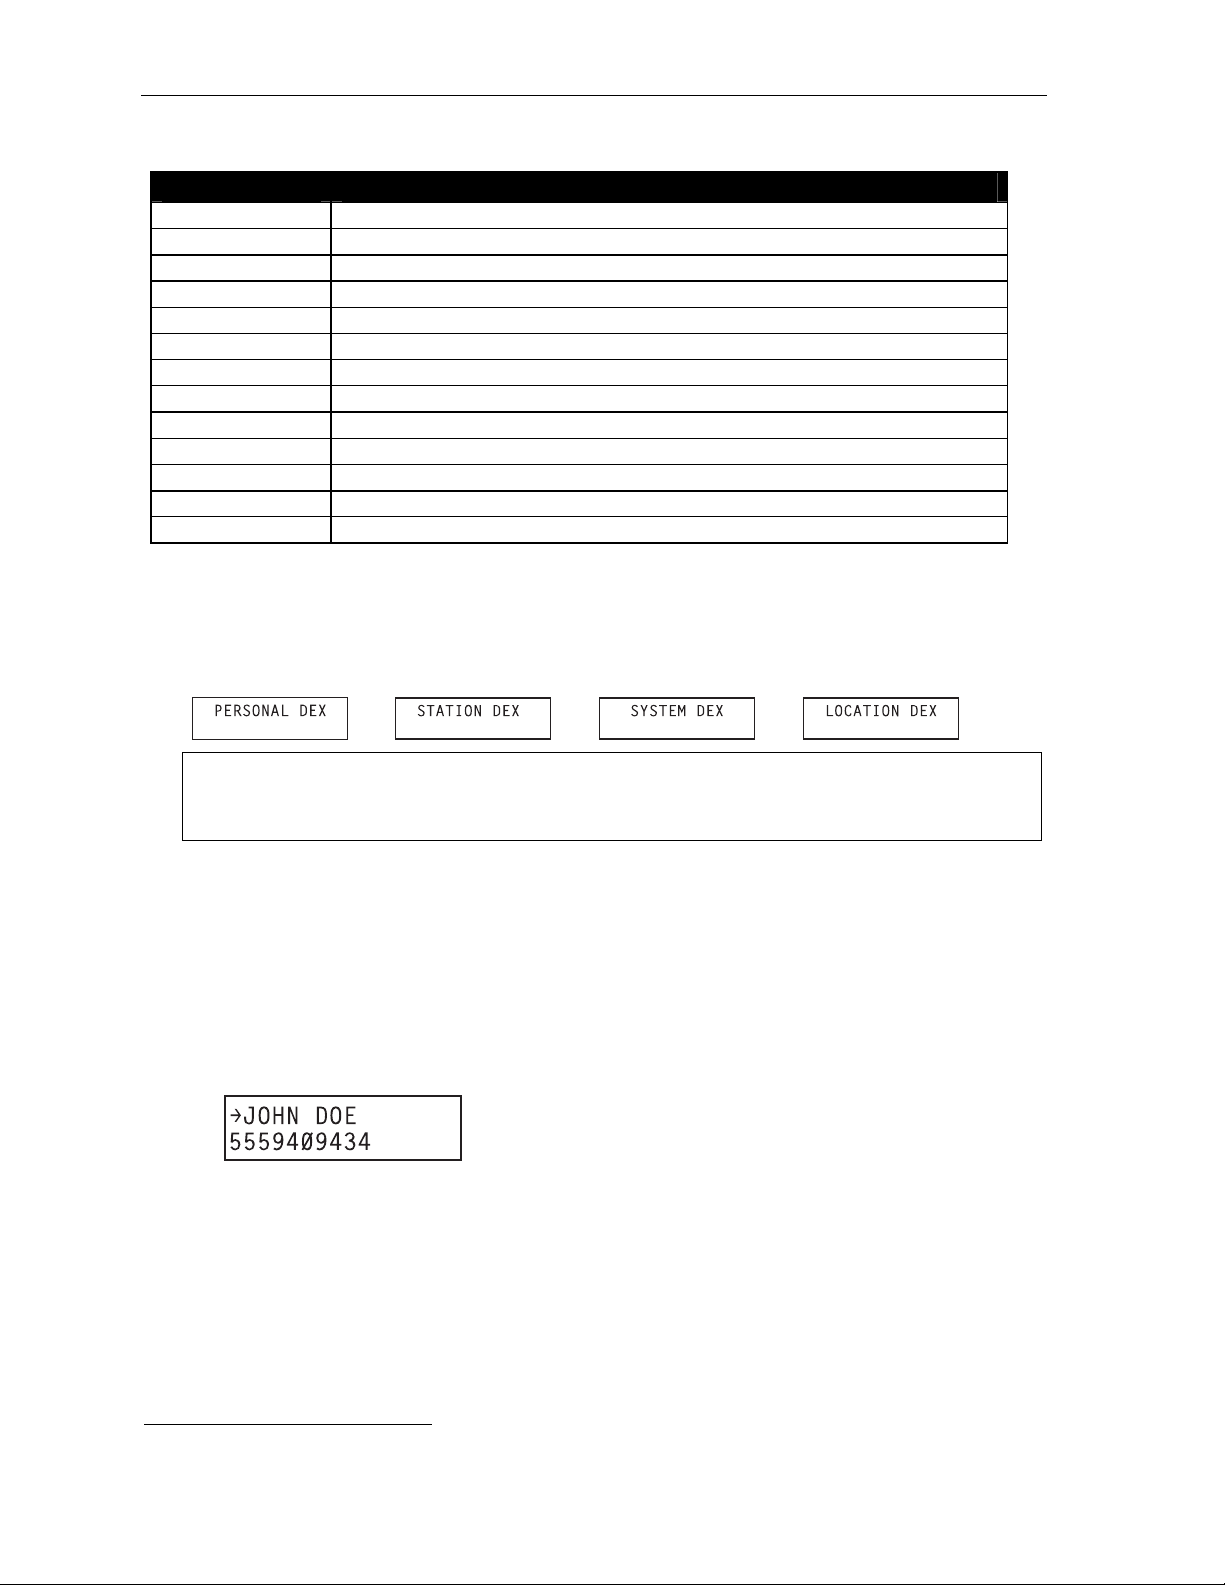
Special keys User’s Guide
Esi-Dex prompts displayed on a 48-K ey Fea tur e P hone
Prompt What it means
[Arrows] Move in the direction of the arrow as desired
BACK Moves backward to previous screen/record
DEL Del et es a speci fic name and/ or number shown on the di spl ay
DIAL Dials the phone number
EDIT Edits information shown on the display
LOC Selects Location Dex
NEW Creates a new record in Esi-Dex
NEXT Moves to next record or programming prompt
PAUSE Inserts a three-second pause in a phone number (if required for proper dialing)
PER Selects Personal Dex
STA Selects Station Dex
STOR Stores a name and phone number
SYS Selects System Dex
Auto-dialing using Esi- Dex
. . . On the 24-Key Feature Phone
1. While yo ur station is idle (o r just after receiving dial tone), repe atedl y press ESI-DEX to select the
desired Dex:
Notes: System Dex and Locat ion Dex aren’t availabl e on ever y s ystem.
For the remainder of this example, we’ll assu me you selected Personal De x . Howe ver, the
procedure is the same for any of the other Dexes.
2. Choose the desired name from the selected Dex, us ing one of two me thods.
Either:
(a.) Scroll — Press the scroll keys (W and V) to loo k up and dow n th roug h the Dex until you find
the name (names will app ear in t he order in which the y w ere stored in the Dex).
. . . Or . . .
1
(b.) Dial-by-name — Dial up to the firs t th ree ch a racters
of the extension, department, or guest
mailbox name. For example: if you want to call John Doe, dial 5 6 4 (because it spells J O H).
You’ll begin to see names that begin with thos e le t ters . You can then use the scro ll keys (W
and V) until you find the desired name and number.
3. P ress ESI-DEX again to dial the number.
1
You can also dial just one or two characters, and then press # to e n te r.
F.2
Page 51
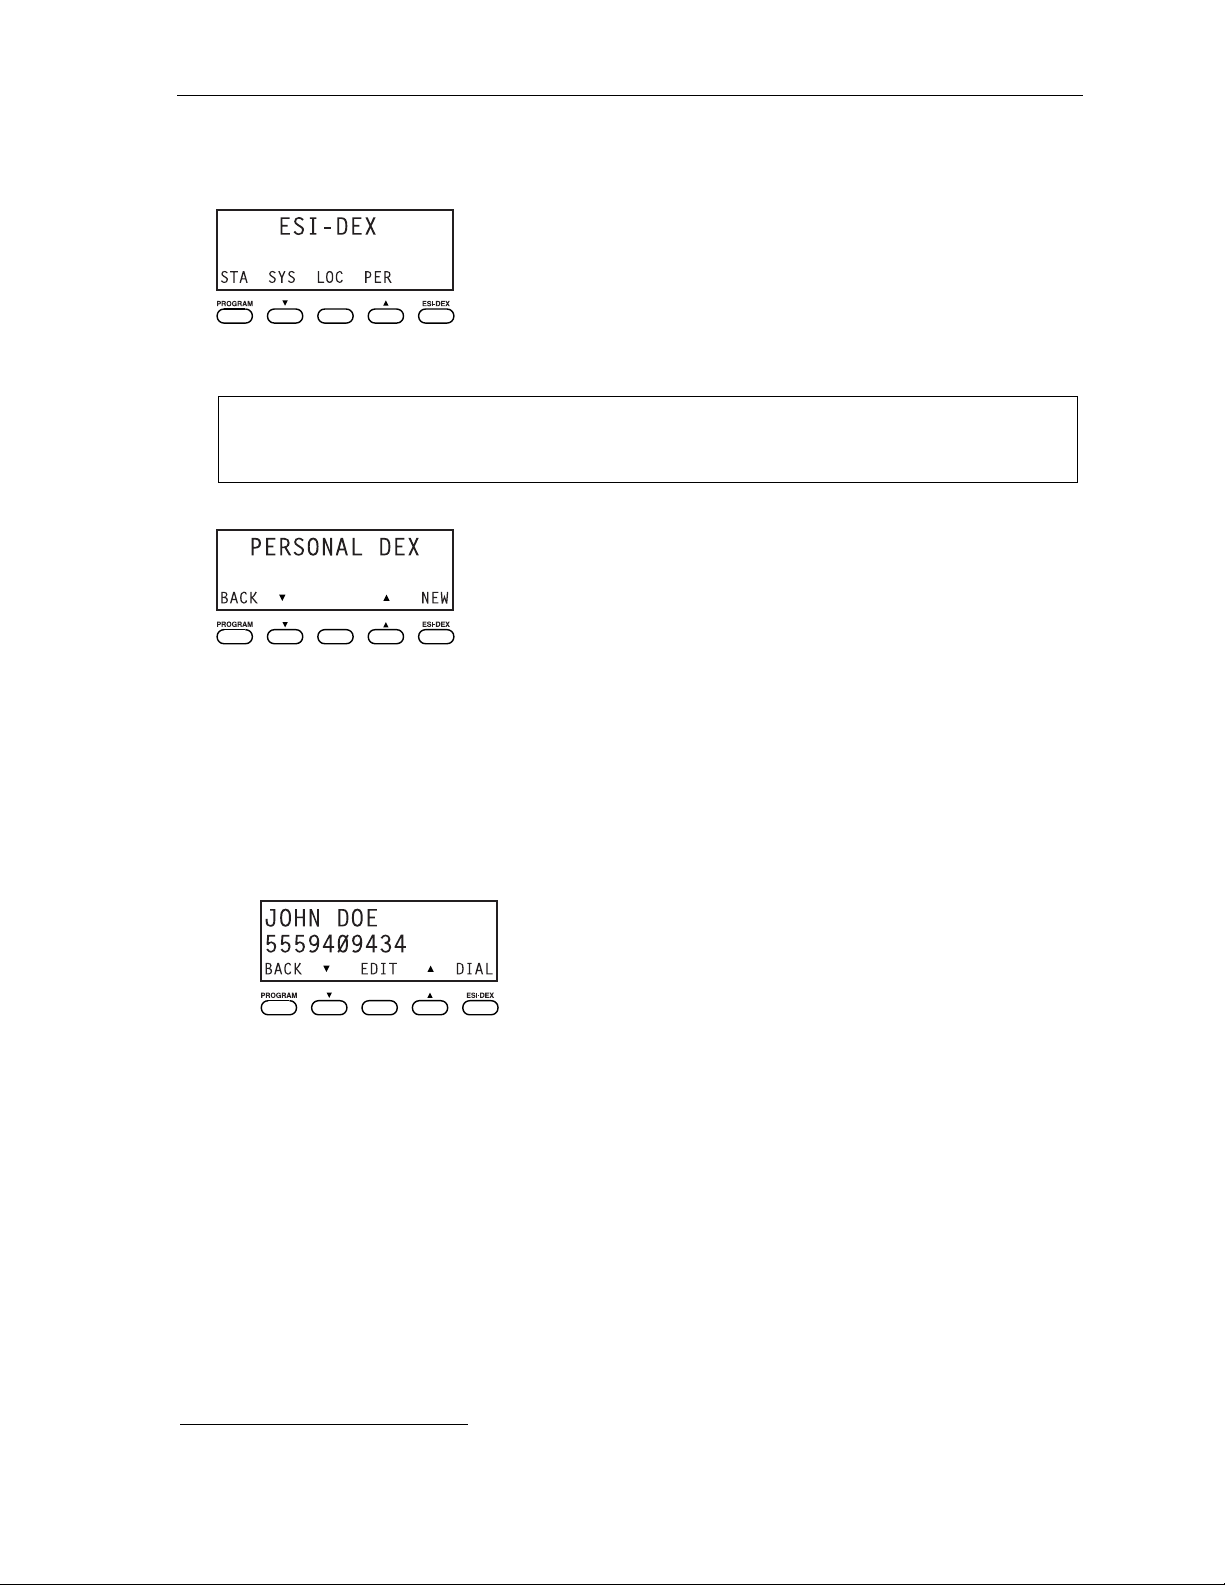
User’s Guide Special keys
. . . On the 48-Key Feature Phone
1. W hile your station is idle (or just after receiving dial tone), press ESI-DEX. This causes the Esi-Dex
menu to appear, as shown:
2. Press a key to choose the appropriate Dex —Station Dex (STA ), System Dex (SYS), Location Dex
(LOC) or Personal Dex (PER) — or press RELEASE to cancel the procedure.
Notes: System Dex and Locat ion Dex aren’t availabl e on ever y s ystem.
For the remainder of this example, we’ll assu me you selected Personal De x . Howe ver, the
procedure is the same for any of the other Dexes.
The disp lay now reads:
3. Choose the desired name from the selected Dex, us ing one of two me thods.
Either:
(a.) Scroll — Press the scroll keys (W and V) to loo k up and dow n th roug h the Dex until you find
the name (names will app ear in t he order in which the y w ere stored in the Dex).
. . . Or . . .
1
(b.) Dial-by-name — Dial up to the firs t th ree ch a racters
of the extension, department, or guest
mailbox name. For example: if you want to call John Doe, dial 5 6 4 (because it spells J O H).
You’ll begin to see names that begin with thos e le t ters . You can then use the scro ll keys (W
and V) until you find the desired name and number.
4. P ress DIAL to place the call.
1
You can also dial just one or two characters, and then press # to e n te r.
F.3
Page 52

Special keys User’s Guide
4
Adding names to y o ur P er sona l D ex
You can add names to you r Persona l Dex by using either the Caller ID method or the manual method.
The Caller ID me thod is the sa me regar d less of whether you’re using a 24- Ke y or 48-Ke y Fea ture
Phone; howe ver, the manua l method is used differently on each phone mode l.
Caller ID method (on either Feature Ph one)
Whenever a Caller ID name appears on your LCD display (while talking on an incoming call or during
message retrieval) press ESI-DEX to automatica lly store the name and number in your Persona l Dex.
The display confirms:
24-Key
Feature
Phone
48-Key
Feature
Phone
Manual method (on the 24-Key Feature Phone)
While your station is idle, press ESI-DEX until prompted to “ADD-A-NAME” . . .
. . . and then enter the name and the number as prompted.
Note: If needed, press HELP for assistance .
1. To enter each character for the name, press the dia lpad key that includes the des ired cha racte r.
The key’s possible character entries will change each time you press the key.
2. When the desired characte r appears, pr ess # to confirm its entr y. The cursor will mo ve to the next
character position. Use W and V (the scroll keys) to back up or to insert a sp ace .
Example: To enter a B, press 2 twice (the possible options through which t o scroll are A, B, C and 2). When
B appears, press # to confirm and move to the next entry.
3. Repeat steps 1–2 until the name is complete. The na me ma y cont a in up to 15 characters (a spac e
is a character, too).
4. Press # again when finished entering the name.
5. Now, enter the number — including, if necessary, the line access code 9 (or 8 or 71–76 ).
Note: Use the V scroll key to enter special characters; use the W scroll key to backspace. Y ou also can
use the scroll keys to view the number after it’s saved. To change the number, you must delete it
and then re-enter it as desired.
6. Press # to confirm the entry .
F.
Page 53
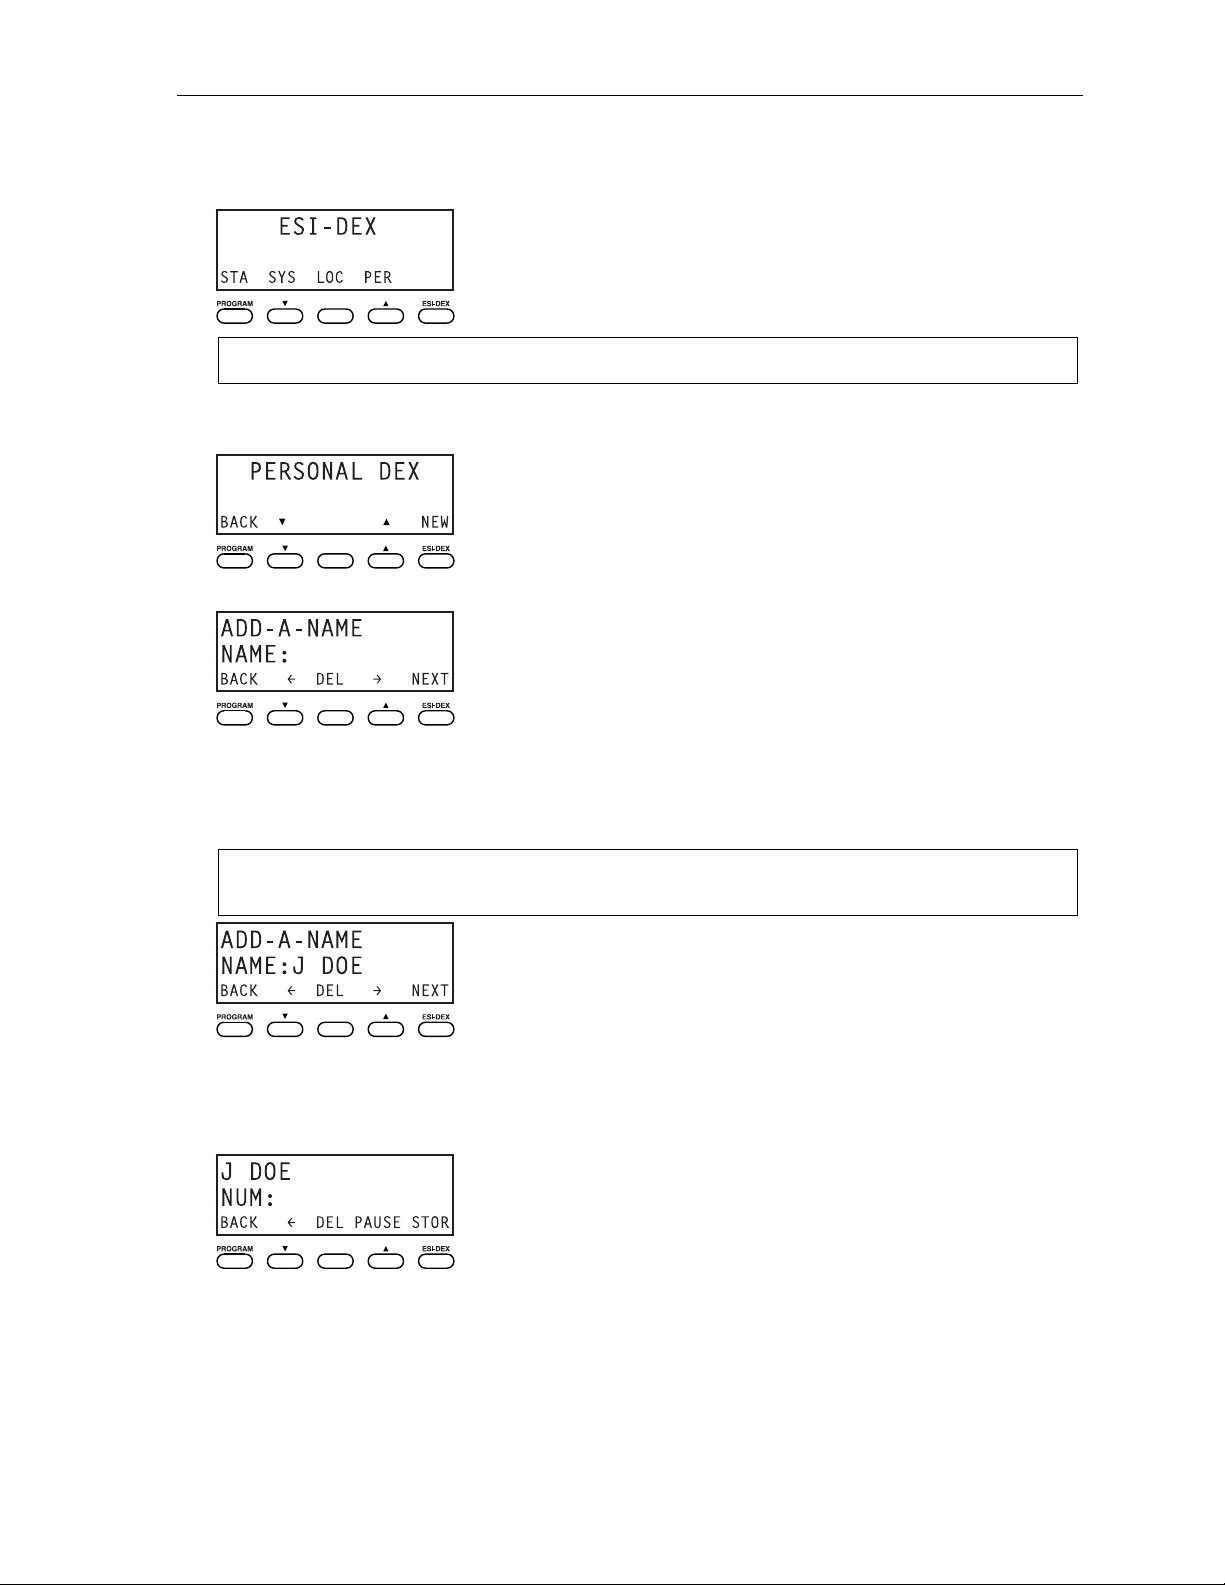
User’s Guide Special keys
Manual method (on the 48-Key Feature Phone)
1. W hile your station is idle (or just after receiving dial tone), press ESI-DEX. This causes the Esi-Dex
menu to appear, as shown:
Note: Y our display may differ, depending upon the availability of certain Dexes o n your s yste m.
2. P ress PER to choose the Personal Dex.
The disp lay now reads:
3. P ress NEW.
4. To enter each character for the name, press the dia lpad key that includes the des ired cha racte r.
The key’s possible character entries will change each time you press the key.
5. When the desired characte r appears, pr ess # to confirm its entr y. The cursor will mo ve to the next
character position. Use W and V (the scroll keys) to back up or to insert a sp ace .
Example: To enter a B, press 2 twice (the possible options to scro ll through are A, B, C and 2). When B
appears, press # to confirm and move to the next entry.
6. Repeat steps 4–5 until the name is complete. The na me ma y cont a in up to 15 characters (a spac e
is a character, too).
7. P ress NEXT when finished entering the name. You will see the display for entering the number that
goes with the name you entered.
(Continued)
F.5
Page 54
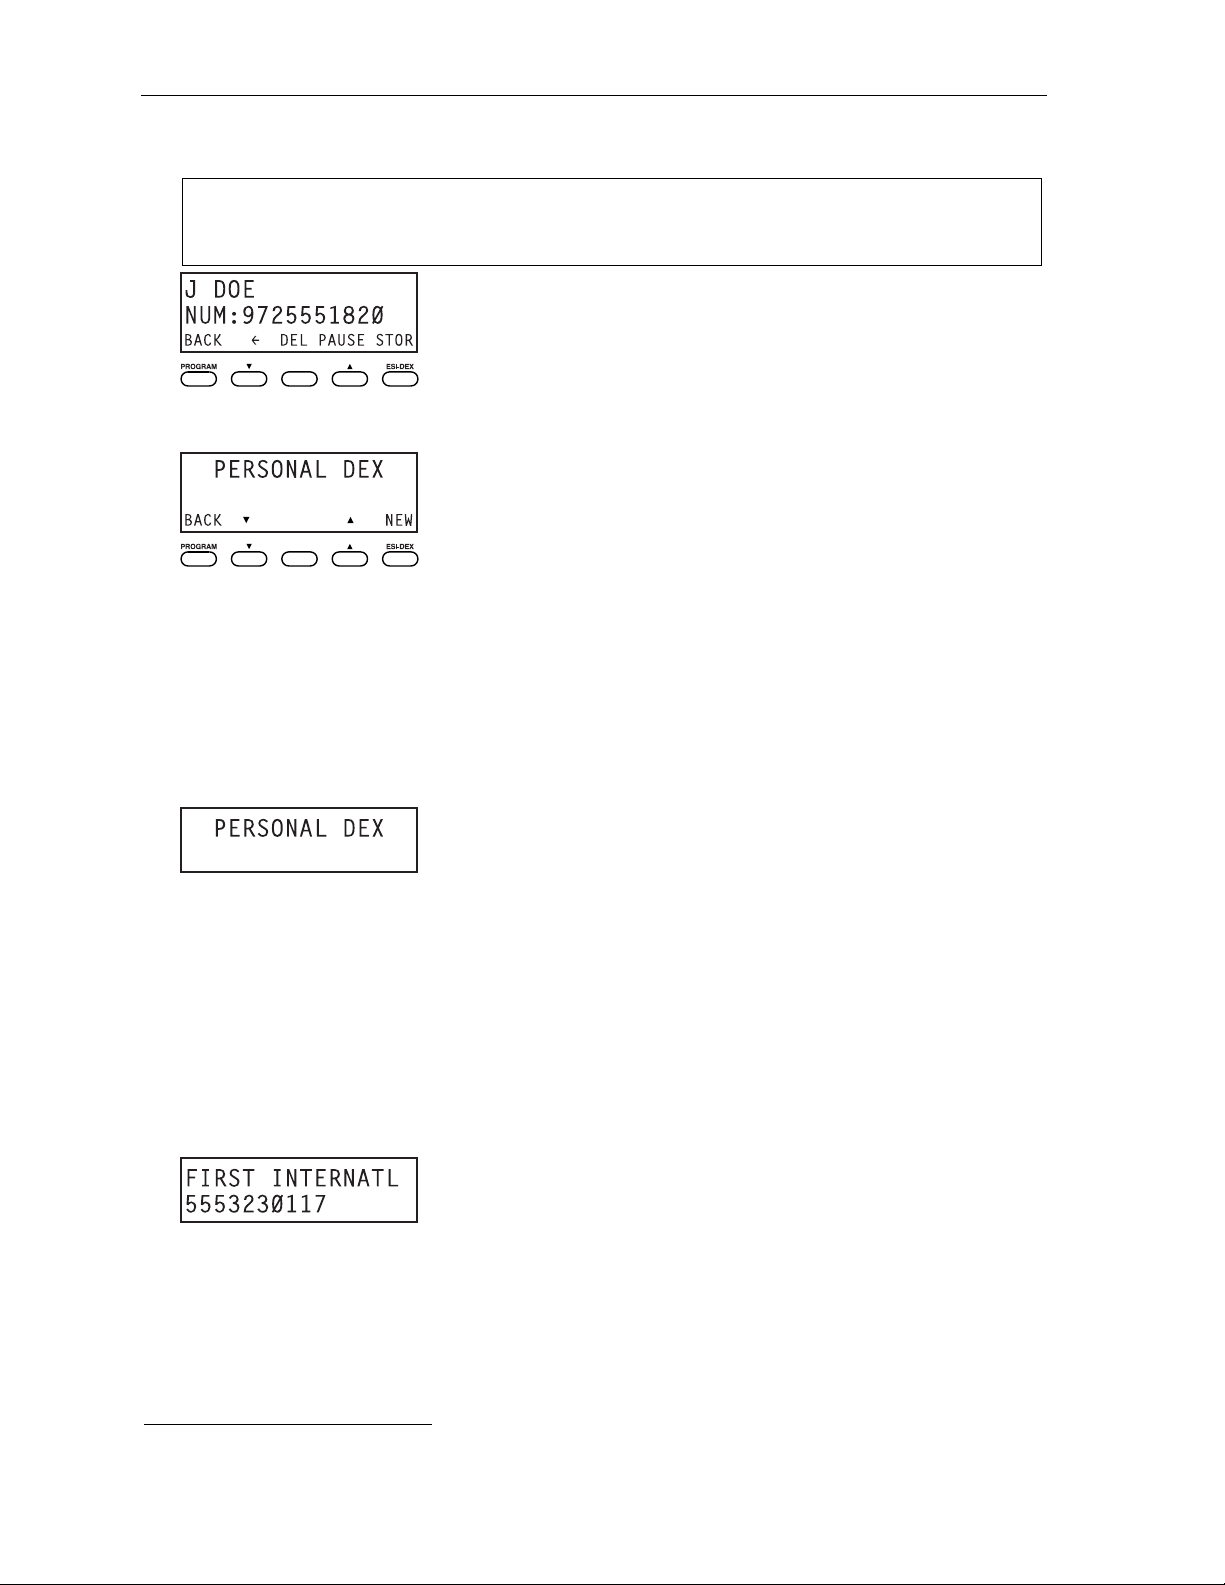
Special keys User’s Guide
8. Enter the number — including, if necessary, the line access code 9 (or 8 or 71–76). T o insert a two-
second pause, press PAUSE.
Note: Use the V scroll key to enter special characters; use the W scroll key to backspace. Y ou also can
use the scroll keys to view the number after it’s saved. To change the number, you must delete it
and then re-enter it as desired.
9. P ress STOR to confirm the entry, which the phone will show briefly before returning to the Personal
Dex display.
10. To make another name/number entry, repeat steps 3–9.
To finish, press BACK.
Deleting nam es fr om your P ers onal D ex
. . . On the 24-Key Feature Phone
1. While your station is idle (or just after receiv ing dial ton e) , repeatedly press ESI-DEX to select the
Personal Dex:
2. Choose the desired name from the Personal Dex, using one of two methods.
Either:
(a.) Scroll — Press the scroll keys (W and V) to loo k up and dow n th roug h the Dex until you find
the name (names will app ear in t he order in which the y w ere stored in the Dex).
. . . Or . . .
(b.) Dial-by-name — Dial up to the firs t th ree ch a racters
the listing for First International Bank, dial 3 4 7 (because it spells F I R). You’ll begin to see
names that beg in with th os e le tters . You can then use the scro ll ke ys ( W and V) until you find
the desired name and number.
3. When the desired nam e and number appears . . .
1
of the name. For example: to br ing up
. . . delete the entry by pressing either or HOLD.
1
You can also dial just one or two characters, and then press # to e n te r.
F.6
Page 55
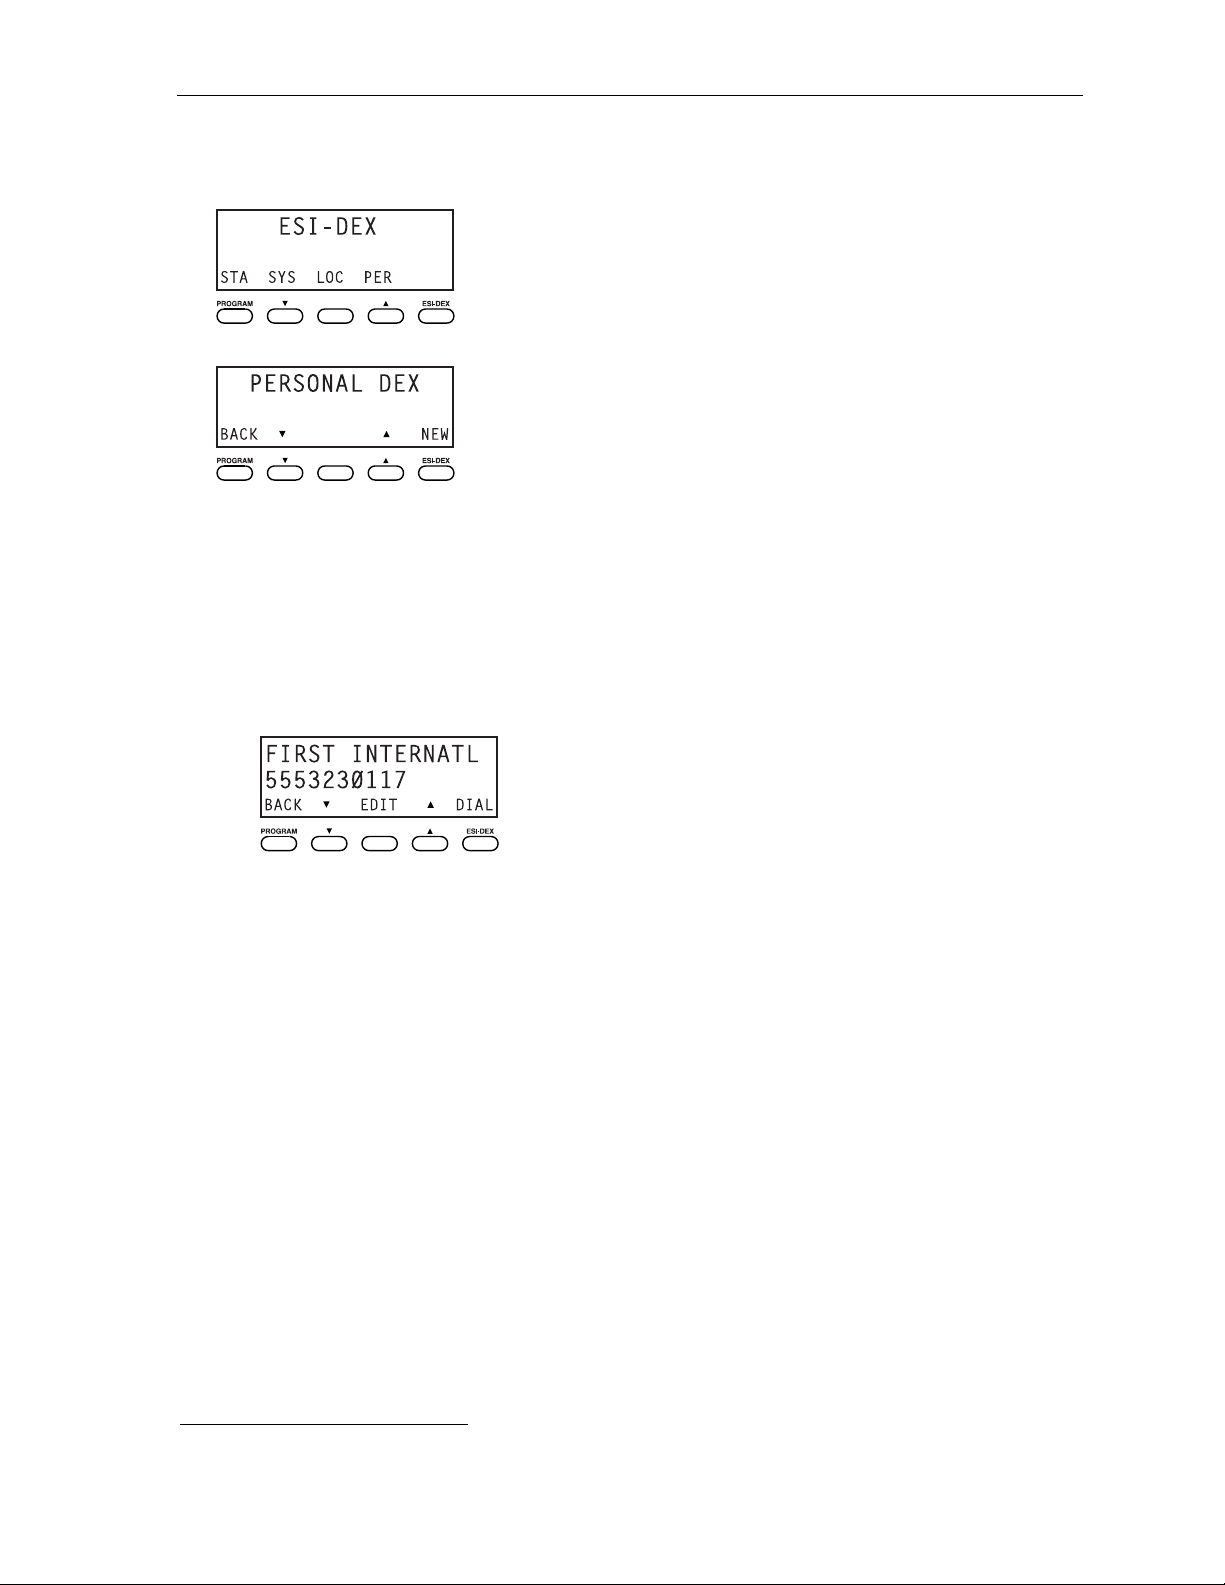
User’s Guide Special keys
. . . On the 48-Key Feature Phone
1. W hile your station is idle (or just after receiving dial tone), press ESI-DEX. This causes the Esi-Dex
menu to appear, as shown:
2. P ress PER to choose the Personal Dex.
3. Choose the desired name from the Personal Dex, using one of two methods.
Either:
(a.) Scroll — Press the scroll keys (W and V) to loo k up and dow n th roug h the Dex until you find
the name (names will app ear in t he order in which the y w ere stored in the Dex).
. . . Or . . .
1
(b.) Dial-by-name — Dial up to the firs t th ree ch a racters
of the name. For example: to br ing up
the listing for First International Bank, dial 3 4 7 (because it spells F I R). You’ll begin to see
names that beg in with th os e le tters . You can then use the scro ll ke ys ( W and V) until you find
the desired name and number.
4. Delete the entry by pressing HOLD.
1
You can also dial just one or two characters, and then press # to e n te r.
F.7
Page 56
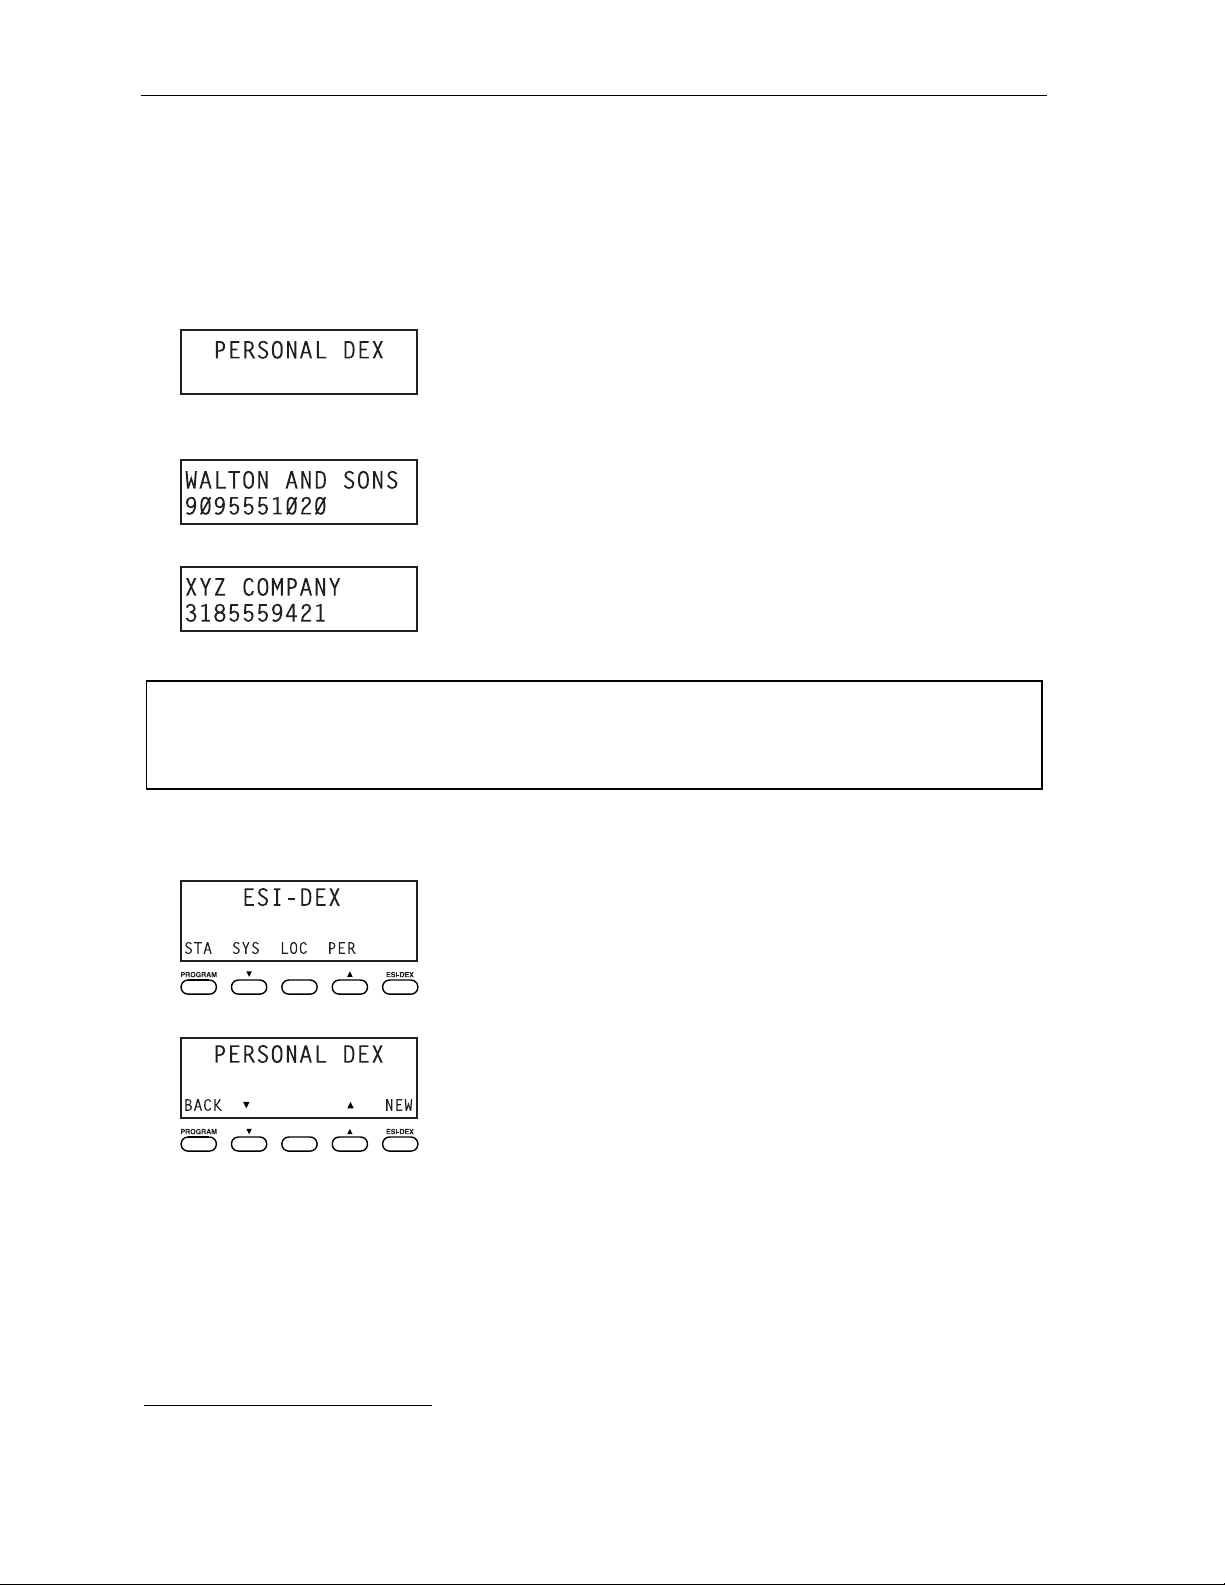
Special keys User’s Guide
Using Esi-Dex: A n example
Let’s say you’re on a call with the XYZ Company — XYZ COMPANY appears on your display — and
you wish to save the name and number for future use. Just press ESI-DEX. Your display will confirm
that the informat ion has been s to red.
described below for each mode l of ES I Fea ture Pho ne.
. . . On the 24-Key Feature Phone
1. Press ESI-DEX unti l you see PERSONAL DEX on the display.
1
Then, to c all the XYZ C ompa ny in th e future, use Es i- D ex as
2. Enter 9 2 5 (W A L). The display will show the first stored name that starts with the character range
from WAJ to YCL.
3. Press the scroll keys (W and V) unt il XYZ COMPANY appears in th e d isp lay.
4. Press ESI-DEX again. This dials the number for the XYZ Company.
Important: The number dialed (if stored from a Ca lle r ID) will be the number for the act u al line used by the
caller, and may be diffe re nt than the caller’s liste d nu mber. Addi tionally, some local calls may not be
auto-dialed correctly , depending on the limitations of your area’s local dialing plan. You may wish
to create a manual listing for these. Consult your administrator if you need further assistance.
. . . On the 48-Key Feature Phone
1. W hile your station is idle (or just after receiving dial tone), press ESI-DEX.
2. P ress PER to se lect th e Personal D ex.
(Continued)
1
If the number is already in your Personal Dex, the message ALREADY STORED will appear on the display. This indicates
Esi-Dex has prevented storing the same number multiple times.
F.8
Page 57

User’s Guide Special keys
3. Enter 9 2 5 (W A L). The display will show the first stored name that starts with the character range
from WAJ to YCL.
4. Pr ess the scroll keys (W and V) until XYZ COMPANY appears in the disp lay.
5. P ress DIAL. This dials the number for the XYZ Company.
Important: The number dialed (if stored from a Ca lle r ID) will be the number for the act u al line used by the
caller, and may be diffe re nt than the caller’s liste d nu mber. Addi tionally, some local calls may not be
auto-dialed correctly , depending on the limitations of your area’s local dialing plan. You may wish
to create a manual listing for these. Consult your administrator if you need further assistance.
System speed-dialing with Esi-Dex
If your administra tor has pro gra m med sys tem sp eed -d ial numbers, you can acces s one o f thes e
numbers either via Esi-Dex, as explained in the foregoing discussion, or auto-dial it by dialing its
corresponding three-digit access number (in the range 600–699).
Example: If an out-of-town factory location has been programmed as system speed-dial access number 605,
you can lift the handset, receive internal dial tone, dial 6 0 5 and this will automatically dial the
factory’s number. You may also program 605 (in this example) as a programmable feature key (see
page C.2).
Override ring
(Not available on 12-Key Feature Phone.)
The override ring feature lets you place a call — station-to-station, outside line or Esi-Link — or leave a
voice message when another call is ringing .
Placing a ca ll us ing the ov er r ide r ing fea tur e
First, program a feature key1 to be an Override Rin g Key — by assigning to it the function code 5 8 0.
Then, to bypass an incoming station or line call:
1. Befor e you begin t he call, press the Override Ring Key you programmed. When you do this,
don’t take the handset off-hook and don’t pre ss either a preassigned headset key (see F.12), a
preprogrammed line key or SPEAKER.
2. Once you receive dial tone, pick up the handset and proceed with your call as you normally would.
The incoming ca ll will be rerouted to the forw ard ing dest ination (such as your voice ma ilbox) yo ur
Installer or System Administrator has set for your station.
Notes: Any other feature key s no t men tio ne d above will neither answer a ca ll no r in itiate the override
ring feature.
Use of the Override Ring Key also overrides any outside dial tone preference (see page F.10) that may
have been set for your station.
1
See “Programmable feature keys,” pp. C.2–C.3, for full details.
2
The override ring feature has no effect on calls ringing in from a hold recall, a queued line or an Esi-Link channel.
2
F.9
Page 58

Special keys User’s Guide
Message monitor mode (live call screening)
(Not available on 12-Key Feature Phone.)
Message monitor mode, also known as liv e call sc reening, lets you hear a caller leaving a message
in your mailbox, just as with your home answering machine. Y ou turn this feature on or off as part of
user programming — PROGRAM 3 6. While you hear th e ca ller th roug h you r spea ke r, you ha ve the
following options :
Option Result
Lift the handset You intercept the call
Do nothing The system records the message to your mailbox for your later retrieval
Press MUTE/DND Te mporarily mu tes your speake r (the syste m continues to record t he message to your mailbox )
Note: During monito r mode, you will hear a call ring , the n subd ued r inging wh ile the ca lle r is hearing your
personal greeting, then their message. Y ou can intercept the call at any time.
Personal greeting reminder
If you frequently change y our personal greeting, use this option; it s ets you r s tation to remind you o f your
current greeting. The first time you use your phone after it has been idle ( fo r the per iod y ou set in this
func tion), the s ystem autom atically plays your current greet ing (and giv es you the option to change it).
The range is 0 (no r eminder) to 500 hours. To set this, pres s PROGRAM 3 2.
Example: If you change your personal greeting only when out of town for a few days, set the reminder interval
to 60 hours; you’ll be reminded if your phone has not been used for three days. If it’s Friday, set the
reminder for 36 hours and yo u will be reminded every Monday morn ing o r if yo u are away fo r a
couple of days. If you change your greeting several times a day , set the reminder for about 3 hours.
Headset operation
You can use a headset1 with your ESI Feature Phone. You must program one of your programmable
feature keys to be a headset key
or disconnect from a call. The key will blink green when a call is ringing and glow green when
connected. If you have a headset connected and the phone is off-hook , pressing the scroll keys (W and
V) will adjust the headset volume. After you initiate or answer a call using the headset key, lifting the
phone’s handset au to ma tica lly ta kes you ou t o f headse t mode . To switch bac k to heads et mod e wh ile
on a call, press the headse t key again and then place the phone’s handset on-hook .
2
(see “Optional features,” pp. F.11–F.14) that you’ll use to connect to
Outside dial tone preference
If you make mostly outside calls, you may find this se ttin g helpful. It tells your st at ion to conne c t
automatically to an available outside line; i.e., you don’ t have to dial 9 (or 8 or 71–76) before the phone
number . The re fore , when you lift the hands et or press SPEAKER, you will immediately receive an
outside dia l tone from the highest-numbered line available to you.
Note: To place an internal call while in this mode, press the appropriate station key or (a.) press TRANSFER
to switch t o internal dial to ne and (b.) then dial th e extension number.
3
1
Not all headsets are compatible with your ESI Feature Phone; contact your ESI Reseller for a list of compatible models.
2
N ot avai lable on a 12 -K e y F e ature Ph one.
3
This aspe ct (i.e., that it’s always the highest line available to you) can’t be changed.
F.10
Page 59
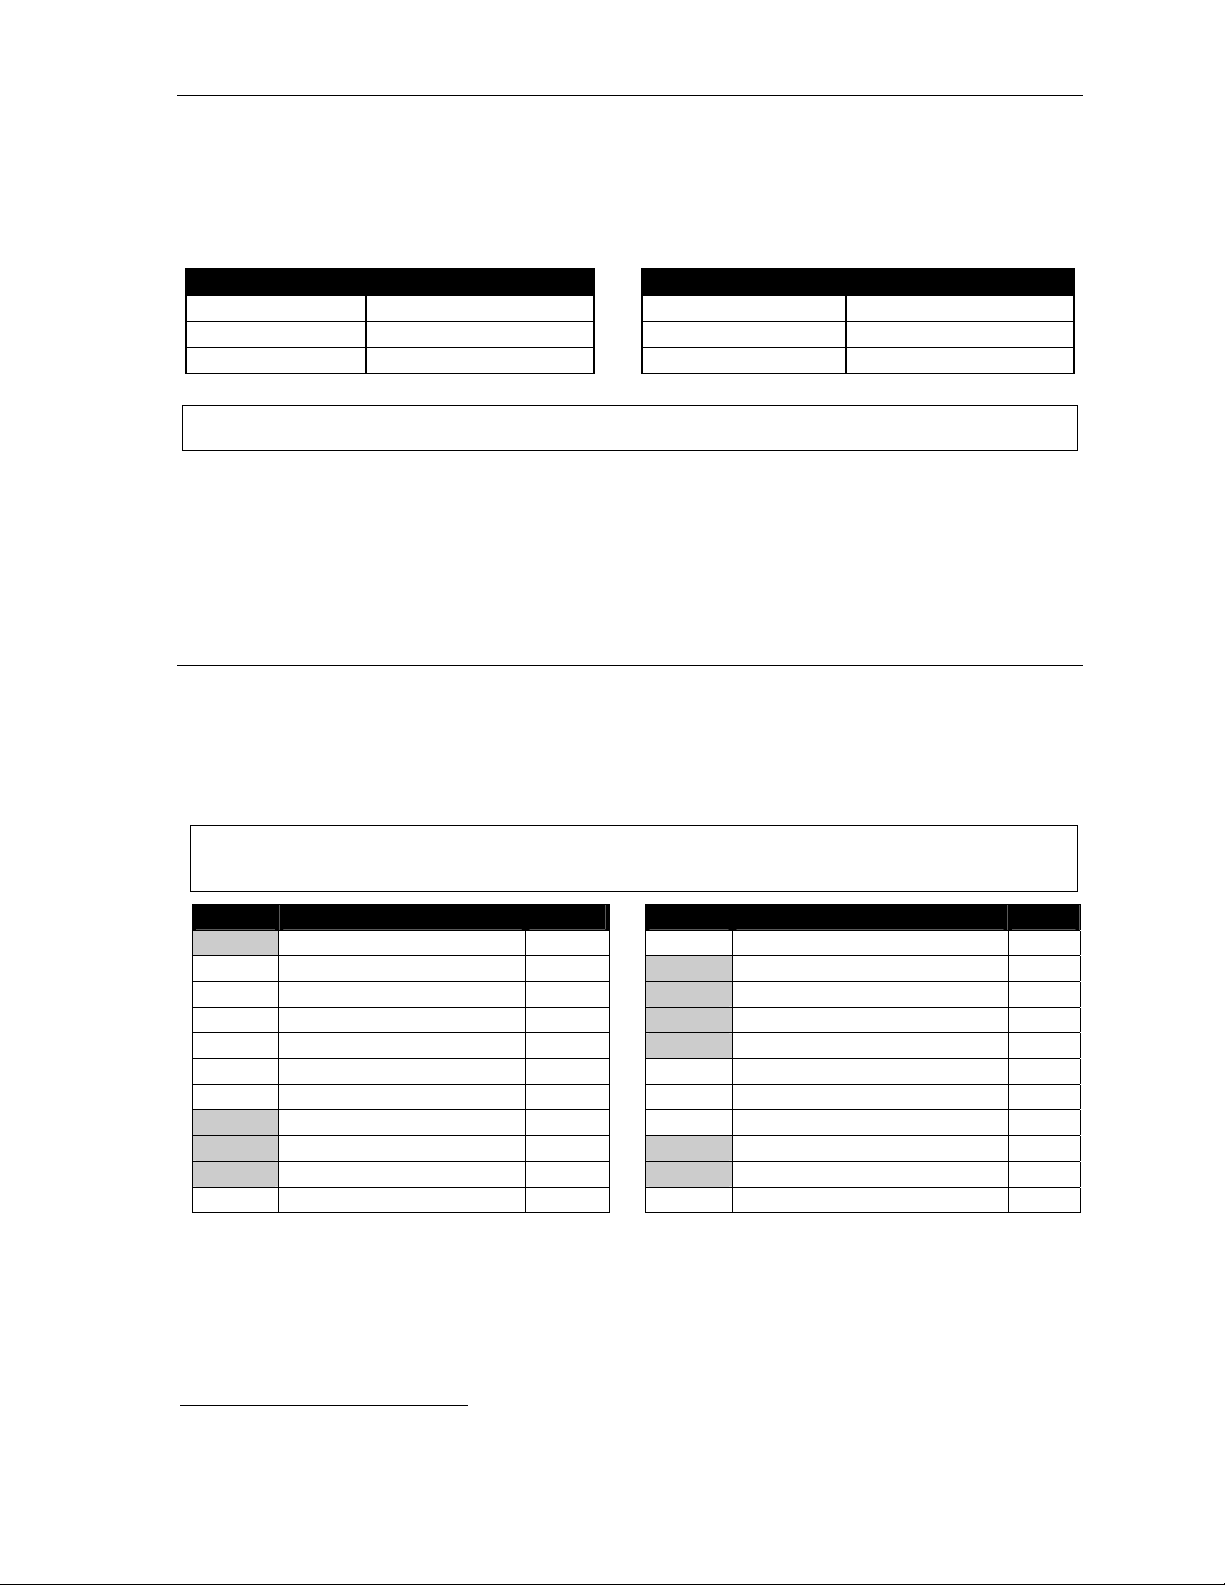
User’s Guide Special keys
Line keys
If some of your programmable feature keys have been programmed as line keys (or you can program
line keys using PROGRAM 2), press an unlit key to access the line. An outside call transferred to your
station can be answered by simply lifting the handset or pressing SPEAKER. You do not have to press
the line key. The LED indications for the line keys are:
LED Line status LED Line status
Solid red In us e Blinking green Ringing at your station
Solid green Connected to your station Slowly blinking red On hol d by another stati on
Blinking red Ringing at another station Slowly blinking green Held by you
Note: Dialing 9 (or 8 or 71–76) to be assigned a line automatically is always available.
Privacy release
This feature makes it easy to “conference-in” on a call: just press a line key assigned to the outside line
the call is using, and you’ll automatically join the ca ll.
Private line
If a private line has been assigned to your station, you must ha ve a line ke y pro gra m med (see pp. C.2–
C.3) in order to access it.
1
Optional features
The following optional features may be accessible f r om y our station. S ee the Administr ator for detai ls.
In many of the cases you can dial the appropriate feature code (one that starts with 5) to activate or use
the featu re. In some ins tances, you mu s t use a programmable feature key t o s erve as an on/ off key for
the feature (see “Programmable feature keys,” page C.2).
Notes: In the codes below, XXX = ACD department number and YYY = extension number.
Codes tinted gray are the only codes that can be programmed on a 12-Key Feature Phone.
Code(s) Key usage Page Code(s) Key usage Page
199 Overhead page E.13 569 Background announce F.12
560 Manual day/night/holiday mode F.11 570 Conference
561 Servi ce observing F.12 571 Personal greeting 1 F.13
5XXX ACD agent log on/off I.1 572 Personal greeting 2 F.13
562 ACD agent wrap I.1 573 Personal greeting 3 F .13
563XXX ACD administrator I.1 574 Missed-Call Key F.13
564 Headse t operatio n F.12 575, 576 Vir tual A nswe r Keys F.13
565 Call forward F.12 577 QuickPage F.14
565YYY Call fwd. to specific extension F.12 578 Mute/DND
566 Redial 579 Vo ice mail
568 Message moni t o r key F.10 580 Override ring F.9
(Continued)
1
This feature may not be available on your system, depending on how it has been programmed. If you wish to enable this feature
on your phone system, contact your System Administrator.
F.11
Page 60

Special keys User’s Guide
Manual day/ni ght m ode (C ode 56 0 )
You can use a programmable feature key to manually change the system’s main auto-attendant
greeting, inco ming ca ll des tinations , and CO line group access .
display switches among: DAY, NGT, DAY2, NG T2, HDAY (holiday) or AUTO.
Tip: T o keep the system from being taken out of this mode, place it in auto and then delete the programmable
feature key’s programming.
Notes: The System Administrator can also change the mode and/or re-record the holiday greeting remotely to
handle unexpected closings, such as for inclement weather.
If a second organization or business (“tenant,” in telephony temrs) is sharing the phone system,
switching between day and night mode also changes that tenant’s day/night mode.
1
Each time the key is pressed, the
2
Service observing (Code 561)
Your administrator may assign service observing capability to those users who need to monitor others’
calls silently (e.g., in order to aid in quality assurance of call activity). To begin service observing, press
the assigned programmable feature key (or dial code 5 6 1), followed b y an exte nsion number or station
key. To discontinue observing, press the station key again or hang up. While you observe another station’s
incoming call, you r disp lay show s to whom that station is connec ted and how long the call has las ted.
Note: The Administrator must authorize service observing for your station, and the Installer must program the
list of all owed extensi ons.
Headset key (Code 564)
This key pro vides for eas y conne c ting to /dis con nec t ing from calls when operating in heads e t mode (see
“Headset operat ion, ” page F.10). Pr ess the key to receive dial tone or to a nswer a ringing call. Pres s the
key again or press RELEASE to disconnect from the ca ll.
Call-forward key (Code 565 or 565XXX)
Note: The 48-Key Feature Phone has a dedicated call-forward key (CFWD).
If you frequently call- forw ard you r phone (see “Ca ll forw arding,” page E.8), you can prog ra m a
programmable fe ature ke y as a call fo rw ard ing key to automatically turn forw ard ing on and off. If you
always forward to the same extension, you can program a key with both 5 6 5 and the extension number.
Redial (Code 566)
This redials the outbound number (i.e., not internal extension) most recently dialed from your station.
Message monitor key (Code 568)
Easily toggle the mes s age mon itor mode on or off with this key. (Otherwise, you can perform the toggle
by pressing PROGRAM 3 6 and following the pro mpts.)
Background announce key (Co de 569)
During call wait ing, you can also make a brief, private background announcement (see “Background
announce feature ,” page E.11) to the station's ear p iece (if the station user has enab led this featu re ) .
Hold down the key until you hear a beep, then begin talking; release the key when finished.
1
Depending on how the Installer has programmed your system, day and night mode for incoming calls and CO line group access
may not change upon use of this key.
2
AUTO indicates that the system will follow the day/night mode tables programmed by the Installer.
F.12
Page 61

User’s Guide Special keys
Personal greeting keys (Codes 571–573)
These keys will provide for easy activation of one or more of your personal greetings (s ee “Pe rsonal
greetings,” page D.1). The key's LED will be green for the associated personal greeting that is active.
These keys can be used in place of or in conjunction with manual activation of the greetings in
programming mode .
Note: For ACD key programming, see “ACD agent operation,” pp. I.1–I.3.)
Missed-Call Key (Code 574)
Note: This works only if you are receiving Caller ID service from your provider. Consult your Administrator,
if needed.
A prog ra mma b le fea ture ke y w ith this co de will flash whenever you have a missed ca ll — mean ing both
(a.) you don’t answer a call to your station; and ( b.) the caller does n’t le ave a mess age in your voice
mailbox. When the key is flashing, press it to see the stored Caller ID record for the most recent missed
call. Use the scroll keys (W / V) to view records for other missed calls; the ESI phone system will stor e
Caller ID records for up to 10 missed calls.
Note: When your sta tion re ceive s its 11th missed call, this will dele te the o ldes t missed c a ll.
Additio nally, while a rec ord is on the display, you may do the following:
• To dial the caller displayed, press REDIAL.
• To view the telephone number (rathe r than th e na me), press 2.
• To delete a record, press 7 whi le the record is on th e displa y.
• T o store the record in your Personal Dex, press ESI-DEX.
Note: If your station is forwarded to anothe r e xtension, any calls will be considered answered and the Missed-
Call Key will not flash . However, if that other extensi on has a m i ssed call key program med, that key
will flash (under cond itions (a.) and ( b .), as de scribed above) even if the call is actua lly forwarded from
your ext ension.
Vir tual Answer Keys (Codes 575, 576)
Note: This works only if call waiting is enabled for your station. Consult your ad ministrator if ne eded.
You can program a Virtual Answer Key to play a greeting to a ca ller when your extension is busy and
route the caller to a desired destination by pressing this key. Program a programmable function key
with either 5 7 5 or 5 7 6. Prompts will instruct you in how to record the greeting and program the
caller’s destination.
The destination can be either the default call waiting or another station; the system takes the caller there
after playing the recorded greeting. With call waiting, the system places the caller on hold as call waiting
(“camping on”) for you r sta tion; if the ca ller can’ t wait, he/she may (a.) press 1 to reach your voice mail,
(b. ) enter anoth er ext ension or (c.) press 0 to re ach the Operator. With another s tati on selec ted, the call
is for warde d to the station.
To record the gree t ing from an id le phone:
1. Press the chosen programmable func tion ke y; th en pres s REC ORD .
2. Follow the prompts to record the greeting and program the destination.
(Continued)
F.13
Page 62

Special keys User’s Guide
4
Sample greetings for Virtual Answer Keys:
“Hello. This is Harvey. I’m currently on another line, but I’d really like to speak to you. Please
hold and I’ll be with you shortly. However , if you do not wish to wait on hold, press 1 to leave me
a voice message. You may also either dial another extension or press 0 to reach the Operator.”
“Hello. This is Bill. I’m currently on another line, but I have been notified of your call. I am
sending your call to our Sale s Depa r t ment admin is tra tor fo r more im medi ate as si stance.
Please remain on the line as your call is being transferred. Thank you.”
QuickPage (Code 577)
Normally used by an operator, this key lets you quickly put on hold, and page, a station user. While on
an ou tside- line call, you can press a QuickP age key, then enter a statio n number ( or press a
programmable feature key programmed for an extension) and the system will automatically page the
1
person
, then forward the ca ll to the pers on’ s voice mailbo x if he/she does n’t ans w er.
Mute/DND key (Code 578)
This multi-mode key’s function varies, depend ing upon whether the phon e is on a ca ll or id le:
• If the phone is on a call (off-hook) — Mutes the micro phone so tha t the person on the other end of
the line can’t hear you.
• If phone is idle (on-hook) — Puts the phone int o do- no t-disturb (DND) mode, sen d ing ca llers
directly to your voice mailbox
2
.
Voice m ail (Code 579)
Allows a 12- Key Feature Phone ( which lacks a dedicated VOICE MAIL key) to have voice mail access .
Warning: T o use voice mail from a 12-Key Feature Phone, you must assign this code to a programmable
feature key. Failing to do so will disab le the mailbox . ( When you try to access a disabled
mailbox, the syste m will no tify you tha t it’s disabled.) You still can retrieve previously lef t mess ages
and access user programming, but the mailbox won’t be able to receive new voice messages.
Therefore, to enable the mailbox, assign key code 579 to a programmable feature key.
Override ring (Code 580)
The override ring feature lets you place a call — station-to-station, outside line or Esi-Link — or leave a
voice message when another call is ringing . For full details on use of this featu re , see “Override ring,”
page F.9.
1
The system will access the paging zone for the extension and play the user’s name as recorded in the directory (if no name is
recorded, it will page by extension number) followed by the phrase “you have a call on hold” and the line on which the caller is
parked — e.g., “John Doe, you have a call on line 21.”
2
Or, alternatively, to other routing (such as the Operator or another coworker’s extension) set by the Installer.
F.1
Page 63

User’s Guide Remote IP Feature Phone
Remote IP Feature Phone
Your Remote IP Fea ture Phon e will operate like a regu lar ESI Feature Phone, with thes e e xcep tions :
1. Channel availability display
The display on an idle Remote IP Feature Phone will show channel availability, rather than
outside line a vailab ility:
As depicted abo ve, the bo tto m r ight of the disp lay of a n idle Remote IP Feature Pho ne will show RMT
(short for remote). The display’s bottom left will show a number of boxes — as few as one or as many
as 12, depending upon your system’s installation and configuration — that represent the total number of
available remote channels. A solid box indicates a remote channel that is in use; an open box indicates
a remote channel that is available. If you access an outside line, your display will switch to the normal
outside line usage display.
2. Channel queue display
There may be times when all remote talk paths are in use. When this occurs and you try to acces s a
remote channel, you will hear a “fast busy” signal, and the display will look like this:
If you wish to be queued to receive the next available remote channel, press 1 and hang up; when a
path becomes available, your Remote IP Feature Phone will ring, the display will show FREE RMT
CHANNEL — and, when you answer, a prompt will automatically tell you there is a channel available.
3. Paging limitation
The Remote IP Feature Phone can initiate pages; however, it cannot receive pages. For example, when
the operator per forms an all -page ( # 0 ), this will be heard on the speakers of all extensions except
those on the Remote IP Feature Phones in the system. Additionally, the Quick Page and Auto Page
features are not available when calling a Remote IP Feature Ph one.
4. No 91 1/emergency calls
Because your Remote IP Feature Phone isn’t connected directly to your local telephone network, you
must use a regular phone connected locally, not the Remote Pho ne, to make 911 or other emergenc y
calls. (See ESI docu men t #0450 -02 62, included with your Re mo te Phone , for more in forma t ion .)
G.1
Page 64

Remote IP Feature Phone User’s Guide
T roubleshooting
Important: The audio quality of the Remote IP Feature Phone is dependent on the quality of the connection
between the Remote Phone and the IP PBX at the main office. High data traffic on a poor or
overloaded connection will cause significant aud io dis tortion, which may include pops an d c licks ,
or warbling. In this case, contact your ESI Reseller or network administrator for assistance.
The quality of your main office’s outside phone lines also can affect the audio quality of the
Remote IP Feature Phone. Due to the interface between advanced, packet-based phone
systems and the traditional public telephone network, a poor-quality phone line can degrade
audio quality, causing an echo on outsi de calls. An occasional echo isn’t unus ual and doesn’t
necessarily indicate a problem with your system or lines; however, if this problem occurs
persistently, contact your ESI Res eller for assista nce.
Condition Procedure
Remote Pho ne display
is blank
Remote Phone display
shows softw are version
Remo te P hone
conn ects but doesn’t
operate correctly
Remo te P hone
won’t connect
• Check other phone functions. If you get dial tone when you lift the receiver and
the display is blank, the phone is defective.
• Make sure the Ethernet cable is plugged into the phone’s NETWORK jack (and
not the PC port).
• If no phone functions operate check the phone power supply. It should be
plugged into the phone and into an active AC outlet. If the display is still bla nk the
phone is defective.
Contact your ESI Reseller if the phone is defective.
The Remote IP Feature Phone either is faulty or is, in fact, a non-remote (i.e., local)
IP Feature Phone. Contact your ESI Reseller.
The remote phone may be defective. Contact your Reseller or use Esi-Test to test all
of the Remote IP Fe a ture Phone’s capabilities. (Esi-Test is part of the Esi-Tools
Users’ Kit and can be installed on a PC from the CD-ROM.)
Important: See page A.6 for instructions on connecting a Remote Phone.
• Check the cable between the phone and network access device (router, hub or
switch). This cable should be plugged into the port on the bottom of the phone
labeled NETWORK.
• Check that the link light for the port on router is illumina ted . If th is light is no t lit
check the power supply connection for the router.
• Check the cable between the network access device and the modem. The WAN
port on a router should be plugged directly into the modem. If using a hub or
switch, connect its UPLINK port to the modem.
• Check your IP connection by using your PC to access a site on the Internet (after
accessing a Web page, press Ctrl R [for Refresh] to verify that your Web browser
is displ aying fresh data) .
• Call the main of fice w ith a regula r phone. Make sure the problem is not with the
network or IP connection at the main office.
Phone works correctly but
the audio quality is poor
G.2
The problem is probably with the connection between the Remote Phone and the
IP PBX at the main office. Ask your Network Administrator or ESI Reseller to
evaluate your connection to the main office using Esi-Networx.
Page 65

User’s Guide Using Esi-Link
Using Esi-Link
Important: You are being assigned a special feature not covered in the regular station user guide or
tutorial. Be sure to consult the System Administrator for the Location Numbers used by your
Esi-Link network.
Overview
Esi-Link is an opt iona l fea ture tha t networks multiple ESI telephone syste ms (o r lo cations) an d IP Gate w ays
(see page H.9) a cross an I P-based network. With Esi-Link, a multi-site business can integrate up to 100 of
its locations, using the latest VoIP (voice over IP) technologies. Inter-office calls, transferring outside calls,
moving voice messages and even accessing outside lines at remote locations are all features you can use
over Esi-Link.
For example: if you have an office in Dallas and another in Chicago, Esi-Link makes it possible for
someone in the Dallas office to dial an extension in the Chicago office just as easily as if it were an
extension down the hall in the Dallas office.
Location Keys
Each location in your Esi-Link network has a location numbe r1 in the range of 700–799. T o facilitat e
dial ing into a remote locati on, you c an assi gn the l ocation number to a progr am mabl e feature key —
making it a Location Key. When you press a Location Key, you’ll hear dial tone; you can then dial any
ext ensi on, depa r tment, mailbox, or outside line group acce s s code
a user in the Dalla s office would press the key program med for the Chi cago office and dial 1 0 4 to
reach extension 104 in the Chi c ago office. You can progr am up to 12 Location Keys on ea c h 24-K ey
Feature Phone and up to 30 Location Keys on each 48-Key Feature Phone.
2
in the remote location. For instance,
3
Program m ing a Loc ation K ey
Note: Y ou may wish to review “Programmable feature keys,” page C.2.
1. Hold down the desired programmable feature key for at least two seconds to enter programming mode.
2. Enter the remote location number — such as 7 0 2.
Note: You can also use Location Dex (see “Location Dex ,” page H.7) to select the remote location number .
3. Press the feature key again.
1
If necessary, consult your System Administrator to learn your Esi-Link network’s location numbers.
2
9, 8 or 71–76.
3
Also, you can program up to 60 Location Keys on a 60-Key Expansion Console (see page A.3).
H.1
Page 66

Using Esi-Link User’s Guide
Programmable feature keys and Esi-Link: an introduction
With Esi-Link, you assign dialing information to your ESI Feature Phone’s programmable feature keys in
the usual way — i.e., if a remote location station or mailbox is to be assigned to a programmable feature
key, enter the location number followed by the station’s extension number or the mailbox number.
Note: Programmable fea tu re key la mp s ta tu s of a re mote locatio n extension will appear only if the extension
is included in the “published” extension list of the remote location. Contact your System Administrator if
you need more information about published extensions.
Tip: You can use direct programming (see page C.2) to program Esi-Link locations and extensions.
Examples
Assigning a programmable feature key for extension 135 in location 712
1. Hold down the desired programmable feature key for at least two seconds to enter programming mode.
2. Dial 7 1 2 1 3 5.
Note: You can also use Location Dex (see “Location Dex ,” page H.7) to select the remote location number .
3. Press the feature key again.
Programming a call-forwarding key to extension 135 in location 712
1. Hold down the desired programmable feature key for at least two seconds to enter programming mode.
2. Dial 5 6 5 (the ESI system’s call-forwarding code [see “Optional features,” page F.11]).
3. Dial 7 1 2 1 3 5.
Note: You can also use Location Dex (see “Location Dex ,” page H.7) to select the remote location number .
4. Press the feature key again.
Note: If you regularly forward to a particular remote location extension, you should also assign your mailbox
to a Remote Virtual Mailbox Key (see page H.6) at that remote location extension.
H.2
Page 67
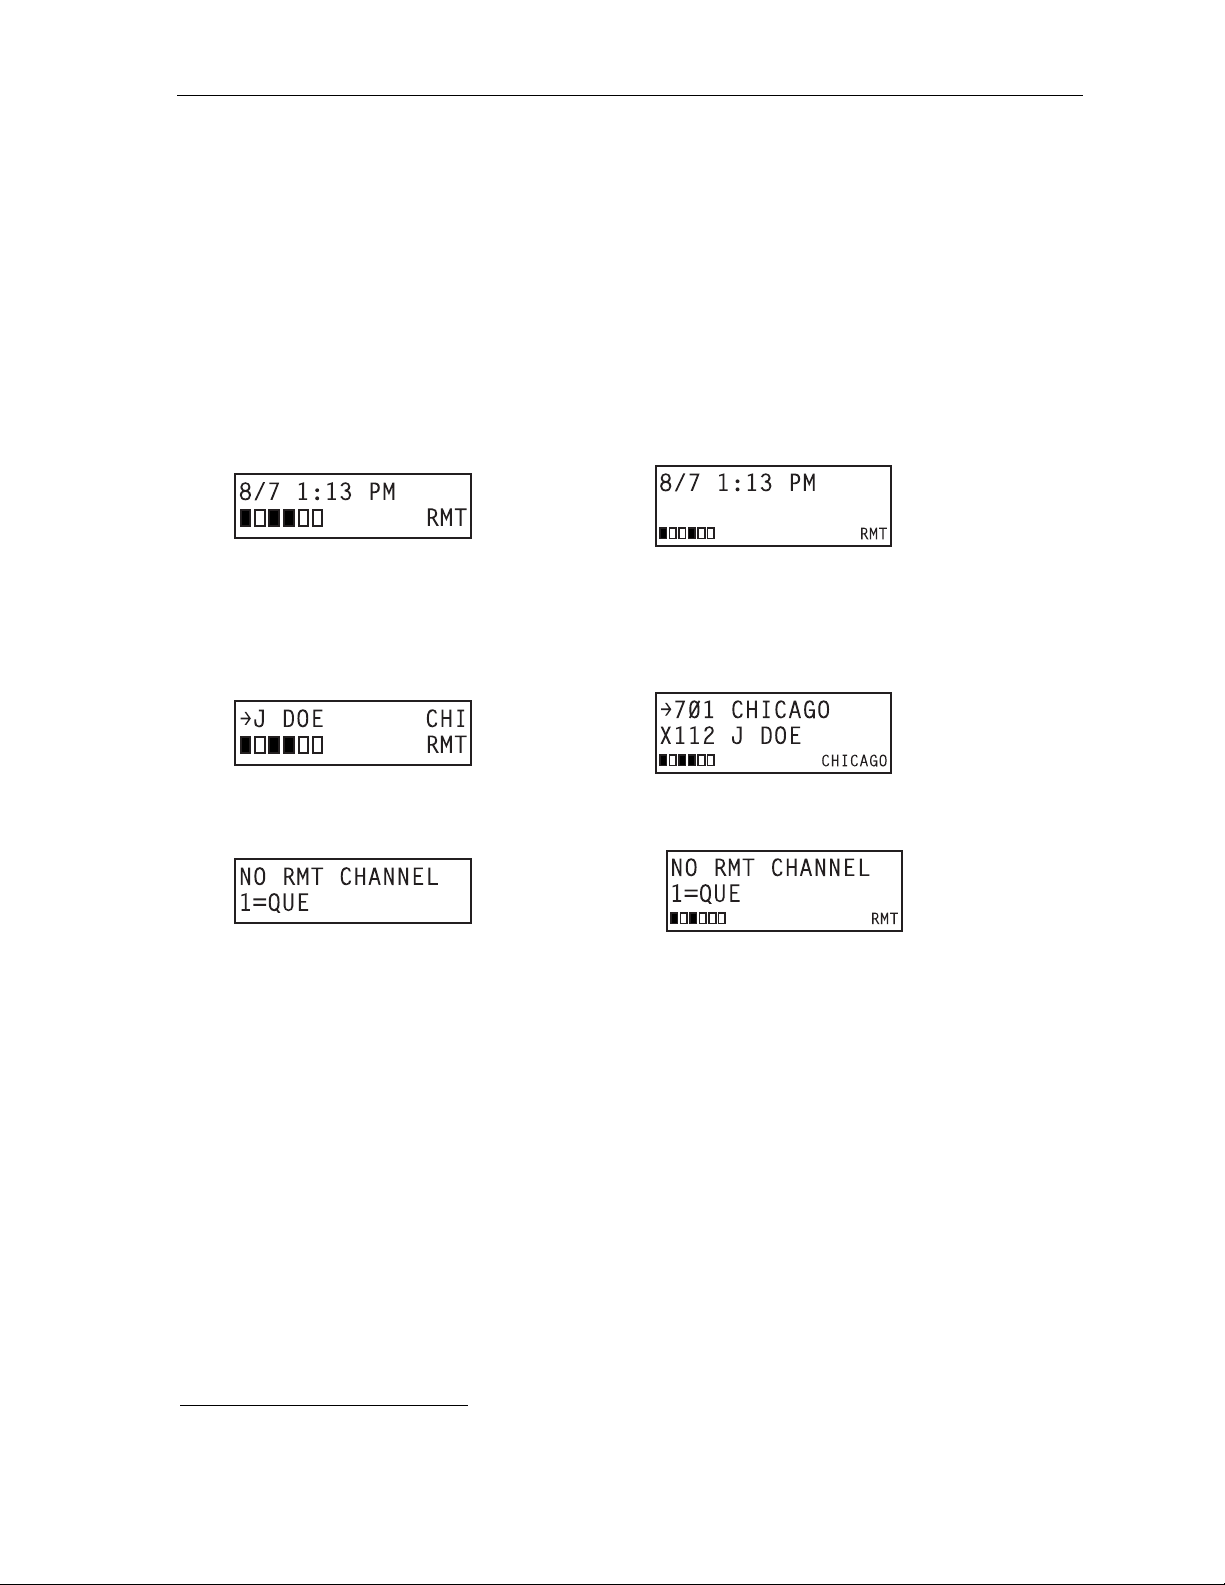
User’s Guide Using Esi-Link
Dialing an Esi-Link location
T o dial a station through Esi-Link, press the appropriate Location Key followed by the desired station’s
remote location extension number. For instan ce , let’ s sa y yo u’re in Dallas and want to call extension 112
at your Chicago location. Just press the Location Key for Chicago plus the extension number (112).
Transferring calls, dialing VOICE MAIL, etc. all operate the same way. Basically, in each case where
you would dial an extension, m ailbox, or outside line acc ess, just pr ess the Location Key first if you’re
calling a remote Esi-Link location.
As you dial, your ESI Feature Phone’s display shows the progress of the call. When you dial a Location
Key, the short name of the loca tion will appear on the Feature Pho ne’ s disp lay (e.g., a location in
Dallas might be assigned a short name of “DAL”).
For example, let’s say y ou want to dial your Chi c ago location.
After you pres s the Loca t ion Ke y for Chicago, the display on your phone mig ht look similar to this:
1
24-Key
Feature
Phone
48-Key
Feature
Phone
The boxes on the second line of the display show there are a total of six Esi-Link channels active at
your location. The first two Esi-Link remote channels are busy, and the rest are idle and available for
new call s.
Or , when yo u pres s the Chicago Location Key and then dial the remote location extension (112 in this
example), the disp lay will look like this (note tha t ano ther re mote channe l is now in use):
24-Key
Feature
Phone
48-Key
Feature
Phone
If all Esi-Link chan ne ls at you r loca t ion are bus y, you will see:
24-Key
Feature
Phone
48-Key
Feature
Phone
You will then be prompted to press 1 to queue for an available channel. If you cho os e to queue, you
may press 1 and hang up. When a channel becomes available, your phone will ring, and when
answered, you can redial the Esi-Link number.
1
Or, if you prefer, you can directly dial the location number — so, in this example, you’d dial 702112. Throughout this text, any
reference to pressing the Location Key is interchangeable with direct dialing of the applicable location number.
H.3
Page 68

Using Esi-Link User’s Guide
4
Transferring calls
Outside callers can be transferred to remote location extensions, departments, and mailboxes.
Note: To avoid poor voice quality on a transferred call, Esi-Link doesn’t allow an outside call coming from one
location to be transferred or forwarded to another (or third) location. In the event a call must be
transferred to another location, use the hold feature (see page H.5).
Transferring an outside call to a remote location extension or department
1. P ress TRANSFER.
2. Either:
(a.) Press the Loca t ion Ke y and then dial the extension.
. . . or . . .
(b.) If you have a programmable feature key assigned to that location number and extension, just
press that key to transfer.
Note: If you’re performing a “blind” transfer — i.e., one which you’re not “supervising” by speaking to the
person to whom you’ re tra nsfe rr ing — don’ t hang up until yo u h e ar a ringing tone , wh ich will
confirm the transfer has been successful.
Transferring an outside call to a remote location mailbox
1. P ress VOICE MAIL.
2. Either:
(a.) Press the Loca t ion Ke y and then dial the extension.
. . . or . . .
(b.) If you have a programmable feature key assigned to that location number and extension,
just press that k e y to tra n sfer.
Using feature keys with Esi-Link
To use a fixed feature key (e.g., TRANSFER) to access an Esi-Link location:
1. Press the fixed feature key.
2. Either:
(a.) Press the approp r iate Loc ation Key .
or
(b.) Dial the location number.
3. Dial the destination as follows:
(a. ) If it’s a n extension, voice m ailbox or de par tment group, dial the thr ee-digit number.
(b.) If it’s a phone number, dial the outside-line-access code (9, 8 or 71–76) followed by the phone
number — e.g., 9 4 6 9 5 5 5 3 2 5 5 to dial 9 + 469-555-3255.
The following information shows how to use both fixed and programmable feature keys to make it even
easier to use certain ESI phone system features ov er Esi- Link.
H.
Page 69

User’s Guide Using Esi-Link
Paging
The ESI phone system can be programmed to allow paging through an overhead paging system and/or
paging through some (if page zones have been created) or all of the ESI Feature Phones’ speakers.
Overhead paging
Station 199 is designated as the overhead paging port. If the remote location system has an overhead
paging syste m con nec ted to it, you can page by dia ling t he loc ation number followed by 1 9 9. After
hearing the connec t tone, you may ma ke you r announ ce men t . I f you frequ en t ly pa ge tha t loca t ion, you
can program a feature key with the location number followed by 199 — e.g., 7 1 2 1 9 9.
Paging through phones
T o page through all of the ESI Feature Phone speakers at a remote location:
1. P ress PAGE (#).
2. Press the approp r iate Loc at ion Ke y.
3. P ress 0.
T o access a programmed paging zone (see the Administrator for a list of page zones):
1. P ress PAGE (#).
2. Press the approp r iate Loc at ion Ke y.
3. Press the key fo r the page zone number (1, 2, 3, 4, 6, 8, or 9). The Installer may have added an
overhead paging system to one or more of these page zones.
Note: Phones in use will not carry a page through their speakers. The same is true for a ll Re mote IP Feature
Phones on the Es i-L i nk netwo rk .
Hold
Hold set
You can place outside line calls on hold as you would normally. When paging someone at a remote
location to retrieve the held call, remember to announce your location number and outside line number
to be retrieved. For ins tance, if you need to ha ve Jane in the Chicago office re t r ie ve a ca ll being held in
Dallas (location 701, in this example):
1. W hile on a call on line 5 in the Dallas office, press HOLD.
2. Page the Chicago office .
3. Announce the call; e.g., “Jane, you have a Dallas ca ll on line 5. Jane, line 5 in Dallas.”
Hold retrieval from a remote location
1. Press HOLD.
2. Press the preprogrammed Loca t ion Ke y (or dial the loc ation number).
3. D ial th e number of the line on which th e c all is being held.
Voice m ail
Moving a message to a remote location
1. While playing back the voice mail message you wish to move, press 6.
2. Press the Location Key (or dial the location number).
3. Dial the mailbox (extension) number.
Note: Messages are moved in the background, so it may take several minutes before the remote location can
receive them.
H.5
Page 70

Using Esi-Link User’s Guide
Dialing directly or transferring to a remote location mailbox
1. Press VOICE MAIL.
2. Press TRANSFER, and then immediately do one of the following:
(a.) Press a programmable feature key that has been pre-programmed for that
remote location mailbo x;
or
(b.) Press the Loca t ion Ke y and then dial the remote mailbo x numb er.
or
(c.) Dial th e location number follo wed by the r emote mailbox num ber.
Virtual Mailbox Key — remote location
Note: It is strongly recommended that you assign a voice mail password. To enter a new password, press
PROGRAM 5 1. (If unsure whether you have one, you can check by pressing PROGRAM 5 3.
If necessary, see page C.5 for more details.
T o assign a programmable feature key to access a voice mailbox in a remote location:
1. Hold down the desired programmable feature key for at least two seconds to enter programming mode.
2. P ress VOICE MAIL .
3. Dial the remote location number (or use Location Dex to select the location and extension number).
4. Dial the remote extension number.
5. Press the feature key again.
When there are new m essages in the Virtual Ma ilbo x, t h e ke y w ill flash red. When you access the
Virtual Mailbo x, t he key will ligh t a so lid gre en . If the Virtual Mailbox be longs to a re mo te- loca t ion
Feature Phone, that phone’s VOICE MAIL key will also be lit gre en.
Note: For proper lamp indication, the mailbox must be included in the remote location’s list of published
number s. Contact your Admini s t r ator if yo u’re not su re if the mailbox is publishe d.
Voice mail re tr ieval from a remote location
1. P ress VOICE MAIL .
2. Press the appropriate Location Key (or dial the remote location number).
3. Dial the mailbox (extension) number.
(If your voice mailbox password is enab led , the sys te m w ill pro mp t you to enter your passw ord. To
proceed, enter this password.)
Quick Groups/Quick Move capabilities
Quick Groups can inc lude both local and remote locat ion extensions, departmen ts and mailboxes that
are assigned as station keys on your phone.
Note: Y ou can use only programmed local or remote Esi-Link station keys to select the additional mailboxes
for Quick Groups.
H.6
Page 71

User’s Guide Using Esi-Link
Other Esi-Link features
Using Location Dex to access a remote location’s Station Dex
. . . on a 2 4-Key F eatur e Phone
1. P ress ESI-DEX until LOCATION DEX appears in the display.
2. Use the scroll keys (V or W) to select t he remote loc ation name and number. You can also use the
dial keys to “jump” to the first location name that begins with one of the letters on that dial key.
3. P ress ESI-DEX again. The phone will display the remote l ocation’s Stati on Dex, where yo u c an
select a stat ion or department, just as you would usi ng the Stati on Dex for your l ocation.
. . . on a 4 8-Key F eatur e Phone
1. P ress ESI-DEX; then select LOC in the display.
2. Use the scroll keys (V or W) to select t he remote loc ation name and number. You can also use the
dial keys to “jump” to the first location name that begins with one of the letters on that dial key.
3. P ress ESI-DEX again; then select STA (for Station Dex) in the display.
4. Use the scroll keys (V or W) to select the desired extension.
5. Select DIAL to ring the Esi-Link extension.
Tip: You can also use Location Dex to assign programmable feature keys as station keys and Location Keys.
If necessary, see “Programmable feature keys,” pp. C.2–C.3.
Examples:
Assigning a Location Key
1. Hold down the desired programmable feature key for at least two seconds to enter
programming mode .
2. Press ESI-DEX until LOCATION DEX appears in the display.
3. Press a scroll key (V or W) until the location is displayed.
4. Press the feature key again.
Assigning a station key
1. Hold down the desired programmable feature key for at least two seconds to enter
programming mode .
2. Press ESI-DEX until LOCATION DEX appears in the display.
3. Press a scroll key (V or W) until the location is displayed.
4. Press ESI-DEX; STATION DEX will appear in the display.
5. Press ESI-DEX again.
6. Press a scroll key (V or W) until the remote location extension appears..
7. Press the feature key again.
H.7
Page 72

Using Esi-Link User’s Guide
Call forwa r ding
Here’s how to program call forwarding to a remote location extension, mailbox, or department.
On the 24-Key Feature Phone
1. Either:
(a.) Press a programmed call-forwarding key and a programmable feature key you have already set
for the desired destination (whether it is an extension, a mailbox or a department).
or
(b.) Dial the call-forwarding feature code (5 6 5) , press the Locati on Key an d then dial the desired
ext ensi on, mailbox, or department.
For instance, to forward to extension 112 in Chicago (location 702 in this example), dial 5 6 5, press
the Chica go Location Key and then dial 1 1 2.
Alternatively, you could dial 5 6 5 7 0 2 1 1 2 — i.e., 565 (call forwarding) + 702 (the location) + 112
(the extension).
2. To cancel call forwarding, either:
(a.) Press the programmed call-forwarding feature key and then press RELEASE.
or
(b.) Dial 5 6 5 .
On the 48-Key Feature Phone
1. Press CFWD.
2. Either:
(a. ) P ress a programmable feature ke y y ou hav e already set for the desired destination (whether it
is an extension, a m ailbox or a depa r tment).
or
(b.) Press the Loca t ion Ke y and then dial the desired extens ion, ma ilbo x, or department.
For instance, to forward to extension 112 in Chicago (location 702 in this example), press CFWD,
press the Chicago Loc ation Key and th en dial 1 1 2.
Alternatively, you could press CFWD and dial 7 0 2 1 1 2 — i.e., 702 (location) + 112 (extension) .
2. To cancel call forward ing , press CFWD.
Note (for either phone):
Incoming calls that are fo rwa rded when the remote location exte ns ion is busy o r does no t answer will
be sent to the forwarding (i.e., original) extension’s mailbox. If you regularly forward to a particular
remote location extension, you should also assign your mailbox to a Virtual Mailbox Key at that remote
location extension (see “Virtual Mailbox Key — remote location” on page H.6 of this document).
H.8
Page 73

User’s Guide Using Esi-Link
Remote outside-line-group access
T o help reduce your long-distance costs, your administrator may have allowed remote outside-linegroup access.
T o dial a phone number that is local to the remote office:
1. Press t h e Location K ey for the remote offi ce.
2. Dial 9 (or 8 or 71–76 )
3. Wait for the second d ial tone. Then, when you hea r it, dial the desired phone numbe r.
As an example, let’s say you’re in the Chicago of fice and need t o call a co ntact near th e Dallas offi c e.
You know that the Dallas location has an outside line access code of 9 and a location number of 701.
Therefore, you press the Location K ey for Dallas ( or dial 7 0 1), dial 9, wait for the second dial tone and
— when you hear it — dia l the loca l Da llas numbe r.
Conferencing
You can conference up to three other local and remote location stations an d outside calls. A c onference
member station in a remote location also can add one or two members to an existing conference by
using the remote loca t ion con fe rence bridge . Additional me mbe rs can be inc luded; but, because of
potential voice quality degradation, ESI recommends that conference bridges from no more than two
locations be used for a conference call. To conference a remote location station:
1. While currently connec ted t o a s tation or outside line, pres s CONF.
2. Press the Loca t ion Ke y and dia l the extension number for the person to be conferenced.
3. When t he pers on answers, press CONF again to initiate the conference.
Note: If you decide you don’t want to conference this call, after all, press FLASH to disconnect the call
and reconnect to the first call.
4. To add a third ca ll to the con fe rence , repe at s tep s 1–3 .
Dialing into an ESI IP Gateway
If your organization’ s Esi-Link network includes one or more ESI IP Gateways at remote loc a t ions , the
method of dialing will cha nge slightly, depending on how the IP Gateway is con nec ted to the phone
system at that location.
Calling a station at an IP Gateway location
1. Press the Loca t ion Ke y (or dial t he loca tion number) for that location , and th en dial th e IP Gateway
pilot number.
2. If you are answ ered by the opera tor or ano ther individual, ask to be transferred .
If the remote location’s auto attendant answers (or you simply receive a second dial tone), dial the
station number (extension) of the individual you wish to reach.
Other features may be accessed this way via the IP Gateway, depending on the configuration of the
phone system a t the IP Ga teway re mo te loca t ion. Contact your Syste m Administra to r if you need
additional information.
1
1
Consult your System Administrator for more information, if necessary.
H.9
Page 74

Using Esi-Link User’s Guide
(This page included for pagination purposes only.)
H.10
Page 75

User’s Guide ACD agent operation
ACD agent operation
(Not available on 12-Key Feature Phone.)
Important: You are being assigned a special feature not explained in the regular station User’s Guide or
tutorial. Be sure to get your ACD department number from the system administrator.
An ACD1 department is made up of agents who, when logged on, can receive calls for that department.
Calls go to the logged -on agent who has been idle for the longest time. If all logged-o n agents are busy,
the ESI phone system places the calls in a holding queue and automatically connects the longestholding call when an agent becomes available. While holding, callers hear periodic prompts to continue
to hold. A s an ACD department agent, you must have one of your phone's programmable feature keys
programmed as an agent log-on/off key
assigned. Th is key let s you man ua lly place you rself in or out of service for that department’s calls.
Notes: Even though you may have been assigned to more than one ACD department, you can be logged into
only one department at a time.
Never program any of your programmable feature keys as line keys if system-wide hold has been
enabled (if you’re not sure, consult your system administrator).
If no agents are logged on, incoming calls immediately follow that department’s call-forwarding routing.
Programming the agent log-on/off key
2
(see below) for each ACD department to which you are
1. Enter Help mode by press ing HELP.
2. Press each programmable feature key to determine the location of the log on/off key (the keys have
been assigned beginning with the lower left hand programmable feature key).
3. To program a new key location (or if one has not pre viou s ly been prog ra m med ):
(a.) Hold down the des ired prog ra m mab le feat ur e ke y for at leas t two seconds, to enter
programming mode .
(b.) Dial 5 plus the department number (the department number will be from 290 to 299).
(c.) Press the programmable feature key again.
Note: Programming an ACD department key inser ts you, as a m em ber, into that departm ent.
1
Automatic call distribution.
2
This key is automatically assigned when an extension is set up as a member of an ACD department.
I.1
Page 76

ACD agent operation User’s Guide
Wrap mode
If you have pape rw ork or oth er wrap -up ac t i vities following a call, you' ll appr ec iate th e system's wrap
mode. While you're logged on as an agent, press ing the prog ra mmed wrap key (or placing the call on
Hold) prior to disconnecting from a call will se t your station in wrap mode — th is de lays im med ia te
assignment of the ne xt ca ll unt il you ha ve had t ime to co mp lete any wra p-u p ac t i vities . Press the wra p
key again to release your station from wrap mode and be available for the next call.
Note: The Installer may have set a ma ximum allowa ble wrap time. If so, when you're in wrap mode, the
upper-right portion of the display will show a count-down timer ind icatin g the a mount o f time remaining
in wrap mode. At the expiration of this time r, you will automatic a lly be availa b le for the nex t call.
Programming the wrap key
Use the phone’s Help mode (HEL P) to ve rify the loc a t i o n of the wrap key.
To program a new key loc ation (or if one has not been previously progr a mmed) :
1. Hold down the desired progra m mab le feat ur e ke y for at leas t two seconds, to enter
programming mode .
2. Dial 5 6 2.
3. Press the programmable feature key again.
LED indicator
The LED on the agen t log-on /off key will indicate you r agent sta t us as fo llows :
LED appearance Indicated status
Solid green Logged on
Solid amber In wrap mode
Solid red Logged off
Flashing red Automatically logged off
Note: If you leave your desk and forget to log off, and the system sends a call to your station that is not
answered, your sta tion will be automatically logged of f. You must log back on, upon returnin g to you r
station, to be available again for calls for that department.
I.2
Page 77

User’s Guide ACD agent operation
Display indications
While you are logged on, the display will show the department’s call status as shown below.
• If you're logged on but idle:
24-Key
Feature
Phone
• If you're logged on and on a call, the display s hows the Caller ID (or line number ) and duration of
the current call
1
. The second line shows the Department name momentarily and then is replaced by
48-Key
Feature
Phone
the number of calls waiting in queue and the longest hold time:
24-Key
Feature
Phone
48-Key
Feature
Phone
Additionally: to help alert agents that calls are in queue, a short tone will be heard each time a new call
is added to the queue.
While logged on: no DND, monitor mode or call forward
While you are logged on as an agent, the system will deny your station the ability to place your phone in
DND o r m onito r mode or to c all-forward calls.
When y ou log off, your s tati on returns to nor mal r egarding these ca pabilities.
Call waiting
While you are logged on as an agent, calls routed to you as a member of an ACD department will not
call-wait to your station. However, calls that have dialed your extension number directly will call-wait.
ACD administrator key
Setting a programmable feature key to be an ACD administrator ke y allows a user to view the call
acti vity of an ACD group. Set a program mable feat ure key with 5 6 3 and the ACD department number
(fo r example, 5 6 3 2 9 0), and then press the key. It will glow green and the bottom line of an ACD
group's display will appear until you press the key again.
To pro gram an ACD adm inistrator key:
1. Hold down the desired progra m mab le feat ur e ke y for at leas t two seconds, to enter
programming mode .
2. Press 5 6 3 followed by the ACD department numbe r.
Note: If you don’t know the department number, contact y our System Administrat or.
3. Press the same programmable feature key again.
Notes: While you’re logged on , your p hone ’s display will show the department’s call stat u s (see “Display
indicat ions,” page I.3) ; however, department calls WON’T be directed to your extension.
Only two ACD administrator keys can be programmed per department.
The department call display takes priority over most other displays, such as voice mail or user
programming. If you must see display information while playing voice messages or programming your
phone, log off from the ACD department first.
1
On a 24-Key Feature Phone, the call duration appears on the first line of the display. On a 48-Key Feature Phone, it appears on
the third line of the display.
I.3
Page 78

ACD agent operation User’s Guide
4
(This page included for pagination purposes only.)
I.
Page 79

User’s Guide Analog stations
Analog stations
If your station has been installed as an analog station, it will be able to use only a standard-type
telephone. Because the phone isn’t dig itally integrated to the phone sys te m (like the ESI Feat ure
Phones), its ope ra t ion and cap abilities will be dif feren t .
Tip: To use a cordless phone in conjunction with an ESI Feature Phone , program a programmable feature key
(or use CFWD) to easily forward calls to the cordless phone when out of your office. Have the Installer
program the cordless phone’s station programming to forward calls not sent to the mailbox associated
with your ESI Feature Phone.
FLASH
A flash- hook, or FLASH — a moment a ry bre ak in the co nnec tion — is required to perfor m many of the
station operations below. You can generate a FLASH by momentarily depressing the hook switch (or, if
your phone is so equipped, press the specia l key on you r phon e) .
Caller ID
1
If you subscribe to Caller ID fro m yo ur telephone service provider, the Caller ID display will show an
outside caller ’s name and/or number.
2
In some instances, the servic e provider can send o nly a general
call er status — such as UNAVAILABLE, PRIVA TE, or NO DATA SENT.
On internal sta t ion- to-s tation calls, the Calle r ID d isp lay w ill show the extension number as the ca lling
number, and the station name as the caller’s name. On Esi-Link calls, the Caller ID display will show the
location number and extension as the calling number, and the remote location’s station name and “short
3
name”
as the caller’s name.
Note: Caller ID will not display with call-waiting.
Placing calls
When you first lift the handset you will hear internal dial tone. Dial 9 (or 8 or 71–76) to access an outsi d e
lin e and dial the number. To place an internal c all, simply dial th e extension number, de partment
number, etc.
1
If you're not sure a bo u t the installation of your station, co n tact your administrator.
2
If you don’t subscribe to Caller ID, the display will show (instead of the caller’s name or number) which line is receiving the call.
3
For example, the Installer might have programmed “DAL” as the short name for a remote location in Dallas.
J.1
Page 80

Analog stations User’s Guide
Transferring calls
Transferring outside calls
While connected to an out side call, FLASH and dial the extension numbe r. Hang up immediately to
perform a blind transfer, wait until the called person answers, announce the caller and then hang up. If
the transferred-to person does not answer, FLASH to be reconnected to the original caller.
Transferring a call to a mailbox
To transfer an outside caller to another user’s mailbox, FLASH and dial # and the mailbox number. You and
the caller will be conn ec ted to th at us er’s pers ona l gree t ing. You may choose to hang up im med iately or
li sten to a porti on of the p erson al gre eting to assure your s elf that you have placed the caller into the
correct mailbox. If not, FLASH to exit the mailbox and be reconnected to the original caller.
Note: Regardles s of when you ha ng up , the c a ller will hear the entire personal gree ting . T o insure the privacy
of the message, you w ill au to matic a lly be disconnected at the record tone.
Transferring a call to the main greeting
T o transfer an outside caller to the main greeting, FLASH, dial # and hang up.
Transferring a user to his/her m ailbox
To trans fer to his/her ma ilbo x a user who's calling from the outs ide to pick up messages, FLA SH , dial ,
and the appropriate mailbox number and hang up.
Conference calling
To create a conference call:
1. Establish the first call.
2. FLASH twice, rapidly, to place the call on hold.
3. Place a se cond cal l as you normally would.
4. Once connected to the second call, FLASH again to connect all of you together.
Notes: To add a fourth member to the conference, FLASH once and then repeat steps 3–4.
A total of 24 members can be in conferences within the system at any one time; however, no mor e
than four members can be in a single conference.
To remove or disconnect a conference you’re in, just hang up (disconnect).
To cancel adding someone to a conference, hang up if:
• The phone is ringing the add-in membe r’s number.
• The add-in membe r ans w ers the ca ll (y ou will ha ve on ly the op t ion to dis conn ec t).
• You’re routed to a voice mailbox (if it’s a station-to-station call).
In all cases, when th e ana log station disconnec ts to can ce l the add- in member, th e ca ll w ill r ing bac k
and connect to the original station or outside line. You will be automatically reconnected to the threemember conferenc e when cancelling the add it ion of a four th me mbe r.
Note: Once you FLASH twice to create a new conference, you can’t toggle between calls or transfer a
connection. This is the same when adding a fourth member to an existing conference.
J.2
Page 81

User’s Guide Analog stations
Call forwarding
Your station has been pre-programmed by the Installer to call-forward your phone when it is busy or
does not answer (usually to your mailbox) . In add it ion yo u can tempo ra r ily ca ll- forw ard all of your calls to
another station or another user’s mailbox.
Lift the handset, dial 5 6 5 and dial the extension number ( or # and the mailbox number) to which the
system should forward all calls.
Note: If the forwarded-to station is busy or does not answer a fo rward e d call, the ESI phone system will retu rn
the call to your mailbox.
T o turn off call forwarding, dial 5 6 5 without selecting a destination, and hang up.
Call waiting
If you have enabled call waiting for your station ( XXX 5 3, where xxx rep res ents your extension
number), you w ill hear a tone in your earpiece. FLASH to tog g le betw een th e or ig inal ca ll and the call
waiting. To drop either call, hang up while connected to t he ca ll to be dropped. When your phon e rings ,
lift the handset and you will be reconnected to the other caller.
Call hold
This is used to place callers on h old for r etrieval from any s tation withi n the ESI phone system.
Putting a call on hold
While on an outside call, FLASH a nd dial . A sh or t voic e pro mp t will tell which line number the
call is using; you will then receive internal dial tone.
Retrieving a call from on hold
From inte r nal dial ton e, dial and the line number where the call is on hold.
Dial 0 to answer the oldest held call in the system.
Hold recall
If a held call is not retrieved during the period of time (set by the Installer), it will recall to your phone if
your station is idle. You will hear three sh or t ring tones . Lift the hands et; you will be connec ted to the
held call.
If you are on a call when the recall occurs, you w ill hear a ca ll wa it ing tone. To toggle betw een the two
calls , FL A SH (or hang up, wait for ring, then answer).
J.3
Page 82

Analog stations User’s Guide
4
Paging
This function allow s for paging through an o verhead paging sys tem and/or d esign ated available
telephone speakers.
Press # and 0 to access all available stations.
Press # and 1, 2 or 3 to access a programmed paging zone.
Note: A p age will not be sent to the speaker s of p hone s in use.
Tip: To page for pick up of an outside call, put the caller on hold by dialing . A voice prompt will
indicate the line number. Then page the person and announce the line number for retrieval. For
example: “John, you have a call on line 1. John, pick up line 1, please.”
Overhead pagi ng
Station number 199 is designated as the overhea d p a ging port. If the ESI phone system has been
connected to an overhead paging system, you can page by dialing 1 9 9 and making your announcement
after the tones.
Call pick-up
A call ringing at another station can be picked-up by pressing and dialin g the extension number.
Dialing 0 will answer the longest ringing outside call.
Voice mail operation from an analog station
The ESI phone system will provide accurate and timely messages. Others will become more
comfortable leaving you voice mess ages if you pick-up and respond to your mess ages pro mp tly.
Personal gr eeti ngs
Initially, your mailbox has a generic greeting : “You have reach ed the mailb ox for extensi on xxx, dial zero
to reach the operato r or begi n re cordin g at the t one .” You can record up to three different personal
greetings in your own voice ind ica t ing you r a vailab ility to re turn calls. Here are some exa mp les :
Sample greeting 1: Hi, this is [name]. I’m away from my desk or on the phone right now; so please either dial
zero to reach our operator, or leave me your name, number and message at the tone and
I’ll get back to you as soon as I can.
Sample greeting 2: Hi, this is [name]. I’m out of the office. You ma y dial 1 2 2 for my assistant or, if you prefer,
you may leave me a voice message at the tone — I’ll check in regularly — or, if it’s
import a nt, dial 2 now to leave me an urgent message that will page me automatically.
Sample greeting 3: Hi, this is [name]. I’m away from my desk at the moment. T o have me paged, dial 3.T o
reach the operator, dial zero. Otherwise, leave your name and phone number at the beep
so I can return your call.
J.
Page 83

User’s Guide Analog stations
Following is a list of opt ions th at you ma y wish to inc lude in you r personal greetings:
Option Instruction
0 T o reach the operator
1 T o skip directly to the record tone
2 T o mark this message as urgent
(See “Urgent Messages,” page D.9)
8 To the main gr eeting
(if your system is using the built-in auto attendant)
XXX [An extension number of another user]
Shortcut: When leaving a message in another mailbox, press 1 during the personal greeting to advance
directly to the record tone w ithout hav ing to lis ten to the remainde r o f the greetin g .
You can change the personal greetings as often as necessary by recording over a previously recorded
personal gree ting.
Warning: Deleting your pe rsona l g reeting will n o t revert to the initial default greeting, bu t will turn off
your mailbox.
Message waiting indication
If you have new mess ages, you will hear a short pro mpt "You have messages" and the n interna l dial
tone whenever you lif t th e hands et to place a ca ll. You can choose to re trieve your messages then or
place the call.
Retrieving messages
You can pick up messages from your station, when away from the office or from another user’s ESI
Feature Phone.
1. Lift the handset, and then dial followed by your extension number . I f calling from the outside, at
the Main Greeting, press and enter your extension number or have the operator transfer you by
pressing VOICE MAIL, , and entering your extension number.
2. If required, enter your password. the ESI phone system will announce the number of new and old
messages and will start playback of messages with the oldest new message and continue until all
messages and rec ord ings have played.
Note: If, while picking up mes s ages, you receive a call waiting tone, h ang up , lift the handset and you will be
connected to the w aiting call. If you hang up dur ing the playback of a me ssage, the message will be sa ved.
Voice prompted instructions will be played at the end of each message. Once you've learned these
prompts (see the chart, “Functions available during analog station voice mail message retrieval,” on the
next page) you can proceed more rapidly by pressing one of the following keys any time during the
mess age or during a prompt .
J.5
Page 84

Analog stations User’s Guide
Functions available during analog station voice mail message retrieval
Note: Functions tinted gray, below, either change or are not available when you’re using an ESI Feature
Phone (se e page D.5).
Key Function Description
1 Pause Pauses for one minute or until 1 is pressed again.
2 Hear time/date Pauses the message, plays the time/date of when the
messag e was l eft and resumes.
3 Reply Replies to the originator of a message (if from a user in the
system). Record your reply at the tone; press 1 to stop. You
will be returned to you r mailb ox a nd the o r igina l messa ge.
4 Back up (rewind) When pressed during message playback, rewinds 4 seconds
for each key press. If pressed after the message has finished,
it returns you to the beginning of the message.
5 Access user
programming
6 Move Moves a copy of the m es sage to another
7 Delete Deletes the message from the mailbox
8 Main greeting Goes to the main greeting
Access es user programming menu.
user’s ma il box.
To move the message with out an in troductio n ,
press 6 when prom pted.
T o add an introduction, press 1 when prompted. When you’ve
finished your recording, press 1 to stop ; You will be returned
to the original message in your mailbox.
(see “Message Recycle Bin,” page D.9).
(if your system is using the built-in auto attendant).
9 Save Saves the message (it will be played as an old message the
next time messages are picked up).
9 9 Save as new Skips over a new message and leaves it as a new message
(i.e., it will be played as a new message the next time you
pick up messages). You must press the 9 key twice with i n two
seconds.
0 Operator Transfers you to the operator.
# To other mailbox To leave a message in another user’s mailbox.
To disconnect Always pr ess before hanging up (if you press it during
playback of a message, the message and any other unsaved
messages will be saved ) .
Retrieving messages fr om another user’s ESI Featur e Phone
Press VOICE MAIL, , and dial y our extensi on number. Follow the pro c edur es described prev iously
(see page J.5).
J.6
Page 85
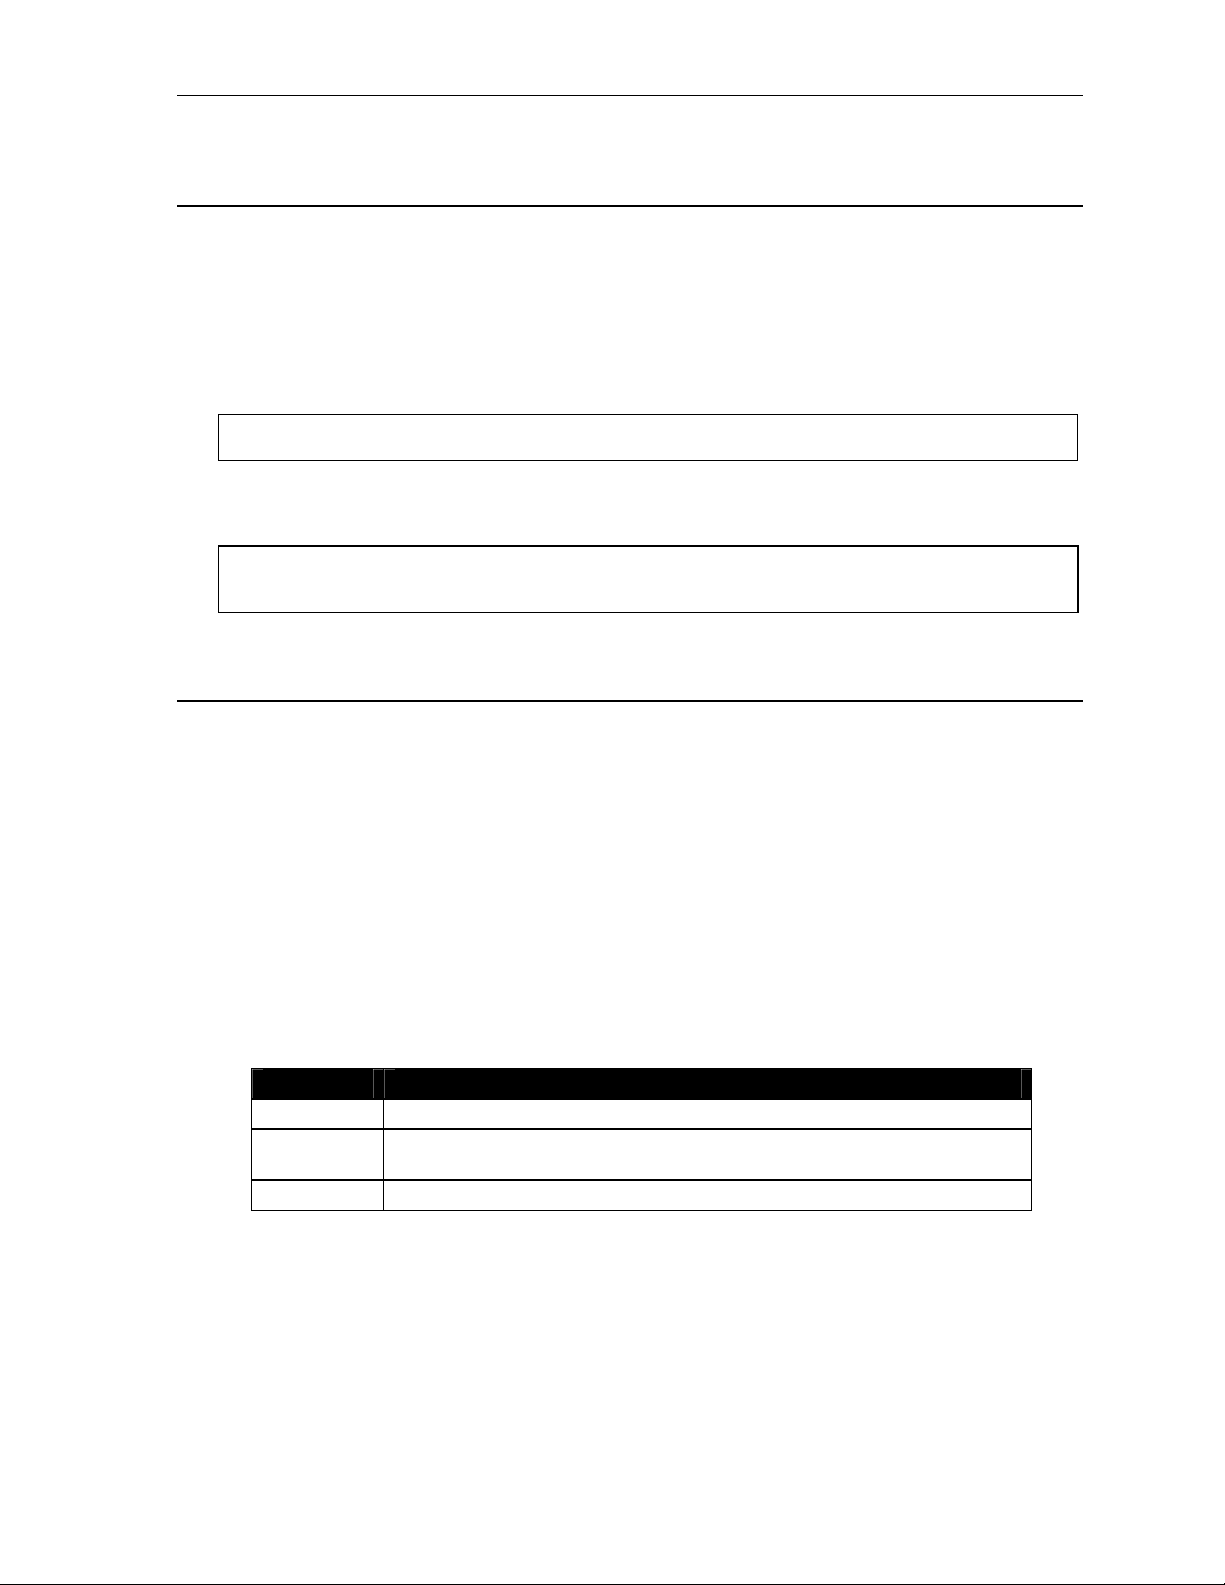
User’s Guide Analog stations
Analog station programming
After logging into your mailbox (pressing followed by the mailbox number), dial 5 to program.
1 Select personal greeting
Select the desired greeting number: 1, 2 or 3. The system will prompts to re-record, delete, hear, or
select as the curren t greeting by pressing #.
1 Record personal greeting
Begin recording at the tone; press 1 to stop. The new pers onal greeting automatically replaces the
previous greeting.
Note: Your mailbox will be d isabled if no personal greetin g exist s .
2 Delete personal greeting
When prompted, press 2 again to confirm deletion.
Warning: Don't delete all of your gree tings. If you do, the syste m will turn o ff your mailbox until at least
there is once again at least one greeting.
3 Hear current personal greeting
5 Password
The password will apply to station progra m ming , voice m ail re tr ieval and certain other featu res
(when activated) .
1 Enter new password
Your password may consist of 2–8 digits followed by # (0 canno t be t he firs t digit ). En ter ing 0 (zero)
as the sole password will turn off the password requirement.
2 Delete current password
3 Hear current password
4 Password security level
Select one of the following password levels.
Selection Result
0 No password required for access from any phone
1 Password required only for remote access, either off-premises or from other
stations within the system
2 Password always required
J.7
Page 86

Analog stations User’s Guide
Off-premises message delivery
The ESI phone system can be programmed to deliver messages to an off-premises phone and/or to
page you when you r voic e ma ilbo x re ce i ves a mes s age. Y ou can set the phone numbe r (ce ll phone ,
home number, another extension, etc.), the pager number and a delay time (the period that the system
is to wait before attempting to deliver the message/page). You can further set the system to deliver only
messages marked as urgent (see "Urgent mes s ages ,” page D.9).
The Administrator can also set for your station the:
• Number to be called or paged
• Delay period before at temp t ing mes s age de livery
• Number of attempts
• Interval between attempts (in increments of 30 minutes)
• "Quiet per iod” which s uspends mess age deliver y for lat e night, etc.
If you have programmed both an off-premises delivery number and a pager number, the system will
prompt you to choose one of the following delivery options:
• Phone-only
• Pager-only
• Phone, then pager — Attempts phone delivery until the maximum number of attempts has been tried,
then follows paging program ming.
• Phone and page at the same time
• No off-pre mises delivery
1
Phone deliver y
Whenever it rece ives a new/urgent message into you r mailbo x, th e syste m w ill ca ll the number that you
have programmed and pl ay the pr ompt “You have messages; please enter your password.” The prompt
will repeat three times be fore as s u ming that no one has answered and dis conn ec ting.
Upon answering , en ter your pas s word (if no password is se t, you mus t en ter 0) . You will then be
connected to yo ur m ailbox and c an proc eed wit h normal messa ge retr ieval oper atio n.
Note: A “” response instead of the p assw o r d will cau se the s yste m to suspend calling until a no the r
urgent/new message is received.
Pager notifi cati on
Pager notification can be programmed to operate as the sole notification method or in conjunction with
phone delivery.
You can have the system call and activate your external pager whenever the first new/urgent message
is left in your mailbox and repeat the page (at the interval programmed by the administrator) until all new
messages have been re trieved.
Note: Entering or deleting the phone number that is to be called for off-premises delivery or to activate your
pager will turn the feature on or o ff, respectively.
1
If pauses or other special dialing characters are required in the phone or pager number, contact the System Administrator.
J.8
Page 87

User’s Guide Analog stations
6 Off-premises message delivery
1 Delivery options
1 Delivery to phone number only
2 Notify pager only
3 Call phone first, then page
4 Call phone and page at the same time
0 No off-premis es de liver y
2 Phone delivery
1 Enter phone number
Enter the phone number followed by # (24 di gits maximum) . Do not include an outs ide line
access code (i.e., don’t add 9, 8 or 71–76) before the number.
2 Delete phone number
Deletes the current phone number.
3 Hear current phone number
Plays back the current phone number.
3 Pager notification
1 Enter pager number
Enter the pager number followed by # (24 digits max imum). Do not include an outside line
access co de (i.e., 9, 8 or 71–76) be fore the nu mber .
2 Delete pager number
Deletes the currently programmed pager number.
3 Hear current pager number
Plays back the currently programmed pager number.
4 Urgent message activation
1 Urgent messages only
Only urgent messages (see “Urgent messages,” page J.10) will be delivered.
Note: Remember to say in your personal greeting that callers should press 2 to mark a message as
urgent. (For more on personal greetings, see page D.1.)
2 All new messages
Any new message will be delivered.
J.9
Page 88

Analog stations User’s Guide
Urgent messages
You can have all new mess ages delivered as explained in the previous discussion or on ly thos e ma rked
as urgent. If you ha ve enab led urgent messages as part of user programming, you must include, in your
personal gree ting, ins truct ions to the ca ller to pres s 2 to ma rk the mes s age as urgen t . In addition,
messages marked urgent will be played ahead of o ther new messages during message re trie val.
9 Message Recycle Bin (un-delete)
Each user’s most recently deleted 10 messages will be stored in a Message Recycle Bin to allo w the
user to recover messages that may have been deleted in error.
The most recently deleted message will be played firs t. Press 9 to move to the next message. Press 8
to restore the mess age to your ma ilbo x as an old mes s age.
J.10
Page 89

Index
V/W keys. See Volume/scroll keys
ACD
Administrat or display, I.3
Agent log-on/off key, I.1
Disp lay indicat io n s , I . 3
LED indicator, I.2
Wrap mode, I.2
Analog stations
Off-premises delivery, J.8
Programming, J.7
Voice mail operations f rom, J.4
Attendant operation. See Operator stat ion
Auto page, D.3
Background announce, E.11
Background announce key, F.12
Blind transfer, E.5, E.6
Broadcast mailbox. See Group/broadcast mailboxes
Call forward key, F.12
Call forwarding, E.8
Call forwarding/no-answer, E.8, E.9
Call forwarding/off-premises, E.9
Call pick-up, E.13
Call waiting, E.10
Background announce, E.11
Station-to-station, E.11
Caller ID, E.1
Analog stations, J.1
Missed-Call Key, F.13
Cascade paging mailbox progra mming, D.13
Conference call ing, E.7
Analog stations, J.2
Console, A.3
Day/night mode, F.12
Dial tone, E.4
Preference, F.10
Dire ct st a tion se l ec t , E . 5
DSS. See Dire ct s t ation select
Echo, G .2
Esi-Dex, F.1
Personal Dex
Adding names, F.4
Deleting names, F.6
System speed dialing, F.9
Esi-Link
Defined, H.1
Dialing, H.3
Hold, H.5
IP Gateway, H.9
Calling station at, H.9
Pilot number, H.9
Location Keys, H.1
Location numbers, H.1
Paging, H.5
Programmable feature keys, H.2
Exclusive hold. See Hold
Fixed feature keys, E.2
FLASH key, F.1
Group/broadca st mailbox es, D.12
Programming, D.12
Guest mailboxes
Off-premises delivery, D.11
Phone delivery, D.11
Programming, D.1 1
Hands-free answer, E.3
Headset jack, A.6
Headset key, F.12, J.1
Headset operation, F.10
Hold, E.11
Difference between hold and exclusive hold, E.11
Exclusive hold, E.12
Retrieving a call, E.12
Retrieving a held call, E.12
Internal calls, E.4
IP Gateway. See Esi-Link
Leaving messages, D.2
LEDs, E.2
Line keys, F.11
Private line, F .11
Live call screening (Message monitor mode), F.10
Live outside calls, E.14
Live recording, D.7
Location Keys, H.1
Location numbers, H.1
Manual day /night mode, F.12
Message monitor key, F.12
Message monitor mode (live call screening), F.10
Message Recycle Bin (un-delete), C.6, D.9, D.11, D.13, D.15
Messa g e re t r ie val, D.4
Off-premises delivery, D.8
Urgent messages, D.9
Messa g e ( s ) w a iting, D. 4
Missed-Call Key, F.13
MUTE/DND key, E.3
Off-premises delivery, D.8, J.8
Operator sta tion, E.14
Outside calls, E.4
Blind transfer, E.5, E.6
Supervised transfer, E.5, E.6
Transferring, E.5
Outside dial tone preference. See Dial tone
Paging, internal, E.13
Overhead paging port (199), E.13, J.4
Paging through phones, E.13
Zones, E.13
Password, C.5
Personal Dex. See Esi-Dex
Personal greetings, D.1, F.10, J.4
Personal greeting keys, F.13
Reminder, F.10
Playback of recordings. See Liv e reco rding
Programmable feature keys, C.2, E.2
Esi-Link, H.2
Programming
Cascade paging mailbox es, D.13
Group/broadca st mailbox es, D.12
Q & A mailboxes, D.14
Quick Groups, D.2, D.12
Quick Move, D.7
QuickPage, F.14
RECORD key, D.7
REDIAL key, F.1
RELEASE key, F.1
Remote IP Feature Phone, G.1
911 call s prohib ited, G.1
Retrieving message s, D.4, D.5, D.8
Ring tone, C.4
Ring volume, C.4
Scroll keys. See Volume/scroll keys
Service observing, F.12
SPEAKER key, E.3
Speed-dial keys, C.3
Station keys, C.3
Station options, C.4
Ring tone, C.4
Ring volume, C.4
Supervised transfer, E.5, E.6
Transferring an outside call, E.5
Urgent messages, D.9, D.11, J.9
User programming
Exiting programming mode, C.1
Programmable feature keys, C.2
Select personal greeting, C.2
Virtual Answe r Keys, F.13
Virtual Mai lbox Key, D.6, D.10
Voice mail, E.6
VOICE MAIL key, D.1
Volume/scroll keys, E.3
Page 90

www.esi-estech.com
 Loading...